
RICOH THETA SC2 - User Guide
file:///C|/r22/en/support/manual/sc2/index.html[2019/11/12 2:04:09]
RICOH THETA SC2
User Guide
Menu List
Preparation
Updating the Camera Firmware
Shooting Still Images
Shooting Videos
Shooting in the Preset Shooting Modes
Viewing and Sharing Using a Smartphone
Viewing and Sharing Using a Computer
Changing the Settings
Troubleshooting
Additional Information
This user guide provides more detailed explanations on how to use RICOH THETA SC2.
Content included and images used in this guide may differ from those of the actual device depending on the app or
firmware version.
Update the camera unit firmware to the latest version before using the camera. See below for how to update the firmware
to the latest version.
Updating the Camera Firmware
See below for a history of firmware version updates.
https://support.theta360.com/en/download/firmware/sc2/
See below for the details of apps available for RICOH THETA SC2.
https://theta360.com/en/about/application/
Images of the basic app for smartphone used throughout this guide are from “RICOH THETA for iPhone” (the basic app for
iOS). There may be some differences from “RICOH THETA for Android” (the basic app for Android).
* There are some differences between functions provided by the iOS app and Android app.
▲ Back to Top

RICOH THETA SC2 - User Guide
file:///C|/r22/en/support/manual/sc2/index.html[2019/11/12 2:04:09]
© 2019 Ricoh Company, Ltd. All Rights Reserved.
RICOH THETA SC2 - User Guide
file:///C|/r22/en/support/manual/sc2/content/menu-prepare.html[2019/11/12 2:04:10]
Top
>
Preparation
Preparation
Checking the Package
Names of Camera Parts
Charging
Turning the Power On/Off
Downloading the App
Connecting to a Smartphone via Wireless LAN
Connecting to a Smartphone via Bluetooth
®
Connecting to a Bluetooth
®
Accessory
← Back
▲ Back to Top
© 2019 Ricoh Company, Ltd. All Rights Reserved.
RICOH THETA SC2 - User Guide
file:///C|/r22/en/support/manual/sc2/content/prepare/prepare_01.html[2019/11/12 2:04:16]
Top
>
Preparation
>
Checking the Package
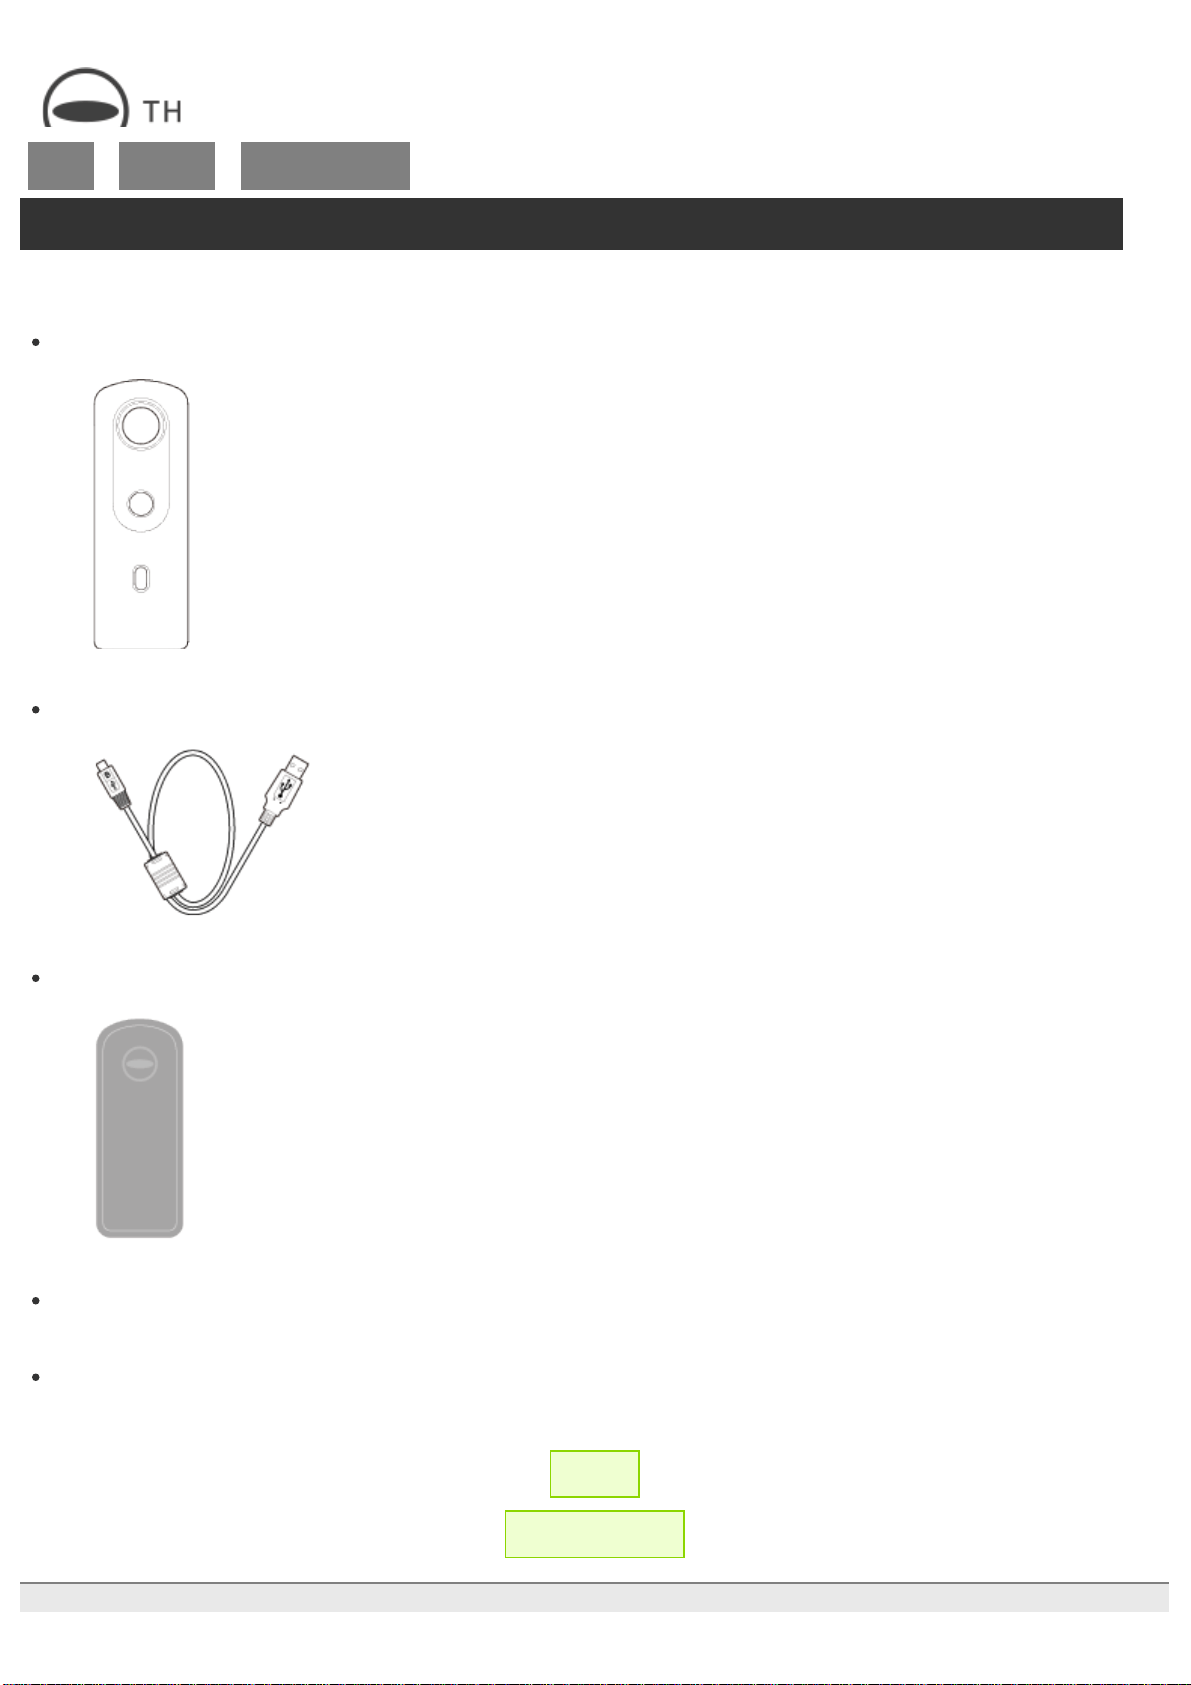
Checking the Package
When opening the package, check that the following items are included:
RICOH THETA SC2
USB cable
Soft case
Quick Start Guide
Important Message to Customers
← Back
▲ Back to Top
© 2019 Ricoh Company, Ltd. All Rights Reserved.
RICOH THETA SC2 - User Guide
file:///C|/r22/en/support/manual/sc2/content/prepare/prepare_02.html[2019/11/12 2:04:17]
Top
>
Preparation
>
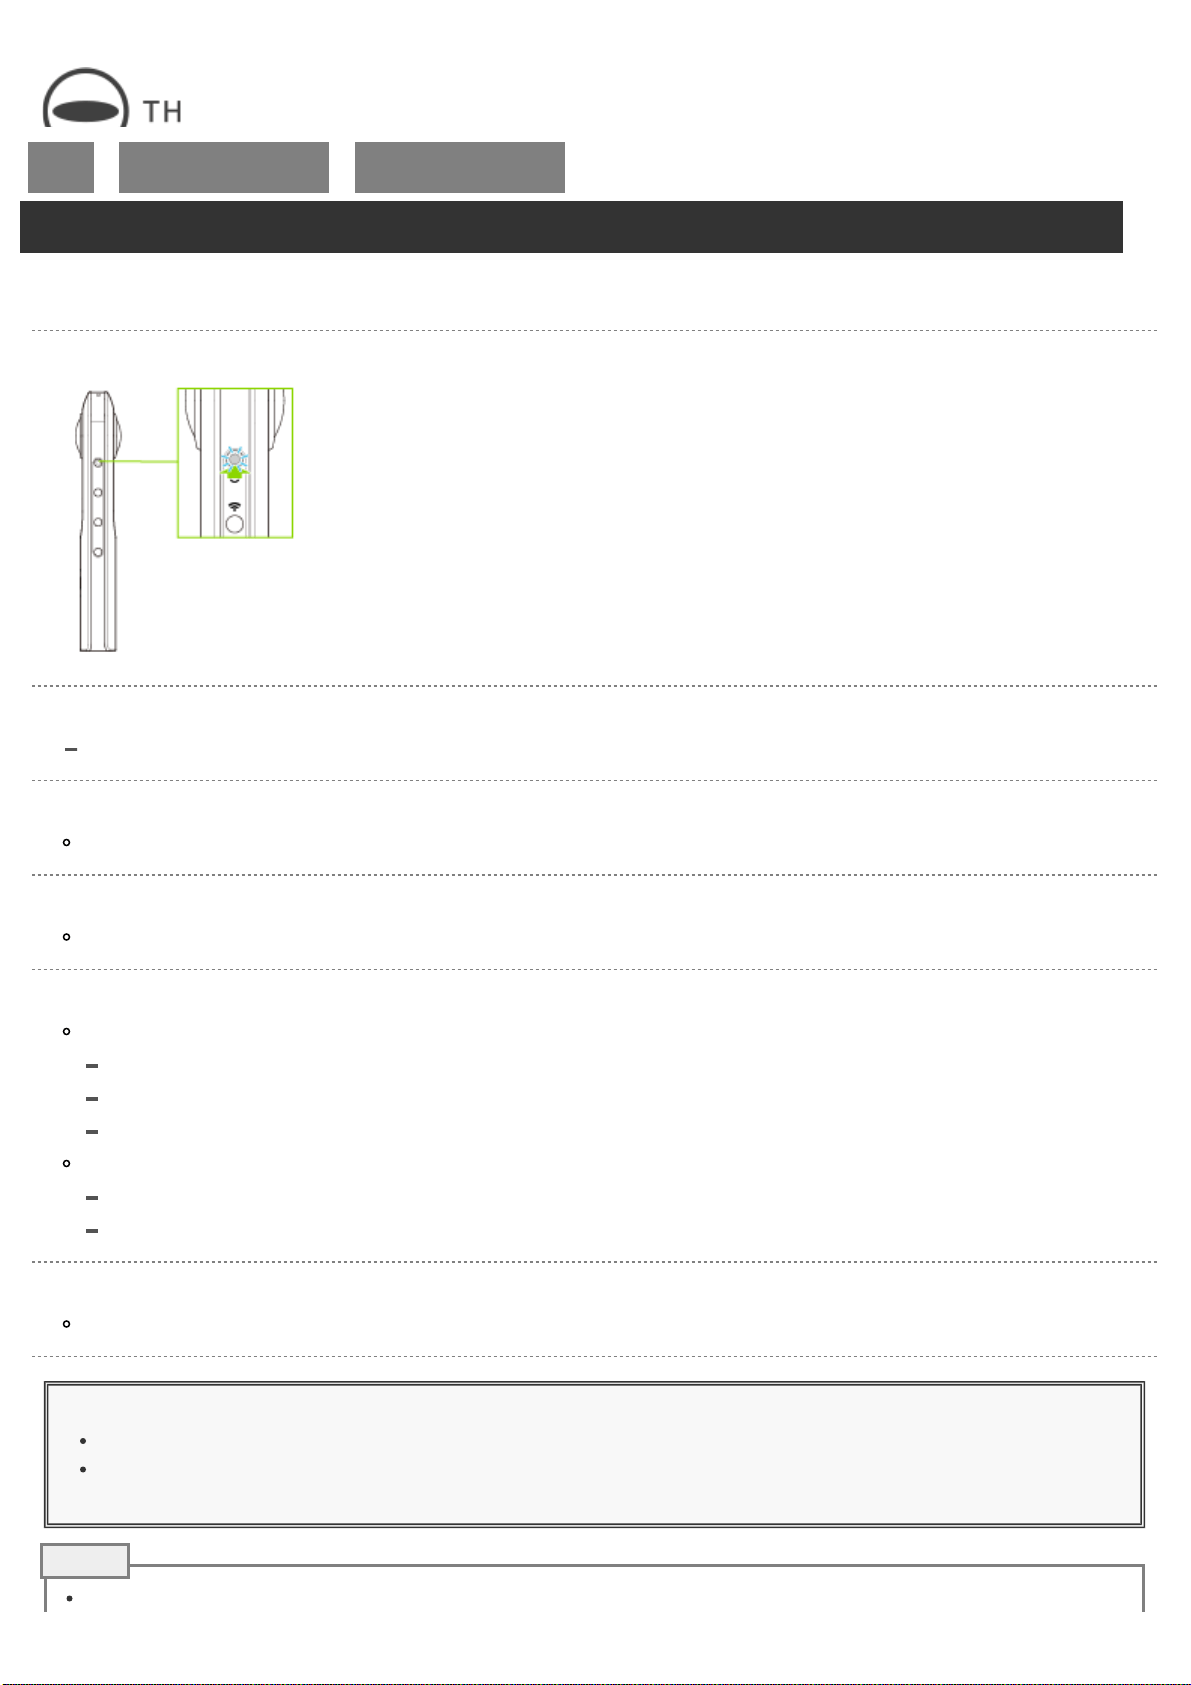
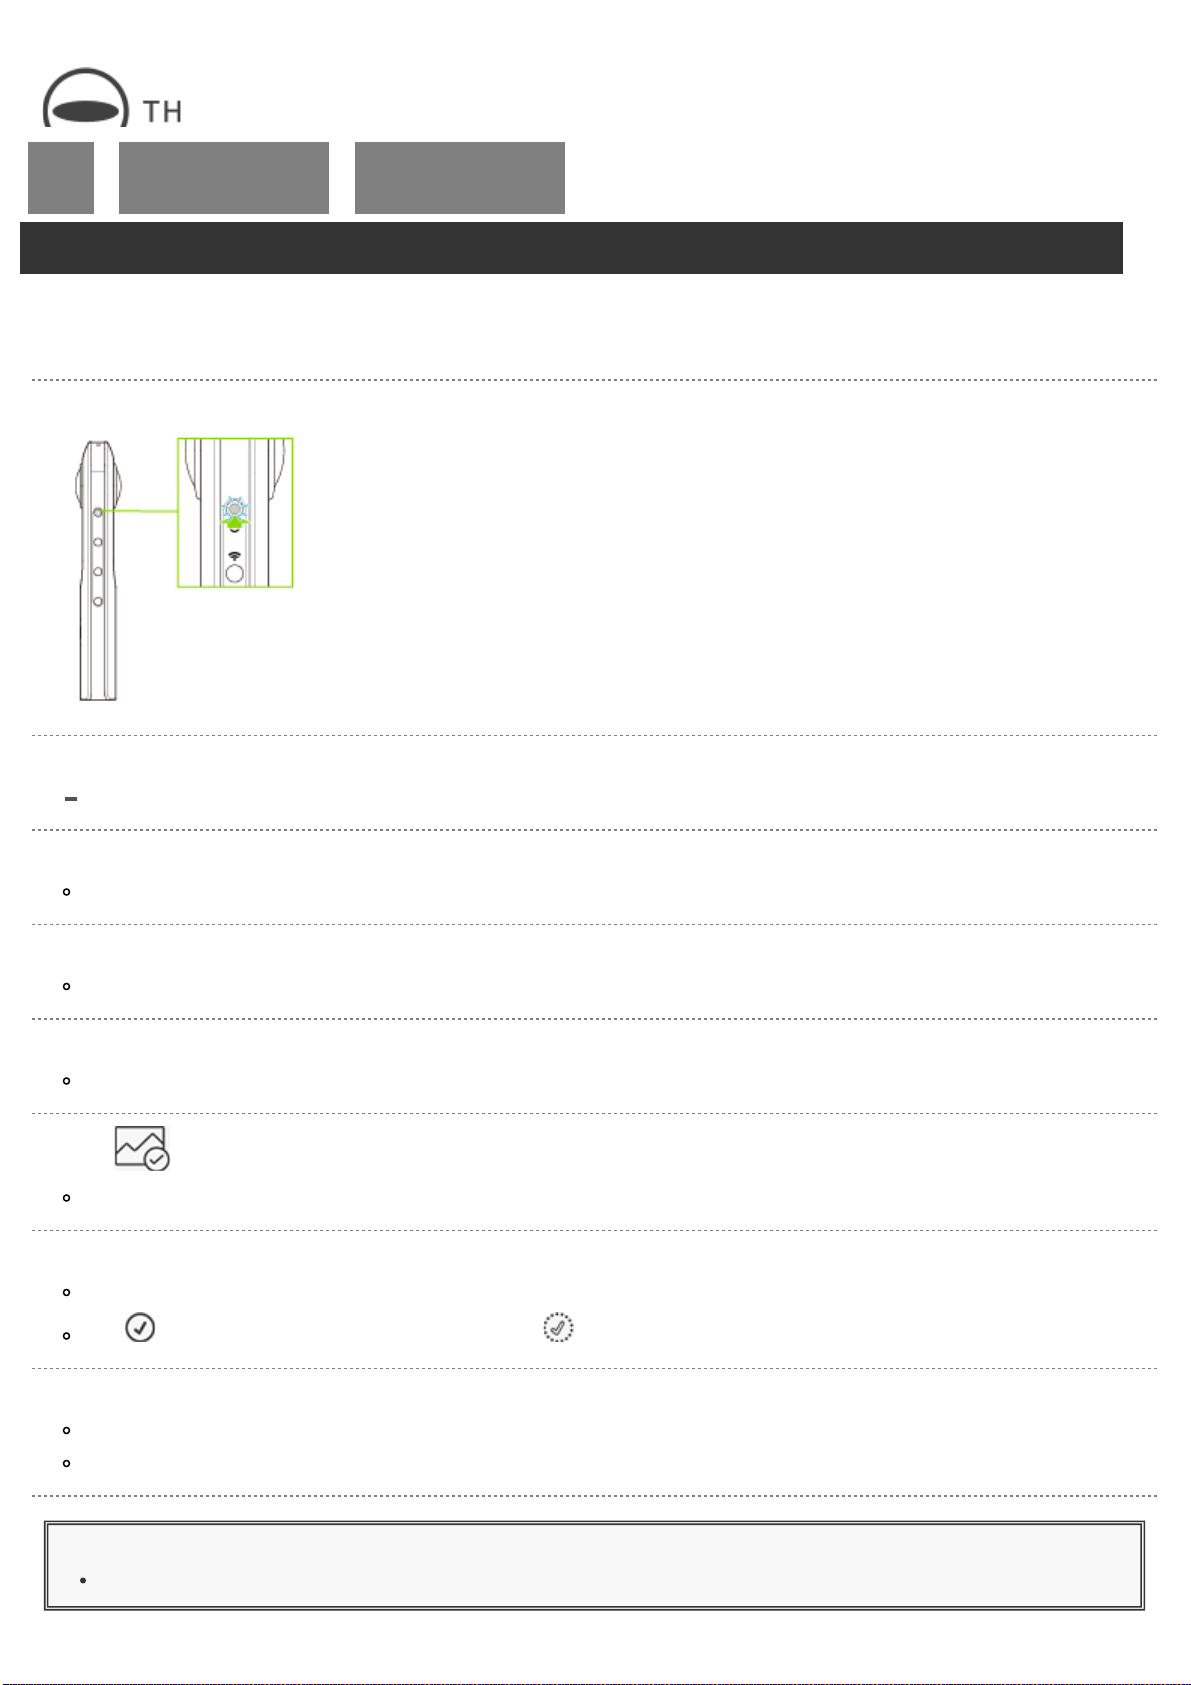
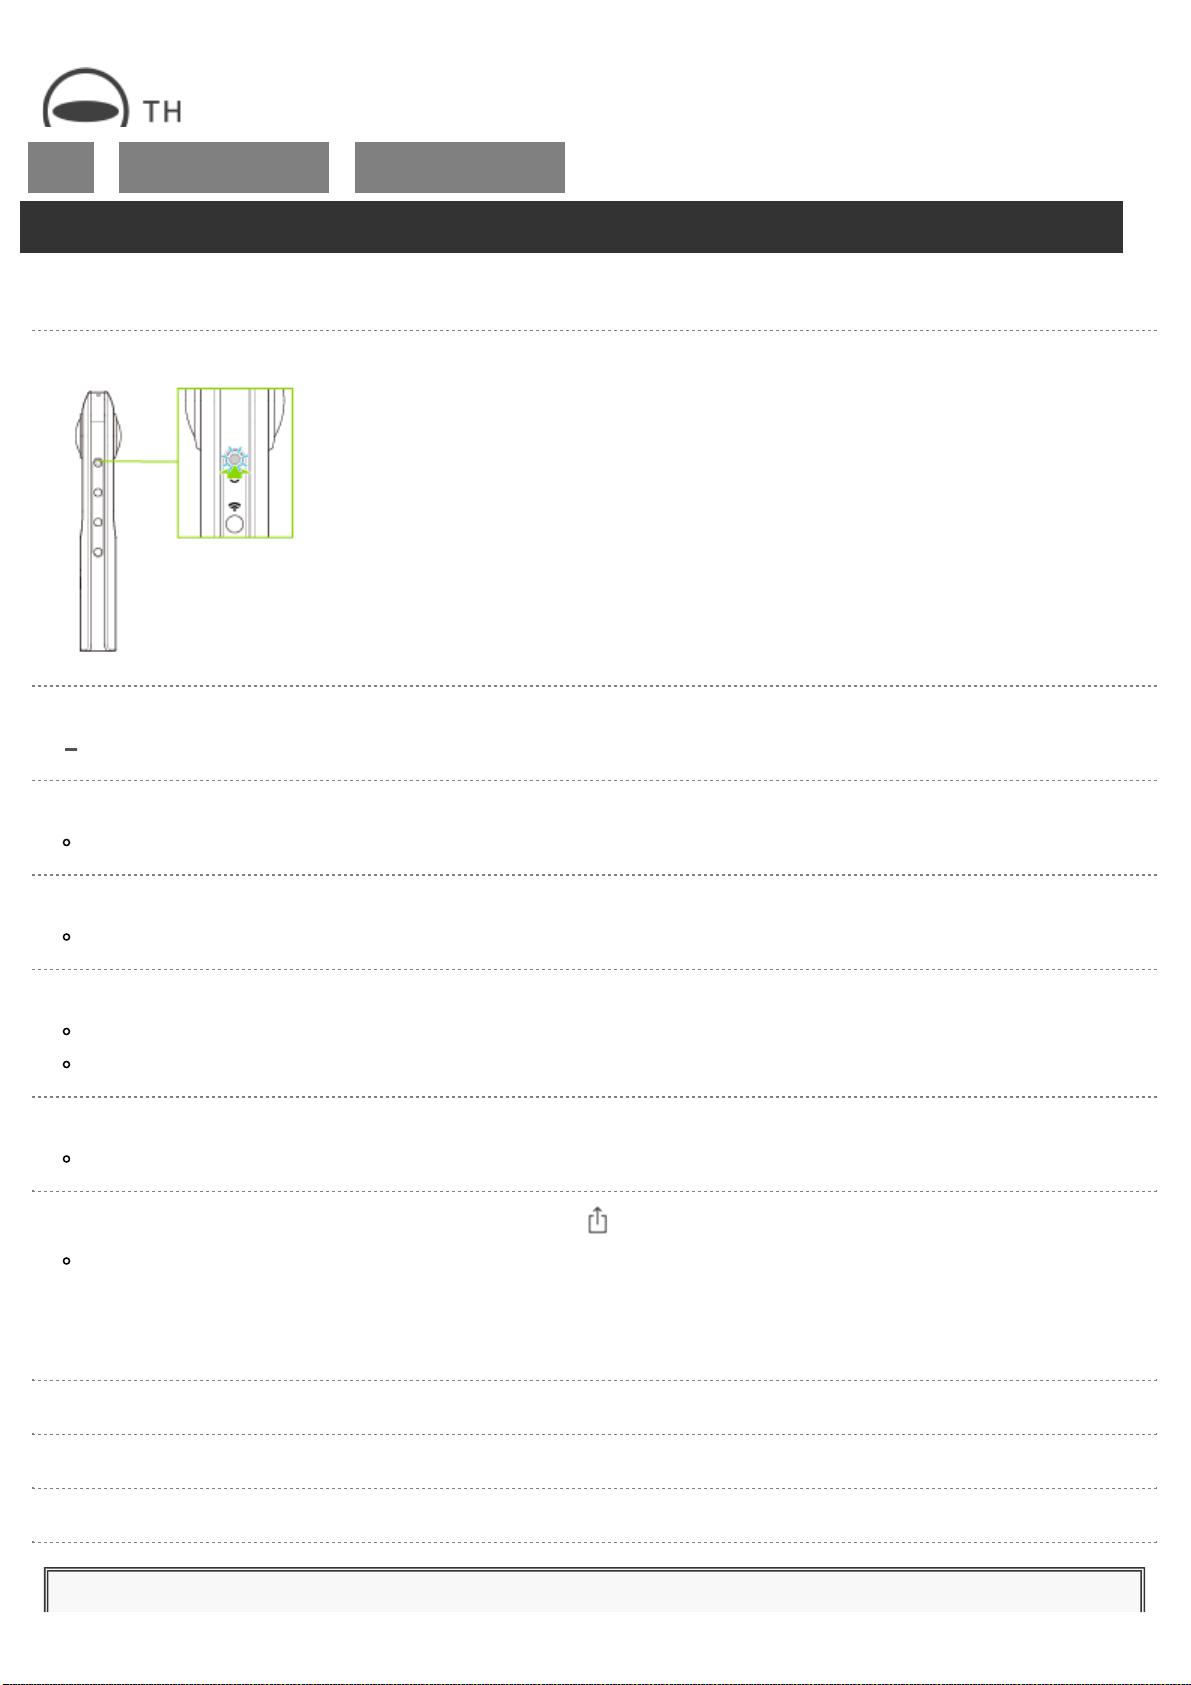
Names of Camera Parts
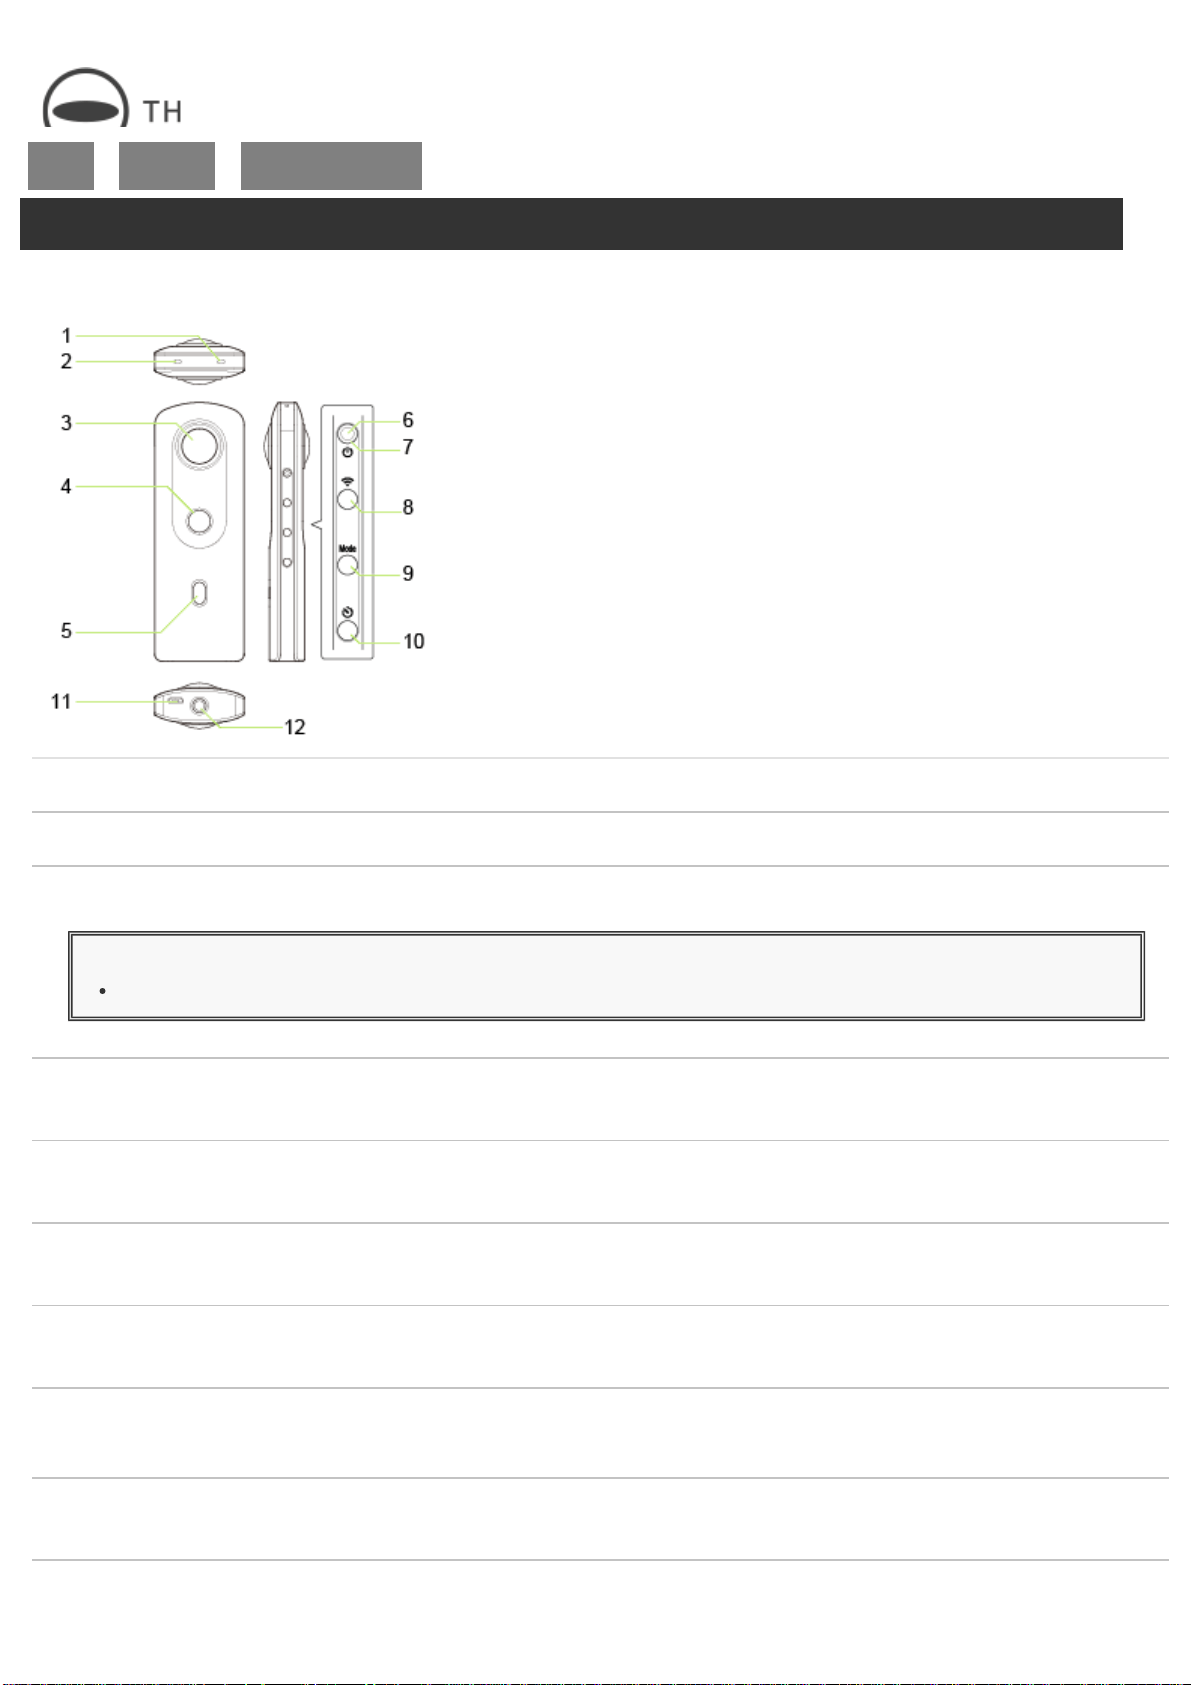
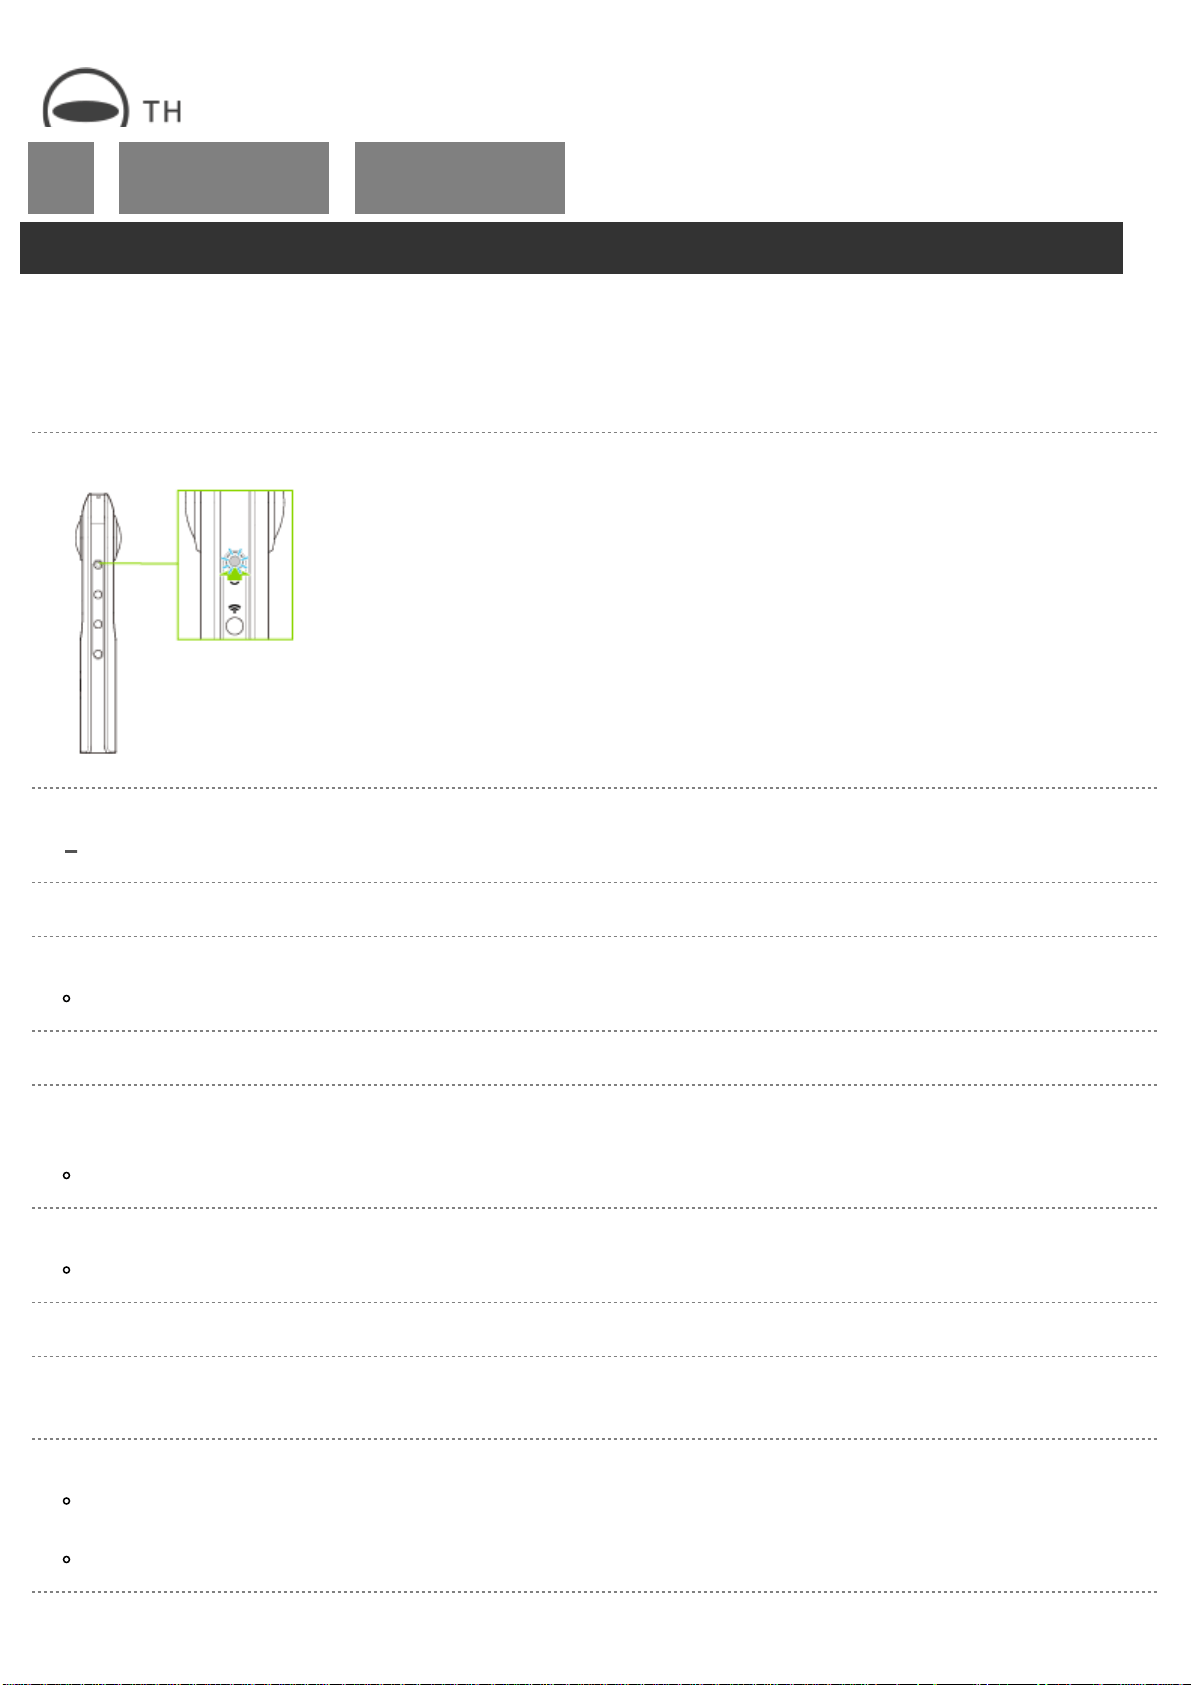
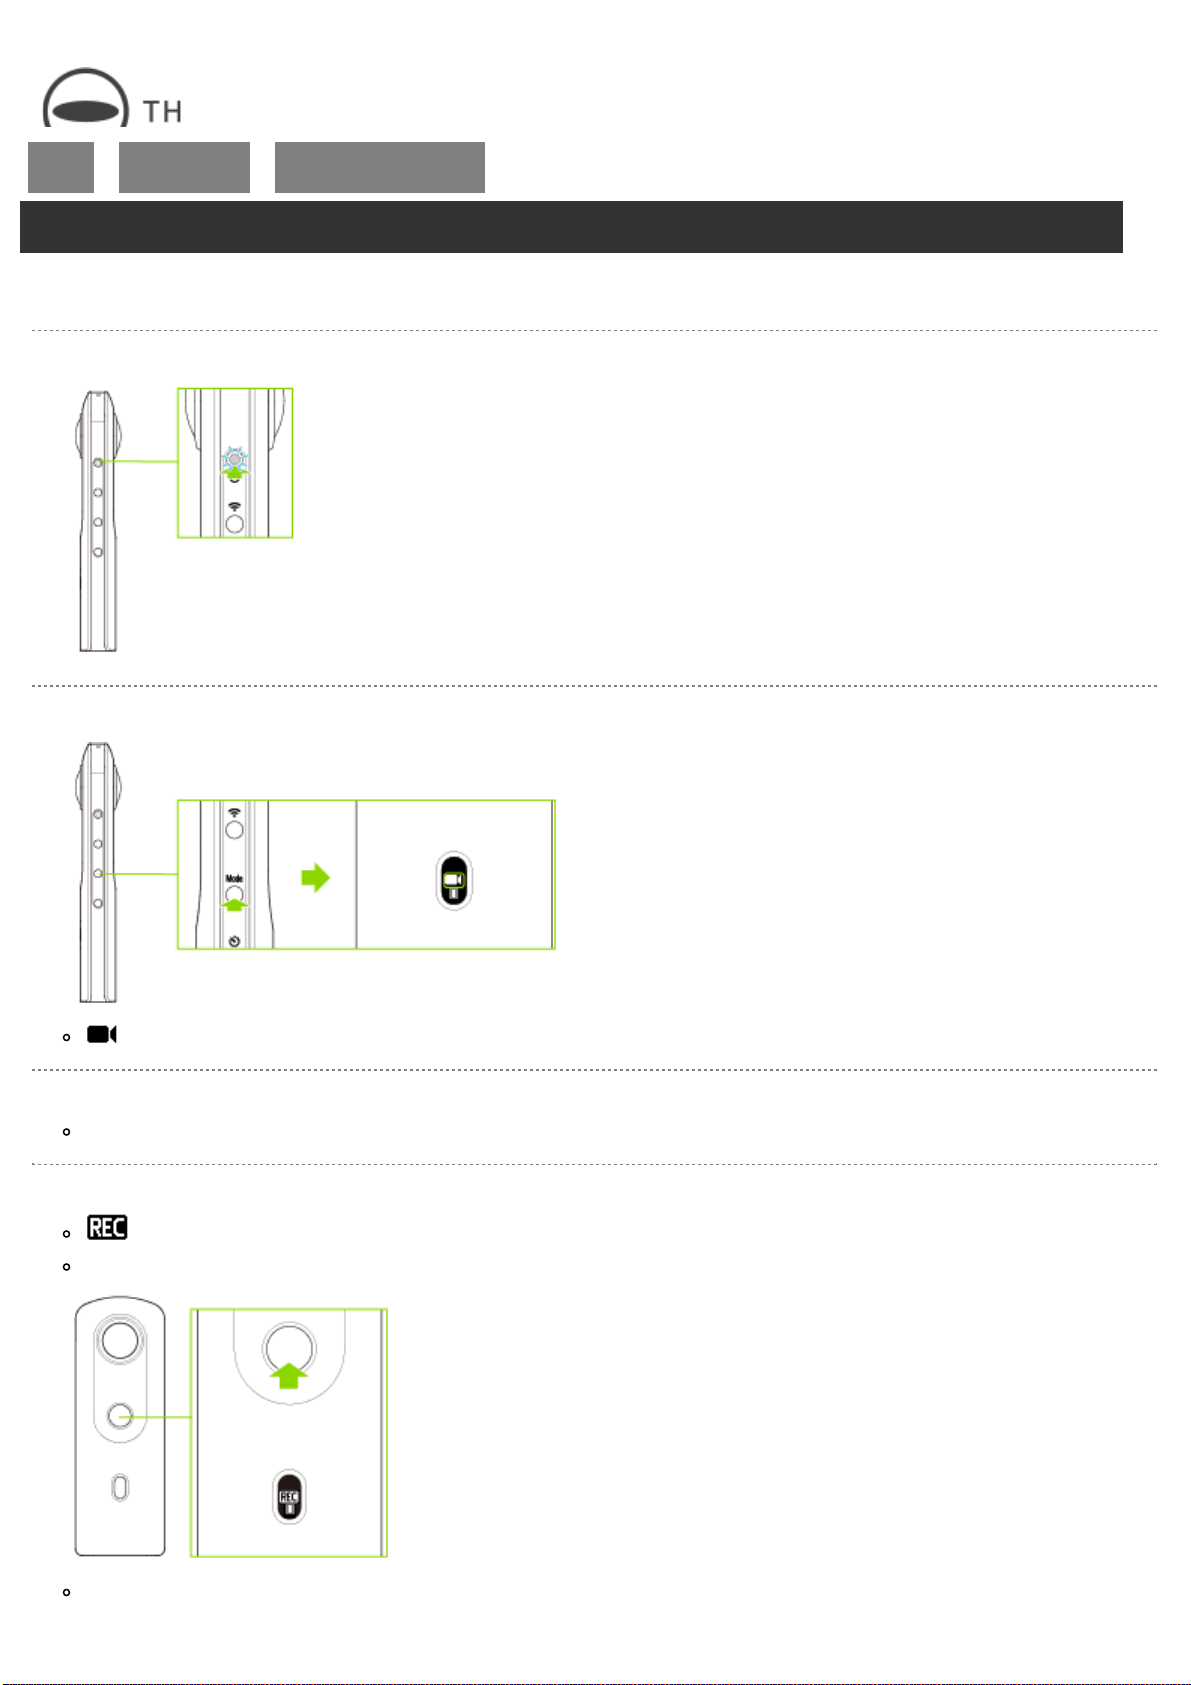
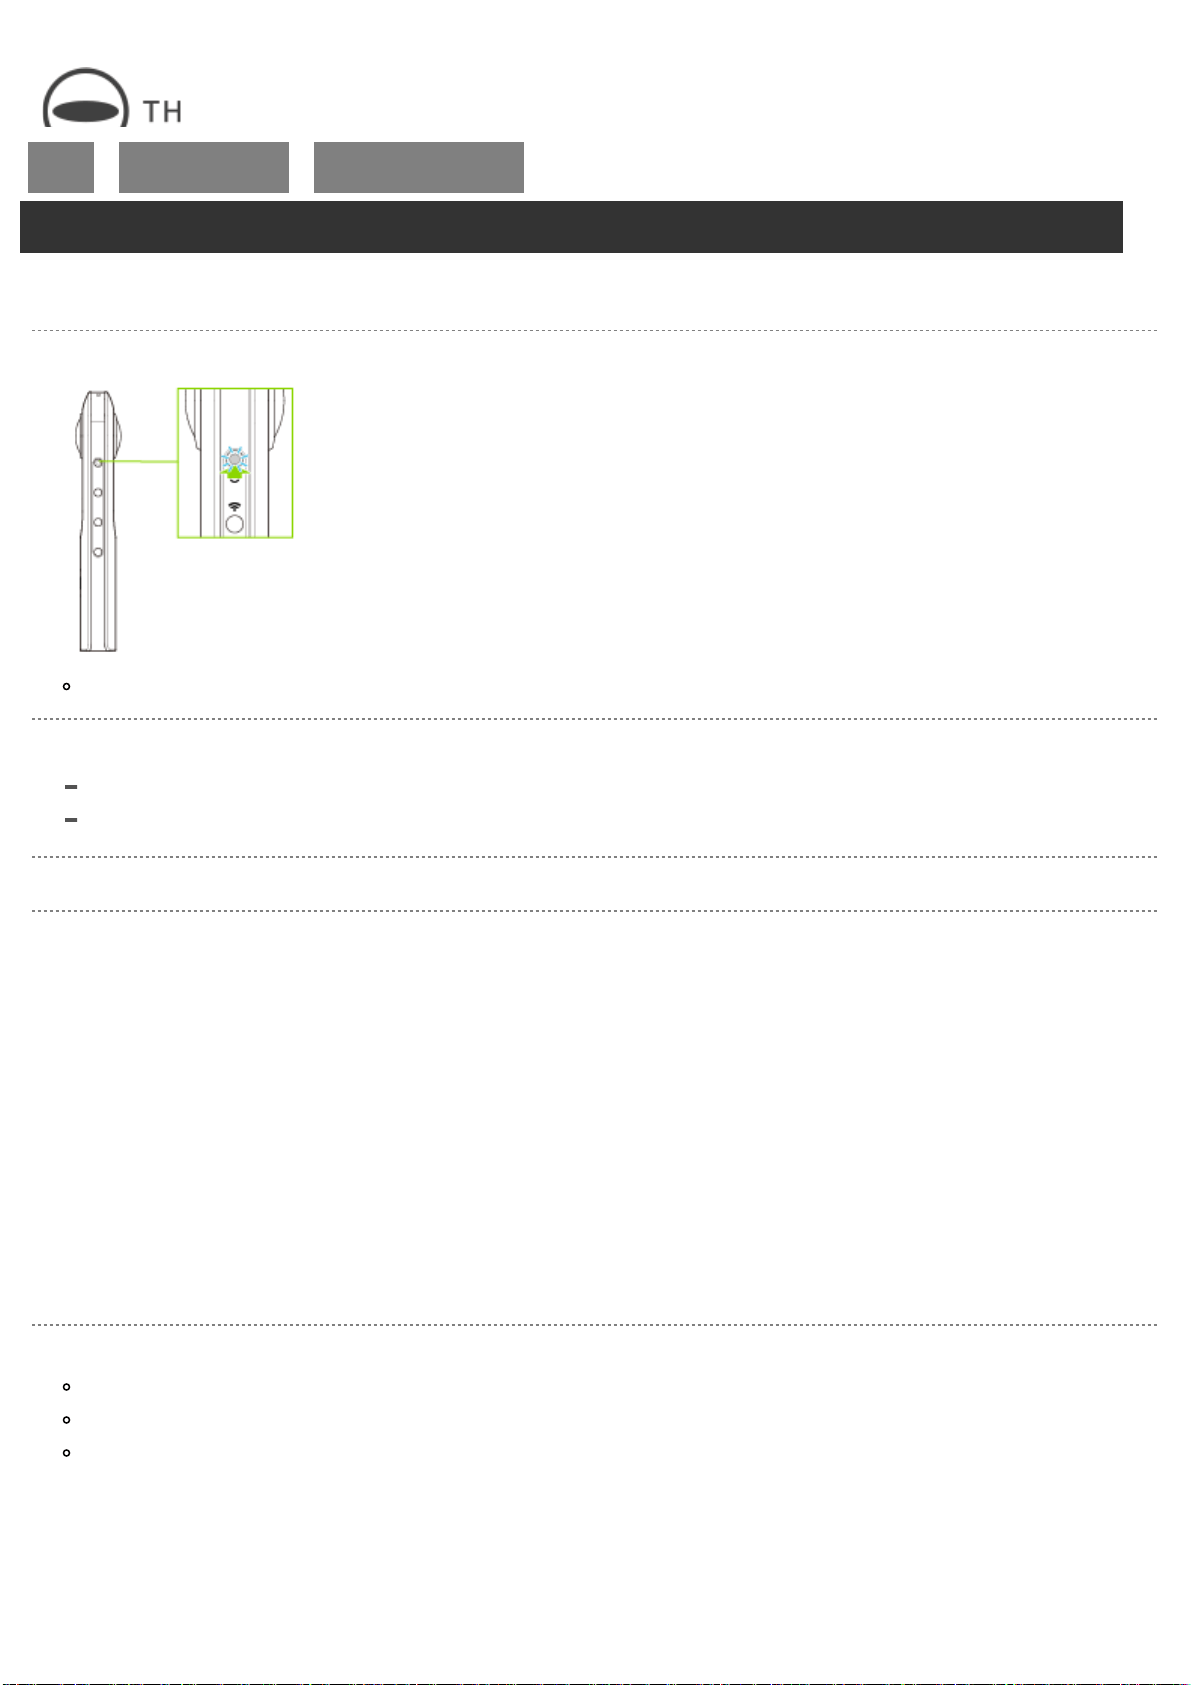
Names of Camera Parts
This section explains the names and functions of the buttons, lamps, etc. on the camera.
1. Speaker
2. Microphone
3. Lens
Caution
Be careful when handling the lens section to avoid damage.
4. Shutter button
Press to capture images.
5. OLED panel
Displays the shooting mode, battery level, etc.
6. Power lamp
Indicates the power status. (Details)
7. Power button
Turns the power on and off.
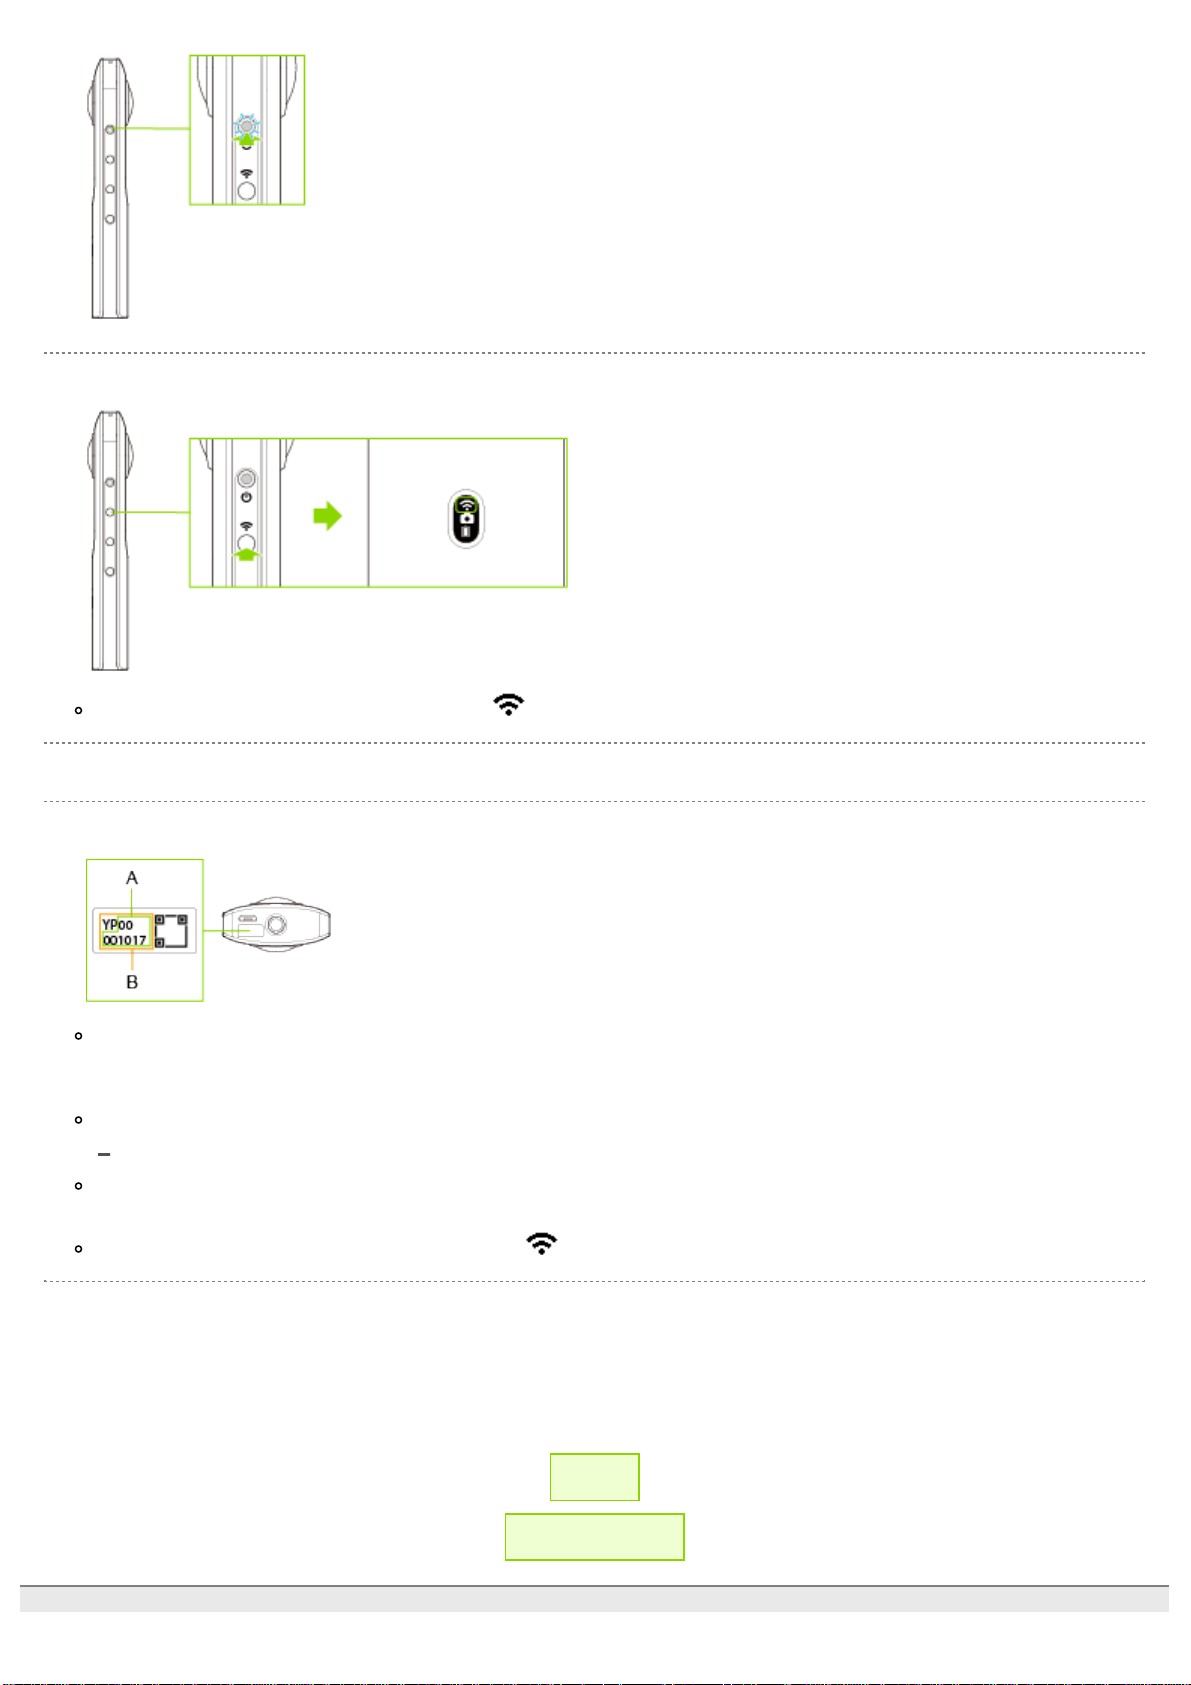
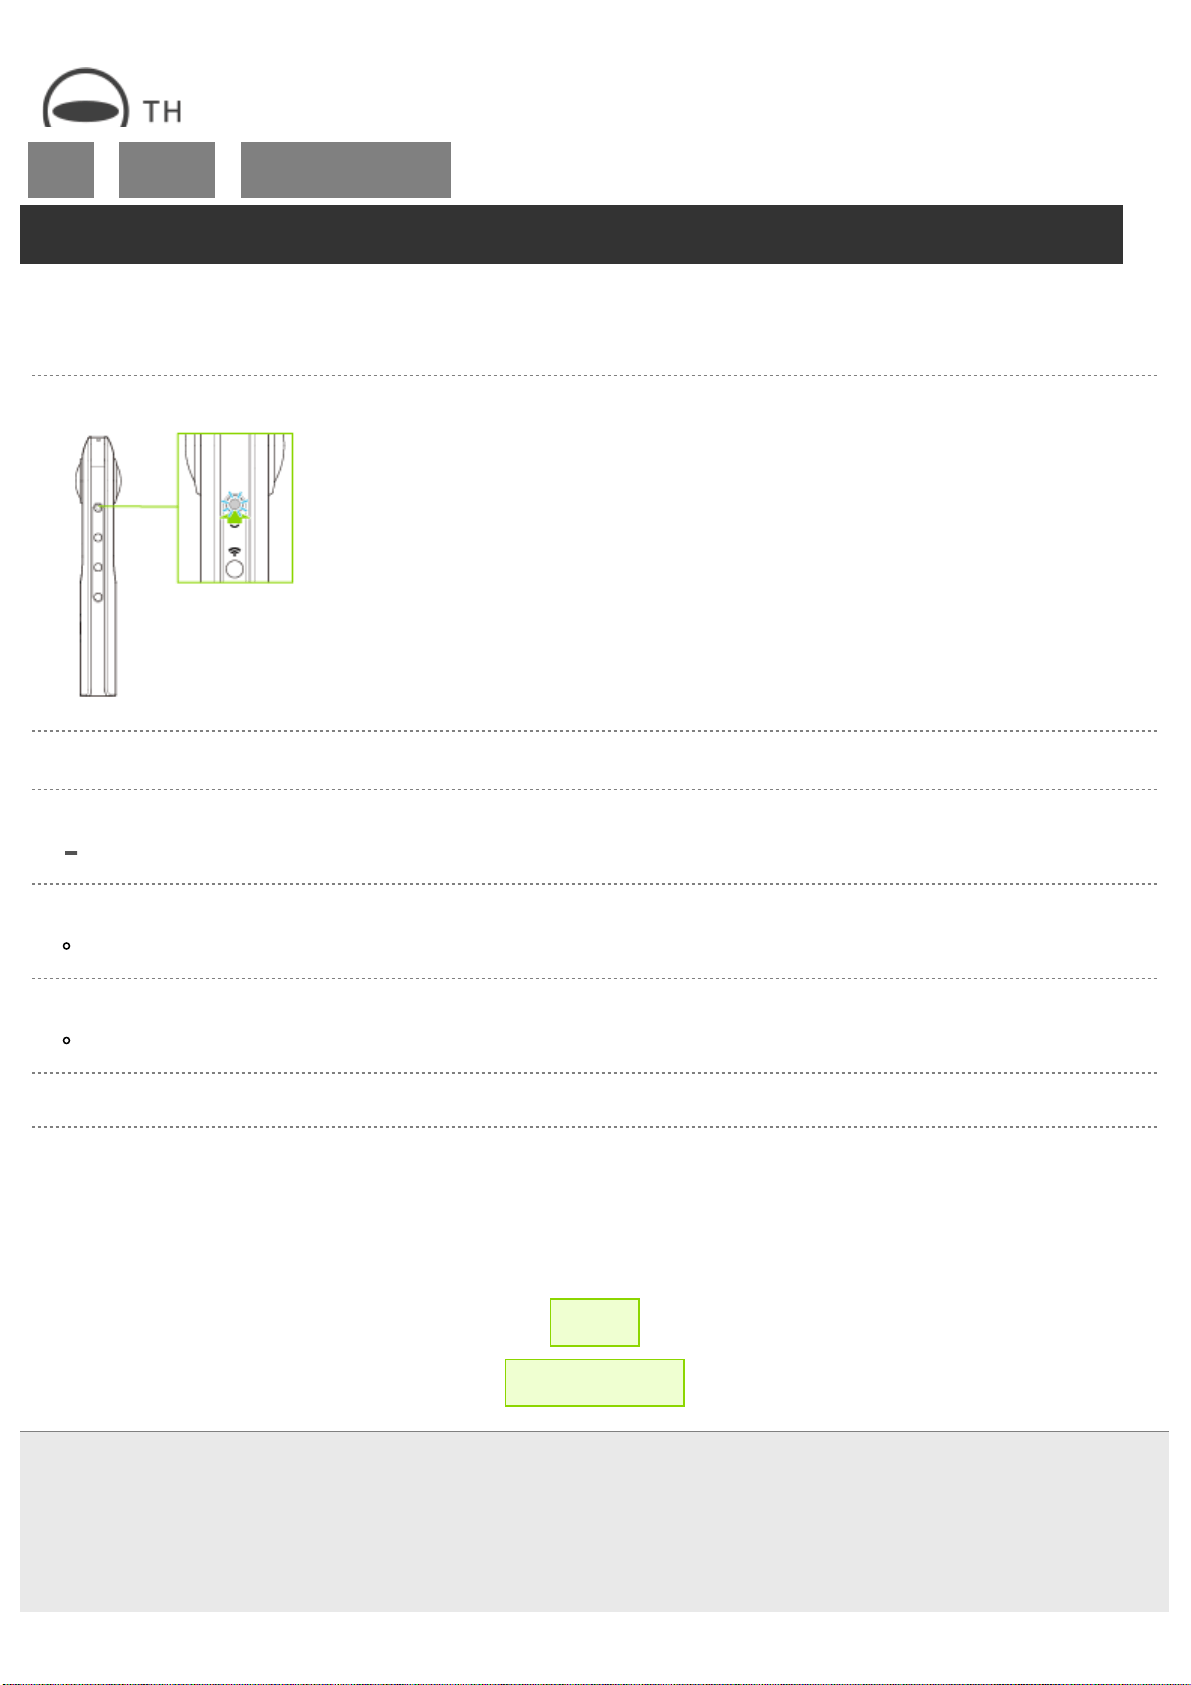
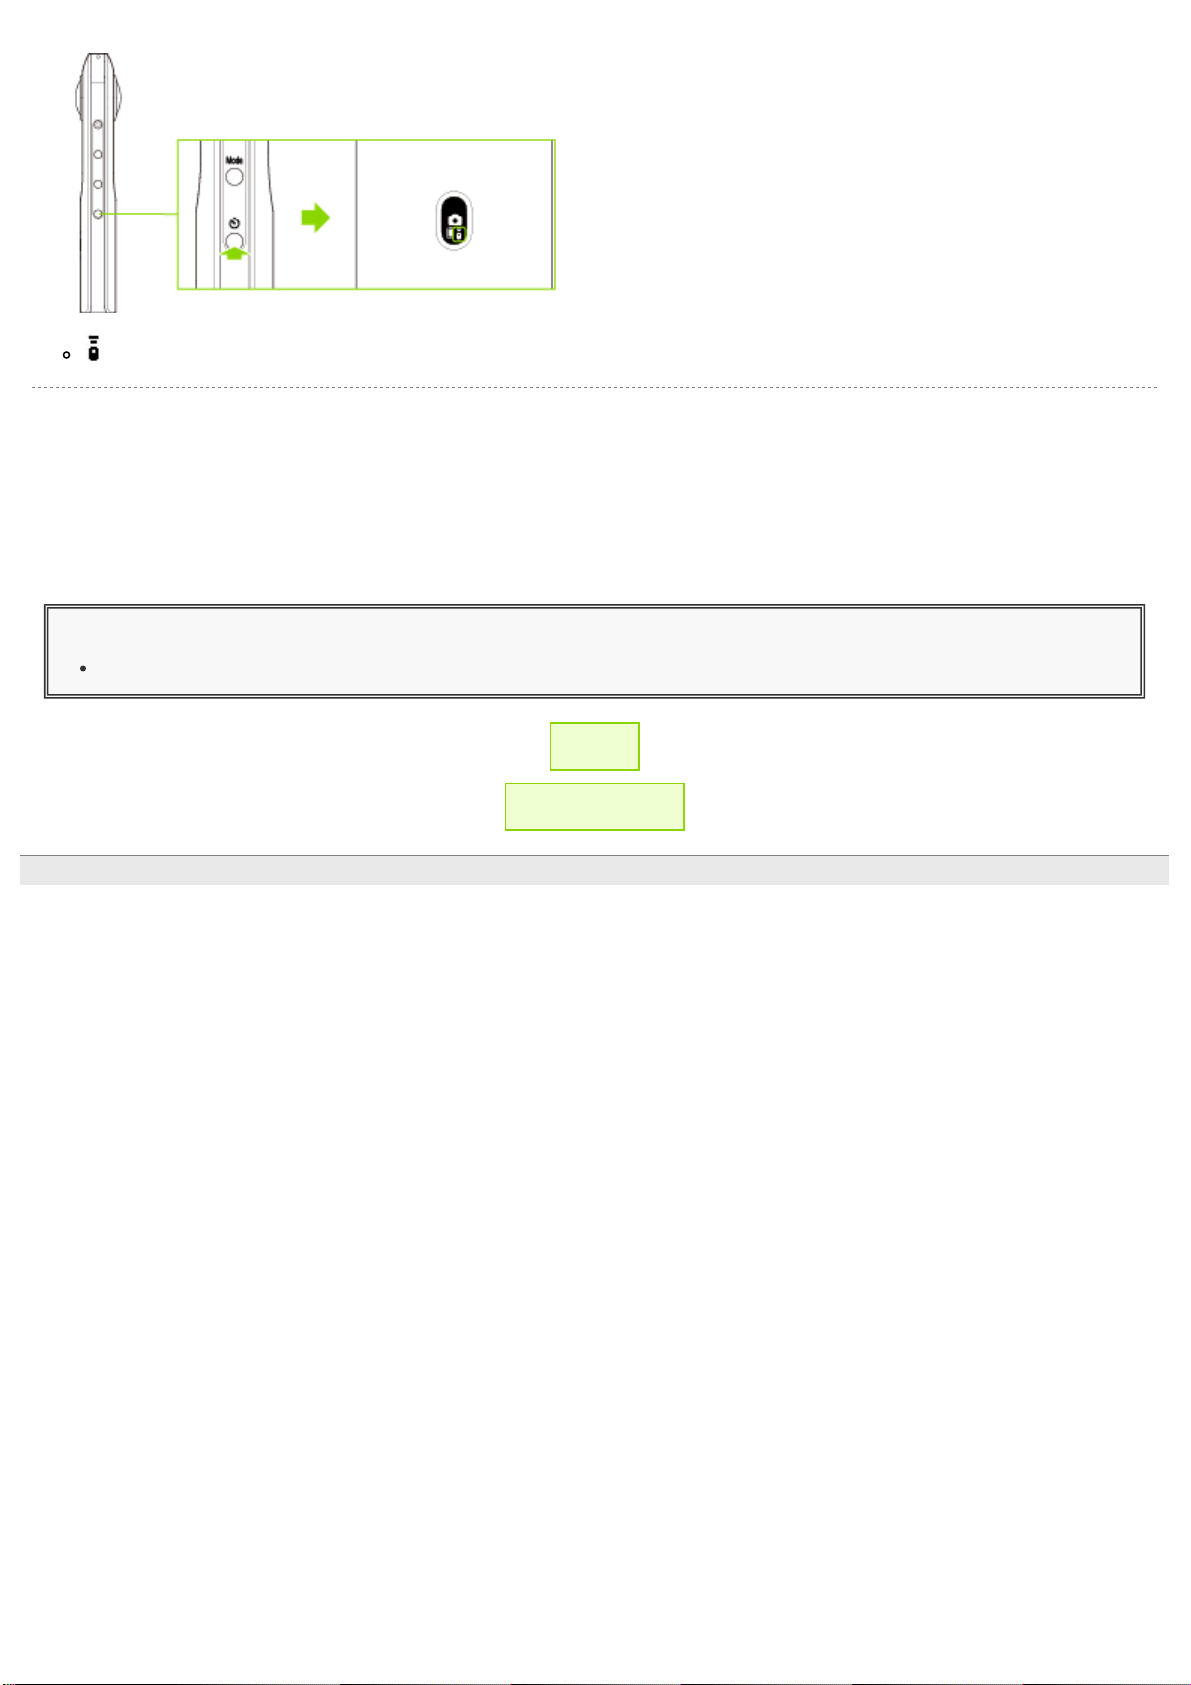
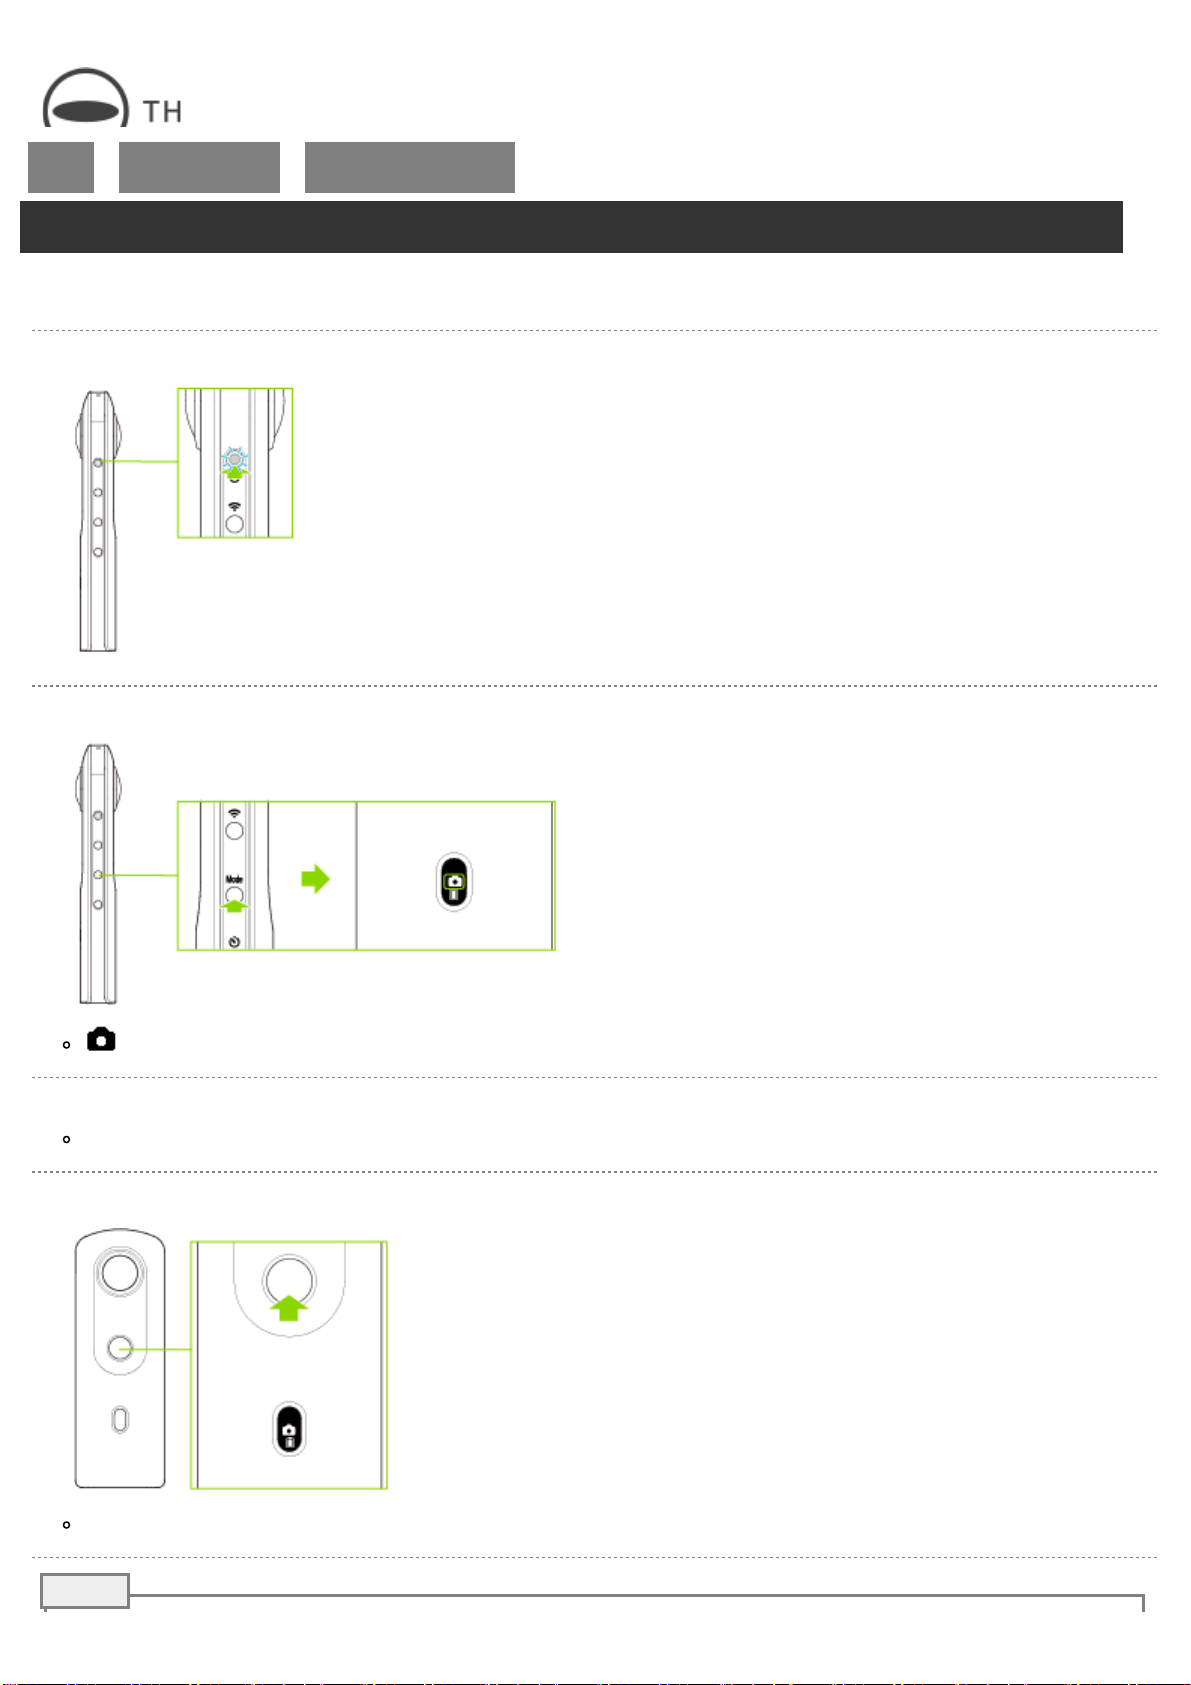
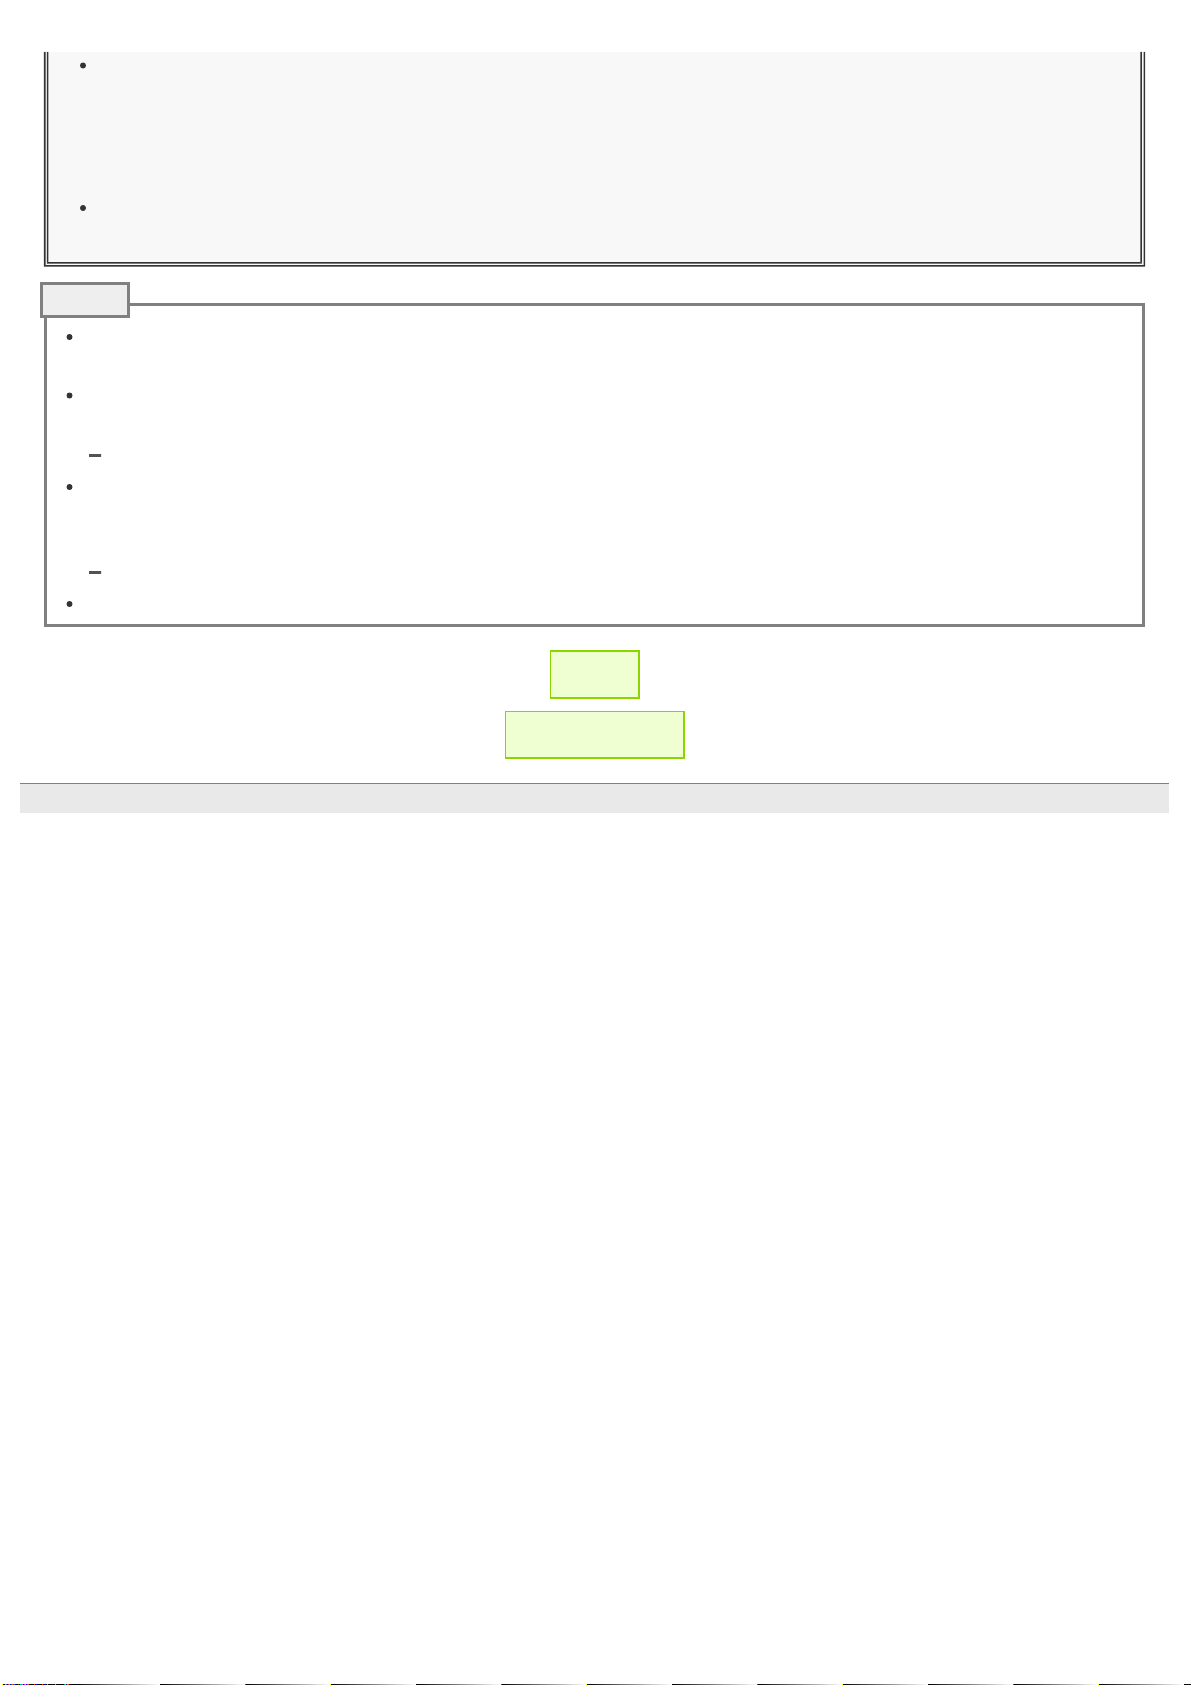
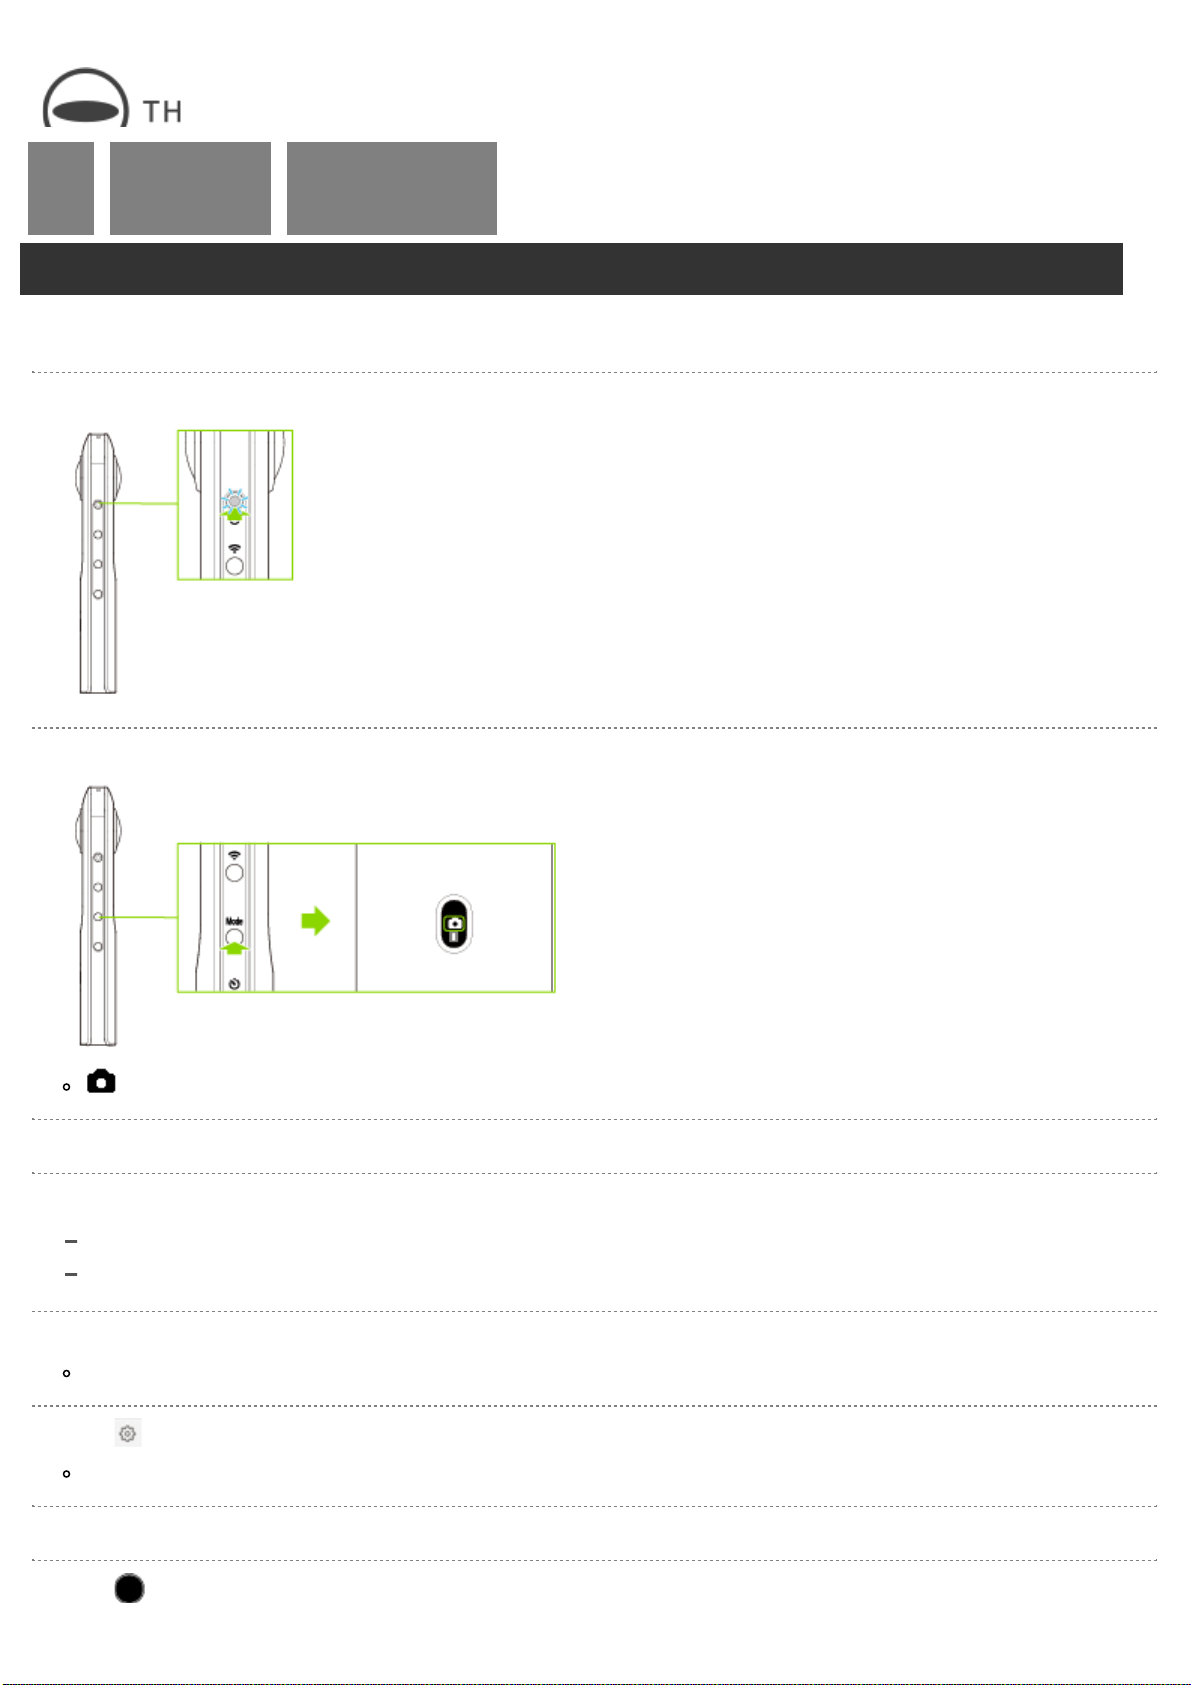
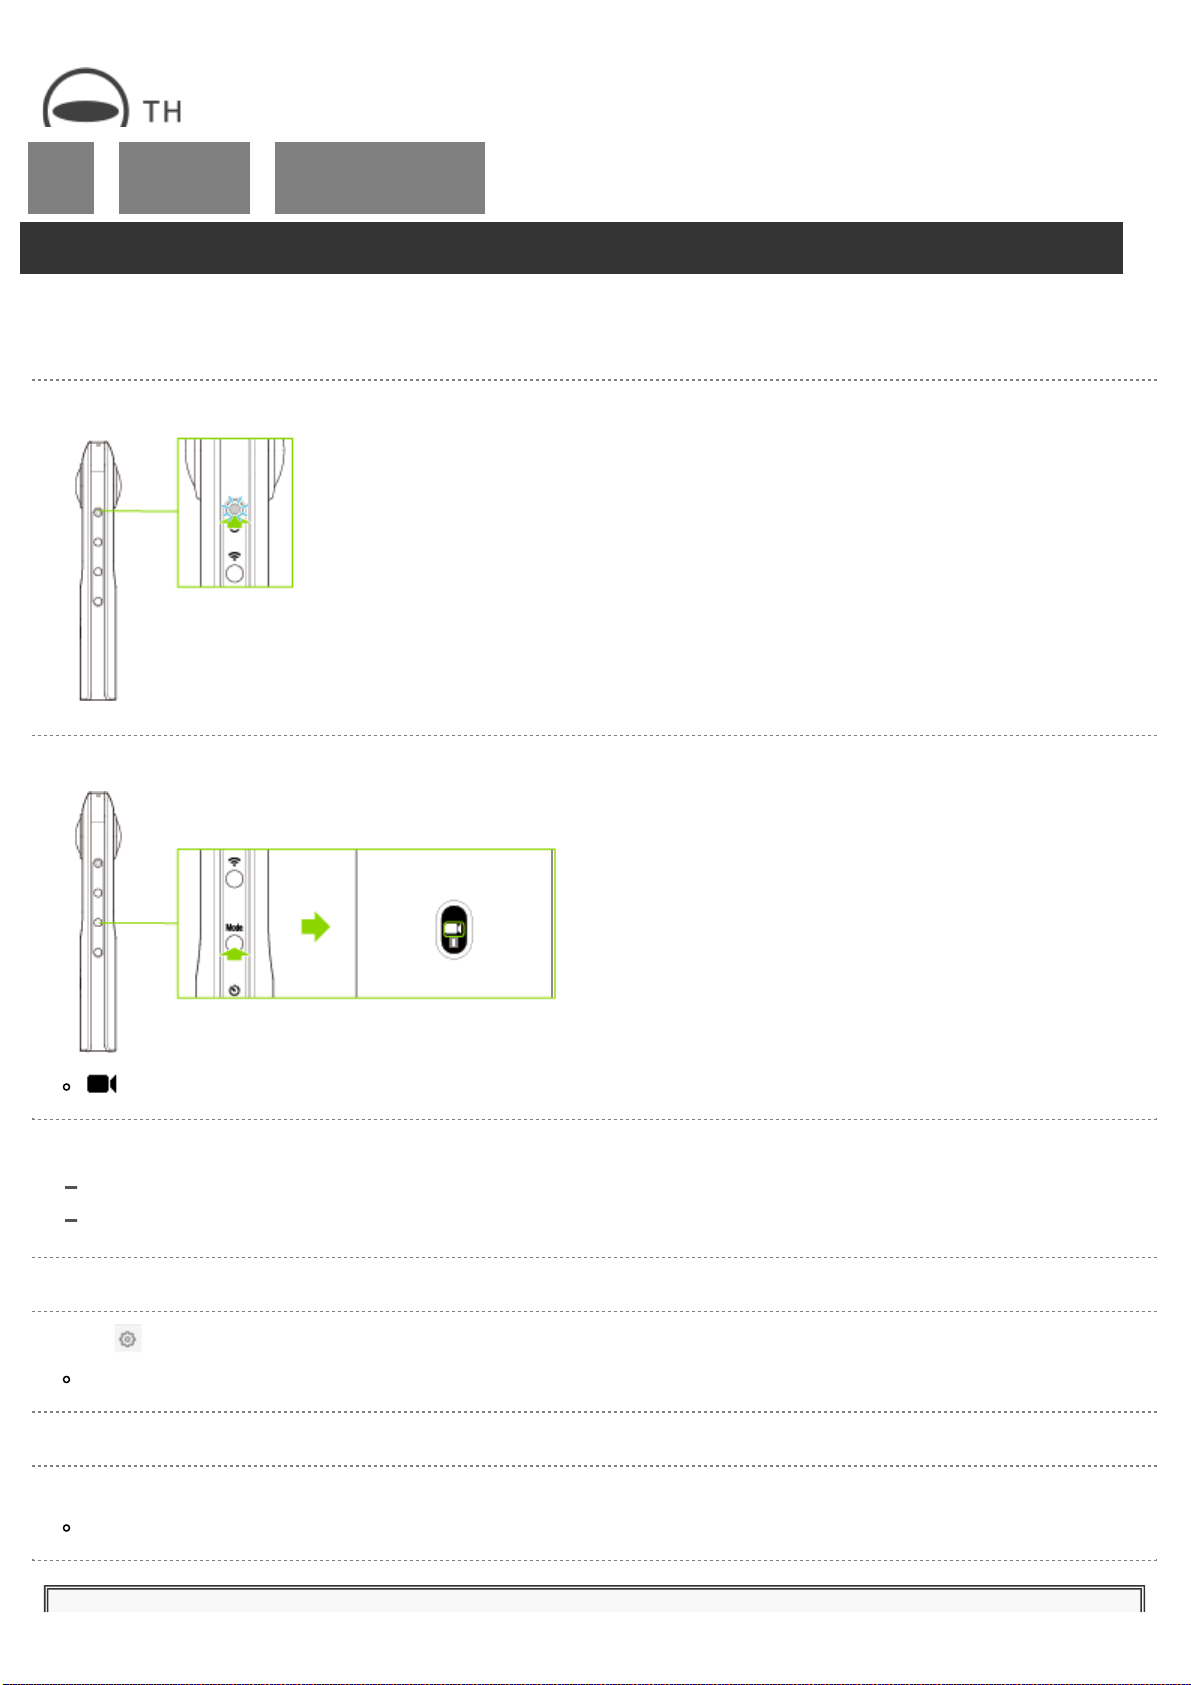
8. Wireless button
Turns on and off the wireless LAN function (Details) and Bluetooth
®
function (Details).
9. Mode button
Switches the shooting mode.
10. Self-timer button

RICOH THETA SC2 - User Guide
file:///C|/r22/en/support/manual/sc2/content/prepare/prepare_02.html[2019/11/12 2:04:17]
Switches the shooting method between “Normal shooting” and “Self-timer shooting”.
Enables the connection to Bluetooth
®
accessories when the button is pressed and held.
For the accessories with which proper operation has been confirmed, see the RICOH website.
11. USB terminal (Micro-B)
Used to connect the camera to a computer via the provided USB cable. (Details)
Caution
It may take time for the battery to charge or the battery may not charge at all when a USB cable other than the
provided USB cable is used.
12. Tripod mount hole
Caution
When using the tripod, take care not to overtighten the screw.
Information Displayed on the OLED Panel
1. Communication status
: Wireless LAN function set to on
: Bluetooth
®
function set to on
2. Shooting mode
: Still image shooting mode
: Video shooting mode
, , : Preset shooting mode (You can change the preset shooting mode according to the shooting scene using the
basic app for smartphone.)
: During video recording
: Camera unit high-temperature warning (Details)
: Memory capacity warning
: Error
3. Battery level / Self-timer status / Bluetooth
®
accessory connection status
to : Battery level (100% to 0%)
: Battery error
: Self-timer shooting
: Bluetooth
®
accessory connected
Note

RICOH THETA SC2 - User Guide
file:///C|/r22/en/support/manual/sc2/content/prepare/prepare_03.html[2019/11/12 2:04:18]
Top
>
Preparation
>
Charging
Charging
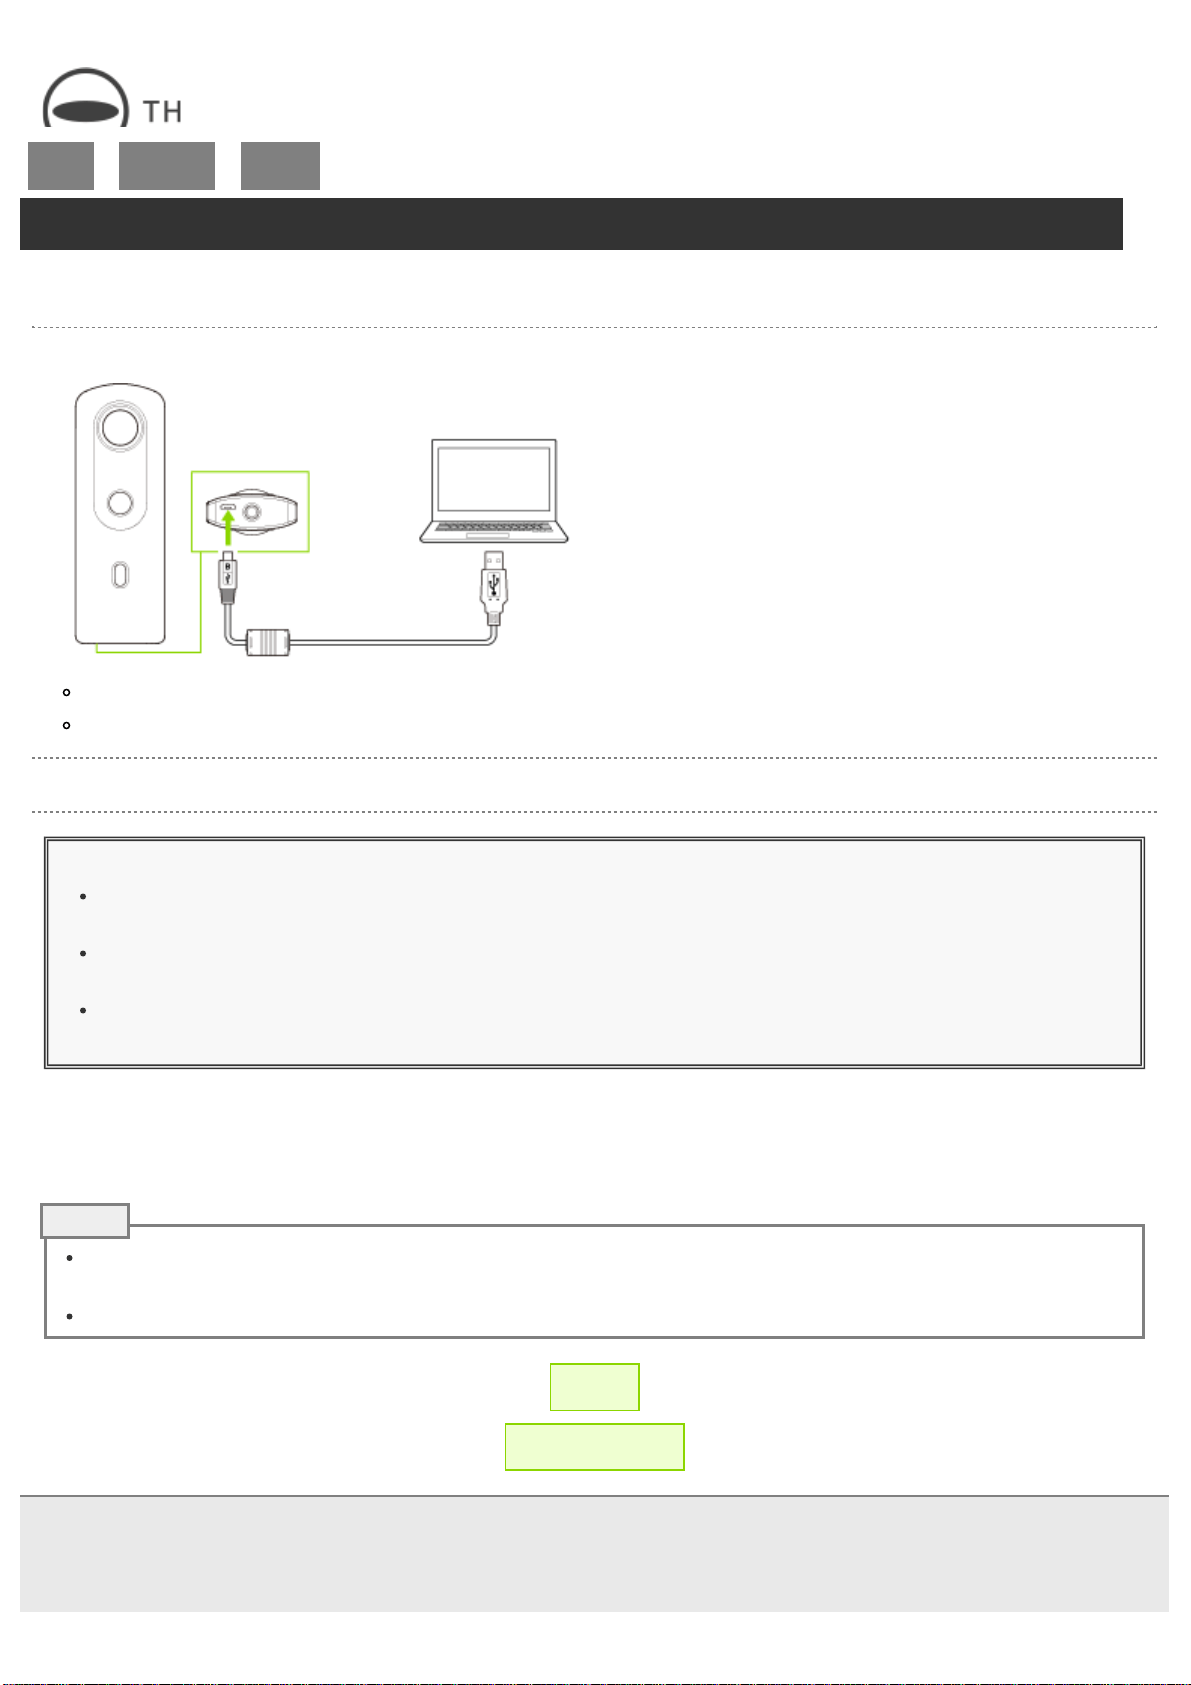
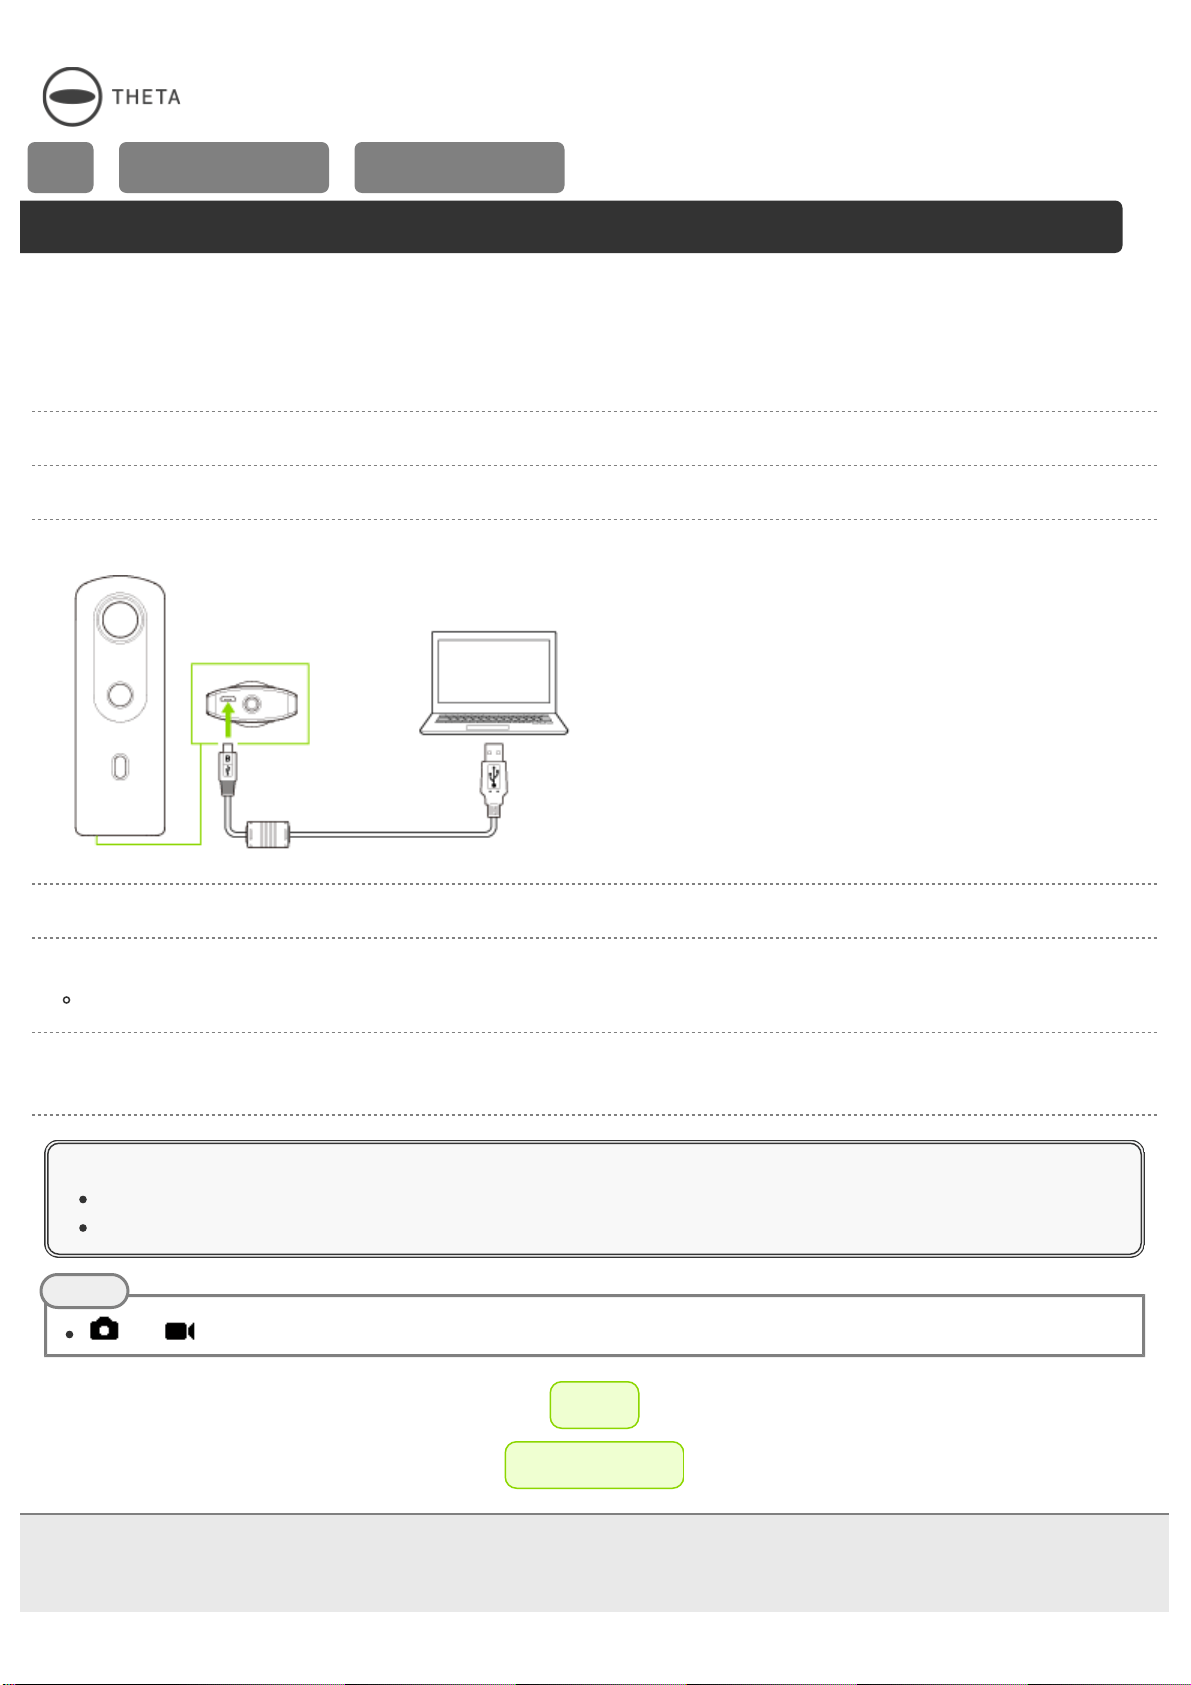
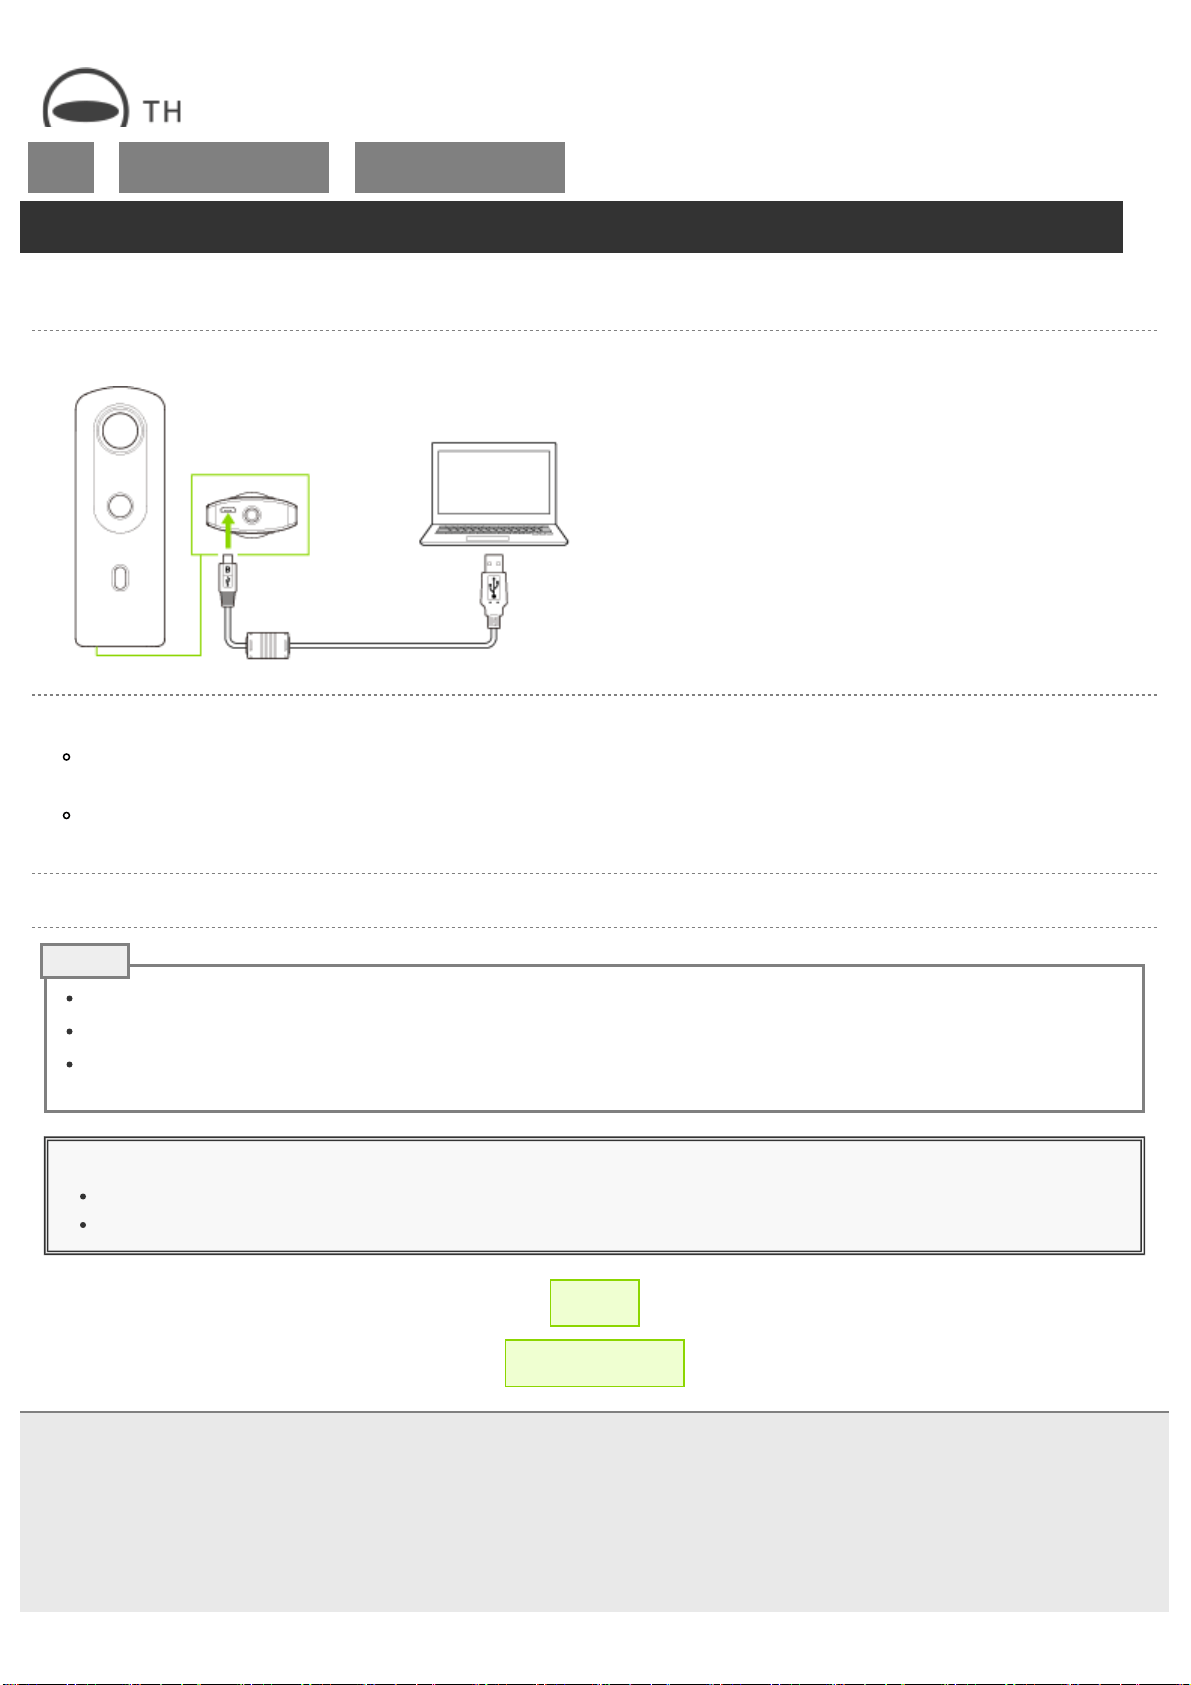
The built-in battery needs to be charged before use.
1. Connect the camera to the computer using the provided USB cable.
The power lamp lights green when charging starts.
The power lamp is unlit when charging is complete.
2. Remove the USB cable after charging is complete.
Caution
Use the provided USB cable for charging. It may take time for the battery to charge or the battery may not charge
at all when a USB cable other than the provided USB cable is used.
Connect the cable directly to a USB port on the computer. Do not connect the cable via a USB hub. It may not be
possible to charge via some USB hubs.
When charging, be sure to insert and remove the USB cable while the computer is turned on. If the computer is
restarted while the USB cable is inserted, the computer may not recognize the camera.
Charging Time
The camera is charged in approx. 270 minutes (at 25°C (77°F)).
The time described above is a guide for full charging. The charging time differs according to the remaining battery
level.
If the remaining battery level is low, it may take time for the camera to be recognized by the computer.
← Back
▲ Back to Top
© 2019 Ricoh Company, Ltd. All Rights Reserved.
Note

RICOH THETA SC2 - User Guide
file:///C|/r22/en/support/manual/sc2/content/prepare/prepare_04.html[2019/11/12 2:04:19]
Top
>
Preparation
>
Turning the Power On/Off
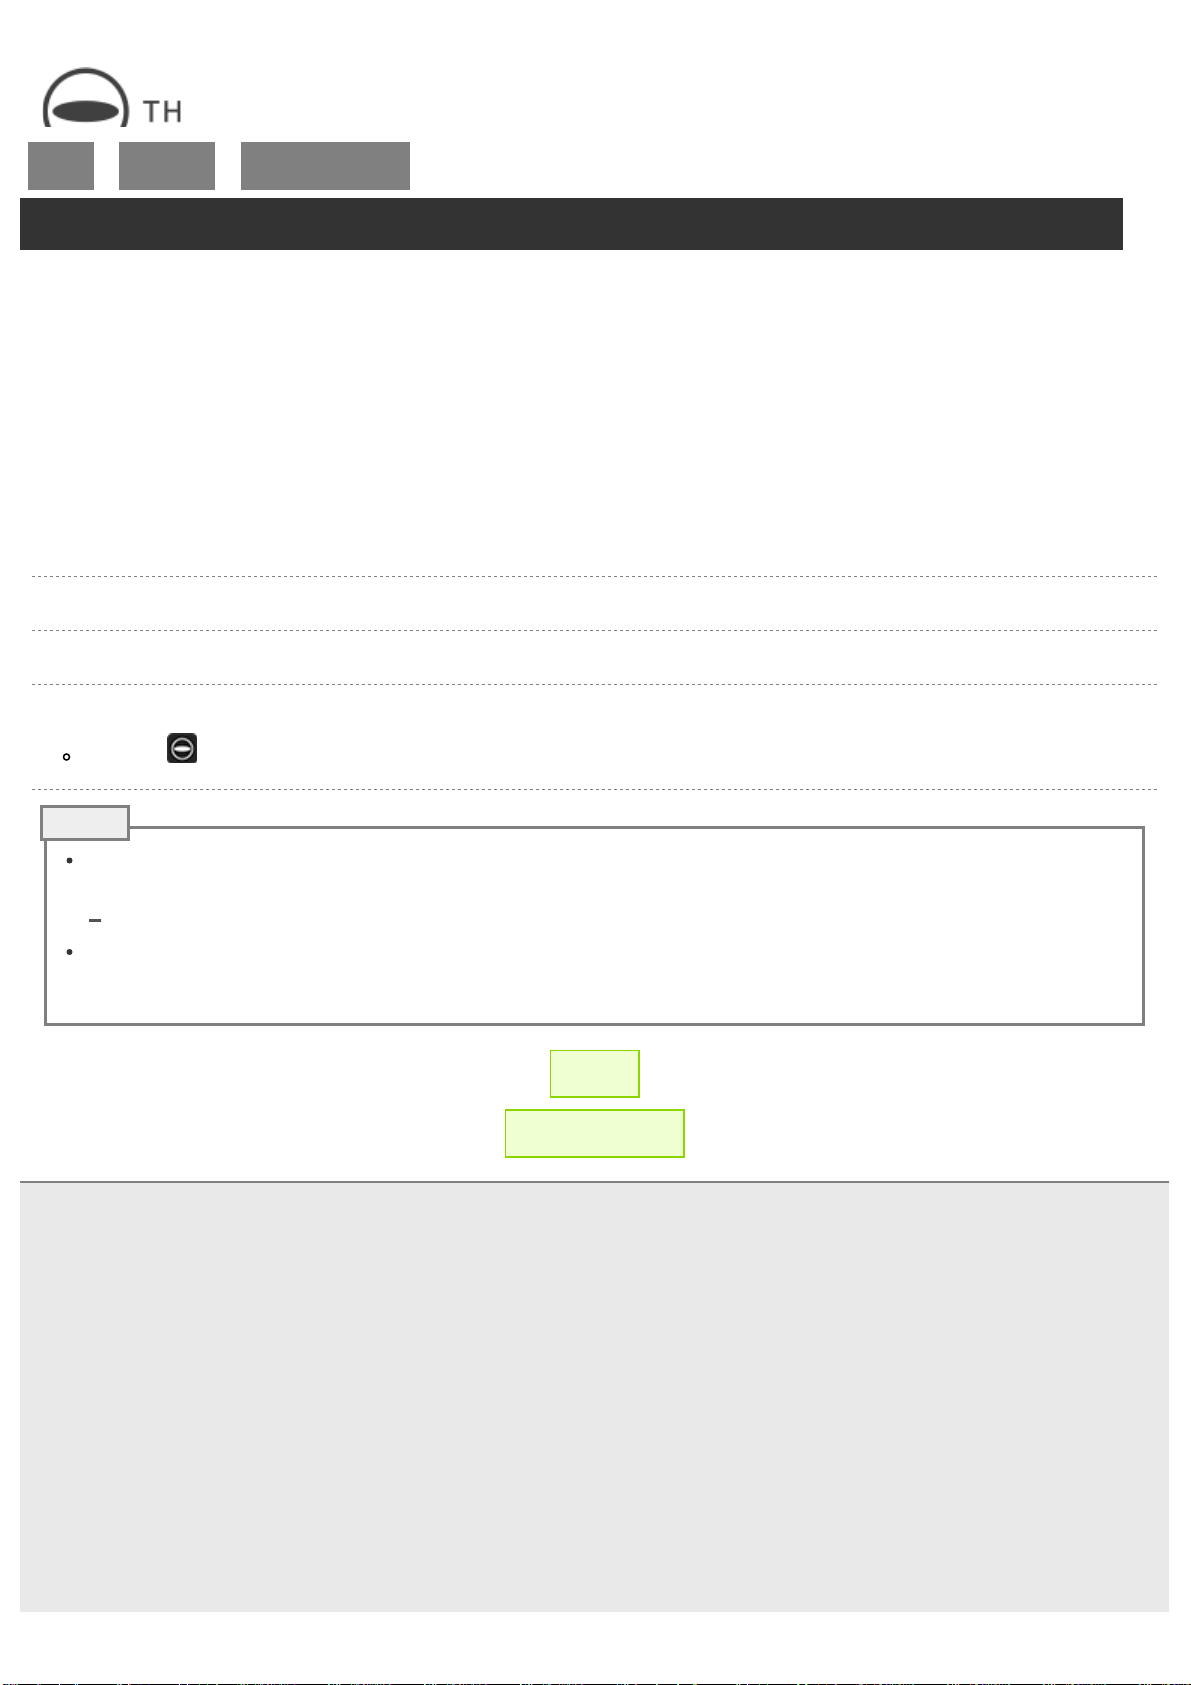
Turning the Power On/Off
When charging of the built-in battery is complete, turn on the power.
1. Press the power button.
The power lamp and OLED panel turn on.
Press the power button again to turn off the power.
Power Lamp
The lamp indicates the camera power status.
Lit in white:
The power is on.
Lit in green:
The battery is charging.
Flashing in red:
The power is turning off.
Unlit:
Charging is complete, the camera is in the sleep mode or light/sound off mode, or the power is off.
When the camera is connected to a computer with a USB cable, the lamp lights green and the battery is charged.
The lamp is unlit when charging is complete.
← Back
▲ Back to Top
© 2019 Ricoh Company, Ltd. All Rights Reserved.
Note
RICOH THETA SC2 - User Guide
file:///C|/r22/en/support/manual/sc2/content/prepare/prepare_05.html[2019/11/12 2:04:19]
Top
>
Preparation
>
Downloading the App
Downloading the App
This camera captures great images. You can also use a smartphone app for shooting, viewing, and sharing
images from your smartphone.
The following apps for smartphone are available for this camera.
Basic app:
RICOH THETA (iOS app and Android app)
Editing app:
RICOH THETA+ (iOS app and Android app)
1. Access the app download service that is compatible with your smartphone.
2. Search for “RICOH THETA”.
3. Follow the instructions on the screen to download the app.
An icon ( ) is displayed on the home screen when the download is complete.
The apps for computer are also available. See below for details on each app and the latest information about apps.
https://theta360.com/en/about/application/
Installing the App for Computer
There are some differences between functions provided by the “RICOH THETA for iPhone” (iOS app) and “RICOH
THETA for Android” (Android app). The screens of “RICOH THETA for iPhone” (iOS app) are used as examples in this
user guide.
← Back
▲ Back to Top
© 2019 Ricoh Company, Ltd. All Rights Reserved.
Note
RICOH THETA SC2 - User Guide
file:///C|/r22/en/support/manual/sc2/content/prepare/prepare_06.html[2019/11/12 2:04:20]
Top
>
Preparation
>
Connecting to a
Smartphone via Wireless
LAN
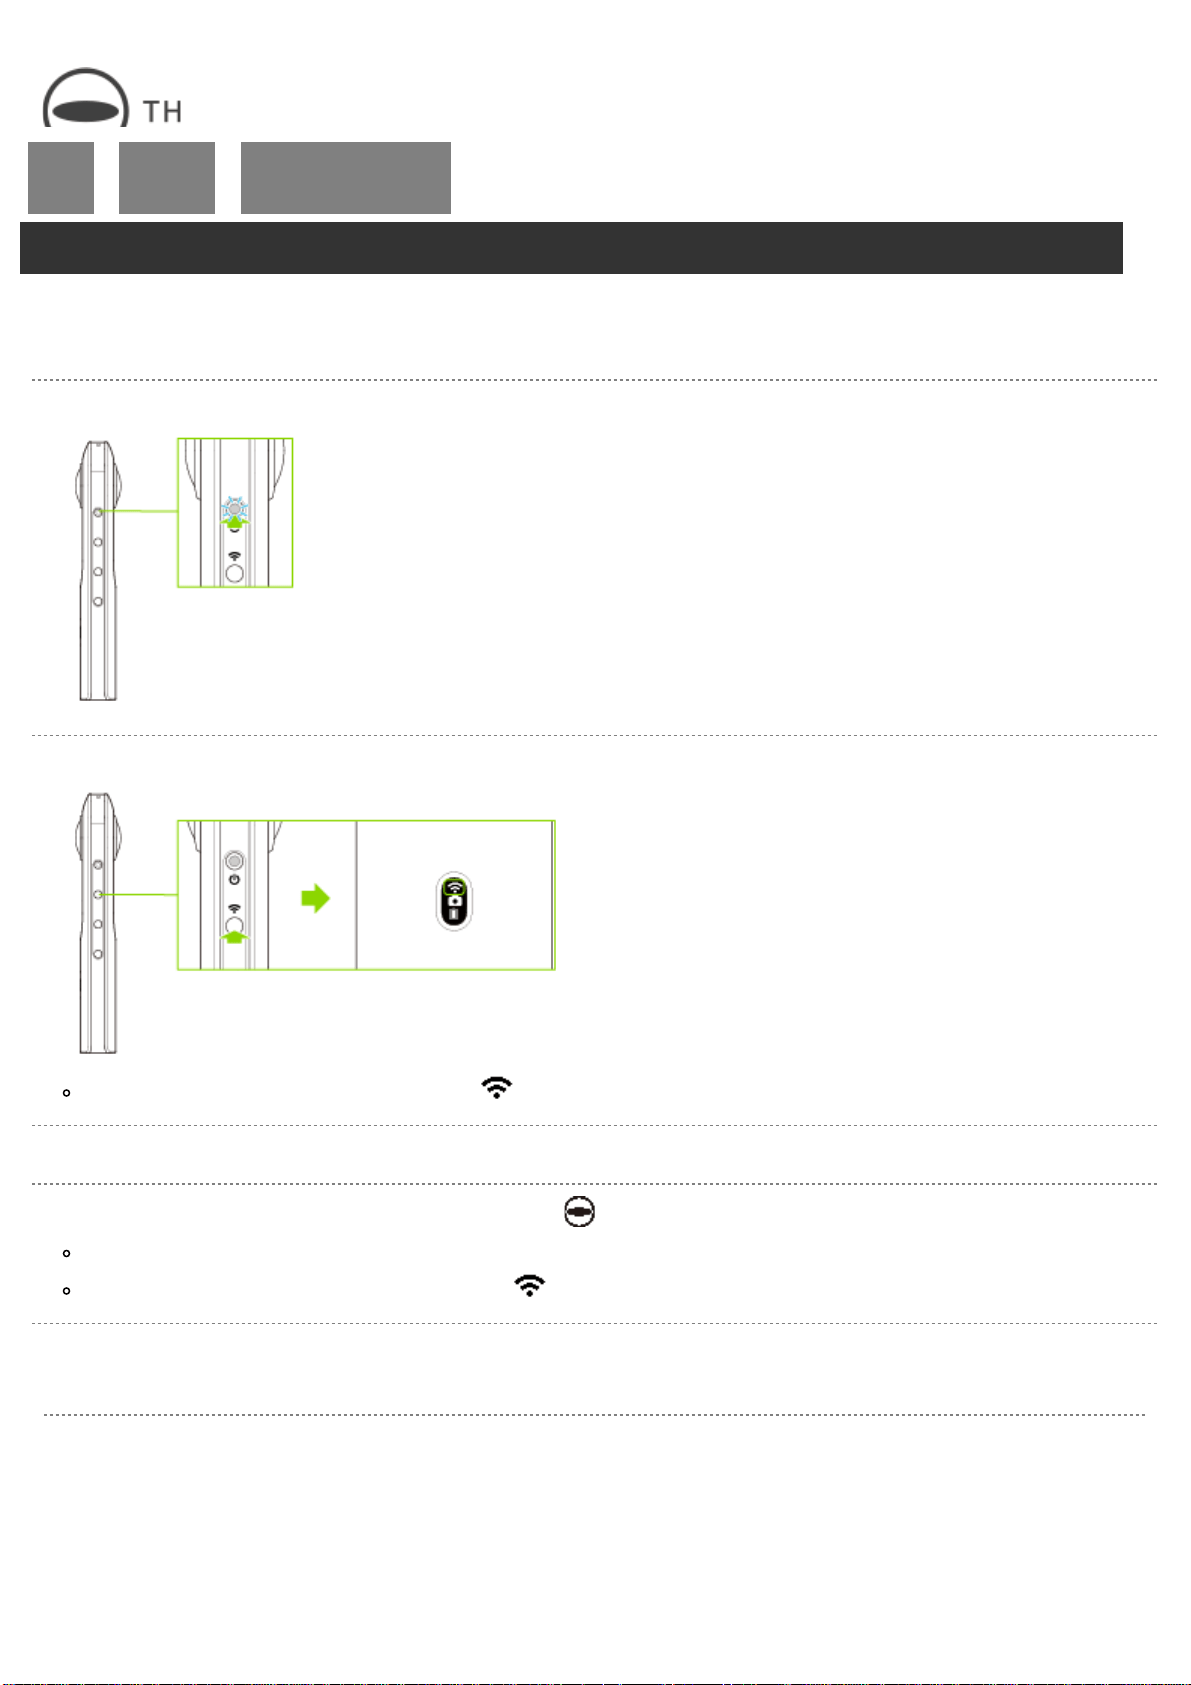
Connecting to a Smartphone via Wireless LAN
When the camera is connected to a smartphone via a wireless LAN, you can use the smartphone to capture
images remotely, view images, and make function settings.
1. Turn on the power of the camera.
2. Press the wireless button.
The wireless LAN function is turned on, and flashes on the OLED panel.
3. Turn on the Wi-Fi
TM
function of the smartphone.
4. Start the basic app for smartphone, and then tap
.
Follow the instructions on the screen to connect the camera to the smartphone.
When the wireless LAN connection is complete, becomes lit.
Connecting by Specifying the SSID
1. Turn on the power of the camera.
RICOH THETA SC2 - User Guide
file:///C|/r22/en/support/manual/sc2/content/prepare/prepare_06.html[2019/11/12 2:04:20]
2. Press the wireless button.
The wireless LAN function is turned on, and flashes on the OLED panel.
3. Display the Wi-Fi
TM
settings of the smartphone.
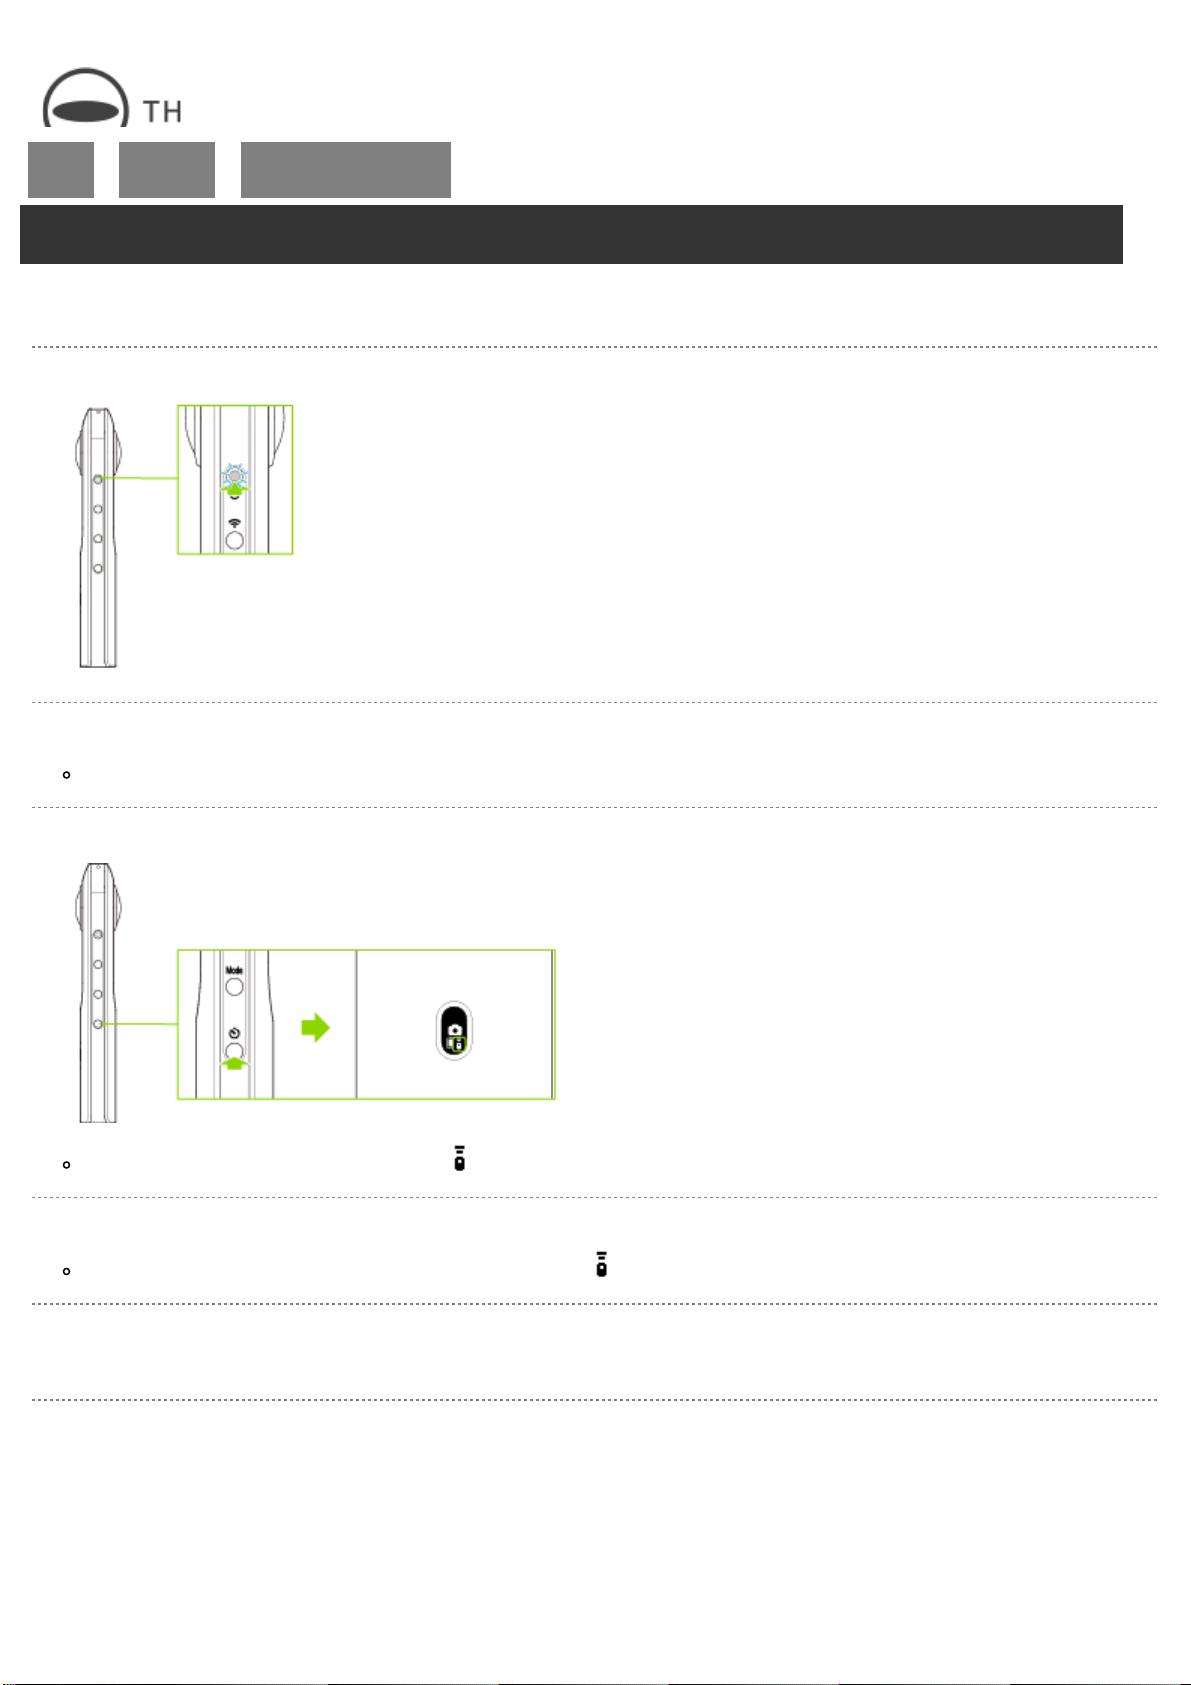
4. Select the SSID of the camera from the network list and enter the password.
The serial number printed at the bottom of the camera is the same as the SSID and password.
The SSID is “THETA + Serial number indicated by (B) + .OSC” (in this case “THETAYP00001017.OSC”). The password
is the numbers indicated by (A) (in this case “00001017”).
The password can be changed using the basic app for smartphone.
Checking and Changing the Camera Settings
The password is initialized by pressing and holding the wireless button and mode button simultaneously while the
power is on. The power turns off automatically at this time.
When the wireless LAN connection is complete, becomes lit.
Date and Time Settings
The date and time of the camera are synchronized with the smartphone or computer when the camera is
connected to the basic app.
← Back
▲ Back to Top
© 2019 Ricoh Company, Ltd. All Rights Reserved.

RICOH THETA SC2 - User Guide
file:///C|/r22/en/support/manual/sc2/content/prepare/prepare_06.html[2019/11/12 2:04:20]
RICOH THETA SC2 - User Guide
file:///C|/r22/en/support/manual/sc2/content/prepare/prepare_07.html[2019/11/12 2:04:21]
Top
>
Preparation
>
Connecting to a
Smartphone via Bluetooth
®
Connecting to a Smartphone via Bluetooth
®
When the camera is connected to a smartphone via the Bluetooth
®
, you can use the smartphone to capture
images remotely and make function settings.
1. Turn on the power of the camera.
2. Turn on the Bluetooth
®
function of the smartphone.
3. Connect the camera to a smartphone via a wireless LAN.
Connecting to a Smartphone via Wireless LAN
4. Start the basic app for smartphone, and then tap [Settings].
The [Settings] screen is displayed.
5. Tap [Cam Bluetooth settings].
The [Cam Bluetooth settings] screen is displayed.
6. Tap [Register].
Date and Time Settings
The date and time of the camera are synchronized with the smartphone or computer when the camera is
connected to the basic app.
← Back
▲ Back to Top
© 2019 Ricoh Company, Ltd. All Rights Reserved.
RICOH THETA SC2 - User Guide
file:///C|/r22/en/support/manual/sc2/content/prepare/prepare_09.html[2019/11/12 2:04:21]
Top
>
Preparation
>
Connecting to a
Bluetooth
®
Accessory
Connecting to a Bluetooth
®
Accessory
An accessory can be connected to the camera via Bluetooth
®
.
1. Turn on the power of the camera.
2. Set the Bluetooth
®
accessory to a pairing state or connection standby state.
See the manual of the Bluetooth
®
accessory for details.
3. Press and hold the self-timer button.
The camera enters the pairing state, and flashes on the OLED panel.
4. Connect the Bluetooth
®
accessory to the camera according to the manual of the accessory.
When the Bluetooth
®
accessory connection is complete, becomes lit.
Disconnecting the Bluetooth
®
Accessory from the Camera
1. Press and hold the self-timer button.
RICOH THETA SC2 - User Guide
file:///C|/r22/en/support/manual/sc2/content/prepare/prepare_09.html[2019/11/12 2:04:21]
turns off, and the Bluetooth
®
accessory is disconnected from the camera.
Resetting the Bluetooth
®
Connection Information
When you want to connect another Bluetooth
®
accessory to the camera or when the accessory cannot be
connected correctly, press and hold the wireless button and mode button simultaneously to reset the
Bluetooth
®
connection information.
Caution
If you reset the Bluetooth
®
connection information, the wireless LAN password is also reset.
← Back
▲ Back to Top
© 2019 Ricoh Company, Ltd. All Rights Reserved.

RICOH THETA SC2 - User Guide
file:///C|/r22/en/support/manual/sc2/content/menu-update.html[2019/11/12 2:04:10]
Top
>
Updating the Camera
Firmware
Updating the Camera Firmware
Updating the Camera Firmware Using a Computer
Updating the Camera Firmware Using a Smartphone
← Back
▲ Back to Top
© 2019 Ricoh Company, Ltd. All Rights Reserved.
RICOH THETA SC2 - User Guide
update_01.pdf[2019/11/12 16:08:39]
Top
>
Updating the Camera
Firmware
>
Updating the Camera
Firmware Using a Computer
Updating the Camera Firmware Using a Computer
The camera firmware can be updated using the basic app for computer.
The app is required to update the firmware. Download the app from the following site.
https://support.theta360.com/en/download/
1. Start the basic app for computer.
2. Select [File] → [Firmware Update] in the menu.
3. Follow the instructions on the screen to connect the camera to the computer using the provided USB cable.
4. Select [To next].
5. Check the current version and available version, and select [To next].
The firmware file transfer starts.
6. When “Transfer Done” is displayed, follow the instructions on the screen to update the firmware on the
device.
Caution
Fully insert the USB cable when connecting it.
Do not disconnect the camera from the computer during the firmware file transfer.
and flash alternately on the OLED panel of the camera during the firmware update.
← Back
▲ Back to Top
© 2019 Ricoh Company, Ltd. All Rights Reserved.
Note
RICOH THETA SC2 - User Guide
file:///C|/r22/en/support/manual/sc2/content/update/update_02.html[2019/11/12 2:04:23]
Top
>
Updating the Camera
Firmware
>
Updating the Camera
Firmware Using a
Smartphone
Updating the Camera Firmware Using a Smartphone
The camera firmware can be updated using the basic app for smartphone.
The app is required to update the firmware. Download the app from the following site.
https://support.theta360.com/en/download/
1. Turn on the power of the camera.
2. Connect the camera to a smartphone via a wireless LAN.
Connecting to a Smartphone via Wireless LAN
3. Start the basic app for smartphone.
4. Tap [Settings], and then tap [Update firmware].
The firmware version of the camera is checked.
5. Tap [Check the latest version].
6. Follow the instructions on the screen to change the wireless LAN settings of the smartphone and connect it
to the Internet.
The latest available firmware version is checked.
7. Tap [Start download].
The firmware file is downloaded to the smartphone.
8. Tap [Transfer files to camera].
9. Follow the instructions on the screen to change the wireless LAN settings of the smartphone and connect it
to the camera.
10. Tap [OK].
The firmware file is transferred from the smartphone to the camera. When the transfer is completed, the update process
starts in the camera.
When the update process is completed, the camera restarts.
RICOH THETA SC2 - User Guide
file:///C|/r22/en/support/manual/sc2/content/update/update_02.html[2019/11/12 2:04:23]
Caution
When the internal storage space of the smartphone is insufficient, the downloading of the firmware file may be
canceled. In this case, free up the space before performing the firmware update.
When the battery level of the camera is low, charge the battery before performing the firmware update.
Do not disconnect the wireless LAN connection between the camera and the smartphone during the firmware file
transfer.
and flash alternately on the OLED panel of the camera during the firmware update.
← Back
▲ Back to Top
© 2019 Ricoh Company, Ltd. All Rights Reserved.
Note
RICOH THETA SC2 - User Guide
file:///C|/r22/en/support/manual/sc2/content/menu-shooting-photo.html[2019/11/12 2:04:11]
Top
>
Shooting Still Images
Shooting Still Images
Shooting Still Images Using Only the Camera
Shooting Still Images While Connected to a Smartphone
Shooting Still Images Using Only the Camera with the Self-timer Function
Shooting Still Images While Connected to a Smartphone with the Self-timer Function
Registering the Still Image Shooting Settings with the My Settings Function
← Back
▲ Back to Top
© 2019 Ricoh Company, Ltd. All Rights Reserved.
RICOH THETA SC2 - User Guide
file:///C|/r22/en/support/manual/sc2/content/shooting-photo/shooting_photo_01.html[2019/11/12 2:04:23]
Top
>
Shooting Still Images
>
Shooting Still Images Using
Only the Camera
Shooting Still Images Using Only the Camera
This section explains basic methods for shooting still images.
1. Turn on the power of the camera.
2. Press the mode button to select the still image shooting mode.
appears on the OLED panel.
3. Position the camera.
Position the camera as upright as possible.
4. Press the shutter button.
The captured still image is saved in the internal memory of the camera.
Note

RICOH THETA SC2 - User Guide
file:///C|/r22/en/support/manual/sc2/content/shooting-photo/shooting_photo_01.html[2019/11/12 2:04:23]
Images saved in the internal memory of the camera can be viewed on a smartphone or computer.
Viewing Captured Still Images and Videos
Importing Still Images and Videos to a Computer
Viewing Still Images on a Computer
Images saved in the internal memory of the camera can be deleted using the basic app for smartphone.
Deleting Captured Still Images and Videos
The date and time of the camera are synchronized with the smartphone or computer when the camera is connected
to the basic app.
The camera automatically enters the sleep mode if no operations are performed for a set period of time (default
setting: 5 minutes). Shooting is not possible in the sleep mode. Press the power button to enable shooting, and then
press the shutter button to perform shooting.
If no more images can be captured, delete images from the camera.
Deleting Captured Still Images and Videos
Importing Still Images and Videos to a Computer
← Back
▲ Back to Top
© 2019 Ricoh Company, Ltd. All Rights Reserved.

RICOH THETA SC2 - User Guide
file:///C|/r22/en/support/manual/sc2/content/shooting-photo/shooting_photo_02.html[2019/11/12 2:04:24]
Top
>
Shooting Still Images
>
Shooting Still Images While
Connected to a
Smartphone
Shooting Still Images While Connected to a Smartphone
You can capture still images using the basic app for smartphone.
1. Turn on the power of the camera.
2. Press the mode button to select the still image shooting mode.
appears on the OLED panel.
3. Connect the camera to a smartphone via a wireless LAN or Bluetooth
®
.
Connecting to a Smartphone via Wireless LAN
Connecting to a Smartphone via Bluetooth
®
4. Start the basic app for smartphone.
5. Tap
to start shooting.
Tapping EV at the bottom of the screen displays the slider for correcting the exposure. If you check a still image and
feel that it is too bright or too dark, adjust the brightness and capture the image to obtain the desired brightness.
Moving the slider to the right brightens the image. Moving the slider to the left darkens the image.
In the still image capture mode, you can make settings such as the shutter speed, ISO sensitivity, white balance,
shooting method, image size, live view, and post-view on/off to suit the purpose of your shooting.
Checking and Changing the Shooting Conditions
Caution
RICOH THETA SC2 - User Guide
file:///C|/r22/en/support/manual/sc2/content/shooting-photo/shooting_photo_02.html[2019/11/12 2:04:24]
If the shutter speed is set slower than 1/8 seconds when the exposure mode is set to the manual mode, a sound is
heard both at the start and end of shooting. In addition, if shooting is performed when the exposure mode is set
to the auto mode and [Option Setting] is set to the noise reduction or HDR rendering, a sound is heard both at
the start and end of shooting. At this time, images are not saved if the power is turned off before shooting is
complete.
When performing shooting after setting the exposure mode to the auto mode and setting [Option Setting] to the
noise reduction or HDR rendering, fix the camera in place using a tripod, etc. to prevent the camera from moving.
If an image is captured while the camera is connected to a smartphone with the GPS function enabled, position
information is recorded for the image.
If [Transfer method] is set to [Move], still images are deleted from the internal memory of the camera after they are
transferred to the smartphone.
Checking and Changing the Camera Settings
When [Display after shooting] is turned on in [Shooting settings] and the shutter button of the basic app is used to
capture still images, the images are automatically transferred to the smartphone. The images captured using the
shutter button of the camera while [Display after shooting] is set to off and videos are not transferred automatically.
Transferring Captured Still Images and Videos to a Smartphone
The OLED panel and all lamps turn off during exposure.
← Back
▲ Back to Top
© 2019 Ricoh Company, Ltd. All Rights Reserved.
Note

RICOH THETA SC2 - User Guide
file:///C|/r22/en/support/manual/sc2/content/shooting-photo/shooting_photo_03.html[2019/11/12 2:04:25]
Top
>
Shooting Still Images
>
Shooting Still Images Using
Only the Camera with the
Self-timer Function
Shooting Still Images Using Only the Camera with the Self-timer Function
This section explains the shooting method using the self-timer function.
1. Turn on the power of the camera.
2. Press the mode button to select the still image shooting mode.
appears on the OLED panel.
3. Press the self-timer button to turn the self-timer shooting function on.
appears on the OLED panel.
4. Place the camera.
5. Press the shutter button to start the self-timer.
Countdown starts and shooting is performed 5 seconds later.
RICOH THETA SC2 - User Guide
file:///C|/r22/en/support/manual/sc2/content/shooting-photo/shooting_photo_03.html[2019/11/12 2:04:25]
During countdown, the countdown sound is heard. Also, the remaining time is displayed on the OLED panel.
(When the remaining time is less than 2 seconds, the countdown sound interval becomes shorter.)
Images saved in the internal memory of the camera can be viewed on a smartphone or computer.
Viewing Captured Still Images and Videos
Importing Still Images and Videos to a Computer
Viewing Still Images on a Computer
Images saved in the internal memory of the camera can be deleted using the basic app for smartphone.
Deleting Captured Still Images and Videos
The default countdown time is 5 seconds. The countdown time can be changed to 2 seconds or 10 seconds using
the basic app for smartphone.
Checking and Changing the Shooting Conditions
If the shutter button is pressed during countdown, shooting can be performed immediately.
(The self-timer is canceled.)
To cancel the self-timer, press the self-timer button or mode button.
(If the remaining countdown time is less than 2 seconds, the self-timer cannot be canceled.)
The countdown sound volume is linked to the shutter sound volume.
(When the shutter sound is off, the countdown sound is off either.)
The date and time of the camera are synchronized with the smartphone or computer when the camera is connected
to the basic app.
The camera automatically enters the sleep mode if no operations are performed for a set period of time (default
setting: 5 minutes). Shooting is not possible in the sleep mode. Press the power button to enable shooting, and then
press the shutter button to perform shooting.
If no more images can be captured, delete images from the camera.
Deleting Captured Still Images and Videos
Importing Still Images and Videos to a Computer
← Back
▲ Back to Top
© 2019 Ricoh Company, Ltd. All Rights Reserved.
Note
RICOH THETA SC2 - User Guide
file:///C|/r22/en/support/manual/sc2/content/shooting-photo/shooting_photo_04.html[2019/11/12 2:04:26]
Top
>
Shooting Still Images
>
Shooting Still Images While
Connected to a
Smartphone with the Self-
timer Function
Shooting Still Images While Connected to a Smartphone with the Self-timer Function
You can capture still images using the self-timer function with the basic app for smartphone.
1. Turn on the power of the camera.
2. Press the mode button to select the still image shooting mode.
appears on the OLED panel.
3. Place the camera.
4. Connect the camera to a smartphone via a wireless LAN or Bluetooth
®
.
Connecting to a Smartphone via Wireless LAN
Connecting to a Smartphone via Bluetooth
®
5. Start the basic app for smartphone.
The shooting screen is displayed.
6. Tap in the upper right-hand corner of the screen.
The [Shooting settings] screen is displayed.
7. Tap [Self-timer], and then tap the countdown time to set.
8. Tap
to start the self-timer shooting.
RICOH THETA SC2 - User Guide
file:///C|/r22/en/support/manual/sc2/content/shooting-photo/shooting_photo_04.html[2019/11/12 2:04:26]
Tapping EV at the bottom of the screen displays the slider for correcting the exposure. If you check a still image and
feel that it is too bright or too dark, adjust the brightness and capture the image to obtain the desired brightness.
Moving the slider to the right brightens the image. Moving the slider to the left darkens the image.
Caution
If the shutter speed is set slower than 1/8 seconds when the exposure mode is set to the manual mode, a sound is
heard both at the start and end of shooting. In addition, if shooting is performed when the exposure mode is set
to the auto mode and [Option Setting] is set to the noise reduction, a sound is heard both at the start and end of
shooting. At this time, images are not saved if the power is turned off before shooting is complete.
When performing shooting after setting the exposure mode to the auto mode and setting [Option Setting] to the
noise reduction, fix the camera in place using a tripod, etc. to prevent the camera from moving.
If an image is captured while the camera is connected to a smartphone with the GPS function enabled, position
information is recorded for the image.
If [Transfer method] is set to [Move], still images are deleted from the internal memory of the camera after they are
transferred to the smartphone.
Checking and Changing the Camera Settings
When [Display after shooting] is turned on in [Shooting settings] and the shutter button of the basic app is used to
capture still images, the images are automatically transferred to the smartphone. The images captured using the
shutter button of the camera while [Display after shooting] is set to off and videos are not transferred automatically.
Transferring Captured Still Images and Videos to a Smartphone
If the exposure mode is set to the manual mode and the shutter speed is set slower than 1/8 seconds, the OLED
panel and all lamps turn off. If shooting is performed when the exposure mode is set to the auto mode and [Option
Setting] is set to the noise reduction, the OLED panel and all lamps may turn off.
The default countdown time is 5 seconds.
If the shutter button of the camera is pressed during countdown, shooting can be performed immediately.
(The self-timer is canceled.)
To cancel the self-timer, tap or press the self-timer button or mode button.
(If the remaining countdown time is less than 2 seconds, the self-timer cannot be canceled.)
The countdown sound volume is proportional to the shutter sound volume.
(When the shutter sound is off, the countdown sound is off either.)
The settings below can be made for the basic app for smartphone.
Countdown time (2 seconds, 5 seconds, 10 seconds)
Exposure mode for still images (ISO sensitivity priority, etc.)
Options (DR compensation, etc.)
Checking and Changing the Shooting Conditions
Changed countdown time is kept even if the camera power is turned off.
To cancel the self-timer, set [Shooting method] to [Normal shooting].
← Back
▲ Back to Top
© 2019 Ricoh Company, Ltd. All Rights Reserved.
Note

RICOH THETA SC2 - User Guide
file:///C|/r22/en/support/manual/sc2/content/shooting-photo/shooting_photo_05.html[2019/11/12 2:04:26]
Top
>
Shooting Still Images
>
Registering the Still Image
Shooting Settings with the
My Settings Function
Registering the Still Image Shooting Settings with the My Settings Function
You can register the shooting conditions as “My Settings” using the basic app for smartphone to use the desired
settings as defaults when the camera is turned on.
1. Turn on the power of the camera.
2. Press the mode button to select the still image shooting mode.
appears on the OLED panel.
3. Connect the camera to a smartphone via a wireless LAN or Bluetooth
®
.
Connecting to a Smartphone via Wireless LAN
Connecting to a Smartphone via Bluetooth
®
4. Start the basic app for smartphone.
5. Tap to set the shooting conditions to register as “My Settings”.
You can set shooting conditions such as the exposure mode, shutter speed, ISO sensitivity, exposure compensation,
white balance, and Option Setting (noise reduction, DR compensation, HDR rendering).
6. Tap [My Settings] on the [Shooting settings] screen.
7. Tap [Register to camera].
The shooting conditions are registered to the camera.
RICOH THETA SC2 - User Guide
file:///C|/r22/en/support/manual/sc2/content/shooting-photo/shooting_photo_05.html[2019/11/12 2:04:26]
Caution
If the shutter speed is set slower than 1/8 seconds when the exposure mode is set to the manual mode, a sound is
heard both at the start and end of shooting. In addition, if shooting is performed when the exposure mode is set
to the auto mode and [Option Setting] is set to the noise reduction or HDR rendering, a sound is heard both at
the start and end of shooting. At this time, images are not saved if the power is turned off before shooting is
complete.
When performing shooting after setting the exposure mode to the auto mode and setting [Option Setting] to the
noise reduction or HDR rendering, fix the camera in place using a tripod, etc. to prevent the camera from moving.
Images saved in the internal memory of the camera can be viewed on a smartphone or computer.
Viewing Captured Still Images and Videos
Importing Still Images and Videos to a Computer
Viewing Still Images on a Computer
Images saved in the internal memory of the camera can be deleted using the basic app for smartphone.
Deleting Captured Still Images and Videos
You can change the shooting conditions even after the My Settings function is turned on.
The My Settings shooting conditions are reset to the original settings when the shooting method is changed to the
normal shooting or self-timer shooting or when the power is turned off.
If the exposure mode is set to the manual mode and the shutter speed is set slower than 1/8 seconds, the OLED
panel and all lamps turn off. If shooting is performed when the exposure mode is set to the auto mode and [Option
Setting] is set to the noise reduction or HDR rendering, the OLED panel and all lamps may turn off.
The camera automatically enters the sleep mode if no operations are performed for a set period of time (default
setting: 5 minutes). Shooting is not possible in the sleep mode. Press the power button to enable shooting, and then
press the shutter button to perform shooting.
If no more images can be captured, delete images from the camera.
Deleting Captured Still Images and Videos
Importing Still Images and Videos to a Computer
← Back
▲ Back to Top
© 2019 Ricoh Company, Ltd. All Rights Reserved.
Note
RICOH THETA SC2 - User Guide
file:///C|/r22/en/support/manual/sc2/content/menu-shooting-movie.html[2019/11/12 2:04:11]
Top
>
Shooting Videos
Shooting Videos
Shooting Videos Using Only the Camera
Shooting Videos While Connected to a Smartphone
Shooting Videos Using Only the Camera with the Self-timer Function
Shooting Videos While Connected to a Smartphone with the Self-timer Function
Registering the Video Shooting Settings with the My Settings Function
← Back
▲ Back to Top
© 2019 Ricoh Company, Ltd. All Rights Reserved.
RICOH THETA SC2 - User Guide
file:///C|/r22/en/support/manual/sc2/content/shooting-movie/shooting_movie_01.html[2019/11/12 2:04:27]
Top
>
Shooting Videos
>
Shooting Videos Using
Only the Camera
Shooting Videos Using Only the Camera
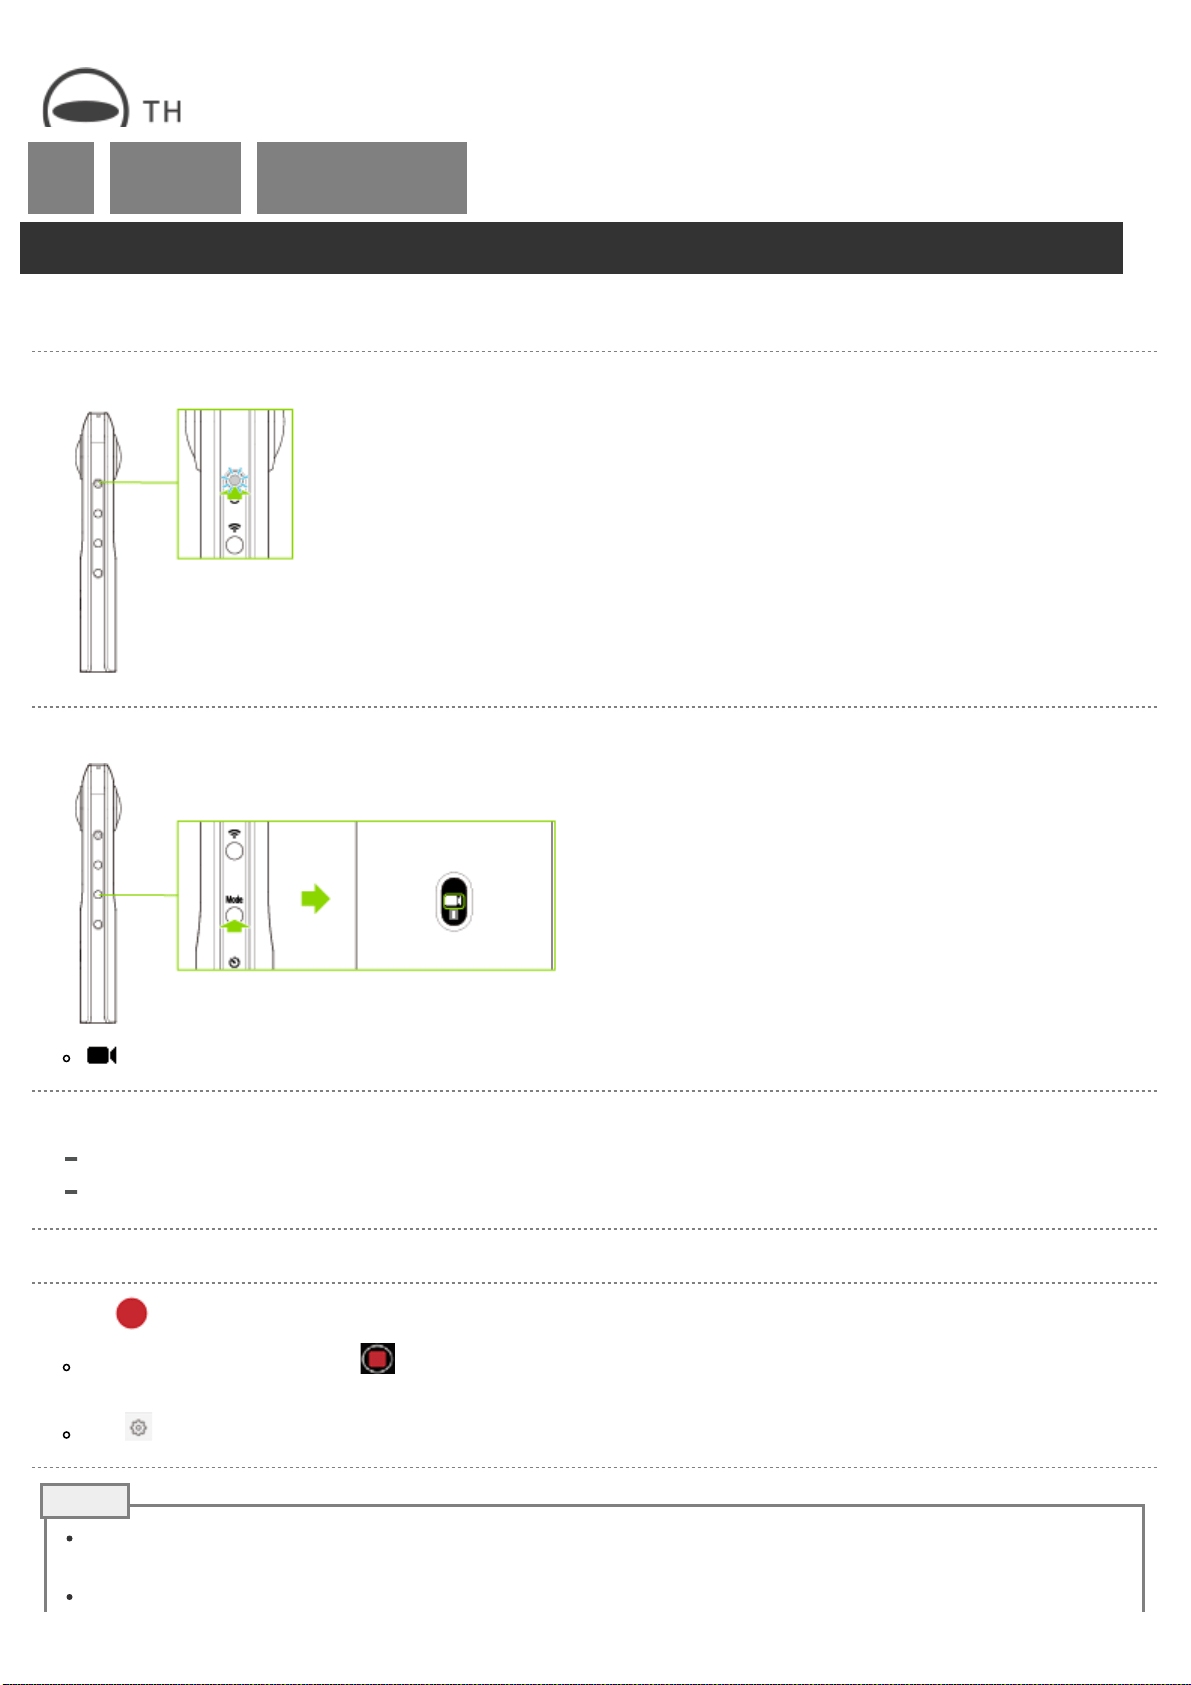
This section explains basic methods for shooting videos.
1. Turn on the power of the camera.
2. Press the mode button to select the video shooting mode.
appears on the OLED panel.
3. Position the camera.
Position the camera as upright as possible.
4. Press the shutter button.
appears on the OLED panel during video recording.
Press the shutter button again to stop shooting.
The recorded video is saved in the internal memory of the camera.
RICOH THETA SC2 - User Guide
file:///C|/r22/en/support/manual/sc2/content/shooting-movie/shooting_movie_01.html[2019/11/12 2:04:27]
Caution
An accurate date and time are not recorded if videos are recorded when the camera has never been connected to
a smartphone.
If you press and hold the power button and wireless button to reset the camera while recording a video, the
internal memory may become damaged and may no longer be able to save data.
Videos may not be transferred to a smartphone depending on the video settings.
Videos may not be played back on a smartphone or computer depending on the video settings.
The camera may get hot if you record a video for a long period of time or perform shooting multiple times in
quick succession. In this case, the camera may stop operating to prevent damage from high temperatures.
Videos saved in the internal memory of the camera can be viewed on a smartphone or computer.
Viewing Captured Still Images and Videos
Importing Still Images and Videos to a Computer
Viewing Videos on a Computer
Videos saved in the internal memory of the camera can be deleted using the basic app for smartphone.
Deleting Captured Still Images and Videos
The following operations are not available with the basic app for smartphone while recording videos.
Viewing images in the camera
Transferring images from the camera
Deleting images from the camera
The camera automatically enters the sleep mode if no operations are performed for a set period of time (default
setting: 5 minutes). Shooting is not possible in the sleep mode. Press the power button to enable shooting, and then
press the shutter button to perform shooting.
If no more time remains for shooting, delete images from the camera.
Deleting Captured Still Images and Videos
Importing Still Images and Videos to a Computer
← Back
▲ Back to Top
© 2019 Ricoh Company, Ltd. All Rights Reserved.
Note
RICOH THETA SC2 - User Guide
file:///C|/r22/en/support/manual/sc2/content/shooting-movie/shooting_movie_02.html[2019/11/12 2:04:28]
Top
>
Shooting Videos
>
Shooting Videos While
Connected to a
Smartphone
Shooting Videos While Connected to a Smartphone
You can capture videos using the basic app for smartphone.
1. Turn on the power of the camera.
2. Press the mode button to select the video shooting mode.
appears on the OLED panel.
3. Connect the camera to a smartphone via a wireless LAN or Bluetooth
®
.
Connecting to a Smartphone via Wireless LAN
Connecting to a Smartphone via Bluetooth
®
4. Start the basic app for smartphone.
5. Tap to start shooting.
The shooting is stopped when is tapped. (The shooting can also be stopped by pressing the shutter button of the
camera.)
Tap in the upper right-hand corner of the screen to change the video size, etc.
If a video is recorded while the camera is connected to a smartphone with the GPS function enabled, the position
information acquired when the shooting is started is recorded for the video.
When [Display after shooting] is turned on in [Shooting settings] and the shutter button of the basic app is used to
Note
RICOH THETA SC2 - User Guide
file:///C|/r22/en/support/manual/sc2/content/shooting-movie/shooting_movie_02.html[2019/11/12 2:04:28]
capture still images, the images are automatically transferred to the smartphone. The images captured using the
shutter button of the camera while [Display after shooting] is set to off and videos are not transferred automatically.
Transferring Captured Still Images and Videos to a Smartphone
The following operations are not available with the basic app for smartphone while recording videos.
Viewing images in the camera
Transferring images from the camera
Deleting images from the camera
Videos can be transferred to a smartphone, and then shared and viewed as spherical images on YouTube.
Caution
Videos may not be transferred to a smartphone depending on the video settings.
Videos may not be played back on a smartphone or computer depending on the video settings.
The camera may get hot if you record a video for a long period of time or perform shooting multiple times in
quick succession. In this case, the camera may stop operating to prevent damage from high temperatures.
← Back
▲ Back to Top
© 2019 Ricoh Company, Ltd. All Rights Reserved.
RICOH THETA SC2 - User Guide
file:///C|/r22/en/support/manual/sc2/content/shooting-movie/shooting_movie_03.html[2019/11/12 2:04:29]
Top
>
Shooting Videos
>
Shooting Videos Using
Only the Camera with the
Self-timer Function
Shooting Videos Using Only the Camera with the Self-timer Function
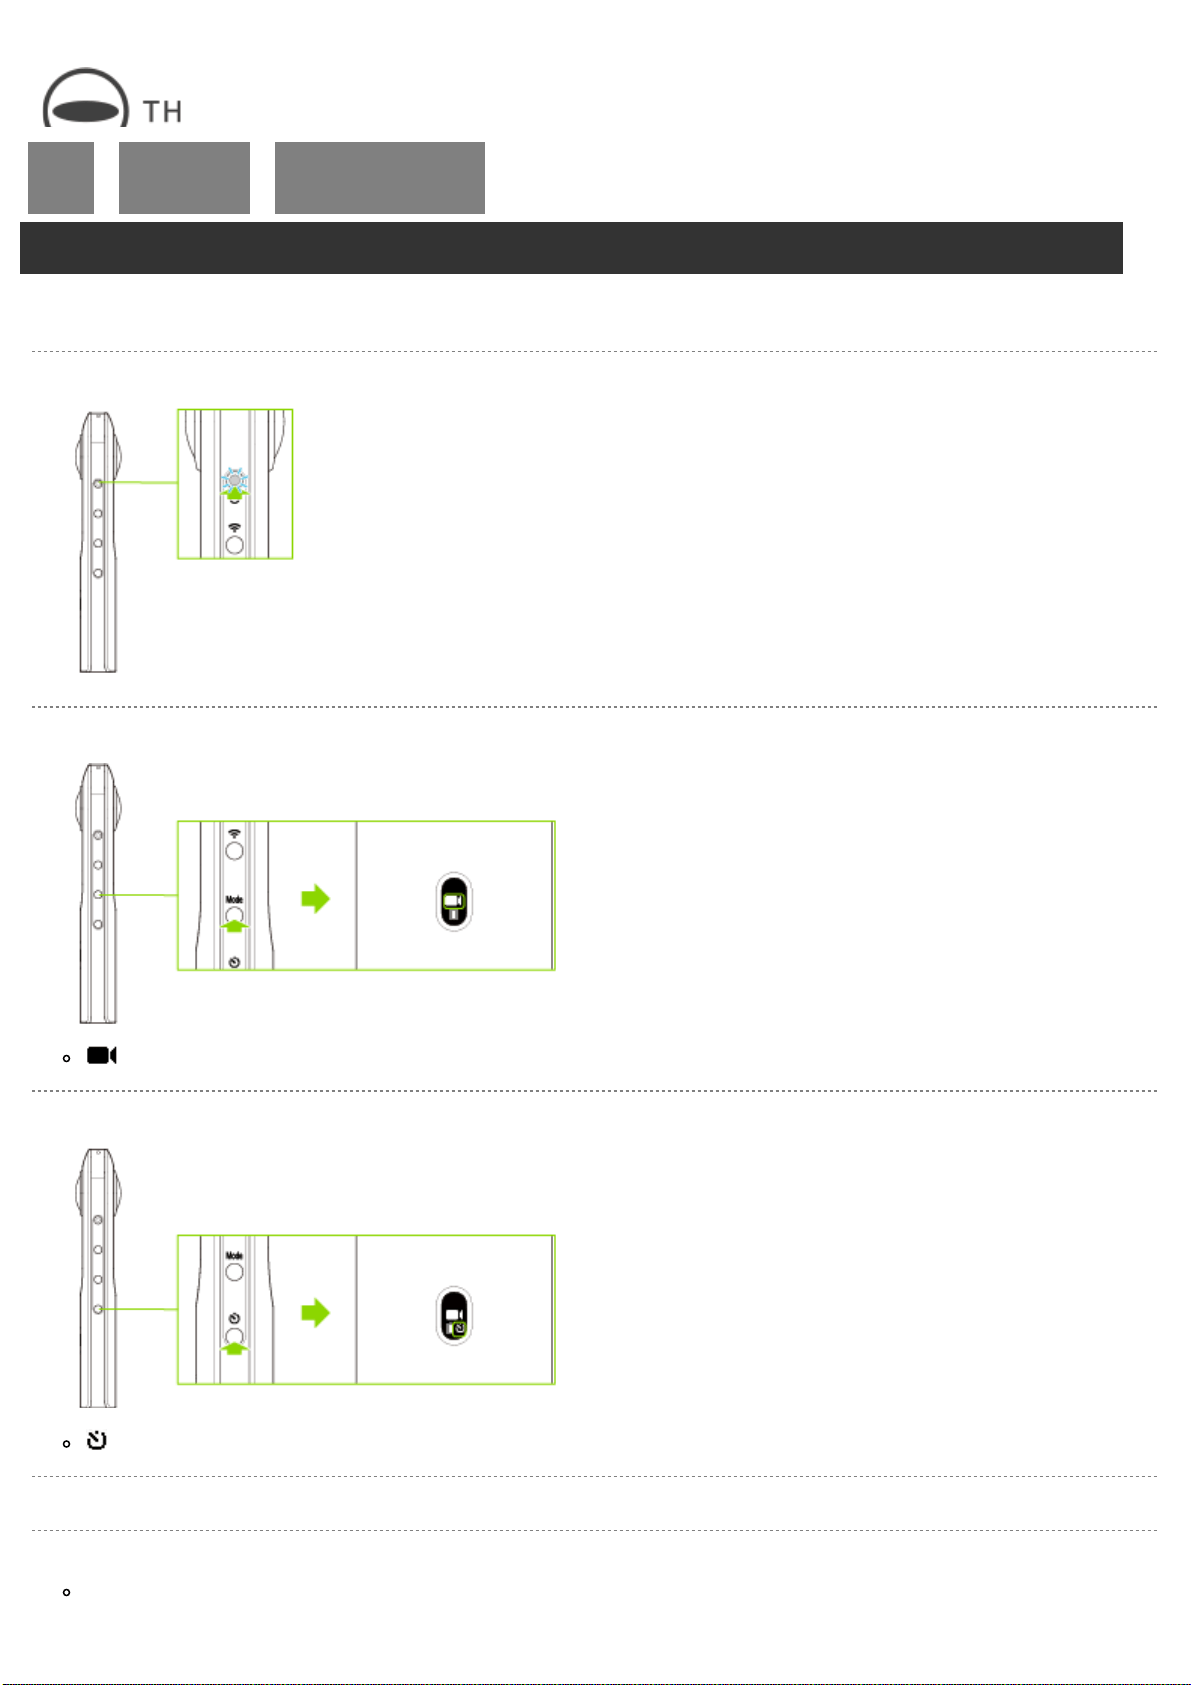
This section explains the shooting method using the self-timer function.
1. Turn on the power of the camera.
2. Press the mode button to select the video shooting mode.
appears on the OLED panel.
3. Press the self-timer button to turn the self-timer shooting function on.
appears on the OLED panel.
4. Place the camera.
5. Press the shutter button to start the self-timer.
Countdown starts and shooting is started 5 seconds later.
RICOH THETA SC2 - User Guide
file:///C|/r22/en/support/manual/sc2/content/shooting-movie/shooting_movie_03.html[2019/11/12 2:04:29]
During countdown, the countdown sound is heard. Also, the remaining time is displayed on the OLED panel.
(When the remaining time is less than 2 seconds, the countdown sound interval becomes shorter.)
appears on the OLED panel during video recording.
Press the shutter button again to stop shooting.
The recorded video is saved in the internal memory of the camera.
Caution
If you press and hold the power button and wireless button to reset the camera while recording a video, the
internal memory may become damaged and may no longer be able to save data.
Videos may not be transferred to a smartphone depending on the video settings.
Videos may not be played back on a smartphone or computer depending on the video settings.
The camera may get hot if you record a video for a long period of time or perform shooting multiple times in
quick succession. In this case, the camera may stop operating to prevent damage from high temperatures.
Videos saved in the internal memory of the camera can be viewed on a smartphone or computer.
Viewing Captured Still Images and Videos
Importing Still Images and Videos to a Computer
Viewing Videos on a Computer
Videos saved in the internal memory of the camera can be deleted using the basic app for smartphone.
Deleting Captured Still Images and Videos
The default countdown time is 5 seconds.
Checking and Changing the Shooting Conditions
If the shutter button is pressed during countdown, shooting can be performed immediately.
(The self-timer is canceled.)
To cancel the self-timer, press the mode button.
(If the remaining countdown time is less than 2 seconds, the self-timer cannot be canceled.)
The countdown sound volume is linked to the shutter sound volume.
(When the shutter sound is off, the countdown sound is off either.)
The following operations are not available with the basic app for smartphone while recording videos.
Viewing images in the camera
Transferring images from the camera
Deleting images from the camera
The date and time of the camera are synchronized with the smartphone or computer when the camera is connected
to the basic app.
The camera automatically enters the sleep mode if no operations are performed for a set period of time (default
setting: 5 minutes). Shooting is not possible in the sleep mode. Press the power button to enable shooting, and then
press the shutter button to perform shooting.
If no more images can be captured, delete images from the camera.
Deleting Captured Still Images and Videos
Importing Still Images and Videos to a Computer
← Back
▲ Back to Top
© 2019 Ricoh Company, Ltd. All Rights Reserved.
Note

RICOH THETA SC2 - User Guide
file:///C|/r22/en/support/manual/sc2/content/shooting-movie/shooting_movie_04.html[2019/11/12 2:04:30]
Top
>
Shooting Videos
>
Shooting Videos While
Connected to a
Smartphone with the Self-
timer Function
Shooting Videos While Connected to a Smartphone with the Self-timer Function
You can record videos using the self-timer function with the basic app for smartphone.
1. Turn on the power of the camera.
2. Press the mode button to select the video shooting mode.
appears on the OLED panel.
3. Place the camera.
4. Connect the camera to a smartphone via a wireless LAN or Bluetooth
®
.
Connecting to a Smartphone via Wireless LAN
Connecting to a Smartphone via Bluetooth
®
5. Start the basic app for smartphone.
The shooting screen is displayed.
6. Tap in the upper right-hand corner of the screen.
The [Shooting settings] screen is displayed.
7. Tap [Self-timer], and then tap the countdown time to set.
8. Tap to start the self-timer shooting.
RICOH THETA SC2 - User Guide
file:///C|/r22/en/support/manual/sc2/content/shooting-movie/shooting_movie_04.html[2019/11/12 2:04:30]
The shooting is stopped when is tapped. (The shooting can also be stopped by pressing the shutter button of the
camera.)
If a video is recorded while the camera is connected to a smartphone with the GPS function enabled, position
information is recorded for the video.
When [Display after shooting] is turned on in [Shooting settings] and the shutter button of the basic app is used to
capture still images, the images are automatically transferred to the smartphone. The images captured using the
shutter button of the camera while [Display after shooting] is set to off and videos are not transferred automatically.
Transferring Captured Still Images and Videos to a Smartphone
The default countdown time is 5 seconds.
If the shutter button of the camera is pressed during countdown, shooting can be performed immediately.
(The self-timer is canceled.)
To cancel the self-timer, press the self-timer button or mode button.
(If the remaining countdown time is less than 2 seconds, the self-timer cannot be canceled.)
The countdown sound volume is proportional to the shutter sound volume.
(When the shutter sound is off, the countdown sound is off either.)
The settings below can be made for the basic app for smartphone.
Countdown time (2 seconds, 5 seconds, 10 seconds)
Exposure mode for videos (ISO sensitivity priority, etc.)
Checking and Changing the Shooting Conditions
Changed countdown time is kept even if the camera power is turned off.
To cancel the self-timer, set [Shooting method] to [Normal shooting].
The following operations are not available with the basic app for smartphone while recording videos.
Viewing images in the camera
Transferring images from the camera
Deleting images from the camera
Videos can be transferred to a smartphone, and then shared and viewed as spherical images on YouTube.
Caution
Videos may not be transferred to a smartphone depending on the video settings.
Videos may not be played back on a smartphone or computer depending on the video settings.
The camera may get hot if you record a video for a long period of time or perform shooting multiple times in
quick succession. In this case, the camera may stop operating to prevent damage from high temperatures.
← Back
▲ Back to Top
© 2019 Ricoh Company, Ltd. All Rights Reserved.
Note
RICOH THETA SC2 - User Guide
file:///C|/r22/en/support/manual/sc2/content/shooting-movie/shooting_movie_05.html[2019/11/12 2:04:30]
Top
>
Shooting Videos
>
Registering the Video
Shooting Settings with the
My Settings Function
Registering the Video Shooting Settings with the My Settings Function
You can register the shooting conditions as “My Settings” using the basic app for smartphone to use the desired
settings as defaults when the camera is turned on.
1. Turn on the power of the camera.
2. Press the mode button to select the video shooting mode.
appears on the OLED panel.
3. Connect the camera to a smartphone via a wireless LAN or Bluetooth
®
.
Connecting to a Smartphone via Wireless LAN
Connecting to a Smartphone via Bluetooth
®
4. Start the basic app for smartphone.
5. Tap to set the shooting conditions to register as “My Settings”.
You can set shooting conditions such as the exposure mode, exposure compensation, and white balance.
6. Tap [My Settings] on the [Shooting settings] screen.
7. Tap [Register to camera].
The shooting conditions are registered to the camera.
RICOH THETA SC2 - User Guide
file:///C|/r22/en/support/manual/sc2/content/shooting-movie/shooting_movie_05.html[2019/11/12 2:04:30]
Caution
If you press and hold the power button and wireless button to reset the camera while recording a video, the
internal memory may become damaged and may no longer be able to save data.
Videos may not be transferred to a smartphone depending on the video settings.
Videos may not be played back on a smartphone or computer depending on the video settings.
The camera may get hot if you record a video for a long period of time or perform shooting multiple times in
quick succession. In this case, the camera may stop operating to prevent damage from high temperatures.
Videos saved in the internal memory of the camera can be viewed on a smartphone or computer.
Viewing Captured Still Images and Videos
Importing Still Images and Videos to a Computer
Viewing Videos on a Computer
Videos saved in the internal memory of the camera can be deleted using the basic app for smartphone.
Deleting Captured Still Images and Videos
You can change the shooting conditions even after the My Settings function is turned on.
The My Settings shooting conditions are reset to the original settings when the shooting method is changed to the
normal shooting or self-timer shooting or when the power is turned off.
The following operations are not available with the basic app for smartphone while recording videos.
Viewing images in the camera
Transferring images from the camera
Deleting images from the camera
Videos can be transferred to a smartphone, and then shared and viewed as spherical images on YouTube.
The camera automatically enters the sleep mode if no operations are performed for a set period of time (default
setting: 5 minutes). Shooting is not possible in the sleep mode. Press the power button to enable shooting, and then
press the shutter button to perform shooting.
If no more images can be captured, delete images from the camera.
Deleting Captured Still Images and Videos
Importing Still Images and Videos to a Computer
← Back
▲ Back to Top
© 2019 Ricoh Company, Ltd. All Rights Reserved.
Note

RICOH THETA SC2 - User Guide
file:///C|/r22/en/support/manual/sc2/content/menu-shooting-preset.html[2019/11/12 2:04:12]
Top
>
Shooting in the Preset
Shooting Modes
Shooting in the Preset Shooting Modes
Shooting Still Images in the Preset Shooting Modes
← Back
▲ Back to Top
© 2019 Ricoh Company, Ltd. All Rights Reserved.
RICOH THETA SC2 - User Guide
file:///C|/r22/en/support/manual/sc2/content/shooting-preset/shooting_preset_01.html[2019/11/12 2:04:31]
Top >
Shooting in the Preset
Shooting Modes
>
Shooting Still Images in the
Preset Shooting Modes
Shooting Still Images in the Preset Shooting Modes
You can capture still images with settings suitable for expressing the atmosphere of each scene by simply
selecting a preset shooting mode.
Face:
This mode is suitable for portrait shooting.
A person’s face is detected and its position is adjusted to the center of the image to obtain a clear image of the
person.
Caution
The detection distance for faces is up to approx. 80 cm.
A face cannot be detected at the seam between the images captured with the front and rear lenses.
Night View:
The dynamic range of bright areas is expanded to reduce noise. In addition, a person’s face is detected to
obtain a clear image of the person.
Caution
It is recommended to use a tripod to prevent the shake of the camera.
Lens-by-Lens Exposure:
Image processing such as exposure adjustment and white balance adjustment is performed individually for
each image captured with the front and rear lenses. This mode is suitable for capturing scenes with significantly
different brightness conditions between the camera front side and the camera rear side.
Images captured with the front and rear lenses are displayed side by side.
Caution
The seam between the images captured with the front and rear lenses is located in the center of the entire
image.
The seam between the images captured with the front and rear lenses may be noticeable.
← Back
▲ Back to Top
© 2019 Ricoh Company, Ltd. All Rights Reserved.
RICOH THETA SC2 - User Guide
file:///C|/r22/en/support/manual/sc2/content/menu-phone.html[2019/11/12 2:04:13]
Top
>
Viewing and Sharing Using
a Smartphone
Viewing and Sharing Using a Smartphone
Viewing Captured Still Images and Videos
Deleting Captured Still Images and Videos
Transferring Captured Still Images and Videos to a Smartphone
Blurring Still Images (iOS App Only)
Sharing Still Images and Videos
← Back
▲ Back to Top
© 2019 Ricoh Company, Ltd. All Rights Reserved.
RICOH THETA SC2 - User Guide
file:///C|/r22/en/support/manual/sc2/content/phone/phone_01.html[2019/11/12 2:04:32]
Top
>
Viewing and Sharing Using
a Smartphone
>
Viewing Captured Still
Images and Videos
Viewing Captured Still Images and Videos
The basic app for smartphone can be used to view images saved in the camera or transferred to a smartphone.
1. Turn on the power of the camera.
2. Connect the camera to a smartphone via a wireless LAN.
Connecting to a Smartphone via Wireless LAN
3. Start the basic app for smartphone.
The shooting screen is displayed.
4. Tap [×] in the upper left-hand corner of the screen.
Transferred images are displayed in [Device images].
5. Select where images are saved.
[Device images]
A list of images transferred from the camera to the smartphone is displayed.
Images can be displayed in either timeline or thumbnail format.
Images can be viewed even when the smartphone is not connected to the camera.
[Cam images]
A list of images saved in the internal memory of the camera is displayed.
The display can be toggled between [Not transferred], [Transferred], and [All].
6. Tap the image to be viewed.
The selected image is displayed in the Viewer.
Caution
It takes a long time to transfer long videos, and the battery may run down during the transfer.
When the video size is “3840 × 1920”, the video may not be played back depending on the connected
smartphone.
When an image is selected in [Cam images] and displayed in the Viewer, the selected image is transferred from the
Note
RICOH THETA SC2 - User Guide
file:///C|/r22/en/support/manual/sc2/content/phone/phone_01.html[2019/11/12 2:04:32]
internal memory of the camera and saved to the smartphone.
Images in the camera cannot be displayed while shooting video.
Viewer
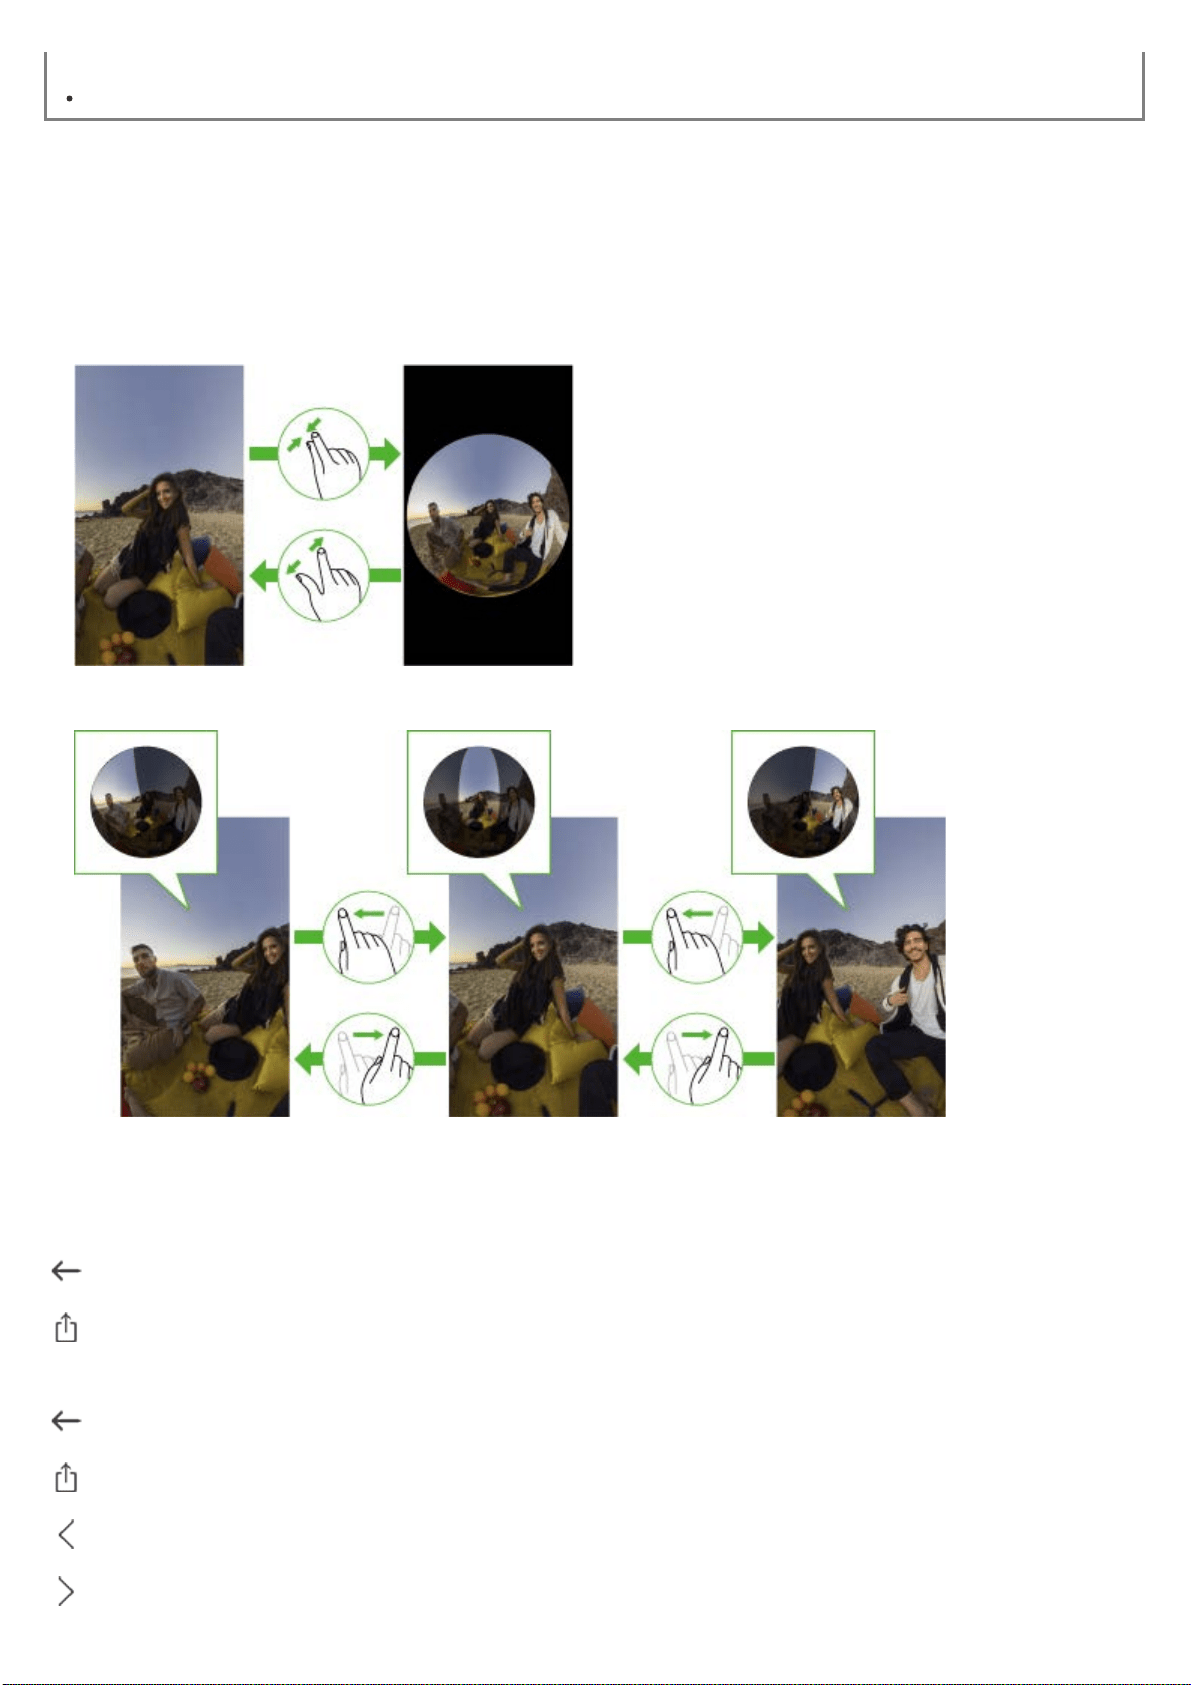
You can display a desired area of a spherical image taken with the camera, and zoom in or out to check details
in the image.
The screens of “RICOH THETA for iPhone” are used as examples in the following descriptions.
Zooming in or out: Pinch out, pinch in
Changing the displayed area: Swipe or flick
Tap the screen when an image is displayed in the Viewer to display the buttons and perform various operations.
When [Cam images] is selected
: Returns to the image list.
: Posts the image to a social networking service.
When [Device images] is selected
: Returns to the image list.
: Posts the image to a social networking service.
: Displays the previous image.
: Displays the next image.
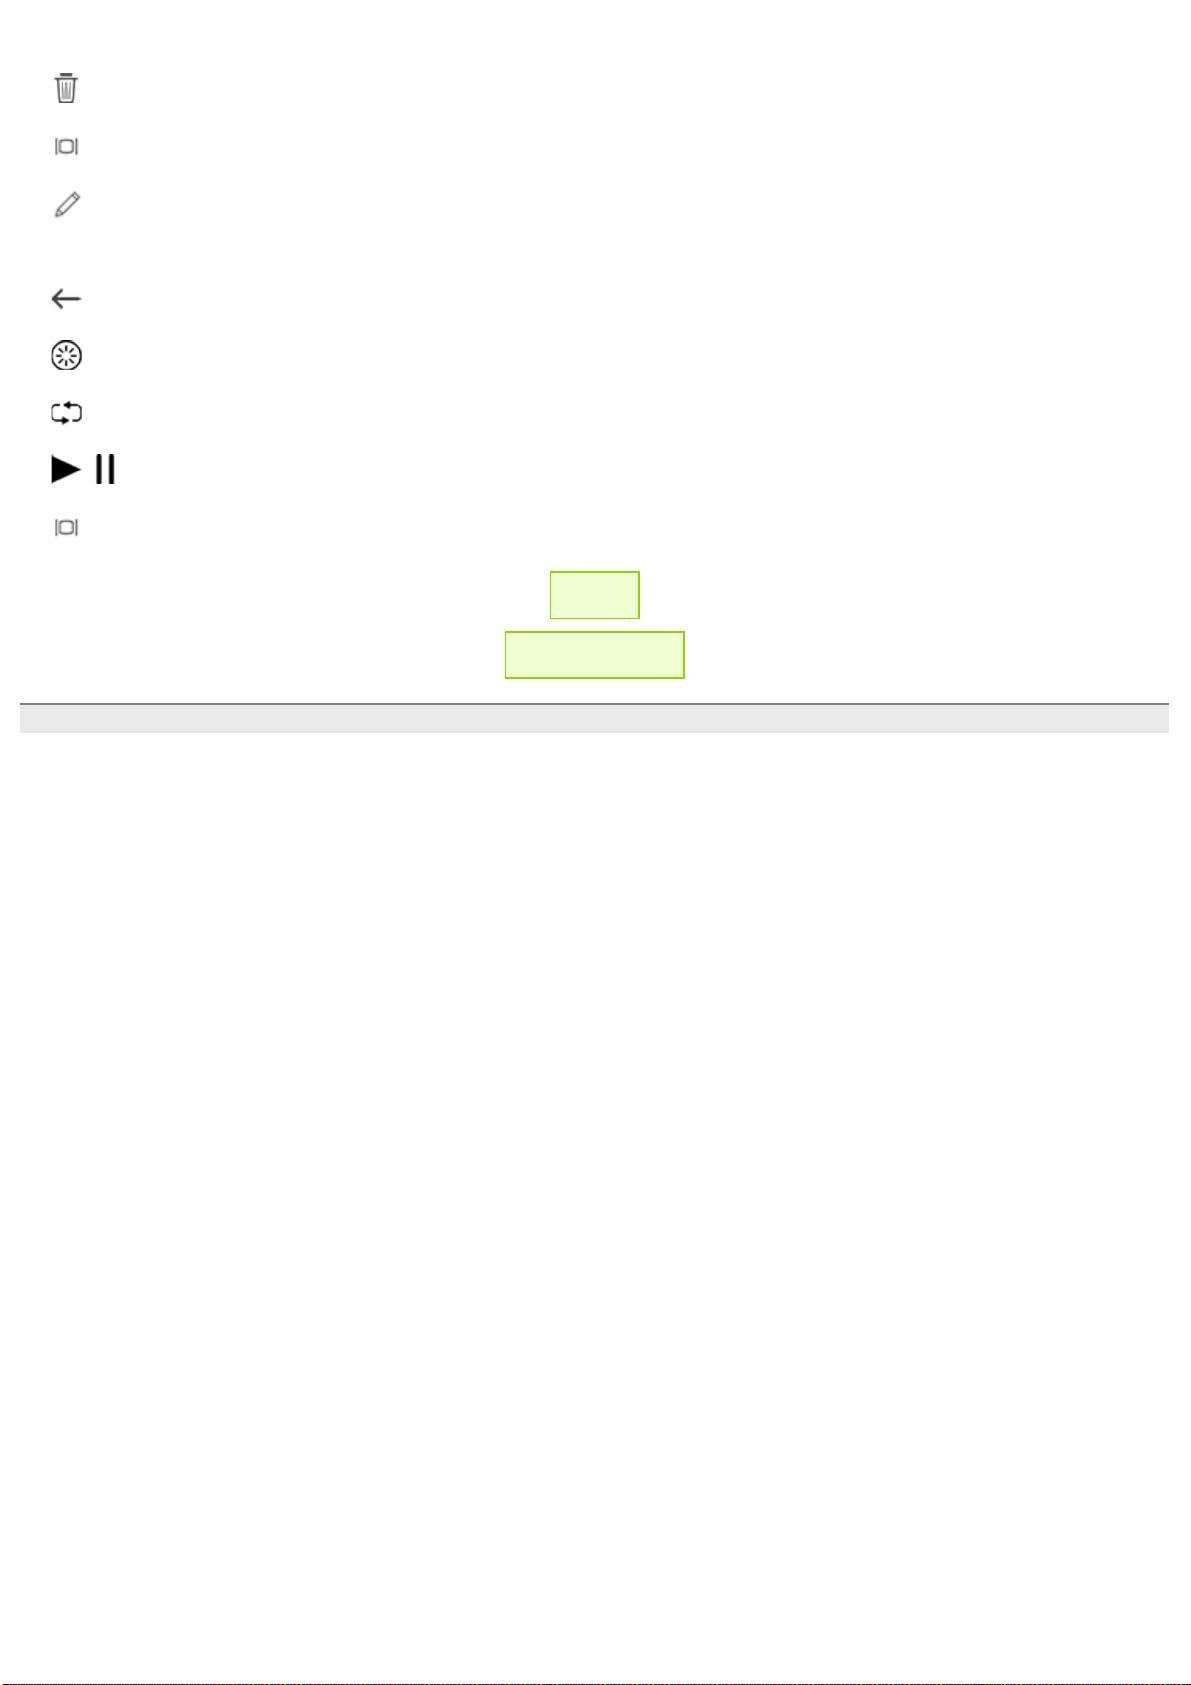
RICOH THETA SC2 - User Guide
file:///C|/r22/en/support/manual/sc2/content/phone/phone_01.html[2019/11/12 2:04:32]
: Deletes the image.
: Changes the display format.
: Edits the image using the basic app, such as adding a blurred effect to a still image or extracting a part of a video.
During video playback
: Returns to the screen before playback.
: Returns the display area to the default state.
: Repeats playback from the beginning.
/ : Plays back/Pauses the video.
: Changes the display format.
← Back
▲ Back to Top
© 2019 Ricoh Company, Ltd. All Rights Reserved.
RICOH THETA SC2 - User Guide
file:///C|/r22/en/support/manual/sc2/content/phone/phone_02.html[2019/11/12 2:04:33]
Top
>
Viewing and Sharing Using
a Smartphone
>
Deleting Captured Still
Images and Videos
Deleting Captured Still Images and Videos
Images that have been saved in the camera or transferred to a smartphone can be deleted.
1. Turn on the power of the camera.
2. Connect the camera to a smartphone via a wireless LAN.
Connecting to a Smartphone via Wireless LAN
3. Start the basic app for smartphone.
The shooting screen is displayed.
4. Tap [×] in the upper left-hand corner of the screen.
A timeline of transferred images is displayed in [Device images].
5. Select where images are saved.
[Device images]
Images transferred to the smartphone can be deleted.
Images can be deleted even when the smartphone is not connected to the camera.
[Cam images]
Images saved in the internal memory of the camera can be deleted.
6. Tap .
The selection screen appears.
7. Select the images to be deleted.
Multiple images can be selected. A check mark appears for selected images.
Tap (Select All button) to select all images. Tap (Cancel button) to cancel all selections.
8. Tap [Delete].
A confirmation screen is displayed. Tap [Delete] to start deleting.
Note

RICOH THETA SC2 - User Guide
file:///C|/r22/en/support/manual/sc2/content/phone/phone_03.html[2019/11/12 2:04:34]
Top
>
Viewing and Sharing Using
a Smartphone
>
Transferring Captured Still
Images and Videos to a
Smartphone
Transferring Captured Still Images and Videos to a Smartphone
Images saved in the internal memory, such as images taken using only the camera, can be transferred to a
smartphone.
1. Turn on the power of the camera.
2. Connect the camera to a smartphone via a wireless LAN.
Connecting to a Smartphone via Wireless LAN
3. Start the basic app for smartphone.
The shooting screen is displayed.
4. Tap [×] in the upper left-hand corner of the screen.
A timeline of transferred images is displayed in [Device images].
5. Select [Cam images].
A list of images saved in the internal memory of the camera is displayed.
6. Tap .
The selection screen appears.
7. Select the images to be transferred.
Multiple images can be selected. A check mark appears for selected images.
Tap (Select All button) to select all images. Tap (Cancel button) to cancel all selections.
8. Tap [Transfer].
The transfer starts and the progress is displayed on the screen.
To cancel the transfer, tap [×], and then tap [Cancel transfer].
Caution
It takes a long time to transfer long videos, and the battery may run down during the transfer.

RICOH THETA SC2 - User Guide
file:///C|/r22/en/support/manual/sc2/content/phone/phone_03.html[2019/11/12 2:04:34]
[Transfer method] in [Settings] can be used to select whether to keep images in the camera when they are
transferred.
Checking and Changing the Camera Settings
When [Display after shooting] is turned on in [Shooting settings] and the shutter button of the basic app is used to
capture still images, the images are automatically transferred to the smartphone. Videos are not transferred
automatically.
Images in the camera cannot be transferred while shooting video.
← Back
▲ Back to Top
© 2019 Ricoh Company, Ltd. All Rights Reserved.
Note

RICOH THETA SC2 - User Guide
file:///C|/r22/en/support/manual/sc2/content/phone/phone_04.html[2019/11/12 2:04:34]
Top
>
Viewing and Sharing Using
a Smartphone
>
Blurring Still Images (iOS
App Only)
Blurring Still Images (iOS App Only)
You can blur part of a still image transferred from the camera to the basic app for smartphone.
* Blurring is only available on the iOS app.
1. Start the basic app for smartphone.
The shooting screen is displayed.
2. Tap [×] in the upper left-hand corner of the screen.
A timeline of transferred images is displayed in [Device images].
3. Select [Device images].
4. Tap the still image you want to edit.
The selected still image is displayed in the Viewer.
5. Tap the image to display the navigation bar.
6. Tap
, and then tap [Blur].
The editing screen is displayed.
7. Trace the area to be blurred with your fingers.
The traced area is blurred.
The displayed area can be moved by flicking or swiping the zoom out display section of the spherical image.
To make the blurred area smaller (remove some of the blurring)
Tap [Cancel]. When the blurred area turns green, trace the area to remove the blurring from with your fingers.
8. Tap [Save new].
The edited still image is saved as a new file.
The original still image is not deleted when the edited still image is saved.
You can edit a still image using the editing app “THETA+” by selecting [Edit in THETA+] after tapping . For details
on the “THETA+”, see the following URL.
https://theta360.com/en/about/application/edit.html#RICOH-THETA-PLUS
← Back
▲ Back to Top
© 2019 Ricoh Company, Ltd. All Rights Reserved.
Note
RICOH THETA SC2 - User Guide
file:///C|/r22/en/support/manual/sc2/content/phone/phone_05.html[2019/11/12 2:04:35]
Top
>
Viewing and Sharing Using
a Smartphone
>
Sharing Still Images and
Videos
Sharing Still Images and Videos
Captured images can be directly uploaded to a social networking service from the basic app.
1. Turn on the power of the camera.
2. Connect the camera to a smartphone via a wireless LAN.
Connecting to a Smartphone via Wireless LAN
3. Start the basic app for smartphone.
The shooting screen is displayed.
4. Tap [×] in the upper left-hand corner of the screen.
A timeline of transferred images is displayed in [Device images].
5. Select where images are saved.
[Device images]: Images transferred from the camera to the smartphone can be shared.
[Cam images]: Images saved in the internal memory of the camera can be shared.
6. Tap the image to be shared.
The selected image is displayed in the Viewer.
7. Tap the image to display the buttons, and then tap .*
The sharing screen is displayed.
* Select [Share with this orientation] to change the area initially displayed as a thumbnail when an image is uploaded to
“theta360.com” and the area that is first displayed when an image is viewed.
8. Enter a comment.
9. Select the social networking service to post the image to.
10. Tap [Done].
Caution
RICOH THETA SC2 - User Guide
file:///C|/r22/en/support/manual/sc2/content/phone/phone_05.html[2019/11/12 2:04:35]
A 3G or LTE line is used for sharing in Step 9 even if the camera is connected to a smartphone via a wireless LAN.
Therefore, this operation needs to be performed in a place where this communication is possible. If sharing images
via a wireless LAN, change the wireless LAN connection to an access point.
When using “RICOH THETA for Android” to connect the smartphone to the camera via a wireless LAN, you may
need to switch network connections to post images. Therefore, when you want to use the camera by connecting it
to the smartphone after posting images, reconnect them.
When an image is posted to a social networking service, it is compressed by the social networking service and may
become grainy. Check the specifications of the social networking service for details.
Images are uploaded to the dedicated site “theta360.com”, and a link to the uploaded images is posted to the social
networking service.
For still images, Photo Sphere XMP meta data is saved when the image is captured. Still images that have Photo
Sphere XMP meta data added can be shared and viewed as spherical images on various Google services (Gallery,
Google Maps, View, Photos, etc.).
← Back
▲ Back to Top
© 2019 Ricoh Company, Ltd. All Rights Reserved.
Note
RICOH THETA SC2 - User Guide
file:///C|/r22/en/support/manual/sc2/content/menu-pc.html[2019/11/12 2:04:13]
Top
>
Viewing and Sharing Using
a Computer
Viewing and Sharing Using a Computer
Recommended Computer Environment
Installing the App for Computer
Importing Still Images and Videos to a Computer
Viewing Still Images on a Computer
Viewing Videos on a Computer
Sharing Still Images from a Computer
Sharing Videos from a Computer
← Back
▲ Back to Top
© 2019 Ricoh Company, Ltd. All Rights Reserved.
RICOH THETA SC2 - User Guide
file:///C|/r22/en/support/manual/sc2/content/pc/pc_01.html[2019/11/12 2:04:36]
Top
>
Viewing and Sharing Using
a Computer
>
Recommended Computer
Environment
Recommended Computer Environment
Images can be transferred from the camera to a computer using the provided USB cable. Transferred images
can be viewed using the basic app for computer.
See below for the recommended computer environment.
https://support.theta360.com/en/enviroment/#PCAPP
Caution
The USB function may not work properly if the OS of the computer has been upgraded.
Correct operation may not be possible if the OS environment is changed or with certain service pack releases.
Connections to USB ports that have been added using an expansion feature (PCI bus, etc.) are not supported.
Correct operation may not be possible when used in combination with a USB hub or other USB device.
← Back
▲ Back to Top
© 2019 Ricoh Company, Ltd. All Rights Reserved.
RICOH THETA SC2 - User Guide
file:///C|/r22/en/support/manual/sc2/content/pc/pc_02.html[2019/11/12 2:04:36]
Top
>
Viewing and Sharing Using
a Computer
>
Installing the App for
Computer
Installing the App for Computer
The basic app for computer needs to be installed to display images transferred from the camera on a computer.
1. Access the following site and download the basic app for computer.
https://support.theta360.com/en/download/
2. Follow the instructions on the screen to install the basic app for computer.
← Back
▲ Back to Top
© 2019 Ricoh Company, Ltd. All Rights Reserved.
RICOH THETA SC2 - User Guide
file:///C|/r22/en/support/manual/sc2/content/pc/pc_03.html[2019/11/12 2:04:37]
Top
>
Viewing and Sharing Using
a Computer
>
Importing Still Images and
Videos to a Computer
Importing Still Images and Videos to a Computer
Images saved in the internal memory of the camera can be transferred to your computer.
1. Connect the camera to the computer using the provided USB cable.
2. Import images to the computer.
Windows
Follow the instructions on the screen display. (Select [Open device to view files].)
Mac
Use the “Photos” app or “Image Capture”.
3. Remove the USB cable after the transfer is completed.
Images in the camera can be deleted from the computer.
Images cannot be transferred from the computer to the camera.
Image slant is not corrected for videos imported from the camera. You can correct the image slant using the basic
app for computer.
Caution
Do not turn off the power or remove the USB cable while importing images.
Fully insert the USB cable when connecting it.
← Back
▲ Back to Top
© 2019 Ricoh Company, Ltd. All Rights Reserved.
Note
RICOH THETA SC2 - User Guide
file:///C|/r22/en/support/manual/sc2/content/pc/pc_04.html[2019/11/12 2:04:37]
Top
>
Viewing and Sharing Using
a Computer
>
Viewing Still Images on a
Computer
Viewing Still Images on a Computer
Using the basic app for computer allows you to scroll, zoom in, and zoom out while viewing spherical images
on the computer.
1. Start the basic app for computer.
2. Select [File] → [Open] in the menu.
3. Select a still image to view.
The selected still image is displayed.
You can also open files by dragging and dropping them to the window of the basic app for computer.
The following operations are available on the display screen:
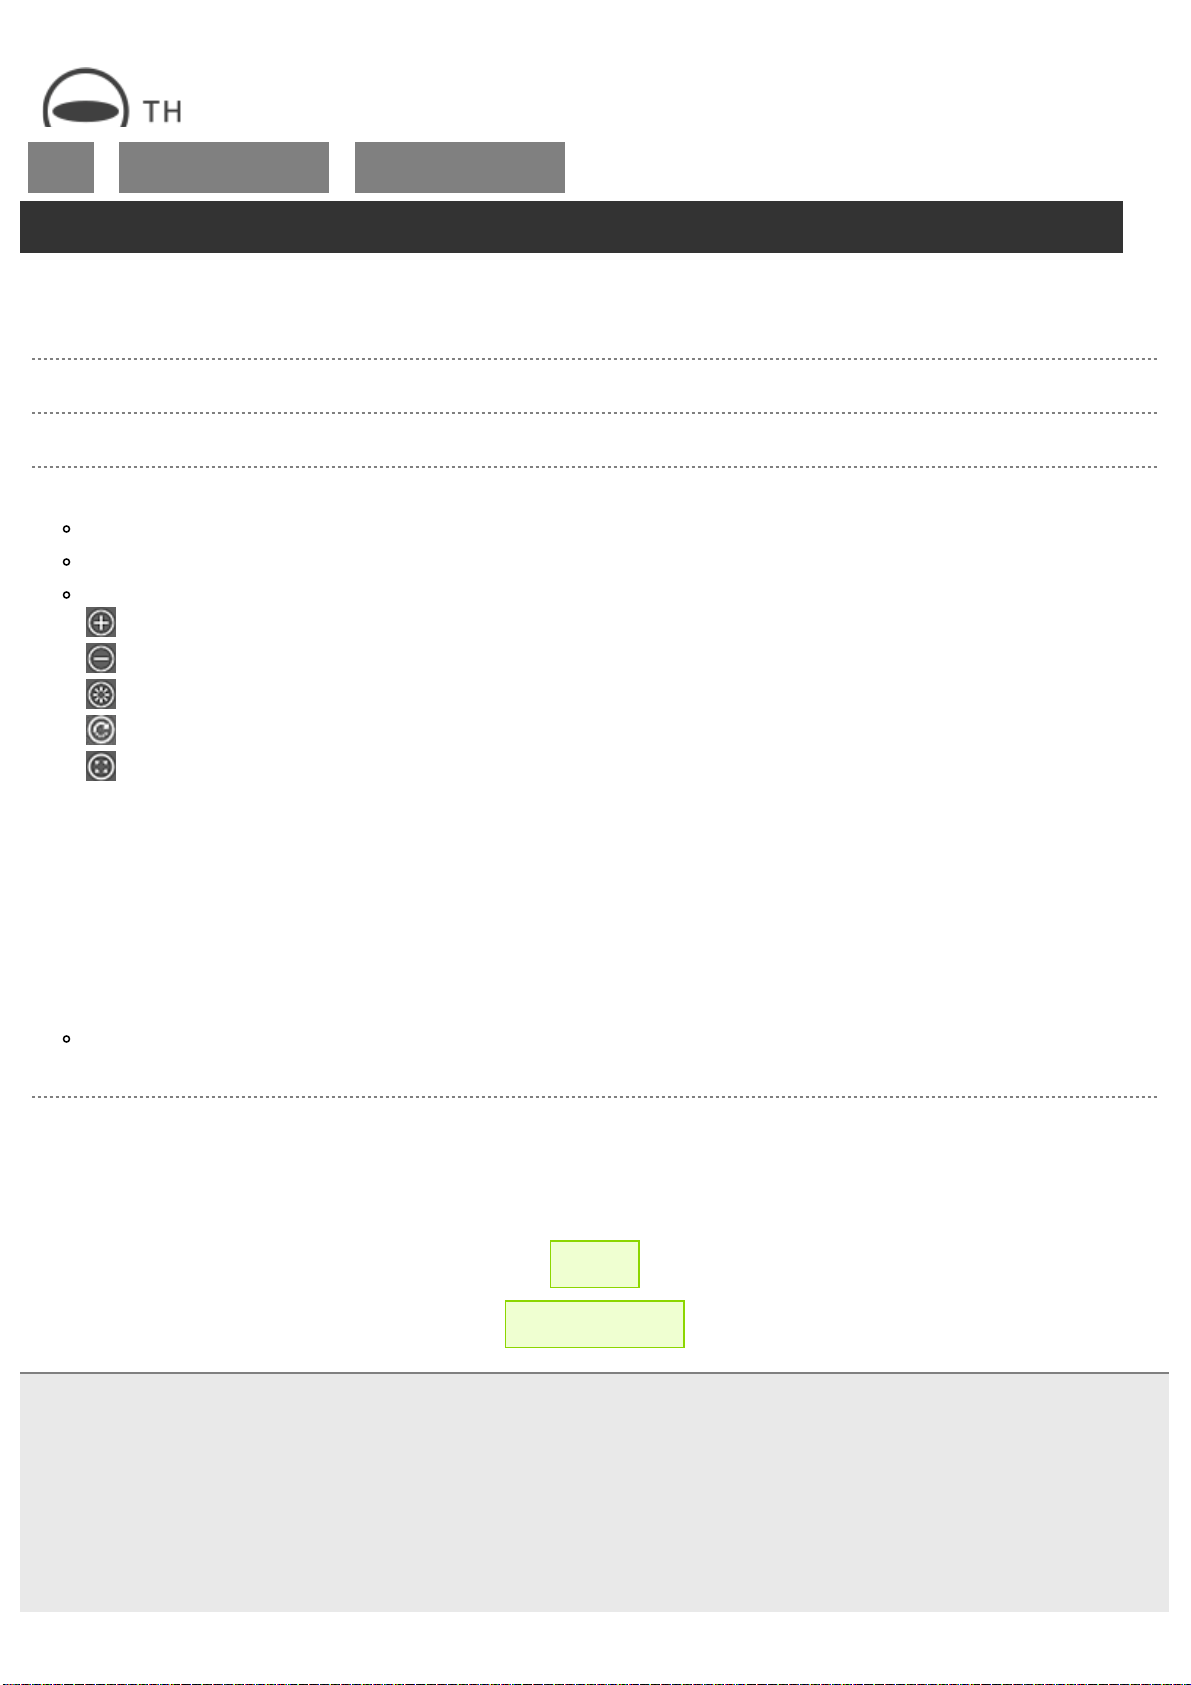
: Zooms in on the image.
: Zooms out on the image.
: Returns the display area to the default state.
: Makes the image rotate automatically.
: Switches to full screen display.
Operations with mouse:
Drag to scroll within the still image.
Use the mouse wheel to zoom in or out on the image.
Operations with keyboard:
Press the “Page Up” key to zoom in on the image.
Press the “Page Down” key to zoom out on the image.
Press the ←, ↑, ↓, and → keys to scroll the image.
A full screen display can be launched by selecting [Display] → [Full Screen]. Press the “Esc” key to close the full screen
display.
Closing the Still Image
Select [File] → [Close] in the menu.
← Back
▲ Back to Top
© 2019 Ricoh Company, Ltd. All Rights Reserved.
RICOH THETA SC2 - User Guide
file:///C|/r22/en/support/manual/sc2/content/pc/pc_05.html[2019/11/12 2:04:38]
Top
>
Viewing and Sharing Using
a Computer
>
Viewing Videos on a
Computer
Viewing Videos on a Computer
Using the basic app for computer allows you to convert videos taken on the camera and then scroll, zoom in,
and zoom out while viewing spherical videos on the computer.
1. Start the basic app for computer.
2. Select [File] → [Open] in the menu.
3. Select a video to view.
The selected video starts playing.
You can also open files by dragging and dropping them to the window of the basic app for computer.
When the file before conversion is selected (the file name is “R***.MP4”)
A video conversion dialog box is displayed. Select or enter the desired output directory (folder to which to save the
converted video) and click [Start].
Multiple files can be converted at the same time by dragging and dropping files that have not been converted.
Conversion may take some time depending on conditions such as the length of the video.
The data file name after conversion is “R***_er.MP4”. This file name can be changed. Videos do not need to be
converted again the next time they are viewed.
The following operations are available on the playback/display screen:
: Zooms in on the video.
: Zooms out on the video.
: Returns the display area to the default state.
: Makes the video rotate automatically.
: Switches to full screen display.
Operations with mouse:
Drag to scroll within the video.
Use the mouse wheel to zoom in or out on the video.
Operations with keyboard:
Press the “Page Up” key to zoom in on the video.
Press the “Page Down” key to zoom out on the video.
Press the ←, ↑, ↓, and → keys to scroll the video.
A full screen display can be launched by selecting [Display] → [Full Screen]. Press the “Esc” key to close the full screen
display.
Caution
When the video size is “3840 × 1920”, the video may not be played back or may be resized to “1920 × 960”
depending on the connected computer.
Closing the Video
Select [File] → [Close] in the menu.

RICOH THETA SC2 - User Guide
file:///C|/r22/en/support/manual/sc2/content/pc/pc_06.html[2019/11/12 2:04:39]
Top
>
Viewing and Sharing Using
a Computer
>
Sharing Still Images from a
Computer
Sharing Still Images from a Computer
Still images displayed in the basic app for computer can be posted to a social networking service (SNS).
1. Select [theta360.com] → [Login] in the menu.
2. Select the account to use.
Read the Terms of Use, check the check box next to “Agree to Terms of Use”, and then click [Login with Facebook] or
[Login with Twitter] to select the account you want to use.
3. Enter your account name and password in the login screen and select [Login].
When you are logged in successfully, the theta360.com menu item changes from [Login] to [Logout].
4. Select [theta360.com] → [Post (share on social networking service)] in the menu.
5. Enter a comment and select [Post].
An account for each social networking service is required to share images.
When [Unlisted] is selected for shared images, only people who have the upload location URL can view the images.
← Back
▲ Back to Top
© 2019 Ricoh Company, Ltd. All Rights Reserved.
Note
RICOH THETA SC2 - User Guide
file:///C|/r22/en/support/manual/sc2/content/pc/pc_07.html[2019/11/12 2:04:39]
Top
>
Viewing and Sharing Using
a Computer
>
Sharing Videos from a
Computer
Sharing Videos from a Computer
Videos displayed in the basic app for computer can be posted to a social networking service (SNS).
1. Select [theta360.com] → [Login] in the menu.
2. Select the account to use.
Read the Terms of Use, check the check box next to “Agree to Terms of Use”, and then click [Login with Facebook] or
[Login with Twitter] to select the account you want to use.
3. Enter your account name and password in the login screen and select [Login].
When you are logged in successfully, the theta360.com menu item changes from [Login] to [Logout].
4. Select [theta360.com] → [Post (share on social networking service)] in the menu.
5. Move the slider to adjust the area to be shared and select [Next].
Files with a size of up to 5 MB can be shared. Videos may be compressed if their file size is large.
6. Enter a comment and select [Post].
An account for each social networking service is required to share videos.
Shared videos can be viewed from a smartphone on which the basic app for smartphone is installed by accessing the
URL of the site where the video was posted.
When [Unlisted] is selected for shared videos, only people who have the upload location URL can view the videos.
Videos that have been converted to MP4 files can also be shared as an e-mail attachment.
In order to view MP4 files received as an e-mail attachment on a smartphone, save the MP4 file to the smartphone,
select [Photos] or [Photo] on the basic app, and then play back the MP4 file.
← Back
▲ Back to Top
© 2019 Ricoh Company, Ltd. All Rights Reserved.
Note
RICOH THETA SC2 - User Guide
file:///C|/r22/en/support/manual/sc2/content/menu-settings.html[2019/11/12 2:04:14]
Top
>
Changing the Settings
Changing the Settings
Checking and Changing the Shooting Conditions
Checking and Changing the Camera Settings
Setting the Camera to the Light/Sound Off Mode
Turning the Power Off Forcibly
← Back
▲ Back to Top
© 2019 Ricoh Company, Ltd. All Rights Reserved.
RICOH THETA SC2 - User Guide
file:///C|/r22/en/support/manual/sc2/content/settings/settings_01.html[2019/11/12 2:04:40]
Top
>
Changing the Settings
>
Checking and Changing the
Shooting Conditions
Checking and Changing the Shooting Conditions
Various settings such as the exposure mode and white balance can be set to suit the shooting conditions.
1. Turn on the power of the camera.
To change the shooting conditions for videos, press the mode button to switch to the video shooting mode.
2. Connect the camera to a smartphone via a wireless LAN or Bluetooth
®
.
Connecting to a Smartphone via Wireless LAN
Connecting to a Smartphone via Bluetooth
®
3. Start the basic app for smartphone.
4. Tap the shooting mode button in the lower right-hand corner of the screen to change the exposure mode.
Auto:
The shutter speed, ISO sensitivity, and white balance are adjusted automatically according to the shooting environment.
The noise reduction, DR compensation, or HDR rendering can also be selected in [Option Setting].
When [Shooting method] is set to [Interval shooting] in [Shooting settings], [Option Setting] cannot be set.
Tv (Shutter speed priority):
The shutter speed and white balance can be set.
ISO (ISO sensitivity priority):
The ISO sensitivity and white balance can be set.
M (Manual):
The shutter speed, ISO sensitivity, and white balance can be set.
5. Make settings for each item.
Move your finger over each setting value to select desired settings.
The section displayed in white is the current setting.
The setting ranges and options that can be selected for each item are as shown below.
Shutter speed:
1/8 to 1/25000 (auto mode and shutter speed priority mode), 60 to 1/25000 (manual mode)
When the exposure mode is set to the auto mode, the shutter speed cannot be set.
ISO sensitivity:
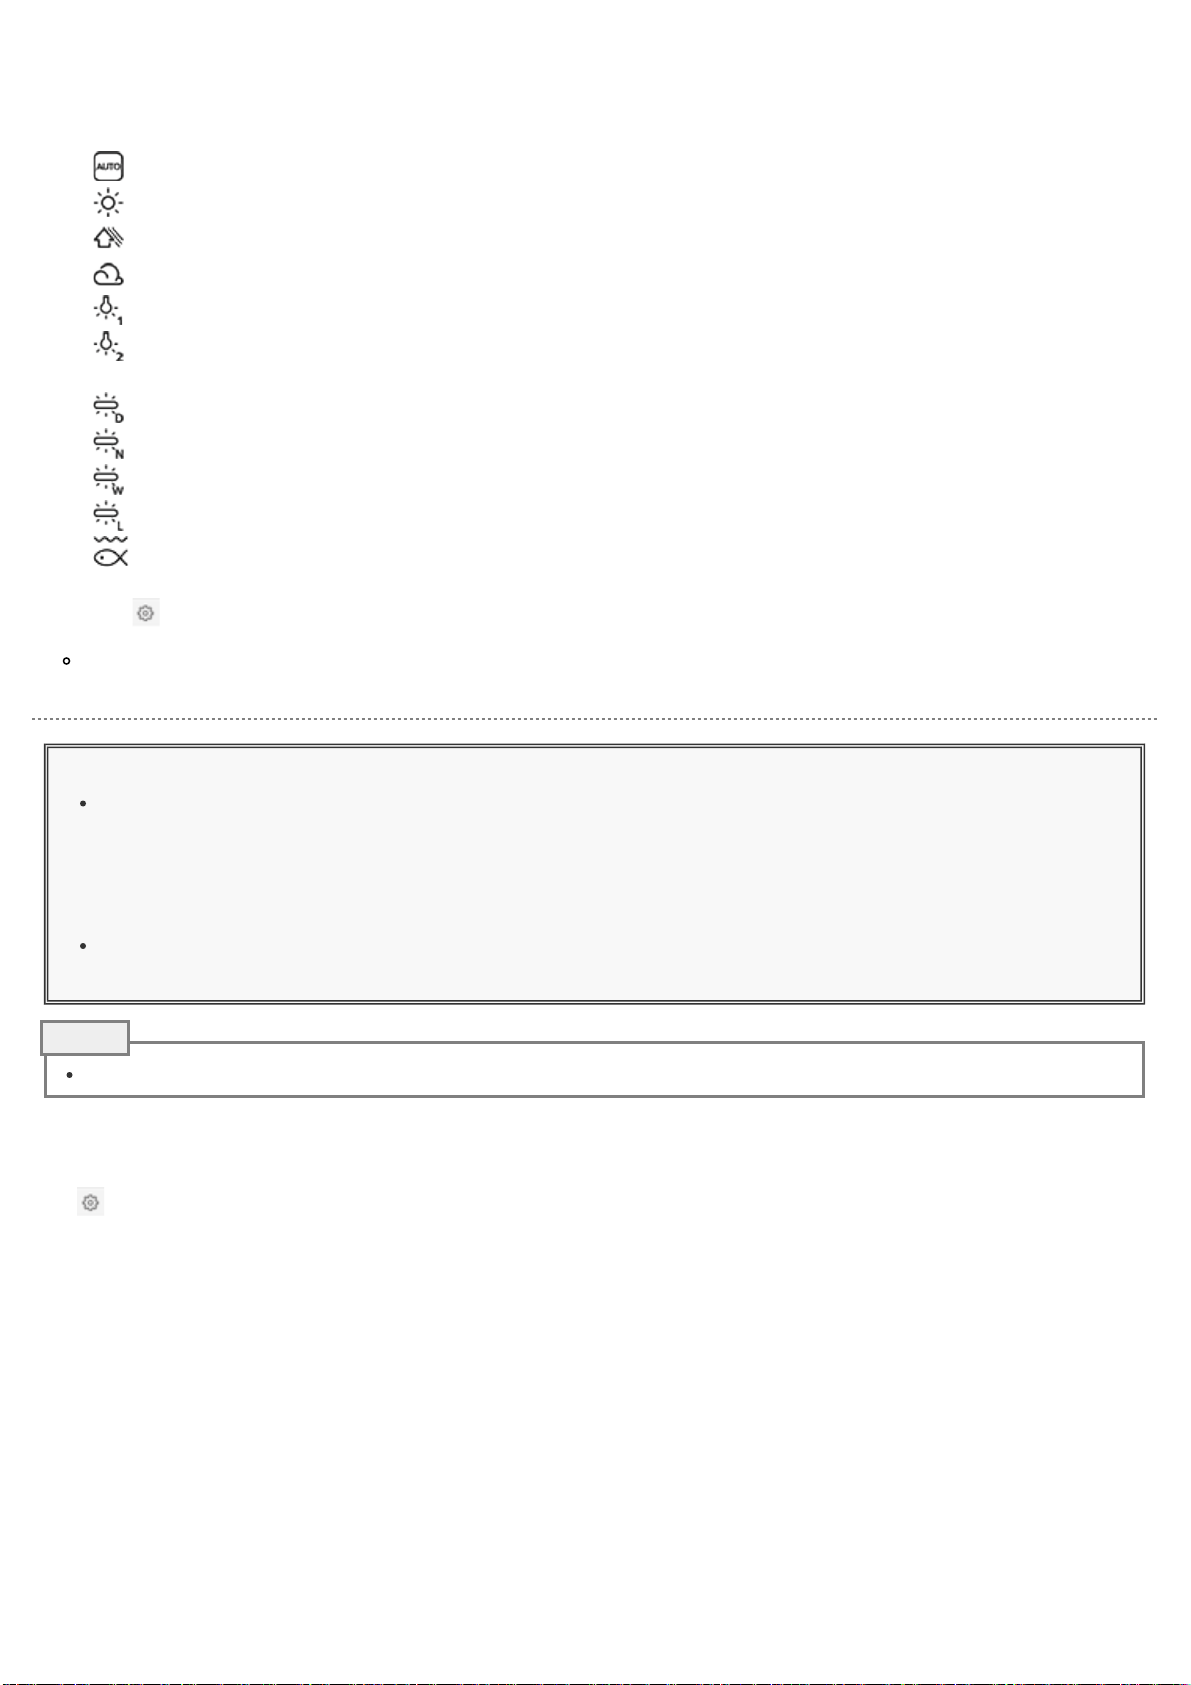
RICOH THETA SC2 - User Guide
file:///C|/r22/en/support/manual/sc2/content/settings/settings_01.html[2019/11/12 2:04:40]
Still image: Auto (ISO 64 to 1600, upper limit settable); ISO sensitivity priority/Manual (ISO 64 to 3200)
Video: Auto (ISO 64 to 6400, upper limit settable)
White balance:
Auto: Adjusted automatically.
Outdoor: Adjusted for shooting outdoors (when sunny).
Shade: Adjusted for shooting in the shade.
Cloudy: Adjusted for shooting when cloudy.
Incandescent light 1: Adjusted for shooting in incandescent light.
Incandescent light 2: Adjusted for shooting in incandescent light.
(More red remains than when using [Incandescent light 1].)
Daylight color fluorescent light: Adjusted for shooting in daylight color fluorescent light.
Natural white fluorescent light: Adjusted for shooting in natural white fluorescent light.
White fluorescent light: Adjusted for shooting in white fluorescent light.
Light bulb color fluorescent light: Adjusted for shooting in light bulb color fluorescent light.
Underwater: Adjusted for shooting under water.
CT Settings: Adjusted with a specified color temperature value in the range 2500 to 10000 K.
Tap
in the upper right-hand corner of the screen during shooting to turn on [CT Settings].
Tapping EV displays the slider for correcting the exposure. Moving the slider to the right brightens the image. Moving
the slider to the left darkens the image.
Caution
If the shutter speed is set slower than 1/8 seconds when the exposure mode is set to the manual mode, a sound is
heard both at the start and end of shooting. In addition, if shooting is performed when the exposure mode is set
to the auto mode and [Option Setting] is set to the noise reduction or HDR rendering, a sound is heard both at
the start and end of shooting. At this time, images are not saved if the power is turned off before shooting is
complete.
When performing shooting after setting the exposure mode to the auto mode and setting [Option Setting] to the
noise reduction or HDR rendering, fix the camera in place using a tripod, etc. to prevent the camera from moving.
Shooting condition settings are retained until the power is turned off or the settings are reconfigured.
Changing the Still Image Shooting Mode Settings
Tap in the upper right-hand corner of the screen in the still image shooting mode to display the [Shooting
settings] screen and change various settings for the still image shooting.
Shooting method:
The shooting method can be selected from [Normal shooting], [Interval shooting], and [Multi bracket].
When [Interval shooting] is selected, set [Interval] and [Shots].
Display after shooting:
You can set whether or not to display the image after shooting.
Self-timer:
The countdown time can be selected from 10 seconds, 5 seconds, and 2 seconds.
CT Settings:
The color temperature setting can be turned on and off.
Note

RICOH THETA SC2 - User Guide
file:///C|/r22/en/support/manual/sc2/content/settings/settings_01.html[2019/11/12 2:04:40]
ISO sensitivity upper limit:
The upper limit of the ISO sensitivity can be set.
Camera shutter volume:
The volume of the shutter sound can be selected from [High], [Medium], [Low], and [OFF].
Changing the Video Shooting Mode Settings
Tap in the upper right-hand corner of the screen in the video shooting mode to check and change various
settings for the video shooting.
Max recordable time (1 time):
The maximum recordable time per shooting can be set.
Microphone gain:
The gain of the microphone can be set.
[Normal] Used when the ambient sound volume is normal.
[Low] Used when the ambient sound volume is high.
Self-timer:
The countdown time can be selected from 10 seconds, 5 seconds, and 2 seconds.
CT Settings:
The color temperature setting can be turned on and off.
Video size:
The video size can be selected.
ISO sensitivity upper limit:
The upper limit of the ISO sensitivity can be set.
Camera shutter volume:
The volume of the shutter sound can be set.
Changing the Preset Shooting Mode Settings
Tap in the upper right-hand corner of the screen in the preset shooting mode to check and change various
settings for the preset shooting.
← Back
▲ Back to Top
© 2019 Ricoh Company, Ltd. All Rights Reserved.

RICOH THETA SC2 - User Guide
file:///C|/r22/en/support/manual/sc2/content/settings/settings_02.html[2019/11/12 2:04:41]
Top
>
Changing the Settings
>
Checking and Changing the
Camera Settings
Checking and Changing the Camera Settings
The status of the camera can be checked and various settings can be made with the basic app for smartphone.
1. Tap [Settings] on the main screen of the basic app for smartphone.
The [Settings] screen is displayed.
Setting Items
The following setting items are displayed on the [Settings] screen.
Connection:
The connection status between the camera and the smartphone can be checked.
Change Wi-Fi Password:
The wireless LAN connection status can be checked and the password can be changed. Follow the procedure
below to change the password.
1. Enter a new password (8 or more characters) and tap [Change Password] at the bottom of the screen.
Single-byte alphanumeric characters and symbols can be used. (Spaces cannot be used.)
2. When the password has been changed successfully, press the wireless button of the camera to turn the
wireless LAN function off and back on.
The password is not changed until the wireless LAN function is turned off.
3. Tap [Cam images] or the shutter button to connect the camera to the smartphone again.
If you cannot connect the camera to the smartphone, delete the old camera information used before the password
change and enter the new password in the Wi-Fi
TM
settings of the smartphone.
Caution
The password can be changed only when the camera is connected to the smartphone.
Note that the previous password can no longer be used.
If you have forgotten the password, press and hold the wireless button and mode button simultaneously to restore
the default password. The power turns off automatically when the password is reset successfully.
Cam Bluetooth settings:
The on/off status of the camera Bluetooth function and GPS continuous transfer function can be checked, and
the status can be switched on/off.
Camera settings:
The following camera settings can be checked and changed.
Sleep Mode:
Note

RICOH THETA SC2 - User Guide
file:///C|/r22/en/support/manual/sc2/content/settings/settings_02.html[2019/11/12 2:04:41]
The length of time before the camera enters the sleep mode can be set. (3 minutes, 5 minutes, 7 minutes, 10 minutes,
OFF)
The power turns off automatically approx. 5 minutes after the camera enters the sleep mode.
Camera shutter volume*:
The volume of the shutter sound can be set. (High, Medium, Low, OFF)
Transfer method*:
You can select whether to keep the images on the camera when transferring images from the camera to the smartphone.
Select [Copy] to retain the images in the internal memory after transfer or select [Move] to delete the images from the
internal memory after transfer.
Camera version*:
The firmware version of the camera can be checked.
Camera license*:
The licenses used for the camera can be checked.
Share Settings:
The account for each social networking service can be set.
* Settings can only be checked and changed when the camera is connected to the smartphone.
← Back
▲ Back to Top
© 2019 Ricoh Company, Ltd. All Rights Reserved.
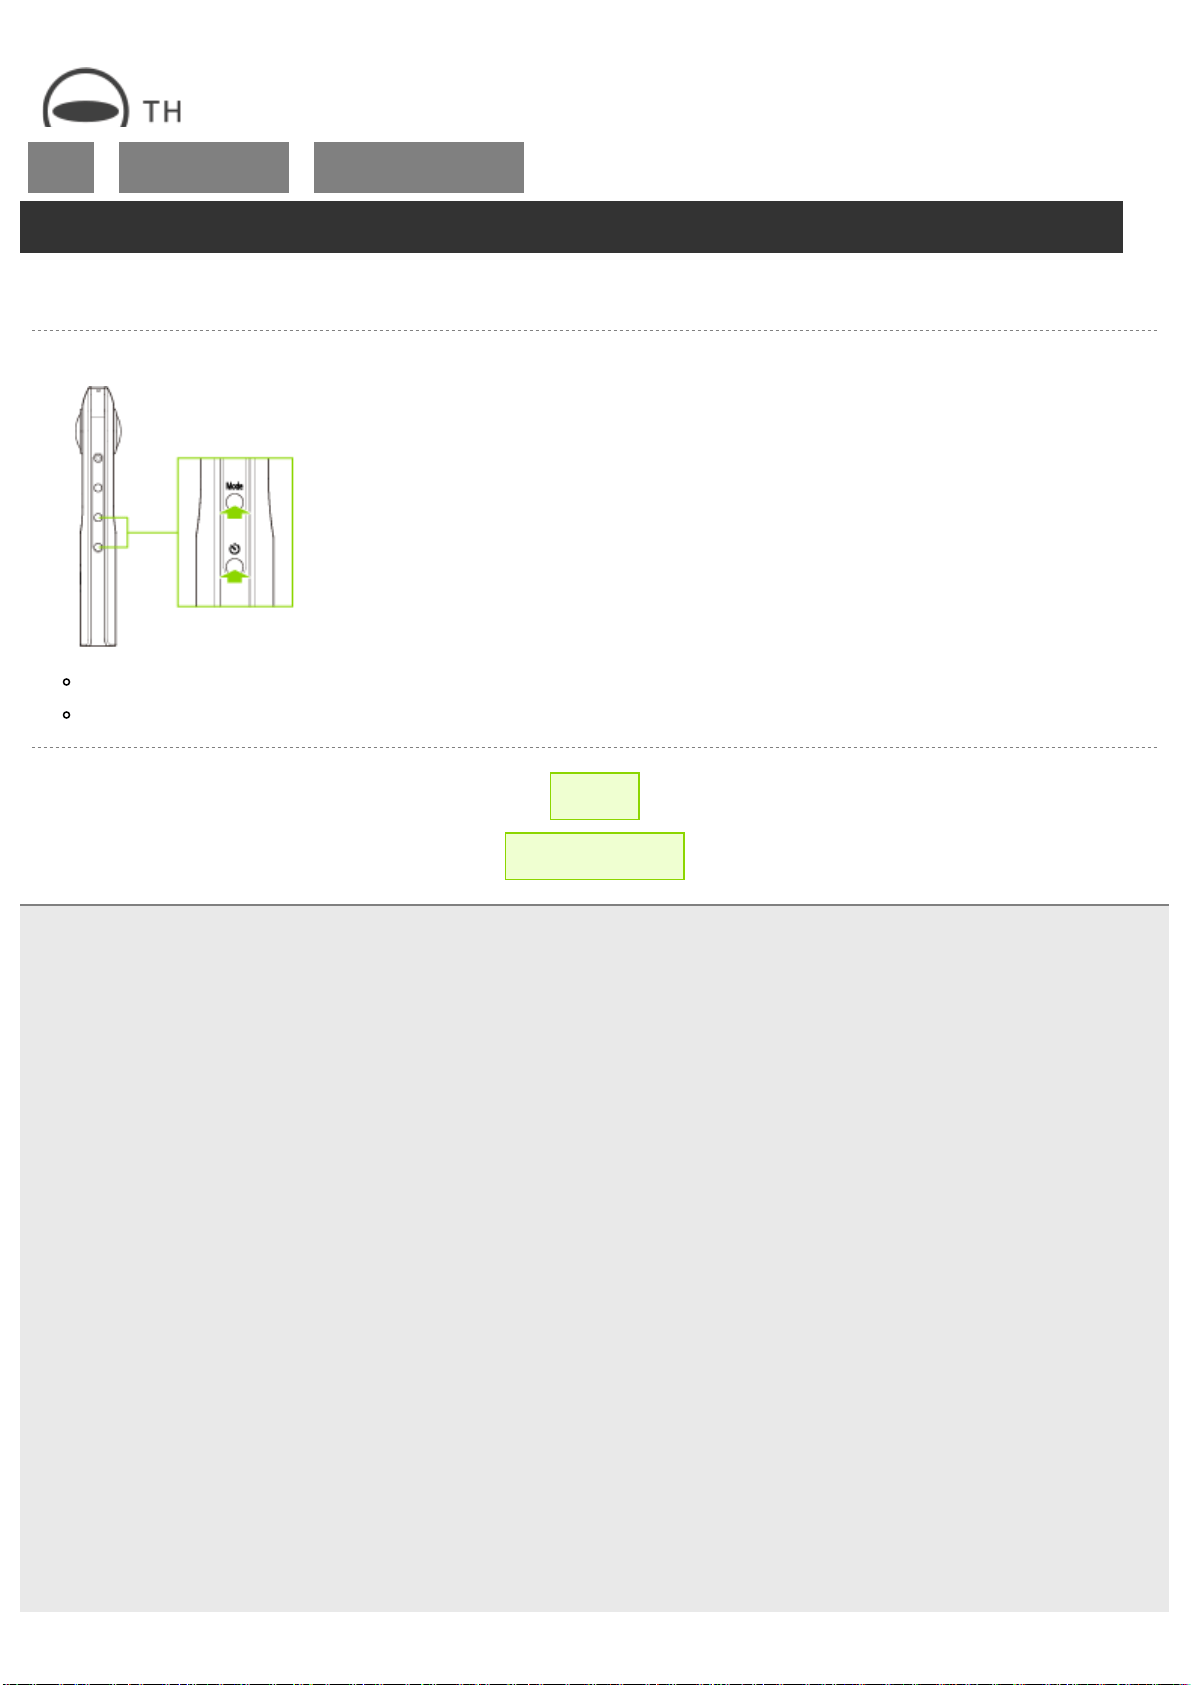
RICOH THETA SC2 - User Guide
file:///C|/r22/en/support/manual/sc2/content/settings/settings_03.html[2019/11/12 2:04:42]
Top
>
Changing the Settings
>
Setting the Camera to the
Light/Sound Off Mode
Setting the Camera to the Light/Sound Off Mode
You can keep the OLED panel and all lamps off and mute sounds including the shutter sound during shooting.
1. Press and hold the mode button and self-timer button simultaneously.
The camera enters the light/sound off mode
To cancel the light/sound off mode, press a button other than the shutter button.
← Back
▲ Back to Top
© 2019 Ricoh Company, Ltd. All Rights Reserved.
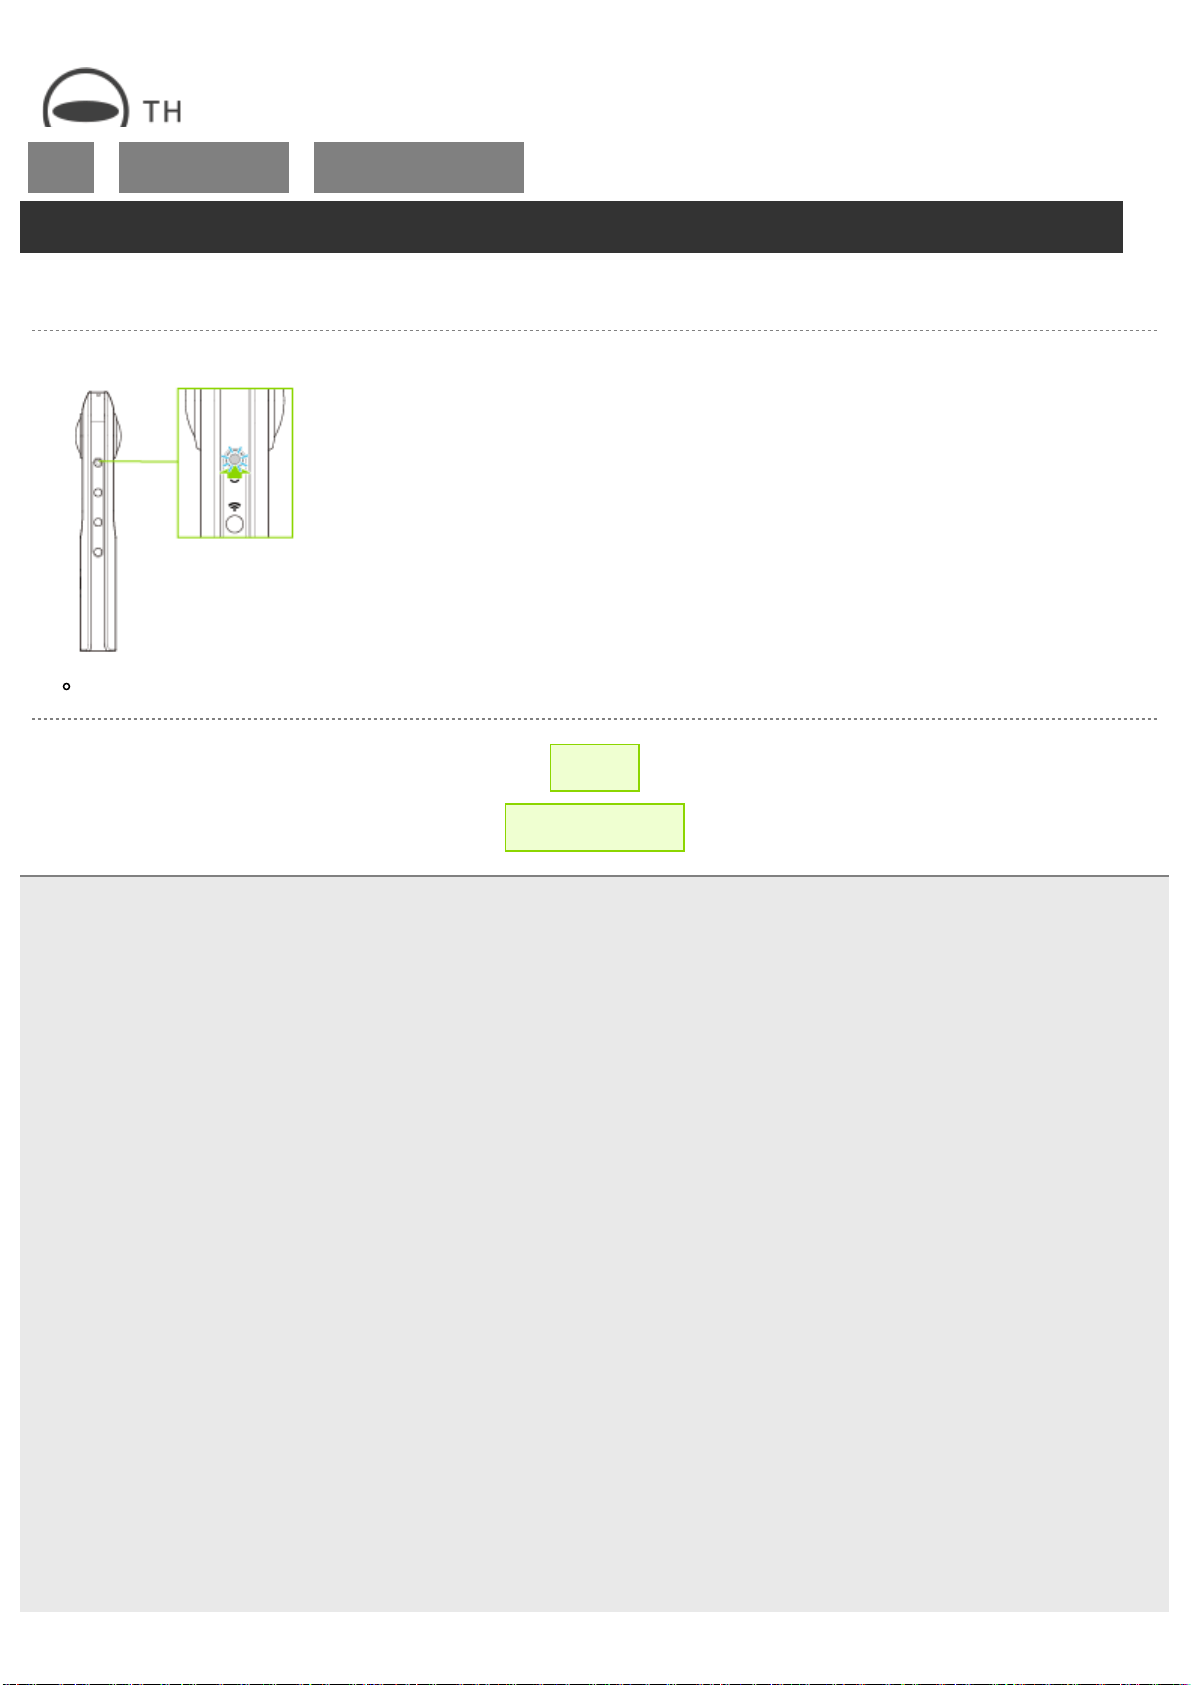
RICOH THETA SC2 - User Guide
file:///C|/r22/en/support/manual/sc2/content/settings/settings_05.html[2019/11/12 2:04:42]
Top
>
Changing the Settings
>
Turning the Power Off
Forcibly
Turning the Power Off Forcibly
You can forcibly turn off the camera when it is operating incorrectly or becomes inoperable.
1. Press and hold the power button.
The power is forcibly turned off.
← Back
▲ Back to Top
© 2019 Ricoh Company, Ltd. All Rights Reserved.

RICOH THETA SC2 - User Guide
file:///C|/r22/en/support/manual/sc2/content/troubleshoot.html[2019/11/12 2:04:14]
Top
>
Troubleshooting
Troubleshooting
If the camera does not work properly or you think there may be a malfunction, check the following support
website:
https://support.theta360.com/en/
← Back
▲ Back to Top
© 2019 Ricoh Company, Ltd. All Rights Reserved.
RICOH THETA SC2 - User Guide
file:///C|/r22/en/support/manual/sc2/content/menu-add_info.html[2019/11/12 2:04:15]
Top
>
Additional Information
Additional Information
Specifications
Separately Sold Products
Cautions on Use
Care and Storage
Safety Precautions
Trademarks
← Back
▲ Back to Top
© 2019 Ricoh Company, Ltd. All Rights Reserved.

RICOH THETA SC2 - User Guide
file:///C|/r22/en/support/manual/sc2/content/add_info/add_info_01.html[2019/11/12 2:04:43]
Top
>
Additional Information
>
Specifications
Specifications
Image sensor:
1/2.3" back-illuminated CMOS image sensor × 2
File size (still images):
5376 × 2688
File size and frame rate (videos):
3840 × 1920 / 29.97 fps
1920 × 960 / 29.97 fps
Lens:
Aperture: F2.0
Lens construction: 7 elements in 6 groups × 2
Shooting mode:
Auto, Shutter speed priority, ISO sensitivity priority, Manual (*1)
Shooting distance:
Approx. 10 cm to ∞ (from front of lens)
Exposure control mode:
Still image: Auto, Shutter speed priority AE, ISO sensitivity priority AE, Manual exposure (*1)
Video: Auto
Exposure compensation:
Manual compensation (-2.0 to +2.0 EV, 1/3 EV steps) (*1)
ISO sensitivity (standard output sensitivity):
Still image: [Auto] ISO 64 to 1600, upper limit settable; [ISO sensitivity priority]/[Manual] ISO 64 to 3200 (*1)
Video: [Auto] ISO 64 to 6400, upper limit settable
White balance mode:
Auto, Outdoor, Shade, Cloudy, Incandescent light 1, Incandescent light 2, Daylight color fluorescent light, Natural white
fluorescent light, White fluorescent light, Light bulb color fluorescent light, Underwater, Color temperature settings (2500 to
10000 K) (*1)
Shutter speed:
Still image: [Auto] 1/25000 to 1/8 seconds; [Shutter speed priority] 1/25000 to 1/8 seconds (*2); [Manual] 1/25000 to 60
seconds (*2)
Video: [Auto] 1/25000 to 1/30 seconds (*2)
Recording medium:
Internal memory: Approx. 14 GB
Number of images that can be recorded and recording time (*2):
Still image: Approx. 3000 images
Video (time per recording): Max. 3 minutes (*3)
Video (total recording time): Approx. 32 minutes (4K), approx. 115 minutes (2K)
Power source:

RICOH THETA SC2 - User Guide
file:///C|/r22/en/support/manual/sc2/content/add_info/add_info_01.html[2019/11/12 2:04:43]
Lithium ion battery (built-in battery) (*4)
Battery life:
Still image: Approx. 260 images (*5)
Video: Approx. 60 minutes (*5)
Image file format:
Still image: JPEG (Exif Ver. 2.3), DCF2.0 compliant
Video: MP4 ([Video] MPEG4 AVC/H.264; [Audio] AAC-LC (mono))
Shooting function:
Still image: Noise reduction, DR compensation, HDR rendering, Interval shooting (*6), Multi-bracketing shooting, Self-timer (2
seconds, 5 seconds, 10 seconds), My Settings
Video: Self-timer (2 seconds, 5 seconds, 10 seconds), My Settings
Preset: Face, Night View, Lens-by-Lens Exposure
External interface:
Micro USB: USB 2.0
Bluetooth
®
accessory:
Compatible with Bluetooth
®
HID devices
Dimensions:
45.2 mm (W) × 130.6 mm (H) × 22.9 mm (17.9 mm (*7)) (D)
Weight:
Approx. 104 g
Operating temperature range:
0 to 40°C (0 to 104°F)
Operating humidity range:
90% or less
Storage temperature range:
-20 to 60°C (-4 to 140°F)
(*1)
A smartphone is required to change modes or configure manual settings.
(*2)
The number of images and time are guides only. The actual number differs according to the shooting conditions.
(*3)
The camera may get hot if you record a video for a long period of time or perform shooting multiple times in quick
succession. In this case, the camera may stop operating to prevent damage from high temperatures.
(*4)
Charge the battery by connecting the camera to a computer using the provided USB cable.
(*5)
The number of images that can be taken and recording time are guides based on RICOH’s measurement method. The actual
number differs according to the usage conditions.
(*6)
The minimum interval for the interval shooting differs according to the shooting settings.
(*7)
Excluding lens section.


RICOH THETA SC2 - User Guide
file:///C|/r22/en/support/manual/sc2/content/add_info/add_info_02.html[2019/11/12 2:04:43]
Top
>
Additional Information
>
Separately Sold Products
Separately Sold Products
See below for the accessories sold separately.
https://theta360.com/en/about/theta/accessory.html
← Back
▲ Back to Top
© 2019 Ricoh Company, Ltd. All Rights Reserved.
RICOH THETA SC2 - User Guide
file:///C|/r22/en/support/manual/sc2/content/add_info/add_info_03.html[2019/11/12 2:04:44]
Top
>
Additional Information
>
Cautions on Use
Cautions on Use
Camera
This product was manufactured for use in the country in which it was purchased. The warranty is only valid in the country
in which the camera was purchased.
Should the product fail or malfunction while you are abroad, the manufacturer assumes no responsibility for servicing the
product locally or bearing the expenditure incurred therefore.
Be sure not to drop or apply any sudden force to the camera.
While you are carrying the camera, be careful not to hit it against other objects. Take special care not to hit the lens.
In an environment where the temperature changes suddenly, condensation may occur in the camera, resulting in troubles
such as fogging of the glass surface or malfunctions of the camera. If this occurs, place the camera in a bag to slow the
temperature change as much as possible. Take it out of the bag after the temperature difference from the atmosphere
has decreased to a fairly small amount. If condensation occurs, wait until the moisture has dried before using the camera.
Do not get the camera wet. Do not operate the camera with wet hands. This can result in malfunction or an electrical
shock.
When taking photos of an important event (such as a wedding or overseas trip), take a test photo beforehand to check
that the camera is working properly.
The camera may get hot if you record a video for a long period of time or perform shooting multiple times in quick
succession. In this case, the camera may stop operating to prevent damage from high temperatures.
The temperature of the camera may rise high when a video is recorded for a long period of time or shooting is
performed multiple times in quick succession. Use a tripod etc. when performing shooting for a long period of time to
prevent low temperature burns.
Battery
A lithium ion battery is used in the camera.
Be sure to charge the battery before use, as it is not fully charged before shipment.
Due to the characteristics of the battery, use in cold areas will shorten the usage time even if the battery is sufficiently
charged.
If storing for a long time, charge the battery for around 30 minutes once a year.
Store the battery in a cool place. A dry place with an ambient temperature of 15 to 25°C (59 to 77°F) is recommended.
Avoid extremely hot or cold places.
Do not recharge immediately after charging is done.
Charge the battery in an area with an ambient temperature of 10 to 40°C (50 to 104°F). Charging in a hot area may
cause the battery to deteriorate. Charging in a cold area may prevent sufficient charging.
← Back
▲ Back to Top
© 2019 Ricoh Company, Ltd. All Rights Reserved.
RICOH THETA SC2 - User Guide
file:///C|/r22/en/support/manual/sc2/content/add_info/add_info_04.html[2019/11/12 2:04:45]
Top
>
Additional Information
>
Care and Storage
Care and Storage
Care
Note that if fingerprints, dirt, etc. get onto the lens, image quality may deteriorate.
When dust or dirt does get on the lens, do not touch it directly with your fingers, and either use a blower (available in
stores) to blow it off, or a soft cloth to gently dust it off.
Wipe the lens particularly carefully after use at the beach or around chemicals.
If the camera fails to work properly, consult the nearest service center.
Never disassemble the camera by yourself, as this is dangerous.
Do not get volatile substances, such as thinner, benzine, or pesticides on the camera. This may cause a change in quality,
paint to peel, etc.
If the camera exterior becomes dirty, wipe it clean using a dry soft cloth such as a glasses wiping cloth, or wipe it using a
thoroughly wrung-out wet cloth. Do not use solvents, as doing so may cause the external surface of the camera to
corrode.
Use and Storage
Avoid using or storing the camera in the following kinds of places, as this may damage the camera.
Places with high temperature, high humidity, or rapid changes in humidity or temperature
Places with large amounts of sand or dust
Places with significant vibration
Places where it will be in contact with chemicals such as insect repellent or products made from rubber, vinyl, etc. for
long periods of time
Places where strong magnetism is emitted (next to monitors, transformers, magnets, etc.)
Store the camera in a dust-free camera bag, etc. to prevent dust or dirt from getting on the camera. Also, avoid carrying
the camera without a case (in your pocket, etc.) to help to keep free from dust or fiber particles.
Precautions Regarding Care of the Camera
Be sure to turn the power off.
← Back
▲ Back to Top
© 2019 Ricoh Company, Ltd. All Rights Reserved.
RICOH THETA SC2 - User Guide
file:///C|/r22/en/support/manual/sc2/content/add_info/add_info_05.html[2019/11/12 2:04:45]
Top
>
Additional Information
>
Safety Precautions
Safety Precautions
Warning Symbols
Various symbols are used throughout this user guide and on the product to prevent physical harm to you or
other people and damage to property. The symbols and their meanings are explained below.
Danger
This symbol indicates matters that may lead to imminent risk of death or serious injury if ignored or incorrectly handled.
Warning
This symbol indicates matters that may lead to death or serious injury if ignored or incorrectly handled.
Caution
This symbol indicates matters that may lead to injury or physical damage if ignored or incorrectly handled.
Sample Warnings
The symbol alerts you to actions that must be performed.
The symbol alerts you to prohibited actions.
The symbol may be combined with other symbols to indicate that a specific action is prohibited.
Examples
Do not touch
Do not disassemble
Observe the following precautions to ensure safe use of the camera.
Danger
Do not attempt to disassemble, repair or alter the camera yourself. The high-voltage circuitry in the camera poses
significant electrical hazard.
RICOH THETA SC2 - User Guide
file:///C|/r22/en/support/manual/sc2/content/add_info/add_info_05.html[2019/11/12 2:04:45]
Stop use immediately if you notice something unusual such as an abnormal smell, smoke, or overheating. Ask your
nearest dealer or service center for repair.
Warning
Turn off the power immediately if any metallic object, water, liquid, or other foreign object gets into the camera. And
contact the nearest service center. Do not continue using the camera if it has a failure or malfunction.
Keep the camera out of the reach of children. Young children cannot understand the information in “Safety Precautions”
and “Cautions on Use”, which may cause an accident.
Do not touch the internal components of the camera if they become exposed as a result of being dropped or damaged.
The high-voltage circuitry in the camera poses significant electrical hazard. Contact your nearest dealer or service center
if it is damaged.
Do not use the camera near flammable gases, gasoline, benzine, thinner, or similar substances to avoid the risk of
explosion, fire, or burns.
Do not use the camera in locations such as airplanes where usage is restricted or prohibited as this may lead to disasters
or accidents.
Stop charging if the charging does not complete within the specified charging time.
Never put the battery in a microwave oven or high-pressure container.
Caution
Contact with fluid leaking from the battery in the camera can lead to burns. If you touch the fluid, rinse the area with
water immediately. (Do not use soap.) And contact the nearest service center. Do not continue using the camera if it has
a failure or malfunction.
Do not get the camera wet. In addition, do not operate it with wet hands. Both pose the risk of electric shock.
Do not use the camera wrapped in a cloth, etc. Doing so may cause a fire.
Do not allow the metal of the terminals to short circuit. Doing so may cause a fire.
Do not use the camera in wet places like kitchens where it will be exposed to oily smoke and humidity. Doing so may
cause a fire or electric shock.

RICOH THETA SC2 - User Guide
file:///C|/r22/en/support/manual/sc2/content/add_info/add_info_06.html[2019/11/12 2:04:46]
Top
>
Additional Information
>
Trademarks
Trademarks
Wi-Fi is a registered trademark of Wi-Fi Alliance.
Microsoft and Windows are registered trademarks of Microsoft Corporation in the United States of America
and other countries.
Mac, OS X, macOS, iPhone, and App Store are trademarks of Apple Inc., registered in the U.S. and other
countries.
IOS is a trademark or registered trademark of Cisco in the U.S. and other countries and is used under license.
Facebook, the Facebook logo, and “f” logo are the trademarks or registered trademarks of Facebook, Inc.
Twitter, the Twitter logo, Twitter “t” logo, and Twitter blue bird are the registered trademarks of Twitter, Inc. in
the United States and other countries.
Tumblr and the Tumblr logo are the registered trademarks of Tumblr, Inc.
Google, Android, Google Play, YouTube, and YouTube logo are trademarks or registered trademarks of
Google Inc.
The Bluetooth word mark and logos are registered trademarks owned by Bluetooth SIG, Inc. and any use of
such marks by Ricoh Company Ltd. is under license.
Instagram and the Camera logos are trademarks of Instagram, LLC in the United States and elsewhere.
All other trademarks are the property of their respective owners.
← Back
▲ Back to Top
© 2019 Ricoh Company, Ltd. All Rights Reserved.