
Contents
1. Part Names
2. Basic Operation
3. Menu Operation
4. USB Media
5. Connecting Other
Devices
6. Operating the Monitor
Using a PC (IP control)
7. Troubleshooting
8. Specifications, etc.
Ver. 1.00
>

Contents
1. Part Names
2. Basic Operation
3. Menu Operation
4. USB Media
5. Connecting Other
Devices
6. Operating the Monitor
Using a PC (IP control)
7. Troubleshooting
8. Specifications, etc.
Ver. 1.00
>
<
Contents
1. Part Names
1-1. Monitor
1-6. Name of Remote Control Buttons
2. Basic Operatio
n
2-1. Initial Installation
2-3. Basic Operation
2-4. Listening with Headphones
3. Menu Operatio
n
3-1. How to Use Menu
3-2. How to Use Setup Menu
3-3. List of Setup Menu Items
3-44. How to Use Application Menu
3-45. Entering Letters (Software Keyboard)
4
. USB Media
4-1. Before Using USB Media
4-7. Enjoying Photo
4-21. Enjoying Music
4-24. En
j
o
y
in
g
Vide
o
5. Connecting Other Devices
5-1. Connecting 8K output compatible Device/Quad-
screen display(4K or less)
5-5. Connecting 4K output compatible Device
5-7. Viewing HDR Video (INPUT1, INPUT7, INPUT8)
5-9. Using the HDMI CEC
5-11. Connecting Recorder, Player, etc.
5-21. Connecting Audio Device
5-22. Connecting PC
6. Operating the Monitor Using a PC (IP control)
6-1. Connecting the Monitor and PC
6-3. Settings to operate the Monitor
6-4. Command list
7. Troubleshooting
7-1. If You Suspect a Problem
7-9. If Error Message Appears
7-11. What If
8. Specifications, etc
.
8-1. PC Supported signal timing
8-2. AV Supported signal timing
8-4. Dimensional Drawing
8-5. Software License
Contents
Contents
1. Part Names
1. Monitor
6. Name of Remote
Control Buttons
2. Basic Operation
3. Menu Operation
4. USB Media
5. Connecting Other
Devices
6. Operating the Monitor
Using a PC (IP control)
7. Troubleshooting
8. Specifications, etc.
Ver. 1.00
>
<
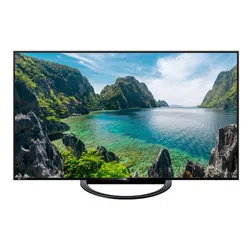
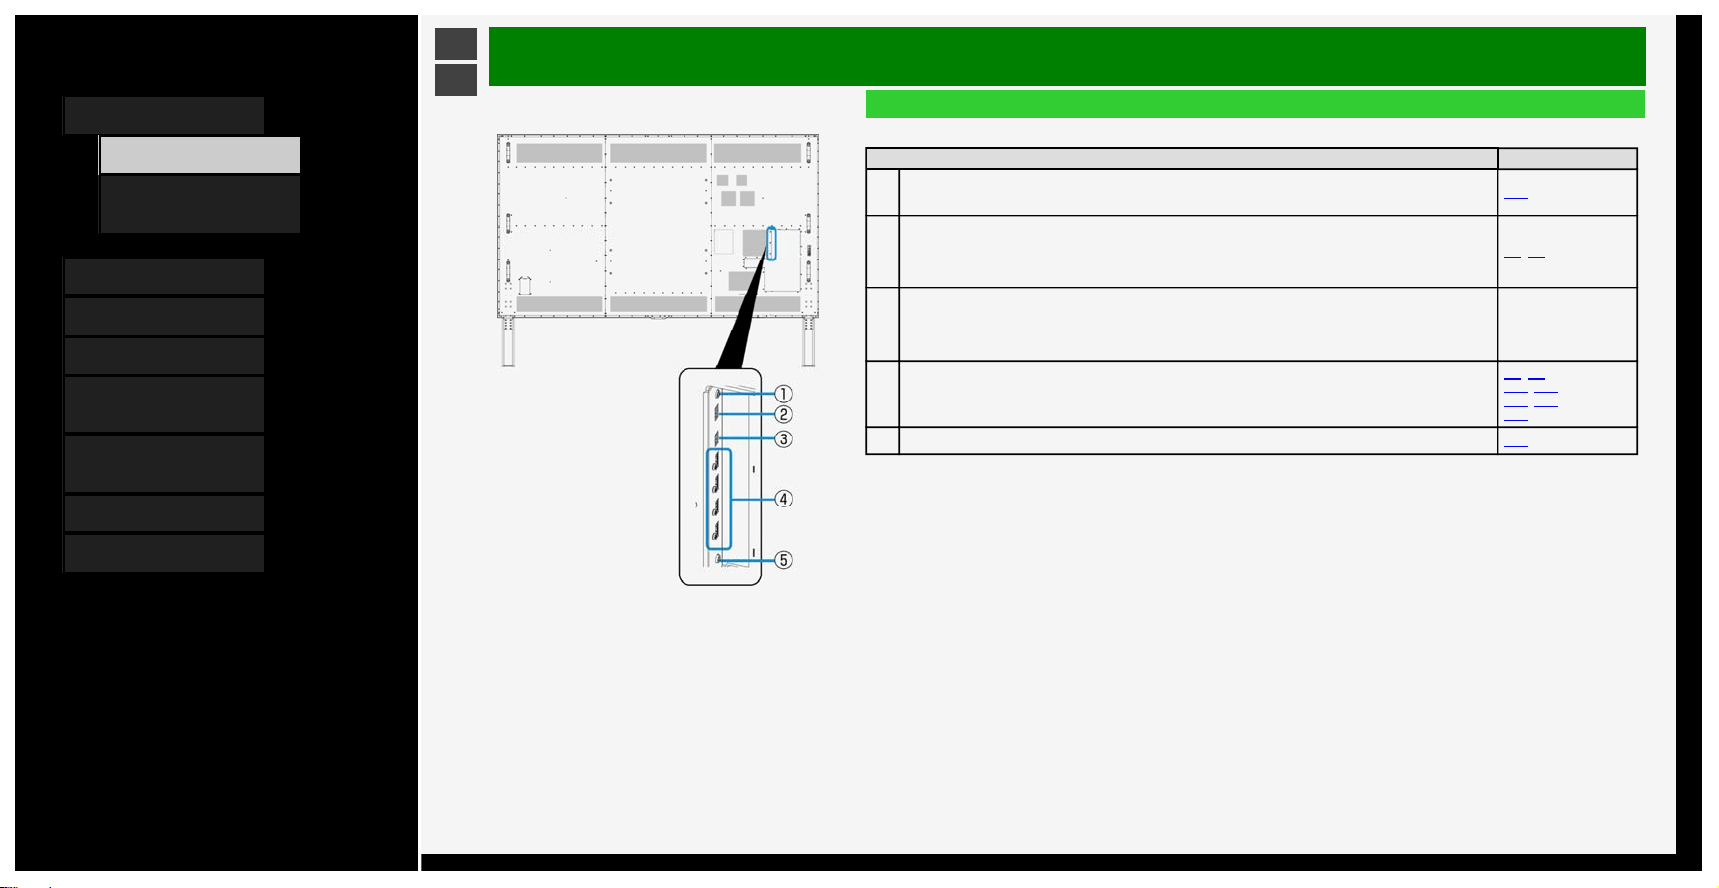
Part Names
Monitor
Front
Name Page
1
Remote control light receiving section
• Point the remote control toward this section.
―
2
POWER lamp
• Lit white: operating state
• Unlit: power-off state
2-3
1-1
Contents
1. Part Names
1. Monitor
6. Name of Remote
Control Buttons
2. Basic Operation
3. Menu Operation
4. USB Media
5. Connecting Other
Devices
6. Operating the Monitor
Using a PC (IP control)
7. Troubleshooting
8. Specifications, etc.
Ver. 1.00
>
<
Part Names
Monitor
Rear
Name Page
1
Headphone terminal (Ø 3.5, stereo mini jack)
• It allows sounds to come out from the speakers even after headphones are connected.
3-34
2
USB1 terminal
• Connect USB memory.
• You can enjoy photo / music / video files stored in USB memory on the Monitor.
• You can use the multimedia auto play function.
3-4, 4-1
3
USB2 terminal
• Connect USB memory.
• You can enjoy photo / music / video files stored in USB memory on the Monitor.
• You can use the multimedia auto play function.
―
4
INPUT 1 to 4 (HDMI) (INPUT 1: (4K)~4:4:4, INPUT 2/3/4: (4K)~4:2:0)
• Connect 4K or 2K output HDMI compatible device.
5-5, 5-6,
5-11, 5-13,
5-14, 5-27,
5-28
5
AUDIO OUTPUT 3.5mm stereo 5-21
1-2

Contents
1. Part Names
1. Monitor
6. Name of Remote
Control Buttons
2. Basic Operation
3. Menu Operation
4. USB Media
5. Connecting Other
Devices
6. Operating the Monitor
Using a PC (IP control)
7. Troubleshooting
8. Specifications, etc.
Ver. 1.00
>
<
Part Names
Monitor
Rear
Name Page
6
INPUT 7 A to D (8K, HDMI x 4)
5-1, 5-2
7
INPUT 8 (8K, HDMI)
1-3

Contents
1. Part Names
1. Monitor
6. Name of Remote
Control Buttons
2. Basic Operation
3. Menu Operation
4. USB Media
5. Connecting Other
Devices
6. Operating the Monitor
Using a PC (IP control)
7. Troubleshooting
8. Specifications, etc.
Ver. 1.00
>
<
Part Names
Monitor
Rear
Name Page
8
LAN terminal (10BASE-T/100BASE-TX)
• Used for IP Control, etc.
―
9
INPUT 5
• AV INPUT/AUDIO IN FOR INPUT1/INPUT6/INPUT7/INPUT8
3-35, 3-36,
5-15, 5-27,
5-28, 5-29
10
Digital audio output (optical) terminal
• Connect the audio device.
5-21
11
INPUT 6 (Analog RGB)
• Connect with the analog RGB terminal for a computer.
5-29
1-4
Contents
1. Part Names
1. Monitor
6. Name of Remote
Control Buttons
2. Basic Operation
3. Menu Operation
4. USB Media
5. Connecting Other
Devices
6. Operating the Monitor
Using a PC (IP control)
7. Troubleshooting
8. Specifications, etc.
Ver. 1.00
>
<
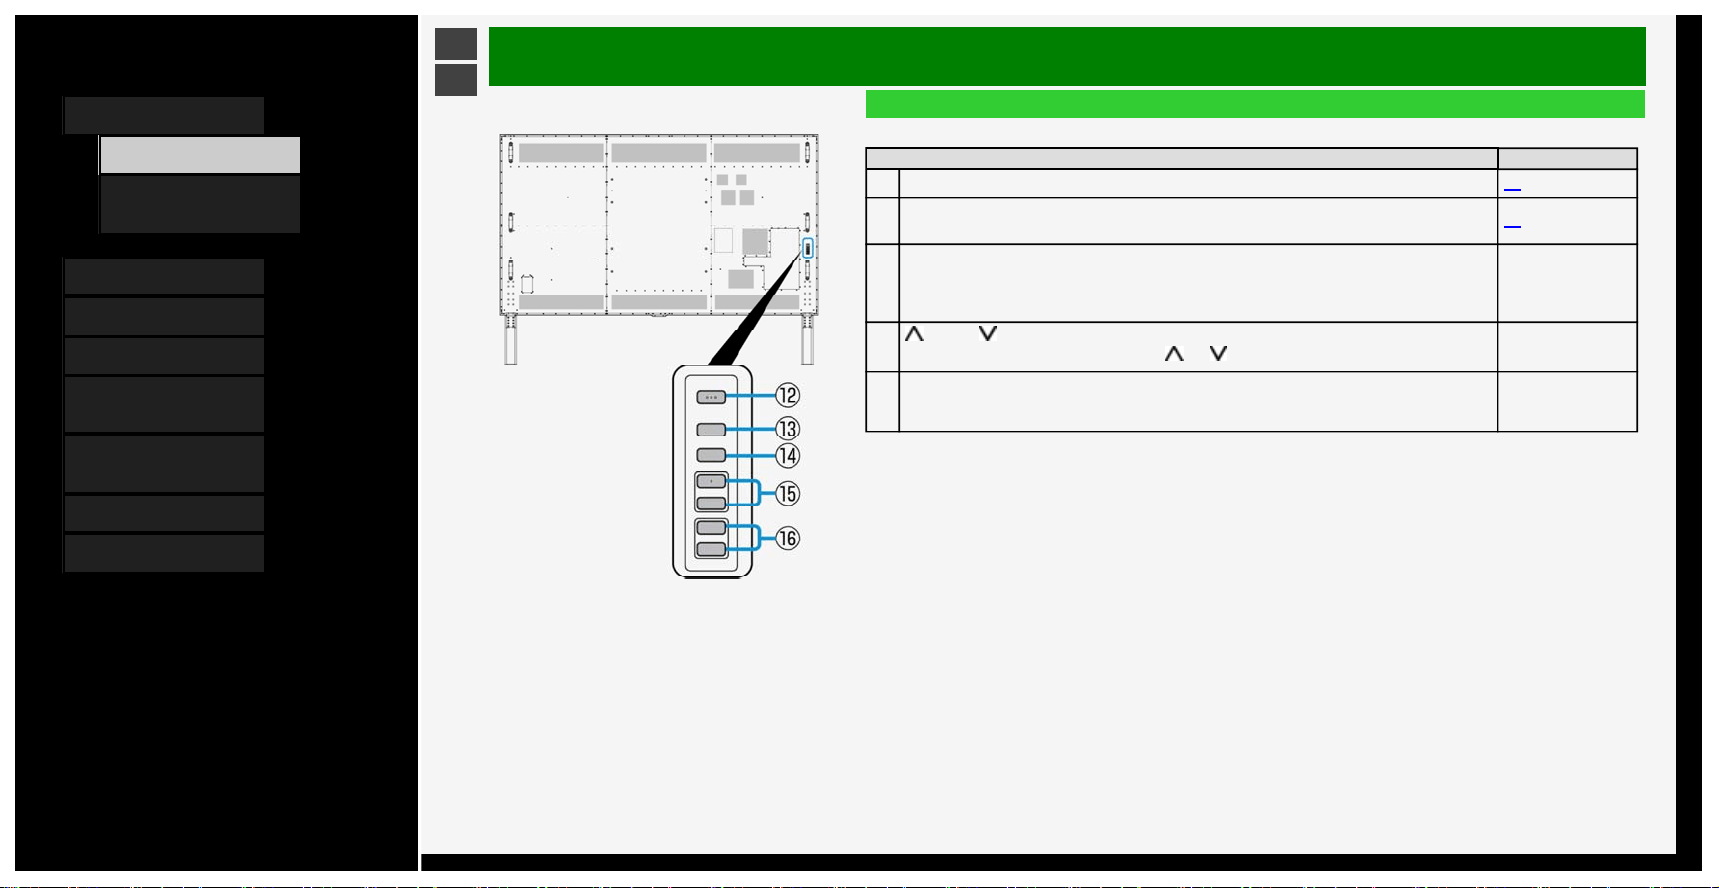
Part Names
Monitor
Rear
Name Page
12
Power button
2-3
13
MENU button
• Displays the menu.
3-2
14
INPUT button
• When in the Menu, this functions as the OK button.
―
15
forward / backward button
• When Menu is operated, it is used as
and cursor.
―
16
Volume (+ / -) button
• When Menu is operated, it is used as right-left cursor.
• When in the Menu, this functions as the right-left cursor.
―
1-5
Contents
1. Part Names
1. Monitor
6. Name of Remote
Control Buttons
2. Basic Operation
3. Menu Operation
4. USB Media
5. Connecting Other
Devices
6. Operating the Monitor
Using a PC (IP control)
7. Troubleshooting
8. Specifications, etc.
Ver. 1.00
>
<
Part Names
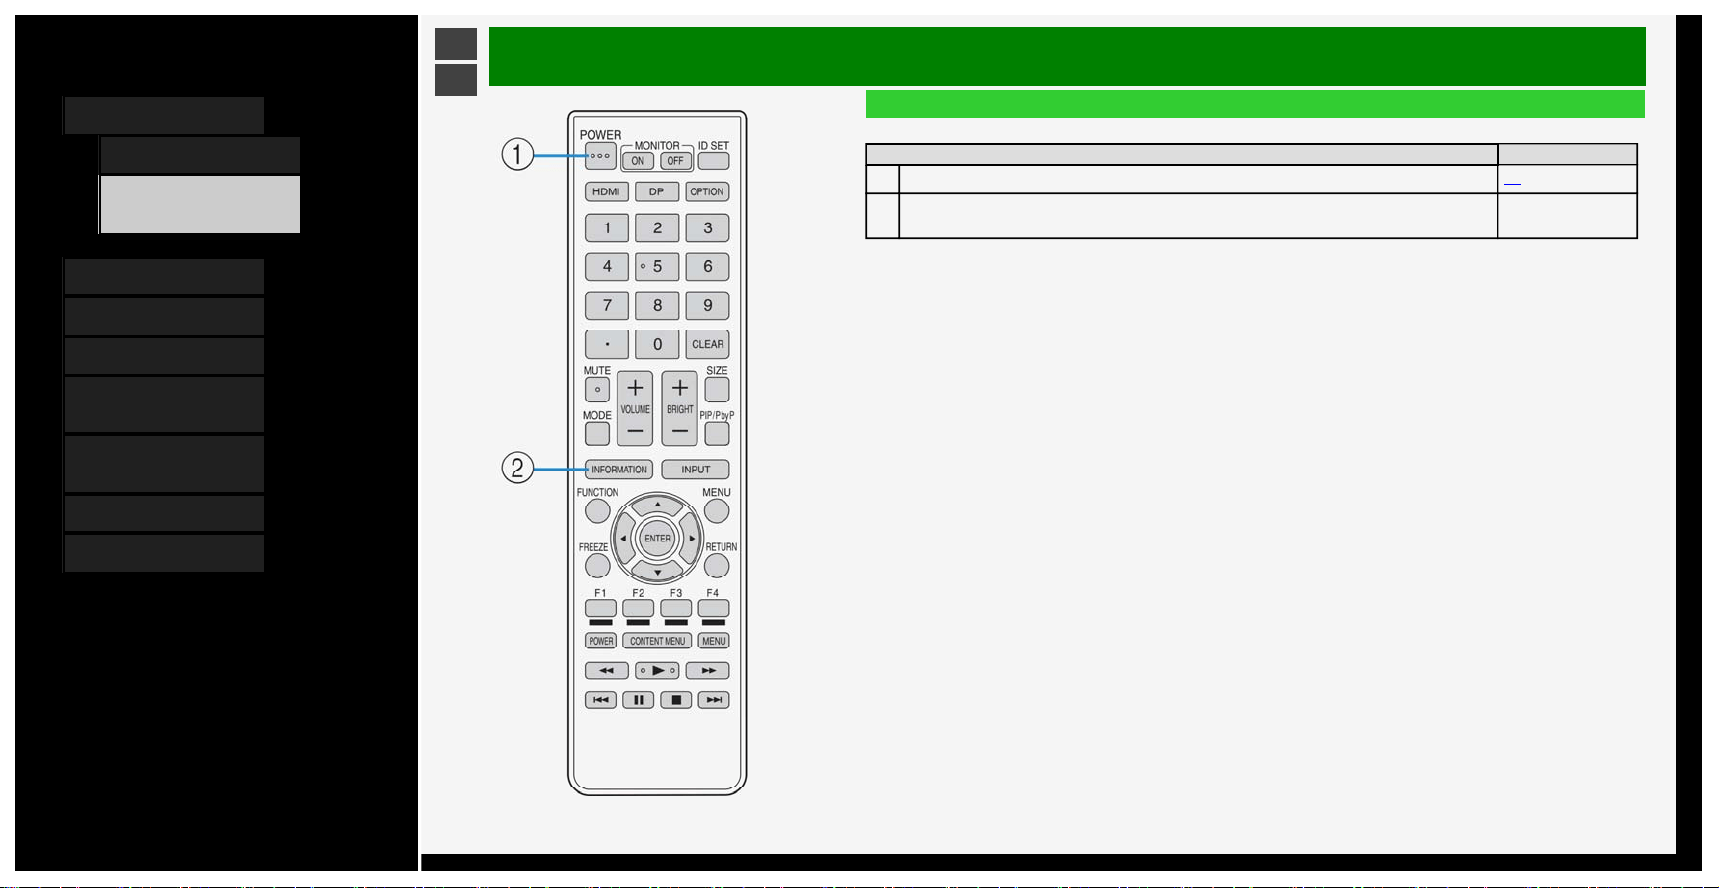
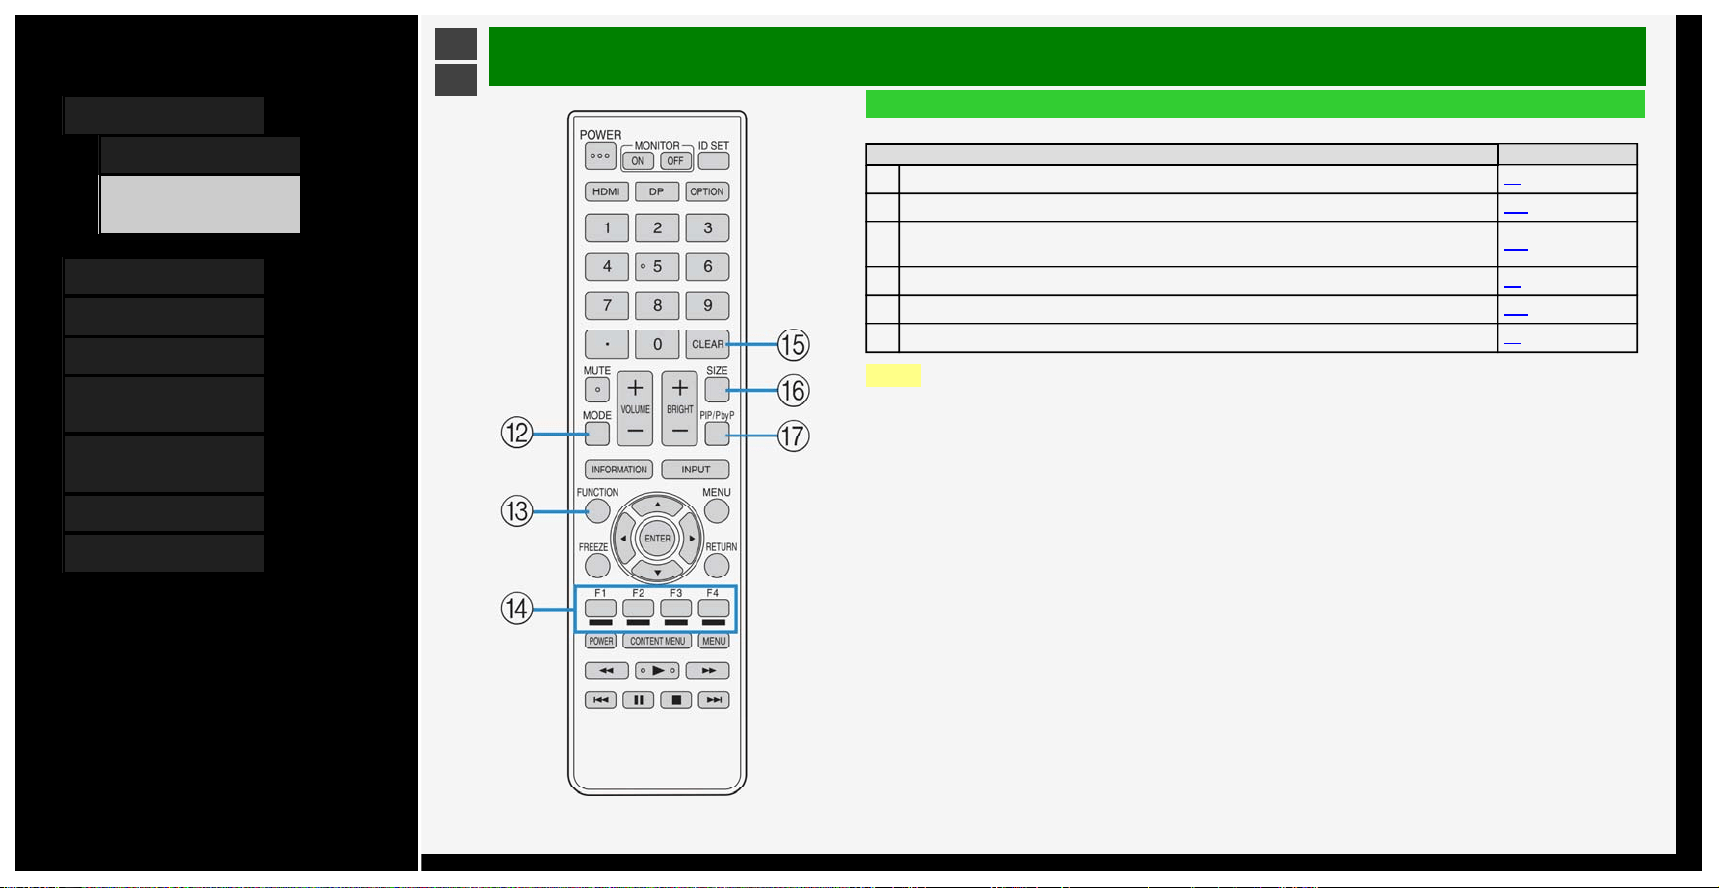
Name of Remote Control Buttons
Button name Page
1
POWER
2-3
2
INFORMATION
• Display the information.
―
1-6
Contents
1. Part Names
1. Monitor
6. Name of Remote
Control Buttons
2. Basic Operation
3. Menu Operation
4. USB Media
5. Connecting Other
Devices
6. Operating the Monitor
Using a PC (IP control)
7. Troubleshooting
8. Specifications, etc.
Ver. 1.00
>
<
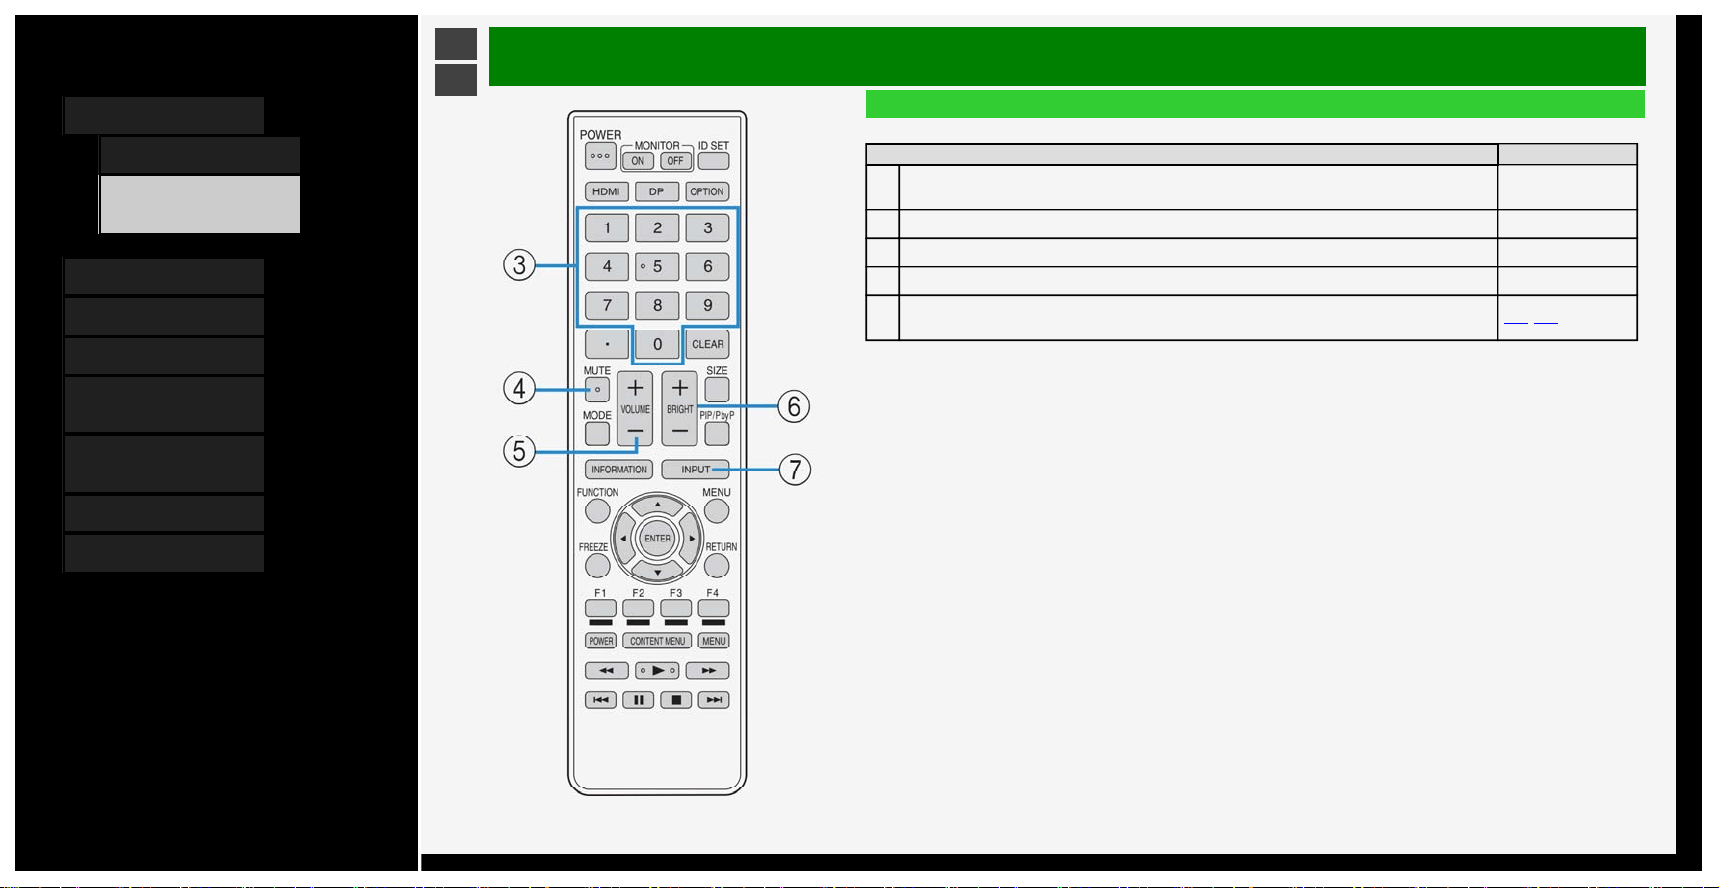
Part Names
Name of Remote Control Buttons
Button name Page
3
Number
• Also used to enter characters or numbers and perform the setup operations.
―
4
MUTE ―
5
VOLUME +/- ―
6
BRIGHT +/- ―
7
INPUT
• Also used to change the input source to PC, USB media, etc.
5-18, 5-26
1-7

Contents
1. Part Names
1. Monitor
6. Name of Remote
Control Buttons
2. Basic Operation
3. Menu Operation
4. USB Media
5. Connecting Other
Devices
6. Operating the Monitor
Using a PC (IP control)
7. Troubleshooting
8. Specifications, etc.
Ver. 1.00
>
<
Part Names
Name of Remote Control Buttons
Button name Page
8
/ / / , ENTER
• Used for the menu, character entry, etc.
3-2, 3-45
9
OPTION 3-44
10
MENU 3-2
11
RETURN
• Used for the menu, character entry, etc.
3-2, 3-45
1-8
Contents
1. Part Names
1. Monitor
6. Name of Remote
Control Buttons
2. Basic Operation
3. Menu Operation
4. USB Media
5. Connecting Other
Devices
6. Operating the Monitor
Using a PC (IP control)
7. Troubleshooting
8. Specifications, etc.
Ver. 1.00
>
<
Part Names
Name of Remote Control Buttons
Button name Page
12
MODE
3-8
13
FUNCTION 3-27
14
F1 / F2 / F3 / F4
• Operation for character entry
3-45
15
CLEAR 5-4
16
SIZE 5-25
17
PIP/PbyP 5-3
NOTE
• The following buttons are not used on this monitor.
MONITOR ON, MONITOR OFF, ID SET, HDMI, DP, ., FREEZE
1-9
Contents
1. Part Names
2. Basic Operation
1. Initial Installation
3. Basic Operation
4. Listening with
Headphones
3. Menu Operation
4. USB Media
5. Connecting Other
Devices
6. Operating the Monitor
Using a PC (IP control)
7. Troubleshooting
8. Specifications, etc.
Ver. 1.00
>
<
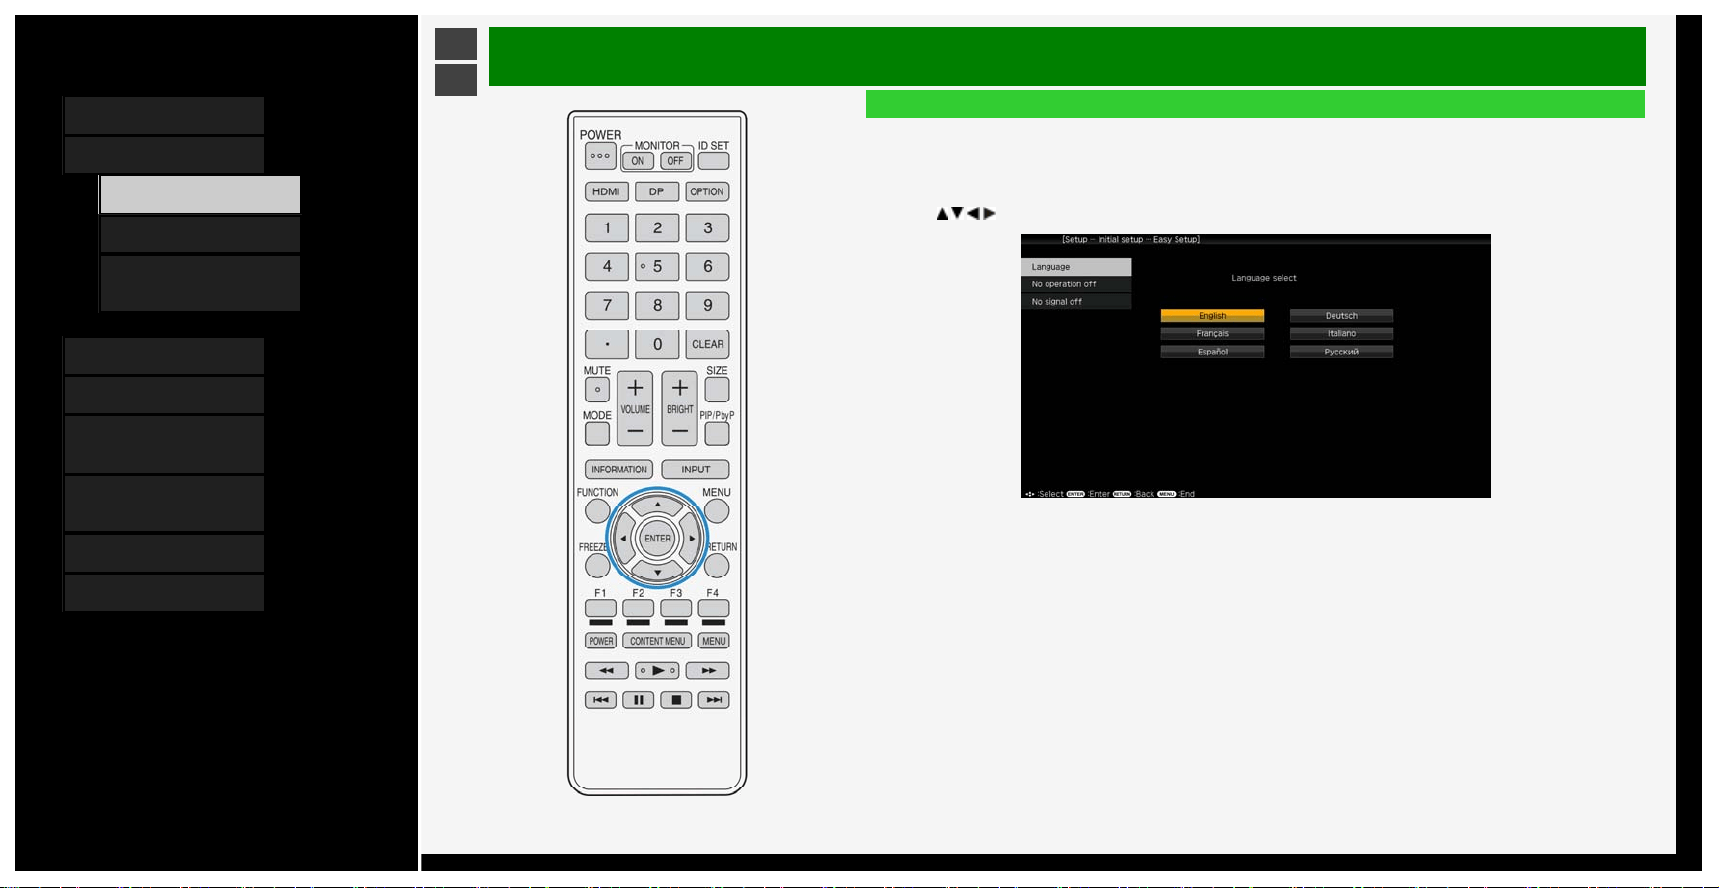
Basic Operation
Initial Installation
Perform the following steps before you press POWER on the remote control unit.
1. Insert the batteries into the remote control unit.
2. Plug in the AC cord to the AC outlet.
Language (Language setting)
1. Press
/ / / to select the desired language listed on the screen, and then press ENTER.
2-1
Contents
1. Part Names
2. Basic Operation
1. Initial Installation
3. Basic Operation
4. Listening with
Headphones
3. Menu Operation
4. USB Media
5. Connecting Other
Devices
6. Operating the Monitor
Using a PC (IP control)
7. Troubleshooting
8. Specifications, etc.
Ver. 1.00
>
<
Basic Operation
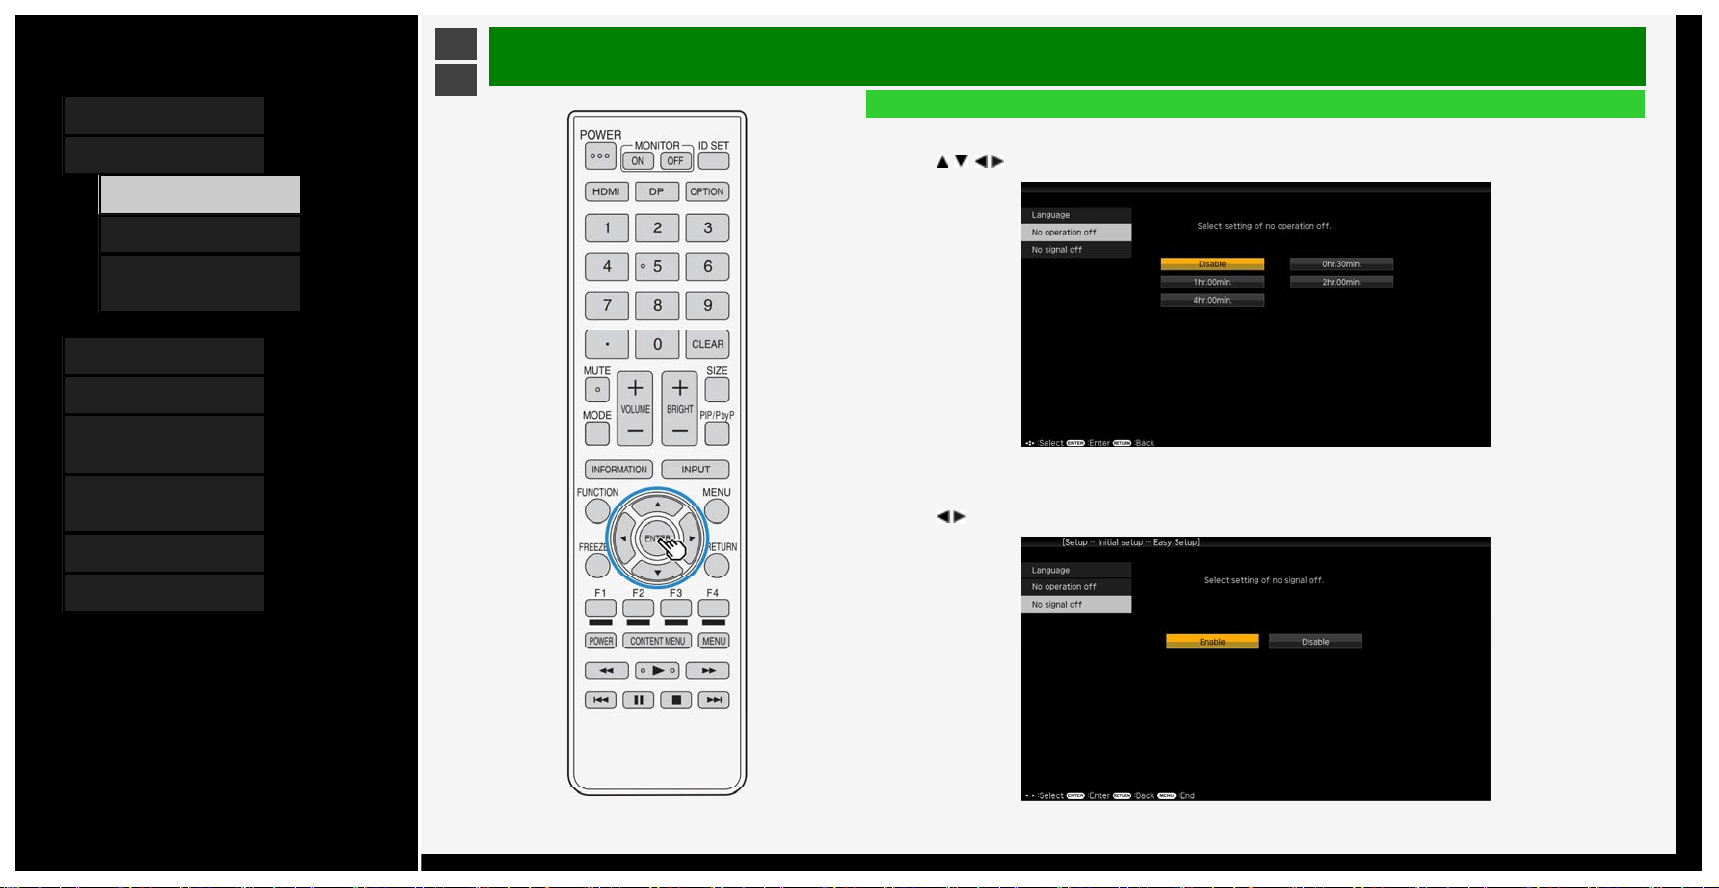
Initial Installation (Continue)
No operation off
Enter standby automatically if no operation continues for the set time.
2. Press
/ / / to select setting, and then press ENTER.
No signal off
Enter standby automatically if no signal is received for 10min.
3. Press
/ to select setting, and then press ENTER.
2-2
Contents
1. Part Names
2. Basic Operation
1. Initial Installation
3. Basic Operation
4. Listening with
Headphones
3. Menu Operation
4. USB Media
5. Connecting Other
Devices
6. Operating the Monitor
Using a PC (IP control)
7. Troubleshooting
8. Specifications, etc.
Ver. 1.00
>
<
Basic Operation
Basic Operation
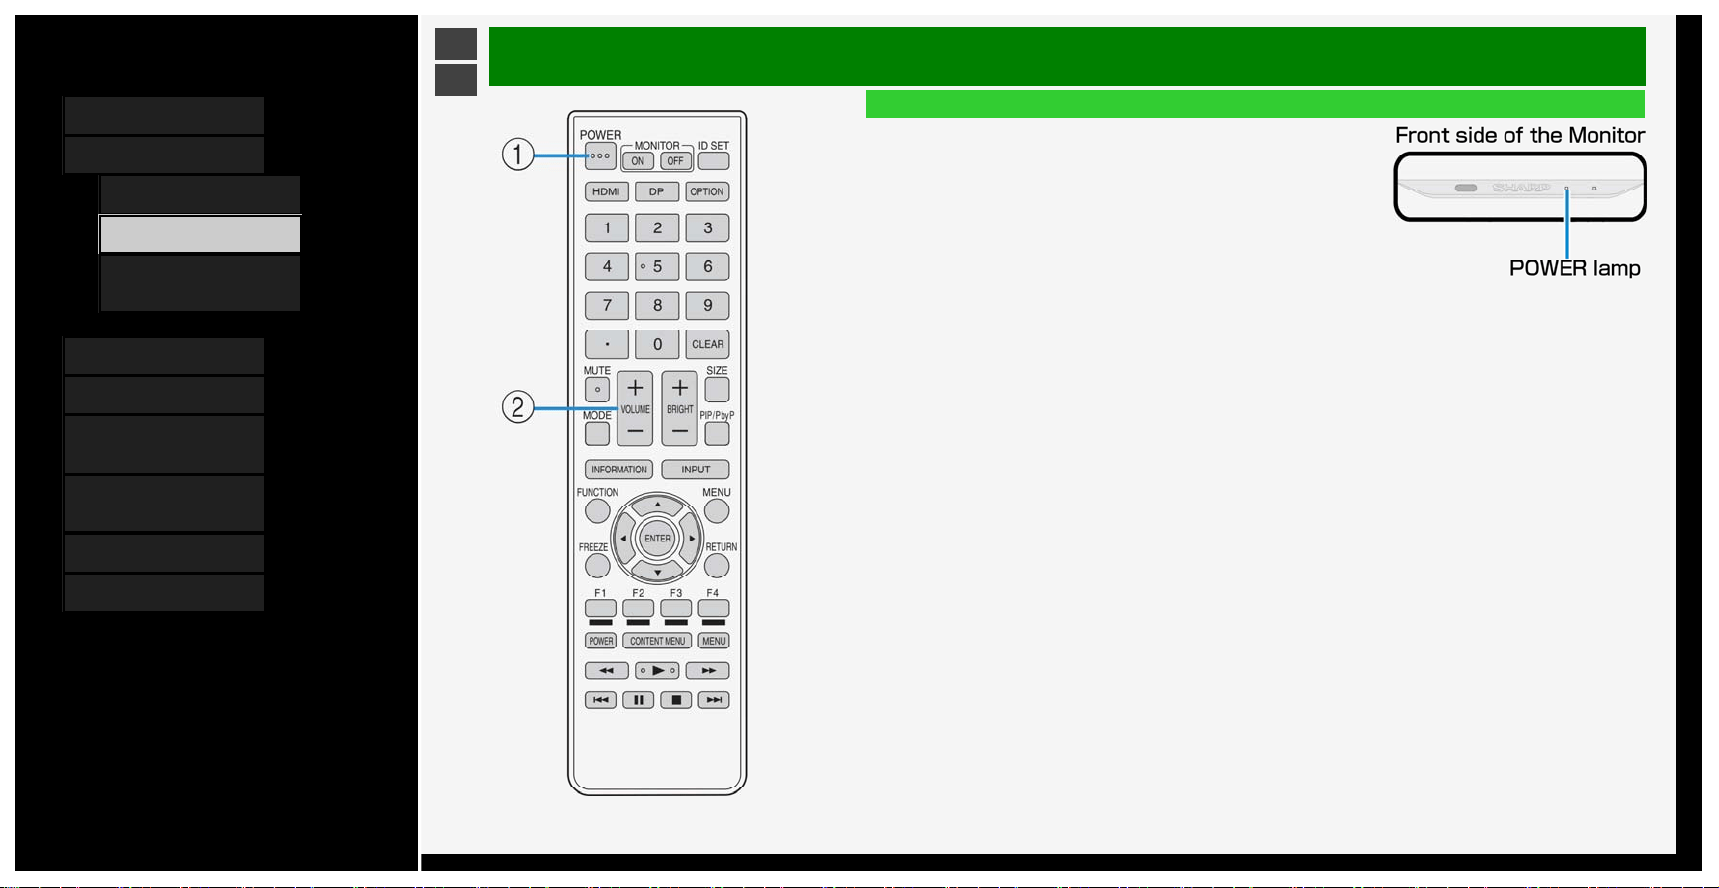
1. Turn on the Monitor
• Each time you press the power button on the remote control
turn on or off the Monitor.
• After pressing the power button on the rear side of the
Monitor to turn "ON", the POWER lamp turns white.
2. Adjust the volume
• Press "+" to turn the volume up, and "-" to turn it down.
2-3

Contents
1. Part Names
2. Basic Operation
1. Initial Installation
3. Basic Operation
4. Listening with
Headphones
3. Menu Operation
4. USB Media
5. Connecting Other
Devices
6. Operating the Monitor
Using a PC (IP control)
7. Troubleshooting
8. Specifications, etc.
Ver. 1.00
>
<
Basic Operation
Listening with Headphones
Setting up the headphones
• Sets the audio sound that comes out of the speakers / headphone terminal during the use of
headphones.
1. Press MENU to display the home screen
2. Press
/ / / to select "Setup", and then press ENTER
3. Press / / / to select " (Option)" - "Terminal setting", and then press ENTER
4. Press
/ to select "Headphone", and then press ENTER
5. Press
/ to select any of "Mode1"or "Mode2", and then press ENTER
• For information on how to adjust the sound / volume of the speakers or headphone jack, see the
following.
Setup
Sound output
Volume control method
Headphone Monitor's speaker
Mode1 Yes No Adjust the volume by using the volume button on the remote control or the Monitor
Mode2 Yes Yes
Adjust the headphone volume by using the volume button on the Monitor
Adjust the speaker volume of the Monitor by using the volume button on the remote control
2-4
Contents
1. Part Names
2. Basic Operation
3. Menu Operation
1. How to Use Menu
2. How to Use Setup Menu
3. List of Setup Menu
Items
44. How to Use Application
Menu
45. Entering Letters
(Software Keyboard)
4. USB Media
5. Connecting Other
Devices
6. Operating the Monitor
Using a PC (IP control)
7. Troubleshooting
8. Specifications, etc.
Ver. 1.00
>
<
Menu Operation
How to Use Menu
• The screen that serves as a gateway to operating the Monitor is called the "Menu".
• This section describes how to use Menu.
NOTE
• You can also use the buttons on the Monitor to operate the Menu.(page
1-5)
3-1
Contents
1. Part Names
2. Basic Operation
3. Menu Operation
1.
How to Use Menu
2. How to Use Setup Menu
3. List of Setup Menu
Items
44. How to Use Application
Menu
45. Entering Letters
(Software Keyboard)
4. USB Media
5. Connecting Other
Devices
6. Operating the Monitor
Using a PC (IP control)
7. Troubleshooting
8. Specifications, etc.
Ver. 1.00
>
<
Menu Operation
How to Use Setup Menu
Basic operation for using the setup menu
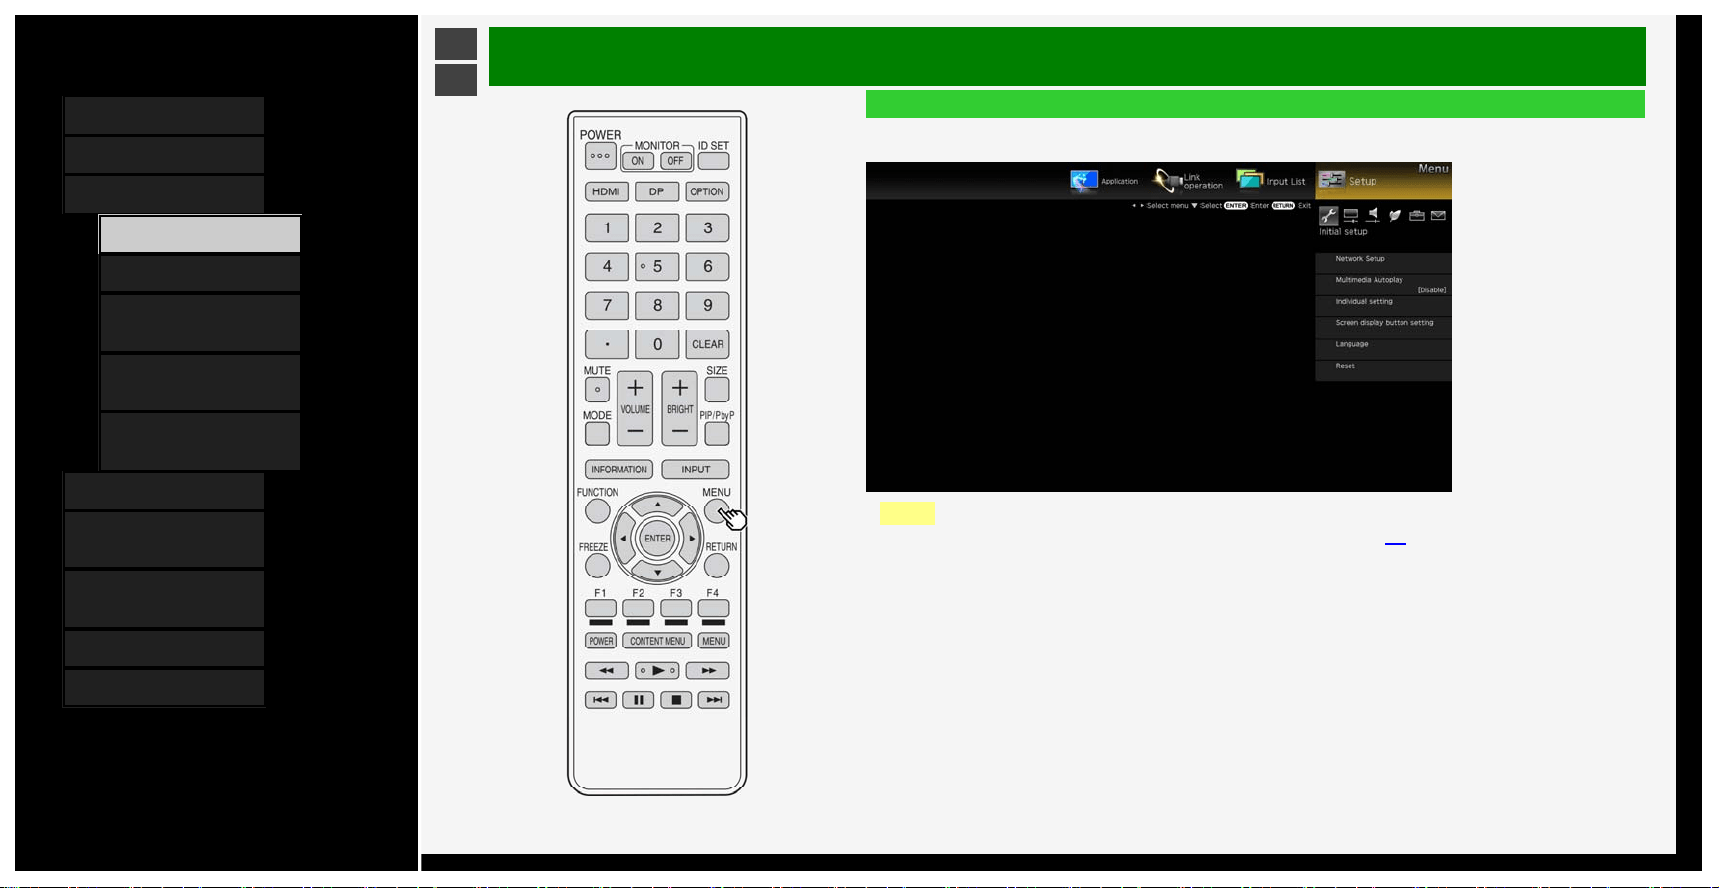
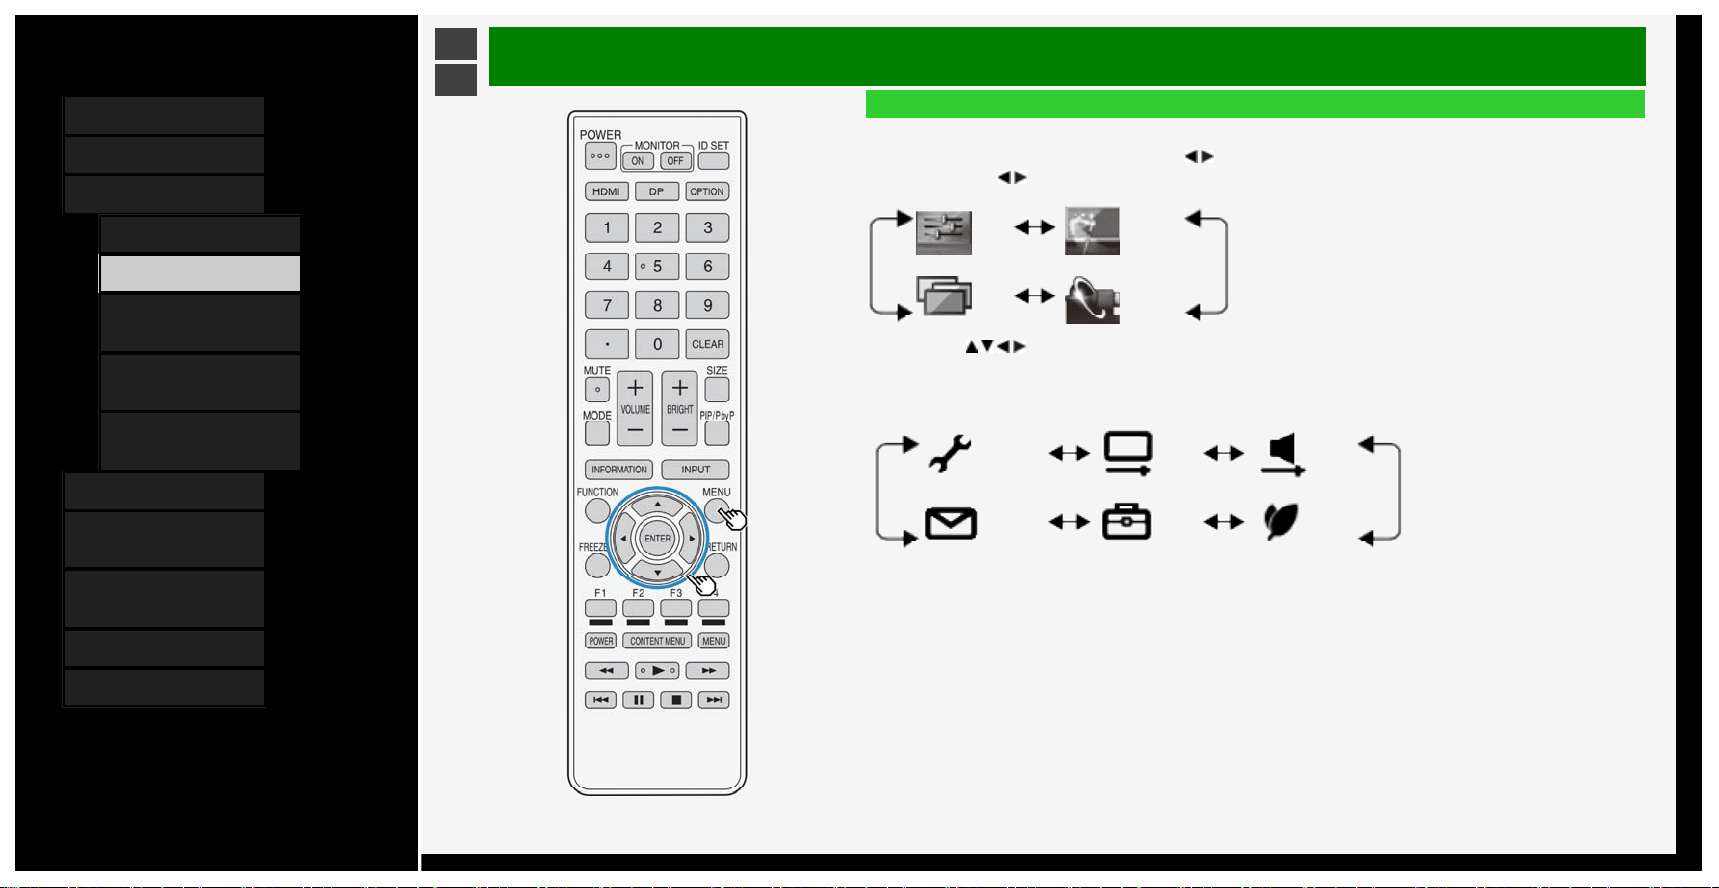
1. Press MENU to display the Menu, press
/ to select "Setup", and then press ENTER
• If
/ button is pressed, the Menu item can be selected as follows.
Setup Application
Input
List
Link
operation
2. Press
/ / / to select a desired item, and then press ENTER.
• Depending on the selected item, there may be further options to select from.
e.g.: for "Setup"
Initial
setup
Picture Audio
Information Option Ecology
• To select the Menu item (step 1) again, press RETURN.
3-2
Contents
1. Part Names
2. Basic Operation
3. Menu Operation
1. How to Use Menu
2. How to Use Setup Menu
3. List of Setup Menu
Items
44. How to Use Application
Menu
45. Entering Letters
(Software Keyboard)
4. USB Media
5. Connecting Other
Devices
6. Operating the Monitor
Using a PC (IP control)
7. Troubleshooting
8. Specifications, etc.
Ver. 1.00
>
<
Menu Operation
List of Setup Menu Items
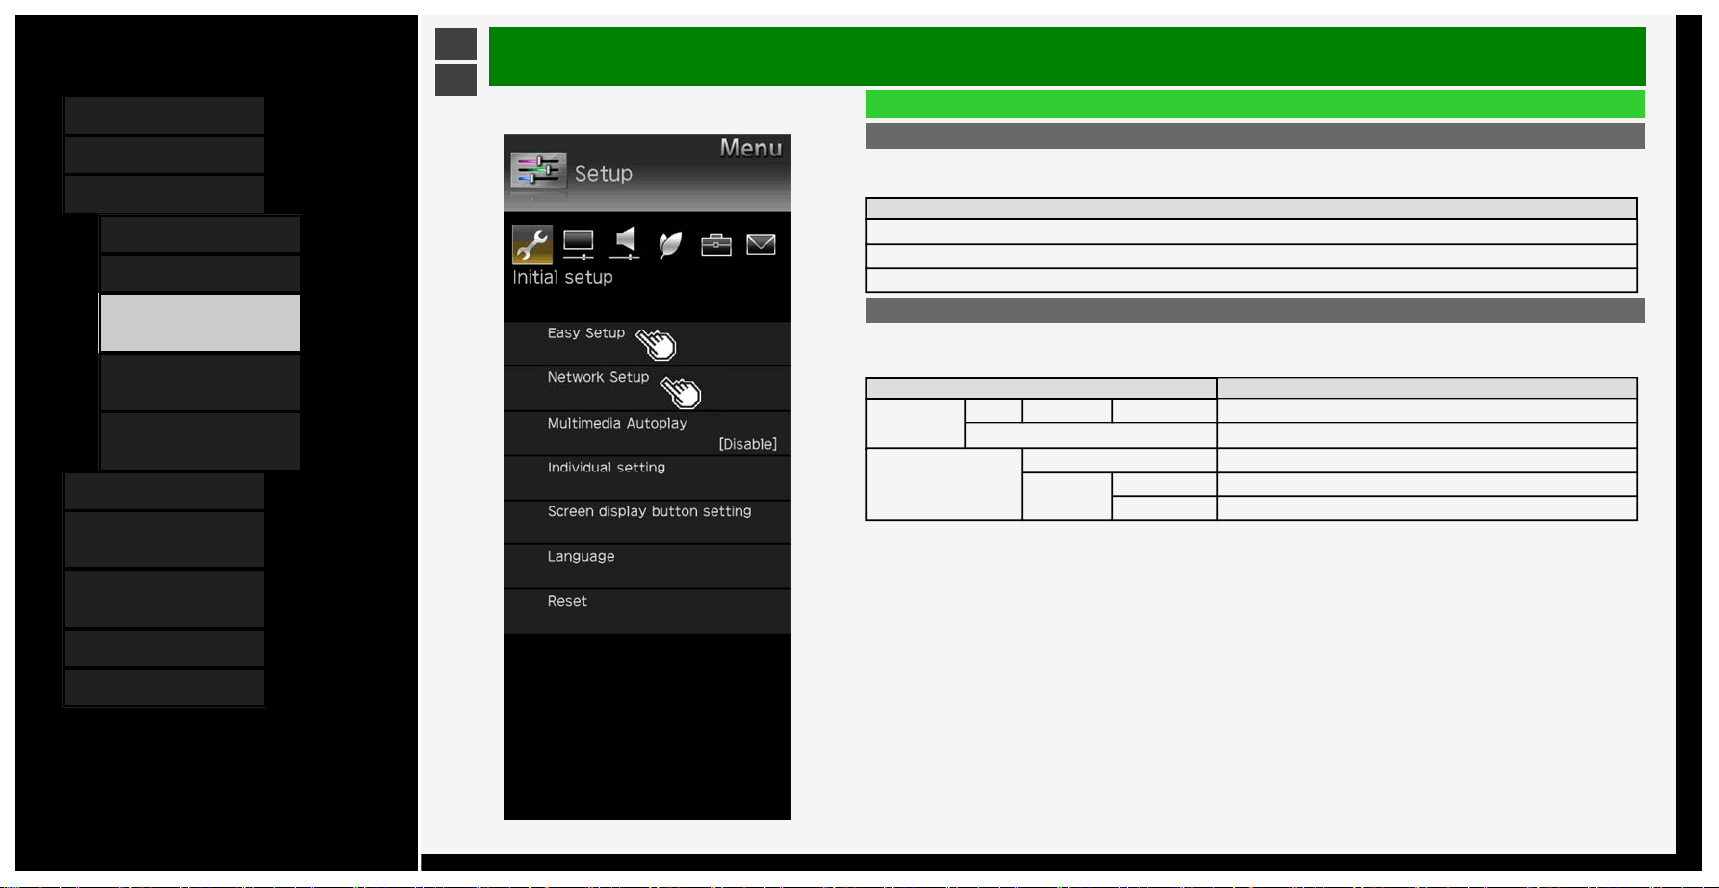
Easy Setup
When you turn on the Monitor for the first time, the “Easy Setup” screen appears. Configure the setting
by following onscreen instructions.
Menu item names
Language
No operation off
No signal off
Network setup
IP Control setup
• This setting is necessary when operating Monitor remotely using a mobile device or a personal computer.
Menu item names Setup
Ethernet setup Change IP address DNS IP address Test, Complete
Initialize
IP Control setup
IP Control setup Enable, Disable, Login ID, Password, Control port, Power Save Mode
Detail setting
Change Login ID, Password, Control port
Initialize
3-3

Contents
1. Part Names
2. Basic Operation
3. Menu Operation
1.
How to Use Menu
2. How to Use Setup Menu
3. List of Setup Menu
Items
44. How to Use Application
Menu
45. Entering Letters
(Software Keyboard)
4. USB Media
5. Connecting Other
Devices
6. Operating the Monitor
Using a PC (IP control)
7. Troubleshooting
8. Specifications, etc.
Ver. 1.00
>
<
Menu Operation
List of Setup Menu Items
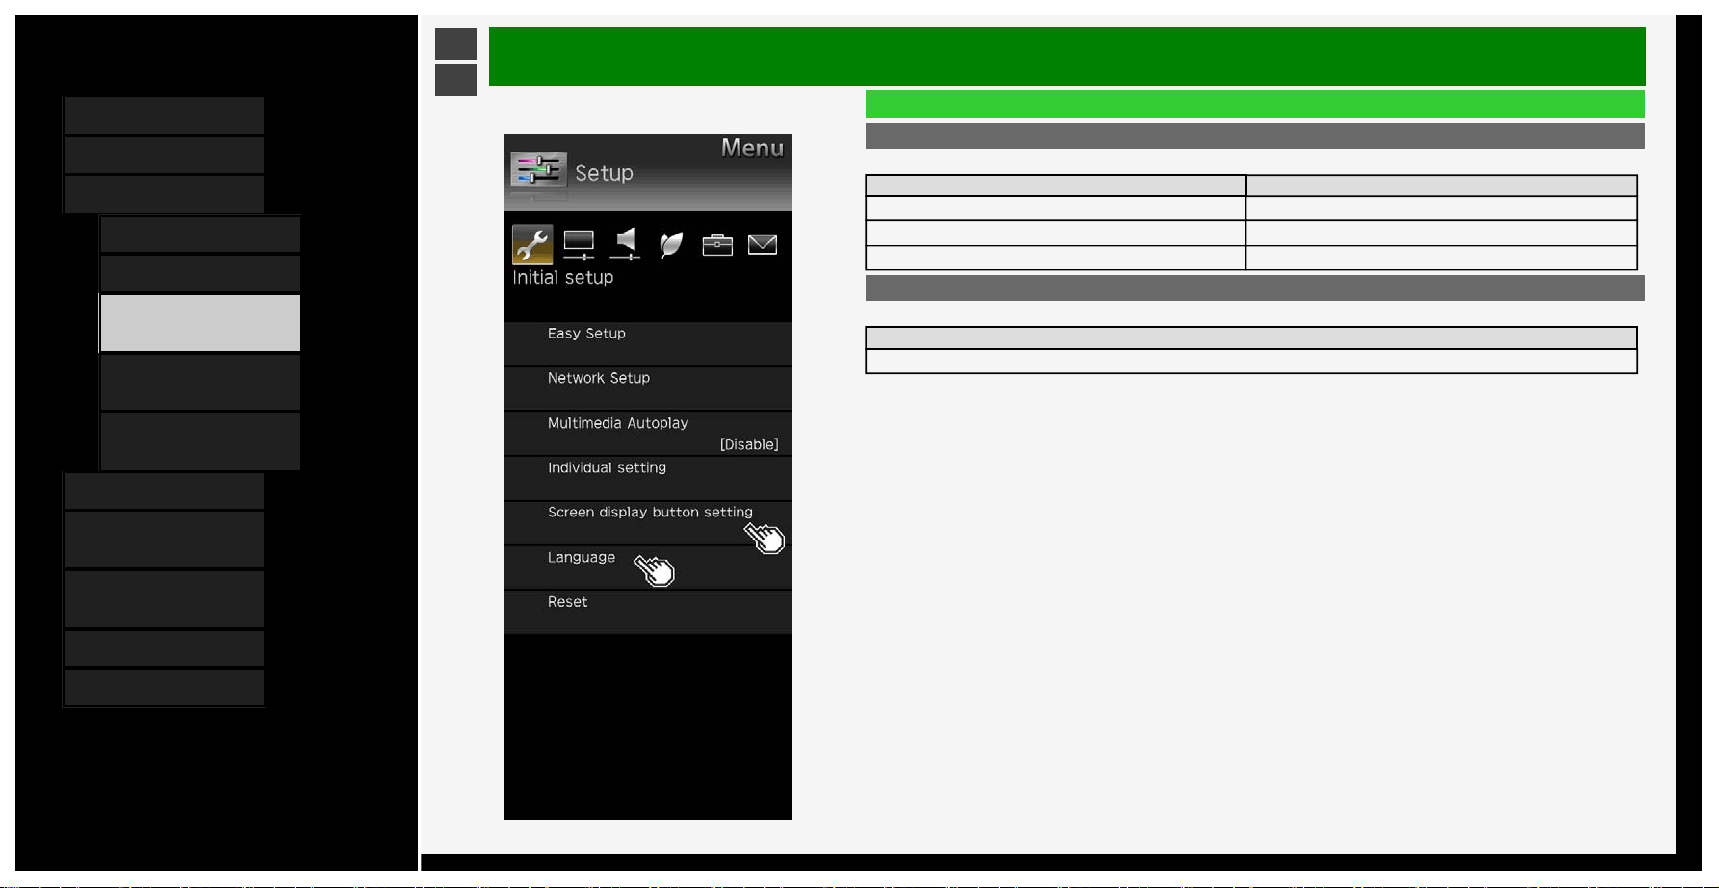
Multimedia Autoplay
Playback the pictures in the USB memory automatically when power is turned on. Create a folder and
name it as "autoplay", then put pictures into this folder.
3-4
Contents
1. Part Names
2. Basic Operation
3. Menu Operation
1. How to Use Menu
2. How to Use Setup Menu
3. List of Setup Menu
Items
44. How to Use Application
Menu
45. Entering Letters
(Software Keyboard)
4. USB Media
5. Connecting Other
Devices
6. Operating the Monitor
Using a PC (IP control)
7. Troubleshooting
8. Specifications, etc.
Ver. 1.00
>
<
Menu Operation
Menu item name Setup
Power indicator off setting
Enable
Disable
List of Setup Menu Items
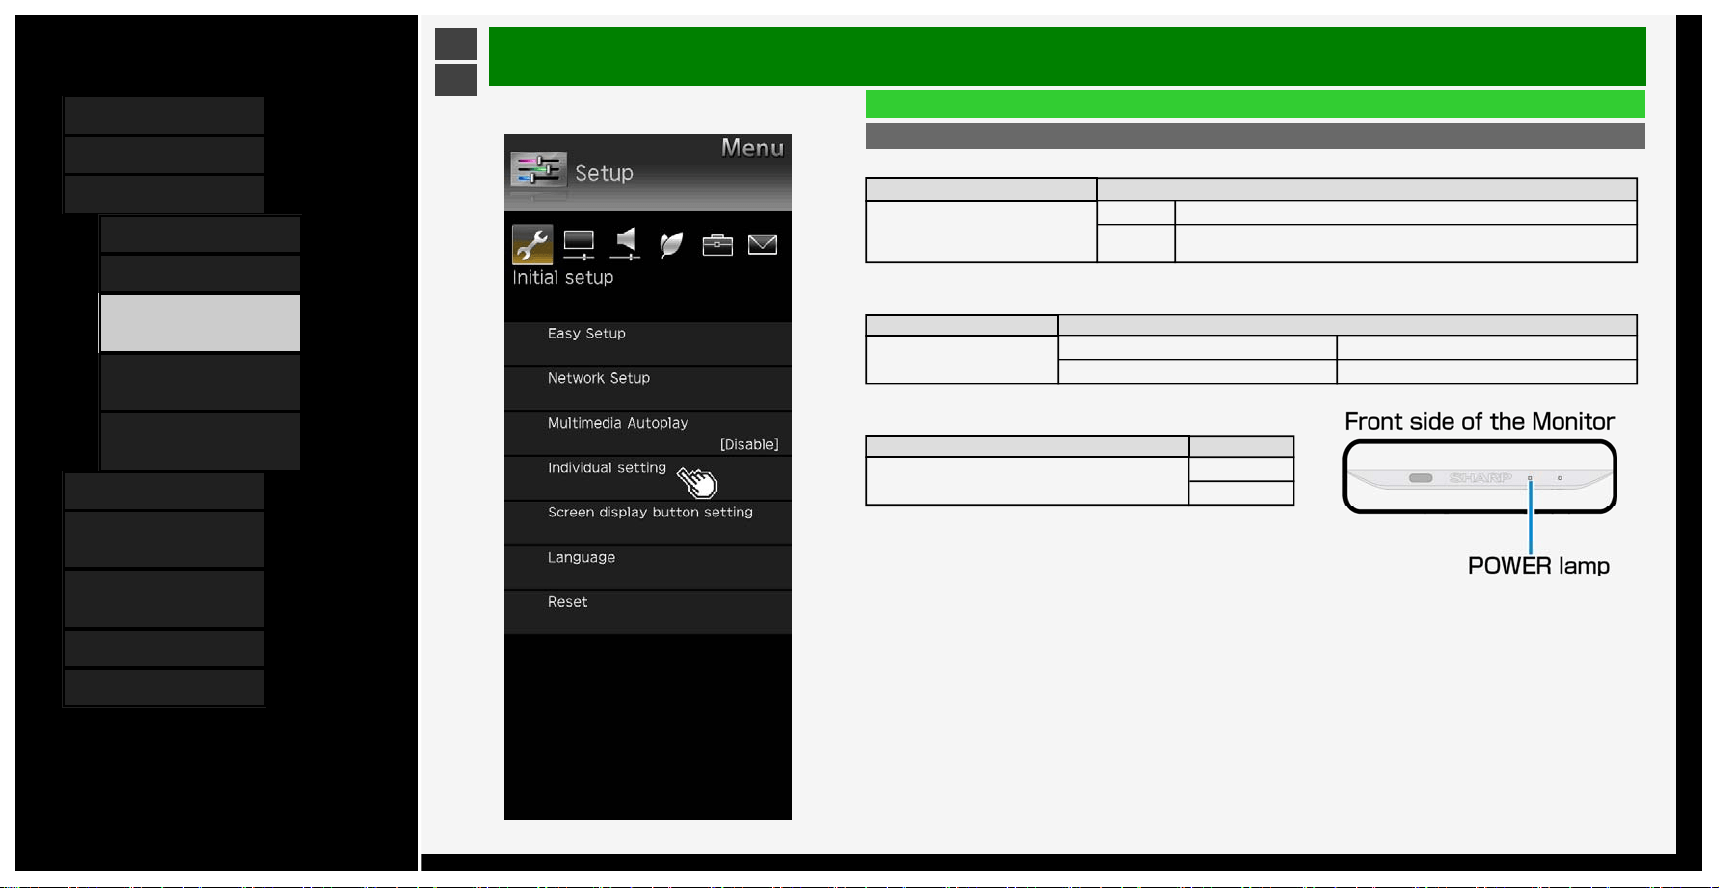
Individual setting
Power Save Mode
Menu item name Setup
Power Save Mode
On Go into normal standby.
Off
The standby power consumption will increase when "Off" is selected. IP Control is
active even during standby.
USB memory setting
• This setting allows you to select a USB memory to copy pictures.
Menu item name Setup
USB memory setting
Select USB memory Select USB memory to use for copy
Remove selected USB memory Remove the selected USB memory
Power indicator off setting
• Turns off POWER lamp during operation.
3-5
Contents
1. Part Names
2. Basic Operation
3. Menu Operation
1. How to Use Menu
2. How to Use Setup Menu
3. List of Setup Menu
Items
44. How to Use Application
Menu
45. Entering Letters
(Software Keyboard)
4. USB Media
5. Connecting Other
Devices
6. Operating the Monitor
Using a PC (IP control)
7. Troubleshooting
8. Specifications, etc.
Ver. 1.00
>
<
Menu Operation
List of Setup Menu Items
Screen display button setting
• This setting allows you to choose the displayed information when you press INFORMATION.
Menu item name Setup
Input display Yes, During Input select, No
Input detail Yes, During Input select, No
Sound/Screen info. display Yes, During Input select, No
Language
• Using the Menu screen, you can switch the on-screen display language to other languages.
Setup
English, Deutsch, Français, Italiano, Español, Русский
3-6

Contents
1. Part Names
2. Basic Operation
3. Menu Operation
1.
How to Use Menu
2. How to Use Setup Menu
3. List of Setup Menu
Items
44. How to Use Application
Menu
45. Entering Letters
(Software Keyboard)
4. USB Media
5. Connecting Other
Devices
6. Operating the Monitor
Using a PC (IP control)
7. Troubleshooting
8. Specifications, etc.
Ver. 1.00
>
<
Menu Operation
List of Setup Menu Items
Reset
• Before transferring or disposing the Monitor, erase all of your personal information.
The information (various adjustment values, LAN setup, passwords, etc.) will be erased.
3-7

Contents
1. Part Names
2. Basic Operation
3. Menu Operation
1. How to Use Menu
2. How to Use Setup Menu
3. List of Setup Menu
Items
44. How to Use Application
Menu
45. Entering Letters
(Software Keyboard)
4. USB Media
5. Connecting Other
Devices
6. Operating the Monitor
Using a PC (IP control)
7. Troubleshooting
8. Specifications, etc.
Ver. 1.00
>
<
Menu Operation
List of Setup Menu Items
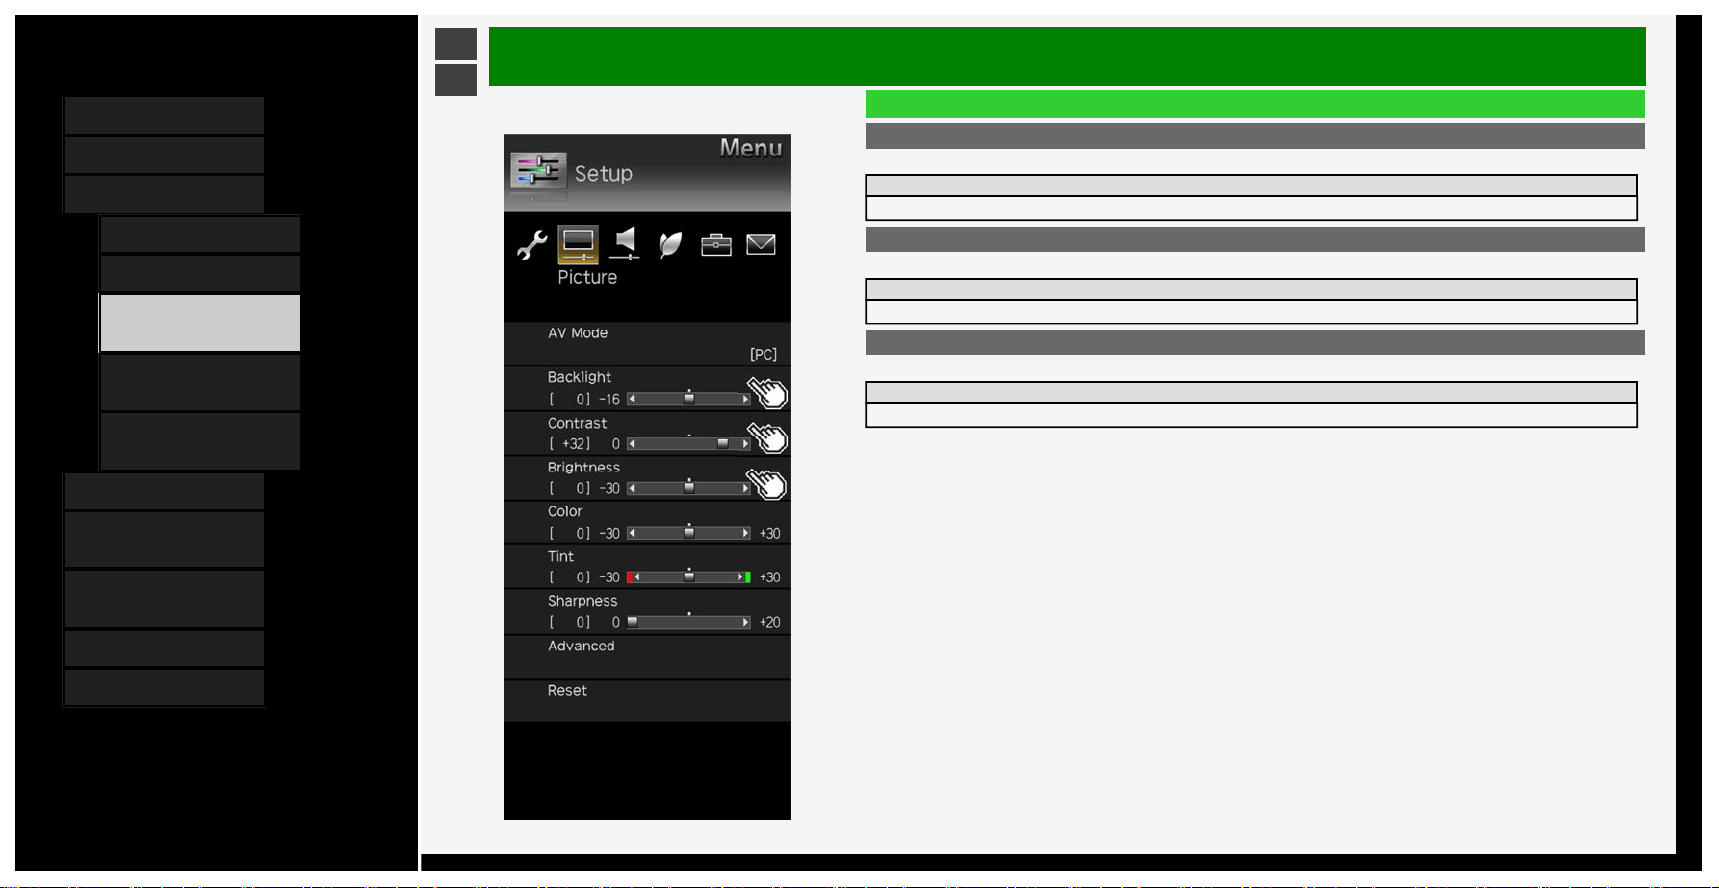
AV Mode
• This function allows you to switch the video and sound to be more suitable.
Setup
USER 1, USER 2, USER 3, PC, PC2, sRGB, DYNAMIC
You can also confi
g
ure these settin
g
s from the Application menu
(
pa
g
e 3-44
)
3-8
Contents
1. Part Names
2. Basic Operation
3. Menu Operation
1.
How to Use Menu
2. How to Use Setup Menu
3. List of Setup Menu
Items
44. How to Use Application
Menu
45. Entering Letters
(Software Keyboard)
4. USB Media
5. Connecting Other
Devices
6. Operating the Monitor
Using a PC (IP control)
7. Troubleshooting
8. Specifications, etc.
Ver. 1.00
>
<
Menu Operation
List of Setup Menu Items
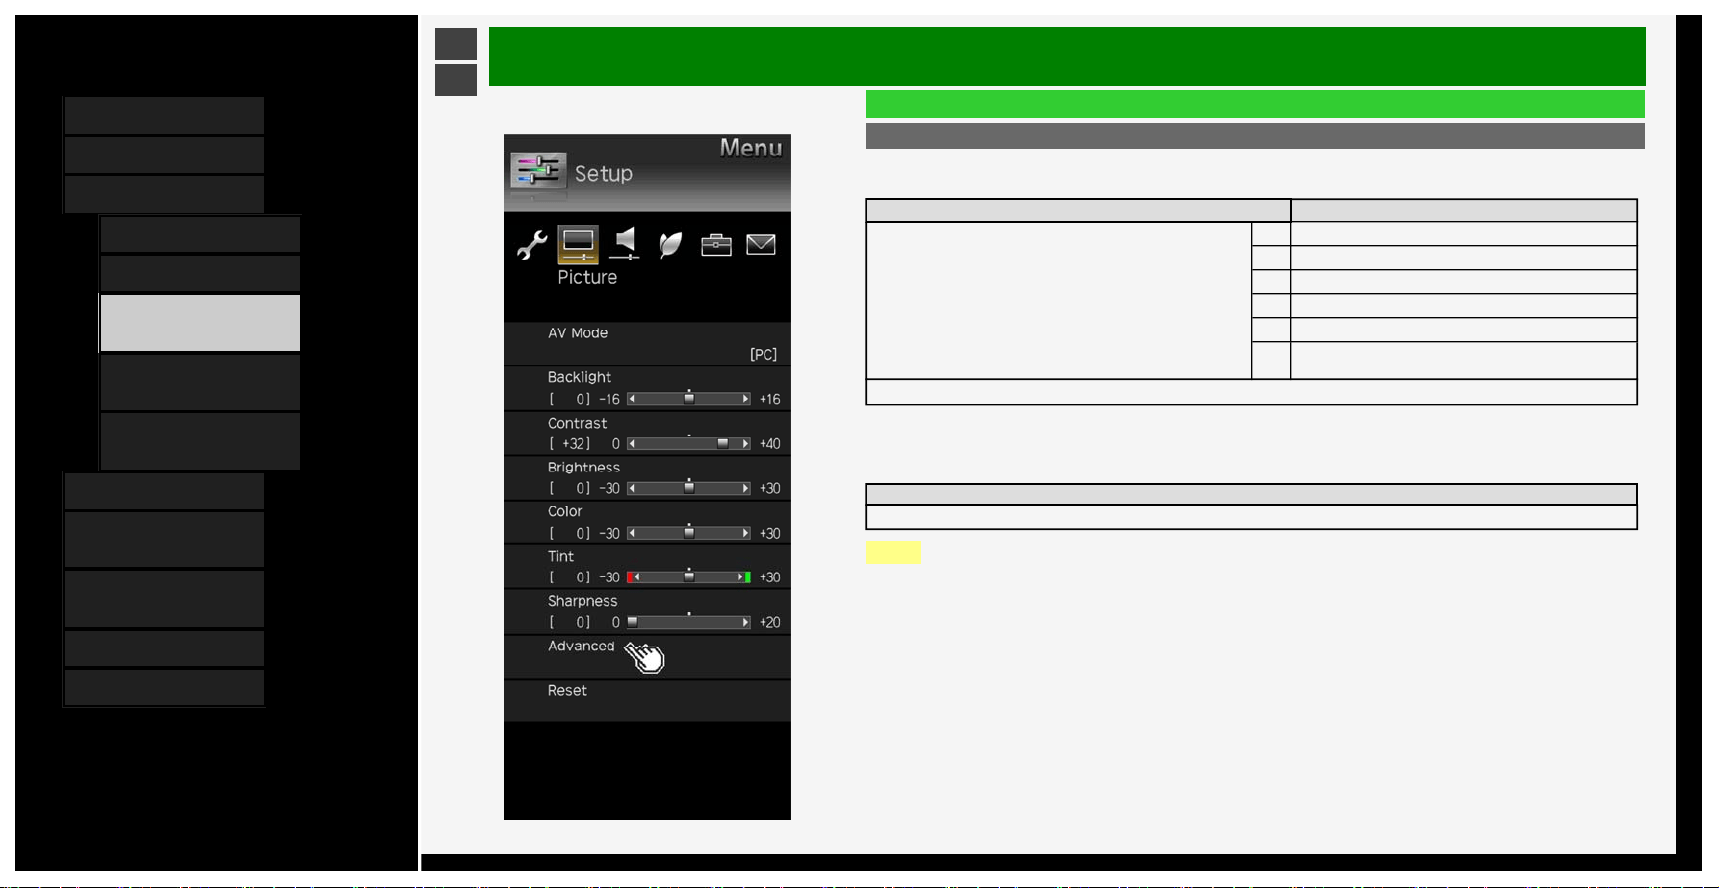
Backlight
• You can adjust the backlight brightness.
Setup
-16 to 0 to +16
Contrast
• You can adjust the contrast.
Setup
0 to +40
Brightness
• You can adjust the brightness.
Setup
-30 to 0 to +30
3-9
Contents
1. Part Names
2. Basic Operation
3. Menu Operation
1.
How to Use Menu
2. How to Use Setup Menu
3. List of Setup Menu
Items
44. How to Use Application
Menu
45. Entering Letters
(Software Keyboard)
4. USB Media
5. Connecting Other
Devices
6. Operating the Monitor
Using a PC (IP control)
7. Troubleshooting
8. Specifications, etc.
Ver. 1.00
>
<
Menu Operation
List of Setup Menu Items
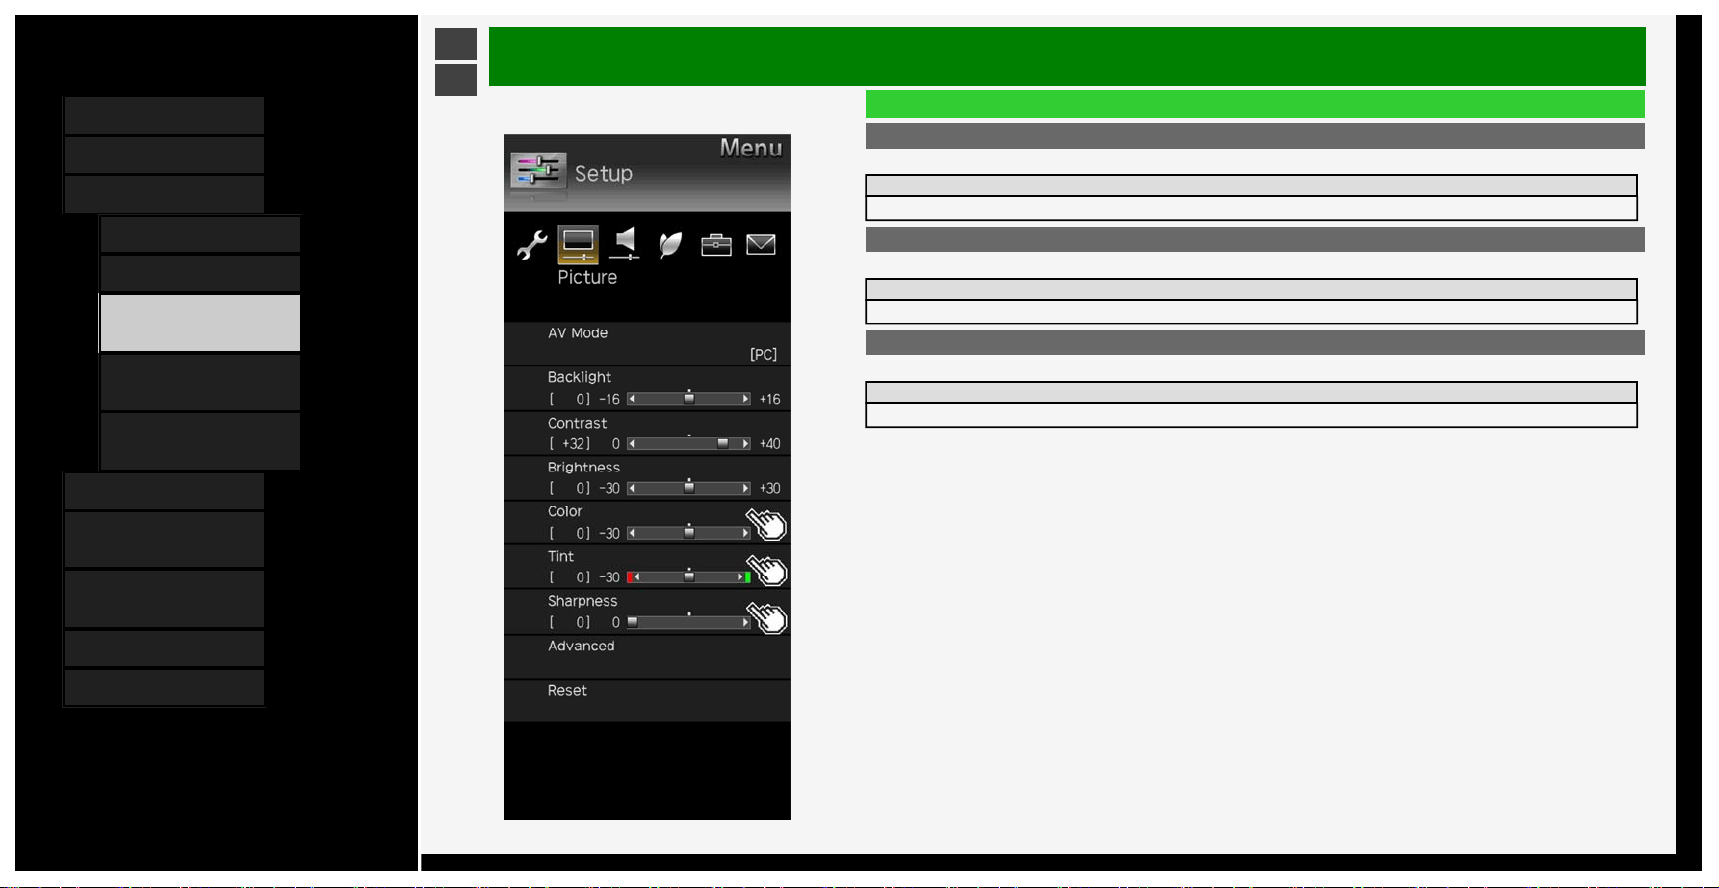
Color
• You can adjust the color saturation.
Setup
-30 to 0 to +30
Tint
• You can adjust the color tint.
Setup
-30 to 0 to +30
Sharpness
• You can adjust the sharpness.
Setup
0 to +20
3-10
Contents
1. Part Names
2. Basic Operation
3. Menu Operation
1.
How to Use Menu
2. How to Use Setup Menu
3. List of Setup Menu
Items
44. How to Use Application
Menu
45. Entering Letters
(Software Keyboard)
4. USB Media
5. Connecting Other
Devices
6. Operating the Monitor
Using a PC (IP control)
7. Troubleshooting
8. Specifications, etc.
Ver. 1.00
>
<
Menu Operation
List of Setup Menu Items
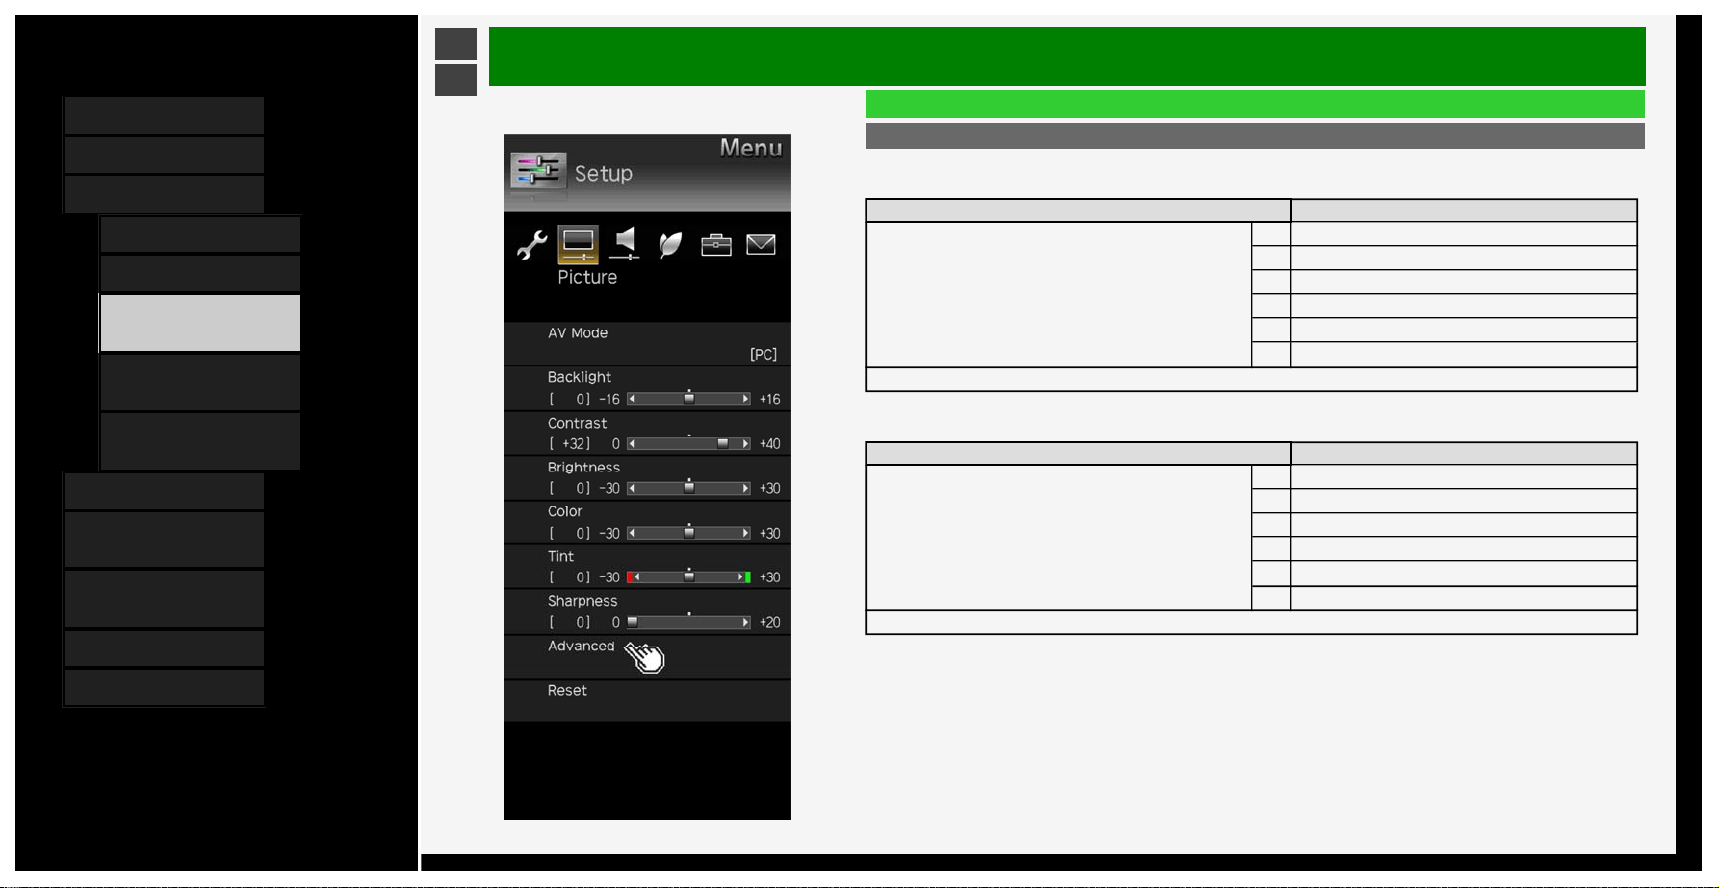
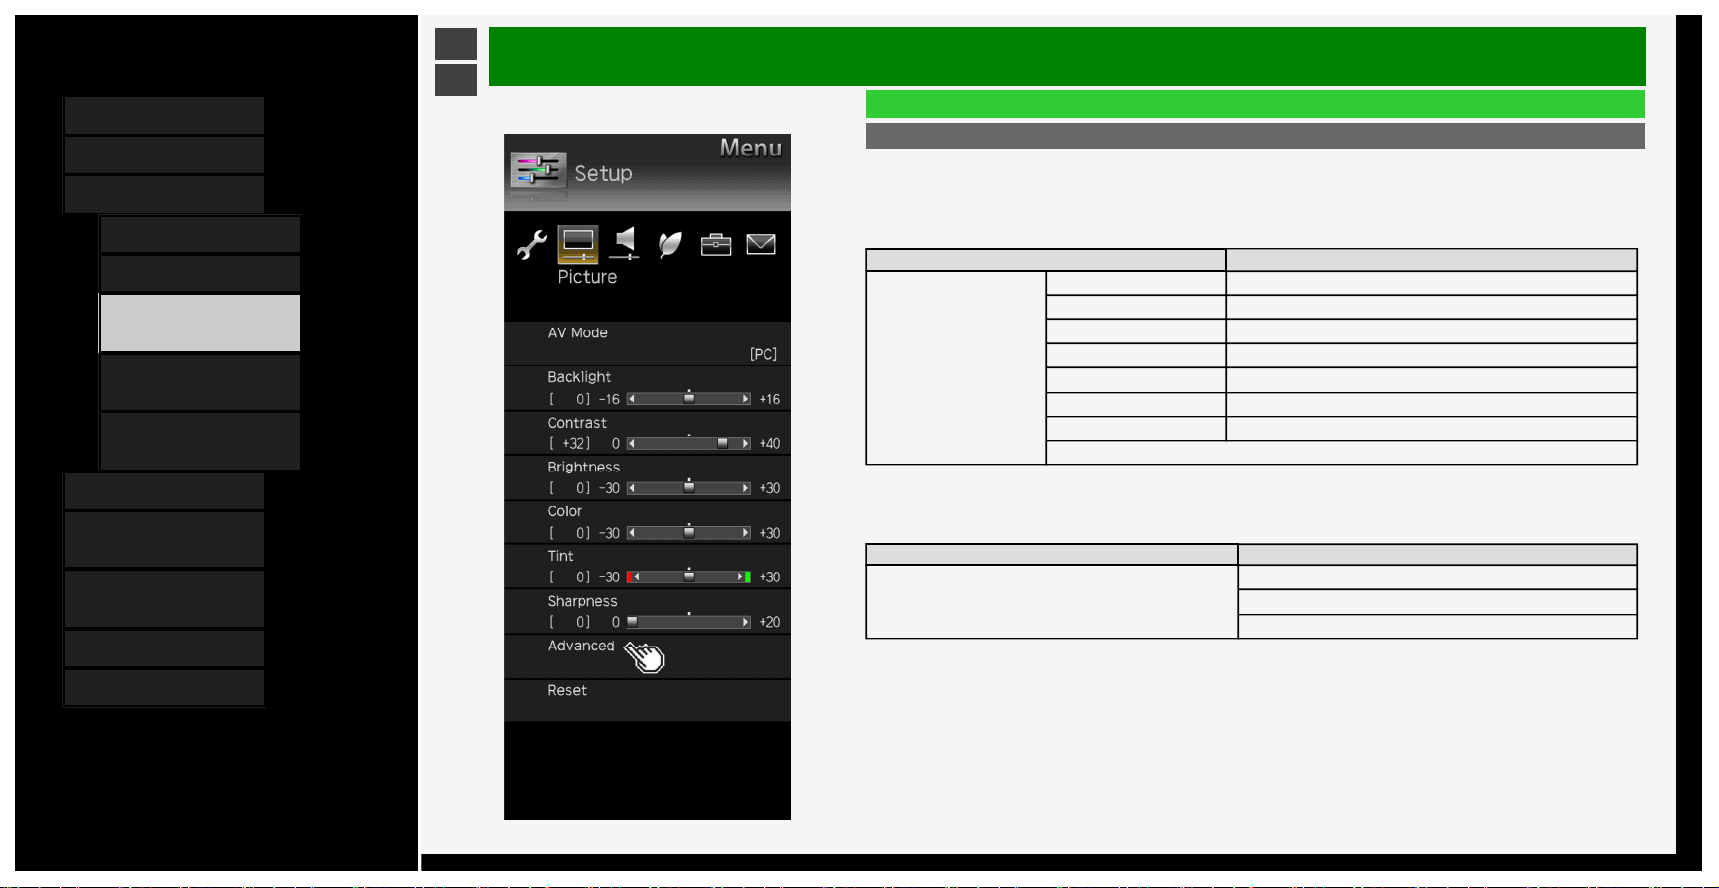
Advanced
C.M.S.-hue
• Adjusts six-color hue.
Menu item name Setup
C.M.S.-hue
R -30 to 0 to +30
Y -30 to 0 to +30
G -30 to 0 to +30
C -30 to 0 to +30
B -30 to 0 to +30
M -30 to 0 to +30
Reset
C.M.S.-saturation
• Adjusts six-color saturation.
Menu item name Setup
C.M.S.-saturation
R -15 to 0 to +15
Y -15 to 0 to +15
G -15 to 0 to +15
C -15 to 0 to +15
B -15 to 0 to +15
M -15 to 0 to +15
Reset
3-11
Contents
1. Part Names
2. Basic Operation
3. Menu Operation
1.
How to Use Menu
2. How to Use Setup Menu
3. List of Setup Menu
Items
44. How to Use Application
Menu
45. Entering Letters
(Software Keyboard)
4. USB Media
5. Connecting Other
Devices
6. Operating the Monitor
Using a PC (IP control)
7. Troubleshooting
8. Specifications, etc.
Ver. 1.00
>
<
Menu Operation
List of Setup Menu Items
Advanced (Continue)
C.M.S.-value
• Adjusts six-color image value.
Menu item name Setup
C.M.S.-value
R -30 to 0 to +30
Y -30 to 0 to +30
G -30 to 0 to +30
C -30 to 0 to +30
B -30 to 0 to +30
M -30 to 0 to +30
Reset
Color Adjustment Table
• Sets the color reproduction range to be displayed.
Steps
Advanced, Standard, Custom*
NOTE
*ICC profile is necessary.
For the ICC
p
rofile, consult
y
our authorized SHARP dealer
.
3-12
Contents
1. Part Names
2. Basic Operation
3. Menu Operation
1. How to Use Menu
2. How to Use Setup Menu
3. List of Setup Menu
Items
44. How to Use Application
Menu
45. Entering Letters
(Software Keyboard)
4. USB Media
5. Connecting Other
Devices
6. Operating the Monitor
Using a PC (IP control)
7. Troubleshooting
8. Specifications, etc.
Ver. 1.00
>
<
Menu Operation
List of Setup Menu Items
Advanced (Continue)
Color temp.
• You can make adjustments to make the color blueish white (color temperature; high) or redish white (color
temperature: low).
In addition, you can adjust the white balance by changing the R / G / B gain values on a per-color temperature
basis.
Menu item name Setup
Color temp.
Color temp. 12000K, 9300K, 6500K, THRU
R Gain(LO) -30 to 0 to +30
G Gain(LO) -30 to 0 to +30
B Gain(LO) -30 to 0 to +30
R Gain(HI) -30 to 0 to +30
G Gain(HI) -30 to 0 to +30
B Gain(HI) -30 to 0 to +30
Reset
Video Compensation
• Use Motion Enhancement to view fast action video more clearly.
Menu item name Setup
Video Compensation
High double speed drive
Double speed drive
Off
3-13
Contents
1. Part Names
2. Basic Operation
3. Menu Operation
1. How to Use Menu
2. How to Use Setup Menu
3. List of Setup Menu
Items
44. How to Use Application
Menu
45. Entering Letters
(Software Keyboard)
4. USB Media
5. Connecting Other
Devices
6. Operating the Monitor
Using a PC (IP control)
7. Troubleshooting
8. Specifications, etc.
Ver. 1.00
>
<
Menu Operation
List of Setup Menu Items
Advanced (Continue)
Dynamic range expansion setting
• Sets the local dimming control and the peak brightness.
Enhances the contrast through the use of area-driven backlight.
Setup
0 to +6
3-14

Contents
1. Part Names
2. Basic Operation
3. Menu Operation
1.
How to Use Menu
2. How to Use Setup Menu
3. List of Setup Menu
Items
44. How to Use Application
Menu
45. Entering Letters
(Software Keyboard)
4. USB Media
5. Connecting Other
Devices
6. Operating the Monitor
Using a PC (IP control)
7. Troubleshooting
8. Specifications, etc.
Ver. 1.00
>
<
Menu Operation
List of Setup Menu Items
Advanced (Continue)
Menu item name Setup
Gamma adjustment
*
-3 to 0 to +3 The difference in tone between the bright and dark sections of a video image can be adjusted.
HDR(PQ) Gamma Setting
*
-2 to 0 to +2
NOTE
*Not selectable de
p
endin
g
on INPUT or AV mode
.
3-15

Contents
1. Part Names
2. Basic Operation
3. Menu Operation
1.
How to Use Menu
2. How to Use Setup Menu
3. List of Setup Menu
Items
44. How to Use Application
Menu
45. Entering Letters
(Software Keyboard)
4. USB Media
5. Connecting Other
Devices
6. Operating the Monitor
Using a PC (IP control)
7. Troubleshooting
8. Specifications, etc.
Ver. 1.00
>
<
Menu Operation
List of Setup Menu Items
Advanced (Continue)
Film dejudder
*1*2*3*4*5
• Intended to play back videos, such such as films on a DVD, whose original signal is 24 images per second at
high image quality.
Noise Reduction
*1*4*5
• This function reduces the noise in the video, smoothening the video.
Menu item name Setup
Film dejudder High smooth, Smooth, Off
Noise Reduction Auto, High, Middle, Low, Off
NOTE
*1 Not selectable depending on INPUT or AV mode.
*2 This is not selectable at any time when the input signal is progressive (480p, 720p, 1080p, 2160p).
*3 This is not selectable at any times when the input signal is PC signal.
*4 Not selectable depending on the screen viewed.
*5 The effect ma
y
not be available dependin
g
on the input si
g
nal t
y
pe or video contents.
3-16

Contents
1. Part Names
2. Basic Operation
3. Menu Operation
1. How to Use Menu
2. How to Use Setup Menu
3.
List of Setup Menu
Items
44. How to Use Application
Menu
45. Entering Letters
(Software Keyboard)
4. USB Media
5. Connecting Other
Devices
6. Operating the Monitor
Using a PC (IP control)
7. Troubleshooting
8. Specifications, etc.
Ver. 1.00
>
<
Menu Operation
List of Setup Menu Items
Reset
• Resets all video adjustments to factory defaults.
Setup
Yes, No
3-17

Contents
1. Part Names
2. Basic Operation
3. Menu Operation
1.
How to Use Menu
2. How to Use Setup Menu
3. List of Setup Menu
Items
44. How to Use Application
Menu
45. Entering Letters
(Software Keyboard)
4. USB Media
5. Connecting Other
Devices
6. Operating the Monitor
Using a PC (IP control)
7. Troubleshooting
8. Specifications, etc.
Ver. 1.00
>
<
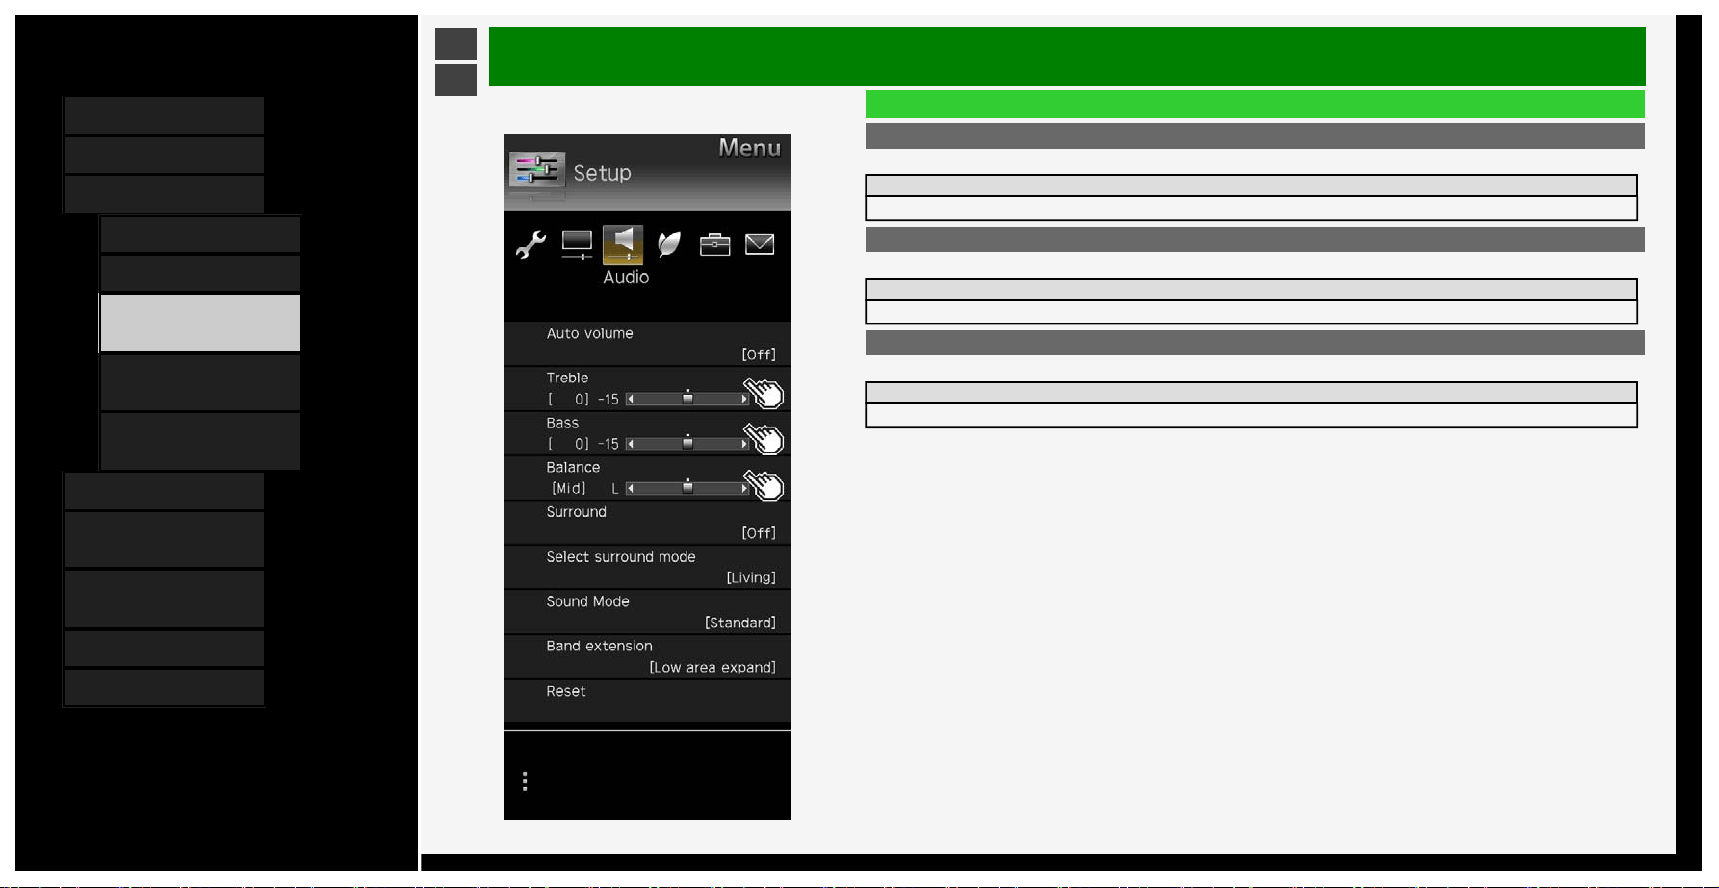
Menu Operation
List of Setup Menu Items
Auto volume
• If the volume level differs in the same input, you can set to adjust the volume automatically.
Setup
High Volume range will be kept very narrow.
Middle Volume range will be kept narrow.
Low Volume range will be kept slightly narrow.
Off This function is disabled. Volume range will be kept as original.
NOTE
• If the Clear voice setup is set to "Standard", "Mild" or "Clear", Auto volume is automatically set and cannot be
changed.
• This function works only for the audio sounds output from the Monitor' s speakers. It does not work for any audio
sounds from headphones or external speakers.
• This function may not be effective enough depending on the contents.
3-18
Contents
1. Part Names
2. Basic Operation
3. Menu Operation
1.
How to Use Menu
2. How to Use Setup Menu
3. List of Setup Menu
Items
44. How to Use Application
Menu
45. Entering Letters
(Software Keyboard)
4. USB Media
5. Connecting Other
Devices
6. Operating the Monitor
Using a PC (IP control)
7. Troubleshooting
8. Specifications, etc.
Ver. 1.00
>
<
Menu Operation
List of Setup Menu Items
Treble
• You can adjust Treble
Setup
-15 to 0 to +15
Bass
• You can adjust Bass
Setup
-15 to 0 to +15
Balance
• You can adjust the balance of the speaker volume for both left and right.
Setup
L30 to Mid to R30
3-19
Contents
1. Part Names
2. Basic Operation
3. Menu Operation
1.
How to Use Menu
2. How to Use Setup Menu
3. List of Setup Menu
Items
44. How to Use Application
Menu
45. Entering Letters
(Software Keyboard)
4. USB Media
5. Connecting Other
Devices
6. Operating the Monitor
Using a PC (IP control)
7. Troubleshooting
8. Specifications, etc.
Ver. 1.00
>
<
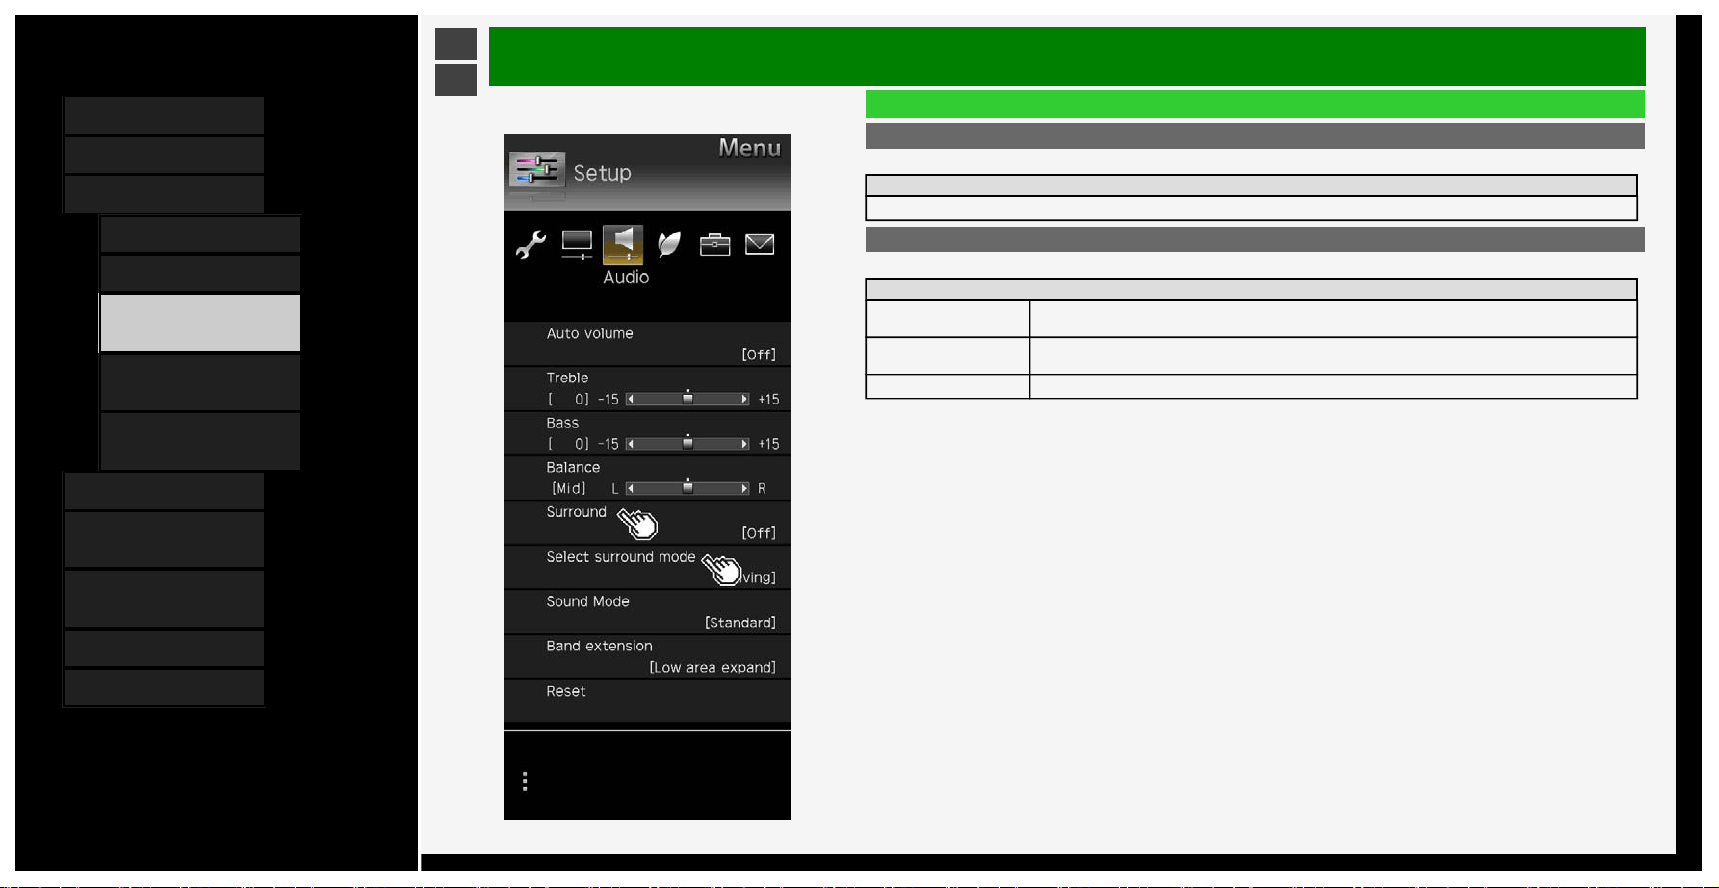
Menu Operation
List of Setup Menu Items
Surround
• Recreates an enviroment where audio appears to come from all directions via the built in speakers.
Setup
Auto, On, Off
Select surround mode
• Select the mode when surround setting is enabled.
Setup
Living Enjoy three dimensional sound.
Theater Enjoy realistic sound like a theater.
3D Hall Enjoy sound surrounding like a hall.
3-20
Contents
1. Part Names
2. Basic Operation
3. Menu Operation
1.
How to Use Menu
2. How to Use Setup Menu
3. List of Setup Menu
Items
44. How to Use Application
Menu
45. Entering Letters
(Software Keyboard)
4. USB Media
5. Connecting Other
Devices
6. Operating the Monitor
Using a PC (IP control)
7. Troubleshooting
8. Specifications, etc.
Ver. 1.00
>
<
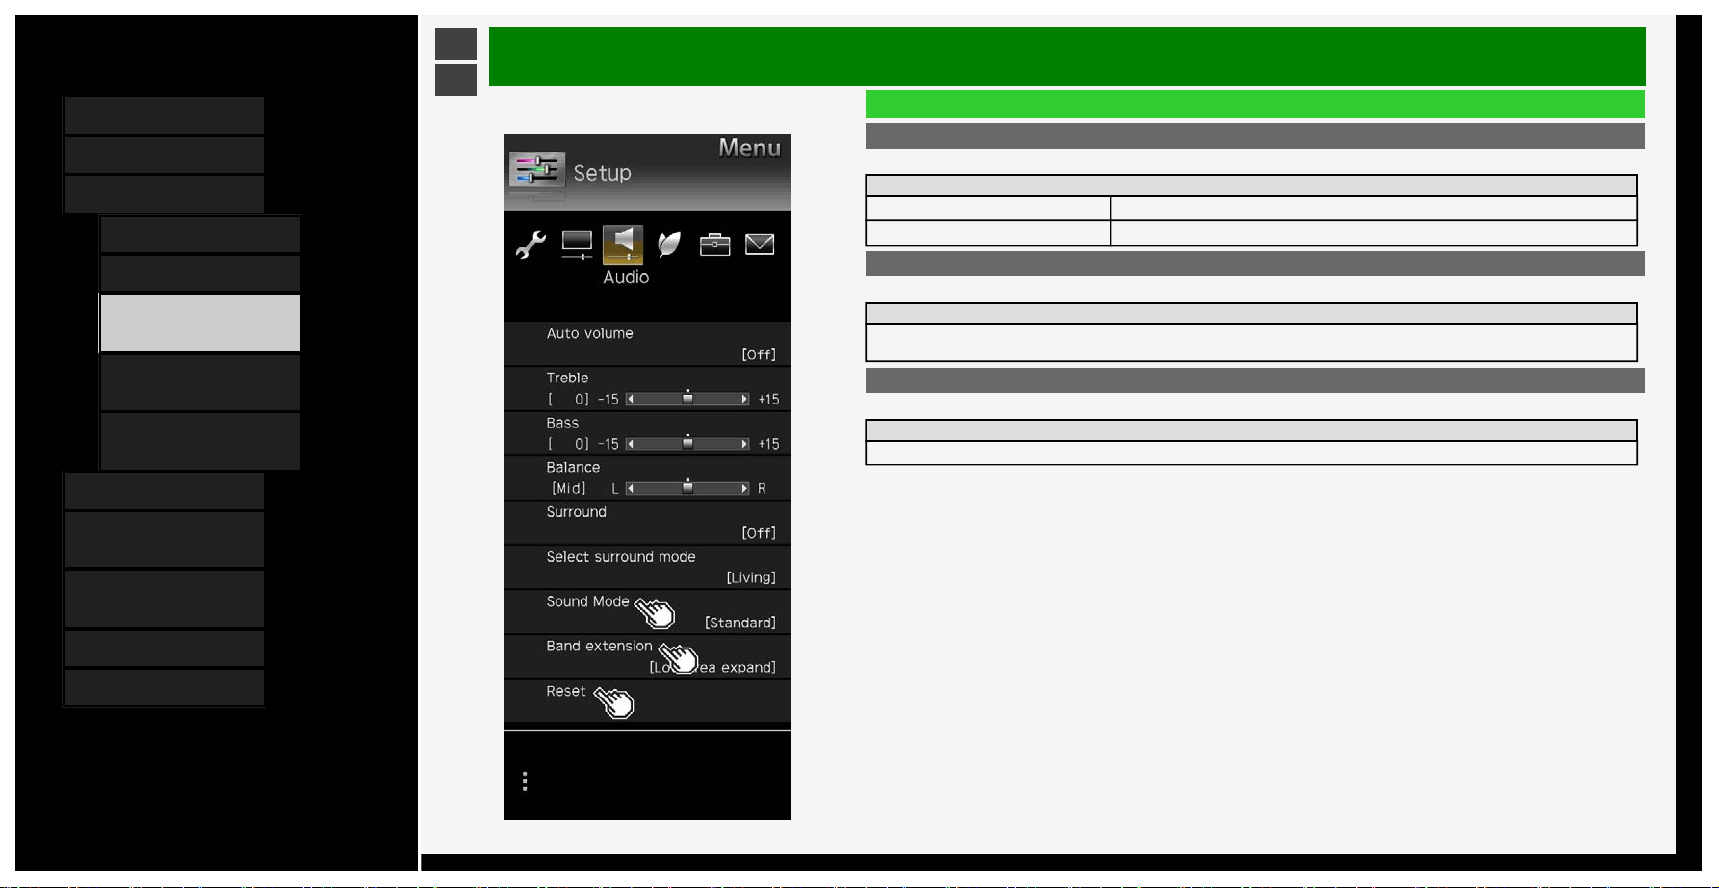
Menu Operation
List of Setup Menu Items
Sound Mode
• This function enables you to set the sound quality of the AV mode selected.
Setup
Standard Standard setting.
Dynamic Dynamic sound setting.
Band extension
• Expands band area.
Setup
Low + high area, Low area, No
Reset
• Resets the audio adjustment settings to factory defaults
Setup
Yes, No
3-21
Contents
1. Part Names
2. Basic Operation
3. Menu Operation
1.
How to Use Menu
2. How to Use Setup Menu
3. List of Setup Menu
Items
44. How to Use Application
Menu
45. Entering Letters
(Software Keyboard)
4. USB Media
5. Connecting Other
Devices
6. Operating the Monitor
Using a PC (IP control)
7. Troubleshooting
8. Specifications, etc.
Ver. 1.00
>
<
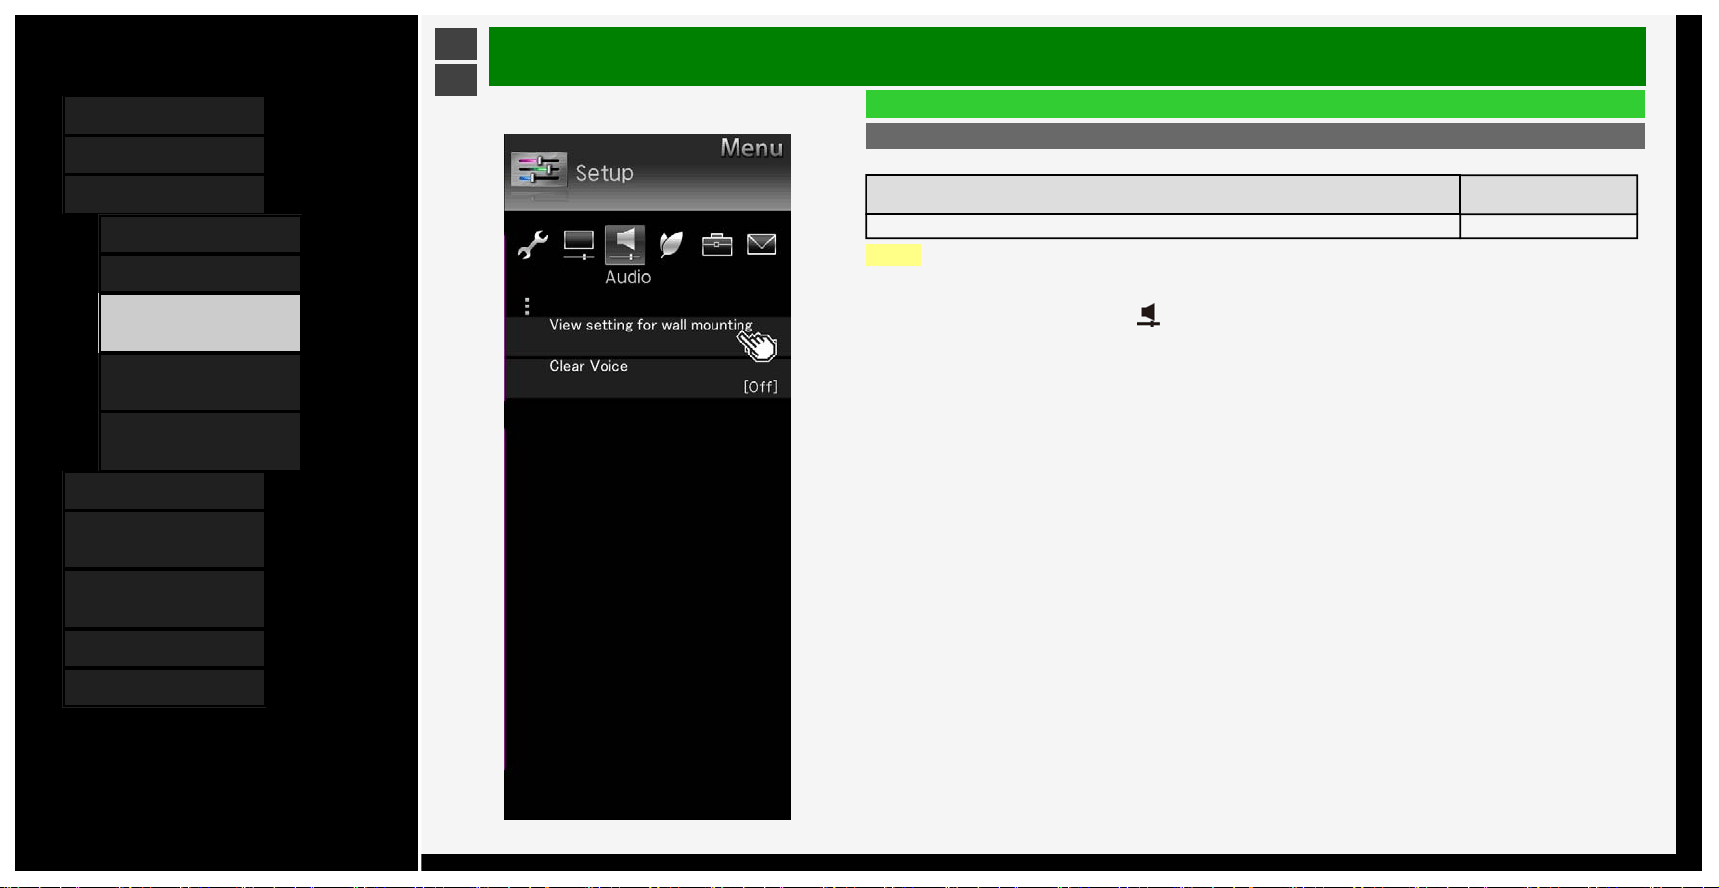
Menu Operation
List of Setup Menu Items
View setting for wall mounting
• This function is intended to set the sound quality suitable for the wall mount.
Menu item name Setup
View setting for wall mounting Yes, No
NOTE
• View setting for wall mounting is intended to set the sound of Monitor typically mounted on wall; however, this
setting may not be applicable depending on the wall material quality or the setting conditions. In such a case,
from the Menu, adjust "Setup" - " (Audio)".
• If Clear voice is set to "Standard", "Mild" or "Clear", the view setting is not selectable.
• This function works only for the audio sounds output from the Monitor's speakers.It does not work for any audio
sounds from headphones or external speakers.
3-22

Contents
1. Part Names
2. Basic Operation
3. Menu Operation
1.
How to Use Menu
2. How to Use Setup Menu
3. List of Setup Menu
Items
44. How to Use Application
Menu
45. Entering Letters
(Software Keyboard)
4. USB Media
5. Connecting Other
Devices
6. Operating the Monitor
Using a PC (IP control)
7. Troubleshooting
8. Specifications, etc.
Ver. 1.00
>
<
Menu Operation
List of Setup Menu Items
Clear voice
• When it is difficult to hear the dialog of a drama or a movie, this setting makes it easier to hear and understand
by emphasizing the human voice range.
Setup
Standard This audio setting sets the audio volume to that of the standard sound quality.
Mild
It makes sound quality milder than the standard.
Making it easier to listen to dialog by decreasing sounds effect and noise other than the lines.
Clear
It makes sound quality clearer than the Standard.
Making it easier to hear and understand by clearing the speech quality of the spoken dialog.
Off This function is disabled. (factory default)
NOTE
• This function works only for the audio sounds output from the Monitor's speakers.
It does not work for any audio sounds from headphones or external speakers.
3-23

Contents
1. Part Names
2. Basic Operation
3. Menu Operation
1. How to Use Menu
2. How to Use Setup Menu
3. List of Setup Menu
Items
44. How to Use Application
Menu
45. Entering Letters
(Software Keyboard)
4. USB Media
5. Connecting Other
Devices
6. Operating the Monitor
Using a PC (IP control)
7. Troubleshooting
8. Specifications, etc.
Ver. 1.00
>
<
Menu Operation
List of Setup Menu Items
Audio only
• You can hear only audio sound with no video playing.
Setup
On, Off
NOTE
• It is automatically set to "Off" if you operate to restore video or turn the power off once.
To restore video
• Perform operations other than "Volume adjustment" or "Mute".
3-24
Contents
1. Part Names
2. Basic Operation
3. Menu Operation
1. How to Use Menu
2. How to Use Setup Menu
3. List of Setup Menu
Items
44. How to Use Application
Menu
45. Entering Letters
(Software Keyboard)
4. USB Media
5. Connecting Other
Devices
6. Operating the Monitor
Using a PC (IP control)
7. Troubleshooting
8. Specifications, etc.
Ver. 1.00
>
<
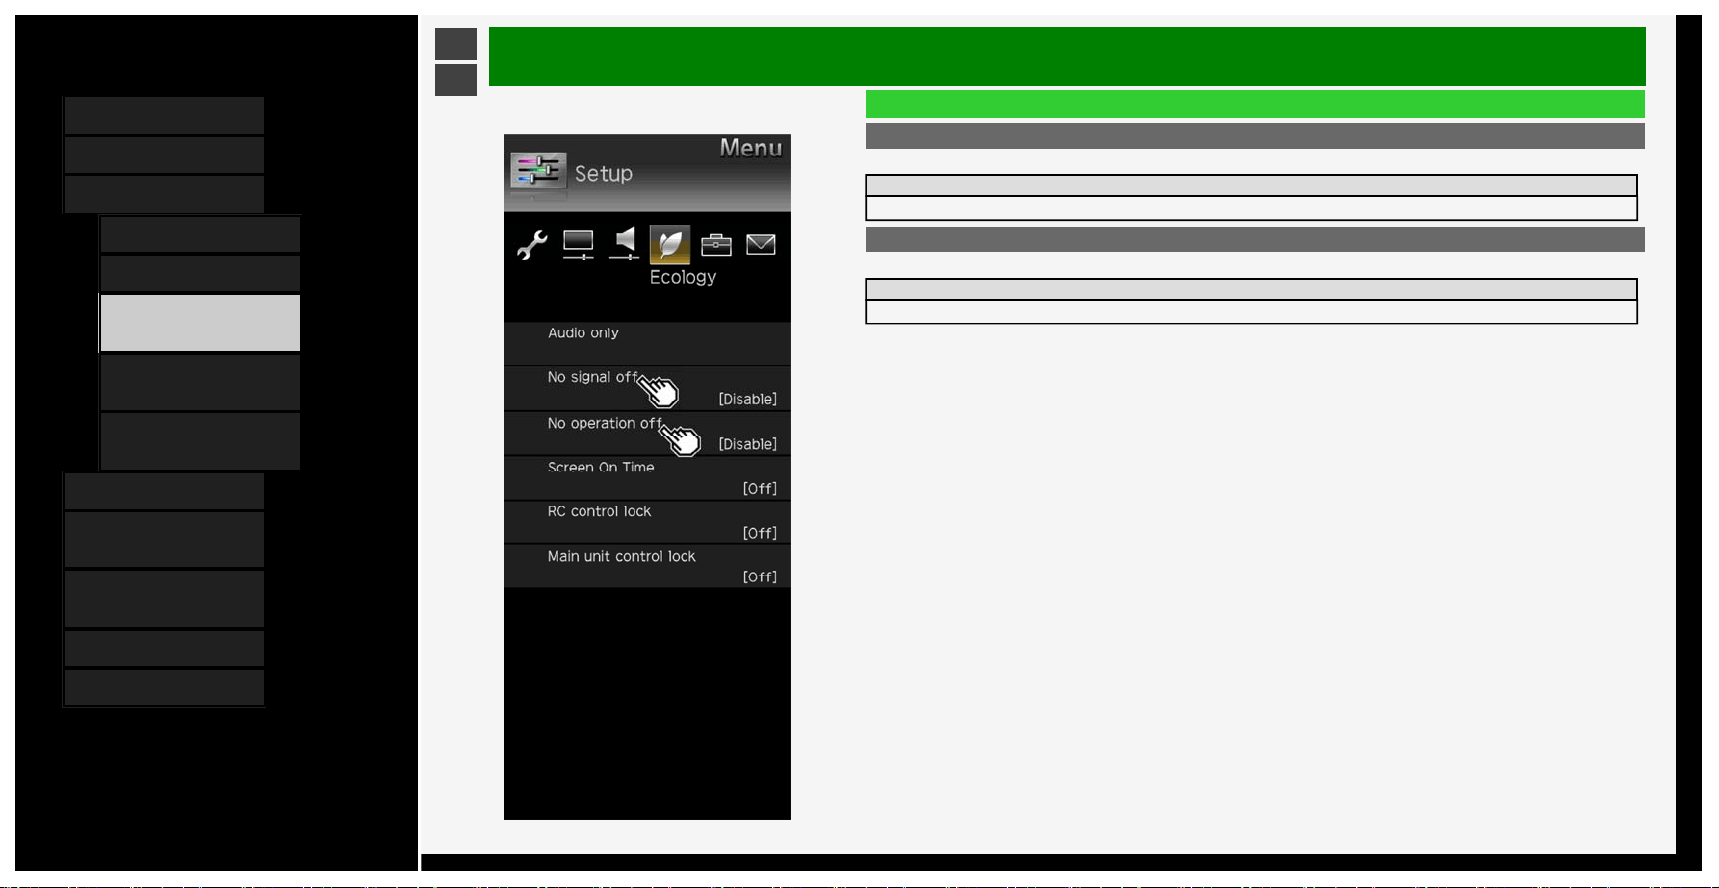
Menu Operation
List of Setup Menu Items
No signal off
• Enter standby automatically if no signal is received for 10min.
Setup
Enable, Disable
No operation off
• Enter standby automatically if no operation occurs for a preset period.
Setup
Disable, 0hr.30min., 1hr.00min., 2hr.00min., 4hr.00min.
3-25

Contents
1. Part Names
2. Basic Operation
3. Menu Operation
1. How to Use Menu
2. How to Use Setup Menu
3. List of Setup Menu
Items
44. How to Use Application
Menu
45. Entering Letters
(Software Keyboard)
4. USB Media
5. Connecting Other
Devices
6. Operating the Monitor
Using a PC (IP control)
7. Troubleshooting
8. Specifications, etc.
Ver. 1.00
>
<
Menu Operation
List of Setup Menu Items
Screen On Time
• It is a function that displays the play time every 30 minutes to prevent her / him from losing track of time playing
games
• It is displayed when the input is changed to INPUT1 to INPUT6.
Setup
On, Off
3-26
Contents
1. Part Names
2. Basic Operation
3. Menu Operation
1. How to Use Menu
2. How to Use Setup Menu
3. List of Setup Menu
Items
44. How to Use Application
Menu
45. Entering Letters
(Software Keyboard)
4. USB Media
5. Connecting Other
Devices
6. Operating the Monitor
Using a PC (IP control)
7. Troubleshooting
8. Specifications, etc.
Ver. 1.00
>
<
Menu Operation
List of Setup Menu Items
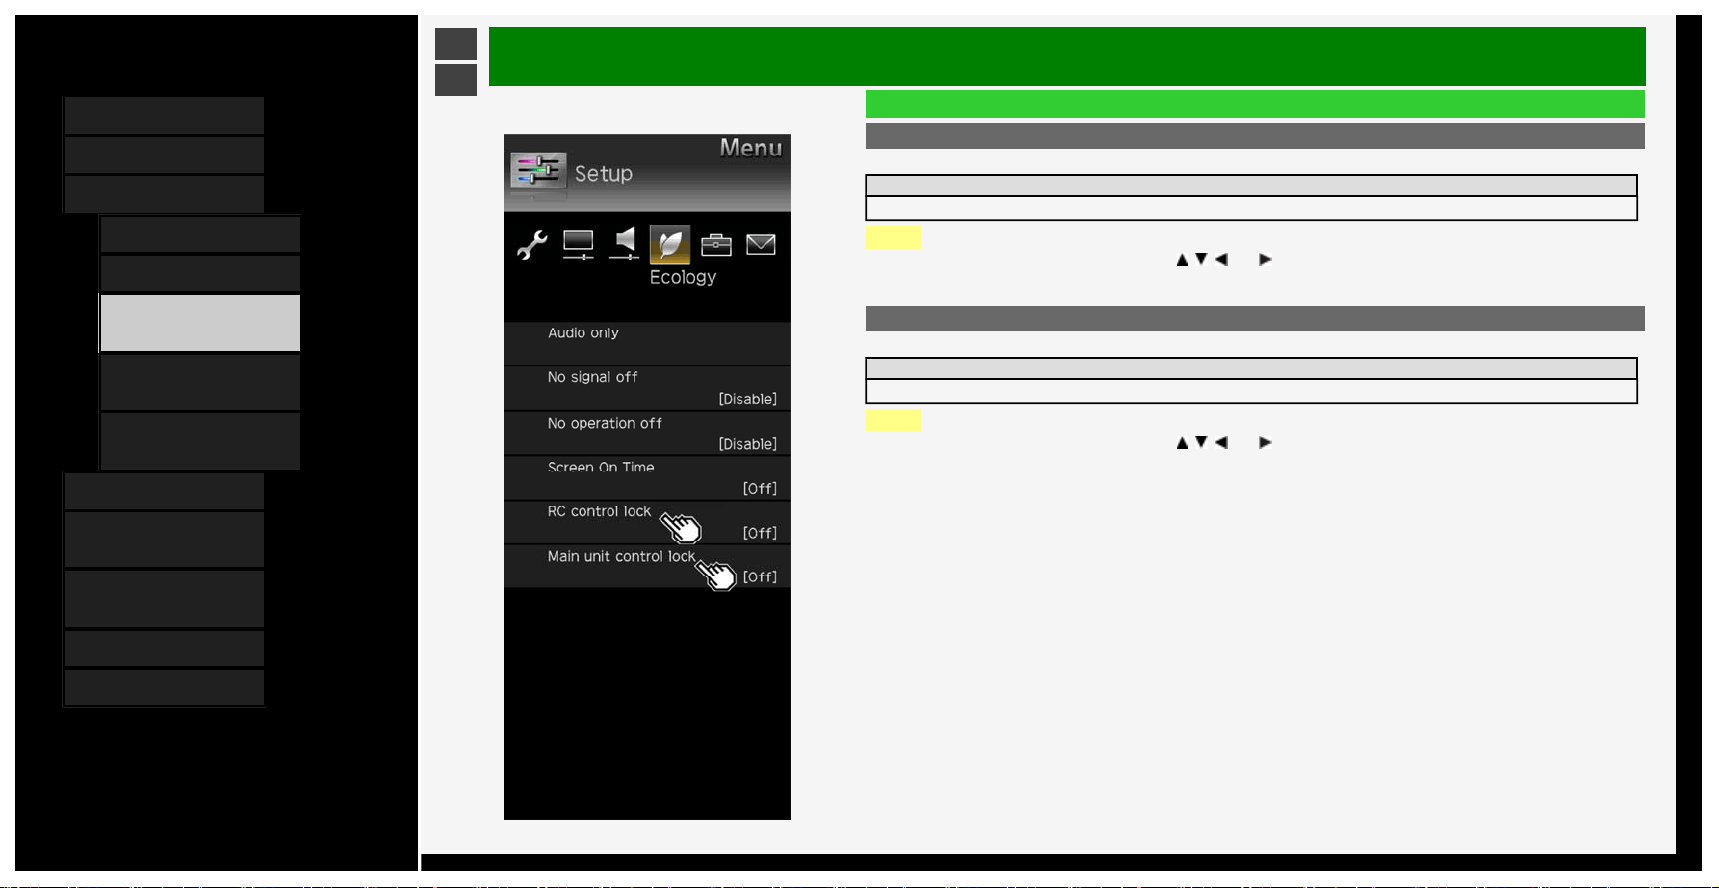
RC control lock
• You can lock the operation of the remote control.
Setup
Off, Lock, Lock except power, Lock except volume
NOTE
• To release the lock, press FUNCTION,
, , and on the remote control unit in this sequence.
Main unit control lock
• You can lock the operation of the control buttons of the monitor.
Setup
Off, Lock
NOTE
• To release the lock, press FUNCTION,
, , and on the remote control unit in this sequence.
3-27

Contents
1. Part Names
2. Basic Operation
3. Menu Operation
1.
How to Use Menu
2. How to Use Setup Menu
3. List of Setup Menu
Items
44. How to Use Application
Menu
45. Entering Letters
(Software Keyboard)
4. USB Media
5. Connecting Other
Devices
6. Operating the Monitor
Using a PC (IP control)
7. Troubleshooting
8. Specifications, etc.
Ver. 1.00
>
<
Menu Operation
List of Setup Menu Items
Option for view
Menu item name
Multi-audio When a program has multiple audio channels, you can switch between the audio channels.
3-28

Contents
1. Part Names
2. Basic Operation
3. Menu Operation
1.
How to Use Menu
2. How to Use Setup Menu
3. List of Setup Menu
Items
44. How to Use Application
Menu
45. Entering Letters
(Software Keyboard)
4. USB Media
5. Connecting Other
Devices
6. Operating the Monitor
Using a PC (IP control)
7. Troubleshooting
8. Specifications, etc.
Ver. 1.00
>
<
Menu Operation
List of Setup Menu Items
Option for view (Continue)
Menu item name
Wide mode
Depending on the type of content, the black borders around the monitor can be removed by changing the
horizontal or vertical width in the "Wide Mode" setting.
This operation can also be performed from the Application. (page 3-44)
(For information on changing the screen size, see page 5-25.)
About "Screen size"
• While displaying images from USB memory, the screen size cannot be changed.
3-29

Contents
1. Part Names
2. Basic Operation
3. Menu Operation
1.
How to Use Menu
2. How to Use Setup Menu
3. List of Setup Menu
Items
44. How to Use Application
Menu
45. Entering Letters
(Software Keyboard)
4. USB Media
5. Connecting Other
Devices
6. Operating the Monitor
Using a PC (IP control)
7. Troubleshooting
8. Specifications, etc.
Ver. 1.00
>
<
Menu Operation
List of Setup Menu Items
Option for view (Continue)
Menu item name
CEC control
*
Enables operation of an HDMI CEC device.
Manual Displays the built-in Operation Manual.
NOTE
*This is not selectable while the manual is dis
p
la
y
ed. Exit the manual before selectin
g
this
.
3-30

Contents
1. Part Names
2. Basic Operation
3. Menu Operation
1.
How to Use Menu
2. How to Use Setup Menu
3. List of Setup Menu
Items
44. How to Use Application
Menu
45. Entering Letters
(Software Keyboard)
4. USB Media
5. Connecting Other
Devices
6. Operating the Monitor
Using a PC (IP control)
7. Troubleshooting
8. Specifications, etc.
Ver. 1.00
>
<
Menu Operation
List of Setup Menu Items
CEC setup
Menu item name Setup
CEC control On, Off
Set it to "Off" if the power supply is turned on or the channel changes
automatically when connecting a device that is not HDMI CEC enabled.
Auto power on Yes, No Set it to turn on automatically once an HDMI CEC-enable device is operated.
Selecting
channel
key
INPUT1 Auto, On, Off
When you set "Selecting channel key" to "On", you can perform HDMI CEC-
enabled tuner built-in device operation with the remote control.(page
5-13)
For "Auto", a device operates in the same manner as it does when this is set
to "Off". Only when there is a request from a connected device however, it
will operate in the same manner as it would when this is set to "On".
INPUT2 Auto, On, Off
INPUT3 Auto, On, Off
INPUT4 Auto, On, Off
INPUT7 Auto, On, Off
INPUT8 Auto, On, Off
Audio return channel Auto, Off
"ARC (Audio Return Channel)" is the function to transmit sound from the
monitor to the AV amplifier, etc. using an HDMI cable. If you set "Audio
return channel" to "Auto", you can connect to an ARC compatible audio
device with a HDMI cable. This function is available only when it is connected
to INPUT 2 terminal.
You can also setup from the Application menu (page
3-44)
3-31

Contents
1. Part Names
2. Basic Operation
3. Menu Operation
1.
How to Use Menu
2. How to Use Setup Menu
3. List of Setup Menu
Items
44. How to Use Application
Menu
45. Entering Letters
(Software Keyboard)
4. USB Media
5. Connecting Other
Devices
6. Operating the Monitor
Using a PC (IP control)
7. Troubleshooting
8. Specifications, etc.
Ver. 1.00
>
<
Menu Operation
List of Setup Menu Items
Sleep timer
• Turn the power off after the specified time has elapsed
Setup
Change Off, 0hr.30min., 1hr.00min., 1hr.30min., 2hr.00min., 2hr.30min.
No
3-32

Contents
1. Part Names
2. Basic Operation
3. Menu Operation
1.
How to Use Menu
2. How to Use Setup Menu
3. List of Setup Menu
Items
44. How to Use Application
Menu
45. Entering Letters
(Software Keyboard)
4. USB Media
5. Connecting Other
Devices
6. Operating the Monitor
Using a PC (IP control)
7. Troubleshooting
8. Specifications, etc.
Ver. 1.00
>
<
Menu Operation
List of Setup Menu Items
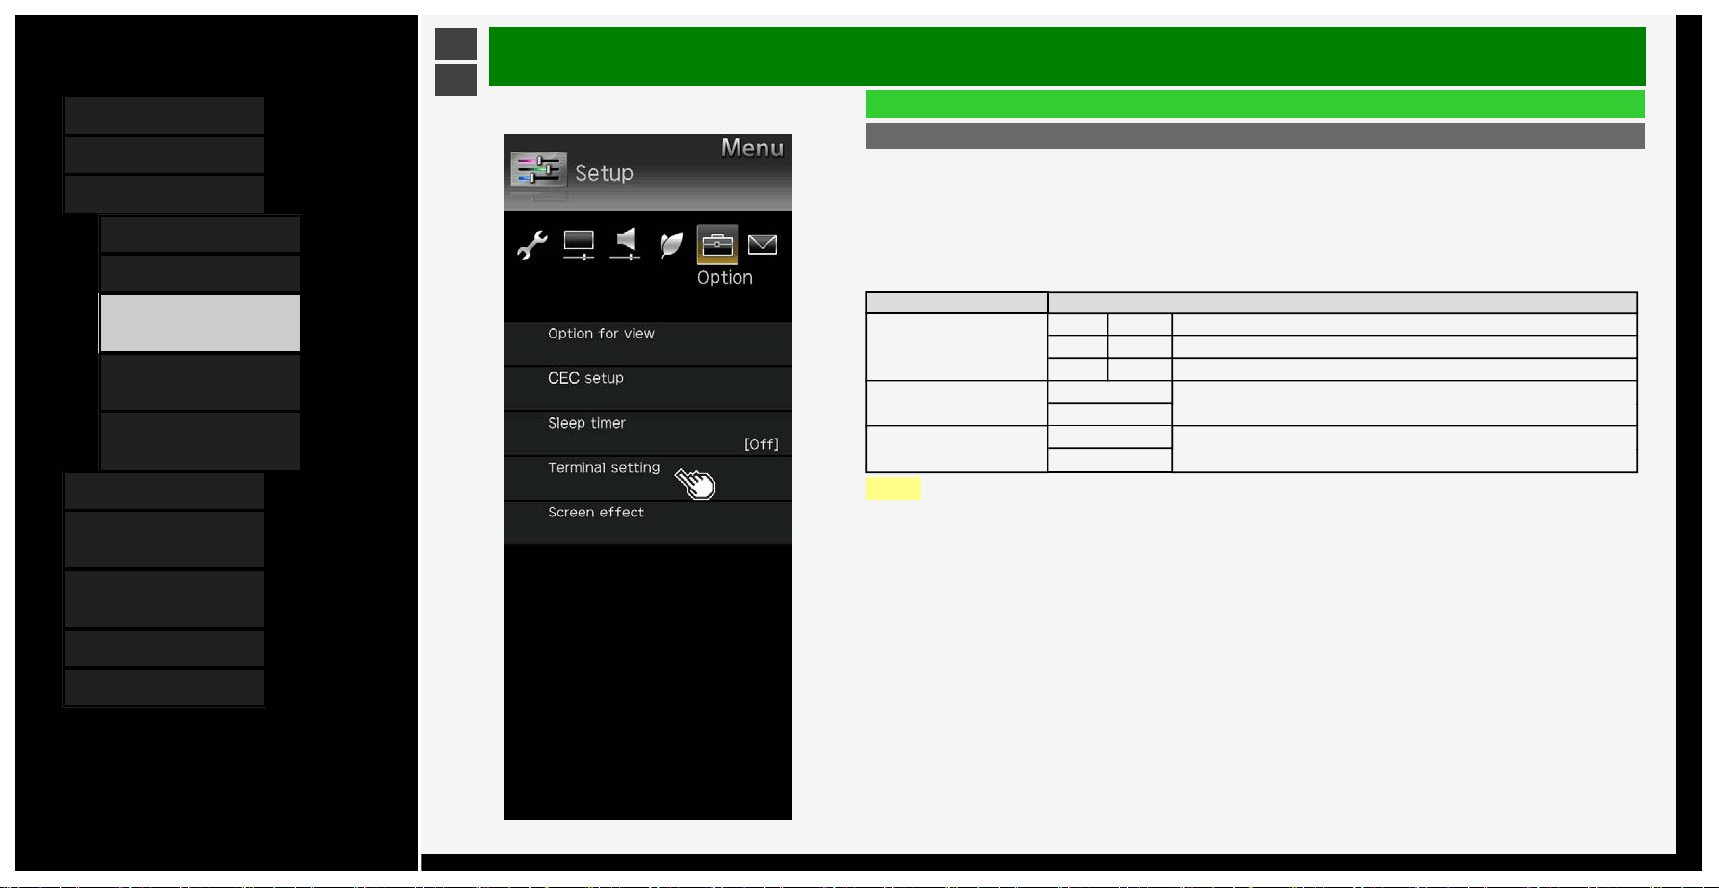
Terminal setting
Color gamut range
*1
• Sets color gamut range for INPUT7-A,B,C,D and INPUT8
Setup
Auto Selects color gamut range by automatic detection
BT.709 Sets to BT.709
BT.2020 Sets to BT.2020
NOTE
*1 It is displayed when the input is changed to INPUT7 or 8.
HDR-SDR Switch
*2
• Sets dynamic range for INPUT7-A,B,C,D and INPUT8
Setup
Auto Selects dynamic range mode by automatic detection
HLG Sets to HLG
PQ Sets to PQ
SDR Sets to SDR
NOTE
*2 It is displayed when the input is changed to INPUT7 or 8.
Input range setting
*3
• Sets input range for INPUT7-A,B,C,D and INPUT8
Setup
Auto Selects input range mode by automatic detection
Full Sets to Full mode
Limited Sets to Limited mode
NOTE
*3 It is displayed when the input is changed to INPUT7 or 8.
3-33

Contents
1. Part Names
2. Basic Operation
3. Menu Operation
1.
How to Use Menu
2. How to Use Setup Menu
3. List of Setup Menu
Items
44. How to Use Application
Menu
45. Entering Letters
(Software Keyboard)
4. USB Media
5. Connecting Other
Devices
6. Operating the Monitor
Using a PC (IP control)
7. Troubleshooting
8. Specifications, etc.
Ver. 1.00
>
<
Menu Operation
List of Setup Menu Items
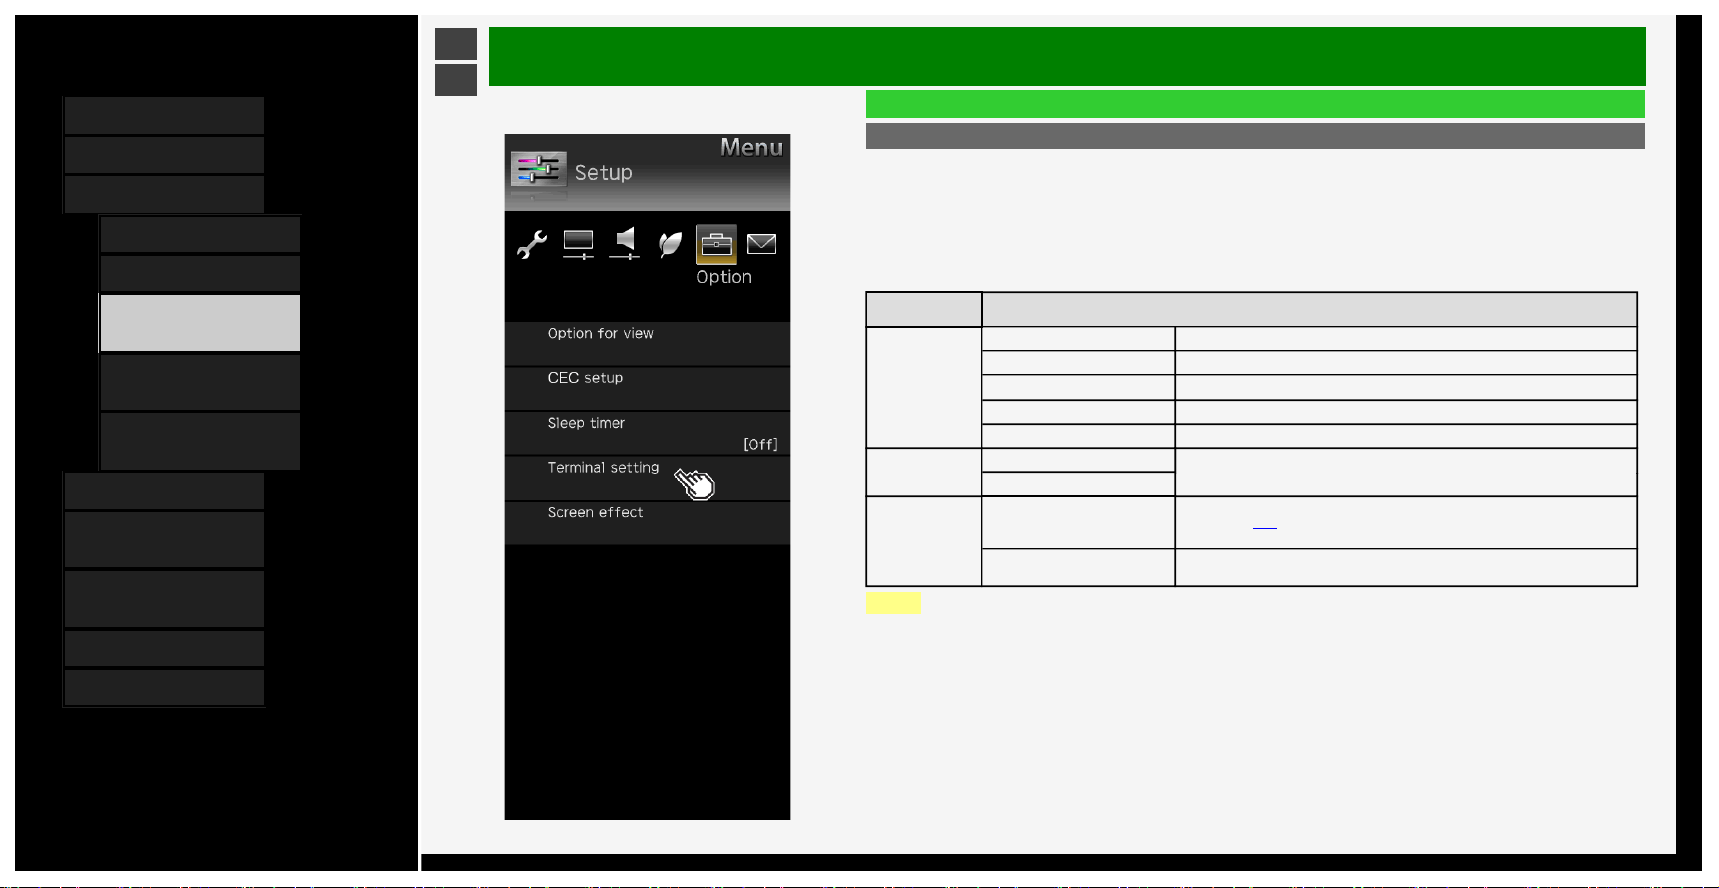
Terminal setting (Continue)
Headphone
• Switches the audio sound between speakers and headphones during the use of the headphones.
Menu item name Setup
Headphone
Mode1
This is intended to listen to the Monitor with the headphones alone.Once you connect the
headphones, no sound will come out of the speakers.
Mode2
Sound comes out of the speakers even after the headphones are connected.This is useful for
two people with different needs (one having difficulty listening to the Monitor with the speakers
alone and the other not wanting the volume of the speakers to be too loud) to enjoy watching the
Monitor together.
NOTE
About volume adjustment during "Mode2"
• The speaker volume is adjusted by using the remote control.
• The headphone volume is adjusted by using the volume (+ / -) button on Monitor.
• Even if the MUTE button on the remote control is pressed, the volume of the headphones would not become "0".
3-34
Contents
1. Part Names
2. Basic Operation
3. Menu Operation
1. How to Use Menu
2. How to Use Setup Menu
3. List of Setup Menu
Items
44. How to Use Application
Menu
45. Entering Letters
(Software Keyboard)
4. USB Media
5. Connecting Other
Devices
6. Operating the Monitor
Using a PC (IP control)
7. Troubleshooting
8. Specifications, etc.
Ver. 1.00
>
<
Menu Operation
List of Setup Menu Items
Terminal setting (Continue)
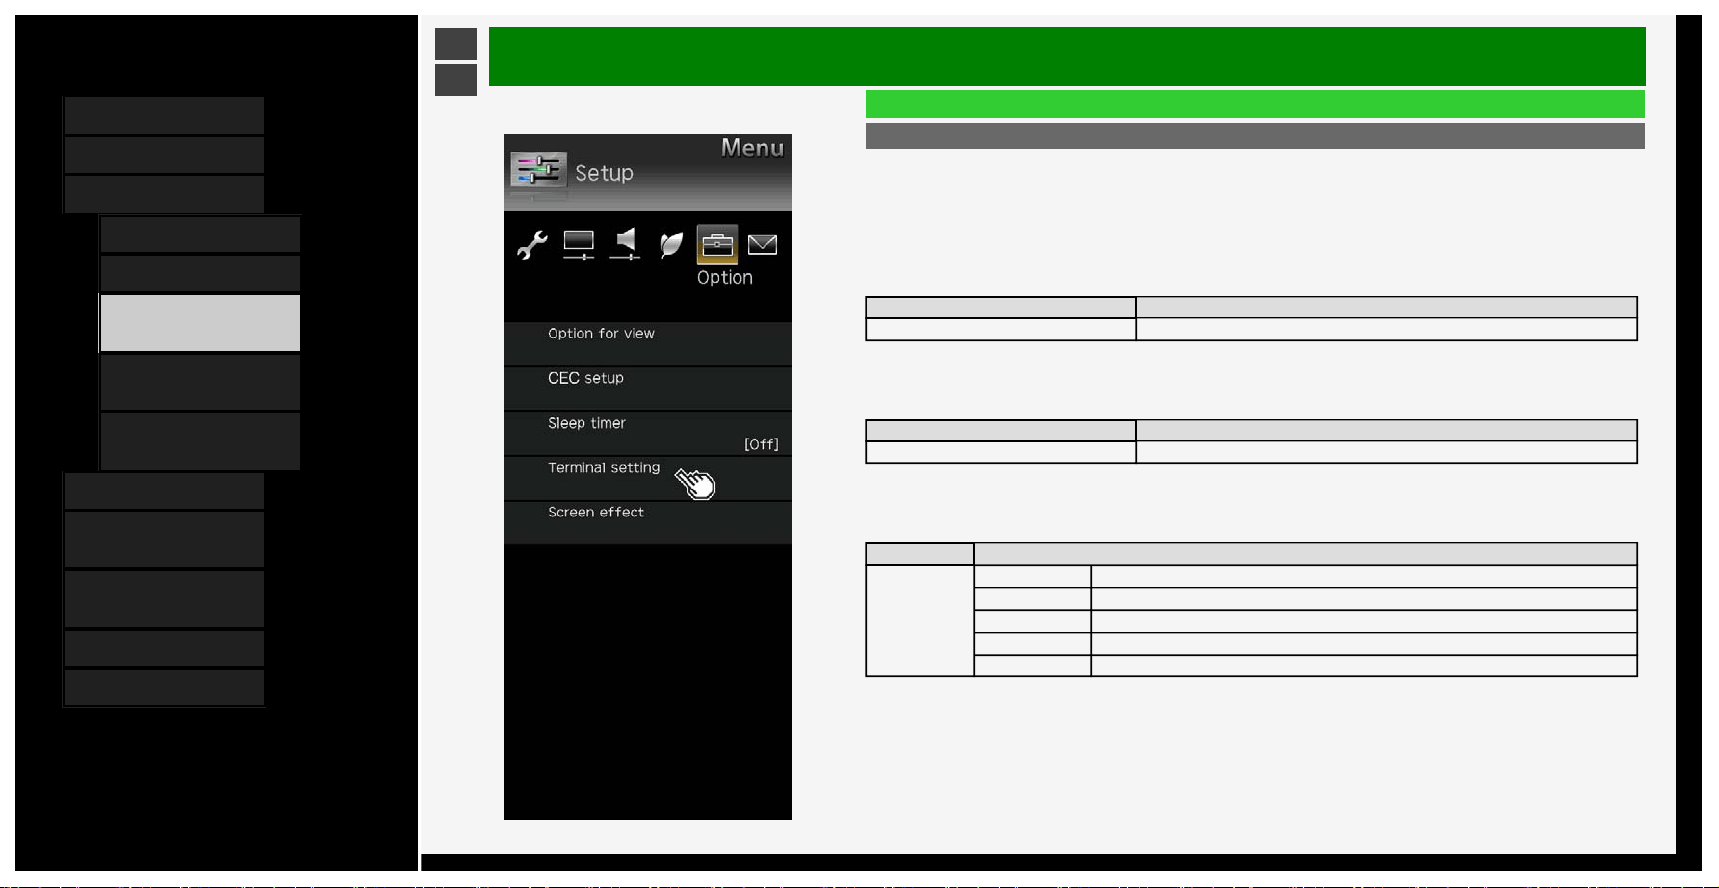
Analog Audio output setting
• Changes the analog audio output setting.
INPUT1 audio setting
*1
• Switches the audio input terminal for INPUT 1.
INPUT6 audio setting
*2
• Sets the audio input for INPUT 6.
Menu item name Setup
Analog Audio output setting
Mode1 On, Off Set to the audio output (fixed). Sounds also come out of the speakers.
Mode2 On, Off Set to the audio output (variable). Normally, no sounds come out of the speakers.
Mode3 On, Off Set to the audio output (variable). Sounds also come out of the speakers.
INPUT1 audio setting
HDMI
Switches the audio input terminal for INPUT 1.
Analog audio input
INPUT6 audio setting
Analog audio input
Sets the audio input for INPUT 6.
No
NOTE
*1 It is displayed when the input is changed to INPUT1.
*2 It is dis
p
la
y
ed when the in
p
ut is chan
g
ed to INPUT6
.
3-35
Contents
1. Part Names
2. Basic Operation
3. Menu Operation
1. How to Use Menu
2. How to Use Setup Menu
3. List of Setup Menu
Items
44. How to Use Application
Menu
45. Entering Letters
(Software Keyboard)
4. USB Media
5. Connecting Other
Devices
6. Operating the Monitor
Using a PC (IP control)
7. Troubleshooting
8. Specifications, etc.
Ver. 1.00
>
<
Menu Operation
List of Setup Menu Items
Terminal setting (Continue)
INPUT7 audio setting
*1
• Sets the audio input for INPUT 7.
INPUT8 audio setting
*2
• Switches the audio input terminal for INPUT 8.
Digital audio output
*3
• Sets the signal format for digital sound
Menu
item name
Setup
INPUT7 audio
setting
INPUT7-A Uses the INPUT7-A sound.
INPUT7-B Uses the INPUT7-B sound.
INPUT7-C Uses the INPUT7-C sound.
INPUT7-D Uses the INPUT7-D sound.
Audio input terminal Uses the Audio input terminal sound.
INPUT8 audio
setting
HDMI
Switches the audio input terminal for INPUT 8.
Analogue audio input
Digital audio
output
PCM
When connecting a device that does not support AAC / Dolby Digital, set it to
"PCM" (page
5-14). The same sound (Main, sub, M/S) as the program which is being
viewed will be the output.
Bit Stream
To connect an amplifier that supports AAC / Dolby Digital, set it to "Bit Stream". Both
the main and sub sound will be simultaneously output.
NOTE
*1 It is displayed when the input is changed to INPUT7.
*2 It is displayed when the input is changed to INPUT8.
*3 It is dis
p
la
y
ed when the in
p
ut is chan
g
ed to INPUT1,2,3,4
.
3-36

Contents
1. Part Names
2. Basic Operation
3. Menu Operation
1. How to Use Menu
2. How to Use Setup Menu
3. List of Setup Menu
Items
44. How to Use Application
Menu
45. Entering Letters
(Software Keyboard)
4. USB Media
5. Connecting Other
Devices
6. Operating the Monitor
Using a PC (IP control)
7. Troubleshooting
8. Specifications, etc.
Ver. 1.00
>
<
Menu Operation
List of Setup Menu Items
Terminal setting (Continue)
Input skip
• Unused inputs (INPUT1 to 4, INPUT6, INPUT7, INPUT8) can be skipped during input change.
Menu item name Setup
Input skip
INPUT1 (HDMI) Yes, No
INPUT2 (HDMI) Yes, No
INPUT3 (HDMI) Yes, No
INPUT4 (HDMI) Yes, No
INPUT6 (PC) Yes, No
INPUT7 (8K) Yes, No
INPUT8 (8K) Yes, No
Input Signal info
• Displays details of the 8K input signal.
It is displayed when the input is changed to INPUT7 or 8.
3-37

Contents
1. Part Names
2. Basic Operation
3. Menu Operation
1.
How to Use Menu
2. How to Use Setup Menu
3. List of Setup Menu
Items
44. How to Use Application
Menu
45. Entering Letters
(Software Keyboard)
4. USB Media
5. Connecting Other
Devices
6. Operating the Monitor
Using a PC (IP control)
7. Troubleshooting
8. Specifications, etc.
Ver. 1.00
>
<
Menu Operation
List of Setup Menu Items
Terminal setting (Continue)
Input label
• The device names displayed in the input menu, etc. can be changed to the names of the devices connected to
INPUT 1 to 8.
Menu item name Setup
Input label
*1
(Entry depends on selection) User Setting: EDIT
NOTE
*1 It is dis
p
la
y
ed when the in
p
ut is chan
g
ed to INPUT1 to INPUT8
.
3-38

Contents
1. Part Names
2. Basic Operation
3. Menu Operation
1.
How to Use Menu
2. How to Use Setup Menu
3. List of Setup Menu
Items
44. How to Use Application
Menu
45. Entering Letters
(Software Keyboard)
4. USB Media
5. Connecting Other
Devices
6. Operating the Monitor
Using a PC (IP control)
7. Troubleshooting
8. Specifications, etc.
Ver. 1.00
>
<
Menu Operation
List of Setup Menu Items
Terminal setting (Continue)
Suitable mode for signals
• Changes the suitable mode for signals in order to maintain compatibility with connected devices. (INPUT 1 only)
Menu item name Setup
Suitable mode for
signals
Full mode
(HDR)
The mode is intended for connected devices that provide support for the high definition
(4:4:4/4:2:2) / wide color gamut (BT.2020) / high contrast (HDR) of 4K video.
Full mode
The mode is intended for connected devices that provide support for the high definition
(4:4:4/4:2:2) / wide color gamut (BT.2020) of 4K video.
Compatibility mode 1
The mode is intended for connected devices that provide support for the high definition
(4:4:4/4:2:2) of 4K video.
Compatibility mode 2 The mode is intended to place high priority on compatibility with connected devices.
3-39
Contents
1. Part Names
2. Basic Operation
3. Menu Operation
1. How to Use Menu
2. How to Use Setup Menu
3. List of Setup Menu
Items
44. How to Use Application
Menu
45. Entering Letters
(Software Keyboard)
4. USB Media
5. Connecting Other
Devices
6. Operating the Monitor
Using a PC (IP control)
7. Troubleshooting
8. Specifications, etc.
Ver. 1.00
>
<
Menu Operation
List of Setup Menu Items
Terminal setting (Continue)
PC input
• Set the analog RGB input.
• It is displayed when the input is changed to INPUT6.
Input Signal
• Set the resolution of video input signal.
Menu item name Setup
Input Signal Auto, 1024 x 768, 1366 x 768
Auto sync.
• Adjust the screen automatically. (Adjustment may not be possible depending on the input signal.)
Menu item name Setup
Auto sync. Yes, No
Fine sync.
• Adjust the screen manually.
Menu item name Setup
Fine sync.
H-Pos. Adjust the horizontal position of the image.
V-Pos. Adjust the vertical position of the image.
Clock Adjust when there is flickering in the form of vertical stripes.
Phase Useful when small characters appear with low contrast and/or there are flickers at corners.
Reset Resets to factory default.
3-40

Contents
1. Part Names
2. Basic Operation
3. Menu Operation
1. How to Use Menu
2. How to Use Setup Menu
3. List of Setup Menu
Items
44. How to Use Application
Menu
45. Entering Letters
(Software Keyboard)
4. USB Media
5. Connecting Other
Devices
6. Operating the Monitor
Using a PC (IP control)
7. Troubleshooting
8. Specifications, etc.
Ver. 1.00
>
<
Menu Operation
List of Setup Menu Items
Screen effect
Menu item name Setup
Position
H-Pos.
Adjusts the position of a left-aligned or right-aligned image using
/ button.
V-Pos.
Adjusts the position of an image positioned too high or low using
/ button.
Reset Resets to factory default.
3-41

Contents
1. Part Names
2. Basic Operation
3. Menu Operation
1.
How to Use Menu
2. How to Use Setup Menu
3. List of Setup Menu
Items
44. How to Use Application
Menu
45. Entering Letters
(Software Keyboard)
4. USB Media
5. Connecting Other
Devices
6. Operating the Monitor
Using a PC (IP control)
7. Troubleshooting
8. Specifications, etc.
Ver. 1.00
>
<
Menu Operation
List of Setup Menu Items
Screen effect (Continue)
Auto Wide
• According to the type of original video, you can display the video on the screen of the size most suitable for the
video.
Menu item name Setup
Auto
Wide
Auto Mode Yes, No
In the presence of black curtains / bars at the top and bottom of the video (screen) input from
INPUT1 to 5, the screen size will be automatically switched to "Zoom".
HDMI Signal
Enable,
Disable
If any screen size control signal is included in a video input from INPUT1 to 4, the screen size will
be automatically optimized.
3-42
Contents
1. Part Names
2. Basic Operation
3. Menu Operation
1.
How to Use Menu
2. How to Use Setup Menu
3. List of Setup Menu
Items
44. How to Use Application
Menu
45. Entering Letters
(Software Keyboard)
4. USB Media
5. Connecting Other
Devices
6. Operating the Monitor
Using a PC (IP control)
7. Troubleshooting
8. Specifications, etc.
Ver. 1.00
>
<
Menu Operation
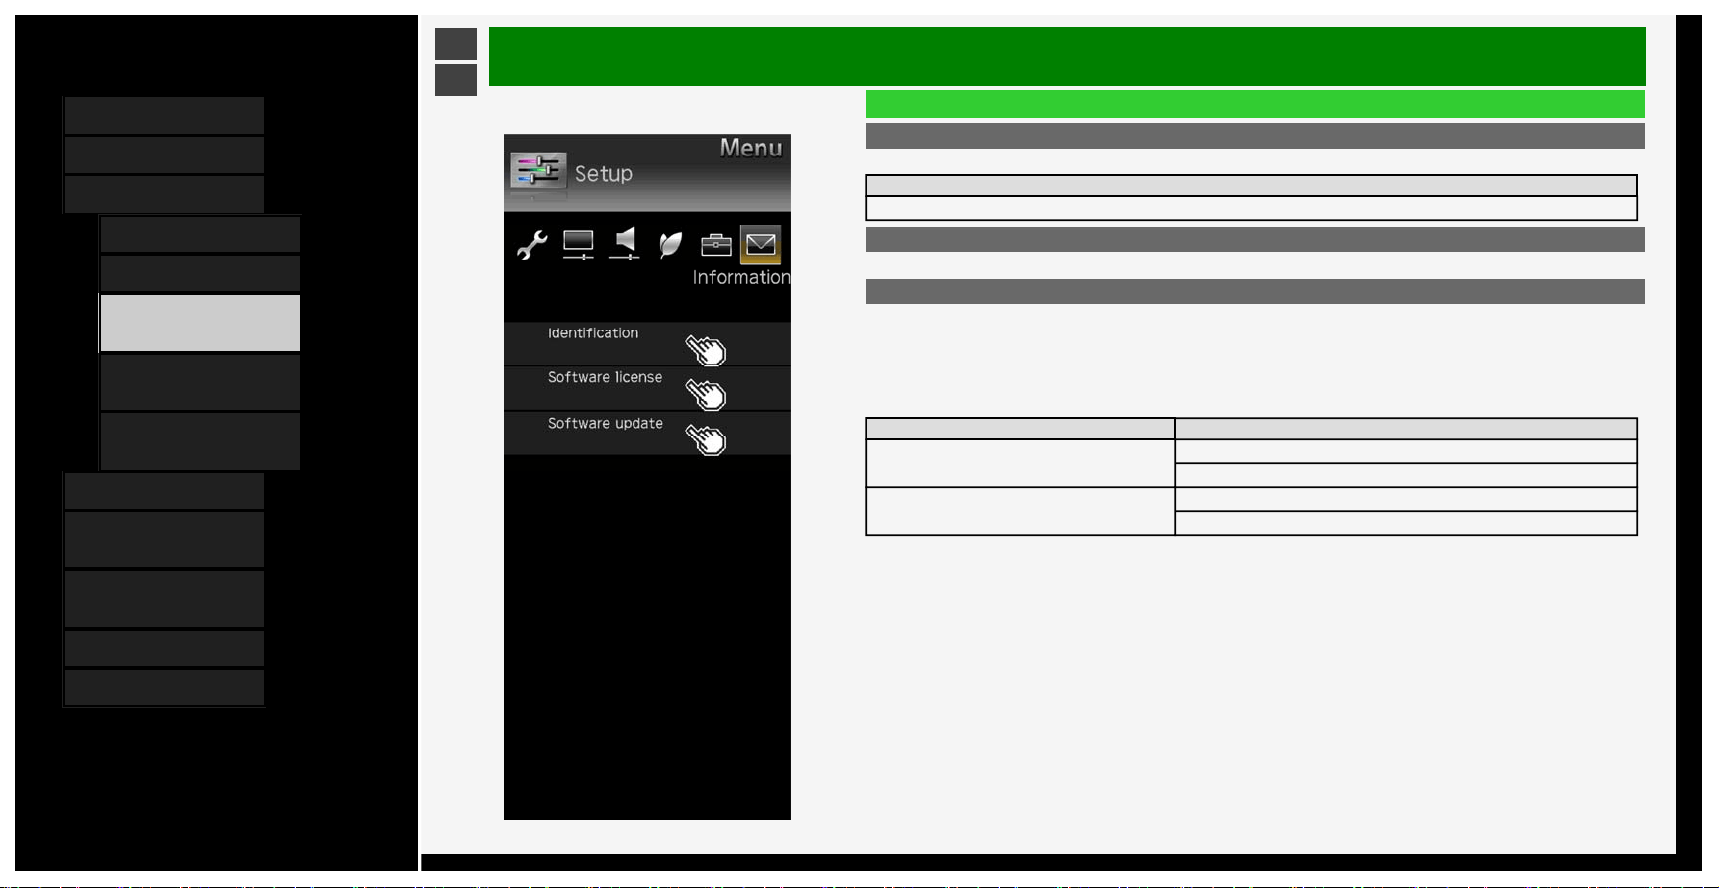
List of Setup Menu Items
Identification
• Displays the system status
Setup
Start, Test pattern
Software license
• Displays software licenses
Software update
USB update
• Updates software.
Import ICC
• Import ICC profile data.
For the ICC profile, consult your authorized SHARP dealer.
Menu item name Setup
USB update
Check
Back
Import ICC
Yes
No
3-43
Contents
1. Part Names
2. Basic Operation
3. Menu Operation
1.
How to Use Menu
2. How to Use Setup Menu
3. List of Setup Menu
Items
44. How to Use Application
Menu
45. Entering Letters
(Software Keyboard)
4. USB Media
5. Connecting Other
Devices
6. Operating the Monitor
Using a PC (IP control)
7. Troubleshooting
8. Specifications, etc.
Ver. 1.00
>
<
Menu Operation
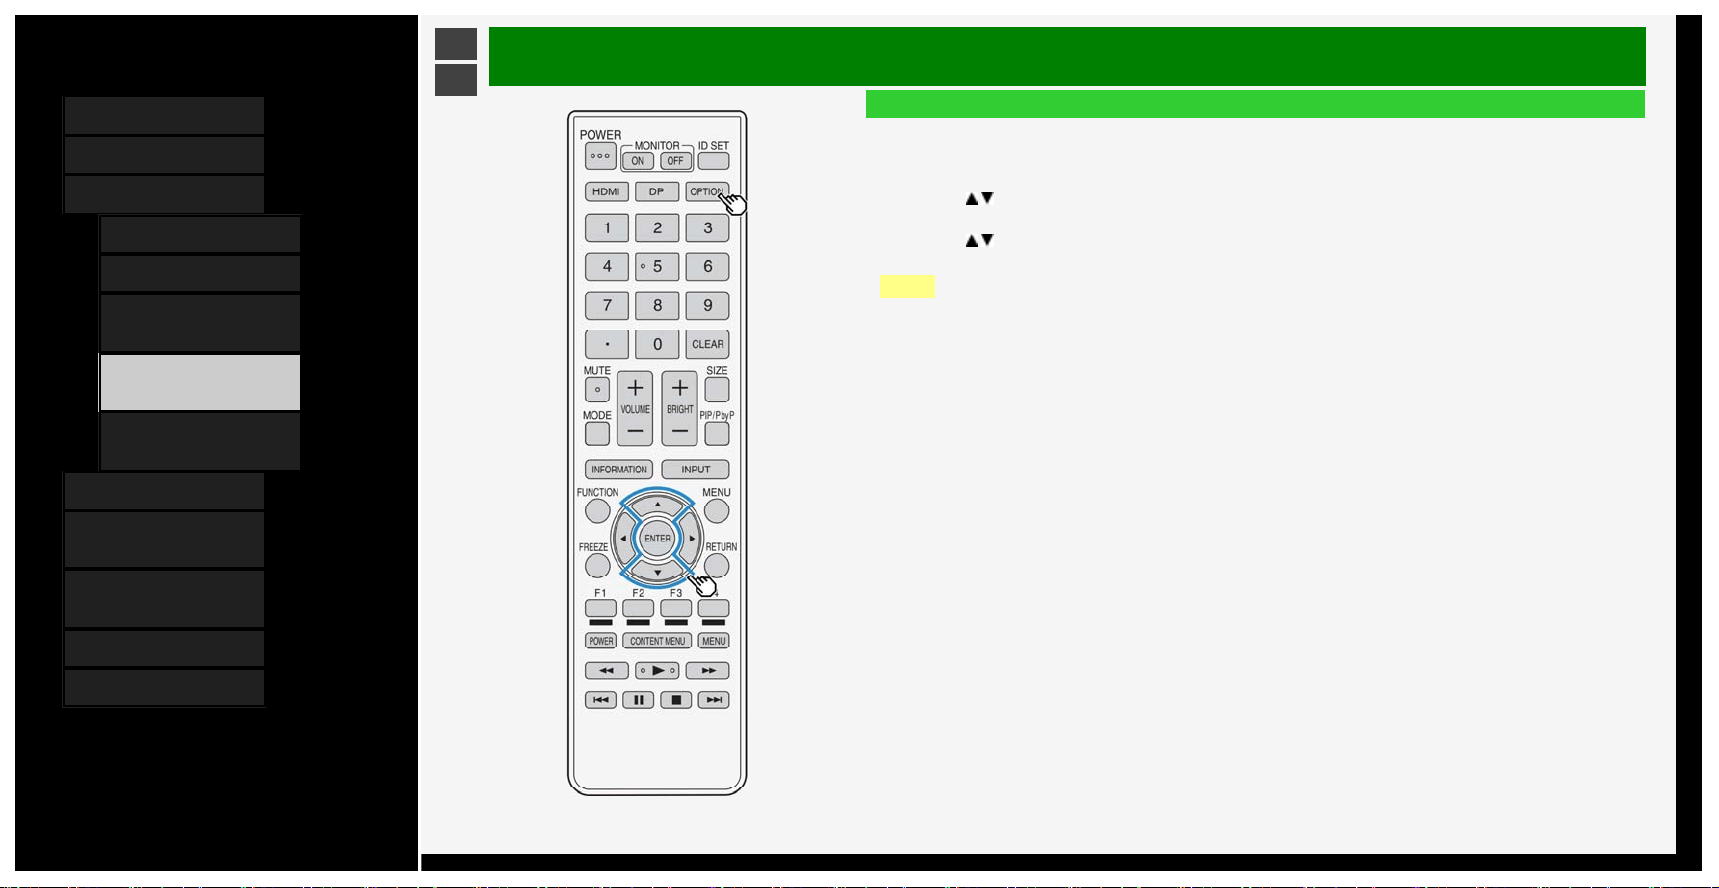
How to Use Application Menu
Basic procedure for using the Application
1. Press OPTION to display the Application.
• You can also use the Application menu by selecting "Application" of the Menu item.
2. Press
/ to select a desired item, and then press ENTER
• You can also select an item by using a number button on the remote control.
3. Press / to select another desired item, and then press ENTER
• Depending on the item selected, you may have to make further item selections.
NOTE
• The items in the Application menu vary depending on the currently-displayed screen
3-44
Contents
1. Part Names
2. Basic Operation
3. Menu Operation
1. How to Use Menu
2. How to Use Setup Menu
3. List of Setup Menu
Items
44. How to Use Application
Menu
45.
Entering Letters
(Software Keyboard)
4. USB Media
5. Connecting Other
Devices
6. Operating the Monitor
Using a PC (IP control)
7. Troubleshooting
8. Specifications, etc.
Ver. 1.00
>
<
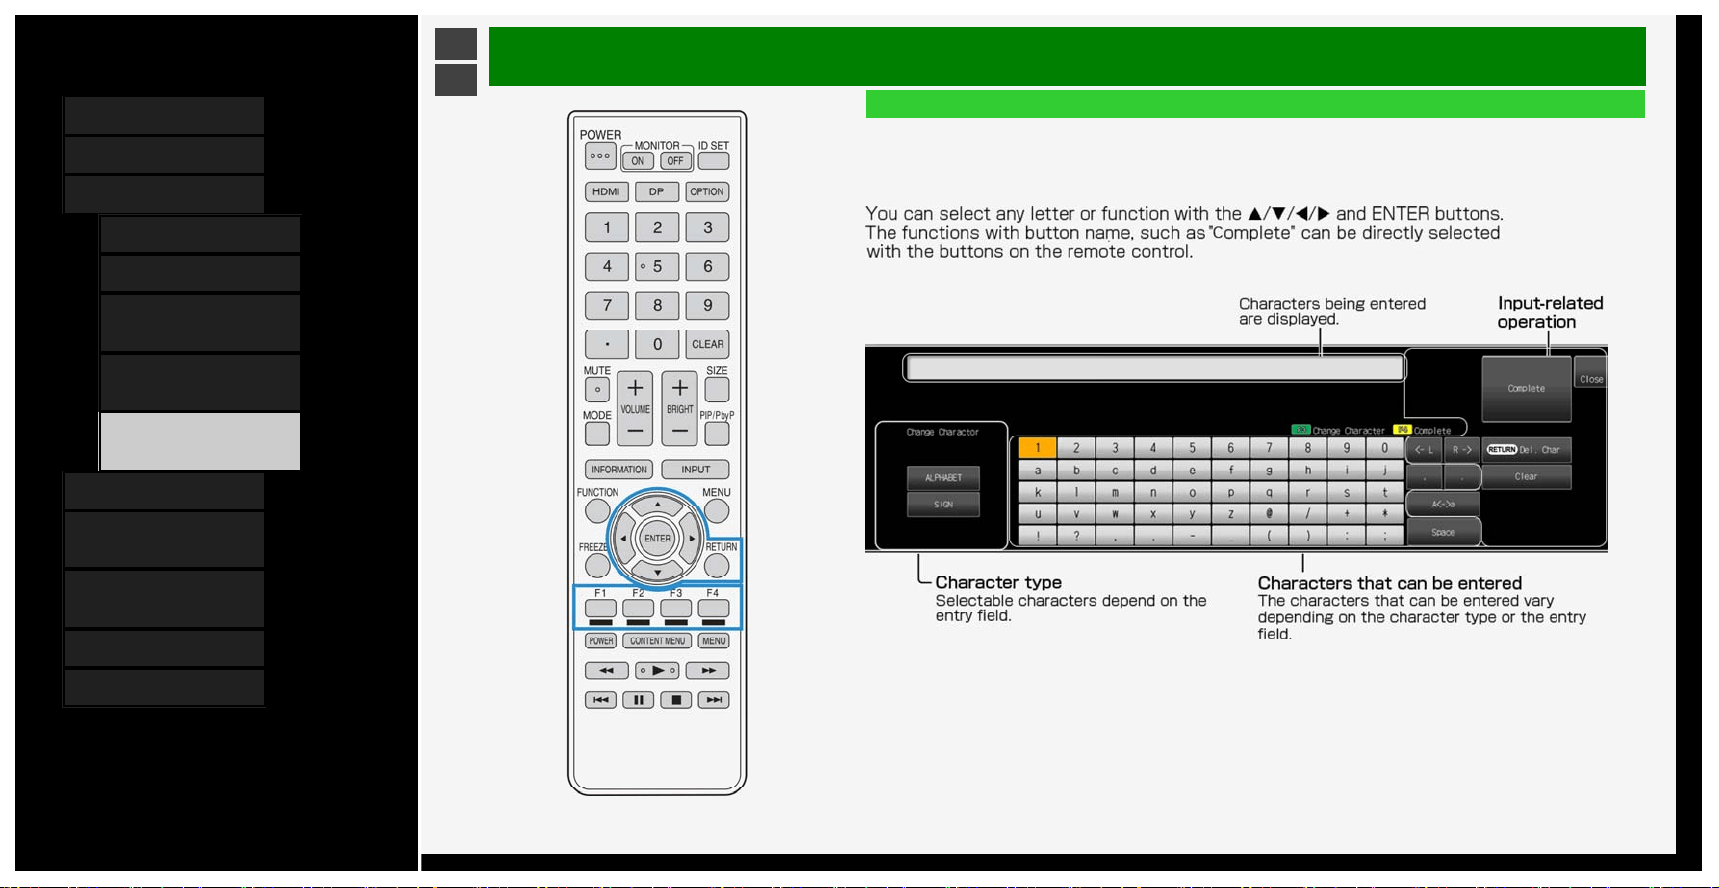
Menu Operation
Entering Letters (Software Keyboard)
• If you are required to enter letters, use on-screen software keyboard for entry.
• The software keyboard will be displayed if you select an entry field and press ENTER.
Software keyboard screen example
3-45
Contents
1. Part Names
2. Basic Operation
3. Menu Operation
4. USB Media
1.
Before Using USB
Media
7. Enjoying Photo
21. Enjoying Music
24. Enjoying Video
5. Connecting Other
Devices
6. Operating the Monitor
Using a PC (IP control)
7. Troubleshooting
8. Specifications, etc.
Ver. 1.00
>
<
USB Media
Before Using USB Media
W
hat you can do with USB Media
• You can play the photo, music or video files stored on USB memory.
In addition, you can copy photos to a USB memory .
4-1

Contents
1. Part Names
2. Basic Operation
3. Menu Operation
4. USB Media
1.
Before Using USB
Media
7. Enjoying Photo
21. Enjoying Music
24. Enjoying Video
5. Connecting Other
Devices
6. Operating the Monitor
Using a PC (IP control)
7. Troubleshooting
8. Specifications, etc.
Ver. 1.00
>
<
USB Media
Before Using USB Media
A
bout USB memories that can be attached to Monitor
Devices that can be connected to USB terminal
• USB memory, USB card reader (mass storage class)
File system
• FAT, FAT32
NOTE
• If you attach a USB memory to Monitor with the power on, the USB Media will be displayed.
4-2

Contents
1. Part Names
2. Basic Operation
3. Menu Operation
4. USB Media
1.
Before Using USB
Media
7. Enjoying Photo
21. Enjoying Music
24. Enjoying Video
5. Connecting Other
Devices
6. Operating the Monitor
Using a PC (IP control)
7. Troubleshooting
8. Specifications, etc.
Ver. 1.00
>
<
USB Media
Before Using USB Media
A
bout USB memories attached to Monitor
How to attach / remove USB memor
y
• Do not remove the USB memory from Monitor while transferring files, viewing slide shows, switching screens or before exiting "USB Media" at the input selection menu.
• Do not insert and remove a USB memory repeatedly without any reason.
• When using a USB card reader, make sure to insert a memory card in the USB card reader before connecting it to the Monitor.
• Do not use any USB extension cable to connect USB memory into the USB terminal on the Monitor.
The Monitor may fail to operate properly if you do so.
• Turn off the Monitor before removing the USB memory.
4-3

Contents
1. Part Names
2. Basic Operation
3. Menu Operation
4. USB Media
1.
Before Using USB
Media
7. Enjoying Photo
21. Enjoying Music
24. Enjoying Video
5. Connecting Other
Devices
6. Operating the Monitor
Using a PC (IP control)
7. Troubleshooting
8. Specifications, etc.
Ver. 1.00
>
<
USB Media
Before Using USB Media
A
bout files in USB memory that can be played on Monitor
Photo file format
• JPEG (jpg) (DCF2.0-compliant)
• Maximum resolution (image size): 16384 x 16384 pixels
• Minimum resolution (image size): 32 x 32 pixels
• If a JPEG still image file is large in size, the file may require time to display the photo.
4-4

Contents
1. Part Names
2. Basic Operation
3. Menu Operation
4. USB Media
1.
Before Using USB
Media
7. Enjoying Photo
21. Enjoying Music
24. Enjoying Video
5. Connecting Other
Devices
6. Operating the Monitor
Using a PC (IP control)
7. Troubleshooting
8. Specifications, etc.
Ver. 1.00
>
<
USB Media
Before Using USB Media
A
bout files in USB memory that can be played on Monitor
Music file format
• FLAC (.fla)
Bit rate: 128k to 2304kbps
Sampling frequency: 8k, 16k, 22.05k, 24k, 32k, 44.1k, 48k, 88.2k, 96k, 192kHz
Quantization bit rate: 8bit, 16bit, 24bit
• MP3 (.mp3)
Bit rate: 32 to 320kbps
Sampling frequency: 32k, 44.1k, 48kHz
• WAV (.wav)
Bit rate: 64 to 1536kbps (LPCM)
Sampling frequency: 32k, 44.1k, 48kHz
• WMA (.wma)
Bit rate: 32 to 384kbps
Sampling frequency: 8k, 11.025k, 16k, 22.05k, 32k, 44.1k, 48kHz
• AAC (.m4a / .aac)
Bit rate: 1 to 1728kbps
Sampling frequency:
8k, 11.025k, 12k, 16k, 22.05k, 24k, 32k, 44.1k, 48kHz (AAC)
16k, 22.05k, 24k, 32k, 44.1k, 48kHz (HE-AAC)
4-5

Contents
1. Part Names
2. Basic Operation
3. Menu Operation
4. USB Media
1.
Before Using USB
Media
7. Enjoying Photo
21. Enjoying Music
24. Enjoying Video
5. Connecting Other
Devices
6. Operating the Monitor
Using a PC (IP control)
7. Troubleshooting
8. Specifications, etc.
Ver. 1.00
>
<
USB Media
Before Using USB Media
A
bout files in USB memory that can be played on Monitor
V
ideo file format
• m2ts, mp4, 3gp (AVC, H.264/MP3, AAC)
NOTE
• jpeg files in progressive format cannot be supported.
• 3D-form photos cannot be supported.
• Music files in USB1.1 device may not be played properly.
• Depending on a certain type of USB memory devices, the stored data may not be recognized in Monitor.
• The file name may not be displayed if length of the file name exceeds 80 characters.
• Files may not be played properly even if their file format is supported.
• Music files which are subject to copyright protection may not be played properly.
4-6

Contents
1. Part Names
2. Basic Operation
3. Menu Operation
4. USB Media
1.
Before Using USB
Media
7. Enjoying Photo
21. Enjoying Music
24. Enjoying Video
5. Connecting Other
Devices
6. Operating the Monitor
Using a PC (IP control)
7. Troubleshooting
8. Specifications, etc.
Ver. 1.00
>
<
USB Media
Enjoying Photo
Displaying photo
About this function
• You can display photos on USB memory.
NOTE
• It may take more than 20 seconds to display a photo depending on the pixel size.
How to operate
1. Press INPUT, use the
/ button to select "USB media", and then press ENTER
• Once USB memory is connected, "USB media" will be automatically displayed.
2. Press
/ to select "Photo mode", and then press ENTER
4-7

Contents
1. Part Names
2. Basic Operation
3. Menu Operation
4. USB Media
1.
Before Using USB
Media
7. Enjoying Photo
21. Enjoying Music
24. Enjoying Video
5. Connecting Other
Devices
6. Operating the Monitor
Using a PC (IP control)
7. Troubleshooting
8. Specifications, etc.
Ver. 1.00
>
<
USB Media
Enjoying Photo
Displaying photo
3. Press
/ to select a folder, and then press ENTER
4. Press / / / to select photo, and then press ENTER
• The photo appears full-screen.
• If you select a folder, all images in the folder will be displayed.
• By pressing RETURN, you can return to photo select screen.
NOTE
• If there is an invalid photo file, X mark is played on the thumbnail.
• At the bottom left corner of the photo select screen, file name, photo data*, pixel / file size, and remaining
capacity of the media are displayed.
*Only EXIF file format data can be shown.
• Depending on a certain photo data, they may not be displayed as thumbnail.
• When any photo is not shown but an error message appears, see "Message concerning USB Media" (pages
7-9
to 7-10).
4-8

Contents
1. Part Names
2. Basic Operation
3. Menu Operation
4. USB Media
1. Before Using USB
Media
7.
Enjoying Photo
21. Enjoying Music
24. Enjoying Video
5. Connecting Other
Devices
6. Operating the Monitor
Using a PC (IP control)
7. Troubleshooting
8. Specifications, etc.
Ver. 1.00
>
<
USB Media
Enjoying Photo
Operation during photo display
About this function
• When viewing photos, you can switch to the next photo.
• A guidance (operation guide) indicating the operation method is displayed at the bottom of the screen. Press the
buttons according to the guidance display to operate.
NOTE
• Photos cannot be rotated.
/ : Switch to previous or next photo in the same folder.
F1: Toggles between displaying and not displaying the operation guide.
OPTION: Displays the function menu.
RETURN: Returns to the display list.
4-9

Contents
1. Part Names
2. Basic Operation
3. Menu Operation
4. USB Media
1.
Before Using USB
Media
7. Enjoying Photo
21. Enjoying Music
24. Enjoying Video
5. Connecting Other
Devices
6. Operating the Monitor
Using a PC (IP control)
7. Troubleshooting
8. Specifications, etc.
Ver. 1.00
>
<
USB Media
Enjoying Photo
Switching photo display mode
About this function
• You can switch the photo display mode
How to operate
1. During the display of photo, press OPTION, use the
/ button to select "Screen Size", and then press ENTER
2. Use the / button to specify the desired setting, and then press ENTER
About display mode switch item and photo display
4-10

Contents
1. Part Names
2. Basic Operation
3. Menu Operation
4. USB Media
1.
Before Using USB
Media
7. Enjoying Photo
21. Enjoying Music
24. Enjoying Video
5. Connecting Other
Devices
6. Operating the Monitor
Using a PC (IP control)
7. Troubleshooting
8. Specifications, etc.
Ver. 1.00
>
<
USB Media
Enjoying Photo
Enjoying slide sho
w
A
bout this functio
n
• Photos can be displayed as a slide show.
• The photos from USB memory can be selected to be displayed as slide show.
4-11

Contents
1. Part Names
2. Basic Operation
3. Menu Operation
4. USB Media
1.
Before Using USB
Media
7. Enjoying Photo
21. Enjoying Music
24. Enjoying Video
5. Connecting Other
Devices
6. Operating the Monitor
Using a PC (IP control)
7. Troubleshooting
8. Specifications, etc.
Ver. 1.00
>
<
USB Media
Enjoying Photo
Enjoying slide show
To play a slide show based on photo list
1. Press INPUT, followed by
/ to select "USB media" and then press ENTER
2. If more than one USB memory are connected, select desired memory with F1
3. Press / to select "Photo Mode", and then press ENTER
4-12
Contents
1. Part Names
2. Basic Operation
3. Menu Operation
4. USB Media
1.
Before Using USB
Media
7. Enjoying Photo
21. Enjoying Music
24. Enjoying Video
5. Connecting Other
Devices
6. Operating the Monitor
Using a PC (IP control)
7. Troubleshooting
8. Specifications, etc.
Ver. 1.00
>
<
USB Media
Enjoying Photo
Enjoying slide show
To play a slide show based on a photo list.
4. Press
/ to select a folder, and then press ENTER
5. Press F1
• Photo selection mode will be used to display photos. Press
/ / / to select the photos to be displayed as a
slide show. Press F4 to toggle between selecting / deselecting the photos.
To select / deselect photos all at once, press OPTION, and then choose between "Set all slide show image" or
"Reset all slide show image" from the function menu.
Press F1 to start slide show.
• To quit the slide show, press RETURN.
4-13

Contents
1. Part Names
2. Basic Operation
3. Menu Operation
4. USB Media
1.
Before Using USB
Media
7. Enjoying Photo
21. Enjoying Music
24. Enjoying Video
5. Connecting Other
Devices
6. Operating the Monitor
Using a PC (IP control)
7. Troubleshooting
8. Specifications, etc.
Ver. 1.00
>
<
USB Media
Enjoying Photo
Setting up slide show
1. Press OPTION on the photo list screen to display the function menu.
2. Press
/ to select "Slide Show Setup", and then press ENTER
3. Press / to select the setting, and then press ENTER
Slide show interval
• Set the time duration before switching to the next picture.
• Depending on the photo, the display may not be switched according to the set time.
Slide show off timer setting
• Set the timer for the slide show. The power will automatically turn off after the set time duration.
• This is a function that can be helpful should you forget to turn off the power supply when using this machine as a
large screen photo frame.
• The timer will start only during slide show operation.
Low brightness mode
• Reduces glare so that the slide show can be enjoyed better.
• Even when displaying a slide show for a long duration, the power consumption can be reduced to a certain
degree.
(The power consumption reduction depends on the environment and the photos.)
4-14
Contents
1. Part Names
2. Basic Operation
3. Menu Operation
4. USB Media
1.
Before Using USB
Media
7. Enjoying Photo
21. Enjoying Music
24. Enjoying Video
5. Connecting Other
Devices
6. Operating the Monitor
Using a PC (IP control)
7. Troubleshooting
8. Specifications, etc.
Ver. 1.00
>
<
USB Media
Enjoying Photo
Selecting BGM for a slide show
About this function
• Choosing the music (BGM) that will be played when displaying the slide show.
• The music stored in the USB memory can be used as BGM.
1. Press F3 in the slide show picture selection mode.
2. Press
/ / / to select the media, and then press ENTER
3. Press
/ to select the folder that contains the audio file to be made as BGM, and then press ENTER
4. Press
/ to select the audio file that will be made as BGM, and then press F4 to select / deselect it
5. Press RETURN to return to the screen which is displayed for selecting the folder.
6. Press RETURN to return to the slide show photo selection mode.
7. Press F1 in photo selection mode to start the slide show.
NOTE
• In initial setting, all music files are selected by default.
• During the display of the slide show, the selected BGM will be repeatedly played back.
4-15
Contents
1. Part Names
2. Basic Operation
3. Menu Operation
4. USB Media
1.
Before Using USB
Media
7. Enjoying Photo
21. Enjoying Music
24. Enjoying Video
5. Connecting Other
Devices
6. Operating the Monitor
Using a PC (IP control)
7. Troubleshooting
8. Specifications, etc.
Ver. 1.00
>
<
USB Media
Enjoying Photo
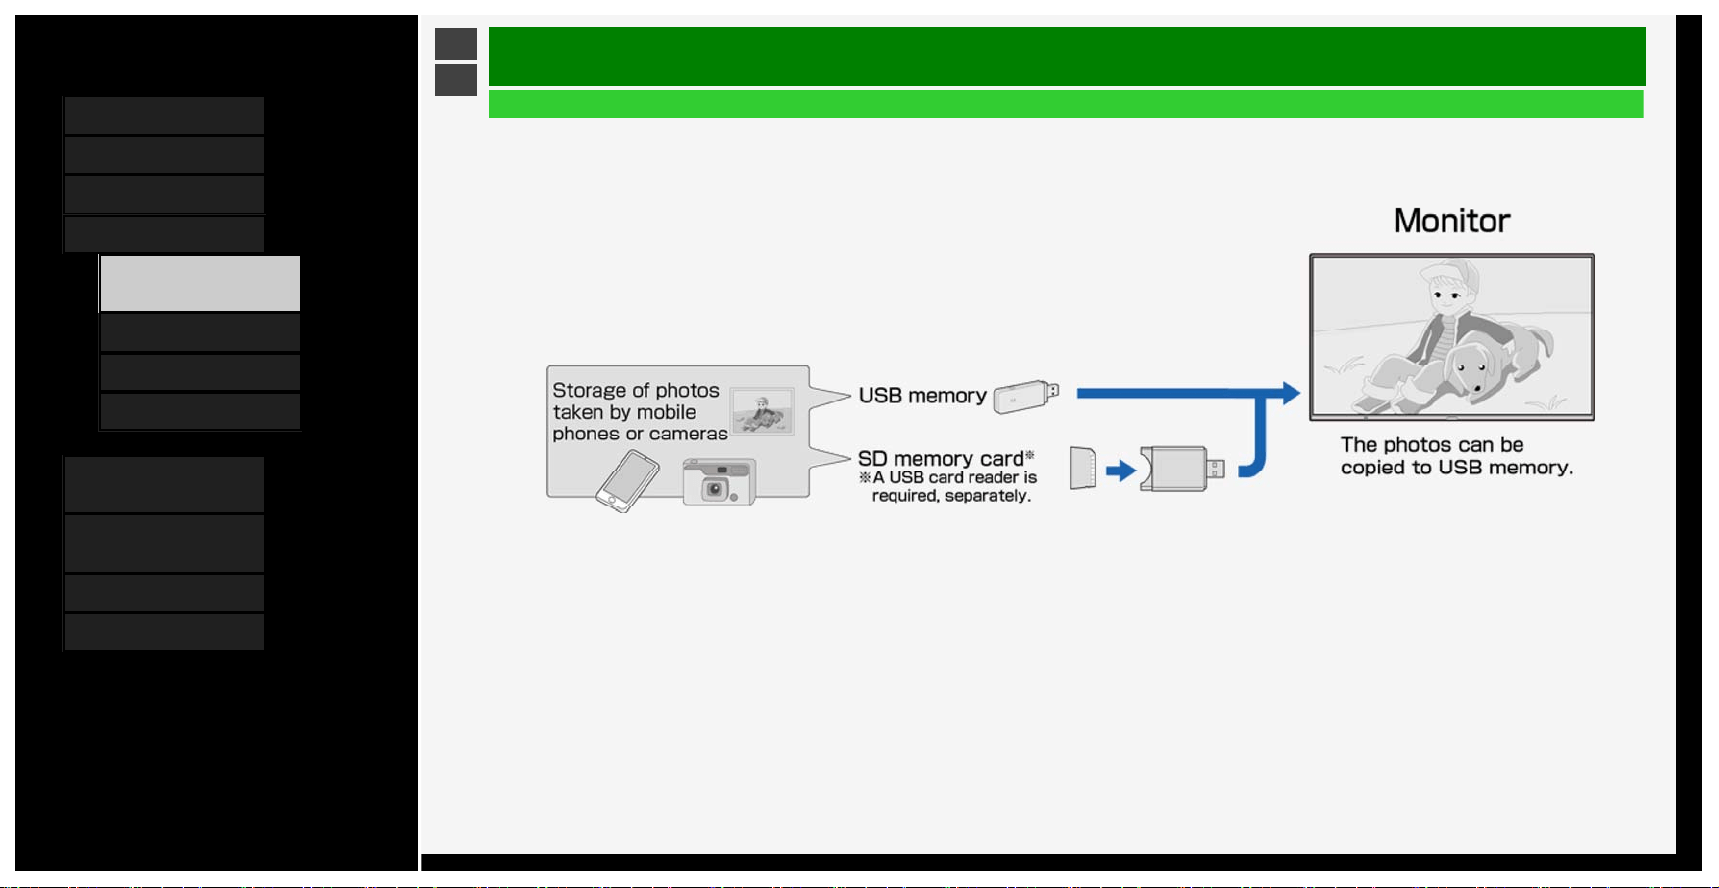
Copying photo
About this function
• Copying a photo from USB memory to another memory.
• When copying a photo to an SD memory card, a USB card reader is needed.
• Attach the USB memory to be used for copying to the Monitor in advance.
• Specify the copy destination by using the Setup menu, and then use USB Media to perform copy operation.
To copy photos, more than one USB memories need to be connected. However, only one connection is
allowed when setting the USB memory destination.
Specify the destination to copy the photo
1. Make sure that only one USB memory is attached to the Monitor.
2. Press MENU to display the Menu, press
/ / / to select "Setup", and then press ENTER
3. Press
/ / / to select " (Initial Setup)" - "Individual setting" - "USB memory setting", and then press
ENTER
4. Press / button to select "Select USB memory", and then press ENTER
5. Press
/ button to select "Yes", and then press ENTER
• For information on copy operation, see page
4-17.
4-16
Contents
1. Part Names
2. Basic Operation
3. Menu Operation
4. USB Media
1.
Before Using USB
Media
7. Enjoying Photo
21. Enjoying Music
24. Enjoying Video
5. Connecting Other
Devices
6. Operating the Monitor
Using a PC (IP control)
7. Troubleshooting
8. Specifications, etc.
Ver. 1.00
>
<
USB Media
Enjoying Photo
Copying photo
• To copy photos, more than one USB memories need to be connected. However, only one connection is allowed
when setting the USB memory destination.
1. Connect the USB memory destination.
2. If more than one USB memory are connected, select desired memory with F1.
3. Press
, and then press / to select a memory on which the target photo is stored, and then press ENTER
4. Press
/ to select "Photo Mode", and then press ENTER
5. Press
/ to select the folder containing the target photo, and then press ENTER
6. Press OPTION or F2, followed by
/ to select "Copy picture", and then press ENTER
7. Select the copy source from "All folder", "Current folder" or "Selected file", and then press ENTER
• If you select "Selected file", the image selection screen will be displayed.
Press
/ / / and F4 to select the file to be copied, and then press F2.
8. Press
/ to select the destination to save, and then press ENTER
9. Press
/ to select the folder to save the file, and then press ENTER
• If you select "Create new folder", you can create a new folder.
A software keyboard appears, which you will use to enter the name of the folder.(page
3-45)
10. Use the / button to select "Yes", and then press ENTER
11. Press ENTER on the confirmation screen.
4-17

Contents
1. Part Names
2. Basic Operation
3. Menu Operation
4. USB Media
1.
Before Using USB
Media
7. Enjoying Photo
21. Enjoying Music
24. Enjoying Video
5. Connecting Other
Devices
6. Operating the Monitor
Using a PC (IP control)
7. Troubleshooting
8. Specifications, etc.
Ver. 1.00
>
<
USB Media
Enjoying Photo
Copying phot
o
NOTE
• The limit for the file name is up to 80 two-byte or 160 one-byte characters. File names that exceed the limit cannot be copied.
• If the input source is changed during copying photo, the copying operation will be interrupted.
• If there are photos with the same file names, it will be copied up to 10 items, and "(01) to (10)" will be added at the end of the file name by default.
• When "All folder" / "Current folder" is specified, only the files that does not exist in destination will be copied.
To remove USB memory that is used as copy destination
,
see page 4-19.
For information of USB memories that are available for Monitor
,
see page 4-2.
4-18

Contents
1. Part Names
2. Basic Operation
3. Menu Operation
4. USB Media
1.
Before Using USB
Media
7. Enjoying Photo
21. Enjoying Music
24. Enjoying Video
5. Connecting Other
Devices
6. Operating the Monitor
Using a PC (IP control)
7. Troubleshooting
8. Specifications, etc.
Ver. 1.00
>
<
USB Media
Enjoying Photo
To remove the USB memory that is used as the copy destination
How to operate
1. Press MENU to display the Menu, press
/ / / to select "Setup", and then press ENTER
2. Press
/ / / to select " (Initial Setup)" - "Individual setting" - "USB memory setting", and then press
ENTER
3. Press
/ to select "Remove selected USB memory", and then press ENTER
4. Press ENTER
5. Press ENTER
6. Remove USB memory
NOTE
• Even after selecting "Remove selected USB memory", data in the USB memory can still be viewed through
"USB Media" until the USB memory is physically removed.
• After selecting "Remove selected USB memory", the copy / delete function will not be available. To enable the
copy / delete function, remove and reconnect the USB memory physically. (will be automatically specified again)
4-19

Contents
1. Part Names
2. Basic Operation
3. Menu Operation
4. USB Media
1.
Before Using USB
Media
7. Enjoying Photo
21. Enjoying Music
24. Enjoying Video
5. Connecting Other
Devices
6. Operating the Monitor
Using a PC (IP control)
7. Troubleshooting
8. Specifications, etc.
Ver. 1.00
>
<
USB Media
Enjoying Photo
Deleting photo
About this function
• You can delete unnecessary photos stored on a USB memory.
How to operate
1. Press OPTION on the photo list screen to display the function menu.
2. Use the
/ button to select "Delete photo", and then press ENTER
3. Use the / button to select the target file from "All folder", "Current folder" or "Selected file", and then press
ENTER
• If you select "Selected file", the image selection screen is displayed. Use the
/ / / button and F4 to select
the target file, and then press F2.
4. Use the
/ button to select "Yes", and then press ENTER
5. Press ENTER
4-20
Contents
1. Part Names
2. Basic Operation
3. Menu Operation
4. USB Media
1.
Before Using USB
Media
7. Enjoying Photo
21. Enjoying Music
24. Enjoying Video
5. Connecting Other
Devices
6. Operating the Monitor
Using a PC (IP control)
7. Troubleshooting
8. Specifications, etc.
Ver. 1.00
>
<
USB Media
Enjoying Music
Playing back music
About this function
• You can play back music file in USB memory.
How to operate
1. Press INPUT, followed by
/ to select "USB media", and then press ENTER
2. Press
/ to select "Music Mode", and then press ENTER
3. Press
/ / / to select a song title, and then press ENTER
4-21

Contents
1. Part Names
2. Basic Operation
3. Menu Operation
4. USB Media
1.
Before Using USB
Media
7. Enjoying Photo
21. Enjoying Music
24. Enjoying Video
5. Connecting Other
Devices
6. Operating the Monitor
Using a PC (IP control)
7. Troubleshooting
8. Specifications, etc.
Ver. 1.00
>
<
USB Media
Enjoying Music
Playing music
• Music is played.
• When selecting a folder, music files in that folder will be displayed.
• Press RETURN to display the previous screen.
• When there are multiple music files in the same folder being played, the music files in the folder will be played in
order.
• Press F4 to place check mark at the check box which is on the left side of the music file, then only the selected
file will be played. If "Set all auto play" is selected from the menu which is displayed after pressing OPTION,
check mark will be placed at all music files, and if "Reset all auto play" is selected, check mark will disappear
from all music files.
• If "AV Mode" is selected from the menu which is displayed after pressing OPTION, image and sound quality can
be changed.
• For information of the setup items for "AV Mode", see page
3-8.
NOTE
• If there is an invalid music file, an x-mark will be displayed at the file.
• For a variable bit rate file, the playback time displayed may differ from the actual playback time. In addition,
playback may stop even if the progress bar display is in progress.
4-22

Contents
1. Part Names
2. Basic Operation
3. Menu Operation
4. USB Media
1.
Before Using USB
Media
7. Enjoying Photo
21. Enjoying Music
24. Enjoying Video
5. Connecting Other
Devices
6. Operating the Monitor
Using a PC (IP control)
7. Troubleshooting
8. Specifications, etc.
Ver. 1.00
>
<
USB Media
Enjoying Music
How to operate during the playback of music
Playing music that is store on USB memory.
RETURN: Returns to the previous step.
F2: Plays / stops music playback.
F3: Stops playing music.
F4: Selects / deselect the music that will be played.
OPTION: Displays the function menu.
4-23
Contents
1. Part Names
2. Basic Operation
3. Menu Operation
4. USB Media
1.
Before Using USB
Media
7. Enjoying Photo
21. Enjoying Music
24. Enjoying Video
5. Connecting Other
Devices
6. Operating the Monitor
Using a PC (IP control)
7. Troubleshooting
8. Specifications, etc.
Ver. 1.00
>
<
USB Media
Enjoying Video
Playing video
About this function
• You can play a video from USB memory.
How to operate
1. Press INPUT, use
/ to select "USB media", and then press ENTER.
• Once USB memory is connected, "USB media" will be automatically displayed.
2. Press
/ to select "Video mode", and then press ENTER
4-24

Contents
1. Part Names
2. Basic Operation
3. Menu Operation
4. USB Media
1. Before Using USB
Media
7.
Enjoying Photo
21. Enjoying Music
24. Enjoying Video
5. Connecting Other
Devices
6. Operating the Monitor
Using a PC (IP control)
7. Troubleshooting
8. Specifications, etc.
Ver. 1.00
>
<
USB Media
Enjoying Video
Playing video
3. Use the
/ / / button to select a video, and then press ENTER
• The video will be played back.
• If you select a video that you watched halfway through, the video will resume from where you left off.
• If you select a folder, any videos in the folder will be displayed.
• RETURN allows the preceding screen to be displayed.
NOTE
• If there is an invalid video file, an x-mark is displayed at the file.
• For a variable bit rate file, the playback time displayed may differ from the actual playback time. In addition, it
may even end halfway through the progress bar.
• A video that cannot be played back on Monitor may be displayed.
• It is not ensured that any videos displayed can be properly played back.
Resume playback
• Up to 50 videos, which played back halfway through, can be retained by Monitor in reverse chronological order.If
you select this, the video resumes from where you left it off the last time.
• Some types of videos may prevent you from resuming playback.
To play back from the beginning
• Use the up / down cursor button to select a video, and press F2.
4-25
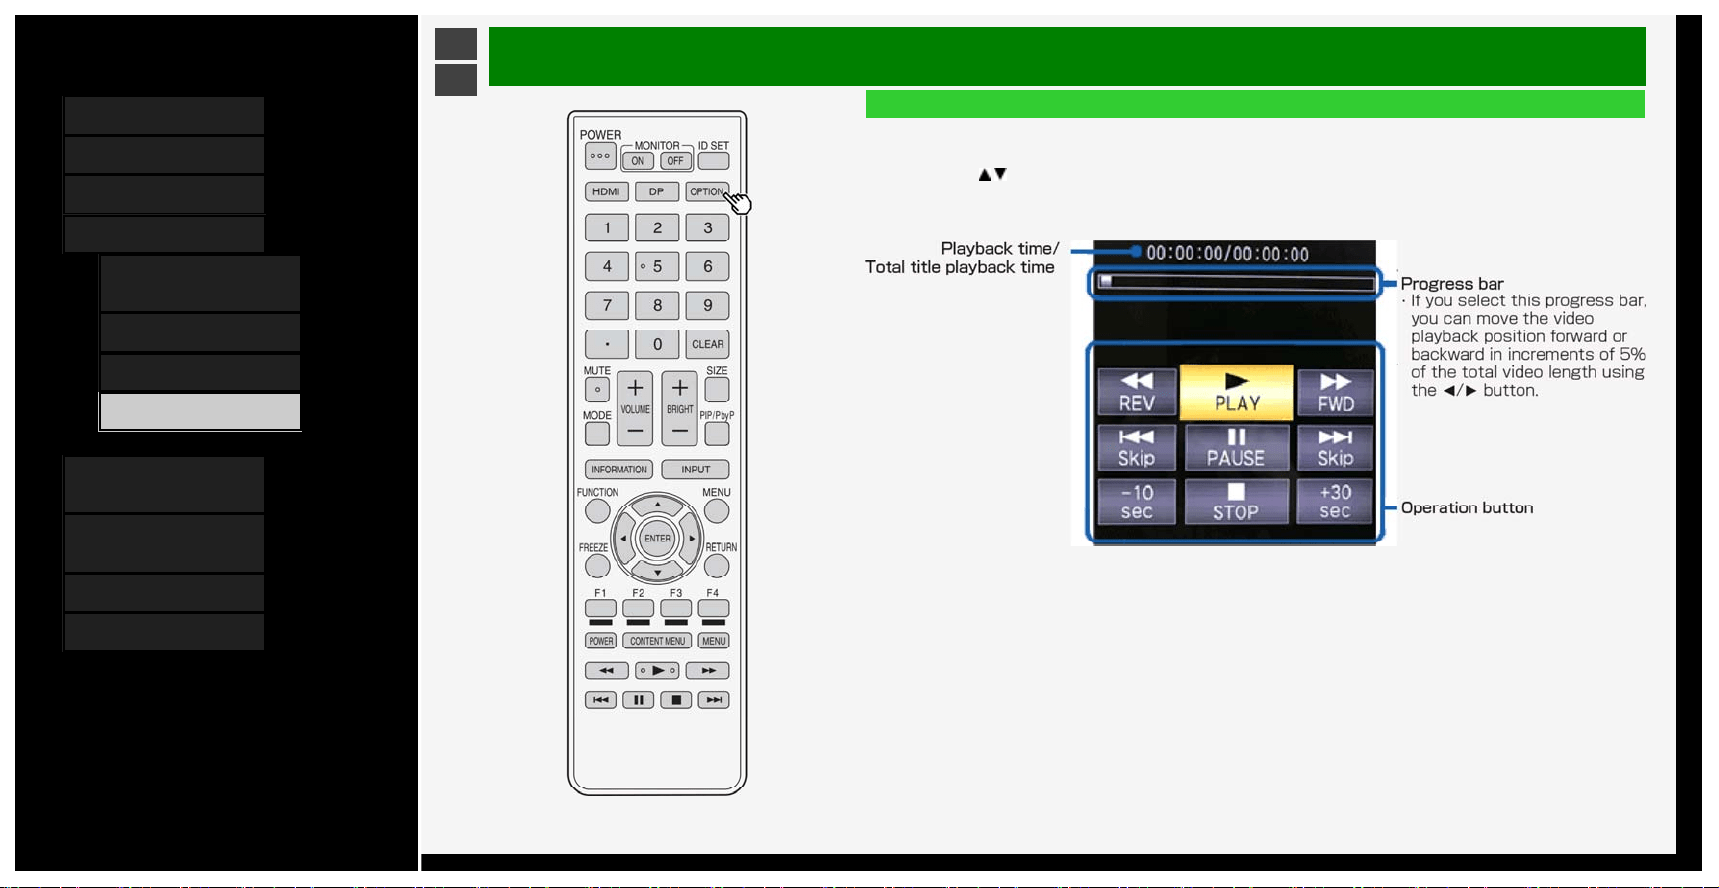
Contents
1. Part Names
2. Basic Operation
3. Menu Operation
4. USB Media
1.
Before Using USB
Media
7. Enjoying Photo
21. Enjoying Music
24. Enjoying Video
5. Connecting Other
Devices
6. Operating the Monitor
Using a PC (IP control)
7. Troubleshooting
8. Specifications, etc.
Ver. 1.00
>
<
USB Media
Enjoying Video
How to operate during the playback of video
1. Press OPTION during the playback of VIDEO to the Application menu.
2. Use the
/ button to select "Operation Panel," and then press ENTER
How to use the operation panel
4-26
Contents
1. Part Names
2. Basic Operation
3. Menu Operation
4. USB Media
1.
Before Using USB
Media
7. Enjoying Photo
21. Enjoying Music
24. Enjoying Video
5. Connecting Other
Devices
6. Operating the Monitor
Using a PC (IP control)
7. Troubleshooting
8. Specifications, etc.
Ver. 1.00
>
<
USB Media
Enjoying Video
How to operate during the playback of video
Operations during the playback of video
• You can perform operations such as pausing or playing a video.
Plays the video.
Pauses the video.
Fast reverses the video. Press the button down again to speed up.(4 steps)
Returns to the beginning of the chapter being viewed now.
Fast forward the video. Press the button down again to speed up.(4 steps)
Locates the beginning of the next chapter.
Stops playback of the video, and returns to the video list screen.
Rewinds the video by 10 seconds.
Fast forward the video by about 30 seconds.
NOTE
• Some types of videos may prevent you from performing certain button operations.
• Available operations vary depending on the video viewed. Unavailable buttons are not displayed.
• Playback time can be navigated using the 10 sec REWIND / 30 SEC FF (approximate time) operations.
• During the speeding up or slowing down of playback, there may be no audio output.
4-27

Contents
1. Part Names
2. Basic Operation
3. Menu Operation
4. USB Media
5. Connecting Other
Devices
1.
Connecting 8K Output-
compatible
Device/Quad-screen
display(4K or less)
5. Connecting 4K Output-
compatible Device
7. Viewing HDR Video
(INPUT1, INPUT7,
INPUT8)
9. Using the HDMI CEC
11. Connecting Recorder,
Player, etc.
21. Connecting Audio
Device
22. Connecting PC
6. Operating the Monitor
Using a PC (IP control)
7. Troubleshooting
>
<
Connecting Other Devices
Connecting 8K output compatible Device/Quad-screen display(4K or less)
• Connects the Monitor to 8K output (7680 × 4320 of resolution output) compatible equipment by
using 4 HDMI cables.
• When connecting an 8K output compatible device to the Monitor, use commercially available
premium HDMI cables.
• Connect the devices properly so that the output signal from the device can be displayed at the
appropriate position.
Video images from the HDMI input terminal are displayed at the position as shown on the right
(default).
• Multi-screen display by using 8K signal is not supported.
• In MODE2, 8K display is possible whenever any input signal to INPUT 7 (A to D) is
synchronized.
• Under the factory default setting, INPUT7-A is set as the sound input.
• To change the factory default setting, switch to INPUT7, select "Setup" - " (Option)" -
"Terminal setting" - "INPUT7 audio setting" from the Menu, and then select input for audio
sound.
• Read the operation manual on the device to be connected to the Monitor as well.
◆Important◆
• Use / connect four HDMI cables of the same type and brand, otherwise performance cannot be
guaranteed.
• In Mode2, input the format 3840×2160 (24Hz, 25Hz, 30Hz, 50Hz, 60Hz) to each terminal of
INPUT 7 (A to D).
If any format other than the above is input, the video or picture may be distorted.
5-1
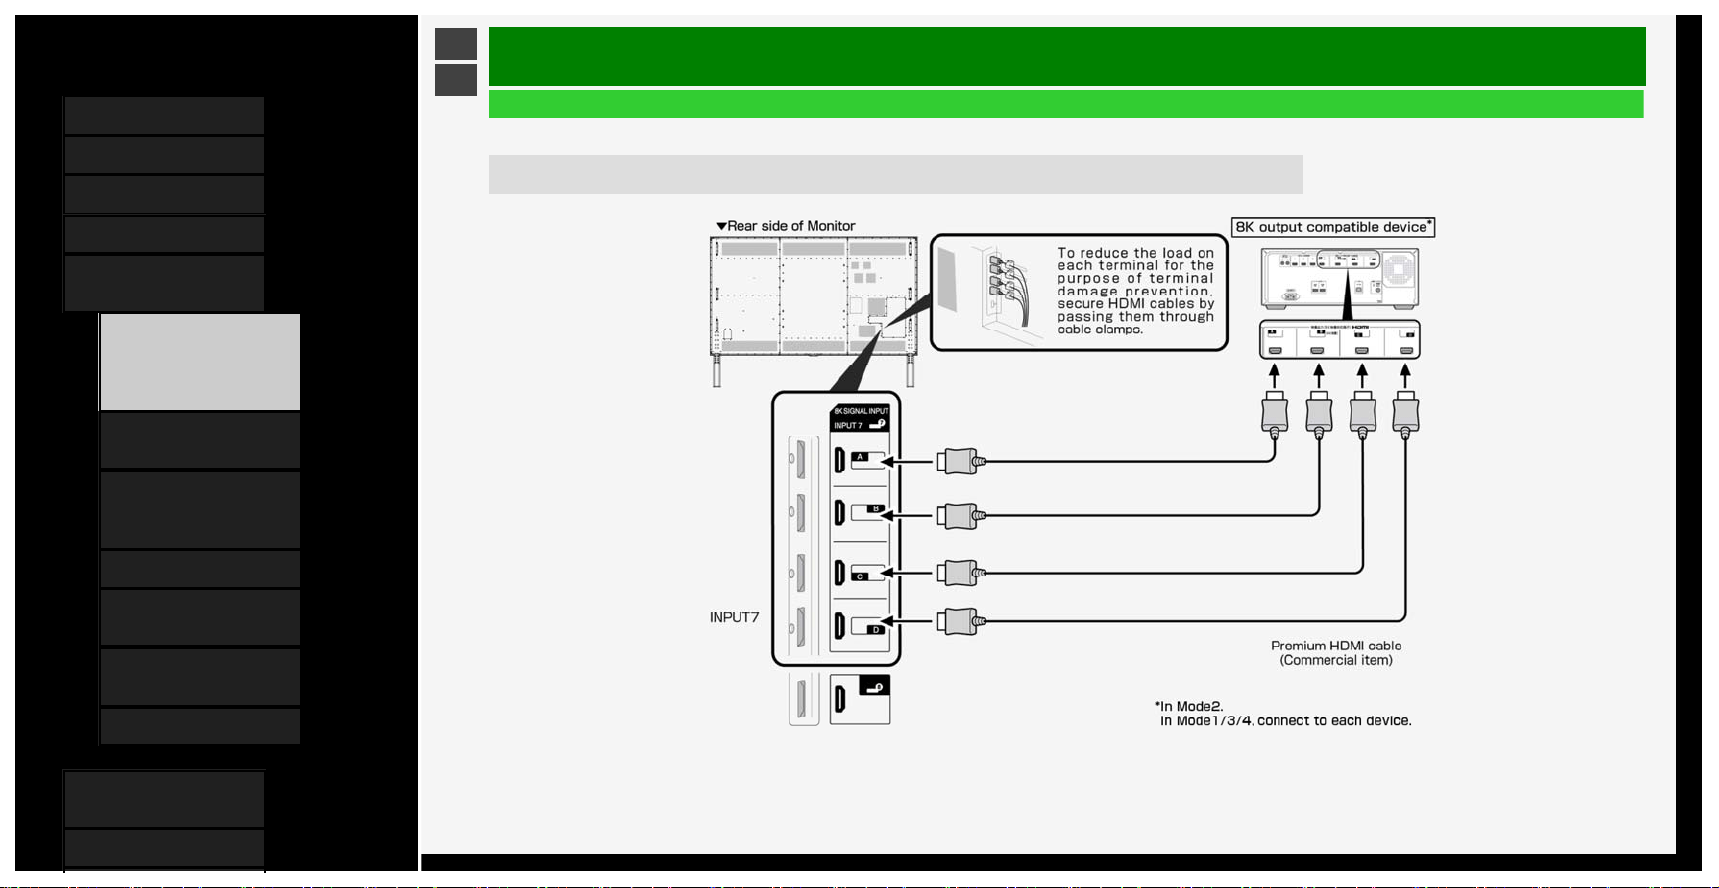
Contents
1. Part Names
2. Basic Operation
3. Menu Operation
4. USB Media
5. Connecting Other
Devices
1.
Connecting 8K Output-
compatible
Device/Quad-screen
display(4K or less)
5. Connecting 4K Output-
compatible Device
7. Viewing HDR Video
(INPUT1, INPUT7,
INPUT8)
9. Using the HDMI CEC
11. Connecting Recorder,
Player, etc.
21. Connecting Audio
Device
22. Connecting PC
6. Operating the Monitor
Using a PC (IP control)
7. Troubleshooting
>
<
Connecting Other Devices
Connecting 8K output compatible Device/Quad-screen display(4K or less)
Connect four HDMI cables (8K output compatible device)
• A commercially available premium HDMI cable is required.
5-2
Contents
1. Part Names
2. Basic Operation
3. Menu Operation
4. USB Media
5. Connecting Other
Devices
1. Connecting 8K Output-
compatible
Device/Quad-screen
display(4K or less)
5. Connecting 4K Output-
compatible Device
7. Viewing HDR Video
(INPUT1, INPUT7,
INPUT8)
9. Using the HDMI CEC
11. Connecting Recorder,
Player, etc.
21. Connecting Audio
Device
22. Connecting PC
6. Operating the Monitor
Using a PC (IP control)
7. Troubleshooting
>
<
Connecting Other Devices
Connecting 8K output compatible Device/Quad-screen display(4K or less)
Supported format in Mode2
• 7680 × 4320 (24Hz, 25Hz, 30Hz, 50Hz, 60Hz)
How to switch
• Press INPUT on the remote control. During the display of the input change menu, use the
/ to select
"INPUT7", and press ENTER.
Indication when 8K video input is used
• When a synchronizing 8K signal is input to INPUT7 (A to D), the video information is displayed as "4320p".
NOTE
•"Out of range" message will be displayed if an unsupported signal is input. In such situation, refer to the
operation manual of the connected device and change to the supported signal.
• Video will not be displayed properly if input signals are not synchronized.
How to change the mode
• Each time you press PIP/PbyP, the Mode changes in the following order.
Mode1 -> Mode2 -> Mode3 -> Mode4 -> Mode1...
How to change the display in Mode1
• Press the button for the input you want to display.
INPUT7-A:F1, INPUT7-B:F2, INPUT7-C:F3, INPUT7-D:F4
5-3

Contents
1. Part Names
2. Basic Operation
3. Menu Operation
4. USB Media
5. Connecting Other
Devices
1. Connecting 8K Output-
compatible
Device/Quad-screen
display(4K or less)
5. Connecting 4K Output-
compatible Device
7. Viewing HDR Video
(INPUT1, INPUT7,
INPUT8)
9. Using the HDMI CEC
11. Connecting Recorder,
Player, etc.
21. Connecting Audio
Device
22. Connecting PC
6. Operating the Monitor
Using a PC (IP control)
7. Troubleshooting
>
<
Connecting Other Devices
Connecting 8K output compatible Device/Quad-screen display(4K or less)
How to change the display position in Mode3/4
• In mode 3, press the button for the input you want to display at the top left.
The display position of the selected screen and the upper left screen change.
• In mode 4, press the button for the input you want to display at the left side.
The display position of the selected screen and the left side screen change.
INPUT7-A:F1, INPUT7-B:F2, INPUT7-C:F3, INPUT7-D:F4
• To return initial display position, press CLEAR.
Supported audio sound signals
• Type: Linear PCM
• Sampling frequency: 48kHz / 44.1kHz / 32kHz
How to change the input audio sound in Mode2/3/4
• Press MENU, followed by / / / and ENTER to select "Setup" - " (Option)" - "Terminal setting" -
"INPUT7 audio setting", then select input for audo sound.
NOTE
• When "Audio input terminal" has been selected for "INPUT7 audio setting", no sound will come out of the
Monitor if you connect between the Monitor and a typical HDMI compatible device using an HDMI cable instead
of an analog audio cable. (An analog audio cable needs to be connected)
To connect the Monitor to a HDMI compatible device using an HDMI cable alone, select the input to which the
device has been connected in "INPUT7 audio setting".
5-4
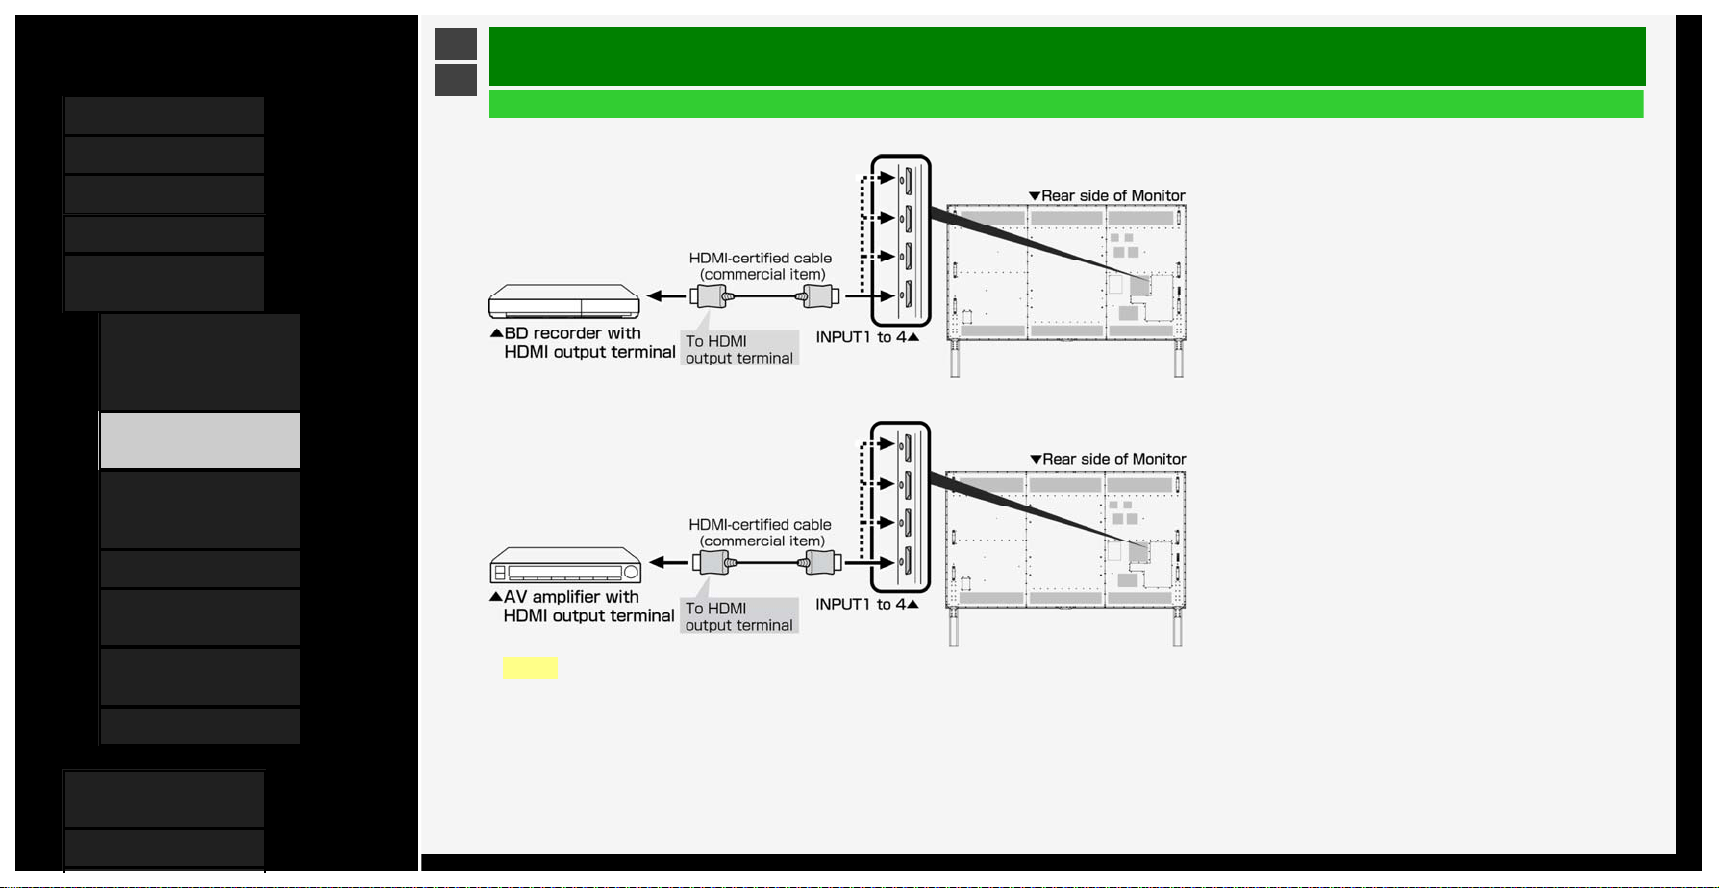
Contents
1. Part Names
2. Basic Operation
3. Menu Operation
4. USB Media
5. Connecting Other
Devices
1.
Connecting 8K Output-
compatible
Device/Quad-screen
display(4K or less)
5. Connecting 4K Output-
compatible Device
7. Viewing HDR Video
(INPUT1, INPUT7,
INPUT8)
9. Using the HDMI CEC
11. Connecting Recorder,
Player, etc.
21. Connecting Audio
Device
22. Connecting PC
6. Operating the Monitor
Using a PC (IP control)
7. Troubleshooting
>
<
Connecting Other Devices
Connecting 4K output compatible Device
Connecting a 4K output compatible BD recorder
Connecting a 4K output compatible AV amplifier
NOTE
• A commercially available premium HDMI cable is required.
• Only INPUT 1 supports for 4K50p/60P (4:2:2, 4:4:4) signals.
• Only INPUT 2 supports ARC.
5-5
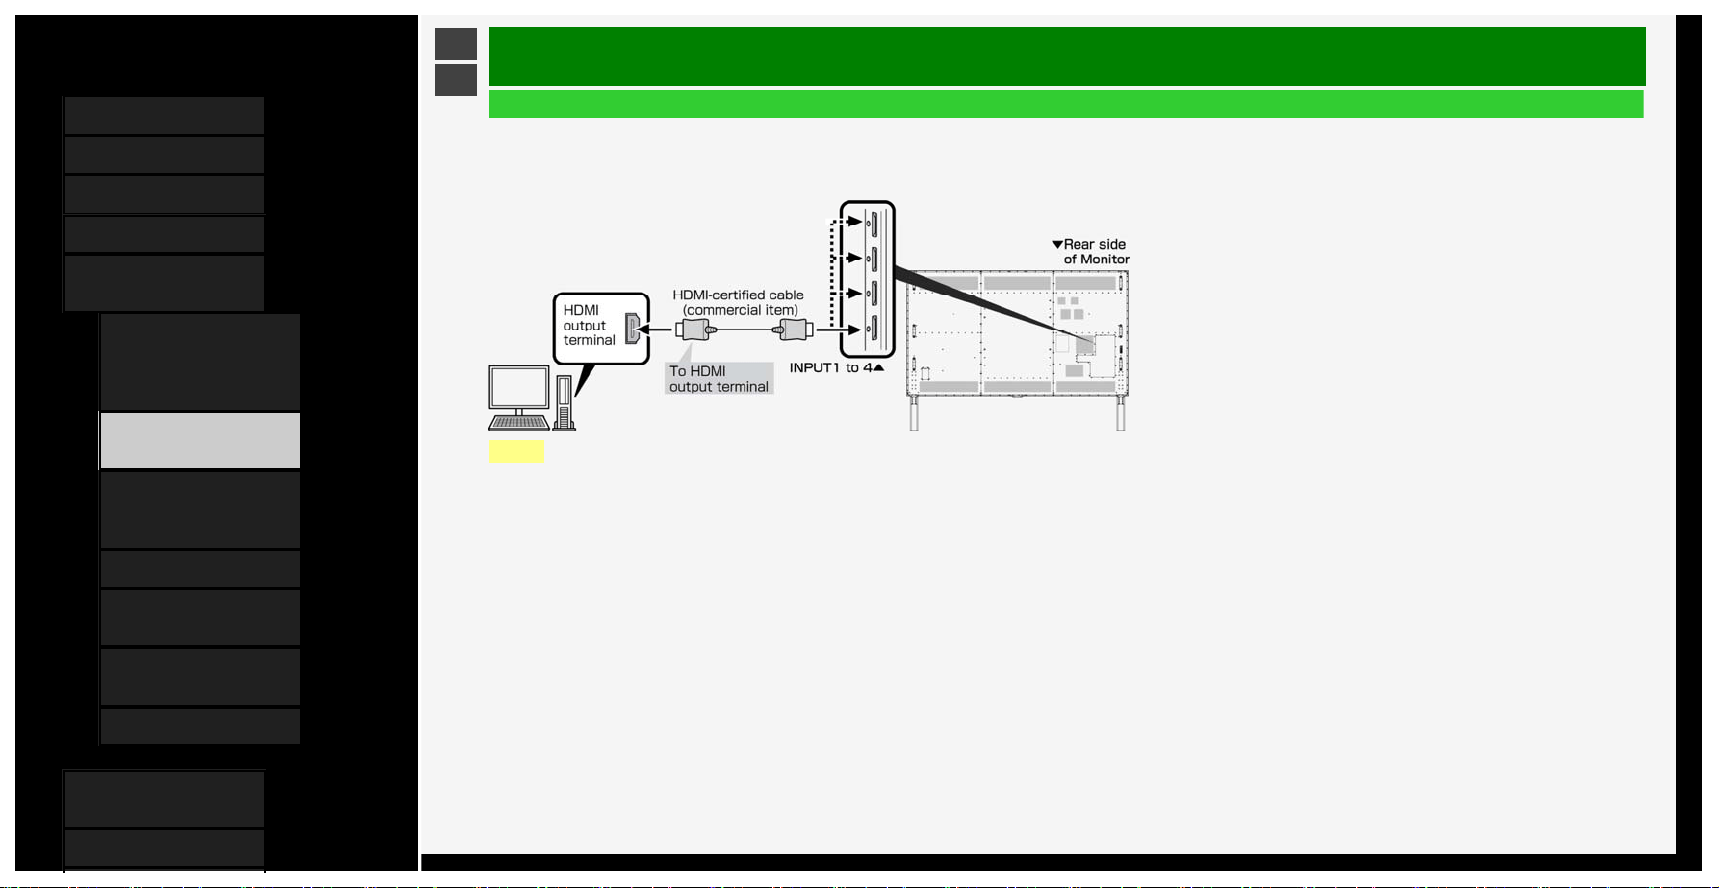
Contents
1. Part Names
2. Basic Operation
3. Menu Operation
4. USB Media
5. Connecting Other
Devices
1.
Connecting 8K Output-
compatible
Device/Quad-screen
display(4K or less)
5. Connecting 4K Output-
compatible Device
7. Viewing HDR Video
(INPUT1, INPUT7,
INPUT8)
9. Using the HDMI CEC
11. Connecting Recorder,
Player, etc.
21. Connecting Audio
Device
22. Connecting PC
6. Operating the Monitor
Using a PC (IP control)
7. Troubleshooting
>
<
Connecting Other Devices
Connecting 4K output compatible Device
Connecting 4K output compatible device
• Use a PC that supports 4K output (resolution output of 3840 × 2160).
NOTE
• A commercially available HDMI-certified cable (Premium HDMI cable) is required.
• Only INPUT 1 supports for 4K50p/60P (4:2:2, 4:4:4) signals.
5-6

Contents
1. Part Names
2. Basic Operation
3. Menu Operation
4. USB Media
5. Connecting Other
Devices
1. Connecting 8K Output-
compatible
Device/Quad-screen
display(4K or less)
5. Connecting 4K Output-
compatible Device
7.
Viewing HDR Video
(INPUT1, INPUT7,
INPUT8)
9. Using the HDMI CEC
11. Connecting Recorder,
Player, etc.
21. Connecting Audio
Device
22. Connecting PC
6. Operating the Monitor
Using a PC (IP control)
7. Troubleshooting
>
<
Connecting Other Devices
Viewing HDR Video (INPUT1, INPUT7, INPUT8)
• This Monitor provides support for HDR (High Dynamic Range) supported by “ULTRA HD Blu-ray
TM
".
Ever-more brightness information is included on HDR video, making it possible to express the gradation of bright and
dark areas in the HDR video. This was previously impossible to express in videos such as ones with a high contrast
between bright and dark areas, and thereby offering high-contrast, realistic video images.
• To view a HDR video using INPUT 1 of the Monitor, connect a HDR-capable device to INPUT 1, and set "Suitable
mode for signals" to "Full mode (HDR)".
• When INPUT7 or 8 is selected, you can use a HDR compatible device with the default setting.
1. Press INPUT, use the
/ to select "INPUT 1", and then press ENTER
2. Press MENU to display the Menu, press
/ / / to select "Setup", and then press ENTER
3. Press
/ / / to select " (Option)" - "Terminal setting", and press ENTER
4. Press
/ to select "Suitable mode for signals", and press ENTER
5. Press
/ to select "Full mode (HDR)", and press ENTER
NOTE
• During "Full mode (HDR)" and "Backlight" (page
3-9) can be adjusted respectively for HDR and SDR video
contents.
• HDR and SDR video content signals are identified automatically.
5-7
Contents
1. Part Names
2. Basic Operation
3. Menu Operation
4. USB Media
5. Connecting Other
Devices
1. Connecting 8K Output-
compatible
Device/Quad-screen
display(4K or less)
5. Connecting 4K Output-
compatible Device
7.
Viewing HDR Video
(INPUT1, INPUT7,
INPUT8)
9. Using the HDMI CEC
11. Connecting Recorder,
Player, etc.
21. Connecting Audio
Device
22. Connecting PC
6. Operating the Monitor
Using a PC (IP control)
7. Troubleshooting
>
<
Connecting Other Devices
Viewing HDR Video (INPUT1, INPUT7, INPUT8)
Adjusting an HDR video to be either brightness-oriented or tone-oriented.
1. Press MENU to display the Menu, use the
/ / / to select "Setup", and then press ENTER
2. Press
/ / / to select " (Picture)" - "Advanced", and press ENTER
3. Press
/ to select "Dynamic range expansion setting", and press ENTER
4. Make adjustments using the / button
• The video will be brightness-oriented if it is set to a larger value. The video will be tone-oriented if it is
set to a smaller value.
NOTE
• This selection is only available during the input of HDR signal.
• When HDR video contents are input, the "HDR" icon is displayed on the screen.
5-8
Contents
1. Part Names
2. Basic Operation
3. Menu Operation
4. USB Media
5. Connecting Other
Devices
1.
Connecting 8K Output-
compatible
Device/Quad-screen
display(4K or less)
5. Connecting 4K Output-
compatible Device
7. Viewing HDR Video
(INPUT1, INPUT7,
INPUT8)
9. Using the HDMI CEC
11. Connecting Recorder,
Player, etc.
21. Connecting Audio
Device
22. Connecting PC
6. Operating the Monitor
Using a PC (IP control)
7. Troubleshooting
>
<
Connecting Other Devices
Using the HDMI CEC
W
hat is HDMI CEC (Consumer Electronics Control)?
• HDMI terminals are not limited to video or audio signals but it permits control signals, which allow for device-to-
device control, which is transmitted through the HDMI cable.
You can control each other between the compatible devices.
NOTE
• To operate HDMI CEC using the remote control, point the remote control at the Monitor.
5-9

Contents
1. Part Names
2. Basic Operation
3. Menu Operation
4. USB Media
5. Connecting Other
Devices
1.
Connecting 8K Output-
compatible
Device/Quad-screen
display(4K or less)
5. Connecting 4K Output-
compatible Device
7. Viewing HDR Video
(INPUT1, INPUT7,
INPUT8)
9. Using the HDMI CEC
11. Connecting Recorder,
Player, etc.
21. Connecting Audio
Device
22. Connecting PC
6. Operating the Monitor
Using a PC (IP control)
7. Troubleshooting
>
<
Connecting Other Devices
Using the HDMI CEC
Before using HDMI CEC functions
1. Connect to an HDMI CEC enabled device
• With a commercially available HDMI-certified cable, connect an HDMI CEC compatible device and the Monitor using a commercially available HDMI-certified cable.
2. Configuring the settings.
• Settings (page
3-31) have to be configured to use the HDMI CEC compatible device.
• Settings must also be configured for the recorder. Read the operation manual of the device before configuring the settings.
5-10

Contents
1. Part Names
2. Basic Operation
3. Menu Operation
4. USB Media
5. Connecting Other
Devices
1. Connecting 8K Output-
compatible
Device/Quad-screen
display(4K or less)
5. Connecting 4K Output-
compatible Device
7.
Viewing HDR Video
(INPUT1, INPUT7,
INPUT8)
9. Using the HDMI CEC
11. Connecting Recorder,
Player, etc.
21. Connecting Audio
Device
22. Connecting PC
6. Operating the Monitor
Using a PC (IP control)
7. Troubleshooting
>
<
Connecting Other Devices
Connecting Recorder, Player, etc.
To connect through HDMI terminals
• Check the output terminals of your recorder or player, and connect to a terminal that is capable of high definition / high image quality.
NOTE
• For information on video types and image quality, page
5-14
• Even with a high-definition- / high-image-quality-capable terminal, a video input of standard image quality will be of standard quality.
• For information on connections, see page
5-13.
• When the Monitor is connected to an HDMI CEC compatible recorder, you can operate the recorder with the remote control.
• For information on connection to INPUT 7 (8K signal), see page
5-2.
5-11
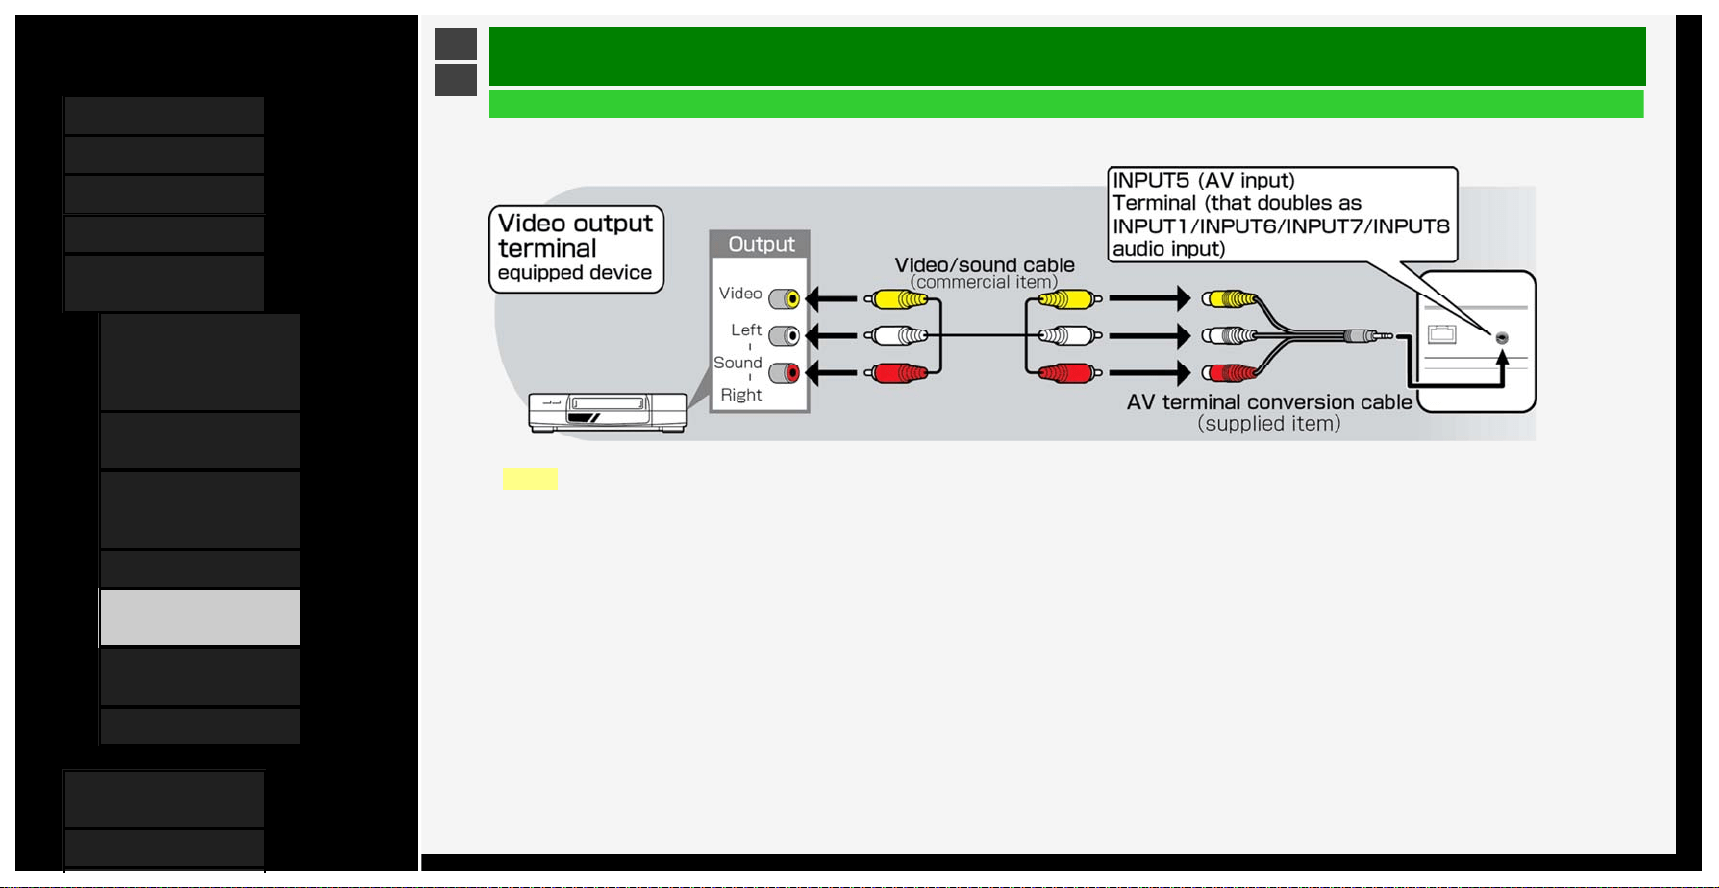
Contents
1. Part Names
2. Basic Operation
3. Menu Operation
4. USB Media
5. Connecting Other
Devices
1.
Connecting 8K Output-
compatible
Device/Quad-screen
display(4K or less)
5. Connecting 4K Output-
compatible Device
7. Viewing HDR Video
(INPUT1, INPUT7,
INPUT8)
9. Using the HDMI CEC
11. Connecting Recorder,
Player, etc.
21. Connecting Audio
Device
22. Connecting PC
6. Operating the Monitor
Using a PC (IP control)
7. Troubleshooting
>
<
Connecting Other Devices
Connecting Recorder, Player, etc.
To connect through video terminals
NOTE
• Connect each video / audio cable to the terminal of the same color as its tip (yellow cable connects to yellow terminal, and white / red cables to white / red terminals,
respectively).
• To play a commercially available Blu-ray Disc in a recorder or player, connect between the recorder or player and the Monitor through an HDMI cable. There may be no
video or audio / sound output from a blu-ray disc in a Digital Rights Management-based recorder or player.
5-12
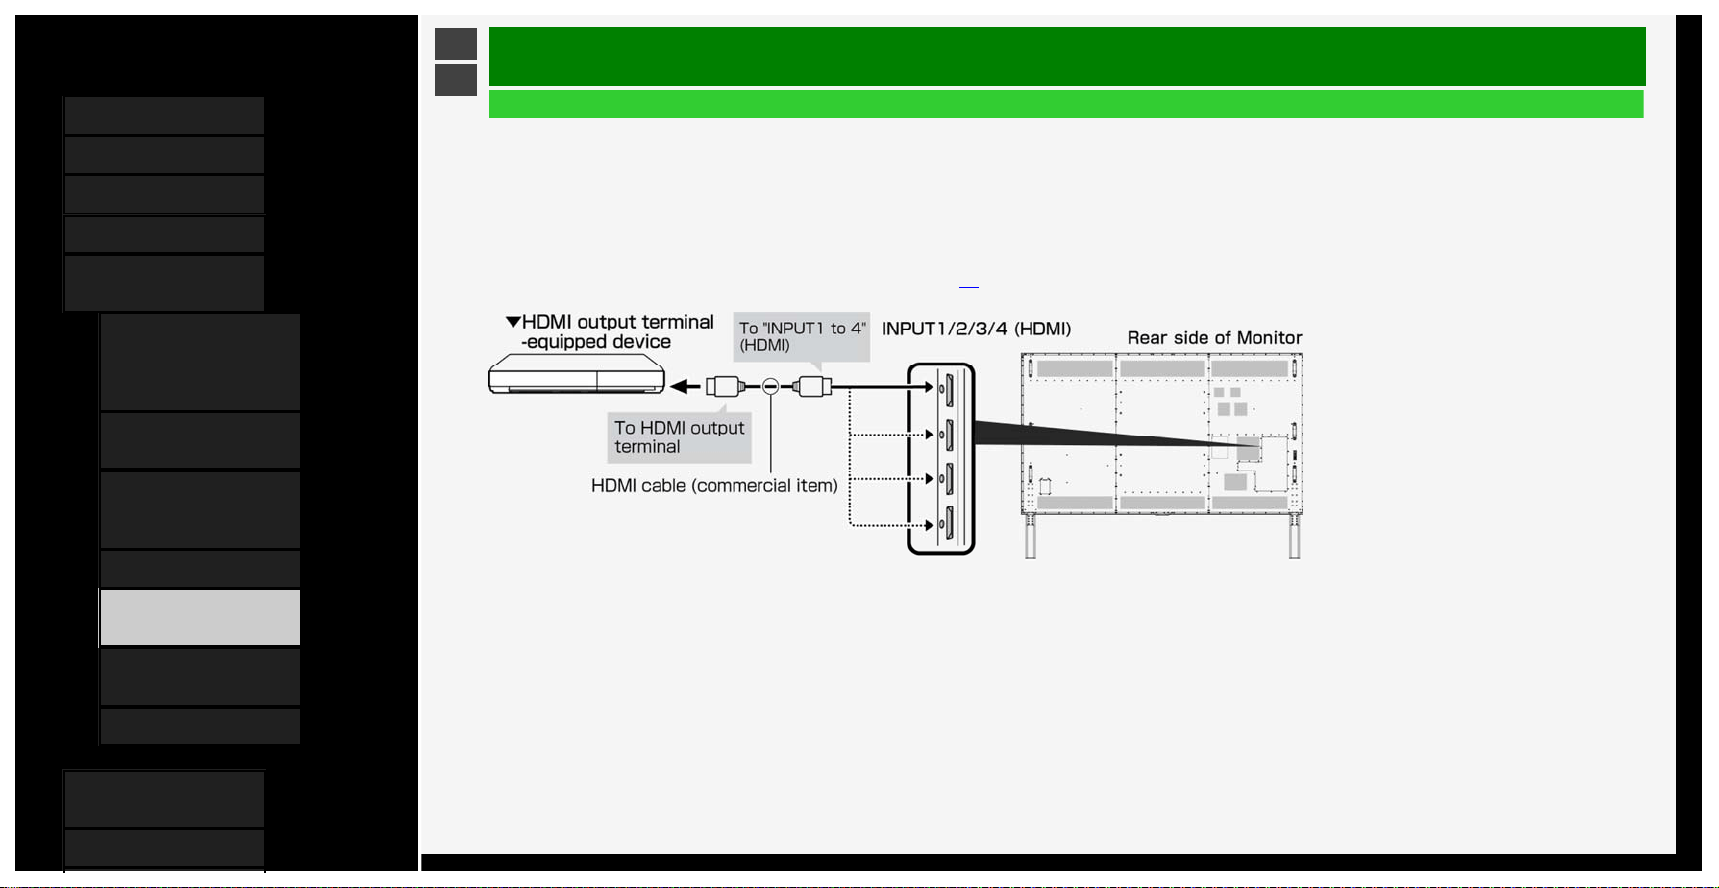
Contents
1. Part Names
2. Basic Operation
3. Menu Operation
4. USB Media
5. Connecting Other
Devices
1. Connecting 8K Output-
compatible
Device/Quad-screen
display(4K or less)
5. Connecting 4K Output-
compatible Device
7.
Viewing HDR Video
(INPUT1, INPUT7,
INPUT8)
9. Using the HDMI CEC
11. Connecting Recorder,
Player, etc.
21. Connecting Audio
Device
22. Connecting PC
6. Operating the Monitor
Using a PC (IP control)
7. Troubleshooting
>
<
Connecting Other Devices
Connecting Recorder, Player, etc.
For a device with an HDMI output terminal
• HDMI terminals allow video and audio signals to be transmitted through an HDMI-certified cable (commercial product).
• Be sure to use a commercially available HDMI-certified product.
If you use a cable that is not HDMI-certifed, a malfunction may occur, such as a failure to display a video or operate HDMI CEC, no sound coming from the Monitor, or a
noise in video.
• If any of the following apply, use a Premium HDMI cable.
- When connecting to a device that is 4K2K output compatible
- When inputting a video signal (1080p)
• For information on connection to INPUT 7 (8K signal), see page
5-2.
• When playing back a 4K60p video or an HDR video from ULTRA HD Blu-ray TM, connect to INPUT1 of the Monitor through a 18Gbps-capable cable certified as a "premium
HDMI cable".
5-13

Contents
1. Part Names
2. Basic Operation
3. Menu Operation
4. USB Media
5. Connecting Other
Devices
1. Connecting 8K Output-
compatible
Device/Quad-screen
display(4K or less)
5. Connecting 4K Output-
compatible Device
7. Viewing HDR Video
(INPUT1, INPUT7,
INPUT8)
9. Using the HDMI CEC
11.
Connecting Recorder,
Player, etc.
21. Connecting Audio
Device
22. Connecting PC
6. Operating the Monitor
Using a PC (IP control)
7. Troubleshooting
>
<
Connecting Other Devices
Connecting Recorder, Player, etc.
For a device with an HDMI output terminal (INPUT 1 / 2 / 3 / 4)
Supported video signals
• 3840 × 2160 (24Hz/25Hz/30Hz/50Hz/60Hz
*
), 1080p (24Hz/30Hz/50Hz/60Hz), 720p (30Hz/50Hz/60Hz),
1080i, 576p, 576i, 480p, 480i, VGA, SVGA, XGA, WXGA, SXGA, SXGA+
*Only INPUT 1 supports for 4K50p/60p (4:2:2, 4:4:4) signals.
Supported audio sound signals
• Type: Linear PCM (2ch)
*1
, AAC
*2
, Dolby Digital
sampling frequency: 48kHz / 44.1kHz / 32kHz
*1 Only Linear PCM is supported (INPUT 7) during viewing 8K video.
*2 Since digital broadcasting makes efficient use of limited radio waves, videos or sounds are compressed before being transmitted.
AAC is an audio compression format that is used in digital broadcasting, and that, in spite of a high compression ratio, can achieve high sound quality and even support
multi-channel audio (5.1 channel surround, etc.).
NOTE
• If a device that is not HDMI CEC compatible is connected to the monitor, it may turn on and off, or switch channels on its own. In this case, set "CEC control" to "Off".
(page
3-31)
5-14
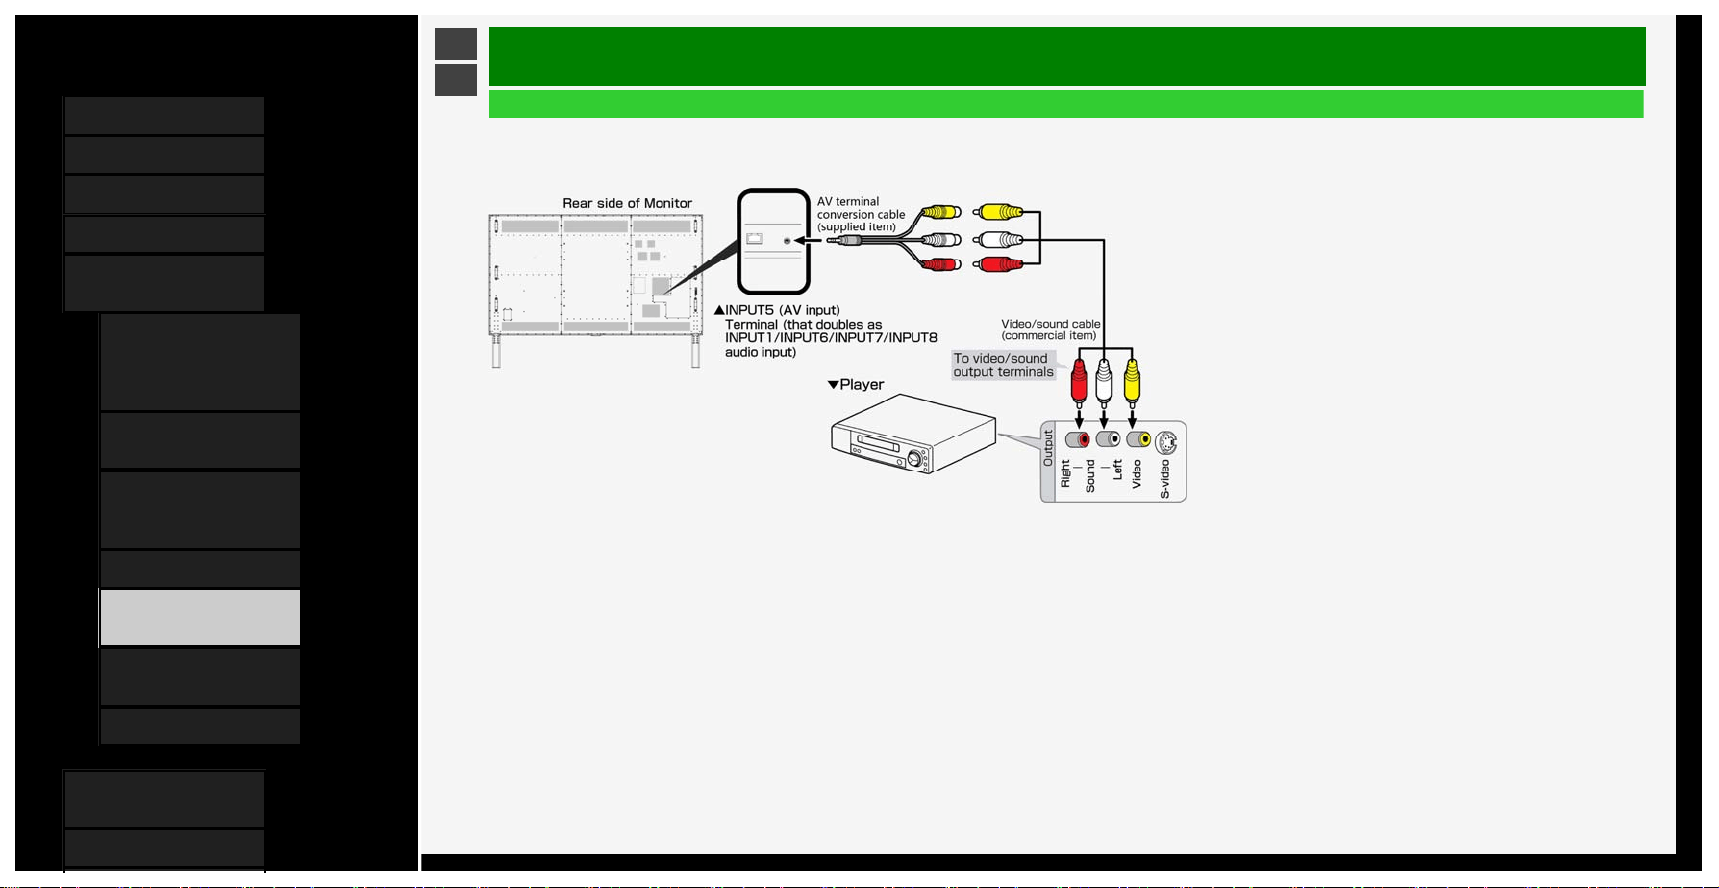
Contents
1. Part Names
2. Basic Operation
3. Menu Operation
4. USB Media
5. Connecting Other
Devices
1.
Connecting 8K Output-
compatible
Device/Quad-screen
display(4K or less)
5. Connecting 4K Output-
compatible Device
7. Viewing HDR Video
(INPUT1, INPUT7,
INPUT8)
9. Using the HDMI CEC
11. Connecting Recorder,
Player, etc.
21. Connecting Audio
Device
22. Connecting PC
6. Operating the Monitor
Using a PC (IP control)
7. Troubleshooting
>
<
Connecting Other Devices
Connecting Recorder, Player, etc.
For a device with a video output terminal (connection for playback)
• Do not turn on the Monitor and recoding device before completing connection between the Monitor and the recording device.
• Connect each video / audio cable to the terminal of the same color as its tip (yellow cable connects to yellow terminal, and white / red cables to white / red terminals,
respectively).
• Be sure to use the supplied conversion cable. When using any conversion cable other than the supplied one, the Monitor may not operate properly, or breakages may occur.
5-15
Contents
1. Part Names
2. Basic Operation
3. Menu Operation
4. USB Media
5. Connecting Other
Devices
1.
Connecting 8K Output-
compatible
Device/Quad-screen
display(4K or less)
5. Connecting 4K Output-
compatible Device
7. Viewing HDR Video
(INPUT1, INPUT7,
INPUT8)
9. Using the HDMI CEC
11. Connecting Recorder,
Player, etc.
21. Connecting Audio
Device
22. Connecting PC
6. Operating the Monitor
Using a PC (IP control)
7. Troubleshooting
>
<
Connecting Other Devices
Connecting Recorder, Player, etc.
Switching to the screen of a BD recorder, etc.
• Switching to the screen of HDMI output allows you to watch BD or DVD video.
The underlined step describes the operation of an external device such as BD recorder.
1. Connect a BD recorder to the Monitor, and press its power button to turn on the BD recorder
2. Insert a disk you want to play back.
3. Press INPUT to display the input change menu.
• Perform the operation on page
5-17 during the display of the menu.
5-16

Contents
1. Part Names
2. Basic Operation
3. Menu Operation
4. USB Media
5. Connecting Other
Devices
1.
Connecting 8K Output-
compatible
Device/Quad-screen
display(4K or less)
5. Connecting 4K Output-
compatible Device
7. Viewing HDR Video
(INPUT1, INPUT7,
INPUT8)
9. Using the HDMI CEC
11. Connecting Recorder,
Player, etc.
21. Connecting Audio
Device
22. Connecting PC
6. Operating the Monitor
Using a PC (IP control)
7. Troubleshooting
>
<
Connecting Other Devices
Connecting Recorder, Player, etc.
Switching to the screen of a BD recorder, etc.
The underlined step describes the operation of an external device such as BD recorder.
4. Press INPUT repeatedly to select the name of the input to which the device is connected
• It can also be selected by using the
/ button.
Selectable input
•"INPUT5" can be selected only when a video device is connected to the Monitor.
5. Play a video from a BD recorder
• A video is played on the Monitor.
• Some external devices may require a setting be made to output a video.For information on how to
make the setting, refer to the operation manual for the BD recorder connected to the Monitor.
5-17
Contents
1. Part Names
2. Basic Operation
3. Menu Operation
4. USB Media
5. Connecting Other
Devices
1.
Connecting 8K Output-
compatible
Device/Quad-screen
display(4K or less)
5. Connecting 4K Output-
compatible Device
7. Viewing HDR Video
(INPUT1, INPUT7,
INPUT8)
9. Using the HDMI CEC
11. Connecting Recorder,
Player, etc.
21. Connecting Audio
Device
22. Connecting PC
6. Operating the Monitor
Using a PC (IP control)
7. Troubleshooting
>
<
Connecting Other Devices
Connecting Recorder, Player, etc.
Switching to the screen of a BD recorder, etc.
To change displayed name of input source as desired
• The device names displayed in the input menu, etc. can be changed to the names of the devices connected to
INPUT1 to 8.
1. Press INPUT, followed by
/ to select any input to be renamed (INPUT1 to 8), and then press ENTER
2. Press MENU to display the Menu, followed by / / / to select "Setup", and then press ENTER
3. Press
/ / / to select " (Option)" - "Terminal setting"
4. Press / to select "Input label", and then select the name to be displayed
• If you want to input a desired device name, select "EDIT" and determine the name. (Entering Letters
page
3-45)
5-18
Contents
1. Part Names
2. Basic Operation
3. Menu Operation
4. USB Media
5. Connecting Other
Devices
1.
Connecting 8K Output-
compatible
Device/Quad-screen
display(4K or less)
5. Connecting 4K Output-
compatible Device
7. Viewing HDR Video
(INPUT1, INPUT7,
INPUT8)
9. Using the HDMI CEC
11. Connecting Recorder,
Player, etc.
21. Connecting Audio
Device
22. Connecting PC
6. Operating the Monitor
Using a PC (IP control)
7. Troubleshooting
>
<
Connecting Other Devices
Connecting Recorder, Player, etc.
Switching to the screen of a BD recorder, etc.
To skip unused inputs
• Unused inputs (INPUT1 to 4, INPUT6, INPUT7, INPUT8) can be skipped during input change.
1. Press MENU to display the Menu, followed by
/ / / to select "Setup", and then press ENTER
2. Press
/ / / to select " (Option)" - "Terminal setting"
3. Press / to select "Input skip", and then press ENTER
4. Press / to select an input you want to skip, and then set the input to "Yes"
• To cancel the input skip, select "No".
5-19

Contents
1. Part Names
2. Basic Operation
3. Menu Operation
4. USB Media
5. Connecting Other
Devices
1.
Connecting 8K Output-
compatible
Device/Quad-screen
display(4K or less)
5. Connecting 4K Output-
compatible Device
7. Viewing HDR Video
(INPUT1, INPUT7,
INPUT8)
9. Using the HDMI CEC
11. Connecting Recorder,
Player, etc.
21. Connecting Audio
Device
22. Connecting PC
6. Operating the Monitor
Using a PC (IP control)
7. Troubleshooting
>
<
Connecting Other Devices
Connecting Recorder, Player, etc.
Switching to the screen of a BD recorder, etc
.
W
hen connecting a video game console
.
• You can connect and play video game console in all INPUT. In case you play video game in INPUT7, you can feel better response in PC mode.
5-20
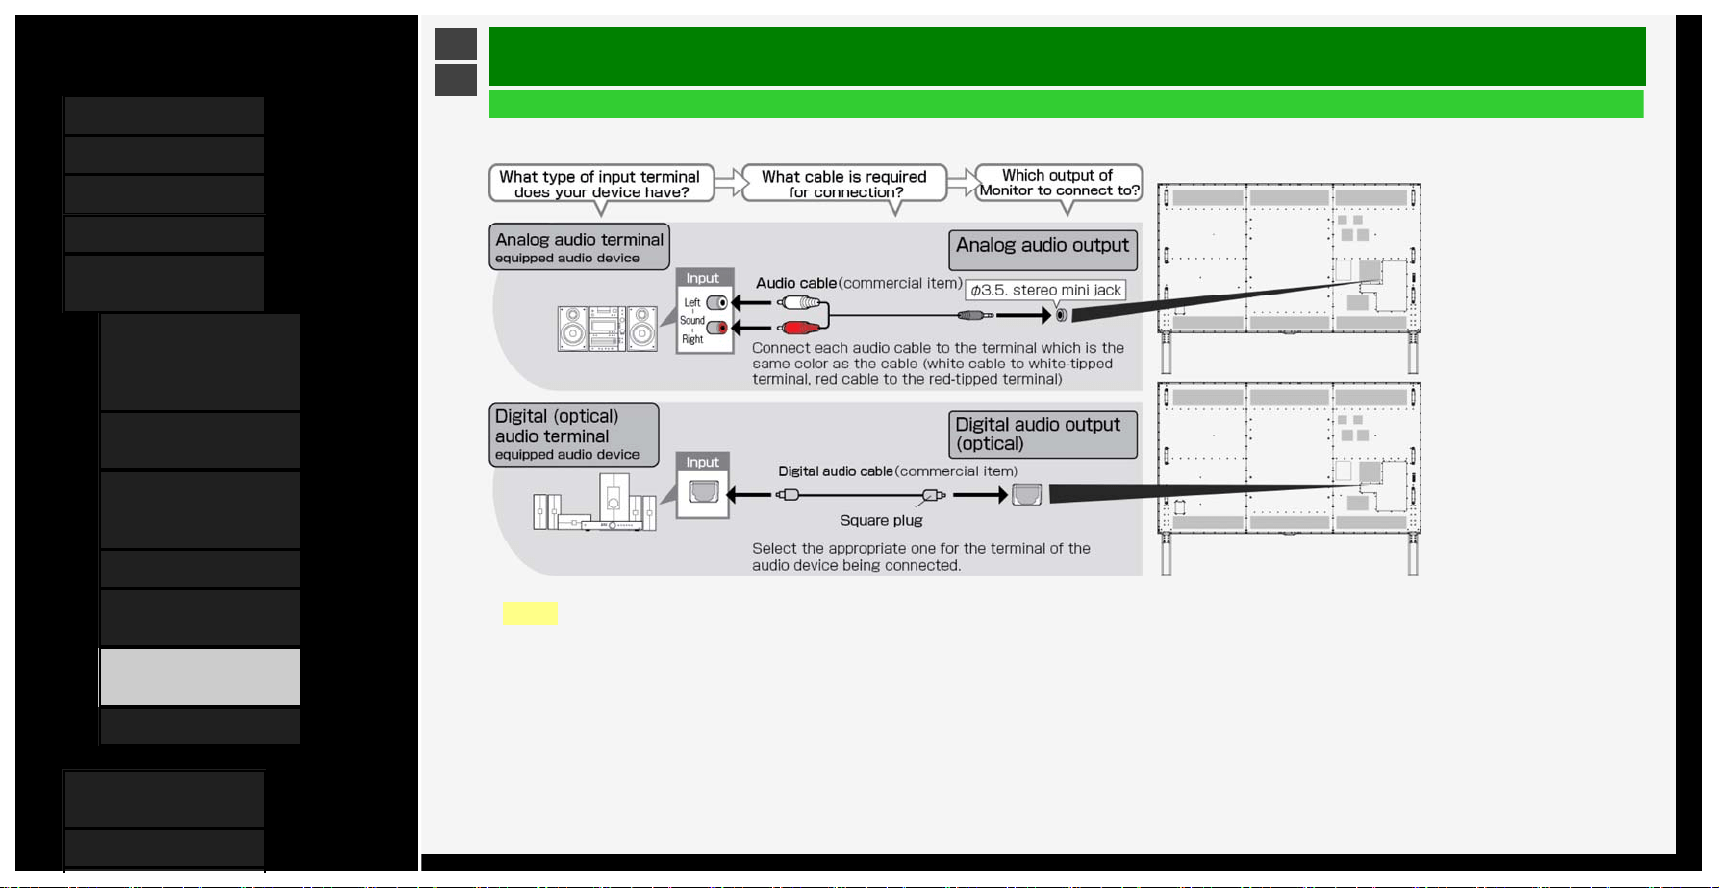
Contents
1. Part Names
2. Basic Operation
3. Menu Operation
4. USB Media
5. Connecting Other
Devices
1.
Connecting 8K Output-
compatible
Device/Quad-screen
display(4K or less)
5. Connecting 4K Output-
compatible Device
7. Viewing HDR Video
(INPUT1, INPUT7,
INPUT8)
9. Using the HDMI CEC
11. Connecting Recorder,
Player, etc.
21. Connecting Audio
Device
22. Connecting PC
6. Operating the Monitor
Using a PC (IP control)
7. Troubleshooting
>
<
Connecting Other Devices
Connecting Audio Device
• You can connect an audio device to the Monitor and enjoy impressive sound quality and volume.
NOTE
• The supplied conversion cable cannot be used in analog audio output applications.
if the supplied conversion cable is used, one side of the audio will fail to output properly.
5-21
Contents
1. Part Names
2. Basic Operation
3. Menu Operation
4. USB Media
5. Connecting Other
Devices
1. Connecting 8K Output-
compatible
Device/Quad-screen
display(4K or less)
5. Connecting 4K Output-
compatible Device
7. Viewing HDR Video
(INPUT1, INPUT7,
INPUT8)
9. Using the HDMI CEC
11. Connecting Recorder,
Player, etc.
21. Connecting Audio
Device
22.
Connecting PC
6. Operating the Monitor
Using a PC (IP control)
7. Troubleshooting
>
<
Connecting Other Devices
Connecting PC
Using as a monitor for P
C
• Before connecting a PC to the Monitor, check the output resolution of the PC. If the PC does not provide support for the following resolutions, the PC screen cannot be
displayed on the Monitor.
The resolutions supported by this monitor
Resolution (pixel)
Horizontal frequency
(kHz)
Vertical frequency
(Hz)
VESA
standards
Input1
Input2〜4
Input6
Input7
A〜D
Input8
720 x 400 31.5 70 No Yes Yes Yes No No
VGA 640 x 480
31.5 60 Yes Yes Yes Yes Yes Yes
37.9 72 Yes Yes Yes Yes No No
37.5 75 Yes Yes Yes Yes No No
SVGA 800 x 600
35.1 56 Yes Yes Yes Yes No No
37.9 60 Yes Yes Yes Yes Yes Yes
48.1 72 Yes Yes Yes Yes No No
46.9 75 Yes Yes Yes Yes No No
XGA 1024 x 768
48.4 60 Yes Yes Yes Yes Yes Yes
56.5 70 Yes Yes Yes Yes No No
60.0 75 Yes Yes Yes Yes No No
WXGA
1280 x 800 49.7 60 Yes Yes Yes Yes Yes Yes
1366 x 768 47.7 60 Yes Yes Yes Yes Yes Yes
SXGA 1280 x 1024 64.0 60 Yes Yes Yes Yes Yes Yes
SXGA+ 1400 x 1050 65.3 60 Yes Yes Yes Yes Yes Yes
5-22
Contents
1. Part Names
2. Basic Operation
3. Menu Operation
4. USB Media
5. Connecting Other
Devices
1. Connecting 8K Output-
compatible
Device/Quad-screen
display(4K or less)
5. Connecting 4K Output-
compatible Device
7. Viewing HDR Video
(INPUT1, INPUT7,
INPUT8)
9. Using the HDMI CEC
11. Connecting Recorder,
Player, etc.
21. Connecting Audio
Device
22.
Connecting PC
6. Operating the Monitor
Using a PC (IP control)
7. Troubleshooting
>
<
Connecting Other Devices
Connecting PC
Using as a monitor for P
C
The resolutions supported by this monitor
Resolution (pixel)
Horizontal frequency
(kHz)
Vertical frequency
(Hz)
VESA
standards
Input1
Input2〜4
Input6
Input7
A〜D
Input8
480p 720 x 480 31.5 60 No Yes Yes No Yes Yes
576p 720 x 576 31.3 50 No Yes Yes No Yes Yes
1080i 1920 x 1080
28.1 50 No Yes Yes No Yes Yes
33.8 60 No Yes Yes No Yes Yes
720p 1280 x 720
22.5 30 No Yes Yes No No No
37.5 50 No Yes Yes No Yes Yes
45.0 60 No Yes Yes No Yes Yes
1080p 1920 x 1080
27.0 24 No Yes Yes No Yes Yes
33.8 30 No Yes Yes No Yes Yes
56.3 50 No Yes Yes No Yes Yes
67.5 60 No Yes Yes Yes Yes Yes
4K 3840 x 2160
54.0 24 No Yes Yes No Yes Yes
56.3 25 No Yes Yes No Yes Yes
67.5 30 No Yes Yes No Yes Yes
112.5 50 No Yes No No Yes Yes
135.0 60 No Yes No No Yes Yes
5-23

Contents
1. Part Names
2. Basic Operation
3. Menu Operation
4. USB Media
5. Connecting Other
Devices
1.
Connecting 8K Output-
compatible
Device/Quad-screen
display(4K or less)
5. Connecting 4K Output-
compatible Device
7. Viewing HDR Video
(INPUT1, INPUT7,
INPUT8)
9. Using the HDMI CEC
11. Connecting Recorder,
Player, etc.
21. Connecting Audio
Device
22. Connecting PC
6. Operating the Monitor
Using a PC (IP control)
7. Troubleshooting
>
<
Connecting Other Devices
Connecting PC
Using as a monitor for P
C
NOTE
• When a certain type of PC is connected to the Monitor, the PC screen may fail to display properly or completely even if the input signal is supported by the Monitor.
•"Out of range" message will be displayed if an unsupported signal is input. In such situation, refer to the operation manual of the connected device and change to the
supported signal.
• The selectable screen size may vary depending on the input signal from PC. For information on the screen size types,
see page
5-25.
• For particular input signals, on-screen letters may appear blurred if certain conditions are met.
5-24

Contents
1. Part Names
2. Basic Operation
3. Menu Operation
4. USB Media
5. Connecting Other
Devices
1.
Connecting 8K Output-
compatible
Device/Quad-screen
display(4K or less)
5. Connecting 4K Output-
compatible Device
7. Viewing HDR Video
(INPUT1, INPUT7,
INPUT8)
9. Using the HDMI CEC
11. Connecting Recorder,
Player, etc.
21. Connecting Audio
Device
22. Connecting PC
6. Operating the Monitor
Using a PC (IP control)
7. Troubleshooting
>
<
Connecting Other Devices
Connecting PC
Using as a monitor for P
C
Selectable screen size for the Monitor (The selectable screen sizes may vary depending on the input signal from PC.)
Input signal Normal Zoom Full Dot by Dot
Video image being vertically longer
than
16:9
640×480,
800×600,
1024×768,
1280×1024, etc.
>
Appears as shown by the drawing,
without disturbing the aspect ratio for
the input signal
Appears enlarged laterally to the limit
of the screen.
Cuts off the top and bottom of the
video image.
Appears full screen. Displayed to the input signal
resolution.
16:9 video image
>
--
Appears full screen. Displayed to the input signal
resolution.
5-25

Contents
1. Part Names
2. Basic Operation
3. Menu Operation
4. USB Media
5. Connecting Other
Devices
1. Connecting 8K Output-
compatible
Device/Quad-screen
display(4K or less)
5. Connecting 4K Output-
compatible Device
7.
Viewing HDR Video
(INPUT1, INPUT7,
INPUT8)
9. Using the HDMI CEC
11. Connecting Recorder,
Player, etc.
21. Connecting Audio
Device
22. Connecting PC
6. Operating the Monitor
Using a PC (IP control)
7. Troubleshooting
>
<
Connecting Other Devices
Connecting PC
Using as a monitor for PC
Displaying the PC screen / selecting the screen size
1. Turn on PC
2. Press INPUT to display the input change menu, and after selecting the input to which the PC has been
connected with the
/ button, press ENTER
• The PC screen will be displayed.
3. Press MENU to display the Menu, select "Setup" with the
/ / / and press ENTER
4. Press / / / to select " (Option)" - "Option for view", and press ENTER
5. Select "Wide mode", and then press ENTER
6. Select the desired screen size from the screen size selection menu
• When you need to adjust the screen, refer to the following.
Adjusting the screen of PC connected to INPUT1 to 4
• Press MENU to display the Menu, press
/ / / and ENTER to select "Setup" - " (Option)" - "Screen
effect" - "Position" to configure the settings.
(page
3-41)
5-26
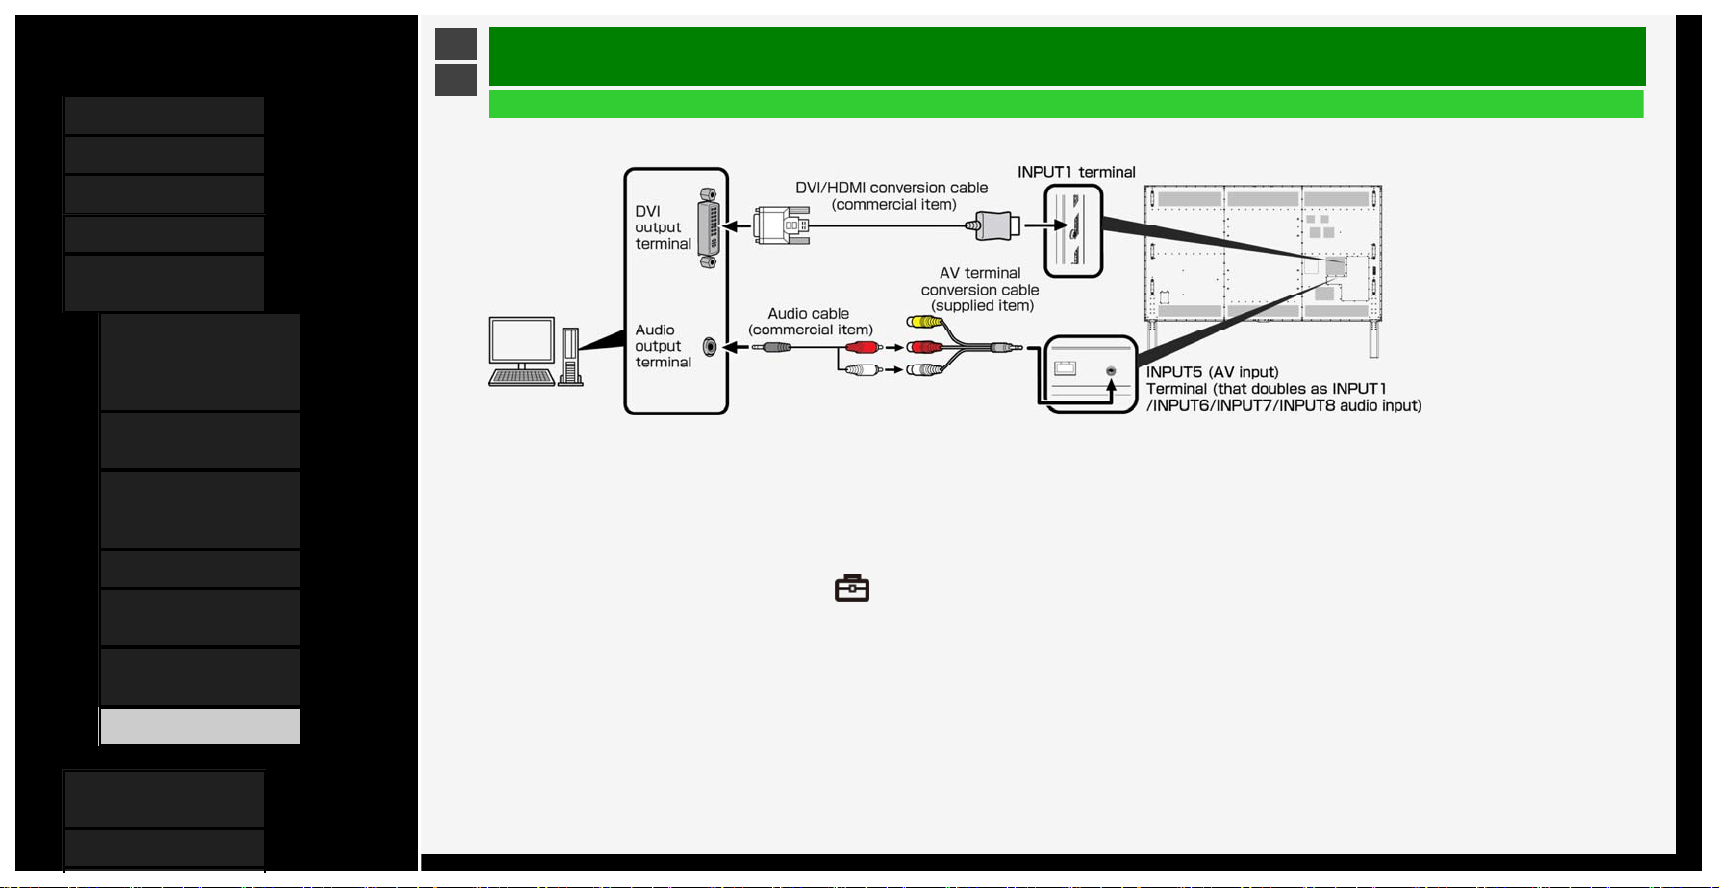
Contents
1. Part Names
2. Basic Operation
3. Menu Operation
4. USB Media
5. Connecting Other
Devices
1.
Connecting 8K Output-
compatible
Device/Quad-screen
display(4K or less)
5. Connecting 4K Output-
compatible Device
7. Viewing HDR Video
(INPUT1, INPUT7,
INPUT8)
9. Using the HDMI CEC
11. Connecting Recorder,
Player, etc.
21. Connecting Audio
Device
22. Connecting PC
6. Operating the Monitor
Using a PC (IP control)
7. Troubleshooting
>
<
Connecting Other Devices
Connecting PC
W
hen the monitor is connected to a PC with DVI output terminal (digital connection)
• Be sure to use the supplied conversion cable. When using any conversion cable other than the supplied one, the Monitor may not operate properly, or breakages may occur.
• A commercially available DVI / HDMI conversion cable and an audio cable are required.
• Use an audio cable that is compatible with the terminal of PC.
• The HDMI terminal of the Monitor, and the PC DVI terminal with a conversion cable, the PC screen may not be displayed properly or completely. This is because the cable
does not sufficiently meet HDMI standards.
• "This input signal is not supported" message will be displayed when an unsupported signal is input. In such situation, refer to the operation manual of the connected PC and
change to the supported signal.
• After switching to INPUT 1, select "Setup" - " (Option)" -"Terminal setting" - "INPUT1 audio setting" from the Menu, and then select "Analog audio input".
5-27
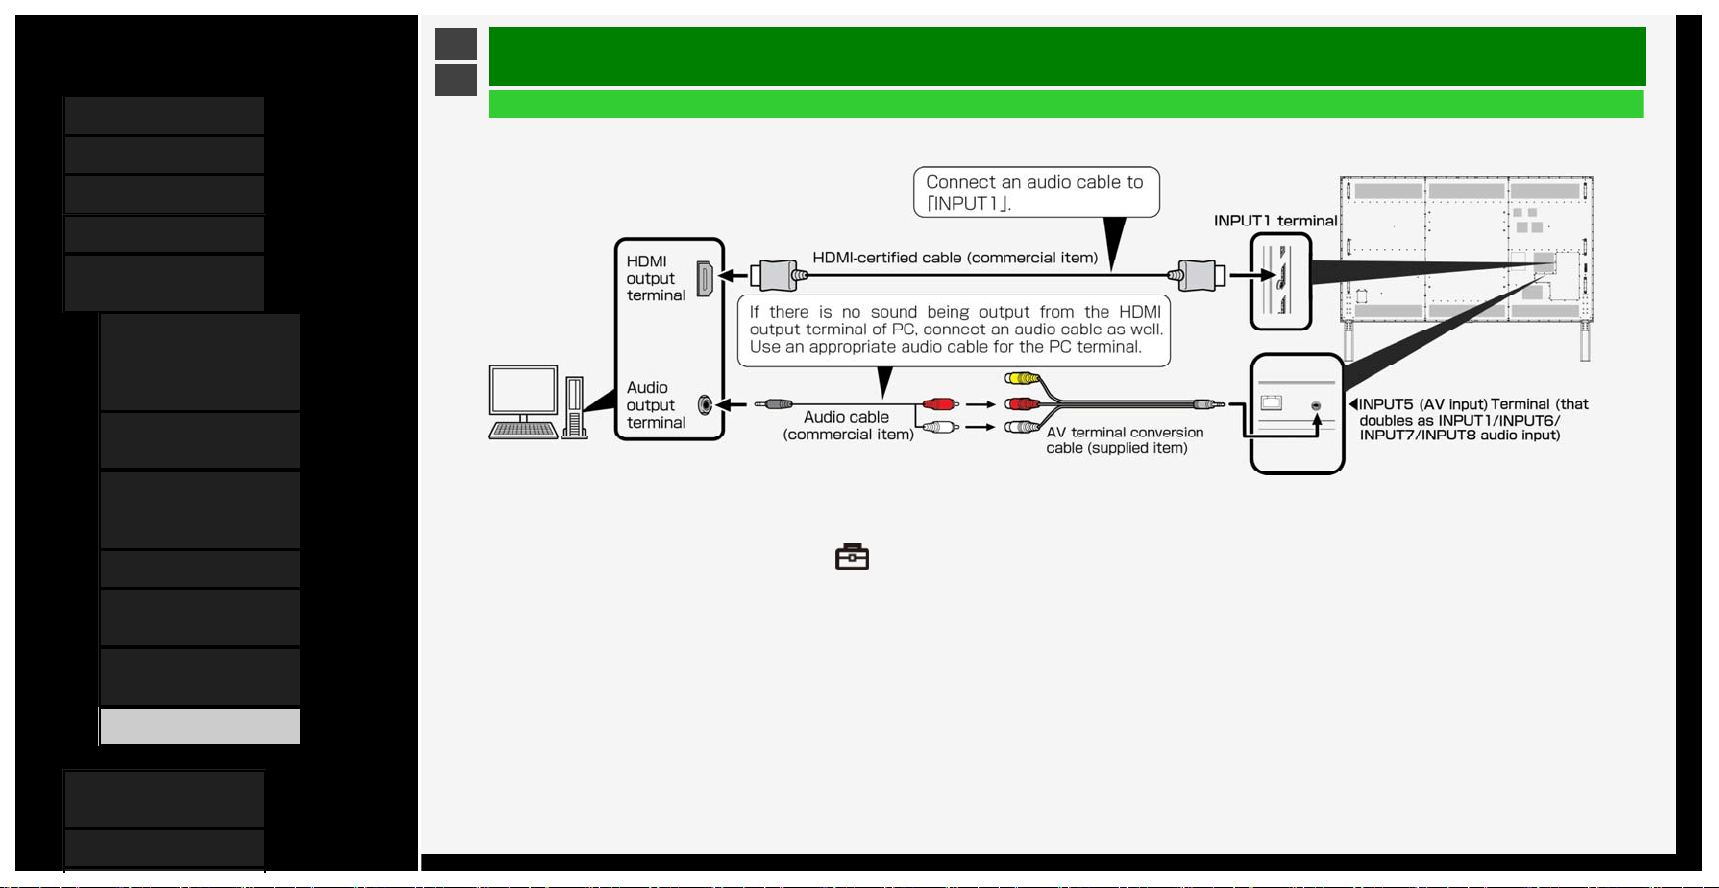
Contents
1. Part Names
2. Basic Operation
3. Menu Operation
4. USB Media
5. Connecting Other
Devices
1.
Connecting 8K Output-
compatible
Device/Quad-screen
display(4K or less)
5. Connecting 4K Output-
compatible Device
7. Viewing HDR Video
(INPUT1, INPUT7,
INPUT8)
9. Using the HDMI CEC
11. Connecting Recorder,
Player, etc.
21. Connecting Audio
Device
22. Connecting PC
6. Operating the Monitor
Using a PC (IP control)
7. Troubleshooting
>
<
Connecting Other Devices
Connecting PC
W
hen the monitor is connected to a PC with HDMI output terminal (digital connection)
• Be sure to use the supplied conversion cable.When using any conversion cable other than the supplied one, the Monitor may not operate properly, or a part may be broken.
• A commercially available HDMI-certified cable is required.
• After switching to INPUT 1, select "Setup" - " (Option)" -"Terminal setting" - "INPUT1 audio setting" from the Menu, and then select "Analog audio input".
5-28

Contents
1. Part Names
2. Basic Operation
3. Menu Operation
4. USB Media
5. Connecting Other
Devices
1.
Connecting 8K Output-
compatible
Device/Quad-screen
display(4K or less)
5. Connecting 4K Output-
compatible Device
7. Viewing HDR Video
(INPUT1, INPUT7,
INPUT8)
9. Using the HDMI CEC
11. Connecting Recorder,
Player, etc.
21. Connecting Audio
Device
22. Connecting PC
6. Operating the Monitor
Using a PC (IP control)
7. Troubleshooting
>
<
Connecting Other Devices
Connecting PC
W
hen the monitor is connected to a PC with analog RGB output terminal (analog connection)
• Be sure to use the supplied conversion cable.When using any conversion cable other than the supplied one, the Monitor may not operate properly, or a part may be broken.
• A commercially available D-sub cable and an audio cable are required.
• Use an audio cable that is compatible with the PC terminal.
• After switching to INPUT 6, select "Setup" - " (Option)" -"Terminal setting" - "INPUT6 audio setting" from the Menu, and then select "Analog audio input".
5-29
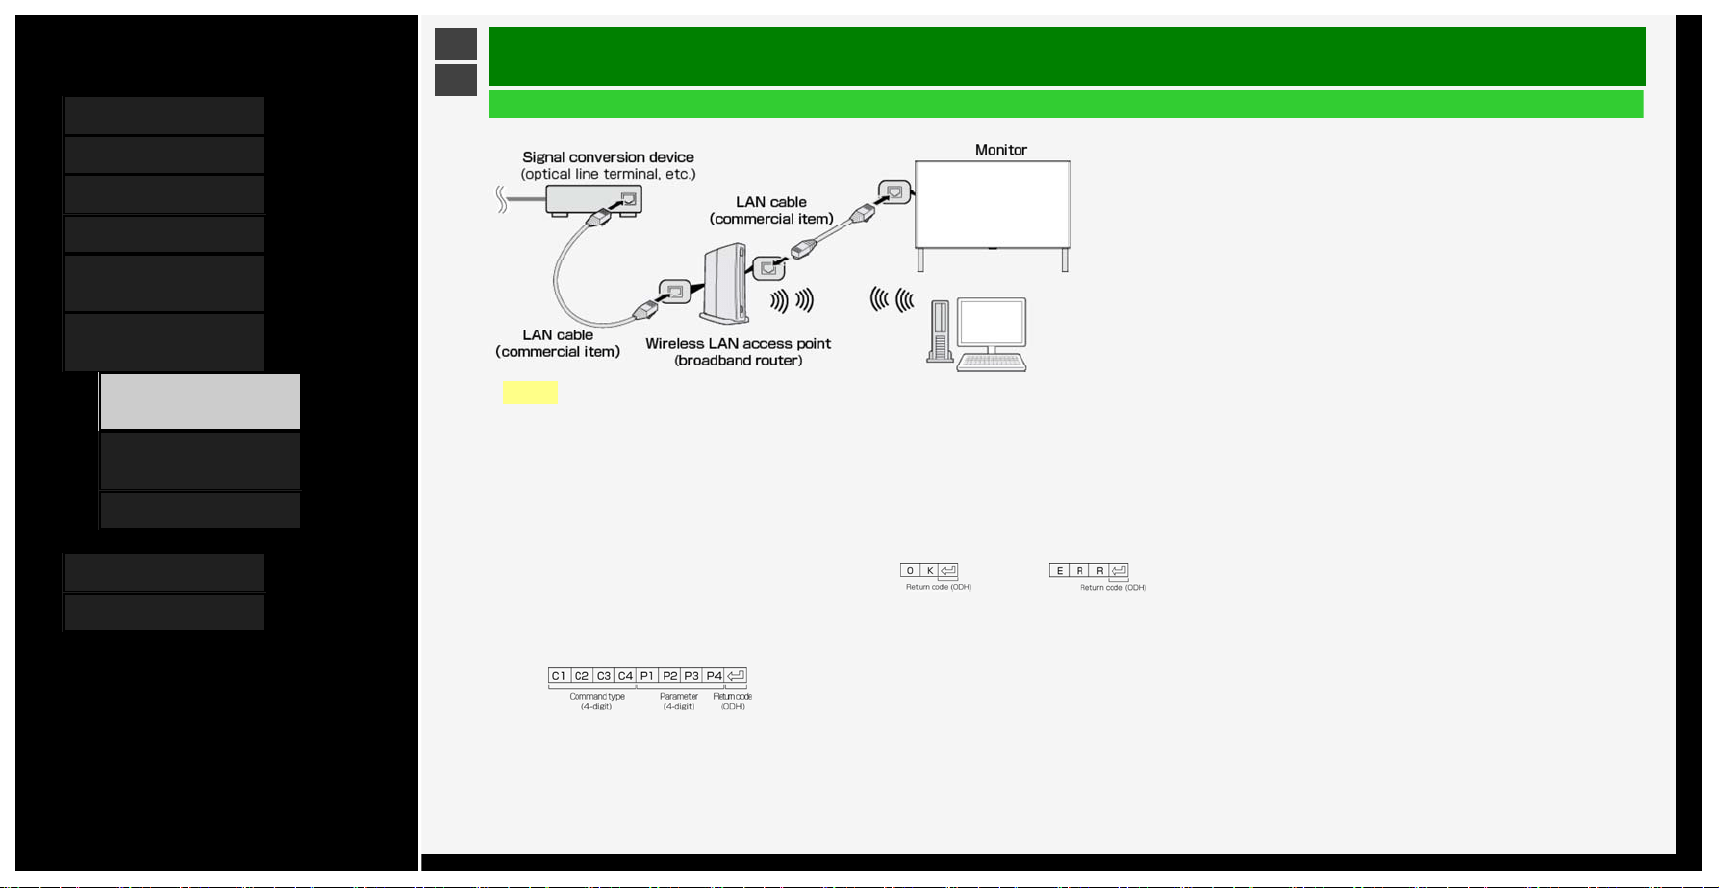
Contents
1. Part Names
2. Basic Operation
3. Menu Operation
4. USB Media
5. Connecting Other
Devices
6. Operating the Monitor
Using a PC (IP control)
1.
Connecting the Monitor
and PC
3. Settings to operate the
Monitor
4. Command list
7. Troubleshooting
8. Specifications, etc.
Ver. 1.00
>
<
Operating the Monitor Using a PC (IP control)
How to communicate
• Send a control command from PC.The
Monitor operates according to the
transmitted command, and sends a response
message back to PC.
• Do not send more than one command at the
same time.Send next command from PC
after it receives the successful return value
(OK).
Command (PC to Monitor)
Response (Monitor to PC)
When successful When unsuccessful (in the event of
a communication or command
error)
Connecting the Monitor and PC
• The Monitor is connected using a commercially available LAN cable.
NOTE
• When you use a network, your communication data is exposed to the risks of being stolen or illegally accessed.
To avoid these risks, you need to use this monitor in a secure network environment.
6-1

Contents
1. Part Names
2. Basic Operation
3. Menu Operation
4. USB Media
5. Connecting Other
Devices
6. Operating the Monitor
Using a PC (IP control)
1.
Connecting the Monitor
and PC
3. Settings to operate the
Monitor
4. Command list
7. Troubleshooting
8. Specifications, etc.
Ver. 1.00
>
<
Operating the Monitor Using a PC (IP control)
Command and argumen
t
• In the "B" part field, characters should be
entered left-aligned, and fill the rest of the
field length with spaces. (Must be 4
characters.) If it is outside the settable range,
"ERR" is returned.
• Any argument shown as "-" in the command
list on pages
6-4 to 6-7 can take on any one
of the followings:"0" to "9", "-" (minus), space
or "?"
• Certain commands return the currently set
value whenever "?" is assigned to their
arguments.
Connecting the Monitor and PC
6-2
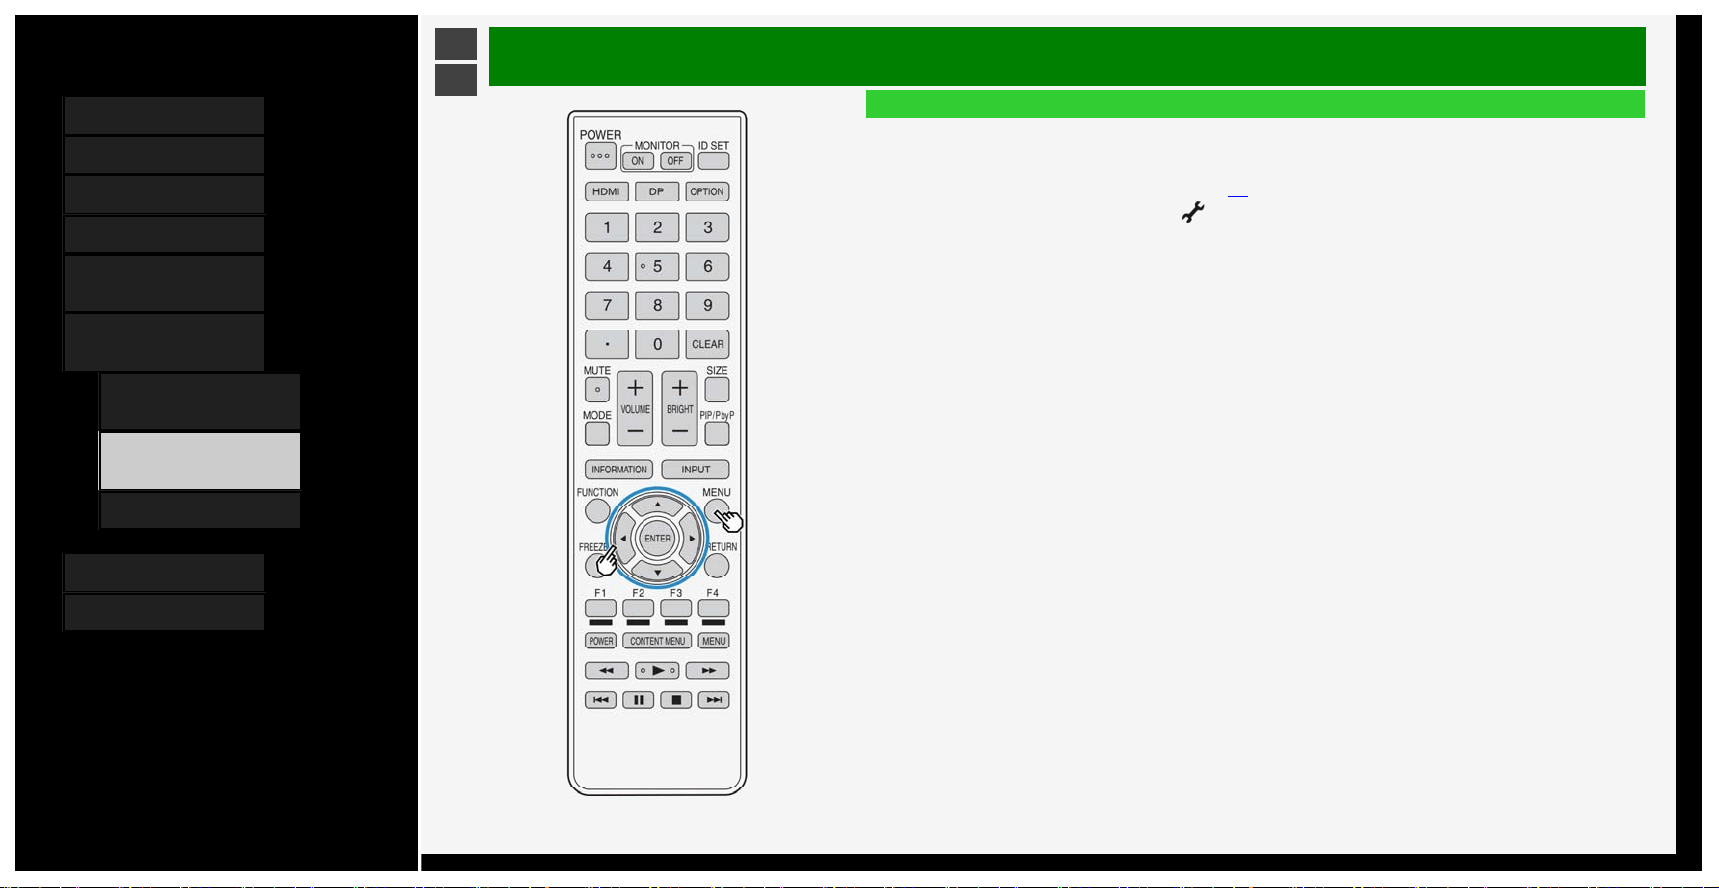
Contents
1. Part Names
2. Basic Operation
3. Menu Operation
4. USB Media
5. Connecting Other
Devices
6. Operating the Monitor
Using a PC (IP control)
1. Connecting the Monitor
and PC
3. Settings to operate the
Monitor
4. Command list
7. Troubleshooting
8. Specifications, etc.
Ver. 1.00
>
<
Operating the Monitor Using a PC (IP control)
Settings to operate the Monitor
• This is required to operate the Monitor remotely using a mobile device or PC.
• Using a terminal emulator, you can perform the Monitor operations, such as volume control and input change.
• This should be used by those who are computer-literate.
• For information on connecting to PC, see page
6-1.
1. Display the Menu, and select "Setup" - " (Initial setup)" - "Network setup"
2. Select "IP Control setup"
3. Select "IP Control setup"
4. Select "Change" to enable IP control
5. Select "Enable"
6. Set Login ID and Password
7. Select "Next"
8. Set Control port
9. Select "Next"
10. Select "Completed"
11. Follow on-screen instructions to establish the Power Save Mode.
• To turn on the Monitor using a mobile device or PC while it is in standby mode, you need to set the
Power Save Mode to "Off".
6-3
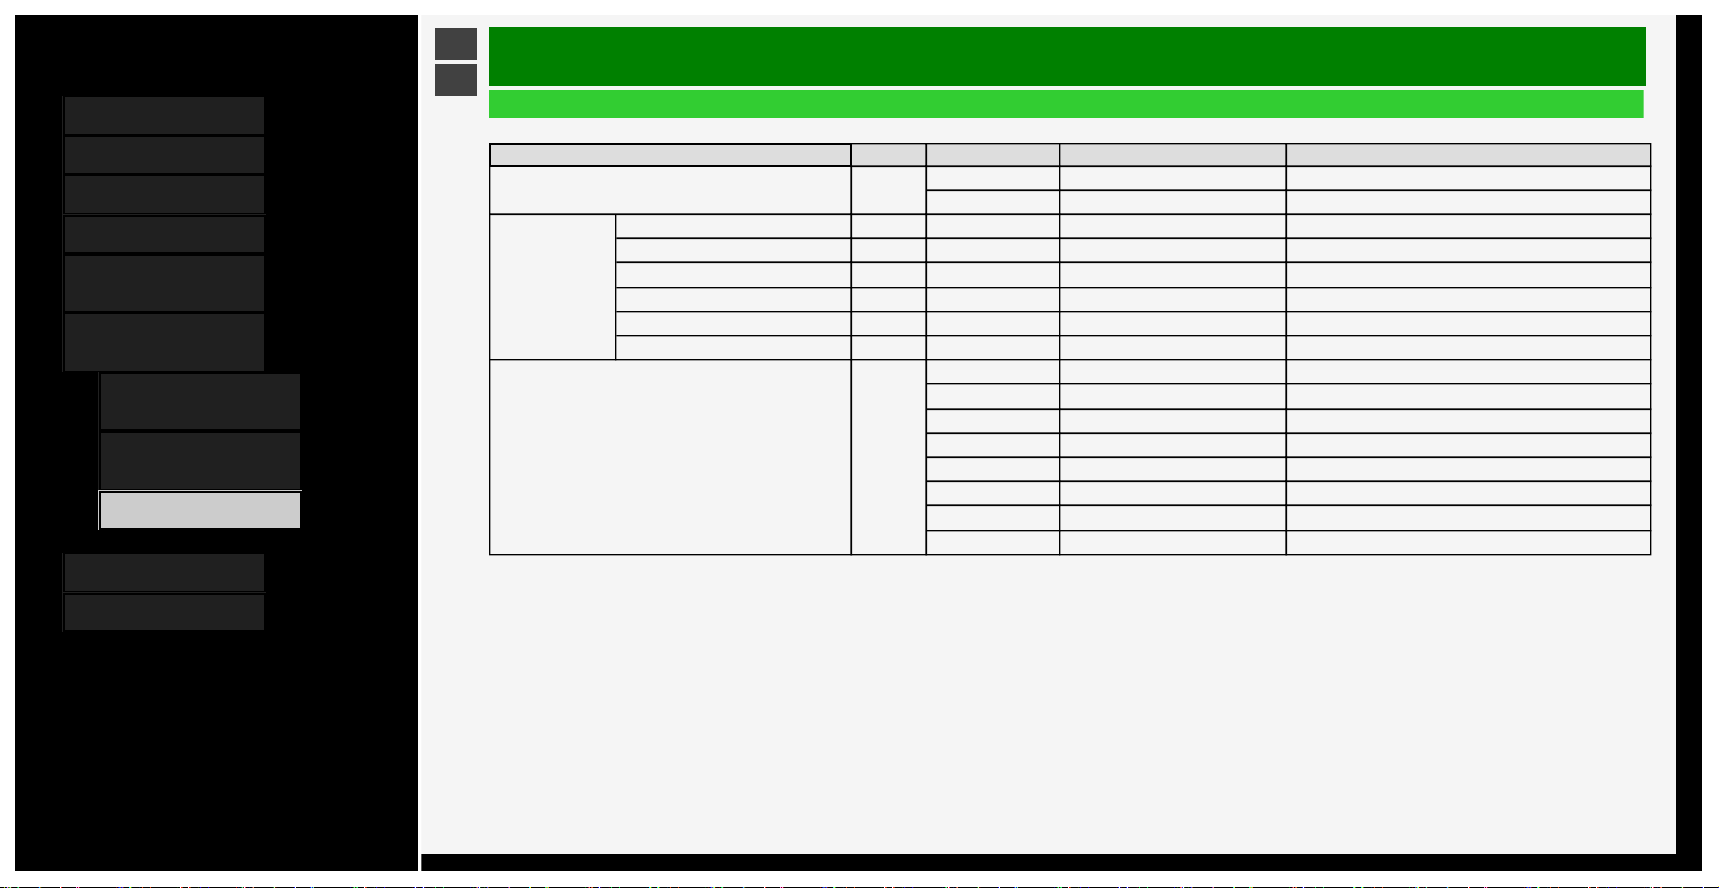
Contents
1. Part Names
2. Basic Operation
3. Menu Operation
4. USB Media
5. Connecting Other
Devices
6. Operating the Monitor
Using a PC (IP control)
1. Connecting the Monitor
and PC
3. Settings to operate the
Monitor
4. Command list
7. Troubleshooting
8. Specifications, etc.
Ver. 1.00
>
<
Operating the Monitor Using a PC (IP control)
Command list
• Any commands not listed in the following table are out of operation guarantee range.
Function “A”part “B”part Part operation description Remarks
Power POWR 0 Power off Transition to standby
1 Power on Return from standby*
Input change Toggle ITGD 0 (Toggle)
INPUT 1 to 4 (HDMI) IAVD 1 to 4 (Input terminal number) Change to INPUT 1 to INPUT 4
INPUT 5 (video) IAVD 5 Change to INPUT 5
INPUT 6 (analog RGB) IAVD 6 Change to INPUT 6
INPUT 7 (8K: HDMI×4) IAVD 7 Change to INPUT 7
INPUT 8 (8K) IAVD 8 Change to INPUT 8
AV MODE AVMD 0 (Toggle) Toggled among currently selectable items
504 USER1
505 USER2
506 USER3
7PC
500 PC2
9sRGB
6 DYNAMIC
6-4
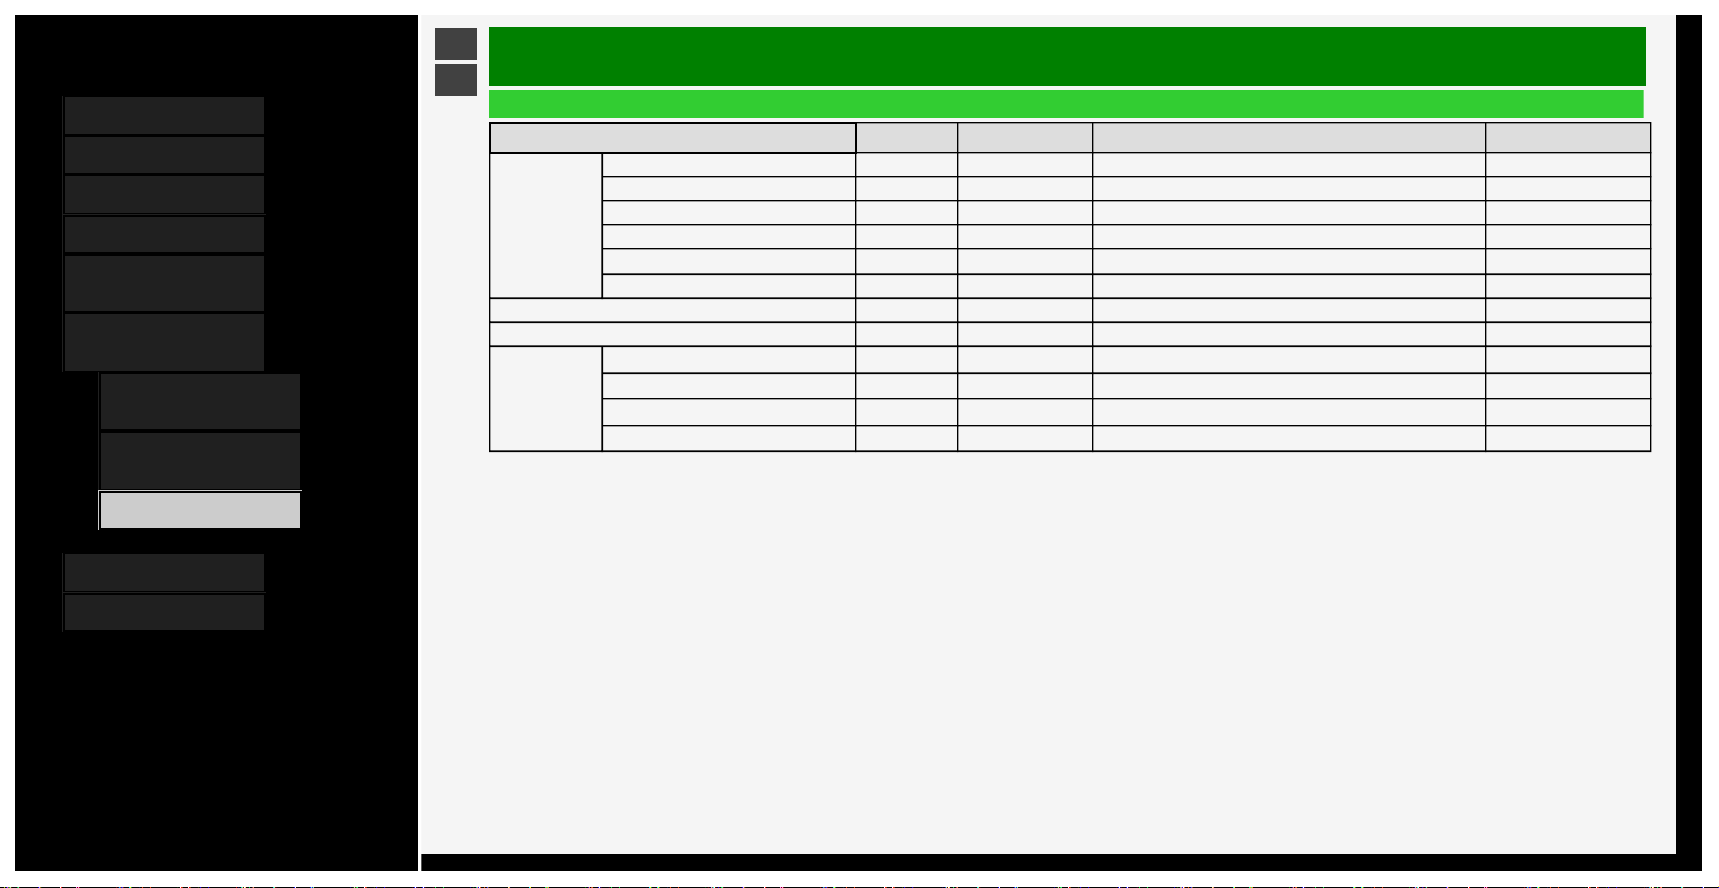
Contents
1. Part Names
2. Basic Operation
3. Menu Operation
4. USB Media
5. Connecting Other
Devices
6. Operating the Monitor
Using a PC (IP control)
1.
Connecting the Monitor
and PC
3. Settings to operate the
Monitor
4. Command list
7. Troubleshooting
8. Specifications, etc.
Ver. 1.00
>
<
Operating the Monitor Using a PC (IP control)
Command list
Function “A”part “B”part Part operation description Remarks
Picture Backlight VLMP -16 to 16 Backlight setup
Contrast CONT 0 to 40 Contrast setup
Brightness BLVL -30 to 30 Brightness setup
Color COLR -30 to 30 Color setup
Tint TINT -30 to 30 Tint setup
Sharpness SHRP 0 to 20 Sharpness setup
Volume VOLM 0 to 100 Volume value
Balance SBAL -30 to 30 Speaker output balance setup
Screen
Horizontal position HPOS
*
Moving value
PC input (
*
)
Vertical position VPOS
*
Moving value
PC input (
*
)
Clock frequency CLCK
*
Moving value
PC input (
*
)
Clock phase PHSE
*
Moving value
PC input (
*
)
*
The range varies depending on input, signal or screen size.
6-5
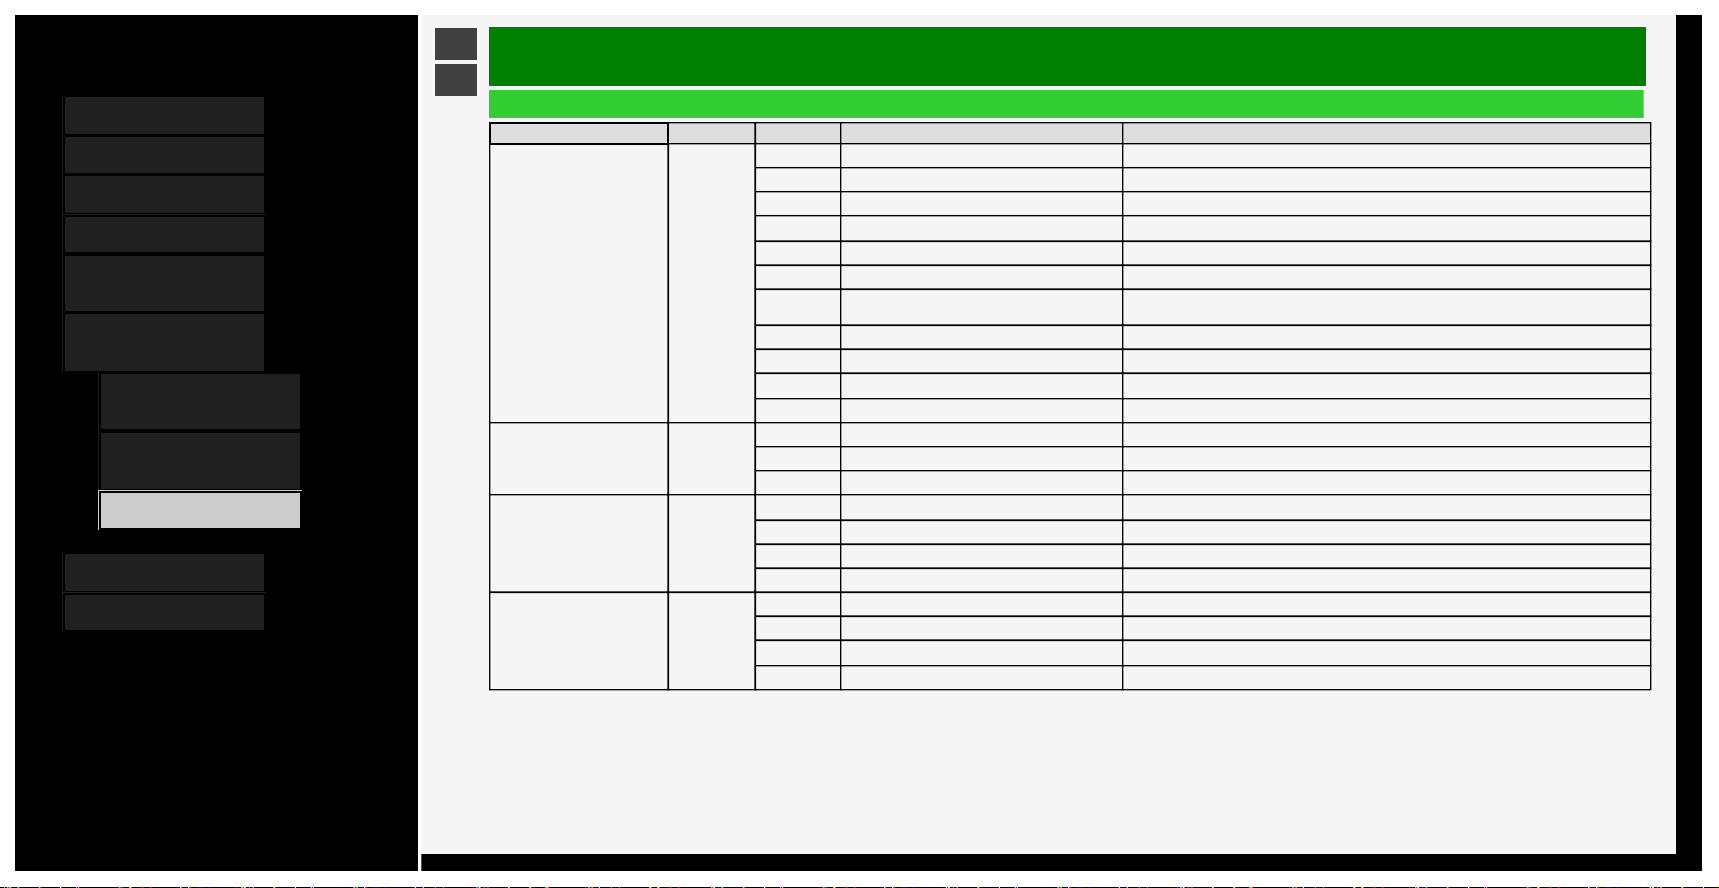
Contents
1. Part Names
2. Basic Operation
3. Menu Operation
4. USB Media
5. Connecting Other
Devices
6. Operating the Monitor
Using a PC (IP control)
1.
Connecting the Monitor
and PC
3. Settings to operate the
Monitor
4. Command list
7. Troubleshooting
8. Specifications, etc.
Ver. 1.00
>
<
Operating the Monitor Using a PC (IP control)
Command list
Function “A”part “B”part Part operation description Remarks
Screen size WIDE 0 (Toggle) Toggles among currently selectable items
1Normal
2 Smart zoom
3Wide 4:3
4Zoom
5Full
6 Full 1
7 Full 2
8 Underscan
9Dot by Dot
10 Wide 16:9
Mute MUTE 0 (Toggle) Toggles between mute states
1Mute
2 Unmute
Surround ACSU 0 (Toggle) Toggles among surround states
1On
2 Off
3Auto
RC control lock RKLC 0 Off Unlock "RC control lock"
1 Lock Prohibits remote control operation
2 Lock except power Prohibits remote control operation except power
3 Lock except volume Prohibits remote control operation except volume
6-6

Contents
1. Part Names
2. Basic Operation
3. Menu Operation
4. USB Media
5. Connecting Other
Devices
6. Operating the Monitor
Using a PC (IP control)
1.
Connecting the Monitor
and PC
3. Settings to operate the
Monitor
4. Command list
7. Troubleshooting
8. Specifications, etc.
Ver. 1.00
>
<
Operating the Monitor Using a PC (IP control)
Command list
Function “A”part “B”part Part operation description Remarks
Main unit control lock BKLC 0 Off Unlock "Main unit control lock"
1 Lock Prohibits monitor button operation
Reply product name RPPN ???? Reply product name
Set displaying OSD DOSD 0 Display OSD
1 Not display OSD
Change mode of INPUT 7 CMMD 0 (Toggle) Toggles among mode 1 ~ 4
1Mode1
2Mode2
3Mode3
4Mode4
???? Display current mode
Change screen layout of mode1, 3 or 4 of INPUT 7 CMSP
0 (Toggle) or Initialize screen layout
Mode1 : Toggles among INPUT 7-A ~ D
Mode3 or 4 : Initialize screen layout
A
Mode1 : Display screen of INPUT 7-A
Mode3 or 4 : Move screen of INPUT 7-A
B
Mode1 : Display screen of INPUT 7-B
Mode3 or 4 : Move screen of INPUT 7-B
C
Mode1 : Display screen of INPUT 7-C
Mode3 or 4 : Move screen of INPUT 7-C
D
Mode1 : Display screen of INPUT 7-D
Mode3 or 4 : Move screen of INPUT 7-D
****
Mode1 : No operation
Mode3 or 4 : Specify INPUT 7-A ~ D any order. (e.g. CMSPBACD)
????
Mode1 : Check current displaying input
Mode3 or 4 : Check current order of inputs
NOTE
• For "-" in the “B”part, any of the followings can be entered: "0" to "9", "-" (minus), space or "?".
• The selectable screen size varies depending on the input signal.
6-7
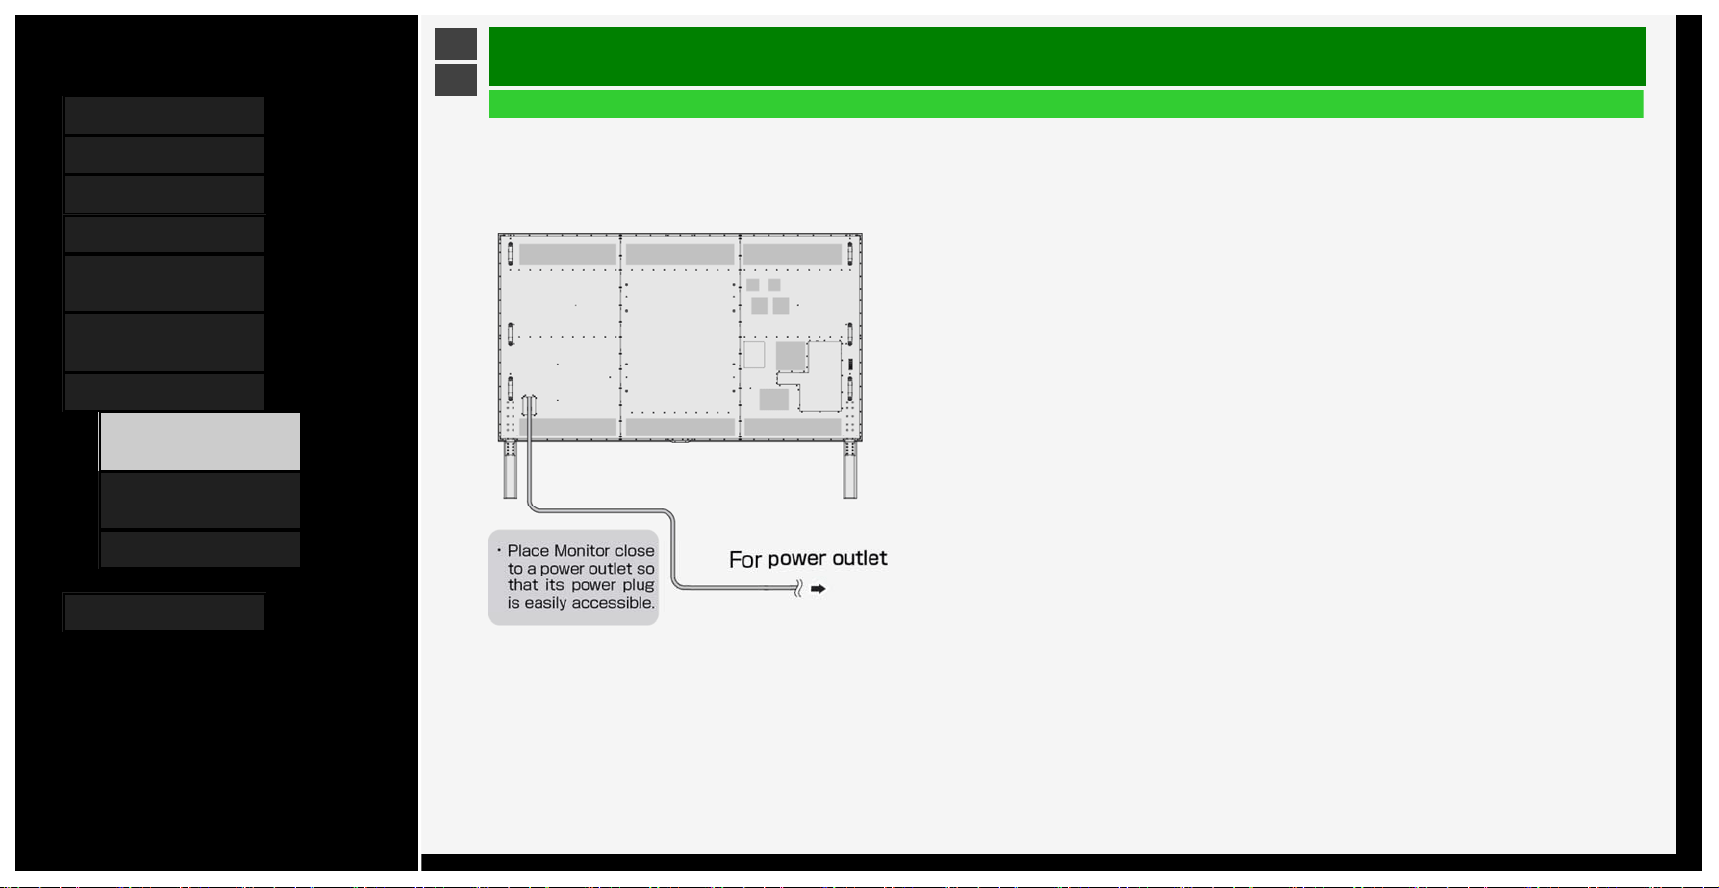
Contents
1. Part Names
2. Basic Operation
3. Menu Operation
4. USB Media
5. Connecting Other
Devices
6. Operating the Monitor
Using a PC (IP control)
7. Troubleshooting
1.
If You Suspect a
Problem
9. If Error Message
Appears
11. What If
8. Specifications, etc.
Ver. 1.00
>
<
Troubleshooting
If You Suspect a Problem
• If you encounter a problem, verify the problem before asking for repair.
Check the following
;
The power cannot be turned o
n
Be sure to insert the power cord plug all the way in
.
7-1
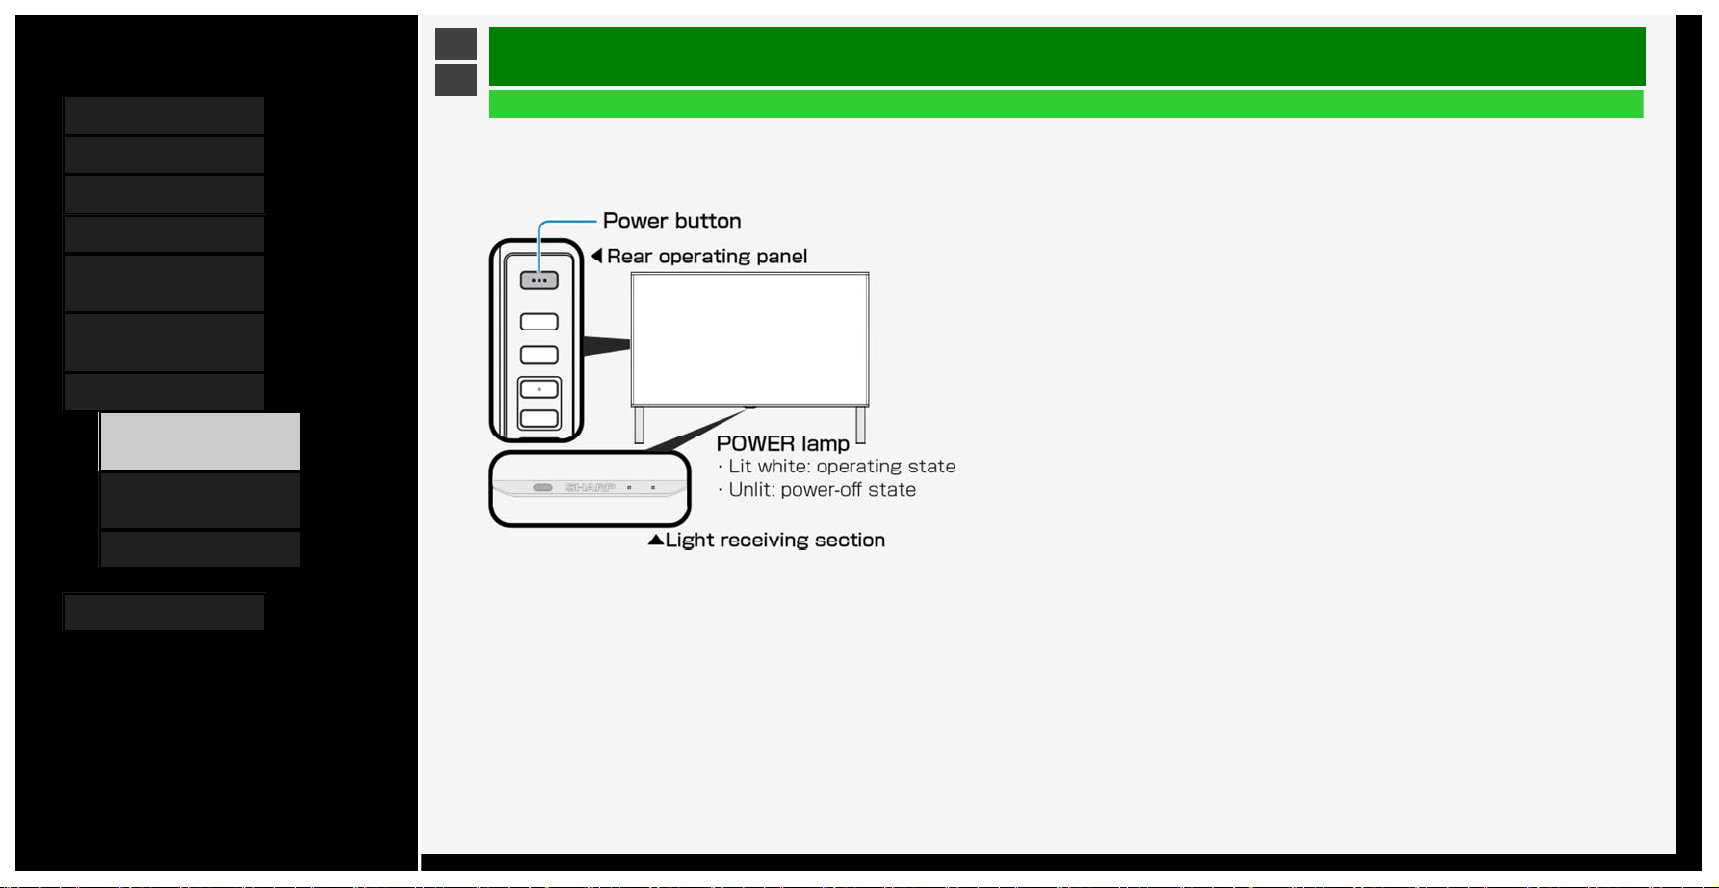
Contents
1. Part Names
2. Basic Operation
3. Menu Operation
4. USB Media
5. Connecting Other
Devices
6. Operating the Monitor
Using a PC (IP control)
7. Troubleshooting
1.
If You Suspect a
Problem
9. If Error Message
Appears
11. What If
8. Specifications, etc.
Ver. 1.00
>
<
Troubleshooting
If You Suspect a Problem
Check the following
;
The power cannot be turned on (Continue)
If the lamp is not lit, press the power button on the Monitor to turn on the power
.
• The POWER lamp stays lit even after the Monitor is turned off by pressing its power button.
It can be turned on with the remote control.
7-2

Contents
1. Part Names
2. Basic Operation
3. Menu Operation
4. USB Media
5. Connecting Other
Devices
6. Operating the Monitor
Using a PC (IP control)
7. Troubleshooting
1.
If You Suspect a
Problem
9. If Error Message
Appears
11. What If
8. Specifications, etc.
Ver. 1.00
>
<
Troubleshooting
If You Suspect a Problem
General
What if Where to check Reference page
There is no video and
sound output from the
Monitor
Is the power plug unplugged from the outlet?
The operation manual supplied with the Monitor
"Connecting AC Cord"
Is the POWER lamp lit white?
2-3
Is the input changed to a proper source to permit a video from an external device to be played on the Monitor? 5-16 to 5-17
Is any connecting cable disconnected? ―
The remote control
does not operate
Is the POWER lamp lit white?
2-3
Isn't the polarity (+, -) of the dry battery reversed?
The operation manual supplied with the Monitor
"Preparation and How to Use Remote Control Unit"
Are the dry batteries for the remote control drained? The higher the use frequency is, the faster the dry batteries may be
drained. Whenever there is a sign of draining of a dry battery, such as when the Monitor does not respond to the remote
control, replace the dry battery with a new one early.
The operation manual supplied with the Monitor
"Preparation and How to Use Remote Control Unit"
Do you point the remote control toward the light receiving section of the Monitor when using it?
The operation manual supplied with the Monitor
"Preparation and How to Use Remote Control Unit"
You will have difficulty operating the remote control if any of the following apply:
• There is an obstacle between the remote control and the remote control light receiving section of the Monitor.
• The remote control light receiving section is exposed to direct sunlight or intensified light.
• Try to angle the light.
• There is a light source, such as a fluorescent, near the Monitor.
• A battery terminal is oxidized (darkened)?
• The room temperature is extremely low.
―
7-3
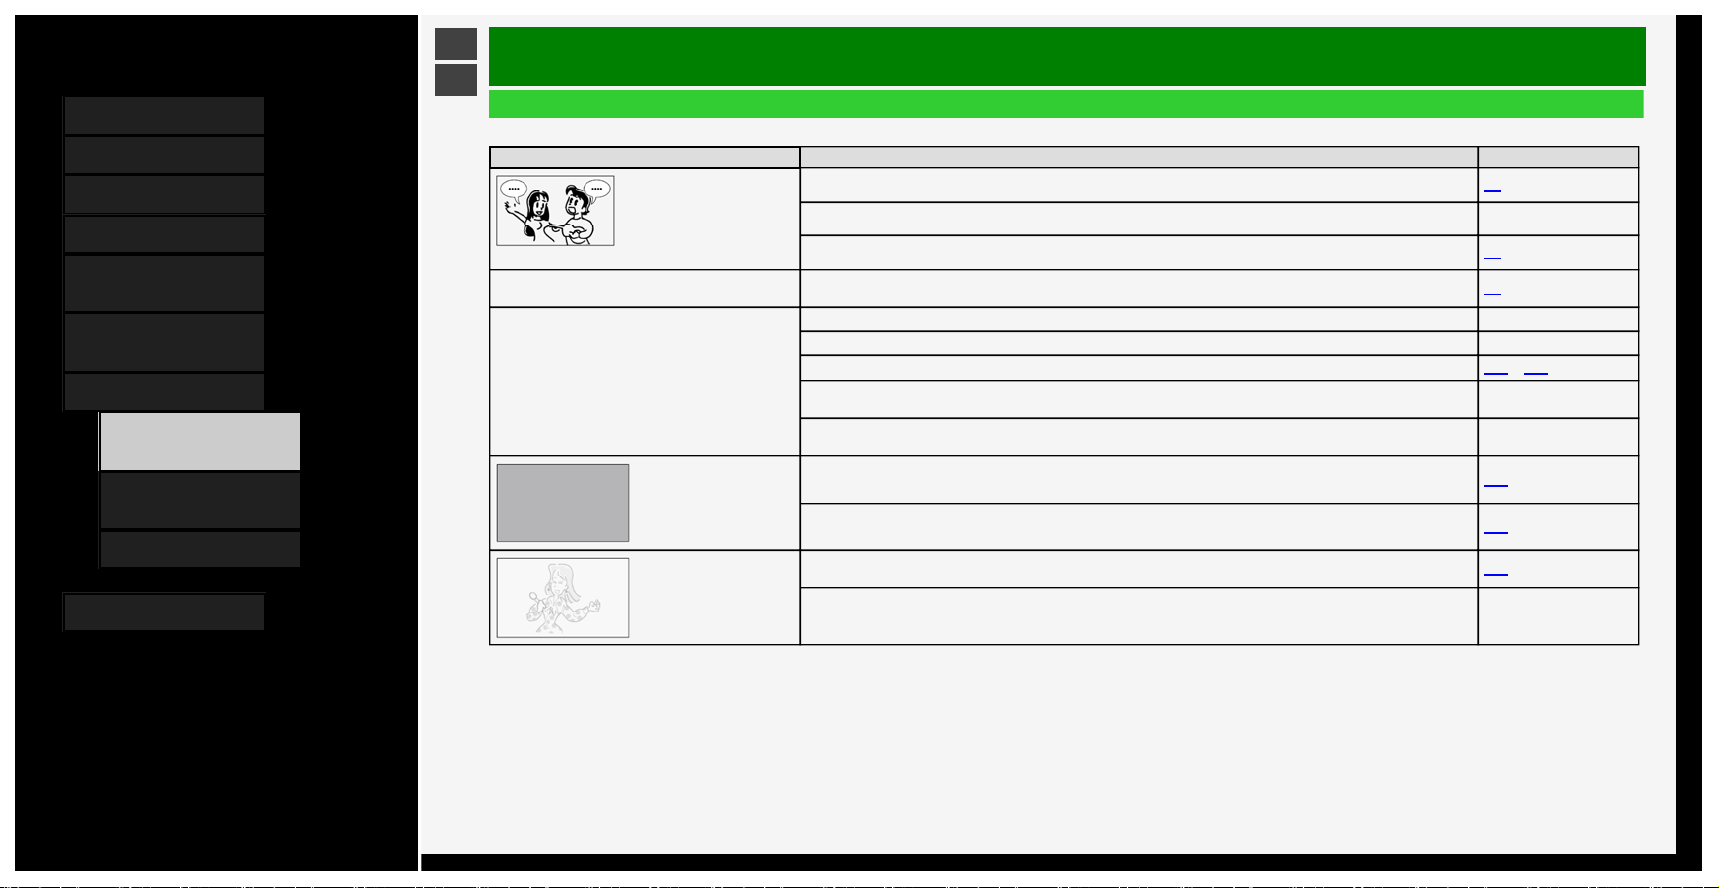
Contents
1. Part Names
2. Basic Operation
3. Menu Operation
4. USB Media
5. Connecting Other
Devices
6. Operating the Monitor
Using a PC (IP control)
7. Troubleshooting
1.
If You Suspect a
Problem
9. If Error Message
Appears
11. What If
8. Specifications, etc.
Ver. 1.00
>
<
Troubleshooting
If You Suspect a Problem
General
What if Where to check Reference page
Video appears on Monitor but no sound comes out of it
Is the volume control set to the minimum level? 2-3
Is it set to "Mute"? ―
Is the headphone left plugged into the headphone terminal?
1-2
The audio sound differs in volume level from one input
source to another
Because the input sound level may vary depending on the device connected or the disk played back, the volume can be set
per input. Set the volume control for each input.
2-3
Video image from a BD player or external device does
not appear, or stopped appearing, on the Monitor
Is the external device unplugged? ―
Is the external device turned on? ―
Have you selected the input to which the external device is connected?
5-16 to 5-17
For INPUT 5 or INPUT 6, due to the provisions of Advanced Access Content System (AACS), BD videos (commercial blue-
ray software) from certain external devices connected to the INPUT cannot be played back on the Monitor.
―
Due to copyright restrictions, videos from certain devices fail to appear on Monitor unless the devices are directly connected
to the Monitor through HDMI cable.
―
Sound comes out of the
Monitor but no video
appears on it
Is Audio only set to "On"? 3-24
Is the video cable disconnected? 5-12
Faded
poorly tinted
Are "Color" and "Tint" for video picture properly adjusted?
3-10
Due to the viewing angle characteristics of the LC panel, when viewed from an oblique direction, some video pictures may
look faded or have a different color tone. This is not a failure.
―
7-4

Contents
1. Part Names
2. Basic Operation
3. Menu Operation
4. USB Media
5. Connecting Other
Devices
6. Operating the Monitor
Using a PC (IP control)
7. Troubleshooting
1.
If You Suspect a
Problem
9. If Error Message
Appears
11. What If
8. Specifications, etc.
Ver. 1.00
>
<
Troubleshooting
If You Suspect a Problem
General
What if Where to check Reference page
The screen is dim
Change "Picture". 3-8 to 3-17
Adjust "Backlight". 3-9
Check "AV Mode". 3-8
Underexposure Adjust "Backlight", "Brightness", or "Advanced" - "Gamma adjustment". 3-9 , 3-15
The display screen increases or decreases in
size
Is the Auto Wide function set to "Yes"? Change the setting to "No".
3-42
The screen flickers or has poor resolution or
noise
Set "Noise Reduction" for "Advanced" to "Auto", "High", "Middle" or "Low".
3-16
The monitor gets warm/hot at the top
This is because the Monitor is structured to allow the air heated with the heat from internal circuits to naturally flow out through its top.
When the Monitor increases abnormally in temperature, the letters "Temperature" or "Temperature of monitor" blink at the bottom
right corner of the screen, causing it to automatically turn off afterwards.
―
The letters "Temperature" or "Temperature of
monitor" blink at the bottom right corner of the
screen. Subsequent to that, the Monitor turns
off automatically.
This is due to an increase in the temperature of the Monitor. Eliminate the cause of the temperature increase. ―
Check the installation condition or location of the Monitor for potential causes of temperature increase. Install the Monitor so that
ventilation holes in its rear are not blocked.
―
Frequently eliminate any dust settling inside the Monitor or ventilation holes if it is possible to dust from the outside of Monitor. ―
7-5

Contents
1. Part Names
2. Basic Operation
3. Menu Operation
4. USB Media
5. Connecting Other
Devices
6. Operating the Monitor
Using a PC (IP control)
7. Troubleshooting
1.
If You Suspect a
Problem
9. If Error Message
Appears
11. What If
8. Specifications, etc.
Ver. 1.00
>
<
Troubleshooting
If You Suspect a Problem
General
What if Where to check Reference page
You cannot operate the buttons on the remote
control or Monitor
It may be attributable to external or interference noises. Turn off the Monitor with its power button, leave it alone for about a
minute after unplugging the power plug, and then plug the power plug back in again to turn its power on.
―
Isn't the RC control lock set to Lock?
3-27
You hear a crack sometimes It is a sound of the cabinet slightly expanding or contracting with changes in temperature. It has no impact on performance, etc. ―
7-6
Contents
1. Part Names
2. Basic Operation
3. Menu Operation
4. USB Media
5. Connecting Other
Devices
6. Operating the Monitor
Using a PC (IP control)
7. Troubleshooting
1.
If You Suspect a
Problem
9. If Error Message
Appears
11. What If
8. Specifications, etc.
Ver. 1.00
>
<
Troubleshooting
If You Suspect a Problem
General
What if Where to check Reference page
Input change does not allow selection Is the input skip set to "No"? 3-37
The power turns off automatically Check if the Monitor is in the mode where it is turned off automatically. ―
8K inpu
t
What if Where to check Reference page
Not shown as 4320p
Check if four HDMI cables are inserted into A to D of INPUT 7.
Check the resolution of the output device.
5-1 to 5-3
No video appears Any connections to HDMI 1 to 4? 5-1 to 5-2
No sound is coming out
Go to "INPUT7 audio setting" where you should select the audio input terminal used. The
compatible format is Linear PCM only.
5-4
If any problem persists after you try the corresponding solution above, be sure to unplug the power plug and then contact your local distributor
.
7-7
Contents
1. Part Names
2. Basic Operation
3. Menu Operation
4. USB Media
5. Connecting Other
Devices
6. Operating the Monitor
Using a PC (IP control)
7. Troubleshooting
1.
If You Suspect a
Problem
9. If Error Message
Appears
11. What If
8. Specifications, etc.
Ver. 1.00
>
<
Troubleshooting
If You Suspect a Problem
IP control-related
What if Where to check Reference page
No IP control
Go to the setup menu, and then " (Initial Setup)" - "Network Setup" - "IP Control setup". Check if it is set to "Enable".
3-3
7-8
Contents
1. Part Names
2. Basic Operation
3. Menu Operation
4. USB Media
5. Connecting Other
Devices
6. Operating the Monitor
Using a PC (IP control)
7. Troubleshooting
1.
If You Suspect a
Problem
9. If Error Message
Appears
11. What If
8. Specifications, etc.
Ver. 1.00
>
<
Troubleshooting
If Error Message Appears
Message concerning USB Media
On-screen error message example Solution
The power supply requirement of the connected USB device is too large. After turning power off the Monitor, connect only
necessary USB devices.
USB inrush current has occurred.It can occur when multiple USB devices are connected to
the Monitor.
Turn off the Monitor, and then disconnect any unnecessary USB devices.
Cannot display the data.
Data in any format other than JPEG, which is compatible with the Monitor, or corrupted
data cannot be displayed.
7-9

Contents
1. Part Names
2. Basic Operation
3. Menu Operation
4. USB Media
5. Connecting Other
Devices
6. Operating the Monitor
Using a PC (IP control)
7. Troubleshooting
1.
If You Suspect a
Problem
9. If Error Message
Appears
11. What If
8. Specifications, etc.
Ver. 1.00
>
<
Troubleshooting
If Error Message Appears
Message concerning USB Media
On-screen error message example Solution
Cannot play.
Unable to play this file.
Out-of-spec video data cannot be played back.
Check if the video data format can be played back on the Monitor.
"About files in USB memory that can be played on Monitor" (see page
4-4)
Cannot play.
Cannot playback the audio file.
Out-of-spec music data cannot be played back.
Check if the music data format can be played back on the Monitor.
"About files in USB memory that can be played on Monitor" (see page
4-5)
7-10
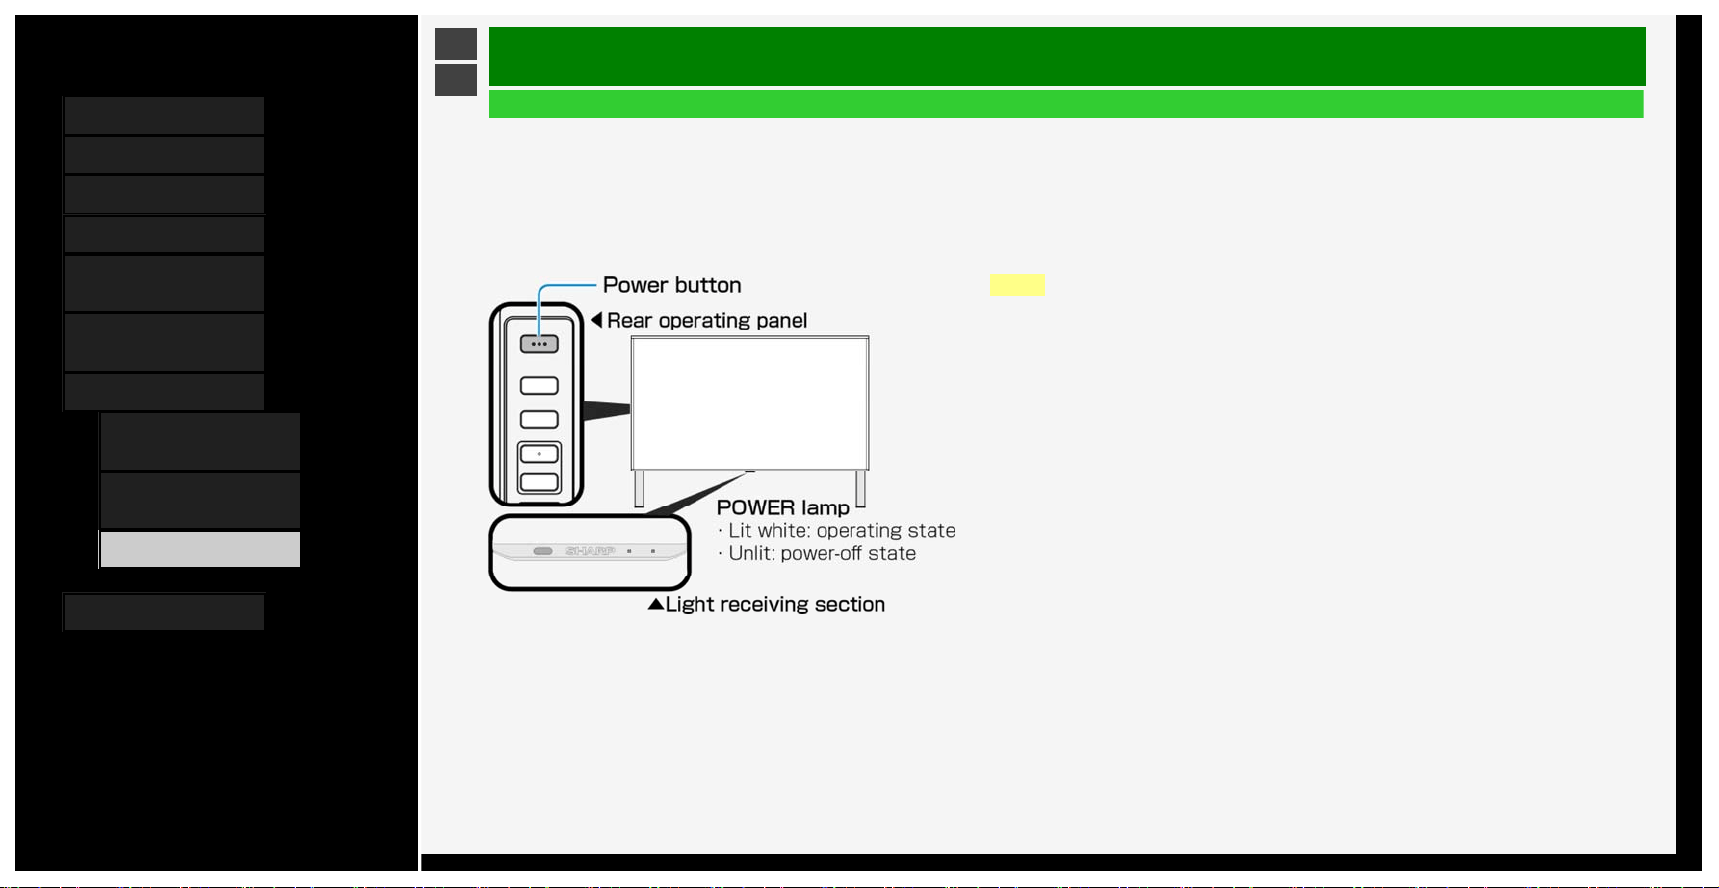
Contents
1. Part Names
2. Basic Operation
3. Menu Operation
4. USB Media
5. Connecting Other
Devices
6. Operating the Monitor
Using a PC (IP control)
7. Troubleshooting
1.
If You Suspect a
Problem
9. If Error Message
Appears
11. What If
8. Specifications, etc.
Ver. 1.00
>
<
Troubleshooting
What If
If the Monitor cannot be operated
• If the Monitor is exposed to intensive external noise (very large amount of static electricity, source voltage error caused by lighting strike, etc.), or if you operate the Monitor in
an improper manner, an error may result, such as failure to operate or control the Monitor.
• In such a case, press the power button on the Monitor to temporarily turn the power off, and then turn the power back on to retry an operation that previously failed.
• If you still fail to operate the Monitor even after turning the power on again, keep pressing the power button on the Monitor for at least five seconds. That turns off the Monitor.
Wait about a minute before pressing the power button to turn the Monitor back on, and then retry the operation again. Even after these button operations above, setting items
such as menu are retained.
NOTE
• Since data is loaded into the Monitor immediately after it is turned back on, it takes some time before a
screen is displayed.
7-11
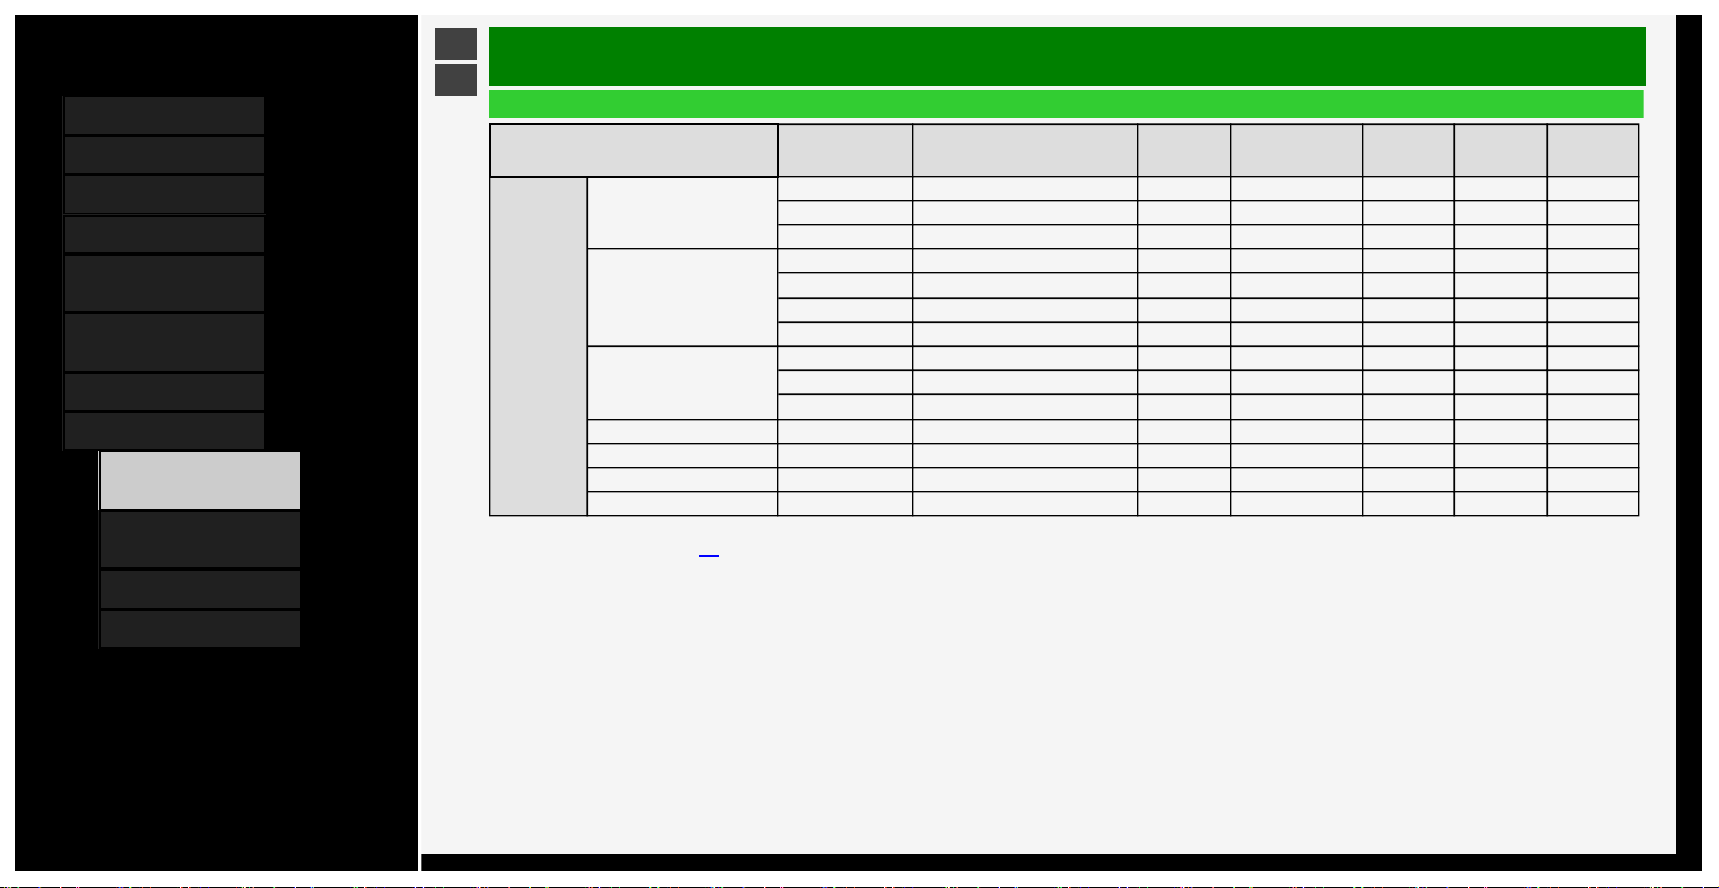
Contents
1. Part Names
2. Basic Operation
3. Menu Operation
4. USB Media
5. Connecting Other
Devices
6. Operating the Monitor
Using a PC (IP control)
7. Troubleshooting
8.
Specifications, etc.
1. PC Supported signal
timing
2. AV Supported signal
timing
4. Dimensional Drawing
5. Software License
Ver. 1.00
>
<
Specifications, etc.
PC Supported signal timing
Resolution (pixel)
Horizontal
frequency
(kHz)
Vertical frequency
(Hz)
Input1
Input2〜4
Input6
Input7
A〜D
Input8
VESA
640 x 480 31.5 60 Yes Yes Yes Yes Yes
37.9 72 Yes Yes Yes No No
37.5 75 Yes Yes Yes No No
800 x 600 35.1 56 Yes Yes Yes No No
37.9 60 Yes Yes Yes Yes Yes
48.1 72 Yes Yes Yes No No
46.9 75 Yes Yes Yes No No
1024 x 768 48.4 60 Yes Yes Yes Yes Yes
56.5 70 Yes Yes Yes No No
60.0 75 Yes Yes Yes No No
1280 x 800 49.7 60 Yes Yes Yes Yes Yes
1366 x 768 47.7 60 Yes Yes Yes Yes Yes
1280 x 1024 64.0 60 Yes Yes Yes Yes Yes
1400 x 1050 65.3 60 Yes Yes Yes Yes Yes
• Depending on the PC connected, even the supported signals above may not be transmitted or displayed properly.
• For 8K input, see page
7-7.
8-1
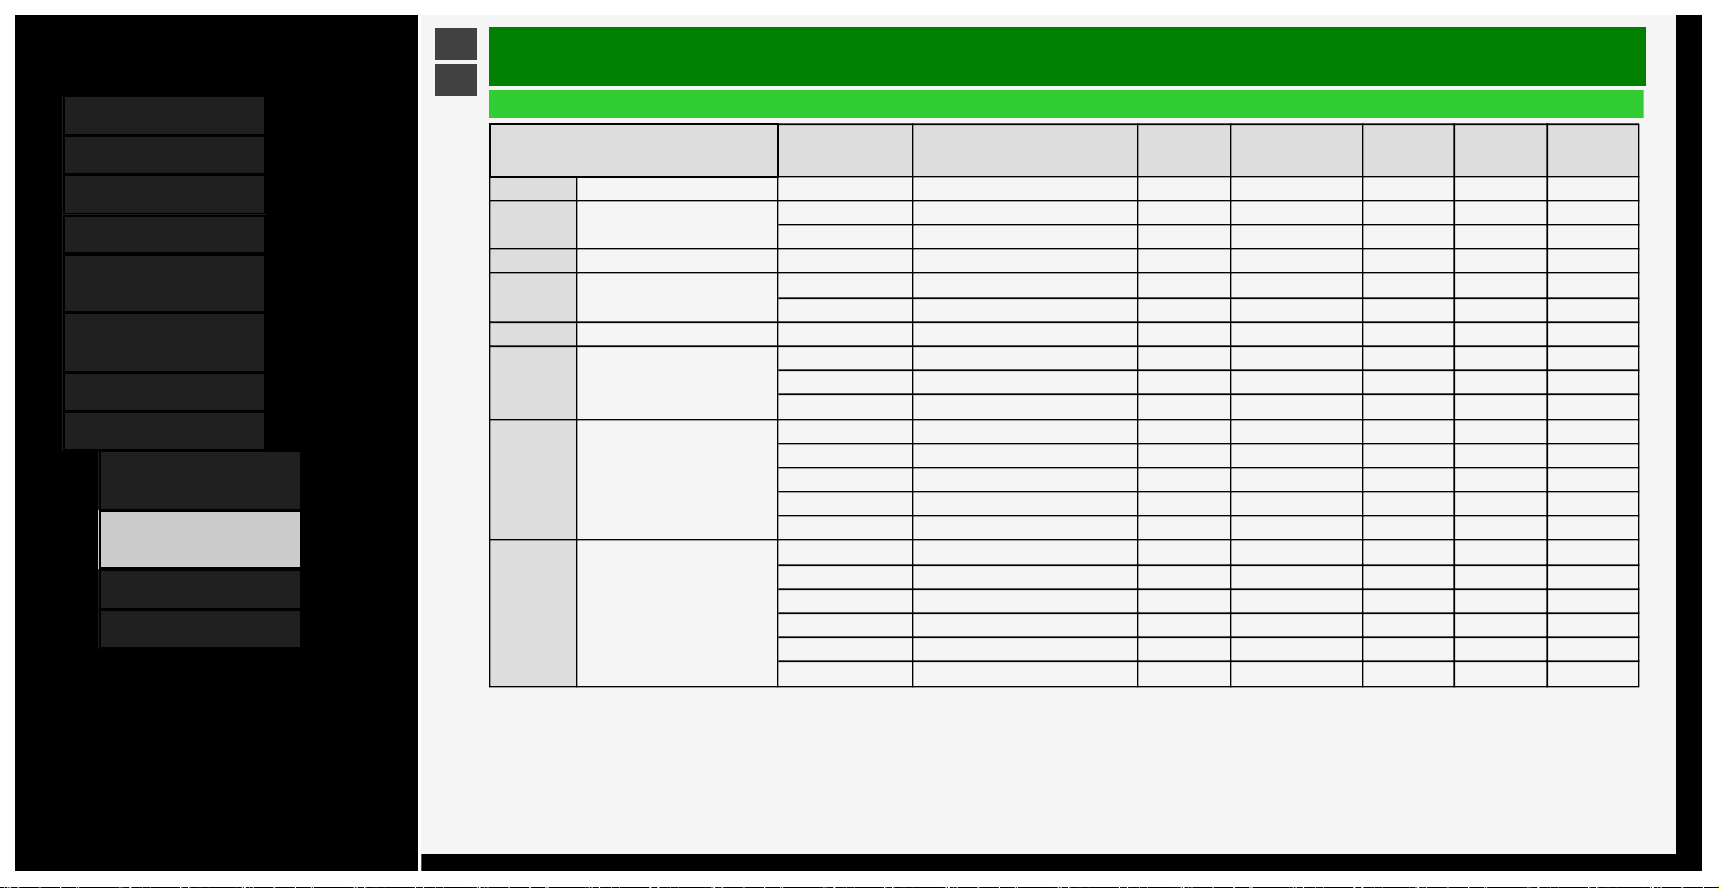
Contents
1. Part Names
2. Basic Operation
3. Menu Operation
4. USB Media
5. Connecting Other
Devices
6. Operating the Monitor
Using a PC (IP control)
7. Troubleshooting
8. Specifications, etc.
1. PC Supported signal
timing
2.
AV Supported signal
timing
4. Dimensional Drawing
5. Software License
Ver. 1.00
>
<
Specifications, etc.
AV Supported signal timing
Resolution (pixel)
Horizontal
frequency
(kHz)
Vertical frequency
(Hz)
Input1
Input2〜4
Input6
Input7
A〜D
Input8
720 x 400 31.5 70 Yes Yes Yes No No
480i 720(1440)x480i
15.7 59.94 Yes Yes No No No
15.8 60 Yes Yes No No No
576i 720(1440)x576i 15.6 50 Yes Yes No No No
480p 720x480
31.5 59.94 Yes Yes No Yes Yes
31.5 60 Yes Yes No Yes Yes
576p 720x576 31.3 50 Yes Yes No Yes Yes
1080i 1920x1080
28.1 50 Yes Yes No Yes Yes
33.7 59.94 Yes Yes No Yes Yes
33.8 60 Yes Yes No Yes Yes
720p 1280x720
22.5 29.94 Yes Yes No No No
22.5 30 Yes Yes No No No
37.5 50 Yes Yes No Yes Yes
45.0 59.94 Yes Yes No Yes Yes
45.0 60 Yes Yes No Yes Yes
1080p 1920x1080
27.0 24 Yes Yes No Yes Yes
33.7 29.97 Yes Yes No Yes Yes
33.8 30 Yes Yes No Yes Yes
56.3 50 Yes Yes No Yes Yes
67.4 59.94 Yes Yes Yes Yes Yes
67.5 60 Yes Yes Yes Yes Yes
8-2
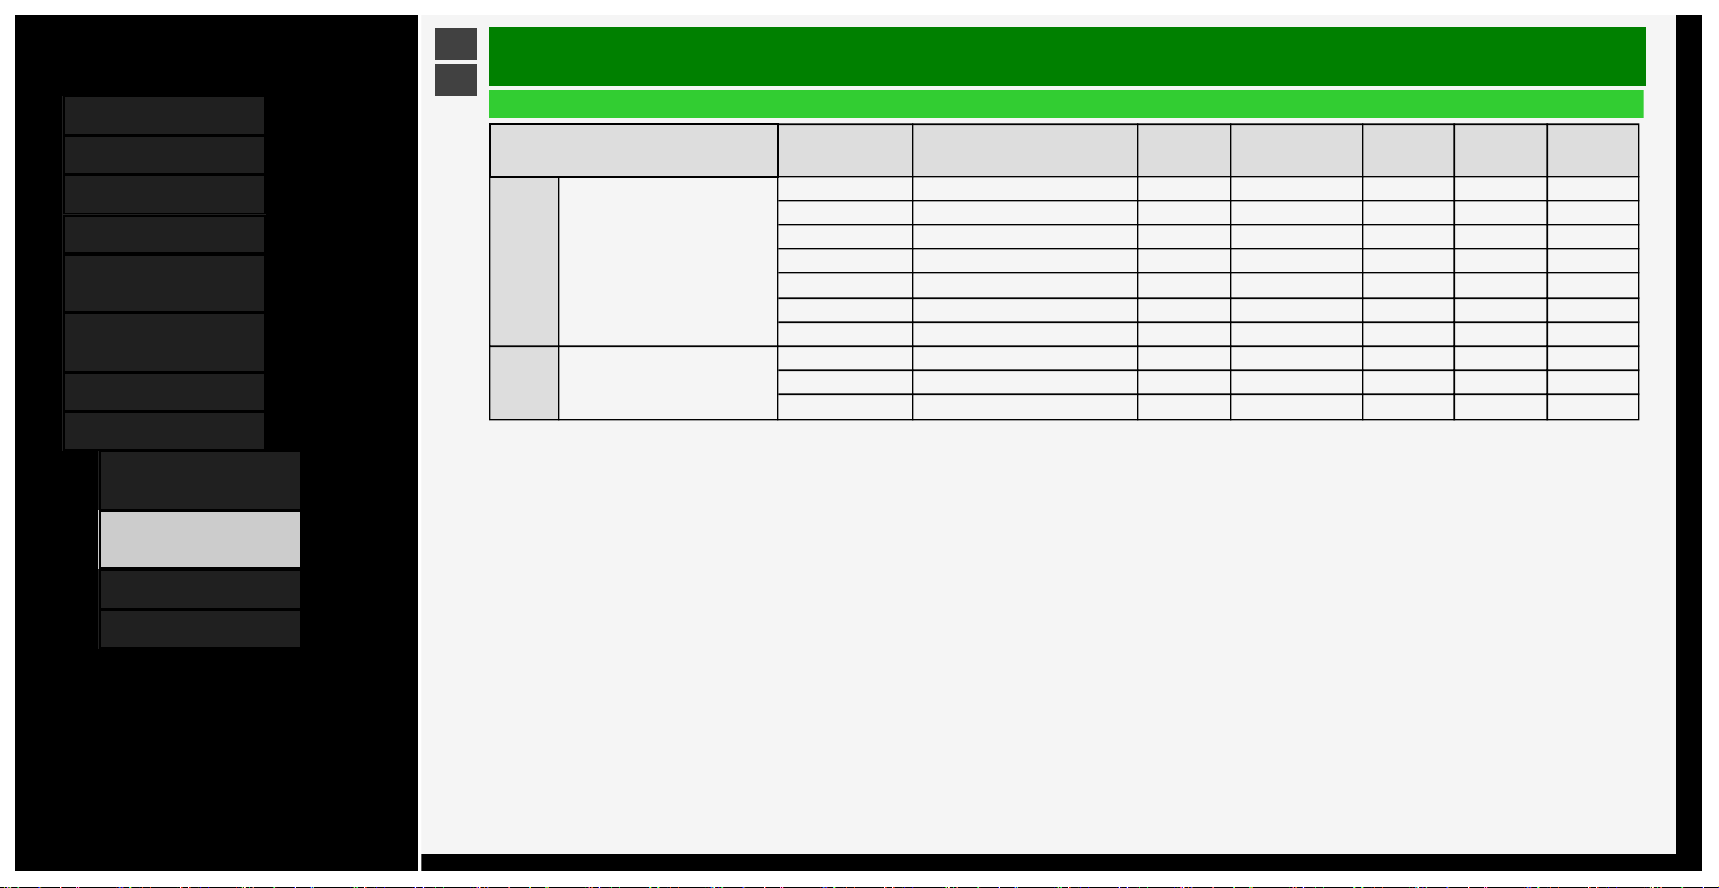
Contents
1. Part Names
2. Basic Operation
3. Menu Operation
4. USB Media
5. Connecting Other
Devices
6. Operating the Monitor
Using a PC (IP control)
7. Troubleshooting
8. Specifications, etc.
1. PC Supported signal
timing
2.
AV Supported signal
timing
4. Dimensional Drawing
5. Software License
Ver. 1.00
>
<
Specifications, etc.
AV Supported signal timing
Resolution (pixel)
Horizontal
frequency
(kHz)
Vertical frequency
(Hz)
Input1
Input2〜4
Input6
Input7
A〜D
Input8
4K 3840x2160
54.0 24 Yes Yes No Yes Yes
56.3 25 Yes Yes No Yes Yes
67.4 29.97 Yes Yes No Yes Yes
67.5 30 Yes Yes No Yes Yes
112.5 50 Yes Yes No Yes Yes
134.9 59.94 Yes Yes No Yes Yes
135.0 60 Yes Yes No Yes Yes
8K 7680x4320
220.0 50 No No No No Yes
263.7 59.94 No No No No Yes
264.0 60 No No No No Yes
DDC (Plug & Play)
• The Monitor supports VESA Display Data Channel (DDC) Standard.
• DDC is a signal standard for Plug and Play between display and PC.
• Information such as the one about resolution, etc. is transmitted between the display and the PC.
• This feature is enabled when PC is DDC-compatible and set to detect a Plug and Play monitor.
• There are different types of DDC, depending on the communication system.
• The Monitor is DDC2B-compliant.
8-3
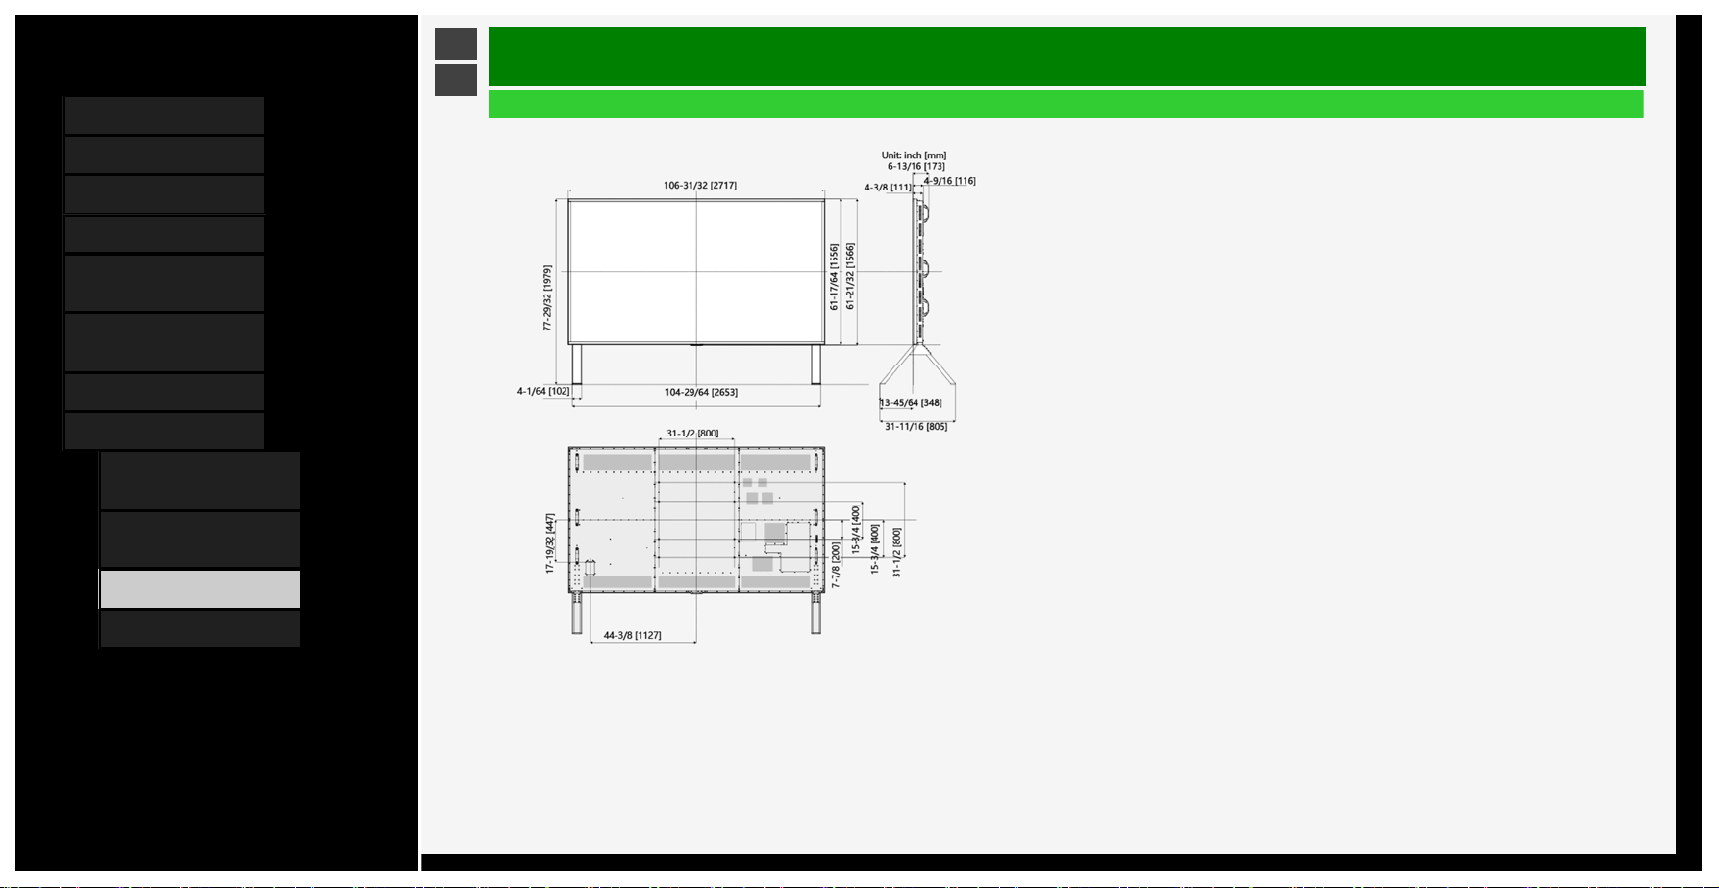
Contents
1. Part Names
2. Basic Operation
3. Menu Operation
4. USB Media
5. Connecting Other
Devices
6. Operating the Monitor
Using a PC (IP control)
7. Troubleshooting
8. Specifications, etc.
1. PC Supported signal
timing
2. AV Supported signal
timing
4. Dimensional Drawing
5. Software License
Ver. 1.00
>
<
Specifications, etc.
Dimensional Drawing
Note that the values shown are approximate values
.
8-4

Contents
1. Part Names
2. Basic Operation
3. Menu Operation
4. USB Media
5. Connecting Other
Devices
6. Operating the Monitor
Using a PC (IP control)
7. Troubleshooting
8. Specifications, etc.
1. PC Supported signal
timing
2. AV Supported signal
timing
4. Dimensional Drawing
5. Software License
Ver. 1.00
>
<
Specifications, etc.
Software License
Information on the open-source software license
.
Software composition
The software included in this product is comprised of various software components whose individual copyrights are held by third parties
.
This product also makes use of freely distributed software and software components whose copyrights are held by third parties. These include software components covered by a
GNU General Public License (hereafter GPL), a GNU Lesser General Public License (hereafter LGPL) or other license agreement
.
Obtaining source code
Some of the open source software licensors require the distributor to provide the source code with the executable software components. GPL and LGPL include similar requirements.
For information on obtaining the source code for the open source software and for obtaining the GPL, LGPL, and other license agreement information, visit the following website
.
https://jp.sharp/business/lcd-display/support/download/source_e.html
W
e are unable to answer any questions about the source code for the open source software. The source code for the software components whose copyrights are held by SHARP is
not distributed.
8-5
Contents
1. Part Names
2. Basic Operation
3. Menu Operation
4. USB Media
5. Connecting Other
Devices
6. Operating the Monitor
Using a PC (IP control)
7. Troubleshooting
8. Specifications, etc.
1.
PC Supported signal
timing
2. AV Supported signal
timing
4. Dimensional Drawing
5. Software License
Ver. 1.00
>
<
Specifications, etc.
Software License
Information on licenses of software used in the Monitor
NOTE
• Select "Setup" - " (Information)" - "Software license" on the MENU to display the information concerning the licenses of software used for the Monitor.
and LC logo mark are registered trademarks of SHARP Corporation.
This product is embedded with LC Font technology, which was developed by SHARP Corporation for clearly displaying
easy-to-read characters on an LCD screen. However, other non-LCD fonts are used for displaying some screen pages.
8-6

Contents
1. Part Names
2. Basic Operation
3. Menu Operation
4. USB Media
5. Connecting Other
Devices
6. Operating the Monitor
Using a PC (IP control)
7. Troubleshooting
8. Specifications, etc.
1. PC Supported signal
timing
2. AV Supported signal
timing
4. Dimensional Drawing
5.
Software License
Ver. 1.00
<
Specifications, etc.
Software License
T
rademark, Registered Trademark, etc
.
• Manufactured under license from Dolby Laboratories. Dolby, Dolby Audio and the double-D symbol are trademarks of Dolby Laboratories.
• The terms HDMI, HDMI High-Definition Multimedia Interface, and the HDMI Logo are trademarks or registered trademarks of HDMI Licensing Administrator, Inc.
• VESA is either registered trademark or trademark of Video Electronics Standards Association in the United States and/or other countries.
• All other brand and product names are trademarks or registered trademarks of their respective holders.
http://www.espial.com
• THIS PRODUCT IS LICENSED UNDER THE AVC PATENT PORTFOLIO LICENSE FOR THE PERSONAL USE OF A CONSUMER OR OTHER USES IN WHICH IT DOES
NOT RECEIVE REMUNERATION TO (i) ENCODE VIDEO IN COMPLIANCE WITH THE AVC STANDARD ("AVC VIDEO") AND/OR (ii) DECODE AVC VIDEO THAT WAS
ENCODED BY A CONSUMER ENGAGED IN A PERSONAL ACTIVITY AND/OR WAS OBTAINED FROM A VIDEO PROVIDER LICENSED TO PROVIDE AVC VIDEO. NO
LICENSE IS GRANTED OR SHALL BE IMPLIED FOR ANY OTHER USE. ADDITIONAL INFORMATION MAY BE OBTAINED FROM MPEG LA, L.L.C. SEE
HTTP://WWW.MPEGLA.COM
• THIS PRODUCT IS LICENSED UNDER THE MPEG-4 VISUAL PATENT PORTFOLIO LICENSE FOR THE PERSONAL AND NON-COMMERCIAL USE OF A CONSUMER
FOR (i) ENCODING VIDEO IN COMPLIANCE WITH THE MPEG-4 VISUAL STANDARD ("MPEG-4 VIDEO") AND/OR (ii) DECODING MPEG-4 VIDEO THAT WAS
ENCODED BY A CONSUMER ENGAGED IN A PERSONAL AND NON-COMMERCIAL ACTIVITY AND/OR WAS OBTAINED FROM A VIDEO PROVIDER LICENSED BY
MPEG LA TO PROVIDE MPEG-4 VIDEO. NO LICENSE IS GRANTED OR SHALL BE IMPLIED FOR ANY OTHER USE. ADDITIONAL INFORMATION INCLUDING THAT
RELATING TO PROMOTIONAL, INTERNAL AND COMMERCIAL USES AND LICENSING MAY BE OBTAINED FROM MPEG LA, L.L.C. SEE
HTTP://WWW.MPEGLA.COM
8-7