
Loading ...
Loading ...
Loading ...
firmly, tilt it forward so that the toe of
the saw foot rests on the work, but with
the blade well clear of the work. Turn the
tool on and run at top speed, and then
very gradually lower the blade (Fig. 7).
When it touches, continue pressing
down on the toe of the saw foot slowly
pivoting the saw like a hinge until the
blade cuts through and the foot rests
flat on the work. Then saw ahead on the
cutting line. We do not recommend
plunge cutting with a scroll blade. Do
not try to plunge cut into hard materials
such as steel.
To make sharp corners, cut up to the
corner, then back up slightly before
rounding the corner. After the opening
is complete, go back to each corner and
cut it from the opposite direction to
square it off.
JA1010 Circle and Parallel
Cutting Guide
(Sold separately)
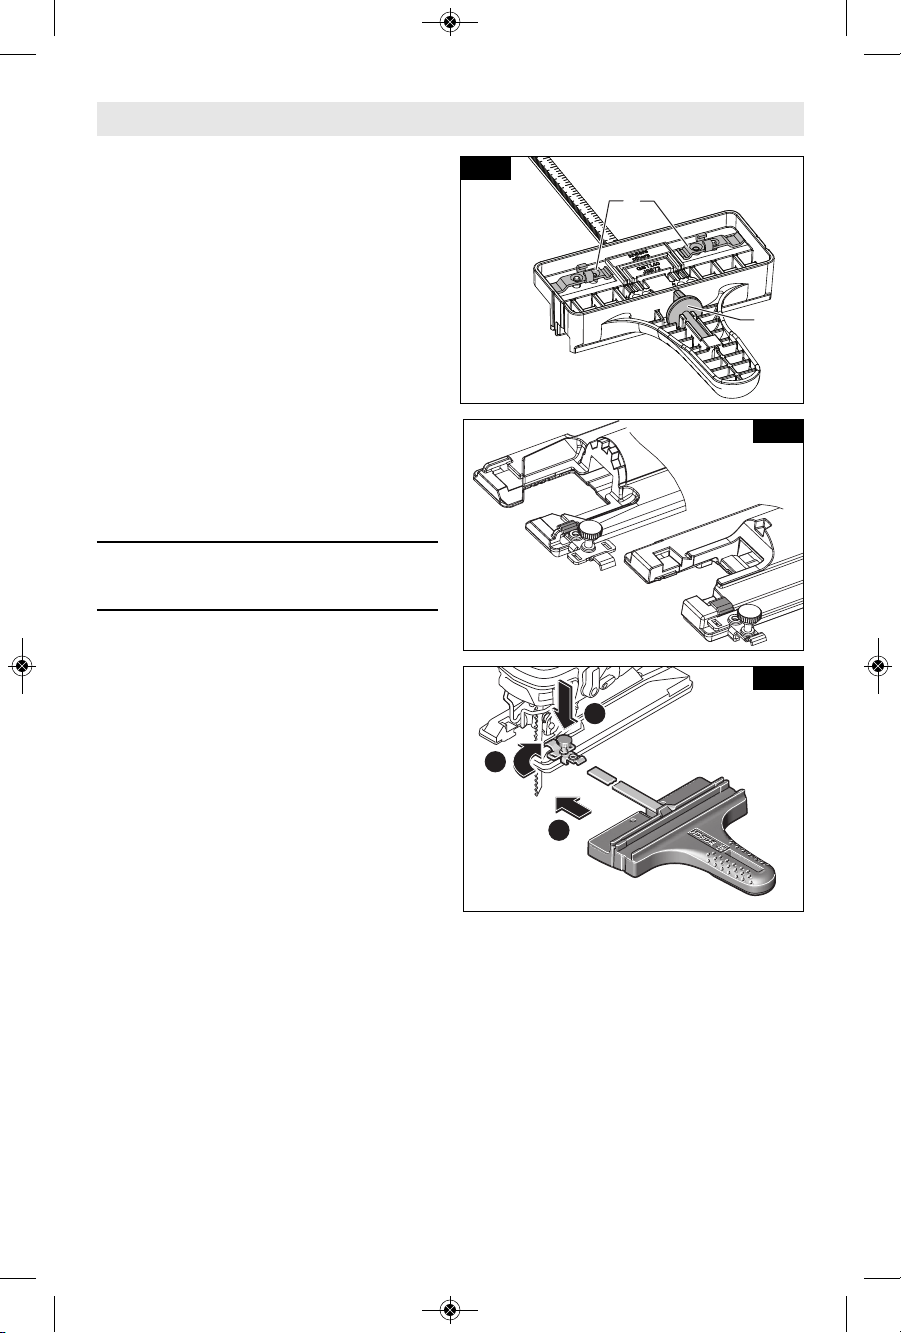
The JA1010 is used for fast and
accurate straight and circle cutting. It
includes the guide, two clamps A for
attaching it to the jig saw, and a center
pin B for guiding cIrcle cuts. The clamps
and the centering pin can be stored on
the guide (Fig. 8).
One end of the clamp is used to attach
the guide’s bar to jig saws that have
narrow tops on their footplate mounting
slots (C) and the other end is used to
attach the guide’s bar to jig saws that
have wide tops on their footplate
mounting slots (D) (Fig. 9).
When possible, attach the bar to the jig
saw using both clamps for enhanced
grip and precision.
ATTACHING GUIDE TO JIG SAW
1. Orient the blade clamp so that the
proper end is placed on the jig saw
foot from either side of the tool.
2. Insert guide’s bar through a clamp,
then through the slots provided in
foot, with the guide’s fence
orientated correctly for the intended
application, parallel cutting or circle
cutting. (If possible, place second
clamp on bar from opposite side of
jig saw.)
3. Place lock knob(s) on proper side of
clamp(s) and securely tighten lock
knob(s) on the clamp(s) (Fig. 10).
PARALLEL CUTTING
Parallel cuts can be made from 5/8” to
6” in from the edge of the workpiece.
1. The guide fence surface needs to be
positioned ALONGSIDE the
workpiece (Fig. 11).
2. Hook clamp(s) onto footplate, adjust
fence to desired width and place lock
knob(s) on proper side of clamp(s)
3. Securely tighten lock knob(s) on the
clamp(s) (Fig. 10).
4. Insert jig saw’s plug into power
source, hold the saw firmly, squeeze
-13-
Operating Instructions
A
B
D
C
1
3
2
Fig. 8
Fig. 9
Fig. 10
2610051978.qxp_JSH180 3/16/20 8:33 AM Page 13
Loading ...
Loading ...
Loading ...