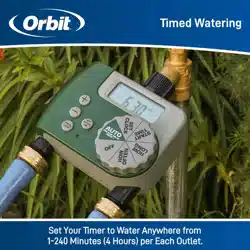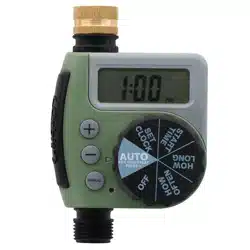
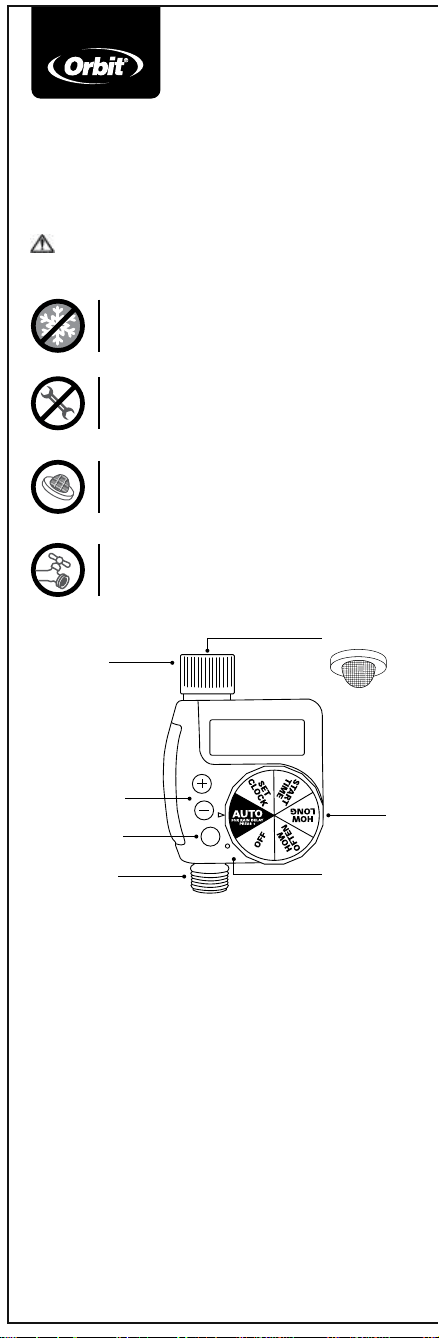
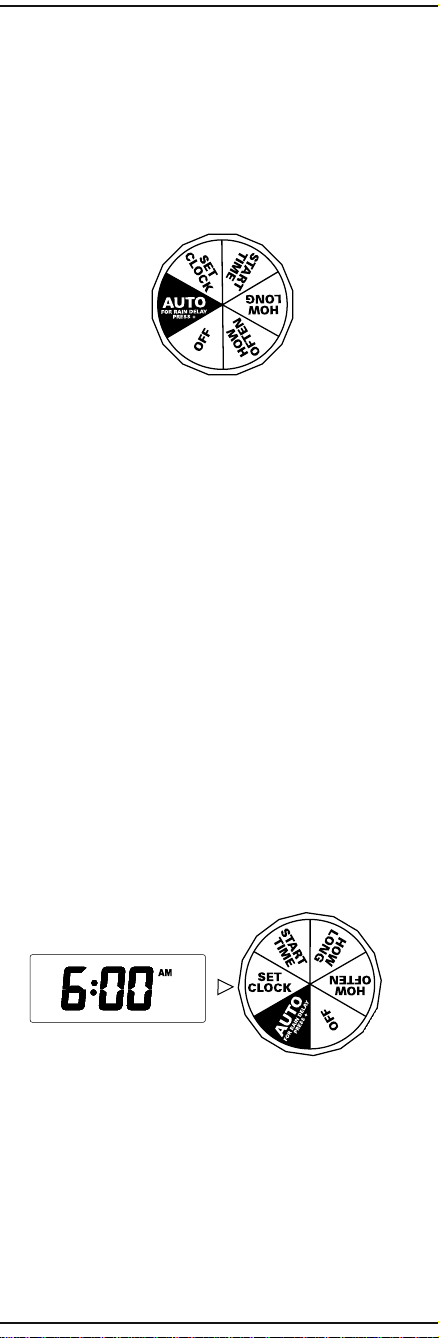
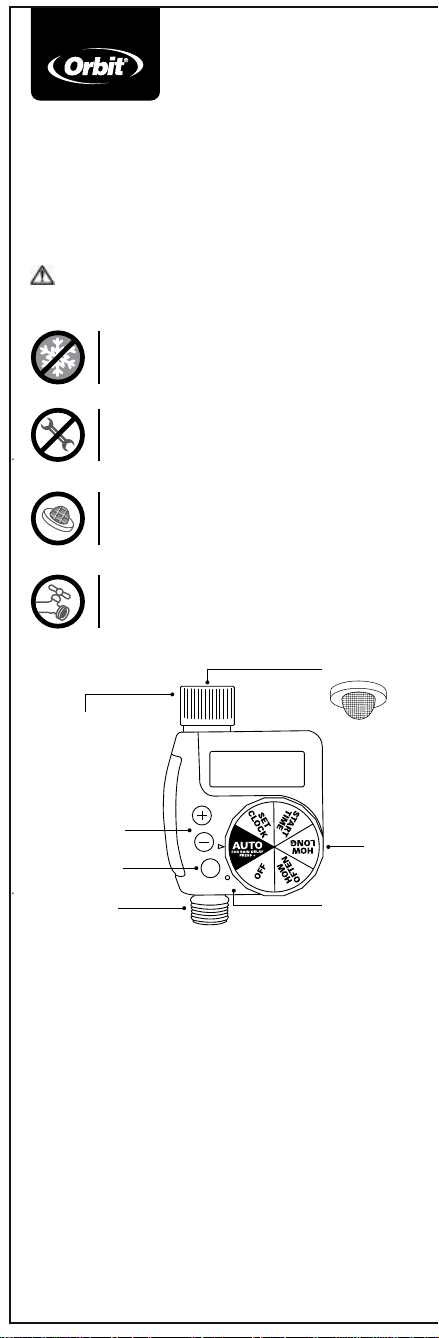
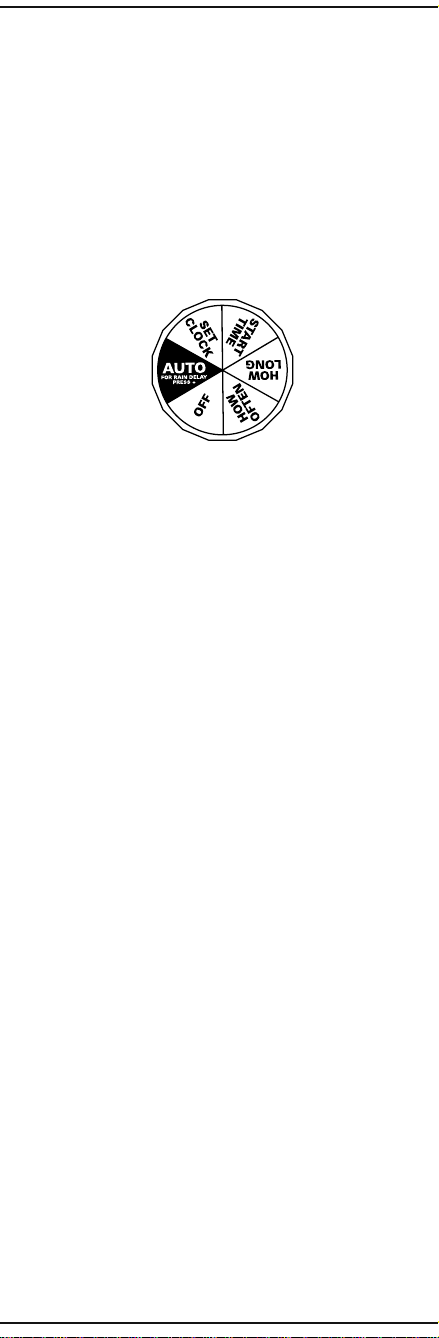
TIMER FEATURES
DIAL—Rotate the dial to customize your watering schedule
+/- BUTTONS—Use these buttons to adjust time and
system setup
MANUAL—Press to water manually or to clear
programming
RESET—Press to clear all programming
AUTO—Timer waters according to your customized schedule
SET CLOCK—Set the time of day
START TIME—Select what time you would like
to start watering
HOW LONG—Determine how long to water
HOW OFTEN—Choose how often you will water
OFF—Turn o all watering
INSTALLING THE BATTERIES
1. Remove the tray on the back of the timer by sliding or
pulling it out.
2. Insert two AA (1.5V) alkaline batteries (not included)
and replace the tray.
NOTE: Firmly replace the battery tray to ensure water resistance
and increase battery life. You will know the battery tray is fully
inserted if it locks in place and does not pull out easily. Used up
or dead batteries must be removed from the timer and disposed
of properly. Batteries should be removed from the timer at the
end of the watering season and replaced with new ones at the
beginning of the next watering season. Replace batteries when low
battery icon appears on display. Do not dispose of batteries in fire.
Batteries may explode or leak.
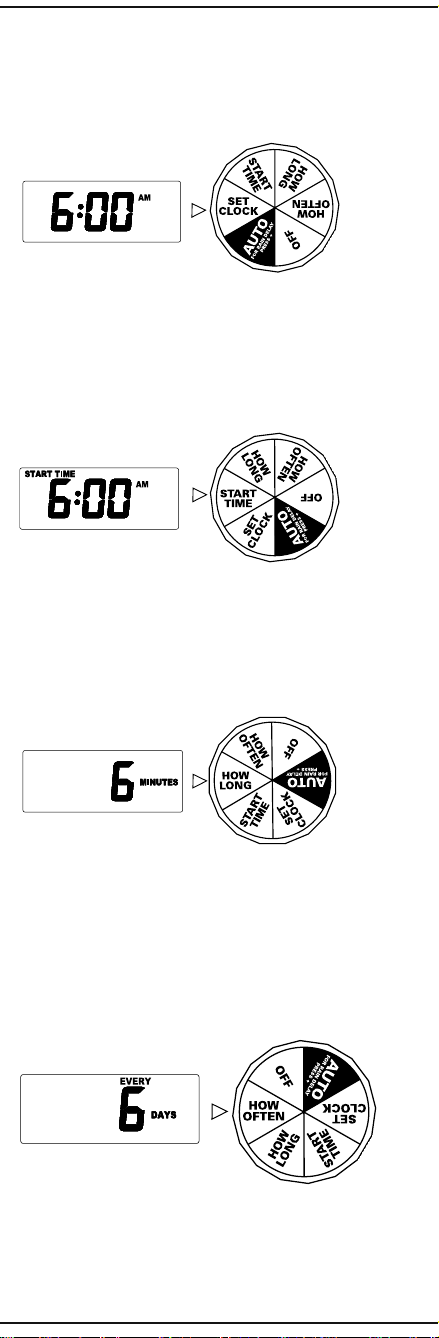
PROGRAMMING THE TIMER
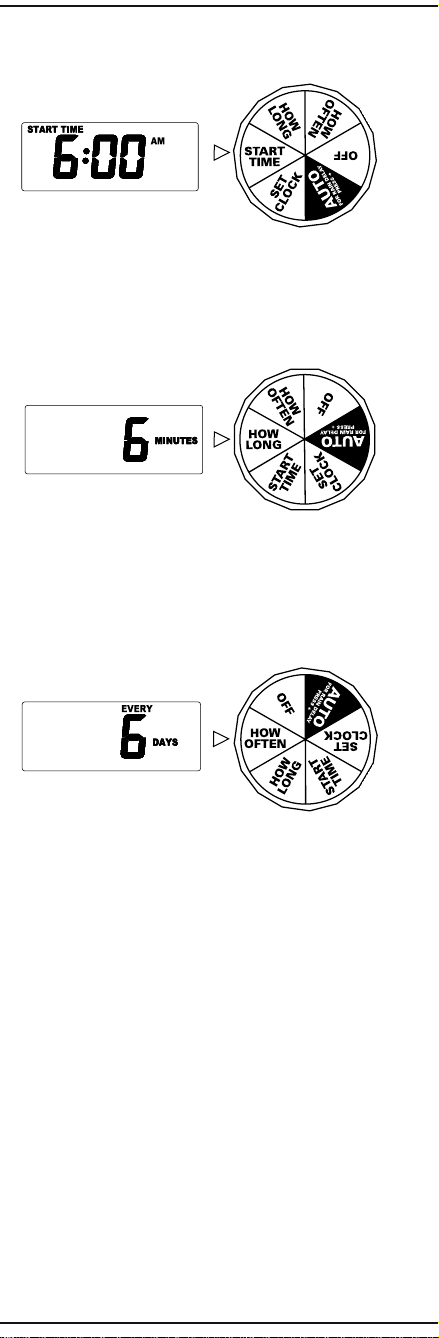
SET CLOCK
1. Turn dial to SET CLOCK.
2. Using the +/- buttons, set the time of day, including AM
and PM. Timer advances faster if button is held down.
3. Turn dial to save changes.
Important, please read the following!
1 OUTLET HOSE
FAUCET TIMER
Do not allow the timer to freeze. Freezing
temperatures can permanently damage
your timer.
Keep the filter washer clean and in place
when using the timer. Replace the filter if
damaged. Debris entering the timer may
prevent it from closing.
Do not use tools on the timer. Hand tighten
only. Use of tools may damage the timer.
For cold water outdoor irrigation use only.
START TIME
1. Turn dial to START TIME.
2. Using the +/- buttons, set your start time, including AM
and PM. Timer advances faster if button is held down.
3. Turn dial to save changes.
HOW LONG
1. Turn dial to HOW LONG.
2. Using the +/- buttons, select watering duration from 1 to
240 minutes. Timer advances faster if button is held down.
3. Press CLEAR button to reset run time.
4. Turn dial to save changes.
HOW OFTEN
1. Turn dial to HOW OFTEN.
2. Using the +/- buttons, set your watering frequency.
You may choose to water every 6 hours, 12 hours, or
from 1 to 7 days.
NOTE: 1 is every day, 2 is every other day, etc.
3. Turn dial to save changes.
NOTE: For watering programs set up to run more frequently
than once every 24 hours, your timer will use the watering interval
to determine its first start time, rather than the start time you
have entered for that program.
CONGRATULATIONS!
Your timer is now programmed. Turn your dial to AUTO to
allow your timer to water according to programmed time,
station, duration, and frequency.
ADDITIONAL FEATURES
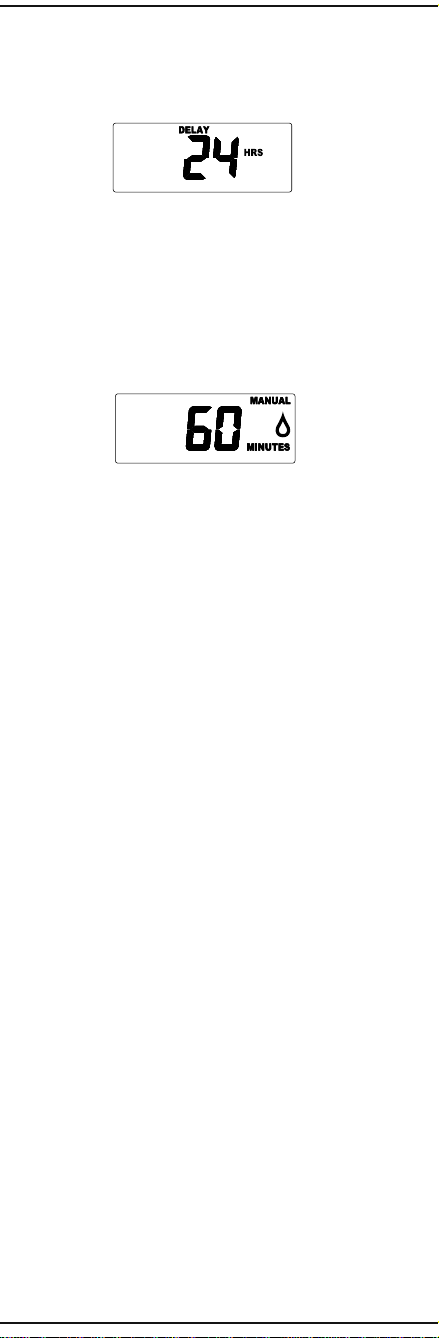
RAIN DELAY
Rain delay allows you to postpone watering for a set period of
time. To access the rain delay, follow the steps below.
1. With the dial on AUTO, press the + button to select a delay
of 24 hrs, 48 hrs, or 72 hrs.
2. Screen will flash between clock and hours remaining before
programmed cycle resumes.
NOTE: To remove rain delay, turn dial to OFF and then
back to AUTO.
MANUAL/HAND WATERING
This feature allows you to water without interrupting your set
schedule. To access this feature, follow the steps below.
1.
With the dial on AUTO, press the MANUAL button.
2. Use the + and – buttons to select watering time, from 1
to 240 minutes. (There will be a slight delay between the
time the + button is pressed and when watering begins.)
NOTE: To stop manual watering, turn the dial to OFF and then
back to AUTO.
OFF MODE
Turning the dial to the OFF position at any time during
the day will reset the timer’s internal timing and will clear a
RAIN DELAY or MANUAL watering. This will also cancel
all scheduled watering times for the day until the next
programmed START TIME. This means if you turn the dial
back to AUTO the timer will not water until the next day;
beginning at your desired programmed START TIME.
EXAMPLE: You have a 6:00 AM START TIME with HOW
OFTEN 6 hour intervals. If you turn the dial to OFF at 10:00
AM today the timer will not water until tomorrow at 6:00 AM.
The 12:00 PM, 6:00 PM, and 12:00 AM watering times have
been cancelled for the day.
TROUBLESHOOTING
Water does not come on at desired time.
Check if:
• Clock is set to correct time, including AM and PM.
• Dial is set to “Auto”
• Start time is set to desired time, including AM and PM.
• Rain Delay is on. Clear if necessary.
Timer does not water or has low flow.
Check if:
• Timer is set to AUTO.
• Hose faucet is on.
• Batteries are low.
• Clock is set to correct time, including AM and PM.
• Rain Delay is on. Clear if necessary.
• Filter washer screen is clean.
• Water pressure is above 25 psi.
©2020 Orbit | Utah, USA
orbitonline.com
6:00
RESET
MANUAL
FAUCET
CONNECTION
+/-
BUTTONS
MANUAL
FILTER
DIAL
RESET
OUTLET
Need Help?
If you encounter a problem, please use the following resources
before returning your Orbit product to the store.
or visit us at:
community.orbitonline.com
AM
AM
MINUTES
HRS
MANUAL
MINUTES
DAYS
Water won’t turn o.
Check if:
• HOW LONG is set to desired time.
• HOW OFTEN is set to desired
interval hour or day.
Timer is leaking.
Check if:
• Filter washer is in place.
• Filter washer is clean and undamaged.
• Faucet connection is hand tight.
Working water pressure:
• Minimum: 25 psi
• Maximum: 100 psi
Working temperature:
• Maximum: Do not exceed 120°F (48°C)
• Minimum: Keep from freezing
text
us
801-797-2319
call
us
1-800-488-6156
TIMER FEATURES
DIAL—Rotate the dial to customize your watering schedule
+/- BUTTONS—Use these buttons to adjust time and
system setup
MANUAL—Press to water manually or to clear
programming
RESET—Press to clear all programming
AUTO—Timer waters according to your customized schedule
SET CLOCK—Set the time of day
START TIME—Select what time you would like
to start watering
HOW LONG—Determine how long to water
HOW OFTEN—Choose how often you will water
OFF—Turn o all watering
INSTALLING THE BATTERIES
1. Remove the tray on the back of the timer by sliding or
pulling it out.
2. Insert two AA (1.5V) alkaline batteries (not included)
and replace the tray.
NOTE: Firmly replace the battery tray to ensure water resistance
and increase battery life. You will know the battery tray is fully
inserted if it locks in place and does not pull out easily. Used up
or dead batteries must be removed from the timer and disposed
of properly. Batteries should be removed from the timer at the
end of the watering season and replaced with new ones at the
beginning of the next watering season. Replace batteries when low
battery icon appears on display. Do not dispose of batteries in fire.
Batteries may explode or leak.
PROGRAMMING THE TIMER
SET CLOCK
1. Turn dial to SET CLOCK.
2. Using the +/- buttons, set the time of day, including AM
and PM. Timer advances faster if button is held down.
3. Turn dial to save changes.
Important, please read the following!
1 OUTLET HOSE
FAUCET TIMER
Do not allow the timer to freeze. Freezing
temperatures can permanently damage
your timer.
Keep the filter washer clean and in place
when using the timer. Replace the filter if
damaged. Debris entering the timer may
prevent it from closing.
Do not use tools on the timer. Hand tighten
only. Use of tools may damage the timer.
For cold water outdoor irrigation use only.
START TIME
1. Turn dial to START TIME.
2. Using the +/- buttons, set your start time, including AM
and PM. Timer advances faster if button is held down.
3. Turn dial to save changes.
HOW LONG
1. Turn dial to HOW LONG.
2. Using the +/- buttons, select watering duration from 1 to
240 minutes. Timer advances faster if button is held down.
3. Press CLEAR button to reset run time.
4. Turn dial to save changes.
HOW OFTEN
1. Turn dial to HOW OFTEN.
2. Using the +/- buttons, set your watering frequency.
You may choose to water every 6 hours, 12 hours, or
from 1 to 7 days.
NOTE: 1 is every day, 2 is every other day, etc.
3. Turn dial to save changes.
NOTE: For watering programs set up to run more frequently
than once every 24 hours, your timer will use the watering interval
to determine its first start time, rather than the start time you
have entered for that program.
CONGRATULATIONS!
Your timer is now programmed. Turn your dial to AUTO to
allow your timer to water according to programmed time,
station, duration, and frequency.
ADDITIONAL FEATURES
RAIN DELAY
Rain delay allows you to postpone watering for a set period of
time. To access the rain delay, follow the steps below.
1. With the dial on AUTO, press the + button to select a delay
of 24 hrs, 48 hrs, or 72 hrs.
2. Screen will flash between clock and hours remaining before
programmed cycle resumes.
NOTE: To remove rain delay, turn dial to OFF and then
back to AUTO.
MANUAL/HAND WATERING
This feature allows you to water without interrupting your set
schedule. To access this feature, follow the steps below.
1.
With the dial on AUTO, press the MANUAL button.
2. Use the + and – buttons to select watering time, from 1
to 240 minutes. (There will be a slight delay between the
time the + button is pressed and when watering begins.)
NOTE: To stop manual watering, turn the dial to OFF and then
back to AUTO.
OFF MODE
Turning the dial to the OFF position at any time during
the day will reset the timer’s internal timing and will clear a
RAIN DELAY or MANUAL watering. This will also cancel
all scheduled watering times for the day until the next
programmed START TIME. This means if you turn the dial
back to AUTO the timer will not water until the next day;
beginning at your desired programmed START TIME.
EXAMPLE: You have a 6:00 AM START TIME with HOW
OFTEN 6 hour intervals. If you turn the dial to OFF at 10:00
AM today the timer will not water until tomorrow at 6:00 AM.
The 12:00 PM, 6:00 PM, and 12:00 AM watering times have
been cancelled for the day.
TROUBLESHOOTING
Water does not come on at desired time.
Check if:
• Clock is set to correct time, including AM and PM.
• Dial is set to “Auto”
• Start time is set to desired time, including AM and PM.
• Rain Delay is on. Clear if necessary.
Timer does not water or has low flow.
Check if:
• Timer is set to AUTO.
• Hose faucet is on.
• Batteries are low.
• Clock is set to correct time, including AM and PM.
• Rain Delay is on. Clear if necessary.
• Filter washer screen is clean.
• Water pressure is above 25 psi.
©2020 Orbit | Utah, USA
orbitonline.com
6:00
RESET
MANUAL
FAUCET
CONNECTION
+/-
BUTTONS
MANUAL
FILTER
DIAL
RESET
OUTLET
Need Help?
If you encounter a problem, please use the following resources
before returning your Orbit product to the store.
or visit us at:
community.orbitonline.com
AM
AM
MINUTES
HRS
MANUAL
MINUTES
DAYS
Water won’t turn o.
Check if:
• HOW LONG is set to desired time.
• HOW OFTEN is set to desired
interval hour or day.
Timer is leaking.
Check if:
• Filter washer is in place.
• Filter washer is clean and undamaged.
• Faucet connection is hand tight.
Working water pressure:
• Minimum: 25 psi
• Maximum: 100 psi
Working temperature:
• Maximum: Do not exceed 120°F (48°C)
• Minimum: Keep from freezing
text
us
801-797-2319
call
us
1-800-488-6156
CARACTERÍSTICAS DEL
TEMPORIZADOR
ESFERA—Gire la esfera para personalizar su programación
de riego
BOTONES +/-—Utilice estos botones para ajustar la hora y
configurar el sistema
MANUAL—Presione para regar manualmente o para borrar
la programación
RESET (REINICIAR)—Presione para borrar toda la
programación
AUTO (AUTOMÁTICO)—El temporizador riega de
acuerdo con su programación personalizada
SET CLOCK (CONFIGURAR RELOJ)—Configure la
hora del día
START TIME (HORA DE INICIO)—Seleccione la hora
cuando desea iniciar el riego
HOW LONG (DURACIÓN)—Determine la duración
del riego
HOW OFTEN (FRECUENCIA)—Elija la frecuencia del
riego deseada
OFF (APAGADO)—Desactive todo el riego
COLOCACIÓN DE LAS
BATERÍAS
1. Retire la bandeja de la parte posterior del temporizador
deslizándola o halándola hacia afuera.
2. Inserte dos baterías alcalinas AA (1.5V) (no se suministran)
y vuelva a colocar la bandeja.
NOTA: Vuelva a colocar la bandeja de las baterías firmemente
para lograr resistencia al agua y prolongar la vida de las baterías.
Sabrá que la bandeja de las baterías está totalmente insertada si
esta traba en su lugar y no se puede halar hacia afuera fácilmente.
Las baterías gastadas o totalmente descargadas deben retirarse
del temporizador y desecharse adecuadamente. Las baterías deben
retirarse del temporizador al final de la temporada de riego y
reemplazarse por nuevas al comienzo de la siguiente temporada de
riego. Cambie las baterías cuando aparezca el icono de batería con
poca carga. No deseche las baterías en el fuego.
Las baterías pueden explotar o presentar fugas.
¡Importante, lea lo siguiente!
TEMPORIZADOR PARA
GRIFO DE MANGUERA
DE 1 SALIDA
No permita que el temporizador se congele.
Las temperaturas de congelación pueden dañar
permanentemente su temporizador.
Conserve limpia la arandela del filtro y en su
lugar cuando use el temporizador. Remplace el
filtro si está dañado. Las partículas que ingresan
al temporizador pueden impedirle que cierre.
No utilice herramientas en el temporizador.
Apriete solo manualmente. El uso de
herramientas puede dañar el temporizador.
Para uso en conexiones de irrigación para
exteriores, con agua fría solamente.
PROGRAMACIÓN DEL
TEMPORIZADOR
SET CLOCK (CONFIGURAR RELOJ)
1. Gire la esfera a SET CLOCK.
2. Utilizando los botones +/-, coloque la hora del día
incluyendo a.m. y p.m. El temporizador avanza más
rápidamente si el botón se conserva apretado.
3. Gire la esfera para guardar los cambios.
START TIME (HORA DE INICIO)
1. Gire la esfera a START TIME.
2. Utilizando los botones +/-, coloque su hora de inicio,
incluyendo a.m. y p.m. El temporizador avanza más
rápidamente si el botón se conserva apretado.
3. Gire la esfera para guardar los cambios.
HOW LONG (DURACIÓN)
1. Gire la esfera a HOW LONG.
2. Utilizando los botones +/-, seleccione la duración del riego
desde 1 hasta 240 minutos. El temporizador avanza más
rápidamente si el botón se conserva apretado.
3. Presione el botón CLEAR (BORRAR) para reiniciar el
tiempo de funcionamiento.
4. Gire la esfera para guardar los cambios.
HOW OFTEN (FRECUENCIA)
1. Gire la esfera a HOW OFTEN.
2. Utilizando los botones +/-, coloque la frecuencia de riego
deseada. Puede elegir regar cada 6 horas, 12 horas o de 1 a 7
días.
NOTA: 1 es todos los días, 2 es en días alternos, etc.
3. Gire la esfera para guardar los cambios.
NOTA: Para la configuración de programas de riego que
funcionen con más frecuencia de una vez cada 24 horas, su
temporizador utilizará el intervalo de riego para determinar la
primera hora de inicio de este, en vez de la hora de inicio que usted
ingresó para ese programa.
¡FELICITACIONES!
Su temporizador ya está programado. Gire la esfera a AUTO
(AUTOMÁTICO) para permitirle a su temporizador que
riegue de acuerdo con la hora, estación, duración y frecuencia
programadas.
FUNCIONES ADICIONALES
RETARDO POR LLUVIA (DELAY)
El retardo por lluvia le permite posponer el riego durante un
período determinado. Para acceder al retardo por lluvia, siga
los pasos que se indican a continuación.
1. Con la esfera en AUTO (AUTOMÁTICO), presione el
botón + para seleccionar un retraso de 24 h, 48 h o 72 h.
2. La pantalla destellará entre el reloj y las horas restantes
establecidas antes de que el ciclo programado se reanude.
NOTA: Para eliminar el retardo por lluvia, gire la esfera a OFF
(APAGADO) y luego de nuevo a AUTO (AUTOMÁTICO).
RIEGO MANUAL/A MANO (MANUAL)
Esta función le permite regar sin interrumpir la programación
establecida. Para acceder a esta función, siga los pasos que se
indican a continuación.
1. Con la esfera en la posición AUTO (AUTOMÁTICO)
presione el botón MANUAL.
2. Utilice los botones + y – para configurar de 1 a 240
minutos (Habrá una ligera demora entre el tiempo en que
el botón + se oprime y cuando se inicie el riego.
NOTA: Para detener el riego manual, gire la esfera a OFF
(APAGADO) y luego de nuevo a AUTO (AUTOMÁTICO).
MODO APAGADO
El girar la esfera a la posición OFF (APAGADO) en
cualquier momento durante el día reiniciará el cronómetro
interno del temporizador y borrará la programación de
riego de RETARDO POR LLUVIA o MANUAL. Esto
además cancelará todas las horas de riego programadas para
el día hasta la próxima HORA DE INICIO programada.
Esto significa que si gira la esfera nuevamente a AUTO
(AUTOMÁTICO) el temporizador no regará hasta el
siguiente día de riego; comenzando a su HORA DE INICIO
programada.
©2019 Orbit | Utah, USA
orbitonline.com
6:00
RESET
MANUAL
CONEXIÓN
AL GRIFO
BOTONES
+/-
MANUAL
FILTRO
ESFERA
REINICIAR
SALIDA
¿Necesita ayuda?
Si encuentra un problema, use los siguientes recursos antes de
devolver el producto Orbit a la tienda.
llámenos
1-800-488-6156
envíenos un texto
801-797-2319
o visítenos en:
community.orbitonline.com
AM
AM
MINUTES
HRS
MANUAL
MINUTES
DAYS
EJEMPLO: Tiene una HORA DE INICIO a las 6:00 a.m. con
una FRECUENCIA de intervalos de 6 horas. Si gira la esfera a
la posición OFF (APAGADO) a las 10:00 a.m. del día de hoy, el
temporizador no iniciará el riego hasta las 6:00 a.m. del día de
mañana. Las horas de riego de las 12:00 p.m., 6:00 p.m. y 12:00
a.m. han sido canceladas para ese día.
LOCALIZACIÓN Y SOLUCIÓN
DE PROBLEMAS
El agua no se activa a la hora deseada.
Revise si:
• El reloj se ha colocado en la hora correcta incluyendo
a.m. y p.m.
• La esfera está colocada en AUTO.
• La hora de inicio se ha colocado en la hora deseada
incluyendo a.m. y p.m.
• El retardo por lluvia está activado. Borre si fuese necesario.
El temporizador no inicia el riego o tiene bajo flujo.
Revise si:
• El temporizador está colocado en AUTO.
• El grifo de la manguera está abierto.
• Las baterías tienen poca carga.
• El reloj se ha colocado en la hora correcta incluyendo
a.m. y p.m.
• El retraso por lluvia está activado. Borre si fuese necesario.
• La arandela de la malla del filtro está limpia.
• La presión del agua es superior a 25 psi.
El flujo de agua no se detiene.
Revise si:
• LA DURACIÓN está configurada al tiempo deseado.
• LA FRECUENCIA está configurada al intervalo de
hora o día deseado.
El temporizador gotea.
Revise si:
• La arandela del filtro está en su lugar.
• La arandela del filtro está limpia y sin daños.
• La conexión al filtro está apretada a mano.
Presión de agua de riego:
• Mínima: 25 psi
• Máxima: 100 psi
Temperatura de trabajo:
• Máxima: No debe exceder de 120° F (48° C)
• Mínima: Evite el congelamiento