
Loading ...
Loading ...
Loading ...
ENGLISH
14
PRODUCT CARE
Driving On Slopes
Refer to the slope gauge in the Safe Operation Section to help determine slopes where
you may operate safely..
WARNING: Do not operate on inclines with a slope in excess of 15°/26% (a
rise of approximately 4 feet every 10 feet). The machine could overturn and
cause serious injury.
1. Always drive across slopes, never up and down. Control the speed and direction of
the mower using primarily the control lever on the downhill side of the mower, with
the uphill control lever remaining essentially in a fixed position.
2. Avoid turning downhill if possible. Start at the bottom of a slope and work upward.
Always slow down before turning.
3. Use extra care and go slowly when turning downhill.
Engaging the PTO
Engaging the PTO transfers power to the cutting deck. To engage the PTO:
1. Move the throttle to the FAST
position.
2. Pull the PTO switch up/out into the ENGAGED (ON) position.
NOTE: When operating the mower be certain that the throttle is always in the
FAST
position. Operating with the throttle at less than full throttle may lead to
premature battery wear and a poor quality cut.
3. To disengage the PTO, push the PTO switch down/into the DISENGAGED
(OFF) position.
Mowing
WARNING: To help avoid blade contact or a thrown object injury, keep
bystanders, helpers, children and pets at least 75 feet from the machine
while it is in operation. Stop machine if anyone enters the area.
WARNING: Make certain the area to be mowed is free of debris, sticks,
stones, wire or other objcts that can be thrown by the rotating blades.
NOTE: Do not engage the mower deck when lowered in grass. Premature wear and
possible failure of the ‘V” belt and PTO clutch will result. Fully raise the deck or move to a
non grassy area before engaging the mower deck.
• Mow across slopes, not up and down. If mowing a slope, start at bottom and work
upward to ensure turns are made uphill.
• Do not mow at high ground speed, especially if a mulch kit or grass collector
is installed.
• Do not cut the grass too short. Short grass is prone to weed growth and yellows
quickly in dry weather.
• Always operate the mower with the throttle in the FAST position while mowing.
• On the first pass pick a point on the opposite side of the area to be mowed. Follow
the point to maintain a straight line
• Move the throttle control or throttle control to the FAST position and engage the PTO.
• Lower the mower deck to the desired height setting.
• For best results it is recommended that the first two laps be cut with the discharge
thrown towards the center. After the first two laps, reverse the direction to throw the
discharge to the outside for the balance of cutting. This will give a better appearance
to the lawn.
• Slowly and evenly push the RH and LH drive control levers forward to move the
mower forward, and keep the mower headed directly toward the alignment point.
NOTE: The speed of the mower will affect the quality of the mower cut. Mowing at
full speed will adversely affect the cut quality. Control the ground speed with the
drive control levers.
• The mower is designed to cut normal residential grass of a height no more than 10”
(25cm). Do not attempt to mow through unusually tall, dry grass (e.g., pasture) or
piles of dry leaves. Dry grass or leaves may contact the engine exhaust and/or build
up on the mower.
• Do NOT attempt to mow heavy brush and weeds or extremely tall grass. The mower
is designed to mow lawns, NOT clear brush.
• Keep the blades sharp and replace the blades when worn.
• When approaching the other end of the strip, slow down or stop before turning. A
Y-turn is recommended unless a pivot or zero turn is required.
• Align the mower with an edge of the mowed strip and overlap approximately 3”
(7.6 cm).
• Direct the mower on each subsequent strip to align with a previously cut strip.
• To prevent rutting or grooving of the turf, if possible, change the direction that the
strips are mowed by approximately 45° for the next and each subsequent mowing.
When stopping the mower for any reason while on a grass surface, always:
• Return the RH and LH drive control levers to the natural position and engage the park
brake lever.
• Shut engine off and remove the key.
• Doing so will minimize the possibility of having your lawn ‘‘browned’’ by hot exhaust
from the mower’s running engine.
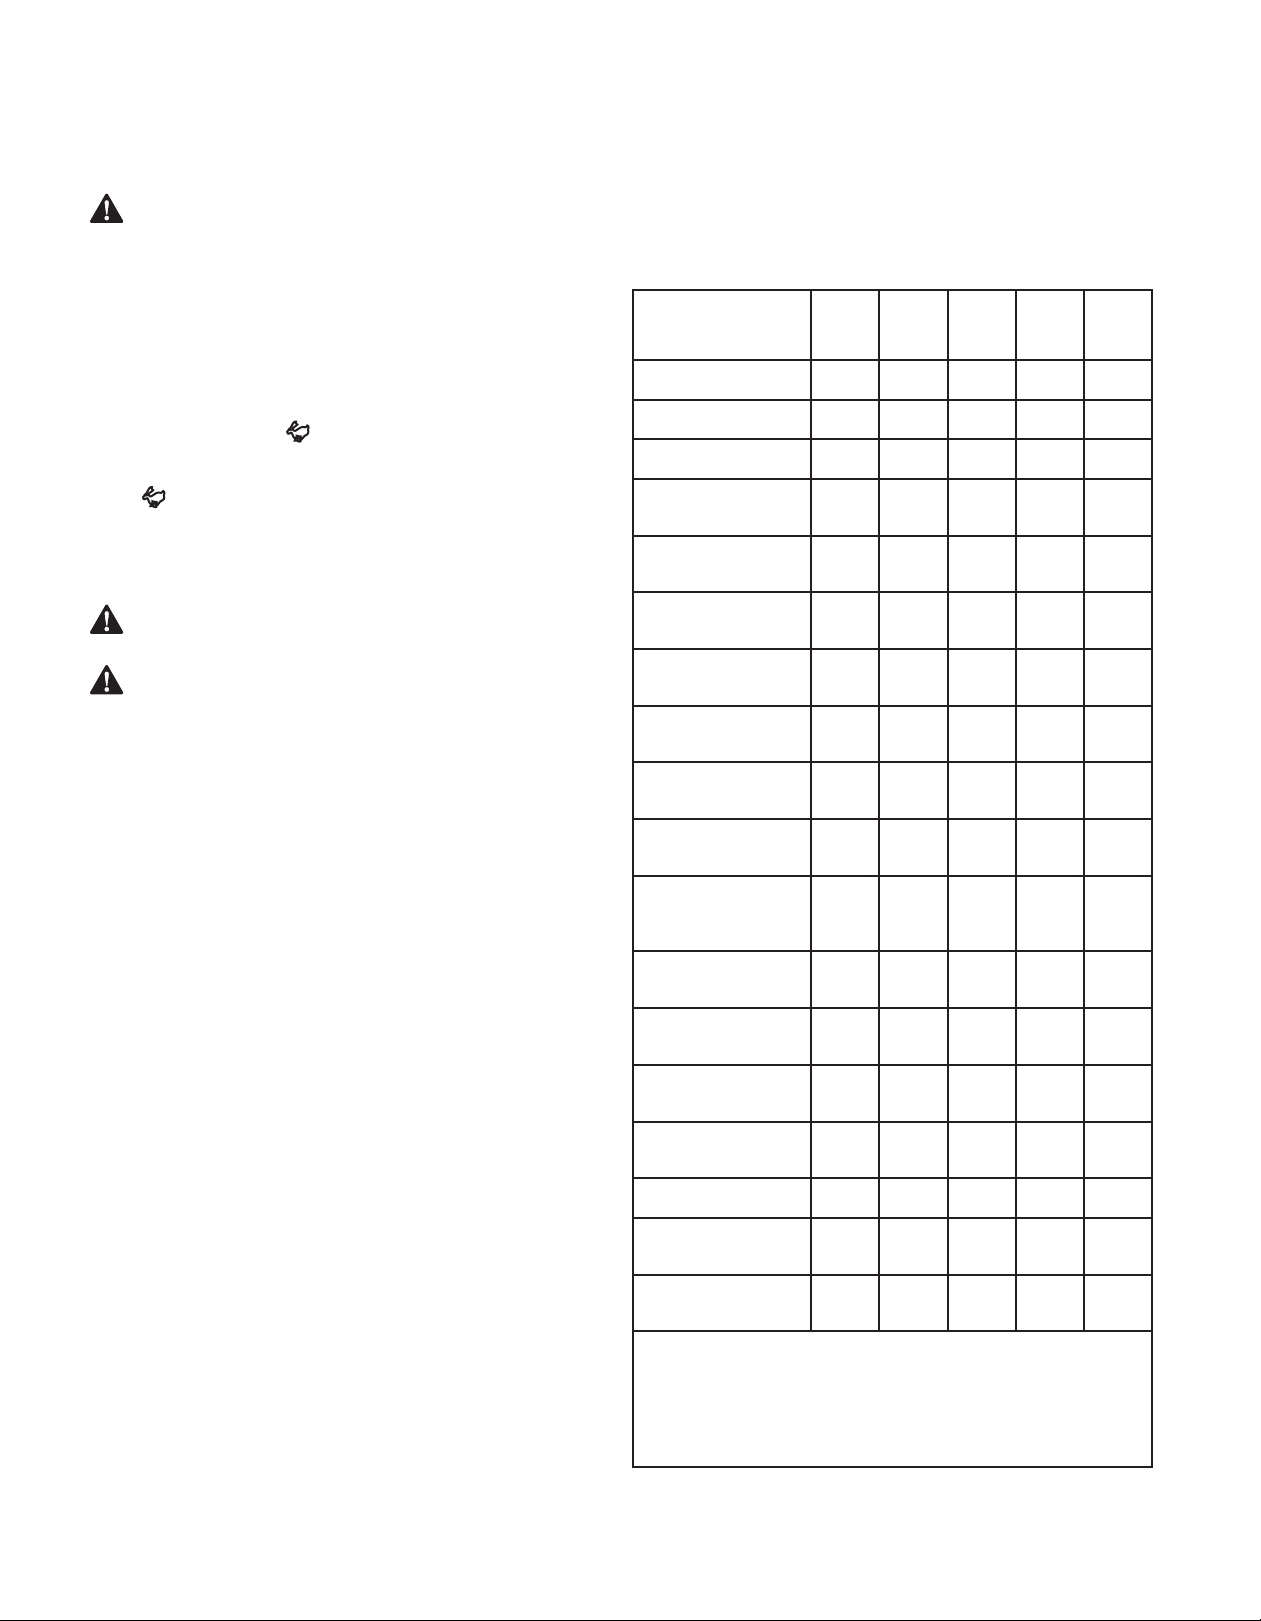
Maintenance Schedule
Before
Each Use
Every
25 Hours
Every
50 Hours
Every
500 Hours
After
Each Use
Check gasoline level
P
Check hydraulic hoses for leaks
P
Check tires & tire pressure
P
Check deck, mower and hydro
drive belts
P
Check parking brake for proper
operation **
P
Check blades and blade
bolt tightness
P
Check safety switches for
proper operation
P
Check fluid level in transmission oil
expansion reservoir
P
Check/Clean Engine Intake Screens
& Cooling Fans *
P P
Check/Clean Exhaust Manifold,
Muffler Pipe & Muffler Shields *
P P
Check/Clean Top & Underside of
Deck, Under and Around Spindle
Covers & Belt Area *
P P
Check/Clean Around Fuses, Wiring
and Wiring Harnesses *
P P
Check/Clean Around Transmission,
Axle and Fans *
P P
Blow out/clean the engine/
pump control
P
Blow out/clean the operator’s
platform area
P
Lubricate wear points (see chart)
P P
Clean engine cooling fins & external
surfaces *
P
Change hydrostatic fluid & filter in
transaxles ^
P
* - Perform more frequently under dusty conditions.
** - Parking Brake on 36 Inch Mowings Decks - Uses brake wedges that will require
adjustment as the rear wheel tire tread wears. Refer to Parking Brake Check/
Adjustment - 36 Inch Deck Only on page 17.
^ - After first 300 hours, change hydrostatic fluid and filter in transaxles
Loading ...
Loading ...
Loading ...