Loading ...
Loading ...
Loading ...
30
31
• Clean the molded plastic housing of the chain saw using a soft brush and clean cloth.
DO NOT use water, solvents or polishes.
• Remove all debris, especially from the motor cooling vents.
• Remove and brush clean the cover plate, chain and chain bar after 1 to 3 hours of use.
• Clean the area under the cover plate, the drive sprocket and chain bar assembly using a soft brush.
• Clean oil outlet with a clean cloth.
• If the chain saw is to be stored for a long period of time, clean chain and chain bar.
STORE IN A SECURE, DRY PLACE OUT OF THE REACH OF CHILDREN.
• Do not place other objects on the chain saw.
• To prevent oil leakage, ensure machine is left in a horizontal position.
• When storing machine in original packaging the chain oil reservoir must be completely emptied.
CLEANING / STORAGE
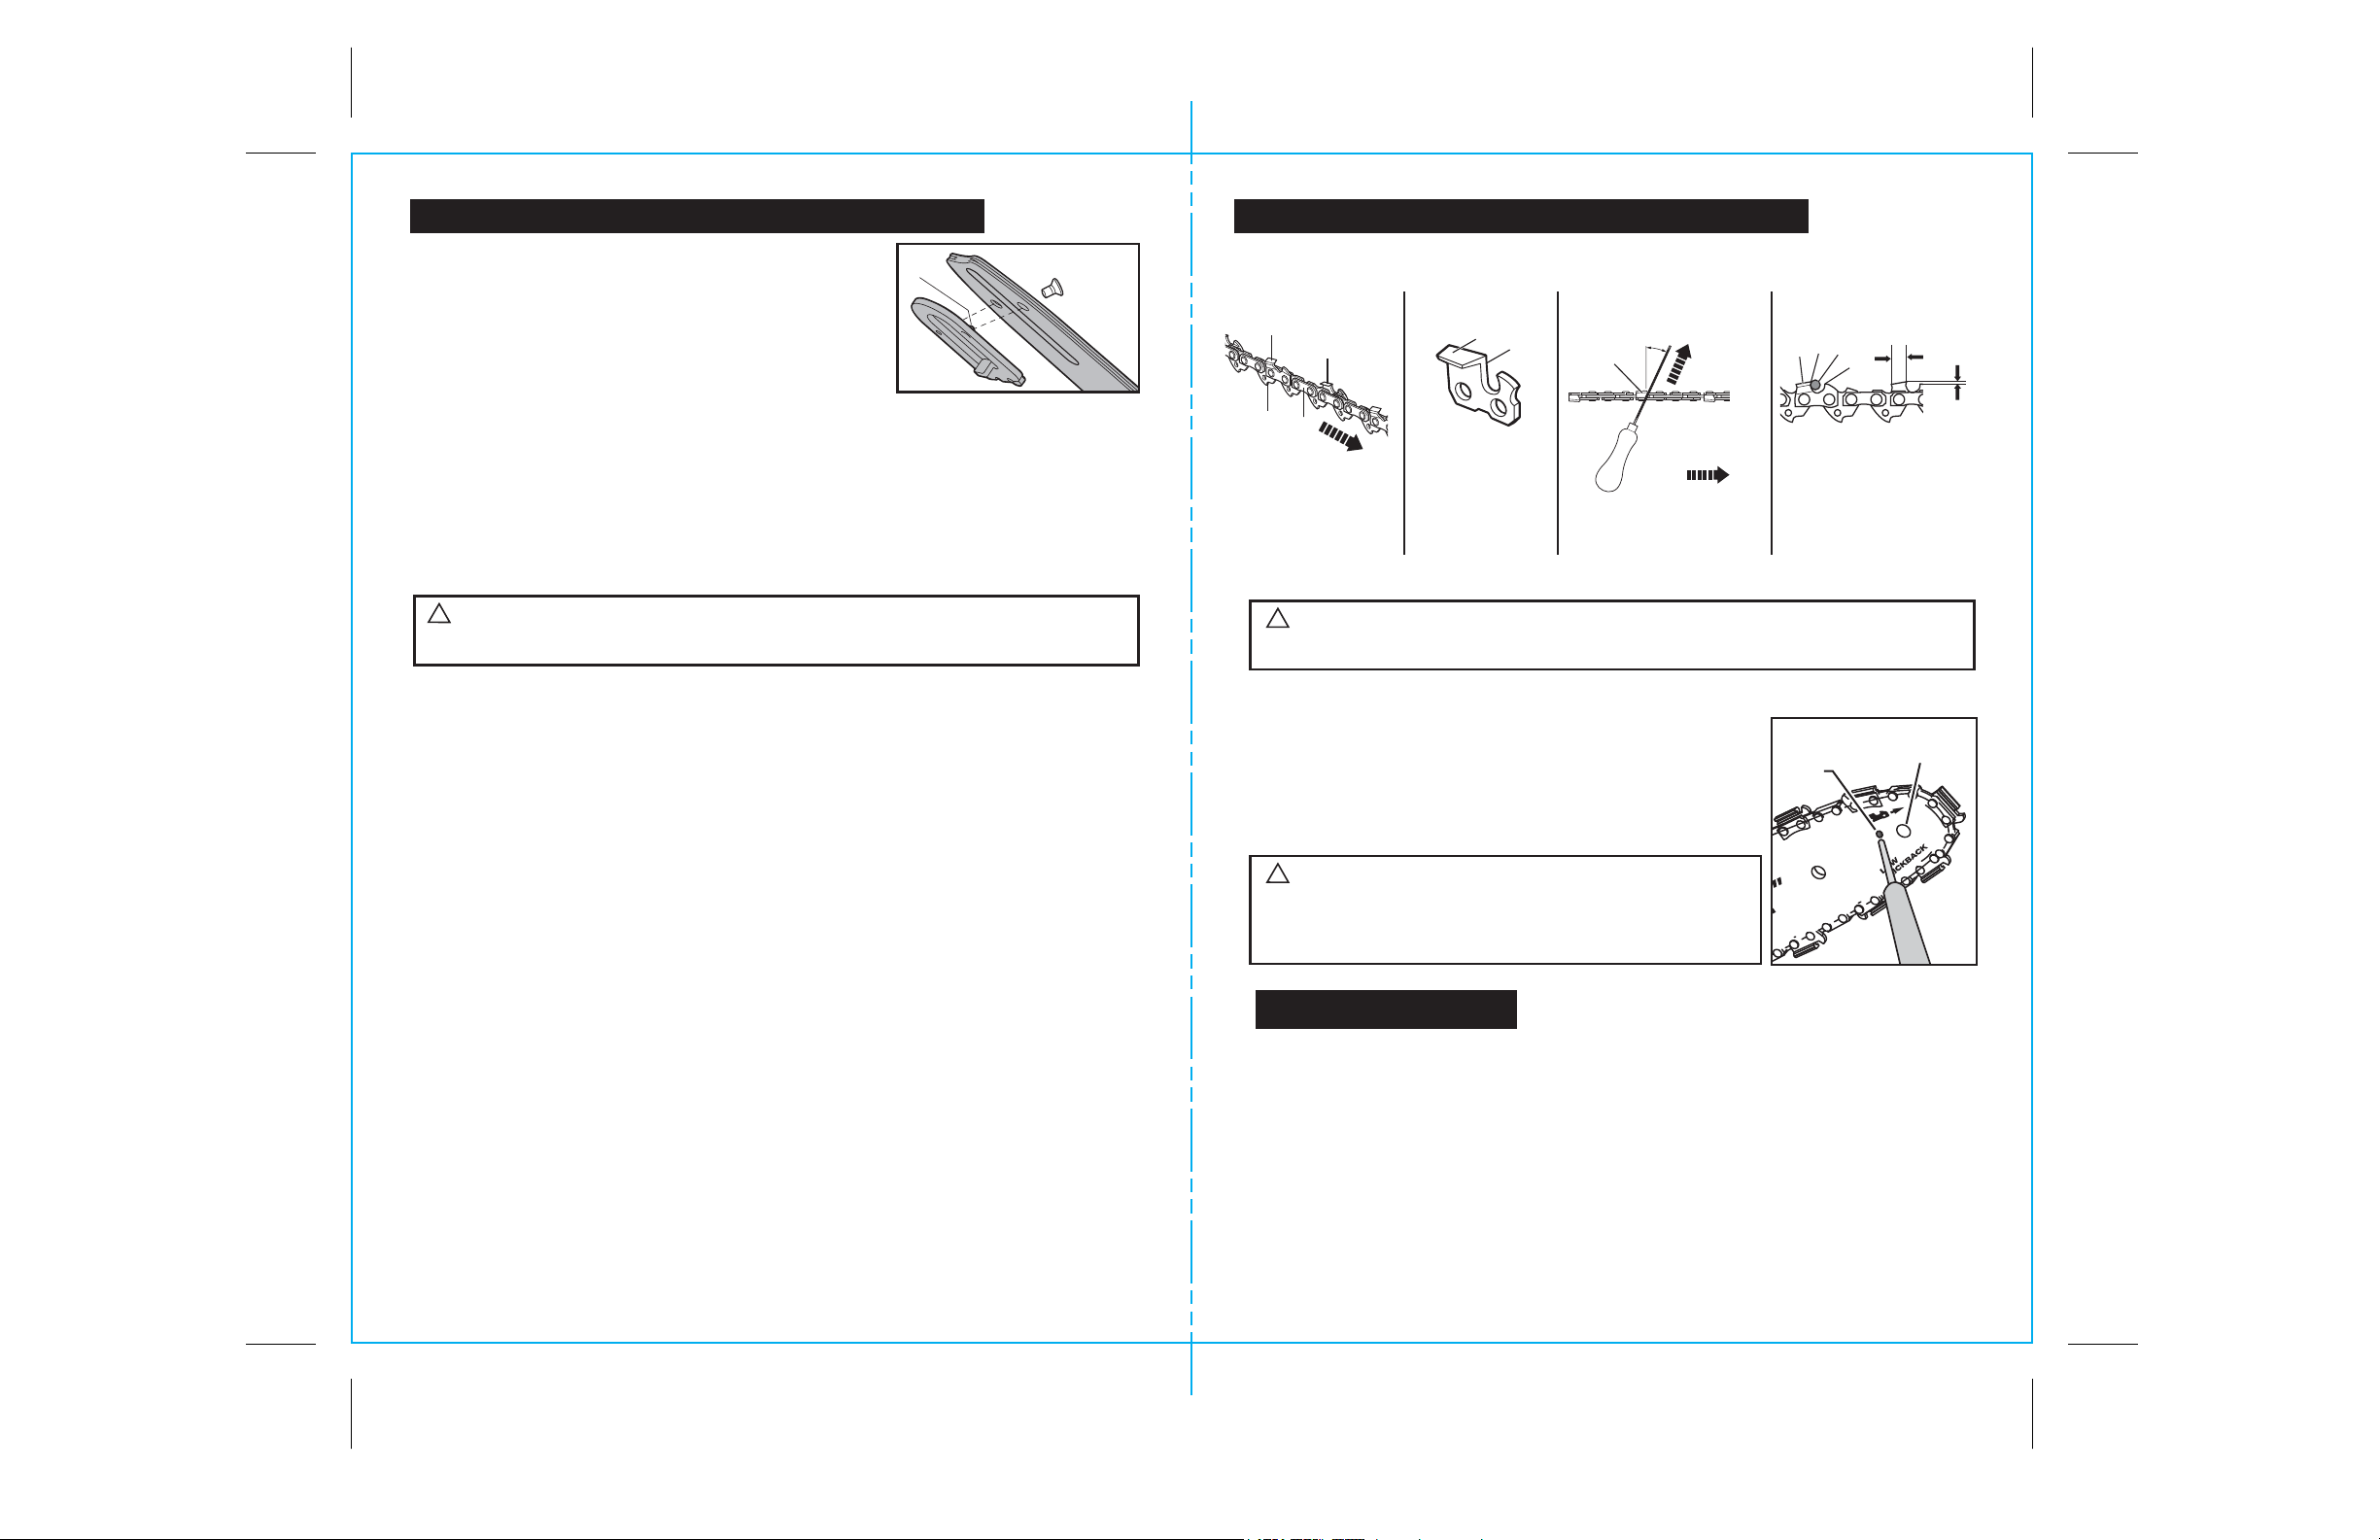
Keep chain sharp. Your saw will cut faster and more safely. A dull chain will cause undue
sprocket, Guide Bar, chain, and motor wear. If you must force chain into wood and cutting
creates only sawdust with a few large chips, then chain is dull.
Purchase a new chain or have your chain sharpened professionally at a qualified service center,
or sharpen the chain yourself by using a proper sharpening kit. Also observe the sharpening
instructions supplied with the sharpening kit. The height difference between the cutting tip and
the ridge is the depth gauge setting.
(See Fig. 27)
When you sharpen the cutting tip, the depth gauge setting between the tip and the side plate
ridge will decrease. To maintain optimal cutting performance the ridge has to be filed down to
achieve the recommended depth gauge setting.
TO SHARPEN THE CHAIN, PROCEED AS FOLLOWS:
• Use protective gloves.
• Ensure the chain is correctly tensioned on the guide bar.
• Use a round file, whose diameter is 1.1 times the cutting tooth depth. Make sure 20% of the
file diameter is above the cutter’s top plate
(See Fig. 26 and 27).
NOTE: A file guide is available from most chainsaw retailers and is the easiest way to hold
the file at the correct position.
• File at an angle perpendicular to the bar, and at an angle of 25° to the direction of travel.
(See Fig. 26)
• File each tooth from the inside towards outside only. File one side of the chain first than
turn the saw around and repeat the process.
• Sharpen each tooth equally by using the same number of strokes.
• Keep all cutter lengths equal
(See Fig. 27)
. Each time the cutting tip is sharpened the cutting
length is reduced. When the cutter length is reduced to 0.16 inch (4 mm) the chain is worn
out and should be replaced.
• The depth gauge setting is also reduced with each sharpening. Every 5 sharpenings use a
depth gauge measuring tool to check the height between the cutting tip and the ridge
(See Fig. 27)
. When necessary use a flat file to file down the ridge to achieve the .025 inch
depth gauge setting. Depth gauge measuring tools are available from most chainsaw retailers.
• If the saw is not functioning properly, take it to a qualified chainsaw service center to have
saw inspected for possible repair. Use only identical parts as listed in this manual.
SHARPENING SAW CHAIN
SHARPENING SAW CHAIN cont.
WARNING: Unplug chain saw from power source before servicing. Severe injury
or death could occur from electrical shock or body contact with moving chain. Cutting
edges on chain are sharp. Use protective gloves when handling chain.
!
1
Fig. 23
Fit the chain and guide bar as described in
ASSEMBLY and TENSIONING CHAIN sections, (See pages 16 and 17). The circular groove
of the guide bar will wear particularly on the lower edge with time. When replacing the chain turn
the chain bar 180° to allow even wear, thus extending chain bar life.
Check Drive Sprocket. Replace the bar if the drive sprocket is worn out or damaged.
If The Chain Bar Is Worn Out Or Damaged, take the chain catcher off the bar by loosening the
screw counterclockwise. Then fit the chain catcher into the new bar by tightening
the screw clockwise. The protrusion (1) on the bar side of the catcher must fit into the hole for it
in the bar. (See Fig. 23)
Replace chain when cutters are too worn to sharpen or
when chain stops.
Only use replacement chain noted in this manual.
Inspect Guide Bar before replacing chain.
A worn or damaged Guide Bar is unsafe and will damage
chain. It will also make cutting harder.
Replacing/Changing Chain And Guide Bar
MAINTENANCE AND STORAGE OF CHAIN SAW cont. MAINTENANCE AND STORAGE OF CHAIN SAW cont.
Note: It is not necessary to remove the chain or bar when lubricating the sprocket.
1. Clean the bar and sprocket.
2. Using a grease gun, insert the tip of the gun into the
lubrication hole and inject grease until it appears at the
outside edge of the sprocket tip.
(See Fig. 28)
3. Put on heavy duty protective gloves. Pull the chain in the
direction of the bar tip to rotate the sprocket to evenly distribute
the grease onto the sprocket teeth.
LUBRICATE SPROCKET
WARNING:
Wear heavy duty gloves when performing any maintenance
or service to this tool. Always unplug the tool before performing any service
or maintenance on this tool.
!
WARNING:
The chain pulls with a significant amount
of resistance. ALWAYS wear heavy duty gloves to pull the
chain. To minimize exposure to the chain cutting edges, ONLY
pull the chain forward in the direction of the bar tip. DO NOT
pull the chain in the direction of the motor.
!
A
B
C
D
A - Right-hand Cutter
B - Left-hand Cutter
C - Bumper Drive Link
D - Tie Strap
A
B
C
D
Cutter
Length
Depth Gauge
Setting 0.025 in.
A - Top Plate
B - Cutting Tip
C - File Position
D - Ridge
Fig. 24
25°
A
SAW CHAIN DIRECTION
Sharpening Angle
FILE
DIRECTION
Outside
Inside
Fig. 26 Fig. 25
B
A
Fig. 27
SAW CHAIN DIRECTION
A - Top Plate
B - Side Plate
A - Left-hand Cutter
Fig. 28
Injecting grease to lubricate
Lubrication
Hole
Sprocket Disc
Loading ...
Loading ...