Loading ...
Loading ...
Loading ...
3
Select Remove.
Adding a Dog to the Astro 900 Handheld
The handheld device can track up to 20 dogs with dog collar
devices. If you purchase additional dog collar devices, you can
add them to the handheld device.
NOTE: You can only add a dog collar device of the same
communication protocol to your handheld device. Go to
support.garmin.com/collars for compatibility information.
1
Bring your dog collar device within range of the handheld
device.
NOTE: The devices should be close enough to touch.
2
Select DOG.
3
Select Add Dog.
4
Follow the on-screen instructions.
NOTE: An error message could appear if there is a conflict
with the ID number of another dog.
After pairing is complete, you can add the dog collar device to
additional handheld devices using the dog collar device track
code or control code.
Adding a Dog Using the Track and Control Codes
NOTE: This feature varies based on dog collar device type and
feature availability in your area.
Before you can add a dog using the track and control codes, the
dog owner must find the track and control codes (Finding the
Dog ID and Track and Control Codes, page 4) and tell them
to you.
You can use track and control codes to authorize a handheld
device to interact with your dog collar device. If you are not near
the dog you want to add or you cannot put the collar into pairing
mode, you can add the dog using the track and control codes.
1
Select DOG > Add Dog.
2
When asked if you are near the collar, select No.
3
When asked if you know the track and control codes, select
Yes.
4
Enter the track or control code for the collar, and select
Done.
The dog’s track code allows you to track the dog. The dog’s
control code allows you to both track the dog and access the
collar settings.
5
Enter the name of the dog, and select Done > OK.
Finding the Dog ID and Track and Control Codes
You can share a dog’s track code so another person can track
your dog. Also, you can share a dog's control code so another
person can track your dog and access the collar settings.
1
Select Dog List.
2
Select a dog.
3
Select Show Info.
Assigning a Dog ID Manually
Before you can assign a dog ID manually, you must turn on the
dog collar device and bring it within 3 m (10 ft.) of the handheld
device. You must assign a new ID number to the dog.
1
Select DOG.
2
Select a dog.
3
Select Show Info > MENU > Change ID.
4
Select an unassigned and nonconflicting ID.
Changing the Update Rate
You can select a longer duration for the update rate to conserve
battery power. The 30-second and 2-minute rates reduce battery
drain, but they record less-detailed dog tracks and statistics.
1
Bring the handheld device within a few feet of the dog collar
device.
2
Select DOG.
3
Select a dog.
4
Select Show Info > MENU > Change Update Rate.
5
Select an update rate.
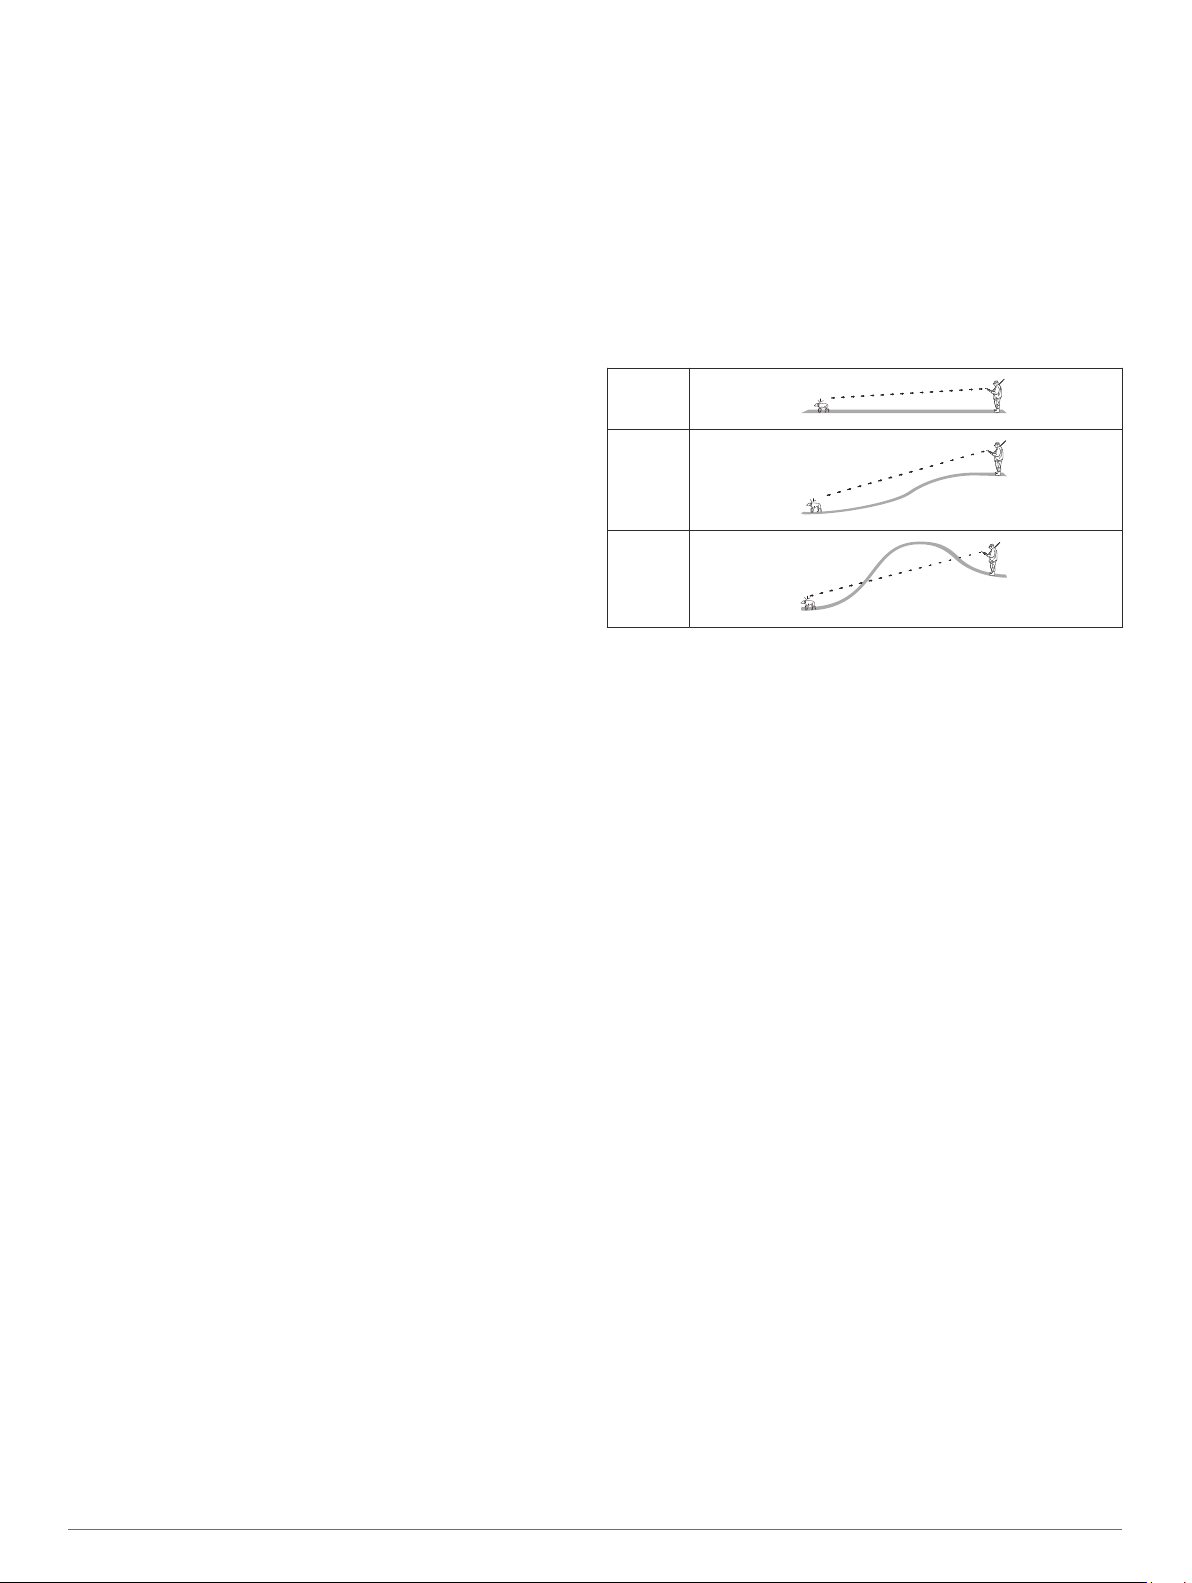
Communication with the Collar
You should keep an unobstructed line of sight between your
handheld device and the dog collar device to produce the best
communication signal. To achieve the best line-of-sight
conditions, you should move to the highest elevation point in
your area (for example, on the top of a hill).
Best
Good
Poor
Tracking with BaseCamp
™
BaseStation
Before you can track your dogs using BaseCamp, you must
download BaseCamp to your computer (www.garmin.com
/basecamp).
The BaseStation feature of BaseCamp allows you to track your
dogs in real-time on a computer. For more information on using
BaseCamp, see the help file in the application.
1
Select Setup > System > BaseCamp Basestation >
Prompted.
2
Open BaseCamp.
3
Follow the on-screen instructions.
Waypoints, Routes, and Tracks
Waypoints
Waypoints are locations you record and store in the device.
Waypoints can mark where you are, where you are going, or
where you have been. You can add details about the location,
such as name, elevation, and depth.
Marking Your Vehicle Location
You can mark the location of your vehicle so you can navigate
back to your vehicle after a hunt.
1
Select MARK.
2
Follow the on-screen instructions.
Marking Your Current Location
1
Select MARK.
2
Select an option:
• Select New.
• Select a default location name, such as Truck or Camp.
3
Edit the location information (optional).
4
Select Done.
Marking a Covey
You can mark a covey location and enter the estimated number
of birds flushed and the number of birds taken.
1
Select MARK > Covey.
4 Waypoints, Routes, and Tracks
Loading ...
Loading ...
Loading ...