
0
Explosion-Proof Bullet Network Camera
Quick Start Guide
20200930
UD14888B

Network Bullet Camera·Quick Start Guide
1
Quick Start Guide
©2020 Hangzhou Hikvision Digital Technology Co., Ltd. All rights
reserved.
This Manual is the property of Hangzhou Hikvision Digital Technology
Co., Ltd. or its affiliates (hereinafter referred to as “Hikvision”), and it
cannot be reproduced, changed, translated, or distributed, partially
or wholly, by any means, without the prior written permission of
Hikvision. Unless otherwise expressly stated herein, Hikvision does
not make any warranties, guarantees or representations, express or
implied, regarding to the Manual, any information contained herein.
About this Manual
The Manual includes instructions for using and managing the
Product. Pictures, charts, images and all other information
hereinafter are for description and explanation only. The information
contained in the Manual is subject to change, without notice, due to
firmware updates or other reasons. Please find the latest version of
this Manual at the Hikvision website (https://www.hikvision.com/).
Please use this Manual with the guidance and assistance of
professionals trained in supporting the Product.
Trademarks Acknowledgement
● and other Hikvision’s trademarks and logos
are the properties of Hikvision in various jurisdictions.

Network Bullet Camera·Quick Start Guide
2
● Other trademarks and logos mentioned are the properties of
their respective owners.
LEGAL DISCLAIMER
TO THE MAXIMUM EXTENT PERMITTED BY APPLICABLE LAW, THIS
MANUAL AND THE PRODUCT DESCRIBED, WITH ITS HARDWARE,
SOFTWARE AND FIRMWARE, ARE PROVIDED “AS IS” AND “WITH ALL
FAULTS AND ERRORS”. HIKVISION MAKES NO WARRANTIES, EXPRESS
OR IMPLIED, INCLUDING WITHOUT LIMITATION, MERCHANTABILITY,
SATISFACTORY QUALITY, OR FITNESS FOR A PARTICULAR PURPOSE.
THE USE OF THE PRODUCT BY YOU IS AT YOUR OWN RISK. IN NO
EVENT WILL HIKVISION BE LIABLE TO YOU FOR ANY SPECIAL,
CONSEQUENTIAL, INCIDENTAL, OR INDIRECT DAMAGES, INCLUDING,
AMONG OTHERS, DAMAGES FOR LOSS OF BUSINESS PROFITS,
BUSINESS INTERRUPTION, OR LOSS OF DATA, CORRUPTION OF
SYSTEMS, OR LOSS OF DOCUMENTATION, WHETHER BASED ON
BREACH OF CONTRACT, TORT (INCLUDING NEGLIGENCE), PRODUCT
LIABILITY, OR OTHERWISE, IN CONNECTION WITH THE USE OF THE
PRODUCT, EVEN IF HIKVISION HAS BEEN ADVISED OF THE
POSSIBILITY OF SUCH DAMAGES OR LOSS.
YOU ACKNOWLEDGE THAT THE NATURE OF INTERNET PROVIDES FOR
INHERENT SECURITY RISKS, AND HIKVISION SHALL NOT TAKE ANY
RESPONSIBILITIES FOR ABNORMAL OPERATION, PRIVACY LEAKAGE
OR OTHER DAMAGES RESULTING FROM CYBER-ATTACK, HACKER
ATTACK, VIRUS INFECTION, OR OTHER INTERNET SECURITY RISKS;
HOWEVER, HIKVISION WILL PROVIDE TIMELY TECHNICAL SUPPORT IF
REQUIRED.

Network Bullet Camera·Quick Start Guide
3
YOU AGREE TO USE THIS PRODUCT IN COMPLIANCE WITH ALL
APPLICABLE LAWS, AND YOU ARE SOLELY RESPONSIBLE FOR
ENSURING THAT YOUR USE CONFORMS TO THE APPLICABLE LAW.
ESPECIALLY, YOU ARE RESPONSIBLE, FOR USING THIS PRODUCT IN A
MANNER THAT DOES NOT INFRINGE ON THE RIGHTS OF THIRD
PARTIES, INCLUDING WITHOUT LIMITATION, RIGHTS OF PUBLICITY,
INTELLECTUAL PROPERTY RIGHTS, OR DATA PROTECTION AND
OTHER PRIVACY RIGHTS. YOU SHALL NOT USE THIS PRODUCT FOR
ANY PROHIBITED END-USES, INCLUDING THE DEVELOPMENT OR
PRODUCTION OF WEAPONS OF MASS DESTRUCTION, THE
DEVELOPMENT OR PRODUCTION OF CHEMICAL OR BIOLOGICAL
WEAPONS, ANY ACTIVITIES IN THE CONTEXT RELATED TO ANY
NUCLEAR EXPLOSIVE OR UNSAFE NUCLEAR FUEL-CYCLE, OR IN
SUPPORT OF HUMAN RIGHTS ABUSES.
IN THE EVENT OF ANY CONFLICTS BETWEEN THIS MANUAL AND THE
APPLICABLE LAW, THE LATER PREVAILS.
Regulatory Information
FCC Information
Please take attention that changes or modification not expressly
approved by the party responsible for compliance could void the
user’s authority to operate the equipment.
FCC compliance: This equipment has been tested and found to
comply with the limits for a Class A digital device, pursuant to part
15 of the FCC Rules. These limits are designed to provide reasonable
protection against harmful interference when the equipment is
operated in a commercial environment. This equipment generates,
Network Bullet Camera·Quick Start Guide
4
uses, and can radiate radio frequency energy and, if not installed and
used in accordance with the instruction manual, may cause harmful
interference to radio communications. Operation of this equipment
in a residential area is likely to cause harmful interference in which
case the user will be required to correct the interference at his own
expense.
FCC Conditions
This device complies with part 15 of the FCC Rules. Operation is
subject to the following two conditions:
1. This device may not cause harmful interference.
2. This device must accept any interference received, including
interference that may cause undesired operation.
EU Conformity Statement
This product and - if applicable - the supplied
accessories too are marked with "CE" and comply
therefore with the applicable harmonized
European standards listed under the EMC Directive 2014/30/EU, the
RoHS Directive 2011/65/EU, the ATEX Directive 2014/34/EU.
2012/19/EU (WEEE directive): Products marked
with this symbol cannot be disposed of as unsorted
municipal waste in the European Union. For proper
recycling, return this product to your local supplier
upon the purchase of equivalent new equipment, or dispose of it at
designated collection points. For more information see:
www.recyclethis.info
2006/66/EC (battery directive): This product
contains a battery that cannot be disposed of as

Network Bullet Camera·Quick Start Guide
5
unsorted municipal waste in the European Union. See the product
documentation for specific battery information. The battery is
marked with this symbol, which may include lettering to indicate
cadmium (Cd), lead (Pb), or mercury (Hg). For proper recycling,
return the battery to your supplier or to a designated collection
point. For more information see:www.recyclethis.info
Intended use of the camera
ATEX: II 2 G D Ex db IIC T6 Gb/Ex tb IIIC T80℃ Db IP68
IECEx: Ex db IIC T6 Gb/Ex tb IIIC T80℃ Db IP68
UL (Zone): Class I, Zone 1, AEx db IIC T6; Zone 21, AEx tb IIIC T80°C
cUL (Zone): Ex db IIC T6 Gb X; Ex tb IIIC T80°C Db X
Hazardous Area Classification: Zone 1, Zone 2, Zone 21, Zone 22.
Hazardous Location Classification: Class I, Zone 1, Class I, Zone 2;
Zone 21, Zone 22
IP Degree: IP68 (2m, 2h)
Ex Standards:
IEC 60079-0: 2017
EN 60079-0: 2018
IEC 60079-1: 2014
EN 60079-1: 2014
IEC 60079-31: 2013
EN 60079-31: 2014
UL 60079-0: 2019
CSA 60079-0: 19
UL 60079-1: 2015
CSA 60079-1: 16

Network Bullet Camera·Quick Start Guide
6
UL 60079-31: 2015
CSA 60079-31: 15
Nameplate:
Special Conditions for Safe Use:
Conditions particulières pour un usage sécuritaire :
Ambient Temperature: -30°C ~+60°C, or -40°C ~ +60°C if the
camera model has an “H” in its suffix.
Température ambiante : -30 °C ~ + 60 °C, ou -40 °C ~ + 60 °C si le
modèle de l'appareil contient un « H » dans son suffixe.
Industry Canada ICES-003 Compliance
Conformité Industrie Canada ICES-003
This device meets the CAN ICES-3 (A)/NMB-3(A) standards
requirements.
Ce dispositif répond aux exigences des normes CAN ICES-3
(A)/NMB-3(A).
Warning:
Avertissement :
This is a class A product. In a domestic environment this product may
cause radio interference in which case the user may be required to
take adequate measures.

Network Bullet Camera·Quick Start Guide
7
Il s’agit d’un produit de classe A. Dans un environnement
domestique, ce produit peut provoquer des interférences radio,
auquel cas l’utilisateur peut être amené à prendre les mesures qui
s’imposent.
Safety Instruction
Directives de sécurité
These instructions are intended to ensure that user can use the
product correctly to avoid danger or property loss.
Les présentes directives visent à garantir que l’utilisateur puisse
utiliser le produit adéquatement afin d’éviter tout danger ou perte
matérielle.
The precaution measure is divided into “Warnings” and “Cautions”
La mesure de précaution est divisée en «avertissements» et en
«mises en garde»
Warnings: Serious injury or death may occur if any of the warnings
are neglected.
Avertissements : De graves blessures et même la mort peuvent
survenir si l’un des avertissements n’est pas respecté.
Cautions: Injury or equipment damage may occur if any of the
cautions are neglected.
Mises en garde : Une blessure ou un bris d’équipement peuvent
survenir si l’une des mises en garde n’est pas respectée.

Network Bullet Camera·Quick Start Guide
8
Warnings
Avertissements
● For device with this sticker, this device is intended for
installation in a restricted access
location, access can only be gained by
service persons or by users who have
been instructed about the reasons for
the restrictions applied to the location and about any
precautions that shall be taken.
Si l'appareil est doté de cet autocollant, il est destiné à être
installé dans un endroit à accès restreint atteignable
uniquement par le personnel d’entretien ou des utilisateurs qui
ont été informés des raisons des restrictions appliquées à
l'emplacement et des précautions à prendre.
Warnings Follow these
safeguards to prevent
serious injury or death.
Avertissements Suivez ces
mesures de sécurité afin
d’éviter des blessures
graves ou la mort.
Cautions Follow these precautions
to prevent potential injury or
material damage.
Mises en garde Suivez ces mesures
de prévention afin d’éviter toute
blessure ou tout dommage
matériel.

Network Bullet Camera·Quick Start Guide
9
● Proper configuration of all passwords and other security
settings is the responsibility of the installer and/or end-user.
La configuration appropriée de tous les mots de passe et autres
paramètres de sécurité relève de la responsabilité de
l'installateur ou de l'utilisateur final.
● Do not stare at the operating light source. May be harmful to
the eyes. Wear appropriate eye protection or do not turn on
the supplement light when you assemble, install or maintain
the camera.
Ne pas regarder la source de lumière. Cela peut être nocif pour
les yeux. Porter un dispositif de protection oculaire approprié
ou ne pas allumer la lampe d'appoint lors du montage, de
l’installation ou de l’entretien de l’appareil.
● The both internal and external earthing shall be connected
reliably.
Les mises à la terre interne et externe doivent être
adéquatement connectées.
Ground wire cross-sectional area of not less than the phase
connector cross-sectional area level, at least 4 mm
2
.
La zone transversale du fil de mise à la terre ne doit pas être
inférieure au niveau de la zone transversale du connecteur de phase,
au moins 4 mm
2
.
● Suitable IECEx/ATEX certified flameproof 'db' and dust ignition
protection 'tb' cable glands or listed fittings with same
hazardous location classfications, correctly installed and
suitable for the conditions of use.

Network Bullet Camera·Quick Start Guide
10
Des presse-étoupes antidéflagrants certifiés IECEx/ATEX « db »
avec protection anti-poussière « tb » ou raccords répertoriés
avec les mêmes classifications pour zones dangereuses,
adéquatement installées et adaptées aux conditions
d'utilisation.
● IECEx/ATEX certified cable glands are needed during the
installation.
Les presse-étoupes doivent être certifiés IECEx/ATEX lors de
l'installation.
● All the electrical operation should be strictly compliance with
the electrical safety regulations, fire prevention regulations and
other related regulations of the nation and region.
Toute exploitation de matériel électrique doit être
rigoureusement conforme aux règlements de sécurité
électrique, de prévention des incendies et autres
réglementations nationales et régionales.
● Make sure that the power has been disconnected before you
wire, install or disassemble the camera. Never wire, install or
disassemble the camera in explosive environment.
Assurez-vous que l’alimentation a été déconnectée avant de
câbler, d’installer ou de démonter la caméra. Ne jamais câbler,
installer ou démonter la caméra dans un environnement
explosif.
● Do not connect several devices to one power adapter as
adapter overload may cause over-heating or a fire hazard.

Network Bullet Camera·Quick Start Guide
11
Ne pas connecter plusieurs appareils à un seul adaptateur
d’alimentation, car une surcharge de l’adaptateur peut
entraîner une surchauffe et un risque d’incendie.
● To avoid fire danger caused by electrostatic charge, never touch
or wipe the camera in explosive environment. Perform the
wiping and replacing accessories only under non-explosive
environment with the provided glove.
Pour éviter tout risque d’incendie dû à une charge
électrostatique, ne touchez et n’essuyez jamais la caméra dans
un environnement explosif. Procédez à l’essuyage et au
remplacement des accessoires uniquement dans un
environnement non explosif à l’aide du gant fourni.
● When the camera is installed on wall or ceiling, the device shall
be firmly fixed.
Lorsque la caméra est installée au mur ou au plafond, elle doit
être fermement fixée.
● If smoke, odors or noise rise from the camera, turn off the
power at once and unplug the power cable, and then contact
the service center.
Si de la fumée, des odeurs ou du bruit proviennent de la caméra,
coupez l’alimentation aussitôt et débranchez le câble
d’alimentation, puis communiquez avec le centre de service.
● If the camera does not work properly, contact your dealer or
the nearest service center. Never attempt to disassemble the
speed dome yourself. (We shall not assume any responsibility
for problems caused by unauthorized repair or maintenance.)

Network Bullet Camera·Quick Start Guide
12
Si la caméra ne fonctionne pas adéquatement, contactez votre
distributeur ou le centre de service le plus près. N’essayez
jamais de démonter la caméra dôme haute vitesse par
vous-même. (Nous déclinons toute responsabilité pour des
problèmes causés par une réparation ou un entretien non
autorisés.)
● The flameproof joints are not intended to be repaired.
Les joints antidéflagrants ne peuvent être réparés.
● When assembly, operation and maintenance, the operator must
follow the requirements of the IEC 60079-14: latest version
Explosive atmosphere- Part 14: Electrical installation design,
selection and erection, beside of the manufacturer’s operation
instruction or its National equivalent. In the United Statas,
when assembly, operation and maintenance, the operator must
follow the requirements of Article 505 or 506 in the National
Electrical Code, ANSI/NFPA 70.
Lors de l’assemblage, de l’utilisation et de l’entretien,
l’utilisateur doit respecter les exigences de la norme IEC
60079-14 : dernière version Atmosphère explosive - Partie 14 :
Conception, choix et montage de l’installation électrique, outre
les recommandations d’utilisation du fabricant ou leur
équivalent national. Aux États-Unis, lors du montage, de
l’utilisation et de l’entretien, l'opérateur doit respecter les
exigences de l'article 505 ou 506 du National Electrical Code,
ANSI/NFPA 70.

Network Bullet Camera·Quick Start Guide
13
● In Canada, CSA C22.1, when assembly, operation and
maintenance, the operator must follow the requirements of
Canadian Electrical Code, Part I.
Au Canada, lors du montage, de l’utilisation et de l’entretien,
l’opérateur doit respecter les exigences de la partie I du Code
canadien de l’électricité (CSA C22.1).
● Please select cable and conduit fittings suitable for above +70°
C.
Sélectionner les raccords de câbles et de conduits adaptés à
plus de +70 °C.
Cautions
Mises en garde
● The internal grounding terminal shall be used for the
equipment grounding connection and that the external
terminal is for a supplementary bonding connection where local
codes or authorities permit or require such connection.
La borne de mise à la terre interne doit être utilisée pour la
connexion de MALT de l'équipement et la borne externe sert à
une connexion de MALT supplémentaire lorsque les codes
locaux ou autorités locales autorisent ou exigent une telle
connexion.
● Make sure the power supply voltage is correct before using the
camera.
Assurez-vous que la tension d'alimentation est adéquate avant
d’utiliser la caméra.

Network Bullet Camera·Quick Start Guide
14
● Do not drop the camera or subject it to physical shock.
Ne laissez pas tomber la caméra et ne la soumettez pas à un
choc physique.
● To ensure explosion-proof performance, do not damage
explosion-proof surface.
Pour assurer une performance antidéflagrante, ne pas
endommager la surface antidéflagrante.
● Do not touch sensor modules with fingers. If cleaning is
necessary, use clean cloth with a bit of ethanol and wipe it
gently. If the camera will not be used for an extended period,
please replace the lens cap to protect the sensor from dirt.
Ne touchez pas les modules de capteur avec les doigts. Si un
nettoyage est requis, utilisez un chiffon propre et un peu
d’éthanol et essuyez-les délicatement. Si la caméra ne sert pas
pendant une période prolongée, veuillez remettre le capuchon
protecteur sur la lentille pour protéger le capteur de la
poussière.
● Do not aim the camera at the sun or extra bright places.
Blooming or smearing may occur otherwise (which is not a
malfunction), and affect the endurance of sensor at the same
time.
N’orientez pas la caméra vers le soleil ou vers des endroits très
lumineux. Autrement, un effet de voile ou de bariolage peut
apparaître (ce qui n’est pas un dysfonctionnement), et cela
pourrait affecter tout à la fois l’endurance du capteur.

Network Bullet Camera·Quick Start Guide
15
● The sensor may be burned out by a laser beam, so when any
laser equipment is in using, make sure that the surface of
sensor will not be exposed to the laser beam.
Un faisceau laser peut brûler le capteur et donc, lorsqu’un
équipement laser est utilisé, assurez-vous que la surface du
capteur ne soit pas exposée au faisceau laser.
● Do not place the camera in extremely hot, cold (the operating
temperature shall be-30°C ~+60°C, or -40°C ~ +60°C if the
camera model has an “H” in its suffix), dusty or damp locations,
and do not expose it to high electromagnetic radiation.
Ne pas placer l'appareil dans un endroit extrêmement chaud ou
froid (la température de fonctionnement doit se situer entre
-30 °C ~ + 60 °C, ou -40 °C ~ + 60 °C si le modèle de l'appareil
contient un « H » dans son suffixe) ni dans des endroits
poussiéreux ou humides, et ne pas l'exposer à un rayonnement
électromagnétique élevé.
● To avoid heat accumulation, good ventilation is required for
operating environment.
Pour éviter l’accumulation de chaleur, une bonne ventilation est
requise dans le milieu de fonctionnement.
● Keep the camera away from liquid while in use.
Gardez la caméra à l’écart du liquide pendant qu’elle
fonctionne.
● While in delivery, the camera shall be packed in its original
packing, or packing of the same texture.
Pendant la livraison, la caméra doit être emballée dans son
emballage d’origine ou dans un emballage de même texture.

Network Bullet Camera·Quick Start Guide
16
● Regular part replacement: a few parts (e.g. electrolytic
capacitor) of the equipment shall be replaced regularly
according to their average enduring time. The average time
varies because of differences between operating environment
and using history, so regular checking is recommended for all
the users. Please contact with your dealer for more details.
Remplacement régulier des pièces : quelques pièces (par
exemple le condensateur électrolytique) de l’équipement
doivent être remplacées régulièrement en fonction de leur
durée de vie moyenne. Le temps moyen varie en raison des
différences entre les milieux d’utilisation et de l’historique
d’utilisation, donc une vérification régulière est recommandée à
tous les utilisateurs. Veuillez communiquer avec votre
distributeur pour plus de détails.
● DO NOT replace the battery by yourself. If the battery is
damaged, contact the dealer.
NE PAS remplacer la pile vous-même. Si la pile est endommagée,
contacter le revendeur.
● Improper use or replacement of the battery may result in
hazard of explosion. Replace with the same or equivalent type
only. Dispose of used batteries according to the instructions
provided by the battery manufacturer.
L’utilisation ou le remplacement inadéquats de la pile peuvent
entraîner un risque d’explosion. Remplacez-la par le même type
ou l’équivalent du même type seulement. Jetez les piles
usagées conformément aux directives fournies par le fabricant
de la pile.

Network Bullet Camera·Quick Start Guide
17
● If the product does not work properly, please contact your
dealer or the nearest service center. Never attempt to
disassemble the camera yourself. (We shall not assume any
responsibility for problems caused by unauthorized repair or
maintenance.)
Si l’appareil ne fonctionne pas correctement, veuillez contacter
votre distributeur ou le centre de service le plus proche.
N’essayez jamais de démonter vous-même la caméra. (Nous
déclinons toute responsabilité pour des problèmes causés par
une réparation ou un entretien non autorisés.)

Network Bullet Camera·Quick Start Guide
18
Table of Contents
1 Introduction .................................................................................. 19
1.1 Overview ....................................................................... 19
1.2 Model Description......................................................... 19
2 Appearance ................................................................................... 21
2.1 Overview ....................................................................... 21
2.2 Cable Description .......................................................... 22
3 Installation .................................................................................... 24
3.1 Wall Mounting .............................................................. 25
3.2 Cable Connection .......................................................... 28
4 Setting the Network Camera over the LAN .................................. 32
4.1 Wiring ........................................................................... 32
4.2 Activating the Camera ................................................... 33
4.2.1 Activation via Web Browser ................................ 33
4.2.2 Activation via SADP Software ............................. 34
4.3 Modifying the IP Address .............................................. 36
5 Accessing via Web Browser .......................................................... 39
6 Operating via Hik-Connect App .................................................... 41
6.1 Enable Hik-Connect Service on Camera ......................... 41
6.1.1 Enable Hik-Connect Service via SADP Software .. 41
6.1.2 Enable Hik-Connect Service via Web Browser .... 42
6.2 Hik-Connect Setup ........................................................ 44
6.3 Adding Camera to Hik-Connect ..................................... 44
6.4 Initializing the Memory Card ......................................... 46

Network Bullet Camera·Quick Start Guide
19
1 Introduction
1.1 Overview
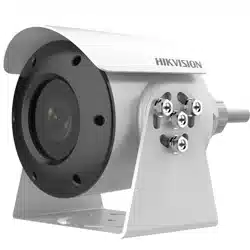
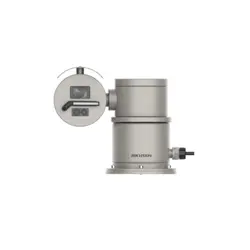
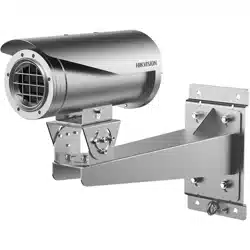
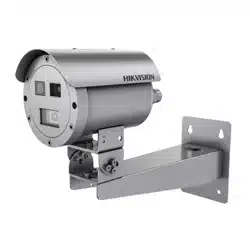
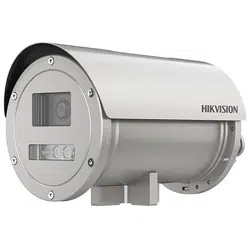
Explosion-proof network camera is a surveillance product capable of
video/audio collecting, smart encoding and network transmitting. It
adopts an embedded system and a high-performed hardware
process platform to achieve good stability and reliability.
You can visit and configure your camera via web browser and client
software.
Explosion-proof network camera adopts a stainless steel enclosure,
receiving an IP68 rating for ingress protection.
Application Scenarios: oil industry, mine fields, chemical industry,
port, grain processing industry, etc.
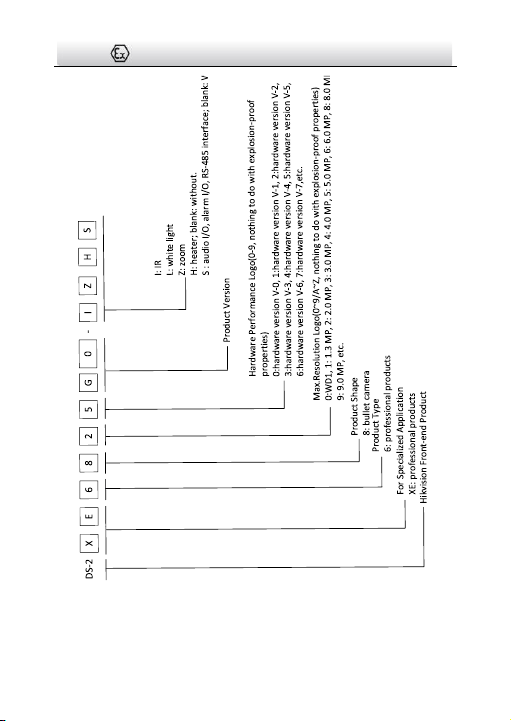
1.2 Model Description
This manual is applicable to the following models:
Table 1-1 Applicable Model List
Model List
DS-2XE6825G0-IZHS
DS-2XE6845G0-IZHS
DS-2XE6885G0-IZHS
DS-2XE6825G0-LZHS
DS-2XE6845G0-LZHS
DS-2XE6885G0-LZHS
DS-2XE6825G0-IZ
DS-2XE6845G0-IZ
DS-2XE6885G0-IZ
DS-2XE6825G0-LZ
DS-2XE6845G0-LZ
DS-2XE6885G0-LZ
Network Bullet Camera·Quick Start Guide
20
Figure 1-1 Model Explanation
Network Bullet Camera·Quick Start Guide
21
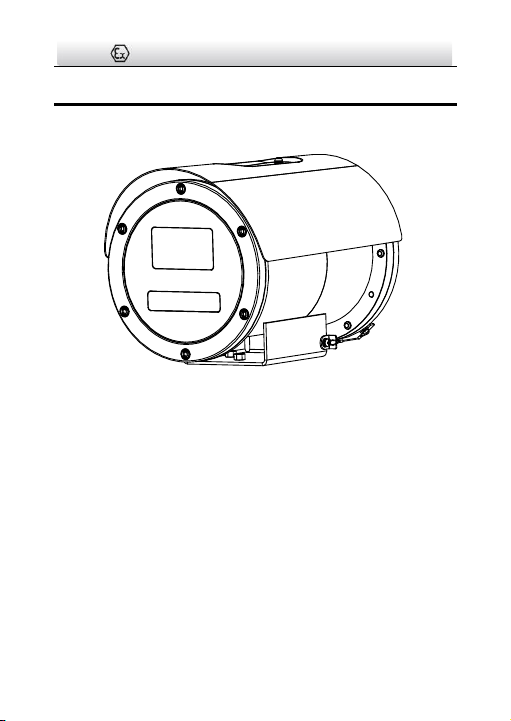
2 Appearance
2.1 Overview
Figure 2-1 Overview
Network Bullet Camera·Quick Start Guide
22
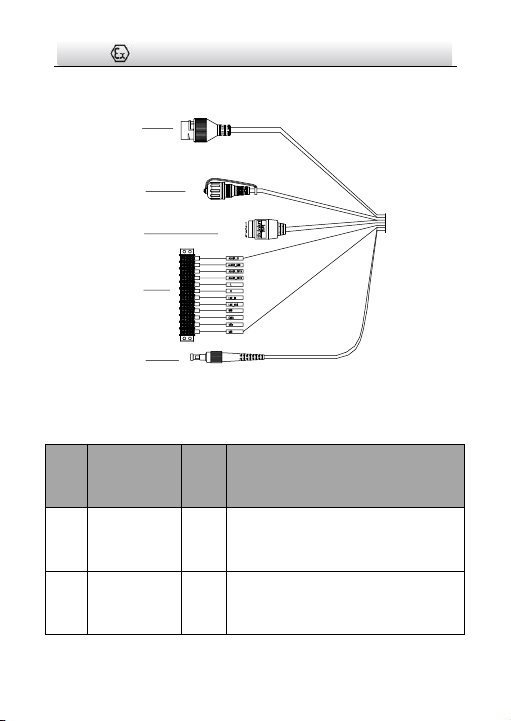
2.2 Cable Description
1
2
3
4
5
Figure 2-2 Overview of Cables
Table 2-1 Description of Cables
No
.
Description
No.
Description
1
Network
Interface
4
Alarm*/Power/Audio*/Grounding/CV
BS/RS-485 Interface
2
Reset
Interface
5
Fiber Optical Interface

Network Bullet Camera·Quick Start Guide
23
3
Serial Port

Network Bullet Camera·Quick Start Guide
24
3 Installation
Before you start:
● Suitable certified flameproof 'd' and dust ignition protection 't'
cable glands, correctly installed and suitable for the conditions
of use.
● IECEx/ATEX certified cable glands are needed during the
installation.
● Make sure the device in the package is in good condition and all
the assembly parts are included.
● The standard power supply is 100 to 240 VAC, please make sure
your power supply matches with your camera.
● Make sure all the related equipment is power-off during the
installation.
● Check the specification of the products for the installation
environment.
● Make sure that the wall is strong enough to withstand four
times the weight of the camera and the bracket.
For the camera that supports IR, you are required to pay attention to
the following precautions to prevent IR reflection:
● Dust or grease on the dome cover will cause IR reflection.
Please do not remove the dome cover film until the installation
is finished. If there is dust or grease on the dome cover, clean
the dome cover with clean soft cloth and isopropyl alcohol.

Network Bullet Camera·Quick Start Guide
25
● Make sure that there is no reflective surface too close to the
camera lens. The IR light from the camera may reflect back into
the lens causing reflection.
● The foam ring around the lens must be seated flush against the
inner surface of the bubble to isolate the lens from the IR LEDS.
Fasten the dome cover to camera body so that the foam ring
and the dome cover are attached seamlessly.
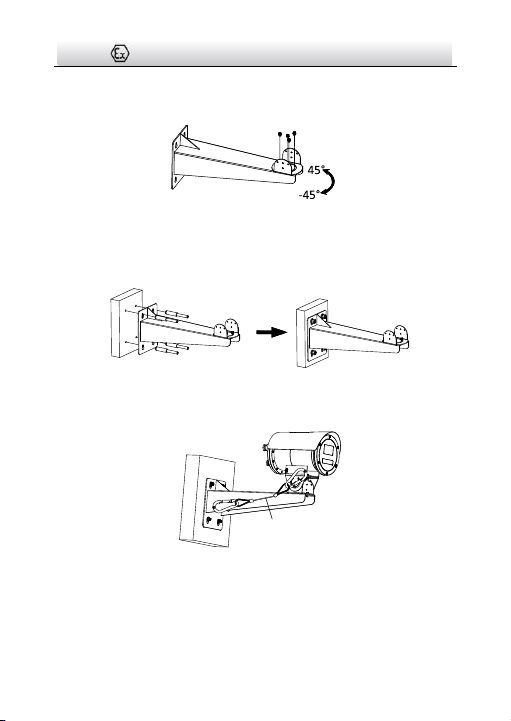
3.1 Wall Mounting
Before you start:
Loosen the screws on the side of the PT joint to uninstall it.
Fixed
Mount
Bottom
Base
Figure 3-1 PT Joint
Steps:
1. Install the fixed mount of the PT joint to the camera with screws.
Figure 3-2 Install Fixed Mount to the Camera
Network Bullet Camera·Quick Start Guide
26
2. Install the bottom base of the PT joint to the wall mounting
bracket with the screws.
Figure 3-3 Install Bottom Base to the Bracket
3. Drill holes on the mounting plate and install the bracket to the
mounting plate with the screws.
Figure 3-4 Install the Bracket
4. Hook the safety rope to the camera and the bracket.
Safety Rope
Figure 3-5 Hook the Safety Rope
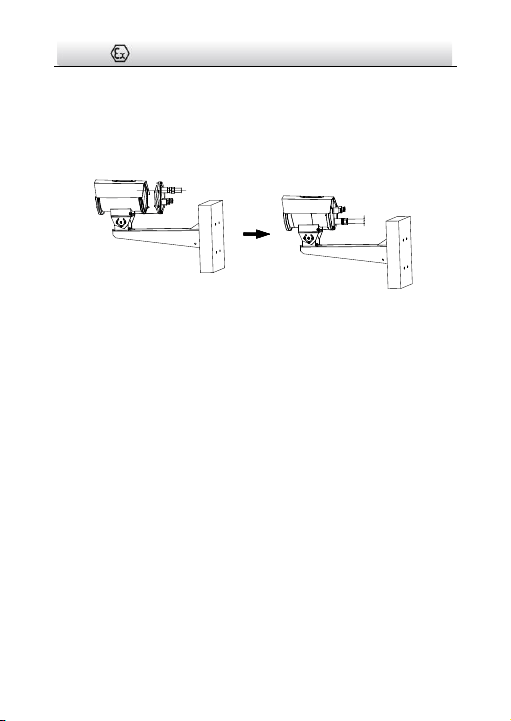
5. Install the camera to the bracket with the screws.

Network Bullet Camera·Quick Start Guide
27
Figure 3-6 Install the Camera
Network Bullet Camera·Quick Start Guide
28
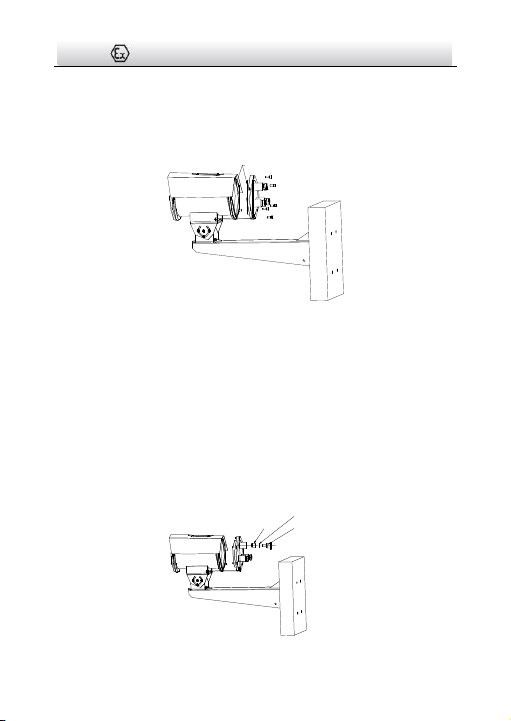
3.2 Cable Connection
Steps:
1. Loosen the screws to remove the back cover.
Flameproof Surface
Figure 3-7 Remove the Back Cover
Note:
● Do not unhook the safety rope from the camera when removing
the back cover. Be careful with the flameproof surface in case it
is damaged.
● Refer to Figure 3-7 for the entry places. The maximum
permitted number of these entries is 3.
2. Loosen the gland nut to take out the gasket and sealing ring.
Gasket
Sealing Ring
Gland Nut
Network Bullet Camera·Quick Start Guide
29
Figure 3-8 Loosen the Gland Nut
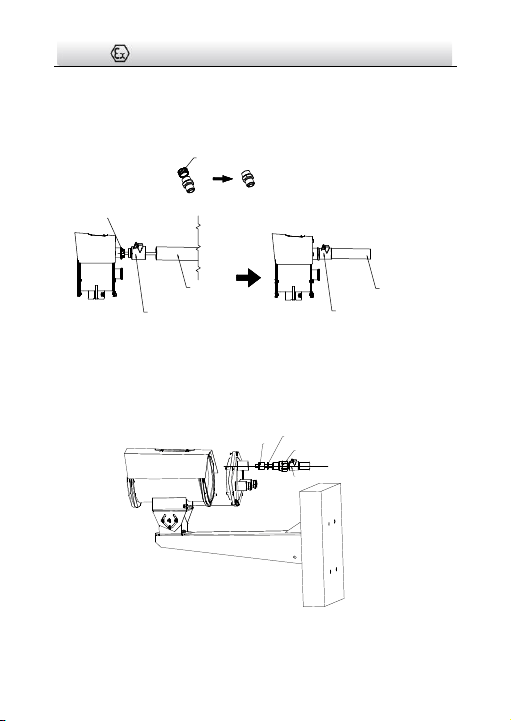
3. Loosen the thread cap of the adapter. Thread the cable through
the adapter, sealing ring, conduit sealing fitting and the conduit.
Thread Cap
M25 × 1.5-NPT3/4
Conduit
Sealing Fitting
Flexible
Conduit Fitting
Conduit
Sealing Fitting
Flexible
Conduit Fitting
Figure 3-9 Thread the Cable through the Conduit
4. Secure the adapter to the back cover with the wrench.
Adapter
Gasket
Sealing
Ring
Conduit Sealing Fitting
Network Bullet Camera·Quick Start Guide
30
Figure 3-10 Secure Adapter to the Back Cover
5. Connect the cables to the corresponding terminal blocks and
fasten the gland nut.
6. Install the back cover to the camera with the screws.
Figure 3-11 Install the Back Cover
Note:
● The flexible conduit shall then connect to a junction box use in
hazardous locations. The cable needs to be entirely protected
within hazardous locations for Class I, Zone 1.
● The conduit sealing fitting and flexible connection fitting should
be UL and c-UL Listed for the same Class, Group and Division or
equivalent Zone as marked on this manufacturer's nameplate.
● An explosionproof conduit seal shall be applied by the installer
or user of the equipment according to the National Electrical
Code® or the equivalent in Canada.
7. Route the camera cables according to the figure below.
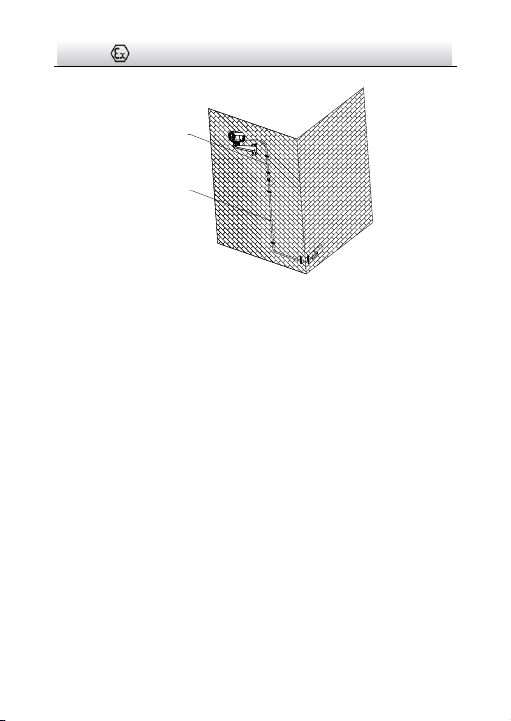
Network Bullet Camera·Quick Start Guide
31
Explosion
-Proof
Hose
Explosion-
Proof Flexible
Steel Pipe or
Galvanized
Steel pipe
Figure 3-12 Route Cables
Note:
The cables connected to the control room should be protected by
explosion-proof flexible steel pipe or galvanized steel pipe.
Network Bullet Camera·Quick Start Guide
32
4 Setting the Network Camera over the
LAN
Note:
You shall acknowledge that the use of the product with Internet
access might be under network security risks. For avoidance of any
network attacks and information leakage, please strengthen your
own protection.
If the product does not work properly, contact your dealer or the
nearest service center for help.
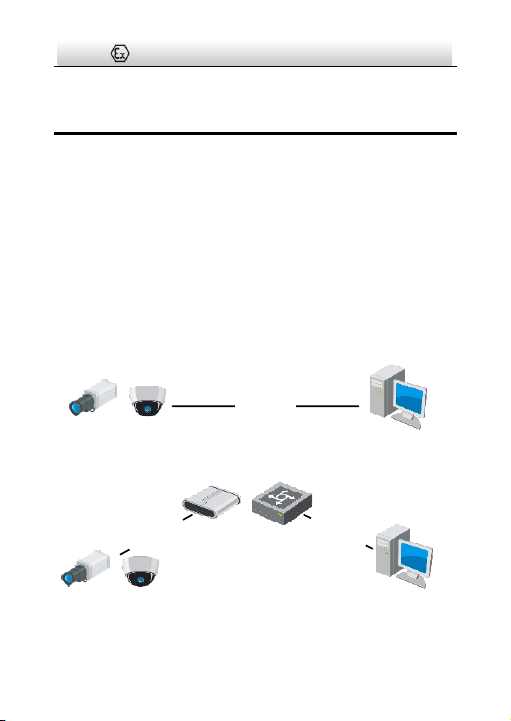
4.1 Wiring
Connect the camera to network according to the following figures.
半球
Network Cable
or
Network Camera
Computer
Figure 4-1 Connecting Directly
网络交换机
半球
Network Cable
Network Cable
or
or
Network Camera Computer
Figure 4-2 Connecting via a Switch or a Router

Network Bullet Camera·Quick Start Guide
33
4.2 Activating the Camera
You are required to activate the camera first by setting a strong
password for it before you can use the camera.
Activation via Web Browser, Activation via SADP, and Activation via
Client Software are all supported. We will take activation via SADP
software and Activation via Web Browser as examples to introduce
the camera activation.
Note:
Refer to the User Manual of Network Camera for Activation via
Client Software.
4.2.1 Activation via Web Browser
Steps:
1. Power on the camera. Connect the camera to your computer or
the switch/router which your computer connects to.
2. Input the IP address into the address bar of the web browser, and
press Enter to enter the activation interface.
Notes:
The default IP address of the camera is 192.168.1.64.
The computer and the camera should belong to the same
subnet.
For the camera enables the DHCP by default, you need to use
the SADP software to search the IP address.
Network Bullet Camera·Quick Start Guide
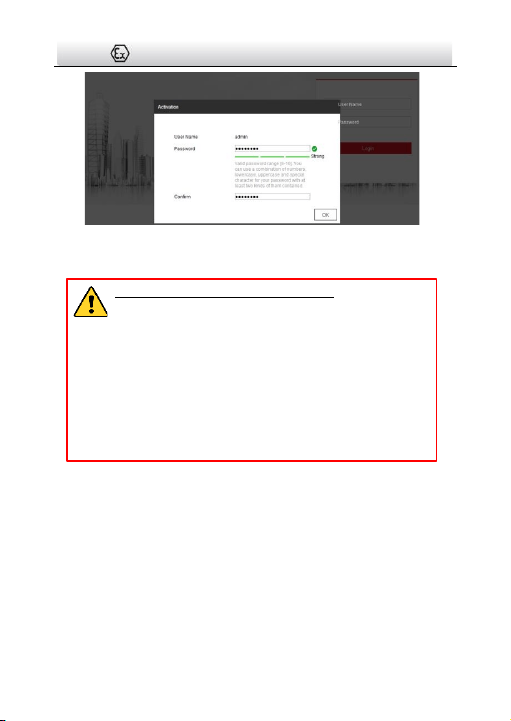
34
Figure 4-3 Activation Interface (Web)
3. Create a password and input the password into the password field.
STRONG PASSWORD RECOMMENDED– We highly
recommend you create a strong password of your own
choosing (using a minimum of 8 characters, including
upper case letters, lower case letters, numbers, and
special characters) in order to increase the security of
your product. And we recommend you reset your
password regularly, especially in the high security
system, resetting the password monthly or weekly can
better protect your product.
4. Confirm the password.
5. Click OK to save the password and enter the live view interface.
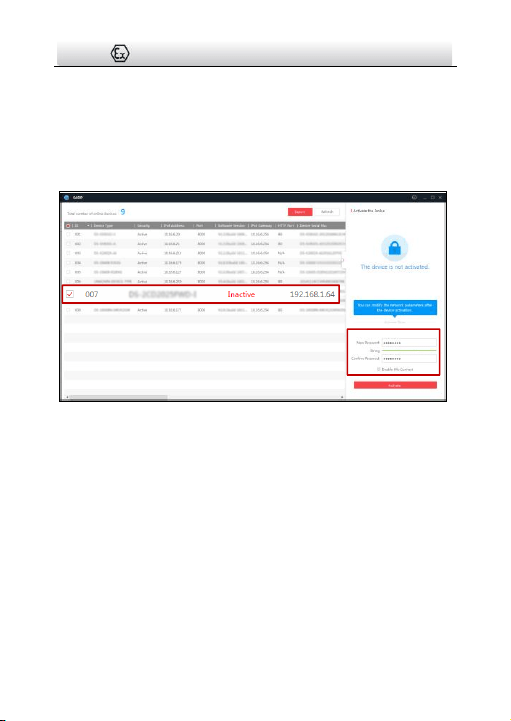
4.2.2 Activation via SADP Software
SADP software is used for detecting the online device, activating the
camera, and resetting the password.
Get the SADP software from the supplied disk or the official website,
and install the SADP according to the prompts.
Network Bullet Camera·Quick Start Guide
35
Follow the steps to activate the camera.
Steps:
1. Run the SADP software to search the online devices.
2. Check the device status from the device list, and select the
inactive device.
Select inactive device.
Input and confirm
password.
Figure 4-4 SADP Interface
Note:
The SADP software supports activating the camera in batch. Refer
to the user manual of SADP software for details.
3. Create and input the new password in the password field, and
confirm the password.

Network Bullet Camera·Quick Start Guide
36
STRONG PASSWORD RECOMMENDED– We highly
recommend you create a strong password of your own
choosing (using a minimum of 8 characters, including
upper case letters, lower case letters, numbers, and
special characters) in order to increase the security of
your product. And we recommend you reset your
password regularly, especially in the high security
system, resetting the password monthly or weekly can
better protect your product.
Note:
You can enable the Hik-Connect service for the device during
activation. Refer to Chapter 6.1 for detailed information.
4. Click Activate to start activation.
You can check whether the activation is completed on the popup
window. If activation failed, make sure that the password meets
the requirement and try again.
4.3 Modifying the IP Address
Purpose:
To view and configure the camera via LAN (Local Area Network), you
need to connect the network camera in the same subnet with your
PC.
Use the SADP software or client software to search and change the
IP address of the device. We take modifying the IP Address via SADP
software as an example to introduce the IP address modification.
For IP address modification via client software, refer to the user
manual of client software.

Network Bullet Camera·Quick Start Guide
37
Steps:
1. Run the SADP software.
2. Select an active device.
3. Change the device IP address to the same subnet with your
computer by either modifying the IP address manually or checking
the checkbox of Enable DHCP.
Figure 4-5 Modify the IP Address

Network Bullet Camera·Quick Start Guide
38
Note:
You can enable the Hik-Connect service for the device during
activation. Refer to Chapter 6.1 for detailed information.
4. Input the admin password and click Modify to activate your IP
address modification.
The batch IP address modification is supported by the SADP. Refer to
the user manual of SADP for details.

Network Bullet Camera·Quick Start Guide
39
5 Accessing via Web Browser
System Requirement:
Operating System: Microsoft Windows XP SP1 and above version
CPU: 2.0 GHz or higher
RAM: 1G or higher
Display: 1024×768 resolution or higher
Web Browser: Internet Explorer 8.0 and above version, Apple Safari
5.0.2 and above version, Mozilla Firefox 5.0 and above version and
Google Chrome 18 and above version
Steps:
1. Open the web browser.
2. In the browser address bar, input the IP address of the network
camera, and press the Enter key to enter the login interface.
Note:
The default IP address is 192.168.1.64. You are recommended
to change the IP address to the same subnet with your
computer.
3. Input the user name and password.
The admin user should configure the device accounts and
user/operator permissions properly. Delete the unnecessary
accounts and user/operator permissions.
Note:
The device IP address gets locked if the admin user performs 7
failed password attempts (5 attempts for the user/operator).
Network Bullet Camera·Quick Start Guide
40
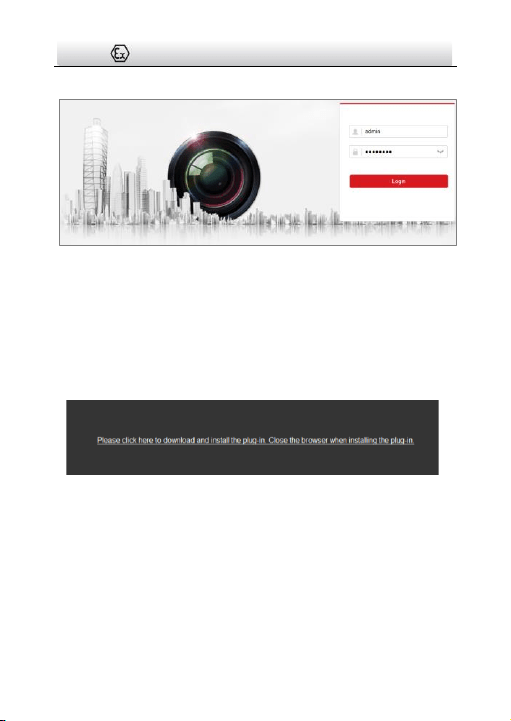
4. Click Login.
Figure 5-1 Login Interface
5. Install the plug-in before viewing the live video and managing the
camera. Follow the installation prompts to install the plug-in.
Note:
You may have to close the web browser to finish the installation of
the plug-in.
Figure 5-2 Download Plug-in
6. Reopen the web browser after the installation of the plug-in and
repeat steps 2 to 4 to login.
Note:
For detailed instructions of further configuration, please refer to
the user manual of network camera.

Network Bullet Camera·Quick Start Guide
41
6 Operating via Hik-Connect App
Purpose:
Hik-Connect is an application for mobile devices. With the App, you
can view live image of the camera, receive alarm notification and so
on.
Note:
Hik-Connect service is not supported by certain camera models.
6.1 Enable Hik-Connect Service on Camera
Purpose:
Hik-Connect service should be enabled on your camera before using
the service.
You can enable the service through SADP software or web browser.
6.1.1 Enable Hik-Connect Service via SADP Software
Steps:
1. Check the checkbox of Enable Hik-Connect on:
1). "Activate the Device" page during camera activation, refer to
Chapter 4.2.2.
2). Or "Modify Network Parameters" page during modifying IP
address, refer to Chapter 4.3.
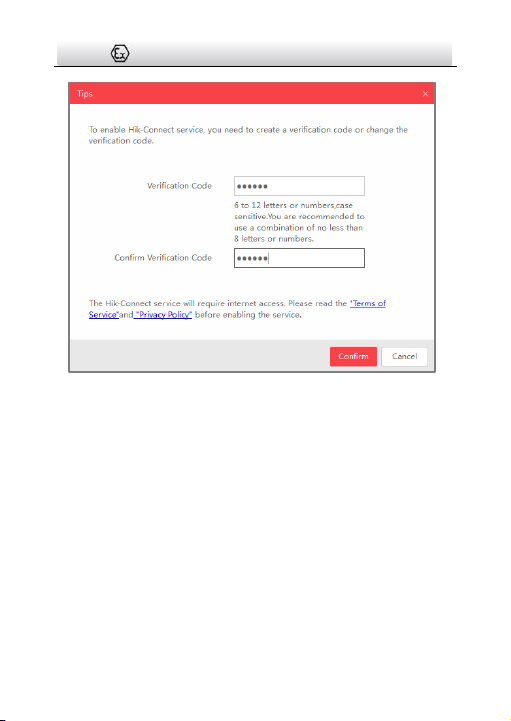
2. Create a verification code or change the verification code.
Network Bullet Camera·Quick Start Guide
42
Figure 6-1 Verification Code Setting (SADP)
Note:
The verification code is required when you add the camera to
Hik-Connect app.
3. Click and read "Terms of Service" and "Privacy Policy".
4. Confirm the settings.
6.1.2 Enable Hik-Connect Service via Web Browser
Before you start:
You need to activate the camera before enabling the service. Refer to
Chapter 4.2.

Network Bullet Camera·Quick Start Guide
43
Steps:
1. Access the camera via web browser. Refer to Chapter 5.
2. Enter platform access configuration interface: Configuration >
Network > Advanced Settings > Platform Access.
Figure 6-2 Platform Access Configuration (Web)
3. Select Platform Access Mode as Hik-Connect.
4. Check the checkbox of Enable.
5. Click and read "Terms of Service" and "Privacy Policy" in pop-up
window.
6. Create a verification code or change the verification code for the
camera.
Note:
The verification code is required when you add the camera to
Hik-Connect app.
7. Save the settings.
Network Bullet Camera·Quick Start Guide
44
6.2 Hik-Connect Setup
Steps:
1. Download and install the Hik-Connect app by searching
“Hik-Connect” in App Store or Google Play
TM
.
2. Launch the app and register for a Hik-Connect user account.
3. Log in Hik-Connect app after registration.
6.3 Adding Camera to Hik-Connect
Before you start:
You need to enable the Hik-Connect service on camera before
adding it to your Hik-Connect account. Refer to Chapter 6.1.
Steps:
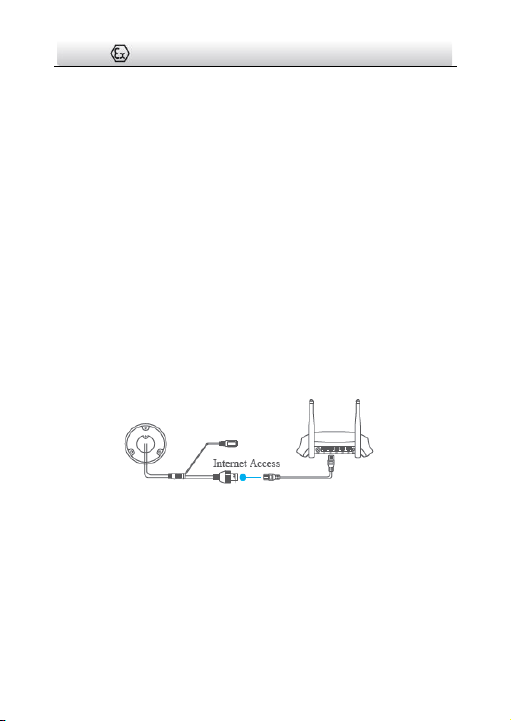
1. Use a network cable to connect the camera with a router if the
camera does not support Wi-Fi.
Figure 6-3 Connect a Router
Note:
After the camera connects to the network, please wait one minute
before any operation on the camera using Hik-Connect app.
2. In the Hik-Connect app, tap “+” on the upper-right corner and
then scan the QR code of the camera to add the camera.

Network Bullet Camera·Quick Start Guide
45
You can find the QR code on the camera or on the cover of the
Quick Start Guide of the camera in the package.
Figure 6-4 Scan QR Code
Note:
If the QR code is missing or too blur to be recognized, you can also
add the camera by tapping the icon and inputting the
camera's serial number.
3. Input the verification code of your camera.
Note:
● The required verification code is the code you create or
change when you enabling Hik-Connect service on camera.
● If you forget the verification code, you can check the current
verification code on Platform Access configuration page via
web browser.
4. Follow the prompts to set the network connection and add the
camera to your Hik-Connect account.
Note:
For detailed information, refer to the user manual of the
Hik-Connect app.

Network Bullet Camera·Quick Start Guide
46
6.4 Initializing the Memory Card
Check the memory card status by tapping on the Storage Status in
the Device Settings interface.
If the memory card status displays as Uninitialized, tap to initialize
it. The status will then change to Normal. You can then start
recording any event triggered video in the camera such as motion
detection.

0