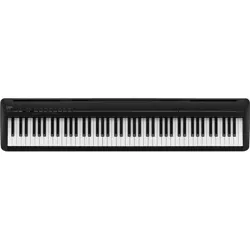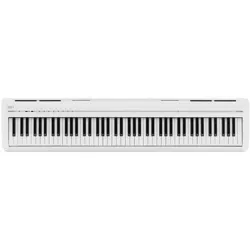

DIGITAL PIANO
ES120
Owner's Manual
Important Information Preparation AppendixAdjustments & SettingsBasic Operation
2
Important Information
Important Safety Instructions
Important Safety Instructions
Be sure to read these Safety Precautions carefully before using this instrument to ensure correct use.
When using this electronic musical instrument, please observe the following precautions for safety.
When this instrument is used by small children, please ensure safe use under the supervision of a parent.
▋ Warnings, cautions, and symbols have the following meanings.
denotes that care (precaution) should be taken.
denotes a prohibited operation (an operation
that must not be done).
denotes an instruction (an operation that should
be carried out) or indicative notice.
WARNING
Describes a potential hazard that could result in death or serious injury if the indication
is ignored and this instrument is handled incorrectly.
Doing so may cause a electric shock, re, injury fall, damage, or breakdown .
The product should be connected to an
AC outlet of the specied voltage.
The included power cord and AC adap-
tor are only for use with this instrument.
Do not forcibly bend, place a heavy ob-
ject on, bring a high-temperature object
close to, or damage the power cord and
AC adapter cord.
Do not bring the AC adaptor close to a
hightemperature object or use in a man-
ner that heat accumulates.
If dust accumulates on the power plug,
wipe it clean with a cloth.
When any of the following cases occur,
this instrument may have broken down.
In such a case, do not use this instru-
ment, keep the power cord disconnect-
ed from the outlet, and contact the shop
from which the product was purchased.
1. Foreign objects fell into the instrument.
2. Water was spilled into the instrument.
3. Some parts of the instrument or accessory be-
came abnormally hot.
4. Unusual smell or smoke occurred.
Do not
disassemble
Do not disassemble, repair, or modify
this instrument.
When disconnecting the power cord
plug, always hold the plug and pull out.
Disconnect the power cord during light-
ning storms or when this instrument is
unused for long periods of time.
Should an abnormality occur in this in-
strument, immediately turn the power
o and disconnect the power plug from
the outlet.
No wet hands
Do not insert or pull out the power plug
with wet hands.
No water
Do not get this instrument wet.
3
Important Information
Important Safety Instructions
CAUTION
Describes a potential hazard that could result in injury or damage to property if the indi-
cation is ignored and this instrument is handled incorrectly.
Doing so may cause a fall, damage, breakdown, injury, Health damage.
Keep the power cord plug in a state
where it can be disconnected from the
outlet easily.
This instrument is not completely shut-
o from the power supply even when
the power switch is turned o.
To shut-o completely, disconnect the
power plug from the outlet.
Do not put any part of your body under
the music stand or pedals.
Do not stand on, hang down from, or
push this instrument.
When moving this instrument, always
lift in a horizontal direction by two or
more people.
Piano should be placed in a location
such that its position does not aect its
own ventilation. Keep a minimum dis-
tance of 5 cm around the instrument for
sucient ventilation.
Do not use anything other than our op-
tional stand.
Do not run around this instrument.
Do not drop this instrument or apply a
large impact.
When using the headphones, do not lis-
ten for long periods of time at high vol-
ume levels.
Do not use this instrument in the follow-
ing areas.
1. Areas where the oor is unstable and the instru-
ment becomes wobbly.
2. Areas that become wet.
3. Extremely hot or cold areas.
4. Extremely humid or dry areas.
5. Areas where the instrument is exposed to direct
sunlight, such as those near a window.
6. Areas where a large amount of sand or dust is
present.
7. Areas where the instrument is exposed to exces-
sive vibrations.
4
Important Information
Règles de sécurité (Supplémentairespour le Canada)
Règles de sécurité (Supplémentairespour le Canada)
▋ Exemples de symboles graphiques
Indique que des précautions doivent être prises.
Indique une manipulation interdite.
Indique qu’une manipulation doit être eectuée.
AVERTISSEMENT
Indique un risque potentiel qui peut entraîner la mort, ou de graves lé-
sions, si l’appareil n’est pas manipulé correctement.
Doing so may cause a electric shock, re, injury fall, damage, or breakdown .
Faite attention de ne pas introduire un
produit étranger à l’intérieur de l’appa-
reil.
Ne jamais placer sur le produit des ob-
jets contenant des liquides, tels que des
vases ou autres recipients..
Ce produit n’est pas totalement décon-
necté du circuit électrique lorsqu’il est
mis hors tension par le bouton d’arrêt.
Si l’appareil ne doit pas être utilisé pen-
dant une longue période, débranchez le
câble d’alimentation de la prise secteur.
Il est recommandé de placer l’instrument
à proximité de la prise de courant et de
positionner le câble d’alimentation sec-
teur de sorte qu’il puisse être débranché
rapidement en cas d’urgence, le courant
électrique étant toujours présent tant
que la prise est branchée même si le
bouton de mise en marche est en posi-
tion Arrêt.
PRECAUTION
Indique un risque potentiel qui peut entraîner la détérioration, ou des dommages, pour
l’appareil ou ses propriétés, si celui-ci n’est pas manipulé correctement.
Description de la l’emplacement de la reference
(Le cas échéant):
Anglais phrase: The nameplate label is located
on the underside of the instruments, as indicated
below.
Français phrase: La reference commerciale est
inscrite sur une etiquette en dessous de votre
instrument, conformement a l’indication ci-des-
sous.
Votre piano doit être placé à un endroit tel que
sa position n’altère pas sa propre ventilation.
Gardez une distance minimum de 5 cm autour de
l’instrument pour une aération susante.
5
Important Information
Règles de sécurité (Supplémentairespour le Canada)
▋ Notes on Repair
Should an abnormality occur in the product, immediately turn
the power OFF, disconnect the power cord plug, and then con-
tact the shop from which the product was purchased.
▋ An information on Disposal for users
If your product is marked with this recycling
symbol it means that, at the end of its life, you
must dispose of it separately by taking it to an
appropriate collection point.You should not mix
it with general household waste. Disposing of this
product correctly will prevent potential negative
eects on the environment and human health
which could otherwise arise due to inappropriate
waste handling.
For further details, please contact your local au-
thority. (European Union only)
▋ FCC Information (U.S.A)
Caution :
Changes or modications not expressly approved by KAWAI
could void the user’s authority to operate the equipment.
Note :
This equipment has been tested and found to comply with the
limits for a Class B digital device, pursuant to Part 15 of the FCC
Rules. These limits are designed to provide reasonable protec-
tion against harmful interference in a residential installation.
This equipment generates, uses and can radiate radio frequency
energy and, if not installed and used in accordance with the in-
structions, may cause harmful interference to radio communica-
tions. However, there is no guarantee that interference will not
occur in a particular installation. If this equipment does cause
harmful interference to radio or television reception, which can
be determined by turning the equipment o and on, the user is
encouraged to try to correct the interference by one or more of
the following measures:
• Reorient or relocate the receiving antenna.
• Increase the separation between the equipment and receiver.
• Connect the equipment into an outlet on a circuit dierent
from that to which the receiver is connected.
• Consult the dealer or an experienced radio/TV technician for
help.
▋ Supplier’s Declaration of Conformity
Products : Electronic Piano
Model Number : ES120
Responsible Party Name : Kawai America Corporation
Address : 2055 East University Drive Rancho
Dominguez, CA 90220
Telephone : 310-631-1771
This device complies with Part 15 of the FCC Rules. Operation
is subject to the following two conditions:
(1) this device may not cause harmful interference, and
(2) this device must accept any interference received, includ-
ing interference that may cause undesired operation.
This applies only to products distributed by Kawai America Cor-
poration.
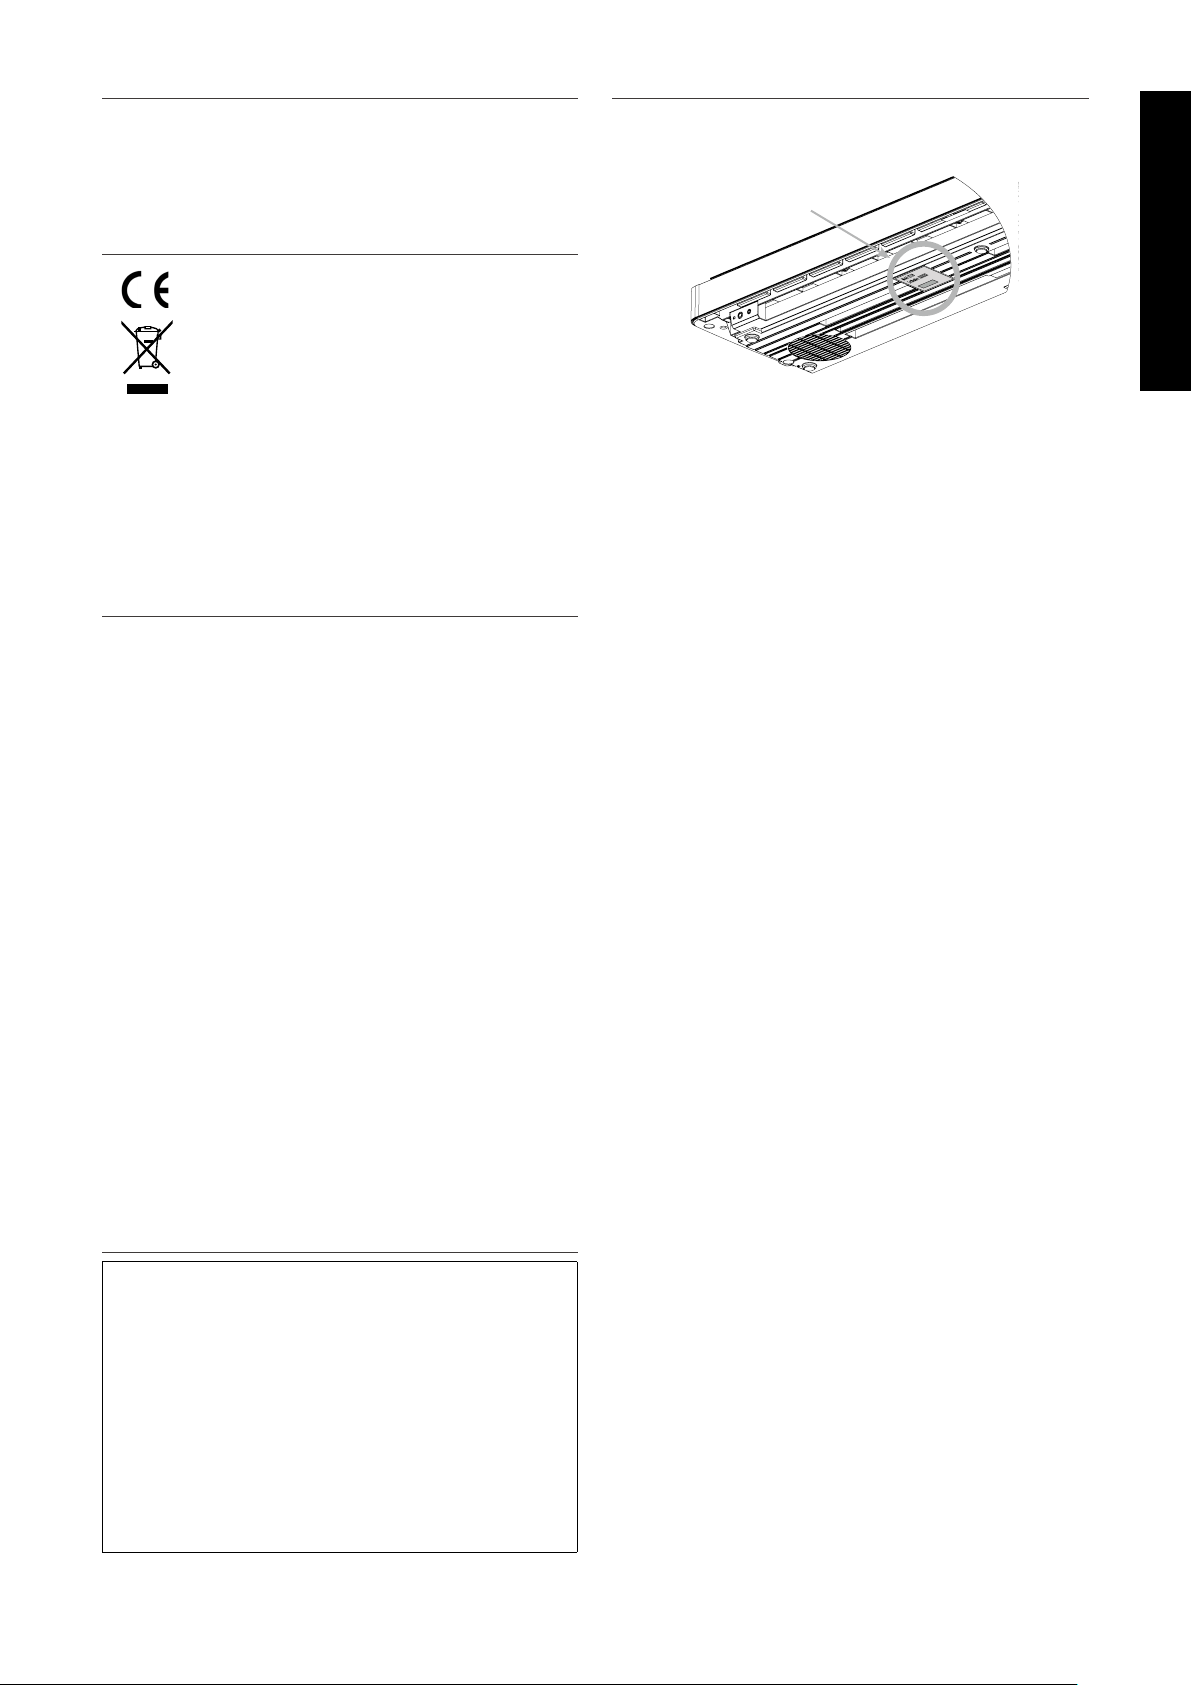
▋ Nameplate location
The nameplate label is located on the underside of the instru-
ment, as indicated below.
Nameplate

6
Important Information
Introduction
Introduction
Thank you for purchasing this Kawai digital piano.
Please read this owner’s manual carefully and keep the manual in a safe place to make full use of this product and maximise its prod-
uct life.
▋ About this owner’s manual
This owner’s manual contains quick references for basic play-
back features and operation details for various functions.
▋ Nameplate
The information, including model name and serial number, is
specied on the nameplate located on the underside of the in-
strument.
▋ Intellectual property rights
• The Bluetooth® word mark and logos are registered trade-
marks owned by the Bluetooth SIG, Inc. and any use of such
marks by Kawai Musical Instruments Mfg. Co., Ltd. is under li-
cense.
• “Windows” is a registered trademark of Microsoft Corporation.
• “Mac” is a registered trademark of Apple Inc.
• Some samples © PREMIER Engineering Inc.
▋ About tuning
This piano is a digital instrument and does not require tuning.
If any aspect of this instrument does not function or perform as
expected, please contact the store from where the instrument
was purchased to seek assistance.
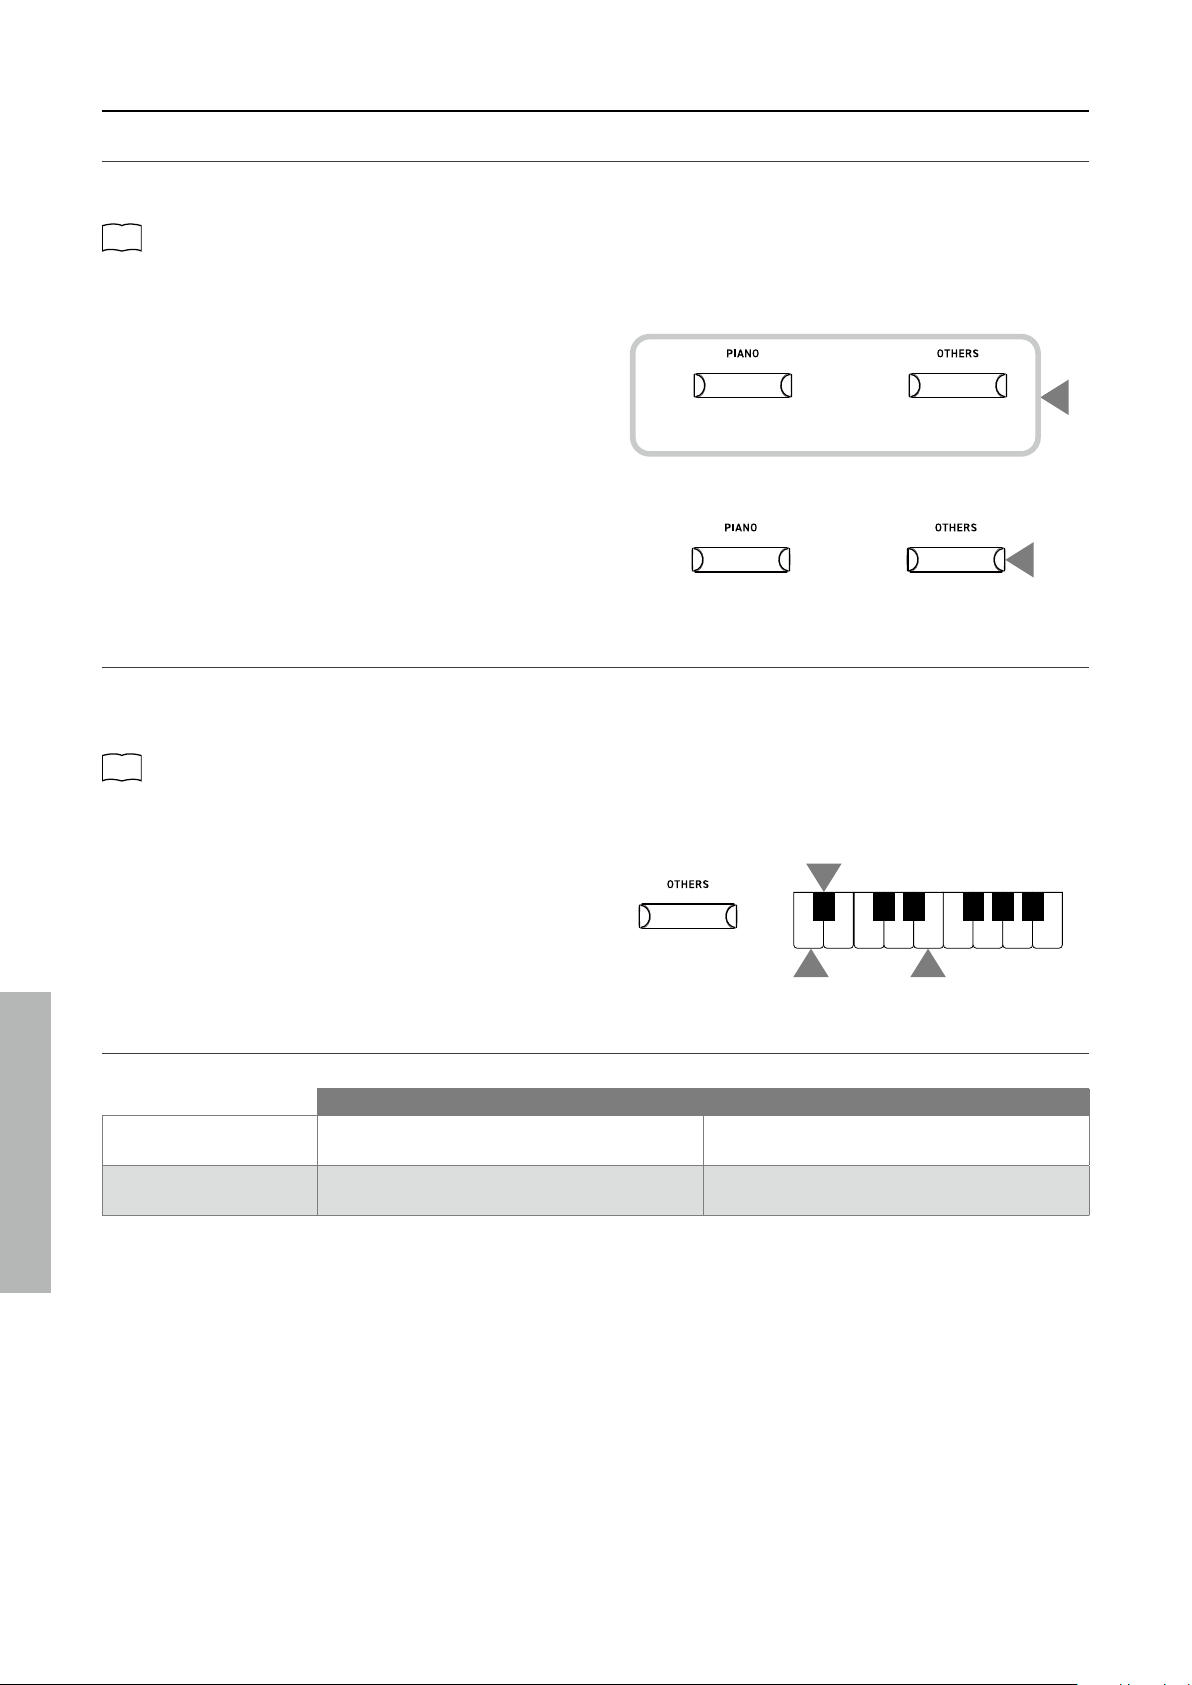
▋ Symbols
[ ]
The characters enclosed in brackets [ ] indicate
the names of sliders, buttons, ports or jacks.
This symbol shows the location of the button to
be operated, and the number in this symbol indi-
cates the order of operation.
The value in this symbol corresponds to the num-
ber describing the operating instructions.
This symbol indicates operating precautions.
This symbol describes terminology and provides
information on options.
P
This symbol indicates the page to be referenced.
▋ Cleaning
• Use a dry soft cloth to wipe the main body.
• Avoid using alcohol, benzene, thinner, or chlorine bleach. Do-
ing so may result in discoloration or deformation of the keys,
exterior, or panels.
• Depending on the material of the cloth used, wiping the prod-
uct repeatedly may result in discoloration or deformation.
• If the pedals become dirty, do not attempt to clean them with
rust-removing solvents, abrasives, or les.

7
Important Information
Table of Contents
Table of Contents
For more information on MIDI and its operation details, please download the supplementary PDF manual from the Kawai Global
website:
https://www.kawai-global.com/support/manual/
Important Information
Important Safety Instructions ������� 2
Règles de sécurité
(Supplémentairespour le Canada) �����4
Introduction ��������������6
Table of Contents ������������7
Preparation
Part Names and Functions ��������8
Music Rest ���������������9
Connecting the pedal ����������9
Power ���������������� 10
Volume and Headphones �������� 10
Basic Operation
Sounds���������������� 11
Metronome �������������� 12
Recorder ��������������� 14
Demo Songs ������������� 15
Registration Memories ��������� 16
Adjustments & Settings
Settings ��������������� 17
Basic Settings………………………………… 17
Dual ���������������� 18
Split ���������������� 19
Reverb ��������������� 19
Damper Resonance ���������� 20
Brilliance �������������� 20
Voicing ��������������� 20
Touch Curve ������������� 20
Fall-back Noise ������������ 21
Damper Noise ������������ 21
Eects ��������������� 21
Smart Mode ������������� 22
Transpose �������������� 22
Tuning ��������������� 22
Temperament ������������ 23
Temperament Key ���������� 23
Phones/Speaker Settings …………………… 23
Spatial Headphone Sound ������� 24
Phones Type ������������� 24
Low Volume Balance ��������� 24
Speaker EQ ������������� 24
Speaker On/O ������������ 25
Power/Memory Settings …………………… 25
Auto Power O ������������ 25
Factory Reset ������������ 25
Startup Settings ����������� 26
Bluetooth Settings ………………………… 26
Appendix
Troubleshooting ������������ 27
Connecting to Other Devices ������ 28
Drum Rhythm List ����������� 30
Information about Adaptor Specications � 31
EU Declaration of Conformity ������ 32
Specications ������������� 33
Operation Guide ������������ 34
8
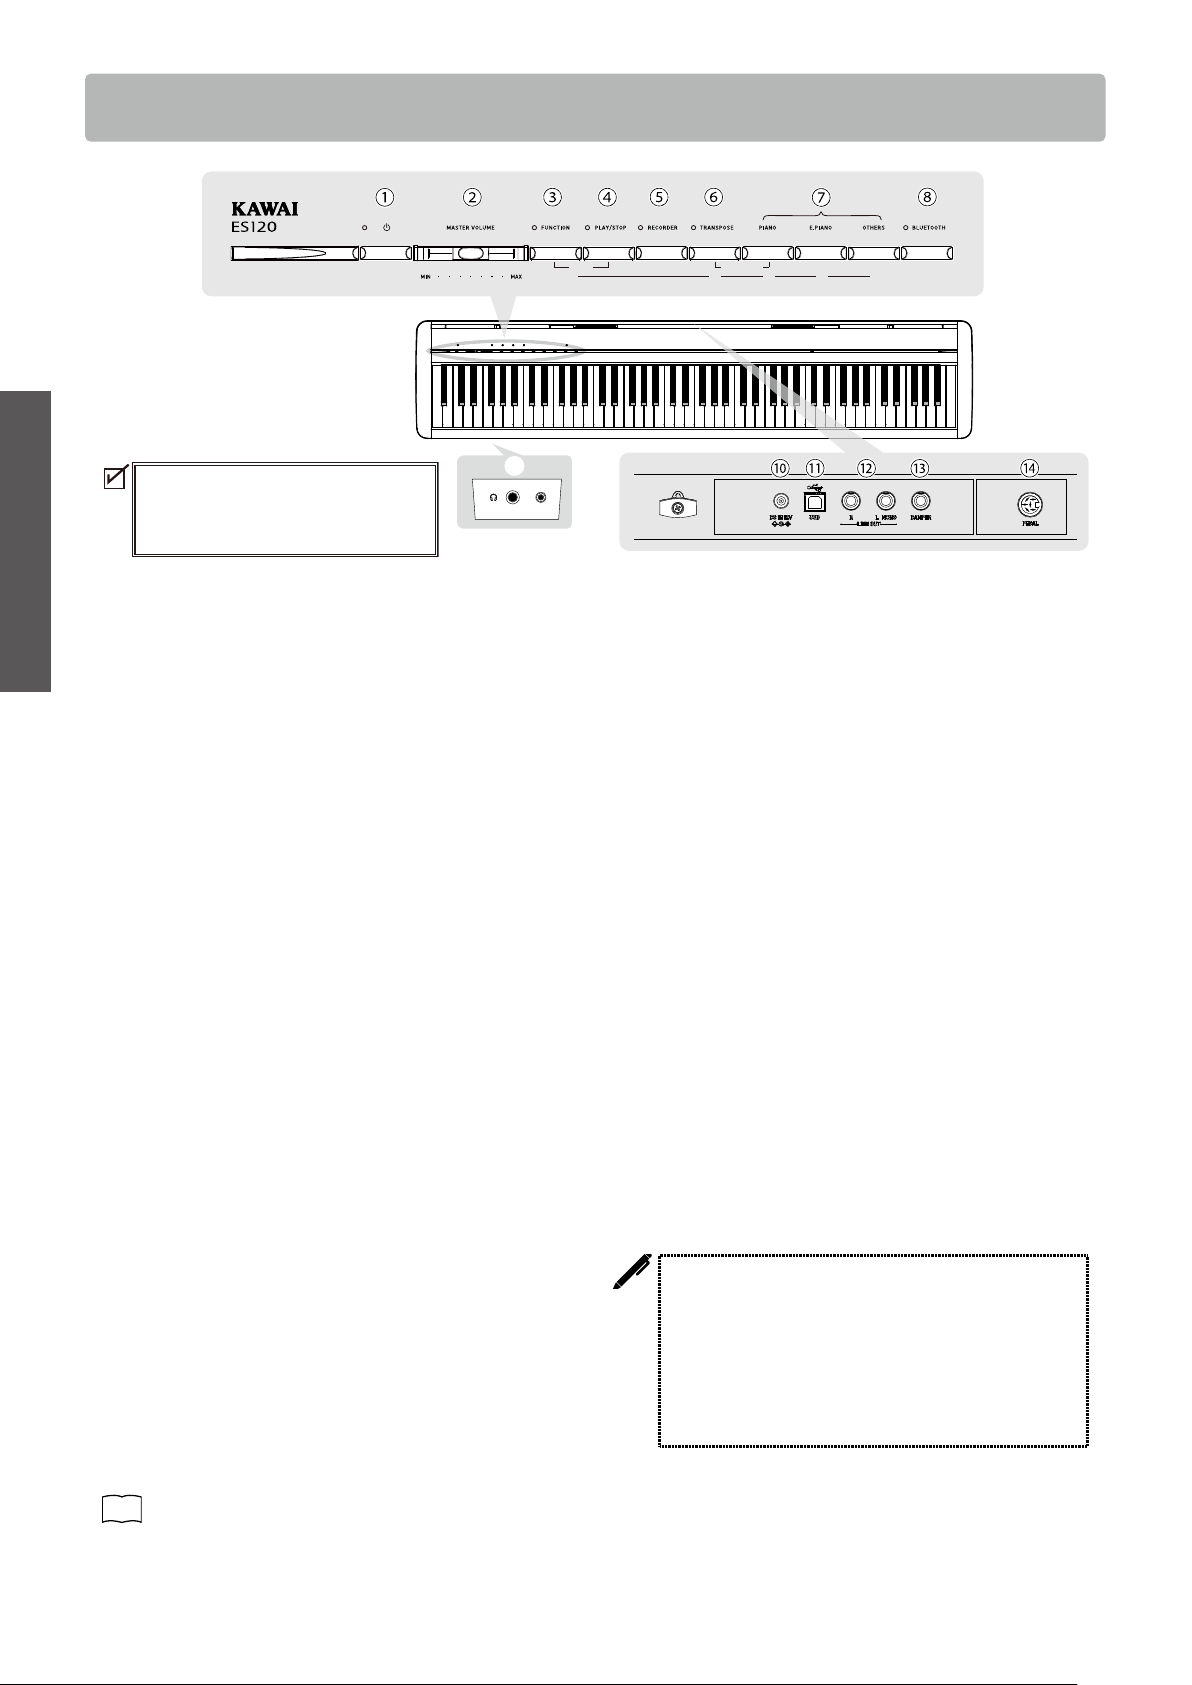
Preparation
Part Names and Functions
Part Names and Functions
⑨
In market locations where Bluetooth
functionality is not available, the Bluetooth
mark will not be printed.
REGISTRATION
DEMO METRONOME
1 2 3 4
① [POWER] button
This button is used to turn the power on/o. Be sure to turn
o the instrument after playing.
② [MASTER VOLUME] slider
This slider controls the volume output from the built-in
speakers, headphones, or LINE OUT connectors.
③ [FUNCTION] button
This button is used to set various settings and registration
memories.
④ [PLAY/STOP] button
This button is used to play/stop recorded performances
and Internal Songs.
⑤ [RECORDER] button
This button is used to record the performance.
⑥ [TRANSPOSE] button
This button is used to set Transpose and Tuning.
⑦ SOUND buttons
These buttons are used to select sounds.
[PIANO], [E.PIANO], and [OTHERS] buttons are available.
⑧ [BLUETOOTH] button
This button is used to turn on and o Bluetooth.
⑨ [PHONES] jacks
These jacks are used to connect stereo headphones to
the instrument, allowing headphones with a stereo mini
phone plug and headphones with a stereo standard plug
to be connected at the same time.
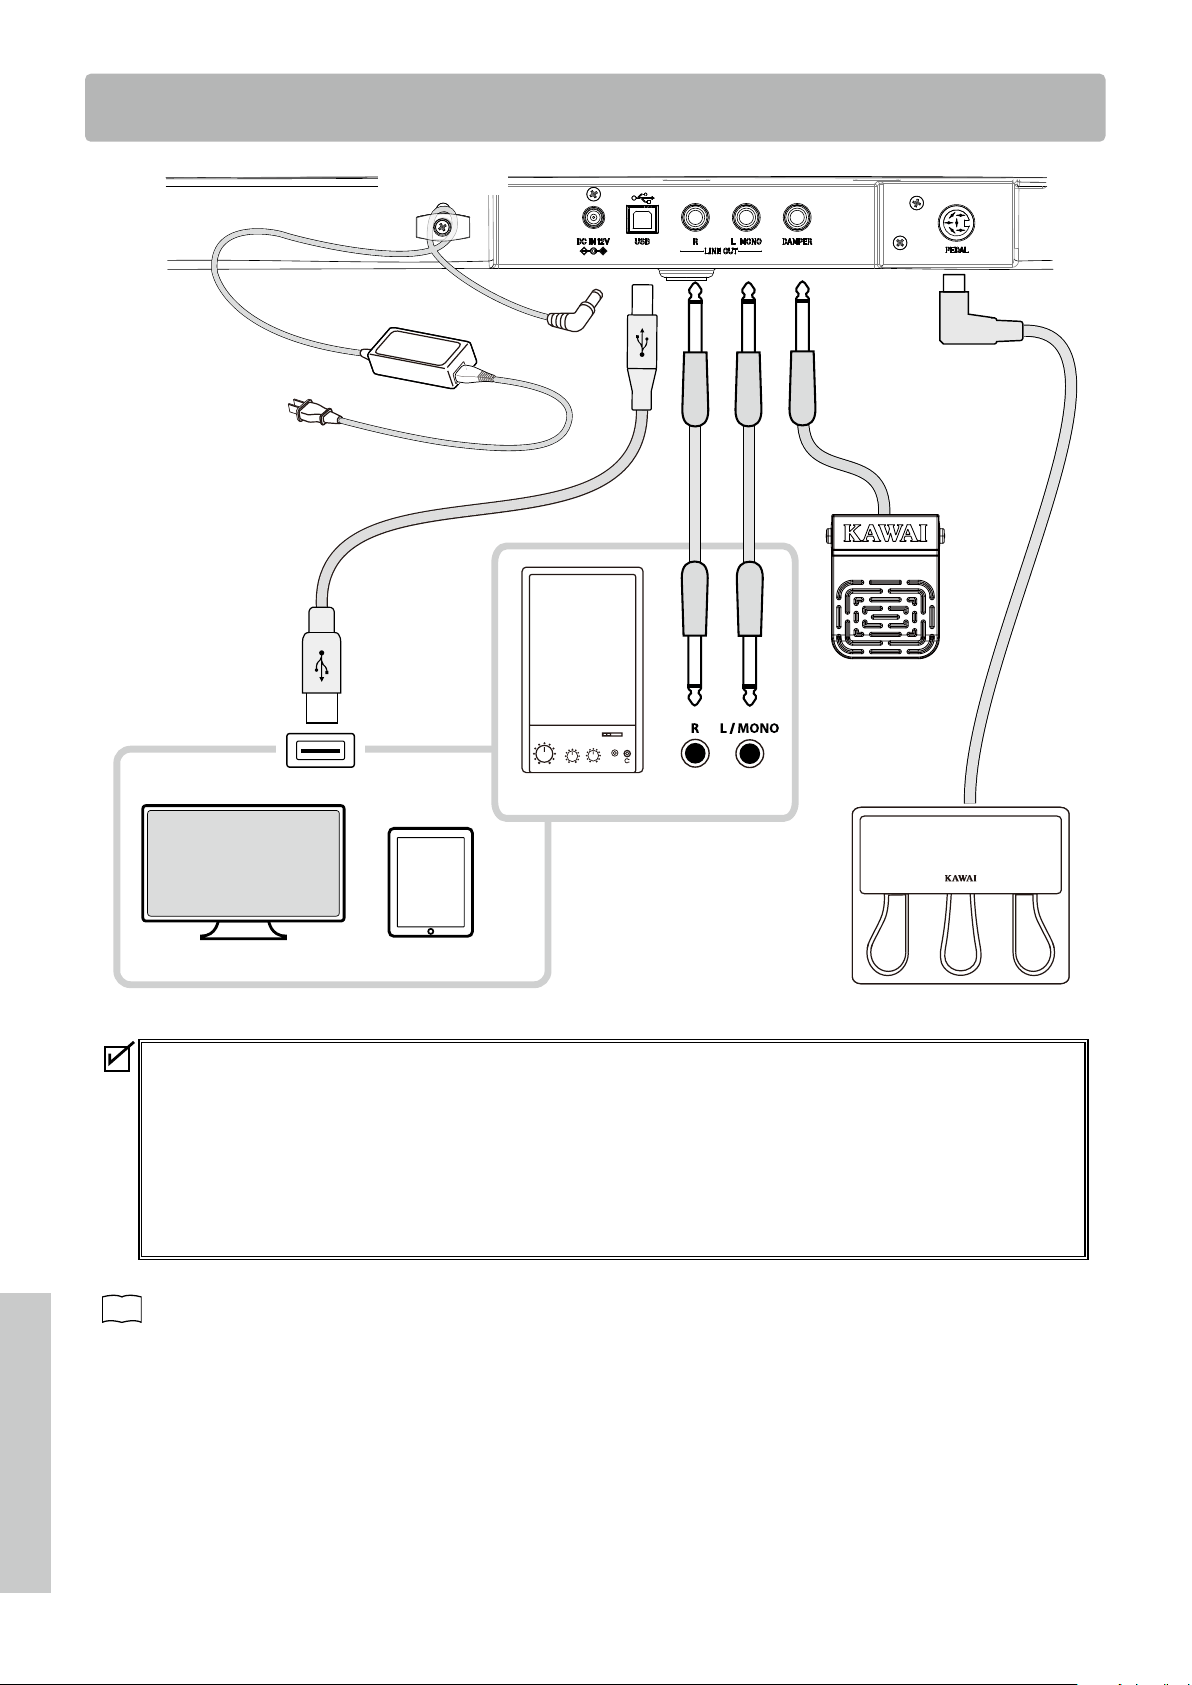
⑩ [DC IN] jack
This jack is used to connect the AC adaptor.
⑪ [USB to HOST] port
This port is used to connect the instrument to a computer
using a USB “B to A” type cable in order to send and receive
MIDI data.
⑫ [LINE OUT] jacks
These jacks are used to connect other external devices (am-
plier, stereo system) to listen to the instrument’s sound, or
to record to audio devices.
⑬ [DAMPER] connector
This connector is used to connect the supplied damper
pedal or optional damper pedal.
⑭ [PEDAL] connector
This connector is used to connect the optional triple pedal.
The following stand and pedals are optionally available.
• Single pedal: F-10H (for the [DAMPER] connector)
• Triple pedal: GFP-3 (for the [PEDAL] connector)
• Stand: HML-2
• Triple pedal and pedal unit for HML-2: F-351
See the details at the following URL.
https://www.kawai-global.com/support/
P28
Connecting to Other Devices
9
Preparation
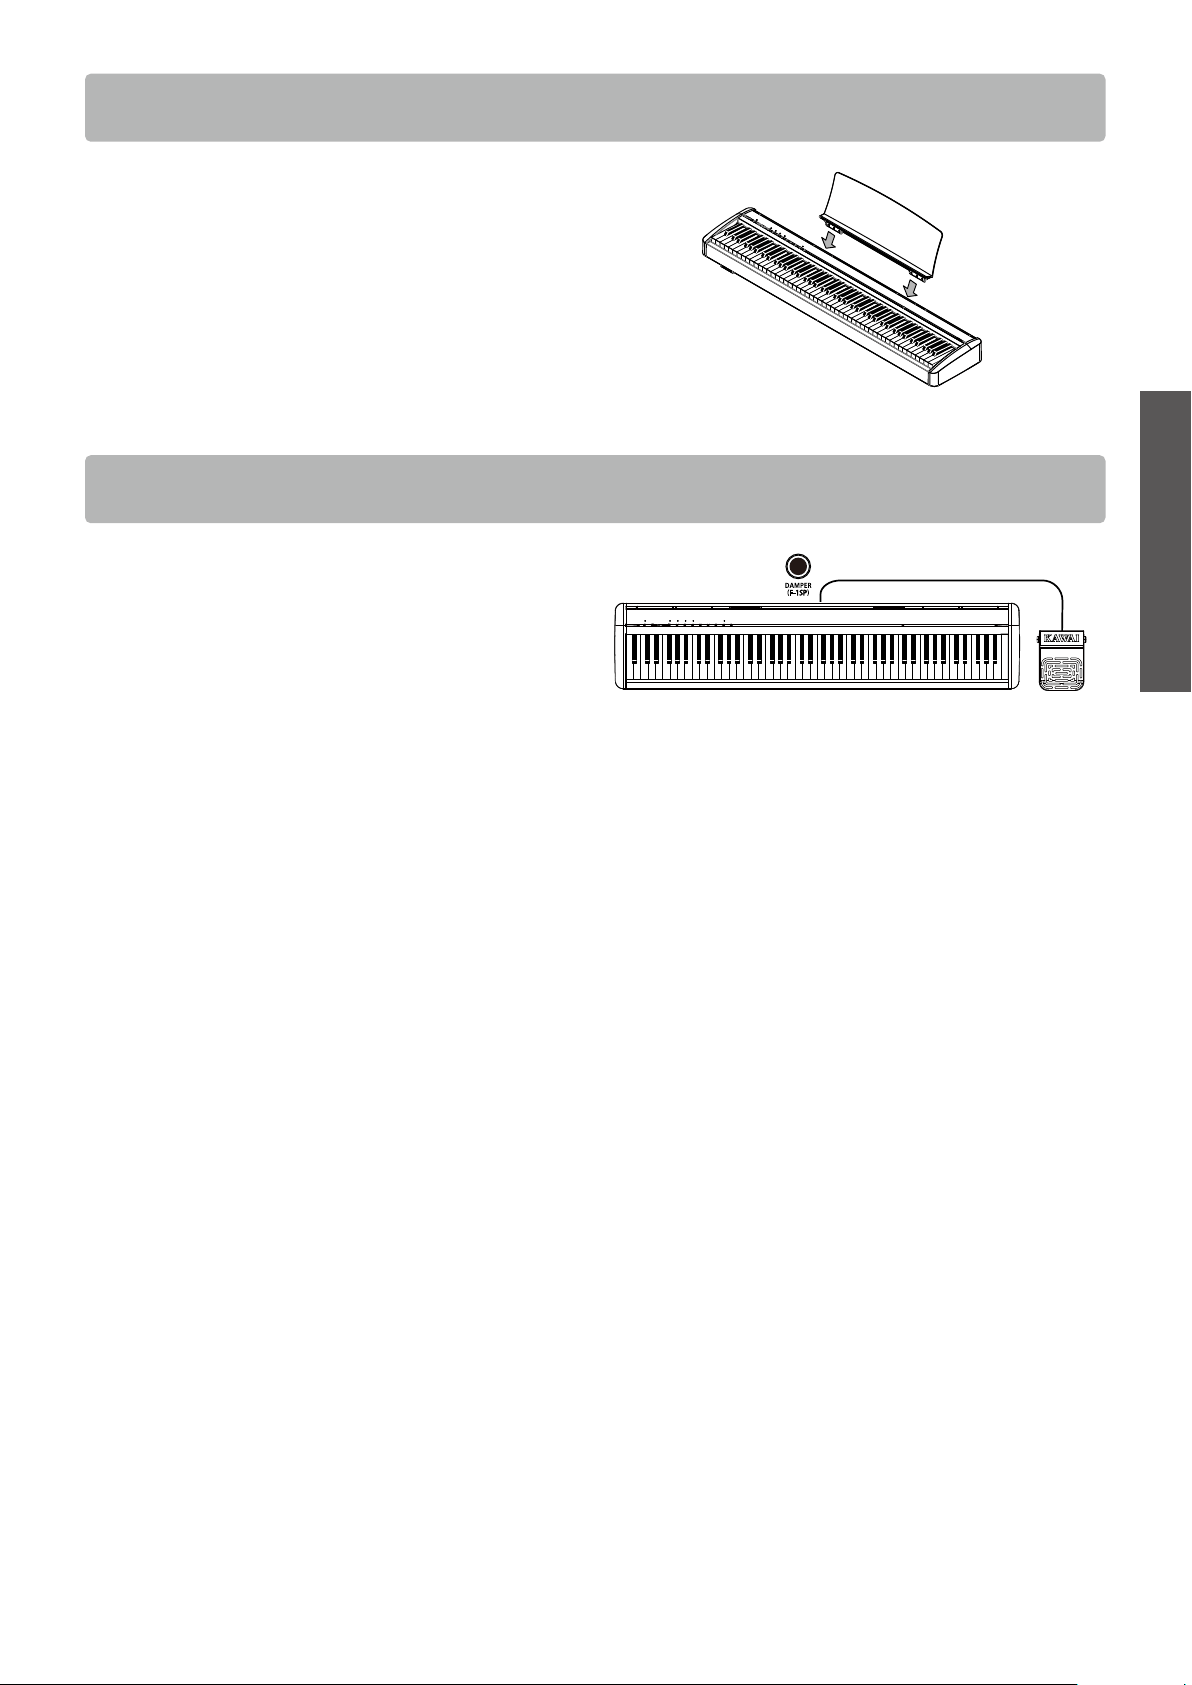
Music Rest
Music Rest
Insert the music rest into the grooves cut on the top surface of
the piano along the rear edge.
Do not apply excessive force when attaching and detaching the
music rest to prevent damage.
Connecting the pedal
Connect the supplied pedal to the [DAMPER] connector on the
rear panel of the main body.
The sound sustains even after hands are lifted from the key-
board.
The length of sustain can be controlled by the level of pedal de-
pression when the optional F-10H damper pedal is connected.
(Half-pedal supported)
10
Preparation
Power
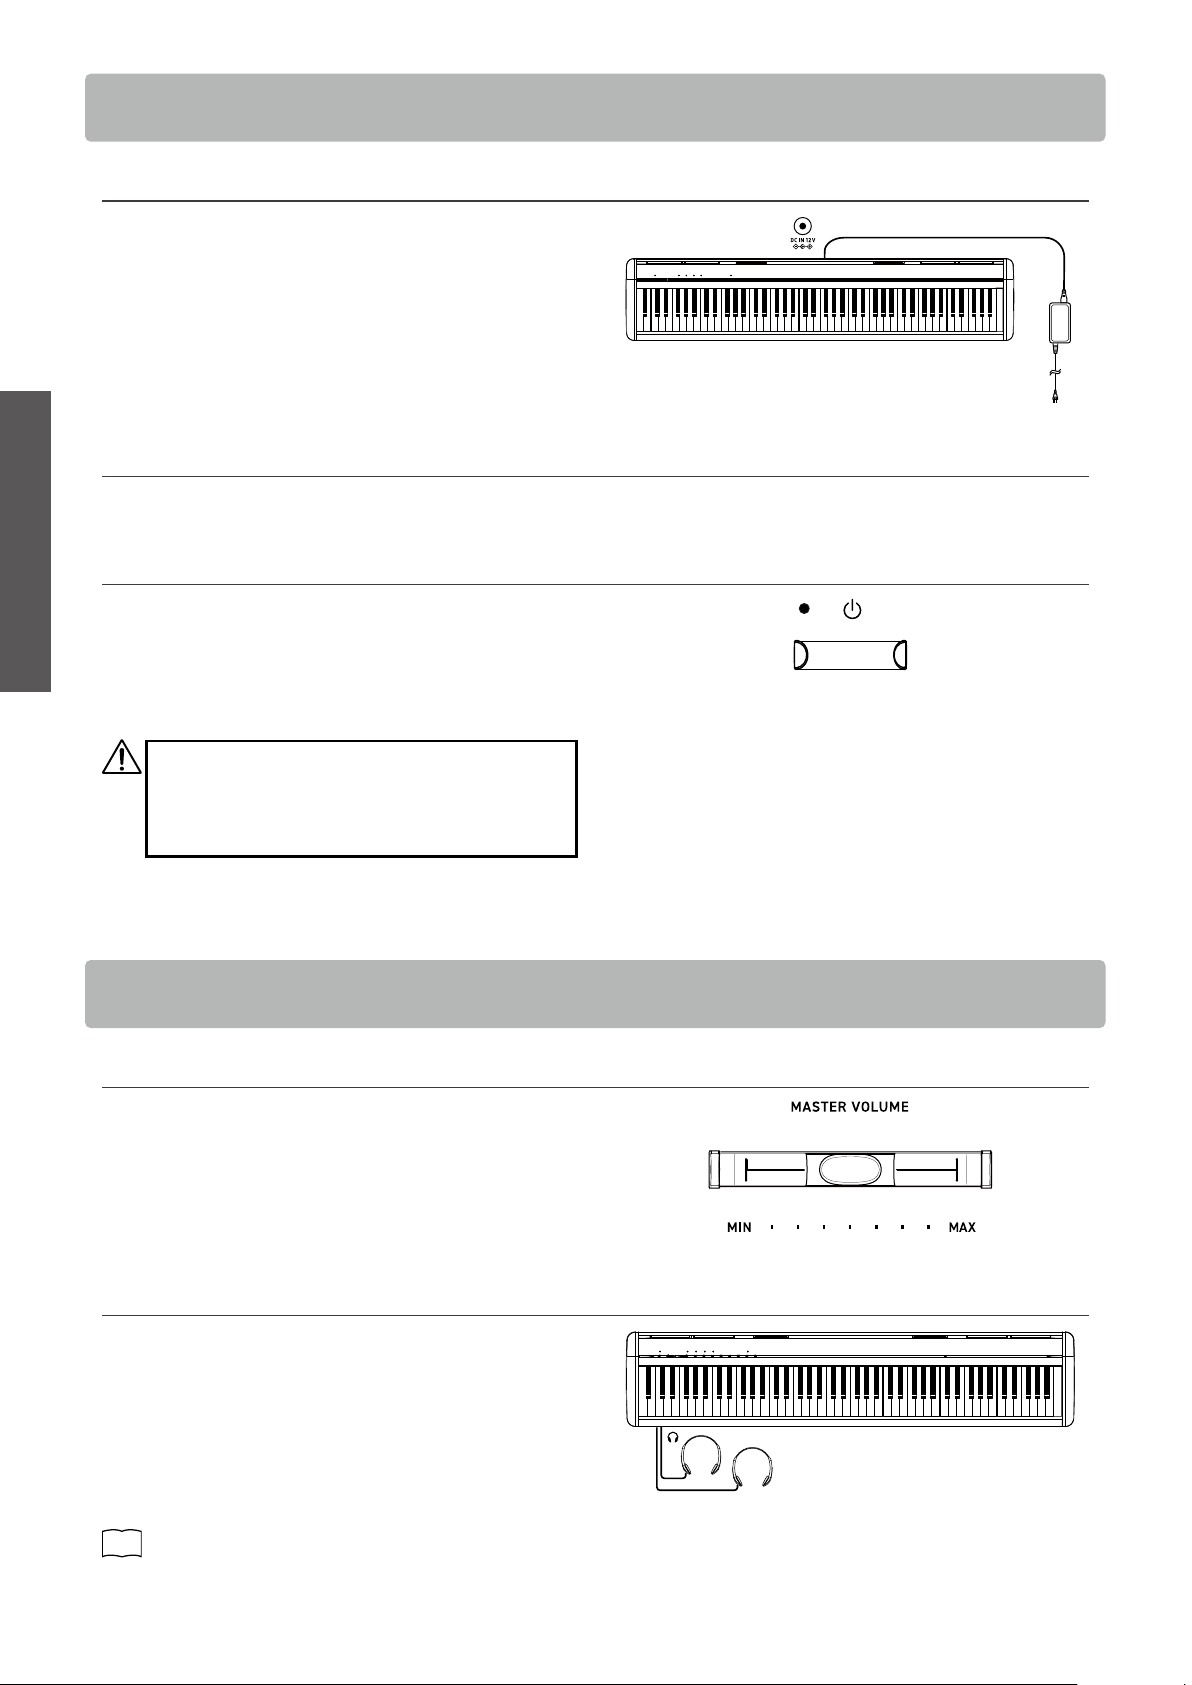
Power
1. Connecting the AC adaptor to the main body
Plug the supplied AC adaptor into the power cord and insert it
into the [DC IN] jack located on the rearside of the main body.
2. Connecting the plug into an outlet
Connect the AC power adaptor to an AC outlet.
3. Turning the power on/o
Press the [POWER] button to turn the power on.
When the instrument has started up, the LED indicator of the
[POWER] button will turn on.
To turn the power o, press the [POWER] button again.
Do not turn o the power until the startup process is
completed.
Do not unplug the power cord until the LED indicator
of the [POWER] button has turned o.
▋ Adjusting the volume
Use the [MASTER VOLUME] slider located on the right side of the
main body to adjust the volume.
Move the slider right to increase the volume and left to decrease
the volume.
Adjust the volume to a comfortable level by moving the slider
while striking the keys.
▋ Using headphones
Plug the headphones into the [PHONES] jack located on the left
side of the main body.
1/4” and 1/8” connectors are provided for convenience.
When the headphones are connected, the speakers on the main
body will no longer produce sound.
The internal speakers can also be muted by using the speaker
on/o setting.
P25
Speaker On/O
Volume and Headphones
11
Basic Operation
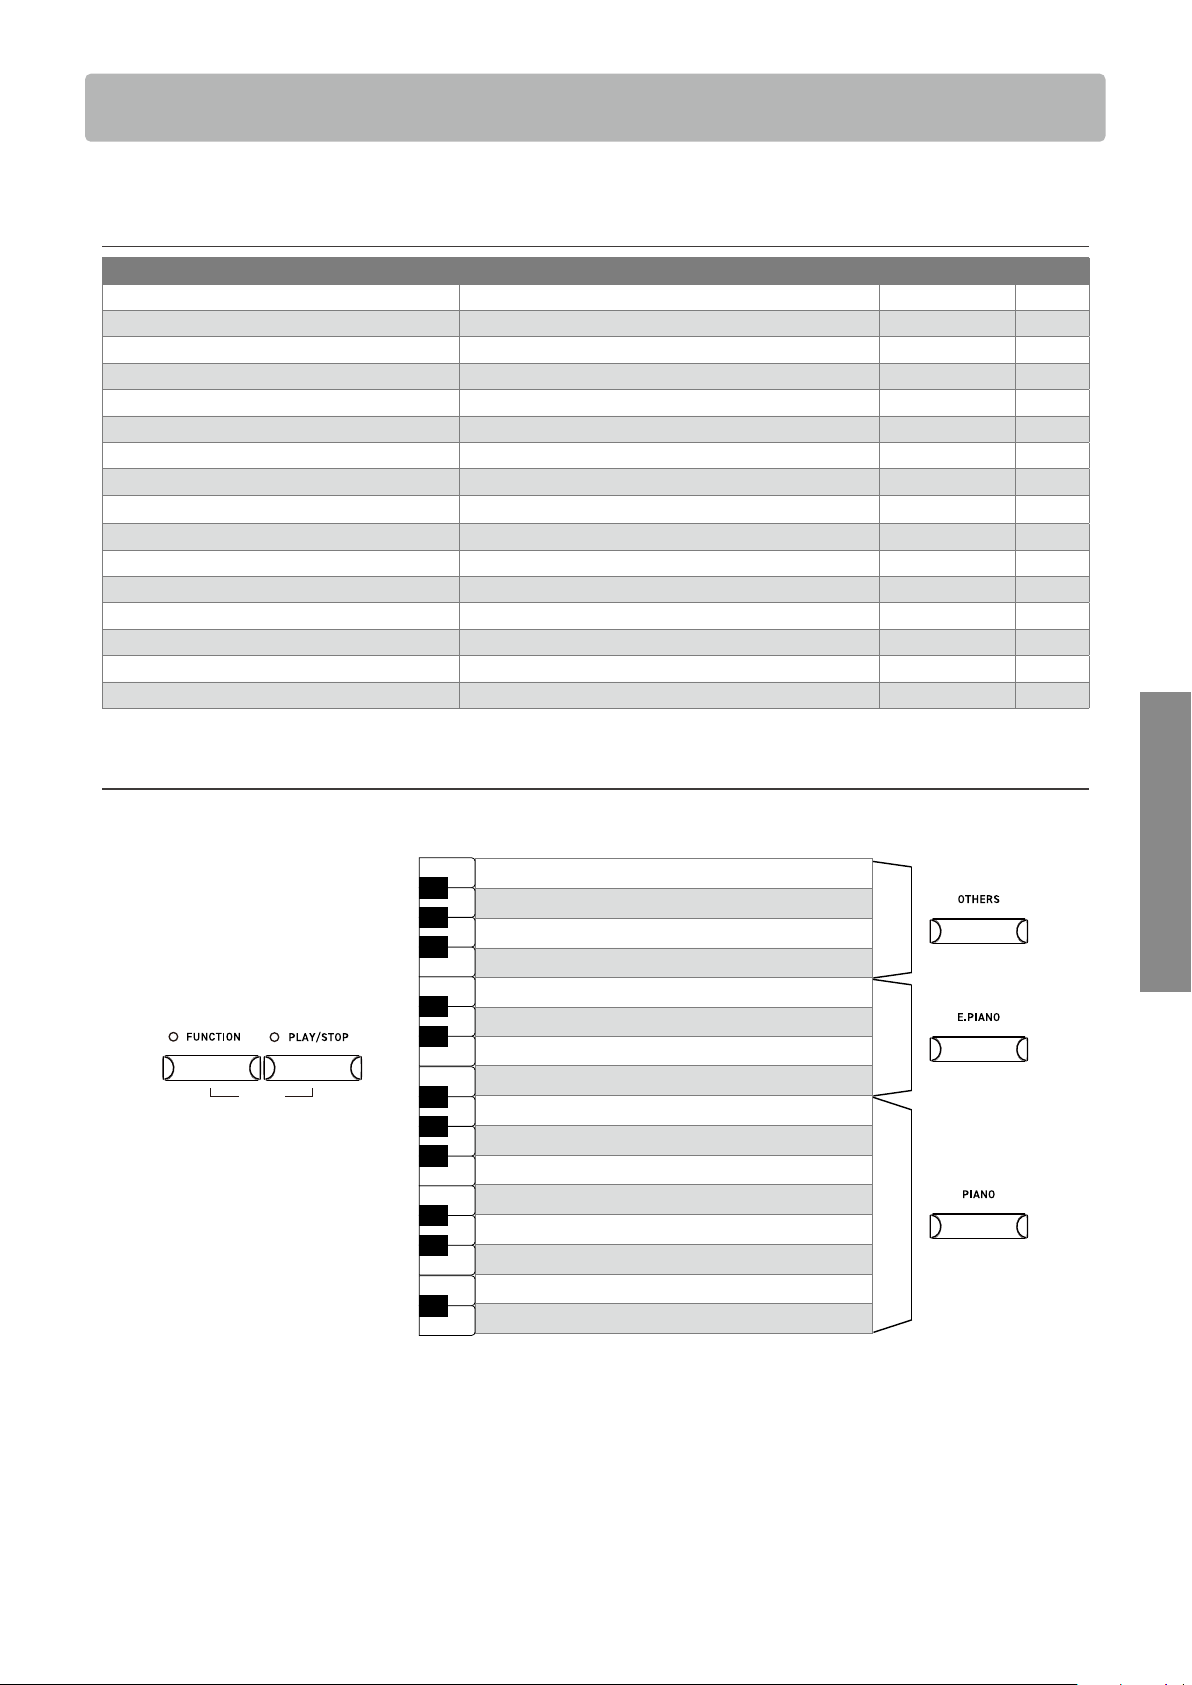
Sounds
Sounds
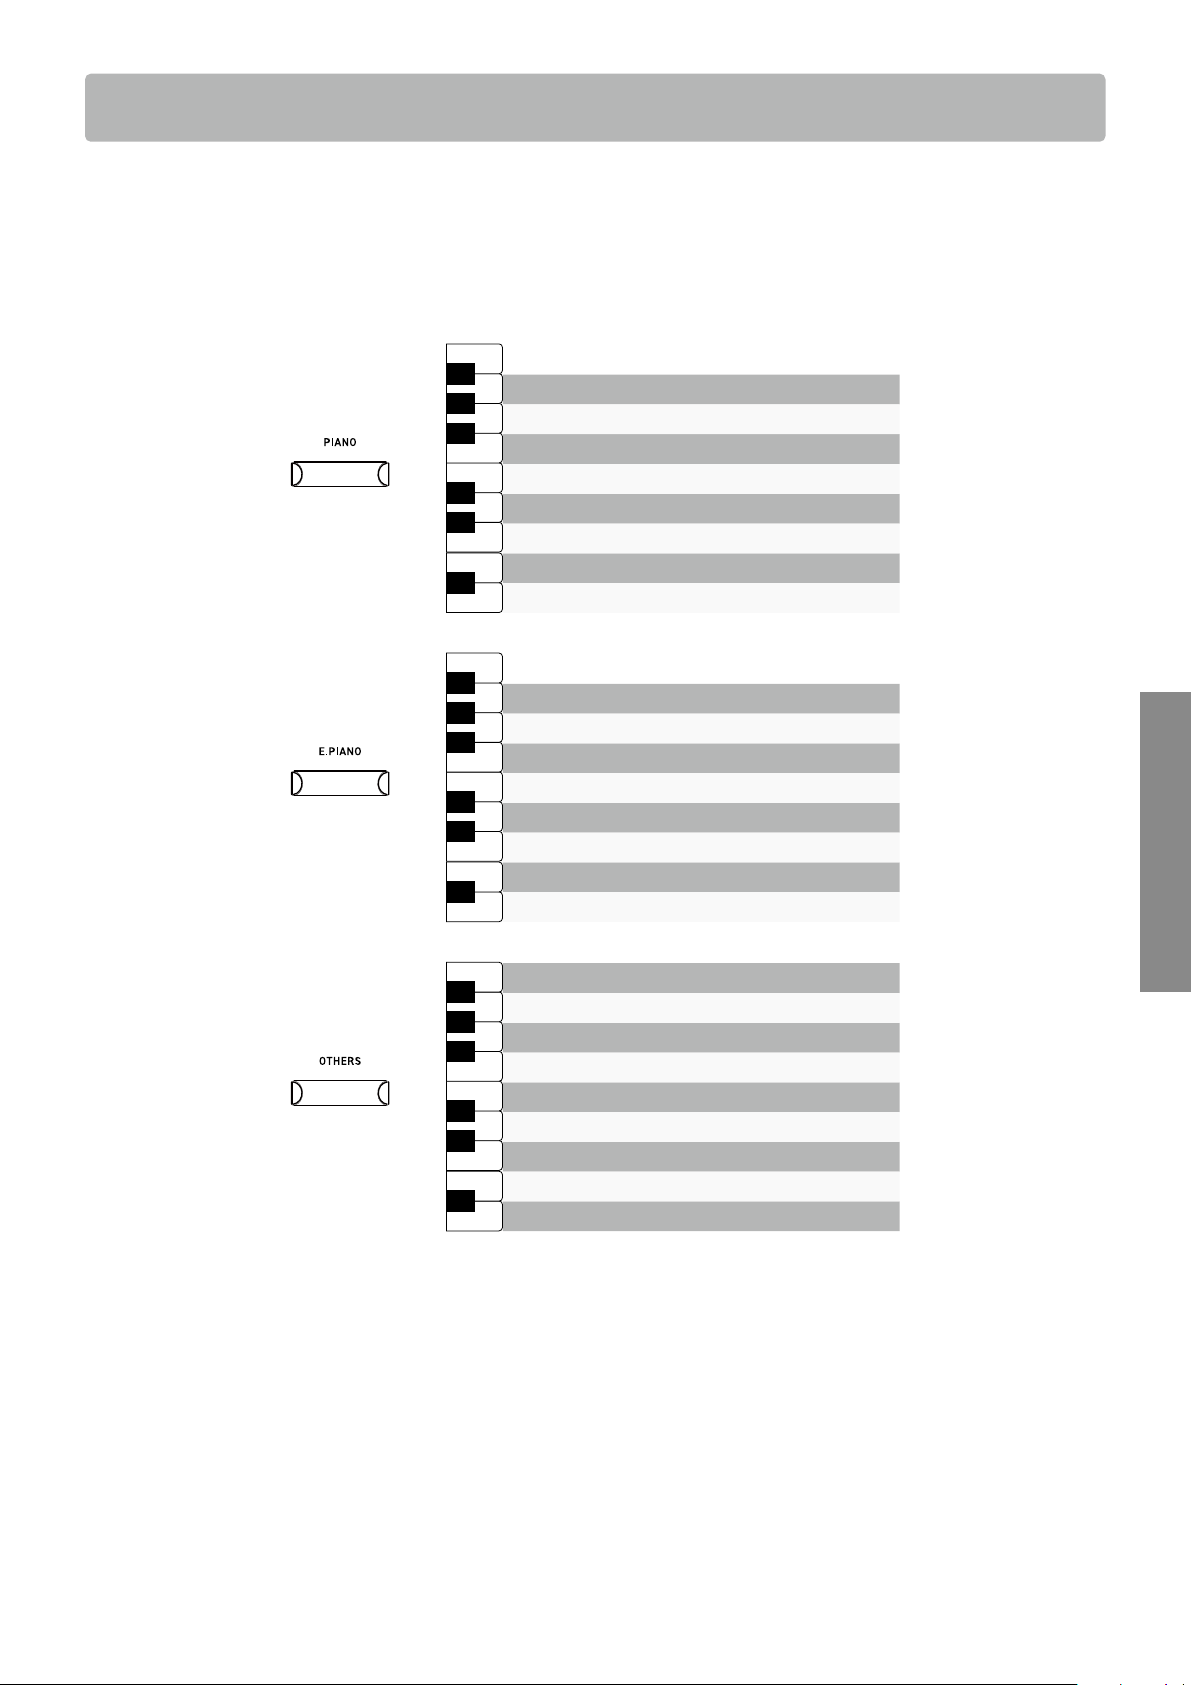
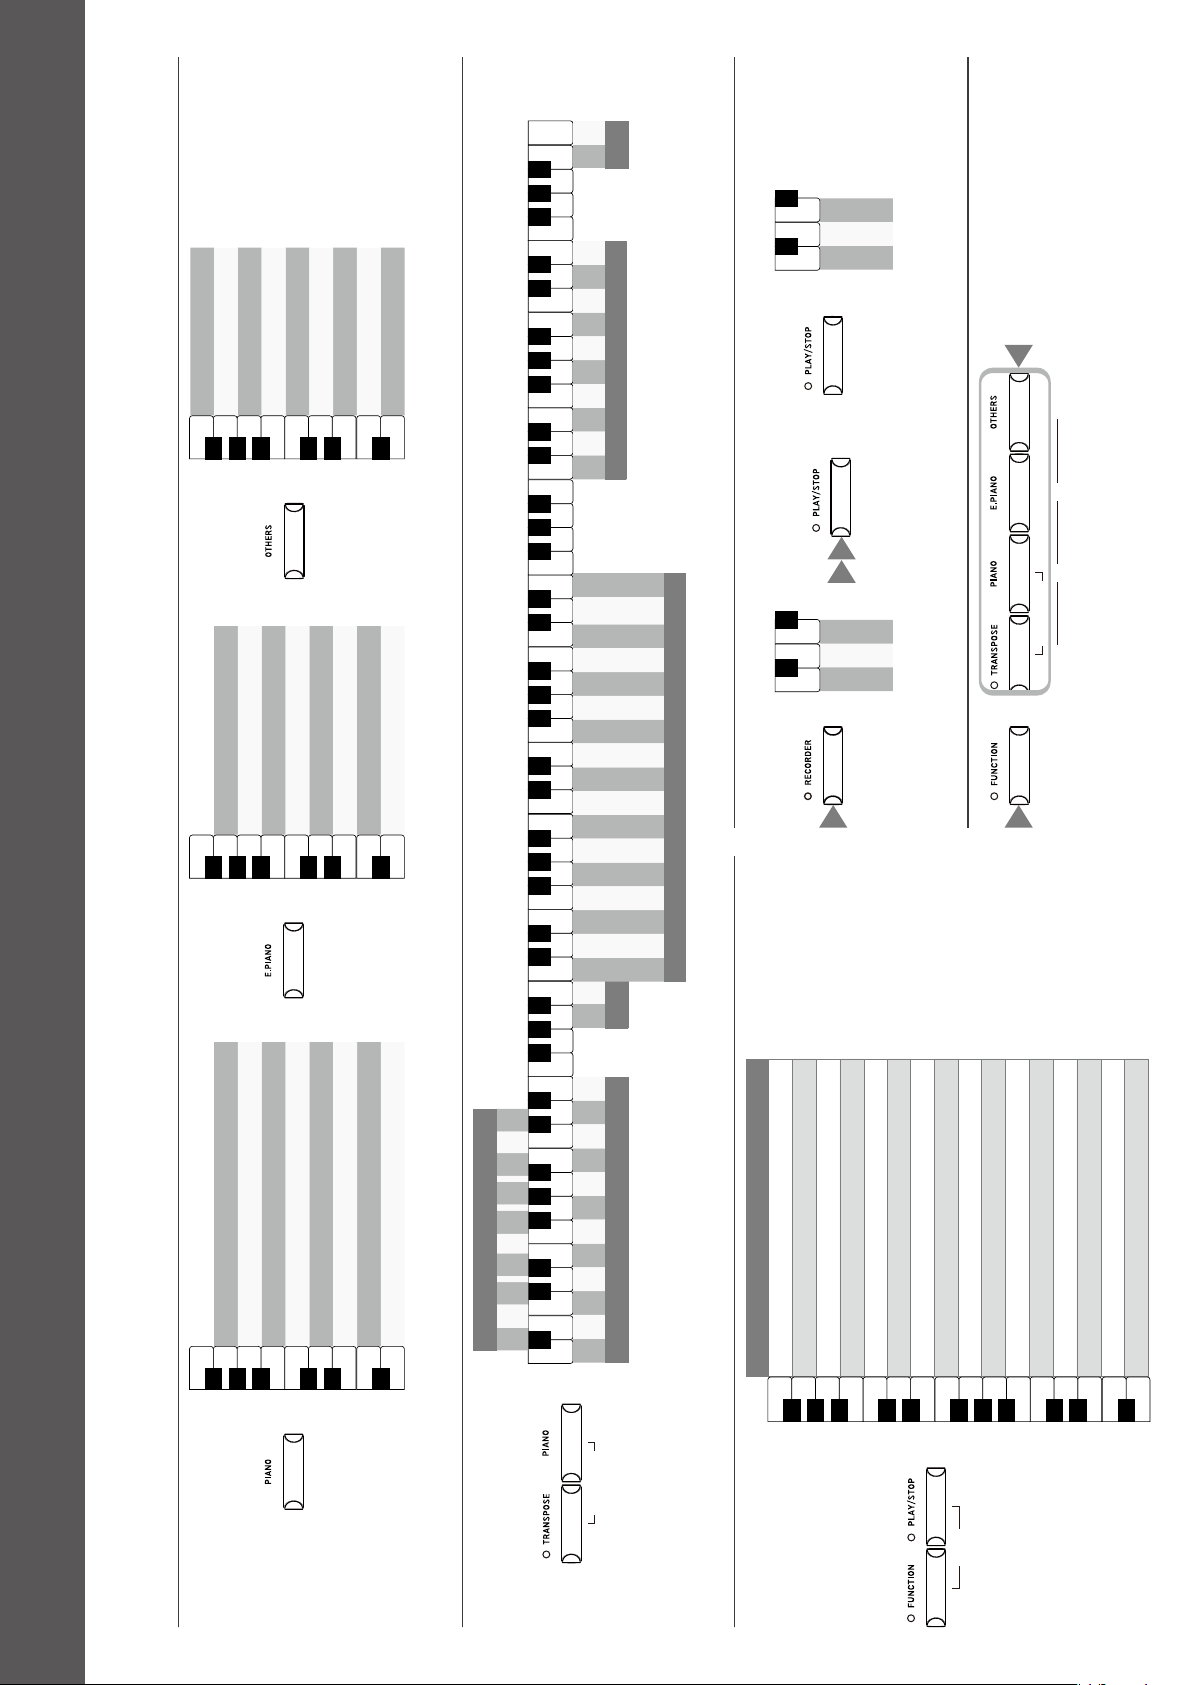
This instrument features a selection of 25 realistic instrument sounds. Sounds are arranged into three
categories, namely “PIANO”, “E.PIANO”, and “OTHERS”, and they are assigned to the corresponding SOUND
buttons. “SK-EX Concert Grand Piano | Concert” is selected as the default setting.
Method 1
Press and hold the desired SOUND button and press one of the keys shown below to select the sound.
Vibraphone
Harpsichord
Wood Bass & Ride
Electric Bass
Wood Bass
New Age Pad
Choir
String Ensemble
Slow Strings
A0
B0
C1
D1
E1
F1
G1
A1
B1
♯
D
1
C
1
♯
F
♯
1
G
♯
1
A
♯
1
A
0
♯
Hold
Diapason
Church Organ
Blues Organ
Jazz Organ
Modern Electric Piano
Reed Electric Piano 2
Reed Electric Piano
Tine Electric Piano
A0
B0
C1
D1
E1
F1
G1
A1
B1
♯
D
1
C
1
♯
F
♯
1
G
♯
1
A
♯
1
A
0
♯
Hold
EX Concert Grand Piano | Modern
EX Concert Grand Piano | Mellow
SK-EX Concert Grand Piano | Mellow
EX Concert Grand Piano | Pop
SK-EX Concert Grand Piano | Jazz
Upright Piano | Classic
EX Concert Grand Piano | Concert
SK-EX Concert Grand Piano | Concert
A0
B0
C1
D1
E1
F1
G1
A1
B1
♯
D
1
C
1
♯
F
♯
1
G
♯
1
A
♯
1
A
0
♯
Hold
Method 2
Press the SOUND button repeatedly to select the sound in ascending order in the above list.
When the last sound of the category is selected, pressing the SOUND button again will return to selecting the rst sound in the cat-
egory.
Example:
If “EX Concert Grand Piano | Modern” is selected for the [PIANO] button, pressing the [PIANO] button again will selected the “SK-EX
Concert Grand Piano | Concert” sound.
• When Jazz Organ or Blues Organ is selected, pressing the [FUNCTION] button and [RECORDER] button simultaneously toggles the
slow/fast modes of the rotary speaker eect.
• The sound currently selected by each SOUND button will be remembered until the power is turned o.
Example:
If “Upright Piano | Classic” is selected for the [PIANO] button, then a dierent sound from the [E.PIANO] or [OTHERS] sound categories
is selected, pressing the [PIANO] button again will return to the “Upright Piano | Classic” sound.
12
Basic Operation
Metronome
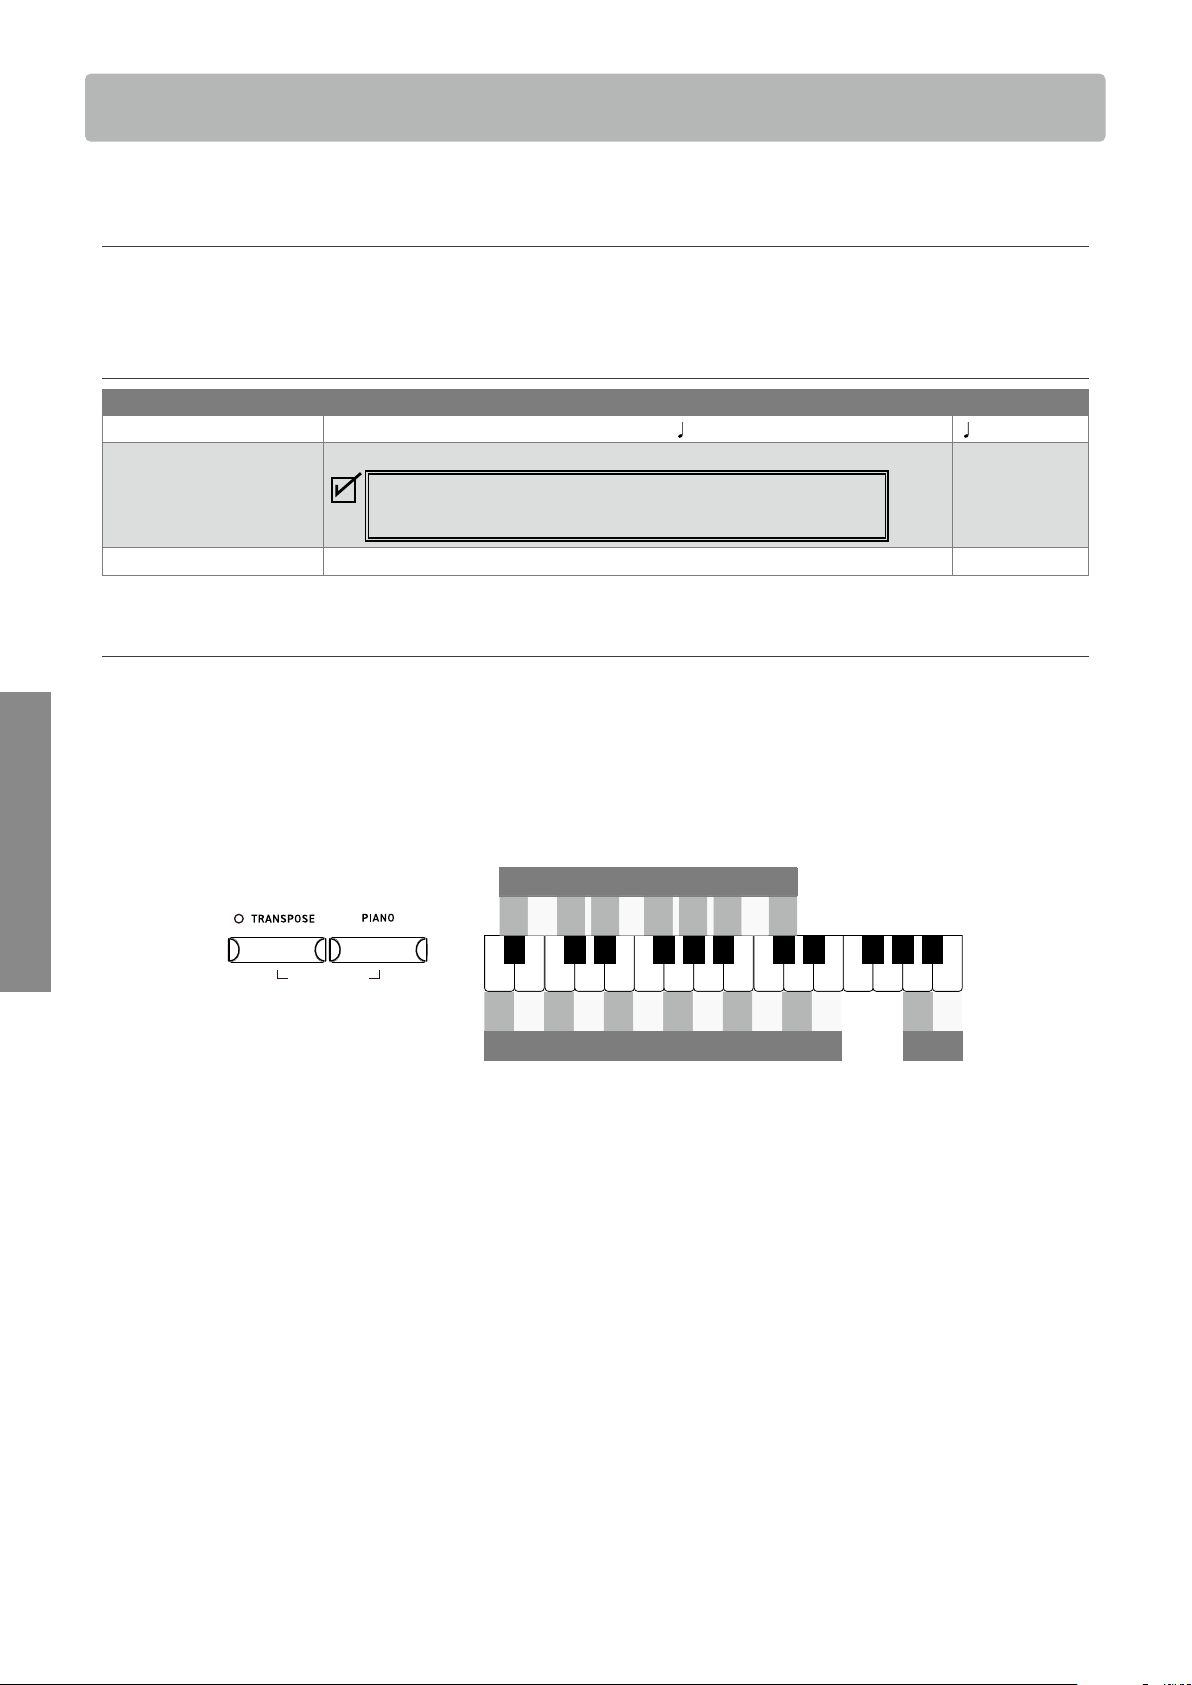
Metronome
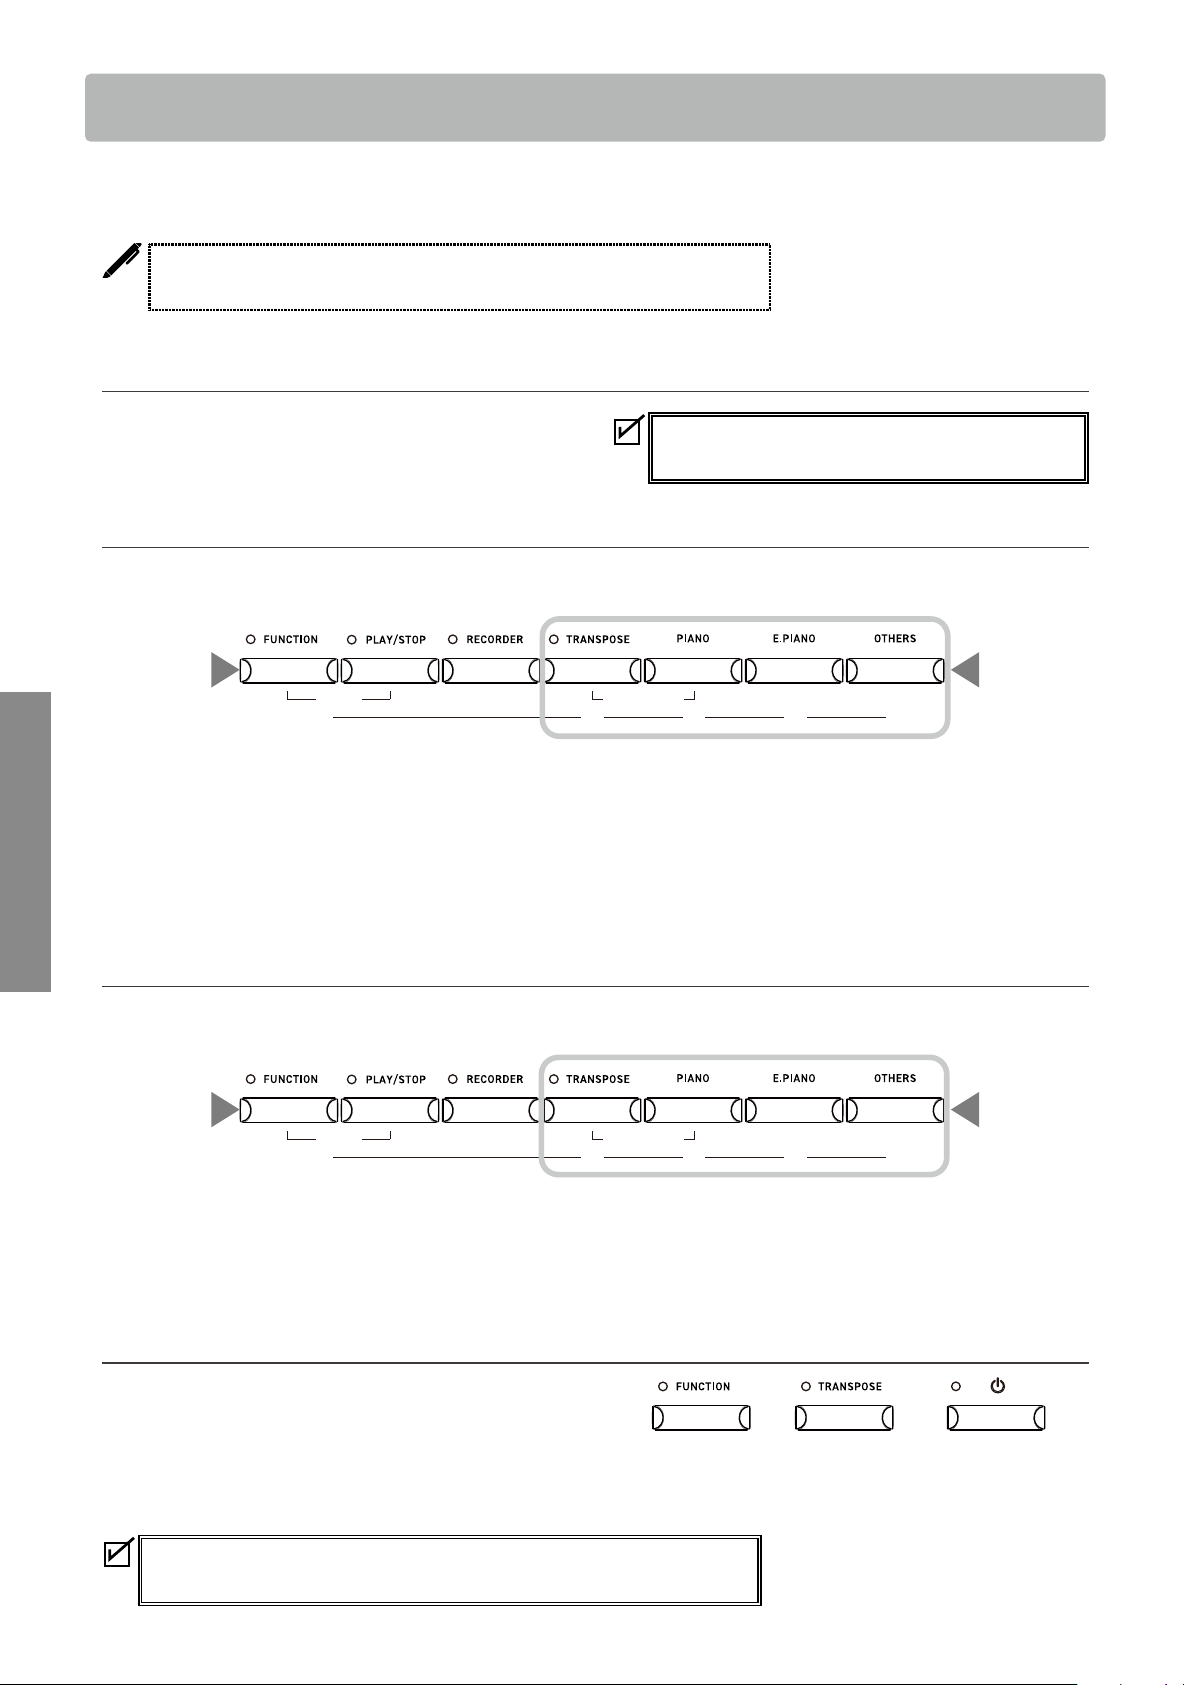
The Metronome function provides a steady beat to aid practicing the piano.
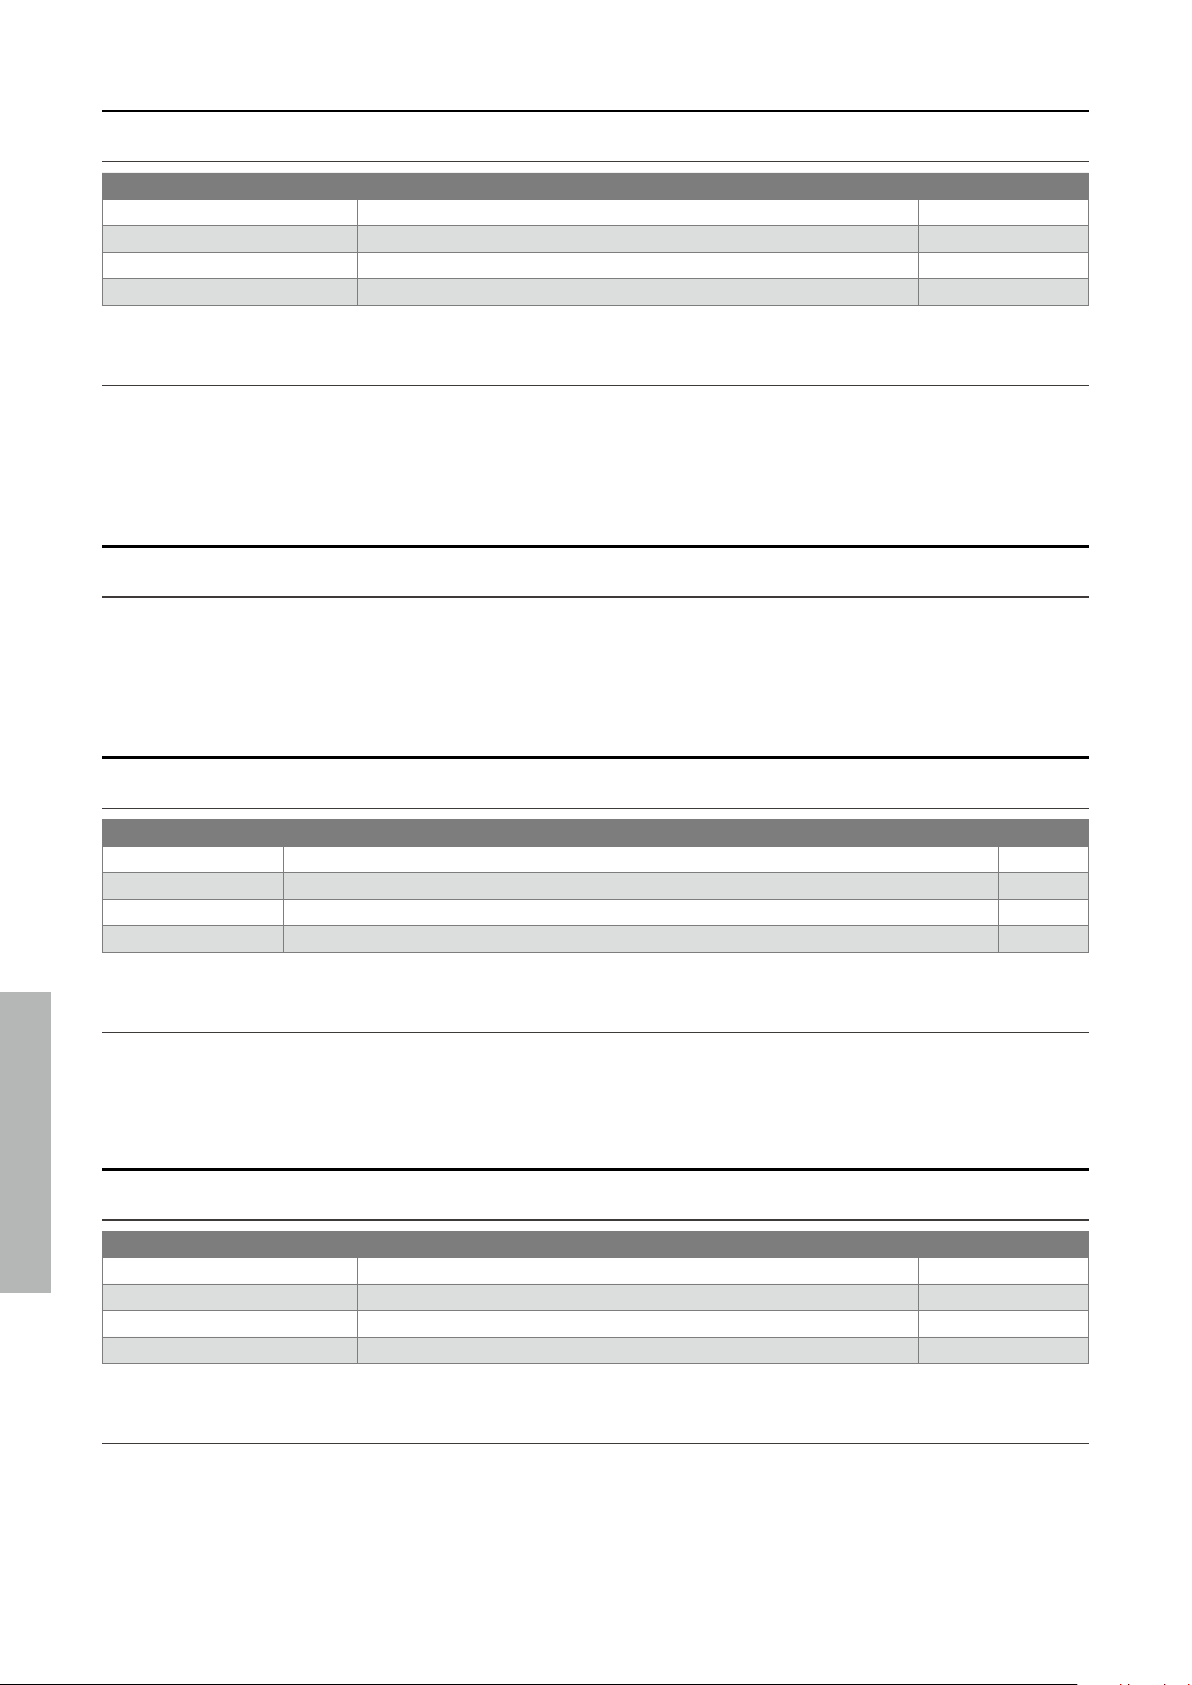
▋ Turning the metronome on/o
Press the [TRANSPOSE] button and [PIANO] button simultaneously to turn the metronome on.
Press the [TRANSPOSE] button and [PIANO] button simultaneously again to turn the metronome o.
▋ Metronome settings
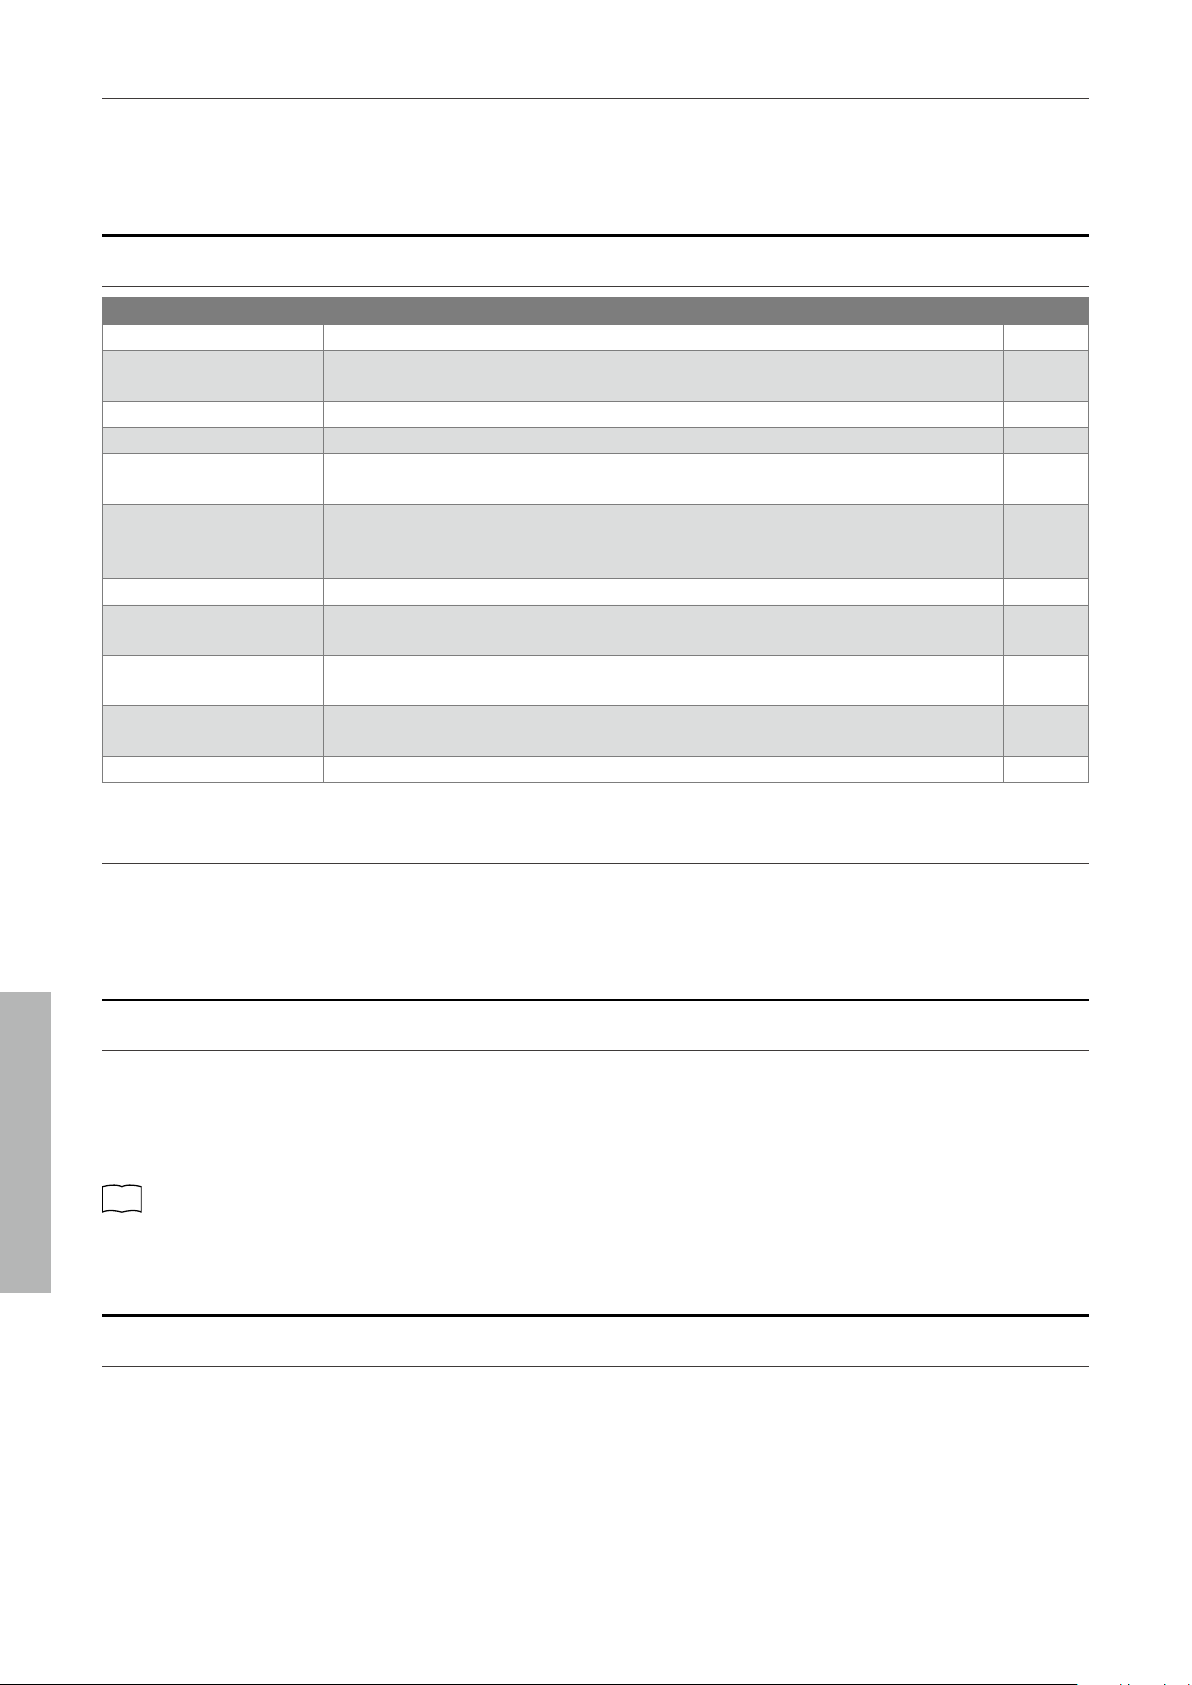
Item Description Default setting
Tempo The value can be specied in the range from
= 10 to 300. = 120
Beat/Rhythm The beat setting is available from the following: 1/4, 2/4, 3/4, 4/4, 5/4, 3/8, 6/8.
When the setting 1/4 is selected, it produces only the click sounds
without an accent beat.
1/4
Volume The metronome volume can be specied in the range from 1 to 10. 5
▋ Setting tempo, time signature, and volume of the metronome
Press and hold the [TRANSPOSE] button and [PIANO] button simultaneously and press one of the following keys to change the setting.
The metronom tempo specify by entering the number in 3 digits.
Example:
To set the metronom tempo “60” :
Press and hold the [TRANSPOSE] button and [PIANO] button simultaneously and press keys “0”, “6”, “0”.
A0
B0
C1
D1
E1
F1
G1
A1
B1
C2
D2
E2
F2
G2
A2
B2
♯
D
1
C
1
♯
F
♯
1
G
♯
1
A
♯
1
A
0
♯
♯
D
2
C
2
♯
F
♯
2
G
♯
2
A
♯
2
- + 1 2 3 4 5 6 7 8 9 0
Metronome tempo
- +
Volume
Time signature
1/4 2/4 3/4 4/4 4/5 3/8 6/8
Press and hold simultaneously
METRONOM E
13
Basic Operation
Metronome
▋ List of tempo markings
Tempo can also be set using the tempo markings commonly used in classical music.
Tempo marking Description Tempo
Grave Very slow 40
Largo Broadly 46
Lento Slowly 52
Larghetto Rather broadly 56
Adagio Slowly, with great expression 60
Adagietto Slightly faster than Adagio 66
Andante At a walking pace 72
Andantino Slightly faster than Andante 80
Maestoso Majestic and stately 88
Moderato At a moderate speed 96
Allegretto Moderately fast 108
Animato Lively and fast 120
Allegro Fast, quick, and bright 132
Vivace Active and quick 160
Presto Very, very fast 184
Vivacissimo Very fast and lively 192
Prestissimo Even faster than Presto 208
▋ Tempo setting using tempo markings
Press and hold the [TRANSPOSE] button and [PIANO] button simultaneously and press one of the following keys to set the tempo.
Grave
Largo
Lento
Larghetto
Adagio
Adagietto
Andante
Andantino
Maestoso
Moderato
Allegretto
Animato
Allegro
Vivace
Presto
Vivacissimo
Prestissimo
Tempo markings
C3
D3
E3
F3
G3
A3
B3
C4
D4
E4
F4
G4
A4
B4
C5
D5
E5
♯
D
3
C
3
♯
F
♯
3
G
♯
3
A
♯
3
♯
D
4
C
4
♯
F
♯
4
G
♯
4
A
♯
4
♯
D
5
C
5
♯
Press and hold simultaneously
METRONOM E
▋ Drum rhythm settings
Press and hold the [TRANSPOSE] button and [PIANO] button simultaneously and specify the rhythm pattern by entering the assigned
number in 3 digits.
Example:
To select the “Motown 1” rhythm pattern (no. 72):
Press and hold the [TRANSPOSE] button and [PIANO] button simultaneously and press keys “0”, “7”, “2”.
Press and hold the [TRANSPOSE] button and [PIANO] button simultaneously, then enter [-] or [+] to select the previous or next rhythm
pattern.
C6
D6
E6
F6
G6
A6
B6
C7
D7
E7
F7
G7
A7
B7
C8
♯
D
6
C
6
♯
F
♯
6
G
♯
6
A
♯
6
♯
D
7
C
7
♯
F
♯
7
G
♯
7
A
♯
7
- +
Rhythm
1 2 3 4 5 6 7 8 9 0
Rhythm
Press and hold simultaneously
METRONOM E
There are 100 rhythm pattern types available.
P30
Drum Rhythm List
14
Basic Operation
Recorder
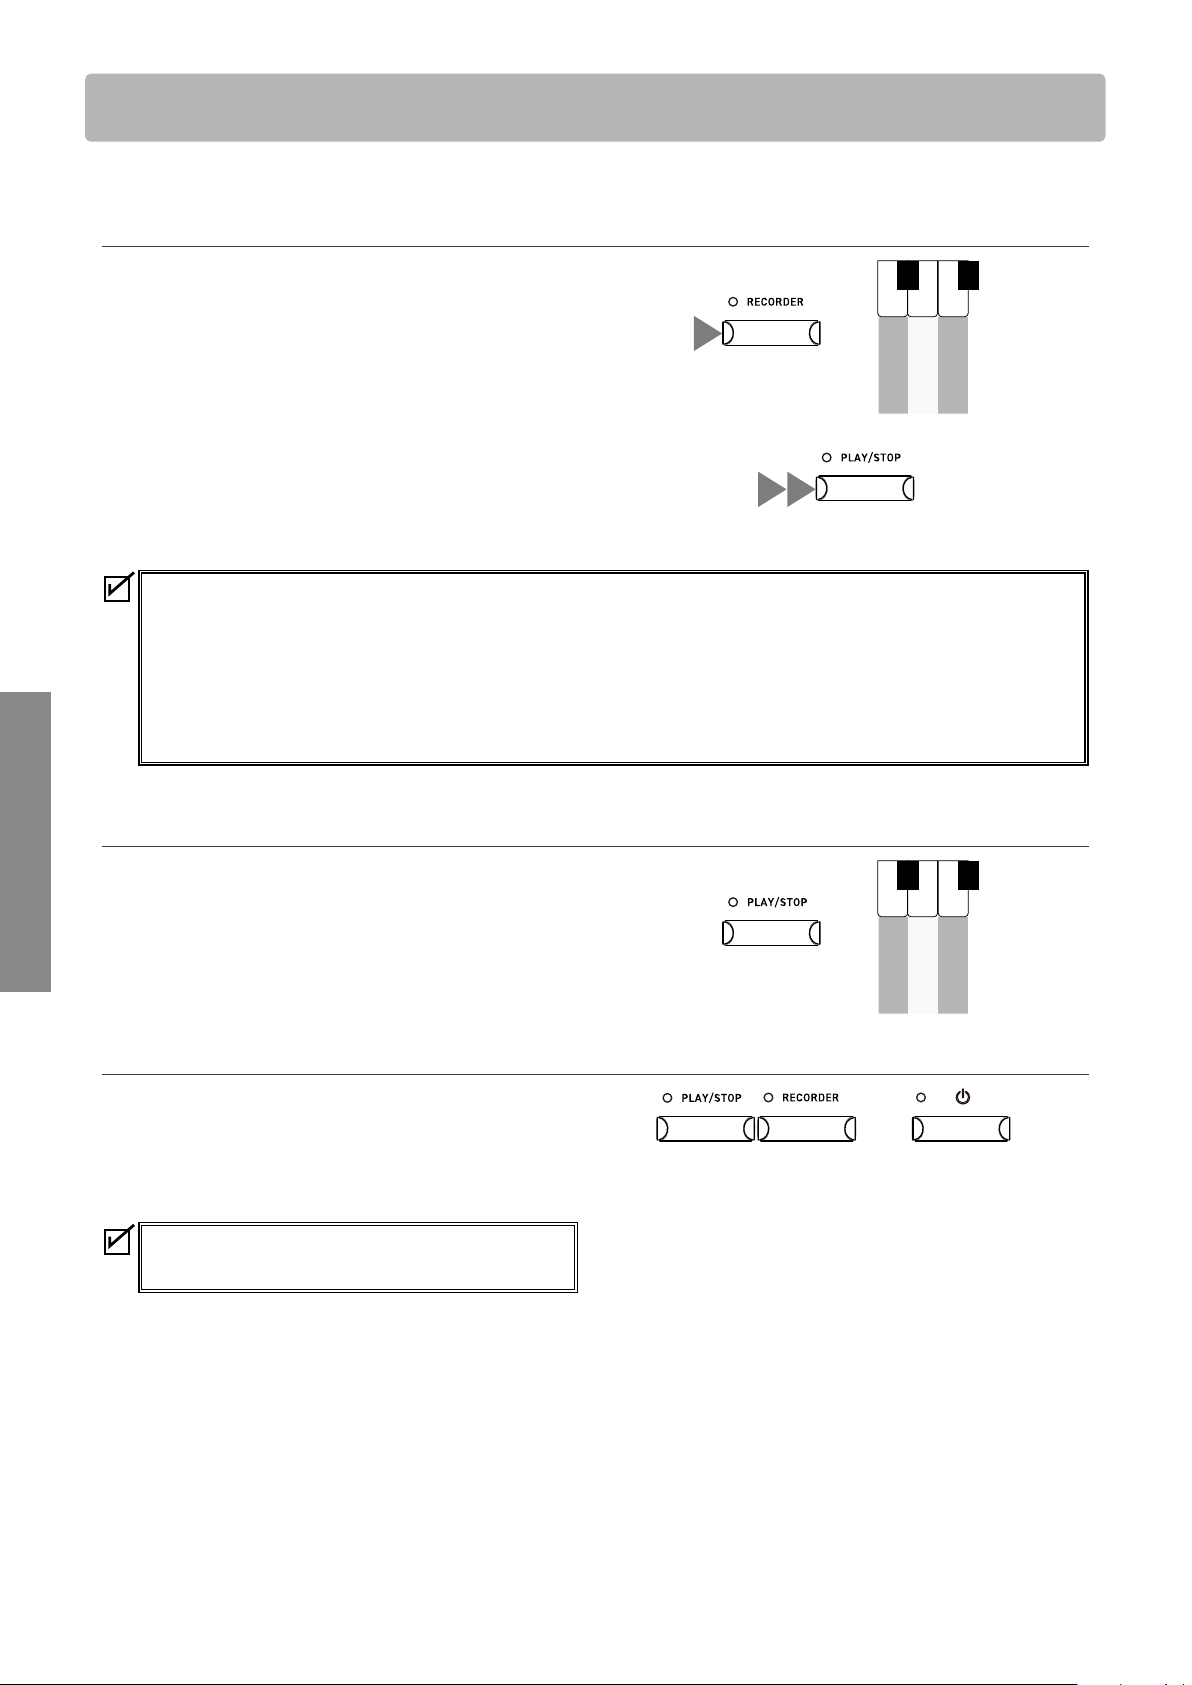
Recorder
The Recorder function allows the player to record up to three songs.
▋ Recording a song
1. Press and hold the [RECORDER] button and select a song
memory.
2. Press the [PLAY/STOP] button to start recording.
Recording can also be started by pressing a key.
When the recording starts, the LED indicators for the [RE-
CORDER] button and the [PLAY/STOP] button will turn on.
3. Press the [PLAY/STOP] button to nish recording.
When the recording ends, the LED indicators for the [RE-
CORDER] button and the [PLAY/STOP] button will turn o.
• The performances can be recorded with the Metronome func-
tion turned on by pressing the [METRONOME] button.
• When a song is recorded to the song memory containing performance data, the existing performance data will be
overwritten by the new performance data.
• The tempo set by the metronome will not be recorded in the recorder data.
• The total recording capacity is 15,000 notes. (This number also includes the number of times the pedal is depressed and
buttons are pressed.)
The Recorder stops automatically when the maximum capacity is reached while recording.
• Recorded songs are retained even after the power is turned o.
▋ Playing back a recorded song
Press and hold the [PLAY/STOP] button and press the key corre-
sponding to the desired song memory to start the playback.
Press the [PLAY/STOP] button again to stop the playback.
▋ Deleting a recorded song
While the instrument is turned o, press and hold the [RECORD-
ER] button and [PLAY/STOP] button and turn the power on.
The LED indicators for the [RECORDER] button and [PLAY/STOP]
button will ash while deleting.
The LED indicators will turn o when deletion is complete.
All three song memories will be deleted.
Note that songs cannot be recovered after deletion.
Song 1
Song 2
Song 3
A0
B0
C1
C
1
♯
A
0
♯
Hold
1
2 3
Hold
Song 1
Song 2
Song 3
A0
B0
C1
C
1
♯
A
0
♯
Hold
15
Basic Operation
Demo Songs
Demo Songs
This instrument includes a demo song for each sound.
▋ Demo songs list
Sound Name Song Title Composer Key
SK-EX Concert Grand Piano | Concert La Campanella Liszt A0
EX Concert Grand Piano | Concert Hungarian Rhapsody No. 6 Liszt B0
Upright Piano | Classic Alpenglühen Oesten C1
SK-EX Concert Grand Piano | Jazz Original Kawai D1
EX Concert Grand Piano | Pop Original Kawai E1
SK-EX Concert Grand Piano | Mellow Sonata No.30 Op.109 Beethoven F1
EX Concert Grand Piano | Mellow La Fille aux Cheveux de lin Debussy G1
EX Concert Grand Piano | Modern Original Kawai A1
Tine Electric Piano Original Kawai B1
Modern Electric Piano Original Kawai C2
Jazz Organ Original Kawai D2
Church Organ Chorale Prelude “Wachet auf, ruft uns die Stimme.” Bach E2
Slow Strings Original Kawai F2
Electric Bass Original Kawai G2
Harpsichord French Suite No.6 Bach A2
Vibraphone Original Kawai B2
▋ Playing demo songs
Press and hold the [FUNCTION] button and [PLAY/ STOP] button simultaneously and press one of the following keys to select the song.
The LED indicators for the [FUNCTION] button and [PLAY/STOP] button will ash.
DEMO
Hold
Vibraphone
Harpsichord
Electric Bass
Slow Strings
Church Organ
Jazz Organ
Modern Electric Piano
Tine Electric Piano
EX Concert Grand Piano | Modern
EX Concert Grand Piano | Mellow
SK-EX Concert Grand Piano | Mellow
EX Concert Grand Piano | Pop
SK-EX Concert Grand Piano | Jazz
Upright Piano | Classic
EX Concert Grand Piano | Concert
SK-EX Concert Grand Piano | Concert
A0
B0
C1
D1
E1
F1
G1
A1
B1
C2
D2
E2
F2
G2
A2
B2
♯
D
1
C
1
♯
F
♯
1
G
♯
1
A
♯
1
A
0
♯
♯
D
2
C
2
♯
F
♯
2
G
♯
2
A
♯
2
• When a song ends, the next song is automatically played.
For example, after playing the demo song for “Vibraphone”, the demo song for “SK-EX Concert Grand Piano | Concert” will follow
automatically.
• Pressing the desired SOUND button switches to the demo song for the selected sound.
• Press the [FUNCTION] button or [PLAY/STOP] button again to stop the playback.
16
Basic Operation
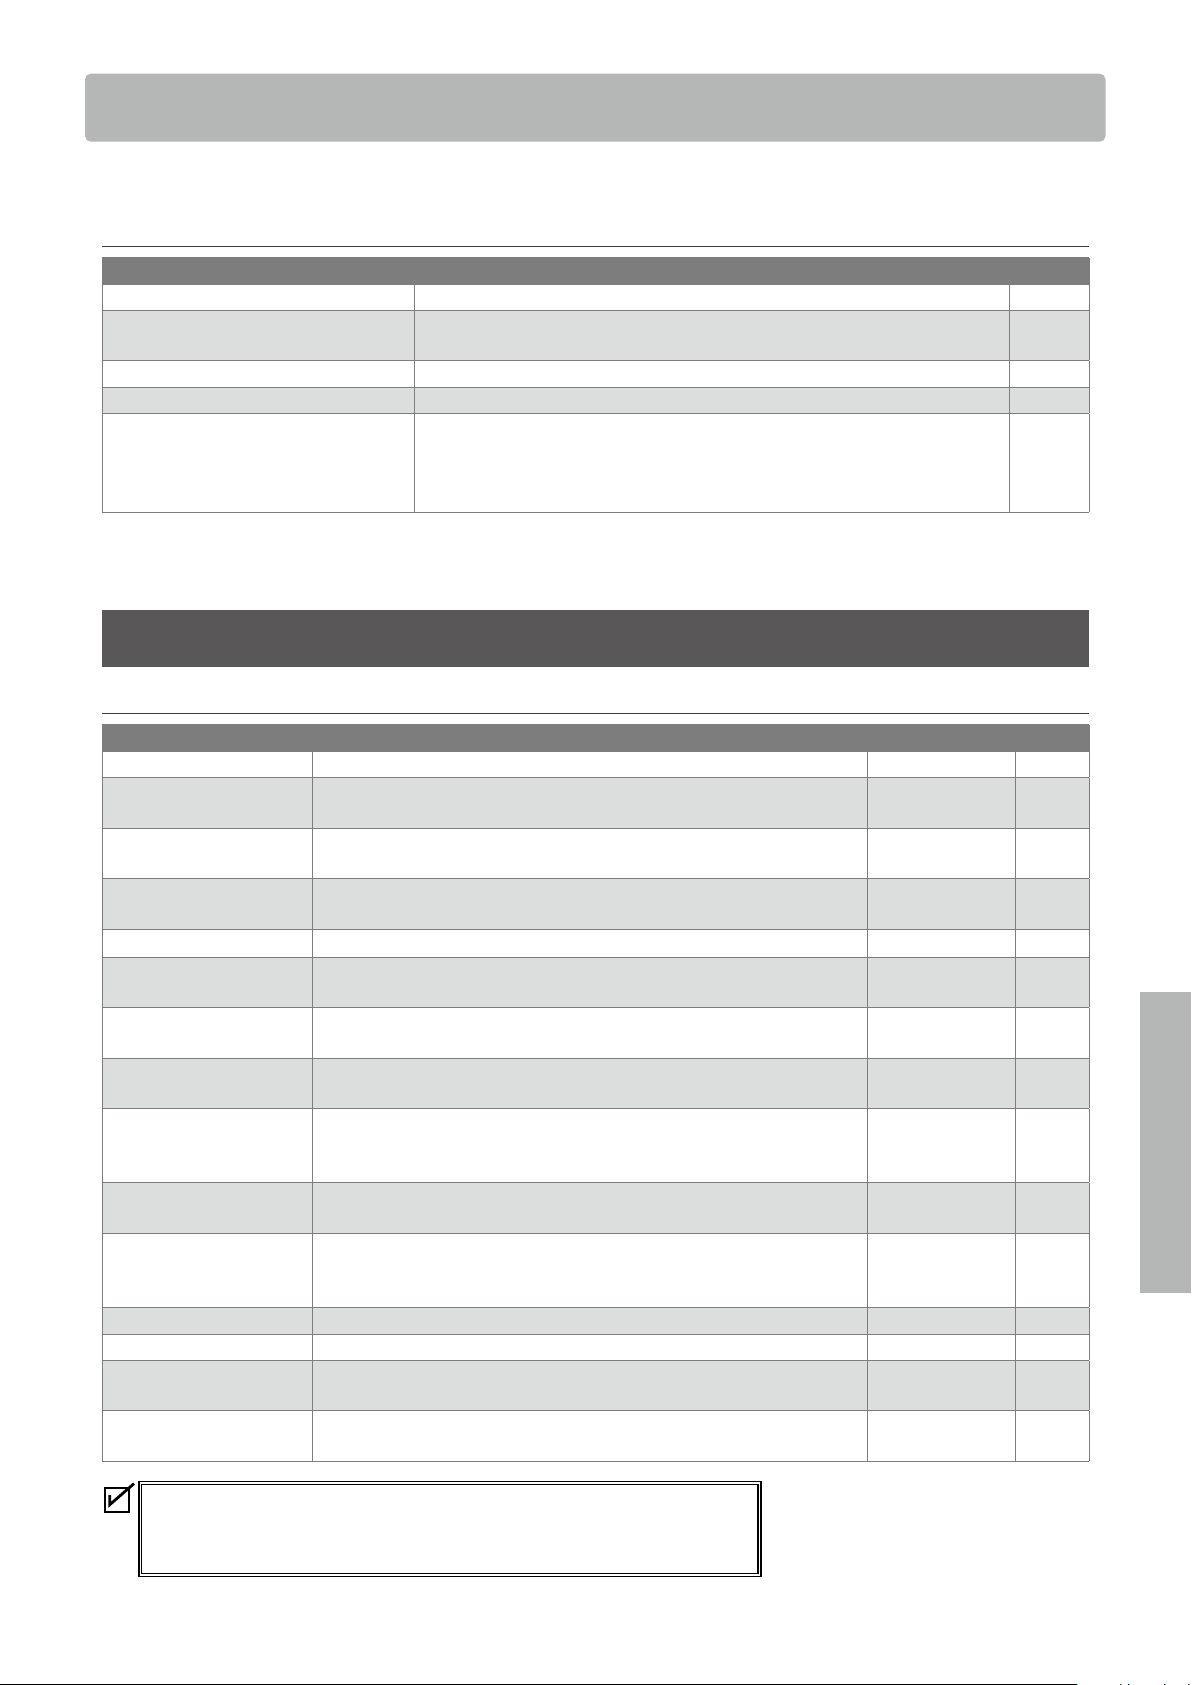
Registration Memories
Registration Memories
The Registration function memorizes settings such as selected sounds and Reverb settings, etc. Simply
pressing the button recalls the memorized settings. Up to four Registration memories can be stored.
A collection of settings can be stored to a memory. This memory is called a
“Registration”.
▋ Settings that can be stored in registration memories
• Sound settings (including Dual/Split combinations)
• Metronome settings
• Basic Settings
▋ Recalling the registration
1. Press the [FUNCTION] button. The LED indicator for the [FUNCTION] button will turn on.
2. Press one of the four registration memory (SOUND) buttons to select the registration to be recalled.
REGISTRATIO N
DEMO METRONOM E
1
2
3
4
The registration memory (SOUND) buttons
1
2
• Press the [FUNCTION] button again to return to normal operation.
• By default, the Registration memories correspond to the following sounds:
Memory 1 : SK-EX Concert Grand Piano | Jazz
Memory 2 : Reed Electric Piano 2
Memory 3 : Jazz Organ
Memory 4 : String Ensemble.
▋ Storing a registration memory
With the setting to be memorized selected, press and hold the [FUNCTION] button then press one of the four registration memory
(SOUND) buttons to store the current sound to the registration memory.
REGISTRATIO N
DEMO METRONOM E
1
2
3
4
The registration memory (SOUND) buttons
1 2
Hold
• The LED indicator for the [FUNCTION] button will ash while storing into the Registration memory.
It will stop ashing when storing is complete.
▋ Resetting all registration memories
While the instrument is turned o, press and hold the [FUNC-
TION] button and [TRANSPOSE] button, and turn the power on.
• The LED indicator for the [FUNCTION] button will turn on and
the LED indicator for the [TRANSPOSE] button will ash while
resetting. The LED indicators will turn o when reset is com-
plete.
All four Registration memories will be reset.
Note that registration memories cannot be recovered after a reset.
The “Sound settings” and “Basic Settings” cannot be
changed while a Registration memory is selected.
Press and hold simultaneously
17
Adjustments & Settings
Settings
Settings
Settings can be changed to suit playing conditions.
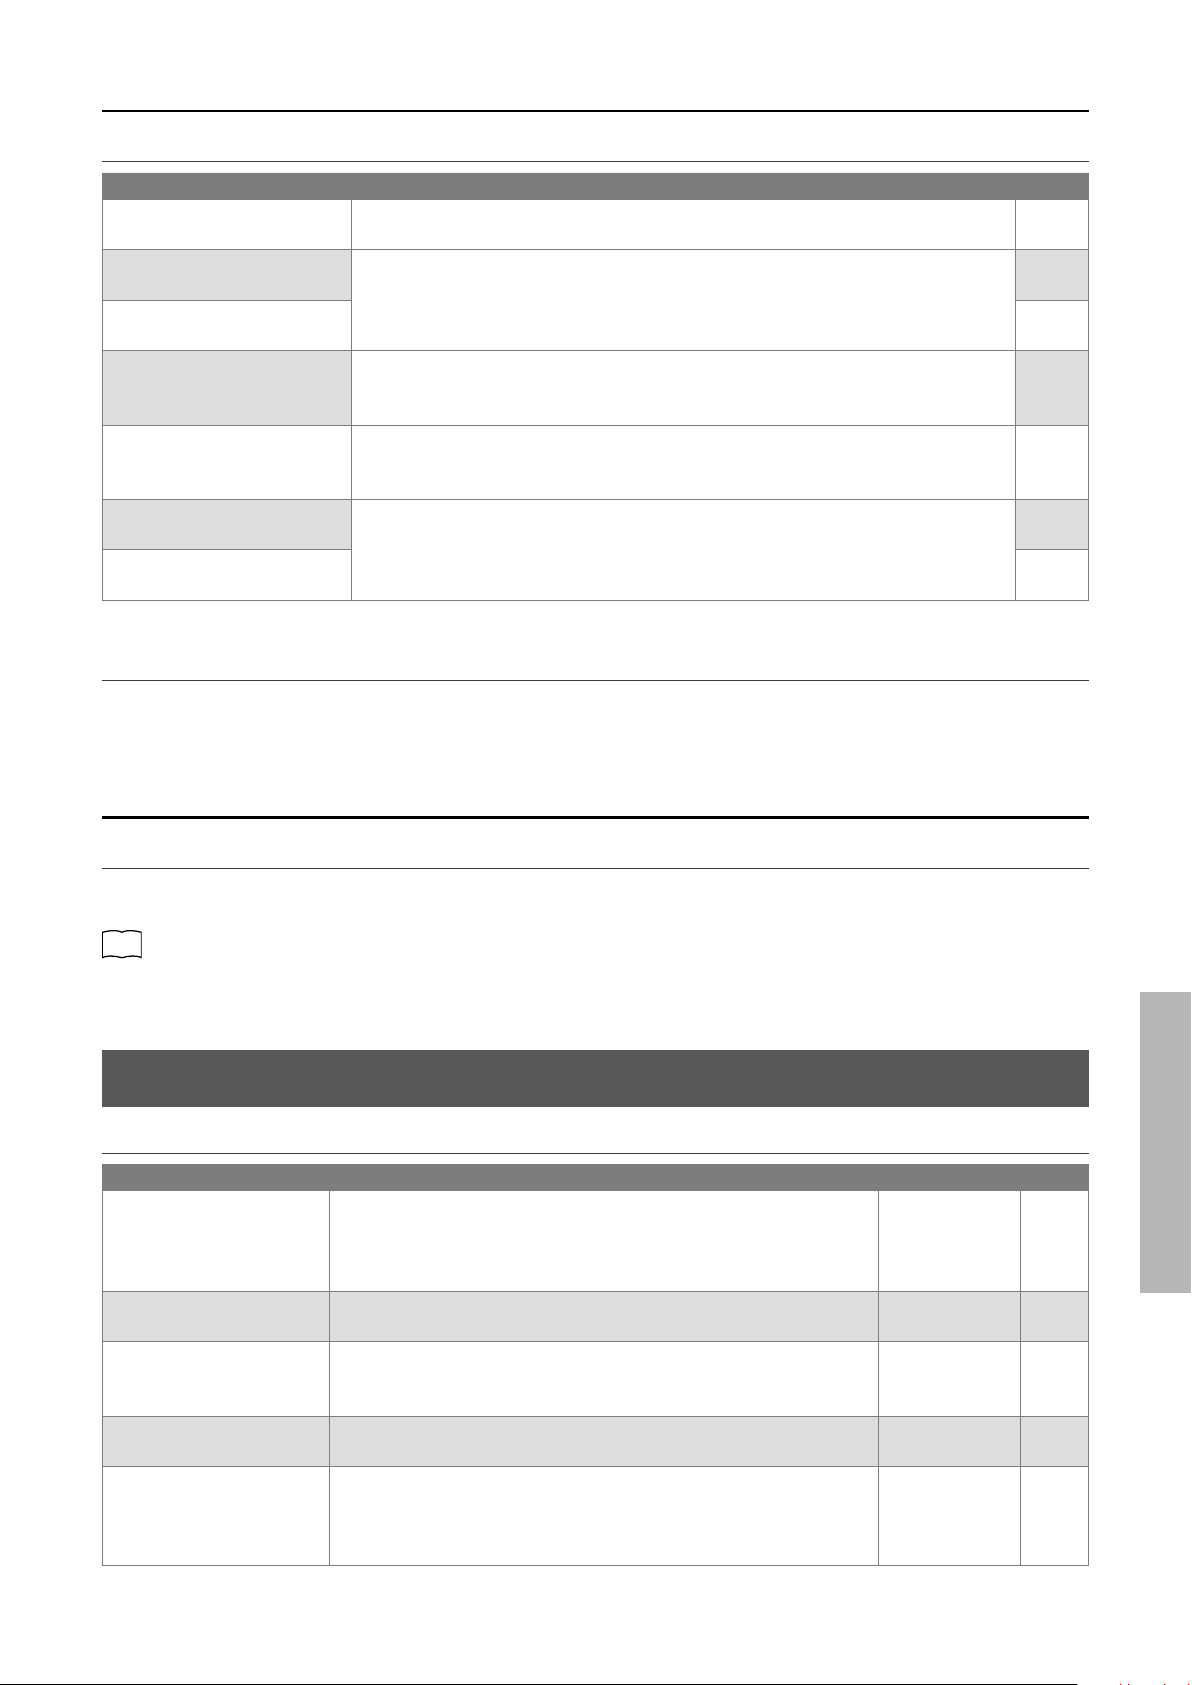
▋ Settings
Settings Description Page
Basic Settings Adjust settings related to the selected sound etc. P17
Phones/Speaker Settings Adjust settings related to the instrument’s headphone and speaker sound
output.
P23
Power/Memory Settings Adjust settings related to the instrument’s power and memory. P25
Bluetooth Settings Bluetooth Audio and Bluetooth MIDI settings. P26
MIDI Settings Adjust settings related to MIDI.
For more information on MIDI and its operation details, please download the
supplementary PDF manual from the Kawai Global website:
https://www.kawai-global.com/support/manual/
Basic Settings
▋ Basic Settings functions and default values
Item Description Default setting Page
Dual This function allows two sounds to be layered together. - P18
Split This function divides the keyboard into lower and upper sections, each
of which can be played with a dierent sound.
- P19
Reverb This setting adjust the reverberation applied to the sound. (Depending on
the sound)
P19
Damper Resonance This setting simulates the resonance eects of the whole piano when
the damper pedal is pressed.
Medium P20
Brilliance This setting adjusts the brightness of the sound. 0 P20
Voicing This setting simulates dierent hammer properties, aecting the tonal
character of the piano.
Normal P20
Touch Curve This setting allows players to change the relationship between the vol-
ume and the strength of keystrokes.
Normal P20
Fall-back Noise This setting simulates the noise from the acoustic piano key action
when keys are released.
Normal P21
Damper Noise This setting adjusts the volume of the noise that occurs when the damp-
er pedal is pressed or released as the damper head touches or leaves
the strings.
Normal P21
Eects This setting allows various eects to be added to the sound. (Depending on
the sound)
P21
Smart Mode This setting switches between various preset congurations, adjusting
various characteristics of the grand piano sound to match dierent mu-
sical styles.
Normal P22
Transpose This setting changes the pitch of the keyboard in semi-tone steps. 0 P22
Tuning This setting changes the pitch of the instrument in 0.5 Hz steps. 440.0Hz P22
Temperament This setting allows musicians to play the instrument using early tuning
systems popularised in the Renaissance and Baroque eras.
Equal P23
Temperament Key This setting is used to set the tonic note (key of temperament) when a
non-Equal temperament is selected.
C P23
The above default settings can be overridden using the Startup Settings
function.
Basic Settings will remain eective until the power is turned o.
18
Adjustments & Settings
Settings
Dual
▋ Layering sounds from dierent SOUND buttons
1. Select the desired sound used for two SOUND button categories.
2. Press and hold the SOUND button, then press another SOUND button to layer two sounds together.
P11
Sounds
Example:
To layer “Upright Piano | Classic” and “Slow Strings”:
1. Select “Upright Piano | Classic” for the [PIANO] button, and
“Slow Strings” for the [OTHERS] button.
2. Press and hold the [PIANO] button, then press the [OTHERS]
button.
• The combination can be changed by pressing and holding the
main SOUND button and pressing another SOUND button.
• Press one of the SOUND buttons to restore normal operation.
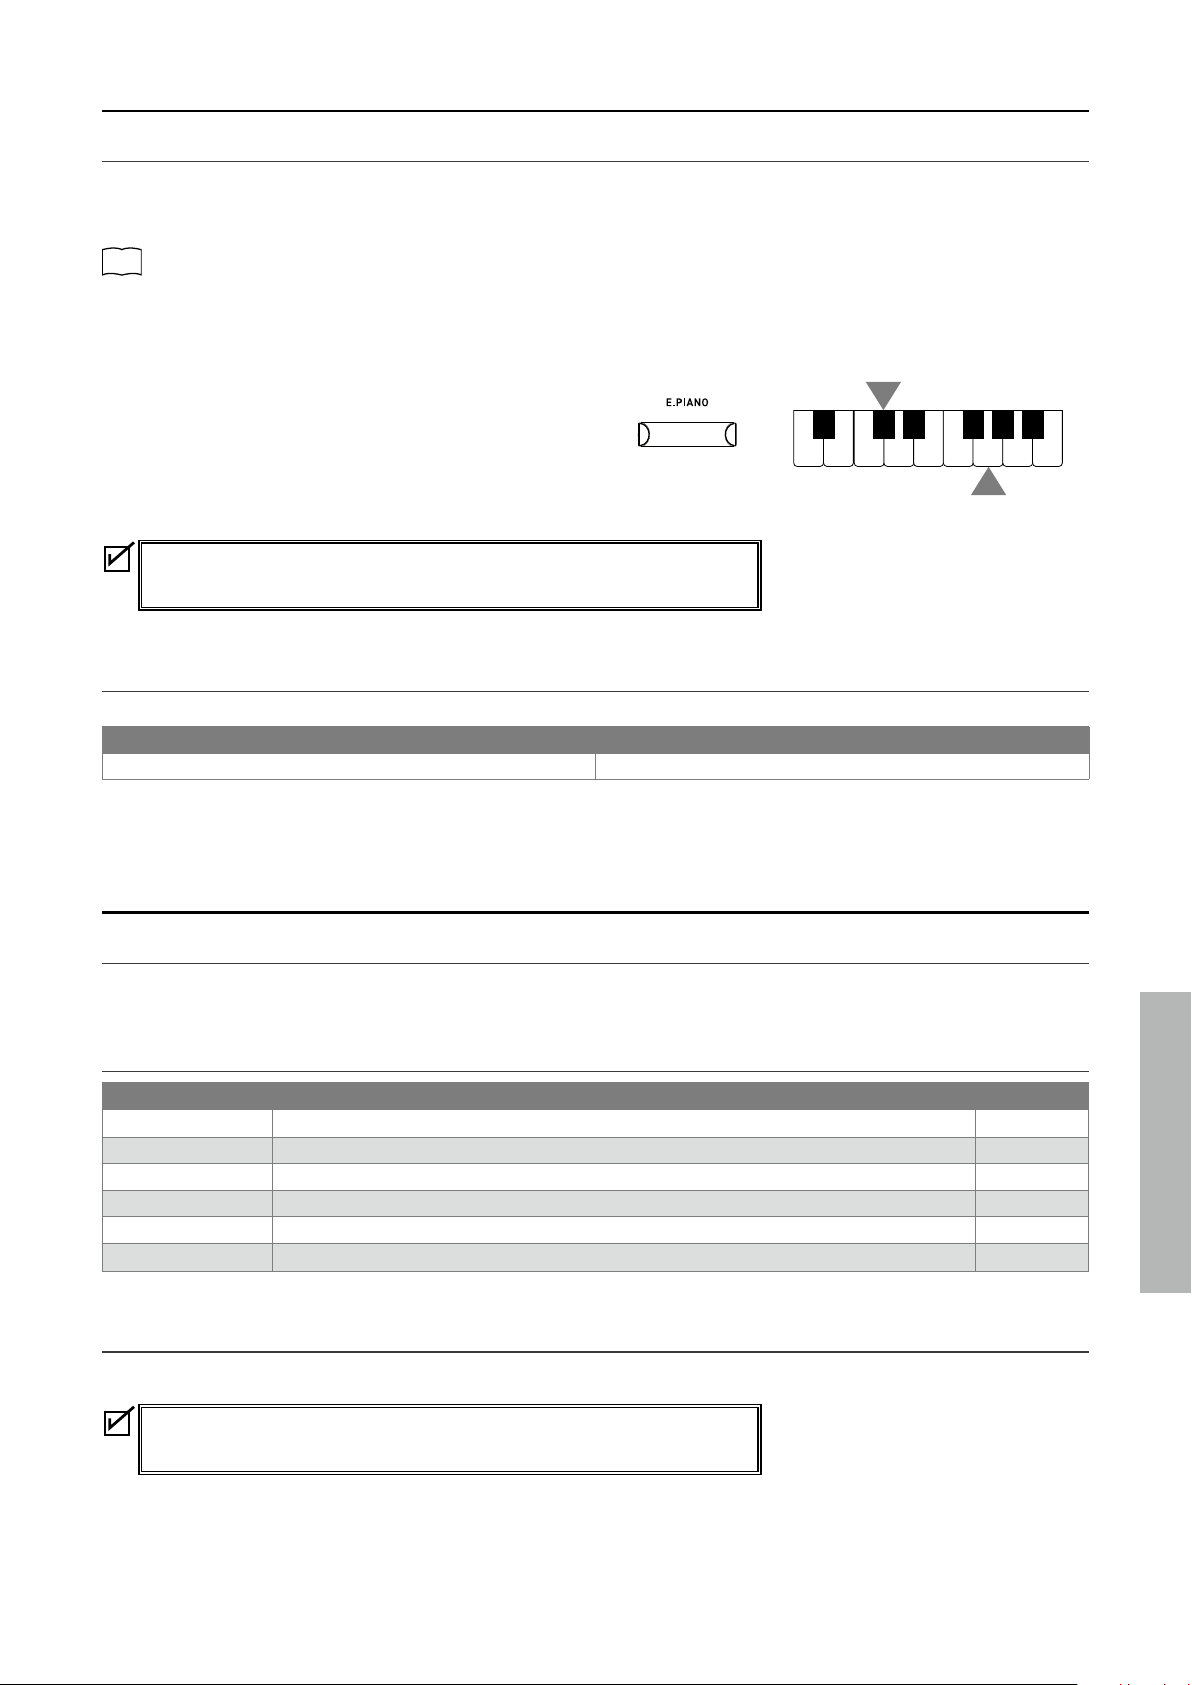
▋ Layering sounds from the same SOUND button
Press and hold the SOUND category button, and:
1. Press A#0.
2. Press the two keys that correspond to the two desired sounds.
P11
Sounds
Example:
To layer “Slow Strings” and “Wood Bass”, press and hold the [OTHERS] button, and:
1. Press A#0.
2. Press A0 and E1.
• Press one of the SOUND buttons to restore normal operation.
▋ Adjusting the layered sound volume balance
Press and hold a SOUND button and press keys F#1 and G#1 to adjust the volume balance between two sounds.
F#1 G#1
Dierent SOUND buttons
The volume of the sound assigned to the SOUND
button on the left increases.
The volume of the sound assigned to the SOUND
button on the right increases.
Same SOUND button
The volume of the sound assigned to the lower
section increases.
The volume of the sound assigned to the upper
section increases.
Press and hold a SOUND button and press D#1 to reset the balance.
2
Hold
“Upright Piano | Classic”
“Slow Strings”
1
A0
B0
C1
D1
E1
F1
G1
A1
B1
♯
D
1
C
1
♯
F
♯
1
G
♯
1
A
♯
1
A
0
♯
1
22
Hold
19
Adjustments & Settings
Settings
Split
▋ Selecting a sound
Select a sound for the upper section. Press and hold the SOUND button for the lower section and:
1. Press C#1.
2. Press a key that is in the range to where the selected sound should be assigned.
P11
Sounds
Example:
To assign “SK-EX Concert Grand Piano | Concert” to the upper section and “Church Organ” to the lower section, rst select “SK-EX Con-
cert Grand Piano | Concert”, then press and hold the [E.PIANO] button, and:
1. Press C#1.
2. Press G1.
• Press one of the SOUND buttons to restore normal operation.
• By default, the lower section will be set to the “Wood Bass”
sound.
• The split point is set to C4 and cannot be changed. C4 is the lowest note in the
upper section.
▋ Adjusting the volume balance
Press and hold a SOUND button and press keys F#1 and G#1 to adjust the volume balance between two sounds.
F#1 G#1
The volume of the sound assigned to the lower section increases. The volume of the sound assigned to the upper section increases.
Press and hold a SOUND button and press D#1 to reset the balance.
Reverb
▋ Turning Reverb on/o
Press and hold a SOUND button, then press C#2 to turn Reverb o or D#2 to turn Reverb on.
▋ Reverb types
Type Description Key
Room Simulates the reverberation of a performance in a small rehearsal room. C2
Lounge Simulates the reverberation of a performance in a piano lounge. D2
Small Hall Simulates the reverberation of a performance in a small hall. E2
Concert Hall Simulates the reverberation of a performance in a large concert hall for classical music. F2
Live Hall Simulates the reverberation of a performance in a large hall for live music performance. G2
Cathedral Simulates the reverberation of a performance in a large cathedral. A2
▋ Reverb setting
Press and hold a SOUND button, then press the key corresponding to the desired Reverb type.
If reverb is turned o, it will be turned on automatically upon selecting a reverb
type.
Hold
A0
B0
C1
D1
E1
F1
G1
A1
B1
♯
D
1
C
1
♯
F
♯
1
G
♯
1
A
♯
1
A
0
♯
1
2
20
Adjustments & Settings
Settings
Damper Resonance
▋ Damper Resonance types
Type Description Key
O Turns damper resonance o. C3
Small Sets the volume of the resonance to low. D3
Medium Sets the volume of the resonance to medium. E3
Large Sets the volume of the resonance to high. F3
▋ Damper Resonance setting
Press and hold a SOUND button, then press the key corresponding to the desired Damper Resonance type.
The Damper Resonance eect will only be applied to the [PIANO] sound button sounds.
Brilliance
▋ Adjusting the Brilliance level
Press and hold a SOUND button, then press F#3 or G#3 to decrease or increase the Brilliance level, or C#3 to turn Brilliance o.
The Brilliance level can be adjusted in the range between -10 and +10.
Voicing
▋ Voicing types
Type Description Key
Normal Normal setting. C4
Mellow Setting to produce a softer tone by softening the hammers. D4
Dynamic Setting to produce a dynamic tone from soft to bright according to the touch of keys. E4
Bright Setting to produce a brighter tone by hardening the hammers. F4
▋ Voicing setting
Press and hold a SOUND button, then press the key corresponding to the desired Voicing type.
Touch Curve
▋ Touch Curve types
Type Description Key
O Maintains the same volume regardless of the strength of the touch. C#4
Normal Reproduces the standard touch sensitivity of an acoustic piano. F#4
Light Maintains even sound for light touch. G#4
Heavy Maintains soft and even sound. A#4
▋ Touch Curve setting
Press and hold a SOUND button, then press the key corresponding to the desired Touch Curve type.
21
Adjustments & Settings
Settings
Fall-back Noise
▋ Fall-back Noise types
Type Description Key
O Turns fall-back noise o. A4
Normal Normal setting. B4
Small Sets the volume of the fall-back noise to low. C5
Large Sets the volume of the fall-back noise to high. D5
▋ Fall-back Noise setting
Press and hold a SOUND button, then press the key corresponding to the desired Fall-back Noise type.
The Fall-Back Noise eect will only be applied to the [PIANO] sound button sounds.
Damper Noise
▋ Damper Noise types
Type Description Key
O Turns damper noise o. F5
Normal Normal setting. G5
Small Sets the volume of the damper noise to low. A5
Large Sets the volume of the damper noise to high. B5
▋ Damper Noise setting
Press and hold a SOUND button, then press the key corresponding to the desired Damper Noise type.
The Damper Noise eect will only be applied to the [PIANO] sound button sounds.
Eects
▋ Eects types
Type Description Eective sound
Mono Delay This eect adds a mountain-like echo to the sound. Piano sound
String Ensemble
Ping Delay This eect echoes the sound alternately left and right. Choir
Triple Delay This eect echoes the sound in the order of center, right, and left. Church Organ
Diapason
Harpsichord
Chorus This eect expands the sound by matching the original sound with a sound that
has pitch uctuations.
Slow Strings
Wood Bass
Electric Bass
Wood Bass & Ride
Classic Chorus This eect reproduces the chorus of yesteryear by digital signal processing. Modern Electric Piano
New Age Pad
Tremolo This eect gives uctuations to the volume. Vibraphone
Classic Tremolo This eect reproduces the tremolo of yesteryear by digital signal processing. Reed Electric Piano
Reed Electric Piano 2
Classic Auto Pan This eect reproduces the sound of famous antique instruments by periodically
changing the position of the sound source.
Tine Electric Piano
Rotary This eect reproduces the change in sound caused by the rotary speaker. Jazz Organ
Blues Organ
22
Adjustments & Settings
Settings
▋ Turning Eects on and o
Press and hold a SOUND button, then press C#6 to turn Eects o or press D#6 to turn Eects on.
Smart Mode
▋ Smart Mode settings
Type Description Key
Normal Smart Mode default setting. C7
Noiseless Setting to minimise additional damper and string resonance, and mechanism noises
when keys are released.
D7
Deep Resonance Setting to emphasise damper pedal resonance and string resonance. E7
Light Resonance Setting to reduce damper pedal resonance and string resonance. F7
Soft Setting to produce a softer tone by softening the hammers and increasing the touch
weight of the keyboard, which is suitable for slow, quiet pieces.
G7
Brilliant Setting to produce a brighter tone including damper resonance by hardening the ham-
mers, which is suitable for cheerful and elegant pieces or songs requiring good reso-
nance.
A7
Clean Setting to reduce resonance by hardening the hammers and lightening the touch of keys. C#7
Full Setting to emphasise noises and resonance by increasing the sensitivity of the hammers,
which is suitable for dynamic and powerful pieces.
D#7
Dark Setting to add unique darkness to the tone by hardening the hammers and increasing
the touch weight of keys.
F#7
Rich Setting to emphasise the resonance by increasing the sensitivity of the hammers and
lightening the touch of keys.
G#7
Historical Setting to replicate the tone of a piano used during the Classical and Romantic eras. A#7
▋ Selecting the Smart Mode preset
Press and hold a SOUND button, then press the key corresponding to the desired Smart Mode type.
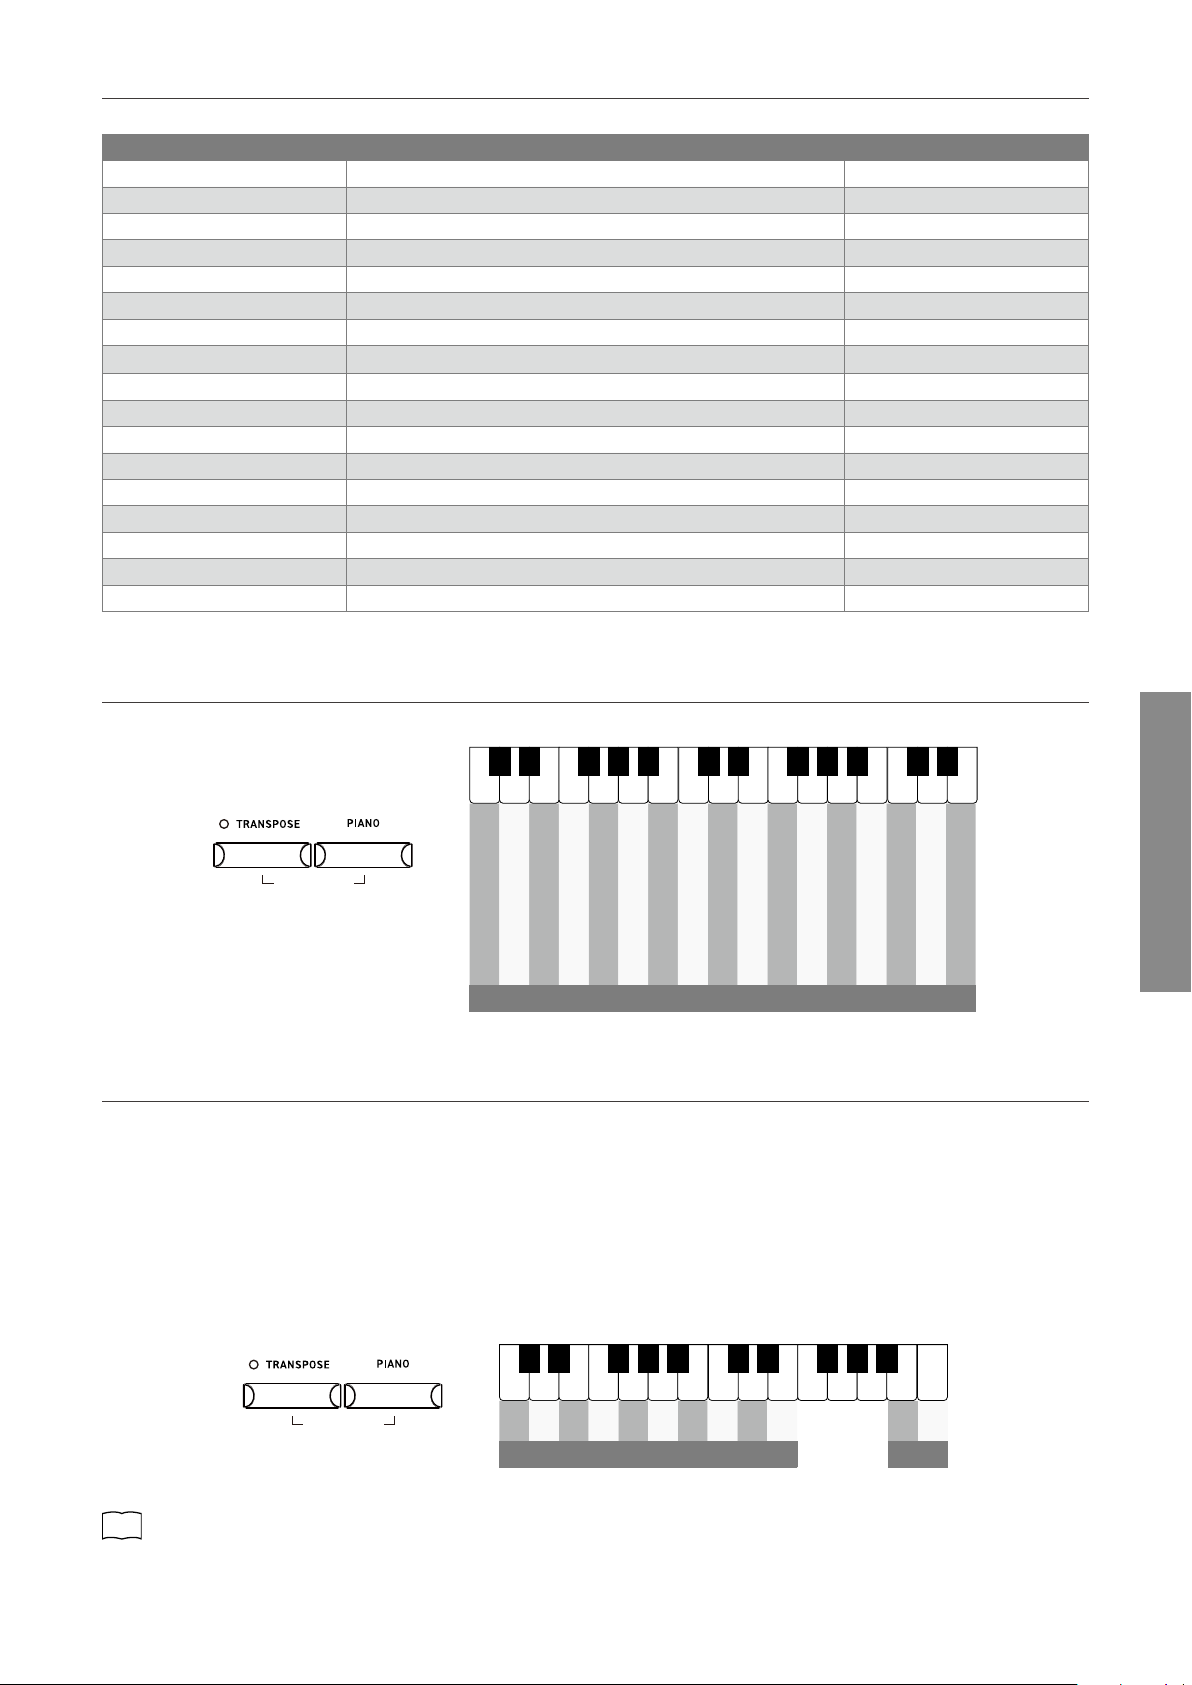
Transpose
▋ Transpose setting
Press and hold the [TRANSPOSE] button, then press the a key 12 notes above or below middle C to set the desired transpose key.
Or press and hold the [TRANSPOSE] button, then press the A0 key to decrease or B0 key to increase the value of the transpose setting.
The Transpose value can be adjusted in the range between -12 and +12 in semi-tone steps.
The LED indicator for the [TRANSPOSE] button will turn on when Transpose is turned on and the value is not set to 0.
P35
Operation Guide
Tuning
▋ Adjusting the pitch
Press and hold the [TRANSPOSE] button, then press F#6 to lower the pitch or G#6 to raise the pitch.
The Tuning pitch can be adjusted in the range from 420.0 Hz to 453 Hz in 0.5 Hz increments.
Press C#6 to restore the Tuning pitch to the default setting of 440.0 Hz.
23
Adjustments & Settings
Settings
Temperament
▋ Temperament types
Type Description Key
Equal Temperament
(Equal)
The most common tuning system for modern pianos. This allows consistent harmonies
regardless of modulations and transpositions.
C6
Pure Temperament
(Pure Major)
The tuning system that eliminated impurity from the most important third and fth
intervals. Therefore, third and fth sound pure; however, other intervals may sound
impure.
Use this system by specifying the tonic of the piece to be played.
D6
Pure Temperament
(Pure Minor)
E6
Pythagorean Temperament
(Pythagorean)
The tuning system that eliminated impurity from most of fth intervals. Although
chords sound impure due to the impurity in third intervals, the system brings out the
character of melodies.
F6
Meantone Temperament
(Meantone)
The tuning system that incorporated slight impurity in fth intervals in order to elim-
inate impurity from the most important major third intervals. This system was com-
monly used for early keyboard music.
G6
Werckmeister Temperament
(Werckmeister)
This tuning system makes keys with fewer key signatures sound closer to the Mean-
tone Temperament which produces chords purer, and keys with more key signatures
sound closer to the Pythagorean Temperament which brings out the character of mel-
odies. This reects the “character of keys” intended by the classical composers.
A6
Kirnberger Temperament
(Kirnberger)
B6
▋ Temperament settings
Press and hold a [TRANSPOSE] button, then press the key corresponding to the desired Temperament type.
Temperament Key
▋ Selecting the Temperament Key
Press and hold a [TRANSPOSE] button, then press the key corresponding to the desired Temperament Key.
The Temperament Key can be specied in the range from C to B.
P35
Operation Guide
Phones/Speaker Settings
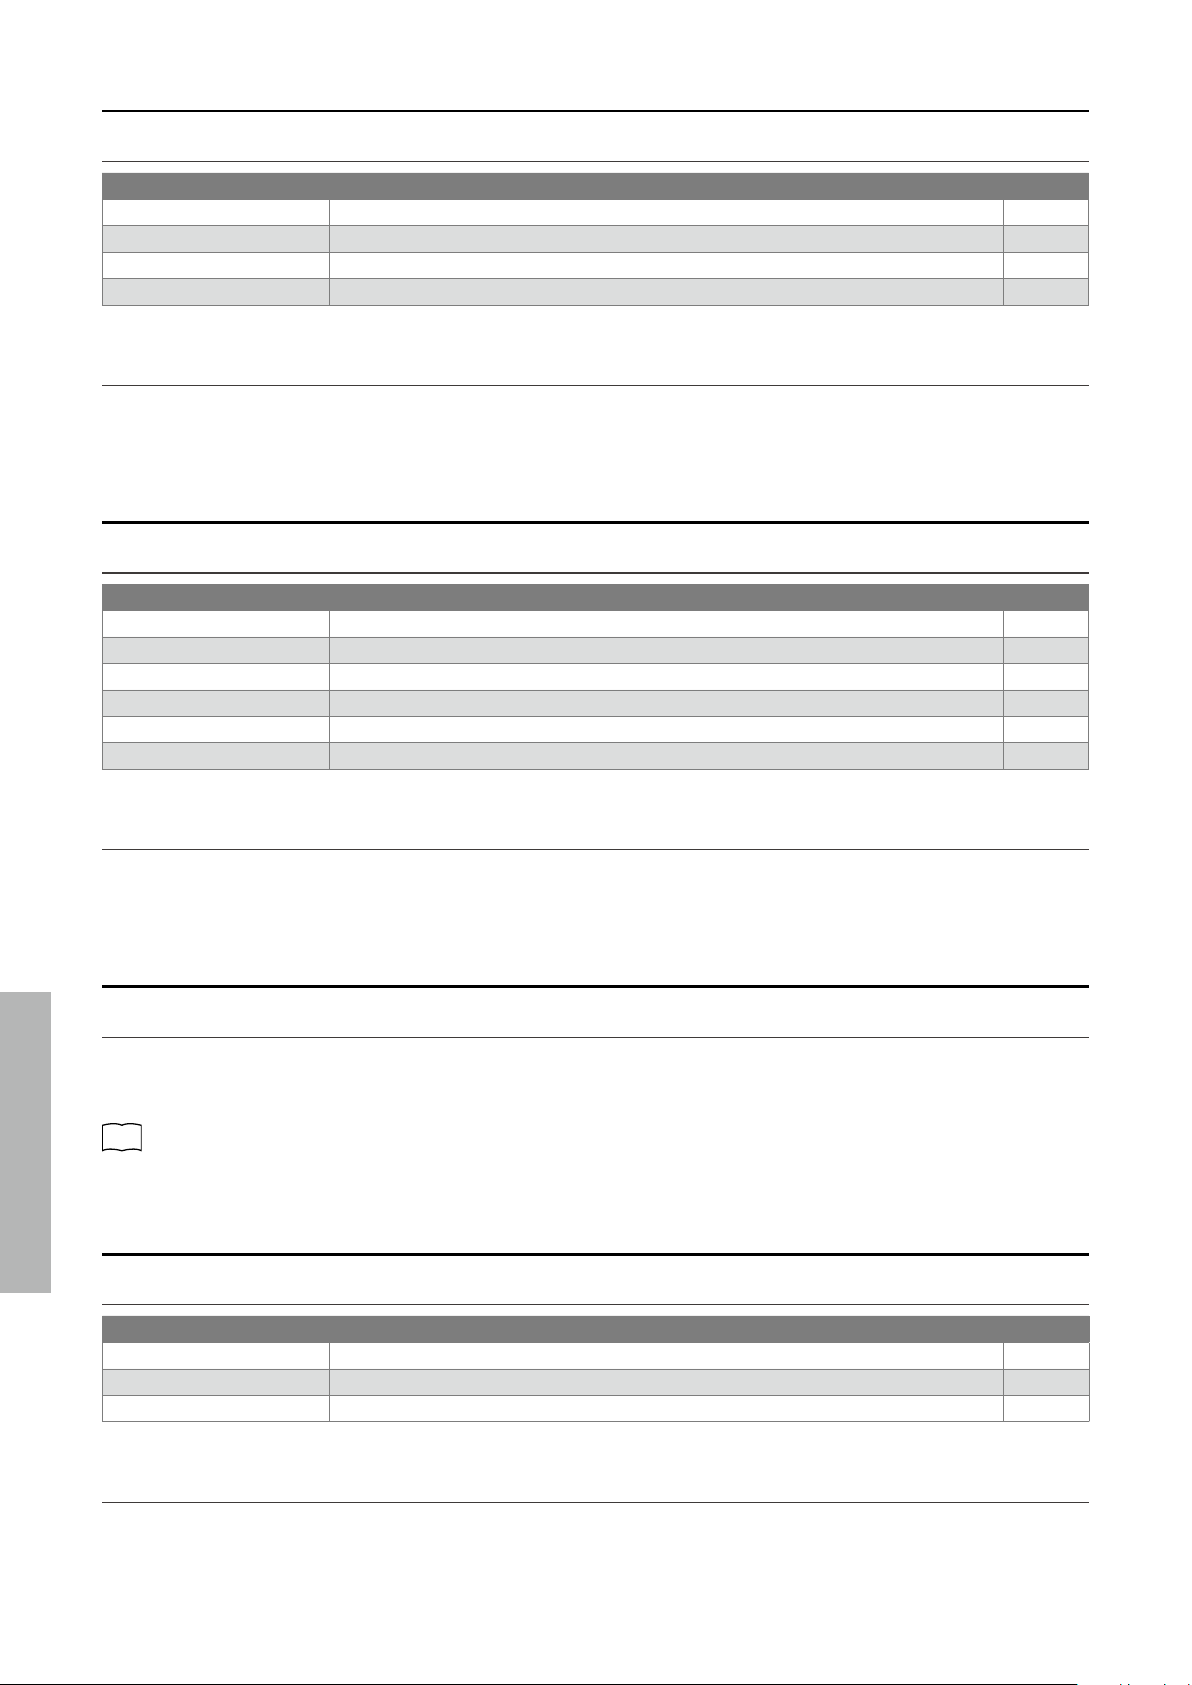
▋ Phones/Speaker Settings types
Type Description Default setting Page
Spatial Headphone Sound This setting is a feature that enhances the depth and realism of the
acoustic piano sound through earphones or headphones. This feature
also reduces auditory discomfort and fatigue when using headphones
or earphones for extended periods of time.
Normal P24
Phones Type This setting optimises the sound of the instrument when listening
through dierent types of headphones or earphones.
Normal P24
Low Volume Balance This setting enhances pianissimo touches, allowing the piano to be
played more naturally when the [MASTER VOLUME] slider is set to a low
level.
3 P24
Speaker EQ This setting optimizes the sound quality of the speaker system accord-
ing to the position of the instrument.
Normal P24
Speaker On/O This setting turns the internal speakers on and o. This setting may be
useful when the internal speakers are no longer required, because the
instrument is connected to an external speaker or amplier system via
the [LINE OUT] jacks.
On P25
24
Adjustments & Settings
Settings
Spatial Headphone Sound
▋ Spatial Headphone Sound types
Type Description Key
O Disables the Spatial Headphone Sound feature. C#5
Forward Provides front focused, somewhat narrow spatial positioning. F#5
Normal Provides naturally balanced spatial positioning that is neither forward nor wide. G#5
Wide Provides wide, very open spatial positioning. A#5
▋ Spatial Headphone Sound setting
Press and hold the [FUNCTION] button, then press the key corresponding to the desired Spatial Headphone Sound type.
Phones Type
▋ Phones type types
Type Description Key
Normal Disables the headphone optimisation. C5
Open Optimises the sound for open-type headphones. D5
Semi-Open Optimises the sound for semi-open type headphones. E5
Closed Optimises the sound for closed-type headphones. F5
Inner-ear Optimises the sound for inner-ear type headphones. G5
Canal Optimises the sound for canal-type headphones. A5
▋ Phones Type setting
Press and hold the [FUNCTION] button, then press the key corresponding to the desired Phones type.
Low Volume Balance
▋ Low Volume Balance setting
Press and hold the [FUNCTION] button, then press the key corresponding to the desired Low Volume Balance type.
The Low Volume Balance setting can be specied in the range from 1 to 5, or set to “O”.
Increasing the value will enhance the sound of pianissimo touches when the volume is set to a reduced level.
P35
Operation Guide
Speaker EQ
▋ Speaker EQ types
Type Description Key
O Turns Speaker EQ o. Optimum setting for connecting to the [LINE OUT] jack. F#6
Normal Optimum setting for placing on a stand. G#6
Table Optimum setting for placing on a table. A#6
▋ Speaker EQ setting
Press and hold the [FUNCTION] button, then press the key corresponding to the desired Speaker EQ type.
25
Adjustments & Settings
Settings
Speaker On/O
▋ Speaker On/O types
Type Description Key
O Turns o the internal speakers. C#7
On Turns on the internal speakers. D#7
▋ Turning the speakers on/o
Press and hold the [FUNCTION] button, then press C#7 to turn the internal speakers o or D#7 to turn the internal speakers on.
Power/Memory Settings
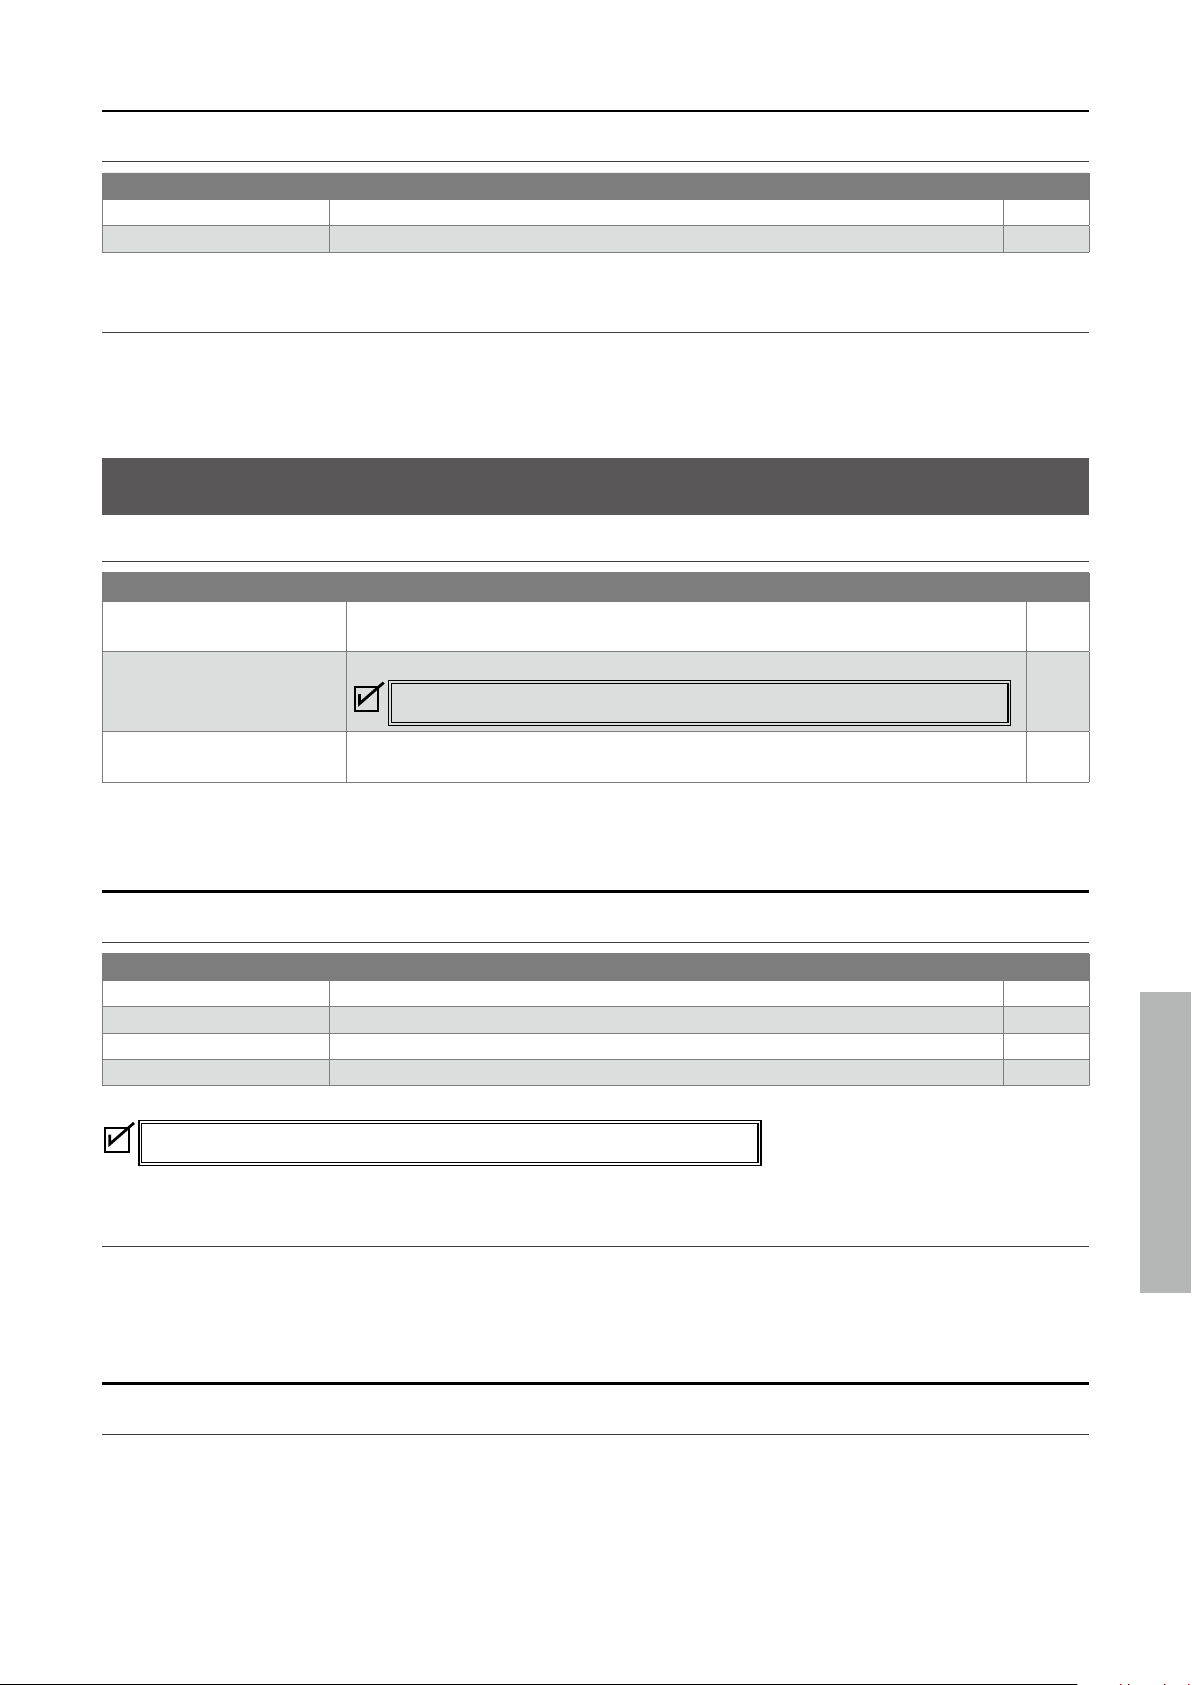
▋ Power/memory setting types
Type Description Page
Auto Power O This function can be used to automatically turn o the power after a specied period of
inactivity.
P25
Factory Reset This function restores the instrument back to its factory default conguration.
Recorded songs and registration memories will not be initialized.
P25
Startup Settings This function allows preferred settings to be stored in memory, and automatically re-
called as the default settings every time the instrument is turned on.
P26
Auto Power O
▋ Auto Power O types
Type Description Key
O Disables Auto Power O. G7
15 min. Turns o the power after 15 minutes of inactivity. A7
60 min. Turns o the power after 60 minutes of inactivity. B7
120 min. Turns o the power after 120 minutes of inactivity. C8
This setting will be stored to Startup Settings automatically.
▋ Auto Power O setting
Press and hold the [FUNCTION] button, then press the key corresponding to the desired Auto Power O type.
Factory Reset
▋ Executing the Factory Reset
Press and hold the [FUNCTION] button and press G#7.
The LED indicator for the [FUNCTION] button will ash while executing the Factory Reset.
The LED indicators will turn o when reset is complete.
26
Adjustments & Settings
Settings
Startup Settings
▋ Settings stored in Startup Settings
• Sound settings • Metronome settings • Reverb and Eects settings for each sound
• Basic Settings • Phones/Speaker Settings • Bluetooth settings • MIDI Settings
▋ Executing the Startup Settings
While the instrument is set to the desired settings, press and hold the [FUNCTION] button, then press A#7.
The LED indicator for the [FUNCTION] button will ash while storing Startup Settings.
The LED indicators will turn o when Startup Settings storing is complete.
Bluetooth Settings
Availability of Bluetooth function dependent on market location.
▋ Bluetooth types and connection methods
Type Description Connection method
Bluetooth MIDI When using a smart device app that supports
Bluetooth MIDI, this function allows the instru-
ment to be controlled by an app, or send/receive
MIDI data wirelessly.
Enable the smart device’s Bluetooth function, launch an
app that supports Bluetooth MIDI, then select “ES120”
from the app’s connection setting screen. The LED indi-
cator for the [BLUETOOTH] button will turn on when a
Bluetooth MIDI application is connected.
Bluetooth Audio This function allows audio from the connected
smart device (such as songs, videos, etc.) to be
played through the instrument’s speakers wire-
lessly.
Enable the smart device’s Bluetooth function, then se-
lect “ES120 Audio” from the device’s Bluetooth connec-
tion setting screen. If not displayed, press and hold the
[BLUETOOTH] button until its LED indicator starts ash-
ing. The LED indicator for the [BLUETOOTH] button will
turn on when a smart device is successfully paired.
After pairing successfully, the instrument will automat-
ically reconnect to the smart device when the power is
turned on.
• For more detailed instructions regarding Bluetooth pairing, please refer to the supplementary Bluetooth® Connectivity
Guide manual, available from the Kawai Global website: https://www.kawai-global.com/support/manual/
• Only one smart device can be connected to the piano’s Bluetooth MIDI or Bluetooth audio at a time.
• If pairing has been unsuccessful, press the [BLUETOOTH] button to stop the LED indicator ashing.
▋ Bluetooth On/O setting
If the LED indicator for the [BLUETOOTH] button turns o when the button is pressed, Bluetooth is o. Press and hold the [BLUE-
TOOTH] button until the LED turns on to turn on Bluetooth.
If the LED indicator for the [BLUETOOTH] button turns on when the button is pressed, Bluetooth is on. Press and hold the [BLUE-
TOOTH] button until the LED turns o to turn o Bluetooth.
The default setting is Bluetooth on.
▋ Check Bluetooth smart device connection status
When the LED indicator for the [BLUETOOTH] button is turned on, a smart device is connected. When the LED indicator for the [BLUE-
TOOTH] button is turned o, a smart device is not connected.
▋ Adjusting the Bluetooth Audio Volume
This setting allows the volume of the Bluetooth Audio playback to be adjusted. After rst adjusting the playback volume on the smart
device or using the instrument’s [MASTER VOLUME] slider, this setting may be used to further adjust the playback volume.
Press and hold the [BLUETOOTH] button, then press the A0 key to decrease the Bluetooth Audio volume or the B0 key to increase the
volume.
The Bluetooth Audio volume can be adjusted in the range from -15 to +15. The default setting is 0.
27
Appendix
Troubleshooting
Troubleshooting
▋ Power (Settings)
Problem Possible Cause and Solution Page
The instrument does not turn
on.
Check to see if the main connector of this instrument, AC adaptor, and power outlet
are properly connected.
P10
The instrument turned itself
o all of a sudden.
The instrument turned o by
itself.
Check to see if the “Auto Power O” function is not enabled. P25
▋ Sound/Performance
Problem Possible Cause and Solution Page
No sound is coming out. • Check to see whether the volume has been set to the lowest level.
• Check to see whether a pair of headphones or a headphone conversion plug have
been connected to the [PHONES] jacks.
• Check to see whether the Speaker setting has been set to “o”.
• Check to see whether the Local Control of MIDIsetting has been set to “o”.
P10
P25
Sounds get distorted in certain
performances or at specic
ranges.
For some performances, increasing the volume may cause the sound to be distorted.
If this happens, reduce the volume.
P10
The pitch or sound quality of
certain piano tones is odd.
The built-in piano tones are designed to reproduce the tones created by an acoustic
grand piano as accurately as possible. Since the pianos produce a rich variety of reso-
nance, the way the sound is perceived changes depending on the location or environ-
ment. The way the sound is perceived also changes when a single key is pressed and
when the same key is pressed in the ow of a song. For this reason, strong overtones
may be heard in some ranges, or the pitch and sound quality may seem odd.
But this is normal.
The high frequency notes
sustain longer even when the
damper pedal is not pressed.
This is normal.
The highest keys on an acoustic piano (shown below) are not equipped with dampers.
This instrument replicates this behaviour precisely and allows the sound of the keys
without dampers to sustain longer even when the damper pedal is not pressed.
C6
D6
E6
F6
G6
A6
B6
C7
D7
E7
F7
G7
A7
B7
C8
♯
D
6
C
6
♯
F
♯
6
G
♯
6
A
♯
6
♯
D
7
C
7
♯
F
♯
7
G
♯
7
A
♯
7
No damper is attached
The pedal does not work at
all, or it does not produce the
same eect each time.
Check to see if the pedal cable is properly connected to the instrument. Even when
they are connected, try unplugging the cable and inserting it again to make sure.
P9
▋ Connection
Problem Possible Cause and Solution Page
The instrument is unable to
connect to a smart device.
• Check to see if the instrument’s Bluetooth function is enabled.
• Use the application’s settings to connect, instead of the Bluetooth setting of the smart
device.
P26
Connection fails for the
paired smart device.
If the connection gets cut o immediately after pairing, turn o the Bluetooth setting on
the smart device and turn it back on, then try connecting the device again.
P26
The name of the piano does
not appear in the smart
device.
It’s possible that another device is connected to the piano’s Bluetooth MIDI/Bluetooth
Audio. Press and hold the [BLUETOOTH] button until its LED indicator starts ashing to
unpair the device.
P26
Unable to send recorded per-
formance of built-in songs.
Recorded performances of built-in songs will not output from Bluetooth MIDI.
28
Appendix
Connecting to Other Devices
Connecting to Other Devices
Smart device
Computer
Amplier, speaker
Cable hook
• Turn o both this instrument and the given device before connecting to another device.
Devices can be damaged if they are connected while the power is on.
• The protection circuit of the instrument’s amplier may stop the sound output in certain circumstances.
Restart the instrument and reset the protection circuit of the amplier if the sound stops.
• The Phones Type and Spatial Headphone Sound eects will be applied to the sound output from the [LINE OUT] of the
instrument.
Phones Type and Spatial Headphone Sound can be turned o.
Also, both Speaker EQ and Speaker On/O can be turned o to optimize the sound quality when using the [LINE OUT] jack.
P23
Phones/Speaker Settings
29
Appendix
Connecting to Other Devices
▋ USB drivers
For exchanging data between this digital piano and a computer via USB connection, the software (USB-MIDI driver) for the digital pi-
ano to function properly must be installed in the computer. On most modern operating systems, this driver software will be installed
automatically, and additional drivers will not be required.
The USB-MIDI driver to use is dierent depending on the computer’s operating system. For more information, please visit the Kawai
Global website:
https://www.kawai-global.com/support/manual
▋ Smart devices
This product supports connection to smart devices and allows players to use applications designed for the instrument.
Before using this feature, please check the latest information on the supported applications and operating environment, which is
available from the Kawai Global website:
https://www.kawai-global.com/support
▋ Precautions for using USB
When connecting the digital piano to a computer with a USB cable, insert the USB cable rst and then turn on the digital piano.
After connecting the digital piano to a computer via USB, it may take some time to establish communication between them.
If communication becomes unstable on the connection between the digital piano and the computer through a USB hub, connect
the USB cable directly to one of the computer’s USB ports.
Powering on/o the digital piano or plugging/unplugging the USB cable during any of the following situations may cause the
computer or digital piano to exhibit unstable behaviour:
- while installing the driver
- while restarting the computer
- while the MIDI application is running
- while communicating with the computer
- while the computer is in energy-saver mode
Depending on the settings of the computer, the USB function may not work as intended. Please read the owner’s manual of the
computer and adjust the settings accordingly.
30
Appendix
Drum Rhythm List
Drum Rhythm List
No. Rhythm Name
1 8 Beat 1
2 8 Beat 2
3 8 Beat 3
4 16 Beat 1
5 16 Beat 2
6 16 Beat 3
7 16 Beat 4
8 16 Beat 5
9 16 Beat 6
10 Rock Beat 1
11 Rock Beat 2
12 Rock Beat 3
13 Hard Rock
14 Heavy Beat
15 Surf Rock
16 2nd Line
17 50 Ways
18 Ballad 1
19 Ballad 2
20 Ballad 3
21 Ballad 4
22 Ballad 5
23 Light Ride 1
24 Light Ride 2
25 Smooth Beat
26 Rim Beat
27 Slow Jam
28 Pop 1
29 Pop 2
30 Electro Pop 1
31 Electro Pop 2
32 Ride Beat 1
33 Ride Beat 2
34 Ride Beat 3
35 Ride Beat 4
36 Slip Beat
37 Jazz Rock
38 Funky Beat 1
39 Funky Beat 2
40 Funky Beat 3
41 Funk 1
42 Funk 2
43 Funk 3
44 Funk Shue 1
45 Funk Shue 2
46 Buzz Beat
47 Disco 1
48 Disco 2
49 Hip Hop 1
50 Hip Hop 2
No. Rhythm Name
51 Hip Hop 3
52 Hip Hop 4
53 Techno 1
54 Techno 2
55 Techno 3
56 Heavy Techno
57 8 Shue 1
58 8 Shue 2
59 8 Shue 3
60 Boogie
61 16 Shue 1
62 16 Shue 2
63 16 Shue 3
64 T Shue
65 Triplet 1
66 Triplet 2
67 Triplet 3
68 Triplet 4
69 Triplet Ballad 1
70 Triplet Ballad 2
71 Triplet Ballad 3
72 Motown 1
73 Motown 2
74 Ride Swing
75 H.H. Swing
76 Jazz Waltz 1
77 Jazz Waltz 2
78 5/4 Swing
79 Fast 4 Beat
80 H.H. Bossa Nova
81 Ride Bossa Nova
82 Beguine
83 Mambo
84 Cha Cha
85 Samba
86 Light Samba
87 Surdo Samba
88 Latin Groove
89 Afro Cuban
90 Songo
91 Bembe
92 Merenge
93 Reggae
94 Tango
95 Habanera
96 Waltz
97 Ragtime
98 Country & Western
99 March
100 6/8 March
31
Appendix
Information about Adaptor Specications
Information about Adaptor Specications
This adapter specication table conforms to the requirements of EU Commission Regulation (EU)
2019/1782.
Adaptor Type
PS-129 PS-154 PS-241 PS-242
Manufacturer’s trademark KAWAI KAWAI KAWAI KAWAI
Model identier PS-129 PS-154 PS-241 PS-242
Input voltage 230 V 230 V 230 V 230 V
Input AC frequency 50 Hz 50 Hz 50 Hz 50 Hz
Output voltage 12.0 V 15.0 V 24.0 V 24.0 V
Output current 2.0 A 4.0 A 6.2 A 5.0 A
Output power 24.0 W 60.0 W 150.0 W 120.0 W
Average active eciency 90.38% 90.17% 90.41% 91.55%
Eciency at low load (10%) 85.71% 85.13% 78.62% 88.84%
No-load power consumption 0.061 W 0.200W 0.135 W 0.020 W
32
Appendix
EU Declaration of Conformity
SV
Swedish
FÖRENKLAD EU-FÖRSÄKRAN OM ÖVERENSSTÄMMELSE
Härmed försäkrar Kawai Europa GmbH att denna typ av radioutrustning [ ES120 ] överensstämmer med direktiv 2014/53/EU.
Den fullständiga texten till EU-försäkran om överensstämmelse finns på följande webbadress:
https://www.kawai-global.com/
Slovenian
FI
Finnish
YKSINKERTAISTETTU EU-VAATIMUSTENMUKAISUUSVAKUUTUS
Kawai Europa GmbH vakuuttaa, että radiolaitetyyppi [ ES120 ] on direktiivin 2014/53/EU mukainen. EU-
vaatimustenmukaisuusvakuutuksen täysimittainen teksti on saatavilla seuraavassa internetosoitteessa:
SK
Slovak
ZJEDNODUŠENÉ EÚ VYHLÁSENIE O ZHODE
Kawai Europa GmbH týmto vyhlasuje, že rádiové zariadenie typu [ ES120 ] je v súlade so smernicou 2014/53/EÚ.
Úplné EÚ vyhlásenie o zhode je k dispozícii na tejto internetovej adrese:
SL
POENOSTAVLJENA IZJAVA EU O SKLADNOSTI
Kawai Europa GmbH potrjuje, da je tip radijske opreme [ ES120 ] skladen z Direktivo 2014/53/EU.
Celotno besedilo izjave EU o skladnosti je na voljo na naslednjem spletnem naslovu:
Portuguese
RO
Romanian
DECLARAȚIA UE DE CONFORMITATE SIMPLIFICATĂ
Prin prezenta, Kawai Europa GmbH declară că tipul de echipamente radio [ ES120 ] este în conformitate cu Directiva 2014/53/UE.
Textul integral al declarației UE de conformitate este disponibil la următoarea adresă internet:
PL
Polish
UPROSZCZONA DEKLARACJA ZGODNOŚCI UE
Kawai Europa GmbH niniejszym oświadcza, że typ urządzenia radiowego [ ES120 ] jest zgodny z dyrektywą 2014/53/UE.
Pełny tekst deklaracji zgodności UE jest dostępny pod następującym adresem internetowym:
PT
DECLARAÇÃO UE DE CONFORMIDADE SIMPLIFICADA
O(a) abaixo assinado(a) Kawai Europa GmbH declara que o presente tipo de equipamento de rádio [ ES120 ] está em conformidade com a Diretiva 2014/53/
UE. O texto integral da declaração de conformidade está disponível no seguinte endereço de Internet:
Maltese
NL
Dutch
VEREENVOUDIGDE EU-CONFORMITEITSVERKLARING
Hierbij verklaar ik, Kawai Europa GmbH, dat het type radioapparatuur [ ES120 ] conform is met Richtlijn 2014/53/EU. De
volledige tekst van de EU-conformiteitsverklaring kan worden geraadpleegd op het volgende internetadres:
HU
Hungarian
EGYSZERŰSÍTETT EU-MEGFELELŐSÉGI NYILATKOZAT
Kawai Europa GmbH igazolja, hogy a [ ES120 ] típusú rádióberendezés megfelel a 2014/53/EU irányelvnek.
Az EU-megfelelőségi nyilatkozat teljes szövege elérhető a következő internetes címen:
MT
DIKJARAZZJONI SSIMPLIFIKATA TA' KONFORMITÀ TAL-UE
B'dan, Kawai Europa GmbH, niddikjara li dan it-tip ta' tagħmir tar-radju [ ES120 ] huwa konformi mad-Direttiva 2014/53/UE. It-
test kollu tad-dikjarazzjoni ta' konformità tal-UE huwa disponibbli f'dan l-indirizz tal-Internet li ġej:
Latvian
LT
Lithuanian
SUPAPRASTINTA ES ATITIKTIES DEKLARACIJA
Aš, Kawai Europa GmbH, patvirtinu, kad radijo įrenginių tipas [ ES120 ] atitink
a Direktyvą 2014/53/ES. Visas
ES atitikties deklaracijos tekstas prieinamas šiuo interneto adresu:
IT
Italian
DICHIARAZIONE DI CONFORMITÀ UE SEMPLIFICATA
Il fabbricante, Kawai Europa GmbH, dichiara che il tipo di apparecchiatura radio [ ES120 ] è conforme alla direttiva 2014/53/UE. Il
testo completo della dichiarazione di conformità UE è disponibile al seguente indirizzo Internet:
LV
VIENKĀRŠOTA ES ATBILSTĪBAS DEKLARĀCIJA
Ar šo Kawai Europa GmbH deklarē, ka radioiekārta [ ES120 ] atbilst Direktīvai 2014/53/ES. Pilns
ES atbilstības deklarācijas teksts ir pieejams šādā interneta vietnē:
French
HR
Croatian
POJEDNOSTAVLJENA EU IZJAVA O SUKLADNOSTI
Kawai Europa GmbH ovime izjavljuje da je radijska oprema tipa [ ES120 ] u skladu s Direktivom 2014/53/EU.
Cjeloviti tekst EU izjave o sukladnosti dostupan je na sljede?oj internetskoj adresi:
EN
English
SIMPLIFIED EU DECLARATION OF CONFORMITY
Hereby, Kawai Europa GmbH declares that the radio equipment type [ ES120 ] is in compliance with Directive 2014/53/EU.
The full text of the EU declaration of conformity is available at the following internet address:
FR
DECLARATION UE DE CONFORMITE SIMPLIFIEE
Le soussigné, Kawai Europa GmbH, déclare que l'équipement radioélectrique du type [ ES120 ] est conforme à la directive 2014/53/UE.
Le texte complet de la déclaration UE de conformité est disponible à l'adresse internet suivante:
Estonian
EL
Greek
ΑΠΛΟΥΣΤΕΥΜΕΝΗ ΔΗΛΩΣΗ ΣΥΜΜΟΡΦΩΣΗΣ ΕΕ
Με την παρούσα ο/η Kawai Europa GmbH, δηλώνει ότι ο ραδιοεξοπλισμός [ ES120 ] πληροί την οδηγία 2014/53/ΕΕ.
Το πλήρες κείμενο της δήλωσης συμμόρφωσης ΕΕ διατίθεται στην ακόλουθη ιστοσελίδα στο διαδίκτυο:
DE
German
VEREINFACHTE EU-KONFORMITÄTSERKLÄRUNG
Hiermit erklärt Kawai Europa GmbH, dass der Funkanlagentyp [ ES120 ] der Richtlinie 2014/53/EU entspricht.
Der vollständige Text der EU-Konformitätserklärung ist unter der folgenden Internetadresse verfügbar:
ET
LIHTSUSTATUD ELI VASTAVUSDEKLARATSIOON
Käesolevaga deklareerib Kawai Europa GmbH, et käesolev raadioseadme tüüp [ ES120 ] vastab direktiivi 2014/53/EL nõuetele.
ELi vastavusdeklaratsiooni täielik tekst on kättesaadav järgmisel internetiaadressil:
Czech
DA
Danish
FORENKLET EU-OVERENSSTEMMELSESERKLÆRING
Hermed erklærer Kawai Europa GmbH, at radioudstyrstypen [ ES120 ] er i overensstemmelse med direktiv 2014/53/EU.
EU-overensstemmelseserklæringens fulde tekst kan findes på følgende internetadresse:
ES
Spanish
DECLARACIÓN UE DE CONFORMIDAD SIMPLIFICADA
Por la presente, Kawai Europa GmbH declara que el tipo de equipo radioeléctrico [
ES120 ] es conforme con la Directiva 2014/53/UE.
El texto completo de la declaración UE de conformidad está disponible en la dirección Internet siguiente:
CS
ZJEDNODUŠENÉ EU PROHLÁŠENÍ O SHODĚ
Tímto Kawai Europa GmbH prohlašuje, že typ rádiového zařízení [ ES120 ] je v souladu se směrnicí 2014/53/EU. Úplné
znění EU prohlášení o shodě je k dispozici na této internetové adrese:
EU Declaration of Conformity
BG
Bulgarian
ОПРОСТЕНА ЕС ДЕКЛАРАЦИЯ ЗА СЪОТВЕТСТВИЕ
С настоящото Kawai Europa GmbH декларира, че този тип радиосъоръжение [ ES120 ] е в съответствие с Директива 2014/53/
ЕС. Цялостният текст на ЕС декларацията за съответствие може да се намери на следния интернет адрес:
EU Declaration of Conformity
33
Appendix
Specications
Specications
Keyboard
Responsive Hammer Compact (RHC)
Polyphony max. 192 notes
Sounds 25 sounds
P11
Metronome 1/4, 2/4, 3/4, 4/4, 5/4, 3/8, 6/8 beat + 100 drum rhythms
Internal Recorder 3 songs – approximately 15,000 note memory capacity
Internal Songs Demo Songs: 16 songs
Phones Settings Spatial Headphone Sound (SHS), Phones Type
Bluetooth®
MIDI: Bluetooth (Ver. 5.0 GATT-compatible) / Bluetooth Low Energy MIDI
Specication-compliant
AUDIO: Bluetooth (Ver. 5.1 A2DP-compatible)
Other Functions
Registration Memories, Dual, Split, Reverb, Damper Resonance, Brilliance, Voicing, Touch Curve,
Fall-back Noise, Damper Noise, Eects, Smart Mode, Transpose, Tuning, Temperament,
Temperament Key, Low Volume Balance, Speaker EQ, Speaker On/O, Auto Power O,
Factory Reset, Startup Settings, MIDI Settings
Pedal
F-1SP switch pedal (included)
Compatible with F-10H damper pedal, GFP-3 triple pedal unit, F-351 triple pedal board accessories
Jacks
Headphones x 2 (1/4”, 1/8”), LINE OUT (1/4” L/MONO, R),
USB to Host, DAMPER, PEDAL
Output Power 10 W +10 W
Speakers 12 cm x 2
Power Consumption 9 W (PS-129 AC adaptor)
Dimensions
1305 (W) x 280 (D) x 150 (H) mm
51
1/3” (W) x 11” (D) x 6” (H)
Weight
12.0 kg / 26 1/2 lbs.
* Specications are subject to change without notice.
* Availability of Bluetooth function dependent on market location.
▋ SOUND SELECT
Vibraphone
Harpsichord
Wood Bass & Ride
Electric Bass
Wood Bass
New Age Pad
Choir
String Ensemble
Slow Strings
A0
B0
C1
D1
E1
F1
G1
A1
B1
♯
D
1
C
1
♯
F
♯
1
G
♯
1
A
♯
1
A
0
♯
Hold
Diapason
Church Organ
Blues Organ
Jazz Organ
Modern Electric Piano
Reed Electric Piano 2
Reed Electric Piano
Tine Electric Piano
A0
B0
C1
D1
E1
F1
G1
A1
B1
♯
D
1
C
1
♯
F
♯
1
G
♯
1
A
♯
1
A
0
♯
Hold
EX Concert Grand Piano | Modern
EX Concert Grand Piano | Mellow
SK-EX Concert Grand Piano | Mellow
EX Concert Grand Piano | Pop
SK-EX Concert Grand Piano | Jazz
Upright Piano | Classic
EX Concert Grand Piano | Concert
SK-EX Concert Grand Piano | Concert
A0
B0
C1
D1
E1
F1
G1
A1
B1
♯
D
1
C
1
♯
F
♯
1
G
♯
1
A
♯
1
A
0
♯
Hold
▋ METRONOME
A0
B0
C1
D1
E1
F1
G1
A1
B1
C2
D2
E2
F2
G2
A2
B2
C3
D3
E3
F3
G3
A3
B3
C4
D4
E4
F4
G4
A4
B4
C5
D5
E5
F5
G5
A5
B5
C6
D6
E6
F6
G6
A6
B6
C7
D7
E7
F7
G7
A7
B7
C8
♯
D
1
C
1
♯
F
♯
1
G
♯
1
A
♯
1
A
0
♯
♯
D
2
C
2
♯
F
♯
2
G
♯
2
A
♯
2
♯
D
3
C
3
♯
F
♯
3
G
♯
3
A
♯
3
♯
D
4
C
4
♯
F
♯
4
G
♯
4
A
♯
4
♯
D
6
C
6
♯
F
♯
6
G
♯
6
A
♯
6
♯
D
5
C
5
♯
F
♯
5
G
♯
5
A
♯
5
♯
D
7
C
7
♯
F
♯
7
G
♯
7
A
♯
7
- + 1 2 3 4 5 6 7 8 9 0
Metronome tempo
- +
Volume
Time signature
1/4 2/4 3/4 4/4 4/5 3/8 6/8
Grave
Largo
Lento
Larghetto
Adagio
Adagietto
Andante
Andantino
Maestoso
Moderato
Allegretto
Animato
Allegro
Vivace
Presto
Vivacissimo
Prestissimo
Tempo markings
- +
Rhythm
1 2 3 4 5 6 7 8 9 0
Rhythm
Press and hold simultaneously
METRONOM E
▋ DEMO SONGS
Sound Name
Vibraphone
Harpsichord
Electric Bass
Slow Strings
Church Organ
Jazz Organ
Modern Electric Piano
Tine Electric Piano
EX Concert Grand Piano | Modern
EX Concert Grand Piano | Mellow
SK-EX Concert Grand Piano | Mellow
EX Concert Grand Piano | Pop
SK-EX Concert Grand Piano | Jazz
Upright Piano | Classic
EX Concert Grand Piano | Concert
SK-EX Concert Grand Piano | Concert
A0
B0
C1
D1
E1
F1
G1
A1
B1
C2
D2
E2
F2
G2
A2
B2
♯
D
1
C
1
♯
F
♯
1
G
♯
1
A
♯
1
A
0
♯
♯
D
2
C
2
♯
F
♯
2
G
♯
2
A
♯
2
DEMO
Hold
▋ RECORDER
Song 1
Song 2
Song 3
A0
B0
C1
C
1
♯
A
0
♯
Hold
1
2 3
Recording Playing back
Song 1
Song 2
Song 3
A0
B0
C1
C
1
♯
A
0
♯
Hold
▋ REGISTRATION
REGISTRATIO N
METRONOM E
1
2
3
4
1 2
Operation Guide

▋ SOUND SELECT
Vibraphone
Harpsichord
Wood Bass & Ride
Electric Bass
Wood Bass
New Age Pad
Choir
String Ensemble
Slow Strings
A0
B0
C1
D1
E1
F1
G1
A1
B1
♯
D
1
C
1
♯
F
♯
1
G
♯
1
A
♯
1
A
0
♯
Hold
Diapason
Church Organ
Blues Organ
Jazz Organ
Modern Electric Piano
Reed Electric Piano 2
Reed Electric Piano
Tine Electric Piano
A0
B0
C1
D1
E1
F1
G1
A1
B1
♯
D
1
C
1
♯
F
♯
1
G
♯
1
A
♯
1
A
0
♯
Hold
EX Concert Grand Piano | Modern
EX Concert Grand Piano | Mellow
SK-EX Concert Grand Piano | Mellow
EX Concert Grand Piano | Pop
SK-EX Concert Grand Piano | Jazz
Upright Piano | Classic
EX Concert Grand Piano | Concert
SK-EX Concert Grand Piano | Concert
A0
B0
C1
D1
E1
F1
G1
A1
B1
♯
D
1
C
1
♯
F
♯
1
G
♯
1
A
♯
1
A
0
♯
Hold
▋ METRONOME
A0
B0
C1
D1
E1
F1
G1
A1
B1
C2
D2
E2
F2
G2
A2
B2
C3
D3
E3
F3
G3
A3
B3
C4
D4
E4
F4
G4
A4
B4
C5
D5
E5
F5
G5
A5
B5
C6
D6
E6
F6
G6
A6
B6
C7
D7
E7
F7
G7
A7
B7
C8
♯
D
1
C
1
♯
F
♯
1
G
♯
1
A
♯
1
A
0
♯
♯
D
2
C
2
♯
F
♯
2
G
♯
2
A
♯
2
♯
D
3
C
3
♯
F
♯
3
G
♯
3
A
♯
3
♯
D
4
C
4
♯
F
♯
4
G
♯
4
A
♯
4
♯
D
6
C
6
♯
F
♯
6
G
♯
6
A
♯
6
♯
D
5
C
5
♯
F
♯
5
G
♯
5
A
♯
5
♯
D
7
C
7
♯
F
♯
7
G
♯
7
A
♯
7
- + 1 2 3 4 5 6 7 8 9 0
Metronome tempo
- +
Volume
Time signature
1/4 2/4 3/4 4/4 4/5 3/8 6/8
Grave
Largo
Lento
Larghetto
Adagio
Adagietto
Andante
Andantino
Maestoso
Moderato
Allegretto
Animato
Allegro
Vivace
Presto
Vivacissimo
Prestissimo
Tempo markings
- +
Rhythm
1 2 3 4 5 6 7 8 9 0
Rhythm
Press and hold simultaneously
METRONOM E
▋ DEMO SONGS
Sound Name
Vibraphone
Harpsichord
Electric Bass
Slow Strings
Church Organ
Jazz Organ
Modern Electric Piano
Tine Electric Piano
EX Concert Grand Piano | Modern
EX Concert Grand Piano | Mellow
SK-EX Concert Grand Piano | Mellow
EX Concert Grand Piano | Pop
SK-EX Concert Grand Piano | Jazz
Upright Piano | Classic
EX Concert Grand Piano | Concert
SK-EX Concert Grand Piano | Concert
A0
B0
C1
D1
E1
F1
G1
A1
B1
C2
D2
E2
F2
G2
A2
B2
♯
D
1
C
1
♯
F
♯
1
G
♯
1
A
♯
1
A
0
♯
♯
D
2
C
2
♯
F
♯
2
G
♯
2
A
♯
2
DEMO
Hold
▋ RECORDER
Song 1
Song 2
Song 3
A0
B0
C1
C
1
♯
A
0
♯
Hold
1
2 3
Recording Playing back
Song 1
Song 2
Song 3
A0
B0
C1
C
1
♯
A
0
♯
Hold
▋ REGISTRATION
REGISTRATIO N
METRONOM E
1
2
3
4
1 2
▋ SOUND SETTINGS
A0
B0
C1
D1
E1
F1
G1
A1
B1
C2
D2
E2
F2
G2
A2
B2
C3
D3
E3
F3
G3
A3
B3
C4
D4
E4
F4
G4
A4
B4
C5
D5
E5
F5
G5
A5
B5
C6
D6
E6
F6
G6
A6
B6
C7
D7
E7
F7
G7
A7
B7
C8
♯
D
1
C
1
♯
F
♯
1
G
♯
1
A
♯
1
A
0
♯
♯
D
2
C
2
♯
F
♯
2
G
♯
2
A
♯
2
♯
D
3
C
3
♯
F
♯
3
G
♯
3
A
♯
3
♯
D
4
C
4
♯
F
♯
4
G
♯
4
A
♯
4
♯
D
6
C
6
♯
F
♯
6
G
♯
6
A
♯
6
♯
D
5
C
5
♯
F
♯
5
G
♯
5
A
♯
5
♯
D
7
C
7
♯
F
♯
7
G
♯
7
A
♯
7
Room
Lounge
Small Hall
Concert Hall
Live Hall
Cathedral
Reverb
O
Small
Medium
Large
Damper Resonance
Normal
Mellow
Dynamic
Bright
Voicing
O
Normal
Small
Large
Fall-back Noise
O
Normal
Small
Large
Damper Noise
Normal
Noiseless
Deep Resonance
Light Resonance
Soft
Brilliant
Smart Mode
Dual / Split
Dual
Split
Balance reset
- +
Brilliance
O
- +
Reverb
O
On
Touch Curve
O
Normal
Light
Heavy
Eects
O
On
Smart Mode
Clean
Full
Dark
Rich
Historical
or
or
▋ TRANSPOSE
A0
B0
C1
D1
E1
F1
G1
A1
B1
C2
D2
E2
F2
G2
A2
B2
C3
D3
E3
F3
G3
A3
B3
C4
D4
E4
F4
G4
A4
B4
C5
D5
E5
F5
G5
A5
B5
C6
D6
E6
F6
G6
A6
B6
C7
D7
E7
F7
G7
A7
B7
C8
♯
D
1
C
1
♯
F
♯
1
G
♯
1
A
♯
1
A
0
♯
♯
D
2
C
2
♯
F
♯
2
G
♯
2
A
♯
2
♯
D
3
C
3
♯
F
♯
3
G
♯
3
A
♯
3
♯
D
4
C
4
♯
F
♯
4
G
♯
4
A
♯
4
♯
D
6
C
6
♯
F
♯
6
G
♯
6
A
♯
6
♯
D
5
C
5
♯
F
♯
5
G
♯
5
A
♯
5
♯
D
7
C
7
♯
F
♯
7
G
♯
7
A
♯
7
Tuning
440Hz
-0.5Hz
+0.5Hz
Temperament Key
C# D# F# G# A#
- +
Transpose
-12 -10 -8 -7 -5 -3 -1 0 2 4 5 7 9 11 12
Transpose
C D E F G A B
Temperament Key
Equal Temperament
Pure Temperament
(Pure Major)
Pure Temperament
(Pure Minor)
Pythagorean Temperament
Meantone Temperament
Werckmeister Temperament
Kirnberger Temperament
Temperament
Transpose
-11 -9 -6 -4 -2 1 3 6 8 10
▋ FUNCTION
C5
D5
E5
F5
G5
A5
B5
C6
D6
E6
F6
G6
A6
B6
C7
D7
E7
F7
G7
A7
B7
C8
♯
D
6
C
6
♯
F
♯
6
G
♯
6
A
♯
6
♯
D
5
C
5
♯
F
♯
5
G
♯
5
A
♯
5
♯
D
7
C
7
♯
F
♯
7
G
♯
7
A
♯
7
Spatial Headphone Sound
O
Forward
Normal
Wide
Speaker EQ
O
Normal
Table
Speaker
On/O
O
On
O
1 2 3 4 5
Low Volume Balance
Normal
Open
Semi-Open
Closed
Inner-ear
Canal
Phones Type
O
15 min.
60 min.
120 min.
Auto Power O
Factory Reset
Startup Settings
▋ BLUETOOTH
A0
B0
A
0
♯
- +
Bluetooth
Audio
Volume

Copyright © 2022 Kawai Musical Instruments Mfg. Co.,Ltd. All Rights Reserved.
SP00001153
Printed in Indonesia