Loading ...
Loading ...
Loading ...

10 | ENGLISH
Attach the Hand Control Holster
Wrap the hook & loop strap and holster around the tripod
leg and place the hand control in the holster.
Plug in the Hand Control
Plug the supplied NexStar+ hand control into one of the
Aux ports.
Warning: Do not plug the hand control into the
Autoguide Port. Damage to the mount or hand control
could occur. Similarly, do not plug an autoguider cable
into the Aux port or damage could occur.
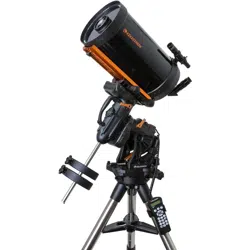
Home Position
The mount is in the “home” position when the counterweight
shaft is pointing downward, and the telescope is pointing
along the polar axis of the mount as pictured in (Figure 7).
The mount’s internal switches will take the mount to its
home position when you power it on (more on that in “Basic
Usage”), but you can still manually position it before powering
on the mount. Simply unlock the two lock levers.
Basic Usage
With your mount assembled and polar aligned, proceed to
startup the mount:
Powering the Mount
The CGX mount can be powered by the supplied car battery
adapter to a 12VDC battery source that can deliver at least 4
amperes of current. Or you may use an optional AC adapter
that delivers 12VDC and 4 amperes of current. AC power
adapters with threaded barrel connectors are available
from Celestron.
Home Position and Site Information
1. Plug the included NexStar+ Hand Control into one of
the Aux ports. You can plug into Aux 1 or Aux 2.
2. Plug the power cable into the power input port on the
mount. Be sure to secure the power cable with the
threaded barrel connector.
3. Turn the power switch on.
4. When the hand control displays “CGX Ready”, press
ENTER twice. The mount will proceed to move to the
home switch position.
5. Select City Database or Custom Site.
• In City Database, select the nearest city to your location.
• If you choose Custom Site, you will have to enter the
longitude, latitude and time zone of your location.
6. Once the location is selected, proceed to enter the date
and time. The CGX has a Real-Time Clock (RTC) which
stores the date, time and location information for the next
time you use the mount.
Alignment
Prerequisite: The mount must be roughly polar aligned,
with the date, time and location information correctly
entered as outlined before this step.
1. For best alignment results, choose Two Star Align and
press ENTER.
You can also choose from Solar System, One Star, Last
Align, or Quick Align. The Scroll buttons 6 and 9 on the
keypad are used to scroll through any list selection in the
hand control.
Figure 7 Telescope in the home position
Loading ...
Loading ...
Loading ...