COPYRIGHT © Hangzhou EZVIZ Software Co., Ltd.. ALL RIGHTS RESERVED.
Any and all information, including, among others, wordings, pictures, graphs are the
properties of Hangzhou EZVIZ Software Co., Ltd. (hereinafter referred to as “EZVIZ”).
This user manual (hereinafter referred to as “the Manual”) cannot be reproduced,
changed, translated, or distributed, partially or wholly, by any means, without the
prior written permission of EZVIZ. Unless otherwise stipulated, EZVIZ does not make
any warranties, guarantees or representations, express or implied, regarding to the
Manual.
About this Manual
The Manual includes instructions for using and managing the product. Pictures,
charts, images and all other information hereinafter are for description and
explanation only. The information contained in the Manual is subject to change,
without notice, due to rmware updates or other reasons. Please nd the latest
version in the ™ website (http://www.ezviz.com).
Revision Record
New release – January, 2019
Trademarks Acknowledgement
™, ™, and other EZVIZ’s trademarks and logos are the properties of
EZVIZ in various jurisdictions. Other trademarks and logos mentioned below are the
properties of their respective owners.
Legal Disclaimer
TO THE MAXIMUM EXTENT PERMITTED BY APPLICABLE LAW, THE PRODUCT
DESCRIBED, WITH ITS HARDWARE, SOFTWARE AND FIRMWARE, IS PROVIDED
“AS IS”, WITH ALL FAULTS AND ERRORS, AND EZVIZ MAKES NO WARRANTIES,
EXPRESS OR IMPLIED, INCLUDING WITHOUT LIMITATION, MERCHANTABILITY,
SATISFACTORY QUALITY, FITNESS FOR A PARTICULAR PURPOSE, AND NON-
INFRINGEMENT OF THIRD PARTY. IN NO EVENT WILL EZVIZ, ITS DIRECTORS,
OFFICERS, EMPLOYEES, OR AGENTS BE LIABLE TO YOU FOR ANY SPECIAL,
CONSEQUENTIAL, INCIDENTAL, OR INDIRECT DAMAGES, INCLUDING, AMONG
OTHERS, DAMAGES FOR LOSS OF BUSINESS PROFITS, BUSINESS INTERRUPTION,
OR LOSS OF DATA OR DOCUMENTATION, IN CONNECTION WITH THE USE OF THIS
PRODUCT, EVEN IF EZVIZ HAS BEEN ADVISED OF THE POSSIBILITY OF SUCH
DAMAGES.
TO THE MAXIMUM EXTENT PERMITTED BY APPLICABLE LAW, IN NO EVENT SHALL
EZVIZ’S TOTAL LIABILITY FOR ALL DAMAGES EXCEED THE ORIGINAL PURCHASE

PRICE OF THE PRODUCT.
EZVIZ DOES NOT UNDERTAKE ANY LIABILITY FOR PERSONAL INJURY OR
PROPERTY DAMAGE AS THE RESULT OF PRODUCT INTERRUPTION OR SERVICE
TERMINATION CAUSED BY: A) IMPROPER INSTALLATION OR USAGE OTHER THAN
AS REQUESTED; B) THE PROTECTION OF NATIONAL OR PUBLIC INTERESTS; C)
FORCE MAJEURE; D) YOURSELF OR THE THIRD PARTY, INCLUDING WITHOUT
LIMITATION, USING ANY THIRD PARTY’S PRODUCTS, SOFTWARE, APPLICATIONS,
AND AMONG OTHERS. REGARDING TO THE PRODUCT WITH INTERNET ACCESS,
THE USE OF PRODUCT SHALL BE WHOLLY AT YOUR OWN RISKS. EZVIZ SHALL NOT
TAKE ANY RESPONSIBILITES FOR ABNORMAL OPERATION, PRIVACY LEAKAGE OR
OTHER DAMAGES RESULTING FROM CYBER ATTACK, HACKER ATTACK, VIRUS
INSPECTION, OR OTHER INTERNET SECURITY RISKS; HOWEVER, EZVIZ WILL
PROVIDE TIMELY TECHNICAL SUPPORT IF REQUIRED.SURVEILLANCE LAWS AND
DATA PROTECTION LAWS VARY BY JURISDICTION. PLEASE CHECK ALL RELEVANT
LAWS IN YOUR JURISDICTION BEFORE USING THIS PRODUCT IN ORDER TO
ENSURE THAT YOUR USE CONFORMS TO THE APPLICABLE LAW. EZVIZ SHALL
NOT BE LIABLE IN THE EVENT THAT THIS PRODUCT IS USED WITH ILLEGITIMATE
PURPOSES.
IN THE EVENT OF ANY CONFLICTS BETWEEN THE ABOVE AND THE APPLICABLE
LAW, THE LATTER PREVAILS.
1
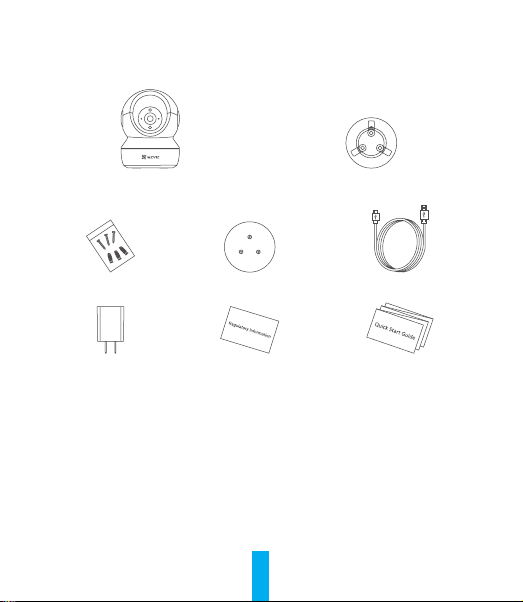
Package Contents
Camera Base
Screw Kit Drill Template Power Cable
Power Adapter Regulatory Information Quick Start Guide
2
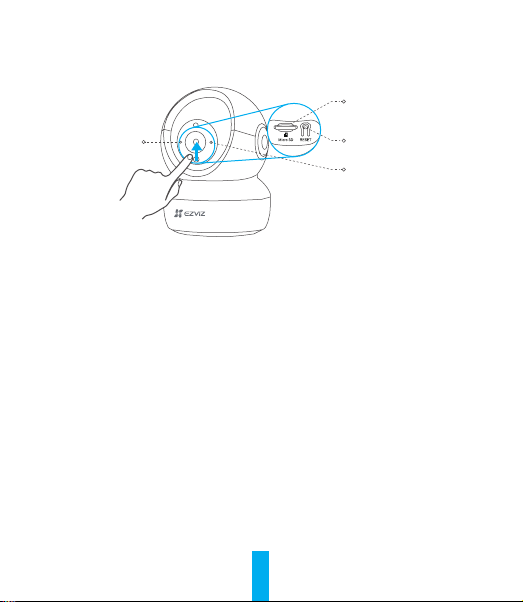
Basics
LED Indicator
Micro SD Card Slot
Reset Button
MIC
Name Description
LED Indicator • Solid Red: Camera starting up.
• Slow-ashing Red: Wi-Fi connection failed.
• Fast-ashing Red: Camera exception (e.g. Micro SD card
error).
• Fast-ashing Blue: Camera ready for Wi-Fi connection.
• Slow-ashing Blue: Camera running properly.
Micro SD Card
(sold separately)
Initialize the card in the EZVIZ app before using it.
Reset Button Hold for 5 seconds to restart and set all parameters to default.
MIC For audio in.
Speaker For audio out.
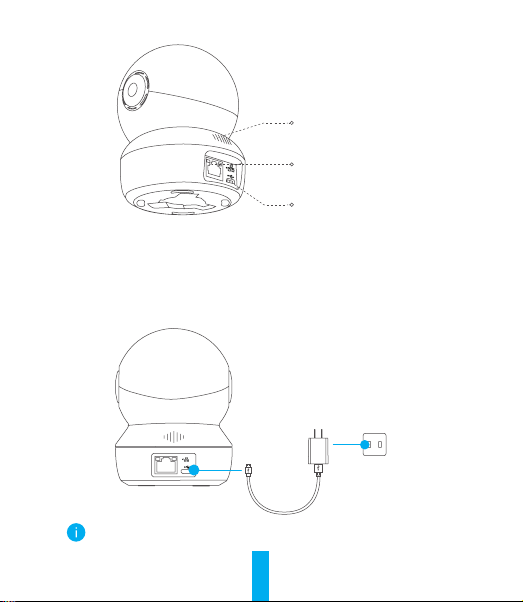
3
Ethernet Port
Power Port
Speaker
Setup
1
Power-on
Plug the power cable into the camera, and then plug the power adapter into
an outlet as shown in the gure below.
Power Outlet
Power Cable
The LED turning fast-ashing blue indicates that the camera is powered
on and ready for Wi-Fi conguration.
4
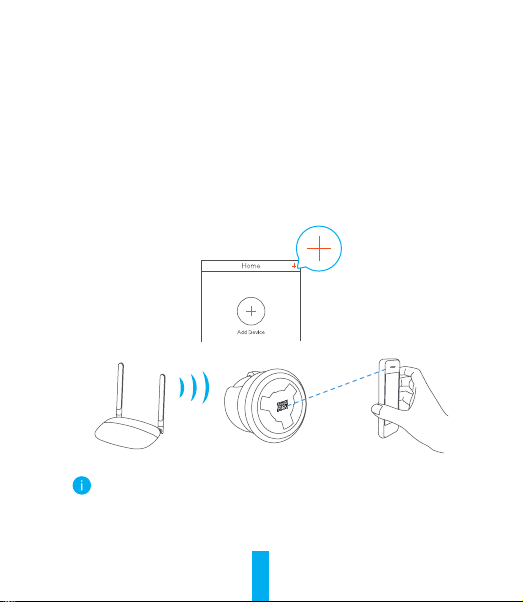
2
Camera Setup
1. Create a user account
- Connect your mobile phone to Wi-Fi using your 2.4GHz network.
- Search for "EZVIZ" in the App Store or Google Play Store
(TM)
.
- Download and install the EZVIZ app.
- Launch the app.
- Create and register an EZVIZ user account by following the start-up wizard.
2. Add a camera to EZVIZ
- Log in to your account using the EZVIZ app.
- On the Home screen, tap “+” on the upper-right corner to go to the Scan QR
Code interface.
- Scan the QR code on the bottom of the camera.
- Follow the EZVIZ app wizard to nish Wi-Fi conguration.
Hold the Reset button for 5s in any of the following cases:
• The camera fails to connect to your Wi-Fi network.
• You want to select another Wi-Fi network.
5
Installation (Optional)
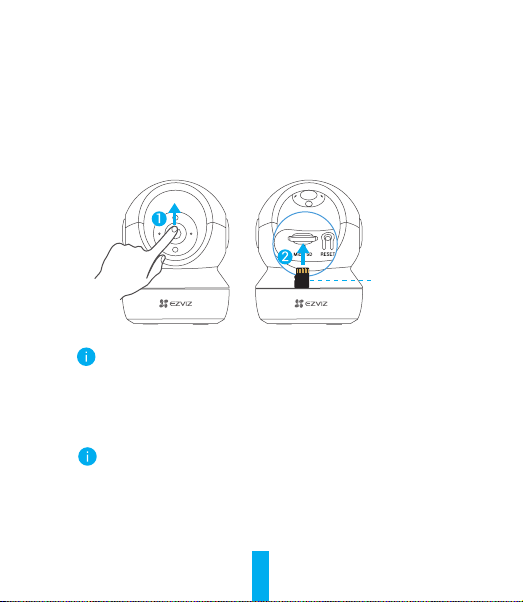
1
Install the Micro SD Card (Optional)
1. Rotate the sphere upwards until you see the card slot.
2. Insert the Micro SD card (sold separately) into the card slot as shown in
the gure below.
This Side Up
After installing the Micro SD card, you should initialize the card in the
EZVIZ app before using it.
3. In the EZVIZ app, tap the Storage Status in the Device Settings interface to
check the SD card status.
4. If the memory card status displays as Uninitialized, tap to initialize it.
The status will then change to Normal and it can store videos and/or
pictures.
6
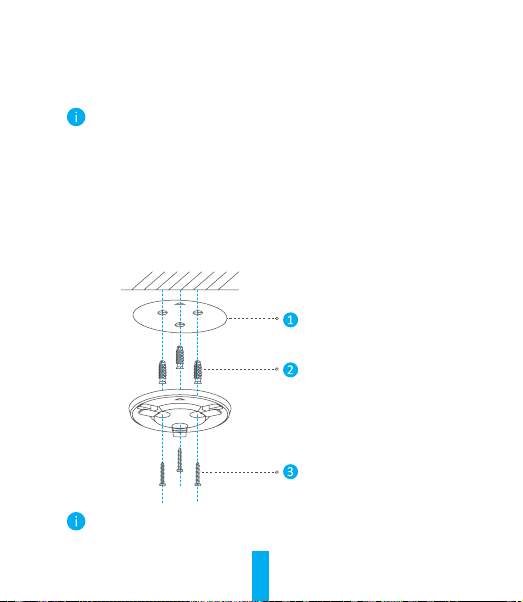
2
Install the Base
The camera can be placed horizontally or mounted on the ceiling. Here we take
ceiling mounting as an example.
• Make sure the ceiling is strong enough to withstand three times the
weight of the camera.
• Avoid positioning the camera in an area that gets a lot of light shining
directly into the camera lens.
- Place the drill template onto the surface you have chosen to mount the
camera.
- (For cement wall/ceiling only) Drill screw holes according to the template,
and insert three anchors.
- Use three metal screws to x the camera base according to the template.
Drill Template
Anchor
Metal Screw
Please tear up the drill template after installing the base if needed.
7
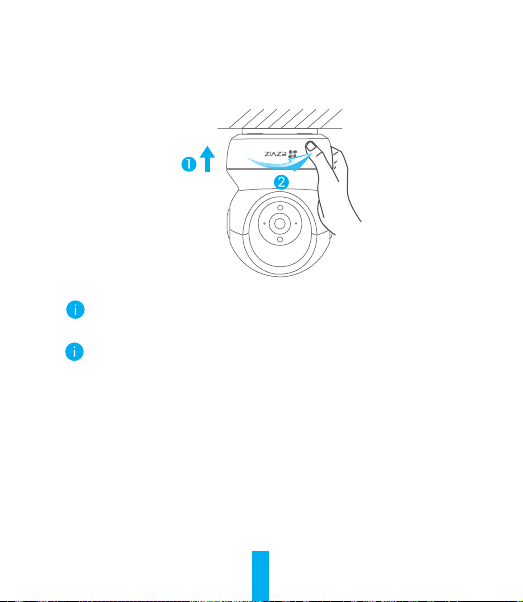
3
Install the Camera
Mount the camera to the base, and turn it clockwise until it is xed.
After installing the camera, please go to the EZVIZ app to ip the camera
image.
For detailed information, please visit www.ezviz.com/eu.

8
INFORMATION FOR PRIVATE
HOUSEHOLDS
1. Separate collection of waste equipment: Electrical and electronic equipment
that has become waste is referred to as waste equipment. Owners of waste
equipment must dispose of it separately from unsorted municipal waste. In
particular, waste equipment does not belong in household waste, but in special
collection and return systems.
2. Batteries and rechargeable batteries as well as lamps: Owners of waste
equipment shall, as a rule, separate waste batteries and rechargeable batteries that
are not enclosed in the waste equipment, which can be removed from the waste
equipment without being destroyed, from the waste equipment before handing
them in at a collection point. This does not apply if waste equipment is prepared for
reuse with the participation of a public waste management authority.
3. Options for returning waste equipment: Owners of waste equipment from
private households can return it free of charge to the collection points of the public
waste management authorities or to the take-back points set up by manufacturers
or distributors within the meaning of the Electrical and Electronics Equipment Law.
Stores with a sales area of at least 400 m² for electrical and electronic equipment
and those grocery stores with a total sales area of at least 800 m² that offer
electrical and electronic equipment several times a year or on a permanent basis
and make it available in the market are required to take it back. This also applies in
the case of distribution using means of distance communication, if the storage and
shipping areas for electrical and electronic equipment are at least 400 m² or the
total storage and shipping areas are at least 800 m². Distributors shall, in principle,
ensure take-back by providing suitable return facilities at a reasonable distance
from the respective end user. The possibility of returning waste equipment free of
charge exists for distributors who are obliged to take it back, among other things,
if a new similar device that essentially fulfills the same functions is delivered to an
end user.
4. Privacy Notice: Waste equipment often contains sensitive personal data. This
applies in particular to devices of information and telecommunications technology
such as computers and smartphones. In your own interest, please note that
each end user is responsible for deleting the data on the waste equipment to be

9
disposed of.
5. Meaning of the symbol “crossed-out wheelie bin”: The symbol of a crossed-out
wheelie bin regularly depicted on electrical and electronic equipment indicates that
the respective device is to be collected separately from unsorted municipal waste
at the end of its service life.