Loading ...
Loading ...
Loading ...

1716
EN
ENGLISH
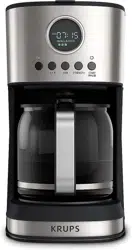
SETTING THE CLOCK
1. Press and hold the “HOUR” button (L) for three seconds. (Fig. 12)
The time on the LCD screen will ash. Use the “HOUR” (L) and
“MIN” (M) buttons to set the time. (Fig. 13 and 14)
2. After your selection, the time on the LCD screen will ash for ve
seconds and the time is set.
USEFUL INFORMATION AND TIPS
Once the clock is set, it will continue to show the correct time. However,
the clock will be reset if the coffee machine is disconnected from the
mains or if there is a power failure. In this case, repeat the instructions
above to reset the clock. The hour and minute can be reset at any time.
SETTING THE AUTO-ON FUNCTION
1. First, make sure the clock on the appliance is set to the correct
time. If the time shown is incorrect, follow the instructions in the
“Setting the clock” section.
2. Press the “PROG” button (K) once (Fig. 15). The LED light will
come on.
3. Use the “HOUR” (L) and “MIN” (M) buttons to set the desired start
time for the brew cycle. (Fig. 16 and 17)
4. After your selection, auto start time on the LCD screen will blink for
ve seconds and the time is set. The blue LED light will stay on.
Note: i) The current time is shown on the screen. You can check the
auto start time by pressing the “PROG” button (K) again.
ii) You can cancel the auto start function by pressing the “PROG”
button (K) and the LED light will go out.
iii) If you want to change the set auto start time, simply repeat steps
1 to 4 above.
5. The coffee maker will automatically brew coffee at the set auto-on time.
6. After the brew cycle, if you do not want to pour the coffee
immediately, leave the machine switched on and the coffee will
stay warm on the warming plate (G). Default keep warm time is 2
hours after coffee brewing has nished. The keep-warm time can
be adjusted, see “Setting the Keep Warm Time” section (p. 17 ) for
more information.
USEFUL INFORMATION AND TIPS
You can only set one auto-on time at a time on this machine. The
brew cycle can be interrupted at any time by pressing the START/
PAUSE button (O); the LED light and the appliance will turn off.
SETTING THE KEEP WARM TIME
1. Press and hold the START/PAUSE button (O) for three seconds.
(Fig. 18)
2. The keep-warm time will ash on the LCD display. Use the “HOUR” (L)
and “MIN” (M) buttons to set desired Keep Warm Time. (Fig. 19 and 20)
3. After your selection, the keep warm time on the LCD screen will
blink for ve seconds and the time is set.
SETTING THE COFFEE STRENGTH/
SETTINGS FOR SMALL BATCHES OF COFFEE
To personalize brewing strength for best taste: select 1 bean for mild,
2 beans for medium, and 3 beans for strong. When preparing small
amounts of coffee, we recommend that you use the “SMALL BATCH”
setting, which is designed for this purpose.
1. Press the “STRENGTH” (N) button once. (Fig. 21) The coffee bean
strength on the LCD screen will ash.
2. Press the “PROG” button (K) to adjust the coffee strength: 1 bean,
2 beans, 3 beans or SMALL BATCH. (Fig. 22 and 23)
3. After you have done this, the coffee strength selection on the LCD
screen will ash for ve seconds and the strength will be set.
USEFUL INFORMATION AND TIPS
When preparing small amounts of coffee, we recommend that you
use the “SMALL BATCH” setting, which is designed for this purpose.
Loading ...
Loading ...
Loading ...