Loading ...
Loading ...
Loading ...

13
Installation Manual
Model P250 EQ
ARCHITECT
™
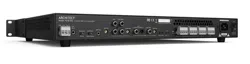
4. Input Priority Switch - Specify the
active input stage you have from your
source here. If you are using either the
optical or digital coaxial input, select
digital. If you are using analog RCA
Inputs, select analog. If you are using
both and want to switch between
the two input stages, select the one
you want to be prioritized. If the
non-prioritized input is active then the
prioritized input becomes active, the
prioritized input will cause the input
stage to switch to the prioritized input.
5. SDS Input - Use this input with event
based audio sources like voice-noti-
and doorbells. Connect your product
here and the audio from the analog or
digital input will mute when a signal
is sensed on this SDS input. That SDS
audio will now become the active
input. After 2 to 3 seconds of no con-
tent from this input, the active source
switches back to the analog or digital
input. Great for door bells, voice
enabled devices or periodic applause
tracks.
6. SDS Gain – Control the gain of the
SDS Input source here to balance
out the volume of that source vs the
analog or digital input. You can make it
louder or quieter with this control.
7. RCA Input - connect your line level ana
-
log input here with RCAs.
8. Loop outputs
outputs will pass the content from the
analog inputs right back out to any down
-
stream device
9. Analog Gain Control - Use this control
knob to increase or decrease the input
gain of the analog input stage. Turning
up this control knob will increase the sig
-
nal to the amp stage. Take care not to clip
this input stage as maxing out your gain
with a common signal from a streamer
for example will likely bring about the
objectionable sounds of a distorted input.
turning up this control. Leaving at the
default detente is really the way to go.
If you are using a phone as your source
- you would turn this up. If the source
is coming from a analog matrix distro -
leave at detente or turn down a touch.
10. Digital Coaxial Input - For sources with
Digital Coaxial outputs, you can connect
it to this digital input. Make sure to use a
Digital Audio RCA cable as the imped
-
ance is tightly control and will make the
connection robust. Using a standard RCA
may be OK for a while but you’re sure to
a get a drop out or two. Using the right
cable will eliminate many troubleshoot-
ing steps.
11. Optical Input - For those sources with
a Toslink Optical digital audio output,
connect that source to this input.
12. Digital Loop Output - This loop out will
pass through either digital audio input -
the Digital Coaxial or the Toslink Optical
inputs.
***Important note - the loop outputs -
analog or digital - are not eected by the
Gain controls
Loading ...
Loading ...
Loading ...