
www.blackanddecker.co.uk
2 9
2 1 9
1
3
4
5 8
5 8a
3
4
6
7
6
7
BHSB315J
BHSB320JP

2
3
English (original instructions) 5
2
3
3
9
9a
11
10
A B
3
D
2
E
14
F
3
3a
C
4
5
7
6
G
7 7b
I
5
K
7
7a
H
12
13
J
8a
14
L
5
ENGLISH
(Original instructions)
4
5
Intended use
Your BLACK + DECKER BHSB315J, BHSB320JP Spillbuster
®
handheld vacuum cleaner has been designed for light wet and
dry vacuum cleaning purposes. This appliance is intended for
household use only.
Safety instructions
@
Warning! Read all safety
warnings and all instructions.
Failure to follow the warnings
and instructions listed below
may result in electric shock, re
and/or serious injury.
@
Warning! When using battery-
powered appliances, basic
safety precautions, including the
following, should always be fol-
lowed to reduce the risk of re,
leaking batteries, personal injury
and material damage.
u Read all of this manual carefully before
using the appliance.
u The intended use is described in this
manual. The use of any accessory
or attachment or the performance
of any operation with this appliance
other than those recommended in this
instruction manual may present a risk
of personal injury.
u Retain this manual for future refer-
ence.
Using your appliance
u Do not use the appliance to pick up
any materials that could catch re.
u Do not pick up toxic material (chlorine
bleach, ammonia, drain cleaner, etc.).
8 8b
M
8
N
8
O

6
ENGLISH
(Original instructions)
u Do not immerse the appliance in water.
u Never pull the charger lead to discon-
nect the charger from the socket. Keep
the charger lead away from heat, oil
and sharp edges.
u This appliance can be used by children
aged from 8 years and above and
persons with reduced physical, sen-
sory or mental capabilities or lack of
experience and knowledge if they have
been given supervision or instruction
concerning use of the appliance in a
safe way and understand the hazards
involved. Children shall not play with
the appliance. Cleaning and user
maintenance shall not be made by
children without supervision.
u This appliance contains batteries that
are only replaceable by skilled
persons.
WARNING: For the purposes of recharg-
ing the battery, only use the detachable
supply unit provided with this appliance.
Inspection and repairs
u Before use, check the appliance for
damaged or defective parts. Check for
breakage of parts, damage to switches
and any other conditions that may af-
fect its operation.
u Do not use the appliance if any part is
damaged or defective.
u Have any damaged or defective parts
repaired or replaced by an authorized
repair agent.
u Regularly check the charger lead for
damage.
Replace the charger if the lead is
damaged or defective.
u Never attempt to remove or replace
any parts other than those specied in
this manual.
Residual risks.
Additional residual risks may arise when
using the tool which may not be included
in the enclosed safety warnings. These
risks can arise from misuse, prolonged
use etc.
Even with the application of the relevant
safety regulations and the implementa-
tion of safety devices, certain residual
risks can not be avoided. These include:
u Injuries caused by touching any mov-
ing parts.
u Injuries caused by touching any hot
parts.
u Injuries caused when changing any
parts or accessories.
u Injuries caused by prolonged use of
the appliance. When using any appli-
ance for prolonged periods ensure you
take regular breaks.
Batteries and chargers
Batteries
u Never attempt to open for any reason.
u Do not expose the battery to water.
u Do not expose the battery to heat.
u Do not store in locations where the
temperature may exceed 40°C.
u Charge only at ambient temperatures
between 10°C and 40°C.
u Charge only using the charger pro-
vided with the appliance/tool.

7
ENGLISH
(Original instructions)
u Never attempt to charge nonrecharge-
able batteries.
u If the supply cord is damaged, it must
be replaced by the manufacturer or an
authorised BLACK+DECKER Service
Centre in order to avoid a hazard.
u Do not expose the charger to water.
u Do not open the charger.
u Do not probe the charger.
u The appliance/tool/battery must be
placed in a well ventilated area when
charging.
Electrical safety
Your charger has been designed for a
specic voltage. Always check that the
mains voltage corresponds to the volt-
age on the rating plate. Never attempt
to replace the charger unit with a regular
mains plug.
Symbols on the charger
)
Read all of this manual carefully
before using the appliance.
#
This tool is double insulated;
therefore no earth wire is
required. Always check that the
power supply corresponds to
the voltage on the rating plate.
$
The charging base is intended
for indoor use only.
Labels on appliance
The following symbols appear on this appliance along with the
date code:
S003AQ 15
Use with charger
QW = S010QV1400040 /S003AQV1500015
GB = S010QB1400040 / S003AQB1500015
Using the wrong charger could result
in an electric shock or overheating of
the battery.
u When disposing of batteries, follow
the instructions given in the section
"Protecting the environment".
u Do not damage/deform the battery
pack either by puncture or impact, as
this may create a risk of injury and re.
u Do not charge damaged batteries.
u Under extreme conditions, battery
leakage may occur. When you notice
liquid on the batteries carefully wipe
the liquid off using a cloth. Avoid skin
contact.
u In case of skin or eye contact, follow
the instructions below.
Warning! The battery uid may cause
personal injury or damage to property. In
case of skin contact, immediately rinse
with water. If redness, pain or irritation
occurs seek medical attention. In case of
eye contact, rinse immediately with clean
water and seek medical attention.
Chargers
Your charger has been designed for a
specic voltage. Always check that the
mains voltage corresponds to the voltage
on the rating plate and the information in
the technical data table.
Warning! Never attempt to replace the
charger unit with a regular mains plug.
u Use your BLACK+DECKER charger
only to charge the battery in the appli-
ance/tool with which it was supplied.
Other batteries could burst, causing
personal injury and damage.
QW = S010QV1400040
GB = S010**1400040 /
S003**1500015

8
ENGLISH
(Original instructions)
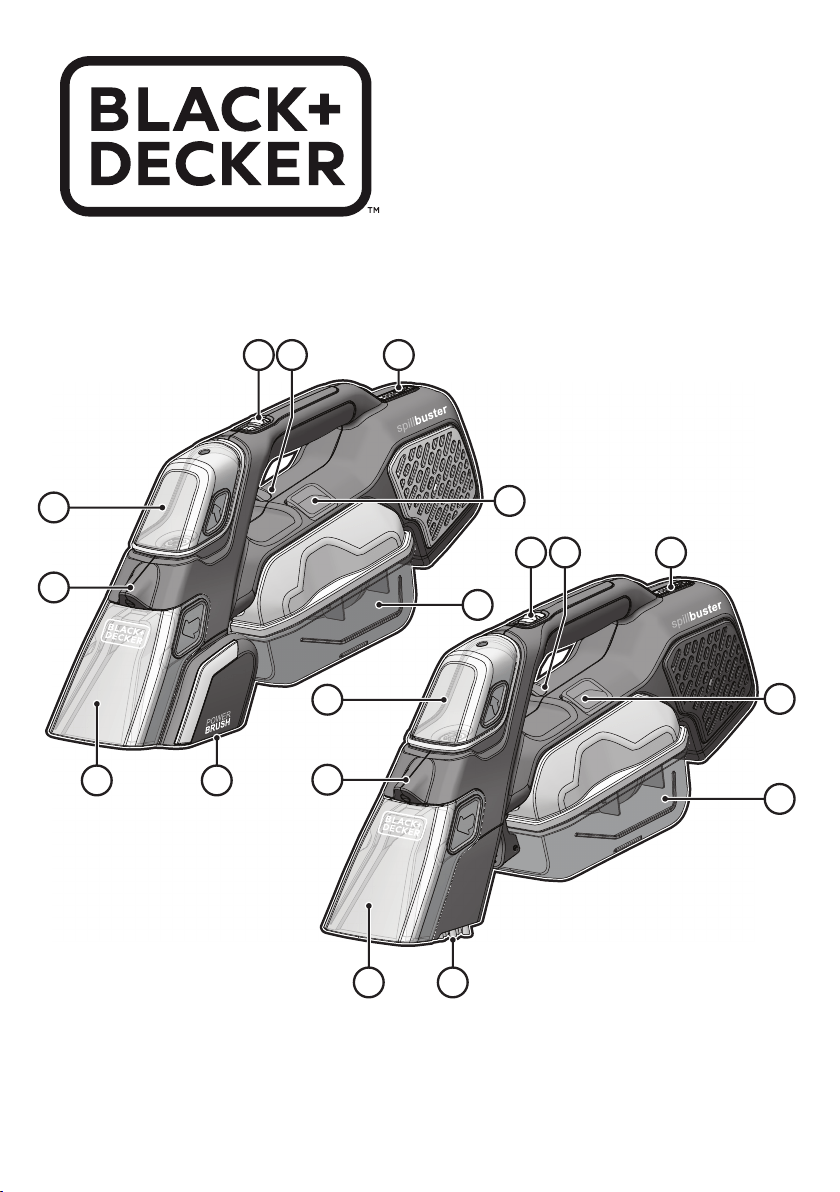
Features
This tool includes some or all of the following features.
1. Fluid dispenser trigger
2. Vacuum ON/OFF button (BHSB315J)
Vacuum ON/OFF button / beater bar ON button
(BHSB320JP)
3. Removable uid tank
4. Spray nozzle
5. Removable chute
6. Collection tank release button
7. Collection tank
8. Power brush (BHSB320JP)
8a. Manual brush (BHSB315J)
9. LED indicator
9a. State of charge button
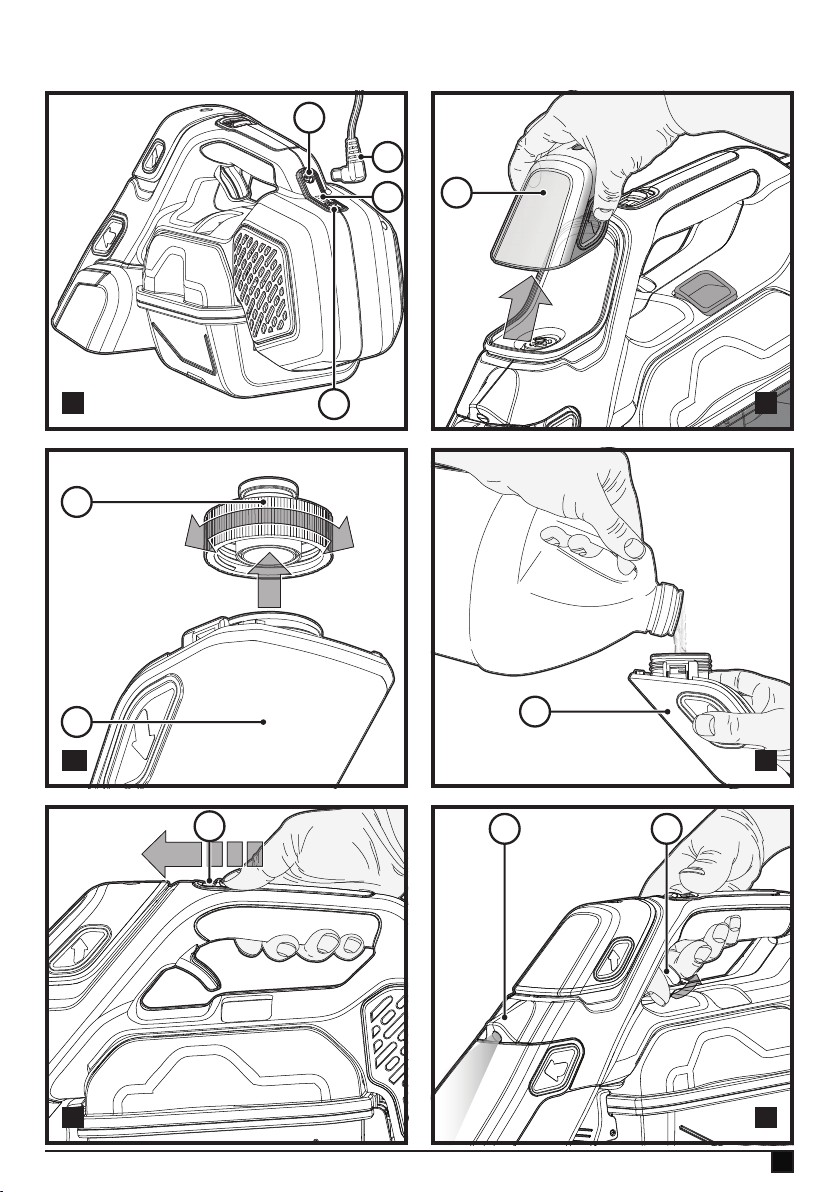
Charging the battery BHSB315J, BHSB320JP
(Fig. A)
u Ensure unit is not switched on.
u Plug wall adapter into outlet.
u Plug connector (11) into charging port (10) at the back of
the handle.
u The LED light (9) at the back of the handle will light while
charging.
u The LED light (9) will turn off upon completion of charge.
u Product is not operational while plugged in to charger.
Both these appliances include a state of charge indicator
which consists of three white LED lights (9a) that indicate the
approximate level of charge remaining in the battery.
u To check the state of charge, press the state of charge
button (9a).
Note: The state of charge indicator is only an indication
of the charge left on the battery. It does not indicate tool
functionality and is subject to variation based on product
components, temperature and end-user application.
Switching ON and OFF (Fig. E)
BHSB315J
u To start the vacuum, slide the switch (2) forward to the
ON position.
u To stop the vacuum, return the switch to the OFF
position.
u Return the product to the charger immediately after use
so that it will be ready and fully charged for the next
use. Ensure that the plug connector is fully inserted into
the charging port.
BHSB320JP
u To start the vacuum, slide the switch (2) forward to the
ON position.
u To start the powered scrub brush (8), slide the switch (2)
forward to the scrub and vacuum position.
u To stop the vacuum and scrub brush, return the switch to
the OFF position.
u Return the product to the charger immediately after
use so that it will be ready and fully charged for the next
use. Ensure that the plug connector is fully inserted into
the charging port.
Vacuuming dry and wet spills
Wet and dry pick-up
u This unit can be used to pick up everyday dry, wet
or liquid spills.
u For best results, hold the appliance at an angle of 45° and
pull it slowly towards you.
u If there is any liquid in the collection tank, do not turn
the unit upside down, sideways, point the nozzle upward
or shake the vac excessively.
u After picking up wet and dry substances clean the vac and
collection tank immediately. Mould and mildew may
form if the unit is not properly cleaned after wet pickups.
Hard Surfaces BHSB315J and BHSB320JP
Vacuum only mode
u Switch the vacuum to the ON position.
u Make a forward pass over the area that needs to be
cleaned. Vacuuming is optimized with nose slightly
angled toward with the vacuum head on the
surface being cleaned.
u Make a backward pass over the area that needs to be
cleaned. Vacuuming is optimized with the vacuum head
pressed rmly onto the surface being cleaned, at a
slightly steeper angle than the forward pass.
u Multiple passes may be necessary depending on the
type of surface and the size of the mess being cleaned.
Carpeted Surfaces BHSB315J and BHSB320JP
Vacuum only mode
u Switch the vacuum to the ON position.
u Make a forward pass over the area that needs to be
cleaned. Vacuuming is optimized with nose slightly
angled toward with the vacuum head on the area
being cleaned.
u Make a backward pass over the area that needs to be
cleaned. Vacuuming is optimized with the vacuum head
pressed rmly into the carpet, at a slightly steeper
angle than the forward pass.
u Multiple passes may be necessary depending on the
type of surface and the size of the mess being cleaned.
Scrubbing Hard and Carpeted Surfaces
Scrub and vacuum mode ( BHSB315J Only)
u Switch the vacuum to the ON position.

9
ENGLISH
(Original instructions)
u Make a forward pass over the area that needs to be
cleaned. Vacuuming is optimized with nose slightly
angled toward with the vacuum head on the area
being cleaned.
u Make a backward pass over the area that needs to be
cleaned. Vacuuming is optimized with the vacuum
head pressed rmly into the carpet or against the
surface being cleaned, at a slightly steeper angle than
the forward pass.
u Multiple passes may be necessary depending on the
type of surface and the size of the mess being cleaned.
u If a stain is still present, refer to stain cleaning
instructions.
Scrub and vacuum mode (BHSB320JP Only)
u Switch the vacuum to the scrub and vacuum position. The
powered scrub brush (8) will activate.
u Make a forward pass over the area that needs to be
cleaned. Vacuuming is optimized with nose slightly angled
toward with the vacuum head on the area
being cleaned.
u Make a backward pass over the area that needs to be
cleaned. Vacuuming is optimized with the vacuum
head pressed rmly into the carpet or against the
surface being cleaned, at a slightly steeper angle than
the forward pass.
u Multiple passes may be necessary depending on the
type of surface and the size of the mess being cleaned.
u If a stain is still present, refer to stain cleaning
instructions.
Stain Cleaning
Filling Fluid Dispenser (Fig. B, C, D)
u Remove uid tank (3) by pulling straight up and away from
the main body as illustrated in gure B.
u Unscrew the cap (3a) as illustrated in gure C.
u Fill with a suitable cleaning solution up to 120ml. Follow
cleaning solution manufacturer instructions for proper use.
A non-foaming cleaning solution is recommended
u Replace cap (3a).
u Replace uid tank (3) onto the main body. An
aubible click will be heard indicating the tank is secured
in position.
u To ensure the uid dispenser tank (3) is fully seated,
ensure there are no gaps in the seams between the
tank (3) and main body. The uid tank may leak if gaps are
present.
Cleaning New/Fresh spills (BHSB315J Only)
u Switch the vacuum to the ON position.
u Vacuum the liquid and solids from the area of the spill
using the vacuum head.
u Switch vacuum off. Empty tank of any liquids or solids.
Then look for any stains.
u If a stain is present, angle uid dispenser nozzle (4)
toward the stain and pull the spray trigger (1) under the
main handle to dispense the cleaning solution as
illustrated in gure F.
u Lightly coat the stained area with the cleaning solution.
Warning! If too much cleaning solution is applied, excessive
foaming can occur. If foam is seen coming through the rear
of the unit, this will not harm the product. If this occurs, switch
the unit off and allow to dry thoroughly before reusing.
u Scrub stained area with the bristle brushes (8a).
u Switch the vacuum to the ON position.
u Vacuum the liquid and foam on the stained area by
tilting the unit to a slight angle and ensuring the
vacuum head makes contact with the liquid and
foam.
Note: Pull the vacuum head backward over the area to
improve suction. Repeat this process across the entire stained
area.
u Repeat the spray solution, scrubbing and vacuuming
process as necessary. Empty tank between process for
best results
u Once area is cleaned, allow the area to completely dry
and check affected area for any remaining staining.
Note: Area may appear to still be stained while wet.
Please allow treated area 24 hours to dry completely before
further treatment.
Cleaning New/Fresh spills (BHSB320JP Only)
u Switch the vacuum to the ON position.
u Vacuum the liquid and solids from the area of the spill
using the vacuum head.
u Switch vacuum off. Empty tank of any liquids or solids.
Then look for any stains.
u If a stain is present, angle uid dispenser nozzle (4)
toward the stain and pull the spray trigger (1) under the
main handle to dispense the cleaning solution as illus-
trated in gure F.
u Lightly coat the stained area with the cleaning solution.
Warning! If too much cleaning solution is applied, excessive
foaming can occur.
u Switch vacuum to scrub and vacuum position.
u Placing the face of the powered scrub brush at to the
surface, moderately pressing down to engage brush into
the surface, slowly move the unit back and forth over the
stained area.
u Switch to Vacuum mode.
u Vacuum the liquid and foam on the stained area by
tilting the unit to a slight angle and ensuring the
vacuum head makes contact with the liquid and foam.
Note: Pull the vacuum head backward over the area to
improve suction. Repeat this process across the entire stained
area.

10
ENGLISH
(Original instructions)
u Repeat the spray solution, scrubbing and vacuuming
process as necessary. Empty tank between process for
best results.
u Once area is cleaned, allow the area to completely dry
and check affected area for any remaining staining.
Note: Area may appear to still be stained while wet.
Please allow treated area 24 hours to dry completely
before further treatment.
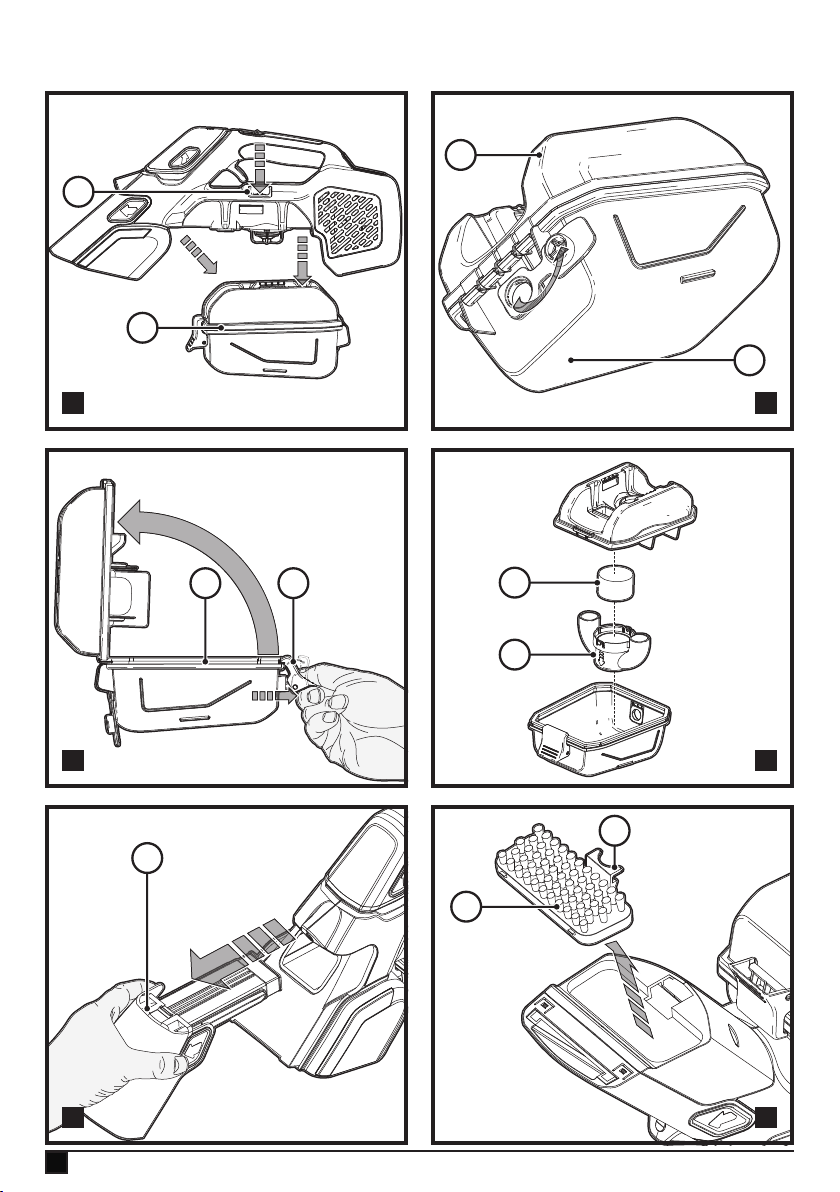
Emptying and cleaning the collection tank (Fig. G, H, I,J)
Warning! Never use the vac without its foam lter.
There are two methods of cleaning the collection tank (7), a
quick empty method for liquid only waste and a thorough
clean out method for solid and liquid waste.
Emptying collection tank
Warning! DO NOT try to empty waste in the collection tank
(7) when still installed on the main body.
u When uid reaches the max. ll line (250ml), turn
the vacuum OFF.
Removing collection tank
u Press the collection tank release button (6) .
u Pull the collection tank (7) straight down and away from
the main body as illustrated in gure G.
Liquid only waste
u Remove collection tank (7) from main body.
u Place collection tank (7) over an appropriate disposal
area.
u Pull the liquid plug (7a) and tilt the collection tank (7) to
drain liquid contents quickly.
u Once drained, reinstall liquid plug (7a).
u Install collection tank (7) onto main body until it “clicks”
rmly into position, resume cleaning.
u When cleaning task is complete, follow Maintenance
instructions for cleaning and storage.
Solid and liquid waste
Warning! DO NOT try to empty waste in the collection tank
(7) when still installed on the main body.
u Before the uid reaches the max. ll line (250ml), turn
the vacuum OFF.
u Remove collection tank (7) from main body.
u Place collection tank (7) over an appropriate disposal
area.
u While holding the bottom half of the collection tank,
unlock the latch (7b) at the front of the collection tank
(7) .
u Open the collection tank (7) and pour the contents into
an appropriate container.
u Rinse the collection tank (7) with water to remove leftover
debris.
u Remove the air seperator (12) and rinse clean with water.
u Remove the foam lter (13) and rinse clean with water
and allow to dry. Once dry and clean, install into place.
u Close the collection tank (7) and lock the latch (7b),
ensuring the collection tank (7) is properly sealed.
Note: The foam lter is re-usable, do not confuse it with a
disposable lter, and do not throw it away when the product is
emptied. We recommend that you replace the foam lter every
6–9 months depending on frequency of use.
Note: Check to see if the air separator (12) is free of
water and debris. Clean if needed.
u Install collection tank (7) onto main body until it “clicks”
rmly into position.and resume cleaning.
u When cleaning task is complete, follow Maintenance
instructions for cleaning and storage.
Note: Maximum debris collection will only be obtained with a
clean lter, clean chute and an empty collection tank.
If debris begins to fall back out of the product after it is
switched OFF, this indicates that the collection tank is full and
requires emptying.
u Wash the foam lter, chute and collection tank
regularly using warm, soapy water and ensure that it is
completely dry before using again.
u It is very important that the lter is correctly in position
before use.
Note: Use only mild soap and damp cloth to clean the vac.
Never let any liquid get inside the vac; never immerse any part
of the vac into a liquid.
Warning! Make sure the vacuum is completely dry before
using it.
Note: To assure product SAFETY and RELIABILITY, repairs,
maintenance and adjustment (other than those listed in this
manual) should be performed by authorized service centers
or other qualied service organizations, always using identical
replacement parts.
Cleaning Chute & Nozzle (Fig. K)
u Remove the chute and cap (5) by pulling the cap away
from the main body as illustrated in gure K.
u The cap (5) can be lifted away from the chute to rinse and
wash each component.
u Both components are dish washer safe (top rack only).
u Ensure the chute and cap are dry before re-assembling.
u Once cleaning is nished, attach cap onto the chute and
insert into the assembly into the front of the main body.
Removing and cleaning the manual scrub brush
BHSB315J only (Fig. L)
The manual scrub brush (8a) can be easily removed from the
vacuum head for cleaning.
u Press down the tab (14) and remove the entire brush
assembly (8a).
u Once the brushes have been cleaned, replace the brush
assembly, ensuring it clicks into place.
11
ENGLISH
(Original instructions)
Note: Do not attempt to wash manual scrub brush while still
attached to the unit.
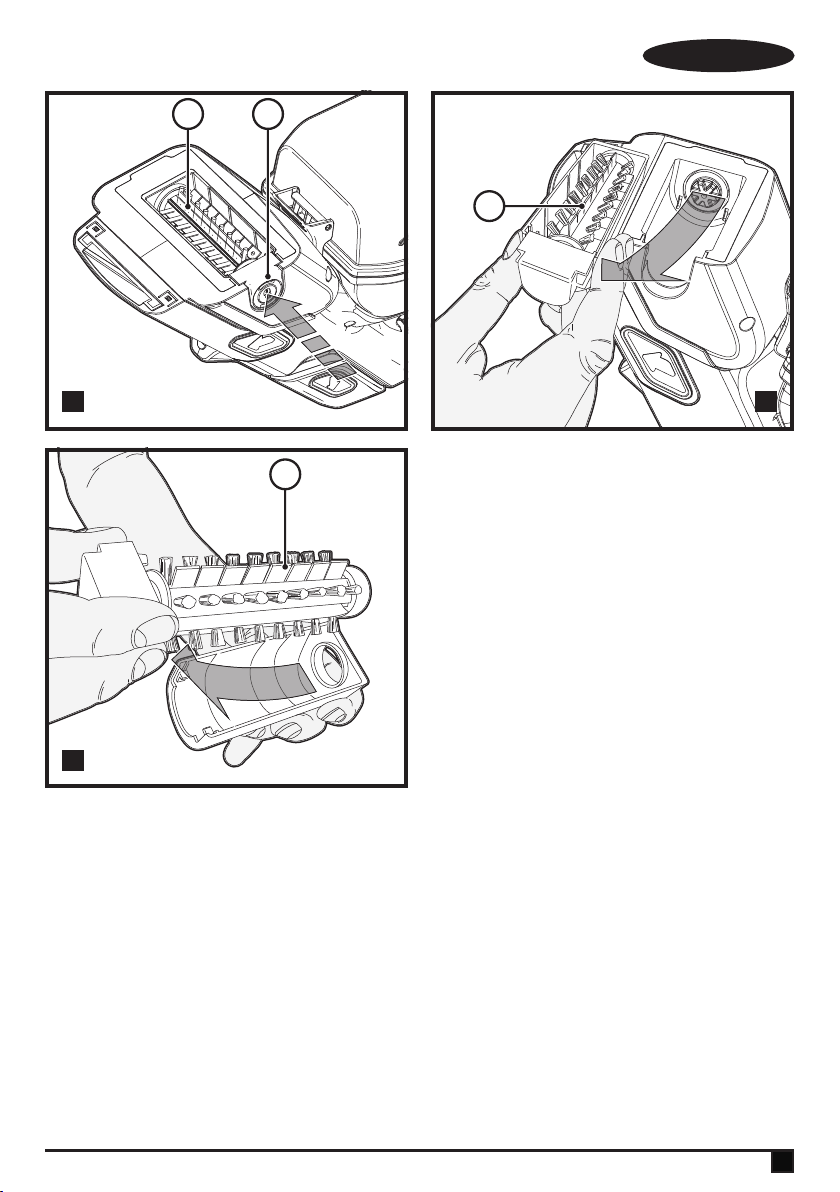
Removing and cleaning the powered scrub brush
BHSB320JP Only (Fig. M, N, O)
u To remove the powered scrub brush (8) depress the
release button (8b) as illustrated in gure M.
u The powered scrub brush (8) can now be lifted up and
removed.
u Clean the powered scrub brush ( 8), and reinstall. Ensure
it is secured in its locked position before operating.
Note: Do not attempt to wash powered scrub brush while still
attached to the unit.
Storage
u Ensure vacuum is turned OFF.
u Empty uid tank of all chemicals. Wash with warm clean
water and dry. Ensure collection tank is emptied and
cleaned to reduce dirt build up.
u Check if charging is required by pressing the state of
charge indicator button (9a) at the back of the main
handle. If charge is required, plug in the jack plug to
charging socket and allow the appliance to charge.
u Store main body with the collection tank (7) on a at level
surface with ON/OFF switch (2) facing up.
u Store out of reach of children or pets.
Troubleshooting
If the product does not work, check the following:
u The charger was correctly plugged in for recharge. (It
feels slightly warm to the touch.)
u The charger cord is not damaged and is correctly
attached.
u The charger is plugged into a working electrical outlet.
u The switch is in the “OFF” position when charging.
Replacing the lters
The lters should be replaced every 6 to 9 months and when-
ever worn or damaged.
Replacement lters are available from your BLACK+DECKER
Service Department:
Maintenance
Your BLACK+DECKER corded/cordless appliance/tool has
been designed to operate over a long period of time with a
minimum of maintenance. Continuous satisfactory operation
depends upon proper tool care and regular cleaning.
Warning! Before performing any maintenance on corded/
cordless power tools:
u Switch off and unplug the appliance/tool.
u Or switch off and remove the battery from the appliance/
tool if the appliance/tool has a separate battery pack.
u Or run the battery down completely if it is integral and then
switch off.
u Unplug the charger before cleaning it. Your charger does
not require any maintenance apart from regular cleaning.
u Regularly clean the ventilation slots in your appliance/tool/
charger using a soft brush or dry cloth.
u Regularly clean the motor housing using a damp cloth. Do
not use any abrasive or solvent-based cleaner.
Protecting the environment
Z
Separate collection. Products and batteries marked
with this symbol must not be disposed of with normal
household waste.
Products and batteries contain materials that can be recov-
ered or recycled reducing the demand for raw materials.
Please recycle electrical products and batteries according to
local provisions. Further information is available at
www.2helpU.com
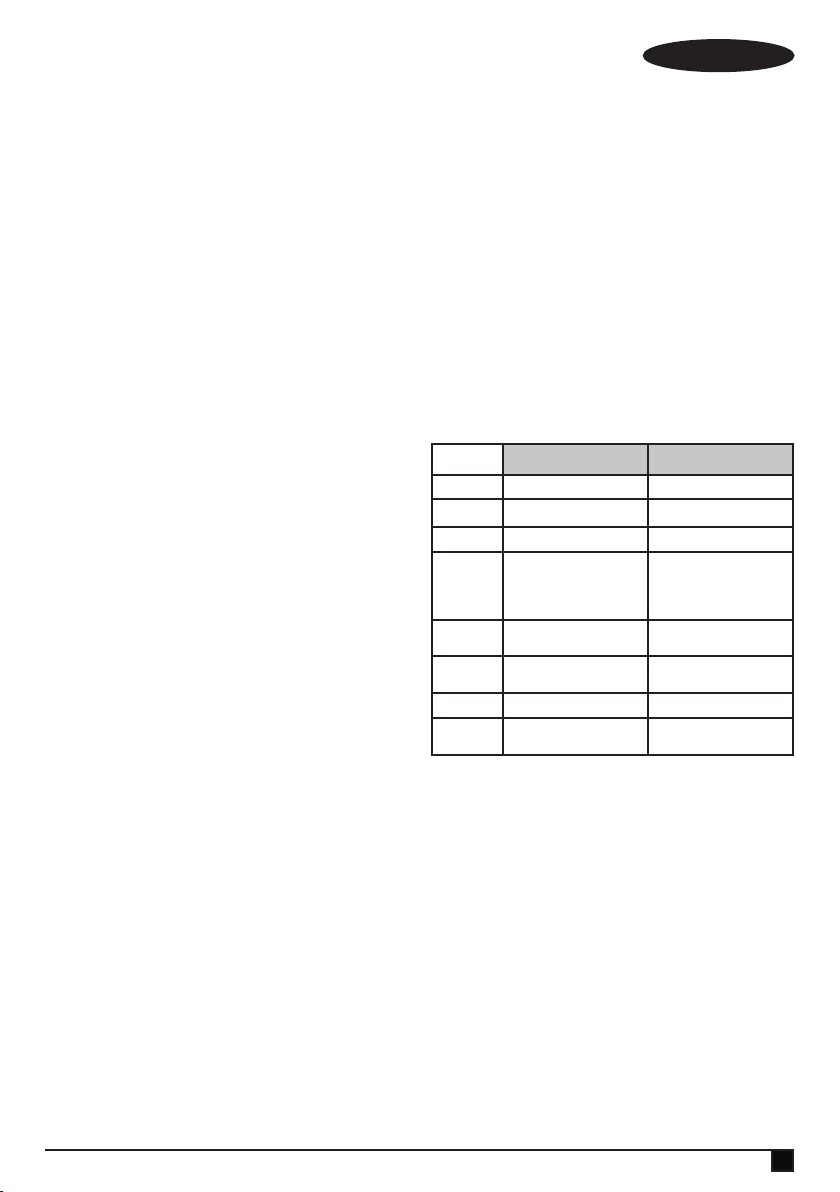
Technical data
BHSB315J BHSB320JP
Voltage (V) 12V 12V
Battery
1.5Ah 2.0Ah
Weight (Kg) 1.9Kg 2.0Kg
Charger
QW=S010QV1400040 /
S003AQV1500015
GB=S010QB1400040 /
S003AQB1500015
QW=S010QV1400040 /
S003AQV1500015
GB=S010QB1400040 /
S003AQB1500015
Input Voltage
(V
ac
)
100 - 240V
ac
100 - 240V
ac
Output
Voltage (V)
14V 14V
Current (mA) 400 400
Approx
charge time
3.75h 5h
Guarantee
Black & Decker is condent of the quality of its products and
offers consumers a 24 month guarantee from the date
of purchase. This guarantee is in addition to and in no way
prejudices your statutory rights. The guarantee is valid within
the territories of the Member States of the European Union
and the European Free Trade Area.
To claim on the guarantee, the claim must be in accordance
with Black&Decker Terms and Conditions and you will need to
submit proof of purchase to the seller or an authorised repair
agent. Terms and conditions of the Black&Decker 2 year guar-
antee and the location of your nearest authorised repair agent
can be obtained on the Internet at www.2helpU.com, or
by contacting your local Black & Decker ofce at the address
indicated in this manual.
Please visit our website www.blackanddecker.co.uk to register
your new Black & Decker product and receive updates on new
products and special offers.

N719680 REV-0 03/2020
Australia Black & Decker (Australia) Pty. Ltd. Tel. 03-8720 5100
20 Fletcher Road, Mooroolbark, Fax 03-9727 5940
Victoria, 3138
New Zealand Black & Decker Tel. +64 9 259 1133
5 Te Apunga Place Fax +64 9 259 1122
Mt Wellington
Aukland 1060
United Kingdom & Black & Decker Tel. 01753 511234
Republic Of Ireland 270 Bath Road Fax 01753 512365
www.blackanddecker.co.uk Slough, Berkshire SL1 4DX