Loading ...
Loading ...
Loading ...

5
ENGLISH
Additional safety instructions for grass trimmers
The following warning symbols are found on the appliance:
Read the manual prior to operation.
Wear safety glasses or goggles when operating this
tool.
360˚
6
m
/2
0
ft
Keep people and animals at least 6 m away from the
cutting area.
Do not expose the appliance to rain or high humidity.
Do not use heavy duty line in edging mode.
◆ Before using the appliance, check that your cutting path is
free from sticks, stones, wire and any other objects.
◆ Only use the appliance in the correct position, with the
cutting line near the ground, as shown in the illustrations.
Never switch the appliance on in any other position.
◆ Switch on the appliance only when hands and feet are
away from the cutting line.
◆ Avoid body contact with the cutting line while the
appliance is running.
◆ Do not work on steep slopes. Be sure of your footing. Be
aware that freshly cut grass is damp and slippery.
◆ Take care when trimming near borders and gravel paths
or roads, as stones and soil may be moved by the cutting
line.
◆ Do not put the appliance down until the cutting line has
come to a complete standstill.
◆ Use only the appropriate type of Black & Decker cutting
line. Never use metal cutting line or fishing line.
◆ After extending new cutting line, always return the
appliance to its normal operating position before
switching on.
◆ Take care to keep the mains cable away from the cutting
line. Always be aware of the position of the cable.
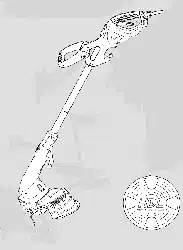
Features
This tool includes some or all of the following features.
1. Trigger lever (on/off switch)
2. Handle
3. Cable restraint
4. Power inlet
5. Secondary handle
6. Handle knob
7. Adjustment button
8. Cable storage hooks
9. Motor housing
10. Guard
11. Line trimming blade (see fig. F)
12. Spool housing
13. Cutting line
14. Line storage pouch
15. Tube
16. Spool storing position
Assembly
Warning! Before assembly, make sure that the tool is
switched off and unplugged.
Fitting the guard (fig. A)
◆ Remove the screw (17) from the guard (10).
◆ Place the guard onto the tool as shown.
◆ Firmly press the guard until it snaps into place.
◆ Secure the guard with the screw.
Warning! Never use the tool unless the guard is properly fitted.
Fitting the secondary handle (fig. B)
◆ Place the handle (5) on the tool as shown.
◆ Adjust the handle to the most comfortable position.
Use the markings as a guide.
◆ Pass the bolt (6) through the secondary handle and the
main handle.
◆ Screw the bolt into the far side of the secondary handle.
Do not overtighten the bolt.
Storing the spool not in use (fig. C)
The tool has two cutting systems:
◆ Reflex plus: Twin line autofeed for light trimming and
edging.
◆ HDL: Heavy Duty Line cutting system for more overgrown
areas.
The cutting system not in use can be stored in the position
provided (16).
◆ Align the tabs on the cutting head with the cut outs (28)
at the underside of the handle.
◆ Push the cutting head into the handle until it snaps
securely into place.
Storing the heavy cutting line (fig. C)
◆ The unit is supplied with several pieces of spare heavy
cutting line.
◆ The extra pieces of heavy cutting line can be stored
securely in the recess in the handle (14).
Releasing the cutting line
In transit, the cutting line is taped to the spool housing.
◆ Remove the tape holding the cutting line (13) to the spool
housing (12).
Loading ...
Loading ...
Loading ...