

3-IN-1 STEAM MOP
OWNER’S GUIDE
SF-295

2 | ENGLISH
IMPORTANT SAFETY INSTRUCTIONS
This owner's guide and any additional inserts are considered part of the product. They contain important
information about safety, use, and disposal. Before using the product, please familiarize yourself with
all operating and safety instructions. Please keep all documents for future reference and pass these
documents on, together with the product, to any future owner. See our website for the most current
version of this owner’s guide.
INTENDED USE: This product is intended to be used indoors for household cleaning and/or the steaming
of garments and other fabrics in the United States and/or Canada. This product is not intended for
commercial or industrial uses. The manufacturer assumes no responsibility for damage or injury due to
unauthorized use or product modication. Failure to follow these directions will void the product warranty.
WARNING: Risk to Children and Impaired Persons
Supervision is required during the installation, operation, cleaning and maintenance of this product by
children under age 12 and anyone with reduced physical, sensory or mental capabilities. Children should
be supervised to ensure that they do not play with the appliance, its parts and packaging material.
Directions to reduce risk of re, electrical shock, and injury:
1. Read all instructions before use.
2. Use caution when handling this steam unit. Burns could occur from touching hot metal parts, hot water,
or steam. Use special care to avoid contact with hot water when turning the product upside down to
empty the reservoir.
3. If an extension cord is necessary, use a properly rated cord (15 ampere, 14 gauge). Use care to position
extension cord where it is least likely to be damaged or tripped over during use.
4. Before plugging power cord into electrical outlet, be sure that all electrical information on rating label
agrees with your power supply.
5. To reduce likelihood of circuit overload, DO NOT operate another high wattage appliance on the same
circuit as this unit.
6. To protect against risk of electrical shock, do not immerse unit in water or other liquids. Do not use
power cord as handle, let it hang over edges of counters, or be crimped or closed in doors.
7. Never yank power cord to disconnect from outlet; instead, grasp plug and pull to disconnect.
8. Do not operate unit with a damaged power cord or if the unit has been dropped or damaged. To avoid
risk of electrical shock, do not disassemble unit; contact Steamfast Consumer Service for examination
and repair. Incorrect reassembly can cause a risk of electrical shock when unit is used.
9. A loose t between wall outlet (receptacle) and plug may cause overheating and distortion of the
plug. Discontinue use of the product in this outlet. Contact a qualied electrician to replace loose or
wornoutlets.
10. Do not leave unit unattended while plugged in.
11. Do not use unit where aerosol-based products are being used, or where oxygen is beingadministered.
12. Unit is only meant to be used with recommended accessories. Using other types of attachments may
cause damage to unit or injury.
13. If Lighted On/Off Switch does not illuminate when set to “ON” position while power cord is plugged
in, unit is not operating normally. Immediately disconnect cord from power supply, then refer to
troubleshooting guide in this manual for assistance.
14. Always disconnect appliance from electrical outlet when lling with water or emptying, and when not
in use.
15. When lling, only water should be used in unit – other cleaning agents could damage unit or cause
injury. Distilled or de-mineralized water is highly recommended, in order to minimize potential build-up
of mineral deposits. Do not ll with more than 15 oz. (444 ml.) of water. Do not attempt to use unit
without properly lling the unit.
16. To avoid burns from escaping steam when removing cap to rell unit:
• Always allow unit to cool for 5-10 minutes.
• Press and hold Steam Button to release all remaining steam pressure. To reduce risk of contact with
hot water, check appliance before each use by positioning it away from body and turning it on. Do
ENGLISH | 3
not operate unit if Main Nozzle is blocked.
17. Burns can occur from touching hot metal parts, hot water, or steam. Do not touch Main Nozzle or
attempt to connect accessories while unit is in use. Do not touch removable accessories or attempt to
change accessories while unit is in use. Use caution when you turn unit upside-down – there may be
hotwater.
18. Use caution when using unit on uneven surfaces, such as stairs.
19. When steaming any surface for the rst time, it is recommended that you consult the manufacturer’s
guidelines for material being steamed. For items in question, test on an inconspicuous area
beforeproceeding.
20. Steaming unsealed hardwood or unglazed ceramic surfaces is not recommended, and may result in
warping or damage to the surface. Steam may remove the sheen from surfaces treated withwax.
21. When steam mopping, never leave unit resting in one spot on any surface for any period of time –
prolonged exposure to heat and moisture may damage oor surfaces.
22. Do not allow power cord to touch hot surfaces during use. Bundle cord loosely when storing.
23. Always allow unit to cool (at least 30 minutes for complete cooling) and empty before storing. Do not
store unit with damp accessories, including a Microber Pad, still attached.
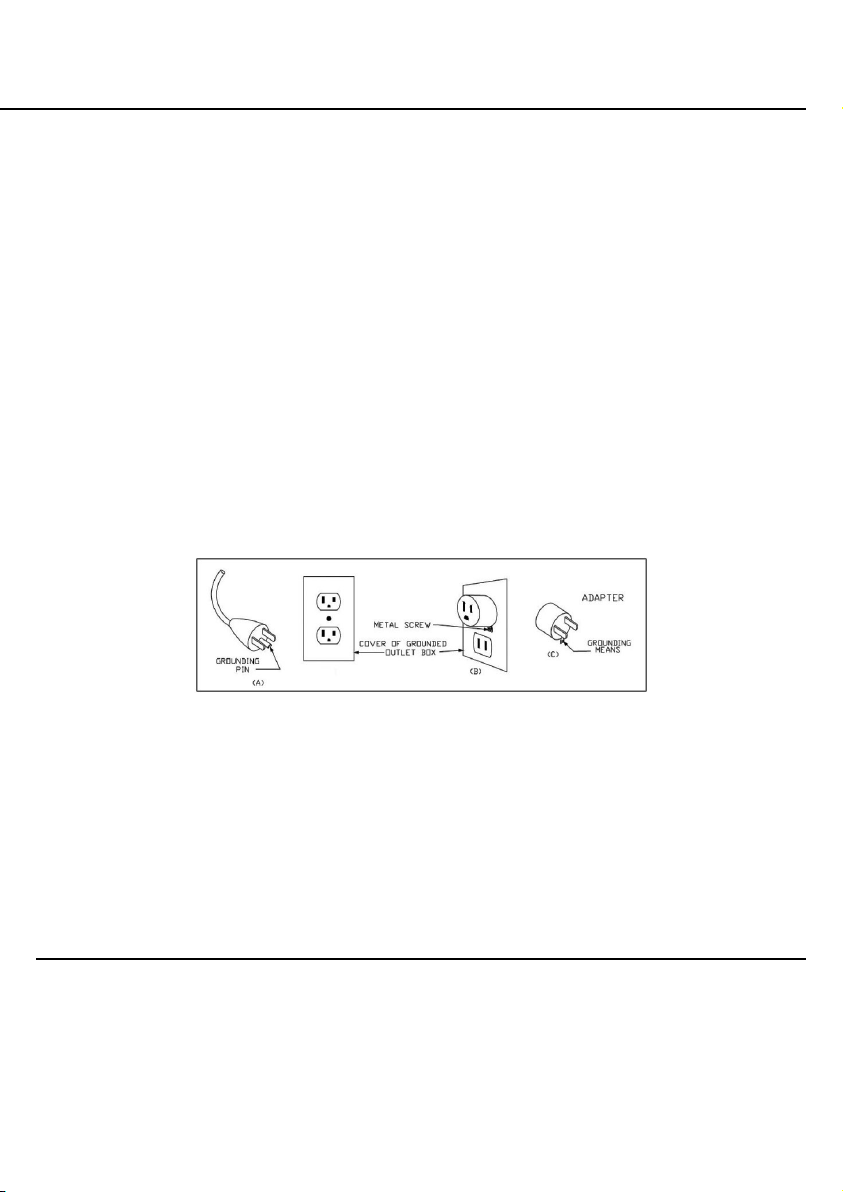
24. This product for use on 120 volt electrical outlets. The cord has a plug as shown at A in Figure 65.1.
An adapter, as shown at C, can be used to connect three-blade grounding-type plugs to two-slot
receptacles (it is not included with your product). The green grounding lug extending from the adapter
must be connected to a permanent ground such as a properly grounded outlet box. An adapter should
not be used if a three-slot grounded receptacle is available. *NOTE: A TWO-PRONG ADAPTOR IS
NOT INCLUDED WITH THIS PRODUCT.
WARNING: Changes or modications to this unit not expressly approved by the party responsible for
compliance could void the user’s authority to operate the equipment.
FCC CONSUMER ADVISEMENT: This equipment may generate, use and/or radiate radio frequency
energy that may cause harmful interference to radio communications. If this equipment does cause harmful
interference to radio or television reception, which can be determined by turning the equipment off and
on, the user is encouraged to contact Steamfast Consumer Service at 1-800-711-6617.
SAVE THESE INSTRUCTIONS
Questions or comments?
• steamfast.com
• 1-800-711-6617
Speak your mind! We invite you to review this product online:
steamfast.com/reviews
Figure 65.1
4 | ENGLISH
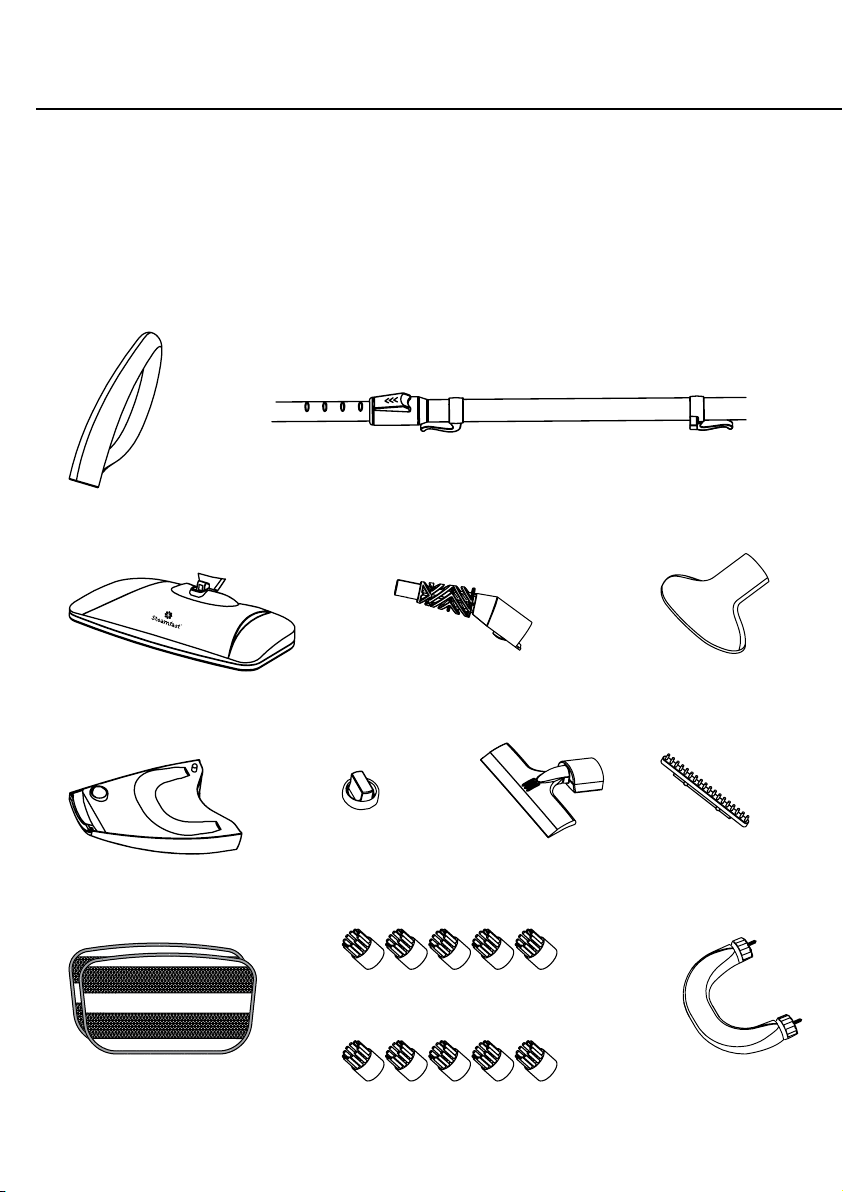
The following features and accessories are included with your 3-in-1 Steam Mop. Carefully
inspect the packing material for all parts listed below.
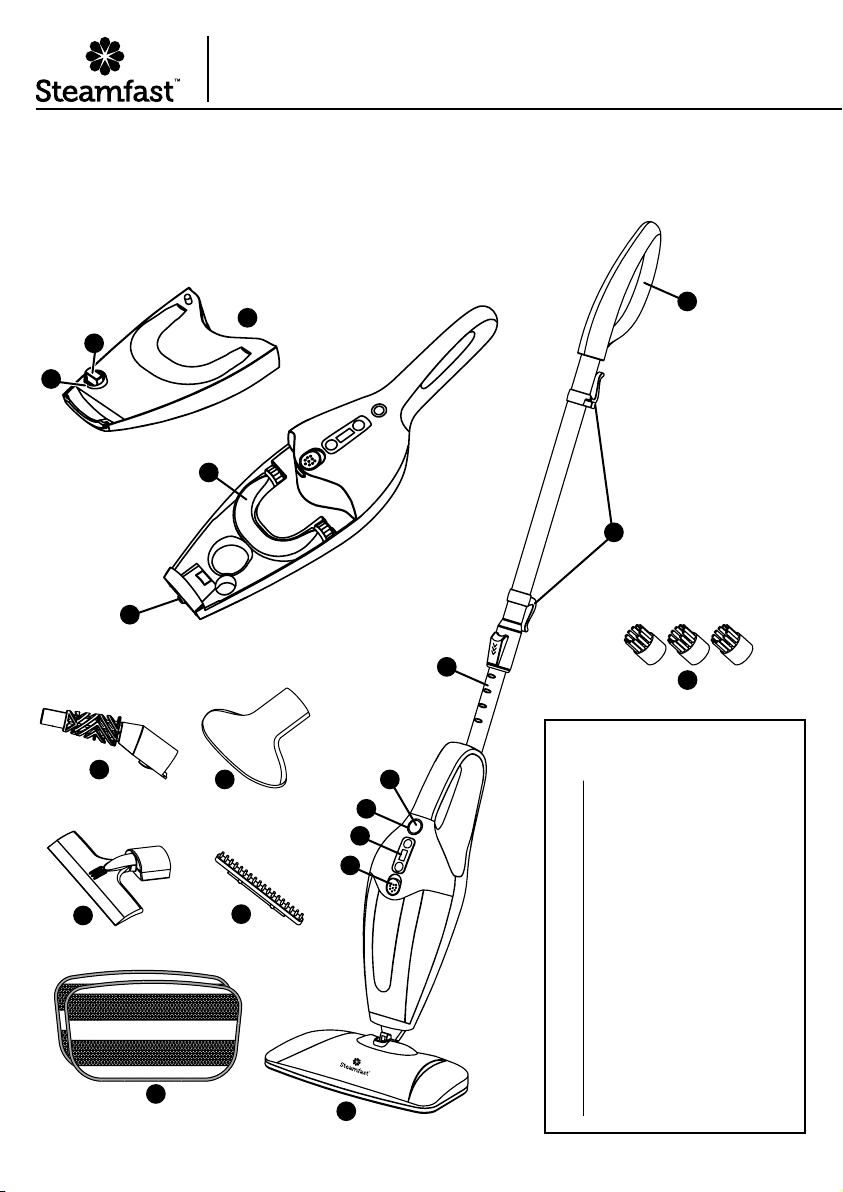
UNIT FEATURES
& ACCESSORIES
Steam Nozzle
Water Tank
Water Tank Cap
Water Tank Fill Hole
Power Indicator Light
Power Button
LCD Display Control
Water Tank Release Button
Extension Pole
Handle
Cord Brackets
Mop Head
Microber Pads (2)
Utility Brushes (3)
Jet Nozzle
Fabric Nozzle
Squeegee
Fabric Brush
Water Treatment Cartridge
1
2
2A
2b
3
4
5
6
7
7A
7b
8
9
10
11
12
13
14
15
2
2A
2B
3
4
5
6
7
7A
7B
1
8
11
9
14
12
13
10
15
Product Information

ENGLISH | 5
• The Steam Nozzle (1) emits the ow of hot, penetrating steam. The Mop Head, Jet Nozzle, Fabric
Nozzle and Squeegee all connect to the Steam Nozzle.
• The Water Tank (2) is the reservoir where water is held before being transferred to the heat
exchange and converted to steam. The Water Tank holds 15 oz. (444 ml.) of water.
• The Water Tank Cap (2A) covers the Water Tank Fill Hole, and must be removed in order to ll the
Water Tank with water. To unlock the Water Tank Cap turn counter-clockwise. To lock the Water
Tank Cap turn clockwise.
• The Water Tank Fill Hole (2B) is the opening through which water is poured into the Water Tank.
• The Power Indicator Light (3) illuminates to indicate that the unit is powered On and heating.
• The Power Button (4), located on the front of the 3-in-1 Steam Mop, activates and deactivates the
unit. The Power Button is pressed to turn the unit On, and pressed again to turn the unit Off.
• The LCD Display Control (5) is used to view and set desired steam intensity by pushing the "+" or
"-" push buttons.
• The Water Tank Release Button (6) releases the Water Tank from the Mop Body.
• The Extension Pole (7) connects to the main body of the unit, and is designed for convenient use
on oors, windows, and other out-of-reach surfaces.
• The Handle (7A) provides a comfortable grip when using the Extension Pole.
• The Cord Brackets (7B) provide a safe and convenient way to store the power cord when not in use.
• The Mop Head (8) connects to the Steam Nozzle, for steam cleaning a variety of hard oors.
NOTE: It is NOT recommended that this unit be used on unsealed oors. Use care when
steaming oors that may be warped or damaged by heat and moisture, and limit use of this
unit on these types of surfaces.
• The Microber Pads (9) each attach to the pad grips on the bottom of the Mop Head. The Pads
are designed to clean scuffs and stains from hard oors. The Microber Pads are reusable and
machine washable. Two Pads are included.
NOTE: Microber Pads are not designed to absorb and collect large amounts of dirt. For best
results, it is recommended to vacuum oor before mopping.
• The 3 Utility Brushes (10) connect to the Jet Nozzle, and are designed for scrubbing tough stains.
There are two nylon Brushes for general scrubbing (such as carpet), and a brass-bristled Brush for
scrubbing metal surfaces (such as oven and grill racks).
NOTE: Use careful judgement when deciding what surface to clean with the brass Utility Brush.
Some delicate surfaces, such as stainless steel, may be scratched or damaged by the brass
bristles. If you are unsure whether or not a surface will be damaged, it is recommended that
you test a small inconspicuous spot before proceeding.
• The Jet Nozzle (11) connects to the Steam Nozzle, and is designed to focus the ow of steam for
concentrated cleaning.
• The Fabric Nozzle (12) connects to the Steam Nozzle, and is designed to disperse the ow of
steam for steaming fabrics, linens and upholstery.
• The Squeegee (13) connects to the Steam Nozzle, and is used for cleaning windows, mirrors, and
other smooth glass surfaces.
• The Fabric Brush (14) connects to the Fabric Nozzle to remove larger particles like loose threads
and hairs and rejuvenate bers.
• The Water Treatment Cartridge (15) removes impurities from water to prolong the life of the unit.

6 | ENGLISH
STEAM MOP SETUP
EXTENSION POLE
1. Connect Handle to upper, wider end of Telescopic Pole. To do this, simply slide Handle onto
Telescopic Pole until it locks into place (Figure 1-A).
2. Insert lower, narrower end of Telescopic Pole into Mop Body (Figure 1-B). Make sure
Release Button aligns with the small hole on Mop Body. Press Telescopic Pole until Release
Button snaps through small hole on Mop Body. Telescopic Pole should now be secured to
MopBody.
NOTE: In order to coax Release Button through hole, it may be necessary to rotate and
adjust Telescopic Pole until button aligns properly with hole.
3. To adjust the height of Telescopic Pole, press and hold Extension Lock downward (Figure
1-C). While holding Extension Lock down, move Telescopic Pole until it is adjusted to the
desired height. Release Extension Lock, then move Telescopic Pole again until it “clicks”
securely into place.
4. To disconnect Telescopic Pole for storage, press rmly on Release Button on Mop Body
while simultaneously pulling Telescopic Pole upward from Mop Body (Figure 1-D).
NOTE: Increasing length of Extension Pole may provide additional leverage for easier,
more effective steam mopping.
FIGURE 1-A FIGURE 1-B FIGURE 1-C FIGURE 1-D
±
±
±
±
±
±
Assembling Your
3-in-1 Steam Mop
ENGLISH | 7
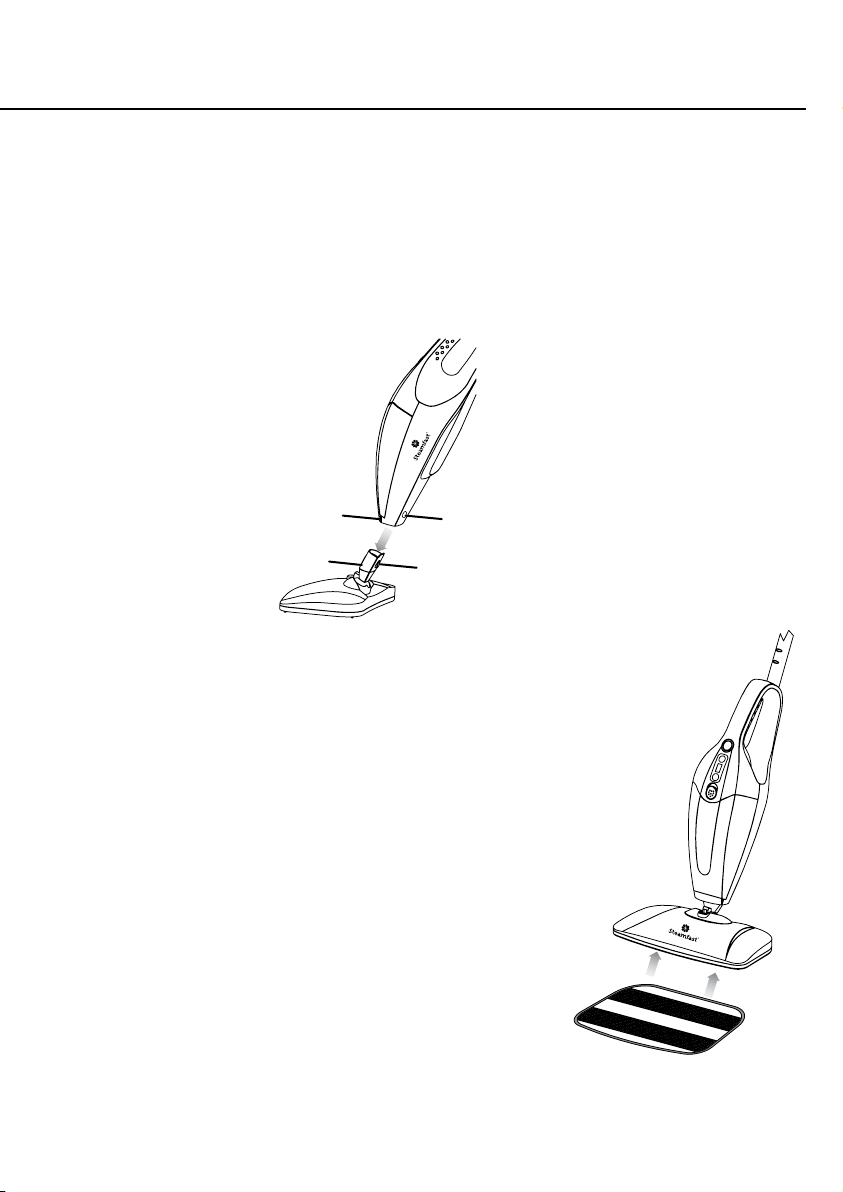
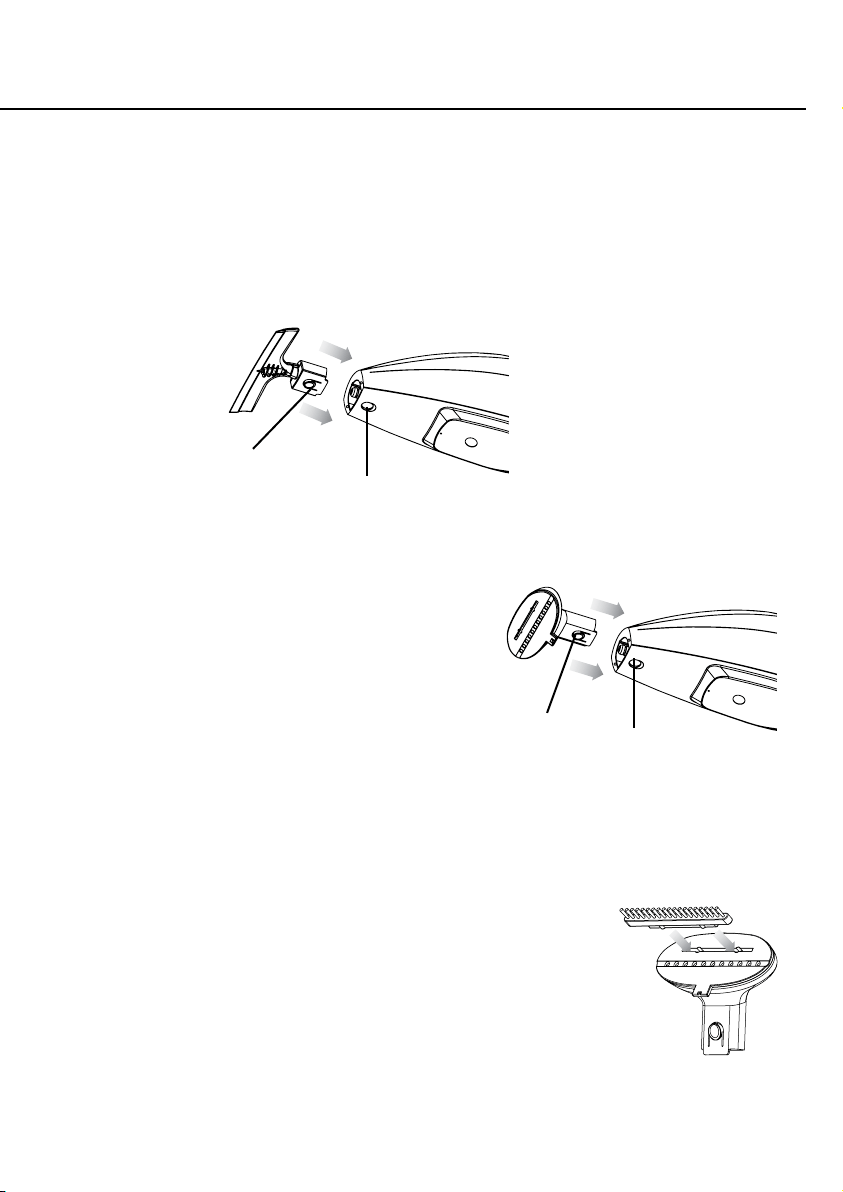
MOP HEAD
CAUTION: Always allow unit to cool before connecting/disconnecting any accessories.
1. Align Mop Head with main unit as shown (Figure 2).
2. Slide Mop Head neck into Steam Nozzle, pressing rmly until release button snaps
throughhole.
3. To remove Mop Head, press rmly on release button while simultaneously pulling Mop Head
away from Steam Nozzle.
MICROFIBER PADS
1. Lay one Microber Pad on at surface, with two fastener
strips facing upward.
2. Align Mop Head above Microber Pad. Make sure Mop
Head is oriented with Pad as shown, and centered as best
as possible (Figure 3).
3. Press Mop Head rmly down onto Microber Pad.
Fastener strips will adhere to pad grips on underside
of Mop Head. Pad should now be attached and ready
foruse.
CAUTION: Use care when handling a recently used
Microber Pad, as it may still be hot.
NOTE: Microber Pads are machine washable. To
avoid picking up lint, washing separately from other
fabrics is recommended. Only use liquid detergent.
Avoid using any fabric softeners or bleach. Air drying
is recommended; machine drying on a low setting is
acceptable as well.
HOLE
FIGURE 3
RELEASE
BUTTON
FIGURE 2
±
±
±
MOP HEAD NECK
STEAM NOZZLE
8 | ENGLISH
STEAM CLEANER SETUP
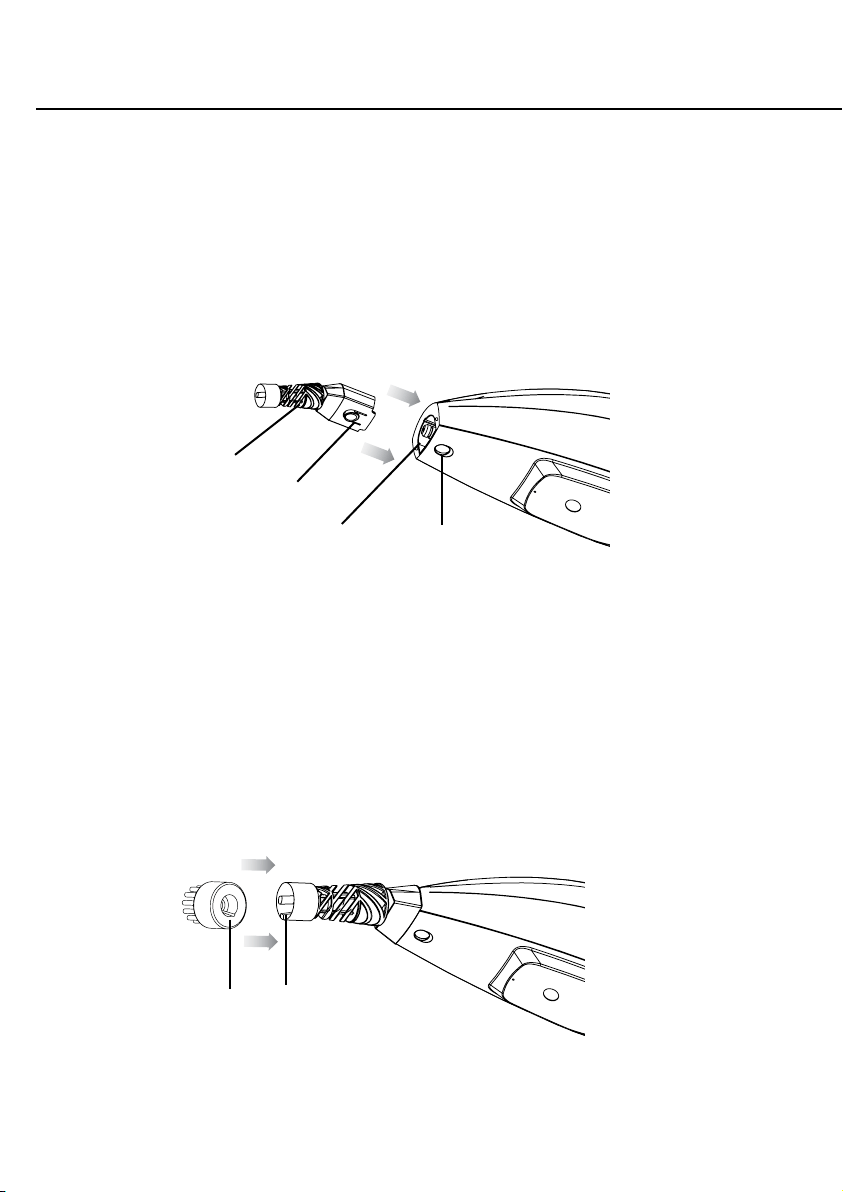
JET NOZZLE
CAUTION: Always allow unit to cool before connecting/disconnecting any accessories.
1. Align Jet Nozzle with Steam Nozzle as shown (FIGURE 4).
2. Slide Jet Nozzle into Steam Nozzle, pressing rmly until release button snaps through hole.
3. To remove Jet Nozzle, press rmly on release button while simultaneously pulling Jet Nozzle
away from Steam Nozzle.
UTILITY BRUSHES
CAUTION: Metal tip of Jet Nozzle becomes hot during use. Always allow unit to cool
before connecting/disconnecting any accessories.
1. Align Utility Brush by lining up the ridge on the inside of the Brush with the groove on Jet
Nozzle as shown (FIGURE 5), and press it rmly on as far as it will go.
STEAM
NOZZLE
JET
NOZZLE
FIGURE 4
FIGURE 5
±
±
±
±
RELEASE
BUTTON
HOLE
RIDGE GROOVE
ENGLISH | 9
SQUEEGEE
CAUTION: Always allow unit to cool before connecting/disconnecting any accessories.
1. Align Squeegee with Steam Nozzle as shown (FIGURE 6).
2. Slide Squeegee into Steam Nozzle, pressing rmly until release button snaps through hole.
3. To remove Squeegee, press rmly on release button while simultaneously pulling Squeegee
away from Steam Nozzle.
FABRIC STEAMER SETUP
FABRIC NOZZLE
CAUTION: Always allow unit to
cool before connecting/disconnecting
anyaccessories.
1. Align Fabric Nozzle with Steam Nozzle as
shownFIGURE 7).
2. Slide Fabric Nozzle into Steam Nozzle, pressing rmly
until release button snaps through hole.
3. To remove Fabric Nozzle, press rmly on release button while
simultaneously pulling Fabric Nozzle away from SteamNozzle.
FABRIC BRUSH
CAUTION: Always allow unit to cool before connecting/
disconnecting any accessories.
1. Align Fabric Brush with Fabric Nozzle.
2. Insert tab on Fabric Brush into slot on face of Fabric Nozzle
(FIGURE 8). Press in until secure.
3. To remove Fabric Brush, simply pull it off of Fabric Nozzle.
It does not need to be released or otherwise unlocked.
FIGURE 6
FIGURE 7
FIGURE 8
±
±
±
±
RELEASE
BUTTON
HOLE
RELEASE
BUTTON HOLE
±
±
10 | ENGLISH
FIGURE 1 FIGURE 2 FIGURE 3
Water Tank
Release
Button
±
FILLING WATER TANK
NOTE: Do not turn unit upside-down when Water Tank is full - a small amount of water may
leak out.
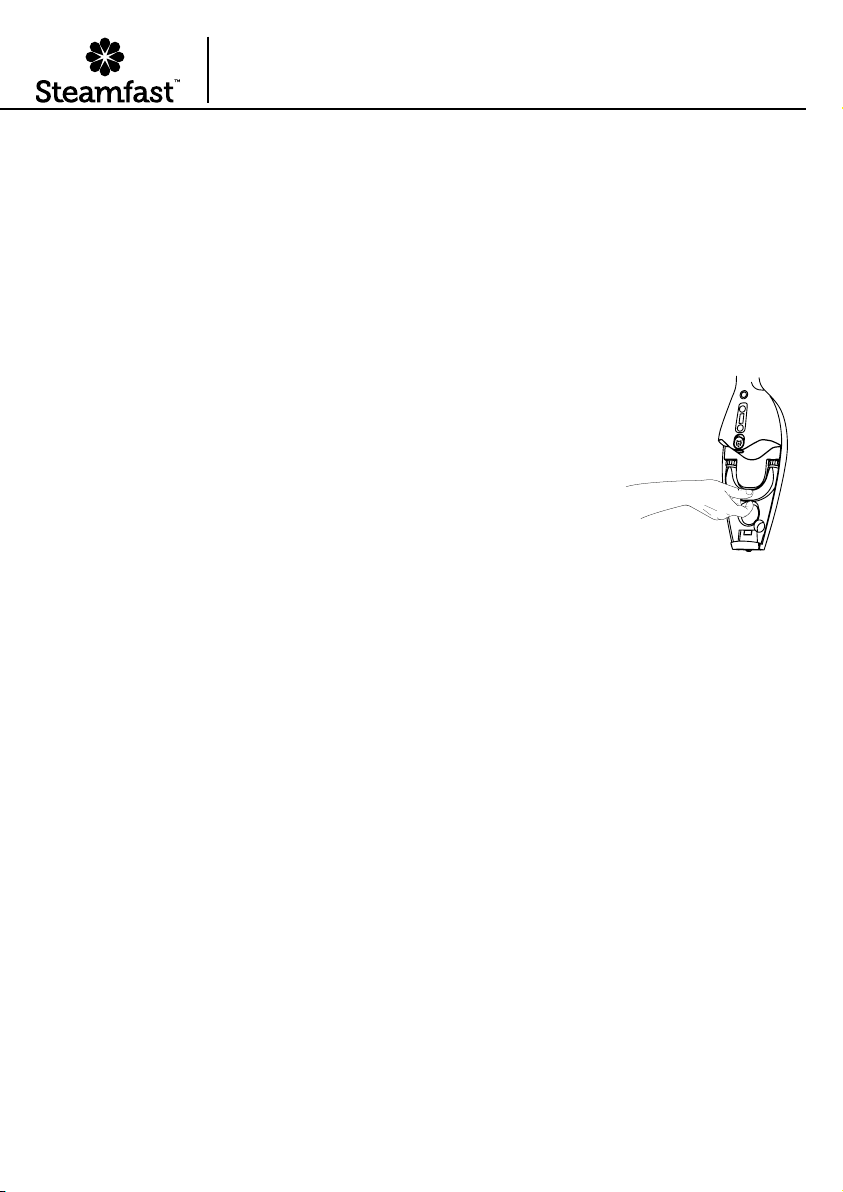
1. Slide the Water Tank Release Button upward (Figure 1) and hold as you remove Water Tank.
Pull Water Tank upwards and towards you to remove.
2. Remove Water Tank Cap by unscrewing it in a counter-clockwise direction to unlock. Pull
Water Tank Cap out (Figure 2). Fill Water Tank with room temperature water, up to 15 oz.
(444 ml.), and replace Water Tank Cap so that the grooves on top and bottom of Water Tank
Cap align with the tabs inside Fill Hole. Screw Water Tank Cap in a clockwise direction to
lock (Figure 3).
3. Slide the Water Tank Release Button upward and hold. Insert Water Tank inside the cavity of
Mop Body (inserting and aligning the bottom of Water Tank rst). Push Water Tank forward
until locked into place.
NOTE: In order to signicantly reduce mineral build-up and prolong the life of your 3-in-1
Steam Mop, use of distilled or de-mineralized water in the unit is highly recommended.
NOTE: The tube that transfers water from the Water Tank to the boiler is weighted down
with a brass ball. This is an intentional design to improve efciency of water usage. It is
normal for this ball to create a rattling sound inside of Water Tank during use.
If you think brass ball has come loose from tube, refer to troubleshooting guide.
Using Your
3-in-1 Steam Mop
Choking hazard. Small parts.
Keep away from children and pets.

ENGLISH | 11
GENERAL OPERATION
NOTE: Be sure that Water Tank has been lled and all
desired accessories are connected before following these steps.
1. For rst-time use, remove protective plastic cover that is shipped on
electrical plug. Plug power cord into a 120V grounded electrical outlet.
2. Press the Power Button to turn the unit On. Power Indicator Light will
immediately illuminate to indicate that unit is powered on and heating.
Select desired steam setting (Default setting is Level 4). Increase the
steam setting by pressing the "+" button or decrease the steam setting by
pressing the "-" button.
NOTE: Steam settings are broken down by intensity (Levels 1 - 7 with
Level 1 “LOW” setting, Level 7 “HIGH” setting and Level 4 “DEFAULT” setting) as well as function
(“MOP/FABRIC” & “HANDHELD CLEANER”).
3. After approximately 30 seconds, you will hear a buzzing sound as unit begins to emit steam.
4. Direct Steam Nozzle (with any connected accessories) towards surface you wish to steam. Refer to
Steam Mopping section below, as well as Fabric Steaming and Steam Cleaning sections for further
details.
CAUTION: Always be sure that Steam Nozzle and any accessories are pointed in a safe direction
(away from yourself, other people, pets and plants) when steaming.
STEAM MOPPING
NOTE: It is recommended to sweep or vacuum oors before mopping.
• Make sure Extension Pole, Mop Head and a Microber Pad are all properly connected.
• Follow General Operating Instructions above to begin steaming.
• Mop using a steady back-and-forth motion over the oor, working your way backwards in order to avoid
walking over the freshly mopped area.
NOTE: To avoid warping or damage caused by heat and moisture, do not use on unsealed hardwood
or unglazed ceramic surfaces. Care should also be taken when steaming sealed hardwood oors, as
prolonged exposure to steam in a single spot may cause damage and discoloration.To avoid this,
keep the 3-in-1 Steam Mop in constant motion on these surfaces. Steam may remove the sheen from
some oors that have been treated with wax.
Surfaces that are not properly sealed may be warped or damaged by exposure to heat and moisture.
Before steaming any ooring, it is recommended to consult the manufacturer’s guidelines.For ooring in
question, always test on a small inconspicuous area before proceeding.
• The Microber Pad will absorb moisture during mopping. However, depending on oor surface and
steam intensity setting, some residual moisture may be left behind. In this case, it is recommended to
allow oor time to air-dry. A fan may be directed towards mopped area to facilitate drying.

12 | ENGLISH
FABRIC STEAMING
CAUTION: When steaming any material for the rst time, it is recommended that you test on
a small inconspicuous area before proceeding. Do not use on synthetic fabrics, velvet, or other
steam-sensitive materials.
• Make sure Fabric Nozzle is properly connected.
• For general steaming convenience, Extension Pole should be removed so that unit functions as a
handheld fabric steamer.
• Follow General Operating Instructions to begin steaming.
• For fabrics and linens, direct Fabric Nozzle towards material you wish to steam, and keep the ow of
steam focused there. Using a slight back-and-forth motion over the area you are steaming will further
enhance the steaming process.
• For garments:
- Hang garment from a clean, rust-free hanger.
- Direct Fabric Nozzle towards bottom of garment. Steam will rise along inside and outside of
material, removing wrinkles. Slowly slide Fabric Nozzle upward from bottom to top of garment.
- Direct Fabric Nozzle away from garment and smooth material with your free hand.
- Repeat as necessary until garment is fresh and wrinkle-free.
• General steaming tips:
- Curtains and draperies can be steamed while still hanging.
- To remove wrinkles from towels, handkerchiefs and napkins, drape them over a rod or towel rack
and gently steam them.
- Heavier fabrics may require repeated steaming to achieve desired results.
- To remove exceptionally stubborn wrinkles, steam both sides of fabric.
- Be especially careful when steaming any delicate fabrics that may be damaged by water spotting.
STEAM CLEANING
CAUTION: When steaming any surface for the rst time, it is recommended that you test on a
small inconspicuous area before proceeding. Do not use on leather, wax, polished furniture and
oors, or other delicate, steam-sensitive surfaces.
• Make sure desired cleaning accessories are properly connected.
• For general cleaning convenience, Extension Pole should be removed so that unit functions as a
handheld steam cleaner.
• Follow General Operating Instructions to begin steaming.
• Direct Jet Nozzle towards surface you wish to steam. Use a slight back-and-forth motion over area to
enhance the cleaning process.
• When using Squeegee, start by thoroughly steaming entire window or mirror, then turn steam off.
Next, press Squeegee to top of window or mirror, and pull slowly downward. Move slowly from one
side of the surface to the other in this fashion until entire surface is clean.
• Wipe steamed areas with a clean cloth to remove loosened dirt and grime. Wiping the area while it is
still wet is recommended, but use caution when wiping surfaces such as metal that may still be hot.

ENGLISH | 13
APPLICATIONS
Below is a listing of some possible applications of the 3-in-1 Steam Mop. These are intended to
provide some general guidelines as you become more familiar with your steamer. You will likely
discover a wide variety of other uses around your home.
NOTE: Start with lower settings and increase only as needed to quickly and easily achieve your desired
results. Higher steam settings increase the amount of moisture being emitted with the steam.
STEAM MOPPING FABRIC STEAMING STEAM CLEANING
Level 1 – 3 Steam Setting
Smooth, at surfaces
Sealed hardwood
Sealed laminate
Linoleum
Ceramic
Granite
Marble
Level 3 – 5 Steam Setting
Textured, porous surfaces
Stained concrete
Vinyl
Tile
Level 1 – 2 Steam Setting
Most fabrics
Garments
Upholstery
Level 3 – 5 Steam Setting
Heavy fabrics
Curtains & drapes
Level 5 – 7 Steam Setting
Windows / mirrors
Kitchen / bath xtures
Ceramic tile / grout
Ovens / BBQ grills
Stove / counter tops

14 | ENGLISH
GENERAL STEAMING TIPS
You will nd nearly limitless uses for your 3-in-1 Steam Mop. There are no rules when it
comes to steam cleaning and/or the attachments you received with your unit. Use whichever
attachment seems to accomplish the intended job quickly and easily. Below are a few
startingguidelines:
• Many surfaces only require to be sprayed with the Jet Nozzle to clean and disinfect them,
then wiped with a clean dry cloth, towel, or paper towel.
EX: kitchen counters, microwaves, stove tops, bathroom sinks, kitchen and bath xtures
• The nylon Utility Brushes can be used on most surfaces for hard-to-remove dirt, grime spots
or stains. EX: baked on food on ovens and oven doors, baked on stove top spills, bath
and/or kitchen grease and grime, rubber seal on the refrigerator, under/around bath
and kitchen xtures, bath tile seams, grouting
NOTE: Use careful judgement when deciding what surface to clean with the Utility Brush.
Some delicate surfaces may be scratched or damaged by the bristles. If you are unsure
whether or not a surface will be damaged, it is recommended that you test a small
inconspicuous spot beforeproceeding.
• Steam is effective for removing spots and stains from clothing and upholstery. This can be
done with steam alone or with a stain remover designed for your specic use. DO NOT put
any type of chemical or liquid product in your steamer. Only water is to be used in the unit.
• Older, dried stains on carpet or hard oor surfaces may require a bit of extra scrubbing with
the Utility Brush and/or a product designed for stain removal. It is helpful on carpet to blot
with a clean dry towel to help remove the spot/stain.
• The brass Utility Brush is useful for heavy-duty jobs and durable surfaces such as BBQ grills,
oven racks, etc. DO NOT use this Brush on anything that the hard bristles might scratch
ordamage.
• The Extension Pole should be attached for mopping oors, but is also useful for reaching
overhead or otherwise hard-to-reach places. When raising unit to reach high places, it is best
to grasp Pole with both hands for better support.
This should help to get you started with your new 3-in-1 Steam Mop. As you use your steamer,
you will nd what works best for you and your cleaning projects. Should you have any
questions on how to best utilize you new steamer, please feel free to contact our Consumer
Service Department at:
1-800-711-6617 or [email protected]
ENGLISH | 15
Storage & Care
PROPER STORAGE
Preparing your 3-in-1 Steam Mop for storage is quick and simple. When you have completed your tasks,
follow the steps listed below.
1. Press Power Button to Off (the red Power Indicator Light will turn off), and unplug power cord.
2. Allow unit time to cool (at least 5 minutes).
3. Remove all attachments and accessories from unit.
4. Remove Water Tank Cap and drain any remaining water from Water Tank into a sink or tub to minimize
potential mineral build-up. Replace Water Tank Cap when done.
5. Collapse Extension Pole to shortest length and wrap power cord around Cord Brackets.
6. Store 3-in-1 Steam Mop in a cool, dry location, along with all included accessories.
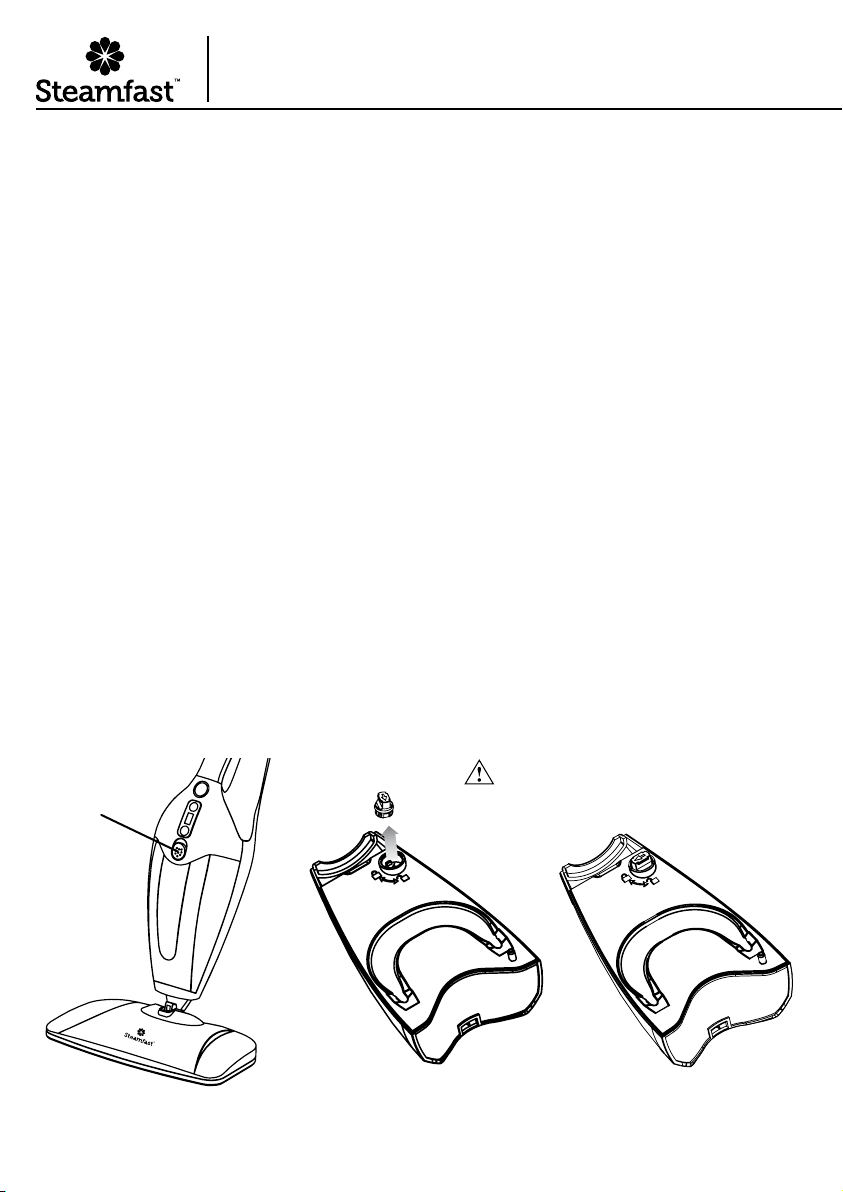
WATER TREATMENT CARTRIDGE
Your 3-in-1 Steam Mop includes a removable Water Treatment Cartridge, which
removes impurities from water to prolong the life of the unit. To keep the Water
Treatment Cartridge functioning at its maximum potential, it is recommended that
it be removed and replaced after 40 hours of use. To do this:
1. Remove Water Tank.
2. Grasp Water Treatment Cartridge handle and pull towards you to remove.
3. Replace with a new Water Treatment Cartridge (Figure 1) and replace
WaterTank.
MINERAL BUILD-UP
A common maintenance need for steam appliances is the removal of build-up caused by high mineral
content in many municipal water supplies. This mineral build-up may limit the effectiveness and reduce the
life of your 3-in-1 Steam Mop.
The best way to minimize mineral build-up is to use distilled or de-mineralized water when using your
3-in-1 Steam Mop. In addition, it is recommended that the cleaning procedure below be followed at least
once a month in order to remove any deposits that form. This will help to extend the life of your 3-in-1
Steam Mop and keep it functioning at its maximum potential.
To remove mineral build-up:
1. Follow STEPS 1-4 under Proper Storage section above. However, do not replace Water Tank
Cap at the end of STEP 4.
2. Fill Measuring Cup (not included) with 3.5 oz. (103 ml.) distilled water and 1.5 oz. (44 ml.) vinegar.
3. Slowly pour water-vinegar solution into Water Tank through Fill Hole, then replace Water Tank Cap.
4. Plug in power cord and press Power Button to “ON” and increase steam setting to Level 7 “HIGH”. Allow
unit to steam for 1 minute, then press Power Button to “OFF”.
5. Allow unit to sit for approximately 30 minutes, then press Power Button to “ON” and increase steam setting
to Level 7 “HIGH” and allow the remainder of the Water Tank’s contents to be steamed out.
6. Once Water Tank is drained, turn unit off and rell Tank with 15 oz. (444 ml.) of fresh distilled water. Press
Power Button to “ON” and increase steam setting to Level 7 “HIGH,” and allow unit to steam until Water
Tank is empty. Repeat as necessary until vinegar odor dissipates.
7. Press Power Button to “OFF”, unplug power cord and store 3-in-1 Steam Mop as usual.
IMPORTANT: On average, it is recommended that you follow the mineral build-up removal procedure
once per month (if unit is used once every week). More frequent use may require following the
procedure more often in order to keep your 3-in-1 Steam Mop operating at full potential. Do not
exceed 20 hours of use without cleaning out mineral build-up.
FIGURE 1
16 | ENGLISH
Troubleshooting
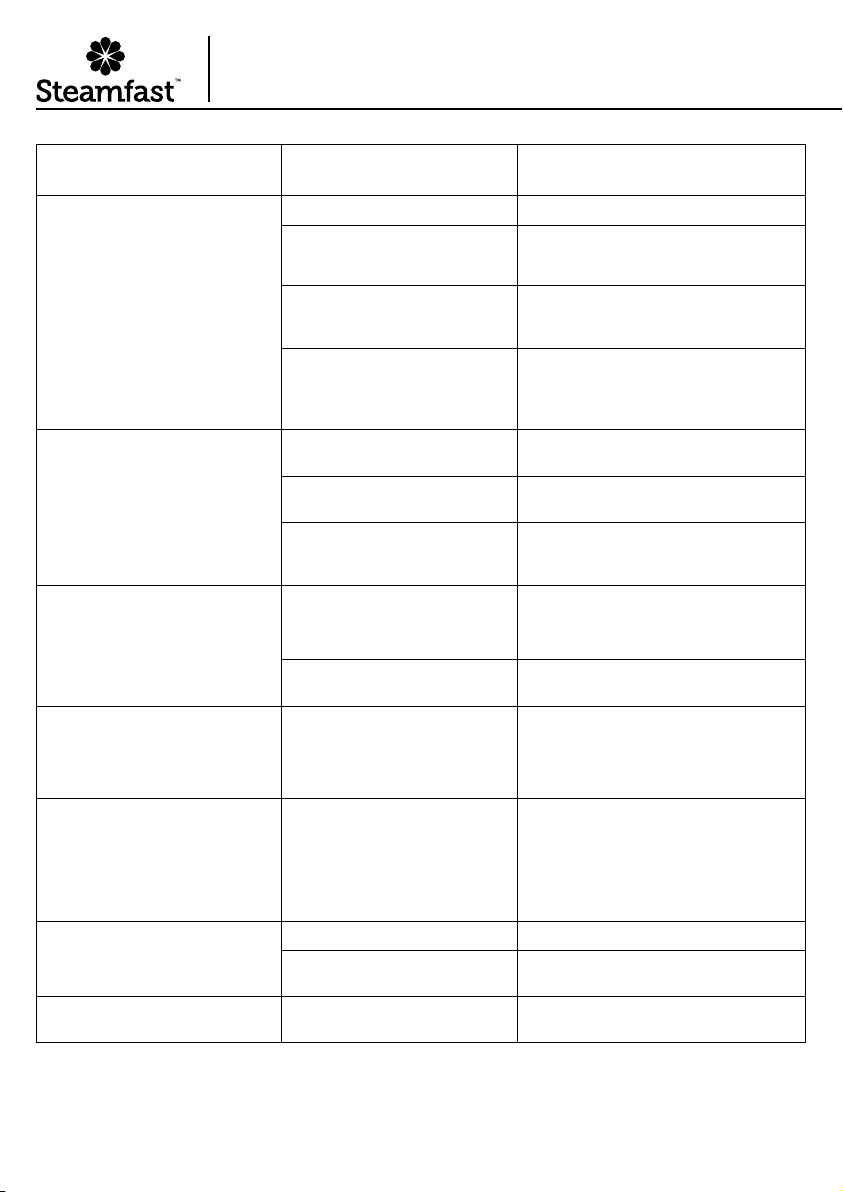
PROBLEM POSSIBLE CAUSE SOLUTION
Unit fails to heat up. Heating
Indicator Light DOES illuminate.
Unit is not plugged in. Plug power cord into electrical outlet.
The Power Button is pressed Off.
Make sure the Power Button is pressed to
turn the unit On, and Power Indicator Light
is illuminated.
Household circuit breaker /
ground fault interrupter has
tripped or blown a fuse.
Reset circuit breaker / ground fault
interrupter, or replace fuse. If you need
assistance, contact a licensedelectrician.
Unit is damaged or otherwise in
need of repair.
Immediately cease usage and
unplug. Contact Consumer
Service for further assistance.
Unit heats up, but fails to steam.
Power Indicator Light
doesilluminate.
(NOTE: Always allow proper time
for unit to heat up and begin
producing steam.)
Water Tank is empty. Refer to Filling Water Tank
procedure.
Mineral build-up in unit. Refer to Mineral Build-up section for
cleaning procedure.
Weighted brass ball connected to
end of water tube inside Water
Tank has come loose.
If brass ball has become disconnected
contact Consumer Service for further
assistance.
Steam output is weak or intermit-
tent.
The LCD Display Control is set to
“LOW” or steam setting Level 1.
Increasing the steam setting by pressing the
"+" button will result in a stronger (and wet-
ter) ow of steam.
Mineral build-up in unit. Refer to Mineral Build-up section for
cleaning procedure.
Excess water in steam ow. The LCD Display Control is set to
“HIGH” or steam setting Level 7.
At "HIGH” or steam setting Level 7, some
amount of water may be released along with
the steam. Decreasing the steam setting by
pressing the "-" button will reduce this water
spotting.
Rattling sound is heard coming
from Water Tank.
Sound is being caused by
weighted brass ball connected to
end of water tube inside Tank.
The weighted brass ball is an
intentional design that helps the
unit more efciently utilize all
water inside of Water Tank.
If brass ball has become disconnected
contact Consumer Service for further
assistance.
Floor surfaces appear cloudy or
streaky after steaming.
Microber Pad is dirty. Replace Microber Pad with a cleanone.
Hard water residue on oor. Switch to distilled or de-mineralized
water.
Steam coming through Pressure
Relief Valve on back of unit.
Mineral build-up in unit. Refer to Mineral Build-up section for
cleaning procedure.
ENGLISH | 17
ACCESSORIES & PARTS
When ordering accessories and parts for your 3-in-1 Steam Mop, you may refer to the part
numbers below. Replacement parts may be ordered through our Web site:
www.steamfast.com
You may also contact Consumer Service directly:
[email protected] or 1-800-711-6617
MOP HEAD
A295-008
JET NOZZLE
A295-001
SQUEEGEE
A295-003
FABRIC NOZZLE
A295-002
EXTENSION POLE
T295-004
MICROFIBER PADS (2)
A295-100
WATER TANK
T295-007
POLE HANDLE
T295-003
WATER TANK CAP
T295-008
WATER TREATMENT
CARTRIDGE
A295-009
FABRIC BRUSH
A295-004
BRASS UTILITY BRUSHES (5)
A295-007-5
NYLON UTILITY BRUSHES (5)
A295-006-5

18 | ENGLISH
Steamfast, a division of Vornado Air, LLC. Steamfast warrants to the original consumer or pur-
chaser this Steamfast (“Product”) is free from defects in material or workmanship for a period
of two (2) years from the date of purchase. If any such defect is discovered within the warranty
period, Vornado, at its discretion, will repair or replace the Product at no cost.
For warranty service: Call 1-800-711-6617 or email [email protected] to obtain
a Return Authorization (“RA”). Please have or include your Product’s model number and serial
number, as well as your name, address, city, state, Zip code, email, and phone number when
contacting Vornado for warranty service. To le a contactless warranty claim, visit www.steam-
fast.com/contact
After receiving the RA, ship your Product to: Vornado Air LLC Attn: Warranty & Repair 415
East 13th Street, Andover, KS 67002. For your convenience, please have your model number
and serial number when contacting Vornado with service inquiries. To ensure proper handling,
packages must be clearly marked with the RA number. Packages not clearly marked with the RA
number may be refused at the receiving dock. Please allow 2–3 weeks for warranty service and
return of your Product after the Product is received.
This warranty does not apply to defects resulting from abuse of the Product, modication,
alteration, mishandling, improper maintenance, commercial use or repair or service of the Prod-
uct by anyone other than Vornado; damages which occur in shipment or are attributed to acts
of God. Improper product use, which includes using an external device that alters or converts
the voltage or frequency of electricity, or shipping a Vornado product to a country not intended
for use will void all warranties. Any unauthorized product modication, repair by unauthorized
repair center or use of non-approved replacement parts is not recommended and any conse-
quences will not be covered by support services or product warranties.
The product warranty will be honored only on models that are being used in the country intend-
ed. REPAIR OR REPLACEMENT AS PROVIDED UNDER THIS WARRANTY IS THE EXCLUSIVE
REMEDY OF THE CONSUMER. VORNADO SHALL NOT BE LIABLE FOR ANY INCIDENTAL OR
CONSEQUENTIAL DAMAGES FOR BREACH OF ANY EXPRESS OR IMPLIED WARRANTY ON
THIS PRODUCT. EXCEPT TO THE EXTENT PROHIBITED BY APPLICABLE LAW, ANY IMPLIED
WARRANTY OF MERCHANTABILITY OR FITNESS FOR A PARTICULAR PURPOSE ON THIS
PRODUCT IS LIMITED IN DURATION TO THE DURATION OF THIS WARRANTY. Some states
do not allow the exclusion or limitation of incidental or consequential damages, or allow limita-
tions on how long an implied warranty lasts, so the above limitations or exclusions may not ap-
ply to you. This warranty gives you specic legal rights, and you may have other rights that vary
from state to state. The manufacturer assumes no responsibility for damage or injury caused
by failure to follow these instructions, improper product use or unauthorized product modica-
tions. Any such actions will invalidate the product warranty.
All company names and product names are trademarks of their respective owners. ©All rights
reserved. All technical information, data and instructions for the installation, connection and
operation contained in these instructions for use correspond to the latest available informa-
tion at time of printing. The contents of this manual may differ slightly from the actual product.
Observe any additional supplements.
© 2023 Vornado Air, LLC. Andover, KS 67002, U.S. Specications subject to change without
notice. Steamfast® is a trademark owned by Vornado Air, LLC. Manufactured in China.
Warranty Information

Steamfast
415 East 13th, Andover, KS 67002
1-800-711-6617 steamfast.com [email protected]
T295-005 R-, V03
