Loading ...
Loading ...
Loading ...

©
2018 DJI All Rights Reserved.
7
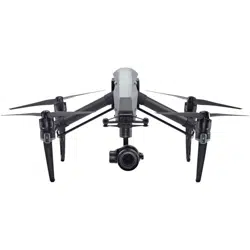
INSPIRE 2
SERIES User Manual
Battery must be fully charged before using it for the first time. Refer to "Charging the
Intelligent Flight Battery" for more information .
The aircraft cannot change to Landing Mode from Travel Mode with the gimbal camera
attached.
Place the aircraft on the smooth and reective surface (e.g. table or tile) before switching between
the travel modes to the landing mode.
Keep your hands away from the transformation mechanism when unfolding the landing gear.
Make sure to press the battery remove button when removing the battery.
Follow these steps to enter Travel Mode: Press the power button at least 5 times then
detach the gimbal (Powering off not required) and the propellers. Place the aircraft on a
smooth surface and wait as it changes into Travel Mode, then press the Remove Battery
Button and remove the batteries.
Always ensure that the DJI Gimbal Connector 2.0 on the Inspire 2 is in the right position
when mounting, otherwise the camera will not mount.
Remove the lens cap when the Zenmuse X5S is in use.
When entering Travel Mode, it is not necessary to power off the aircraft to detach the gimbal. But
always power off the aircraft before removing the gimbal camera in other situations.
Press the power button
a minimum of ve times
Unfold the landing gear to Landing
Mode and power on
Insert the battery
pair
5 x
Mounting the Zenmuse X5S to the
aircraft (Powering off not required)
Mounting the Zenmuse X5S to the Inspire 2
1. Remove the Gimbal Cap from the Zenmuse X5S.
2. Press the gimbal and camera release button on the Inspire 2. Rotate to remove the Gimbal Cap
from the Inspire 2.
3. Align the white dot on the gimbal to the red dot on Inspire 2 and insert the gimbal.
4. Rotate the Gimbal Lock to the locked position by aligning the red dots.
2
3
4
11
Loading ...
Loading ...
Loading ...