Loading ...
Loading ...
Loading ...
operating controls
C. Push lever in with thumb -- to turn switch off.
WARNING: THIS LOCKING FEATURE IS
PROVIDED TO PREVENT UNAUTHORIZED
USE OF YOUR SAW. ALWAYS REMOVE THE
KEY AND KEEP IT IN A SAFE PLACE. TO
REMOVE KEY, HOLD THUMB ON END OF
LEVER TO KEEP SWITCH IN "OFF" POSITION
AND PULL KEY STRAIGHT OUT.
o
WARNING: FOR YOUR OWN SAFETY ALWAYS
LOCK THE SWITCH "'OFF" WHEN SAW IS NOT
IN USE. REMOVE KEY AND KEEP IT IN A SAFE
PLACE ...ALSO IN THE EVENT OFAPOWER
FAILURE (ALL YOUR LIGHTS GO OUT} TURN
SWITCH OFF. LOCK IT AND REMOVE THE KEY
THIS WILL PREVENT THE SAW FROM
STARTING UP AGAIN WHEN THE POWER
COMES BACK ON.
7. The Manual Motor Brake.
The manual brake is located on the motor shaft at
the right-hand end of motor.
BRAKE
____ BRAKE HOUSING
DRUM ASSEM_! Y
I
SCREW
(1/4-20x I/2 IN., HLX-HD)
\
,V,OT OR
b. Pressing on the brake button with finger or thumb,
after turning off the ON OFF switch, will greatly
reduce blade coasting time.
NOTE: When using an accessory such as a drill chuck
attached to end of motor shaft, it ,,,viii be necessary to
remove the brake housing assembly and brake drum. Be
sure to re-install the brake after removing the accessory.
Use only the following recommended accessories:
Drill chuck, Sanding drum, and Router adapter.
CAUTION: The sawblade, dado, or cutting tool must be
removed from the saw arbor before using the accessory
shaft. NEVER operated the saw with cutting tools
(including sanding accessories) installed on both ends of the
saw arbor.
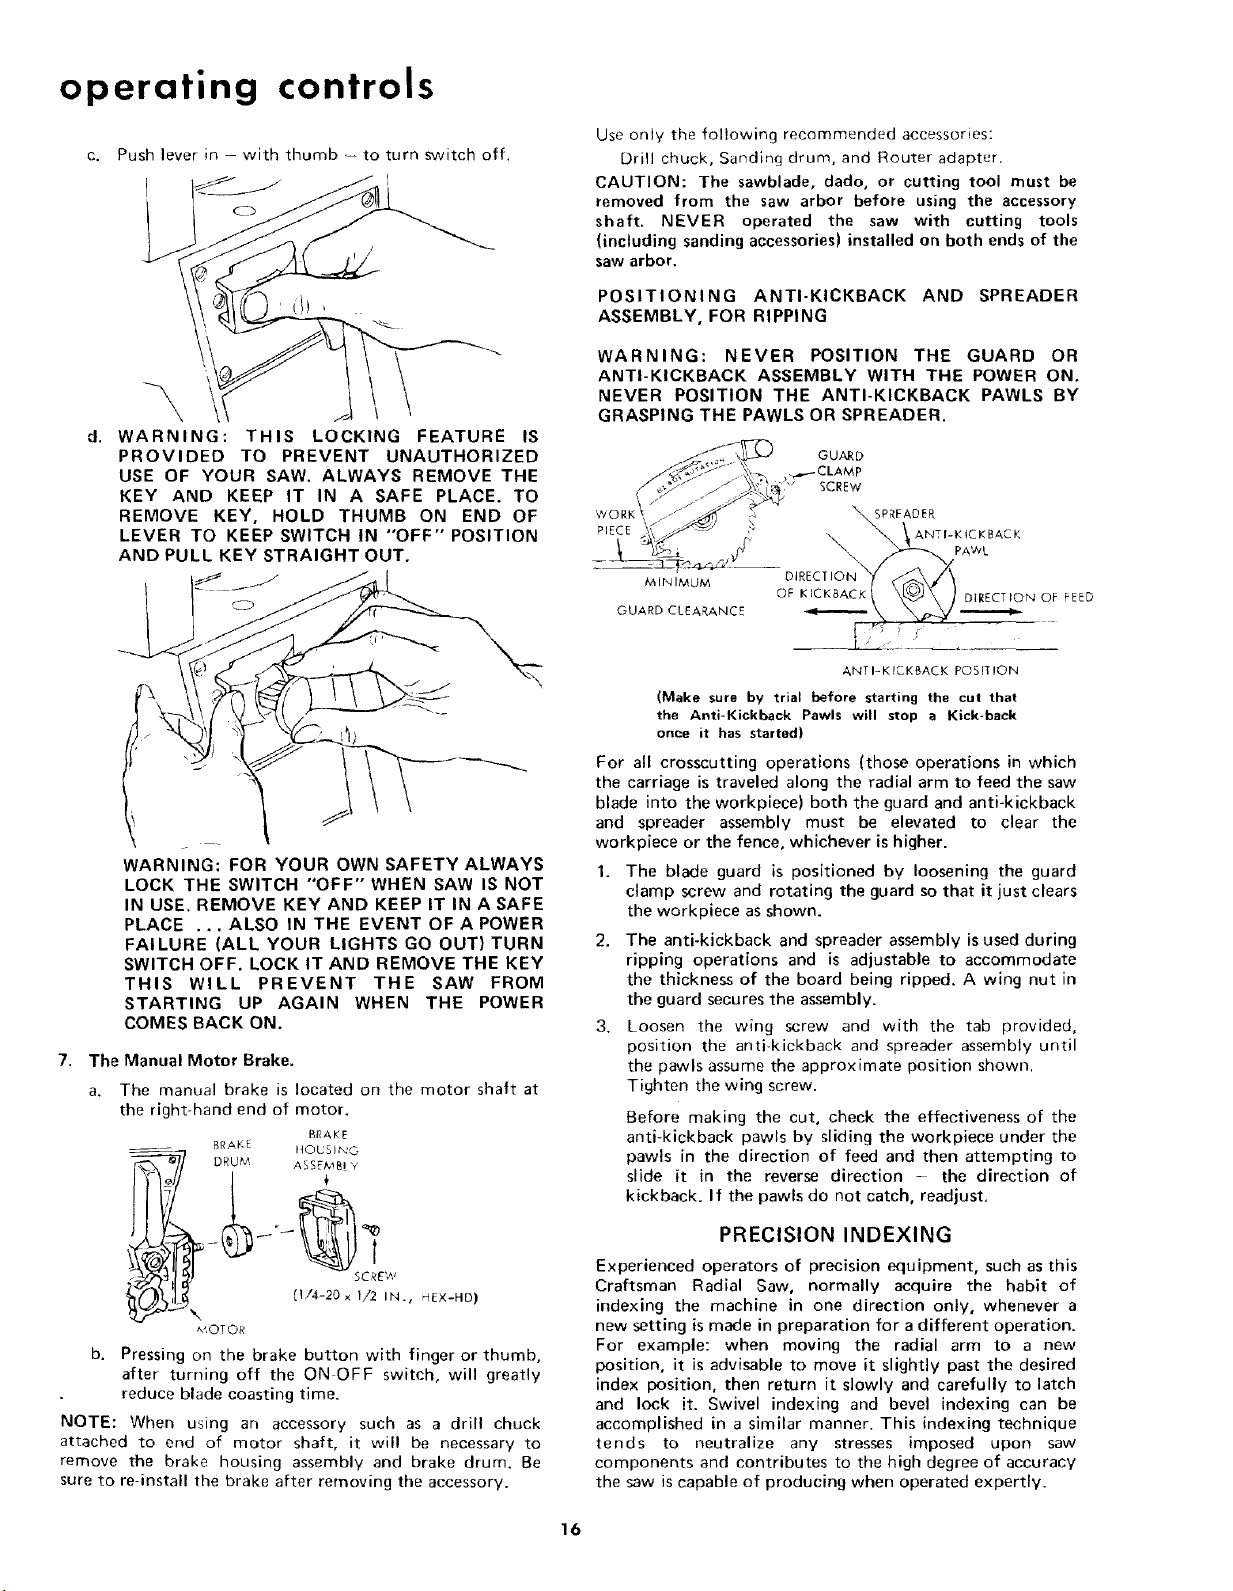
POSITIONING ANTI-KICKBACK AND SPREADER
ASSEMBLY, FOR RIPPING
WARNING: NEVER POSITION THE GUARD OR
ANTI-KICKBACK ASSEMBLY WITH THE POWER ON.
NEVER POSITION THE ANTI-KICKBACK PAWLS BY
GRASPING THE PAWLS OR SPREADER.
WORK_,
PIECE
MINIMUM
GUARD CLEARANCE
GUARD
_,7 SCREW
ANTI-KICKBACK POSITION
(Make sure by trial before starting the cut that
the Anti-Kickback Pawls will stop a Kick-beck
once it has started)
For all crosscutting operations (those operations in which
the carriage is traveled along the radial arm to feed the saw
blade into the workpiece) both the guard and anti-kickback
and spreader assembly must be elevated to clear the
workpiece or the fence, whichever is higher.
1. The blade guard is positioned by loosening the guard
clamp screw and rotating the guard so that it just clears
the workpiece as shown.
2. The anti-kickback and spreader assembly is used during
ripping operations and is adjustable to accommodate
the thickness of the board being ripped. A wing nut in
the guard secures the assembly.
3. Loosen the wing screw and with the tab provided,
position the anti-kickback and spreader assembly until
the pawls assume the approximate position shown.
Tighten the wing screw.
Before making the cut, check the effectiveness of the
anti-kickback pawls by sliding the workpiece under the
pawls in the direction of feed and then attempting to
slide it in the reverse direction - the direction of
kickback. If the pawls do not catch, readjust.
PRECISION INDEXING
Experienced operators of precision equipment, such as this
Craftsman Radial Saw, normally acquire the habit of
indexing the machine in one direction only, whenever a
new setting is made in preparation for a different operation.
For example: when moving the radial arm to a new
position, it is advisable to move it slightly past the desired
index position, then return it slowly and carefully to latch
and lock it. Swivel indexing and bevel indexing can be
accomplished in a similar manner. This indexing technique
tends to neutralize any stresses imposed upon saw
components and contributes to the high degree of accuracy
the saw is capable of producing when operated expertly.
16
Loading ...
Loading ...
Loading ...