
B
P0803387-01
P0803387-01
GWK 2000PSI Pressure Washer
5111802VT
技术要求:
2.28P, 内容见电子档;
3.单色印刷,要求无色差、无污点;色块要求在最外侧
4.骑马钉,裁切均匀、无连页;
5.以封样为准;
6.料件需符合格力博HSF文件(编号:GLB-CGR-146) 里关于环保和有害物质的具体要求。
1.材质要求:60g双胶纸
常州格力博集团
说明书
杨媛
@
@设变前料号P0803387-00,在原版本上更新配件表
1杨媛
刘小娟
周艳
向叶春
李金涛
22.4.29
22.4.29
版本号
重要度等级
工艺
审核
校对
设计
标记
处数
签名
日期
阶段标记
视角标记
重量比例
批准
审定
标准化
日期
更改文件号
SCALE: A5
210mm
145mm
ABS
B
B
PWA201
GPW2000-1RB
EN OPERATOR MANUALPRESSURE WASHER
ES MANUAL DEL OPERADORLAVADORA A PRESIÓN
7.与P0803388-00说明书套美款塑料袋(P1100021-00)一起成套.

PWA201
GPW2000-1RB
EN OPERATOR MANUALPRESSURE WASHER
ES MANUAL DEL OPERADORLAVADORA A PRESIÓN


1 Description......................................... 4
1.1 Purpose.............................................................. 4
1.2 Product overview...............................................4
2 General power tool safety
warnings.............................................4
2.1 General power tool safety warnings.................. 4
2.2 Electrical safety warnings..................................4
2.3 Pressure washer safety warnings....................... 5
2.4 Ground fault circuit interrupter protection........ 5
2.5 Servicing of a double-insulated appliance.........5
2.6 Extension cords..................................................5
2.7 Child safety........................................................5
2.8 Symbols on the product..................................... 5
2.9 Risk levels..........................................................6
2.10 Proposition 65....................................................6
3 Installation......................................... 6
3.1 Electrical connection......................................... 6
3.2 Unpack the machine.......................................... 7
3.3 Install the spray wand........................................7
3.4 Install the wheels............................................... 7
3.5 Install the upper handle......................................7
3.6 Install the spray gun holder............................... 8
3.7 Install the power cord storage arm.................... 8
3.8 Install the high pressure hose.............................8
4 Operation........................................... 8
4.1 Connect the water supply to the machine .........8
4.2 Use the spray gun.............................................. 9
4.3 Change the nozzle..............................................9
4.4 Start the machine............................................. 10
4.5 Stop the machine............................................. 10
4.6 Use the detergent............................................. 10
5 Maintenance.....................................11
5.1 Nozzle maintenance.........................................11
6 Transportation and storage............ 11
6.1 Move the machine............................................11
6.2 Store the machine.............................................11
7 Troubleshooting...............................12
8 Technical data..................................13
9 Limited warranty............................ 13
10 Exploded view..................................14
3
English
EN
1 DESCRIPTION
1.1 PURPOSE
The machine is used to used to clean vehicles, boats,
buildings, porches, decks, patios, and driveways.
For residential use only, not for professional use, and for
operation at temperature above 32°F (0°C).
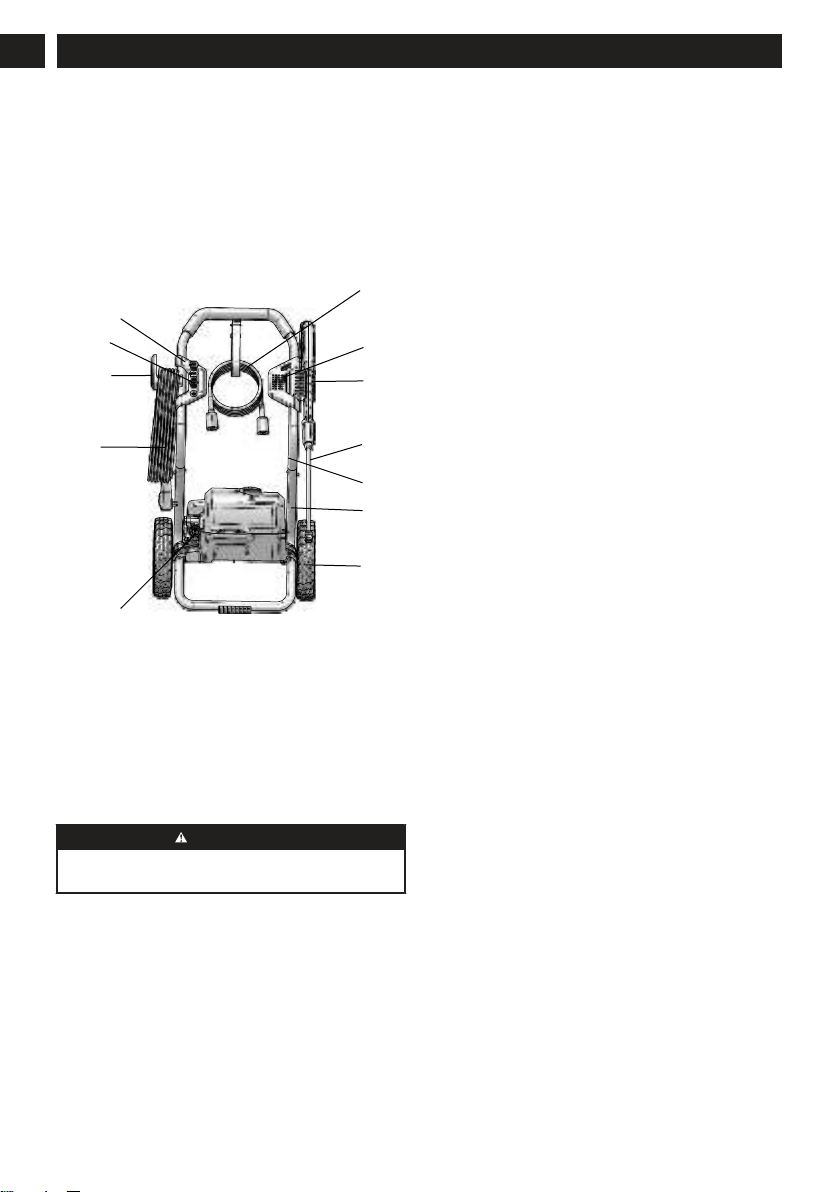
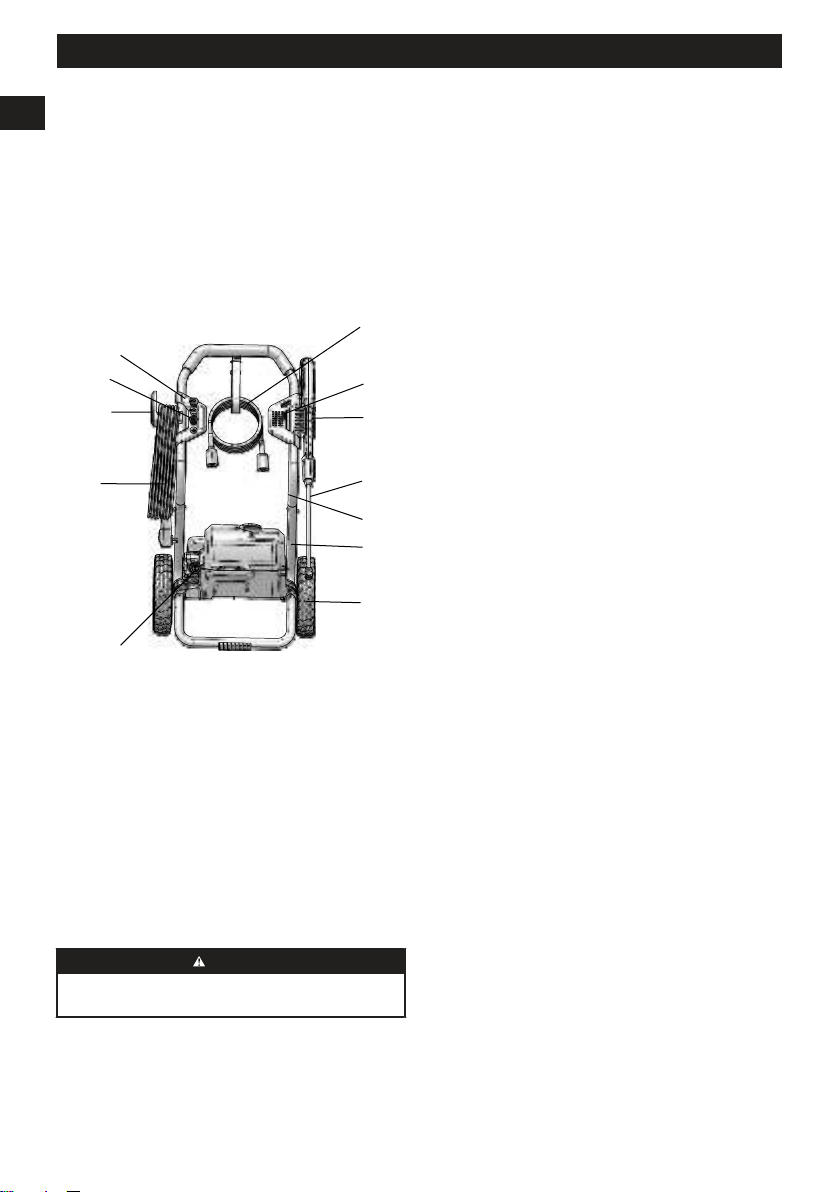
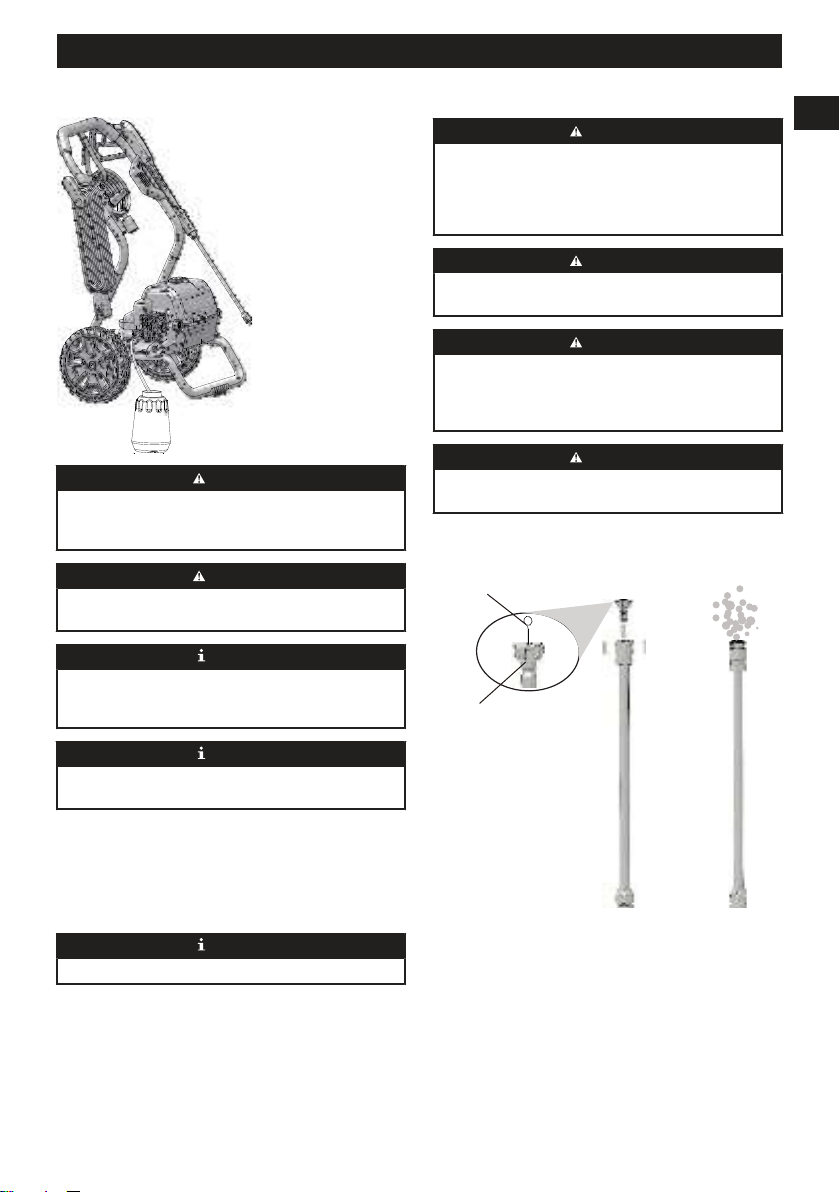
1.2 PRODUCT OVERVIEW
2
1
3
4
5
7
8
9
10
11
12
6
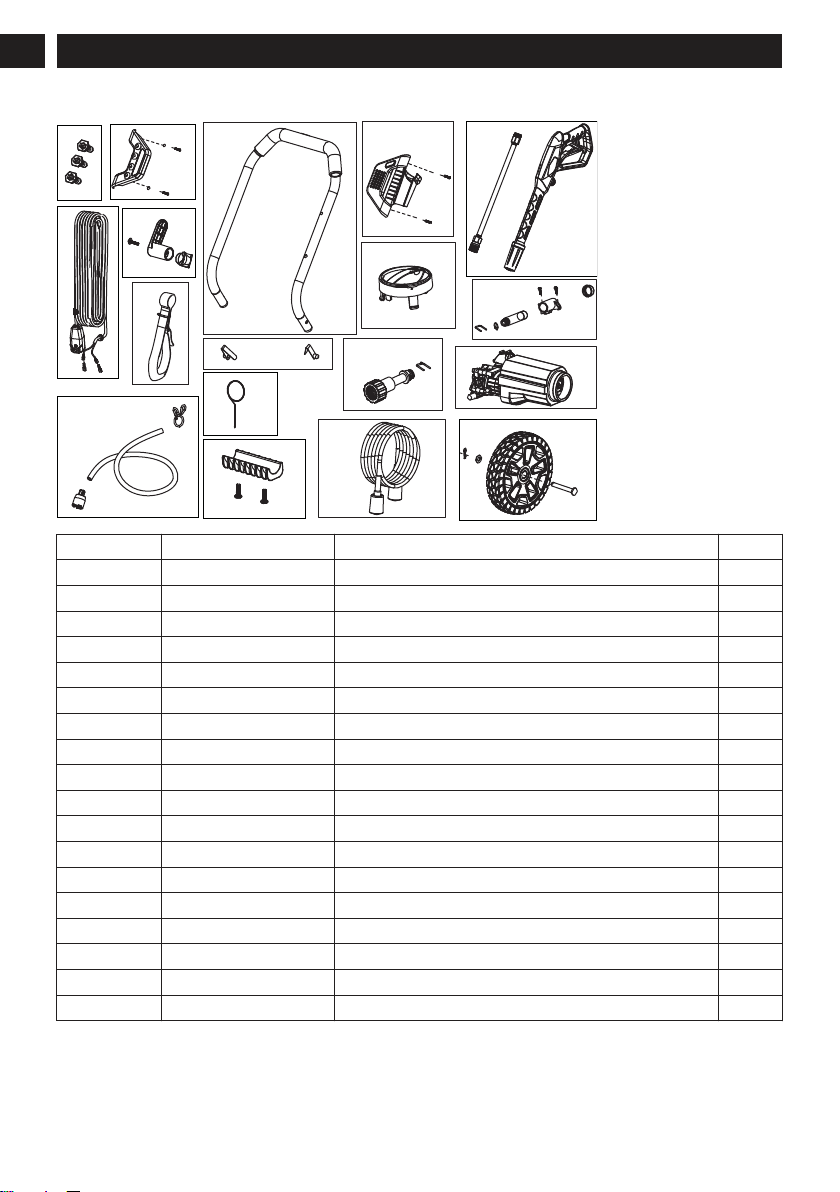
1
High pressure hose
2
Spray gun holder
3
Spray gun
4
Spray wand
5
Upper handle
6
Lower handle
7
Wheel
8
Water inlet
9
Power cord
10
Cord retainer
11
Spray tip
12
Front panel
2 GENERAL POWER TOOL
SAFETY WARNINGS
WARNING
When using this product basic precautions should always be
followed, including the following:
Save all warnings and instructions for future reference.
The term “power tool” in the warnings refers to your mains-
operated (corded) power tool.
2.1 GENERAL POWER TOOL SAFETY
WARNINGS
• The machine is not intended for use by persons
(including children) with reduced physical, sensory or
mental capabilities, or lack of experience and knowledge,
unless they have been given supervision or instruction
concerning use of the machine by a person responsible
for their safety. Children should be supervised to ensure
that they do not play with the machine.
• Learn the machine's applications and limitations as well
as the specified potential hazards related to this tool by
studying this manual.
• Never operate the machine with any guard or cover
removed or damaged.
• Do not operate the product while under the influence of
drugs, alcohol, or any medication.
• Do not wear loose clothing, gloves, neckties, or jewelry.
They can get caught and draw you into moving parts.
• Rubber gloves and non-skid footwear are recommended
when working outdoors. Also wear protective hair
covering to contain long hair. Wear footwear that will
protect your feet and improve your grip on slippery
surfaces.
• Don't overreach or stand on unstable support. Keep
proper footing and balance at all times.
• Check the work area before each use. Remove all objects
such as rocks, broken glass, nails, wire, or string which
can be thrown or become entangled in the machine.
• Avoid dangerous environments. Don’t expose to rain.
Keep work area well lit.
• Before starting any cleaning operation, close doors and
windows. Clear the area to be cleaned of debris, toys,
outdoor furniture, or other objects that could create a
hazard.
• Don’t use the appliance within range of persons unless
they wear protective clothing.
2.2 ELECTRICAL SAFETY
WARNINGS
• Disconnect from the electrical power supply before
carrying out user maintenance.
• Use only extension cords that have watertight
connections and are intended for outdoor use. Use only
extension cords having an electrical rating not less than
the rating of the product. Examine extension cord before
using and replace if damaged. Do not abuse extension
cord and do not pull on any cord to disconnect. Keep cord
away from heat and sharp edges. Always disconnect the
extension cord from the receptacle before disconnecting
the product from the extension cord.
• Do not use the machine if a supply cord or important
parts of the appliance are damaged, e.g. safety devices,
high pressure hoses, trigger gun.
• Inadequate extension cords can be dangerous.
• To reduce the risk of electrocution, keep all connections
dry and off the ground. Do not touch plug with wet hands.
• Do not abuse the cord. Never use the cord to carry the
product or to disconnect the plug from an outlet. Keep
cord away from heat, oil, sharp edges, or moving parts.
Replace damaged cords immediately. Damaged cords
increase the risk of electric shock.
4
English
EN
• Inspect extension cords periodically and replace if
damaged. Keep handles dry, clean, and free from oil or
grease.
2.3 PRESSURE WASHER SAFETY
WARNINGS
• Read all the instructions before using the product.
• To reduce the risk of injury, close supervision is
necessary when a product is used near children.
• Know how to stop the product and bleed unit pressure
quickly. Be thoroughly familiar with the controls.
• Stay alert – watch what you are doing.
• Do not operate the product when fatigued or under the
influence of alcohol or drugs.
• Keep operating area clear of all persons.
• Do not overreach or stand on unstable support. Keep
good footing and balance at all times.
• Follow the maintenance instructions specified in the
manual.
• This product is provided with a ground fault circuit
interrupter built into the power cord plug. if replacement
of the plug or cord is needed, use only identical
replacement parts.
• Risk of injection or injury– Do not direct discharge
stream at persons.
• Keep the motor away from flammables and other
hazardous materials.
• Keep product dry, clean, and free from oil and grease.
Always use a clean cloth when cleaning. Never use
brake fluids, gasoline, petroleum-based products, or any
solvents to clean product.
WARNING
To reduce the risk of electrocution, keep all connections dry
and off the ground. Do not touch plug with wet hands.
2.4 GROUND FAULT CIRCUIT
INTERRUPTER PROTECTION
This pressure washer is provided with a ground-fault circuit-
interrupter (GFCI) built into the plug of the power-supply
cord. This device provides additional protection from the risk
of electric shock. Should replacement of the plug or cord
become necessary, use only identical replacement parts that
include GFCI protection.
2.5 SERVICING OF A DOUBLE-
INSULATED APPLIANCE
• Within a double-insulated product, two systems of
insulation are provided instead of grounding. No
grounding means is provided on a double-insulated
product, nor should a means for grounding be added to
the product. Servicing a double-insulated product requires
extreme care and knowledge of the system, and should
be done only by qualified service personnel. Replacement
parts for a double-insulated product must be identical
to the parts they replace. A doubleinsulated product is
marked with the words “DOUBLE INSULATION” or
“DOUBLE INSULATED.”
2.6 EXTENSION CORDS
• Use only extension cords that are intended for outdoor
use. These extension cords are identified by a marking
“Acceptable for use with outdoor appliances; store
indoors while not in use.” Use only extension cords
having an electrical rating not less than the rating of the
product. Do not use damaged extension cords. Examine
extension cord before using and replace if damaged. Do
not abuse extension cord and do not yank on any cord to
disconnect. Keep cord away from heat and sharp edges.
Always disconnect the extension cord from the receptacle
before disconnecting the product from the extension cord.
2.7 CHILD SAFETY
Tragic accidents can occur if the operator is not aware of the
presence of children.
• Keep children out of the working area and under the
watchful care of a responsible adult.
• Do not allow children under the age of 14 to operate
this machine. Children who are 14 years of age and
older must read and understand the operating instructions
and safety rules in this manual and must be trained and
supervised by a parent.
• Stay alert, and turn the machine off if a child or any other
person enters the working area.
• Use extreme care when approaching blind corners,
doorways, shrubs, trees, or other objects that may obscure
your view of a child who may run into the path of the
machine.
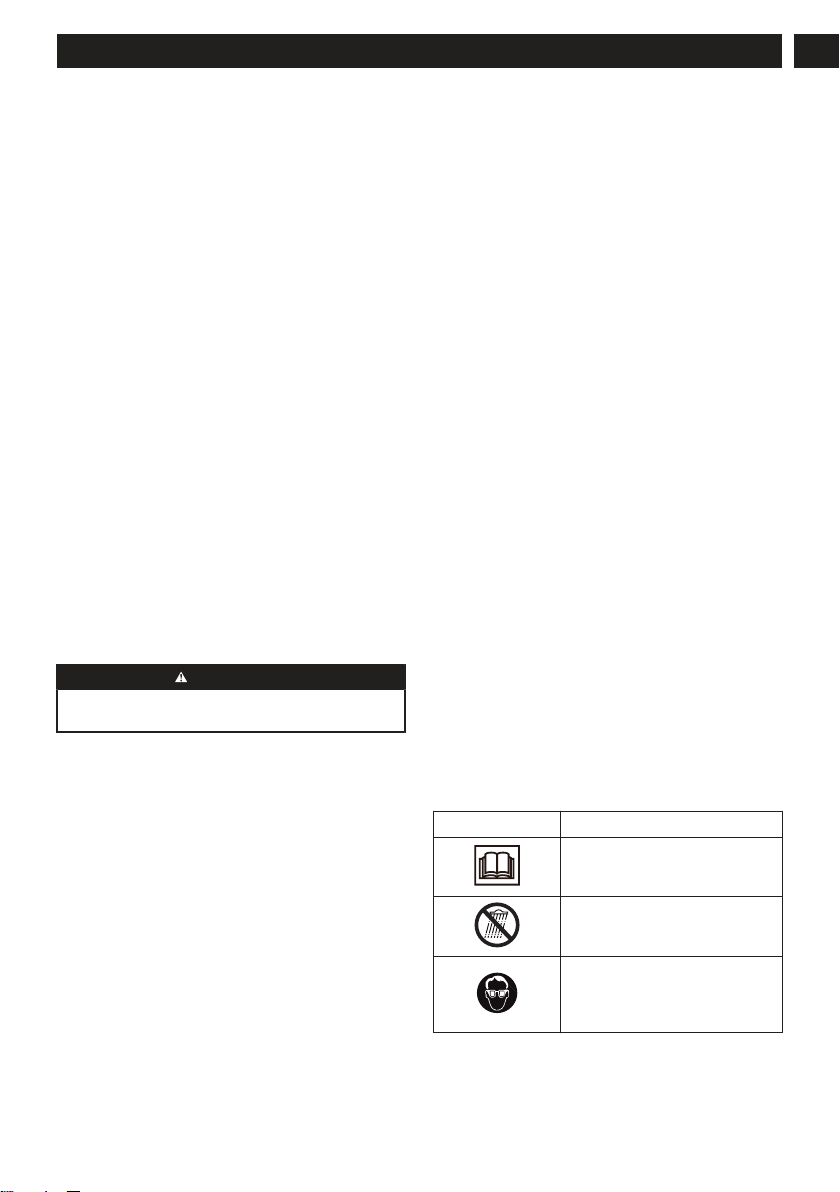
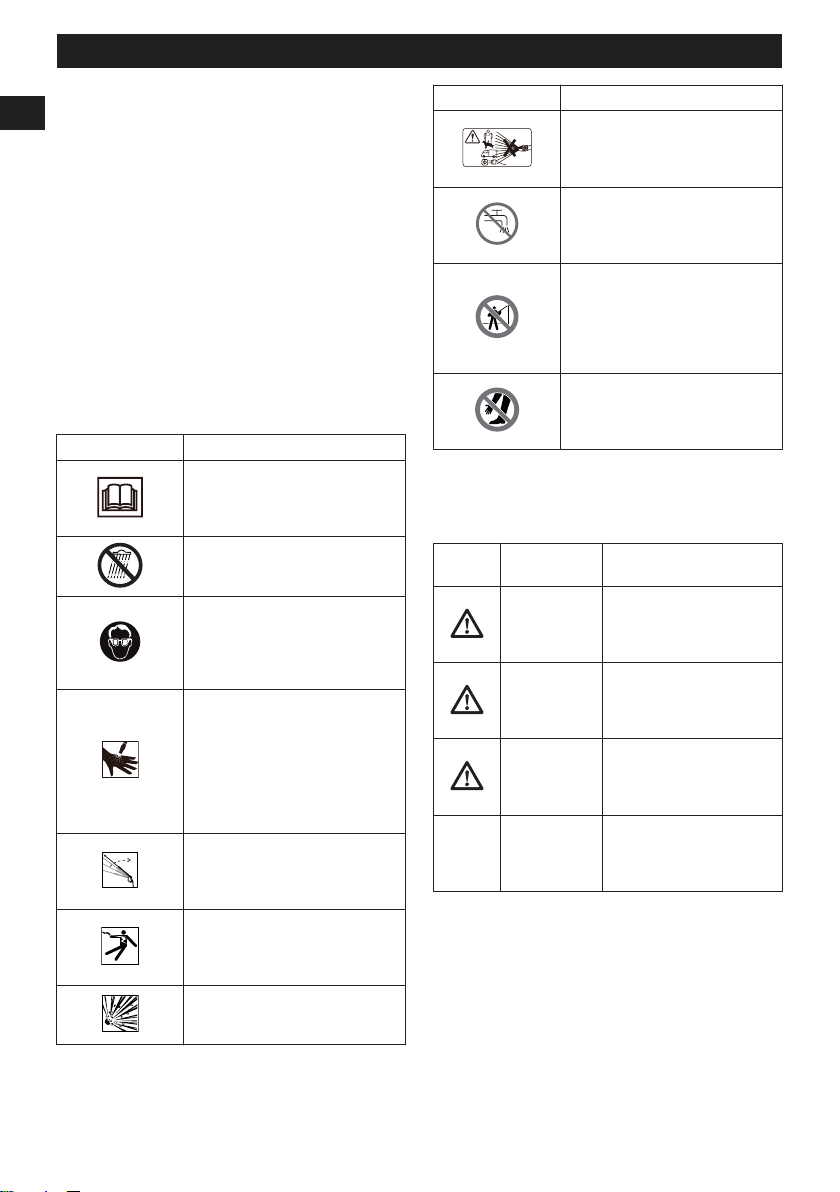
2.8 SYMBOLS ON THE PRODUCT
Some of the following symbols may be used on this
tool. Please study them and learn their meaning. Proper
interpretation of these symbols will allow you to operate the
tool better and safer.
Symbol Explanation
To reduce the risk of injury, user must
read and understand operator’s man-
ual before using this product.
Do not expose the product to rain or
moist conditions.
Always wear safety goggles or safety
glasses with side shields and, as nec-
essary, a full face shield when operat-
ing this product.
5
English
EN
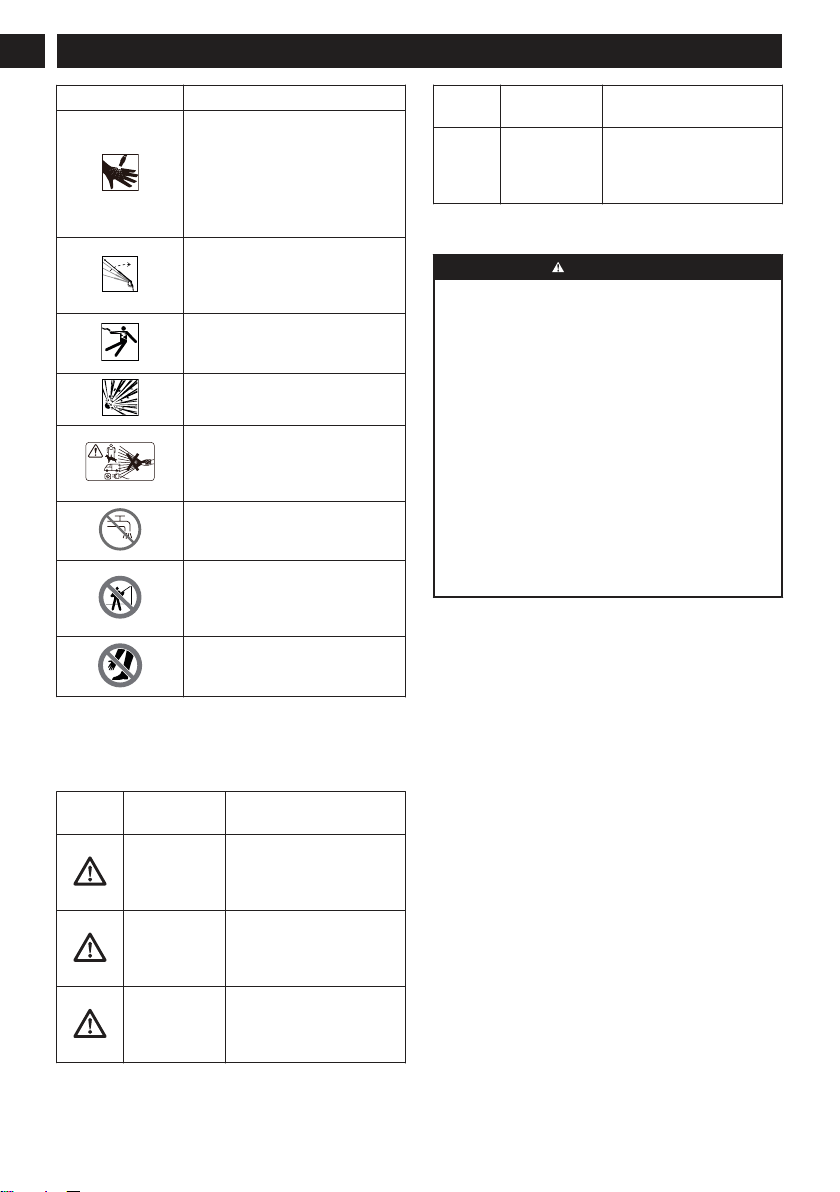
Symbol Explanation
To reduce the risk of injection or in-
jury, never direct a water stream to-
wards people or pets or place any
body part in the stream. Leak ing ho-
ses and fittings are also capable of
causing injection injury. Do not hold
hoses or fittings.
To reduce the risk of injury from
kickback, hold the spray lance se-
curely with both hands when the ma-
chine is on.
Failure to use in dry conditions and
to observe safe practices can result in
electric shock.
Fuel and its vapors are explosive and
can cause severe burns or death.
Warning! Never point the gun to
human, animals, the machine body,
power supply or any electric applian-
ces.
Appliance not suitable for connection
to the drinking water mains without
backflow preventer.
Only use cleaning deck on flat, hor-
izontal surfaces. Never lift cleaning
deck from the cleaning surface while
operating the pressure washer.
Keep hands and feet away from
the cleaning deck while the pressure
washer is running.
2.9 RISK LEVELS
The following signal words and meanings are intended to
explain the levels of risk associated with this product.
SYM-
BOL
SIGNAL MEANING
DANGER Indicates an imminently haz-
ardous situation, which, if not
avoided, will result in death
or serious injury.
WARNING Indicates a potentially hazard-
ous situation, which, if not
avoided, could result in death
or serious injury.
CAUTION Indicates a potentially hazard-
ous situation, which, if not
avoided, may result in minor
or moderate injury.
SYM-
BOL
SIGNAL MEANING
CAUTION (Without Safety Alert Sym-
bol) Indicates a situation that
may result in property dam-
age.
2.10 PROPOSITION 65
WARNING
This product contains a chemical known to the state
of California to cause cancer, birth defects or other
reproductive harm. Some dust created by power sanding,
sawing, grinding, drilling, and other construction activities
contains chemicals known to cause cancer, birth defects or
other reproductive harm. Some examples of these chemicals
are:
• Lead from lead-based paints;
• Crystalline silica from bricks and cement and other
masonry products;
• Arsenic and chromium from chemically treated lumber.
Your risk of exposure to these chemicals varies depending
on how often you do this type of work. To reduce your
exposure to these chemicals, work in a well-ventilated area,
and work with approved safety equipment, such as dust
masks that are specially designed to filter out microscopic
particles.
Save these instructions.
3 INSTALLATION
3.1 ELECTRICAL CONNECTION
This machine has a precisely built electrical motor. It should
be connected to a power supply that is 120V, 60 Hz, AC only
(household). Do not operate this machine on direct current
(DC). A considerable voltage drop will cause a loss of power
and the motor will be overheated.
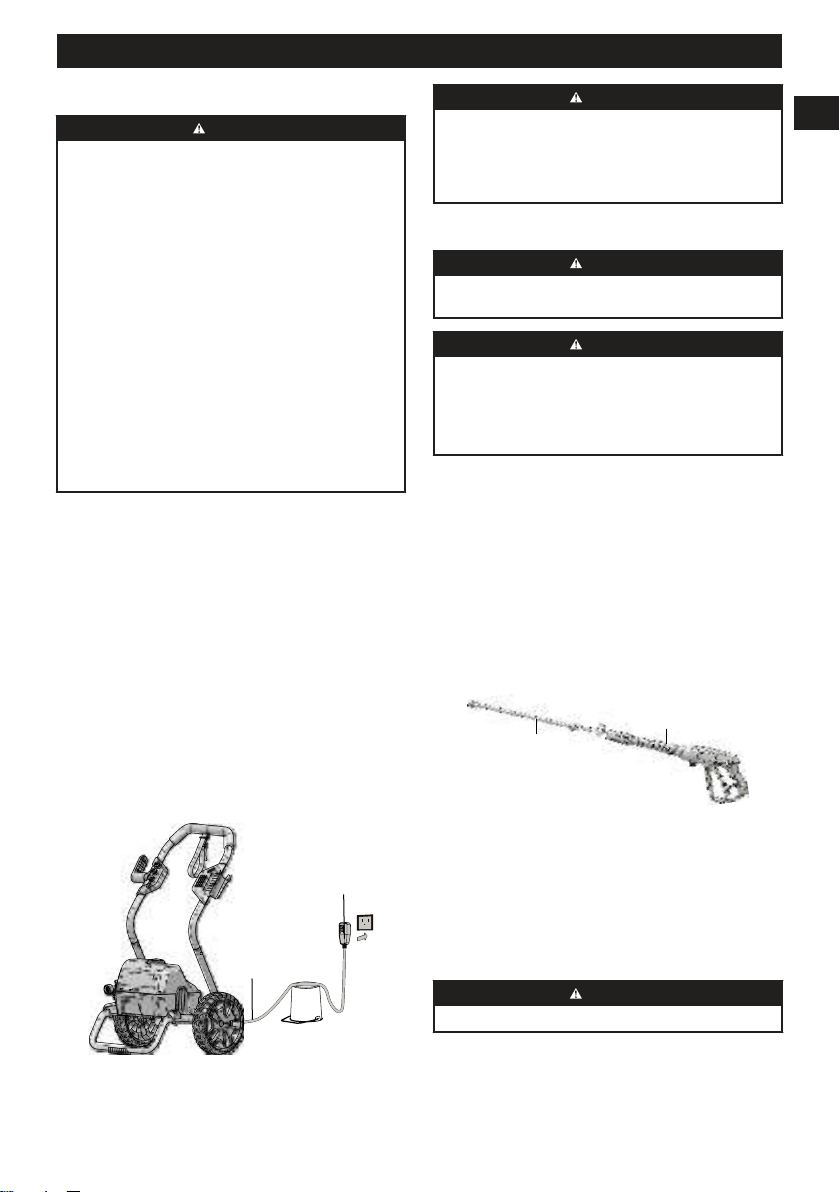
3.1.1 PREPARE A DRIP LOOP
Recommend the use of a drip loop (13) as below so the water
can not run along the power cord (9) even possibly reach the
electrical outlet and plug.
6
English
EN
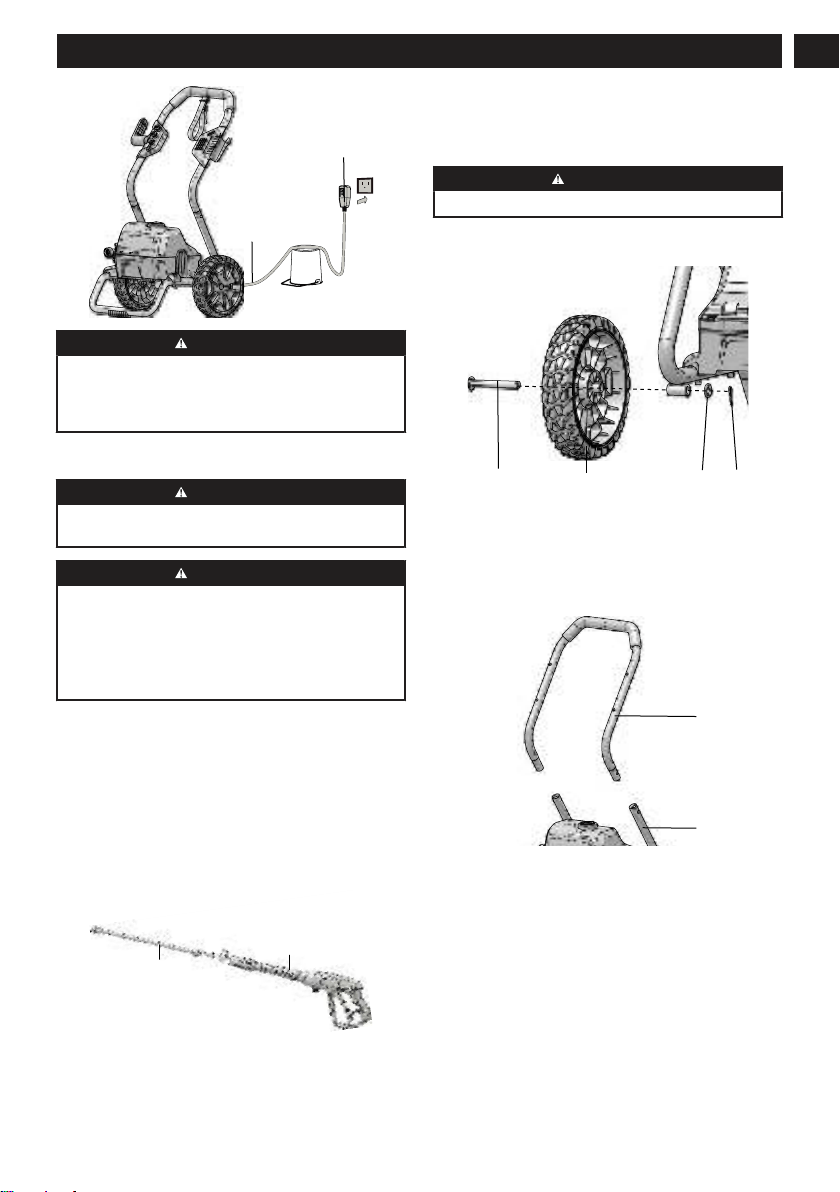
9
13
WARNING
Keep the extension cord clear of the working area. Position
the cord so that it will not get caught on lumber, tools, or
other obstructions while you are working with a power tool.
Failure to do so can result in serious personal injury.
3.2 UNPACK THE MACHINE
WARNING
Make sure that you correctly assemble the machine before
use.
WARNING
• If parts of the machine are damaged, do not use the
machine.
• If you do not have all the parts, do not operate the
machine.
• If parts are damaged or missing, contact the service
center.
1. Open the package.
2. Read the documentation provided in the box.
3. Remove all the unassembled parts from the box.
4. Remove the machine from the box.
5. Discard the box and packing material in compliance with
local regulations.
3.3 INSTALL THE SPRAY WAND
4
2
1. Push the end of the spray wand (4) into the gun handle
(2).
2. Turn the spray wand (4) clockwise until the tabs lock into
position.
WARNING
Make sure that the connection has no leakage.
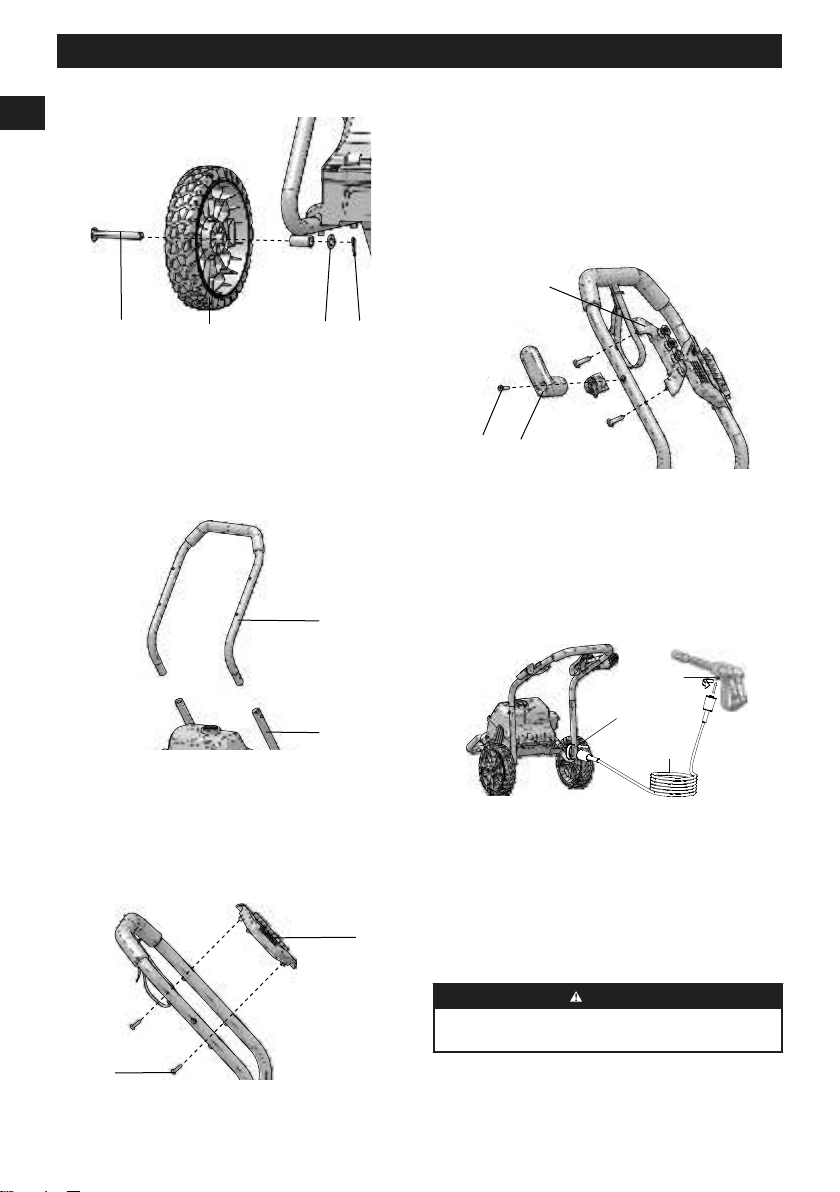
3.4 INSTALL THE WHEELS
22
14 15
7
1. Insert axle (22) through the wheel (7) and handle frame.
2. Attach a washer (14) to the axle.
3. Insert cotter pin (15) through the hole of the axle.
3.5 INSTALL THE UPPER HANDLE
5
6
1. Push and hold the handle lock buttons on the upper
handle (5).
2. Move the upper handle (5) into the lower handle (6) until
the handle lock button clicks through the hole.
7
English
EN
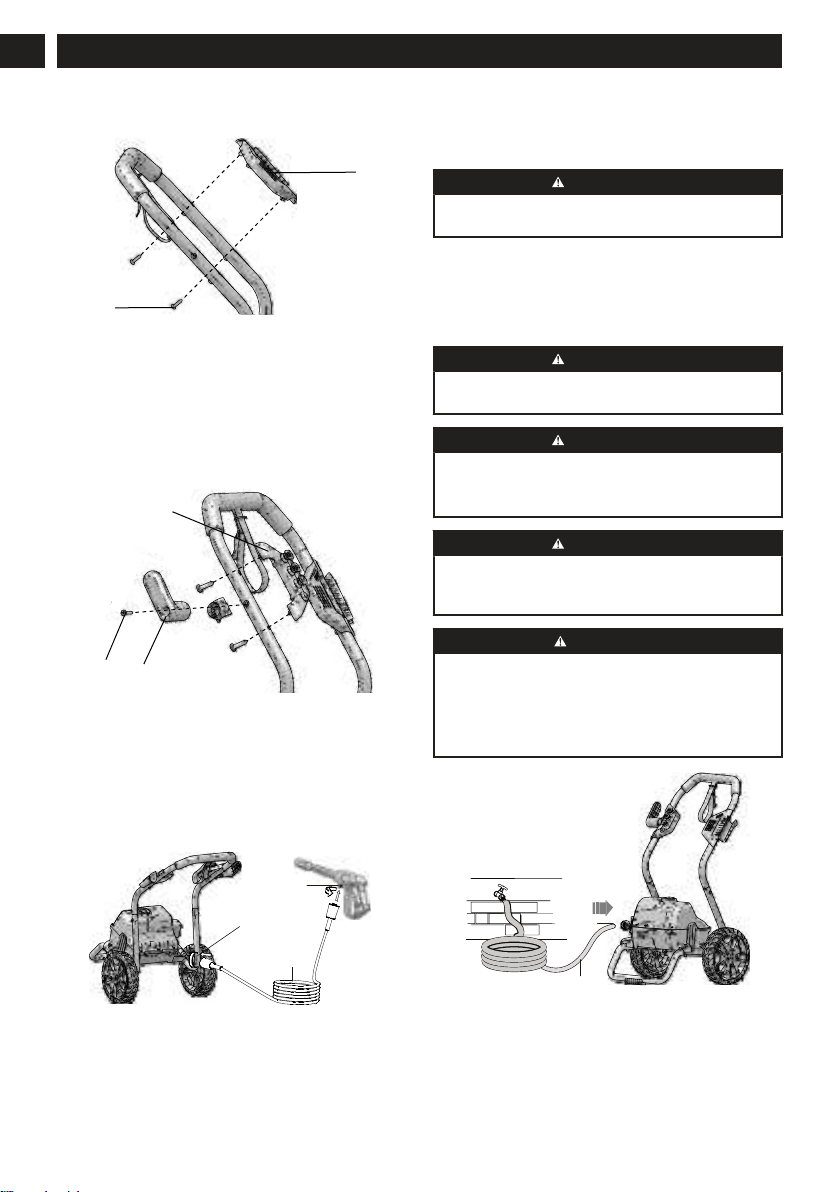
3.6 INSTALL THE SPRAY GUN
HOLDER
2
16
1. Aligh the screw sleeves of the spray gun holder (2) with
the screw holes on the upper handle (5).
2. Push the screws (16) through the screw sleeves and
tighten them with a Phillips Head Screwdriver (not
included).
3.7 INSTALL THE POWER CORD
STORAGE ARM
12
16
10
1. Attach the power cord storage arm (12) onto the fixture.
2. Align the screw (16) with the hole in the power cord
storage arm (12).
3. Push the screw (16) through and tighten it.
3.8 INSTALL THE HIGH PRESSURE
HOSE
17
8
1
1. Pull on the end of the hose retainer to release the high
pressure hose (1).
2. Push and turn clockwise one end of the high pressure
hose (1) into the inlet coupler (8).
3. Install and tighten the other end of the high pressure hose
(1) onto the water outlet (17).
4 OPERATION
WARNING
Make sure that all the connections are tight and have no
leakage before operation.
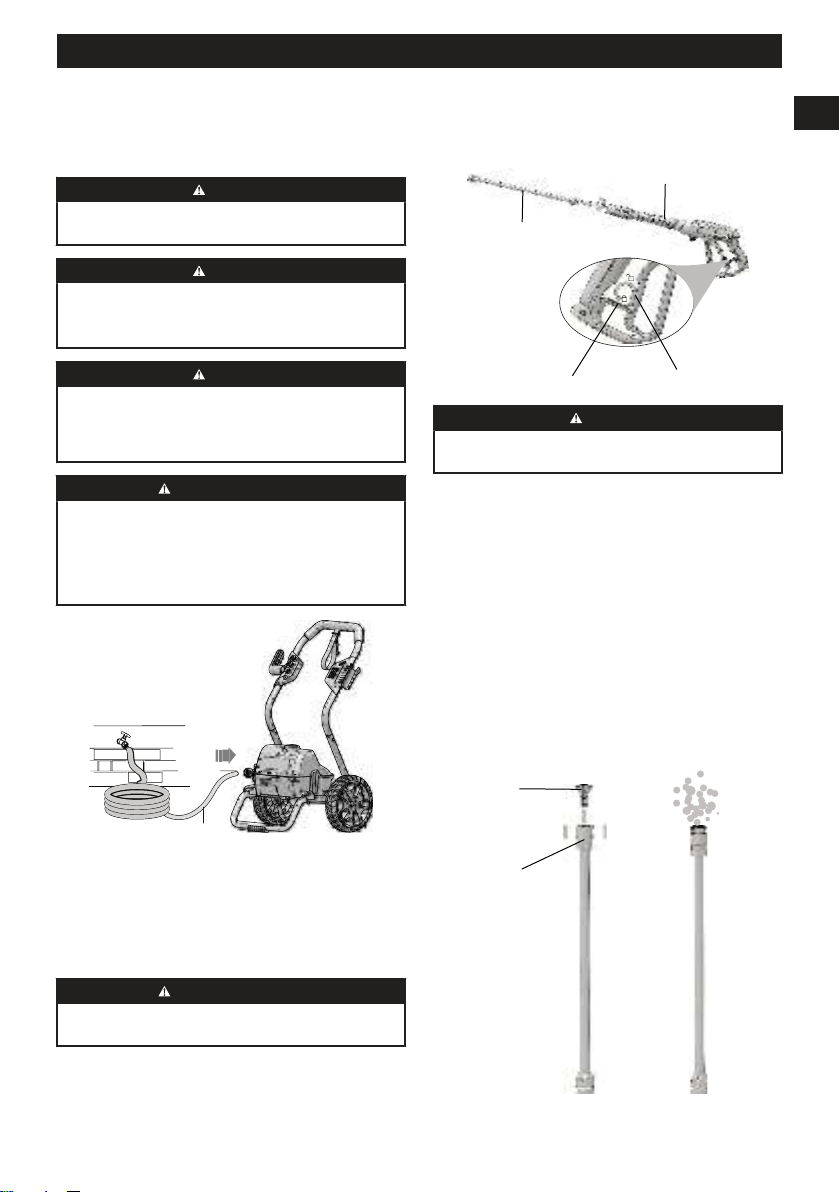
4.1 CONNECT THE WATER SUPPLY
TO THE MACHINE
For easy operation, please use a self-coiling garden hose (not
provided).
WARNING
When you operate the self-coiling hose, make sure that the
hose has no blockage.
WARNING
• The water supply must come from the water main
• Do not use hot water
• Do not use water from ponds or lakes
WARNING
Do the local regulations when you connect the garden hose
to the water supply. Direct connection through a receiver
tank or backflow preventer is usually permitted.
CAUTION
Inspect the filter in the water inlet connector before you
connect the garden hose
• If the filter is damaged, do not use the machine until the
filter is replaced.
• If the filter is dirty, clean the filter.
8
18
1. Uncoil the garden hose (18).
2. Let the water flow through the garden hose for 30
seconds.
3. Turn the water supply off.
8
English
EN
4. Install and tighten the end of the garden hose (18) to the
water inlet connector (8).
CAUTION
There must be a minimum of 10 ft of free hose between the
water inlet and the water supply.
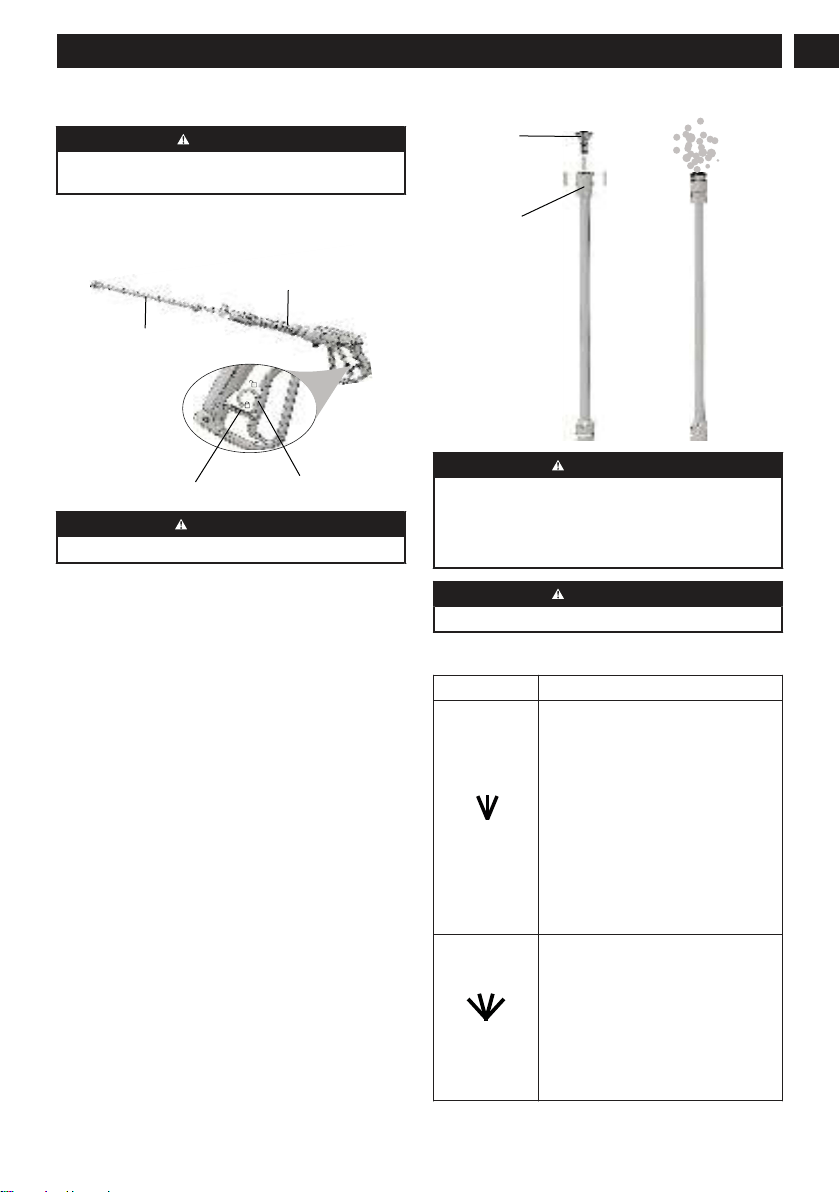
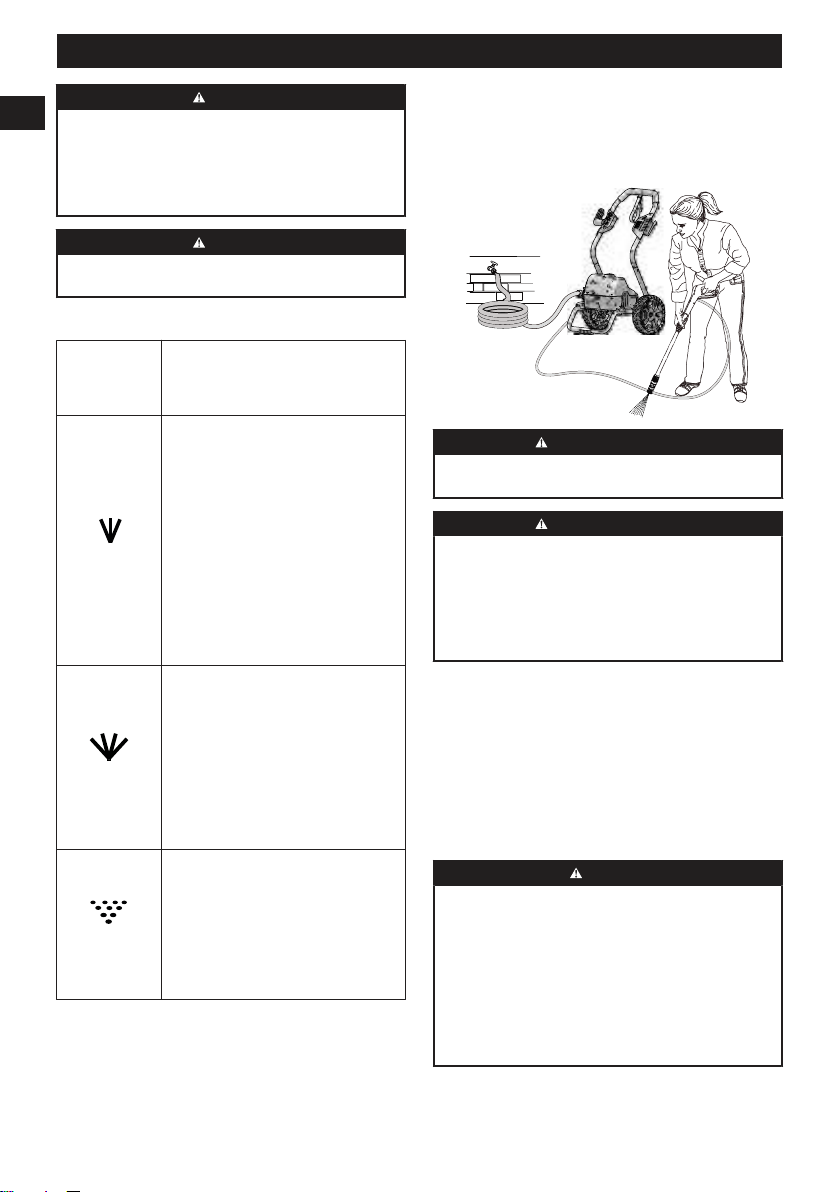
4.2 USE THE SPRAY GUN
4
2
19
20
WARNING
For safe control, keep your hands on the gun at all times.
• Pull and hold the spray gun trigger (19) to start the
machine.
• Release the spray gun trigger (19) to stop water flow
through the nozzle (11).
4.2.1 UNLOCK THE SPRAY GUN TRIGGER
• Push backward the trigger safety button (20).
4.2.2 LOCK THE SPRAY GUN TRIGGER
• Push forward the trigger safety button (20).
4.3 CHANGE THE NOZZLE
11
21
WARNING
Before you change the nozzle:
1. Pull the gun trigger to release water pressure.
2. Lock the trigger safety button on the gun.
3. Stop the mahcine.
WARNING
Do not point the spray wand at your face or others'.
4.3.1 NOZZLE TYPE
SPRAY TIP APPLICATION
25
O
Green - Narrow fan tip (25° )
• The green pressure washer tip pro-
vides high versatility with its 25 de-
gree angle tip. Referred to as the
washing tip, because it provides ad-
equate pressure to remove dirt from
surfaces, but is designed to not dam-
age many surfaces. This pressure
washer tip is designed for “sweep-
ing” foliage or debris given its wide
angle. This tip is versatile due to
its wide area of cleaning and strong
pressure application.
40
O
White - Wide fan tip (40° )
• The white 40 degree tip, referred to
as the “fan” tip creates the widest
area of cleaning with relatively low
pressure. This pressure washer tip is
best used for light or delicate clean-
ing applications. It is recommended
for light cleaning on wood decks and
other soft or delicate surfaces.
9
English
EN
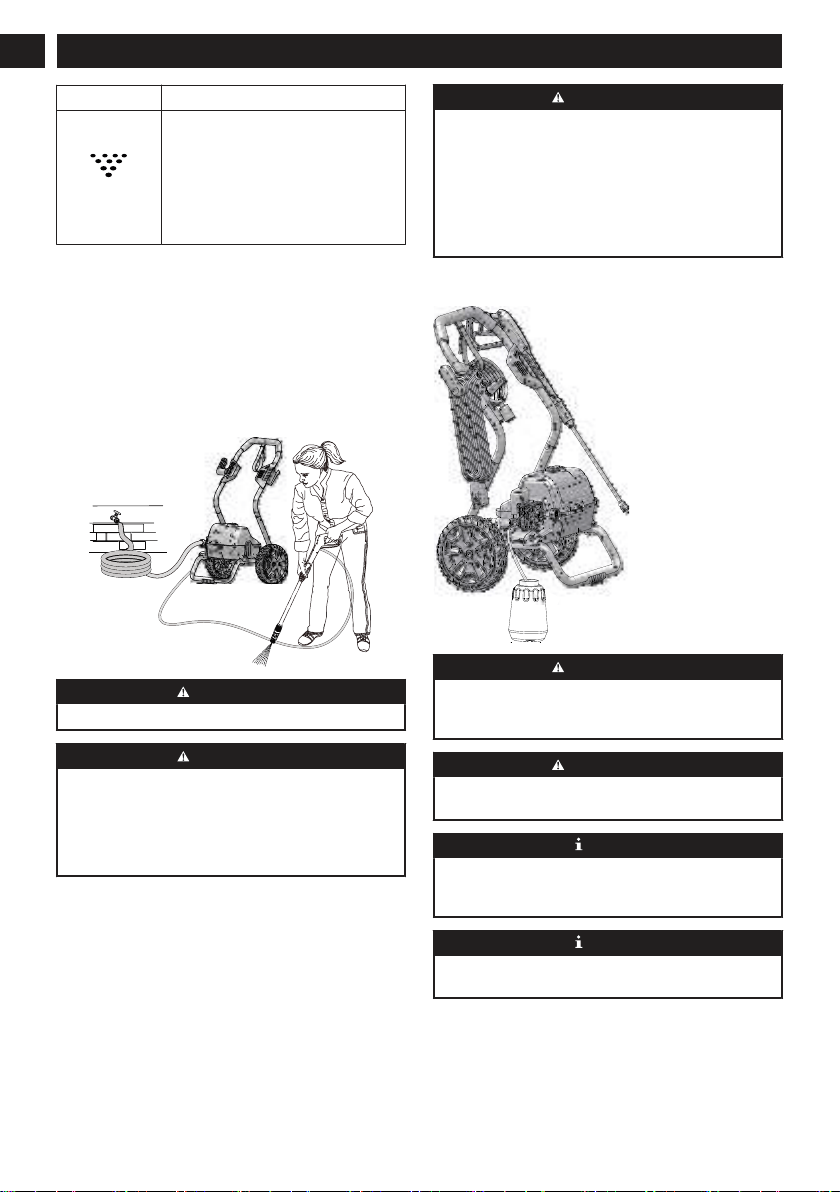
SPRAY TIP APPLICATION
SOAP
Black - Soap spray tip
• The black soap spray tip, is used for
soap application. Soap is applied un-
der low pressure high volume for op-
timum performance. Soap cannot be
applied under high pressure with this
machine.
4.3.2 INSTALL THE NOZZLE
1. Pull back the quick-connect collar (21) on the spray wand
(4).
2. Install the nozzle (11) onto the spray wand (4).
3. Release the quick-connect collar (21) to attach the nozzle
(11).
4.4 START THE MACHINE
CAUTION
Do not operate without the water supply connected.
CAUTION
Before you start the machine:
1. Turn the water supply on.
2. Pull the gun trigger to release air pressure.
3. If a stable stream of water comes out from the gun,
release the gun trigger.
1. Connect the machine to the power supply.
2. Set the power switch to the “ON” ( | ) position.
3. Turn the water supply on.
4. Pull the gun trigger.
4.5 STOP THE MACHINE
1. Release the spray gun trigger.
2. Press down on the ON/OFF switch, once again, to set the
power switch to the "OFF" (O) position.
WARNING
If you do not use the machine:
• Stop the machine.
• Turn the water supply off.
• Disconnect the power cord from the outlet.
• Pull the spray gun trigger to release the remaining
pressure from the machine.
• Engage the trigger safety lock-out on the spray gun.
4.6 USE THE DETERGENT
WARNING
Do not use household detergents, acids, alkalines, bleaches,
solvents, flammable material, or industrial grade solutions,
which can do damage to the pump.
WARNING
Do the instructions on the solution bottle to prepare
detergent.
NOTE
If it is necessary, use a funnel to prevent the spill of
detergent. Clean and dry the spilled detergent when you fill
it.
NOTE
Soap/detergent can only be applied with this machine when
the black nozzle(75 degree) is installed.
1. Put the machine vertically on a flat surface.
2. Put the end of the detergent hose into the detergent bottle.
3. Install the soap spray tip onto the wand.
10
English
EN

4. The machine will suck detergent automatically when you
use the spray gun.
NOTE
Do not let detergent dry on the surface to prevent streaks.
5 MAINTENANCE
WARNING
Before maintenance, make sure that you
• Stop the machine.
• Wait until all the moving parts stop.
• Disconnect the plug from the power source.
WARNING
Do not use strong solvents or detergents on the plastic
housing or components.
WARNING
Do not let brake fluids, gasoline, petroleum-based materials
touch the plastic parts. Chemicals can cause damage to the
plastic, and make the plastic unserviceable.
WARNING
Replace the power cord by an approved service center.
5.1 NOZZLE MAINTENANCE
23
11
If there is too much pump pressure, the nozzle can become
clogged, you can feel a pulsing sensation while you pull the
gun trigger.
5.1.1 REMOVE THE NOZZLE
1. Pull back the quick-connect collar (21) on the spray gun
wand (4).
2. Remove the nozzle (11) from the spray gun wand (4).
5.1.2 CLEAN THE NOZZLE
1. Use a straight paper clip or cleaning tool (23) to clean the
spray tip (11).
2. Flush and clean the unwanted materials out of the nozzle
(11) with the garden hose (18).
3. Install the clean nozzle (11) onto the spray wand (4).
6 TRANSPORTATION AND
STORAGE
WARNING
Disconnect the power cord and watter supply hose before
transportation and storage.
6.1 MOVE THE MACHINE
• Point the spray wand in a safe direction.
• Only hold the machine with the handgrip.
6.2 STORE THE MACHINE
WARNING
Make sure that the spray gun, the high pressure hose and the
pump are dry.
WARNING
Make sure the machine is out of the reach of children.
NOTE
Use a recommended pump protector to prevent cold
weather damage during storage in winter.
• Disconnect the garden hose from machine.
• Wind the power cord and the high pressure hose.
• Clean housing and the plastic components with a moist
and soft cloth.
• Make sure that the machine does not have loose or
damaged parts. If it is necessary, follow these steps/
instructions:
• Replace the damaged parts.
• Tighten the bolts.
• If needed, call the customer service phone number
(enter number here) for servicing instructions.
• Store the machine in a dry, isolated and frost-free area.
11
English
EN

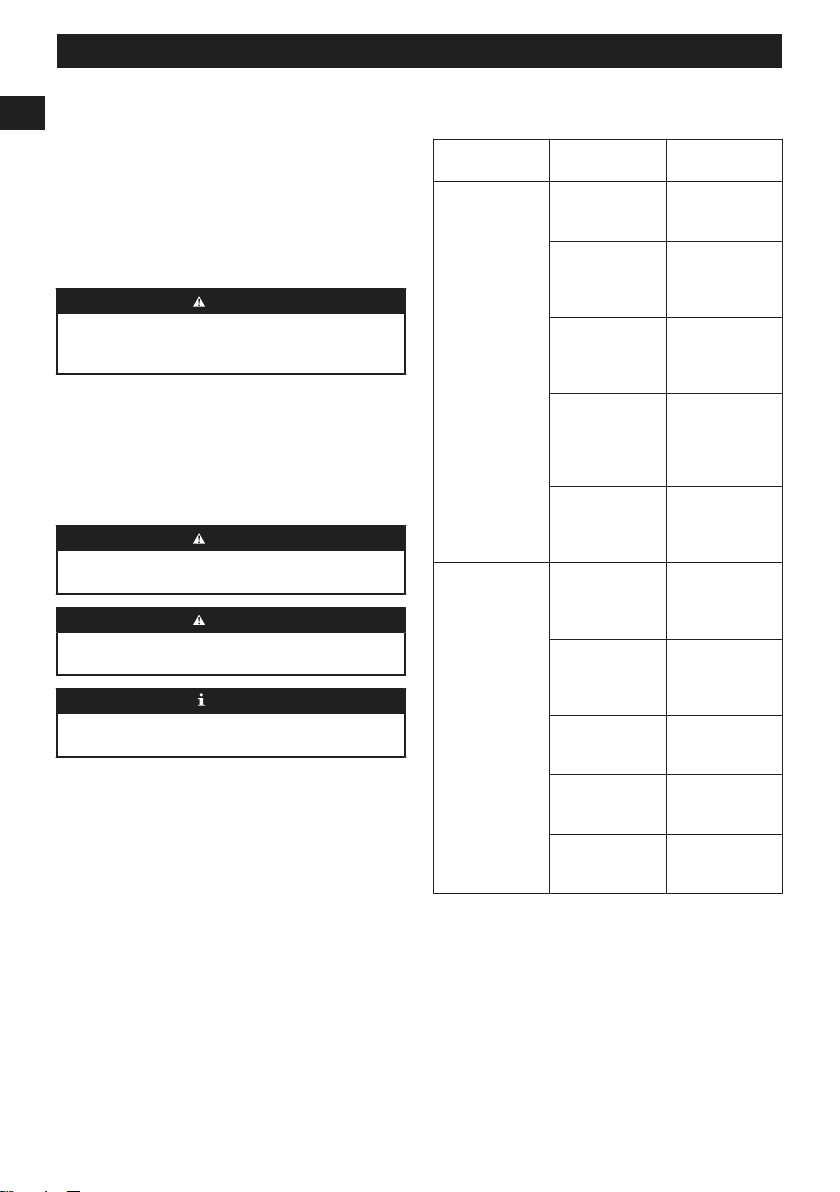
7 TROUBLESHOOTING
PROBLEM POSSIBLE
CAUSE
SOLUTION
The motor does
not start.
The power switch
is off.
Set the power
switch to the
“ON” ( | ) posi-
tion.
You do not plug
the power cord.
Connect the power
cord to the power
supply.
Electrical outlet
does not supply
sufficient power.
Try another elec-
trical outlet.
The circuit breaker
is tripped.
Let it cool, and
start the machine
again.
The power switch
is on, but you do
not pull the gun
trigger.
Pull the gun trig-
ger.
The machine does
not get high pres-
sure.
The diameter of
garden hose is too
small.
Replace with a 1”
(25 mm) or 5/8”
(16 mm) garden
hose.
The garden hose is
blocked.
Make sure that the
garden hose is free
from blockage.
The water supply
is not sufficient.
Open the water
suppy fully.
You do not install
the nozzle onto the
spray wand.
Install the nozzle
onto the spray
wand.
The water intake
filter is blocked.
Remove the filter
and make it clean
in warm water.
PROBLEM POSSIBLE
CAUSE
SOLUTION
The output pres-
sure varies high
and low.
The water supply
is not sufficient.
Open water suppy
fully. Make sure
the garden hose is
free from block-
age.
The pump absorbs
air.
1. Make sure that
the hoses and
fittings have
no problem.
2. Turn the ma-
chine off.
3. Pull the gun
trigger until a
stable flow of
water comes
out through
the nozzle.
The water intake
filter is clogged.
Remove the filter
and clean it in
warm water.
The supply volt-
age is low.
Make sure that on-
ly the pressure
washer operates
on the circuit.
The gun, hose or
nozzle are calci-
fied.
Operate distilled
vinegar through
detergent tank.
12
English
EN
PROBLEM POSSIBLE
CAUSE
SOLUTION
The motor buzzes,
but you can not
start the machine.
The supply volt-
age is low.
Make sure that on-
ly the pressure
washer operates
on the circuit.
The system has re-
maining pressure.
1. Stop the ma-
chine.
2. Pull the gun
trigger on
spray wand to
release pres-
sure
3. Start the ma-
chine.
The voltage de-
creases across ex-
tension cord.
Disconnect the ex-
tension cord, and
connect the ma-
chine directly into
the outlet.
You do not use the
machine for a long
time.
Speak to a person
of an approved
service center.
There is remaining
friction in compo-
nents. You can
hear a hum.
1. Disconnect the
water supply.
2. Turn the ma-
chine on for 2
or 3 seconds.
3. Repeat the
above step for
several times.
There is no water. The water supply
is off.
Turn the water
supply on.
The garden hose is
blocked.
Make sure that the
garden hose is free
from blockage.
8 TECHNICAL DATA
Universal Motor 120V~ 60 Hz, 13 Amps
Max. Pounds Per Square Inch
Pressure
2000 PSI
Max Gallon Per Minute 1.1 GPM
Maximum Inlet Water Temper-
ature
104 °F (40 °C)
Cleaning Units 2200 C.U.
Weight 28.8 lbs. (13.1 kg)
Double-insulated construc-
tion.
9 LIMITED WARRANTY
YEAR
ANS
AÑOS
LIMITED WARRANTY
GARANTIE LIMITÉE
GARANTÍA
LIMITADA
3
Greenworks hereby warranties this product, to the original
purchaser with proof of purchase, for a period of three (3)
years against defects in materials, parts or workmanship.
Greenworks, at its own discretion, will repair or replace any
and all parts found to be defective, through normal use, free
of charge to the customer. This warranty is valid only for
units which have been used for personal use that have not
been purchased or rented for industrial/commercial use, and
that have been maintained in accordance with the instructions
in the owners’ manual supplied with the product when new.
ITEMS NOT COVERED BY WARRANTY:
1. Any part that has become inoperative due to misuse,
commercial use, abuse, neglect, accident, improper
maintenance, or alteration; or
2. The unit, if it has not been operated and/or maintained in
accordance with the owner's manual; or
3. Normal wear;
4. Routine maintenance items such as lubricants, blade
sharpening;
5. Normal deterioration of the exterior finish due to use or
exposure.
HELPLINE:
Warranty service is available by calling our toll-free helpline
at 1-888-909-6757.
TRANSPORTATION CHARGES:
Transportation charges for the movement of any power
equipment unit or attachment are the responsibility of
the purchaser. It is the purchaser’s responsibility to pay
transportation charges for any part submitted for replacement
under this warranty unless such return is requested in writing
by Greenworks.
USA address:
Greenworks Tools
P.O. Box 1238
Mooresville, NC 28115
13
English
EN
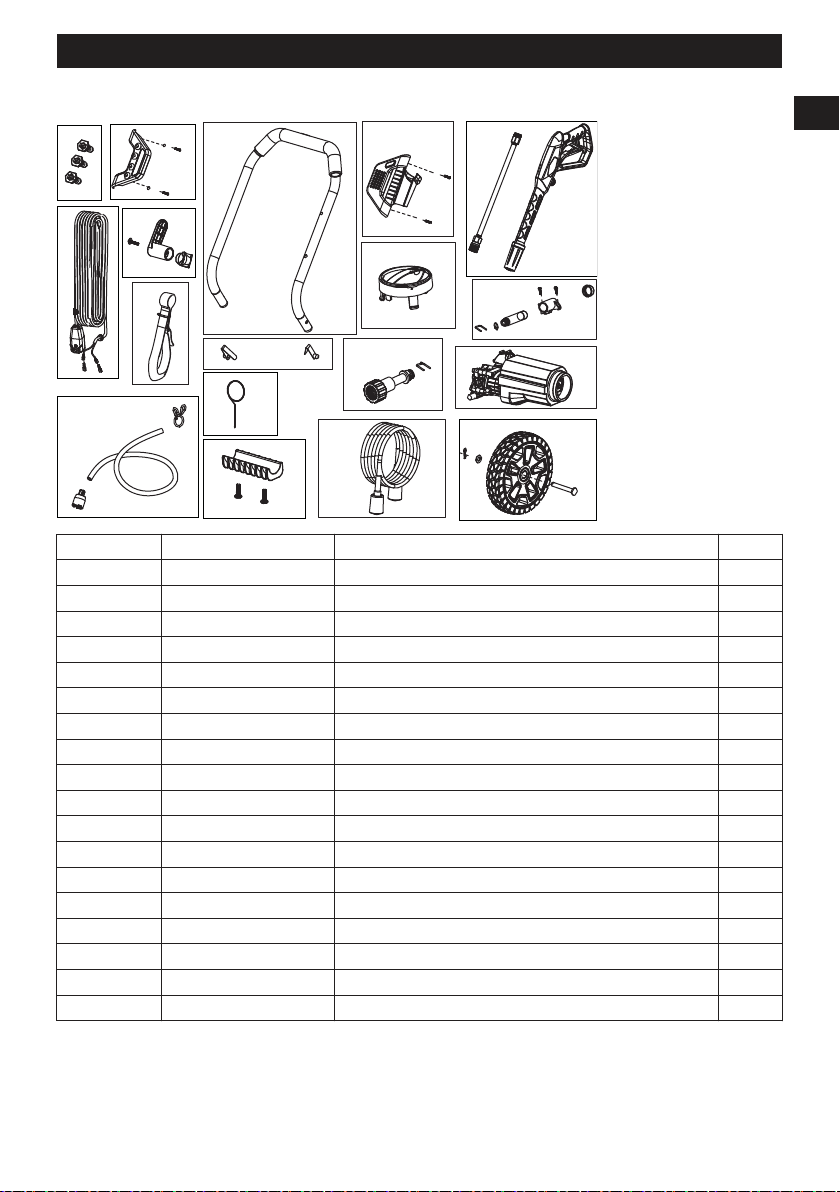
10 EXPLODED VIEW
1
2
6
7
8
3
4
10
5
12
13
18
11
17
14
9
15
16
ITEM NO. PART NO. DESCRIPTION QTY
1 C1109644-00 Kit, Spray tips 1
2 R0203794-00 Kit, Spray tip storage panel 1
3 R0203797-00 Kit, Upper handle 1
4 R0203799-00 Kit, Spray gun holder 1
5 C1109648-00 Kit, Spray gun 1
6 C1109650-00 Kit, Power cord (with GFCI) 1
7 311213614 Kit, Power cord storage arm 1
8 349011824 Belt 1
9 C1108239-00 Spring Button 1
10 C4100526-00 Switch knob 1
11 C1109652-00 Kit, Water inlet connector 1
12 C1109653-00 Kit, Water outlet connector 1
13 C1109686-00 Kit, Motor 1
14 C1109654-00 Kit, Suction hose 1
15 33201671 Spray tip cleaning tool 1
16 R0203815-00 Kit, Frame foot pad 1
17 31203670-1 Kit, High pressure hose 1
18 R0203816-00 Kit, Wheel 2
14
English
EN

1 Descripción.......................................16
1.1 Finalidad.......................................................... 16
1.2 Descripción general del producto....................16
2 Advertencias generales de
seguridad para herramientas
eléctricas...........................................16
2.1 Advertencias de seguridad generales para
herramientas eléctricas.................................... 16
2.2 Advertencias sobre seguridad eléctrica........... 16
2.3 Advertencias de seguridad para
limpiadores a presión.......................................17
2.4 Protección de interruptor de circuito de
fallo a tierra......................................................17
2.5 Tareas de mantenimiento de un aparato de
doble aislamiento.............................................17
2.6 Cables alargadores...........................................17
2.7 Seguridad infantil............................................ 17
2.8 Símbolos en el producto.................................. 18
2.9 Niveles de riesgo............................................. 18
2.10 Propuesta 65.................................................... 19
3 Instalación........................................19
3.1 Conexión eléctrica........................................... 19
3.2 Desembalaje de la máquina............................. 19
3.3 Instale la varilla pulverizadora........................ 19
3.4 Instale las ruedas..............................................20
3.5 Instalación del manillar superior..................... 20
3.6 Instale el soporte de la pistola de
pulverización................................................... 20
3.7 Instale el brazo para enrollar el cable
eléctrico........................................................... 20
3.8 Instale la manguera de alta presión..................20
4 Funcionamiento...............................20
4.1 Conecte el suministro de agua al aparato. ...... 21
4.2 Use la pistola de pulverización........................21
4.3 Cambie la boquilla...........................................21
4.4 Ponga la herramienta en marcha......................22
4.5 Detención de la máquina................................. 22
4.6 Use the detergent............................................. 23
5 Mantenimiento.................................23
5.1 Mantenimiento de la boquilla..........................23
6 Transporte y almacenamiento........24
6.1 Traslado de la máquina....................................24
6.2 Almacenamiento de la máquina...................... 24
7 Resolución de problemas................ 24
8 Datos técnicos.................................. 25
9 Garantía limitada............................26
10 Vista despiezada.............................. 27
15
Español
ES
1 DESCRIPCIÓN
1.1 FINALIDAD
Este aparato se usa para limpiar vehículos, barcos, edificios,
porches, cubiertas, patios y caminos de entrada.
Indicado solo para el uso doméstico, no apto para el uso
profesional, y no debe funcionar en temperaturas superiores a
32°F (0°C).
1.2 DESCRIPCIÓN GENERAL DEL
PRODUCTO
2
1
3
4
5
7
8
9
10
11
12
6
1
Manguera de alta
presión
2
Soporte de la pistola
de pulverización
3
Pistola de
pulverización
4
Varilla pulverizadora
5
Manillar superior
6
Manillar inferior
7
Rueda
8
Entrada de agua
9
Cable de
alimentación
10
Retenedor del cable
11
Consejos para la
pulverización
12
Panel frontal
2 ADVERTENCIAS GENERALES
DE SEGURIDAD
PARA HERRAMIENTAS
ELÉCTRICAS
AVISO
Cuando utilice este producto, deben seguirse siempre
precauciones básicas, incluidas las siguientes:
Guarde todas las advertencias e instrucciones para su consulta
posterior.
El término “herramienta eléctrica” empleado en las
advertencias se refiere a su herramienta eléctrica con
funcionamiento de red (con cable).
2.1 ADVERTENCIAS DE
SEGURIDAD GENERALES PARA
HERRAMIENTAS ELÉCTRICAS
• Esta herramienta no ha sido concebida para ser utilizar
por personas (incluidos niños) con discapacidades físicas,
sensoriales o mentales, o sin experiencia ni conocimiento
del producto, a menos que estén bajo supervisión o hayan
recibido instrucciones sobre el uso del aparato por parte
de una persona responsable de su seguridad. Los niños
deben estar bajo vigilancia para asegurarse de que no
juegan con el aparato.
• Conozca las aplicaciones y limitaciones de este aparato
así como sus peligros potenciales estudiando su manual.
• No utilizar nunca este aparato con protecciones o
cubiertas retiradas o dañadas.
• No utilizar el producto bajo los efectos del consumo de
drogas, alcohol o cualquier medicación.
• No llevar puesta ropa suelta, guantes, corbata, ni joyas
durante el uso del aparato. Podrían quedar atrapados y
arrastrarle hacia las piezas móviles.
• Se recomienda utilizar guantes de goma y calzado
antideslizante para trabajar en el exterior. En caso de
tener el pelo largo, también debe llevar el pelo cubierto
como protección. Utilice calzado que proteja sus pies y
mejore su agarre sobre superficies resbaladizas.
• No intente excederse para llegar a puntos de difícil acceso
o superficies inestables. Mantenga en todo momento un
buen equilibrio y los pies firmemente apoyados en el
suelo.
• Inspeccione la zona de trabajo antes de utilizar la
herramienta. Retire todos los objectos como piedras,
cristales rotos, clavos, alambres, o cuerdas que pudieran
salir lanzados o quedar enredados en el aparato.
• Evite cualquier entorno peligroso. No exponer a la lluvia.
Mantener la zona de trabajo bien iluminada.
• Antes de iniciar la operación de limpieza, cierre puertas y
ventanas. Retire de la zona a limpiar, residuos, juguetes,
muebles de exterior, u otros objetos que pudieran suponer
un peligro.
• No utilice el aparato cerca de otras personas a menos que
utilicen ropa de protección.
2.2 ADVERTENCIAS SOBRE
SEGURIDAD ELÉCTRICA
• Antes de realizar cualquier tarea de mantenimiento por
parte del usuario desconecte el suministro eléctrico.
• Utilice solo cables alargadores con conexiones estancas y
concebidos para el uso en el exterior. Utilice solo cables
alargadores con características eléctricas no inferiores
a las especificadas del producto. Examine el cable
alargador antes de utilizarlo y sustitúyalo si estuviera
dañado. No maltrate el alargador eléctrico y no estire del
16
Español
ES

cable para desconectarlo. Mantenga el cable alejado del
calor y bordes afilados. Desconecte siempre primero el
alargador de la toma de corriente antes de desconectar el
producto del alargador.
• No utilice el aparato si el cable de alimentación o
cualquier pieza importante del aparato está dañada, por
ejemplo dispositivos de seguridad, manguera de alta
presión, pistola de gatillo.
• Un alargador eléctrico inadecuado puede ser peligroso.
• Para reducir el riesgo de electrocución, mantenga todas
las conexiones secas y fuera del suelo. No toque el
enchufe con las manos mojadas.
• No maltrate el cable de alimentación eléctrica. No utilice
el cable eléctrico para transportar el producto y tampoco
para desconectar el enchufe de la toma de corriente.
Mantenga el cable apartado de las fuentes de calor, el
aceite, los cantos agudos o las piezas móviles. Si el
cable está dañado, deberá ser sustituido inmediatamente.
Un cable dañado incrementa el riesgo de una descarga
eléctrica.
• Inspeccione periódicamente los cables alargadores y
reemplácelos si están dañados. Mantenga los manillares
secos, limpios y sin restos de aceite o grasa.
2.3 ADVERTENCIAS DE SEGURIDAD
PARA LIMPIADORES A PRESIÓN
• Lea todas las instrucciones antes de utilizar el producto.
• Para reducir el riesgo de lesiones, es necesaria una
supervisión estrecha cuando se utiliza un producto cerca
de niños.
• Debe saber cómo detener el producto y purgar las
presiones rápidamente. Familiarícese bien con los
controles.
• Manténgase alerta – observe lo que está haciendo.
• No utilice el producto cuando esté cansado o bajo la
influencia de alcohol o drogas.
• Mantenga alejadas a las personas de la superficie de
trabajo.
• No se estire ni se suba sobre un soporte inestable.
Mantenga en todo momento una buena postura y el
equilibrio.
• Siga las instrucciones de mantenimiento especificadas en
el manual.
• Este producto se suministra con un interruptor de circuito
de fallo a tierra integrado en el enchufe del cable de
alimentación. Si es necesario sustituir el enchufe o el
cable, utilice únicamente piezas de repuesto idénticas.
• Riesgo de inyección o lesión – No dirija el chorro de
descarga a las personas.
• Mantenga el motor alejado de materiales inflamables y
otros materiales peligrosos.
• Mantenga el producto seco, limpio y sin restos de aceite
y grasa. Para la limpieza utilice siempre un paño limpio.
Nunca utilice líquidos de frenos, gasolina, productos a
base de petróleo o cualquier otro disolvente para limpiar
el producto.
AVISO
Para reducir el riesgo de electrocución, mantenga todas las
conexiones secas y alejadas del suelo. No maneje el cable
con las manos mojadas.
2.4 PROTECCIÓN DE INTERRUPTOR
DE CIRCUITO DE FALLO A
TIERRA
Este limpiador a presión cuenta con un interruptor de
circuito de fallo a tierra (GFCI) incorporado en el enchufe
del cable de alimentación. Este dispositivo proporciona
protección adicional contra el riesgo de descarga eléctrica.
En caso de que sea necesario sustituir el enchufe o el cable,
utilice únicamente piezas de repuesto idénticas que incluyan
protección GFCI.
2.5 TAREAS DE MANTENIMIENTO
DE UN APARATO DE DOBLE
AISLAMIENTO.
• Un producto con doble aislamiento posee dos sistemas
de aislamiento, en vez de una toma a tierra. Sin toma de
tierra quiere decir que el producto posee un aislamiento
doble, y por ello no debe agregarse ningún medio de toma
a tierra al producto. El mantenimiento de un producto
con doble aislamiento requiere un cuidado extremo y
conocimiento del sistema, y solo debe realizarlo un
servicio técnico autorizado. Las piezas de repuesto de
un producto con doble aislamiento deben ser idénticas
a las piezas que sustituyen. Un producto con doble
aislamiento está marcado con las palabras «DOBLE
AISLAMIENTO» o «DOBLEMENTE AISLADO».
2.6 CABLES ALARGADORES
• Utilice únicamente cables alargadores que se hayan
diseñado para uso en exteriores. Estos cables alargadores
se identifican con el marcado "Aceptable para su
utilización con aparatos de exterior; almacenar en el
interior mientras no esté en uso". Utilice únicamente
cables alargadores que tengan una potencia eléctrica
no inferior a la potencia nominal del producto. No
utilice cables eléctricos dañados. Examine el cable
alargador antes del uso y sustitúyalo si está dañado.
No abuse del cable alargador y no tire de ningún
cable para desconectarlo. Mantenga el cable alejado del
calor y de los bordes afilados. Desconecte siempre el
cable alargador del receptáculo antes de desconectar el
producto del cable alargador.
2.7 SEGURIDAD INFANTIL
Pueden producirse accidentes trágicos si el operario no es
consciente de la presencia de niños.
• Mantenga a los niños fuera de la zona de trabajo y bajo la
vigilancia de un adulto responsable.
17
Español
ES
• No permita que niños menores de 14 años utilicen esta
herramienta. Los niños de 14 años y mayores deben
leer y entender las instrucciones de funcionamiento y las
normas de seguridad que se encuentran en este manual y
deben recibir formación y supervisión por parte de uno de
sus progenitores.
• Manténgase alerta y apague el aparato si un niño o
cualquier otra persona entra en la zona de trabajo.
• Tenga mucho cuidado al acercarse a esquinas ciegas,
portales, arbustos, árboles u otros objetos que puedan
ocultar su visión de un niño que pueda correr hacia el
recorrido del aparato.
2.8 SÍMBOLOS EN EL PRODUCTO
En esta herramienta pueden utilizarse algunos de los
siguientes símbolos. Le rogamos que los estudie y aprenda
su significado. La interpretación correcta de estos símbolos
le permitirá manejar la herramienta mejor y de manera más
segura.
Símbolo Explicación
Para reducir el riesgo de lesiones, el
usuario debe leer y entender el man-
ual del operario antes de utilizar este
producto.
No exponga el producto a la lluvia o
a condiciones de humedad.
Lleve siempre gafas de seguridad o
anteojos de seguridad con protectores
laterales y, en caso necesario, un pro-
tector facial completo cuando utilice
este producto.
Para reducir el riesgo de inyección o
lesión, nunca dirija un chorro de agua
hacia personas o animales, ni coloque
ninguna parte del cuerpo delante del
chorro. Las fugas en las mangueras y
los racores también pueden provocar
lesiones por inyección. No sujete las
mangueras ni los racores.
Para reducir el riesgo de lesiones por
retroceso, sujete firmemente la lanza
con ambas manos cuando la máquina
esté encendida.
Si no se utiliza en condiciones secas
y no se respetan prácticas seguras,
pueden producirse descargas eléctri-
cas.
El combustible y sus vapores son ex-
plosivos y pueden producir quemadu-
ras graves o incluso la muerte.
Símbolo Explicación
¡Advertencia! Nunca apunte la pisto-
la hacia personas, animales, el cuerpo
de la máquina, la fuente de alimenta-
ción o cualquier aparato eléctrico.
El aparato no es adecuado para la
conexión a la red de agua potable sin
un dispositivo de prevención de reflu-
jo.
Utilice la plataforma de limpieza úni-
camente sobre superficies planas y
horizontales. Nunca levante la plata-
forma de limpieza de la superficie de
limpieza mientras esté utilizando el
limpiador a presión.
Mantenga las manos y los pies ale-
jados de la plataforma de limpieza
mientras el limpiador a presión esté
en funcionamiento.
2.9 NIVELES DE RIESGO
Las siguientes indicaciones y los significados explican los
niveles de riesgo asociados a este producto.
SÍMBO-
LO
INDICACIÓN SIGNIFICADO
PELIGRO Indica una situación de pel-
igro inminente que, de no
evitarse, provocará lesiones
graves o incluso la muerte.
ADVERTEN-
CIA
Indica una situación de peli-
gro potencial que, de no evita-
rse, podría provocar lesiones
graves o incluso la muerte.
PRECAUCIÓN Indica una situación de peli-
gro potencial que, de no evita-
rse, puede provocar lesiones
leves o moderadas.
PRECAUCIÓN (Sin símbolo de alerta sobre
seguridad) Indica una situa-
ción que puede provocar da-
ños materiales.
18
Español
ES
2.10 PROPUESTA 65
AVISO
Este producto contiene una sustancia química conocida en
el estado de California como causante de cáncer, defectos
de nacimiento u otros daños reproductivos. El polvo
generado por el lijado eléctrico, el serrado, el esmerilado,
la perforación y otras actividades de construcción contiene
sustancias químicas que se sabe que son causantes de
cáncer, defectos de nacimiento u otros daños reproductivos.
Algunos ejemplos de estas sustancias químicas son:
• Plomo de pinturas con base de plomo;
• Sílice cristalina de ladrillos y cemento y otros productos
de albañilería;
• Arsénico y cromo de la madera tratada químicamente.
El riesgo de exposición a estas sustancias químicas varía
según la frecuencia con la que realice este tipo de
trabajo. Para reducir su exposición a estas sustancias
químicas, trabaje en una zona bien ventilada y trabaje con
equipos de seguridad aprobados, como máscaras antipolvo,
que estén especialmente diseñadas para filtrar partículas
microscópicas.
Conserve estas instrucciones.
3 INSTALACIÓN
3.1 CONEXIÓN ELÉCTRICA
Esta máquina tiene un motor eléctrico fabricado con
precisión. Debe conectarse a una fuente de alimentación de
120V, 60 Hz, únicamente CA (doméstica). No utilice esta
máquina con corriente continua (CC). Una caída de tensión
considerable provocará una pérdida de potencia y el motor se
sobrecalentará.
3.1.1 PREPARE UN BUCLE DE GOTEO
Se recomienda usar un bucle de goteo (13) como se ilustra
abajo para que el agua no pueda derramarse por el cable de
alimentación (9) e incluso poder alcanzar la salida eléctrica y
al enchufe.
9
13
AVISO
Mantenga el cable de extensión fuera del área de trabajo.
Coloque el cable de modo que no pueda engancharse
con maderas, herramientas u otras obstrucciones mientras
está trabajando con el aparato. De lo contrario se pueden
producir lesiones corporales graves.
3.2 DESEMBALAJE DE LA MÁQUINA
AVISO
Asegúrese de montar correctamente la máquina antes del
uso.
AVISO
• Si las piezas de la máquina presentan daños, no utilice
la máquina.
• Si no tiene todas las piezas, no utilice la máquina.
• Si faltan piezas o hay piezas dañadas, contacte con el
centro de servicio.
1. Abra el embalaje.
2. Lea la documentación que se proporciona en la caja.
3. Retire todas las piezas sin montar de la caja.
4. Retire la máquina de la caja.
5. Deseche la caja y el material de embalaje de conformidad
con los reglamentos locales.
3.3 INSTALE LA VARILLA
PULVERIZADORA
4
2
1. Introduzca el extremo de la varilla pulverizadora (4) en la
empuñadura de la pistola (2).
2. Gire la varilla pulverizadora (4) en el sentido de
las agujas del reloj hasta que las pestañas queden
correctamente acopladas.
AVISO
Compruebe que la conexión no tiene fugas.
19
Español
ES
3.4 INSTALE LAS RUEDAS
22
14 15
7
1. Coloque el eje (22) a través de la rueda (7) y el armazón
del manillar.
2. Acople una arandela (14) al eje.
3. Introduzca un pasador de chaveta (15) por el orificio del
eje.
3.5 INSTALACIÓN DEL MANILLAR
SUPERIOR
5
6
1. Pulse y mantenga pulsado los botones de bloqueo del
manillar en el manillar superior (5).
2. Coloque el manillar superior (5) en el manillar inferior
(6) hasta que el botón de bloqueo se acople en la ranura.
3.6 INSTALE EL SOPORTE DE LA
PISTOLA DE PULVERIZACIÓN
2
16
1. Los casquillos de los tornillos del soporte de la pistola de
pulverización (2) deben estar alineados con los orificios
para tornillos del manillar superior (5).
2. Pase los tornillos (16) a través de los casquillos y
apriételos con un destornillador Phillips (no incluido).
3.7 INSTALE EL BRAZO PARA
ENROLLAR EL CABLE
ELÉCTRICO
12
16
10
1. Acople el brazo para enrollar el cable (12) en el
accesorio.
2. Alinee el tornillo (16) con el orificio del brazo para
enrollar el cable eléctrico (12).
3. Pase el tornillo (16) y apriételo.
3.8 INSTALE LA MANGUERA DE
ALTA PRESIÓN
17
8
1
1. Tire del extremo de retenedor del cable para liberar la
manguera de alta presión (1).
2. Empuje y gire en el sentido horario un extremo de la
manguera de alta presión (1) para introducirla en el
acoplamiento de entrada (8).
3. Instale y apriete el otro extremo de la manguera de alta
presión (1) en el acoplamiento de salida del agua (17).
4 FUNCIONAMIENTO
AVISO
Asegúrese de que todas las conexiones estén apretadas y no
tengan fugas antes del funcionamiento.
20
Español
ES
4.1 CONECTE EL SUMINISTRO DE
AGUA AL APARATO.
Para facilitar su funcionamiento, utilice una manguera de
jardín autoenrollable (no suministrada).
AVISO
Cuando utilice una manguera autoenrollable, asegúrese de
que la manguera no está atascada.
AVISO
• El suministro de agua debe proceder de la red de agua.
• No utilizar agua caliente
• No utilizar agua de estanques ni lagos
AVISO
Siga la normativa local a la hora de conectar la manguera
de jardín al suministro de agua. Por lo general, se permite
la conexión directa a través de un tanque receptor o un
dispositivo de prevención de reflujo.
PRECAUCIÓN
Inspeccione el filtro en el conector de entrada de agua antes
de conectar la manguera de jardín.
• Si el filtro está dañado, no use el aparato hasta que se
reemplace el filtro.
• Si el filtro está sucio, límpielo.
8
18
1. Desenrolle la manguera de jardín (18).
2. Deje que salga agua por la manguera durante 30
segundos.
3. Cierre el suministro de agua.
4. Instale y apriete el extremo de la manguera de jardín (18)
al conector de entrada de agua (8).
PRECAUCIÓN
Debe haber como mínimo 10 pies (3 m) de manguera entre
la entrada de agua y el suministro de agua.
4.2 USE LA PISTOLA DE
PULVERIZACIÓN
4
2
19
20
AVISO
Para asegurar el control, mantenga siempre las manos
sujetando la pistola.
• Apriete y sujete el gatillo de la pistola (19) para poner en
marcha el aparato.
• Suelte el gatillo de la pistola (19) para detener el chorro
de agua que sale por la boquilla (11).
4.2.1 DESBLOQUEE EL GATILLO DE LA
PISTOLA DE PULVERIZACIÓN
• Empuje hacia atrás el botón de seguridad del gatillo (20).
4.2.2 BLOQUEE EL GATILLO DE LA
PISTOLA
• Empuje hacia delante el botón de seguridad del gatillo
(20).
4.3 CAMBIE LA BOQUILLA
11
21
21
Español
ES
AVISO
Antes de cambiar la boquilla:
1. Apriete el gatillo de la pistola para liberar la presión del
agua.
2. Bloquee el botón de seguridad del gatillo de la pistola.
3. Detenga el aparato.
AVISO
No apunte la varilla pulverizadora hacia su cara o la cara de
otras personas.
4.3.1 TIPO DE BOQUILLA
CONSEJOS
SOBRE LA
PULVERIZA-
CIÓN
APLICACIÓN
25
O
Verde - Punta estrecha de abanico (25º)
• La punta verde de arandela de pre-
sión ofrece mayor versatilidad con
su punta de ángulo de 25 grados. De-
nominada punta limpiadora, porque
ofrece la presión adecuada para elim-
inar la suciedad de superficies, pero
ha sido diseñada para no dañar mu-
chas superficies. Esta punta de ara-
ndela de presión ha sido diseñada
para «barrer» hojas o residuos gracias
a su ángulo ancho. Esta punta es ver-
sátil debido a su amplia zona de lim-
pieza y su fuerte presión.
40
O
Blanco - Punta ancha de abanico (40° )
• La punta ancha de 40 grados, denom-
inada punta de «abanico» crea un
área más ancha de limpieza con una
presión relativamente baja. Es mejor
utilizar esta punta de lavado a presión
para realizar limpiezas ligeras o deli-
cadas. Se recomienda para limpiezas
ligeras de cubiertas de madera y otras
superficies blandas o delicadas.
SOAP
Negra - punta pulverizadora de jabón
• La punta negra pulverizadora de ja-
bón se utiliza para aplicaciones con
jabón. El jabón se aplica con poca
presión y alto volumen para obtener
un resultado óptimo. No se puede
utilizar jabón a alta presión con este
aparato.
4.3.2 INSTALE LA BOQUILLA
1. Tire hacia atrás del cuello de conexión rápida (21) de la
varilla pulverizadora (4).
2. Instale la boquilla (11) en la varilla pulverizadora (4).
3. Suelte el cuello de conexión rápida (21) para acoplar la
boquilla (11).
4.4 PONGA LA HERRAMIENTA EN
MARCHA
PRECAUCIÓN
No ponga la herramienta en funcionamiento sin conectarla a
la red de suministro de agua.
PRECAUCIÓN
Antes de encender la herramienta:
1. Abra el suministro de agua.
2. Apriete el gatillo de la pistola para liberar la presión del
aire.
3. Si sale un chorro de agua estable de la pistola, suelte el
gatillo.
1. Conecte el aparato a la toma de corriente.
2. Sitúe el interruptor en la posición de encendido ( | ).
3. Abra el grifo de agua.
4. Pulse el gatillo de la pistola.
4.5 DETENCIÓN DE LA MÁQUINA
1. Suelte el gatillo de la pistola pulverizadora.
2. Pulse de nuevo el interruptor de encendido/apagado para
situar el interruptor en la posición de apagado (O).
AVISO
Si no utiliza la máquina:
• Detenga la herramienta.
• Desconecte el suministro de agua.
• Desconecte el cable de alimentación de la toma de
pared.
• Apriete el gatillo de la pistola pulverizadora para liberar
la presión restante de la herramienta.
• Acople el bloqueo de seguridad del gatillo en la pistola
pulverizadora.
22
Español
ES
4.6 USE THE DETERGENT
AVISO
Do not use household detergents, acids, alkalines, bleaches,
solvents, flammable material, or industrial grade solutions,
which can do damage to the pump.
AVISO
Do the instructions on the solution bottle to prepare
detergent.
NOTA
If it is necessary, use a funnel to prevent the spill of
detergent. Clean and dry the spilled detergent when you fill
it.
NOTA
Soap/detergent can only be applied with this machine when
the black nozzle(75 degree) is installed.
1. Put the machine vertically on a flat surface.
2. Put the end of the detergent hose into the detergent bottle.
3. Install the soap spray tip onto the wand.
4. The machine will suck detergent automatically when you
use the spray gun.
NOTA
Do not let detergent dry on the surface to prevent streaks.
5 MANTENIMIENTO
AVISO
Antes del mantenimiento, asegúrese de
• Detener la herramienta.
• Esperar hasta que se detengan todas las piezas móviles.
• Desconectar el enchufe de la fuente de alimentación.
AVISO
No utilice disolventes o detergentes fuertes en la carcasa o
los componentes de plástico.
AVISO
No permita que líquidos de frenos, gasolina y otros
derivados del petróleo toquen las piezas de plástico. Las
sustancias químicas pueden dañar el plástico y hacer que
quede inservible.
AVISO
El cable de alimentación debe ser sustituido por un centro
de servicio autorizado.
5.1 MANTENIMIENTO DE LA
BOQUILLA
23
11
Si existe excesiva presión en la bomba, la boquilla podría
quedar obstruida, usted sentirá una sensación de pulsación
mientras pulsa el gatillo.
5.1.1 RETIRE LA BOQUILLA
1. Tire hacia atrás del cuello de conexión rápida (21) de la
varilla pulverizadora (4).
2. Retire la boquilla (11) de la varilla pulverizadora (4).
23
Español
ES
5.1.2 LIMPIE LA BOQUILLA
1. Utilice un clip de papel enderezado o la herramienta de
limpieza (23) para limpiar la punta del pulverizador (11).
2. Purgue y limpie los materiales no deseados del interior de
la boquilla (11) utilizando la manguera de jardín (18).
3. Instale la boquilla de limpieza (11) en la varilla
pulverizadora (4).
6 TRANSPORTE Y
ALMACENAMIENTO
AVISO
Desconecte el cable de alimentación y la manguera
de suministro de agua antes del transporte y el
almacenamiento.
6.1 TRASLADO DE LA MÁQUINA
• Apunte la varilla pulverizadora en una dirección segura.
• Sujete la máquina únicamente por la empuñadura.
6.2 ALMACENAMIENTO DE LA
MÁQUINA
AVISO
Asegúrese de que la pistola de pulverización, la manguera
de alta presión y la bomba estén secas.
AVISO
Asegúrese de que la máquina esté fuera del alcance de los
niños.
NOTA
Utilice un protector de bomba recomendado para evitar
daños por el frío durante el almacenamiento en invierno.
• Desconecte la manguera de jardín de la máquina.
• Enrolle el cable de alimentación y la manguera de alta
presión.
• Limpie la carcasa y los componentes de plástico con un
paño húmedo y suave.
• Asegúrese de que la máquina no tenga piezas sueltas
o dañadas. Si es necesario, siga estos pasos/estas
instrucciones:
• Sustituya las piezas dañadas.
• Apriete los pernos.
• Si es necesario, llame al número de teléfono del
servicio de atención al cliente (introducir el número
aquí) para obtener instrucciones de servicio.
• Almacene la máquina en un lugar seco, aislado y donde
no hiele.
7 RESOLUCIÓN DE
PROBLEMAS
PROBLEMA CAUSA POSI-
BLE
SOLUCIÓN
El motor no arran-
ca.
El interruptor está
apagado.
Sitúe el interruptor
en la posición
“ON” ( | ).
No ha conectado
el cable de alimen-
tación.
Conecte el cable
de alimentación a
la toma de cor-
riente.
La toma de cor-
riente no suminis-
tra suficiente po-
tencia.
Utilice otra toma
de corriente.
El disyuntor se ha
activado.
Espere hasta que
se haya enfriado, y
ponga la máquina
en funcionamiento
de nuevo.
El interruptor está
encendido, pero
usted no ha pulsa-
do el gatillo.
Pulse el gatillo de
la pistola.
La máquina no
tiene suficiente
presión.
El diámetro de la
manguera de jar-
dín es demasiado
pequeño.
Sustituya por una
manguera de jar-
dín de 25 mm (1")
o 16 mm (5/8").
La manguera de
jardín está obstrui-
da.
Asegúrese de que
la manguera de
jardín no está ob-
struida.
El suministro de
agua no es sufi-
ciente.
Abra el grifo de
agua por comple-
to.
No ha instalado la
boquilla en la var-
illa pulverizadora.
Instale la boquilla
en la varilla pul-
verizadora.
El filtro de entrada
de agua está ob-
struido.
Retire el filtro y
límpielo en agua
templada.
24
Español
ES

PROBLEMA CAUSA POSI-
BLE
SOLUCIÓN
La presión de sali-
da varía entre alta
a baja.
El suministro de
agua no es sufi-
ciente.
Abra el grifo de
agua por comple-
to. Asegúrese de
que la manguera
de jardín no está
obstruida.
La bomba absorbe
aire.
1. Asegúrese de
que las man-
gueras y los
acoplamientos
están en bue-
nas condi-
ciones.
2. Apague la má-
quina.
3. Pulse el gatillo
hasta obtener
un chorro de
agua estable
por la boquil-
la.
El filtro de entrada
de agua está ob-
struido.
Retire el filtro y
límpielo en agua
templada.
El suministro eléc-
trico no tiene sufi-
ciente potencia.
Asegúrese de que
solo la hidrolim-
piadora está con-
ectada al circuito
eléctrico.
La pistola, man-
guera o boquilla
están calcificadas.
Añada vinagre
destilado al depós-
ito de detergente.
PROBLEMA CAUSA POSI-
BLE
SOLUCIÓN
El motor genera
un zumbido, pero
usted no puede en-
cender la máquina.
El suministro eléc-
trico no tiene sufi-
ciente potencia.
Asegúrese de que
solo la hidrolim-
piadora está con-
ectada al circuito
eléctrico.
El sistema todavía
tiene presión en el
interior.
1. Detenga la
máquina.
2. Pulse el gatillo
o la varilla
pulverizadora
para expulsar
la presión.
3. Ponga la má-
quina en fun-
cionamiento.
El voltaje dismi-
nuye por el alarga-
dor eléctrico.
Desconecte el alar-
gador eléctrico y
conecte la máqui-
na directamente a
la toma de cor-
riente.
No utilice la má-
quina durante un
largo periodo de
tiempo.
Hable con alguien
del servicio técni-
co oficial.
Hay fricción entre
los componentes.
Puede escuchar un
zumbido.
1. Desconecte el
suministro de
agua.
2. Encienda la
máquina du-
rante 2 ó 3 se-
gundos.
3. Repita varias
veces el paso
anterior.
No hay agua. El grifo del agua
está cerrado.
Abra el grifo de
agua.
La manguera de
jardín está obstrui-
da.
Asegúrese de que
la manguera de
jardín no está ob-
struida.
8 DATOS TÉCNICOS
Motor universal 120V~ 60 Hz, 13 Amps
Máx. presión libras por pulga-
da al cuadrado
2000 PSI
Galones máx. por minuto 1.1 GPM
Temperatura máxima de agua
de entrada
104 °F (40 °C)
25
Español
ES

Unidades de limpieza 2200 C.U.
Peso 28.8 lbs. (13.1 kg)
Estructura con doble aisla-
miento.
9 GARANTÍA LIMITADA
YEAR
ANS
AÑOS
LIMITED WARRANTY
GARANTIE LIMITÉE
GARANTÍA
LIMITADA
3
Por la presente Greenworks garantiza este producto, al
comprador original con el comprobante de compra, durante
un periodo de tres (3) años frente a defectos en materiales,
piezas o mano de obra. A su entera discreción Greenworks
reparará o sustituirá cualquiera y todas las piezas que resulten
ser defectuosas, con un uso normal, sin coste alguno para
el cliente. Esta garantía es válida únicamente para unidades
que se hayan utilizado para uso personal que no han
sido compradas o alquiladas para uso industrial/comercial
y cuyo mantenimiento se ha realizado de acuerdo con las
instrucciones del manual del propietario suministrado con el
producto nuevo.
ARTÍCULOS NO CUBIERTOS POR LA GARANTÍA:
1. Cualquier pieza que no funcione debido a mal uso, uso
comercial, abuso, negligencia, accidente, mantenimiento
inadecuado o alteración; o
2. La unidad, si no ha sido utilizada o mantenida de acuerdo
con el manual del propietario; o
3. Desgaste normal;
4. Artículos de mantenimiento de rutina tales como
lubricantes, afilado de cuchillas;
5. Deterioro normal del acabado exterior debido al uso o la
exposición.
LÍNEA DE ASISTENCIA TELEFÓNICA:
Puede contactar con el servicio de garantía llamando a nuestra
línea de asistencia telefónica gratuita a 1-888-909-6757.
COSTES DE TRANSPORTE:
Los costes de transporte por el desplazamiento de cualquier
unidad o accesorio de equipos eléctricos son responsabilidad
del comprador. Es responsabilidad del comprador pagar los
costes de transporte de cualquier pieza enviada para su
sustitución bajo esta garantía, a menos que dicha devolución
sea solicitada por escrito por Greenworks.
Dirección en EE.UU.:
Greenworks Tools
P.O. Box 1238
Mooresville, NC 28115
26
Español
ES
10 VISTA DESPIEZADA
1
2
6
7
8
3
4
10
5
12
13
18
11
17
14
9
15
16
Nº ARTÍCULO Nº PIEZA DESCRIPCIÓN CANT.
1 C1109644-00 Kit, Puntas de pulverización 1
2 R0203794-00 Kit, Panel de almacenamiento de punta de pulverización 1
3 R0203797-00 Kit, Asa superior 1
4 R0203799-00 Kit, Soporte de pistola pulverizadora 1
5 C1109648-00 Kit, Pistola pulverizadora 1
6 C1109650-00 Kit, Cable de alimentación (con GFCI) 1
7 311213614 Kit, Brazo de almacenamiento de cable de alimentación 1
8 349011824 Cinturón 1
9 C1108239-00 Botón a resorte 1
10 C4100526-00 Mando de interruptor 1
11 C1109652-00 Kit, Conector de entrada de agua 1
12 C1109653-00 Kit, Conector de salida de agua 1
13 C1109686-00 Kit, Motor 1
14 C1109654-00 Kit, Manguera de aspiración 1
15 33201671 Herramienta de limpieza de punta de pulverización 1
16 R0203815-00 Kit, Almohadilla de pie de marco 1
17 31203670-1 Kit, Manguera de alta presión 1
18 R0203816-00 Kit, Rueda 2
27
Español
ES

www.greenworkstools.com
P0803387-01 Rev B
