ARTUSI REFRIGERATION
INSTALLATION AND
OPERATIONS MANUAL
MODELS AINT3000
APPLIANCES
FOR LIVING
2
Rev.13052022
Congratulations, you are now the proud owner of an ARTUSI appliance. Thank you for purchasing ARTUSI and welcome to the
exciting world of ARTUSI. This instruction manual has been specially created to inform you of the full range of features your ARTUSI
appliance has to offer and serves as an introduction to the wonderful benets of ARTUSI’s dynamic systems.
We present detailed information on each of the advanced systems built into ARTUSI appliances. Once you have read this section
you will be able to choose the most appropriate settings for your appliance. We ask you to read the instructions in this booklet very
carefully as this will allow you to get the best results from using your appliance.
KEEP THE DOCUMENTATION OF THIS PRODUCT FOR FUTURE REFERENCE.
REGISTER YOUR WARRANTY ONLINE NOW AT WWW.EUROLINX.SUPPORT
Note: This user manual is prepared for more than one model. Some of the features
specied in this Manual may not be available on your appliance.
All our appliances are only for domestic use, not for commercial use.
Products marked with (*) are optional.
THIS APPLIANCE IS CONCEIVED FOR DOMESTIC USE ONLY. THE MANUFACTURER SHALL NOT IN ANY WAY BE
HELD RESPONSIBLE FOR WHATEVER INJURIES OR DAMAGES ARE CAUSED BY INCORRECT INSTALLATION OR
BY UNSUITABLE, WRONG OR ABSURD USE.
If the supply cord is damaged, it must be replaced by the manufacturer or its service agent or a similarly qualied person in
order to avoid a hazard.
TO REGISTER
YOUR WARRANTY

3
Rev.13052022
CONTENTS
Warnings and Pre installation check 4
Pre Install checklist 7
Installation preparation 8
Installing your appliance into the cabinetry 9
Attaching the door panel 10
Mounting the door panel to the appliance 11
Before rst use 13
General fridge/freezer use 14
Storage 15
Control panel 16
Care and cleaning 17
Defrosting the appliance 18
Troubleshooting 19
Climate range 19
Warranty 20

4
Rev.13052022
WARNINGS AND PRE INSTALLATION CHECK
Please read the user instructions carefully before using the appliance for the rst time and before installing it. Failure to install
the appliance, or to have it installed, as per the user manual could invalidate the warranty. Any service calls relating to misuse
or incorrect installation could incur a service charge.
IMPORTANT:
The manufacturer cannot be held responsible for injuries or losses caused by incorrect use or installation of this product.
Please note that we reserve the right to invalidate the guarantee supplied with this product following incorrect installation
or misuse of the appliance. This appliance is not designed to be used by people (including children) with reduced physical,
sensorial or mental capacity, or who lack experience or knowledge about it, unless they have had supervision or instructions
on how to use the appliance by someone who is responsible for their safety. Under no circumstances should any external
covers be removed for servicing or maintenance except by suitably qualied personnel.
APPLIANCE INFORMATION:
Please enter the details on the appliance rating plate below for your reference, to assist Customer Care in the event of a fault
with your appliance and to register your appliance for warranty purposes.
EU DECLARATIONS OF CONFORMITY:
This appliance has been designed, constructed and marketed in-compliance with safety requirements of EU Directive
2014/35/EU(Low voltage) and requirements of EU Directive 2014/30/EU (EMC).
This appliance has been manufactured to the strictest standards and complies with all applicable legislation, including
Electrical safety(LVD) and Electromagnetic interference compatibility (EMC). Parts intended to come into contact with food
conform to 1935/2004/EC.
IMPORTANT INFORMATION FOR CORRECT DISPOSAL OF THE PRODUCT IN ACCORDANCE WITH EC
DIRECTIVE 2012/19/EU
At the end of its working life, the product must not be disposed of as urban waste. The refrigeration system contains insulating
gases and refrigerants, which require specialised waste disposal. The valuable materials contained in this appliance can be
recycle. It must be taken to a special local authority differentiated waste collection centre or to a dealer providing this service.
Before disposing of an old appliance, remove the door seals etc. to reduce the risk of child entrapment. Disposing of a
household appliance separately avoids possible negative consequences for the environment and health deriving from
inappropriate disposal and enables the constituent materials to be recovered to obtain signicant savings in energy and
resources.As a reminder of the need to dispose of household appliances separately, the product is marked with a crossed-out
wheeled dustbin.
IMPORTANT
• Never store inammable or explosive items and strong corrosive acids or alkalis in the appliance.
• This is a household appliance, which is produced in accordance with the national standard. It is intended for food storage
only, not for storage of blood, medicine and biological products.
• To prevent risk of re, keep the appliance away from petrol or any other inammables.
• To prevent risk of electromagnetic interference or other accidents, do not place a microwave oven on top of the refrigerator
or use any electric appliance inside the freezer.
• Do not allow children to play with or near the appliance.
• The internal surface of freezer compartment is very cold when the appliance is running. Do not touch the surface especially
when hands are wet.
• Do not splash water onto the appliance. Keep it away from places of high humidity that may have adverse effect on the
electric insulation performance.
• This appliance is designed to be used in ambient temperatures between 18˚C and 43˚C. Use outside of this range may
cause the appliance to fail.
• This appliance should not be located in direct sunlight or next to any heat generating appliance such as a freestanding
cooker or built-in oven.
• To ensure an accidental switch off, connect this appliance to its own power point. Avoid plugging it in a shared power point
using an extension cord or double adaptors
• Ensure this appliance be properly grounded (earthed).

5
Rev.13052022
WARNING; RISK OF FIRE / FLAMMABLE MATERIALS
This appliance is not intended for use by persons (including children) with reduced physical, sensory or mental capabilities, or
lack of experience and knowledge, unless they have been given supervision or instruction concerning use of the appliance by a
person responsible for their safety. Children should be supervised to ensure that they do not play with the appliance.
If the supply cord is damaged, it must be replaced by the manufacturer, its service agent or similarly qualied persons in order to
avoid a hazard.
WARNING:
Keep ventilation openings, in the appliance enclosure or in the built-in structure, clear of obstruction.
WARNING:
Do not use mechanical devices or other means to accelerate the defrosting process, other than those
recommended by the manufacturer. WARNING: Do not damage the refrigerant circuit.
WARNING:
Do not use electrical appliances inside the food storage compartments of the appliance, unless they are of the type
recommended by the manufacturer.
WARNING:
When positioning the appliance, ensure the supply cord is not trapped or damaged.
WARNING:
Do not locate multiple portable socket-outlets or portable power supplies at the rear of the appliance.
Do not store explosive substances such as aerosol cans with a ammable propellant in this appliance.
This appliance is intended to be used in household and similar applications such as
• staff kitchen areas in shops, ofces and other working environments;
• farm houses and by clients in hotels, motels and other residential type environments;
• bed and breakfast type environments;
• catering and similar non-retail applications.
Please according to local regulations regarding disposal of the appliance for its ammable refrigerant and blowing gas.
If the LED lamp is damaged, it must be replaced by the manufacturer, its service agent or similarly qualied persons in order to
avoid a hazard
WARNING:
To avoid a hazard due to instability of the appliance, it must be xed in accordance with the instructions
ELECTRICAL INFORMATION
WARNING! THIS APPLIANCE MUST BE EARTHED.
HOW TO CONNECT AN ALTERNATIVE PLUG
As the colours of the wires in the mains lead of this appliance may not correspond with the coloured markings identifying the
terminals in your plug, proceed as follows:.
• The wire which is coloured GREEN and YELLOW must be connected to the terminal which is marked with letter (E) or by the
Earth symbol or coloured GREEN and YELLOW.
• The wire which is coloured BLUE must be connected to the terminal which is marked with the letter (N) or coloured BLACK.
• The wire which is coloured BROWN must be connected to the terminal which is marked with the letter (L) or coloured RED.
If in doubt regarding the electrical connection of this appliance, consult a qualied electrician. Do not shorten the supply cable,
the appliance may require removing for servicing.
N.B.
Ensure that the plug socket is situated in an easily accessible place after installation.
6
Rev.13052022
540
57
988
640
57
28
540
1770
560 min
560-570
1780
min.30
300
min. 30
300
560-570airow
* Supplied power cord is located from the
bottom rear right and is 150cm long
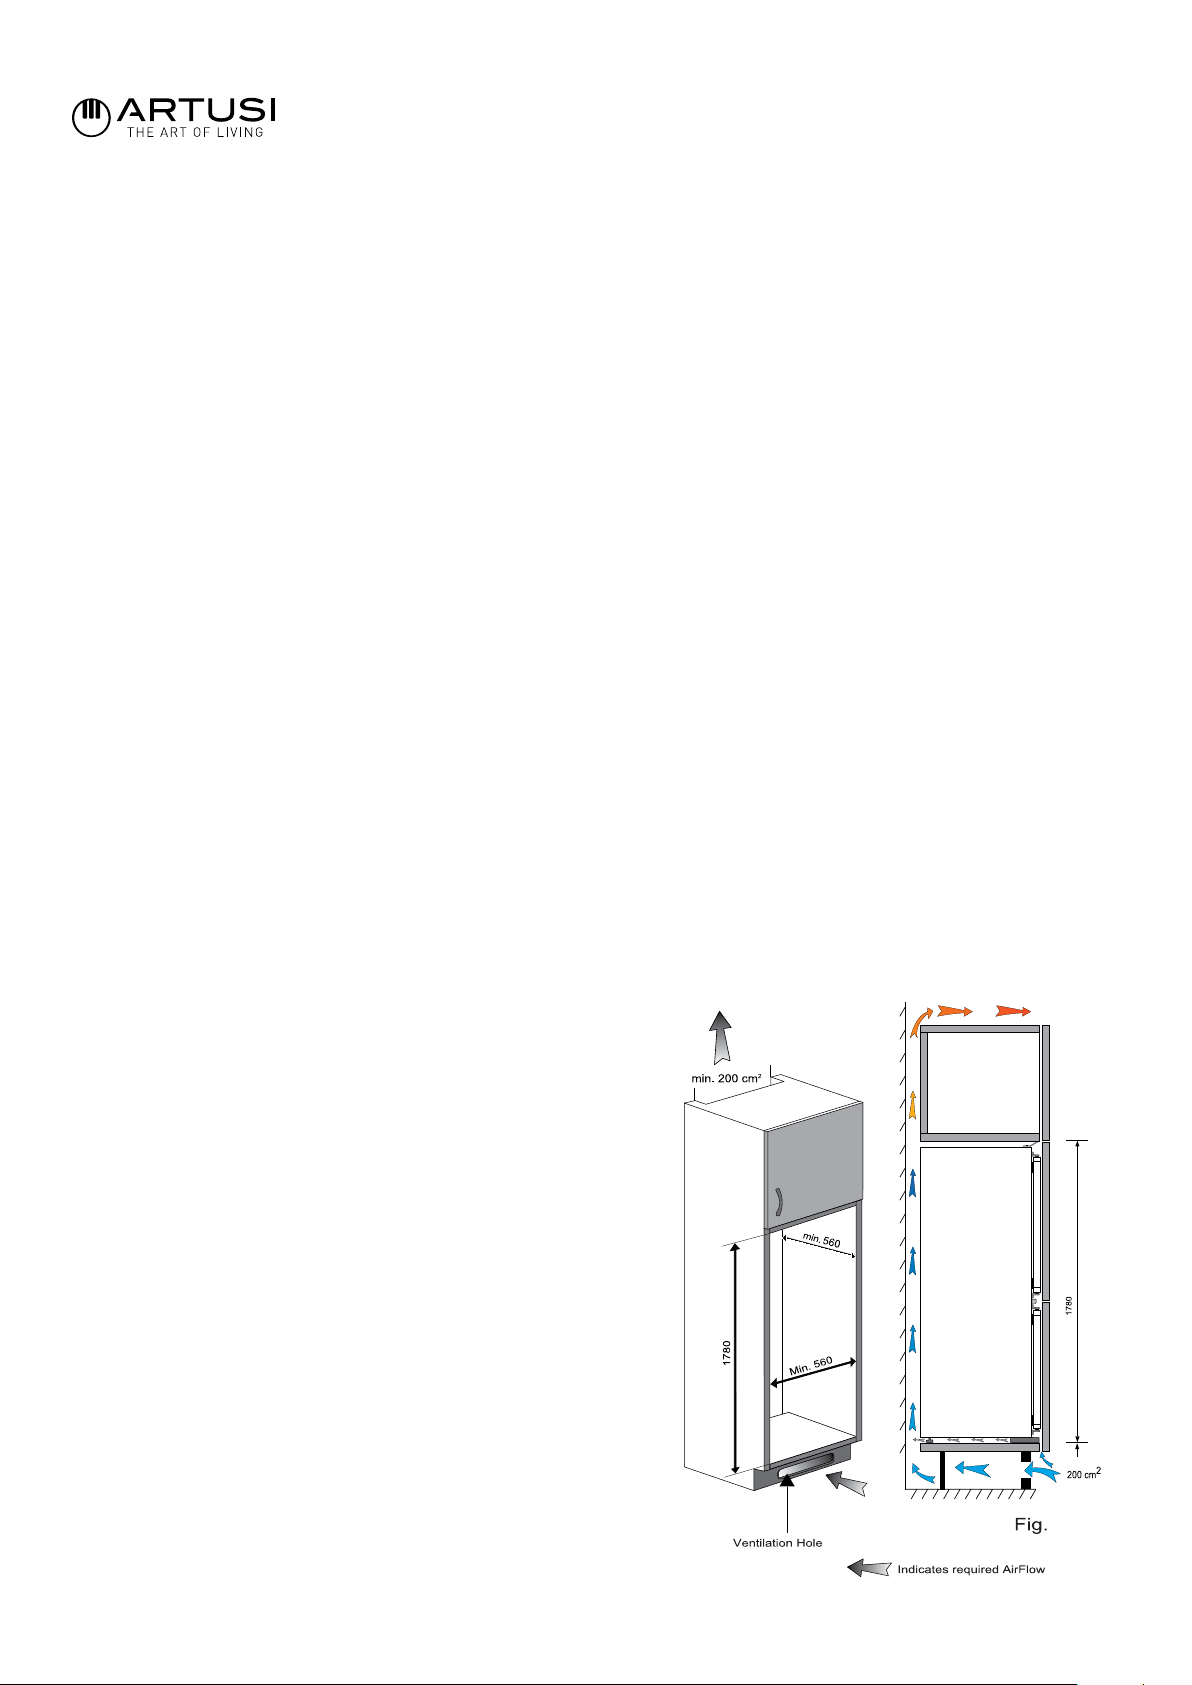
EXPLODED VIEW OF REFRIGERATOR & CABINETRY
7
Rev.13052022
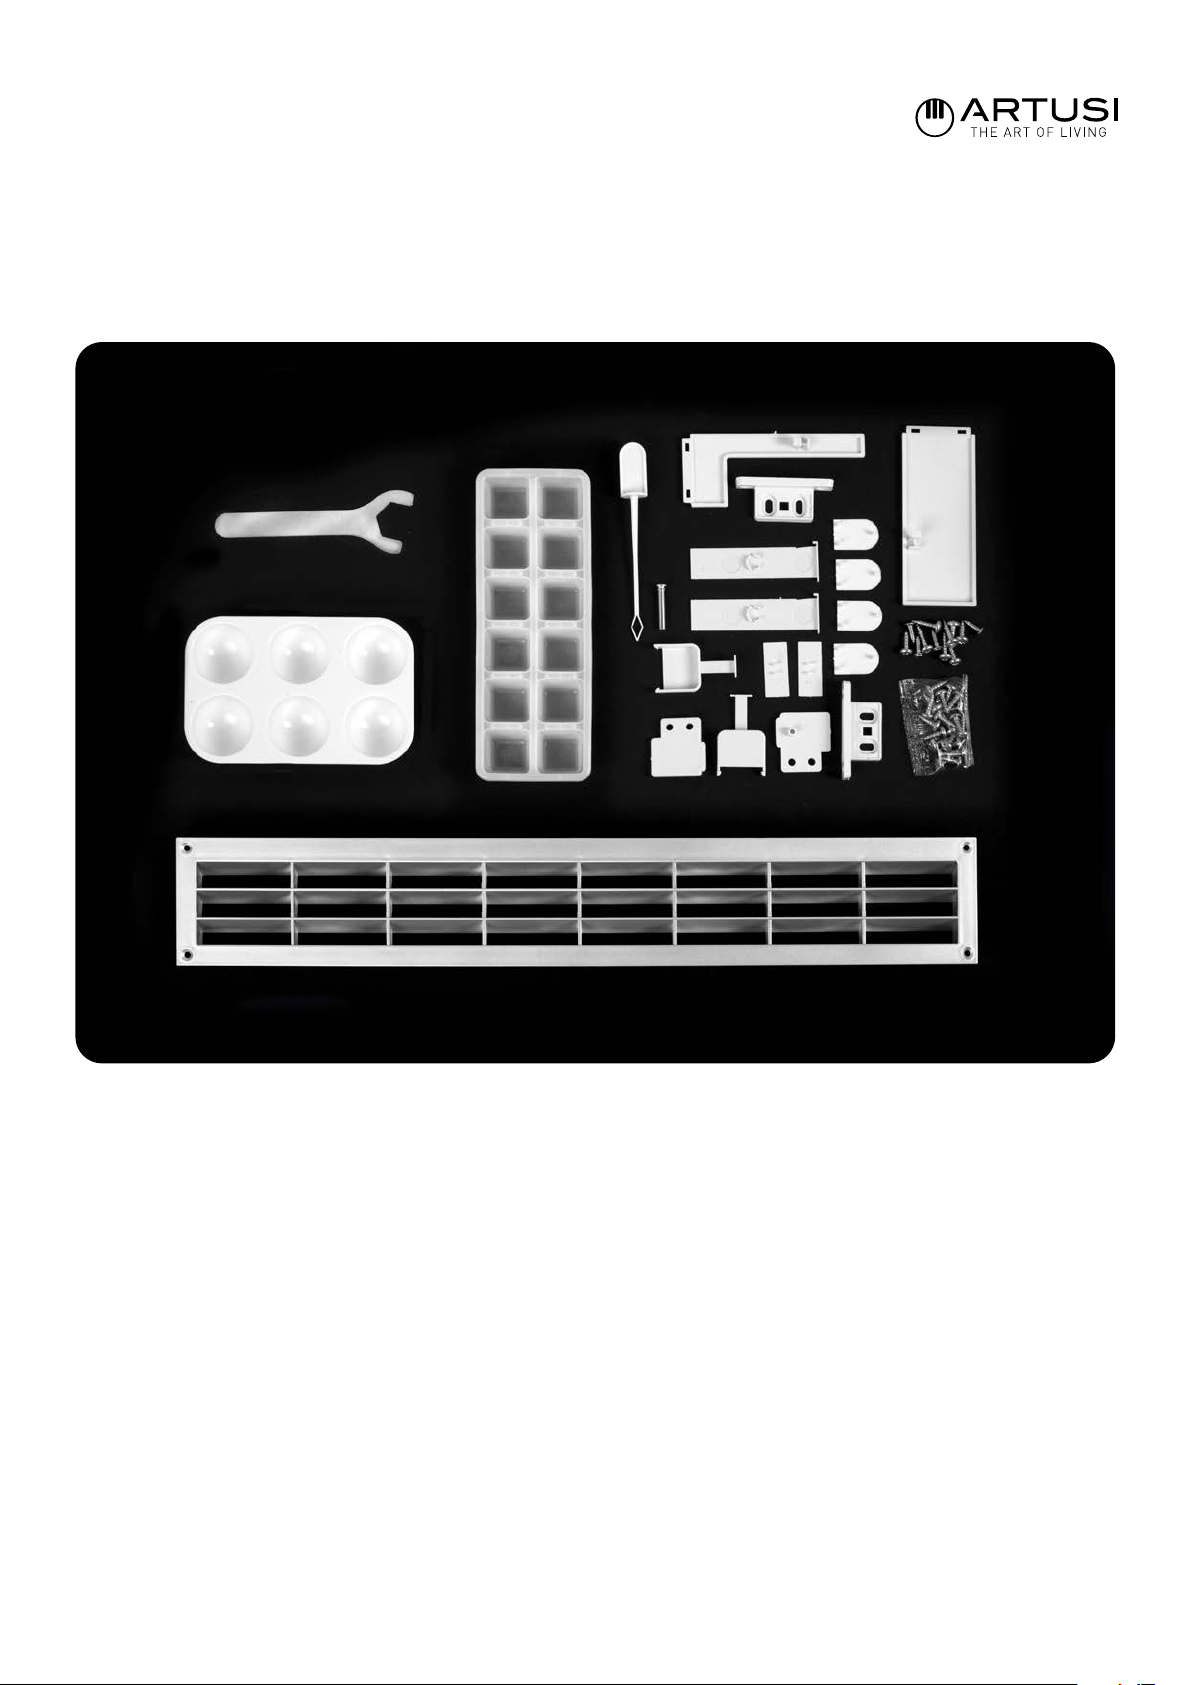
INSTALLATION KIT COMPONENTS LIST
8
Rev.13052022
INSTALLATION PREPARATION
DOOR HINGE
Available with left or right hand hinge options, however, each model is still reversible
This appliance/s are designed to t into cabinetry with 18mm thickness
This appliance must never be installed close to its sources or cooking appliances. It should also not been stored in damp
locations. Seek the help of another individual, when installing this appliance. Is appliances may have sharp edges. You should
wear adequate protection equipment for the task and installation environment.
To ensure the appliance is level, you should use the height adjustable feet at the front of the appliance
The cooling system at the rear of the appliance must not touch the rear wall
The appliance must be installed with adequate ventilation. Insure that there is a clear rinse above the appliance to allow air to
escape and that there is space between the rear of the appliance and the wall
VENTILATION
The main consideration when installing this refrigerator unit into a tted kitchen is ventilation. The heat removed from the cooling
compartment needs to evaporate into the atmosphere. Incorrect ventilation can lead to premature compressor failure, excessive
power consumption, total system failure and may void the warranty provided with your appliance. What products intended to be
installed into a tall housing unit, the following requirements need to be met.
The open channel at the rear is clearly shown. For the correct operation of the appliance it is important that at the top of the
housing unit it is not blocked off. Channel depth of 50 mm is normal with most units. If ventilation hole is required in the plinth of
the unit, this allows air to be drawn over the compressor and heat exchange. Required airow can be achieved by removal of a
thin section of the plinth (recommended 600mm x 10mm minimum)
VENTILATION GRILL
It is recommended that you use the supplied grill vent.
The specications of this are approximately 175mm x 465mm x 20mm.
If you are using your own vent, it must equal the minimum size opening of the supplied vent. If the furniture does not allow
free air into the room then a plinth vent, or other means of ventilation needs to be provided to ensure a natural ow of air There
should be space at the rear of the cabinet to allow cool air to be drawn over the condenser. Recommended: 500 x 35mm
(recommended 600mm x 10mm).
Fig. 1
The open channel at the rear is clearly shown. For the correct
operation of the appliance it is important that the top of the housing
unit is not blocked off. A channel depth of 40-50mm is normal with
most units. A ventilation hole is required in the plinth of the unit; this
allows air to 15 be drawn over the compressor & heat exchange.
The required air ow can be achieved by removal of a thin section
of plinth (recommended 500mm x 50mm minimum).
As a rule, the more air that can get in and out, the better and more
efcient the operation of your product will be.
1
9
Rev.13052022
INSTALLING YOUR APPLIANCE INTO THE CABINETRY
PLACING THE REFRIGERATOR INTO THE CABINET
With the help of another individual, manoeuvre the appliance into the cabinet. Pull the power cord through a pre drilled hole at
the back of the cabinet or a the power point is inside the cabinet, plug in the refrigerator before installing it into the cabinet.
Ensure you do not kink or bend the power cord as damaging the cord could be a safety and re risk.
For safety reasons, only turn the main power on the appliance once the installation process is complete.
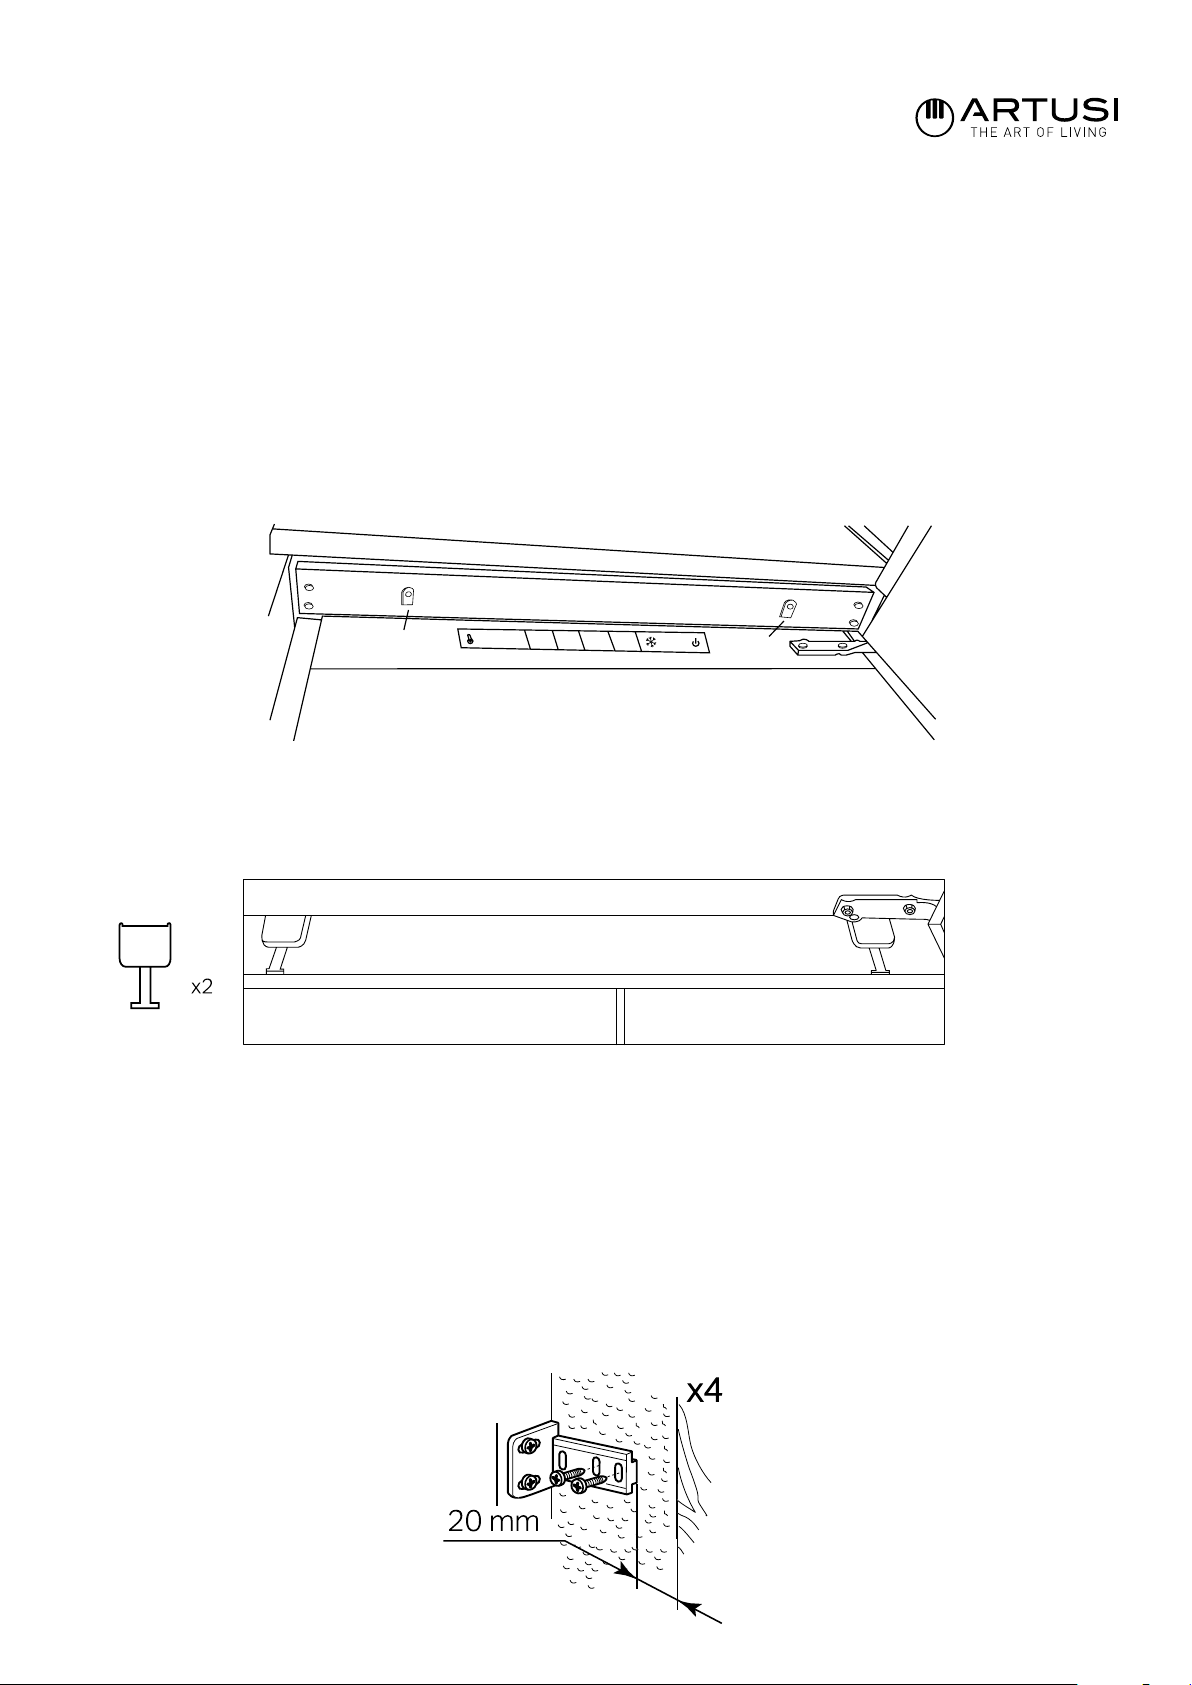
Lift and slide the appliance into the cabinet then adjust its position making sure that the top adjustment plate is meeting the
top of the cupboard. Ensure that the appliance is centred in the cabinet cavity checking the side panel and the door gasket is
attached to the front end of the cupboard sides.
Check that the lips of the spacers are lined up with the top lip of the cabinet.
There are two metal plates at the base of the appliance. Fit the supplied spacers as illustrated. Ensure that the step in from the
cabinet base edge to the appliance is the same on both sides.
Using a level, check that the appliance is aligned correctly and using a spanner, adjust the levelling feet as required.
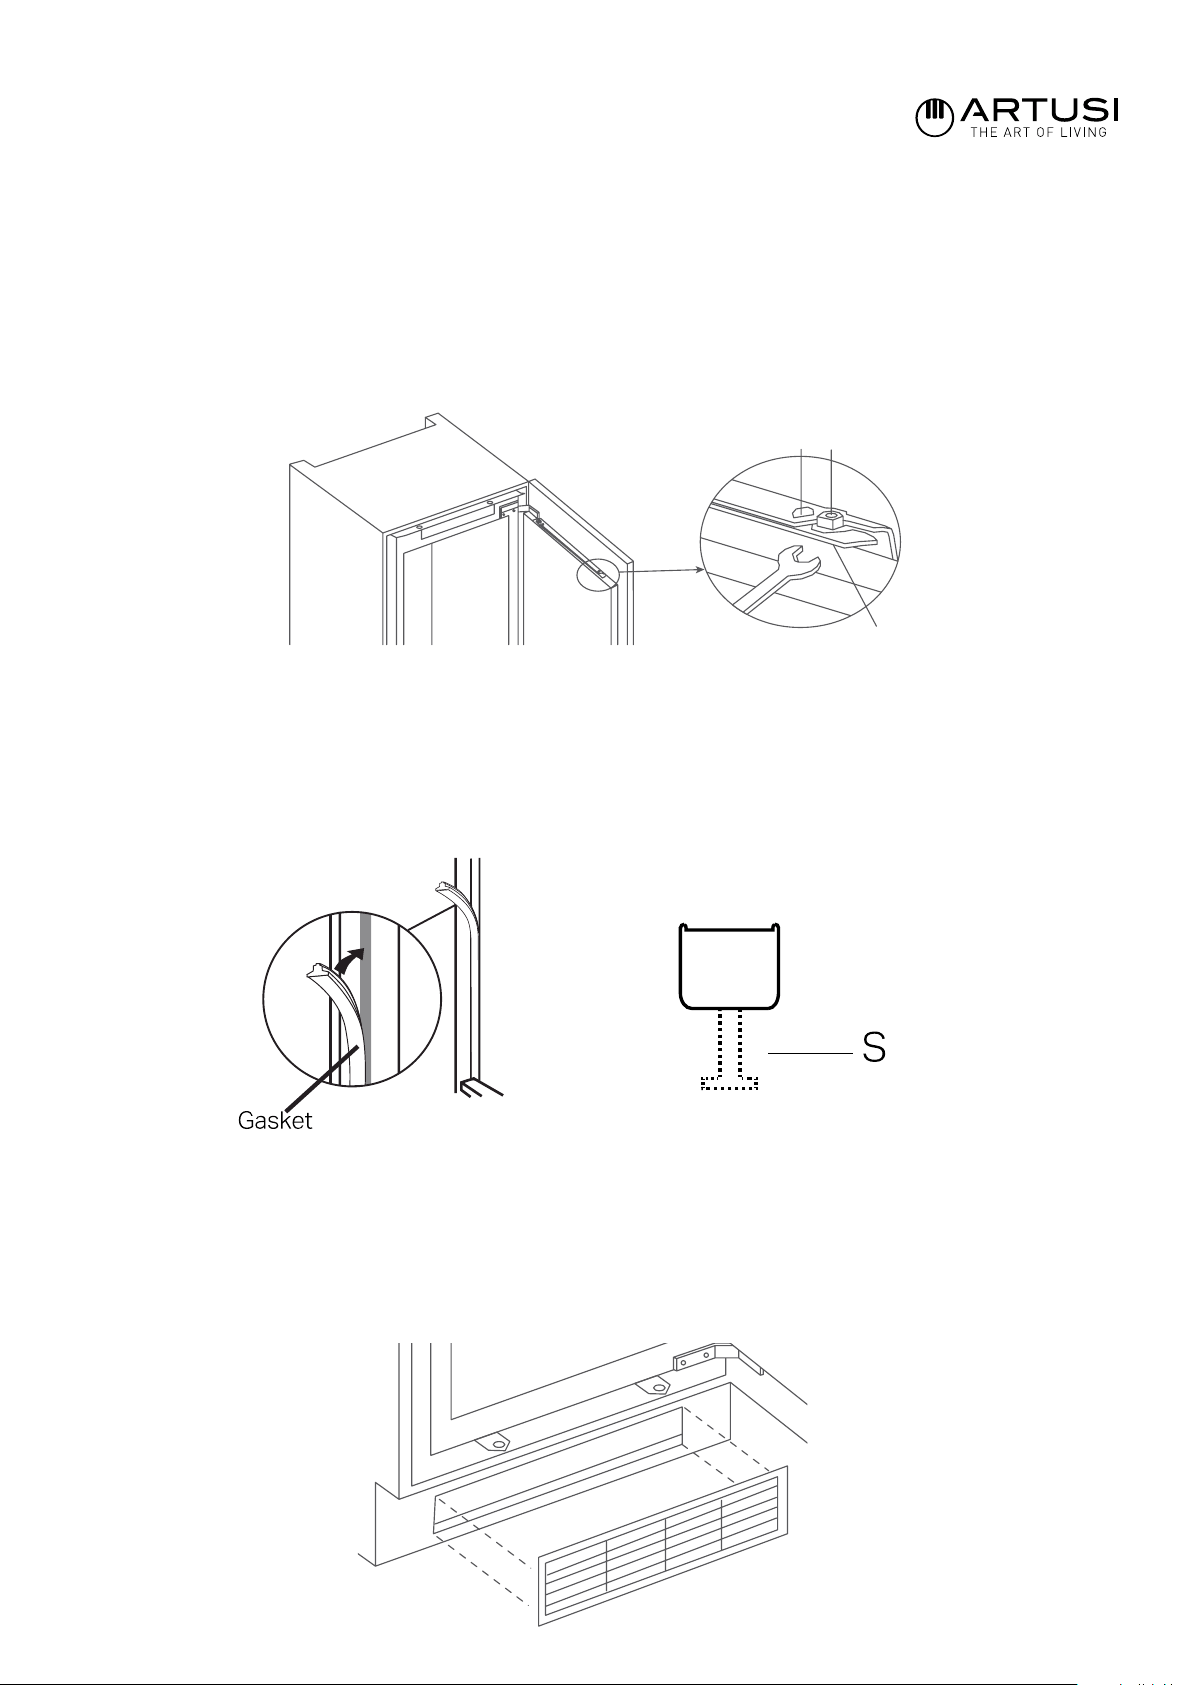
Fix the appliance to the cabinet by screwing through the 2 screw holes in the top plate lip
Fasten the side surfaces of the hinge with screws. Fix one screw to the top hinge and one screw to the bottom
hinge. Then x all other screws to the remaining hinges.
Fasten the hinge side with screws putting one at the top hinge and one at the bottom hinge, check the alignment and then
fasten the remaining screws. Remove the 2 plastic spacers at the bottom and x the appliance to the cabinet base, and re-apply
the spacers (these are also used as covers for the bottom bracket).
Freezer base
Cabinet base
Floor
Freezer base
Cabinet base
Floor
Trim
T
T
1
2
3 4
5
10
Rev.13052022
ATTACHING THE DOOR PANEL
Close the appliance door and measure from the top of the cabinet cavity to the bottom of the door bracket on both sides
ensuring that the distance is the same. You will need to know this measurement when pre-drilling the xing points in the
decor panel.
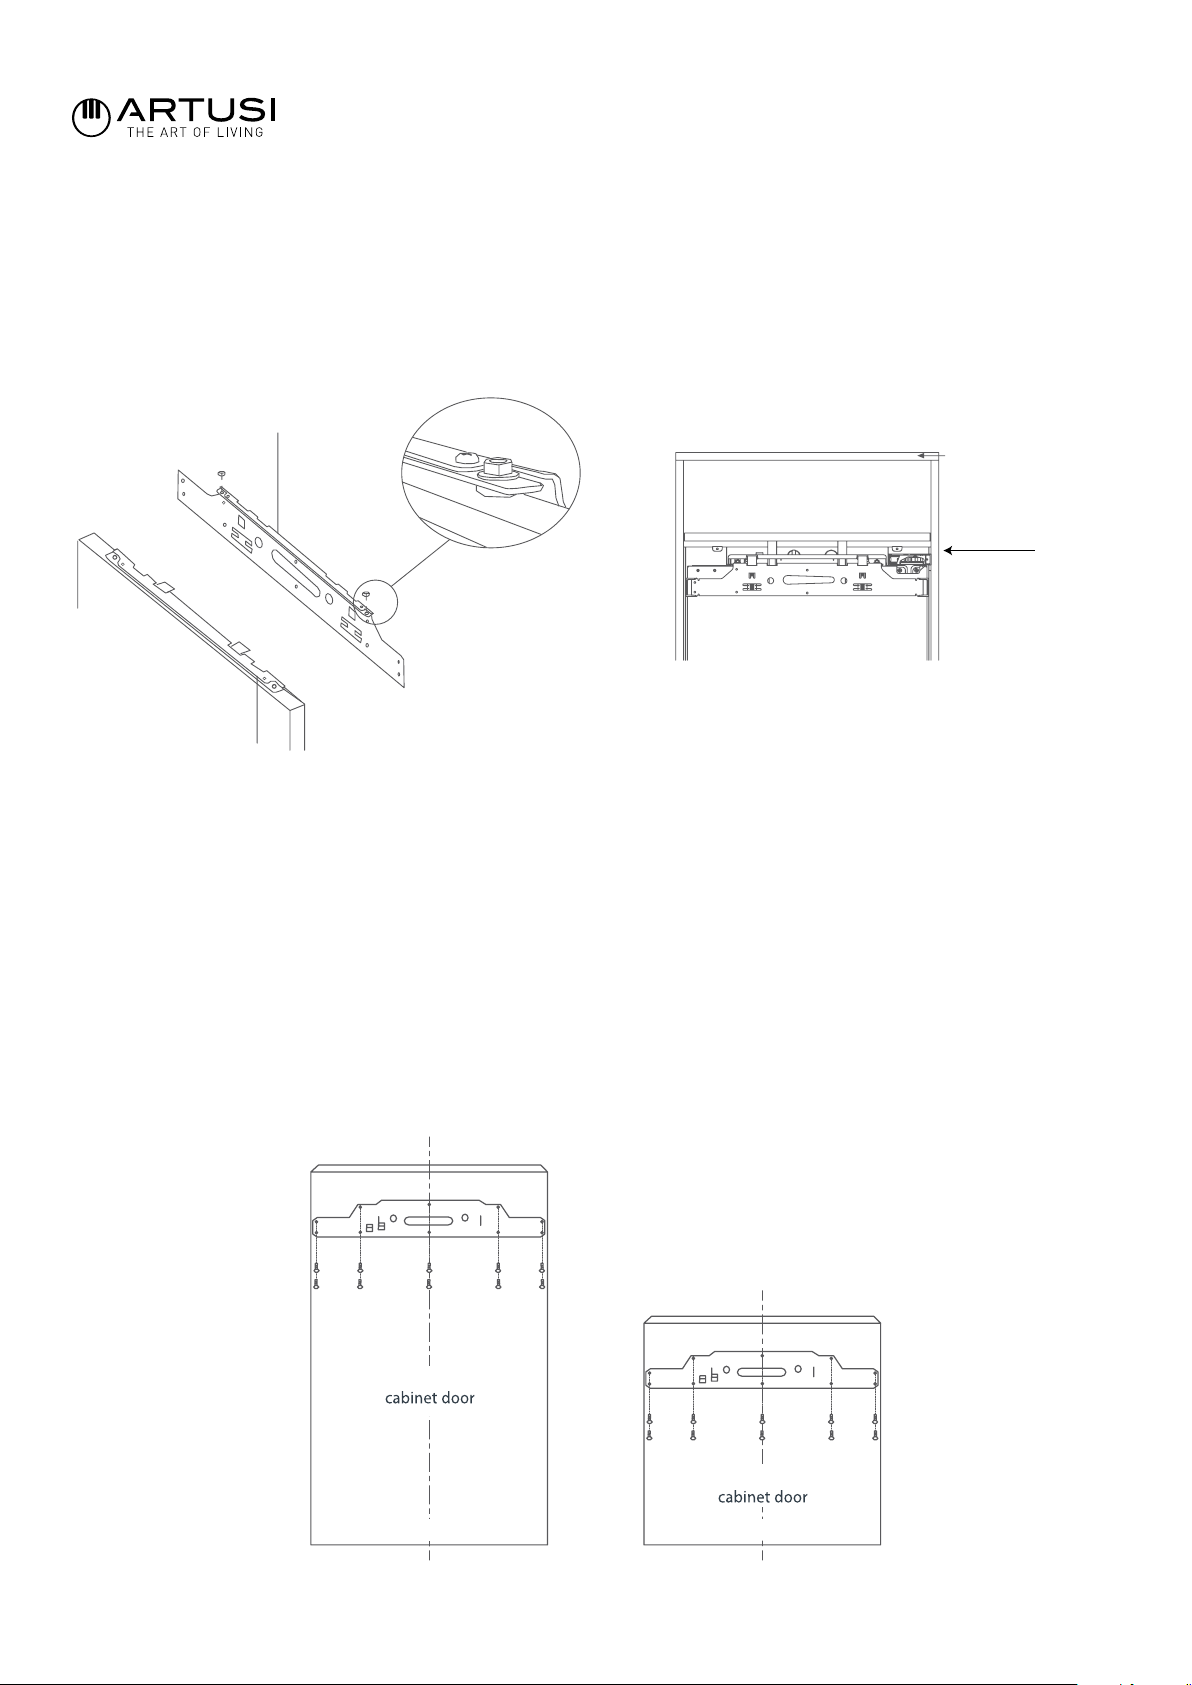
Remove the bracket by loosening the hexagonal screws located at the top of the door. Fig.2 Lift the bracket it upwards and it
should come free. Do the same for all doors. Be careful to not bend the bracket.
MOUNTING BRACKET TO THE CABINET DOOR/S
Place the each cabinet door (face down) onto a clean oor or large blanket so it does not get damaged.
Fix the panel bracket to the top of each cabinet door. Measure and adjust to ensure the centre line at the top bracket aligns with
the centre of the decor door. The alignment guides should latch onto the top of the cabinet door.
Using the measurements taken whilst the mounting bracket was xed to the door panel, mark the decor panel on each side and
draw a vertical guide line across the panel. This will show you where to place the base of the bracket. Fig. 4
Then, measure the centre point so you have a denite drill guide for the bracket screws. Use a ‘set square’ to draw these guides.
Once aligned, pre-drill the holes then place the bracket over the guides and screw wood screws to attach the decor bracket to
the cabinet door. Screw into any other xing holes (there should be 10). Fig. 4
Backside of
Upper cabinet door Lower cabinet door
Backside of
Centre line Centre line
Top of kitchen cabinet
Top of the appliance
Refrigerator door
Top attachment bracket
(disassembled status)
Fig.3
Top of kitchen cabinet
Top of the appliance
Refrigerator door
Top attachment bracket
(disassembled status)
Fig.2
Fig. 4
11
Rev.13052022
MOUNTING THE DOOR PANEL TO THE APPLIANCE
Ensure that there is a gap of 3–4 mm between the non-hinge side of the appliance and the vertical cabinet wall.
Mount the door panel onto the appliance door using the screw thread ad a xing guide.
Screw the bracket back onto to the appliance and use the hex nut to secure and level.
Locate the slider in the bracket and x the slider to the fascia door 20–22 mm from the edge of the fascia as shown in Fig. 5.
Ensuring that the slider is positioned sensually and horizontally within the bracket. Allow for some horizontal movement of the
cabinet door/s. Once you are happy with the alignment of each door, tighten securely by hand then use a spanner to x into
position.
Once you are happy with the alignment and have checked that the door closes and seals properly, x the remaining vertical
brackets provided to the appliance door and decor panel using wood screws
Fit all remaining covers to the appliance, concealing any screw holes and bracket bolts.
Fill the gap on the non-hinged side with the gasket/seal strip provided, as shown in Fig. 6.
Ensure the appliance door opens correctly, closes and seals properly.
Once complete, and you are happy with the t of the appliance in the cabinet, bend and snap the ’T’ parts of the white spaces at
the bottom of the appliance marked S as shown by the dotted outline in Fig. 7.
Leave the rest of the spacer cover in place over the metal plates
Install the ventilation grill at the kick panel void section at the appliance base cabinet. Fix the ventilation grill into the kick strip. Fig. 8.
Fixed screwFixed screw
Further xing
Depth adjustment
W
Cabinet door
W
Fig.18 Adjusting bottom of cabinet door
Fig.5
Fig. 7Fig. 6
Fig. 8

12
Rev.13052022
IMPORTANT
After completing the installation, check that the appliance is secured within the cabinet unit and that the doors close and open
correctly. If there is no resistance from the door seals when opening the doors, then it is probable that the appliance and all decor
doors are not tted properly
REVERSING THE APPLIANCE DOOR - TO BE DONE BEFORE FITTING THE PANEL
We recommend you seek the help of another individual to support the doors whilst performing this operation. Always wear
adequate PPE (Personal Protective Equipment) for the task at hand. Prepare a surface with a soft, clean towel or similar where
you can place the door during these steps.
1. Carefully remove the cover cap for the top hinge and unscrew the screws xing the top hinge to the appliance, you should
support the door whilst doing this.
2. Carefully remove the door from the bottom hinge (by lifting) and place it somewhere safe. Note that there may be spacers
between the door and the hinge; note how many and their position.
3. Swap the previous top hinge to the opposite side at the bottom.
4. Place the door onto the new bottom hinge. Support it.
5. Ret the “new” top hinge and x securely to the appliance.
6. Fit the central cover caps and top hinge cover pieces in place to complete the process.
7. Unscrew all four slider brackets from the door and swap them over to the side furthest from the new hinge positions, before
the decor door is tted.
ENSURING THE DOOR SEALS CORRECTLY:
It is normal for the seal to be compressed after the door has been reversed. With the door closed, use a hair dryer to expand
the seal and ll the gap between the door and the body of the appliance.Take care not to use the hair dryer too close to the
appliance, which could damage the seal. A distance of approximately 10cm should be adequate. When completed, allow the
seal and door to cool before touching them. Once done, the seal should remain in position.

13
Rev.13052022
BEFORE FIRST USE
You must allow the appliance to settle for at least twenty four (24) hours prior to switching the power on. It is recommended
that you clean the interior of the appliance prior to rst use, using a solution of bicarbonate of soda and warm water and then
thoroughly drying the interior. The freezer may have an odour to it at rst use. This will disappear as the appliance cools.
DURING USE
• Avoid overcrowding the fridge shelves, as this reduces airow.
• Avoid using shelf liners, as this reduces airow.
• Avoid loading large amounts or warm food at once
• Allow for good clearances in front of the air ducts within the cabinet for maximum cold air distribution.
• Your refrigerator is at its most efcient when it is 2/3 full.
• Do not leave the door open for any longer than is necessary
• Organise items in the refrigerator to reduce the time that the door is open when accessing items.
BEFORE PLACING FOOD IN THE FRESH FOOD OR FREEZER COMPARTMENTS
• Remove all packaging found inside the compartments eg tape, polystyrene etc.
• Clean the inside of the appliance with a mixture of warm water and a little liquid detergent to remove manufacturing and
transportation dust.
• The appliance may have an odour on its initial operation, but this will go when the refrigerator has cooled sufciently.
• Allow the refrigerator to run empty for 2 – 3 hours to allow each compartment to cool to the appropriate temperature.
PRACTICAL TIPS
Due to the natural circulation of the air in the appliance, there are different temperature zones in the refrigerator chamber.
The coldest area is directly above the vegetable drawers. Use this area for all delicate and highly perishable food such as:
• Fish, meat, poultry
• Sausage products, ready meals
• Dishes or baked goods containing eggs or cream
• Fresh dough, cake mixtures
• Pre-packed vegetables and other fresh food with a label stating it should be stored at a temperature of approximately 4°C
The warmest area is in the top section of the door. Use this area for storing butter and cheese.
To achieve the most effective food preservation for the longest possible time and to avoid wasting any food, position the
products as shown on page 15. In addition this gure illustrates the layout of drawers, baskets and shelves, which allows
the most efcient use of energy.
Optimal temperature and storage conditions will extend product shelf life and optimise electricity consumption. Optimal storage
temperature range should be stated on the food packaging.
PLEASE NOTE:
The appliance will start on a factory set temperature setting and work continuously until it comes down to the optimum
temperature. If the appliance is switched off, you should allow ve minutes before switching it on again to prevent possible
damage to the compressor. Never store inammable or explosive items and strong corrosive acids or alkalis in the appliance.
CRISPER DRAWER HUMIDITY ADJUSTMENT
The crisper drawer within this appliance features a humidity level adjustment slider. Vegetables and similar produce that are
subject to wilting (e.g. rocket, spinach leaves, herbs such as basil etc.) should be kept in the crisper drawer and the adjustment
slider kept closed (fully to the left -high). By keeping the adjustment slider closed, water vapour is held in the drawer and
subsequently greens are kept crisper and fresher for longer.
By contrast, fruits that are susceptible to rotting should be stored in the crisper drawer with the humidity adjustment slider fully
open (to the right -low). This will allow gases, emitted by certain produce and that accelerate the rotting process, to exit the
crisper drawer. The drawer is marked high and low with vegetable and fruit symbols to aid you.
FRESH ZONE
The Fresh Zone is a chiller box that keeps food stored at a temperature between -2°C and 3°C and the humidity at just the right
level. This will help meat, sh and dairy products stay fresher for longer and also keep any unwanted odours from the main fridge
compartment.

14
Rev.13052022
GENERAL FRIDGE/FREEZER USE
• Never put liquids in the refrigerator uncovered.
• Never put hot foods in the refrigerator. Warm food should be allowed to cool to room temperature before being put into the
refrigerator.
• Nothing should rest against the rear wall of the refrigerator.
• Make sure food is clean and any extra water is wiped away before putting into the fridge.
• Wrap or cover food before putting into the fridge. This will help prevent the loss of moisture, keep food fresh and avoid
unpleasant odours.
• Sort foods prior to storing. Any foods to be used soon should be stored at the front of the shelf to prevent deterioration caused
by the door being open for prolonged periods.
• Do not overll the fridge. his appliance has a forced air system allowing the cool air to circulate evenly inside the fridge so there
should be sufcient space between the foods to allow the cool air to circulate.
• Thawing frozen foods in the fridge compartment will help to keep the temperature low and save energy.
• Never store raw meats on shelves above cooked meats or other produce. This will help to prevent juices from raw meat
contaminating other foodstuffs.
• The freezer compartments are designed to store only frozen food.
• Never put hot or warm foods in the freezer, allow them to cool fully before putting them into the freezer.
• Follow the instructions on the food packaging for storage of frozen food. If no information is provided, foods should not be
stored for more than three months after the purchase date.
• Store food in small packages (ideally less than 1kg). This reduces the freezing time and improves the quality of the food after
thawing.
• Wrap food before putting into the freezer. To stop the wrapping sticking together, ensure it is dry.
• Label the food before freezing with information including type of food and dates of storage and expiry.
• Once food is thawed, it must not be refrozen. Only defrost as much food as is required to prevent wastage.
• Bottled or canned drinks should not be stored in the freezer compartments as they could explode.
• The maximum amount of fresh food that can be frozen within a 24 hour period is 2.5 kg .
• Do not attempt to freeze more than the maximum amount.
• To freeze fresh food more quickly, switch on the super freeze function a few hours prior to placing the food in the freezer.
15
Rev.13052022
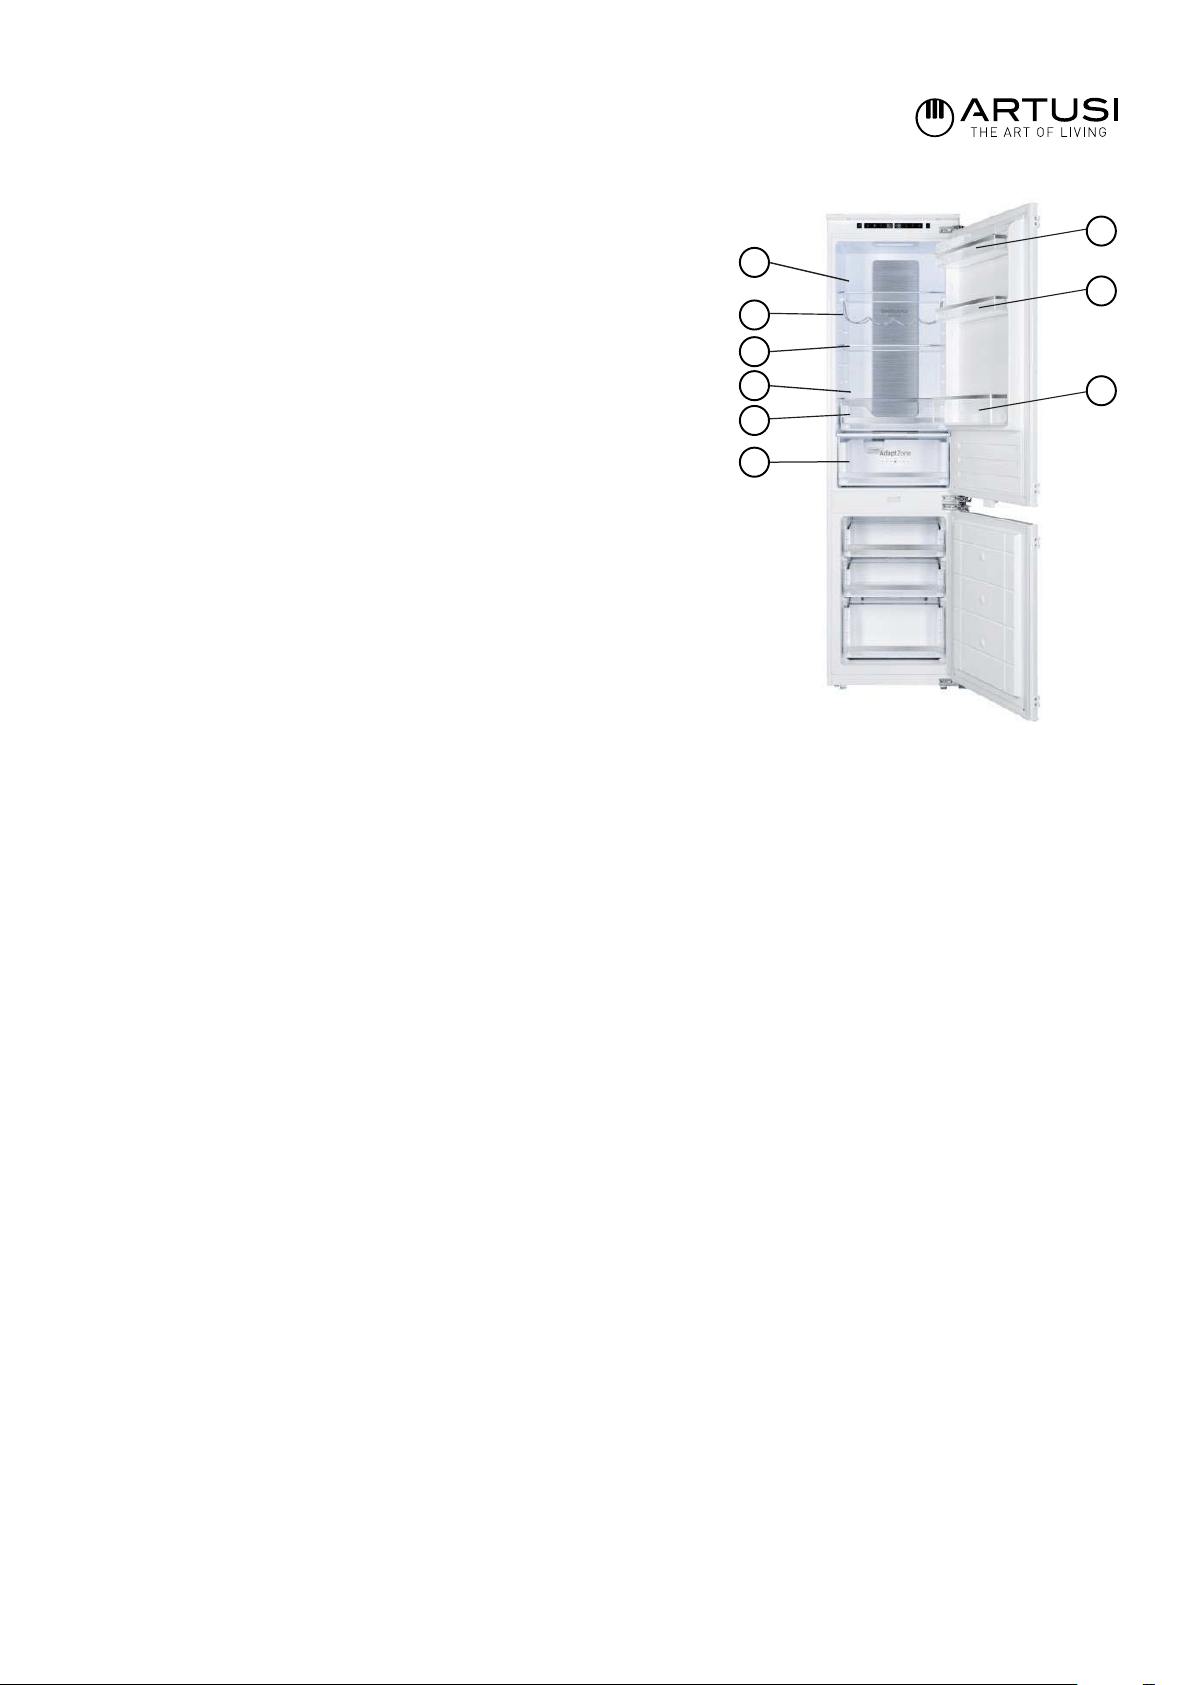
STORAGE
The fridge section is for short term food storage. Although low temperatures
can be maintained, extended periods of food storage is not recommended.
As the cold air circulates within the fridge, the temperature can vary between
the different sections. As such, foods should be stored in different sections
according to type. Section 7 is the coldest part of the fridge.
1. Butter, cheeses etc.
2. Food in jars and bottles
3. Drinks, e.g. milk
4. Cooked food
5. 75cl bottles
6. Yogurts, preserves etc
7. Fresh meat and sh
8. Fruit and vegetables
9. Fresh zone -3°C to 3°C
The fridge shelves can be moved according to the storage requirements within the fridge section. To move the shelf, lift up the
rear section and then pull it outwards. To replace, slide the shelf back into the slot, and then lower the rear section.
The wine rack is a fold-able rack that can be pulled down from under the glass shelf for use or folded back to the shelf to give
more storage in the fridge if not required. If storing wine (deigned for a standard size Bordeaux bottle) on the bottle rack, the
bottles should be placed with the bottle neck facing the rear wall of the appliance.
1
2
3
4
5
6
7
8
9
16
Rev.13052022
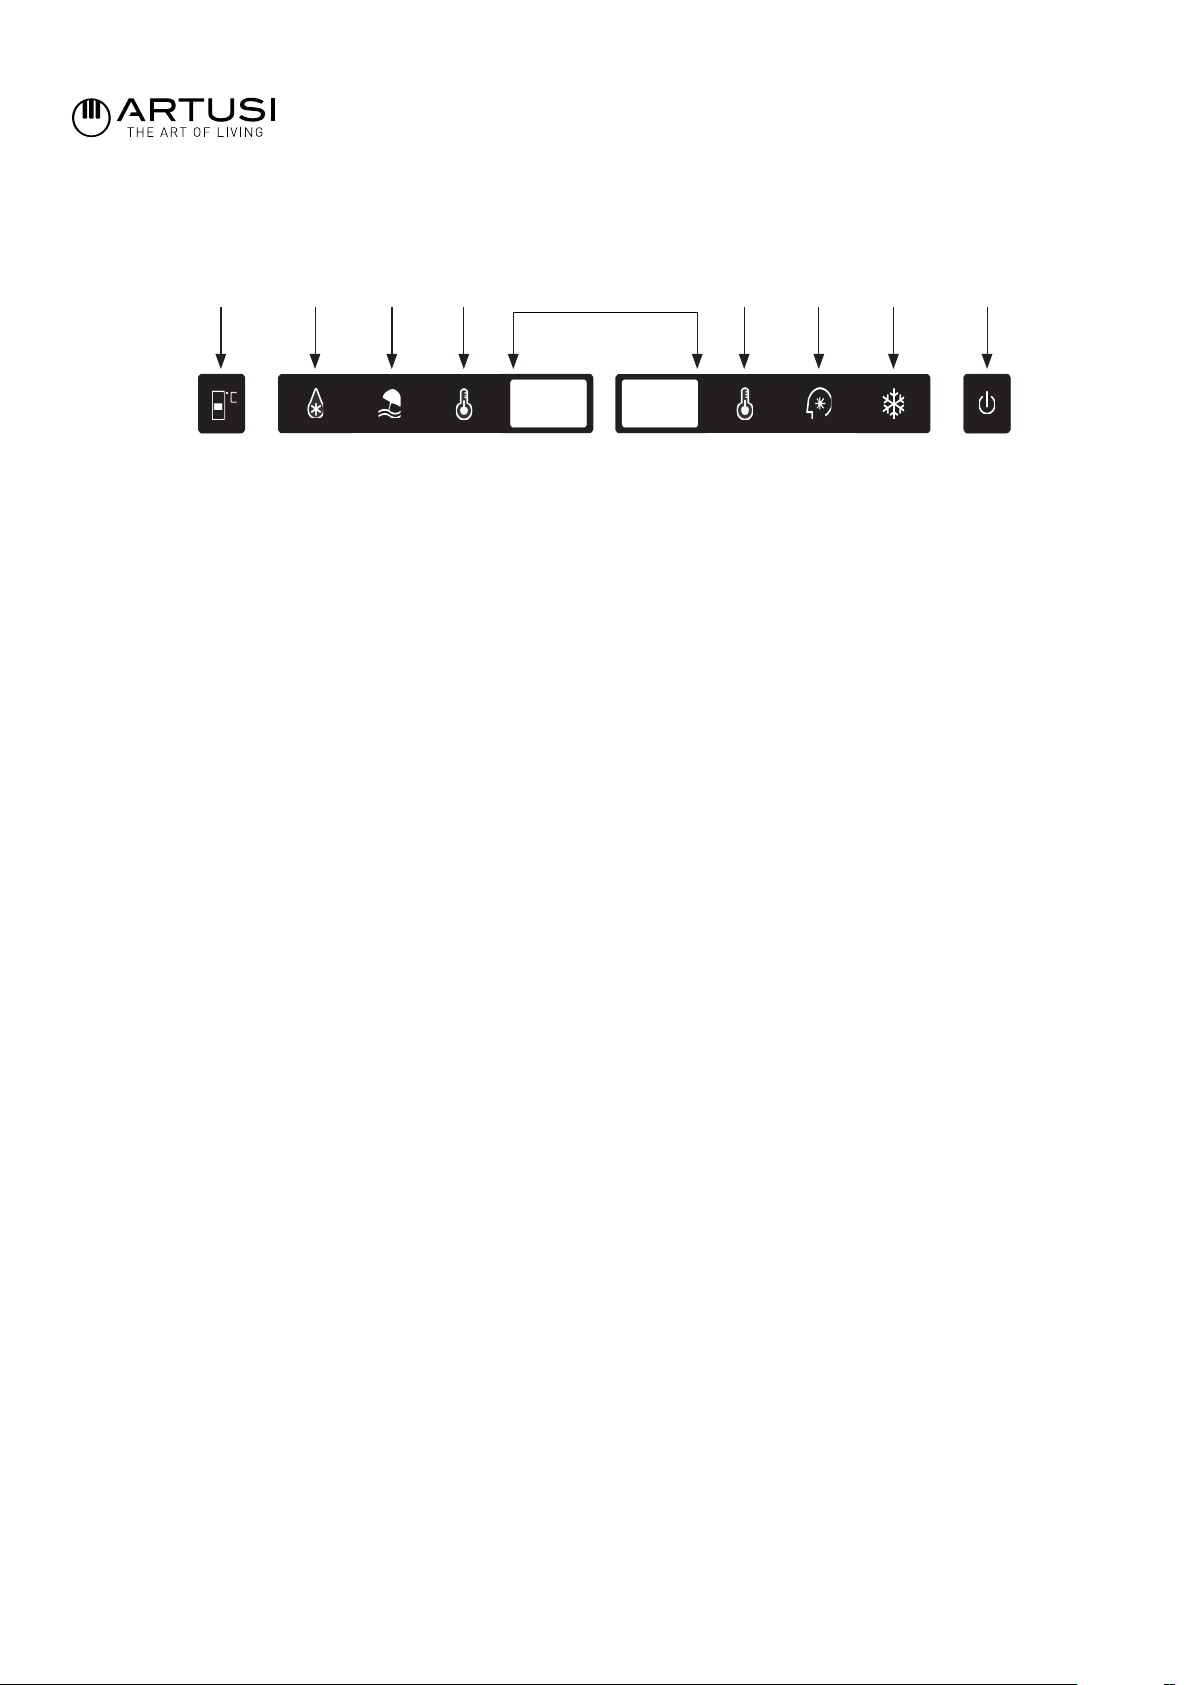
CONTROL PANEL
FRIDGE/FREEZER CONTROL PANEL
A. FRESH ZONE TEMPERATURE ADJUSTMENT SENSOR
This button is used to adjust the temperature within the Fresh Zone. Press this button once to alter the display to show
the current temperature in the Fresh Zone, and then as many times as necessary until the desired temperature is selected.
The settings range from -3 to 3°C
NOTE:
The Fresh Zone temperature adjustment sensor is replaced with a padlock symbol, holding down button ‘A’ for 3
seconds activates the lock function. A beep will be heard, the pad lock illuminates and all functions cannot be altered,
a beep will be heard and the padlock light will go out.
B. FAST COOLING FUNCTION
Pressing this button will cause the fridge to operate at 2°C and
automatically turns off after 2 and a half hours, during this time the button will be illuminated
C. HOLIDAY FUNCTION
Pressing this button activates the holiday function and the fridge
temperature will operate at 17°C and the freezer at -18°C. This is designed so that if you are going to be away for more than a
few days you can empty the fridge and save energy while away. It will continue to freeze your frozen food but the temperature in
the fridge will prevent odours or mould forming as it would if you turned the appliance off completely.
D. FRIDGE TEMPERATURE ADJUSTMENT
This button is used to adjust the temperature within the fridge. Press this button once to activate adjustment, and then as many
times as necessary until the desired level is selected
DISPLAY
This is where you can see the current temperature in the fridge (left) and freezer (right)
E. FREEZER TEMPERATURE ADJUSTMENT
This button is used to adjust the temperature within the freezer. Press this button once to activate adjustment, and then as many
times as necessary until the desired level is selected
F. SMART FUNCTION
This button automatically sets the fridge temperature to 5°C and the freezer temperature to -18°C
G. FAST FREEZING FUNCTION
Pressing this button automatically starts the freezer working at a temperature of -25°C. After 6 hours the function stops and the
temperature will revert back to its previous setting
H. ON/OFF BUTTON
Hold this button down for 3 seconds to switch the appliance on or off
HG
F
E
Display
D
C
BA

17
Rev.13052022
CARE AND CLEANING
AINT3000
The fridge and crisper sections should be cleaned using a solution of bicarbonate soda and lukewarm water.
Do not use abrasive products or detergent. After washing and dry thoroughly. Clean the shelves, drawers and balconies
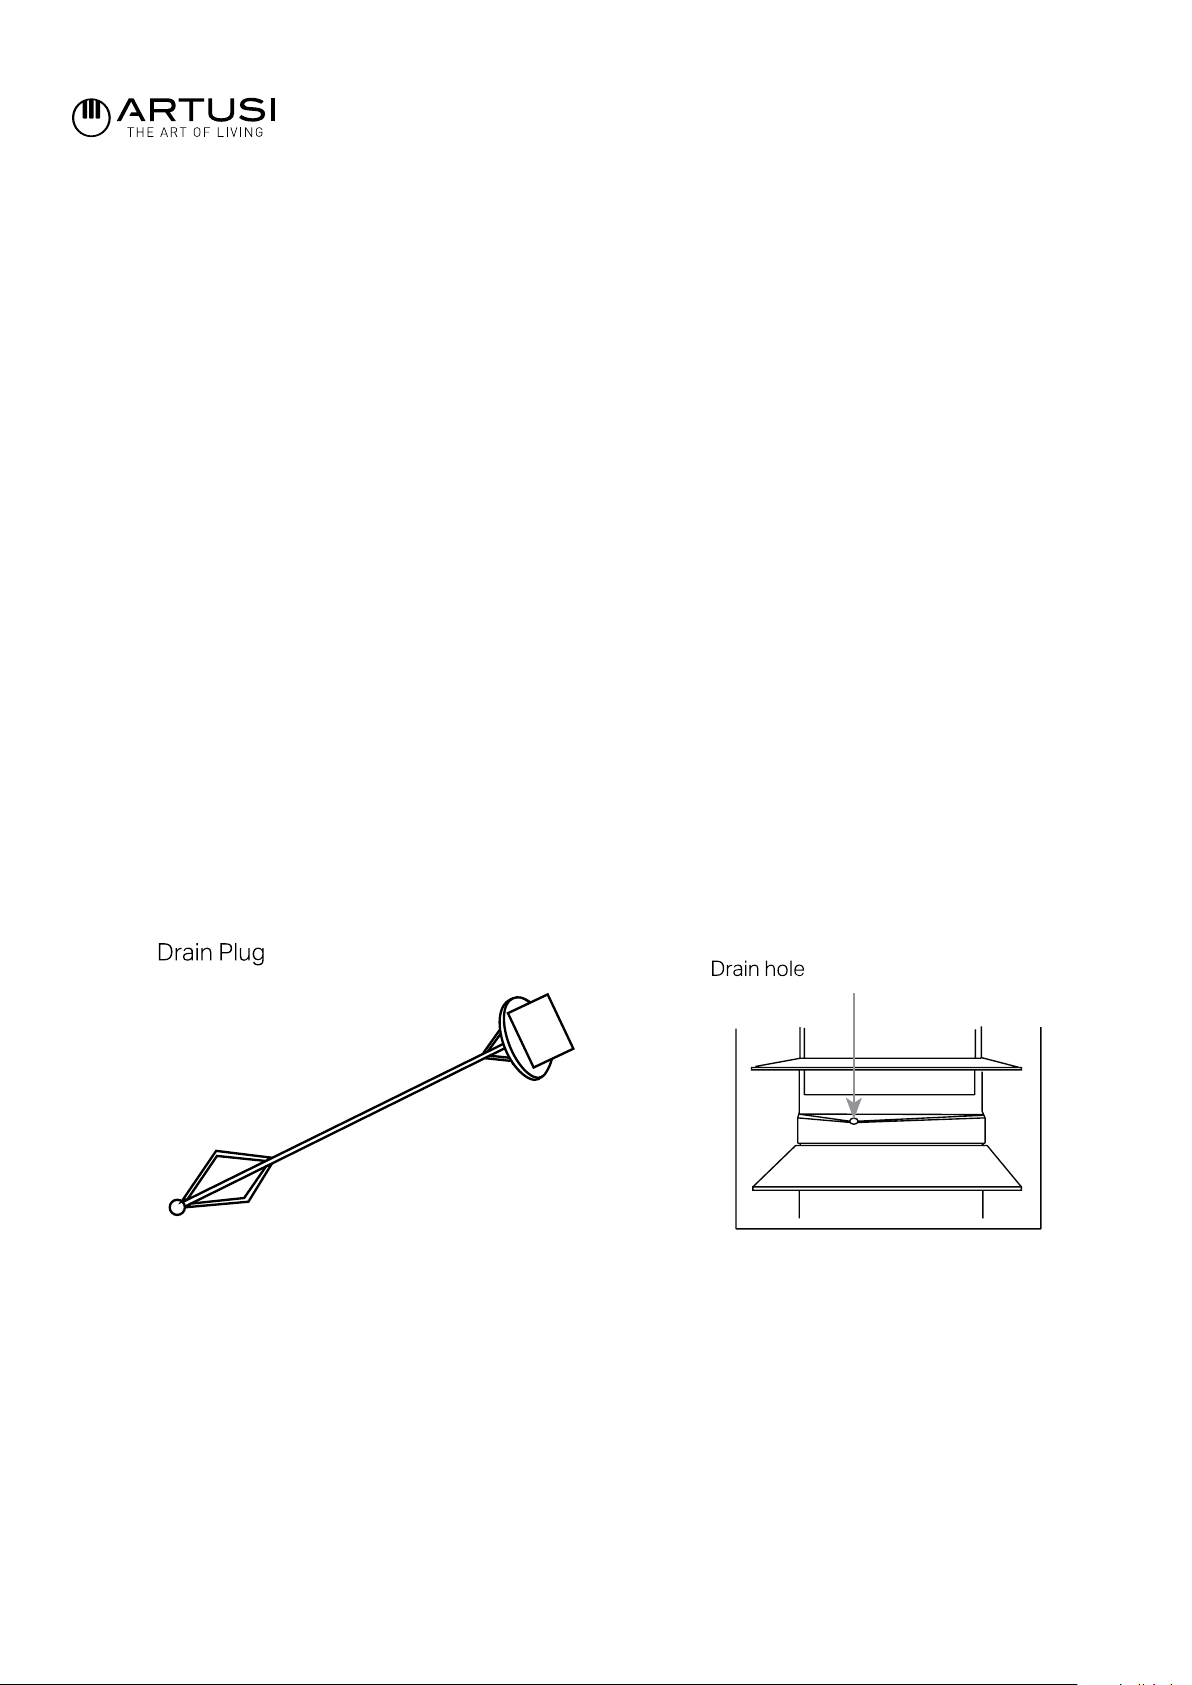
separately by hand with a mild solution of washing up liquid and water. Do not put them in the dishwasher. It’s a drain hole at
the back of the fridge compartment should be cleaned periodically to prevent the defrosted water from collecting inside the
fridge compartment. The crane plug can be used to clean the drain hole. If the appliance is not to be used for a prolonged
period of time, unplug the clean appliance. The doors should be left slightly ajar to prevent the formation of mould and
unpleasant odours.
18
Rev.13052022
DEFROSTING THE APPLIANCE
DEFROSTING THE AINT3000 FRIDGE
The fridge is self defrosting. Any water created will run out of the fridge through the channel at the back of the fridge,
unless the drain hole is blocked. It is important to keep the channel clear at all times using the cleaning tool/drain plug
supplied. Defrosted water is collected in the evaporating tray at the back of the appliance and dissipated by evaporation.
PLEASE NOTE:
If you are regularly nding pools of water in the fridge, we noticed that the compressor is always running,
then it is likely that the door is not ceiling properly. This could be due to a defective door seal or incorrectly or over heavy
decor door panel. For more information, see troubleshooting section in this manual.
PLEASE NOTE:
If you are regularly nding a heavy build up of ice, or pools of water, in the freezer section then it is likely
that the door is not sealing properly. This could be due to a defective door seal or an incorrectly tted, or overly heavy,
decor door. For more information see the troubleshooting section on ice on page 19.
DEFROSTING THE AINT3000 FREEZER
The freezer is self-defrosting. Any water created will run out through the channel at the back of the freezer, unless the drain
hole is blocked. The defrosted water is collected in the evaporating tray at the back of the appliance and dissipated by
evaporation (when the compressor gets hot).
PLEASE NOTE:
If you are regularly nding pools of water in the freezer, frost build-ups, or you notice that the compressor
is always running, then it is likely that the door is not sealing properly. This could be due to a defective door seal or an
incorrectly tted, or overly heavy, decor door.
For more information see the troubleshooting section on ice on page 19.
CHANGING THE LIGHT
If the LED lights in fails in any way, it should be replaced by authorised service agents. In the event of light failure within
your fridge please contact customer care to arrange a service. Contact details are within the warranty information in this
manual

19
Rev.13052022
TROUBLESHOOTING
If you have any problems with your appliance, you should check the troubleshooting prior to calling the Customer Care.
IF THE APPLIANCE IS NOT WORKING, YOU SHOULD CHECK:
• That there is power to the appliance.
• The house fuses are intact and the fuse in the plug has not blown.
• The appliance has not been turned off at the socket or on the control panel
• The plug socket is functioning ne. To check this, plug another electrical appliance in to see if the socket is faulty.
IF THE APPLIANCE IS WORKING, BUT NOT VERY WELL, YOU SHOULD CHECK:
• The appliance is not overloaded.
• The thermostat is set to an appropriate temperature.
• The doors are closing properly.
• The cooling system at the rear of the appliance is clean and free of dust, and not touching the rear wall.
• There is enough ventilation at the side, rear walls and underneath.
IF THE APPLIANCE IS NOISY, YOU SHOULD CHECK:
•The appliance is level and stable.
• The side and rear walls are clear, and there is nothing resting on the appliance.
NOTE:
The cooling gas in the refrigerator may make a slight bubbling or gurgling noise, even when the compressor is not running.
IF THE APPLIANCE IS BEEPING, YOU SHOULD CHECK:
• That the doors are closed. An alarm will sound after 60 seconds of a door being open.
IF EXCESSIVE ICE HAS FORMED IN THE FREEZER:
• Check that there is some resistance when opening the door of the appliance. If it opens at the slightest touch it may mean
that the door seal needs to be replaced or the appliance is incorrectly tted and this can be due to the decor door(s) not being
properly tted. If you are at all unsure, ask your tter to check the decor doors.
• Check the door seal for any kinks, debris or damage. If you notice any, and are unable to resolve the issue yourself, contact the
Customer Care so that the seal can be replaced.
• To ensure the appliance is level, you should use the height adjustable feet at the front of the appliance.
• The cooling system at the rear of the appliance must not touch the rear wall.
• The appliance must be installed with adequate ventilation. Ensure that there is clearance above the appliance to allow air
to escape and that there is space between the rear of the appliance and the wall.
• Adequate ventilation should be provided in the base of the unit to aid airow (Fig.6)
(A) Recommended cut out of 300mm x 300mm.
IF ONE OR MORE OF THE LED UNITS WITHIN THE APPLIANCE IS NOT WORKING:
• Contact the Customer Care to arrange a service visit.
CLIMATE RANGE
The information about the climate range of the appliance is provided on the rating plate. It indicates at which ambient
temperature (that is room temperature in which the appliance is working) is optimal for the operation of the appliance.
CLIMATE CLASS ALLOWABLE AMBIENT TEMPERATURE
T
Tropical This refrigeration appliance is intended for use at an ambient
temperature ranging between 18°C and 43°C

20
Rev.13052022
Warranty Card
Worldwide Appliances Pty Limited
A.B.N. 45868077422
Distributed by Eurolinx pty Ltd
Ofce:
48-50 Moore Street, Leichhardt N.S.W 2040
Post:
Locked Bag 3000, Annandale, N.S.W 2038
P: 1300 694 583
WARRANTY REGISTRATION
Your ongoing satisfaction with your artusi
product is important to us. We ask that you
complete the enclosed Warranty Registration
Card and return it to us so that we have a record
of the artusi product purchased by you.
PRIVACY
Worldwide Appliances respects your
privacy and is committed to handling your
personal information in accordance with the
National Privacy Principles and the Privacy
Act 1988 (Cth). A copy of the Worldwide
Appliances Privacy Policy is available at
www.artusi.com.au. Worldwide Appliances will
not disclose any personal information set out
in the Warranty Registration Card (“Personal
Information”) without your consent unless
required by:
1. law;
2. any Worldwide Appliances related company;
3. any service provider which provide services
to artusi or assist artusi in providing services
(including repair and warranty services) to
customers. Our purpose in collecting the
Personal Information is
to keep a record of the artusi product purchased
by you, in order to provide a better warranty
service to you in the unlikely event that there is
a problem with your artusi product. Worldwide
Appliances may contact you at any one or more
of the address, email address or telephone
numbers set out in the Warranty Registration
Card. Please contact artusi on 1300 694
583 should you not wish to be contacted by
Worldwide Appliances.
WARRANTY
1. Warranty
Worldwide Appliances warrants that each artusi
product will remain, for a period of either 12
months or 24 months of warranty. All Warranties
are valid from the original date of purchase, And
warranty claims must be accompanied by the
proof of purchase.
24 months warranty products:
All Built-in Appliances – Limited to Ovens,
Gas, Induction and Electric Cooktops, and All
Rangehoods. Freestanding Cookers - Gas and
Electric Models (900mm Width).
artusi.com.au
Dishwashers - Freestanding, Fully Integrated,
Semi Integrated and built-in. All Wine coolers. All
Dryers. Freestanding Cookers - Gas and Electric
Models in 50cm, 54cm and 60cm Widths
Portable Appliances* – Benchtop Models and
Portable Gas Models
2. What is not Covered by the Warranty.
The Warranty does not apply if an artusi product
is defective by a factor other than a defect arising
in the manufacture of the artusi product, including
but not limited to:
(a) damage through misuse (including failure
to maintain, service or use with proper care),
neglect, accident or ordinary wear and tear
(including deterioration of parts and accessories
and glass breakage);
(b) use for purpose for which the artusi product
was not sold or designed;
(c) use or installation which is not in accordance
with any specied instructions for use or
installation;
(d) use or operation after a defect has occurred or
been discovered;
(e) damage through freight, transportation or
handling in transit (other than when Worldwide
Appliances is responsible);
(f) damage through exposure to chemicals, dusts,
residues, excessive voltage, heat, atmospheric
conditions or other forces or environmental
factors outside the control or Worldwide
Appliances;
(g) repair, modication or tampering by the
purchaser or any person other than Worldwide
Appliances, an employee of Worldwide
Appliances or an authorised artusi service
contractor*;
(h) use of parts, components or accessories
which have not been supplied or specically
approved by artusi.
(i) damage to surface coatings caused by cleaning
or maintenance using products not recommended
in the artusi product handbook provided to the
purchaser upon purchase of the artusi product;
(j) damage to the base of an electric oven due to
items having been placed on the base of the oven
cavity or covering the base, such as aluminium
foil (this impedes the transfer of heat from the
element to the oven cavity and can result in
irreparable damage); or
(k) damages, dents or other cosmetic
imperfections not aecting the performance of the
artusi in respect of an artusi product purchased
as a “factory second” or from display
The Warranty does not extend to light globes
used in artusi products.
3. Domestic Use
Each artusi product is made for domestic use.
This Warranty may not extend to artusi products
used for commercial purposes.
Continued over...

21
Rev.13052022
DON’T FORGET TO REGISTER
YOUR WARRANTY ONLINE
NOW AT
www.eurolinx.support
artusi.com.au
4. Time for Claim under the Warranty
You must make any claim under this Warranty
within twenty eight (28) days after the occurrence
of an event which gives rise to a claim pursuant
to the Warranty, by booking a service call on the
telephone number below.
5. Proof of Purchase
Customers must retain proof of purchase in order
to be eligible to make a warranty claim in respect
of an artusi product.
6. Claiming under the Warranty
Customers will bear the cost of claiming under
this Warranty unless Worldwide Appliances
determines the expenses are reasonable, in which
case the customer must claim those expenses
by providing written evidence of each expense
to Worldwide Appliances at the address on the
Warranty Registration Card.
7. Statutory Rights
(a) These terms and conditions do not aect your
statutory rights.
(b) The limitations on the Warranty set out in this
document do not exclude or limit the application
of the consumer guarantees set out in the Act or
any other equivalent or corresponding legislation
in the relevant jurisdiction where to do so would:
(i) contravene the law of the relevant jurisdiction;
or
(ii) cause any part of the Warranty to be void.
(c) Worldwide Appliances excludes indirect or
consequential loss of any kind (including, without
limitation, loss of use of the artusi product) and
(other than expressly provided for in these terms
and conditions) subject to all terms,
conditions and warranties implied by custom, the
general law, the Act or other statute.
(d) The liability of Worldwide Appliances to you
for a breach of any express or non-excludable
implied term, condition or warranty is limited at
the option of Worldwide Appliances to:
(i) replacing or repairing the defective part of the
artusi product;
(ii) paying the cost of replacing or repairing the
defective part of the artusi product;
(iii) replacing the artusi product; or
(iv) paying the cost of replacing the artusi
product.
(e) Our goods come with guarantees that cannot
be excluded under the Australian Consumer
Law. You are entitled to a replacement or refund
for a major failure and for compensation for any
other reasonably foreseeable loss or damage.
You are also entitled to have the goods repaired
or replaced if the goods fail to be of acceptable
quality and the failure does not amount to a
major failure.
8. Defects
Any part of an artusi product deemed to be
defective and replaced by Worldwide Appliances
is the property of Worldwide Appliances.
Worldwide Appliances reserves the right to
inspect and test artusi products in order to
determine the extent of any defect and the
validity of a claim under the Warranty.
All warranty service calls must be booked via
the customer care department. The team can
be contacted on 1 300 85 64 11 option 1 or
customercare@eurolinx.com.au
01082016
Warranty Card continued
Warranty Card tear off
TO REGISTER
YOUR WARRANTY

VIC
2r/131 Church St,
Hawthorn
@artusi_kitchen_laundry_outdoor
