
*Select Models Only
SAFETY INFORMATION .....3
OPERATING INSTRUCTIONS
Features ..........................6
Controls ..........................9
Dispenser* ....................... 13
Autofill* ......................... 14
Single Serve Brewer* .............. 15
About Appliance Communication . . . 16
Water Filter ...................... 17
Fresh Food Storage Options ....... 18
Climate Zone & Temperature
Controlled Drawer ................20
Freezer ..........................22
Automatic Ice maker ..............23
CARE AND CLEANING ..... 24
Replacing the Lights ..............25
INSTALLATION INSTRUCTIONS
Preparing to Install the
Refrigerator ......................26
Installing the Refrigerator ..........28
Installing the Water Line ........... 41
TROUBLESHOOTING TIPS . . 45
Normal Operating Conditions ......44
Truth or Myth ....................48
WARRANTY ..................50
CONSUMER SUPPORT
RPWFE Water Filter Cartridge
Limited Warranty ................ 51
Performance Data Sheet ...........52
Consumer Support ................54
ENGLISH/FRANÇAIS/
ESPAÑOL
Write the model and serial
numbers here:
Model # _________________
Serial # _________________
Find these numbers on a label
on the left side, near the middle
of the refrigerator compartment.
49-60792-2 02-18 GEA
GE and GE Profile™ Models
Models that start with DFE, GFE,
GNE, PFH, PFE, PFD and GFD are
Standard Depth Models (SD)
Models that start with GYE, PYE,
DYE, CYE, PWE, CWE, ZWE and
PYD are Counter Depth Models
(CD)
OWNER’S MANUAL &
INSTALLATION
INSTRUCTIONS
REFRIGERATORS
Bottom Freezer
GE is a trademark of the General Electric Company. Manufactured under trademark license.

249-60792-2
THANK YOU FOR MAKING GE APPLIANCES A PART OF YOUR HOME.
Whether you grew up with GE Appliances, or this is your first, we’re happy to have you in the family.
We take pride in the craftsmanship, innovation and design that goes into every GE Appliances
product, and we think you will too. Among other things, registration of your appliance ensures that we
can deliver important product information and warranty details when you need them.
Register your GE appliance now online. Helpful websites and phone numbers are available in the
Consumer Support section of this Owner’s Manual. You may also mail in the pre-printed registration
card included in the packing material.
49-60792-2 3
STATE OF CALIFORNIA PROPOSITION 65 WARNINGS:
WARNING This product contains one or more chemicals known to the State of California to cause cancer
and birth defects or other reproductive harm.
CAUTION To reduce the risk of injury when using your refrigerator, follow these basic safety
precautions.
Ŷ 'RQRWFOHDQJODVVVKHOYHVRUFRYHUVZLWKZDUP
water when they are cold. Glass shelves and
covers may break if exposed to sudden temperature
changes or impact, such as bumping or dropping.
Tempered glass is designed to shatter into many
small pieces if it breaks.
Ŷ .HHSILQJHUVRXWRIWKH³SLQFKSRLQW´DUHDV
clearances between the doors and between the
doors and cabinet are necessarily small. Be careful
closing doors when children are in the area.
Ŷ 'RQRWWRXFKWKHFROGVXUIDFHVLQWKHIUHH]HU
compartment when hands are damp or wet, skin
may stick to these extremely cold surfaces.
Ŷ 'RQRWUHIUHH]HIUR]HQIRRGVZKLFKKDYHWKDZHG
completely.
Ŷ ,QUHIULJHUDWRUVZLWKDXWRPDWLFLFHPDNHUVDYRLG
contact with the moving parts of the ejector
mechanism, or with the heating element that
UHOHDVHVWKHFXEHV'RQRWSODFHILQJHUVRUKDQGV
on the automatic ice making mechanism while the
refrigerator is plugged in.
SAFETY INFORMATION
READ AND SAVE THESE INSTRUCTIONS
IMPORTANT SAFETY INFORMATION
READ ALL INSTRUCTIONS BEFORE USING THE APPLIANCE
INSTALLATION
WARNING EXPLOSION HAZARD
.HHSIODPPDEOHPDWHULDOVDQGYDSRUVVXFKDVJDVROLQHDZD\IURPUHIULJHUDWRU)DLOXUHWRGRVRFDQUHVXOWLQILUH
explosion, or death.
WARNING TIP OVER HAZARD.
%XLOWLQVW\OHPRGHOVPRGHO3<(&<(*<(3:(&:(3<'DQG=:(DUHWRSKHDY\HVSHFLDOO\ZLWKDQ\
doors open. These models must be secured with the anti-tip floor bracket to prevent tipping forward, which could
result in death or serious injury. Read and follow the entire installation instructions for installing the anti-tip floor
bracket packed with your refrigerator.
WARNING To reduce the risk of fire, explosion, electric shock, or injury when using your
refrigerator, follow these basic safety precautions:
Ŷ 7KLVUHIULJHUDWRUPXVWEHSURSHUO\LQVWDOOHG
DQGORFDWHGLQDFFRUGDQFHZLWKWKH,QVWDOODWLRQ
,QVWUXFWLRQVEHIRUHLWLVXVHG
Ŷ 8QSOXJWKHUHIULJHUDWRUEHIRUHPDNLQJUHSDLUV
replacing a light bulb, or cleaning.
NOTE: Power to the refrigerator cannot be
disconnected by any setting on the control panel.
NOTE: Repairs must be performed by a qualified
Service Professional.
Ŷ 5HSODFHDOOSDUWVDQGSDQHOVEHIRUHRSHUDWLQJ
Ŷ 'RQRWXVHDQH[WHQVLRQFRUG
Ŷ 'RQRWVWRUHRUXVHJDVROLQHRURWKHUIODPPDEOH
vapors and liquids in the vicinity of this or any other
appliance.
Ŷ 'RQRWVWRUHH[SORVLYHVXEVWDQFHVVXFKDVDHURVRO
cans with a flammable propellant in this appliance.
Ŷ 7RSUHYHQWVXIIRFDWLRQDQGHQWUDSPHQWKD]DUGV
WRFKLOGUHQUHPRYHWKHIUHVKIRRGDQGIUHH]HU
doors from any refrigerator before disposing of it or
discontinuing its use.
Ŷ 7RDYRLGVHULRXVLQMXU\RUGHDWKFKLOGUHQVKRXOGQRW
stand on, or play in or with the appliance.
Ŷ &KLOGUHQDQGSHUVRQVZLWKUHGXFHGSK\VLFDOVHQVRU\
or mental capabilities or lack of experience and
knowledge can use this appliance only if they are
supervised or have been given instructions on safe
XVHDQGXQGHUVWDQGWKHKD]DUGVLQYROYHG
Ŷ 7KLVDSSOLDQFHLVLQWHQGHGWREHXVHGLQKRXVHKROG
and similar applications such as: staff kitchen areas
LQVKRSVRIILFHVDQGRWKHUZRUNLQJHQYLURQPHQWV
IDUPKRXVHVE\FOLHQWVLQKRWHOVPRWHOVEHG
EUHDNIDVWDQGRWKHUUHVLGHQWLDOHQYLURQPHQWV
catering and similar non-retail applications.
449-60792-2
SAFETY INFORMATION
IMPORTANT SAFETY INFORMATION
READ ALL INSTRUCTIONS BEFORE USING THE APPLIANCE
READ AND SAVE THESE INSTRUCTIONS
PROPER DISPOSAL OF YOUR OLD REFRIGERATOR
Do not, under any circumstances, cut or remove the third (ground) prong from the power cord. For
personal safety, this appliance must be properly grounded.
The power cord of this appliance is equipped with a
SURQJJURXQGLQJSOXJZKLFKPDWHVZLWKDVWDQGDUG
SURQJJURXQGLQJZDOORXWOHWWRPLQLPL]HWKH
SRVVLELOLW\RIHOHFWULFVKRFNKD]DUGIURPWKLVDSSOLDQFH
Have the wall outlet and circuit checked by a qualified
electrician to make sure the outlet is properly
grounded.
Where a standard 2-prong wall outlet is encountered, it
is your personal responsibility and obligation to have it
replaced with a properly grounded 3-prong wall outlet.
'RQRWXVHDQDGDSWHU
The refrigerator should always be plugged into its own
individual electrical outlet which has a voltage rating
that matches the rating plate.
$9ROW$&+]RUDPSIXVHGJURXQGHG
electrical supply is required. This provides the best
performance and also prevents overloading house
ZLULQJFLUFXLWVZKLFKFRXOGFDXVHDILUHKD]DUGIURP
overheated wires.
Never unplug your refrigerator by pulling on the power
cord. Always grip plug firmly and pull straight out from
the outlet.
,PPHGLDWHO\GLVFRQWLQXHXVHRIDGDPDJHGVXSSO\
FRUG,IWKHVXSSO\FRUGLVGDPDJHGLWPXVWEH
replaced by a qualified service professional with an
DXWKRUL]HGVHUYLFHSDUWIURPWKHPDQXIDFWXUHU
When moving the refrigerator away from the wall, be
careful not to roll over or damage the power cord.
CONNECTING ELECTRICITY
WARNING ELECTRICAL SHOCK HAZARD
Plug into a grounded 3-prong outlet
'RQRWUHPRYHWKHJURXQGSURQJ
'RQRWXVHDQDGDSWHU
'RQRWXVHDQH[WHQVLRQFRUG
)DLOXUHWRIROORZWKHVHLQVWUXFWLRQVFDQUHVXOWLQGHDWKILUHRUHOHFWULFDOVKRFN
WARNING SUFFOCATION AND ENTRAPMENT HAZARD
)DLOXUHWRIROORZWKHVHGLVSRVDOLQVWUXFWLRQVFDQUHVXOWLQGHDWKRUVHULRXVLQMXU\
IMPORTANT: Child entrapment and suffocation
are not problems of the past. Junked or abandoned
refrigerators are still dangerous even if they will sit
IRU³MXVWDIHZGD\V´,I\RXDUHJHWWLQJULGRI\RXUROG
refrigerator, please follow the instructions below to help
prevent accidents.
Before You Throw Away Your Old Appliance
Ŷ7DNHRIIWKHIUHVKIRRGDQGIUHH]HUGRRUV
Ŷ Leave the shelves in place so that children may not
easily climb inside.
Refrigerant and Foam Disposal:
'LVSRVHRIDSSOLDQFHLQDFFRUGDQFHZLWK)HGHUDODQG/RFDO5HJXODWLRQV)ODPPDEOHLQVXODWLRQPDWHULDOXVHG
requires special disposal procedures. Contact your local authorities for the environmentally safe disposal of your
appliance.
49-60792-2 5
Use this appliance only for its intended purpose as described in this Owner’s Manual. To reduce the risk
of severe burns, scald injuries, or death when using your hot water dispenser, the instructions below
must be followed:
Ŷ'RQRWSHUPLWFKLOGUHQWRXVHWKHKRWZDWHU
dispenser.
Ŷ The water coming from the dispenser is very hot.
8VHH[WUHPHFDXWLRQZKHQGLVSHQVLQJDQGGULQNLQJ
water. Allow water to cool to a drinkable temperature
before drinking.
Ŷ:KHQGLVSHQVLQJZDWHUEHORZÛ)Û&
always test the temperature of the water before
drinking.
Ŷ When dispensing hot water, the container can
EHFRPHYHU\KRW8VHDWHPSHUDWXUHLQVXODWLQJ
FRQWDLQHUVXFKDVFHUDPLFRUIRDP8VLQJFRQWDLQHU
materials such as paper or plastic may result in
DEXUQZKLOHKROGLQJWKHFXS'RQRWXVHJODVV
containers, as thermal shock can cause the container
to break and may result in scalding or lacerations.
Ŷ'RQRWXVHZLWKZDWHUWKDWLVPLFURELRORJLFDOO\XQVDIH
or of unknown quality.
Ŷ Your container should be close to the dispensing
SRLQWWRPLQLPL]HWKHVSODVKLQJRIKRWZDWHU
Ŷ A newly installed water filter cartridge will cause
water to spurt from the dispenser. Run 2 gallons
/LWHUVRIZDWHUWKURXJKWKHFROGZDWHU
GLVSHQVHUDERXWPLQXWHVWRUHPRYHDLUIURPWKH
V\VWHP8QWLOWKLVDLULVUHPRYHGIURPWKHV\VWHP
WKURXJKWKHFROGZDWHUGLVSHQVHU'2127XVHWKH
hot water dispenser as it may result in spurting of hot
water and lead to hot water scalding.
Ŷ The first time the hot water feature is used, confirm
LI\RXOLYHDERYHIHHWPHWHUVKLJK
DOWLWXGH7KLVOLPLWVWKHWHPSHUDWXUHRIWKHKRWZDWHU
system to avoid boiling. To access the high altitude
selection, press Fridge and Door Alarm and control
will cycle from Hi AL to Lo AL (high altitude to low
DOWLWXGH
Ŷ The hot water dispenser is designed to only dispense
ZDWHU'RQRWDWWHPSWWRKHDWRUGLVSHQVHDQ\WKLQJ
RWKHUWKDQZDWHU'RQRWDWWHPSWWRGLVDVVHPEOHRU
clean the tank.
Ŷ7KHKRWZDWHUGLVSHQVLQJWDQNLVDQRQSUHVVXUL]HG
tank, with a vent on the tank and a dispenser tube
RXWOHW'RQRWPRGLI\WKHV\VWHPFORVHRUEORFNWKH
dispense tube, or connect any other type of device
WRWKHWDQNRUGLVSHQVHWXEH'RLQJVRPD\OHDGWR
rupture of the tank and hot water scalding.
WARNING Scalding Hazard.
7KHKRWZDWHUGLVSHQVHULVFDSDEOHRIKHDWLQJZDWHUWRDWHPSHUDWXUHRIDSSUR[LPDWHO\)&:DWHU
WHPSHUDWXUHVDERYH)&FDQFDXVHVHYHUHEXUQVRUGHDWKIURPVFDOGLQJ&KLOGUHQWKHGLVDEOHGDQG
the elderly are at highest risk of being scalded.
IMPORTANT SAFETY INFORMATION
READ ALL INSTRUCTIONS BEFORE USING THE APPLIANCE
SAFETY INFORMATION
HOT WATER DISPENSER
READ AND SAVE THESE INSTRUCTIONS

649-60792-2
Space-saving ice maker*
,FHPDNHUDQGELQDUHORFDWHGRQWKHGRRUFUHDWLQJ
more usable storage space.
Showcase LED lighting
/('OLJKWLQJLVSRVLWLRQHGWKURXJKRXWWKHLQWHULRUWR
VSRWOLJKWDUHDVLQWKHUHIULJHUDWRU/('VDUHORFDWHG
XQGHUWKHIUHVKIRRGGRRUWROLJKWWKHIUHH]HUZKHQ
opened.
Drop-down tray*
Allows for extra door storage when you need it and
tucks away when you don’t.
Full-width temperature controlled drawer
Adjustable temperature control bin that can
accommodate larger items.
Dairy bin
Separate compartment for your items.
Ice bin/Ice maker*
,FHPDNHUZLWKLFHVWRUDJHELQV
QuickSpace™ shelf*
)XQFWLRQVDVDQRUPDOIXOOVL]HGVKHOIZKHQQHHGHG
and easily slides back to store tall items below.
Spillproof shelves
'HVLJQHGWRFDSWXUH\RXUVSLOOVIRUHDVLHUFOHDQXS
Anti-slip Mat
Liner that captures spills, keeps containers from
shifting when the door is opened and is easily
removable for cleaning.
Removable door bin
Can be removed for those with a wall limiting the door
opening.
Climate zone bin
Separate bins for produce storage.
Water filter
)LOWHUVZDWHUDQGLFH
* Select models only.
Features
USING THE REFRIGERATOR:)HDWXUHV

49-60792-2 7
Space-saving ice maker*
,FHPDNHUDQGELQDUHORFDWHGRQWKHGRRUFUHDWLQJPRUHXVDEOHVWRUDJH
space.
Showcase LED lighting
/('OLJKWLQJLVSRVLWLRQHGWKURXJKRXWWKHLQWHULRUWRVSRWOLJKWDUHDVLQWKH
UHIULJHUDWRU/('VDUHORFDWHGXQGHUWKHIUHVKIRRGGRRUWROLJKWWKHIUHH]HU
when opened.
Full-width temperature controlled drawer
Adjustable temperature control bin that can accommodate larger items.
Freezer Ice maker/Ice Bin*
An ice maker in both compartments give you more ice whenever you need
LW$YDLODEOHRQ1RQ'LVSHQVHPRGHOVDOVRDYDLODEOHDVDNLWIRUVRPH
models.
QuickSpace™ shelf*
)XQFWLRQVDVDQRUPDOIXOOVL]HGVKHOIZKHQQHHGHGDQGHDVLO\VOLGHVEDFN
to store tall items below.
Spillproof shelves
'HVLJQHGWRFDSWXUH\RXUVSLOOVIRUHDVLHUFOHDQXS
Removable door bin
Can be removed for those with a wall limiting the door opening.
Climate zone bin
Separate bins for produce storage.
Water filter
)LOWHUVZDWHUDQGLFH
Rotating Bin*
Can be rotated out for easy access.
Door in Door Latch*
6TXHH]HWKHODWFKRQWKHXQGHUVLGHRIWKHKDQGOHWRRSHQWKHRXWHUGRRU * Select models only.
Features
USING THE REFRIGERATOR:)HDWXUHV
849-60792-2
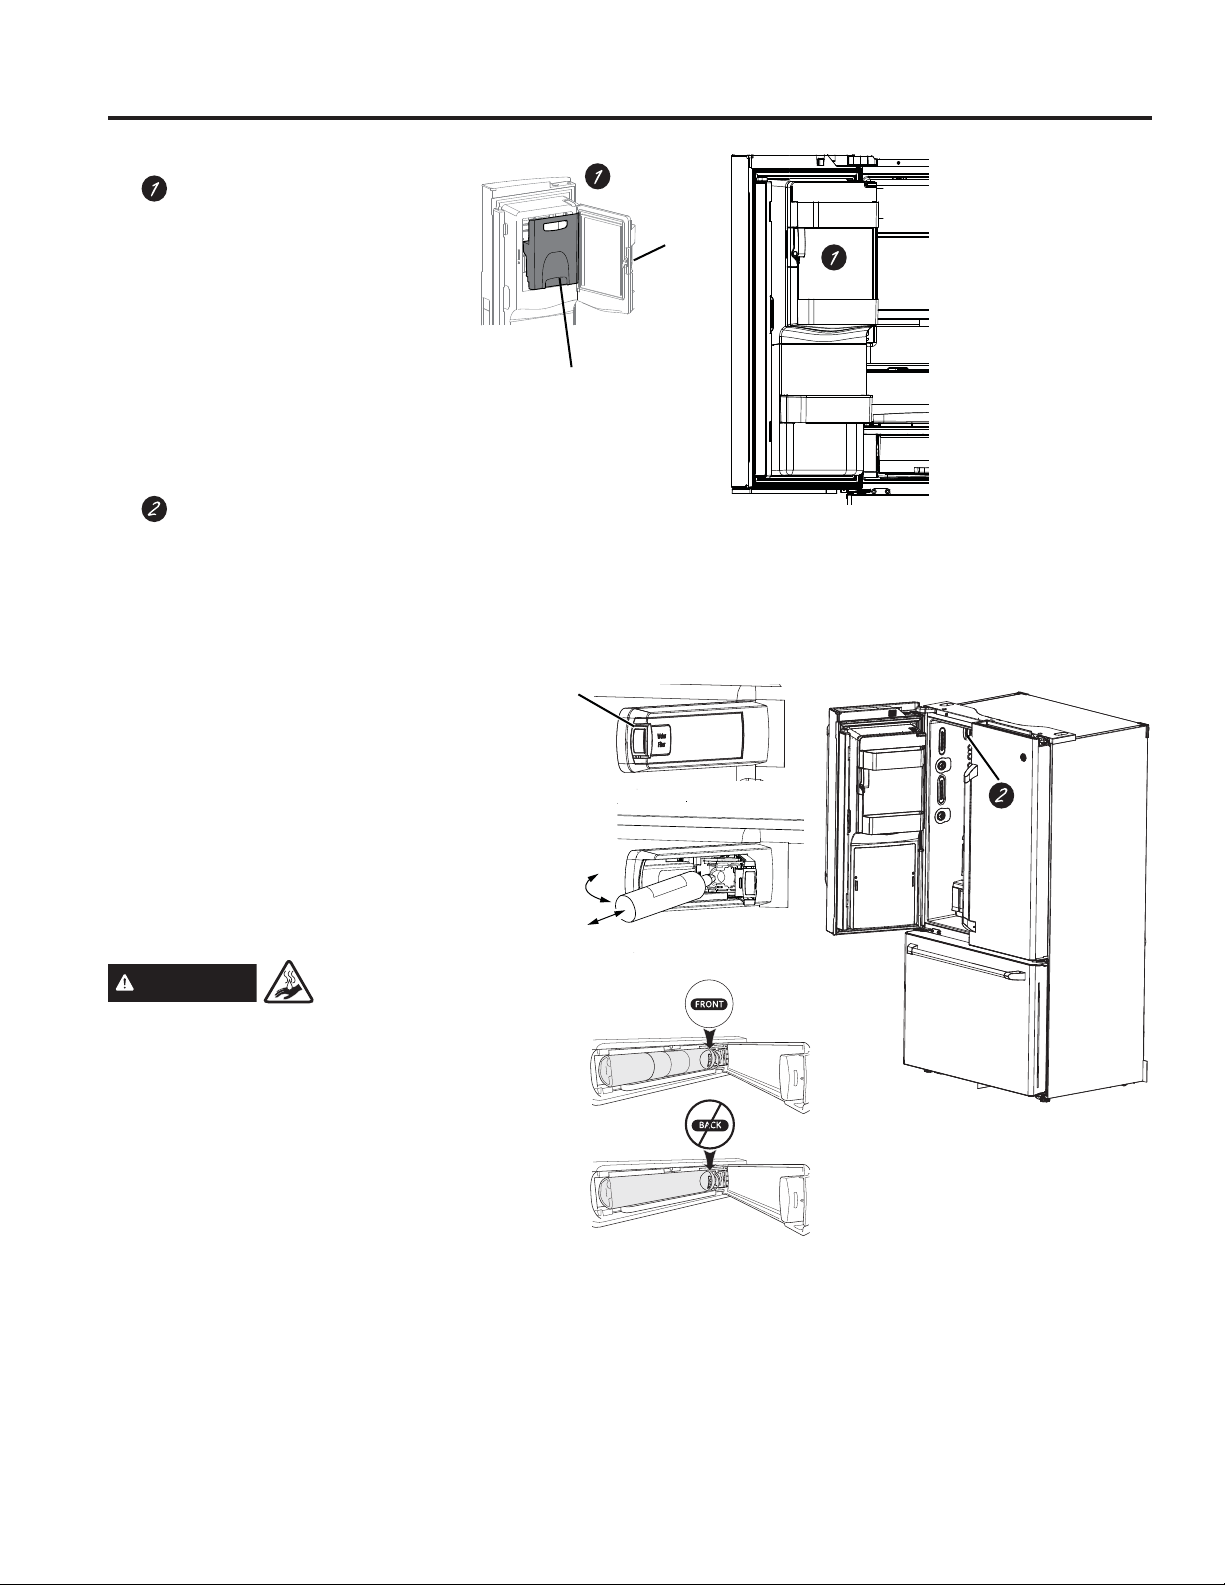
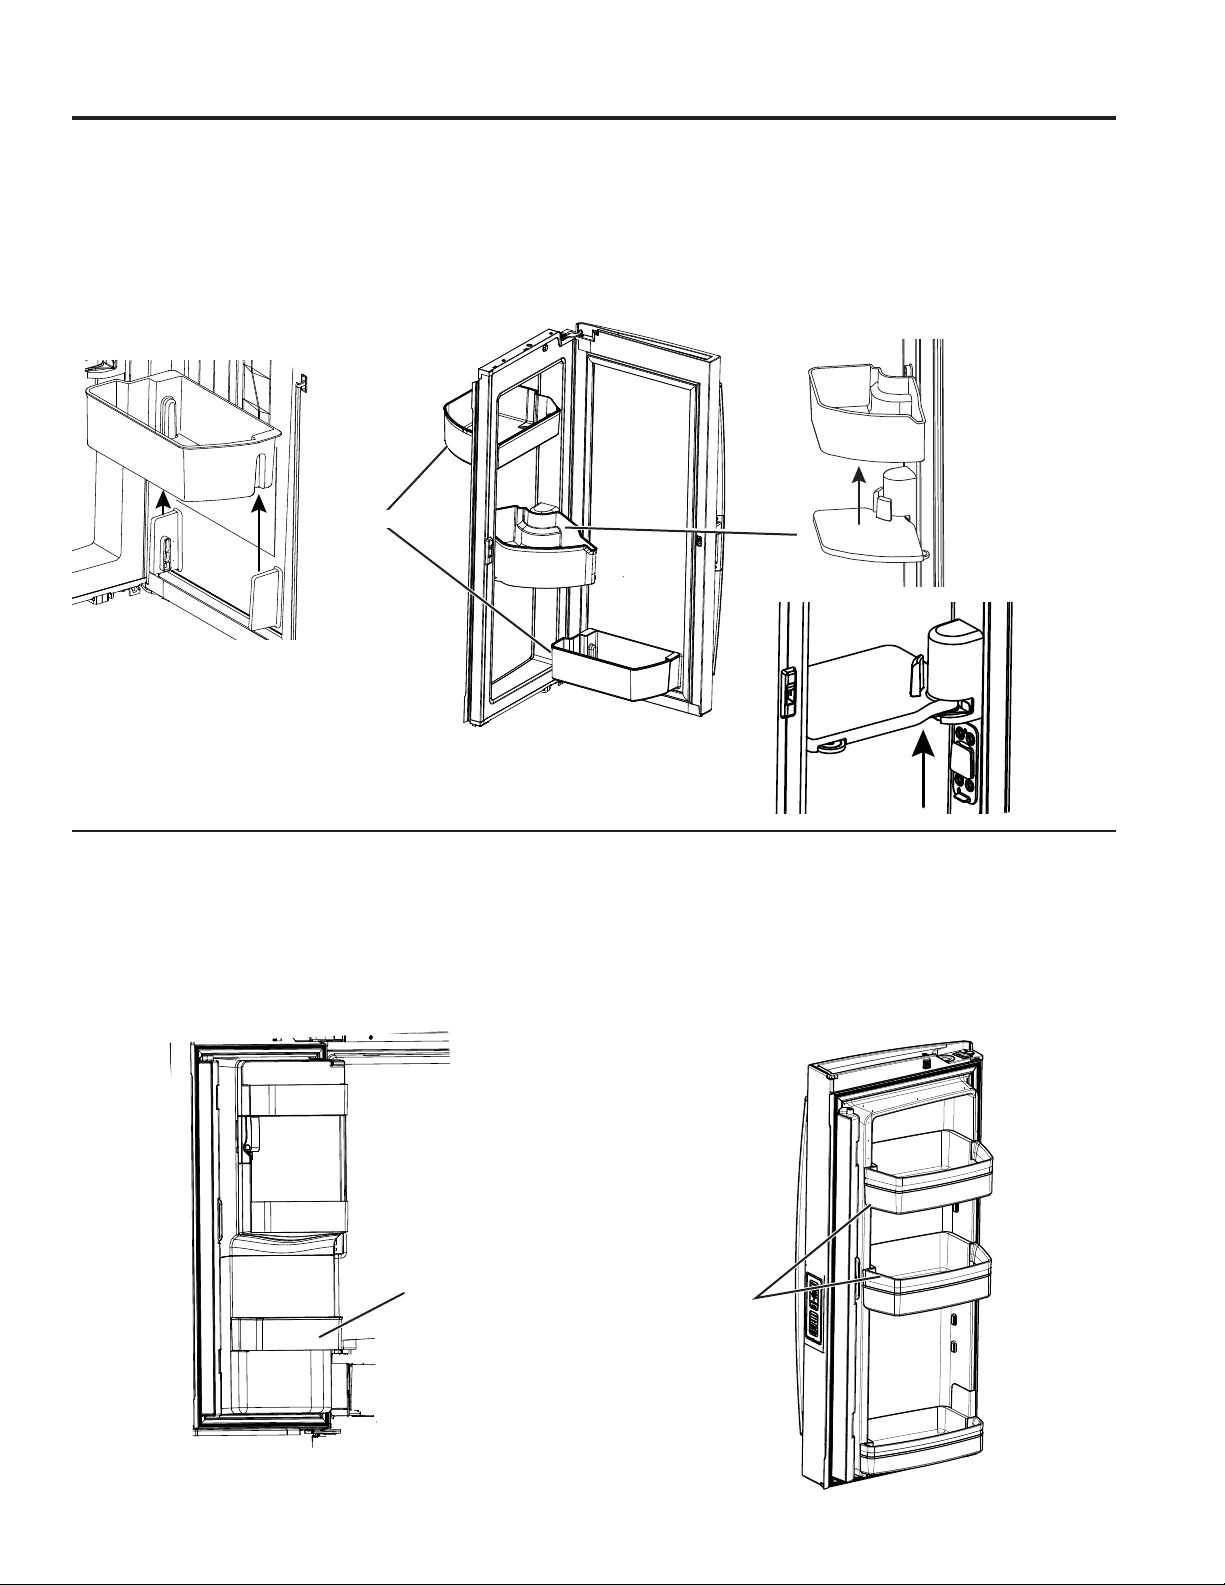
Door ice bin*
1. Open left fresh food door.
2. Pull down latch to release bin
door.
8VLQJKDQGKROGOLIWLFHEXFNHW
up and out to clear locators in
bottom of bin.
4. To replace the ice bucket, set
it on the guide brackets and push
until the ice bucket seats properly.
,IEXFNHWFDQQRWEHUHSODFHG
URWDWHWKH,FH%XFNHW)RUNWXUQ
clockwise.
Ice/water filter
Remove filter/bypass plug
Push the indent on the cover and
pull open filter door fully. Rotate the
ILOWHUE\SDVVSOXJDVIDUDVLWZLOOJR
DQGSXOOWKHILOWHUE\SDVVSOXJWRZDUG
you to remove.
Installing the filter cartridge
3XVKWKHQHZILOWHUE\SDVVSOXJ
straight in aligning the lugs with the
notches in cabinet and rotate the
ILOWHUE\SDVVSOXJLQWRWKHUHFHVVLQ
the cabinet. Make sure the front of
the filter is toward the interior of the
refrigerator.
Close the cover making sure the
indent snaps into position.
,FHEXFNHW
Latch
*Select Models Only
Push in and
pull open
Swing
Push \ Pull
1
2
WARNING Scalding Hazard.*
8VHRIWKHKRWZDWHUGLVSHQVHUSULRUWRSXUJLQJ
air from the system may result in spurting of hot
ZDWHUDQGOHDGWRKRWZDWHUVFDOGLQJ)ROORZWKH
LQVWUXFWLRQVIRU³:DWHU)LOWHU6WHS´RQSDJH
16 to purge all air from the system through the
cold water dispenser prior to using the hot water
dispenser.
The first time the hot water feature is used,
confirm if you live above 5000 feet (1524
meters) (high altitude). This limits the
temperature of the hot water system to avoid
boiling. To access the high altitude selection,
see Controls.
Features
USING THE REFRIGERATOR:)HDWXUHV

49-60792-2 9
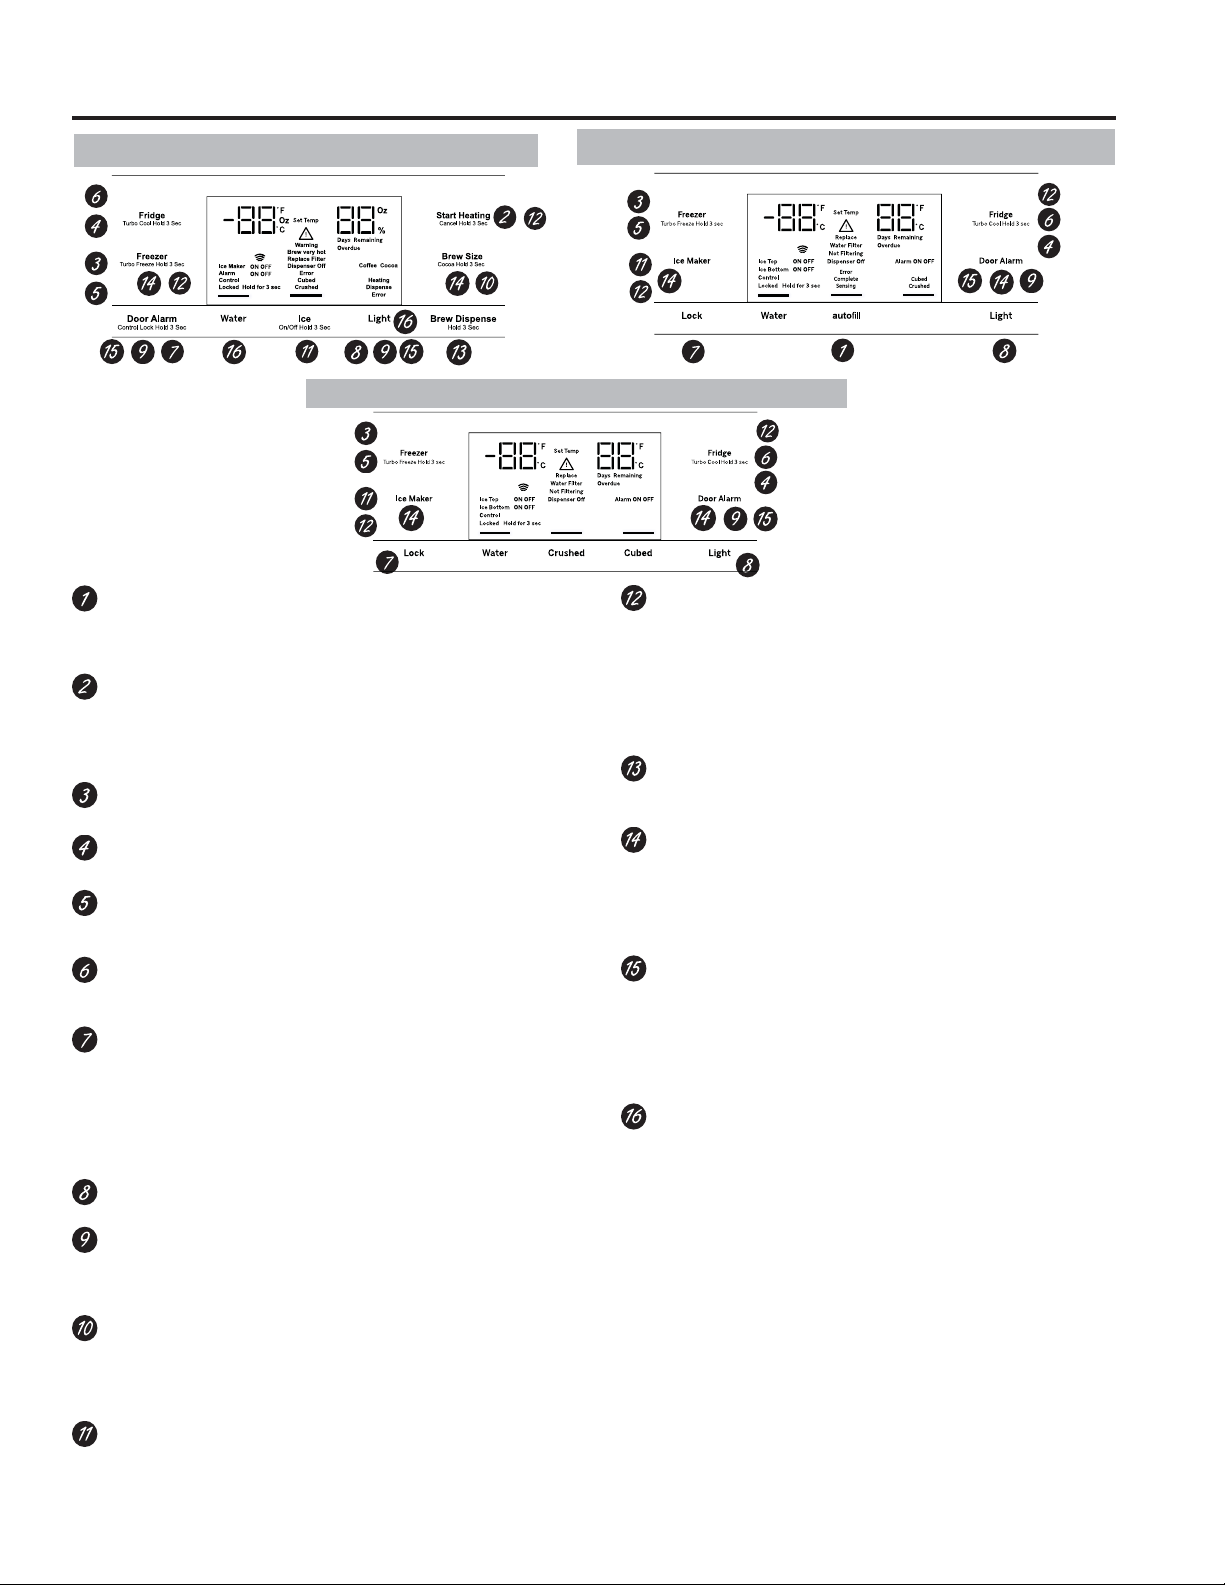
USING THE REFRIGERATOR: Controls
7KHWHPSHUDWXUHFRQWUROVDUHSUHVHWLQWKHIDFWRU\DW)IRUWKHUHIULJHUDWRUFRPSDUWPHQWDQG)IRUWKHIUHH]HU
FRPSDUWPHQW$OORZKRXUVIRUWKHWHPSHUDWXUHWRVWDELOL]HWRWKHSUHVHWUHFRPPHQGHGVHWWLQJV
Control Style D: The temperature controls can display both the SET temperature as well as the actual temperature
LQWKHUHIULJHUDWRUDQGIUHH]HU7KHDFWXDOWHPSHUDWXUHPD\YDU\VOLJKWO\IURPWKH6(7WHPSHUDWXUHEDVHGRQXVDJH
DQGRSHUDWLQJHQYLURQPHQW3:(DQG*1(RQO\
NOTE: The refrigerator is shipped with protective film covering the temperature controls.
,IWKLVILOPZDVQRWUHPRYHGGXULQJLQVWDOODWLRQUHPRYHLWQRZ
PFE28P, PYE22P Control Style A, Single Serve Models
PFH28, PFE28K, DFE28, PFD28, PYE22K, PYD22, DYE22
&RQWURO6W\OH%$XWR)LOO0RGHOV
GFD28, GFE28, GFE26, GYE22 Control Style C, GE Models
GNE29, PWE23&RQWURO6W\OH'1RQ'LVSHQVH&RQWURO
Refrigerator
Hold 3 Sec for °F/°C
Hold 3 Seconds
Hold 3 Seconds
Recommended: 37 °F
Actual Set
Freezer
Door Alarm
Ice Maker
Lock Controls
Reset Filter
Recommended: 0°F
F
Ice
Error
Complete
Sensing
Cubed
Crushed
Controls

10 49-60792-2
NOTE: )RURSWLPDOWHPSHUDWXUHSHUIRUPDQFHZHUHFRPPHQGWRDYRLGSODFLQJIRRGLWHPVGLUHFWO\DWWKHDLUIORZYHQWV
of the fresh food air tower and thus blocking the air flow.
Changing the Temperature for Control Style A
To Change the Refrigerator Temperature:
Press the Fridge button and current set temperature
will display. Pressing and releasing the button will cycle
through the available temperature settings. Press and
hold button for Turbo Cool feature. The display will show
tC.
To Change the Freezer Temperature:
Press the Freezer button and current set temperature
will display. Pressing and releasing the button will cycle
through the available temperature settings. Press and
hold button for Turbo Freeze feature. The display will
show tF.
Cooling system can be turned off by pressing and holding
Freezer and Start Heating. OFF will be displayed. To
turn on, press Fridge or Freezer. ON will be displayed.
Turning the cooling system off stops the cooling to the
refrigerator, but it does not shut off the electrical power.
Changing the Temperature for Control Styles B and C
To change the temperature, press and release the
Freezer or Fridge pad. The display will show the set
temperature. To change the temperature, press either the
Freezer or Fridge pad until the desired temperature is
displayed. Press and hold button for Turbo Cool feature.
The display will show tC. Press and hold button for Turbo
Freeze feature. The display will show tF.
To turn off the cooling system press and hold the Fridge
and Ice Maker buttons. To turn on, press Fridge or
Freezer.
Turning the cooling system off stops the cooling to the
refrigerator, but it does not shut off the electrical power.
Changing Temp. for Control Style D
7HPSHUDWXUH'LVSOD\LVORFDWHGRQLQVLGHRIOHIWKDQG
refrigerator door. To change the temperature, press
and release the REFRIGERATOR or FREEZER
pad. The ACTUAL TEMP light will come on and the
display will show the actual temperature. To change
the temperature, tap either the REFRIGERATOR or
FREEZER pad until the desired temperature is displayed.
To turn OFF cooling system, press and hold the
REFRIGERATOR and FREEZER pads simultaneously
for 3 seconds. When cooling system is OFF the display
should read OF. To turn ON cooling system, press either
REFRIGERATOR or FREEZER pad. The display will
show the preset temperature settings of 37°F (3Û& for
refrigerator and 0°F (-18Û& IRUIUHH]HU
Turning the cooling system off stops the cooling to
refrigerator, but it does not shut off the electrical power.
Controls
USING THE REFRIGERATOR: Controls
49-60792-2 11
USING THE REFRIGERATOR: Controls
Controls
Ice
Hands-free Autofill*
Hands-free Autofill uses sensors to monitor container
height to automatically dispense filtered water without
having to activate the paddle.
Start Heating*
The Start Heating button is used to initiate the water
heating for the Single Serve feature. To abort the Start
Heating feature, press and hold the Start Heat button for
3 seconds.
Freezer temp control
$GMXVWIUHH]HUFRPSDUWPHQWWHPSHUDWXUH
Fresh food temp control
Adjust fresh food compartment temperature.
TurboFreeze™ setting
Activate TurboFreezeWRTXLFNO\UHVWRUHIUHH]HU
temperatures after frequent door openings.
TurboCool™ setting
Activate TurboCool to quickly restore fresh food
temperature after frequent door openings.
Lock Controls
Control Style A - Press and hold the Door Alarm pad
for 3 seconds to lock out ice and water dispenser and all
feature and temperature buttons.
Control Styles B & C - Press Lock pad and hold 3
seconds to lock out ice and water dispenser and all
feature and temperature buttons.
Dispenser light
/LJKWLQJWKDWFDQEHWXUQHGRQRIIWROLJKW\RXUGLVSHQVHU
Door Alarm
6RXQGVWRDOHUWZKHQWKHIUHH]HURUIUHVKIRRGGRRUVKDYH
been left open. Press and hold Door Alarm pad and it will
toggle the sound between low, high, and off.
Brew Size*
7KH%UHZ6L]HEXWWRQLVXVHGWRVHOHFWWKHGHVLUHGFXS
VL]HIRUVLQJOHVHUYH3UHVVDQGKROGWKHEXWWRQIRU
seconds to toggle the brew type between Coffee and
Cocoa.
Ice maker setting
7XUQ\RXULFHPDNHUVRQRII
Cooling system On/Off
Control Style A - Press and hold Freezer and Start
Heating simultaneously to turn cooling system off. To turn
cooling system on press either the Fridge or Freezer.
Control Style B & C - Press and hold Fridge and Ice
Maker simultaneously for 3 seconds to turn the cooling
system off. To turn cooling system on press either the
Fridge or Freezer.
Brew Dispense
Press and hold Brew Dispense button for 3 seconds, but
no longer than 6 seconds, to dispense coffee or cocoa.
F°/C°
Control Style A - Press and hold Freezer and Brew Size
WRVZLWFKEHWZHHQ)&
Control Style B & C - Press and hold Ice Maker and
Door Alarm simultaneously for 3 seconds to switch
EHWZHHQ)&
Sound Control for pad chimes
Control Style A - Press and hold the Light pad: Once for
High to Off, twice for Off to Low and three times for Low
to High.
Control Styles B & C - Press and hold the Door Alarm
pad: Once for High to Off, twice for Off to Low and three
times for Low to High.
High Altitude
Control Style A (PYE and PFE only) - Press and hold
Fridge and Door Alarm for to toggle between Hi Al and
Lo AL for high altitude and low altitude.
Additional settings:
• &RQQHFWHG+RPHUHDG\3)(33<(33)+RQO\
• :DWHU)LOWHU - An indicator will illuminate when the filter
needs to be replaced. When a new filter is installed the
indicator will go off.
Additional Mode:
• Sabbath Mode
Control Style A - Press and hold Alarm and Light
VLPXOWDQHRXVO\IRUVHFRQGVWRHQWHUH[LW6DEEDWKPRGH
Control Style B & C - Press and hold Lock and Light
VLPXOWDQHRXVO\IRUVHFRQGVWRHQWHUH[LW6DEEDWKPRGH
Sabbath Mode will turn off or dim interior lights, temperature
control and advanced features. Compressor will run on a
timed defrost when in Sabbath mode.
Control Style A, External Controls 3)(33<(3 Control Style B, External Controls 3)+3)(.')(3)'
3<(.3<''<(
Control Style C, External Controls *)'*)(*)(GYE22
*Select Models Only
Error
Complete
Sensing
Cubed
Crushed
12 49-60792-2
Refrigerator
Hold 3 Sec for °F/°C
Hold 3 Seconds
Hold 3 Seconds
Recommended: 37 °F
Actual Set
Freezer
Door Alarm
Ice Maker
Lock Controls
Reset Filter
Recommended: 0°F
F
Controls Style D, Internal Controls GNE29, PWE23
Door Alarm
6RXQGVWRDOHUWZKHQWKHIUHH]HURUIUHVKIRRGGRRUV
have been left open.
Reset Filter
Hold for 3 seconds after replacing filter.
Lock Controls
Press and hold 3 seconds to lock out ice and water
dispenser and all feature and temperature buttons.
Freezer temp control
$GMXVWIUHH]HUFRPSDUWPHQWWHPSHUDWXUH
Refrigerator temp control
Adjust fresh food compartment temperature
Ice maker setting
7XUQ\RXULFHPDNHURQRII
Additional Mode:
• Sabbath Mode
Press and hold Door Alarm and Ice Maker
VLPXOWDQHRXVO\IRUVHFRQGVWRHQWHUH[LW6DEEDWKPRGH
Controls
USING THE REFRIGERATOR: Controls
49-60792-2 13
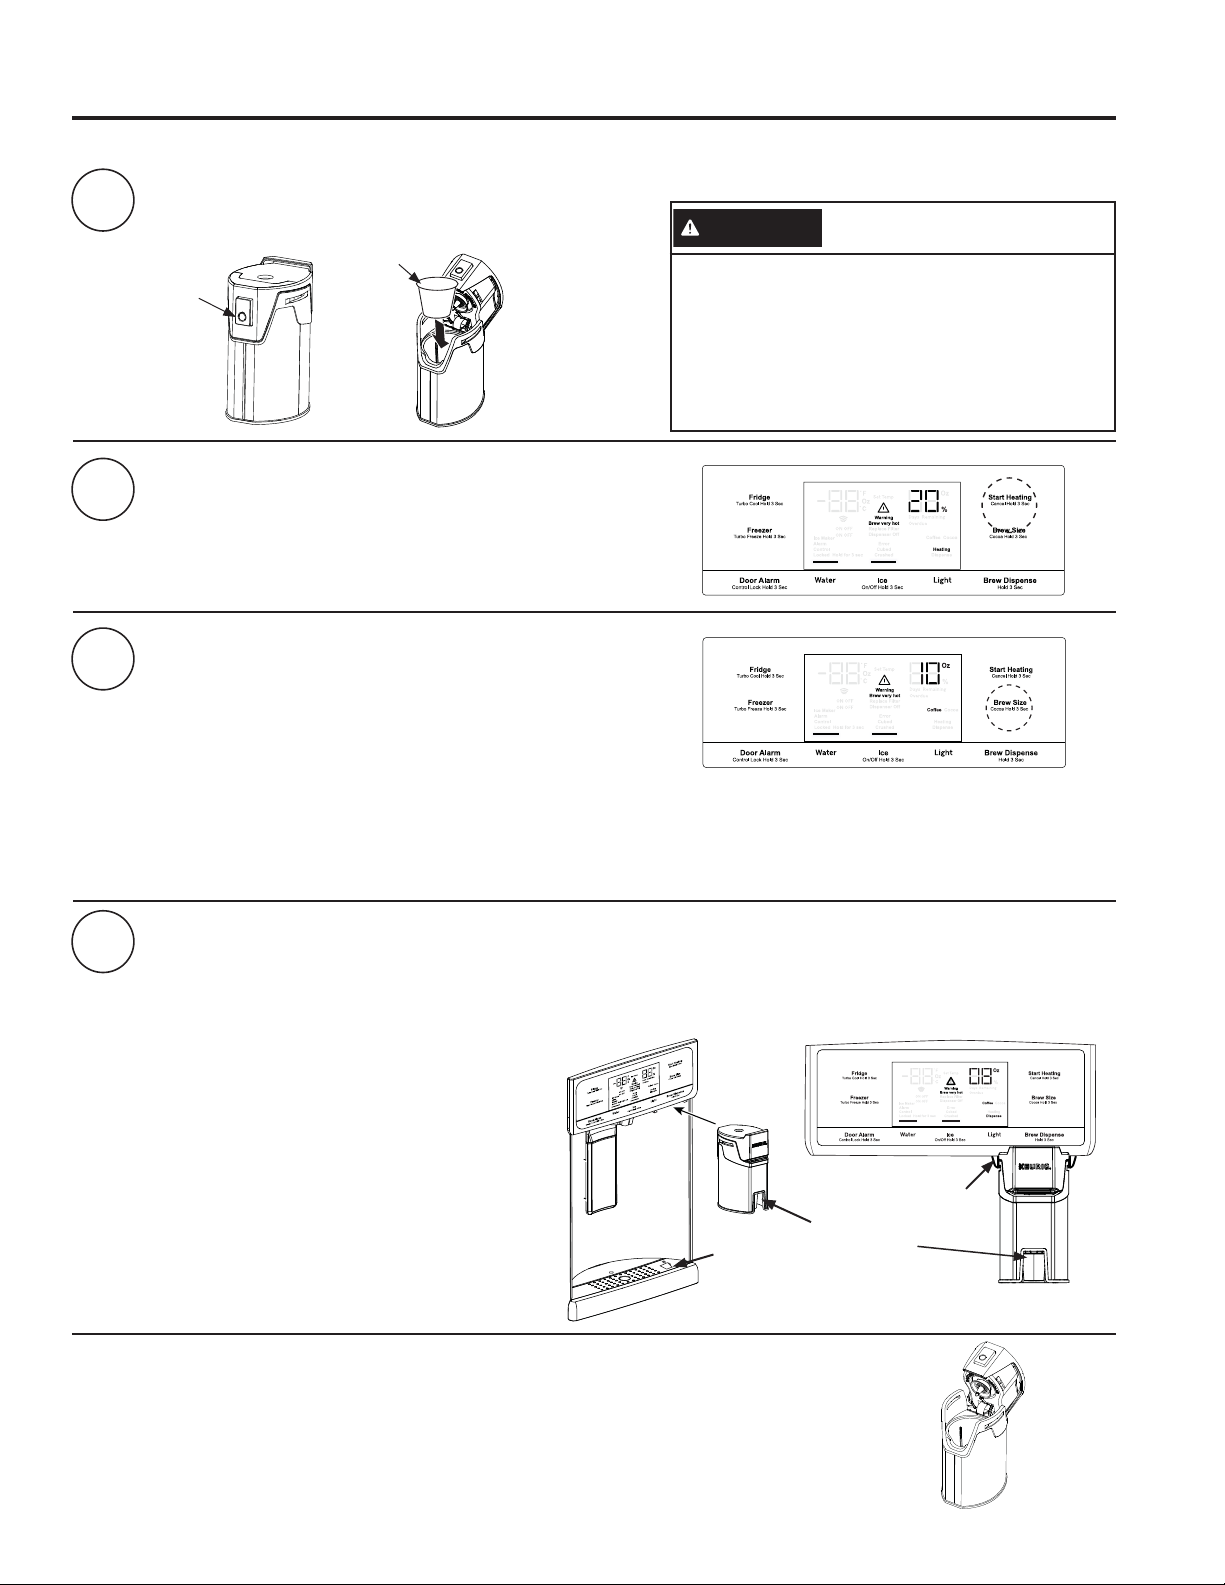
USING THE REFRIGERATOR: 'LVSHQVHU
'LVSHQVHU7UD\
Important Facts About Your Dispenser
Ŷ'RQRWDGGLFHIURPWUD\VRUEDJVWRWKHGRRULFH
PDNHUEXFNHW,WPD\QRWFUXVKRUGLVSHQVH
Ŷ Avoid overfilling glass with ice and use of narrow
glasses. Backed-up ice can jam the chute or cause the
GRRULQWKHFKXWHWRIUHH]HVKXW,ILFHLVEORFNLQJWKH
chute remove the ice bucket, poke it through with a
wooden spoon.
Ŷ Beverages and foods should not be quick-chilled in the
door ice maker bin. Cans, bottles or food packages in
the storage drawer may cause the ice maker or auger
to jam.
Ŷ To keep dispensed ice from missing the glass, put the
glass close to, but not touching, the dispenser opening.
Ŷ Some crushed ice may be dispensed even though you
selected CUBED ICE. This happens occasionally when
a few cubes accidentally get directed to the crusher.
Ŷ After crushed ice is dispensed, some water may drip
from the chute.
Ŷ Sometimes a small mound of snow will form on the
door in the ice chute. This condition is normal and
usually occurs when you have dispensed crushed ice
repeatedly. The snow will eventually evaporate.
,IQRZDWHULVGLVSHQVHGZKHQWKHUHIULJHUDWRULVILUVW
installed, there may be air in the water line system. Press
the dispenser paddle for at least five minutes to remove
trapped air from the water line and to fill the water
system. To flush out impurities in the water line, throw
away the first six full glasses of water.
To remove Dispenser Tray (Type A and B Only)
Ŷ3XOO'LVSHQVHU7UD\RXWXQWLOLWVWRSV
Ŷ Locate tab in the center on the bottom and push up.
Ŷ3XOO'LVSHQVHU7UD\DVVHPEO\RXW
Ŷ/LIW'LVSHQVHU7UD\RXWDWFHQWHUQRWFKWRFOHDQ
To remove Dispenser Tray (Type C Only)
*UDVS'LVSHQVHU7UD\DQGSXOOILUPO\XQWLOLWFRPHVRXW
To reinstall Dispenser Tray (Type A and B Only)
Ŷ3ODFHWKH'LVSHQVHU7UD\FRYHURQWRSRIFDWFKWUD\
and position under the two plastic retainers on either
side.
Ŷ&HQWHU'LVSHQVHUWUD\DQGDOLJQZLWKFHQWHUJXLGHV
Ŷ Push in until it locks firmly in place.
To reinstall Dispenser Tray (Type C Only)
Line up the guide on tray bottom with track on dispenser
and slide it in until it stops against the back of the
dispenser.
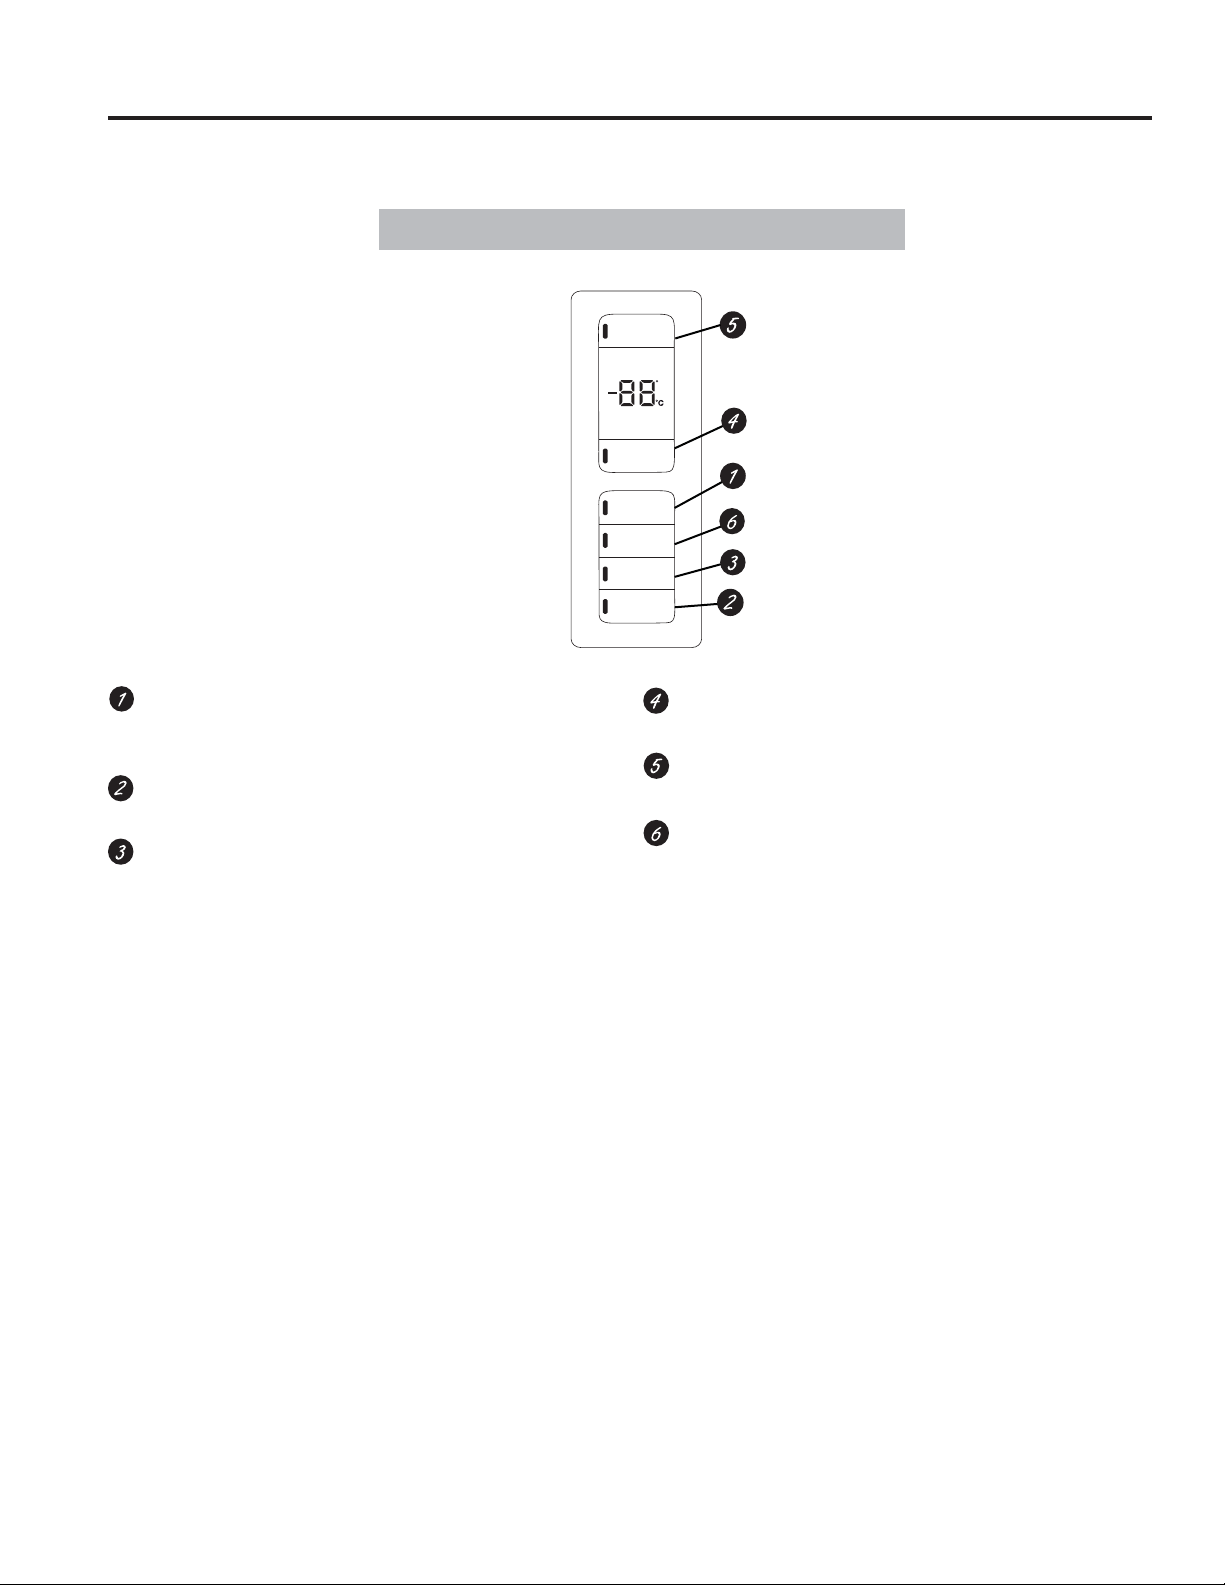
Water & Ice Dispenser
(See About the controls
with temperature settings
& About the control
IHDWXUHV
To Use the Internal Water Dispenser*
The water dispenser is located on
the left wall inside the refrigerator
compartment.
To dispense water:
Hold the glass against the recess.
Push the water dispenser button.
Hold the glass underneath the
dispenser for 2–3 seconds after
releasing the dispenser button.
Water may continue to dispense
after the button is released.
,IQRZDWHULVGLVSHQVHGZKHQWKHUHIULJHUDWRULVILUVW
installed, there may be air in the water line system. Press
the dispenser button for at least 5 minutes to remove
trapped air from the water line and to fill the water
V\VWHP'XULQJWKLVSURFHVVWKHGLVSHQVHUQRLVHPD\EH
loud as the air is purged from the water line system. To
flush out impurities in the water line, throw away the first
6 glassfuls of water.
NOTE: To avoid water deposits, the dispenser should
be cleaned periodically by wiping with a clean cloth or
sponge.
WARNING Laceration Hazard
Ŷ Never put fingers or any other object into ice crusher
GLVFKDUJHRSHQLQJ'RLQJVRFDQUHVXOWLQFRQWDFWLQJ
the ice crushing blades and lead to serious injury or
amputation
Ŷ8VHDVWXUG\JODVVZKHQGLVSHQVLQJLFH$GHOLFDWH
glass may break and result in personal injury.
*Select Models Only
Dispenser*

14 49-60792-2
To Use HANDS FREE AUTOFILL:
Ŷ &HQWHUFRQWDLQHURQ5HFHVV'LVSHQVHU7UD\DVIDU
back as possible without activating paddle and remove
hand from container
Ŷ Press AUTOFILL
To Stop AUTOFILL
Ŷ Press AUTOFILL to stop.
Important Facts about AUTOFILL
Ŷ)RURSWLPXPUHVXOWVXVHDXQLIRUPFRQWDLQHUEHWZHHQ
´FPWDOODQG´FPZLGH
Ŷ)LOOOHYHODQGIXQFWLRQDOLW\PD\YDU\RQFRQWDLQHUVWDOOHU
WKDQ´FPRUZLGHUWKDQ´FP
Ŷ&RQWDLQHUYROXPHVPD\YDU\LIHUURUPHVVDJH³1RW
)RXQG´LVJLYHQWU\DGLIIHUHQWFRQWDLQHU
Ŷ$872),//ZLOOWLPHRXW
Ŷ Handles, straws, and garnishes on the rim of the
container my cause overfilling or variation in fill
volumes.
Ŷ Splashing may occur depending on the location of the
container, water flow rate, container shape, and ice
cubes.
Ŷ.HHSVHQVRUVFOHDQZLWKDFOHDQGDPSFORWKDQGGR
not spray liquid or cleaners directly on sensors
Ŷ$872),//ZRUNVEHVWZLWKKRXVHKROGZDWHUSUHVVXUH
RIWRSVLWRN3D
Ŷ,FHLQFRQWDLQHUPD\DIIHFWILOOYROXPH,ILVVXHVDUH
experienced, use less ice.
Sensors
*Select Models Only
Single Serve Keurig K-Cup Brewer*
WARNING Scalding Hazard.
Ŷ The water coming from the dispenser is very hot and
can cause scalds or burns. Read all warnings on
page 5 prior to use.
Ŷ'RQRWSHUPLWFKLOGUHQWRXVHWKHEUHZHU
Ŷ Always use a container that is suitable for hot liquids
FHUDPLFIRDPHWF
Ŷ'RQRWEUHZLQWRDPXJPDGHRIJODVV'RLQJVRPD\
cause the glass to crack or break.
Ŷ,I\RXOLYHDERYHIHHWPHWHUVSUHVV
Fridge and Door Alarm and control will cycle from
/RZ$OWLWXGH/R$/WR+LJK$OWLWXGH+L$/
Ŷ DO NOT use the hot water dispenser immediately after
installing a new water filter as it may result in spurting
RIKRWZDWHU'LVSHQVHFROGZDWHUIRUDERXWPLQXWHV
to purge air from the system prior to dispensing hot
water.
Important Facts about HOT WATER
AUTOFILL*
USING THE REFRIGERATOR:$872),//.HXULJ.&XS%UHZHU
49-60792-2 15
USING THE REFRIGERATOR: .HXULJ.&XS%UHZHU
*Select Models Only
Push to
open
1
2
3
Load the K-Cup Brewer
,QVHUWD.HXULJ.&XSSRGLQWRWKHEUHZHUDQGSUHVVGRZQ
ILUPO\\RXZLOOKHDUDSRSSLQJVRXQG
Two Ways To Brew
1. Press the Start Heating button.
OR
,QLWLDWHKHDWLQJZLWKWKH*(.LWFKHQ$SS'RZQORDG
WKH$SS³*(.LWFKHQ´9LVLWZZZGEAppliances.com/
connect for more information.**
CAUTION Cut/Puncture Hazard.
• There are two sharp needles located inside the
.&XSEUHZHU7RDYRLGULVNRILQMXU\GRQRW
SXW\RXUILQJHUVLQVLGHWKHEUHZHU8VHFDXWLRQ
when cleaning.
• .HHSWKH.&XSEUHZHURXWRIWKHUHDFKRI
children, as they may be injured in using the
.&XSEUHZHULQFRUUHFWO\
4Dispense
2QFHWKHKHDWLQJSURFHVVLVFRPSOHWHWKH'LVSHQVHOLJKWRQWKHGLVSOD\ZLOOIODVK
To dispense, slide the brewer into the rails. Make sure the brewer is pushed all the way into the bracket.
Place your mug on the drip tray mug icon, under the red brew spout. Press and hold Brew Dispense for 3
seconds until you hear the dispenser engage.
Cleaning the brewer
Ŷ7KH.&XSEUHZHULVWRSUDFNGLVKZDVKHUVDIH
Ŷ,WLVUHFRPPHQGHGWRULQVHLWWKRURXJKO\DIWHUZDVKLQJWRUHPRYHDOOVRDSUHVLGXH
Ŷ Periodic cleaning of dispenser recess area is recommended as staining may occur with usage
RIWKH.&XSEUHZHU
.&XS
Close the
brewer.
Lid will
click when
secure.
Change Brew Size
Press the Brew Size button any time during the heating cycle to
FKRRVHRUR]7KHGHIDXOWVL]HLVR](QVXUHWKHPXJ
EHLQJXVHGLVODUJHHQRXJKIRUWKHVL]HVHOHFWHG
NOTE: Press and hold the Brew Size button for 3 seconds to
toggle between Coffee and Cocoa. The default is Coffee.
NOTE: To abort the heating cycle, press and hold the Start Heating button for 3
seconds. To abort the brew dispense cycle, press and hold the Start Heating button
for 3 seconds, press the paddle, press any button on the display besides Brew Size or
Brew Dispense, or open the right fresh food door.
Red brew
spout for mug
alignment
Mug icon for
placement
Rails for
the brewer
)RU86DQG867HUULWRULHV2QO\
How to use the single serve dispenser
Single Serve Keurig K-Cup Brewer* (Cont.)
16 49-60792-2
GE WiFi Connect**
GE WiFi Connect Enabled* (PFE28P, PFD28, PYD22,
PYE22P, PFH models only)
,I\RXUUHIULJHUDWRUKDVD&RQQHFWHG$SSOLDQFHLQIRUPDWLRQODEHOORFDWHGRQWKHLQVLGHDVVKRZQ
\RXUUHIULJHUDWRUFDQEHFRQQHFWHGWR\RXU:L)LQHWZRUNDOORZLQJLWWRFRPPXQLFDWHZLWK\RXU
VPDUWSKRQHIRUUHPRWHPRQLWRULQJFRQWURODQGQRWLILFDWLRQV'HSHQGLQJRQWKHUHIULJHUDWRU
PRGHO\RXKDYH\RXHLWKHUKDYHD:L)LFRPPXQLFDWLRQFDUGEXLOWLQWRWKHSURGXFWRUDSRUW
IRUDQH[WHUQDO:L)L&RQQHFW3OXV0RGXOHVROGVHSDUDWHO\3OHDVHYLVLWwww.GEAppliances.
com/connect to learn more about connected appliance features, and to learn what connected
appliance apps will work with your Smart Phone.**
7RXVH\RXU:L)LSUHVVWater and Light on the control panel.
REGULATORY INFORMATION
FCC/IC Compliance Statement:
7KLVGHYLFHFRPSOLHVZLWK3DUWRIWKH)&&5XOHV2SHUDWLRQLVVXEMHFWWRWKHIROORZLQJWZRFRQGLWLRQV
1. This device may not cause harmful interference.
2. This device must accept any interference received, including interference that may cause undesired operation.
This equipment has been tested and found to comply with the limits for a Class B digital device, pursuant to Part
RIWKH)&&5XOHV7KHVHOLPLWVDUHGHVLJQHGWRSURYLGHUHDVRQDEOHSURWHFWLRQDJDLQVWKDUPIXOLQWHUIHUHQFHLQD
residential installation. This equipment generates uses and can radiate radio frequency energy and, if not installed
and used in accordance with the instructions, may cause harmful interference to radio communications. However,
WKHUHLVQRJXDUDQWHHWKDWLQWHUIHUHQFHZLOOQRWRFFXULQDSDUWLFXODULQVWDOODWLRQ,IWKLVHTXLSPHQWGRHVFDXVHKDUPIXO
interference to radio or television reception, which can be determined by turning the equipment off and on, the user
is encouraged to try to correct the interference by one or more of the following measures:
• Reorient or relocate the receiving antenna.
,QFUHDVHWKHVHSDUDWLRQEHWZHHQWKHHTXLSPHQWDQGUHFHLYHU
• Connect the equipment into an outlet on a circuit different from that to which the receiver is connected.
&RQVXOWWKHGHDOHURUDQH[SHULHQFHGUDGLRWHOHYLVLRQWHFKQLFLDQIRUKHOS
Labelling: Changes or modifications to this unit not expressly approved by the manufacturer could void the user’s
authority to operate the equipment.
ConnectPlus module only (or similar communication module)
RF Exposure -7KLVGHYLFHLVRQO\DXWKRUL]HGIRUXVHLQDPRELOHDSSOLFDWLRQ$WOHDVWFPRIVHSDUDWLRQGLVWDQFH
between the ConnectPlus device and the user’s body must be maintained at all times.
GE WiFi Connect Optional *
You refrigerator is GE WiFi Connect compatible using the GE ConnectPlus module that is provided with your
refrigerator. To connect this appliance to the internet you will need to attach the module to your appliance through
the communication port in the appliance. The GE ConnectPlus will allow your appliance to communicate with your
smart phone for remote appliance monitoring, control and notifications. Please visit www.GEAppliances.com/
connect to learn more about connected appliance features, to learn what connected appliance App’s will work with
your Smart Phone and to learn where you can purchase a GE ConnectPlus.**
:L)L&RQQHFWLYLW\)RUDVVLVWDQFHZLWKWKHDSSOLDQFHRUWKHConnectPlus network connectivity (for models that are
:L)LHQDEOHGRU:L)LRSWLRQDOSOHDVHFDOO1-800-220-6899.
)RU86DQG867HUULWRULHV2QO\
Appliance Communication (for customers in the United States and its territories)
*Select Models Only
USING THE REFRIGERATOR: Appliance Communication
49-60792-2 17
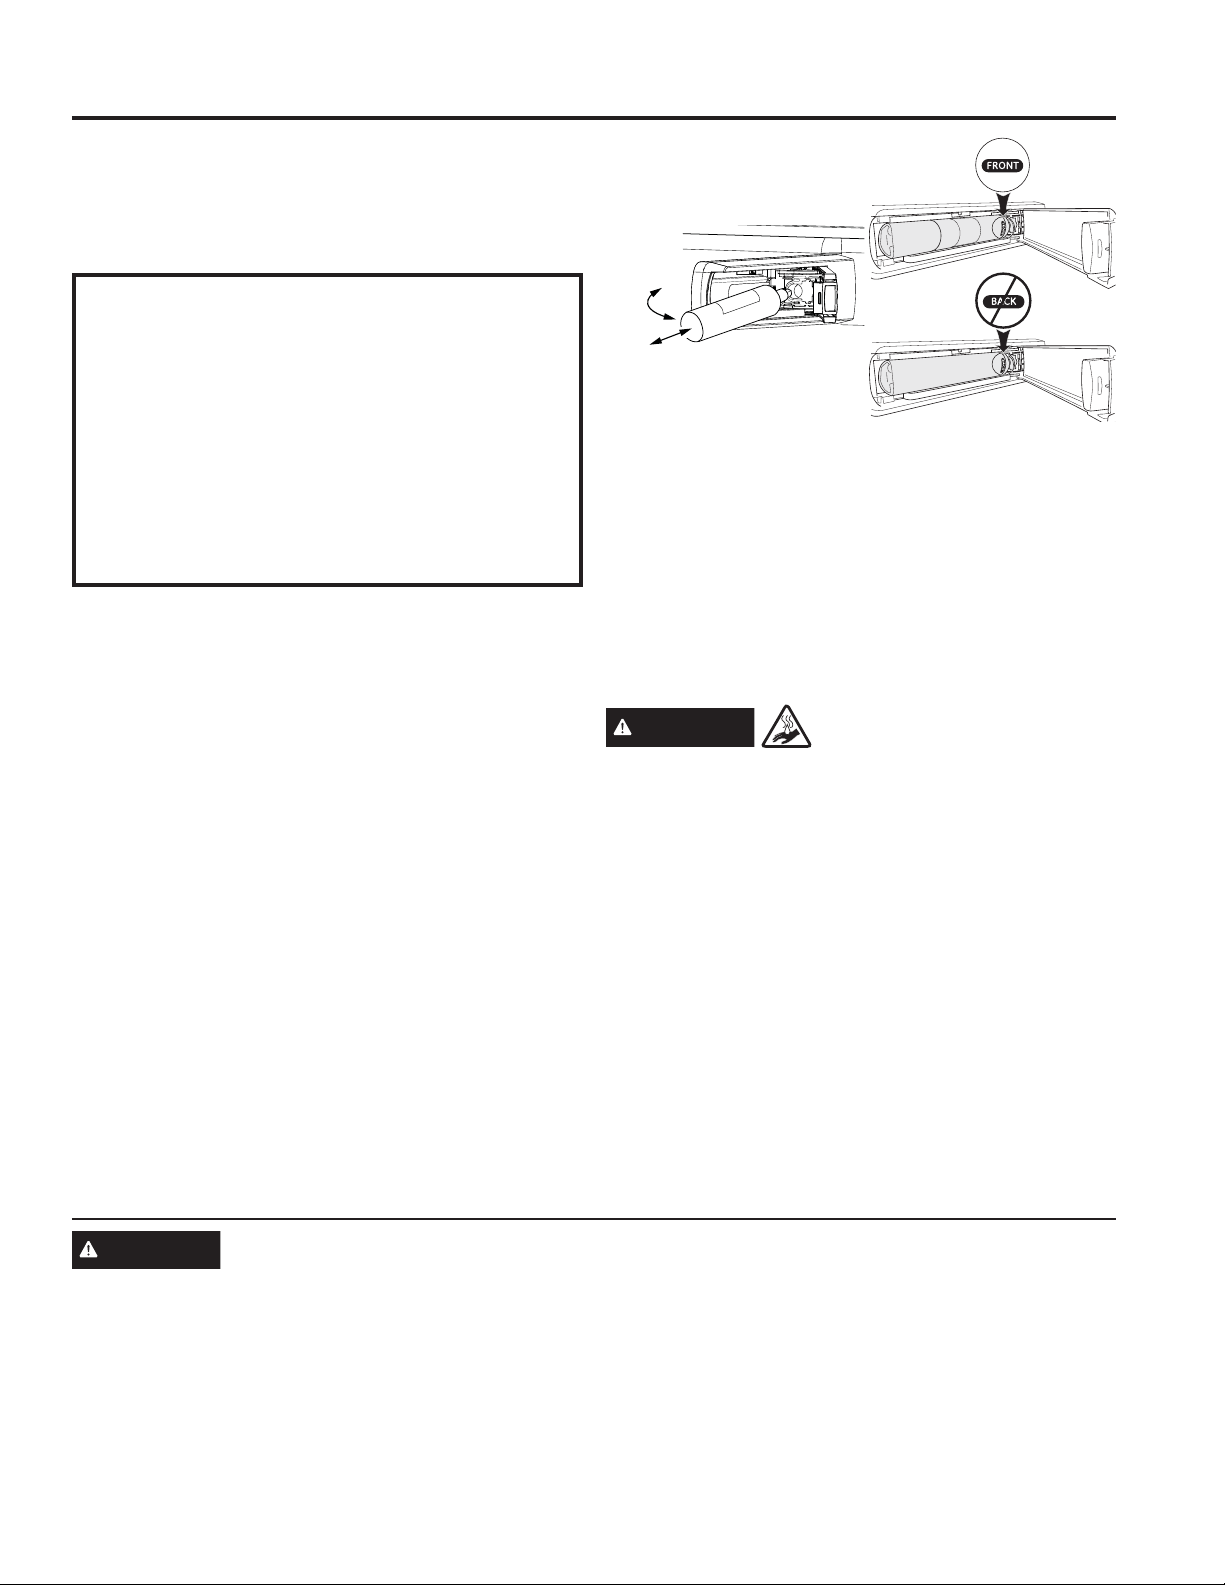
USING THE REFRIGERATOR::DWHU)LOWHU&DUWULGJH53:)(
*Select Models Only
Water Filter Cartridge
The water filter cartridge is located in the fresh food
interior on the left side wall, near the top.
7KLVSURGXFWXVHVUDGLRIUHTXHQF\LGHQWLILFDWLRQ5),'
WRGHWHFWOHDNVDQGPRQLWRUILOWHUVWDWXV7KH5),'
WHFKQRORJ\LVFHUWLILHGE\WKH)&&
When to replace the filter cartridge
The filter cartridge should be replaced every six months
RUHDUOLHULIJDOORQV/LWHUVRIZDWHUKDV
been dispensed or the flow of water to the dispenser or
icemaker decreases.
Touch Screen Models: A filter status message will
appear on the screen when the water filter needs to be
replaced. The filter status will automatically update when
the filter is replaced.
Non-touch Screen Models: A filter indicator light will
illuminate on the screen when the water filter needs to
be replaced.
Removing the filter cartridge
To replace the filter, first remove the old cartridge by
opening the filter door and pulling on the bottom of the
cartridge to allow it to swing outward. When the cartridge
can no longer swing, gently pull to unseat it from the
FDUWULGJHKROGHU'21277:,67&$575,'*($VPDOO
amount of water may drip out.
Installing the Filter Cartridge
1. Align top of filter cartridge with cartridge holder with
WKHZRUG³FRONT” facing outward then push the
cartridge toward the rear of the unit until it is fully
VHDWHG'21277:,677+(),/7(5&$575,'*(
2. While continuing to ensure cartridge is fully seated in
the holder, gently swing the filter inward until it is in
SRVLWLRQ,IILOWHUZLOOQRWVZLQJHDVLO\FKHFNWRHQVXUH
filter is properly aligned and fully seated within the
cartridge holder. Close the filter door.
5XQWZRJDOORQV/LWHUVRIZDWHUWKURXJKWKHFROG
ZDWHUGLVSHQVHUDERXWPLQXWHVWRUHPRYHDLUIURP
the system. A newly installed filter cartridge will
cause water to spurt from the dispenser.8VHD
large pitcher or sports bottle to catch the water spray.
'2127XVHKDQGVIUHHDXWRILOOVRPHPRGHOVXQWLO
all air is removed from the system.
5HVHW)LOWHU6WDWXVPHVVDJHQRQWRXFKVFUHHQ
PRGHOV
WARNING SCALDING HAZARD.*
8VHRIWKHKRWZDWHUGLVSHQVHUSULRUWRSXUJLQJDLUIURP
the system may result in spurting of hot water and lead
WRKRWZDWHUVFDOGLQJ)ROORZWKHLQVWUXFWLRQVDERYHWR
purge all air from the system through the cold water
dispenser prior to using the hot water dispenser.
NOTE:,WLVQRUPDOIRUZDWHUWRDSSHDUGLVFRORUHGGXULQJ
the initial system flush. Water color will return to normal
after first few minutes of dispensing.
Filter Bypass Plug
To reduce the risk of property damage due to water
leakage, you MUST use the filter bypass plug when
a replacement filter cartridge is not available. Some
models do not come equipped with the filter bypass plug.
7RREWDLQDIUHHE\SDVVSOXJFDOO*(&$5(6,Q
Canada, call 800.561.3344. The dispenser and icemaker
will not operate without either the filter or bypass plug
installed. The bypass plug is installed in the same way
as a filter cartridge.
FCCID: ZKJ-EBX1532P001 ICID:
10229A-EBX1532P001
“This device complies with part 15 of the FCC Rules.
Operation is subject to the following two conditions: (1)
This device may not cause harmful interference, and
(2) this device must accept any interference received,
including interference that may cause undesired
operation.”
“This device complies with Industry Canada licence-
exempt RSS standard(s). Operation is subject to the
following two conditions: (1) this device may not cause
interference, and (2) this device must accept any
interference, including interference that may cause
undesired operation of the device.”
WARNING To reduce the risk associated with choking, do not allow children under 3 years of age to
have access to small parts during the installation of this product. The disposable filter cartridge should be
replaced every 6 months at the rated capacity, or sooner if a noticeable reduction in flow rate occurs.
)RUWKHPD[LPXPEHQHILWRI\RXUILOWUDWLRQV\VWHP*($SSOLDQFHVUHFRPPHQGVWKHXVHRI*($SSOLDQFHVEUDQGHG
ILOWHUVRQO\8VLQJ*($SSOLDQFHVEUDQGHGILOWHUVLQ*($SSOLDQFHVDQG+RWSRLQW® refrigerators provides optimal
SHUIRUPDQFHDQGUHOLDELOLW\*($SSOLDQFHVILOWHUVPHHWULJRURXVLQGXVWU\16)VWDQGDUGVIRUVDIHW\DQGTXDOLW\WKDW
are important for products that are filtering your water. GE Appliances has not qualified non-GE Appliances-branded
filters for use in GE Appliances and Hotpoint refrigerators and there is no assurance that non-GE Appliances-
branded filters meet GE Appliances standards for quality, performance and reliability.
If you have questions, or to order additional filter cartridges, visit our website at www.gewaterfilters.com or
call GE Appliances Parts and Accessories, 877.959.8688.
Customers in Canada should consult the yellow pages for the nearest Camco Service Center.
Swing
Push \ Pull
Water Filter Cartridge - RPWFE
18 49-60792-2
*Select Models Only
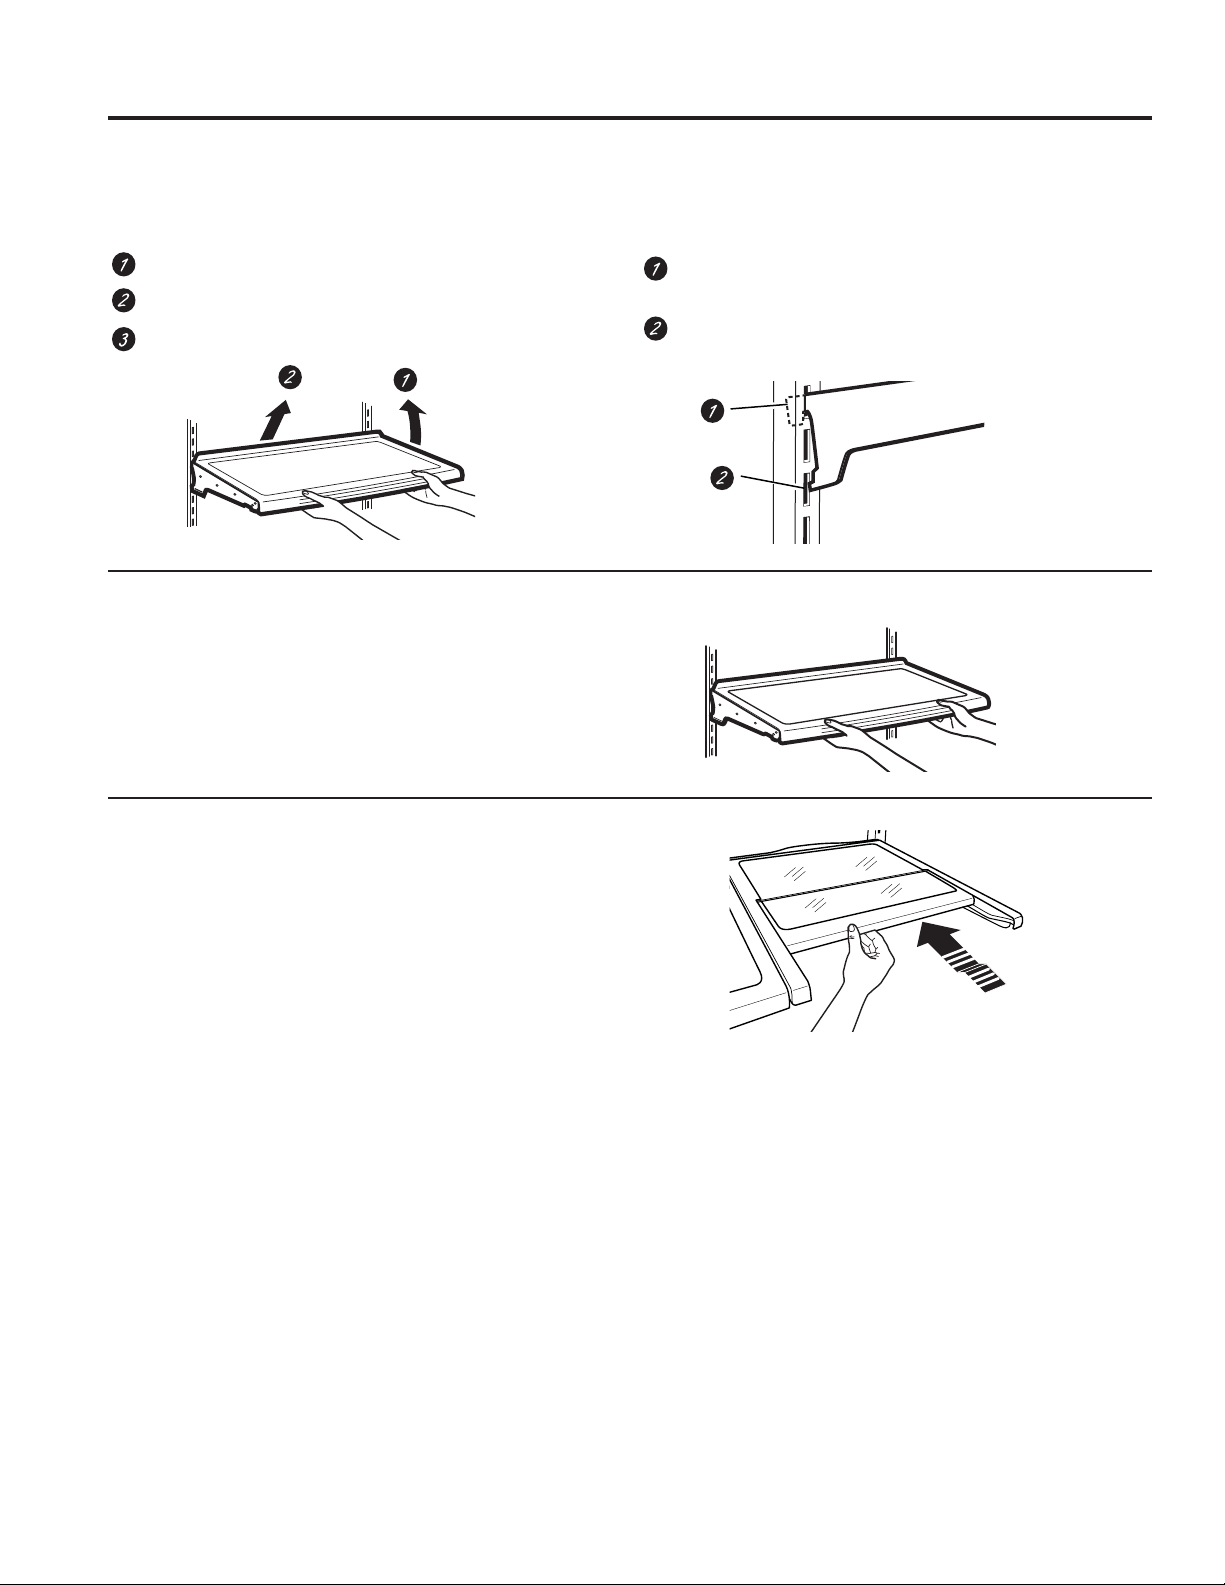
Fresh Food Storage Options
Rearranging the Shelves
Shelves in the refrigerator compartment are adjustable.
To remove:
Remove all items from the shelf.
Tilt the shelf up at the front.
Lift the shelf up at the back and bring the shelf out.
To replace:
While tilting the shelf up, insert the top hook at the
back of the shelf in a slot on the track.
Lower the front of the shelf until the bottom of the
shelf locks into place.
Spillproof Shelves
Spillproof shelves have special edges to help prevent
spills from dripping to lower shelves.
Quick Space Shelf *
This shelf splits in half and slides under itself for storage of
tall items on the shelf below.
This shelf can be removed and replaced or relocated (just
OLNHVSLOOSURRIVKHOYHV
NOTE: The back half of the Quick Space Shelf is not
adjustable.
USING THE REFRIGERATOR:)UHVK)RRG6WRUDJH2SWLRQV
49-60792-2 19
USING THE REFRIGERATOR:)UHVK)RRG6WRUDJH2SWLRQV
*Select Models Only
Fresh Food Storage Options
Left Door Bins
DISPENSER MODELS - FIXED BIN*
To remove: Lift the bin straight up, then pull out.
The ice maker door bins are not interchangeable, note the
location upon removal and replace the bin in its proper
location.
NON-DISPENSER MODELS - ADJUSTABLE BINS*
Adjustable bins can easily moved up or down the inside
of the door to give better flexibility for storage.
To remove: Lift bin straight up, then pull out.
Right Door Bins
FIXED BINS can easily be carried from refrigerator to
work area.
To remove: Lift bin straight up, then pull out.
ROTATING BIN:
To remove: Rotate bin outward then lift straight up. To
remove Place hand under metal base and lift up.
To remove Metal Base: Place hand under metal base
and lift up.
)L[HG%LQV
)L[HG%LQ Adjustable Bins
Remove
Rotating Bin
5HPRYH)L[HG%LQV Remove
Metal Base
20 49-60792-2
C
Fruits Vegetables
F
C
MEATDELI PRODUCECHEESE CITRUS
SELECT
ClimateZone
Fruits Vegetables Fruits Vege
D
*Select Models Only
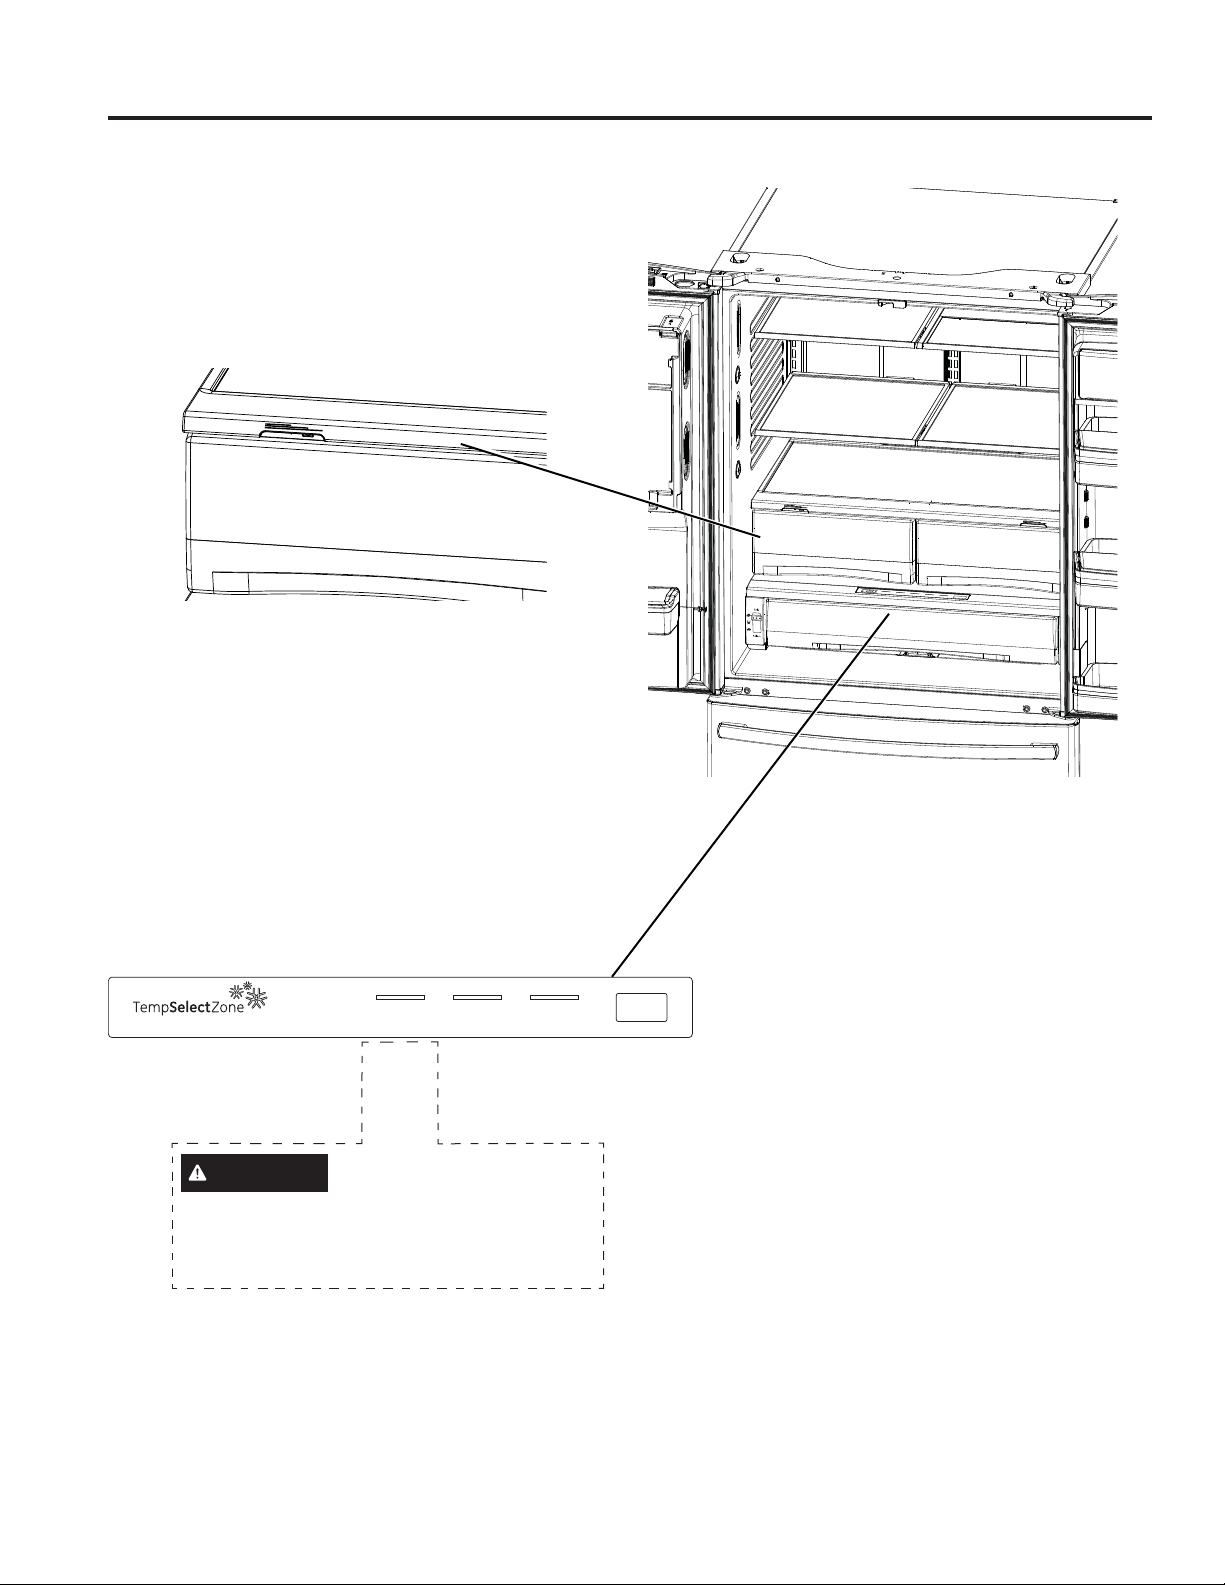
Climate Zone & Temperature Controlled Drawer
32° 34° 38°
Note: Temperatures indicate the appropriate tem-
peratures for the food and actual temperatures
may vary based on normal operation and other
factors such as door openings and fresh food set
point.
CAUTION Laceration Hazard.
'RQRWVWRUHJODVVERWWOHVDWWKLVVHWWLQJ,I
WKH\DUHIUR]HQWKH\FDQEUHDNDQGUHVXOWLQ
personal injury.
Meat Beverage Deli Select
ClimateZone
.HHSIUXLWVDQGYHJHWDEOHVRUJDQL]HGLQVHSDUDWH
compartments for easy access.
Excess water that may accumulate in the bottom of the
drawers or under the drawers should be wiped dry.
Temperature Controlled Drawer*
7KH7HPSHUDWXUH&RQWUROOHG'UDZHULVDIXOOZLGWK
drawer with adjustable temperature control. This drawer
can be used for large miscellaneous items.
To change setting, press select button.
USING THE REFRIGERATOR: &OLPDWH=RQH7HPSHUDWXUH&RQWUROOHG'UDZHU

49-60792-2 21
USING THE REFRIGERATOR: &OLPDWH=RQH7HPSHUDWXUH&RQWUROOHG'UDZHU
'LYLGHU
*Select Models Only
Climate Zone & Temperature Controlled Drawer
How to Remove and Replace Drawer
To remove:
Pull the drawer out to the stop position.
Lift the front of the drawer up and out.
To replace:
Pull left and right slides until fully extended.
Place drawer back in first and rotate drawer front down
to seat on slide.
Push the drawer in to closed position.
How to Remove and Replace Drawer
Divider*
To remove:
Pull the drawer out to the stop position.
Raise the front side of the divider to unhook it from
the rear wall of the drawer.
To replace:
Hook the back of the divider over the rear wall of the
drawer.
Push the divider down.

22 49-60792-2
Freezer Basket and Drawer
Basket.
'UDZHU
,FH%XFNHW$YDLODEOHRQ1RQ'LVSHQVHPRGHOV
RQO\$YDLODEOHDVD,0.LWRQVRPHPRGHOV
Non-Adjustable Bin in the Freezer*
To remove:
Push in plastic tab on either left or right side
To replace:
Slide bin into location until it locks into place.
Basket Removal
To remove, standard depth models only:
2SHQIUHH]HUGRRUWRWKHVWRSSRVLWLRQ
5HPRYHIUHH]HUGRRUELQE\SXVKLQJSODVWLFWDERQ
either left or right side to release bin hinge pin.
5HPRYHIUHH]HUEDVNHWE\OLIWLQJXSWKHUHDURIWKH
basket and moving basket rearward until the front of
the basket can be rotated upward and out.
4. Lift it out to remove.
To remove, counter depth models only:
1. Open fresh food doors.
2SHQIUHH]HUGRRUWRWKHVWRSSRVLWLRQ
5HPRYHIUHH]HUEDVNHWE\OLIWLQJXSWKHUHDURIWKH
basket and rotate it upward.
4. Lift it out to remove.
To replace:
Reverse step 1 through 4 to replace.
*Select Models Only
Baskets, Drawers, and Bins
Plastic Tabs
USING THE FREEZER:%DVNHWV'UDZHUVDQG%LQV
49-60792-2 23
USING THE FREEZER:$XWRPDWLF,FH0DNHU
'LVSOD\7\SH
6HH3DJH Model # +RZWRWXUQWKHLFHPDNHURQRII
Control Style A 3)(33<(3 8VHWKH³,&(´EXWWRQRQWKHFRQWURO6HHControls, pages 10 & 11.
Control Style B, C 3)+3)(.3)'
')(*)(*)'
*)(3<'3<(.
'<(.*<(
8VHWKH³,&(0$.(5´EXWWRQRQWKHFRQWURO6HHControls,
pages 10 & 11.
&RQWURO6W\OH' GNE29, PWE23 8VHWKH³,&(0$.(5´EXWWRQRQWKHFRQWURO6HHControls,
pages 10 & 11.
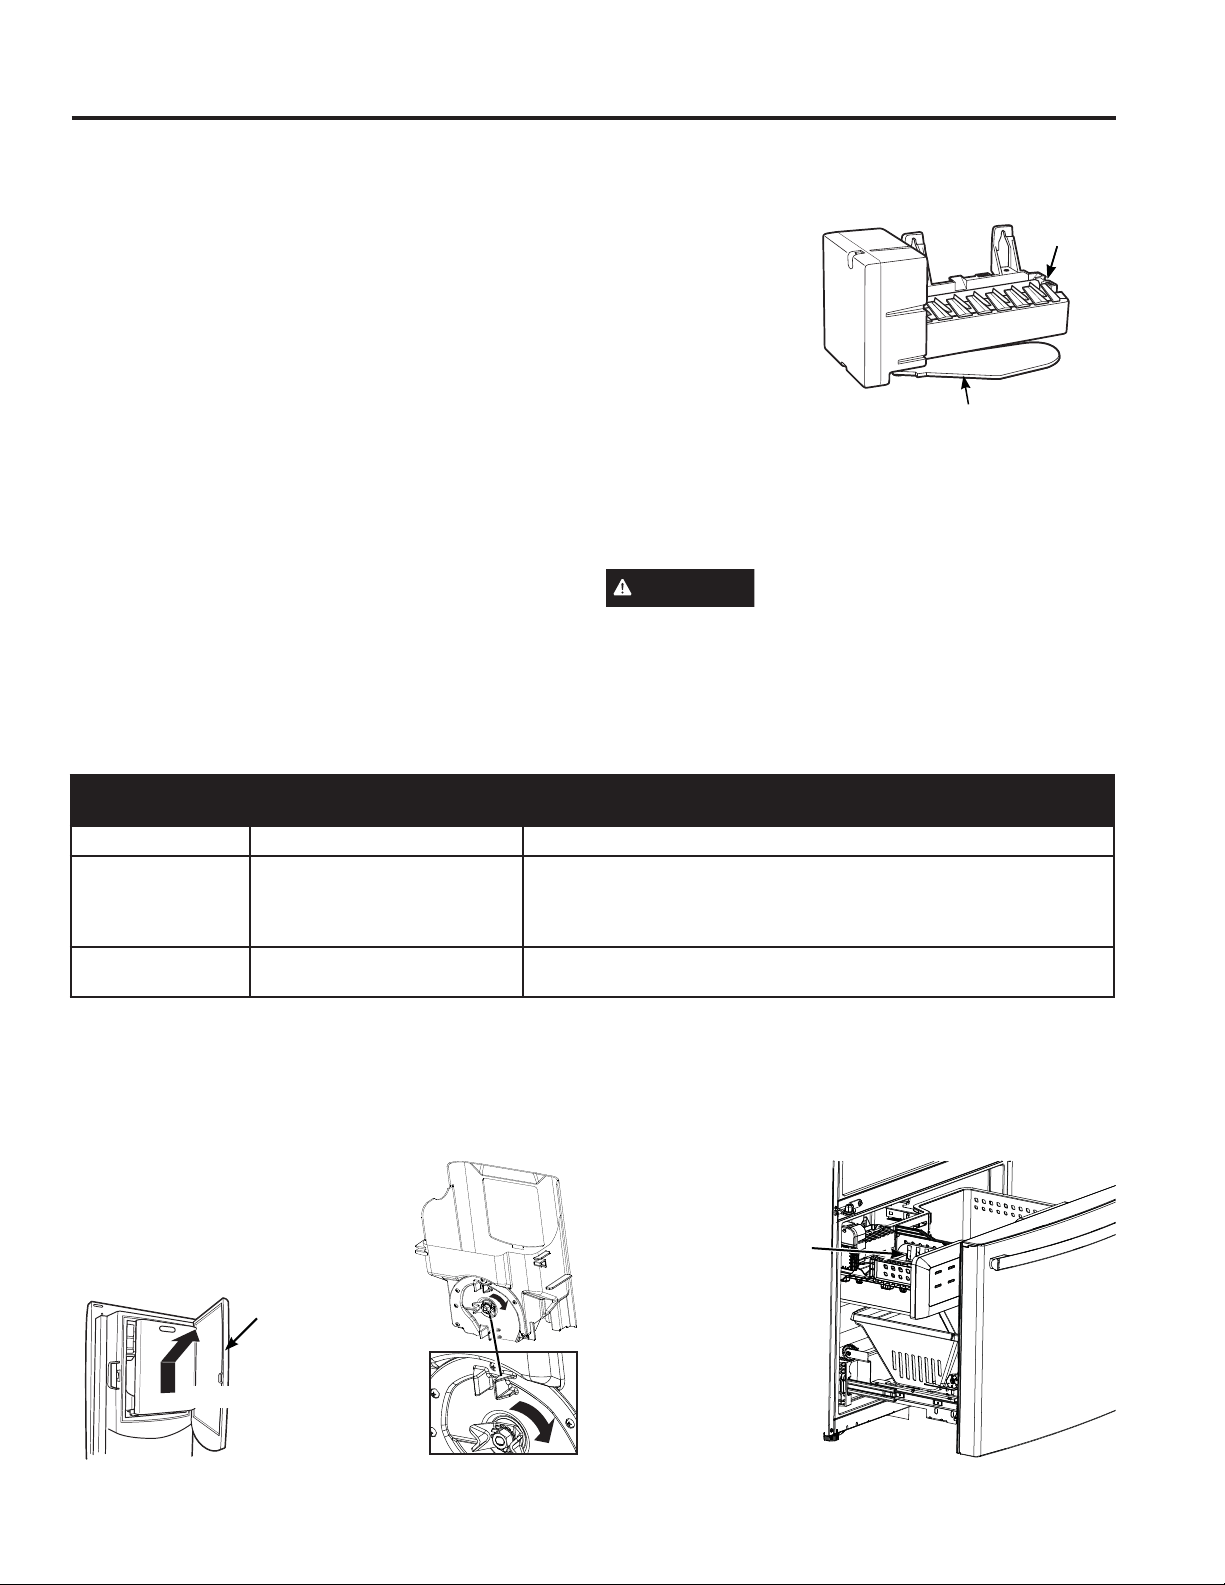
How to Turn the Ice Maker On/Off
*Select Models Only
Lift and pull
,FH%R[
'RRU
Ice Bucket and Dispenser*
• Open the ice box door on inside of the left door.
• Pull up and out on the ice bucket in the left hand door
to remove it from the compartment .
• To replace the ice bucket, set it on
the guide brackets and push until
the ice bucket seats properly.
,IEXFNHWFDQQRWEHUHSODFHG
URWDWHWKHLFHEXFNHWIRUNWXUQ
clockwise.
Ice Maker (Available on Non Dispense models,
also available as IM Kit for some models)
7KHUHLVDGGLWLRQDOLFHVWRUDJHLQWKHIUHH]HUFRPSDUWPHQW
drawer.
2SHQWKHIUHH]HUGUDZHU
• The ice bucket
is located on
the left side
of the upper
basket.
• Pull the upper
basket forward
to remove the
ice bucket.
)UHH]HU
,FH
Bucket
Automatic Ice Maker
A newly installed refrigerator may take 12 to 24 hours to begin making ice.
Automatic Ice maker*
The ice maker will produce seven cubes per cycle
approximately 100–130 cubes in a 24-hour period,
GHSHQGLQJRQIUHH]HUFRPSDUWPHQWWHPSHUDWXUHURRP
temperature, number of door openings and other use
conditions.
7KHLFHPDNHUZLOOILOOZLWKZDWHUZKHQLWFRROVWR)
&$QHZO\LQVWDOOHGUHIULJHUDWRUPD\WDNHWR
hours to begin making ice cubes.
,IWKHUHIULJHUDWRULVRSHUDWHGEHIRUHWKHZDWHUOLQH
connection is made to the unit or if the water supply to
an operating refrigerator is turned off, make sure that
the ice maker is turned off. Once the water has been
connected to the refrigerator, the ice maker may be
turned on. See the table below for details.
<RXPD\KHDUDEX]]LQJVRXQGHDFKWLPHWKHLFHPDNHU
fills with water.
Throw away the first few batches of ice to allow the
water line to clear.
Be sure nothing interferes with the sweep of the feeler
arm.
When the bin fills to
the level of the feeler
arm, the ice maker
will stop producing
LFH,WLVQRUPDOIRU
several cubes to be
joined together.
,ILFHLVQRWXVHG
frequently, old ice
cubes will become
cloudy, taste stale and shrink.
NOTE: ,QKRPHVZLWKORZHUWKDQDYHUDJHZDWHU
pressure, you may hear the ice maker cycle multiple
times when making one batch of ice.
CAUTION 7RPLQLPL]HWKHULVNRISHUVRQDOLQMXU\
avoid contact with the moving parts of the ejector
mechanism, or with the heating element that releases
WKHFXEHV'RQRWSODFHILQJHUVRUKDQGVRQWKH
automatic ice making mechanism while the refrigerator is
plugged in.
)HHOHU$UP
,FH
maker
24 49-60792-2
Care and Cleaning
Cleaning the Outside
The stainless steel panels, door handles and trim.
The stainless steel doors and door handles (on some
PRGHOVFDQEHFOHDQHGZLWKDFRPPHUFLDOO\DYDLODEOH
stainless steel cleaner. Cleaners with oxalic acid such as
%DU.HHSHUV)ULHQG6RIW&OHDQVHUZLOOUHPRYHVXUIDFH
UXVWWDUQLVKDQGVPDOOEOHPLVKHV8VHRQO\DOLTXLG
cleanser free of grit and rub in the direction of the brush
OLQHVZLWKDGDPSVRIWVSRQJH'RQRWXVHDSSOLDQFH
wax or polish on the stainless steel.
Silver-accented plastic parts.
Wash parts with soap or other mild detergents. Wipe
clean with a sponge, damp cloth or paper towel.
'RQRWXVHVFRXULQJSDGVSRZGHUHGFOHDQHUVEOHDFKRU
cleaners containing bleach because these products can
scratch and weaken the paint finish.
Should spill tray need cleaning use lime remover.
Cleaning the Inside
To help prevent odors, leave an open box of baking
VRGDLQWKHUHIULJHUDWRUDQGIUHH]HUFRPSDUWPHQWV
Unplug the refrigerator before cleaning.
,IWKLVLVQRWSUDFWLFDOZULQJH[FHVVPRLVWXUHRXWRI
sponge or cloth when cleaning around switches, lights or
controls.
8VHDQDSSOLDQFHZD[SROLVKRQWKHLQVLGHVXUIDFH
between the doors.
8VHZDUPZDWHUDQGEDNLQJVRGDVROXWLRQ²DERXWD
WDEOHVSRRQPORIEDNLQJVRGDWRDTXDUWOLWHURI
ZDWHU7KLVERWKFOHDQVDQGQHXWUDOL]HVRGRUV5LQVHDQG
wipe dry.
To clean the inside metal panel*, open the outer door
XVLQJWKH'RRULQ'RRU/DWFK&OHDQWKHSDQHOZLWKD
PLOGGHWHUJHQWDQGWKHQZLSHGU\ZLWKDVRIWFORWK'RQRW
use any stainless steel cleaner on the panel as it may
damage the surrounding plastic.
CAUTION 'RQRWFOHDQJODVVVKHOYHVRU
coverswith warm water when they are cold. Glass
shelves and covers may break if exposed to sudden
temperature changes or impact such as bumping or
dropping. Tempered glass is designed to shatter into
many small pieces if it breaks.
'RQRWZDVKDQ\SODVWLFUHIULJHUDWRUSDUWVLQWKH
dishwasher.
Behind the Refrigerator
Be careful when moving the refrigerator away from
the wall. All types of floor coverings can be damaged,
particularly cushioned coverings and those with
embossed surfaces.
Raise the leveling legs located at the bottom front of the
refrigerator.
Pull the refrigerator straight out and return it to position
by pushing it straight in. Moving the refrigerator in a side
direction may result in damage to the floor covering or
refrigerator.
Lower the leveling legs until they touch the floor.
WARNING
ELECTRICAL SHOCK HAZARD
When pushing the refrigerator back, make sure you
don’t roll over the power cord or water supply line.
Preparing for Vacation
)RUORQJYDFDWLRQVRUDEVHQFHVUHPRYHIRRGDQG
unplug the refrigerator. Clean the interior with a baking
VRGDVROXWLRQRIRQHWDEOHVSRRQPORIEDNLQJVRGD
WRRQHTXDUWOLWHURIZDWHU/HDYHWKHGRRUVRSHQ
,IWKHWHPSHUDWXUHFDQGURSEHORZIUHH]LQJKDYHD
qualified service technician drain the water supply
system to prevent serious property damage due to
flooding.
1. Turn refrigerator off or unplug the refrigerator.
2. Empty ice bucket
3. Turn water supply off
If you cut the water supply off, turn off the ice
maker.
8SRQUHWXUQLQJIURPYDFDWLRQ
1. Replace the water filter.
5XQJDOORQVOLWHUVRIZDWHUWKURXJKWKHFROG
ZDWHUGLVSHQVHUDERXWPLQXWHVWRIOXVKWKHV\VWHP
CARE AND CLEANING
*Select Models Only

49-60792-2 25
CARE AND CLEANING / REPLACING THE LIGHTS
*Select Models Only
Preparing to Move
Secure all loose items such as shelves and drawers by
taping them securely in place to prevent damage.
When using a hand truck to move the refrigerator, do not
rest the front or back of the refrigerator against the hand
truck. This could damage the refrigerator.
Handle only from the sides of the refrigerator.
Be sure the refrigerator stays in an upright position
during moving.
Care and Cleaning
Replacing the Lights
Refrigerator Lights (LEDs)
Appearance may vary by model.
7KHUHLV/('OLJKWLQJLQIUHVKIRRGFRPSDUWPHQWDQGRQ
WKHERWWRPRIWKHIUHVKIRRGGRRUVWROLJKWWKHIUHH]HU
compartment.*
$QDXWKRUL]HGWHFKQLFLDQZLOOQHHGWRUHSODFHWKH/('
light.
,IWKLVDVVHPEO\QHHGVWREHUHSODFHGFDOO*(
$SSOLDQFHV6HUYLFHDWLQWKH8QLWHG
States or 1.800.561.3344 in Canada.
/('/LJKWV
26 49-60792-2
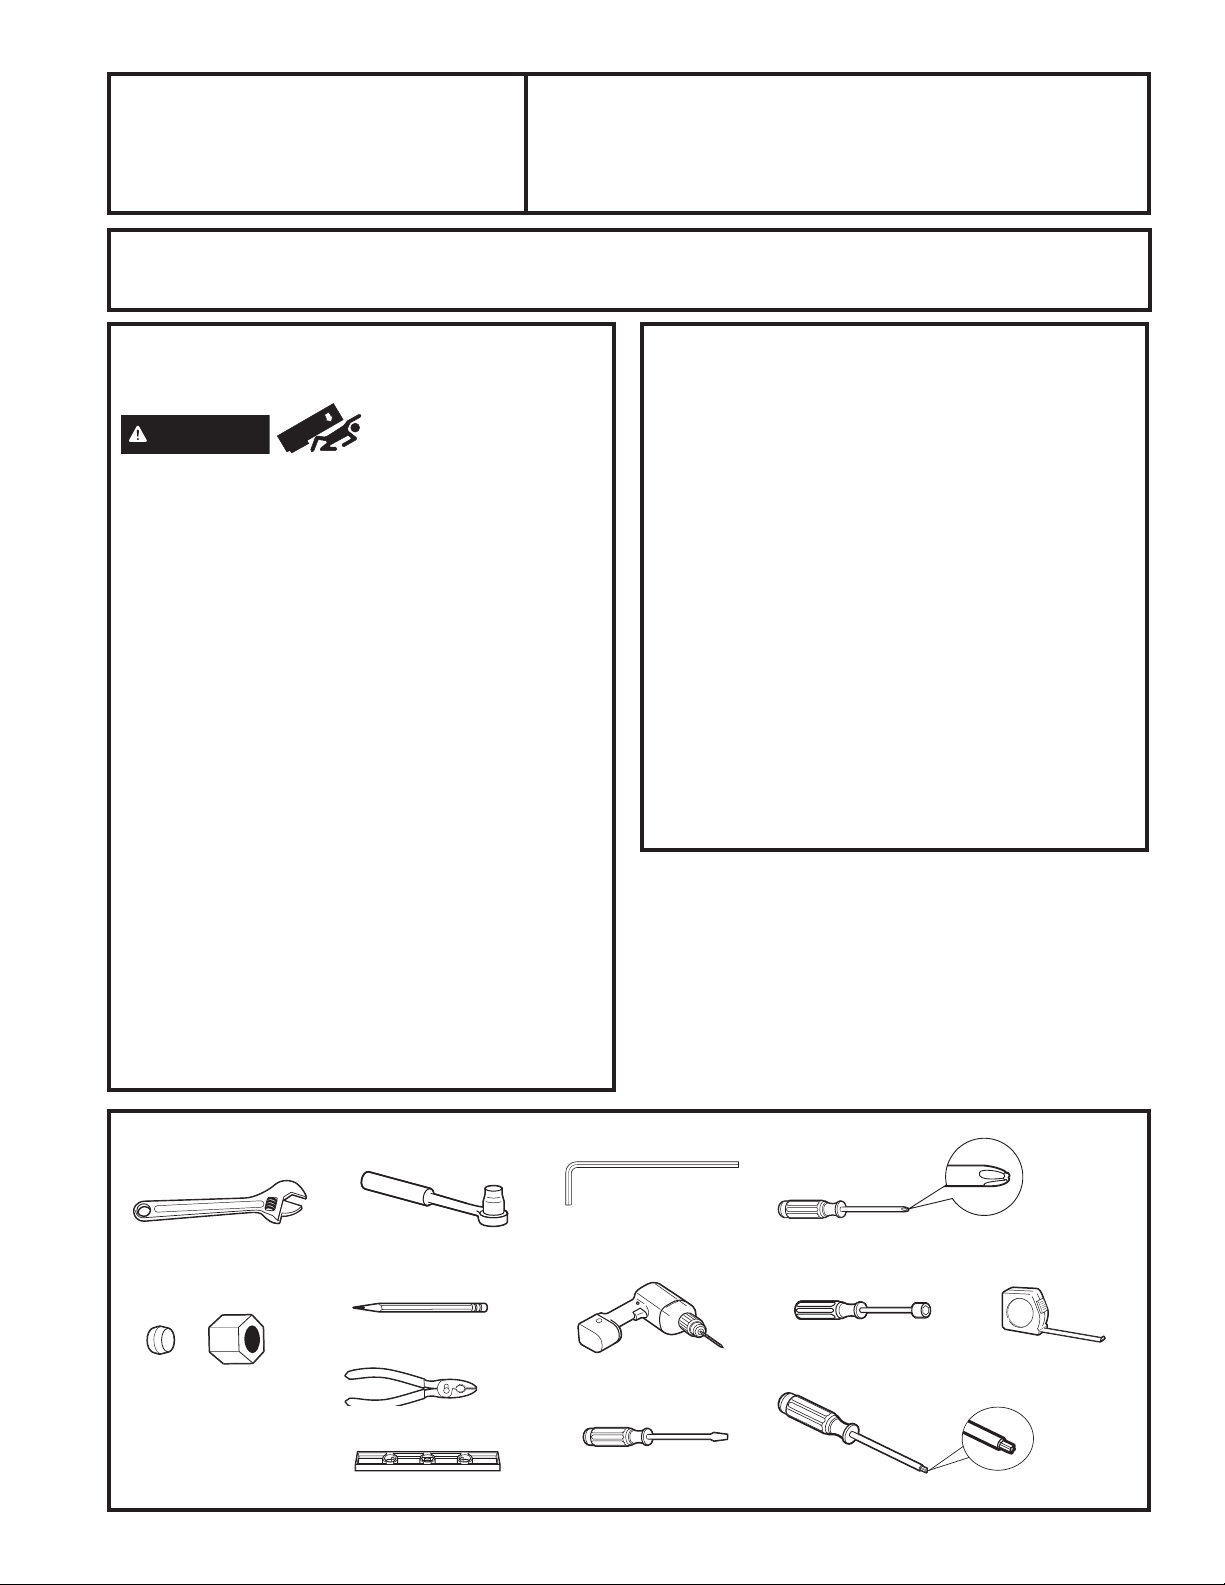
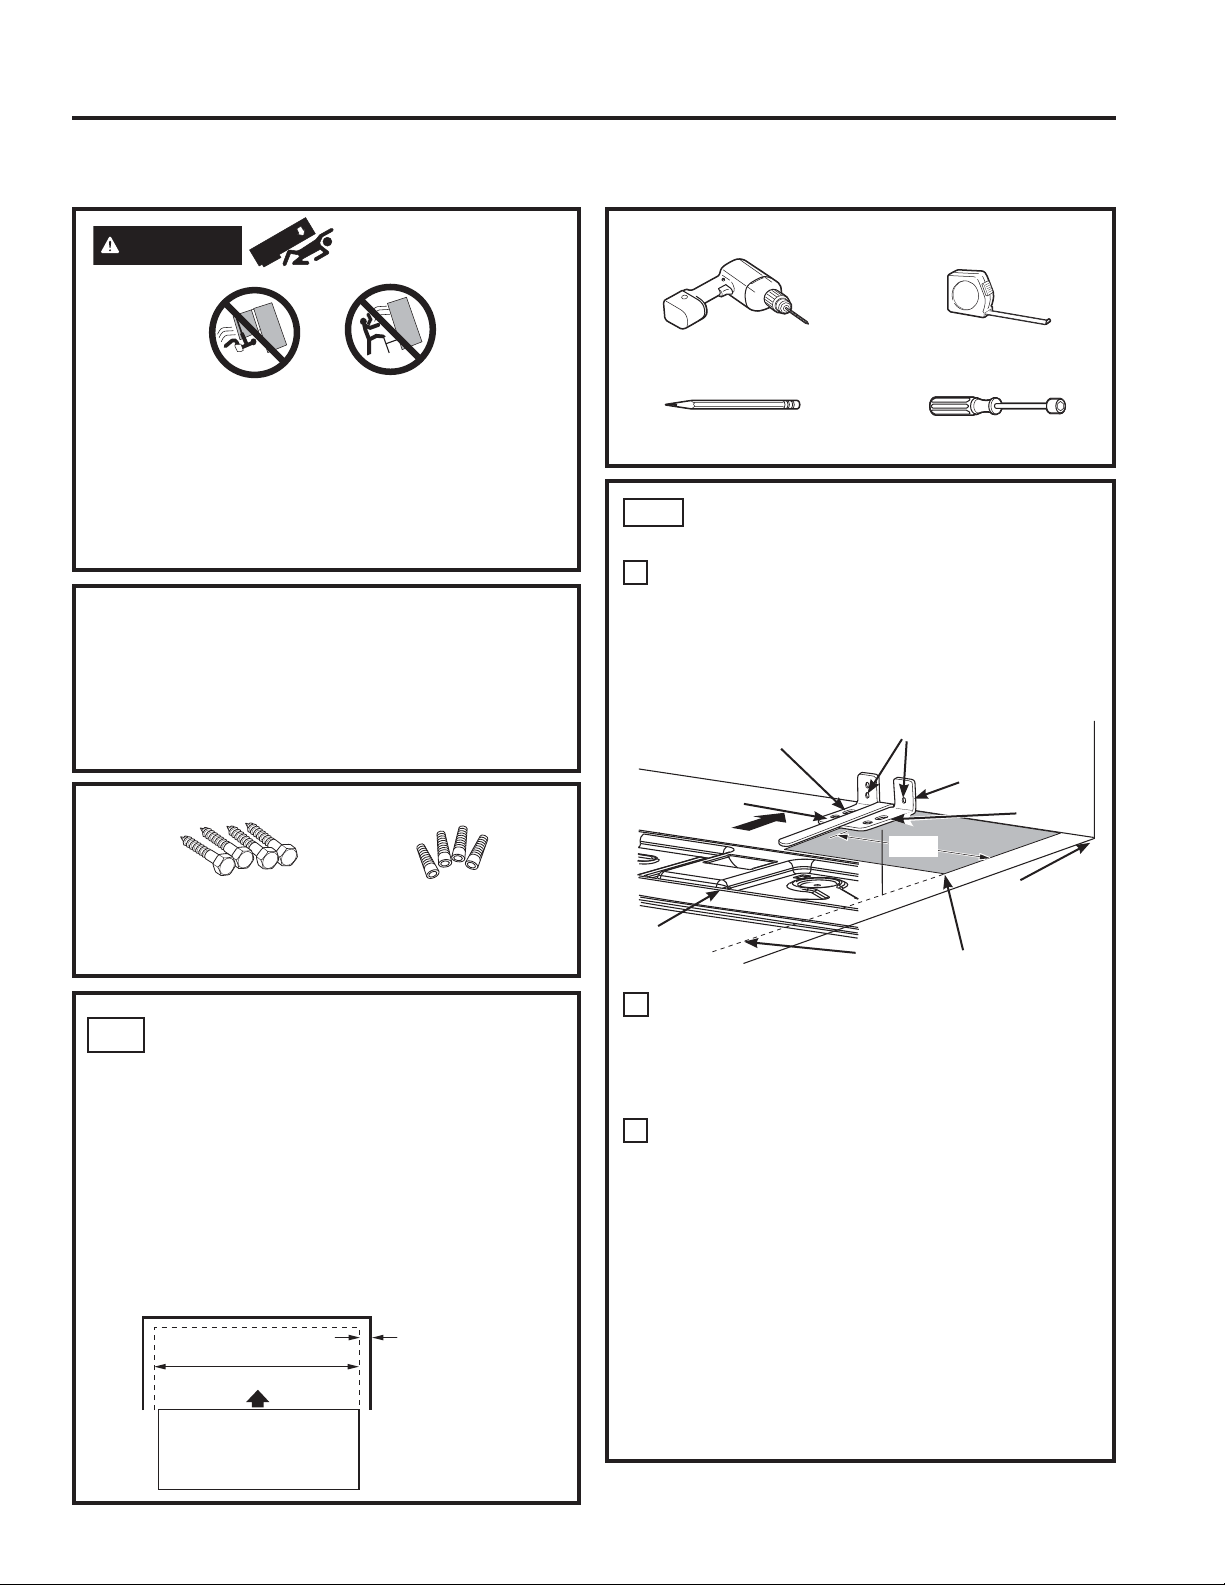
TOOLS YOU MAY NEED
BEFORE YOU BEGIN
Read these instructions completely and carefully.
WARNING Tip Over Hazard.
Built-in style models (model PYE, CYE, GYE, PWE,
&:(DQG=:(DUHWRSKHDY\HVSHFLDOO\ZLWKDQ\
doors open. These models must be secured with the
anti-tip floor bracket to prevent tipping forward, which
could result in death or serious injury. Read and
follow the entire installation instructions for installing
the anti-tip floor bracket packed with your refrigerator.
• IMPORTANT — Observe all governing codes
and ordinances. Save these instructions for local
inspector’s use.
• Note to Installer – Be sure to leave these
instructions with the Consumer.
• Note to Consumer –.HHSWKHVHLQVWUXFWLRQVIRU
future reference.
• Skill level – ,QVWDOODWLRQRIWKLVDSSOLDQFHUHTXLUHV
basic mechanical skills.
• Completion time –5HIULJHUDWRU,QVWDOODWLRQ
can vary
:DWHU/LQH,QVWDOODWLRQ
30 minutes
• Proper installation is the responsibility of the
installer.
• Product failure due to improper installation is not
covered under the Warranty.
PREPARATION
MOVING THE REFRIGERATOR INDOORS
,IWKHUHIULJHUDWRUZLOOQRWILWWKURXJKDGRRUZD\WKH
UHIULJHUDWRUGRRUDQGIUHH]HUGUDZHUFDQEHUHPRYHG
7RUHPRYHWKHUHIULJHUDWRUGRRUVHHWKH,QVWDOOLQJ
the Refrigerator section.
7RUHPRYHWKHIUHH]HUGUDZHUVHHWKH5HPRYLQJ
WKH)UHH]HU'UDZHUVHFWLRQ
WATER SUPPLY TO THE ICE MAKER AND
DISPENSER
,IWKHUHIULJHUDWRUKDVDQLFHPDNHULWZLOOKDYH
to be connected to a cold water line. A GE
Appliances water supply kit (containing tubing, shutoff
YDOYHILWWLQJVDQGLQVWUXFWLRQVLVDYDLODEOHDWH[WUD
cost from your dealer, by visiting our website at
GEAppliances.com (in Canada at
www.GEAppliances.caRUIURP3DUWVDQG
Accessories, 888.959.8688 (in Canada
Adjustable Wrench
´2XWHU'LDPHWHU
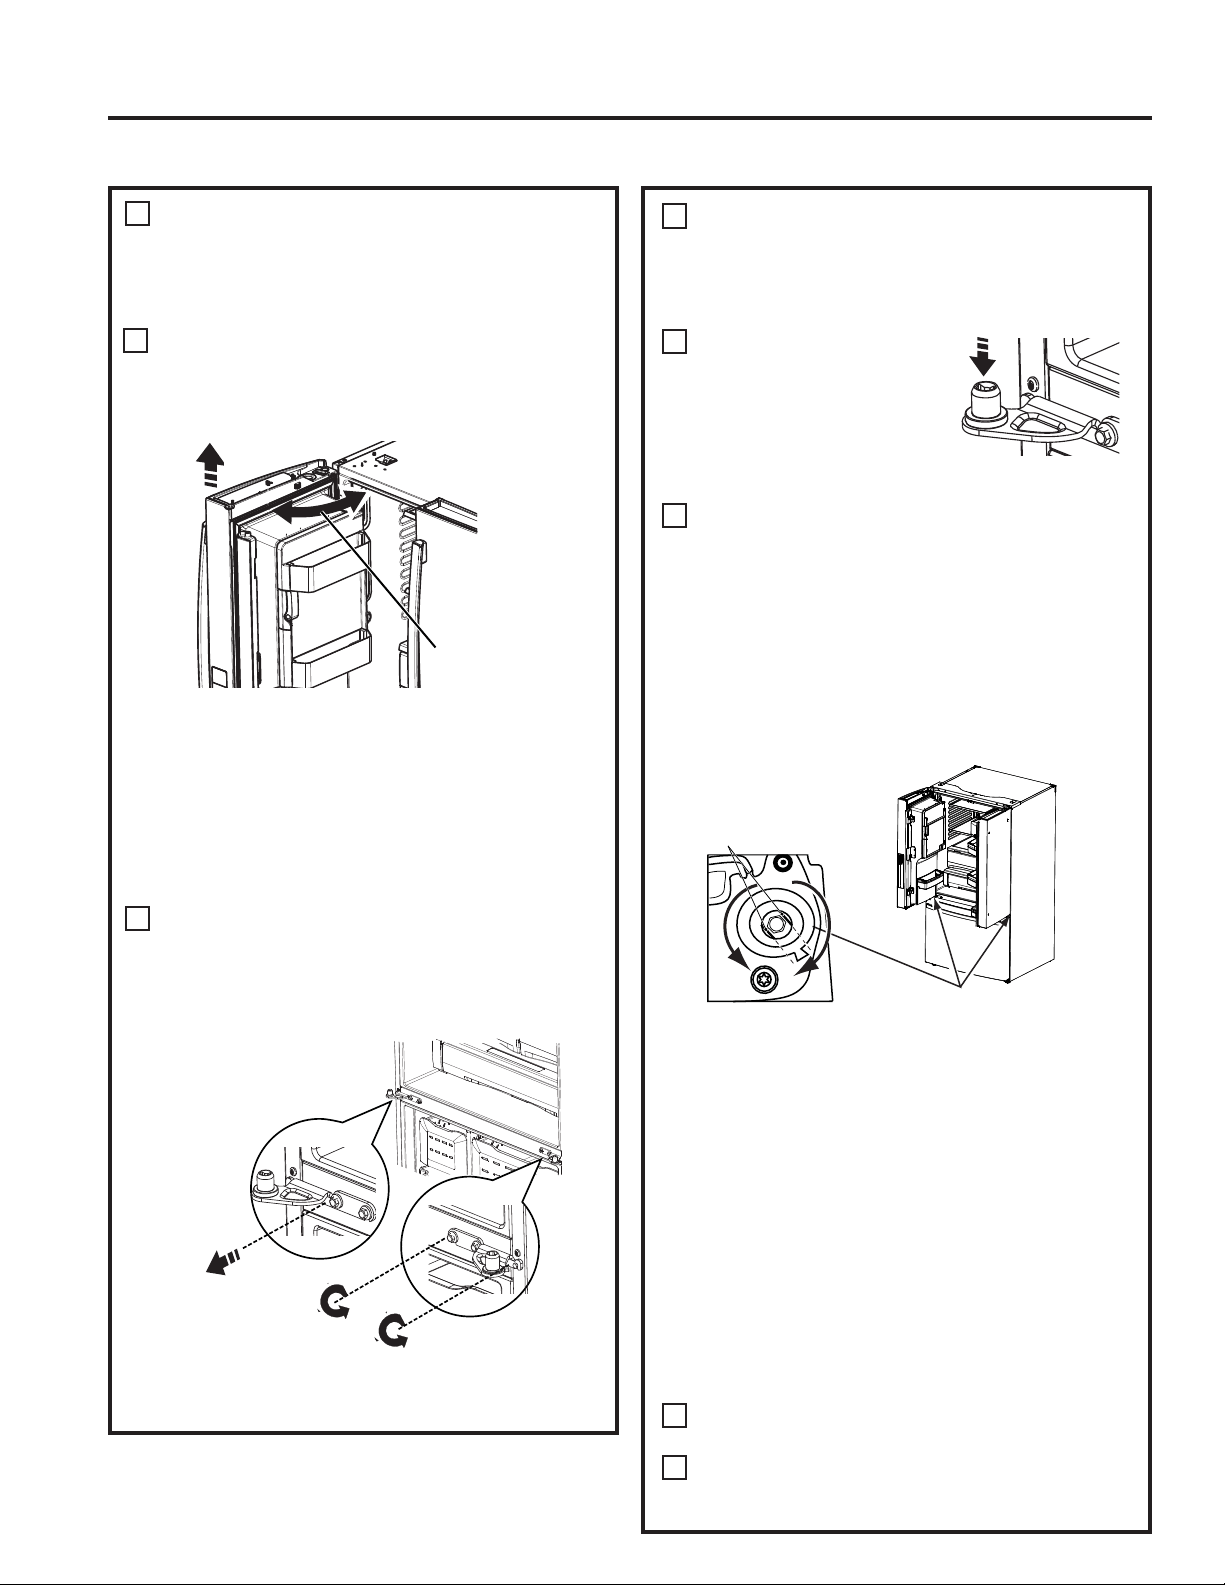
Compression Nut
DQG)HUUXOHVOHHYH
Phillips-Head Screwdriver
Ǫ´6RFNHW5DWFKHW'ULYHU ´´´& ´
Allen Wrenches
Pencil
´'ULOO%LWDQG
(OHFWULFRU+DQG'ULOO
Tape Measure
´1XW'ULYHU
Pliers
Level )ODW+HDG6FUHZGULYHU Torx T20, T25
Installation
Instructions Refrigerator
GE and GE Profile™ models
Questions? Call 800.GE.CARES (800.432.2737) or visit our Website at: GEAppliances.com
In Canada, call 1.800.561.3344 or visit our Website at: www.GEAppliances.ca
INSTALLATION INSTRUCTIONS
49-60792-2 27
INSTALLATION INSTRUCTIONS
MOVING THE REFRIGERATOR
8VLQJWKHFKDUWEHORZGHWHUPLQHLIWKHZLGWKRI\RXUSDVVDJHZD\FDQDFFRPPRGDWHWKHGHSWKRIWKH
refrigerator. Ensure you have clearance to prevent damage to the refrigerator before safely moving it to the final
location.
,ISDVVDJHZD\VDUHODUJHHQRXJKWRDFFRPPRGDWHWKHUHIULJHUDWRUZLWKRXWUHPRYLQJWKHKDQGOHVVNLSWR6WHS
Leave tape, film and all packaging on doors until the refrigerator is in the final location.
• NOTE: Use a padded hand truck or moving straps to move this refrigerator. Place the refrigerator on the
hand truck with a side against the truck. We strongly recommend that two people move and complete
this installation.
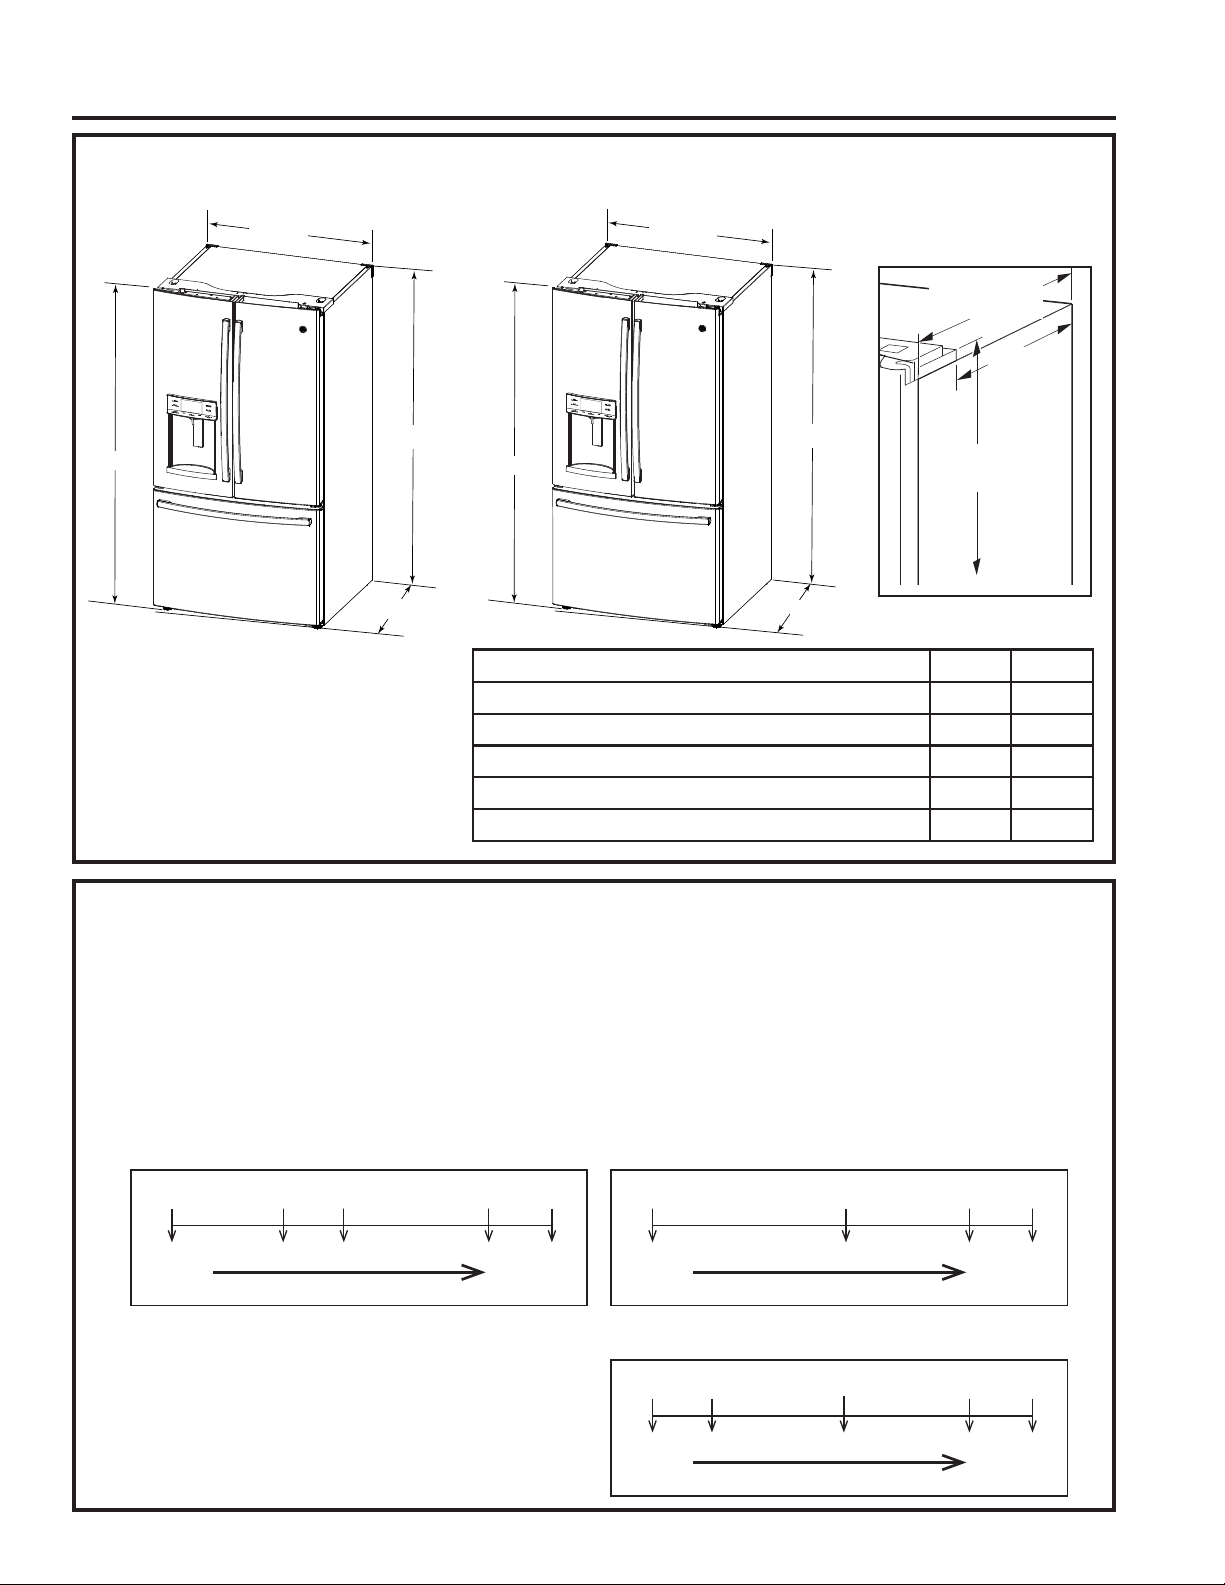
DIMENSIONS All measurements are given with leveling leg fully retracted.
SD CD
Overall Height to Top of Hinge Cover 69´ 69´
Height to Top of Cabinet
69´69´
Case Depth without Doors 29
´24
´
Overall Exterior Case Width
´ ´
Overall Exterior Depth Doors/Drawers with Handles 36
´31
´
6WDQGDUG'HSWK6'0RGHOV2QO\&RXQWHU'HSWK&'0RGHOV2QO\
&DVH'HSWKZR
'RRUV´6'
´&'
Height from floor
to hinge cover top
´
$GGLWLRQDO'LPHQVLRQV
´6'
´&'
´
´
´
´
´
´
´
´
Fully
Assembled
36.375” 34.375” 34” 30.5” 29.625”
Remove door parts in order until dimension is less than opening
Removing
Handles Removing
LH Door Case w/
Fz Slides Case only
(no hinges)
If your model number starts with PFE, PFH, PFD, GFD,
GFE, DFE (SD)
Fully
Assembled
36.275” 33.75” 30.5” 29.625”
Remove door parts in order until dimension is less than opening
Removing
Handles Case w/
Fz Slides Case only
(no hinges)
If your model number starts with GNE (SD)
Fully
Assembled
31.375” 29.375” 25.875” 24.625”
Remove door parts in order until dimension is less than opening
Removing
Handles Removing
LH Door Case w/
Fz Slides Case only
(no hinges)
28.875”
If your model number starts with DYE, GYE, PYE, PYD,
PWE (CD)
Installation Instructions
28 49-60792-2
Installation Instructions
INSTALLING THE REFRIGERATOR
REFRIGERATOR LOCATION
Ŷ'RQRWLQVWDOOWKHUHIULJHUDWRUZKHUHWKH
WHPSHUDWXUHZLOOJREHORZ)&EHFDXVH
it will not run often enough to maintain proper
temperatures.
Ŷ'RQRWLQVWDOOWKHUHIULJHUDWRUZKHUHWKH
WHPSHUDWXUHZLOOJRDERYH)&EHFDXVH
it will not perform properly.
Ŷ 'RQRWLQVWDOOWKHUHIULJHUDWRULQDORFDWLRQH[SRVHG
WRZDWHUUDLQHWFRUGLUHFWVXQOLJKW
Ŷ,QVWDOOLWRQDIORRUVWURQJHQRXJKWRVXSSRUWLWIXOO\
loaded.
CLEARANCES
Allow the following clearances for ease of
installation, proper air circulation and plumbing and
electrical connections.
6LGHV ´PP
7RS ´PP&DELQHW+LQJH&RYHU
%DFN ´PP
REMOVING THE REFRIGERATOR
DOORS
Ŷ IMPORTANT NOTE: This refrigerator is 3614´GHHS
(3114´IRU&'PRGHOV'RRUVDQGSDVVDJHZD\V
leading to the installation location must be at least
3614´ZLGHLQRUGHUWROHDYHWKHGRRUVDQGKDQGOHV
attached to the refrigerator while transporting it into
WKHLQVWDOODWLRQORFDWLRQ,ISDVVDJHZD\VDUHOHVV
than 3614´WKHUHIULJHUDWRUGRRUVDQGKDQGOHVFDQ
easily be scratched and damaged. The top cap and
doors can be removed to allow the refrigerator to be
VDIHO\PRYHGLQGRRUV,ISDVVDJHZD\VDUHOHVVWKDQ
3114´VWDUWZLWK6WHS
Ŷ,ILWLVQRWQHFHVVDU\WRUHPRYHGRRUVVNLSWR6WHS
11. Leave tape and all packaging on doors until the
refrigerator is in the final location.
Ŷ NOTE:8VHDSDGGHGKDQGWUXFNWRPRYHWKLV
refrigerator. Place the refrigerator on the hand
truck with a side against the truck. We strongly
recommend that TWO PEOPLE move and complete
this installation.
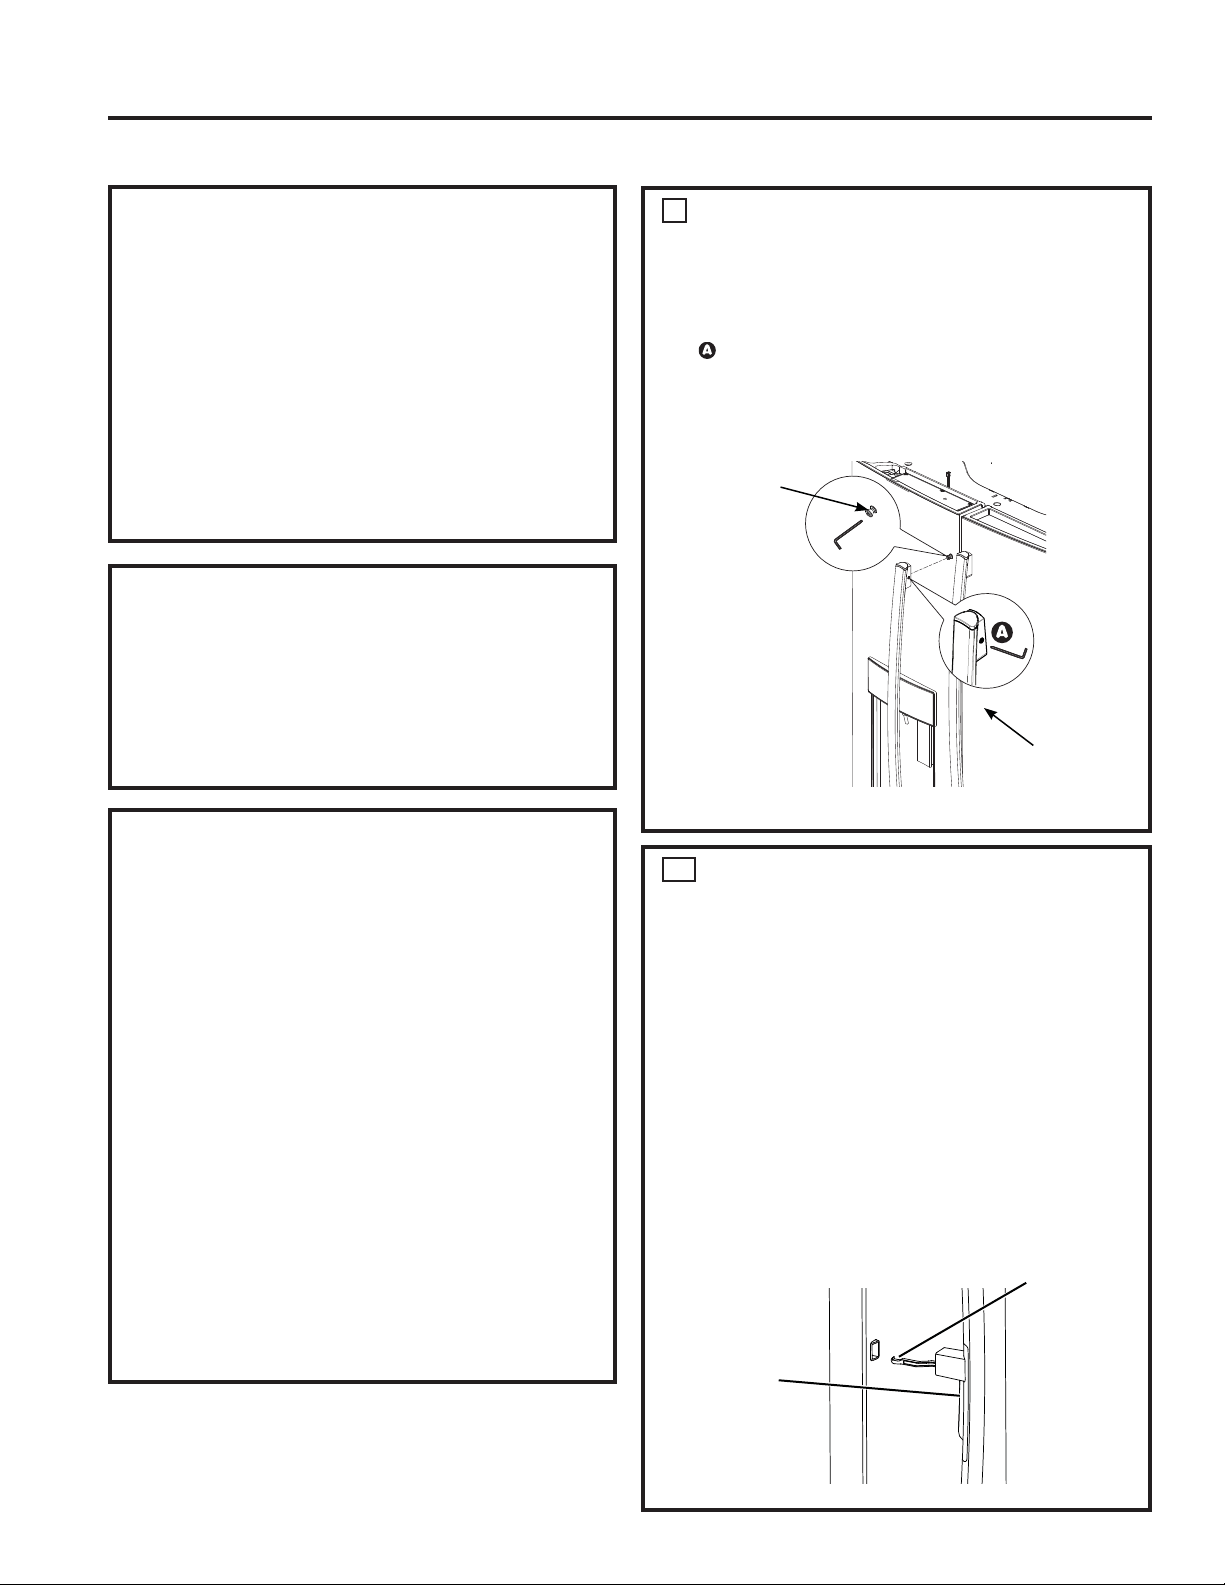
REMOVE THE FRESH FOOD
DOOR HANDLE
+DQGOH'HVLJQYDULHVEDVHGRQPRGHOVKRZHYHU
,QVWDOODWLRQLVVDPH
Stainless steel and plastic handles:
/RRVHQWKHVHWVFUHZVZLWKWKH´$OOHQ
wrench and remove the handle.
NOTE: ,IWKHKDQGOHPRXQWLQJIDVWHQHUVQHHG
WREHWLJKWHQHGRUUHPRYHGXVHD´ Allen
wrench.
FOR DOOR IN DOOR MODELS
ONLY
To Remove the Handle:
Ŷ2SHQWKHRXWHUGRRUE\SUHVVLQJWKH'RRULQ
'RRUODWFK
Ŷ Loosen the set screws as shown in Step 1.
To Install the Handle:
Ŷ Align the lever with the opening on the outer
door. Make sure the hook is pointed up.
Ŷ,QVHUWWKHODWFKOHYHULQWRWKHRSHQLQJDQG
align the handle with the mounting fasteners.
Ŷ Once the handle is flush with the outer door,
tighten the set screws.
'RQRWUHPRYHWDSHIURPGRRUXQWLOKDQGOHLV
installed
1
1a
Mounting
)DVWHQHUV
Leave film
on until after
installation
INSTALLATION INSTRUCTIONS
'RRULQGRRU
Latch
Latch Lever
with Hook
facing up.
49-60792-2 29
3 REMOVE THE REFRIGERATOR
DOORS (cont)
C'LVFRQQHFWHOHFWULFDOFRQQHFWRUVFRPLQJIURPHDFK
door located under the hinge covers.
5HPRYHWKH´KH[KHDGVFUHZWRGLVFRQQHFWWKH
ground wire from the hinge.
5HPRYHWKH´KH[KHDGVFUHZWRUHPRYHWKH
strain relief from the water line.
' 'LVFRQQHFWWKHZDWHUOLQHIURPWKHEDFNRIWKHXQLW
by pressing down on the dark grey collar while
pulling up on the water line.Pull water line through
case conduit from the top to free the line for door
removal. The water line is more than 4’ long and
PD\QHHGWREHWDSHGWR'RRUIRUDFFHVVLELOLW\
when reinstalling.
E8VLQJD´VRFNHWUDWFKHWGULYHU
remove the screws securing the
top hinge to the cabinet, then lift
the hinge straight up to free the
hinge pin from the location in the
top of the door.
CAUTION Lifting Hazard
Single person lift could cause injury. Use
assistance when handling, moving or lifting the
doors.
NOTE: when removing door, to prevent damage to
door and electronics, carefully place the door in a
proper location.
NOTE: The lower door hinge pin and hinge are keyed
and must be matched correctly for the door to self
close properly. Please follow the directions carefully.
REMOVE THE FREEZER DOOR
HANDLE
+DQGOH'HVLJQYDULHVEDVHGRQPRGHOVKRZHYHU
,QVWDOODWLRQLVVDPH
Stainless steel and plastic handles:
/RRVHQWKHVHWVFUHZVZLWKWKH´$OOHQ
wrench and remove the handle.
NOTE: ,IWKHKDQGOHPRXQWLQJIDVWHQHUVQHHGWR
EHWLJKWHQHGRUUHPRYHGXVHD´ Allen wrench.
2
Reinstall the handles using the same procedure as
removing.
Mounting
)DVWHQHUV
Leave film
on until after
installation
INSTALLATION INSTRUCTIONS
Installation Instructions
INSTALLING THE REFRIGERATOR (Cont.)
REMOVE REFRIGERATOR DOORS
WARNING )ROORZDOOVWHSVIRUUHPRYLQJ
DQGUHLQVWDOOLQJWKHGRRU)DLOXUHWRIROORZWKHVH
instructions, leaving off parts, or overtightening screws,
can lead to the door falling off and result in injury and
property damage.
A Securely tape the
door shut with
masking tape or
have a second
person support
the door.
B Start with
left-hand door
first: Remove the hinge
cover on top of the left
refrigerator door by
removing all hex screws
DQGSXOOLQJLWXS'RWKH
same for the right-hand
door and the middle cover.
3
Hinge
Cover
Ground
screw
Strain
Relief
Y or Straight
Connector
30 49-60792-2
REINSTALLING THE
REFRIGERATOR DOORS
Reverse steps 1 through 4 to reinstall refrigerator
doors, follow details below for critical alignments.
A
Reinstall center hinge first
and torque the screws to 65
in-lbs (7.34 N-m). With the LH
door at 90º to the front of the
case, lower the refrigerator
door onto the center hinge.
Ensure that the door and hinge align correctly.
BRotate doors closed and make sure moveable
center sealing portion of the door aligns with the
VWULNHU,IWKHGRRUZLOOQRWVHOIFORVHDIWHU
reinstalling, remove door, turn door upside down,
FKHFNDOLJQPHQWPDUNDQGDUURZWKHUHLVDQ
DOLJQPHQWPDUNRQWKHGRRUFORVXUHPHFKDQLVP,W
corresponds to an alignment arrow on the plastic
ring. Rotate door closure mechanism to align mark
DQGDUURZUHLQVWDOOGRRU'RRULQ'RRUPRGHOVGR
not have the same closure mechanism on the right
hand door. You may notice a difference in closure.
Securely tape the door shut with masking tape or
have a second person support the door. Reinstall
the top hinge and torque the screws to 65 in-lbs
(7.34 N-m).
CBe sure to reinstall the ground wire and strain
relief to the top hinge.
'Reinstall hinge cover. NOTE: Ensure wires are not
pinched or under screw bosses before tightening
screws.
3REMOVE THE REFRIGERATOR
DOORS (cont)
Note: For proper installation later, please follow
the next step carefully.
) Remove the tape and keeping the door as
straight as possible, open the door to 90º then lift
straight up to remove it.
REMOVE OPPOSITE DOOR
)ROORZWKHVDPHSURFHGXUHRQWKHRSSRVLWHGRRU
There are no water lines on the opposite side.
For Door in Door Models: Securely tape the
inner and outer doors before installing or removing.
90º door alignment not required during installation
or removal for these models.
4 REMOVE CENTER HINGE (if necessary)
5HPRYHWKHƎVFUHZVVHFXULQJWKHFHQWHUKLQJH
to the cabinet.
8VH7GULYHUWRUHPRYHRXWERDUGVFUHZ
5
Remove
center screw
Lift up & off
center hinge
2SHQ'RRUWR
Align flats with tab.
8QGHUVLGHRI
)UHVK)RRG'RRU
If door cannot be installed at 90° follow steps below:
,QVWDOOGRRUDWWRFDVHIURQW
,IVSDFHOLPLWVRSHQLQJGRRUWROHVVWKDQWKHQ
D5HPRYHGRRUFDUHIXOO\WXUQGRRUXSVLGHGRZQ
E&KHFNDOLJQPHQWRIGRRUFORVXUHPHFKDQLVPVKDIW
on underside of door. The flats on the shaft should
correspond to alignment tab on plastic ring or
mark on bottom end cap.
F,IVKDIWLVQRWDOLJQHGWRWDEPDUNXVLQJ´
Allen wrench, rotate door closure mechanism
shaft counterclockwise for right door and clock-
ZLVHIRUOHIWGRRU7KHQDOLJQIODWZLWKWDEPDUN
G,QVWDOOWKHGRRUDW
Loosen outer
screws
Installation Instructions
INSTALLING THE REFRIGERATOR (Cont.)
INSTALLATION INSTRUCTIONS
49-60792-2 31
INSTALLATION INSTRUCTIONS
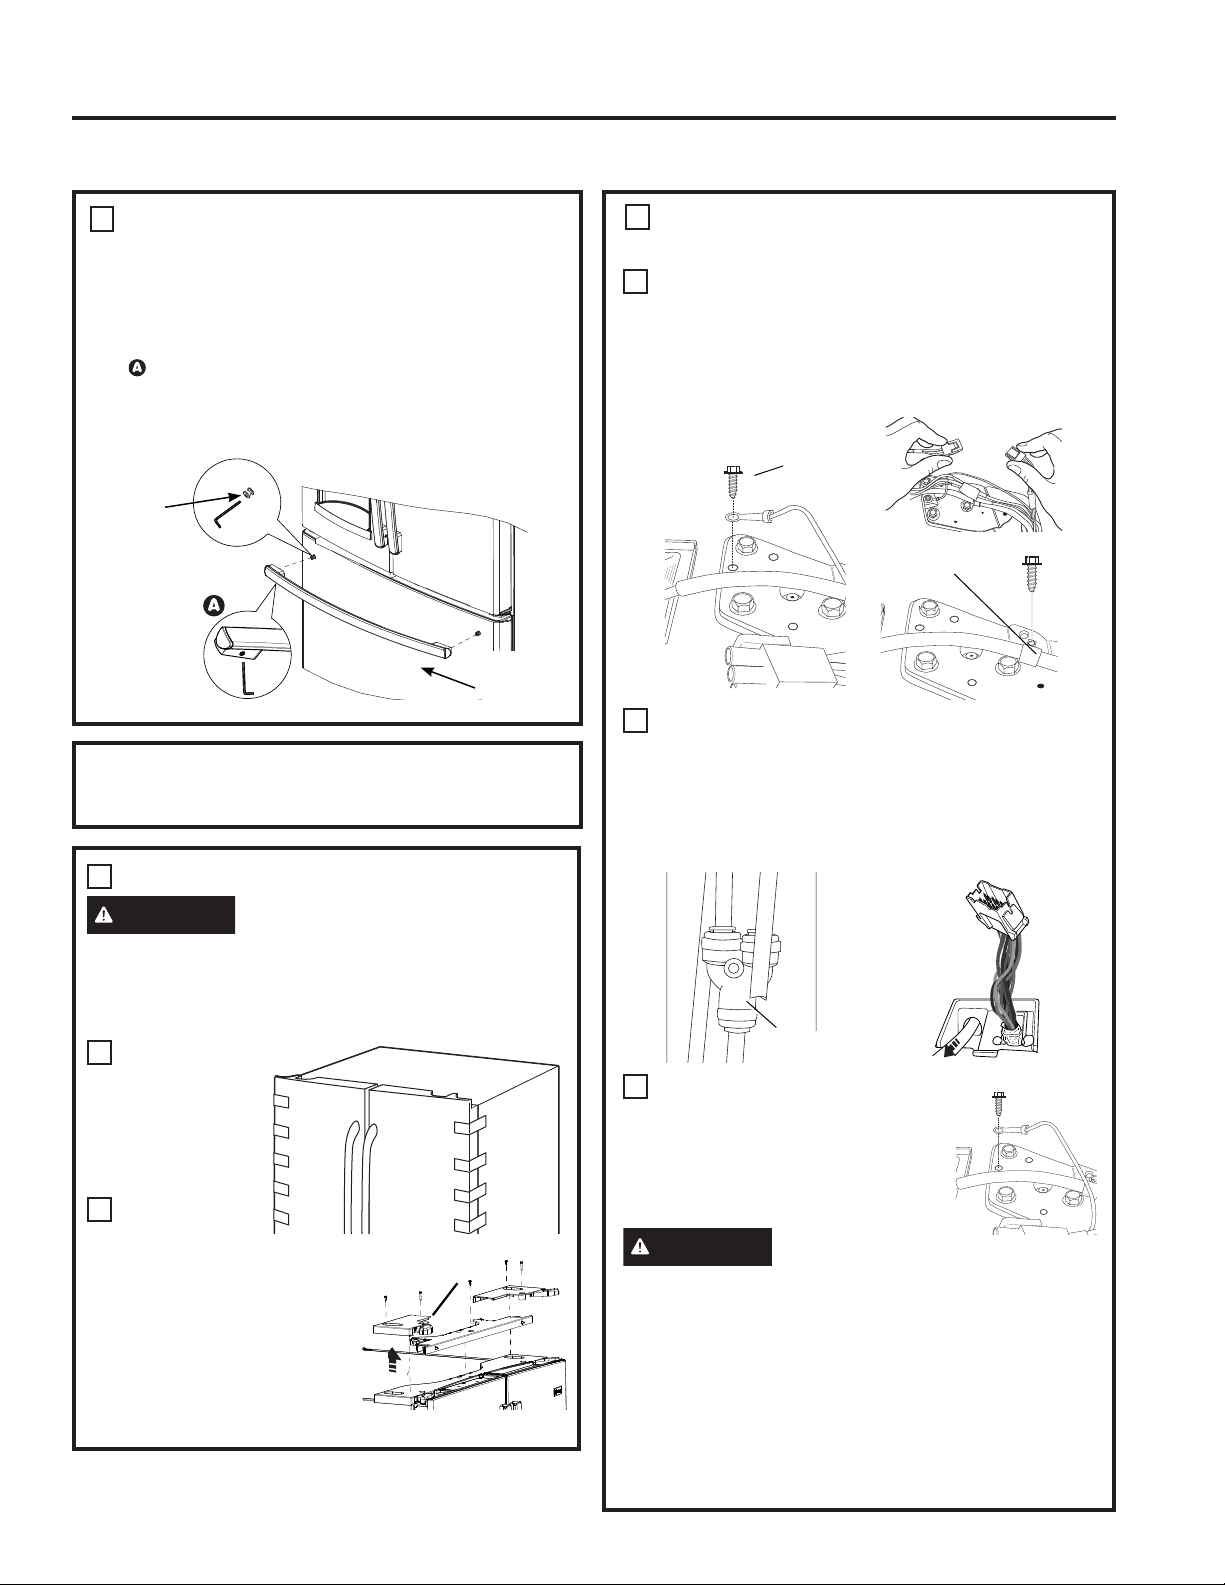
REMOVE THE FREEZER DOOR
3XOOWKHIUHH]HUGRRURSHQWRIXOOH[WHQVLRQ
Remove 3 attachment screws, located at the
ERWWRPRQHDFKVLGHRIWKHIUHH]HUGRRUXVLQJ
´KH[VRFNHWGULYHU
CAUTION Lifting Hazard
Freezer door is heavy Use both hands to
secure the door before lifting.
/LIWWKHIUHH]HUGRRU
to disengage it from
the slide mechanism
The door can safely
rest on the bottom.
'RQRWUHVWWKH
door on any other
surfaces to avoid
scratches.
REMOVE THE FREEZER
BASKET SLIDES
7KHIUHH]HUEDVNHWVOLGHVFDQEHUHPRYHGWR
JDLQDQRWKHU´FPFOHDUDQFHWKURXJK
a doorway.
5HPRYHIUHH]HUGRRUDVVKRZQLQ6WHS
Remove the upper and lower baskets as shown
in Step 7.
Remove the clip on the crossbar
located along the right hand
side of the rack and pinion gear
assembly by sliding forward.
Remove crossbar by sliding to the
right, then pull out and to the left.
5HPRYHWKHIRXU´KH[KHDGEROWVSHUVLGH
and remove side supports.
Reverse the steps to assemble. When installing
the crossbar, always put the hole on the right
hand side. Align the left and
right gears with the timing
marks on the gears when
inserting the crossbar. Always
insert the crossbar in the right
hang gear first and then the
left hand gear.
,QVHWWKHFOLSLQWRWKHFURVVEDUKROHORFDWHGRQ
the right hand side.
A
A
B
B
C
C
68
3 Screws
REMOVE FREEZER BASKET
Pull the lower basket and slide mechanism to
full extension using both hands.
Remove the top
IUHH]HUGUDZHUE\
fully extending the
drawer then lifting
up and out.
Remove the basket
resting on the
slides.
Push the bottom
basket slides back
until the slide mechanism self retracts.
7
A
B
C
'
'
E
)
G
Installation Instructions
INSTALLING THE REFRIGERATOR (Cont.)
1
2
1
2
Hex head
bolts
Clip
Hole for clip
Timing
mark
Clip
32 49-60792-2
RE-INSTALL FREEZER DRAWER
5HLQVWDOOIUHH]HUGUDZHUE\SODFLQJWKHGUDZHU
wheels onto the top of the track mounted to the
VLGHRIWKHIUHH]HUZDOOV7KHZKHHOVRQWKH
IUHH]HUGUDZHUVKRXOGEHRQWRSRIWKHERWWRP
basket sides.
ON MODELS EQUIPPED WITH ICE MAKER
IN THE FREEZER: Place the ice bucket in the
GUDZHUDQGSXVKWKHGUDZHULQWRWKHIUHH]HUZLWK
the front of the bucket to the front of the basket,.
Make sure:
- The ice bucket does not hit the icemaker arm
DQGWKHIUHH]HUGUDZHUUHWUDFWVFRPSOHWHO\LQWR
WKHIUHH]HUFRPSDUWPHQW
- The fill tube extends into the fill cup opening at
the back of the icemaker.
9
A
Installation Instructions
INSTALLING THE REFRIGERATOR (Cont.)
INSTALLATION INSTRUCTIONS
REPLACE FREEZER DOOR
CAUTION Lifting Hazard
Freezer door is heavy Use both hands to
secure the door before lifting.
Pull the lower basket slide mechanism to full
extension with both hands.
/LIWWKHIUHH]HUGRRUDQGDOLJQWKHWDEVRQWKH
door bracket sides with the square holes in slide
mechanisms.
Replace the attachment screws and torque the
VFUHZVWRLQOE1P
)RUDGMXVWLQJIUHH]HUGRRUJDSVIROORZWKH
instructions on page 30 or in the Owner’s
Manual.
5HSODFHIUHH]HUEDVNHWRQWRWKHVOLGHEUDFNHWV
DQGPDNHVXUHWKHIUHH]HUGRRURSHUDWHVDQG
closes freely.
10
Align and insert
WDERQ)UHH]HU
'RRU%UDFNHWZLWK
VORWRQ)UHH]HU
Slide Bracket.
NOTE: Place one
side in first and
then align the
other side.
A
B
C
'
E

49-60792-2 33
INSTALLATION INSTRUCTIONS
IMPORTANT!
The 6 mounting screws (3 on each side) are NOT interchangeable with the center or top hinge screws.
Drawer screws have flat washer heads, and other screws have lines/ribs on washer heads.
$IWHULQVWDOODWLRQRIWKHIUHH]HUGRRUFKHFNIRUXQLIRUPJDSVWRSDQGERWWRPRIULJKWDQGOHIWKDQGVLGHZLWKWKH
template provided.
,QWKHHYHQWRIH[FHVVLYHJDSVXVHWKHIROORZLQJVWHSVWRDGMXVWWKHIUHH]HUGRRU
Step 1 /RRVHQWKHVFUHZVRQHDFKVLGHULJKWDQGOHIWRIWKHIUHH]HUGRRU
Step 2 -$GMXVWVHWVFUHZFORFNZLVHLIJDSDWWKHWRSLVWRRELJVHHWHPSODWH7XUQWKHVHWVFUHZXVLQJ´KH[
key clockwise by quarter to half a rotation
Step 3 -$GMXVWVHWVFUHZFRXQWHUFORFNZLVHLIJDSDWWKHERWWRPLVWRRELJVHHWHPSODWHTurn the set screw using
´KH[NH\FRXQWHUFORFNZLVHE\TXDUWHUWRKDOIDURWDWLRQ
Step 4 -7LJKWHQWKHVFUHZVRQHDFKVLGHULJKWDQGOHIW
Step 5 - Re-check the gaps using the template and repeat steps 1 to 4 if required and complete with step 5.
Instructions for adjusting freezer door gaps:
Fold here for using template
FP
´
Template for checking gaps.
*DSVKRXOGEH´RUEHORZ
Gabarit pour vérifier les écarts.
L’écart doit être de 0,6 po (1,5
FPRXPRLQV
Plantilla para el control de
espacios. El espacio debería
VHUGH´RLQIHULRU
Step 1
Étape 1
Paso 1
Step 4
Étape 4
Paso 4
Set Screw
Vis d’ajustement
Tornillo del Set Step 3
Étape 3
Paso 3
Step 2
Étape 2
Paso 2
Plier ici pour utiliser le gabarit Dóblelo aquí para usar la plantilla
Installation Instructions
INSTALLING THE REFRIGERATOR (Cont.)
34 49-60792-2
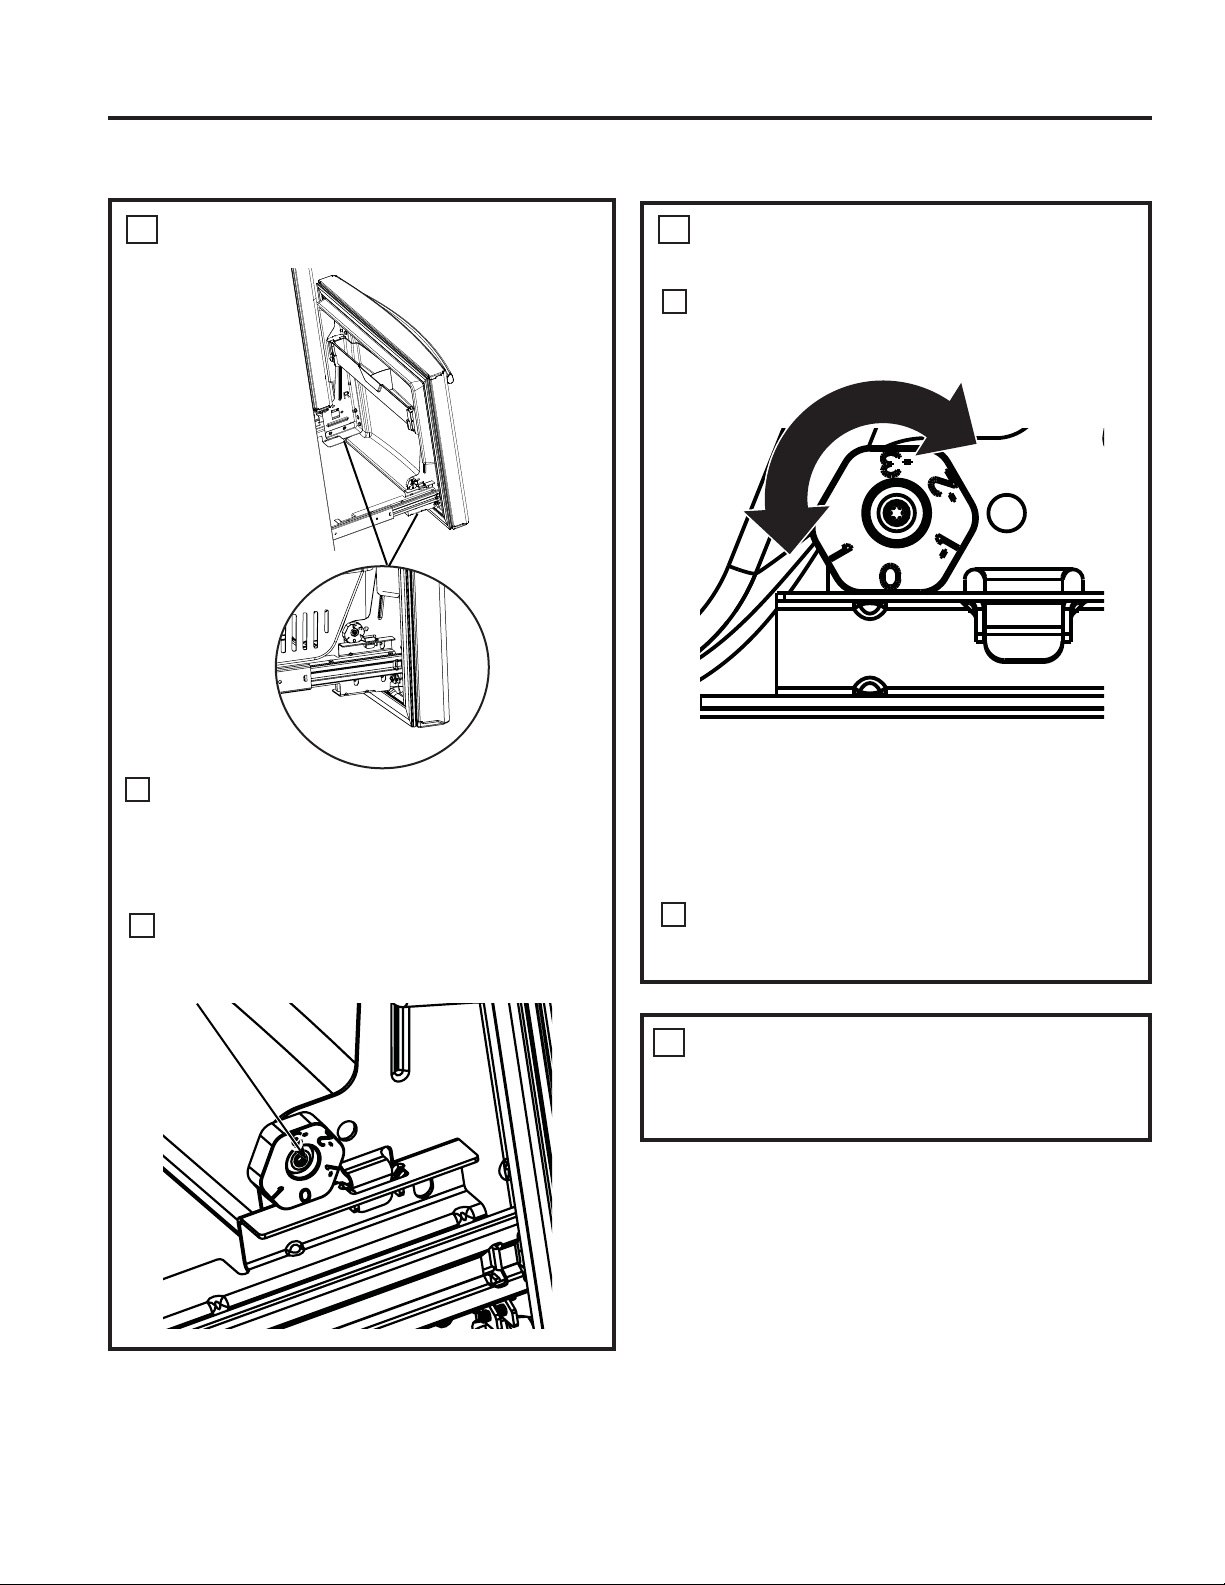
LEVEL THE FREEZER DOOR
Locate the height adjuster cam in the
IUHH]HUGRRU6OLJKWO\ORRVHQWKHWKUHHGRRU
attachment screws on both sides using a
´KH[VRFNHWGULYHU
Locate and loosen the cam screw using the
T-27 screw driver.
10
A
B
REMOVE PACKAGING
Remove all tape, foam and protective
packing from shelves and drawers.
11
LEVEL THE FREEZER DOOR
(cont.)
Lift the door on the side requiring
adjustment, rotate the cam to required
position.
After adjustment tighten the 3 attachment
VFUHZVXVLQJWRLQOE1P
10
,QLWLDOSRVLWLRQ
/LIWE\´FP
/RZHUE\´FP
/RZHUE\´FP
/RZHUE\´FP
A
B
Installation Instructions
INSTALLING THE REFRIGERATOR (Cont.)
INSTALLATION INSTRUCTIONS
49-60792-2 35
INSTALLATION INSTRUCTIONS
MEASURE CABINET
OPENING AVAILABLE VS.
REFRIGERATOR WIDTH
Measure width of cabinet opening where
refrigerator will be placed, W.
Be sure to account for any countertop overhang,
baseboard thickness and any clearance desired.
:LGWK:VKRXOGQRWEHOHVVWKDQ´7KH
refrigerator will be placed approximately in the
middle of this opening.
MATERIALS YOU MAY NEED QRWLQFOXGHG
TOOLS YOU WILL NEED
Pencil
´PP'ULOO%LWDQG
(OHFWULFRU+DQG'ULOO
Tape measure
´PP1XW'ULYHU
Lag Bolts
´PP[´PP Anchor Sleeves
´PP2'
)RU$QWL7LS%UDFNHW0RXQWHGRQ&21&5(7()ORRUV2QO\
'ULOO%LW$SSURSULDWHIRU$QFKRUV
AT-1
LOCATING THE ANTI-TIP
FLOOR BRACKET
Place the anti-tip floor bracket locator template
LQFOXGHGLQVLGHWKHDQWLWLSNLWRQWRWKHIORRU
up against the rear wall, within W, and in line
with the desired location of the RH side of the
UHIULJHUDWRUVHH)LJXUH
Place the anti-tip floor bracket onto the locator
template with its RH floor holes lined up with
the floor holes indicated on the template sheet,
DSSUR[LPDWHO\ó´FPIURPWKHHGJH
of the sheet or the RH side of the refrigerator.
Hold down in position and use the anti-tip floor
bracket as a template for marking the holes
based upon your configuration and type of
construction as shown in Step 3. Mark the hole
locations with a pencil, nail or awl.
NOTE:
,WLV5(48,5('WRXVHDWOHDVWVFUHZVWR
mount the floor bracket (one on each side of
WKHDQWLWLSIORRUEUDFNHW%RWKPXVWEHLQWR
HLWKHUWKHZDOORUWKHIORRU)LJXUHLQGLFDWHV
all the acceptable mounting configurations for
VFUHZV,GHQWLI\WKHVFUHZKROHVRQWKHDQWLWLS
floor bracket for your configuration.
AT-2
A
B
C
Baseboard
Thickness or
Countertop
Overhang
:KLFKHYHU,V
/DUJHU3OXV
$Q\'HVLUHG
Clearance
Rear Wall
)URQW RH Side
W
5()5,*(5$725
)LJXUH± ,QVWDOODWLRQ2YHUYLHZ
Base Bracket
on the
Refrigerator
2 Wall Holes
RH Side of
Refrigerator
)ORRU±&RQFUHWH
+ROHV
)ORRU±:RRG
+ROHV
ó´
Locator
Template Sheet
)ORRU%UDFNHW
WR,QVWDOO
RH Holes
Rear RH
Corner of
Cabinet Wall
WARNING Tip Over Hazard.
Built-in style models (model PYE, CYE, GYE, PWE,
&:(DQG=:(DUHWRSKHDY\HVSHFLDOO\ZLWKDQ\
doors open. These models must be secured with the
anti-tip floor bracket to prevent tipping forward, which
could result in death or serious injury. Read and
follow the entire installation instructions for installing
the anti-tip floor bracket packed with your refrigerator.
NOTE:
,I\RXGLGQRWUHFHLYHDQDQWLWLSEUDFNHWZLWK\RXU
purchase, call 1.800.626.8774 to receive one at no
FRVW,Q&DQDGDFDOO
)RULQVWDOODWLRQLQVWUXFWLRQVRIWKHEUDFNHWYLVLWZZZ
GEAppliances.com.
,Q&DQDGDZZZ*($SSOLDQFHVFD
Installation Instructions
INSTALLING THE REFRIGERATOR (Cont.)
Anti-Tip Floor Bracket Installation
(Models PYE, CYE, GYE, DYE, PWE, CWE, and ZWE only)
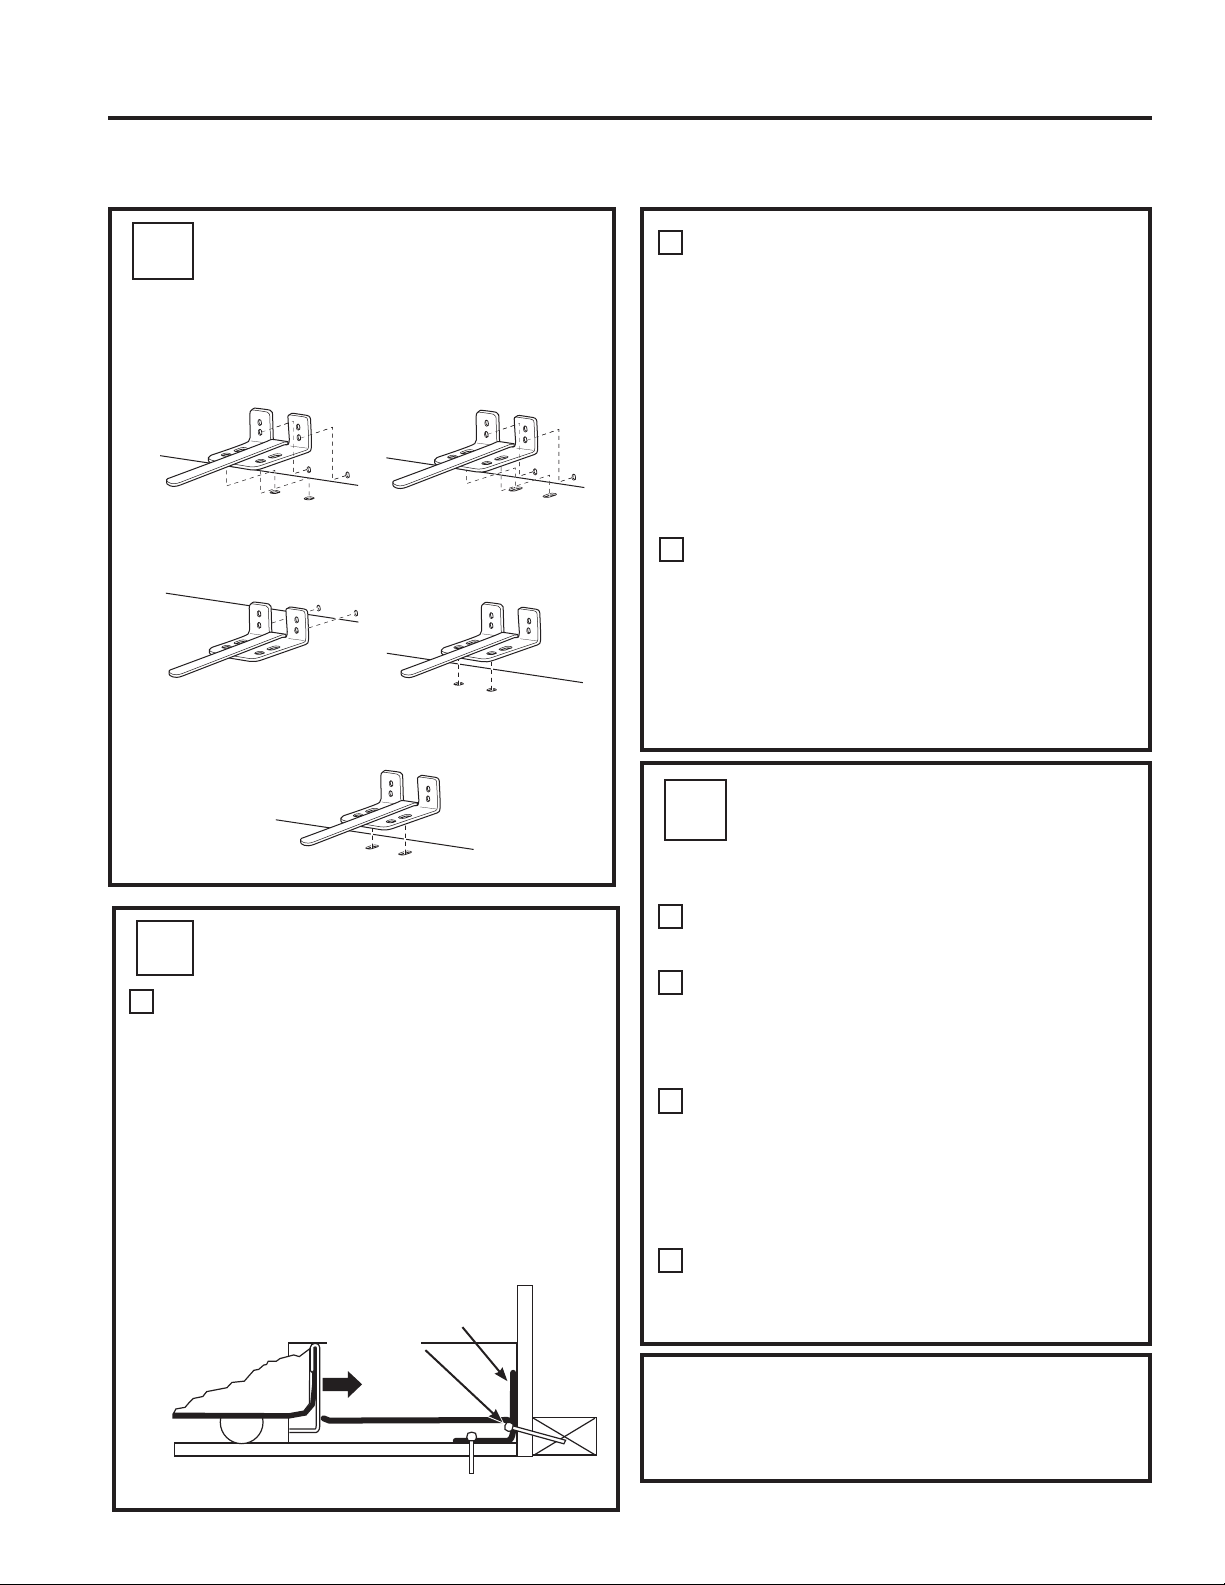
36 49-60792-2
AT-2 LOCATING THE ANTI-TIP
FLOOR BRACKET (cont.)
5HFRPPHQGHG,QVWDOODWLRQ
– Wood
5HFRPPHQGHG,QVWDOODWLRQ
– Concrete
Minimum Acceptable #1 –
Wall Plate Stud
Minimum Acceptable #2
±:RRG)ORRU
Minimum Acceptable #3
±&RQFUHWH)ORRU
)LJXUH± $FFHSWDEOH6FUHZ3ODFHPHQW
Locations
&21&5(7(:DOODQG)ORRU&RQVWUXFWLRQ
$QFKRUVUHTXLUHGQRWSURYLGHG
HDFK´PP[´PPODJEROWV
HDFK´PP2'VOHHYHDQFKRUV
'ULOOWKHUHFRPPHQGHGVL]HKROHVIRUWKH
anchors into the concrete at the center of the
holes marked in Step 2.
•
,QVWDOOWKHVOHHYHDQFKRUVLQWRWKHGULOOHGKROHV
Place the anti-tip floor bracket as indicated in Step
2. Remove the locator template from the floor.
,QVWDOOWKHODJEROWVWKURXJKWKHDQWLWLSIORRU
bracket and tighten appropriately.
:22':DOODQG7,/()ORRU&RQVWUXFWLRQ
)RUWKLVVSHFLDOFDVHORFDWHWKHZDOOKROHV
LGHQWLILHGLQ)LJ'ULOODQDQJOHG´PP
SLORWKROHDSSUR[DVVKRZQLQ)LJLQWKH
center of each hole.
• Mount the anti-tip floor bracket using the
0LQLPXP$FFHSWDEOH,QVWDOODWLRQDV
LOOXVWUDWHGLQ)LJ
C
B
AT-3 ANTI-TIP BRACKET
INSTALLATION
:22':DOODQG)ORRU&RQVWUXFWLRQ
'ULOOWKHDSSURSULDWHQXPEHURI´PP
pilot holes in the center of each floor bracket
hole being used (a nail or awl may be used if
DGULOOLVQRWDYDLODEOH$1'UHPRYHWKHORFDWRU
template from the floor.
• Mount the anti-tip floor bracket by fastening the
2, or recommended 4, #10-16 hex-head screws
WLJKWO\LQWRSODFHDVLOOXVWUDWHGLQ)LJXUH
A
AT-4 POSITIONING THE
REFRIGERATOR TO ENGAGE
THE ANTI-TIP FLOOR AND
BASE BRACKETS
Before pushing the refrigerator into the opening,
plug the power cord into the receptacle and
FRQQHFWZDWHUOLQHLIHTXLSSHG&KHFNIRUOHDNV
Locate the refrigerator’s RH side and move back
approximately in line with the RH side of the
cabinet opening, W. This should position the
anti-tip floor bracket to engage the anti-tip base
bracket on the refrigerator.
Gently roll the refrigerator back into the cabinet
opening until it comes to a complete stop.
Check to see if the refrigerator front lines up
ZLWKWKHFDELQHWIURQWIDFH,IQRWFDUHIXOO\URFN
the refrigerator forward and backward until
engagement occurs and you notice that the
refrigerator is fully pushed up against the rear wall.
If Applicable:$GMXVWWKHUHDUDQGIURQWZKHHO
height settings to fully engage the rear anti-tip
brackets, while also aligning the refrigerator
front with the cabinet front face.
A
C
B
'
)LJXUH± $WWDFKPHQWWR:DOODQG)ORRU
NOTE:,I\RXSXOOWKHUHIULJHUDWRURXWDQG
away from the wall for any reason, make sure
the anti-tip floor bracket is engaged when the
refrigerator is pushed back against the rear wall.
Rear RH Corner
of the Refrigerator
)ORRU
Wall
Plate
Stud
)ORRU
Bracket
2 Screws
Must Enter
Wood or
Metal Stud
Wall
Installation Instructions
INSTALLING THE REFRIGERATOR (Cont.)
Anti-Tip Floor Bracket Installation
(Models PYE, CYE, GYE, DYE, PWE, CWE, and ZWE only)
INSTALLATION INSTRUCTIONS

49-60792-2 37
INSTALLATION INSTRUCTIONS
CONNECTING THE REFRIGERATOR TO THE HOUSE WATER LINE
A cold water supply is required for automatic
LFHPDNHURSHUDWLRQ,IWKHUHLVQRWDFROGZDWHU
supply, you will need to provide one. See
,QVWDOOLQJWKH:DWHU/LQHVHFWLRQ
NOTES:
• Before making the connection to the
refrigerator, be sure the refrigerator power
cord is not plugged into the wall outlet.
,I\RXUUHIULJHUDWRUGRHVQRWKDYHDZDWHU
filter, we recommend installing one if your
water supply has sand or particles that
could clog the screen of the refrigerator’s
ZDWHUYDOYH,QVWDOOLWLQWKHZDWHUOLQHQHDU
WKHUHIULJHUDWRU,IXVLQJ6PDUW&RQQHFW
5HIULJHUDWRU7XELQJ.LW\RXZLOOQHHGDQ
DGGLWLRQDOWXEH:;;WRFRQQHFWWKH
ILOWHU'RQRWFXWSODVWLFWXEHWRLQVWDOOILOWHU
• Before connecting the water line to the house,
purge the house line for at least 2 minutes.
,I\RXDUHXVLQJFRSSHUWXELQJSODFHD
FRPSUHVVLRQQXWDQGIHUUXOHVOHHYHRQWRWKH
end of the tubing coming from the house cold
water supply.
,I\RXDUHXVLQJWKH6PDUW&RQQHFW tubing, the
nuts are already assembled to the tubing.
,I\RXDUHXVLQJFRSSHUWXELQJLQVHUWWKHHQG
of the tubing into the refrigerator connection, at
the back of the refrigerator, as far as possible.
While holding the tubing, tighten the fitting.
,I\RXDUHXVLQJ6PDUW&RQQHFW tubing,
insert the molded end of the tubing into the
refrigerator connection, at the back of the
refrigerator, and tighten the compression nut
until it is hand tight. Then tighten one additional
turn with a wrench. Over tightening may cause
leaks.
)DVWHQWKHWXELQJLQWRWKHFODPSSURYLGHGWR
hold it in position. You may need to pry open
the clamp.
11
A
B
C
Installation Instructions
INSTALLING THE REFRIGERATOR (Cont.)
” Compression
Nut
)HUUXOH
VOHHYH
SmartConnect
Tubing
Refrigerator
Connection
1/4” Tubing
Tuyau de 1/4 po
Tubería de 1/4“
Tubing Clamp
Bride
Abrazadera del tubo
OR
Tubing Clamp
´7XELQJ
WARNING Electrical Shock Hazard.
$WWDFKWXELQJFODPSXVLQJH[LVWLQJKROHRQO\'2
NOT drill into the refrigerator.
WARNING Connect to potable water supply
only. A cold water supply is required for automatic
icemaker operation. The water pressure must be
EHWZHHQDQGSVLNLORSDVFDOV
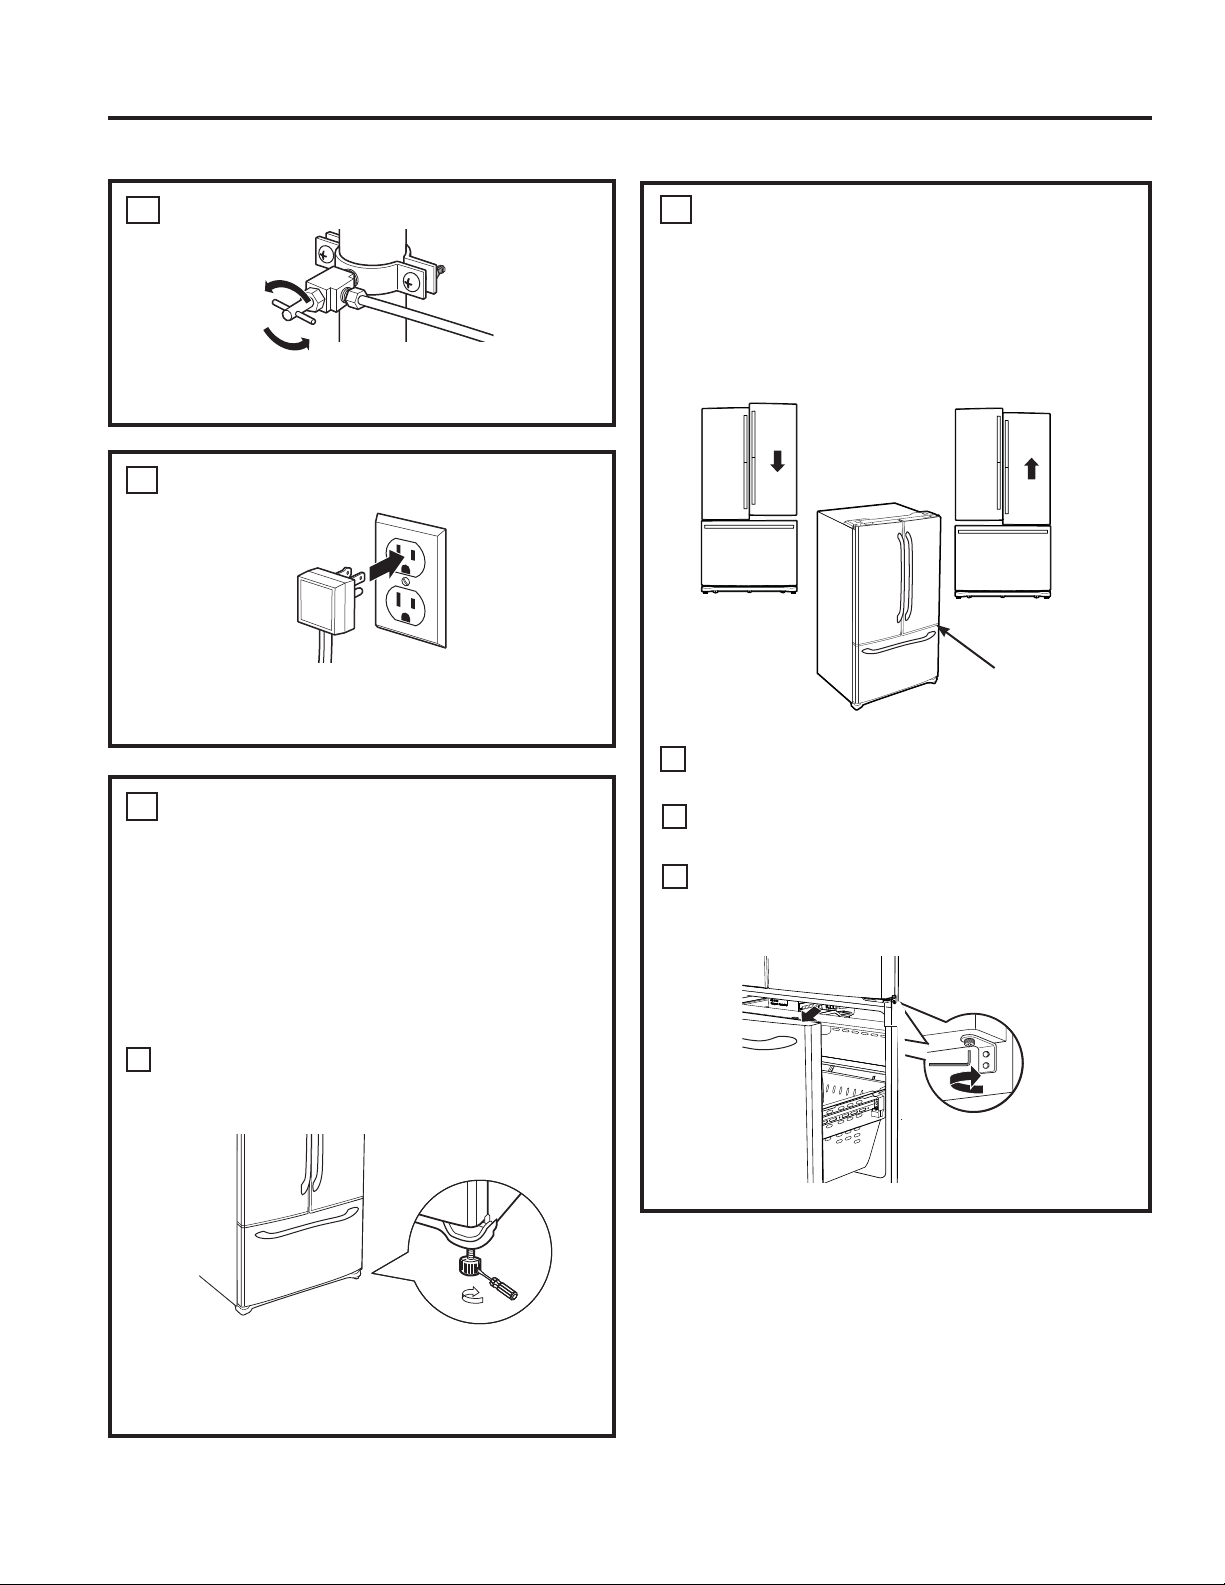
38 49-60792-2
TURN ON THE WATER SUPPLY
Turn the water on at the shutoff valve (house
ZDWHUVXSSO\DQGFKHFNIRUDQ\OHDNV
12
PLUG IN THE REFRIGERATOR
See the grounding information attached to the
power cord.
13
LEVEL THE REFRIGERATOR
The leveling legs have 2 purposes:
1. Leveling legs adjust so the refrigerator is
firmly positioned on the floor and does not
wobble.
/HYHOLQJOHJVVHUYHDVDVWDELOL]LQJEUDNH
to hold the refrigerator securely in position
during operation and cleaning. The leveling
legs also prevent the refrigerator from tipping.
Turn the leveling legs clockwise to raise the
refrigerator, counterclockwise to lower it.
NOTICE: To avoid possible property damage,
the leveling legs must be firmly touching the
floor.
14
A
)ODW+HDG6FUHZGULYHU
Raise
LEVEL THE REFRIGERATOR
DOORS
Remember a level refrigerator is necessary for
JHWWLQJWKHGRRUVSHUIHFWO\HYHQ,I\RXQHHG
help, review the previous section on leveling the
refrigerator.
,I\RXRSHQWKHIUHH]HUGRRU\RXFDQVHH
the center hinge.
,QVHUW´$OOHQZUHQFKLQWRWKHVKDIWRIWKH
center hinge.
Adjust the height by turning clockwise
or counterclockwise. When you turn
counterclockwise, the door will move up.
15
A
B
When
the left
door is
lower than
the right
door.
When
the left
door is
higher
than
the right
door.
Adjustment
point
C
RAISE
Installation Instructions
INSTALLING THE REFRIGERATOR (Cont.)
INSTALLATION INSTRUCTIONS
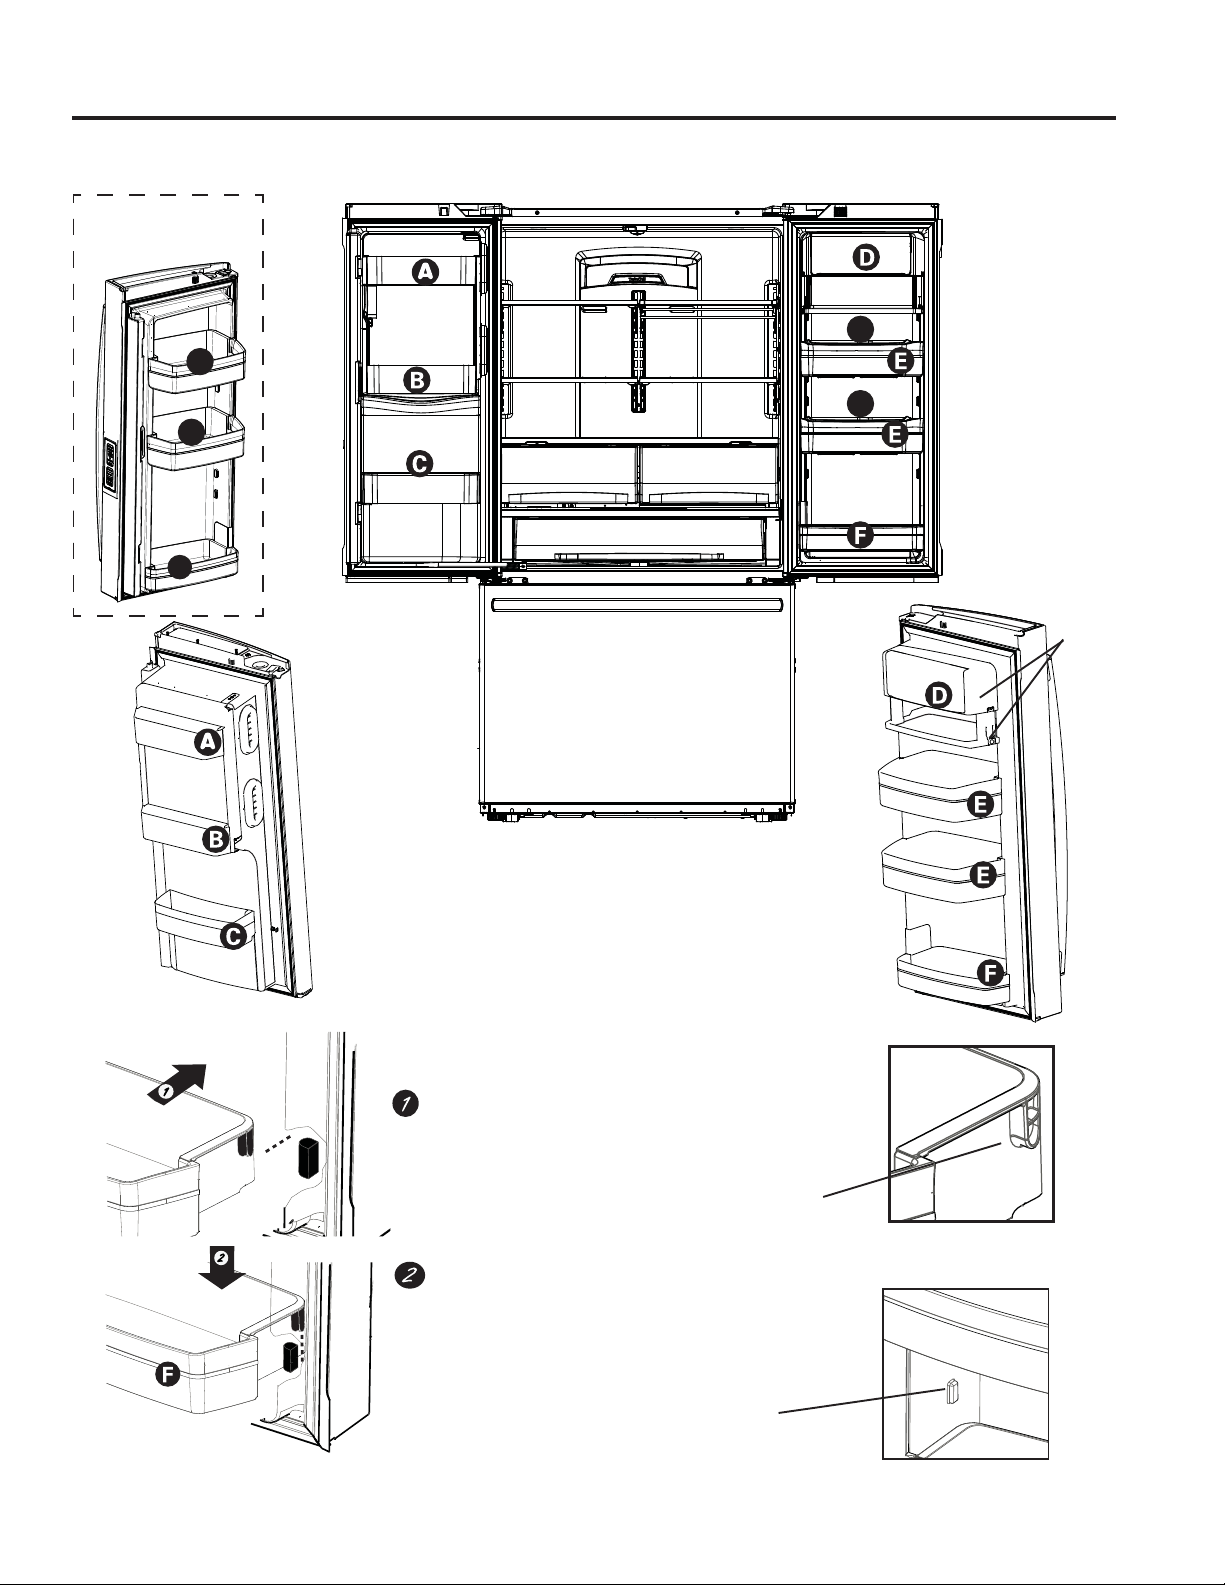
49-60792-2 39
To place bins into doors:
Match your bin with the letter shown.Position
the bin hooks over the bin locator and push
forward until inserted fully.
Bin locator
each side
Bin hook
rear each side
Push bin down until locked into position.
J
H
H
(Select
models
RQO\
1RQ'LVSHQVH
Models
INSTALLING THE REFRIGERATOR (Cont.)
INSTALLATION INSTRUCTIONS
Installation Instructions
G
G
,FHPDNHULQIUHH]HU
available on Non-
'LVSHQVHPRGHOVDQG
DYDLODEOHDV,0.LWIRU
some models.
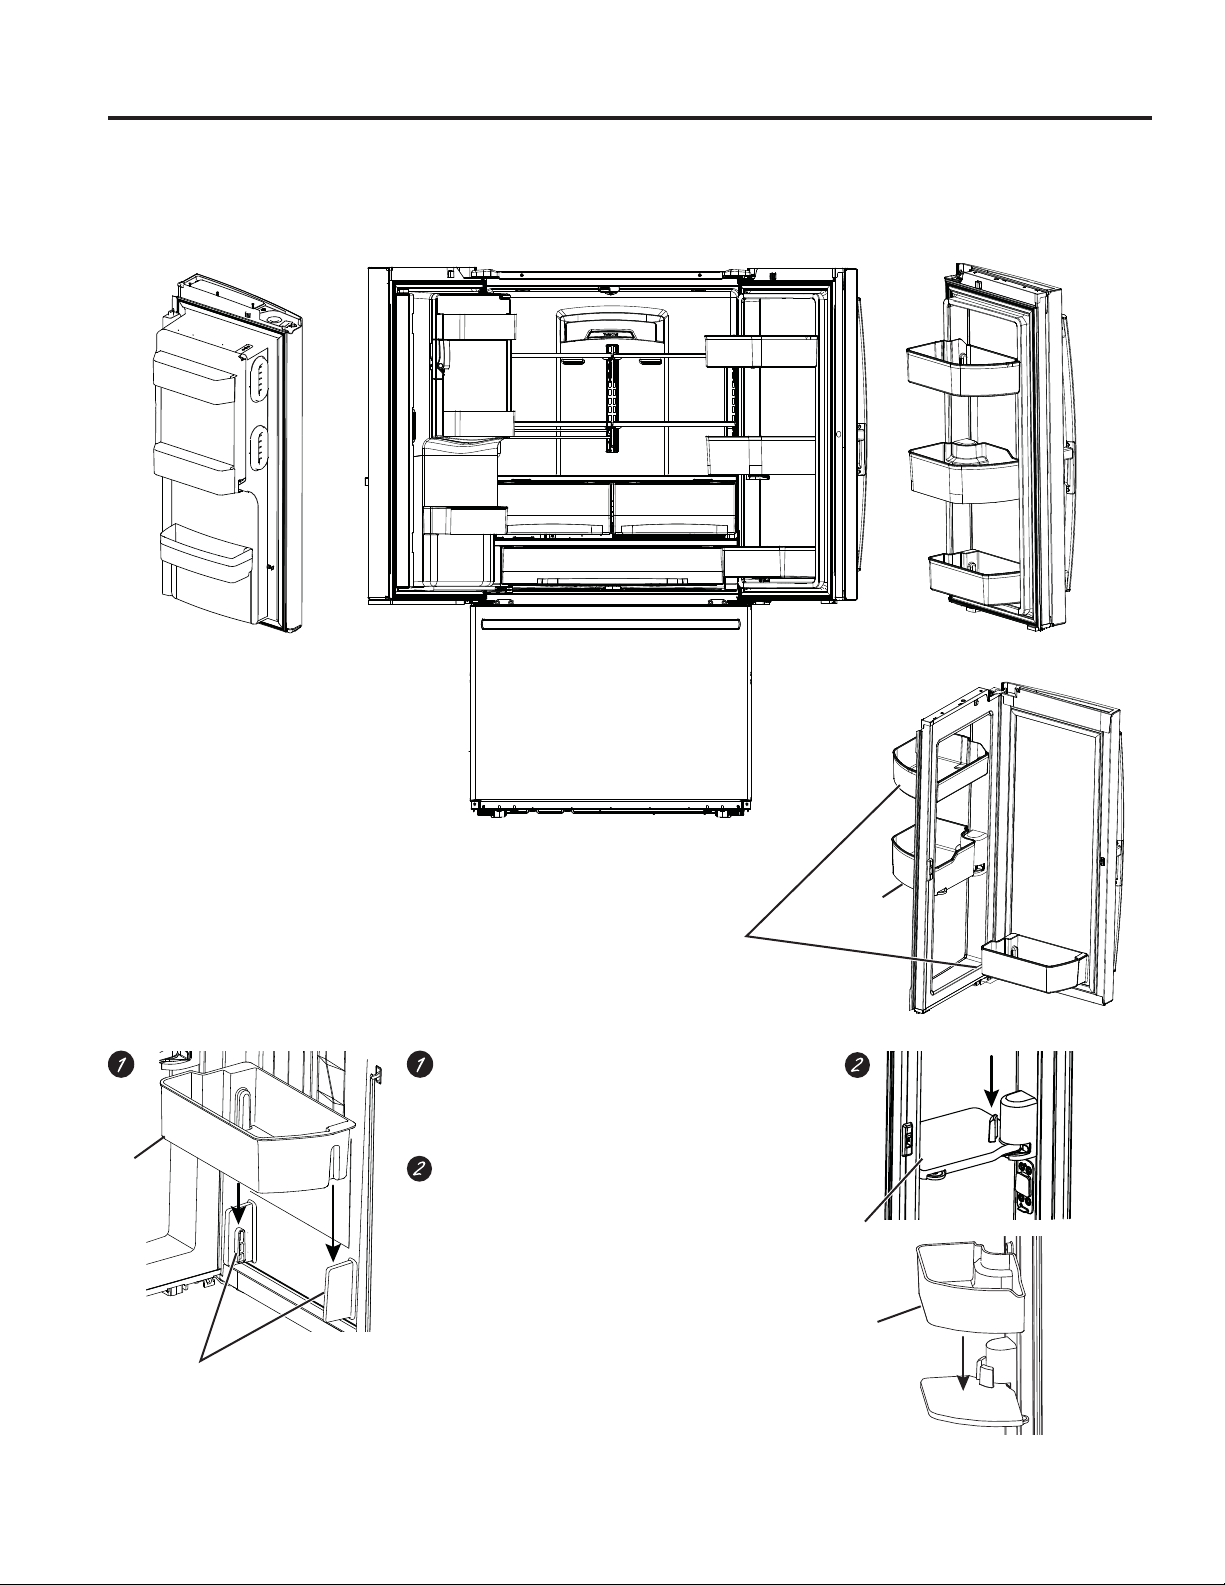
40 49-60792-2
To place rotating bin into door:
1. Slide bin base assembly onto the bracket on
the door.
2. Slide the bin onto the bin base
To place adjustable bins into door:
Position the bins over the bin locators and
push down until locked in position.
Installation Instructions
INSTALLING THE REFRIGERATOR (Cont.)
Bin
Bin
base
,QVWDOO
metal
base
Bin
Bin locators
Adjustable
bins
Rotating
bin
INSTALLATION INSTRUCTIONS
Models PFD, PYD, GFD
49-60792-2 41
INSTALLATION INSTRUCTIONS
Recommended copper water supply kits are WX8X2,
WX8X3 or WX8X4, depending on the amount of
tubing you need. Approved plastic water supply
lines are SmartConnect Refrigerator Tubing
:;;:;;DQG:;;
When connecting your refrigerator to a GE
Appliances Reverse Osmosis Water System, the only
DSSURYHGLQVWDOODWLRQLVZLWKD*($SSOLDQFHV59.LW
)RURWKHUUHYHUVHRVPRVLVZDWHUV\VWHPVIROORZWKH
manufacturer’s recommendations.
,IWKHZDWHUVXSSO\WRWKHUHIULJHUDWRULVIURPD
5HYHUVH2VPRVLV52:DWHU)LOWUDWLRQ6\VWHP
$1'WKHUHIULJHUDWRUDOVRKDVDZDWHUILOWHUXVH
WKHUHIULJHUDWRU¶VILOWHUE\SDVVSOXJ8VLQJWKH
refrigerator’s water filtration cartridge in conjunction
with the RO water filter can result in hollow ice cubes.
Some models do not come equipped with the filter
bypass plug. To obtain a free bypass plug, call 800.
*(&$5(6,Q&DQDGDFDOO
This water line installation is not warranted by the
UHIULJHUDWRURULFHPDNHUPDQXIDFWXUHU)ROORZWKHVH
LQVWUXFWLRQVFDUHIXOO\WRPLQLPL]HWKHULVNRIH[SHQVLYH
water damage.
:DWHUKDPPHUZDWHUEDQJLQJLQWKHSLSHVLQKRXVH
plumbing can cause damage to refrigerator parts and
lead to water leakage or flooding. Call a qualified
plumber to correct water hammer before installing the
water supply line to the refrigerator.
To prevent burns and product damage, do not hook
up the water line to the hot water line.
,IWKHUHIULJHUDWRULVRSHUDWHGEHIRUHWKHZDWHU
connection is made to the ice maker, see Controls
section on page 9 to turn ice maker off.
'RQRWLQVWDOOWKHLFHPDNHUWXELQJLQDUHDVZKHUH
WHPSHUDWXUHVIDOOEHORZIUHH]LQJ
When using any electrical device (such as a power
GULOOGXULQJLQVWDOODWLRQEHVXUHWKHGHYLFHLVGRXEOH
insulated or grounded in a manner to prevent the
KD]DUGRIHOHFWULFVKRFNRULVEDWWHU\SRZHUHG
All installations must be in accordance with local
plumbing code requirements.
BEFORE YOU BEGIN WHAT YOU WILL NEED
• Copper or SmartConnect Refrigerator Tubing kit,
´RXWHUGLDPHWHUWRFRQQHFWWKHUHIULJHUDWRUWRWKH
ZDWHUVXSSO\,IXVLQJFRSSHUEHVXUHERWKHQGVRI
the tubing are cut square.
To determine how much tubing you need: measure
the distance from the water valve on the back of the
refrigerator to the water supply pipe. Be sure there
is sufficient extra tubing to allow the refrigerator to
move out from the wall after installation.
SmartConnect5HIULJHUDWRU7XELQJ.LWVDUHDYDLODEOH
in the following lengths:
¶P ±:;;
¶P ±:;;
¶P ±:;;
Installation Instructions
INSTALLING THE WATER LINE
WARNING
Connect to potable water supply only.
A cold water supply is required for automatic icemaker
operation. The water pressure must be between 40
DQGSVLNLORSDVFDOV
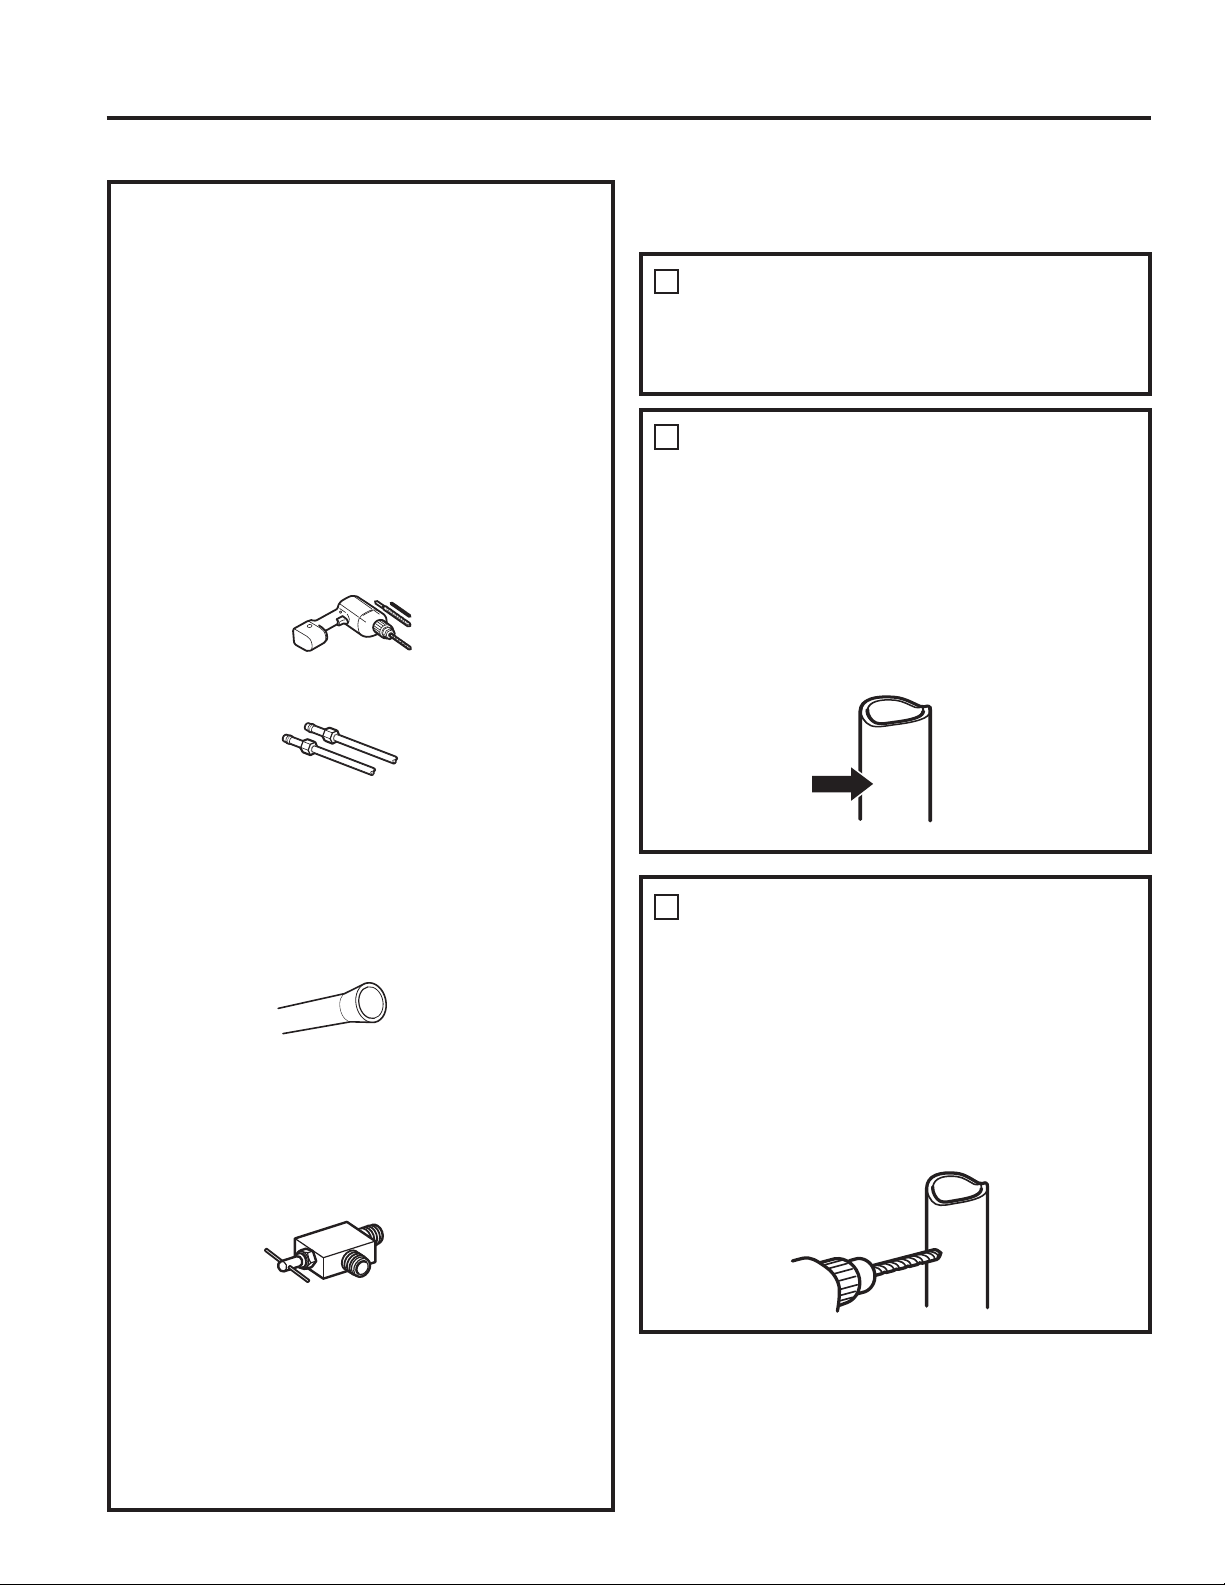
42 49-60792-2
NOTE: The only GE Appliances approved
plastic tubing is that supplied in SmartConnect
5HIULJHUDWRU7XELQJNLWV'RQRWXVHDQ\RWKHU
plastic water supply line because the line is under
pressure at all times. Certain types of plastic will
crack or rupture with age and cause water damage
to your home.
• A GE Appliances water supply kit (containing
WXELQJVKXWRIIYDOYHDQGILWWLQJVOLVWHGEHORZLV
available at extra cost from your dealer or from
Parts and Accessories, 877-959-8688 (in Canada
• A cold water supply. The water pressure must be
EHWZHHQDQGSVL±EDU
• Power drill.
´RUDGMXVWDEOHZUHQFK
• Straight and Phillips blade screwdriver.
7ZR´RXWHUGLDPHWHUFRPSUHVVLRQQXWV
DQGIHUUXOHVVOHHYHV²WRFRQQHFWWKHFRSSHU
tubing to the shutoff valve and the refrigerator
water valve.
OR
,I\RXDUHXVLQJD6PDUW&RQQHFW Refrigerator
Tubing kit, the necessary fittings are preassembled
to the tubing.
,I\RXUH[LVWLQJFRSSHUZDWHUOLQHKDVDIODUHGILWWLQJ
at the end, you will need an adapter (available
DWSOXPELQJVXSSO\VWRUHVWRFRQQHFWWKHZDWHU
line to the refrigerator OR you can cut off the
flared fitting with a tube cutter and then use a
FRPSUHVVLRQILWWLQJ'RQRWFXWIRUPHGHQGIURP
SmartConnect Refrigerator tubing.
• Shutoff valve to connect to the cold water line.
The shutoff valve should have a water inlet
ZLWKDPLQLPXPLQVLGHGLDPHWHURI´DWWKH
SRLQWRIFRQQHFWLRQWRWKH&2/':$7(5/,1(
Saddle-type shutoff valves are included in many
water supply kits. Before purchasing, make sure
a saddle-type valve complies with your local
plumbing codes.
SHUT OFF THE MAIN WATER
SUPPLY
Turn on the nearest faucet long enough to clear
the line of water.
,QVWDOOWKHVKXWRIIYDOYHRQWKHQHDUHVWIUHTXHQWO\
used drinking water line.
1
Choose a location for the valve that is easily
DFFHVVLEOH,WLVEHVWWRFRQQHFWLQWRWKHVLGHRI
a vertical water pipe. When it is necessary to
FRQQHFWLQWRDKRUL]RQWDOZDWHUSLSHPDNHWKH
connection to the top or side, rather than at the
bottom, to avoid drawing off any sediment from
the water pipe.
CHOOSE THE VALVE LOCATION
2
DRILL THE HOLE FOR THE
VALVE
3
'ULOOD´KROHLQWKHZDWHUSLSHHYHQLIXVLQJ
DVHOISLHUFLQJYDOYHXVLQJDVKDUSELW5HPRYH
any burrs resulting from drilling the hole in the
pipe.
Take care not to allow water to drain into the drill.
)DLOXUHWRGULOOD´KROHPD\UHVXOWLQUHGXFHG
ice production or smaller cubes.
Installation Instructions
INSTALLING THE WATER LINE (Cont.)
WHAT YOU WILL NEED (Cont.)
INSTALLATION INSTRUCTIONS
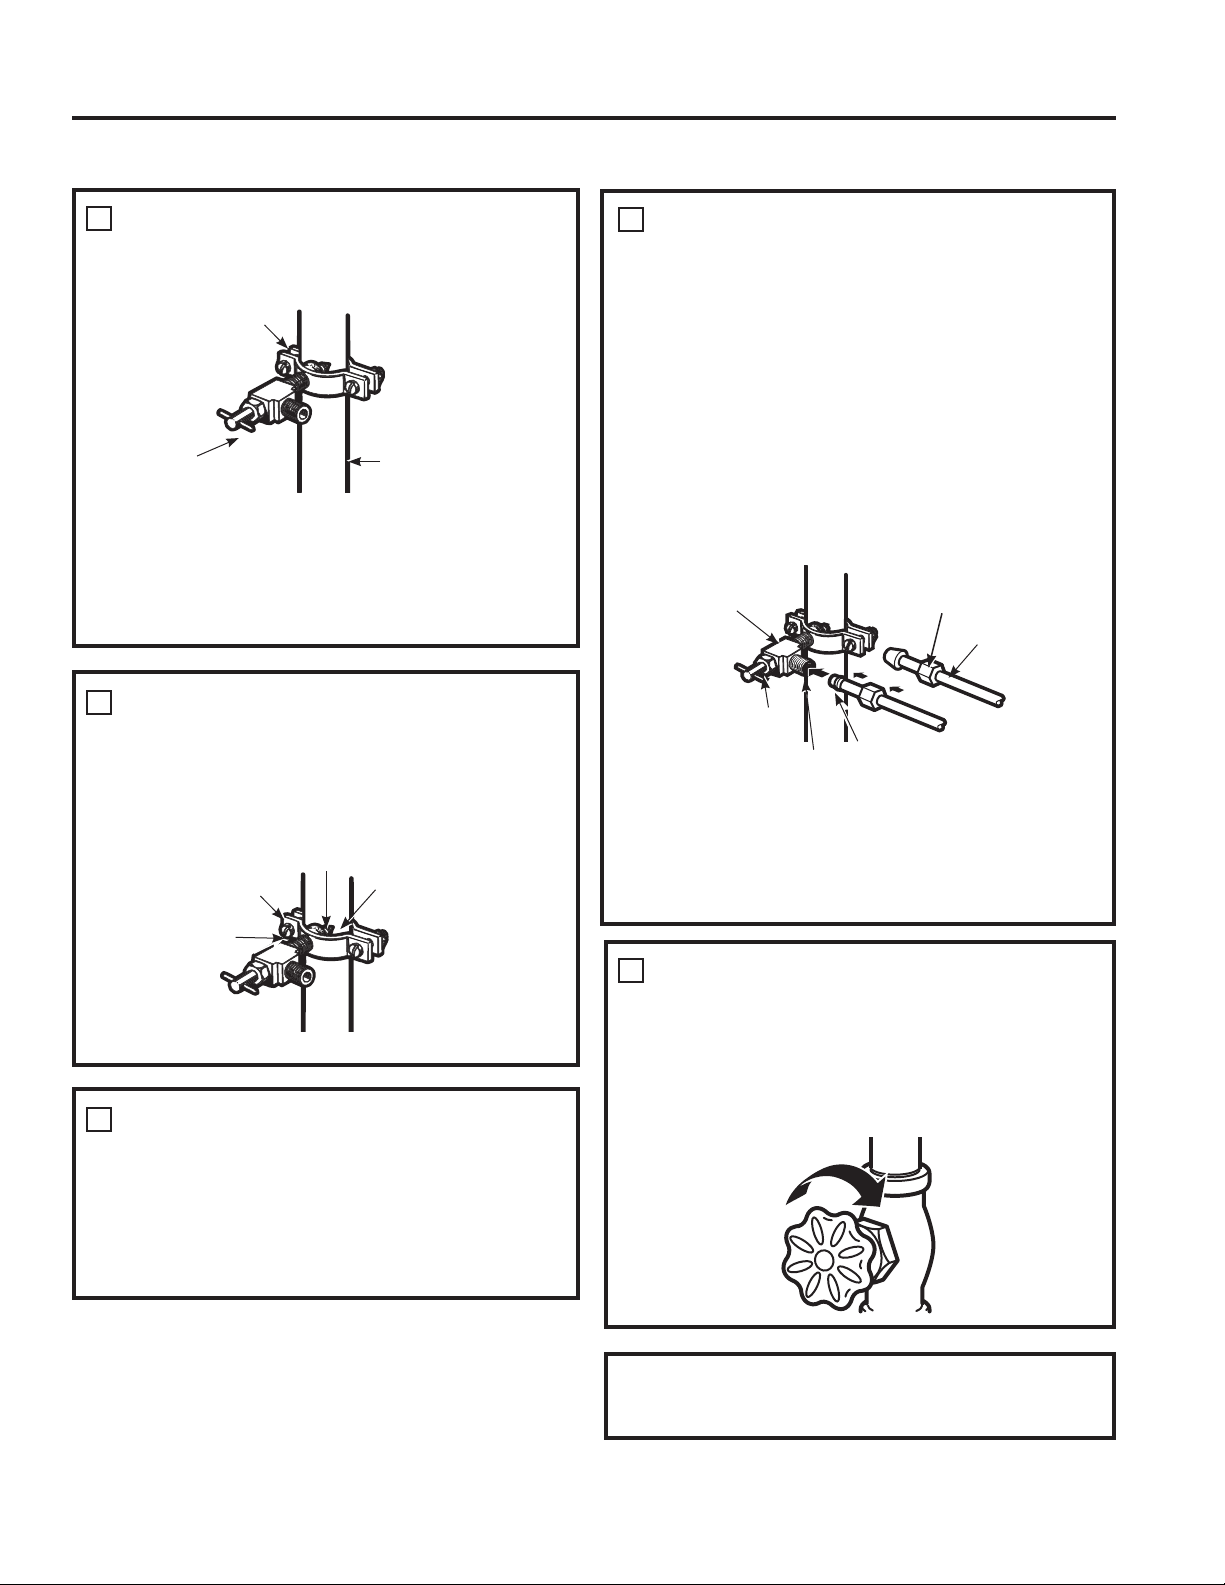
49-60792-2 43
INSTALLATION INSTRUCTIONS
3ODFHWKHFRPSUHVVLRQQXWDQGIHUUXOHVOHHYH
for copper tubing onto the end of the tubing and
connect it to the shutoff valve.
Make sure the tubing is fully inserted into the valve.
Tighten the compression nut securely.
)RUSODVWLFWXELQJIURPD6PDUW&RQQHFW
Refrigerator Tubing kit, insert the molded end
of the tubing into the shutoff valve and tighten
compression nut until it is hand tight, then tighten
one additional turn with a wrench. Over tightening
may cause leaks.
NOTE: Commonwealth of Massachusetts
Plumbing Codes 248CMR shall be adhered to.
Saddle valves are illegal and use is not permitted
in Massachusetts. Consult with your licensed
plumber.
CONNECT THE TUBING TO THE
VALVE
7
Turn the main water supply on and flush out the
tubing until the water is clear.
Shut the water off at the water valve after about
RQHTXDUWOLWHURUPLQXWHVRIZDWHUKDVEHHQ
flushed through the tubing.
FLUSH OUT THE TUBING
8
Saddle-Type
Shutoff Valve Compression Nut
Packing Nut
Outlet Valve )HUUXOHVOHHYH
SmartConnect
Tubing
)DVWHQWKHVKXWRIIYDOYHWRWKHFROGZDWHUSLSH
with the pipe clamp.
NOTE: Commonwealth of Massachusetts
Plumbing Codes 248CMR shall be adhered to.
Saddle valves are illegal and use is not permitted
in Massachusetts. Consult with your licensed
plumber.
FASTEN THE SHUTOFF VALVE
4
Tighten the clamp screws until the sealing washer
begins to swell.
NOTE:'RQRWRYHUWLJKWHQRU\RXPD\FUXVK
the tubing.
TIGHTEN THE PIPE CLAMP
5
Pipe Clamp
Vertical Cold
Water Pipe
Saddle-Type
Shutoff Valve
Washer
,QOHW(QG
Pipe Clamp
Clamp
Screw
Route the tubing between the cold water line and
the refrigerator.
Route the tubing through a hole drilled in the wall
or floor (behind the refrigerator or adjacent base
FDELQHWDVFORVHWRWKHZDOODVSRVVLEOH
ROUTE THE TUBING
6
To complete the installation of the refrigerator, go
EDFNWR6WHSLQ,QVWDOOLQJWKH5HIULJHUDWRU
Installation Instructions
INSTALLING THE WATER LINE (Cont.)

44 49-60792-2
Newer refrigerators sound different from older refrigerators.
Modern refrigerators have more features and use newer technology.
HUMMM...
WHOOSH...
Ŷ The new high efficiency compressor may run faster
and longer than your old refrigerator and you may
hear a high-pitched hum or pulsating sound while it
is operating.
Ŷ <RXPD\KHDUDZKRRVKLQJVRXQGZKHQWKHGRRUV
FORVH7KLVLVGXHWRSUHVVXUHHTXDOL]LQJZLWKLQWKH
refrigerator.
Ŷ $IWHUGLVSHQVLQJLFHDPRWRUZLOOFORVHWKHLFHFKXWH
to keep warn room air from entering the ice bucket,
PDLQWDLQLQJLFHDWDIUHH]LQJWHPSHUDWXUH
The hum of the motor closing the ice chute is
normal, shortly after dispensing ice.
Ŷ
You may hear the fans spinning at high speeds.
This happens when the refrigerator is first plugged
in, when the doors are opened frequently or when
a large amount of food is added to the refrigerator
RUIUHH]HUFRPSDUWPHQWV7KHIDQVDUHKHOSLQJWR
maintain the correct temperatures.
Ŷ
The fans change speeds in order to provide optimal
cooling and energy savings.
CLICKS, POPS,
CRACKS and SNAPS
Ŷ You may hear cracking or popping sounds when
the refrigerator is first plugged in. This happens as
the refrigerator cools to the correct temperature.
Ŷ The compressor may cause a clicking or chirping
sound when attempting to restart (this could take
XSWRPLQXWHV
Ŷ Expansion and contraction of cooling coils during
and after defrost can cause a cracking or popping
sound.
Ŷ On models with an ice maker, after an ice making
cycle, you may hear the ice cubes dropping into the
ice bucket.
Ŷ After dispensing ice, a motor will close the ice chute
to keep warm room air from entering the ice bucket,
PDLQWDLQLQJLFHDWDIUHH]LQJWHPSHUDWXUH
WATER SOUNDS
Ŷ The flow of refrigerant through the cooling coils may
make a gurgling noise like boiling water.
Ŷ Water dropping on the defrost heater can cause
DVL]]OLQJSRSSLQJRUEX]]LQJVRXQGGXULQJWKH
defrost cycle.
Ŷ A water dripping noise may occur during the defrost
cycle as ice melts from the evaporator and flows
into the drain pan.
Ŷ Closing the door may cause a gurgling sound due to
SUHVVXUHHTXDOL]DWLRQ
Do you hear what I hear? These conditions are normal.
START UP COOLING
,WFDQWDNHXSWRKRXUVIRUWKHUHIULJHUDWRUDQG
IUHH]HUWHPSHUDWXUHVWRPDWFKWKHGLVSOD\'XULQJWKDW
WLPHUHIULJHUDWRUDQGIUHH]HUGRRURSHQLQJVVKRXOGEH
PLQLPL]HG
TIPS
Ŷ )UHH]HUFRROVILUVW
Ŷ 5HIULJHUDWRUFRPSDUWPHQWFRROVODVWLWPD\WDNH
VHYHUDOKRXUVDIWHUWKHIUHH]HU
Ŷ 7XUQLQJRIILFHPDNHUPDNHVERWKIUHVKIRRGDQG
IUHH]HUIRRGFRROIDVWHU
Normal Operating Conditions.
TROUBLESHOOTING TIPS: Normal Operating Conditions
49-60792-2 45
TROUBLESHOOTING TIPS
Problem Possible Causes What to Do
Water filter indicated as installed
incorrectly or a leak is present on
cap control panel.
Water filter installed backward or is
leaking. &KHFNIRUOHDN,IQROHDNLVSUHVHQW
UHPRYHILOWHUE\SDVVSOXJURWDWH
180° and reinstall.
³:DUQLQJ7ULDQJOH´LVOLW
5HSODFH)LOWHU5HSODFH:DWHU)LOWHU
is lit
2YHU'XHOLJKWLVOLW
Water filter leaking or needs
replacing
Water filter backwards
Replace water filter, check for leak
Remove filter, rotate 180° and reinstall
'LVSHQVHU2IILVOLW Control A, B & C
Wrong filter installed Replace filter with proper filter
Remove filter, rotate 180° and reinstall
Not filtering )LOWHUE\SDVVLQVWDOOHG&RQWUROV%
C,QVWDOOFRUUHFWZDWHUILOWHU
5HVHW)LOWHULVOLW Water filter leaking or needs
replacing Replace water filter, or install filter
bypass **
3UHVVDQGKROG5HVHW)LOWHUIRU
VHFRQGVWRUHVHW&RQWURO'RQO\
Water filter indicator light is not lit This is normal. This indicator will
turn on to tell you that you need to
replace the filter soon.
See About the Water Filter for more
information.
+DQGOHLVORRVHKDQGOHKDVDJDS Handle needs adjusting See Attach Fresh Food Handle and
$WWDFKWKH)UHH]HU+DQGOHVHFWLRQVIRU
detailed instructions.
Refrigerator beeping This is door alarm -Turn off or disable with door closed
,IGRRURSHQDQGDODUPLVVRXQGLQJ
\RXFDQRQO\VQRR]HWKHDODUP
Not cooling The cooling system is off See About Controls.
:DWHUKDVSRRUWDVWHRGRU Water dispenser has not been used
for a long time 'LVSHQVHZDWHUXQWLODOOZDWHULQ
system is replenished.
Water in glass is warm* Normal when refrigerator is first
installed Wait 24 hours for the refrigerator to
completely cool down.
Water dispenser has not been used
for a long time 'LVSHQVHZDWHUXQWLODOOZDWHULQ
system is replenished
Water system has drained Allow several hours for replenished
supply to chill
Water dispenser does not work* Water supply line turned off or not
connected See Installing the Water Line
:DWHUILOWHUFORJJHGRUILOWHUE\SDVV
plug not installed Replace filter cartridge or remove filter
and install bypass plug**
Air may be trapped in the water
system Press the dispenser arm for at least 5
minutes.
:DWHULQUHVHUYRLULVIUR]HQEHFDXVH
the controls are set too cold Set the refrigerator control to a warmer
VHWWLQJDQGZDLWKRXUV,IWKHZDWHU
does not dispense after 24 hours, call
for service
*Select Models Only
6RPHPRGHOVGRQRWFRPHHTXLSSHGZLWKWKHILOWHUE\SDVVSOXJ7RREWDLQDIUHHE\SDVVSOXJFDOO*(&$5(6,Q&DQDGDFDOO
Troubleshooting Tips... Before you call for service
6DYHWLPHDQGPRQH\5HYLHZWKHFKDUWVRQWKHIROORZLQJSDJHVILUVWDQG\RXPD\QRWQHHGWRFDOOIRUVHUYLFH
46 49-60792-2
*Select Models Only
6RPHPRGHOVGRQRWFRPHHTXLSSHGZLWKWKHILOWHUE\SDVVSOXJ7RREWDLQDIUHHE\SDVVSOXJFDOO*(&$5(6,Q&DQDGDFDOO
Problem Possible Causes What to Do
Water spurting from dispenser* Newly installed filter cartridge Run water from the dispenser for 5
PLQXWHVDERXWJDOORQV
No water or ice cube production* Supply line or shutoff valve is
clogged
Call a plumber
Water filter is clogged Replace filter cartridge or remove filter
and install bypass plug**
)LOWHUFDUWULGJHQRWSURSHUO\LQVWDOOHG Remove and reinstall filter cartridge,
being certain that it locks in place.
,FHPDNHULVWXUQHGRII Check that the ice maker is turned on.
See About the Automatic Ice Maker.
Water is leaking from dispenser* Air may be present in the water line
system, causing water to drip after
being dispensed
'LVSHQVHZDWHUIRUDWOHDVWPLQXWHVWR
remove air from system
AUTO FILLXQGHUILOOQRILOO Not all containers work with
AUTOFILL
Try different container
Error message See page 14
Clean sensor. See page 14.
AUTO FILL overfills* Not all containers work with
AUTO FILL
Try different container
)UHH]HUFRROLQJIUHVKIRRGQRW
cooling
Normal, when refrigerator first
plugged in or after extended power
outage
Wait 24 hours for temperature in both
compartments to reach selected
temperatures.
,FHGLVSHQVHURSHQVDIWHUFORVLQJ
IUHH]HUGUDZHU
Normal The ice dispenser door may open after
FORVLQJIUHH]HUGRRUWRDOORZDFFHVV
Low brewing flow rate There may have been a dent at the
ERWWRPRI.&XSFDXVLQJWKHSLQ
to pierce the filter allowing coffee
grounds clogging the bottom pin
$YRLGXVLQJGDPDJHGGHQWHG.FXSV
and clean the lower needle before next
brew
/RZEUHZLQJIORZUDWHZDWHUGULSV
from inner door
Top needle of the brewer clogged 8QFORJWKHWRSQHHGOHKROHVXVLQJD
paper clip and rinse brewer. Rinse
brewer after every use.
Brewer is not detected or hot water
leaking from top of the brewer
,QFRUUHFWDVVHPEO\RIEUHZHULQWKH
bracket
0DNHVXUHWKH.HXULJ/RJRLVLQWKH
front. Push brewer all the way in the
brackets
Coffee dispensed with splash or
bubble bursting
Blocked vent hole in the brewer Make sure the vent hole at the bottom
of the brewer is clear from food or any
other contamination
Troubleshooting Tips... Before you call for service
TROUBLESHOOTING TIPS
49-60792-2 47
TROUBLESHOOTING TIPS
*Select Models Only
6RPHPRGHOVGRQRWFRPHHTXLSSHGZLWKWKHILOWHUE\SDVVSOXJ7RREWDLQDIUHHE\SDVVSOXJFDOO*(&$5(6,Q&DQDGDFDOO
Problem Possible Causes What to Do
Beverage quality not as expected You may be using non-standard or
RXWGDWHG.&XSV
5HFRPPHQGXVLQJRIILFLDO.HXULJ
.FXSVWKDWDUHQRWSDVWH[SLUDWLRQDQG
have not been damaged
Liquid drips from the brewer after
brewer cycle is completed and the
brewer is removed from the bracket
,WLVSRVVLEOHIRUOLTXLGVWREH
retained by the brewer and drip
when it is removed
8VHDFORWKRUFRQWDLQHUWRFDSWXUHWKH
drips when brewer is removed
'HOD\ZKHQXVLQJ.HXULJ.FXS3RG
dispenser
To ensure a quality beverage is
delivered, a short delay is required
to ensure the refrigerator is
operating correctly
Ensuring consistent, quality operation
requires the refrigerator to delay
dispense for a short period of time
After brewing, my powdered
beverage is not fully cleared from
the used pod
'HSHQGLQJRQVL]HVHOHFWHGWKH
powder may not dissolve fully.
Some powdered beverages develop
into ‘clumps’ when left sitting for
some time
Shake the powdered pods before
brewing to break up these clumps and
DOORZEHWWHUFOHDULQJ)RUSRZGHUHG
beverage with no filter, use the Cocoa
cycle selection
Brewer lid is difficult to close .FXSLVQRWIXOO\VHDWHG 3UHVV.FXSDOOWKHZD\GRZQLQWRWKH
brewer prior to closing the lid. Lower
QHHGOHPXVWSXQFWXUH.FXSEIRUH
closing the brewer lid
Brewer leaks during the brew cycle Trouble in closing brewer lid or
GDPDJHG.FXS
3UHVV.FXSDOOWKHZD\GRZQLQWRWKH
brewer prior to closing the lid. Lower
QHHGOHPXVWSXQFWXUH.FXSEIRUH
closing the brewer lid. Recommend
XVLQJRIILFLDO.HXULJ.FXSVWKDWKDYH
not been damaged and have a good
seal between the top cover and plastic
bottom
Troubleshooting Tips... Before you call for service

48 49-60792-2
TROUBLESHOOTING TIPS/TRUTH OR MYTH
Truth or Myth? Answer Explanation
The refrigerator water filter may require
replacement prior to six months 758( The water filter indicator will indicate the need to replace the water
filter every six months or 170 gallons of water dispensed (select
PRGHOVRQO\:DWHUTXDOLW\YDULHVIURPFLW\WRFLW\,IZDWHUIORZIURP
the dispenser slows, or ice production decreases, the water filter
should be replaced, even though the filter indicator may not indicate
the need for replacement.
The automatic ice maker in my refrigerator will
produce ice when the refrigerator is plugged
into a power receptacle.
MYTH The refrigerator must be connected to water, and the ice maker
must be turned on. Make sure the ice maker is turned on, only after
the water line is connected and water is turned on. The ice maker
can be turned onoff from the controls and ensure the ice maker
is on, as indicated on the refrigerator control panel. See About the
Automatic Ice Maker.
After the refrigerator has been plugged in and
FRQQHFWHGWRZDWHU,ZLOOLPPHGLDWHO\KDYH
unlimited chilled water available from the
water dispenser.
MYTH The water dispenser tank located inside the refrigerator stores water
for dispensing. The water in this tank requires 24 hours to chill after
installation. High usage conditions will not allow time for the water
to chill.
After water dispenses, a few drops of water
are normal. 758( A few drops of water may fall from the dispenser, after the dispenser
SDGGOHKDVEHHQUHOHDVHG7RPLQLPL]HWKHGURSVUHPRYHWKHJODVV
slowly from the dispenser.
,ZLOOQHYHUVHHIURVWLQVLGHWKHIUHH]HU
compartment.
MYTH )URVWLQVLGHWKHIUHH]HUW\SLFDOO\LQGLFDWHVWKDWWKHGRRULVQRW
SURSHUO\VHDOHGRUKDVEHHQOHIWRSHQ,IIURVWLVIRXQGFOHDUWKH
frost using a plastic spatula and towel, then check to ensure that no
IRRGSDFNDJHVRUFRQWDLQHUVDUHSUHYHQWLQJWKHIUHH]HUGRRUIURP
closing. Check the refrigerator control panel to ensure the door
alarm is on.
When the refrigerator is installed, or after
UHSODFLQJWKHZDWHUILOWHU,PXVWGLVSHQVH
water for five minutes.
758(
A newly installed refrigerator or water filter contains air in the water
lines. Press the dispenser paddle and dispense cold water for at
least 5 minutes to remove air from the water line, and flush the filter.
To fill the ice bucket to the maximum capacity,
,VKRXOGGLVSHQVHDQGKRXUVDIWHU
installation.
758( 'LVSHQVLQJFXEHVKRXUVDQGKRXUVDIWHULQVWDOODWLRQ
allows ice to disperse within the ice bucket, which in turns calls on
the ice maker to produce additional ice. Normal ice production =
100 cubes in 24 hours.
,FDQXVHWKHZDWHUILOWHUE\SDVVSOXJWR
determine if the filter requires replacement. 758( 'HFUHDVHLQIORZIURPWKHZDWHUGLVSHQVHURUGHFUHDVHGLFH
SURGXFWLRQPD\LQGLFDWHWKHQHHGWRUHSODFHWKHZDWHUILOWHU,QVWDOO
the water filter bypass plug (provided with the refrigerator on some
PRGHOVDQGFKHFNIORZIURPWKHGLVSHQVHU,IZDWHUIORZUHWXUQVWR
normal with the bypass plug in place, replace the water filter.
The top of the refrigerator doors will always be
aligned.
MYTH Several things can affect the fresh food door alignment, including
WKHIORRUWKHUHIULJHUDWRULVLQVWDOOHGRQDQGORDGLQJRIGRRUV,IWKH
WRSRIWKHIUHVKIRRGGRRUVDUHQRWDOLJQHGXVHD´DOOHQZUHQFK
WRDGMXVWWKHULJKWOHIWKDQGGRRU7KHDGMXVWPHQWVFUHZLVORFDWHG
RQWKHERWWRPULJKWRUOHIWKDQGVLGHRIWKHGRRURSHQWKHIUHH]HU
door to access the screw.
Refrigerator door handles can be easily
tightened. 758( ,IGRRUKDQGOHVDUHORRVHRUKDYHDJDSWKHKDQGOHFDQEHDGMXVWHG
XVLQJD´DOOHQZUHQFKRQVHWVFUHZVORFDWHGRQWKHHQGVRIWKH
handles.
There may be odor and taste problems with
your ice. 758( After starting the ice maker, throw away 24 hours of ice production
to avoid odor and taste problems.
,FDQPDNHILQHDGMXVWPHQWVWRWKHIUHVKIRRG
doors to align them. 758( ,IWKHIUHVKIRRGGRRUVDUHQRWDOLJQHGXVHD´$OOHQZUHQFKWR
adjust the right hand door. The adjustment screw is located on the
ERWWRPRIWKHULJKWOHIWKDQGGRRU2SHQWKHIUHH]HUGRRUWRDFFHVV
Truth or Myth
Truth or Myth
SERVICE
Before you call for service, review the detailed troubleshooting tips in the Owner’s manual.
,IQHHGHGVHUYLFHFDQEHVFKHGXOHGE\YLVLWLQJXVRQOLQHGEAppliances.com or calling
800.GE.CARES 800.432.2737. ,Q&DQDGDYLVLWGEAppliances.ca or call 800.561.3344.

49-60792-2 49
TROUBLESHOOTING TIPS/TRUTH OR MYTH
Truth or Myth? Answer Explanation
'RRUKDQGOHVVKRXOGDOZD\VEHUHPRYHGIRU
installation.
MYTH ,IWKHGRRUVPXVWEHUHPRYHGGRQRWUHPRYHWKHKDQGOHVRULIWKH
refrigerator will fit easily through the passage way opening. Adjust
KDQGOHVWKDWDUHORRVHRUKDYHDJDSE\DGMXVWLQJ´VHWVFUHZV
on either end of handles.
'RRUUHPRYDOLVDOZD\VUHTXLUHGIRU
installation.
MYTH &KHFNFKDUWRQUHYHUVHVLGHRIWKLVLQVWUXFWLRQ'RRUVVKRXOGRQO\EH
removed when necessary to prevent damage from passage way or
access to final location.
Refrigerator doors that won’t close after
installation, can be adjusted to close properly.
758( 'RRUPHFKDQLVPZRUNVEHVWLILQVWDOOHGDW,ILQVWDOOHGDW
remove the door from the mid hinge, and swing the door 180° before
reinstalling. See Reinstalling the Refrigerator Doors.
There is an adjustment to rear wheels. MYTH )URQWOHYHOLQJOHJVDUHDGMXVWDEOHDQGVKRXOGEHXVHGWREDODQFHWKH
refrigerator. Leveling legs are used to make initial fresh food door
adjustment.
Check for leaks after all water connections
are made.
758( While purging the air from the water system, check all water line
connections for leaks. Check the connection to the household water
supply at back of refrigerator, and door water line connect.
Any packaging residue can be cleaned off the
refrigerator using any cleaner.
MYTH 'RQRWXVHZD[SROLVKEOHDFKRURWKHUSURGXFWVFRQWDLQLQJFKORULQH
on Stainless Steel panels, door handles and trim. Check this
LQVWUXFWLRQXQGHU³&OHDQLQJWKH2XWVLGH´IRUIXOOGHWDLOV
6RPHPRGHOVGRQRWFRPHHTXLSSHGZLWKWKHILOWHUE\SDVVSOXJ7RREWDLQDIUHHE\SDVVSOXJFDOO*(&$5(6,Q&DQDGDFDOO
Truth or Myth
Truth or Myth
SERVICE
Before you call for service, review the detailed troubleshooting tips in the Owner’s manual.
,IQHHGHGVHUYLFHFDQEHVFKHGXOHGE\YLVLWLQJXVRQOLQHGEAppliances.com or calling
800.GE.CARES 800.432.2737. ,Q&DQDGDYLVLWGEAppliances.ca or call 800.561.3344.
50 49-60792-2
Ŷ Service trips to your home to teach you how to use
the product.
Ŷ,PSURSHULQVWDOODWLRQGHOLYHU\RUPDLQWHQDQFH
Ŷ)DLOXUHRIWKHSURGXFWLILWLVDEXVHGPLVXVHGRU
used for other than the intended purpose or used
commercially.
Ŷ/RVVRIIRRGGXHWRVSRLODJH
Ŷ5HSODFHPHQWRIKRXVHIXVHVRUUHVHWWLQJRIFLUFXLW
breakers.
Ŷ'DPDJHWRILQLVKVXFKDVVXUIDFHUXVWWDUQLVKRU
small blemishes not reported within 48 hours of
delivery.
Ŷ5HSODFHPHQWRIWKHZDWHUILOWHUFDUWULGJHLI
included, due to water pressure that is outside
the specified operating range or due to excessive
sediment in the water supply.
Ŷ5HSODFHPHQWRIWKHOLJKWEXOEVLILQFOXGHGRU
water filter cartridge, if included, other than as
noted above.
Ŷ'DPDJHWRWKHSURGXFWFDXVHGE\DFFLGHQWILUH
floods or acts of God.
Ŷ,QFLGHQWDORUFRQVHTXHQWLDOGDPDJHFDXVHGE\
possible defects with this appliance.
Ŷ3URGXFWQRWDFFHVVLEOHWRSURYLGHUHTXLUHGVHUYLFH
Ŷ'DPDJHFDXVHGE\DQRQ*($SSOLDQFHV%UDQG
water filter.
What GE Appliances Will Not Cover:
For the Period of: GE Appliances Will Replace
One Year
)URPWKHGDWHRIWKH
original purchase
Any part of the refrigerator which fails due to a defect in materials or workmanship.
'XULQJWKHlimited one-year warranty, GE Appliances will also provide, free of
charge, all labor and related service to replace the defective part.
Thirty Days
:DWHUILOWHULILQFOXGHG
)URPWKHRULJLQDOSXUFKDVH
date of the refrigerator
Any part of the water filter cartridge which fails due to a defect in materials or
ZRUNPDQVKLS'XULQJWKLV limited thirty-day warranty, GE Appliances will also
provide, free of charge, a replacement water filter cartridge.
GE PROFILE™ & GE CAFÉ™ MODELS ONLY
Five Years
)URPWKHGDWHRIWKH
purchase
Any part of the sealed refrigerating system (the compressor, condenser, evaporator
DQDOOFRQQHFWLQJWXELQJZKLFKIDLOVGXHWRDGHIHFWLQPDWHULDOVRUZRUNPDQVKLS
'XULQJWKLVOimited five-year sealed refrigerating system warranty, GE Appliances
will also provide, free of charge, all labor and related service to replace the defective
part in the sealed refrigerating system.
GEAppliances.com
For US Customers, DOOZDUUDQW\VHUYLFHLVSURYLGHGE\RXU)DFWRU\6HUYLFH&HQWHUVRUDQDXWKRUL]HG&XVWRPHU&DUH®
technician. To schedule service online, visit us at www.geappliances.com, or call GE Appliances at 800.GE.CARES
3OHDVHKDYH\RXUVHULDOQXPEHUDQG\RXUPRGHOQXPEHUDYDLODEOHZKHQFDOOLQJIRUVHUYLFH
In Canada, call 800.661.1616.
GE Appliances Refrigerator Warranty
EXCLUSION OF IMPLIED WARRANTIES
Your sole and exclusive remedy is product repair as provided in this Limited Warranty. Any implied warranties,
including the implied warranties of merchantability or fitness for a particular purpose, are limited to one year or the
shortest period allowed by law.
For US Customers: This warranty is extended to the original purchaser and any succeeding owner for products
SXUFKDVHGIRUKRPHXVHZLWKLQWKH86$,IWKHSURGXFWLVORFDWHGLQDQDUHDZKHUHVHUYLFHE\D*($SSOLDQFHV$XWKRUL]HG
Servicer is not available, you may be responsible for a trip charge or you may be required to bring the product to an
$XWKRUL]HG*($SSOLDQFHV6HUYLFHORFDWLRQIRUVHUYLFH,Q$ODVNDWKHZDUUDQW\H[FOXGHVWKHFRVWRIVKLSSLQJRUVHUYLFH
calls to your home.
Some states do not allow the exclusion or limitation of incidental or consequential damages. This warranty gives you
specific legal rights, and you may also have other rights which vary from state to state. To know what your legal rights
are, consult your local or state consumer affairs office or your state’s Attorney General.
Warrantor: GE Appliances, a Haier company
For Customers in Canada: This warranty is extended to the original purchaser and any succeeding owner for
SURGXFWVSXUFKDVHGLQ&DQDGDIRUKRPHXVHZLWKLQ&DQDGD,QKRPHZDUUDQWVHUYLFHZLOOEHSURYLGHGLQDUHDVZKHUH
it is available and deemed reasonable by Mabe to provide.
Warrantor Canada: MC Commercial, Burlington, Ontario, L7R 5B6
Servicing your refrigerator may require the use of the onboard data port for diagnostics. This gives a GE
Appliances Factory Service technician the ability to quickly diagnose any issues with your appliance and
helps GE Appliances improve its products by providing GE Appliances with information on your appliance.
If you do not want your appliance data to be sent to GE Appliances, please advise your technician NOT to
submit the data to GE Appliances at the time of service.
Staple your receipt here. Proof of the original purchase
date is needed to obtain service under the warranty. WARRANTY

49-60792-2 51
RPWFE Water Filter Cartridge Limited Warranty
Contact us at www.geapplianceparts.com,
or call 800.GE.CARES.
This warranty is extended to the original purchaser and any succeeding owner for products purchased for
home use within the U.S.A. In Alaska, the warranty excludes the cost of shipping or service calls to your home.
Some states do not allow the exclusion or limitation of incidental or consequential damages. This warranty
gives you specific legal rights, and you may also have other rights which vary from state to state. To know
what your legal rights are, consult your local or state consumer affairs office or your state’s Attorney General.
For Purchases Made In Iowa: This form must be signed and dated by the buyer and seller prior to the
consummation of this sale.
This form should be retained on file by the seller for a minimum of two years.
Buyer:
Name
Address
City State Zip
Signature Date
Seller:
Name
Address
City State Zip
Signature Date
For The Period Of: We Will Replace, At No Charge To You:
Thirty Days
From the date of the
original purchase
Any part of the water filter cartridge which fails due to a defect in materials or
workmanship during this limited thirty-day warranty.*
What is Not Covered:
• Service trips to your home to teach you how to use the product.
• Improper installation.
• Failure of the product if it is abused, misused, used for other than the intended
purpose or used commercially.
• Replacement of house fuses or resetting of circuit breakers.
• Replacement of the water filter cartridge due to water pressure that is outside the
specified operating range or due to excessive sediment in the water supply.
• Damage to the product caused by accident, fire, floods or acts of God.
• Incidental or consequential damage caused by possible defects with this appliance.
Staple your receipt
here. Proof of the
original purchase
date is needed to
obtain service
under the warranty.
Appliance Service
800-GE-CARES
GE
Appliances
* If your GE Appliances part fails because of a manufacturing defect within thirty days from the date of original purchase for use, we will give you a new or, at our option, a rebuilt part without charge.
Return the defective part to the parts supplier from whom it was purchased together with a copy of the “proof of purchase” for the part. If the part is defective and shows no signs of abuse,
it will be exchanged. The warranty does not cover the failure of parts which are damaged while in your possession, are abused, or have been installed improperly. It does not cover the cost
of returning the part to the supplier from whom it was purchased nor does it cover the cost of labor to remove or install it to diagnose the fault. It does not cover parts used in products in
commercial use except in the case of air conditioning equipment. In no event shall GE Appliances be liable for consequential damages. Warrantor: GE Appliances, a Haier company
EXCLUSION OF IMPLIED WARRANTIES: Your sole and exclusive remedy is part exchange as provided in this Limited Warranty. Any implied warranties, including the implied warranties of
merchantability or fitness for a particular purpose, are limited to six months or the shortest period allowed by law.
52 49-60792-2
Performance Data Sheet
Model: GE Appliances RPWFE
Use Replacement Cartridge RPWFE.
The concentration of the indicated substances in water entering the system was reduced to a concentration less than or equal to the permissible
limit for water leaving the system as specified in NSF/ANSI Standard 42 and Standard 53. System tested and certified by NSF International against
NSF/ANSI Standard 42 and Standard 53 for the reduction of substances listed below.
The following pharmaceutical reduction claims have not been certified by NSF International. Claims tested and verified
by independent laboratory:
Substance
Reduction Average Influent NSF specified
Challenge Concentration Avg %
Reduction Average Product Water
Concentration
Max Permissible
Product Water
Concentration NSF
Test Report
Atenolol 1088 ng/L N/A 99.5% 5.0 ng/L N/A J-00103221
Fluoxetine 845 ng/L N/A 99.4% 5.0 ng/L N/A J-00103221
Ibuprofen 898 ng/L N/A 98.8% 9.9 ng/L N/A J-00103726
Progesterone 945 ng/L N/A 99.4% 5.5 ng/L N/A J-00103727
Trimethoprim 403 ng/L N/A 99.5% 2.0 ng/L N/A J-00103221
It is essential that the manufacturer’s recommended installation, maintenance and filter replacement requirements be carried out for the product to perform
as advertised.
See Installation Manual for Warranty information.
Application Guidelines/Water Supply Parameters
Service Flow 0.5 gpm (1.89 lpm)
Water Supply Potable Water
Water Pressure 25-120 psi (172– 827 kPa)
Water Temperature 33º F - 100º F (0.6º C - 38º C)
NOTE: While the testing was performed under standard laboratory conditions,
actual performance may vary.
Replacement Cartridge: RPWFE. For estimated costs of replacement elements
please call 1-800-626-2002 or visit our website at www.geapplianceparts.com.
To reduce the risk associated with ingestion of contaminants:
• Do not use with water that is microbiologically unsafe or of unknown
quality without adequate disinfection before and after the system.
Systems certified for cyst reduction may be used on disinfected water that may
contain filterable cysts. EPA Establishment Number 070595-MEX-001.
NOTICE
To reduce the risk of water leakage or flooding, and to ensure optimal filter
performance:
• Read and follow use instructions before installation and use of this system.
• Installation and use MUST comply with all state and local plumbing codes.
• Do not install if water pressure exceeds 120 psi (827 kPa). If your water pressure
exceeds 80 psi (552 kPa), you must install a pressure-limiting valve. Contact
a plumbing professional if you are uncertain how to check your water pressure.
• Do not install where water hammer conditions may occur. If water hammer
conditions exist you must install a water hammer arrester. Contact a plumbing
professional if you are uncertain how to check for this condition.
• Do not install on hot water supply lines. The maximum operating water
temperature of this filter system is 100º F (38º C).
• Protect filter from freezing. Drain filter when temperatures drop
below 33ºF (0.6ºC).
•
a noticeable reduction in water flow rate.
•
lead to reduced filter performance and cracks in the filter housing, causing water
leakage or flooding.
Capacity 170 Gallons (643.5 Liters). Contaminant Reduction Determined by NSF testing.
Substance Tested
for Reduction Average Influent NSF specified
Challenge Concentration Avg %
Reduction
Average Product
Water
Concentration
Max Permissible
Product Water
Concentration
NSF Reduction
Requirements
NSF
Test Report
Chlorine Taste and Odor
2.0 mg/L 2.0 mg/L ± 10% 97.4% 0.05 mg/L N/A ≥50% J-00102044
Nominal Particulate
Class I, , ≥0.5 to < 1.0 µm
7,633,333 pts/mL At least 10,000 particles/mL 99.0% 71,850 pts/ml N/A ≥85% J-00106249
Asbestos 109 MFL 107 to 108
fibers/L; fibers
greater than 10µm in length 99.99% <1 MFL N/A ≥99% J-00102069
Atrazine 0.009 mg/L 0.009 mg/L ± 10% 94.4% 0.0005 mg/L 0.003 mg/L N/A J-00102058
Benzene 0.016 mg/L 0.015 mg/L ± 10% 96.4% 0.001 mg/L 0.005 mg/L N/A J-00102065
Carbofuran 0.08 mg/L 0.08 mg/L ± 10% 98.8% 0.001 mg/L 0.04 mg/L N/A J-00102059
Cyst* 104,750 cysts/L Minimum 50,000 cysts/L 99.99% 3 cyst/L N/A ≥99.95% J-00102057
Lead pH @6.5 0.140 mg/L 0.15 mg/L ± 10% 99.3% 0.001 mg/L 0.010 mg/L N/A J-00102052
Lead pH @8.5 0.158 mg/L 0.15 mg/L ± 10% 98.3% 0.002 mg/L 0.010 mg/L N/A J-00102053
Mercury @ pH 6.5 0.006 mg/L 0.006 mg/L ± 10% 91% 0.0003 mg/L 0.002 mg/L N/A J-00102054
Mercury @ pH 8.5 0.006 mg/L 0.006 mg/L ± 10% 88.3%% 0.0007 mg/L 0.002 mg/L N/A J-00104087
Lindane 0.002 mg/L 0.002 mg/L ± 10% 99% 0.00002 mg/L 0.0002 mg/L N/A J-00102063
P-Dichlorobenzene 0.222 mg/L 0.225 mg/L ± 10% 99.8% 0.0005 mg/L 0.075 mg/L N/A J-00102067
Toxaphene 0.015 mg/L 0.015 mg/L ± 10% 93.5% 0.001 mg/L 0.003 mg/L N/A J-00102061
2, 4-D Reduction 0.218 mg/L 0.210 mg/L±10% 99.9% 0.0001 mg/L 0.07 mg/L N/A J-00102064
VOC 0.278 mg/L 0.300 mg/L ± 10% 97.7% 0.0015 mg/L N/A ≥95% J-00102070
*Based on the use of Cryptosporidium parvum oocysts.
REPLACEMENT
ELEMENT
Tested and certified by NSF International
against NSF/ANSI Standard 42 and Standard 53
in model GE Appliances RPWF and GE Appliances
RPWFE for the reduction of the claims specified
on the performance data sheet. RPWFE
WARNING

49-60792-2 53
NOTES
Notes

54 49-60792-2
3ULQWHGLQ8QLWHG6WDWHV
Consumer Support
CONSUMER SUPPORT
GE Appliances Website
+DYHDTXHVWLRQRUQHHGDVVLVWDQFHZLWK\RXUDSSOLDQFH"7U\WKH*($SSOLDQFHV:HEVLWHKRXUVDGD\DQ\GD\RIWKH\HDU
You can also shop for more great GE Appliances products and take advantage of all our on-line support services designed for
\RXUFRQYHQLHQFH,QWKH86GEAppliances.com ,Q&DQDGDGEAppliances.ca
Register Your Appliance
5HJLVWHU\RXUQHZDSSOLDQFHRQOLQHDW\RXUFRQYHQLHQFH7LPHO\SURGXFWUHJLVWUDWLRQZLOODOORZIRUHQKDQFHGFRPPXQLFDWLRQDQG
prompt service under the terms of your warranty, should the need arise. You may also mail in the pre-printed registration card
included in the packing material.
,QWKH86GEAppliances.com/register
,Q&DQDGDProdsupport.mabe.ca/crm/Products/ProductRegistration.aspx
Schedule Service
Expert GE Appliances repair service is only one step away from your door. Get on-line and schedule your service at your
FRQYHQLHQFHDQ\GD\RIWKH\HDU,QWKH86GEAppliances.com/service or call 800.432.2737 during normal business hours.
,Q&DQDGDGEAppliances.ca/en/support/service-request or call 800.561.3344
Extended Warranties
Purchase a GE Appliances extended warranty and learn about special discounts that are available while your warranty is still
LQHIIHFW<RXFDQSXUFKDVHLWRQOLQHDQ\WLPH*($SSOLDQFHV6HUYLFHVZLOOVWLOOEHWKHUHDIWHU\RXUZDUUDQW\H[SLUHV,QWKH86
GEAppliances.com/extended-warranty or call 800.626.2224 during normal business hours.
,Q&DQDGDGEAppliances.ca/en/support/purchase-extended-warranty or call 866.277.9842.
Parts and Accessories
,QGLYLGXDOVTXDOLILHGWRVHUYLFHWKHLURZQDSSOLDQFHVFDQKDYHSDUWVRUDFFHVVRULHVVHQWGLUHFWO\WRWKHLUKRPHV
9,6$0DVWHU&DUGDQG'LVFRYHUFDUGVDUHDFFHSWHG2UGHURQOLQHWRGD\KRXUVHYHU\GD\
,QWKH86GEApplianceparts.com or by phone at 877.959.8688 during normal business hours.
Instructions contained in this manual cover procedures to be performed by any user. Other servicing generally should
be referred to qualified service personnel. Caution must be exercised, since improper servicing may cause unsafe
operation.
Customers in Canada should consult the yellow pages for the nearest Mabe service center, visit our website at
GEAppliances.ca/en/products/parts-filters-accessories or call 800.661.1616.
Contact Us
,I\RXDUHQRWVDWLVILHGZLWKWKHVHUYLFH\RXUHFHLYHIURP*($SSOLDQFHVFRQWDFWXVRQRXU:HEVLWHZLWKDOOWKHGHWDLOVLQFOXGLQJ
your phone number, or write to:
,QWKH86*HQHUDO0DQDJHU&XVWRPHU5HODWLRQV_*($SSOLDQFHV$SSOLDQFH3DUN_/RXLVYLOOH.<
GEAppliances.com/contact
,Q&DQDGD'LUHFWRU&RQVXPHU5HODWLRQV0DEH&DQDGD,QF_6XLWH)DFWRU\/DQH_0RQFWRQ1%(&0
GEAppliances.ca/en/contact-us

*Modelos Selectos Únicamente
INSTRUCCIONES
DE SEGURIDAD ................. 3
INSTRUCCIONES
DE FUNCIONAMIENTO
Funciones .......................... 6
Controles ........................... 9
Dispensador ........................13
Autollenado* ........................14
Cafetera Personal* ...................15
Acerca de la Comunicación
del Electrodoméstico ..............16
Filtro de Agua .......................17
Opciones de Almacenamiento
de Comidas Frescas ...............18
Climate Zone y Cajón
de Temperatura Controlada .......20
Freezer ............................ 22
Máquina de Hacer Hielo Automática . . 23
CUIDADO Y LIMPIEZA ........ 24
Reemplazo de las Luces ............. 25
INSTRUCCIONES DE INSTALACIÓN
Preparación para Instalar
el Refrigerador ................... 26
Instalación del Refrigerador .......... 28
Instalación del Suministro de Agua ....41
CONSEJOS PARA LA SOLUCIÓN
DE PROBLEMAS ............45
Condiciones de Funcionamiento
Normal ..........................44
Servicio Técnico – Verdad o Mito .....48
GARANTÍA .....................50
SOPORTE AL CLIENTE
Certificado Limitado del Dispositivo del
Cartucho del Filtro de Agua RPWFE . . .51
Ficha Técnica de Rendimiento ........ 52
Soporte al Cliente .................. 56
Escriba los números de modelo y
de serie aquí:
Nº de Modelo ____________
Nº de Serie ______________
Busque estos números en una
etiqueta del lado izquierdo,
cerca de la parte intermedia del
compartimiento del refrigerador.
MANUAL DEL
PROPIETARIO E
INSTRUCCIONES
DE INSTALACIÓN
REFRIGERADORES
Congelador Inferior
GE es una marca registrada de General Electric Company. Fabricado bajo licencia de marca.
Modelos GE Café™ y GE Profile™
Los modelos que comienzan con
las letras DFE, GFE, GNE, PFH,
PFE, PFD y GFD son Modelos con
Profundidad Estándar (SD)
Los modelos que comienzan con las
letras GYE, PYE, DYE, CYE, PWE,
CWE, ZWE y PYD son Modelos con
Profundidad de Mesada (CD)
49-60792-2 02-18 GEA

249-60792-2
GRACIAS POR HACER QUE GE APPLIANCES SEA PARTE DE SU HOGAR.
Ya sea que haya crecido usando GE Appliances, o que ésta es su primera vez, nos complace
tenerlo en la familia.
Sentimos orgullo por el nivel de arte, innovación y diseño de cada uno de los electrodomésticos de
GE Appliances, y creemos que usted también. Entre otras cosas, el registro de su electrodoméstico
asegura que podamos entregarle información importante del producto y detalles de la garantía
cuando los necesite.
Registre su electrodoméstico GE ahora a través de Internet. Sitios Web y números telefónicos útiles
están disponibles en la sección de Soporte para el Consumidor de este Manual del Propietario.
También puede enviar una carta en la tarjeta de inscripción preimpresa que se incluye con
el material embalado.
49-60792-2 3
ADVERTENCIAS DE LA PROPOSICIÓN 65 DEL ESTADO DE CALIFORNIA
ADVERTENCIA Este producto contiene uno o más químicos que el Estado de California entiende que producen
cáncer y defectos en el nacimiento u otros daños reproductivos.
PRECAUCIÓN A fin de reducir el riesgo de lesiones al usar el refrigerador, siga estas precauciones
básicas.
Ŷ 1ROLPSLHHVWDQWHVGHYLGULRQLWDSDVFRQDJXDFDOLHQWH
cuando estén fríos. Los estantes de vidrio y las tapas
se pueden romper si son expuestos a cambios de
temperatura repentinos o impactos, tales como sacudones
o caídas. El vidrio templado está diseñado para destruirse
en pequeñas piezas en caso de rotura.
Ŷ 0DQWHQJDORVGHGRVIXHUDGHORVHVSDFLRVGH³ULHVJRGH
lastimaduras”; los despejes entre las puertas y entre las
puertas y el gabinete son necesariamente pequeños.
Tenga el cuidado de cerrar las puertas cuando los niños
se encuentren en el área.
Ŷ 1RWRTXHODVVXSHUILFLHVIUtDVGHOFRPSDUWLPLHQWRGHO
freezer cuando las manos estén húmedas o mojadas,
ya que la piel se podrá adherir a estas superficies
extremadamente frías.
Ŷ 1RYXHOYDDFRQJHODUFRPLGDVTXHKD\DQHVWDGR
totalmente congeladas en forma previa.
Ŷ (QUHIULJHUDGRUHVFRQPiTXLQDVGHKDFHUKLHOR
automáticas, evite el contacto con las partes móviles del
mecanismo eyector o con el elemento de calefacción que
OLEHUDORVFXERV1RFRORTXHORVGHGRVQLODVPDQRVHQHO
mecanismo de la máquina de hielo automática mientras el
refrigerador esté enchufado.
INFORMACIÓN DE SEGURIDAD
LEA Y GUARDE ESTAS INSTRUCCIONES
INFORMACIÓN IMPORTANTE DE SEGURIDAD
LEA TODAS LAS INSTRUCCIONES ANTES DE USAR
INSTALACIÓN
ADVERTENCIA RIESGO DE EXPLOSIÓN
Mantenga cualquier material y vapores inflamables, tales como gasolina, alejados del refrigerador. Si no se cumple con esto
se podrá producir una explosión, incendio o la muerte.
ADVERTENCIA RIESGO DE CAÍDA
Los modelos con estilo incorporado (modelo PYE, CYE, GYE, PWE, CWE, PYD, y ZWE son inestables, especialmente con las
puertas abiertas. Estos modelos deben ser asegurados con el soporte anti-volcaduras, a fin de evitar caídas hacia adelante,
que podrían resultar en la muerte o lesiones graves. Lea y siga las instrucciones de instalación en su totalidad, a fin de instalar
el soporte de piso anti-volcaduras embalado con su refrigerador.
ADVERTENCIA A fin de reducir el riesgo de incendio, explosión, descargas eléctricas o lesiones al usar
su refrigerador, siga estas precauciones básicas de seguridad:
Ŷ (VWHUHIULJHUDGRUVHGHEHUiLQVWDODU\XELFDU
adecuadamente de acuerdo con las Instrucciones de
Instalación antes de ser usado.
Ŷ 'HVHQFKXIHHOUHIULJHUDGRUDQWHVGHKDFHUUHSDUDFLRQHV
reemplazar una lámpara de luz o hacer una limpieza.
1RWD/DFRUULHQWHTXHYDDOUHIULJHUDGRUQRSXHGHVHU
desconectada por ninguna configuración del panel de
control.
1RWD/DVUHSDUDFLRQHVGHEHUiQVHUUHDOL]DGDVSRUXQ
Profesional del Servicio Técnico calificado.
Ŷ 5HHPSODFHWRGDVODVSLH]DV\SDQHOHVDQWHVGHOXVR
Ŷ 1RXVHXQSURORQJDGRU
Ŷ 1RJXDUGHQLXVHJDVROLQDXRWURVYDSRUHVLQIODPDEOHV\
líquidos cerca de este ni de otro electrodoméstico.
Ŷ 1RJXDUGHVXVWDQFLDVH[SORVLYDVWDOHVFRPRODWDV
de aerosoles con propelentes inflamables en este
electrodoméstico.
Ŷ $ILQGHHYLWDUULHVJRVGHTXHORVQLxRVVXIUDQDVIL[LDR
queden atrapados, retire las puertas de comidas frescas y
del freezer de cualquier refrigerador antes de deshacerse
o dejar de usar el mismo.
Ŷ /RVQLxRV\ODVSHUVRQDVFRQFDSDFLGDGItVLFD
sensorial o mental reducida o con falta de experiencia y
conocimiento podrán usar este electrodoméstico sólo si
son supervisados o les fueron dadas instrucciones sobre
un uso seguro y entienden los riesgos involucrados.
Ŷ (VWHHOHFWURGRPpVWLFRIXHGLVHxDGRSDUDXVRKRJDUHxR
y para aplicaciones similares tales como: áreas de
personal de cocina en tiendas, oficinas y otros espacios
laborales; casas de campo; por clientes en hoteles,
moteles, hostales y otros espacios residenciales, catering
y aplicaciones no minoristas similares.
449-60792-2
INFORMACIÓN DE SEGURIDAD
INFORMACIÓN IMPORTANTE DE SEGURIDAD
LEA TODAS LAS INSTRUCCIONES ANTES DE USAR
LEA Y GUARDE ESTAS INSTRUCCIONES
CONEXIÓN DE LA ELECTRICIDAD
Nunca, bajo ninguna circunstancia, corte o elimine el tercer cable (tierra) del cable de corriente. Para su seguridad
personal, este electrodoméstico debe estar adecuadamente conectado a tierra.
El cable de corriente de este electrodoméstico contiene un
enchufe de 3 cables (conexión a tierra) que se conecta a un
tomacorriente de pared estándar de 3 cables (conexión a
tierra) para minimizar la posibilidad de riesgos de descargas
eléctricas por parte del mismo.
Contrate a un electricista calificado para que controle el
tomacorriente y el circuito eléctrico, a fin de asegurar que el
enchufe esté correctamente conectado a tierra.
En caso de contar con un tomacorriente de pared de 2
cables, es su responsabilidad y obligación reemplazarlo
por un tomacorriente de pared de 3 cables correctamente
FRQHFWDGRDWLHUUD1RXVHXQDGDSWDGRU
El refrigerador debería estar siempre conectado a un enchufe
específico con un índice de voltaje equivalente al que figura
en su etiqueta de características técnicas.
Se requiere un suministro eléctrico con fusible y conexión
a tierra de 115 voltios de CA, 60 Hz, 15 o 20 amperes.
Esto garantiza el mejor funcionamiento y además previene
la sobrecarga de los circuitos del hogar, lo cual podría
ocasionar riesgos de incendio debido al recalentamiento de
cables.
1XQFDGHVHQFKXIHHOUHIULJHUDGRUWLUDQGRGHOFDEOHGH
corriente. Siempre tome su enchufe firmemente y empuje el
mismo hacia afuera para retirarlo.
Repare o reemplace de inmediato todos los cables de
FRUULHQWHSHODGRVRFRQFXDOTXLHUWLSRGHGDxR1RXVH
un cable con cortaduras o abrasión sobre su extensión o
extremos.
Al alejar el refrigerador de la pared, se deberá tener cuidado
de que no ruede sobre ni dañe el cable de corriente.
ADVERTENCIA RIESGO DE DESCARGA ELÉCTRICA
Enchufe en un tomacorriente con conexión a tierra de 3 cables.
1RHOLPLQHHOFDEOHGHFRQH[LyQDWLHUUD
1RXVHXQDGDSWDGRU
1RXVHXQSURORQJDGRU
Si no se siguen estas instrucciones se podrá producir a muerte, incendios o descargas eléctricas.
ADVERTENCIA PELIGRO DE SUFFOCATION Y ENTRAPMENT
El incumplimiento de estas instrucciones de eliminación puede causar la muerte o lesiones graves.
IMPORTANTE: Que un niño quede atrapado o que sufra
una asfixia no son problemas del pasado. Los refrigeradores
antiguos o abandonados aún son peligrosos, incluso aunque
VHFRQVHUYHQSRU³VyORXQRVSRFRVGtDV´6LVHGHVKDUiGHVX
antiguo refrigerador, siga las siguientes instrucciones a fin de
evitar accidentes.
Antes de Descartar su Antiguo Aparato:
Ŷ Retire las puertas de comidas frescas y del freezer.
Ŷ Deje los estantes en su lugar de modo que los niños no
puedan trepar dentro con facilidad.
Cómo Eliminar Refrigerantes y Gomaespumas:
Descarte el electrodoméstico de acuerdo con las Regulaciones Federales y Locales. El material aislante inflamable usado
requiere procedimientos de descarte especiales. Comuníquese con las autoridades locales para descartar su electrodoméstico
de forma ambientalmente segura.
49-60792-2 5
Use este electrodoméstico sólo para su propósito original, como se describe en el Manual del
Propietario. A fin de reducir el riesgo de quemaduras severas, lesiones por escaldadura, o la muerte al
usar el dispensador de agua caliente, se deberán seguir las siguientes instrucciones:
Ŷ1RSHUPLWDTXHORVQLxRVXVHQHODJXDFDOLHQWHGHO
dispensador.
Ŷ El agua proveniente del dispensador está muy
caliente. Tenga extremo cuidado al dispensar y
beber agua. Espere a que el agua se enfríe hasta
que sea posible beberla antes de tomarla.
Ŷ 4 Al dispensar agua por debajo de los 51.67ºC
(125ºF), siempre controle la temperatura del agua
antes de beber la misma.
Ŷ Al dispensar agua caliente, el recipiente puede
alcanzar una temperatura muy alta. Use un
recipiente con aislante de temperatura tal como
cerámica o gomaespuma. El uso de materiales para
envases tales como el papel o el plástico pueden
resultar en una quemadura al sostener la taza.
1RXVHHQYDVHVGHYLGULR\DTXHORVFDPELRVGH
temperatura pueden hacer que el envase se rompa y
produzca escaldaduras o laceraciones.
Ŷ1RXVHFRQDJXDTXHQRVHDVHJXUDDQLYHO
microbiológico o de calidad desconocida.
Ŷ Mantenga la taza o el recipiente cerca del punto
desde donde se dispensa, a fin de minimizar
salpicaduras de agua caliente que podrían tomar
contacto con su mano. .
Ŷ Un cartucho del filtro de agua instalado en forma
reciente hará que chorree agua del dispensador.
Deje correr 7.57 litros (2 galones) de agua a través
del dispensador de agua fría (aproximadamente 5
minutos) a fin de eliminar el aire del sistema. Hasta
que el aire sea eliminado del sistema a través del
GLVSHQVDGRUGHDJXDIUtD12XVHHOGLVSHQVDGRUGH
agua caliente ya que puede hacer que chorree agua
caliente y ocasionar escaldaduras con agua caliente.
Ŷ Al usar la función de agua caliente por primera vez,
confirme si vive por encima de los 1524 meters
(5000 pies) (altitud alta). Esto limita la temperatura
del sistema de agua caliente a fin de evitar el
hervor. Para acceder a la sección de altitud elevada,
presione las telcas Fridge (Refrigerador) y Door
Alarm (Alarma de la Puerta) y el control pasará de Hi
AL (Alt. Elevada) a Lo AL (Alt. Baja) (altitud elevada
a altitud baja).
Ŷ El dispensador de agua caliente está diseñado para
GLVSHQVDUDJXD~QLFDPHQWH1RLQWHQWHFDOHQWDUR
GLVSHQVDUQLQJXQDRWUDFRVDTXHQRVHDDJXD1R
intente desensamblar o limpiar el tanque.
Ŷ El tanque para dispensar agua caliente no está
presurizado, y cuenta con una ventilación en el
WDQTXH\XQDVDOLGDGHOWXERSDUDGLVSHQVDU1R
modifique el sistema, ni cierre o bloquee el tubo
para dispensar, ni conecte cualquier otro dispositivo
al tanque o tubo para dispensar. Hacer esto podrá
conducir a la ruptura del tanque y escaldaduras con
agua caliente.
CONEXIÓN DE LA ELECTRICIDAD
ADVERTENCIA RIESGO DE ESCALDADURA
El dispensador de agua caliente puede calentar agua a una temperatura de aproximadamente 185ºF (85ºC). Las
temperaturas del agua superiores a los 125º F (52º C) pueden ocasionar quemaduras graves o la muerte por escaldadura.
Los niños, las personas incapacitadas y los mayores presentan el mayor riesgo de sufrir escaldaduras.
INFORMACIÓN IMPORTANTE DE SEGURIDAD
LEA TODAS LAS INSTRUCCIONES ANTES DE USAR
INFORMACIÓN DE SEGURIDAD
LEA Y GUARDE ESTAS INSTRUCCIONES

649-60792-2
Funciones
OPERACIÓN DEL REFRIGERADORE: Funciones
Máquina de hacer hielo con ahorro de espacio*
La máquina de hacer hielo y el recipiente están ubicados
en la puerta, creando un espacio de almacenamiento con
mayor uso.
Luz LED de exhibición
La luz LED está posicionada a través del interior para
iluminar áreas del refrigerador. Las luces LED están
ubicadas debajo de la puerta de comidas frescas para
iluminar el freezer cuando se abra.
Bandeja desplegable*
Permite un almacenamiento adicional en la puerta cuando
lo necesite y se guarda cuando no.
Cajón con control de temperatura electrónica de ancho
completo (en algunos modelos)
Recipiente con control de temperatura ajustable que puede
ubicar artículos más grandes.
Recipiente de lácteos
Compartimiento aparte para sus productos.
Cubo de hielo/ Máquina de hielos*
Máquina de hielos con cubos de almacenamiento de
hielo..
Estante de QuickSpaceT™ *
Funciona como un estante normal de tamaño completo
cuando lo necesite y se desliza fácilmente hacia adentro
para guardar artículos altos en la parte inferior.
Estantes a prueba de derrames
Diseñados para capturar derrames y permitir una limpieza
más fácil.
Tapete Antideslizante
Revestimiento que captura los derrames, evita el
desplazamiento de los envases cuando la puerta es
abierta y se puede retirar fácilmente para su limpieza.
Recipiente con puerta desmontable
Puede ser retirado cuando haya una pared que limite la
apertura de la puerta.
Recipiente de Climate zone (área climática)
Recipientes aparte para almacenar productos alimenticios.
Filtro de agua
Filtra agua y hielo
*Modelos Selectos Únicamente
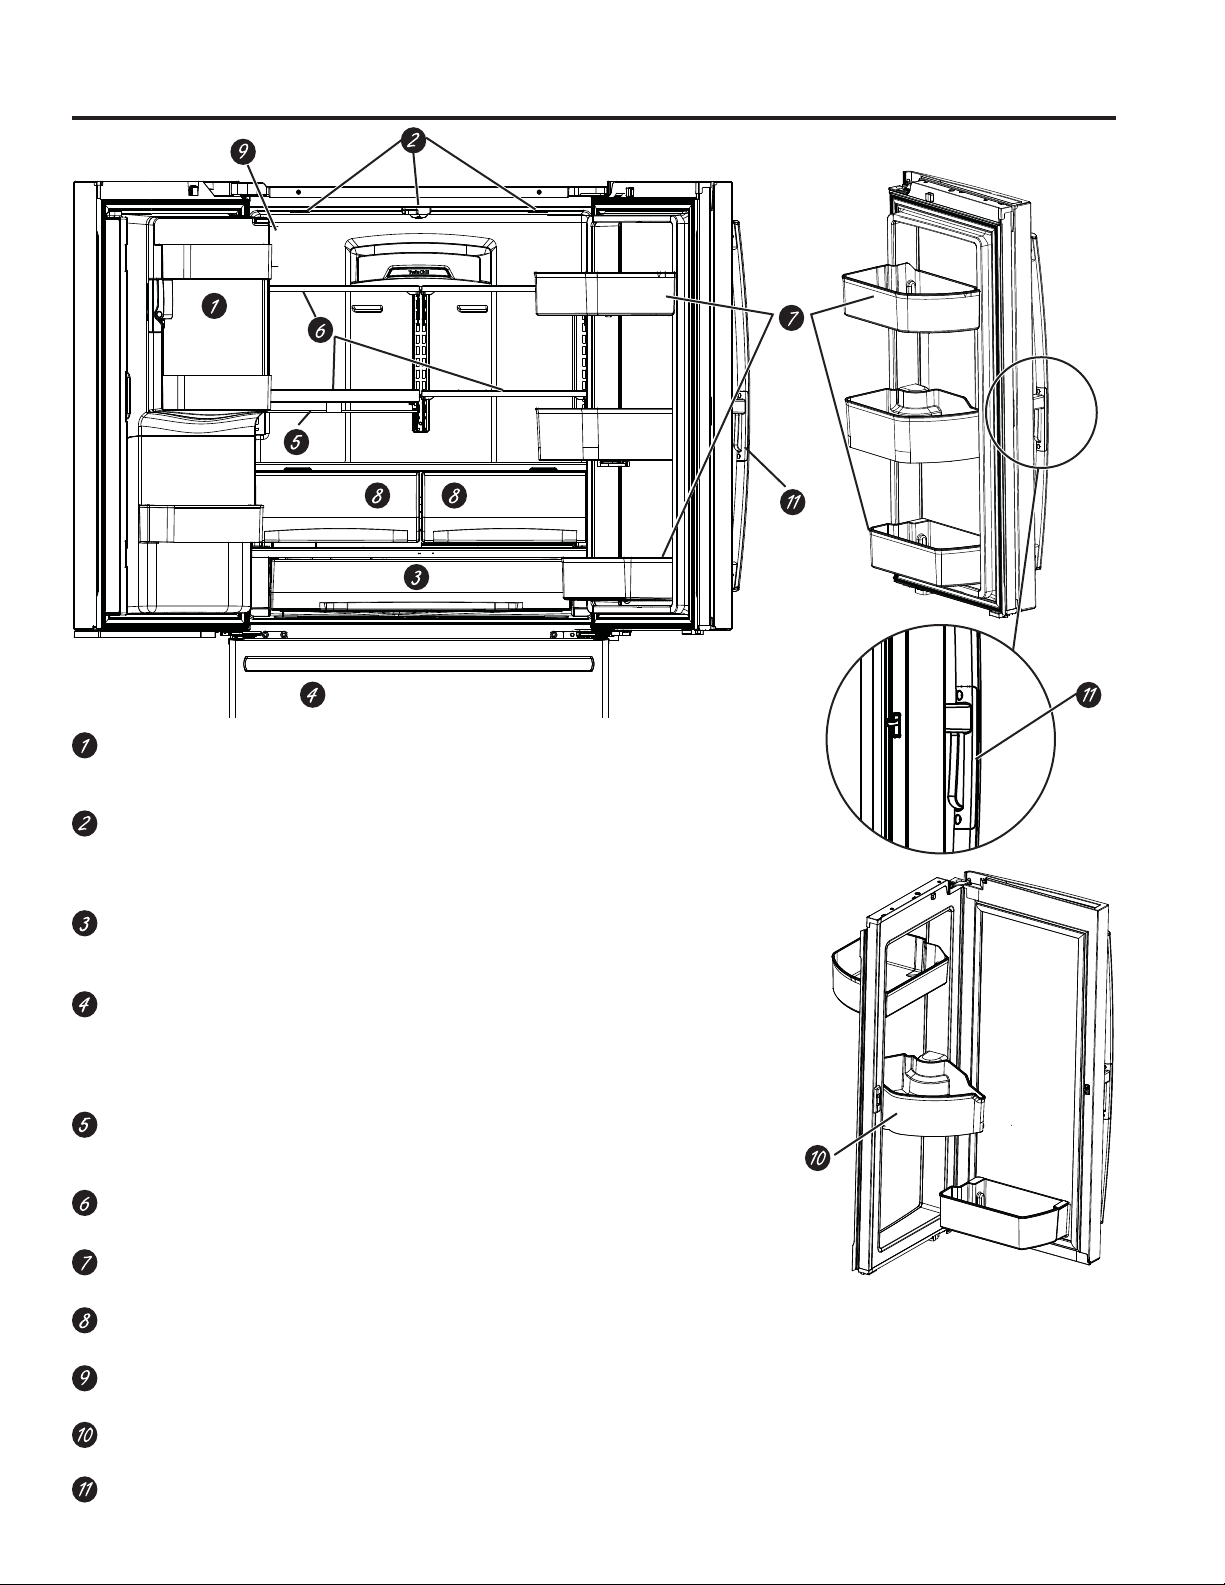
49-60792-2 7
*Modelos Selectos Únicamente
Funciones
OPERACIÓN DEL REFRIGERADORE: Funciones
Máquina de hacer hielo con ahorro de espacio*
La máquina de hacer hielo y el recipiente están ubicados en la puerta, creando un
espacio de almacenamiento con mayor uso.
Luz LED de exhibición
La luz LED está posicionada a través del interior para iluminar áreas del refrigerador.
Las luces LED están ubicadas debajo de la puerta de comidas frescas para iluminar
el freezer cuando se abra.
Cajón con control de temperatura electrónica de ancho completo
Recipiente con control de temperatura ajustable que puede ubicar artículos más
grandes.
Máquina de Hielos/ Hielera del Freezer*
Una máquina de hielos en ambos compartimientos le brinda más hielo cuando usted
lo necesite.
Disponible en modelos Sin Dispensador; también disponible como un kit en algunos
modelos.
Estante de QuickSpaceT™ *
Funciona como un estante normal de tamaño completo cuando lo necesite y se
desliza fácilmente hacia adentro para guardar artículos altos en la parte inferior.
Estantes a prueba de derrames
Diseñados para capturar derrames y permitir una limpieza más fácil.
Recipiente con puerta desmontable
Puede ser retirado cuando haya una pared que limite la apertura de la puerta.
Recipiente de Climate zone
Recipientes aparte para almacenar productos alimenticios.
Filtro de agua
Filtra agua y hielo
Bandeja Giratoria*
Puede ser rotada para un fácil acceso.
Traba para Puerta en la Puerta*
Presione la traba desde el lado inferior de la manija para abrir la puerta externa.
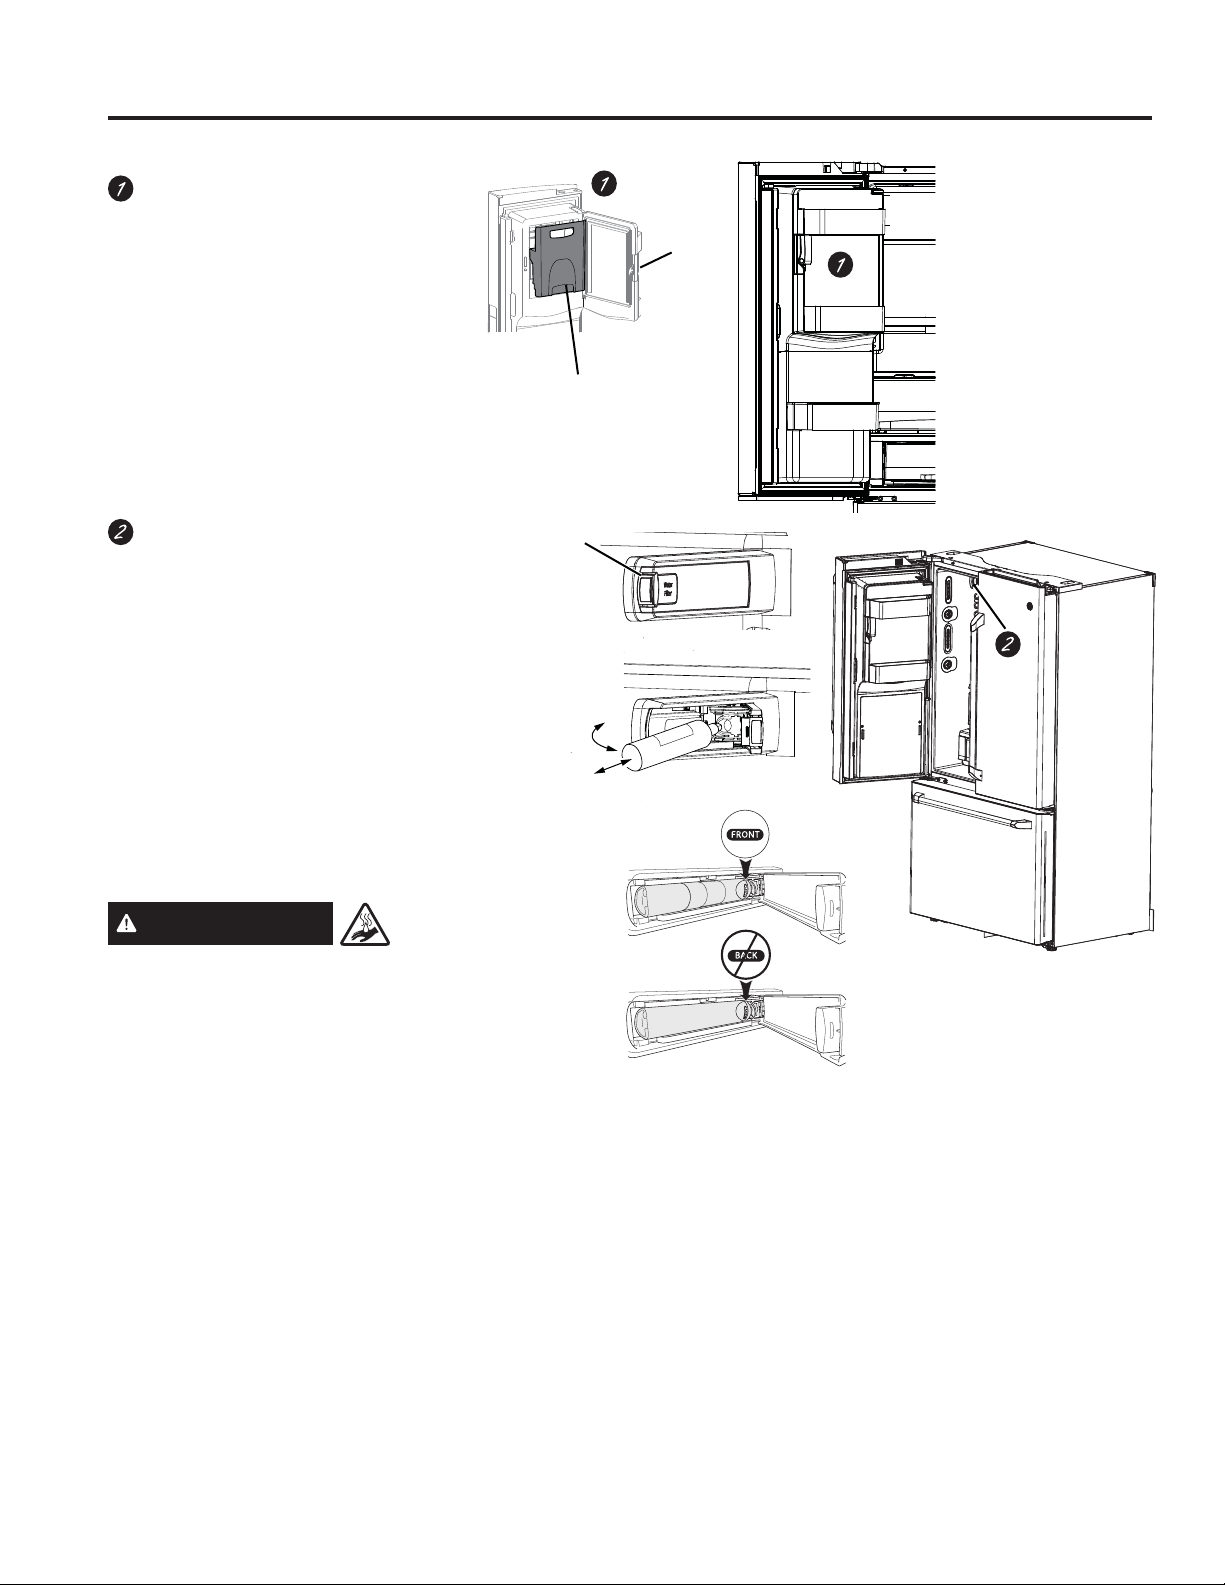
849-60792-2
Recipiente de hielo en la puerta*
1. Abra la puerta izquierda de comidas
frescas.
2. Baje la traba para abrir la puerta del
recipiente.
3. . Uso del recipiente con sujeción
manual hacia arriba y afuera para
despejar los localizadores en la parte
inferior del recipiente.
4. Para reemplazar la hielera, ajuste la
misma a los soportes de la guía y
empuje hasta que la misma se ubique
correctamente.
5. Si la hielera no se puede reemplazar,
gire la Horquilla de la Hielera ¼ en
dirección de las agujas del reloj.
Hielo en la puerta/ filtro de agua
Retire el filtro/ tapón del bypass
Presione sobre la depresión de la tapa y
abra la puerta del filtro completamente.
Gire el tapón del filtro/bypass tanto como
sea posible y empuje el tapón del filtro/
bypass hacia usted para retirar el mismo.
Instale el cartucho del filtro
Presione el tapón del filtro/bypass de forma
recta alineando las agarraderas con las
ranuras en el gabinete y gire el tapón del
filtro/bypass sobre el hueco del gabinete.
Asegúrese de que el frente del filtro mire
hacia el interior del refrigerador.
Cierre la tapa asegurando que la lengüeta
calce en su posición.
*Modelos Selectos Únicamente
ADVERTENCIA RIESGO
DE ESCALDADURA *
El uso de distribuidor agua caliente antes de la
evacuación de aire del sistema puede causar
quemaduras que causan intrusión de agua
caliente. 6LJDODVLQVWUXFFLRQHVSDUDHO³)LOWURGH
Agua – Paso 3” en la página 16 para purgar todo el
aire del sistema, a través del dispensador de agua
fría antes de usar el dispensador de agua caliente.
Al usar la función de agua caliente por primera
vez, confirme si vive por encima de los 1524
meters (5000 pies) (altitud elevada). Esto limita
la temperatura del sistema de agua caliente a fin
de evitar el hervor. Para acceder a la sección de
altitud elevada, consulte la sección Acerca de
los controles-funciones.
Funciones
Hielera
Traba
Poussez puis
tirez pour
ouvrir
Swing
Push \ Pull
1
2
OPERACIÓN DEL REFRIGERADORE: Funciones
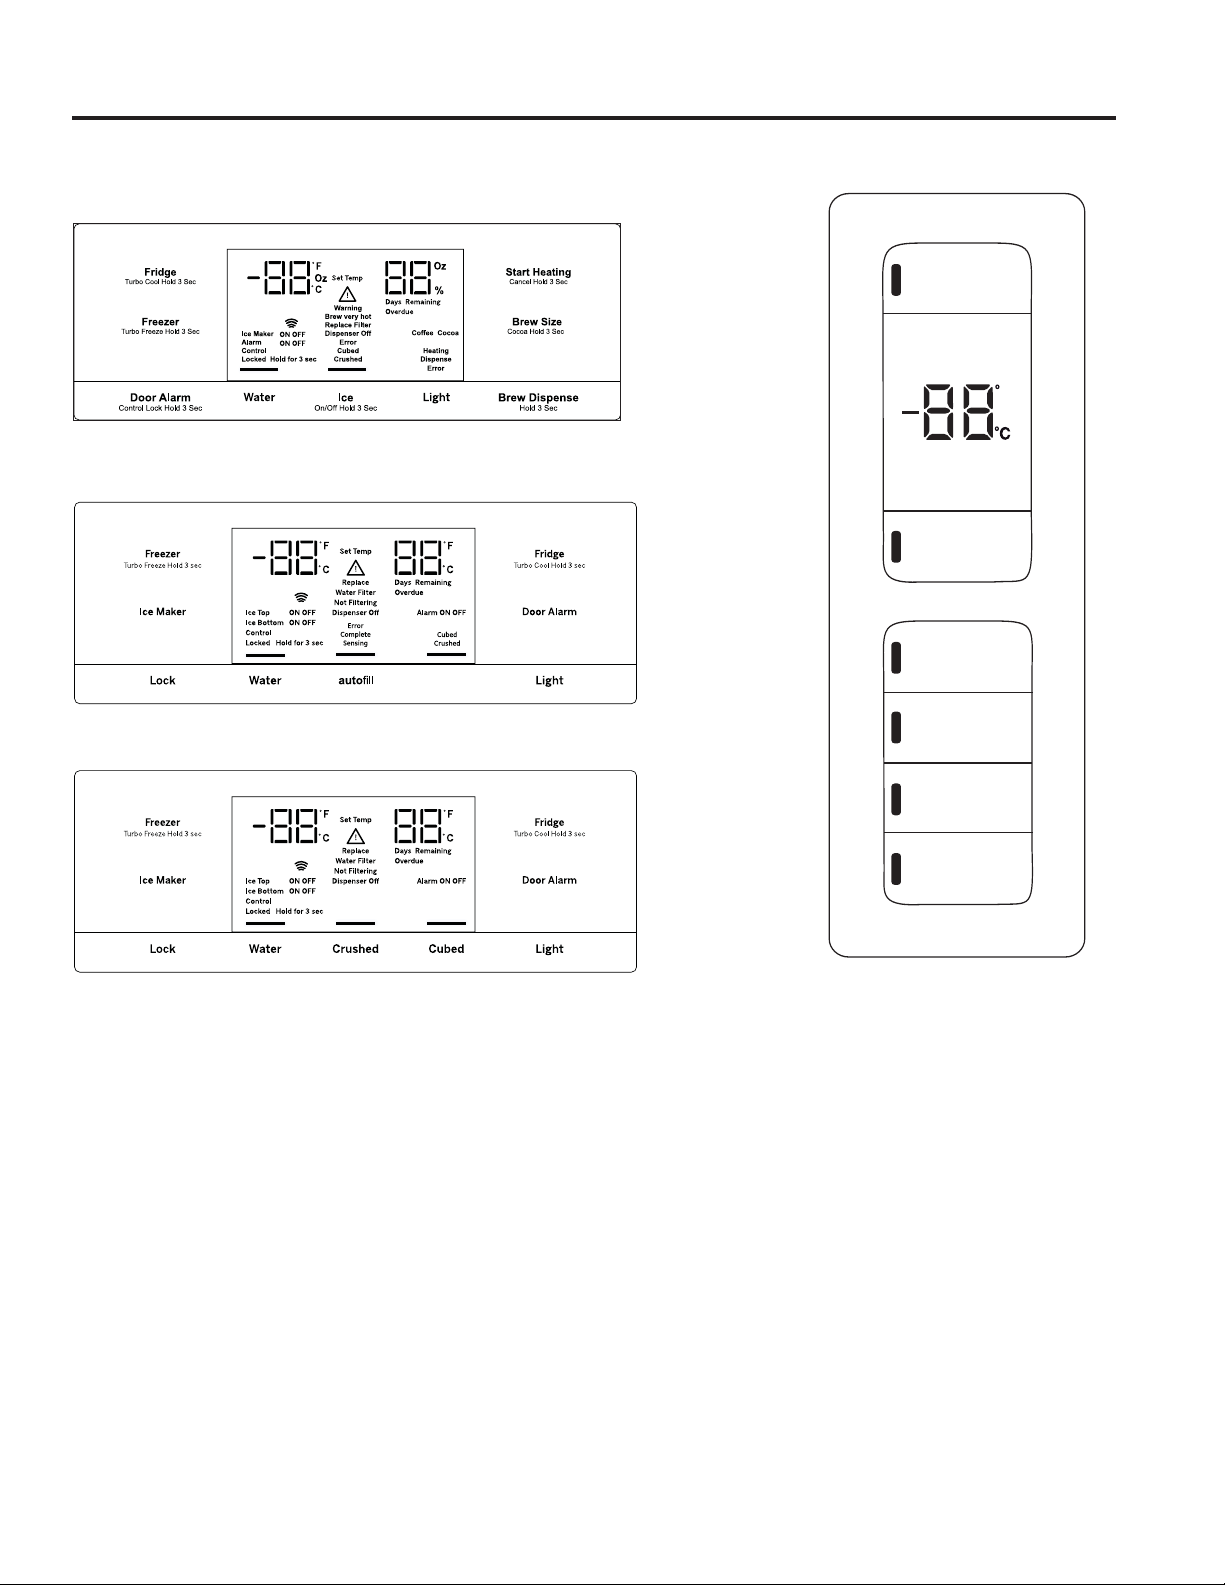
49-60792-2 9
OPERACIÓN DEL REFRIGERADORE: Controles
Los controles de temperatura fueron configurados previamente en la fábrica en 37°F para el compartimiento del refrigerador
y en 0°F para el compartimiento del freezer. Espere 24 horas hasta que la temperatura se estabilice hasta los ajustes de
preconfiguración recomendados.
Estilo de Control D: Es posible que los controles de temperatura muestren la temperatura en SET (Ajustada), como también
la temperatura real en el refrigerador y en el freezer. La temperatura real puede variar levemente de la temperatura en SET
$MXVWDGDHQEDVHDOXVR\DODPELHQWHGRQGHVHXVD3:(\*1(RQO\
NOTA: El refrigerador se envía con una envoltura que protege los controles de temperatura. Si esta envoltura no fue retirada
durante la instalación, retire la misma ahora.
PFE28P, PYE22P Estilo de Control A, Modelos Personales
PFH28, PFE28K, DFE28, PFD28, PYE22K, PYD22, DYE22
Estilo de Control B, Modelos con AutoFill (Llenado Automático)
GFD28, GFE28, GFE26, GYE22 Estilo de Control C,
Modelos de GE Appliances
GNE29, PWE23 Estilo de Control D, Control Sin Dispensador
Refrigerator
Hold 3 Sec for °F/°C
Hold 3 Seconds
Hold 3 Seconds
Recommended: 37 °F
Actual Set
Freezer
Door Alarm
Ice Maker
Lock Controls
Reset Filter
Recommended: 0°F
F
Ice
Error
Complete
Sensing
Cubed
Crushed
Controles

10 49-60792-2
NOTA: Para un rendimiento óptimo de la temperatura, es recomendable evitar colocar comida u otros productos directamente en
las ventilaciones de aire o en la torre de aire de comidas frescas, bloqueando de este modo el flujo de aire.
Cambio de la Temperatura para el Estilo de Control A
Para Cambiar la Temperatura del Refrigerador:
Presione el botón Fridge (Refrigerador) y se mostrará la
temperatura configurada actualmente. Presionando y liberando
el botón, se realizará un ciclo a través de las configuraciones
de temperatura disponibles. Mantenga presionado el botón
para la función Turbo Cool (Frío con Turbo). La pantalla
mostrará tC.
Para Cambiar la Temperatura del Freezer:
Presione el botón Freezer (Freezer) y se mostrará la
temperatura configurada actualmente. Presionando y liberando
el botón, se realizará un ciclo a través de las configuraciones
de temperatura disponibles. Mantenga presionado el botón
para la función Turbo Freeze (Congelación con Turbo). La
pantalla mostrará tF.
El sistema de enfriamiento puede ser apagado manteniendo
presionado Freezer (Freezer) y Start Heating (Comenzar
D&DOHQWDU6HPRVWUDUi2))$SDJDGR3DUDHQFHQGHUOR
presione Fridge (Refrigerador) o Freezer (Freezer). Se
mostrará ON (Encendido).
Apagar el sistema de refrigeración detiene el enfriamiento del
refrigerador, pero no corta la corriente eléctrica.
Cambio de la Temperatura para el Estilo de los Controles B y C
Para cambiar la temperatura, presione y libere las teclas
Freezer (Freezer) o Fridge (Refrigerador). La pantalla mostrará
la temperatura configurada. Para cambiar la temperatura,
presione la tecla Freezer (Freezer) o Fridge (Refrigerador)
hasta que se muestre la temperatura deseada. Mantenga
presionado el botón para la función Turbo Cool (Frío Turbo).
La pantalla mostrará tC. Mantenga presionado el botón para
la función Turbo Freeze (Congelación con Turbo). La pantalla
mostrará tF.
Para colocar el sistema de refrigeración en OFF (Apagar),
mantenga presionadas las teclas Fridge (Refrigerador) y
Ice Maker (Máquina de Hielos) de forma. Para encenderlo,
presione Fridge (Refrigerador) o Freezer (Freezer).
Apagar el sistema de refrigeración detiene el enfriamiento del
refrigerador, pero no corta la corriente eléctrica.
Cambio de Temperatura para el Estilo de Control D
La Pantalla de Temperatura está ubicada en la parte interior
de la puerta izquierda del refrigerador. Para cambiar la
temperatura, presione y libere las teclas Refrigerator
(Refrigerador) o Freezer (Freezer). La luz de Actual Temp
(Temperatura Real) se encenderá y la pantalla mostrará la
temperatura real. Para cambiar la temperatura, presione
ligeramente la tecla Refrigerator (Refrigerador) o Freezer
(Freezer) hasta que se muestre la temperatura deseada.
Para apagar el sistema de refrigeración, mantenga presionadas
las teclas Refrigerator (Refrigerador) y Freezer (Freezer)
de forma simultánea por 3 segundos. Cuando el sistema de
UHIULJHUDFLyQHVWpHQ2))$SDJDGRHQODSDQWDOODVHGHEHUtD
leer Off (Apagado).
Para encender el sistema de refrigeración, presione tanto
las teclas Refrigerator (Refrigerador) o Freezer (Freezer).
La pantalla mostrará la configuración de la temperatura
programada de 3ºC (37ºF) para el refrigerador y -18ºC (0ºF)
para el freezer.
Apagar el sistema de refrigeración detiene el enfriamiento del
refrigerador, pero no corta la corriente eléctrica.
Controles
OPERACIÓN DEL REFRIGERADORE: Controles
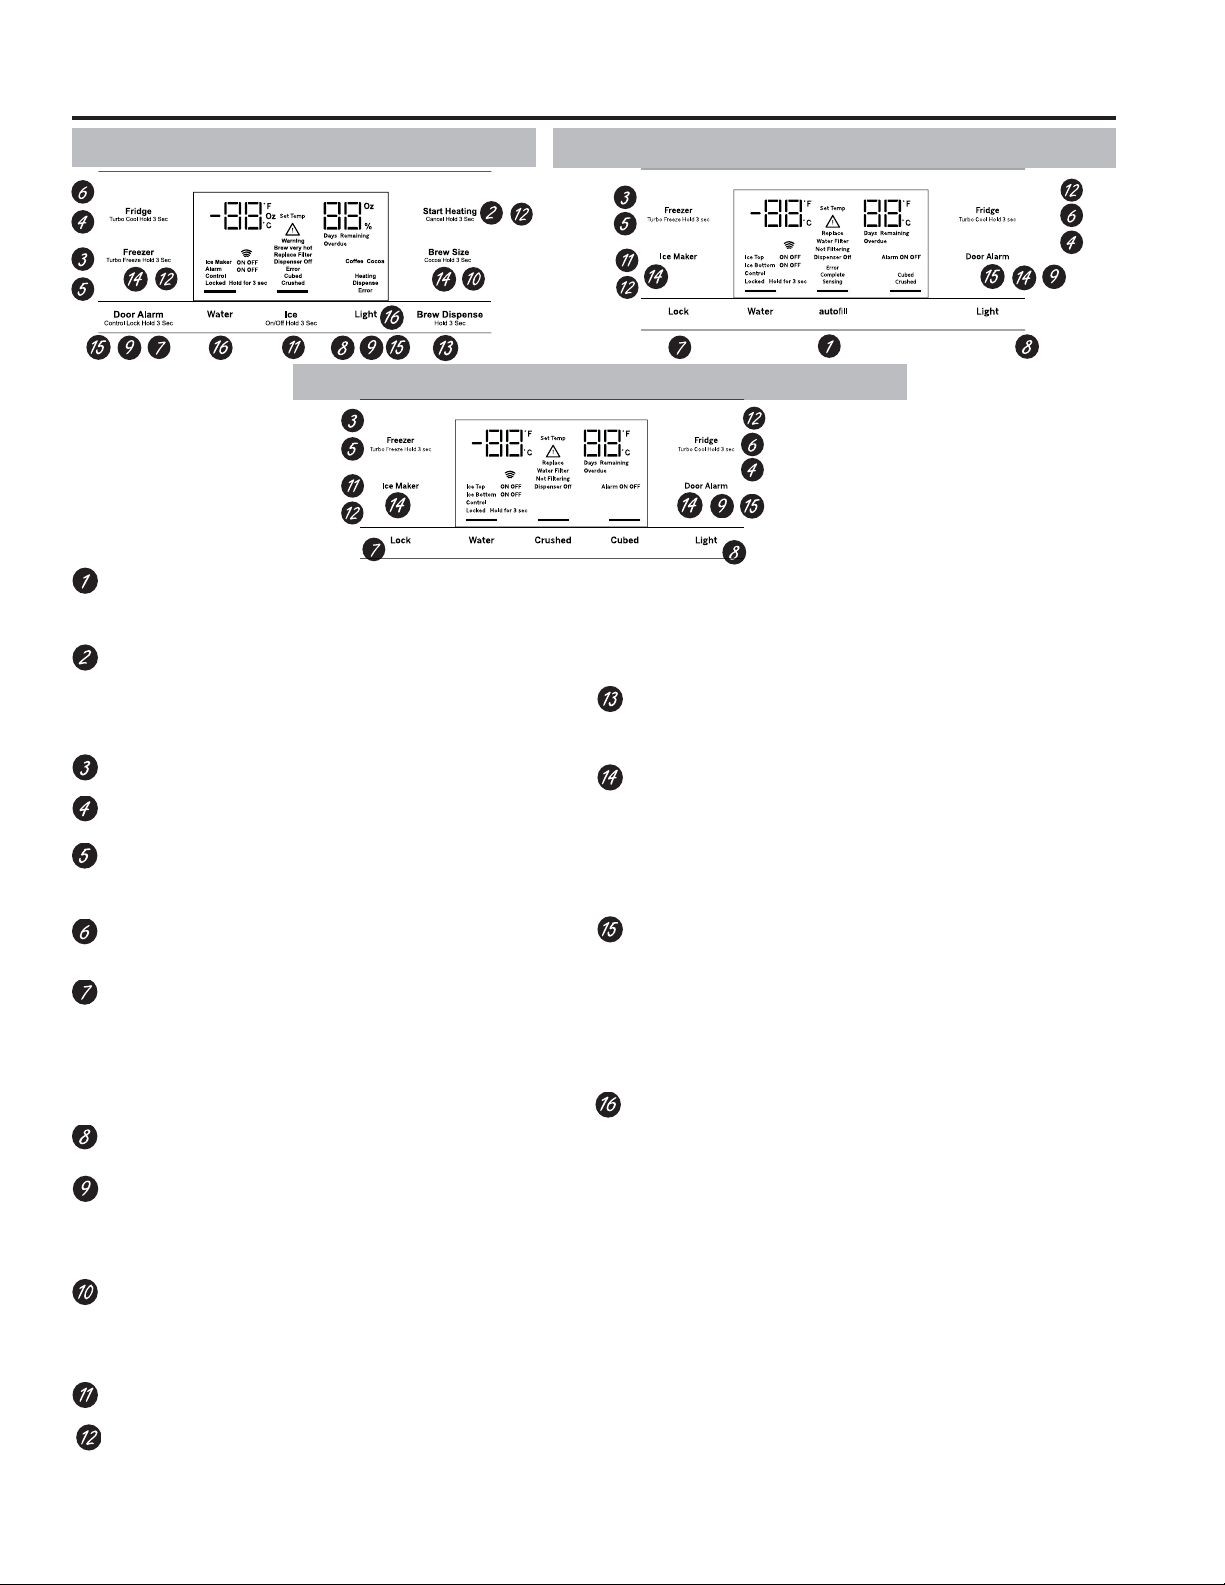
49-60792-2 11
OPERACIÓN DEL REFRIGERADORE: Controles
Ice
Estilo de Control A, Controles Externos Control Style B, External Controls PFH28, PFE28K, DFE28, PFD28,
PYE22K, PYD22, DYE22
Estilo de Control C, Controles Externos GFD28, GFE28, GFE26, GYE22
*Modelos Selectos Únicamente
Error
Complete
Sensing
Cubed
Crushed
Controles
PFE28P,
PYE22P
Llenado Automático con Manos Libres*
El llenado automático sin manos utiliza sensores para
monitorear el peso de un envase a fin de dispensar de forma
automática agua filtrada sin tener que activar la paleta.
Comenzar a Calentar*
El botón Start Heating (Comenzar a Calentar) se utiliza para
iniciar el calentamiento del agua para la función Single Serve
(Individual). Para abortar la función Start Heating (Comenzar a
Calentar), mantenga presionado el botón Start Heat (Comenzar
a Calentar) durante 3 segundos
Control de temperatura del freezer
Ajuste la temperatura del compartimiento del freezer.
Control de temperatura de comida fresca
Ajusta la temperatura del compartimiento de alimentos frescos.
Configuración de TurboFreeze™
Active TurboFreeze para restaurar rápidamente las
temperaturas del freezer luego de aperturas de puerta
frecuentes.
Configuración TurboCool™
Activa TurboCool rápidamente para recuperar la temperatura
de las comidas frescas luego de aperturas de puerta frecuentes.
Controles de bloqueo
Estilo de Control A – Mantenga presionada la tecla Alarm
(Alarma) durante 3 segundos para bloquear el dispensador de
hielo y agua y todos los botones de funciones y temperatura.
Estilos de Control B y C – Mantenga presionada la tecla Lock
(Bloquear) durante 3 segundos para bloquear el dispensador de
hielo y agua y todos los botones de funciones y temperatura.
Luz del dispensador
La Luz puede ser encendida/ apagada para iluminar el
dispensador.
Alarma de la Puerta
Suena para alertarlo cuando las puertas del freezer o de
comidas frescas se hayan dejado abiertas. Mantenga
presionada la tecla Door Alarm (Alarma de la Puerta) y esto
alternará el sonido entre bajo, alto y apagado.
Tamaño de la Preparación*
El botón Brew Size (Tamaño de la Preparación) se utiliza
para seleccionar el tamaño de la taza individual. Mantenga
presionado el botón durante 3 segundos para variar el tipo de
preparación entre Coffee (Café) y Cocoa (Cacao).
Configuración de la máquina de hacer hielo
Enciende/ apaga sus máquinas de hacer hielo.
Sistema de enfriamiento Encendido/Apagado
Estilo de control A - Mantenga presionadas las teclas Freezer
(Freezer) y Start Heating (Comenzar a Calentar) de forma
simultánea para apagar el sistema de enfriamiento. Para
encender el sistema de enfriamiento, presione la tecla Fridge
(Refrigerador) o la tecla Freezer (Freezer).
Estilo de control B y C - Mantenga presionadas las teclas
Fridge (Refrigerador) y Ice Maker (Máquina de Hielos) de forma
simultánea por 3 segundos, para encender o apagar el sistema
de enfriamiento. Para encender el sistema de enfriamiento,
presione la tecla Fridge (Refrigerador) o la tecla Freezer
(Freezer).
Dispensar la Preparación
Mantenga presionado el botón Brew Dispense (Dispensar la
Preparación) durante 3 segundos, pero no más de 6 segundos, para
dispensar café o cacao.
F°/C°
Estilo de control A - Mantenga presionadas las teclas Freezer
(Freezer) y Brew Size (Tamaño de la Preparación) para variar
entre Fº y Cº.
Estilo de control B y C - Mantenga presionadas las teclas Ice
Maker (Máquina de hacer hielo) y Door Alarm (Alarma de la
Puerta) de forma simultánea durante 3 segundos, para cambiar
entre Fº y Cº.
Control de Sonido sobre los tonos de las teclas.
Estilo de Control A – Mantenga presionada la tecla Light
/X]XQDYH]SDUD+LJK$OWRD2II$SDJDUGRVYHFHVSDUD
2II$SDJDUD/RZ%DMR\WUHVYHFHVSDUD/RZ%DMRD+LJK
(Alto).
Estilos de Control B y C – Mantenga presionada la tecla
'RRU$ODUP$ODUPDGHOD3XHUWDXQDYH]SDUD+LJK$OWRD2II
$SDJDUGRVYHFHVSDUD2II$SDJDUD/RZ%DMR\WUHVYHFHV
para Low (Bajo) a High (Alto).
Altitud Elevada
Estilo de Control A (sólo PYE y PFE) – Mantenga
presionada la tecla Fridge (Refrigerador) y Door Alarm (Alarma
de la Puerta) para alternar entre Hi AL (Alt. Elevada) y Lo AL
(Alt. Baja) para altitudes elevadas y altitudes bajas.
Configuraciones adicionales:
• Connected Home (Hogar Conectado) está listo* (PFE28P,
PYE22P, PFH solamente)
• Filtro de Agua * - Un indicador se iluminará cuando sea
necesario reemplazar el filtro. Cuando un nuevo filtro sea
instalado, el indicador se apagará.
Modos Adicionales:
• Modo Sabático
Estilo de control A - Mantenga presionadas las teclas
Alarm (Alarma) y Light (Luz) de forma simultánea durante 3
segundos para entrar/ salir de Sabbath Mode (Modo Sabático).
Estilo de control B y C - Mantenga presionado el bloqueo y
la luz de forma simultánea por 3 segundos para entrar/ salir
del modo Sabático. Sabbath Mode (Modo Sabático) apagará
o atenuará las luces internas, el control de temperatura y
las funciones avanzadas. El compresor funcionará con una
descongelación por tiempo cuando esté en modo Sabático.

12 49-60792-2
Refrigerator
Hold 3 Sec for °F/°C
Hold 3 Seconds
Hold 3 Seconds
Recommended: 37 °F
Actual Set
Freezer
Door Alarm
Ice Maker
Lock Controls
Reset Filter
Recommended: 0°F
F
Estilo de Control D, Controles Internos *1(3:(
Alarma de la Puerta
Suena para alertarlo cuando las puertas del freezer o de
comidas frescas se hayan dejado abiertas.
Reinicio del Filtro*
Espere 3 segundos luego de reemplazar el filtro.r.
Controles de Bloqueo
Mantenga presionado por 3 segundos para bloquear
el dispensador de hielo y agua y todos los botones de
funciones y temperatura
Control de temperatura del freezer
Ajusta la temperatura del compartimiento del freezer.
Control de temperatura del refrigerador
Ajuste la temperatura del compartimiento del comidas
frescas.
Configuración de la máquina de hacer hielo
Enciende/ apaga sus máquinas de hacer hielo
Modos Adicionales:
• Modo Sabático
Mantenga presionadas las teclas Door Alarm (Alarma de la
Puerta) y Ice Maker (Configuración de la máquina de hacer
hielo) de forma simultánea durante 3 segundos para entrar/
salir de Sabbath Mode (Modo Sabático).
Controles
OPERACIÓN DEL REFRIGERADORE: Controles
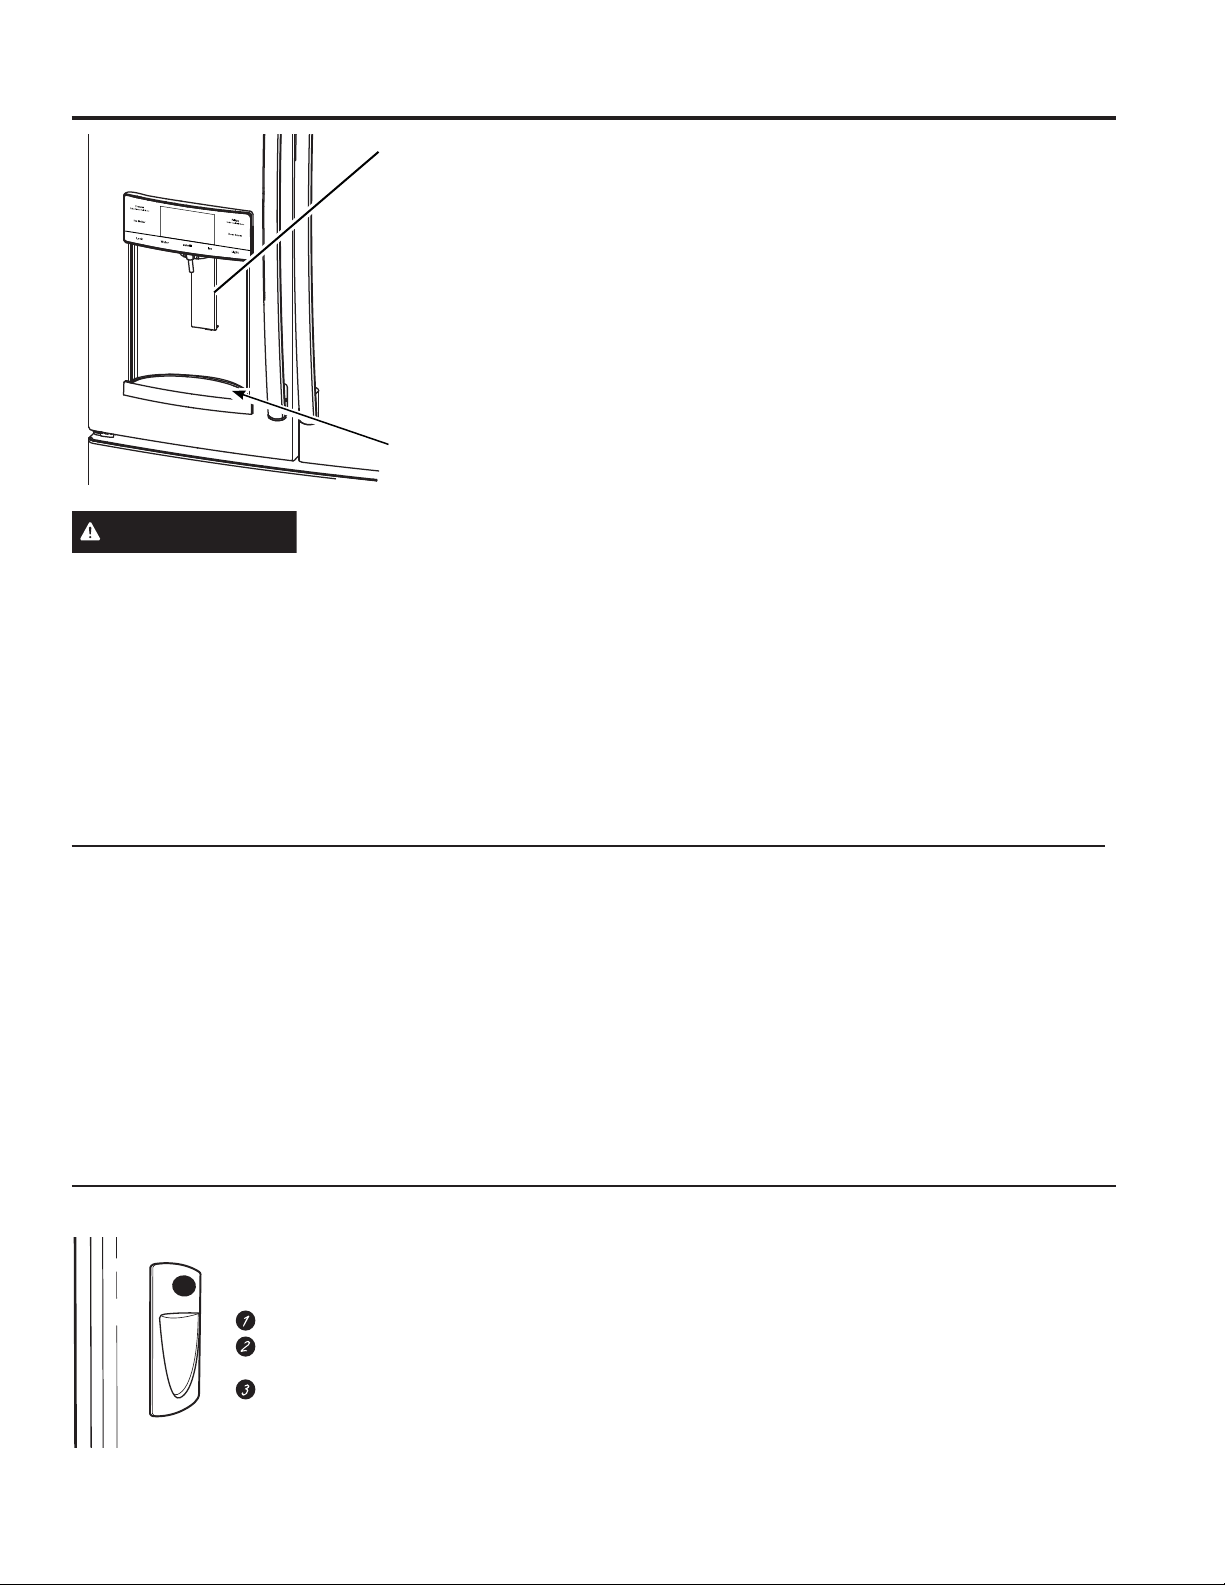
49-60792-2 13
OPERACIÓN DEL REFRIGERADORE: Dispensador
Dispenser tray
Hechos Importantes sobre Su Dispensador
Ŷ1RDJUHJXHKLHORGHEDQGHMDVREROVDVDODKLHOHUDGHOD
máquina de hacer hielo de la puerta. Es posible que no lo
pique o vierta correctamente.
Ŷ Evite llenar el vaso con hielo de forma excesiva y use
vasos angostos. El hielo estancado puede trabar el vertedor
o hacer que la puerta del vertedor quede cerrada por
congelación. Si el hielo bloquea el vertedor, retire la hielera y
desbloquee el mismo con una cuchara de madera.
Ŷ Las bebidas y las comidas no se deberán enfriar de
forma rápida en el cajón de almacenamiento de hielo.
Las latas, botellas o paquetes de comida en el cajón de
almacenamiento pueden hacer que la máquina de hacer
hielo o el taladro se bloqueen.
Ŷ Para que el hielo dispensado no caiga afuera del vaso,
coloque el vaso cerca de, pero sin que tenga contacto con,
la abertura del dispensador.
Ŷ Es posible que cierta cantidad de hielo picado sea
dispensada incluso aunque haya seleccionado CUBED
ICE (Hielo en Cubos). Esto sucede ocasionalmente cuando
algunos cubos son dirigidos accidentalmente a la picadora.
Ŷ Una vez que el hielo picado es dispensado, es posible que
parte del agua gotee del vertedor.
Ŷ A veces se formará una pequeña cantidad de nieve en la
puerta del vertedor de hielo. Esta condición es normal y
habitualmente sucede cuando se dispensó hielo picado en
forma repetida. La nieve finalmente se evaporará.
Si no se dispensa agua cuando el refrigerador se instala por
primera vez, es posible que la tubería de agua posea aire.
Presione la paleta dispensadora durante por lo menos cinco
minutos para eliminar el aire atrapado de la tubería de agua y
para llenar el sistema de agua. A fin de limpiar las impurezas en
la tubería de agua, descarte los seis primeros vasos de agua.
A fin de eliminar la Bandeja del Dispensador (Tipo A et B
Únicamente)
Ŷ Saque la Bandeja del Dispensador hasta que se detenga.
Ŷ Ubique la lengüeta en el centro sobre la parte inferior y
empuje hacia adentro.
Ŷ Empuje el ensamble de la Bandeja del Dispensador hacia
afuera.
Ŷ Levante la Bandeja del Dispensador hacia afuera desde la
ranura central para limpiar.
A fin de eliminar la Bandeja del Dispensador (Tipo C
Únicamente)
Tome la Bandeja del Dispensador y empuje la misma de
manera firme hacia usted hasta que salga.
Para reinstalar la Bandeja del Dispensador (Tipo A et B
Únicamente)
Ŷ Coloque la tapa de la Bandeja del Dispensador sobre la
bandeja de agarre y posicione la misma debajo de los dos
tensores sobre cada lado.
Centre la bandeja del dispensador y alinee la misma con las
guías centrales.
Empuje hacia adentro hasta que esté firmemente en su
lugar.
Para reinstalar la Bandeja del Dispensador (Tipo C Únicamente)
Alinee la guía sobre la bandeja inferior con el riel sobre el
dispensador y deslice el mismo hasta que se detenga contra la
parte trasera del dispensador.
Water & Ice Dispenser
(See About the controls
with temperature settings
& About the control
features)
Para Usar el Dispensador de Agua Interno*
El dispensador de agua está ubicado en la
pared izquierda dentro del compartimiento
del refrigerador.
Para dispensar agua:
Sostenga el vaso contra el hueco.
Presione el botón dispensador
de agua.
Sostenga el vaso debajo del
dispensador entre 2 y 3 segundos
luego de liberar el botón del
dispensador. Es posible que continúe
dispensando agua luego de que el
botón fue liberado.
Si no se dispensa agua cuando el refrigerador se instala por
primera vez, es posible que la cañería de agua posea aire.
Presione el botón dispensador durante por lo menos 5 minutos
para eliminar el aire atrapado de la cañería de agua y para
llenar el sistema de agua. Durante este proceso, es posible
que el dispensador produzca un ruido fuerte a medida que
se elimina el aire de la cañería de agua. A fin de limpiar las
impurezas en la cañería de agua, descarte los seis primeros
vasos de agua.
NOTA: A fin de evitar depósitos de agua, el dispensador debe
ser limpiado en forma periódica con un paño limpio o una
esponja.
ADVERTENCIA RIESGO DE LACERACIÓN
Ŷ1XQFDFRORTXHORVGHGRVRFXDOTXLHURWURREMHWRHQOD
abertura de descarga de la picadora de hielo. Hacer esto
puede resultar en el contacto entre los filos de la picadora
de hielo y ocasionar lesiones graves o una amputación.
Ŷ8VHXQYLGULRUHVLVWHQWHDOGLVSHQVDUKLHOR8QYLGULRQR
resistente se podrá romper y ocasionar lesiones personales.
*Modelos Selectos Únicamente
Dispensador

14 49-60792-2
Para Usar LLENADO AUTOMÁTICO CON MANOS LIBRES:
• Centre el envase en la Bandeja del Dispensador con la
Depresión tan atrás como sea posible, sin activar la paleta, y
retire la mano del envase.
• Presione AUTO FILL//(1$'2$8720È7,&2
Para Detener AUTO FILL (LLENADO
AUTOMÁTICO)
• 3UHVLRQH$872),///OHQDGR$XWRPiWLFRKDVWDTXHVH
detenga.
Factor Importante acerca del LLENADO
AUTOMÁTICO
• Para obtener resultados óptimos, use un envase uniforme
entre 10-20 cm (4 y 8”) de alto y entre 5-15 cm (2 y 6”) de
ancho. El envase ser tan alto como los sensores inferiores.
• El nivel y funcionalidad del llenado pueden variar en envases
más altos que 20 cm (8”) o más anchos que 15 cm (6”).
• Los volúmenes de los envases podrán variar; si aparece el
PHQVDMHGHHUURU(QYDVH1R(QFRQWUDGR´LQWHQWHXVDUXQ
envase diferente.
• El tiempo de AUTO FILL//(1$'2$8720È7,&2
concluirá.
• Las manijas, sorbete y decoraciones sobre el borde del
envase podrán ocasionar desbordes o variaciones en los
volúmenes de llenado.
• Se podrán producir salpicaduras dependiendo de la
ubicación del envase, el nivel de flujo del agua, la forma del
envase, y los cubos de hielo.
• Conserve los sensores limpios con una tela húmeda y
limpia, y no rocíe líquido ni limpiadores directamente sobre
los sensores.
• AUTO FILL//(1$'2$8720È7,&2IXQFLRQDPHMRUFRQ
una presión de agua del hogar de 414 a 689 kPa (40 a 100
psi).
• El hielo en el envase puede afectar el volumen de llenado.
Si se experimentan problemas, use menos hielo
Sensores
*Modelos Selectos Únicamente
Una Sola Cápsula Keurig*
ADVERTENCIA Riesgo de Escaldadura.
• El agua proveniente del dispensador es muy caliente y
puede ocasionar escaldaduras o quemaduras. Lea todas las
advertencias antes del uso. (Lea la página 5).
1RSHUPLWDTXHORVQLxRVXVHQODFDIHWHUD
• Siempre use un recipiente adecuado para líquidos calientes
(cerámica, gomaespuma, etc.)
1RUHDOLFHODHODERUDFLyQHQXQDWD]DGHYLGULR(VWRSRGUi
hacer que el vidrio se fisure o rompa.
• Si vive a más de 5000 pies (1524 litos), presione Fridge
(Refrigerador) y Door Alarm (Alarma de la Puerta) y el
control realizará ciclos desde Altitud Baja (Lo AL) a Altitud
Elevada (Hi AL).
12XVHHOGLVSHQVDGRUGHDJXDFDOLHQWHGHIRUPDLQPHGLDWD
luego de instalar un nuevo filtro de agua, ya que esto puede
hacer que el agua caliente se chorree. Dispense agua fría
durante aproximadamente 5 minutos para purgar el aire del
sistema antes de dispensar agua caliente.
Hechos Importantes sobre el AGUA CALIENTE
AUTOFILL (Llenado Automático)*
OPERACIÓN DEL REFRIGERADORE:$872),//8QD6ROD&iSVXOD.HXULJ
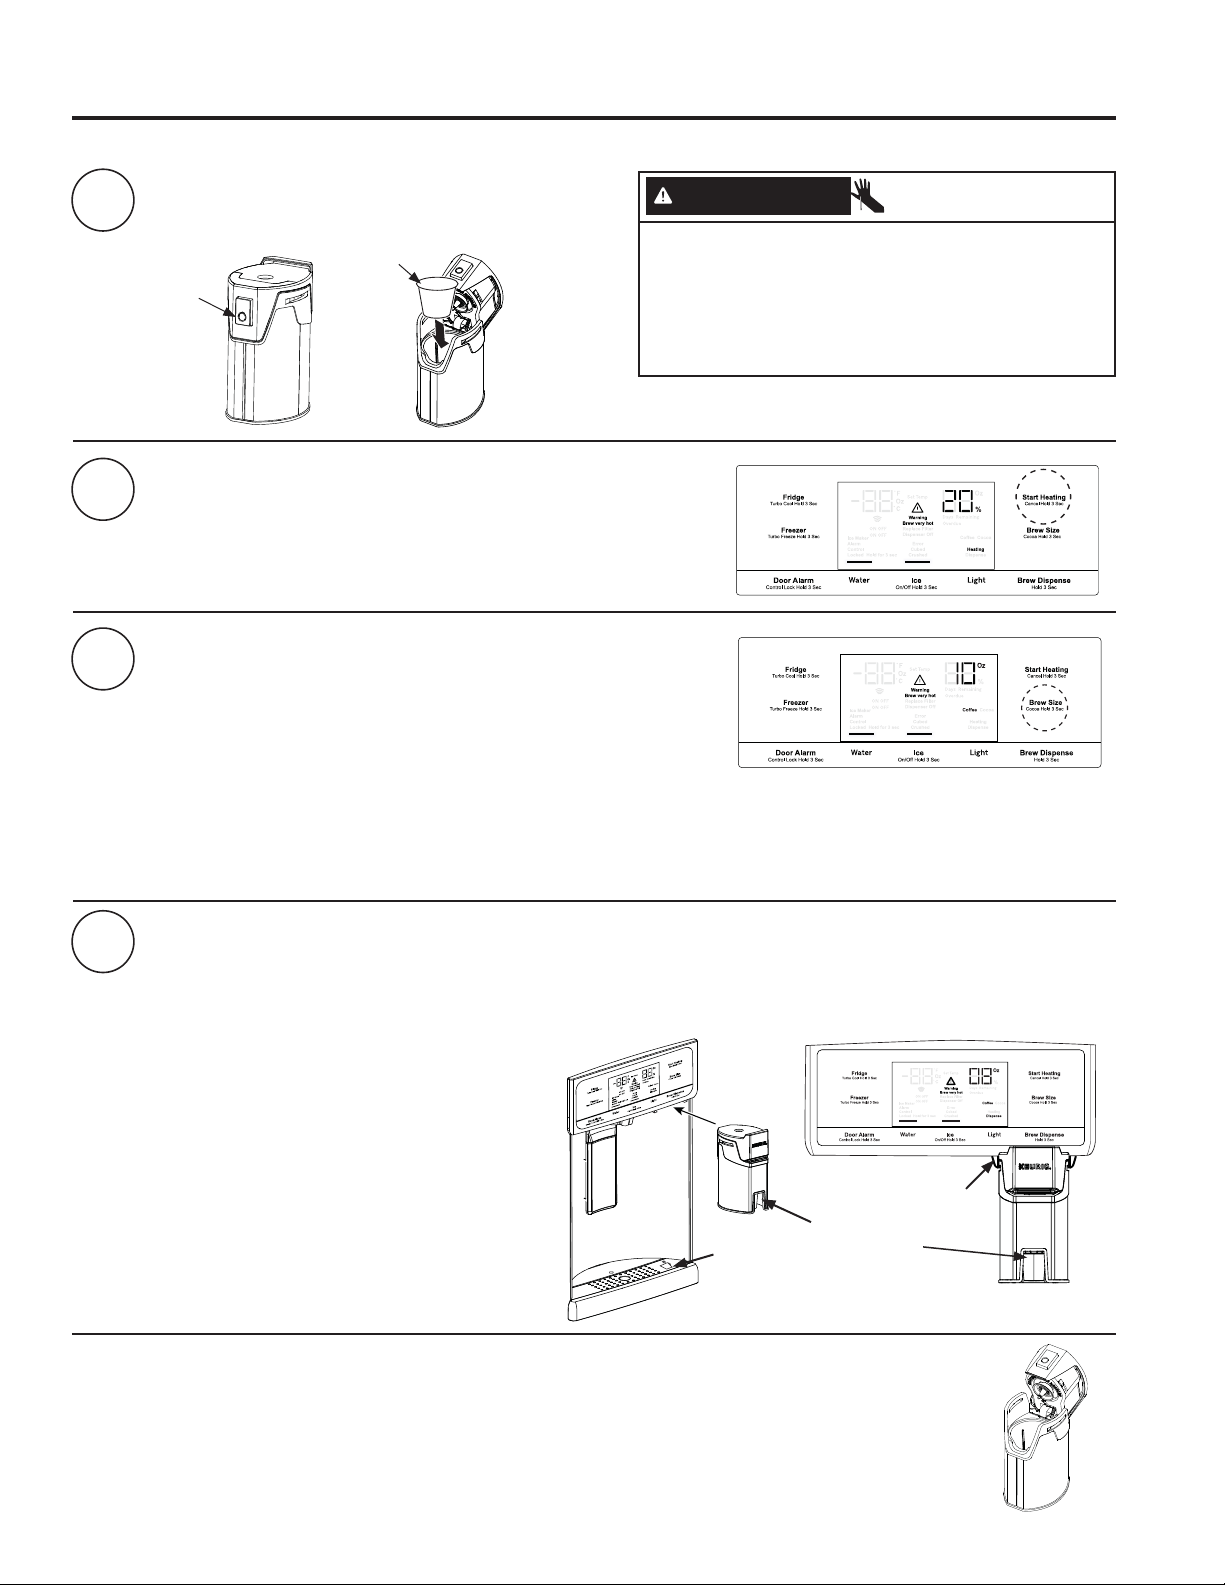
49-60792-2 15
OPERACIÓN DEL REFRIGERADORE: Una Sola Cápsula Keurig*
*Modelos Selectos Únicamente
Presione
para abrir
1
2
3
Cargue la Cápsula K.
Inserte la Cápsula Keurig en la cafetera y presione hacia
abajo de manera firme (escuchará un sonido de estallido).
Dos Formas de Preparación
1. Presione el botón Start Heating (Comenzar a Calentar).
2
2. Inicie el calentamiento con la Aplicación GE Kitchen. Descargue
OD$SOLFDFLyQ³*(.LWFKHQ´3DUDPiVLQIRUPDFLyQYLVLWHZZZ
GEAppliances.com/connect.**
4Dispensar
Una vez que el proceso se haya completado, la luz de Dispense (Dispensar) titilará en la pantalla.
Para dispensar, deslice la cafetera sobre los rieles. Asegúrese de que la cafetera sea empujada totalmente dentro
del soporte. Coloque el tazón en el ícono del tazón en la bandeja de goteo, debajo de la boca de preparación roja.
Mantenga presionado el botón Brew Dispense (Dispensar la Preparación) durante 3 segundos hasta que escuche que
el dispensador se activa.
Limpieza de la cafetera
Ŷ La cafetera para cápsulas K es de uso seguro en el estante superior del lavavajillas.
Ŷ Se recomienda enjuaguar la misma completamente luego del lavado, a fin de eliminar todos los residuos de jabón.
Ŷ Se recomienda la limpieza periódica del área de separación entre el dispensador y los muebles, ya que se pueden
producir manchas por el uso de la cafetera con cápsulas.
K-Cup
Cierre la cafe-
tera.
La tapa hará
clic cuando esté
asegurada.
Cambie el Tamaño de la Preparación
Presione el botón Brew Size (Tamaño de la Preparación) en cualquier
momento durante el ciclo de calentamiento, para elegir entre 6, 8 y 10
onzas. El tamaño por omisión es de 8 onzas. Asegúrese de que la taza
usada sea lo suficientemente grande para el tamaño seleccionado.
NOTA: Mantenga presionado el botón Brew Size (Tamaño de la
Preparación) durante 3 segundos para variar entre Coffee (Café) y
Cocoa (Cacao). La función por omisión es Coffee (Café).
NOTA: Para abortar el ciclo de calentamiento, mantenga presionado el botón Start Heating (Iniciar Calentamiento)
durante 3 segundos. Para abortar el ciclo para dispensar la preparación, mantenga presionado el botón Start Heating
(Iniciar Calentamiento) durante 3 segundos, presione la paleta, presione cualquier botón de la pantalla además de Brew
Size (Tamaño de la Preparación) o Brew Dispense (Dispensar la Preparación), o abra la puerta de comidas frescas
derecha.
Boca de
preparación
roja para
alinear la taza
Ícono de la
taza para
su ubica-
ción
Rieles de
la cafetera
** Para clientes en Estados Unidos y sus territorios
Uso del dispensador para servir de forma individual
Elaboración con Una Sola Cápsula Keurig*
PRECAUCIÓN Riesgo de Corte/ Punción
• Dentro de la cafetera con cápsulas hay dos agujas
filosas. A fin de evitar riesgos de lesiones, no coloque
los dedos dentro de la cafetera. Tenga cuidado al
realizar la limpieza.
• Mantenga la cafetera con cápsula fuera del alcance
de los niños, ya que podrán sufrir lesiones al usar la
misma de forma incorrecta.
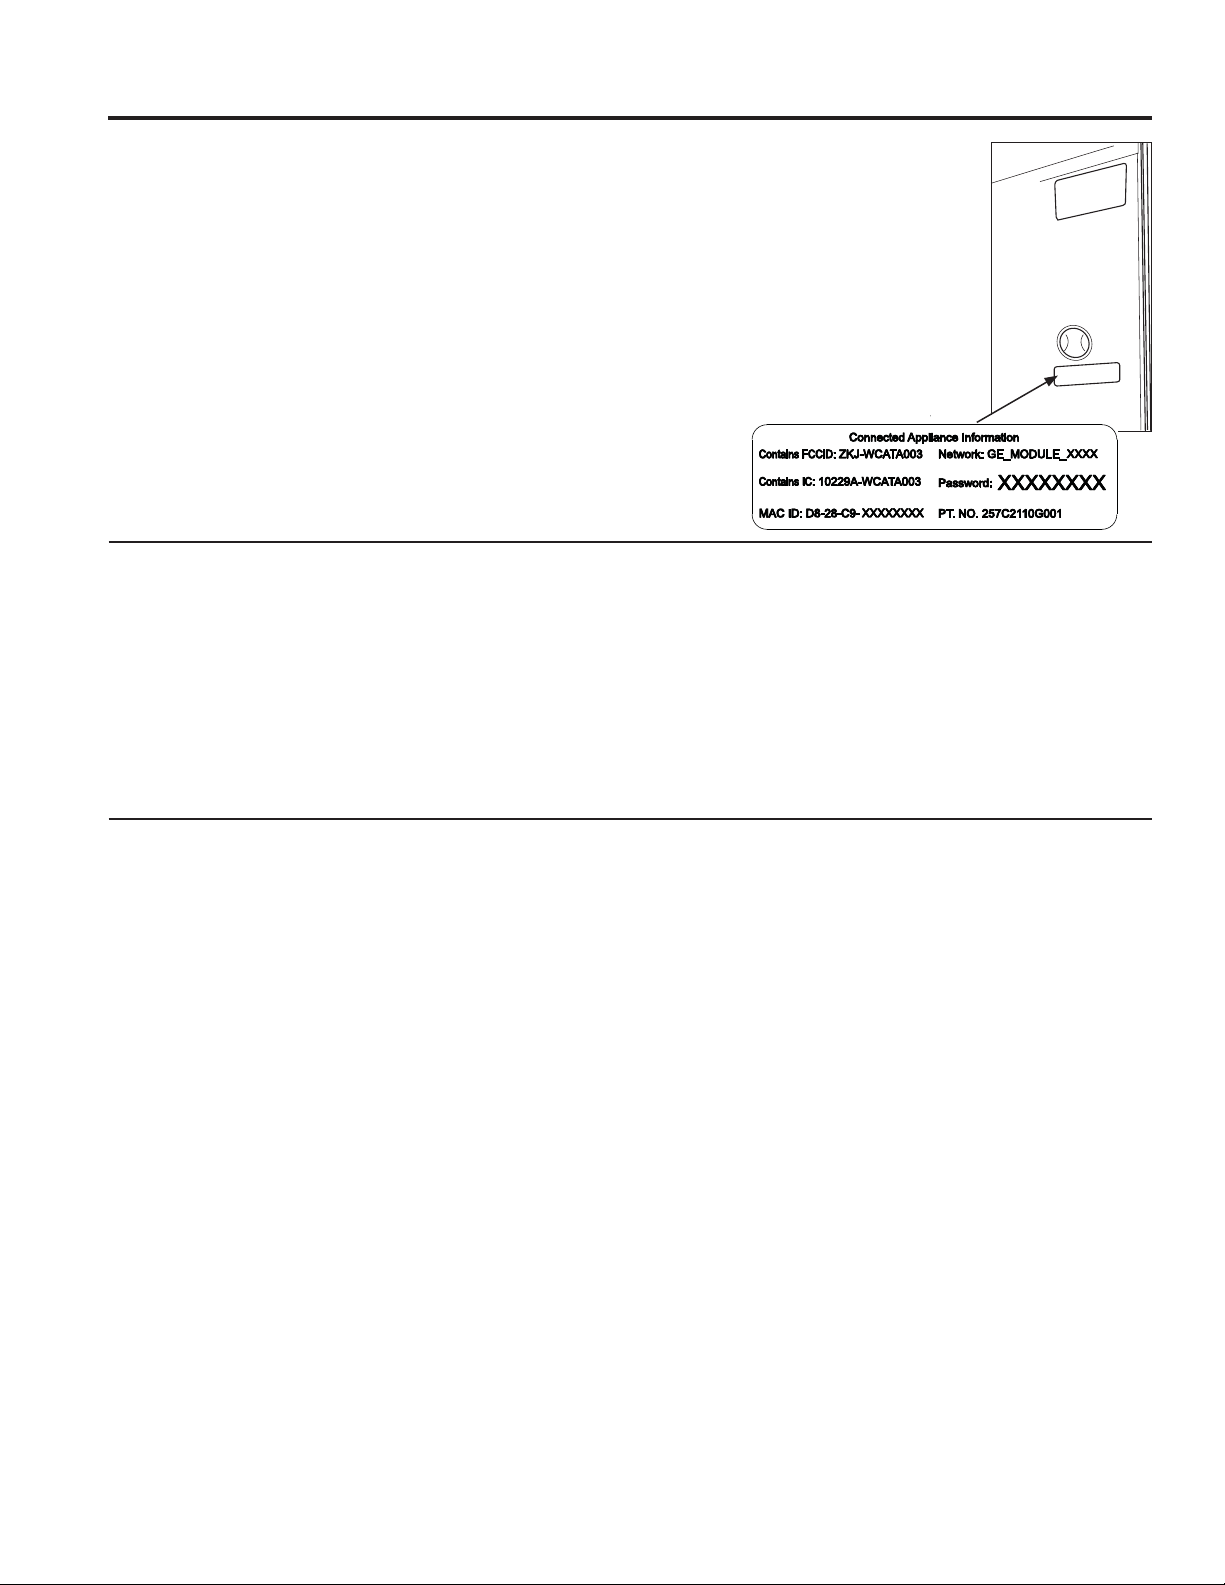
16 49-60792-2
GE WiFi Connect
GE WiFi Connect Permitido* (sólo los modelos PFE28P, PFD28,
PYD22, PYE22P, PFH)
Si su refrigerador cuenta con una etiqueta con información del Electrodoméstico Conectado ubicada
en la parte interior como se muestra, su refrigerador puede ser conectado a su red Wifi, permitiendo
que se comunique a su teléfono inteligente para realizar monitoreo remoto, control y notificaciones.
Dependiendo de cuál sea el modelo de su refrigerador, también puede contar con una tarjeta de
comunicación Wifi incorporada en el producto, o un puerto para el Módulo Wifi ConnectPlus externo (se
vende por separado). Para conocer más sobre las funciones del electrodoméstico conectado, visite www.
GEAppliances.com/connect, y para saber qué aplicaciones de electrodomésticos conectados funcionarán
con su Teléfono Inteligente. **
Para usar su WiFi, presione Water (Agua) y Light (Luz) en el panel de control.
INFORMACIÓN REGULATORIA
Declaración de Cumplimiento con FCC/IC:
(VWHGLVSRVLWLYRFXPSOHFRQOD3DUWHGHOD1RUPDWLYDGHOD)&&6XIXQFLRQDPLHQWRHVWiVXMHWRDODVGRVFRQGLFLRQHV
siguientes:
1. Este dispositivo no podrá causar interferencias perjudiciales.
2. Este dispositivo debe aceptar cualquier interferencia recibida, incluidas las interferencias que puedan provocar un
funcionamiento no deseado.
Este equipo fue probado y cumple con los límites establecidos para un dispositivo digital de clase B, según la parte 15 de la
1RUPDWLYDGHOD)&&(VWHSURGXFWRIXHSUREDGR\FXPSOHFRQORVOtPLWHVHVWDEOHFLGRVSDUDXQGLVSRVLWLYRGLJLWDOGH&ODVH
%VHJ~QODSDUWHGHOD1RUPDWLYDGHOD)&&(VWHHTXLSRJHQHUDXVD\SXHGHHPLWLUHQHUJtDGHUDGLRIUHFXHQFLD\VLQR
se instala y utiliza de acuerdo con las instrucciones, puede ocasionar interferencias perjudiciales sobre las comunicaciones
radiales. Sin embargo, no se garantiza que no se presenten interferencias en una instalación en particular. Si el equipo provoca
interferencias perjudiciales para la recepción de radio o televisión, lo que puede comprobar encendiendo y apagando el equipo,
se aconseja al usuario que intente corregir la interferencia a través de una de las siguientes medidas:
• Reoriente o reubique la antena receptora.
• Aumente la separación entre el equipo y el receptor.
• Conecte el equipo a un tomacorriente de un circuito diferente al tomacorriente al cual se encuentra conectado el receptor.
• Para solicitar ayuda, consulte al proveedor minorista o a un técnico experimentado de radio/ TV.
Etiqueta: Las modificaciones sobre esta unidad no aprobadas expresamente por parte del fabricante podrían anular la autoridad
del usuario para utilizar el equipo.
Sólo el módulo ConnectPlus (o un módulo de comunicación similar)
Exposición a RF – Sólo se autoriza el uso de este dispositivo a través de una aplicación móvil. Se deberá mantener en todo
momento una distancia de separación mínima de 20 cm. entre el dispositivo ConnectPlus y el cuerpo del usuario.
GE WiFi Connect Opcional*
Su refrigerador es compatible con GE WiFi Connect usando el módulo GE ConnectPlus provisto con su refrigerador. Para
conectar este electrodoméstico a Internet, es necesario que conecte el módulo a su electrodoméstico a través del puerto de
comunicación del electrodoméstico. El GE ConnectPlus permitirá que su electrodoméstico tenga comunicación con su teléfono
inteligente para un monitoreo remoto, control y notificaciones. Para aprender más sobre las funciones del electrodoméstico
conectado, para saber qué aplicaciones del electrodoméstico conectado funcionarán con su teléfono inteligente y para saber
dónde puede adquierir un GE ConnectPlus, visite www.GEAppliances.com/connect.**
Conectividad WiFi: Para solicitar asistencia en relación a su electrodoméstico o sobre la conectividad de red ConnectPlus (para
modelos con WiFi permitido o Wifi opcional), comuníquese al 1-800-220-6899.
Comunicación del Electrodoméstico
*Modelos Selectos Únicamente **Para EE.UU. y Territorios de EE.UU. Únicamente.
(Para clientes en Estados
Unidos y sus territorios)
OPERACIÓN DEL REFRIGERADORE: Comunicación del Electrodoméstico
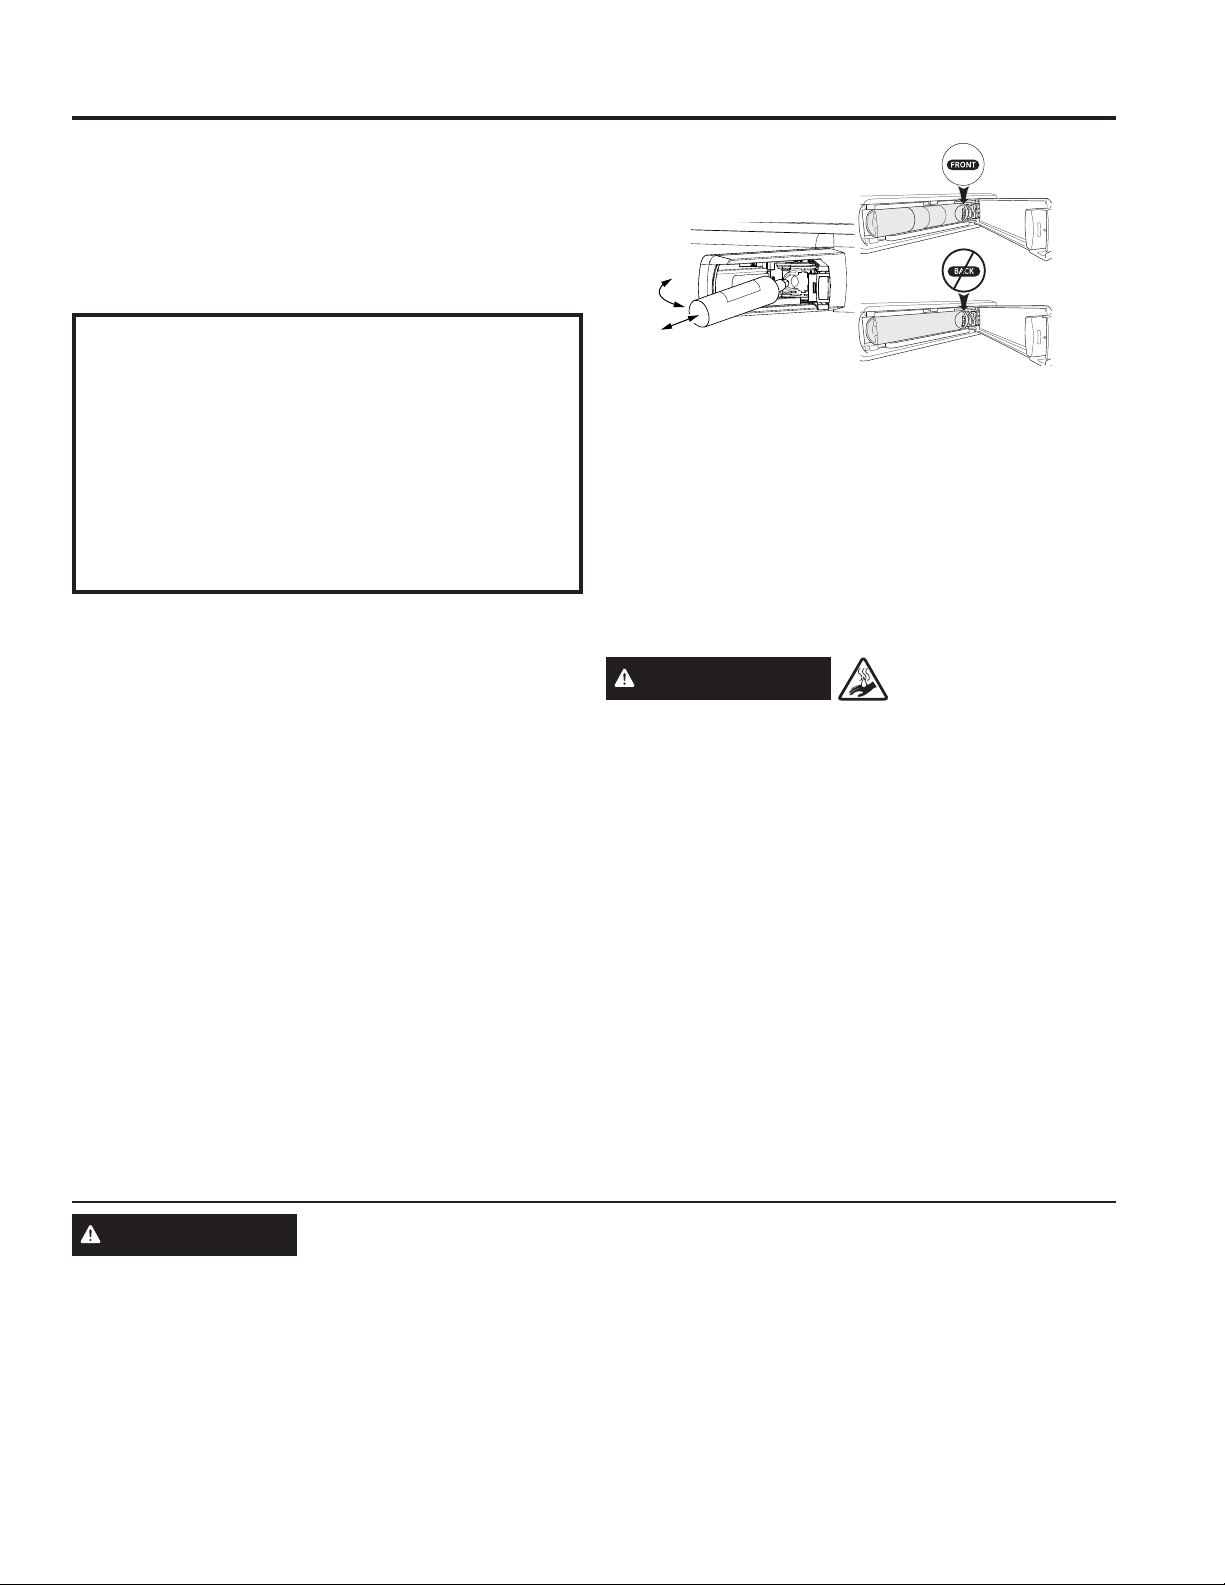
49-60792-2 17
OPERACIÓN DEL REFRIGERADORE: Cartucho del Filtro de Agua - RPWFE
*Modelos Selectos Únicamente
Cartucho del Filtro de Agua
El cartucho del filtro de agua está ubicado en el interior de los
alimentos frescos en la pared del lado izquierdo, cerca de la
parte superior.
Modelos selectos utilizan identificación por frecuencia radial
(RFID, según sus siglas en inglés) para detectar goteras
y monitorear el estado del filtro. La tecnología RFID está
certificada por la FCC.
Cuándo es necesario reemplazar el cartucho del filtro
El cartucho del filtro se debe reemplazar cada seis meses o
antes si 170 galones de agua fueron dispensados o el flujo de
agua al dispensador o la máquina de hielos se ve reducido.
Modelos con Pantalla Táctil: Un mensaje del estado del filtro
aparecerá en la pantalla cuando sea necesario reemplazar
el filtro de agua. El estado del filtro se actualizará de forma
automática cuando el filtro sea reemplazado.
Modelos sin Pantalla Táctil: Una luz del indicador del filtro se
iluminará en la pantalla cuando sea necesario reemplazar el
filtro de agua.
Retiro del cartucho del filtro
Para reemplazar el filtro, primero retire el cartucho gastado
abriendo la puerta del filtro y empujando la parte inferior
del cartucho a fin de permitir que se balancee hacia afuera.
Cuando el cartucho ya no se pueda balancear, de forma suave
HPSXMHSDUDGHVFRQHFWDUHOPLVPRGHOSRUWDFDUWXFKRV12
78(5=$(/&$578&+2(VSRVLEOHTXHJRWHHXQDSHTXHxD
cantidad de agua.
Instalación del Cartucho del Filtro
1. Alinee la parte superior del cartucho del filtro con el
VXVSHQVRUGHOFDUWXFKRFRQODSDODEUD³)5217´)UHQWH
hacia afuera; luego empuje el cartucho hacia la parte trasera
GHODXQLGDGKDVWDTXHHVWpWRWDOPHQWHLQVHUWDGR£12
78(5=$(/&$578&+2'(/),/752
2. Mientras continúa asegurando que el cartucho
esté completamente insertado en el sostén, gire
suavemente el filtro hacia adentro hasta que se afirme en
su posición. Si el filtro no gira fácilmente, controle para
asegurar que el filtro esté alineado de forma adecuada y
completamente insertado dentro del porta cartuchos.
3. Deje correr 7.57 litros (2 galones) de agua a través del
dispensador de agua fría (aproximadamente 5 minutos) a
fin de eliminar el aire del sistema. Un cartucho del filtro de
agua instalado en forma reciente hará que chorree agua del
dispensador. Use una jarra grande o una botella deportiva
SDUDDWUDSDUHODJXDURFLDGD12XVHHOGLVSHQVDGRUGH
agua caliente hasta que todo el aire haya sido eliminado del
sistema.
4. Mensaje de Estado de Reinicio del Filtro (modelos sin
pantalla táctil).
ADVERTENCIA RIESGO DE
ESCALDADURA.**
Usar el dispensador de agua caliente antes de purgar el
aire del sistema podrá generar chorreos de agua caliente
y ocasionar escaldaduras con agua caliente. Siga las
instrucciones anteriores sobre cómo purgar todo el aire del
sistema, a través del dispensador de agua fría antes de usar el
dispensador de agua caliente.
1RWD(VQRUPDOTXHHODJXDVHYHDGHVFRORULGDGXUDQWH
el flujo inicial del sistema. El color del agua regresará a su
estado normal luego de unos pocos minutos de comenzar a
dispensar.
Tapón de Bypass del Filtro
A fin de reducir el riesgo de daños sobre la propiedad debido a
SpUGLGDVGHDJXDXVWHG'(%(5ÈXVDUHOWDSyQGHOE\SDVVGHO
filtro cuando no se disponga de un reemplazo del cartucho del
filtro. Algunos modelos no vienen equipados con el tapón del
filtro del bypass. A fin de obtener un tapón del filtro del bypass,
comuníquese al 800-GECARES. En Canadá, comuníquese
al 800.561.3344. El dispensador y la máquina de hielos no
funcionarán si el filtro o el tapón del bypass del filtro no están
instalados. El tapón del bypass se instala del mismo modo que
un cartucho del filtro.
FCCID: ZKJ-EBX1532P001 ICID: 10229A-EBX1532P001
“Este dispositivo cumple con la Parte 15 de la Normativa de
la FCC. Su funcionamiento está sujeto a las dos condiciones
siguientes:. (1) Este dispositivo no podrá ocasionar
interferencias nocivas, y (2) este dispositivo debe aceptar
cualquier interferencia recibida, incluyendo interferencias que
puedan ocasionar un funcionamiento no deseado”.
“Este dispositivo cumple el estándar(es) de exención de licencia
de la RSS de la Industria de Canadá. Su funcionamiento está
sujeto a las dos condiciones siguientes: (1) Este dispositivo
no podrá ocasionar interferencias, y (2) este dispositivo
debe aceptar cualquier interferencia recibida, incluyendo
interferencias que puedan ocasionar un funcionamiento no
deseado”.
ADVERTENCIA A fin de reducir el riesgo asociado con asfixia, no permita que los niños menores de 3 años
tengan acceso a las partes pequeñas durante la instalación de este producto. El cartucho del filtro descartable deberá
ser reemplazado cada 6 meses luego de agotar su capacidad, o antes si se produce una reducción notoria en el caudal.
Para obtener el máximo beneficio de su sistema de filtrado, GE Appliances recomienda el uso de los filtros de la marca GE
Appliances únicamente. El uso de filtros de la marca GE Appliances en refrigeradores GE Appliances y Hotpoint® brinda un
ySWLPRIXQFLRQDPLHQWR\FRQILDELOLGDG/RVILOWURV*($SSOLDQFHVFXPSOHQFRQULJXURVRVHVWiQGDUHV16)GHODLQGXVWULDVREUH
seguridad y calidad, que son importantes para los productos que están filtrando su agua. GE Appliances no posee filtros de la
marca GE Appliances que no estén calificados para su uso en refrigeradores GE Appliances y Hotpoint, y no existe seguridad
de que los filtros que no son de la marca GE Appliances cumplan con los estándares de GE Appliances en relación a calidad,
funcionamiento y confiabilidad.
Ante cualquier consulta, o para ordenar cartuchos de filtros adicionales, visite nuestro sitio Web en www.gewaterfilters.
com, o llame a GE Appliances Parts and Accessories (Piezas y Accesorios de GE Appliances), 877.959.8688.
Los clientes de Canadá deberán buscar el Centro de Servicio Técnico Camco en las páginas amarillas
Cartucho del Filtro de Agua - RPWFE
Swing
Push \ Pull
Balancee
Empuje hacia
adentro/ afuera
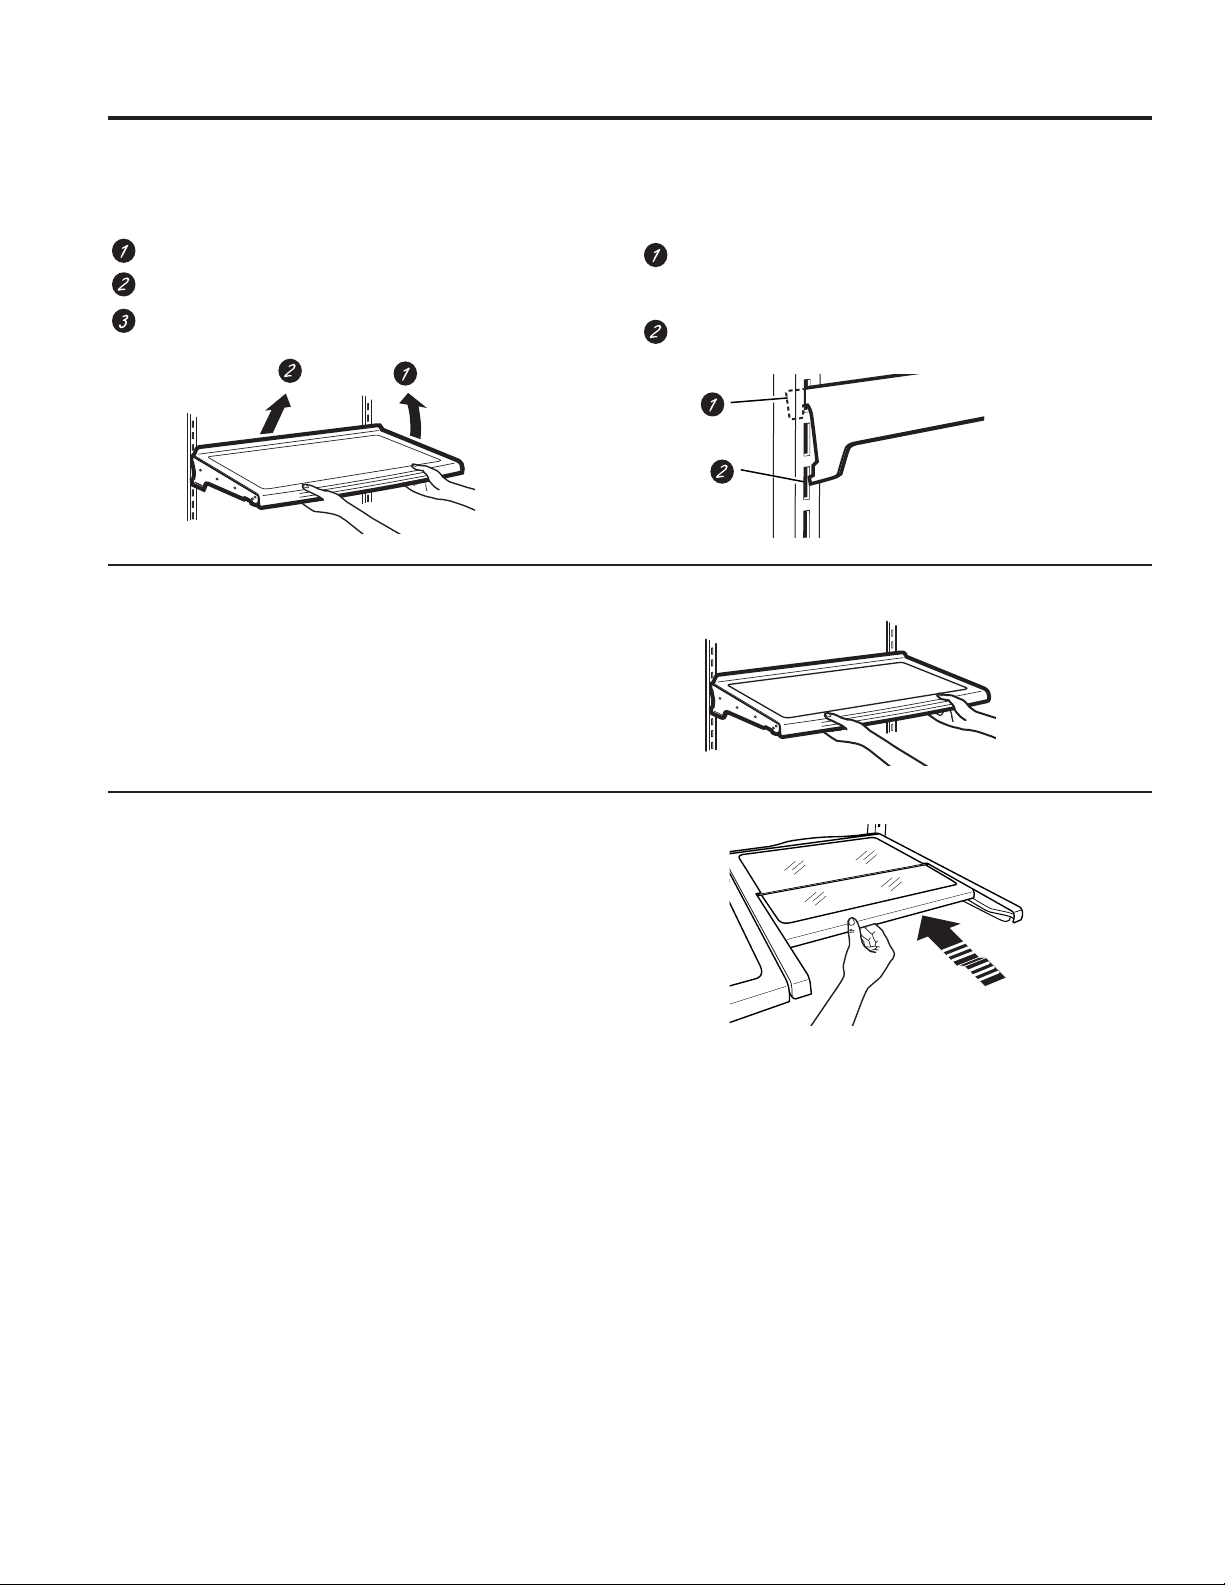
18 49-60792-2
Opciones de almacenamiento de comidas frescas
Cómo Reorganizar los Estantes
Los estantes del compartimiento del refrigerador son ajustables.
Para retirar:
Retire todos los artículos del estante.
Incline el estante hacia arriba en la parte frontal.
Levante el estante hacia arriba desde la parte trasera y
retire el mismo.
Para reemplazar:
Al inclinar el estante hacia arriba, inserte el gancho
superior en la parte trasera del estante en una ranura del
soporte.
Incline hacia abajo la parte frontal del estante, hasta que
la parte inferior del mismo quede bloqueada.
Estantes a Prueba de Derrames
Los estantes a prueba de derrames poseen extremos
especiales que ayudan a evitar derrames sobre estantes
inferiores.
Estante Quick Space*
Este estante se divide a la mitad y se desliza por debajo de sí
mismo para almacenar productos altos en el estante de abajo.
Este estante puede ser retirado y reemplazado o reubicado (al
igual que los estantes a prueba de derrames).
NOTA: La mitad trasera del Estante Quick Space no es ajustable.
*Modelos Selectos Únicamente
OPERACIÓN DEL REFRIGERADORE:2SFLRQHVGHDOPDFHQDPLHQWR
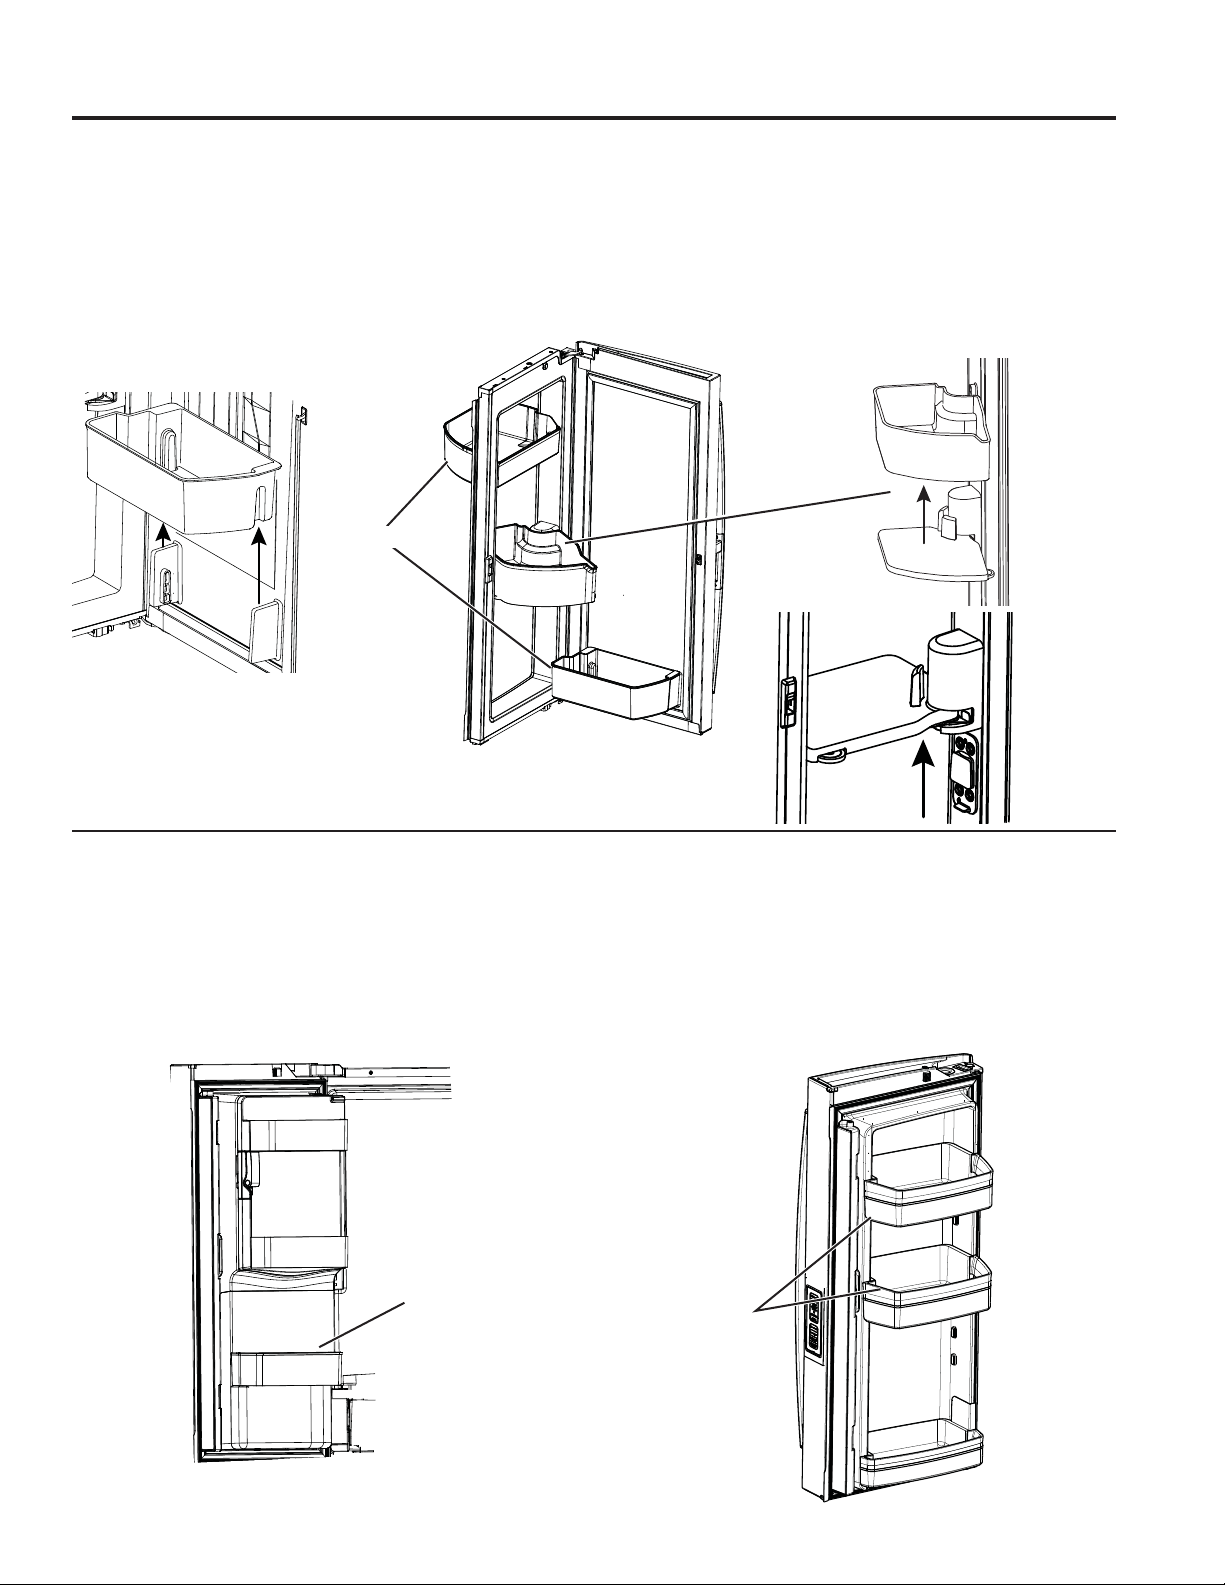
49-60792-2 19
OPERACIÓN DEL REFRIGERADORE:2SFLRQHVGHDOPDFHQDPLHQWR
*Modelos Selectos Únicamente
Opciones de almacenamiento de comidas frescas
Bandejas de la Puerta Izquierda
MODELOS CON DISPENSADOR – BANDEJA FIJA*
Para retirar el mismo: Levante el recipiente de forma recta y
luego empuje hacia afuera.
Las bandejas de la puerta de la máquina de hielos no son
intercambiables; observe la ubicación al retirar el mismo y
reemplace la bandeja en su ubicación correcta.
MODELOS SIN DISPENSADOR – BANDEJAS
AJUSTABLES*
Las bandejas ajustables se pueden mover fácilmente hacia
arriba o hacia abajo dentro de la puerta, para dar mayor
flexibilidad al almacenamiento.
Para retirar el mismo: Levante el recipiente de forma recta y
luego empuje hacia afuera.
Bandejas de la Puerta Derecha
Las BANDEJAS FIJAS pueden ser llevadas fácilmente del
refrigerador al área de trabajo.
Para retirar el mismo: Levante el recipiente de forma recta y
luego empuje hacia afuera.
BANDEJA GIRATORIA:
Para retirar: Gire la bandeja hacia afuera y luego levante la
misma de forma recta. Para retirar, coloque la mano debajo de
la base metálica y levante la misma.
Para retirar la Base Metálica: Coloque la mano debajo de la
base metálica y levante la misma.
Bandejas Fijas
Bandeja Fija Bandejas Ajustables
Retire la
Bandeja
Giratoria
Retire las Bandejas Fijas Retire
la Base
Metálica
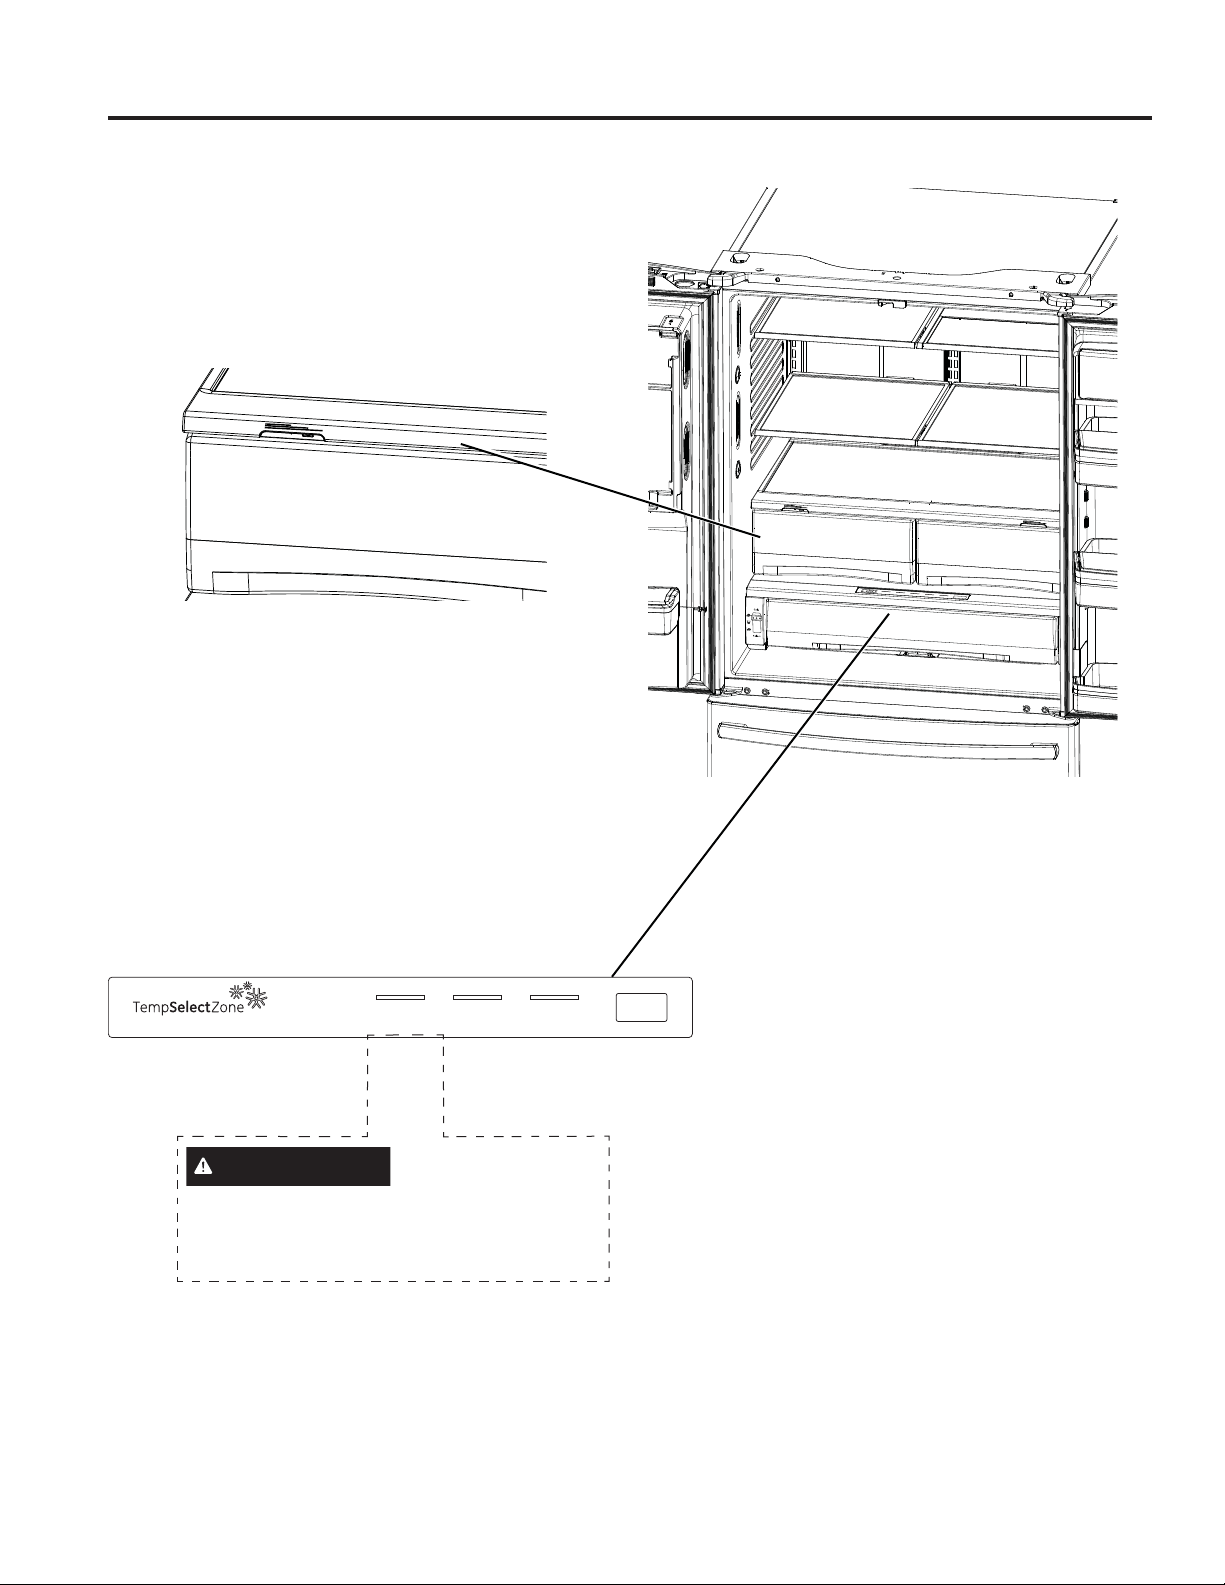
20 49-60792-2
C
Fruits Vegetables
F
C
MEATDELI PRODUCECHEESE CITRUS
SELECT
ClimateZone
Fruits Vegetables Fruits Vege
D
*Modelos Selectos Únicamente
32° 34° 38°
Nota: Las temperaturas indican las temperaturas
adecuadas para la comida y la temperatura real
puede variar de acuerdo con el funcionamiento
normal y otros factores tales como aperturas de
puertas y el punto de configuración de comidas
frescas.
Meat Beverage Deli Select
Climate Zone & Cajón con Control de Temperatura
ClimateZone
Mantenga las frutas y verduras organizadas en
compartimientos separados para un fácil acceso.
El exceso de agua que se puede acumular en la parte inferior
de los cajones o debajo de los mismos se deberá limpiar.
Cajón con Control de Temperatura*
El Cajón con Control de Temperatura es un cajón de anchura
completa con control de temperatura ajustable. Este cajón
puede ser usado para productos grandes de tipos variados.
Para cambiar la configuración, presione el botón de selección.
PRECAUCIÓN Riesgo de Laceración.
1RJXDUGHERWHOODVGHYLGULRHQHVWDXELFDFLyQ6L
están congeladas, se podrán romper y producir
lesiones personales.
OPERACIÓN DEL REFRIGERADORE: Climate Zone & Cajón

49-60792-2 21
OPERACIÓN DEL REFRIGERADORE: Climate Zone & Cajón
Divisor
*Modelos Selectos Únicamente
Cómo Retirar y Reemplazar el Cajón Ajustable
Para retirar:
Empuje el cajón fuera de su posición final.
Levante la parte frontal del cajón hacia arriba y hacia afuera.
Para reemplazar:
Empuje los costados izquierdo y derecho hasta que estén
completamente extendidos.
Primero vuelva a colocar el cajón nuevamente y gire el mismo
del frente hacia abajo para que se apoye en el deslizador.
Empuje el cajón hacia adentro hasta la posición cerrada.
Cómo Retirar y Reemplazar el Divisor
del Cajón*
Para retirar:
Empuje el cajón fuera de su posición final.
Levante el lado frontal del divisor para desenganchar
el mismo de la pared trasera del cajón.
Para reemplazar:
Enganche la parte trasera del divisor a la pared
trasera del cajón.
Empuje el divisor hacia abajo.
Climate Zone & Cajón con Control de Temperatura

22 49-60792-2
Canasta y Cajón del Freezer
Canasta.
Cajón
Hielera * (Disponible para modelos Sin Dispensador
únicamente). Disponible como Kit IM en algunos modelos).
Recipiente No Ajustable en el
Freezer*
Para retirar: Empuje hacia adentro la lengüeta plástica, ya sea
hacia la izquierda o la derecha.
Para reemplazar: Deslice el recipiente en la ubicación hasta
que quede bloqueado.
Retiro de la Cesto
Para retirar , modelos CFE únicamente:
1. Abra la puerta del freezer hasta la posición de detención.
2. Retire el cubo de la puerta del freezer empujando la
lengüeta de plástico tanto hacia la derecha como hacia la
izquierda para liberar el perno de las bisagras del cubo.
3. Retire la canasta del freezer levantando su parte trasera y
moviendo la misma hacia atrás hasta que el frente se pueda
rotar hacia arriba y afuera.
4. Levante hacia afuera para retirar la misma.
Para retirar los modelos CYE y CWE únicamente:
1. Abra las puertas de alimentos frescos.
2. Abra la puerta del freezer hasta la posición de detención.
3. Retire la canasta del freezer levantando la parte trasera de
la canasta y rotando la misma hacia arriba.
4. Levante hacia afuera y retire la misma.
Para reemplazarla:
Invierta el paso 1 al 4 para reemplazarla.
*Modelos Selectos Únicamente
Cestos, Cajones y Cubos
Lengüeta plástica
OPERACIÓN DEL FREEZER: Cestos, Cajones y Cubos
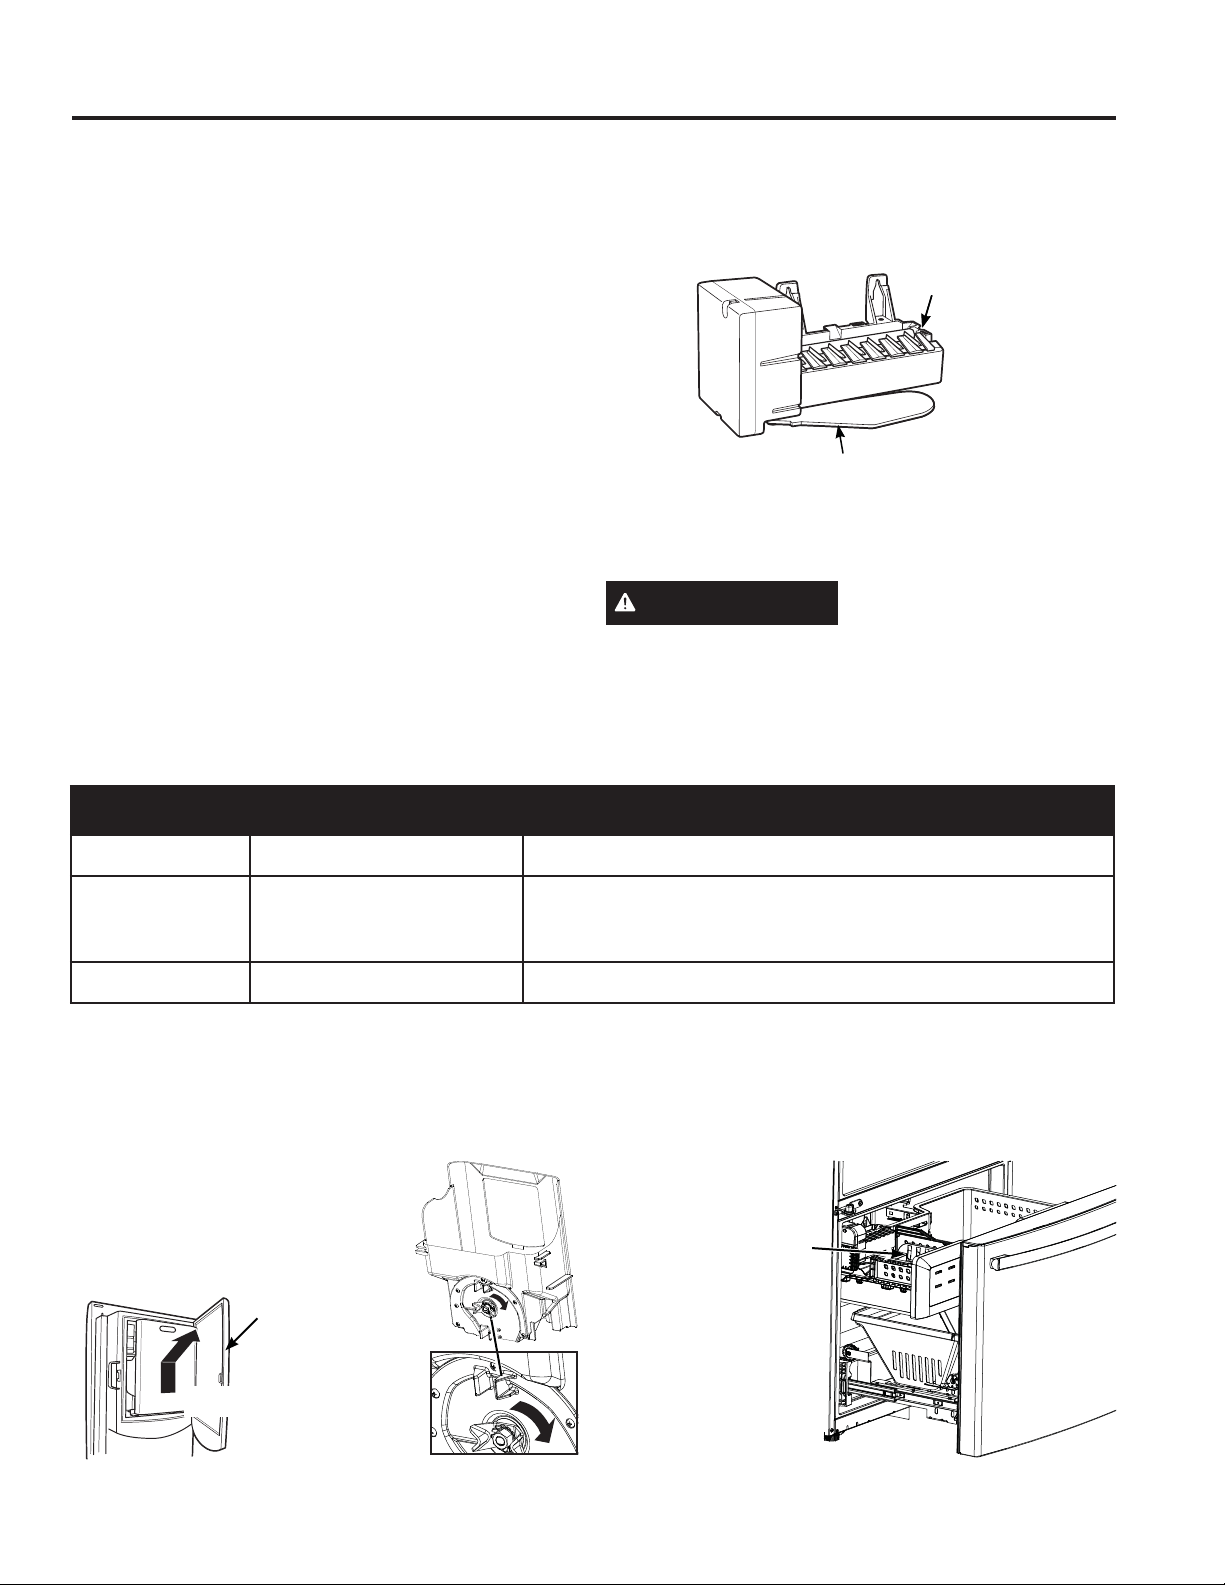
49-60792-2 23
OPERACIÓN DEL FREEZER: Hacer Hielo Automática
Tipo de Pantalla
(Lea la Página 8) 1GH0RGHOR Cómo Encender/ Apagar la Máquina de Hacer Hielo
Estilo de Control A PFE28, PYE22P 8VHHOERWyQ³,&(´+LHORHQHOFRQWURO/HDVREUHORV&RQWUROHVHQODV
páginas 10 y 11.
Estilo de Control B PFH28, PFE28K, PFD28,
DFE28, GFE28, GFD28, GFE26,
PYD22, PYE22K, DYE22K,
GYE22
8VHHOERWyQ³,&(0$.(5´+LHOHUDHQHOFRQWURO
Lea sobre los Controles, en las páginas 10 y 11.
Estilo de Control C *1(3:(
8VHHOERWyQ³,&(0$.(5´+LHOHUDHQHOFRQWUROLea sobre los Controles, en
las páginas 10 y 11.
Cómo Encender/ Apagar la Máquina de Hacer Hielo
*Modelos Selectos Únicamente
Levante y empuje
Puerta de
la Caja
de Hielo
Hielera y Dispensador*
• Abra la puerta de la caja de hielos dentro de la puerta
izquierda.
• Empuje hacia arriba y afuera la hielera en la puerta del lado
izquierdo para retirar la misma del compartimiento.
• Para reemplazar la hielera, ajuste la
misma a los soportes de la guía y
empuje hasta que la hielera se ubique
correctamente.
• Si la hielera no se puede reemplazar,
gire la horquilla de la hielera ¼ en
dirección de las agujas del reloj.
Máquina de hacer hielo (Disponible
en modelos sin dispensador; también
disponible como Kit IM para algunos
modelos.)
El cajón del compartimiento del freezer cuenta con
almacenamiento de
hielo adicional.
• Abra el cajón de
freezer.
• La hielera se
encuentra
ubicada en el
lado izquierdo
de la canasta
superior.
• Empuje la
canasta superior
hacia adelante
para retirar la
hielera.
Freezer
Ice
Bucket
Hacer Hielo Automática
Puede llevar entre 12 y 24 horas que un refrigerador recién instalado comience a fabricar hielo.
Máquina de Hacer Hielo Automática*
La máquina de hacer hielo producirá siete cubos por ciclo, y
aproximadamente entre 100 y 130 cubos en un período de 24
horas, dependiendo de la temperatura del compartimiento del
freezer, la temperatura ambiente, la cantidad de veces que se
abra la puerta y otras condiciones de uso.
La máquina de hacer hielo se llenará de agua cuando se enfríe
y llegue a los 15°F (–10°C). Puede llevar entre 12 y 24 horas
que un refrigerador recién instalado comience a fabricar hielo.
Si el refrigerador es utilizado antes de realizar las conexiones
de la tubería de agua a la unidad o si el suministro de agua a
un refrigerador en funcionamiento es apagado, asegúrese de
que la máquina de hacer hielo esté apagada. Una vez que el
agua haya sido conectada al refrigerador, la máquina de hacer
hielo podrá ser encendida. Para más detalles, lea la tabla que
aparece más abajo.
Es posible que escuche un zumbido cada vez que la máquina
de hacer hielo se llene de agua.
Descarte las primeras cantidades de hielo para permitir que el
suministro de agua se despeje.
Asegúrese de que nada interfiera con la extensión del brazo
indicador.
Cuando el cubo se llene hasta el nivel del interruptor de
energía, la máquina de hacer hielo dejará de producir hielo. Es
normal que varios cubos queden juntos.
Si el hielo no se usa con frecuencia, los cubos de hielo viejos
se volverán turbios, con sabor rancio y su tamaño se reducirá.
NOTA: En hogares con un nivel de presión inferior a la normal,
es posible que escuche que la válvula de agua de la máquina
de hacer hielo realice varios ciclos para producir una cantidad
de hielo.
PRECAUCIÓN Para minimizar el riesgo de
lesiones personales, evite el contacto con las partes móviles
del mecanismo eyector o con el elemento de calefacción que
OLEHUDORVFXERV1RFRORTXHORVGHGRVQLODVPDQRVHQHO
mecanismo de la máquina de hielo automática mientras el
refrigerador esté enchufado.
Interruptor de Energía
Máquina de
hacer hielo
24 49-60792-2
Cuidado y Limpieza
Limpieza de la Parte Interior
Para evitar olores, deje abierta una caja de bicarbonato de
sodio en los compartimientos del refrigerador y del freezer.
Desenchufe el refrigerador antes de limpiar.
Si esto no resulta práctico, estruje el exceso de humedad
para eliminarlo de la esponja o tela al limpiar alrededor de los
interruptores, luces o controles.
Use un pulidor de cera para electrodomésticos en la superficie
interior entre las puertas.
Use agua caliente y solución de bicarbonato de sodio —
aproximadamente una cuchara sopera (15 ml) de bicarbonato
de sodio para un cuarto de galón (1 litro) de agua. Esto limpia y
neutraliza los olores. Enjuague y seque.
Para limpiar el panel metálico interno*, abra la puerta externa
usando la Traba de Puerta en Puerta. Limpie el panel con un
GHWHUJHQWHVXDYH\OXHJRVHTXHFRQXQDWHODVXDYH1RXVH
ningún limpiador de acero inoxidable sobre el panel, ya que
estos podrán dañar el plástico circundante.
PRECAUCIÓN 1ROLPSLHHVWDQWHVGHYLGULRQLWDSDV
con agua caliente cuando estén fríos. Los estantes de vidrio
y las tapas se pueden romper si son expuestos a cambios de
temperatura repentinos o impactos tales como sacudones o
caídas. El vidrio templado está diseñado para destruirse en
pequeñas piezas en caso de rotura.
1RODYHQLQJXQDSDUWHSOiVWLFDGHOUHIULJHUDGRUHQODODYDGRUD
de platos.
Limpieza de la Parte Exterior
Los paneles de acero inoxidable, manijas de las
puertas y componentes.
Los puertas y las manijas de las puertas de acero inoxidable
(en algunos modelos) pueden ser limpiados con un limpiador
para acero inoxidable para usos comerciales. Los limpiadores
con ácido oxálico tales como Bar Keepers Friend Soft
Cleanser™ eliminarán el óxido sobre la superficie, deslustres
y pequeñas manchas. Use sólo un limpiador líquido libre
de material abrasivo y frote en la dirección de las líneas del
cepillo con una esponja suave y húmeda.
1RXWLOLFHFHUDSDUDHOHFWURGRPpVWLFRVVREUHHODFHUR
inoxidable.
Partes plásticas con acentos de plata.
Lave las partes con jabón u otros detergentes suaves. Limpie
con una esponja, una tela húmeda o toallas de papel.
1RXVHHVWURSDMRVOLPSLDGRUHVHQSROYREODQTXHDGRUHVR
limpiadores que contengan blanqueadores, ya que estos
productos pueden rayar y dañar la terminación de la pintura.
Si es necesario limpiar la bandeja de derrames, use un
eliminador de sarro.
Detrás del Refrigerador
Tenga cuidado al alejar el refrigerador de la pared. Cualquie
tipo de cobertura de piso puede ser dañada, particularmente
las coberturas acolchonadas y aquellas con superficies con
relieves.
Levante las patas niveladoras ubicadas en la parte frontal
interior del refrigerador.
Empuje el refrigerador hacia afuera de forma recta y regrese
el mismo a su posición empujándolo hacia adentro. Mover el
refrigerador hacia una ubicación lateral podrá ocasionar daños
sobre la cobertura del piso o el refrigerador.
Baje las patas niveladoras hasta que toquen el piso.
ADVERTENCIA RIESGO DE
DESCARGA ELÉCTRICA Al volver a empujar el
refrigerador, asegúrese de que no atraviese el cable de
corriente ni la tubería de suministro de agua.
Preparación para las vacaciones
Si estará de vacaciones o ausente por tiempo prolongado,
retire la comida y desenchufe el refrigerador. Limpie el interior
con una solución de bicarbonato de sodio de una cuchara
sopera (15 ml) de bicarbonato de sodio para un cuarto de
galón (1 litro) de agua. Deje las puertas abiertas.
Modelos con LCD: Apague el refrigerador del control (pág. 9).
Si la temperatura puede llegar a estar por debajo de la
congelación, solicite a un técnico calificado que drene el
sistema de suministro de agua a fin de prevenir daños graves
sobre la propiedad debido a una inundación.
1) Apague el refrigerador (pág. 9) o desenchufe el refrigerador.
2) Vacíe la hielera
3) Cierre el suministro de agua
Si cierra el suministro de agua, apague la máquina de hacer
hielo (pág. 21).
Al regresar de sus vacaciones:
1) Reemplace el filtro de agua.
2) Deje correr 7.57 litros (2 galones) de agua a través del
dispensador de agua fría (aproximadamente 5 minutos) a fin
de eliminar el aire del sistema.
3) Dispense agua caliente a 185ºF 3 veces (10 onzas cada
vez) para eliminar el aire del sistema.
CUIDADO Y LIMPIEZA
*Modelos Selectos Únicamente
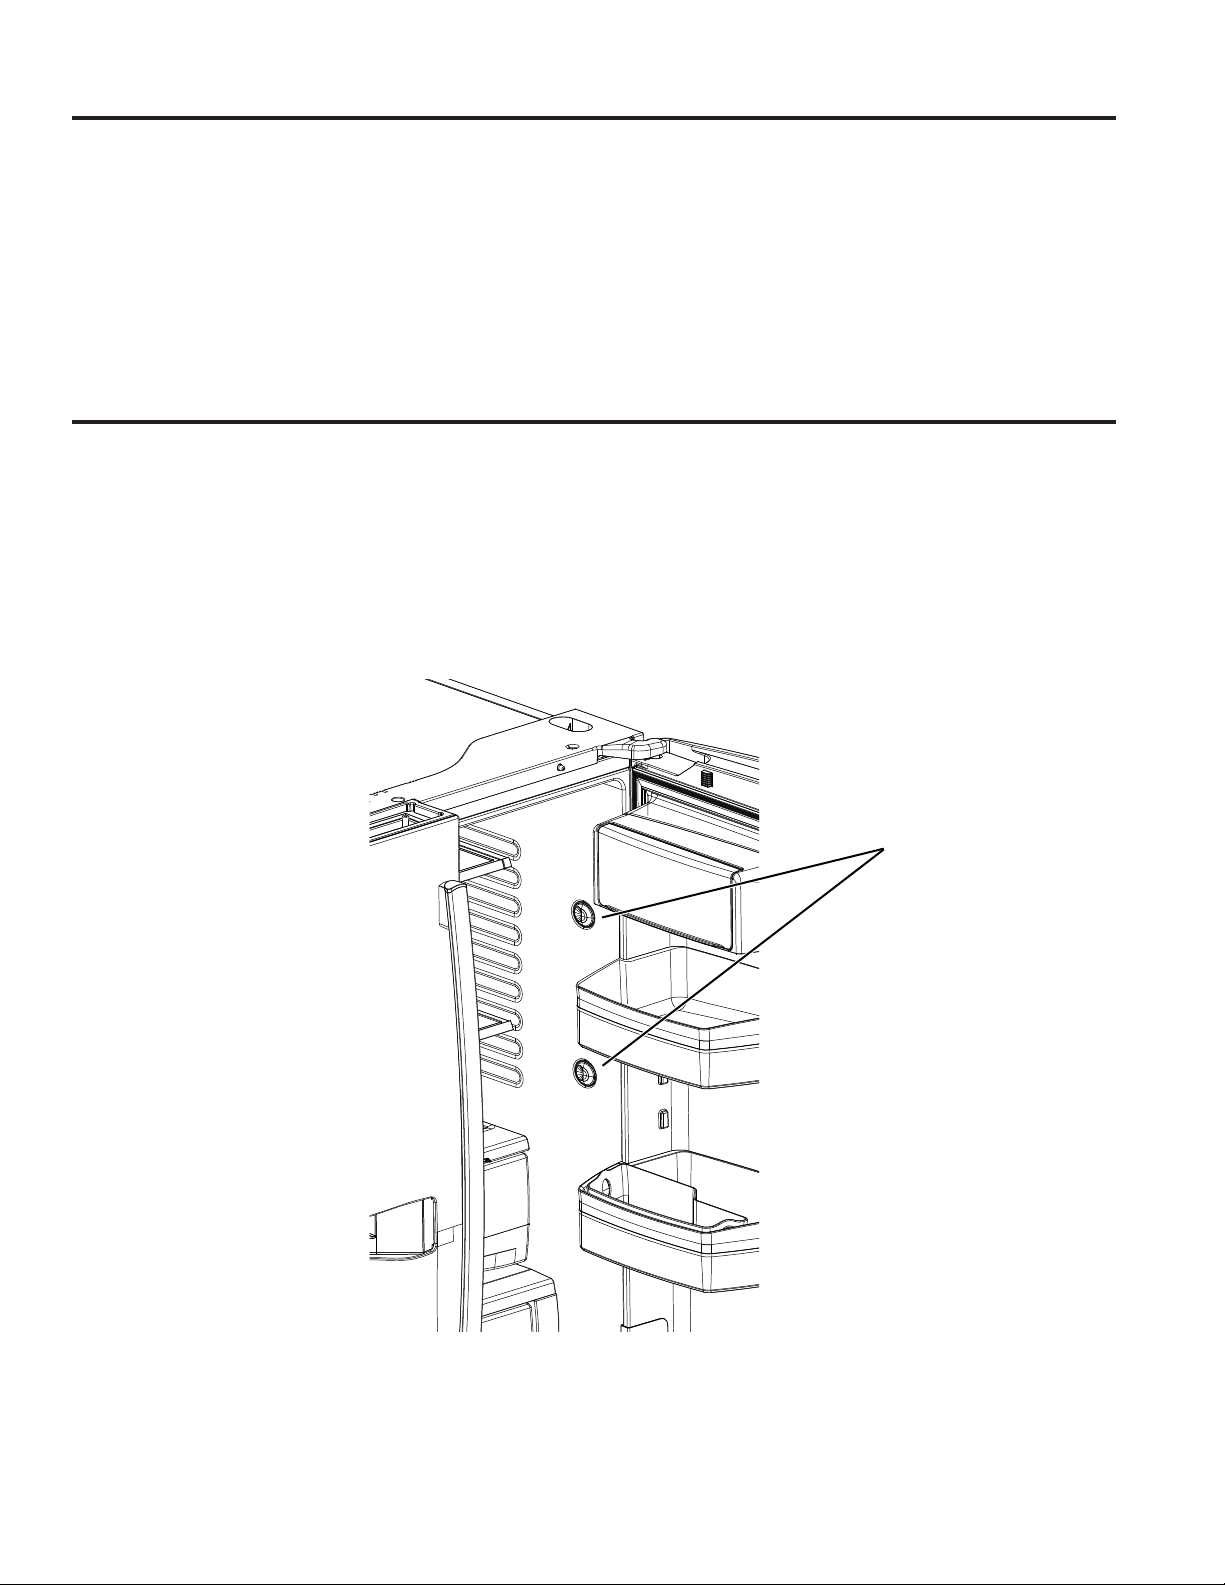
49-60792-2 25
CUIDADO Y LIMPIEZA / REEMPLAZO DE LAS LUCES
*Modelos Selectos Únicamente
Reemplazo de las luces
Luces del Refrigerador (LEDs)
El aspecto puede variar dependiendo del modelo.
Hay una luz LED en el compartimiento de comidas frescas
y en la parte inferior de las puertas de comidas frescas para
iluminar el compartimiento del freezer.*
Será necesario que un técnico autorizado reemplace las luces
LED.
En caso de ser necesario un reemplazo de este ensamble,
llame al Servicio Técnico de GE Appliances al 1.800.432.2737
en Estados Unidos o al 1.800.561.3344 en Canadá.
Luces LED.
Cuidado y Limpieza
Preparación para la mudanza
Asegure todos los ítems tales como estantes y cajones,
pegando los mismos de forma segura en sus respectivos
lugares a fin de evitar daños.
Al usar un carro manual para mover el refrigerador, no deje
que la parte frontal ni la parte trasera descansen contra el
carro manual. Esto podría dañar el refrigerador.
Lleve el mismo sólo sobre los costados del refrigerador.
Asegúrese de que el refrigerador permanezca en una posición
erguida durante el movimiento.
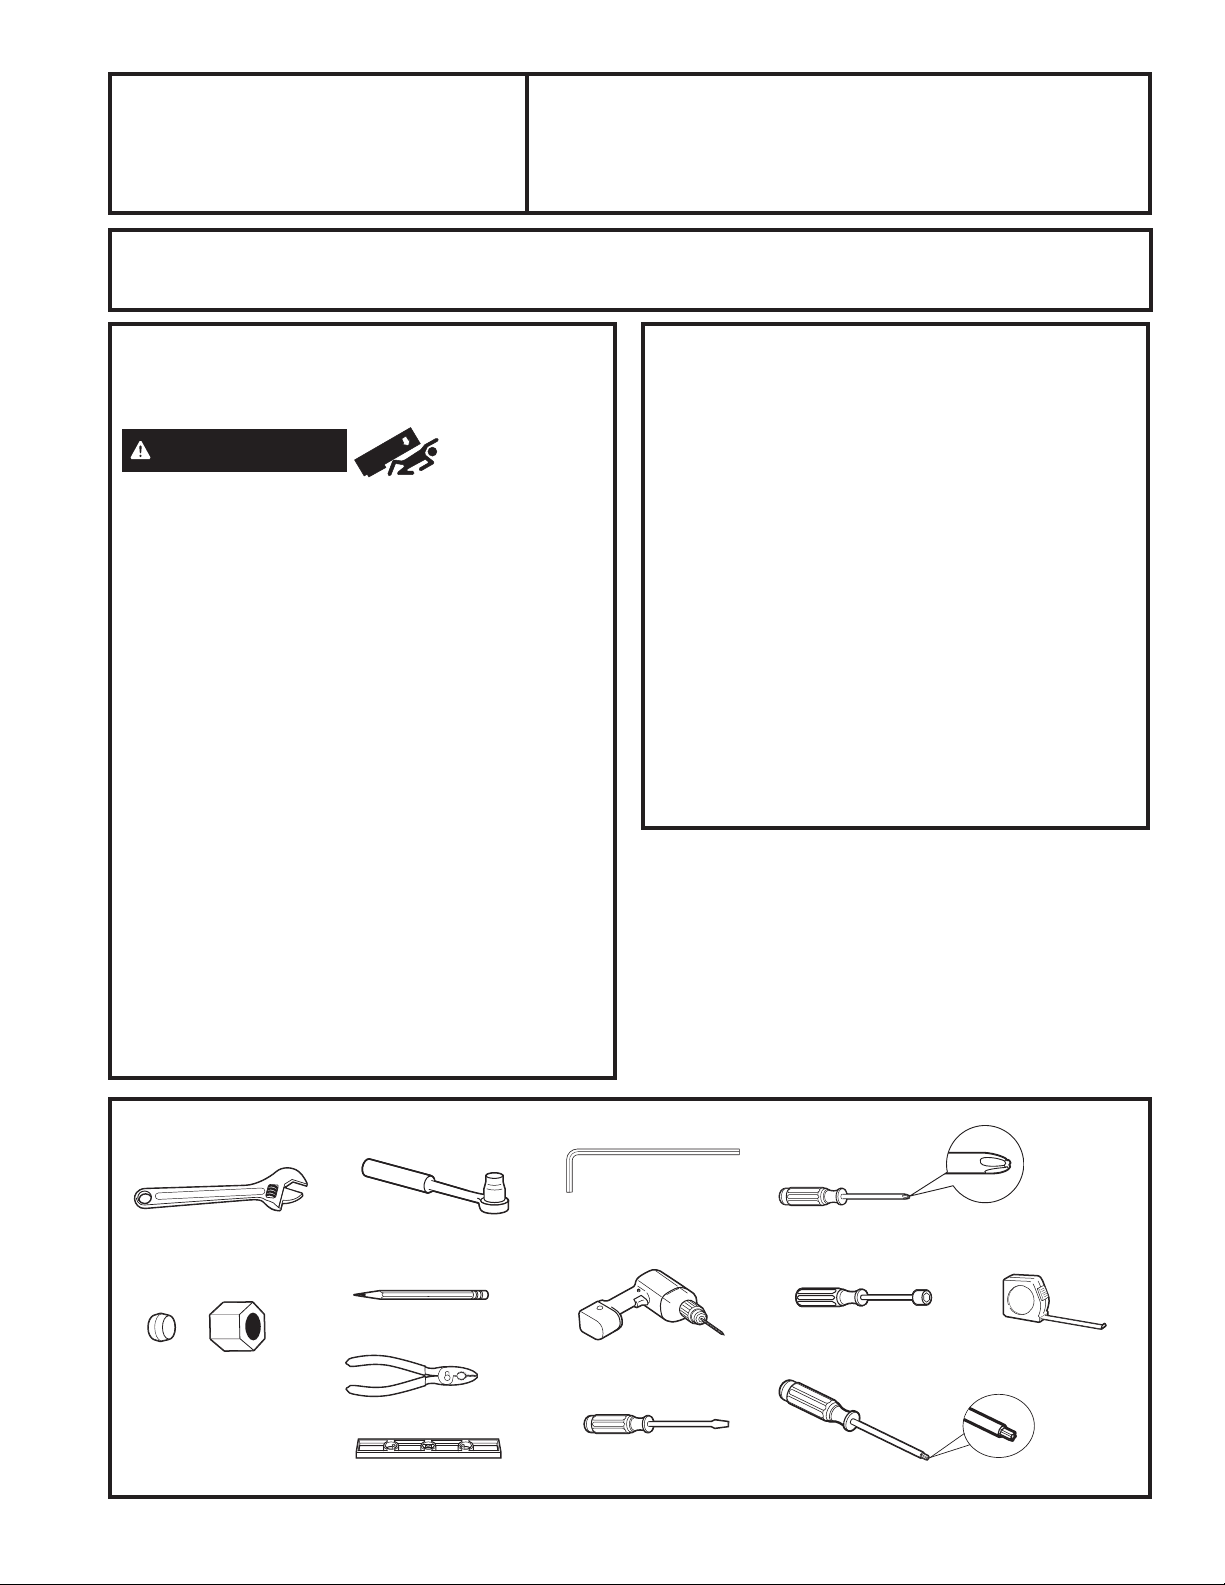
26 49-60792-2
HERRAMIENTAS QUE PUEDE NECESITAR
ANTES DE COMENZAR
Lea estas instrucciones en su totalidad y
atentamente.
ADVERTENCIA Riesgo de
Caída.
Los modelos con estilo incorporado (modelo PYE, CYE,
y PWE) son inestables, especialmente con las puertas
abiertas. Estos modelos deben ser asegurados con el
soporte anti-volcaduras, a fin de evitar caídas hacia
adelante, que podrían resultar en la muerte o lesiones
graves. Lea y siga las instrucciones de instalación en su
totalidad, a fin de instalar el soporte de piso anti-volcaduras
embalado con su refrigerador.
• IMPORTANTE — Cumpla con todos los
códigos y ordenanzas gubernamentales. Conserve estas
instrucciones para uso del inspector local.
1RWDSDUDHO,QVWDODGRU±$VHJ~UHVHGHTXHHO
Consumidor conserve estas instrucciones.
1RWDSDUDHO&RPSUDGRU±&RQVHUYHHVWDVLQVWUXFFLRQHV
para referencia futura.
1LYHOGHKDELOLGDG±/DLQVWDODFLyQGHHVWH
electrodoméstico requiere un nivel básico de habilidades
mecánicas.
• Tiempo de Instalación – La instalación del refrigerador
puede variar de acuerdo con la Instalación de la Tubería
de Agua en unos 30 minutos
• La correcta instalación del producto es responsabilidad
del instalador.
• Si se producen fallas en el producto debido a una
instalación inadecuada la Garantía no cubrirá las
mismas.
PREPARACIÓN
CÓMO MOVER EL REFRIGERADOR EN UN
ESPACIO INTERNO
Si el refrigerador no pasa por una puerta, la puerta del
refrigerador y el cajón del freezer podrán ser retirados.
• Para retirar la puerta del refrigerador, consulte la sección
Cómo Instalar el Refrigerador.
• Para retirar el cajón del freezer, consulte la sección Cómo
Retirar el Cajón del Freezer.
SUMINISTRO DE AGUA A LA MAQUINA DE
HACER HIELO Y EL DISPENSADOR
Si el refrigerador cuenta con una máquina de hacer hielo,
deberá ser conectada al suministro de agua fría. Un kit
de suministro de agua de GE Appliances (que contenga
tubería, válvula de cierre, uniones e instrucciones) está
disponible por un costo adicional a nivel minorista, visitando
nuestro sitio web en GEAppliances.com (en Canadá en
www.geappliances.ca) o en Parts and Accessories (Piezas
y Accesorios), 877.959.8688 (en Canadá 1.800.661.1616).
Llave Ajustable
Tuerca de Compresión
de Diámetro Externo y
Abrazadera de Refuerzo
(manga) de ¼”
Destornillador con Cabeza Phillips
Trinquete / Destornillador
de 3/8”
Llaves Allen de 1/8”, 3/32”,
¼” y 5/32”
Lápiz
Broca y Taladro Eléctrico o
Manual de 1/8”
Cinta métrica
Llave de Tuercas de ¼”
Pinzas
1LYHO
Destornillador con cabeza
aplanada Llave Torx T20, T25
Instrucciones
de Instalación Refrigerador
Modelos GE y GE Profile™
¿Preguntas? Llame a 800.GE.CARES (800.432.2737) o visite nuestro sitio web en: GEAppliances.com
En Canadá, llame al 1.800.561.3344 o visite nuestro Sitio Web en: www.GEAppliances.ca
INSTRUCCIONES DE INSTALACIÓN
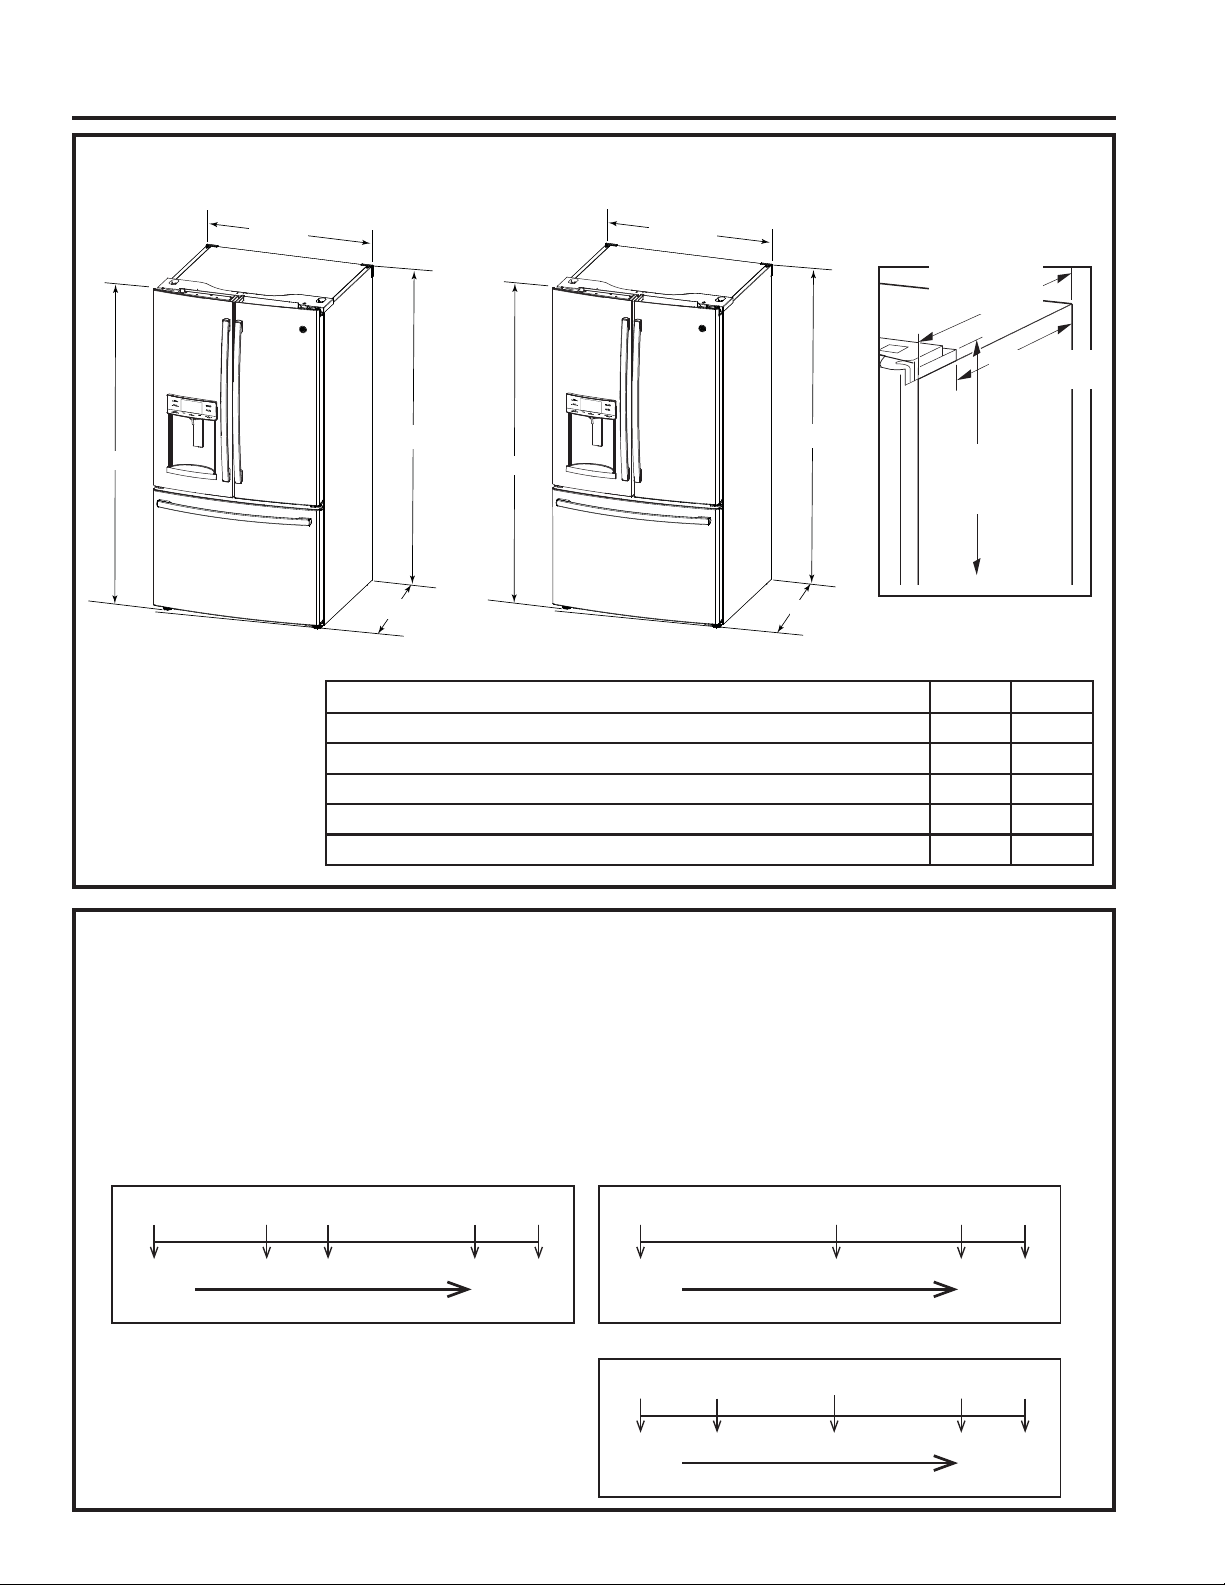
49-60792-2 27
INSTRUCCIONES DE INSTALACIÓN
CÓMO MOVER EL REFRIGERADOR
• Usando el siguiente cuadro, determine si el ancho de su pasillo es suficiente para la profundidad del refrigerador.
Asegúrese de contar con espacio para evitar daños sobre el refrigerador antes de moverlo de forma segura hasta su
ubicación final.
• Si los pasillos son los suficientemente grandes como para ubicar el refrigerador sin retirar las manijas, continúe con el
Paso 6. Deje la cinta, la envoltura y todo el embalaje en las puertas hasta que el refrigerador se encuentre en la ubicación
final.
• NOTA: Use un carro manual con almohadillas o correas móviles para transportar el refrigerador. Coloque el refrigerador
en el carro manual, apoyando un costado contra este último. Recomendamos enfáticamente que dos personas realicen el
traslado y completen la instalación.
DIMENSIONES
Todas las medicion es se dan con la pata niveladora completamente replegada.
SD CD
Altura General a la Parte Superior de la Tapa de la Bisagra 69-7/8” 69-7/8”
Altura hasta la Parte Superior del Gabinete 69” 69”
Profundidad de la Caja sin Puerta 29-5/8” 24-5/8”
Ancho General de la Caja Exterior 35-3/4” 35-3/4”
Profu ndidad Exterior General de las Puertas/Cajones con Manijas 36-3/8” 31-3/8”
Profundidad de
Caja sin Puertas
de 29-5/8” SD
24-5/8” CD
Altura del suelo a la
parte superior de la
tapa de bisagra de
»´
Dimensiones Adicionales
23-1/4” SD
18-1/4” CD
35-3/4”
69”
31-3/8”
69-7/8”
35-3/4”
69”
36-3/8”
69-7/8”
Totalmente
Ensamblado
36.375” 34.375” 34” 30.5” 29.625”
Retire las partes de la puerta en orden hasta que su dimensión
sea inferior que la abertura Retire las partes de la puerta en orden hasta que su dimensión
sea inferior que la abertura
Retire las partes de la puerta en orden hasta que su dimensión
sea inferior que la abertura
Retiro
de las Manijas Retiro de la
Puerta del
Lado Izq.
Caja con
Manijas
del Fz Solo la caja
(sin manijas)
Si su número de modelo comienza con PFE, PFH, PFD, GFD, GFE,
DFE (SD)
Totalmente
Ensamblado
36.275” 33.75” 30.25” 29.625”
Retiro
de las Manijas Caja con
Manijas
del Fz Solo la caja
(sin manijas)
Si su número de modelo comienza con GNE (SD)
Totalmente
Ensamblado
31.375” 29.375” 25.875” 24.625”
Retiro de
las Manijas Retiro de la Puerta
del Lado Izq. Caja con
Manijas
del Fz Solo la caja
(sin manijas)
28.875”
Si su número de modelo comienza con DYE, GYE, PYE, PYD, PWE (CD)
Instrucciones de Instalación
Modelos con Profunidad Estándar (SD) Únicamente
Modelos con Profunidad de Mesada (CD) Únicamente
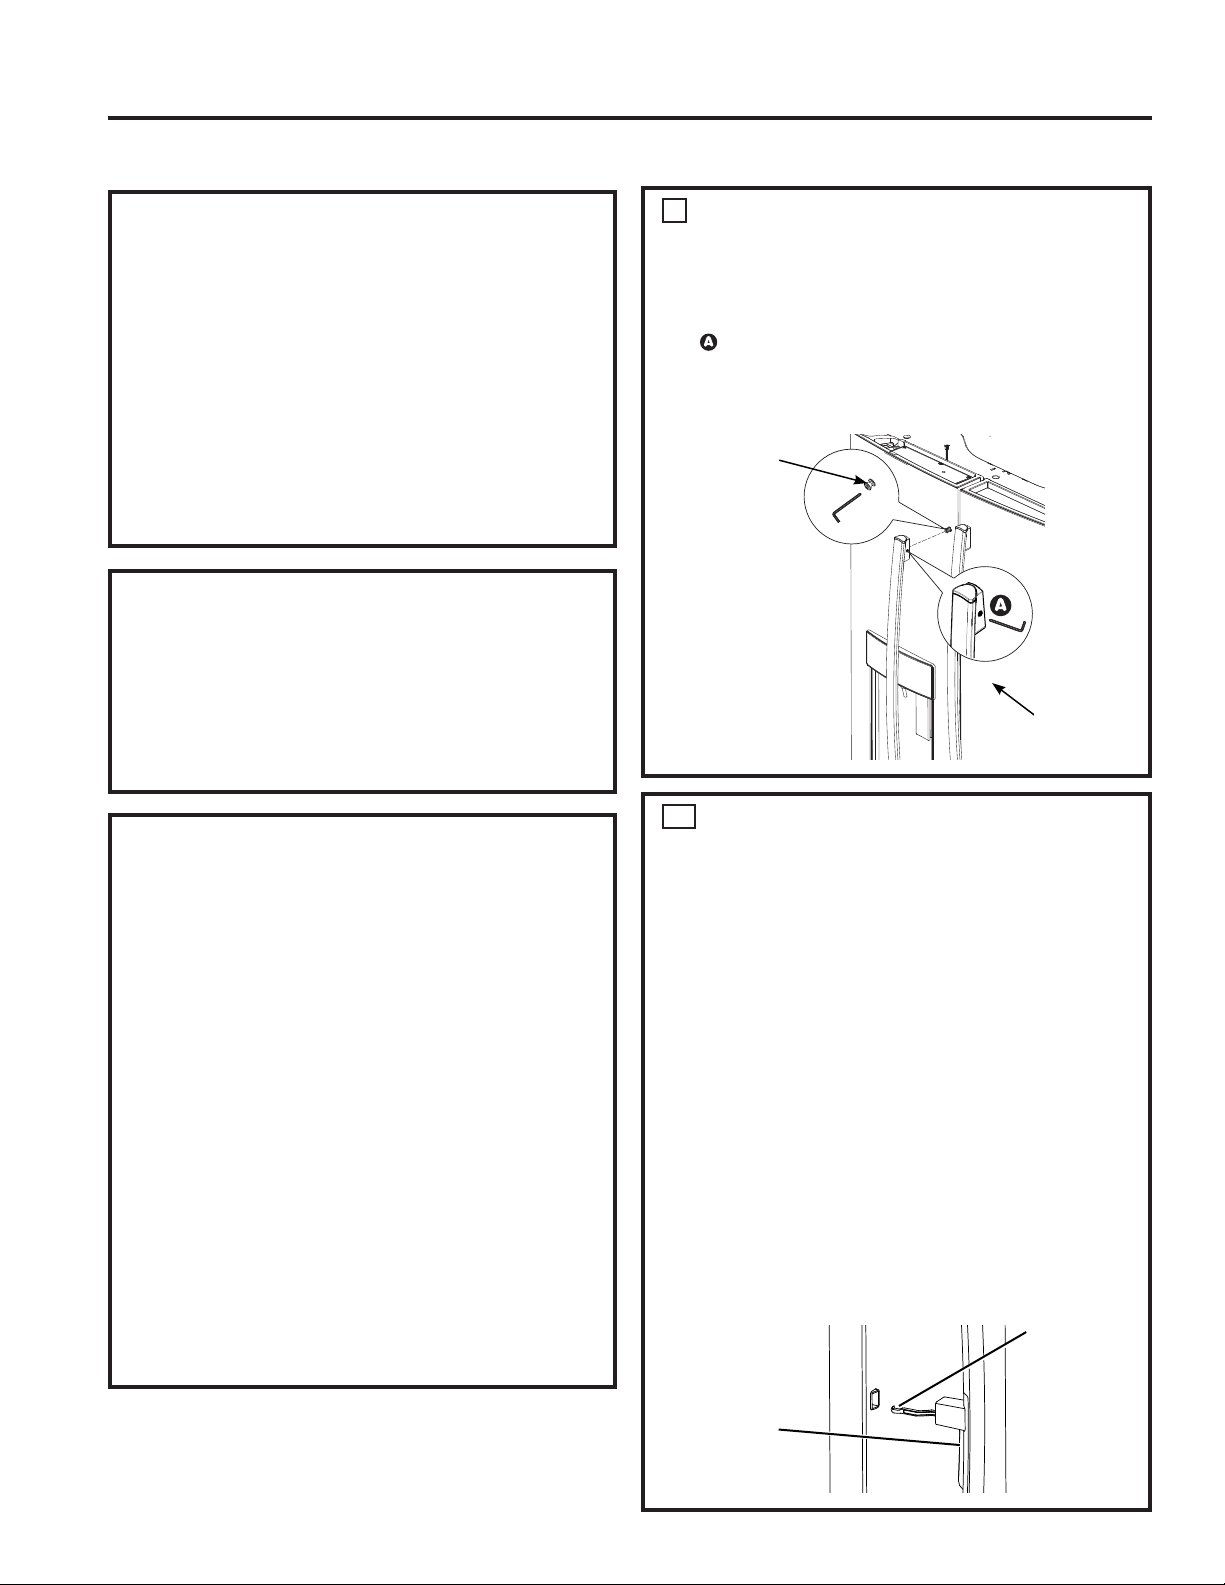
28 49-60792-2
CÓMO INSTALAR EL REFRIGERADOR
RETIRE LA MANIJA DE LA
PUERTA DE COMIDAS FRESCAS
El diseño del mango varía dependiendo de los
modelos; sin embargo, la instalación es igual.
Manijas de acero inoxidable y de plástico:
Afloje el conjunto de tornillos con la llave Allen de
1/8” y retire la manija.
NOTA: Si es necesario ajustar o retirar los tensores
de montaje de la manija, use una llave Allen de ¼”.
1
Tensores
de Montaje
Deje la
película puesta
hasta finalizar
la instalación
Instrucciones de Instalación
CÓMO INSTALAR EL
REFRIGERADOR
Ŷ1RLQVWDOHHOUHIULJHUDGRUGRQGHODWHPSHUDWXUDOOHJXHD
ser inferior a los 60ºF (16ºC), ya que no se activará con
la frecuencia necesaria para mantener las temperaturas
apropiadas.
Ŷ1RLQVWDOHHOUHIULJHUDGRUGRQGHODWHPSHUDWXUDVHD
superior a los 100ºF (37ºC), ya que no funcionará de
forma correcta.
Ŷ1RLQVWDOHHOUHIULJHUDGRUHQXQDXELFDFLyQH[SXHVWDDO
agua (lluvia, etc.) o en contacto directo con la luz solar.
Ŷ Instale el mismo en un piso lo suficientemente fuerte
como para soportarlo completamente cargado.
ESPACIO NECESARIO
Deje el siguiente espacio para facilitar la instalación, una
adecuada circulación de aire y plomería y conexiones
eléctricas.
Costados 1/8” (3 mm)
Parte superior Gabinete/ Tapa de la Bisagra de 1” (25 mm)
Parte trasera 2” (50 mm)
CÓMO RETIRAR LAS PUERTAS
DEL REFRIGERADOR
Ŷ NOTA IMPORTANTE: Este refrigerador posee una
profundidad de 36 ¼” (31 ¼” para los modelos CYE).
Las puertas y pasillos que conducen a la ubicación de la
instalación deberán tener por lo menos 36 1/4” de ancho,
a fin de poder dejar las puertas y manijas adheridas al
refrigerador mientras se lo transporta hasta la ubicación
de la instalación. Si los pasillos poseen menos de 36 ¼”,
las puertas y las manijas del refrigerador se podrán rayar
y dañar fácilmente. La tapa superior y las puertas podrán
ser retiradas, a fin de permitir que el refrigerador sea
movido de forma segura en áreas interiores. Si los pasillos
poseen menos de 31 ¼”, comience por el Paso 1.
Ŷ Si no es necesario retirar las puertas, continúe con el
Paso 11. Deje la cinta y todo el embalaje en las puertas
hasta que el refrigerador se encuentre en su ubicación
final.
Ŷ NOTA: Use un carro manual para transportar el
refrigerador. Coloque el refrigerador en el carro manual,
apoyando un costado contra este último. Recomendamos
HQIiWLFDPHQWHTXH'263(5621$6UHDOLFHQHOWUDVODGR\
completen la instalación.
INSTRUCCIONES DE INSTALACIÓN
PARA MODELOS DE PUERTA
EN PUERTA ÚNICAMENTE
Para Retirar la Manija:
Ŷ Abra la puerta externa presionando la traba
de Puerta en Puerta.
Ŷ Afloje los tornillos como se muestra en el
Paso 1.
Para Instalar la Manija:
Ŷ Alinee la palanca con la abertura sobre la
puerta externa. Asegúrese de que el gancho
apunte hacia arriba.
Ŷ Inserte la palanca de la traba en la aperture
y alinee la manija con los tensores de
montaje.
Ŷ Una vez que la manija está alineada con la
puerta externa, ajuste los tornillos.
1RUHWLUHODFLQWDGHODSXHUWDKDVWDTXHOD
manija esté instalada.
1a
Traba para
Puerta en la
Puerta
Trabe la Pa-
lanca con el
Gancho hacia
arriba

49-60792-2 29
RETIRE LA MANIJA DE LA
PUERTA DEL FREEZER
El Diseño del Mango varía dependiendo de los
modelos; sin embargo, la instalación es igual.
Manijas de acero inoxidable y de plástico:
Afloje el conjunto de tornillos con la llave Allen de
1/8” y retire la manija.
NOTA: Si es necesario ajustar o retirar los tensores de
montaje de la manija, use una llave Allen de ¼”.
2
Vuelva a instalar las manijas usando el procedimiento que
usó para retirar las mismas.
Tensores
de Montaje
Deje la
película
puesta hasta
finalizar la
instalación
INSTRUCCIONES DE INSTALACIÓN
Instrucciones de Instalación
CÓMO INSTALAR EL REFRIGERADOR (Cont.)
RETIRE LAS PUERTAS DEL
REFRIGERADOR
ADVERTENCIA Siga todos los pasos para
retirar y volver a instalar la puerta. Si no se siguen estas
instrucciones, dejando piezas sin uso o ajustando tornillos
en exceso, esto podrá hacer que la puerta se caiga y
producir lesiones y daños sobre la propiedad.
A De forma segura
encinte el cierre de la
puerta con cinta de
mascarar o pida a otra
persona que sostenga
la puerta.
B Comience por la puerta
del lado izquierdo:
Retire la tapa de la bisagra
en la parte superior de la
puerta izquierda del
refrigerador, retirando todos
los tornillos hexagonales y
empujando la misma hacia
arriba. Haga lo mismo en la
puerta derecha y en la tapa
intermedia.
3
Tapa de la
Bisagra
RETIRE LAS PUERTAS DEL
REFRIGERADOR (cont)
C Desconecte los conectores eléctricos provenientes de
cada puerta ubicados debajo de los cobertores de las
bisagras. Retire el tornillo de cabeza hexagonal de ¼”
para desconectar el cable a tierra de la bisagra. Retire
el tornillo de cabeza hexagonal de ¼” para retirar el
amortiguador de refuerzo de la tubería de agua.
Desconecte la tubería de agua de la parte trasera de
la unidad, presionando hacia abajo el collar gris oscuro
mientras levanta la tubería de agua. Coloque la línea
de agua a través del conducto de la caja desde la parte
superior para liberar la línea para el retiro de la puerta.
La línea de agua tiene una longitud superior a 4” y es
posible que se deba encintar a la Puerta para que esté
accesible al reinstalar.
Usando un trinquete/ destornillador
de 3/8”, retire los tornillos asegurando
la bisagra superior al gabinete, luego
levante la bisagra hacia arriba para
liberar el perno de la bisagra desde
la ubicación en la parte superior de la
puerta.
PRECAUCIÓN Riesgo al levantar la
puerta.
Si es levantada por una sola persona, podrían
ocasionarse lesiones. Solicite ayuda al sostener, mover
o levantar las puertas del refrigerador.
Nota: Al retirar la puerta, a fin de evitar daños sobre la
puerta y la parte electrónica, coloque con cuidado la puerta
en una ubicación adecuada.
Nota: El perno de la bisagra inferior de la puerta y la
bisagra poseen tamaños proporcionales y se los debe
hacer coincidir correctamente para que la puerta se cierre
sola. Siga las instrucciones detenidamente.
3
E
D
Conector en Y
o Recto
Tornillo de
conexión
a tierra
Amortiguador
de Refuerzo
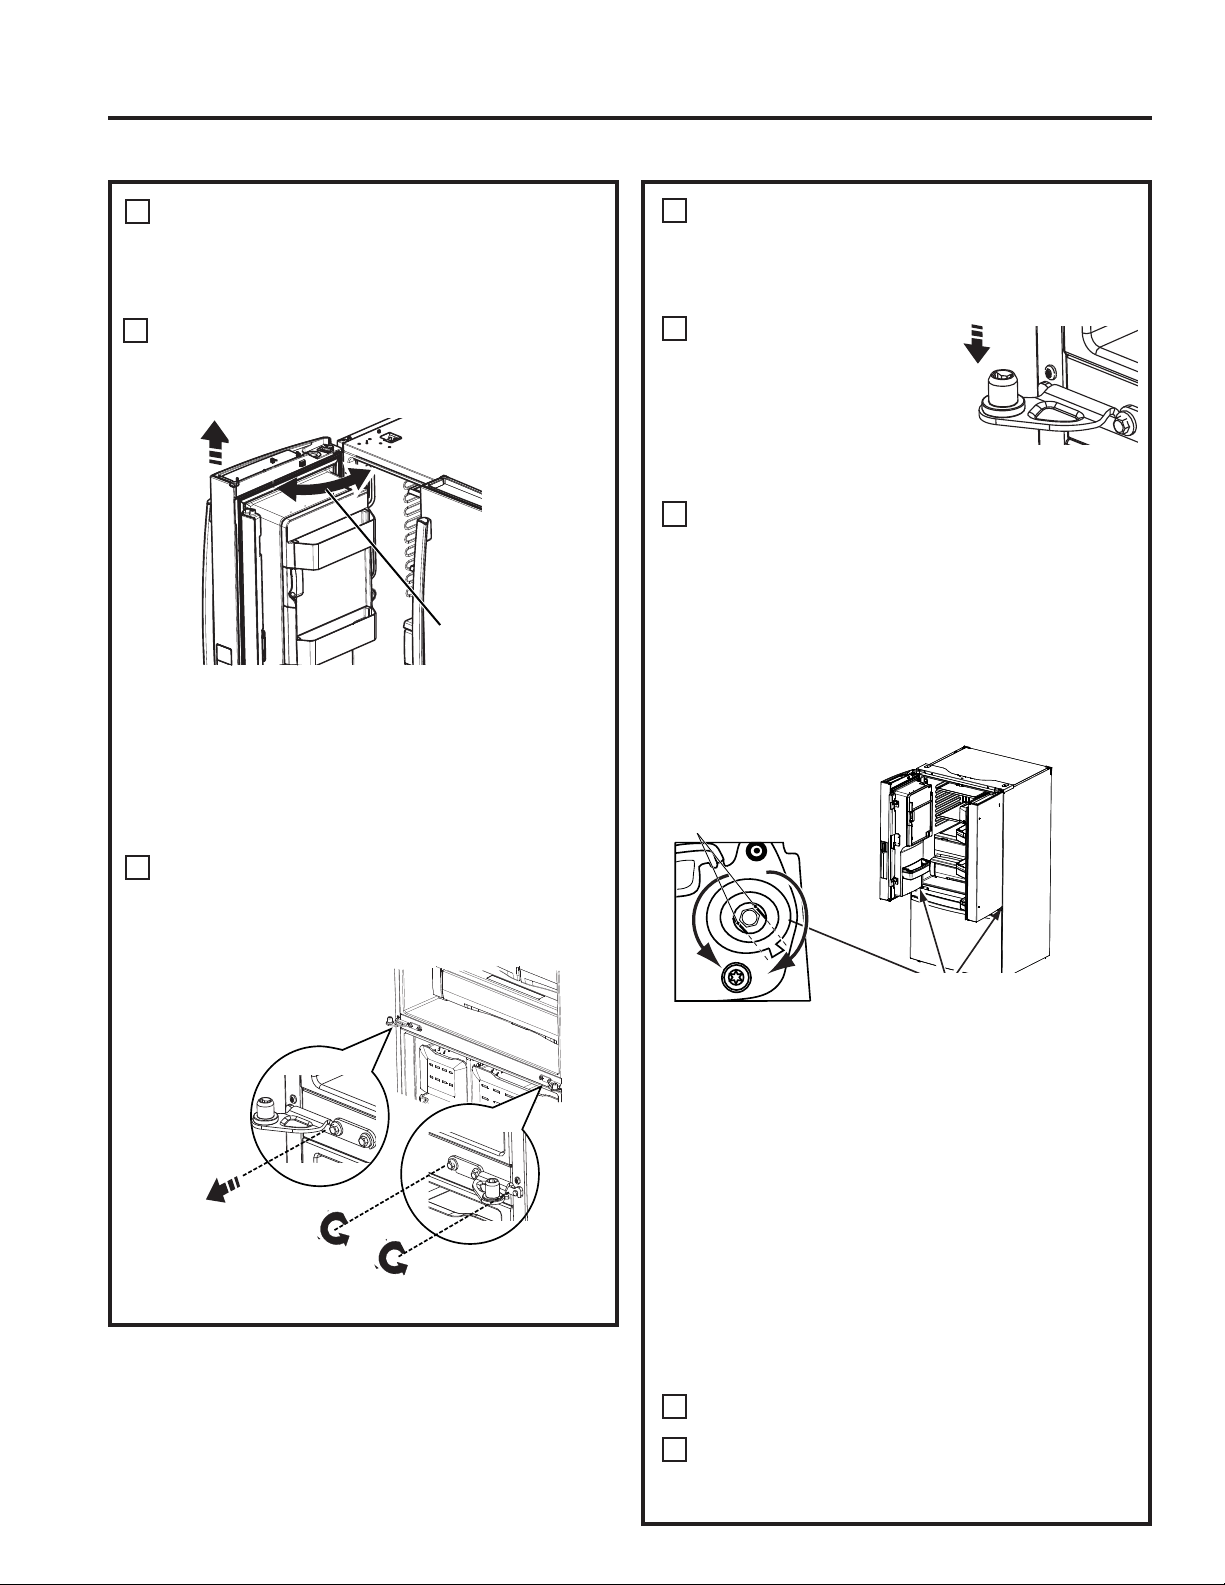
30 49-60792-2
REINSTALACIÓN DE LAS
PUERTAS DEL REFRIGERADOR
Invierta los pasos 1 a 4 para reinstalar el refrigerador, siga
los detalles que figuran a continuación para conocer las
alineaciones críticas.
AReinstale la bisagra central
primero y ajuste los tornillos
con giros de torsión de 7.34
N-m (65 libras pulgada). Con la
puerta del lado izquierdo a más
de 90º hacia el frente de la caja,
baje la puerta del refrigerador
sobre la bisagra central. Asegúrese de que la puerta y la
bisagra se alineen correctamente.
BGire las puertas hasta cerrarlas y asegúrese de que la
posición de sellado del centro móvil de la puerta se alinee
con el cerradero. Si la puerta no se cierra sola luego de la
reinstalación, retire la puerta, dé vuelta la misma, controle
la marca y la flecha de alineación; (hay una marca de
alineación en el mecanismo de cierre de la puerta.
Corresponde a una marca de alineación en la tapa del
extremo inferior. Gire el mecanismo de cierre de la puerta
para alinear la marca y la flecha, reinstale la puerta). Los
modelos de Puerta en Puerta no poseen el mismo
mecanismo de cierre en la puerta para la mano derecha.
Es posible que observe una diferencia en el cierre.
De forma segura encinte el cierre de la puerta con cinta
de mascarar o pida a otra persona que sostenga la
puerta. Reinstale la bisagra sus tornillos con giros de
torsión de 7.34 N-m (65 libras pulgada).
CAsegúrese de reinstalar el cable a tierra y el
amortiguador de refuerzo a la bisagra superior.
DVuelva a instalar la tapa de la bisagra. Nota: Asegúrese
de que los cables no sufran cortes ni queden debajo de
tornillos antes de ajustar estos últimos.
3RETIRE LAS PUERTAS DEL
REFRIGERADOR (cont)
Nota: Para una instalación posterior adecuada, siga el
siguiente paso de forma cuidadosa.
F Las puertas de comidas frescas se deben RETIRAR e
,167$/$5DELHUWDVDFRQODFDMDKDFLDHOIUHQWH
RETIRE LA PUERTA OPUESTA
Siga el mismo procedimiento en la puerta opuesta. 1R
hay tuberías de agua del otro lado.
PARA MODELOS DE PUERTA EN PUERTA De forma
segura, encinte las puertas interna y externa antes de su
LQVWDODFLyQRUHWLUR1RVHUHTXLHUHXQDDOLQHDFLyQGH
durante la instalación y el retiro en estos modelos.
4 RETIRE LA BISAGRA CENTRAL (si es necesario)
Retire los tornillos de 3/8” asegurando la bisagra central
al gabinete. Use un destornillador T20 para retirar el
tornillo externo.
5
Retire el torni-
llo central
Levante la bisagra
central hacia ar-
riba y afuera
Abra la Puerta a 90º
Afloje los
tornillos exte-
riores
Instrucciones de Instalación
CÓMO INSTALAR EL REFRIGERADOR (Cont.)
Align flats with tab.
Lado inferior de la puerta
de comidas frescas
Si la puerta no puede ser instalada a 90º, siga estos
próximos pasos.
1. Instale la puerta a 180º del frente de la caja.
2. Si el espacio o el modelo limitan la apertura de la puerta
a menos de 180º, entonces:
a) Retire la puerta, y con cuidado dé vuelta la misma.
b) Controle la alineación del hueco del mecanismo de cierre de
la puerta en la parte trasera de la misma. Las partes
planas del hueco deberían corresponder con la lengüeta de
alineación en el anillo plástico o con la marca en la tapa del
extremo inferior.
c) Si el hueco no está alineado con la lengüeta/ marca, usando
una llave Allen de 5/32”, rote el hueco del mecanismo de
cierre de la puerta en contra de las agujas del reloj para
la puerta derecha y a favor de las agujas del reloj para
la puerta izquierda. Luego alinee la parte plana con la
lengüeta/ marca.
d) Instale la puerta a 90º.
Marcas
de alineación
INSTRUCCIONES DE INSTALACIÓN

49-60792-2 31
INSTRUCCIONES DE INSTALACIÓN
RETIRE LA PUERTA DEL
FREEZER
Abra la puerta del freezer hasta su extensión
completa.
Retire los 3 tornillos adheridos, ubicados en la parte
inferior a cada lado de la puerta del freezer usando un
destornillador con cabeza hueca hexagonal de 3/8”.
PRECAUCIÓN Riesgo al levantar la
puerta La puerta del freezer es pesada. Use ambas
manos para asegurar
la puerta antes de
levantar la misma.
Levante la puerta
del freezer para
desconectarla del
mecanismo de
deslizamiento.
La puerta puede
descansar de forma
segura en la parte
LQIHULRU1RDSR\HOD
puerta sobre ninguna
otra superficie a fin de
evitar rayones.
A
B
C
6
3 Tornillos
RETIRE LA CANASTA DEL
FREEZER
Empuje la canasta
inferior y deslice el
mecanismo hasta su
extensión completa
usando ambas
manos.
Retire el cajón del
freezer superior
extendiendo
completamente
el cajón, y luego
levantando el mismo hacia arriba y afuera.
Retire la canasta que se apoya sobre los
deslizadores.
Presione los deslizadores de la canasta inferior
nuevamente hasta que el mecanismo de
deslizamiento se repliegue.
7
A
B
C
D
Instrucciones de Instalación
CÓMO INSTALAR EL REFRIGERADOR (Cont.)
RETIRE LAS CORREDERAS DE
LA CANASTA DEL FREEZER
Las correderas de la canasta del freezer pueden ser
retiradas para ganar otro espacio de 1.90 cm (3/4”)
a través de la puerta.
Retire la puerta del freezer como se muestra en el
Paso 6.
Retire las canastas superior e inferior
como se muestra en el Paso 7.
Retire el sujetador del travesaño
ubicado a lo largo del lado derecho
del ensamble del sistema de piñón
y cremallera, deslizando el mismo
hacia adelante.
Retire el travesaño deslizando el mismo hacia la
derecha, y luego empuje hacia afuera y hacia la
izquierda.
Retire los cuatro tornillos de ¼” con cabeza
hexagonal por lado y retire los soportes laterales.
Invierta los pasos para realizar el ensamble. Al
instalar el travesaño, siempre coloque el agujero
del lado derecho. Alinee los
sistemas izquierdo y derecho
con las marcas de tiempo
sobre los sistemas, al insertar
el travesaño. Siempre inserte
el travesaño en el sistema del
lado derecho primero y luego el
sistema del lado izquierdo.
Inserte el sujetador en el agujero del travesaño
ubicado del lado derecho.
A
B
C
8
D
E
F
G
1
2
1
2
Tornillos
con cabeza
hexagonal
Sujetador
Agujero para
el sujetador
Marca
de tiempo
Sujetador
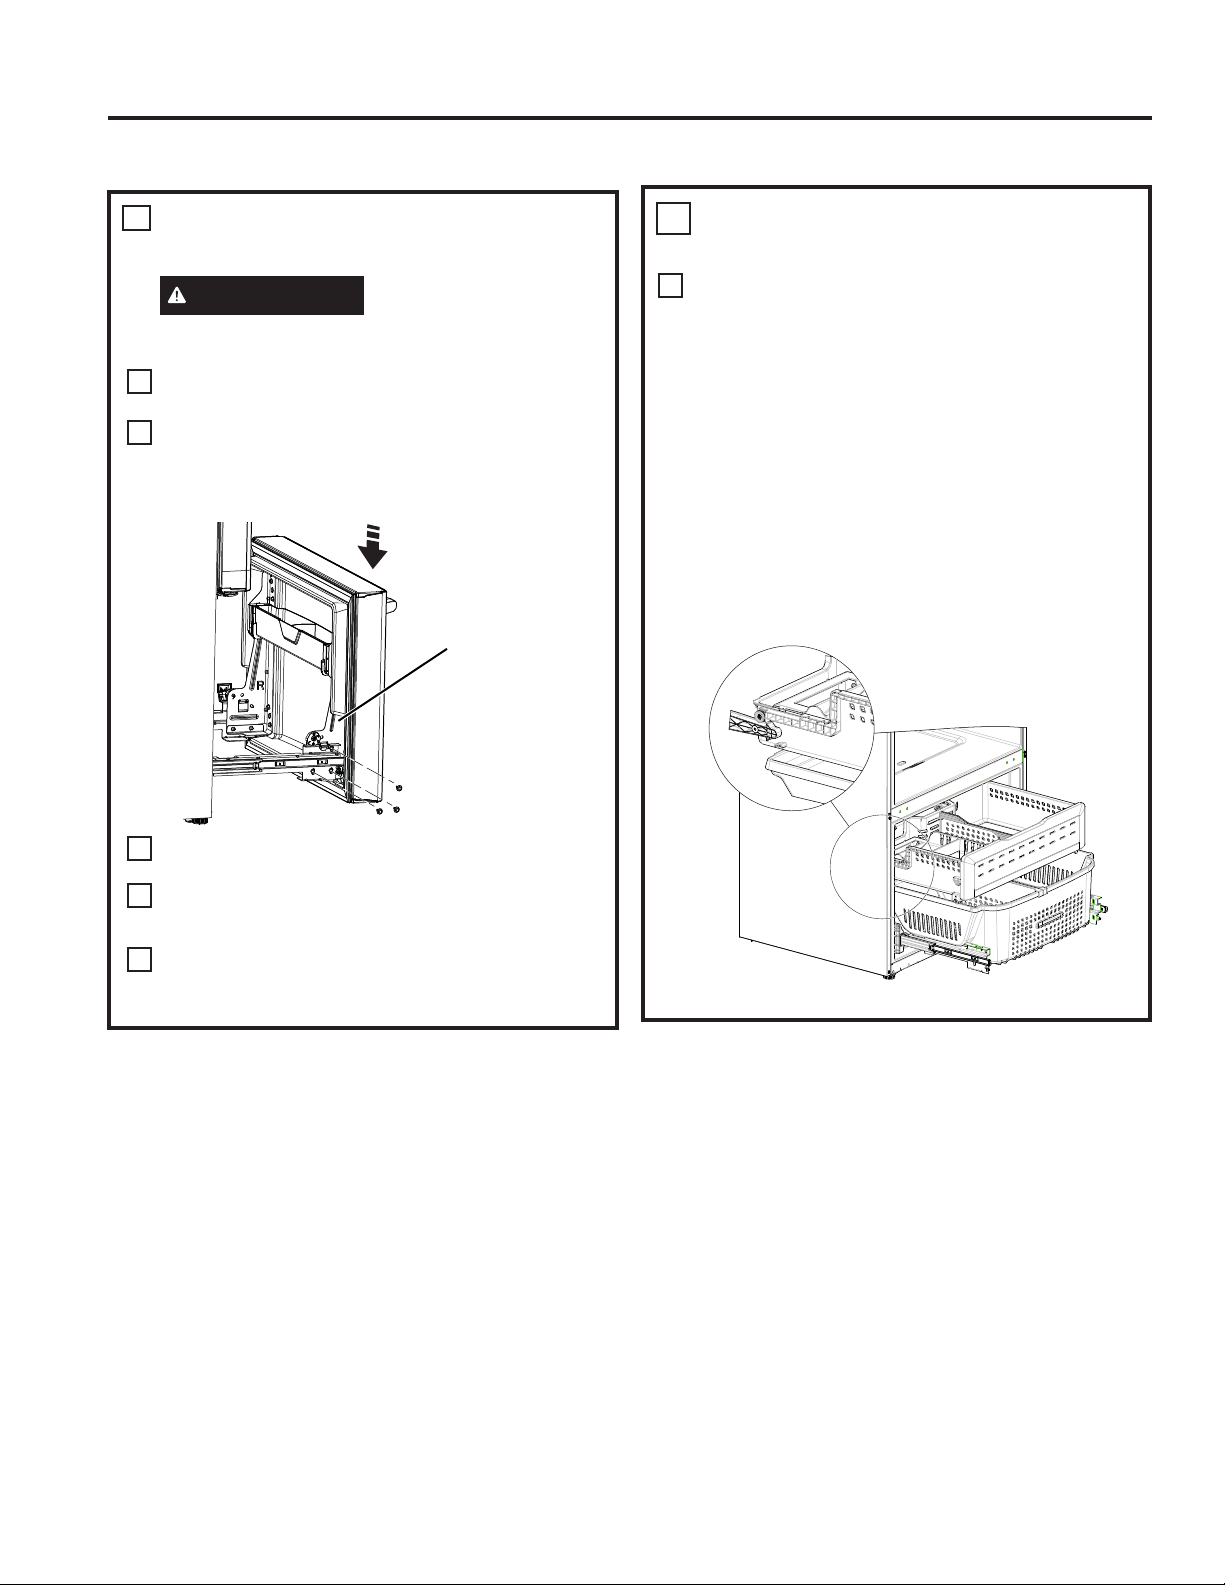
32 49-60792-2
VUELVA A INSTALAR LOS
CAJONES DEL FREEZER
Vuelva a instalar el cajón del freezer colocando las
ruedas del cajón en la parte superior del riel montado
sobre el costado de las paredes del freezer. Las
ruedas del cajón del freezer deben estar sobre los
costados de la canasta inferior.
EN MODELOS EQUIPADOS CON MÁQUINA DE
HACER HIELO EN EL FREEZER: Coloque la hielera
en el cajón y empuje este último en el freezer con el
frente de la hielera hacia el frente de la canasta.
Asegúrese de que:
- La hielera no golpee el brazo de la máquina de
hacer hielo y que el cajón del freezer se repliegue
completamente en el compartimiento del freezer.
- El tubo de llenado se extiende en la abertura de la
taza de llenado en la parte trasera de la máquina de
hacer hielo.
10
A
Instrucciones de Instalación
CÓMO INSTALAR EL REFRIGERADOR (Cont.)
INSTRUCCIONES DE INSTALACIÓN
REEMPLAZO DE LA PUERTA DEL
FREEZER
PRECAUCIÓN Riesgo al levantar la
puerta
La puerta del freezer es pesada. Use ambas manos para
asegurar la puerta antes de levantar la misma.
Empuje el mecanismo de deslizamiento de la canasta
inferior hasta su máxima extensión usando ambas
manos.
Levante la puerta del freezer y alinee las lengüetas
sobre los costados de los soportes de la puerta
con los agujeros cuadrados en los mecanismos de
deslizamiento.
Reemplace los tornillos adheridos y ajuste los tornillos
FRQJLURVGHWRUVLyQGH1POLEUDVSXOJDGD
Para ajustar las brechas de la puerta del freezer, siga
las instrucciones que figuran en la página 130 del
Manual del Propietario.
Reemplace la canasta del freezer en los soportes
de deslizamiento y asegúrese de que la puerta del
freezer funcione y se cierre libremente.
9
Alinee e inserte
la lengüeta en
el soporte de la
puerta del freezer
con la ranura
sobre el soporte
de deslizamiento
del freezer.
NOTA: Coloque
un lado hacia
adentro primero
y luego alinee el
otro lado.
A
B
C
D
E

49-60792-2 33
INSTRUCCIONES DE INSTALACIÓN
¡IMPORTANTE!
Los 6 tornillos de montaje (3 en cada lado) NO son intercambiables con los tornillos de la bisagra central o superior.
Luego de la instalación de la puerta del freezer, controle que los espacios sean uniformes (la parte superior e inferior del lado
derecho e izquierdo) con la plantilla provista.
En caso de espacios excesivos siga los siguientes pasos para ajustar la puerta del freezer.
Paso 1 – Afloje los 3 tornillos a cada lado (derecha e izquierda) de la puerta del freezer.
Paso 2 – Ajuste el tornillo del set en dirección de las agujas del reloj si el espacio en la parte superior es demasiado grande (vea
la plantilla). Gire el tornillo del set usando una llave hexagonal de 3/32” en dirección de las agujas del reloj con una rotación de
un cuarto hasta la mitad.
Paso 3 – Ajuste el tornillo del set en dirección contraria a las agujas del reloj si el espacio en la parte inferior es demasiado
grande (vea la plantilla). Gire el tornillo del set usando una llave hexagonal de 3/32” en dirección contraria a las agujas del reloj
con una rotación de un cuarto hasta la mitad.
Paso 4 – Ajuste los 3 tornillos a cada lado (derecha e izquierda).
Paso 5 – Vuelva a controlar los espacios usando la plantilla y repita los pasos 1 a 4 si se requiere y complete con el paso 5.
Instrucciones para ajustar los espacios de la puerta del freezer:
(0.600”)
1.5 cm
Plantilla para el control de
espacios. El espacio debería
ser de 1.5 cm (0.6”) o inferior.
Paso 1
Paso 4
Tornillo del Set
Paso 3
Paso 2
Dóblelo aquí para usar la plantilla
Instrucciones de Instalación
CÓMO INSTALAR EL REFRIGERADOR (Cont.)
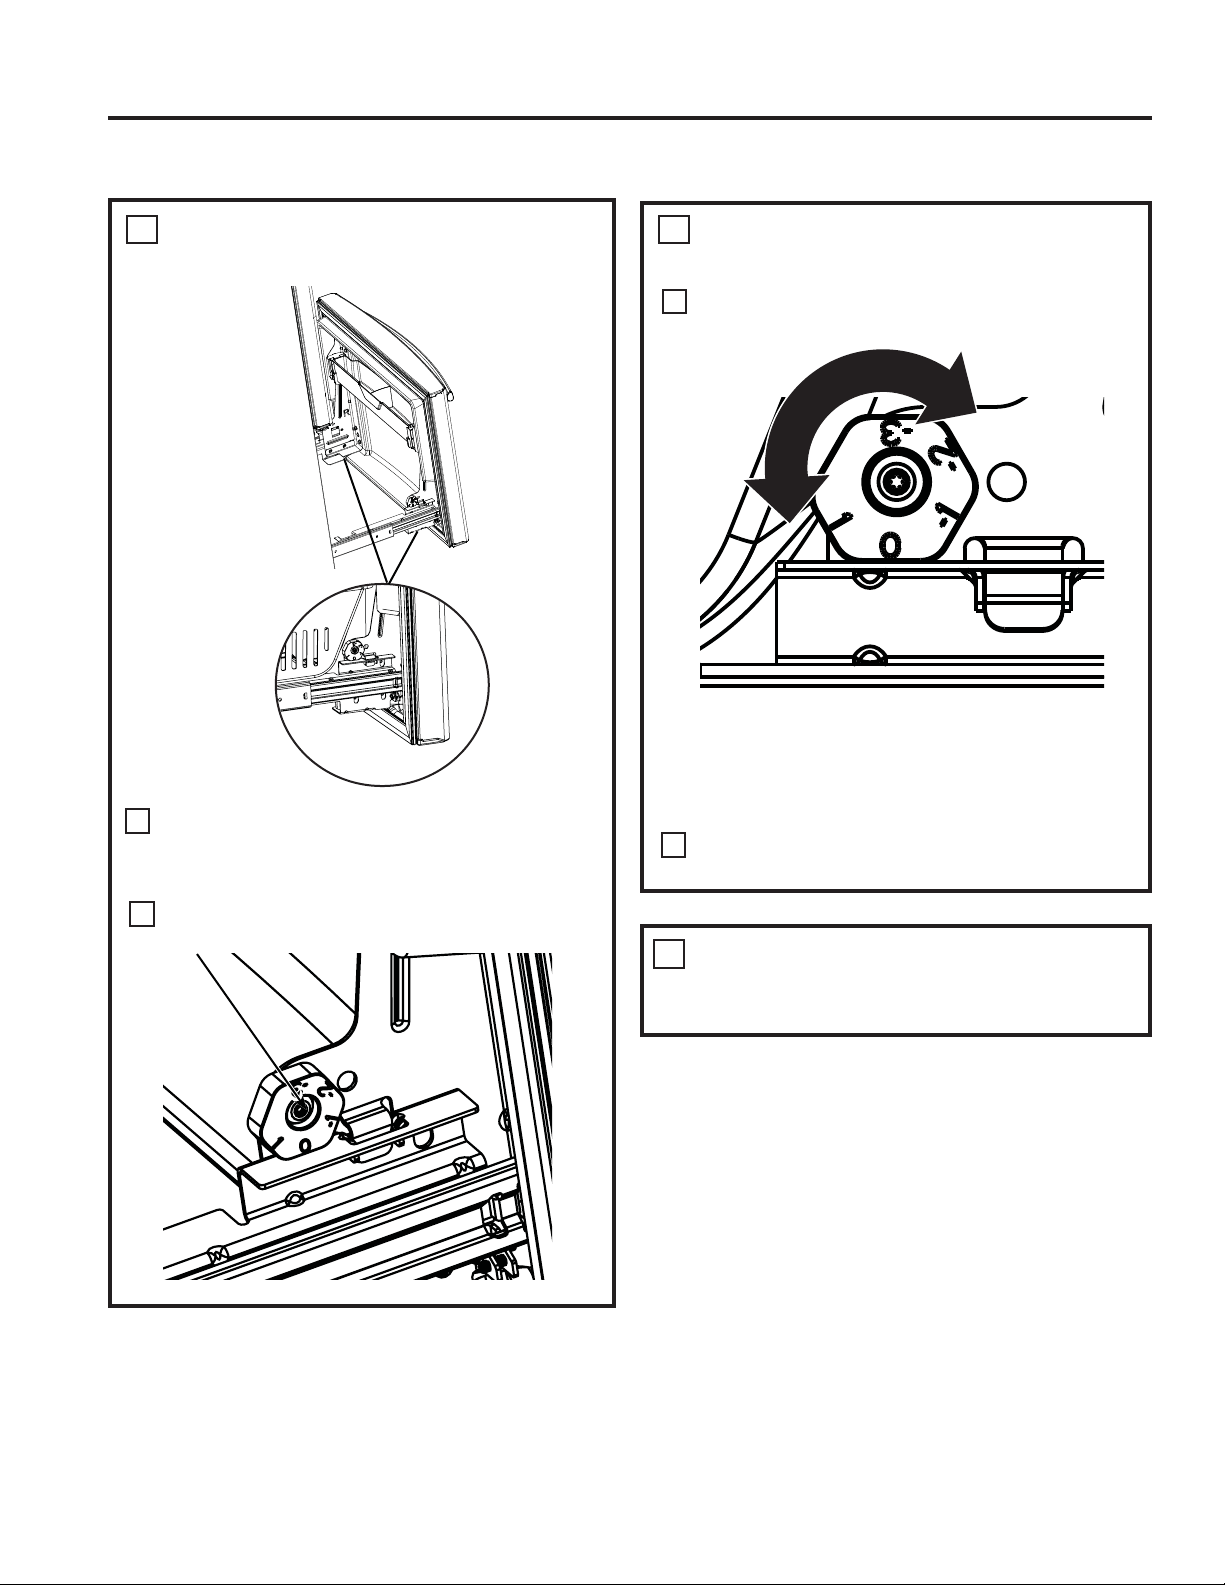
34 49-60792-2
NIVELACIÓN DE LA PUERTA
DEL FREEZER
Ubique la leva de ajuste de altura en la puerta del
freezer. Lentamente afloje los tres tornillos de ajuste
de la puerta a ambos lados usando un destornillador
con cabeza hueca hexagonal de 3/8”.
Ubique y afloje el tornillo de leva usando un
destornillador T-27.
10
A
B
RETIRE EL EMBALAJE
Retire toda la cinta, gomaespuma y embalajes
protectores de los estantes y cajones.
11
NIVELACIÓN DE LA PUERTA DEL
FREEZER (cont.)
Levante la puerta del lado que requiera ajustes, gire
la leva hacia la posición requerida.
Luego del ajuste tense los 3 tornillos de ajuste
XVDQGRKDVWD1POLEUDVSXOJDGD
10
A
B
Instrucciones de Instalación
CÓMO INSTALAR EL REFRIGERADOR (Cont.)
0 - Initial position
1 - Levante de a 0.127 cm (0.050”)
-1 - Baje de a 0.127 cm (0.050”)
-2 - Baje de a 0.254 cm (0.100”)
-3 - Baje de a 0.381 cm (0.150”)
INSTRUCCIONES DE INSTALACIÓN
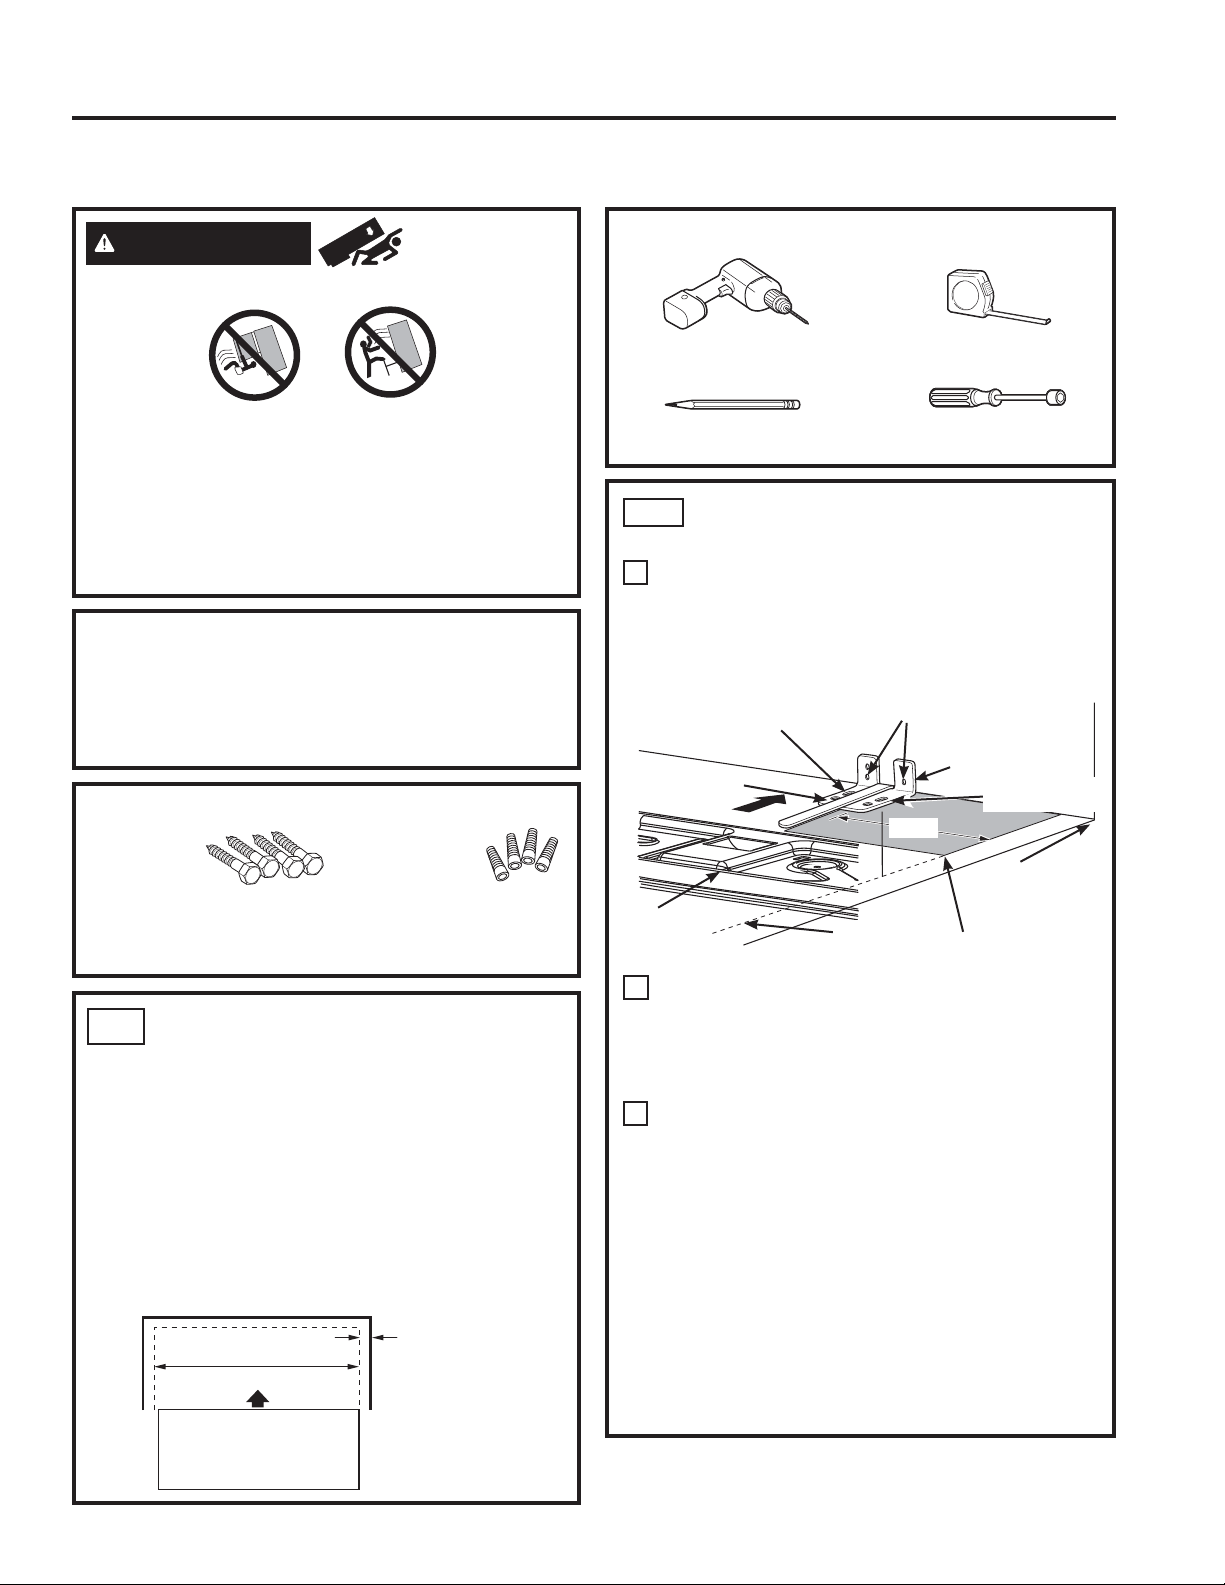
49-60792-2 35
INSTALLATION INSTRUCTIONS
MIDA LA ABERTURA DEL
GABINETE DISPONIBLE VS. EL
ANCHO DEL REFRIGERADOR
Mida el ancho de la abertura del gabinete donde será
ubicado el refrigerador, W.
Asegúrese de contar con espacio por encima de la
mesada, grosor en el rodapié y cualquier despeje
deseado. El ancho, W, no debería ser inferior a 36”.
El refrigerador será ubicado aproximadamente en el
medio de esta abertura.approximately in the middle of
this opening.
MATERIALES QUE PUEDE NECESITAR
(not included)
HERRAMIENTAS NECESARIAS
Lápiz
Broca y Taladro Eléctrico
o Manual de 1/8” (3 mm)
Cinta métrica
Llave de tuercas de
5/16” (8 mm)
Tirafondos
1/4” (6 mm) x 1-1/2” (38 mm)
Casquillos de
Anclaje
1/2” (12 mm) Diámetro Exterior
Para Soporte Anti-Volcaduras Montado en Pisos de
Concreto Únicamente
Broca para Taladro Apropiada para Anclajes
AT-1
UBICACIÓN DEL SOPORTE DE
PISO ANTI-VOLCADURAS
Coloque la plantilla de ubicación del soporte de
piso anti-volcaduras (incluido dentro del kit anti-
volcaduras) sobre el piso contra la pared trasera,
dentro de W, y alineado con la ubicación deseada del
lado derecho del refrigerador (vea la Figura 1).
Coloque el soporte para piso anti-volcaduras en la
plantilla de ubicación con sus agujeros para piso
del lado derecho alineado con los agujeros del piso
indicados en la hoja de la plantilla, aproximadamente
38.73 cm (15 1/4”) desde el extremo de la hoja o del
lado derecho del refrigerador.
Sostenga en la posición y use el soporte para piso
anti-volcaduras como una plantilla para hacer los
agujeros, basados en su configuración y tipo de
construcción como se muestra en el Paso 3. Marque
las ubicaciones de los agujeros con un lápiz, clavo o
punzón.
NOTA:
• Se REQUIERE el uso de por lo menos 2 tornillos
para montar el soporte (uno a cada lado del soporte
para piso anti-volcaduras). Ambos deben estar en
la pared o en el piso. La figura 2 indica todas las
configuraciones de montaje aceptables para los
tornillos. Identifique los agujeros de los tornillos
en el soporte para piso anti-volcaduras para su
configuración.
AT-2
A
B
C
El Grosor del
Rodapié o el
Espacio Encima
de la Mesada
(Cualquiera Sea
Más Grande)
Además de
Cualquier
Despeje
Deseado
Pared Trasera
Frente Lado Derecho
W
5()5,*(5$'25
Figura 1 – Visión General de Instalación
Soporte de
Base en el
Refrigerador
2 Agujeros en la Pared
Piso - Concreto
(2 Agujeros)
Piso - Madera
(2 Agujeros)
15 ¼”
Hoja de la Plantilla
de Ubicación
Soporte de
Piso para
Instalar
Esquina Trasera
Derecha de la
Pared del Gabinete
Agujeros del
Lado Derecho
Lado
Derecho del
Refrigerador
ADVERTENCIA Riesgo de
Caída.
Los modelos con estilo incorporado (modelo PYE, CYE,
y PWE) son inestables, especialmente con las puertas
abiertas. Estos modelos deben ser asegurados con el
soporte anti-volcaduras, a fin de evitar caídas hacia
adelante, que podrían resultar en la muerte o lesiones
graves. Lea y siga las instrucciones de instalación en su
totalidad, a fin de instalar el soporte de piso anti-volcaduras
embalado con su refrigerador.
NOTA:
Si no recibió el soporte anti-volcaduras con su compra,
llame al 1.800.432.2737 para recibir uno sin costo. (En
Canadá, llame al 1.800.561.3344).
Para acceder a instrucciones sobre el soporte, visite:
www.GEAppliances.com.
Instrucciones de Instalación
CÓMO INSTALAR EL REFRIGERADOR (Cont.)
SOPORTE DE PISO ANTI-VOLCADURAS (Modelos de PYE, CYE, GYE, DYE, PWE, CWE, y ZWE sólo )
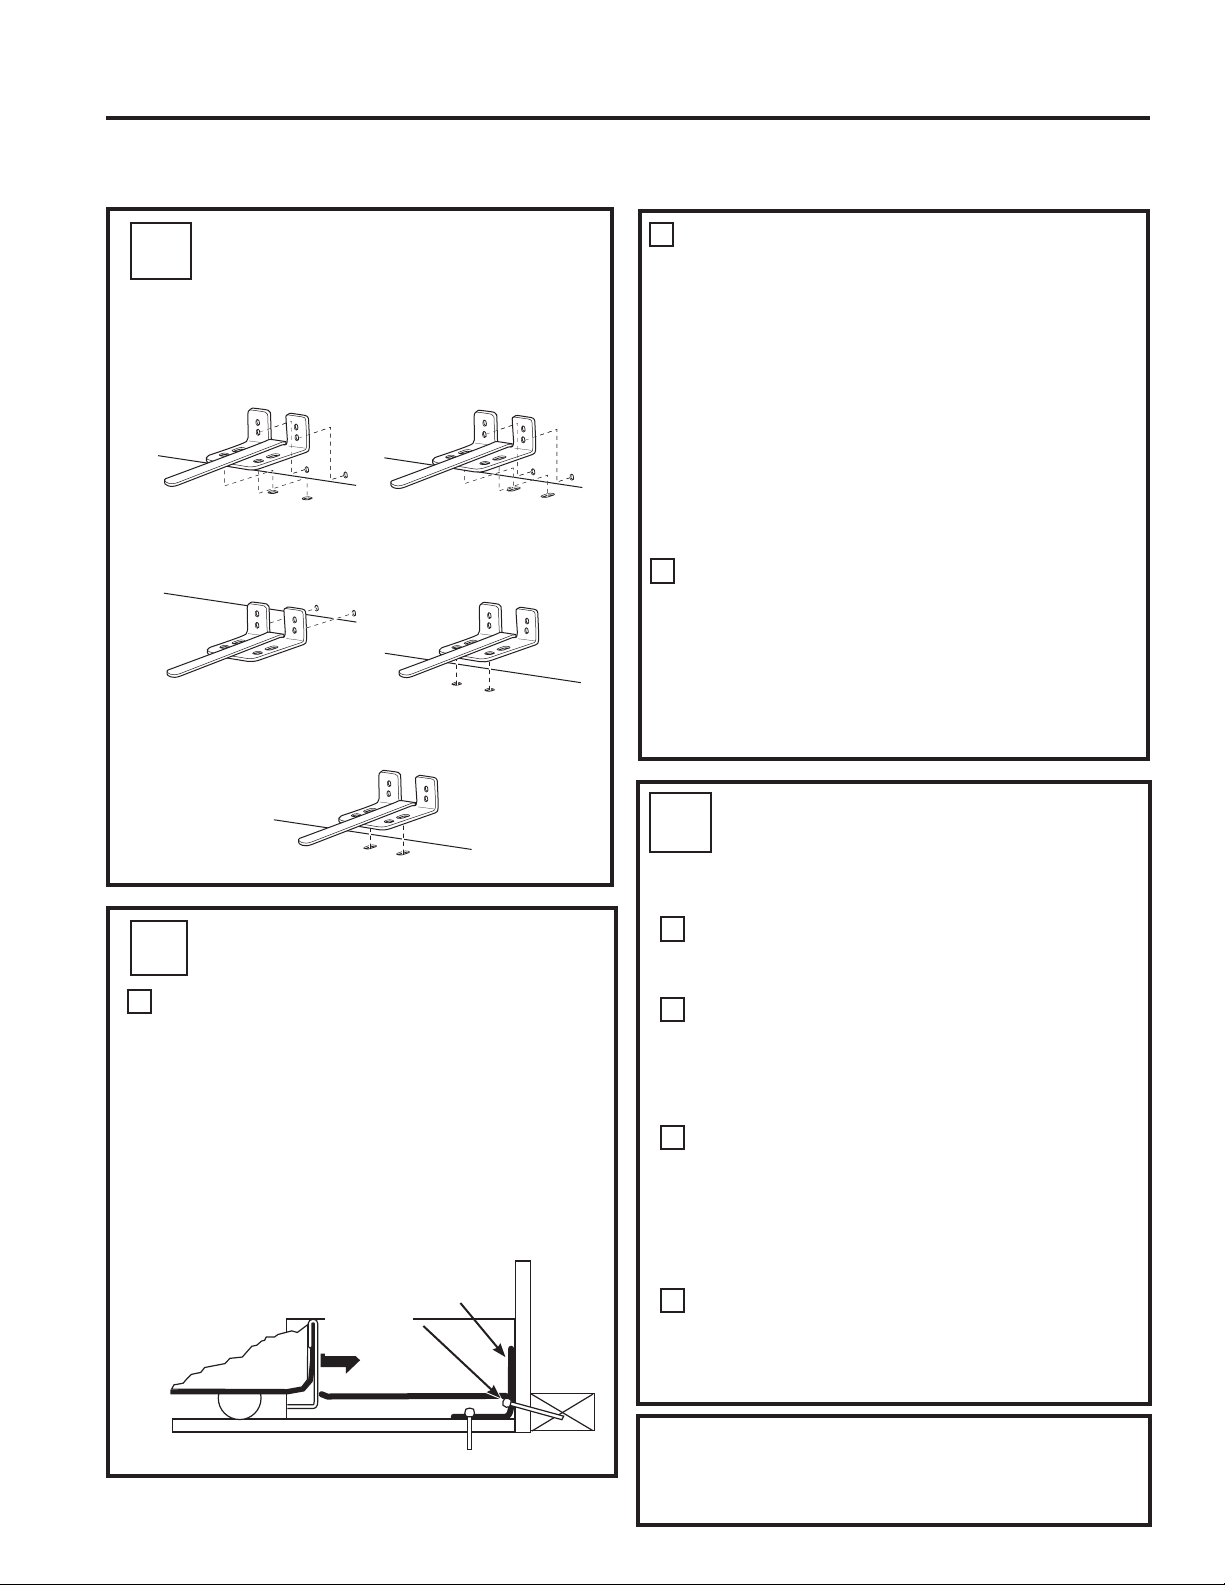
36 49-60792-2
CÓMO POSICIONAR EL
REFRIGERADOR PARA ADHERIR
LOS SOPORTES DEL PISO ANTI-
VOLCADURAS Y DE LA BASE
Antes de empujar el refrigerador hacia la abertura,
enchufe el cable de corriente en el receptáculo y
conecte el suministro de agua (si está equipado).
Controle que no haya pérdidas.
Ubique el lado derecho del refrigerador y mueva
el mismo hacia atrás aproximadamente en línea
con el lado derecho de la abertura del gabinete,
W. Esto debería posicionar el soporte del piso anti-
volcaduras, a fin de adherir la base anti-volcaduras
con el refrigerador.
De forma suave haga girar el refrigerador
nuevamente hacia el gabinete, abriendo el mismo
hasta que se detenga completamente. Controle que
el frente del refrigerador se alinee con la cara frontal
del gabinete. Si no es así, con cuidado mueva el
refrigerador hacia adelante y atrás hasta que se
produzca la adherencia y observe que el refrigerador
esté completamente apoyado sobre la pared trasera.
Si Corresponde: Realice los ajustes de altura
de las ruedas traseras (y frontales) para adherir
completamente los soportes anti-volcaduras
traseros, mientras también alinea el frente del
refrigerador con la cara frontal del gabinete.
Construcción del Piso y la Pared de CONCRETO:
• Se requiere el uso de anclajes (no provistos):
4 tirafondos cada uno de ¼” (6 mm) x 1-1/2” (38
mm) 4 sujetadores de manga cada uno de ½” (12
mm) de diámetro exterior
• Realice los agujeros usando los tamaños
recomendados para los anclajes en el concreto
sobre el centro de los agujeros marcados en el
Paso 2.
• Instale los sujetadores de mangas en los agujeros
perforados. Coloque el soporte de piso anti-
volcaduras como se indica en el Paso 2. Retire la
plantilla de ubicación desde el piso.
• Instale los tirafondos a través del soporte para
piso anti-volcaduras y ajuste los mismos de forma
apropiada.
Construcción del Piso de MOSAICO y la Pared de
MADERA::
• For this special case, locate the 2 wall holes
identified in Fig. 2. Drill an angled 1/8” (3 mm) pilot
hole (approx. as shown in Fig. 3) in the center of
each hole.
• Monte el soporte para piso anti-volcaduras usando
la Instalación Mínima Aceptable nº 1, como se
ilustra en la Figura 2.
AT-2
UBICACIÓN DEL SOPORTE DE
PISO ANTI-VOLCADURAS
(cont.)
Instalación Recomendada
- Madera
Instalación Recomendada
- Concreto
0tQLPR$FHSWDEOH1±
Piso de Madera
0tQLPR$FHSWDEOH1±
Piso de Madera
0tQLPR$FHSWDEOH1±
Piso de Madera
Figura 2 – Ubicaciones Aceptables para la
Colocación de Tornillos
C
B
AT-3 INSTALACIÓN DEL SOPORTE
ANTI-VOLCADURAS
Construcción del Piso y la Pared de MADERA:
• Realice la cantidad apropiada de agujeros de
prueba de 1/8” (3 mm) en el centro de cada agujero
de soporte del piso que se usará (se podrá usar un
clavo o punzón si no se cuenta con una broca) Y
retire la plantilla de ubicación del piso.
• Monte el soporte para piso anti-volcaduras
ajustando los 2, o se recomienda 4, tornillos de
cabeza hexagonal nº 10-16 de forma ajustada en
cada lugar como se ilustra en la Figura 3.
A
A
C
B
D
Figura 3 – Ajuste a la Pared y el Piso
NOTA: Si empuja el refrigerador hacia afuera y lo aleja de la
pared por alguna razón, asegúrese de que el soporte para
piso anti-volcaduras esté adherido cuando el refrigerador es
empujado hacia atrás contra la pared trasera.
Esquina Trasera
del Lado Derecho
del Refrigerador
Piso
Perno de
la Placa
de Pared
Soporte
del Piso
2 Tornillos
Deben
Entrar en la
Madera o
la Tachuela
de Metal
Pared
Instrucciones de Instalación
CÓMO INSTALAR EL REFRIGERADOR (Cont.)
SOPORTE DE PISO ANTI-VOLCADURAS (Modelos de PYE, CYE, GYE, DYE, PWE, CWE, y ZWE sólo )
AT-4
INSTRUCCIONES DE INSTALACIÓN
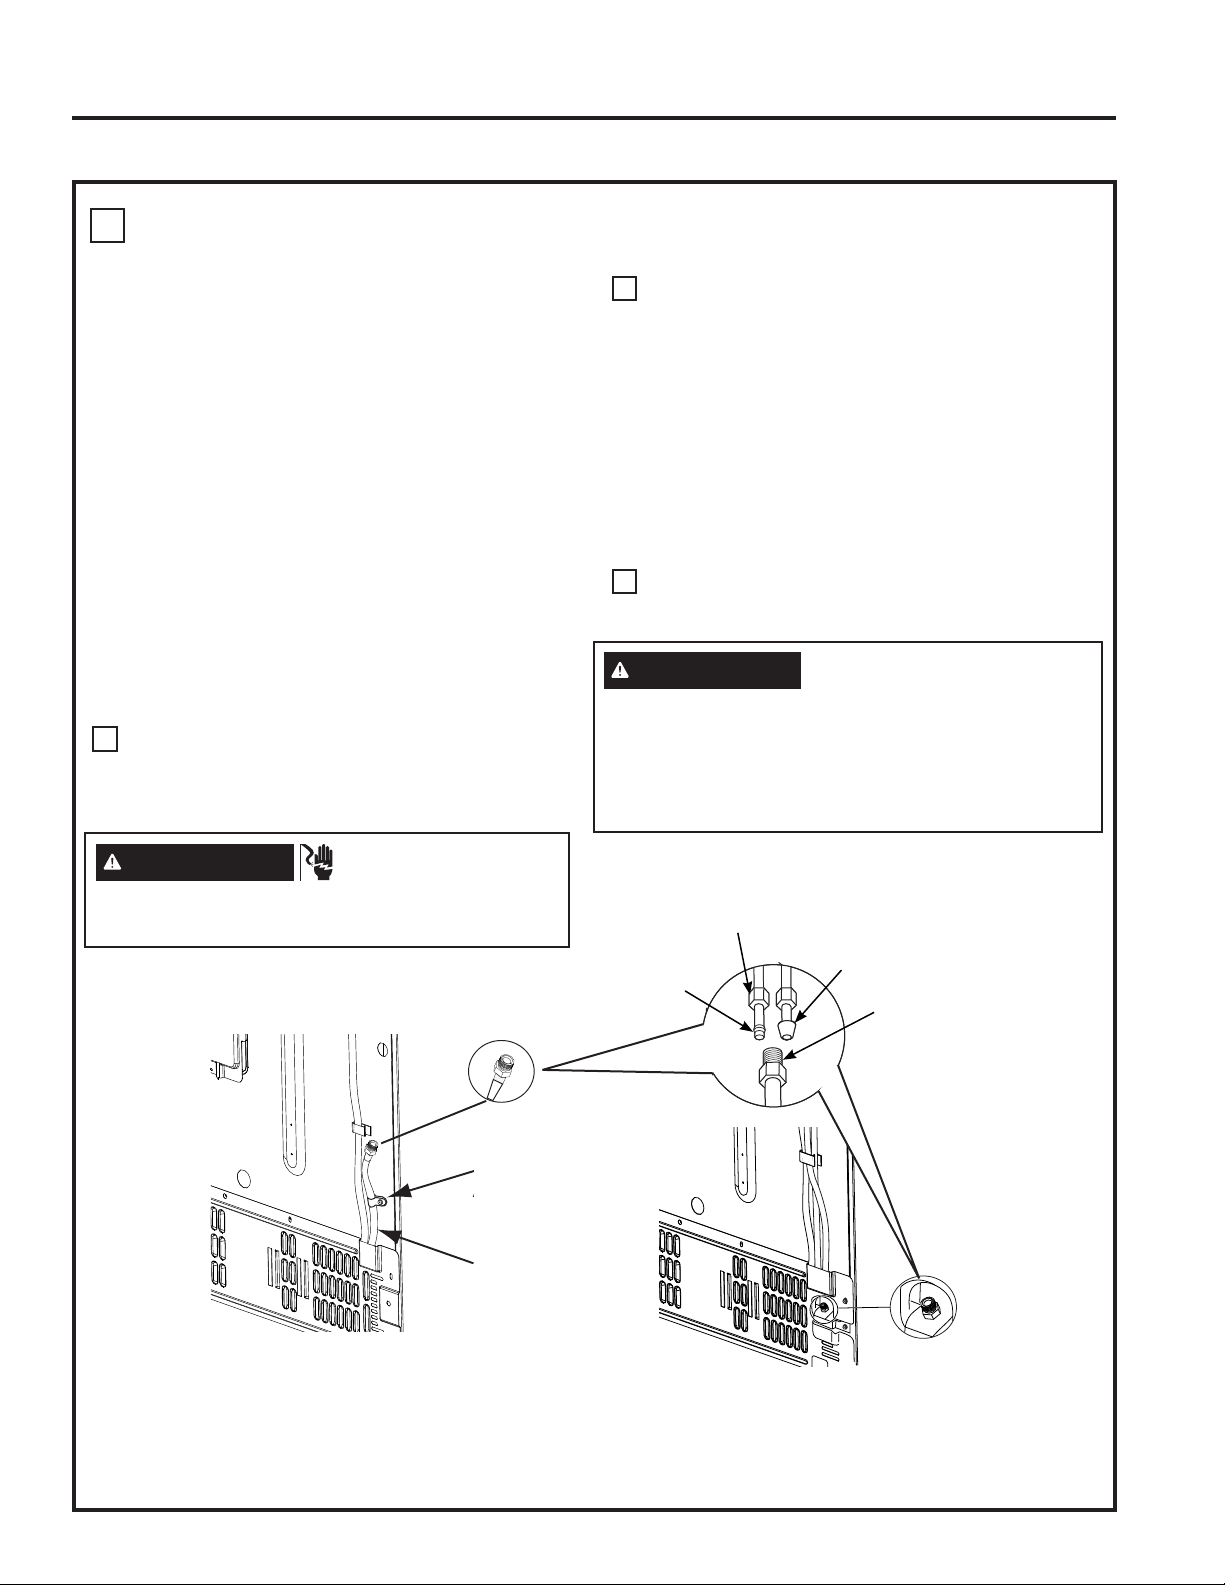
49-60792-2 37
INSTRUCCIONES DE INSTALACIÓN
CÓMO CONECTAR EL REFRIGERADOR AL SUMINISTRO DE AGUA DEL
HOGAR
Se requiere un suministro de agua fría para el
funcionamiento de la máquina de hielo automática.
Si no se cuenta con un suministro de agua fría,
deberá proveer uno. Consulte la sección sobre
Cómo Instalar el Suministro de Agua.
NOTAS:
• Antes de realizar la conexión al refrigerador,
asegúrese de que el cable de corriente del mismo
no se encuentre enchufado al tomacorriente.
• Si su refrigerador no cuenta con un filtro de
agua, le recomendamos que instale uno si el
suministro de agua posee arena o partículas
que podrían atascar la rejilla de la válvula de
agua del refrigerador. Instale el mismo en la
tubería de agua más cercana al refrigerador. Si
usará el Kit de Tuberías para Refrigeradores de
SmartConnectTM, necesitará una tubería adicional
(WX08X10002) para realizar la conexión al filtro.
1RFRUWHODWXEHUtDGHSOiVWLFRSDUDLQVWDODUHOILOWUR
• Antes de conectar la tubería de agua al hogar,
purgue la cañería del hogar durante por lo menos
2 minutos.
Si usará una tubería de cobre, coloque una tuerca
de compresión y una abrazadera de refuerzo
(mango) en el extremo de la tubería proveniente del
suministro de agua fría del hogar.
Si usará tuberías de SmartConnectTM, las tuercas
ya están ensambladas en la tubería.
Si usará tuberías de cobre, inserte el extremo de la
tubería en la conexión del refrigerador, en la parte
trasera del refrigerador, lo más lejos posible. Al
sostener la tubería, ajuste la unión.
Si usará tuberías de SmartConnectTM , inserte el
extremo moldeado de la tubería en la conexión del
refrigerador, en la parte trasera del refrigerador, y
ajuste la tuerca de compresión hasta que quede
ajustada manualmente. Luego realice un ajuste
adicional con un giro de llave. Un ajuste excesivo
podrá ocasionar pérdidas.
Ajuste la tubería en la abrazadera provista para
sostener la misma en la posición correcta. Será
necesario que abra la abrazadera haciendo palanca.
11
A
B
C
Instrucciones de Instalación
CÓMO INSTALAR EL REFRIGERADOR (Cont.)
Tuerca de
Compresión de ¼”
Ferrule
(sleeve)
Tubería de
SmartConnectTM
Conexión del
Refrigerador
1/4” Tubing
Tuyau de 1/4 po
Tubería de 1/4“
Tubing Clamp
Bride
Abrazadera del tubo
O
Abrazadera
del Tubo
Tubería de ¼”
ADVERTENCIA
PELIGRO DE
DESCARGA ELÉCTRICA
Adhiera la abrazadera de la tubería usando el agujero
H[LVWHQWH~QLFDPHQWH12SHUIRUHHOUHIULJHUDGRU
ADVERTENCIA
Realice la conexión a un suministro de agua potable
únicamente.
Se requiere un suministro de agua fría para el
funcionamiento de la máquina de hielos automática. La
presión del agua deberá estar entre 40 y 120 psi (275-827
kilopascales).
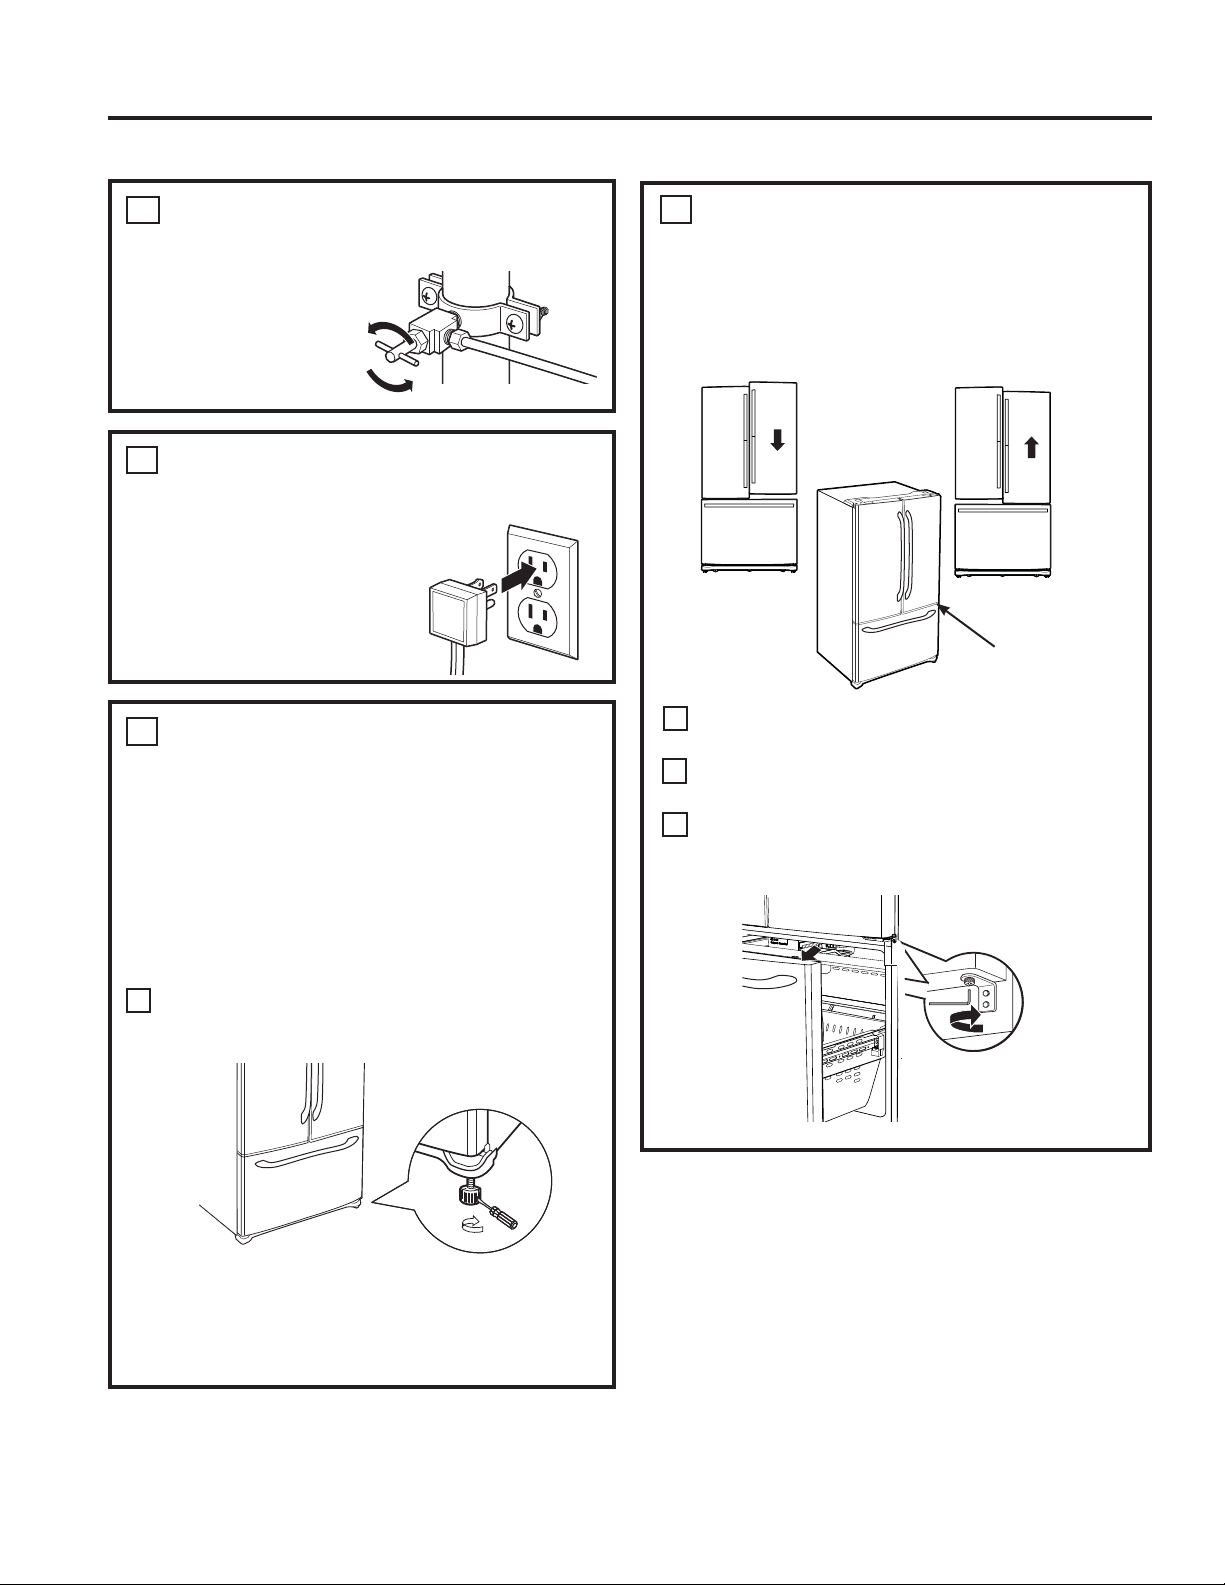
38 49-60792-2
ABRA EL SUMINISTRO DE
AGUA
Abra el suministro
de agua usando la
válvula de cierre
(suministro de agua
hogareño) y controle
que no haya pérdidas.
12
ENCHUFE EN EL
REFRIGERADOR
Consulte la información de
conexión a tierra adjunta con
el cable de corriente.
13
NIVELACIÓN DEL
REFRIGERADOR
Las patas niveladoras poseen 2 propósitos:
1) Las patas niveladoras se ajustan de modo que el
refrigerador quede posicionado de manera firme
en el piso y no se tambalee.
2) Las patas niveladoras sirven como freno
estabilizador para sostener el refrigerador
de forma segura en su posición durante
el funcionamiento y la limpieza. Las patas
niveladoras también evitan la caída del
refrigerador.
Gire las patas niveladoras en dirección de las agujas
del reloj para levantar el refrigerador, en contra de
las agujas del reloj para bajarlo.
AVISO: A fin de evitar posibles daños sobre la
propiedad, las patas niveladoras deberán estar
tocando el piso de manera firme.
14
A
Destornillador con
cabeza aplanada
Levantar
NIVELACIÓN DE LAS PATAS
DEL REFRIGERADOR
Recuerde que es necesario que el refrigerador esté
nivelado para que las puertas estén perfectamente
apoyadas. Si necesita ayuda, revise la sección previa
sobre nivelación del refrigerador.
Si abre la puerta del freezer, podrá ver la bisagra
central.
Inserte una llave Allen de ¼” en el hueco de la
bisagra central.
Ajuste la altura girando en dirección a favor o en
contra de las agujas del reloj. Al girar en contra de
las agujas del reloj, la puerta se moverá.
15
A
B
Cuando
la puerta
izquierda está
más baja
que la puerta
derecha.
Cuando
la puerta
izquierda
está más
alta que
la puerta
derecha.
Punto de ajuste
C
RAISE
Instrucciones de Instalación
INSTRUCCIONES DE INSTALACIÓN
CÓMO INSTALAR EL REFRIGERADOR (Cont.)
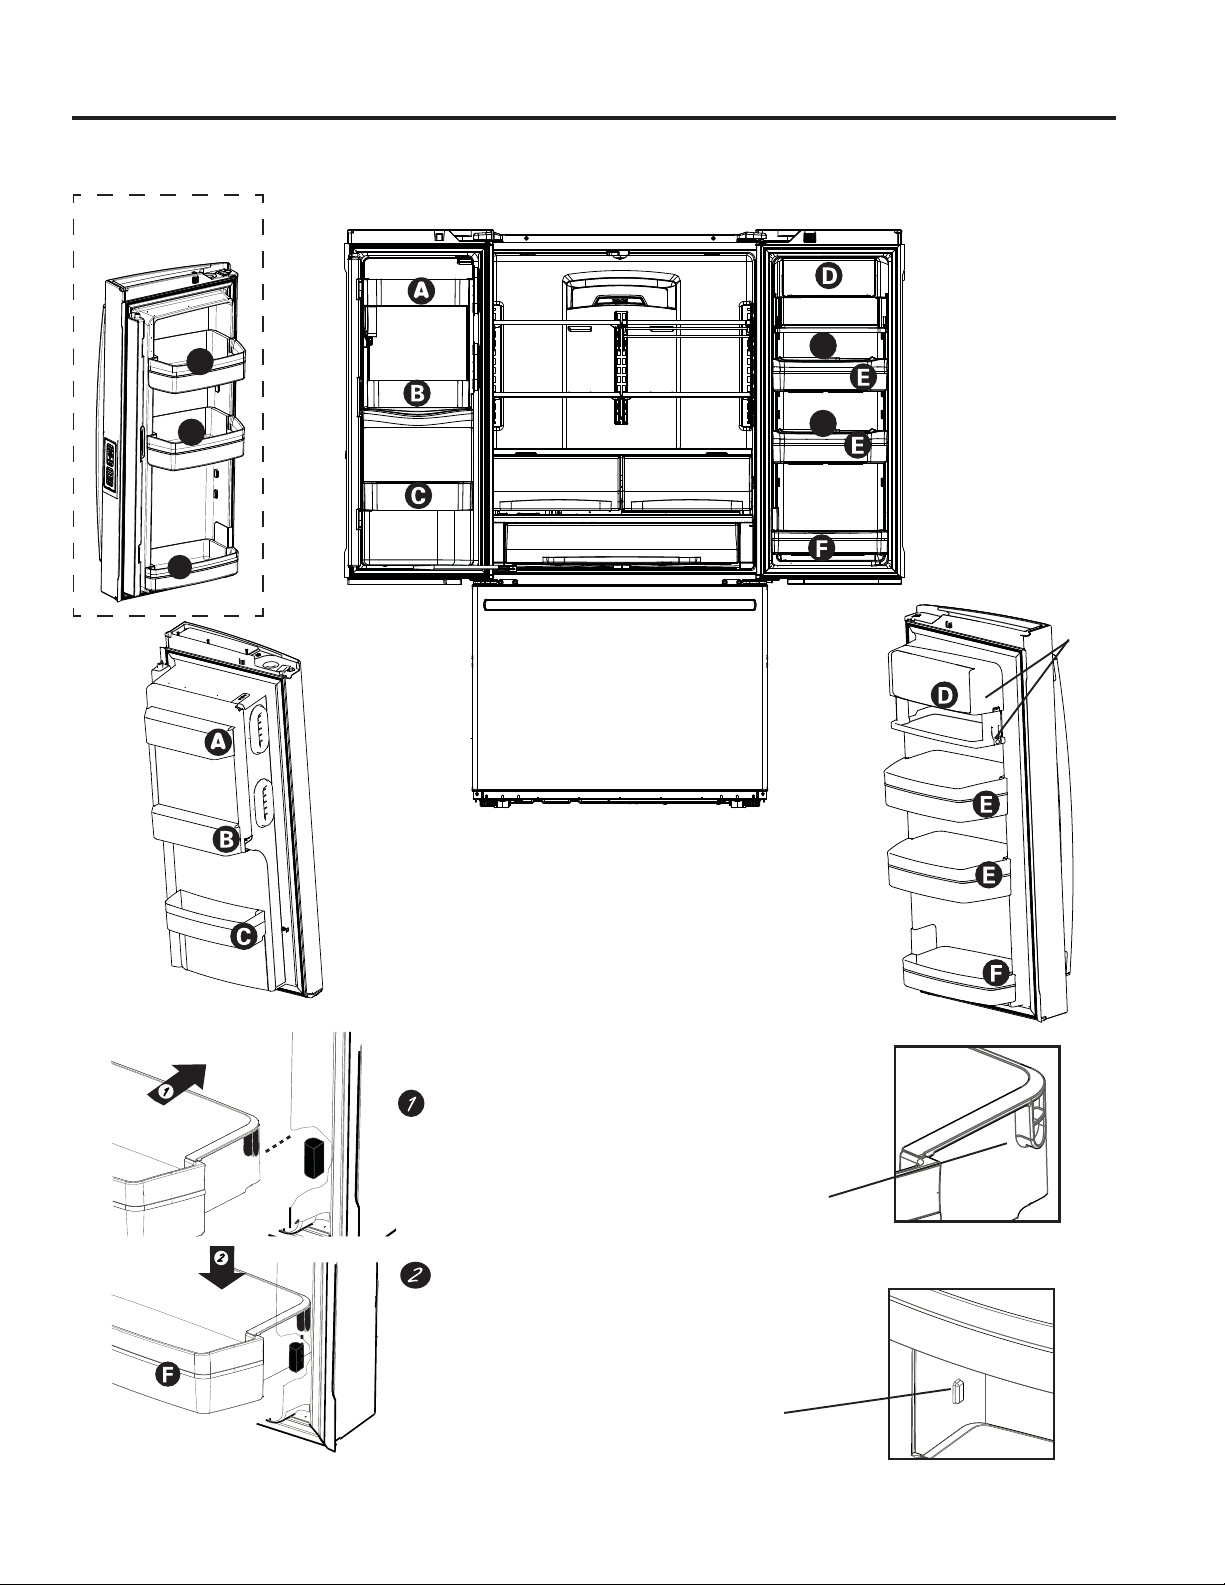
49-60792-2 39
J
H
H
INSTRUCCIONES DE INSTALACIÓN
INSTRUCCIONES DE INSTALACIÓN
Instrucciones de Instalación
Coloque los recipientes en las puertas:
Enlace su recipiente con la letra mostrada.
Posicione los ganchos del recipiente sobre el
ubicador del recipiente y empuje hacia adelante
hasta que se inserte completamente.
Ubicador del
recipiente a cada
lado
Parte trasera del
gancho del recipien-
te a cada lado
Empuje el recipiente hacia abajo hasta que se
bloquee en su posición.
Máquina de Hacer Hielo en
el Freezer, disponible en
modelos Sin Dispensador y
disponible como Kit IM para
algunos modelos.
(modelos
selectos
únicamente)
Modelos sin
Dispensión
G
G
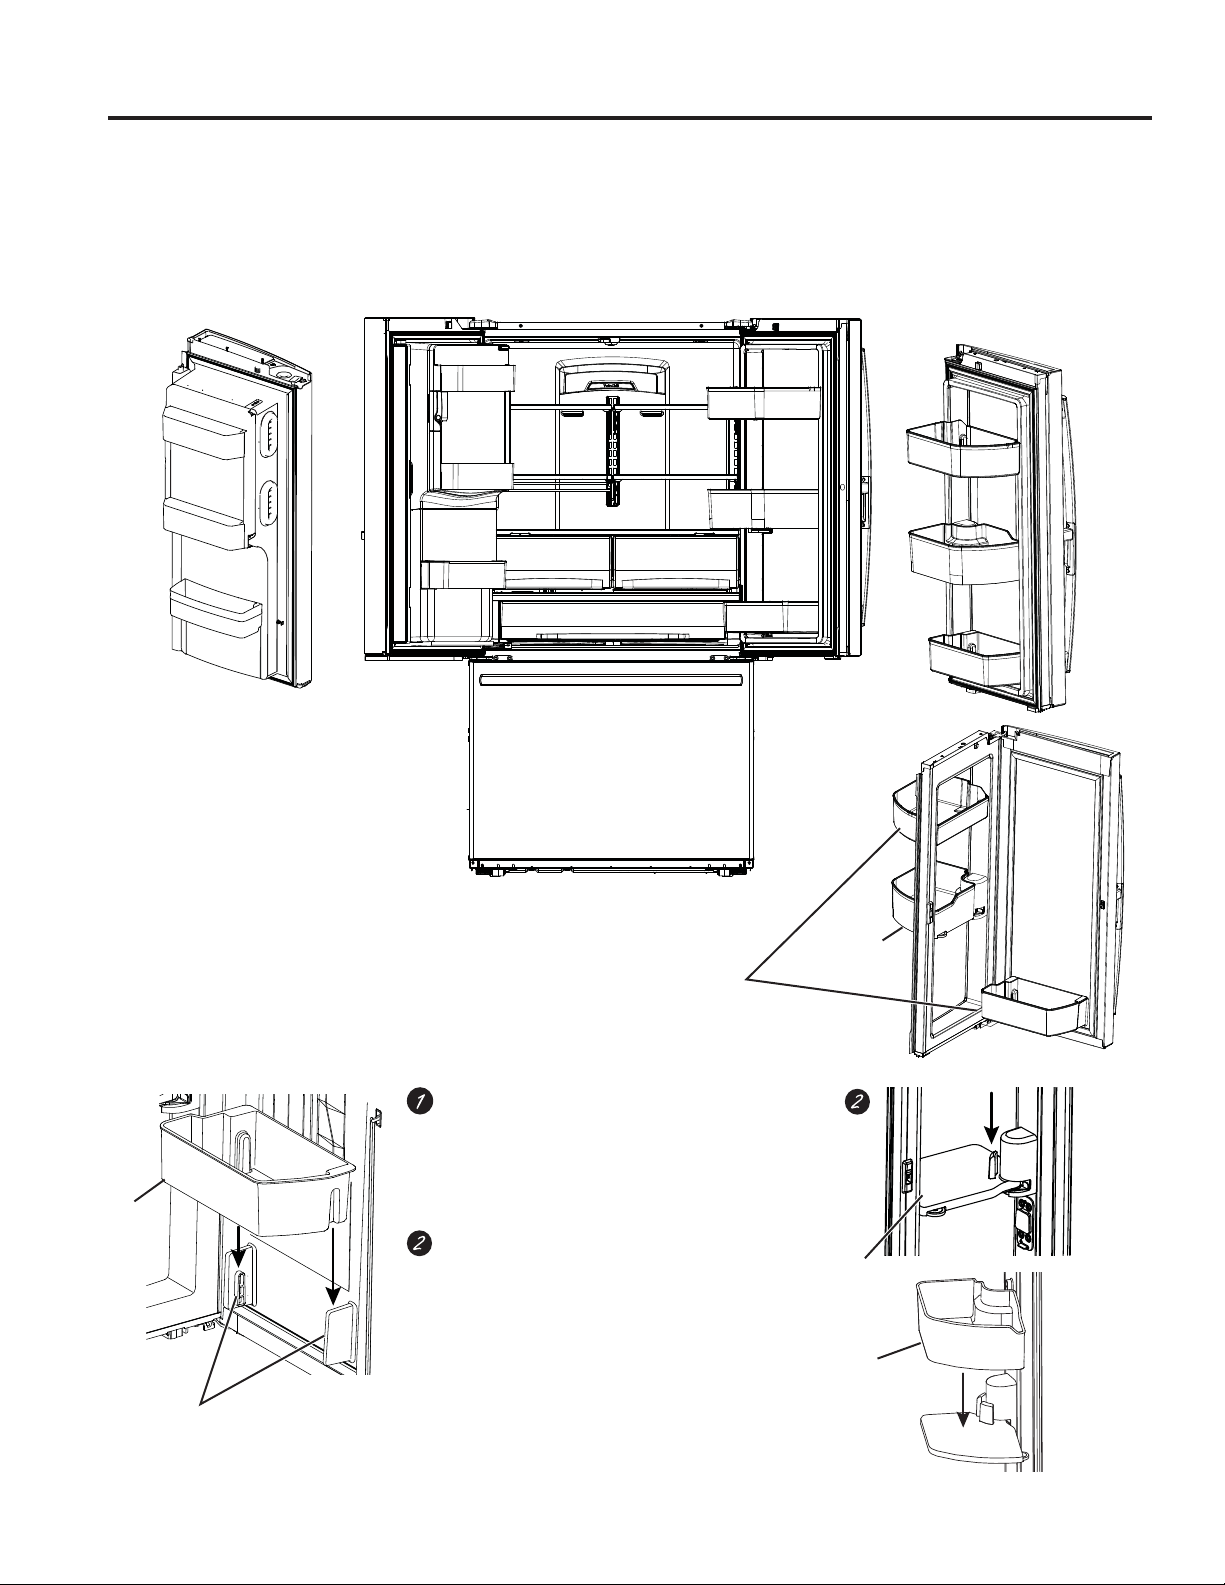
40 49-60792-2
INSTRUCCIONES DE INSTALACIÓN
Instrucciones de Instalación
CÓMO INSTALAR EL REFRIGERADOR (Cont.)
Porta
bandejas
Bandejas
ajustables
Bandeja
giratoria
Modelos PFD, PYD, GFD
Para colocar la bandeja giratoria en la
puerta:
1. Deslice el ensamble de la base de la bandeja
en el soporte de la puerta.
2. Deslice la bandeja sobre la base de la
bandeja.
Para colocar las bandejas ajustables
en la puerta:
Posicione las bandejas sobre los porta
bandejas y empuje hacia abajo hasta que se
ajusten en sus posiciones.
Bin
Bin
Base
de la
bandeja
Instale
la base
metálica
49-60792-2 41
Los kits de suministro de agua de cobre recomendados son
WX8X2, WX8X3 o WX8X4, dependiendo de la cantidad
de tubería necesaria. Las tuberías de suministro de agua
de plástico aprobadas son las Tuberías para Refrigerador
de SmartConnectTM (WX08X10006, WX08X10015 y
WX08X10025).
Al conectar su refrigerador a un Sistema de Agua por
Ósmosis Inversa de GE Appliances, la única instalación
aprobada es con el Kit GE Appliances RV. Con otros
sistemas de agua por ósmosis inversa, siga las
recomendaciones del fabricante.
Si el suministro de agua al refrigerador es de un Sistema
GH)LOWUDFLyQGH$JXDSRUÏVPRVLV,QYHUVD52<HO
refrigerador también cuenta con un filtro de agua, use el
tapón del bypass del filtro del refrigerador. Cómo usar
el tapón del bypass del filtro del Refrigerador. El uso del
cartucho de filtración de agua del refrigerador junto con un
ILOWURGHDJXD52SRGUiSURGXFLUFXERVGHKLHORKXHFRV
Algunos modelos no están equipados con el tapón del
bypass del filtro. Para obtener un tapón del bypass del
filtro, llame al 800-GECARES. En Canadá, llame
al 800.561-3344.
Esta instalación de la tubería de agua no posee garantía
del fabricante del refrigerador o de la máquina de hacer
hielo. Siga estas instrucciones con cuidado, a fin de
minimizar el riesgo de daños caros sobre el agua.
Los golpes de ariete (agua que golpea las tubería) en
la plomería del hogar pueden ocasionar daños sobre
las piezas del refrigerador y generar pérdidas de agua o
inundación. Llame a un plomero calificado para corregir los
golpes de ariete antes de instalar la tubería de suministro
de agua al refrigerador.
A fin de evitar quemaduras y daños sobre los productos, no
adhiera la tubería de agua a la tubería de agua caliente.
Si el refrigerador es utilizado antes de haber realizado la
conexión de agua a la máquina de hacer hielo,consulte
la sección de Controles en la página 109 para apagar la
máquina de hacer hielo.
1RLQVWDOHODWXEHUtDGHODPiTXLQDGHKDFHUKLHORHQiUHDV
donde las temperaturas lleguen a estar bajo cero.
Al usar un dispositivo eléctrico (tal como un taladro
eléctrico) durante la instalación, asegúrese de que
el dispositivo cuente con doble aislación o que esté
conectado a tierra de modo que se eviten riesgos de
descargas eléctricas, o que sea cargados a través del uso
de una batería.
Todas las instalaciones de deben realizar de acuerdo con
los requisitos indicados en el código local de plomería.
ANTES DE COMENZAR LO QUE NECESITARÁ
• Kit de Tubería para Refrigerador de Cobre o
SmartConnectTM de ¼” de diámetro externo para
conectar el refrigerador al suministro de agua. Si usará
cobre, asegúrese de que ambos extremos de la tubería
hayan sido cortados de forma recta.
A fin de determinar cuánta tubería es necesaria: mida
la distancia desde la válvula de agua en la parte trasera
del refrigerador hasta la tubería del suministro de agua.
Asegúrese de que haya suficiente tubería adicional para
permitir que el refrigerador pueda ser retirado de la pared
luego de la instalación.
Los Kits de Tuberías para Refrigerador de
SmartConnectTM están disponibles en las siguientes
longitudes:
8’ (2.4 m) – WX08X10006
15’ (4.6 m) – WX08X10015
25’ (7.6 m) – WX08X10025
Instrucciones de Instalación
CÓMO INSTALAR LA TUBERÍA DE AGUA
INSTRUCCIONES DE INSTALACIÓN
ADVERTENCIA
Realice la conexión a un suministro de agua potable
únicamente.
Se requiere un suministro de agua fría para el
funcionamiento de la máquina de hielos automática. La
presión del agua deberá estar entre 40 y 120 psi (275-827
kilopascales).
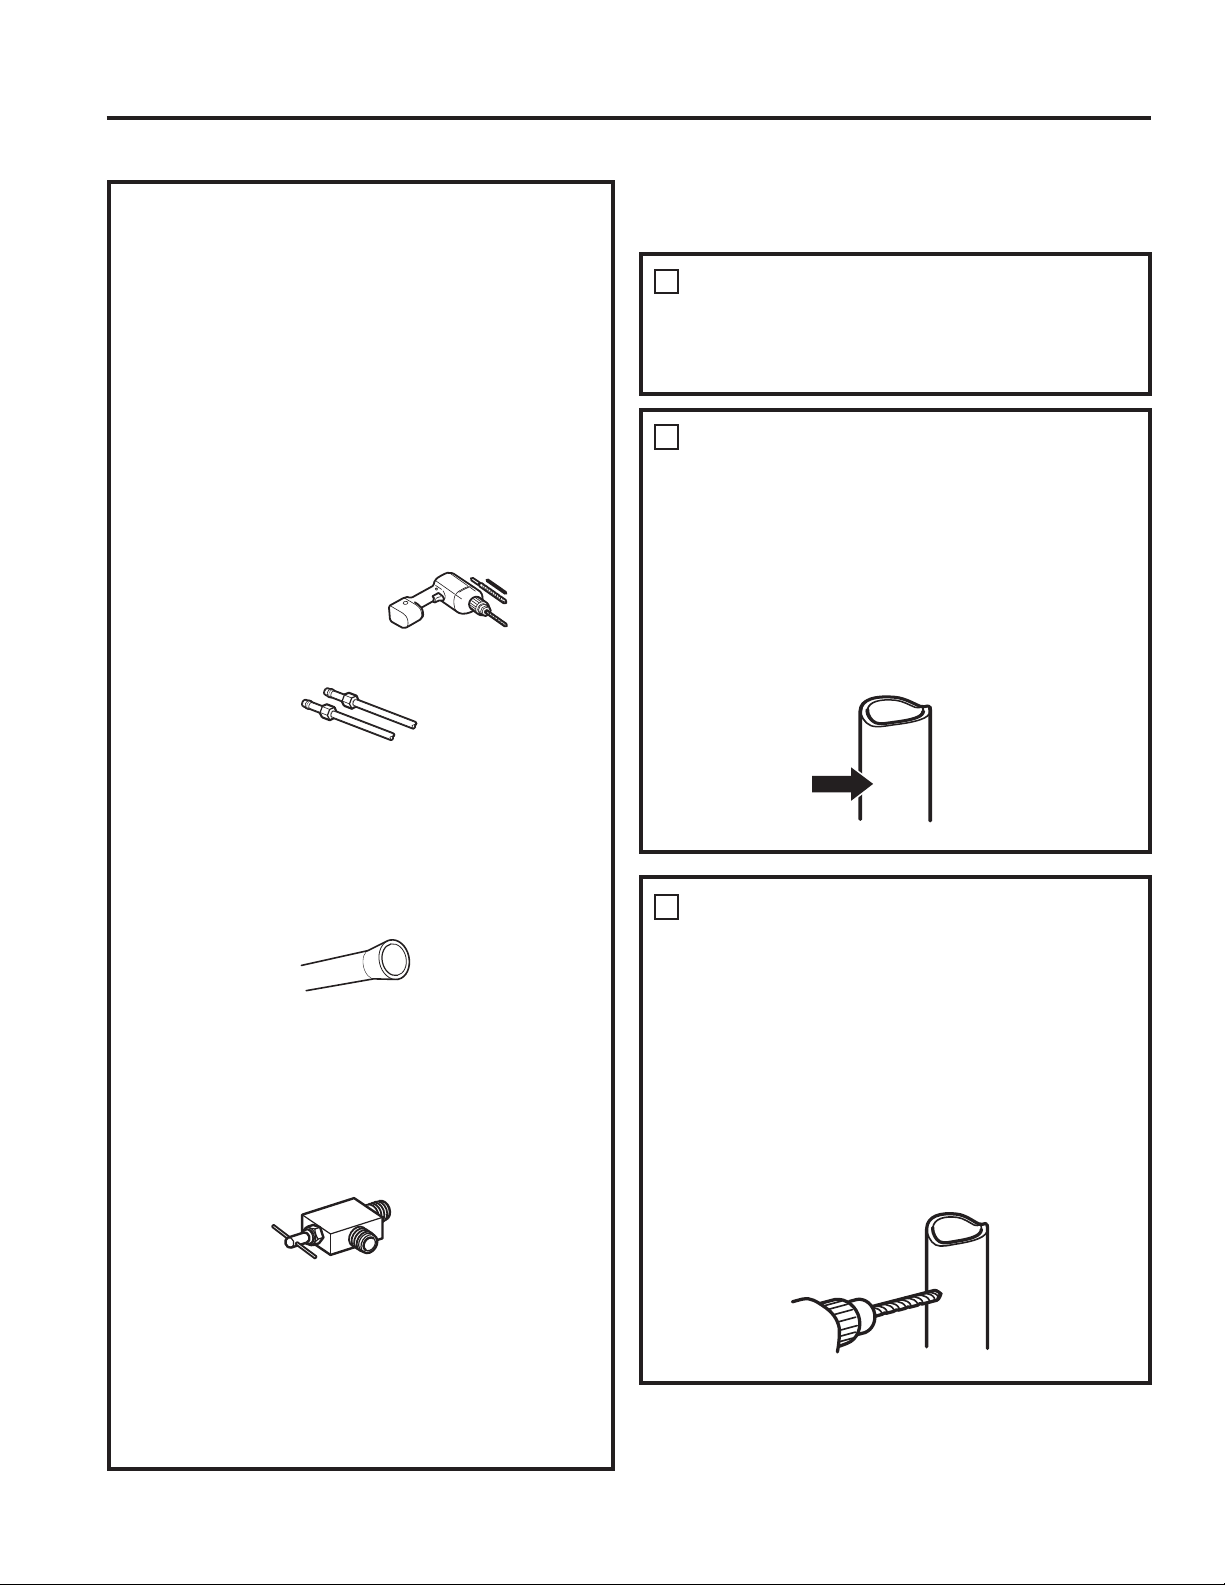
42 49-60792-2
NOTA: La única tubería plástica aprobada es aquella
provista con los Kits de Tuberías para Refrigerador de
6PDUW&RQQHFW701RXVHQLQJ~QRWURVXPLQLVWURGHDJXD
plástico, ya que el suministro se encuentra bajo presión
en todo momento. Ciertos tipos de plásticos podrán sufrir
fisuras o roturas con el paso del tiempo y ocasionar
problemas con el agua en su hogar.
• Un kit de suministro de agua de GE Appliances (el
cual contiene tubería, válvula de cierre y uniones que
figuran en la lista siguiente) está disponible por un costo
adicional a través de su vendedor minorista o de Parts
and Accessories (Piezas y Accesorios), 877.959.8688
(En Canadá 1.800.661.1616).
• Un suministro de agua fría. La presión del agua deberá
estar entre 20 y 120 p.s.i. (barra 1.4-8.1).
• Taladro eléctrico.
• 1/2” o llave ajustable.
• Destornillador de punta
plana o Phillips.
• 2 abrazaderas de compresión (mangas) y dos tuercas
de compresión de ¼” de diámetro externo – para
conectar la tubería de cobre a la válvula de cierre y a la
válvula de agua del refrigerador.
2
• Si usará un kit de Tuberías para Refrigerador de
SmartConnectTM, las uniones necesarias están
preensambladas a la tubería.
• Si su tubería de agua de cobre existente posee una
unión con avellanado en su extremo, necesitará un
adaptador (disponible en las tiendas de suministros)
SDUDFRQHFWDUODWXEHUtDGHDJXDDOUHIULJHUDGRU2SXHGH
cortar la unión con avellanado con un cortador de tubo
\OXHJRXVDUXQDXQLyQGHFRPSUHVLyQ1RFRUWHORV
extremos con forma de la tubería para refrigerador de
SmartConnectTM.
• Cierre la válvula para conectar a la tubería de agua fría.
La válvula de cierre debería tener una entrada de agua
con un diámetro interior mínimo de 5/32” en el punto de
conexión a la TUBERÍA DE AGUA FRÍA. Las válvulas
de cierre tipo montura están incluidas en muchos kits de
suministro de agua. Antes de su adquisición, asegúrese
de que la válvula tipo montura cumpla con los códigos
de plomería locales.
CIERRE EL SUMINISTRO DE
AGUA PRINCIPAL
Encienda la canilla más cercana que sea lo
suficientemente larga para despejar la tubería de agua.
Instale la válvula de cierre en la tubería de agua potable de
uso frecuente más cercana.
1
Elija una ubicación para la válvula que sea de fácil
acceso. Es mejor conectar la misma en el lateral de
una tubería de agua vertical. Cuando sea necesario
conectarla en una tubería de agua horizontal, realice
la conexión a la parte superior o lateral, en vez de la
parte inferior, a fin de evitar el drenaje de cualquier
sedimento de la tubería de agua.
ELIJA LA UBICACIÓN DE LA
VÁLVULA
2
TALADRE EL AGUJERO DE LA
VÁLVULA
3
Taladre un agujero de ¼” en la tubería de agua (incluso
si usará una válvula auto-perforante), usando una punta
afilada. Elimine cualquier zumbido que resulte de haber
taladrado el agujero en la tubería.
Tenga cuidado de no permitir que el agua se drene en
el taladro.
Si no se taladra un agujero de ¼” se podrá ver reducida
la producción de hielo o los cubos de hielo podrán ser
más pequeños.
Instrucciones de Instalación
CÓMO INSTALAR LA TUBERÍA DE AGUA (Cont.)
LO QUE NECESITARÁ (CONT.)
INSTRUCCIONES DE INSTALACIÓN
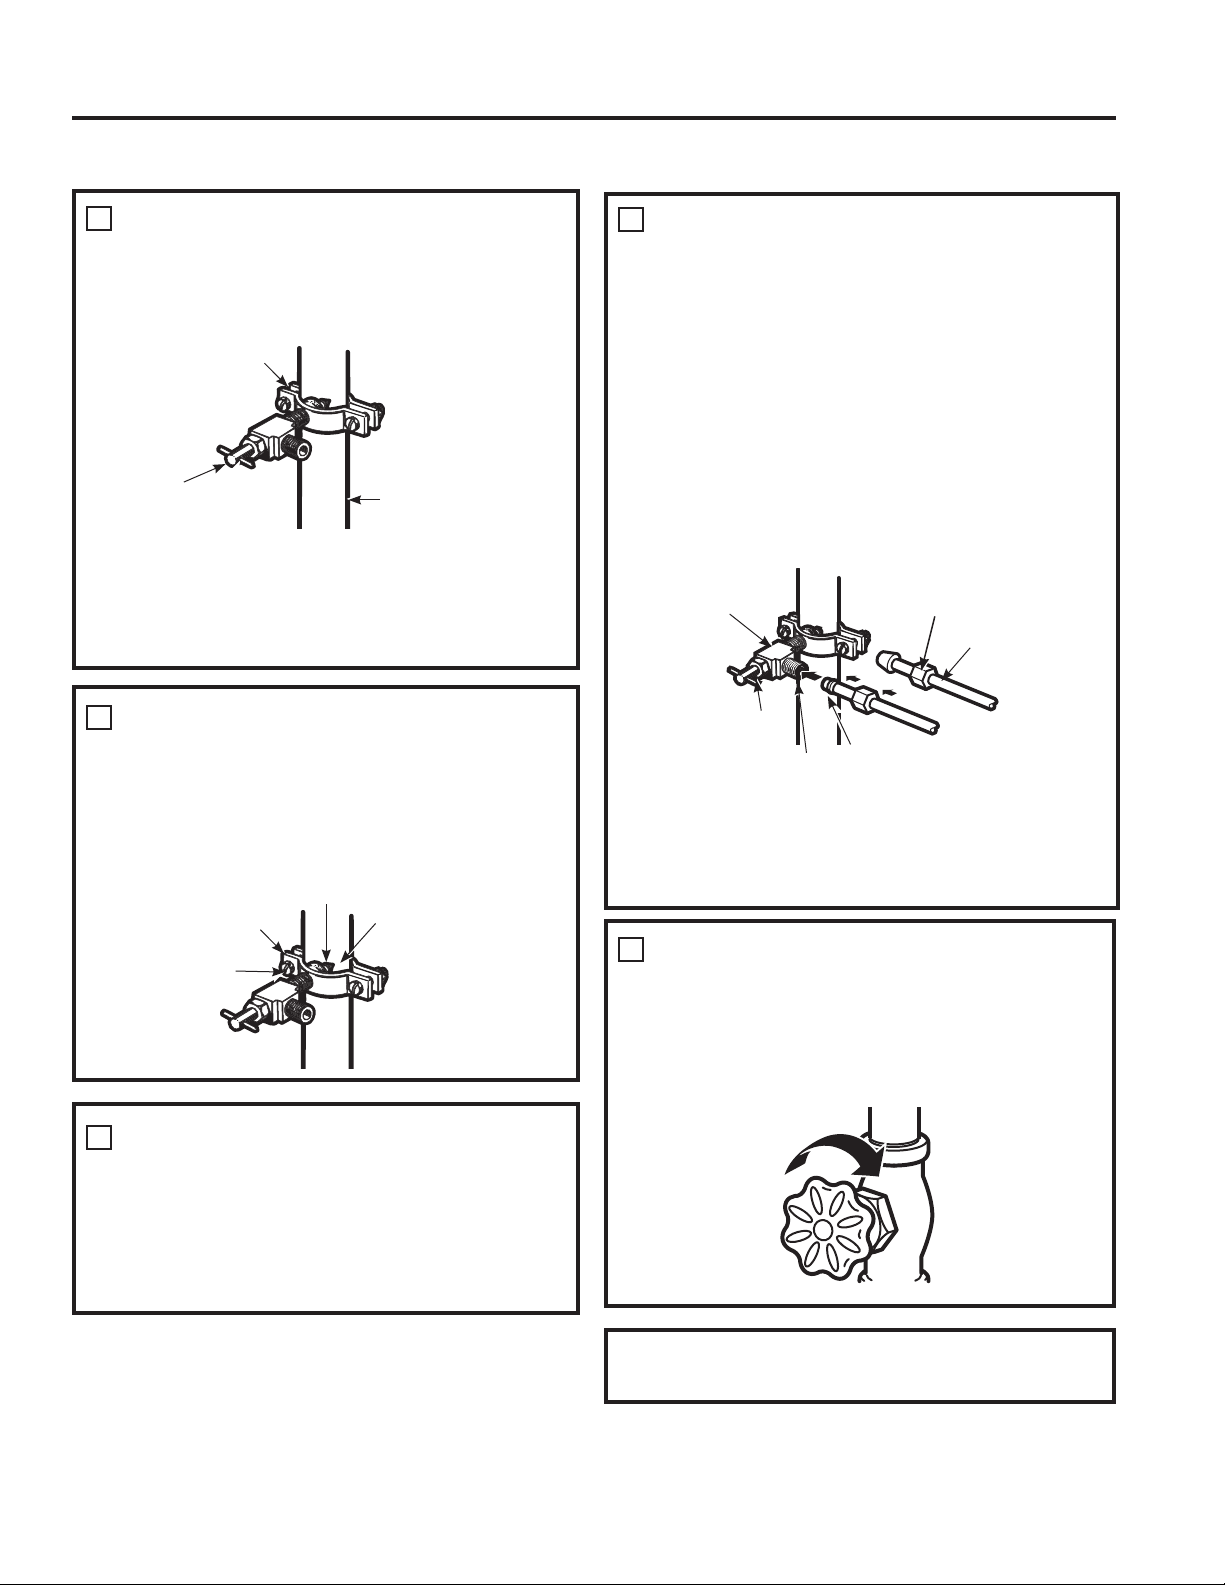
49-60792-2 43
INSTRUCCIONES DE INSTALACIÓN
Coloque la tuerca de compresión y la abrazadera de
refuerzo (manga) para colocar la tubería de cobre en el
extremo de la tubería y conecte la misma a la válvula de
cierre.
Asegúrese de que la tubería esté completamente
insertada en la válvula. Ajuste la tuerca de compresión
de forma segura.
Para usar una tubería de plástico del kit de Tuberías
para Refrigerador SmartConnectTM, inserte el extremo
moldeado de la tubería en la válvula de cierre y ajuste
la tuerca de compresión hasta que quede ajustada
manualmente, y luego dé un giro de ajuste adicional con
una llave. Un ajuste excesivo podrá ocasionar pérdidas.
NOTA: Se deberá cumplir con los Códigos de Plomería
del Commonwealth de Massachusetts 248CMR.
Las válvulas tipo montura son ilegales y su uso está
prohibido en Massachusetts. Consulte a un plomero
matriculado.
CONECTE LA TUBERÍA A LA
VÁLVULA
7
Abra el suministro de agua principal y despeje la tubería
hasta que el agua esté limpia.
Cierre el agua usando la válvula de agua luego de haber
dejado correr aproximadamente un galón (1 litro), o 2
minutos, de agua a través de la tubería.
DESPEJE LA TUBERÍA
8
Válvula de Cierre
Tipo Montura Tuerca de Compresión
Tuerca de
Embalaje
Válvula de Salida Abrazadera de refuerzo
(manga)
Tubería de
SmartConnectTM
Ajuste la válvula de cierre de la tubería de agua fría
con la abrazadera de la tubería.
NOTA: Se deberá cumplir con los Códigos de
Plomería del Commonwealth de Massachusetts
248CMR. Las válvulas tipo montura son ilegales y su
uso está prohibido en Massachusetts. Consulte a un
plomero matriculado.
AJUSTE LA VÁLVULA DE
CIERRE
4
Ajuste los tornillos de la abrazadera hasta que la
arandela de sellado comience a hincharse.
NOTA: 1RDMXVWHHQH[FHVRRVHSRGUiURPSHUOD
tubería.
AJUSTE LA ABRAZADERA DE
LA TUBERÍA
5
Abrazadera
de la tubería
Tubería de Agua
Fría Vertical
Válvula de Cierre
Tipo Montura
Lavadora
Extremo de
la Entrada
Abrazadera de la
tubería
Tornillos con
Abrazadera
Enrute la tubería entre la entrada de agua fría y el
refrigerador.
Enrute la tubería a través de un agujero perforado
en la pared o el piso (detrás del refrigerador o del
gabinete con base adyacente) tan cerca a la pared
como sea posible.
ENRUTE LA TUBERÍA
6
Para completar la instalación del refrigerador, vuelva al
Paso 11 en Cómo Instalar el Refrigerador.
Instrucciones de Instalación
CÓMO INSTALAR LA TUBERÍA DE AGUA (Cont.)
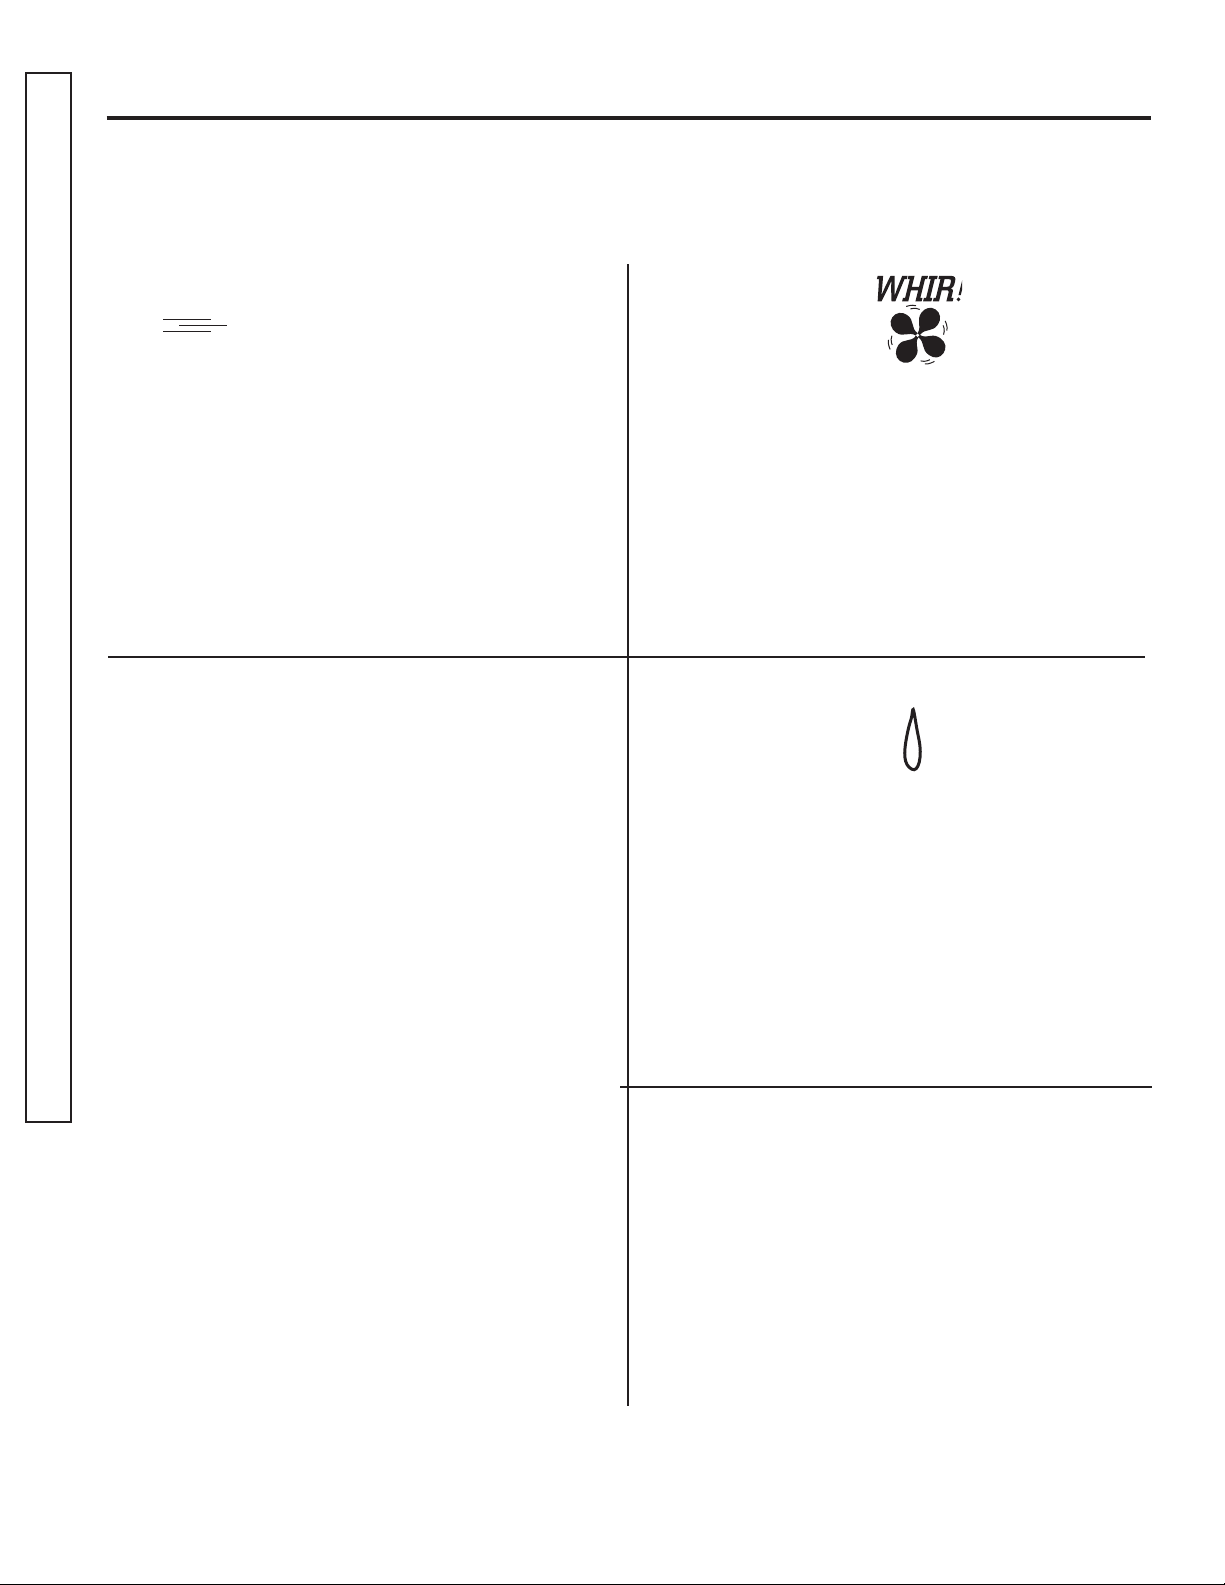
44 49-60792-2
CONDICIONES DE FUNCIONAMIENTO NORMAL
El sonido de los refrigeradores nuevos es diferente al de aquellos más antiguos.
Los refrigeradores modernos cuentan con más funciones y utilizan una tecnología más nueva.
HUMMM...
WHOOSH...
Ŷ Es posible que el nuevo compresor de alta efectividad
funcione más rápido y por más tiempo que aquel de
su refrigerador antiguo, y es posible que escuche un
zumbido o sonido de pulsación en un tono alto mientras
está funcionando.
Ŷ Es posible que escuche gorgoteos al cerrar la puerta.
Esto se debe al equilibrio de la presión dentro del
refrigerador.
Ŷ Luego de dispensar hielo, un motor cerrará el vertedor
de hielo para evitar que entre aire caliente en el cubo
de hielo, manteniendo el hielo en una temperatura de
congelamiento.
El zumbido del motor al cerrar el cubo de hielo es normal,
poco después de dispensar hielo.
Ŷ
Es posible que escuche los ventiladores girar en altas
velocidades. Esto sucede cuando el refrigerador se
enchufa por primera vez, cuando las puertas se abren
con frecuencia o cuando una gran cantidad de comida
es agregada a los compartimientos del refrigerador o del
freezer. Los ventiladores están ayudando a mantener las
temperaturas correctas.
Ŷ Los ventiladores cambian de velocidad a fin de proveer
un enfriamiento óptimo y ahorros de energía.
SONIDOS DE CLIC, ESTALLIDOS
ROTURAS y CHASQUIDOS
Ŷ Es posible que escuche sonidos de roturas o estallidos
cuando se enchufe el refrigerador por primera vez.
Esto sucede mientras el refrigerador se enfría hasta la
temperatura correcta.
Ŷ El compresor puede causar un sonido de chasquido o
chirrido al intentar reiniciar (esto podría tomar hasta 5
minutos).
Ŷ La expansión y contracción de las bobinas de
enfriamiento durante y después de la descongelación
pueden producir sonidos de roturas o estallidos.
Ŷ En los modelos con máquina de hacer hielo, luego de un
ciclo de producción de hielo, es posible que escuche los
cubos de hielo caer al recipiente del hielo.
Ŷ En los modelos con dispensador, cuando se dispense
el agua es posible que escuche el movimiento de las
tuberías de agua al iniciar el proceso y luego de que el
botón del dispensador sea liberado.
SONIDOS DEL AGUA
Ŷ Es posible que el flujo de refrigerante a través de las
bobinas de enfriamiento produzca un gorgoteo similar a
agua hirviendo.
Ŷ – El agua que cae sobre el calentador de
descongelamiento puede producir un chisporroteo,
estallido o zumbido durante el ciclo de descongelamiento.
Ŷ Es posible que se escuche un sonido de goteo durante el
ciclo de descongelación, a medida que el hielo se derrite
desde el evaporador y fluye hasta la olla de drenaje.
Ŷ Cerrar la puerta podrá provocar un sonido de burbujeo
debido a la igualación de la presión.
¿Escuchas lo que yo escucho? Estos condiciones son normales.
COMIENZO DEL ENFRIAMIENTO
Es posible que pasen hasta 24 horas para que las
temperaturas del refrigerador y del freezer igualen la
pantalla. Durante dicho tiempo, se deberían minimizar las
aperturas de las puertas del refrigerador y del freezer.
CONSEJOS
Ŷ (OIUHH]HUVHHQIUtDSULPHUR
Ŷ (OFRPSDUWLPLHQWRGHOUHIULJHUDGRUVHHQIUtDHQ~OWLPR
lugar; es posible que alcance el nivel de frío luego de
varias horas después que el freezer.
Ŷ $SDJDUODPiTXLQDGHKDFHUKLHORSHUPLWHTXHWDQWROD
comida fresca como la comida del freezer se enfríen con
mayor rapidez.
Condiciones de Funcionamiento Normal
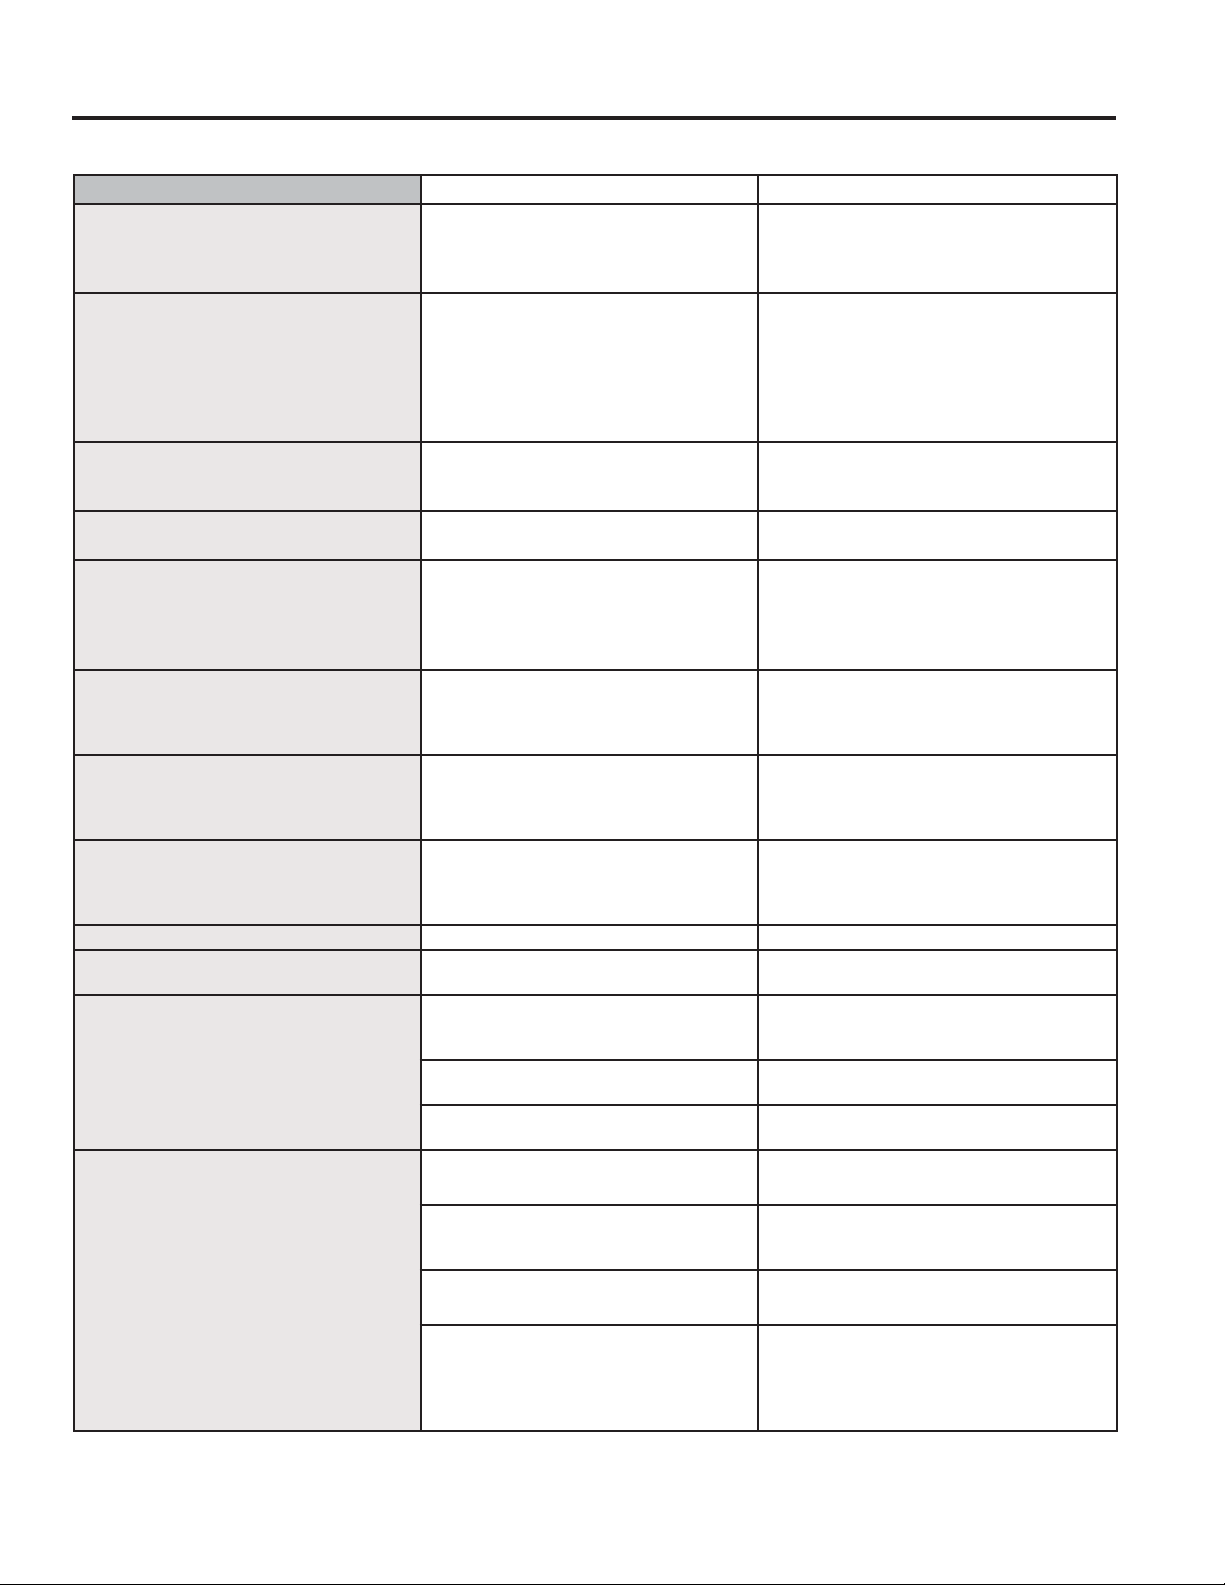
49-60792-2 45
Problema Causas Posibles Qué Hacer
Se indicó que el filtro de agua se instaló
de forma incorrecta o que hay una
pérdida presente en el panel de control
de la tapa.
El filtro de agua se instaló al revés o
tiene una pérdida.
Controle que no haya pérdidas. Si no hay
pérdidas presentes**, retire el filtro/ tapón
del bypass**, gire 180º y reinstale.
(O³7ULiQJXORGH$GYHUWHQFLD´HVWi
encendido.
Replace Filter (Reemplace el Filtro)/
Replace Water Filter (Reemplace el Filtro
de Agua) está encendido.
/D/X]2YHU'XH5HWUDVRHVWi
encendida.
El filtro de agua está goteando o debe
ser reemplazado.
Filtro de agua en reverso.
Reemplace el filtro de agua, controle que
no haya goteos.
Retire el filtro, gírelo 180º y vuelva a
instalarlo.
'LVSHQVHU2II'LVSHQVDGRU$SDJDGR
está encendido.
Control A, B y C.
Se instaló el filtro equivocado.
Reemplace por el filtro adecuado.
Retire el filtro, gírelo 180º y vuelva a
instalarlo.
1RHVWiILOWUDQGR Bypass del filtro instalado en los
Controles B y C
Instale el filtro de agua correcto.
Reset Filter (Reiniciar Filtro) está
encendido
El filtro de agua está goteando o debe
ser reemplazado
Reemplace el filtro de agua, o instale el
bypass del filtro**
Mantenga presionado Reset Filter
(Reiniciar Filtro) durante 3 segundos para
reiniciar (control D únicamente)
La luz del indicador del filtro de agua no
está iluminada
Esto es normal. Este indicador se
encenderá para indicarle que es
necesario reemplazar el filtro de forma
rápida.
Para más información, consulte Acerca del
Filtro de Agua.
La manija está floja/ la manija tiene un
espacio de separación.
Es necesario ajustar la manija Para acceder a instrucciones detalladas,
consulte las secciones Cómo Ajustar
la Manija de Comidas Frescas y Cómo
Ajustar la Manija del Freezer.
Pitido del refrigerador Se trata de la alarma de la puerta Apague o desactive la misma con la puerta
cerrada**. Si la puerta está abierta y la
alarma está sonando, sólo podrá detener
la alarma.
1RHQIUtD Consulte Acerca de los Controles. Consulte Acerca de los Controles
El agua tiene mal gusto/ olor* El dispensador de agua no fue usado
durante un tiempo prolongado
Dispense agua hasta que toda el agua en
el sistema sea repuesta.
El agua en el vaso está caliente* Es normal cuando el refrigerador es
usado por primera vez luego de su
instalación
Espere 24 horas hasta que el refrigerador
se enfríe completamente.
El dispensador de agua no fue usado
durante un tiempo prolongado
Dispense agua hasta que toda el agua en
el sistema sea repuesta.
El sistema de agua fue drenado Espere varias horas hasta que el
suministro repuesto se haya enfriado.
El dispensador de agua no funciona* El suministro de agua está apagado o
no está conectado
Consulte Cómo Instalar el Suministro de
Agua.
El filtro de agua está atascado o
el enchufe del filtro/ bypass no fue
instalado
Reemplace el cartucho del filtro o retire el
filtro e instale el tapón del bypass**.
Es posible que haya aire atrapado en el
sistema de agua
Presione el brazo dispensador durante por
lo menos 5 minutos.
El agua en la reserva está congelada
debido a que los controles están
configurados en una temperatura
demasiado fría
Configure el control del refrigerador en una
configuración más caliente y espere 24
horas. Si el agua no es dispensada luego
de 24 horas, comuníquese al servicio
técnico.
*Modelos Selectos Únicamente
**Algunos modelos no vienen equipados con el tapón del filtro del bypass. A fin de obtener un tapón del filtro del bypass,
comuníquese al 800-GECARES. En Canadá, comuníquese al 800.561.3344.
Consejos para la Solución de Problemas... Antes de solicitar el servicio técnico
£$KRUUHWLHPSR\GLQHUR3ULPHURUHYLVHORVFXDGURVTXHDSDUHFHQHQODVVLJXLHQWHVSiJLQDV\HVSRVLEOHTXHQRQHFHVLWHVROLFLWDU
reparaciones.
CONSEJOS PARA LA SOLUCIÓN DE PROBLEMAS
46 49-60792-2
Problema Causas Posibles Qué hacer
Chorrea agua del dispensador* El cartucho del filtro fue instalado en
forma reciente
Deje correr agua del dispensador durante 5
minutos (aproximadamente 2 galones).
1RKD\SURGXFFLyQGHDJXDQLGHFXERV
de hielo*
La línea de suministro o la válvula de
cierre están atascadas
Llame a un plomero
El filtro de agua está atascado Reemplace el cartucho del filtro o retire el
filtro e instale el tapón del bypass**.
El cartucho del filtro no está instalado
de forma apropiada
Retire y vuelva a instalar el cartucho del
filtro, asegurándose de que se puede
bloquear correctamente en su lugar.
La máquina de hacer hielo está
apagada
Controle que la máquina de hacer hielo esté
encendida. Consulte Acerca de la Máquina
de Hacer Hielo Automática.
Gotea agua desde el dispensador* Puede haber aire presente en
el sistema de entrada de agua,
haciendo que gotee agua luego de ser
dispensada
Dispense agua durante por lo menos 5
minutos para eliminar el aire del sistema
AUTO FILL (LLENADO
AUTOMÁTICO) bajo llenado/ sin
llenado*
1RWRGRVORVHQYDVHVIXQFLRQDQFRQ
AUTO FILL (Llenado Automático) Intente con un envase diferente
Mensaje de error Consulte la pág. 14
Sensor de limpieza. Consulte la pág. 14
AUTO FILL (Llenado Automático) se
desborda* 1RWRGRVORVHQYDVHVIXQFLRQDQFRQ
AUTO FILL (Llenado Automático) Intente con un envase diferente
Enfriamiento del freezer, la comida
fresca no se enfría
Es normal, cuando el refrigerador se
enchufa por primera vez o luego de un
corte de energía prolongado
Espere 24 horas para que la temperatura
en ambos compartimiento alcance las
temperaturas seleccionadas.
El dispensador de hielo se abre luego
de cerrar el cajón del freezer* 1RUPDO La puerta del dispensador de agua se podrá
abrir luego de cerrar la puerta del freezer
para permitir el acceso
Flujo de producción bajo Es posible que la parte inferior de la
cápsula se haya abollado, haciendo que
el punzón perfore el filtro y haciendo
que el café molido atasque el punzón
inferior
Evite usar cápsulas dañadas/ abolladas, y
limpie la aguja inferior antes de la próxima
producción
Flujo de producción bajo/ gotea agua
desde la puerta interna
La aguja superior de la cafetera se
atascó
Desatasque los agujeros de la aguja
superior, usando un gancho de papel y
enjuague la cafetera. Enjuague la misma
luego de cada uso.
La cafetera no es detectada o hay un
goteo de agua caliente desde la parte
superior de la misma.
Ensamble incorrecto de la cafetera en
el soporte
Asegúrese de que el Logo de Keurig
esté en el frente. Presione la cafetera
completamente dentro de los soportes.
El café es dispensado con salpicaduras
o con burbujas que revientan.
Agujero de ventilación bloqueado en la
cafetera
Asegúrese de que el agujero de ventilación
en la parte inferior de la cafetera esté
despejado de comida o de cualquier otro
tipo de contaminación.
Consejos para la Solución de Problemas... Antes de solicitar el servicio técnico
CONSEJOS PARA LA SOLUCIÓN DE PROBLEMAS
*Modelos Selectos Únicamente
**Algunos modelos no vienen equipados con el tapón del filtro del bypass. A fin de obtener un tapón del filtro del bypass,
comuníquese al 800-GECARES. En Canadá, comuníquese al 800.561.3344.
49-60792-2 47
CONSEJOS PARA LA SOLUCIÓN DE PROBLEMAS
Problema Causas Posibles Qué hacer
La calidad de la bebida no es la
esperada.
Es posible que esté usando Cápsulas K
no estándares o vencidas.
Se recomienda el uso de las cápsulas K de
Keurig oficiales que no estén vencidas ni
dañadas.
Gotea líquido de la cafetera una vez
completado el ciclo y luego de haber
retirado la misma del soporte.
Es posible que queden líquidos
retenidos por la cafetera y que goteen
cuando ésta sea retirada.
Use una tela o envase para capturar los
goteos al retirar la cafetera.
Retraso al usar el dispensador de la
Cápsula de Keurig
Para asegurar que se sirva una
bebida de calidad, se requiere un
pequeño retraso a fin de asegurar
que el refrigerador está funcionando
correctamente
Asegurar un funcionamiento consistente
y de calidad requiere que el refrigerador
se retrase al dispensar por un período de
tiempo corto
Una vez servida, mi bebida en polvo
no salió completamente de la cápsula
usada.
Dependiendo del tamaño seleccionado,
es posible que el polvo no sea disuelto
completamente. Algunas bebidas en
SROYRGHVDUUROODQ³JUXPR´DOVHUGHMDGDV
colocadas durante cierto tiempo.
Sacuda las cápsulas de polvo antes de la
preparación, a fin de deshacer el grumo y
permitir un mejor uso. Para aquellas bebidas
en polvo sin filtro, use la selección del ciclo
Cocoa (Cacao).
Es difícil cerrar la tapa del dispositivo de
preparación.
La cásula K no está completamente
apoyada.
Presione la cápsula K hasta el fondo de la
cafetera antes de cerrar la tapa. La aguja
inferior debe perforar la cápsula K antes del
cierre de la tapa de la cafetera.
La cafetera gotea durante el ciclo de
preparación
Problemas al cerrar la tapa de la
cafetera o la cápsula K está dañada
Presione la cápsula K hasta el fondo de la
cafetera antes de cerrar la tapa. La aguja
inferior debe perforar la cápsula K antes
del cierre de la tapa de la cafetera. Se
recomienda usar cápsulas K oficiales de
Keurig que no hayan sido dañadas y que
cuenten con un buen sellado entre la tapa
superior y el fondo de plástico.
Consejos para la Solución de Problemas... Antes de solicitar el servicio técnico
*Modelos Selectos Únicamente
**Algunos modelos no vienen equipados con el tapón del filtro del bypass. A fin de obtener un tapón del filtro del bypass,
comuníquese al 800-GECARES. En Canadá, comuníquese al 800.561.3344.
48 49-60792-2
Verdad o Mito? Respuesta Explicación
Es posible que se requiera un cambio
del filtro de agua del refrigerador antes
de los seis meses.
9(5'$'(52 El indicador del filtro de agua indicará la necesidad de reemplazar
el filtro de agua cada seis meses o que se dispensen 170 galones
(643.52 litros) de agua (modelos selectos únicamente). La calidad
del agua varía de una ciudad a otra; si el flujo del agua del
dispensador disminuye, o la producción de hielo decrece, el filtro de
agua debería ser reemplazado, incluso aunque el indicador del filtro
no indique la necesidad del reemplazo
La máquina de hacer hielo automática
de mi refrigerador produce hielo cuando
el refrigerador se encuentra enchufado
a un receptáculo de corriente.
0,72 El refrigerador debe ser conectado al agua, y la máquina de hacer
hielo debe ser encendida. Asegúrese de que la máquina de hacer
hielo esté encendida, sólo después de que la cañería de agua esté
conectada y que el agua esté abierta. La máquina de hacer hielo
puede ser encendida/ apagada desde los controles y asegurar que
la misma está encendida, como se indica en el panel de control
del refrigerador. Consulte Acerca de la Máquina de Hacer Hielo
Automática.
Luego de que el refrigerador haya sido
enchufado y conectado al agua, tendré
inmediatamente agua fría disponible
desde el dispensador de agua.
0,72 El tanque del dispensador de agua ubicado dentro del refrigerador
guarda agua para dispensar. El agua del tanque necesita 24 horas
para enfriarse luego de la instalación. Las altas condiciones de uso
no permitirán que haya tiempo para que el agua se enfríe.
Luego de dispensar agua, es normal
que caigan unas pocas gotas de agua. . 9(5'$'(52 Es posible que caigan unas pocas gotas de agua del dispensador,
luego de que la paleta del mismo se haya liberado. A fin de minimizar
los goteos, retire el vidrio lentamente del dispensador.
1XQFDYHUpHVFDUFKDGHQWURGHO
compartimiento del freezer. 0,72 La escarcha dentro del freezer típicamente indica que la puerta
no está correctamente sellada, o se dejó abierta. Si se encuentra
escarcha, despeje la misma utilizando una espátula de plástico y
una toalla, luego asegúrese de que no haya paquetes ni envases de
comida que impidan que la puerta del freezer se cierre. Controle el
panel de control del refrigerador para asegurar que la alarma de la
puerta esté activada.
Cuando se instala el refrigerador, o
luego de reemplazar el filtro de agua,
debo dispensar agua por cinco minutos.
9(5'$'(52
Un refrigerador o filtro de agua instalado en forma reciente contiene
aire en las cañerías de agua. Presione la paleta del dispensador y
dispense agua durante por lo menos 5 minutos para eliminar el aire
de la cañería de agua y despejar el filtro.
Para llenar la hielera hasta su
capacidad máxima, debería dispensar
entre 12 y 18 horas después de la
instalación.
9(5'$'(52 Dispensar 3 o 4 cubos entre 12 y 18 horas luego de la instalación
permite que el hielo se dispense dentro de la hielera, que a su vez
requiere de la máquina de hacer hielo para producir hielo adicional.
Producción normal de hielo = 100 cubos en 24 horas.
Puede usar el tapón del bypass del
filtro de agua para determinar si el filtro
requiere un reemplazo.
9(5'$'(52 Una reducción en el flujo del dispensador de agua o una reducción
en la producción de hielo podrán indicar la necesidad de reemplazar
el filtro de agua. Instale el tapón del bypass del filtro de agua
(provisto con el refrigerador en algunos modelos), y controle el flujo
desde el dispensador. Si el flujo de agua regresa a la normalidad con
la colocación del tapón del bypass, reemplace el filtro de agua.
La parte superior de las puertas del
refrigerador siempre estará alineada. 0,72 Varias cosas pueden afectar la alineación de la puerta de alimentos
frescos, incluyendo el piso sobre el cual el refrigerador está
instalado, y la carga de las puertas. Si la parte superior de las
puertas de alimentos frescos no están alineadas, use una llave Allen
de ¼” para ajustar la puerta derecha o izquierda. El tornillo de ajuste
está ubicado en el costado inferior derecho o izquierdo de la puerta;
abra la puerta del freezer para acceder al tornillo.
Las manijas de la puerta del refrigerador
se pueden ajustar fácilmente. 9(5'$'(52 Si las manijas de la puerta están flojas o tienen una separación con
la puerta, se podrán ajustar usando una llave Allen de 1/8”, sobre los
tornillos ubicados en los extremos de las manijas.
Es posible que el hielo presente
problemas con su olor y sabor. 9(5'$'(52 Luego de iniciar la máquina de hacer hielo, deshágase de 24 horas
de producción de hielo para evitar problemas de olor y sabor.
Puedo hacer ajustes finos sobre las
puertas de alimentos frescos para
alinearlas.
9(5'$'(52 Si las puertas de alimentos frescos no están alineadas, use una llave
Allen de ¼” para ajustar la puerta de la derecha / izquierda. El tornillo
de ajuste está ubicado en la parte inferior de la puerta derecha o
izquierda. Abra la puerta del freezer para tener acceso.
Verdad o Mito
Verdad o Mito
SERVICIO
Antes de solicitar el servicio técnico, revise los consejos para la solución de problemas de forma de-
tallada en el Manual del Propietario. En caso de ser necesario, se podrá programar el servicio técnico
visitándonos a través de Internet en GEAppliances.com o llamando al 800.GE.CARES 800.432.2737.
CONSEJOS PARA LA SOLUCIÓN DE PROBLEMAS/VERDAD O MITO
49-60792-2 49
CONSEJOS PARA LA SOLUCIÓN DE PROBLEMAS/VERDAD O MITO
Verdad o Mito? Respuesta Explicación
Las manijas de la puerta siempre se deben
retirar para la instalación. 0,72 Controle el cuadro sobre el lado inverso de esta instrucción. Si las
puertas se deben retirar, no retire las manijas, o si el refrigerador
cabe cómodamente a través de la abertura del pasillo. Ajuste las
manijas que estén flojas o que posean un espacio, ajustando el
conjunto de tornillos de 1/8” en cada extremo de las manijas.
Siempre se requiere el retiro de la puerta
para la instalación. 0,72 Las puertas sólo se deben retirar cuando sea necesario para
evitar daños en el pasillo o en el acceso hasta la ubicación final.
Las puertas del refrigerador que no cierren
luego de la instalación se podrán ajustar
para que cierren de forma correcta.
9(5'$'(52 El mecanismo de la puerta funciona mejor si se instala a más
de 90º. Si se instala a 180º, retire la puerta de la bisagra media,
y balancee la puerta 180º antes de reinstalarla. Lea Cómo
Reinstalar las Puertas del Refrigerador.
Hay un ajuste sobre las ruedas traseras. 0,72 Las patas niveladoras frontales son ajustables y se deberían usar
para equilibrar el refrigerador. Las patas niveladoras se usan para
hacer el ajuste inicial de la puerta de alimentos frescos.
Controle pérdidas una vez realizadas todas
las conexiones del agua. 9(5'$'(52 Al purgar el aire del sistema de agua, controle pérdidas en todas
las conexiones de las cañerías de agua. Controle la conexión
con el suministro de agua del hogar en la parte trasera del
refrigerador, y en la conexión de la tubería de agua de la puerta.
Cualquier residuo del embalaje se podrá
eliminar del refrigerador con un limpiador. 0,72 1RXVHFHUDSXOLGRUEODQTXHDGRUXRWURVSURGXFWRVTXH
contengan cloro sobre los paneles de Acero Inoxidable, manijas
de puertas y componentes. Para acceder a detalles completos,
FRQWUROHHVWDVLQVWUXFFLRQHVHQ³/LPSLH]DGHOD3DUWH([WHULRU´
Algunos modelos no están equipados con el tapón del bypass del filtro. Para obtener un tapón del bypass del filtro, llame al 800-GECARES. En
Canadá, llame al 800.561-3344.
Verdad o Mito
Verdad o Mito
SERVICIO
Antes de solicitar el servicio técnico, revise los consejos para la solución de problemas de forma de-
tallada en el Manual del Propietario. En caso de ser necesario, se podrá programar el servicio técnico
visitándonos a través de Internet en GEAppliances.com o llamando al 800.GE.CARES 800.432.2737.
50 49-60792-2
GE Appliances Garantía del Refrigerador
Abroche su recibo aquí. Para acceder al servicio técnico de acuerdo con
la garantía deberá contar con la prueba de la fecha original de compra. GARANTÍA
Ŷ Viajes del técnico del servicio a su hogar para enseñarle
sobre cómo usar el producto.
Ŷ,QVWDODFLyQHQWUHJDRPDQWHQLPLHQWRLQDGHFXDGRV
Ŷ)DOODVGHOSURGXFWRHQFDVRGHDEXVRPDOXVRRXVR
para propósitos diferentes al original o uso comercial.
Ŷ3pUGLGDGHDOLPHQWRVSRUPDOHVWDGR
Ŷ5HHPSOD]RGHIXVLEOHVGHODFDVDRUHLQLFLRGH
disyuntores.
Ŷ'DxRVVREUHHODFDEDGRWDOHVFRPRy[LGRVREUH
la superficie, deslustres o manchas pequeñas no
informadas dentro de las 48 horas luego de la entrega.
Ŷ5HHPSOD]RGHOFDUWXFKRGHOILOWURGHDJXDVLVHLQFOX\H
debido a la presión del agua que está fuera del rango
de funcionamiento específico o debido a exceso de
sedimentos en el suministro de agua.
Ŷ5HHPSOD]RGHERPELOODVGHOX]VLVHLQFOX\HQRGHO
cartucho del filtro de agua, si se incluye, a diferencia de
lo detallado anteriormente.
Ŷ'DxRVRFDVLRQDGRVVREUHHOSURGXFWRSRUDFFLGHQWH
incendio, inundaciones o catástrofes naturales.
Ŷ'DxRVFRQVHFXHQWHVRLQFLGHQWDOHVFDXVDGRVSRU
posibles defectos de este producto.
Ŷ3URGXFWRQRDFFHVLEOHSDUDEULQGDUHOVHUYLFLRUHTXHULGR
Ŷ'DxRRFDVLRQDGRSRUXQILOWURGHDJXDGHXQDPDUFDTXH
no es GE Appliances.
What GE Appliances Will Not Cover:
Por el período de GE Appliances reemplazará:
Un Año
Desde la fecha de la
compra original
Cualquier parte del refrigerador que falle debido a un defecto en los materiales o la fabricación. Durante
esta garantía limitada de un año, GE Appliances también proveerá, sin costo, todo el trabajo y el
servicio relacionado con el reemplazo de la parte que presente defectos.
Treinta Días
(Filtro de Agua, si está
incluido) Desde la fecha
de la compra original del
refrigerador
Cualquier parte del cartucho del filtro de Agua que falle debido a un defecto en los materiales o la
fabricación. Durante la garantía limitada por treinta días, GE Appliances también le brindará, sin costo,
el reemplazo de un cartucho del filtro de agua.
Sólo Modelos GE PROFILETM y GE CAFÉTM
Cinco Años
Desde la fecha de la
compra original
Cualquier parte del sistema de refrigeración sellado (el compresor, condensador, evaporador
y todas las tuberías de conexión) que falle debido a un defecto en los materiales o la fabricación.
Durante esta garantía de cinco años del sistema de refrigeración sellado, GE Appliances
también proveerá, sin costo, todo el trabajo y el servicio relacionado con el reemplazo de la parte
que presente defectos en el sistema de refrigeración sellado.
GEAppliances.com
Todo el servicio de garantía es provisto por nuestros Centros de Servicio de Fabricación, o un técnico autorizado de Servicio al Cliente
(Customer Care®). Para programar una visita del servicio técnico, visítenos en GEAppliances.com, o comuníquese al 800.GE.CARES
(800.432.2737). Cuando llame para solicitar el servicio, tenga los números de serie y modelo disponibles.
EXCLUSIÓN DE GARANTÍAS IMPLÍCITAS—Su única y exclusiva alternativa es la reparación del producto, como
se indica en la Garantía Limitada. Las garantías implícitas, incluyendo garantías implícitas de comerciabilidad o
conveniencia sobre un propósito particular, se limitan a un año o al período más corto permitido por la ley.
Esta garantía se extiende al comprador original y a cualquier dueño subsiguiente de productos comprados para uso hogareño dentro
de EE.UU. Si el producto está en un área donde no se encuentra disponible un Proveedor Autorizado del Servicio Técnico de GE
Appliances, usted será responsable por el costo de un viaje o se podrá requerir que traiga el producto a una ubicación del Servicio
Técnico de GE Appliances Autorizado para recibir el servicio. En Alaska, la garantía excluye el costo de envío o llamadas del servicio a
su hogar.
Algunos estados no permiten la exclusión o limitación de daños fortuitos o consecuentes. Esta garantía le da derechos legales
específicos y es posible que tenga otros derechos legales que varían entre un estado y otro. Para conocer cuáles son sus
derechos legales, consulte a la oficina de asuntos del consumidor local o estatal o al Fiscal de su estado.
Warrantor: GE Appliances, a Haier company
Para los clientes de Canadá : Esta garantía se extiende al comprador original y cualquier comprador posterior de productos
comprados en Canadá para uso residencial dentro de Canadá. El servicio a domicilio warrant será proporcionado en las áreas
donde está disponible y que se considere razonable por Mabe para ofrecer.
Warrantor Canada: MC Commercial, Burlington, Ontario, L7R 5B6
Para realizar el servicio técnico de su refrigerador se podrá requerir el uso de datos del puerto de abordaje para su diagnóstico. Esto da al
técnico del Servicio de Fábrica de GE Appliances la habilidad de diagnosticar de forma rápida cualquier problema con su electrodoméstico,
y de ayudar a GE Appliances a mejorar sus productos al brindarle a GE Appliances la información sobre su electrodoméstico. Si no desea
que los datos de su electrodoméstico sean enviados a GE Appliances, solicitamos que le indique a su técnico NO entregar los datos a GE
Appliances en el momento del servicio.

49-60792-2 51
Garantía Limitada del Cartucho del Filtro
de Agua RPWFE
Comuníquese con nosotros en www.geapplianceparts.com,
o llame al 800.GE.CARES.
Esta garantía se extiende al comprador original y a cualquier dueño subsiguiente de productos adquiridos para uso
hogareño dentro de EE.UU. En Alaska, la garantía excluye el costo de envío o llamadas al servicio técnico desde su hogar.
Algunos estados no permiten la exclusión o limitación de daños fortuitos o consecuentes. Esta garantía le da derechos
legales específicos y es posible que tenga otros derechos legales que varían entre un estado y otro. Para conocer cuáles
son sus derechos legales, consulte a la oficina de asuntos del consumidor local o estatal o al Fiscal de su estado.
Para Adquisiciones Realizadas en Iowa: Este formulario debe poseer la firma y fecha del comprador y del vendedor
antes de la consumación de esta venta.
Este formulario debería ser retenido por el vendedor en un archivo durante un mínimo de dos años.
Comprador:
Nombre
Domicilio
Ciudad Estado Código Postal
Firma Fecha
Vendedor:
Nombre
Domicilio
Ciudad Estado Código Postal
Firma Fecha
Por el Período de: Reemplazaremos, Sin Costo:
Treinta Días
Desde la fecha
de compra original.
Cualquier parte del cartucho del filtro de agua que falle debido a un defecto en los
materiales o la fabricación durante esta garantía limitada de treinta días.*
Qué No Está Cubierto:
• Viajes del técnico del servicio a su hogar para enseñarle sobre cómo usar el producto.
• Instalación inadecuada.
• Fallas del producto en caso de abuso, mal uso, o uso para propósitos diferentes al original o uso comercial
• Reemplazo de fusibles de la casa o reinicio de disyuntores.
• Reemplazo del cartucho del filtro de agua debido a la presión del agua que está fuera del rango de funcionamiento
específico o debido a exceso de sedimentos en el suministro de agua.
• Daños ocasionados sobre el producto por accidente, incendio, inundaciones o catástrofes naturales.
• Daños consecuentes o incidentales causados por posibles defectos de este producto.
Abroche su recibo aquí.
Para acceder al servicio
técnico de acuerdo con
la garantía deberá contar
con la prueba de la fecha
original de compra.
Appliance Service
800-GE-CARES
GE
Appliances
* Si su pieza de GE falla debido a un defecto en la fabricación dentro de los treinta días desde la fecha de compra original, le entregaremos una pieza nueva o, a su elección, una pieza reconstruida
sin cargo. Devuelva la pieza defectuosa al proveedor de piezas a quien le realizó la compra, junto con una copia de la “prueba de compra” de la pieza. Si la pieza es defectuosa y no muestra signos
de abuso, será cambiada. La garantía no cubre la falla de las piezas que están dañadas mientras están en su posesión, si son abusadas, o si fueron instaladas de forma incorrecta. No cubre el costo
de regresar la pieza al proveedor a quien le realizó la compra ni cubre el costo del trabajo para retirar o instalar la misma a fin de diagnosticar la falla. No cubre las piezas usadas en productos
de uso comercial, excepto en el caso de equipos acondicionadores de aire. En ningún caso GE será responsable por daños consecuentes. Garante: GE Appliances, a Haier company
EXCLUSIÓN DE GARANTÍAS IMPLÍCITAS: Su única y exclusiva alternativa es el cambio de la pieza, como se indica en esta Garantía Limitada. Las garantías implícitas, incluyendo garantías
implícitas de comerciabilidad o conveniencia sobre un propósito particular, se limitan a seis meses o al período más corto permitido por la ley.
52 49-60792-2
Ficha Técnica de Funcionamiento
del Modelo: GE Appliances RPWFE
Use el Cartucho de Reemplazo de RPWFE.
La concentración de las sustancias indicadas en el agua que ingresa al sistema fue reducida a la concentración menor que o igual al límite
permisible para el agua que deja el sistema, como se especifica en el Estándar 42 y en el Estándar 53 de NSF/ANSI. Sistema evaluado y certificado
por NSF International contra el Estándar 42 y el Estándar 53 de NSF/ANSI para la reducción de sustancias que figuran a continuación.
Los siguientes reclamos de reducción farmacéutica no fueron certificados por NSF International. Reclamos evaluados y verificados
por un laboratorio independiente:
Reducción
de la Sustancia
Concentración
Promedio Concentración Máxima
Especificada por NSF
% Promedio
de Reducción
Promedio de
Concentración
del Agua Procesada
Concentración Máxima
Autorizada Aceptable
de Agua Procesada
Informe
de Evaluación
de NSF
Atenolol 1088 ng/L N/A 99.5% 5.0 ng/L N/A J-00103221
Fluoxetina 845 ng/L N/A 99.4% 5.0 ng/L N/A J-00103221
Ibuprofeno 898 ng/L N/A 98.8% 9.9 ng/L N/A J-00103726
Progesterona 945 ng/L N/A 99.4% 5.5 ng/L N/A J-00103727
Trimetoprima 403 ng/L N/A 99.5% 2.0 ng/L N/A J-00103221
Es esencial que se cumpla con los requisitos de instalación, mantenimiento y reemplazo de filtros recomendados por el fabrican te, a fin de que
el producto funcione de acuerdo a como fue promocionado. Para acceder a información sobre la Garantía, consulte el Manual de Instalación.
Pautas de Aplicación/ Parámetros de Suministro de Agua
Flujo de Servicio 0.5 gpm (1.89 lpm)
Suministro de Agua Agua Potable
Presión del Agua 25-120 psi (172– 827 kPa)
Temperatura del agua 33º F - 100º F (0.6º C - 38º C)
Nota: Observe que aunque la evaluación se realizó de acuerdo con
condiciones estándares de laboratorio, el desempeño puede variar
Reemplazo del Cartucho: RPWFE. Para conocer costos estimados de elementos
de reemplazo, comuníquese al 1-800-626-2002 o visite nuestro sitio Web
en www.geapplianceparts.com.
A fin de reducir el riesgo asociado con la ingestión de contaminantes:
•
No se deben usar con agua que no sea microbiológicamente segura o de calidad
desconocida sin una desinfección adecuada, antes o después, del sistema.
Los sistemas certificados para la reducción de quistes se podrían usar en aguas
desinfectadas que puedan contener quistes filtrables. Número
de Establecimiento de EPA 070595-MEX-001.
AVISO
A fin de reducir el riesgo de pérdidas de agua o inundación, y para asegurar
un rendimiento óptimo del filtro:
• Lea y siga las Instrucciones de uso antes de la instalación y uso de este sistema.
• La instalación y uso DEBERÁN cumplir con todos los códigos estatales
y locales de plomería.
•
•
•
•
•
•
Capacidad de 170 galones (643.5 litros). Reducción de Contaminantes Determinada por la evaluación de NSF.
Sustancia Evaluada
para la Reducción
Concentración
Promedio Concentración Máxima
Especificada por NSF
% Promedio
de Reducción
Promedio de
Concentración del
Agua Procesada
Concentración Máxima
Autorizada Aceptable
de Agua Procesada
Requisitos
de Reducción
de NSF
Informe de
Evaluación
de NSF
Gusto y Olor a Cloro 2.0 mg/L 2.0 mg/L ± 10% 97.4% 0.05 mg/L N/A ≥50% J-00102044
Partícula Nominal
Clase I, , ≥0.5 to < 1.0 μm
7,633,333 pts/mL
Por lo menos 10,000
partículas/mL 99.0% 71,850 pts/ml N/A ≥85% J-00106249
Asbestos 109 MFL 107 a 108 fibras/L; fibras
superiores a 10μm de longitud
99.99% <1 MFL N/A ≥99% J-00102069
Atrazine 0.009 mg/L 0.009 mg/L ± 10% 94.4% 0.0005 mg/L 0.003 mg/L N/A J-00102058
Benceno 0.016 mg/L 0.015 mg/L ± 10% 96.4% 0.001 mg/L 0.005 mg/L N/A J-00102065
Carbofurano 0.08 mg/L 0.08 mg/L ± 10% 98.8% 0.001 mg/L 0.04 mg/L N/A J-00102059
Quiste*
104,750 quistes/L
Mínimo de 50,000 quistes/L
99.99% 3 quistes/L N/A ≥99.95% J-00102057
Plomo en pH 6.5 0.140 mg/L 0.15 mg/L ± 10% 99.3% 0.001 mg/L 0.010 mg/L N/A J-00102052
Plomo en pH 8.5 0.158 mg/L 0.15 mg/L ± 10% 98.3% 0.002 mg/L 0.010 mg/L N/A J-00102053
Mercury en pH 6.5 0.006 mg/L 0.006 mg/L ± 10% 91% 0.0003 mg/L 0.002 mg/L N/A J-00102054
Mercury en pH 8.5 0.006 mg/L 0.006 mg/L ± 10% 88.3%% 0.0007 mg/L 0.002 mg/L N/A J-00104087
Lindano 0.002 mg/L 0.002 mg/L ± 10% 99% 0.00002 mg/L 0.0002 mg/L N/A J-00102063
P-Diclorobenceno 0.222 mg/L 0.225 mg/L ± 10% 99.8% 0.0005 mg/L 0.075 mg/L N/A J-00102067
Toxafeno 0.015 mg/L 0.015 mg/L ± 10% 93.5% 0.001 mg/L 0.003 mg/L N/A J-00102061
Reducción de 2,4 D 0.218 mg/L 0.210 mg/L±10% 99.9% 0.0001 mg/L 0.07 mg/L N/A J-00102064
COV 0.278 mg/L 0.300 mg/L ± 10% 97.7% 0.0015 mg/L N/A ≥95% J-00102070
*Basado en el uso de Cryptosporidium parvum oocysts.
Elemento
de Reemplazo
Evaluado y certificado por NSF International contra
el Estándar 42 y el Estándar 53 de NSF/ANSI en el modelo
GE Appliances RPWF para la reducción de los reclamos
especificados en la ficha técnica de funcionamiento.
RPW FE
No se deberá instalar si la presión del agua supera los 120 psi (827 kPa). Si la
presión del agua es superior a los 80 psi, deberá instalar una válvula limitadora
de presión. Si no está seguro sobre cómo controlar la presión del agua,
comuníquese con un plomero profesional.
No instale cuando se puedan producir condiciones de golpe de ariete. Si existen
condiciones de golpe de ariete, deberá instalar un suspensor de golpes de ariete.
Si no está seguro sobre cómo controlar esta condición, comuníquese con un
plomero profesional.
No instale en líneas de suministro de agua caliente. La temperatura máxima de
funcionamiento del agua para este sistema de filtro es de 100°F (37.8°C).
Proteja el filtro de heladas. Drene el filtro cuando las temperaturas sean
inferiores a 33ºF (0.6ºC).
Cambie el cartucho del filtro descartable cada seis meses o antes, si observa una
reducción notoria en el promedio del flujo de agua.
Si no se reemplaza el cartucho del filtro descartable en intervalos recomenda-
dos, se podrá producir un rendimiento inferior del filtro y quebraduras en el
espacio de colocación del filtro, ocasionando pérdidas de agua o inundación.
ADVERTENCIA

49-60792-2 53
NOTAS
Notas

54 49-60792-2
Notas

49-60792-2 55
Notas

56 49-60792-2
Impreso en Estados Unidos
Soporte para el Consumidor
SOPORTE PARA EL CONSUMIDOR
Sitio Web de GE Appliances
¿Desea realizar una consulta o necesita ayuda con su electrodoméstico? ¡Intente a través del Sitio Web de GE Appliances las
KRUDVGHOGtDFXDOTXLHUGtDGHODxR8VWHGWDPELpQSXHGHFRPSUDUPiVHOHFWURGRPpVWLFRVPDUDYLOORVRVGH*($SSOLDQFHV\
aprovechar todos nuestros servicios de soporte a través de Internet, diseñados para su conveniencia.
En EE.UU.: GEAppliances.com
Registre su Electrodoméstico
£5HJLVWUHVXHOHFWURGRPpVWLFRQXHYRDWUDYpVGH,QWHUQHWVHJ~QVXFRQYHQLHQFLD8QUHJLVWURSXQWXDOGHVXSURGXFWRSHUPLWLUi
una mejor comunicación y un servicio más puntual de acuerdo con los términos de su garantía, en caso de surgir la necesidad.
También puede enviar una carta en la tarjeta de inscripción preimpresa que se incluye con el material embalado.
En EE.UU.: GEAppliances.com/register
Servicio Programado
El servicio de reparación de expertos de GE Appliances está a sólo un paso de su puerta. Conéctese a través de Internet y programe
su servicio a su conveniencia cualquier día del año. En EE.UU.: GEAppliances.com/service
o comuníquese al 800.432.2737 durante el horario de atención comercial.
Garantías Extendidas
Adquiera una garantía extendida de GE Appliances y conozca los descuentos especiales que están disponibles mientras su
garantía aún está vigente. La puede adquirir en cualquier momento a través de Internet. Los servicios de GE Appliances aún
estarán allí cuando su garantía caduque.
En EE.UU.: GEAppliances.com/extended-warranty o comuníquese al 800.626.2224 durante el horario de atención comercial.
Piezas y Accesorios
Aquellos individuos calificados para realizar el servicio técnico de sus propios electrodomésticos podrán solicitar el envío de
SLH]DVRDFFHVRULRVGLUHFWDPHQWHDVXVKRJDUHVVHDFHSWDQODVWDUMHWDV9,6$0DVWHU&DUG\'LVFRYHU2UGHQHKR\DWUDYpVGH
Internet durante las 24 horas, todos los días. En EE.UU.: GEApplianceparts.com o de forma telefónica al 877.959.8688 durante
el horario de atención comercial.
Las instrucciones que figuran en este manual cubren los procedimientos que serán realizados por cualquier usuario.
Otros servicios técnicos generalmente deben ser derivados a personal calificado del servicio. Se deberá tener cuidado,
ya que una reparación indebida podrá hacer que el funcionamiento no sea seguro.
Contáctenos
Si no se encuentra satisfecho con el servicio que recibió de GE Appliances, comuníquese con nosotros a través de nuestro sitio
Web con todos los detalles, incluyendo su número telefónico, o escriba a:
En EE.UU.: General Manager, Customer Relations | GE Appliances, Appliance Park | Louisville, KY 40225
GEAppliances.com/contact

