Loading ...
Loading ...
Loading ...
6. Removethe blade by removingthe internalhex
screws,lockwashers,andhexnutswhichsecureit to
the impeller.Retainthe hardware.See Figure5-3.
NOTE: Usea 3/16"hex key(Allen)wrenchonthe outside
of the blade and a 1/2" box(or socket)wrenchonthe
insideof the impeller.HoldtheAllenwrenchstationary
and rotatethe box(or socket)wrenchto loosenthe nut.
7. Installa replacementblade(PartNo.781-0490)with
the hardwareremovedearlieror sharpen.
IMPORTANT:Whensharpeningthe blade,protecthands
by usinggloves.Followthe originalangleof grind and
makesureto removean equalamountfromeachblade.
Figure 5-3
8. To replacethe otherblade,rotatethe impellerto
exposethe secondblade and repeatthe stepsabove.
NOTE: Makecertainbladesarereassembledwith the
sharpedgefacingupward.Torquehardwareto 250- 300
in. Ibs.
,_ WARNING:Theimpeller's chipper
blades and shredderblade are sharp.
Wear leather work gloves to protect your
hands.
Sharpening Or Replacing The Shred-
der Blade
1. Stop theengineand makecertainthat all moving
partshavecometo acompletestop.
2. Disconnectthe sparkplug wireand groundagainstthe
engine.
3. Lowerthe hopperassemblyand block up the housing.
4. Removethe six hex locknutsandflatwashers
fromthe weldstudson theflail housing.Retainthe
hardware.
5. Carefullyseparatethe hopperassemblyfromthe
impellerassemblyandremovethe supportplate.
NOTE:When reassemblingthe supportplate,make
certaintheembossedtab facesinwardtowardsthe
impeller.
6. Removethe two wing knobsand cuppedwashersthat
securethe chute deflectorandraisethe chute.
7. Inserta 1/2"or 3/4" diameterpipethroughthe flail
screenintothe impellerto keepit fromturningor
removethe flail screenand inserta pieceof wood into
the chuteopening.
8. a. Removethe two internalhex screws,lockwashers,
and hexlocknutswhichsecurethe shredderblade
to the impeller.
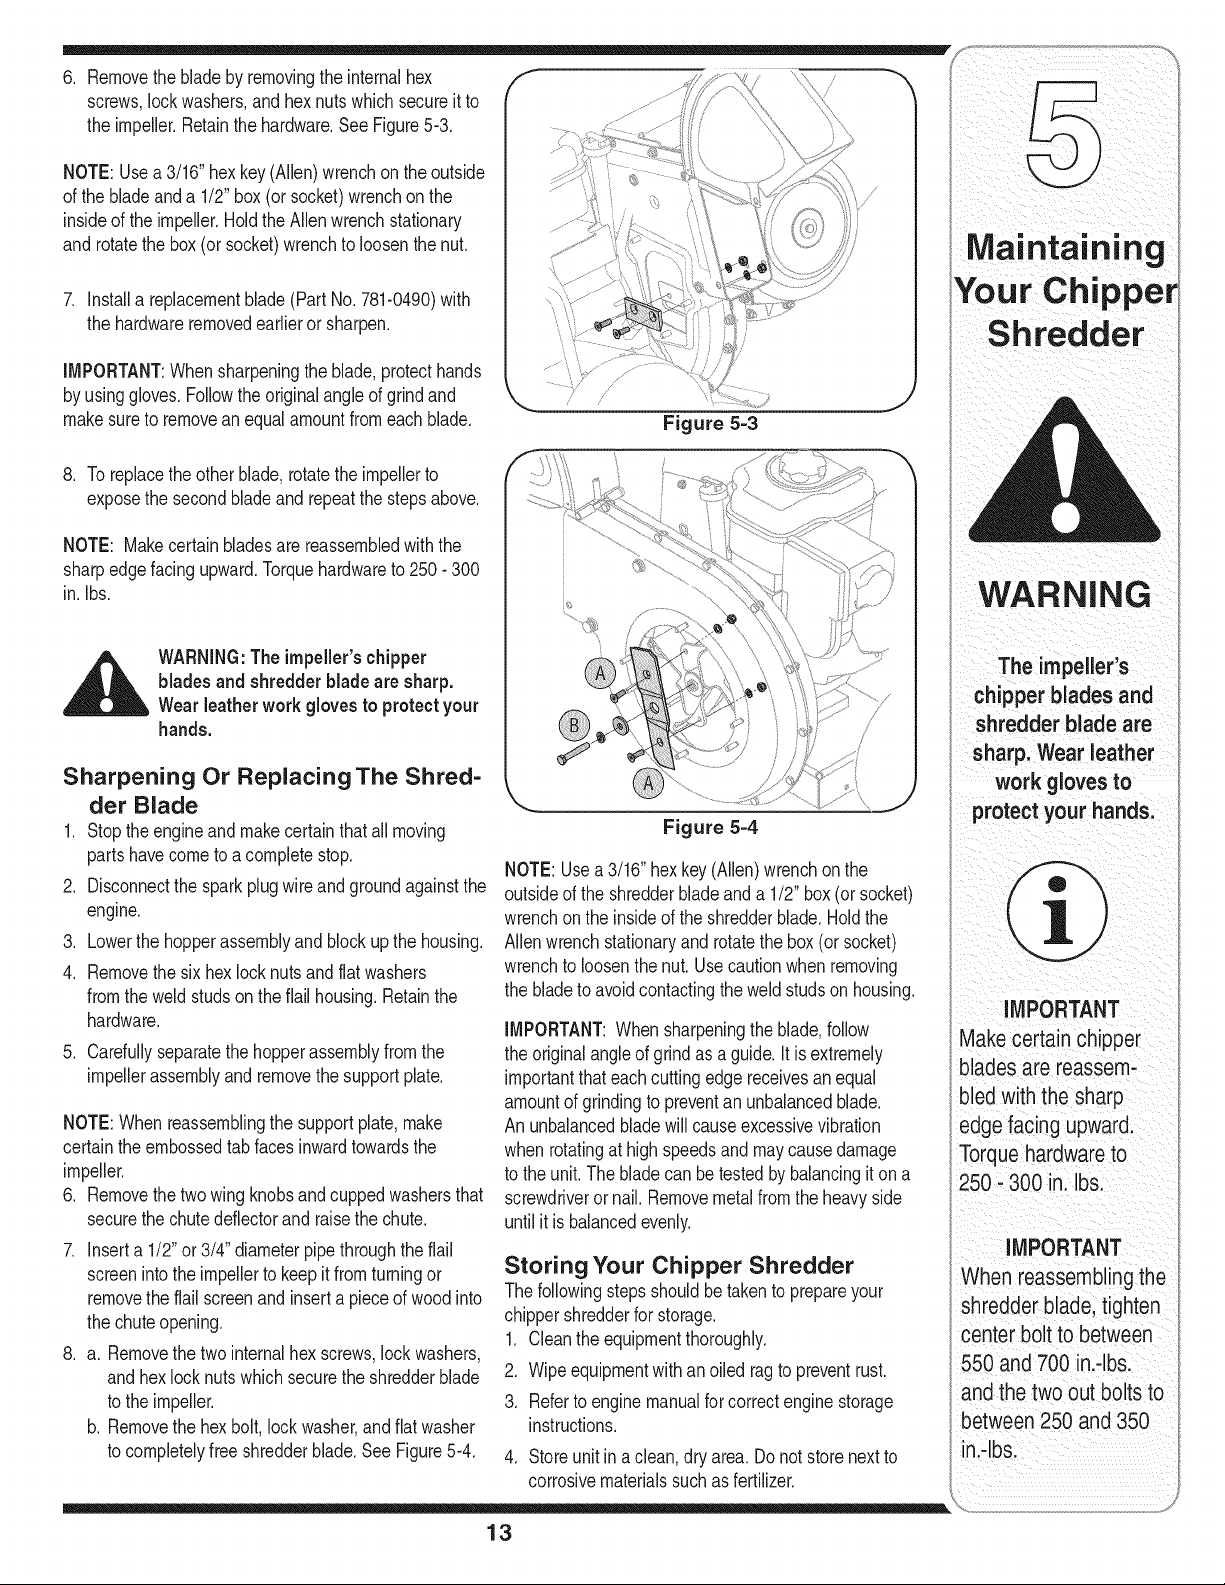
b. Removethe hexbolt, lock washer,andflat washer
to completelyfree shredderblade.See Figure5-4.
Figure 5-4
NOTE:Usea3/16" hexkey(Allen)wrenchon the
outsideof the shredderbladeanda 1/2" box(or socket)
wrenchonthe insideof the shredderblade.Holdthe
Allenwrenchstationaryandrotatethe box (or socket)
wrenchto loosenthenut. Usecautionwhen removing
the bladeto avoidcontactingthe weldstudson housing.
IMPORTANT:Whensharpeningthe blade,follow
the originalangleof grind as a guide.It is extremely
importantthat eachcuttingedge receivesanequal
amountof grindingto preventan unbalancedblade.
Anunbalancedbladewill causeexcessivevibration
whenrotatingat high speedsand maycause damage
to the unit. Theblade can be testedby balancingit on a
screwdriveror nail. Removemetalfromthe heavyside
until it is balancedevenly.
Storing Your Chipper Shredder
Thefollowingstepsshouldbetakento prepareyour
chippershredderfor storage.
1. Cleantheequipmentthoroughly.
2. Wipeequipmentwithanoiled ragto preventrust.
3. Referto engine manualforcorrectenginestorage
instructions.
4. Storeunitin a clean,dry area. Donot storenextto
corrosivematerialssuchas fertilizer.
13
Maintaining
Your Chipper
Shredder
WARNING
The impelleCs
chipper blades and
shredder blade are
sharp: Wear leather
work gloves to
IMPORTANT
Makecertainchipper
blades are reassem:
bled with the sharp
edge facing upwar&
Torquehardwareto
250,300 in. Ibs.
iMPORTANT
When reasSemblingthe
shredder blade,tighten
center bolt tObetween
550 and 700 ini,lb&
andthe twoOutboltsto
between 250 and 350
in.4b&
Loading ...
Loading ...
Loading ...