IENGLISH]
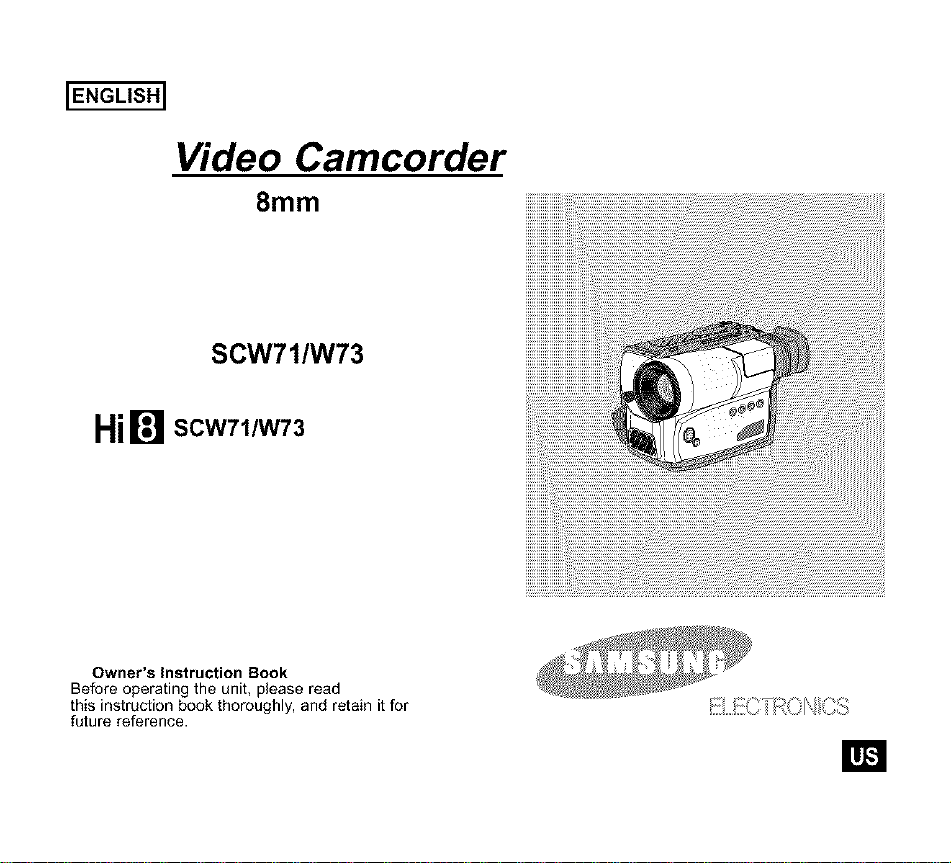
Video Camcorder
8ram
SCW71/W73
Hi[] scw711w73
Owner's Instruction Book
Before operating the unit, please read
this instruction book thoroughly, and retain it for
future reference.
W!
IENGLISH]
Contents
Notices and Safety Instructions
Getting to Know Your Camcorder
FeaLures
Descnptlons
• Front View/Side Vtew/Rear View
• OSD qQn Screen Display)
Accessories Supplied with the Camcorder
Preparing
AdJustin_ the Hand and Sr_oulder Straps
Lithium Battery Installation
Connecting the Power Source
• To use the AC Power Adapter
• To use the Battery Pack
Using the Battery Pack
• Continuous Recording time table
• Battery Level Display
Inserting and Ejecting a Cassette
Basic Recording
Making your First Recording
HFntsfor Stable Image Recording
• Recording with Vte;',,frnder
AdJusbng Focus of the VlEWFINDER
Playrng back a tape on the CAMCORDER
• _ewtng a Sbll Ptcture
• P_cture Search
Advanced Recording
Zooming In and Out
Digltar Zoom
EASY mode ['forbeginners)
CUSTOM-Creating your own customized recording settings
12
13 14 15
16
18
19
20
21
21
22
23
23
24
25
26
28
28
28
29
30
30
31
32
34
35
A
Contents (continued)
ENGLISH]
MF/AF {'_,lanual Focus/Auto Focus) 36
BLC 37
Program AE (Automatic Exposure) 38
DSE {Digital Special Effectsl in CAMERA mode 40
Setting and Recording the DATE/TIME 42
Selecting and Recording a Ti[le 44
Fade In and Out 46
WhiLe Balance 47
Demonstration 48
Setting the Date/T_tle Color 49
Lighting Techniques 50
Playing back a Tape
Towatchwith TV monitor
Various FunctionsinPLAYERmode
Mult_PFaybackqUslngthe PAL60Systeml
DSEinPLAYERmode
51
53
54
55
Maintenance
Cleaningand Takingcareof the Car'ncorder 55
• Cleaningthe Viewfinder 55
• Cleaningthe WdeoHeads 56
• S[onngthe Camcorder 56
Using Your Camcerder Abroad ................................................................................ 57
Troubleshooting
Self DlagnosrsDrsplay 58
Checking 59
MoistureCondensation 61
Specifications ........................................................................................................... 62
Index ........................................................................................................................ 63
Warranty ................................................................................................................ 65
A
IENGLISH]
Notices and Safety Instructions
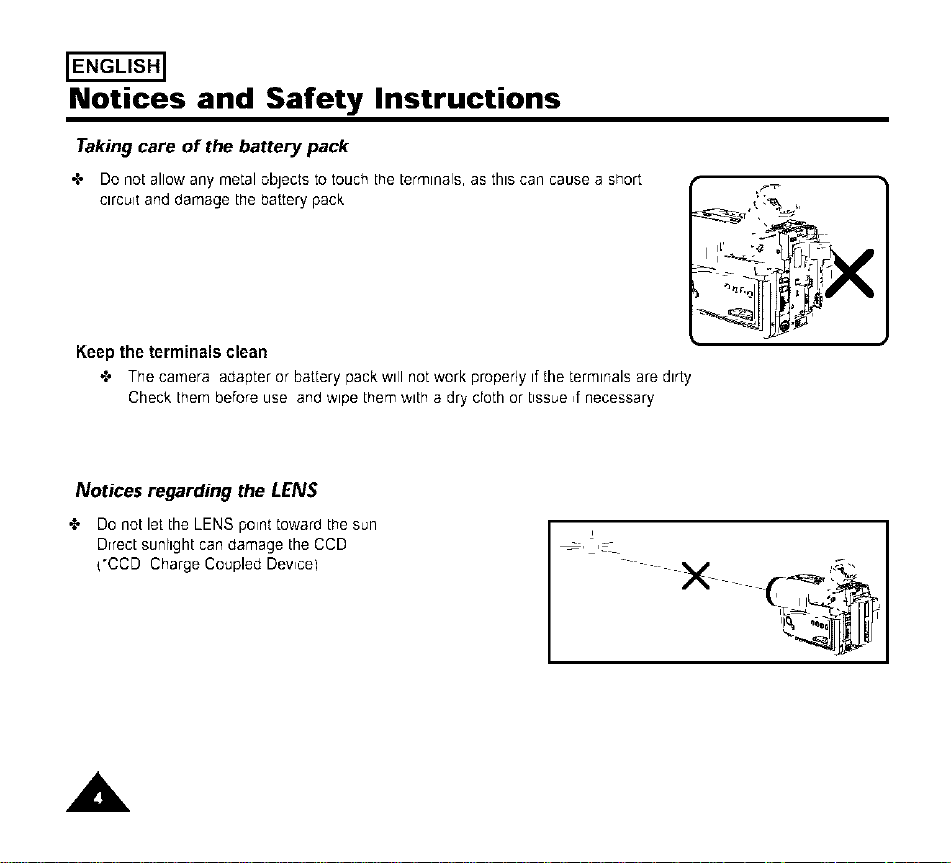
Taking care of the battery pack
+ Do not allow any metal objects to touch the termtnals, as ths can cause a short
ctrcu_tand damage Lhebattery pack
Keep the terminals clean
'{' The camera adapter or battery pack will not work propedy tf the termtnals are dtrty
Check them before use and wipe them with a dry cloth or tissue _fnecessary
,
Notices regarding the LENS
'_ Do not let the LENS point toward the sun
Drrect sunlight can damage the CCD
{'CCD Charge Coupled Dewce)
i
i
- X C'_
'__._#

Notices and Safety Instructions
ENGLISH]
Notices regarding electronic viewfinder
1) Do not place the camcorder so that the vlewfinder
is pointing towards the sun
Direct sunlight can damage ihe msrde of the
vie'Minder Be careful when placing the
camcorder under sunhghi or by a window
2) Do not p_ckup the camcorder by the vlewfinder
3_ Unintended rotabon may cause damage to the
wewflnder
X _,!,_-i
2 X
"-,_HI'_£_
3 X
9,
r _n_
Notices regarding moisture condensation
1) A sudden rise in atmosphenc temperature may cause condensabon to form
Inside the camcorder
for example
• When you take the camcorder from cold temperature outside to warm
temperature inside dunng the winter
• When you take the camcorder from cool temperature ms,de to hot
temperature outside dunng the summer
2) If the DEW { LQJ )" protecbon feature is actwated leave the camcorder
m a dry warm room wtth the cassette compartment opened and the battery
removed
3/ If the DEW { [6J )" protection feature is activated unexpectedly, and you
want to override _t detach then reinstall the battery pack and htmum battery
Please make sure that the condensabon has dBappeared completely
(see page 61]
rl I-
,_,_ DEW
,A
IENGLISH]
Notices and Safety Instructions
Not#ces regarding the battery pack
'{' Make sure thaLthe baLLerypack ts charged before recordtng outdoors
'{' To preserve baLLerypower keep your camcorder Lurnedoff when you are not operaLrng rt
'{' When your car'ncorder is in CAMERA mode if it is left tnSTANDBY for more than 5 mtnutes w_thouLoperation
tLw_llauLomaLtcally Lurnoff to protecL aga_nsLunexpected batLery d,scharge
'{' Make sure thaLthe baLLerypack ts frtted firmly ,nto place
Dropptng Lhebattery pack mtghLdamage tL
'{' When LhebaLLeryreaches Lheend of its life please contact your local dealer
The battenes have to be dealt wtth as chemical waste
Notices regarding the Lithium battery
Warnm_L Keep the LITHIUM BATTERY out of the reach of chtldren Should the battery be swallowed,
consult a doctor =mmedtately
•t, The lithtum battery ma,ntatr-s the clock function TITLE CUSTOM function and preset contents memory
even tfthe baLLerypack or AC power adapter is removed
•t, The I_thtumbattery for the camcorder lasts abouL 8-10 monLhs under normal operatton from Lrmeof ,nsLarlaLron
•t, When Lhehthtum battery becomes weak or dead, Lhedate/ttme rndtcator flashes abouL 5 seconds when you set Lhe
power swtLch LoCAMERA In thts case reprace the hLhiumbaLLerywtLnLypeCR2025 (see page 201
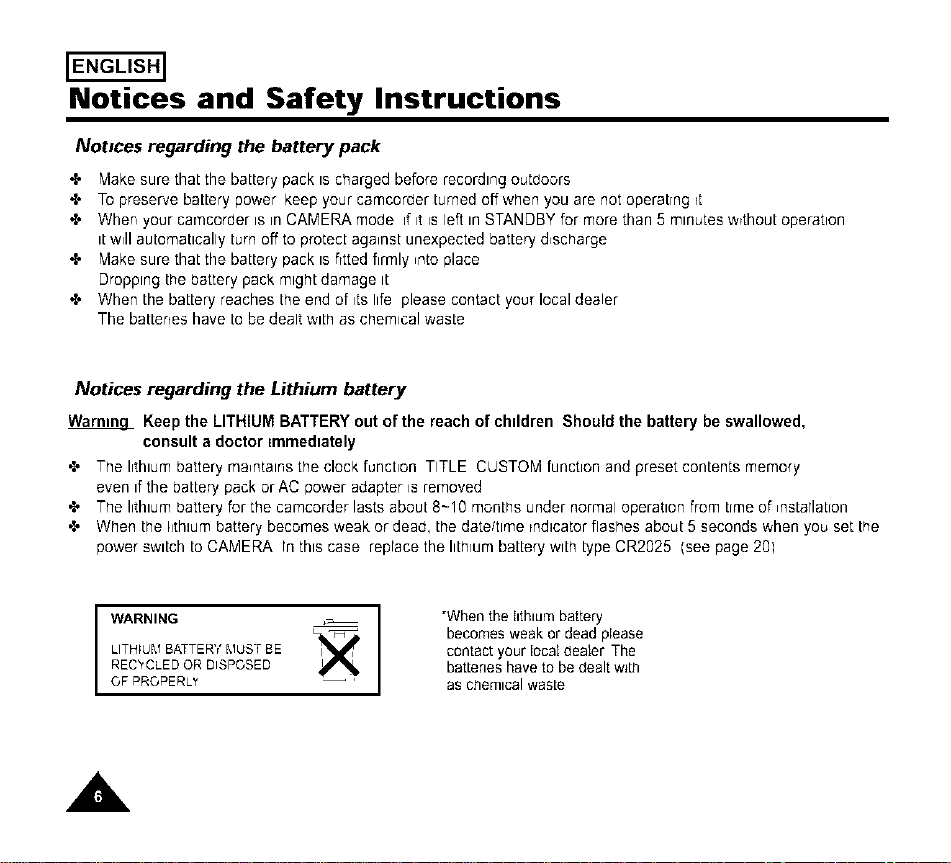
WARNING
LITHIUM BATTER'( MUST BE
REC_'CLED OR DISPOSED
OF PRGPERL"
"When the hthtumbattery
becomes weak or dead please
contact your IocaIdealer The
battenes have to be dealt w_Lh
as chemtcal wasLe
,AL
Notices and Safety Instructions
ENGLISH]
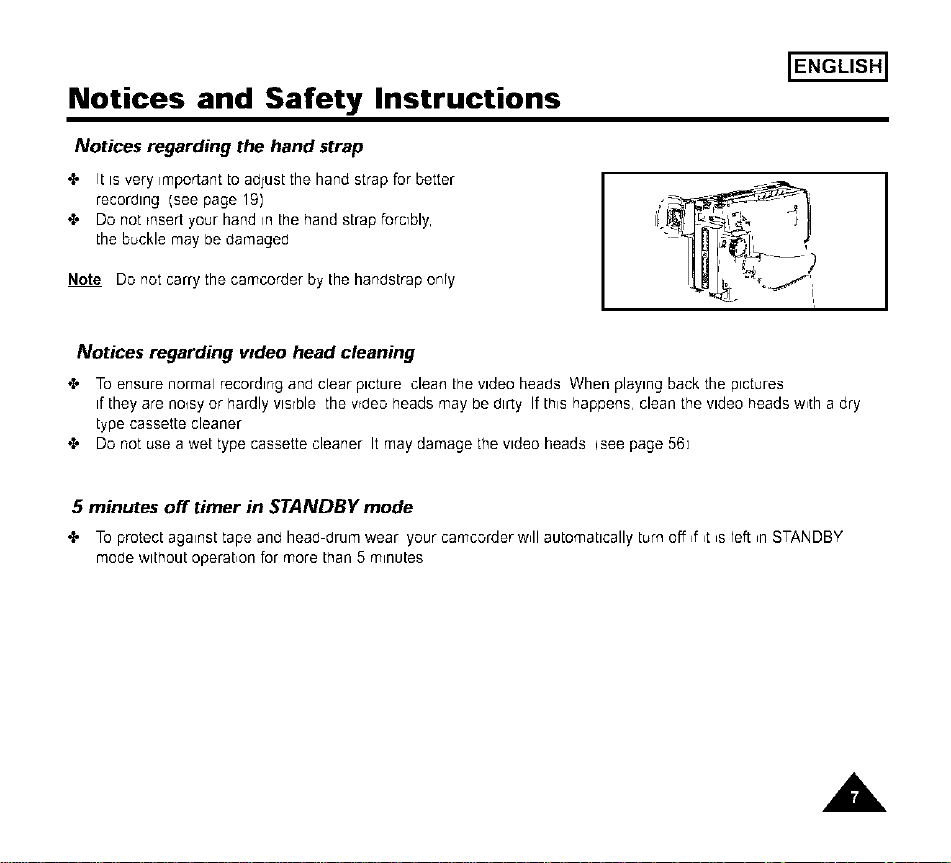
Notices regarding the hand strap
It is very _mportant to adjust the hand strap for better
recording (see page 19)
,,l, Do not rnsert your hand in the hand strap forcibly,
the buckle may be damaged
Note Do not carry the camcorder by the handstrap only
Notices regarding wdeo head cleaning
"l' To ensure normal recording and clear picture clean the video heads When playing back the pictures
if they are no_sy or hardly vtsrble the vrdeo heads may be dirty If this happens, clean the video heads w,th a dry
type cassette cleaner
,,l, Do not use a wet type cassette cleaner It may damage the video heads qsee page 56]
5 minutes off timer in STANDBY mode
"l' To protect against tape and head-drum wear your camcorder w,II automatically turn off ,f ,t ,sleft ,nSTANDBY
mode Withoutoperation for more than 5 minutes
,A.
ENGLISH]
Notices and Safety Instructions
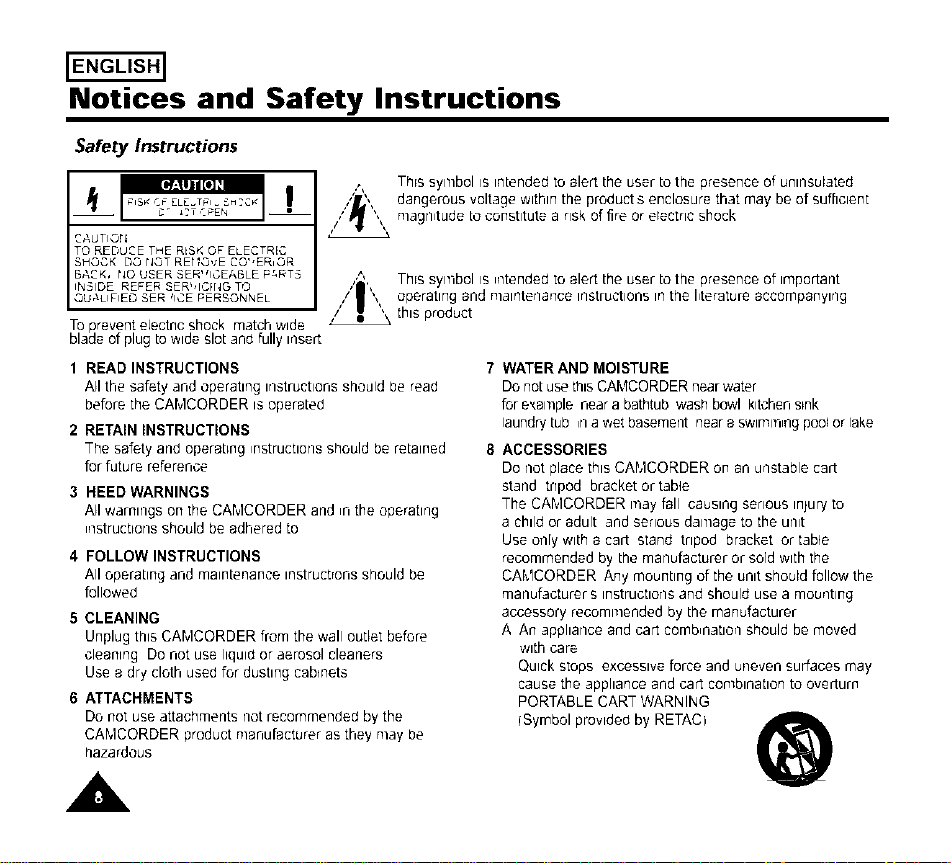
Safety Instructions
To prevent electric shock matchwide --
blade of plug to wide slot and fully riser[
This symbol _s _ntended [o alert the user to the presence of unmsulated
dangerous voltage within the product s enclosure that may be of sufficient
magnitude to constitute a risk of fire or electric shock
This symbol is _ntended to alert the user to the presence of important
operating and nlalnterlaFTce irlstructlons in the literature accompanylrlg
this product
1 READ INSTRUCTIONS 7
All the safety and operating instructionsshould be read
before the CAMCORDER is operated
2 RETAIN INSTRUCTIONS
The safety and operabng _nstructlonsshould be retained 8
for future reference
3 HEED WARNINGS
All warnings on the CAMCORDER and _nthe operating
_nstruct_onsshould be adhered to
4 FOLLOW INSTRUCTIONS
All operating and maiNtenaNce instructrons should be
followed
E CLEANING
Unplug this CAMCORDER from the walloutlet before
cleaning Do not use liquid or aerosol cleaners
Use a dry cloth used for dusbng caDnets
6 ATTACHMENTS
Do not use attachments not recommended by the
CAMCORDER product manufacturer as they may be
hazardous
A,
WATER AND MOISTURE
Do notuse thisCAMCORDER nearwater
for e_ample near a bathtub wash bowl k_tchens_nk
laundrytub irl a wet basement neara SWlmll]lilgpool or lake
ACCESSORIES
Do not place this CAMCORDER on an unstable carl
stand tripod bracket or table
The CANICORDER may fall causing senous injury to
a chld or adult and senous damage to the unit
Use only with a car[ stand tripod bracket or table
recommended by the manufacturer or sold with the
CAkICORDER Any mounbng of the unit should follow the
manufacturer s instructionsand should use a mounting
accessory recommended by the manufacturer
A An appllarlce and cart comb_natlorlshould be moved
w_thcare
Quick stops excessive force and uneven surfaces may
cause the appliance and cart combination to overturn
PORTABLE CART WARNING
(Symbol provided by RETAC)
Notices and Safety Instructions
ENGLISH]
9. VENTILATION:
Slots and openings in the cabinet are provided for
ventilation to ensure retiable operation of the
CAMCORDER and to protect itfrom overheating.
These openings must not be btocked or covered.
Never place your CAMCORDER on a bed, sofa, rug,
or other similar surface: on or near a radiator or heat
register.
This CAMCORDER should not be placed in a built-in
installation such as a bookcase or rack unless proper
ventilation is provided or the manufacturer's instructions
have been adhered to.
10. POWER SOURCES:
The CAMCORDER should be operated only from the type
of power source indicated on the labeL
If you are not sure of the type of power supply at your
home, consult your appliance dealer or local power
company.
ACAMCORDER is intended to be operated from battery
power, or other sources, refer to the operating instructions.
It.GROUNDING OR POLARIZATION:
This CAMCORDER may be equipped with either a
polarized 2-wire AC line plug (a plug having one blade
wider than the other) or a 3-wire grounding type plug,
a plug having a third (grounding) pin.
If you are unable to insert the plug fully into the outlet,
try reversing the plug. If the plug still fails to fit, contact
your electrician to replace your outlet.
Do not defeat the safety purpose of the polarized plug.
12. POWER-CORD PROTECTION:
Power-supply cords should be routed so that they are
not tikely to be walked on or pinched by items placed upon
or against them, paying particular attention to cords or
plugs, convenient receptacles, and the point where they
exit from the unit.
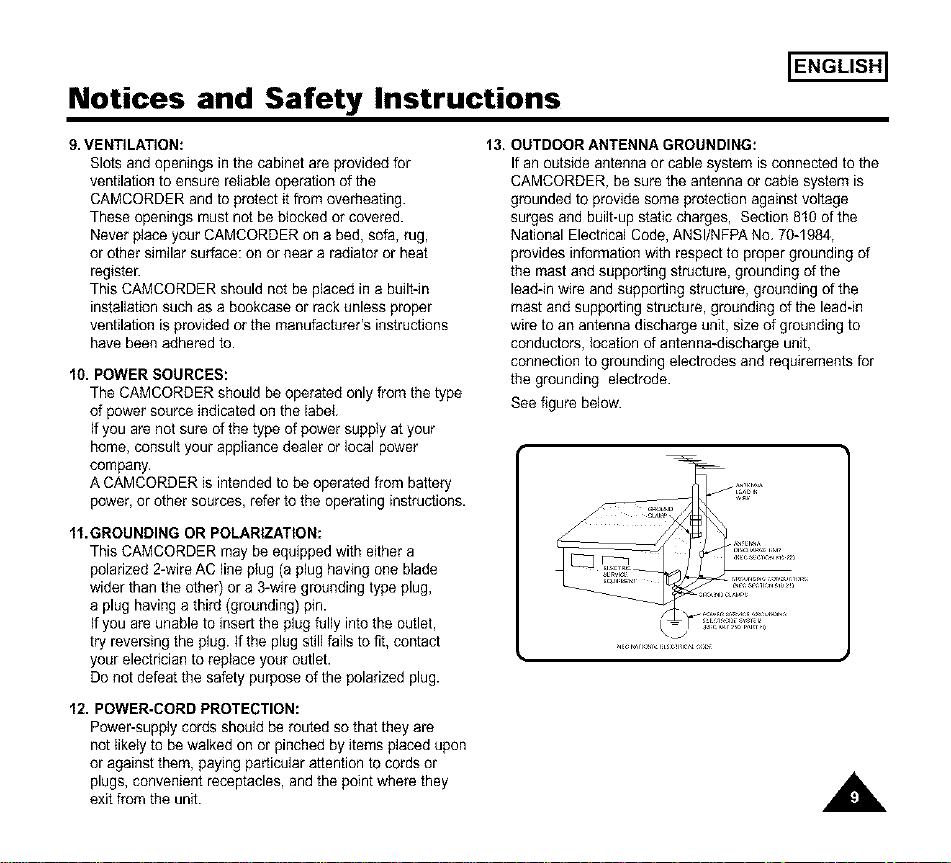
13. OUTDOOR ANTENNA GROUNDING:
If an outside antenna or cable system is connected to the
CAMCORDER, be sure the antenna or cabie system is
grounded to provide some protection against voltage
surges and built-up static charges, Section 8t0 of the
National Electhcal Code, ANSI/NFPA No, 70-1984,
provides information with respect to proper grounding of
the mast and supporting structure, grounding of the
lead-in wire and supporting structure, grounding of the
mast and supporting structure, grounding of the leadqn
wire to an antenna discharge unit, size of grounding to
conductors, Iocation of antenna-discharge unit,
connection to grounding electrodes and requirements for
the grounding electrode.
See figure below.
(
ENGLISH]
Notices and Safety Instructions
14. LIGHTNING:
For added protection of this CAMCORDER duhng a
lightning storm or when it is left unattended and unused
for long periods of time, unplug it from the wall outlet and
disconnect the antenna or cable system.
This will prevent damage to the CAMCORDER due to
lightning and power-line surges.
15. POWER LINES:
An outside antenna system should not be located in the
vicinity of overhead power lines or other electric light or
power circuits where it can fall into such power lines or
circuits.
When installing an outside antenna system, extreme care
should be taken to keep from touching such power lines
or circuits as contact with them might be fatal.
16. OVERLOADING:
Do not overload wall outlets and extension cords as this
can result in a risk of fire or electric shock.
17. OBJECTS AND LIQUIDS:
Never push objects of any kind into this CAMCORDER
through openings as they may touch dangerous voltage
points or short out a part that could result in a fire or
electdc shock.
Never spill liquids of any kind onto the CAMCORDER.
Should spitlage occur, unplug unit and have it checked
by a technician before use.
18. SERVICING:
Do not attempt to service this CAMCORDER yourself.
Opening or removing covers may expose you to
dangerous vottage or other hazards.
Refer all servicing to qualified service personnel.
A
19. DAMAGE REQUIRING SERVICE:
Unplug this CAMCORDER from the wall outlet and refer
servicing to qualified service personnel under the
following conditions:
a. When the power-supply cord or plug is damaged.
b. Ifany liquid has been spilled onto, or objects have
fallen into the CAMCORDER.
c. Ifthe CAMCORDERhas been exposedto rain or water.
d. Ifthe CAMCORDER does not operate normally by
following the operating instructions, adjust only those
controls that are covered by the operating instructions.
Improper adjustment of other controIs may result in
damage and will often require extensive work by a
qualified technician to restore the CAMCORDER to its
normal operation.
e.If the CAMCORDER has been dropped or the cabinet
has been damaged.
f. When the CAMCORDER exhibits a distinct change in
performance, this indicates a need for service.
20. REPLACEMENT PARTS:
When replacement parts are required, be sure the service
technician has used replacement parts specified by the
manufacturer and having the same characteristics as the
ohginal part.
Unauthorized substitutions may result in fire,
electric shock or other hazards.
21. SAFETY CHECK:
Upon completion of any service or repairs to this
CAMCORDER, ask the service technician to perform
safety checks to determine that the CAMCORDER is in
safe operating order.
Notices and Safety Instructions
NOTE TO CATV SYSTEM iNSTALLER:
This reminder isprovided to call the CATV system installer's
attention to Article 820-40 of the NEC that provides guidelines
for proper grounding and,
in particular, specifies that the cabte ground shell be
connected to the grounding system of the building as close to
the point of cable entry as practical.
USER INSTALLER CAUTION:
Yourauthority to operate this FCC certified equipment could he
voided if you make changes or modifications not expressly
approved by this party responsible for compliance to part 15
FCC rules.
ENGLISH]
A

IENGLISH]
Getting to Know Your Camcorder
Features
Yourcamcorderhas manyfeaturesfor recordingandplaying back
BLC
• BLC Back Light Compensation
When you record a subject with the light source behind the subject or a subject w_tha hght background
use the BLC function {see page 37)
DSE (Digital Special Effects)
The DSE enabFes you to give a creative look to your films by adding various special effects (see page 40]
Program AE (Auto Exposure)
The Program AE enables you to adapt the shutter speed and aperture to adJUStto the type of scene to be flhed
isee page 38]
22x High ratio zoom lens
Zooming is a recording technique that lets you change the size of the subJect m the p_cture
For more professional recordings use the zoom function (see page 31]
Digital Zoom (880x)
Zooms more than 22x are performed d_gltally qsee page 32)
Macro
The macro functron allows you to record your subject at close range
You have to adjust the zoom fully w_defor macro recording (see page 31]
EASY
This mode enables even the beginner to easily make a recording ['see page 34)
Multi PLAYBACK (PAL60)
PAL60 _sa spec_a4output s_gnal format with which a tape recorded on this camcorder ['NTSC format) can be wewed on
a PAL TV
Hi8
H_8is an enhanced 8ram format
When a H_8cassette _sinserted the camcorder will automatically select the Hi-8 format for record or prayback
A
Getting to Know Your Camcorder
ENGLISH]
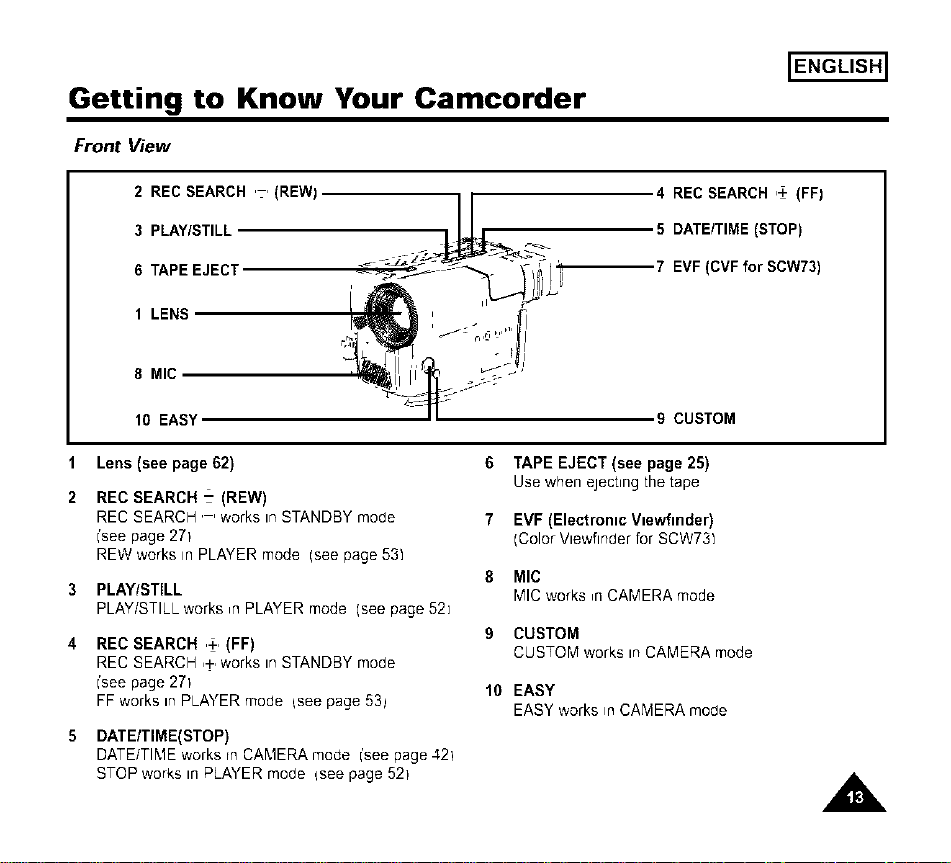
Front View
2 REC SEARCH ,-, (REW)
3 PLAY/STILL
6 TAPE EJECT
1 LENS
4 REC SEARCH ,+ (FF)
5 DATE/TIME (STOP)
7 EVF (CVF for SCW73)
8 MIC
10 EASY
9 CUSTOM
Lens (see page 62)
2 REC SEARCH- (REW)
REC SEARCH '-' works in STANDBY mode
['seepage 271
REW works in PLAYER mode (see page 531
3 PLAY/STILL
PLAY/STILLworks _rlPLAYERmode (seepage52]
4 REC SEARCH ,+, (FF)
REC SEARCH ,+,works in STANDBY mode
['seepage 271
FF works in PLAYER mode {see page 53_
5 DATE/TIME(STOP)
DATE/TIME works rnCA'_,IERA mode ['see page 421
STOP works in PLAYER moae {see page 521
6 TAPE EJECT (see page 25)
Use when ejecting the tape
7 EVF (Electronic Viewfinder)
(Color Vlewfinder for SCW731
8 MIC
r_;ICworks ,n CAMERA mode
9 CUSTOM
CUSTOM works in CAMERA mode
10 EASY
EASY works inCAMERA moae
A
IENGLISH]
Getting to Know Your Camcorder
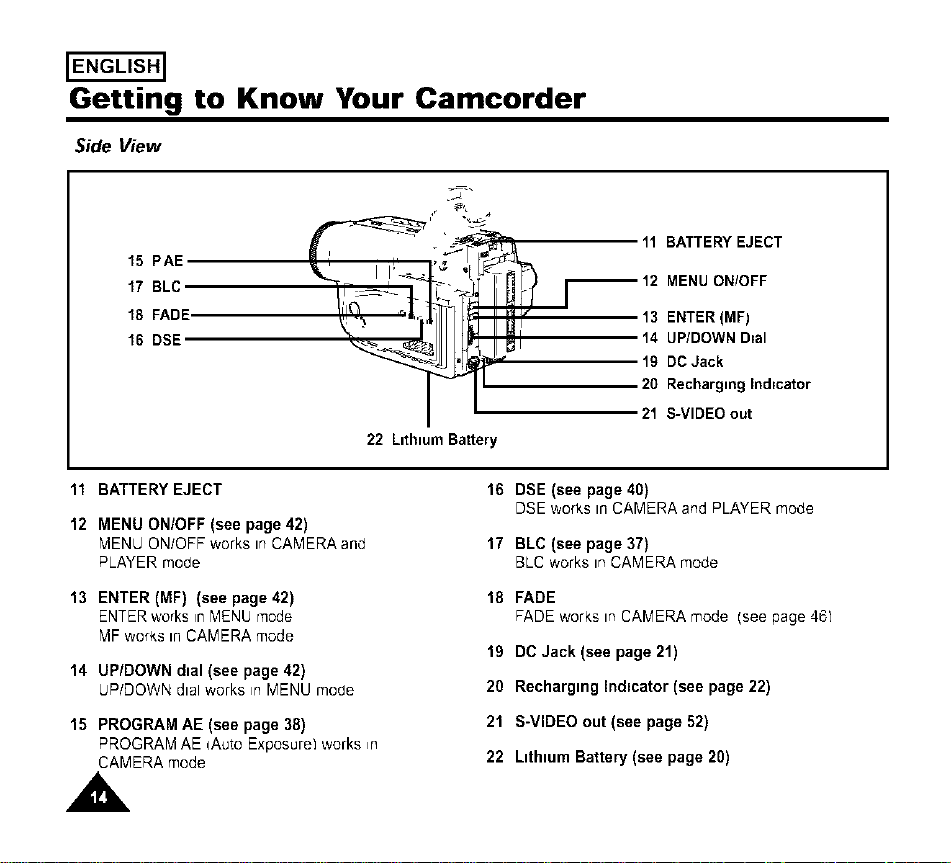
Side View
15 PAE
17 BLC
18 FADE
16 DSE
L "t,
11 BATTERY EJECT
° 12 MENU ON/OFF
13 ENTER (MF)
I_i 14 UP/DOWN D=al
" 19 DC Jack
20 Rechargmg Ind=cator
21 S-VIDEO out
22 Ltthtum Battery
11 BATTERY EJECT
12 MENU ON/OFF (see page 42)
MENU ON/OFF works m CAMERA and
PLAYER mode
13 ENTER (MF) (see page 42)
ENTER works in "_IENUmode
MF works In CAMERA mode
14 UP/DOWNdial (see page42)
UP/DOWNdtalworks inMENUmo(Je
15 PROGRAM AE (see page 38)
PROGRAM AE qAuto Exposure1 works ,n
CAMERA mode
16 DSE (see page 40)
DSE works tn CAMERA and PLAYER mode
17 BLC (see page 37)
BLC works m CAMERA mode
18 FADE
FADE works m CAMERA mode (see page 461
19 DO Jack (see page 21)
20 Recharging Indicator (see page 22)
21 S-VIDEO out (see page 52)
22 Lithium Battery (see page 20)
Getting to Know Your Camcorder
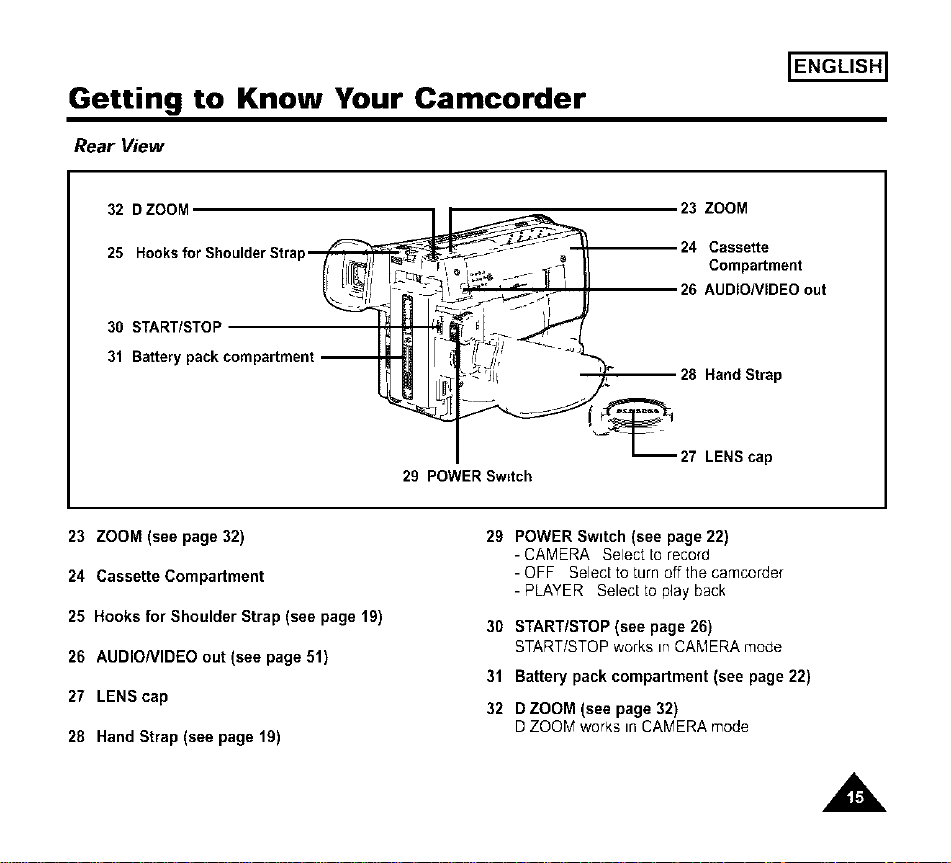
Rear View
ENGLISH]
32 D ZOOM
25
30 START/STOF
31 Batter_
23 ZOOM
24 Cassette
Compartment
26 AUDIONIDEO out
Hand Strap
29 POWER Sw=tch
27 LENS cap
23 ZOOM (see page 32)
24 Cassette Compartment
25 Hooks for Shoulder Strap (see page lg)
26 AUDIONIDEO out (see page 51)
27 LENS cap
28 Hand Strap (see page 19)
29 POWER Switch (see page 22)
- CAMERA Select torecord
- OFF Select to turn off the camcorder
- PLAYER Select to play back
30 START/STOP (see page 26)
START/STOP works tnCAMERA mode
31 Battery pack compartment (see page 22)
32 D ZOOM (see page 32)
D ZOOM works In CAMERA mode
A
ENGLISH]
Getting to Know Your Camcorder
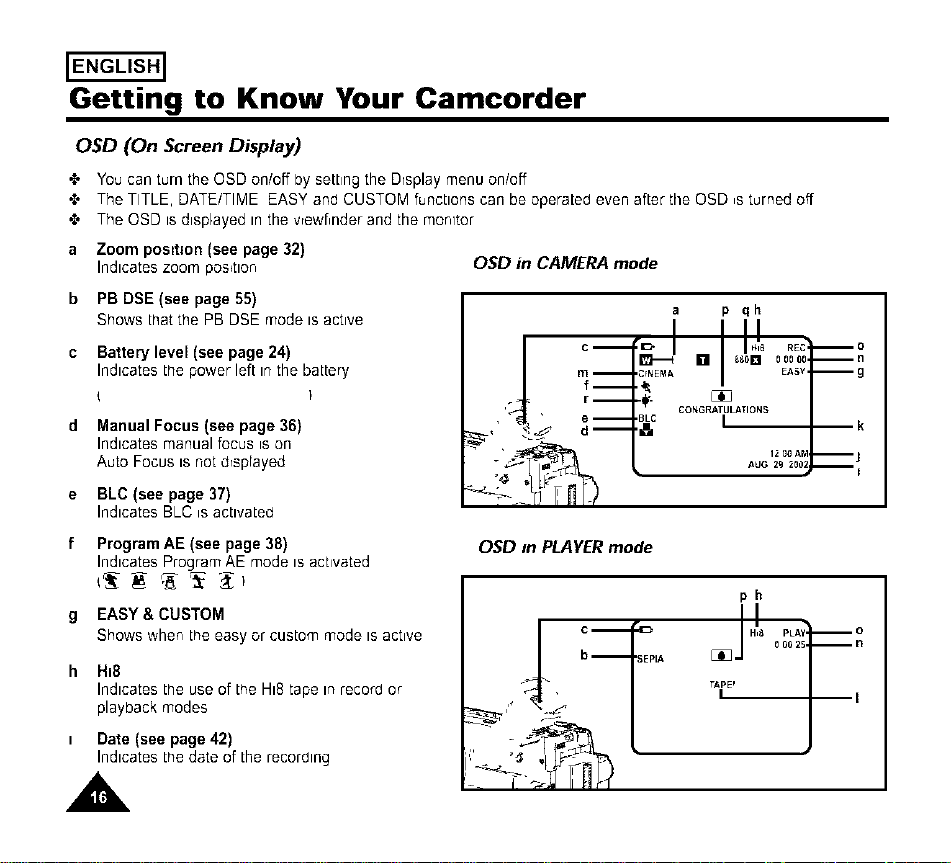
OSD (On Screen Display)
'_ You can turn the OSD on/off by setting the Drsplay menu on/off
,_ The TITLE, DATE/TIME EASY and CUSTOM functions can be operated even after the OSD _sturned off
'_ The OSD is displayed in the vrewf_nder and the monitor
a Zoom posit=on (see page 32)
Indicates zoom position
OSD in CAMERA mode
b PB DSE(see page 55)
Shows that the PB DSE mode is active
c Battery level (see page 24)
Indicates the power left in the battery
d Manual Focus (see page 36)
Indicates manual focus _son
Auto Focus is not drsprayed
e BLC (see page 37)
Indicates BLC isactivated
p qh
f Program AE (see page 38)
Indicates Program AE mode is activated
_'_ _ '_'_ _
g EASY& CUSTOM
Shows wher, the easy or custom mode IS active
h H=8
Indicates the use of the HI8 tape in recorO or
playback modes
= Date(see page42)
Indicatesthedateof the recorblng
A
OSD In PLAYER mode
ph
Getting to Know Your Camcorder
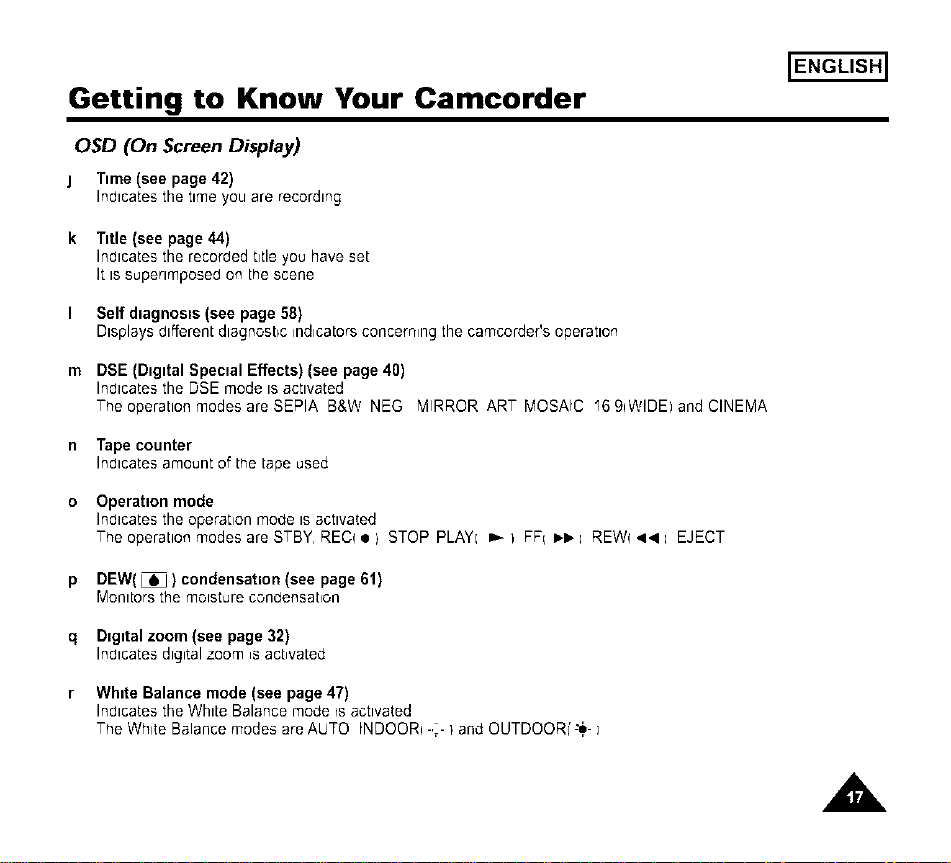
OSD (On Screen Display)
j Time (see page 42)
Indicates the time you are recording
k Title (see page 44)
Indicates the recorded t_tle you have set
It is superimposed on the scene
I Selfdlagnos_s(see page58)
Displaysdifferentdiagnosticindicatorsconcerningthe camcorder'soperation
m DSE (Digital Special Effects) (see page 40)
Indicates the DSE mode is activated
The operation modes are SEPIA B&W NEG MIRROR ART MOSAIC "6 9qWIDEI and CINEMA
n Tape counter
Indicates amount of the tape used
o Operation mode
Indicates the operation mode isactivated
The operation modes are STBY, REC( • i STOP PLAYI _ I FFI _-I_-; REW( 4.ql ; EJECT
p DEW(_ ) condensation (see page 61)
Monitors the moisture condensation
q Digital zoom (see page 32)
Indlca[es digital zoom is act,vated
r White Balance mode (see page 47)
Indicates the White Balance mode is activated
The White Balance modes are AUTO INDOORI-,_- I and OUTDOORI'-_- ]
ENGLISH]
,A,
IENGLISH]
Getting to Know Your Camcorder
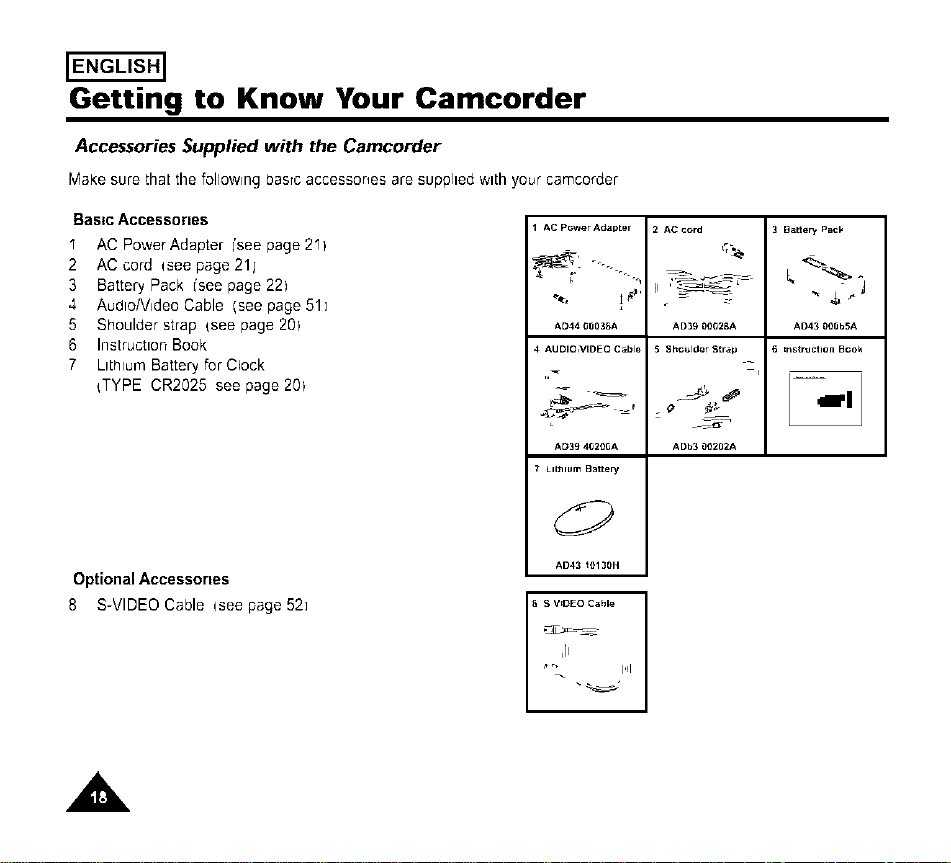
Accessories Supplied with the Camcorder
MakesurethaLthe followingbasrcaccessonesare supplied with your camcofder
Bastc Accessories
I AC Power Adapter i'see page 2II
2 AC cord qsee page 21j
3 Battery Pack i'see page 221
4 AudtoNideo Cable (see page 51]
5 Shoulder strap {see page 201
6 Instructton Book
7 Ltthlur'q Battery for Clock
{TYPE CR2025 see page 201
Optional Accessones
8 S-VIDEO Cable qsee page 52]
AC P_wer Adapter
AD44 08D3_A
4 AUDIO,VIDEO Cable
AD39 402t)0A
7 LILhlum BatLery
AD43 _t)130H
S V_DEO Cable I
I
"" 14
2 AC c_rd
_r_
AD39 _002BA
S Shoulder Strap
C
ADb3 00282A
Batter,/ Pack
-, 4_J
AD43 0OSbSA
_nstnJctlon Beok
A
Preparing
ENGLISH]
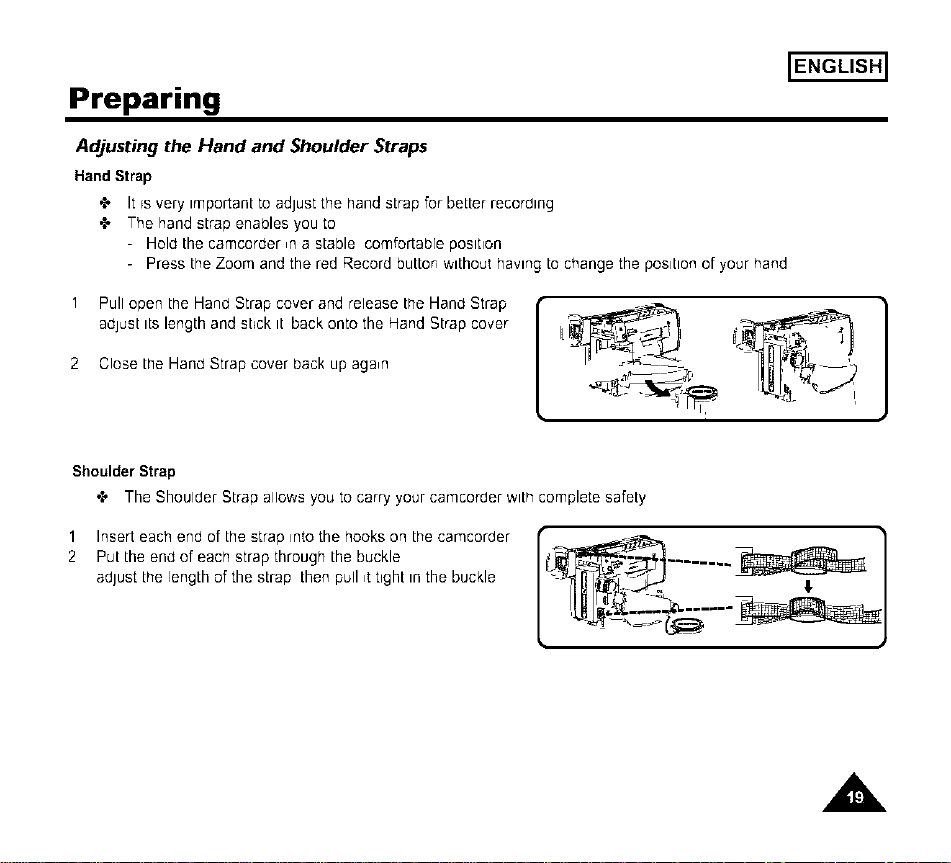
Adjusting the Hand and Shoulder Straps
Hand Strap
•t, It rs very important to adjust the hand strap for better recording
•t, The hand strap enables you to
- Hold the camcorder ,n a stable comfortable poslt_on
- Press the Zoom and the red Record button without having to change the position of your hand
1
2
Pull open the Hand Strap cover and release the Hand Strap
adjust its length and st_ck it back onto the Hand Strap cover
Close the Hand Strap cover back up again
Shoulder Strap
"l' The Shoulder Strap allows you to carry your camcorber with complete safety
1 Insert each end of the strap into the hooks on the camcorder
2 Put the end of each strap through the buckle
adjust the length of the strap then pull ,ttight in the buckle
A

IENGLISH]
Preparing
Lithium Battery Installation
•t, The llthlucn battery maintains the clock function trtleand preset contents of the memory even if the battery pack or
AC power adapter is removed
4,, The lithium battery for the camcorder lasts about 8-10 months under normal operabon from the time of installat_on
4,, When the lithium battery becomes weak or dead the date/brae _nd_catorflashes for about 5 seconds when you set
the power switch to CAMERA
When this occurs reprace the lithium battery w_thtype CR2025
I Take out the holder from the lithium battery compartment
2 Insert the ,+,side of the lithium battery toward the bottom
of the holder
3 Re_nsert the holder _ntothe hth_um battery compartment
Note If the holder _sinserted in the wrong d_rect_on,
_twill not fit correctly
Warnm_L Keep the LITHIUM BATTERY out of the reach of the chddren Should the battery be swallowed,
consult a doctor immediately
A
Preparing
Connecting the Power Source
'_ There are twoways to connect power source
Ustng the AC PowerAdapter used for indoor recordtng
Ustng the Battery Pack used for outdoor record,ng
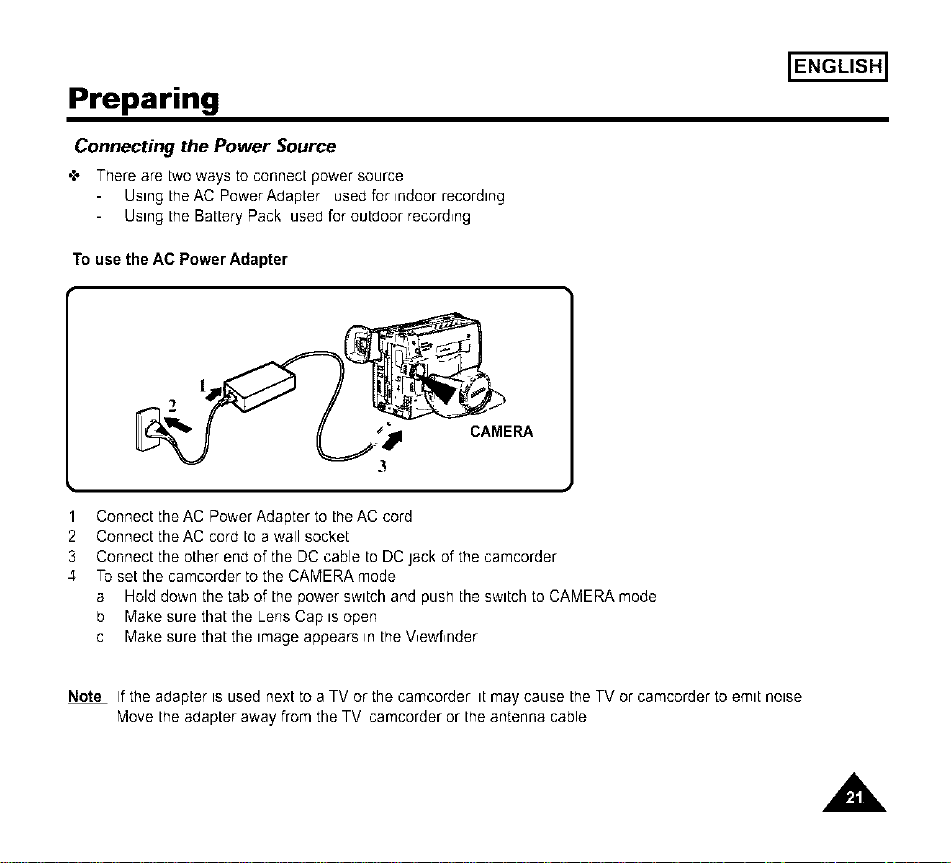
To use the AC Power Adapter
ENGLISH]
1 Connect the AC Power Adapter to the AC cord
2 Connect the AC cord to a wall socket
3 Connect the other end of the DC cable to DC jack of the camcorder
4 To set the camcorder to the CAMERA mode
a Hold down the tab of the power swttch and push the swttch to CAMERA mode
b Make sure that the Lens Cap tsopen
c Make sure that the trudge appears in the V,ewf,nder
Note If the adapter ts used next to a TV or the camcorder tt may cause the TV or camcorder to emtt noise
Move the adapter away from the TV camcorder or the antenna cable
A
IENGLISH]
Preparing
To use the Battery Pack
How long will the battery lastfor recording9
'1" Dependson howoftenzoom lensis used _nrecording Prepareas manybatterypacksas possible
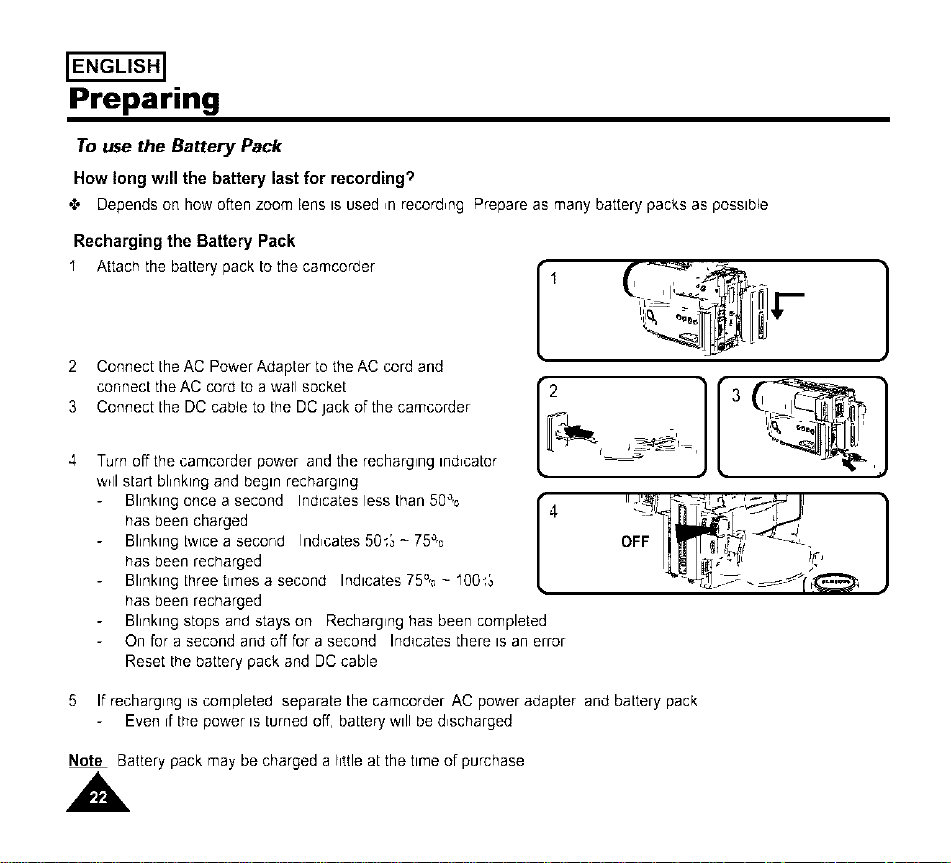
Recharging the Battery Pack
" Attachthe batterypackto the camcorder
2 Connect the AC Power Adapter to the AC cord and
connect theAC cord to a wall socket
3 Connect the DC cable to the DC Jack of the camcorder
4 Turn off the camcorder power and the recharging indicator
w_llstart blinking and begin recharging
Blinking once a second Indicates less than 50%
has been charged
Blinking twice a second Indicates 50_:_- 75%
has been recharged
Blinking three times a second Indicates 75% - I00_:_
has been recharged
Blinking stops and stays on Recharging has been completed
On for a second and off for a second Indicates there is an error
Reset the battery pack and DC cable
°;,o .,I,
]
5 If recharging is completed separate the camcorder AC power adapter and battery pack
Even d the power is turned off, battery will be d_scharged
Note Battery pack may be charged a little at the time of purchase
A
Preparing
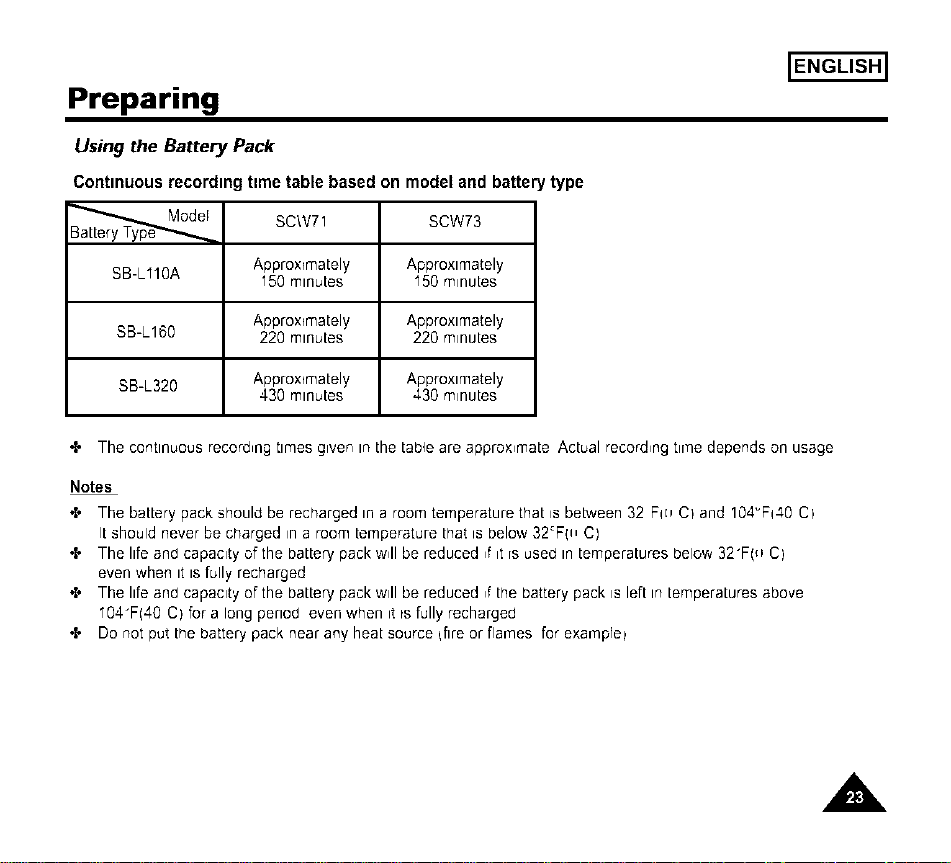
Using the Battery Pack
Contmuous recordmg ttme table based on model and battery type
F
SB-LI10A
SCW71 SCW73
Approximately Approximately
150 minutes I50 minutes
Approximately Approximately
SB-L160 220 minutes 220 minutes
SB-L320 Approximately Approximately
430 minutes 430 minutes
ENGLISH]
+ The continuous record,ng times given in the table are approx,mate Actual record,ng tlrqe depends on usage
Notes
'{' The battery pack should be recharged in a room temperature that is beb.,veen32 Fm CI and 104_Fq40 CI
It should never be charged in a room temperature that is below 32_FpI C)
'{' The life and capacity of the battery pack w41be reduced ,f it [s used in temperatures below 32"F(_1C)
even when it is fully recharged
'{' The life and capacity of the battery pack will be reduced ,f the battery pack is left in temperatures above
I04"F(40 C) for a long period even when it _sfully recharged
'{' Do not put the battery pack near any heat source {fire or flames for exar'qpre_
,A.
ENGLISH]
Preparing
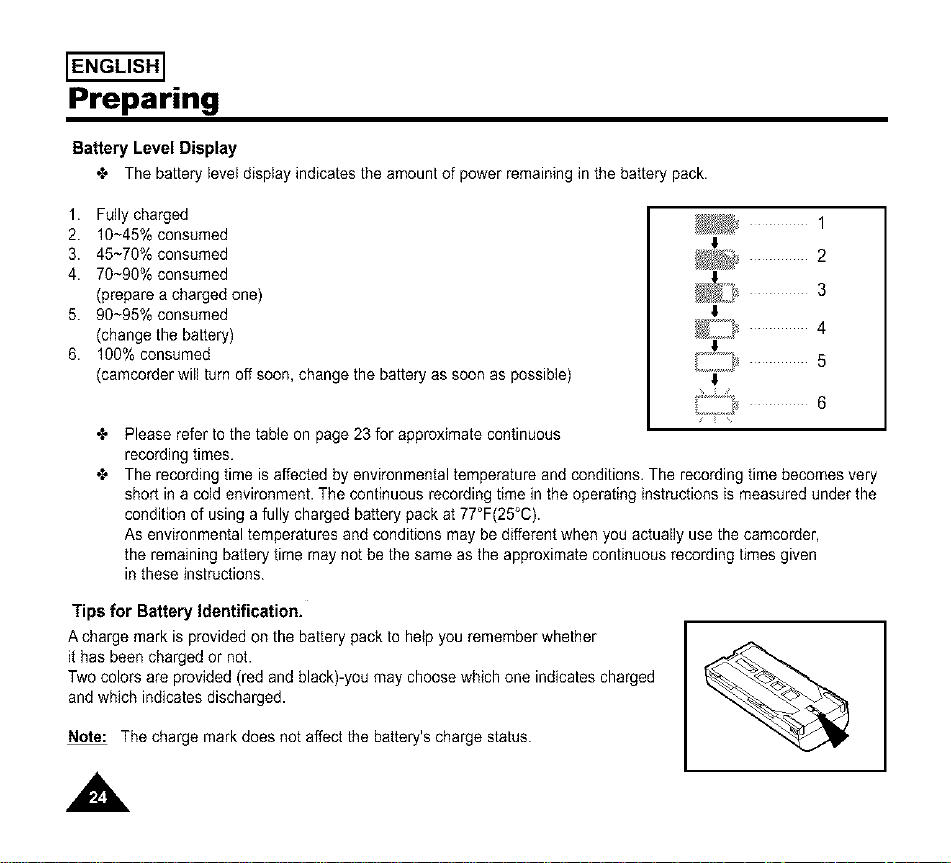
Battery Level Display
•"_ The batteryleveldisplayindicatesthe amountof powerremaininginthe batterypack.
1. Fullycharged
2. 10~45%consumed
3. 45~70%consumed
4. 70~90%consumed
(preparea chargedone)
5. 90~95%consumed
(changethe battery)
6. 100%consumed
_/ 1
t
2
_ 3
_/_ 4
(camcorder will turnoff soon, change the battery as soon as possible) t
•"_ Please refer to the table on page 23 for approximate continuous
recording times,
•"_ The recording time is affected by environmental temperature and conditions, The recording time becomes very
short in a cold environment. The continuous recording time in the operating instructions is measured under the
condition of using a fully charged battery pack at 77°F(25°C).
As environmental temperatures and conditions may be different when you actually use the camcorder,
the remaining battery time may not be the same as the approximate continuous recording times given
in these instructions.
Tips for Battery Identification.
A charge mark is provided on the battery pack to help you remember whether
it has been charged or not.
Two colors are provided (red and black)-you may choose which one indicates charged
and which indicates discharged.
Note: The charge mark does not affect the battery's charge status.
A
Preparing
ENGLISH]
Inserting and Ejecting a Cassette
'{' There are several cassette types dependtng on
Color system used
Recordtng/Playback trme
H_8
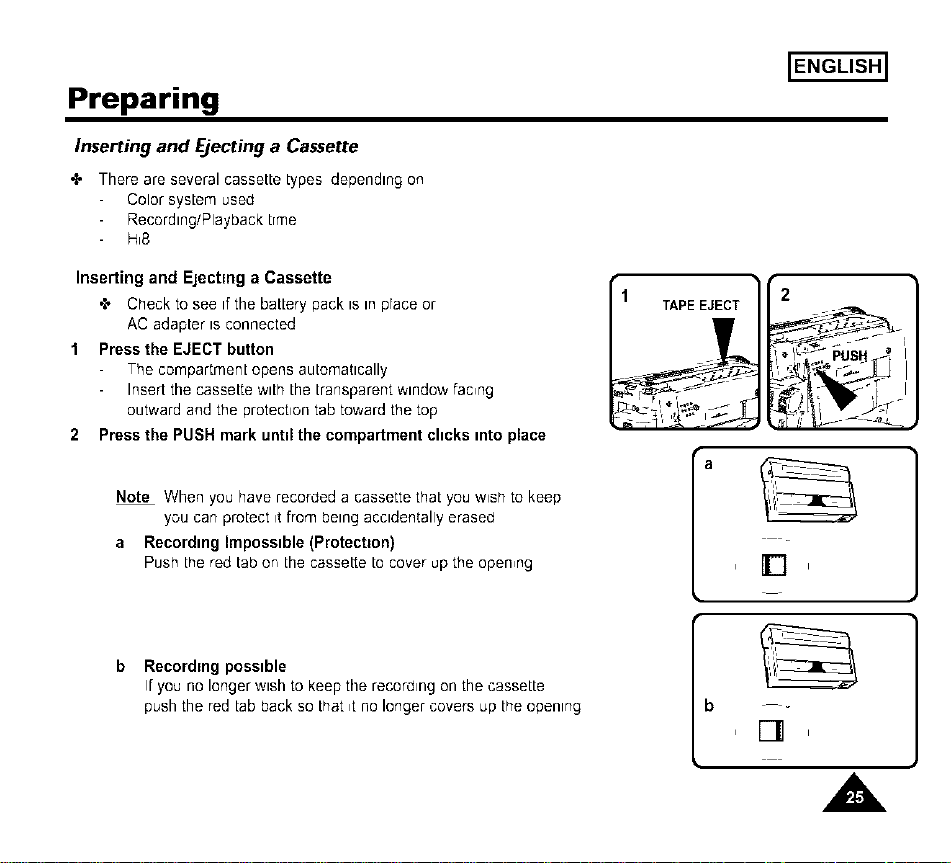
Inserting and Ejecting a Cassette
,e Crleck to see if the battery pack is in prace or
AC adapter ts connected
1 Press the EJECT button
The compartment opens automattcally
Insert the cassette wtth the transparent wtndow fac,ng
outward and the protechon tab toward the top
2 Press the PUSH mark unttl the compartment clicks into place
Note When you have recorded a cassette that you wish to keep
you can protect it from betng acctdentally erased
a Recording Impossible (Protection)
Push the red tab or, the cassette to cover up the open,ng
1 TAPEEJECT
2
a
Ir't,
Recordmg possible
If you no longer wtsh to keep the recording on the cassette
push the red tab back so that ,t no longer covers up the opentng
b
[] ,
,A
ENGLISH]
Basic Recording
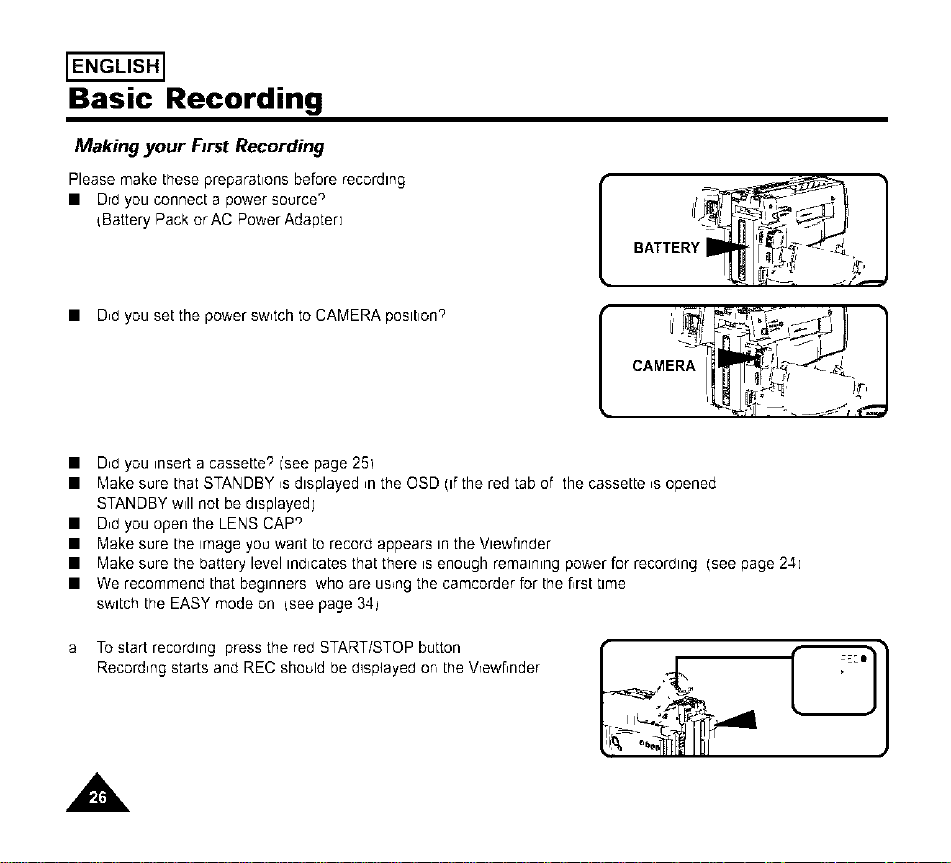
Making your First Recording
Please make these preparations before recording
• Drd you connect a power source °
Battery Pack or AC Power Adapter]
• D,d you setthe powersw,tchto CAMERAposltion'_
[
1
• D,0 you insert a cassette'; (see page 25)
• "_,lakesure that STANDBY ,sdisplayed ,n the OSD (if the red tab of the cassette ,s opened
STANDBY will not be displayedj
• D,d you open the LENS CAP '_
• Make sure the image you want to record appears in the Viewfinder
• Make sure the battery level indicates that there isenough remairmg power for recorOing (see page 24]
• We recommen,J that beginners who are using the camcorder for the f,rsLtime
switch the EASY mode on {see page 34_
a To start recording press the red START/STOP button
Record,ng starts and RBC should be O_splayedor, LheVrewf,nder
A
Basic Recording
ENGLISH]
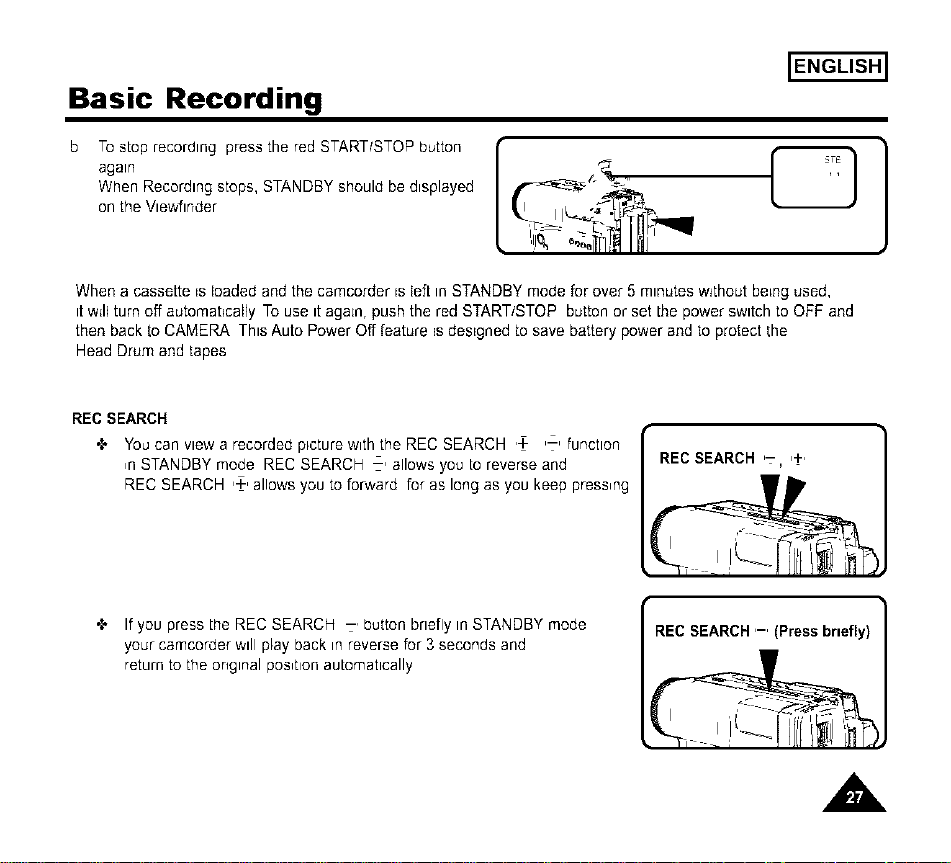
To stop recording press the red START/STOP button
again
When Recording stops, STANDBY should be displayed
on the Vtewfinder
",,,,C
When a cassette _sloaded and the camcorder _sIefLin STANDBY mode for ove_ 5 minutes w_thout beLng used,
it w_llturn off automatically To use it again, push the red START/STOP button or set the power switch to OFF and
then back [o CAMERA This Auto Power Off feature _sdesigned to save battery power and to protect the
Head Drum and tapes
REC SEARCH
You can view a recorded p_cturewith the REC SEARCH ,+ ,:, function
,n STANDBY mode REC SEARCH -' allows you to reverse and
REC SEARCH ,4-,allows you to forward for as long as you keep press,ng
REC SEARCH ,- ,+,
If you press the REC SEARCH 7, button briefly in STANDBY mode
your camcorder wdl play back in reverse for 3 seconds and
return to the ongtnal pos,t_on automattcally
REC SEARCH '-' (Press briefly)
,A

ENGLISH]
Basic Recording
Hints for Stable Image Recording
• Whde recording it is very important to hold the camcorder correctly
• For stable recording fix the LENS cap firmly by cl,pplng it on the hand strap
{refer to figure)
Recording w=th the VJewfinder
" Hold the camcorder firmly w_ththe han0 strap qsee page 19_
2 Place your right elbow against your side
3 Place your left hand under the camcorder to support rt
Be sure r-ot to touchthe built-in microphone
4 Choose a comfortable stable position for the shots that you are taking
You can lean aga,nst a wall or on a table for greater stablhty
Do not forget to breathe gently
5 Put your eye firmly against the eyecup
6 Use the vlewfinder frame as a guide to determ,ne the horizontal plane
7 Whenever possible use a tripod
-j
;I
I I,I -_ ,
Adjusting Focusofthe VIEWFINDER
FOCUS:
Usethefocus adjustmentknob ofthe VIEWFINDER tofocusthe picture
A
Basic Recording
Playing back a tape on the CAMCORDER
"_ You can monitor the playback picture on the V,ewJlnder
,,_ "Vlakesure that the battery pack is in place
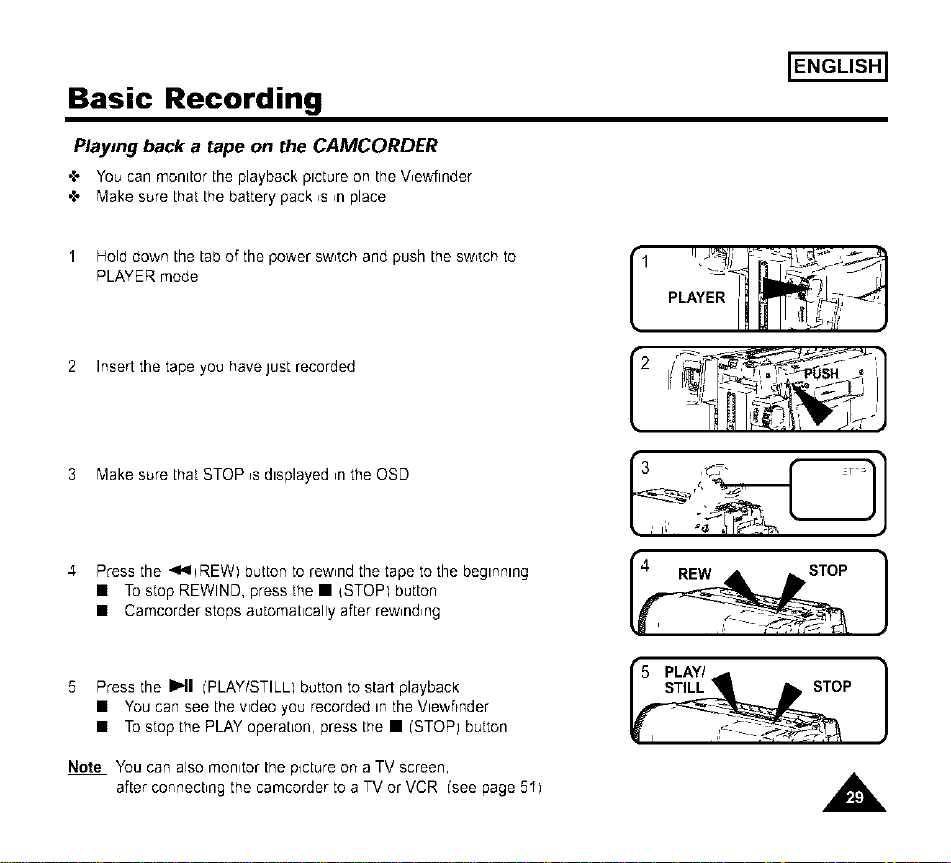
Holddown thetabof the powerSWmtChandpush the SWmtChto
PLAYERmode
ENGLISH]
2 Insert the tape you have just recorded
3 "Vlakesure that STOP ,s displayed ,n the OSD
4 Press the _l'qiREW) button to rewmndthe tape to the beginning
• To stop REWIND, press the • {STOP) button
• Camcorder stops automatically after rewmndmng
5 Press the I1,,11['PLAY/STILL) button to start playback
• You can see the wdeo you recorded in the Vle;',,ftnder
• To stop the PLAY operahon, press the • ['STOP] button
! U .'vl iiJ
I)UI P_ R'Vjl --'J
Note You can also monitor the picture on a TV screen,
after connecbng the camcorder to a TV or VCR ['see page 5I)
ENGLISH]
Basic Recording
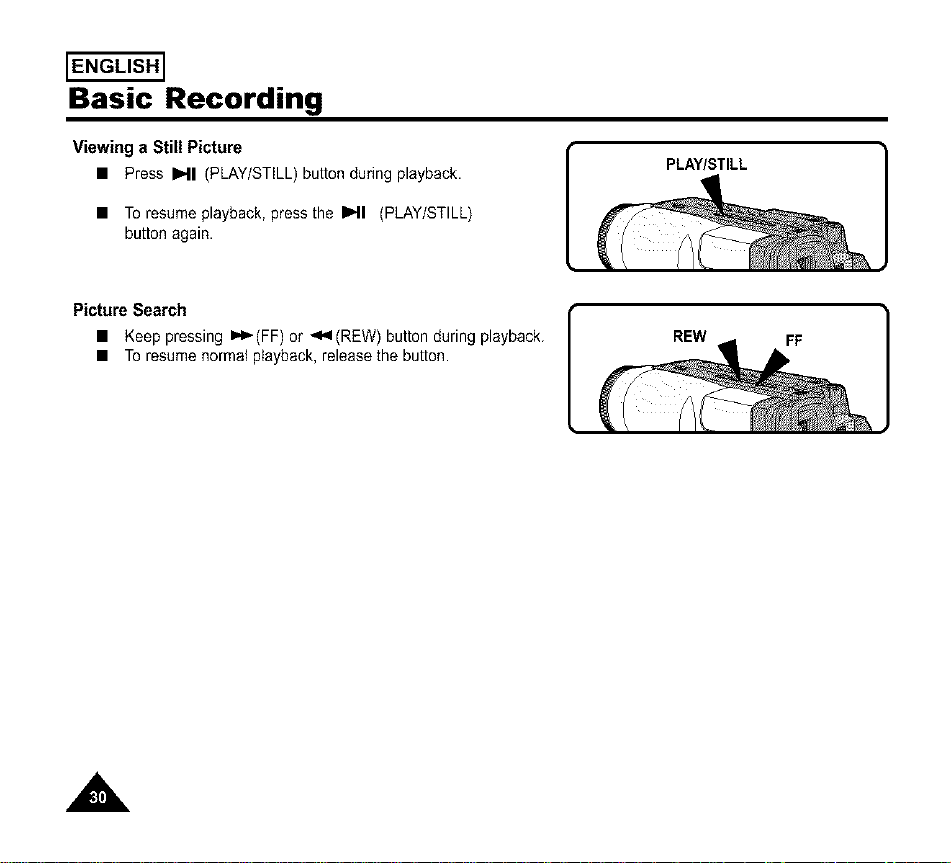
Viewing a Still Picture
• Press I_11(PLAY/STILL)buttonduring playback.
• To resumeplayback,pressthe I_11 (PLAY/STILL)
button again.
PLAY/STILL
Picture Search
• Keep pressing _(FF) or _(REW) button during playback.
• To resume normaJ p)ayback, release the button.
REW
FF
A
Advanced Recording
ENGLISH]
Zooming In and Out
,e Zoom works in CAMERA mode only
,_ Zooming rs a recording technique that lets you change the size of the subject in the picture
For more professlonar looking recordings use the zoom function spanngly
,_ You can also choose from two zoom speeds to su,t d_fferent needs
• Gradual zoom {9-12 seconds from TELE/WIDE to WlDE/TELEI
• High-Speed zoom (3-6 seconds from TELE/WIDE to W[DE/TELEI
'_ Use these features for d_fferent shots, Please note that overuse of the zoom feature can lead tounprofessional
Iook,ng results and a reduction of battery pack usage time
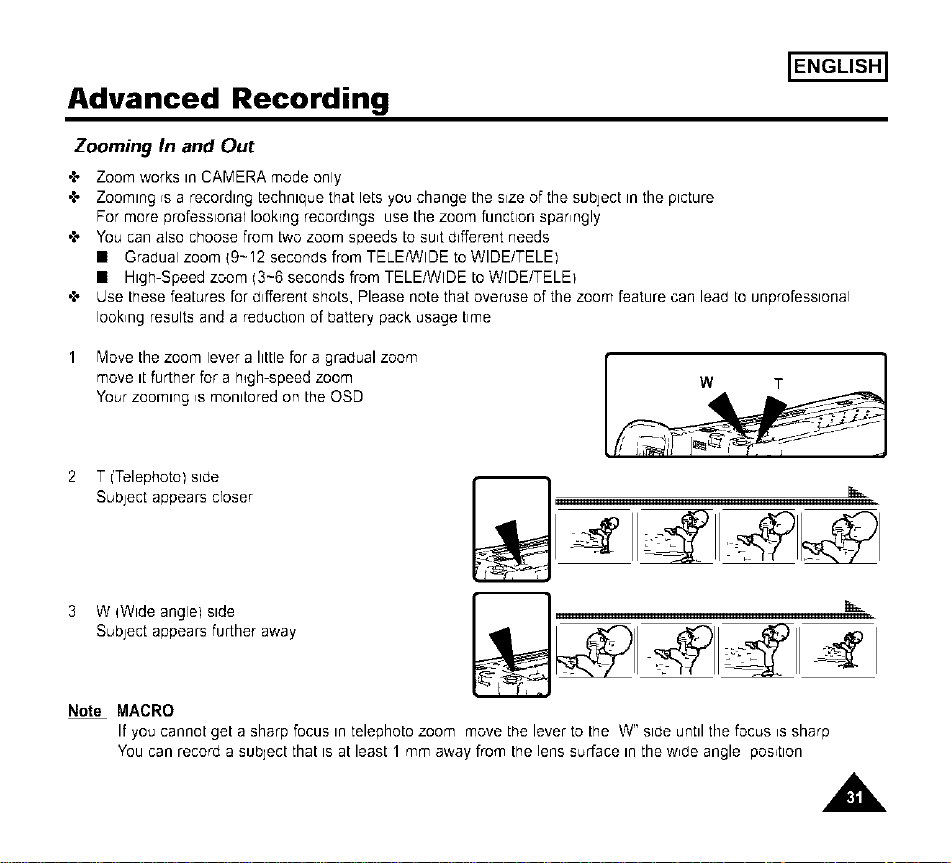
Move the zoom lever a little for a gradual zoom
move it further for a h_gh-speed zoom
Your zooming ,s monitored on the OSD
2 T i'Telephoto) side
SubJect appears croser
3 W iWlde angle) side
Subject appears further away
Note MACRO
If you cannot get a sharp focus in telephoto zoom move the lever to the W" side until the focus is sharp
You can record a subject that is at least 1 mm away from the lens surface in the w,de angle position
A
ENGLISH]
Advanced Recording
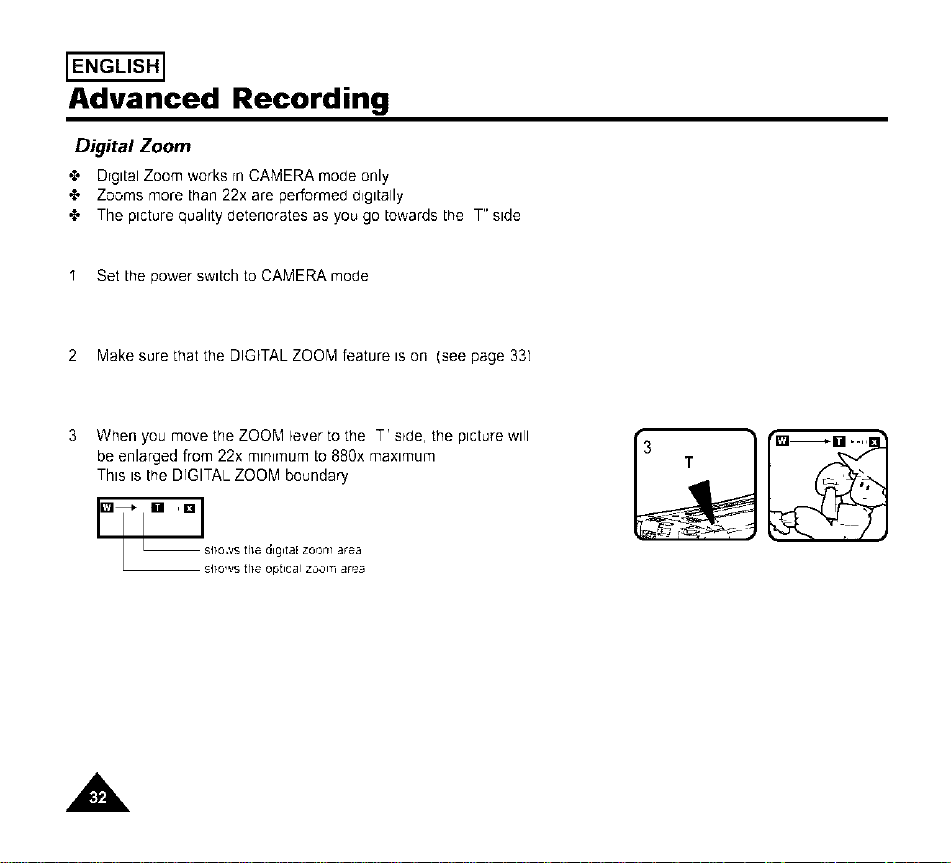
Digital Zoom
•t, Drgltal Zoom works rnCAMERA mode only
•t, Zooms more than 22x are performed digitally
•t, The picture quality deteriorates as you go towards the T" side
I Set the power switch to CAMERA mode
2 Make sure that the DIGITAL ZOO'_I feature is on (see page 331
3 When you move the ZOOM lever to the T' side, the picture will
be enlarged from 22x mnl['num to 880x maximum
This is the DIGITAL ZOOM boundary
[]_ [] ' [] sl}o.','s the dlgltaE ZOOm area
_sI}o, vs t[}e optical zoc,i]'- _r_3
A
Advanced Recording
ENGLISH]
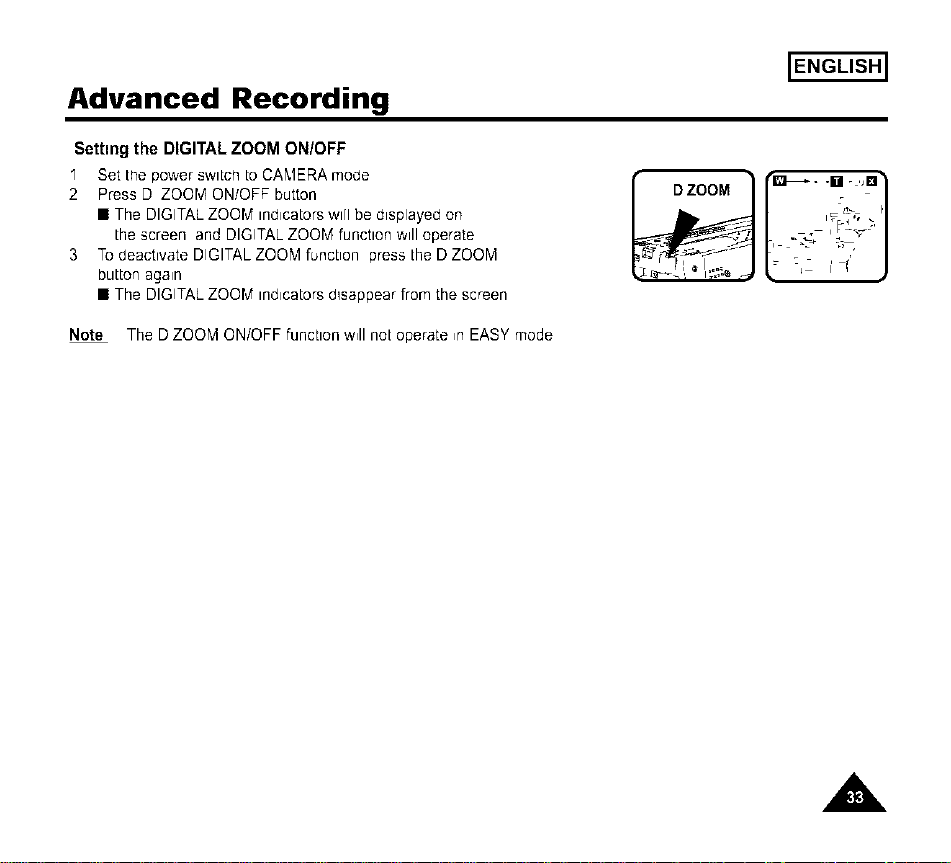
Setting the DIGITAL ZOOM ON/OFF
I Set trlepower switch to CA'_,IERAmode
2 Press D ZOOM ON/OFF button
• The DIGITAL ZOOM indicators will be displayed on
the screen and DIGITAL ZOOM function will operate
3 To deactivate DIGITAL ZOOM function press the D ZOOM
button again
• The DIGITAL ZOOM indicators d_sappear from the screen
Note The D ZOOM ON/OFF function w41not operate ,rl EASY mode
A
ENGLISH]
Advanced Recording
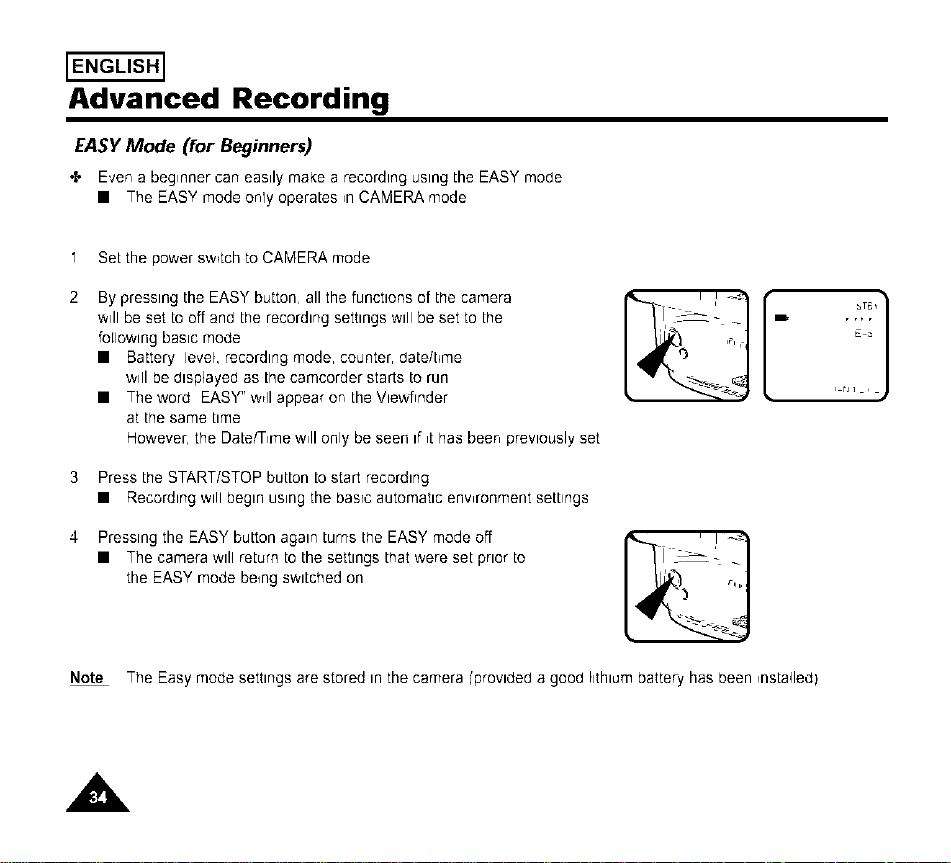
EASY Mode (for Beginners)
4' E,;enabeginnercan easilymakea recordingusingthe EASY mode
• The EASYmodeonly operates,nCAMERAmode
1 Setthe bowersw_tchto CAr,4ERAmode
By pressing the EASY button, all the functions of the car'qera
will be set Looff and the recording settings will be set to the
foEIowtngbasic mode
• Battery level, recording mode, counter, daLe/t_me
will be dtsp4ayed as Lhe camcorder starts Lorun
• The word EASY" w_llappear on the Vtewflnder
at the same time
However, the Date/T,r'qe w41only be seen if ,t has been previously set
3 Press trle START/STOP button to start recording
• Recording will begin using the baste automattc enwronment settings
Presstng the EASY button agan turns the EASY mode off
• The camera will return to the setttngs that were set prtor to
the EASY mode being swttched on
Note The Easy mode settings are stored In the camera ['provideda good hthtum battery has been ,nstalled)
A
Advanced Recording
ENGLISH]
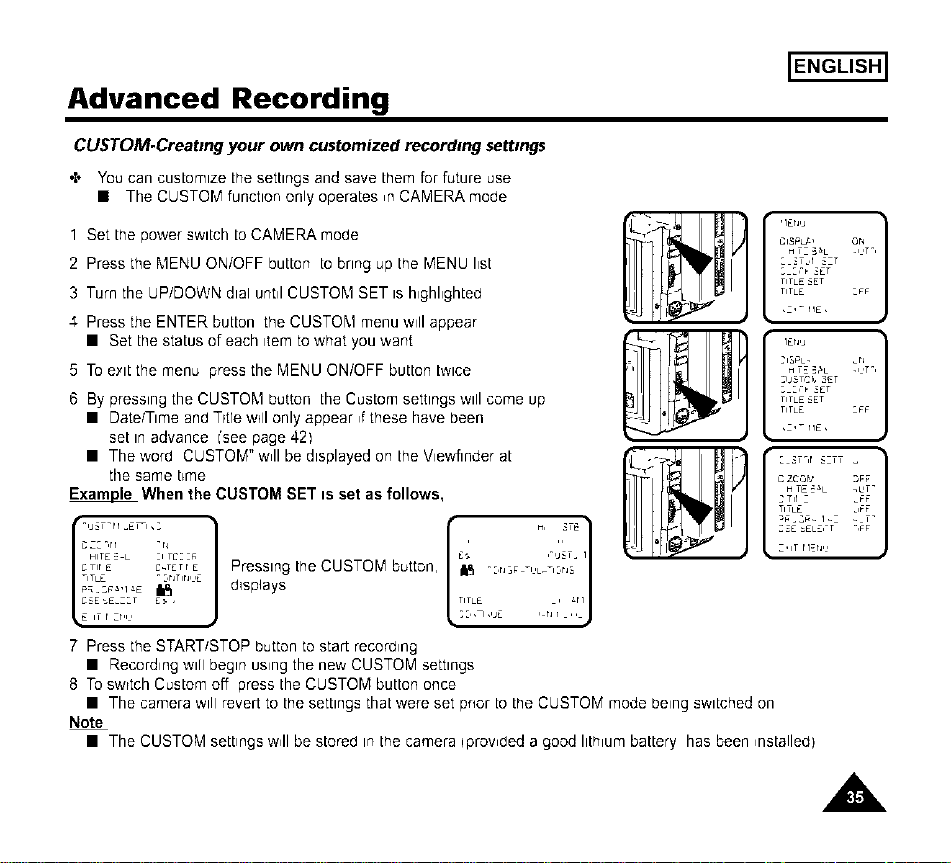
CUSTOM.Creating your own customized recording settings
•:* You can cusLomlze Lhesettings and save them for future use
• The CUSTOM function only operates ,n CAMERA mode
1 Set the power switch LoCAMERA mode
2 Press the MENU ON/OFF button to bring up the MENU list
3 Turn the UP/DOWN dial until CUSTOM SET is highlighted
4 Press the ENTER button the CUSTOM menu will appear
• Set the status of each _temto what you ;,.,ant
5 To eylt the menu press the MENU ON/OFF button twice
6 By pressing the CUSTOM button the Custom settings will come up
• Date/Time and Trtle will only appear ,f these have been
set in advance ['see page 42)
• The word CUSTOM" w41be displayed on the Vlewfinder at
the same t_me
E_ When the CUSTOM SET is set as follows,
r -,j_T-rl _ETi, : 1
C 2:-,rl -r_
HITE = • :1TC::_
CTIr E C_TETr E
qT•E - :,nTin, ,E
tie IT r zr,i,
Pressing the CUSTOM button,
d_splays
":,r_ -i ,L_I :,r_S
TIT•E , _H
::,, i,,JE , n l ,,
HTZ-5_ • .HT",
_TJ _ZT
TIT•£ _ET
TIT•E :FF
,1,_ HE,
2USTC _, 3€T
TIT•£ _ET
TIT•E :FF
,1,_ HE,
C ZC,_ _,_ _FF
2Tir i _FF
TIT•E _,FF
:_£ .'EL£,'T
Z,IT ri_r_,,
7 Press the START/STOP button to start recording
• Recording w_[Ibegin using the new CUSTOM settings
8 To swttch Custom off press the CUSTOM button once
• The camera will revert to the settings that were set prior 1othe CUSTOM mode being switched on
Note
• The CUSTOM settings w,II be stored _nthe camera iprowded a good hth_um battery has been ,nstalled)
A
ENGLISH]
Advanced Recording
MF/AF (Manual Focus/Auto Focus)
•t, The MF/AF function works in the CAMERA mode only
•t, In most srtuatlons It Is better to use the Automatic Focus feature as _tenables you to concentrate on the creative
side of your recording
•t, Manual focusing may be necessary under certain corbl[iONS that make automatic focusing inadequate
Auto Focusing
•t, The AF tAuto Focus) mode isset automatically when you switch on the Power switch
•t, If you are inexperienced with camcorders, we recommend that you use the Auto Focus mode
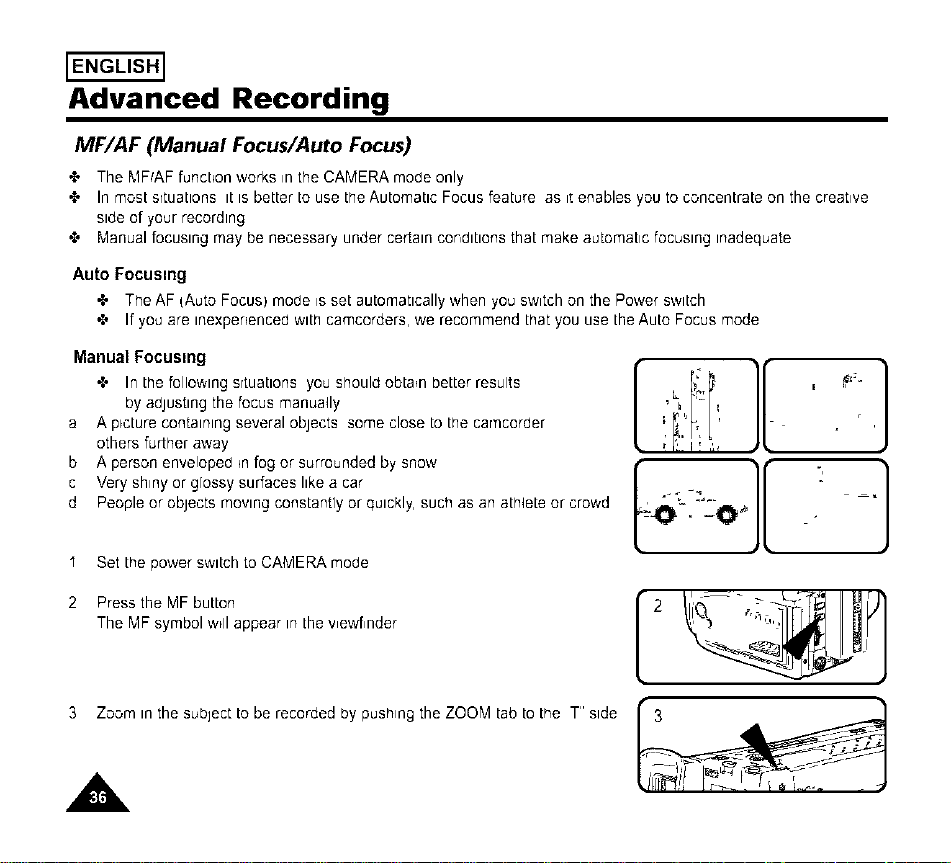
Manual Focusing
•t, In the following srtuatlons you should obtain better results
by adjusting the focus manua41y
a A picture containing several objects some close to the car'ncorber
others further away
b A person enveloped _nfog or surrounded by snow
c Very shiny or glossy surfaces like a car
d People or objects moving constantly or quickly, such as an ath4ete or crowd
I Set the power switch to CAMERA mode
2 Press the MF button
The MF symbol wdl appear in the v,ewf,nder
3 Zoom in the subject to be recorded by pushing the ZOOM tab to the T" side
A
3
ENGLISH]
Advanced Recording
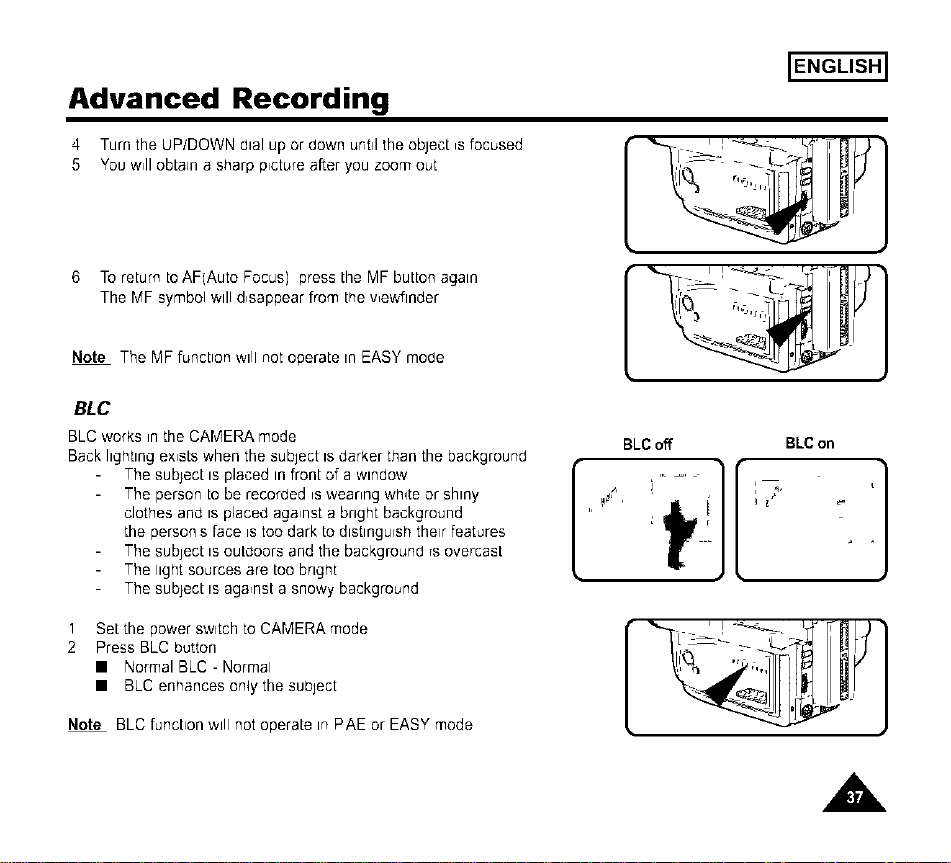
4 Turn the UP/DOWN dial up or down until the object ,s focused
5 You w,II obtain a sharp p,cture after you zoom out
6 To return to AF(Auto Focus) press the MF button again
The MF symbol will d,sappear from the v,ewftnder
Note The MF function will not operate in EASY mode
--" /
.I_
BLC
BLC works in the CAMERA mode
Back lighting ex,sts when the subject is darker than the background
The subject is placed in front of a window
The person to be recorded is wearing white or shiny
clothes and is placed aga,nst a bright background
the person s face is too dark to distinguish their features
The subject is outdoors and the background rs overcast
The light sources are too bngiqt
The subject is aga,nst a snowy background
BLC off BLCon
[ ][],.....
Set the power switch to CAMERA mode
Press BLC button
• Normal BLC - Normal
• BLC enhances only the subject
Note BLC function will not operate in PAE or EASY mode
A
ENGLISH]
Advanced Recording
PROGRAM AE (Automatic Exposure)
"t, The PROGRAM AE function works in the CAMERA mode only
•t, The PROGRAM AE modes a41owyou to adjust shutter speeds and apertures to su,t d,fferent recording conditions
They give you creative control over the depth of the field
•t, There are 6 automatic exposure modes
1 AUTO mode
• Auto balance between the subtect and the background
• To be used in norma4 conditions
• The shutter speed automatically vanes from 1/60 to 1/250 second depending on the picture
2 SPORTS mode (_)
• For recording people or objects moving quickly, you should able to play back the picture ,n slow motion on an
8 mm VCR or stop on a given ,mage w,th very I,ttle blur
3 PORTRAIT mode ( _ )
• For focusrng on the background of the subtect the background being out of focus
The PORTRAIT mode _smost effective when used outdoors
• The shutter speed automatically vanes from 1/60 to 1/I000 second depending on the picture
4 SPOTLIGHT mode (A-)
• To record correctly when there is only light on the subject and not the rest of the p,cture
• The shutter speed is 1/60 second
5 SANDISNOW mode (_)
• For recording when the people or objects are darker than the background because of reflected I,ght from
sand or snow
• The shutter speed automatically vanes from 1/60 to 1/250 second depending on the p,cture
6 HSS (High Speed Shutter) mode (_)
• For recording fast-mowng subjects such as prayers in golf or tennis games
• You may need to light the recording area
A

ENGLISH]
Advanced Recording
Setting the PROGRAM AE(Automatic Exposure) mode
1. Setthepowerswitchto CAMERAmode.
2. Press the P.AE button, the (_) symbol will be displayed.
3. Press the P.AE button until the appropnate symbol isdisplayed.
• No Display : FullAuto mode.
STBY 1
&0&00
4_
JAN 3/_2002
Notes:
• The P.AE mode chosen will be recorded on the tape.
• To end the P.AE function, press the P.AE button once or several times, until the P.AE Icon is no longer
displayed.
• The P.AE function will not operate in EASY or CUSTOM mode.
• The BLC function will not operate in P.AE mode.
A
ENGLISH]
Advanced Recording
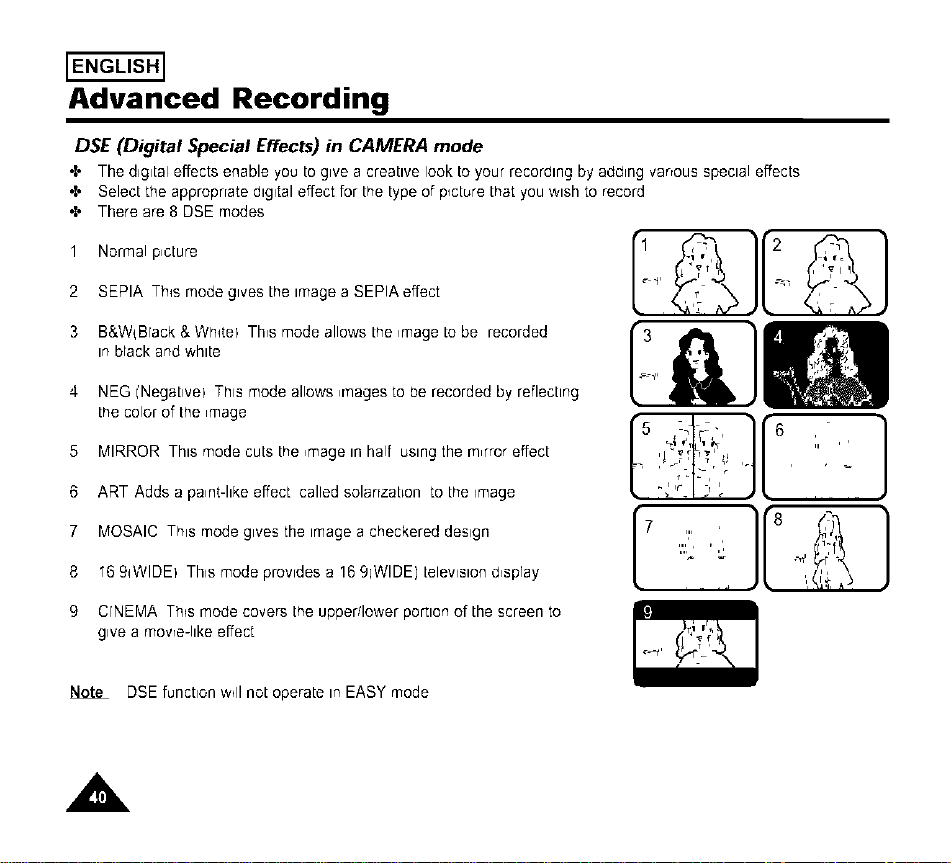
DSE (Digital Special Effects) in CAMERA mode
•t, The digital effects enable you to give a creative look to your recording by adding varrous special effects
•t, Select the approprrate digital effect for the type of picture that you wish to record
•t, There are 8 DSE modes
Normal p,cture
2 SEPIA Th_s mode gives the image a SEPIA effect
3 B&W{Brack & Wh_tel Th,s mode allows the ,mage to be recorded
in brack and white
4 NEG i'NegaLivel This mode allows ,r'qagesto be recorded by reflecting
the color of the _mage
5 MIRROR This mode cuts the ,mage in half using the m,rror effect
6 ART Adds a pa,nt-hke effect called solarrzat_on to the image
}
7 MOSAIC This modegives the imageacheckereddesign
8 "6 9q_NIDEIThis modeprovides a 1691WIDE)televisiond,spray
9 CFNEMA Th_smode covers the upper/Iower portion of the screen to
give a movre-Ilke effect
Note DSE function ;,.,_11not operate in EASY mode
A
Advanced Recording
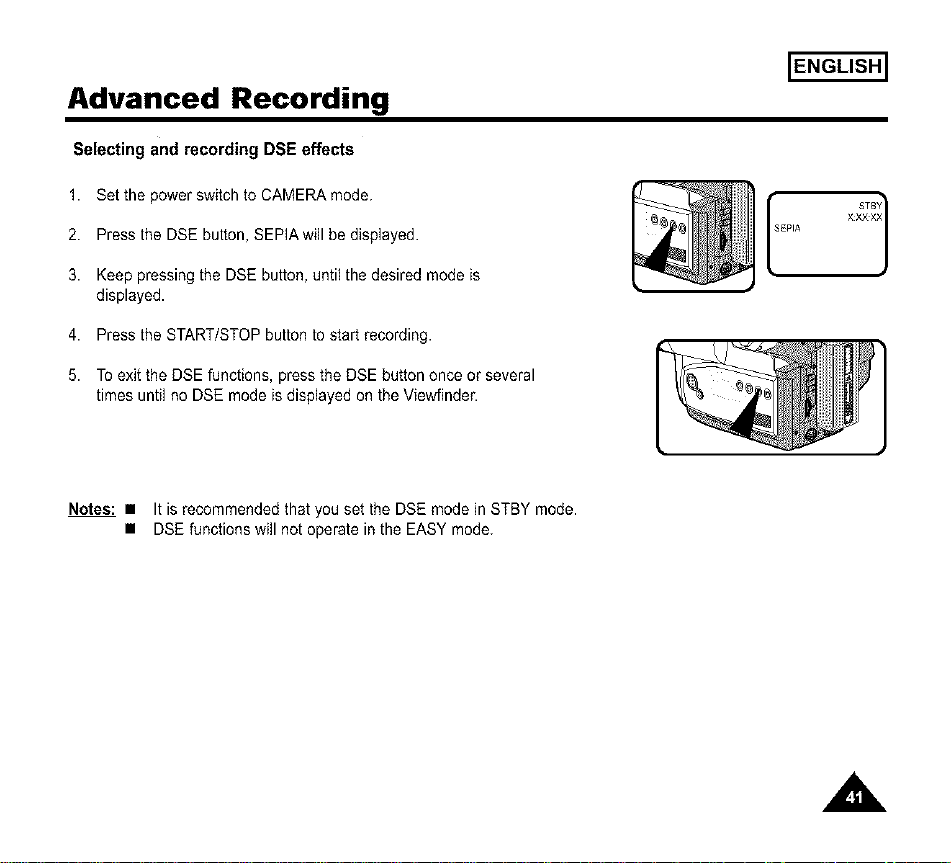
Selecting and recording DSE effects
1. Set the power switch to CAMERA mode.
2. Press the DSE button, SEPIA will be displayed.
3. Keep pressing the DSE button, until the desired mode is
displayed.
4. Press the START/STOP button to start recording.
5. To exit the DSE functions, press the DSE button once or several
times until no DSE mode is displayed on the Viewfinder.
ENGLISH]
fEPIA ×_
Notes: • It is recommended that you set the DSE mode in STBY mode.
• DSE functions will not operate in the EASY mode.
ENGLISH]
Advanced Recording
Setting and Recording the DATE/TIME
•t, Setting and recording the date/time feature works in the CAMERA mode only
•t, You can record the date/time on the tapes so you w41know when ,t;',,as made The date and time are recorded
whenever they are displayed or', the vrewf,nder
Setting a DATE/TIME
•t, Settingthe DATE/TIMEispossiblein CAMERASTANDBYmodeonly
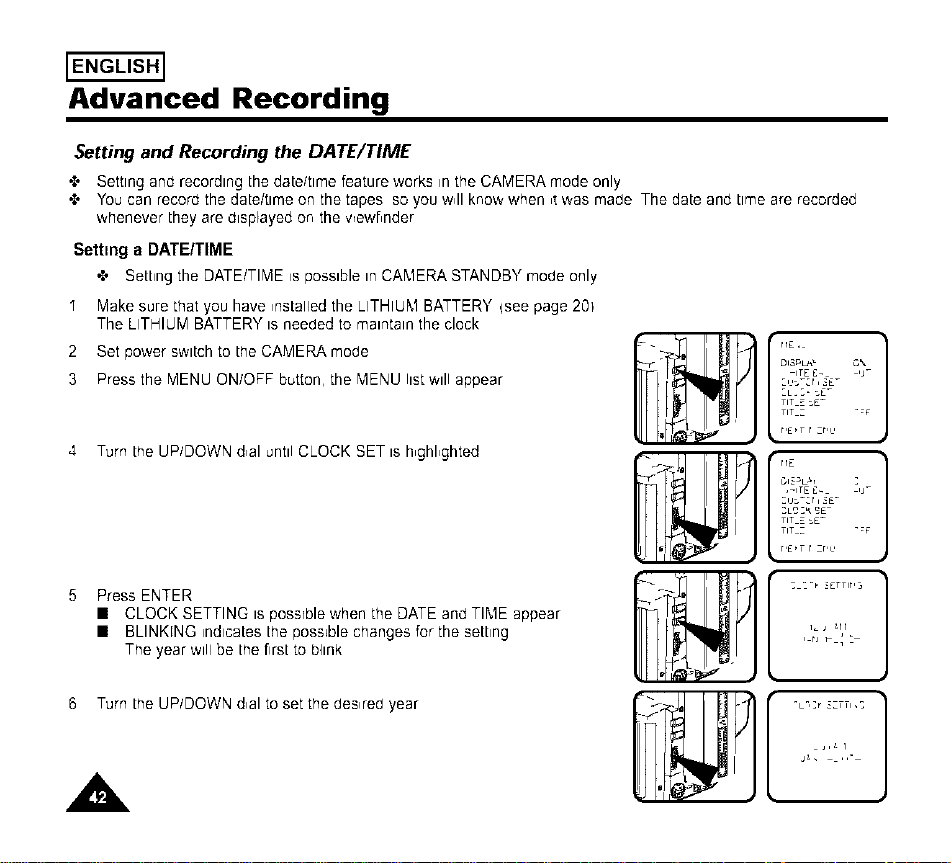
" Make sure that you have ,nstalled the LITHIUM BATTERY {see page 201
The LITHIUM BATTERY is needed to maintain the clock
2 Set power switch to the CAMERA mode
3 Press the MENU ON/OFF button, the MENU list will appear
4 Turn the UP/DOWN d,al until CLOCK SET is h,ghl,ghted
PressENTER
• CLOCKSETTINGis possrblewhen the DATEandTIME appear
• BLINKINGindicatesthe possiblechanges for the setting
The yearwill be the firstto bhnk
6 Turn the UP/DOWN d,al to set the des,red year
A
rl
DI3PL_" C,%
ITE E_
_L_ _- _E-
TIT Z _£-
TIT Z
r,E,T r zr,,
,qErlE
Zu:zcr i _E_
TIT Z _£_
TIT Z
r,E,T r zr,,
Advanced Recording
ENGLISH]
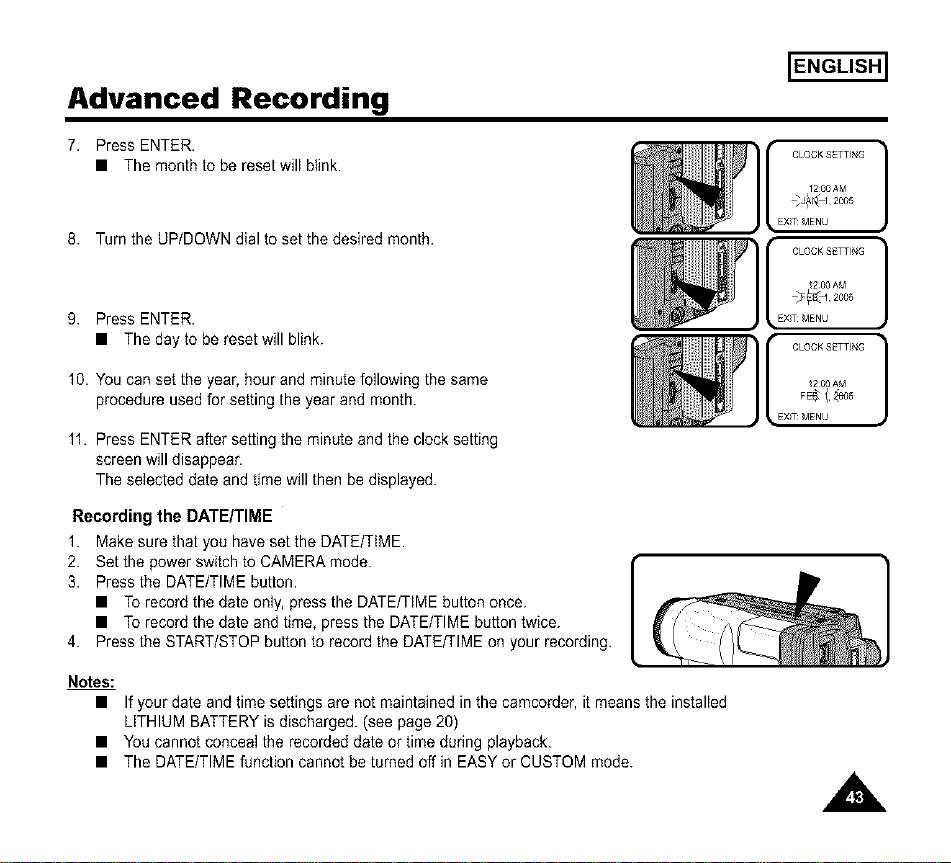
7. PressENTER.
• The month to bereset will blink.
8. Turn the UP/DOWN dial to set the desired month.
9. PressENTER.
• The day to bereset will blink.
10. You can set the year, hour and minute following the same
procedure used for setting the year and month.
11. PressENTERaftersettingthe minuteand the clocksetting
screen willdisappear.
The selecteddateand time willthenbe displayed.
Recording the DATE/TIME
1. Make sure that you have set the DATE/T_ME.
2. Set the power switch to CAMERA mode.
3. Press the DATE/TIME button.
• To record the date only, press the DATE/TIME button once.
• To record the date and time, press the DATE/TIME button twice.
4. Press the START/STOP button to record the DATEFIME on your recording.
CLOCK SETTING 1
1200AM
_J_t I 2oo8
EXT MENU
[ CLOCKSETTING ]@_ 2 (_0AM2005
_EXT MENU
'[ CLOCKSETTING]EXT F_t_SMENU2[_0AM
Notes:
• If your date and time settings are not maintained inthe camcorder, it means the installed
LITHIUM BATTERY is discharged. (see page 20)
• You cannot conceal the recorded date or time dudng playback.
• The DATE/TIME function cannot be turned off in EASY or CUSTOM mode.
A
ENGLISH]
Advanced Recording
Selecting and Recording a Title
4- Selecting and recording a TITLE is possible in the CAMERA mode only
4- The TITLE feature allows you to select a preset title stored ,n the camcorder's memory
4- You can also select the language of the titles
Selecting a Language and Setting a Title
•2. Selectrng a language is possible in CAMERA STANDBY mode orly
•t. The factory default language is ENGLISH
You can change the language
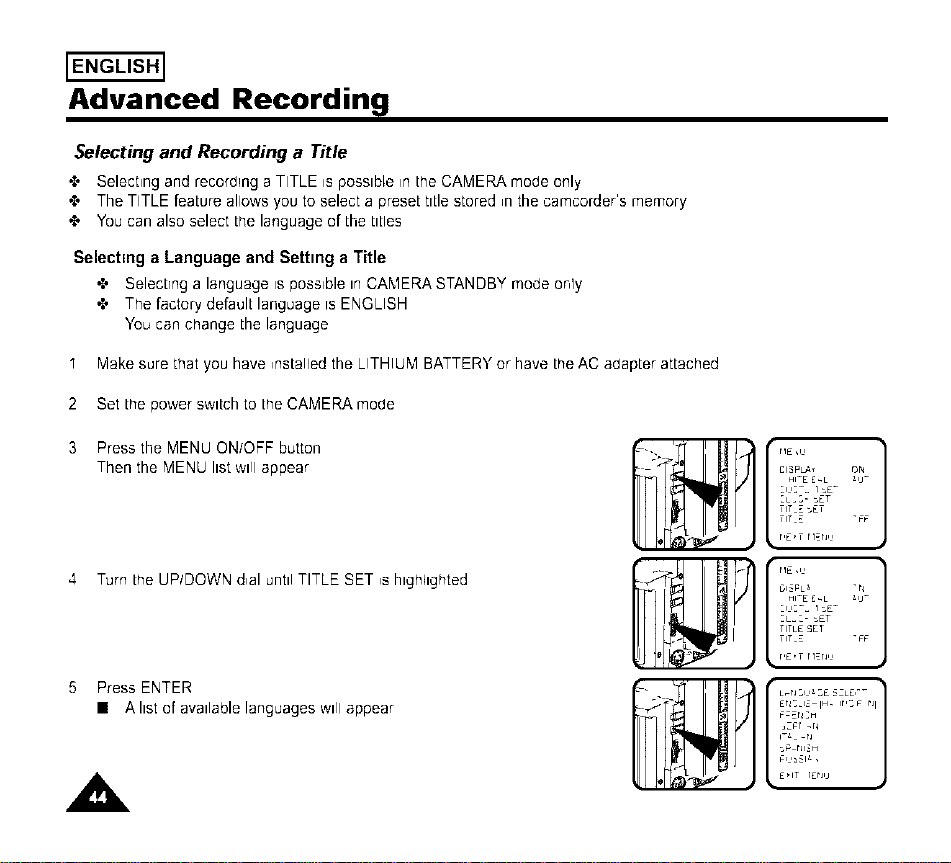
" Make sure that you have installed the LITHIUM BATTERY or have the AC adapter attached
2 Set the power sw_tch to the CAMERA mode
3 Press the MENU ON/OFF button
Then the MENU list will appear
4 Turn the UP/DOWN d,al until TITLE SET ,s hlgh41ghted
5 PressENTER
• A list of availablelanguageswill appear
A
-2 r1£,1,
CI_pLA_ ON
:L_ :- _£T
TiT Z _£T
TiT _ "FF
e r'E'T H_n,,
TITL£ SET
TiT _ "FF
P r,E,T H_n,,
_'_Ti ERS-G IH- ir,sF r_I
FZEN:H
,z_r _N
_ rJl_H
e _ E'iT IErJ,j
Advanced Recording
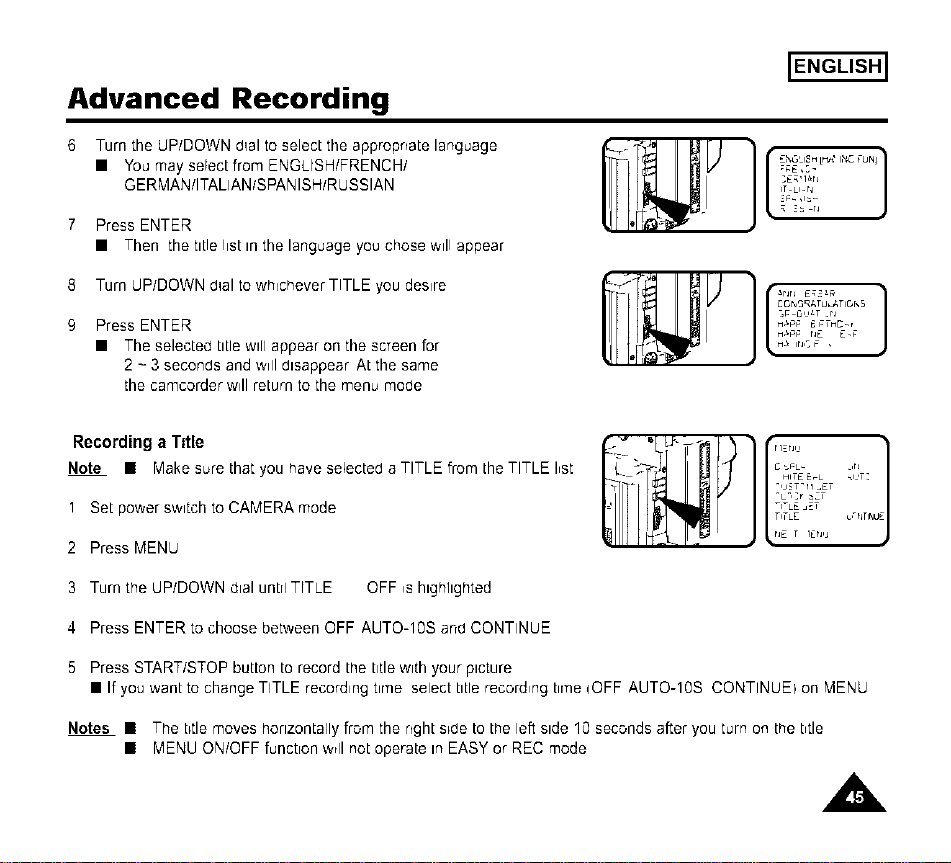
Turn the UP/DOWN d_alto select the appropriate language
• You may select from ENGLISH/FRENCH/
GERMAN/ITALIAN/SPANISH/R USSIAN
PressENTER
• Then the titlelist Inthe languageyouchose will appear
ENGLISH]
;gE,:-
IT U.N
8 Turn UP/DOWN d_alto whichever TITLE you desire
Press ENTER
• The selected title will appear on the screen for
2 - 3 seconds and ;,.,ill disappear At the same
the camcorder will return to the menu mode
_r_r_ E_#
H_#_ E_THD_,
H_#_ nE E._
H_ ir_c F ,
Recording a Title
Note • Make sure that you have selected a TITLE from the TITLE I,st
1 Set power switch to CAMERA mode
2 Press MENU
-I-LE _ET
TITLE u,-_jTINU
tiE T IErvJ
3 Turn the UP/DOWN dial untrl TITLE OFF ,s hlghhghted
4 Press ENTER to choose between OFF AUTO-10S and CONTINUE
5 Press START/STOP button to record the titlewith your picture
• If you want to change TITLE recording tir'ne select title recording tir'qe IOFF AUTO-10S CONTINUEI on MENU
Notes • The t_tlemoves horizontally from the right s_de to the left side 10 seconds after you turn on the btle
• MENU ON/OFF function ;v_llnot operate in EASY or REC mode
A,
ENGLISH]
Advanced Recording
Fade In and Out
•_" The FADE function works in CAMERA mode only
•_" You can give your films a profess,onal look.by using spec,al effects such as fading ,n and out at the beginn,ng
or end of a sequence
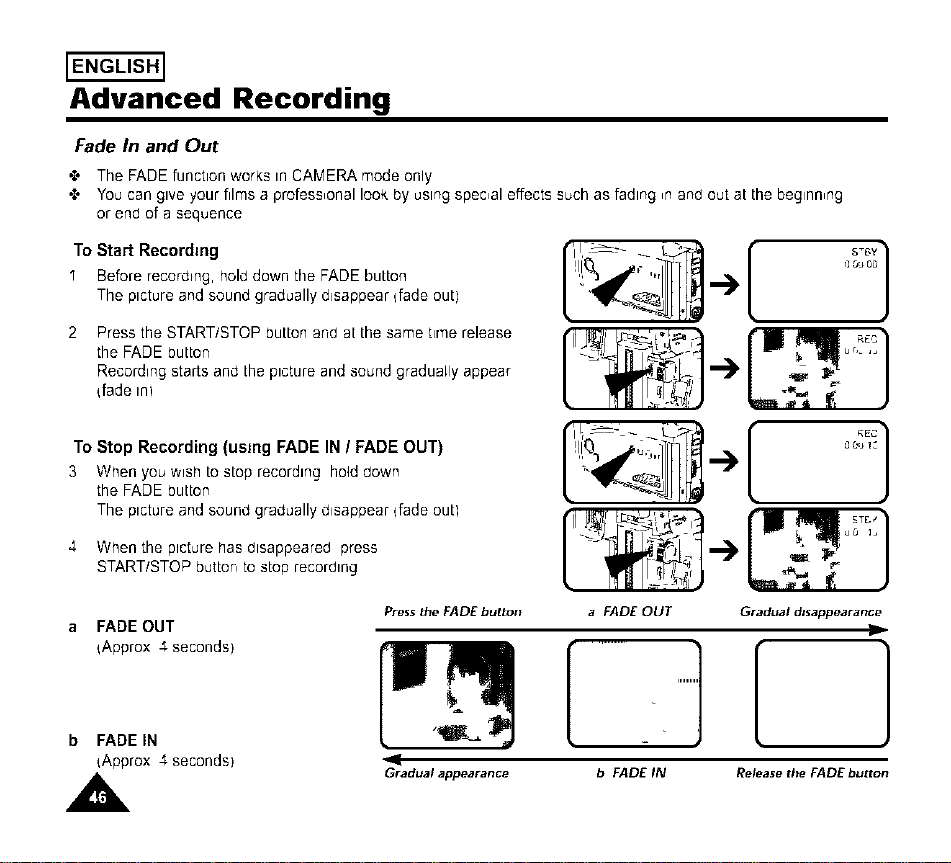
To Start Recording
I Before recording, hold down the FADE button
The picture and sound gradually disappear bade out)
2 Pressthe START/STOPbuttonand at the sametime release
the FADE button
Recordingstartsand the pictureand soundgraduallyappear
bade _n)
S_6Y 1
r] ,% 0_
_,,_ _ J
To Stop Recording (using FADE IN / FADE OUT)
3 Whenyou wish tostop recording holddown
the FADE button
The pictureand soundgraduallydisappearbade outl
4 When the picture has disappeared press
START/STOP button to stop recording
a FADE OUT
{Approx 4 seconds)
Press the FADE button
b FADEIN
iApprox 4 seconds)
,A
Gradualappearance
f,r
[
a FADE OUT Gradual disappearance
b FADE IN Release the FADEbutton
Advanced Recording [ENGLISH]
White Balance
4- WHITE BALANCE m a recordlngfunctlonthatpreservestrleumque coloroftheoblect_nany record,ngcond,tlon
4- You may selecttheappropriateWHITE BALANCE mode toobtaingood rmage colorqual,ty
AUTO This mode isgenerallyused tocontroltheWHITE BALANCE automaticarly
INDOOR (-_-1 controlsWHITE BALANCE accordingtotheindoorambience
OUTDOOR r'-_-_ coR[rolsWHITE BALANCE accord,ngtotheoutdoorambience
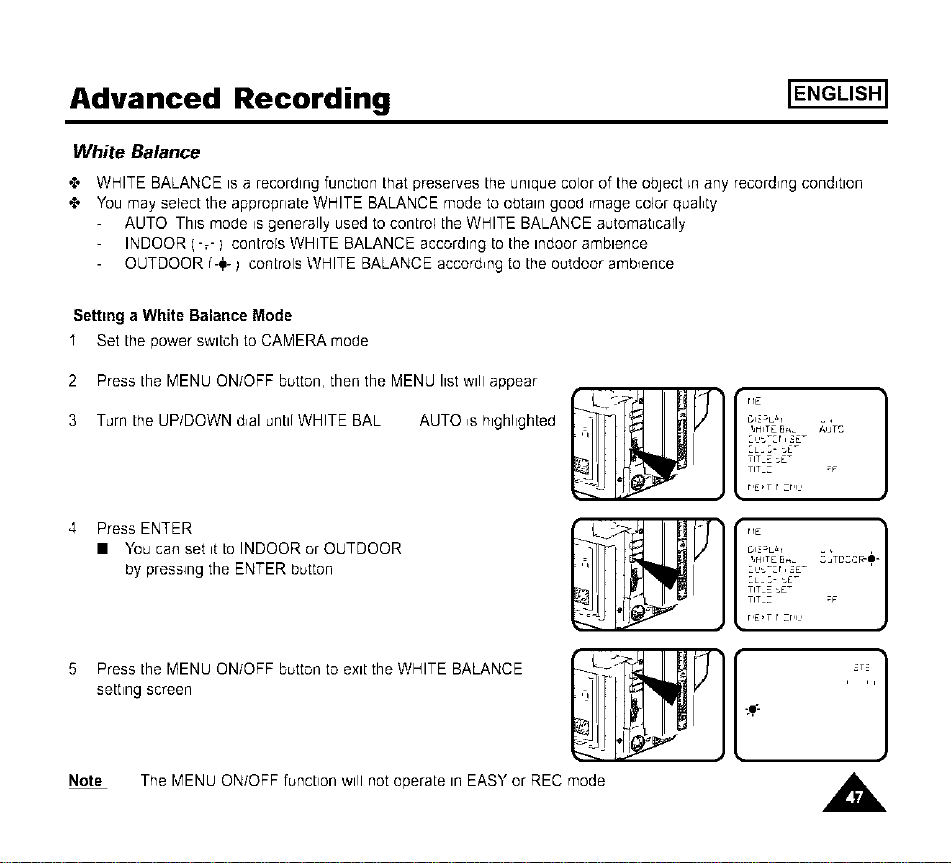
Setting a White Balance Mode
I Set the power switch to CAMERA mode
2 Press the MENU ON/OFF button, then the MENd list will appear
3 Turn the UP/DOWN d,al until WHITE BAL AUTO ,s highlighted
4 Press ENTER
• You can set it to INDOOR or OUTDOOR
by pressing the ENTER button
5 Press the MENU ON/OFF button to exit the WHITE BALANCE
setting screen
Note The MENU ON/OFF function will not operate in EASY or REC mode
rlE }
GI3_Lal =,
IJHITE 5__ AUTC
TIT E sE-
TIT Z ;F
r,E,T r zr,i,
I_HITE 5__ DC,3 R-_-
_L_ _- sE_
TIT E sE_
TIT Z
r,E,T r zr,i,
[..,..,]
A
ENGLISH]
Advanced Recording
Demonstration
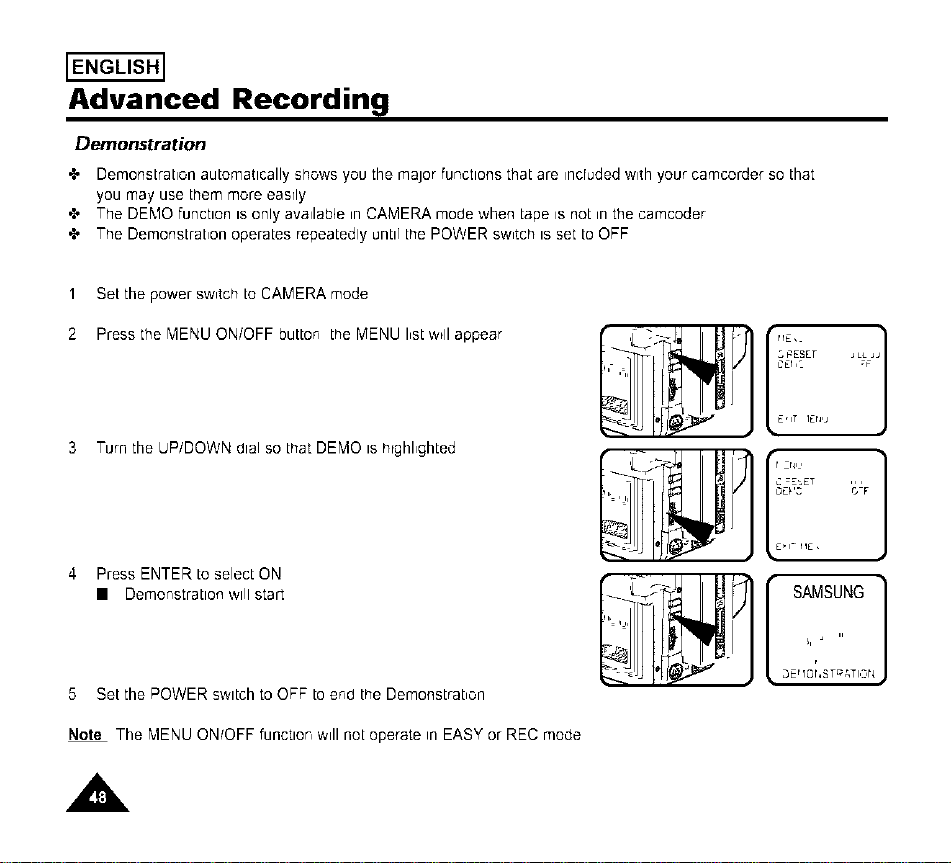
•t, Demonstration automatically snows you the major functions that are _ncrudedw_thyour camcorder so that
you may use them more easrly
•t, The DEMO function is only availab4e in CAMERA mode when [ape is not in the camcoder
•X, The Demonstrabon operates repeatedly until the POWER sw_tch is set to OFF
1 Set the power sw,tch to CAMERA mode
2 Press the "VIENUON/OFF buttor, the MENU I,st w_llappear
3 Turn the UP/DOWN dial so that DEMO is hrghl,ghted
4 Press ENTER to select ON
• Demor,stratlon will start
5 Set the POWER switch to OFF 1oer,d the Demonstrabon
Note The "VIENUON/OFF functlor, will not operate in EASY or REC mode
cEr, _ T JL_FJ
E,IT IEr_,J
zr_l,
£,1- r1£,
SAMSUNG
A
ENGLISH]
Advanced Recording
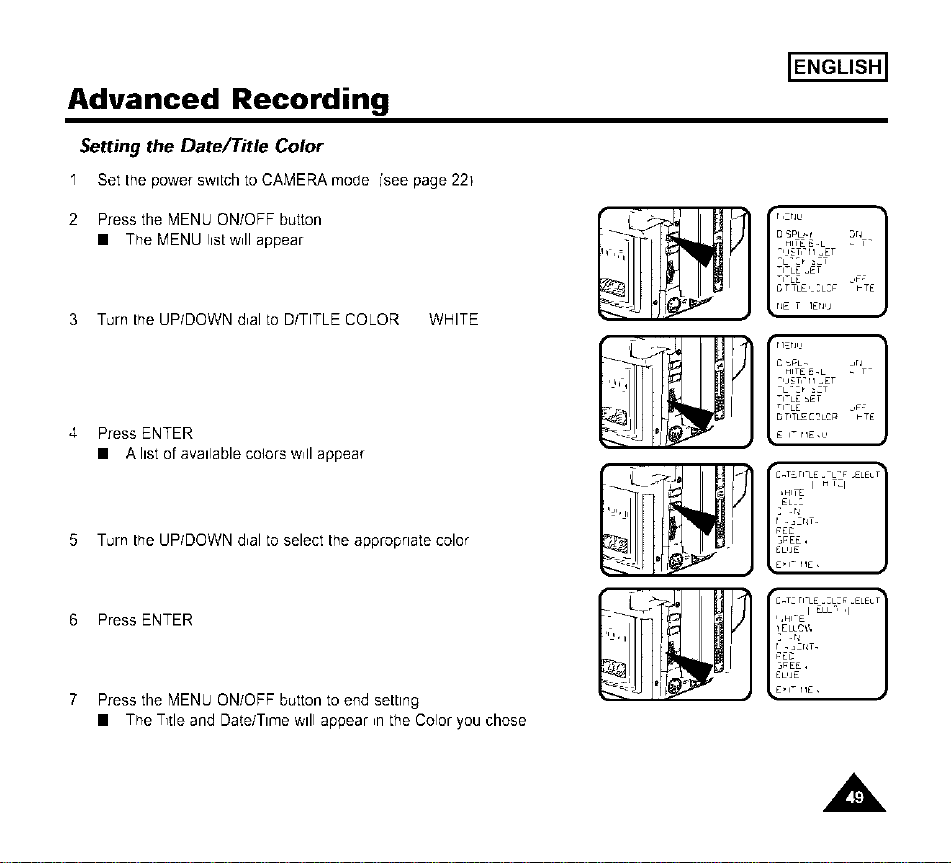
Setting the Date/Title Color
I Set thepower sw_tchto CAMERAmode ['seepage22)
2 Press the MENU ON/OFF button
• The MENU list w,II appear
3 Turn the UP/DOWN d,al to D/TITLE COLOR WHITE
4 Press ENTER
• A listof availablecolorsw,IIappear
5 Turn the UP/DOWN d,al to select the appropriate color
6 Press ENTER
7 Press the MENU ON/OFF button to end setting
• The T_tle and Date/Time will appear _nthe Color you chose
]....
D SPL_t Dq I
HWE E.L _ -
",l_T," H _ET
q-LE _ET
q_LE ,F_
D TTLE, _L_F _TE
r_E T IEr_,J
C _-L_ _,rJI
HWE _.L _ -
",l_T," H _ET
q_LE .-ET
D T,TL_ [2LC# _TE
E i- H E,I,
bHLTE I H I_ I
Z .rl-
_EC
_PEE,
EL,JE
E,I_ rlE,
,_I_E I ELL' ,I
Z .N
_EC
_PEE,
_LUE
E,I_ HE,
A
ENGLISH]
Advanced Recording
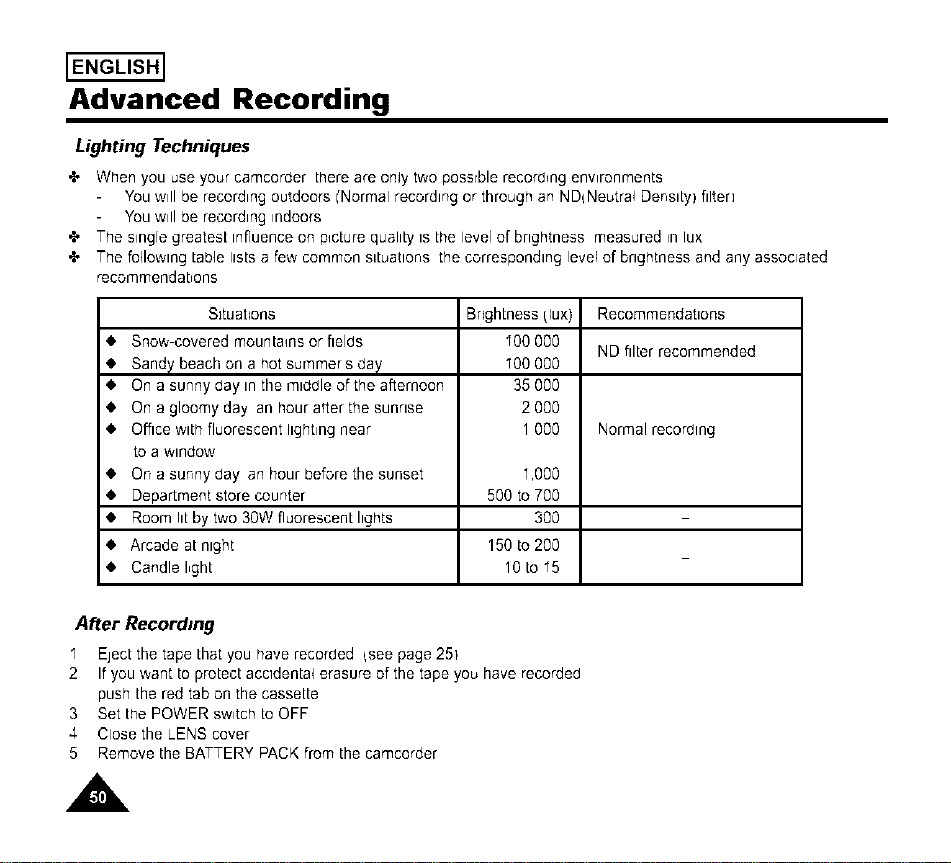
Lighting Techniques
•t, When you use your camcorder there are only two possrble recording environments
You will be recording outdoors i'Normal recording or through an ND{Neutral Density) filter]
You will be recording indoors
•t, The s_ng[egreatesL influence on picture quality is the level of brightness measured _nlux
•t, The following table lists a few common situations the corresponding level of brightness and any associated
recommendations
Sltuat_ons
4. Snow-covered mountains or fields
4. Sandy beach on a hot sur'qmer s day
4. On a sunny day in the middle of the afternoon
4. On a gloomy day an hour after the sunrise
4. Office with fluorescent lighting near
to a window
On a sunny day an hour before the sunset
Department store counter
Room lit by two 30W fluorescent hghts
Arcade at night
Candle I,ght
Bngh[ness!lux)
"00 00O
"00 00O
35000
2000
1000
1,000
500to 700
3OO
150to 200
10 to I5
Recommendations
ND filter recommended
Normal recording
After Recording
I Eject the tape that you have recorded {see page 251
2 If you want to protect accidental erasure of the tape you have recorded
push the red tab on the cassette
3 Set the POWER switch to OFF
4 Close the LENS cover
5 Remove the BATTERY PACK from the camcorder
A
Playing back a Tape
+ To view a tape that you have recorded
+ Playback function works in PLAYER mode only
• To see with TV monitor recommended for indoor use
ENGLISH]
To watch with TV momtor
_' It is practical to use a TV monitor to wew tapes indoors
+ To play a [ape back, [he TV must feature a compatible color system (see page 57]
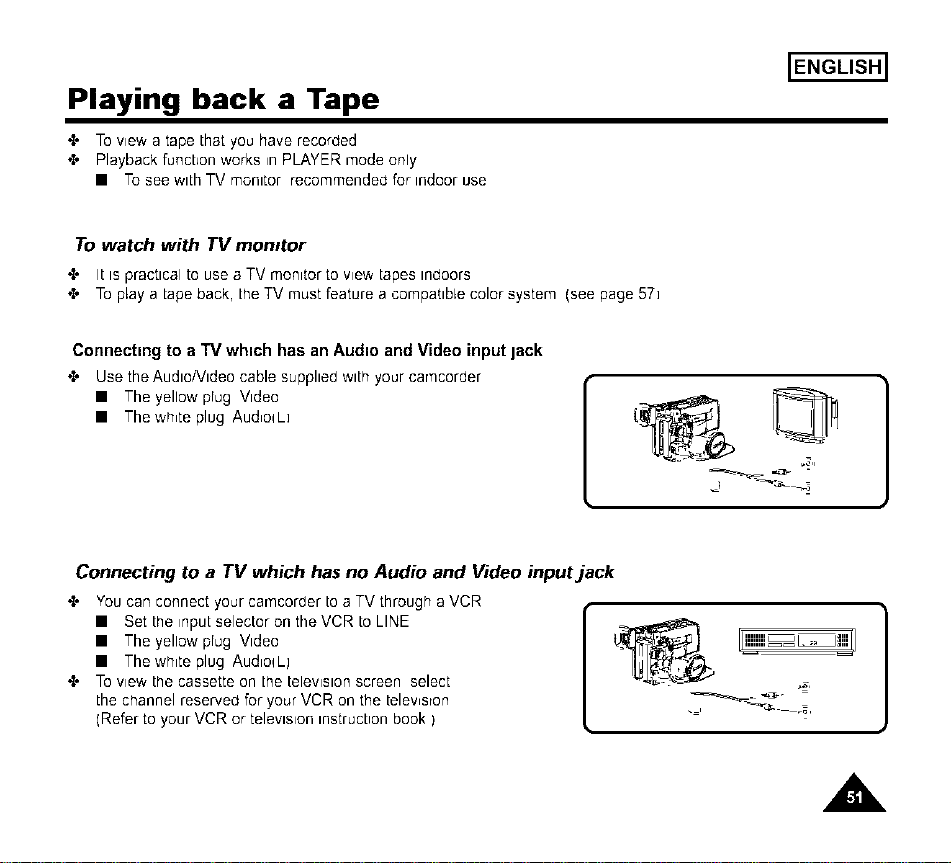
Connecting to a TV which has an Audio and Video input jack
+ Use the Audio/Video cable supplied with your ca['qcor_er
• The yellow prug Video
• The wh,te plug Aud,oqL]
Connecting to a TV which has no Audio and Video input jack
_' You can connect your camcoraer to a TV through a VCR
• Set the input selector on the VCR to LINE
• The yellow prug Video
• The white plug AudlolLj
+ To view the cassette on [he television screen select
the channel reserved for your VCR on the telev,sron
(Refer to your VCR or television instruction book )
"1 " DinL anqJ
A
ENGLISH]
Playing back a Tape
Notes:
• SCW71AN73 feature a monaural audio system.
If your TV or VCR are stereo, connect the audio cable to input "L" of your TV or VCR.
• You can use an S-VIDEO cane to obtain better quality pictures if you have on S-VIDEO connector
on your TV.
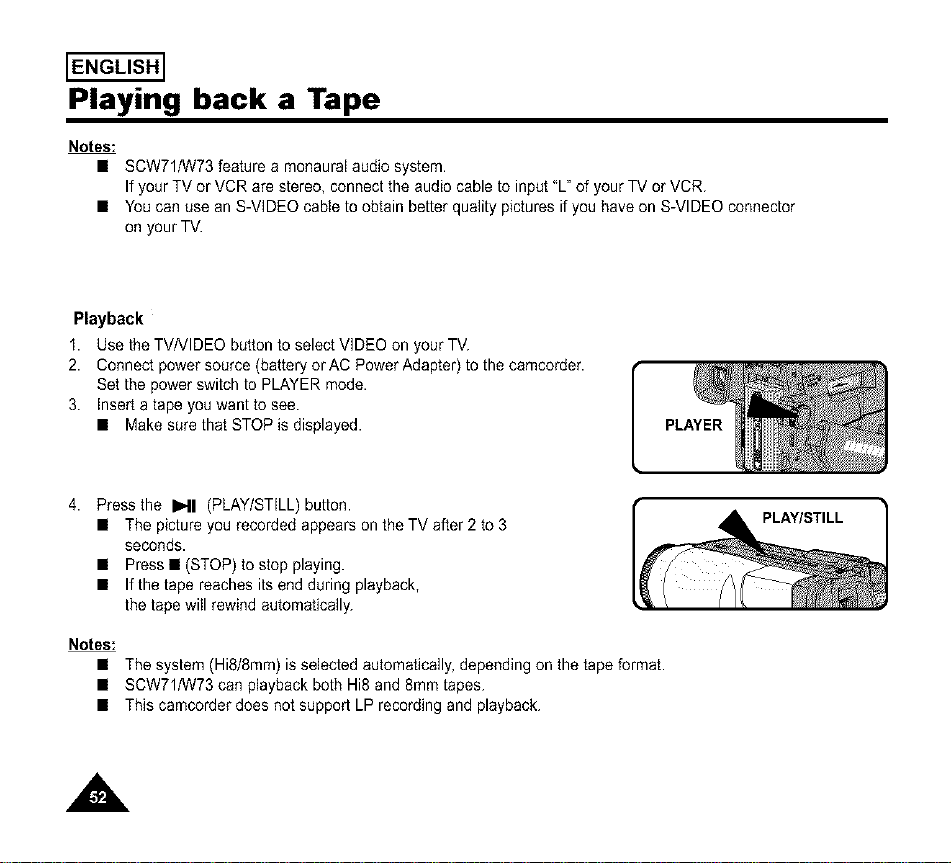
Playback
I. Use the TV/VIDEO button to select VIDEO on your TV.
2. Connect power source (battery or AC Power Adapter) to the camcorder.
Set the power switch to PLAYER mode.
3. Insert a tape you want to see.
• Make sure that STOP is displayed.
4. Press the I_11 (PLAY/STILL) button.
• The picture you recorded appears on the TV after 2 to 3
seconds.
• Press • (STOP) to stop playing.
• If the tape reaches its end during playback,
the tape will rewind automatically.
Notes:
• The system(Hi8/8mm)is selectedautomatically,dependingon the tapeformat.
• SCW71/W73canplaybackbothHi8 and8mmtapes.
• This camcorderdoes not supportLP recordingandplayback.
PLAY/STILL
A
Playing back a Tape
Various Functions in PLAYER mode
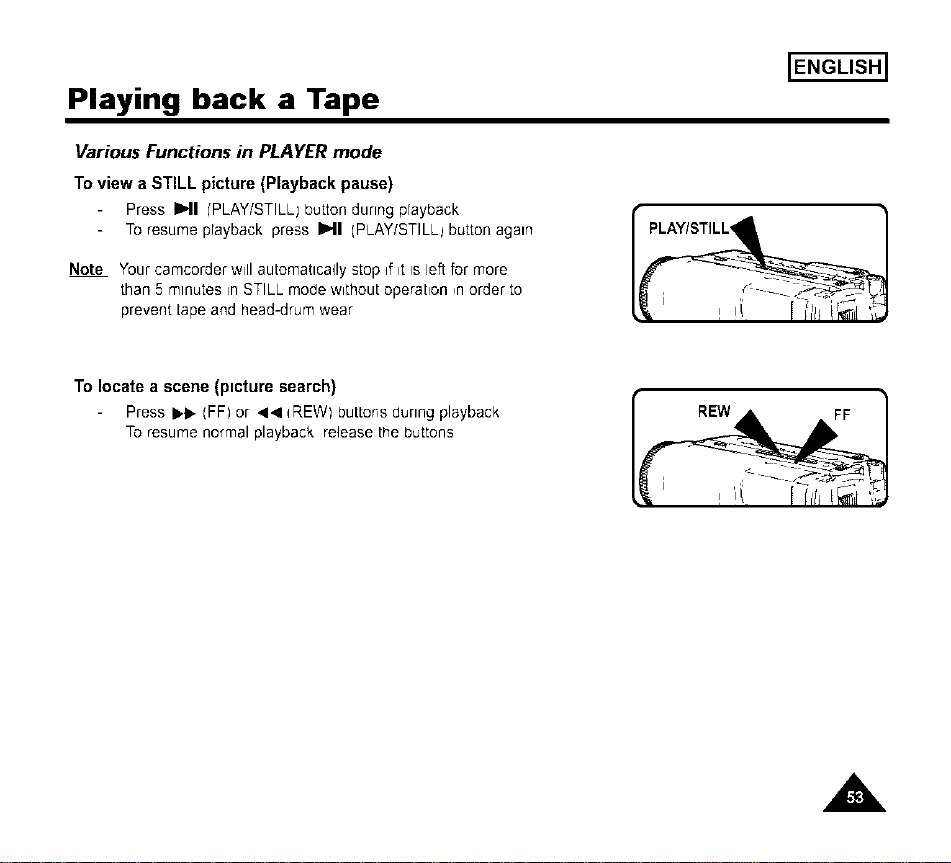
Toview aSTILL picture (Playback pause)
Press I_11I'PLAY/STILLJbutton dunngprayback
Toresumeprayback press I_1 (PLAY/STILL_buttonagain
Note Your camcorder will automatlca41y stop if it is left for more
than 5 minutes in STILL mode without operation ,n order to
prevent tape and mead-drum wear
ENGLISH]
To locate a scene (picture search)
Press I_k, (FFI or 44 qREWI buttons during playback
To resume normal playback release the buttons
A
ENGLISH]
Playing back a Tape
Multi Playback (using the PAL60 System)
4" This Camcorder can convert an NTSC tape recorded ,n the SP mode to the PAL60" format,
allowing you to view ,t on a PAL TV which has Vertical sync adjustment circuitry for 60Hz
- PAL60" is a special output signal format w,th wh,ch a PAL TV can be used to v,ew a tape recorded
by an NTSC recorder
1 Set POWER switch to PLAYER mode
2 Insert an NTSC tape you want to see
3 Press MENU ON/OFF button then the MENU list w,II appear
4 Turn the UP/DOWN dial to PAL CONV OFF"
5 Press ENTER, then _twill change to PAL CONV PAL60"
• Now you can see the picture by pressing the PLAY button
6 Press MENU ON/OFF button to end setting
Notes
" This Camcorder can not record using the PAL60" system
2 When an NTSC tape is being played back the p_cture on the PAL monitor screen may shrink in the
Vertical direction
3 If the signal recorded on the tape is rnbad condition the PAL60 prayback system may malfunction
4 A PAL recorded tape can not be played back on this camcorder
ENGLISH]
Playing back a Tape
DSE in PLAYER mode
,,l* The procedure for using DSE in PLAYER mode is the same as the procedure for using DSE in CAMERA mode
except that the power switch must be set to PLAYER instead of CAMERA
Prease refer to pages 40 and 41
Note TheNEG MIRROR, MOSAIC ClNEMAand 16 91'WIDEi effects ;vlll not operate when
your camcorder Is rn PLAYER mode
•l* Pressing trle DSE button will scroll through the available sett,ngs
Stop at the one you require
Maintenance
Cleaning and Taking care of the Camcorder
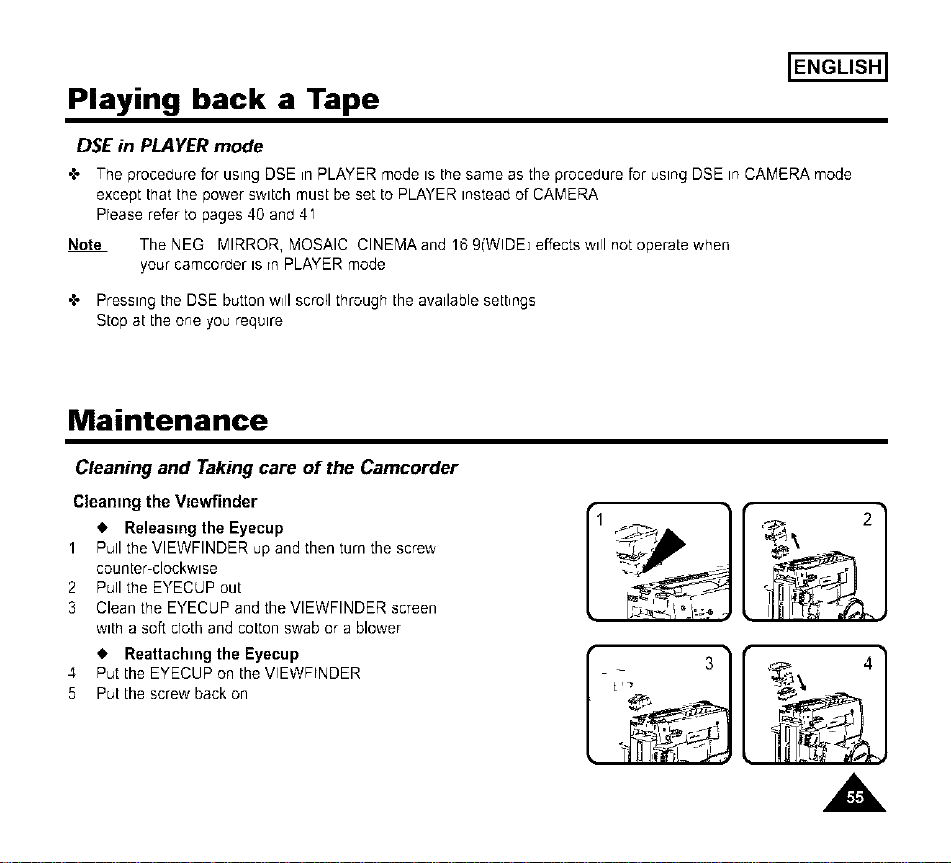
Cleaning the VJewfinder
• Releasing the Eyecup
1 Pull the VIEWFINDER up and then turn the screw
counter-clockwise
2 Pull the EYECUP out
3 Clean the EYECUP and the VIEWFINDER screen
with a soft cloth and cotton swab or a blower
• Reattaching the Eyecup
4 Put the EYECUP on the VIEWFINDER
5 Put the screw back on
A
ENGLISH]
Maintenance
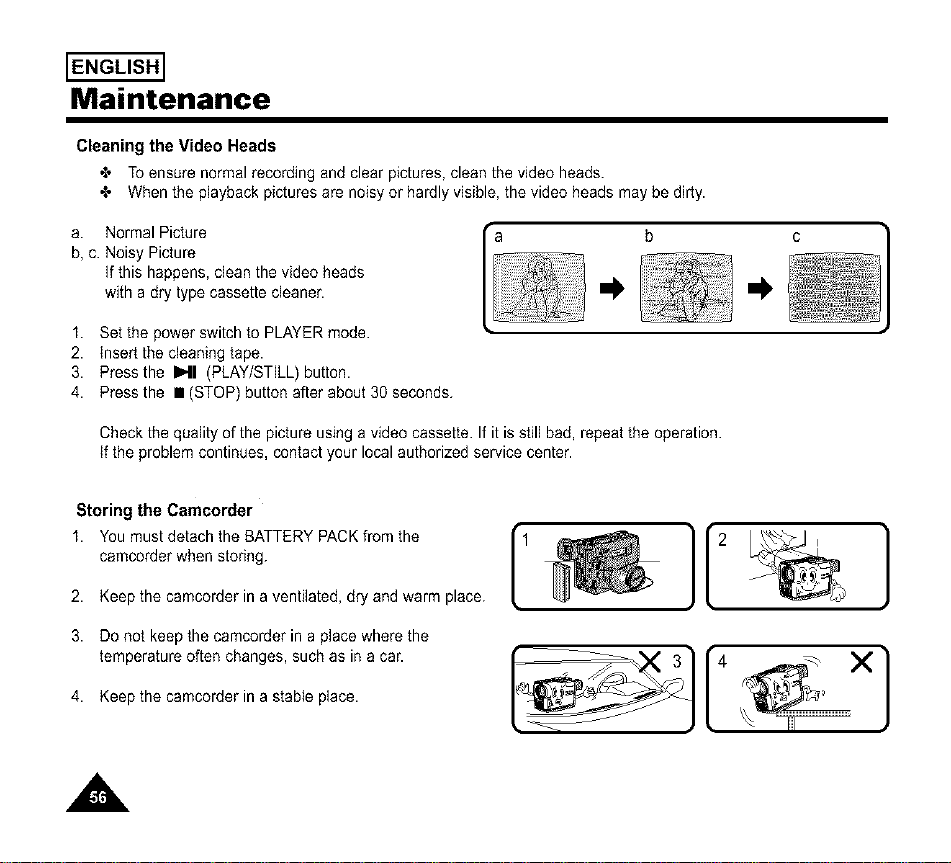
Cleaning the Video Heads
_, Toensurenormalrecordingand clear pictures,cleanthe video heads.
_* Whenthe playbackpicturesare noisyor hardlyvisible,the video headsmay bedirty.
a. NormalPicture
b,c. Noisy Picture
If this happens,cleanthe video heads
with a dry type cassettecleaner.
I. Set the power switch to PLAYER mode.
2. insert the cleaning tape.
3. Press the I_11 (PLAY/STILL) button.
4. Press the • (STOP) button after about 30 seconds.
Check the quality of the picture using a video cassette. If it is still bad, repeat the operation.
if the problem continues, contact your local authorized service center.
Storing the Camcorder
I. You must detach the BATTERY PACK from the
camcorder when storing.
2. Keep the camcorder in a ventilated, dry and warm place.
3. Do not keep the camcorder in a place where the
temperature often changes, such as in a car.
4. Keep the camcorder in a stable place.
1 }[2
}
A

Using Your Camcorder Abroad
Using Your Camcorder Abroad
'_ Each country or area has rtsown electric and TV color system
,_ Before using your car'ncorder abroad check the following
ENGLISH]
Power sources
• You can L_seyour camcorder in any country or area that uses 100V to 240V, 50/60 Hz
• Use a commercially available AC plug adapter if necessary, depending on the power used
Color system
• You can view your recording on the Vlewfinder
However to view a recording on a television or to make a copy to a video cassette recorder,
the television or VCR must be NTSC or PAL60(Player mode onlyj compatible and have the appropriate
audto/vtdeo _acks
'_ PAL-compatible area
Australia, Austria Belgium Bulgartar Ch_nar CIS, Czech Repubitc, Denmarkr Egypt, Finland, France, Germany,
Graecer Great Britain, Holland Hong Kongr Hungary, India, fran, Iraq, Kuwait Dbyar Malaysia Mauritius,
Romania, Saud_Arab_ar Singapore, SIovak Repubhc, Spa_n,Sweden Swttzedand, Syria, T_tatland, Tunlsta, etc
•;, NTSC-compat=blearea
Bahamas,Canada, CentralAmenca,Japan,Mexico,PhLhpptnes,Korea,Tarwan,United States,etc
Note" You can make recordtngs wttr_your camcorder anywhere tn the worId
A
ENGLISH]
Troubleshooting
Troubleshooting
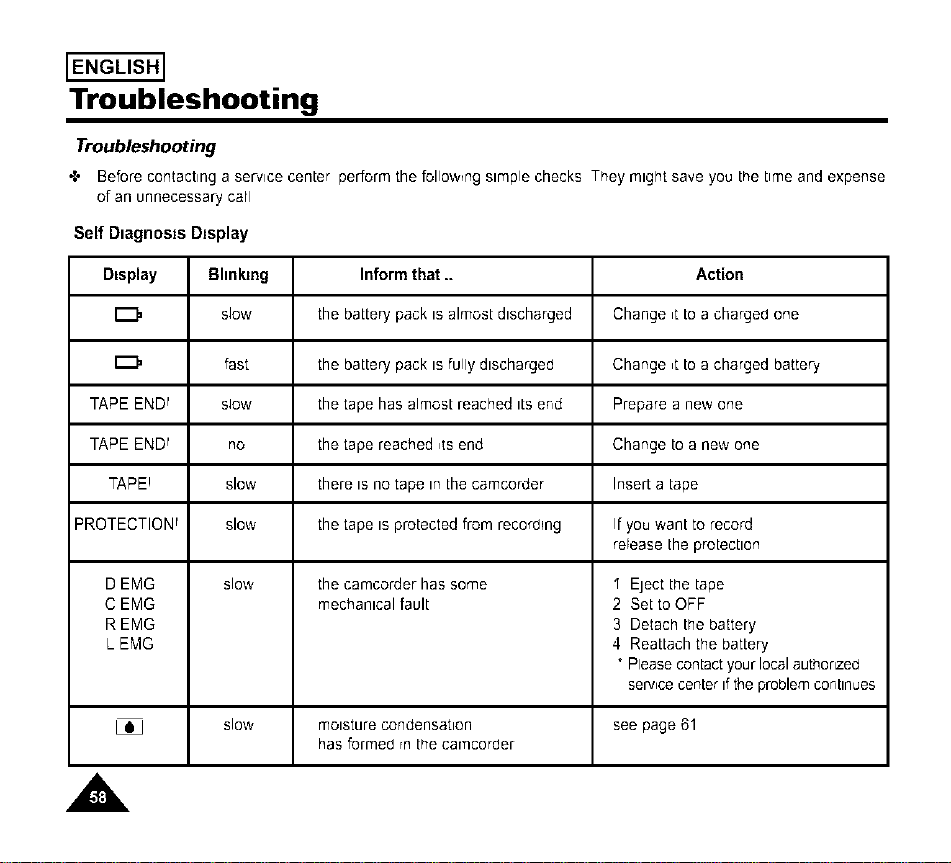
•b Before contacting a service center perform the follo;wng simple checks They might save you the time and expense
of an unnecessary carl
A
Self D=agnosts Display
Display Bhnkmg Inform that _ Action
slow the battery pack is almost discharged Change ,t to a charged one
fast the battery pack is fully discharged Change _ttoa charged battery
TAPE ENDf slow the tape has almost reached its end Prepare a new one
TAPE ENDf no the tape reached _tsend Change to a new one
TAPE! slow there is no tape in the camcorder Insert a tape
PROTECTIONf slow the tape is protected from recording if you want to record
reFease the protection
D EMG slow the camcorder has some I Eject the tape
C EMG mechanical fault 2 Set to OFF
R EMG 3 Detach the battery
L BMG 4 Reattach the battery
* Please contact your local authonzed
serv,ce center Ifthe problem continues
slow moisture condensation see page 61
has formed rRthe camcorder
ENGLISH]
Troubleshooting
Checking
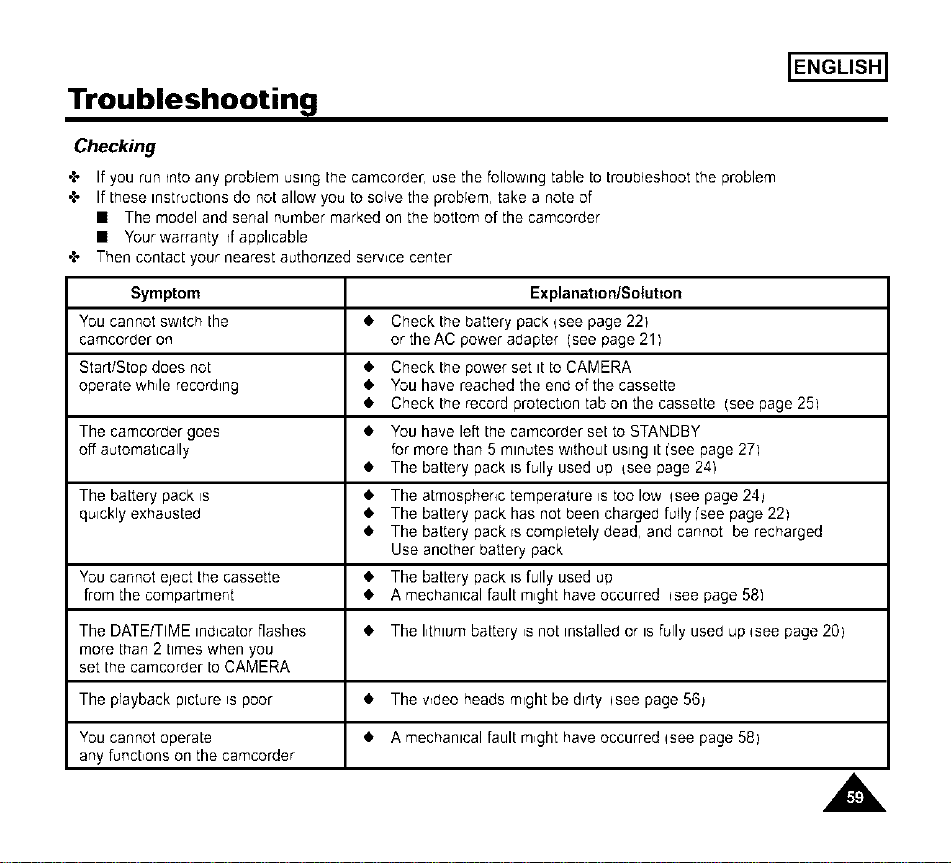
+ If you run _ntoany problem using the cacncorder, use the following table to troubleshoot the problem
+ If these instructions do not allow you to solve the problem, take a note of
• The model and serial number marked on the bottom of the camcorder
• Your warranty d applicable
+ Then contact your nearest authorized serwce center
Symptom Explanat=on/Sotutton
You cannot switch the • Check the battery pack _see page 221
camcorber on or the AC power adapter (see page 21]
Start/Stop does not • Check the power set it to CAMERA
operate wh4e recording • You have reached the end of the cassette
• Check the record protection tab on the cassette (see page 251
The camcorder goes • You have left the car'ncorber set to STANDBY
off automatically for more than 5 minutes without using it ['see page 27]
• The battery pack is fully used up {see page 241
The battery pack is • The atmospheric temperature is too low qsee page 24_
quickly exhausted • The battery pack has not been charged fully ['see page 22)
• The battery pack is completely dead, and cannot be recharged
Use another battery pack
You cannot eject the cassette • The battery pack is fully used up
from the compartment • A mechanical fault m,ght have occurred i see page 581
The DATE/TIME indicator flashes • The I,thlum battery ,s not installeb or Is fully useb up Isee page 20)
more than 2 t_meswhen you
set the car'qcorder to CAMERA
The prayback picture is poor • The wbeo heads might be dirty Isee page 56_
You cannot operate • A mechanical fault m,ght have occurred isee page 58)
any funct,ons on the camcorder
A
ENGLISH]
Troubleshooting
Symptom - Explanation/Solution
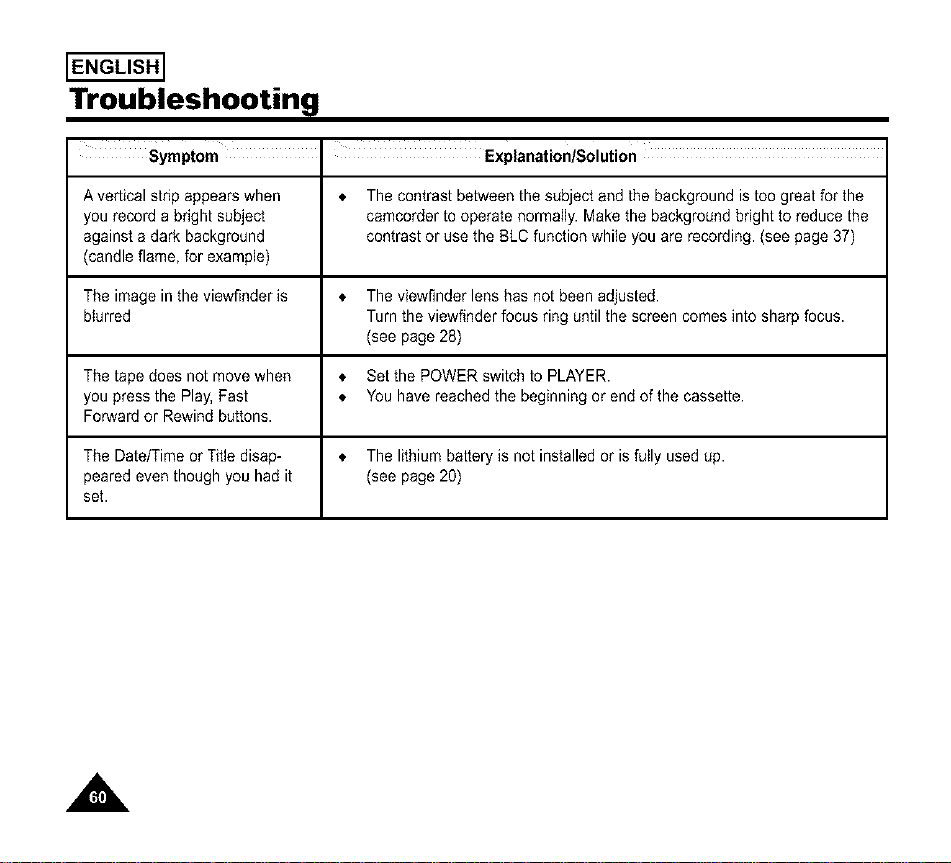
A vertical stdp appears when _, The contrast between the subject and the background is too great for the
you record a bright subject camcorder to operate normally. Make the background bright to reduce the
against a dark background contrast or use the BLC function while you are recording. (see page 37)
(candle flame, for example)
The image in the viewfinder is * The viewfinder lens has not been adjusted.
blurred Turn the viewfinder focus ring until the screen comes into sharp focus.
(see page 28)
The tape does not move when * Set the POWER switch to PLAYER.
you press the Play, Fast * You have reached the beginning or end of the cassette.
Forward or Rewind buttons.
The Date/Time or Title disap- _, The lithium battery is not installed or is fully used up.
peared even though you had it (see page 20)
set.
A
ENGLISH]
Troubleshooting
Moisture Condensation
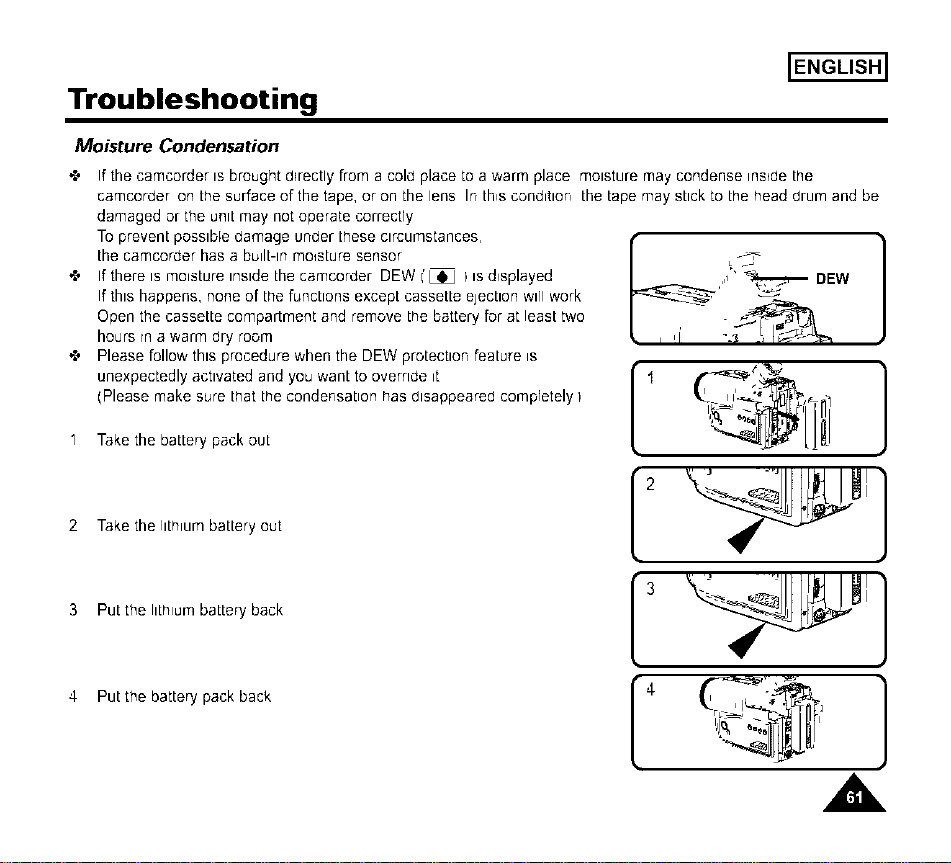
'_ If the camcorder is brought d_rectly from a cold place to a warm place moisture may condense insrdethe
camcorder on the surface of the tape, or on the lens In th,s condition the tape may stick to the head drum and be
damaged or the unit may not operate correctly
To prevent possible damage under these c_rcumstances,
the camcorder has a bullt-lnmoisture sensor
"l' If there is moisture inside the camcorder DEW I'L_J I is displayed
If this happens, none of t_e functions except cassette ejection will work
Open the cassette compartment and remove the battery for at least two
hours rn a warm dry room
,.l, Please follow this procedure when the DEW protection feature is
unexpectedly activated and you want to override it
(Please make sure that the condensation has disappeared compretely I
1 Take the battery pack out
2 Take the lithium battery out
3 Put the Ilthlulq battery back
4 Putthe battery pack back
,'1" _ DEW
• 2 " •
• 3 iI
A
ENGLISH]
Specifications
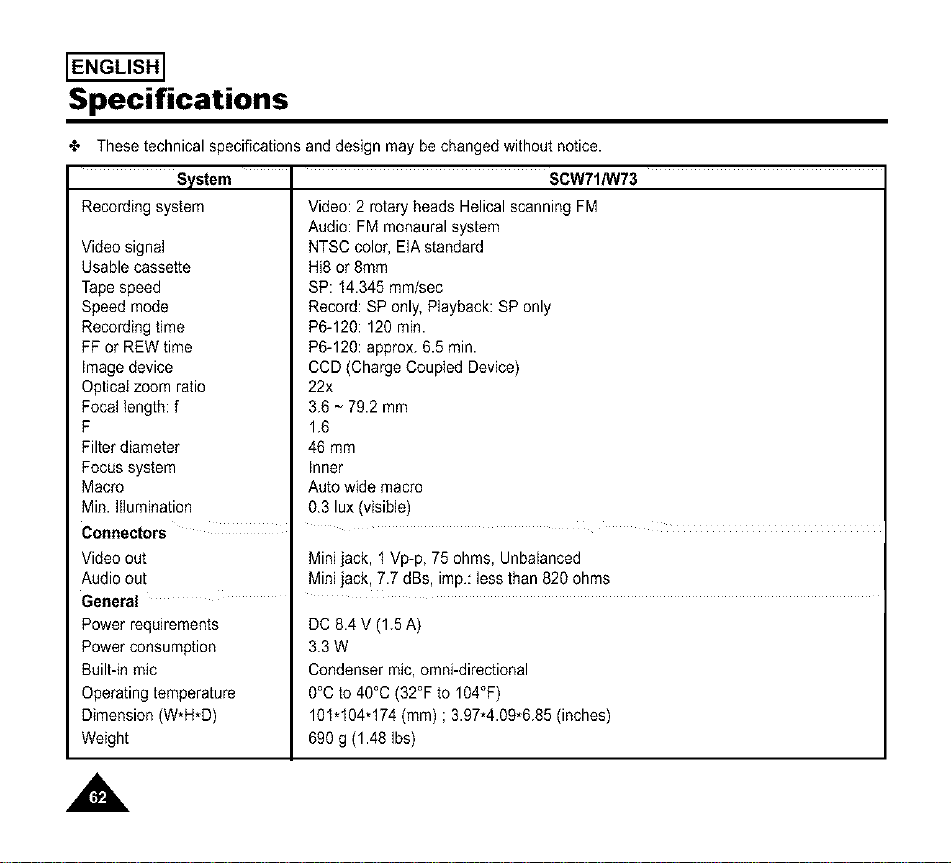
•_, These technical specifications and design may be changed without notice.
System
Recordingsystem
Videosignal
Usablecassette
Tapespeed
Speedmode
Recordingtime
FFor REWtime
Imagedevice
Opticalzoom ratio
Focallength: f
F
Filterdiameter
Focussystem
Macro
Min.Illumination
Connectors
SCW71/W73
Video:2 rotaryheads HelicalscanningFM
Audio:FMmonauralsystem
NTSCcolor,EIAstandard
Hi8 or8ram
SP: 14.345mm/sec
Record:SPonly,Playback:SPonly
P6-120:120 min.
P6-120:approx.6.5 rain.
CCD(ChargeCoupledDevice)
22x
3.6 ~ 79.2mm
1.6
46 mm
Inner
Autowidemacro
0.3 lux (visible)
Videoout Minijack, t Vp-p, 75ohms, Unbalanced
Audioout Minijack, 7.7 dBs, imp.:lessthan 820 ohms
General
Power requirements
Power consumption
Built-in talc
Operating temperature
Dimension (W*H*D)
Weight
DC8.4 V (1.5A)
3.3 W
Condensertalc,omni-directioeal
0°Cto 40°C(32°Fto 104°F)
101.104q74 (ram) ; 3.97*4.09*6.85(inches)
690g (1.48Ibs)
,A
ENGLISH]
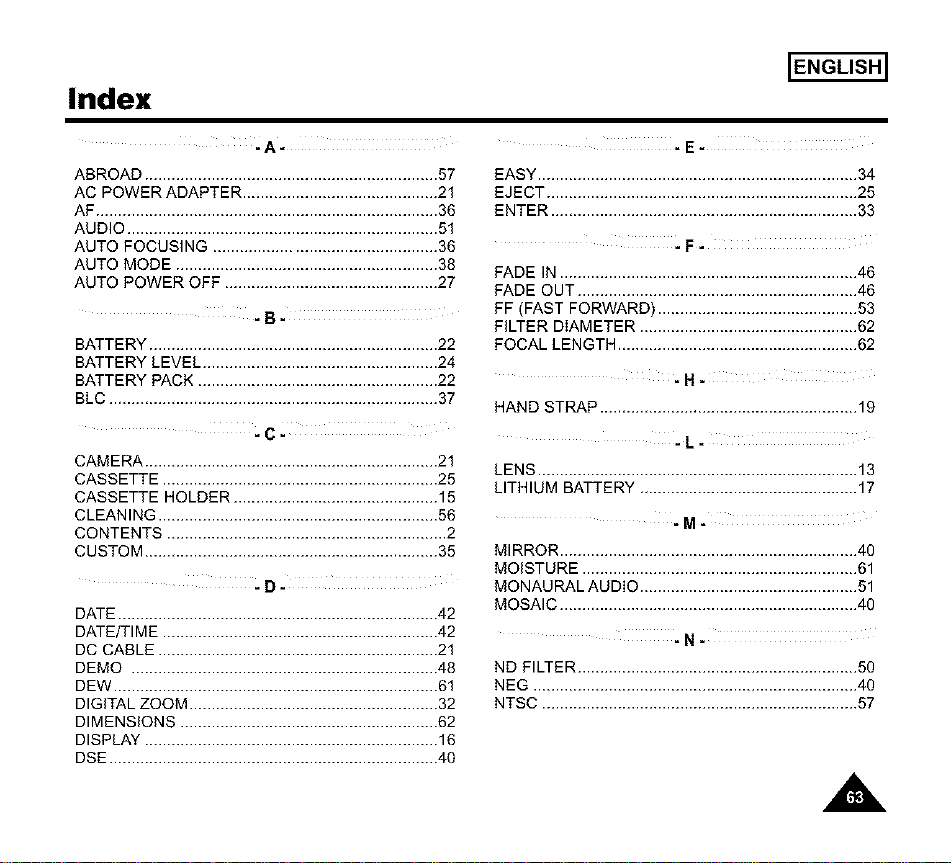
Index
ABROAD .................................................................. 57
AC POWER ADAPTER ............................................ 21
AF ............................................................................. 36
AUDIO ...................................................................... 51
AUTO FOCUSING .................................................. 36
AUTO MODE ........................................................... 38
AUTO POWER OFF ................................................ 27
-B-
BATTERY ................................................................. 22
BATTERY LEVEL ..................................................... 24
BATTERY PACK ...................................................... 22
BLC .......................................................................... 37
-C-
CAMERA .................................................................. 21
CASSETTE .............................................................. 25
CASSETTE HOLDER .............................................. 15
CLEANING ............................................................... 56
CONTENTS ............................................................... 2
CUSTOM .................................................................. 35
DATE ........................................................................ 42
DATE/TIME .............................................................. 42
DC CABLE ............................................................... 21
DEMO ..................................................................... 48
DEW ......................................................................... 61
DIGITAL ZOOM ........................................................ 32
DIMENSIONS .......................................................... 62
DISPLAY .................................................................. 16
DSE .......................................................................... 40
-E-
EASY ........................................................................ 34
EJECT ...................................................................... 25
ENTER ..................................................................... 33
-F-
FADE IN ................................................................... 46
FADE OUT ............................................................... 46
FF (FAST FORWARD) ............................................. 53
FILTER DIAMETER ................................................. 62
FOCAL LENGTH ...................................................... 62
-H-
HAND STRAP .......................................................... 19
-L-
LENS ........................................................................ 13
LITHIUM BATTERY ................................................. 17
-M-
MIRROR ................................................................... 40
MOISTURE .............................................................. 61
MONAURAL AUDIO ................................................. 51
MOSAIC ................................................................... 40
-N-
ND FILTER ............................................................... 50
NEG ......................................................................... 40
NTSC ....................................................................... 57
A
ENGLISH]
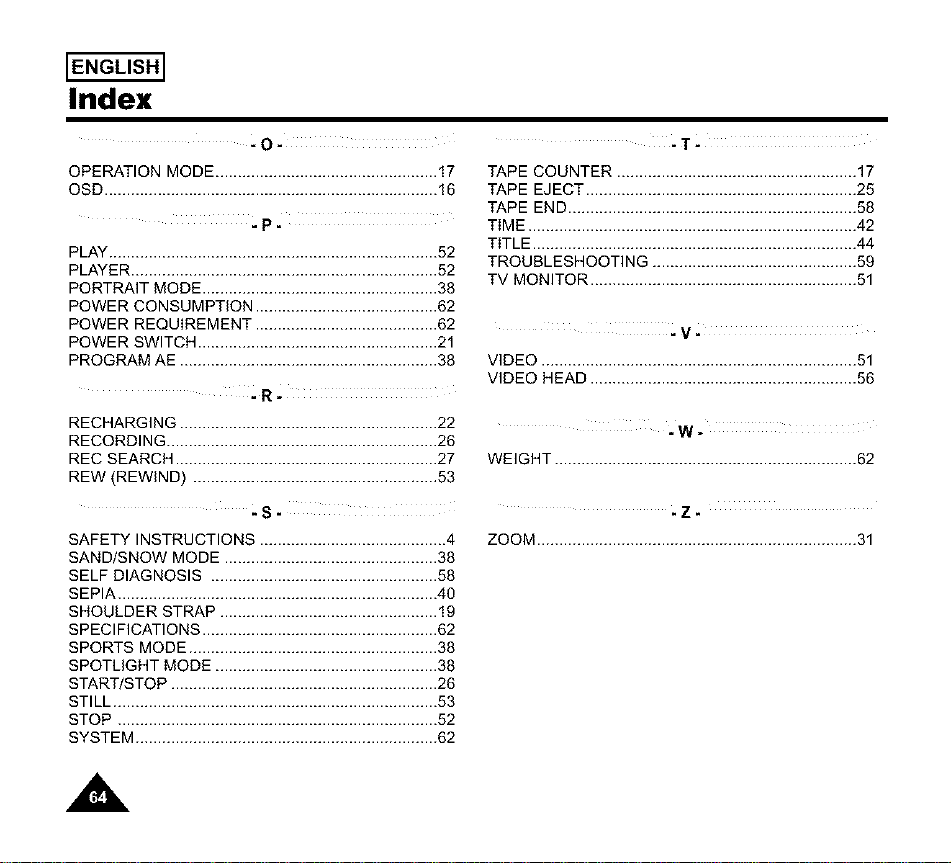
Index
-O-
OPERATION MODE .................................................. 17
OSD ........................................................................... 16
PLAY .......................................................................... 52
PLAYER ..................................................................... 52
PORTRAIT MODE ..................................................... 38
POWER CONSUMPTION ......................................... 62
POWER REQUIREMENT ......................................... 62
POWER SWITCH ...................................................... 21
PROGRAM AE .......................................................... 38
RECHARGING .......................................................... 22
RECORDING ............................................................. 26
REC SEARCH ........................................................... 27
REW (REWIND) ....................................................... 53
-S-
SAFETY INSTRUCTIONS .......................................... 4
SAND/SNOW MODE ................................................ 38
SELF DIAGNOSIS ................................................... 58
SEPIA ........................................................................ 40
SHOULDER STRAP ................................................. 19
SPECIFICATIONS ..................................................... 62
SPORTS MODE ........................................................ 38
SPOTLIGHT MODE .................................................. 38
START/STOP ............................................................ 26
STILL ......................................................................... 53
STOP ........................................................................ 52
SYSTEM .................................................................... 62
-T-
TAPE COUNTER ...................................................... 17
TAPE EJECT ............................................................. 25
TAPE END ................................................................. 58
TIME .......................................................................... 42
TITLE ......................................................................... 44
TROUBLESHOOTING .............................................. 59
TV MONITOR ............................................................ 51
-V-
VIDEO ....................................................................... 51
VIDEO HEAD ............................................................ 56
=W _
WEIGHT .................................................................... 62
-Z-
ZOOM........................................................................31
A
Warranty
ENGLISH]
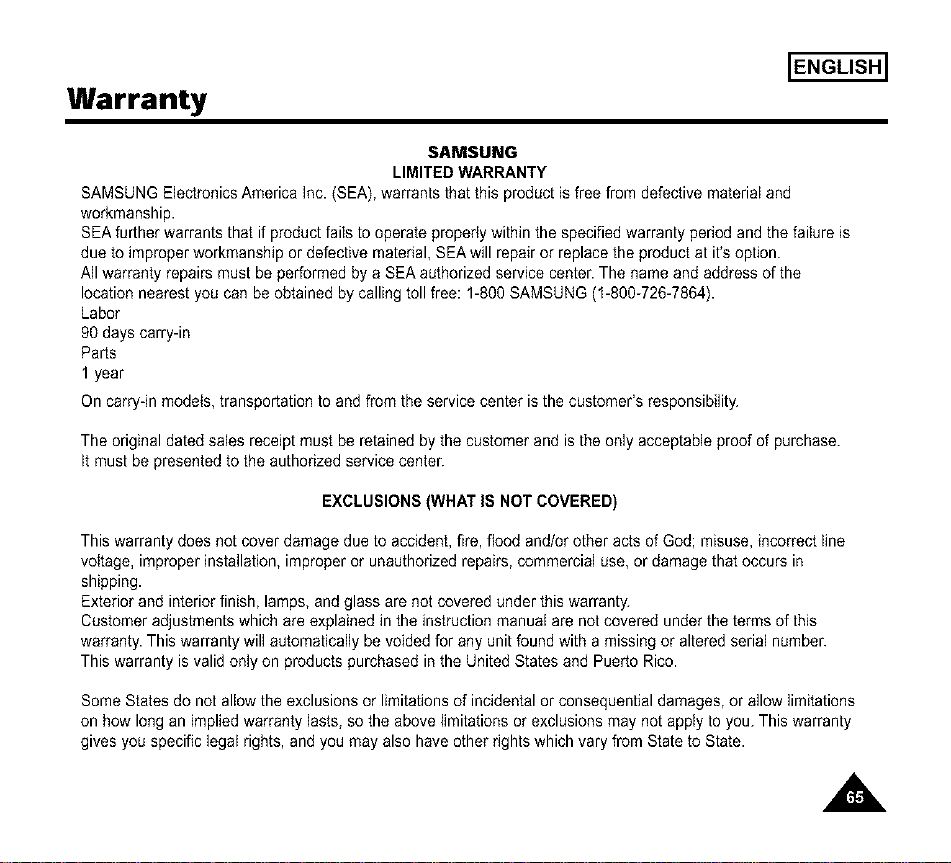
SAMSUNG
LIMITED WARRANTY
SAMSUNG Electronics America Inc. (SEA), warrants that this product is free from defective material and
workmanship.
SEA further warrants that if product fails to operate propedy within the specified warranty pedod and the failure is
due to improper workmanship or defective material, SEA will repair or replace the product at it's option.
All warranty repairs must be performed by a SEA authorized service center. The name and address of the
location nearest you can be obtained by calling toll free: 1-800 SAMSUNG (I-800-726-7864).
Labor
90 days carry-in
Parts
1 year
On carry-in models, transportation to and from the service center is the customer's responsibility.
The original dated sales receipt must be retained by the customer and is the only acceptable proof of purchase.
It must be presented to the authorized service center.
EXCLUSIONS (WHAT IS NOT COVERED)
This warranty does not cover damage due to accident, fire, flood and/or other acts of God; misuse, incorrect line
voltage, improper installation, improper or unauthorized repairs, commercial use, or damage that occurs in
shipping.
Exterior and interior finish, lamps, and glass are not covered under this warranty.
Customer adjustments which are explained in the instruction manuat are not covered under the terms of this
warranty. This warranty will automatically be voided for any unit found with a missing or altered serial number.
This warranty is valid only on products purchased in the United States and Puerto Rico.
Some States do not allow the exclusions or limitations of incidental or consequential damages, or allow limitations
on how long an implied warranty lasts, so the above limitations or exclusions may not apply to you. This warranty
gives you specific legal rights, and you may also have other rights which vary from State to State.
A

THIS CAMCORDER IS MANUFACTURED BY."
£ /:cC_3_c{O_CS
SAMSUNG Electronics America Inc.
105 Challenger Road, Ridgefield Park N.J 07660-0511
Tel: 1-800-SAMSUNG
(1-800-726-7864)
*SamsungElectronics'Internet HomePage
http://www.samsungusa.corn AD68-O0440B