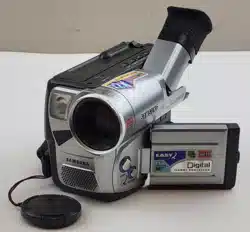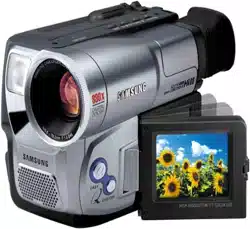
I ENGLISHI
Video Camcorder
8mm
COLOR LCD
SCL610/L630/L650
Hi_ SCL610/L630/L650
Owner's Instruction Book
Before operating the unit, please read
this instruction book thoroughly, and retain it for
future reference.
El
[ENGLISH I
Contents
Features................................................................................................................................................................... 12
Descriptions
• Front View/Side View/Rear View ........................................................................................................ 13, 14, 15
• OSD (On Screen Display) ............................................................................................................................. 16
Accessories Supplied with the Carncorder .............................................................................................................. 18
Remote Control........................................................................................................................................................ 19
• Self Timer Recording ...................................................................................................................................... 19
Adjusting the Hand Strap and Shoulder Strap ........................................................................................................ 20
Lithium Battery Installation ...................................................................................................................................... 21
Connecting the Power Source................................................................................................................................. 22
• To use the AC Power Adapter ........................................................................................................................ 22
• To use the Battery Pack ................................................................................................................................. 23
Using the Battery Pack ............................................................................................................................................ 24
• Continuous Recording time table ................................................................................................................... 24
• Battery Level Display ...................................................................................................................................... 25
Inserting and Ejecting a Cassette ........................................................................................................................... 26
Making Your First Recording ................................................................................................................................... 27
Hints for Stable Image Recording .......................................................................................................................... 29
• Recording with LCD Monitor........................................................................................................................... 29
• Recording with Viewfinder .............................................................................................................................. 29
Adjusting the LCD.................................................................................................................................................... 30
Adjusting Focus of the VIEWFINDER ..................................................................................................................... 31
Playing back a tape on the LCD .............................................................................................................................. 32
• Adjusting the LCD during PLAY...................................................................................................................... 33
• Controlling the Sound from the Speaker ........................................................................................................ 33
• Viewing a Still Picture ..................................................................................................................................... 33
• Picture Search ................................................................................................................................................ 33
Zooming In and Out ................................................................................................................................................. 34
Digital Zoom ............................................................................................................................................................. 35
EASY mode (for beginners) ..................................................................................................................................... 37
CUSTOM-Creating your own customized recording settings .................................................................................. 38
[ENGLISH 1
Contents (continued)
DIS (Digital Image Stabilizer, SCL630/L650 only)................................................................................................... 39
MF/AF (Manual Focus/Auto Focus) ......................................................................................................................... 40
BLC.......................................................................................................................................................................... 41
Program AE (Automatic Exposure) .......................................................................................................................... 42
DSE (Digital Special Effects) in CAMERA mode..................................................................................................... 44
Setting and Recording DATE/TIME ......................................................................................................................... 46
Selecting and Recording a Title............................................................................................................................... 48
Fade In and Out....................................................................................................................................................... 50
PIP........................................................................................................................................................................... 51
Snap Shot ................................................................................................................................................................ 52
White Balance.......................................................................................................................................................... 53
Demonstration ......................................................................................................................................................... 54
Lighting Techniques ................................................................................................................................................. 55
To watch with LCD .................................................................................................................................................. 56
To watch with TV monitor ........................................................................................................................................ 56
Various Functions in PLAYER mode ....................................................................................................................... 58
Adjusting the LCD.................................................................................................................................................... 59
Setting the Speaker ON/OFF .................................................................................................................................. 59
DSE in PLAYER mode ............................................................................................................................................ 59
Multi Playback (Using the PAL60 System) .............................................................................................................. 60
Cleaning and Taking care of the Camcorder ........................................................................................................... 61
• Cleaning the Viewfinder ................................................................................................................................. 61
• Cleaning the LCD Panel ................................................................................................................................. 61
• Cleaning the Video Heads ............................................................................................................................. 61
• Storing the Camcorder .................................................................................................................................... 61
Self Diagnosis Display ............................................................................................................................................ 63
Checking .................................................................................................................................................................. 64
Moisture Condensation ............................................................................................................................................ 66
IENGLISHI
Notices and Safety Instructions
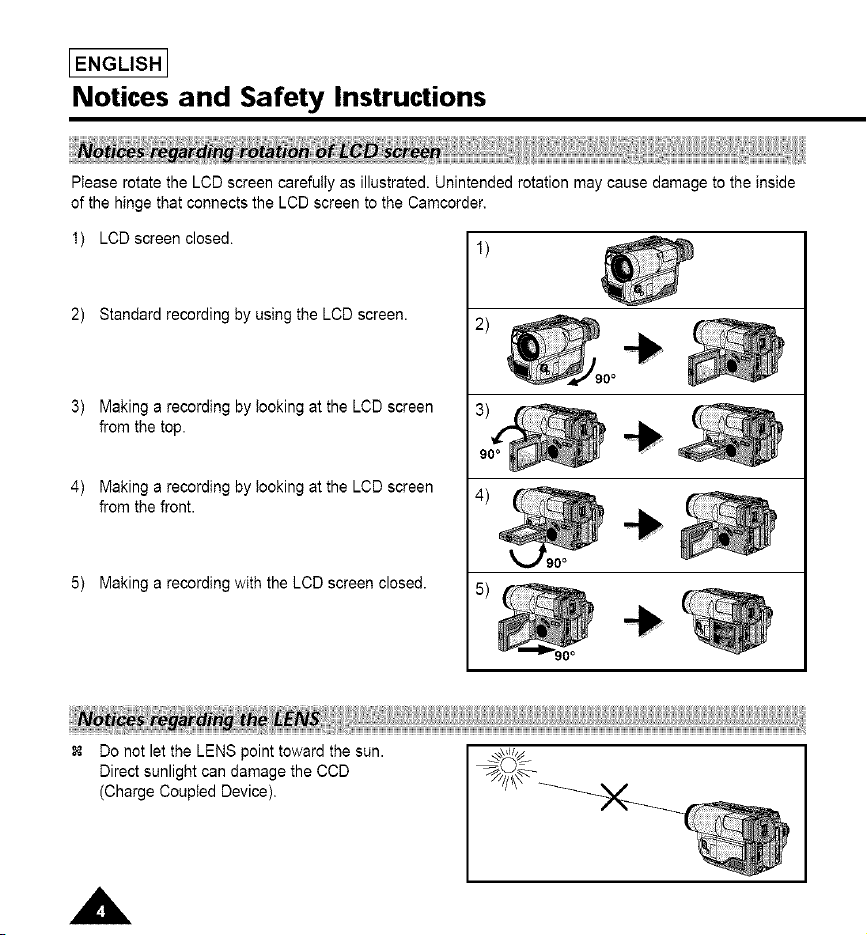
Please rotate the LCD screen carefully as illustrated. Unintended rotation may cause damage to the inside
of the hinge that connects the LCD screen to the Camcorder,
1) LOD screen closed.
2) Standard recording by using the LCD screen.
3) Making a recording by looking at the LCD screen
from the top.
4) Making a recording by looking at the LCD screen
from the front.
5) Making a recording with the LCD screen closed.
0o
Do not let the LENS point toward the sun.
Direct sunlight can damage the CCD
(Charge Coupled Device),
Notices and Safety Instructions
IENGLISH I
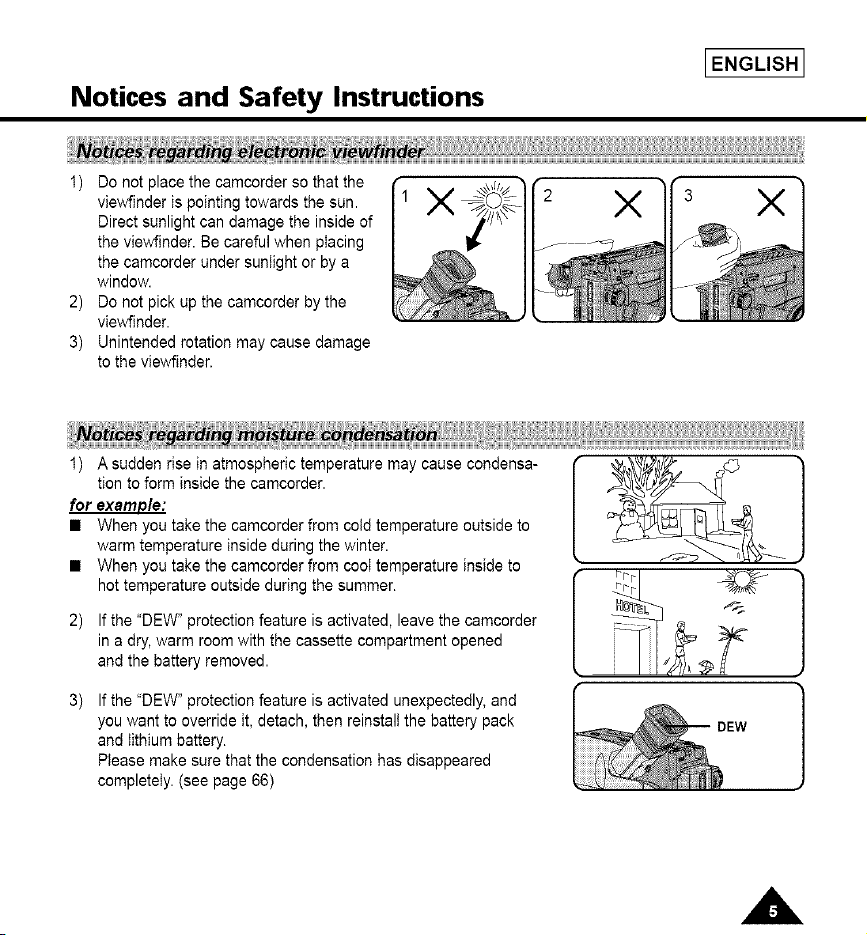
1) Do not place the camcorder so that the
viewfinder is pointing towards the sun.
Direct sunlight can damage the inside of
the viewfinder. Be careful when placing
the camcorder under sunlight or by a
window.
2) Do not pick up the camcorder by the
viewfinder.
3) Unintended rotation may cause damage
to the viewfinder.
X X X
1) A sudden rise in atmospheric temperature may cause condensa-
tion to form inside the camcorder.
for example:
• When you take the camcorder from cold temperature outside to
warm temperature inside during the winter.
When you take the camcorder from cool temperature inside to
hot temperature outside during the summer.
2) If the "DEW" protection feature is activated, leave the camcorder
in a dry, warm room with the cassette compartment opened
and the battery removed.
If the "DEW" protection feature is activated unexpectedly, and
you want to override it, detach, then reinstall the battery pack
and lithium battery.
Please make sure that the condensation has disappeared
completely. (see page 66)
IENGLISHI
Notices and Safety Instructions
Make sure that the battery pack is charged before recording outdoors.
To preserve battery power, keep your camcorder turned off when you are not operating it.
When your camcorder is in CAMERA mode, if it is left in STANDBY for more than 5 minutes
without operation, it will automatically turn off to protect against unexpected battery discharge.
It is a good idea to use the viewfinder instead of the LCD when recording for a tong time because
the LCD uses more battery power.
Make sure that the battery pack is fitted firmly into place.
Dropping the battery pack might damage it.
When the battery reaches the end of its life, please contact your local dealer.
The batteries have to be dealt with as chemical waste.
Warnin.qi: Keep the LITHIUM BATTERY out of the reach of children. Should the battery be swal-
lowed, consult a doctor immediately.
The lithium battery maintains the clock function, TITLE, CUSTOM function and preset contents
memory; even if the battery pack or AC power adapter is removed.
The lithium battery for the camcorder lasts about 8~10 months under normal operation from time of
installation.
When the lithium battery becomes weak or dead, the date/time indicator flashes about 5 seconds
when you set the power switch to CAMERA. In this case, replace the lithium battery with type CR2025.
(see page 21)
WARNING: I _'When the lithium battery
> becomes weak or dead please
LITHIUMBATTERYMUSTBE I contact your local dealer. The
RECYCLEDORDISPOSED batteries have to be dealt with
OF PROPERLY. as chemical waste.
Notices and Safety Instructions
IENGLISH I
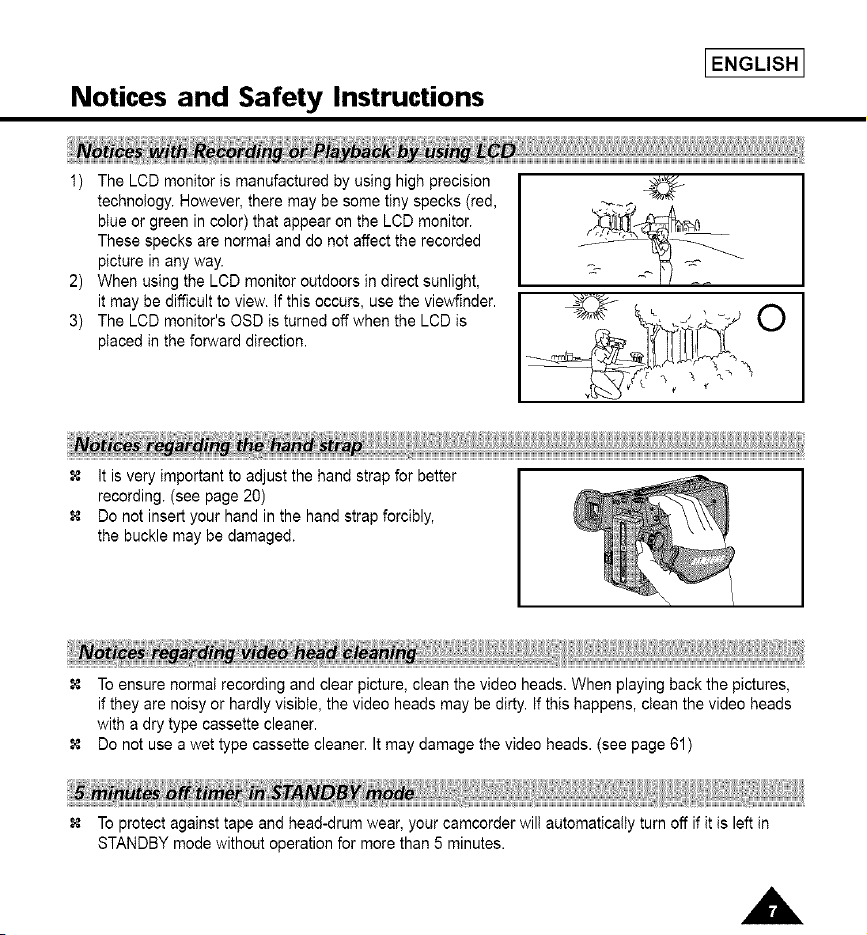
1) The LCD monitor is manufactured by using high precision
technoiegy. However, there may be some tiny specks (red,
btue or green in color) that appear on the LCD monitor.
These specks are normaI and do not affect the recorded
picture in any way.
2) When using the LCD monitor outdoors in direct sunlight,
it may be difficult to view. If this occurs, use the viewfinder.
3) The LCD monitor's OSD is turned off when the LCD is
placed in the forward direction.
It is very important to adjust the hand strap for better
recording. (see page 20)
Do not insert your hand in the hand strap forcibly,
the buckle may be damaged.
To ensure normat recording and clear picture, clean the video heads. When playing back the pictures,
if they are noisy or hardly visible, the video heads may be dirty. If this happens, clean the video heads
with a dry type cassette cleaner.
Do not use a wet type cassette cleaner. It may damage the video heads. (see page 61)
To protect against tape and head-drum wear, your camcorder wilt automatically turn off if it is left in
STANDBY mode without operation for more than 5 minutes.
IENGLISHI
Notices and Safety Instructions
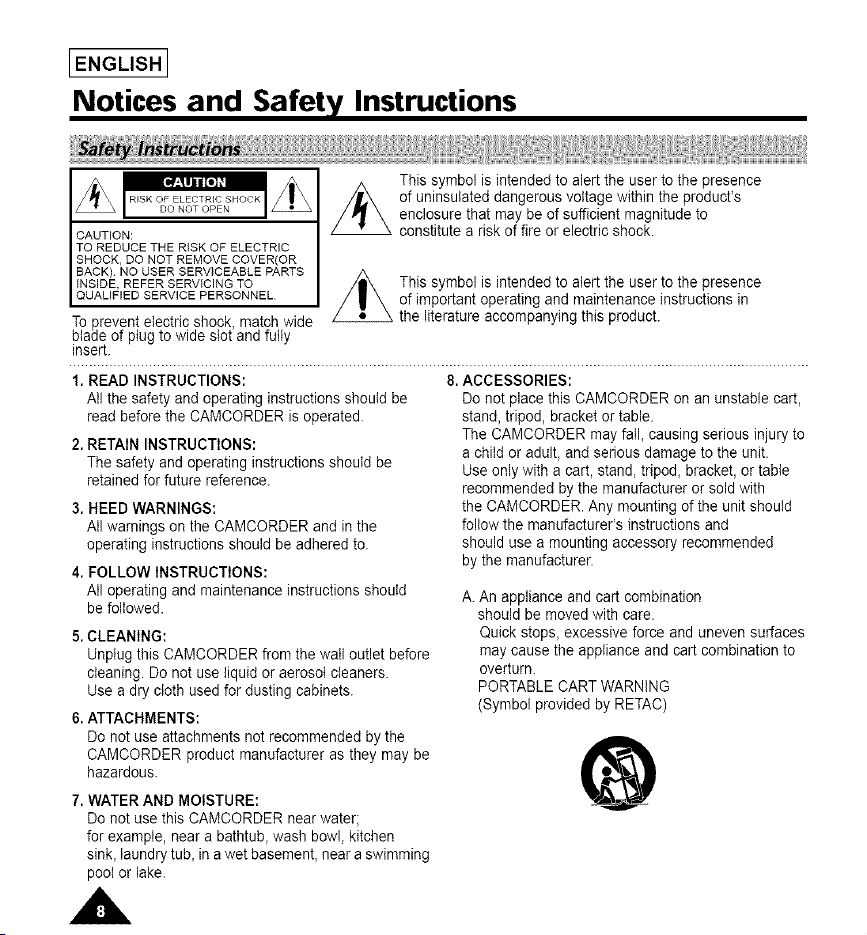
CAUTION:
TO REDUCE THE RISK OF ELECTRIC
SHOCK, DO NOT REMOVE COVER(OR
BACK). NO USER SERVICEABLE PARTS
INSIDE, REFER SERVICING TO
QUALIFIED SERVICE PERSONNEL
Toprevent electric shock match wide
bade of pug to w de sot and fu y
insert.
This symbol is intended to alert the user to the presence
of uninsutated dangerous voltage within the product's
enclosure that may be of sufficient magnitude to
constitute a risk of fire or electric shock.
This symbol is intended to alert the user to the presence
of important operating and maintenance instructions in
, the literature accompanying this product.
1. READ INSTRUCTIONS:
All the safety and operating instructions should be
read before the CAMCORDER is operated.
2. RETAIN INSTRUCTIONS:
The safety and operating instructions should be
retained for future reference.
3. HEED WARNINGS:
All warnings on the CAMCORDER and inthe
operating instructions should be adhered to.
4. FOLLOW INSTRUCTIONS:
AII operating and maintenance instructions should
be followed.
5. CLEANING:
Unplug this CAMCORDER from the wail outlet before
cleaning. Do not use liquid or aerosol cleaners.
Use a dry cloth used for dusting cabinets.
6. ATTACHMENTS:
Do not use attachments not recommended by the
CAMCORDER product manufacturer as they may be
hazardous.
8. ACCESSORIES:
Do not place this CAMCORDER on an unstable cart,
stand, tripod, bracket or table.
The CAMCORDER may fall_ causing serious injury to
a child or adult, and serious damage to the unit.
Use only with a cart, stand, tripod_ bracket, or table
recommended by the manufacturer or sold with
the CAMCORDER. Any mounting of the unit should
follow the manufacturer's instructions and
should use a mounting accessory recommended
by the manufacturer.
A. An appliance and cart combination
should be moved with care.
Quick stops_ excessive force and uneven surfaces
may cause the appliance and cart combination to
overturn.
PORTABLE CART WARNING
(Symbol provided by RETAC)
7. WATER AND MOISTURE:
Do not use this CAMCORDER near water;
for example, near a bathtub_ wash bowl, kitchen
sink_laundry tub_in a wet basement, near a swimming
poot or lake.
IENGLISH I
Notices and Safety Instructions
9. VENTILATION:
Slots and openings inthe cabinet are provided for
ventilation to ensure reliable operation of
the CAMCORDER and to protect it from overheating.
These openings must not be blocked or covered.
Never place your CAMCORDER on a bed, sofa, rug,
or other similar surface: on or near a radiator or heat
register.
This CAMCORDER should not be placed in a built-in
installation such as a bookcase or rack unless
proper ventilation is provided or the manufacturer's
instructions have been adhered to.
10. POWER SOURCES:
The CAMCORDER should be operated only from
the type of power source indicated on the label.
If you are not sure of the type of power supply at
your home, consult your appliance dealer or local
power company.
A CAMCORDER is intended to be operated from
battery power, or other sources, refer to the
operating instructions.
11.GROUNDING OR POLARIZATION:
This CAMCORDER may be equipped with either a
polarized 2-wire AC line plug (a plug having
one blade wider than the other) or a 3-wire grounding
type plug, a plug having a third (grounding) pin.
If you are unable to insert the plug fully into the outlet,
try reversing the plug. If the plug still fails to fit,
contact your electrician to replace your outlet.
Do not defeat the safety purpose of the polarized
plug.
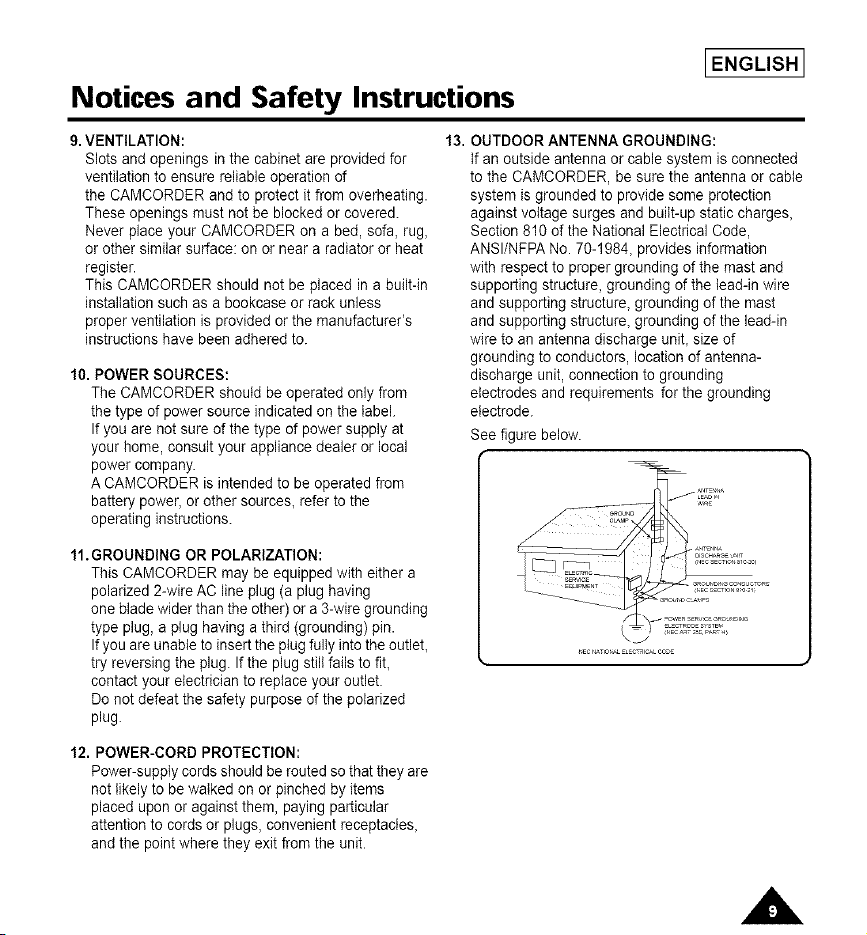
13. OUTDOOR ANTENNA GROUNDING:
tf an outside antenna or cable system is connected
to the CAMCORDER, be sure the antenna or cable
system is grounded to provide some protection
against voltage surges and buiIt-up static charges,
Section 810 of the National Electrical Code,
ANSI/NFPA No. 70-1984, provides information
with respect to proper grounding of the mast and
supporting structure, grounding of the tead-in wire
and supporting structure, grounding of the mast
and supporting structure, grounding of the lead-in
wire to an antenna discharge unit, size of
grounding to conductors, location of antenna-
discharge unit, connection to grounding
electrodes and requirements for the grounding
electrode.
See figure below.
12. POWER-CORD PROTECTION:
Power-supply cords should be routed so that they are
not likely to be walked on or pinched by items
placed upon or against them, paying particular
attention to cords or plugs, convenient receptacles,
and the point where they exit from the unit.
[ENGLISH I
Notices and Safety Instructions
14. LIGHTNING: 19. DAMAGE REQUIRING SERVICE:
For added protection of this CAMCORDER during
a lightning storm or when it is left unattended and
unused for tong periods of time, unplug it from
the wall outlet and disconnect the antenna or cable
system.
This will prevent damage to the CAMCORDER due
to lightning and power-line surges.
15. POWER LINES:
An outside antenna system should not be located
in the vicinity of overhead power lines or other
electric light or power circuits where it can fall into
such power lines or circuits.
When installing an outside antenna system,
extreme care should be taken to keep from touching
such power lines or circuits as contact with them
might be fatal.
16. OVERLOADING:
Do not overload wail outlets and extension cords
as this can result in a risk of fire or electric shock.
17. OBJECTS AND LIQUIDS:
Never push objects of any kind into this
CAMCORDER through openings as they may touch
dangerous voltage points or short out a part
that could result in a fire or electric shock.
Never spill liquids of any kind onto the
CAMCORDER. Should spillage occur, unplug unit
and have it checked by a technician before use.
Unplug this CAMCORDER from the wail outlet and
refer servicing to qualified service personnel
under the following conditions:
a. When the power-supply cord or plug is damaged.
b. If any liquid has been spilled onto, or objects have
fatien into the CAMCORDER.
c. If the CAMCORDER has been exposed to rain or
water.
d. If the CAMCORDER does not operate normatly
by following the operating instructions, adjust only
those controls that are covered by the operating
instructions. Improper adjustment of other
controls may result in damage and will often
require extensive work by a qualified technician to
restore the CAMCORDER to its normal
operation.
e. tf the CAMCORDER has been dropped or
the cabinet has been damaged.
f. When the CAMCORDER exhibits a distinct
change in performance, this indicates a
need for service.
20. REPLACEMENT PARTS:
When replacement parts are required, be sure
the service technician has used replacement parts
specified by the manufacturer and having the
same characteristics as the original part.
Unauthorized substitutions may result in fire,
electric shock or other hazards.
18. SERVICING:
Do not attempt to service this CAMCORDER
yourself. Opening or removing covers may expose
you to dangerous voltage or other hazards.
Refer all servicing to qualified service personnel.
21. SAFETY CHECK:
Upon completion of any service or repairs to this
CAMCORDER, ask the service technician to
perform safety checks to determine that
the CAMCORDER is in safe operating order.

Notices and Safety Instructions
NOTE TO CATV SYSTEM INSTALLER:
This reminder is provided to calt the CATV system
installer's attention to Article 820-40 of the NEC that
provides guidelines for proper grounding and,
in particular, specifies that the cable ground shall be
connected to the grounding system of the building as
close to the point of cable entry as practical.
USER INSTALLER CAUTION:
Your authority to operate this FCC certified equipment
could be voided if you make changes or modifications
not expressly approved by this party responsible for
compliance to part 15 FCC rules.
LENGLISH l
_ENGLISHI
Getting to Know Your Camcorder
Your camcorder has many features for recording and playing back.
Snap Shot (SCL630/L650 only)
The Snap Shot function lets you record an object at a standstill for a limited time in Camera mode.
(see page 52)
PIP (SCL630/L650 only)
The PiP function shows where the center of the image is while recording in Digital Zoom of
the Camera mode. (see page 51)
BLC
When you record a subject with the light source behind the subject or a subject with a light background,
use the BLC function. (see page 41)
DSE (Digital Special Effects)
The DSE enables you to give a creative look to your films by adding various special effects.
(see page 44)
Program AE (Auto Exposure)
The Program AE enables you to adapt the shutter speed and aperture to the type of scene to be filmed.
(see page 42)
DIS (SCL630/L650 only)
The DIS compensates for unstable images caused by hand shake, particularly at high magnification.
(see page 39)
22x High ratio zoom lens
Zooming is a recording technique that lets you change the size of the subject in the picture.
For more professional recordings, use the zoom function. (see page 34)
Digital Zoom
Zooms more than 22x are performed digitally. (see page 35)
Macro
The macro function allows you to record your subject at close range.
You have to adjust the zoom fully wide for macro recording. (see page 34)
EASY
This mode enables even the beginner to easily make a recording. (see page 37)
Multi PLAYBACK (PAL60)
PAL60 is a special output signal format with which a tape recorded on this camcorder (NTSC format) can
be viewed on a PAL TV.
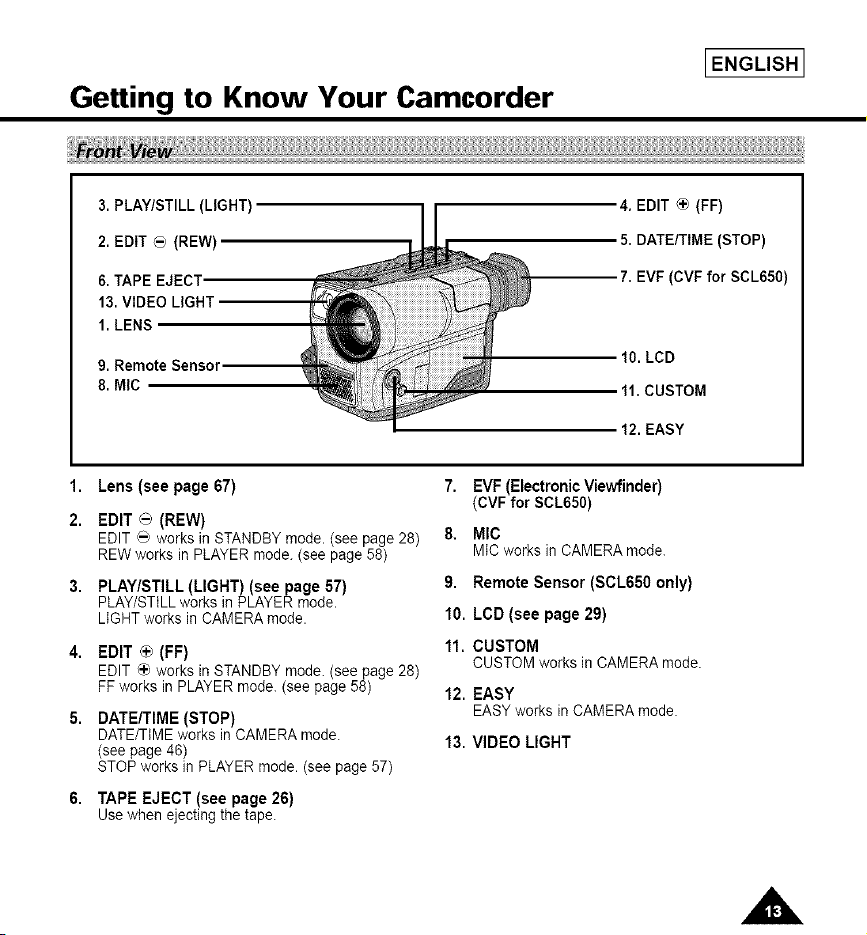
Getting to Know Your Camcorder
IENGLISH I
3. PLAY/STILL (LIGHT)
2. EDIT _ (REW)
6. TAPE EJECT
13. VIDEO LIGHT
1. LENS
9. Remote Sensor
8. MIC
4. EDIT _ (FF)
5. DATE/TIME (STOP)
7. EVF (CVF for SCL650)
t0. LCD
tl. CUSTOM
t2. EASY
1,
2.
Lens (seepage 67)
EDIT _ (REW)
EDIT _ works in STANDBY mode. (see page 28)
REW works in PLAYER mode. (see page 58)
PLAY/STILL (LIGHT) (see page 57)
PLAY/STiLL works in PLAYER mode.
LIGHT works in CAMERA mode.
EDIT _+_(FF)
EDIT _'_works in STANDBY mode. (see page 28)
FF works in PLAYER mode. (see page 58)
DATE/TIME (STOP)
DATE/TIME works in CAMERA mode.
(see page 46)
STOP works in PLAYER mode. (see page 57)
7. EVF(Electronic Viewfinder)
(CVFfor SCL650)
8, MIC
MICworks inCAMERAmode.
9. RemoteSensor (SCL650 only)
10. LCD (see page 29)
11. CUSTOM
CUSTOMworksin CAMERAmode.
12. EASY
EASYworks inCAMERAmode.
13. VIDEO LIGHT
6. TAPE EJECT (see page 26)
Use when ejecting the tape.
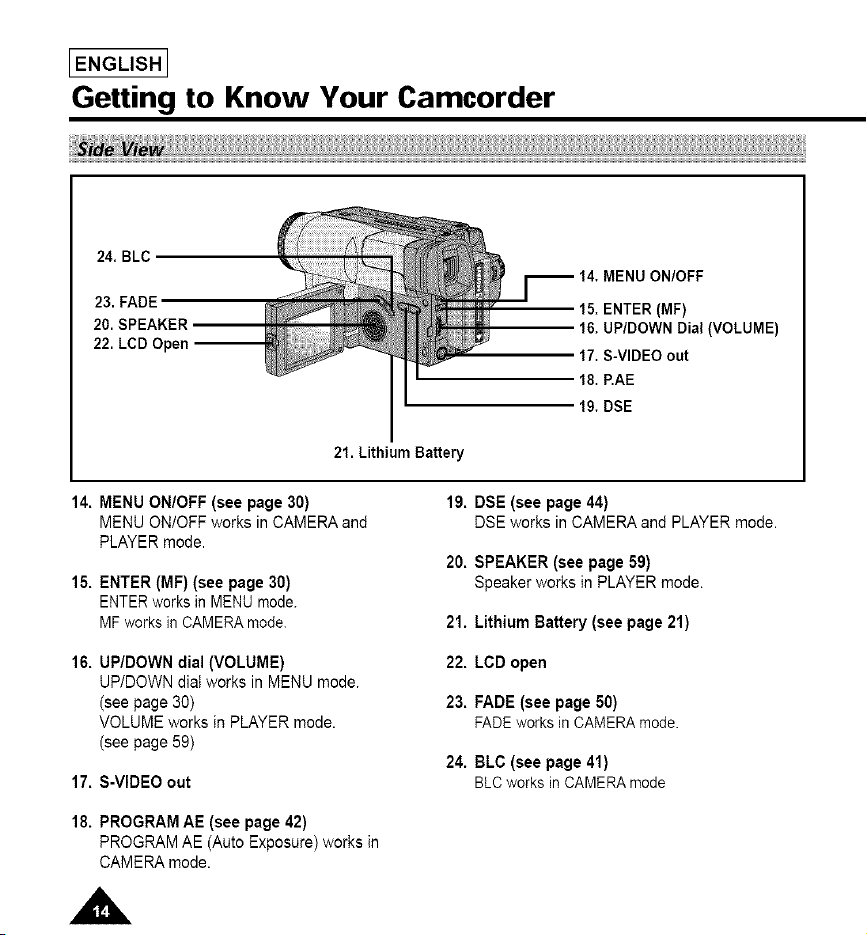
IENGLISHI
Getting to Know Your Camcorder
24. BLC
23. FADE
20. SPEAKER
22. LCD Open --
MENU ON/OFF
15. ENTER (iF)
16. UP/DOWN Dial (VOLUME)
17. S-VIDEO out
18. P.AE
19. DSE
21. Lithium Battery
14. MENU ON/OFF (see page 30)
MENU ON/OFF works in CAMERA and
PLAYER mode.
15. ENTER (MF) (see page 30)
ENTER works in MENU mode.
MF works in CAMERA mode.
16. UP/DOWN dial (VOLUME)
UP/DOWN diaI works in MENU mode.
(see page 30)
VOLUME works in PLAYER mode.
(see page 59)
17. S-VIDEO out
19. DSE (see page 44)
DSE works in CAMERAand PLAYERmode.
20. SPEAKER (see page 59)
Speaker works in PLAYER mode.
21. Lithium Battery (see page 21)
22. LCD open
23. FADE (see page 50)
FADEworksin CAMERAmode.
24. BLC (see page 41)
BLCworksin CAMERAmode
18. PROGRAM AE (see page 42)
PROGRAM AE (Auto Exposure) works in
CAMERA mode.

Getting to Know Your Camcorder
IENGLISH I
25. ZOOM
36. BATTERY EJECT I [
27. Hooks for shoulder stra
26. CASSETTE
Compartment
28. AUDIONIDEO Out
32. START/STOP
35. Batter,
38. Recharging Indicator
37. SNAP SHOT/D.ZOOM
33. External MIC
(SCL630/L650)
29. LENS Cap
34. DC Jack
31. POWER Switch
30. Hand Strap
25. ZOOM (see page 34)
26. Cassette Compartment
27. Hooksfor Shoulder Strap (see page 21)
28. AUDIO/VIDEOout (see page 56)
29. LENSCap
30. Hand Strap (see page 20)
31. POWERSwitch (see page 22)
- CAMERA: Selectto record.
- OFF : Selectto turn off the camcorder.
- PLAYER:Selectto playback.
32. START/STOP(see page 28)
START/STOPworksin CAMERAmode.
33. External MIC (see page 67)
34. DC Jack (see page 22)
35. Battery Pack Compartment(see page 23)
36. BATTERYEJECT
37. SNAPSHOT/D.ZOOM
SNAP SHOTworks in CAMERAmode.
(SCL630/L650only,see page 52)
D.ZOOM works in CAMERAmode.
(SOL610only, see page 35)
38. Recharging Indicator (see page 23)
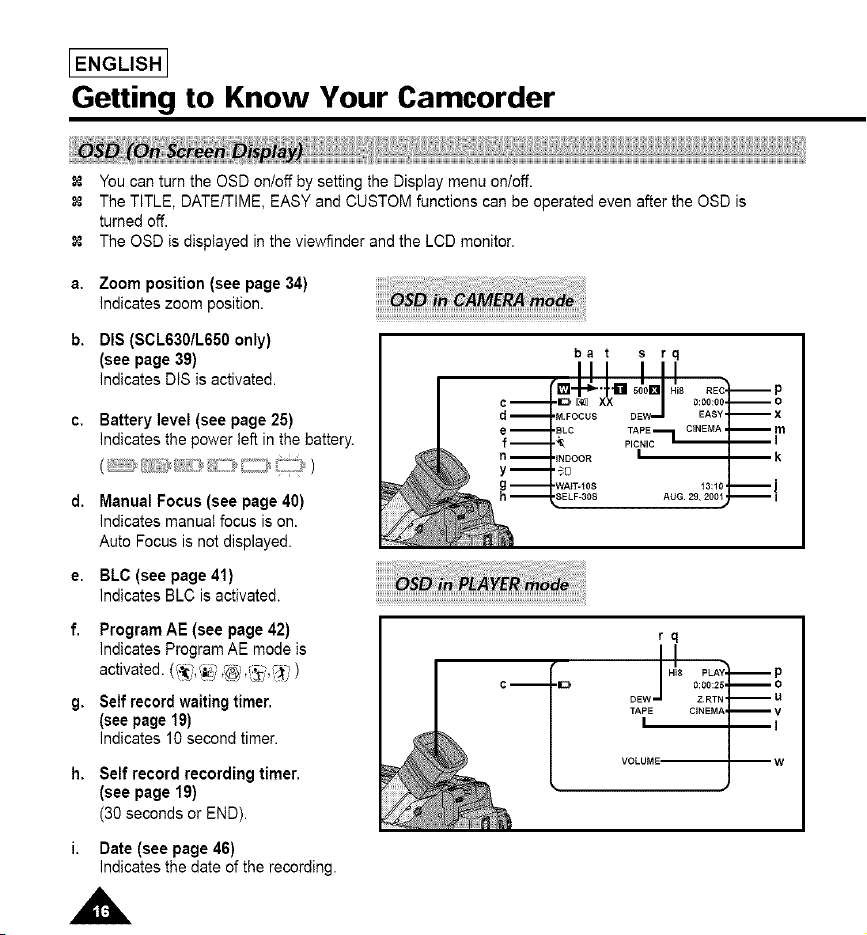
IENGLISHI
Getting to Know Your Camcorder
You can turn the OSD on/off by setting the Display menu on/off.
The TITLE, DATE/TIME, EASY and CUSTOM functions can be operated even after the OSD is
turned off.
The OSD is displayed in the vie_Minder and the LCD monitor.
a. Zoom position (see page 34)
indicateszoom position.
b. DIS (SCL630/L650 only)
(see page 39)
indicates DIS is activated.
c, Batterylevel (see page 25)
indicatesthe power left in the battery.
d. Manual Focus (see page 40)
indicates manual focus is on.
Auto Focus is not displayed.
e. BLC (see page 41)
indicates BLC is activated.
f. ProgramAE (see page 42)
indicates Program AE mode is
activated. (7-I(/.,_i ,'@.,_},'4" ' )
g. Self record waiting timer.
(see page 19)
Indicates 10 second timer.
rq
h. Self record recordingtimer.
(see page 19)
(30 secondsor END).
i. Date(see page 46)
indicatesthe date of the recording.
I
Getting to Know Your Camcorder
_ENGLISH 1
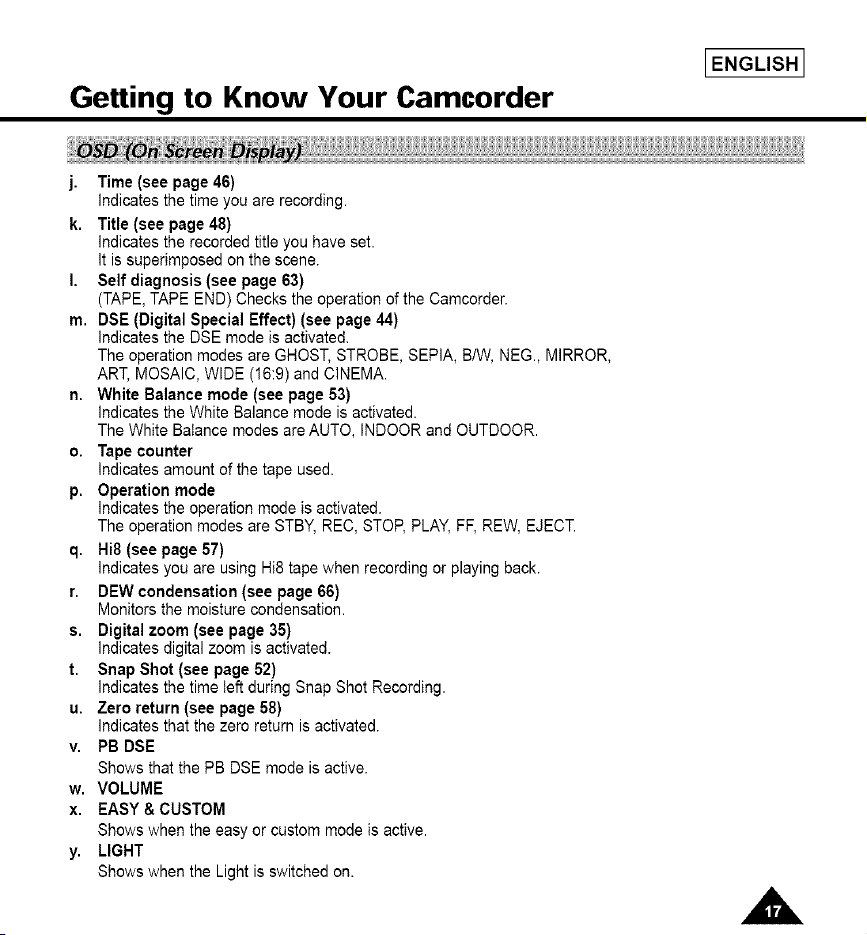
j. Time (see page46)
Indicates the time you are recording.
k. Title (see page 48)
Indicates the recorded title you have set.
It is superimposed on the scene.
I. Self diagnosis (see page 63)
(TAPE, TAPE END) Checks the operation of the Camcerder.
m. DSE (Digital Special Effect) (see page 44)
Indicates the DSE mode is activated.
The operation modes are GHOST, STROBE, SEPIA, B/W, NEG., MIRROR,
ART, MOSAIC, WIDE (16:9) and CINEMA.
n. White Balance mode (see page 53)
Indicates the White Balance mode is activated.
The White Balance modes are AUTO, INDOOR and OUTDOOR.
o. Tape counter
Indicates amount of the tape used.
p. Operation mode
Indicates the operation mode is activated.
The operation modes are STBY, REC, STOP, PLAY, FF, REW, EJECT.
q. Hi8 (see page 57)
Indicates you are using Hi8 tape when recording or playing back.
r. DEW condensation (see page 66)
Monitors the moisture condensation.
s. Digital zoom (see page 35)
Indicates digital zoom is activated.
t. Snap Shot (see page 52)
Indicates the time left during Snap Shot Recording.
u. Zero return (see page 58)
Indicates that the zero return is activated.
v. PB DSE
Shows that the PB DSE mode is active.
w. VOLUME
x. EASY&CUSTOM
Shows when the easy or custom mode is active.
y. LIGHT
Shows when the Light is switched on.
IENGLISHI
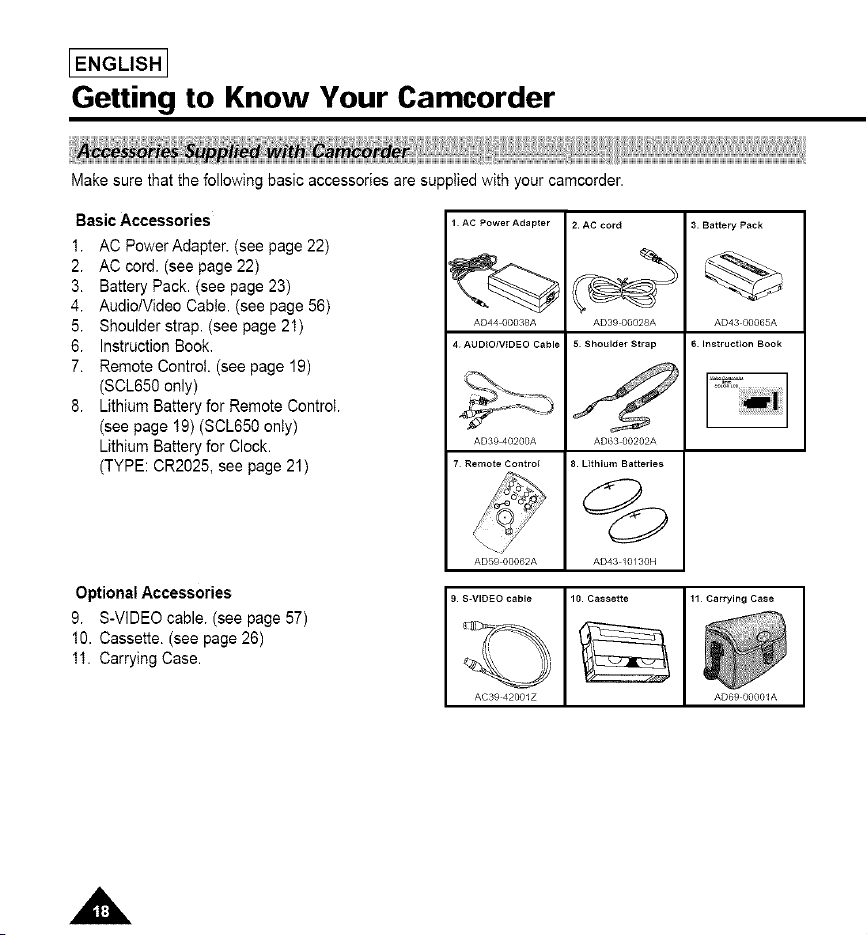
Getting to Know Your Camcorder
Make sure that the following basic accessories are supplied with your camcorder.
Basic Accessories
1. AC Power Adapter. (see page 22)
2. AC cord. (see page 22)
3. Battery Pack. (see page 23)
4. AudiolVideo Cable. (see page 56)
5. Shoulder strap. (see page 21)
6. Instruction Book.
7. Remote Control. (see page 19)
(SOL650 only)
8. Lithium Battery for Remote Control.
(see page 19) (SCL650 only)
Lithium Battery for Clock.
(TYPE: 0R2025, see page 21)
1 AC Power Adapter
AD44 00038A
4 AUDIO/VIDEO Cable
AD39 40200A
7 Remote Control
2. AC cord
AD39 00028A
5 Shoulder Strap
3. Battery Pack
AD43 00065A
6. Instruction Book
AD63 00202A
8. Lithium Batteries
@
AD59 00062A AD43 /0/30N
9. S-VIDEO cable 10. Cassette 11 Carrying Case
AC39 42001Z AD69 00001A
Optional Accessories
9. S-VIDEO cable. (see page 57)
10. Cassette. (see page 26)
11. Carrying Case.
Getting to Know Your Camcorder
IENGLISH I
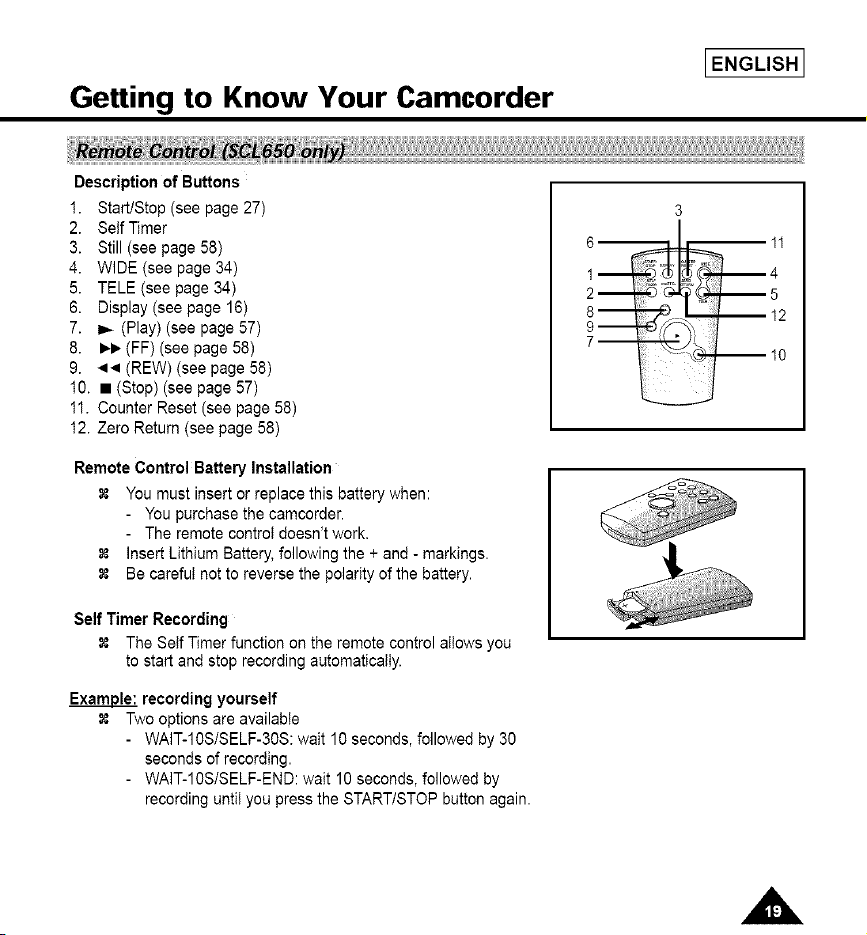
Description of Buttons
1. Start/Stop (see page 27)
2. Self Timer
3. Still (see page 58)
4. WIDE (see page 34)
5. TELE (see page 34)
6. Display (see page 16)
7. _ (Play) (see page 57)
8. ),1_ (FF) (see page 58)
9. << (REW) (see page 58)
10. • (Stop) (see page 57)
1I. Counter Reset (see page 58)
12. Zero Return (see page 58)
Remote Control Battery Installation
You must insert or replace this battery when:
- You purchase the camcorder.
- The remote controt doesn't work.
insert Lithium Battery, following the + and - markings.
Be carefut not to reverse the polarity of the battery.
Self Timer Recording
The Self Timer function on the remote control allows you
to start and stop recording automatically.
Example: recording yourself
Two options are availabIe
- WAIT-10S/SELF-30S: wait 10 seconds, followed by 30
seconds of recording.
- WAIT-10S/SELF-END: wait 10 seconds, followed by
recording until you press the START/STOP button again.
3
6 11
1 4
2 5
IENGLISHI
Preparing
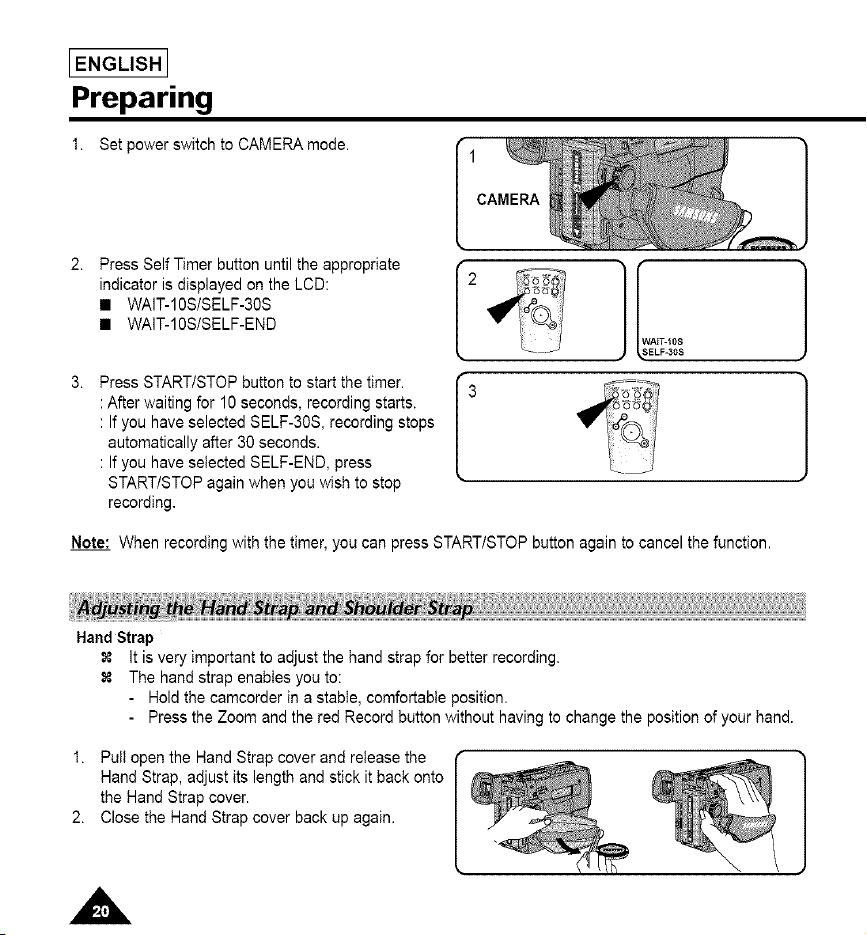
1. Set power switch to CAMERA mode.
CAMERA
Press Self Timer button until the appropriate
indicator is displayed on the LCD:
• WAIT-10S/SELF-30S
• WAIT-10S/SELF-END
Press START/STOP button to start the timer.
: After waiting for 10 seconds, recording starts.
: If you have selected SELF-30S, recording stops
automatically after 30 seconds.
: If you have selected SELF-END, press
STARTtSTOP again when you wish to stop
recording.
2
I_ AIT-10S
ELF-30S
Note: When recording with the timer, you can press START/STOP button again to cancel the function.
Hand Strap
It is very important to adjust the hand strap for better recording.
The hand strap enables you to:
Hold the camcorder in a stable, comfortable position.
Press the Zoom and the red Record button without having to change the position of your hand.
1. Pull open the Hand Strap cover and release the
Hand Strap, adjust its length and stick it back onto
the Hand Strap cover.
2. Close the Hand Strap cover back up again.
IENGLISH I
Preparing
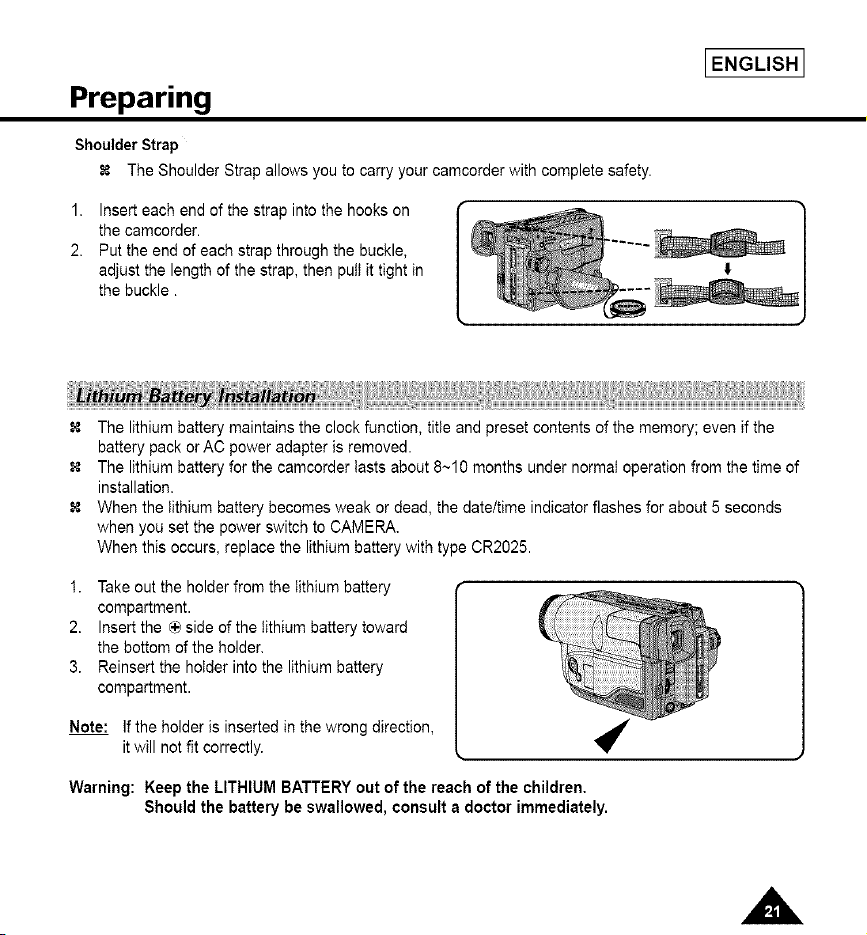
Shoulder Strap
The Shoulder Strap allows you to carry your camcorder with complete safety.
1. Insert each end of the strap into the hooks on
the camcorder.
2. Put the end of each strap through the buckle,
adjust the length of the strap, then pull it tight in
the buckle.
The lithium battery maintains the clock function, title and preset contents of the memory; even if the
battery pack or AC power adapter is removed.
The lithium battery for the camcorder lasts about 8~10 months under normal operation from the time of
installation.
When the lithium battery becomes weak or dead, the date/time indicator flashes for about 5 seconds
when you set the power switch to CAMERA.
When this occurs, replace the lithium battery with type CR2025.
1. Take out the holder from the lithium battery
compartment.
2. Insert the _ side of the lithium battery toward
the bottom of the holder.
3. Reinsert the holder into the lithium battery
compartment.
Note: If the holder is inserted in the wrong direction,
it will not fit correctly.
Warning: Keep the LITHIUMBATTERYout of the reach of the children,
Shouldthe battery be swallowed,consulta doctor immediately.
IENGLISHI
Preparing
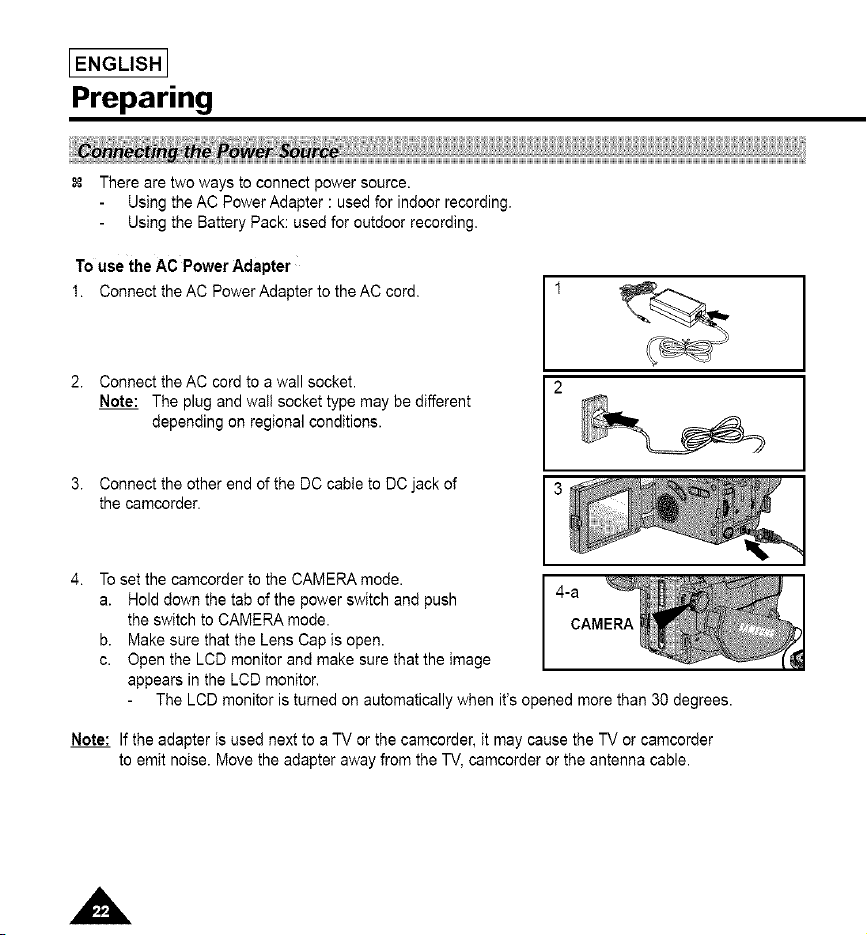
There are two ways to connect power source.
Using the AC Power Adapter : used for indoor recording.
Using the Battery Pack: used for outdoor recording.
To use the AC Power Adapter
1. Connect the AC PowerAdapterto the AC cord,
2. Connect the AC cord to a wall socket.
Note: The plug and wall socket type may be different
depending on regional conditions.
Connect the other end of the DC cable to DC jack of
the camcorder.
To set the camcorder to the CAMERA mode.
a. Hold down the tab of the power switch and push
the switch to CAMERA mode.
b. Make sure that the Lens Cap is open.
c. Open the LCD monitor and make sure that the image
appears in the LCD monitor.
The LCD monitor is turned on automatically when it's opened more than 30 degrees.
Note: If the adapter is used next to a TV or the camcorder, it may cause the TV or camcorder
to emit noise. Move the adapter away from the TV, camcorder or the antenna cable.
Preparing
IENGLISH I
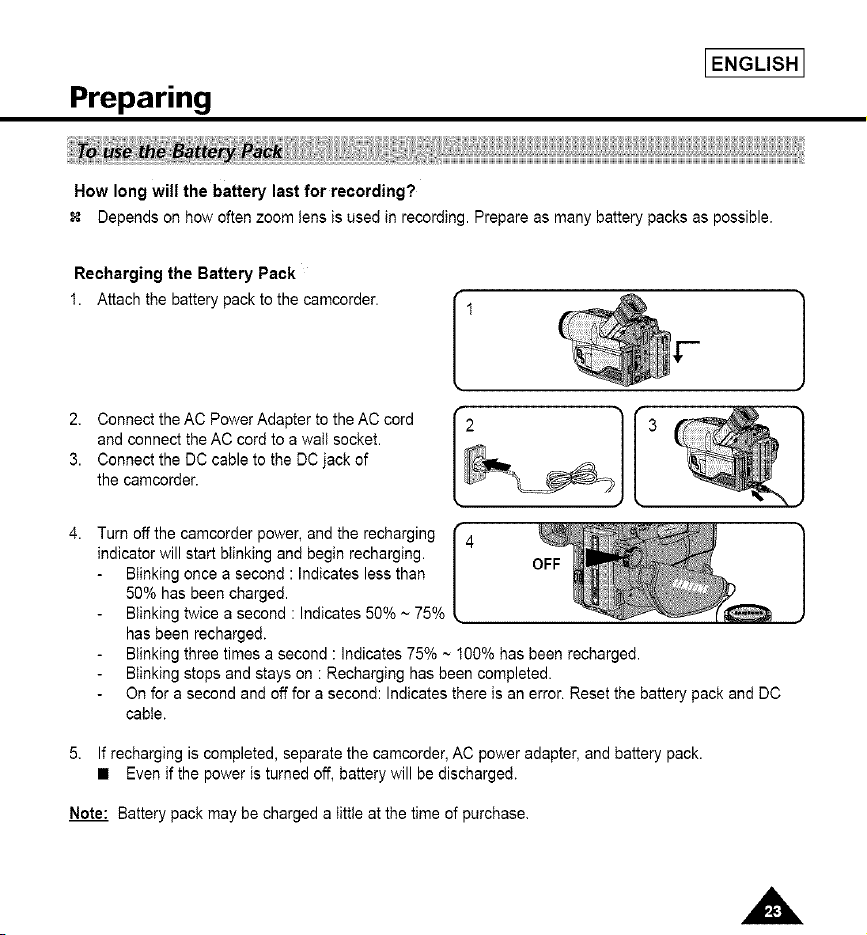
How long will the battery last for recording?
Depends on how often zoom tens is used in recording. Prepare as many battery packs as possible.
Recharging the Battery Pack
1. Attach the battery pack to the camcorder.
2. Connect the AC Power Adapter to the AC cord
and connect the AC cord to a wail socket.
3. Connect the DC cable to the DC jack of
the camcorder.
I
Turn off the camcorder power, and the recharging
indicator will start blinking and begin recharging.
Blinking once a second : Indicates less than
50% has been charged.
Blinking twice a second : Indicates 50% ~ 75%
has been recharged.
Blinking three times a second : Indicates 75% ~ 100% has been recharged.
Blinking stops and stays on : Recharging has been completed.
On for a second and off for a second: Indicates there is an error. Reset the battery pack and DC
cable.
5. If recharging is completed, separate the camcorder, AC power adapter, and battery pack.
• Even if the power is turned off, battery will be discharged.
Note: Battery pack may be charged a little at the time of purchase.
I ENGLISH I
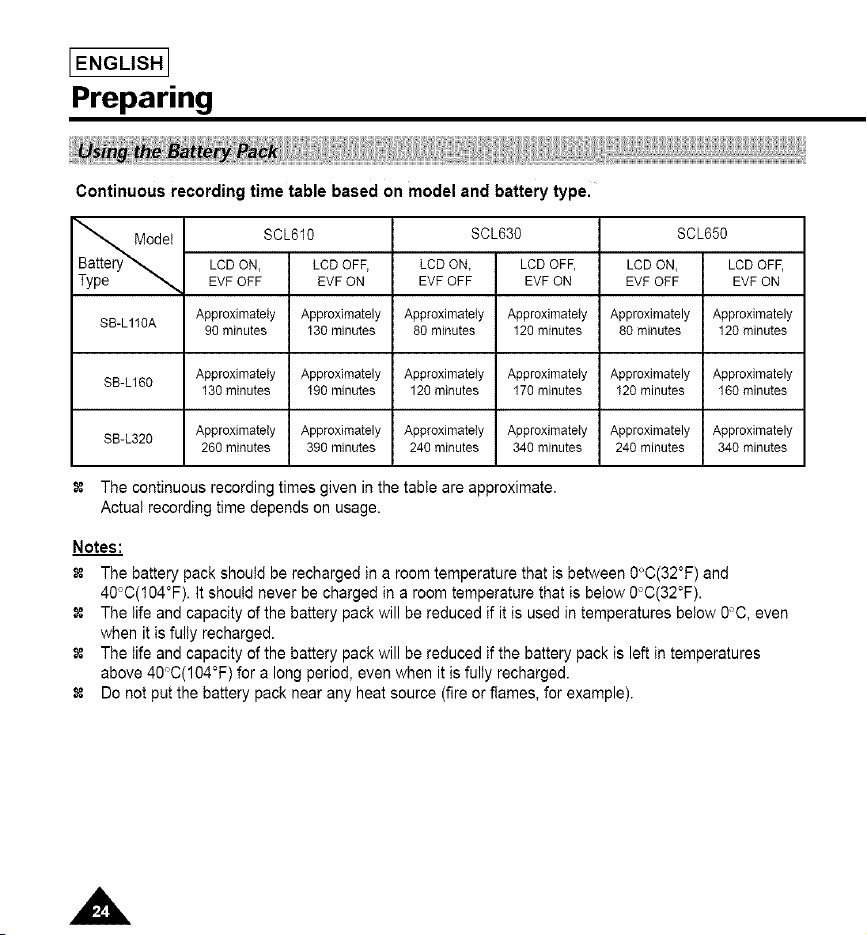
Preparing
Continuous recording time table based on model and battery type.
det SCL610 SCL630 SCL650
LCD ON, LCD OFF, LCD ON, LCD OFF, LCD ON, LCD OFF,
EVF OFF EVF ON EVF OFF EVF ON EVF OFF EVF ON
SB-L110A Approximately Approximately Approximately Approximately Approximately Approximately
90 minutes 130 minutes 80 minutes 120 minutes 80 minutes 120 minutes
SB-L160 Approximately Approximately Approximately Approximately Approximately Approximately
130 minutes 190 minutes 120 minutes 170 minutes 120 minutes 160 minutes
SB-L320 Approximately Approximately Approximately Approximately Approximately Approximately
260 minutes 390 minutes 240 minutes 340 minutes 240 minutes 340 minutes
The continuous recording times given in the table are approximate.
Actual recording time depends on usage.
Notes:
The battery pack should be recharged in a room temperature that is between 0°C(32°F) and
40°0(104°F). It should never be charged in a room temperature that is below 0°C(32°F).
The life and capacity of the battery pack will be reduced if it is used in temperatures below 0°C, even
when it is fully recharged.
The life and capacity of the battery pack will be reduced if the battery pack is left in temperatures
above 40°C(104°F) for a long period, even when it is fully recharged.
Do not put the battery pack near any heat source (fire or flames, for example).

Preparing
IENGLISH I
Battery Level Display
The battery level display indicates the amount of power remaining in the battery pack.
1. Fully charged
2. 10~40% consumed
3. 40~60% consumed
4. 60~80% consumed
(prepare a charged one)
5. 80~95% consumed
(change the battery)
6. 100% consumed
(camcorder wilt turn off soon, change the battery
as soon as possible)
I
;,_,,_.j ............... 3
t
...............4
!
CCI ...............s
I
...............6
Please refer to the table on page 24 for approximate
continuous recording times.
The recording time is affected by environmental temperature and conditions.
The recording time becomes very short in a cold environment.
The continuous recording time in the operating instructions is measured under the condition of
using a fully charged battery pack at 25°C(77°F). As the environmental temperature and conditions
may be different when you actually use the camcorder, the remaining battery time may not be the
same as the approximate continuous recording times given in these instructions.
Tips for Battery Identification.
A charge mark is provided on the battery pack to help you remember
whether it has been charged or not.
Two colors are provided (red and black)-you may choose which
one indicates charged and which indicates discharged.
Note: The charge mark does not affect the battery's charge status.
I ENGLISH I
Preparing
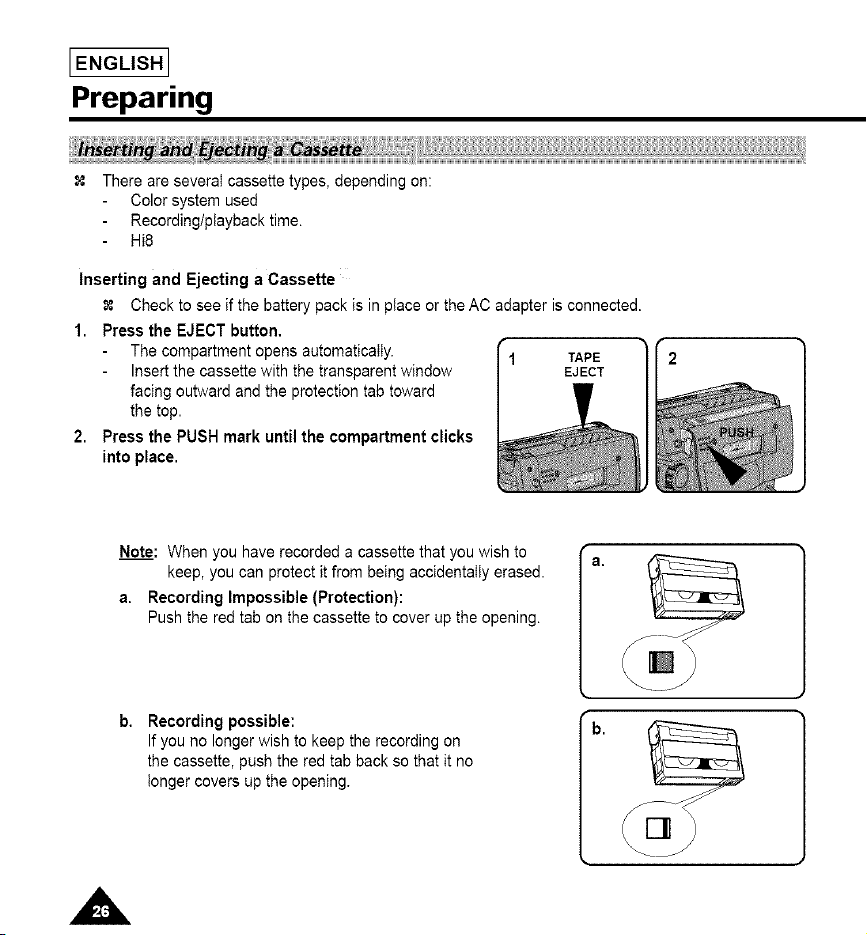
There are several cassette types, depending on:
Color system used
Recording/playback time.
Hi8
Inserting and Ejecting a Cassette
Check to see if the battery pack is in place or the AC adapter is connected.
1. Press the EJECT button.
The compartment opens automatically.
Insert the cassette with the transparent window
facing outward and the protection tab toward
the top.
2. Press the PUSH mark until the compartment clicks
into place.
TAPE 2
EJECT
Note: When you have recorded a cassette that you wish to
keep, you can protect it from being accidentally erased.
a. Recording Impossible (Protection):
Push the red tab on the cassette to cover up the opening.
Recording possible:
If you no longer wish to keep the recording on
the cassette, push the red tab back so that it no
longer covers up the opening.
b.
Basic Recording
IENGLISH I
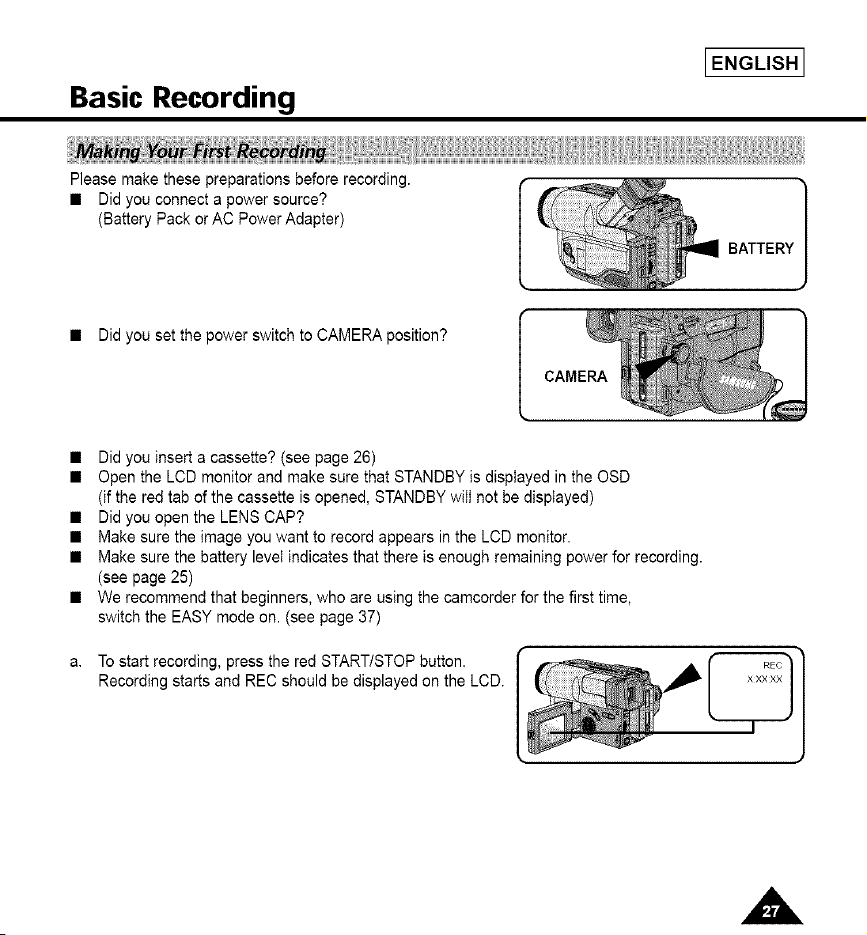
Please make these preparations before recording.
• Did you connect a power source?
(Battery Pack or AC Power Adapter)
• Did you set the power switch to CAMERA position?
• Did you insert a cassette? (see page 26)
• Open the LCD monitor and make sure that STANDBY is displayed in the OSD
(if the red tab of the cassette is opened, STANDBY will not be displayed)
• Did you open the LENS CAP?
• Make sure the image you want to record appears in the LCD monitor.
• Make sure the battery level indicates that there is enough remaining power for recording.
(see page 25)
• We recommend that beginners, who are using the camcorder for the first time,
switch the EASY mode on. (see page 37)
a. To start recording, press the red START/STOP button.
Recording starts and REC should be displayed on the LCD.
I ENGLISH I
Basic Recording
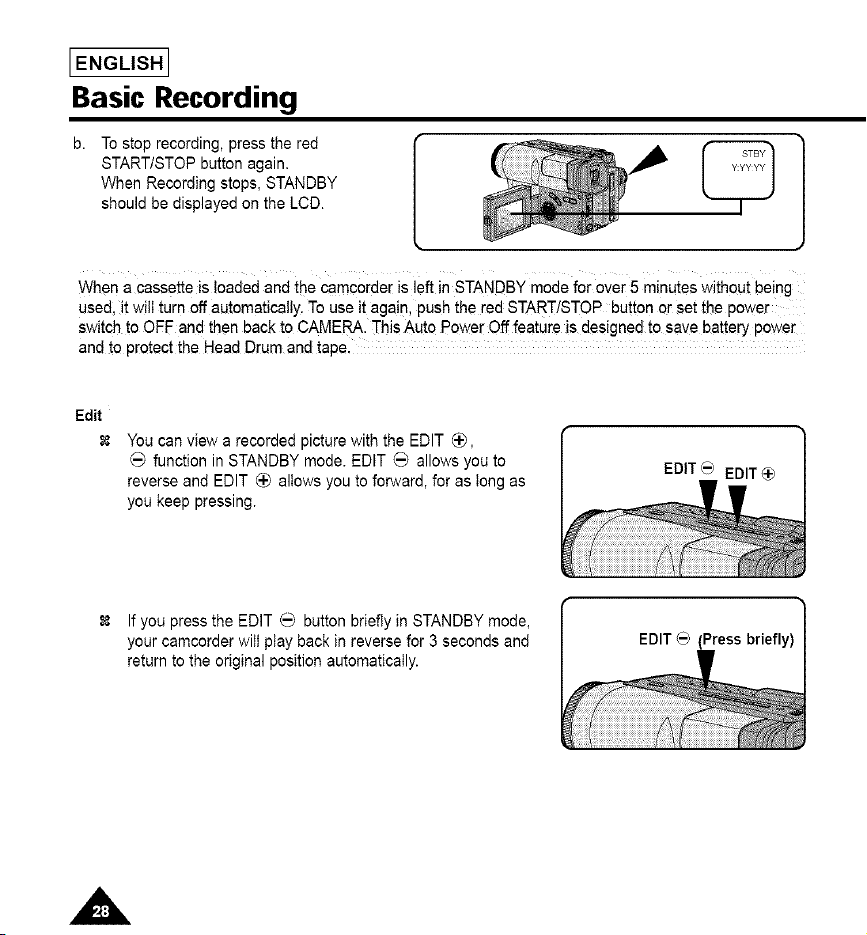
To stop recording, press the red
START/STOP button again.
When Recording stops, STANDBY
should be displayed on the LCD.
When a cassette is loaded and the camcorder is left in STANDBY mode for over 5 minutes without being
used, it will turn off automatically. To use it again, push the red START/STOP button or set the power
switch to OFF and then back to CAMERA. This Auto Power Off feature Js designed to save battery power
and to protect the Head Drum and tape.
Edit
You can view a recorded picture with the EDIT _,
function in STANDBY mode. EDIT _ allows you to
reverse and EDIT _ allows you to forward, for as tong as
you keep pressing.
If you press the EDIT _ button briefly in STANDBY mode,
your camcorder will play back in reverse for 3 seconds and
return to the original position automatically.
Basic Recording
IENGLISH I
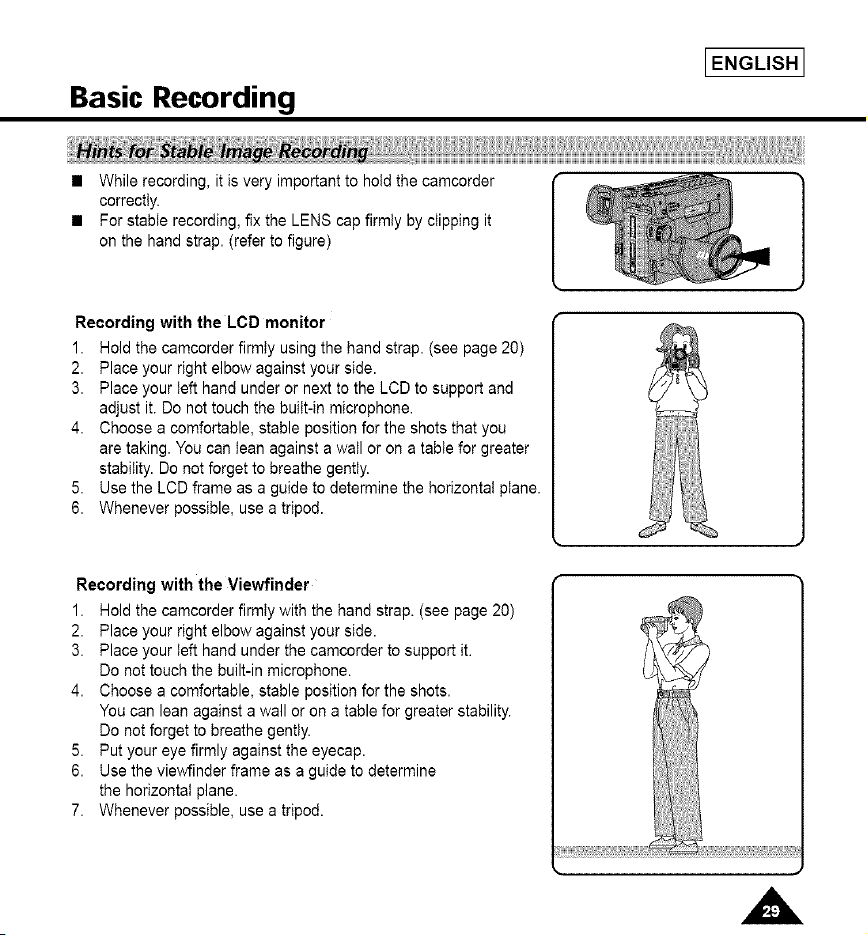
• While recording, it is very important to hold the camcorder
correctly.
• For stable recording, fix the LENS cap firmly by clipping it
on the hand strap. (refer to figure)
Recording with the LCD monitor
1. Hold the camcorder firmly using the hand strap. (see page 20)
2. Place your right elbow against your side.
3. Place your left hand under or next to the LCD to support and
adjust it. Do not touch the built-in microphone.
4. Choose a comfortable, stable position for the shots that you
are taking. You can lean against a wail or on a table for greater
stability. Do net forget to breathe gently.
5. Use the LCD frame as a guide to determine the horizontal plane.
6. Whenever possible, use a tripod.
Recording with the Viewfinder
1. Hold the camcorder firmly with the hand strap. (see page 20)
2. Place your right elbow against your side.
3. Place your left hand under the camcorder to support it.
Do not touch the built-in microphone.
4. Choose a comfortable, stable position for the shots.
You can lean against a wall or on a table for greater stability.
Do not forget to breathe gently.
5. Put your eye firmly against the eyecap.
6. Use the viewfinder frame as a guide to determine
the horizontaI plane.
7. Whenever possible, use a tripod.
HH_
I ENGLISH I
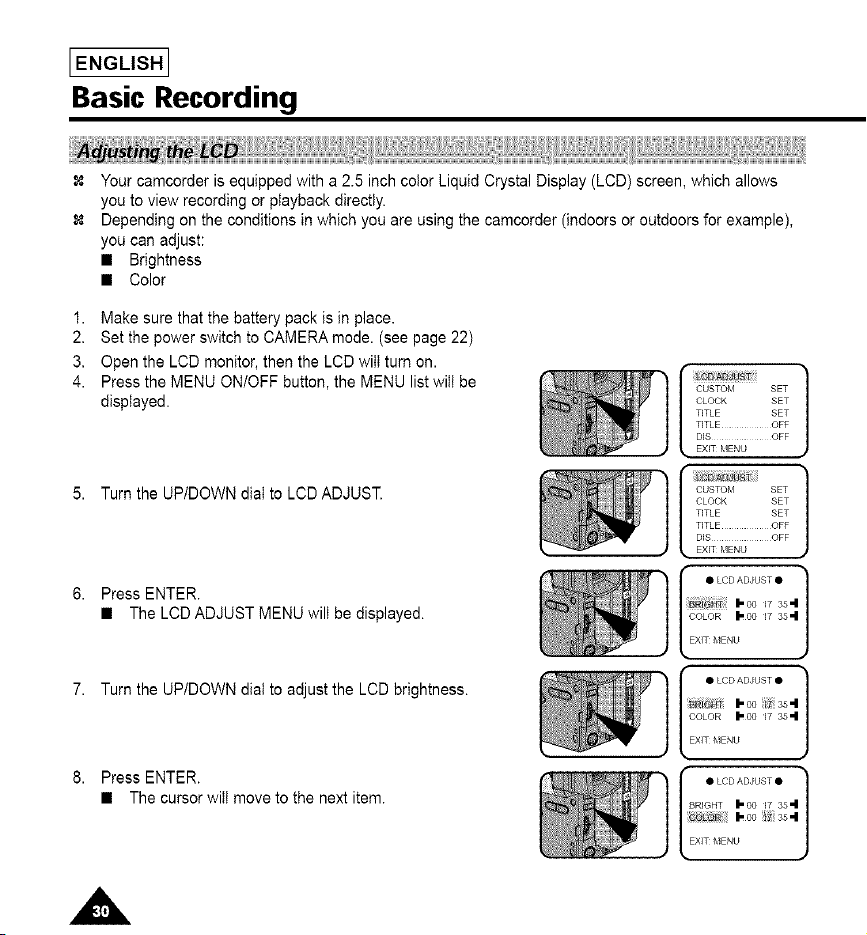
Basic Recording
Your camcorder is equipped with a 2.5 inch color Liquid Crystal Display (LCD) screen, which allows
you to view recording or playback directly.
Depending on the conditions in which you are using the camcorder (indoors or outdoors for example),
you can adjust:
• Brightness
• Color
1. Make sure that the battery pack is in place.
2. Set the power switch to CAMERA mode. (see page 22)
3. Open the LCD monitor, then the LCD will turn on.
4. Press the MENU ON/OFF button, the MENU list will be
displayed.
5. Turn the UP/DOWN dial to LCD ADJUST.
6. Press ENTER.
• The LCD ADJUSTMENU wilt be displayed.
7. Turn the UP/DOWN dial to adjust the LCD brightness.
8. Press ENTER.
• The cursorwill move to the next item.
•• T]TLET]TLECLOcKCUSTO_iExITDISMENU SEToFFOFFSETSET]
_," T]TLET]TLECLOcKCUSTOMExITDISMENU SEToFFOFFSETSET1
I _ O0 17 35
CiSiOR I_o0 17 35=1
EXIT _,IENU
COLOR _O0 W 35=1
EX]T MENU
I • LCD AD*_UST •
BRIGHT _O0 W 35=1
co _ I-oo 35,,,I
EXIT _,IENU
Basic Recording
9. Turn the UP/DOWN dial to adjust the LCD color setting.
10. Press ENTER.
• For further adjustment, repeat steps 7, 8, 9.
11. Press the MENU ONtOFF button to end the setting.
Notes: • If you don't press a button within 30 seconds, the setting will disappear.
• The MENU ONtOFF function will not operate in EASY or CUSTOM mode.
IENGLISH I
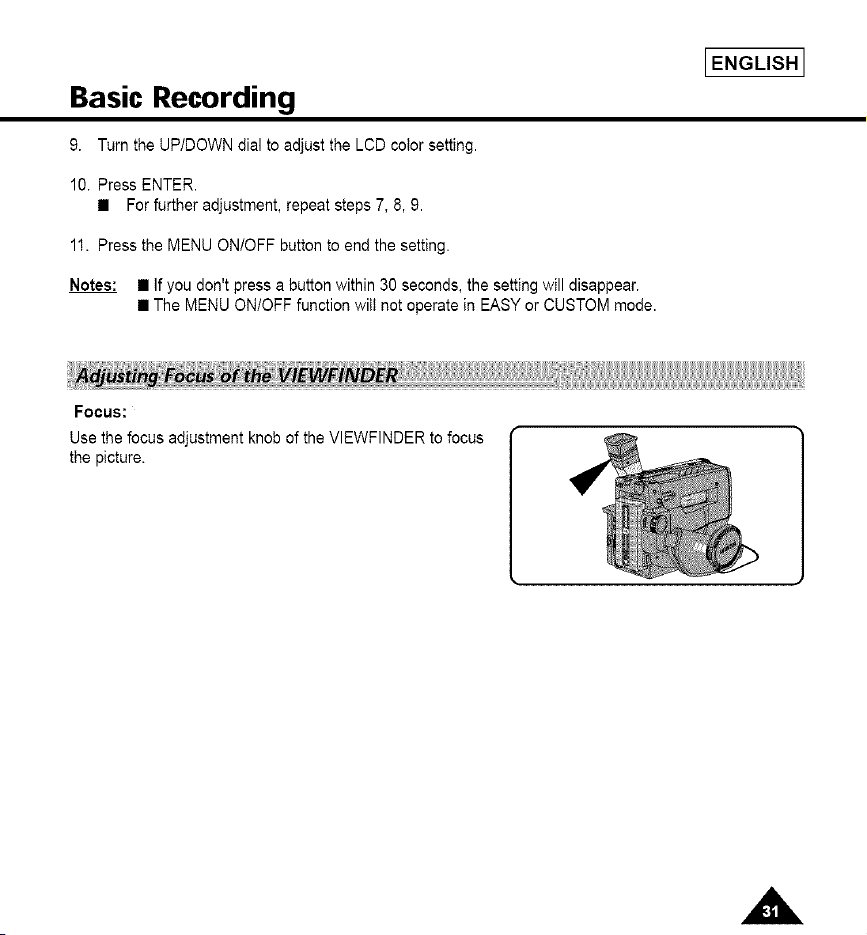
Focus:
Use the focus adjustment knob of the VIEWFINDER to focus
the picture.
I ENGLISH I
Basic Recording
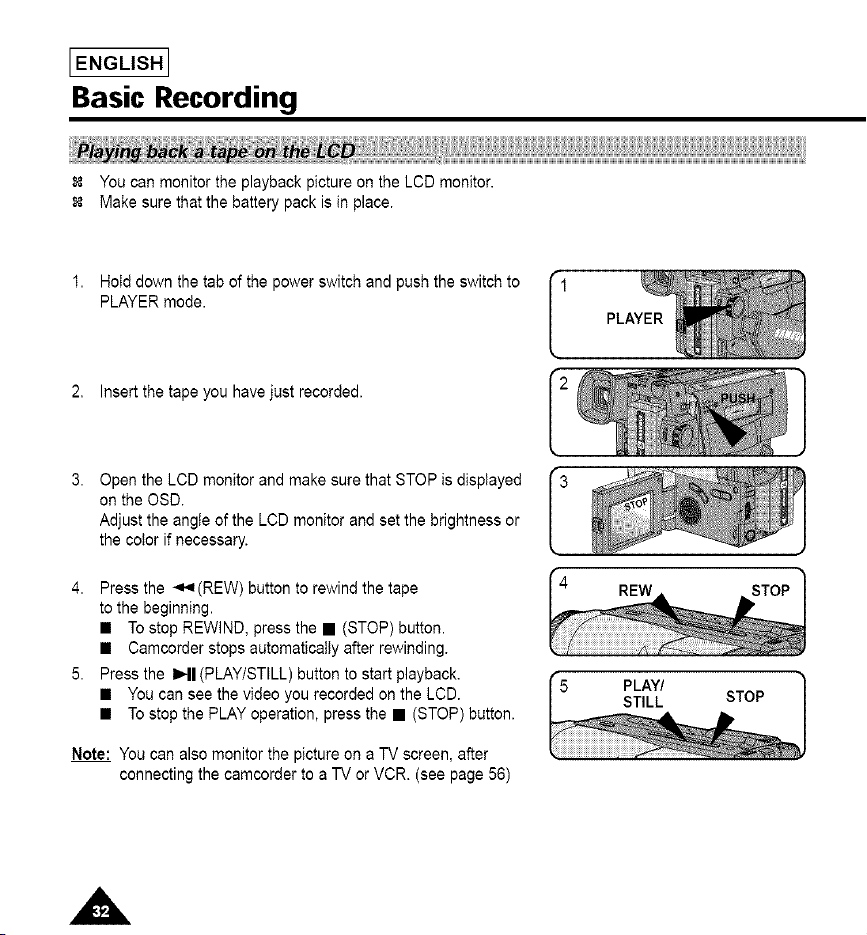
You can monitor the playback picture on the LCD monitor,
Make sure that the battery pack is in place.
1. Hold down the tab of the power switch and push the switch to
PLAYER mode.
2, Insert the tape you have just recorded.
Open the LCD monitor and make sure that STOP is displayed
on the OSD.
Adjust the angle of the LCD monitor and set the brightness or
the color if necessary.
4. Press the _.,=(REW) button to rewind the tape
to the beginning.
• To stop REWIND, press the • (STOP) button.
• Camcorder stops automatically after rewinding.
5. Press the 1_11(PLAYtSTILL) button to start playback.
• You can see the video you recorded on the LCD.
• To stop the PLAY operation, press the • (STOP) button.
Note: You can also monitor the picture on a TV screen, after
connecting the camcorder to a TV or VCR. (see page 56)
IENGLISH I
Basic Recording
Adjusting the LCD during PLAY
The LCD adjustment method in PLAYER mode is identicaI to step number 4 of page 30, except the power
switch must be set to PLAYER.
Controlling the Sound from the Speaker
When you use the LCD monitor while playing back,
you can hear sound from the Speaker.
Volume of the Speaker is controlled by the UPtDOWN
dial tab on the camcorder.
If you close the LCD monitor, the LCD monitor and
Speaker are turned off.
If the speaker does not work properly, check the following:
• Is the LCD monitor closed?
• Is the volume adjusted to a low level?
• Is the speaker off? (see page 59)
Notes:
__ • Lower the volume if vibration from the built-in speaker causes screen disturbance.
• Volume display will automatically disappear 2 seconds after adjusting.
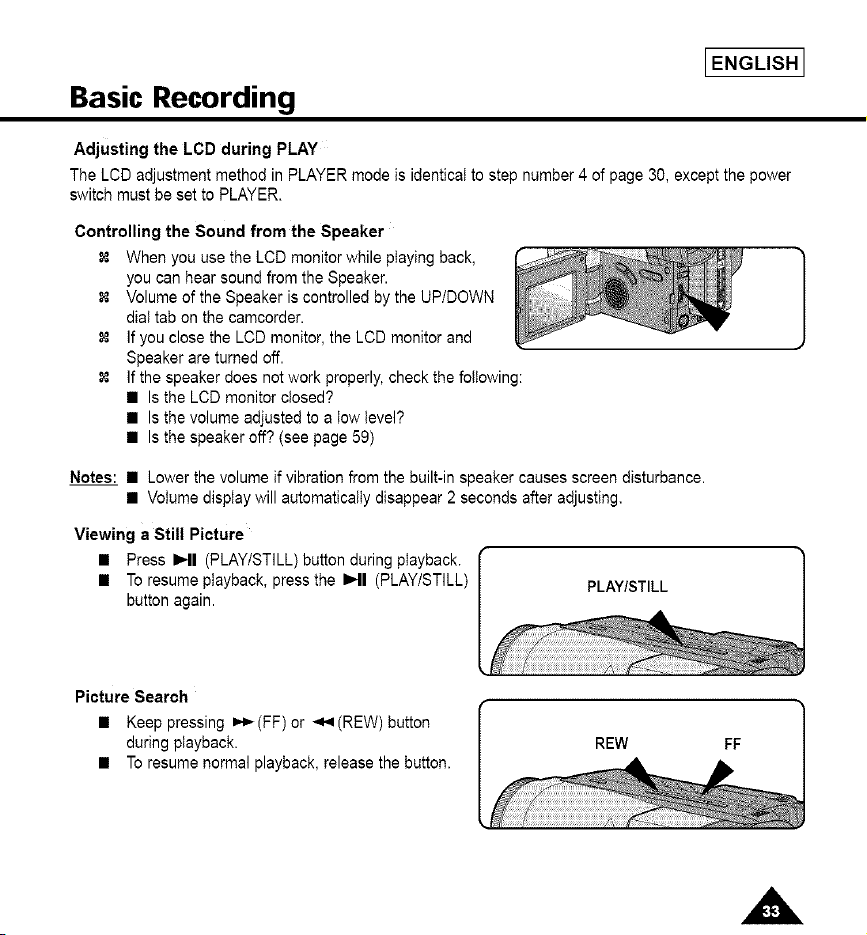
Viewing a Still Picture
• Press I_11 (PLAYtSTILL) button during playback.
• To resume playback, press the IHI (PLAY/STILL)
button again.
PLAY/STILL
Picture Search
• Keep pressing =,,_(FF) or _(REW) button
during playback.
• To resume normal playback, release the button.
REW FF
I ENGLISH I
Advanced Recording
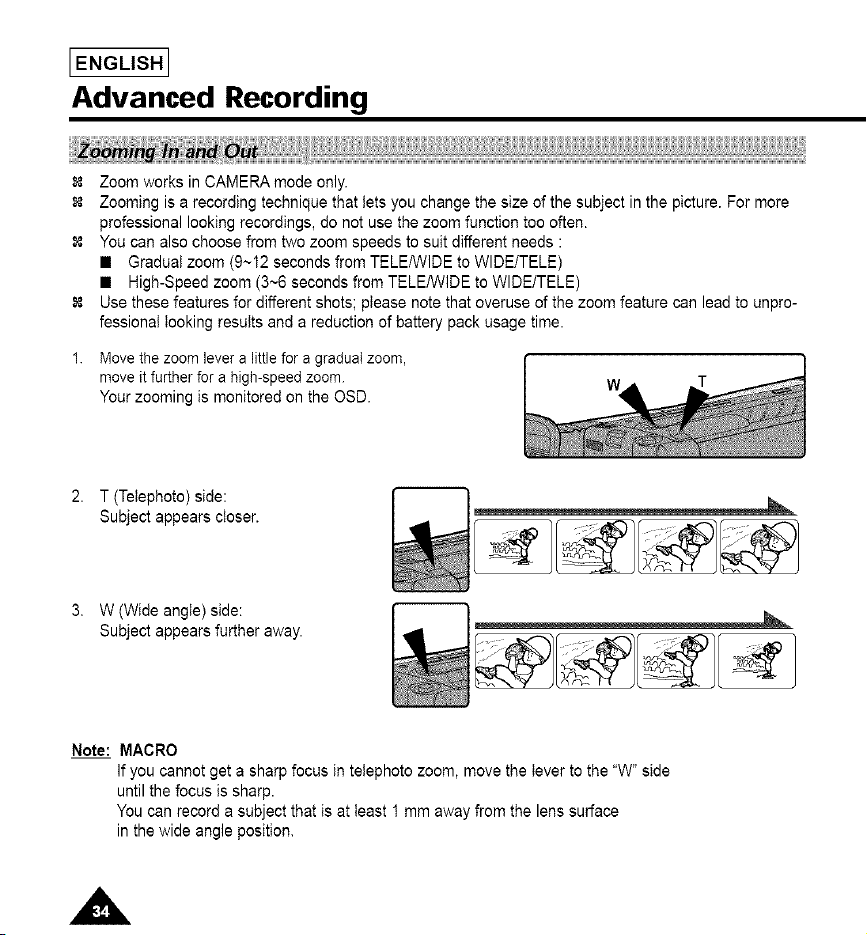
1.
Zoom works in CAMERA mode only.
Zooming is a recording technique that lets you change the size of the subject in the picture. For more
professional looking recordings, do not use the zoom function too often.
You can also choose from two zoom speeds to suit different needs :
• Gradual zoom (9~12 seconds from TELE/WlDE to WlDE/TELE)
• High-Speed zoom (3~6 seconds from TELE/WlDE to WlDE/TELE)
Use these features for different shots; please note that overuse of the zoom feature can lead to unpro-
fessional looking results and a reduction of battery pack usage time.
Move the zoom lever a little for a gradual zoom,
move it further for a high-speed zoom.
Your zooming is monitored on the OSD.
2. T (Telephoto)side:
Subjectappears closer.
3, W (Wide angle) side:
Subject appears further away.
Note: MACRO
If you cannot get a sharp focus in telephoto zoom, move the lever to the "W" side
until the focus is sharp.
You can record a subject that is at least 1 mm away from the lens surface
in the wide angle position.
Advanced Recording
IENGLISH I
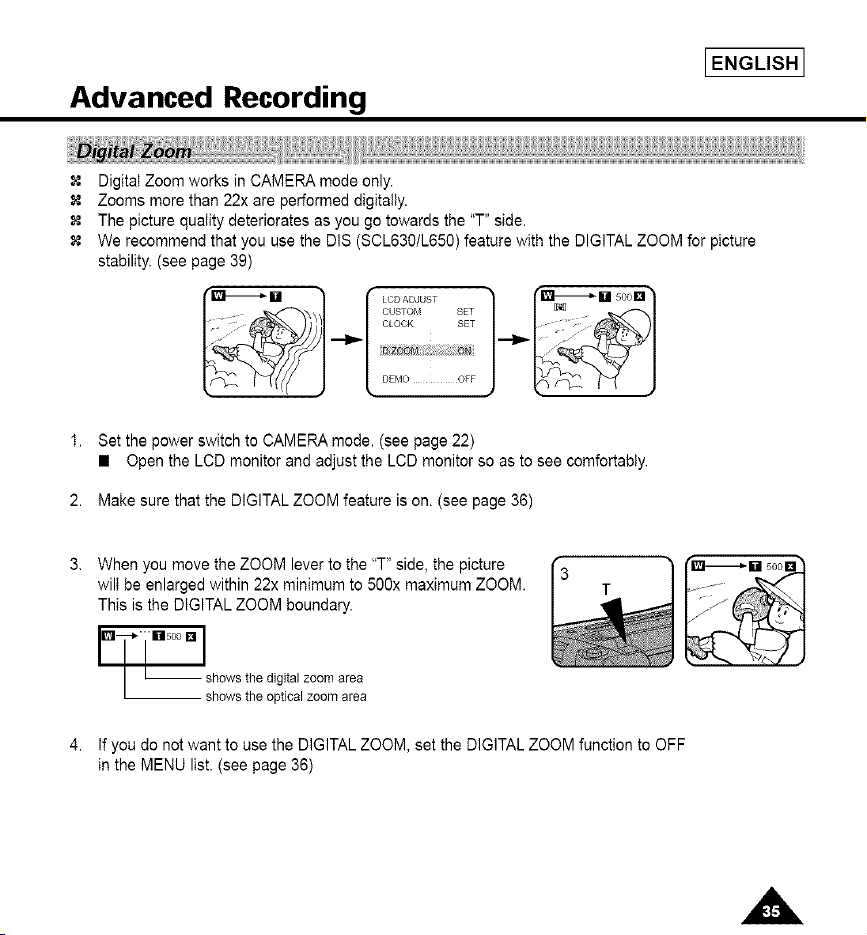
Digitat Zoom works in CAMERA mode only.
Zooms more than 22x are performed digitally.
The picture quality deteriorates as you go towards the "T" side.
We recommend that you use the DIS (SCL630/L650) feature with the DIGITAL ZOOM for picture
stability. (see page 39)
"_u 1 f Loo_o_OST _ f_-_U _oon
_"'- "_51 / CLOCK SET .........
OFF--":;........
1. Set the power switch to CAMERA mode. (see page 22)
• Open the LCD monitor and adjust the LCD monitor so as to see comfortably.
2. Make sure that the DIGITAL ZOOM feature is on. (see page 36)
When you move the ZOOM lever to the "T" side, the picture
wilI be enlarged within 22x minimum to 500x maximum ZOOM.
This is the DIGITAL ZOOM boundary.
IDL* [ llils°°" Ishowsthe digitalzoomarea
showsthe opticalzoomarea
If you do not want to use the DIGITAL ZOOM, set the DIGITAL ZOOM function to OFF
in the MENU list. (see page 36)
I ENGLISH I
Advanced Recording
1.
2.
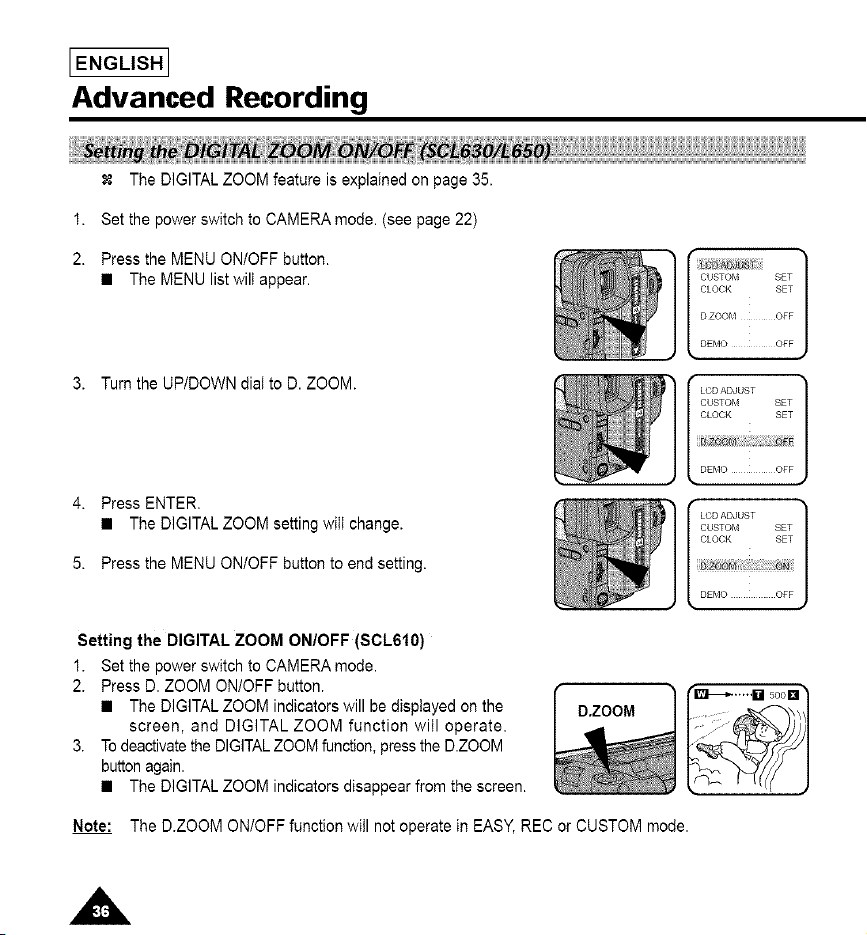
The DIGITAL ZOOM feature is explained on page 35.
Set the power switch to CAMERA mode. (see page 22)
Press the MENU ONtOFF button.
• The MENU list wilt appear.
3. Turn the UP/DOWN dial to D. ZOOM.
4. Press ENTER.
• The DIGITAL ZOOM setting will change.
5. Press the MENU ONtOFF button to end setting.
CUSTOT_ SET
CLOCK SET
D ZOO_,I OFF
DENO OFF
LCDADJUST
CUSTOm{ SET
CLOCK SET
DENO OFF
LCD ADJUST
CUSTOTkt SET
CLOCK SET
DEMO OFF
Setting the DIGITAL ZOOM ON/OFF (SCL610)
1. Set the power switch to CAMERA mode.
2. Press D. ZOOM ON/OFF button.
• The DIGITAL ZOOM indicators will be displayed on the
screen, and DIGITAL ZOOM function will operate.
3. To deactivate the DIGITAL ZOOM function, press the D.ZOOM
button again.
• The DIGITAL ZOOM indicators disappear from the screen.
DZOOM
_.....1_15coD]
Note: The D.ZOOM ON/OFF function will not operate in EASY, REC or CUSTOM mode.
Advanced Recordin l
IENGLISH I
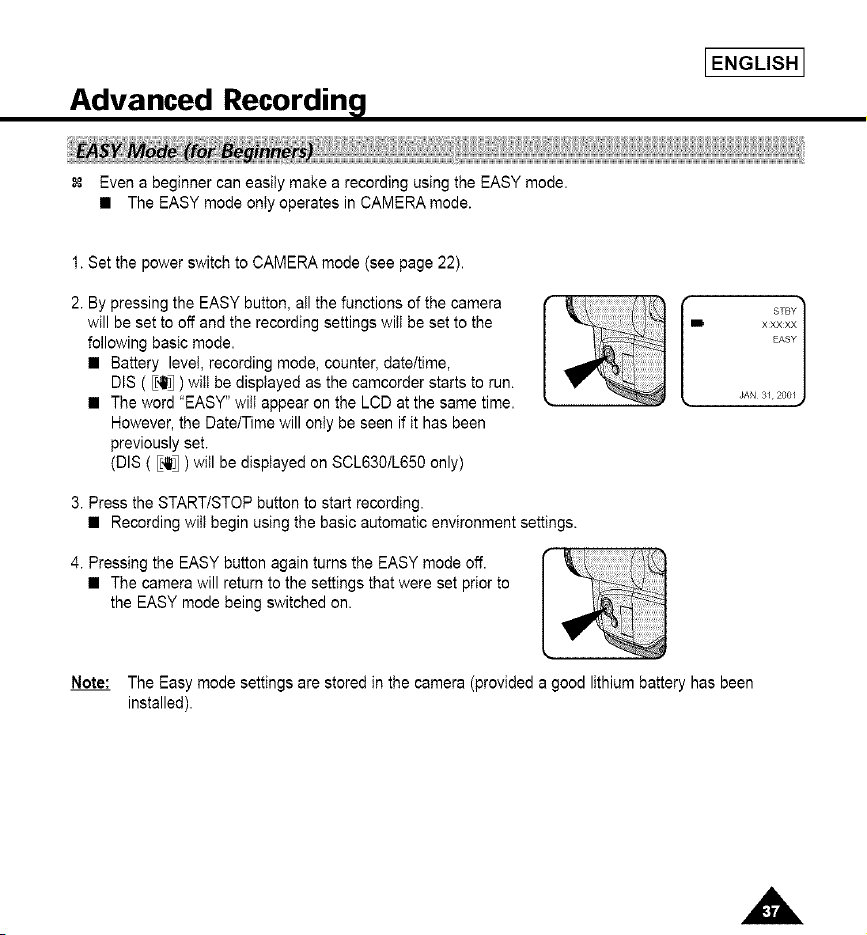
Even a beginner can easily make a recording using the EASY mode.
• The EASY mode only operates in CAMERA mode.
1. Set the power switch to CAMERA mode (see page 22).
2. By pressing the EASY button, all the functions of the camera
will be set to off and the recording settings will be set to the
following basic mode.
• Battery level, recording mode, counter, datettime,
DIS ( E{_ ) wilt be displayed as the camcorder starts to run.
• The word "EASY" will appear on the LCD at the same time.
However, the DatetTime will only be seen if it has been
previously set.
(DIS ( E.41t_) will be displayed on SOL630/L650 only)
3. Press the START/STOP button to start recording.
• Recording will begin using the basic automatic environment settings.
4. Pressing the EASY button again turns the EASY mode off.
• The camera will return to the settings that were set prior to
the EASY mode being switched on.
B XXXXX
EASY
JAN 3/200/
Note: The Easy mode settings are stored in the camera (provided a good lithium battery has been
installed).
I ENGLISH I
Advanced Recording
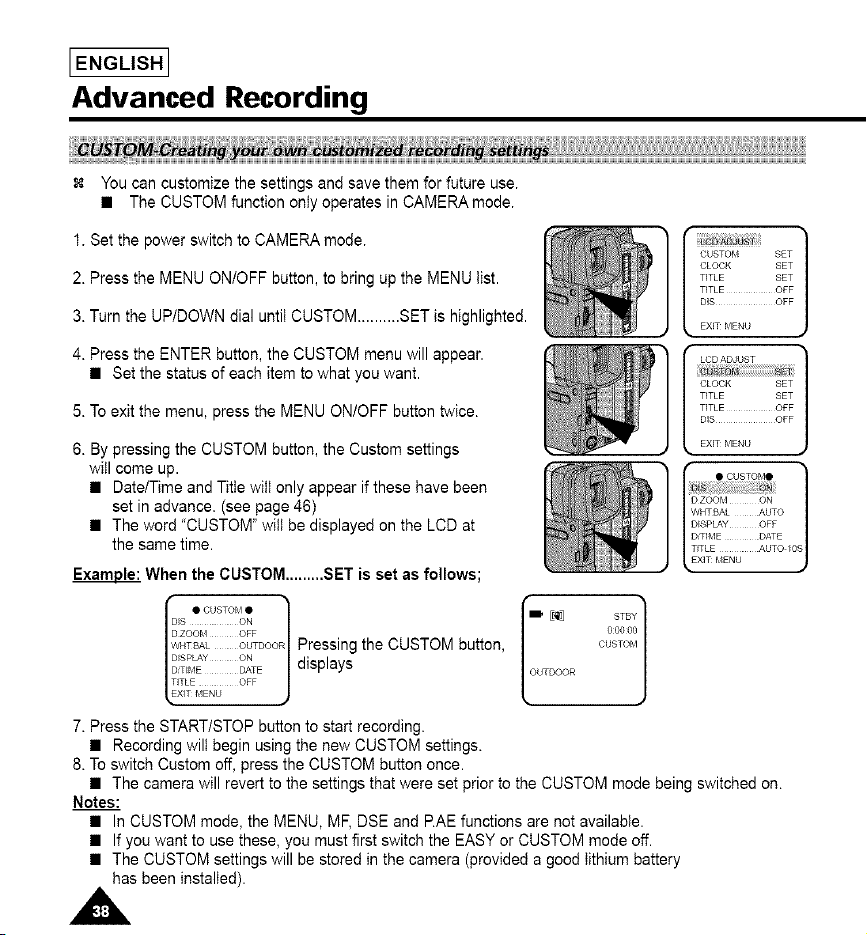
You can customize the settings and save them for future use.
• The CUSTOM function only operates in CAMERA mode.
1. Set the power switch to CAMERA mode.
2. Press the MENU ON/OFF button, to bring up the MENU tist.
3. Turn the UP/DOWN dial until CUSTOM ..........SET is highlighted.
UST
CUSTOM SET
CLOCK SET
TITLE SET
TITLE OFF
DIS OFF
EXIT MENU
LCD ADJUST
CLOCK SET
TITLE SET
TITLE OFF
DiS OFF
EXIT MENU
4. Press the ENTER button, the CUSTOM menu will appear.
• Set the status of each item to what you want.
5. To exit the menu, press the MENU ON/OFF button twice.
6. By pressing the CUSTOM button, the Custom settings
will come up.
• DatetTime and Title wilt only appear if these have been
set in advance. (see page 46)
• The word "CUSTOM" will be displayed on the LCD at
the same time.
Example: When the CUSTOM .........SET is set as follows;
li • CUSTOM •
DiS ON
D ZOOM OFF
WHTBAL OUTDOCPressing the CUSTOM button,
D_SPLA¥ ON displays
D_TIME DATE
TITLE OFF
XIT _,IENU
CUSTOM
OUTDOOR
• CUSTOM•
D ZOOM ON
WHTBAL AUTO
DISPLAY OFF
D_TIIkaE DATE
TITLE AUTO I0
EXIT MENU
7. Press the START/STOP button to start recording.
• Recording wilt begin using the new CUSTOM settings.
8. To switch Custom off, press the CUSTOM button once.
• The camera will revert to the settings that were set prior to the CUSTOM mode being switched on.
Notes:
• In CUSTOM mode, the MENU, ME DSE and RAE functions are not availabIe.
• If you want to use these, you must first switch the EASY or CUSTOM mode off.
• The CUSTOM settings will be stored in the camera (provided a good lithium battery
has been installed).
Advanced Recording
IENGLISH I
The DIS function works in CAMERA mode only.
DIS (Digital Image Stabilizer) is a handshake compensation function that compensates for any shaking
or moving of the hand holding the camcorder (within reasonable limits).
It provides more stable pictures when:
• Recording in the Zoom In mode
• Recording a small object close-up
• Recording and walking at the same time
• Recording through the window of a vehicle
1,
2.
Set the power switch to CAMERA mode. (See page 22)
• Open the LCD monitor and adjust it to see comfortably.
Press the MENU ON/OFF button.
• The MENU list will appear.
3. Turn the UP/DOWN dial to DIS.
CUSTO_i SET
CLOCK SET
TITLE SET
TITLE OFF
DiS OFF
DEMO OFF
4. Press ENTER.
• The DISsetting will change.
5. Press the MENU ON/OFF button to end the setting.
• When the DIS is set, the DIS mark ( _41_) will displayed
on the OSD.
Notes: 1. It is recommended you deactivate the handshake compensation function when using a tripod.
2. The DIS function will not operate in the DSE mode,
3. The MENU ONtOFF function will not operate in EASY or CUSTOM mode.
i ENGLISH i
Advanced Recording
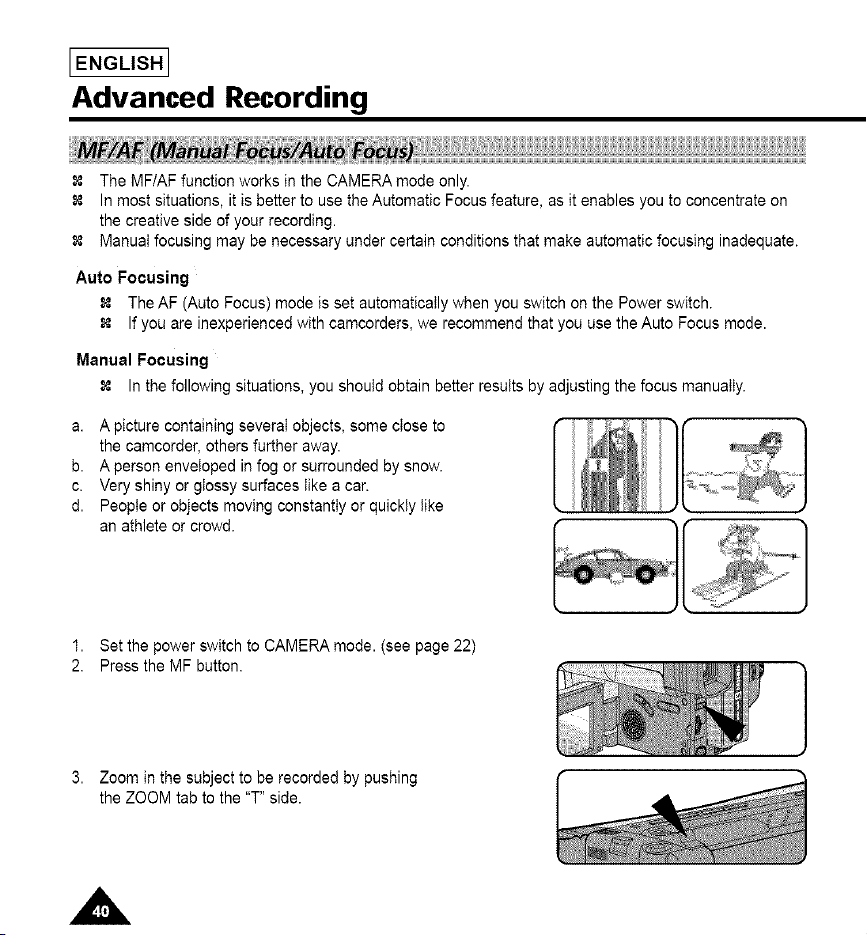
The MFIAF function works in the CAMERA mode only.
In most situations, it is better to use the Automatic Focus feature, as it enables you to concentrate on
the creative side of your recording.
Manual focusing may be necessary under certain conditions that make automatic focusing inadequate.
Auto Focusing
_, The AF (Auto Focus) mode is set automatically when you switch on the Power switch.
If you are inexperienced with camcorders, we recommend that you use the Auto Focus mode.
Manual Focusing
In the following situations,you should obtain better results by adjusting the focusmanually.
a. A picture containing severai objects, some close to
the camcorder, others further away.
b. A person enveloped in fog or surrounded by snow.
c. Very shiny or glossy surfaces like a car.
d. People or objects moving constantly or quickly like
an athlete or crowd.
1. Set the power switch to CAMERA mode. (see page 22)
2. Press the MF button.
3. Zoom in the subject to be recorded by pushing
the ZOOM tab to the "T" side.
IENGLISH I
Advanced Recording
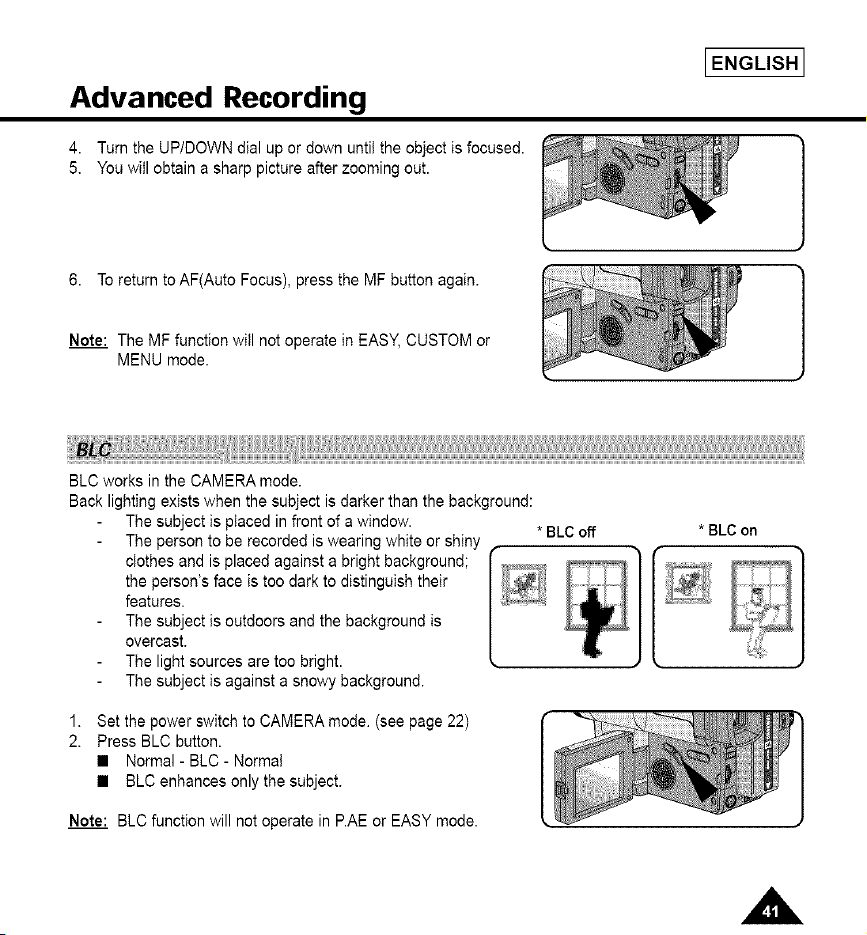
4. Turn the UP/DOWN dial up or down until the object is focused.
5. You will obtain a sharp picture after zooming out.
6. To return to AF(Auto Focus), press the MF button again.
Note: The MF function will not operate in EASY, CUSTOM or
MENU mode.
BLC works in the CAMERA mode.
Back lighting exists when the subject is darker than the background:
The subject is placed in front of a window.
The person to be recorded is wearing white or shiny
clothes and is placed against a bright background; I _;_
the person's face is too dark to distinguish their [
features. _,,,_,
The subject is outdoors and the background is
overcast.
The light sources are too bright.
The subject is against a snowy background.
* BLC off * BLC on
Set the power switch to CAMERA mode. (see page 22)
Press BLC button.
• Normal - BLC- Normal
• BLC enhances only the subject.
Note: BLC function will not operate in P.AE or EASY mode.
[ENGLISHJ
Advanced Recording
1.
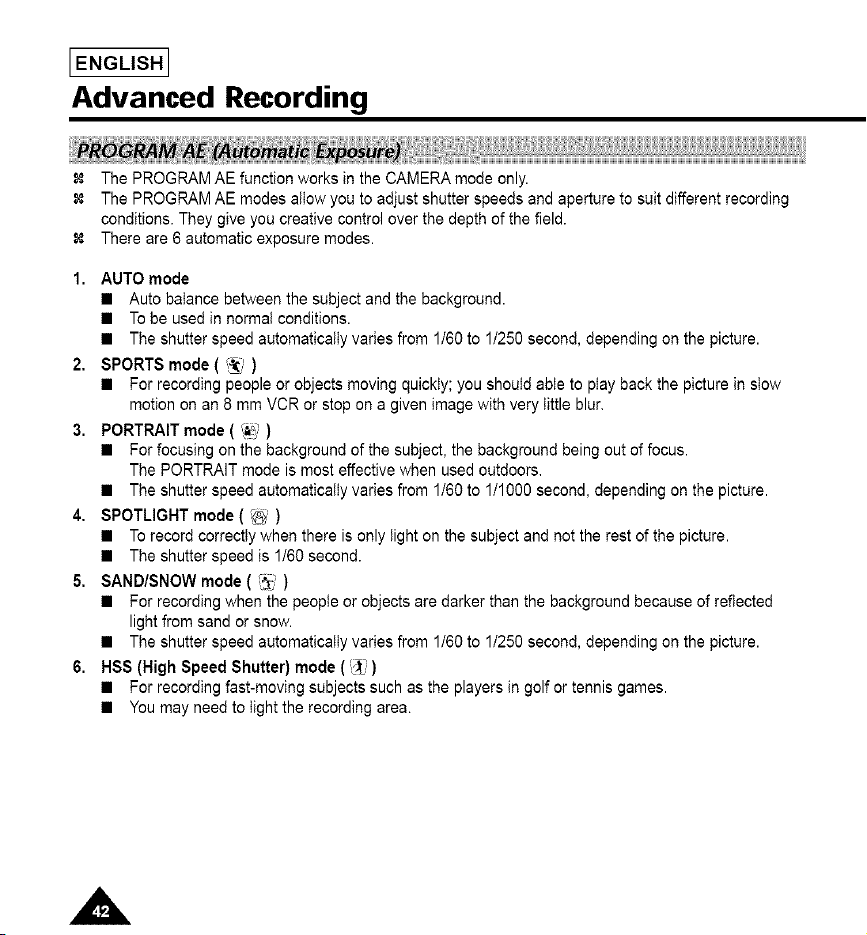
The PROGRAM AE function works in the CAMERA mode only.
The PROGRAM AE modes allow you to adjust shutter speeds and aperture to suit different recording
conditions. They give you creative control over the depth of the field.
There are 6 automatic exposure modes.
AUTO mode
• Auto balance between the subject and the background.
• To be used in normal conditions.
• The shutter speed automatically varies from 1/60 to 1/250 second, depending on the picture.
2. SPORTS mode ( _, )
• For recording people or objects moving quickly; you should able to play back the picture in stow
motion on an 8 mm VCR or stop on a given image with very little blur.
3. PORTRAIT mode ( _-':_)
• For focusing on the background of the subject, the background being out of focus.
The PORTRAIT mode is most effective when used outdoors.
• The shutter speed automatically varies from 1/60 to 1/1000 second, depending on the picture.
4. SPOTLIGHT mode ( _ )
• To record correctly when there is only light on the subject and not the rest of the picture.
• The shutter speed is 1/60 second.
5. SAND/SNOW mode ( 13_)
• For recording when the people or objects are darker than the background because of reflected
light from sand or snow.
• The shutter speed automatically varies from 1/60 to 1/250 second, depending on the picture.
6. HSS (High Speed Shutter) mode (_')
• For recording fast-moving subjects such as the players in golf or tennis games.
• You may need to light the recording area.
IENGLISH I
Advanced Recording
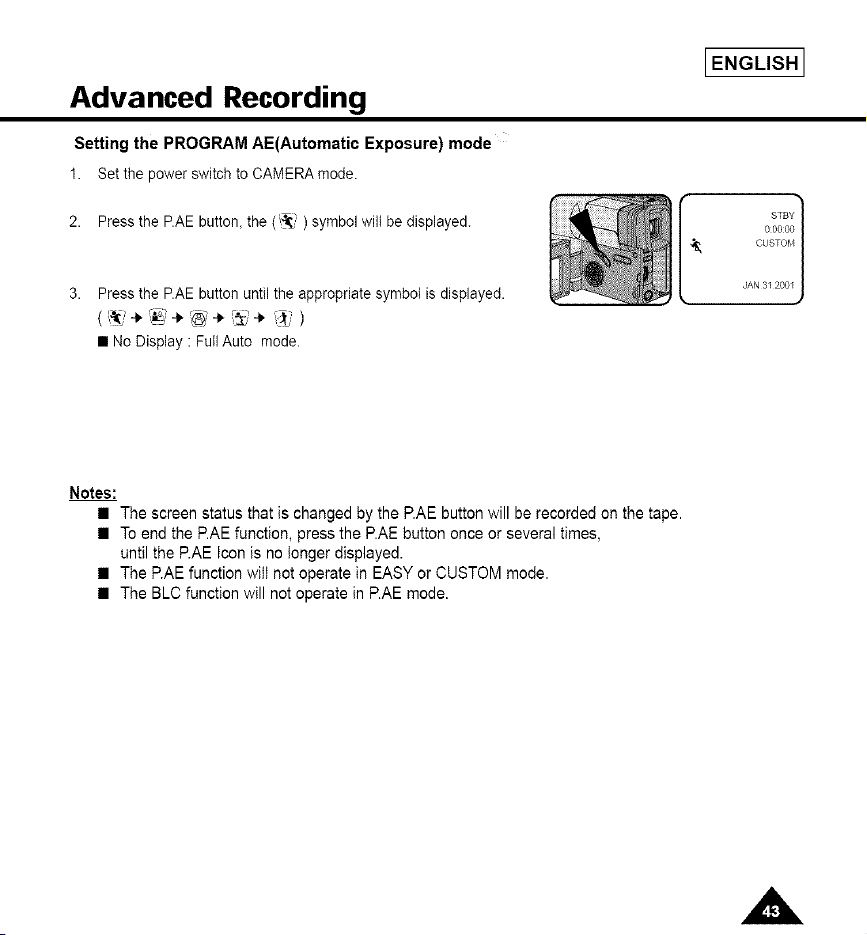
Setting the PROGRAM AE(Automatic Exposure) mode
1. Set the power switch to CAMERA mode.
2. Press the P.AE button_the (_:{_') symbol will be displayed.
Press the P.AE button until the appropriate symbol is displayed.
STBY 1
00000
CUSTOM
JAN 3I 200I
• No Display : Full Auto mode.
Notes:
• The screen status that is changed by the P.AE button will be recorded on the tape.
• To end the RAE function, press the P.AE button once or several times,
until the RAE Icon is no longer displayed.
• The RAE function will not operate in EASY or CUSTOM mode.
• The BLC function will not operate in RAE mode.
I ENGLISH I
Advanced Recording
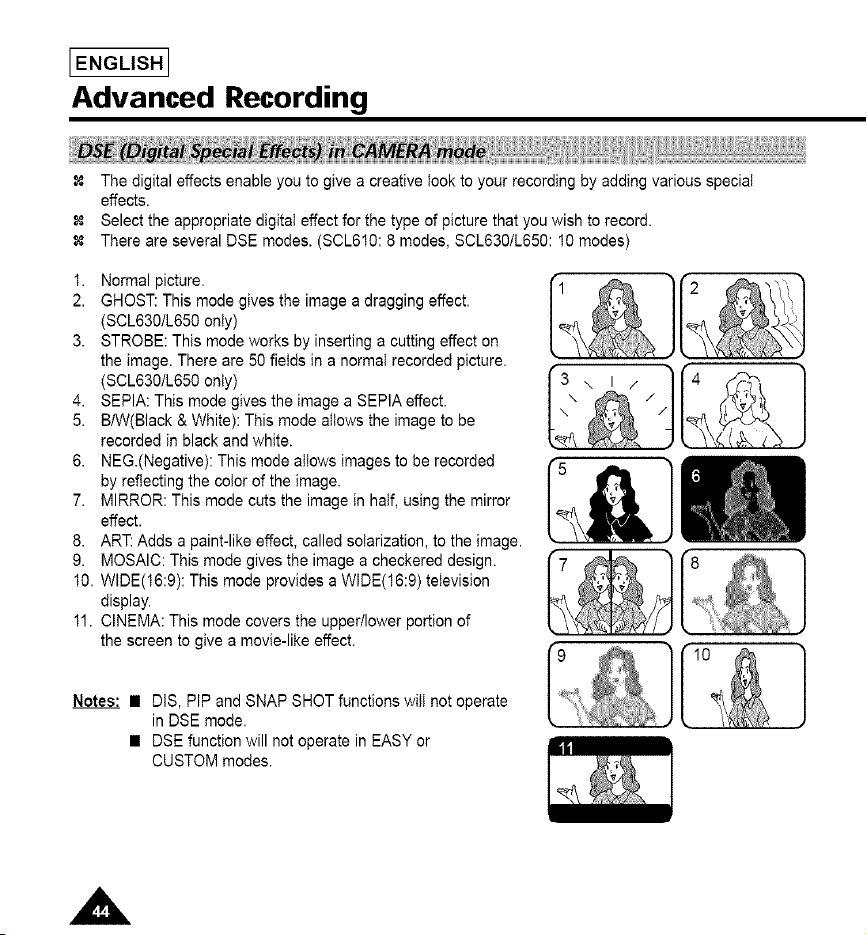
The digital effects enable you to give a creative took to your recording by adding various special
effects.
Select the appropriate digital effect for the type of picture that you wish to record.
There are several DSE modes. (SCL610:8 modes, SCL630/L650:10 modes)
1. Normal picture.
2. GHOST: This mode gives the image a dragging effect.
(SCL630/L650 only)
3. STROBE: This mode works by inserting a cutting effect on
the image. There are 50 fields in a normal recorded picture.
(SCL630/L650 only) \ I /
4. SEPIA: This mode gives the image a SEPIA effect.
5. BIW(Black & White): This mode allows the image to be
recorded in black and white.
6. NEG.(Negative): This mode allows images to be recorded _&]
by reflecting the color of the image.
7. MIRROR: This mode cuts the image in half, using the mirror
effect.
8. ART: Adds a paint-like effect, called soIarization, to the image.
9. MOSAIC: This mode gives the image a checkered design.
10. WIDE(16:9): This mode provides a WIDE(16:9) television
display.
11. CINEMA: This mode covers the upper/lower portion of
the screen to give a movie-like effect.
Notes: • DIS, PiP and SNAP SHOT functions will not operate
in DSE mode.
• DSE function will not operate in EASY or
CUSTOM modes.
I &]
'hi'
}
Advanced Recording
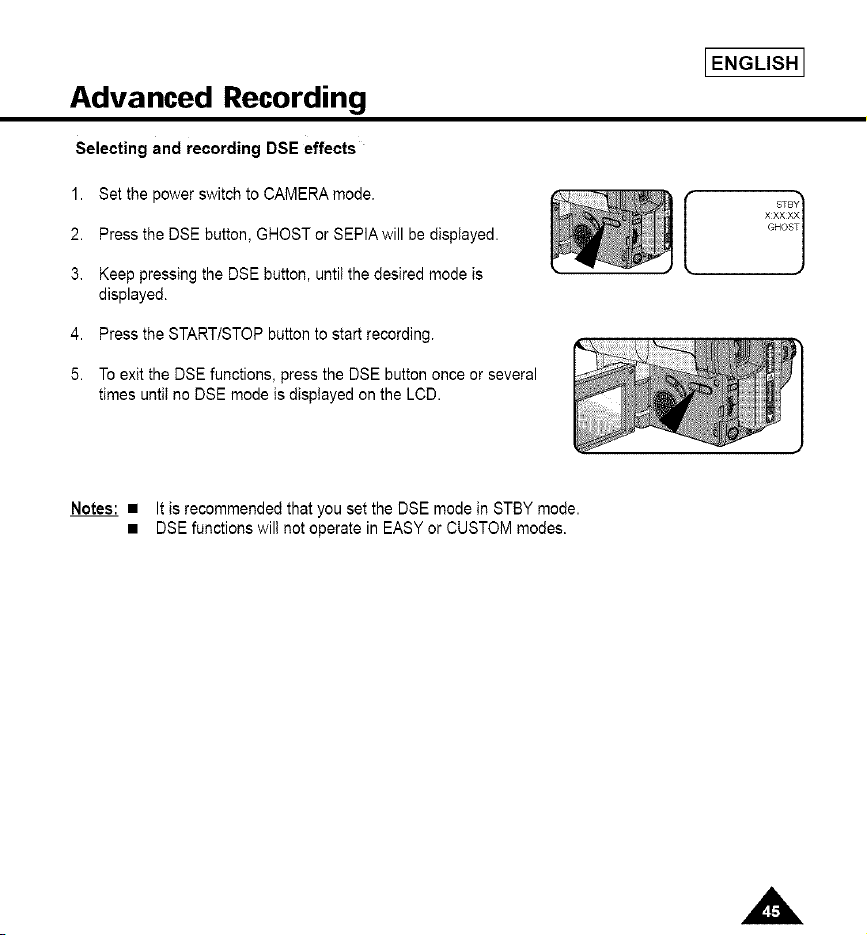
Selecting and recording DSE effects
1. Set the power switch to CAMERA mode.
2. Press the DSE button, GHOST or SEPIA will be displayed.
3. Keep pressing the DSE button, until the desired mode is
displayed.
[
4. Press the STARTISTOP button to start recording.
5. To exit the DSE functions, press the DSE button once or several
times until no DSE mode is displayed on the LCD.
IENGLISH I
STB1
XXXXX
GHOS
Notes: • It is recommended that you set the DSE mode in STBY mode.
• DSE functions wilt not operate in EASY or CUSTOM modes.
I ENGLISH I
Advanced Recording
Setting and recording the date/time feature works in the CAMERA mode only.
You can record the date/time on your tapes, so you will knew when it was made. The date and time
are recorded whenever they are displayed on the viewfinder or LCD.
Setting a DATE/TIME
Setting the DATE/TIME is possibie in STANDBY of CAMERA mode only.
1. Make sure that you have installed the LITHIUM BATTERY. (see page 21)
The LITHIUM BATTERY is needed to maintain the clock.
2. Set the power switch to CAMERA mode. (see page 22)
3. Press the MENU ON/OFF button,
then the MENU tist will appear.
Turn the UP/DOWN dial until CLOCK ........... SET
is highlighted.
]
CUSTO_,I SET
CLOCK SET
TITLE SET
TITLE OFF
DIS OFF
EXIT MENU
Press ENTER.
• CLOCK SETTING is possible when the DATE and TIME
appear.
• BLINKING indicates the possibie changes for the setting.
The year wilI be the first to blink.
6. Turn the UPIDOWN dial to set the desired year.
• CLOCK SET •
gO0
AUG2@_o_
• CLOCK SET •
000
AUG2_;2_
Advanced Recording
IENGLISH I
7, Press ENTER.
• The monthto be reset wilt blink.
8. Turn the UP/DOWN dial to set the desired month.
9. Press ENTER.
• The day to be reset wil) b(ink.
10. You can set the day, hour and minute following
the same procedure used for setting the year and month.
I • CLOCK SET •
000
I • CLOCK SET •
000
÷q<-_, 2cos
I • CLOCK SET •
000
AU÷2_9,:_eos
11. Press ENTER after setting the minute and the clock setting screen will disappear.
The selected date and time will then be displayed.
Recording the DATE/TIME
1. Make sure that you have set the DATE/TIME
2. Set the power switch to CAMERA mode. (see page 22)
• Open the LCD monitor and adjust it to see comfortably.
3. Press the DATE/TIME button the required number of times.
• To record the date only, press the DATE/TIME button once.
• To record the date and time, press the DATE/TIME button
twice.
4. Press the START/STOP button to record the DATE/TIME on your recording.
Notes:
if your date and time settings are not maintained in the camcorder,
it means the installed LITHIUM BATTERY is discharged. (see page 21)
You cannot conceal the recorded date or time during playback.
The DATE/TIME function cannot be turned off in EASY or CUSTOM modes.
I ENGLISH I
Advanced Recording
Selecting and recording a TITLE is possible in the CAMERA mode only.
The TITLE feature allows you to select a preset title stored in the camcorder's memory.
You can also select the language of the titles.
Selecting a Language and Setting a Title
Selecting a language is possible in STANDBY in CAMERA mode only.
The factory default language is ENGLISH.
You can change the language.
1. Make sure that you have installed the LITHIUM BATTERY or have the AC adapter attached.
(see page 21)
2. Set the power switch to CAMERA mode. (see page 22)
• Open the LCD monitor and adjust it to see comfortably.
3. Press the MENU ON/OFF button. The MENU list will appear,
Turn the UP/DOWN dial until TITLE ........... SET
is highlighted.
CUSTO_,I SET 1
CLOCK SET
TITLE SET
TITLE OFF
DIS OFF
EXIT¸ _,IENU
I LCI) ADJUST
CUSTOI_t SET
CLOCK SET
DIS OFF
EXiT MENU •
5. Press ENTER.
• A list of available languageswill appear.
Advanced Recording
IENGLISH I
Turn the UP/DOWN diat to select the appropriate language.
• You may select languages from ENGLISHIFRENCHt
GERMAN/ITALIAN/SPANISH/RUSSIAN.
Press ENTER.
• Then,the title list in the languageyou chosewill appear.
#RENCH
GERMAN
iTAUAN
SPANISH
RUSSIAN
8.
9.
Turn UP/DOWN dial to whichever TITLE you desire.
Press ENTER.
• The selected title wilt appear on the screen for
2 ~ 3 seconds and will disappear. At the same,
the camcorder will return to the menu mode.
I ANNIVERSARY 1
_RAGOAYi6N
HAPPY BIRTHDAY
HAPPY NEW YEAR
HAVING FUN
Recording a Title
Note: • Make sure that you have selected a TITLE from
the TITLE list,
1. Set power switch to CAMERA mode.
• Open the LCD monitor and adjust it to see comfortably.
2. Press MENU.
3. Turn the UPIDOWN dial until TITLE ........ OFF is highlighted.
4. Press ENTER to choose between OFF, AUTO-10S and CONTINUE.
5. Press START/STOP button to record the title with your picture.
• If you want to change TITLE recording time, select title recording time
(OFF, AUTO-10S, CONTINUE)on MENU.
Notes: • The title moves horizontally from the right side to the left side 10 seconds
after you turn on the title.
• MENU ONtOFF function will not operate in EASY or CUSTOM mode.
I ENGLISHI
Advanced Recording
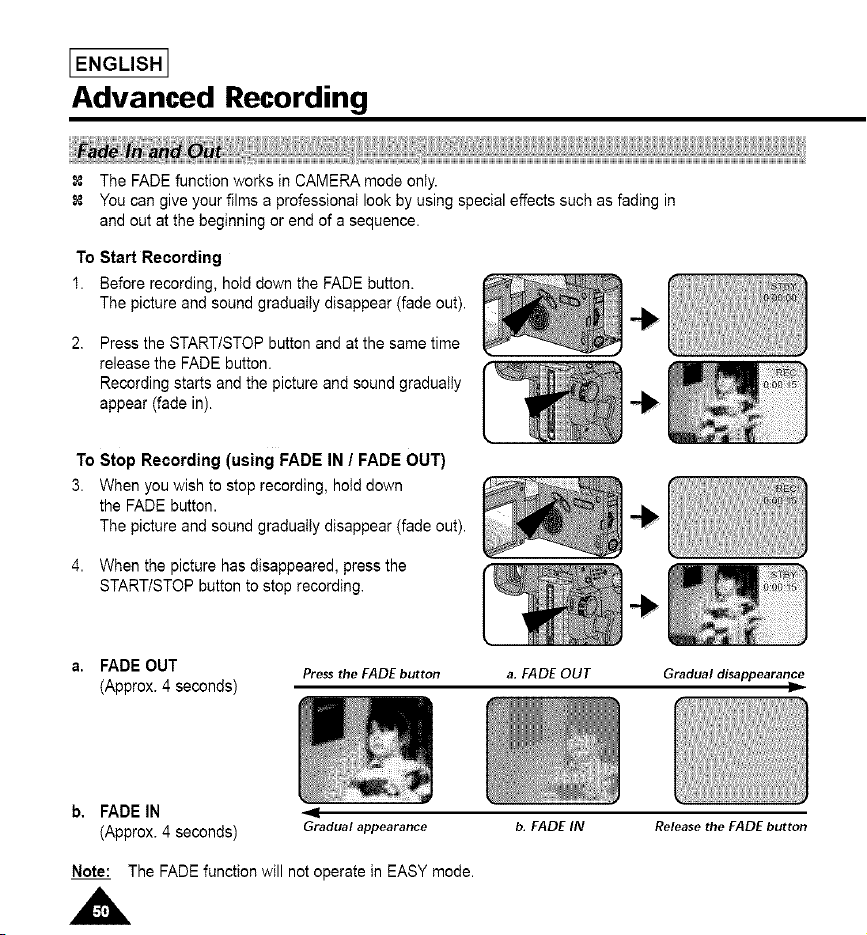
The FADE function works in CAMERA mode only.
You can give your films a professional look by using special effects such as fading in
and out at the beginning or end of a sequence.
To Start Recording
1. Before recording, hold down the FADE button.
The picture and sound gradually disappear (fade out).
Press the START/STOP button and at the same time
release the FADE button.
Recording starts and the picture and sound gradually
appear (fade in).
To Stop Recording (using FADE IN / FADE OUT)
3. When you wish to stop recording, hold down
the FADE button.
The picture and sound gradually disappear (fade out).
4. When the picture has disappeared, press the
START/STOP button to stop recording.
a. FADEOUT
(Approx.4 seconds)
Press the FADE button
a. FADE OUT Gradual disappearance
l=
b, FADEIN
(Approx.4 seconds) Gradual appearance
b. FADE IN Release the FADE button
Note: The FADE function will not operate in EASY mode.
Advanced Recording
IENGLISH I
1,
2.
The PIP(Picture-In-Picture) feature works in combination with the DIGITAL ZOOM function by using
a smaII, superimposed screen to show an image that is wider than the image being recorded.
This should help you to get a more clear idea of what you are recording.
The PIP function works in CAMERA mode only.
Set the power switch to CAMERA mode.
Turn on DIGITAL ZOOM. (see page 35)
3,
4.
5.
6.
Pressthe MENU ON/OFF button,the MENU List
wilI be displayed.
Turn the UP/DOWN dial until PIP.......... OFF is
highiighted.
Press ENTER,the PIP ON and a small screen
shouldappear.
LCD ADJUST
CUSTOM SET
CLOCK SET
TITLE SET
TITLE OFF
D_S OFF
D ZOOM OFF
+ ENTER
Check which part you are recording on the PIP screen,
and turn the Zoom button to "T" position to activate
the DIGITAL ZOOM mode.
• Start recording by pressing the START/STOP button
when the portion you want to record appears.
LCD ADJUST
CUSTO_,I SET
CLOCK SET
TITLE SET
TITLE OFF
D_S OFF
D ZOOM OFF
Setting PIP......ON to OFF in the MENU wilI make the small screen disappear
and switch the PIP mode off.
Notes: • When you use PIP function while making a recording,
the PIP screen wilI be recorded on the Tape.
• The MENU ONIOFF function will not operate in EASY or CUSTOM mode.
• PIP function witI not operate in DSE mode.
I ENGLISHI
Advanced Recording
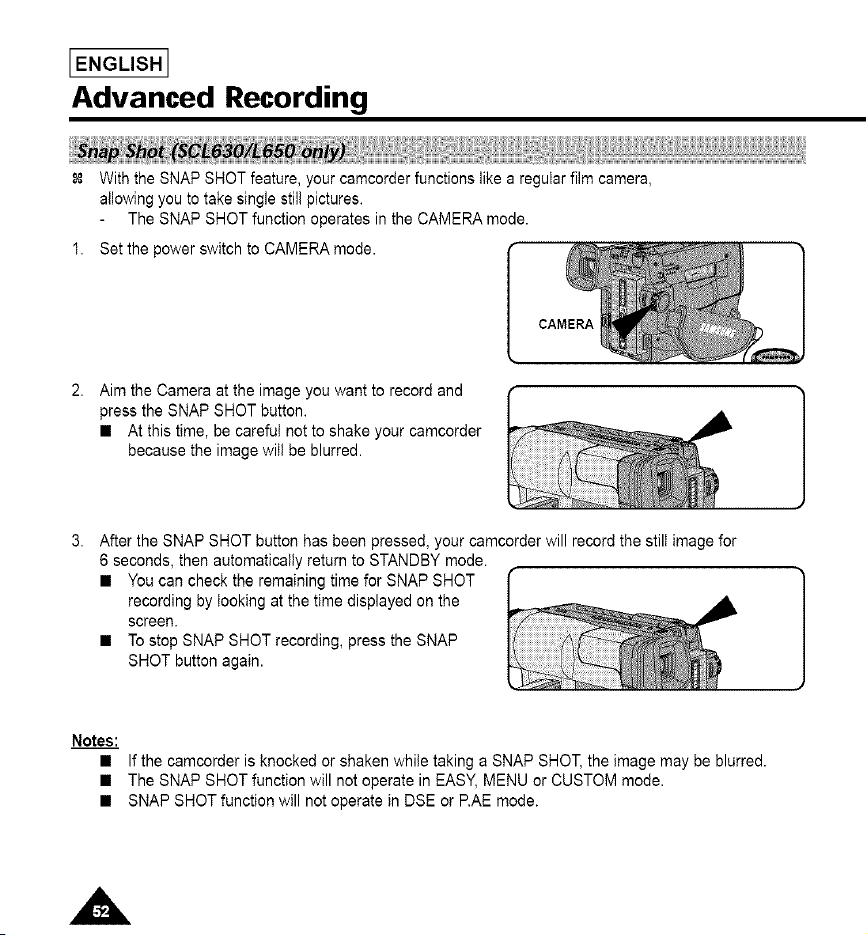
With the SNAP SHOT feature, your camcorder functions like a regular film camera,
allowing you to take single still pictures.
The SNAP SHOT function operates in the CAMERA mode.
Set the power switch to CAMERA mode.
Aim the Camera at the image you want to record and
press the SNAP SHOT button.
• At this time, be careful not to shake your camcorder
because the image will be blurred.
After the SNAP SHOT button has been pressed, your camcorder will record the still image for
6 seconds, then automatically return to STANDBY mode.
• You can check the remaining time for SNAP SHOT
recording by looking at the time displayed on the
screen.
• To stop SNAP SHOT recording, press the SNAP
SHOT button again.
Notes:
If the camcorder is knocked or shaken while taking a SNAP SHOT, the image may be blurred.
The SNAP SHOT function will not operate in EASY, MENU or CUSTOM mode.
SNAP SHOT function will not operate in DSE or P.AE mode.
Advanced Recording
IENGLISH I
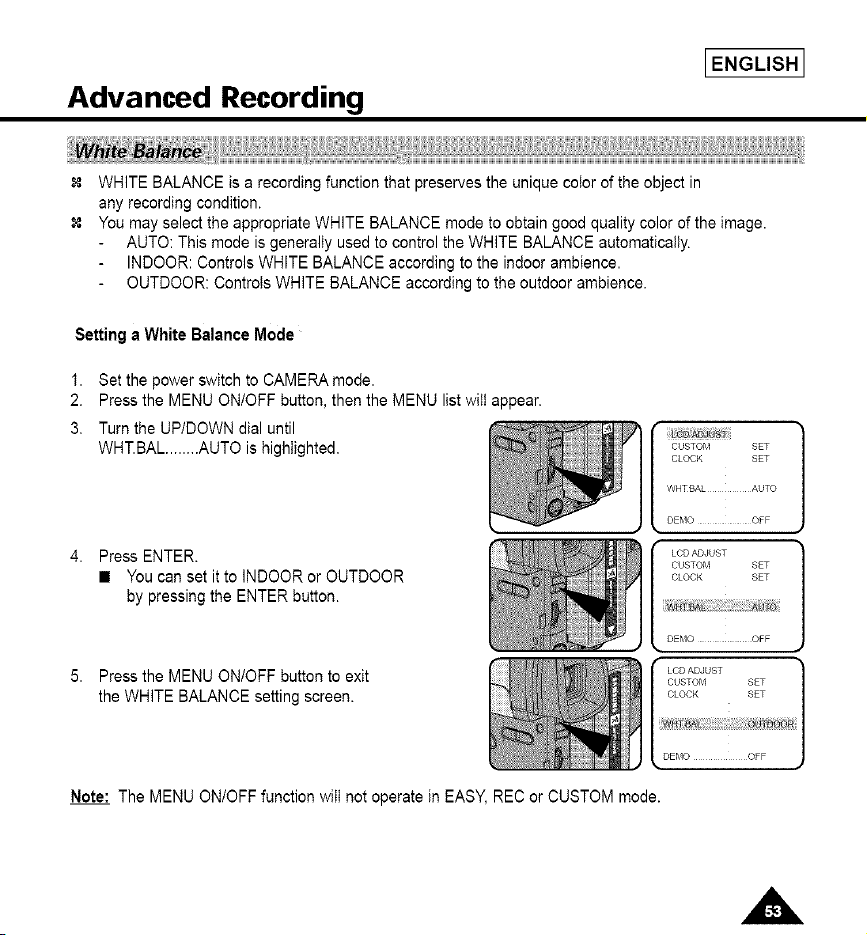
WHITE BALANCE is a recording function that preserves the unique color of the object in
any recording condition.
You may select the appropriate WHITE BALANCE mode to obtain good quality color of the image.
AUTO: This mode is generally used to control the WHITE BALANCE automatically.
INDOOR: Controls WHITE BALANCE according to the indoor ambience.
OUTDOOR: Controls WHITE BALANCE according to the outdoor ambience.
Settinga White Balance Mode
1. Set the power switch to CAMERA mode.
2. Press the MENU ON/OFF button, then the MENU list will appear.
3. Turn the UP/DOWN dial until
WHT.BAL ........ AUTO is highlighted.
Press ENTER.
• You can set it to INDOOR or OUTDOOR
by pressing the ENTER button.
Press the MENU ON/OFF button to exit
the WHITE BALANCE setting screen.
CUSTOM SET
CLOCK SET
WHTBAL AUTO
DEMO OFF
LCDADJUST
CUSTOM SET
CLOCK SET
DEMO OFF
LCDADJUST
CUSTOM SET
CLOCK SET
DEMO OFF
Note: The MENU ON/OFF function will not operate in EASY, REC or CUSTOM mode.
i ENGLISHi
Advanced Recording
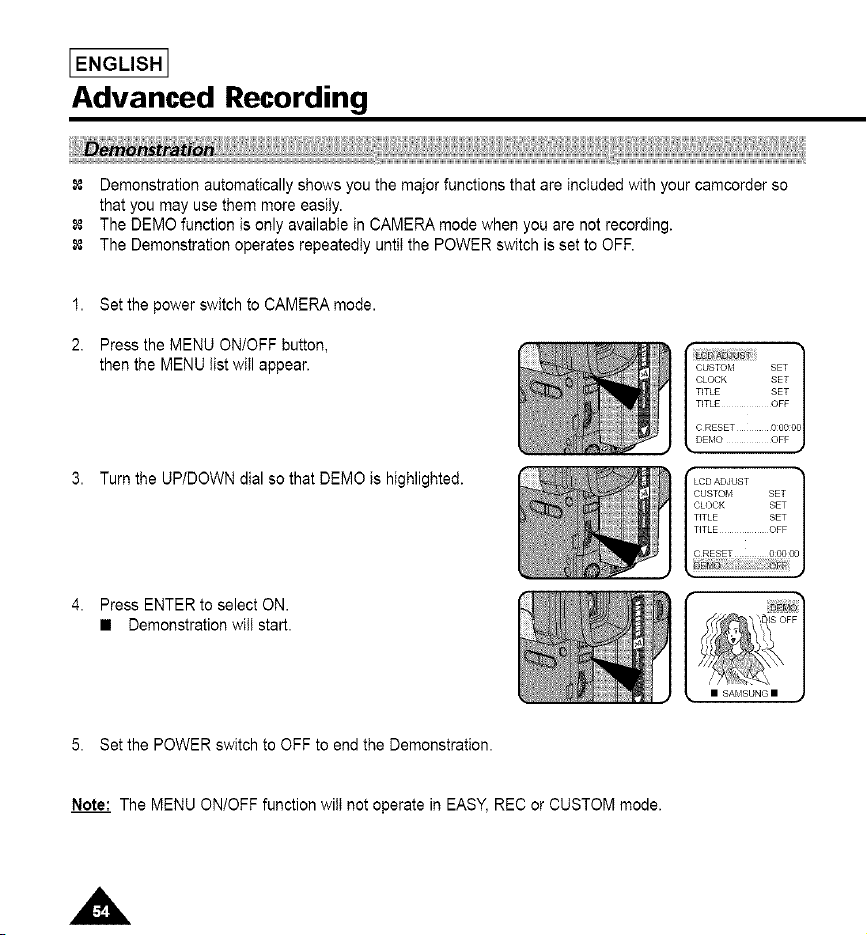
Demonstration automatically shows you the major functions that are included with your camcorder so
that you may use them more easily.
The DEMO function is only available in CAMERA mode when you are not recording.
The Demonstration operates repeatedly until the POWER switch is set to OFF.
1. Set the power switch to CAMERA mode.
2. Press the MENU ON/OFF button,
then the MENU list will appear.
3. Turn the UPIDOWN dial so that DEMO is highlighted.
4. Press ENTER to select ON.
• Demonstration will start.
5. Set the POWER switch to OFF to end the Demonstration.
Note: The MENU ONIOFF function will not operate in EASY, REC or CUSTOM mode.
Advanced Recording
IENGLISH I
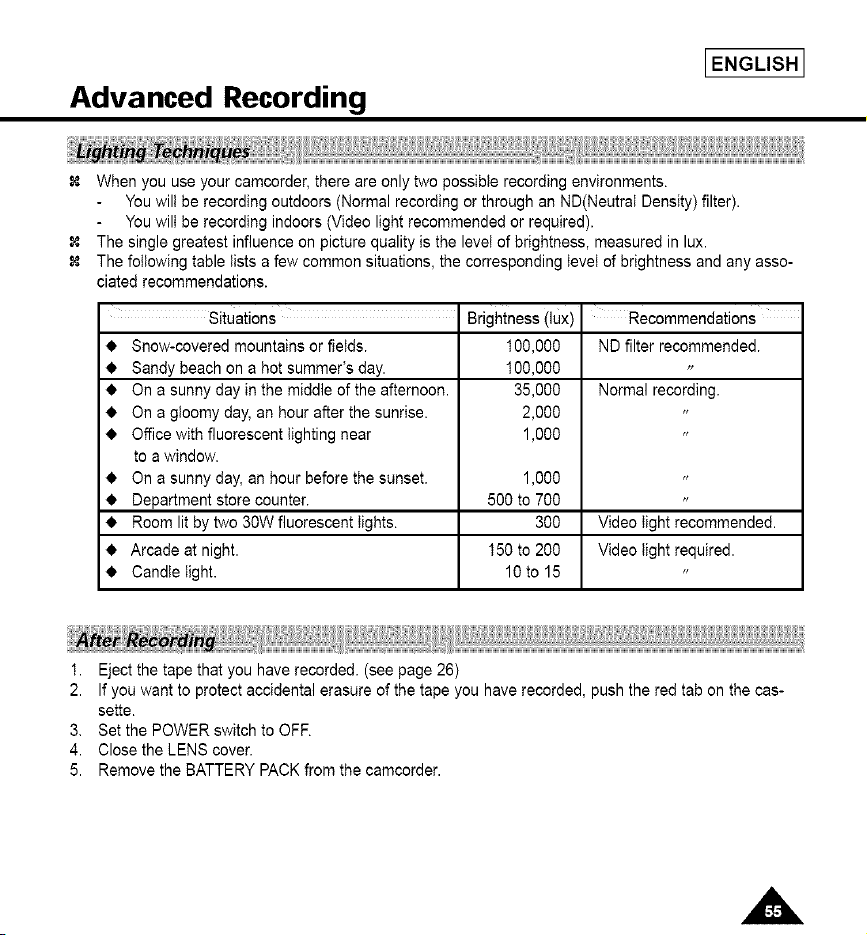
When you use your camcorder, there are only two possible recording environments.
You wilt be recording outdoors (Normal recording or through an ND(NeutraI Density) filter).
You will be recording indoors (Video light recommended or required).
The single greatest influence on picture quality is the level of brightness, measured in lux.
The following table lists a few common situations, the corresponding level of brightness and any asso-
ciated recommendations.
situations Brightness (lux)
• Snow-covered mountains or fields. 100,000
• 100,000
• 35,000
• 2,000
• 1,000
• 1,000
• 500 to 700
• 300
• 150 to 200
• 10 to 15
Sandy beach on a hot summer's day.
On a sunny day in the middle of the afternoon.
On a gloomy day, an hour after the sunrise.
Office with fluorescent lighting near
to a window.
On a sunny day, an hour before the sunset.
Department store counter.
Room lit by two 30W fluorescent lights.
Arcade at night.
Candle light.
Recommendations
ND filter recommended.
Normal recording.
Video light recommended.
Video light required.
1. Eject the tape that you have recorded. (see page 26)
2. If you want to protect accidental erasure of the tape you have recorded, push the red tab on the cas-
sette.
3. Set the POWER switch to OFF.
4. Close the LENS cover.
5. Remove the BATTERY PACK from the camcorder.
I ENGLISHI
Playing back a Tape
To view a tape that you have recorded.
Playback function works in PLAYER mode only.
There are two ways to see a tape;
• To watch with LCD: recommended for outdoor use.
• To watch with TV monitor: recommended for indoor use.
To view a tape using the LCD monitor in a car or the outdoors. (see page 32)
It is practical to use a TV monitor to view tapes indoors.
To ptay a tape back, the TV must feature a compatible color system. (see page 62)
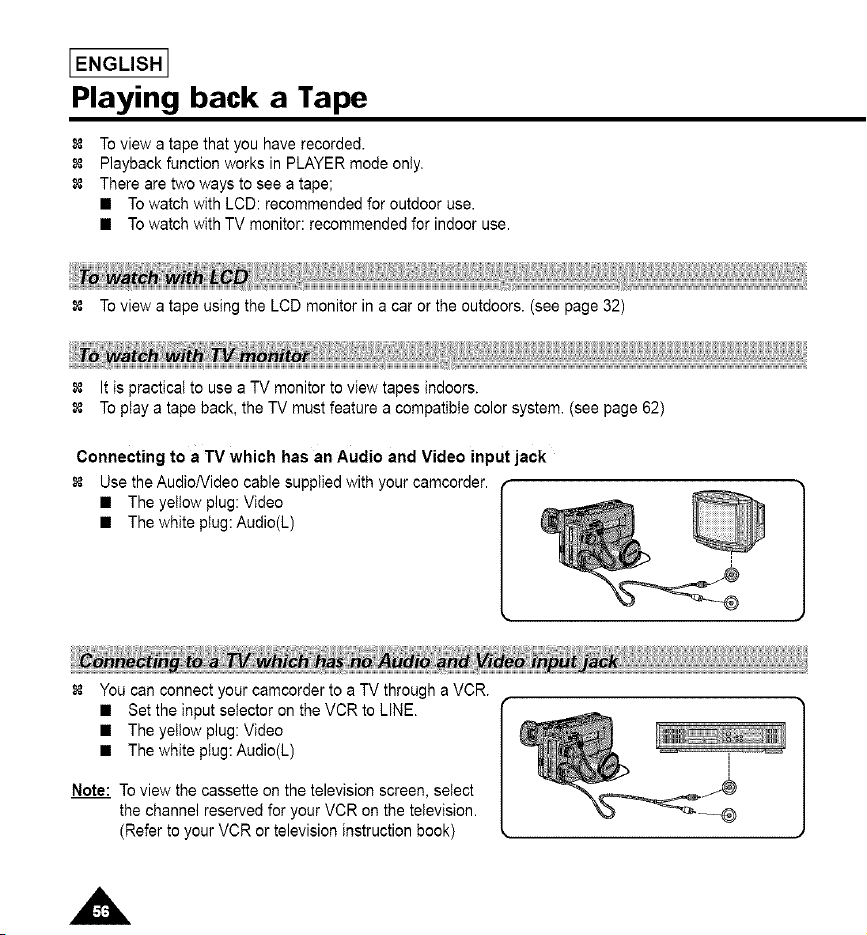
Connecting to a TV which has an Audio and Video input jack
Use the AudioNideo cable supplied with your camcorder.
• The yellow plug: Video
• The white plug:Audio(L)
You can connect your camcorder to a TV through a VCR.
• Set the input selector on the VCR to LINE.
• The yellow plug: Video
• The white plug:Audio(L)
Note: To view the cassette on the television screen, select
the channel reserved for your VCR on the television.
(Refer to your VCR or television instruction book)
IENGLISH I
Playing back a Tape
Notes:
• SCL6101L630/L650 feature a monaural audio system. If your TV or VCR are stereo,
connect the audio cable to input "L" of your TV or VCR.
• You can use an S-VIDEO cable to obtain better quality pictures if you have an S-VIDEO connector
on your TV.
• While playing back on a TV screen, close the LCD panel. Otherwise, picture distortion may occur.
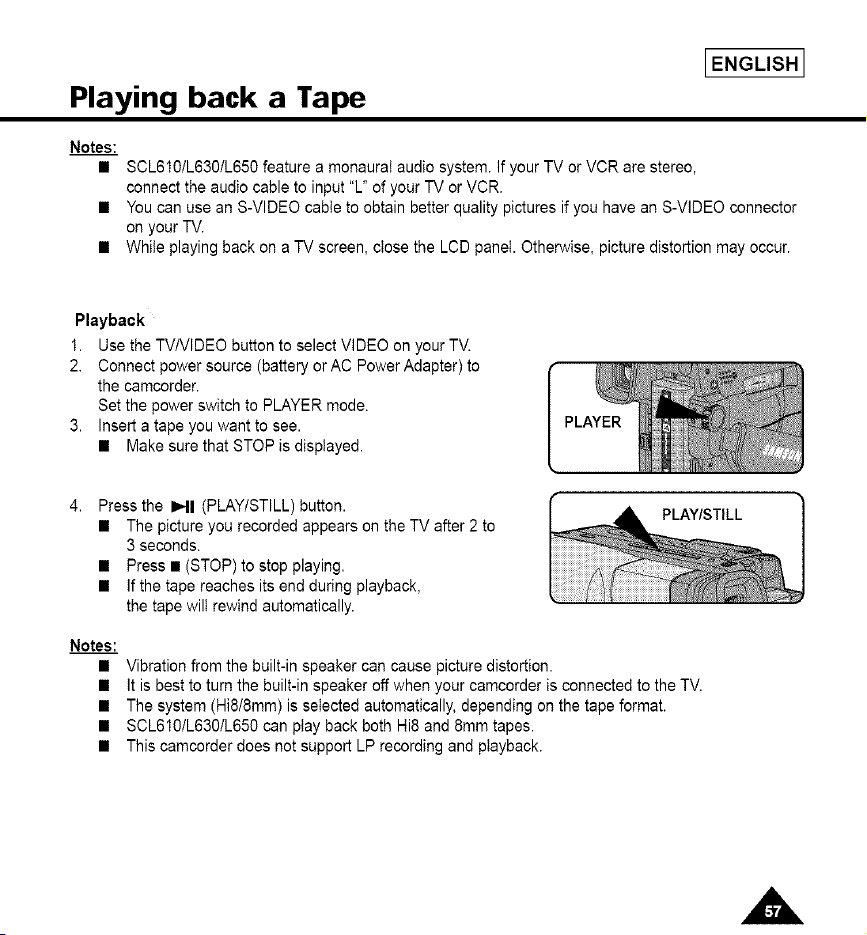
Playback
1. Use the TV/VIDEO button to select VIDEO on your TV.
2. Connect power source (battery or AC Power Adapter) to
the camcorder.
Set the power switch to PLAYER mode.
3. Insert a tape you want to see.
• Make sure that STOP is displayed.
PLAYER
Press the I_1 (PLAYtSTILL) button.
• The picture you recorded appears on the TV after 2 to
3 seconds.
• Press • (STOP) to stop playing.
• If the tape reaches its end during playback,
the tape wilt rewind automatically.
PLAY/STILL
Notes:
• Vibration from the built-in speaker can cause picture distortion.
• It is best to turn the built-in speaker off when your camcorder is connected to the TV.
• The system (Hi8/8mm) is selected automatically, depending on the tape format.
• SCL610/L630IL650 can play back both Hi8 and 8ram tapes.
• This camcorder does not support LP recording and playback.
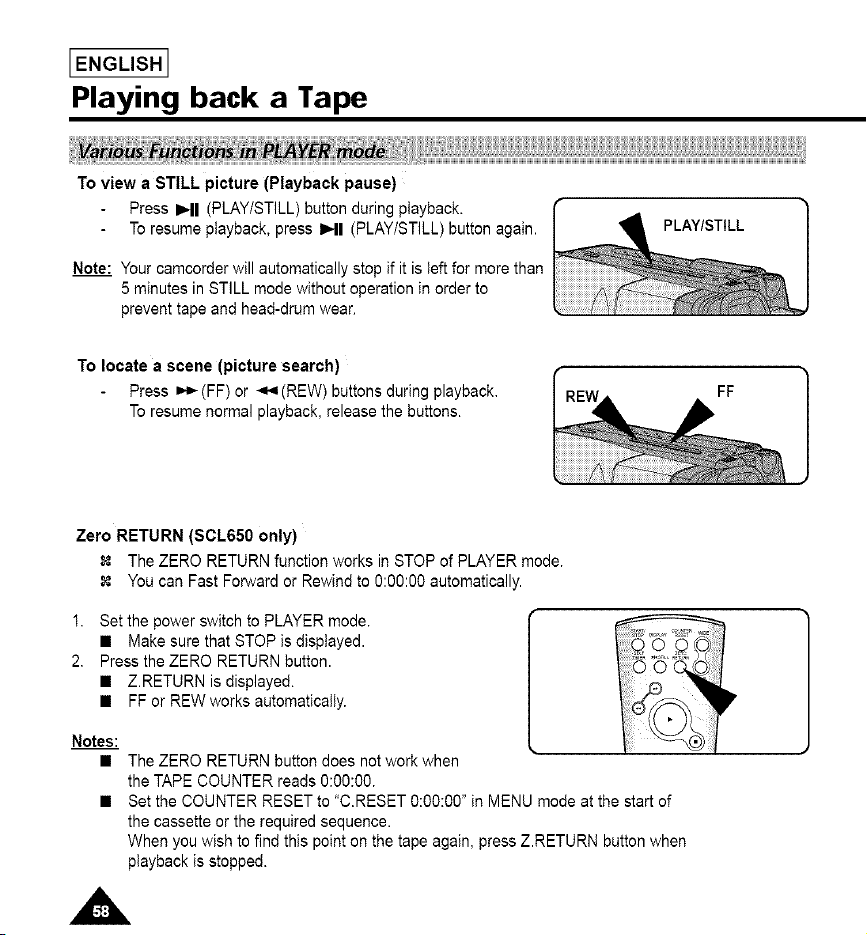
I ENGLISHI
Playing back a Tape
To view a STILL picture (Playback pause)
Press PHI (PLAY/STILL) button during playback.
To resume playback, press IHI (PLAY/STILL) button again.
Note: Your camcorder will automatically stop if it is left for more than
5 minutes in STILL mode without operation in order to
prevent tape and head-drum wear.
PLAY/STILL
To locate a scene (picture search)
Press _t,-(FF) or _I,9(REW) buttons during playback.
To resume normal playback, release the buttons.
FF
Zero RETURN (SOL650 only)
The ZERO RETURN function works in STOP of PLAYER mode.
You can Fast Forward or Rewind to 0:00:00 automatically.
1, Set the power switch to PLAYER mode.
• Make sure that STOP is displayed.
2, Press the ZERO RETURN button.
• Z.RETURN is displayed.
• FF or REW works automatically.
Notes:
The ZERO RETURN button does not work when
the TAPE COUNTER reads 0:00:00.
Set the COUNTER RESET to "C.RESET 0:00:00" in MENU mode at the start of
the cassette or the required sequence.
When you wish to find this point on the tape again, press Z.RETURN button when
playback is stopped.
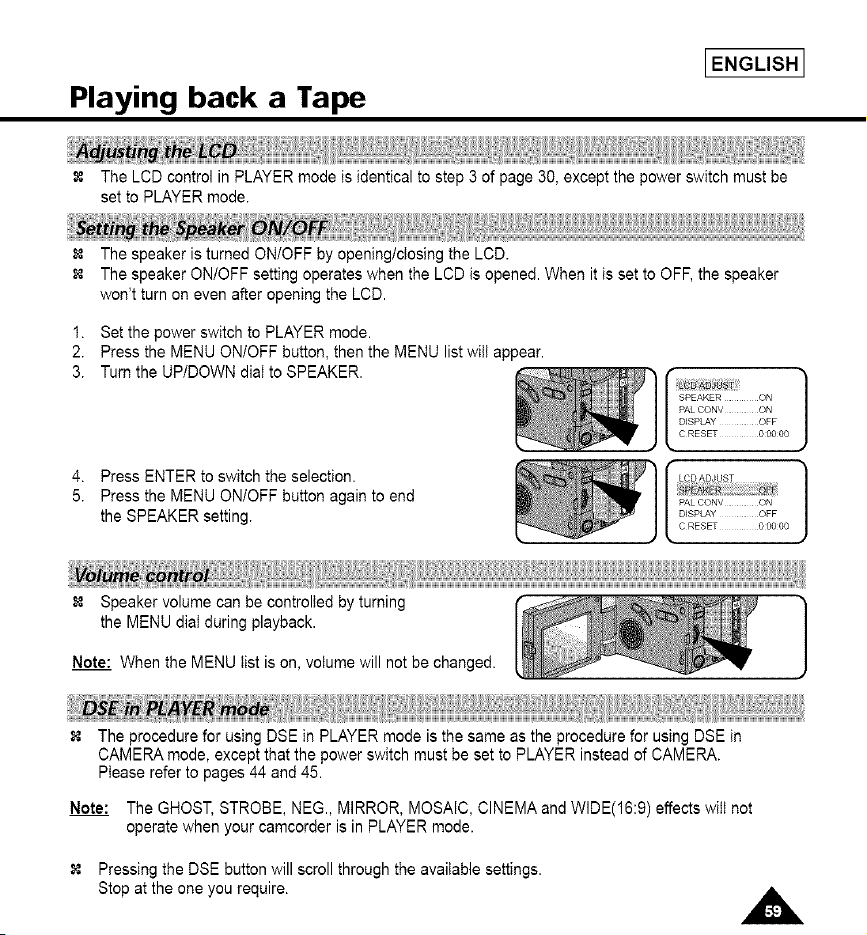
Playing back a Tape
IENGLISH I
The LCD control in PLAYER mode is identical to step 3 of page 30, except the power switch must be
set to PLAYER mode.
The speaker is turned ON/OFF by opening/closing the LCD.
The speaker ON/OFF setting operates when the LCD is opened. When it is set to OFF, the speaker
won't turn on even after opening the LCD.
1. Set the power switch to PLAYER mode.
2. Press the MENU ONIOFF button, then the MENU list will appear.
3. Turn the UPIDOWN dial to SPEAKER.
4. Press ENTER to switch the selection.
5. Press the MENU ON/OFF button again to end
the SPEAKER setting.
]
• ]
LCDADJUST
DISPLAY OFF
C RESET O0000
Speaker volume can be controlled by turning
the MENU dial during playback.
Note: When the MENU list is on, volume will not be changed.
The procedure for using DSE in PLAYER mode is the same as the procedure for using DSE in
CAMERA mode, except that the power switch must be set to PLAYER instead of CAMERA.
Please refer to pages 44 and 45.
Note: The GHOST, STROBE, NEG., MIRROR, MOSAIC, CINEMA and WIDE(16:9) effects will not
operate when your camcorder is in PLAYER mode.
Pressing the DSE button will scroll through the available settings.
Stop at the one you require.
[ENGLISH 1
Playing back the Tape
This Camcorder can convert an NTSC tape recorded in the SP mode to the "PAL60" format,
allowing you to view it on a PAL TV which has Vertical sync adjustment circuitry for 60Hz.
- "PAL60" is a special output signal format with which a PAL TV can be used to view a tape recorded
by an NTSC recorder.
1. Set POWER switch to PLAYER mode.
2. Insert an NTSC tape you want to see.
3. Press MENU ON/OFF button, then the MENU list will appear.
4. Turn the UP/DOWN dial to "PAL.CONV.OFF"
5. Press ENTER, then it will change to "PAL CONV.PAL60"
• Now you can see the picture by pressing the PLAY button.
6. Press MENU ON/OFF button to end setting.
Notes: 1. This Camcorder can not record using the "PAL60" system.
2. When an NTSC tape is being played back, the picture on the PAL monitor screen may shrink in
the Vertical direction.
3. If the signal recorded on the tape is in bad condition, the PAL60 playback system may
malfunction.
4. A PAL recorded tape can not be played back on this camcorder.
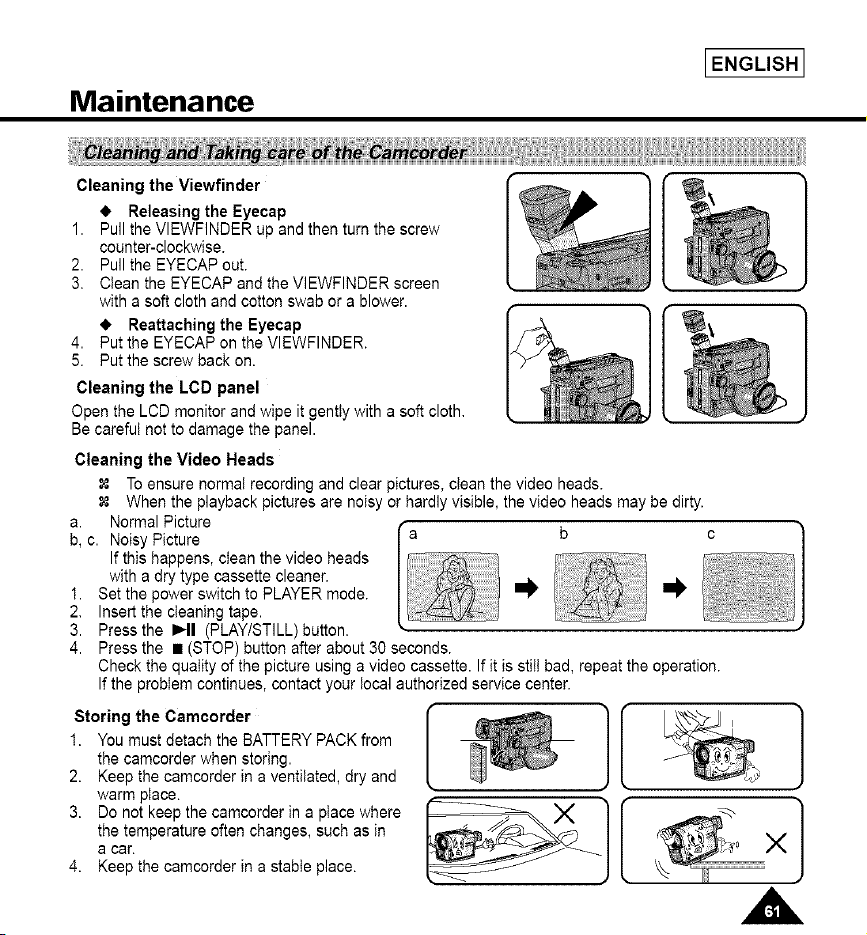
Maintenance
IENGLISH I
Cleaning the Viewfinder
• Releasing the Eyecap
1. Pull the VIEWFINDER up and then turn the screw
counter-clockwise.
2. Pull the EYECAP out.
3. Clean the EYECAP and the VIEWFINDER screen
with a soft cloth and cotton swab or a blower.
• Reattaching the Eyecap
4. Put the EYECAP on the VIEWFINDER.
5. Put the screw back on.
Cleaning the LCD panel
Open the LCD monitor and wipe it gently with a soft cloth.
Be carefut not to damage the panel.
Cleaning the Video Heads
To ensure normal recording and clear pictures, clean the video heads.
When the playback pictures are noisy or hardly visible, the video heads may be dirty.
a. Normal Picture
b, c. Noisy Picture b c
If this happens, clean the video heads
with a dry type cassette cleaner.
1. Set the power switch to PLAYER mode. I_ m_,
2. Insert the cleaning tape.
3. Press the I_11 (PLAYISTILL) button.
4. Press the • (STOP) button after about 30 seconds.
Check the quality of the picture using a video cassette. If it is still bad, repeat the operation.
If the problem continues, contact your local authorized service center.
Storing the Camcorder
1. You must detach the BATTERY PACK from
the camcorder when storing.
2. Keep the camcorder in a ventilated, dry and
warm place.
3. Do not keep the camcorder in a place where
the temperature often changes, such as in
a car.
4. Keep the camcorder in a stable place.

[ENGLISH 1
Using Your Camcorder Abroad
Each country or area has its own electric and TV color system.
Before using your camcorder abroad, check the following:
Power sources
• You can use your camcorder in any country or area that uses 100V to 240V, 50/60 Hz.
• Use a commercially available AC plug adapter, if necessary, depending on the power used.
Color system
• You can view your recording on the LCD or viewfinder.
However, to view a recording on a television or to make a copy to a video cassette recorder,
the television or VCR must be NTSC or PAL60(Player mode only) compatible and have the appropriate
audio/video jacks.
PAL-compatible area
Australia. Austria. Belgium, Bulgaria. China. CIS. Czech Republic. Denmark. Egypt, Finland. France.
Germany, Greece. Great Britain. Holland. Hong Kong, Hungary. India. Iran. Iraq, Kuwait. Libya.
Malaysia. Mauritius. Rumania. Saudi Arabia. Singapore, S]ovak Republic, Spain, Sweden.
Switzerland. Syria, Thailand. Tunisia. etc.
•_, NTSC-compatible area
Bahamas. Canada. Central America, Japan. Mexico Philippines, Korea. Taiwan. United States. etc.
Note: You can make recordings with your camcorder anywhere in the world.
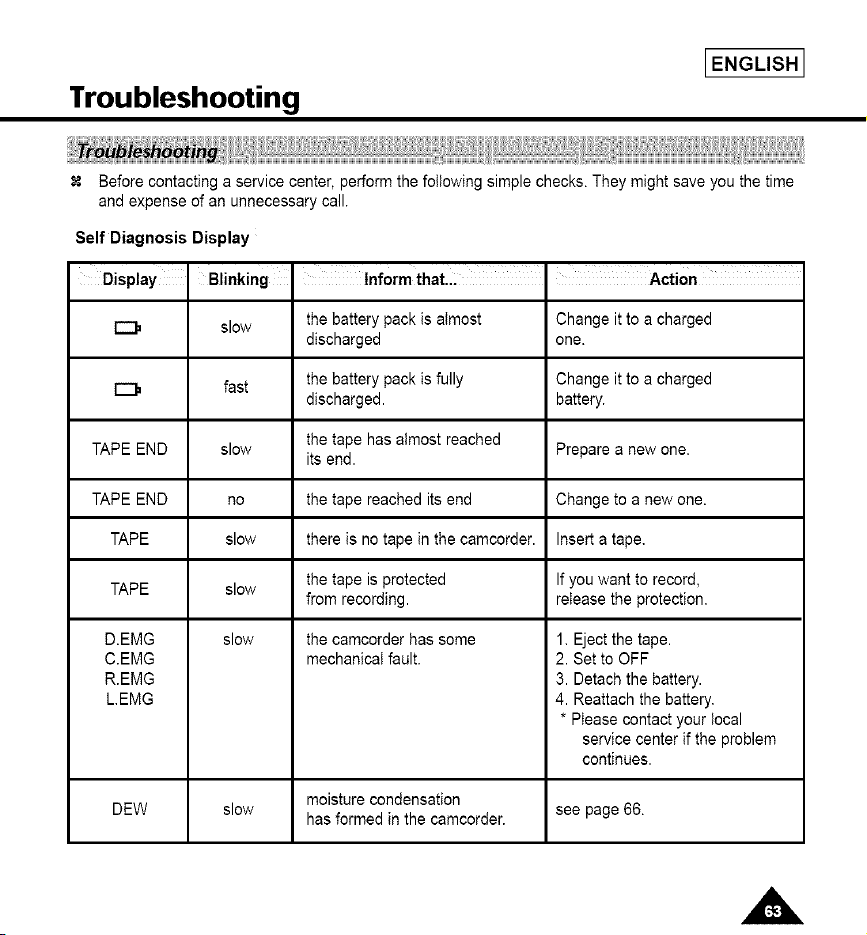
Troubleshooting
IENGLISH I
Before contacting a service center, perform the following simple checks. They might save you the time
and expense of an unnecessary call.
Self Diagnosis Display
Display Blinking Inform that,L Action
E::)
E:],
TAPE END
TAPE END
TAPE
TAPE
D.EMG
C.EMG
R.EMG
L.EMG
slow Change it to a charged
one.
Change it to a charged
fast battery.
slow Prepare a new one.
no Change to a new one.
slow Insert a tape.
If you want to record,
slow release the protection.
slow
the battery pack is almost
discharged
the battery pack is fully
discharged.
the tape has almost reached
its end.
the tape reached its end
there is no tape in the camcorder.
the tape is protected
from recording.
the camcorder has some
mechanical fault.
1. Eject the tape.
2. Set to OFF
3. Detach the battery.
4. Reattach the battery.
* Please contact your local
service center if the problem
continues.
moisture condensation
DEW slow has formed in the camcorder, see page 66.
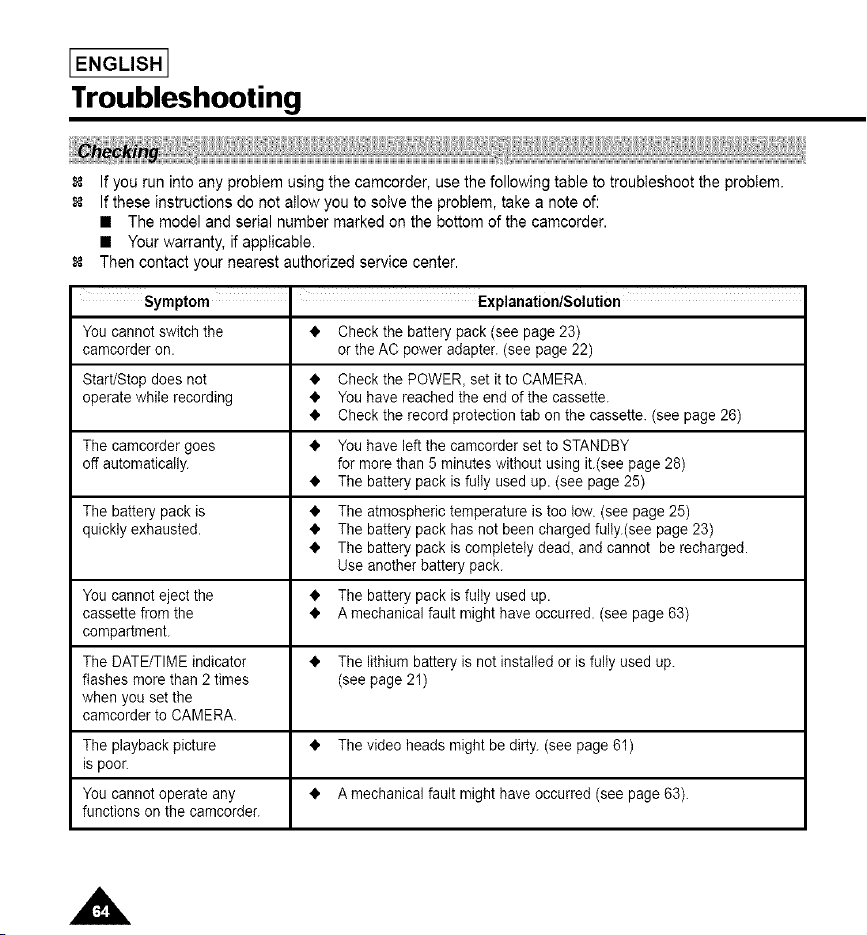
I ENGLISHI
Troubleshooting
If you run into any problem using the camcorder, use the following table to troubleshoot the probtem.
If these instructions do not allow you to soive the problem, take a note of:
• The model and serial number marked on the bottom of the camcorder.
• Your warranty, if applicable.
Then contact your nearest authorized service center.
Symptom - Explanation/Solution
You cannot switch the • Check the battery pack (see page 23)
camcorder on. or the AC power adapter. (see page 22)
Start/Stop does not • Check the POWER, set it to CAMERA.
operate while recording • You have reached the end of the cassette.
• Check the record protection tab on the cassette. (see page 26)
The camcorder goes • You have leftthe camcorder set to STANDBY
off automatically, for more than 5 minutes wJthout using it.(see page 28)
• The battery pack is fully used up. (see page 25)
The battery pack is • The atmospheric temperature Jstoo low. (see page 25)
quickly exhausted. • The battery pack has not been charged fulty.(see page 23)
• The battery pack is completely dead, and cannot be recharged.
Use another battery pack.
You cannot eject the • The battery pack is fulty used up.
cassette from the • A mechanical fault might have occurred. (see page 63)
compartment.
The DATE/TIME indicator • The lithJumbattery is not installed or is fully used up.
flashes more than 2 times (see page 21)
when you set the
camcorder to CAMERA.
The playback picture • The video heads might be dirty. (see page 61)
is poor.
You cannot operate any • A mechanical fault might have occurred (see page 63).
functions on the camcorder.
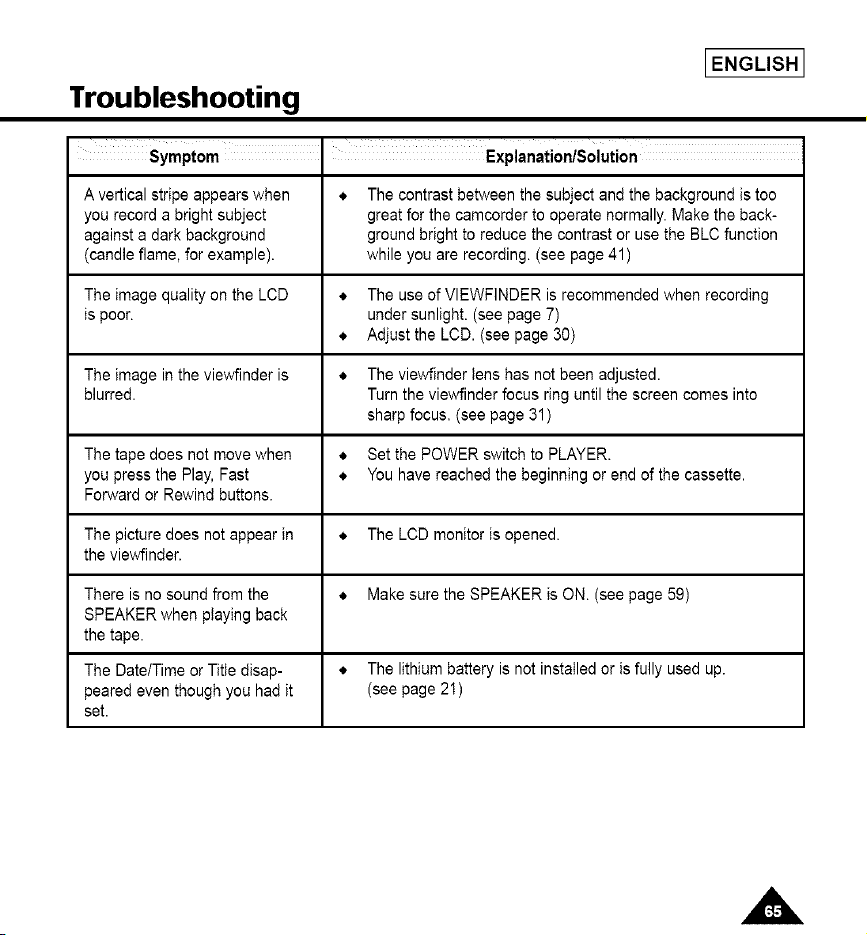
Troubleshooting
IENGLISH I
Symptom I Explanation/Solution
A vertical stripe appears when • The contrast between the subject and the background is too
you record a bright subject great for the camcorder to operate normally. Make the back-
against a dark background ground bright to reduce the contrast or use the BLC function
(candle flame, for example), while you are recording. (see page 41)
The image quality on the LCD • The use of VIEWFINDER is recommended when recording
is poor. under sunlight. (see page 7)
• Adjust the LCD. (see page 30)
The image in the viewfinder is • The viewfinder lens has not been adjusted.
blurred. Turn the viewfinder focus ring until the screen comes into
sharp focus. (see page 31)
The tape does not move when • Set the POWER switch to PLAYER.
you press the Play, Fast • You have reached the beginning or end of the cassette.
Forward or Rewind buttons.
The picture does not appear in • The LCD monitor is opened.
the viewfinder.
There is no sound from the • Make sure the SPEAKER is ON. (see page 59)
SPEAKER when playing back
the tape.
The Date/Time or Title disap- • The lithium battery is not installed or is fully used up.
peared even though you had it (see page 21)
set.
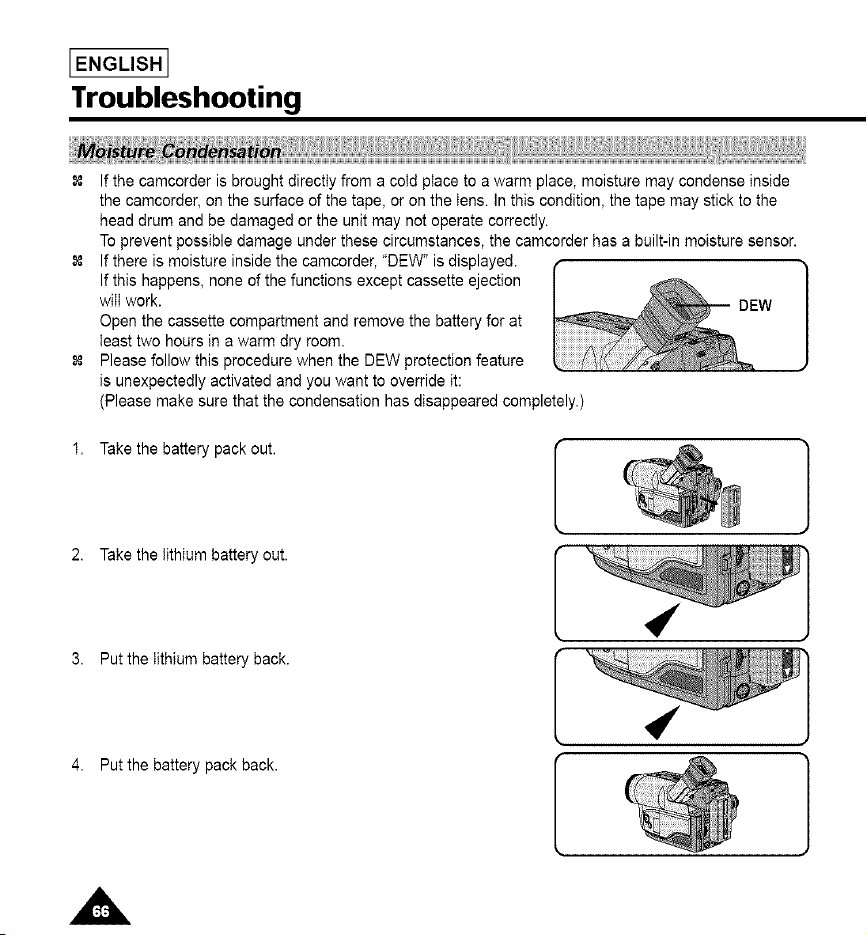
I ENGLISHI
Troubleshooting
If the camcorder is brought directly from a cold place to a warm place, moisture may condense inside
the camcorder, on the surface of the tape, or on the tens. In this condition, the tape may stick to the
head drum and be damaged or the unit may not operate correctly.
To prevent possible damage under these circumstances, the camcorder has a built-in moisture sensor.
If there is moisture inside the camcorder, "DEW" is displayed.
If this happens, none of the functions except cassette ejection
will work. DEW
Open the cassette compartment and remove the battery for at
least two hours in a warm dry room.
Please follow this procedure when the DEW protection feature
is unexpectedly activated and you want to override it:
(Please make sure that the condensation has disappeared completely.)
1. Take the battery pack out.
2. Take the lithium battery out.
3. Put the lithium battery back.
]
4. Put the battery pack back.
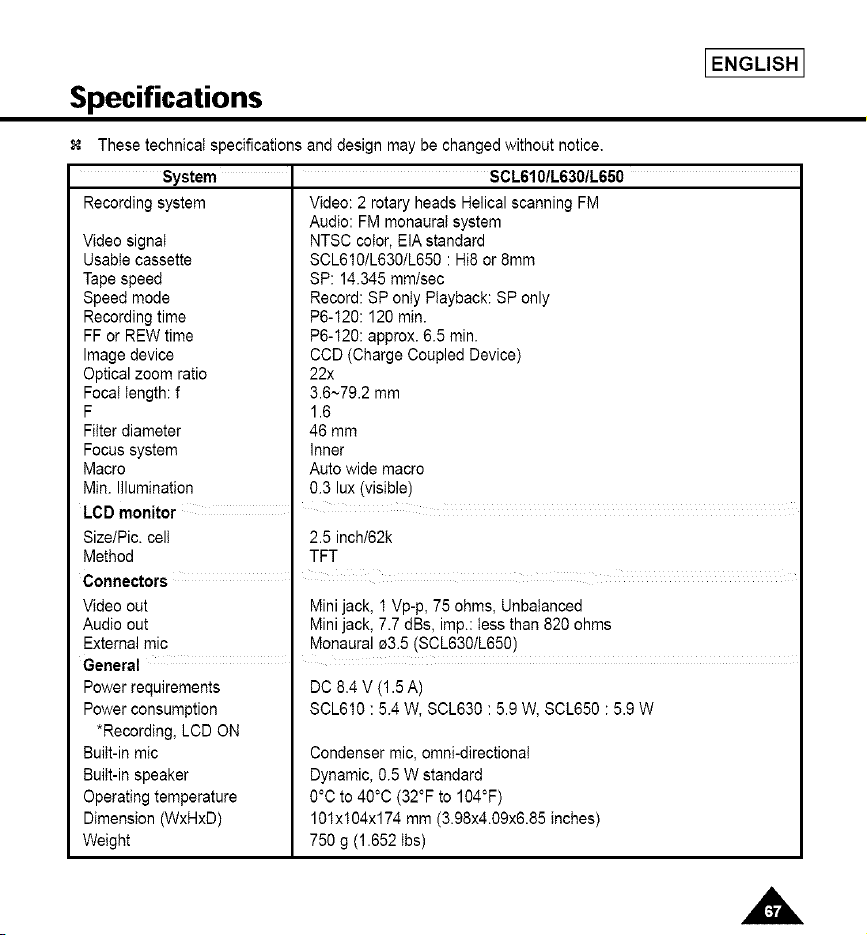
IENGLISH I
Specifications
These technical specifications and design may be changed without notice.
System " SCL610tL630tL650
Recording system Video: 2 rotary heads Helical scanning FM
Audio: FM monaural system
Video signal NTSC color, EIA standard
Usable cassette SCL610/L63O/L650 : Hi8 or 8ram
Tape speed SP: 14.345 mm/sec
Speed mode Record: SP only Playback: SP only
Recording time P6-120:120 min.
FF or REW time P6-120: approx. 6.5 rain.
Image device CCD (Charge Coupled Device)
Optical zoom ratio 22x
Focal length: f 3.6~79.2 mm
F 1.6
Filter diameter 46 mm
Focus system Inner
Macro Auto wide macro
Min. Illumination 0.3 lux (visible)
LCD monitor I
Size/Pic. celt
Method
Connectors
Video out
Audio out
External mic
General
Power requirements
Power consumption
*Recording, LCD ON
Built-in mic
Built-in speaker
Operating temperature
Dimension (WxHxD)
Weight
2.5 inch/62k
TFT
Minijack, 1Vp-p, 75 ohms, Unbalanced
Minijack, 7.7 dBs, imp.: tessthan 820 ohms
Monaural_3.5 (SCL630/L650)
DC 8.4 V (1.5 A)
SCL610 : 5.4 W, $0L630 : 5.9 W, SCL650 : 5.9 W
Condensermic, omni-directionaI
Dynamic,0.5W standard
0°C to 40°C (32°F to 104°F)
10Ix 104xl74 mm (3.98x4.09x6.85inches)
750 g (1.652 tbs)
LENGLISH 1
Index
'A-
ABROAD ................................................................... 62
AC POWER ADAPTER ............................................. 22
ADJUSTING .............................................................. 30
AF .............................................................................. 40
AUDIO ....................................................................... 56
AUTO FOCUSING .................................................... 40
AUTO MODE............................................................. 42
AUTO POWER OFF .................................................. 28
=R=
BATTERY .................................................................. 23
BATTERY LEVEL ...................................................... 25
BATTERY PACK........................................................ 23
BLC............................................................................ 41
BRIGHTNESS ........................................................... 30
-C-
CAMERA ................................................................... 22
CASSETTE ................................................................ 26
CASSETTE HOLDER................................................ 15
CLEANING ................................................................ 61
COLOR ..................................................................... 30
CONTENTS ................................................................. 2
COUNTER ................................................................. 58
CUSTOM ................................................................... 38
=D=
DATE ......................................................................... 46
DATE/TIME................................................................ 46
DC CABLE ................................................................. 22
DEMO ....................................................................... 54
DEW .......................................................................... 66
DIGITAL ZOOM ......................................................... 35
DIMENSIONS ............................................................ 67
DIS............................................................................. 39
DISPLAY.................................................................... 16
DSE ........................................................................... 44
-E-
EASY ......................................................................... 37
EDIT ......................................................................... 28
EJECT ....................................................................... 26
ENTER ...................................................................... 30
EXTERNAL MIC ........................................................ 67
=F"
FADE IN ..................................................................... 50
FADE OUT ................................................................. 50
FAR ............................................................................ 40
FF (FAST FORWARD) .............................................. 58
FILTER DIAMETER ................................................... 67
FOCAL LENGTH ....................................................... 67
-G-
GHOST ...................................................................... 44
iN=
HAND STRAP ........................................................... 20
Hi8 ............................................................................. 57
"L"
LCD ........................................................................... 30
LENS ......................................................................... 13
LITHIUM BATTERY ................................................... 21
'M-
MIRROR .................................................................... 44
MOISTURE ................................................................ 66
MOSAIC .................................................................... 44
=N=
ND FILTER ................................................................ 55
NEAR ......................................................................... 40
NEG ........................................................................... 44
NTSC ......................................................................... 62
[ENGLISH 1
Index
"0 =
OPERATION MODE .................................................. 17
OSD........................................................................... 16
=p.
PtP............................................................................. 51
PLAY.......................................................................... 57
PLAYER..................................................................... 57
PORTRAIT MODE ..................................................... 42
POWER CONSUMPTION ......................................... 67
POWER REQUIREMENT ......................................... 67
POWER SWITCH ...................................................... 22
PROGRAM AE .......................................................... 42
'R-
RECHARGING .......................................................... 23
REMOTE CONTROL ................................................. 19
REW (REWIND) ....................................................... 58
=S-
SAFETY INSTRUCTIONS ........................................... 4
SAND/SNOW MODE ................................................. 42
SELF-30S .................................................................. 19
SELF-END ................................................................ 19
SELF DIAGNOSIS ................................................... 63
SELF RECORD ......................................................... 19
SELF TIMER ............................................................. 19
SEPIA ........................................................................ 44
SHOULDER STRAP.................................................. 21
SNAP SHOT .............................................................. 52
SPEAKER .................................................................. 59
SPECIFICATIONS ..................................................... 67
SPORTS MODE ........................................................ 42
SPOTLIGHT MODE .................................................. 42
START/STOP ............................................................ 27
STILL ......................................................................... 58
STOP ........................................................................ 57
STROBE .................................................................... 44
SYSTEM .................................................................... 67
S-VIDEO ................................................................... 57
-T =
TAPE COUNTER ....................................................... 17
TAPE EJECT ............................................................. 26
TAPE END ................................................................. 63
TIME .......................................................................... 46
TITLE ......................................................................... 48
TROUBLESHOOTING .............................................. 64
TV MONITOR ............................................................ 56
-V-
VIDEO ....................................................................... 56
VIDEO HEAD ............................................................ 61
VOLUME ................................................................... 59
=W"
WAtT-10S .................................................................. 19
WEIGHT .................................................................... 67
WHITE BALANCE ..................................................... 53
.Z =
ZERO RETURN......................................................... 58
ZOOM ........................................................................ 34
[ENGLISH 1
Warranty
SAMSUNG
LIMITED WARRANTY
SAMSUNG Electronics America inc. (SEA), warrants that this product is free from defective material
and workmanship.
SEA further warrants that if product fails to operate properly within the specified warranty period and
the failure is due to improper workmanship or defective material, SEA will repair or replace the
product at it's option.
All warranty repairs must be performed by a SEA authorized service center. The name and address
of the location nearest you can be obtained by calling toll free: 1-800 SAMSUNG (1-800-726-7864).
Labor
90 days carry-in
Parts
1 year
On carry-in models, transportation to and from the service center is the customer's responsibility.
The original dated sales receipt must be retained by the customer and is the only acceptable proof
of purchase. It must be presented to the authorized service center.
EXCLUSIONS(WHAT IS NOT COVERED)
This warranty does not cover damage due to accident, fire, flood andlor other acts of God; misuse,
incorrect line voltage, improper installation, improper or unauthorized repairs, commercial use, or
damage that occurs in shipping.
Exterior and interior finish, lamps, and glass are not covered under this warranty.
Customer adjustments which are explained in the instruction manual are not covered under the
terms of this warranty. This warranty will automatically be voided for any unit found with a missing or
altered serial number. This warranty is valid only on products purchased in the United States and
Puerto Rico.
Some States do not allow the exclusions or limitations of incidental or consequential damages, or
allow limitations on how long an implied warranty lasts, so the above limitations or exclusions may
not apply to you. This warranty gives you specific legal rights, and you may also have other rights
which vary from State to State.

THIS CAMCORDER IS MANUFACTURED BY:
ELECTRON CS
SAMSUNG Electronics America inc.
105 Challenger Road Ridgefield Park N.J 07660-0511
Tel: 1-800-SAMSUNG (!-800-726-7864)
*Samsung Electronics' Internet Home Page
http://w_#N.samsungusa.com AD68-00334B