HyperDeck Shuttle HD
HyperDeck
Shuttle HD
April 2022
Installation and Operation Manual

English
Welcome
Thank you for purchasing your Blackmagic HyperDeck Shuttle HD disk recorder!
When we designed the original Blackmagic HyperDeck disk recorders we wanted to make
it easier to record and play back video using fast SSD storage. Now we are excited to
introduce HyperDeck Shuttle HD!
HyperDeck Shuttle HD is a small, portable HDMI video recorder designed for your
desktop. A large search dial and familiar transport controls let you operate the recorder
with one hand which makes HyperDeck Shuttle HD the perfect companion for live
production with an ATEM Mini switcher. You can even use HyperDeck Shuttle HD as a
teleprompter!
HyperDeck Shuttle HD records to SD cards or external flash disks using ProRes, DNxHD
orH.264 codecs for lightning fast recording and playback.
Please check the support page at
www.blackmagicdesign.com for the latest version of
this manual and updates to the HyperDeck software. Keeping your software up to date will
always ensure you get all the latest features. When downloading software, please register
with your information so we can keep you updated when new software is released. We are
constantly working on new features and improvements, so we would love to hear from you!
Grant Petty
CEO Blackmagic Design

Contents
Getting Started 5
Plugging in Power 5
Connecting Video and Audio 6
Plugging in Media 6
Recording Video 7
Playback 8
Using the Search Dial 9
Changing Settings 11
Settings 12
Rear Panel 21
Storage Media 22
SD Card 22
EXT Disk 23
Formatting Media 23
Preparing Media on a Computer 23
Using the Teleprompter Function 25
Blackmagic HyperDeck Setup 26
Transferring Files over a Network 28
Developer Information 30
Blackmagic HyperDeck Ethernet Protocol 30
Protocol Commands 30
Protocol Details 34
Help 46
Regulatory Notices 47
Safety Information 48
Warranty 49
4
HyperDeck Shuttle HD

Getting Started
Getting started with your HyperDeck Shuttle HD is as easy as connecting power, plugging in
anHDMI video source, inserting an SD card or external media, then pressing record!
This section of the manual shows how to get started using your HyperDeck Shuttle HD.
JOG SCR
CLIP
MENU SET
DISK SD
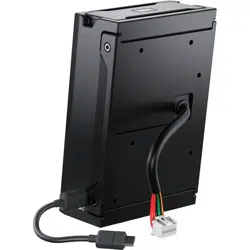
Plugging in Power
To power your HyperDeck Shuttle HD, plug the supplied power adapter into the power input
on the rear panel. Tightening the locking ring secures the power cable to prevent accidental
disconnection.
HDMI OUT
HDMI IN
EXT DISK
SD CARD
ETHERNET
+
12V DC
Secure the power adapter into HyperDeck Shuttle HD’s power input
5
Getting Started
Connecting Video and Audio
To connect video to your HyperDeck Shuttle HD, plug an HDMI video source into the HDMI
input on the rear panel.
HDMI OUT
HDMI IN
EXT DISK
SD CARD
ETHERNET
+
12V DC
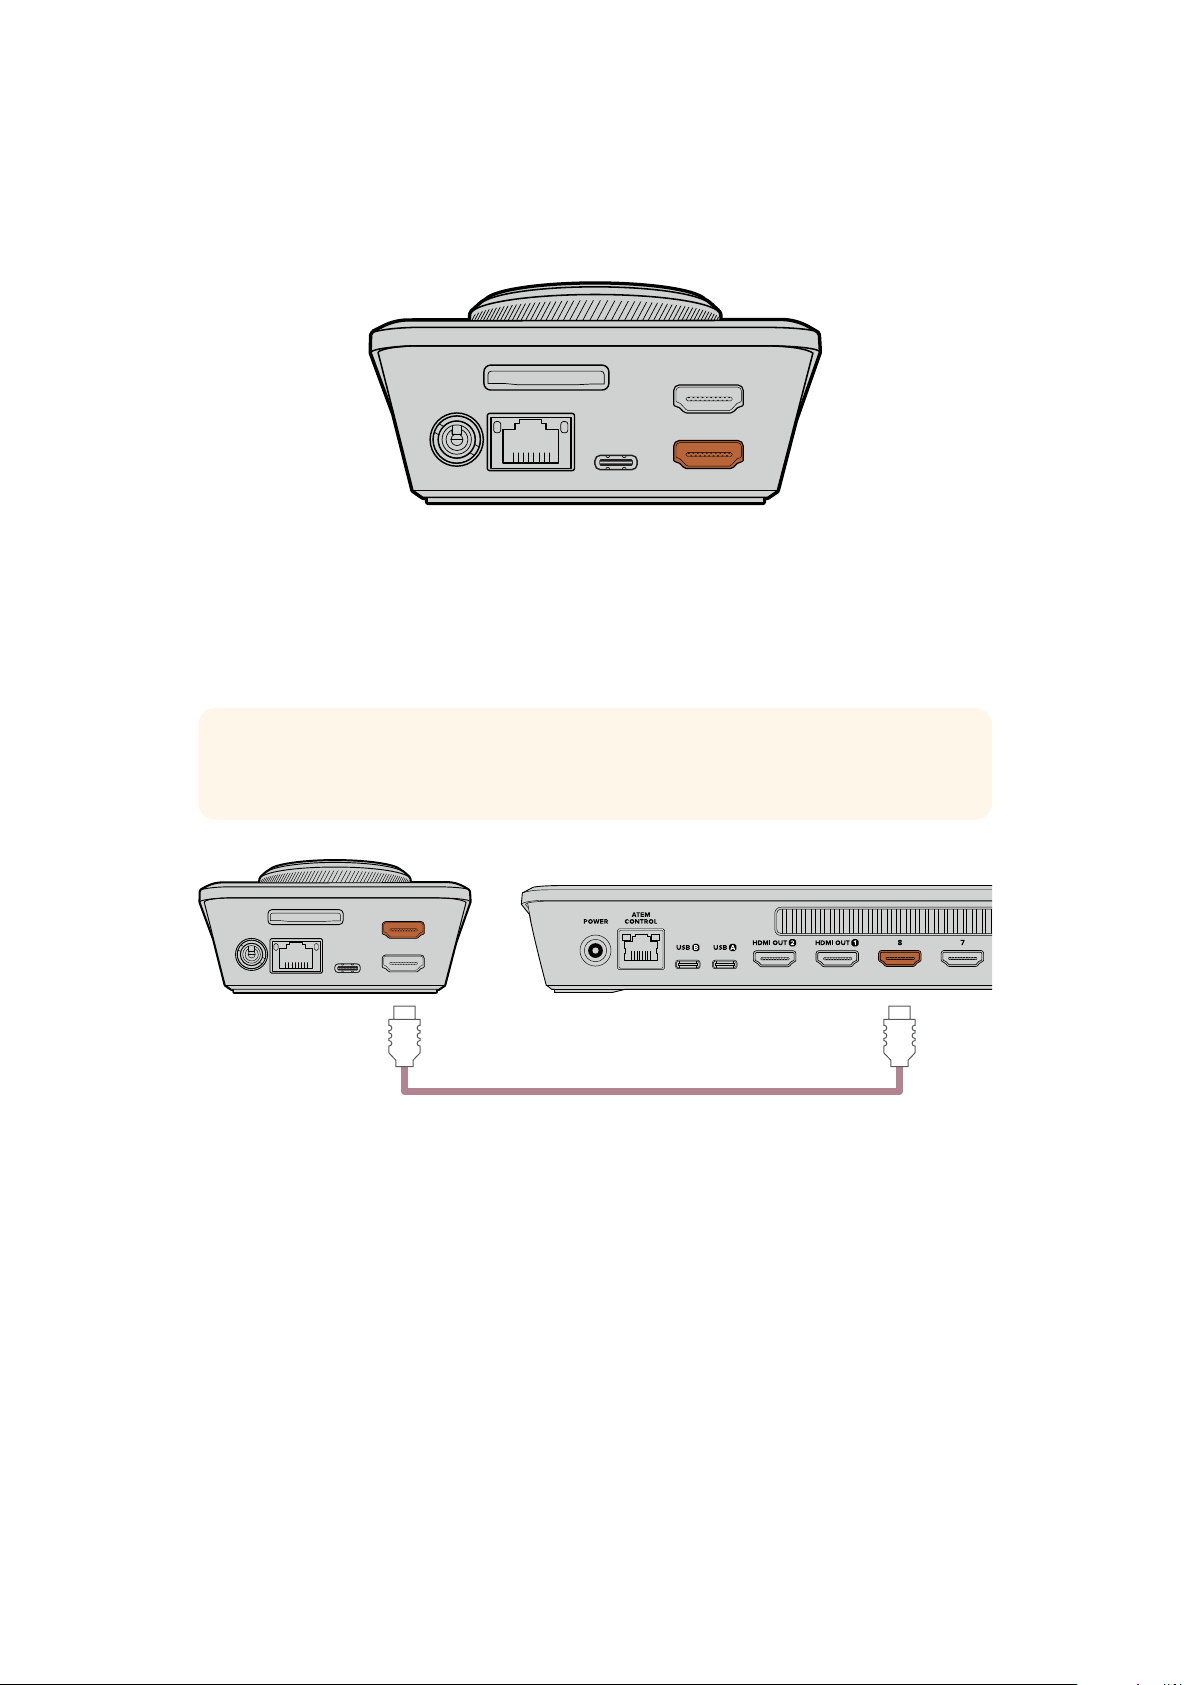
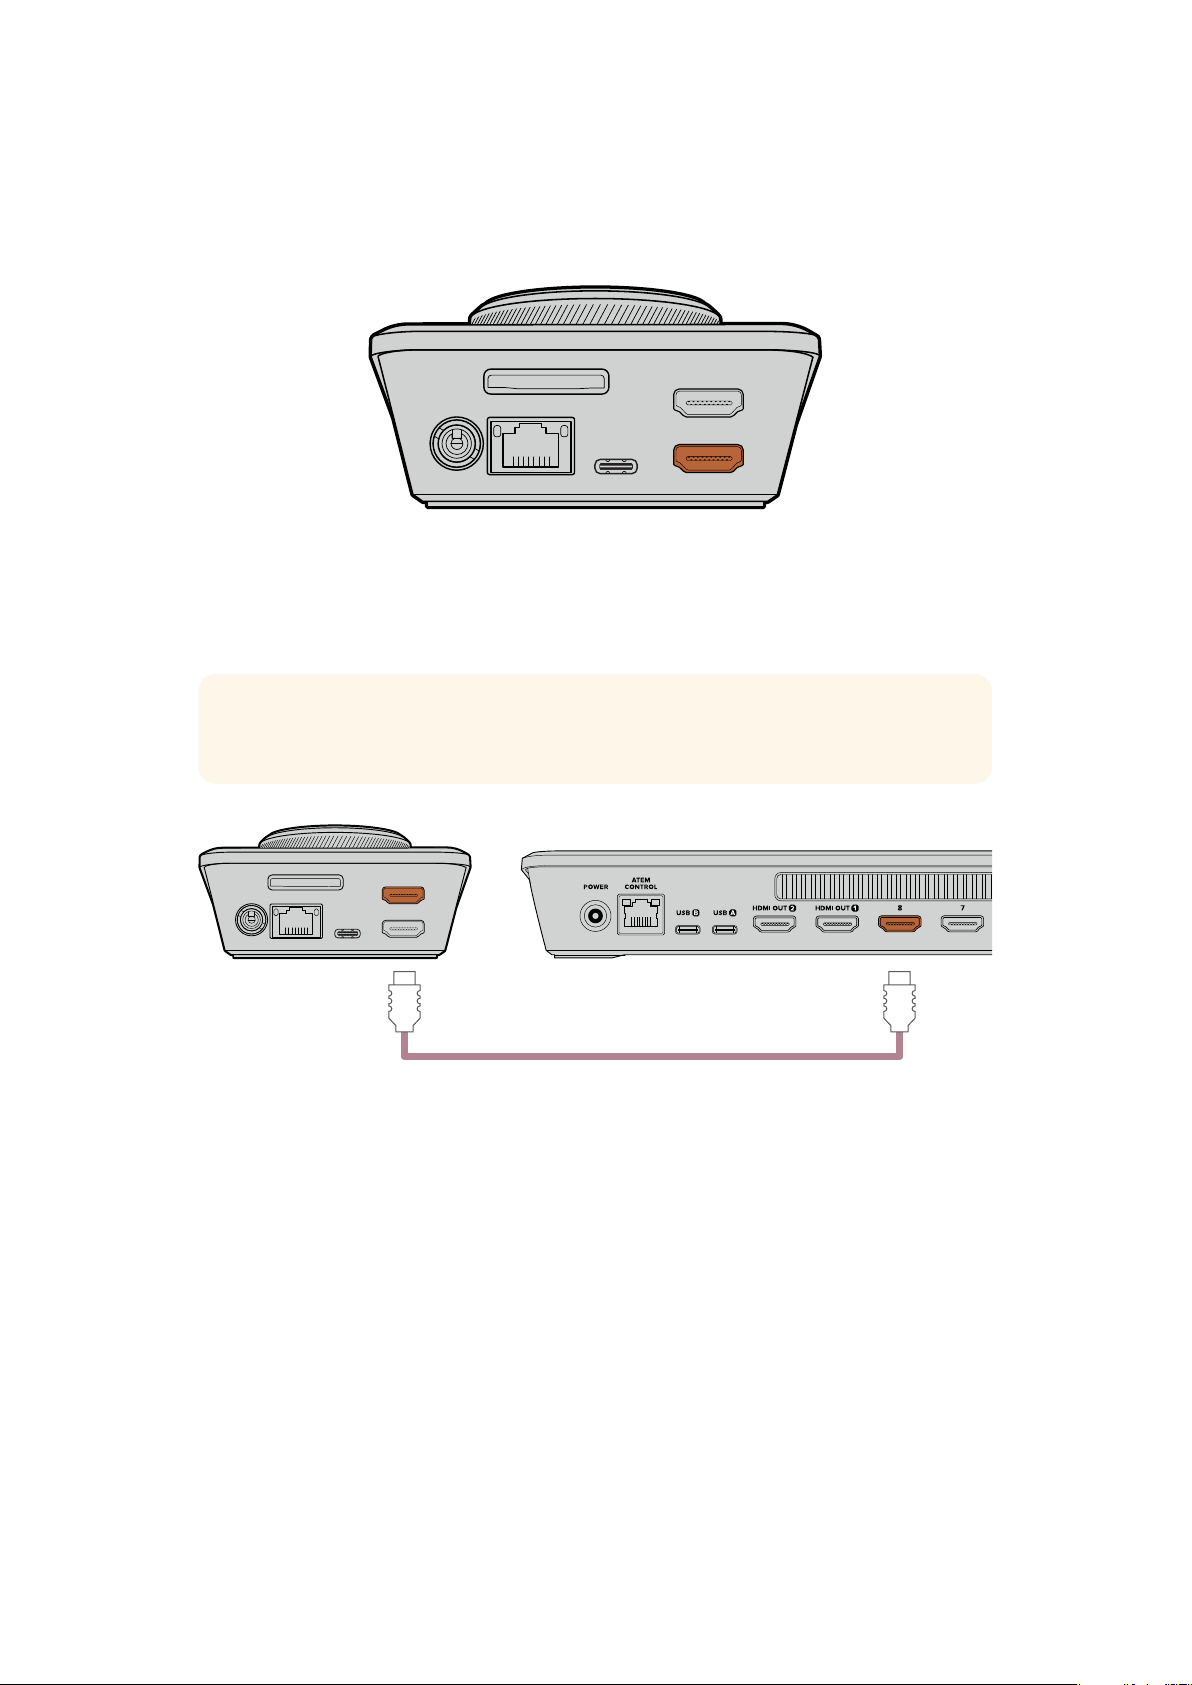
Connect your destination equipment to the HDMI output. For example, an ATEM Mini switcher
or an HDMI television.
The HDMI output is also used to view the settings menu when changing settings for your
HyperDeck. This is because the settings menu is viewed via video overlay on the HDMI output.
More information about the menu settings can be found in the ‘changing settings’ section later
in this manual.
TIP If you cannot see your input video source on the connected display, you may be in
playback mode. Press the record button to enable record mode.
HDMI OUT
HDMI IN
EXT DISK
SD CARD
ETHERNET
+
12V DC
HDMI
Plug the HDMI output into your destination equipment, such as an HDMI television or ATEM Mini switcher
Plugging in Media
All HyperDeck Shuttle HD disk recorders ship ready to record immediately without having to
configure any settings. All you need is a formatted SD card or external disk.
You can easily format media via the menu settings. You can also format using a computer.
Refer to the ‘formatting media’ section in this manual for more information. You can also
find information about the types of media that are best for recording video and a list of
recommended SD cards and external disks.
To plug in an SD card:
1 Hold the SD card with the gold connectors facing up and align it with the media slot.
Now gently push the card into the slot until you feel it lock firmly into place.
6Getting Started

HDMI OUT
HDMI IN
EXT DISK
SD CARD
ETHERNET
+
12V DC
2 Your HyperDeck will verify the SD card. This is shown by an illuminated green SD
indicator on the top of the HyperDeck Shuttle HD. Once verified, the indicator
will turn off.
JOG SCR
CLIP
MENU SET
DISK SD
DISK SD
That’s all there is to getting started and your HyperDeck Shuttle HD is now ready for recording
and playback!
Keep reading this manual for detailed information about how to record and play back clips,
change settings, and much more.
Recording Video
After confirming that your video source is displayed on the HDMI destination equipment, you
can start recording straight away!
To start recording, press the record button. When recording to an SD card, the SD indicator
will illuminate red and the record and play buttons will also illuminate. When recording to an
external disk, the disk indicator will illuminate red.
JOG SCR
CLIP
MENU SET
DISK SD
To finish recording, press the stop button.
7Recording Video
Playback
Press the ‘play’ button to start playback. During playback, the play button will illuminate and
the‘disk’ or ‘SD’ media slot indicator will illuminate green.
If there are multiple clips that have been recorded, you can quickly move through them by
pressing the forward and backward skip buttons.
JOG SCR
CLIP
MENU SET
DISK SD
Using the Skip Buttons
Press the backward skip button to cue the clip at the start. Pressing more than once will move
back through previously recorded clips.
Press the forward skip button to move forward through your clips.
JOG SCR
CLIP
MENU SET
DISK SD
Use the forward and backward skip buttons to cue to the start of each clip
TIP To play back video files on your HyperDeck, you will need to set the codec to
match the codec used to record the files. You can do this using the menu. Refer to the
‘changing settings’ section later in this manual for more information.
Looping Clips
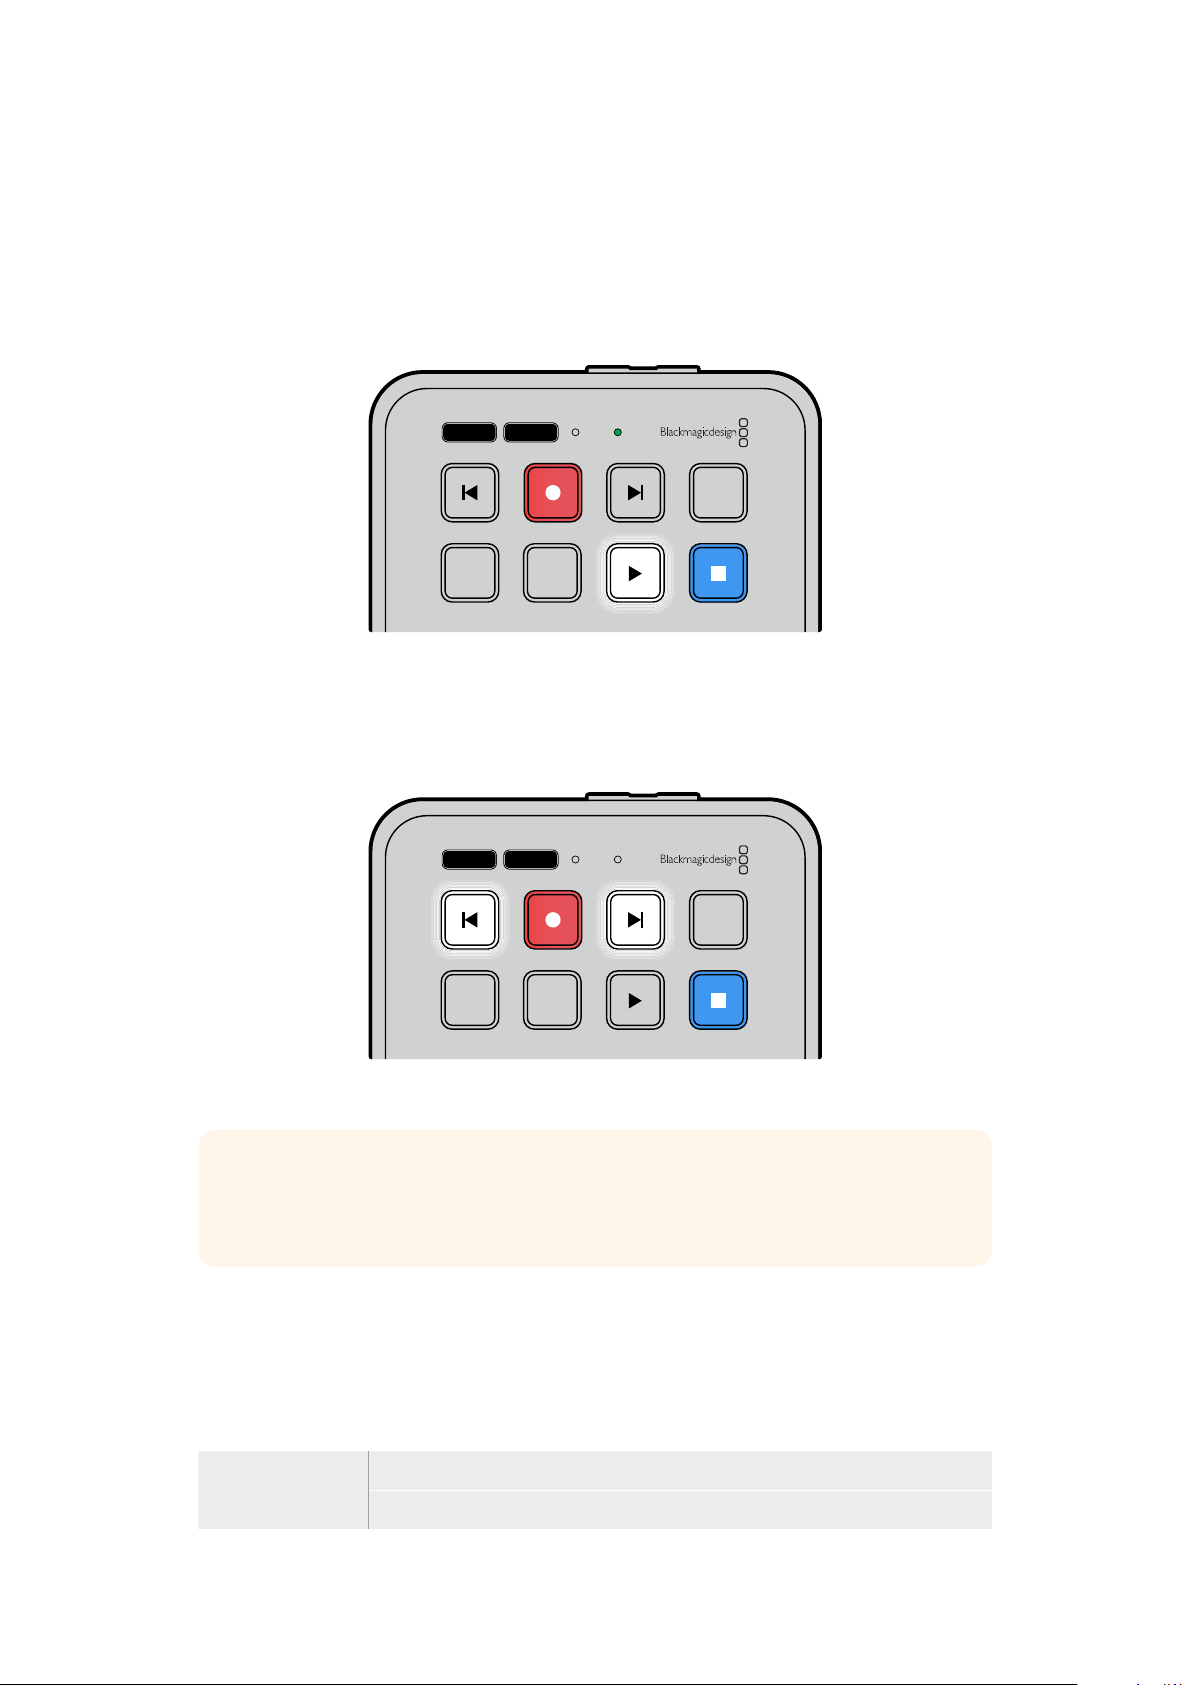
During playback, pressing the ‘play’ button again will set your HyperDeck Shuttle HD to loop
allclips until you press the ‘stop’ button.
If you want to loop a single clip, set your HyperDeck to ‘clip’ mode and press the ‘play’ button
once to play and again to loop.
Loop all clips During playback, press the ‘play’ button a second time to loop all recorded clips
Loop current clip When in clip mode, press the ‘play’ button a second time to loop the current clip
8Playback
Clip Mode
Clip mode lets you limit playback to a single clip. For example, with clip mode enabled you can
shuttle or skip to a clip and then press play knowing that playback will stop when the clip ends.
JOG SCR
CLIP
MENU SET
DISK SD
When clip mode is selected, pressing play a second time will
loop the current clip
Using the Search Dial
The search dial provides a fast way to move through your clips and select specific moments
to play, or review them frame by frame. This can be important if you need to locate a specific
moment by visually monitoring the clip as you turn the dial. It is also helpful for parking the
playhead at a specific cue point, ready for the clip to be rolled to air during a live broadcast.
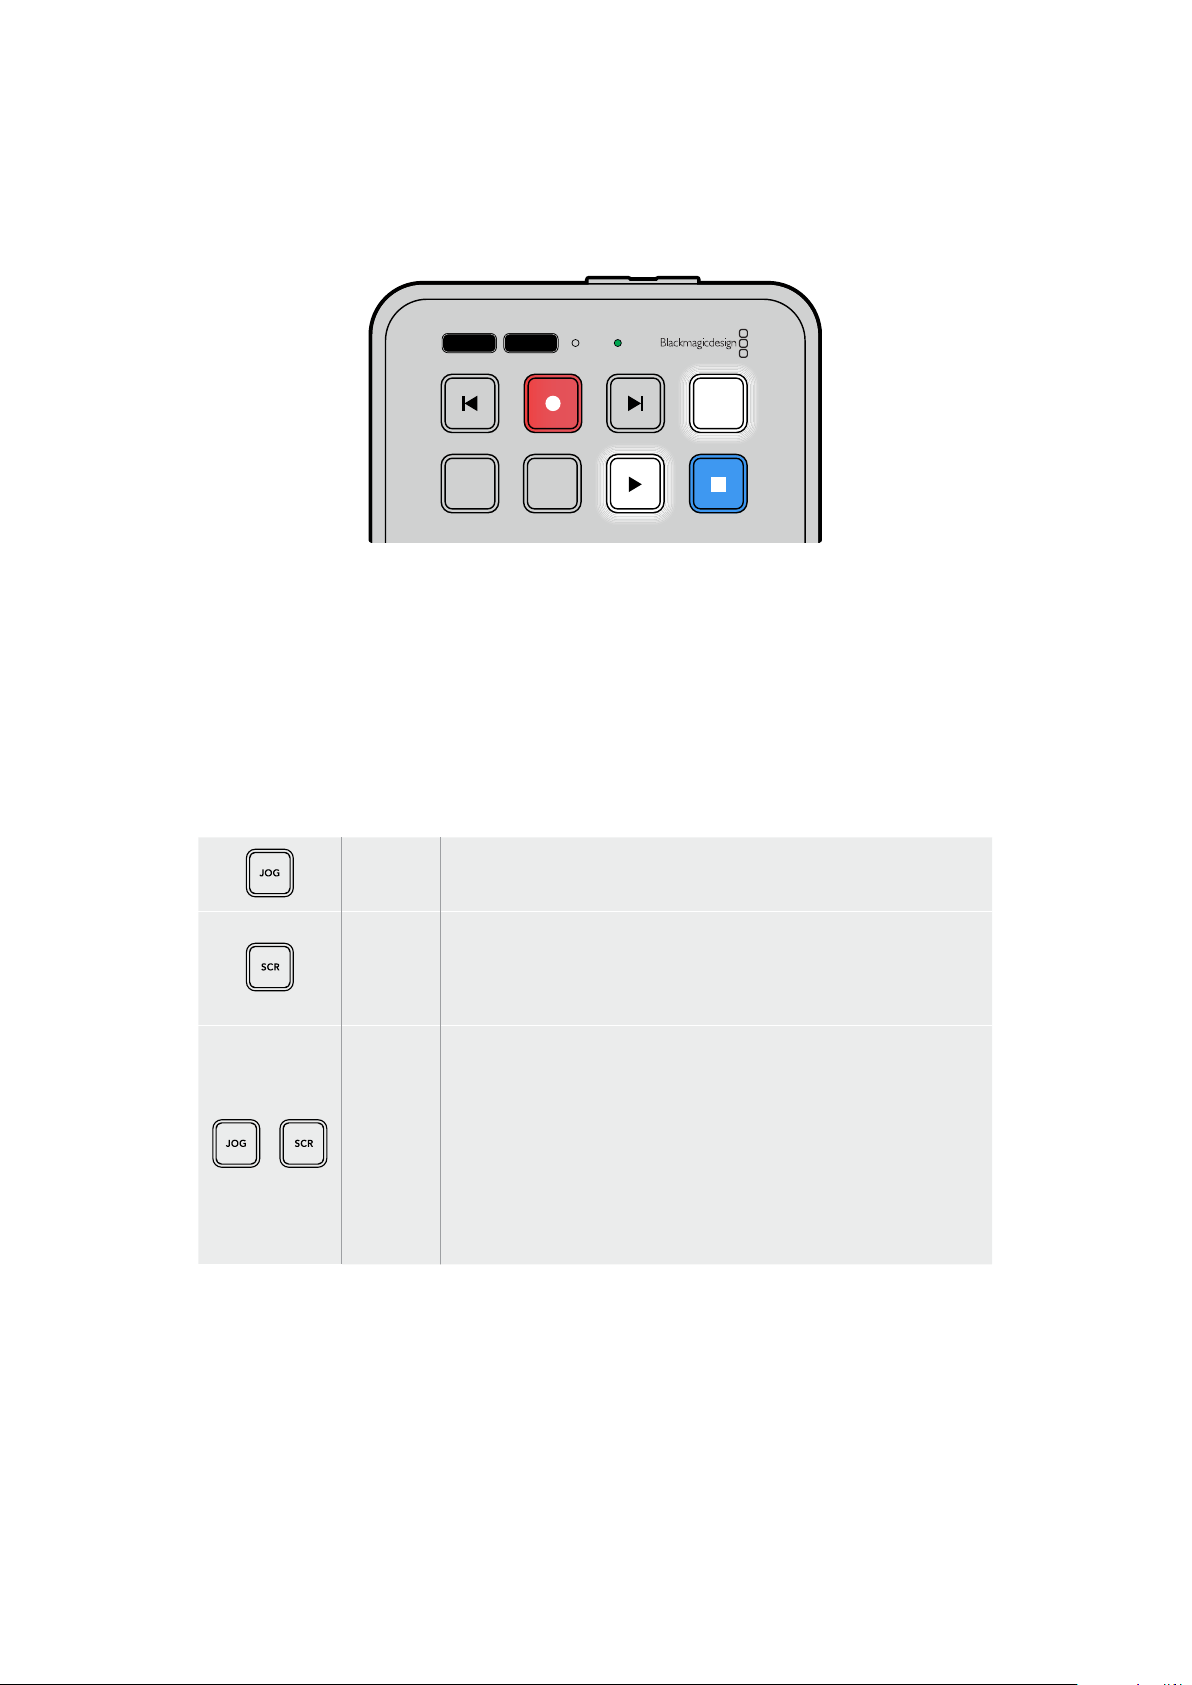
Search dial modes include Jog, Scroll and Shuttle.
Jog Plays through the clip frame by frame allowing precise control.
Scroll
Scroll mode lets you quickly move forwards and backwards through
all your recorded media. As you turn the search dial, scroll is locked
to your movement so you have total control over where to position
playback.
Shuttle
Press the ‘jog’ and ‘scr’ buttons simultaneously to enter shuttle mode.
Once in shuttle mode you can rewind or fast forward through your
media by turning the dial left or right. As you turn the dial, the media
will shuttle faster until you reach the maximum speed of x50. To slow
the shuttle speed to a stop, turn the dial back to the start position. To
stop at a specific point during shuttle, press the stop button, or press
play to resume playback at the current position. It’s worth noting the
maximum shuttle speed can be lowered using the setup menu. For
more information, see the ‘Settings’ section later in this manual.
9Playback

JOG SCR
CLIP
MENU SET
DISK SD
Press the dedicated ‘JOG’ or ‘SCR’ buttons to select jog and
scroll search modes
JOG SCR
CLIP
MENU SET
DISK SD
Once a search mode is selected, turn the search dial
TIP To resume normal playback, press the ‘play’ or ‘stop’ button.
10Playback

Changing Settings
Pressing the ‘menu’ button will open the settings menu, which will appear as a video overlay
onthe bottom left corner of your connected HDMI display.
JOG SCR
CLIP
MENU SET
DISK SD
Press the menu button to open the settings menu
Use the search dial to navigate to the submenu or setting
Press the ‘set’ button to select the submenu or setting
Adjust settings using the search dial or the forward and backward skip buttons. Confirm the
selection by pressing the ‘set’ button.
To leave the menu, press ‘menu’ to step back through the options and return to the
home screen.
TIP You can position the menu to any of the four corners of your display using the
setup menu. We recommend turning the menu off when you have finished changing
settings to make sure the HDMI output is a clean feed when connected to an HDMI
switcher, such as ATEM Mini Extreme.
JOG SCR
CLIP
MENU SET
DISK SD
11Changing Settings
Settings
The settings menu is arranged into 5 distinct categories, including record, monitor, audio,
storage and setup. Each of these submenus contain related settings, most of which can be
adjusted using the HyperDeck Shuttle HD control panel. Some settings are display only and will
appear greyed out, for instance, filename prefix. In this case, the setting can be adjusted via the
HyperDeck Setup utility.
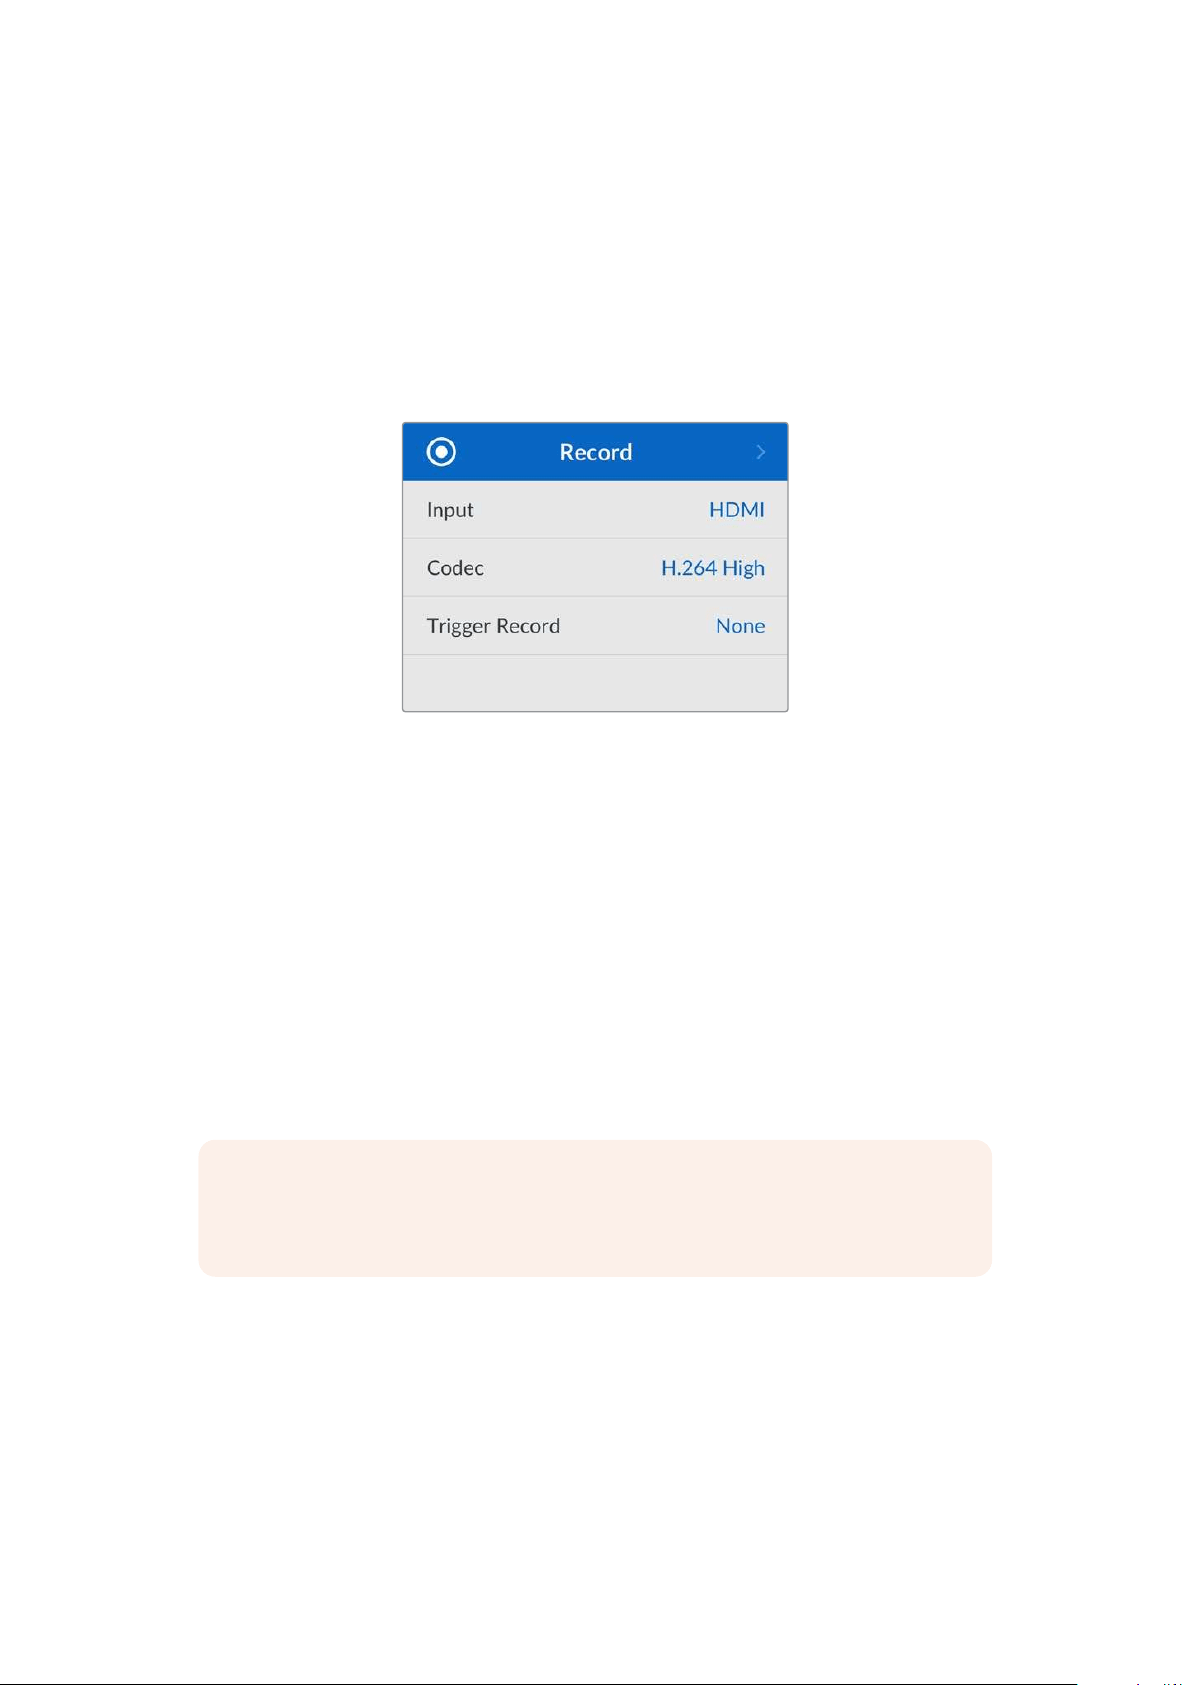
Record Menu
Input
Displays the HyperDeck Shuttle HD HDMI input.
Codec
HyperDeck Shuttle HD can record compressed video using H.264, Apple ProRes and DNxHD
codecs. To use the teleprompter function, select ‘teleprompter’.
Trigger Record
There are two trigger record modes available, including video start/stop and timecode run.
Some cameras, such as Blackmagic Pocket Cinema Camera 4K, send a signal over HDMI to
start and stop recording on external recorders. Selecting ‘video start/stop’ will trigger the
HyperDeck to start or stop recording when the record button is pressed on the camera.
Use the ‘timecode’ run option to trigger the unit to start recording when it receives a valid
timecode signal via the HDMI input. When the signal stops, recording will also stop. Disable
trigger recording by selecting the ‘none’ option.
NOTE When recording from an HDMI camera, make sure the output is clean with
overlays turned off as any overlays that are present in your camera’s video output will
be recorded with your image.
12Settings
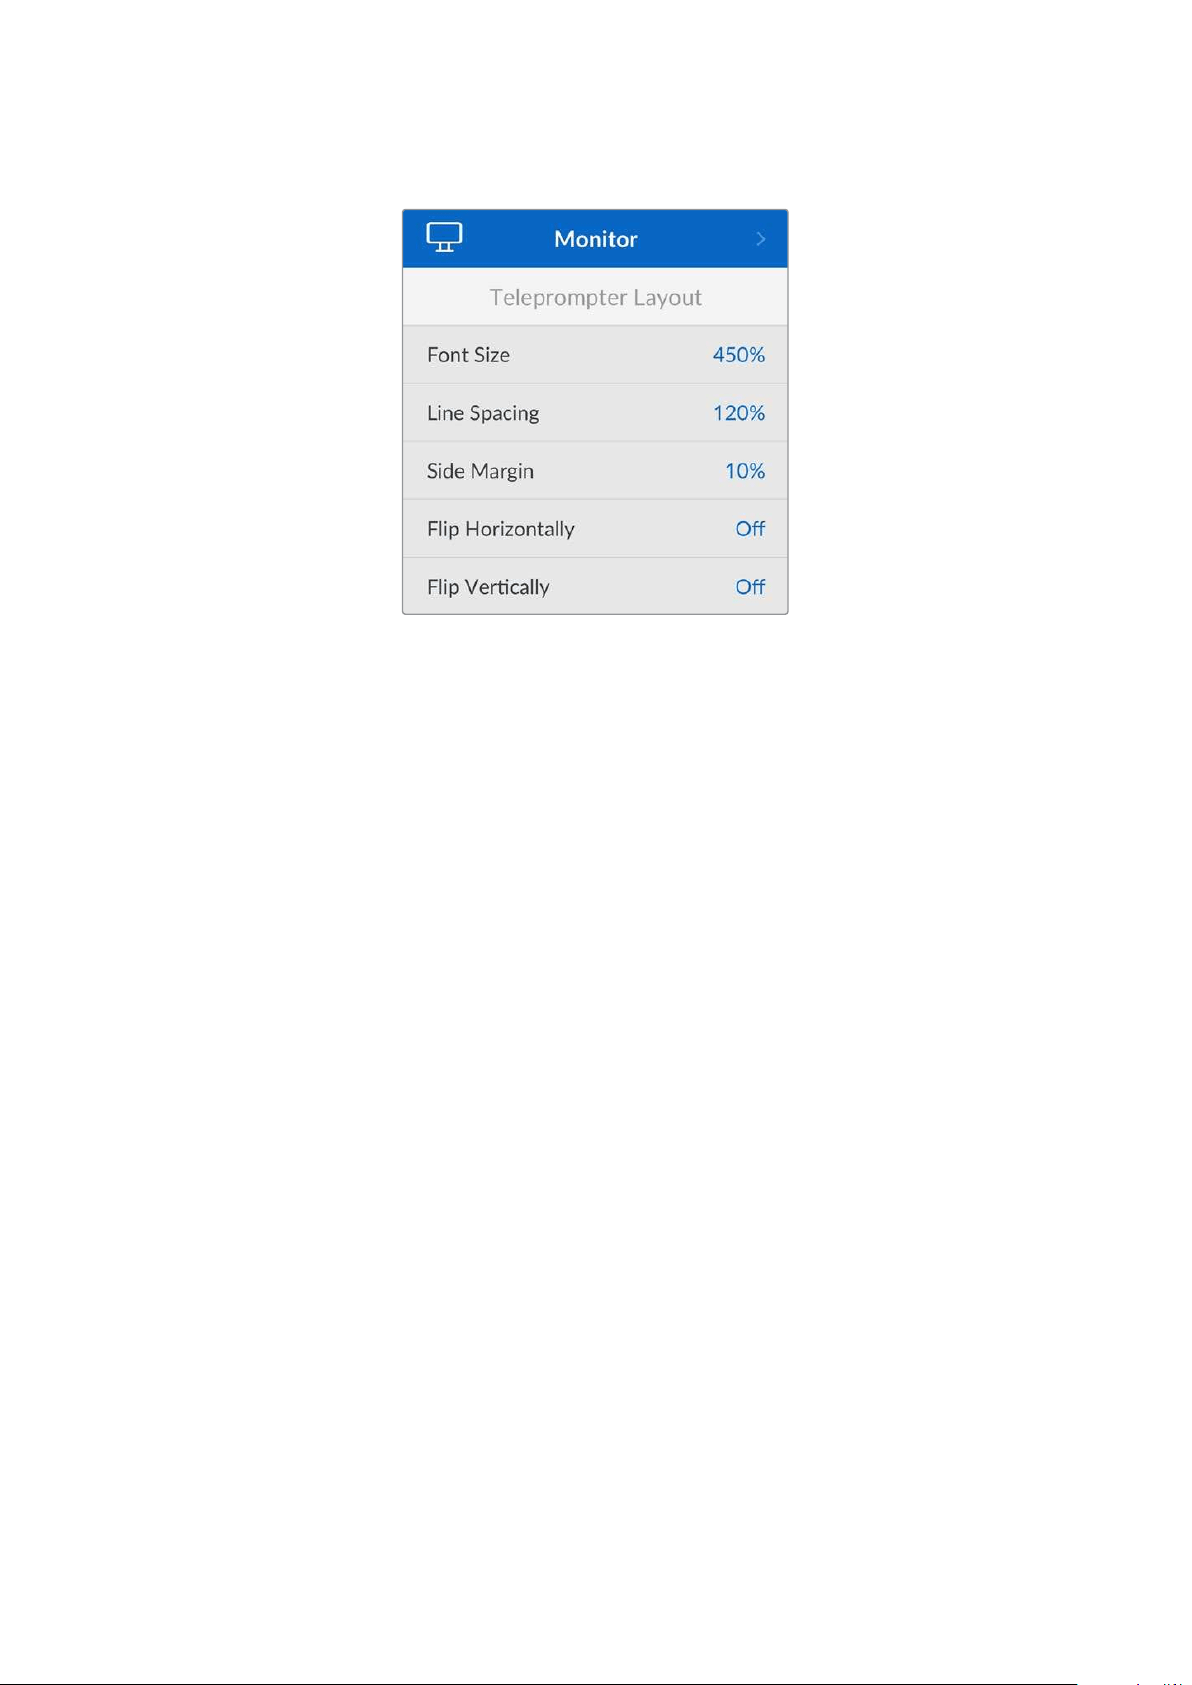
Monitor Menu
Teleprompter Layout
The monitor menu contains all the settings for when using HyperDeck Shuttle HD as a
teleprompter.
Font Size
Adjust the size of the text by selecting the font size option and pressing set. Turn the dial
clockwise to increase, or counterclockwise to decrease.
Line spacing
Turn the dial to increase or decrease the line spacing.
Side Margin
Adjust the widths of the side margins on both sides of the teleprompter display.
Flip
If your teleprompter monitor is set up to reflect onto glass, such as in front or a camera or at a
speakers podium, you will need to use the flip settings to make it readable for the presenter.
There are two flip modes available:
Flip Horizontally - Use this when the bottom of the teleprompter monitor is mounted
closest to the base of the glass.
Flip Vertically - Use this when the bottom of the teleprompter monitor is mounted away
from the base of the glass.
13Settings
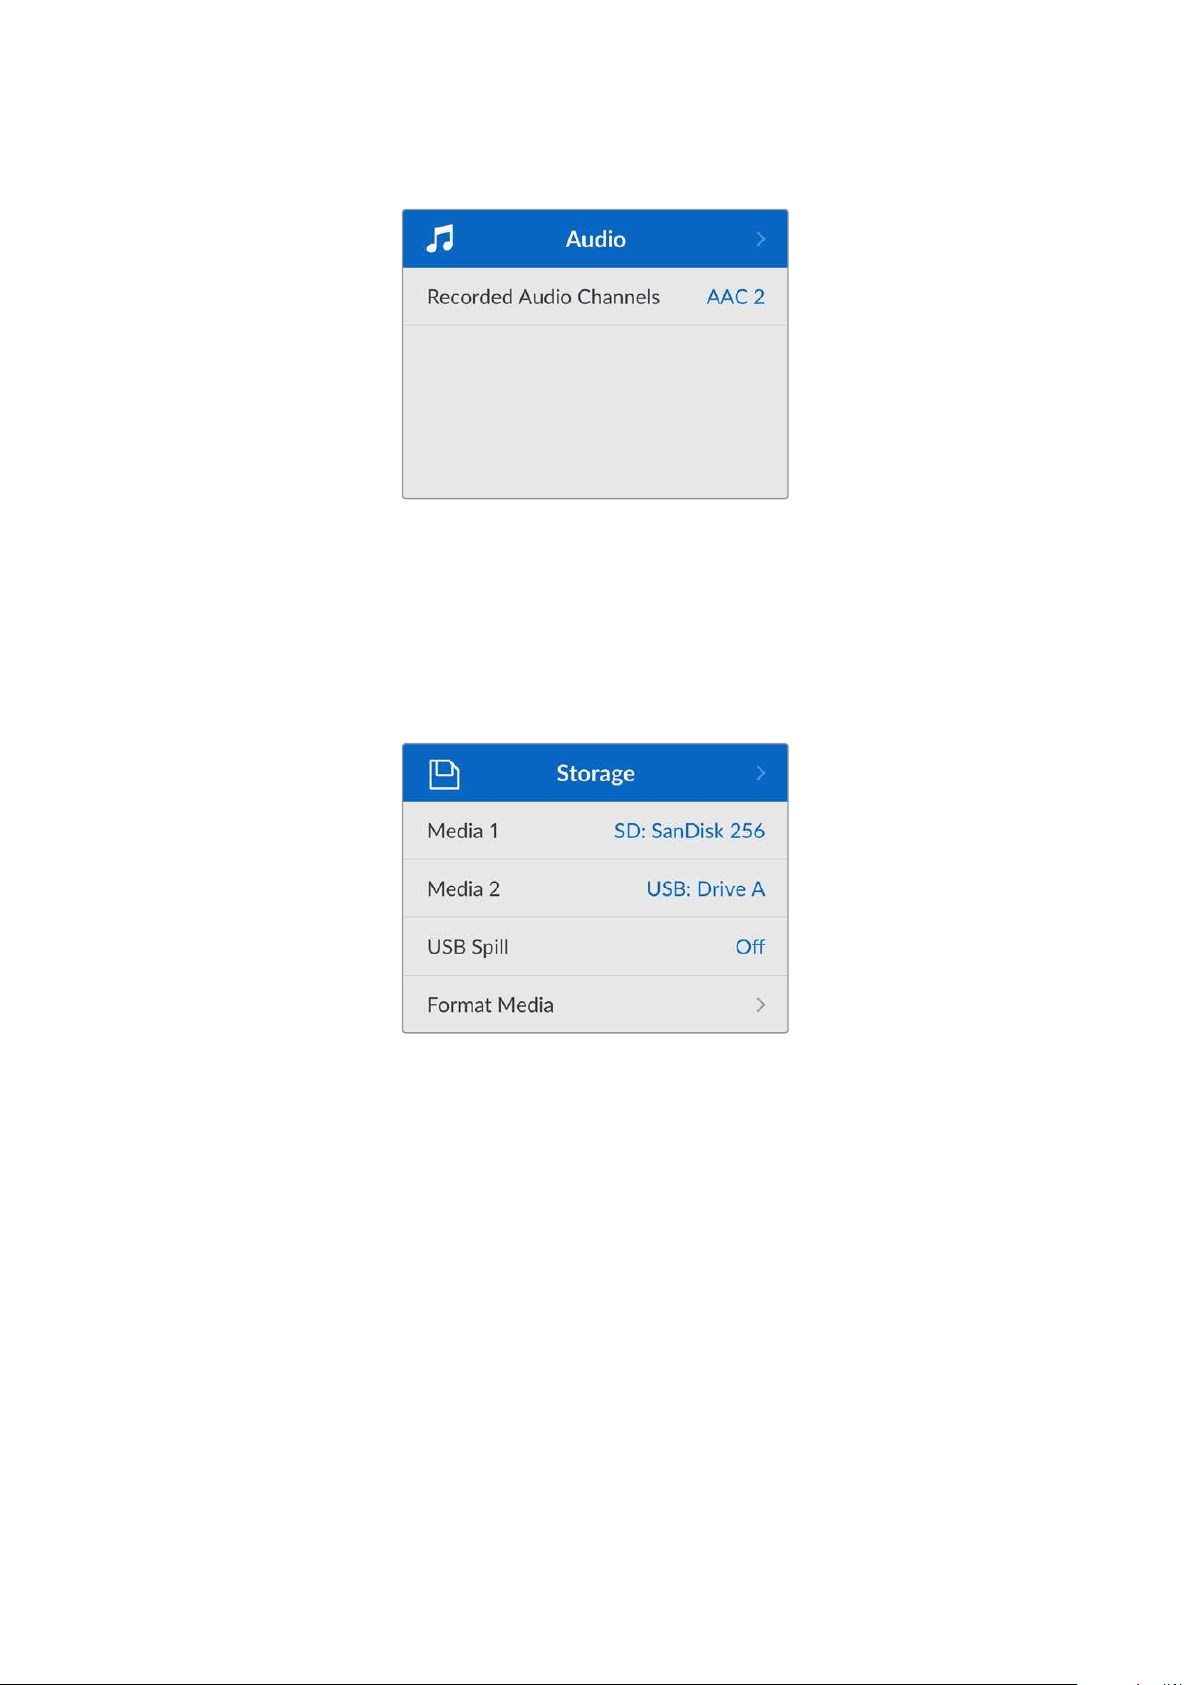
Audio Menu
Recorded Audio Channels
HyperDeck Shuttle HD can record up to 8 channels of PCM audio at a time. To select the
number of channels to record, expand the recorded audio channels list and select 2, 4 or
8 channels.
If the codec is set to H.264, you can also select 2 channels of AAC audio so you can upload
recordings directly to YouTube.
Storage Menu
Connected media will appear in the storage settings. Media 1 will list the name of the connected
SD card and media 2 will display any USB flash disk plugged into to the ext disk connector.
When using a USB hub, such as Blackmagic MultiDock 10G, the active disk is displayed.
USB Spill
If you are using a Blackmagic MultiDock 10G or similar to connect more than one drive via the
‘ext disk’ usb connection, turning USB spill on will ensure that recording will spill from one
external disk to the next.
Format Media
SD Cards and media connected via the rear ext disk connection can be formatted directly on
the unit or via a Mac or Windows computer.
Preparing Media on HyperDeck Shuttle HD:
1 Using the search dial and set button, select format media.
2 Select the media to format from the list and press set.
3 Choose the format and press set.
14Settings

4 A confirmation window will appear detailing which card is to be formatted and the
selected format option, select format.
5 A formatting window will appear once completed, select Ok.
HFS+ is also known as Mac OS X Extended and is the recommended format as it supports
‘journaling’. Data on journaled media is more likely to be recovered in the rare event that your
storage media becomes corrupted. HFS+ is natively supported by Mac. exFAT is supported
natively by Mac and Windows without needing any additional software but does not support
journaling.
To format media on a Mac or Windows computer, refer to the ‘formatting media’ section in
this manual.
Setup Menu
The setup menu contains settings including language selection and default standard as well as
sections for the menu display, network settings and timecode options.
Name
When more than one HyperDeck Shuttle HD is on the network, you may wish to give them
discrete names to help identify the different units. This can be done via Blackmagic HyperDeck
Setup or Blackmagic HyperDeck Ethernet Protocol using a terminal application. The name will
appear in the setup menu.
Language
HyperDeck Shuttle HD supports 13 languages, including English, Chinese, Japanese, Korean,
Spanish, German, French, Russian, Italian, Portuguese, Turkish, Ukrainian and Polish.
To select the language:
1 Once the setup menu is highlighted, press set.
2 Scroll the search dial down to select language and press set.
15Settings
3 Use the search dial to select the language and press set. Once selected you will
automatically return to the setup menu.
Date
To adjust the date, select the date field and press set. Using the search dial you can select the
day, month and year. This will populate the timestamp file suffix when selected.
Time
To adjust the time, select time and press set. Use the search dial to adjust the hours and
minutes. HyperDeck Shuttle HD’s internal clock is a 24 hour clock.
Software
Displays the current software version.
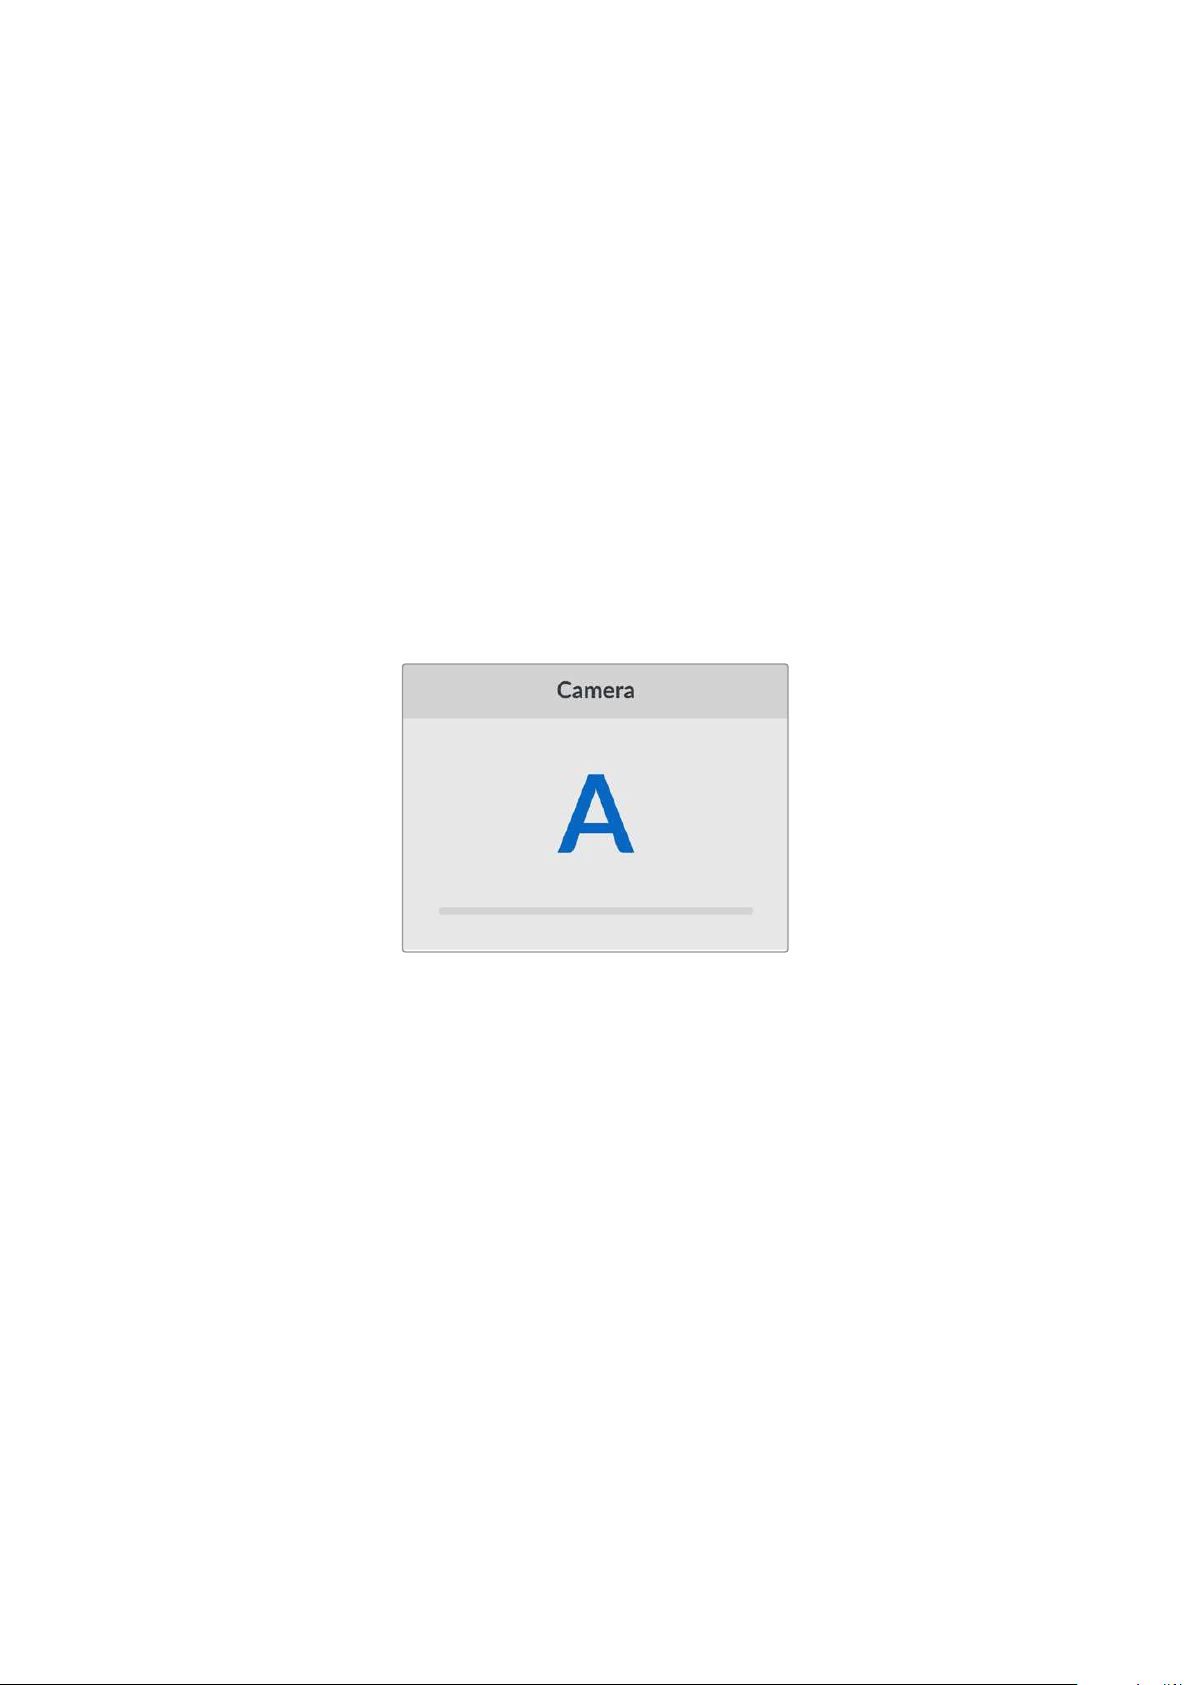
Camera
This setting is helpful when using HyperDeck to record ISO files from multiple cameras and
then editing them on a multicamera timeline in DaVinci Resolve.
Each individual camera identification letter will appear in the files’ metadata, allowing DaVinci
Resolve to identify each angle easily when using the sync bin feature.
Assign your camera using characters A-Z or 1-9
Default Standard
Sometimes the HyperDeck Shuttle HD does not know what video standard you want to use.
This setting will let the HyperDeck know the video standard you want to use most of the time.
A good example is if you have turned on a HyperDeck Shuttle HD, it has no video input
connected and you insert a disk with files on it with 2 different video standards. Which video
standard should the HyperDeck play? The default video standard will give it an indication which
video standard you prefer and it will switch to that format and play those files.
The default video standard is also useful when you first turn on a HyperDeck Shuttle HD and
it has no video input and no media disk inserted. In this case, the HyperDeck does not know
which video standard to use for the monitoring output. The default video standard will guide it
on what to do.
However, the default video standard is only a guide. It won’t override anything. So if you had a
media disk with only 1 type of video file on it and you press play, the HyperDeck disk recorder
will switch to that video standard and play. It will ignore the default video standard because it’s
obvious you just want to play the files on the disk.
It’s a similar situation with recording. If you press record, the HyperDeck will just record
whatever video standard is connected to the video input. Plus, once you have done the
recording, the HyperDeck Shuttle HD will playback the same video standard files on the disk,
16Settings
even if there are other files on the disk that match the default video standard. It’s assumed you
want to playback the same video standard as you just recorded. If you unplug the media disk
and plug it back in again, only then will the default video standard be used to choose which
type of files to play back.
The default video standard is only a guide to help the HyperDeck Shuttle HD make decisions
about what to do when it’s not sure. It’s not an override that forces the deck to behave in any
specific way.
Max Shuttle Speed
The maximum shuttle speed on HyperDeck Shuttle HD is x50 speed. If you want to reduce this
speed, you can select from one of the other speed presets.
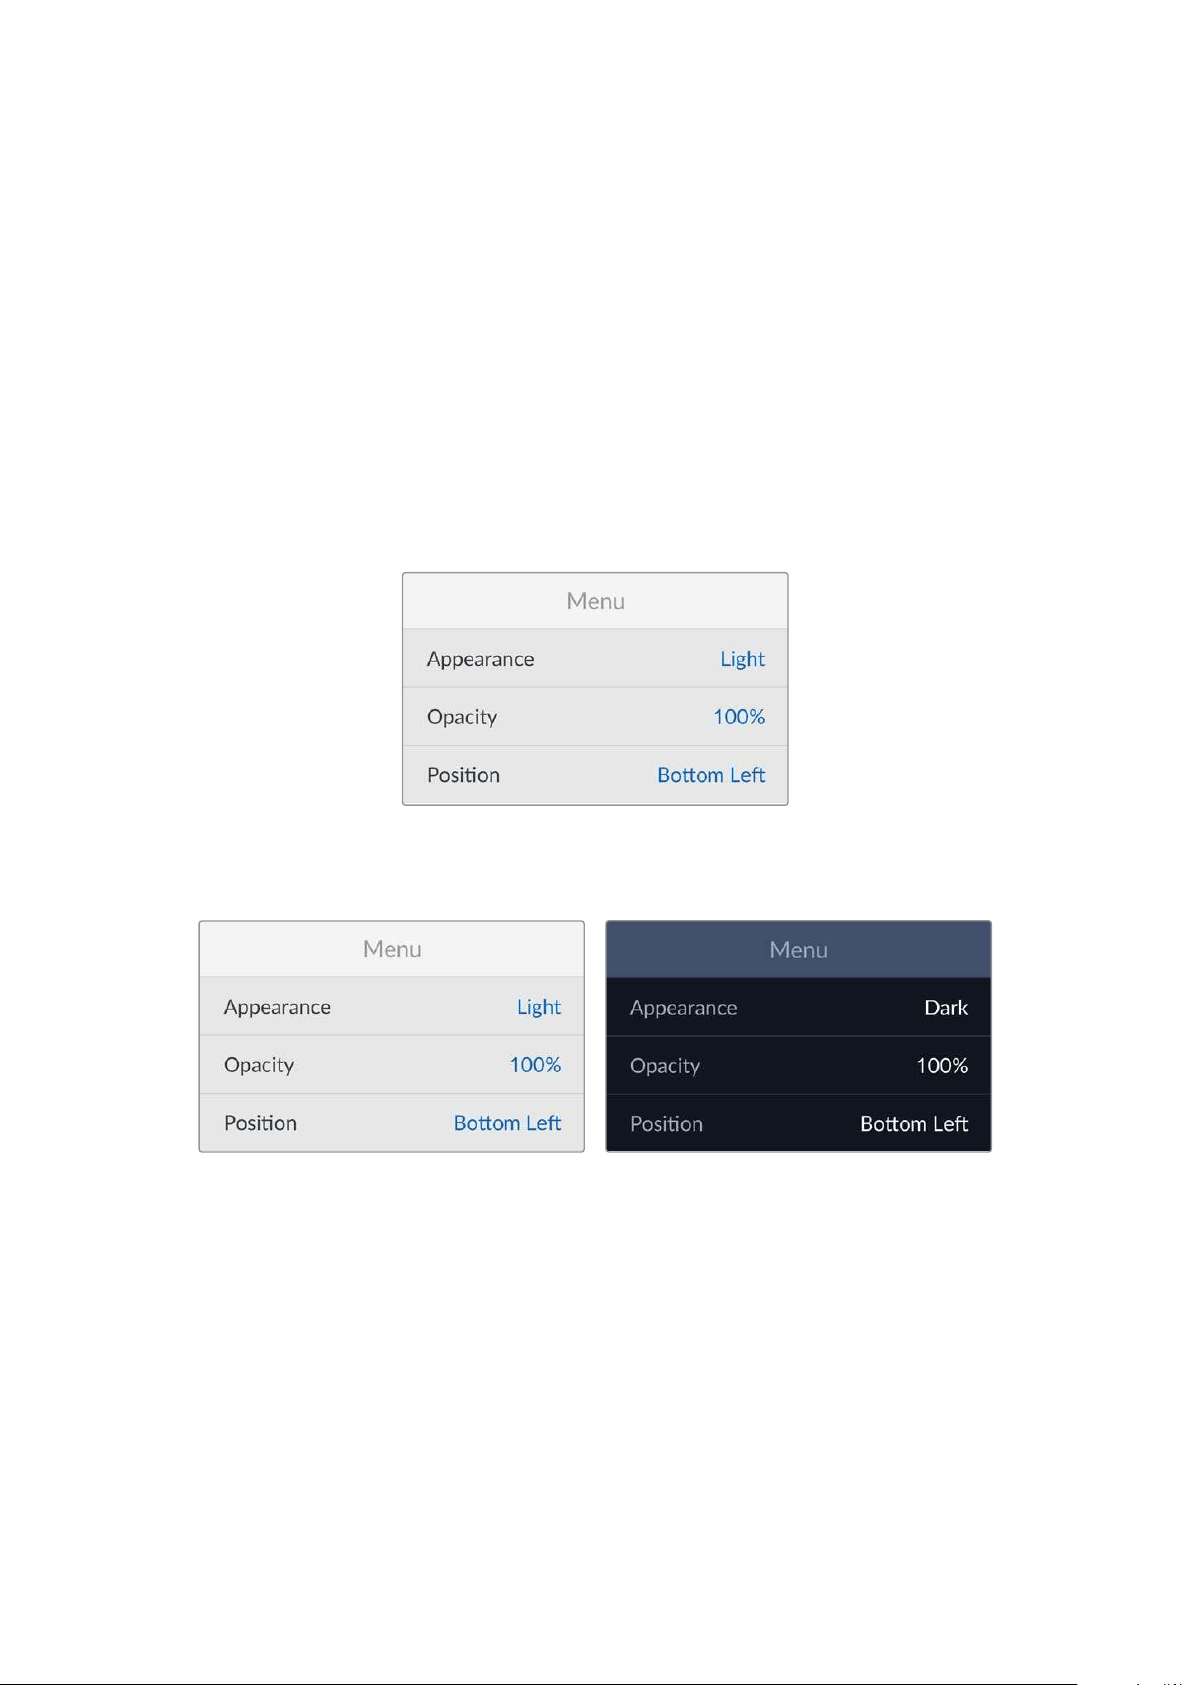
Menu Settings
Using the menu settings you can adjust the location and appearance of the menu on the
connected HDMI display.
Appearance
Set your HyperDeck’s onscreen menu to dark or light mode. Light mode will offer more contrast
when media is dark, or when you are in teleprompter mode.
Opacity
Adjust the levels to reduce the opacity of the menu overlay on the connected display from the
default 100% to 20%.
Position
The menu overlay will default to the bottom left hand corner of the screen. To move the menu to
a different location, select ‘position’ and press the ‘set’ button. Now you can select the top left,
top right, bottom left or bottom right corner of the screen.
17Settings
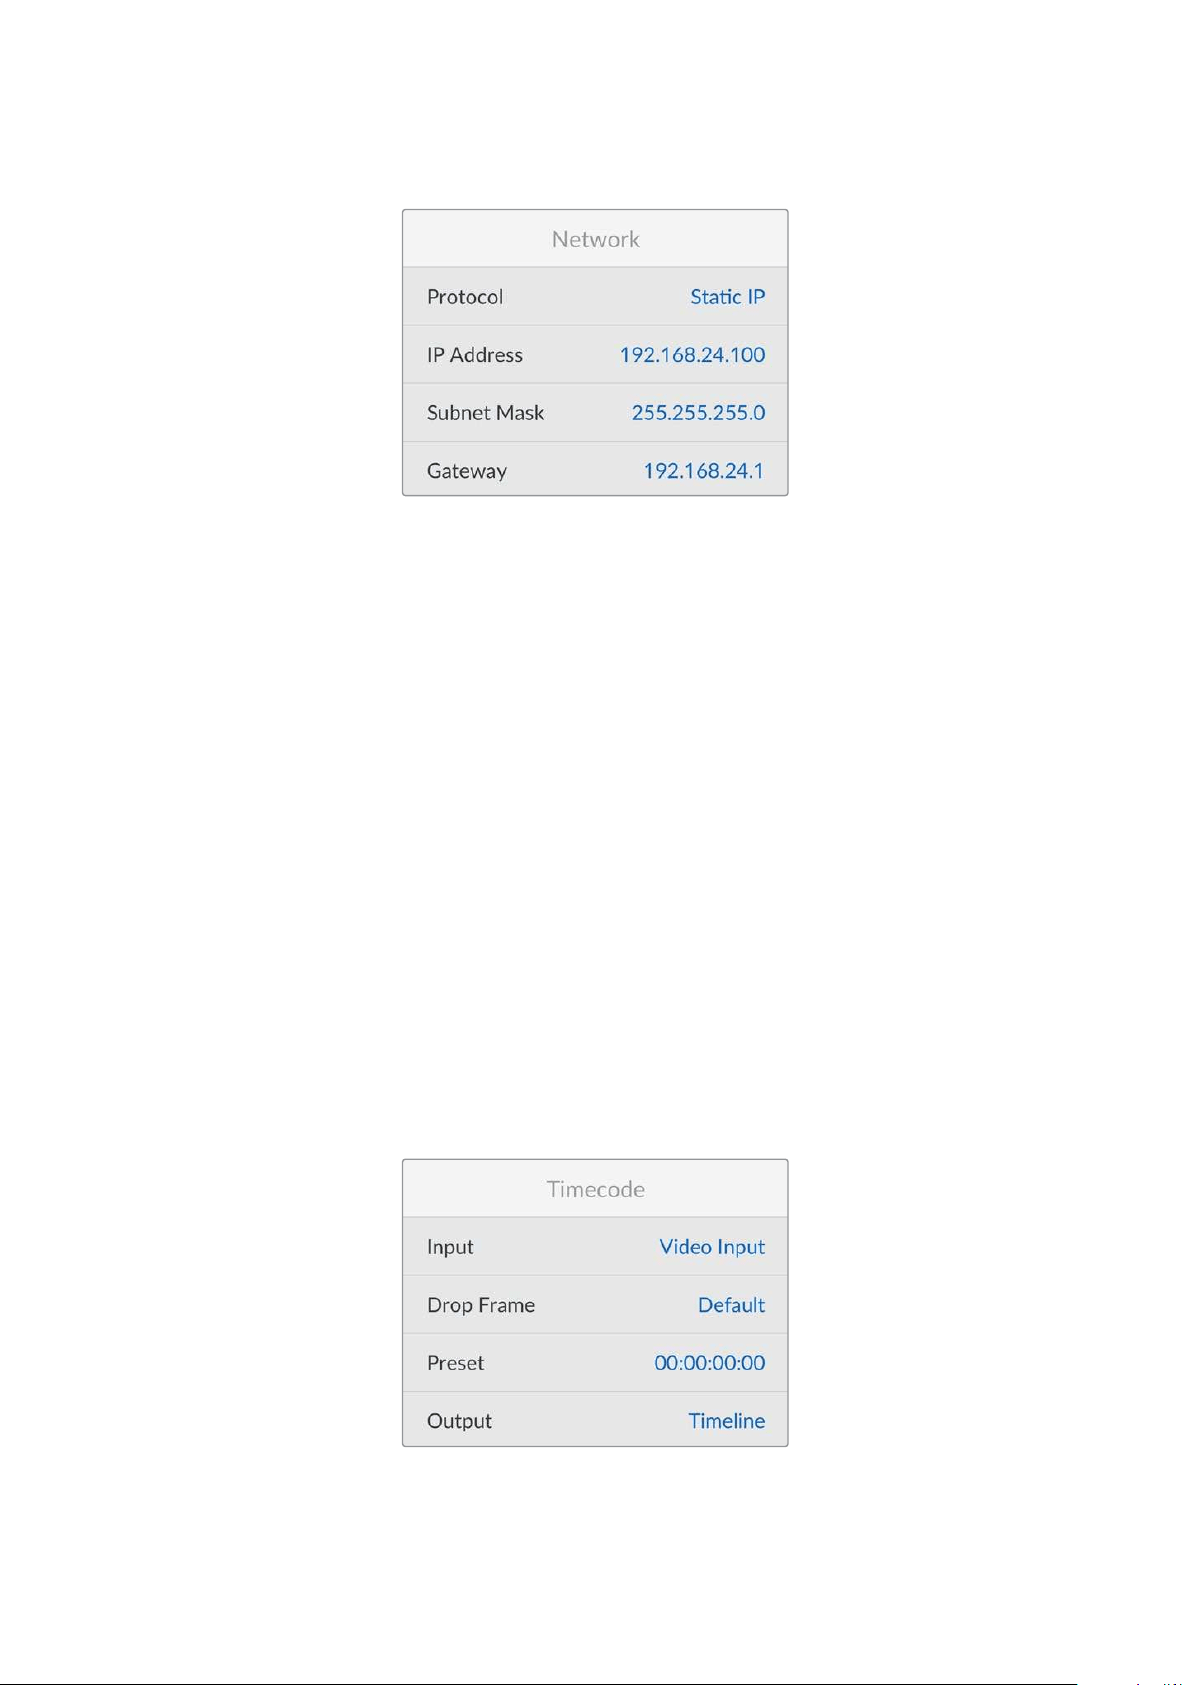
Network Settings
Protocol
Blackmagic HyperDeck is shipped set to DHCP, so once connected, your network server will
automatically assign an IP address and no other network settings will need to be adjusted. If
you need to set a manual address, you can connect via a static IP.
With ‘protocol’ selected press the ‘set’ button to access the menu, scroll to ‘Static IP’ and
press ‘set’.
IP Address, Subnet Mask, Gateway, Primary DNS and Secondary DNS
Once Static IP is selected, you can enter your network details manually.
To change the IP address:
1 Use the search dial to highlight ‘IP address’ and press the ‘set’ button on your
HyperDeck’s control panel.
2 Using the search dial, adjust the IP address, rotate the search dial to adjust your IP
address, pressing ‘set’ to confirm before adjusting the next set of values.
3 Press ‘set’ to confirm the change and move to the next value.
When you have finished entering your IP address, you can repeat these steps to adjust the
Subnet Mask and Gateway. Once finished, press the ‘menu’ button to exit and return to the
home screen.
Timecode Settings
Set your timecode input and output options, including choosing between recording the source
timecode, time of day timecode or setting your timecode manually.
18Settings
Input
There are four timecode input options available when recording.
Video Input
Selecting video input will take the embedded timecode from HDMI sources with
SMPTE RP 188 metadata. This will maintain sync between your HDMI source and
the file recorded on the HyperDeck Shuttle HD.
Internal Use this option to record time of day timecode via the built in timecode generator.
Last Clip
Regen
By selecting ‘last clip regen’ for your timecode input, each file will start one frame
after the last frame of the previous clip. For example, if your first clip ends on
10:28:30:10, the next clip timecode will start at 10:28:30:11.
Preset
If you want to set a timecode manually, select the preset option. Recorded clips will
start at the timecode set via the ‘preset’ setting as shown later in this section.
Drop Frame
For NTSC sources at frame rates of 29.97 or 59.94, you can select ‘drop frame’ or ‘non-drop
frame’ timecode. If the source is unknown, select ‘default’. This will maintain the standard of the
input, or default to drop frame if there is no valid timecode.
Preset
You can set your timecode manually by pressing the set button and entering the start timecode
using the search dial and set button. Make sure the ‘preset’ option is selected under the
input menu.
Output
Select your timecode options for your outputs.
Timeline
To output a continuous timecode for all clips recorded on a card or drive,
selecttimeline.
Clip Selecting the clip option will output the timecode of each individual clip.
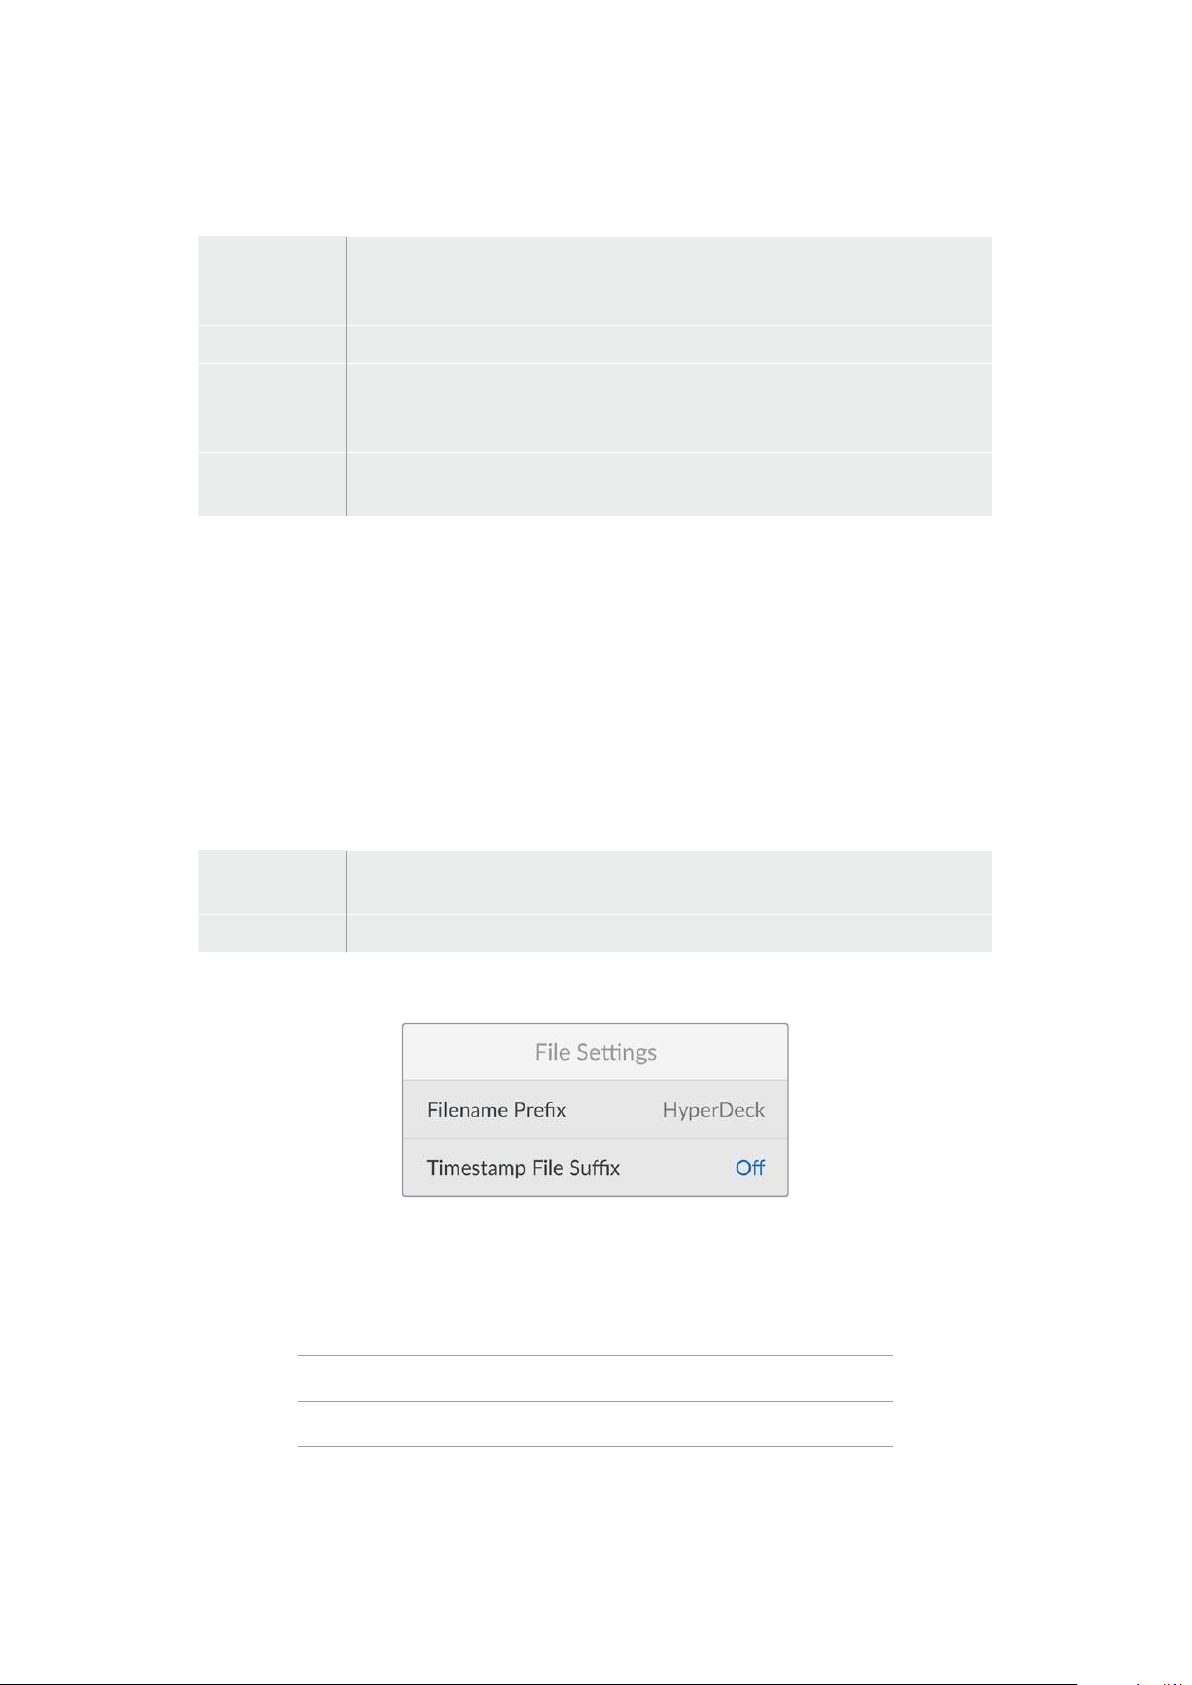
File Settings
Filename Prefix
When first set up, your HyperDeck Shuttle HD will record clips to your SD Card or USB flash
disk using the following filename convention.
HyperDeck_0001
HyperDeck_0001 Prefix
HyperDeck_0001 Clip Number
You can change the filename prefix via the HyperDeck Setup utility. For more information, refer
to ‘Blackmagic HyperDeck Setup’ later in this manual.
19Settings

Timestamp File Suffix
The timestamp added to the filename is turned off by default. If you would like the date and
time recorded in your filename, toggle the ‘timestamp file suffix’ option to on.
HyperDeck_2201061438_0001
HyperDeck_2201061438_0001 Filename Prefix
HyperDeck_2201061438_0001 Year
HyperDeck_2201061438_0001 Month
HyperDeck_2201061438_0001 Day
HyperDeck_2201061438_0001 Hour
HyperDeck_2201061438_0001 Minute
HyperDeck_2201061438_0001 Clip Number
Remote Settings
The remote setting lets the HyperDeck be controlled remotely by other video equipment,
forexample an ATEM Mini Extreme switcher.
Remote
Select ‘remote’ to enable remote control via Ethernet. Deselect remote to control the
unit locally.
Reset Settings
Factory Reset
Highlight ‘factory reset’ in the setup menu to restore your HyperDeck to factory settings. Once
you press ‘set’, you will be prompted to confirm your selection.
20Settings

Rear Panel
HDMI OUT
HDMI IN
EXT DISK
SD CARD
ETHERNET
+
12V DC
1
2
3 4 5
1 Power
HyperDeck Shuttle HD is powered via an AC plug pack. The supplied power cable
included features a locking connector to prevent disconnection, but you can also use
any 36W 12V power cable to power the HyperDeck Shuttle HD.
2 SD Card
Insert SD cards into the slot for recording and playback.
3 Ethernet
The Ethernet port lets you connect to your network for fast ftp transfers or to remotely
control the unit using the HyperDeck Ethernet Protocol. For more details on transferring
files via an FTP client, see the ‘transferring files over a network’ section later in
this manual.
When connected to the same network shared with an ATEM switcher, you can also
control your HyperDeck using the ATEM switcher or an ATEM hardware panel.
4 Ext Disk
Connect a flash disk to the USB-C connector so you can record to external disks at up
to 5Gb/s. You can also connect to multi port USB-C hubs or Blackmagic MultiDock 10G
to connect one or multiple SSDs.
5 HDMI
Connect the HDMI output to HDMI televisions, monitors or even a switcher, such as
ATEM Mini Extreme. The HDMI output is also used to view the menu overlay.
21Rear Panel

Storage Media
SD Card
For high quality HD recording we recommend high speed UHS-I SD cards. These cards need to
be capable of write speeds above 220MB/s for recording up to Ultra HD 2160p60.
However, if you are recording at a lower bit rate with higher compression you might be able to
use slower cards. Generally, the faster the cards the better.
It’s worth regularly checking the latest version of this manual for more up to date
information and can always be downloaded from the Blackmagic Design website at
www.blackmagicdesign.com/support
What SD cards should I use with HyperDeck Shuttle HD?
The following SD Cards are recommended for 1080p up to 60 fps:
Brand Model Capacity
Angelbird AV PRO SD UHS-II 300MB/s V90 SDXC 256GB
Angelbird AV PRO SD UHS-II 260MB/s V60 SDXC 128GB
Angelbird AV PRO SD UHS-II 260MB/s V60 SDXC 64GB
SanDisk Extreme Pro UHS-I 95MB/s SDXC 64GB
Wise SD2-64U3 UHS-II 285MB/s SDXC 64GB
Lexar Professional 1000x UHS-II 150MB/s SDXC 128GB
SONY Tough SF-G128T 128GB
Kingston CANVAS GO! Plus 170MB/s V30 64GB
Kingston CANVAS GO! Plus 170MB/s V30 128GB
Kingston CANVAS GO! Plus 170MB/s V30 512GB
ProGrade Digital SDXC UHS-II V90 300R 64GB
ProGrade Digital SDXC UHS-II V90 300R 128GB
SONY Tough SF-G64T UHS-II SDXC 64GB
Delkin Devices Black UHS-II V90 SDXC 256GB
Delkin Devices Power UHS-II V90 SDXC 128GB
Delkin Devices Power UHS-II V90 SDXC 256GB
Delkin Devices Black UHS-II V90 SDXC 128GB
Exascend Essential SDXC UHS-II V90 R 300MB/s 64GB
Exascend Essential SDXC UHS-II V90 R 300MB/s 128GB
Exascend Catalyst SDXC UHS-II V90 R 300MB/s 64GB
22Storage Media
EXT Disk
All HyperDeck models can record directly to USB-C flash disks. These fast, high capacity
drives allow you to record video for long periods. You can then connect the flash disk to your
computer and edit directly from them!
For even higher storage capacities, you can connect a USB-C dock or external hard drive. To
connect your Blackmagic MultiDock 10G or USB-C flash disk, connect a cable from your USB-C
connected device to the ‘ext disk’ port on the rear panel of your HyperDeck.
What USB-C drives should I use with HyperDeck Shuttle HD?
The following USB-C drives are recommended for 1080p ProRes HQ at up to 60 fps:
Brand Model Capacity
Wise PTS-256 Portable SSD 4K 256GB
OWC Envoy Pro Ex 240GB
BUFFALO SSD-PHE500U3-BA 500GB
The following USB-C drives are recommended for 1080p ProRes HQ at up to 60 fps:
Brand Model Capacity
OWC Envoy Pro Ex 240GB
The following USB-C drives are recommended for 1080p H.264 at up to 60 fps:
Brand Model Capacity
OWC Envoy Pro Ex 240GB
Formatting Media
Preparing Media on a Computer
Formatting Media on a Mac Computer
The Disk Utility application included with Mac can format a drive in the HFS+ or exFAT formats.
Make sure you back up anything important from your disk as you will lose everything on it when
it is formatted.
1 Connect a USB flash disk to your computer with an external dock or cable adapter
and dismiss any message offering to use your SSD for Time Machine backups. For SD
cards, connect it to your computer via an external card reader.
2 Go to applications/utilities and launch Disk Utility.
3 Click on the disk icon of your SD card or USB flash disk and then click the erase tab.
4 Set the format to Mac OS Extended (Journaled) or exFAT.
5 Type a name for the new volume and then click erase. Your media will quickly be
formatted and made ready for use with HyperDeck.
23Formatting Media
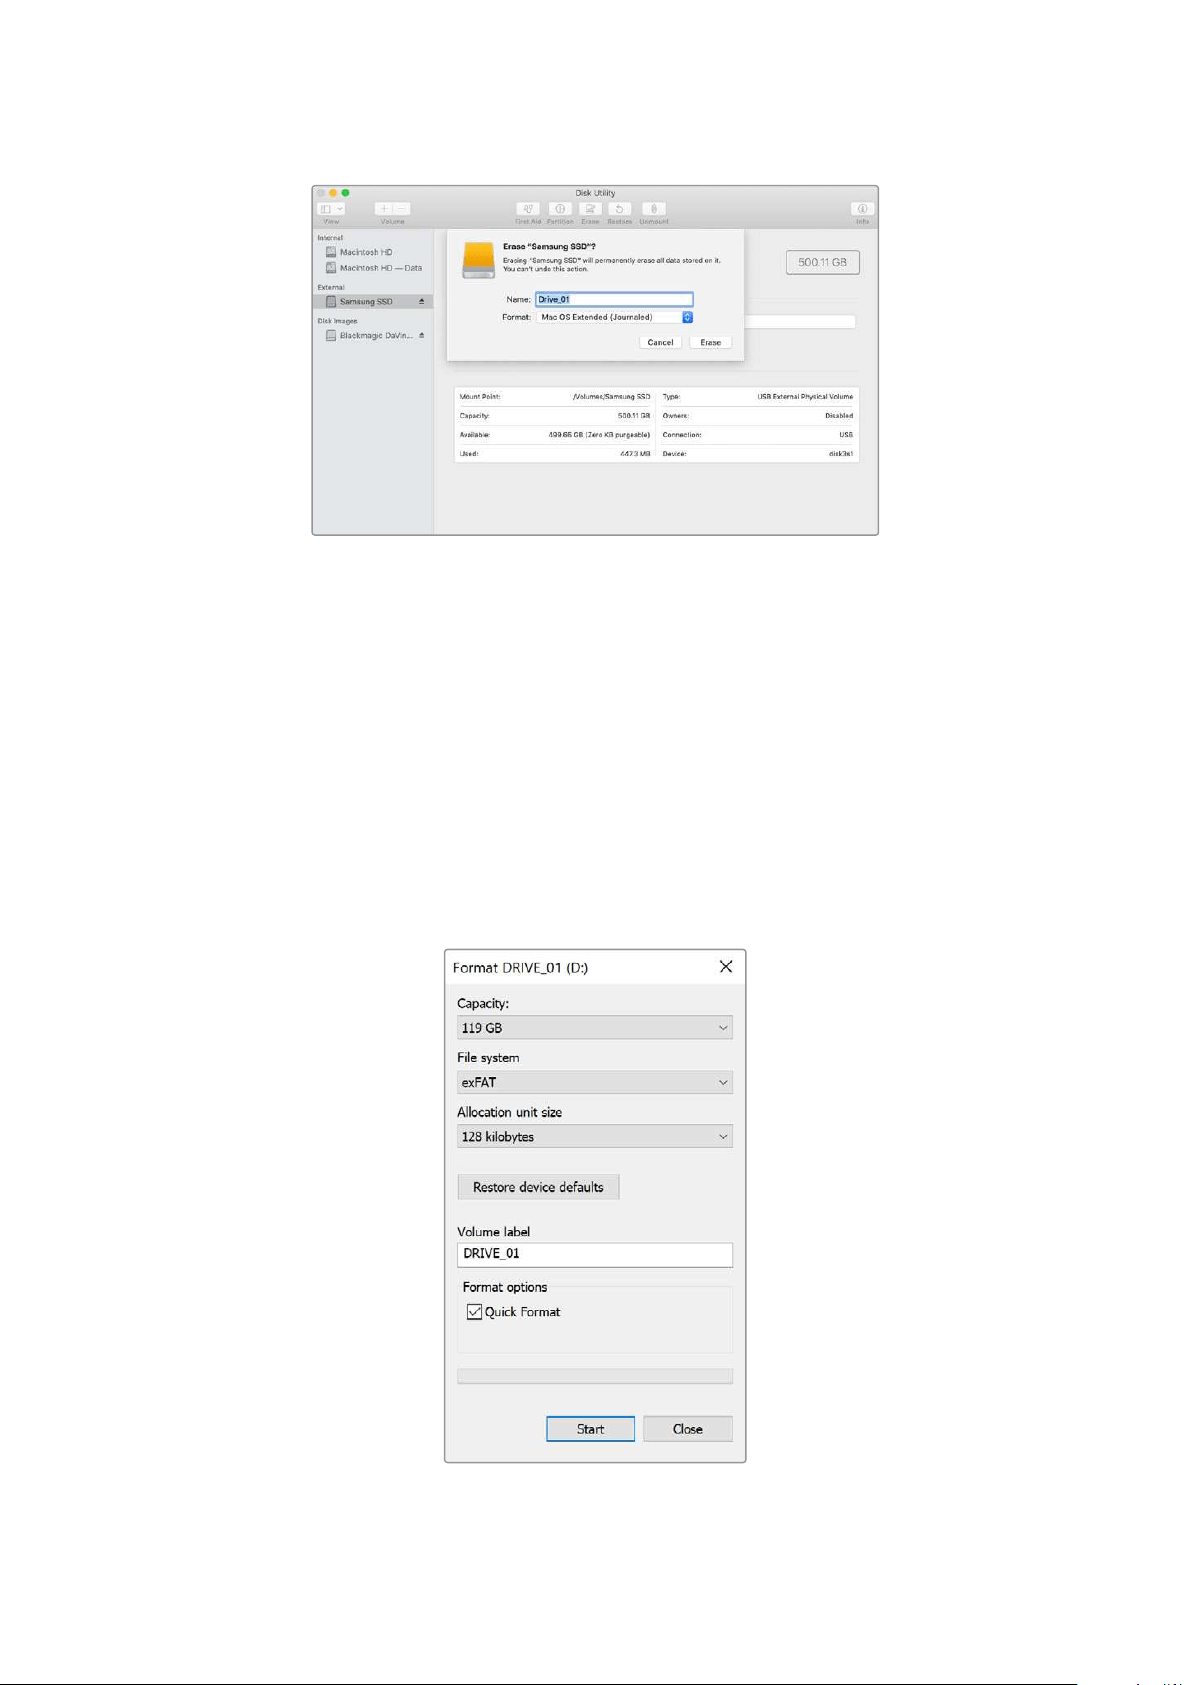
Formatting Media on a Windows computer
The format dialog box can format a drive in the exFAT format on a Windows PC. Make sure you
back up anything important from your SSD or SD card as you will lose everything on it when it is
formatted.
1 Connect a USB flash disk to your computer with an external dock or cable adapter. For
SD cards, connect it to your computer via an external card reader.
2 Open the start menu or start screen and choose computer. Right-click on your USB
flash disk or SD card.
3 From the contextual menu, choose format.
4 Set the file system to exFAT and the allocation unit size to 128 kilobytes.
5 Type a volume label, select quick format and click Start.
6 Your media will quickly be formatted and made ready for use with HyperDeck.
24Formatting Media

Using the Teleprompter Function
Using a standard RTF file, you can use Blackmagic HyperDeck Shuttle HD as a teleprompter.
Create your file in TextEdit or WordPad and save as a rich text format file in any of the 13
supported languages. Once opened with HyperDeck Shuttle HD, you can adjust the font size
and line spacing of your script.
To use the teleprompter:
1 Connect HyperDeck Shuttle HD’s HDMI out to the HDMI display you want to use.
2 Insert an SD card or connect an external USB flash disk containing your script.
3 From the record menu select the codec option. Navigate to ‘teleprompter’ setting and
press set.
The script will appear on your display. From here you can start playback automatically using the
play button, or for additional control use the dial.
Controlling teleprompter playback speed
The large dial on HyperDeck Shuttle HD can be used to control playback when in teleprompter
mode much in the same way as it does for media playback. With a script loaded, press the ‘jog’
and ‘scr’ buttons together to turn on variable speed playback. Once selected, turn the dial. The
script will move at a speed relative to the movement of the dial. For example, the faster the dial
is turned, the faster the script will scroll.
JOG SCR
CLIP
MENU SET
DISK SD
For constant speeds, you can use the jog and scroll buttons individually. Once selected, turning
the dial will move the script at a constant low speed in jog mode, or a faster speed in scroll mode.
To navigate between rtf files on your SD card or external disk, press the forward and back keys.
25Using the Teleprompter Function

The teleprompter will acknowledge the font size, color and whether it is set to bold from the file.
Additionally, you can adjust the font size, line spacing, margins or flip the display horizontally or
vertically for when you are projecting the display to beam splitter glass using the monitor menu.
For more information see ‘menu settings’ earlier in this manual.
Blackmagic HyperDeck Setup
Blackmagic HyperDeck Setup is a software utility you can use to change settings and update
the internal software in your HyperDeck.
To install the software:
1 Download the newest Blackmagic HyperDeck Setup installer from
www.blackmagicdesign.com/support.
2 Run the Blackmagic HyperDeck Setup installer on your computer and follow the
onscreen instructions.
3 After installation is complete, connect your HyperDeck Shuttle HD to the computer
viathe USB or Ethernet connector on the rear panel.
4 Launch Blackmagic HyperDeck Setup and follow any onscreen prompt to update
theinternal software. If no prompt appears, the internal software is up to date and
thereis nothing further you need to do.
Click on the HyperDeck image or the settings icon to open the settings menu.
The home screen will show your HyperDeck Shuttle HD and the name of the unit. This name
ishelpful to identify the unit when more than one HyperDeck is connected to your computer
and can be set using the utility’s settings menu.
26Blackmagic HyperDeck Setup

Network
Protocol
To control your HyperDeck Shuttle HD with ATEM switchers, or to control it remotely via
HyperDeck Ethernet Protocol, the HyperDeck Shuttle HD needs be on the same network as
your other equipment using DHCP or by manually adding a fixed IP address.
DHCP
HyperDeck Shuttle HD disk recorders arrive set to DHCP by default. The dynamic
host configuration protocol, or DHCP, is a service on network servers that
automatically finds your HyperDeck disk recorder and assigns an IP address.
TheDHCP is a great service that makes it easy to connect equipment via Ethernet
and ensure their IP addresses do not conflict with each other. Most computers
andnetwork switchers support DHCP.
Static IP
When ‘static ip’ is selected, you can enter your network details manually. When
setting IP addresses manually so all units can communicate, they must share
the same subnet mask and gateway settings. In addition, the first three fields
ofnumbers in the panel’s IP address also need to match.
If there are other devices on the network that have the same identifying number in their IP
address, there will be a conflict and the units won’t connect. If you encounter a conflict, simply
change the identifying number in the unit’s IP address.
27Blackmagic HyperDeck Setup

File Settings
When first set up, your HyperDeck Shuttle HD will record clips to your SD card or USB flash disk
using ‘HyperDeck’ as the prefix. Type in a new filename to change the prefix.
The timestamp added to the filename is turned off by default. If you would like the date and
time recorded in your filename, switch it to on. Filename prefix and timestamp settings are also
available via onscreen menu on HyperDeck Shuttle HD.
Transferring Files over a Network
Your HyperDeck disk recorder supports file transfer via file transfer protocol, or ftp. This
powerful feature lets you copy files directly from your computer to your HyperDeck via a
network with the fast speeds a local network can provide. For example, you could be copying
new files to a remote HyperDeck unit based at another location for digital signage.
Connecting to HyperDeck Shuttle HD
With your computer and HyperDeck Shuttle HD on the same network, all you will need is an
ftpclient and your HyperDeck Shuttle HD’s IP address.
1 Download and install an FTP client on the computer you want to connect
your HyperDeck to. Werecommend Cyberduck, FileZilla or Transmit but most
FTPapplications will work. Cyberduck and FileZilla are free downloads.
2 Connect your HyperDeck Shuttle HD to your network using an Ethernet cable and
noteits IP address. To access the IP address, press the ‘menu’ button and rotate the
search dial to access the ‘network’ screen. You’ll see your HyperDeck’s IP address at
the bottom ofthis screen.
You can find your HyperDeck Shuttle HD’s IP address
inthe network section of the setup menu.
3 Enter your HyperDeck’s IP address into your TCP application’s connection dialog.
Thenaming and position of this box can vary between applications, but it is usually
labeled ‘server’ or ‘host.’ If your FTP program includes an ‘anonymous login’ checkbox,
make sure this is checked.
28Transferring Files over a Network

When connecting to HyperDeck Shuttle HD, you don’t need to enter a username or password.
Simply enter your disk recorder’s IP address in your FTP application’s ‘server’ or ‘host’ field and
check an ‘anonymous login’ checkbox if one is available.
Transferring Files
Once connected to your HyperDeck you can transfer files as you normally would with your
ftpprogram. Most ftp applications have a drag and drop interface but check your particular
application for the appropriate method.
You can transfer any file to and from your HyperDeck, but it’s worth noting that any files you
intend to play back from HyperDeck Shuttle HD will need to conform to your HyperDeck’s
supported codecs and resolutions.
TIP You can transfer files over a network while your HyperDeck is recording.
HyperDeck will automatically adjust transfer speeds to make sure recording is
notaffected.
29Transferring Files over a Network

Developer Information
Blackmagic HyperDeck Ethernet Protocol
The Blackmagic HyperDeck Ethernet Protocol is a text based protocol accessed by connecting
to TCP port 9993 on HyperDeck models that have a built in Ethernet connection. If you are
a software developer, you can use the protocol to construct devices that integrate with our
products. Here at Blackmagic Design our approach is to open up our protocols and we eagerly
look forward to seeing what you come up with!
Protocol Commands
Command Command Description
help or ? Provides help text on all commands and parameters
commands return commands in XML format
device info return device information
disk list query clip list on active disk
disk list: slot id: {n} query clip list on disk in slot {n}
quit disconnect ethernet control
ping check device is responding
preview: enable: {true/false} switch to preview or output
play play from current timecode
play: speed: {-5000 to 5000} play at specific speed
play: loop: {true/false} play in loops or stop-at-end
play: single clip: {true/false} play current clip or all clips
playrange query playrange setting
playrange set: clip id: {n} set play range to play clip {n} only
playrange set: clip id: {n} count: {m} set play range to {m} clips starting from clip {n}
playrange set: in: {inT} out: {outT}
set play range to play between:
- timecode {inT} andtimecode {outT}
playrange set: timeline in: {in} timeline out:
{out}
set play range in units of frames between:
- timeline position {in} and position {out} clear/reset play
rangesetting
playrange clear clear/reset play range setting
play on startup query unit play on startup state
play on startup: enable: {true/false} enable or disable play on startup
play on startup: single clip: {true/false} play single clip or all clips on startup
play option query play options
play option: stop mode:
{lastframe/nextframe/black}
set output frame when playback stops
record record from current input
record: name: {name} record named clip
30Developer Information

Command Command Description
record spill spill current recording to next slot
record: spill: slot id: {n}
spill current recording to specified slot
use current id to spill to same slot
stop stop playback or recording
clips count query number of clips on timeline
clips get query all timeline clips
clips get: clip id: {n} query a timeline clip info
clips get: clip id: {n} count: {m} query m clips starting from n
clips get: version: {1/2}
query clip info using specified output version:
version 1: id: name startT duration
version 2: id: startT duration inT outT name
clips add: name: {name} append a clip to timeline
clips add: clip id: {n} name: {name} insert clip before existing clip {n}
clips add: in: {inT} out: {outT} name: {name} append the {inT} to {outT} portion of clip
clips remove: clip id: {n}
remove clip {n} from the timeline
(invalidates clip ids following clip {n})
clips clear empty timeline clip list
transport info query current activity
slot info query active slot
slot info: slot id: {n} query slot {n}
slot select: slot id: {n} switch to specified slot
slot select: video format: {format} load clips of specified format
slot unblock unblock active slot
slot unblock: slot id: {n} unblock slot {n}
cache info query cache status
dynamic range query dynamic range settings
dynamic range: playback override:
{off/Rec709/Rec2020_SDR/HLG/
ST2084_300/ST2084_500/
ST2084_800/ST2084_1000/
ST2084_2000/ST2084_4000/ST2084
set playback dynamic range override
dynamic range: record override:
{off/Rec709/Rec2020_SDR/HLG/
ST2084_300/ST2084_500/
ST2084_800/ST2084_1000/
ST2084_2000/ST2084_4000/ST2048}
set record dynamic range override
notify query notification status
notify: remote: {true/false} set remote notifications
notify: transport: {true/false} set transport notifications
notify: slot: {true/false} set slot notifications
notify: configuration: {true/false} set configuration notifications
31Developer Information

Command Command Description
notify: dropped frames: {true/false} set dropped frames notifications
notify: display timecode: {true/false} set display timecode notifications
notify: timeline position: {true/false} set playback timeline position notifications
notify: playrange: {true/false} set playrange notifications
notify: cache: {true/false} set cache notifications
notify: dynamic range: {true/false} set dynamic range settings notifications
notify: slate: {true/false} set digital slate notifications
notify: clips: {true/false}
set timeline clips notifications where two types of changes can
occur:
add: partial update with list of clips and insert positions
snapshot: complete update of all clips on timeline
notify: disk: {true/false}
set disk clips notifications where two types of changes can
occur:
add: partial update with list of clips and insert positions
snapshot: complete update of all clips on timeline
goto: clip id: {start/end} goto first clip or last clip
goto: clip id: {n} goto clip id {n}
goto: clip id: +{n} go forward {n} clips
goto: clip id: -{n} go backward {n} clips
goto: clip: {n} goto frame position {n} within current clip
goto: clip: +{n} go forward {n} frames within current clip
goto: clip: -{n} go backward {n} frames within current clip
goto: clip: {start/end} goto start or end of clip
goto: timeline: {n} goto frame position {n} within timeline
goto: timeline: +{n} o forward {n} frames within timeline
goto: timeline: -{n} go backward {n} frames within timeline
goto: timeline: {start/end} goto start or end of timeline
goto: timecode: {timecode} goto specified timecode
goto: timecode: +{timecode} go forward {timecode} duration
goto: timecode: -{timecode} go backward {timecode} duration
goto: slot id: {n} goto slot id {n}
jog: timecode: {timecode} jog to timecode
jog: timecode: +{timecode} jog forward {timecode} duration
jog: timecode: -{timecode} jog backward {timecode} duration
shuttle: speed: {-5000 to 5000} shuttle with speed
remote query unit remote control state
remote: enable: {true/false} enable or disable remote control
remote: override: {true/false} session override remote control
configuration query configuration settings
configuration: video input: SDI switch to SDI input
32Developer Information

Command Command Description
configuration: video input: HDMI switch to HDMI input
configuration: video input: component switch to component input
configuration: audio input: embedded capture embedded audio
configuration: audio input: XLR capture XLR audio
configuration: audio input: RCA capture RCA audio
configuration: file format: {format} switch to specific file format
configuration: audio codec: PCM switch to PCM audio
configuration: audio codec: AAC switch to AAC audio
configuration: timecode input:
{external/embedded/internal/preset/clip}
change the timecode input
configuration: timecode output:
{clip/timeline}
change the timecode output
configuration: timecode preference:
{default/dropframe/nondropframe}
whether or not to use drop frame timecodes when not
otherwise specified
configuration: timecode preset:
{timecode}
set the timecode preset
configuration: audio input channels: {n} set the number of audio channels recorded to {n}
configuration: record trigger:
{none/recordbit/timecoderun}
change the record trigger
configuration: record prefix: {name} set the record prefix name (supports UTF-8 name)
configuration: append timestamp:
{true/false}
append timestamp to recorded filename
configuration: xlr input id: {n} xlr type:
{line/mic}
configure xlr input type
multiple xlr inputs can be configured in a single command
configuration: genlock input resync:
{true/false}
enable or disable genlock input resync
uptime return time since last boot
format: slot id: {n} prepare:
{exFAT/HFS+} name: {name}
prepare a disk formatting operation to filesystem {format}
format: confirm: {token} perform a pre-prepared formatting operation using token
identify: enable: {true/false} identify the device
watchdog: period: {period in seconds} client connection timeout
reboot reboot device
slate clips slate clips information
slate project slate project information
slate lens slate lens information
33Developer Information

Multiline commands: Command Description
slate clips↵ set slate clips information:
reel: {n} slate reel number, where {n} is in [1, 999]
scene id: {id} slate scene id value, where {id} is a string
shot type: {WS/MS/BCU/MCU/ECU/none} slate shot type
take: {n} slate take number, where {n} is in [1, 99]
take scenario: {PU/VFX/SER/none} slate take scenario
take auto inc: {true/false} slate take auto increment
good take: {true/false} slate good take
environment: {interior/exterior} slate environment
day night: {day/night} slate day or night
slate project:↵ set slate project information:
project name: {name} project name (can be empty, supports UTF-8)
camera: {index} set camera index e.g. A
director: {name} director (can be empty, supports UTF-8)
camera operator: {name} camera operator (can be empty, supports UTF-8)
slate lens:↵ set lens information:
lens type: {type} lens type (can be empty, supports UTF-8)
iris: {type} camera iris (can be empty, supports UTF-8)
focal length: {length} focal length (can be empty, supports UTF-8)
distance: {distance} lens distance (can be empty, supports UTF-8)
filter: {filter} lens filter (can be empty, supports UTF-8)
Command Combinations
You can combine the parameters into a single command, for example:
play: speed: 200 loop: true single clip: true
Or for configuration:
configuration: video input: SDI audio input: XLR
Or to switch to the second disk, but only play NTSC clips:
slot select: slot id: 2 video format: NTSC
Protocol Details
Connection
The HyperDeck Ethernet server listens on TCP port 9993.
Basic syntax
The HyperDeck protocol is a line oriented text protocol. Lines from the server will be separated by an ascii
CR LF sequence. Messages from the client may be separated by LF or CR LF.
New lines are represented in this document as a "↵" symbol.
34Developer Information

Single line command syntax
Command parameters are usually optional. A command with no parameters is terminated with a new line:
{Command name}↵
If parameters are specified, the command name is followed by a colon, then pairs of parameter names and
values. Each parameter name is terminated with a colon character:
{Command name}: {Parameter}: {Value} {Parameter}: {Value} ...↵
Multiline command syntax
The HyperDeck protocol also supports an equivalent multiline syntax where each parameter-value pair is
entered on a new line. E.g.
{Command name}:↵
{P a r a m e t e r}: { Va lu e}↵
{P a r a m e t e r}: { Va lu e}↵
↵
Response syntax
Simple responses from the server consist of a three digit response code and descriptive text terminated by a
new line:
{Response code} {Response text}↵
If a response carries parameters, the response text is terminated with a colon, and parameter name and
value pairs follow on subsequent lines until a blank line is returned:
{Response code} {Response text}:↵
{P a r a m e t e r}: { Va lu e}↵
{P a r a m e t e r}: { Va lu e}↵
...
↵
Successful response codes
A simple acknowledgement of a command is indicated with a response code of 200:
200 ok↵
Other successful responses carry parameters and are indicated with response codes in the range of 201
to299.
35Developer Information

Failure response codes
Failure responses to commands are indicated with response codes in the range of 100 to 199:
100 syntax error
101 unsupported parameter
102 invalid value
103 unsupported
104 disk full
105 no disk
106 disk error
107 timeline empty
108 internal error
109 out of range
110 no input
111 remote control disabled
112 clip not found
120 connection rejected
150 invalid state
151 invalid codec
160 invalid format
161 invalid token
162 format not prepared
163 parameterized single line command not supported
Asynchronous response codes
The server may return asynchronous messages at any time. These responses are indicated with response
codes in the range of 500 to 599:
5xx {Response Text}:↵
{P a r a m e t e r}: { Va lu e}↵
{P a r a m e t e r}: { Va lu e}↵
↵
Connection response
On connection, an asynchronous message will be delivered:
500 connection info:↵
protocol version: {Version}↵
model: {Model Name}↵
↵
Timecode syntax
Timecodes are expressed as non-drop-frame timecode in the format:
HH:MM:SS:FF
36Developer Information

Handling of deck "remote" state
The “remote” command may be used to enable or disable the remote control of the deck. Any attempt to
change the deck state over ethernet while remote access is disabled will generate an error:
111 remote control disabled↵
To enable or disable remote control:
remote: enable: {“true”, “false”} ↵
The current remote control state may be overridden allowing remote access over ethernet irrespective of the
current remote control state:
remote: override: {“true”, “false”} ↵
The override state is only valid for the currently connected ethernet client and only while the connection
remains open.
The “remote” command may be used to query the remote control state of the deck by specifying no
parameters:
remote↵
The deck will return the current remote control state:
210 remote info:↵
enabled: {“true”, “false”}↵
override: {“true”, “false”}↵
↵
Asynchronous remote control information change notification is disabled by default and may be
configured with the “notify” command. When enabled, changes in remote state will generate a “510 remote
info:”asynchronous message with the same parameters as the “210 remote info:” message.
Closing connection
The "quit" command instructs the server to cleanly shut down the connection:
quit↵
Checking connection status
The "ping" command has no function other than to determine if the server is responding:
ping↵
Getting help
The "help" or "?" commands return human readable help text describing all available commands and
parameters:
help↵
Or:
?↵
The server will respond with a list of all supported commands:
201 help:↵
{Help Text}↵
{Help Text}↵
↵
37Developer Information

Switching to preview mode
The "preview" command instructs the deck to switch between preview mode and output mode:
preview: enable: {"true", "false"}↵
Playback will be stopped when the deck is switched to preview mode. Capturing will be stopped when the
deck is switched to output mode.
Controlling device playback
The “play” command instructs the deck to start playing:
play↵
The play command accepts a number of parameters which may be used together in most combinations.
By default, the deck will play all remaining clips on the timeline then stop.
The “single clip” parameter may be used to override this behavior:
play: single clip: {“true”, “false”}↵
By default, the deck will play at normal (100%) speed. An alternate speed may be specified in percentage
between -5000 to 5000:
play: speed: {% normal speed}↵
By default, the deck will stop playing when it reaches to the end of the timeline. The “loop” parameter may be
used to override this behavior:
play: loop: {“true”, “false”}↵
The “playrange” command instructs the deck to play all the clips. To override this behavior: and select a
particular clip:
playrange set: clip id: {Clip ID}↵
To only play a certain timecode range:
playrange set: in: {in timecode} out: {out timecode}↵
To clear a set playrange and return to the default value:
playrange clear↵
The “play on startup command” instructs the deck on what action to take on startup. By default, the deck will
not play. Use the “enable” command to start playback after each power up.
play on startup: enable {“true”, “false”}↵
By default, the unit will play back all clips on startup. Use the “single clip” command to override.
play on startup: single clip: {“true”, “false”}↵
Stopping deck operation
The "stop" command instructs the deck to stop the current playback or capture:
stop↵
38Developer Information

Changing timeline position
The "goto" command instructs the deck to switch to playback mode and change its position within the
timeline.
To go to the start of a specific clip:
goto: clip id: {Clip ID}↵
To move forward/back {count} clips from the current clip on the current timeline:
goto: clip id: +/-{count}↵
Note that if the resultant clip id goes beyond the first or last clip on timeline, it will be clamp at the first or last
clip.
To go to the start or end of the current clip:
goto: clip: {“start”, “end”}↵
To go to the start of the first clip or the end of the last clip:
goto: timeline: {“start”, “end”}↵
To go to a specified timecode:
goto: timecode: {timecode}↵
To move forward or back a specified duration in timecode:
goto: timecode: {“+”, “-”}{duration in timecode}↵
To specify between slot 1 and slot 2:
goto: slot id: {Slot ID}↵
Note that only one parameter/value pair is allowed for each goto command.
Enumerating supported commands and parameters
The "commands" command returns the supported commands:
commands↵
The command list is returned in a computer readable XML format:
212 commands:
<commands>↵
<command name="…"><parameter name="…"/>…</command>↵
<command name="…"><parameter name="…"/>…</command>↵
…
</commands>↵
↵
39Developer Information

Controlling asynchronous notifications
The “notify” command may be used to enable or disable asynchronous notifications from the server.
To enable or disable transport notifications:
notify: transport: {“true”, “false”}↵
To enable or disable slot notifications:
notify: slot: {“true”, “false”}↵
To enable or disable remote notifications:
notify: remote: {“true”, “false”}↵
To enable or disable configuration notifications:
notify: configuration: {“true”, “false”}↵
Multiple parameters may be specified. If no parameters are specified, the server returns the current state of
all notifications:
209 notify:↵
transport: {“true”, “false”}↵
slot: {“true”, “false”}↵
remote: {“true”, “false”}↵
configuration: {“true”, “false”}↵
dropped frames: {“true”, “false”}↵
display timecode: {“true”, “false”}↵
timeline position: {“true”, “false”}↵
playrange: {“true”, “false”}↵
cache: {“true”, “false”}↵
dynamic range: {“true”, “false”}↵
slate: {“true”, “false”}↵
clips: {“true”, “false”}↵
disk: {“true”, “false”}↵
↵
Retrieving device information
The "device info" command returns information about the connected deck device:
device info↵
The server will respond with:
204 device info:↵
protocol version: {Version}↵
model: {Model Name}↵
unique id: {unique alphanumeric identifier}↵
slot count: {number of storage slots}↵
software version: {software version}↵
↵
40Developer Information

Retrieving slot information
The "slot info" command returns information about a slot. Without parameters, the command returns
information for the currently selected slot:
slot info↵
If a slot id is specified, that slot will be queried:
slot info: slot id: {Slot ID}↵
The server will respond with slot specific information:
202 slot info:↵
slot id: {Slot ID}↵
status: {"empty", "mounting", "error", "mounted"}↵
volume name: {Volume name}↵
recording time: {recording time available in seconds}↵
video format: {disk's default video format}↵
blocked: {“true”, “false”}↵
↵
Asynchronous slot information change notification is disabled by default and may be configured with
the "notify" command. When enabled, changes in slot state will generate a "502 slot info:" asynchronous
message with the same parameters as the "202 slot info:" message.
Retrieving clip information
The “disk list” command returns the information for each playable clip on a given disk. Without parameters,
the command returns information for the current active disk:
disk list↵
If a slot id is specified, the disk in that slot will be queried:
disk list: slot id: {Slot ID}↵
The server responds with the list of all playable clips on the disk in the format of: Index, name, formats, and
duration in timecode:
206 disk list:↵
slot id: {Slot ID}↵
{clip index}: {name} {file format} {video format} {Duration
ti m ecode}↵
{clip index}: {name} {file format} {video format} {Duration
ti m ecode}↵
…
↵
Note that the clip index starts from 1.
Retrieving clip count
The "clips count" command returns the number of clips on the current timeline:
clips count ↵
The server responds with the number of clips:
214 clips count: ↵
clip count: {Count}↵
41Developer Information

Retrieving timeline information
The "clips get" command returns information for each available clip on the current timeline. Without
parameters, the command returns information for all clips on timeline:
clips get↵
The server responds with a list of clip IDs, names and timecodes:
205 clips info:↵
clip count: {Count}↵
{Clip ID}: {Start timecode} {Duration timecode} {In timecode}
{Out timecode} {Name}↵
{Clip ID}: {Start timecode} {Duration timecode} {In timecode}
{Out timecode} {Name}↵
…
↵
Retrieving transport information
The “transport info” command returns the state of the transport:
transport info ↵
The server responds with transport specific information:
208 transport info:
status: {“preview”, “stopped”, “play”, “forward”, “rewind”,
“j o g ”, “ s h u t t l e ”,” r e c o r d ”}↵
speed: {Play speed between -5000 and 5000 %}↵
slot id: {Slot ID or “none”}↵
clip id: {Clip ID or “none”}↵
single clip: {“true”, “false”}↵
display timecode: {timecode}↵
timecode: {timecode}↵
video format: {Video format}↵
loop: {“true”, “false”}↵
timeline: {n}↵
input video format: {Video format”}↵
dynamic range: {“off”, “Rec709”, “Rec2020_SDR”, “HLG”,
“ST2084_300”, “ST2084_500”, “ST2084_800”, “ST2084_1000”,
“ST2084_2000”, “ST2084_4000”, “ST2048” or “none”}↵
↵
The "timecode" value is the timecode within the current timeline for playback or the clip for record. The
"display timecode" is the timecode displayed on the front of the deck. The two timecodes will differ in some
deck modes.
Asynchronous transport information change notification is disabled by default and may be configured
with the "notify" command. When enabled, changes in transport state will generate a "508 transport info:"
asynchronous message with the same parameters as the "208 transport info:" message.
42Developer Information

Video Formats
The following video formats are currently supported on HyperDeck Shuttle:
720p50, 720p5994, 720p60
1080p23976, 1080p24, 1080p25, 1080p2997, 1080p30, 1080p60
1080i50, 1080i5994, 1080i60
Video format support may vary between models and software releases.
File Formats
All HyperDeck models currently support the following file formats:
H.264High
H.264Medium
H.264Low
QuickTimeProResHQ
QuickTimeProRes
QuickTimeProResLT
QuickTimeProResProxy
QuickTimeDNxHD220x
DNxHD220x
QuickTimeDNxHD145
DNxHD145
QuickTimeDNxHD45
DNxHD45
Supported file formats may vary between models and software releases.
43Developer Information

Querying and updating configuration information
The "configuration" command may be used to query the current configuration of the deck:
configuration↵
The server returns the configuration of the deck:
211 configuration:↵
audio input: {“embedded”, “XLR”, “RCA”}↵
audio mapping: {n}↵
video input: {“SDI”, “HDMI”, “component”, “composite”}↵
file format: {format}↵
audio codec: {“PCM”, “AAC”}↵
timecode input: {“external”, “embedded”, “preset”, “clip”}↵
timecode output: {“clip”, “timeline”}↵
timecode preference: {“default”, “dropframe”, “nondropframe”}↵
timecode preset: {timecode}↵
audio input channels: {n}↵
record trigger: {“none”, “recordbit”, “timecoderun”}↵
record prefix: {name}↵
append timestamp: {“true”, “false”}↵
genlock input resync: {“true”, “false”}↵
↵
One or more configuration parameters may be specified to change the configuration of the deck.
To change the current video input:
configuration: video input: {“SDI”, “HDMI”, “component”}↵
Valid video inputs may vary between models. To configure the current audio input:
configuration: audio input: {“embedded”, “XLR”, “RCA”}↵
Valid audio inputs may vary between models.
To configure the current file format:
configuration: file format: {File format}↵
Note that changes to the file format may require the deck to reset, which will cause the client connection to
be closed. In such case, response code 213 will be returned (instead of 200) before the client connection is
closed:
“213 deck rebooting”
Asynchronous configuration information change notification is disabled by default and may be configured
with the “notify” command. When enabled, changes in configuration will generate a “511 configuration:”
asynchronous message with the same parameters as the “211 configuration:” message.
44Developer Information

Selecting active slot and video format
The "slot select" command instructs the deck to switch to a specified slot, or/and to select a specified output
video format.
To switch to a specified slot:
slot select: slot id: {slot ID}↵
To select the output video format:
slot select: video format: {video format}↵
Either or all slot select parameters may be specified. Note that selecting video format will result in a rescan of
the disk to reconstruct the timeline with all clips of the specified video format.
Clearing the current timeline
The "clips clear" command instructs the deck to empty the current timeline:
clips clear↵
The server responds with
200 ok↵
Adding a clip to the current timeline
The "clips add:" command instructs the deck to add a clip to the current timeline:
clips add: name: {clip name}↵
The server responds with
200 ok↵
or in case of error
1xx {error description}↵
Configuring the watchdog
The “watchdog” command instructs the deck to monitor the connected client and terminate the connection if
the client is inactive for at least a specified period of time.
To configure the watchdog:
watchdog: period: {period in seconds}↵
To avoid disconnection, the client must send a command to the server at least every {period} seconds. Note
that if the period is set to 0 or less than 0, connection monitoring will be disabled.
45Developer Information

Help
Getting Help
The fastest way to obtain help is to go to the Blackmagic Design online support pages and
check the latest support material available for your Blackmagic HyperDeck disk recorder.
Blackmagic Design Online Support Pages
The latest manual, software and support notes can be found at the Blackmagic Design support
center at
www.blackmagicdesign.com/support.
Blackmagic Design Forum
The Blackmagic Design forum on our website is a helpful resource you can visit for
more information and creative ideas. This can also be a faster way of getting help
as there may already be answers you can find from other experienced users and
Blackmagic Design staff which will keep you moving forward. You can visit the forum at
https://forum.blackmagicdesign.com
Contacting Blackmagic Design Support
If you can’t find the help you need in our support material or on the forum, please use the
“Sendus an email” button on the support page to email a support request. Alternatively,
click on the “Find your local support team” button on the support page and call your nearest
Blackmagic Design support office.
Checking the Software Version Currently Installed
To check which version of Blackmagic HyperDeck software is installed on your computer,
open the About Blackmagic HyperDeck Setup window.
On Mac OS, open Blackmagic HyperDeck Setup from the Applications folder.
Select About Blackmagic HyperDeck Setup from the application menu to reveal the
version number.
On Windows, open Blackmagic HyperDeck Setup utility from your Start menu or Start
Screen. Clickon the Help menu and select About Blackmagic HyperDeck Setup to
reveal the version number.
How to Get the Latest Software Updates
After checking the version of Blackmagic HyperDeck Setup software installed on your computer,
please visit the Blackmagic Design support center at
www.blackmagicdesign.com/support to
check for the latest updates. While it is usually a good idea to run the latest updates, it is wise to
avoid updating any software if you are in the middle of an important project.
46Help

Regulatory Notices
Disposal of Waste of Electrical and Electronic Equipment Within the European Union.
The symbol on the product indicates that this equipment must not be disposed of
with other waste materials. In order to dispose of your waste equipment, it must be
handed over to a designated collection point for recycling. The separate collection
and recycling of your waste equipment at the time of disposal will help conserve
natural resources and ensure that it is recycled in a manner that protects human health
and theenvironment. For more information about where you can drop off your waste
equipment for recycling, please contact your local city recycling office or the dealer
from whom you purchased the product.
This equipment has been tested and found to comply with the limits for a Class A
digitaldevice, pursuant to Part 15 of the FCC rules. These limits are designed to provide
reasonable protection against harmful interference when the equipment is operated
inacommercial environment. This equipment generates, uses, and can radiate radio
frequency energy and, if not installed and used in accordance with the instructions,
maycause harmful interference to radio communications. Operation of this product in
aresidential area is likely to cause harmful interference, in which case the user will be
required to correct the interference at personal expense.
Operation is subject to the following two conditions:
1 This device may not cause harmful interference.
2 This device must accept any interference received, including interference that
may cause undesired operation.
R-R-BMD-20211410001
ISED Canada Statement
This device complies with Canadianstandards for Class A digital apparatus.
Any modifications or use of this product outside its intended use could void
compliance to these standards.
Connection to HDMI interfaces must be made with high quality shielded
HDMI cables.
This equipment has been tested for compliance with the intended use in a
commercial environment. If the equipment is used in a domestic environment,
it may cause radio interference.
47Regulatory Notices

Safety Information
Product is suitable for use in tropical locations with an ambient temperature of up to 40
o
C.
Ensure that adequate ventilation is provided around the product and that it is not restricted.
No operator serviceable parts inside product. Refer servicing to your local Blackmagic Design
service center.
Use only at altitudes not more than 2000m above sea level.
State of California statement
This product can expose you to chemicals such as trace amounts of polybrominated biphenyls
within plastic parts, which is known to the state of California to cause cancer and birth defects
or other reproductive harm.
For more information go to www.P65Warnings.ca.gov.
48Safety Information

Warranty
12 Month Limited Warranty
Blackmagic Design warrants that this product will be free from defects in materials and workmanship
for a period of 12 months from the date of purchase. If a product proves to be defective during this
warranty period, Blackmagic Design, at its option, either will repair the defective product without
charge for parts and labor, or will provide a replacement in exchange for the defective product.
In order to obtain service under this warranty, you the Customer, must notify Blackmagic Design
of the defect before the expiration of the warranty period and make suitable arrangements for
the performance of service. The Customer shall be responsible for packaging and shipping the
defective product to a designated service center nominated by Blackmagic Design, withshipping
charges pre paid. Customer shall be responsible for paying all shipping charges, insurance, duties,
taxes, and any other charges for products returned to us for any reason.
This warranty shall not apply to any defect, failure or damage caused by improper use or
improper or inadequate maintenance and care. Blackmagic Design shall not be obligated to
furnish service under this warranty: a) to repair damage resulting from attempts by personnel
other than Blackmagic Design representatives to install, repair or service the product,
b) to repair damage resulting from improper use or connection to incompatible equipment,
c) to repair any damage or malfunction caused by the use of non Blackmagic Design parts or
supplies, or d) to service a product that has been modified or integrated with other products
when the effect of such a modification or integration increases the time or difficulty of servicing
the product. THIS WARRANTY IS GIVEN BY BLACKMAGIC DESIGN IN LIEU OF ANY OTHER
WARRANTIES, EXPRESS OR IMPLIED. BLACKMAGIC DESIGN AND ITS VENDORS DISCLAIM
ANY IMPLIED WARRANTIES OF MERCHANTABILITY OR FITNESS FOR A PARTICULAR PURPOSE.
BLACKMAGIC DESIGN’S RESPONSIBILITY TO REPAIR OR REPLACE DEFECTIVE PRODUCTS IS THE
WHOLE AND EXCLUSIVE REMEDY PROVIDED TO THE CUSTOMER FOR ANY INDIRECT, SPECIAL,
INCIDENTAL OR CONSEQUENTIAL DAMAGES IRRESPECTIVE OF WHETHER BLACKMAGIC
DESIGN OR THE VENDOR HAS ADVANCE NOTICE OF THE POSSIBILITY OF SUCH DAMAGES.
BLACKMAGIC DESIGN IS NOT LIABLE FOR ANY ILLEGAL USE OF EQUIPMENT BY CUSTOMER.
BLACKMAGIC IS NOT LIABLE FOR ANY DAMAGES RESULTING FROM USE OF THIS PRODUCT.
USER OPERATES THIS PRODUCT AT OWN RISK.
© Copyright 2022 Blackmagic Design. All rights reserved. ‘Blackmagic Design’, ‘DeckLink’, ‘HDLink’, ‘Workgroup Videohub’,
‘Multibridge Pro’, ‘Multibridge Extreme’, ‘Intensity’ and ‘Leading the creative video revolution’ are registered trademarks in the
US and other countries. All other company and product names may be trade marks of their respective companies with which
they are associated.
49Warranty
HyperDeck Shuttle HD
HyperDeck
Shuttle HD
2022年4月
インストール/オペレーションマニュアル

ようこそ
Blackmagic HyperDeck Shuttle HDディスクレコーダーをお買い上げいただき誠にありがとうご
ざいます。
Blackmagic HyperDeckのオリジナルモデルを設計した際、高速のSSDストレージを使用したビ
デオの収録・再生が実行できるディスクレコーダーを作りたいと考えていました。今回、HyperDeck
Shuttle HDをご紹介できることを大変喜ばしく思っています。
HyperDeck Shuttle HDは、小型で可搬性に優れたHDMIビデオレコーダーで、デスクでの使用
を意 図して設 計されています。HyperDeck Shuttle HDは、大型のサーチダイヤルと、馴染み深い
放送コントロールを搭載しているので、片手で操作できます。これにより、ライブプロダクションで
ATEM
Mini
と共に使用するのに最適なレコーダーとなっています。また、テレプロンプターとして使
用することも可能です!
HyperDeck Shuttle HDは、SDカードまたは外付けフラッシュディスクに、ProRes、DNxHD、H.264
で収録するため、極めて高速に収録・再生が実行できます。
弊 社のウェブサイトwww.blackmagicdesign.com/jpのサポートページで、最新バージョンのマニュ
アルおよびHyperDeckソフトウェアのアップデートをご確認ください。ソフトウェアをアップデート
することで、常に最新の機能をお使いいただけます。ソフトウェアをダウンロードする際にユーザ
ー登録していただければ、新しいソフトウェアのリリース時にお知らせいたします。常に新機能の
開発および製品の改善に努めていますので、ユーザーの皆様からご意見をいただければ幸いです。
Blackmagic Design CEO
グラ ント・ ペティ

目次
はじめに 53
電源の接続 53
ビデオとオーディオを接続 54
メディアの接続 54
ビデオの収録 55
再生 56
サーチダイヤルの使用 57
設定の変更 59
設定 60
リアパネル 69
ストレージメディア 70
SD
カード
70
外付けディスク 71
メディアをフォーマット 71
コンピューターでメディアを準備 71
テレプロンプター機能の使用 73
Blackmagic
HyperDeckSetup
74
ネットワークでファイルを転送 76
Developer
Information
78
Blackmagic
HyperDeckEthernetProtocol
78
Protocol
Commands
78
Protocol
Details
82
ヘルプ 94
規制に関する警告 95
安全情報 96
保証 97
52
HyperDec
k
Shuttle H
D

はじめに
HyperDeck Shuttle HDは、電源に接続し、 HDMIビデオソースをつなげ、SDカードまたは外付けメディ
アを挿入したら、収録ボタンを押すだけで使い始められます。
このセクションでは、
HyperDeck Shuttle HDを使い始める手順を紹介します。
JOG SCR
CLIP
MENU SET
DISK SD
電源の接続
HyperDeck
Shuttle
HD
に給電を行うには、同梱の電源アダプターをリアパネルの電源入力に接続し
ます。ロックリングを締めることで、電源ケーブルが固定されるため、誤って外れることを防ぎます。
HDMI OUT
HDMI IN
EXT DISK
SD CARD
ETHERNET
+
12V DC
電源アダプターをHyperDeckShuttleHDの電源入力に固定
53
はじめに
ビデオとオーディオを接続
HyperDeck Shuttle HDにビデオを接続するには、HDMIビデオソースをリアパネルのHDMI入力に接続
します。
HDMI OUT
HDMI IN
EXT DISK
SD CARD
ETHERNET
+
12V DC
送信先の機器をHDMI出力に接続します。例えば、ATEM Miniスイッチャー やHDMIテレビなどです。
HDMI出力は、HyperDeckの設定を変更する際に、設定メニューを表示する際にも使用します。その理
由は、設定メニューがHDMI出力のビデオオーバーレイとして表示されるからです。メニュー設定に関す
る詳細は、「設定の変更」セクションを参照してください。
作業のこつ 接続したディスプレイに入力ビデオソースが表示されない場合、再生モードになっ
ている可能性があります。収録ボタンを押すと、収録モードが有効になります。
HDMI OUT
HDMI IN
EXT DISK
SD CARD
ETHERNET
+
12V DC
HDMI
HDMIテレビやATEMMiniスイッチャーなどの送信先の機器に、HDMI出力を接続
メディアの接続
HyperDeck
Shuttle
HD
ディスクレコーダーはすべて、すぐに収録できる状態で発送されており、設定を
変更する必要はありません。必要な作業は、SDカードまたは外付けディスクのフォーマットだけです。
メディアのフォーマットは、メニュー設定を使用して簡単に実行できます。または、コンピューターでもフ
ォーマットできます。詳細は「メディアをフォーマット」セクションを参照してください。ビデオの収 録に
適したメディアの種類、およびSDカードと外付けディスクのリストも同セクションに記載されています。
SD
カー ド を挿入 する:
1
金のコネクターが上を向くように
SD
カードを持ち、メディアスロットと一直線になるようにします。
カードをスロットに差し込み、固定されるまでゆっくりと押します。
54
はじめに
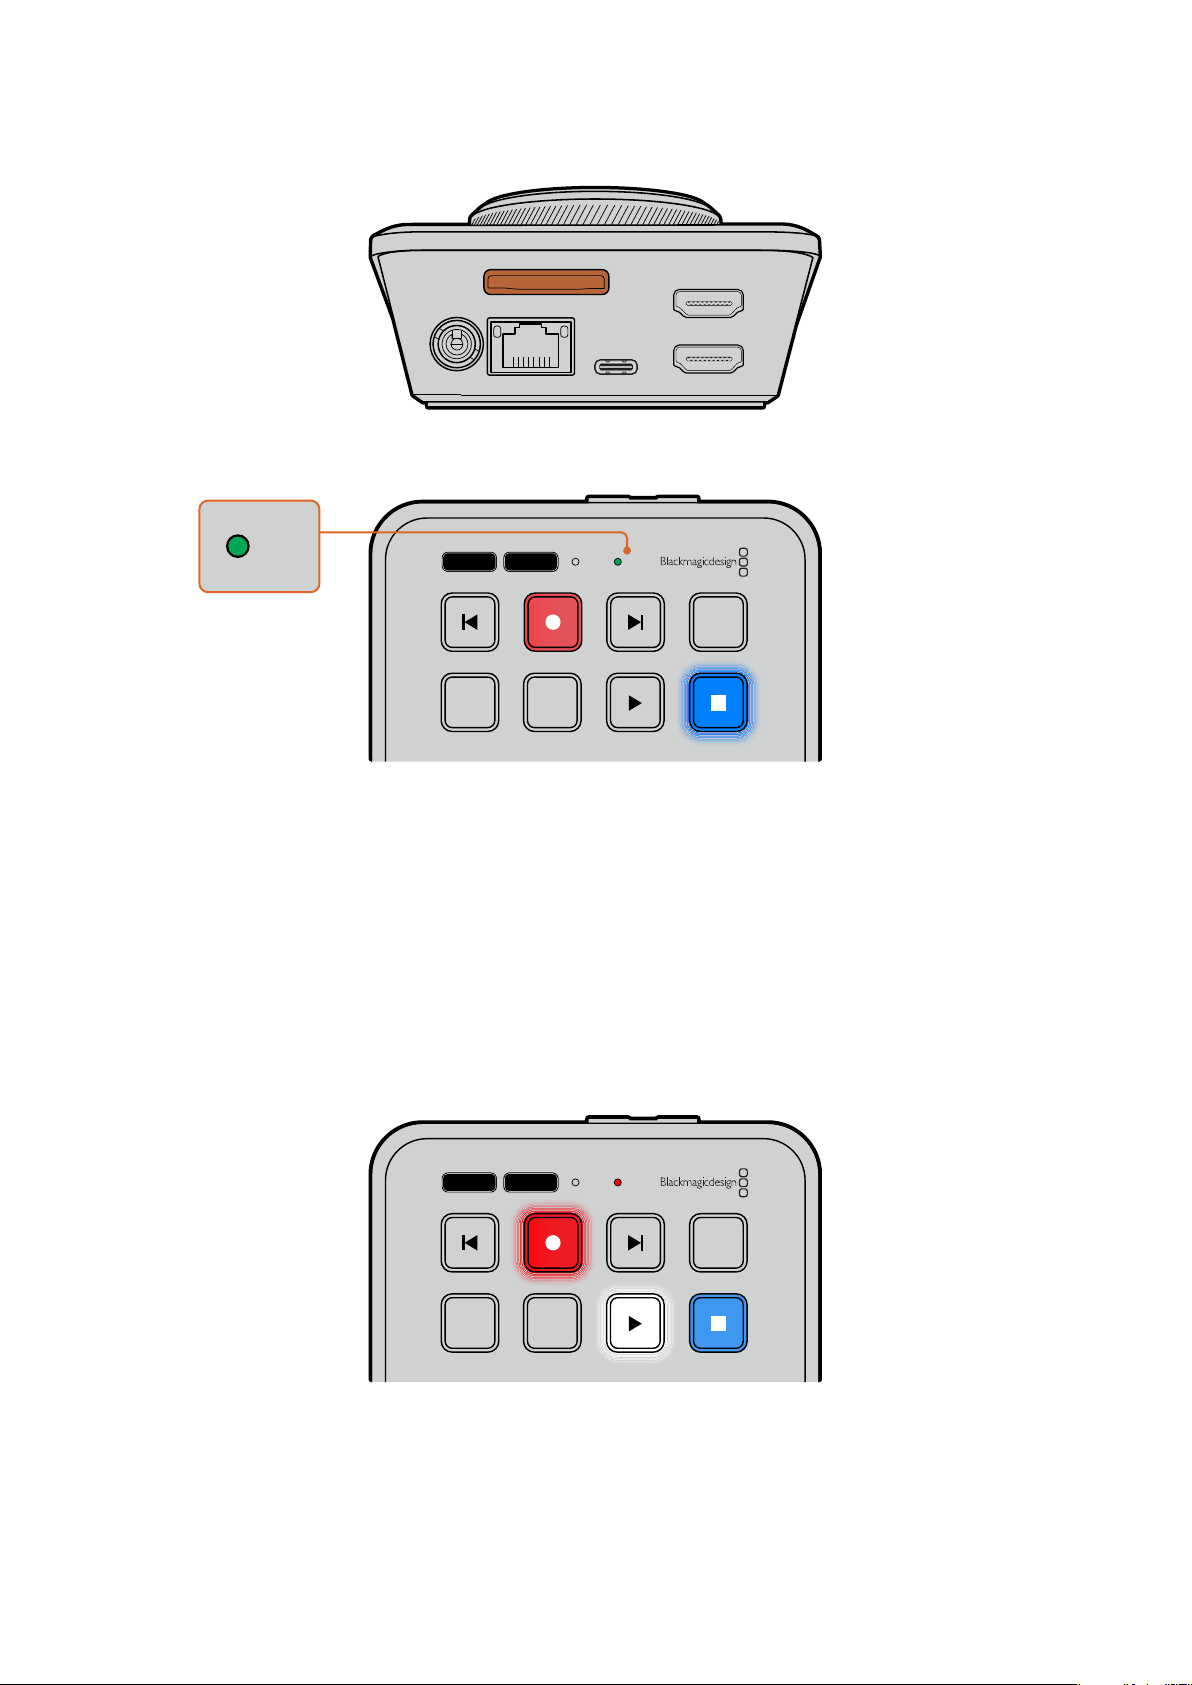
HDMI OUT
HDMI IN
EXT DISK
SD CARD
ETHERNET
+
12V DC
2 HyperDeckがSDカードを検証します。検証中は、HyperDeck Shuttle HDの上部にあるSDカー
ドのインジケーターが緑に点灯します。検証が終わったら、インジケーターのライトが消えます。
JOG SCR
CLIP
MENU SET
DISK SD
DISK SD
これで必要な準備が整い、HyperDeck Shuttle HDで 収 録・再生 を行えるようになりました!
クリップの収録・再生、設定の変更などに関する詳細は、このマニュアルに後述されています。
ビデオの収録
ビデオソースが、送信先のHDMI機器に表示されたことを確認したら、収録を開始できます。
収録ボタンを押すと、収録が開始されます。SDカードに収録中は、SDカードのインジケーターが赤に
点灯し、収録および再生ボタンも点灯します。外付けディスクへ収録する際は、ディスクインジケーター
が赤に点灯します。
JOG SCR
CLIP
MENU SET
DISK SD
収録を停止するには、停止ボタンを押します。
55
ビデオの収録
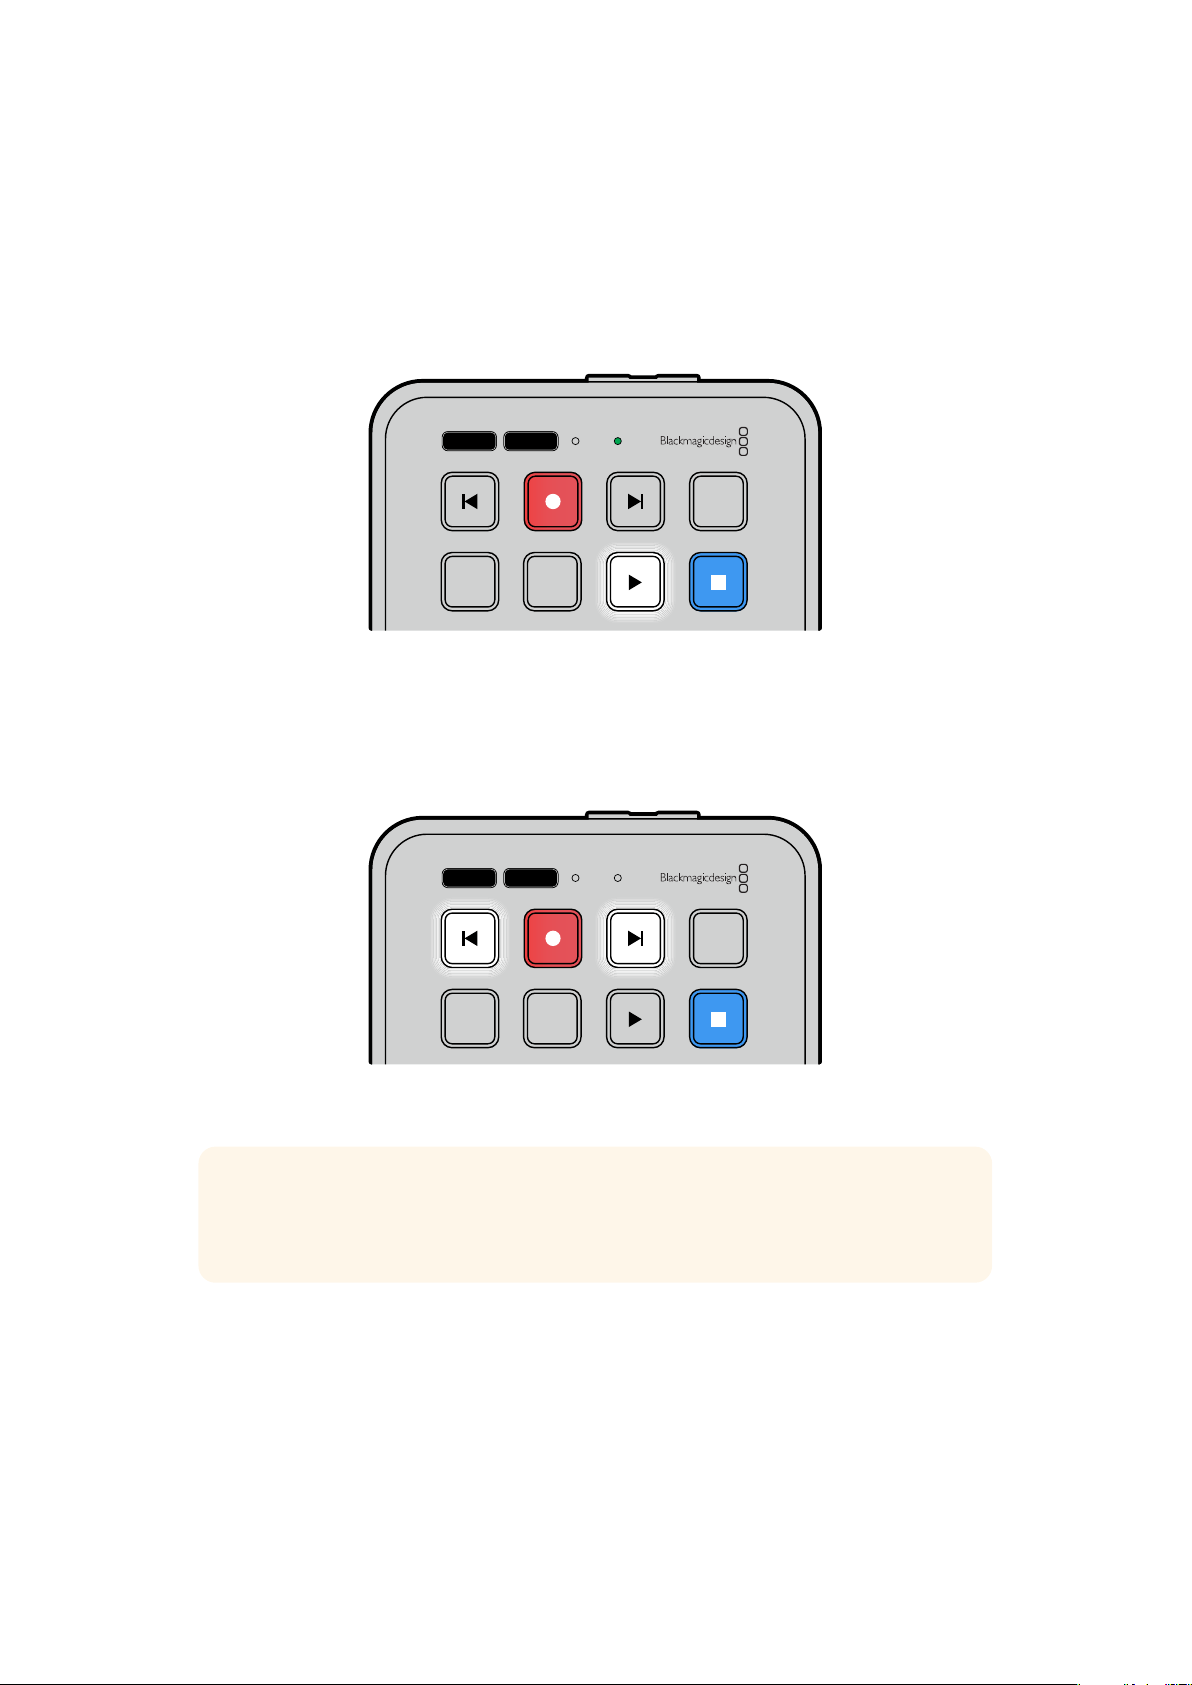
再生
再生ボタンを押して、再生を開始します。再生中は、再生ボタンが点灯し、「DISK」または「SD」メディ ア
スロット・インジケーターが 緑に光ります。
複数 の クリップ が収録 さ れて い る 場合 、順方向 /逆方向 の 頭出し ボタン を 押 すと 、す ば やくクリップ間 を
移動できます。
JOG SCR
CLIP
MENU SET
DISK SD
頭出しボタンの使用
逆方向の頭出しボタンを押すと、クリップを頭出しできます。
2
回以上押すと、それより前のクリップを移
動していきます。
順方向の頭出しボタンを押すと、後続のクリップを移動していきます。
JOG SCR
CLIP
MENU SET
DISK SD
順方向/逆方向の頭出しボタンを使用すると、各クリップの最初のフレームに頭出しが可能
作業のこつ
HyperDeck
でビデオファイルを再生するには、ファイルの収録に使用されたコーデ
ックに設定する必要があります。これは、メニューで実行できます。詳細は、後述の「設定の変
更」セクションを参照してください。
複数のクリップをループ
再生中に、再生ボタンを再び押すと、HyperDeck Shuttle HDはすべてのクリッ プをルー プします。停止
ボタンを押すと、ルー プが停止します。
単 一の クリップを ループ した い場合は、
HyperDeck
をクリップモードにして、再生ボタンを一度押すと再
生し、再度押すとループします。
56
再生
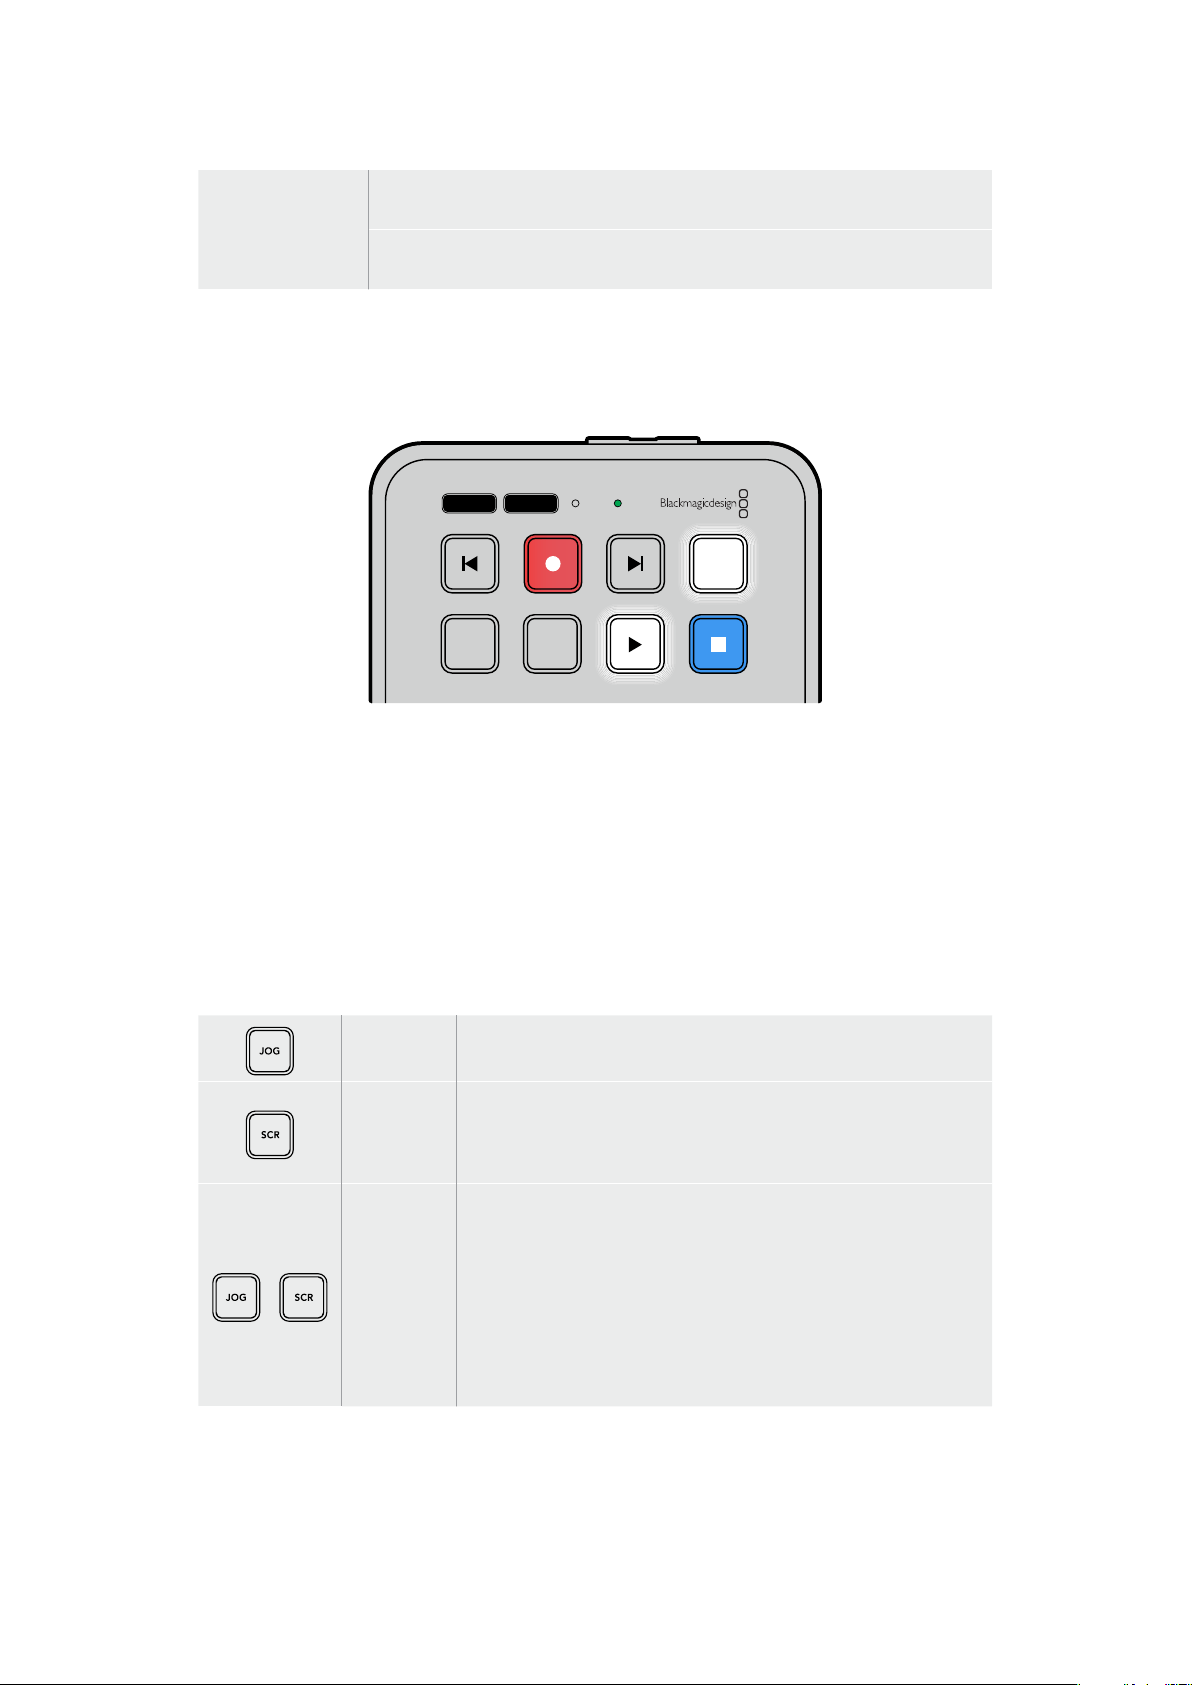
すべてをループ
再生中に再生ボタンをもう一度押すと、収録されたクリップすべてがループで再生
されます。
現在のクリップを
ループ
クリップモー ドで 、再生ボ タ ン を 再び押すと、現在のク リップが ループで再生され
ます。
クリップモード
クリップモ ードで は、再生 を 単一の クリップに制限 できま す。例え ば、クリップモード が有効な 状態では、ク
リップをシ ャトル やスキ ップ でき、その後 、再生ボタ ンを押すと 、そ の クリップ の 最後 で 再生が停 止します。
JOG SCR
CLIP
MENU SET
DISK SD
クリップモードが選択されている場合、再生ボタンを2回押すと現在
のクリップがループ
サーチダイヤルの使用
サーチダイヤルでは、クリップ間をすばやく移動して、特定の箇所を再生するために選択したり、フレーム
ごとにクリップをチェックできます。特定の箇所を見つける必要がある場合に、この機能は重要です。ダイ
ヤルを回転させて、視覚的にクリップをモニタリングして検索できます。特定の位置に再生ヘッドを配置
し、生放送で該当のクリップを再生できるように準備しておくと便利です。
サーチダイヤルのモードには、ジョグ(JOG) 、スクロール (SCR) 、シャトル(STL)があります。
ジョグ
クリップをフレームごとに再生できるため、精度の高いコントロールが
可能です。
スクロール
スクロールモードでは、収録された全メディア内で順方向/逆方向に
すばやく移動できます。サーチダイヤルを回転させると、スクロールが
その動きにロックされるので、再生を開始する場所を完全にコントロ
ールできます。
シャトル
「
JOG」と「SCR」ボタンを同時に押すと、シャトルモードになります。
シャトルモードでは、ダイヤルを左右に回すことで、メディアを巻き戻
し/早送りできます。ダイヤルを回転させると、メディアのシャトル速度
が上がります。最高速度は
50倍速です。停止するためにシャトル速度
を下げるには、ダイヤルを元の位置まで回します。シャトル中に特定
の位置で停止するには、停止ボタンを押すか、再生ボタンを押して、現
在の 位 置 から再 生を再 開します。シャトル 最 高 速 度は「セットアップ」
メニューから変更できます。詳細は、後述の「設定」セクションを参照
してください 。
57
再生
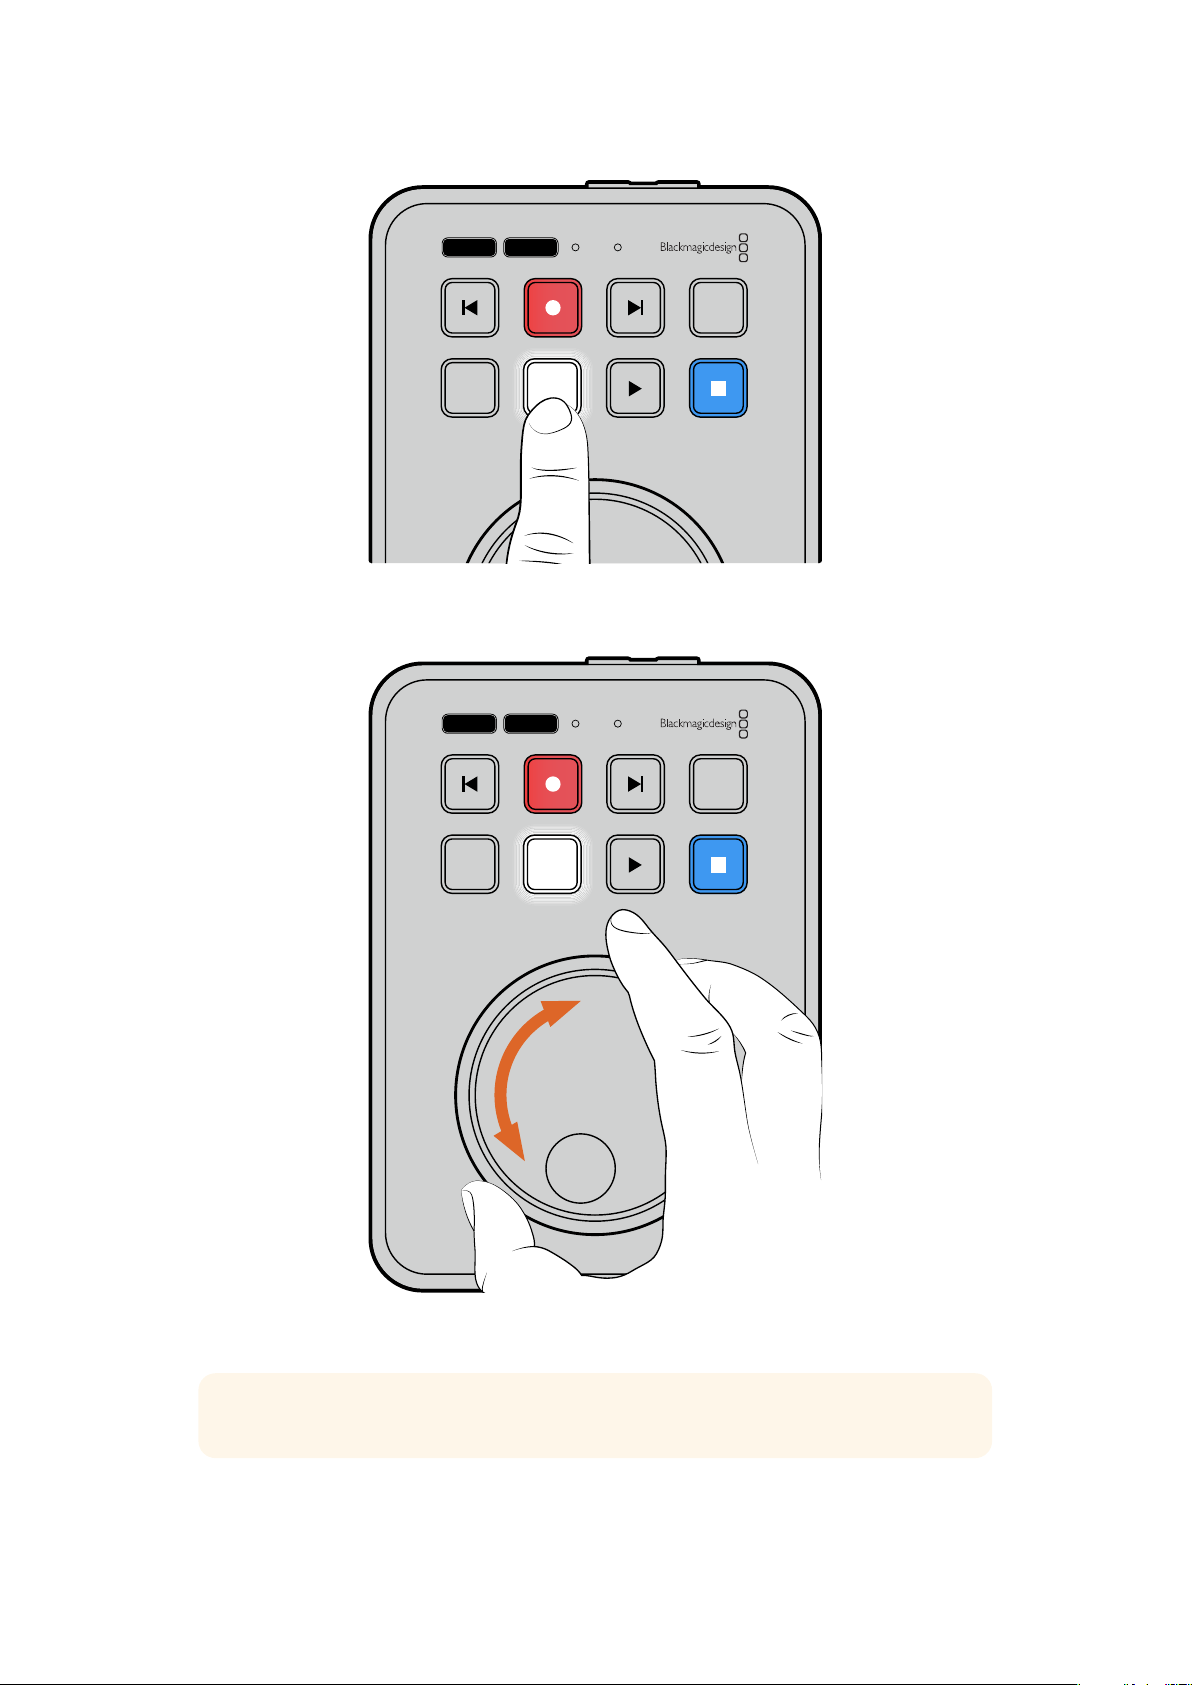
JOG SCR
CLIP
MENU SET
DISK SD
「JOG(ジョグ)」または「SCR(スクロール)」ボタンを押すと、検索
モードをジョグまたはスクロールに設定可能
JOG SCR
CLIP
MENU SET
DISK SD
検索モードを選択したら、サーチダイヤルを回転させます
作業のこつ 通常の再生に戻るには、再生または停止ボタンを押します。
58
再生

設定の変更
「MENU」ボタンを押すと、設 定メニューが開きます。このメニューでは、接 続したHDMIディスプレイの
左下にビデオオーバーレイとして表示されます。
JOG SCR
CLIP
MENU SET
DISK SD
「MENU」ボタンを押して、設定メニューを開きます
サーチダイヤルを使用して、サブメニューや設定をナビゲートします
「
SET」ボタンを押して、サブメニューや設定を選択します
サーチダイヤルや順方向/逆方向の頭出しボタンを使用して、設定を調整します。「
SET
」ボタンを押し
て、設定を確定します。
メニューを出るには「MENU」ボタンを押して、オプションを遡ってホームスクリーンに戻ります。
作業のこつ 「セットアップ」メニューを使用すると、メニューの表示位置は、ディスプレイの四
隅のいずれにも変更可能です。設定の変更が完了したら、メニューをオフにすることをお勧め
します。これにより、 ATEM Mini ExtremeなどのHDMIスイッチャーに HDMI出力を接続してい
る場合に、出力がクリーンフィードとなります。
JOG SCR
CLIP
MENU SET
DISK SD
59
設定の変更

設定
設定メニューは、収録、モニタリング、オーディオ、ストレージ、セットアップの5つのカテゴリーに分か
れています。これらのカテゴリーのサブメニューには関連の設定が含まれており、ほとんどの設定が
HyperDeck Shuttle HDのコントロールパネルで調整できます。一部の設定(例えば、ファイル名プレフ
ィックス)は、メニューにはグレーで表示のみされます。このような場合、そういった設定は
HyperDeck
Setupユーティリティで調整できます。
収録メニュー
入力
HyperDeck Shuttle HDのHDMI入力を表示します。
コーデック
HyperDeck Shuttle HDは、H.264、Apple ProRes、DNxHDコーデックで圧縮ビデオを収録します。テ
レプロンプター機 能を使 用するには、「テレプロンプター」を選 択します。
トリガー収録
「ビデオ開始/停止」と「タイムコードトリガー」 の2種類のトリガー収録から選択できます。
Blackmagic Pocket Cinema Camera 4Kなどの一部のカメラは、外部レコーダーの収録開始/停止をコ
ントロールする信号を
HDMI
経由で送信します。「ビデオ開始/停止」を選択すると、カメラの録画ボタン
が押された際に、HyperDeckで収録を開始/停止します。
「タイムコードトリガー」では、
HDMI
入力を介して有効なタイムコード信号を受信すると、
HyperDeck
で収録を開始します。信号が止まると、収録も停止します。トリガー収録を無効にするには「なし」を選
択します。
メモ HDMIカメラから収録する場合、オーバーレイ機能がオフになっており、出力がクリーン
なことを確認してください。カメラのビデオ出力にオーバーレイが付いていると、イメージと共
にオーバーレイが収録されます。
60
設定
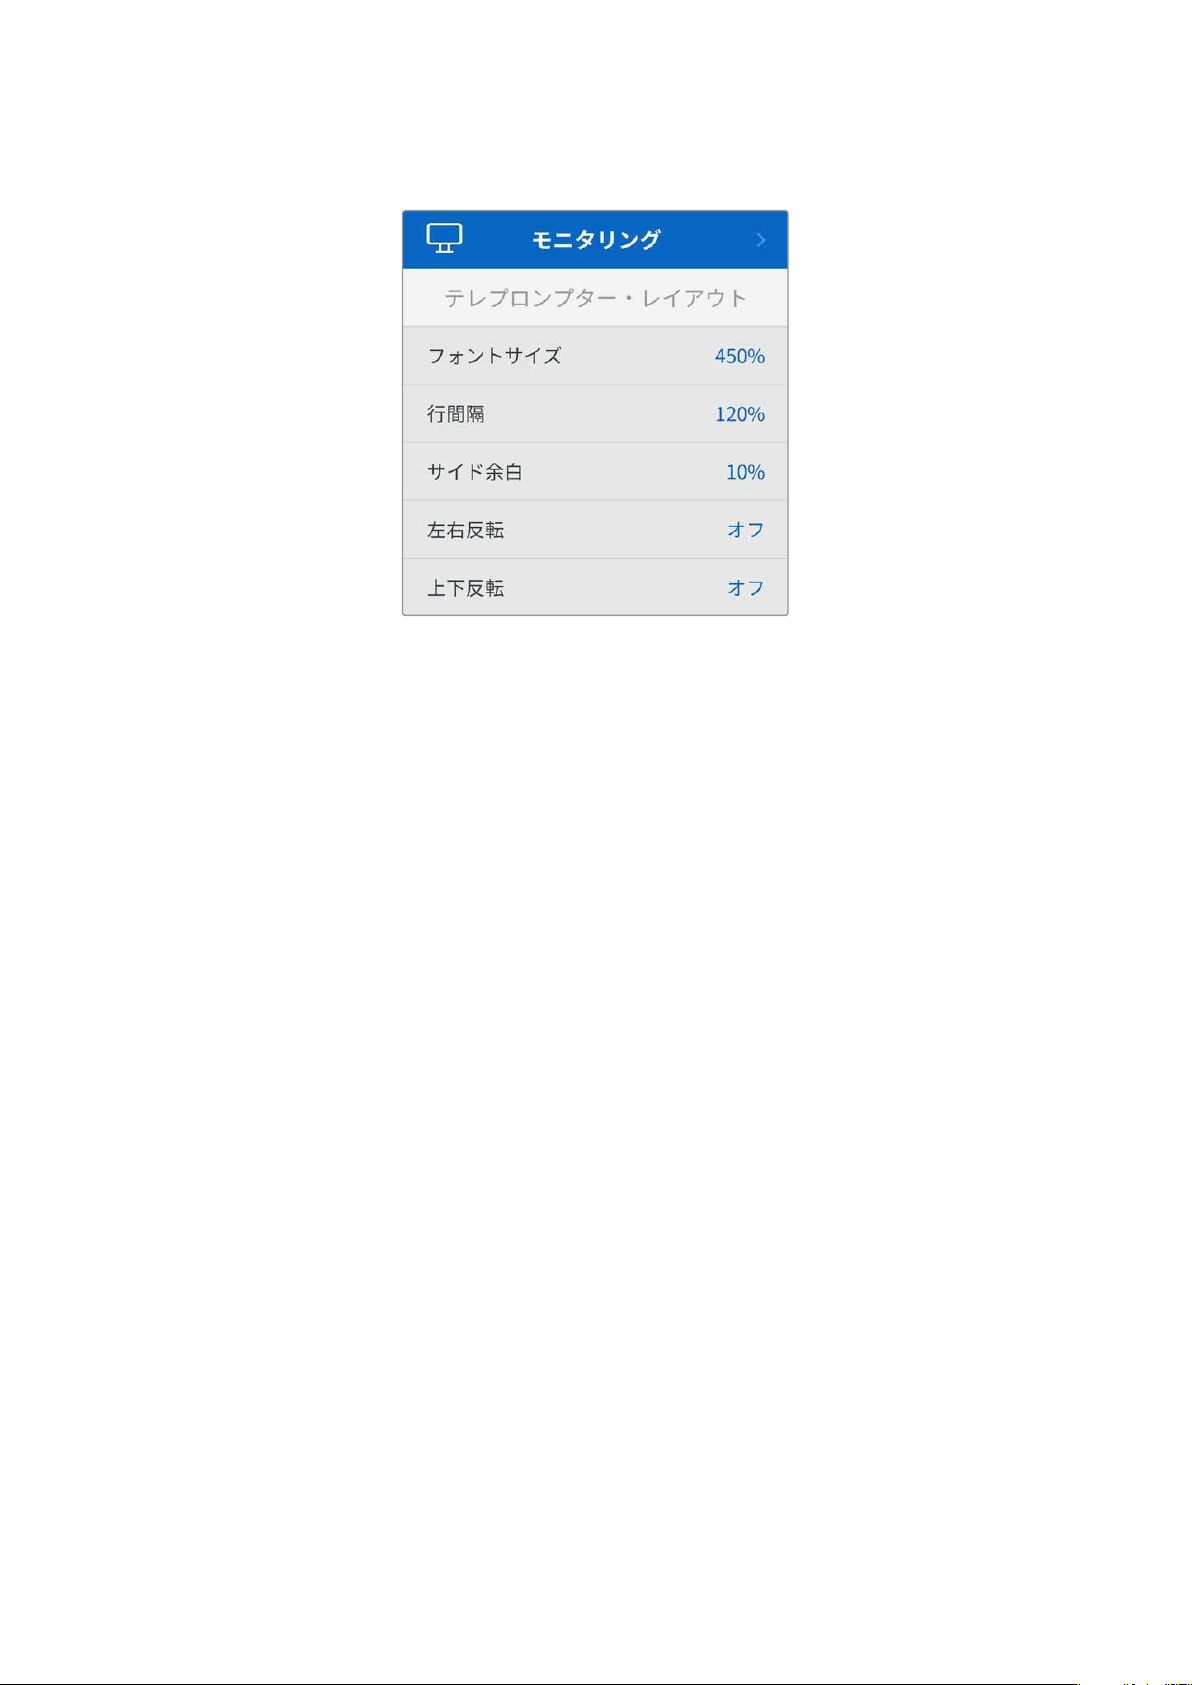
モニタリングメニュー
テレプロンプター・レイアウト
「モニタリング」メニューには、HyperDeck Shuttle HDをテレプロンプターとして使 用する際に必要な
すべての設定が含まれています。
フォントサイズ
フォントサイズのオプションを選択して、文字のサイズを調整し、「
SET
」を押して確定します。ダイヤル時
計回りに回すと数値が上がり、反時計回りに回すと下がります。
行間隔
ダイヤルを回転させると、行の間のスペースを広げたり、縮めたりできます。
サイド余白
テレプロンプター・ディスプレイの両側の余白の幅を調整できます。
反転
テレプロンプターのモニターが、カメラの前や演壇で使用するために、ガラスに投射するようにセットア
ップされている場合、反転のオプションを使用することで、話者が読めるようになります。反転には
2
つ
のモードがあります。
左右反転 - テレプロンプターモニターの底部が、ガラスのベース部分に最も近づけた状態でマウントさ
れている場合に使用します。
上下反転 - テレプロンプターモニターの底部が、ガラスのベース部分から離れた状態でマウントされて
いる場合に使用します。
61
設定

オーディオメニュー
オーディオチャンネル
HyperDeck
Shuttle
HD
は同時に最大
8
チャンネルの
PCM
オーディオを収録できます。収録するオー
ディオチャンネル数を設定するには「オーディオチャンネル」に進み、2ch、4ch、8chから選択します。
コーデックがH.264に設定されている場合、2チャンネルのAACオーディオを選択できるため、直接
YouTubeにアップロードできます。
ストレージメニュー
接続されているメディアが「ストレージ」の設定に表示されます。「メディア 1」には、接続されたSDカー
ドの名前が表示され、「メディア
2」には、「EXT DISK(外付けディスク)」コネクターに接続されたUSB
フラッシュディスクの名前が 表示されます。Blackmagic MultiDock 10GなどのUSBハブを使用している
場合は、アクティブなディスクが表示されます。
USB
スピル
複数のドライブを接続するために、Blackmagic MultiDock 10Gまたは同様の機器を「EXT DISK」とラ
ベルが付いた
USB
接続を介して使用している場合、「
USB
スピル」をオンにすることで、収録が次の外付
けディスクに継続されます。
メディアをフォーマット
SDカードや、リアパネルのEXT DISK(外付けディスク)コネクターに接続したメディアは、直接ユニット
で、あるいは
MacまたはWindowsコンピューターでフォーマットを実行できます。
HyperDeck
Shuttle
HD
で メディア を準備す る:
1 サーチダイヤルと「SET」ボタンを使用して「メディアをフォーマット」を選択します。
2 リストから初期化するメディアを選択して「SET」ボタンを押します。
3 フォーマットを選択して「SET」ボタンを押します。
62
設定
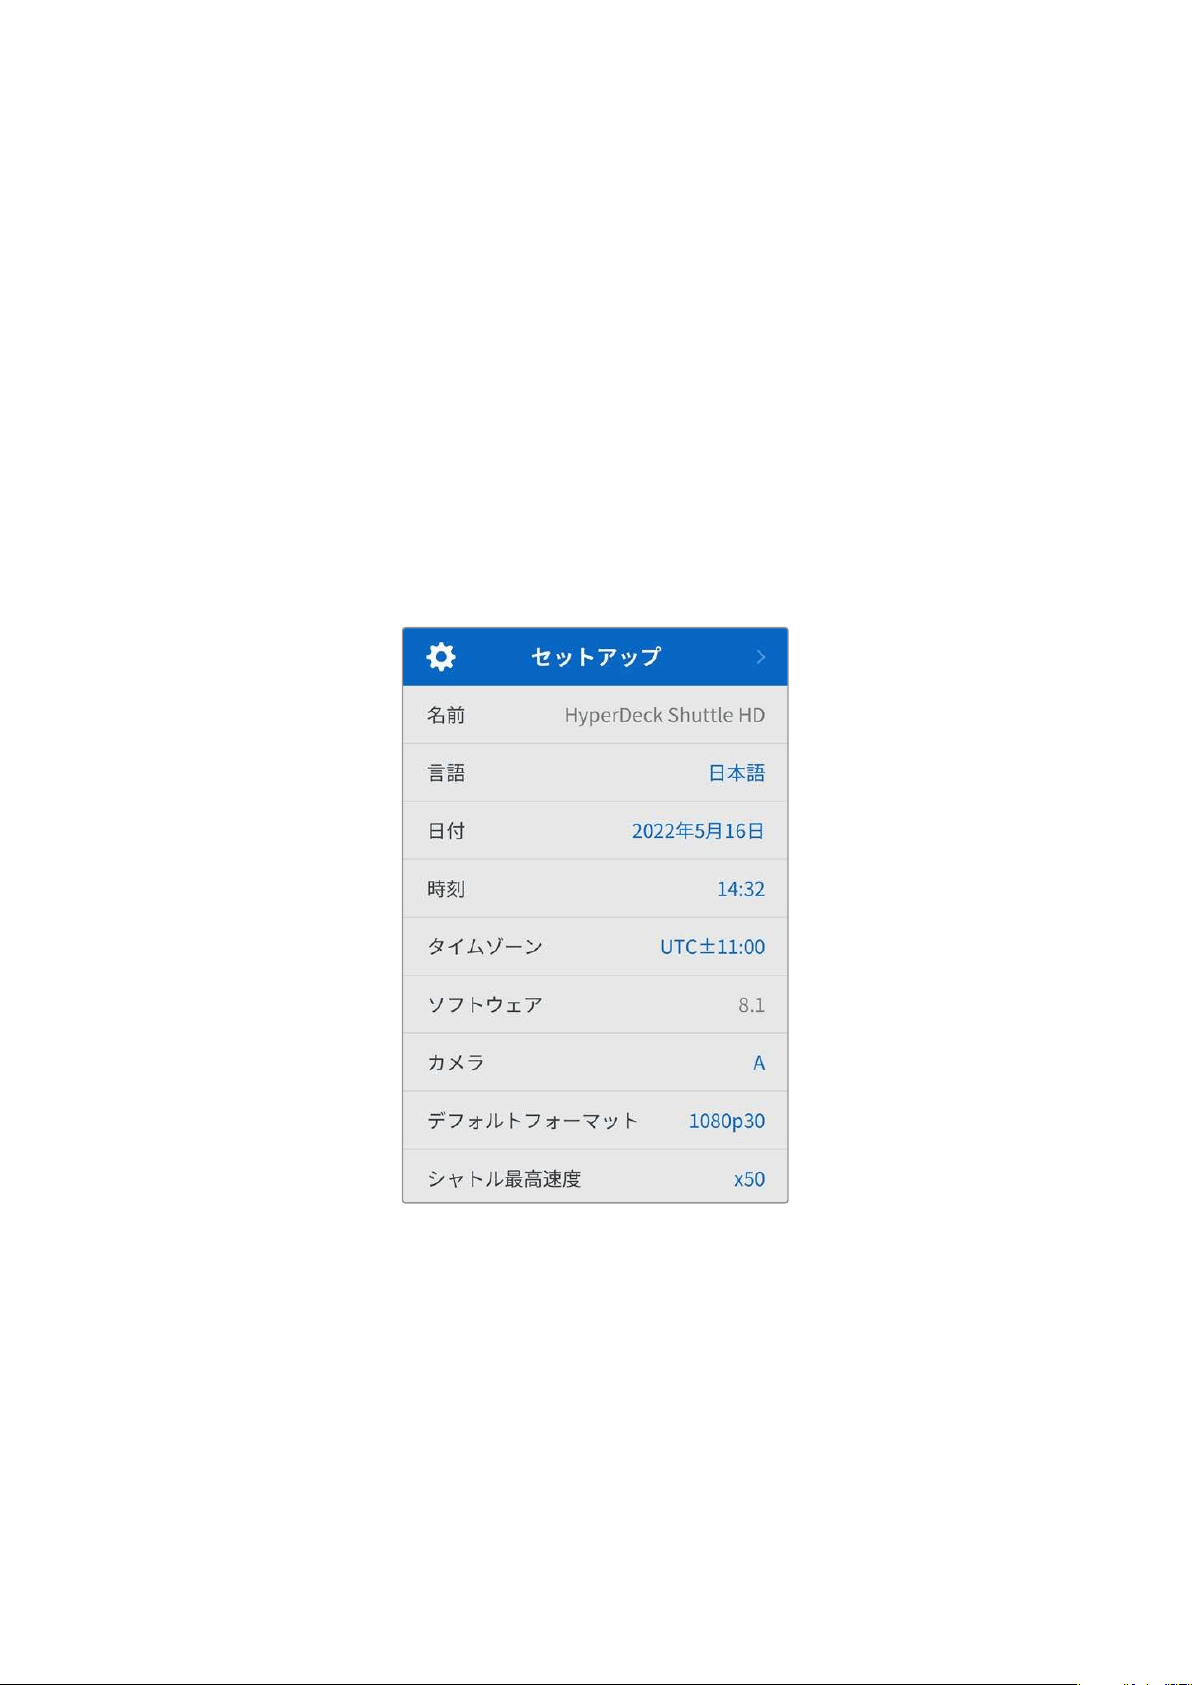
4
初期化されるカードと、選択したフォーマットを確認するメッセージが表示されます。「初期化」
を選 択して確定します。
5
フォーマット中であることを示 すメッセージが 表 示され 、完了のメッセージが 表示されたら「
OK
」
を選択します。
HFS+は「Mac OS X Extended」としても知られており、ジャーナリングをサポートしているため推奨さ
れるフォーマットで す。万が 一 、ストレージメディアが 破損した 場 合、ジャーナリングされたメディアの
データは回復できる可能性があります。
HFS
+は
Mac
でネイティブサポートされています。
exFAT
は
Mac
および
Windows
によりネイティブサポートされており、他のソフトウェアは必要ありませんが、ジャーナ
リングには対応していません。
MacまたはWindowsでのメディアのフォ ーマット方法は、「メディア をフォ ーマット」セクシ ョン を 参照 し
てください 。
セットアップメニュー
「セットアップ」メニュー には 、言 語 の 選 択 、デフォルトフォーマットに 加え 、メニュー 表 示 、ネットワーク
設定、タイムコードオプションに関するセクションが含まれています。
名前
ネットワークで複 数のHyperDeck Shuttle HDを使用している場合、個別の名前を付けると、ユニット
をそれぞれ識別しやすくなります。これは、Blackmagic HyperDeck Setup、またはターミナルアプリ
を使用してBlackmagic HyperDeck Ethernet Protocolで実行できます。この名前は「セットアッ プ」メ
ニューに表示されます。
言語
HyperDeck
Shuttle
HD
は
13
ヶ国語をサポートしています。対応言語は、日本語、英語、中国語、韓国
語、スペイン語、ドイツ語、フランス語、ロシア語、イタリア語、ポルトガル語、トルコ語、ウクライナ語、
ポーランド語です。
言語を選択する:
1 「セットアップ」メニューがハイライトされたら「SET」を押します。
2 サーチダイヤルを回して、「言語」を選択したら「SET」を押します。
63
設定
3
サーチダイヤルを使用して、使用する言語を選択したら「SET」を押します。言語が選択されると、
自動 的に「セットアップ」メニューに戻ります。
日付
日付を設定するには、「日付」設定を選択して「
SET
」ボタンを押します。サーチダイヤルを使用して、
年、月、日を選択します。ファイルのタイムスタンプ・サフィックスを選択している場合、ここで設定した
日付が使用されます。
時刻
時刻を設定するには、「時刻」設定を選択して「SET」ボタンを押します。サーチダイヤルを使用して、時
間と分を調整します。HyperDeck Shuttle HDの内部クロックは24時制です。
ソフトウェア
現在のソフトウェアバージョンを表示します。
カメラ
この設定は、HyperDeckで複数のカメラから個別収録ファイルを収録し、DaVinci Resolveのマルチカ
ムタイムラインで 編集する際に便 利です。
各カメラの識別文字がファイルのメタデータに記録されるため、同期ビン機能を使用する際に
DaVinci
Resolveが各アングルを簡単に識別できます。
カメラの識別文字にはA〜Zまたは1〜9が使用できます。
デフォルトフォーマット
HyperDeck
Shuttle
HD
が、使用するビデオフォーマットを検出できない場合に、この設定を用いて、メ
インで使用するビデオフォーマットを設定します。
例えば、ビデオ入力を接続していない状態で
HyperDeck
Shuttle
HD
をオンにし、
2
つの異なるビデオフォ
ーマットのファイルが存在するディスクを挿入した場合、再生に使用するビデオフォーマットを
HyperDeck
で指定する必要があります。「デフォルトフォーマット」では、HyperDeckで 使用するビデオフォーマット
を設定でき、そのフォーマットに切り替えて、これらのファイルを再生します。
この機能は、HyperDeck Shuttle HDにビデオ入力やメディアディスクが接続されていない状態で、初め
てオンにする際にも便利です。この場合、
HyperDeck
はモニタリング出力に使用するビデオフォーマット
を検出できないので、「デフォルトフォーマット」の情報を使用します。
しかし、この機能はガイドとして使用されるだけで、オーバーライドする訳ではありません。例えば、一種
類のビデオファイルが収録されたメディアディスクを再生する場合、HyperDeckディスクレコーダーはその
ビデオフォーマットに切り替えて再生を実行します。「デフォルトフォーマット」の情報は使用されません。
これは収録でも同様です。収録ボタンを押すと、HyperDeckはビデオ入力に接続されたビデオフォーマ
ットを使用します。収録の終了後、HyperDeck Shuttle HDは収録に使用したのと同一のビデオフォーマ
ットで、そのファイルを再生します。これは 、「デフォルトフォーマット」と一致するビデオフォーマットのフ
ァイルがディスクに存在する場合でも同様です。デッキは、収録に使用したのと同じビデオフォーマット
64
設定
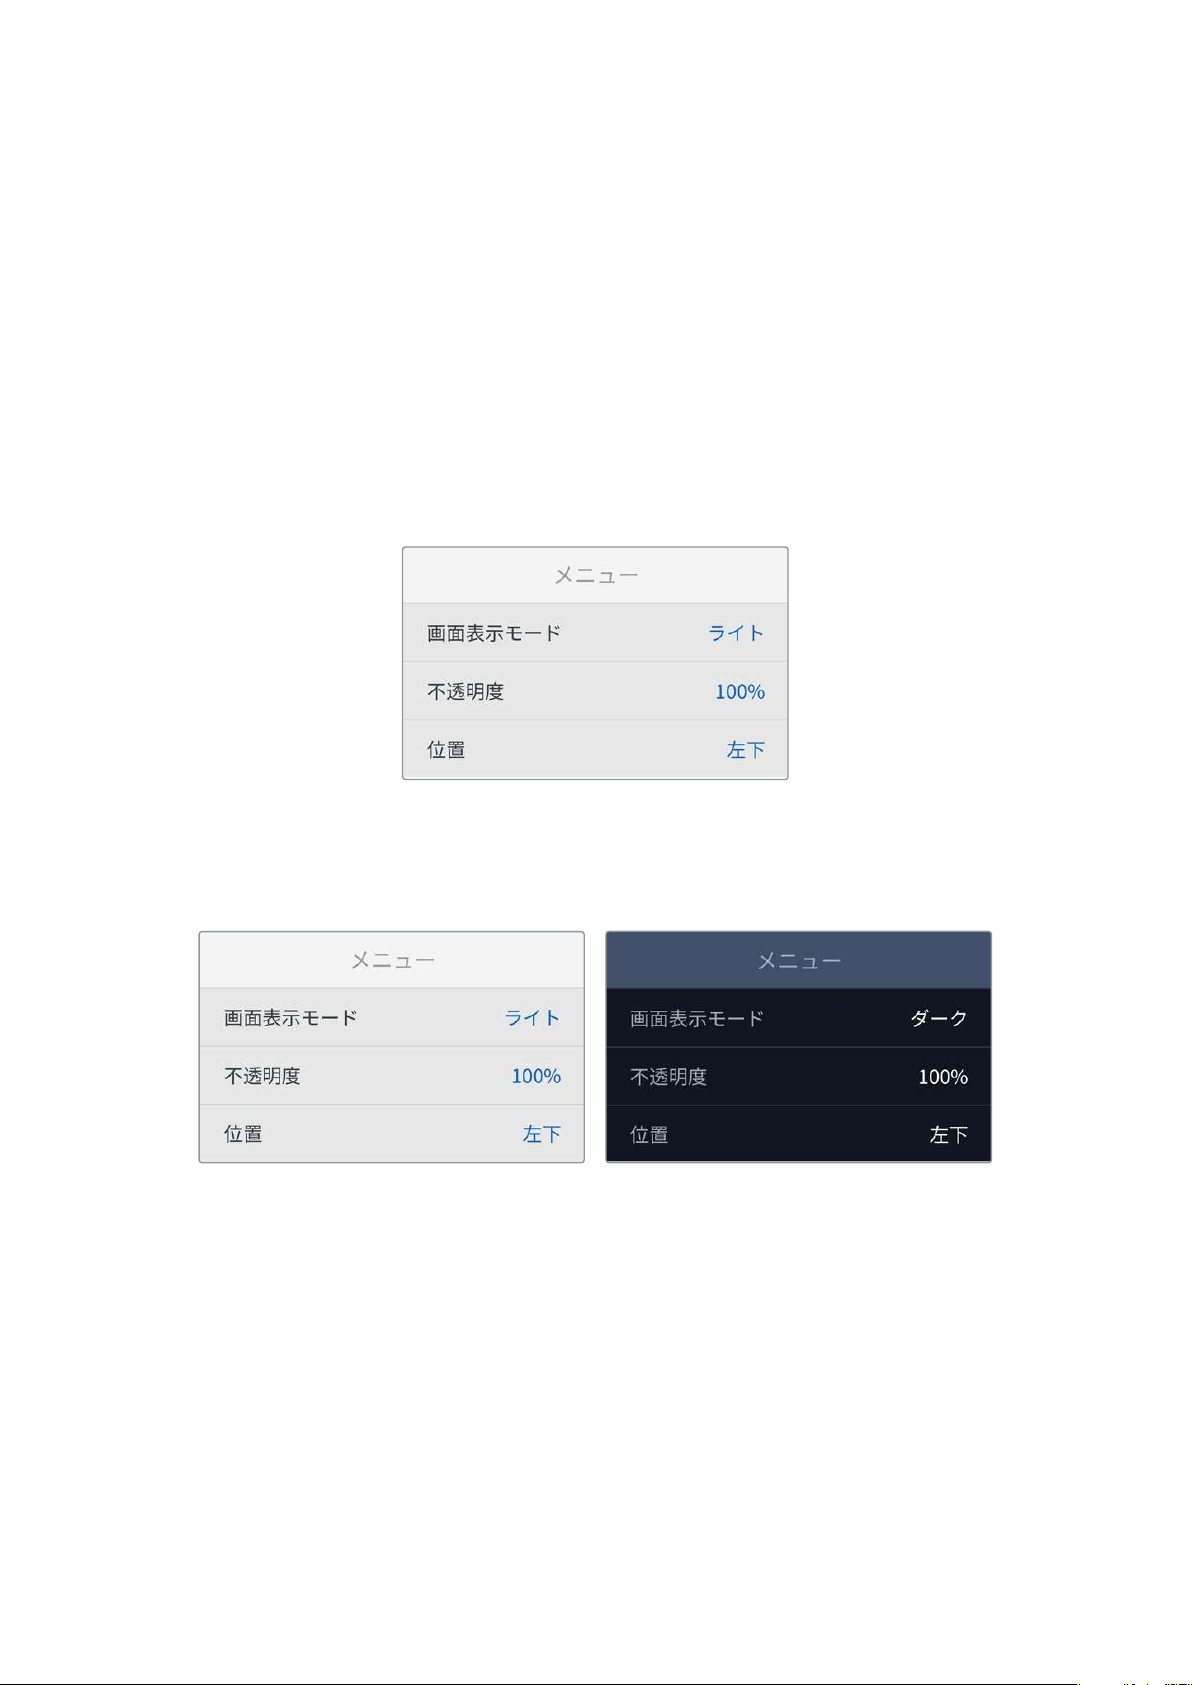
を再生します。メディアディスクの接続を外し、接続し直した場合のみ、「デフォルトフォーマット」の設定
に基づき、再生に使用するファイルの種類が選択されます。
この機能は、HyperDeck Shuttle HDが使用するフォーマットを自動的に決めることができない場合に
ガイドとして使用されるだけであり、デッキを特定の方法で動作させるようにオーバーライドする機能
ではありません。
シャトル最高速 度
HyperDeck
Shuttle
HD
のシャトル最高速度は
50
倍速です。この速度を下げたい場合は、他の速度プ
リセットを選択します。
メニュー設定
「メニュー」設定を使用することで、接続したHDMIディスプレイにメニューが表示される場所と表示モ
ードを調整できます。
画面表示モード
HyperDeckのオンスクリーンメニューをダークまたはライトモードに設定できます。ライトモードでは、
メディアが暗い映像の場合や、テレプロンプターとして使用している場合に、はっきりとしたコントラスト
でメニューが表示されます。
不透明度
接続されたディスプレイに表示されるメニューオーバーレイの不透明度を下げることができます。調整可
能な範囲は、デフォルトの100%から20%までです。
位置
メニューオーバーレイは画面の左下に表示されます。メニューを異なる場所に表示したい場合は、「位置」
を選択し、「
SET
」ボタンを押します。表示場所は「左上」、「右上」、「左下」、「右下」から選択できます。
65
設定
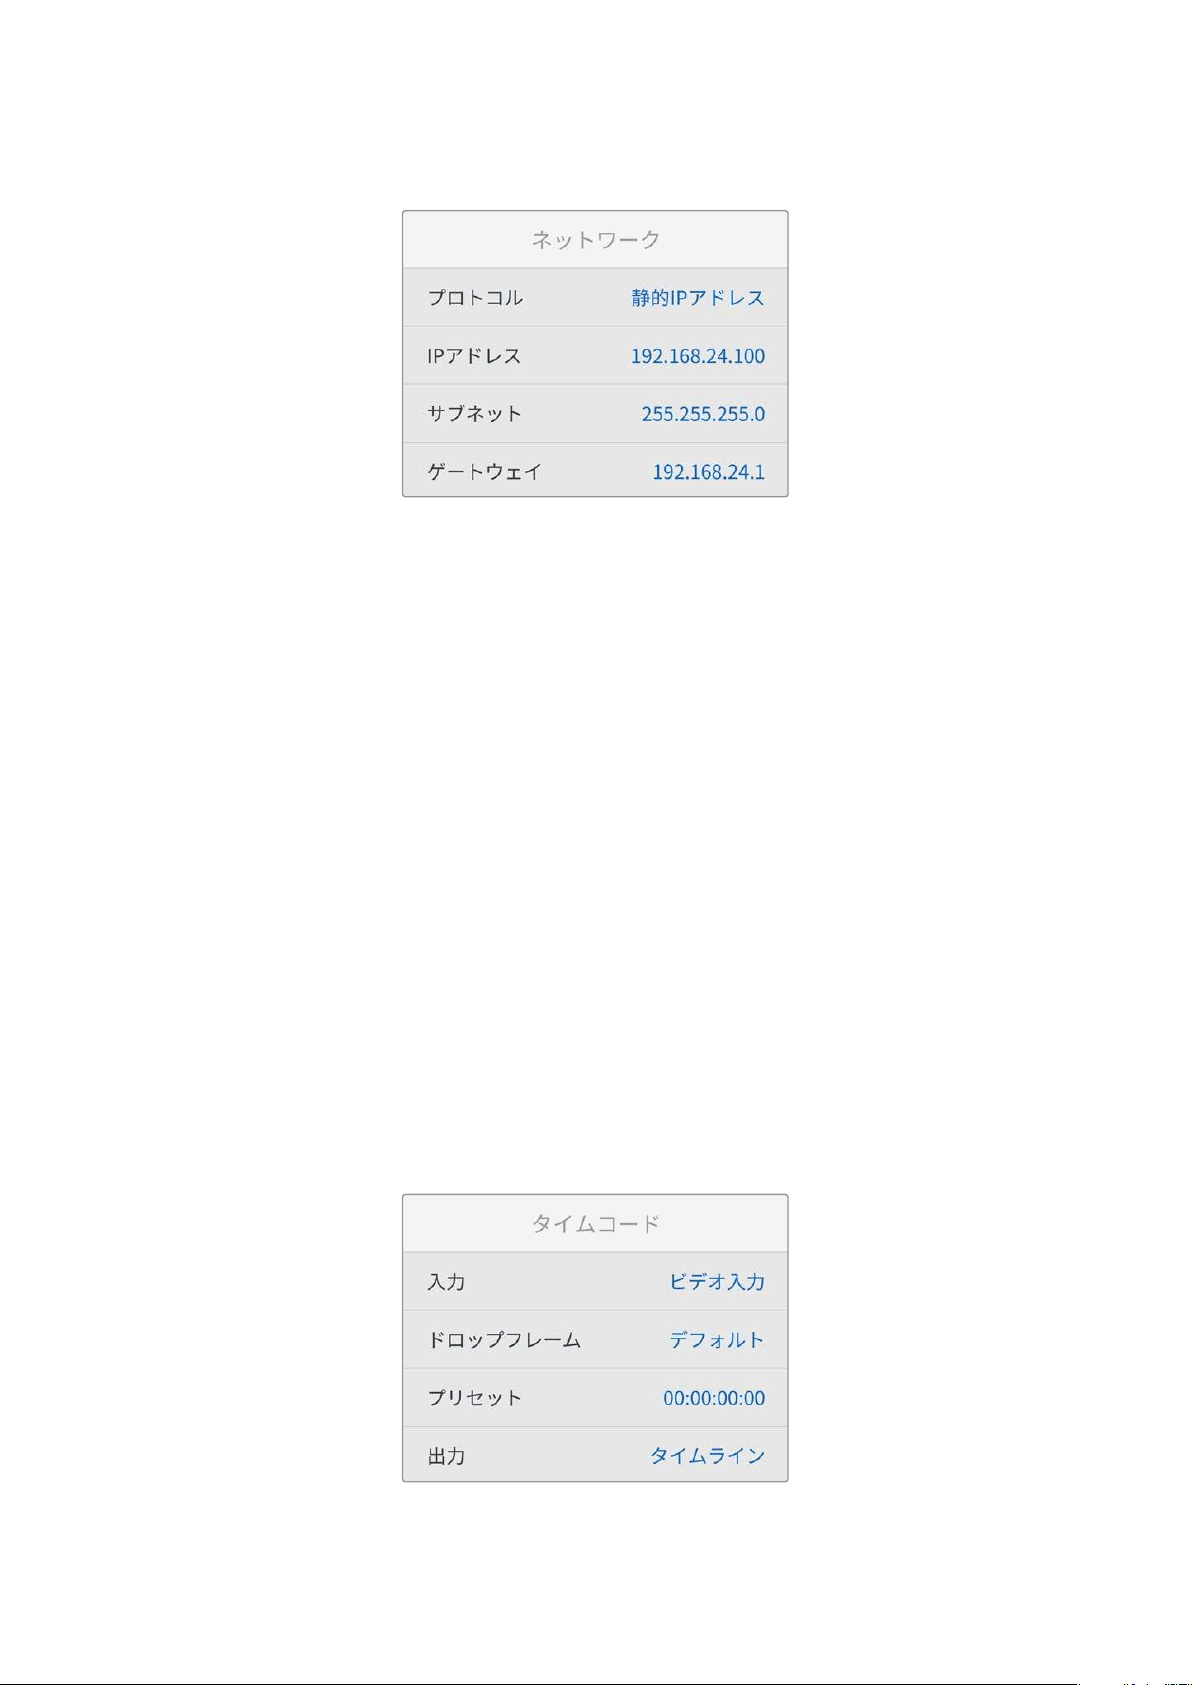
ネットワーク設定
プロトコル
Blackmagic HyperDeckはデフォルトで DHCPに設定されて出荷されます。そのため、ネットワークに接
続するとネットワークサーバーが自動的にIPアドレスを割り当てるので、その他のネットワーク設定を調
整する必要はありません。マニュアルでアドレスを設定する必要がある場合、静的
IP
アドレス経由で接
続できます。
「プロトコル」を選択した状態で、「SET」ボタンを押してメニューに進み、「静的IPアドレス」を選択し
「SET」ボタンを押します。
IP
アドレス、サブネット、ゲートウェイ、プライマリ
DNS
、セカンダリ
DNS
「静的IPアドレス」を選択すると、ネットワークの詳細をマニュアルで入力できます。
IP
アドレスを変更する:
1
サーチダイヤルを使用して「
IP
アドレス」をハイライトし、
HyperDeck
のコントロールパネルで
「SET」ボタンを押します。
2
サーチダイヤルを回転させてIPアドレスを調整し、「SET」ボタンを押して確定し、次の数値に進
みます。
3 「SET」ボタンを押して変更を確定し、次の数値に進みます。
IPアドレスの入力が終わったら、上記の手順を繰り返し、「サブネットマスク」と「ゲートウェイ」も調整で
きます。終了したら、「MENU」 ボタンを押してメニューを出て、ホームスクリーンに戻ります。
タイムコード設定
タイムコード入 出力のオプションを設 定できます。収録に使 用するタイムコードをソースタイムコードや
時刻タイムコードから選択するか、マニュアルで設定するかなどを選択できます。
66
設定
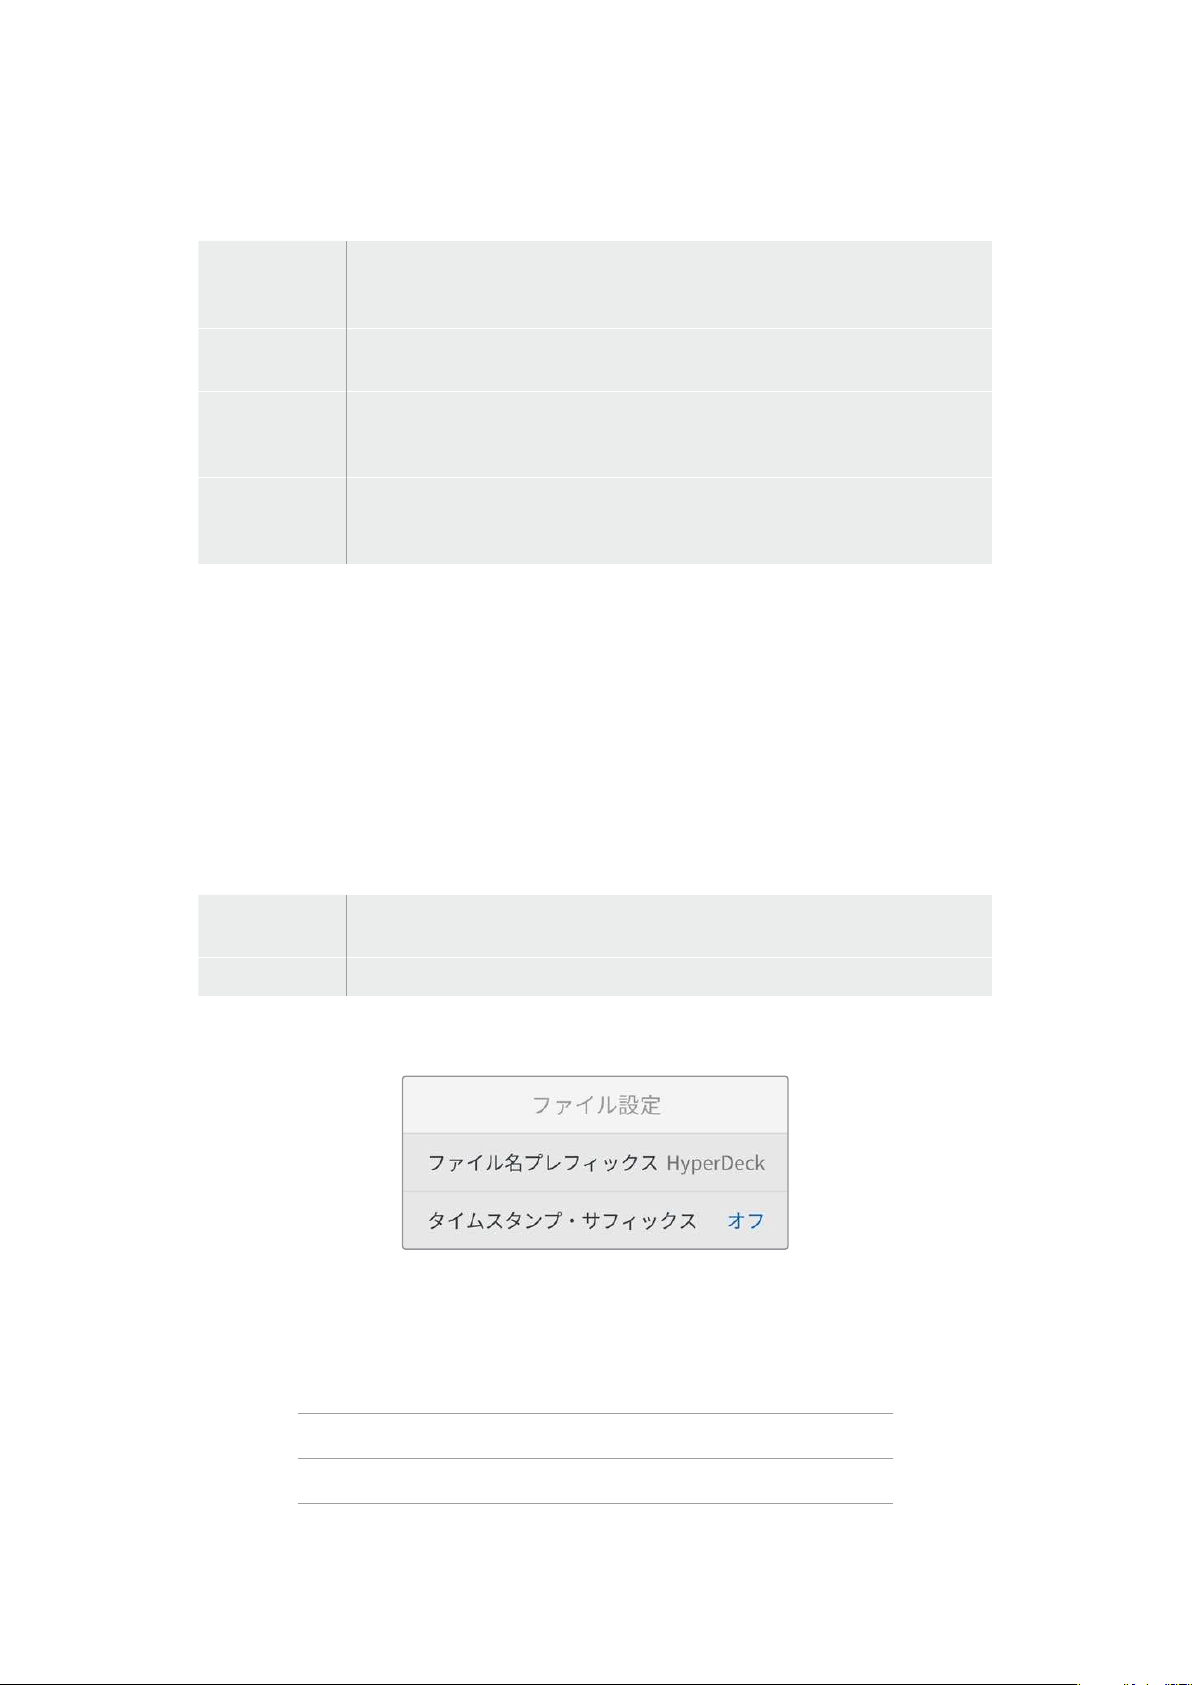
入力
収録中、4つのタイムコード入 力オプションを使 用できます。
ビデオ入力
「ビデオ入力」を選択すると、
SMPTE RP 188メタデータの付いたHDMIソースの
エンベデッドタイムコードを使用します。これにより、
HDMIソースと、HyperDeck
Shuttle HDで収録されるファイルの同期が維持されます。
内部
内 蔵 のタイムコードジェネレ ーターを 介して、時 刻 タイムコ ードを収 録 する 場 合 に 、こ
のオプションを選択します。
前のクリップ
から生成
タイムコード入 力に「前のクリップから生成」を選択すると、各ファイルは、前のクリ
ップの最終フ レームの
1つ後のフレームから開始されます。例えば、最初のクリップが
10:28:30:10で終わる場合、次のクリップのタイムコードは10:28:30:11から開 始します。
プリセット
タイムコードをマニュアルで設定したい場合は「プリセット」オプションを選択しま
す。収録されたクリップは、「プリセット」で 設定されたタイムコードで 開始します。詳
細は、このセクションに後述されています。
ドロップフレーム
29.97
および
59.94fps
の
NTSC
ソースでは「ドロッ プフレーム」または「ノンドロッ プフレーム」を選択で
きます。ソースが不明な場合は「デフォルト」を選択します。これにより、入力の規格が維持されます。
有効なタイムコードがない場合はデフォルトのドロップフレームになります。
プリセット
タイムコードをマニュアルで設定できます。「
SET
」ボタンを押し、サーチダイヤルと「
SET
」ボタンで開始
タイムコードを入力します。「入力」メニューで「プリセット」が選択されている必要があります。
出力
出力に使用するタイムコードのオプションを選択します。
タイムライン
カードまたはドライブに収録された全クリップを通して、継続したタイムコードを出
力するには「タイムライン」を選択します。
クリップ
「 ク リップ」を選択す る と、個別のク リップご と にタ イムコ ー ドを出力 し ます。
ファイル設定
ファイル 名プレフィックス
HyperDeck Shuttle HDを 最初 にセ ットアップすると 、以 下 のファイル 命名規則 を 用 いて、クリップ がSD
カードまたはUSBフラッシュディスクに保存されます。
HyperDeck_0001
HyperDeck
_0001
プレフィックス
HyperDeck_0001
クリップ番号
67
設定

ファイル名のプレフィックスは 、
HyperDeck
Setup
ユーティリティで変更できます。詳細は、このマニュ
アルの「Blackmagic HyperDeck Setup」セクションを参照してください。
タ イムスタンプ・サフ ィ ッ クス
ファイル名に追加されるタイムスタンプは、デフォルトではオフに設定されています。ファイル名に日付と
時刻を記録したい場合は、「タイムスタンプ・サフィックス」のオプションをオンにします。
HyperDeck_2201061438_0001
HyperDeck
_2201061438_0001
ファイル名プレフィックス
HyperDeck_2201061438_0001
年
HyperDeck_2201061438_0001
月
HyperDeck_2201061438_0001
日
HyperDeck_2201061438_0001
時
HyperDeck_2201061438_0001
分
HyperDeck_2201061438_0001
クリップ番号
リモート設定
「リモート」では、ATEM Mini Extremeなどの他のビデオ機器でHyperDeckをコントロールできるよう
に設定できます。
リモート
イーサネットを介したリモートコントロールを有効にするには、「リモート」を選択します。オフにすると、
ローカルでユニットを操作できます。
リセット設定
出荷 時設 定にリセット
「セットアップ」メニューで「出 荷時設定にリセット」をハイライトすると、
HyperDeck
を出荷時の設定に
戻せます。「SET」ボタンを押すと、操作を実行するか確認する画面が表示されます。
68
設定

リアパネル
HDMI OUT
HDMI IN
EXT DISK
SD CARD
ETHERNET
+
12V DC
1
2
3 4 5
1 電源
HyperDeck
Shuttle
HD
は、
AC
プラグパックを介して給電されます。同梱の電源ケーブルには、
接続が外れることを防ぐためにロック式コネクターが採用されていますが、
36W
の
12V
電源ケー
ブルであれば種類を問わず、HyperDeck Shuttle HDの給電に使用できます。
2
SD
CARD
(
SD
カード)
SDカードをスロットに挿入して収録・再生します。
3
ETHERNET
(イーサネット)
イーサネットポートでは、ネットワークに接続し、高速のFTPを使用してファイルの転送
や、HyperDeck Ethernet Protocolを使用してユニットをリモートコントロールできます。FTP
クライアントを使用したファイルの転送に関しては、後述の「ネットワークでファイルを転送」
セクションを参照してください。
ATEM
スイッチャー を同じネットワー クに 接 続してい る場 合、
ATEM
スイッチャーまたは
ATEM
ハ
ードウェアパネルからHyperDeckを操作できます。
4
EXT
DISK
(外付けディスク)
フラッシュディスクを
USB
-
C
コネクターに接続すると、最大
5Gb/s
で外付けディスクに収録しま
す。また、マルチポートのUSB-CハブやBlackmagic MultiDock 10Gを接続すると、1枚または複
数の
SSDを使用できます。
5
HDMI
HDMI
出力を
HDMI
テレビ、モニター、さらには
ATEM
Mini
Extreme
などのスイッチャー に接 続 で
きます。HDMI出力は、メニューオーバーレイの表示にも使用されます。
69
リアパネル
ストレージメディア
SD
カード
高品質のHD収録には、高速のUHS-I SDカードを推奨します。Ultra HD 2160p60までの収録には、220MB/
s以上の書き込み速度に対応しているカードを使用する必要があります。
低ビットレートで高い圧縮率を用いて収録する場合、低速のカードも使用可能ですが、一般的には、高
速であるほど良い品質が得られます。
定期的にこのマニュアルの最新バージョンを確認し、常に新しい情報を入手することをお勧めします。
マニュアルはBlackmagic Designウェブサイト(www.blackmagicdesign.com/jp/support)でダウンロ
ードできます。
HyperDeckShuttleHDで使用が推奨されるSDカードは?
1080p
(
60fps
まで)には、以下の
SD
カードを推奨します。
メーカー モデル容量
Angelbird AV PRO SD UHS-II 300MB/s V90 SDXC256GB
Angelbird AV PRO SD UHS-II 260MB/s V60 SDXC128GB
Angelbird AV PRO SD UHS-II 260MB/s V60 SDXC64GB
SanDisk Extreme Pro UHS-I 95MB/s SDXC64GB
Wise SD2-64U3 UHS-II 285MB/s SDXC64GB
Lexar
Professional 1000x UHS-II 150MB/s SDXC
128GB
SONYTough SF-G128T128GB
Kingston CANVAS GO! Plus 170MB/s V3064GB
Kingston CANVAS GO! Plus 170MB/s V30128GB
KingstonCANVAS GO! Plus 170MB/s V30512GB
ProGrade Digital SDXC UHS-II V90 300R 64GB
ProGrade Digital SDXC UHS-II V90 300R 128GB
SONYTough SF-G64T UHS-II SDXC64GB
Delkin Devices Black UHS-II V90 SDXC256GB
Delkin Devices Power UHS-II V90 SDXC128GB
Delkin Devices Power UHS-II V90 SDXC256GB
Delkin Devices Black UHS-II V90 SDXC128GB
ExascendEssential SDXC UHS-II V90 R 300MB/s64GB
Exascend Essential SDXC UHS-II V90 R 300MB/s128GB
ExascendCatalyst SDXC UHS-II V90 R 300MB/s64GB
70
ストレージメディア
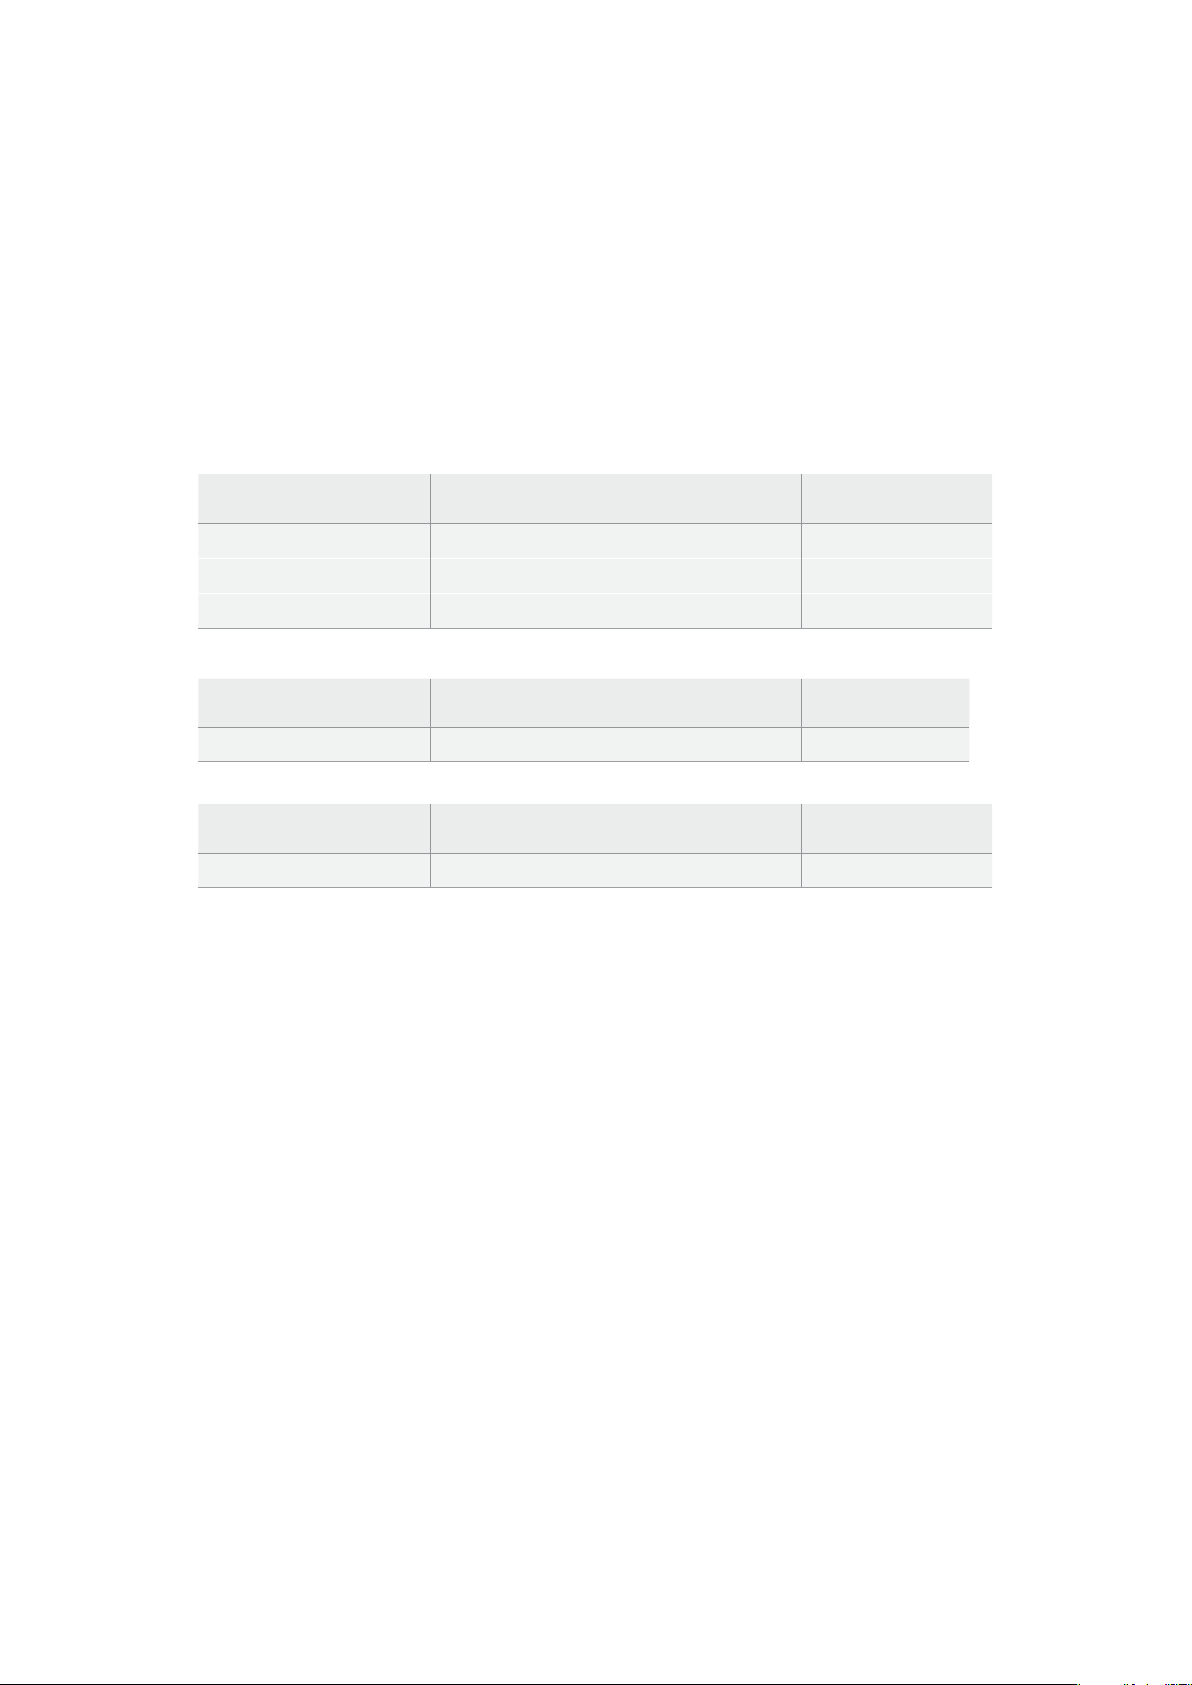
外付けディスク
HyperDeck
の全モデルは、直接
USB
-
C
フラッシュディスクに収録できます。これらのドライブは高速で
大容量なため、ビデオを長時間収録できます。収録に使用したフラッシュディスクは、コンピューターに
接続して直接編集を行えます。
さらに大きな容量が必要な場合は、
USB
-
C
ドックや外付けハードドライブを接続できます。
Blackmagic
MultiDock 10GまたはUSB-Cフラッシュディスクを接続するには、機材のUSB-Cポートに接 続したケーブ
ルをHyperDeckのリアパネルの「EXT DISK(外付けディスク)」ポートに接続します。
HyperDeckShuttleHDで使用が推奨されるUSB-Cドライブは?
1080p
ProRes
HQ
(
60fps
まで)には、以下の
USB
-
C
ドライブを推奨します。
メーカー モデル容量
WisePTS-256 Portable SSD 4K256GB
OWCEnvoy Pro Ex240GB
BUFFALOSSD-PHE500U3-BA500GB
1080p
DNxHR
HQX
(
60fps
まで)には、以下の
USB
-
C
ドライブを推奨します。
メーカー モデル容量
OWC Envoy Pro Ex 240GB
1080p
H
.
264
(
60fps
まで)には、以下の
USB
-
C
ドライブを推奨します。
メーカー モデル容量
OWC Envoy Pro Ex 240GB
メディアをフォーマット
コンピューターでメディアを準備
Mac
コンピューターでメディアをフォーマット
MacのDisk Utilityアプリケーションで、ドライブをHFS+またはexFATでフォーマットできます。
ディスクをフォーマットするとすべての情報が消去されるため、重要な情報は必ずバックアップしてくだ
さい。
1
外付けドックまたはケーブルアダ プターで、USBフラッシュディスクをコンピューターに接続しま
す。SSDをTime Machineバックアップに使用するというメッセージは拒否します。SDカードは、
外付けカードリーダーを介してコンピューターに接続します。
2 Applications/Utilityへ行き、Disk Utilityを起 動します。
3
使用する
SD
カードまたは
USB
フラッシュディスクの ディスクアイコンをクリックし、「
Erase
」タブ
をクリックします。
4 「Format」を「Mac OS Extended (Journaled)」または 「exFAT」に設定します。
5
ボリューム名を入力し、「Erase」をクリックします。メディアがフォーマットされ、HyperDeckで
使用できる状態になります。
71
メディアをフォーマット
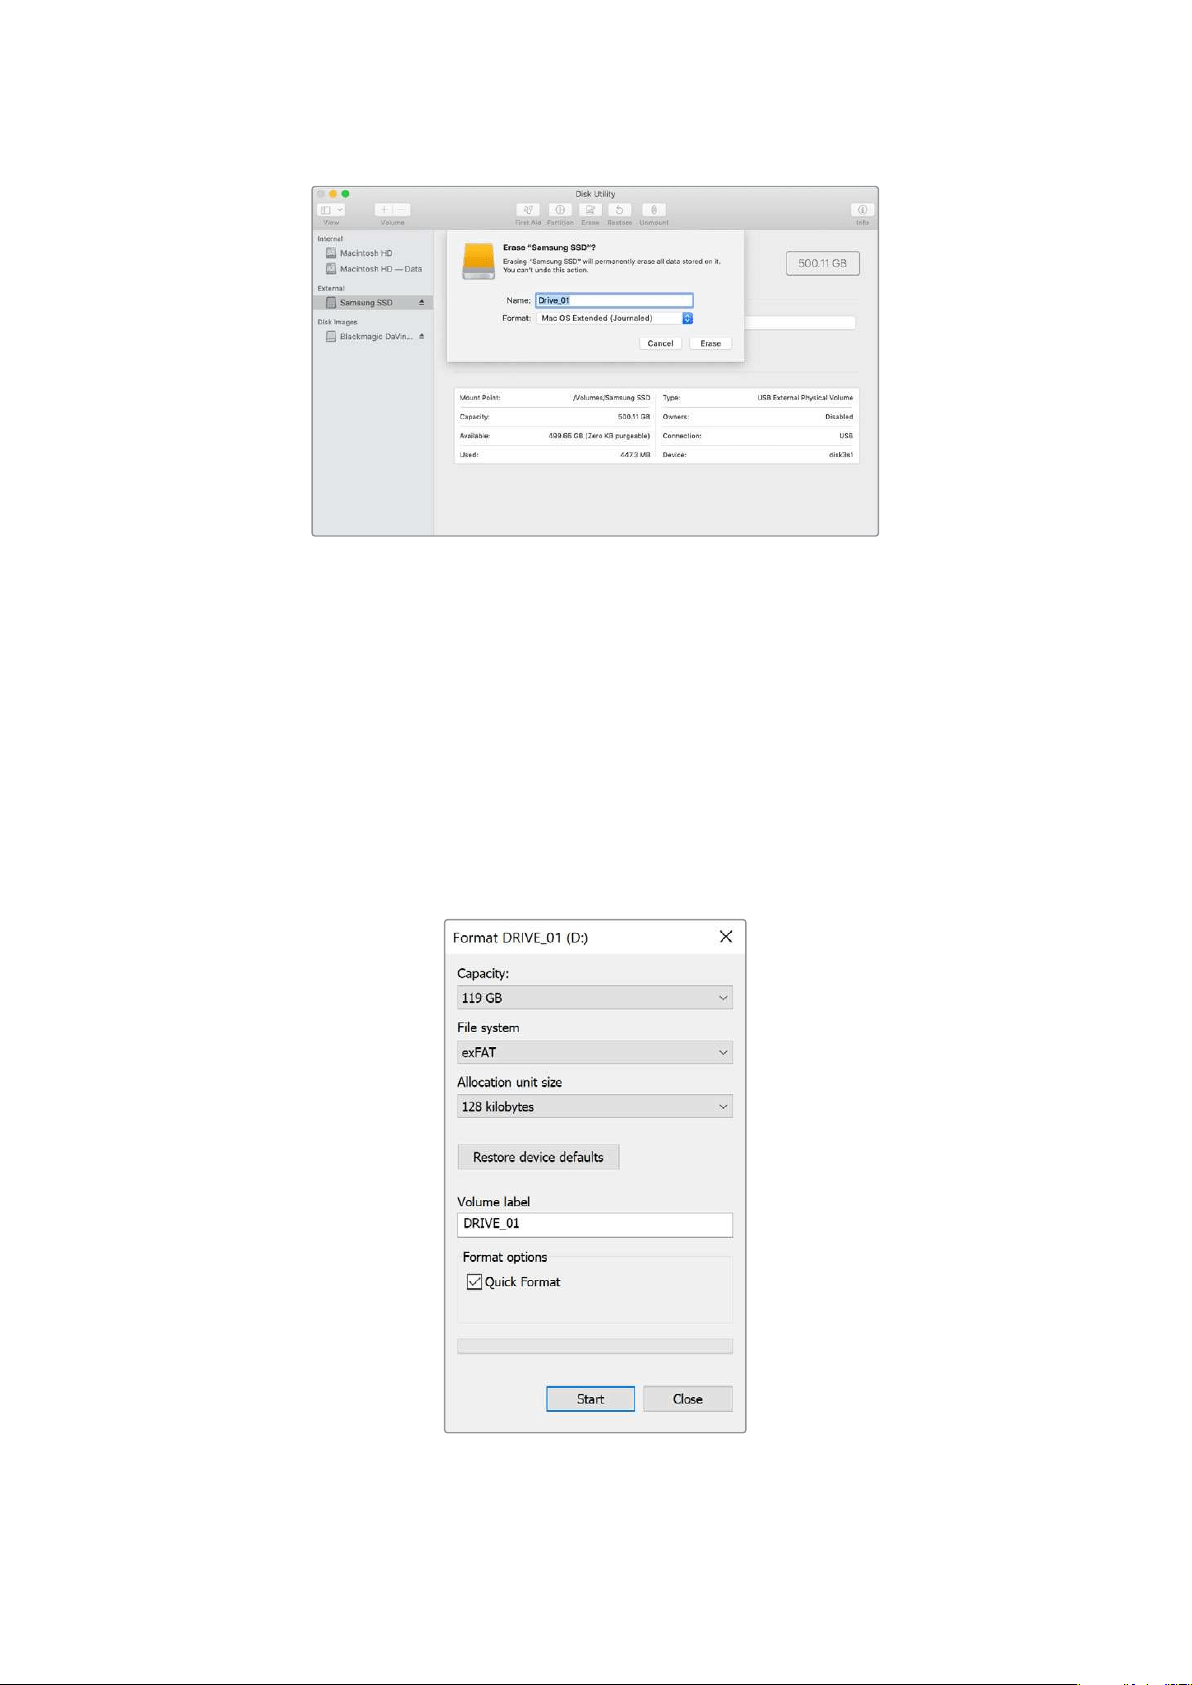
Windows
コンピューターでメディアをフォーマット
Windows
では、
Format
ダイアログボックスでドライブを
exFAT
でフォーマットで きます。
SSD
や
SD
カー
ドをフォーマットするとすべての情報が消去されるため、重要な情報は必ずバックアップしてください。
1
外付けドックやケーブルアダプターを使 用して、USBフラッシュディスクとコンピュー ターを接 続し
ます。SDカードは、外付けカードリーダーを介してコンピューターに接続します。
2
「
Start
」メニューまたは「
Start
」画面を開き、コンピューターを選択します。使用する
USB
フラッ
シュディスクまたは SDカードを右クリックします。
3 コンテクストメニューから「Format」を選択します。
4 ファイルシステムを「exFAT」 に設定し、ユニットサイズ配分を128キロバイトに設定します。
5 ボリュームラベルを入力して、「Quick Format」を選択し、「Start」をクリックします。
6 メディア が フォ ーマットさ れ 、HyperDeckで使用できる状態になります。
72
メディアをフォーマット

テレプロンプター機能の使用
標準のRTFファイルを使用すると、Blackmagic HyperDeck Shuttle HDはテレプロンプターとして使用
できます。テキストエディットまたはワードパッドを使用して、サポートされている
13
言語のいずれかでフ
ァイルを作成し、リッチテキスト形式のファイルとして保存します。
HyperDeck
Shuttle
HD
で開くと、台
本や原稿のフォントサイズや行間隔を調整できます。
テ レプロ ン プ タ ー として 使用する:
1 HyperDeck Shuttle HDのHDMI出力をHDMIディスプレ イに接 続します。
2
台本や原稿が保存されているSDカードを挿入するか、外付けUSBフラッシュディスクを 接 続します。
3 「収録」メニューの「コーデック」で、「テレプロンプター」を選択し、「SET」ボタンを押します。
ディスプレイに台本や原稿が表示されます。これにより、再生ボタンで自動的に再生を開始できます。あ
るいは、ダイヤルを使用することも可能です。
テレプロンプター の再生速度の調 整
HyperDeck Shuttle HDのダイヤルは、テレプロンプターモードでの再生においても、メディアの再生時
の操作とほぼ同じ方法で使用できます。台本や原稿をロードしたら、「
JOG
」と「
SCR
」ボタンを同時に
押して、可変再生速度をオンにします。選択したら、ダイヤルを回します。ダイヤルの動きに応じて、台本
や原稿が動く速度が変わります。例えば、ダイヤルを早く動かすと、台本や原稿がスクロールされる速
度が上がります。
JOG SCR
CLIP
MENU SET
DISK SD
一定の速度でスクロールするには、「
JOG
」または「
SCR
」ボタンのみを使用します。いずれかを選択し
たら、ジョグモードでは、台本や原稿は遅い一定速度で、スクロールモードでは早い速度で動きます。
SDカードまたは外付けディスクのrtfファイル間をナビゲートするには、順方向/逆方向の頭出しボタン
を使用します。
73
テレプロンプター機能の使用
テレプロンプターは、ファイルの情報に基づき、フォントサイズ、 色、ボールド体の使用を認識します。ま
た、「モニタリング」メニューでフォントサイズ、行間隔、余白が調整でき、ビームスプリッターに映し出す
際の上下左右の反転も実行できます。詳細は、前述の「メニュー設定」セクションを参照してください。
Blackmagic
HyperDeck
Setup
Blackmagic HyperDeck Setupソフトウェアでは、HyperDeckの 設定変更 やソ フトウェ アのアップ デ ー
トが行えます。
ソフトウェアのインスト ール:
1 最新のBlackmagic HyperDeck Setupインストーラーを
www.blackmagicdesign.com/jp/supportからダウンロードします。
2
Blackmagic HyperDeck Setupインストーラーをコンピューターで起動し、画面に表示される
指示に従います。
3
インストールが完了したら、
HyperDeck
Shuttle
HD
をリアパネルの
USB
経由またはイーサネット
コネクター経由でコンピューターに接続します。
4
Blackmagic HyperDeck Setupを起動し、スクリーンの指示に従って内部ソフトウェアをアッ
プデートします。内部ソフトウェアが最新で何もする必要がない場合、指示は表示されません。
HyperDeckのイメージまたは設定アイコンをクリックして、設定メニューを開きます。
ホームスクリーンに、HyperDeck Shuttle HDとユニット名が表示されます。この名前は、複数のHyperDeck
がコンピューターに接 続されている場合に、特定のユニットを識 別する際に役 立ちます。ユニット名は、
ユーティリティーの「Setup」メニューで設定できます。
74
BlackmagicHyperDeckSetup
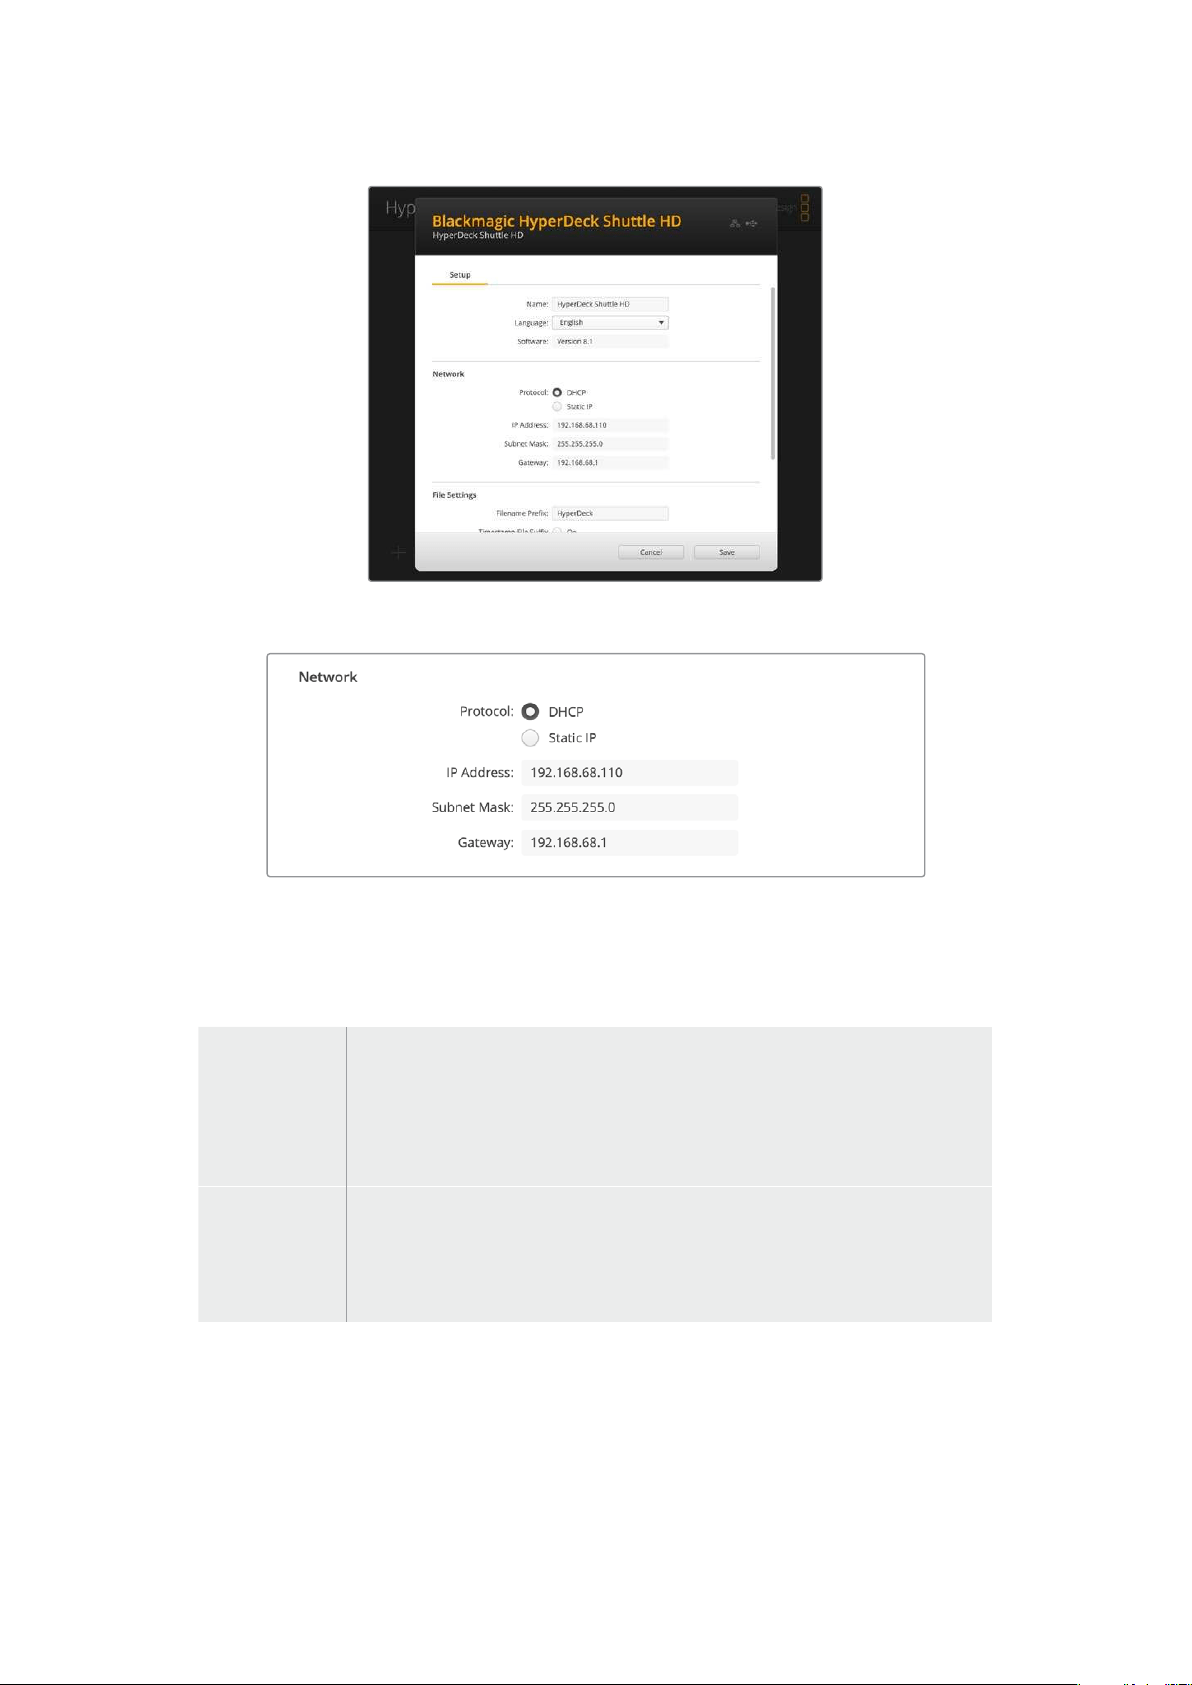
Network(ネットワーク)
Protocol
(プロトコル)
HyperDeck Shuttle HDをATEMスイッチャーから操作したり、HyperDeck Ethernet Protocolを介して
リモートコントロールする場合は、HyperDeck Shuttle HDを他の機器と同じネットワークに接 続する
必要があります。これは、DHCPを使用するか、固定IPアドレスをマニュアルで 追加して実行できます。
DHCP
HyperDeck
Shuttle HDの出荷時のデフォルト設定はDHCPです。DHCP(ダイナミ
ック・ホスト・コンフィギュレーション・プロトコル)は、ネットワークサーバー上のサー
ビスで、
HyperDeckディスクレコー ダー を自 動 的 に 検 出して IPアドレスを割り当てま
す。
DHCPは、イーサネット経由で機材を簡単に接続でき、IPアドレスの競 合が生じな
いようにできる非常に優れたサービスです。ほとんどのコンピューターやネットワー
クスイッ チャ ー は 、
DHCPに対応しています。
静的
IPアドレス
ネットワークの詳細をマニュアルで入力する場合は「
Static IP(静的IPアドレス)」を
選択します。すべてのユニットの通信を可能にするために
IPア ド レス を設定する際、全
ユニットが同一のサブネットマスクとゲートウェイ設定を共有している必要がありま
す 。さらに、パネルの
IPアドレスの最初の3つのフィールドの数値が一致している必要
があります。
ネットワーク上に、
IIP
アドレスの識別番号が同じデバイスが存在する場合、競合が生じるためユニットは
接続されません。競合が生じた場合は、ユニットのIPアドレスの識別番号を変更してください。
75
BlackmagicHyperDeckSetup
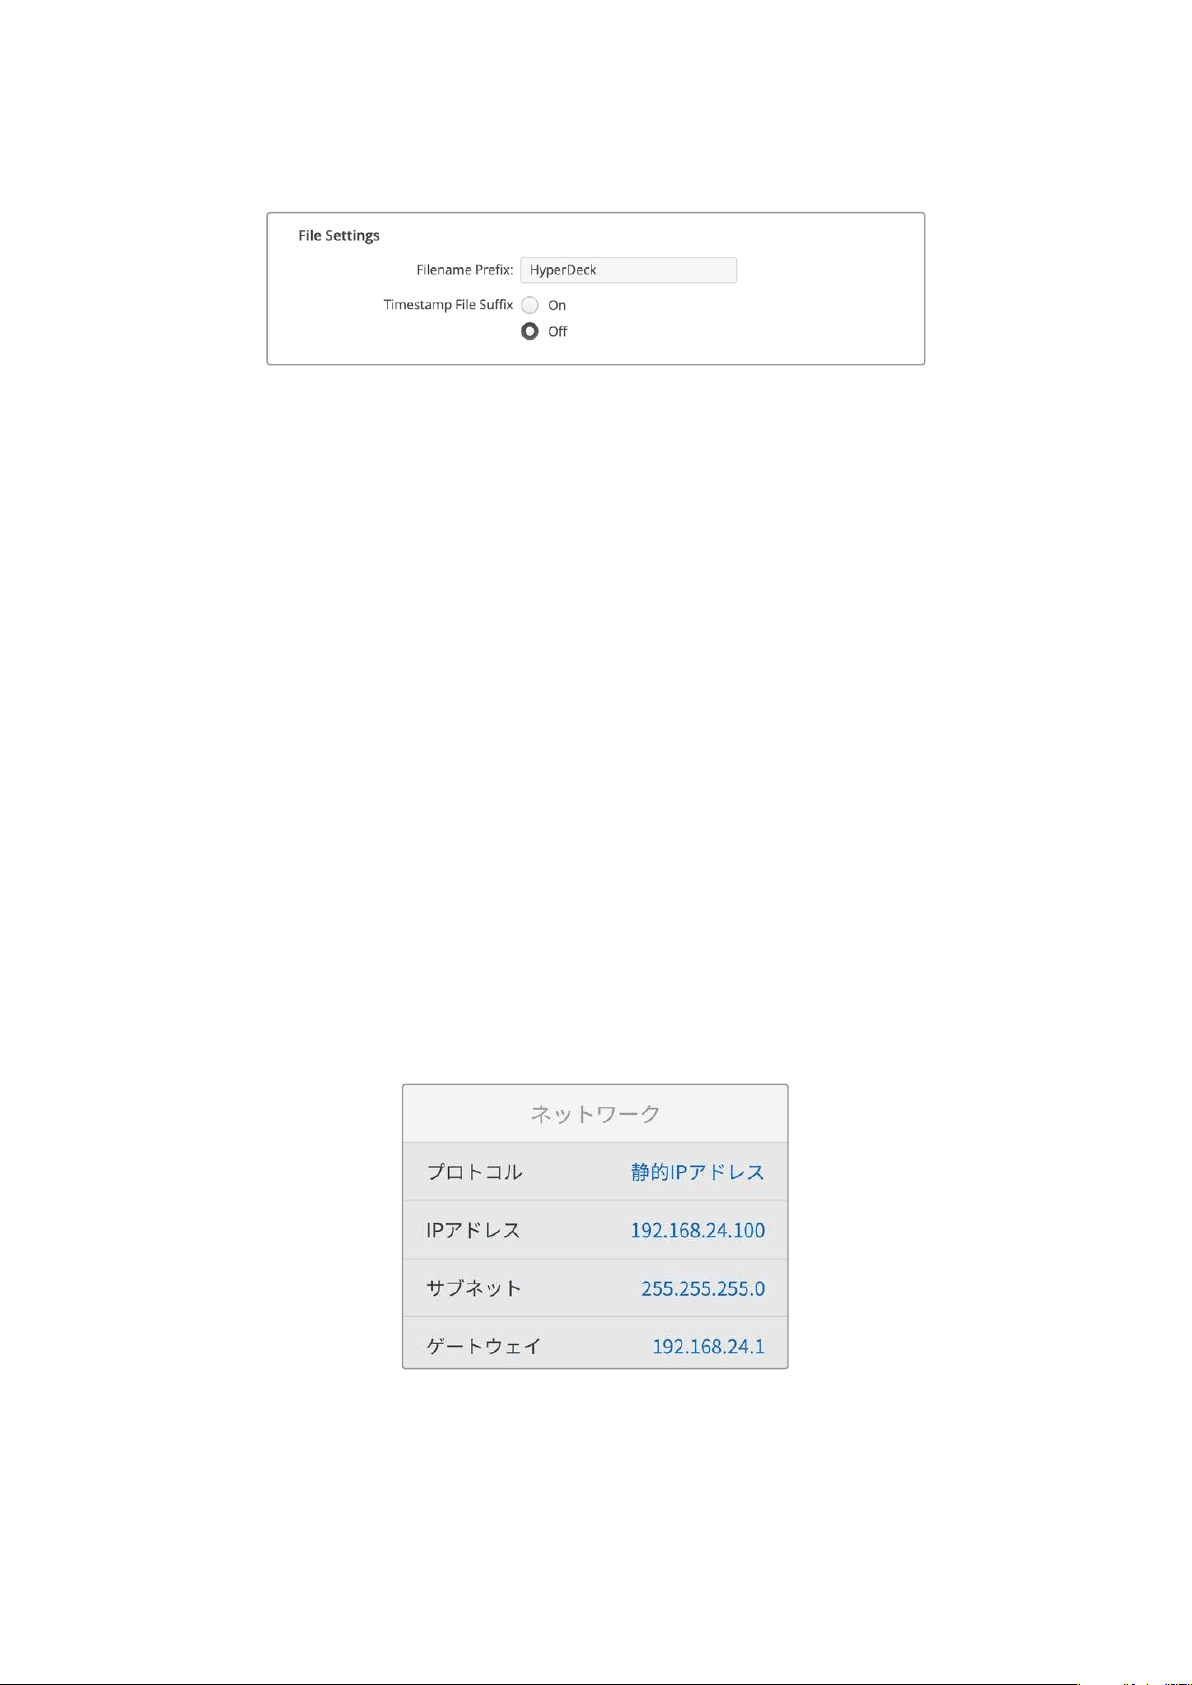
FileSettings(ファイル設定)
HyperDeck
Shuttle
HD
を最初にセットアップすると、プレフィックスとして「
HyperDeck
」がファイル名
に付加されて、クリップがSDカードまたはUSBフラッシュディスクに保存されます。プレフィックスを変更
するには、新しいファイル名を打ち込みます。
ファイル名に追加されるタイムスタンプは、デフォルトではオフに設定されています。ファイル名に日付
と時間を追加したい場合は、オンに変更します。ファイル名のプレフィックスおよびタイムスタンプの設
定は、HyperDeck Shuttle HDのオンスクリーンメニューからも変更できます。
ネットワークでファイルを転送
HyperDeck
ディスクレコー ダーは 、
FTP
(ファイル転送プロトコル)を介してファイルを転送できます。こ
の機能により、ネットワークを介してコンピューターからHyperDeckに、ローカルネットワークの速度で
ファイルを直接コピーできます。例えば、デジタルサイネージに使用するために、別の場所に設置されて
いるHyperDeckに新しいファイルをコピーできます。
HyperDeckShuttleHDの接続
コンピューターとHyperDeck Shuttle HDを同じネットワークに接続した状態で転送を行うために必要
なのは、FTPクライアントとHyperDeck Shuttle HDのIPアドレスだけです。
1
HyperDeckに接続するコンピューターに、FTPクライアントをダウンロードし、インストールしま
す。推奨アプリケーションは、
Cyberduck
、
FileZilla
、
Transmit
ですが、ほとんどの
FTP
クライアン
トが使用できます。CyberduckとFileZillaは無償です。
2
HyperDeck
Shuttle
HD
をイーサネットケーブルでネットワークに接 続して、
HyperDeck
の
IP
アド
レスをメモします。
IP
アドレスを確認するには、「
MENU
」ボタンを押して、サーチダイヤルを回転
させて、「ネットワーク」画面に進みます。画面の下にHyperDeckのIPアドレスが表示されます。
HyperDeckShuttleHDのIPアドレスは
セットアップ」メニューの「ネットワーク」
セクションで確認できます。
3
HyperDeck
の
IP
アドレスを
TCP
アプリケーションの接続ダイアログに入力します。このダイアログ
ボックスの名前や位置はアプリケーションにより異なりますが、通常は「サーバー」や「ホスト」と
いう名称が使われています。使用する
FTP
プログラムに「匿名ログイン」のチェックボックスがあ
る場 合は 必ずチェックを入れてください。
76
ネットワークでファイルを転送

HyperDeckShuttleHDの接続には、ユーザー名やパスワードは必要ありません。
FTPアプリケーションの「サーバー」や「ホスト」のフィールドにIPアドレスを入力し、
「匿名ログイン」のチェックボックスがある場合はチェックを入れるだけです。
ファイルの転送
HyperDeck
を接続したら、通常の
FTP
プログラムで のファイル 転 送と同 様に作 業が行えます。
FTP
アプリ
ケーションの多くは、インターフェースでドラッグ&ドロップが使えますが、使用しているアプリケーショ
ンに対して適切な方法を確認することを推奨します。
HyperDeckでは、あらゆるファイルの送受信が可能ですが、HyperDeck Shuttle HDでファイルを再生
するには、
HyperDeckが対応しているコーデックと解像度である必要があります。
作業のこつ
HyperDeck
で収録中でもネットワークでファイルの転送が可能です。収録に影響
を与えないように、HyperDeckは自動的に転送速度を調整します。
77
ネットワークでファイルを転送

Developer
Information
Blackmagic
HyperDeck
Ethernet
Protocol
The Blackmagic HyperDeck Ethernet Protocol is a text based protocol accessed by connecting
to TCP port 9993 on HyperDeck models that have a built in Ethernet connection. If you are
a software developer, you can use the protocol to construct devices that integrate with our
products. Here at Blackmagic Design our approach is to open up our protocols and we eagerly
look forward to seeing what you come up with!
Protocol
Commands
Command Command Description
help or ? Provides help text on all commands and parameters
commands return commands in XML format
device info return device information
disk list query clip list on active disk
disk list: slot id: {n} query clip list on disk in slot {n}
quit disconnect ethernet control
ping check device is responding
preview: enable: {true/false} switch to preview or output
play play from current timecode
play: speed: {-5000 to 5000} play at specific speed
play: loop: {true/false} play in loops or stop-at-end
play: single clip: {true/false} play current clip or all clips
playrange query playrange setting
playrange set: clip id: {n} set play range to play clip {n} only
playrange set: clip id: {n} count: {m} set play range to {m} clips starting from clip {n}
playrange set: in: {inT} out: {outT}
set play range to play between:
- timecode {inT} andtimecode {outT}
playrange set: timeline in: {in} timeline out:
{out}
set play range in units of frames between:
- timeline position {in} and position {out} clear/reset play
rangesetting
playrange clear clear/reset play range setting
play on startup query unit play on startup state
play on startup: enable: {true/false} enable or disable play on startup
play on startup: single clip: {true/false} play single clip or all clips on startup
play option query play options
play option: stop mode:
{lastframe/nextframe/black}
set output frame when playback stops
record record from current input
record: name: {name} record named clip
record spill spill current recording to next slot
78
DeveloperInformation

Command Command Description
record: spill: slot id: {n}
spill current recording to specified slot
use current id to spill to same slot
stop stop playback or recording
clips count query number of clips on timeline
clips get query all timeline clips
clips get: clip id: {n} query a timeline clip info
clips get: clip id: {n} count: {m} query m clips starting from n
clips get: version: {1/2}
query clip info using specified output version:
version 1: id: name startT duration
version 2: id: startT duration inT outT name
clips add: name: {name} append a clip to timeline
clips add: clip id: {n} name: {name} insert clip before existing clip {n}
clips add: in: {inT} out: {outT} name: {name} append the {inT} to {outT} portion of clip
clips remove: clip id: {n}
remove clip {n} from the timeline
(invalidates clip ids following clip {n})
clips clear empty timeline clip list
transport info query current activity
slot info query active slot
slot info: slot id: {n} query slot {n}
slot select: slot id: {n} switch to specified slot
slot select: video format: {format} load clips of specified format
slot unblock unblock active slot
slot unblock: slot id: {n} unblock slot {n}
cache info query cache status
dynamic range query dynamic range settings
dynamic range: playback override:
{off/Rec709/Rec2020_SDR/HLG/
ST2084_300/ST2084_500/
ST2084_800/ST2084_1000/
ST2084_2000/ST2084_4000/ST2084
set playback dynamic range override
dynamic range: record override:
{off/Rec709/Rec2020_SDR/HLG/
ST2084_300/ST2084_500/
ST2084_800/ST2084_1000/
ST2084_2000/ST2084_4000/ST2048}
set record dynamic range override
notify query notification status
notify: remote: {true/false} set remote notifications
notify: transport: {true/false} set transport notifications
notify: slot: {true/false} set slot notifications
notify: configuration: {true/false} set configuration notifications
notify: dropped frames: {true/false} set dropped frames notifications
79
DeveloperInformation

Command Command Description
notify: display timecode: {true/false} set display timecode notifications
notify: timeline position: {true/false} set playback timeline position notifications
notify: playrange: {true/false} set playrange notifications
notify: cache: {true/false} set cache notifications
notify: dynamic range: {true/false} set dynamic range settings notifications
notify: slate: {true/false} set digital slate notifications
notify: clips: {true/false}
set timeline clips notifications where two types of changes can
occur:
add: partial update with list of clips and insert positions
snapshot: complete update of all clips on timeline
notify: disk: {true/false}
set disk clips notifications where two types of changes can
occur:
add: partial update with list of clips and insert positions
snapshot: complete update of all clips on timeline
goto: clip id: {start/end} goto first clip or last clip
goto: clip id: {n} goto clip id {n}
goto: clip id: +{n} go forward {n} clips
goto: clip id: -{n} go backward {n} clips
goto: clip: {n} goto frame position {n} within current clip
goto: clip: +{n} go forward {n} frames within current clip
goto: clip: -{n} go backward {n} frames within current clip
goto: clip: {start/end} goto start or end of clip
goto: timeline: {n} goto frame position {n} within timeline
goto: timeline: +{n} o forward {n} frames within timeline
goto: timeline: -{n} go backward {n} frames within timeline
goto: timeline: {start/end} goto start or end of timeline
goto: timecode: {timecode} goto specified timecode
goto: timecode: +{timecode} go forward {timecode} duration
goto: timecode: -{timecode} go backward {timecode} duration
goto: slot id: {n} goto slot id {n}
jog: timecode: {timecode} jog to timecode
jog: timecode: +{timecode} jog forward {timecode} duration
jog: timecode: -{timecode} jog backward {timecode} duration
shuttle: speed: {-5000 to 5000} shuttle with speed
remote query unit remote control state
remote: enable: {true/false} enable or disable remote control
remote: override: {true/false} session override remote control
configuration query configuration settings
configuration: video input: SDI switch to SDI input
configuration: video input: HDMI switch to HDMI input
80
DeveloperInformation

Command Command Description
configuration: video input: component switch to component input
configuration: audio input: embedded capture embedded audio
configuration: audio input: XLR capture XLR audio
configuration: audio input: RCA capture RCA audio
configuration: file format: {format} switch to specific file format
configuration: audio codec: PCM switch to PCM audio
configuration: audio codec: AAC switch to AAC audio
configuration: timecode input:
{external/embedded/internal/preset/clip}
change the timecode input
configuration: timecode output:
{clip/timeline}
change the timecode output
configuration: timecode preference:
{default/dropframe/nondropframe}
whether or not to use drop frame timecodes when not
otherwise specified
configuration: timecode preset:
{timecode}
set the timecode preset
configuration: audio input channels: {n} set the number of audio channels recorded to {n}
configuration: record trigger:
{none/recordbit/timecoderun}
change the record trigger
configuration: record prefix: {name} set the record prefix name (supports UTF-8 name)
configuration: append timestamp:
{true/false}
append timestamp to recorded filename
configuration: xlr input id: {n} xlr type:
{line/mic}
configure xlr input type
multiple xlr inputs can be configured in a single command
configuration: genlock input resync:
{true/false}
enable or disable genlock input resync
uptime return time since last boot
format: slot id: {n} prepare:
{exFAT/HFS+} name: {name}
prepare a disk formatting operation to filesystem {format}
format: confirm: {token} perform a pre-prepared formatting operation using token
identify: enable: {true/false} identify the device
watchdog: period: {period in seconds} client connection timeout
reboot reboot device
slate clips slate clips information
slate project slate project information
slate lens slate lens information
Multiline commands: Command Description
slate clips↵ set slate clips information:
reel: {n} slate reel number, where {n} is in [1, 999]
scene id: {id} slate scene id value, where {id} is a string
shot type: {WS/MS/BCU/MCU/ECU/none} slate shot type
81
DeveloperInformation
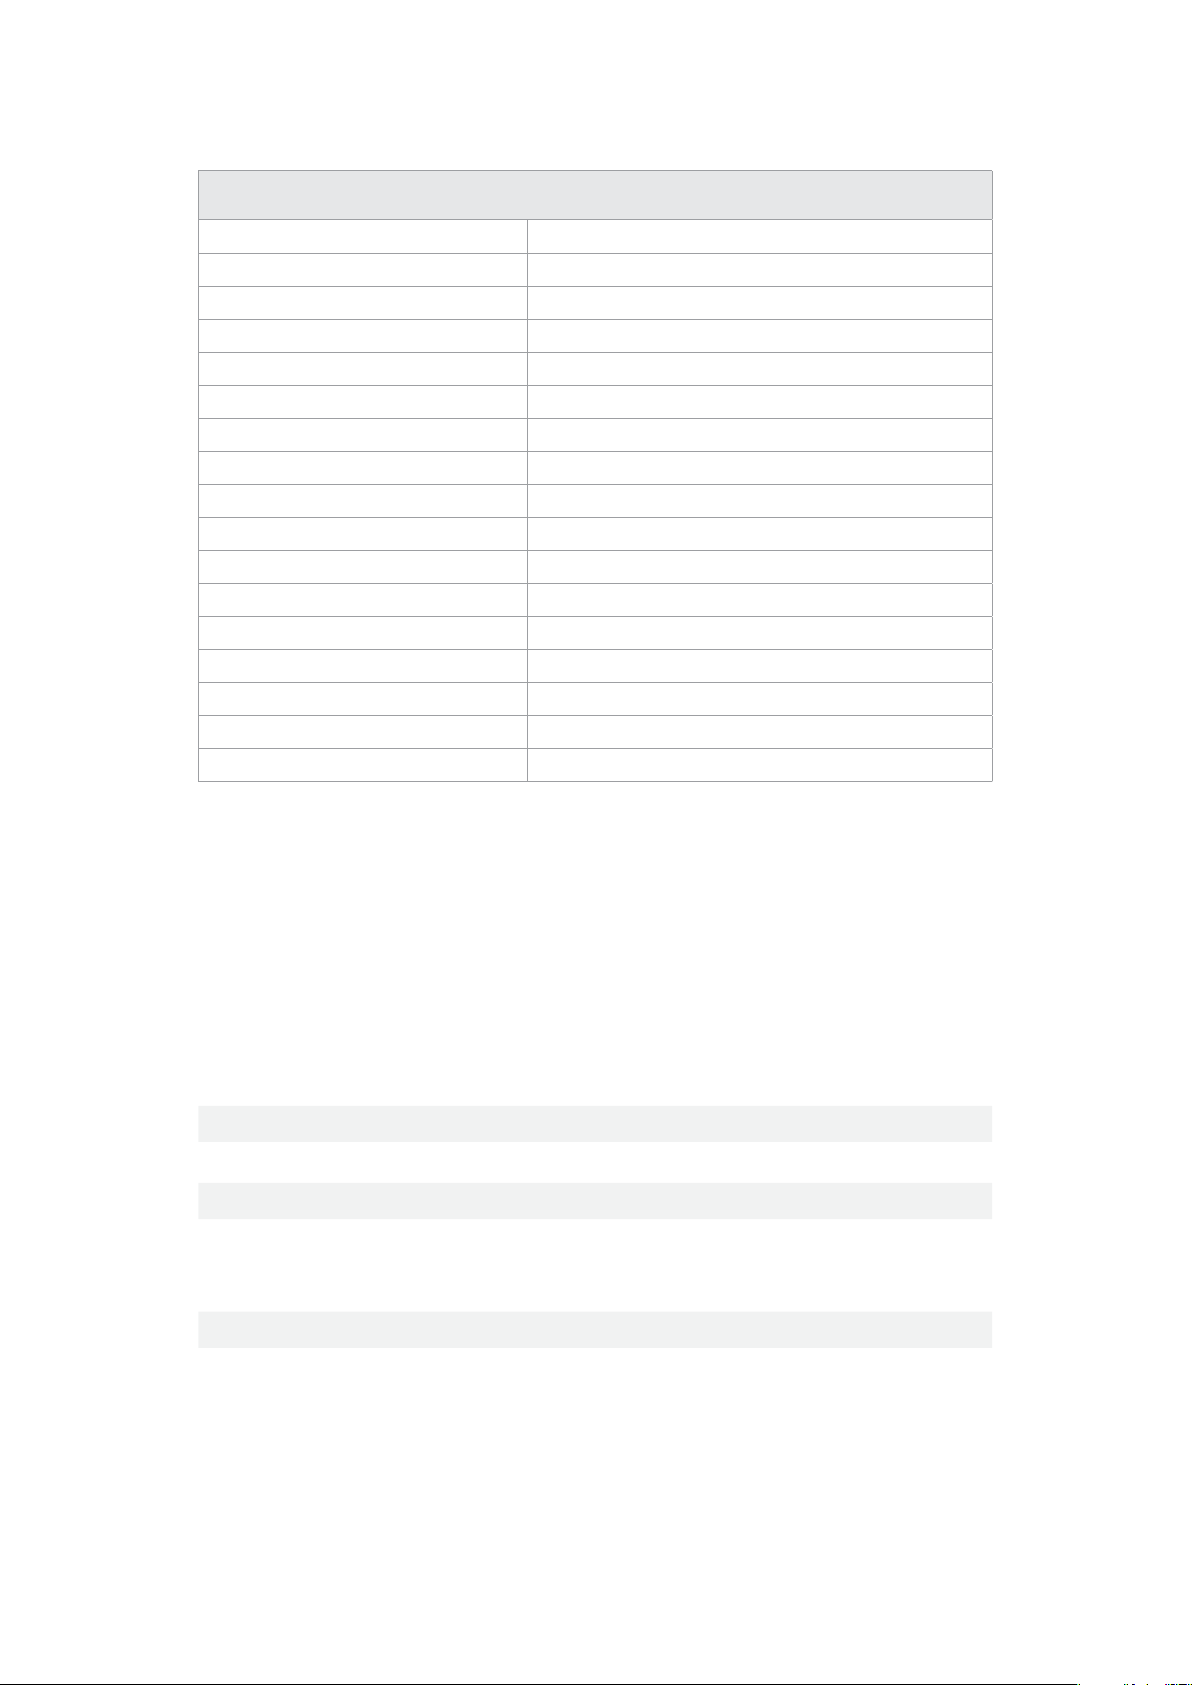
Multiline commands: Command Description
take: {n} slate take number, where {n} is in [1, 99]
take scenario: {PU/VFX/SER/none} slate take scenario
take auto inc: {true/false} slate take auto increment
good take: {true/false} slate good take
environment: {interior/exterior} slate environment
day night: {day/night} slate day or night
slate project:↵ set slate project information:
project name: {name} project name (can be empty, supports UTF-8)
camera: {index} set camera index e.g. A
director: {name} director (can be empty, supports UTF-8)
camera operator: {name} camera operator (can be empty, supports UTF-8)
slate lens:↵ set lens information:
lens type: {type} lens type (can be empty, supports UTF-8)
iris: {type} camera iris (can be empty, supports UTF-8)
focal length: {length} focal length (can be empty, supports UTF-8)
distance: {distance} lens distance (can be empty, supports UTF-8)
filter: {filter} lens filter (can be empty, supports UTF-8)
Command Combinations
You can combine the parameters into a single command, for example:
play: speed: 200 loop: true single clip: true
Or for configuration:
configuration: video input: SDI audio input: XLR
Or to switch to the second disk, but only play NTSC clips:
slot select: slot id: 2 video format: NTSC
Protocol
Details
Connection
The HyperDeck Ethernet server listens on TCP port 9993.
Basic syntax
The HyperDeck protocol is a line oriented text protocol. Lines from the server will be separated by an ascii
CR LF sequence. Messages from the client may be separated by LF or CR LF.
New lines are represented in this document as a "↵" symbol.
Single line command syntax
Command parameters are usually optional. A command with no parameters is terminated with a new line:
{Command name}↵
If parameters are specified, the command name is followed by a colon, then pairs of parameter names and
values. Each parameter name is terminated with a colon character:
{Command name}: {Parameter}: {Value} {Parameter}: {Value} ...↵
82
DeveloperInformation

Multiline command syntax
The HyperDeck protocol also supports an equivalent multiline syntax where each parameter-value pair is
entered on a new line. E.g.
{Command name}:↵
{P a r a m e t e r}: { Va lu e}↵
{P a r a m e t e r}: { Va lu e}↵
↵
Response syntax
Simple responses from the server consist of a three digit response code and descriptive text terminated by a
new line:
{Response code} {Response text}↵
If a response carries parameters, the response text is terminated with a colon, and parameter name and
value pairs follow on subsequent lines until a blank line is returned:
{Response code} {Response text}:↵
{P a r a m e t e r}: { Va lu e}↵
{P a r a m e t e r}: { Va lu e}↵
...
↵
Successful response codes
A simple acknowledgement of a command is indicated with a response code of 200:
200 ok↵
Other successful responses carry parameters and are indicated with response codes in the range of 201
to299.
83
DeveloperInformation

Failure response codes
Failure responses to commands are indicated with response codes in the range of 100 to 199:
100 syntax error
101 unsupported parameter
102 invalid value
103 unsupported
104 disk full
105 no disk
106 disk error
107 timeline empty
108 internal error
109 out of range
110 no input
111 remote control disabled
112 clip not found
120 connection rejected
150 invalid state
151 invalid codec
160 invalid format
161 invalid token
162 format not prepared
163 parameterized single line command not supported
Asynchronous response codes
The server may return asynchronous messages at any time. These responses are indicated with response
codes in the range of 500 to 599:
5xx {Response Text}:↵
{P a r a m e t e r}: { Va lu e}↵
{P a r a m e t e r}: { Va lu e}↵
↵
Connection response
On connection, an asynchronous message will be delivered:
500 connection info:↵
protocol version: {Version}↵
model: {Model Name}↵
↵
Timecode syntax
Timecodes are expressed as non-drop-frame timecode in the format:
HH:MM:SS:FF
84
DeveloperInformation

Handling of deck "remote" state
The “remote” command may be used to enable or disable the remote control of the deck. Any attempt to
change the deck state over ethernet while remote access is disabled will generate an error:
111 remote control disabled↵
To enable or disable remote control:
remote: enable: {“true”, “false”} ↵
The current remote control state may be overridden allowing remote access over ethernet irrespective of the
current remote control state:
remote: override: {“true”, “false”} ↵
The override state is only valid for the currently connected ethernet client and only while the connection
remains open.
The “remote” command may be used to query the remote control state of the deck by specifying no
parameters:
remote↵
The deck will return the current remote control state:
210 remote info:↵
enabled: {“true”, “false”}↵
override: {“true”, “false”}↵
↵
Asynchronous remote control information change notification is disabled by default and may be
configured with the “notify” command. When enabled, changes in remote state will generate a “510 remote
info:”asynchronous message with the same parameters as the “210 remote info:” message.
Closing connection
The "quit" command instructs the server to cleanly shut down the connection:
quit↵
Checking connection status
The "ping" command has no function other than to determine if the server is responding:
ping↵
Getting help
The "help" or "?" commands return human readable help text describing all available commands and
parameters:
help↵
Or:
?↵
The server will respond with a list of all supported commands:
201 help:↵
{Help Text}↵
{Help Text}↵
↵
85
DeveloperInformation

Switching to preview mode
The "preview" command instructs the deck to switch between preview mode and output mode:
preview: enable: {"true", "false"}↵
Playback will be stopped when the deck is switched to preview mode. Capturing will be stopped when the
deck is switched to output mode.
Controlling device playback
The “play” command instructs the deck to start playing:
play↵
The play command accepts a number of parameters which may be used together in most combinations.
By default, the deck will play all remaining clips on the timeline then stop.
The “single clip” parameter may be used to override this behavior:
play: single clip: {“true”, “false”}↵
By default, the deck will play at normal (100%) speed. An alternate speed may be specified in percentage
between -5000 to 5000:
play: speed: {% normal speed}↵
By default, the deck will stop playing when it reaches to the end of the timeline. The “loop” parameter may be
used to override this behavior:
play: loop: {“true”, “false”}↵
The “playrange” command instructs the deck to play all the clips. To override this behavior: and select a
particular clip:
playrange set: clip id: {Clip ID}↵
To only play a certain timecode range:
playrange set: in: {in timecode} out: {out timecode}↵
To clear a set playrange and return to the default value:
playrange clear↵
The “play on startup command” instructs the deck on what action to take on startup. By default, the deck will
not play. Use the “enable” command to start playback after each power up.
play on startup: enable {“true”, “false”}↵
By default, the unit will play back all clips on startup. Use the “single clip” command to override.
play on startup: single clip: {“true”, “false”}↵
Stopping deck operation
The "stop" command instructs the deck to stop the current playback or capture:
stop↵
86
DeveloperInformation

Changing timeline position
The "goto" command instructs the deck to switch to playback mode and change its position within the
timeline.
To go to the start of a specific clip:
goto: clip id: {Clip ID}↵
To move forward/back {count} clips from the current clip on the current timeline:
goto: clip id: +/-{count}↵
Note that if the resultant clip id goes beyond the first or last clip on timeline, it will be clamp at the first or last
clip.
To go to the start or end of the current clip:
goto: clip: {“start”, “end”}↵
To go to the start of the first clip or the end of the last clip:
goto: timeline: {“start”, “end”}↵
To go to a specified timecode:
goto: timecode: {timecode}↵
To move forward or back a specified duration in timecode:
goto: timecode: {“+”, “-”}{duration in timecode}↵
To specify between slot 1 and slot 2:
goto: slot id: {Slot ID}↵
Note that only one parameter/value pair is allowed for each goto command.
Enumerating supported commands and parameters
The "commands" command returns the supported commands:
commands↵
The command list is returned in a computer readable XML format:
212 commands:
<commands>↵
<command name="…"><parameter name="…"/>…</command>↵
<command name="…"><parameter name="…"/>…</command>↵
…
</commands>↵
↵
87
DeveloperInformation

Controlling asynchronous notifications
The “notify” command may be used to enable or disable asynchronous notifications from the server.
To enable or disable transport notifications:
notify: transport: {“true”, “false”}↵
To enable or disable slot notifications:
notify: slot: {“true”, “false”}↵
To enable or disable remote notifications:
notify: remote: {“true”, “false”}↵
To enable or disable configuration notifications:
notify: configuration: {“true”, “false”}↵
Multiple parameters may be specified. If no parameters are specified, the server returns the current state of
all notifications:
209 notify:↵
transport: {“true”, “false”}↵
slot: {“true”, “false”}↵
remote: {“true”, “false”}↵
configuration: {“true”, “false”}↵
dropped frames: {“true”, “false”}↵
display timecode: {“true”, “false”}↵
timeline position: {“true”, “false”}↵
playrange: {“true”, “false”}↵
cache: {“true”, “false”}↵
dynamic range: {“true”, “false”}↵
slate: {“true”, “false”}↵
clips: {“true”, “false”}↵
disk: {“true”, “false”}↵
↵
Retrieving device information
The "device info" command returns information about the connected deck device:
device info↵
The server will respond with:
204 device info:↵
protocol version: {Version}↵
model: {Model Name}↵
unique id: {unique alphanumeric identifier}↵
slot count: {number of storage slots}↵
software version: {software version}↵
↵
88
DeveloperInformation

Retrieving slot information
The "slot info" command returns information about a slot. Without parameters, the command returns
information for the currently selected slot:
slot info↵
If a slot id is specified, that slot will be queried:
slot info: slot id: {Slot ID}↵
The server will respond with slot specific information:
202 slot info:↵
slot id: {Slot ID}↵
status: {"empty", "mounting", "error", "mounted"}↵
volume name: {Volume name}↵
recording time: {recording time available in seconds}↵
video format: {disk's default video format}↵
blocked: {“true”, “false”}↵
↵
Asynchronous slot information change notification is disabled by default and may be configured with
the "notify" command. When enabled, changes in slot state will generate a "502 slot info:" asynchronous
message with the same parameters as the "202 slot info:" message.
Retrieving clip information
The “disk list” command returns the information for each playable clip on a given disk. Without parameters,
the command returns information for the current active disk:
disk list↵
If a slot id is specified, the disk in that slot will be queried:
disk list: slot id: {Slot ID}↵
The server responds with the list of all playable clips on the disk in the format of: Index, name, formats, and
duration in timecode:
206 disk list:↵
slot id: {Slot ID}↵
{clip index}: {name} {file format} {video format} {Duration
ti m ecode}↵
{clip index}: {name} {file format} {video format} {Duration
ti m ecode}↵
…
↵
Note that the clip index starts from 1.
Retrieving clip count
The "clips count" command returns the number of clips on the current timeline:
clips count ↵
The server responds with the number of clips:
214 clips count: ↵
clip count: {Count}↵
89
DeveloperInformation

Retrieving timeline information
The "clips get" command returns information for each available clip on the current timeline. Without
parameters, the command returns information for all clips on timeline:
clips get↵
The server responds with a list of clip IDs, names and timecodes:
205 clips info:↵
clip count: {Count}↵
{Clip ID}: {Start timecode} {Duration timecode} {In timecode}
{Out timecode} {Name}↵
{Clip ID}: {Start timecode} {Duration timecode} {In timecode}
{Out timecode} {Name}↵
…
↵
Retrieving transport information
The “transport info” command returns the state of the transport:
transport info ↵
The server responds with transport specific information:
208 transport info:
status: {“preview”, “stopped”, “play”, “forward”, “rewind”,
“j o g ”, “ s h u t t l e ”,” r e c o r d ”}↵
speed: {Play speed between -5000 and 5000 %}↵
slot id: {Slot ID or “none”}↵
clip id: {Clip ID or “none”}↵
single clip: {“true”, “false”}↵
display timecode: {timecode}↵
timecode: {timecode}↵
video format: {Video format}↵
loop: {“true”, “false”}↵
timeline: {n}↵
input video format: {Video format”}↵
dynamic range: {“off”, “Rec709”, “Rec2020_SDR”, “HLG”,
“ST2084_300”, “ST2084_500”, “ST2084_800”, “ST2084_1000”,
“ST2084_2000”, “ST2084_4000”, “ST2048” or “none”}↵
↵
The "timecode" value is the timecode within the current timeline for playback or the clip for record. The
"display timecode" is the timecode displayed on the front of the deck. The two timecodes will differ in some
deck modes.
Asynchronous transport information change notification is disabled by default and may be configured
with the "notify" command. When enabled, changes in transport state will generate a "508 transport info:"
asynchronous message with the same parameters as the "208 transport info:" message.
90
DeveloperInformation

Video Formats
The following video formats are currently supported on HyperDeck Shuttle:
720p50, 720p5994, 720p60
1080p23976, 1080p24, 1080p25, 1080p2997, 1080p30, 1080p60
1080i50, 1080i5994, 1080i60
Video format support may vary between models and software releases.
File Formats
All HyperDeck models currently support the following file formats:
H.264High
H.264Medium
H.264Low
QuickTimeProResHQ
QuickTimeProRes
QuickTimeProResLT
QuickTimeProResProxy
QuickTimeDNxHD220x
DNxHD220x
QuickTimeDNxHD145
DNxHD145
QuickTimeDNxHD45
DNxHD45
Supported file formats may vary between models and software releases.
91
DeveloperInformation

Querying and updating configuration information
The "configuration" command may be used to query the current configuration of the deck:
configuration↵
The server returns the configuration of the deck:
211 configuration:↵
audio input: {“embedded”, “XLR”, “RCA”}↵
audio mapping: {n}↵
video input: {“SDI”, “HDMI”, “component”, “composite”}↵
file format: {format}↵
audio codec: {“PCM”, “AAC”}↵
timecode input: {“external”, “embedded”, “preset”, “clip”}↵
timecode output: {“clip”, “timeline”}↵
timecode preference: {“default”, “dropframe”, “nondropframe”}↵
timecode preset: {timecode}↵
audio input channels: {n}↵
record trigger: {“none”, “recordbit”, “timecoderun”}↵
record prefix: {name}↵
append timestamp: {“true”, “false”}↵
genlock input resync: {“true”, “false”}↵
↵
One or more configuration parameters may be specified to change the configuration of the deck.
To change the current video input:
configuration: video input: {“SDI”, “HDMI”, “component”}↵
Valid video inputs may vary between models. To configure the current audio input:
configuration: audio input: {“embedded”, “XLR”, “RCA”}↵
Valid audio inputs may vary between models.
To configure the current file format:
configuration: file format: {File format}↵
Note that changes to the file format may require the deck to reset, which will cause the client connection to
be closed. In such case, response code 213 will be returned (instead of 200) before the client connection is
closed:
“213 deck rebooting”
Asynchronous configuration information change notification is disabled by default and may be configured
with the “notify” command. When enabled, changes in configuration will generate a “511 configuration:”
asynchronous message with the same parameters as the “211 configuration:” message.
92
DeveloperInformation

Selecting active slot and video format
The "slot select" command instructs the deck to switch to a specified slot, or/and to select a specified output
video format.
To switch to a specified slot:
slot select: slot id: {slot ID}↵
To select the output video format:
slot select: video format: {video format}↵
Either or all slot select parameters may be specified. Note that selecting video format will result in a rescan of
the disk to reconstruct the timeline with all clips of the specified video format.
Clearing the current timeline
The "clips clear" command instructs the deck to empty the current timeline:
clips clear↵
The server responds with
200 ok↵
Adding a clip to the current timeline
The "clips add:" command instructs the deck to add a clip to the current timeline:
clips add: name: {clip name}↵
The server responds with
200 ok↵
or in case of error
1xx {error description}↵
Configuring the watchdog
The “watchdog” command instructs the deck to monitor the connected client and terminate the connection if
the client is inactive for at least a specified period of time.
To configure the watchdog:
watchdog: period: {period in seconds}↵
To avoid disconnection, the client must send a command to the server at least every {period} seconds. Note
that if the period is set to 0 or less than 0, connection monitoring will be disabled.
93
DeveloperInformation

ヘルプ
ヘルプライン
すぐに情報が必要な方は、Blackmagic Designオンラインサポートページで、Blackmagic HyperDeck
ディスクレコーダーの最新サポート情報を確認できます。
BlackmagicDesignオンラインサポートページ
最新のマニュアル、ソフトウェア、サポートノートは、www.blackmagicdesign.com/jp/supportの
Blackmagic Designサポートセンターで確認できます。
BlackmagicDesignフォーラム
弊社ウェブサイトの
Blackmagic
Design
フォーラムは、様々な情報やクリエイティブなアイデアを共有で
きる有益なリソー スです 。経験豊富なユーザーやBlackmagic Designスタッフによって、すでに多くの問題
の解決策が公開されているので、このフォーラムを参考にすることで、現在の問題をすばやく解決できるこ
とがあります。ぜひご利用ください。
Blackmagic
フォーラムには、
http://forum.blackmagicdesign.com
か
らアクセスできます。
BlackmagicDesignサポートへの連絡
サポートページやフォーラムで必要な情報を得られなかった場合は、サポートページの「メールを送信」
ボタンを使用して、サポートのリクエストをメール送信してください。あるいは、サポートページの「お住
まいの地域のサポートオフィス」をクリックして、お住まいの地域の
Blackmagic
Design
サポートオフィス
に電話でお問い合わせください。
現在インストールされているソフトウェアのバージョンを確認
コンピューターにインストールされているBlackmagic HyperDeck Utilityソフトウェアのバージョンを確
認するには、「About Blackmagic HyperDeck Setup」ウィンドウを開きます。
Mac OSでは、アプリケーションフォルダーから「Blackmagic HyperDeck Setup」を開きます。
アプリケーションメニューから「About Blackmagic HyperDeck Setup」を選択し、バージョン
を確認します。
Windowsでは、スタートメニューまたはスタート画面から「Blackmagic HyperDeck Setup」ユー
ティリティを開きます。ヘルプメニューをクリックして「About Blackmagic HyperDeck Setup」
を選択し、バージョンを確認します。
最新のソフトウェアアップデートを入手する
コンピューターにインストールされているBlackmagic HyperDeck Setupのバージョンを確認した
後、Blackmagicサポートセンター(www.blackmagicdesign.com/jp/support)で最新のソフトウェア
アップデートを確認してください。常に最新のソフトウェアを使用することを推奨しますが、重要なプロ
ジェクトの実行中は、ソフトウェアのアップデートは行わない方がよいでしょう。
94
ヘルプ
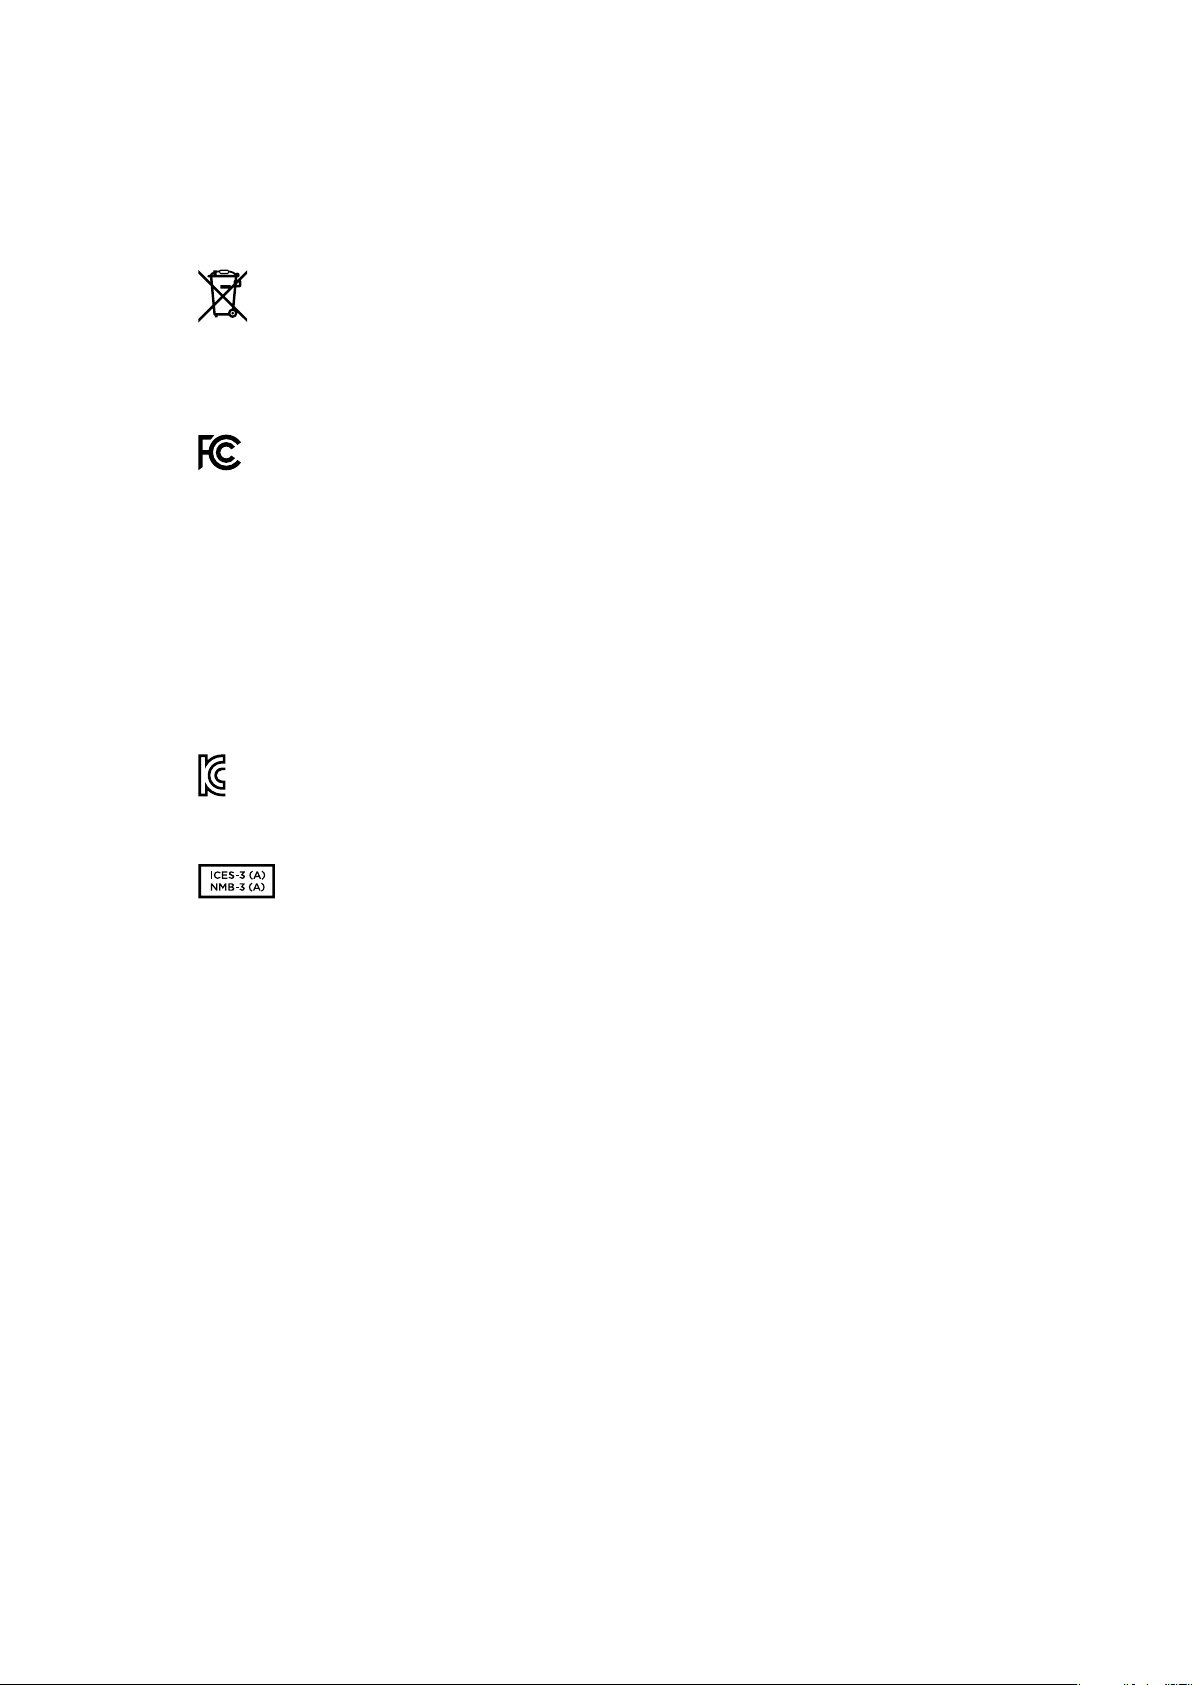
規制に関する警告
欧州連合内での電気機器および電子機器の廃棄処分
製品に記載されている記号は、当該の機器を他の廃棄物と共に処分してはならないことを示
しています。機器を廃棄するには、必ずリサイクルのために指定の回収場所に引き渡してくだ
さい。機器の廃棄において個別回収とリサイクルが行われることで、天然資源の保護につなが
り、健康と環境を守る方法でリサイクルが確実に行われるようになります。廃棄する機器のリ
サイクル のための回 収場 所に関しては 、お住まいの地方自治体 のリサイクル 部門 、または 製 品
を購入した販売業者にご連絡ください。
この機器は、
FCC
規定の第
15
部に準拠し、クラス
A
デジタル機器の制限に適合していることが確
認されています。これらの制限は、商用環境で機器を使用している場合に有害な干渉に対する
妥当な保護を提供するためのものです。この機器は無線周波エネルギーを生成、使用、放出す
る可能性があります。また、指示に従ってインストールおよび使用しない場合、無線通信に有害
な干渉を引き起こす恐れがあります。住宅地域で当製品を使用すると有害な干渉を引き起こす
可能性があり、その場合はユーザーが自己責任で干渉に対処する必要があります。
動作は次の
2つを条 件とします:
1 本機は、有害な干渉を起こさない。
2 本機は希望しない動作を発生しかねない干渉を含む、いかなる受信干渉も受け入れる必要
がある。
R-R-BMD-20211410001
ISED
Canada
ステートメント
本機は、カナダのクラスAデジタル機器の規格に準拠しています。
本機のいかなる改造、あるいは目的の用途以外での使用は、これらの規格への順守を無効
にすることがあります。
HDMI
インターフェースへの接続は、必ず高品質のシールド
HDMI
ケーブルを使 用する必 要
があります。
本機は、商用環境で目的の用途に順守した使用においてテストを行なっています。非商用
環境で使用された場合、無線妨害を引き起こす可能性があります。
95
規制に関する警告

安全情報
この製品は、周囲温度が最高40
o
Cまでの熱帯地区での使用に対応しています。
通気が妨げられないように、この製品の周囲は通気に十分なスペースを開けるようにしてください。
この製品の内部には、ユーザーが保守できる部品はありません。メンテナンスに関しては、お近くの
Blackmagic Designのサービスセンターにお問い合わせください。
海抜2000m以上では使用しないでください。
カリフォルニア州ステートメント
この製品のユーザーは、プラスチック部品内の微量の多臭素化ビフェニルなどの化学物質にさらされる
可能性があります。カリフォルニア州は、多臭素化ビフェニルは発がん性があり、先天異常や生殖機能へ
危害を及ぼす物質であると認識しています。
詳細は、以下のウェブサイトをご確認ください。
www.P65Warnings.ca.gov
96
安全情報

保証
12
ヶ月限定保証
Blackmagic
Design
は、お買い上げの日から
12
ヶ月間、本製品の部品および仕上がりについて瑕疵がない
ことを保証します。この保証期間内に製品に瑕疵が見つかった場合、Blackmagic Designは弊社の裁量に
おいて部品代および人件費無料で該当製品の修理、あるいは製品の交換のいずれかで対応いたします。
この保証に基づいたサービスを受ける際、お客様は必ず保証期限終了前にBlackmagic Designに瑕疵を
通知し、保証サービスの手続きを行ってください。お客様の責任において不良品を梱包し、Blackmagic
Design
が指定するサポートセンターへ配送料前払で送付いただきますようお願い致します。理由の如
何を問わず、Blackmagic Designへの製品返送のための配送料、保険、関税、税金、その他すべての費
用はお客 様の自己負 担となります。
不適切な使用、または不十分なメンテナンスや取扱いによる不具合、故障、損傷に対しては、この保証は適
用されません。
Blackmagic
Design
はこの保証で、以下に関してサービス提供義務を負わないものとしま
す。
a
)製品のインストールや修理、サービスを行う
Blackmagic
Design
販売代理人以外の者に よって 生 じ
た損傷の修理、
b
)不適切な使用や互換性のない機器への接続によって生じた損傷の修理、
c
)
Blackmagic
Designの部品や供給品ではない物を使用して生じたすべての損傷や故障の修理、d)改造や他製品との
統合により時間増加や製品の機能低下が生じた場合のサービス。この保証はBlackmagic Designが保
証するもので、明示または黙示を問わず他の保証すべてに代わるものです。Blackmagic Designとその
販売社は、商品性と特定目的に対する適合性のあらゆる黙示保証を拒否します。Blackmagic Design
の不良品の修理あるいは交換の責任が、特別に、間接的、偶発的、または結果的に生じる損害に対し
て、Blackmagic Designあるいは販売社がそのような損害の可能性についての事前通知を得ているか否
かに関わらず、お客様に提供される完全唯一の救済手段となります。Blackmagic Designはお客 様による
機器のあらゆる不法使用に対して責任を負いません。
Blackmagic
Design
は本製品の使用により生じる
あらゆる損害に対して責任を負いません。使用者は自己の責任において本製品を使用するものとします。
© Copyright 2022 Blackmagic Design 著作権所有、無断複写・転載を禁じます。「Blackmagic Design」、「DeckLink」、「HDLink」
、「Workgroup Videohub」、「Multibridge Pro」、「Multibridge Extreme」、「Intensity」、「Leading the creative video
revolution」は、米国ならびにその他諸国での登録商標です。その他の企業名ならびに製品名全てはそれぞれ関連する会社の登録商
標である可能性があります。
97
保証

HyperDeck Shuttle HD
HyperDeck
Shuttle HD
Avril 2022
Manuel d’installation et d’utilisation

Bienvenue
Nous vous remercions d'avoir fait l'acquisition d'un enregistreur à disque Blackmagic
HyperDeck Shuttle HD.
Lorsque nous avons conçu les premiers enregistreurs à disque originaux, nous souhaitions
faciliter l’enregistrement et la lecture vidéo via des SSD rapides. Aujourd’hui, nous sommes
fiers de vous présenter l’HyperDeck Shuttle HD !
L’HyperDeck Shuttle HD est un enregistreur vidéo HDMI petit et portatif, conçu pour votre
bureau. Sa grande molette et ses commandes de transport familières vous permettent
de l’opérer d’une seule main. L’HyperDeck Shuttle HD est le compagnon idéal des
productions live avec un mélangeur ATEM Mini. Vous pouvez même l’utiliser en tant que
prompteur!
L’HyperDeck Shuttle HD enregistre sur des cartes SD ou des disques flash externes en
ProRes, DNxHD ou H.264 pour un enregistrement et une lecture ultra rapides.
N’oubliez pas de consulter notre page d’assistance sur
www.blackmagicdesign.com/fr
pour obtenir la dernière version de ce manuel et les mises à jour du logiciel de
l’HyperDeck. Nous vous recommandons de mettre le logiciel à jour régulièrement afin de
travailler avec les fonctions les plus récentes. Veuillez entrer vos coordonnées lorsque
vous téléchargerez le logiciel afin d'être informé des mises à jour. Nous travaillons
constamment sur de nouvelles fonctionnalités et nous efforçons d’améliorer nos services
enpermanence: c’est pourquoi nous aimerions avoir votre avis !
Grant PettyPDG de Blackmagic Design

Sommaire
Mise en route 101
Brancher l'alimentation 101
Connecter une source vidéo et audio 102
Brancher un support 102
Enregistrer de la vidéo 103
Lire 104
Utiliser la molette 105
Modifier les paramètres 107
Paramètres 108
Face arrière 117
Supports de stockage 118
Carte SD 118
Disque externe 119
Formater les supports 119
Préparer le support sur un ordinateur 119
Utiliser la fonction Prompteur 121
Blackmagic HyperDeck Setup 122
Transférer des fichiers sur un réseau 124
Developer Information 126
Blackmagic HyperDeck Ethernet Protocol 126
Protocol Commands 126
Protocol Details 130
Assistance 142
Avertissements 143
Informations de sécurité 144
Garantie 145
100
HyperDeck Shuttle HD

Mise en route
Pour utiliser votre HyperDeck Shuttle HD, il suffit de connecter l’alimentation, de brancher une
source vidéo HDMI, d’insérer une carte SD ou un support externe, puis d’appuyer sur le bouton
d’enregistrement!
Cette section du manuel est dédiée à la mise en route de l’HyperDeck Shuttle HD.
JOG SCR
CLIP
MENU SET
DISK SD
Brancher l'alimentation
Pour alimenter votre HyperDeck Shuttle HD, branchez l’adaptateur fourni à l’entrée d’alimentation
située à l’arrière de l’appareil. Serrer la bague de blocage permet d’éviter les déconnexions
accidentelles du câble d’alimentation.
HDMI OUT
HDMI IN
EXT DISK
SD CARD
ETHERNET
+
12V DC
Branchez l’adaptateur à l’entrée d’alimentation de l’HyperDeck Shuttle HD
101
Mise en route
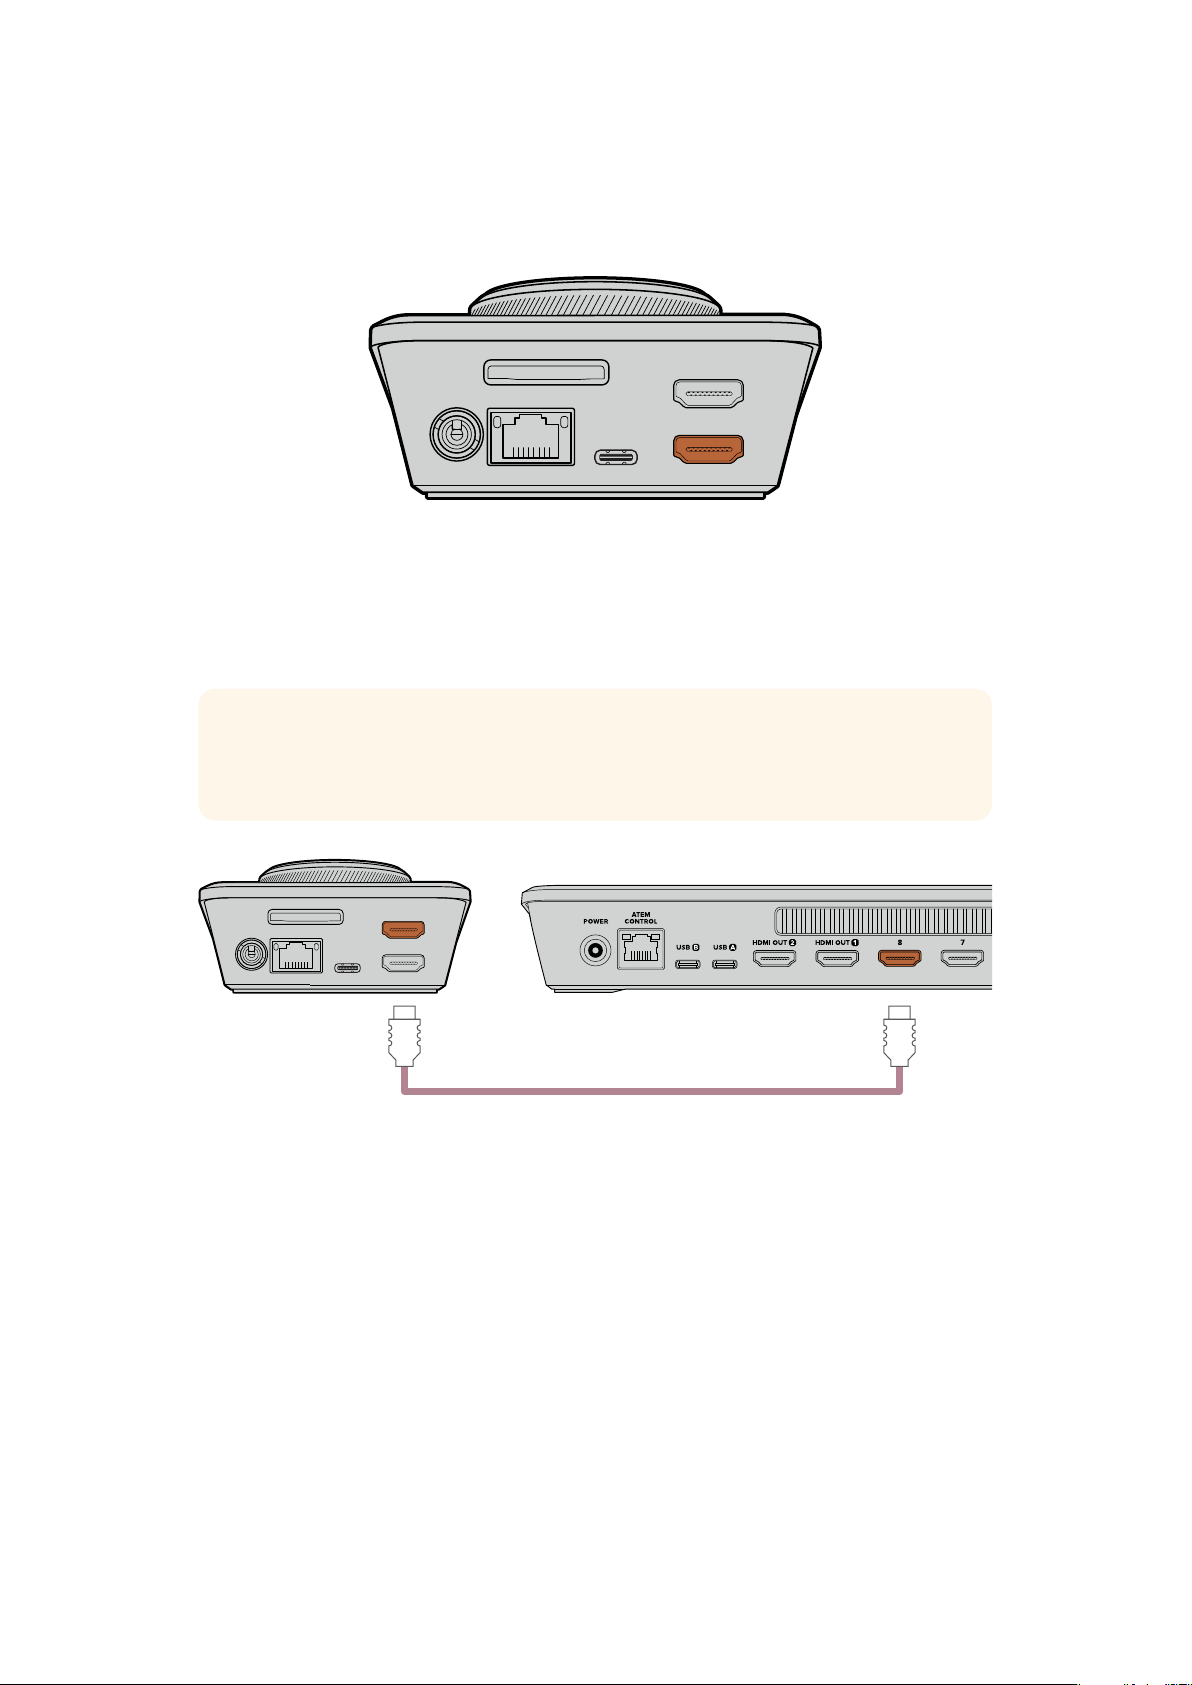
Connecter une source vidéo et audio
Pour connecter une vidéo à votre HyperDeck Shuttle HD, branchez une source vidéo HDMI à
l’entrée HDMI située à l’arrière de l’appareil.
HDMI OUT
HDMI IN
EXT DISK
SD CARD
ETHERNET
+
12V DC
Connectez votre équipement de destination à la sortie HDMI. Par exemple, un mélangeur ATEM Mini
ou un téléviseur HDMI.
La sortie HDMI permet également de visualiser le menu de paramétrage lorsque vous modifiez des
réglages pour votre HyperDeck. En effet, le menu de paramétrage est visualisable en superposition
vidéo sur la sortie HDMI. Pour plus d'informations concernant le menu de paramétrage, consultez la
section «Modifier les paramètres» de ce manuel.
CONSEIL Si vous n’arrivez pas à voir votre source vidéo sur l’écran connecté, c’est
peut-être car vous êtes en mode de lecture. Appuyez sur le bouton d'enregistrement pour
lancer le mode d’enregistrement.
HDMI OUT
HDMI IN
EXT DISK
SD CARD
ETHERNET
+
12V DC
HDMI
Branchez la sortie HDMI à votre équipement de destination, tel qu’un téléviseur HDMI ou un mélangeur ATEM Mini.
Brancher un support
Tous les enregistreurs à disque HyperDeck Shuttle HD peuvent être utilisés sans devoir configurer
les paramètres. Vous avez simplement besoin d’une carte SD ou d’un disque externe formatés.
Il est facile de formater un support via les paramètres du menu. Vous pouvez également le formater
sur un ordinateur. Pour plus d'informations, consultez la section «Formater les supports» de ce
manuel. Vous y trouverez également des informations sur les types de supports les plus adaptés à
l'enregistrement vidéo et une liste de cartes SD et de disques externes recommandés.
Brancher une carte SD :
1 Orientez les contacts dorés de la carte SD vers le haut et alignez-la avec le logement pour
carte SD. Poussez délicatement la carte dans le logement jusqu'à ce qu'elle soit en place.
102Mise en route

HDMI OUT
HDMI IN
EXT DISK
SD CARD
ETHERNET
+
12V DC
2 L'HyperDeck vérifie la carte SD. Le voyant SD en haut de l’HyperDeck Shuttle HD s’allume
en vert. Une fois vérifiée, le voyant s’éteint.
JOG SCR
CLIP
MENU SET
DISK SD
DISK SD
Votre HyperDeck Shuttle HD est désormais prêt pour l’enregistrement et la lecture!
Continuez à lire ce manuel pour des informations plus détaillées concernant l’enregistrement et la
lecture des clips, la modification des paramètres, et bien plus.
Enregistrer de la vidéo
Une fois que votre source vidéo s’affiche sur l’équipement de destination HDMI, vous pouvez
commencer à enregistrer.
Appuyez sur le bouton d'enregistrement pour démarrer l'enregistrement. Lorsque vous enregistrez
sur une carte SD, le voyant SD s’allume en vert. Les boutons d’enregistrement et de lecture
s’allument aussi. Lorsque vous enregistrez sur un disque externe, le voyant du disque
s’allume en rouge.
JOG SCR
CLIP
MENU SET
DISK SD
Pour arrêter l'enregistrement, appuyez sur le bouton d'arrêt.
103Enregistrer de la vidéo
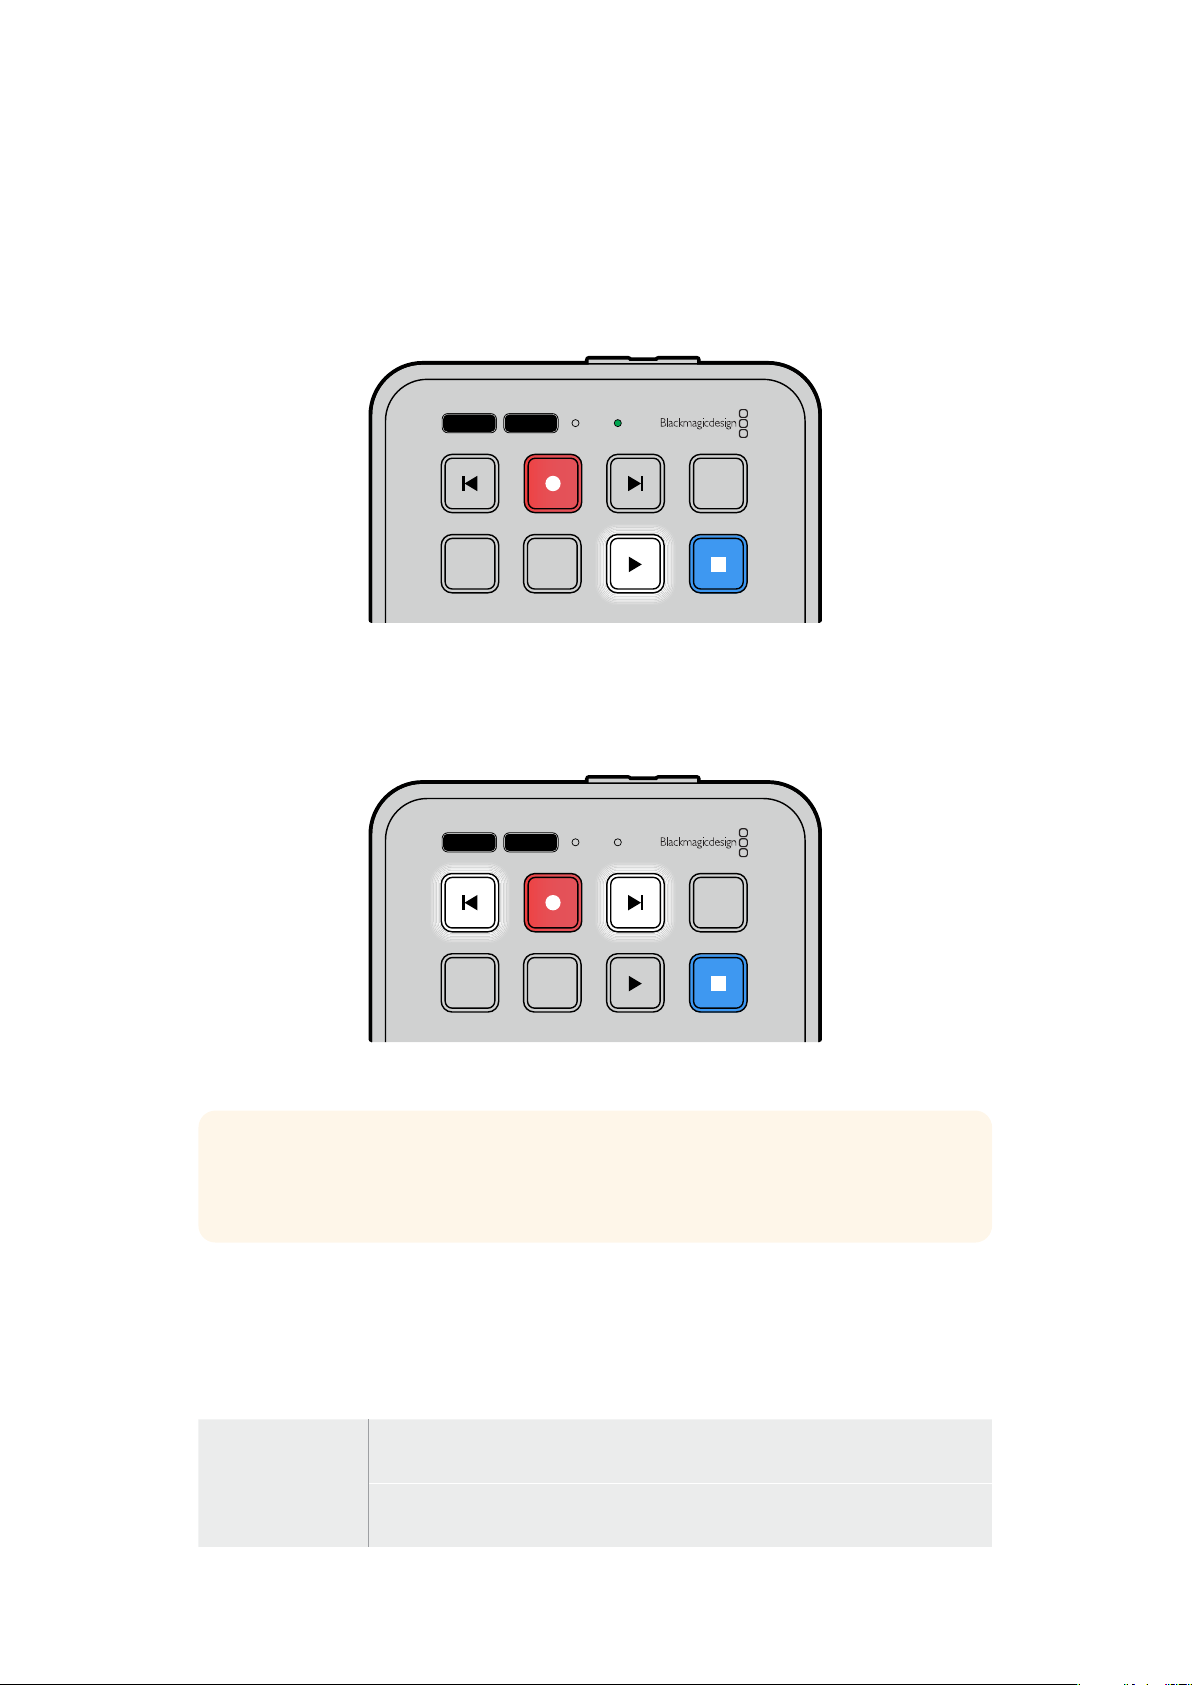
Lire
Appuyez sur le bouton de lecture pour lire les clips. Pendant la lecture, le bouton de lecture s’allume
et les voyants Disk et SD s’allument en vert.
Si plusieurs clips ont été enregistrés, vous pouvez les passer rapidement en revue en appuyant sur
les boutons d’avance ou de retour.
JOG SCR
CLIP
MENU SET
DISK SD
Boutons d’avance et de retour
Appuyez sur le bouton de retour pour revenir au début du clip. En appuyant plusieurs fois sur ce
bouton, vous reviendrez au précédent clip enregistré.
Appuyez sur le bouton d’avance pour avancer dans vos clips.
JOG SCR
CLIP
MENU SET
DISK SD
Utilisez les boutons d’avance et de retour pour repérer le début de chaque clip
CONSEIL Pour lire des fichiers vidéo sur votre HyperDeck, vous devrez réglez le codec pour
qu’il corresponde au codec utilisé pour enregistrer les fichiers. Vous pouvez le faire depuis le
menu. Pour plus d'informations, consultez la section «Modifier les paramètres» de ce manuel.
Lire des clips en boucle
Si vous appuyez une seconde fois sur le bouton de lecture pendant la lecture, votre HyperDeck
Shuttle HD lira tous les clips en boucle jusqu’à ce que vous appuyiez sur le bouton d’arrêt.
Si vous souhaitez lire un seul clip en boucle, réglez votre HyperDeck sur le mode
Clip, puis appuyez
une fois sur le bouton de lecture pour le lire, et une seconde fois pour le lire en boucle.
Lire tous les clips
en boucle
Pendant la lecture, appuyez sur le bouton de lecture une seconde fois pour lire
en boucle tous les clips enregistrés
Lire le clip en
boucle
Lorsque vous êtes en mode Clip, appuyez une seconde fois sur le bouton de
lecture pour lire en boucle le clip en cours
104Lire

Mode Clip
Le mode Clip vous permet de limiter la lecture à un seul clip. Par exemple, lorsque le mode Clip est
activé, vous pouvez aller sur un clip et appuyer sur lecture tout en sachant que cette dernière
s’arrêtera à la fin du clip.
JOG SCR
CLIP
MENU SET
DISK SD
Lorsque le mode Clip est sélectionné, appuyer une seconde
fois sur le bouton de lecture permet de lire en boucle le
clip en cours
Utiliser la molette
La molette vous permet de parcourir rapidement vos clips et de sélectionner des moments
spécifiques à lire, ou de les revoir image par image. C’est pratique si vous devez localiser un
moment précis en contrôlant visuellement le clip lorsque vous tournez la molette. C’est aussi utile
pour positionner la tête de lecture sur un repère précis pour que le clip puisse être diffusé pendant
un événement en direct, par exemple.
Les modes de recherche incluent Jog, Scroll et Shuttle.
Jog Lit le clip image par image pour un contrôle précis.
Scroll
Le mode Scroll vous permet d’avancer et de reculer à travers tous
les médias enregistrés. Lorsque vous tournez la molette, le scroll est
verrouillé à votre mouvement. Ainsi, vous avez un contrôle complet
de l’emplacement de la lecture.
Shuttle
Appuyez sur les boutons {Jog} et {Scr} simultanément pour activer le
mode Shuttle. Une fois que vous êtes en mode Shuttle, vous pouvez
reculer ou avancer rapidement à travers vos médias en tournant la
molette vers la gauche ou vers la droite. Au fur et à mesure que vous
tournez la molette, le défilement sera de plus en plus rapide jusqu’à
ce que vous atteigniez la vitesse maximale de x50. Pour arrêter le
défilement, tournez la molette jusqu’à ce que vous atteigniez votre
position de départ. Pour vous arrêter à un emplacement précis,
appuyez sur le bouton stop, ou appuyez sur lecture pour reprendre
la lecture à l’emplacement actuel. Il est important de noter que la
vitesse de défilement maximale peut être réduite à l’aide du menu
Réglages. Pour plus d’informations, consultez la section « Paramètres »
de ce manuel.
105Lire
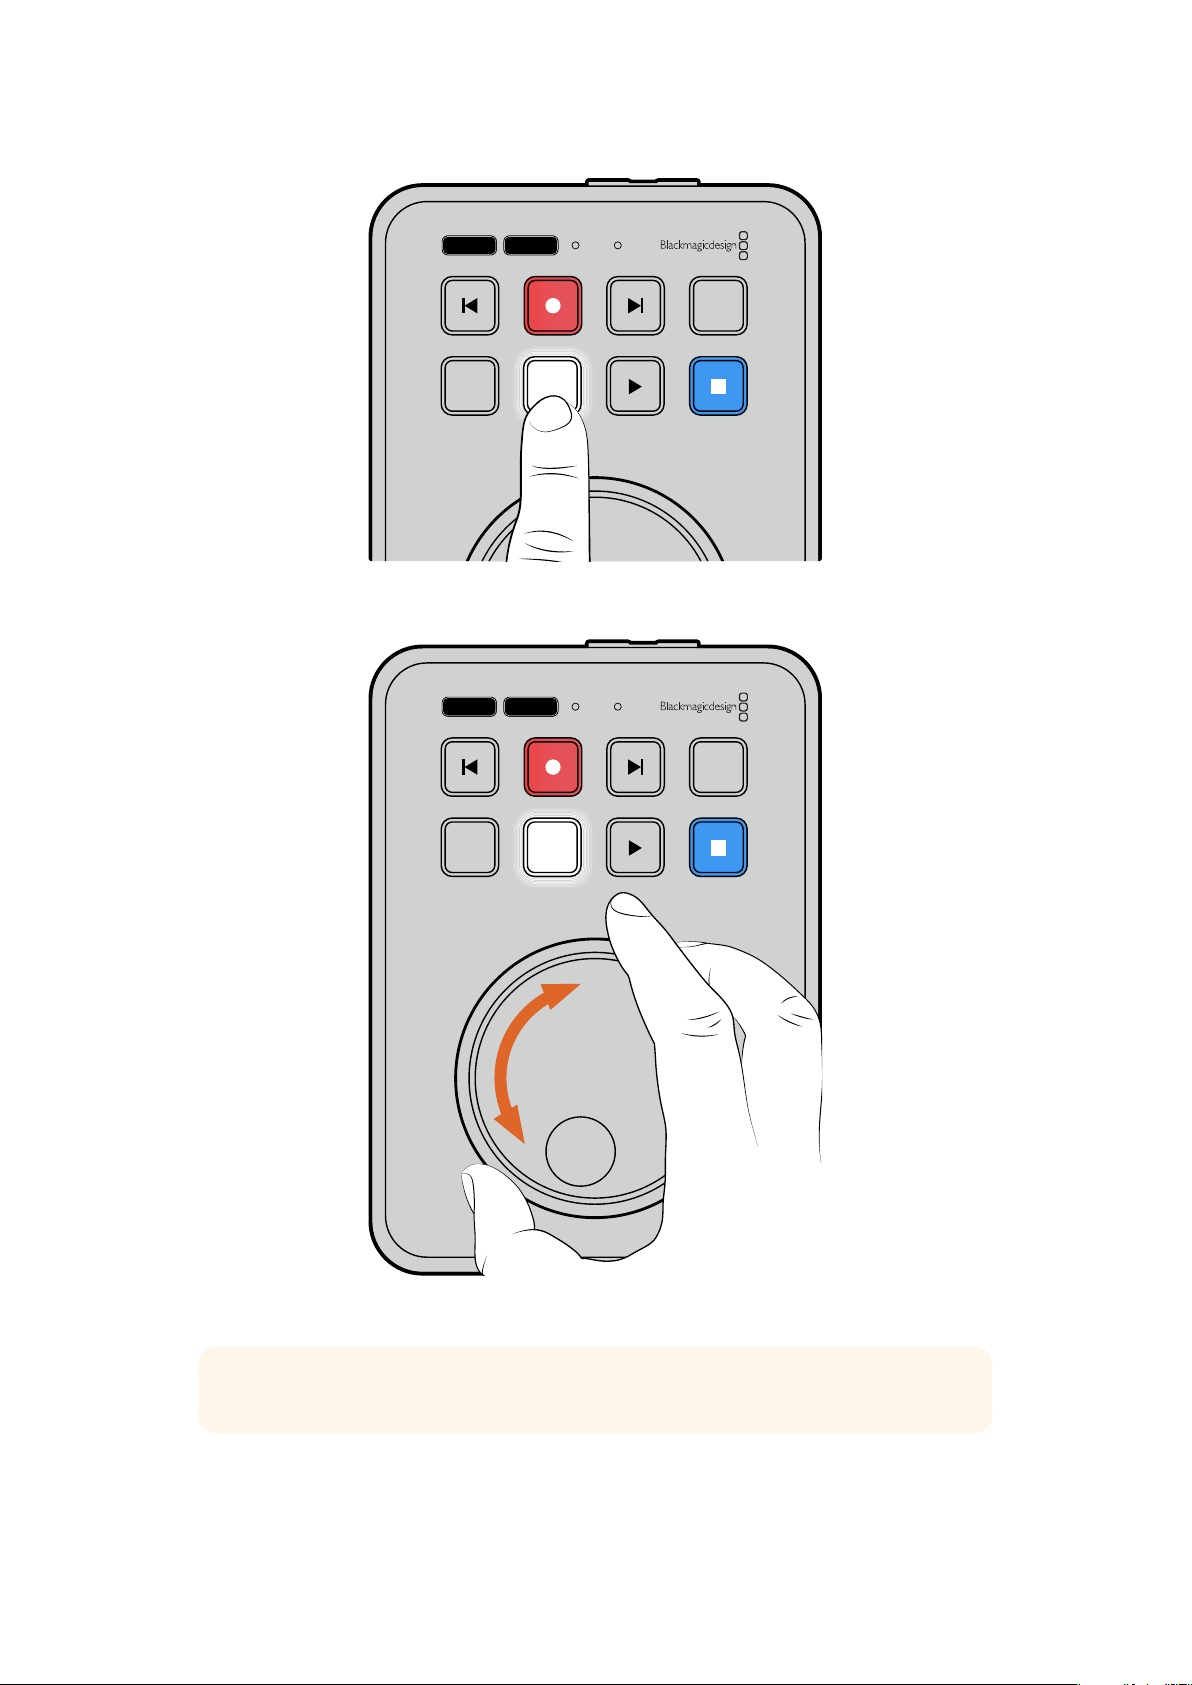
JOG SCR
CLIP
MENU SET
DISK SD
Appuyez sur les boutons Jog ou Scr pour sélectionner les
modes Jog ou Shuttle
JOG SCR
CLIP
MENU SET
DISK SD
Une fois qu’un mode de recherche est sélectionné, tournez la molette
CONSEIL Pour revenir à une lecture normale, appuyez sur le bouton de lecture ou d’arrêt.
106Lire

Modifier les paramètres
Appuyer sur le bouton Menu permet d’ouvrir les paramètres du menu, qui apparaîtront en
superposition de la vidéo dans le coin gauche de votre écran HDMI connecté.
JOG SCR
CLIP
MENU SET
DISK SD
Appuyez sur le bouton Menu pour afficher l'écran de paramétrage
Utilisez la molette pour naviguer vers un sous-menu ou un paramètre
Appuyez sur le bouton Set pour sélectionner le sous-menu ou le paramètre
Ajustez les paramètres à l’aide de la molette ou des boutons d’avance et de retour. Confirmez la
sélection en appuyant sur le bouton Set.
Pour sortir du menu, appuyez sur le bouton
Menu afin de revenir en arrière et d’accéder à l’écran
d'accueil.
CONSEIL Vous pouvez positionner le menu dans n’importe quel des quatre coins de votre
écran via le menu de paramétrage. Nous vous recommandons de désactiver le menu une
fois vos paramètres modifiés, pour vous assurer que la sortie HDMI est un clean feed
lorsqu’elle est connectée à un mélangeur HDMI, tel qu’un ATEM Mini Extreme.
JOG SCR
CLIP
MENU SET
DISK SD
107Modifier les paramètres
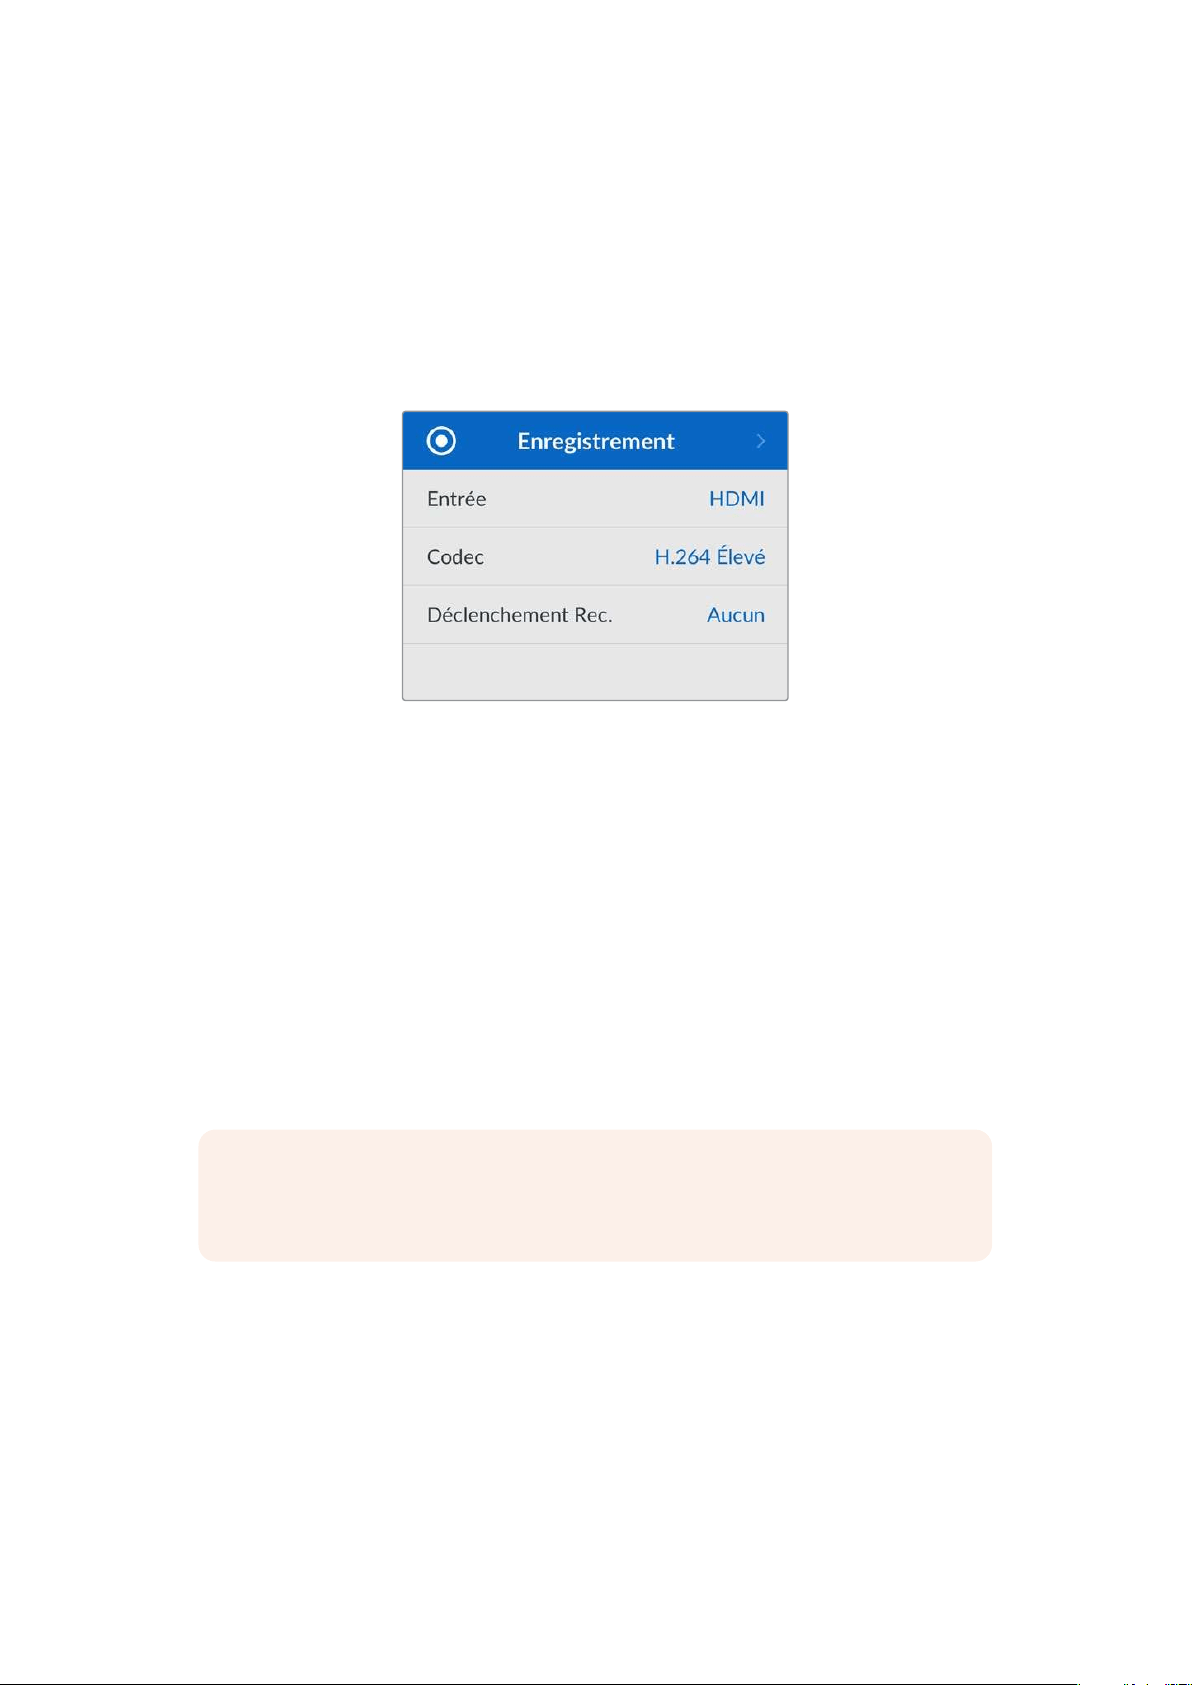
Paramètres
Le menu de paramétrage est classé en 5 catégories distinctes: Enregistrement, Moniteur, Audio,
Stockage et Réglages. Chaque sous-menu contient des paramètres dédiés qui sont pour la plupart
ajustables via le panneau de contrôle HyperDeck Shuttle HD. Certains paramètres sont en affichage
seul et apparaîtront grisés, comme le préfixe du fichier par exemple. Dans ce cas, le paramètre peut
être ajusté via l’utilitaire HyperDeck Setup.
Menu Enregistrement
Entrée
Affiche l’entrée HDMI de l’HyperDeck Shuttle HD.
Codec
L’HyperDeck Shuttle HD peut enregistrer de la vidéo compressée à l'aide des codecs H.264, Apple
ProRes et DNxHD. Pour utiliser la fonction du prompteur, sélectionnez
Prompteur.
Lancer Rec.
Il existe deux modes de déclenchement de l’enregistrement: Vidéo marche/arrêt, et Timecode Run.
Certaines caméras, comme la Blackmagic Pocket Cinema Camera 4K, envoient un signal via HDMI
pour démarrer ou arrêter l’enregistrement sur les enregistreurs externes. Lorsque vous sélectionnez
Vidéo marche/arrêt, l’HyperDeck démarrera ou arrêtera l’enregistrement lorsque le bouton
d’enregistrement sera pressé sur la caméra.
Utilisez l’option
T/C Run pour que l’appareil déclenche l’enregistrement lorsqu’il reçoit un signal de
timecode valide via les entrées. L'enregistrement s’interrompt lorsque le signal s’arrête. Désactivez
le déclenchement de l’enregistrement en sélectionnant l’option Aucun.
REMARQUE Lorsque vous enregistrez avec une caméra HDMI, veillez à ce que les
informations à l'écran soient désactivées sur le signal de sortie, car les informations
présentes sur la vidéo provenant de la caméra sont enregistrées avec l'image.
108Paramètres
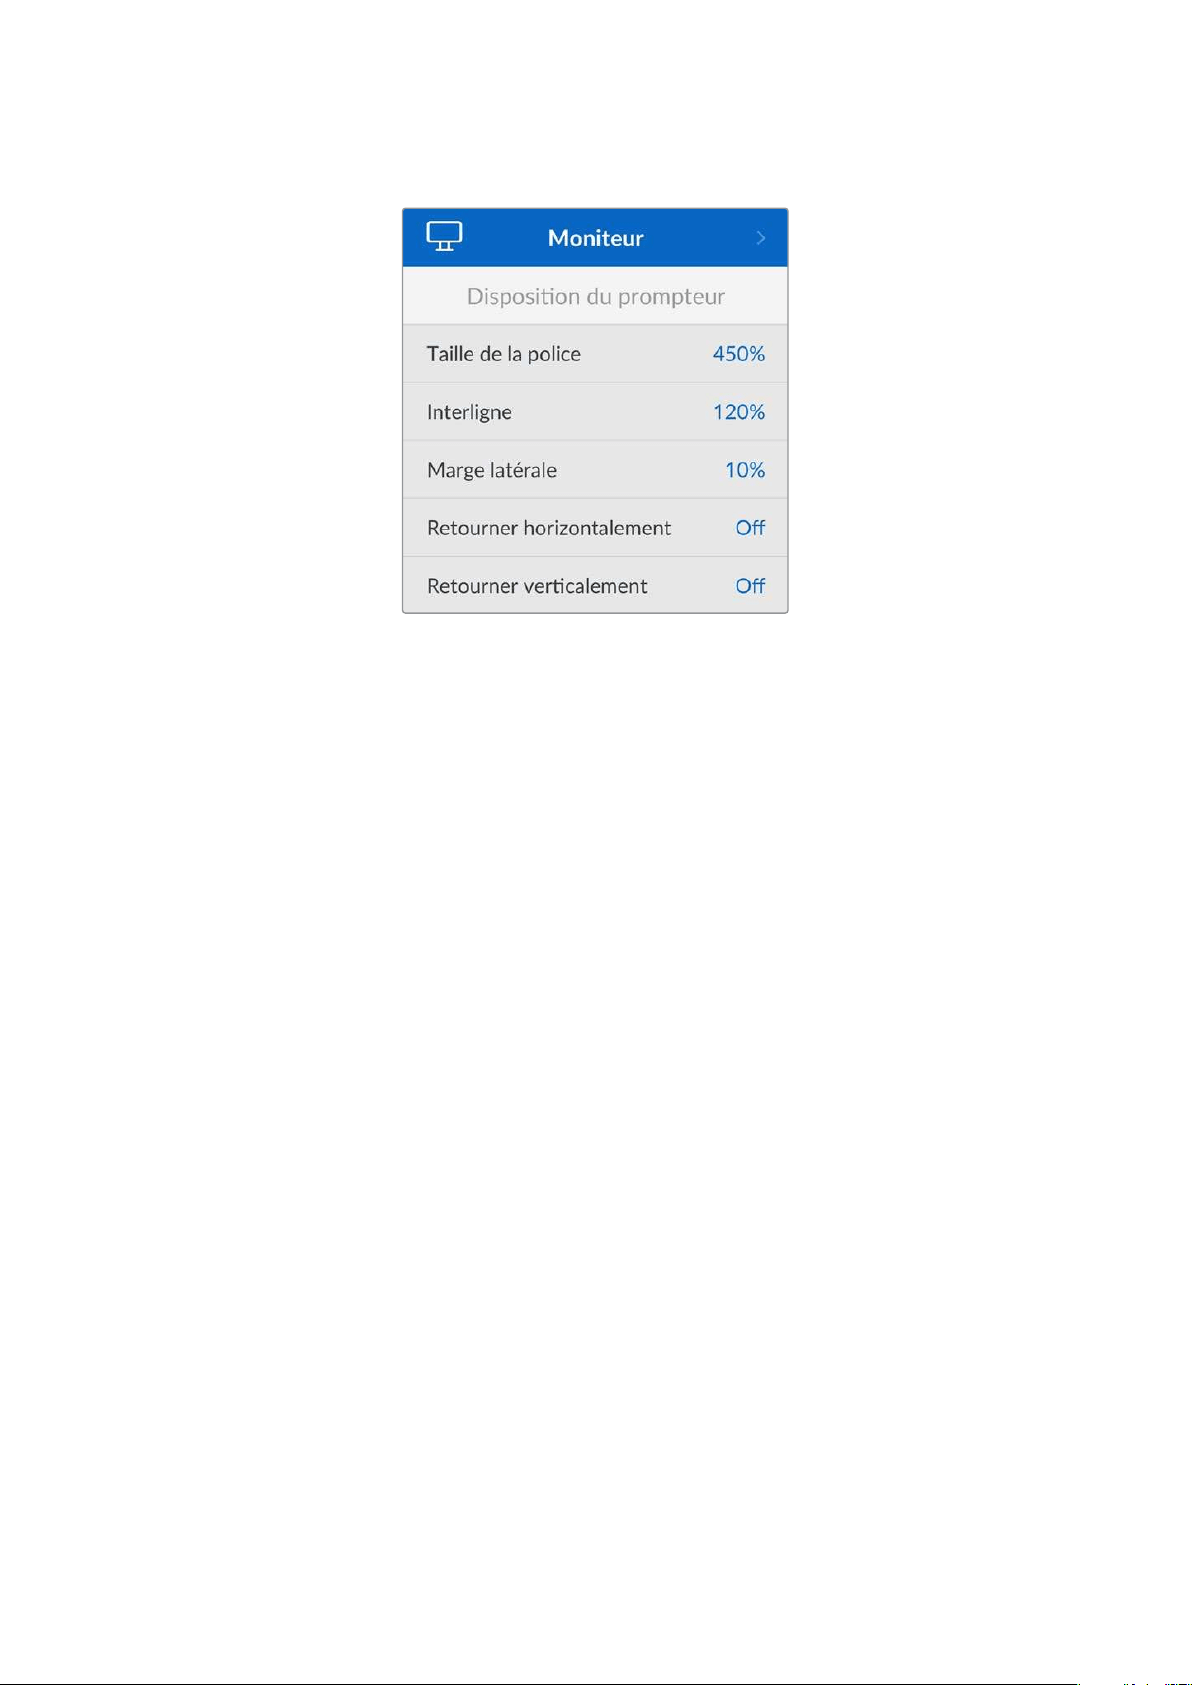
Menu Moniteur
Disposition du prompteur
Le menu Moniteur contient tous les paramètres pour l’utilisation de l’HyperDeck Shuttle HD en
prompteur.
Taille de la police
Ajustez la taille du texte en sélectionnant la taille de la police, puis en appuyant sur Set. Tournez la
molette dans le sens des aiguilles d’une montre pour augmenter la taille, ou dans le sens inverse
pour la diminuer.
Interligne
Tournez la molette pour augmenter ou diminuer l’interligne.
Marge latérale
Ajustez la largeur des marges latérales de chaque côté de l’affichage du prompteur.
Retourner
Si le moniteur de votre prompteur est réglé pour être réfléchi sur un miroir, par exemple lorsque le
présentateur est devant une caméra ou sur un podium, il faudra utiliser les paramètres Retourner
pour qu’il puisse lire le texte. Deux modes de retournement sont disponibles :
Retourner horizontalement - Utilisez ce paramètre lorsque le bas du moniteur de votre
prompteur est monté près de la base du miroir.
Retourner verticalement - Utilisez ce paramètre lorsque le bas du moniteur de votre
prompteur est monté loin de la base du miroir.
109Paramètres
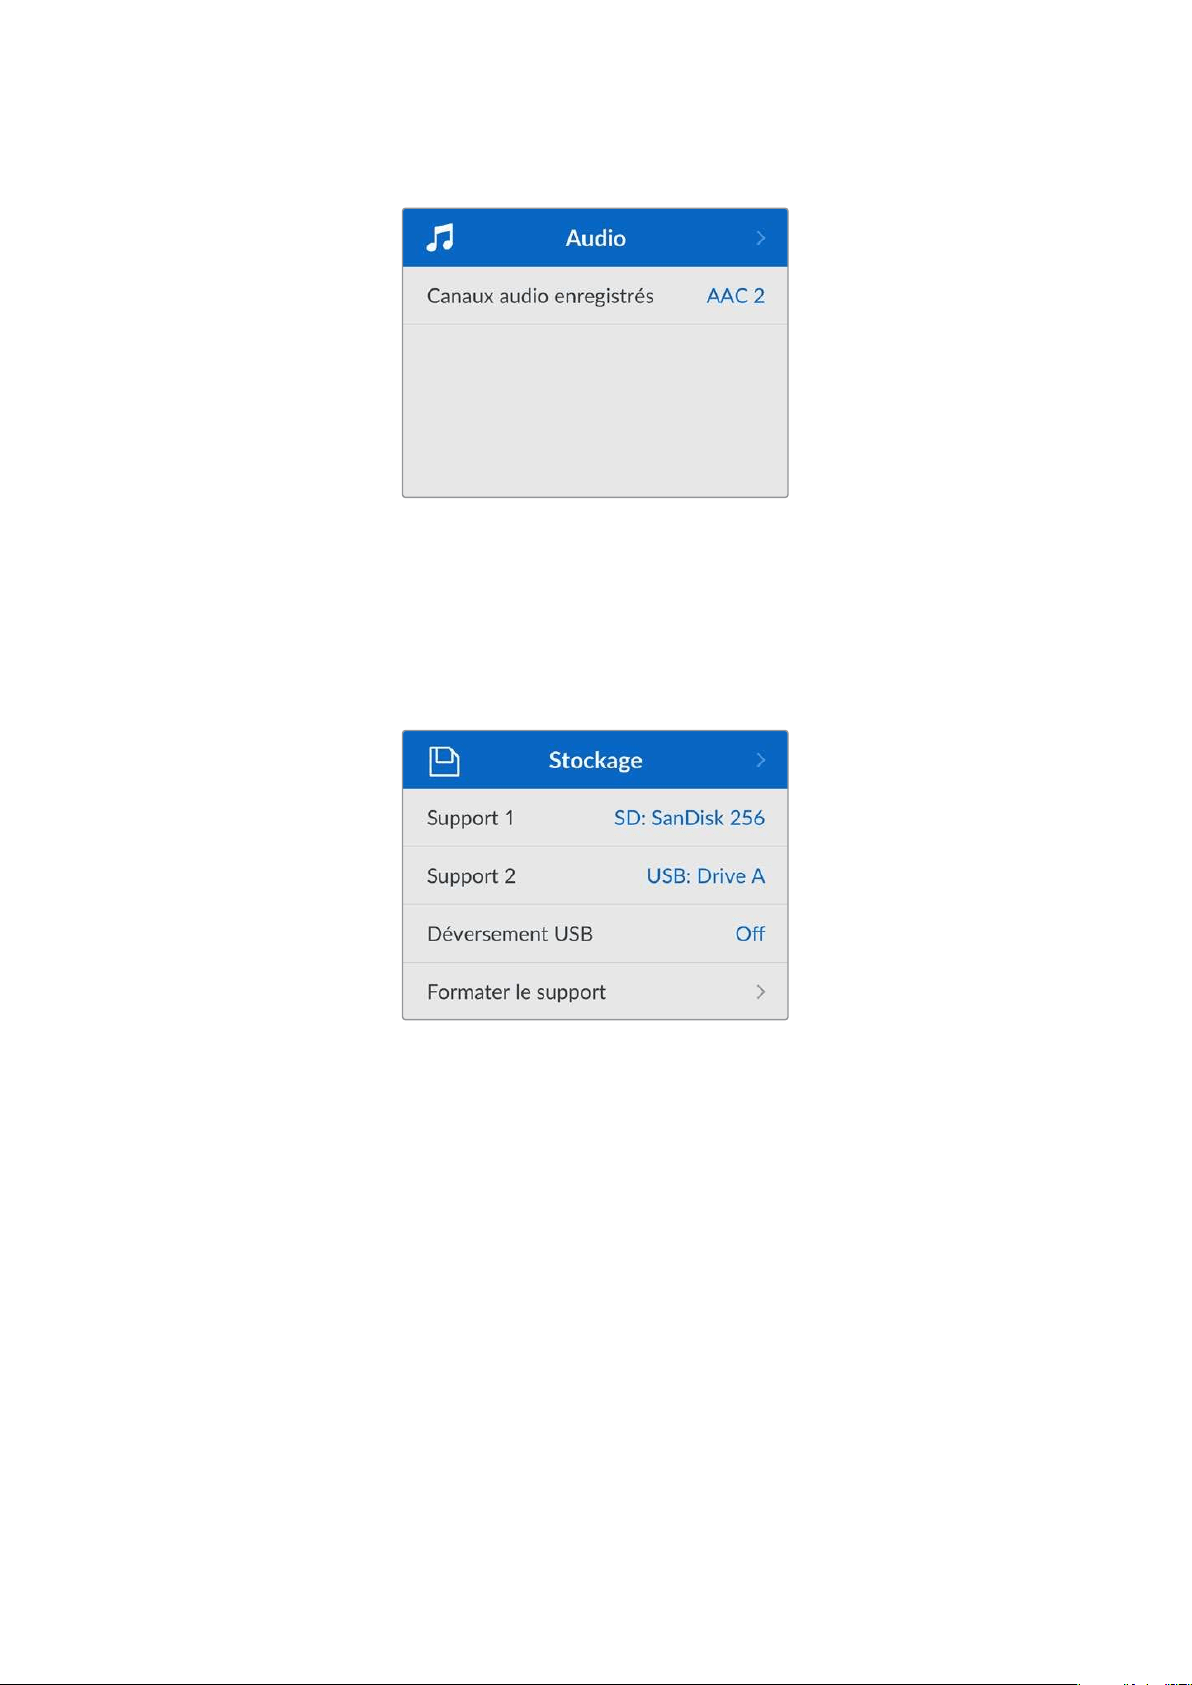
Menu Audio
Canaux audio enregistrés
L’HyperDeck Shuttle HD peut enregistrer simultanément jusqu’à 8 canaux audio PCM. Pour
sélectionner le nombre de canaux à enregistrer, agrandissez la liste des canaux audio enregistrés et
sélectionnez 2, 4 ou 8 canaux.
Si le codec est réglé sur H.264, vous pouvez sélectionner 2 canaux d’audio AAC afin de mettre vos
enregistrements directement sur YouTube.
Menu Stockage
Les supports connectés apparaîtront dans les paramètres de stockage. Support 1 affiche le nom de
la carte SD connectée et Support 2 affiche n’importe quel disque flash USB branché au connecteur
Ext disk. Lorsque vous utilisez un hub USB, tel qu’un Blackmagic MultiDock 10G, le disque actif
est affiché.
Déversement USB
Si vous utilisez un Blackmagic MultiDock 10G ou un appareil similaire pour connecter plus d’un
disque via la connexion USB
Ext disk, vous pouvez activer cette option pour que l’enregistrement
d’un disque externe se déverse sur le prochain.
Formater le support
Les cartes SD et les supports connectés via le port
Ext disk à l’arrière peuvent être formatés
directement sur l’appareil ou via un ordinateur Mac ou Windows.
Préparer les supports sur l’HyperDeck Shuttle HD :
1 À l’aide de la molette et du bouton Set, sélectionnez Formater le support.
2 Dans la liste, sélectionnez le support à formater et appuyez sur Set.
3 Choisissez le format et appuyez sur Set.
110Paramètres

4 Un message de confirmation apparaîtra indiquant la carte qui sera formatée et le format
sélectionné.
5 Une fenêtre de formatage apparaîtra une fois le processus terminé. Sélectionnez Ok.
Nous conseillons d'utiliser le format HFS+, également connu sous le nom de Mac OS X Extended,
car il prend en charge la journalisation. Les données stockées sur un support journalisé ont plus de
chance d'être récupérées si le support est endommagé. Le format HFS+ est pris en charge
nativement par Mac. Le format exFAT est pris en charge nativement par Mac et Windows. Il n'est
donc pas nécessaire d'utiliser de logiciel tiers, mais la journalisation n’est pas prise en charge.
Pour formater un support sur un ordinateur Mac ou Windows, consultez la section «Formater un
support» de ce manuel.
Menu Réglages
Ce menu contient les réglages pour la sélection de la langue, des normes par défaut, ainsi que des
options pour l’affichage du menu, les paramètres réseau et le timecode.
Nom
Lorsqu’il y a plusieurs HyperDeck Shuttle HD sur le réseau, il peut être utile de leur donner chacun
un nom pour mieux les identifier. Pour ce faire, utilisez le Blackmagic HyperDeck Setup ou le
Blackmagic HyperDeck Ethernet Protocol et un émulateur de terminal. Le nom apparaîtra dans le
menu Réglages.
Langue
L’HyperDeck Shuttle HD prend en charge 13 langues dont l’anglais, le chinois, le japonais, le coréen,
l’espagnol, l’allemand, le français, le russe, l’italien, le portugais, le turc, l’ukrainien et le polonais.
Pour sélectionner la langue :
1 Une fois le menu Réglages sélectionné, appuyez sur Set.
2 À l’aide de la molette, faites défiler pour sélectionner la langue et appuyez sur Set.
111Paramètres

3 Utilisez la molette pour sélectionner la langue et appuyez sur Set. Une fois la langue
sélectionnée, vous retournerez automatiquement au menu Réglages.
Date
Pour ajuster la date, sélectionnez le champ de date et appuyez sur
Set. Vous pouvez sélectionner le
jour, le mois et l’année à l’aide de la molette. Cela générera le suffixe horodaté.
Heure
Pour ajuster l’heure, sélectionnez ce paramètre et appuyez sur
Set. Utilisez la molette pour régler les
heures et les minutes. L'heure de l’HyperDeck Shuttle HD est configurée au format 24 heures.
Logiciel
Affiche la version actuelle du logiciel.
Caméra
Ce paramètre est utile lorsque vous utilisez l’HyperDeck pour enregistrer des fichiers ISO depuis
plusieurs caméras et les montez sur une timeline multicaméra dans DaVinci Resolve.
La lettre d’identification de chaque caméra apparaîtra dans les métadonnées du fichier, permettant
ainsi à DaVinciResolve d’identifier facilement chaque angle avec la fonctionnalité Sync bin.
Assignez les caractères A-Z ou 1-9 à votre caméra
Norme par défaut
Parfois, l’HyperDeck Shuttle HD ne sait pas quelle norme vidéo vous voulez utiliser. Ce paramètre
indiquera à l’HyperDeck la norme vidéo que vous souhaitez utiliser majoritairement.
Par exemple, si un HyperDeck Shuttle HD est allumé, qu’aucune entrée vidéo n’est connectée et
que vous insérez un disque contenant des fichiers avec 2 normes vidéo, quelle norme l’HyperDeck
doit-il lire? La norme vidéo par défaut indique la norme vidéo que vous préférez. L’appareil
sélectionne ainsi ce format et lit ces fichiers.
La norme vidéo par défaut est aussi utile quand vous allumez un HyperDeck Shuttle HD pour la
première fois et qu’il n’a aucune entrée vidéo et qu’aucun disque n’a été inséré. Dans ce cas,
l’HyperDeck ne sait pas quelle norme vidéo utiliser pour la sortie de monitoring. La norme vidéo par
défaut lui servira de guide.
En revanche, elle n’est qu’un simple guide. Elle n’écrasera rien. Ainsi, si vous avez un disque avec un
seul type de fichier vidéo et que vous lancez la lecture, l’enregistreur à disque HyperDeck basculera
sur cette norme vidéo et la lira. Il ignorera la norme vidéo par défaut, car il est évident que vous
souhaitez uniquement lire les fichiers sur le disque.
L’enregistrement fonctionne de façon similaire. Si vous lancez l’enregistrement, l’HyperDeck
enregistrera la norme vidéo connectée à l’entrée vidéo. Une fois l’enregistrement terminé,
l’HyperDeck Shuttle HD lira les fichiers avec cette norme vidéo, même si le disque contient d’autres
fichiers qui correspondent à la norme vidéo par défaut. Il est entendu qu’on veut généralement lire
112Paramètres
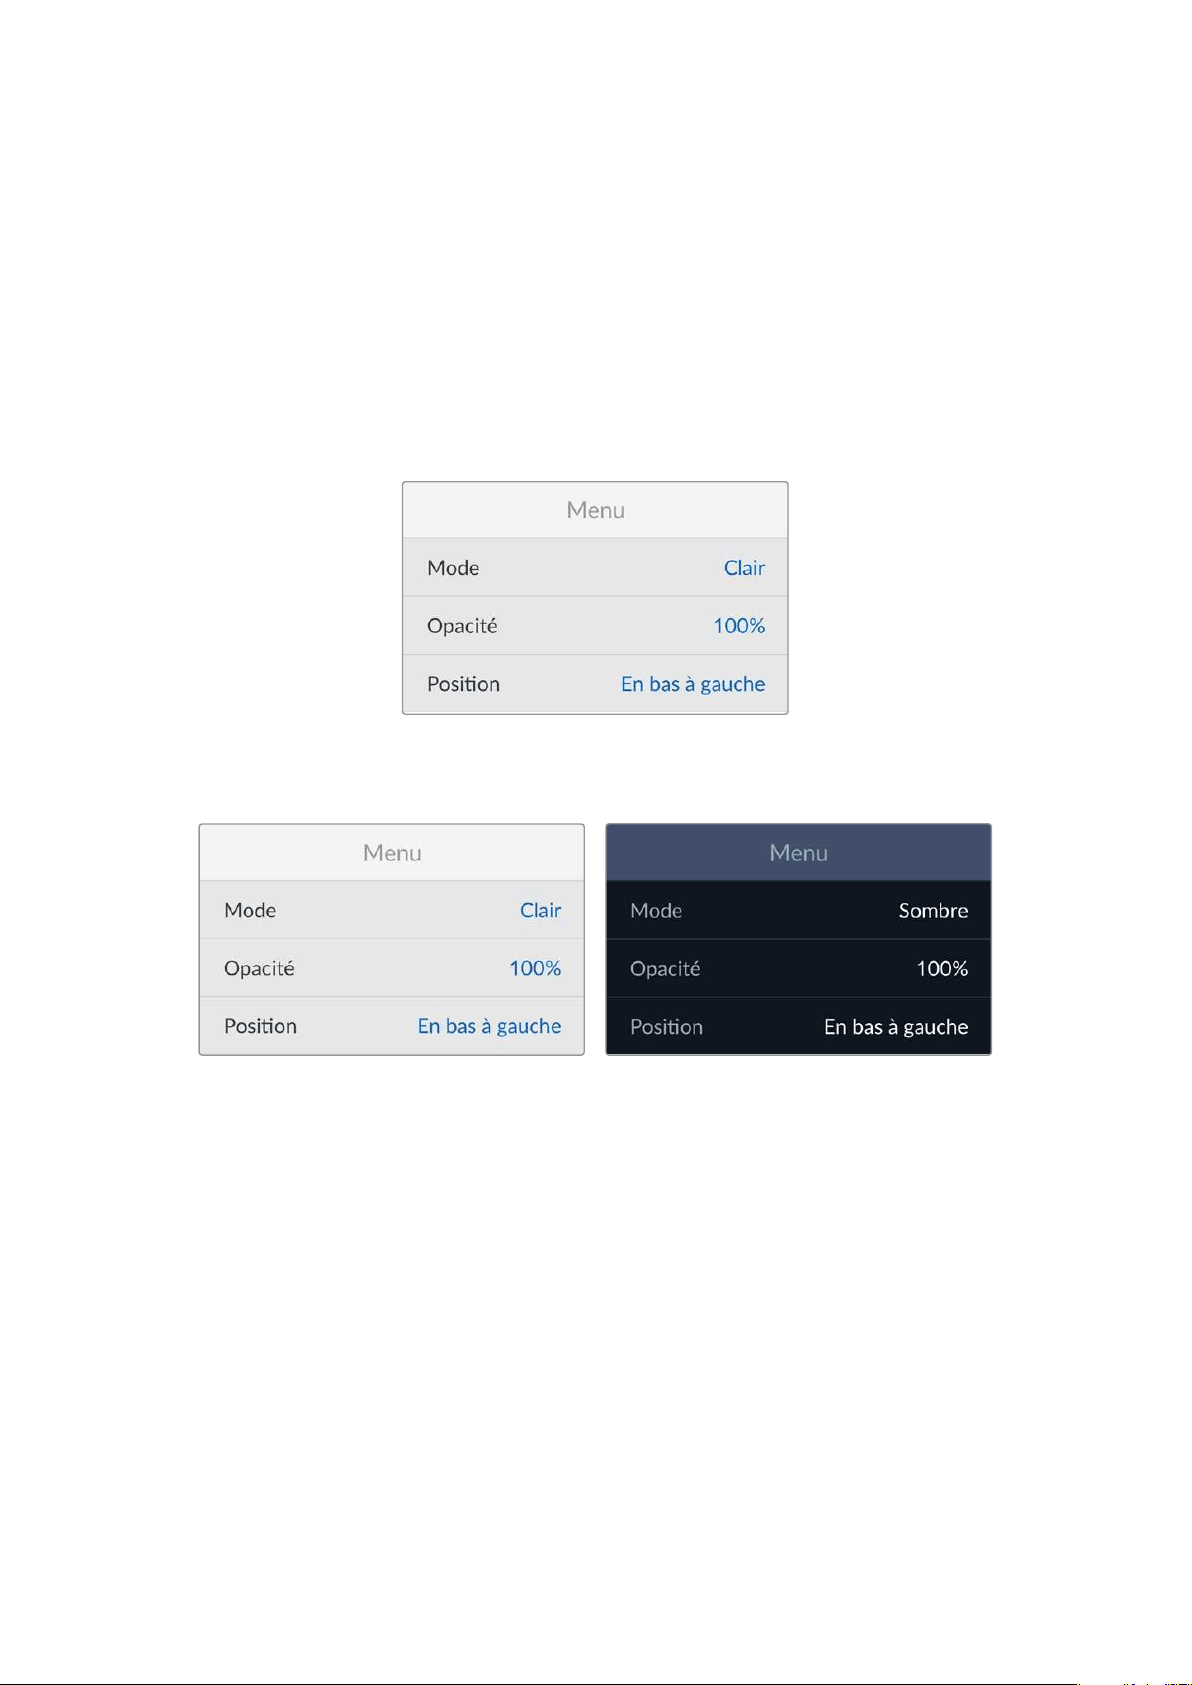
la norme vidéo qu’on vient d’enregistrer. Si vous débranchez et rebranchez le disque, alors la norme
vidéo par défaut sera utilisée pour choisir le type de fichier à lire.
La norme vidéo par défaut n’est qu’un guide pour aider l’HyperDeck Shuttle HD à prendre des
décisions en cas de doute. Elle ne force pas l’enregistreur à réagir de façon particulière.
Vitesse max. Shuttle
La vitesse de défilement maximale sur l’HyperDeck Shuttle HD est de x50. Pour réduire cette
vitesse, vous pouvez choisir parmi la liste des vitesses préréglées.
Menu
Via ce menu des réglages, vous pouvez ajuster la position, ainsi que le mode d’apparence du menu
sur l’écran HDMI connecté.
Mode
Réglez l’écran de l’HyperDeck en mode sombre ou clair. Le mode clair offrira davantage de
contraste lorsque les médias sont sombres, ou lorsque vous êtes en mode prompteur.
Opacité
Ajustez les niveaux pour réduire l’opacité de l’affichage du menu sur l’écran connecté de 100% (par
défaut) à 20%.
Position
Par défaut, le menu apparaîtra superposé en bas à gauche de l’écran. Pour déplacer ce menu,
sélectionnez ce paramètre et appuyez sur le bouton
Set. Ensuite, vous pouvez choisir de positionner
le menu en haut à gauche, en haut à droite, en bas à gauche ou en bas à droite de l’écran.
113Paramètres
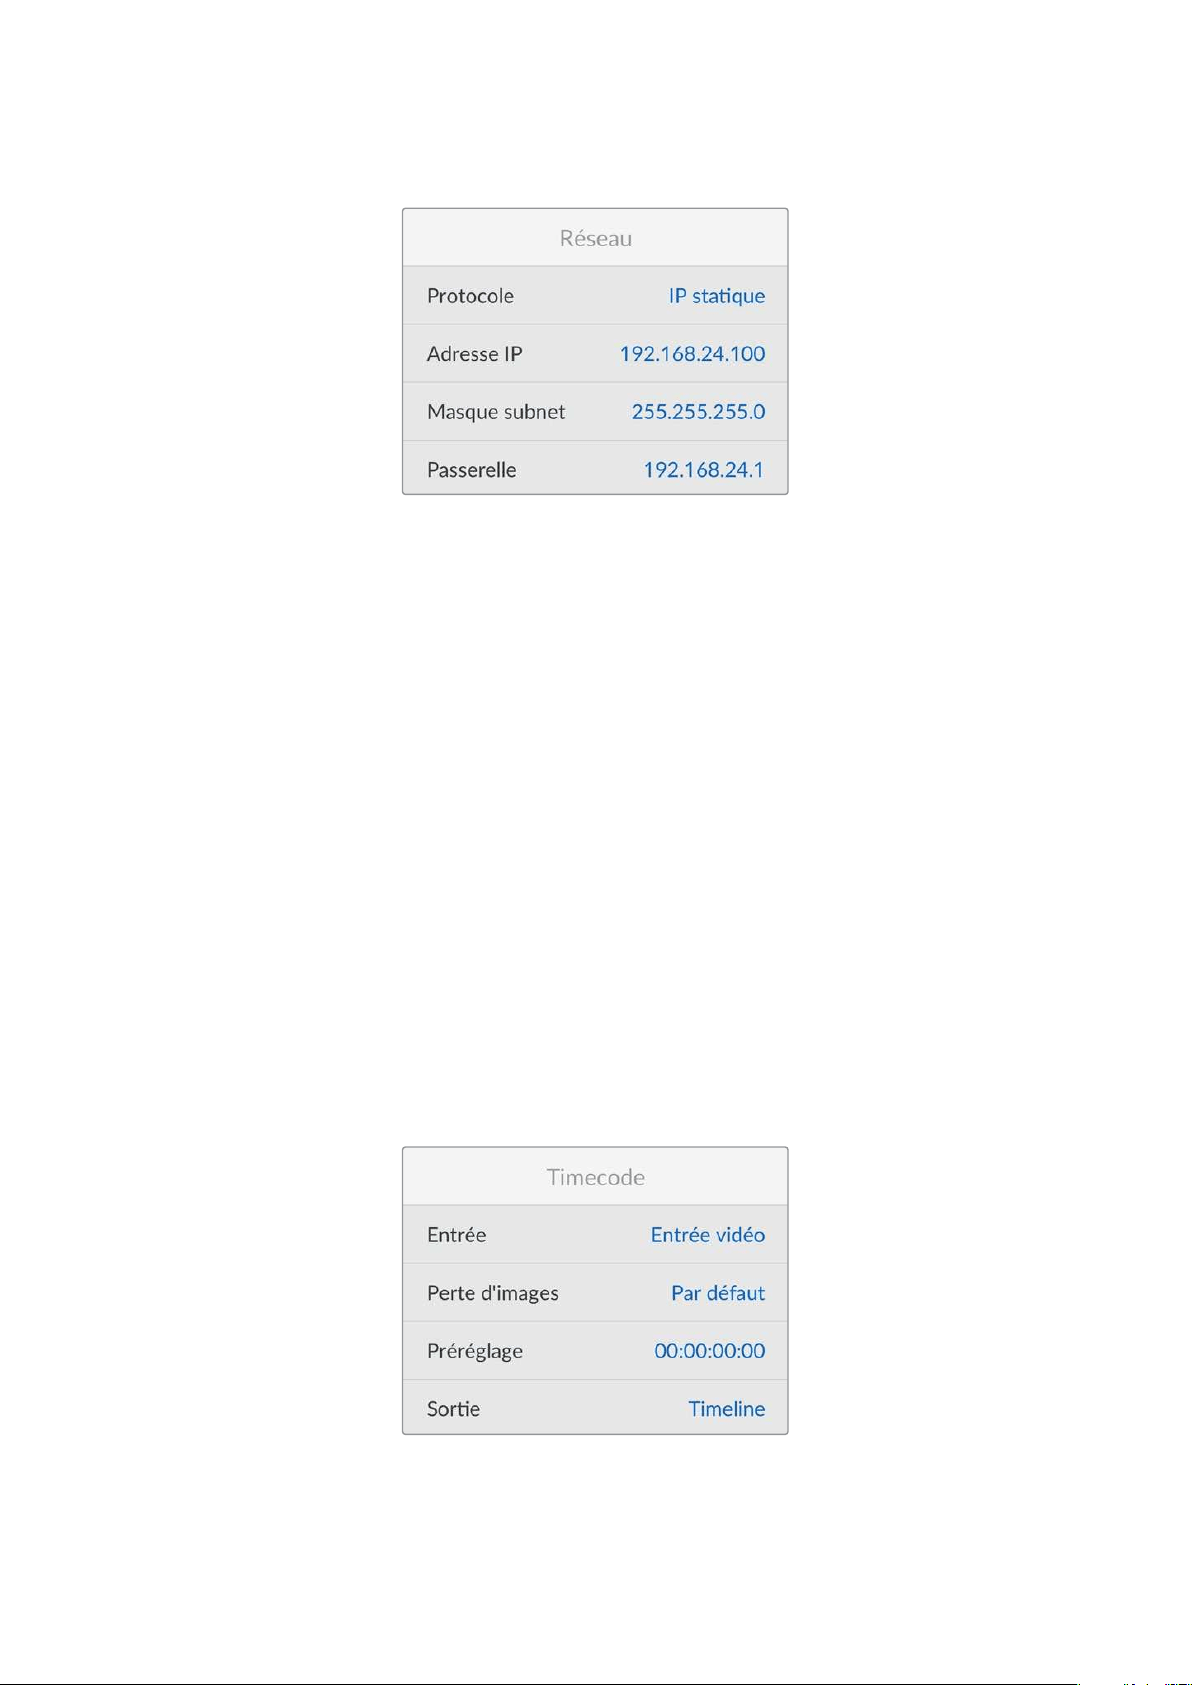
Réseau
Protocole
Le Blackmagic HyperDeck est réglé sur DHCP. Une fois connecté, le serveur de votre réseau
assignera automatiquement une adresse IP et aucun autre paramètre réseau n’aura besoin d’être
ajusté. Si vous avez besoin d’une adresse manuelle, vous pouvez vous connecter via une IP statique.
Une fois
Protocole sélectionné, appuyez sur le bouton Set pour accéder au menu. Puis, faites défiler
jusqu’à IP statique et appuyez sur Set.
Adresse IP, Masque de sous-réseau, Passerelle, DNS primaire et DNS secondaire
Une fois l’IP statique sélectionnée, vous pouvez saisir les informations du réseau manuellement.
Pour changer l’adresse IP:
1 Utilisez la molette pour mettre Adresse IP en surbrillance et appuyez sur le bouton Set sur
le panneau de contrôle de votre HyperDeck.
2 À l’aide de la molette, ajustez l’adresse IP et appuyez sur Set pour confirmer avant d’ajuster
la série de valeurs suivante.
3 Appuyez sur Set pour confirmer le changement et passer à la valeur suivante.
Quand vous avez fini de saisir l’adresse IP, vous pouvez répéter ces étapes pour ajuster le masque
de sous-réseau et la passerelle. Une fois terminé, appuyez sur le bouton
Menu pour retourner à
l’écran d’accueil.
Paramètres du timecode
Réglez les options d’entrée et de sortie du timecode. Vous pouvez par exemple choisir d’enregistrer
le timecode source, le timecode sous forme de code horaire ou encore régler le timecode
manuellement.
114Paramètres
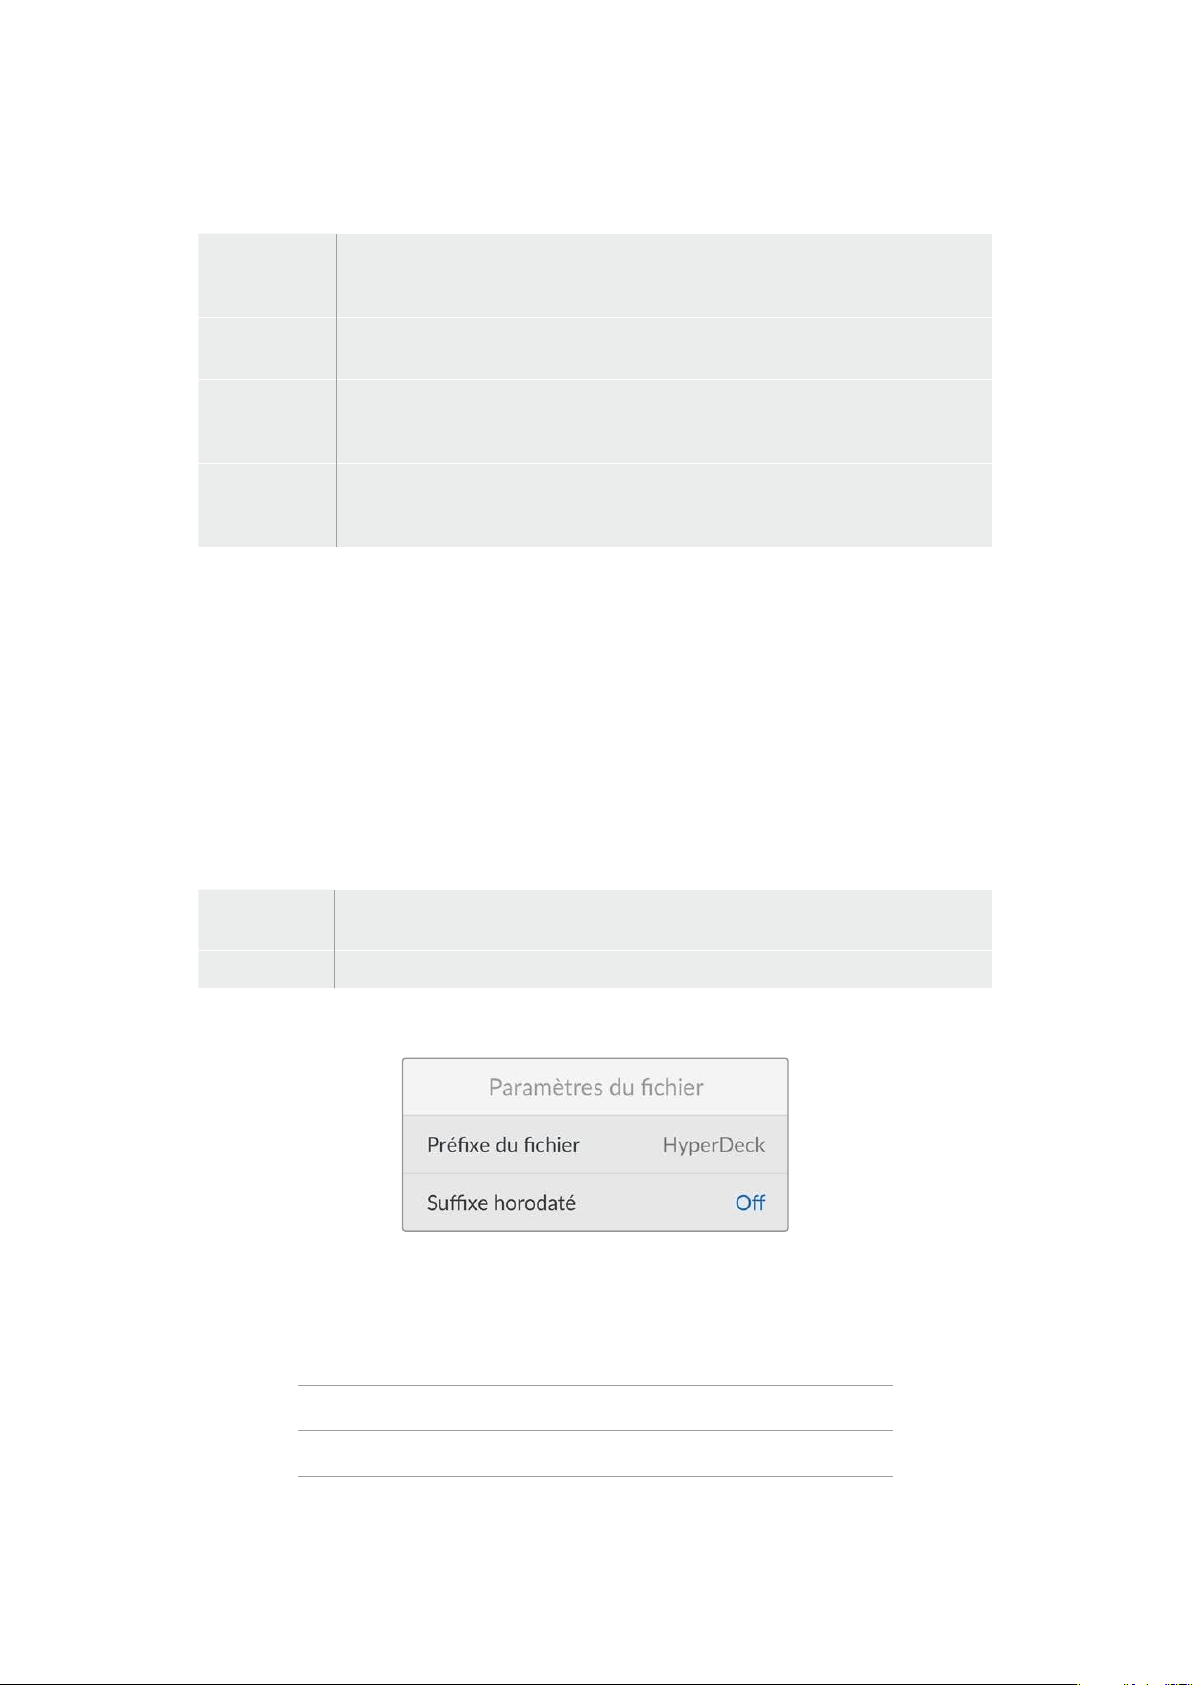
Entrée
Lors de l’enregistrement, vous disposez de quatre options pour l’entrée du timecode.
Entrée vidéo
Sélectionne le timecode intégré aux sources HDMI comportant des métadonnées
SMPTE RP 188. Grâce à cette opération, la source HDMI et le fichier enregistré sur
l’HyperDeck Shuttle HD restent sychronisés.
Interne
Utilisez cette option pour enregistrer le timecode sous forme de code horaire via le
générateur de timecode intégré.
Regen dernier
clip
Lorsque vous sélectionnez
Regen dernier clip pour l’entrée du timecode, chaque fichier
démarre juste après la dernière image du clip précédent. Par exemple, si le premier clip
se termine à 10:28:30:10, le timecode du clip suivant commencera à 10:28:30:11.
Préréglage
Pour régler un timecode manuellement, sélectionnez l’option
Préréglage. Les clips
enregistrés commenceront au timecode réglé via le paramètre
Préréglage comme
indiqué plus loin dans cette section.
Perte d'images
Pour les sources NTSC ayant une fréquence d’images de 29.97 ou de 59.94, vous pouvez choisir
entre un timecode avec ou sans perte d'images. Si la source est inconnue, sélectionnez
Par défaut.
La norme de l’entrée sera conservée, ou s’il n’y pas de timecode valide, elle se réglera par défaut
sur Perte d’images.
Préréglage
Vous pouvez régler votre timecode manuellement en appuyant sur
Set et en saisissant le timecode
à l’aide de la molette et du bouton Set. Vérifiez que l’option Préréglage est correctement
sélectionnée dans le menu Entrée.
Sortie
Choisissez les options du timecode pour les sorties.
Timeline
Pour acheminer un timecode continu pour tous les clips enregistrés sur une carte ou sur
un disque, sélectionnez
Timeline.
Clip Sélectionnez
Clip pour acheminer le timecode de chaque clip.
Paramètres du fichier
Préfixe du fichier
Par défaut, l’HyperDeck Shuttle HD enregistre les clips sur votre carte SD ou disque flash USB à
l’aide de la convention de dénomination des fichiers suivante:
HyperDeck_0001
HyperDeck_0001 Préfixe
HyperDeck_0001 Numéro de clip
Vous pouvez modifier le préfixe du fichier via l’utilitaire HyperDeck Setup. Pour plus d'informations,
consultez la section «Blackmagic HyperDeck Setup» de ce manuel.
115Paramètres
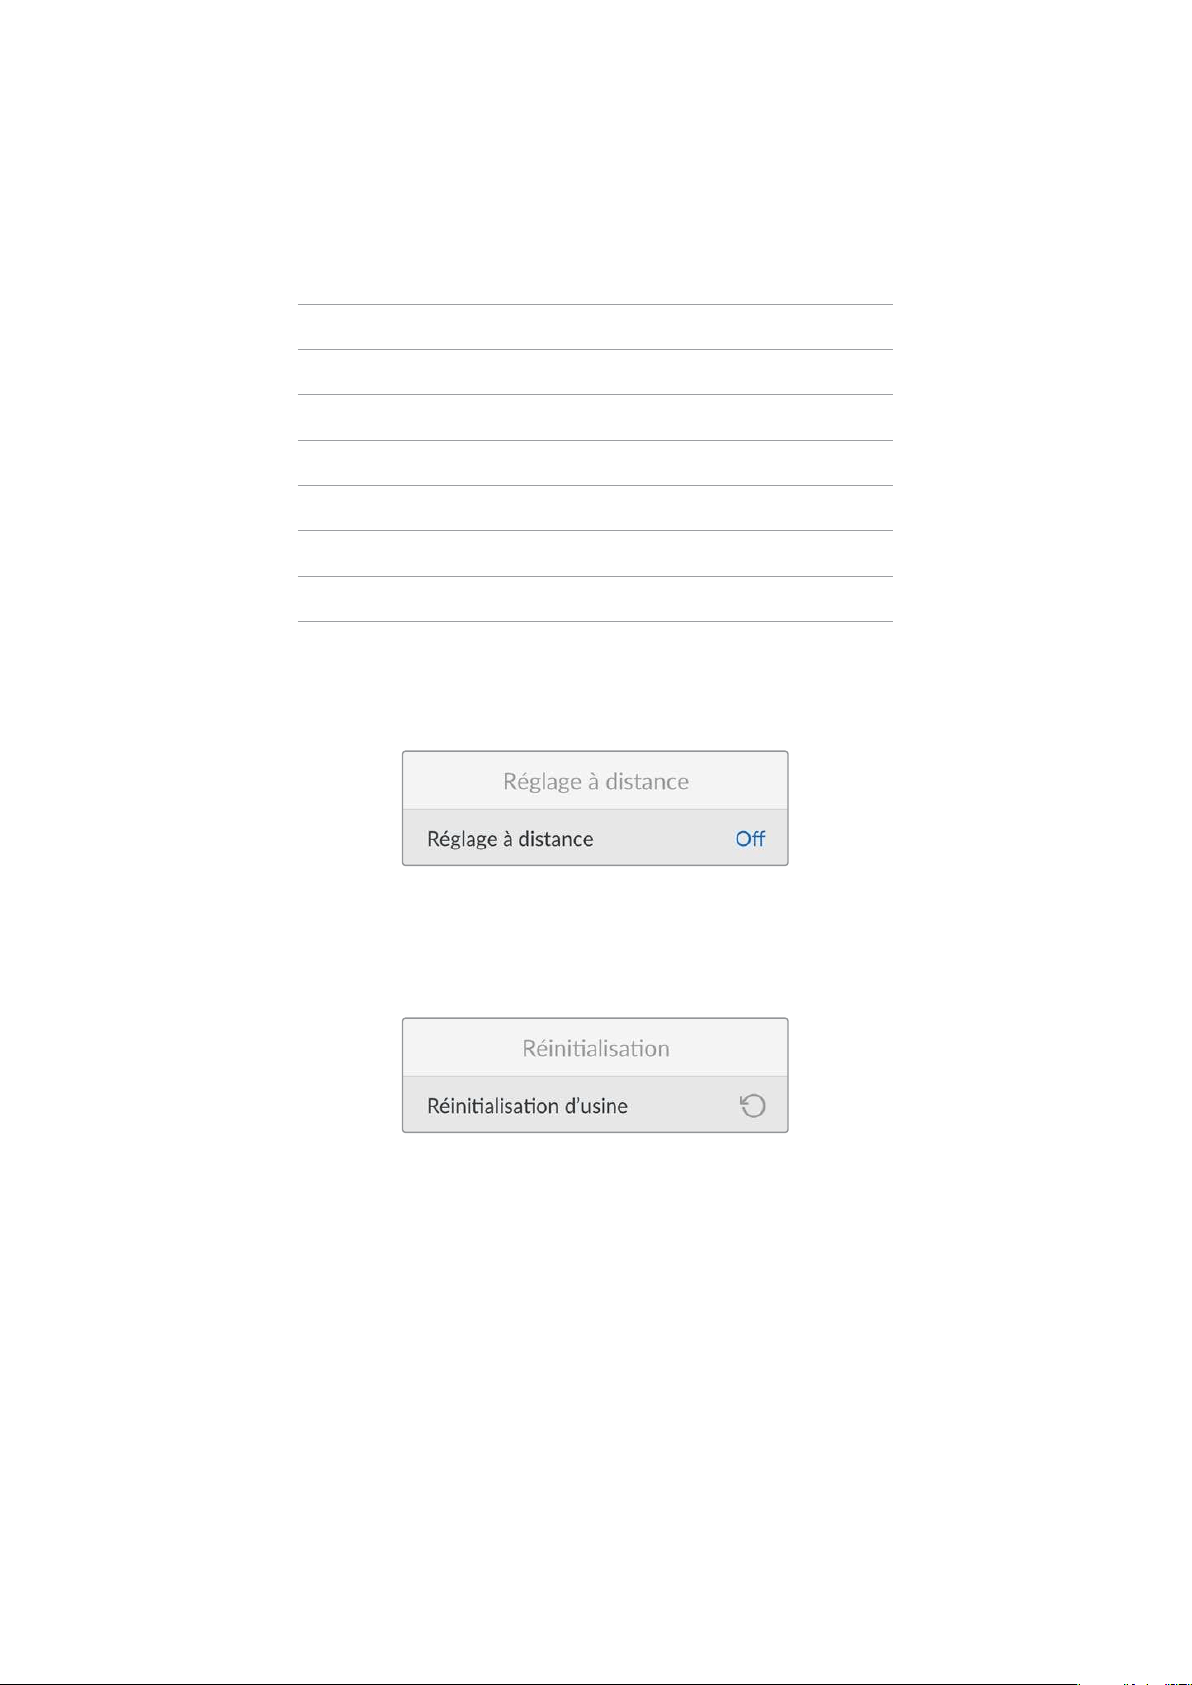
Suffixe horodaté
Par défaut, ce paramètre est désactivé. Si vous souhaitez utiliser la date et l’heure enregistrées dans
votre nom de fichier, activez cette option.
HyperDeck_2201061438_0001
HyperDeck_2201061438_0001 Préfixe du fichier
HyperDeck_2201061438_0001 Année
HyperDeck_2201061438_0001 Mois
HyperDeck_2201061438_0001 Jour
HyperDeck_2201061438_0001 Heure
HyperDeck_2201061438_0001 Minute
HyperDeck_2201061438_0001 Numéro de clip
Paramètres du réglage à distance
Le paramètre
Réglage à distance permet de contrôler l’HyperDeck à distance depuis d’autres
équipements vidéo comme le mélangeur ATEM Mini Extreme.
Réglage à distance
Sélectionnez
Réglage à distance pour contrôler l’appareil à distance via Ethernet. Désélectionnez
ce paramètre pour contrôler l’appareil localement.
Paramètres de réinitialisation
Réinitialisation d’usine
Mettez
Réinitialisation d’usine en surbrillance dans le menu Réglages pour restaurer l’HyperDeck
sur les paramètres par défaut. Une fois que vous aurez appuyé sur Set, on vous demandera de
confirmer votre sélection.
116Paramètres

Face arrière
HDMI OUT
HDMI IN
EXT DISK
SD CARD
ETHERNET
+
12V DC
1
2
3 4 5
1 Alimentation
L’HyperDeck Shuttle HD est alimenté via un adaptateur AC. Le câble d’alimentation fourni
comprend un connecteur sécurisé afin d’éviter toute déconnexion. Vous pouvez toutefois
utiliser n’importe quel câble d’alimentation 12V 36W pour alimenter l’HyperDeck Shuttle HD.
2 Carte SD
Insérez des cartes SD dans le logement pour l'enregistrement et la lecture.
3 Ethernet
Le port Ethernet permet de vous connecter au réseau pour des transferts FTP rapides ou
pour contrôler l’appareil à distance via l’HyperDeck Ethernet Protocol. Pour plus
d’informations concernant le transfert des fichiers via un client FTP, consultez la section
«Transférer des fichiers sur un réseau» de ce manuel.
Lorsqu’il est connecté au même réseau qu’un mélangeur ATEM, votre HyperDeck peut
également être contrôlé à l’aide de ce dernier ou d’un panneau matériel ATEM.
4 Ext Disk
Connectez un disque flash au connecteur USB-C pour enregistrer sur des disques externes
jusqu’à 5Gb/s. Vous pouvez également connecter l’appareil à des hubs USB-C multiports,
ou à un Blackmagic MultiDock 10G pour utiliser un ou plusieurs SSD.
5 HDMI
Connectez la sortie HDMI à des télévisions ou à des moniteurs HDMI, mais aussi à des
mélangeurs, tels que l’ATEM Mini Extreme. La sortie HDMI permet également d’afficher le
menu en surimpression.
117Face arrière
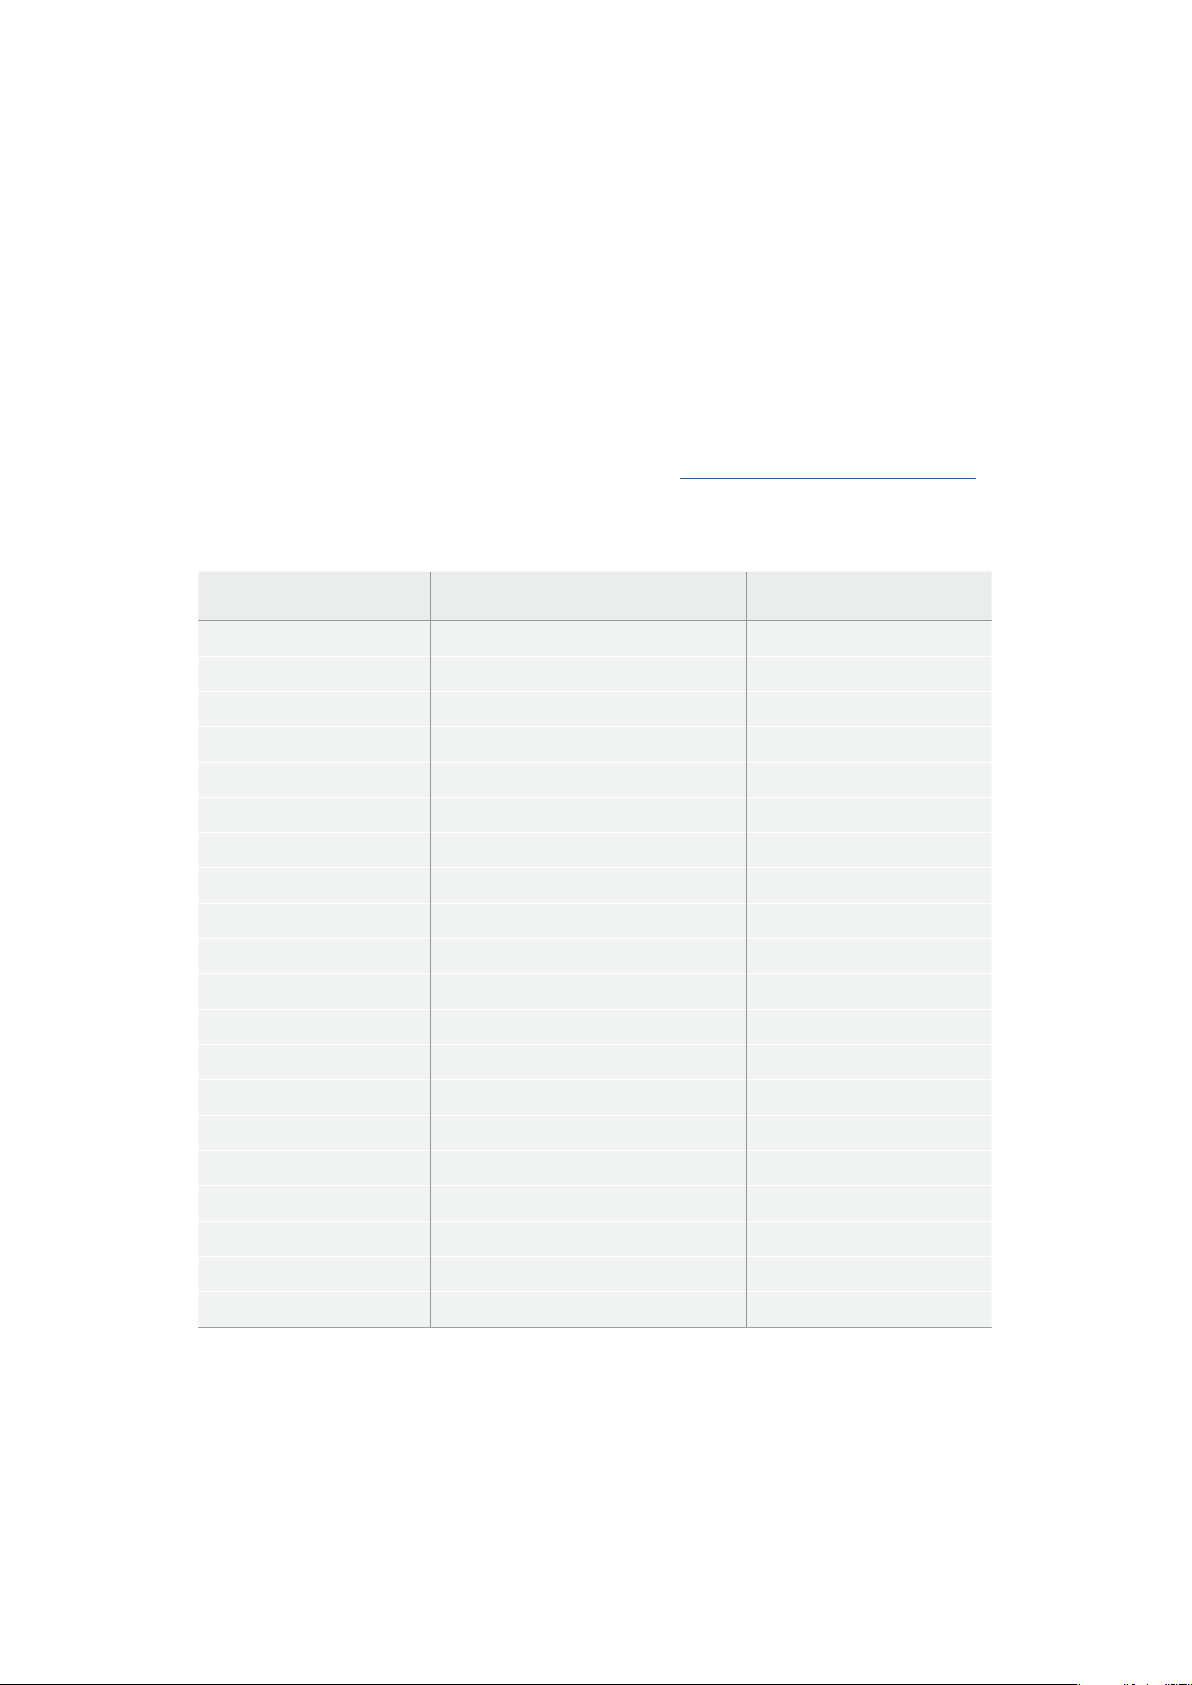
Supports de stockage
Carte SD
Pour un enregistrement HD, nous vous recommandons d'utiliser des cartes SD haut débit UHS-I. Pour
enregistrer de l'Ultra HD 2160p60, ces cartes doivent avoir un débit d'écriture minimum de 220 Mb/s.
Toutefois, si vous enregistrez à des débits plus bas et une compression plus élevée, il est également
possible d'utiliser des cartes moins rapides. Les cartes les plus rapides sont en général plus
performantes.
N'hésitez pas à vérifier les dernières versions du manuel pour obtenir les informations les plus récentes.
Ilpeut être téléchargé sur le site Internet de Blackmagic Design
www.blackmagicdesign.com/fr/support.
Quelles cartes SD dois-je utiliser avec l’HyperDeck Shuttle HD?
Les cartes SD suivantes sont recommandées pour le 1080p jusqu’à 60 im/s:
Brand Model Capacity
Angelbird AV PRO SD UHS-II 300MB/s V90 SDXC 256GB
Angelbird AV PRO SD UHS-II 260MB/s V60 SDXC 128GB
Angelbird AV PRO SD UHS-II 260MB/s V60 SDXC 64GB
SanDisk Extreme Pro UHS-I 95MB/s SDXC 64GB
Wise SD2-64U3 UHS-II 285MB/s SDXC 64GB
Lexar Professional 1000x UHS-II 150MB/s SDXC 128GB
SONY Tough SF-G128T 128GB
Kingston CANVAS GO! Plus 170MB/s V30 64GB
Kingston CANVAS GO! Plus 170MB/s V30 128GB
Kingston CANVAS GO! Plus 170MB/s V30 512GB
ProGrade Digital SDXC UHS-II V90 300R 64GB
ProGrade Digital SDXC UHS-II V90 300R 128GB
SONY Tough SF-G64T UHS-II SDXC 64GB
Delkin Devices Black UHS-II V90 SDXC 256GB
Delkin Devices Power UHS-II V90 SDXC 128GB
Delkin Devices Power UHS-II V90 SDXC 256GB
Delkin Devices Black UHS-II V90 SDXC 128GB
Exascend Essential SDXC UHS-II V90 R 300MB/s 64GB
Exascend Essential SDXC UHS-II V90 R 300MB/s 128GB
Exascend Catalyst SDXC UHS-II V90 R 300MB/s 64GB
118Supports de stockage

Disque externe
Tous les modèles HyperDeck peuvent enregistrer directement sur des disques flash USB-C. Grâce à
ces disques rapides et à leur capacité de stockage élevée, vous pouvez enregistrer sur de longues
périodes. Il suffit de connecter le disque flash à votre ordinateur et de monter directement sur celui-ci!
Pour des capacités de stockage encore plus élevées, vous pouvez également connecter une station
d’accueil USB-C ou un disque dur externe. Pour connecter le Blackmagic MultiDock 10G ou un disque
flash USB-C, reliez un câble de l’appareil USB-C connecté au port
Ext disk situé à l’arrière de
l’HyperDeck.
Quels disques USB-C dois-je utiliser avec l’HyperDeck Shuttle HD?
Les disques USB-C suivants sont recommandés pour le format ProRes HQ en 1080p
jusqu’à 60 im/s:
Marque Modèle Capacité
Wise PTS-256 Portable SSD 4K 256GB
OWC Envoy Pro Ex 240GB
BUFFALO SSD-PHE500U3-BA 500GB
Les disques USB-C suivants sont recommandés pour le format DNxHR HQX en 1080p
jusqu’à 60 im/s:
Marque Modèle Capacité
OWC Envoy Pro Ex 240GB
Les disques USB-C suivants sont recommandés pour le format H.264 en 1080p
jusqu’à 60 im/s:
Marque Modèle Capacité
OWC Envoy Pro Ex 240GB
Formater les supports
Préparer le support sur un ordinateur
Formater un support sur un ordinateur Mac
Utilisez l'utilitaire de disque de Mac pour formater un support au format HFS+ ou exFAT.
N'oubliez pas de sauvegarder les informations importantes contenues sur votre support car toutes
les données seront perdues lors du formatage.
1 Connectez un disque flash USB à votre ordinateur à l'aide d'un dock externe ou d’un câble.
Ignorez les messages proposant d'utiliser le SSD pour sauvegarder vos données à l’aide de
Time Machine. Connectez les cartes SD à votre ordinateur via un lecteur de cartes externe.
2 Allez dans le menu Applications/Utilitaires et lancez l'utilitaire de disque.
3 Cliquez sur l'icône représentant votre carte SD ou disque flash USB, puis cliquez sur
l'onglet Effacer.
4 Choisissez le format Mac OS étendu (journalisé) ou exFAT.
5 Saisissez le nom du nouveau volume, puis cliquez sur Effacer. Le support est alors
rapidement formaté et prêt à être utilisé avec l'HyperDeck.
119Formater les supports
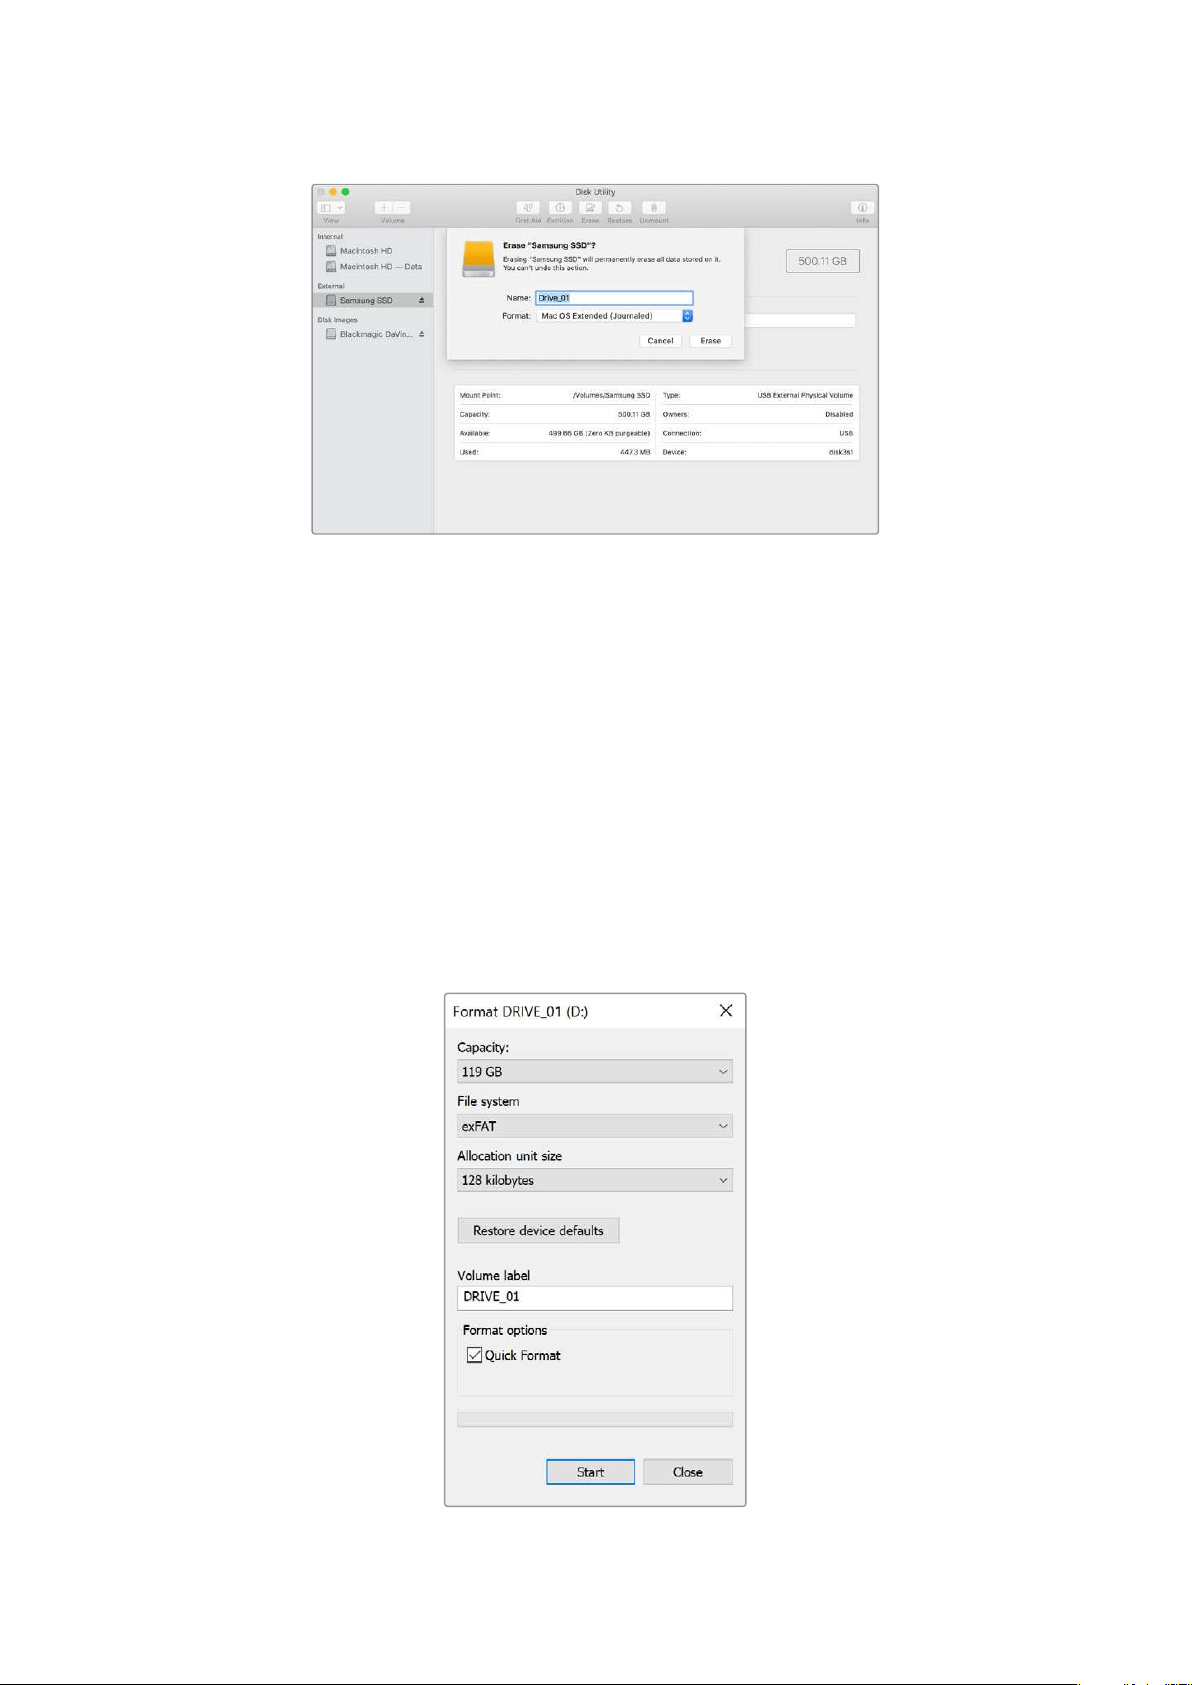
Formater un support sur un ordinateur Windows
La boîte de dialogue
Formater permet de formater un support en exFAT sur un ordinateur Windows.
N'oubliez pas de sauvegarder les informations importantes contenues sur votre support, car toutes
les données seront perdues lors du formatage.
1 Connectez un disque flash USB à votre ordinateur à l'aide d'une baie d'accueil externe ou
d'un adaptateur de câble. Connectez les cartes SD à votre ordinateur via un lecteur de
cartes externe.
2 Ouvrez le menu Démarrer ou l’écran d’accueil et choisissez l'option Ordinateur. Faites un
clic droit sur votre disque flash USB ou carte SD.
3 Cliquez sur Formater à partir du menu contextuel.
4 Configurez le système de gestion des fichiers sur exFAT et la taille d'unité d'allocation
sur 128 Kb.
5 Saisissez un nom de volume, sélectionnez l’option Formatage rapide puis cliquez
sur Démarrer.
6 Le support est alors rapidement formaté et prêt à être utilisé avec l'HyperDeck.
120Formater les supports
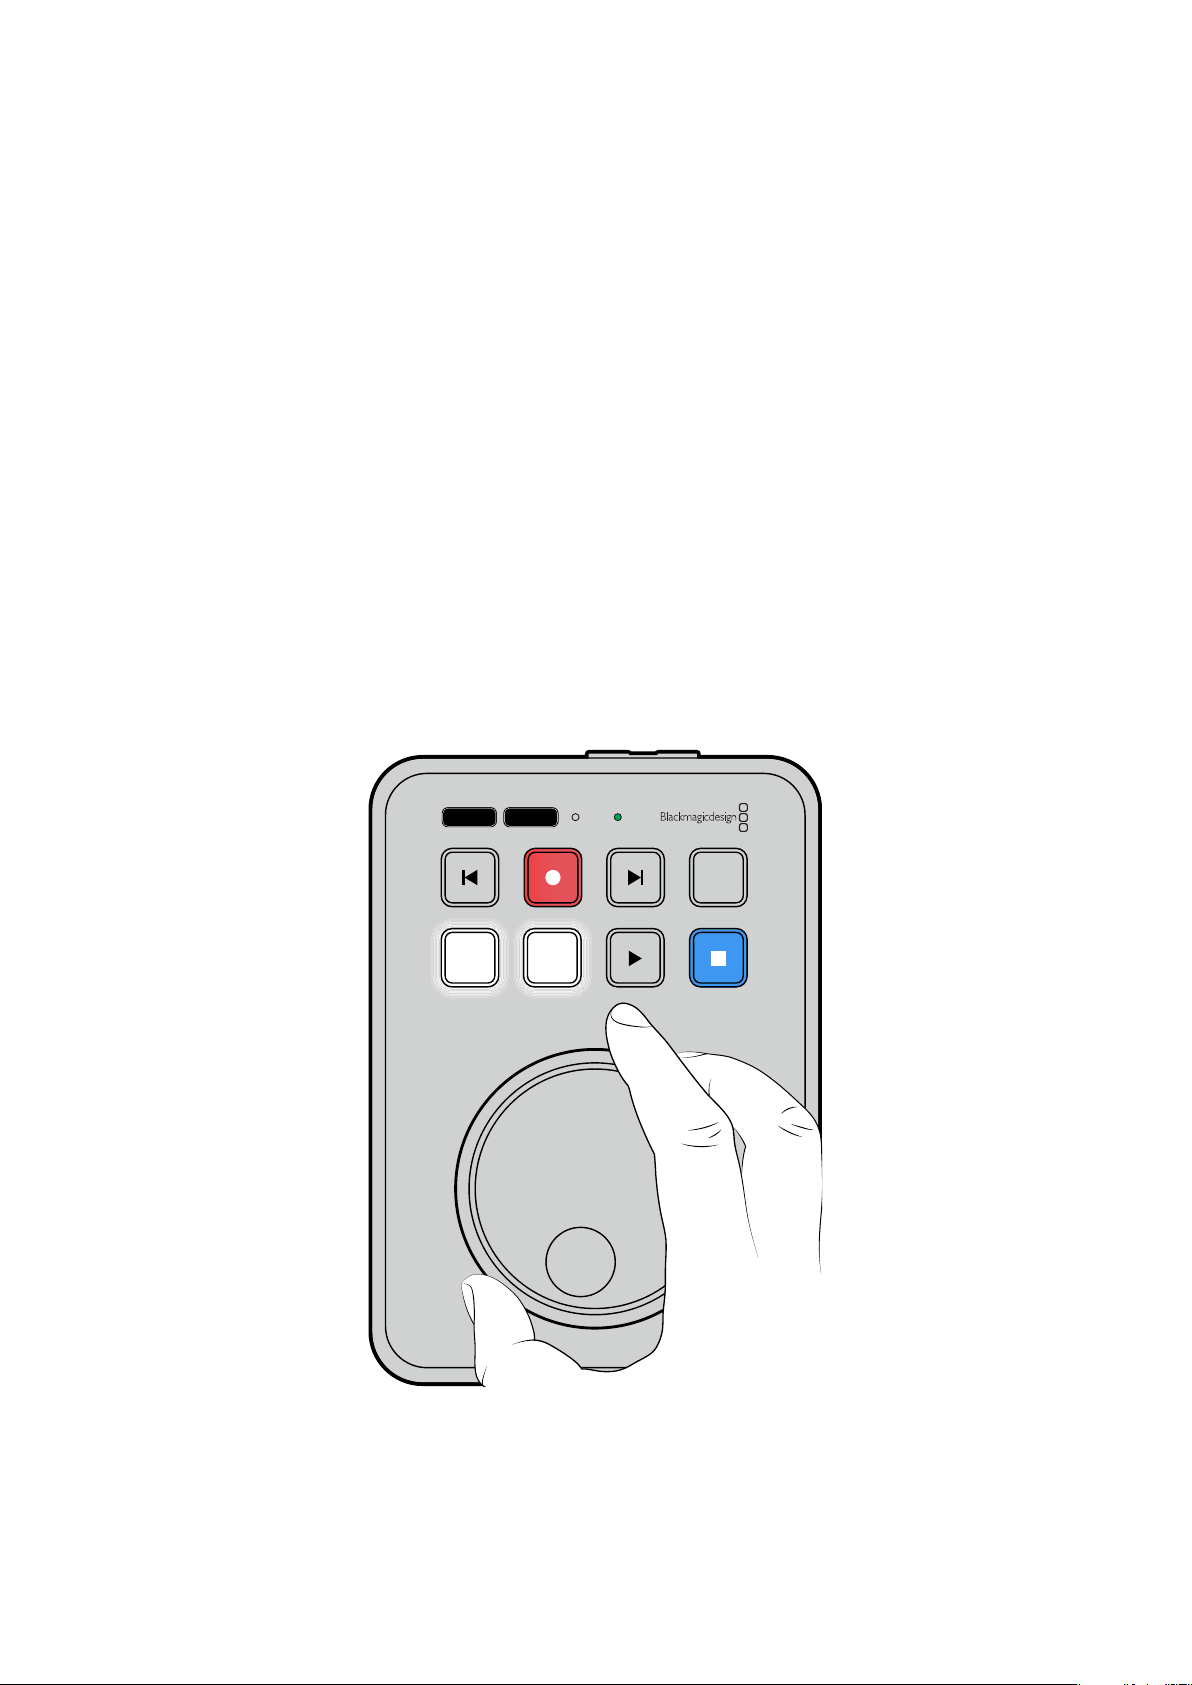
Utiliser la fonction Prompteur
À l’aide d’un fichier RTF standard, vous pouvez utiliser le Blackmagic HyperDeck Shuttle HD comme
prompteur. Créez votre fichier dans TextEdit ou WordPad et sauvegardez-le en fichier RTF dans l’une
des 13 langues supportées. Une fois le fichier ouvert avec l’HyperDeck Shutlle HD, vous pourrez
ajuster la taille de la police et l’interligne de votre script.
Pour utiliser le prompteur:
1 Connectez la sortie HDMI de l’HyperDeck Shuttle HD à l’écran HDMI que vous
souhaitez utiliser.
2 Insérez une carte SD ou connectez un disque flash USB externe contenant votre script.
3 Sélectionnez le codec dans le menu Enregistrement. Allez sur le paramètre Prompteur et
appuyez sur Set.
Le script apparaîtra sur votre écran. Vous pouvez maintenant commencer la lecture
automatiquement à l’aide du bouton de lecture, ou pour un contrôle plus poussé, utilisez la molette.
Contrôler la vitesse de lecture du prompteur
La grande molette de l’HyperDeck Shuttle HD peut être utilisée pour contrôler la lecture en mode
prompteur de la même façon que pour la lecture des médias. Une fois le script chargé, appuyez
simultanément sur les boutons
Jog et Scr pour activer la lecture à vitesse variable. Une fois
sélectionnée, tournez la molette. Le script se déplacera selon la vitesse à laquelle vous tournerez la
molette. Ainsi, plus vous la tournerez rapidement, plus la vitesse de défilement du script augmentera.
JOG SCR
CLIP
MENU SET
DISK SD
Pour une vitesse constante, utilisez les boutons Jog et Scr individuellement. Une fois le bouton
sélectionné, tourner la molette fera défiler le script à une vitesse lente constante en mode Jog, ou à
une vitesse plus rapide en mode Scroll.
Pour naviguer entre les fichiers rtf sur votre carte SD ou disque externe, appuyez sur les touches
avance ou retour.
121Utiliser la fonction Prompteur
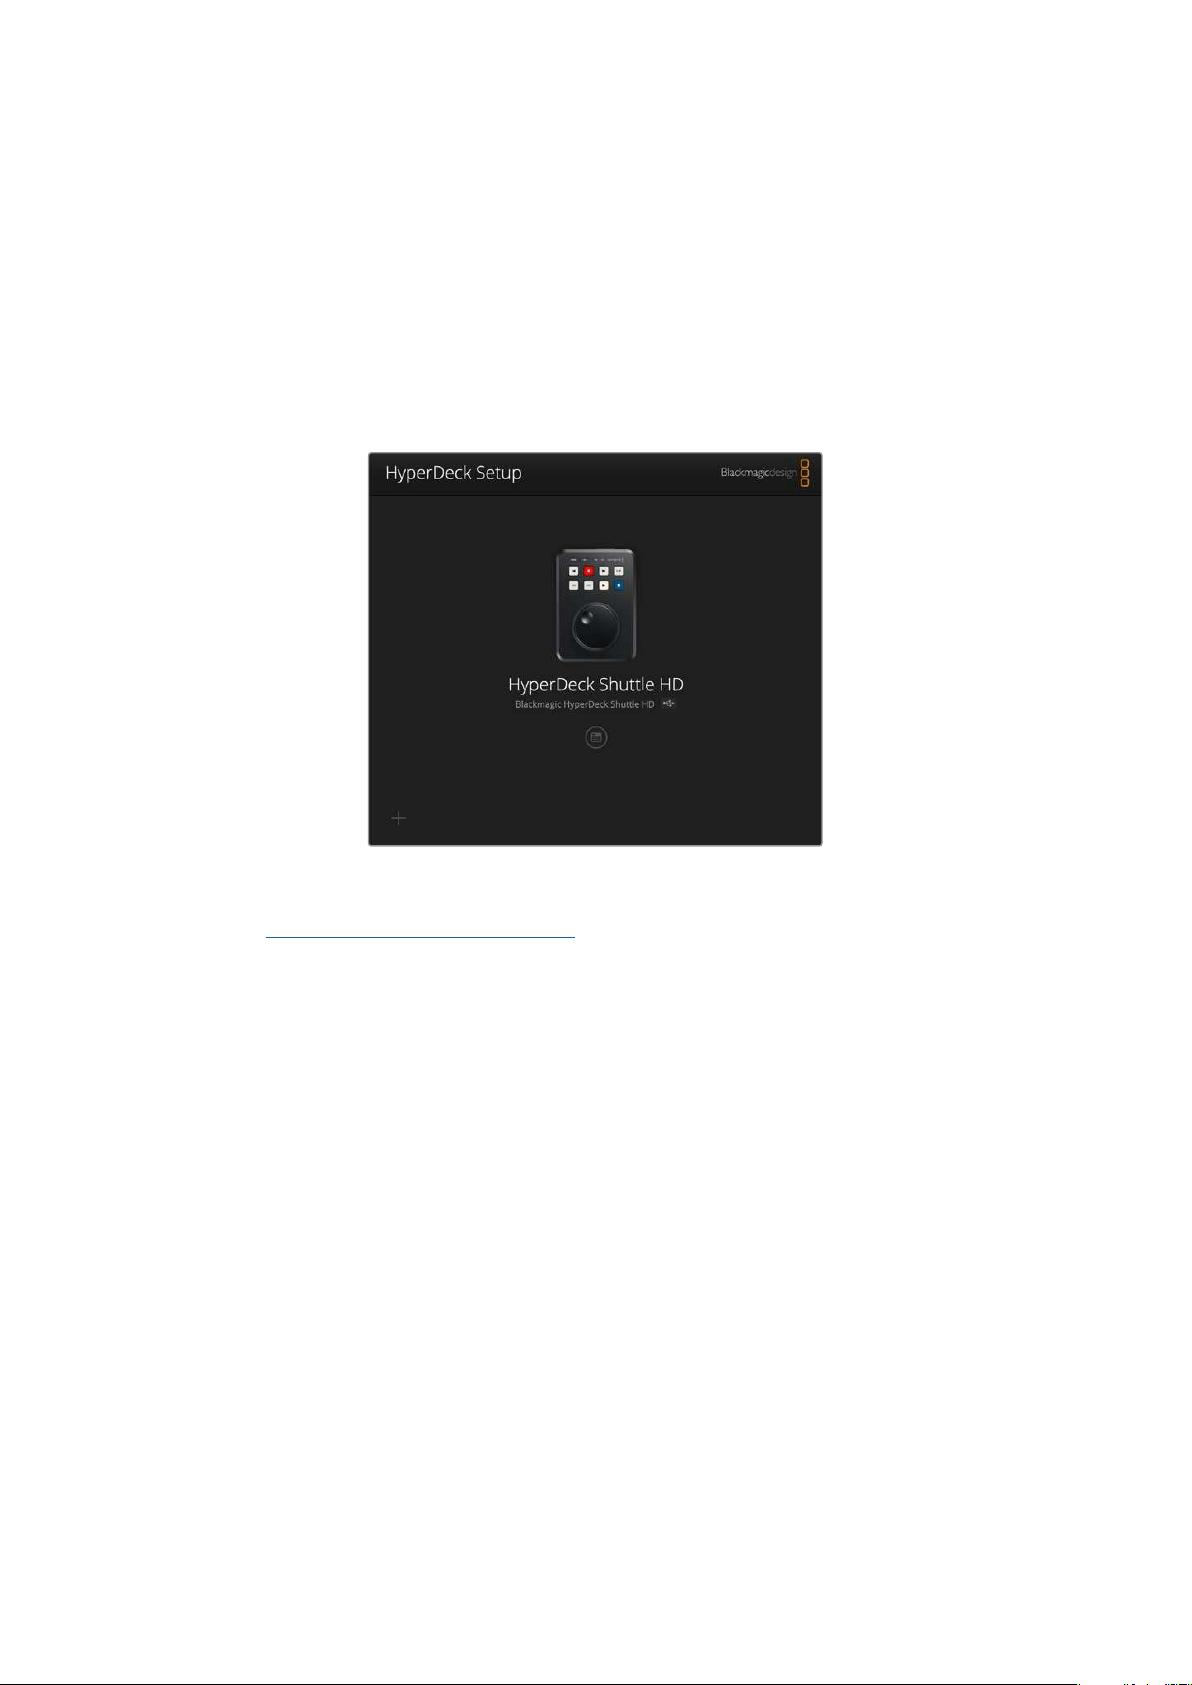
Le prompteur reconnaîtra la taille et la couleur de la police, mais aussi si cette dernière est réglée
sur gras à partir du fichier. De plus, vous pouvez ajuster la taille de la police, l’interligne, et les
marges, ou encore retourner l’écran horizontalement ou verticalement lorsque vous projetez l’écran
sur un miroir semi-transparent à l’aide du menu Moniteur. Pour plus d'informations, consultez la
section «Paramètres» de ce manuel.
Blackmagic HyperDeck Setup
L'utilitaire Blackmagic HyperDeck Setup vous permet de modifier les paramètres et de mettre à jour
le logiciel interne de votre HyperDeck.
Pour installer le logiciel :
1 Téléchargez le nouveau programme d’installation Blackmagic HyperDeck Setup sur
www.blackmagicdesign.com/fr/support.
2 Ouvrez le Blackmagic HyperDeck Setup sur votre ordinateur et suivez les instructions
à l’écran.
3 Une fois l’installation terminée, connectez votre HyperDeck Shuttle HD à l’ordinateur via le
port USB ou Ethernet situé sur le panneau arrière.
4 Lancez le Blackmagic HyperDeck Setup et suivez les instructions affichées à l’écran pour
mettre à jour le logiciel interne. Si aucune information n'apparaît, le logiciel interne
est à jour.
Cliquez sur l'image de l'HyperDeck ou sur l’icône de paramétrage pour ouvrir le menu de
configuration.
L’écran d’accueil affichera votre HyperDeck Shuttle HD et le nom de l’appareil. Ce nom est utile pour
identifier l’appareil lorsque plus d’un HyperDeck est connecté à votre ordinateur. Il peut être réglé à
l’aide du menu de configuration de l’utilitaire.
122Blackmagic HyperDeck Setup

Network (Réseau)
Protocol (Protocole)
Pour contrôler votre HyperDeck Shuttle HD avec les mélangeurs ATEM ou pour le contrôler à
distance via l’HyperDeck Ethernet Protocol, l’HyperDeck Shuttle HD doit être configuré sur le même
réseau que les autres équipements à l’aide du DHCP ou en ajoutant manuellement une
adresse IP fixe.
DHCP
Les enregistreurs à disque HyperDeck Shuttle HD sont réglés sur DHCP par
défaut. Le Dynamic Host Configuration Protocol, ou DHCP, est un service de
serveurs réseau qui attribue automatiquement une adresse IP à l’HyperDeck. Ce
service facilite la connexion des équipements via Ethernet et veille à ce que leur
adresse IP ne soit pas en conflit l’une avec l’autre. La plupart des ordinateurs et
des commutateurs réseau supportent le DHCP.
Static IP (IP
statique)
Lorsque
Static IP est sélectionné, vous pouvez saisir manuellement les
informations du réseau. Lorsque vous réglez des adresses IP manuellement
pour que tous les appareils puissent communiquer, ils doivent partager les
mêmes paramètres de masque de sous-réseau et de passerelle. De plus, les trois
premiers champs de l’adresse IP du panneau doivent coïncider.
Si d’autres appareils sur le réseau possèdent le même numéro d’identification dans leur adresse IP, il
y aura un conflit et les appareils ne se connecteront pas. Le cas échéant, il suffit de modifier le
numéro d’identification dans l’adresse IP de l’appareil.
123Blackmagic HyperDeck Setup
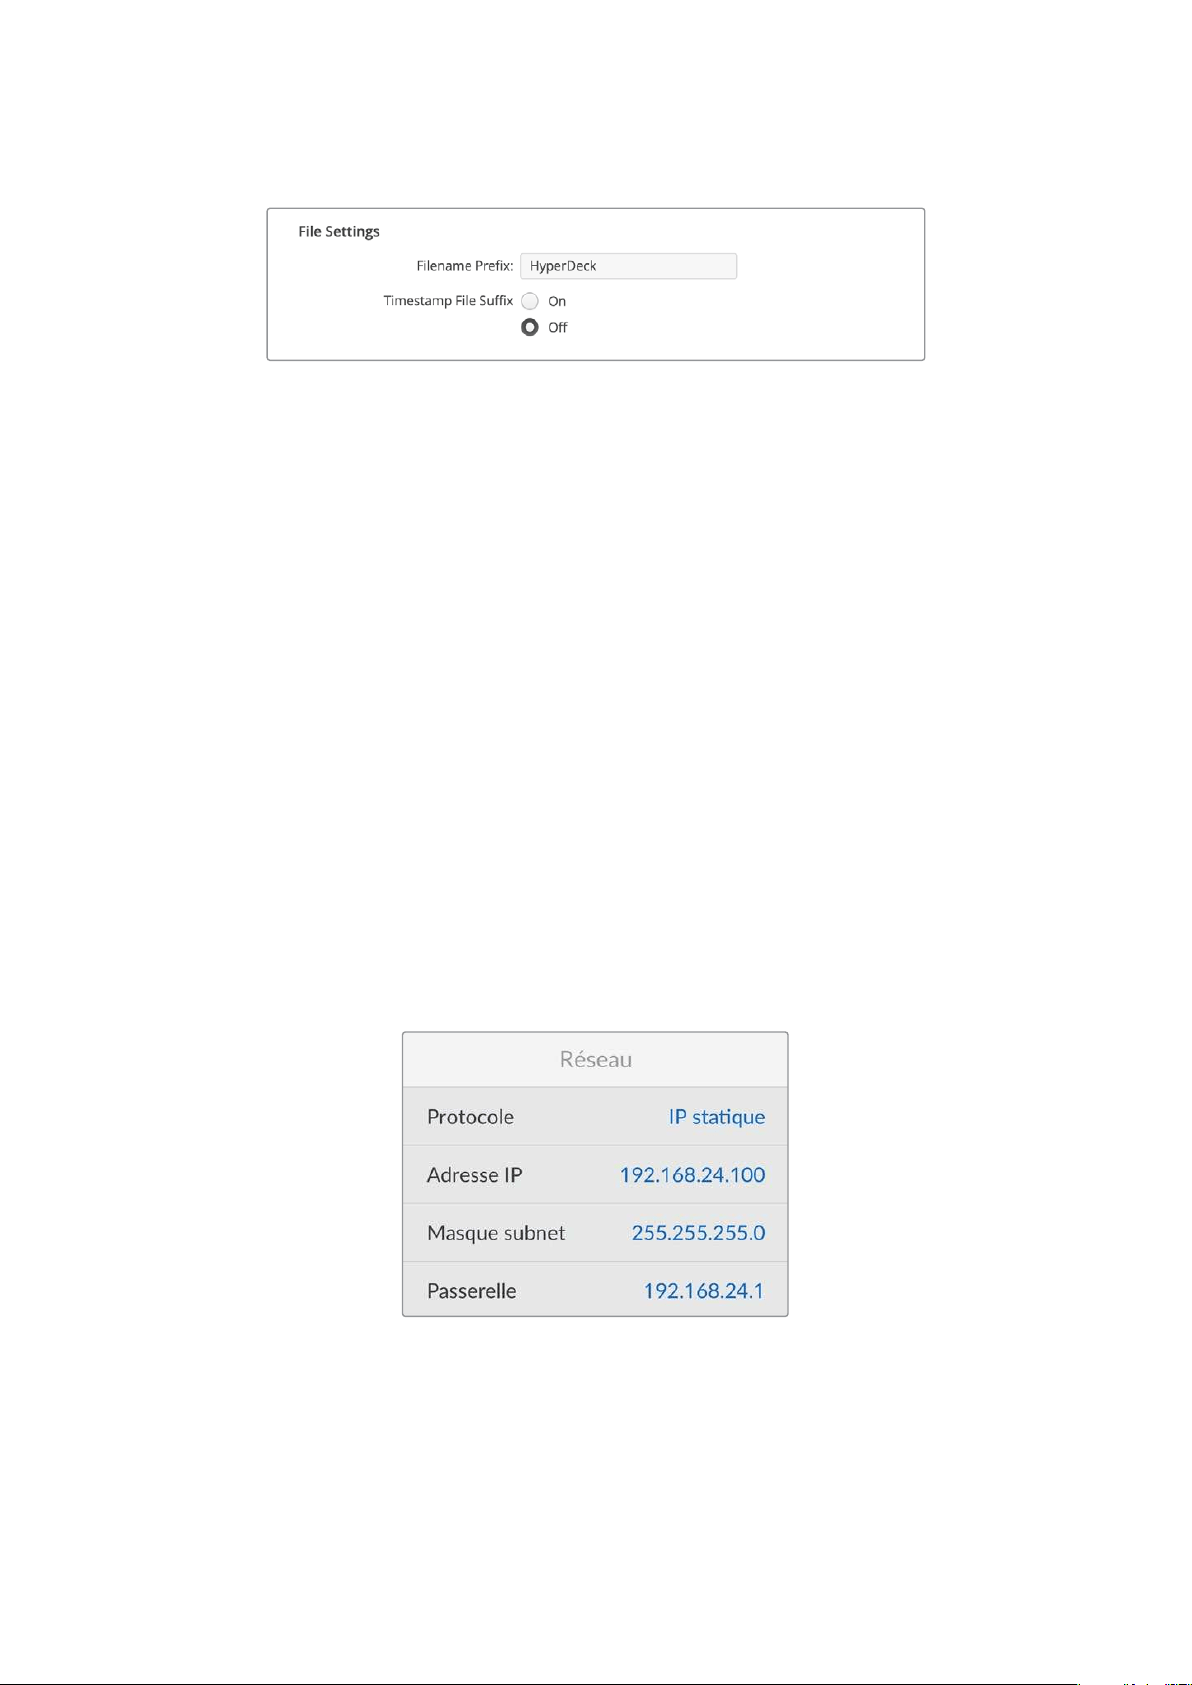
File Settings (Paramètres du fichier)
Par défaut, l’HyperDeck Shuttle HD enregistre les clips sur votre carte SD ou disque flash USB avec
le préfixe HyperDeck. Saisissez un nouveau nom de fichier pour modifier le préfixe.
Par défaut, l’horodateur ajouté au nom de fichier est désactivé. Si vous souhaitez enregistrer la date
et l’heure sur votre fichier, activez-le. Les paramètres concernant le préfixe du fichier et l’horodateur
sont également disponibles sur le menu à l’écran de l’HyperDeck Shuttle HD.
Transférer des fichiers sur un réseau
Votre enregistreur à disque HyperDeck supporte le transfert des fichiers via le File Transfer Protocol,
ou FTP. Cette fonction permet de copier des fichiers directement de votre ordinateur à votre
HyperDeck via un réseau, à la vitesse fournie par le réseau local. Vous pouvez par exemple copier
de nouveaux fichiers sur un HyperDeck installé dans un endroit différent pour l’affichage numérique.
Connecter un HyperDeck Shuttle HD
Lorsque l’ordinateur et l’HyperDeck Shuttle HD sont sur le même réseau, vous aurez besoin d’un
client FTP et de l’adresse IP de l’HyperDeck Shuttle HD.
1 Téléchargez et installez un client FTP sur l’ordinateur auquel vous souhaitez connecter
l’HyperDeck. Nous recommandons Cyberduck, FileZilla ou Transmit, mais la plupart des
logiciels FTP fonctionneront également. Vous pouvez télécharger Cyberduck et FileZilla
gratuitement.
2 Connectez l'HyperDeck Shuttle HD au réseau à l’aide d’un câble Ethernet et notez son
adresse IP. Pour accéder à l’adresse IP, appuyez sur le bouton Menu et tournez la molette
jusqu’à ce que vous arriviez sur l’écran Réseau. L’adresse IP de l’HyperDeck se trouve au
bas de cet écran.
Vous trouverez l’adresse IP de votre HyperDeck Shuttle
HD dans la section Réseau du menu Réglages.
3 Saisissez l’adresse IP de l’HyperDeck dans la boîte de connexion du logiciel FTP. Le nom et
la position de cette boîte varient selon les logiciels, mais en général, elle s’appelle Server
ou Host. Si votre logiciel FTP comprend une case de sélection intitulée Anonymous Login,
veillez à ce qu’elle soit cochée.
124Transférer des fichiers sur un réseau

Lorsque vous connectez un HyperDeck Shuttle HD, vous n’avez pas besoin de saisir de nom
d'utilisateur ou de mot de passe. Il suffit de saisir l’adresse IP de l’enregistreur à disque dans le
champ Server ou Host du logiciel FTP et de cocher la case Anonymous Login si elle est
disponible.
Transférer des fichiers
Une fois l’HyperDeck connecté, vous pouvez transférer les fichiers comme sur n’importe quel
logiciel FTP. La plupart d’entre eux sont dotés d’une interface glisser-déposer, toutefois, vérifiez
quelle est la méthode appropriée pour le logiciel que vous utilisez.
Vous pouvez transférer n’importe quel fichier depuis et vers l’HyperDeck. Toutefois, notez que les
fichiers que vous souhaitez lire avec l’HyperDeck Shuttle HD doivent être conformes aux codecs et
aux résolutions pris en charge par l’HyperDeck.
CONSEIL Vous pouvez transférer des fichiers sur le réseau durant l’enregistrement avec
l’HyperDeck. L’HyperDeck ajuste automatiquement la vitesse de transfert afin de ne pas
affecter l’enregistrement.
125Transférer des fichiers sur un réseau

Developer Information
Blackmagic HyperDeck Ethernet Protocol
The Blackmagic HyperDeck Ethernet Protocol is a text based protocol accessed by connecting
to TCP port 9993 on HyperDeck models that have a built in Ethernet connection. If you are
a software developer, you can use the protocol to construct devices that integrate with our
products. Here at Blackmagic Design our approach is to open up our protocols and we eagerly
look forward to seeing what you come up with!
Protocol Commands
Command Command Description
help or ? Provides help text on all commands and parameters
commands return commands in XML format
device info return device information
disk list query clip list on active disk
disk list: slot id: {n} query clip list on disk in slot {n}
quit disconnect ethernet control
ping check device is responding
preview: enable: {true/false} switch to preview or output
play play from current timecode
play: speed: {-5000 to 5000} play at specific speed
play: loop: {true/false} play in loops or stop-at-end
play: single clip: {true/false} play current clip or all clips
playrange query playrange setting
playrange set: clip id: {n} set play range to play clip {n} only
playrange set: clip id: {n} count: {m} set play range to {m} clips starting from clip {n}
playrange set: in: {inT} out: {outT}
set play range to play between:
- timecode {inT} andtimecode {outT}
playrange set: timeline in: {in} timeline out:
{out}
set play range in units of frames between:
- timeline position {in} and position {out} clear/reset play
rangesetting
playrange clear clear/reset play range setting
play on startup query unit play on startup state
play on startup: enable: {true/false} enable or disable play on startup
play on startup: single clip: {true/false} play single clip or all clips on startup
play option query play options
play option: stop mode:
{lastframe/nextframe/black}
set output frame when playback stops
record record from current input
record: name: {name} record named clip
126Developer Information

Command Command Description
record spill spill current recording to next slot
record: spill: slot id: {n}
spill current recording to specified slot
use current id to spill to same slot
stop stop playback or recording
clips count query number of clips on timeline
clips get query all timeline clips
clips get: clip id: {n} query a timeline clip info
clips get: clip id: {n} count: {m} query m clips starting from n
clips get: version: {1/2}
query clip info using specified output version:
version 1: id: name startT duration
version 2: id: startT duration inT outT name
clips add: name: {name} append a clip to timeline
clips add: clip id: {n} name: {name} insert clip before existing clip {n}
clips add: in: {inT} out: {outT} name: {name} append the {inT} to {outT} portion of clip
clips remove: clip id: {n}
remove clip {n} from the timeline
(invalidates clip ids following clip {n})
clips clear empty timeline clip list
transport info query current activity
slot info query active slot
slot info: slot id: {n} query slot {n}
slot select: slot id: {n} switch to specified slot
slot select: video format: {format} load clips of specified format
slot unblock unblock active slot
slot unblock: slot id: {n} unblock slot {n}
cache info query cache status
dynamic range query dynamic range settings
dynamic range: playback override:
{off/Rec709/Rec2020_SDR/HLG/
ST2084_300/ST2084_500/
ST2084_800/ST2084_1000/
ST2084_2000/ST2084_4000/ST2084
set playback dynamic range override
dynamic range: record override:
{off/Rec709/Rec2020_SDR/HLG/
ST2084_300/ST2084_500/
ST2084_800/ST2084_1000/
ST2084_2000/ST2084_4000/ST2048}
set record dynamic range override
notify query notification status
notify: remote: {true/false} set remote notifications
notify: transport: {true/false} set transport notifications
notify: slot: {true/false} set slot notifications
notify: configuration: {true/false} set configuration notifications
127Developer Information

Command Command Description
notify: dropped frames: {true/false} set dropped frames notifications
notify: display timecode: {true/false} set display timecode notifications
notify: timeline position: {true/false} set playback timeline position notifications
notify: playrange: {true/false} set playrange notifications
notify: cache: {true/false} set cache notifications
notify: dynamic range: {true/false} set dynamic range settings notifications
notify: slate: {true/false} set digital slate notifications
notify: clips: {true/false}
set timeline clips notifications where two types of changes can
occur:
add: partial update with list of clips and insert positions
snapshot: complete update of all clips on timeline
notify: disk: {true/false}
set disk clips notifications where two types of changes can
occur:
add: partial update with list of clips and insert positions
snapshot: complete update of all clips on timeline
goto: clip id: {start/end} goto first clip or last clip
goto: clip id: {n} goto clip id {n}
goto: clip id: +{n} go forward {n} clips
goto: clip id: -{n} go backward {n} clips
goto: clip: {n} goto frame position {n} within current clip
goto: clip: +{n} go forward {n} frames within current clip
goto: clip: -{n} go backward {n} frames within current clip
goto: clip: {start/end} goto start or end of clip
goto: timeline: {n} goto frame position {n} within timeline
goto: timeline: +{n} o forward {n} frames within timeline
goto: timeline: -{n} go backward {n} frames within timeline
goto: timeline: {start/end} goto start or end of timeline
goto: timecode: {timecode} goto specified timecode
goto: timecode: +{timecode} go forward {timecode} duration
goto: timecode: -{timecode} go backward {timecode} duration
goto: slot id: {n} goto slot id {n}
jog: timecode: {timecode} jog to timecode
jog: timecode: +{timecode} jog forward {timecode} duration
jog: timecode: -{timecode} jog backward {timecode} duration
shuttle: speed: {-5000 to 5000} shuttle with speed
remote query unit remote control state
remote: enable: {true/false} enable or disable remote control
remote: override: {true/false} session override remote control
configuration query configuration settings
configuration: video input: SDI switch to SDI input
128Developer Information

Command Command Description
configuration: video input: HDMI switch to HDMI input
configuration: video input: component switch to component input
configuration: audio input: embedded capture embedded audio
configuration: audio input: XLR capture XLR audio
configuration: audio input: RCA capture RCA audio
configuration: file format: {format} switch to specific file format
configuration: audio codec: PCM switch to PCM audio
configuration: audio codec: AAC switch to AAC audio
configuration: timecode input:
{external/embedded/internal/preset/clip}
change the timecode input
configuration: timecode output:
{clip/timeline}
change the timecode output
configuration: timecode preference:
{default/dropframe/nondropframe}
whether or not to use drop frame timecodes when not
otherwise specified
configuration: timecode preset:
{timecode}
set the timecode preset
configuration: audio input channels: {n} set the number of audio channels recorded to {n}
configuration: record trigger:
{none/recordbit/timecoderun}
change the record trigger
configuration: record prefix: {name} set the record prefix name (supports UTF-8 name)
configuration: append timestamp:
{true/false}
append timestamp to recorded filename
configuration: xlr input id: {n} xlr type:
{line/mic}
configure xlr input type
multiple xlr inputs can be configured in a single command
configuration: genlock input resync:
{true/false}
enable or disable genlock input resync
uptime return time since last boot
format: slot id: {n} prepare:
{exFAT/HFS+} name: {name}
prepare a disk formatting operation to filesystem {format}
format: confirm: {token} perform a pre-prepared formatting operation using token
identify: enable: {true/false} identify the device
watchdog: period: {period in seconds} client connection timeout
reboot reboot device
slate clips slate clips information
slate project slate project information
slate lens slate lens information
129Developer Information

Multiline commands: Command Description
slate clips↵ set slate clips information:
reel: {n} slate reel number, where {n} is in [1, 999]
scene id: {id} slate scene id value, where {id} is a string
shot type: {WS/MS/BCU/MCU/ECU/none} slate shot type
take: {n} slate take number, where {n} is in [1, 99]
take scenario: {PU/VFX/SER/none} slate take scenario
take auto inc: {true/false} slate take auto increment
good take: {true/false} slate good take
environment: {interior/exterior} slate environment
day night: {day/night} slate day or night
slate project:↵ set slate project information:
project name: {name} project name (can be empty, supports UTF-8)
camera: {index} set camera index e.g. A
director: {name} director (can be empty, supports UTF-8)
camera operator: {name} camera operator (can be empty, supports UTF-8)
slate lens:↵ set lens information:
lens type: {type} lens type (can be empty, supports UTF-8)
iris: {type} camera iris (can be empty, supports UTF-8)
focal length: {length} focal length (can be empty, supports UTF-8)
distance: {distance} lens distance (can be empty, supports UTF-8)
filter: {filter} lens filter (can be empty, supports UTF-8)
Command Combinations
You can combine the parameters into a single command, for example:
play: speed: 200 loop: true single clip: true
Or for configuration:
configuration: video input: SDI audio input: XLR
Or to switch to the second disk, but only play NTSC clips:
slot select: slot id: 2 video format: NTSC
Protocol Details
Connection
The HyperDeck Ethernet server listens on TCP port 9993.
Basic syntax
The HyperDeck protocol is a line oriented text protocol. Lines from the server will be separated by an ascii
CR LF sequence. Messages from the client may be separated by LF or CR LF.
New lines are represented in this document as a "↵" symbol.
130Developer Information

Single line command syntax
Command parameters are usually optional. A command with no parameters is terminated with a new line:
{Command name}↵
If parameters are specified, the command name is followed by a colon, then pairs of parameter names and
values. Each parameter name is terminated with a colon character:
{Command name}: {Parameter}: {Value} {Parameter}: {Value} ...↵
Multiline command syntax
The HyperDeck protocol also supports an equivalent multiline syntax where each parameter-value pair is
entered on a new line. E.g.
{Command name}:↵
{P a r a m e t e r}: { Va lu e}↵
{P a r a m e t e r}: { Va lu e}↵
↵
Response syntax
Simple responses from the server consist of a three digit response code and descriptive text terminated by a
new line:
{Response code} {Response text}↵
If a response carries parameters, the response text is terminated with a colon, and parameter name and
value pairs follow on subsequent lines until a blank line is returned:
{Response code} {Response text}:↵
{P a r a m e t e r}: { Va lu e}↵
{P a r a m e t e r}: { Va lu e}↵
...
↵
Successful response codes
A simple acknowledgement of a command is indicated with a response code of 200:
200 ok↵
Other successful responses carry parameters and are indicated with response codes in the range of 201
to299.
131Developer Information

Failure response codes
Failure responses to commands are indicated with response codes in the range of 100 to 199:
100 syntax error
101 unsupported parameter
102 invalid value
103 unsupported
104 disk full
105 no disk
106 disk error
107 timeline empty
108 internal error
109 out of range
110 no input
111 remote control disabled
112 clip not found
120 connection rejected
150 invalid state
151 invalid codec
160 invalid format
161 invalid token
162 format not prepared
163 parameterized single line command not supported
Asynchronous response codes
The server may return asynchronous messages at any time. These responses are indicated with response
codes in the range of 500 to 599:
5xx {Response Text}:↵
{P a r a m e t e r}: { Va lu e}↵
{P a r a m e t e r}: { Va lu e}↵
↵
Connection response
On connection, an asynchronous message will be delivered:
500 connection info:↵
protocol version: {Version}↵
model: {Model Name}↵
↵
Timecode syntax
Timecodes are expressed as non-drop-frame timecode in the format:
HH:MM:SS:FF
132Developer Information

Handling of deck "remote" state
The “remote” command may be used to enable or disable the remote control of the deck. Any attempt to
change the deck state over ethernet while remote access is disabled will generate an error:
111 remote control disabled↵
To enable or disable remote control:
remote: enable: {“true”, “false”} ↵
The current remote control state may be overridden allowing remote access over ethernet irrespective of the
current remote control state:
remote: override: {“true”, “false”} ↵
The override state is only valid for the currently connected ethernet client and only while the connection
remains open.
The “remote” command may be used to query the remote control state of the deck by specifying no
parameters:
remote↵
The deck will return the current remote control state:
210 remote info:↵
enabled: {“true”, “false”}↵
override: {“true”, “false”}↵
↵
Asynchronous remote control information change notification is disabled by default and may be
configured with the “notify” command. When enabled, changes in remote state will generate a “510 remote
info:”asynchronous message with the same parameters as the “210 remote info:” message.
Closing connection
The "quit" command instructs the server to cleanly shut down the connection:
quit↵
Checking connection status
The "ping" command has no function other than to determine if the server is responding:
ping↵
Getting help
The "help" or "?" commands return human readable help text describing all available commands and
parameters:
help↵
Or:
?↵
The server will respond with a list of all supported commands:
201 help:↵
{Help Text}↵
{Help Text}↵
↵
133Developer Information

Switching to preview mode
The "preview" command instructs the deck to switch between preview mode and output mode:
preview: enable: {"true", "false"}↵
Playback will be stopped when the deck is switched to preview mode. Capturing will be stopped when the
deck is switched to output mode.
Controlling device playback
The “play” command instructs the deck to start playing:
play↵
The play command accepts a number of parameters which may be used together in most combinations.
By default, the deck will play all remaining clips on the timeline then stop.
The “single clip” parameter may be used to override this behavior:
play: single clip: {“true”, “false”}↵
By default, the deck will play at normal (100%) speed. An alternate speed may be specified in percentage
between -5000 to 5000:
play: speed: {% normal speed}↵
By default, the deck will stop playing when it reaches to the end of the timeline. The “loop” parameter may be
used to override this behavior:
play: loop: {“true”, “false”}↵
The “playrange” command instructs the deck to play all the clips. To override this behavior: and select a
particular clip:
playrange set: clip id: {Clip ID}↵
To only play a certain timecode range:
playrange set: in: {in timecode} out: {out timecode}↵
To clear a set playrange and return to the default value:
playrange clear↵
The “play on startup command” instructs the deck on what action to take on startup. By default, the deck will
not play. Use the “enable” command to start playback after each power up.
play on startup: enable {“true”, “false”}↵
By default, the unit will play back all clips on startup. Use the “single clip” command to override.
play on startup: single clip: {“true”, “false”}↵
Stopping deck operation
The "stop" command instructs the deck to stop the current playback or capture:
stop↵
134Developer Information

Changing timeline position
The "goto" command instructs the deck to switch to playback mode and change its position within the
timeline.
To go to the start of a specific clip:
goto: clip id: {Clip ID}↵
To move forward/back {count} clips from the current clip on the current timeline:
goto: clip id: +/-{count}↵
Note that if the resultant clip id goes beyond the first or last clip on timeline, it will be clamp at the first or last
clip.
To go to the start or end of the current clip:
goto: clip: {“start”, “end”}↵
To go to the start of the first clip or the end of the last clip:
goto: timeline: {“start”, “end”}↵
To go to a specified timecode:
goto: timecode: {timecode}↵
To move forward or back a specified duration in timecode:
goto: timecode: {“+”, “-”}{duration in timecode}↵
To specify between slot 1 and slot 2:
goto: slot id: {Slot ID}↵
Note that only one parameter/value pair is allowed for each goto command.
Enumerating supported commands and parameters
The "commands" command returns the supported commands:
commands↵
The command list is returned in a computer readable XML format:
212 commands:
<commands>↵
<command name="…"><parameter name="…"/>…</command>↵
<command name="…"><parameter name="…"/>…</command>↵
…
</commands>↵
↵
135Developer Information

Controlling asynchronous notifications
The “notify” command may be used to enable or disable asynchronous notifications from the server.
To enable or disable transport notifications:
notify: transport: {“true”, “false”}↵
To enable or disable slot notifications:
notify: slot: {“true”, “false”}↵
To enable or disable remote notifications:
notify: remote: {“true”, “false”}↵
To enable or disable configuration notifications:
notify: configuration: {“true”, “false”}↵
Multiple parameters may be specified. If no parameters are specified, the server returns the current state of
all notifications:
209 notify:↵
transport: {“true”, “false”}↵
slot: {“true”, “false”}↵
remote: {“true”, “false”}↵
configuration: {“true”, “false”}↵
dropped frames: {“true”, “false”}↵
display timecode: {“true”, “false”}↵
timeline position: {“true”, “false”}↵
playrange: {“true”, “false”}↵
cache: {“true”, “false”}↵
dynamic range: {“true”, “false”}↵
slate: {“true”, “false”}↵
clips: {“true”, “false”}↵
disk: {“true”, “false”}↵
↵
Retrieving device information
The "device info" command returns information about the connected deck device:
device info↵
The server will respond with:
204 device info:↵
protocol version: {Version}↵
model: {Model Name}↵
unique id: {unique alphanumeric identifier}↵
slot count: {number of storage slots}↵
software version: {software version}↵
↵
136Developer Information

Retrieving slot information
The "slot info" command returns information about a slot. Without parameters, the command returns
information for the currently selected slot:
slot info↵
If a slot id is specified, that slot will be queried:
slot info: slot id: {Slot ID}↵
The server will respond with slot specific information:
202 slot info:↵
slot id: {Slot ID}↵
status: {"empty", "mounting", "error", "mounted"}↵
volume name: {Volume name}↵
recording time: {recording time available in seconds}↵
video format: {disk's default video format}↵
blocked: {“true”, “false”}↵
↵
Asynchronous slot information change notification is disabled by default and may be configured with
the "notify" command. When enabled, changes in slot state will generate a "502 slot info:" asynchronous
message with the same parameters as the "202 slot info:" message.
Retrieving clip information
The “disk list” command returns the information for each playable clip on a given disk. Without parameters,
the command returns information for the current active disk:
disk list↵
If a slot id is specified, the disk in that slot will be queried:
disk list: slot id: {Slot ID}↵
The server responds with the list of all playable clips on the disk in the format of: Index, name, formats, and
duration in timecode:
206 disk list:↵
slot id: {Slot ID}↵
{clip index}: {name} {file format} {video format} {Duration
ti m ecode}↵
{clip index}: {name} {file format} {video format} {Duration
ti m ecode}↵
…
↵
Note that the clip index starts from 1.
Retrieving clip count
The "clips count" command returns the number of clips on the current timeline:
clips count ↵
The server responds with the number of clips:
214 clips count: ↵
clip count: {Count}↵
137Developer Information

Retrieving timeline information
The "clips get" command returns information for each available clip on the current timeline. Without
parameters, the command returns information for all clips on timeline:
clips get↵
The server responds with a list of clip IDs, names and timecodes:
205 clips info:↵
clip count: {Count}↵
{Clip ID}: {Start timecode} {Duration timecode} {In timecode}
{Out timecode} {Name}↵
{Clip ID}: {Start timecode} {Duration timecode} {In timecode}
{Out timecode} {Name}↵
…
↵
Retrieving transport information
The “transport info” command returns the state of the transport:
transport info ↵
The server responds with transport specific information:
208 transport info:
status: {“preview”, “stopped”, “play”, “forward”, “rewind”,
“j o g ”, “ s h u t t l e ”,” r e c o r d ”}↵
speed: {Play speed between -5000 and 5000 %}↵
slot id: {Slot ID or “none”}↵
clip id: {Clip ID or “none”}↵
single clip: {“true”, “false”}↵
display timecode: {timecode}↵
timecode: {timecode}↵
video format: {Video format}↵
loop: {“true”, “false”}↵
timeline: {n}↵
input video format: {Video format”}↵
dynamic range: {“off”, “Rec709”, “Rec2020_SDR”, “HLG”,
“ST2084_300”, “ST2084_500”, “ST2084_800”, “ST2084_1000”,
“ST2084_2000”, “ST2084_4000”, “ST2048” or “none”}↵
↵
The "timecode" value is the timecode within the current timeline for playback or the clip for record. The
"display timecode" is the timecode displayed on the front of the deck. The two timecodes will differ in some
deck modes.
Asynchronous transport information change notification is disabled by default and may be configured
with the "notify" command. When enabled, changes in transport state will generate a "508 transport info:"
asynchronous message with the same parameters as the "208 transport info:" message.
138Developer Information

Video Formats
The following video formats are currently supported on HyperDeck Shuttle:
720p50, 720p5994, 720p60
1080p23976, 1080p24, 1080p25, 1080p2997, 1080p30, 1080p60
1080i50, 1080i5994, 1080i60
Video format support may vary between models and software releases.
File Formats
All HyperDeck models currently support the following file formats:
H.264High
H.264Medium
H.264Low
QuickTimeProResHQ
QuickTimeProRes
QuickTimeProResLT
QuickTimeProResProxy
QuickTimeDNxHD220x
DNxHD220x
QuickTimeDNxHD145
DNxHD145
QuickTimeDNxHD45
DNxHD45
Supported file formats may vary between models and software releases.
139Developer Information

Querying and updating configuration information
The "configuration" command may be used to query the current configuration of the deck:
configuration↵
The server returns the configuration of the deck:
211 configuration:↵
audio input: {“embedded”, “XLR”, “RCA”}↵
audio mapping: {n}↵
video input: {“SDI”, “HDMI”, “component”, “composite”}↵
file format: {format}↵
audio codec: {“PCM”, “AAC”}↵
timecode input: {“external”, “embedded”, “preset”, “clip”}↵
timecode output: {“clip”, “timeline”}↵
timecode preference: {“default”, “dropframe”, “nondropframe”}↵
timecode preset: {timecode}↵
audio input channels: {n}↵
record trigger: {“none”, “recordbit”, “timecoderun”}↵
record prefix: {name}↵
append timestamp: {“true”, “false”}↵
genlock input resync: {“true”, “false”}↵
↵
One or more configuration parameters may be specified to change the configuration of the deck.
To change the current video input:
configuration: video input: {“SDI”, “HDMI”, “component”}↵
Valid video inputs may vary between models. To configure the current audio input:
configuration: audio input: {“embedded”, “XLR”, “RCA”}↵
Valid audio inputs may vary between models.
To configure the current file format:
configuration: file format: {File format}↵
Note that changes to the file format may require the deck to reset, which will cause the client connection to
be closed. In such case, response code 213 will be returned (instead of 200) before the client connection is
closed:
“213 deck rebooting”
Asynchronous configuration information change notification is disabled by default and may be configured
with the “notify” command. When enabled, changes in configuration will generate a “511 configuration:”
asynchronous message with the same parameters as the “211 configuration:” message.
140Developer Information

Selecting active slot and video format
The "slot select" command instructs the deck to switch to a specified slot, or/and to select a specified output
video format.
To switch to a specified slot:
slot select: slot id: {slot ID}↵
To select the output video format:
slot select: video format: {video format}↵
Either or all slot select parameters may be specified. Note that selecting video format will result in a rescan of
the disk to reconstruct the timeline with all clips of the specified video format.
Clearing the current timeline
The "clips clear" command instructs the deck to empty the current timeline:
clips clear↵
The server responds with
200 ok↵
Adding a clip to the current timeline
The "clips add:" command instructs the deck to add a clip to the current timeline:
clips add: name: {clip name}↵
The server responds with
200 ok↵
or in case of error
1xx {error description}↵
Configuring the watchdog
The “watchdog” command instructs the deck to monitor the connected client and terminate the connection if
the client is inactive for at least a specified period of time.
To configure the watchdog:
watchdog: period: {period in seconds}↵
To avoid disconnection, the client must send a command to the server at least every {period} seconds. Note
that if the period is set to 0 or less than 0, connection monitoring will be disabled.
141Developer Information

Assistance
Obtenir de l’assistance
Le moyen le plus rapide d'obtenir de l'aide est d'accéder aux pages d'assistance en ligne de
Blackmagic Design et de consulter les dernières informations de support concernant votre
enregistreur à disque HyperDeck de Blackmagic.
Pages d'assistance en ligne de Blackmagic Design
Les dernières versions du manuel, du logiciel et des notes d'assistance peuvent être consultées sur
la page d’assistance technique de Blackmagic Design : www.blackmagicdesign.com/fr/support.
Forum Blackmagic Design
Le forum Blackmagic Design est une source d'information utile qui offre des idées innovantes pour
vos productions. Cette plateforme d’aide vous permettra également d’obtenir des réponses rapides
à vos questions, car un grand nombre de sujets peuvent avoir déjà été abordés par d'autres
utilisateurs. Pour vous rendre sur le forum :
http://forum.blackmagicdesign.com
Contacter le service d'assistance de Blackmagic Design
Si vous ne parvenez pas à trouver l'aide dont vous avez besoin dans les pages d’assistance ou sur
notre forum, veuillez utiliser l'option «Envoyez-nous un email», accessible sur la page d'assistance
pour envoyer une demande d'aide par email. Vous pouvez également cliquer sur le bouton «Trouver
un support technique» situé sur la page d'assistance et ainsi contacter le centre d'assistance
technique Blackmagic Design le plus proche de chez vous.
Vérification du logiciel actuel
Pour vérifier quelle version du logiciel Blackmagic HyperDeck est installée sur votre ordinateur,
ouvrez la fenêtre intitulée About Blackmagic HyperDeck Setup.
Sur Mac OS, ouvrez le logiciel Blackmagic HyperDeck Setup dans le dossier Applications.
Sélectionnez About Blackmagic HyperDeck Setup dans le menu d'application pour
connaître le numéro de version.
Sur Windows, ouvrez l’utilitaire Blackmagic HyperDeck Setup dans votre menu de
Démarrage ou sur l’écran de Démarrage. Cliquez sur le menu Aide et sélectionnez About
Blackmagic HyperDeck Setup pour connaître le numéro de version.
Comment obtenir les dernières mises à jour du logiciel
Après avoir vérifié quelle version du logiciel Blackmagic HyperDeck Setup est installée sur votre
ordinateur, veuillez vous rendre au centre de support technique Blackmagic Design à l’adresse
suivante :
www.blackmagicdesign.com/fr/support pour vérifier les dernières mises à jour. Même s'il
est généralement conseillé d'exécuter les dernières mises à jour, il est prudent d’éviter d’effectuer
une mise à jour logicielle au milieu d'un projet important.
142Assistance

Avertissements
Élimination des déchets d'équipements électriques et électroniques au sein de l'Union
européenne.
Le symbole imprimé sur ce produit indique qu'il ne doit pas être jeté avec les autres
déchets. Cet appareil doit être déposé dans un point de collecte agréé pour être recyclé.
La collecte individuelle et le recyclage de votre équipement permettra de préserver les
ressources naturelles et garantit un recyclage approprié afin d'éviter la contamination de
l'environnement par des substances dangereuses pour la santé. Pour obtenir plus
d'informations sur les points de collecte pour recycler votre appareil, veuillez contacter
l'organisme responsable du recyclage dans votre région ou le revendeur du produit.
Cet équipement a été testé et déclaré conforme aux limites imposées aux appareils
numériques de classe A, en vertu du chapitre 15 des règles de la FCC. Ces limites ont pour
objectif d'assurer une protection suffisante contre les interférences nuisibles lorsque
l'équipement est utilisé dans un environnement commercial. Cet équipement génère, utilise
et peut dégager de l'énergie de radiofréquence et, s'il n'est pas installé et utilisé
conformément au manuel d'utilisation, peut provoquer un brouillage préjudiciable aux
communications radio. L'utilisation de cet équipement en zone résidentielle est susceptible
de provoquer des interférences nuisibles, auquel cas il sera demandé à l'utilisateur de
corriger ces interférences à ses frais.
L'utilisation de cet appareil est soumise aux deux conditions suivantes :
1 Cet appareil ne doit pas causer d'interférences nuisibles.
2 Cet appareil doit accepter toute interférence reçue, notamment celles pouvant
entraîner un dysfonctionnement.
R-R-BMD-20211410001
Déclaration de ISDE Canada
Cet appareil est conforme aux normes canadiennes relatives aux appareils numériques
de Classe A.
Toute modification ou utilisation de ce produit en dehors de son utilisation prévue peut
annuler la conformité avec ces normes.
Les connexions aux interfaces HDMI doivent être effectuées avec des câbles HDMI
blindés d’excellente qualité.
Cet équipement a été testé pour être en conformité avec une utilisation prévue dans un
environnement commercial. Si cet équipement est utilisé dans un environnement
domestique, il peut provoquer des interférences radio.
143Avertissements

Informations de sécurité
Ce produit peut être utilisé dans un climat tropical lorsque la température ambiante n'excède
pas 40ºC.
Veillez à ce que l'espace autour du produit soit suffisant afin de ne pas compromettre la ventilation.
Les pièces de cet appareil ne sont pas réparables par l'opérateur. Toute opération d'entretien doit
être effectuée par un centre de service Blackmagic Design.
Cet appareil ne peut être utilisé qu'à une altitude inférieure à 2000 mètres.
Déclaration de l’État de Californie
Ce produit est susceptible de vous exposer à des produits chimiques, dont des traces de
polybromobiphényle dans les parties en plastique, reconnu par l’État de Californie comme étant
responsable de cancers, d’anomalies congénitales ou d’autres effets nocifs sur la reproduction.
Pour de plus amples informations, veuillez vous rendre sur
www.P65Warnings.ca.gov.
144Informations de sécurité

Garantie
Garantie limitée à 12 mois
Par la présente, Blackmagic Design garantit que ce produit sera exempt de défauts matériels et de
fabrication pendant une durée d’un an à compter de la date d'achat. Si un produit s’avère défectueux
pendant la période de garantie, Blackmagic Design peut, à sa seule discrétion, réparer le produit
défectueux sans frais pour les pièces et la main-d’œuvre, ou le remplacer.
Pour se prévaloir du service offert en vertu de la présente garantie, il vous incombe d’informer
Blackmagic Design de l’existence du défaut avant expiration de la période de garantie, et de prendre
les mesures nécessaires pour l’exécution des dispositions de ce service. Le consommateur a la
responsabilité de s’occuper de l’emballage et de l'expédition du produit défectueux au centre de
service nommément désigné par Blackmagic Design, en frais de port prépayé. Il incombe au Consommateur
de payer tous les frais de transport, d’assurance, droits de douane et taxes et toutes autres charges
relatives aux produits qui nous auront été retournés et ce, quelle que soit la raison.
La présente garantie ne saurait en aucun cas s’appliquer à des défauts, pannes ou dommages causés
par une utilisation inappropriée ou un entretien inadéquat ou incorrect. Blackmagic Design n’a en aucun
cas l’obligation de fournir un service en vertu de la présente garantie : a) pour réparer les dommages
résultant de tentatives de réparations, d’installations ou tous services effectués par du personnel non
qualifié par Blackmagic Design, b) pour réparer tout dommage résultant d'une utilisation inadéquate
ou d'une connexion à du matériel incompatible, c) pour réparer tout dommage ou dysfonctionnement
causé par l’utilisation de pièces ou de fournitures n’appartenant pas à la marque de Blackmagic Design,
d) pour examiner un produit qui a été modifié ou intégré à d’autres produits quand l’impact d’une telle
modification ou intégration augmente les délais ou la difficulté d’examiner ce produit. CETTE GARANTIE
REMPLACE TOUTE GARANTIE EXPLICITE OU IMPLICITE. BLACKMAGIC DESIGN ET SES REVENDEURS
DÉCLINENT EXPRESSÉMENT TOUTE GARANTIE IMPLICITE DE COMMERCIALISATION OU D'ADAPTATION
QUEL QU’EN SOIT LE BUT. LA RESPONSABILITÉ DE BLACKMAGIC DESIGN POUR RÉPARER OU
REMPLACER UN PRODUIT S'AVÉRANT DÉFECTUEUX CONSTITUE LA TOTALITÉ ET LE SEUL RECOURS
EXCLUSIF PRÉVU ET FOURNI AU CONSOMMATEUR POUR TOUT DOMMAGE INDIRECT, SPÉCIFIQUE,
ACCIDENTEL OU CONSÉCUTIF, PEU IMPORTE QUE BLACKMAGIC DESIGN OU SES REVENDEURS
AIENT ÉTÉ INFORMÉS OU SE SOIENT RENDUS COMPTE AU PRÉALABLE DE L'ÉVENTUALITÉ DE CES
DOMMAGES. BLACKMAGIC DESIGN NE PEUT ÊTRE TENU POUR RESPONSABLE DE TOUTE UTILISATION
ILLICITE OU ABUSIVE DU MATÉRIEL PAR LE CONSOMMATEUR. BLACKMAGIC DESIGN N'EST PAS
RESPONSABLE DES DOMMAGES RÉSULTANT DE L'UTILISATION DE CE PRODUIT. LE CONSOMMATEUR
MANIPULE CE PRODUIT À SES SEULS RISQUES.
© Copyright 2022 de Blackmagic Design. Tous droits réservés. 'Blackmagic Design’, ‘DeckLink’, ‘HDLink’, ‘Workgroup Videohub’,
‘Multibridge Pro’, ‘Multibridge Extreme’, ‘Intensity’ et ‘Leading the creative video revolution’ sont des marques déposées aux USA
et dans d'autres pays. Tous les autres noms de société et de produits peuvent être des marques déposées de leurs sociétés
respectives auxquelles ils sont associés.
145Garantie

HyperDeck Shuttle HD
HyperDeck
ShuttleHD
April2022
Installations- und Bedienungsanleitung

Willkommen
Vielen Dank, dass Sie sich zum Kauf eines Blackmagic HyperDeck ShuttleHD Rekorders
entschieden haben.
Mit der Entwicklung der originalen Blackmagic HyperDeck Rekorder wollten wir die
Aufzeichnung und Wiedergabe von Video mithilfe von SSD-Speichern vereinfachen. Heute
freuen wir uns, Ihnen den HyperDeck ShuttleHD vorzustellen.
Der HyperDeck ShuttleHD ist ein kleiner, portabler HDMI-Videorekorder für den Einsatz auf
Ihrem Schreibtisch. Ein großer Suchlaufregler und vertraute Transportsteuerelemente gestatten
Ihnen die Bedienung mit einer Hand. Darum ist der HyperDeck Shuttle HD der ideale Gefährte
für Liveproduktionen mit einem ATEM Mini Mischer. Sie können den HyperDeck ShuttleHD
sogar als Teleprompter verwenden.
Der HyperDeck ShuttleHD zeichnet in ProRes-, DNxHD- oder H.264-Codecs auf SD-Karten
oder externe Flash-Laufwerke auf und unterstützt damit die Aufzeichnung und Wiedergabe in
Blitzgeschwindigkeit.
Bitte sehen Sie auf der Support-Seite unter
www.blackmagicdesign.com/de nach der
aktuellsten Version dieser Bedienungsanleitung sowie nach Updates für die HyperDeck
Software. Halten Sie Ihre Produktsoftware stets auf dem aktuellsten Stand und sichern Sie
sich so Zugang zu den neuesten Features. Bitte registrieren Sie sich beim Herunterladen der
Software mit Ihren Kontaktdaten, damit wir Sie über neu veröffentlichte Versionen informieren
können. Wir arbeiten ständig an neuen Features und Verbesserungen und würden uns über
eine Rückmeldung von Ihnen freuen.
Grant Petty CEO Blackmagic Design

Inhalt
Erste Schritte 149
Anschließen an das Stromnetz 149
Anschließen von Video- und Audiogeräten 150
Anschließen von Datenträgern 150
Aufzeichnen von Video 151
Wiedergabe 152
Verwenden des Suchlaufreglers 153
Ändern von Einstellungen 155
Einstellungen 156
Hintere Anschlüsse 165
Datenträger 166
SD-Karte 166
Externe Laufwerke 167
Formatieren von Datenträgern 167
Vorbereiten von Datenträgern auf einem Computer 167
Verwenden der Teleprompterfunktion 169
Blackmagic HyperDeck Setup 170
Übertragen von Dateien über ein Netzwerk 172
Developer Information 174
Blackmagic HyperDeck Ethernet Protocol 174
Protocol Commands 174
Protocol Details 178
Hilfe 190
Gesetzliche Vorschriften 191
Sicherheitshinweise 192
Garantie 193
148
HyperDeck ShuttleHD

Erste Schritte
Die ersten Schritte mit Ihrem HyperDeck ShuttleHD sind einfach: Strom anschließen, eine HDMI-
Videoquelle verbinden, eine SD-Karte einführen oder einen externen Datenträger anschließen und
die Aufnahmetaste drücken.
Dieser Abschnitt des Handbuchs erklärt, wie Sie Ihren HyperDeck ShuttleHD in Betrieb nehmen.
JOG SCR
CLIP
MENU SET
DISK SD
Anschließen an das Stromnetz
Um Ihren HyperDeck ShuttleHD mit Strom zu versorgen, stecken Sie das mitgelieferte Netzteil in
die Strombuchse an der Rückseite. Festziehen der Verriegelung sichert das Kabel, um
versehentliche Stromunterbrechungen zu verhindern.
HDMI OUT
HDMI IN
EXT DISK
SD CARD
ETHERNET
+
12V DC
Sichern Sie das Netzteil an der Strombuchse des HyperDeck ShuttleHD
149
Erste Schritte
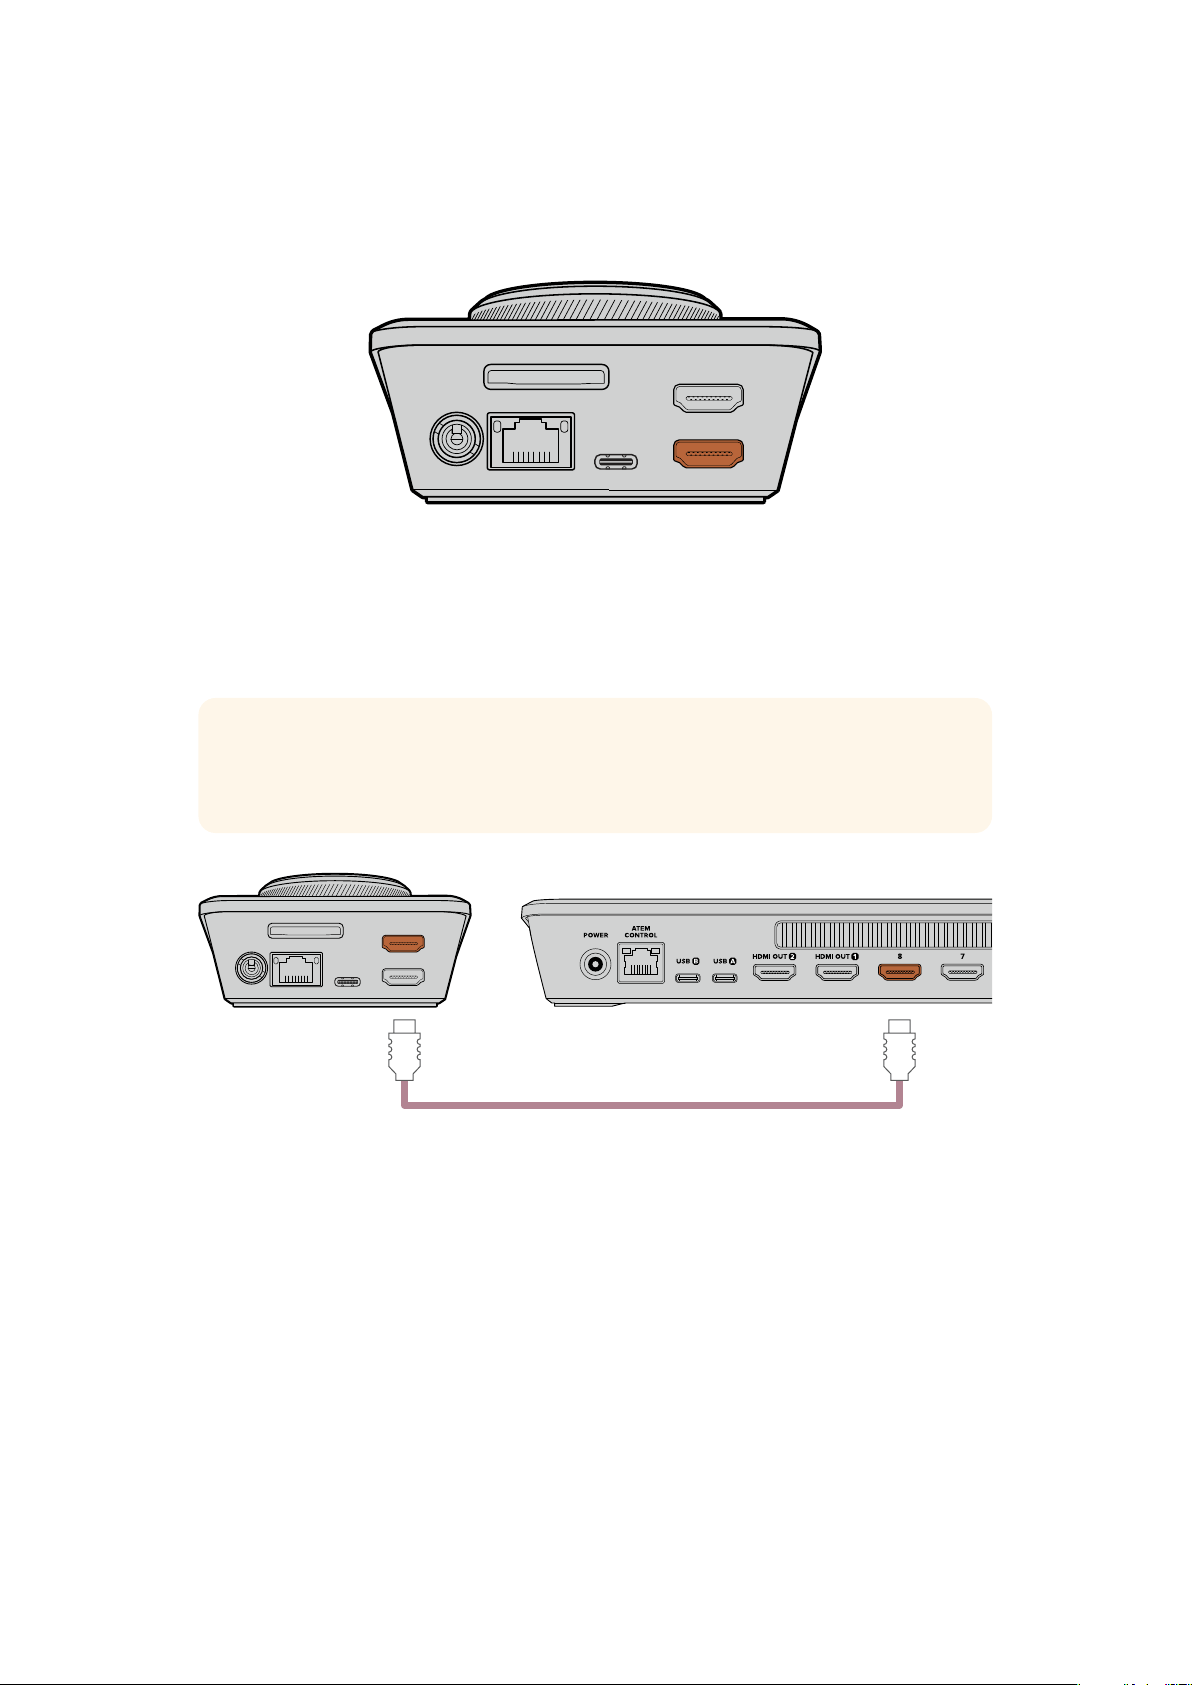
Anschließen von Video- und Audiogeräten
Um ein Videogerät mit Ihrem HyperDeck ShuttleHD zu verbinden, schließen Sie die HDMI-
Videoquelle an den HDMI-Eingang an der Rückseite an.
HDMI OUT
HDMI IN
EXT DISK
SD CARD
ETHERNET
+
12V DC
Schließen Sie Ihr Ausgabegerät an den HDMI-Ausgang an. Dies könnte bspw. ein ATEM Mini
Mischer oder ein HDMI-Fernseher sein.
Der HDMI-Ausgang dient auch zum Sichten des Einstellungsmenüs beim Ändern von Einstellungen
für Ihren HyperDeck. Das Einstellungsmenü wird über die HDMI-Ausgabe als Video-Overlay
eingeblendet. Weitere Informationen zu den Menü-Einstellungen finden Sie im Abschnitt „Ändern
von Einstellungen“ weiter hinten in diesem Handbuch.
TIPP Sollte Ihre Videoeingabe nicht auf dem angeschlossenen Bildschirm erscheinen,
kann es sein, dass sich das Gerät im Wiedergabemodus befindet. Drücken Sie die
Aufnahmetaste, um den Aufzeichnungsmodus zu aktivieren.
HDMI OUT
HDMI IN
EXT DISK
SD CARD
ETHERNET
+
12V DC
HDMI-Anschlüsse
Verbinden Sie den HDMI-Ausgang mit Ihrem Ausgabegerät, wie einem HDMI-Fernseher oder ATEMMini Mischer
Anschließen von Datenträgern
Alle HyperDeck ShuttleHD Rekorder werden einsatzbereit ausgeliefert und erfordern keine vorherige
Konfiguration. Sie benötigen lediglich eine formatierte SD-Karte oder ein externes Laufwerk.
Datenträger lassen sich mühelos über die Menü-Einstellungen formatieren. Sie können dies aber
auch auf Ihrem Computer tun. Einzelheiten finden Sie im Abschnitt „Formatieren von Datenträgern“
in diesem Handbuch. Das Handbuch enthält auch Empfehlungen zu den für Videoaufzeichnungen
bestgeeigneten Datenträgertypen sowie eine Liste mit empfohlenen SD-Karten und externen
Laufwerken.
So führen Sie eine SD-Karte ein:
1 Halten Sie die SD-Karte mit den goldfarbenen Kontakten auf den SD-Kartenschacht
ausgerichtet. Schieben Sie die Karte vorsichtig in den Schacht, bis sie in der richtigen
Position einrastet.
150Erste Schritte
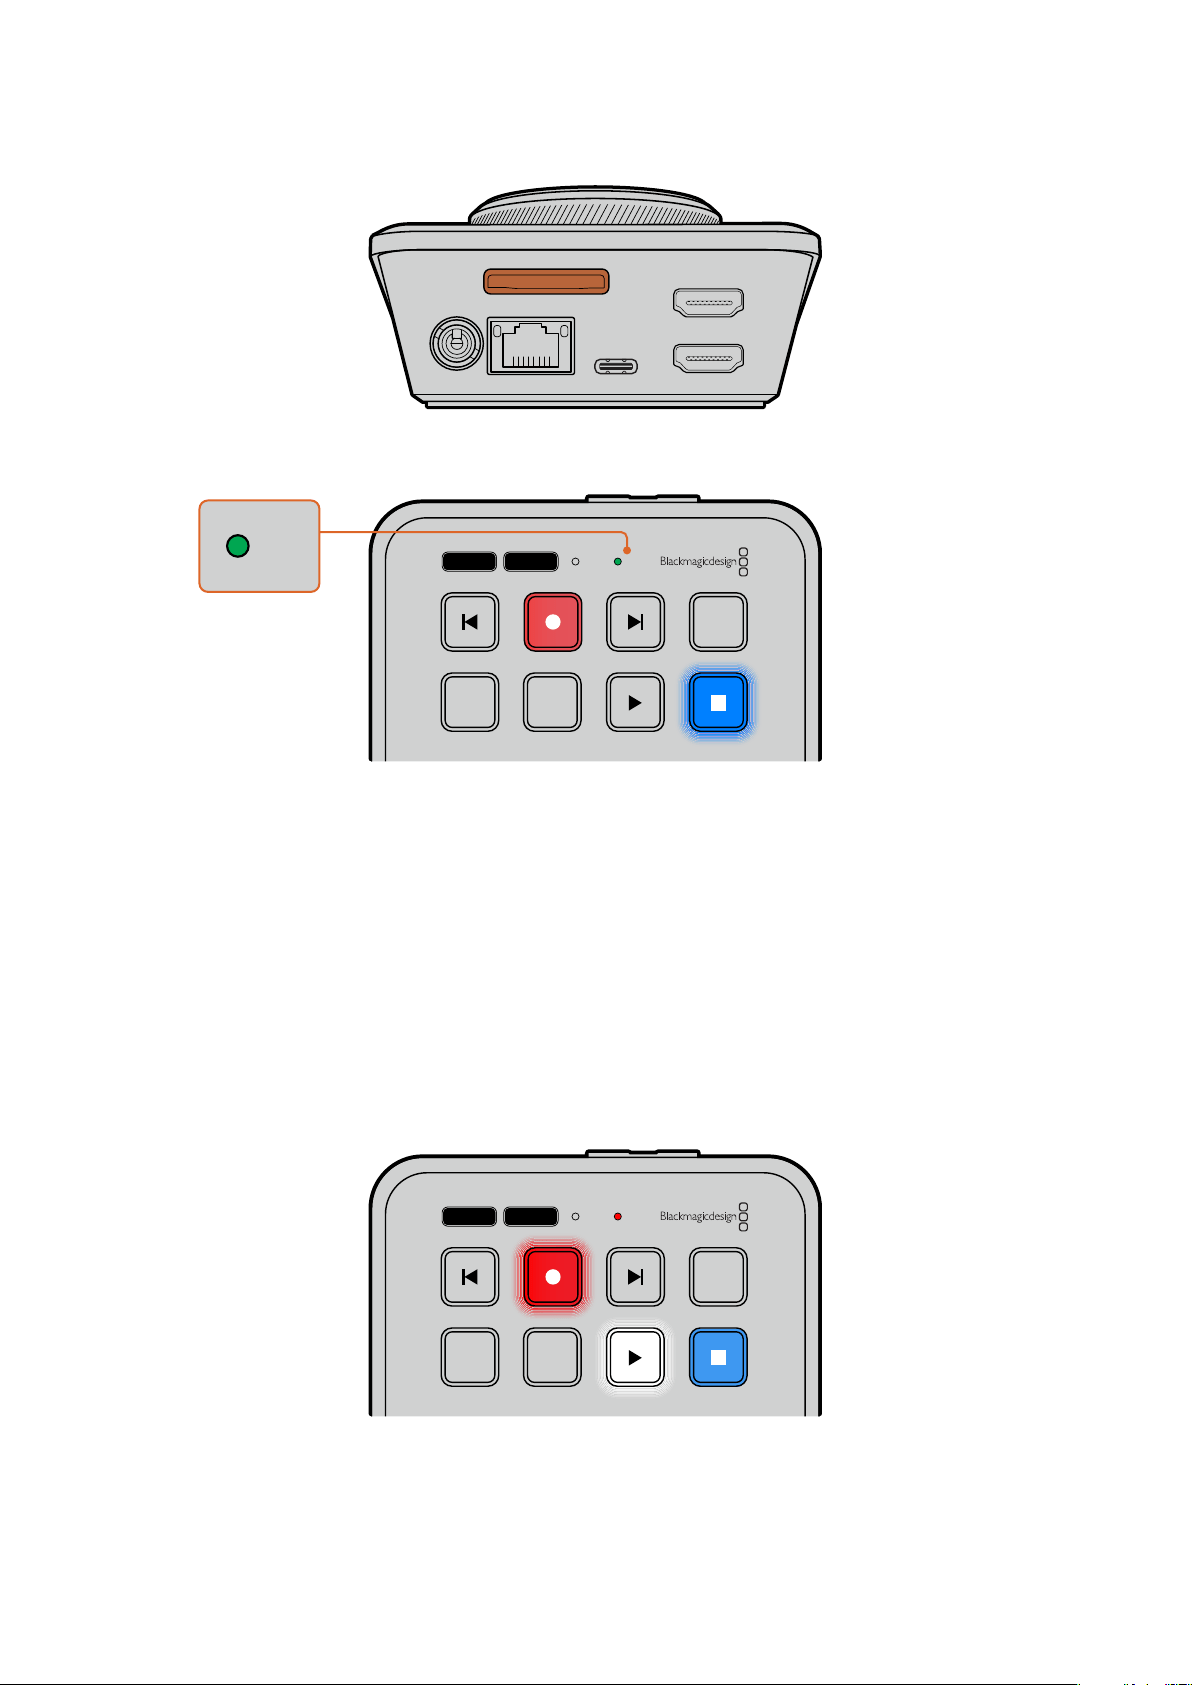
HDMI OUT
HDMI IN
EXT DISK
SD CARD
ETHERNET
+
12V DC
2 Ihre SD-Karte wird nun vom HyperDeck geprüft. Ein grüner SD-Indikator oben am
HyperDeck ShuttleHD zeigt dies an. Nach der Überprüfung erlischt der Indikator.
JOG SCR
CLIP
MENU SET
DISK SD
DISK SD
Das ist schon alles, was für die Inbetriebnahme Ihres HyperDeck ShuttleHD erforderlich ist. Er ist
nun aufzeichnungs- und wiedergabebereit.
Näheres zur Aufzeichnung und Wiedergabe von Clips, zum Ändern von Einstellungen und ähnlichem
erhalten Sie im weiteren Verlauf des Handbuchs.
Aufzeichnen von Video
Nachdem Sie sich vergewissert haben, dass Ihre Videoquelle auf dem HDMI-Ausgabegerät
angezeigt wird, können Sie sofort aufzeichnen.
Starten Sie die Aufzeichnung durch Drücken der Aufnahmetaste. Beim Aufzeichnen auf eine
SD-Karte leuchtet der SD-Indikator rot und die Aufnahme- und Wiedergabetasten leuchten
ebenfalls. Beim Aufzeichnen auf ein externes Laufwerk leuchtet der DISK-Indikator rot.
JOG SCR
CLIP
MENU SET
DISK SD
Beenden Sie die Aufzeichnung durch Drücken der Stopptaste.
151Aufzeichnen von Video
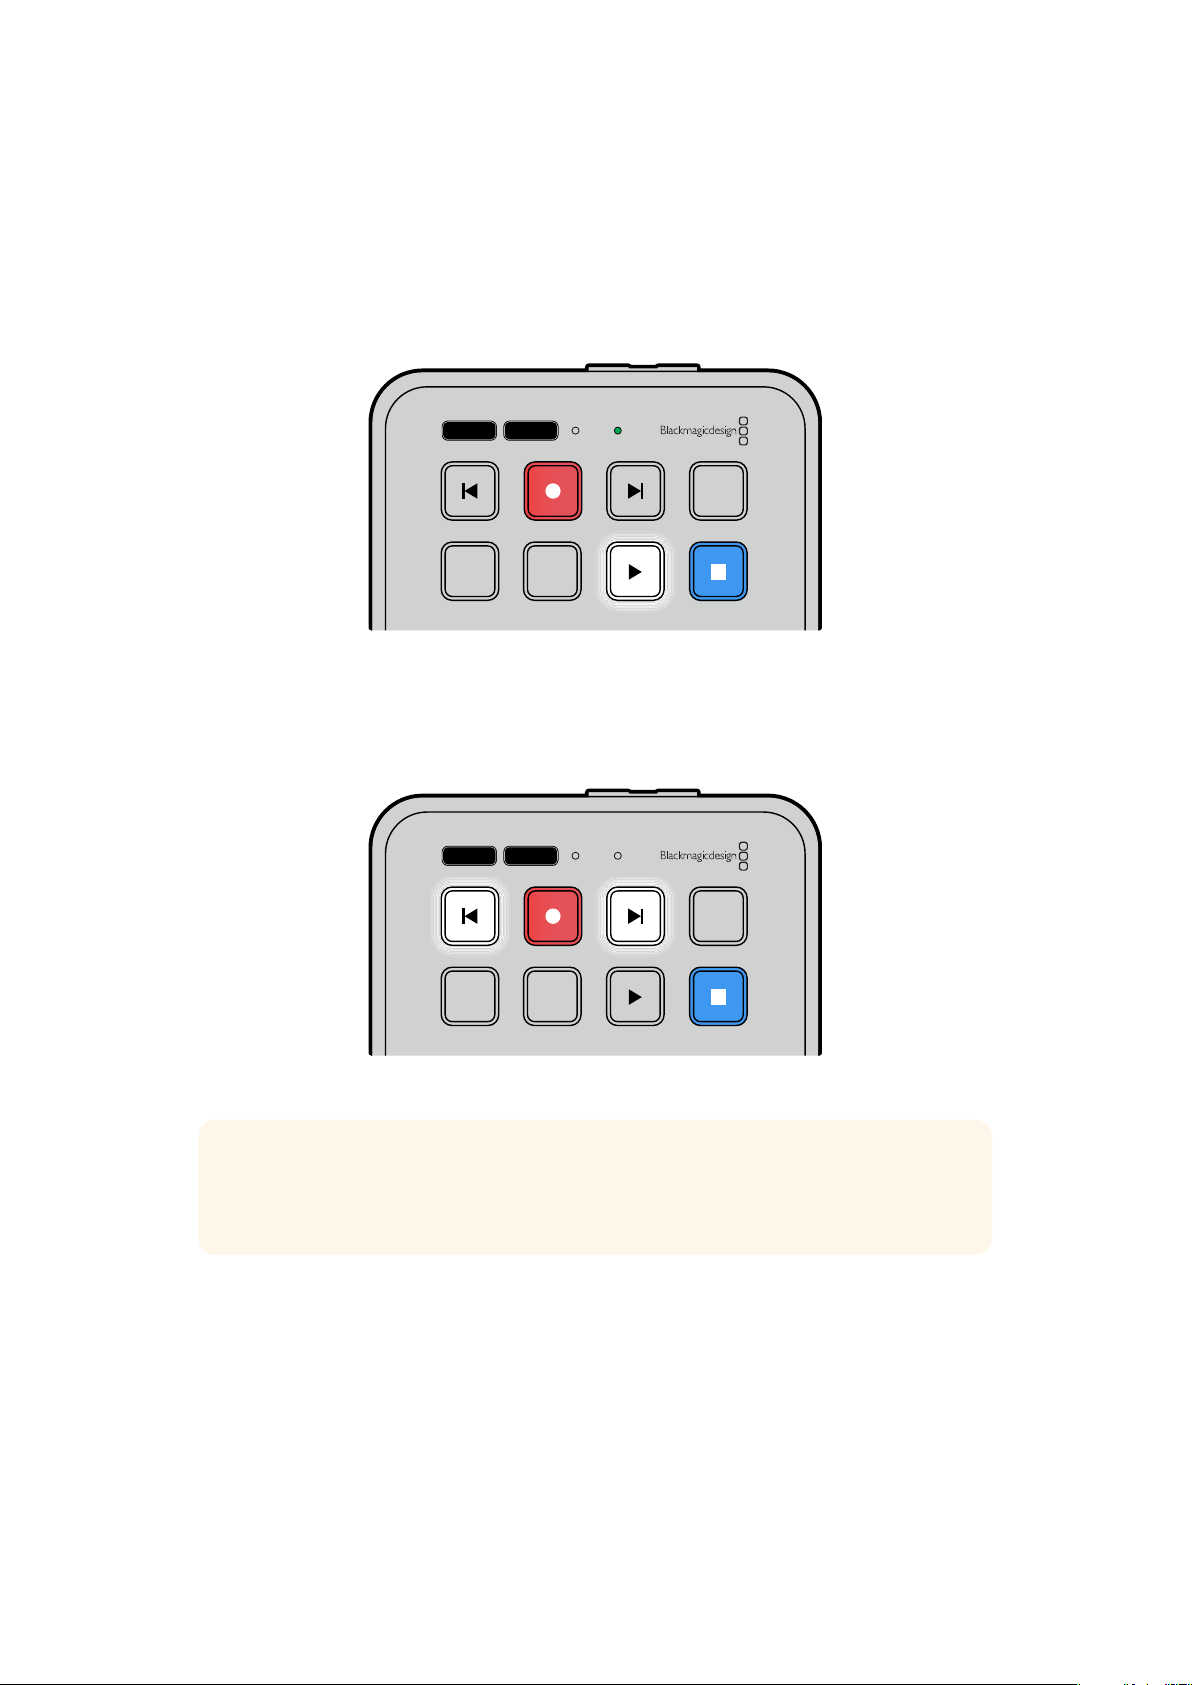
Wiedergabe
Drücken Sie die Wiedergabetaste, um Video abzuspielen. Während der Wiedergabe leuchtet die
Aufnahmetaste. Zudem leuchtet der DISK- oder der SD-Medienschachtindikator grün.
Wenn mehrere Clips aufgezeichnet wurden, können Sie mit den Vor- und Rücklauftasten zügig durch
die Clips navigieren.
JOG SCR
CLIP
MENU SET
DISK SD
Verwenden der Vor- und Rücklauftasten
Drücken Sie die Rücklauftaste, um zum Anfang des Clips zu cuen. Durch mehrmaliges Drücken
navigieren Sie rückwärts durch zuvor aufgezeichnete Clips.
Drücken Sie die Vorlauftaste, um vorwärts durch Ihre Clips zu navigieren.
JOG SCR
CLIP
MENU SET
DISK SD
Mit den Vor- und Rücklauftasten cuen Sie an den Anfang von Clips
TIPP Um Videodateien auf Ihrem HyperDeck abzuspielen, wählen Sie den Codec, in dem
die Dateien aufgezeichnet wurden. Das geht über das Menü. Näheres finden Sie im
Abschnitt „Ändern von Einstellungen“ in diesem Handbuch.
Loopen von Clips
Erneutest Drücken der Wiedergabetaste während der Wiedergabe loopt alle Clips auf dem
HyperDeck ShuttleHD, bis Sie die Stopptaste drücken.
Wenn Sie einen einzelnen Clip in Schleife abspielen möchten, stellen Sie Ihren HyperDeck auf den
Clipmodus ein. Drücken Sie die Wiedergabetaste zum Abspielen eines Clips einmal, und erneut, um
ihn zu loopen.
152Wiedergabe
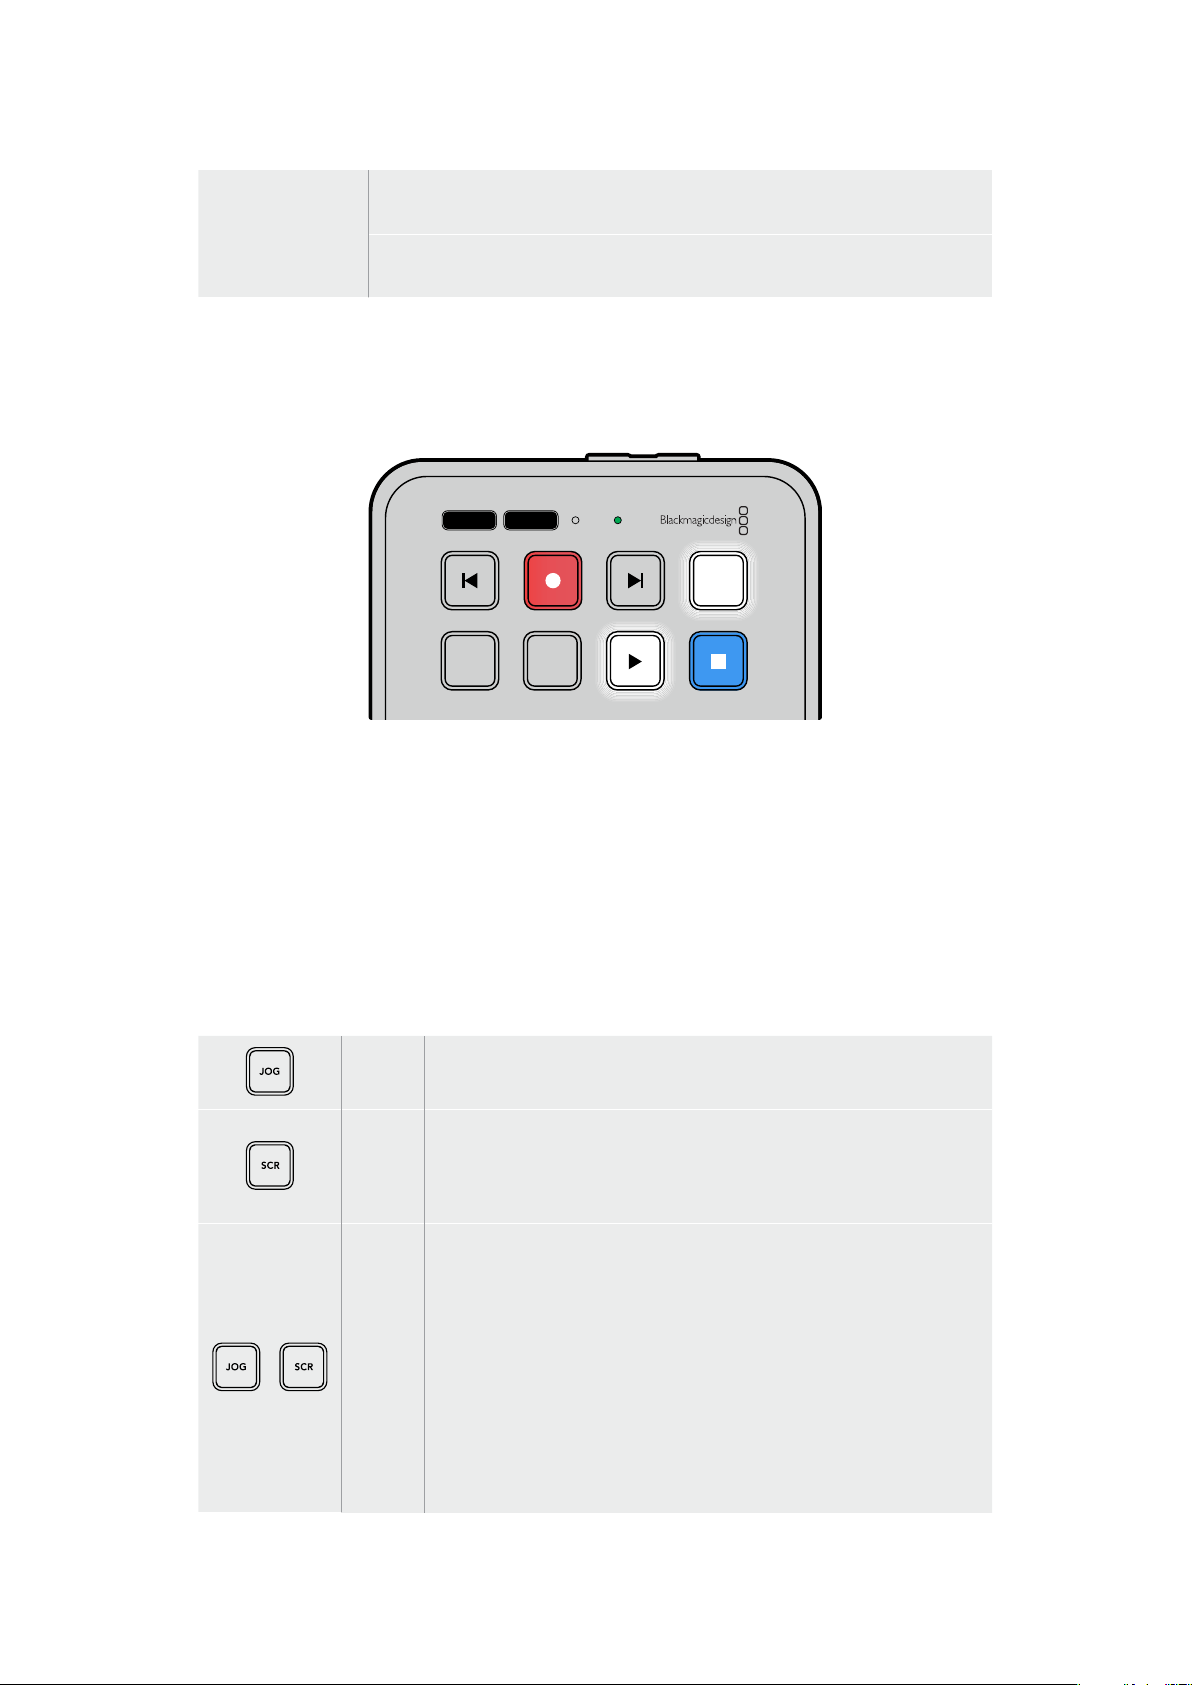
Alle Clips loopen
Drücken Sie die Wiedergabetaste während der Wiedergabe ein zweites Mal,
um alle aufgezeichneten Clips in Schleife abzuspielen.
Aktuellen Clip
loopen
Drücken Sie die Wiedergabetaste im Clipmodus ein zweites Mal, um den
aktuellen Clip in Schleife abzuspielen.
Clipmodus
Im Clipmodus beschränkt sich die Wiedergabe auf einen einzelnen Clip. Ist der Clipmodus aktiviert,
können Sie bspw. spulen oder zu einem anderen Clip springen, und wenn Sie dann die
Wiedergabetaste drücken, stoppt die Wiedergabe am Ende des Clips.
JOG SCR
CLIP
MENU SET
DISK SD
Erneutes Drücken der Wiedergabetaste im Clipmodus spielt
den aktuellen Clip in Schleife ab
Verwenden des Suchlaufreglers
Der Suchlaufregler ermöglicht es Ihnen, während der Wiedergabe schnell durch Ihre Clips zu
navigieren und bestimmte Stellen zur Wiedergabe auszuwählen oder diese frameweise zu sichten.
Dies ist von Vorteil, wenn Sie eine bestimmte Stelle in einem Clip zur visuellen Kontrolle durch
Drehen des Reglers finden müssen. Das ist auch nützlich, um den Abspielkopf an einen bestimmten
Cue-Punkt zu setzen, bspw. um den Clip in eine Live-Sendung einzuspielen.
Die Modi des Suchreglers sind Jog, Scroll und Shuttle.
Jog Spielt Clips frameweise ab und gestattet die präzise Steuerung.
Scroll
Im Scrollmodus navigieren Sie zügig vor- und rückwärts durch Ihr
gesamtes aufgezeichnetes Material. Der Scrollmodus reagiert darauf, wie
schnell und in welche Richtung Sie den Suchlaufregler drehen. So haben
Sie bei der Wiedergabe die volle Kontrolle über die Abspielposition.
Shuttle
Um in den Shuttlemodus zu wechseln, drücken Sie die JOG- und
SCR-Tasten gleichzeitig. Ist der Shuttlemodus aktiviert, spulen Sie
durch Drehen des Reglers nach links oder rechts durch Ihr Material.
Beim Betätigen des Reglers wird das Spulen auf eine bis zu 50-fache
Höchstgeschwindigkeit beschleunigt. Um das Shuttletempo zu verringern
und anzuhalten, drehen Sie den Regler zur Ausgangsposition zurück. Um
beim Shutteln an einer bestimmten Stelle anzuhalten, drücken Sie die
Stopptaste. Oder drücken Sie die Wiedergabetaste, um die Wiedergabe
von der aktuellen Position fortzusetzen. Es sei erwähnt, dass man die
maximale Shuttlegeschwindigkeit im Setup-Menü reduzieren kann.
Näheres dazu finden Sie unter „Einstellungen“ weiter hinten im Handbuch.
153Wiedergabe

JOG SCR
CLIP
MENU SET
DISK SD
Drücken Sie die dedizierte JOG- oder SCR-Taste, um den
Jog- bzw. Scroll-Suchmodus auszuwählen
JOG SCR
CLIP
MENU SET
DISK SD
Ist der Suchmodus gewählt, drehen Sie den Regler
TIPP Um zur normalen Wiedergabe zurückzukehren, drücken Sie die Wiedergabe- oder
die Stopptaste.
154Wiedergabe

Ändern von Einstellungen
Drücken der MENU-Taste ruft das Einstellungsmenü auf. Auf Ihrem angeschlossenen HDMI-
Bildschirm wird das Menü als Video-Overlay in der unteren linken Ecke eingeblendet.
JOG SCR
CLIP
MENU SET
DISK SD
Drücken Sie die MENU-Taste, um das Einstellungsmenü aufzurufen
Navigieren Sie mit dem Suchlaufregler zum Untermenü oder der jeweiligen Einstellung
Drücken Sie die SET-Taste, um das Untermenü oder die Einstellung auszuwählen
Passen Sie Einstellungen mithilfe des Suchlaufreglers oder der Vor- und Rücklauftasten an.
Bestätigen Sie die Auswahl durch Drücken der SET-Taste.
Sie verlassen das Menü, indem Sie die MENU-Taste drücken, um zu den Optionen auf der Ebene
darüber und schließlich zur Startseite zurückkehren.
TIPP Über das Einstellungsmenü können Sie das Menü in einer der vier Ecken Ihres
Bildschirms positionieren. Wir empfehlen, das Menü nach dem Ändern von Einstellungen
auszuschalten. Damit gewährleisten Sie, dass die HDMI-Ausgabe an einen HDMI-Mischer
wie den ATEM Mini Extreme als Cleanfeed erfolgt.
JOG SCR
CLIP
MENU SET
DISK SD
155Ändern von Einstellungen
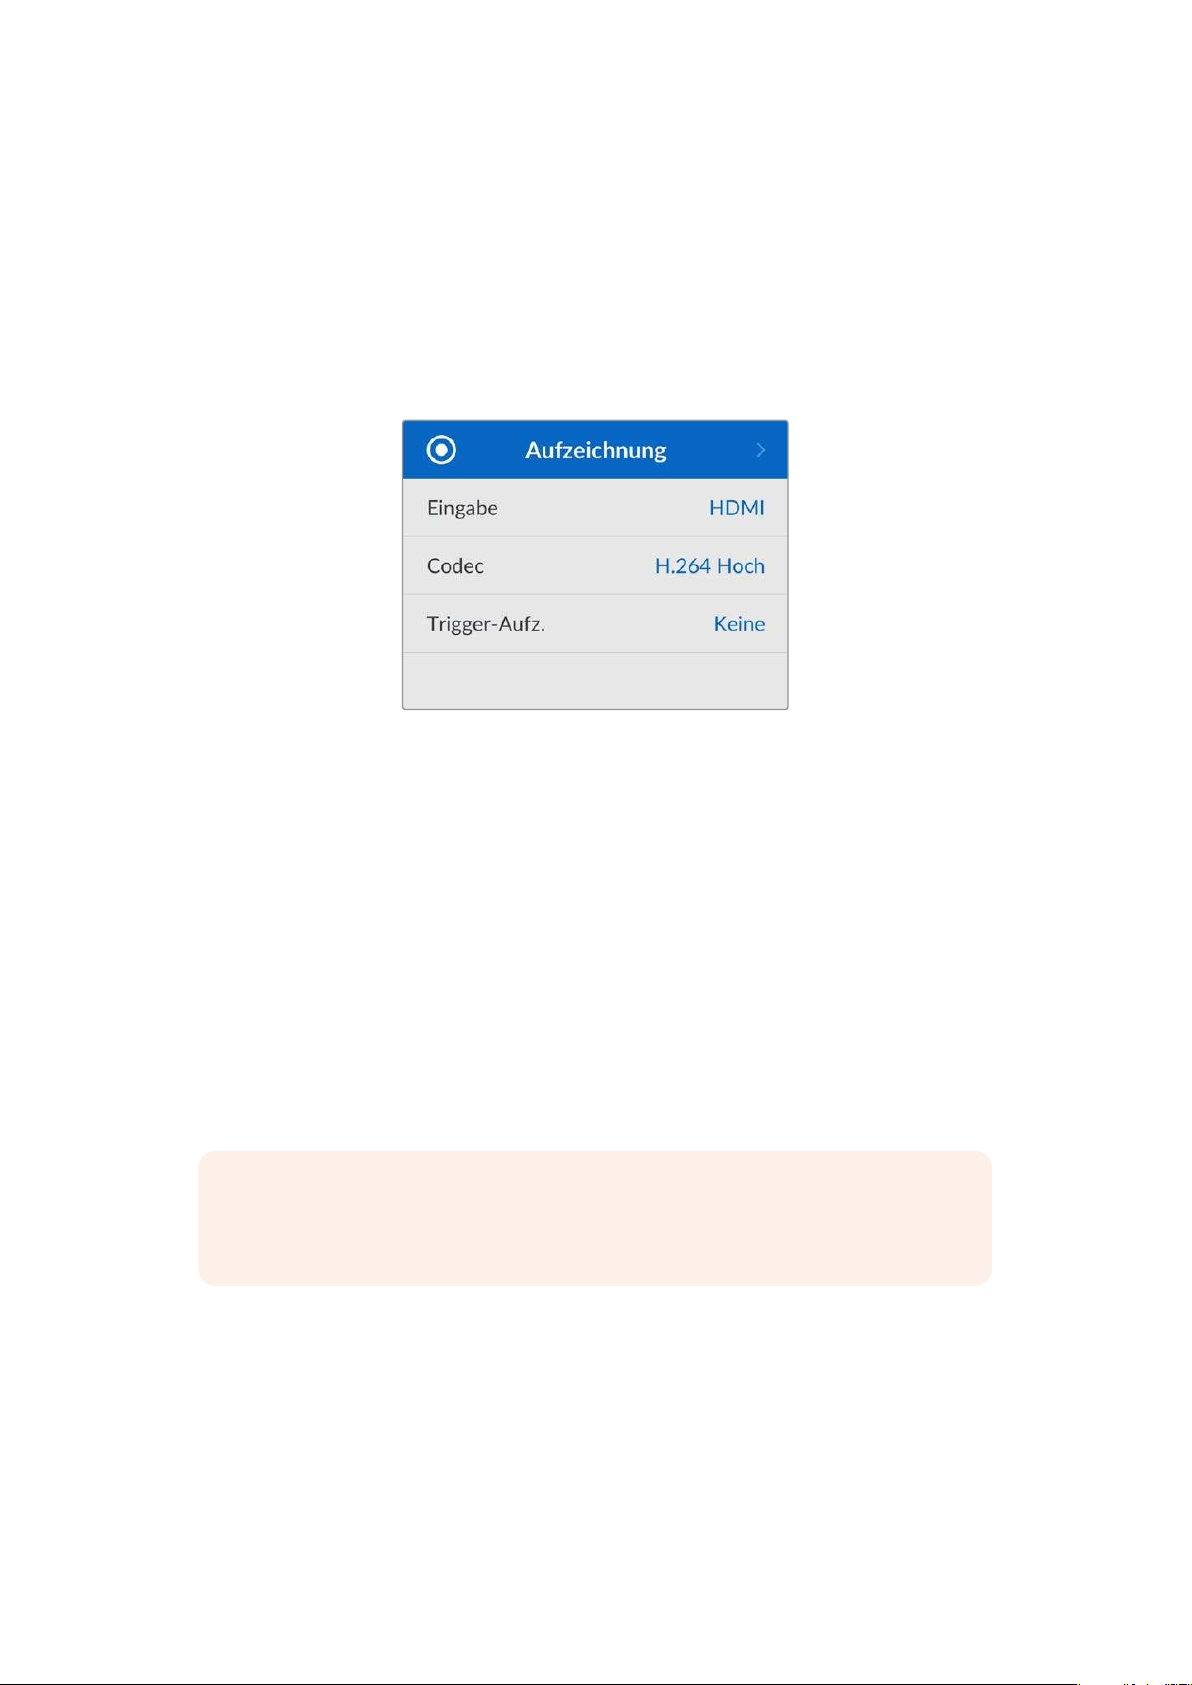
Einstellungen
Das Einstellungsmenü ist in 5verschiedene Kategorien unterteilt: Aufzeichnung, Monitor, Audio,
Datenträger und Setup. Jedes dieser Untermenüs enthält relevante Einstellungen, von denen die
meisten über das HyperDeck ShuttleHD Bedienfeld angepasst werden können. Einige
Einstellungen betreffen nur den Bildschirm und werden ausgegraut, so z.B. Dateinamen-Präfix.
Diese lassen sich über das HyperDeck Setup Dienstprogramm ändern.
Menü „Aufzeichnung“
Eingabe
Zeigt die HDMI-Eingabequelle für den HyperDeck ShuttleHD.
Codec
Der HyperDeck ShuttleHD kann komprimiertes Video in den Codecs H.264, Apple ProRes und
DNxHD aufzeichnen. Um die Teleprompterfunktion zu verwenden, wählen Sie „Teleprompter“.
Trigger-Aufzeichnung
Es sind zwei Modi für die Trigger-Aufzeichnung verfügbar: „Video Start/Stop“ und „Timecode Run“.
Manche Kameras wie die Blackmagic Pocket Cinema Camera4K senden zum Starten und Stoppen
der Aufnahme auf externen Rekordern ein Signal über HDMI. Die Auswahl von „Video Start/Stop“
löst die Aufzeichnung auf einem HyperDeck aus oder stoppt sie, sobald die Aufnahmetaste an der
Kamera gedrückt wird.
Verwenden Sie die Option „Timecode Run“, um die Aufzeichnung auszulösen, sobald das Gerät über
die Eingänge ein gültiges Timecode-Signal empfängt. Bei Abbruch des Signals stoppt auch die
Aufzeichnung. Deaktivieren Sie die Trigger-Aufzeichnung durch Auswählen der Option „Keine“.
HINWEIS Vergewissern Sie sich bei der Aufzeichnung von einer HDMI-Kamera, dass die
Ausgabe sauber und frei von Overlays ist. Andernfalls werden diese in der Videoausgabe
Ihrer Kamera enthaltenen Einblendungen zusammen mit dem Bild aufgezeichnet.
156Einstellungen
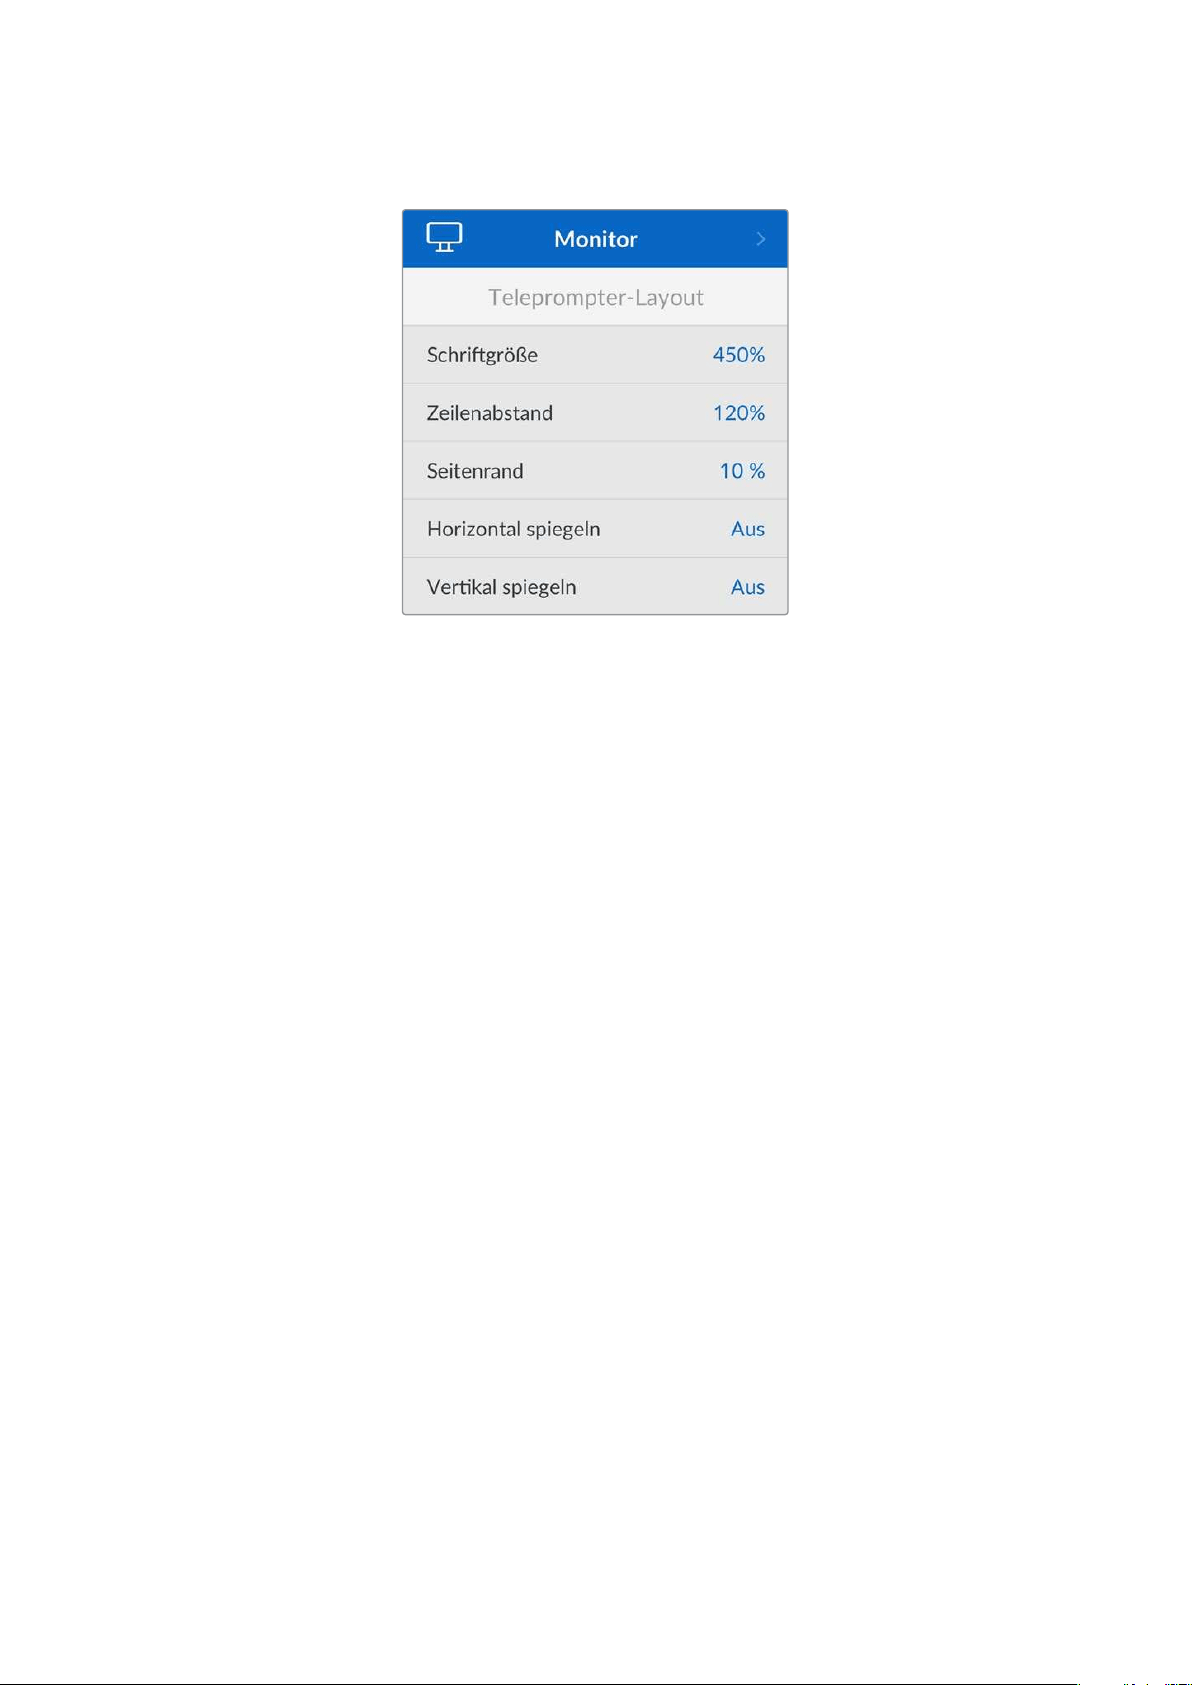
Menü „Monitor“
Teleprompter-Layout
Das Monitor-Menü enthält alle Einstellungen für den Einsatz des HyperDeck ShuttleHD als
Teleprompter.
Schriftgröße
Passen Sie die Größe des Textes an, indem Sie die Option „Schriftgröße“ auswählen und die
SET-Taste drücken. Durch Drehen des Reglers im Uhrzeigersinn vergrößern Sie die Schriftgröße,
gegen den Uhrzeigersinn reduzieren Sie sie.
Zeilenabstand
Drehen Sie den Regler, um den Zeilenabstand zu vergrößern oder zu reduzieren.
Seitenrand
Mit dieser Einstellung passen Sie die Breite der Seitenränder auf beiden Seiten des Teleprompter-
Displays an.
Spiegeln
Verwenden Sie diese Einstellungen, wenn Ihr Teleprompter-Monitor auf Glas vor der Kameraoptik
oder an einem Rednerpult gespiegelt wird, damit der Text für den Redner lesbar ist. Es sind zwei
Modi zum Spiegeln verfügbar:
Horizontal spiegeln – Nutzen Sie diese Einstellung, wenn der Teleprompter-Monitor sehr
nah am Boden des Glases angebracht ist.
Vertikal spiegeln – Nutzen Sie diese Einstellung, wenn der Teleprompter-Monitor abseits
des Glases angebracht ist.
157Einstellungen
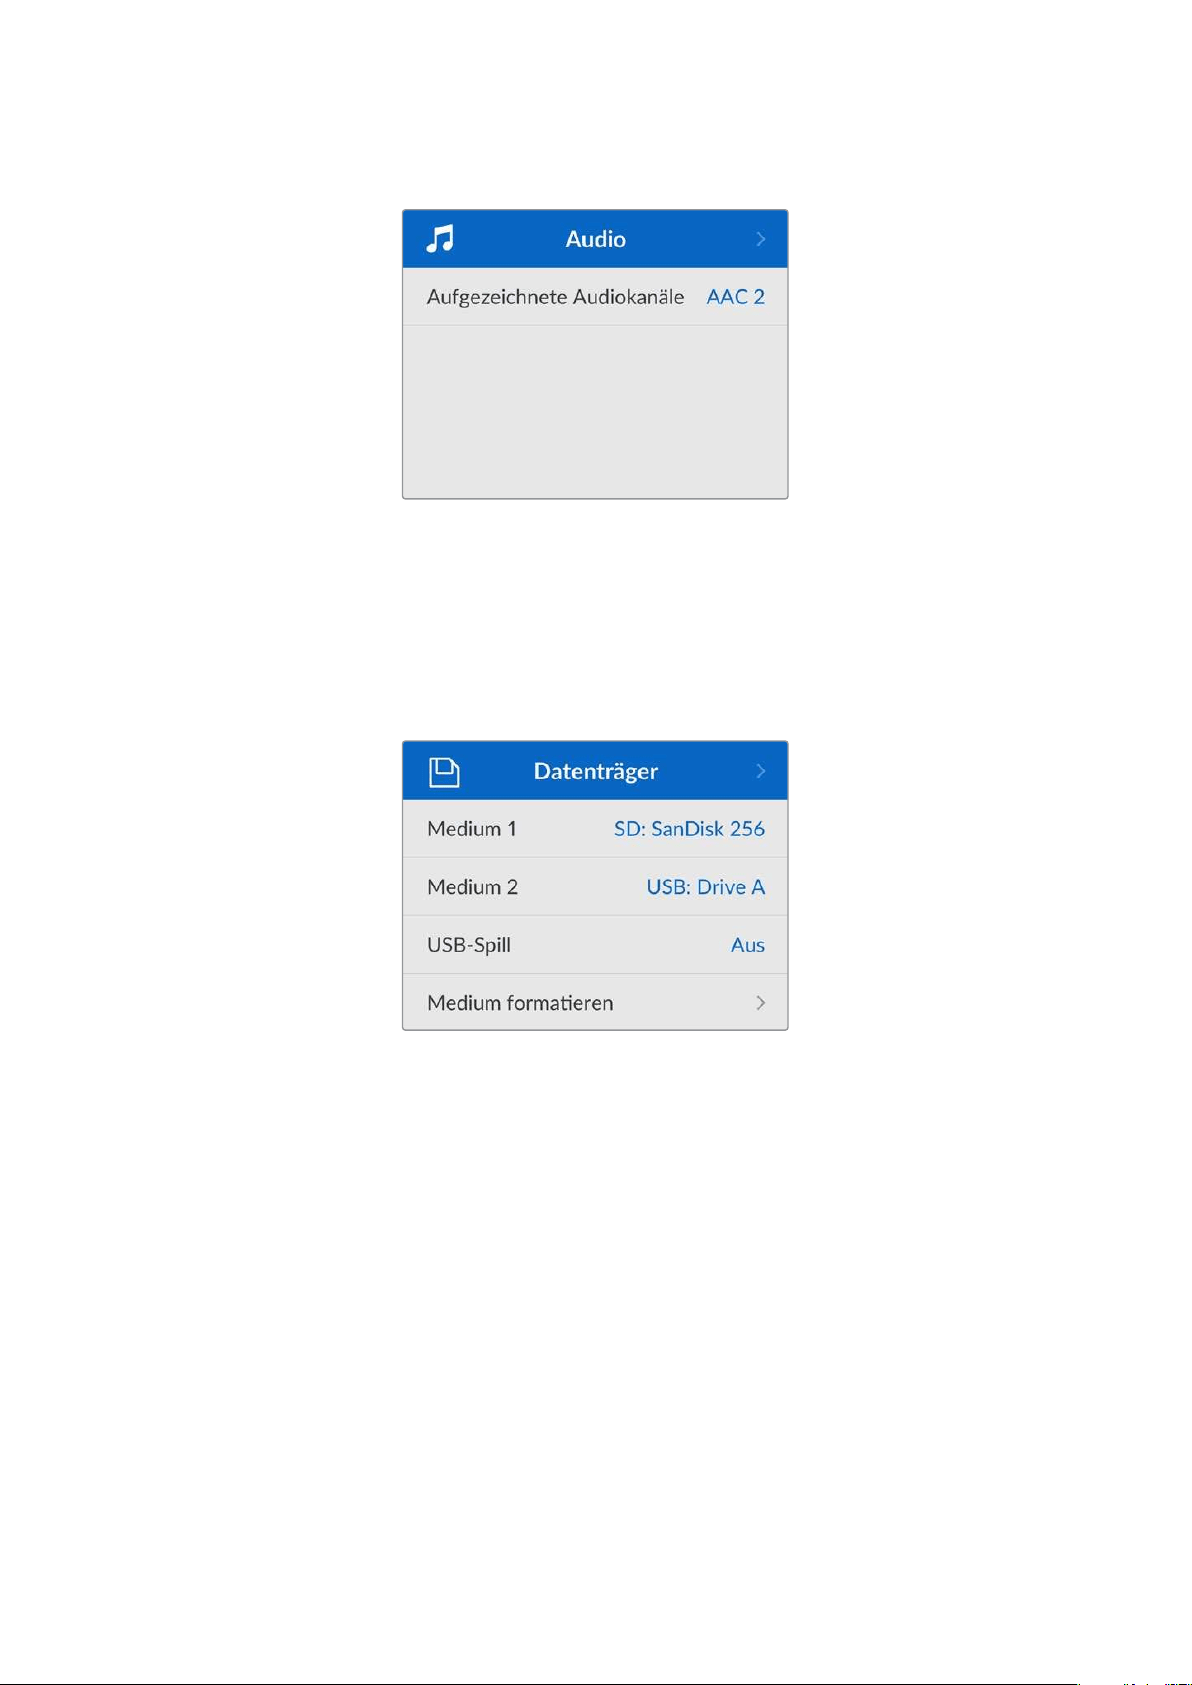
Menü „Audio“
Aufgezeichnete Audiokanäle
Der HyperDeck Shuttle HD kann bis zu 8 Kanäle PCM-Audio gleichzeitig aufzeichnen. Um die
Anzahl der aufzuzeichnenden Audiokanäle vorzugeben, gehen Sie ins Untermenü. Wählen Sie aus
der Liste mit den Audiokanälen 2, 4 oder 8 Kanäle.
Wenn als Codec H.264 ausgewählt ist, können Sie auch 2Kanäle AAC-Audio vorgeben. Diese
Aufnahmen können Sie dann direkt auf YouTube hochladen.
Menü „Datenträger“
Verbundene Datenträger erscheinen in den Datenträgereinstellungen. Medium1 zeigt den Namen
der eingeführten SD-Karte an und Medium2 sämtliche an den USB-Port angeschlossene externe
Flash-Laufwerke. Bei Einsatz eines USB-Hubs wie der Blackmagic MultiDock10G wird das aktive
Laufwerk angezeigt.
USB-Spill
Aktivieren Sie bei Einsatz einer Blackmagic MultiDock10G oder ähnlichem die Option „USB-Spill“.
Bei Verwendung von mehr als einem Laufwerk über den mit „EXT DISK“ beschrifteten USB-
Anschluss stellen Sie so sicher, dass die Aufzeichnung von einem externen Laufwerk auf das
nächste übergeht.
Medium formatieren
SD-Karten und an den rückwärtigen „EXT DISK“-Port angeschlossene Laufwerke können direkt mit
dem Rekorder oder mit einem Mac- oder Windows-Computer formatiert werden.
So bereiten Sie Datenträger auf dem HyperDeck ShuttleHD vor:
1 Wählen Sie mit dem Suchlaufregler und der SET-Taste die Option „Medium formatieren“.
2 Wählen Sie den zu formatierenden Datenträger aus der Liste und drücken Sie die SET-Taste.
158Einstellungen

3 Wählen Sie das Format und drücken Sie die SET-Taste.
4 Der nun erscheinende Bildschirm zeigt, welcher Datenträger in welchem Format formatiert
wird. Wählen Sie „Formatieren“.
5 Nach abgeschlossenem Vorgang erscheint eine Bestätigungsmeldung. Wählen Sie OK.
HFS+ wird auch als „Mac OS X Extended“ bezeichnet und ist das empfohlene Format, da es
„Journaling“ unterstützt. Auf Datenträgern mit Journaling gespeicherte Daten lassen sich im
seltenen Fall einer Beschädigung Ihres Datenträgers mit höherer Wahrscheinlichkeit
wiederherstellen. HFS+ wird nativ von Mac unterstützt. ExFAT wird von Mac und Windows nativ ohne
Verwendung zusätzlicher Software unterstützt. Es unterstützt jedoch kein Journaling.
Einzelheiten zur Datenträgerformatierung finden Sie am Abschnitt „Formatieren von Datenträgern“.
Menü „Setup“
Das Menü „Setup“ enthält Einstellungen für die Sprachauswahl und das Standardformat sowie für
das Bildschirm-Menü, Netzwerkeinstellungen und Timecode-Optionen.
Name
Wenn mehr als ein HyperDeck ShuttleHD in ein Netzwerk eingebunden ist, empfiehlt es sich, die
Rekorder zur Erkennung der einzelnen Geräte individuell zu benennen. Das geht über Blackmagic
HyperDeck Setup oder das Blackmagic HyperDeck Ethernet Protocol mithilfe eines
Terminalprogramms. Der Name wird im Setup-Menü angezeigt.
Sprache
Der HyperDeck ShuttleHD unterstützt 13Sprachen. Neben Deutsch und Englisch sind das
Chinesisch, Französisch, Italienisch, Japanisch, Koreanisch, Polnisch, Portugiesisch, Russisch,
Spanisch, Türkisch und Ukrainisch.
So wählen Sie die Sprache aus:
1 Gehen Sie zum Setup-Menü und drücken Sie die SET-Taste.
2 Scrollen Sie mit dem Suchlaufregler zur gewünschten Sprache und drücken Sie die
SET-Taste.
159Einstellungen

3 Scrollen Sie mit dem Suchlaufregler zur gewünschten Sprache und drücken Sie die SET-
Taste. Ist die Sprache ausgewählt, kehren Sie automatisch zurück ins Setup-Menü.
Datum
Um das Datum vorzugeben, wählen Sie die Option „Datum“ und drücken Sie die SET-Taste. Anhand
des Suchlaufreglers können Sie nun den Tag, Monat und die Uhrzeit vorgeben. Ist die Option
„Zeitstempel“ ausgewählt, wird aus diesen Angaben der Dateisuffix für den Zeitstempel gebildet.
Uhrzeit
Um die Uhrzeit vorzugeben, wählen Sie diese und drücken Sie die SET-Taste. Geben Sie die
Stunden und Minuten anhand des Suchreglers vor. Die interne Uhr des HyperDeck ShuttleHD
verwendet das 24-Stunden-Format.
Software
Zeigt die aktuelle Version der Produktsoftware an.
Kamera
Diese praktische Einstellung ermöglicht es, die Feeds von mehreren Kameras getrennt als ISO-
Dateien aufzuzeichnen. In DaVinciResolve kann man diese Dateien in einer Multicam-Timeline
nachbearbeiten.
Der Kennbuchstabe einzelner Kameras wird in den Metadaten der Datei festgehalten, anhand
dessen DaVinci Resolve bei Einsatz der „Sync Bin“-Funktion unterschiedliche Kamerawinkel
problemlos erkennt.
Ordnen Sie Kameras Buchstaben von A–Z oder Ziffern von 1–9 zu
Standardformat
Es kann vorkommen, dass der HyperDeck ShuttleHD die gewünschte Videonorm nicht sofort
erkennt. Diese Einstellung gibt dem HyperDeck die Videonorm vor, die Sie als Standard
verwenden möchten.
Beispiel: Sie haben einen HyperDeck ShuttleHD eingeschaltet, an den keine Videoquelle
angeschlossen ist. Dann verbinden Sie den Rekorder mit einem Datenträger, der Dateien in zwei
verschiedenen Videonormen enthält. In welchem Videoformat soll der HyperDeck diese nun
abspielen? Das Standard-Videoformat gibt Aufschluss darüber, welche Videonorm Sie bevorzugen,
und spielt die Dateien in diesem Format ab.
Das Standard-Videoformat ist auch beim ersten Einschalten eines HyperDeck ShuttleHD nützlich,
wenn keine Videoquellen oder Datenträger verbunden sind. In diesem Fall ist nämlich nicht klar,
welches Videoformat der HyperDeck für die Monitorausgabe verwenden soll. Das Standardformat
liefert Hinweise, was zu tun ist.
Dennoch ist das Standardformat nur ein Leitwert. Es überschreibt keine Parameter. Haben Sie einen
Datenträger mit nur einer Art von Videodateien und drücken die Wiedergabetaste, wechselt der
160Einstellungen
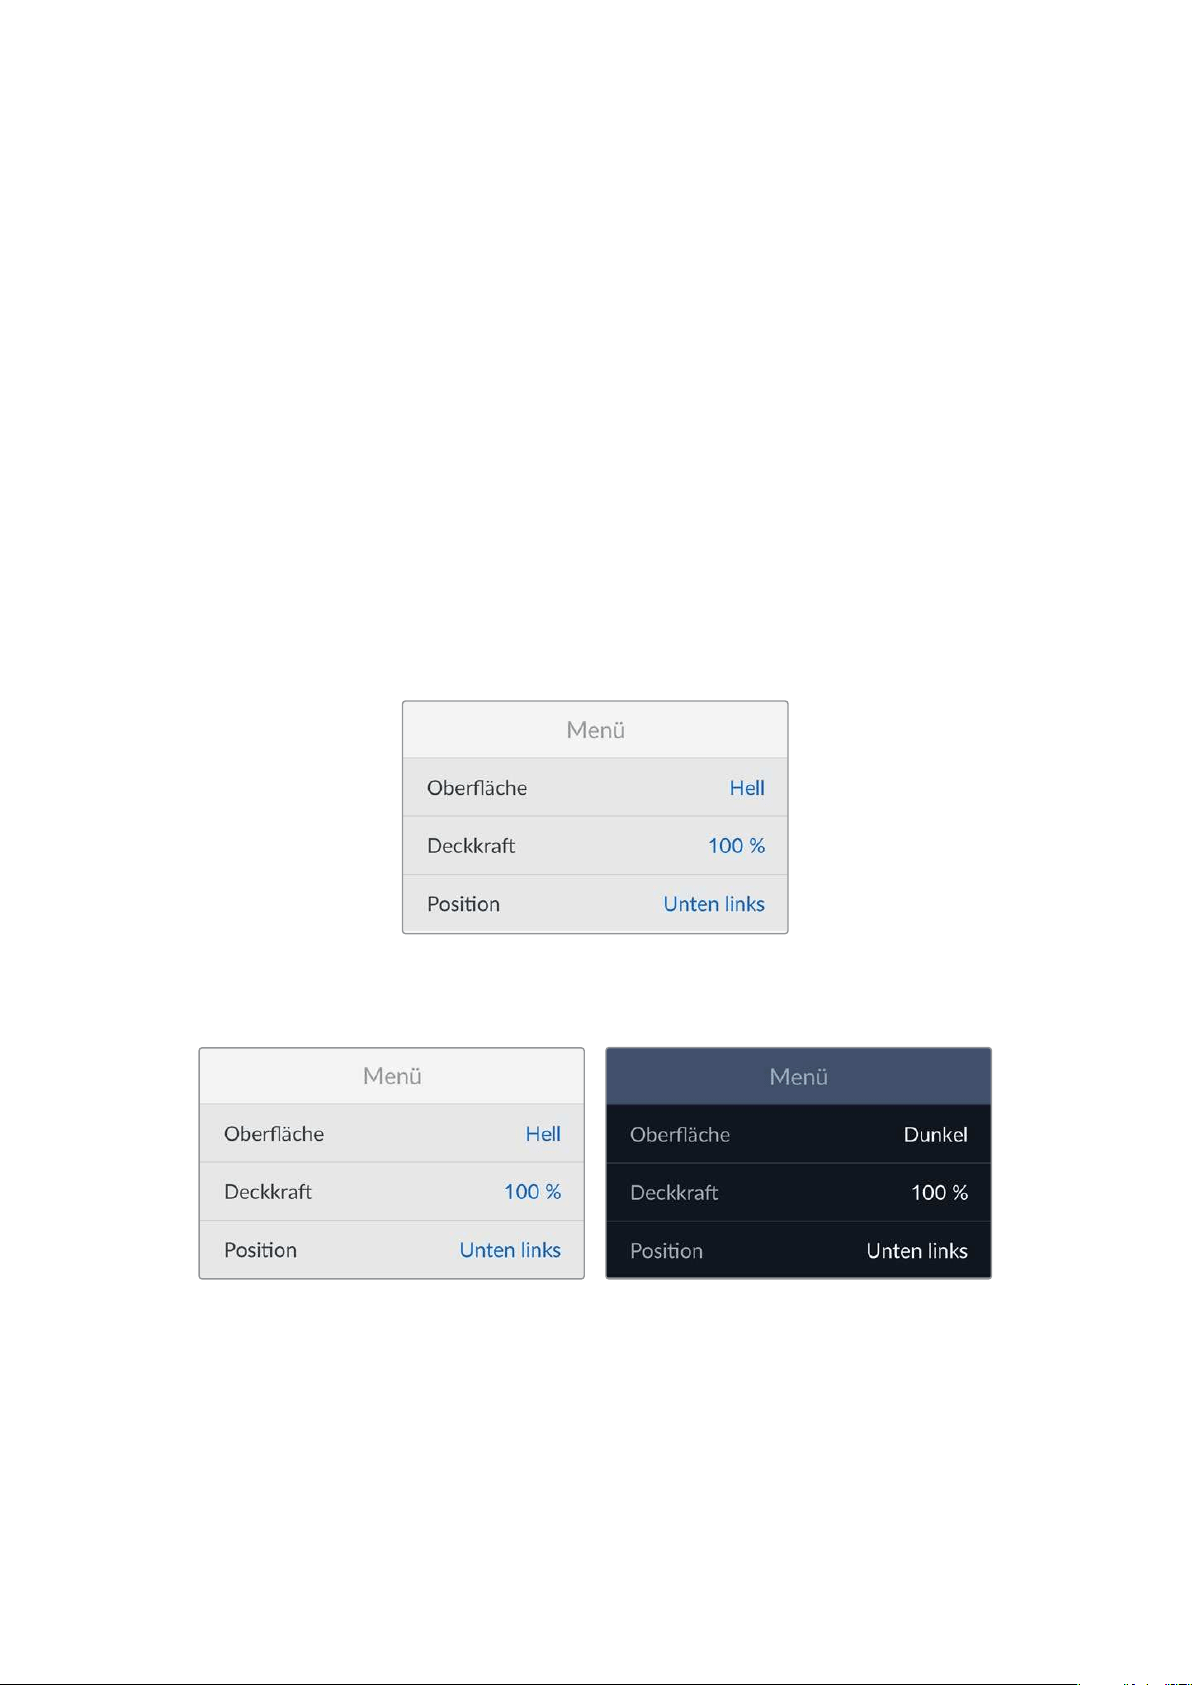
HyperDeck Rekorder für die Wiedergabe zu diesem Videoformat. Das Standard-Videoformat wird
ignoriert, weil offensichtlich ist, dass Sie nur die Dateien von diesem Datenträger abspielen wollen.
Mit der Aufzeichnung verhält es sich ähnlich. Drücken Sie die Aufnahmetaste, wird im Videoformat
der angeschlossenen Videoquelle aufgezeichnet. Nach abgeschlossener Aufzeichnung spielt der
HyperDeck ShuttleHD die Dateien auf dem Datenträger in derselben Videonorm ab. Dies gilt auch,
wenn andere Dateien auf dem Datenträger dem Standard-Videoformat entsprechen. Es wird
angenommen, dass Sie Dateien im gleichen Videoformat abspielen wollen, in dem sie aufgezeichnet
wurden. Erst wenn Sie den Datenträger trennen und wieder verbinden, dient das Standard-
Videoformat zur Auswahl von Dateien in einer bestimmten Videonorm.
Das Standard-Videoformat bietet lediglich Hinweise, um dem HyperDeck ShuttleHD im Zweifelsfall
zu kommunizieren, was er tun soll. Es werden keine Parameter überschrieben oder das Verhalten
des Decks auf eine bestimmte Weise erzwungen.
Max. Geschwindigkeit
Die maximale Shuttlegeschwindigkeit auf dem HyperDeck ShuttleHD ist 50-fach beschleunigt.
Umdiese Geschwindigkeit zu reduzieren, stehen weitere Geschwindigkeits-Presets zur Wahl.
Menü-Einstellungen
Mithilfe der Menü-Einstellungen passen Sie die Platzierung und das Erscheinungsbild des Menüs auf
dem angeschlossenen HDMI-Bildschirm an.
Oberfläche
Stellen Sie das Onscreen-Menü Ihres HyperDecks auf den hellen oder dunklen Modus ein. Der helle
Modus bietet mehr Kontrast, wenn Sie mit dunklem Material oder im Telepromptermodus arbeiten.
Deckkraft
Passen Sie die Intensität an, um den Standardwert von 100% für die Deckkraft der Menü-Overlays
auf dem angeschlossenen Bildschirm auf 20% zu reduzieren.
Position
Das Menü-Overlay wird standardmäßig in der unteren linken Ecke des Bildschirms angezeigt. Um
das Menü an eine andere Stelle zu verschieben, wählen Sie „Fensterposition“ und drücken Sie die
SET-Taste. Nun können Sie „oben links“, „oben rechts“, „unten links“ oder „unten rechts“ auf dem
Bildschirm auswählen.
161Einstellungen
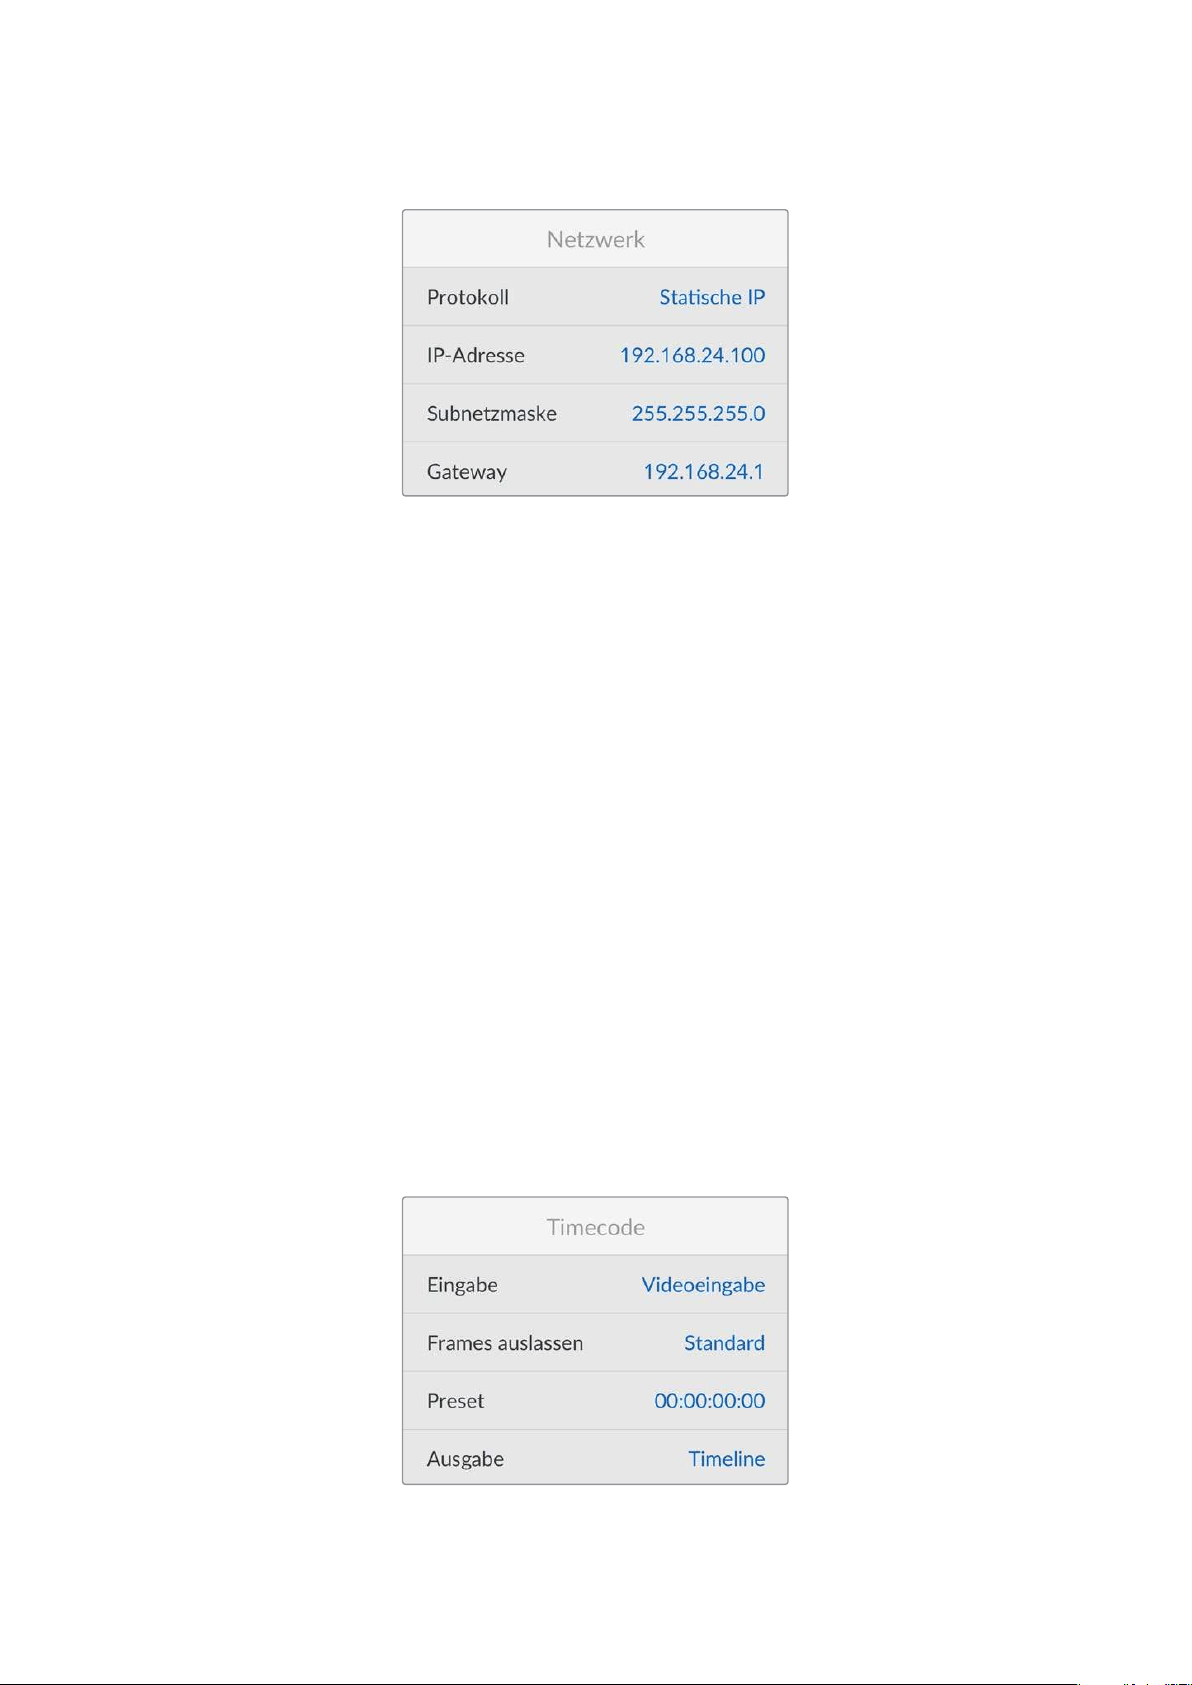
Netzwerk-Einstellungen
Protokoll
Blackmagic HyperDecks werden auf DHCP voreingestellt ausgeliefert. Wird Ihr Rekorder in ein
Netzwerk eingebunden, bekommt er vom Netzwerkserver automatisch eine IP-Adresse zugewiesen.
Es müssen keine weiteren Netzwerkeinstellungen angepasst werden. Wenn Sie eine Adresse
manuell einrichten müssen, können Sie die Verbindung über eine statische IP erstellen.
Um auf das Menü zuzugreifen, wählen Sie „Protokoll“ und drücken Sie die SET-Taste. Scrollen Sie zu
„Statische IP“ und drücken Sie die SET-Taste.
IP-Adresse, Subnetzmaske, Gateway, Primärer DNS und Sekundärer DNS
Nach Auswahl von „Statische IP“ können Sie Ihre Netzwerkinformationen manuell eingeben.
So ändern Sie die IP-Adresse:
1 Navigieren Sie mit dem Suchlaufregler zur Option „IP-Adresse“ und drücken Sie am
Bedienfeld Ihres HyperDecks die SET-Taste.
2 Drehen Sie den Suchregler, um die IP-Adresse anzupassen und drücken Sie zur Bestätigung
die SET-Taste, ehe Sie den nächsten Zahlenblock anpassen.
3 Drücken Sie zur Bestätigung der Änderung die SET-Taste und machen Sie mit dem nächsten
Zahlenblock weiter.
Wenn die Eingabe Ihrer IP-Adresse abgeschlossen ist, wiederholen Sie diese Schritte, um die
Subnetzmaske und das Gateway anzupassen. Wenn Sie fertig sind, drücken Sie die MENU-Taste, um
zur Startseite zurückzukehren.
Timecode
Geben Sie die Optionen für die Timecode-Ein- und -Ausgabe vor. Sie haben die Wahl, den
Timecode nach Referenzquelle, Uhrzeit oder manueller Vorgabe aufzuzeichnen.
162Einstellungen
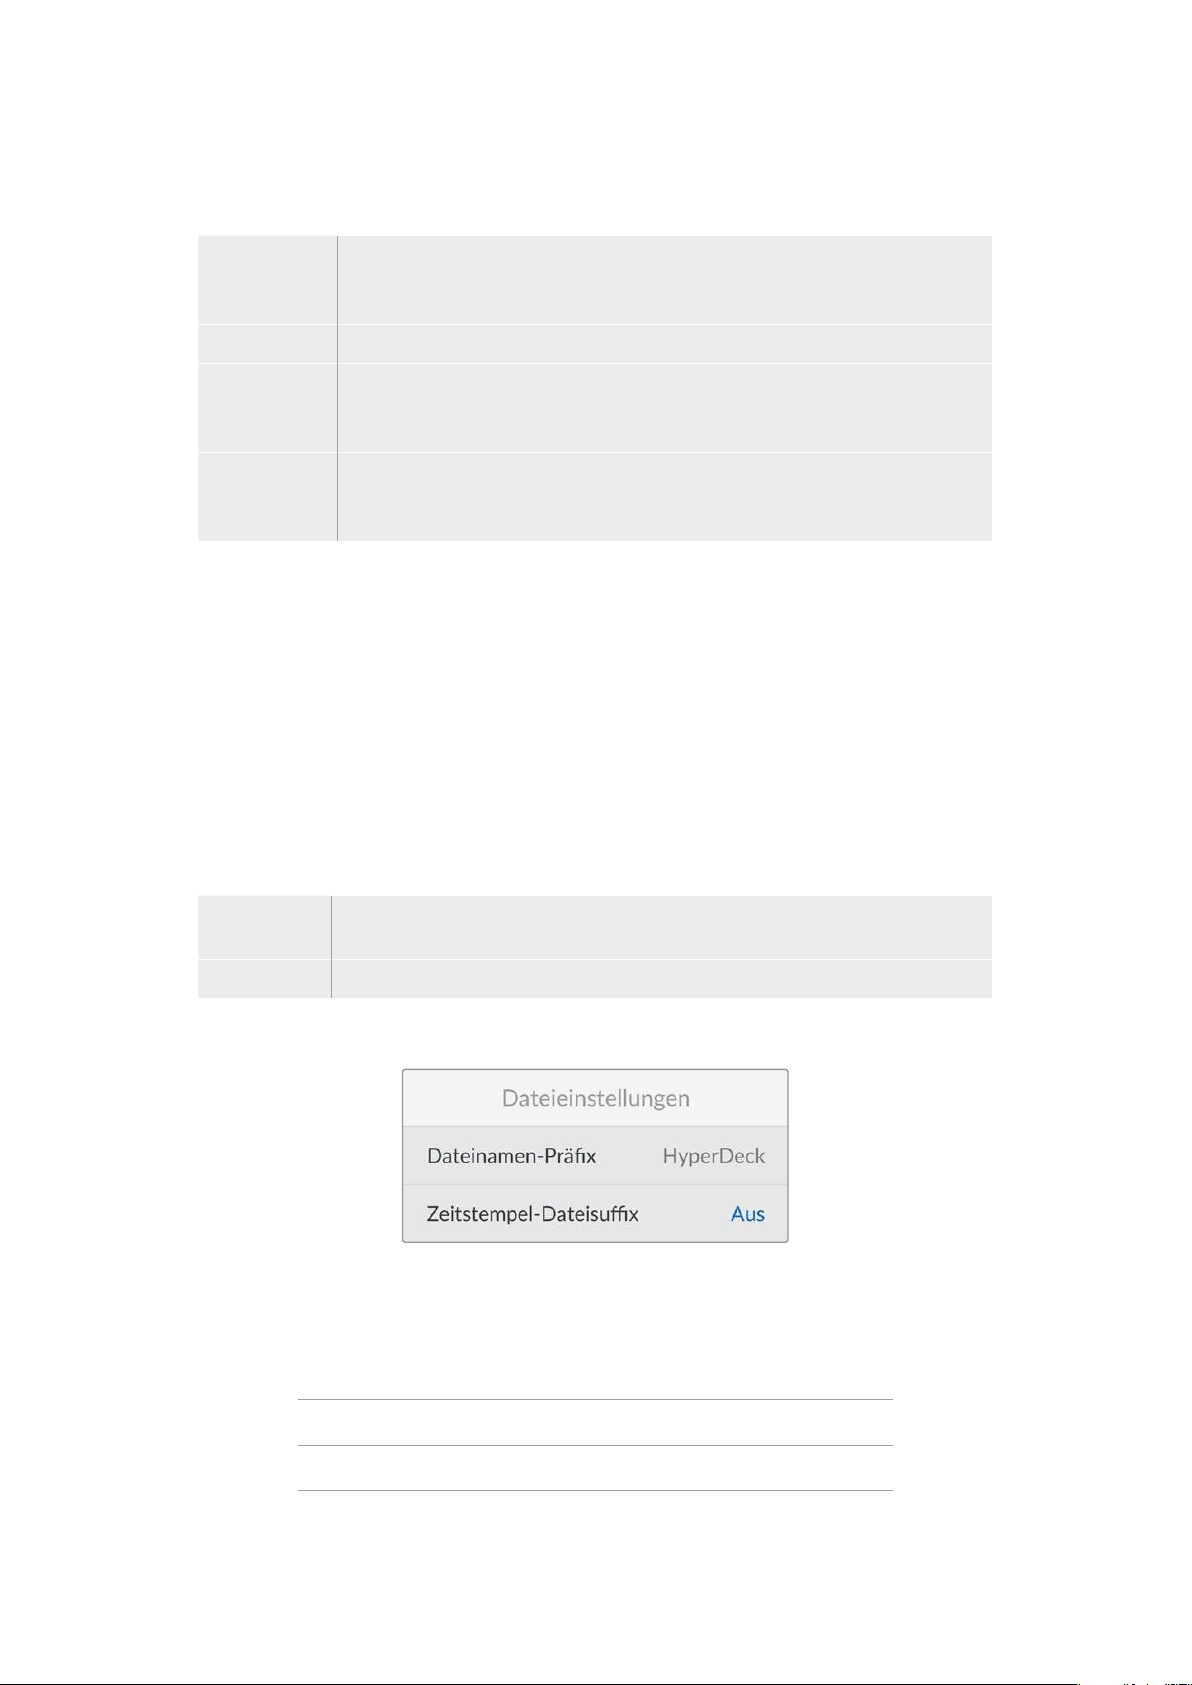
Eingabe
Es stehen vier Timecode-Eingabeoptionen für die Aufzeichnung zur Verfügung.
Videoeingabe
Diese Option übernimmt den in die HDMI-Signale eingebetteten Timecode mit
SMPTE RP-188 Metadaten. Das sorgt für die Synchronisierung Ihrer HDMI-Quellen
mit der auf dem HyperDeck ShuttleHD aufgezeichneten Datei.
Intern Verwenden Sie diese Option für Uhrzeit-Timecode vom internen Timecode-Generator.
Ende letzter
Clip
Mit dieser Auswahl für die Timecode-Eingabe beginnt jede Aufzeichnung einen
Frame nach dem letzten Frame des vorherigen Clips. Endet Ihr erster Clip bspw.
bei 10:28:30:10, beginnt der Timecode des nächsten Clips bei 10:28:30:11.
Preset
Wählen Sie die „Preset“-Option, um Timecode manuell vorzugeben.
Aufgezeichnete Clips beginnen mit dem über die „Preset“-Einstellung
vorgegebenen Timecode. Diese Option wird im nachstehenden Abschnitt erklärt.
Timecode-Voreinstellung
Für NTSC-Quellen mit Bildwechselfrequenzen von 29,97 oder 59,94 können Sie für Timecode die
Option „Frames auslassen“ oder „Keine Frames auslassen“ wählen. Ist die Quelle unbekannt, wählen
Sie „Standard“. Damit wird die Norm der Eingabe beibehalten oder es werden standardmäßig
Frames ausgelassen, wenn kein gültiger Timecode erkannt wird.
Preset
Sie können den Timecode manuell vorgeben, indem Sie die SET-Taste drücken und den Start-
Timecode per Suchlaufregler und SET-Taste vorgeben. Vergewissern Sie sich, dass unter „Eingabe“
die Option „Preset“ vorgegeben ist.
Timecode-Ausgabe
Wählen Sie die Timecode-Optionen für Ihre Ausgaben.
Timeline
Um alle auf einen Datenträger aufgezeichneten Clips mit fortlaufendem Timecode
auszugeben, wählen Sie die Option „Timeline“.
Clip Ist die Option „Clip“ aktiviert, wird der Timecode für jeden Clip einzeln ausgegeben.
Dateieinstellungen
Dateinamen-Präfix
Beim ersten Einsatz zeichnet Ihr HyperDeck ShuttleHD Clips auf Ihre SD-Karte oder Ihr USB-Flash-
Laufwerk nach der folgenden Namenskonvention auf:
HyperDeck_0001
HyperDeck_0001 Präfix
HyperDeck_0001 Clip-Nummer
Den Dateinamen-Präfix können Sie über das HyperDeck Setup Dienstprogramm ändern. Näheres
finden Sie im Abschnitt „Blackmagic Hyperdeck Setup“ weiter hinten im Handbuch.
163Einstellungen
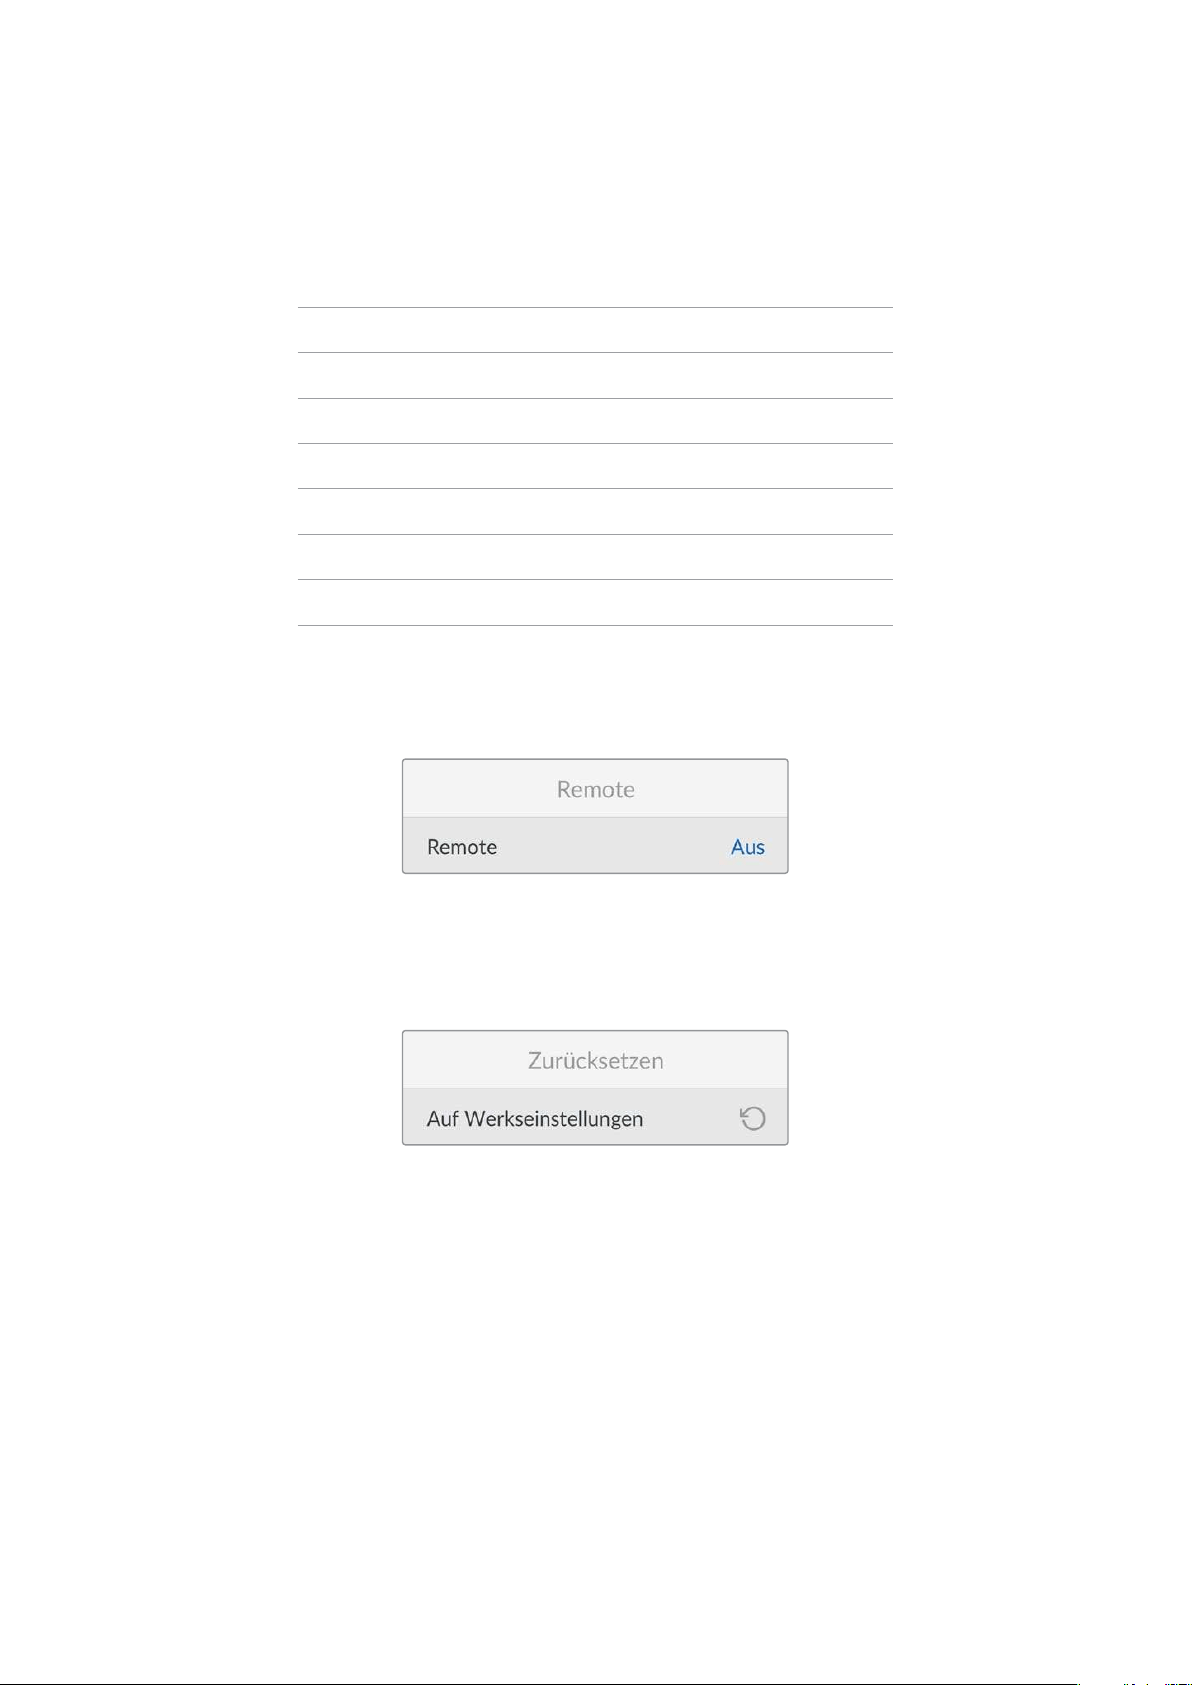
Zeitstempel-Dateisuffix
Standardmäßig ist das Hinzufügen des Zeitstempels zum Dateinamen ausgeschaltet. Schalten Sie
diese Option ein, wenn Sie mit Ihrem Dateinamen das Datum und die Uhrzeit speichern möchten.
HyperDeck_2201061438_0001
HyperDeck_2201061438_0001 Dateinamen-Präfix
HyperDeck_2201061438_0001 Jahr
HyperDeck_2201061438_0001 Monat
HyperDeck_2201061438_0001 Tag
HyperDeck_2201061438_0001 Stunde
HyperDeck_2201061438_0001 Minute
HyperDeck_2201061438_0001 Clip-Nummer
Remote
Die Remote-Einstellung ermöglicht die Fernsteuerung des HyperDeck über andere Videogeräte wie
bspw. einen ATEM Mini Extreme Mischer.
Remote
Mit „Remote“ aktivieren Sie die Fernsteuerung per Ethernet. Um den Rekorder lokal zu steuern,
deaktivieren Sie „Remote“.
Zurücksetzen
Auf Werkseinstellungen zurücksetzen
Um Ihren HyperDeck auf seine Werkseinstellungen zurückzusetzen, wählen Sie im „Setup“-Menü
die Option „Auf Werkseinstellungen“. Nach Drücken der SET-Taste werden Sie aufgefordert, Ihre
Auswahl zu bestätigen.
164Einstellungen

Hintere Anschlüsse
HDMI OUT
HDMI IN
EXT DISK
SD CARD
ETHERNET
+
12V DC
1
2
3 4 5
1 Strombuchse
Der HyperDeck ShuttleHD wird über ein AC-Steckernetzteil mit Strom versorgt. Das mit
Ihrem HyperDeck ShuttleHD mitgelieferte Stromkabel ist mit einem Sperrmechanismus
ausgestattet, um Unterbrechungen zu vermeiden. Zur Stromversorgung des HyperDeck
können Sie jedoch jedes beliebige 36W-12V-Stromkabel verwenden.
2 SD-Karte
Führen Sie zum Aufzeichnen und Abspielen eine SD-Karte in den mit „SD CARD“
beschrifteten Schacht ein.
3 Ethernet
Der ETHERNET-Port dient zum Einbinden Ihres Rekorders in Ihr Netzwerk, für schnelle
FTP-Übertragungen und zum Fernsteuern des Rekorders per HyperDeck Ethernet Protocol.
Einzelheiten zur Übertragung von Dateien über einen FTP-Client siehe Abschnitt
„Übertragen von Dateien per Netzwerk“ weiter hinten im Handbuch.
Wenn Ihr HyperDeck in ein Netzwerk mit einem ATEM Mischer eingebunden ist, können Sie
den Rekorder auch unter Einsatz eines ATEM Mischers oder eines ATEM Hardware-
Bedienpults steuern.
4 Externes Laufwerk
Schließen Sie ein externes Flash-Laufwerk an den USB-C-Port an, um mit einer
Datengeschwindigkeit von bis zu 5Gbit/s darauf aufzuzeichnen. Sie können HyperDecks
auch an USB-C-Hubs mit mehreren Ports oder zur Verwendung einer oder mehrerer SSDs
an eine Blackmagic MultiDock10G anschließen.
5 HDMI-Anschlüsse
Verbinden Sie den HDMI-Ausgang mit HDMI-Fernsehern, -Monitoren oder sogar einem
Mischer wie dem ATEM Mini Extreme. Die HDMI-Ausgabe dient auch zur Anzeige des
Menü-Overlays.
165Hintere Anschlüsse
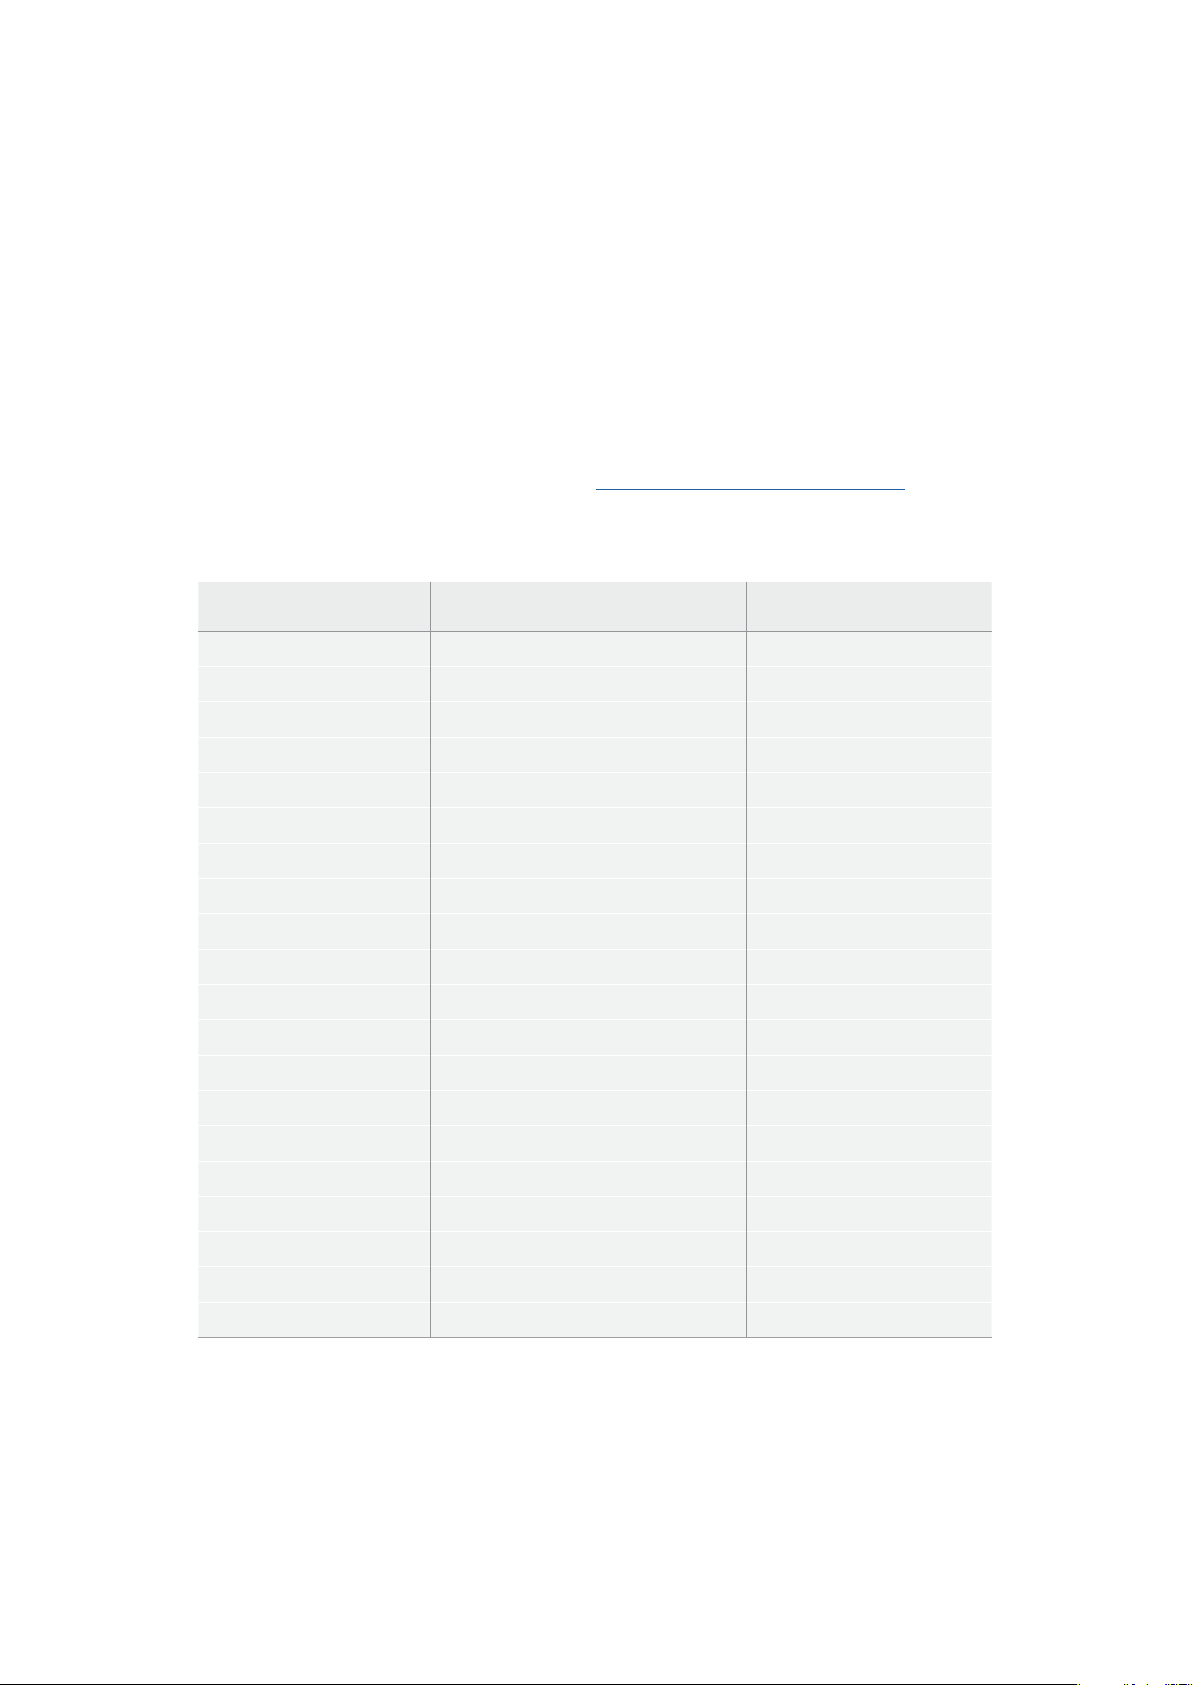
Datenträger
SD-Karte
Für hochqualitative HD-Aufzeichnungen empfehlen wir Hochgeschwindigkeits-SD-Karten mit UHS-I.
Um in Ultra-HD-Formaten bis 2160p/60 aufzunehmen, müssen die Karten Schreibgeschwindigkeiten
über 220MB/s meistern.
Wenn Sie bei niedrigeren Bitraten mit geringerer Kompression aufnehmen, reichen ggf. auch
langsamere Karten. Grundsätzlich gilt: Je schneller die Karte, desto besser.
Sehen Sie in der aktuellsten Ausgabe dieses Handbuchs regelmäßig nach den neuesten Infos. Sie steht
jederzeit zum Download auf unserer Firmenwebsite
www.blackmagicdesign.com/de/support bereit.
Welche SD-Karten sollte ich mit dem HyperDeck Shuttle HD verwenden?
Für Aufzeichnungen in 1080p mit bis zu 60 fps werden folgende SD-Karten empfohlen:
Brand Model Capacity
Angelbird AV PRO SD UHS-II 300MB/s V90 SDXC 256GB
Angelbird AV PRO SD UHS-II 260MB/s V60 SDXC 128GB
Angelbird AV PRO SD UHS-II 260MB/s V60 SDXC 64GB
SanDisk Extreme Pro UHS-I 95MB/s SDXC 64GB
Wise SD2-64U3 UHS-II 285MB/s SDXC 64GB
Lexar Professional 1000x UHS-II 150MB/s SDXC 128GB
SONY Tough SF-G128T 128GB
Kingston CANVAS GO! Plus 170MB/s V30 64GB
Kingston CANVAS GO! Plus 170MB/s V30 128GB
Kingston CANVAS GO! Plus 170MB/s V30 512GB
ProGrade Digital SDXC UHS-II V90 300R 64GB
ProGrade Digital SDXC UHS-II V90 300R 128GB
SONY Tough SF-G64T UHS-II SDXC 64GB
Delkin Devices Black UHS-II V90 SDXC 256GB
Delkin Devices Power UHS-II V90 SDXC 128GB
Delkin Devices Power UHS-II V90 SDXC 256GB
Delkin Devices Black UHS-II V90 SDXC 128GB
Exascend Essential SDXC UHS-II V90 R 300MB/s 64GB
Exascend Essential SDXC UHS-II V90 R 300MB/s 128GB
Exascend Catalyst SDXC UHS-II V90 R 300MB/s 64GB
166Datenträger
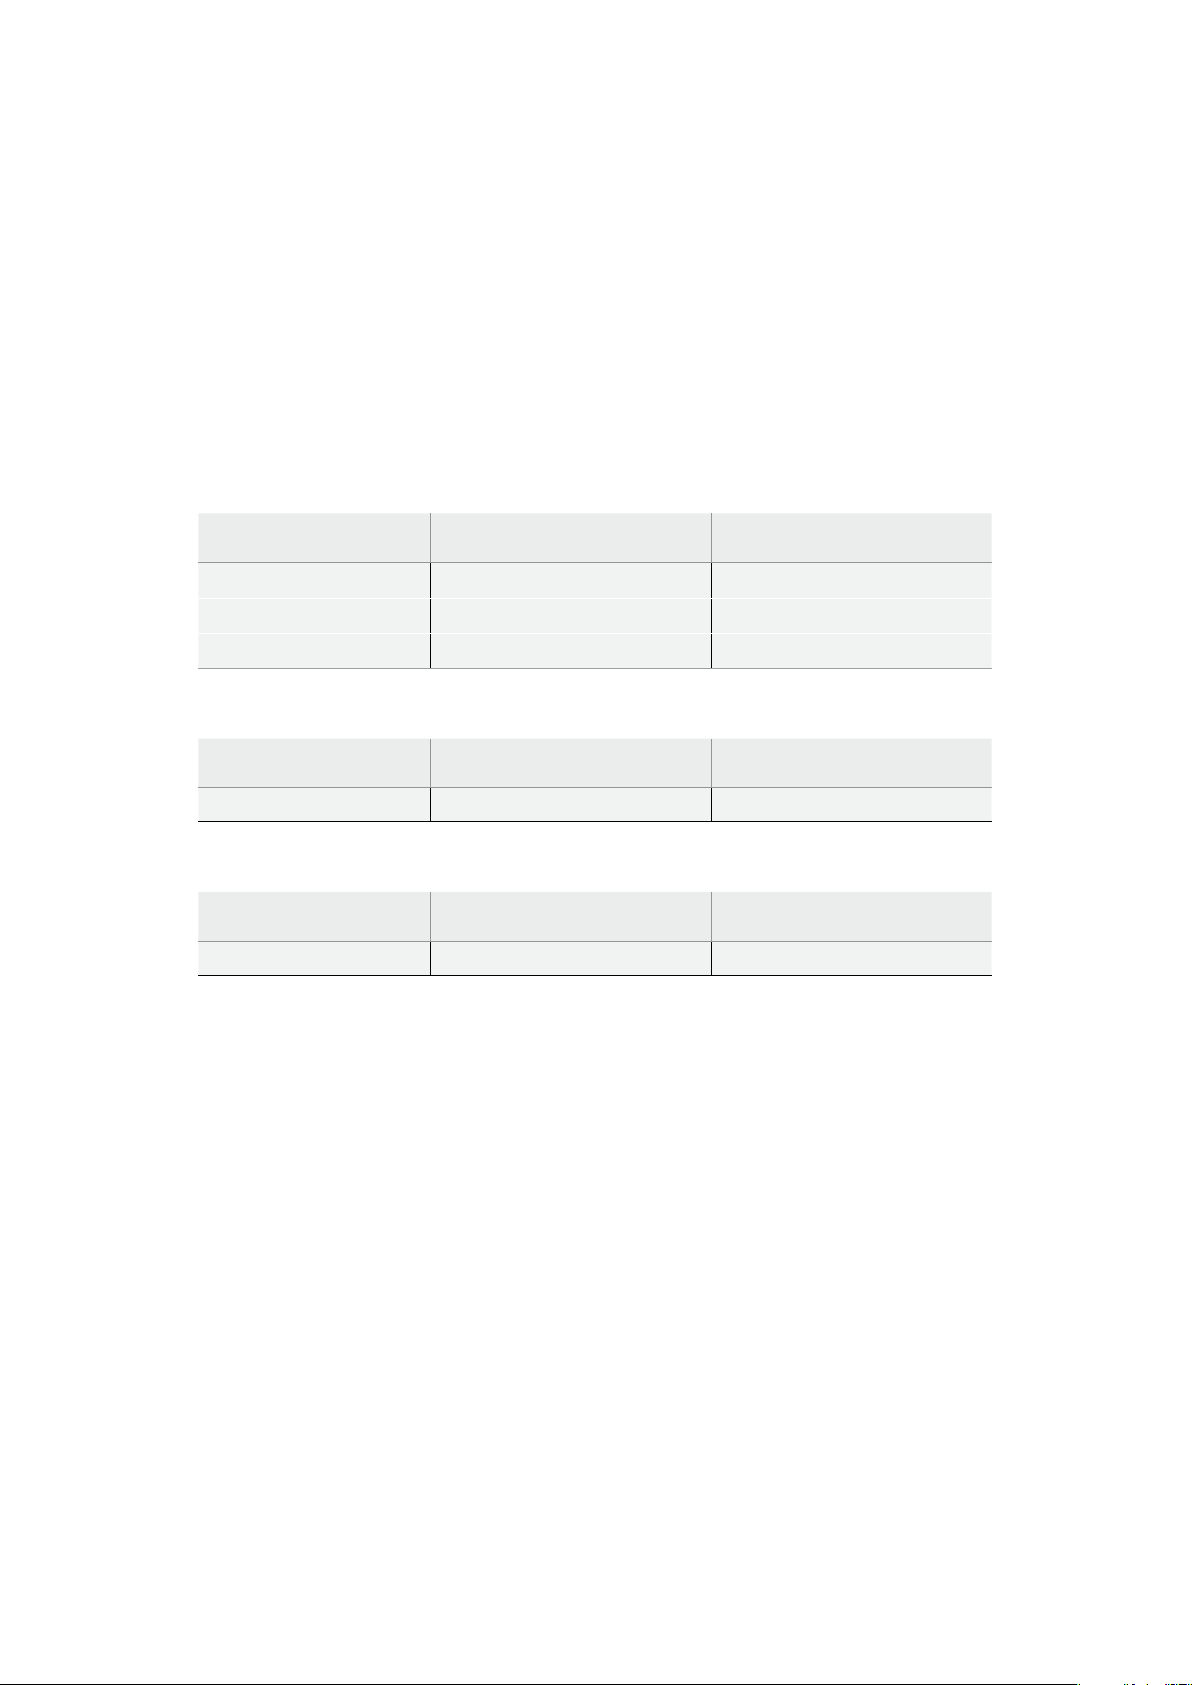
Externe Laufwerke
Alle HyperDeck Modelle können direkt auf USB-C-Flash-Laufwerke aufzeichnen. Diese schnellen
leistungsfähigen Laufwerke ermöglichen Ihnen Langzeit-Videoaufzeichnungen. Anschließend
können Sie die Laufwerke an Ihren Computer anschließen und direkt darauf schneiden.
Noch mehr Speicherkapazität bieten Ihnen USB-C-Dockingstations oder externe Festplatten.
Verbinden Sie Ihre Blackmagic MultiDock10G oder Ihr USB-C-Flash-Laufwerk über ein Kabel mit
dem „EXT DISK“-Port an der Rückseite Ihres HyperDecks.
Welche USB-C-Laufwerke sollte ich mit dem HyperDeck Shuttle HD
verwenden?
Für Aufzeichnungen in 1080p ProRes HQ mit bis zu 60 fps werden folgende USB-C-
Laufwerke empfohlen:
Brand Model Capacity
Wise PTS-256 Portable SSD 4K 256 GB
OWC Envoy Pro Ex 240 GB
BUFFALO SSD-PHE500U3-BA 500 GB
Für Aufzeichnungen in 1080p DNxHR HQX mit bis zu 60 fps werden folgende USB-C-
Laufwerke empfohlen:
Brand Model Capacity
OWC Envoy Pro Ex 240 GB
Für Aufzeichnungen in 1080p H.264 mit bis zu 60 fps werden folgende USB-C-Laufwerke
empfohlen:
Brand Model Capacity
OWC Envoy Pro Ex 240 GB
Formatieren von Datenträgern
Vorbereiten von Datenträgern auf einem Computer
Datenträger auf einem Mac-Computer formatieren
Mithilfe des im Betriebssystem Ihres Macs enthaltenen Festplattendienstprogramms lässt sich Ihr
Datenträger in HFS+ oder exFAT formatieren.
Fertigen Sie unbedingt Sicherungskopien von allen wichtigen Daten auf Ihrem Speichermedium an,
da beim Formatieren alle Inhalte gelöscht werden.
1 Schließen Sie ein USB-Flash-Laufwerk über eine externe Dockingstation oder einen
Kabeladapter an Ihren Computer an. Ignorieren Sie jegliche Meldungen, die den Gebrauch
Ihrer SSD für Time Machine Backups anbieten. Schließen Sie eine SD-Karte über ein
externes Kartenlesegerät an Ihren Computer an.
2 Gehen Sie zu „Programme“ > „Dienstprogramme“ und starten Sie das Festplatten-
Dienstprogramm.
3 Klicken Sie auf das Speicherträgersymbol für Ihre SD-Karte oder Ihr USB-Flash-Laufwerk
und dann auf „Löschen“.
167Formatieren von Datenträgern
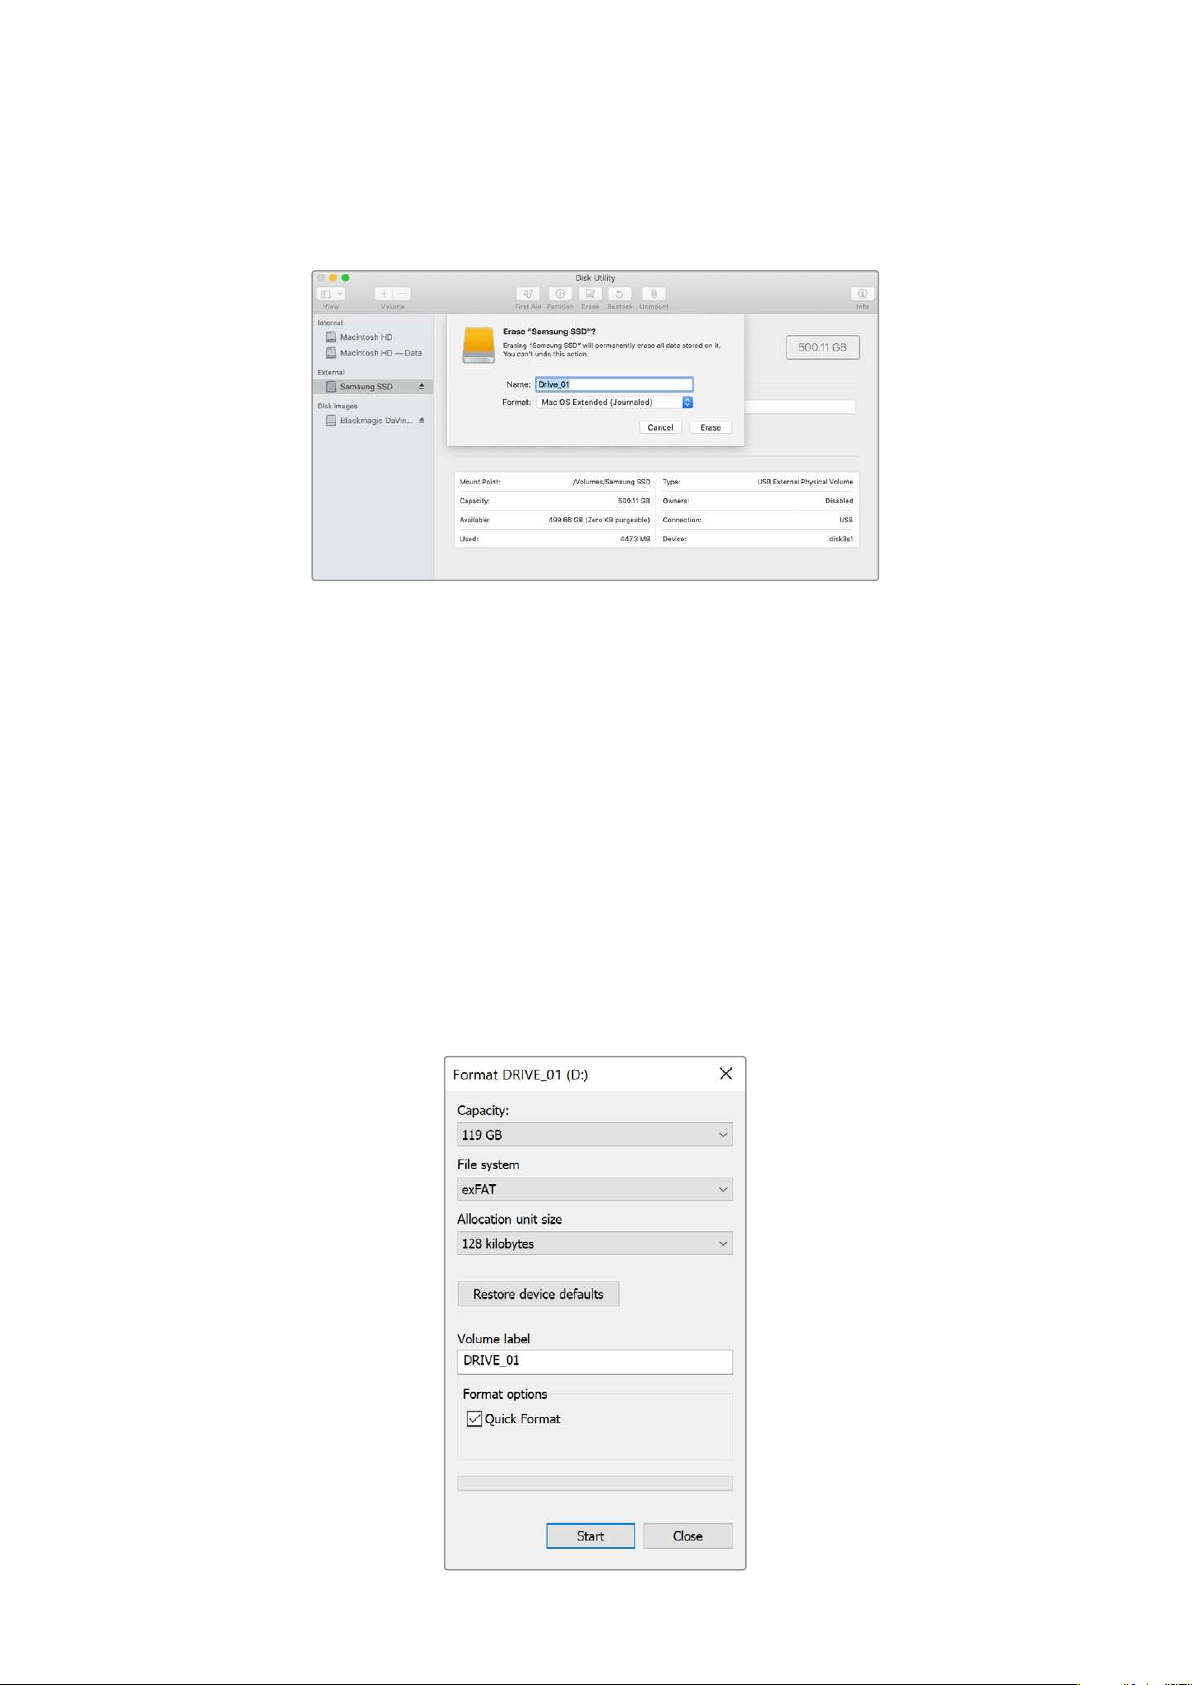
4 Geben Sie als Format „Mac OS Extended (Journaled)“ oder „exFAT“ vor.
5 Geben Sie einen Namen für das neue Volumen ein und klicken Sie auf „Löschen“. Ihr
Datenträger wird schnell formatiert und ist dann mit einem HyperDeck einsatzbereit.
Datenträger auf einem Windows-Computer formatieren
Auf einem Windows-PC erfolgt die Formatierung eines Datenträgers in exFAT über das
„Formatieren“-Fenster. Fertigen Sie auf jeden Fall Sicherungskopien von allen wichtigen Daten auf
Ihrer SSD oder SD-Karte an, da während der Formatierung alle Inhalte gelöscht werden.
1 Schließen Sie ein USB-Flash-Laufwerk über eine externe Dockingstation oder einen
Kabeladapter an Ihren Computer an. Schließen Sie eine SD-Karte über ein externes
Kartenlesegerät an Ihren Computer an.
2 Öffnen Sie das Startmenü oder den Startbildschirm und wählen Sie „Dieser PC“.
Rechtsklicken Sie auf Ihrem USB-Flash-Laufwerk oder Ihrer SD-Karte.
3 Wählen Sie im Kontextmenü „Formatieren“.
4 Stellen Sie das Dateisystem auf „exFAT“ und die Größe der Zuordnungseinheiten auf
„128Kilobytes“ ein.
5 Geben Sie eine Volumenbezeichnung ein, setzen Sie ein Häkchen bei „Schnellformatierung“
und klicken Sie auf „Starten“.
6 Ihr Datenträger wird schnell formatiert und ist dann mit einem HyperDeck einsatzbereit.
168Formatieren von Datenträgern
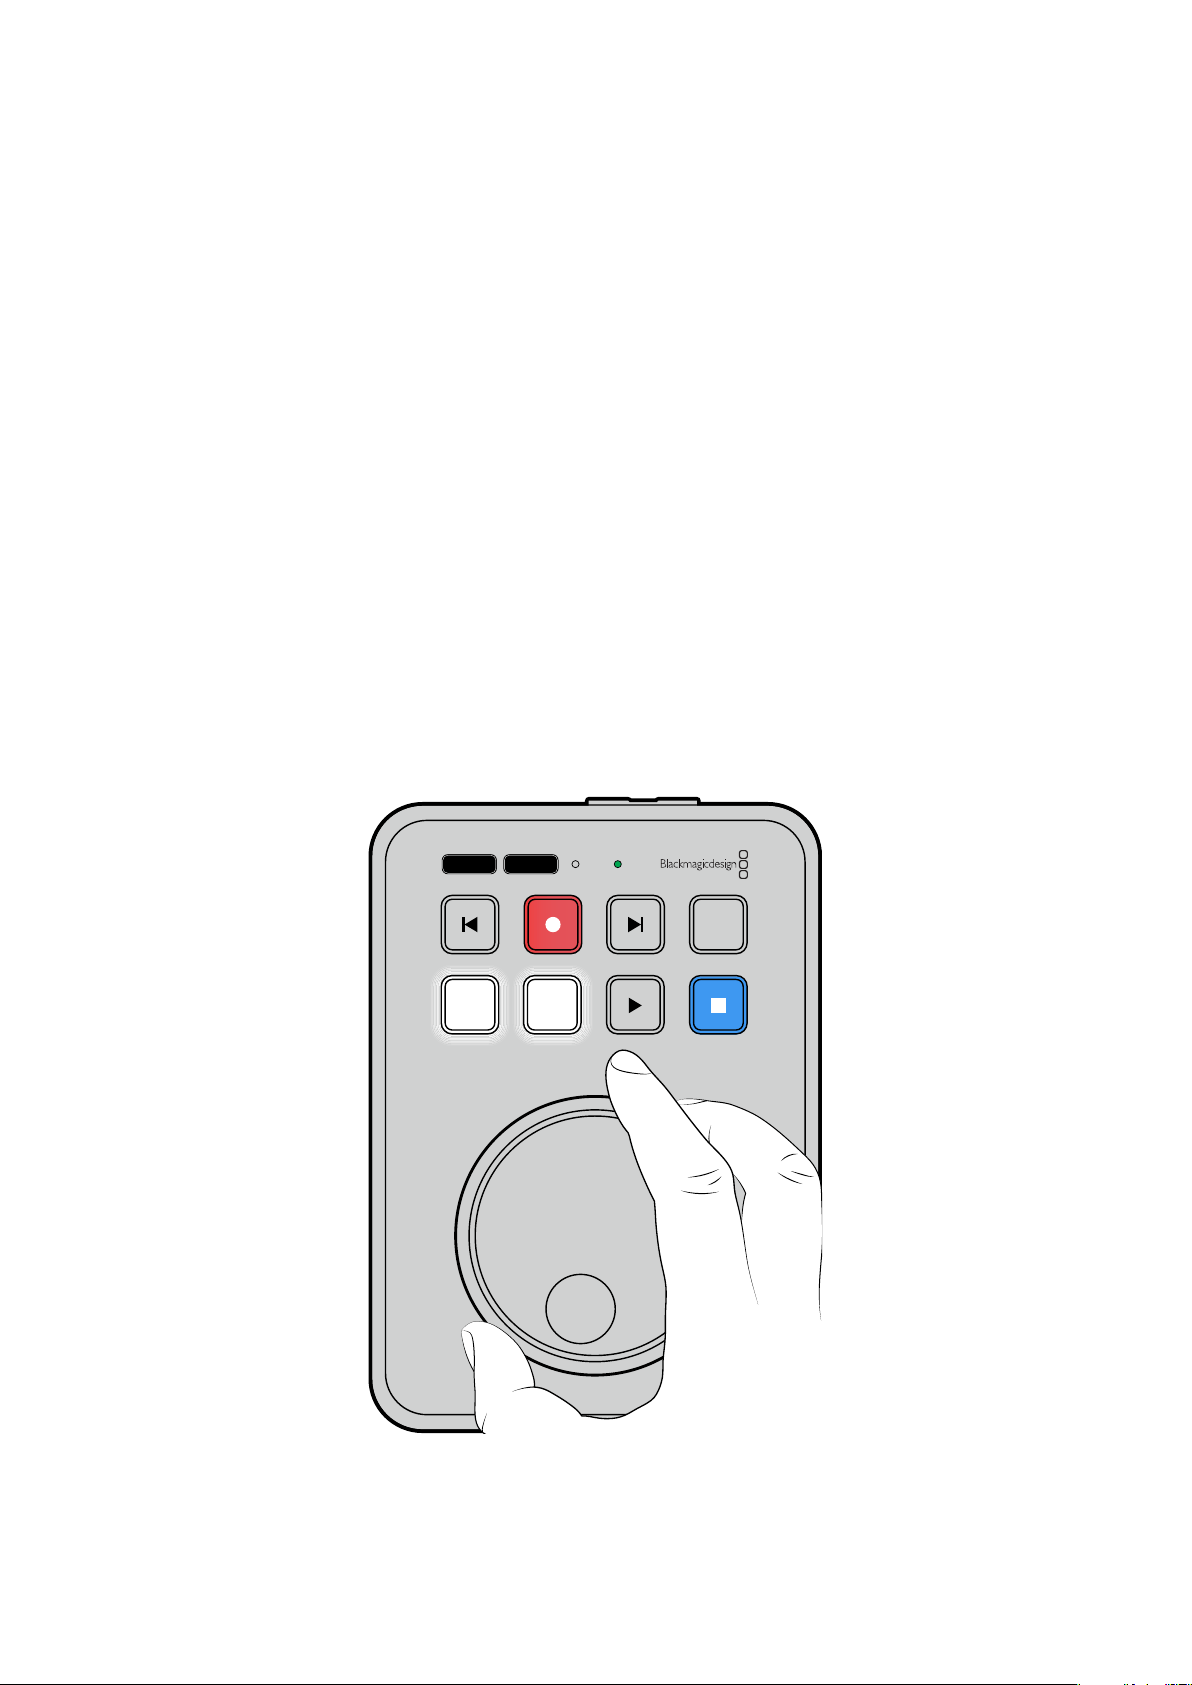
Verwenden der Teleprompterfunktion
Mithilfe einer regulären RTF-Datei lässt sich der Blackmagic HyperDeck ShuttleHD als Teleprompter
einsetzen. Erstellen Sie Ihre Datei in TextEdit oder WordPad und speichern Sie sie in einer der
13unterstützen Sprachen im Rich-Text-Format. Nach Öffnen der Datei mit dem HyperDeck
ShuttleHD können Sie die Schriftgröße und den Zeilenabstand Ihres Skripts anpassen.
So verwenden Sie die Teleprompterfunktion:
1 Verbinden Sie den HDMI-Ausgang des HyperDeck ShuttleHD mit dem gewünschten
HDMI-Bildschirm.
2 Führen Sie die SD-Karte ein, auf der das Skript gespeichert ist, oder schließen Sie das
entsprechende externe USB-Flash-Laufwerk an.
3 Wählen Sie im Aufzeichnungs-Menü die gewünschte Codec-Option aus. Navigieren Sie zur
Einstellung „Teleprompter“ und drücken Sie die SET-Taste.
Das Skript wird auf Ihrem Bildschirm eingeblendet. Mit der Wiedergabetaste starten Sie die
Wiedergabe darauf automatisch, und der Regler bietet weitere Steuerungsoptionen.
Steuern der Wiedergabegeschwindigkeit auf dem Teleprompter
Im Telepromptermodus dient der große Regler am HyperDeck ShuttleHD wie beim Abspielen von
Medien zum Steuern der Wiedergabe. Wenn das Skript geladen ist, drücken Sie die JOG- und
SCR-Tasten gleichzeitig, um variable Wiedergabegeschwindigkeit zu aktivieren. Ist variable
Geschwindigkeit gewählt, drehen Sie den Regler. Die Betätigung des Reglers bestimmt, wie schnell
das Skript läuft. Je schneller Sie den Regler drehen, desto schneller scrollt das Skript.
JOG SCR
CLIP
MENU SET
DISK SD
Für gleichmäßige Geschwindigkeit verwenden Sie entweder die JOG-Taste oder die SCR-Taste. Ist
gleichmäßige Geschwindigkeit ausgewählt, läuft das Skript im Jog-Modus bei konstant niedriger
Geschwindigkeit bzw. im Scroll-Modus schneller.
Um auf Ihrer SD-Karte oder Ihrem externen Laufwerk zwischen RTF-Dateien hin und her zu
navigieren, drücken Sie die Vor- bzw. Rücklauftaste.
169Verwenden der Teleprompterfunktion

Der Teleprompter erkennt die Schriftgröße, -farbe und ob der Text aus der Datei fettgedruckt ist
oder nicht. Darüber hinaus können Sie Schriftgröße, Zeilenabstand und Seitenränder anpassen oder
den Text horizontal oder vertikal spiegeln, wenn Sie ihn über das Monitor-Menü auf
Strahlenteilerglas projizieren. Näheres finden Sie im Abschnitt „Menü-Einstellungen“ weiter vorne
im Handbuch.
Blackmagic HyperDeck Setup
Das Blackmagic HyperDeck Setup Dienstprogramm dient zum Ändern von Einstellungen und zum
Aktualisieren der Produktsoftware Ihres HyperDeck Rekorders.
So installieren Sie die Software:
1 Laden Sie die neueste Version des Installationsprogramms Blackmagic HyperDeck Setup
unter
www.blackmagicdesign.com/de/support herunter.
2 Führen Sie das Installationsprogramm Blackmagic HyperDeck Setup auf Ihrem Computer aus
und folgen Sie den Anweisungen auf dem Bildschirm.
3 Verbinden Sie Ihren HyperDeck ShuttleHD nach abgeschlossener Installation über den
USB- oder Ethernet-Anschluss an der Rückseite mit dem Computer.
4 Starten Sie Blackmagic HyperDeck Setup und folgen Sie etwaigen Aufforderungen auf Ihrem
Bildschirm, die Produktsoftware zu aktualisieren. Erscheint keine Aufforderung, so ist Ihre
Produktsoftware auf dem neuesten Stand und es sind keine weiteren Aktionen Ihrerseits
notwendig.
Klicken Sie auf die Abbildung des HyperDecks oder das Einstellungssymbol, um die
Einstellungen öffnen.
Der Homescreen zeigt Ihnen Ihren HyperDeck ShuttleHD und den Namen des Geräts. Wenn mehr
als ein HyperDeck mit Ihrem Computer verbunden ist, ist eine individuelle Bezeichnung nützlich zur
Identifizierung des Geräts.
170Blackmagic HyperDeck Setup
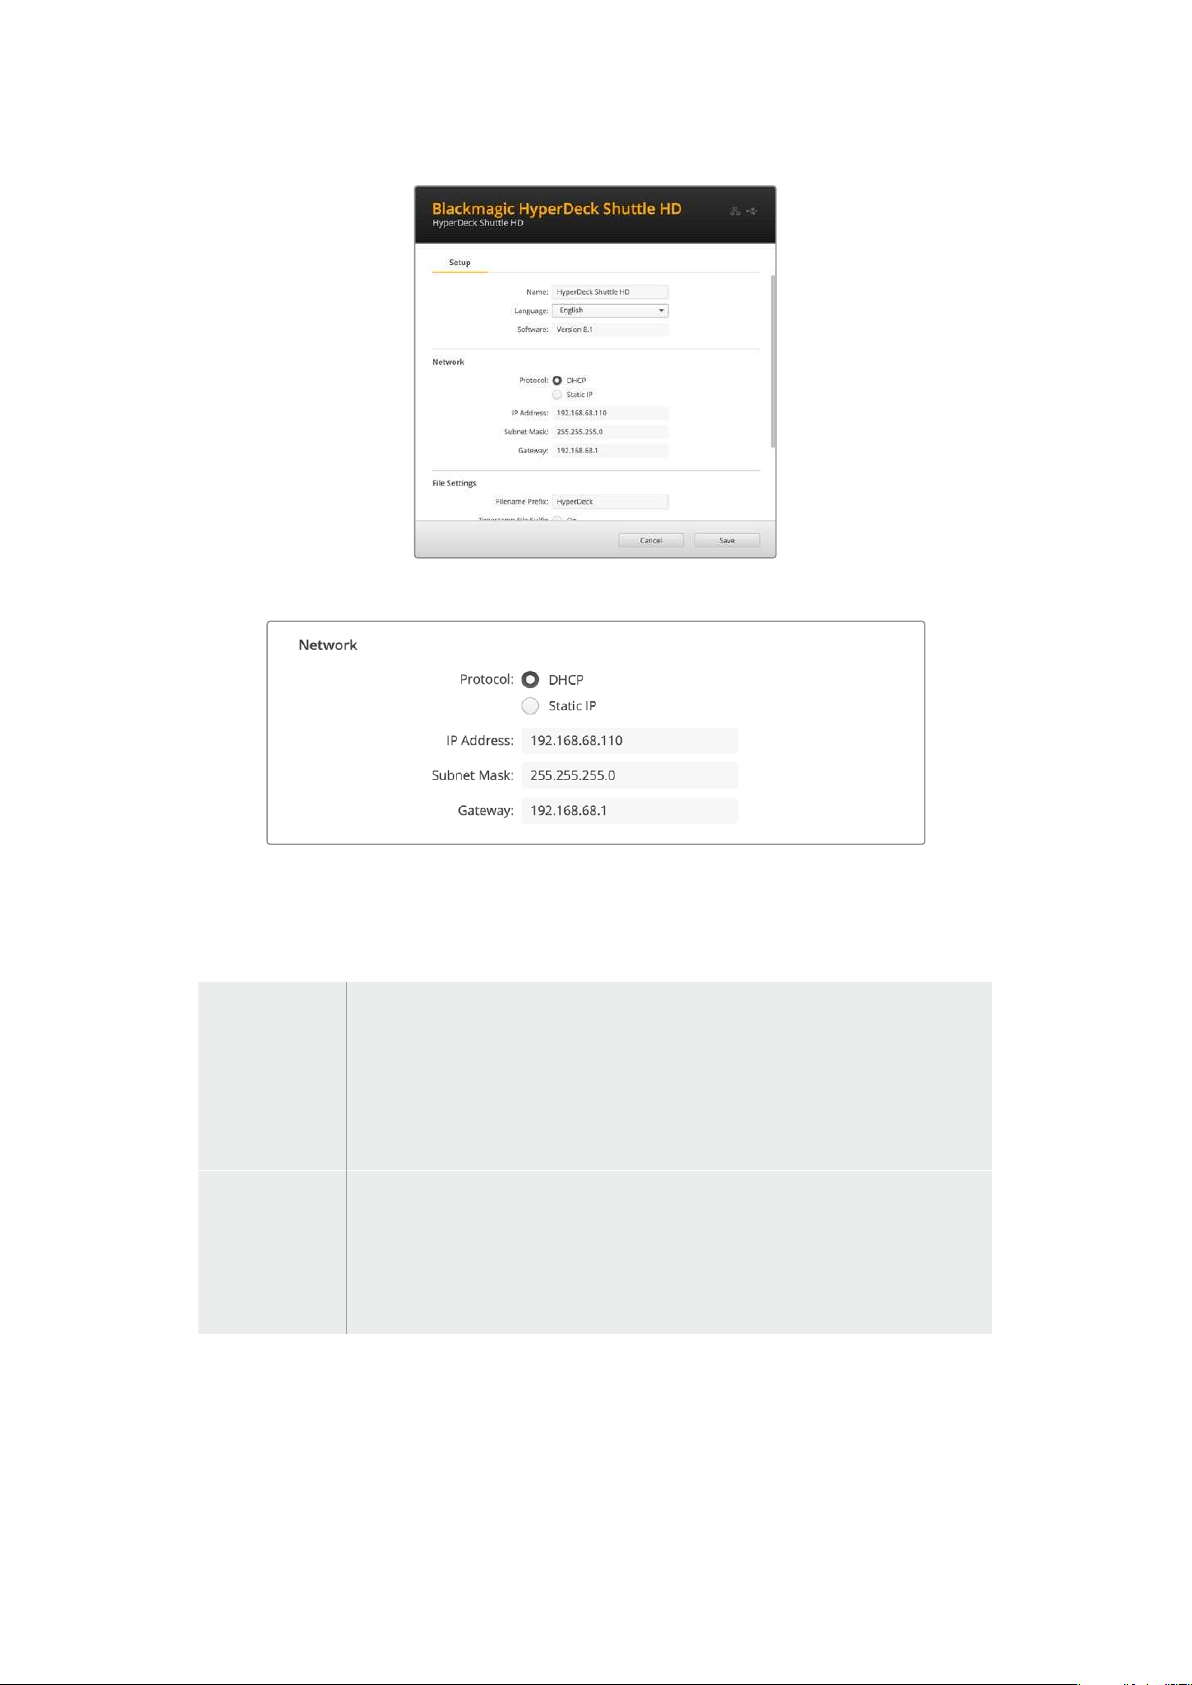
Netzwerk
Protokoll
Um Ihren HyperDeck ShuttleHD mit ATEM Mischern zu steuern oder über das HyperDeck Ethernet
Protocol fernzusteuern, muss er mithilfe des DHCP oder durch manuelles Hinzufügen einer
statischen IP-Adresse im selben Netzwerk wie Ihre anderen Geräte erscheinen.
DHCP
HyperDeck ShuttleHD Rekorder sind standardmäßig auf DHCP eingestellt. Das
Dynamic Host Configuration Protocol, kurz DHCP, ist ein auf Netzwerkservern
verwendeter Dienst, der Ihren HyperDeck ShuttleHD automatisch auffindet und
ihm eine IP-Adresse zuordnet. Das DHCP ist ein großartiger Dienst. Er vereinfacht
die Einbindung von Geräten per Ethernet und sorgt dafür, dass deren IP-Adressen
nicht miteinander in Konflikt geraten. Die meisten Computer und Netzwerkrouter
unterstützen DHCP.
StaticIP
Wenn „StaticIP“ (Statische IP) eingeschaltet ist, können Sie Ihre Netzwerkdaten
manuell eingeben. Achten Sie beim manuellen Einrichten von IP-Adressen
zur Kommunikation zwischen allen Geräten darauf, dass sie die gleiche
Subnetzmaske und die gleichen Gateway-Einstellungen haben. Die ersten
drei Zahlenblöcke der IP-Adresse des Mischers und des Bedienpults müssen
ebenfalls identisch sein.
Wenn andere Geräte im Netzwerk die gleiche Identifikationsnummer haben, verursacht das
Probleme beim Verbinden der Geräte. Ändern Sie bei Auftreten eines solchen Konflikts einfach die
Identifikationsnummer in der IP-Adresse des Geräts.
171Blackmagic HyperDeck Setup
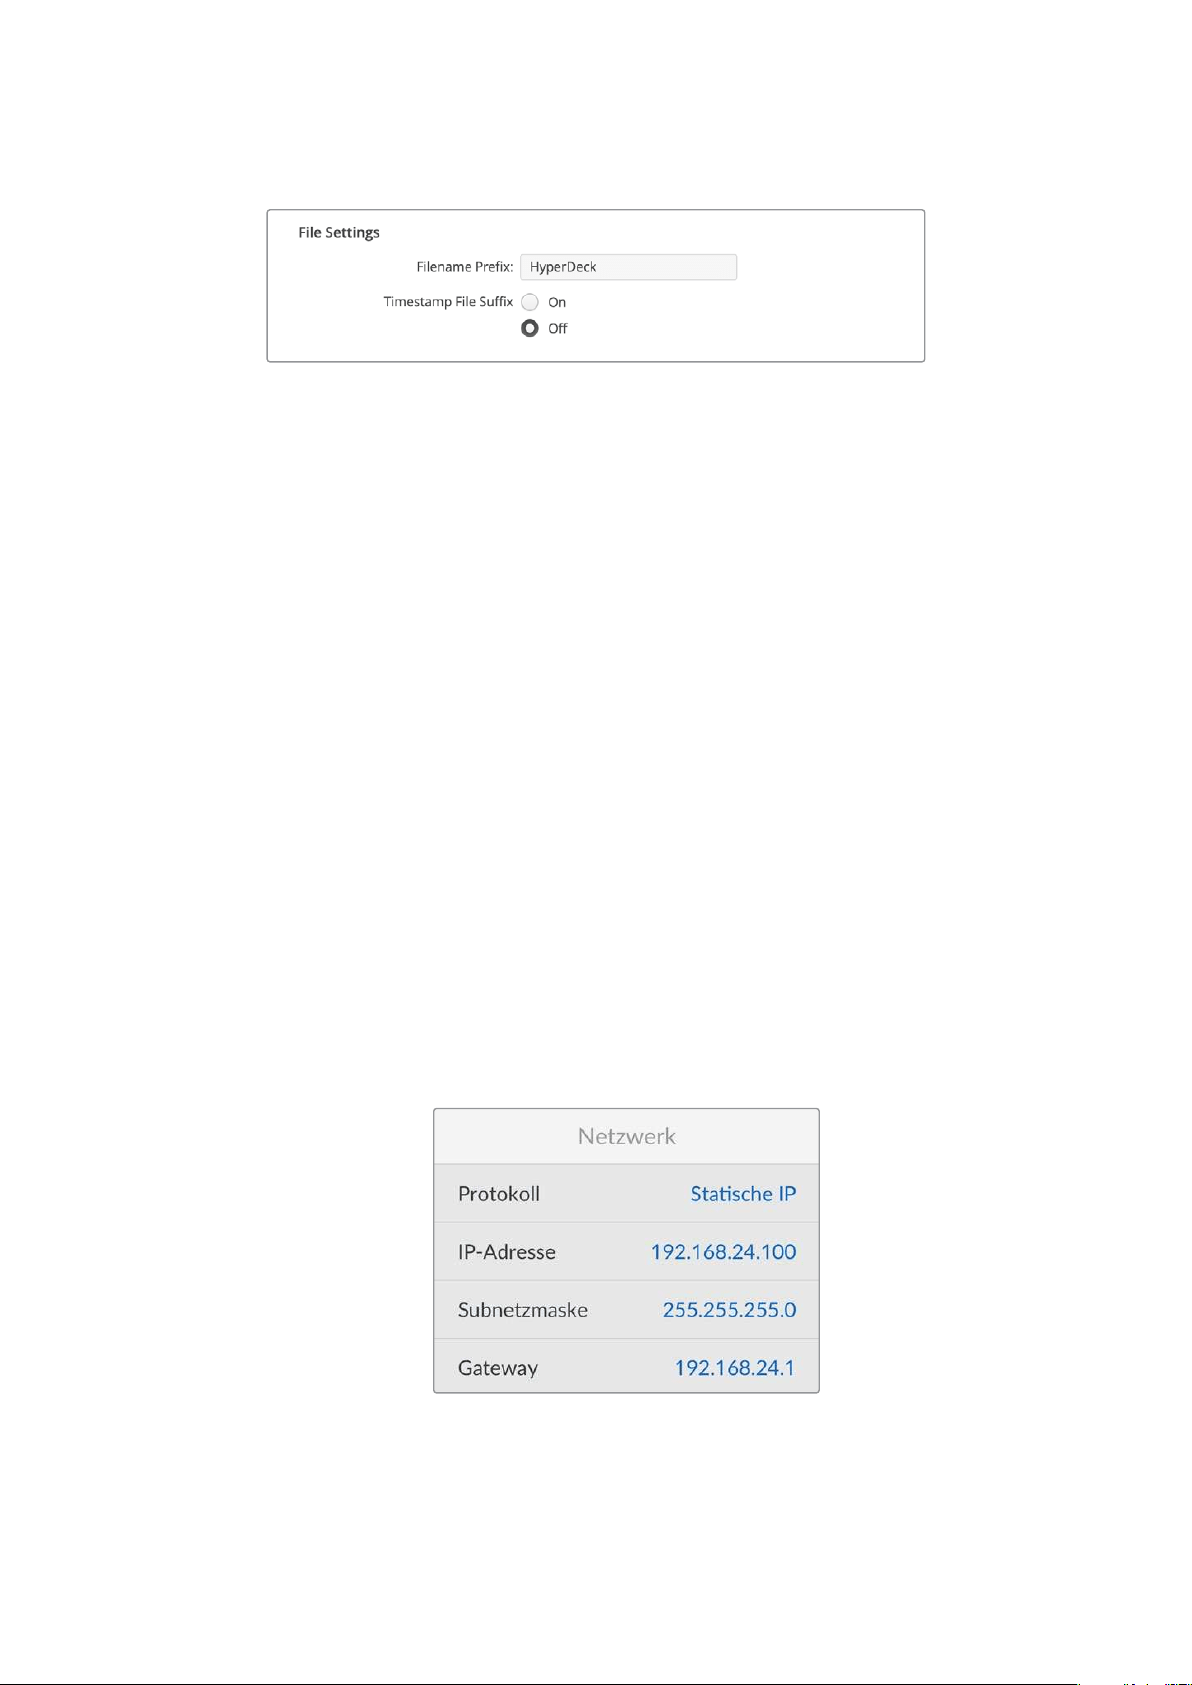
Dateieinstellungen
Beim ersten Einsatz zeichnet Ihr HyperDeck ShuttleHD Clips mit dem Präfix „HyperDeck“ auf Ihre SD-Karte oder Ihr
USB-Flash-Laufwerk auf. Geben Sie einen neuen Dateinamen ein, um das Präfix zu ändern.
Standardmäßig ist das Hinzufügen des Zeitstempels zum Dateinamen ausgeschaltet. Wenn Sie das Datum
und die Uhrzeit in Ihrem Dateinamen mitaufzeichnen möchten, wählen Sie für „Timestamp File Suffix“ die
Option „On“. Die Einstellungen „Dateinamen-Präfix“ und „Zeitstempel“ sind auch über das Onscreen-Menü
auf dem HyperDeck ShuttleHD verfügbar.
Übertragen von Dateien über ein Netzwerk
Ihr HyperDeck Rekorder unterstützt die Übertragung von Dateien über das Dateiübertragungsprotokoll FTP.
Mit dieser leistungsstarken Funktion können Sie Dateien mit den schnellen Geschwindigkeiten eines lokalen
Netzwerks direkt von Ihrem Computer auf Ihren HyperDeck kopieren. Kopieren Sie bspw. neue Dateien für
Digital Signage auf einen ferngesteuerten HyperDeck Rekorder an einem anderen Standort.
Verbinden mit dem HyperDeck ShuttleHD
Wenn Ihr Computer und der HyperDeck ShuttleHD in dasselbe Netzwerk eingebunden sind, brauchen Sie
lediglich einen FTP-Client und die IP-Adresse Ihres HyperDeck ShuttleHD, um beide Geräte miteinander zu
verbinden.
1 Laden Sie einen FTP-Client herunter und installieren Sie ihn auf dem Computer, den Sie mit Ihrem
HyperDeck verbinden möchten. Wir empfehlen die Programme Cyberduck, FileZilla oder Transmit.
Es funktioniert aber mit fast allen FTP-Anwendungen. Cyberduck und FileZilla sind als kostenlose
Downloads erhältlich.
2 Schließen Sie Ihren HyperDeck ShuttleHD mit einem Ethernet-Kabel an Ihr Netzwerk an und
notieren Sie sich die IP-Adresse. Um auf die IP-Adresse zuzugreifen, drücken Sie die MENU-Taste
und navigieren Sie mit dem Suchlaufregler zur Einstellung „Netzwerk“. Die IP-Adresse Ihres
HyperDeck ShuttleHD wird dort am unteren Rand eingeblendet.
Die IP-Adresse Ihres HyperDeck ShuttleHD finden
Sie im Setup-Menü unter „Netzwerk“
3 Geben Sie die IP-Adresse Ihres HyperDecks im TCP-Verbindungsdialogfenster ein. Name und
Position dieses Textfelds variieren von Anwendung zu Anwendung. Für gewöhnlich trägt es jedoch
die Bezeichnung „Server“ oder „Host“. Enthält Ihr FTP-Programm ein Kontrollkästchen namens
„Anonymous Login“, aktivieren Sie dieses unbedingt.
172Übertragen von Dateien über ein Netzwerk
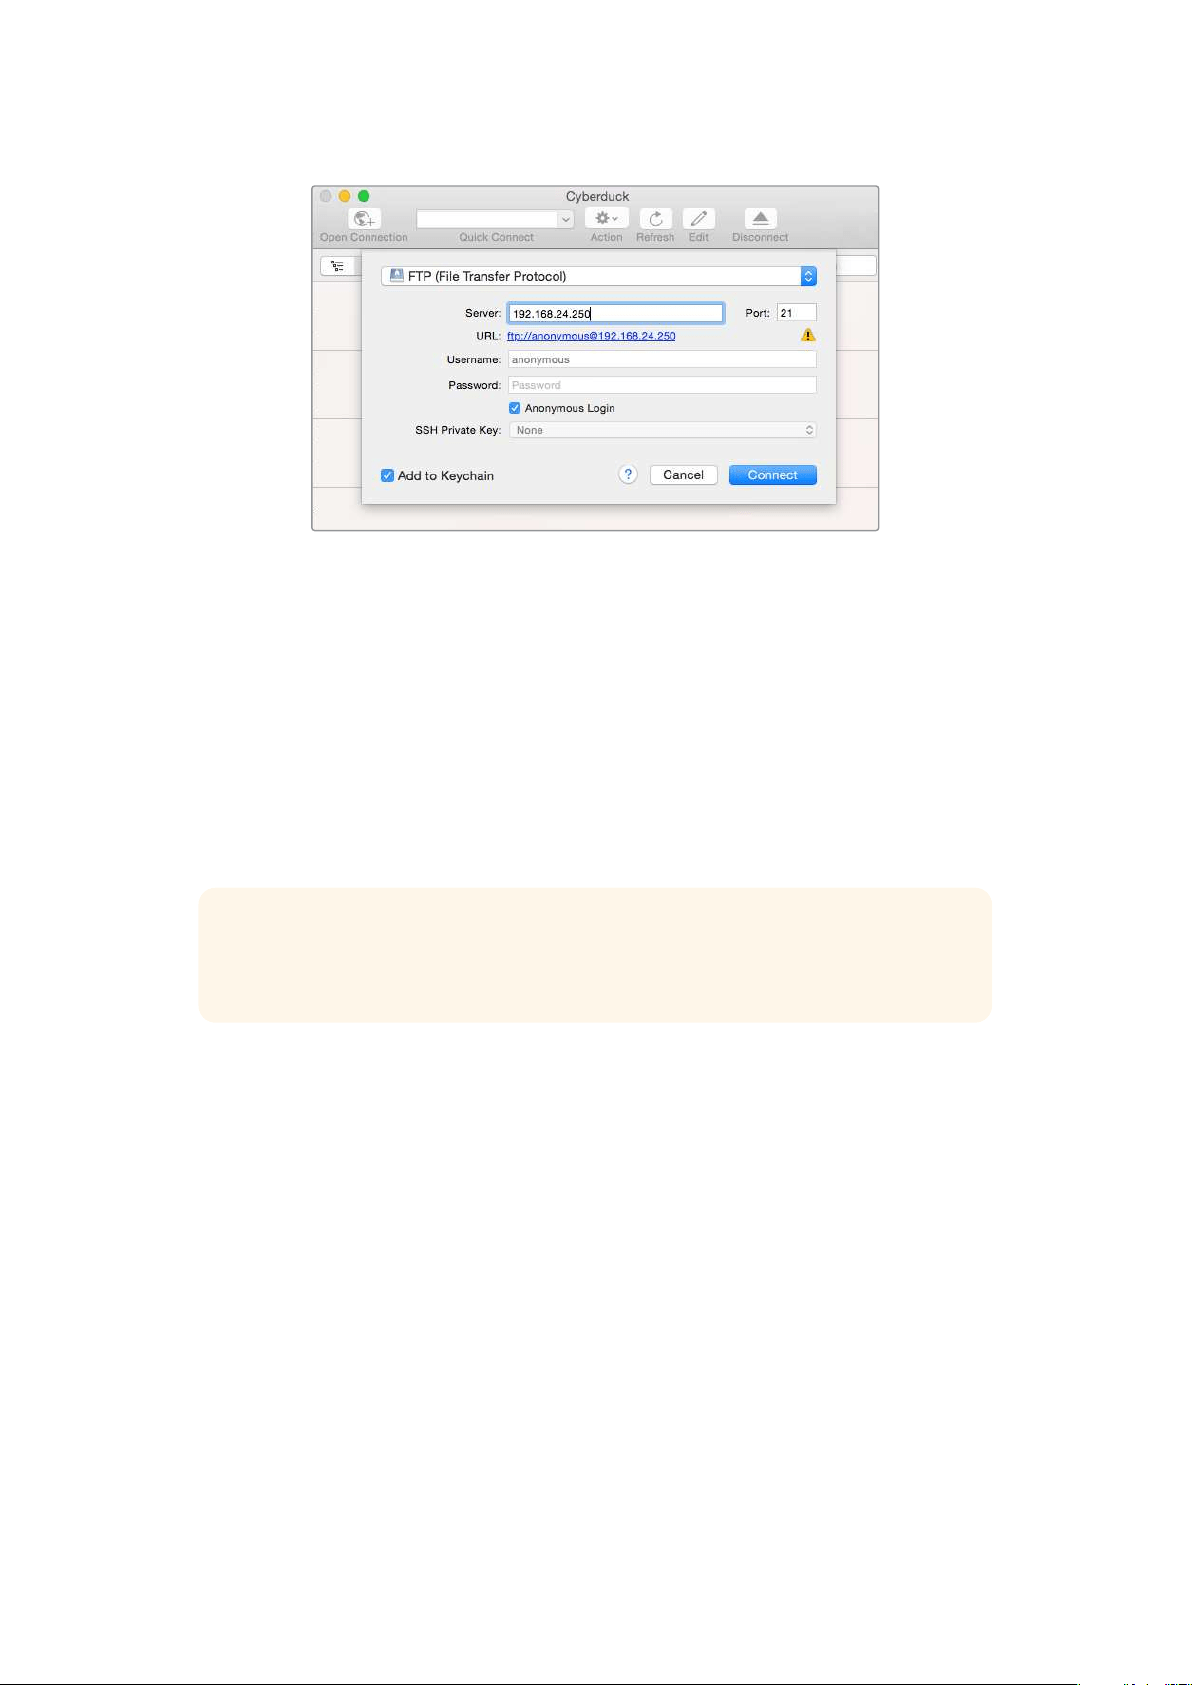
Der Verbindungsaufbau zu Ihrem HyperDeck ShuttleHD erfolgt ohne Eingabe eines
Benutzernamens oder Passworts. Geben Sie im FTP-Programmdialog einfach die IP-
Adresse Ihres Rekorders in das Feld „Server“ bzw. „Host“ ein und aktivieren Sie, falls
vorhanden, das Kontrollkästchen für einen anonymen Login
Dateien übertragen
Haben Sie Ihren Computer an den HyperDeck angeschlossen, können Sie die Dateiübertragung
ganz normal wie mit einem FTP-Programm vornehmen. Ein Großteil der FTP-Anwendungen verfügt
über eine Bedienoberfläche mit Drag-and-drop-Optionen. Sie sollten jedoch prüfen, welche
Methode für Ihre Anwendung verfügbar ist.
Sie können den Datenaustausch mit Ihrem HyperDeck in beliebigen Formaten vornehmen. Beachten
Sie jedoch, dass von Ihrem HyperDeck ShuttleHD abgespielte Dateien mit den von Ihrem
HyperDeck unterstützen Codecs und Auflösungen kompatibel sein müssen.
TIPPSie können Dateien über ein Netzwerk übertragen, während Ihr HyperDeck
aufzeichnet. Der HyperDeck passt Übertragungsgeschwindigkeiten automatisch an, um
die Aufzeichnung nicht zu beeinträchtigen.
173Übertragen von Dateien über ein Netzwerk

Developer Information
Blackmagic HyperDeck Ethernet Protocol
The Blackmagic HyperDeck Ethernet Protocol is a text based protocol accessed by connecting
to TCP port 9993 on HyperDeck models that have a built in Ethernet connection. If you are
a software developer, you can use the protocol to construct devices that integrate with our
products. Here at Blackmagic Design our approach is to open up our protocols and we eagerly
look forward to seeing what you come up with!
Protocol Commands
Command Command Description
help or ? Provides help text on all commands and parameters
commands return commands in XML format
device info return device information
disk list query clip list on active disk
disk list: slot id: {n} query clip list on disk in slot {n}
quit disconnect ethernet control
ping check device is responding
preview: enable: {true/false} switch to preview or output
play play from current timecode
play: speed: {-5000 to 5000} play at specific speed
play: loop: {true/false} play in loops or stop-at-end
play: single clip: {true/false} play current clip or all clips
playrange query playrange setting
playrange set: clip id: {n} set play range to play clip {n} only
playrange set: clip id: {n} count: {m} set play range to {m} clips starting from clip {n}
playrange set: in: {inT} out: {outT}
set play range to play between:
- timecode {inT} andtimecode {outT}
playrange set: timeline in: {in} timeline out:
{out}
set play range in units of frames between:
- timeline position {in} and position {out} clear/reset play
rangesetting
playrange clear clear/reset play range setting
play on startup query unit play on startup state
play on startup: enable: {true/false} enable or disable play on startup
play on startup: single clip: {true/false} play single clip or all clips on startup
play option query play options
play option: stop mode:
{lastframe/nextframe/black}
set output frame when playback stops
record record from current input
record: name: {name} record named clip
174Developer Information

Command Command Description
record spill spill current recording to next slot
record: spill: slot id: {n}
spill current recording to specified slot
use current id to spill to same slot
stop stop playback or recording
clips count query number of clips on timeline
clips get query all timeline clips
clips get: clip id: {n} query a timeline clip info
clips get: clip id: {n} count: {m} query m clips starting from n
clips get: version: {1/2}
query clip info using specified output version:
version 1: id: name startT duration
version 2: id: startT duration inT outT name
clips add: name: {name} append a clip to timeline
clips add: clip id: {n} name: {name} insert clip before existing clip {n}
clips add: in: {inT} out: {outT} name: {name} append the {inT} to {outT} portion of clip
clips remove: clip id: {n}
remove clip {n} from the timeline
(invalidates clip ids following clip {n})
clips clear empty timeline clip list
transport info query current activity
slot info query active slot
slot info: slot id: {n} query slot {n}
slot select: slot id: {n} switch to specified slot
slot select: video format: {format} load clips of specified format
slot unblock unblock active slot
slot unblock: slot id: {n} unblock slot {n}
cache info query cache status
dynamic range query dynamic range settings
dynamic range: playback override:
{off/Rec709/Rec2020_SDR/HLG/
ST2084_300/ST2084_500/
ST2084_800/ST2084_1000/
ST2084_2000/ST2084_4000/ST2084
set playback dynamic range override
dynamic range: record override:
{off/Rec709/Rec2020_SDR/HLG/
ST2084_300/ST2084_500/
ST2084_800/ST2084_1000/
ST2084_2000/ST2084_4000/ST2048}
set record dynamic range override
notify query notification status
notify: remote: {true/false} set remote notifications
notify: transport: {true/false} set transport notifications
notify: slot: {true/false} set slot notifications
notify: configuration: {true/false} set configuration notifications
175Developer Information

Command Command Description
notify: dropped frames: {true/false} set dropped frames notifications
notify: display timecode: {true/false} set display timecode notifications
notify: timeline position: {true/false} set playback timeline position notifications
notify: playrange: {true/false} set playrange notifications
notify: cache: {true/false} set cache notifications
notify: dynamic range: {true/false} set dynamic range settings notifications
notify: slate: {true/false} set digital slate notifications
notify: clips: {true/false}
set timeline clips notifications where two types of changes can
occur:
add: partial update with list of clips and insert positions
snapshot: complete update of all clips on timeline
notify: disk: {true/false}
set disk clips notifications where two types of changes can
occur:
add: partial update with list of clips and insert positions
snapshot: complete update of all clips on timeline
goto: clip id: {start/end} goto first clip or last clip
goto: clip id: {n} goto clip id {n}
goto: clip id: +{n} go forward {n} clips
goto: clip id: -{n} go backward {n} clips
goto: clip: {n} goto frame position {n} within current clip
goto: clip: +{n} go forward {n} frames within current clip
goto: clip: -{n} go backward {n} frames within current clip
goto: clip: {start/end} goto start or end of clip
goto: timeline: {n} goto frame position {n} within timeline
goto: timeline: +{n} o forward {n} frames within timeline
goto: timeline: -{n} go backward {n} frames within timeline
goto: timeline: {start/end} goto start or end of timeline
goto: timecode: {timecode} goto specified timecode
goto: timecode: +{timecode} go forward {timecode} duration
goto: timecode: -{timecode} go backward {timecode} duration
goto: slot id: {n} goto slot id {n}
jog: timecode: {timecode} jog to timecode
jog: timecode: +{timecode} jog forward {timecode} duration
jog: timecode: -{timecode} jog backward {timecode} duration
shuttle: speed: {-5000 to 5000} shuttle with speed
remote query unit remote control state
remote: enable: {true/false} enable or disable remote control
remote: override: {true/false} session override remote control
configuration query configuration settings
configuration: video input: SDI switch to SDI input
176Developer Information

Command Command Description
configuration: video input: HDMI switch to HDMI input
configuration: video input: component switch to component input
configuration: audio input: embedded capture embedded audio
configuration: audio input: XLR capture XLR audio
configuration: audio input: RCA capture RCA audio
configuration: file format: {format} switch to specific file format
configuration: audio codec: PCM switch to PCM audio
configuration: audio codec: AAC switch to AAC audio
configuration: timecode input:
{external/embedded/internal/preset/clip}
change the timecode input
configuration: timecode output:
{clip/timeline}
change the timecode output
configuration: timecode preference:
{default/dropframe/nondropframe}
whether or not to use drop frame timecodes when not
otherwise specified
configuration: timecode preset:
{timecode}
set the timecode preset
configuration: audio input channels: {n} set the number of audio channels recorded to {n}
configuration: record trigger:
{none/recordbit/timecoderun}
change the record trigger
configuration: record prefix: {name} set the record prefix name (supports UTF-8 name)
configuration: append timestamp:
{true/false}
append timestamp to recorded filename
configuration: xlr input id: {n} xlr type:
{line/mic}
configure xlr input type
multiple xlr inputs can be configured in a single command
configuration: genlock input resync:
{true/false}
enable or disable genlock input resync
uptime return time since last boot
format: slot id: {n} prepare:
{exFAT/HFS+} name: {name}
prepare a disk formatting operation to filesystem {format}
format: confirm: {token} perform a pre-prepared formatting operation using token
identify: enable: {true/false} identify the device
watchdog: period: {period in seconds} client connection timeout
reboot reboot device
slate clips slate clips information
slate project slate project information
slate lens slate lens information
177Developer Information

Multiline commands: Command Description
slate clips↵ set slate clips information:
reel: {n} slate reel number, where {n} is in [1, 999]
scene id: {id} slate scene id value, where {id} is a string
shot type: {WS/MS/BCU/MCU/ECU/none} slate shot type
take: {n} slate take number, where {n} is in [1, 99]
take scenario: {PU/VFX/SER/none} slate take scenario
take auto inc: {true/false} slate take auto increment
good take: {true/false} slate good take
environment: {interior/exterior} slate environment
day night: {day/night} slate day or night
slate project:↵ set slate project information:
project name: {name} project name (can be empty, supports UTF-8)
camera: {index} set camera index e.g. A
director: {name} director (can be empty, supports UTF-8)
camera operator: {name} camera operator (can be empty, supports UTF-8)
slate lens:↵ set lens information:
lens type: {type} lens type (can be empty, supports UTF-8)
iris: {type} camera iris (can be empty, supports UTF-8)
focal length: {length} focal length (can be empty, supports UTF-8)
distance: {distance} lens distance (can be empty, supports UTF-8)
filter: {filter} lens filter (can be empty, supports UTF-8)
Command Combinations
You can combine the parameters into a single command, for example:
play: speed: 200 loop: true single clip: true
Or for configuration:
configuration: video input: SDI audio input: XLR
Or to switch to the second disk, but only play NTSC clips:
slot select: slot id: 2 video format: NTSC
Protocol Details
Connection
The HyperDeck Ethernet server listens on TCP port 9993.
Basic syntax
The HyperDeck protocol is a line oriented text protocol. Lines from the server will be separated by an ascii
CR LF sequence. Messages from the client may be separated by LF or CR LF.
New lines are represented in this document as a "↵" symbol.
178Developer Information

Single line command syntax
Command parameters are usually optional. A command with no parameters is terminated with a new line:
{Command name}↵
If parameters are specified, the command name is followed by a colon, then pairs of parameter names and
values. Each parameter name is terminated with a colon character:
{Command name}: {Parameter}: {Value} {Parameter}: {Value} ...↵
Multiline command syntax
The HyperDeck protocol also supports an equivalent multiline syntax where each parameter-value pair is
entered on a new line. E.g.
{Command name}:↵
{P a r a m e t e r}: { Va lu e}↵
{P a r a m e t e r}: { Va lu e}↵
↵
Response syntax
Simple responses from the server consist of a three digit response code and descriptive text terminated by a
new line:
{Response code} {Response text}↵
If a response carries parameters, the response text is terminated with a colon, and parameter name and
value pairs follow on subsequent lines until a blank line is returned:
{Response code} {Response text}:↵
{P a r a m e t e r}: { Va lu e}↵
{P a r a m e t e r}: { Va lu e}↵
...
↵
Successful response codes
A simple acknowledgement of a command is indicated with a response code of 200:
200 ok↵
Other successful responses carry parameters and are indicated with response codes in the range of 201
to299.
179Developer Information

Failure response codes
Failure responses to commands are indicated with response codes in the range of 100 to 199:
100 syntax error
101 unsupported parameter
102 invalid value
103 unsupported
104 disk full
105 no disk
106 disk error
107 timeline empty
108 internal error
109 out of range
110 no input
111 remote control disabled
112 clip not found
120 connection rejected
150 invalid state
151 invalid codec
160 invalid format
161 invalid token
162 format not prepared
163 parameterized single line command not supported
Asynchronous response codes
The server may return asynchronous messages at any time. These responses are indicated with response
codes in the range of 500 to 599:
5xx {Response Text}:↵
{P a r a m e t e r}: { Va lu e}↵
{P a r a m e t e r}: { Va lu e}↵
↵
Connection response
On connection, an asynchronous message will be delivered:
500 connection info:↵
protocol version: {Version}↵
model: {Model Name}↵
↵
Timecode syntax
Timecodes are expressed as non-drop-frame timecode in the format:
HH:MM:SS:FF
180Developer Information

Handling of deck "remote" state
The “remote” command may be used to enable or disable the remote control of the deck. Any attempt to
change the deck state over ethernet while remote access is disabled will generate an error:
111 remote control disabled↵
To enable or disable remote control:
remote: enable: {“true”, “false”} ↵
The current remote control state may be overridden allowing remote access over ethernet irrespective of the
current remote control state:
remote: override: {“true”, “false”} ↵
The override state is only valid for the currently connected ethernet client and only while the connection
remains open.
The “remote” command may be used to query the remote control state of the deck by specifying no
parameters:
remote↵
The deck will return the current remote control state:
210 remote info:↵
enabled: {“true”, “false”}↵
override: {“true”, “false”}↵
↵
Asynchronous remote control information change notification is disabled by default and may be
configured with the “notify” command. When enabled, changes in remote state will generate a “510 remote
info:”asynchronous message with the same parameters as the “210 remote info:” message.
Closing connection
The "quit" command instructs the server to cleanly shut down the connection:
quit↵
Checking connection status
The "ping" command has no function other than to determine if the server is responding:
ping↵
Getting help
The "help" or "?" commands return human readable help text describing all available commands and
parameters:
help↵
Or:
?↵
The server will respond with a list of all supported commands:
201 help:↵
{Help Text}↵
{Help Text}↵
↵
181Developer Information

Switching to preview mode
The "preview" command instructs the deck to switch between preview mode and output mode:
preview: enable: {"true", "false"}↵
Playback will be stopped when the deck is switched to preview mode. Capturing will be stopped when the
deck is switched to output mode.
Controlling device playback
The “play” command instructs the deck to start playing:
play↵
The play command accepts a number of parameters which may be used together in most combinations.
By default, the deck will play all remaining clips on the timeline then stop.
The “single clip” parameter may be used to override this behavior:
play: single clip: {“true”, “false”}↵
By default, the deck will play at normal (100%) speed. An alternate speed may be specified in percentage
between -5000 to 5000:
play: speed: {% normal speed}↵
By default, the deck will stop playing when it reaches to the end of the timeline. The “loop” parameter may be
used to override this behavior:
play: loop: {“true”, “false”}↵
The “playrange” command instructs the deck to play all the clips. To override this behavior: and select a
particular clip:
playrange set: clip id: {Clip ID}↵
To only play a certain timecode range:
playrange set: in: {in timecode} out: {out timecode}↵
To clear a set playrange and return to the default value:
playrange clear↵
The “play on startup command” instructs the deck on what action to take on startup. By default, the deck will
not play. Use the “enable” command to start playback after each power up.
play on startup: enable {“true”, “false”}↵
By default, the unit will play back all clips on startup. Use the “single clip” command to override.
play on startup: single clip: {“true”, “false”}↵
Stopping deck operation
The "stop" command instructs the deck to stop the current playback or capture:
stop↵
182Developer Information

Changing timeline position
The "goto" command instructs the deck to switch to playback mode and change its position within the
timeline.
To go to the start of a specific clip:
goto: clip id: {Clip ID}↵
To move forward/back {count} clips from the current clip on the current timeline:
goto: clip id: +/-{count}↵
Note that if the resultant clip id goes beyond the first or last clip on timeline, it will be clamp at the first or last
clip.
To go to the start or end of the current clip:
goto: clip: {“start”, “end”}↵
To go to the start of the first clip or the end of the last clip:
goto: timeline: {“start”, “end”}↵
To go to a specified timecode:
goto: timecode: {timecode}↵
To move forward or back a specified duration in timecode:
goto: timecode: {“+”, “-”}{duration in timecode}↵
To specify between slot 1 and slot 2:
goto: slot id: {Slot ID}↵
Note that only one parameter/value pair is allowed for each goto command.
Enumerating supported commands and parameters
The "commands" command returns the supported commands:
commands↵
The command list is returned in a computer readable XML format:
212 commands:
<commands>↵
<command name="…"><parameter name="…"/>…</command>↵
<command name="…"><parameter name="…"/>…</command>↵
…
</commands>↵
↵
183Developer Information

Controlling asynchronous notifications
The “notify” command may be used to enable or disable asynchronous notifications from the server.
To enable or disable transport notifications:
notify: transport: {“true”, “false”}↵
To enable or disable slot notifications:
notify: slot: {“true”, “false”}↵
To enable or disable remote notifications:
notify: remote: {“true”, “false”}↵
To enable or disable configuration notifications:
notify: configuration: {“true”, “false”}↵
Multiple parameters may be specified. If no parameters are specified, the server returns the current state of
all notifications:
209 notify:↵
transport: {“true”, “false”}↵
slot: {“true”, “false”}↵
remote: {“true”, “false”}↵
configuration: {“true”, “false”}↵
dropped frames: {“true”, “false”}↵
display timecode: {“true”, “false”}↵
timeline position: {“true”, “false”}↵
playrange: {“true”, “false”}↵
cache: {“true”, “false”}↵
dynamic range: {“true”, “false”}↵
slate: {“true”, “false”}↵
clips: {“true”, “false”}↵
disk: {“true”, “false”}↵
↵
Retrieving device information
The "device info" command returns information about the connected deck device:
device info↵
The server will respond with:
204 device info:↵
protocol version: {Version}↵
model: {Model Name}↵
unique id: {unique alphanumeric identifier}↵
slot count: {number of storage slots}↵
software version: {software version}↵
↵
184Developer Information

Retrieving slot information
The "slot info" command returns information about a slot. Without parameters, the command returns
information for the currently selected slot:
slot info↵
If a slot id is specified, that slot will be queried:
slot info: slot id: {Slot ID}↵
The server will respond with slot specific information:
202 slot info:↵
slot id: {Slot ID}↵
status: {"empty", "mounting", "error", "mounted"}↵
volume name: {Volume name}↵
recording time: {recording time available in seconds}↵
video format: {disk's default video format}↵
blocked: {“true”, “false”}↵
↵
Asynchronous slot information change notification is disabled by default and may be configured with
the "notify" command. When enabled, changes in slot state will generate a "502 slot info:" asynchronous
message with the same parameters as the "202 slot info:" message.
Retrieving clip information
The “disk list” command returns the information for each playable clip on a given disk. Without parameters,
the command returns information for the current active disk:
disk list↵
If a slot id is specified, the disk in that slot will be queried:
disk list: slot id: {Slot ID}↵
The server responds with the list of all playable clips on the disk in the format of: Index, name, formats, and
duration in timecode:
206 disk list:↵
slot id: {Slot ID}↵
{clip index}: {name} {file format} {video format} {Duration
ti m ecode}↵
{clip index}: {name} {file format} {video format} {Duration
ti m ecode}↵
…
↵
Note that the clip index starts from 1.
Retrieving clip count
The "clips count" command returns the number of clips on the current timeline:
clips count ↵
The server responds with the number of clips:
214 clips count: ↵
clip count: {Count}↵
185Developer Information

Retrieving timeline information
The "clips get" command returns information for each available clip on the current timeline. Without
parameters, the command returns information for all clips on timeline:
clips get↵
The server responds with a list of clip IDs, names and timecodes:
205 clips info:↵
clip count: {Count}↵
{Clip ID}: {Start timecode} {Duration timecode} {In timecode}
{Out timecode} {Name}↵
{Clip ID}: {Start timecode} {Duration timecode} {In timecode}
{Out timecode} {Name}↵
…
↵
Retrieving transport information
The “transport info” command returns the state of the transport:
transport info ↵
The server responds with transport specific information:
208 transport info:
status: {“preview”, “stopped”, “play”, “forward”, “rewind”,
“j o g ”, “ s h u t t l e ”,” r e c o r d ”}↵
speed: {Play speed between -5000 and 5000 %}↵
slot id: {Slot ID or “none”}↵
clip id: {Clip ID or “none”}↵
single clip: {“true”, “false”}↵
display timecode: {timecode}↵
timecode: {timecode}↵
video format: {Video format}↵
loop: {“true”, “false”}↵
timeline: {n}↵
input video format: {Video format”}↵
dynamic range: {“off”, “Rec709”, “Rec2020_SDR”, “HLG”,
“ST2084_300”, “ST2084_500”, “ST2084_800”, “ST2084_1000”,
“ST2084_2000”, “ST2084_4000”, “ST2048” or “none”}↵
↵
The "timecode" value is the timecode within the current timeline for playback or the clip for record. The
"display timecode" is the timecode displayed on the front of the deck. The two timecodes will differ in some
deck modes.
Asynchronous transport information change notification is disabled by default and may be configured
with the "notify" command. When enabled, changes in transport state will generate a "508 transport info:"
asynchronous message with the same parameters as the "208 transport info:" message.
186Developer Information

Video Formats
The following video formats are currently supported on HyperDeck Shuttle:
720p50, 720p5994, 720p60
1080p23976, 1080p24, 1080p25, 1080p2997, 1080p30, 1080p60
1080i50, 1080i5994, 1080i60
Video format support may vary between models and software releases.
File Formats
All HyperDeck models currently support the following file formats:
H.264High
H.264Medium
H.264Low
QuickTimeProResHQ
QuickTimeProRes
QuickTimeProResLT
QuickTimeProResProxy
QuickTimeDNxHD220x
DNxHD220x
QuickTimeDNxHD145
DNxHD145
QuickTimeDNxHD45
DNxHD45
Supported file formats may vary between models and software releases.
187Developer Information

Querying and updating configuration information
The "configuration" command may be used to query the current configuration of the deck:
configuration↵
The server returns the configuration of the deck:
211 configuration:↵
audio input: {“embedded”, “XLR”, “RCA”}↵
audio mapping: {n}↵
video input: {“SDI”, “HDMI”, “component”, “composite”}↵
file format: {format}↵
audio codec: {“PCM”, “AAC”}↵
timecode input: {“external”, “embedded”, “preset”, “clip”}↵
timecode output: {“clip”, “timeline”}↵
timecode preference: {“default”, “dropframe”, “nondropframe”}↵
timecode preset: {timecode}↵
audio input channels: {n}↵
record trigger: {“none”, “recordbit”, “timecoderun”}↵
record prefix: {name}↵
append timestamp: {“true”, “false”}↵
genlock input resync: {“true”, “false”}↵
↵
One or more configuration parameters may be specified to change the configuration of the deck.
To change the current video input:
configuration: video input: {“SDI”, “HDMI”, “component”}↵
Valid video inputs may vary between models. To configure the current audio input:
configuration: audio input: {“embedded”, “XLR”, “RCA”}↵
Valid audio inputs may vary between models.
To configure the current file format:
configuration: file format: {File format}↵
Note that changes to the file format may require the deck to reset, which will cause the client connection to
be closed. In such case, response code 213 will be returned (instead of 200) before the client connection is
closed:
“213 deck rebooting”
Asynchronous configuration information change notification is disabled by default and may be configured
with the “notify” command. When enabled, changes in configuration will generate a “511 configuration:”
asynchronous message with the same parameters as the “211 configuration:” message.
188Developer Information

Selecting active slot and video format
The "slot select" command instructs the deck to switch to a specified slot, or/and to select a specified output
video format.
To switch to a specified slot:
slot select: slot id: {slot ID}↵
To select the output video format:
slot select: video format: {video format}↵
Either or all slot select parameters may be specified. Note that selecting video format will result in a rescan of
the disk to reconstruct the timeline with all clips of the specified video format.
Clearing the current timeline
The "clips clear" command instructs the deck to empty the current timeline:
clips clear↵
The server responds with
200 ok↵
Adding a clip to the current timeline
The "clips add:" command instructs the deck to add a clip to the current timeline:
clips add: name: {clip name}↵
The server responds with
200 ok↵
or in case of error
1xx {error description}↵
Configuring the watchdog
The “watchdog” command instructs the deck to monitor the connected client and terminate the connection if
the client is inactive for at least a specified period of time.
To configure the watchdog:
watchdog: period: {period in seconds}↵
To avoid disconnection, the client must send a command to the server at least every {period} seconds. Note
that if the period is set to 0 or less than 0, connection monitoring will be disabled.
189Developer Information

Hilfe
So erhalten Sie Hilfe
Am schnellsten erhalten Sie Hilfe über die Online-Support-Seiten auf der Blackmagic Design
Website. Suchen Sie dort auch nach dem aktuellsten Support-Material für Ihren Blackmagic
HyperDeck Rekorder.
Blackmagic Design Online Support Seiten
Die aktuellsten Versionen der Bedienungsanleitung, Produktsoftware und der Support-Hinweise
finden Sie im Blackmagic Support Center unter
www.blackmagicdesign.com/de/support.
Blackmagic Design Forum
Das Blackmagic Design Forum auf unserer Website ist eine praktische Ressource für weitere
Informationen und kreative Ideen. Manchmal finden Sie dort schnellere Lösungen, da
möglicherweise bereits hilfreiche Antworten auf ähnliche Fragen von anderen erfahrenen
Anwendern und Blackmagic Design Mitarbeitern vorliegen. Das Forum finden Sie unter
http://forum.blackmagicdesign.com.
Kontaktaufnahme mit Blackmagic Design Support
Wenn unser Support-Material oder das Forum Ihnen nicht wie gewünscht hilft, gehen Sie bitte auf
unsere Support-Seite und schicken Sie uns Ihre Anfrage über „Senden Sie uns eine E-Mail“. Oder
klicken Sie auf „Finden Sie Ihr lokales Support-Team“ und rufen Sie Ihre nächstgelegene
Blackmagic Design Support Stelle an.
Überprüfen der aktuell installierten Softwareversion
Um herauszufinden, welche Version der Blackmagic HyperDeck Software momentan auf Ihrem
Computer installiert ist, öffnen Sie das Fenster „About Blackmagic HyperDeck Setup“.
Öffnen Sie Blackmagic HyperDeck Setup auf macOS über den Ordner „Programme“. Wählen
Sie im Anwendungsmenü „About Blackmagic HyperDeck Setup“, um die Versionsnummer
anzuzeigen.
Öffnen Sie Blackmagic HyperDeck Setup auf Windows über das Startmenü oder den
Startbildschirm. Klicken Sie auf das Menü „Help“ (Hilfe) und wählen Sie „About Blackmagic
HyperDeck Setup“ aus, um die Versionsnummer anzuzeigen.
So erhalten Sie die aktuellsten Software-Updates
Prüfen Sie zunächst die Versionierung der auf Ihrem Computer installierten Blackmagic HyperDeck
Setup Software. Sehen Sie dann im Blackmagic Design Support Center unter
www.blackmagicdesign.com/de/support nach neueren Aktualisierungen. In der Regel empfiehltes
sich, die neuesten Updates zu laden. Vermeiden Sie Software-Updates jedoch mitten in einem
wichtigen Projekt.
190Hilfe

Gesetzliche Vorschriften
Entsorgung von elektrischen und elektronischen Geräten innerhalb der
Europäischen Union.
Das auf dem Produkt abgebildete Symbol weist darauf hin, dass dieses Gerät nicht
zusammen mit anderen Abfallstoffen entsorgt werden darf. Altgeräte müssen daher zur
Wiederverwertung an eine dafür vorgesehene Sammelstelle übergeben werden.
Mülltrennung und Wiederverwertung von Altgeräten tragen zum nachhaltigen Umgang mit
natürlichen Ressourcen bei. Gleichzeitig wird sichergestellt, dass die Wiederverwertung
nicht zulasten der menschlichen Gesundheit und der Umwelt geht. Weitere Informationen
zur Entsorgung von Altgeräten sowie zu den Standorten der zuständigen Sammelstellen
erhalten Sie von Ihren örtlichen Müllentsorgungsbetrieben sowie vom Händler, bei dem Sie
dieses Produkt erworben haben.
Dieses Gerät wurde geprüft und entspricht den Grenzwerten für Digitalgeräte der KlasseA
gemäß Abschnitt15 der FCC-Bestimmungen für Funkentstörung. Diese Grenzwerte dienen
dem angemessenen Schutz gegen schädliche Störungen bei Betrieb des Geräts in einer
gewerblichen Umgebung. Geräte dieser Art erzeugen und verwenden Hochfrequenzen
und können diese auch ausstrahlen. Bei Nichteinhaltung der Installations- und
Gebrauchsvorschriften können sie zu Störungen beim Rundfunkempfang führen. Der
Betrieb solcher Geräte im Wohnbereich führt mit großer Wahrscheinlichkeit zu
Funkstörungen. In diesem Fall kann vom Betreiber verlangt werden, selbst für die
Beseitigung solcher Störungen aufzukommen.
Der Betrieb unterliegt den folgenden zwei Bedingungen:
1 Dieses Gerät darf keine schädigenden Störungen hervorrufen.
2 Das Gerät muss unanfällig gegenüber beliebigen empfangenen Störungen sein,
einschließlich solcher, die einen unerwünschten Betrieb verursachen.
R-R-BMD-20211410001
ISED-Zertifizierung für den kanadischen Markt
Dieses Gerät erfüllt die kanadischen Vorschriften für digitale Geräte der KlasseA.
Jedwede an diesem Produkt vorgenommene Änderung oder unsachgemäße
Verwendung kann die Konformitätserklärung zum Erlöschen bringen.
Verbindungen zu HDMI-Schnittstellen müssen über abgeschirmte HDMI-Kabel
hergestellt werden.
Die Ausstattung wurde unter Einhaltung der beabsichtigten Nutzung in einer
gewerblichen Umgebung getestet. Bei Verwendung in häuslichen Umgebungen
können Funkstörungen auftreten.
191Gesetzliche Vorschriften

Sicherheitshinweise
Das Produkt eignet sich für den Einsatz in tropischen Gebieten mit einer Umgebungstemperatur von
bis zu 40ºC.
Sorgen Sie rund um das Gerät für eine angemessene und unbehinderte Luftzufuhr.
Im Inneren des Produkts befinden sich keine durch den Anwender zu wartenden Teile. Wenden Sie
sich für die Wartung an ein Blackmagic Design Service-Center in Ihrer Nähe.
Nicht in Höhen von über 2000m über dem Meeresspiegel einsetzen
California Proposition65
Plastikteile dieses Produkts können Spuren von polybromierten Biphenylen enthalten. Im US-
amerikanischen Bundesstaat Kalifornien werden diese Chemikalien mit Krebs, Geburtsfehlern und
anderen Schäden der Fortpflanzungsfähigkeit in Verbindung gebracht.
Weitere Informationen finden Sie unter
www.P65Warnings.ca.gov.
192Sicherheitshinweise

Garantie
12 Monate eingeschränkte Garantie
Für dieses Produkt gewährt die Firma Blackmagic Design eine Garantie auf Material- und Verarbeitungsfehler
von 12Monaten ab Kaufdatum. Sollte sich ein Produkt innerhalb dieser Garantiezeit als fehlerhaft
erweisen, wird die Firma Blackmagic Design nach ihrem Ermessen das defekte Produkt entweder ohne
Kostenerhebung für Teile und Arbeitszeit reparieren oder Ihnen das defekte Produkt ersetzen.
Zur Inanspruchnahme der Garantieleistungen müssen Sie als Kunde Blackmagic Design über den
Defekt innerhalb der Garantiezeit in Kenntnis setzen und die entsprechenden Vorkehrungen für die
Leistungserbringung treffen. Es obliegt dem Kunden, für die Verpackung und den bezahlten Versand
des defekten Produkts an ein spezielles von Blackmagic Design benanntes Service Center zu sorgen
und hierfür aufzukommen. Sämtliche Versandkosten, Versicherungen, Zölle, Steuern und sonstige
Abgaben im Zusammenhang mit der Rücksendung von Waren an uns, ungeachtet des Grundes, sind
vom Kunden zu tragen.
Diese Garantie gilt nicht für Mängel, Fehler oder Schäden, die durch unsachgemäße Handhabung oder
unsachgemäße oder unzureichende Wartung und Pflege verursacht wurden. Blackmagic Design ist
im Rahmen dieser Garantie nicht verpflichtet, die folgenden Serviceleistungen zu erbringen: a) Behebung
von Schäden infolge von Versuchen Dritter, die Installation, Reparatur oder Wartung des Produkts
vorzunehmen, b) Behebung von Schäden aufgrund von unsachgemäßer Handhabung oder Anschluss
an nicht kompatible Geräte, c) Behebung von Schäden oder Störungen, die durch die Verwendung
von nicht Blackmagic-Design-Ersatzteilen oder -Verbrauchsmaterialien entstanden sind, d) Service für
ein Produkt, das verändert oder in andere Produkte integriert wurde, sofern eine solche Änderung
oder Integration zu einer Erhöhung des Zeitaufwands oder zu Schwierigkeiten bei der Wartung des
Produkts führt. ÜBER DIE IN DIESER GARANTIEERKLÄRUNG AUSDRÜCKLICH AUFGEFÜHRTEN
ANSPRÜCHE HINAUS ÜBERNIMMT BLACKMAGIC DESIGN KEINE WEITEREN GARANTIEN, WEDER
AUSDRÜCKLICH NOCH STILLSCHWEIGEND. DIE FIRMA BLACKMAGIC DESIGN UND IHRE HÄNDLER
LEHNEN JEGLICHE STILLSCHWEIGENDEN GARANTIEN IN BEZUG AUF AUSSAGEN ZUR
MARKTGÄNGIGKEIT UND GEBRAUCHSTAUGLICHKEIT FÜR EINEN BESTIMMTEN ZWECK AB. DIE
VERANTWORTUNG VON BLACKMAGIC DESIGN, FEHLERHAFTE PRODUKTE ZU REPARIEREN ODER
ZU ERSETZEN, IST DIE EINZIGE UND AUSSCHLIESSLICHE ABHILFE, DIE GEGENÜBER DEM KUNDEN
FÜR ALLE INDIREKTEN, SPEZIELLEN, NEBEN- ODER FOLGESCHÄDEN ZUR VERFÜGUNG GESTELLT
WIRD, UNABHÄNGIG DAVON, OB BLACKMAGIC DESIGN ODER DER HÄNDLER VON DER MÖGLICHKEIT
SOLCHER SCHÄDEN ZUVOR IN KENNTNIS GESETZT WURDE. BLACKMAGIC DESIGN IST NICHT
HAFTBAR FÜR JEGLICHE WIDERRECHTLICHE VERWENDUNG DER GERÄTE DURCH DEN KUNDEN.
BLACKMAGIC HAFTET NICHT FÜR SCHÄDEN, DIE SICH AUS DER VERWENDUNG DES PRODUKTS
ERGEBEN. NUTZUNG DES PRODUKTS AUF EIGENE GEFAHR.
© Copyright 2022 Blackmagic Design. Alle Rechte vorbehalten. „Blackmagic Design“, „DeckLink“, „HDLink“, „Workgroup Videohub“,
„Multibridge Pro“, „Multibridge Extreme“, „Intensity“ und „Leading the creative video revolution“ sind eingetragene Warenzeichen
in den USA und anderen Ländern. Alle anderen Unternehmens- und Produktnamen sind möglicherweise Warenzeichen der
jeweiligen Firmen, mit denen sie verbunden sind.
193Garantie

HyperDeck Shuttle HD
HyperDeck
Shuttle HD
Abril 2022
Manual de instalación y funcionamiento

Bienvenido
Gracias por haber adquirido este producto.
Cuando diseñamos los equipos HyperDeck originales, nuestro objetivo era facilitar la
grabación y la reproducción de material audiovisual en unidades de estado sólido de gran
velocidad. Ahora nos complace presentar el nuevo HyperDeck Shuttle HD.
Se trata de un modelo compacto, fácil de transportar y compatible con equipos informáticos.
Este dispositivo presenta un mando de búsqueda cómodo y los clásicos controles de
reproducción que permiten manejarlo con una sola mano y convierten a este equipo en el
complemento ideal para realizar producciones en directo con mezcladores ATEM Mini. El
grabador también puede cumplir la función de teleprónter.
Asimismo, es capaz de registrar contenidos en tarjetas SD o unidades de almacenamiento
USB externas en formato ProRes, DNxHD o H.264, permitiendo así grabar y reproducir a una
velocidad inigualable.
En nuestra página de soporte técnico, encontrarás la versión más reciente de este manual,
así como actualizaciones para este producto. Recuerda actualizarlo con frecuencia, a fin de
asegurarte de que cuentas con las últimas prestaciones disponibles. Por último, no olvides
registrarte al descargar las actualizaciones para que podamos mantenerte informado sobre
nuevos lanzamientos. Trabajamos constantemente para desarrollar herramientas innovadoras y
superarnos, de modo que nos encantaría conocer tu opinión.
Grant Petty
Director ejecutivo de Blackmagic Design

Índice
Primeros pasos 197
Conexión del cable de alimentación 197
Conexión de fuentes audiovisuales 198
Conexión de soportes de grabación 198
Grabación 199
Reproducción 200
Mando de búsqueda 201
Modificar ajustes 203
Ajustes 204
Panel trasero 213
Soportes de grabación 214
Tarjeta SD 214
Discos externos 215
Formatear soportes de almacenamiento 215
Preparación de soportes en equipos informáticos 215
Función Teleprónter 217
Configuración del dispositivo 218
Transferencia de archivos a través de una red 220
Información para desarrolladores (eninglés) 222
Protocolo de Ethernet para Blackmagic HyperDeck (eninglés) 222
Comandos del protocolo (en inglés) 222
Detalles del protocolo (en inglés) 226
Ayuda 238
Normativas 239
Seguridad 240
Garantía 241
196
HyperDeck Shuttle HD

Primeros pasos
Para comenzar a utilizar el grabador, basta con enchufarlo a una red de suministro eléctrico,
conectar la fuente HDMI, emplear una tarjeta SD o una unidad de almacenamiento externa e iniciar
la grabación.
Este apartado del manual presenta información básica para utilizar el modelo HyperDeck
Shuttle HD.
JOG SCR
CLIP
MENU SET
DISK SD
Conexión del cable de alimentación
Para conectar el equipo, enchufe el transformador proporcionado a la entrada correspondiente en
el panel trasero. Ajuste el aro de seguridad para sujetar el cable y evitar que se desconecte
accidentalmente.
HDMI OUT
HDMI IN
EXT DISK
SD CARD
ETHERNET
+
12V DC
Conecte el transformador a la entrada para fuentes de alimentación.
197
Primeros pasos

Conexión de fuentes audiovisuales
Para conectar una fuente audiovisual, enchufe el cable HDMI a la entrada correspondiente del
panel trasero.
HDMI OUT
HDMI IN
EXT DISK
SD CARD
ETHERNET
+
12V DC
Conecte el equipo de destino a la salida HDMI, por ejemplo, un mezclador ATEM Mini o un televisor
con conexión HDMI.
La salida HDMI también permite conectar un monitor para acceder al menú de ajustes del grabador,
que aparecerá superpuesto a la imagen en la pantalla. Consulte el apartado Modificar ajustes para
obtener más información sobre las opciones de configuración disponibles.
SUGERENCIA: Si la señal audiovisual no aparece en la pantalla conectada, es posible que
esté seleccionado el modo de reproducción. Presione el botón de grabación para habilitar
esta función.
HDMI OUT
HDMI IN
EXT DISK
SD CARD
ETHERNET
+
12V DC
HDMI
Conecte el equipo de destino, tal como un televisor
o un mezclador ATEM Mini, a la salida HDMI.
Conexión de soportes de grabación
Todos los equipos HyperDeck Shuttle HD pueden comenzar a grabar contenidos en forma
inmediata sin necesidad de modificar ningún tipo de ajuste o configuración. Para ello, solo es
necesario contar con una tarjeta SD o un soporte de almacenamiento externo formateado.
Los soportes de grabación pueden formatearse fácilmente mediante las opciones del menú. Cabe
destacar que, además, este procedimiento puede realizarse en cualquier equipo informático.
Consulte el apartado Formatear soportes de almacenamiento para obtener información sobre las
unidades más adecuadas. Además, se proporciona una lista de los modelos recomendados.
Para insertar una tarjeta SD:
1 Sostenga la tarjeta SD con los contactos dorados orientados hacia arriba, de forma que
coincida con la respectiva ranura en el dispositivo. Insértela y empújela con cuidado hasta
que calce en su lugar.
198Primeros pasos
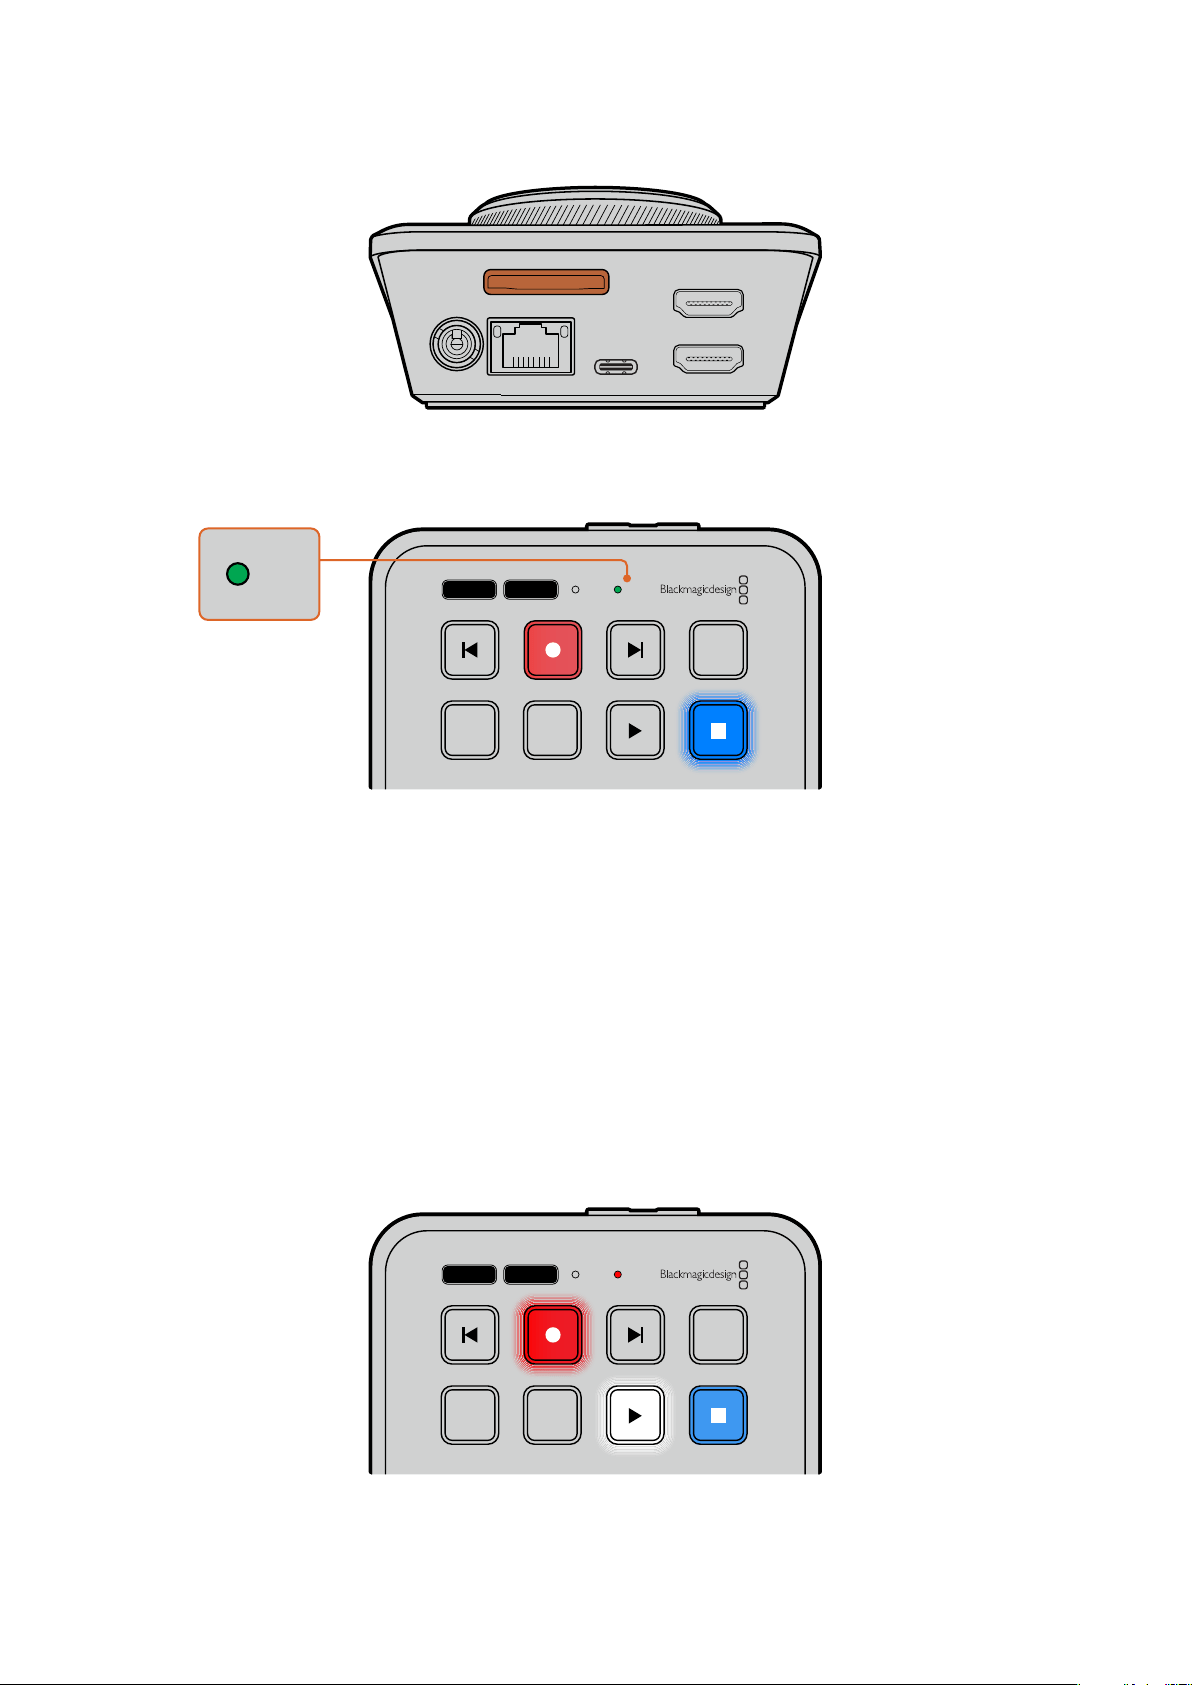
HDMI OUT
HDMI IN
EXT DISK
SD CARD
ETHERNET
+
12V DC
2 A continuación, el dispositivo verificará la tarjeta. El indicador correspondiente se
encenderá de color verde mientras este procedimiento se lleva a cabo. Una vez concluida
la comprobación, la luz indicadora se apagará.
JOG SCR
CLIP
MENU SET
DISK SD
DISK SD
Esto es todo lo que se necesita saber para comenzar a grabar y reproducir contenidos con el
modelo HyperDeck Shuttle HD.
Continúe leyendo este manual para obtener más información sobre cómo grabar y reproducir
secuencias de imágenes y modificar los ajustes de la unidad.
Grabación
Después de confirmar que la fuente aparece en el monitor conectado, podrá comenzar a grabar
inmediatamente.
Presione el botón de grabación para comenzar a grabar. Si se utiliza una tarjeta SD, el indicador
sobre la ranura se encenderá de rojo junto con los botones de grabación y reproducción. De igual
modo, al usar una unidad de almacenamiento externa, el indicador correspondiente se
encenderá de rojo.
JOG SCR
CLIP
MENU SET
DISK SD
Para finalizar la grabación, presione el botón de detención.
199Grabación
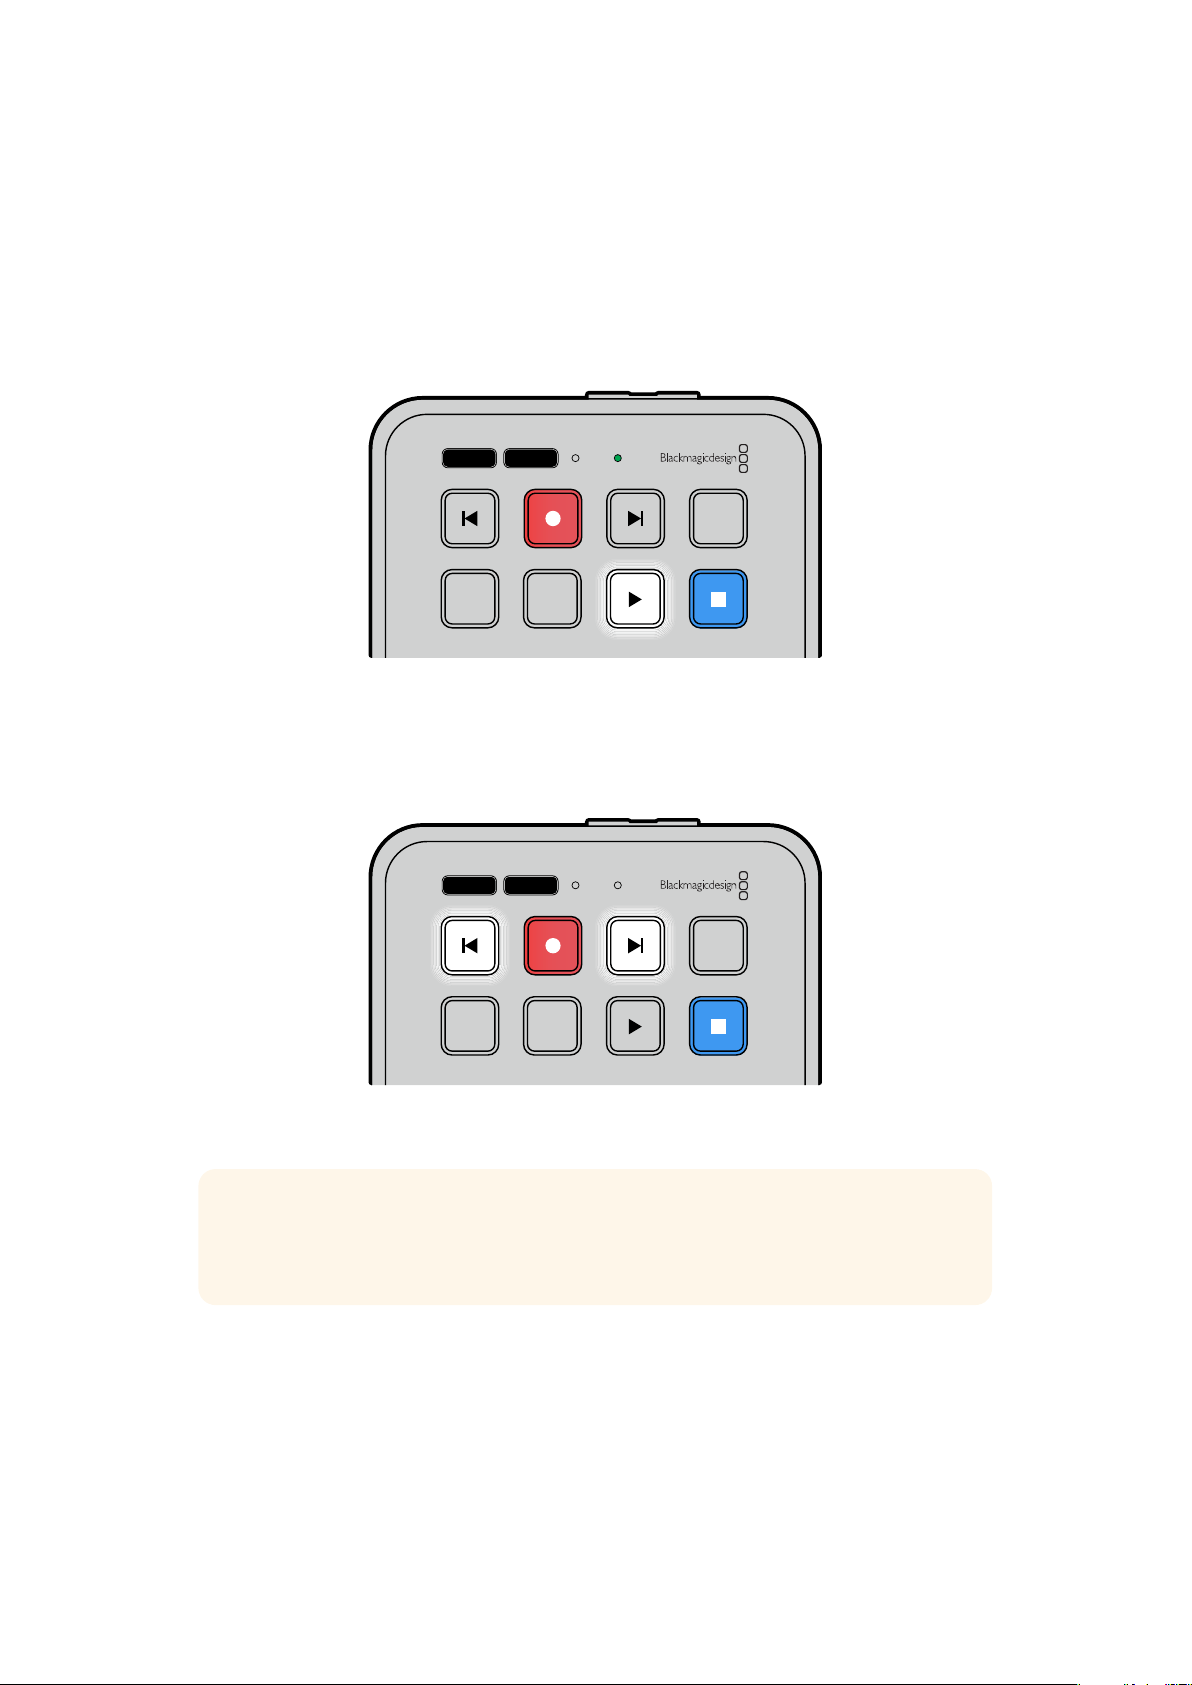
Reproducción
Presione el botón de reproducción para ver la secuencia. Durante este proceso, el botón de
reproducción se encenderá, y el indicador del soporte de grabación o de la tarjeta SD se
iluminará de verde.
En caso de haber grabado más de un clip, utilice los botones de avance y retroceso para
seleccionar el material deseado.
JOG SCR
CLIP
MENU SET
DISK SD
Botones de avance y retroceso
Presione el botón de retroceso una vez para regresar al inicio del clip. Vuelva a presionar el botón
para regresar a los clips anteriores.
Presione el botón de avance para ver los clips posteriores.
JOG SCR
CLIP
MENU SET
DISK SD
Utilice los botones de avance o retroceso para ir
al comienzo de cada secuencia.
SUGERENCIA: Para reproducir una secuencia en el dispositivo, es necesario configurar el
códec mediante el menú en pantalla, a fin de que coincida con el empleado durante la
grabación. Consulte el apartado Modificar ajustes para obtener más información al respecto.
Repetición de una misma secuencia
Al presionar el botón de reproducción nuevamente mientras la secuencia está en curso, el dispositivo
reproducirá todos los clips disponibles continuamente hasta que se presione el botón de detención.
Si se desea repetir un único clip en forma constante, seleccione el modo de clip y presione el botón
de reproducción una vez para dar inicio, y luego otra vez para activar la repetición.
200Reproducción
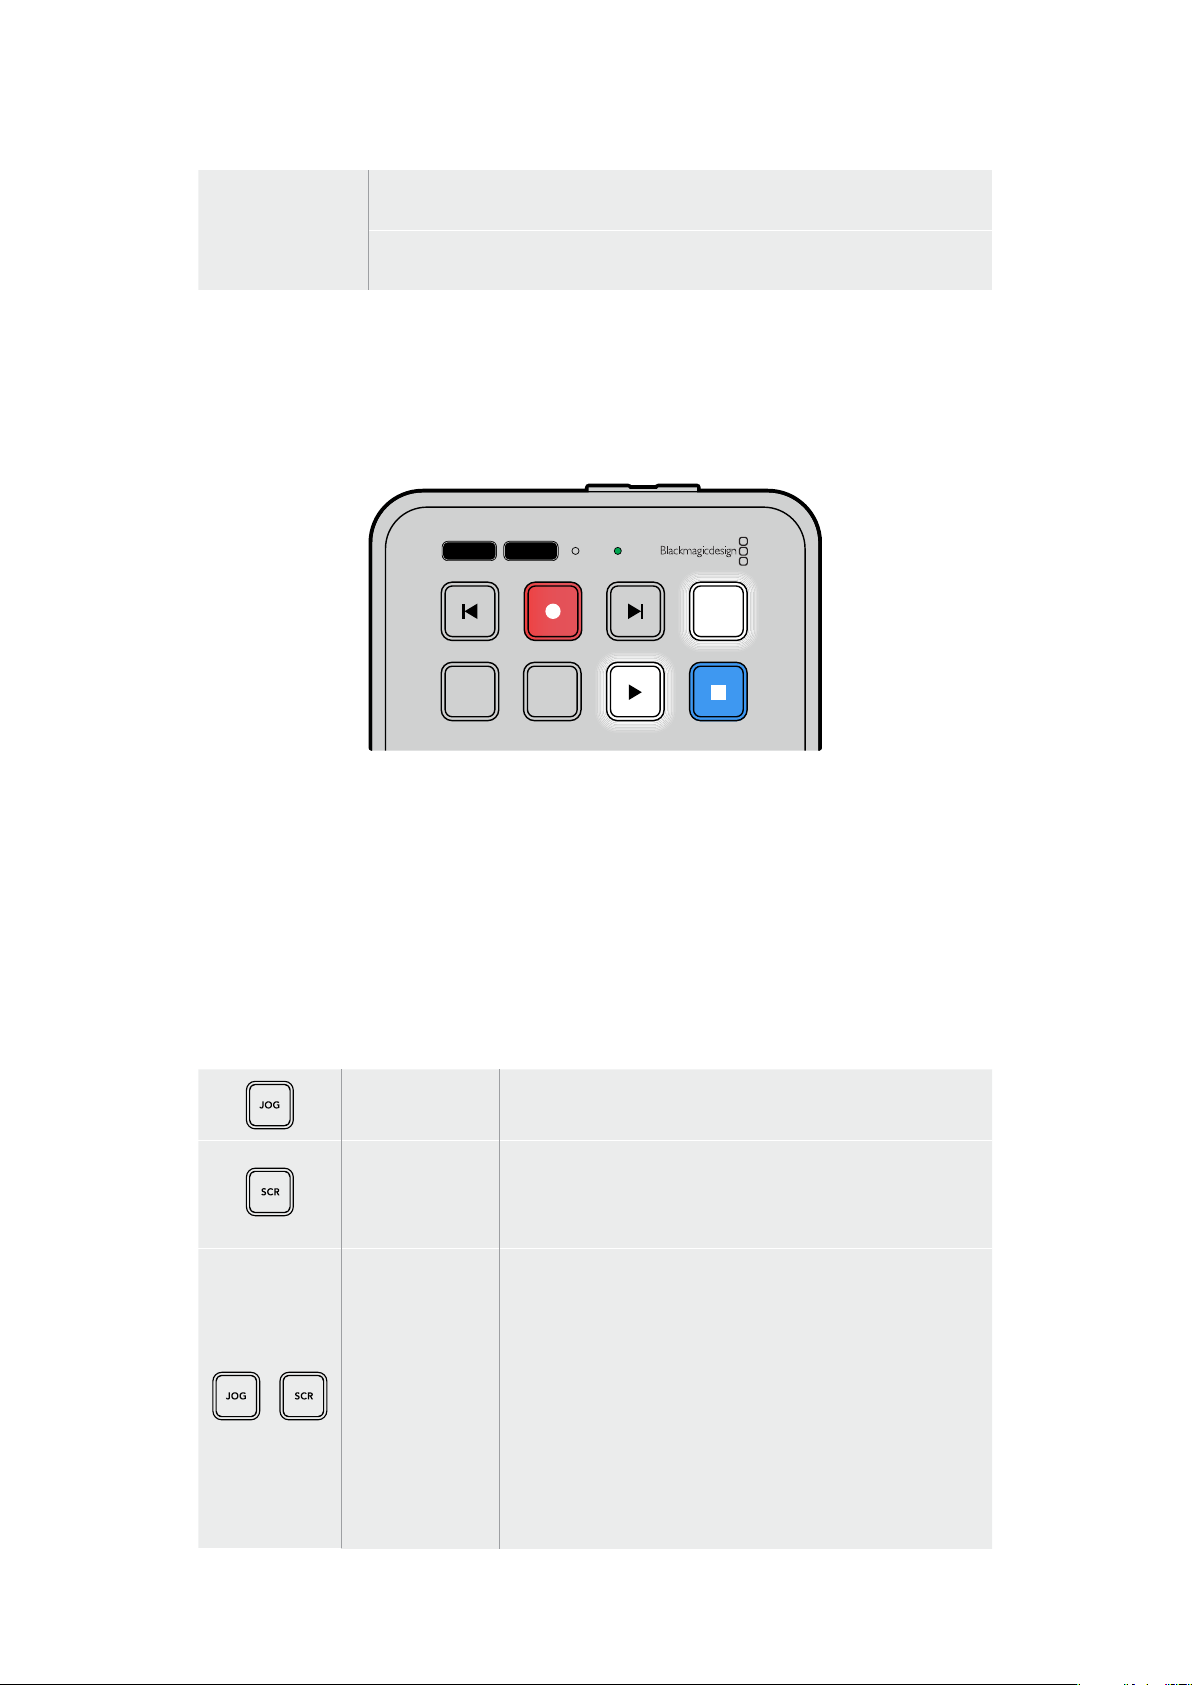
Repetir todos los
clips
Para repetir todos los clips, vuelva a presionar el botón de reproducción
mientras esta se encuentra en curso.
Repetir el clip en
curso
Una vez en el modo de clip, presione el botón de reproducción por segunda
vez para repetir el clip actualmente en curso.
En el siguiente apartado, se describe cómo utilizar este modo.
Modo de clip
Al habilitar este modo, la reproducción estará limitada a un único clip. Por ejemplo, es posible
avanzar, retroceder o saltear una secuencia, sabiendo que, al presionar el botón de reproducción,
esta se detendrá al finalizar el clip.
JOG SCR
CLIP
MENU SET
DISK SD
Una vez en el modo de clip, presione el botón de reproducción
por segunda vez para repetir la secuencia en curso.
Mando de búsqueda
El mando de búsqueda permite encontrar rápidamente una parte específica de un clip y reproducirla
o ver las imágenes fotograma por fotograma. Esto reviste gran importancia cuando es necesario
encontrar una sección particular de la secuencia mirando las imágenes mientras gira el mando.
También es útil cuando es preciso colocar el cabezal de reproducción en un punto específico del
clip para emitirlo al aire durante una producción en directo.
Los modos de búsqueda disponibles son los siguientes:
Desplazamiento
El modo de desplazamiento permite reproducir la secuencia
fotograma por fotograma para lograr una mayor precisión.
Avance y
retroceso
rápido
Este modo permite avanzar o retroceder rápidamente el
material grabado. Esta función está ligada al mando de
búsqueda, por lo que brinda pleno control sobre el punto en
el que se desea reanudar la reproducción.
Avance y
retroceso
Presione los botones JOG y SCROLL simultáneamente para
activar el modo de avance y retroceso. Posteriormente, podrá
retroceder o avanzar a velocidad rápida por las secuencias
con el mando de búsqueda. Al girarlo, la velocidad de avance
irá aumentando hasta alcanzar el valor máximo de x50. Para
detenerse, gire el mando a la posición inicial. Para detenerse en
un punto específico durante la búsqueda, presione el botón de
detención. Por el contrario, presione el botón de reproducción
para reanudar la secuencia a partir de la posición actual. Cabe
destacar que es posible reducir la velocidad máxima de avance
y retroceso desde el menú de
Ajustes. Consulte el apartado
Ajustes para obtener más información al respecto.
201Reproducción

JOG SCR
CLIP
MENU SET
DISK SD
Presione los botones JOG o SCR para acceder
a los distintos modos de búsqueda.
JOG SCR
CLIP
MENU SET
DISK SD
Una vez seleccionado el modo de búsqueda, gire el mando.
SUGERENCIA: Para reproducir la secuencia de manera habitual, presione el botón de
reproducción o detención.
202Reproducción
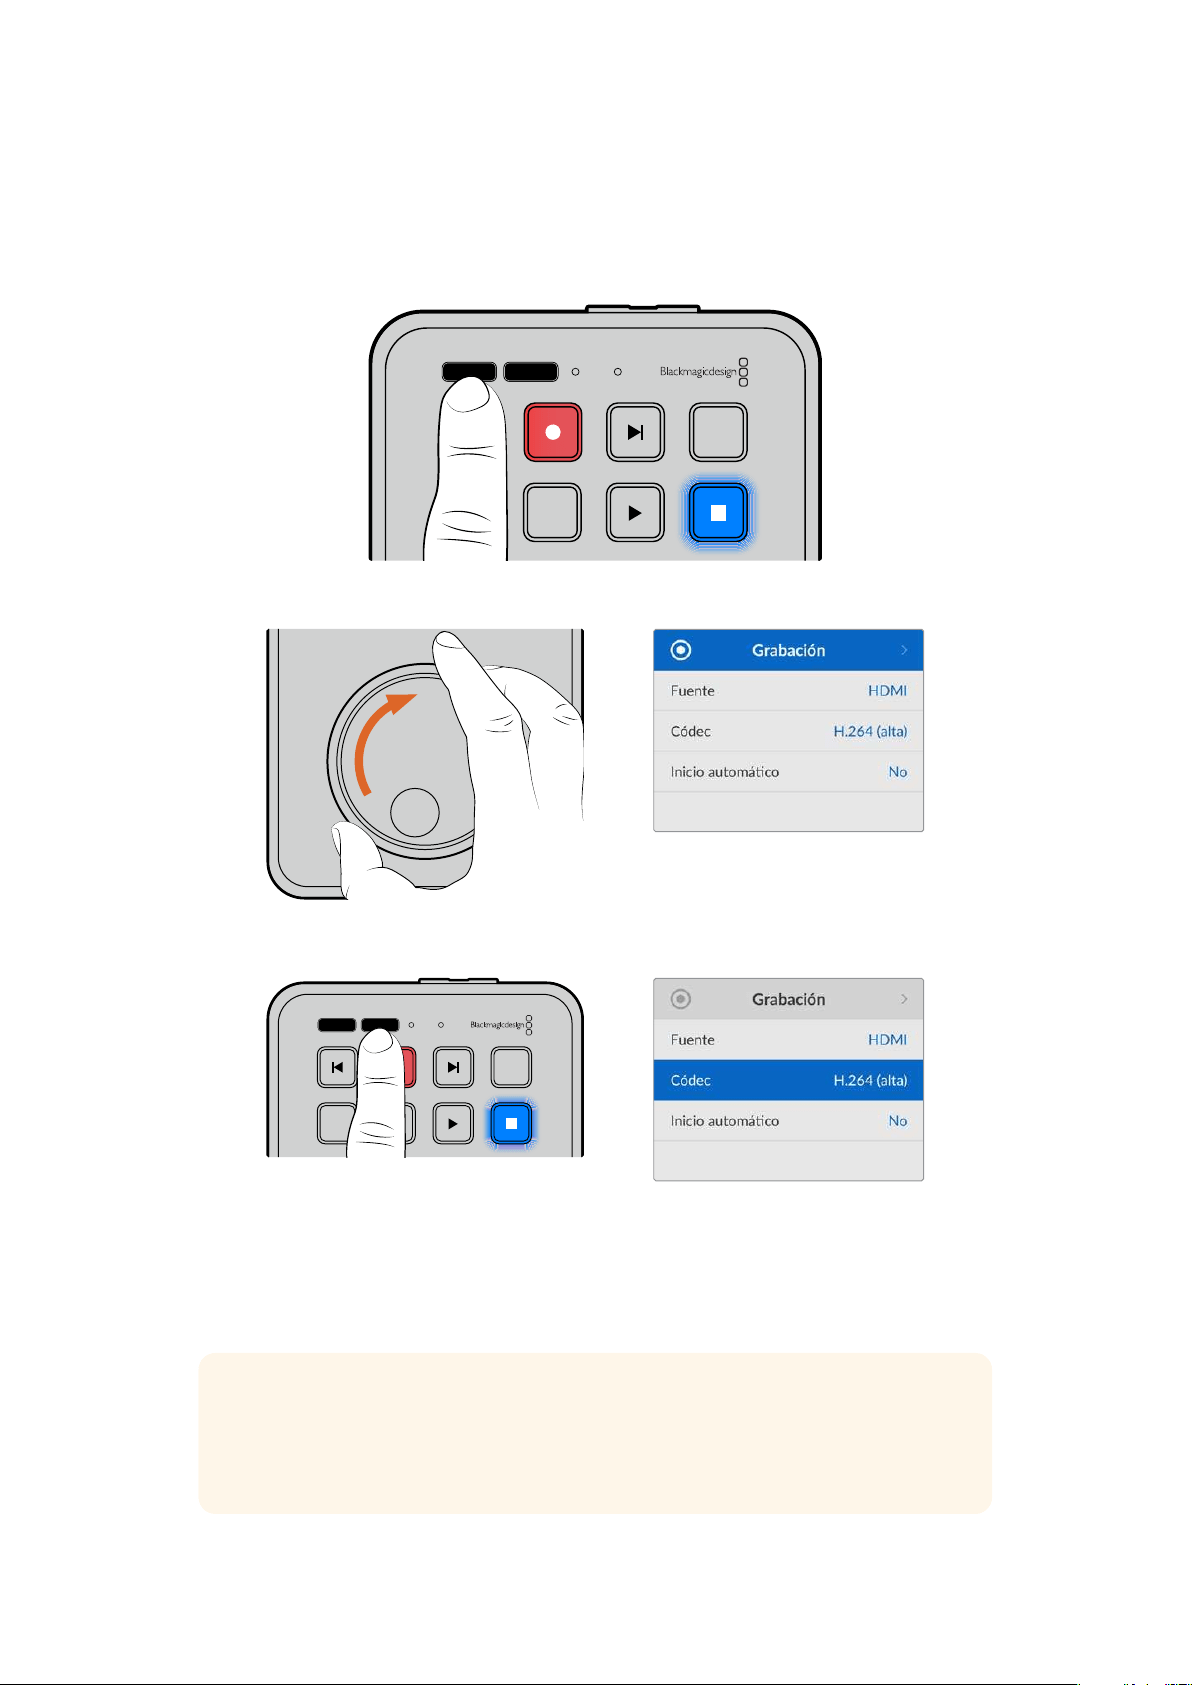
Modificar ajustes
Al presionar el botón MENU, se desplegarán los ajustes disponibles como una ventana
flotanteenla esquina inferior izquierda del monitor HDMI conectado.
JOG SCR
CLIP
MENU SET
DISK SD
Presione el botón MENU para acceder a los ajustes disponibles.
Utilice el mando de búsqueda para acceder al menú deseado o a las opciones de configuración.
Presione el botón SET a fin de seleccionar el menú deseado o realizar cambios.
Para realizar cambios en los ajustes, utilice el mando de búsqueda o los botones de avance y
retroceso. Presione
SET para confirmar.
Presione el botón
MENU para salir y regresar a la pantalla principal.
SUGERENCIA: Es posible ubicar el menú en cualquiera de las cuatro esquinas de la
pantalla a través de las opciones de ajustes. Una vez finalizada la configuración, se
recomienda salir del menú para asegurarse de transmitir una señal limpia al conectar la
salida HDMI a un mezclador, tal como un equipo ATEM Mini Extreme.
JOG SCR
CLIP
MENU SET
DISK SD
203Modificar ajustes
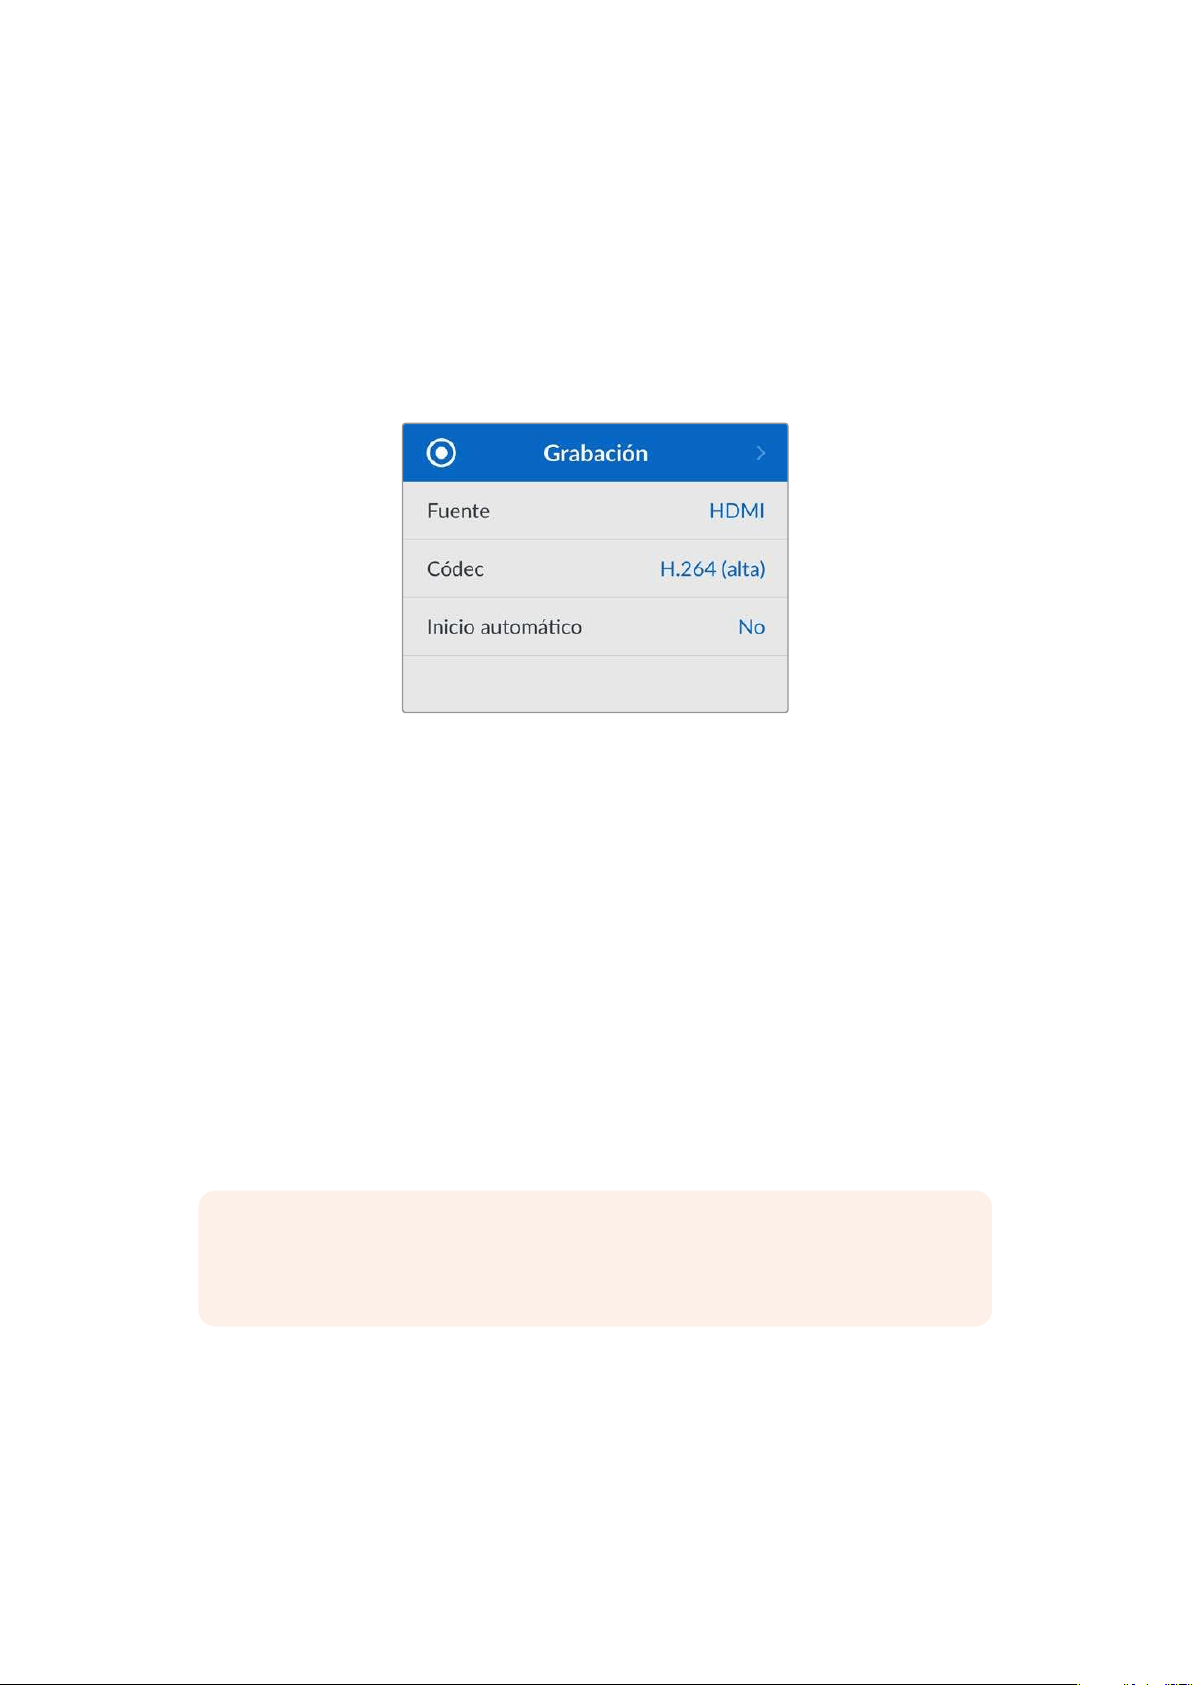
Ajustes
Los ajustes están divididos en cinco categorías: grabación, monitor, audio, almacenamiento y
configuración. Al acceder a cada uno de estos menús, podrá modificar los ajustes pertinentes a
través del panel de control del grabador. Algunos ajustes, como el prefijo del nombre de archivo, no
se pueden modificar desde este menú y, por lo tanto, aparecerán en gris. No obstante, en este caso,
es posible cambiarlos mediante el programa utilitario.
Menú Grabación
Fuente
Muestra la señal recibida a través de la entrada HDMI del grabador.
Códec
El modelo HyperDeck Shuttle HD permite grabar con compresión en formato H.264, ProRes y
DNxHD. Para acceder a la función de teleprónter, seleccione dicha opción.
Inicio automático
Hay dos modos disponibles para iniciar la grabación automáticamente:
Cámara y CT (código
de tiempo).
Algunas cámaras, tales como el modelo Blackmagic Pocket Cinema Camera 4K, transmiten una
señal a través de la conexión HDMI para comenzar o detener la grabación en equipos externos.
Mediante la opción
Cámara, el dispositivo comienza o detiene la grabación cuando se presiona el
botón correspondiente en la cámara.
Por su parte, la opción
CT permite que el dispositivo inicie la grabación al recibir un código de
tiempo válido a través de la entrada HDMI. Cuando este se detiene, la grabación finaliza. Seleccione
la opción No para desactivar esta función.
NOTA: Al grabar imágenes captadas por cámaras HDMI, compruebe que la señal no
contenga ningún tipo de información superpuesta, ya que, de lo contrario, esta quedará
registrada en el material grabado.
204Ajustes
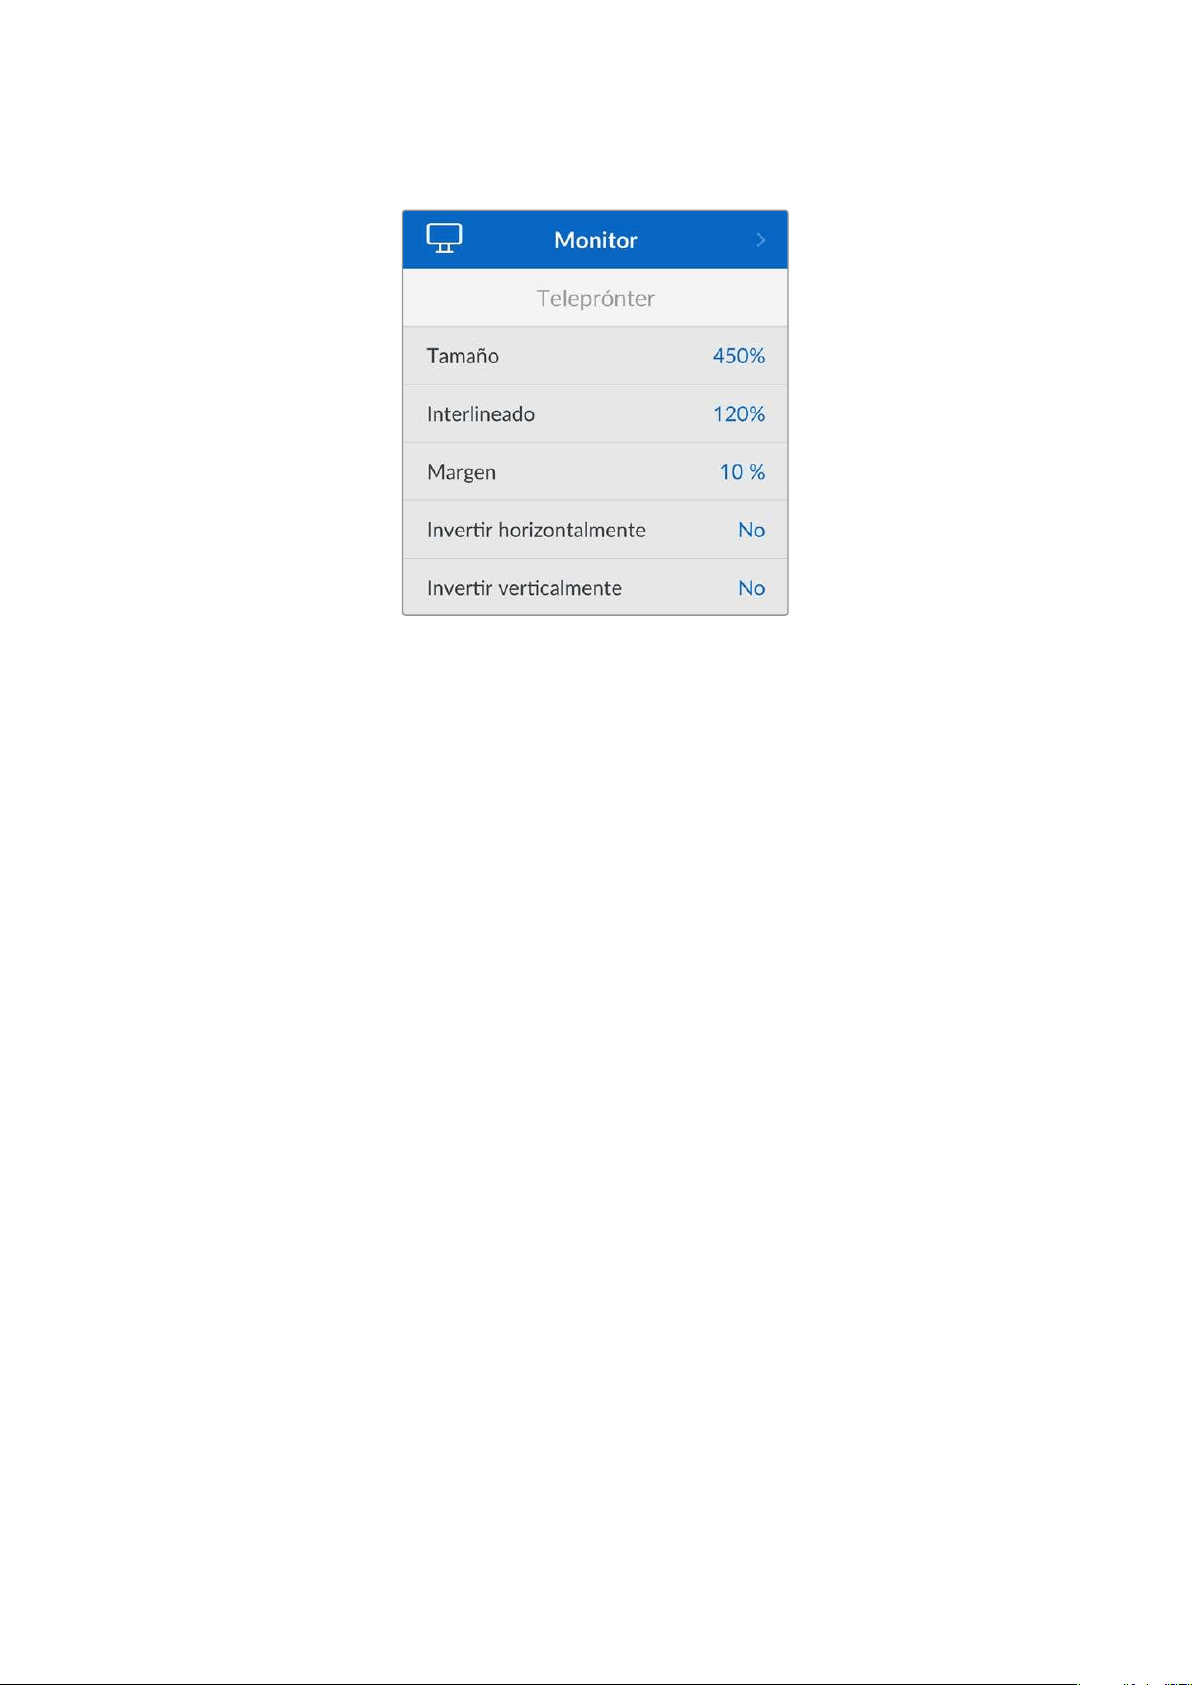
Menú Monitor
Teleprónter
En el menú
Monitor podrá seleccionar los ajustes adecuados para utilizar el grabador a modo de
teleprónter.
Tamaño de texto
Para modificar el tamaño del texto, seleccione la opción correspondiente y presione
SET. Para
aumentarlo o disminuirlo, gire el mando hacia la derecha o la izquierda, respectivamente.
Interlineado
Gire el mando hacia la derecha o la izquierda para modificar el interlineado.
Margen
Es posible ajustar los márgenes del teleprónter.
Invertir
Si el monitor empleado a modo de teleprónter está configurado para reflejar la imagen en un
interferómetro, por ejemplo, delante de una cámara o un teleprónter de podio, será necesario
invertir el texto de manera que el presentador pueda leerlo. Existen dos modos disponibles.
Invertir horizontalmente – Utilice este modo cuando la parte inferior del monitor
conectado esté montada lo más cerca posible del pie del interferómetro.
Invertir verticalmente – Utilice este modo cuando la parte inferior del monitor conectado
esté montada lejos del pie del interferómetro.
205Ajustes
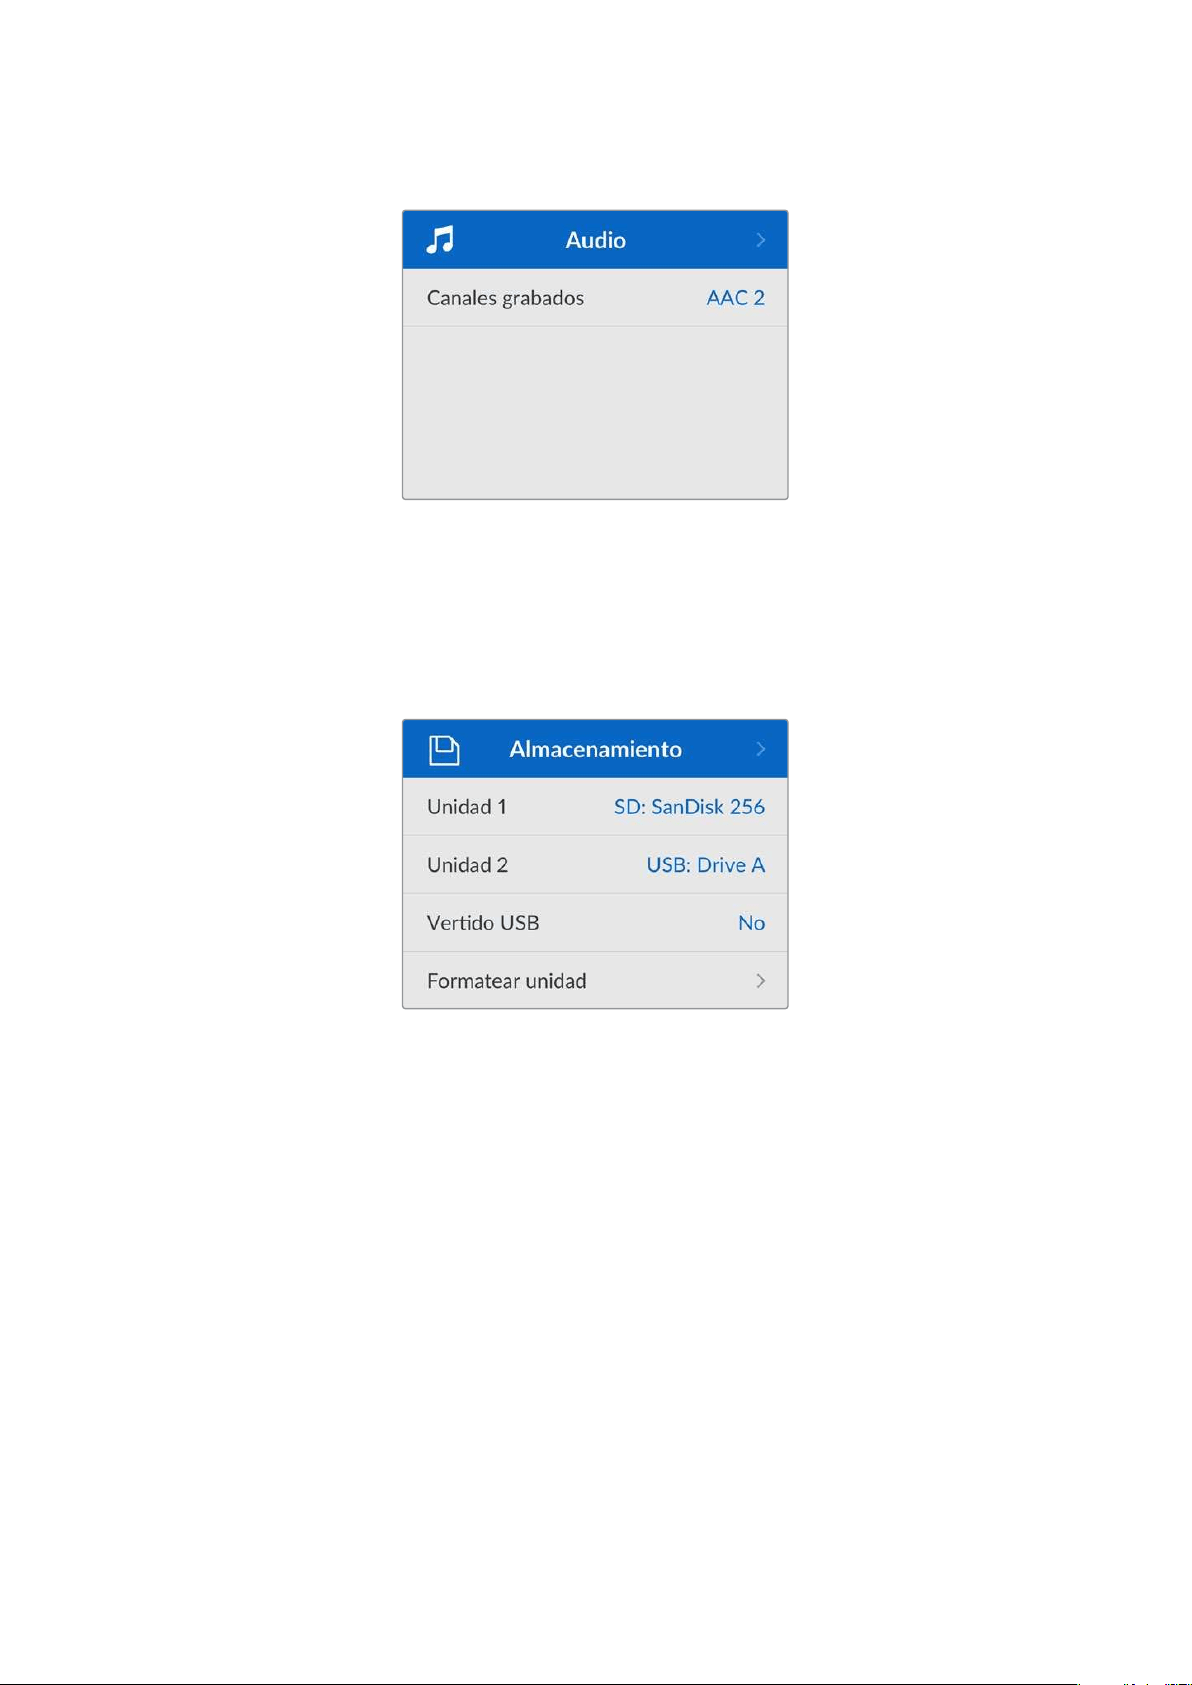
Menú Audio
Canales grabados
El modelo HyperDeck Shuttle HD permite grabar hasta ocho canales de audio PCM
simultáneamente. Para ello, seleccione la cantidad deseada en la lista desplegable de este menú.
Al usar el códec H.264, también es posible elegir dos canales de audio AAC, a fin de compartir la
grabación directamente por YouTube.
Menú Almacenamiento
Los soportes de almacenamiento conectados aparecerán en el menú de ajustes correspondiente.
Unidad 1 refleja la presencia de una tarjeta SD, mientras que Unidad 2 se refiere a una unidad USB
externa conectada. En caso de haber varias conectadas mediante un dispositivo como el modelo
Blackmagic MultiDock 10G, se indica la unidad activa.
Vertido USB
Al activar esta opción, cuando se alcance el límite de capacidad, el dispositivo continuará grabando
en otra unidad de almacenamiento externa que se encuentre conectada.
Formatear soportes de almacenamiento
Las tarjetas SD y los discos externos conectados a través del puerto en el panel trasero del
grabador pueden formatearse directamente en la unidad o mediante equipos Mac y Windows.
Preparación de unidades de almacenamiento:
1 Gire el mando de búsqueda para seleccionar el menú Formatear unidad.
2 Elija la unidad deseada y presione el botón SET.
3 Escoja un formato y presione el botón SET.
206Ajustes
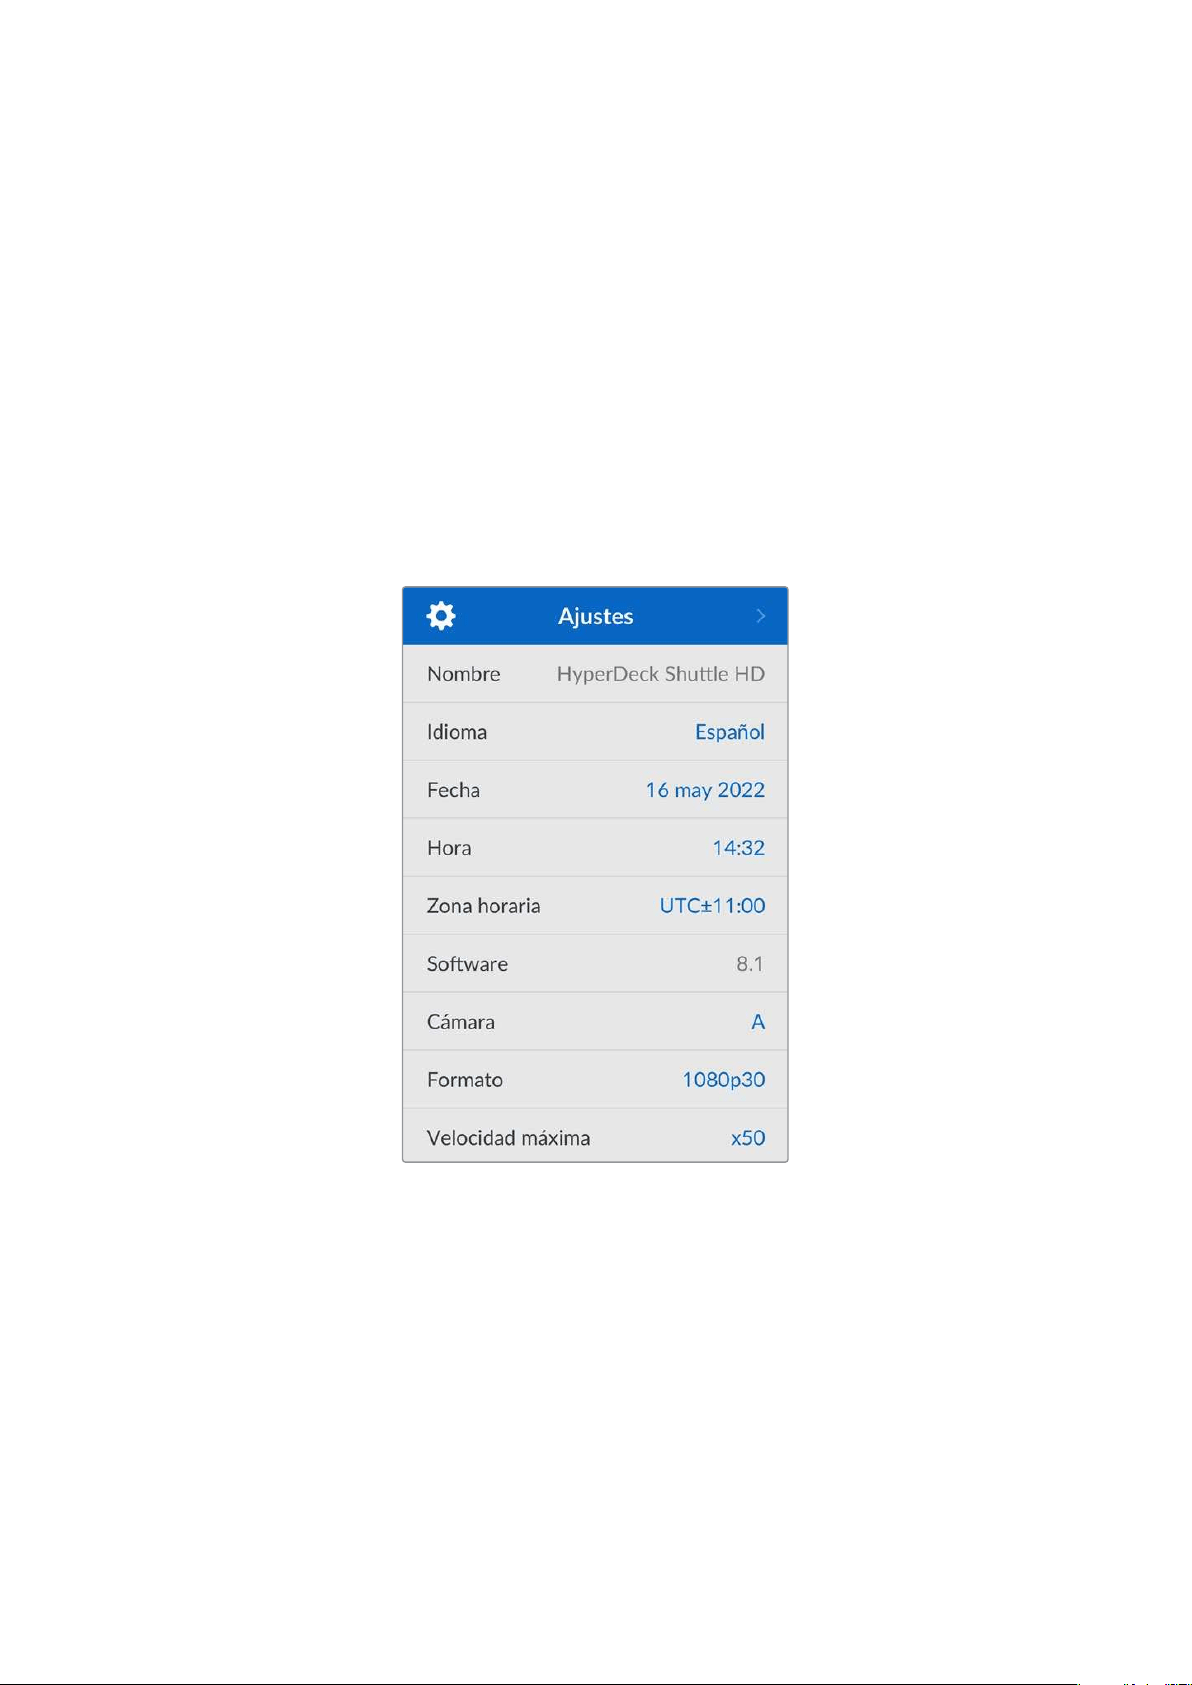
4 Aparecerá un mensaje de confirmación con el nombre de la unidad y el formato
seleccionado.
5 Una vez completado el procedimiento, seleccione Aceptar.
El formato HFS+ (también conocido como Mac OS X Extended) es el más recomendado, ya que
permite registrar la transferencia de los datos a medida que esta se lleva a cabo. De este modo, es
más probable que la información pueda recuperarse en caso de un mal funcionamiento del soporte
de grabación. Por su parte, el formato exFAT puede emplearse en sistemas operativos macOS y
Windows sin necesidad de adquirir programas adicionales, pero no brinda la posibilidad de registrar
la transferencia de datos.
Consulte el apartado correspondiente para obtener más información al respecto.
Menú Ajustes
Aquí encontrará diversas opciones y podrá seleccionar el idioma de la interfaz, el formato
predeterminado, la configuración de red y las opciones del código de tiempo.
Nombre
Al contar con varias unidades HyperDeck Shuttle HD en una misma red, es posible asignarles
distintos nombres para diferenciarlas mediante el programa Blackmagic HyperDeck Setup o el
protocolo de Ethernet para estos grabadores, a través de una terminal. El nombre asignado
aparecerá en el menú de ajustes.
Idioma
La interfaz está disponible en 13 idiomas: español, alemán, chino, coreano, francés, inglés, italiano,
japonés, polaco, portugués, ruso, turco y ucraniano.
Para determinar el idioma:
1 Seleccione el menú Ajustes y presione SET.
2 Gire el mando de búsqueda para seleccionar la opción Idioma y presione SET.
207Ajustes
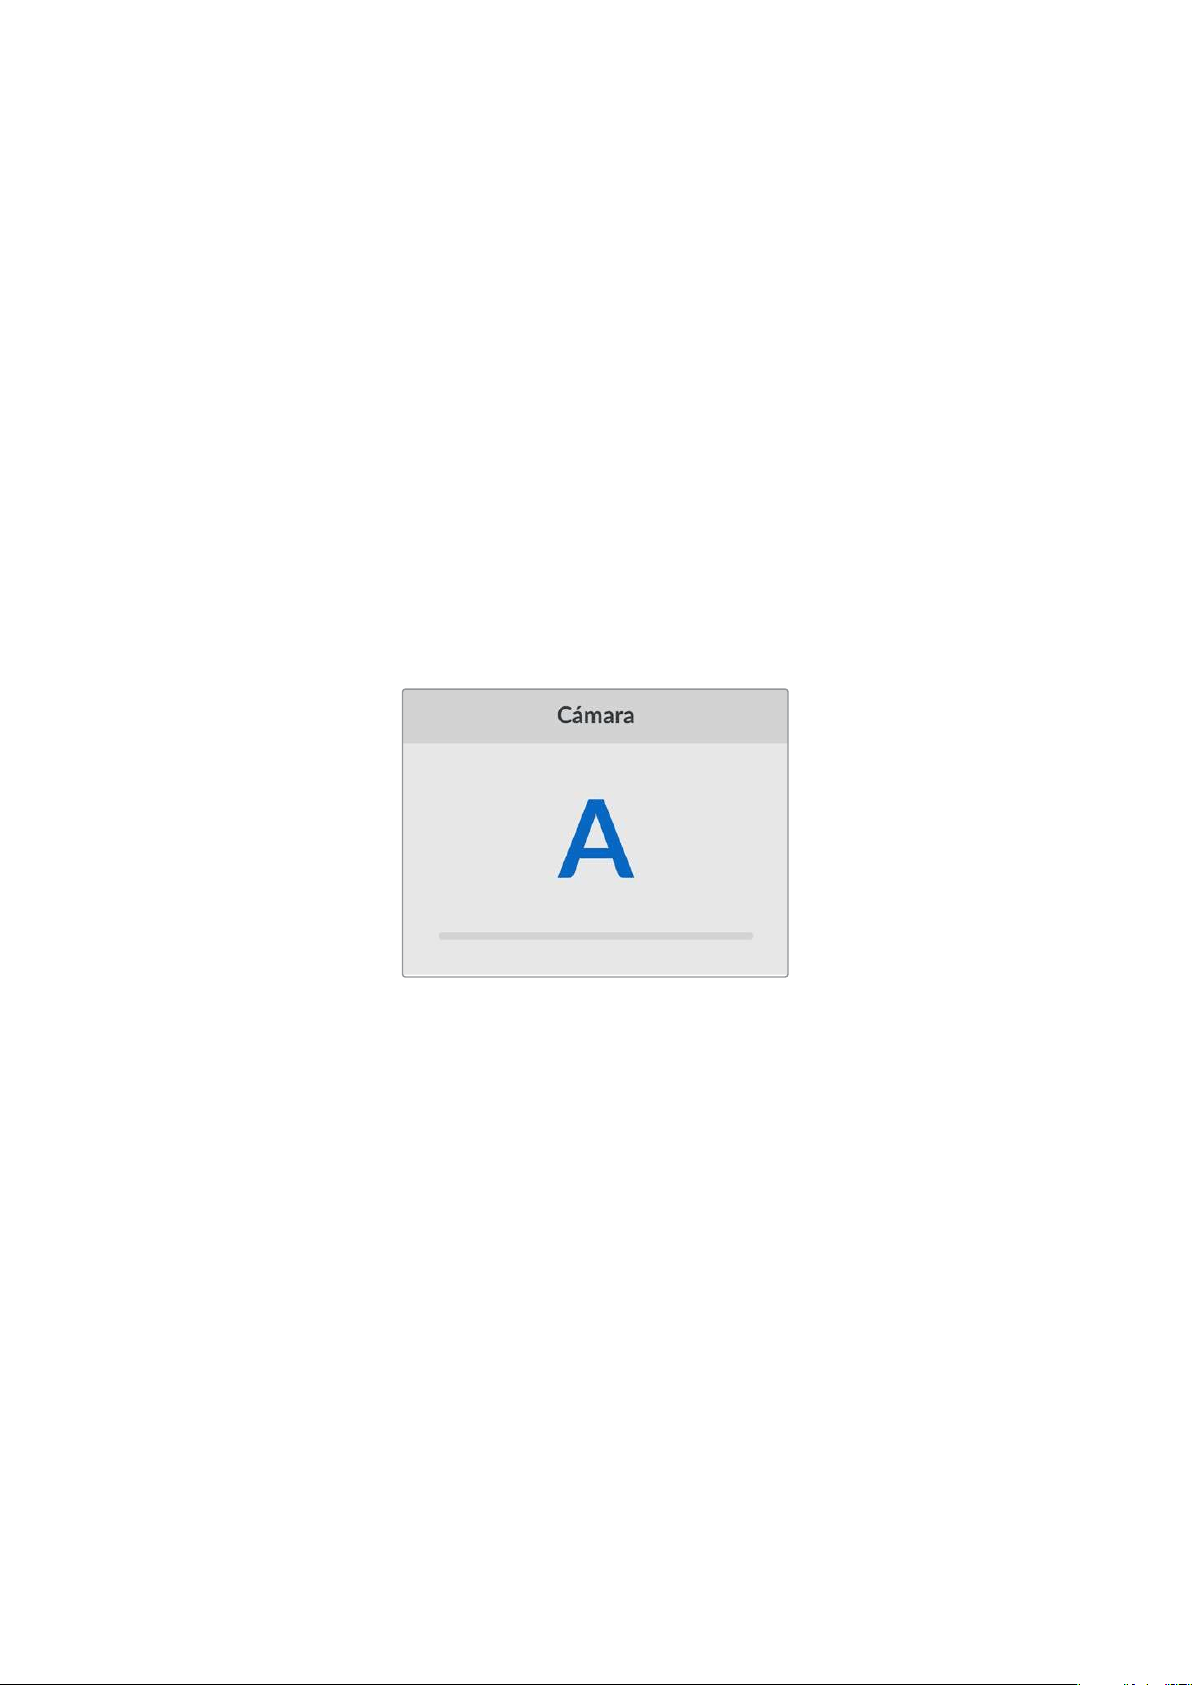
3 Gire el mando de búsqueda para seleccionar el idioma y presione SET. A continuación, la
pantalla mostrará nuevamente el menú
Ajustes.
Fecha
Para ajustar la fecha, seleccione la opción
Fecha y presione SET. Gire el mando de búsqueda para
modificar el día, el mes y el año. Estos datos se usarán para la marca de tiempo que se agrega como
sufijo al nombre de los archivos.
Hora
Para ajustar la hora, seleccione la opción
Hora y presione SET. Gire el mando de búsqueda para
modificar la hora y los minutos. Nótese que estos dispositivos utilizan el formato de 24 horas.
Software
Esta opción muestra la versión del sistema operativo instalado en el dispositivo.
Cámara
Este ajuste es útil al emplear el dispositivo para grabar imágenes aisladas provenientes de distintas
cámaras y editarlas conjuntamente en DaVinci Resolve.
La letra correspondiente a cada unidad aparecerá en los metadatos de los archivos, permitiendo así
que el programa identifique los ángulos correctamente al utilizar la bandeja de sincronización.
Asigne una letra o un número del 1 al 9 a la cámara.
Formato predeterminado
En ocasiones, el grabador no detecta automáticamente el formato que se desea utilizar, por lo que
esta función permite seleccionar el formato que se empleará la mayor parte del tiempo.
Por ejemplo, si se cuenta con un modelo HyperDeck Shuttle HD sin un equipo conectado a la
entrada y se inserta un disco con archivos en dos formatos distintos, ¿qué formato debe reproducir
el grabador? El formato predeterminado permite que el dispositivo conozca las preferencias
del usuario.
Asimismo, esta opción es útil cuando se enciende por primera vez el grabador y no hay otros
equipos conectados o un disco insertado. En este caso, el dispositivo no reconoce cual es el
formato adecuado para la transmisión de la señal, por lo que esta función sirve de guía.
Cabe destacar que esta función no cancela otros ajustes. Si se cuenta con un soporte de
almacenamiento que contiene archivos en un único formato y se presiona el botón de reproducción,
el grabador los reproducirá, indistintamente del formato predeterminado.
Al grabar, sucede algo similar. Cuando se presiona el botón de grabación, el dispositivo registrará el
contenido en el formato del equipo conectado al él. Cabe destacar que, una vez finalizada la
grabación, el dispositivo reproducirá las imágenes con el mismo formato de almacenamiento,
independientemente de si hay otros archivos en el soporte donde se han guardado. En otras
208Ajustes
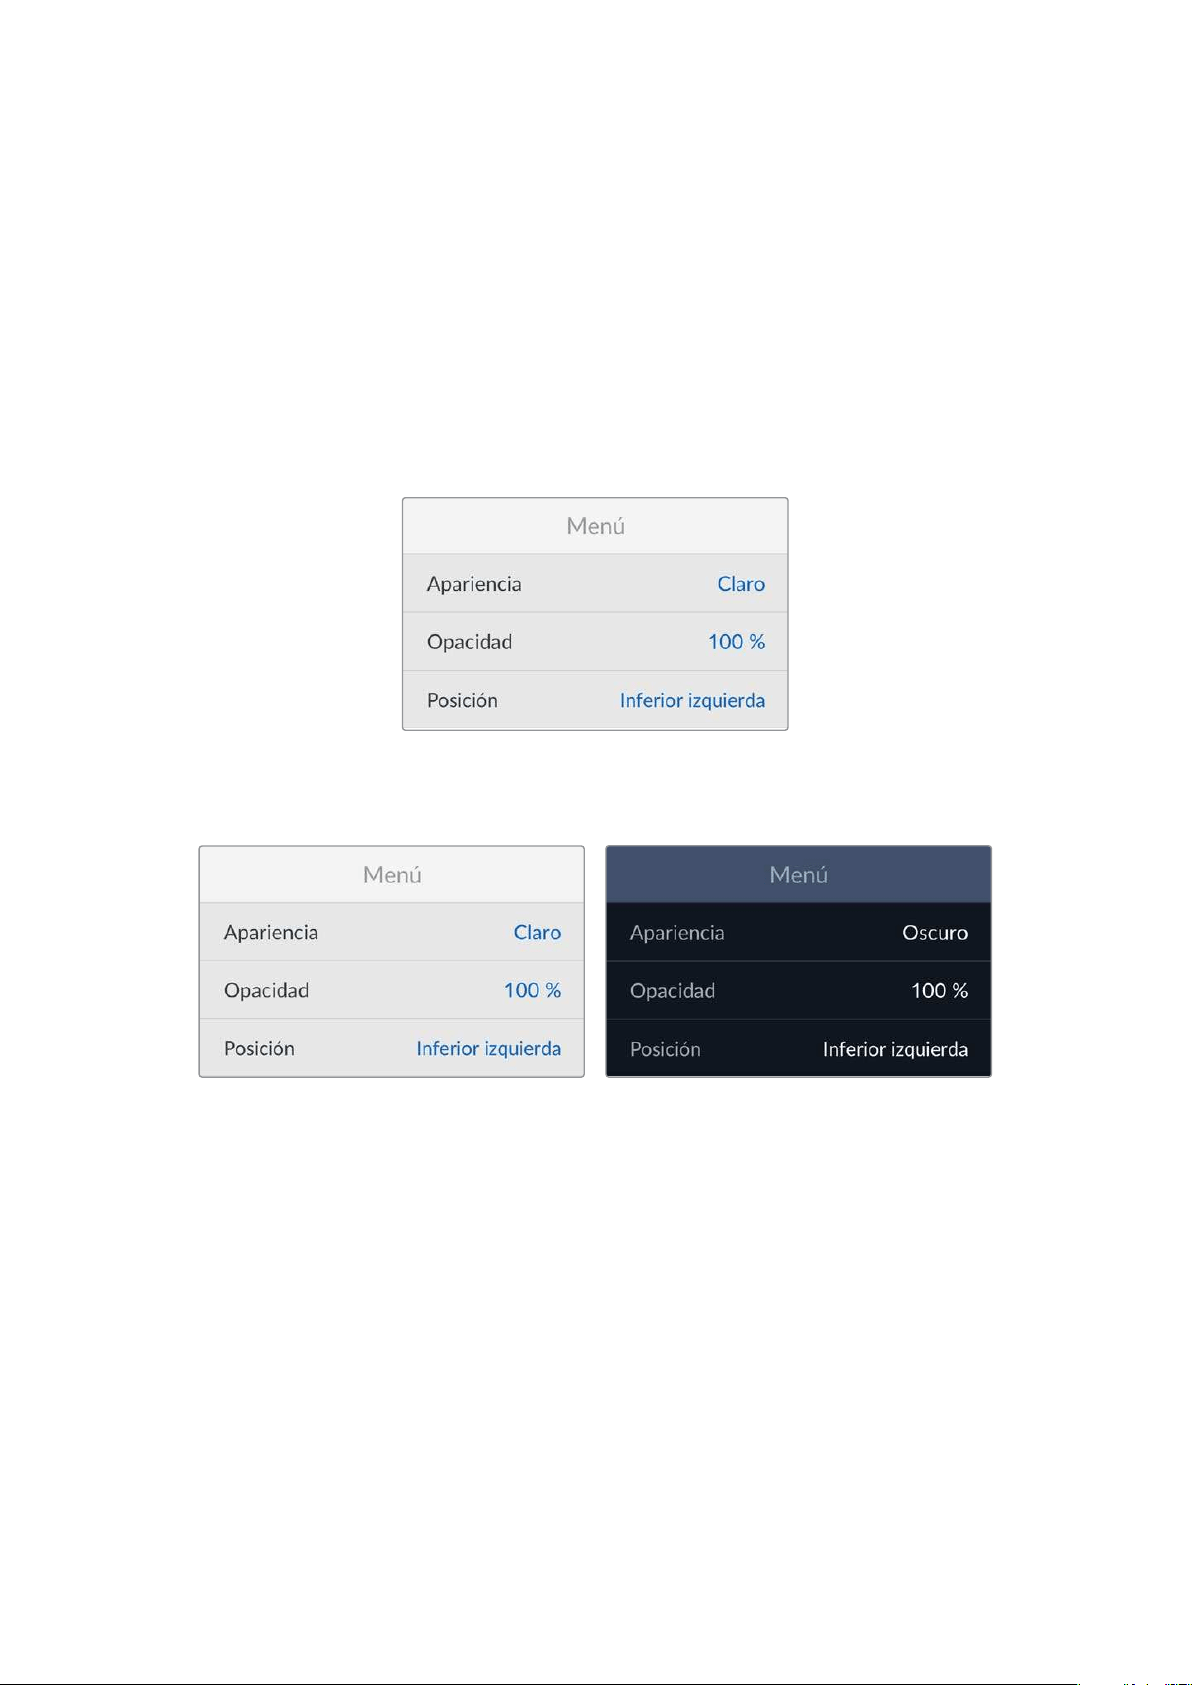
palabras, se reproducirá el material con el mismo formato que el de grabación. Solo si se retira y se
vuelve a introducir el soporte de almacenamiento, el grabador empleará el formato predeterminado.
El formato predeterminado es únicamente una guía para el grabador, a fin de facilitar su
automatización ante la ausencia de pautas específicas, y no anula otros ajustes.
Velocidad de obturación
La velocidad de obturación máxima en este dispositivo es de x50. Esta se puede disminuir
seleccionando otra de las opciones disponibles.
Ajustes
En esta sección es posible modificar la ubicación y la apariencia del menú que puede verse en el
monitor conectado a la salida HDMI.
Apariencia
Es posible elegir entre una interfaz clara u oscura. La primera ofrece un mayor contraste si las
imágenes son oscuras o cuando se está utilizando el modo de teleprónter.
Opacidad
Permite reducir la opacidad del menú superpuesto a la imagen en el monitor de 100% (valor
predeterminado) a 20%.
Posición
Por defecto, el menú se muestra en la esquina inferior izquierda de la pantalla. Para mover el menú a otro
sitio, seleccione
Posición y presione el botón SET. Ahora podrá elegir cualquiera de las cuatro esquinas.
209Ajustes
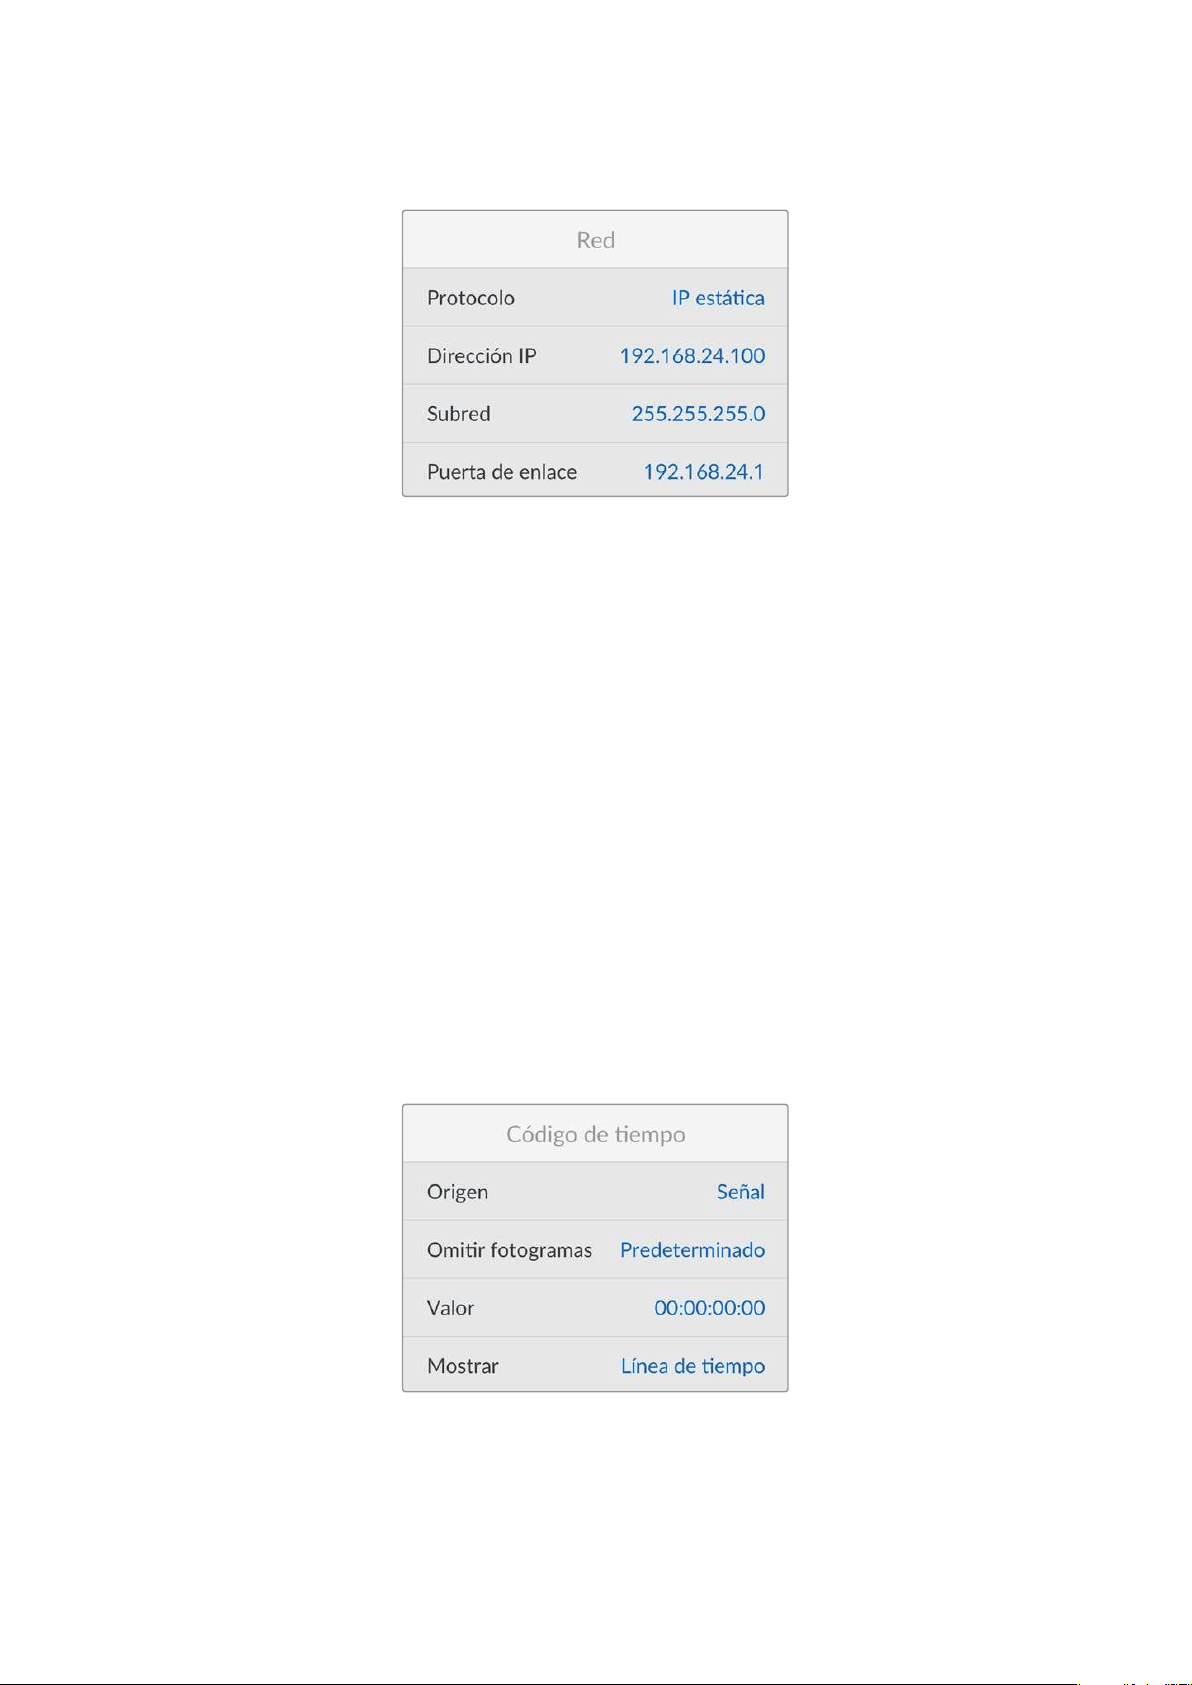
Ajustes de red
Protocolo
Los grabadores HyperDeck utilizan el protocolo DHCP de forma predeterminada, por lo cual, al
conectarlos, el servidor de la red les asignará una dirección IP automáticamente y no será necesario
configurar otros ajustes. Para introducir una dirección particular, seleccione
Protocolo, presione el
botón
SET, elija la opción IP estática y oprima SET nuevamente.
Dirección IP, máscara de subred, puerta de enlace y DNS primario y secundario.
Al seleccionar la opción
IP estática, es posible introducir los datos de la red.
Para cambiar la dirección IP:
1 Gire el mando de búsqueda para seleccionar la opción Dirección IP y presione el botón
SET en el panel frontal del dispositivo.
2 Gire el mando de búsqueda para ajustar cada valor y presione el botón SET para confirmar
antes de continuar con el siguiente.
3 Presione SET para confirmar los cambios.
Una vez introducida la dirección IP, siga los mismos pasos para configurar la máscara de subred y la
puerta de enlace. Al finalizar, presione el botón
MENU para salir y regresar a la pantalla principal.
Ajustes del código de tiempo
Es posible seleccionar el tipo de código de tiempo que el dispositivo recibe y transmite, por
ejemplo, el de la fuente, la hora real o el que se determine manualmente.
210Ajustes
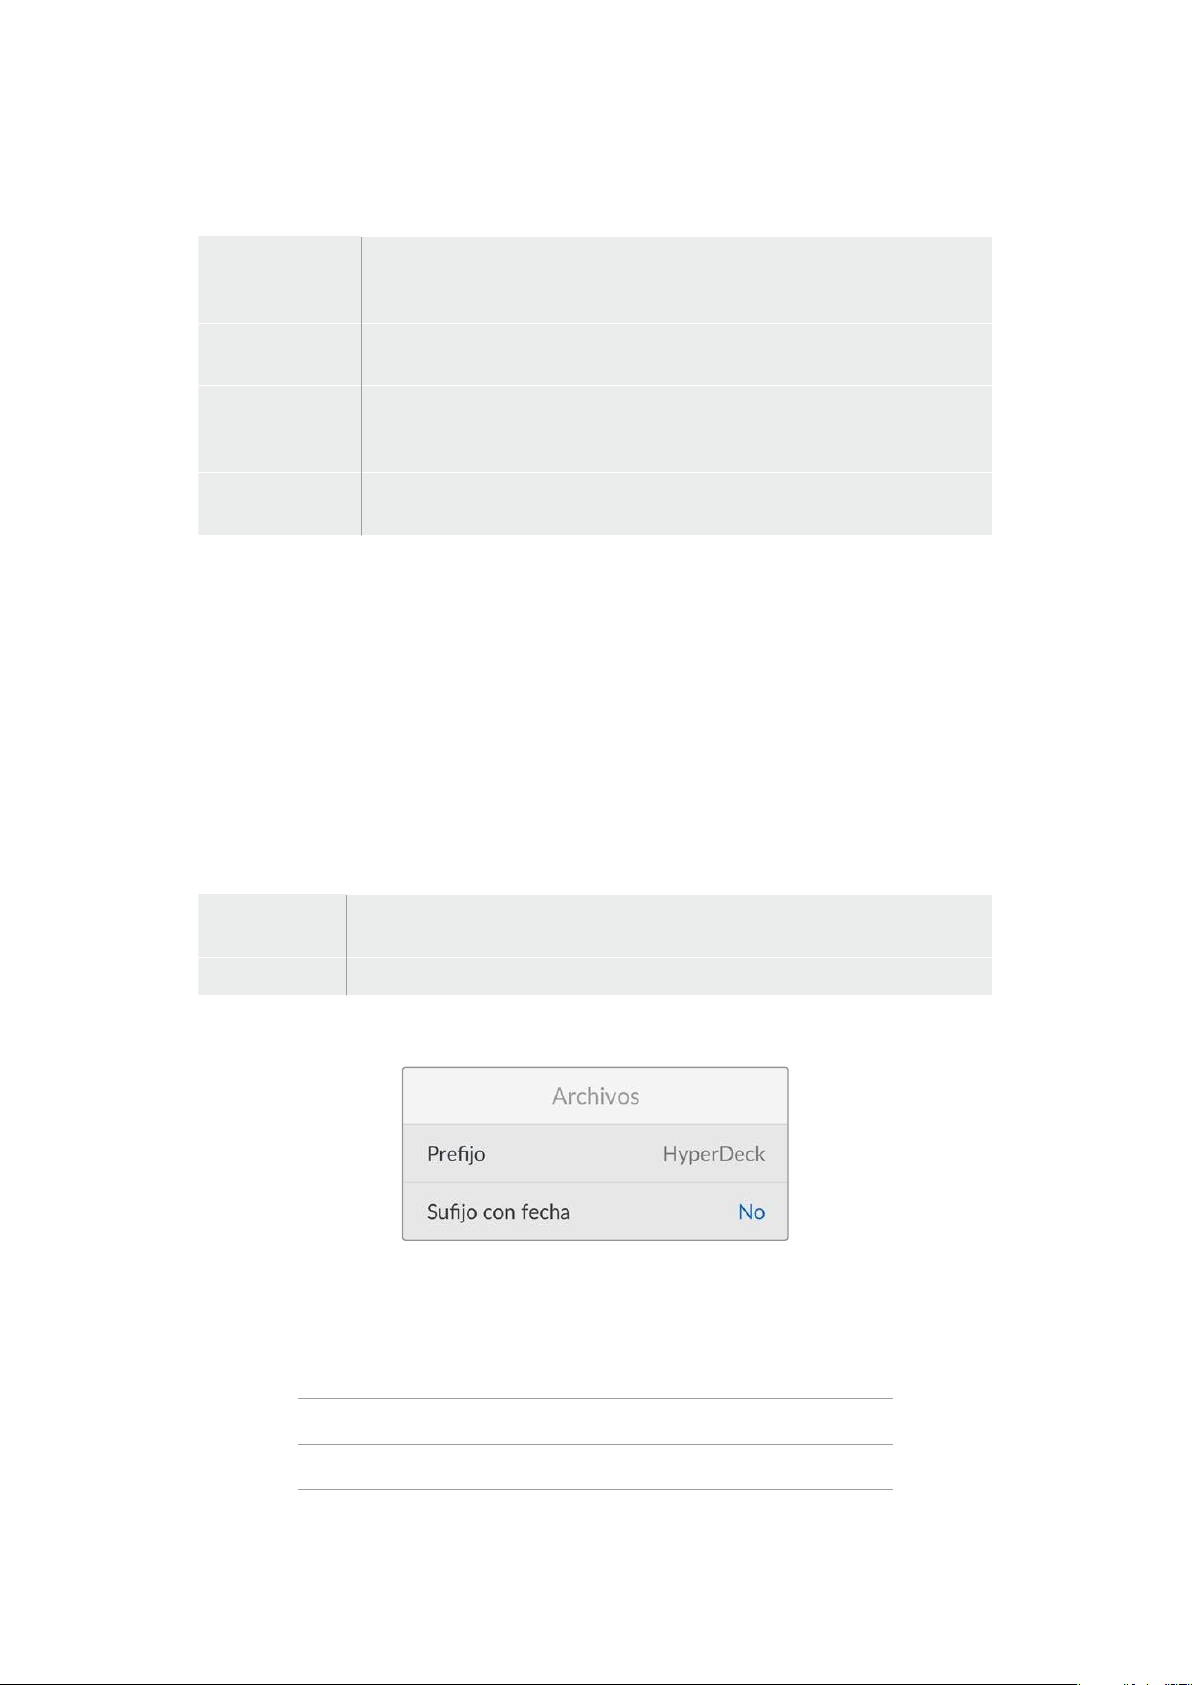
Fuente
Hay cuatro opciones de código de tiempo disponibles al grabar.
Señal
Al seleccionar esta opción, se utiliza el código de tiempo de la señal HDMI con
los metadatos SMPTE RP 188. Esto permite mantener la sincronización entre la
fuente HDMI y el material grabado con el dispositivo.
Interno
Seleccione esta opción para grabar el código de tiempo (hora del día) generado
internamente.
Continuo
Al seleccionar esta opción, la grabación de cada secuencia se inicia un
fotograma después de la anterior. Por ejemplo, si el primer clip finaliza en
10:28:30:10, el siguiente comenzará en 10:28:30:11.
Predeterminado
Seleccione esta opción a fin de indicar un código de tiempo particular para la
grabación.
Tipo
Seleccione cualquiera de los modos disponibles en esta opción para fuentes NTSC con una
frecuencia de imagen de 29.97 o 59.94 f/s. Si la fuente es desconocida, elija la opción
Predeterminado. Esto permitirá que se mantenga el formato. Si no se detecta un código de tiempo
válido, la opción seleccionada por defecto será
Omitir fotogramas.
Predeterminado
Es posible indicar un código de tiempo particular presionando el botón
SET y girando el mando de
búsqueda para introducir el valor inicial. Para ello, seleccione la opción
Predeterminado en el
menú
Fuente.
Salida
Seleccione las opciones para las señales transmitidas.
Línea de
tiempo
Seleccione esta opción a fin de ver un código de tiempo continuo para todos los
clips grabados.
Clip Seleccione esta opción para ver el código de tiempo de cada clip.
Archivos
Prefijo
Al configurar el dispositivo por primera vez, este grabará las imágenes en una tarjeta SD o un disco
USB siguiendo la nomenclatura convencional para los nombres de archivo.
HyperDeck_0001
HyperDeck_0001 Prefijo
HyperDeck_0001 Número de clip
211Ajustes
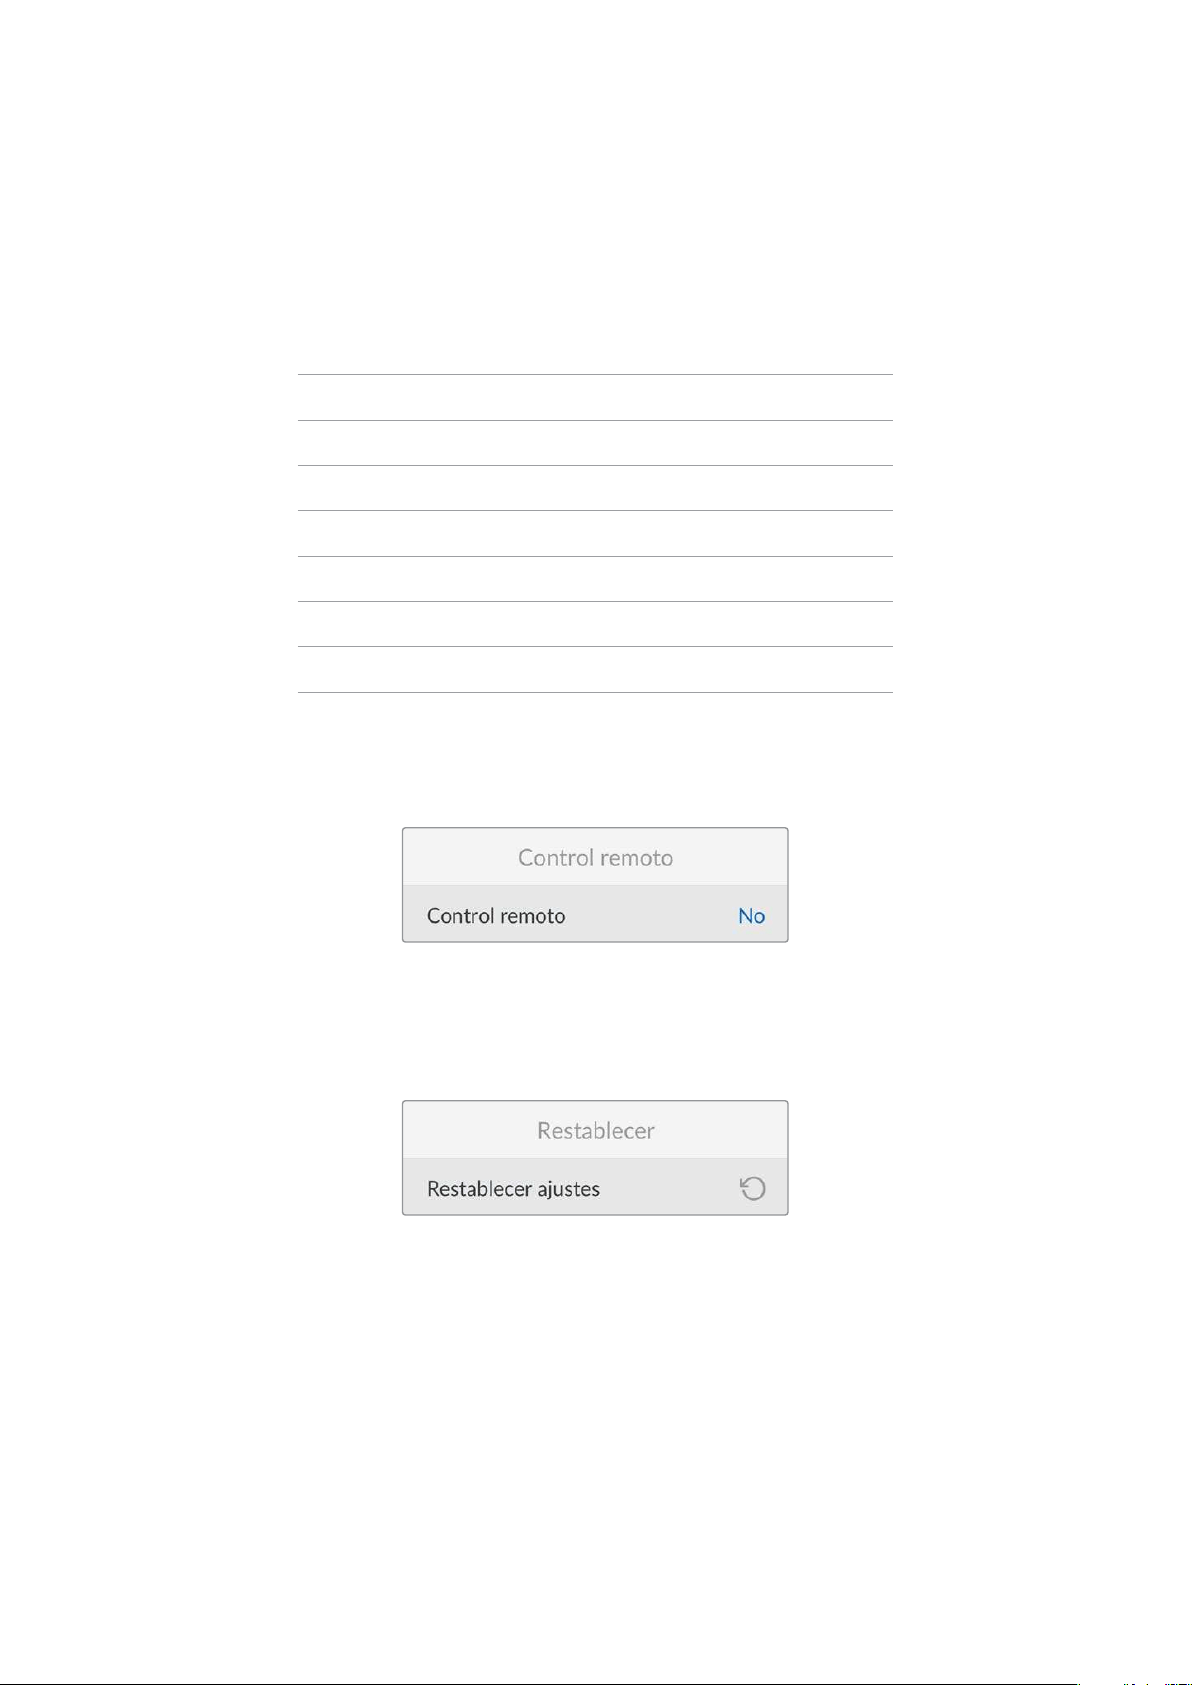
Es posible modificar el nombre del archivo a través del programa utilitario. Consulte el apartado
correspondiente para obtener más información al respecto.
Sufijo con fecha
Por defecto, la opción de añadir el código de tiempo al nombre del archivo se encuentra desactivada.
Para añadir la fecha y la hora al nombre del archivo grabado, active la opción
Sufijo con fecha.
HyperDeck_2201061438_0001
HyperDeck_2201061438_0001 Prefijo
HyperDeck_2201061438_0001 Año
HyperDeck_2201061438_0001 Mes
HyperDeck_2201061438_0001 Día
HyperDeck_2201061438_0001 Hora
HyperDeck_2201061438_0001 Minuto
HyperDeck_2201061438_0001 Número de clip
Ajustes de control remoto
Aquí podrá establecer las opciones de configuración para controlar el grabador a distancia
mediante otros equipos, por ejemplo, un mezclador ATEM Mini Extreme.
Control remoto
Seleccione la opción
Control remoto para activar el control a distancia mediante una conexión a
una red Ethernet. Desactive esta opción para controlar el grabador de manera local.
Restablecer ajustes originales
Restablecer ajustes
Seleccione esta opción para restablecer los ajustes de fábrica. Al presionar el botón
SET, el dispositivo
le solicitará que confirme la opción seleccionada.
212Ajustes

Panel trasero
HDMI OUT
HDMI IN
EXT DISK
SD CARD
ETHERNET
+
12V DC
1
2
3 4 5
1 Alimentación
El grabador se conecta a la red de suministro eléctrico mediante un adaptador para
corriente alterna. El cable de alimentación provisto incluye un conector de seguridad que
impide que se desconecte accidentalmente, aunque también es posible utilizar cualquier
cable de 12V 36W.
2 Tarjeta SD
Inserte una tarjeta SD en la ranura para grabar y reproducir contenidos.
3 Ethernet
El puerto Ethernet permite utilizar este tipo de redes para transferir archivos mediante un
cliente FTP o controlar la unidad a distancia a través del protocolo para dispositivos
HyperDeck. Consulte el apartado Transferencia de archivos a través de una red para
obtener más información al respecto.
Es posible controlar los grabadores desde mezcladores y paneles ATEM si los dispositivos
están conectados a una misma red.
4 Discos externos
Conecte un disco externo al puerto USB-C para grabar a una velocidad máxima de 5Gb/s.
Asimismo, es posible conectar un adaptador con varios puertos USB o un dispositivo
BlackmagicMultiDock10G, a fin de emplear varias unidades SSD.
5 HDMI
Este puerto permite conectar un televisor, un monitor o incluso un mezclador, tal como el
modelo ATEM Mini Extreme. Al conectar una pantalla, también podrá ver el menú
superpuesto.
213Panel trasero
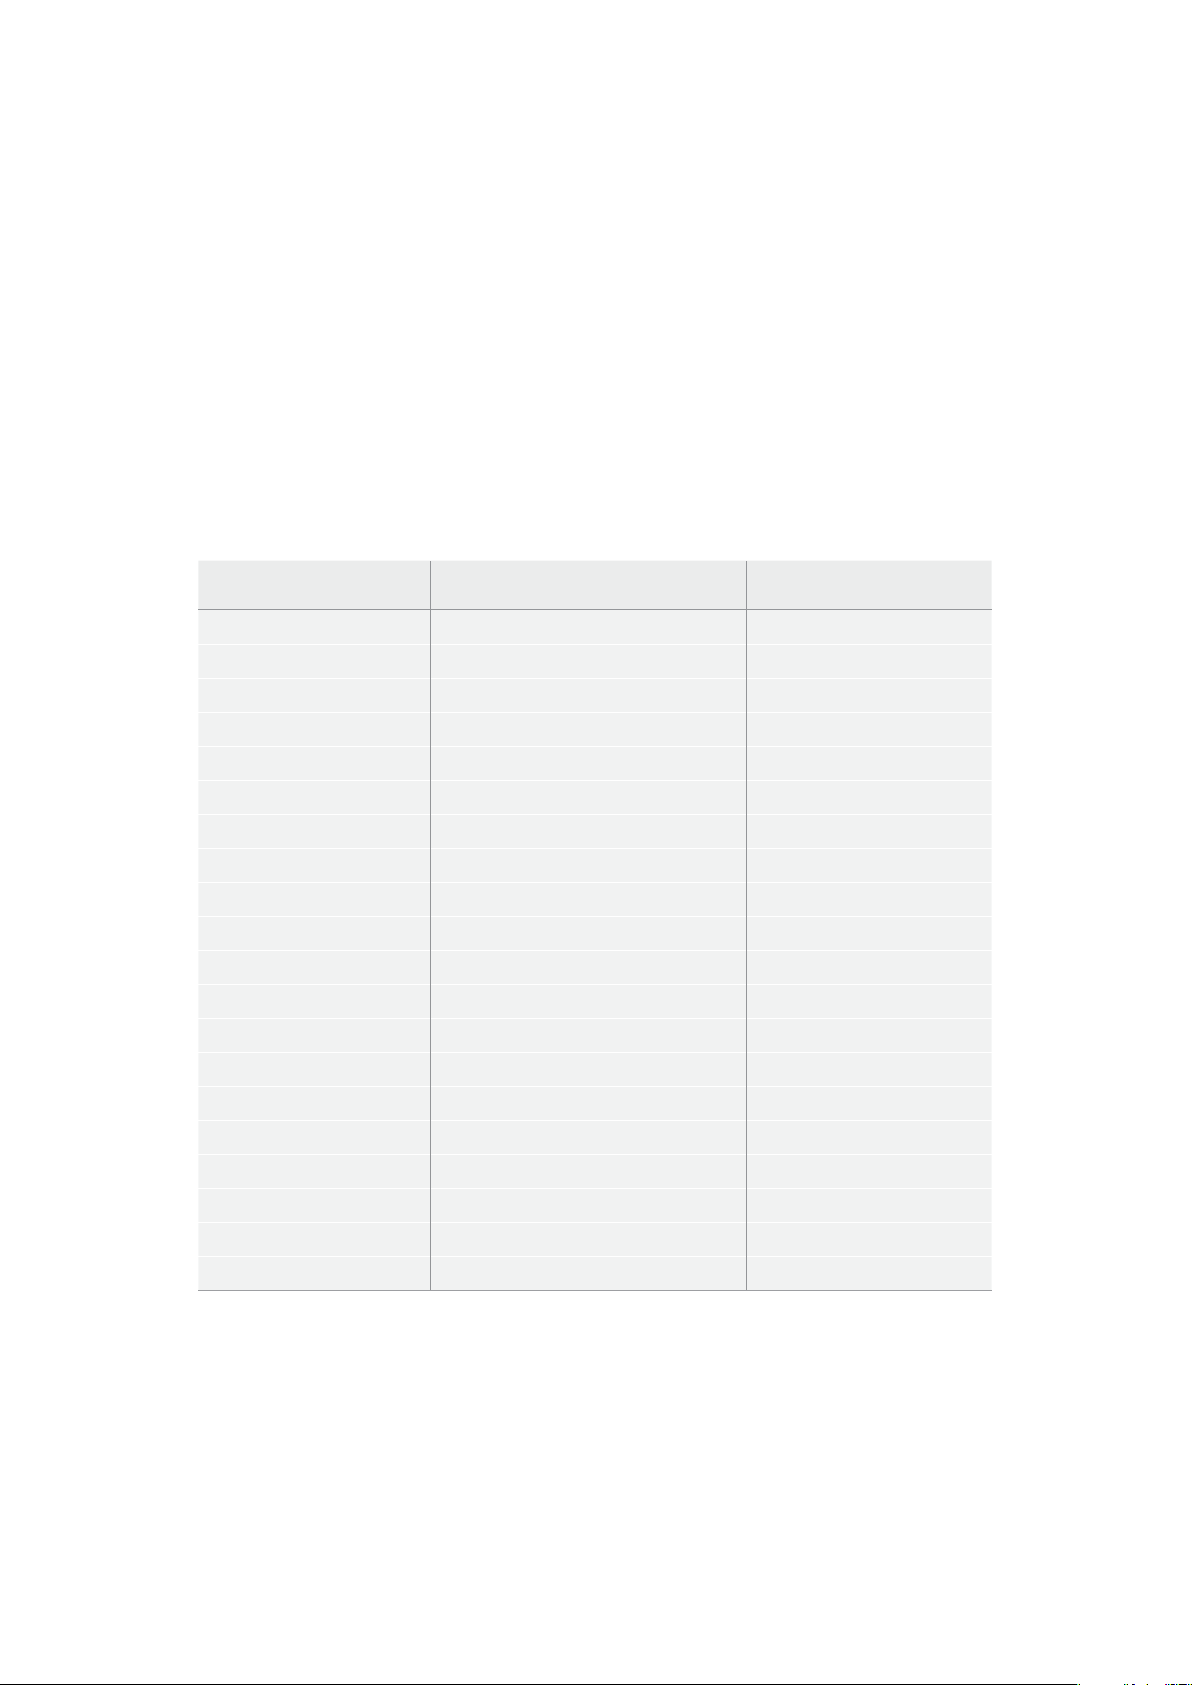
Soportes de grabación
Tarjeta SD
Se recomienda utilizar tarjetas SD UHS-I a fin de grabar en HD. Estas ofrecen una velocidad de escritura
de 220 MB/s y, por lo tanto, resultan adecuadas para almacenar secuencias en formato 2160p60.
Por el contrario, para grabar con mayor compresión o a una velocidad de bits más baja, es posible
emplear tarjetas más lentas. Generalmente, los modelos más rápidos ofrecen un mejor rendimiento.
No obstante, es aconsejable consultar la versión más reciente de este manual en nuestra página de
soporte técnico para obtener información actualizada al respecto.
¿Qué tarjetas SD son compatibles con el modelo HyperDeck Shuttle HD?
The following SD Cards are recommended for 1080p up to 60 fps.
Marca Modelo Capacidad
Angelbird AV PRO SD UHS-II 300 MB/s V90 SDXC 256 GB
Angelbird AV PRO SD UHS-II 260 MB/s V60 SDXC 128 GB
Angelbird AV PRO SD UHS-II 260 MB/s V60 SDXC 64 GB
SanDisk Extreme Pro UHS-I 95 MB/s SDXC 64 GB
Wise SD2-64U3 UHS-II 285 MB/s SDXC 64 GB
Lexar Professional 1000x UHS-II SDXC 150 MB/s 128 GB
Sony Tough SF-G128T 128 GB
Kingston CANVAS GO! Plus 170 MB/s V30 64 GB
Kingston CANVAS GO! Plus 170 MB/s V30 128 GB
Kingston CANVAS GO! Plus 170 MB/s V30 512 GB
ProGrade Digital SDXC UHS-II V90 300 R 64 GB
ProGrade Digital SDXC UHS-II V90 300 R 128 GB
Sony Tough SF-G64T UHS-II SDXC 64 GB
Delkin Devices Black UHS-II V90 SDXC 256 GB
Delkin Devices Power UHS-II V90 SDXC 128 GB
Delkin Devices Power UHS-II V90 SDXC 256 GB
Delkin Devices Black UHS-II V90 SDXC 128 GB
Exascend Essential SDXC UHS-II V90 R 300 MB/s 64 GB
Exascend Essential SDXC UHS-II V90 R 300 MB/s 128 GB
Exascend Catalyst SDXC UHS-II V90 R 300 MB/s 64 GB
214Soportes de grabación
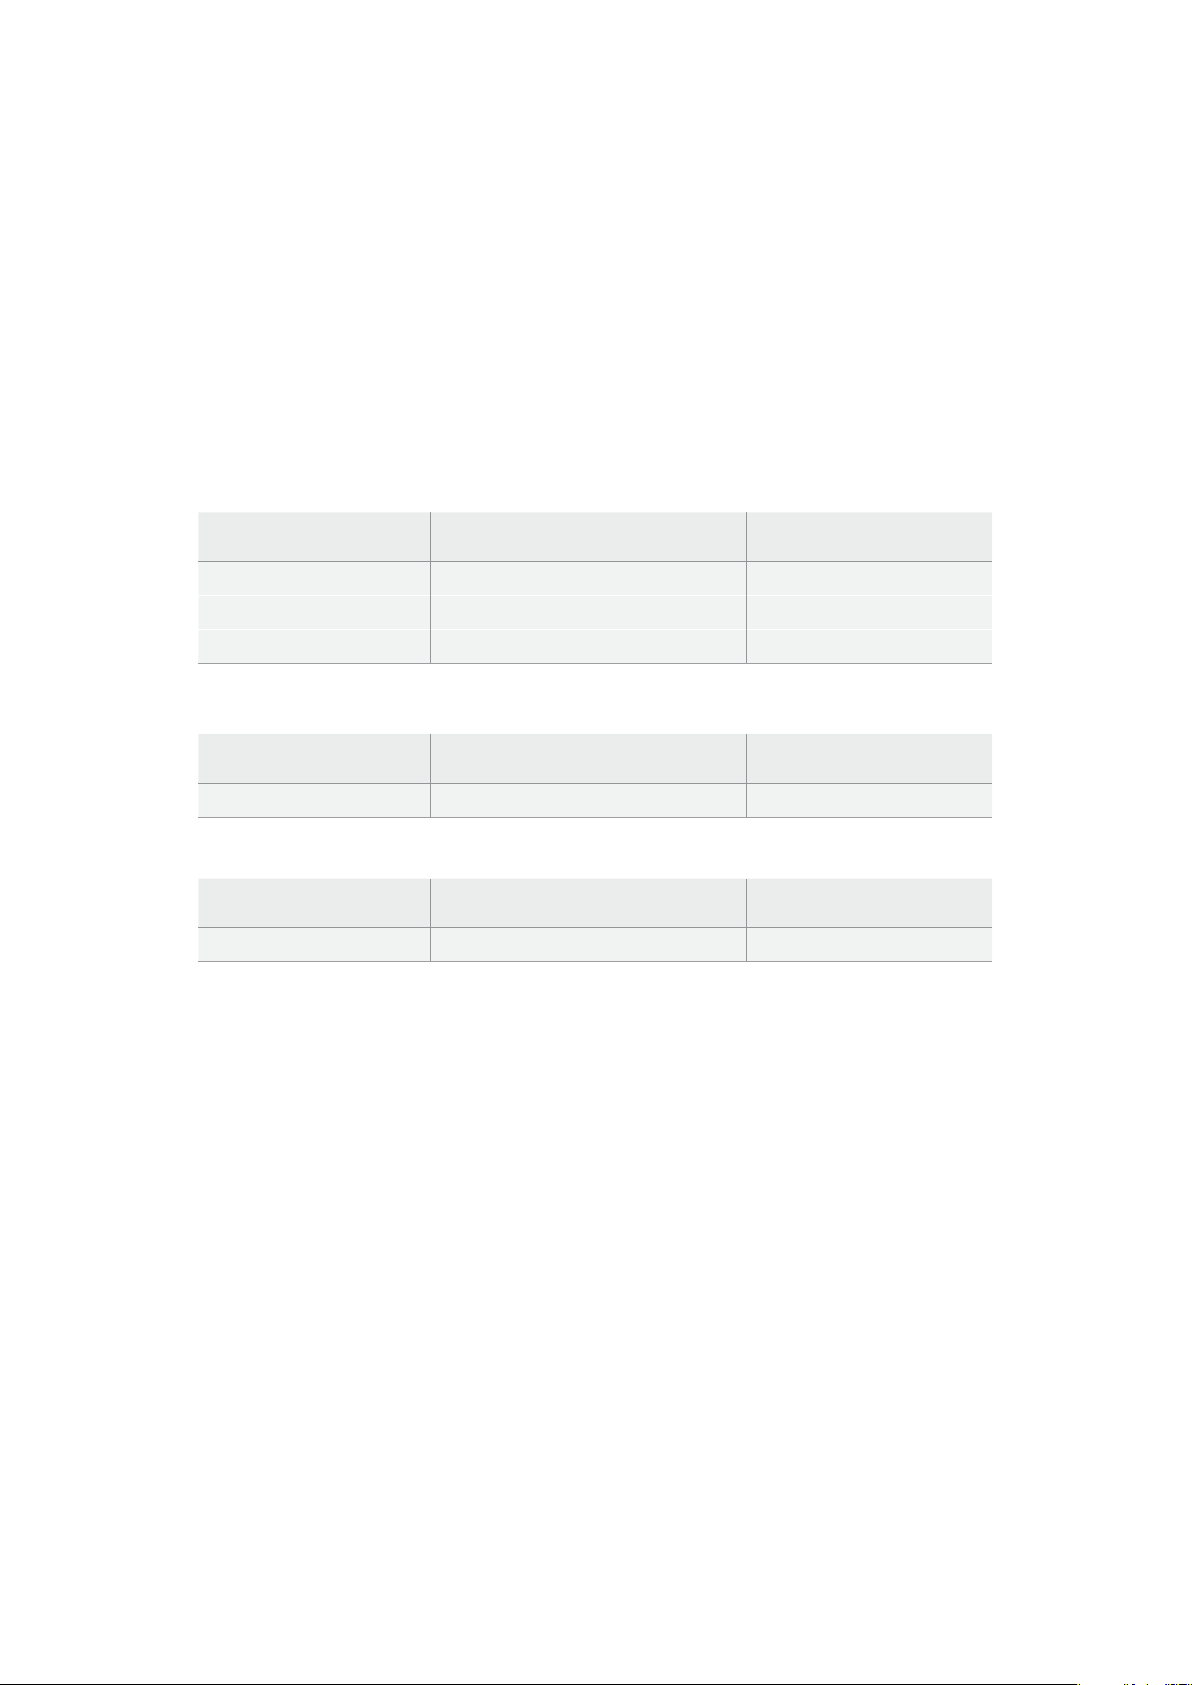
Discos externos
Todos los modelos HyperDeck permiten guardar el material digitalizado directamente en discos
USB-C. Estas unidades de gran capacidad son rápidas y brindan la posibilidad de grabar durante
períodos prolongados. Además, facilitan la edición de los contenidos al instante, al conectarlas a un
equipo informático.
También es posible emplear varias unidades simultáneamente para aumentar la capacidad de
almacenamiento. A tales efectos, conecte un dispositivo Blackmagic MultiDock10G al puerto
EXTDISK en la parte trasera del grabador, mediante un cable USB-C.
¿Qué unidades USB-C son compatibles con el modelo HyperDeck Shuttle HD?
Se recomiendan las siguientes unidades para grabar en formato ProRes HQ a una
resolución de 1080p y una frecuencia máxima de 60 f/s:
Marca Modelo Capacidad
Wise PTS-256 Portable SSD 4K 256 GB
OWC Envoy Pro Ex 240 GB
BUFFALO SSD-PHE500U3-BA 500 GB
Se recomiendan las siguientes unidades para grabar en formato DNxHR HQX a una
resolución de 1080p y una frecuencia máxima de 60 f/s:
Marca Modelo Capacidad
OWC Envoy Pro Ex 240 GB
Se recomiendan las siguientes unidades para grabar en formato H.264 a una resolución de
1080p y una frecuencia máxima de 60 f/s:
Marca Modelo Capacidad
OWC Envoy Pro Ex 240 GB
Formatear soportes de almacenamiento
Preparación de soportes en equipos informáticos
Preparación de soportes en Mac
La aplicación
Utilidad de Discos, incluida en el sistema operativo macOS, permite formatear
unidades de almacenamiento mediante el sistema HFS+ o exFAT.
Asegúrese de hacer una copia de seguridad de cualquier información importante que contenga el
soporte de grabación, puesto que, al iniciar este procedimiento, se borrarán todos los datos.
1 Conecte la unidad USB al equipo informático mediante un cable o una base externa e
ignore cualquier mensaje relativo a su uso para copias de seguridad con Time Machine. En
el caso de las tarjetas SD, utilice un lector externo para este tipo de soportes.
2 Haga clic en Aplicaciones y luego seleccione Utilidades. A continuación, ejecute la
aplicación
Utilidad de Discos.
3 Haga clic en el ícono de la unidad de almacenamiento y luego en la pestaña Borrar.
4 Seleccione la opción Mac OS Extended (con registro) o exFAT.
5 Ingrese un nombre para la unidad y luego haga clic en Borrar. Se dará formato a la unidad
rápidamente y quedará lista para ser utilizada.
215Formatear soportes de almacenamiento
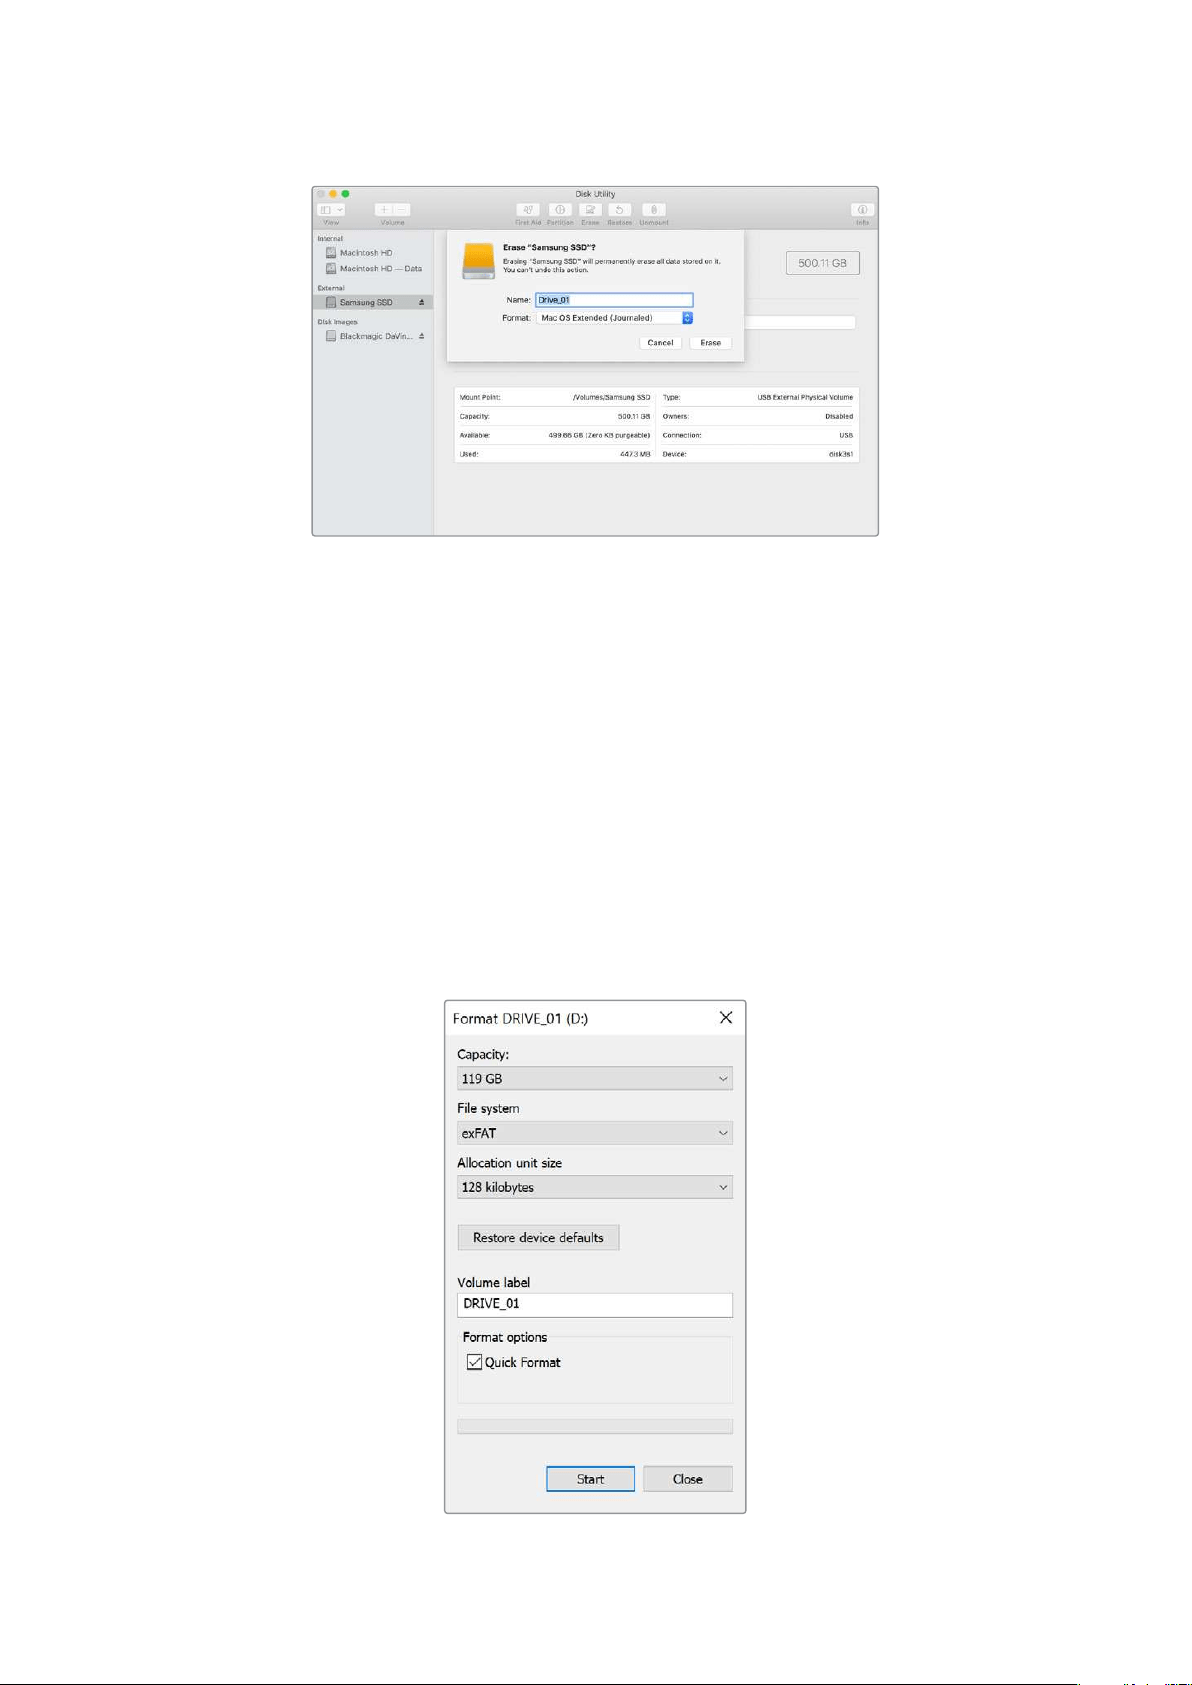
Preparación de soportes en Windows
El cuadro de diálogo
Formato en el sistema operativo Windows permite formatear unidades de
almacenamiento mediante el sistema exFAT. Asegúrese de hacer una copa de seguridad de
cualquier información importante que contenga el soporte de grabación, puesto que, al iniciar este
procedimiento, se borrarán todos los datos.
1 Conecte la unidad USB al equipo informático mediante un cable o un dispositivo externo.
En el caso de las tarjetas SD, utilice un lector externo para este tipo de soportes.
2 Abra el menú Inicio o la Pantalla de Inicio y seleccione la opción PC. Haga clic en el
soporte de almacenamiento con el botón derecho.
3 En el menú contextual, seleccione la opción Formato.
4 Elija la opción exFAT para el sistema de archivos y 128 kilobytes para el tamaño de la
unidad de asignación.
5 Ingrese un nombre de la unidad, marque la casilla Formato rápido y haga clic en Iniciar.
6 Se dará formato a la unidad rápidamente y quedará lista para ser utilizada.
216Formatear soportes de almacenamiento
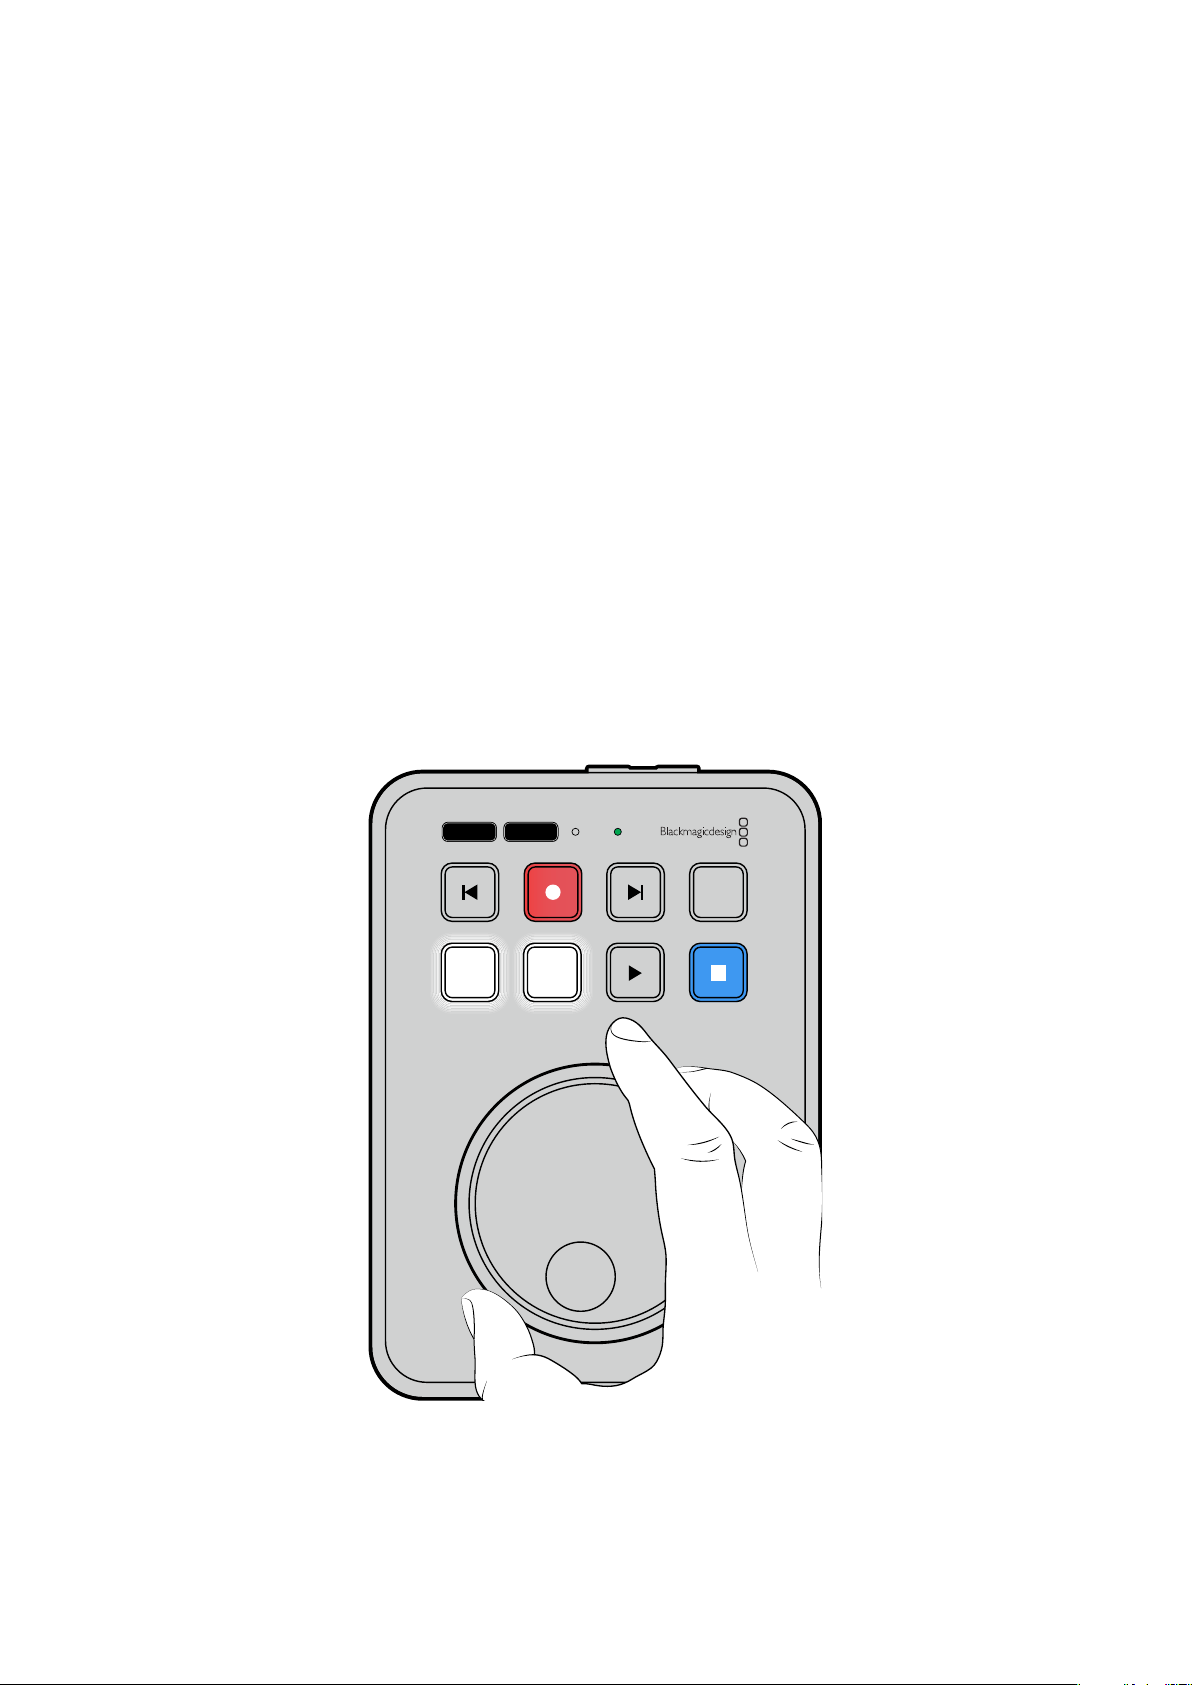
Función Teleprónter
El grabador también puede emplearse a modo de teleprónter si se dispone de un archivo RTF. Cree
un archivo de texto en TextEdit o WordPad en cualquiera de los 13 idiomas admitidos y guárdelo en
formato de texto enriquecido. Al abrirlo con el modelo HyperDeck Shuttle HD, podrá adaptar el
tamaño y el interlineado del texto.
Para utilizar esta función:
1 Conecte el monitor que desee utilizar al puerto HDMI del grabador.
2 Inserte la tarjeta SD o conecte el disco externo USB que contenga el texto.
3 En el menú de grabación, seleccione la opción Códec. Luego, seleccione Teleprónter y
oprima el botón
SET.
El texto aparecerá en pantalla. Ahora, podrá iniciar la reproducción presionando el botón
correspondiente o acceder a opciones adicionales girando el mando.
Velocidad de reproducción del teleprónter
Al igual que con las imágenes, el mando de búsqueda del grabador permite controlar la velocidad
de reproducción cuando está activado el modo de teleprónter. Una vez que se haya cargado el
texto, presione los botones
JOG y SCR simultáneamente para poder ajustar la velocidad de
reproducción. Luego, gire el mando. El texto avanzará a la par del mando de búsqueda. Por ejemplo,
cuanto más rápido gire el mando, más rápido se reproducirá el texto.
JOG SCR
CLIP
MENU SET
DISK SD
Si desea establecer una velocidad constante, utilice los botones JOG y SCR por separado. Ahora, la
velocidad constante será menor en el modo de desplazamiento o mayor en el de avance y
retroceso rápido.
217Función Teleprónter
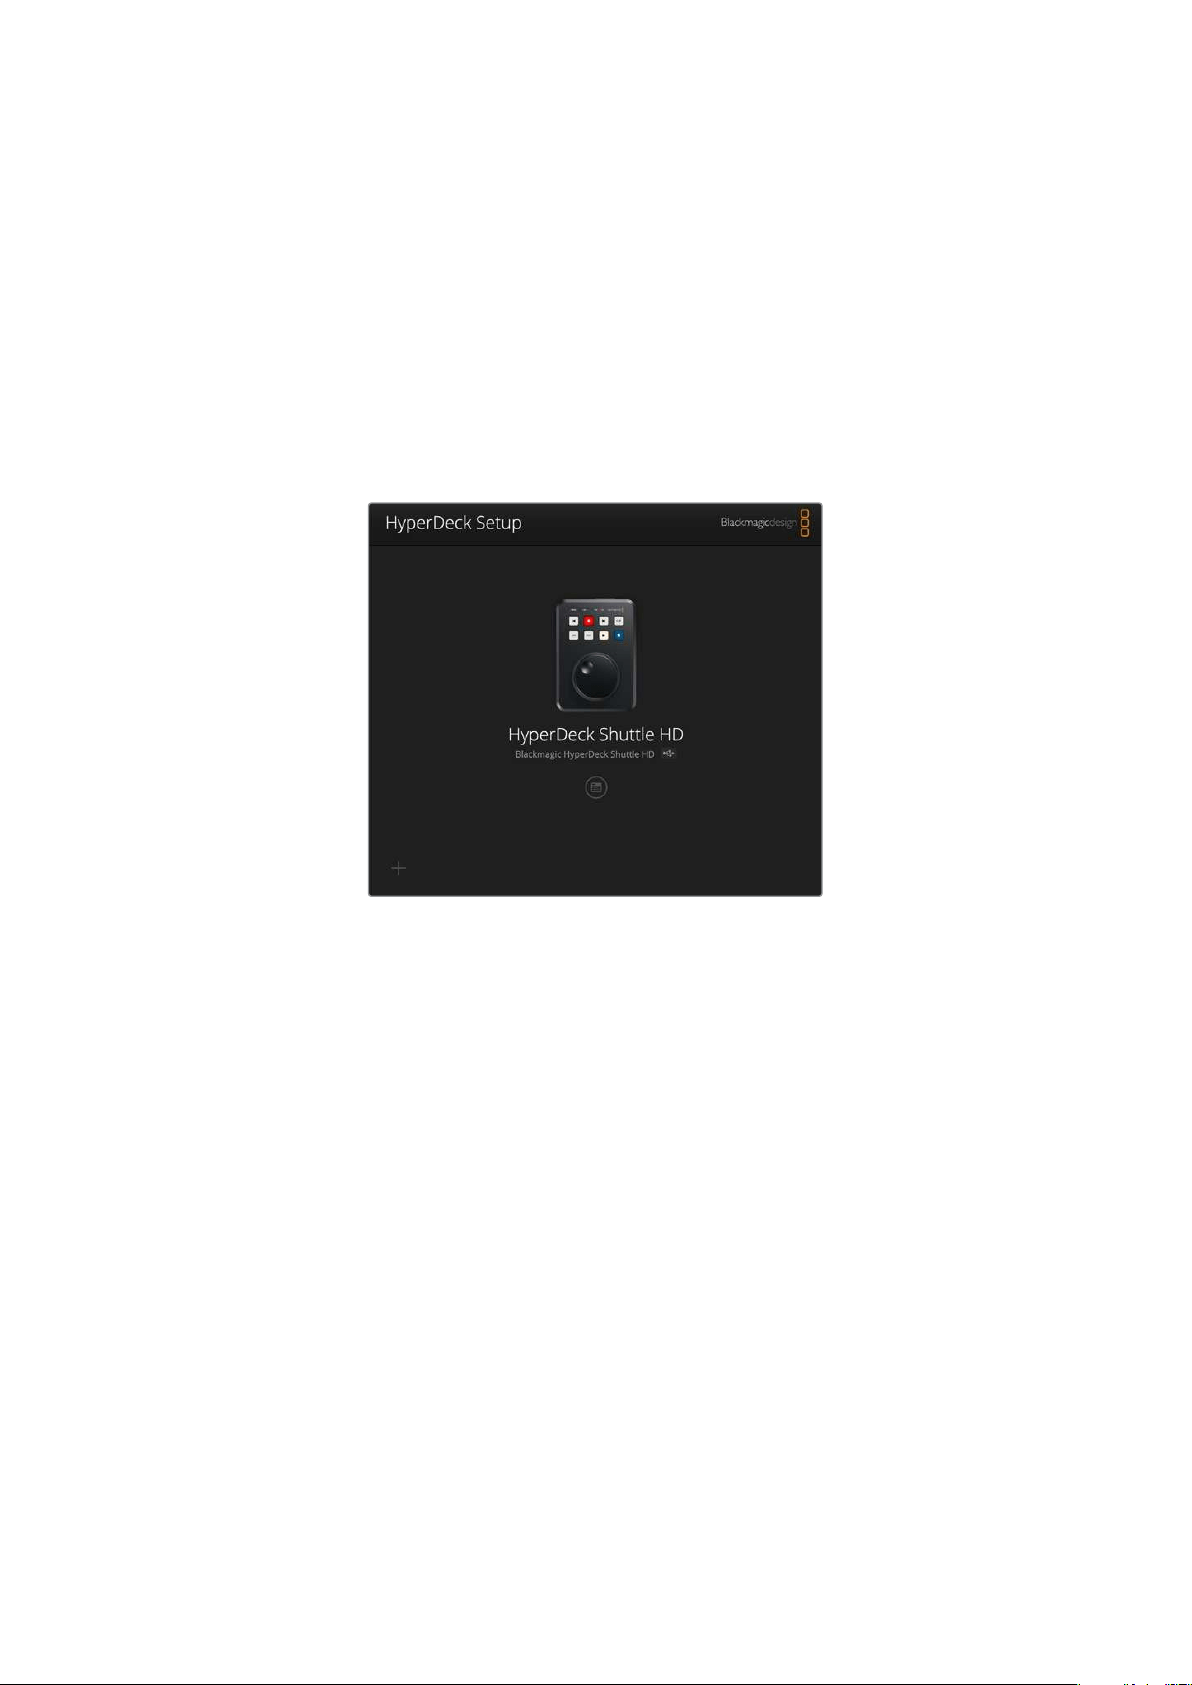
Para alternar entre los archivos de texto disponibles en la unidad de almacenamiento, presione los
botones de avance y retroceso.
Al leerlos, el teleprónter reconocerá el tamaño, el color y el estilo aplicado al texto. Asimismo, es
posible modificar el tamaño de la fuente, el interlineado, los márgenes e incluso invertir el texto en
sentido horizontal o vertical, por ejemplo, en los casos en que se precisa proyectarlo a un
interferómetro. Consulte el apartado Ajustes del menú para obtener más información al respecto.
Configuración del dispositivo
El programa utilitario Blackmagic HyperDeck Setup permite configurar el dispositivo y actualizar
elsistema operativo interno.
Para instalar el programa:
1 Descargue la última versión del instalador desde nuestra página de soporte técnico.
2 Abra el asistente de instalación en su equipo informático y siga las instrucciones.
3 Una vez que la instalación se haya completado, conecte el grabador al equipo informático
mediante los puertos USB o Ethernet situados en la parte trasera.
4 Ejecute el programa Blackmagic HyperDeck Setup y siga las instrucciones que aparecen
enla pantalla para actualizar el sistema operativo interno. Si no aparece ningún aviso,
eldispositivo ya se encuentra actualizado.
Haga clic en el ícono de ajustes o en la imagen del dispositivo para acceder a la ventana de
configuración.
La ventana de inicio muestra el grabador y su nombre, el cual puede determinarse mediante el
menú de ajustes del programa utilitario, a fin de poder identificarlo con mayor facilidad cuando hay
más de uno conectado al equipo informático.
218Configuración del dispositivo

Red
Protocolo
Para emplear el modelo HyperDeck Shuttle HD junto con mezcladores ATEM, o a fin de controlarlo a
distancia a través del protocolo de Ethernet para HyperDeck, el grabador debe estar conectado a la
misma red que el resto de los equipos, bien usando el protocolo DHCP o añadiendo una dirección
IP fija de forma manual.
DHCP
De forma predeterminada, el grabador utiliza el protocolo DHCP, que permite a
los servidores de red reconocerlo automáticamente y asignarle una direcciónIP.
Es un servicio estupendo que facilita la conexión de equipos mediante la
tecnología Ethernet y a la vez garantiza que dichas direcciones sean compatibles
entre ellas. La mayoría de los equipos informáticos y conmutadores de red
aceptan el protocolo DHCP.
Dirección IP
estática
Cuando la opción
IP estática está seleccionada, es posible introducir
manualmente los datos de la red. Para configurar una dirección IP manualmente
yque todos los equipos puedan comunicarse entre sí, es necesario que
compartan los mismos ajustes de máscara de subred y puerta de enlace. Además,
también deben coincidir los primeros tres campos de la dirección IP del panel.
En caso de que haya otros dispositivos en la red con el mismo número de identificación en la
direcciónIP, se producirá un conflicto y las unidades no se conectarán. Si esto sucede, basta con
cambiar dicho valor en la unidad correspondiente.
219Configuración del dispositivo

Archivos
Al configurar el grabador por primera vez, el contenido se guardará en la unidad de almacenamiento
con el prefijo «HyperDeck». Para modificar el nombre, basta con escribir uno nuevo.
Por defecto, la opción de añadir el código de tiempo al nombre del archivo se encuentra desactivada.
Para añadir la fecha y la hora al nombre del archivo grabado, active la opción correspondiente. Estos
ajustes también pueden modificarse mediante el menú que aparece en pantalla.
Transferencia de archivos a través de
una red
Este grabador permite transferir archivos mediante el protocolo FTP. De este modo, es posible
copiarlos directamente de un equipo informático al dispositivo, a través de una red local de gran
velocidad. Por ejemplo, con el propósito de crear carteles digitales, es posible copiar archivos
nuevos de manera remota a otra unidad HyperDeck situada en una ubicación distinta.
Conexión a un grabador HyperDeck Shuttle HD
Si el dispositivo y el equipo informático se encuentran conectados a la misma red, solo es necesario
conocer la dirección IP del grabador y contar con un cliente FTP.
1 Descargue e instale un cliente FTP en el equipo informático al cual desea conectar el
grabador. En tal sentido, recomendamos programas tales como Cyberduck, FileZilla o
Transmit, aunque es posible utilizar prácticamente cualquier cliente FTP. Cabe destacar que
Cyberduck y FileZilla son programas gratuitos.
2 Conecte el grabador a la red mediante un cable Ethernet y tome nota de su dirección IP.
Para ello, presione el botón
MENU y mueva el mando giratorio para acceder al menú Red.
La dirección IP del dispositivo aparecerá en la parte inferior de la pantalla.
La dirección IP del dispositivo aparece en
la sección Red del menú Ajustes.
3 Introduzca la dirección IP del grabador en el cuadro de diálogo del cliente TCP. El nombre y
la posición de esta ventana pueden variar según la aplicación utilizada, aunque
generalmente se denomina «servidor» o «host». Compruebe que la casilla
Anonymous
login esté marcada, si el programa incluye esta opción.
220Transferencia de archivos a través de una red
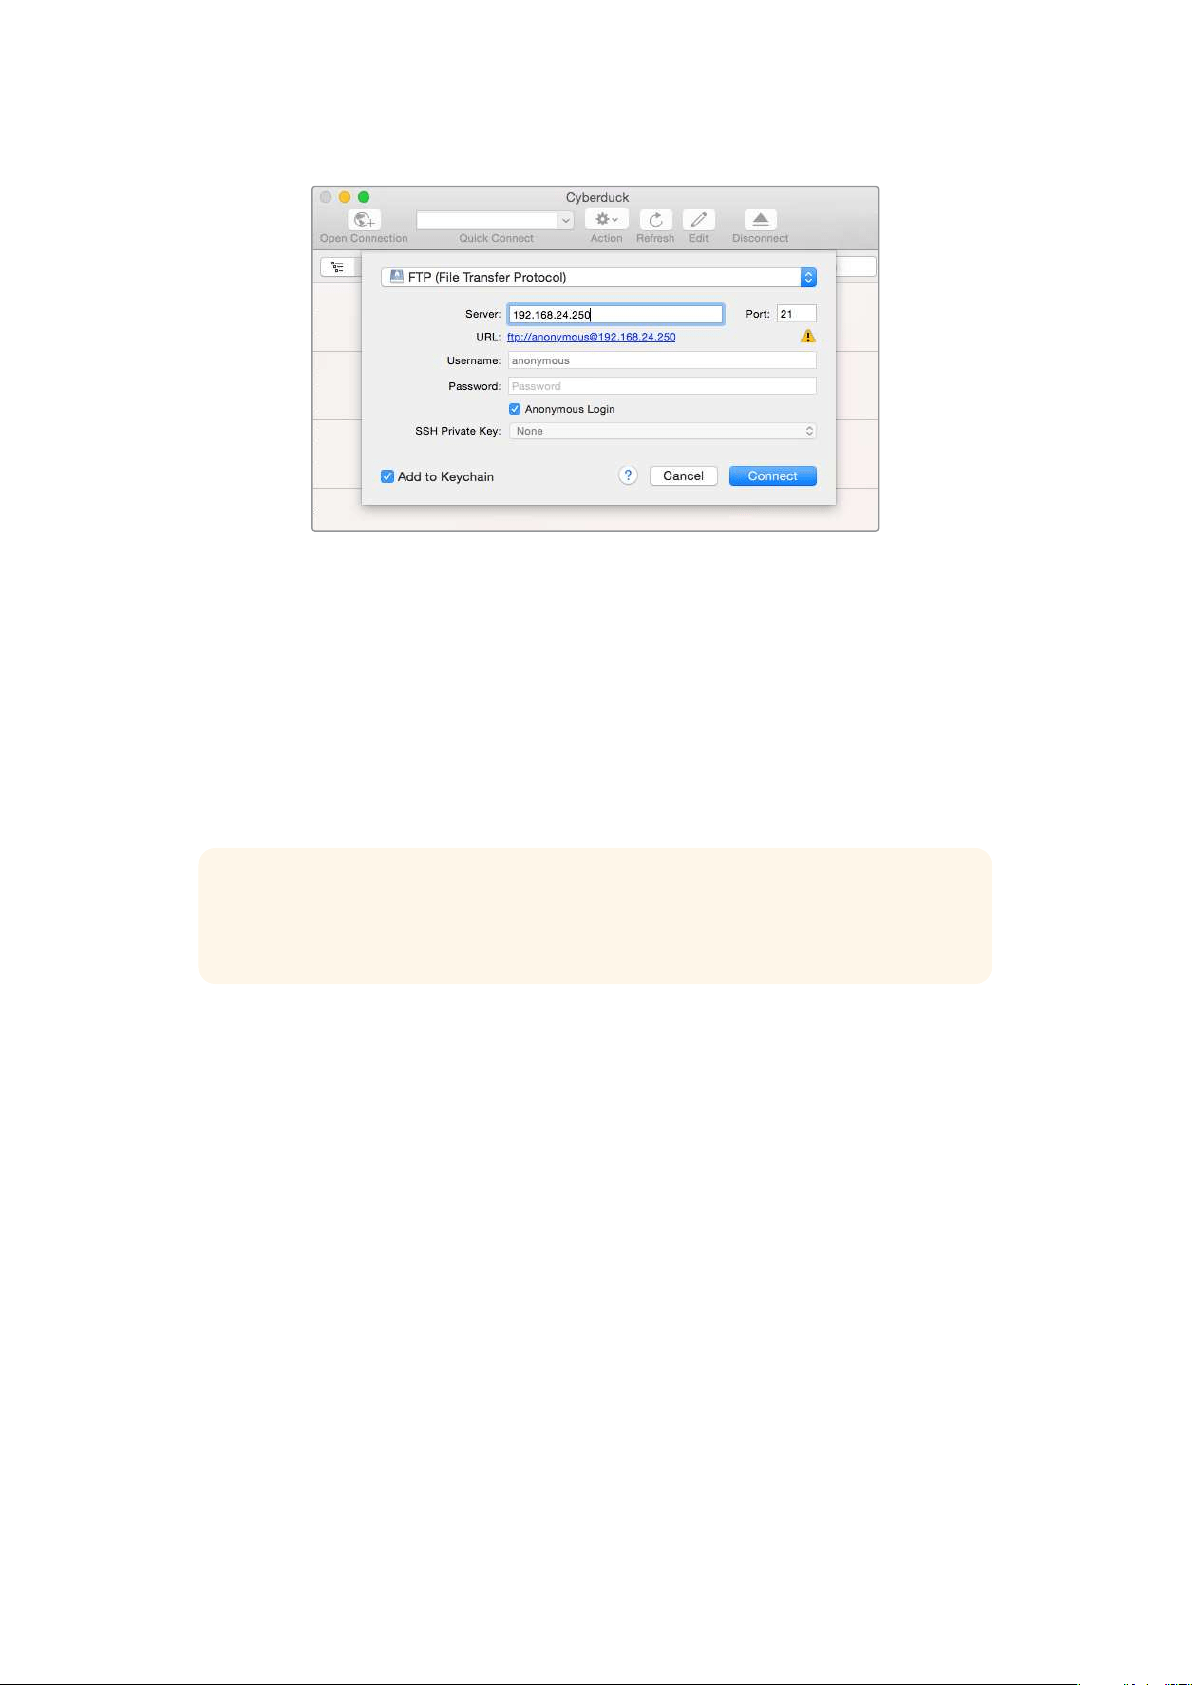
Al conectar una unidad HyperDeck, no es necesario introducir un nombre de usuario
ni una clave. Basta con ingresar la dirección IP del dispositivo en el cliente FTP y
marcar la casilla Anonymous login, si dicha opción está disponible.
Transferencia de archivos
Una vez conectado el grabador, es posible transferir archivos mediante el cliente FTP. Muchos
programas de este tipo cuentan con una interfaz que permite arrastrar y soltar elementos. Verifique
el método de transferencia compatible con el programa en particular.
Aunque es posible transferir cualquier tipo de archivos al grabador, nótese que aquellos que vayan
a reproducirse desde el dispositivo deben ser compatibles con los códecs y las resoluciones que
este admite.
SUGERENCIA: Es posible transferir archivos mediante la red mientras la unidad está
grabando. El dispositivo ajustará automáticamente la velocidad de transferencia para que
la grabación no se vea afectada.
221Transferencia de archivos a través de una red

Información para desarrolladores
(eninglés)
Protocolo de Ethernet para Blackmagic HyperDeck
(eninglés)
The Blackmagic HyperDeck Ethernet Protocol is a text based protocol accessed by connecting
to TCP port 9993 on HyperDeck models that have a built in Ethernet connection. If you are
a software developer, you can use the protocol to construct devices that integrate with our
products. Here at Blackmagic Design our approach is to open up our protocols and we eagerly
look forward to seeing what you come up with!
Comandos del protocolo (en inglés)
Command Command Description
help or ? Provides help text on all commands and parameters
commands return commands in XML format
device info return device information
disk list query clip list on active disk
disk list: slot id: {n} query clip list on disk in slot {n}
quit disconnect ethernet control
ping check device is responding
preview: enable: {true/false} switch to preview or output
play play from current timecode
play: speed: {-5000 to 5000} play at specific speed
play: loop: {true/false} play in loops or stop-at-end
play: single clip: {true/false} play current clip or all clips
playrange query playrange setting
playrange set: clip id: {n} set play range to play clip {n} only
playrange set: clip id: {n} count: {m} set play range to {m} clips starting from clip {n}
playrange set: in: {inT} out: {outT}
set play range to play between:
- timecode {inT} andtimecode {outT}
playrange set: timeline in: {in} timeline out:
{out}
set play range in units of frames between:
- timeline position {in} and position {out} clear/reset play
rangesetting
playrange clear clear/reset play range setting
play on startup query unit play on startup state
play on startup: enable: {true/false} enable or disable play on startup
play on startup: single clip: {true/false} play single clip or all clips on startup
play option query play options
play option: stop mode:
{lastframe/nextframe/black}
set output frame when playback stops
record record from current input
record: name: {name} record named clip
222Información para desarrolladores (eninglés)

Command Command Description
record spill spill current recording to next slot
record: spill: slot id: {n}
spill current recording to specified slot
use current id to spill to same slot
stop stop playback or recording
clips count query number of clips on timeline
clips get query all timeline clips
clips get: clip id: {n} query a timeline clip info
clips get: clip id: {n} count: {m} query m clips starting from n
clips get: version: {1/2}
query clip info using specified output version:
version 1: id: name startT duration
version 2: id: startT duration inT outT name
clips add: name: {name} append a clip to timeline
clips add: clip id: {n} name: {name} insert clip before existing clip {n}
clips add: in: {inT} out: {outT} name: {name} append the {inT} to {outT} portion of clip
clips remove: clip id: {n}
remove clip {n} from the timeline
(invalidates clip ids following clip {n})
clips clear empty timeline clip list
transport info query current activity
slot info query active slot
slot info: slot id: {n} query slot {n}
slot select: slot id: {n} switch to specified slot
slot select: video format: {format} load clips of specified format
slot unblock unblock active slot
slot unblock: slot id: {n} unblock slot {n}
cache info query cache status
dynamic range query dynamic range settings
dynamic range: playback override:
{off/Rec709/Rec2020_SDR/HLG/
ST2084_300/ST2084_500/
ST2084_800/ST2084_1000/
ST2084_2000/ST2084_4000/ST2084
set playback dynamic range override
dynamic range: record override:
{off/Rec709/Rec2020_SDR/HLG/
ST2084_300/ST2084_500/
ST2084_800/ST2084_1000/
ST2084_2000/ST2084_4000/ST2048}
set record dynamic range override
notify query notification status
notify: remote: {true/false} set remote notifications
notify: transport: {true/false} set transport notifications
notify: slot: {true/false} set slot notifications
notify: configuration: {true/false} set configuration notifications
223Información para desarrolladores (eninglés)

Command Command Description
notify: dropped frames: {true/false} set dropped frames notifications
notify: display timecode: {true/false} set display timecode notifications
notify: timeline position: {true/false} set playback timeline position notifications
notify: playrange: {true/false} set playrange notifications
notify: cache: {true/false} set cache notifications
notify: dynamic range: {true/false} set dynamic range settings notifications
notify: slate: {true/false} set digital slate notifications
notify: clips: {true/false}
set timeline clips notifications where two types of changes can
occur:
add: partial update with list of clips and insert positions
snapshot: complete update of all clips on timeline
notify: disk: {true/false}
set disk clips notifications where two types of changes can
occur:
add: partial update with list of clips and insert positions
snapshot: complete update of all clips on timeline
goto: clip id: {start/end} goto first clip or last clip
goto: clip id: {n} goto clip id {n}
goto: clip id: +{n} go forward {n} clips
goto: clip id: -{n} go backward {n} clips
goto: clip: {n} goto frame position {n} within current clip
goto: clip: +{n} go forward {n} frames within current clip
goto: clip: -{n} go backward {n} frames within current clip
goto: clip: {start/end} goto start or end of clip
goto: timeline: {n} goto frame position {n} within timeline
goto: timeline: +{n} o forward {n} frames within timeline
goto: timeline: -{n} go backward {n} frames within timeline
goto: timeline: {start/end} goto start or end of timeline
goto: timecode: {timecode} goto specified timecode
goto: timecode: +{timecode} go forward {timecode} duration
goto: timecode: -{timecode} go backward {timecode} duration
goto: slot id: {n} goto slot id {n}
jog: timecode: {timecode} jog to timecode
jog: timecode: +{timecode} jog forward {timecode} duration
jog: timecode: -{timecode} jog backward {timecode} duration
shuttle: speed: {-5000 to 5000} shuttle with speed
remote query unit remote control state
remote: enable: {true/false} enable or disable remote control
remote: override: {true/false} session override remote control
configuration query configuration settings
configuration: video input: SDI switch to SDI input
224Información para desarrolladores (eninglés)

Command Command Description
configuration: video input: HDMI switch to HDMI input
configuration: video input: component switch to component input
configuration: audio input: embedded capture embedded audio
configuration: audio input: XLR capture XLR audio
configuration: audio input: RCA capture RCA audio
configuration: file format: {format} switch to specific file format
configuration: audio codec: PCM switch to PCM audio
configuration: audio codec: AAC switch to AAC audio
configuration: timecode input:
{external/embedded/internal/preset/clip}
change the timecode input
configuration: timecode output:
{clip/timeline}
change the timecode output
configuration: timecode preference:
{default/dropframe/nondropframe}
whether or not to use drop frame timecodes when not
otherwise specified
configuration: timecode preset:
{timecode}
set the timecode preset
configuration: audio input channels: {n} set the number of audio channels recorded to {n}
configuration: record trigger:
{none/recordbit/timecoderun}
change the record trigger
configuration: record prefix: {name} set the record prefix name (supports UTF-8 name)
configuration: append timestamp:
{true/false}
append timestamp to recorded filename
configuration: xlr input id: {n} xlr type:
{line/mic}
configure xlr input type
multiple xlr inputs can be configured in a single command
configuration: genlock input resync:
{true/false}
enable or disable genlock input resync
uptime return time since last boot
format: slot id: {n} prepare:
{exFAT/HFS+} name: {name}
prepare a disk formatting operation to filesystem {format}
format: confirm: {token} perform a pre-prepared formatting operation using token
identify: enable: {true/false} identify the device
watchdog: period: {period in seconds} client connection timeout
reboot reboot device
slate clips slate clips information
slate project slate project information
slate lens slate lens information
225Información para desarrolladores (eninglés)

Multiline commands: Command Description
slate clips↵ set slate clips information:
reel: {n} slate reel number, where {n} is in [1, 999]
scene id: {id} slate scene id value, where {id} is a string
shot type: {WS/MS/BCU/MCU/ECU/none} slate shot type
take: {n} slate take number, where {n} is in [1, 99]
take scenario: {PU/VFX/SER/none} slate take scenario
take auto inc: {true/false} slate take auto increment
good take: {true/false} slate good take
environment: {interior/exterior} slate environment
day night: {day/night} slate day or night
slate project:↵ set slate project information:
project name: {name} project name (can be empty, supports UTF-8)
camera: {index} set camera index e.g. A
director: {name} director (can be empty, supports UTF-8)
camera operator: {name} camera operator (can be empty, supports UTF-8)
slate lens:↵ set lens information:
lens type: {type} lens type (can be empty, supports UTF-8)
iris: {type} camera iris (can be empty, supports UTF-8)
focal length: {length} focal length (can be empty, supports UTF-8)
distance: {distance} lens distance (can be empty, supports UTF-8)
filter: {filter} lens filter (can be empty, supports UTF-8)
Command Combinations
You can combine the parameters into a single command, for example:
play: speed: 200 loop: true single clip: true
Or for configuration:
configuration: video input: SDI audio input: XLR
Or to switch to the second disk, but only play NTSC clips:
slot select: slot id: 2 video format: NTSC
Detalles del protocolo (en inglés)
Connection
The HyperDeck Ethernet server listens on TCP port 9993.
Basic syntax
The HyperDeck protocol is a line oriented text protocol. Lines from the server will be separated by an ascii
CR LF sequence. Messages from the client may be separated by LF or CR LF.
New lines are represented in this document as a "↵" symbol.
226Información para desarrolladores (eninglés)

Single line command syntax
Command parameters are usually optional. A command with no parameters is terminated with a new line:
{Command name}↵
If parameters are specified, the command name is followed by a colon, then pairs of parameter names and
values. Each parameter name is terminated with a colon character:
{Command name}: {Parameter}: {Value} {Parameter}: {Value} ...↵
Multiline command syntax
The HyperDeck protocol also supports an equivalent multiline syntax where each parameter-value pair is
entered on a new line. E.g.
{Command name}:↵
{P a r a m e t e r}: { Va lu e}↵
{P a r a m e t e r}: { Va lu e}↵
↵
Response syntax
Simple responses from the server consist of a three digit response code and descriptive text terminated by a
new line:
{Response code} {Response text}↵
If a response carries parameters, the response text is terminated with a colon, and parameter name and
value pairs follow on subsequent lines until a blank line is returned:
{Response code} {Response text}:↵
{P a r a m e t e r}: { Va lu e}↵
{P a r a m e t e r}: { Va lu e}↵
...
↵
Successful response codes
A simple acknowledgement of a command is indicated with a response code of 200:
200 ok↵
Other successful responses carry parameters and are indicated with response codes in the range of 201
to299.
227Información para desarrolladores (eninglés)

Failure response codes
Failure responses to commands are indicated with response codes in the range of 100 to 199:
100 syntax error
101 unsupported parameter
102 invalid value
103 unsupported
104 disk full
105 no disk
106 disk error
107 timeline empty
108 internal error
109 out of range
110 no input
111 remote control disabled
112 clip not found
120 connection rejected
150 invalid state
151 invalid codec
160 invalid format
161 invalid token
162 format not prepared
163 parameterized single line command not supported
Asynchronous response codes
The server may return asynchronous messages at any time. These responses are indicated with response
codes in the range of 500 to 599:
5xx {Response Text}:↵
{P a r a m e t e r}: { Va lu e}↵
{P a r a m e t e r}: { Va lu e}↵
↵
Connection response
On connection, an asynchronous message will be delivered:
500 connection info:↵
protocol version: {Version}↵
model: {Model Name}↵
↵
Timecode syntax
Timecodes are expressed as non-drop-frame timecode in the format:
HH:MM:SS:FF
228Información para desarrolladores (eninglés)

Handling of deck "remote" state
The “remote” command may be used to enable or disable the remote control of the deck. Any attempt to
change the deck state over ethernet while remote access is disabled will generate an error:
111 remote control disabled↵
To enable or disable remote control:
remote: enable: {“true”, “false”} ↵
The current remote control state may be overridden allowing remote access over ethernet irrespective of the
current remote control state:
remote: override: {“true”, “false”} ↵
The override state is only valid for the currently connected ethernet client and only while the connection
remains open.
The “remote” command may be used to query the remote control state of the deck by specifying no
parameters:
remote↵
The deck will return the current remote control state:
210 remote info:↵
enabled: {“true”, “false”}↵
override: {“true”, “false”}↵
↵
Asynchronous remote control information change notification is disabled by default and may be
configured with the “notify” command. When enabled, changes in remote state will generate a “510 remote
info:”asynchronous message with the same parameters as the “210 remote info:” message.
Closing connection
The "quit" command instructs the server to cleanly shut down the connection:
quit↵
Checking connection status
The "ping" command has no function other than to determine if the server is responding:
ping↵
Getting help
The "help" or "?" commands return human readable help text describing all available commands and
parameters:
help↵
Or:
?↵
The server will respond with a list of all supported commands:
201 help:↵
{Help Text}↵
{Help Text}↵
↵
229Información para desarrolladores (eninglés)

Switching to preview mode
The "preview" command instructs the deck to switch between preview mode and output mode:
preview: enable: {"true", "false"}↵
Playback will be stopped when the deck is switched to preview mode. Capturing will be stopped when the
deck is switched to output mode.
Controlling device playback
The “play” command instructs the deck to start playing:
play↵
The play command accepts a number of parameters which may be used together in most combinations.
By default, the deck will play all remaining clips on the timeline then stop.
The “single clip” parameter may be used to override this behavior:
play: single clip: {“true”, “false”}↵
By default, the deck will play at normal (100%) speed. An alternate speed may be specified in percentage
between -5000 to 5000:
play: speed: {% normal speed}↵
By default, the deck will stop playing when it reaches to the end of the timeline. The “loop” parameter may be
used to override this behavior:
play: loop: {“true”, “false”}↵
The “playrange” command instructs the deck to play all the clips. To override this behavior: and select a
particular clip:
playrange set: clip id: {Clip ID}↵
To only play a certain timecode range:
playrange set: in: {in timecode} out: {out timecode}↵
To clear a set playrange and return to the default value:
playrange clear↵
The “play on startup command” instructs the deck on what action to take on startup. By default, the deck will
not play. Use the “enable” command to start playback after each power up.
play on startup: enable {“true”, “false”}↵
By default, the unit will play back all clips on startup. Use the “single clip” command to override.
play on startup: single clip: {“true”, “false”}↵
Stopping deck operation
The "stop" command instructs the deck to stop the current playback or capture:
stop↵
230Información para desarrolladores (eninglés)

Changing timeline position
The "goto" command instructs the deck to switch to playback mode and change its position within the
timeline.
To go to the start of a specific clip:
goto: clip id: {Clip ID}↵
To move forward/back {count} clips from the current clip on the current timeline:
goto: clip id: +/-{count}↵
Note that if the resultant clip id goes beyond the first or last clip on timeline, it will be clamp at the first or last
clip.
To go to the start or end of the current clip:
goto: clip: {“start”, “end”}↵
To go to the start of the first clip or the end of the last clip:
goto: timeline: {“start”, “end”}↵
To go to a specified timecode:
goto: timecode: {timecode}↵
To move forward or back a specified duration in timecode:
goto: timecode: {“+”, “-”}{duration in timecode}↵
To specify between slot 1 and slot 2:
goto: slot id: {Slot ID}↵
Note that only one parameter/value pair is allowed for each goto command.
Enumerating supported commands and parameters
The "commands" command returns the supported commands:
commands↵
The command list is returned in a computer readable XML format:
212 commands:
<commands>↵
<command name="…"><parameter name="…"/>…</command>↵
<command name="…"><parameter name="…"/>…</command>↵
…
</commands>↵
↵
231Información para desarrolladores (eninglés)

Controlling asynchronous notifications
The “notify” command may be used to enable or disable asynchronous notifications from the server.
To enable or disable transport notifications:
notify: transport: {“true”, “false”}↵
To enable or disable slot notifications:
notify: slot: {“true”, “false”}↵
To enable or disable remote notifications:
notify: remote: {“true”, “false”}↵
To enable or disable configuration notifications:
notify: configuration: {“true”, “false”}↵
Multiple parameters may be specified. If no parameters are specified, the server returns the current state of
all notifications:
209 notify:↵
transport: {“true”, “false”}↵
slot: {“true”, “false”}↵
remote: {“true”, “false”}↵
configuration: {“true”, “false”}↵
dropped frames: {“true”, “false”}↵
display timecode: {“true”, “false”}↵
timeline position: {“true”, “false”}↵
playrange: {“true”, “false”}↵
cache: {“true”, “false”}↵
dynamic range: {“true”, “false”}↵
slate: {“true”, “false”}↵
clips: {“true”, “false”}↵
disk: {“true”, “false”}↵
↵
Retrieving device information
The "device info" command returns information about the connected deck device:
device info↵
The server will respond with:
204 device info:↵
protocol version: {Version}↵
model: {Model Name}↵
unique id: {unique alphanumeric identifier}↵
slot count: {number of storage slots}↵
software version: {software version}↵
↵
232Información para desarrolladores (eninglés)

Retrieving slot information
The "slot info" command returns information about a slot. Without parameters, the command returns
information for the currently selected slot:
slot info↵
If a slot id is specified, that slot will be queried:
slot info: slot id: {Slot ID}↵
The server will respond with slot specific information:
202 slot info:↵
slot id: {Slot ID}↵
status: {"empty", "mounting", "error", "mounted"}↵
volume name: {Volume name}↵
recording time: {recording time available in seconds}↵
video format: {disk's default video format}↵
blocked: {“true”, “false”}↵
↵
Asynchronous slot information change notification is disabled by default and may be configured with
the "notify" command. When enabled, changes in slot state will generate a "502 slot info:" asynchronous
message with the same parameters as the "202 slot info:" message.
Retrieving clip information
The “disk list” command returns the information for each playable clip on a given disk. Without parameters,
the command returns information for the current active disk:
disk list↵
If a slot id is specified, the disk in that slot will be queried:
disk list: slot id: {Slot ID}↵
The server responds with the list of all playable clips on the disk in the format of: Index, name, formats, and
duration in timecode:
206 disk list:↵
slot id: {Slot ID}↵
{clip index}: {name} {file format} {video format} {Duration
ti m ecode}↵
{clip index}: {name} {file format} {video format} {Duration
ti m ecode}↵
…
↵
Note that the clip index starts from 1.
Retrieving clip count
The "clips count" command returns the number of clips on the current timeline:
clips count ↵
The server responds with the number of clips:
214 clips count: ↵
clip count: {Count}↵
233Información para desarrolladores (eninglés)

Retrieving timeline information
The "clips get" command returns information for each available clip on the current timeline. Without
parameters, the command returns information for all clips on timeline:
clips get↵
The server responds with a list of clip IDs, names and timecodes:
205 clips info:↵
clip count: {Count}↵
{Clip ID}: {Start timecode} {Duration timecode} {In timecode}
{Out timecode} {Name}↵
{Clip ID}: {Start timecode} {Duration timecode} {In timecode}
{Out timecode} {Name}↵
…
↵
Retrieving transport information
The “transport info” command returns the state of the transport:
transport info ↵
The server responds with transport specific information:
208 transport info:
status: {“preview”, “stopped”, “play”, “forward”, “rewind”,
“j o g ”, “ s h u t t l e ”,” r e c o r d ”}↵
speed: {Play speed between -5000 and 5000 %}↵
slot id: {Slot ID or “none”}↵
clip id: {Clip ID or “none”}↵
single clip: {“true”, “false”}↵
display timecode: {timecode}↵
timecode: {timecode}↵
video format: {Video format}↵
loop: {“true”, “false”}↵
timeline: {n}↵
input video format: {Video format”}↵
dynamic range: {“off”, “Rec709”, “Rec2020_SDR”, “HLG”,
“ST2084_300”, “ST2084_500”, “ST2084_800”, “ST2084_1000”,
“ST2084_2000”, “ST2084_4000”, “ST2048” or “none”}↵
↵
The "timecode" value is the timecode within the current timeline for playback or the clip for record. The
"display timecode" is the timecode displayed on the front of the deck. The two timecodes will differ in some
deck modes.
Asynchronous transport information change notification is disabled by default and may be configured
with the "notify" command. When enabled, changes in transport state will generate a "508 transport info:"
asynchronous message with the same parameters as the "208 transport info:" message.
234Información para desarrolladores (eninglés)

Video Formats
The following video formats are currently supported on HyperDeck Shuttle:
720p50, 720p5994, 720p60
1080p23976, 1080p24, 1080p25, 1080p2997, 1080p30, 1080p60
1080i50, 1080i5994, 1080i60
Video format support may vary between models and software releases.
File Formats
All HyperDeck models currently support the following file formats:
H.264High
H.264Medium
H.264Low
QuickTimeProResHQ
QuickTimeProRes
QuickTimeProResLT
QuickTimeProResProxy
QuickTimeDNxHD220x
DNxHD220x
QuickTimeDNxHD145
DNxHD145
QuickTimeDNxHD45
DNxHD45
Supported file formats may vary between models and software releases.
235Información para desarrolladores (eninglés)

Querying and updating configuration information
The "configuration" command may be used to query the current configuration of the deck:
configuration↵
The server returns the configuration of the deck:
211 configuration:↵
audio input: {“embedded”, “XLR”, “RCA”}↵
audio mapping: {n}↵
video input: {“SDI”, “HDMI”, “component”, “composite”}↵
file format: {format}↵
audio codec: {“PCM”, “AAC”}↵
timecode input: {“external”, “embedded”, “preset”, “clip”}↵
timecode output: {“clip”, “timeline”}↵
timecode preference: {“default”, “dropframe”, “nondropframe”}↵
timecode preset: {timecode}↵
audio input channels: {n}↵
record trigger: {“none”, “recordbit”, “timecoderun”}↵
record prefix: {name}↵
append timestamp: {“true”, “false”}↵
genlock input resync: {“true”, “false”}↵
↵
One or more configuration parameters may be specified to change the configuration of the deck.
To change the current video input:
configuration: video input: {“SDI”, “HDMI”, “component”}↵
Valid video inputs may vary between models. To configure the current audio input:
configuration: audio input: {“embedded”, “XLR”, “RCA”}↵
Valid audio inputs may vary between models.
To configure the current file format:
configuration: file format: {File format}↵
Note that changes to the file format may require the deck to reset, which will cause the client connection to
be closed. In such case, response code 213 will be returned (instead of 200) before the client connection is
closed:
“213 deck rebooting”
Asynchronous configuration information change notification is disabled by default and may be configured
with the “notify” command. When enabled, changes in configuration will generate a “511 configuration:”
asynchronous message with the same parameters as the “211 configuration:” message.
236Información para desarrolladores (eninglés)

Selecting active slot and video format
The "slot select" command instructs the deck to switch to a specified slot, or/and to select a specified output
video format.
To switch to a specified slot:
slot select: slot id: {slot ID}↵
To select the output video format:
slot select: video format: {video format}↵
Either or all slot select parameters may be specified. Note that selecting video format will result in a rescan of
the disk to reconstruct the timeline with all clips of the specified video format.
Clearing the current timeline
The "clips clear" command instructs the deck to empty the current timeline:
clips clear↵
The server responds with
200 ok↵
Adding a clip to the current timeline
The "clips add:" command instructs the deck to add a clip to the current timeline:
clips add: name: {clip name}↵
The server responds with
200 ok↵
or in case of error
1xx {error description}↵
Configuring the watchdog
The “watchdog” command instructs the deck to monitor the connected client and terminate the connection if
the client is inactive for at least a specified period of time.
To configure the watchdog:
watchdog: period: {period in seconds}↵
To avoid disconnection, the client must send a command to the server at least every {period} seconds. Note
that if the period is set to 0 or less than 0, connection monitoring will be disabled.
237Información para desarrolladores (eninglés)

Ayuda
Cómo obtener ayuda
Visite nuestra página de soporte técnico para obtener ayuda rápidamente y acceder al material de
apoyo más reciente para los productos descritos en este manual.
Página de soporte técnico
Las versiones más recientes de este manual, los distintos programas mencionados y el material de
apoyo se encuentran disponibles en nuestra página de soporte técnico.
Foro
El foro de Blackmagic Design permite compartir ideas creativas y constituye un recurso útil para
obtener más información sobre nuestros productos. Por otra parte, brinda la posibilidad de
encontrar rápidamente respuestas suministradas por usuarios experimentados o por el personal de
Blackmagic Design. Para acceder al foro, visite la página
https://forum.blackmagicdesign.com.
Cómo ponerse en contacto con Blackmagic Design
Si no encuentra la ayuda que necesita, solicite asistencia mediante el botón
Enviar correo
electrónico
, situado en la parte inferior de nuestra página de soporte técnico. De manera
alternativa, haga clic en el botón
Soporte técnico local para acceder al número telefónico del centro
de atención más cercano.
Cómo comprobar la versión del software instalado
Para comprobar la versión del programa instalada en su equipo informático, acceda al menú About
Blackmagic HyperDeck Setup
.
En macOS, ejecute el programa desde la carpeta de aplicaciones. Seleccione el menú
About Blackmagic HyperDeck Setup en la barra superior de la ventana para ver el número
de versión.
En Windows, ejecute el programa Blackmagic HyperDeck Setup haciendo clic en el ícono
situado en el menú
Inicio. En el menú Help, seleccione la opción About Blackmagic
HyperDeck Setup
para ver el número de versión.
Cómo obtener las actualizaciones más recientes
Después de verificar la versión del programa instalado, visite nuestra página de soporte técnico
para comprobar si hay actualizaciones disponibles. Aunque generalmente es recomendable instalar
las versiones más recientes, evite realizar modificaciones al sistema operativo interno del dispositivo
si se encuentra en medio de un proyecto importante.
238Ayuda
Normativas
Tratamiento de residuos de equipos eléctricos y electrónicos en la Unión Europea:
Este símbolo en el producto indica que el dispositivo no debe desecharse con otros
residuos domésticos. Por lo tanto, es su responsabilidad entregarlo a un centro de
recolección para su posterior reciclado. Esto ayuda a preservar los recursos naturales y
garantiza que dicho procedimiento se realice protegiendo la salud y el medioambiente.
Para obtener más información en este sentido, comuníquese con el centro de reciclaje más
cercano o el distribuidor donde adquirió el producto.
Según las pruebas realizadas, este equipo cumple con los límites indicados para
dispositivos digitales Clase A, en conformidad con la sección 15 de las normas establecidas
por la Comisión Federal de Comunicaciones. Esto permite proporcionar una protección
razonable contra interferencias nocivas al operar el dispositivo en un entorno comercial.
Este equipo usa, genera y puede irradiar energía de radiofrecuencia, y si no se instala o
utiliza de acuerdo con el manual de instrucciones, podría ocasionar interferencias
perjudiciales en las comunicaciones radiales. El funcionamiento de este equipo en una
zona residencial podría ocasionar interferencias significativas, en cuyo caso el usuario
deberá solucionar dicho inconveniente por cuenta propia.
El funcionamiento de este equipo está sujeto a las siguientes condiciones:
1 Este dispositivo no puede causar interferencias nocivas y,
2 El dispositivo debe admitir cualquier interferencia recibida, incluidas aquellas que
pudieran provocar un funcionamiento incorrecto del mismo.
R-R-BMD-20211410001
Declaración ISED (Canadá)
Este dispositivo cumple con las normas del gobierno de Canadá relativas a equipos
digitales clase A.
Cualquier modificación o uso indebido del mismo podría acarrear un incumplimiento de
dichas normas.
Las conexiones a interfaces HDMI deberán realizarse mediante cables blindados.
Este equipo cumple con las normas descritas anteriormente al emplearse en entornos
comerciales. Nótese que podría ocasionar interferencia radial al utilizarlo en ambientes
domésticos.
239Normativas

Seguridad
Este equipo puede utilizarse en climas tropicales, a una temperatura ambiente máxima de 40ºC.
Compruebe que haya suficiente ventilación en torno a la unidad.
La reparación de los componentes internos del equipo no debe ser llevada a cabo por el usuario.
Comuníquese con nuestro centro de atención más cercano para obtener información al respecto.
Evite utilizar el equipo a una altura mayor de 2000metros.
Declaración del Estado de California
Las partes plásticas de este producto pueden contener trazas de compuestos químicos, tales como
polibromobifenilos (PBB), que el Estado de California reconoce como causantes de cáncer,
anomalías congénitas o daños reproductivos.
Consulte el sitio
www.P65Warnings.ca.gov para obtener más información al respecto.
240Seguridad

Garantía
12 meses de garantía limitada
Blackmagic Design ofrece una garantía de 12 meses a partir de la fecha de compra de este producto
por defectos relativos a los materiales o la fabricación. Si el producto resulta defectuoso durante el
período de validez de la garantía, Blackmagic Design podrá optar por reemplazarlo o repararlo sin
cargo alguno por concepto de piezas y/o mano de obra.
Para acceder al servicio proporcionado de acuerdo con los términos de esta garantía, el Cliente deberá
dar aviso del defecto a Blackmagic Design antes del vencimiento del período de garantía y encargarse
de los arreglos necesarios para la prestación del mismo. El Cliente será responsable del empaque y
el envío del producto defectuoso al centro de servicio técnico designado por Blackmagic Design, y
deberá abonar las tarifas postales por adelantado. El Cliente será responsable de todos los gastos de
envío, seguros, aranceles, impuestos y cualquier otro importe que surja con relación a la devolución
de productos por cualquier motivo.
Esta garantía carecerá de validez ante defectos o daños causados por un uso indebido del producto
o por falta de cuidado y mantenimiento. Blackmagic Design no tendrá obligación de prestar el servicio
estipulado en esta garantía para (a) reparar daños provocados por intentos de personal ajeno a
Blackmagic Design de instalar el producto, repararlo o realizar un mantenimiento del mismo; (b) reparar
daños resultantes del uso de equipos incompatibles o conexiones a los mismos; (c) reparar cualquier
daño o mal funcionamiento provocado por el uso de piezas o repuestos no suministrados por
Blackmagic Design; o (d) brindar servicio técnico a un producto que haya sido modificado o integrado
con otros productos, cuando dicha modificación o integración tenga como resultado un aumento de
la dificultad o el tiempo necesario para reparar el producto. ESTA GARANTÍA OFRECIDA POR
BLACKMAGIC DESIGN REEMPLAZA CUALQUIER OTRA GARANTÍA, EXPRESA O IMPLÍCITA. POR
MEDIO DE LA PRESENTE, BLACKMAGIC DESIGN Y SUS DISTRIBUIDORES RECHAZAN CUALQUIER
GARANTÍA IMPLÍCITA DE COMERCIALIZACIÓN O IDONEIDAD PARA UN PROPÓSITO PARTICULAR.
LA RESPONSABILIDAD DE BLACKMAGIC DESIGN EN CUANTO A LA REPARACIÓN O SUSTITUCIÓN
DE PRODUCTOS DEFECTUOSOS CONSTITUYE UNA COMPENSACIÓN COMPLETA Y EXCLUSIVA
PROPORCIONADA AL CLIENTE POR CUALQUIER DAÑO INDIRECTO, ESPECIAL, FORTUITO O
EMERGENTE, AL MARGEN DE QUE BLACKMAGIC DESIGN O SUS DISTRIBUIDORES HAYAN SIDO
ADVERTIDOS CON ANTERIORIDAD SOBRE LA POSIBILIDAD DE TALES DAÑOS. BLACKMAGIC DESIGN
NO SE HACE RESPONSABLE POR EL USO ILEGAL DE EQUIPOS POR PARTE DEL CLIENTE. BLACKMAGIC
DESIGN NO SE HACE RESPONSABLE POR DAÑOS CAUSADOS POR EL USO DE ESTE PRODUCTO.
EL USUARIO UTILIZA EL PRODUCTO BAJO SU PROPIA RESPONSABILIDAD.
© Copyright 2022 Blackmagic Design. Todos los derechos reservados. Blackmagic Design, DeckLink, HDLink, Videohub
Workgroup, Multibridge Pro, Multibridge Extreme, Intensity y «Leading the creative video revolution» son marcas registradas
en Estados Unidos y otros países. Todos los demás nombres de compañías y productos pueden ser marcas comerciales de las
respectivas empresas a las que estén asociados.
241Garantía

HyperDeck Shuttle HD
HyperDeck
Shuttle HD
2022年4月
安装操作手册

欢迎辞
感谢您购买Blackmagic HyperDeck Shuttle HD硬盘录机!
早在构思原版Blackmagic HyperDeck硬盘录机时,我们的目标就是设计出一款能使用高速SSD
存储方案更快捷地记录并播放视频的产品。如今,我们终于推出了HyperDeck Shuttle HD!
HyperDeck Shuttle HD是一款采用小巧便携设计的台式HDMI视频记录设备。它搭载大尺寸搜
索旋钮和熟悉的播放控制,能实现单手操控,是搭配ATEM Mini切换台进行现场制作的理想搭档。
此外,HyperDeck Shuttle HD还可以作为一台提词器来使用!
HyperDeck
Shuttle
HD
能使用
ProRes
、
DNxHD
或
H.264
编码格式将文件记录到
SD
卡或外部
闪存盘上,实现非常快速的记录和播放。
请登陆公司网站www.blackmagicdesign.com/cn,访问支持页面获取最新版操作手册以及
HyperDeck
软件更新。请注意定期更新您的软件以便获得最新功能。下载软件时,请注册您的相
关信息,以便我们发布新软件时能及时通知您。我们将不断致力于产品的功能开发和性能改进,
诚挚期待您的意见和建议!
Grant Petty
Blackmagic Design首席执行官

目录
开始使用 245
连接电源245
连接视频和音频246
连接存储介质246
记录视频 247
播放 248
使用搜索旋钮249
更改设置 251
设置 252
后面板 261
存储介质 262
SD
卡
262
外接硬盘263
格式化存储介质 263
在计算机上准备存储介质263
使用提词器功能 265
Blackmagic
HyperDeck Setup
266
通过网络传输文件 268
Developer
Information
270
Blackmagic
HyperDeckEthernetProtocol
270
Protocol
Commands
270
Protocol
Details
274
帮助 286
监管告知 287
安全信息 288
保修 289
244
HyperDeck Shuttle HD
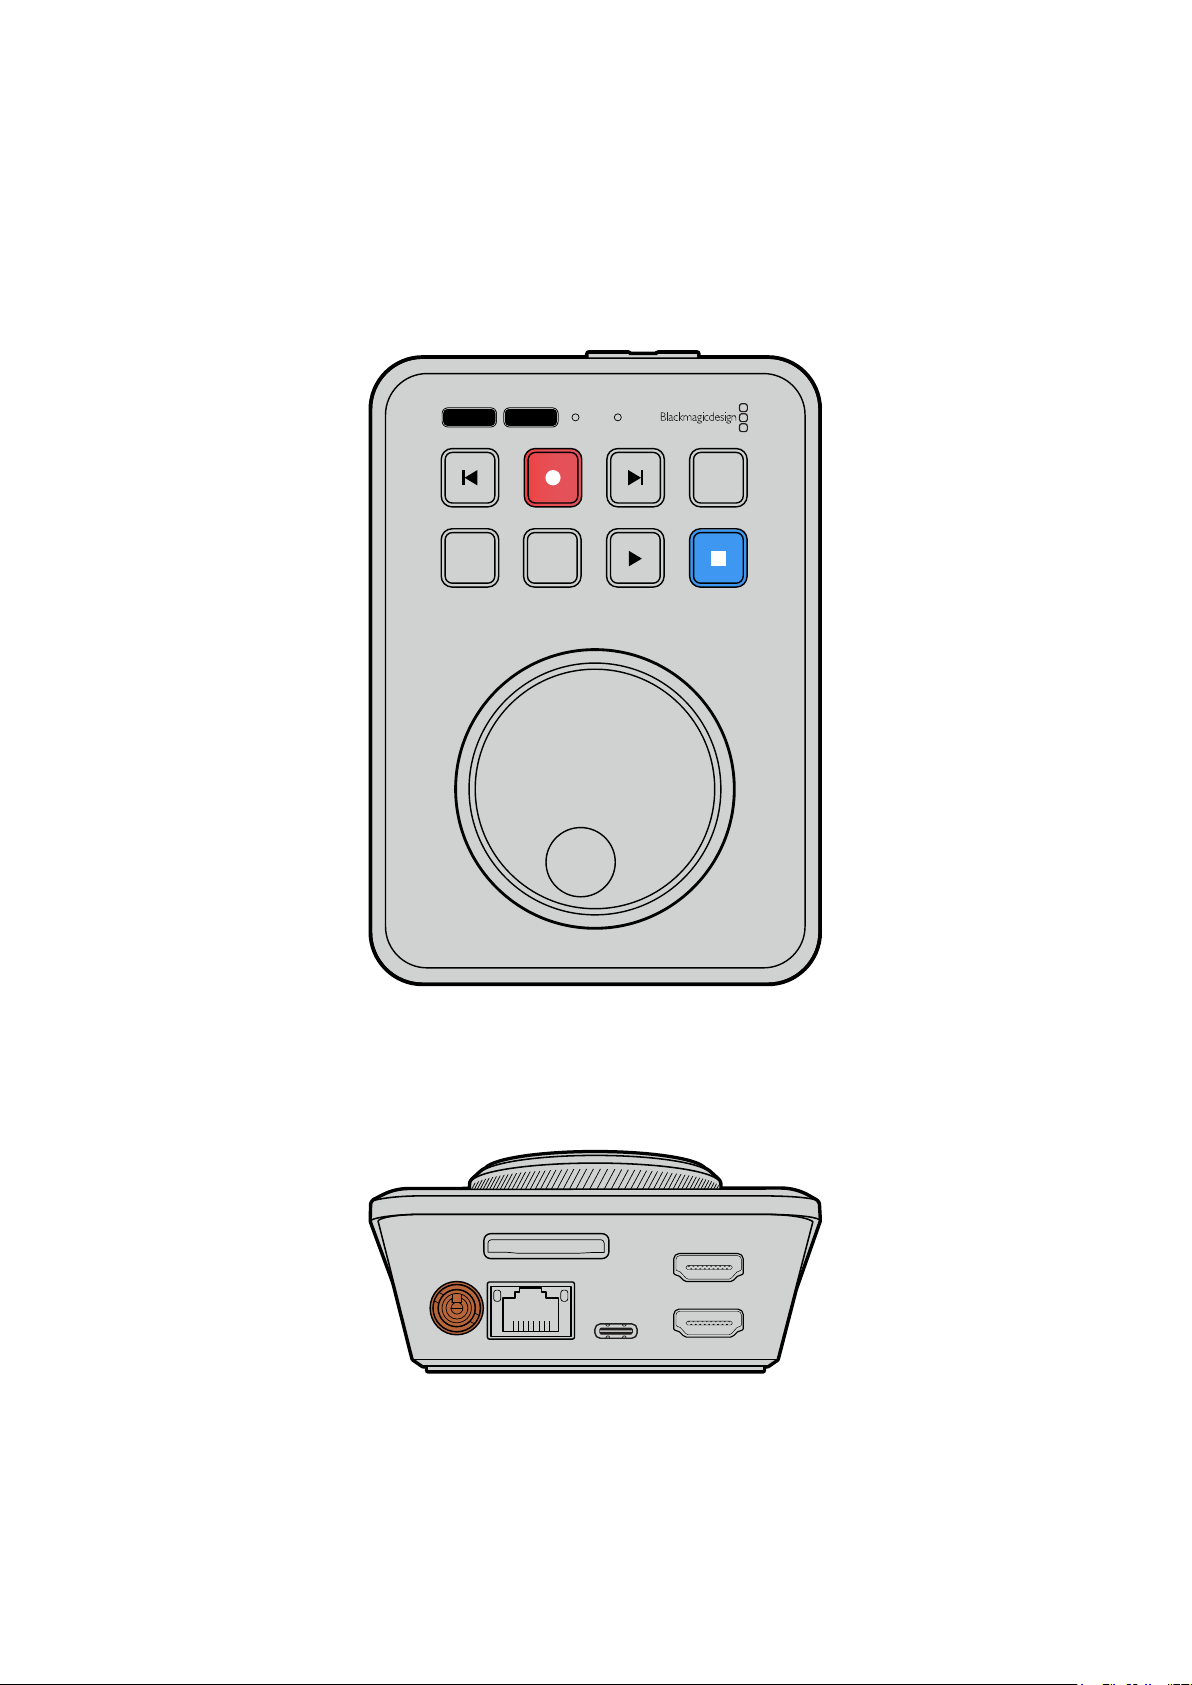
开始使用
HyperDeck Shuttle HD使用前的准备工作很简单,只要连接电源,连接HDMI视频源,插入SD卡或外
接存储介质,然后按下记录就可以了!
本手册的这一部分介绍了开始使用
HyperDeck Shuttle HD前的准备事项。
JOG SCR
CLIP
MENU SET
DISK SD
连接电源
为HyperDeck Shuttle HD连接电源时,请将内附的电源适配器连接到设备后面板的电源输入接口。旋
紧电源线的锁定环,防止连接意外断开。
HDMI OUT
HDMI IN
EXT DISK
SD CARD
ETHERNET
+
12V DC
将电源适配器妥善连接到
HyperDeck
Shuttle
HD
的电源输入接口
245
开始使用

连接视频和音频
要将视频连接到HyperDeck Shuttle HD,请将HDMI视频源连接设备后面板的HDMI输入接口。
HDMI OUT
HDMI IN
EXT DISK
SD CARD
ETHERNET
+
12V DC
将目标设备连接到HDMI输出接口。比如ATEM Mini切换台或HDMI电视。
HDMI输出也可用来在更改HyperDeck的设置时查看设置菜单。因为设置菜单可通过在HDMI输出上显
示视频叠加进行查看。更多关于菜单设置的信息,请阅读本手册后续在“更改设置”部分的介绍。
提示 如果您无法在所连接的显示器上看到输入视频,这可能是因为设备处于播放模式下。按记
录按钮启用记录模式。
HDMI OUT
HDMI IN
EXT DISK
SD CARD
ETHERNET
+
12V DC
HDMI
将
HDMI
输出连接到目标设备,如
HDMI
电视或
ATEM
Mini
切换台
连接存储介质
所有HyperDeck Shuttle HD硬盘录机拆封后便可立即开始记录,无需进行任何配置或设置。您需要准
备的只有一个经过格式化的
SD卡或外部存储盘。
存储介质可通过菜单设置轻松完成格式化,或者使用计算机进行格式化。详情请阅读本手册中“格式化存
储介质”部分的介绍。该部分还具体介绍了哪类存储介质适合用于视频记录,以及推荐使用的SD卡和外
部硬盘列表相关信息。
插入
SD卡步骤如下:
1
手持
SD
卡,将其金色接触点朝上并对准存储介质插槽。然后,将存储卡轻轻推入卡槽,直至插
入到位。
246
开始使用
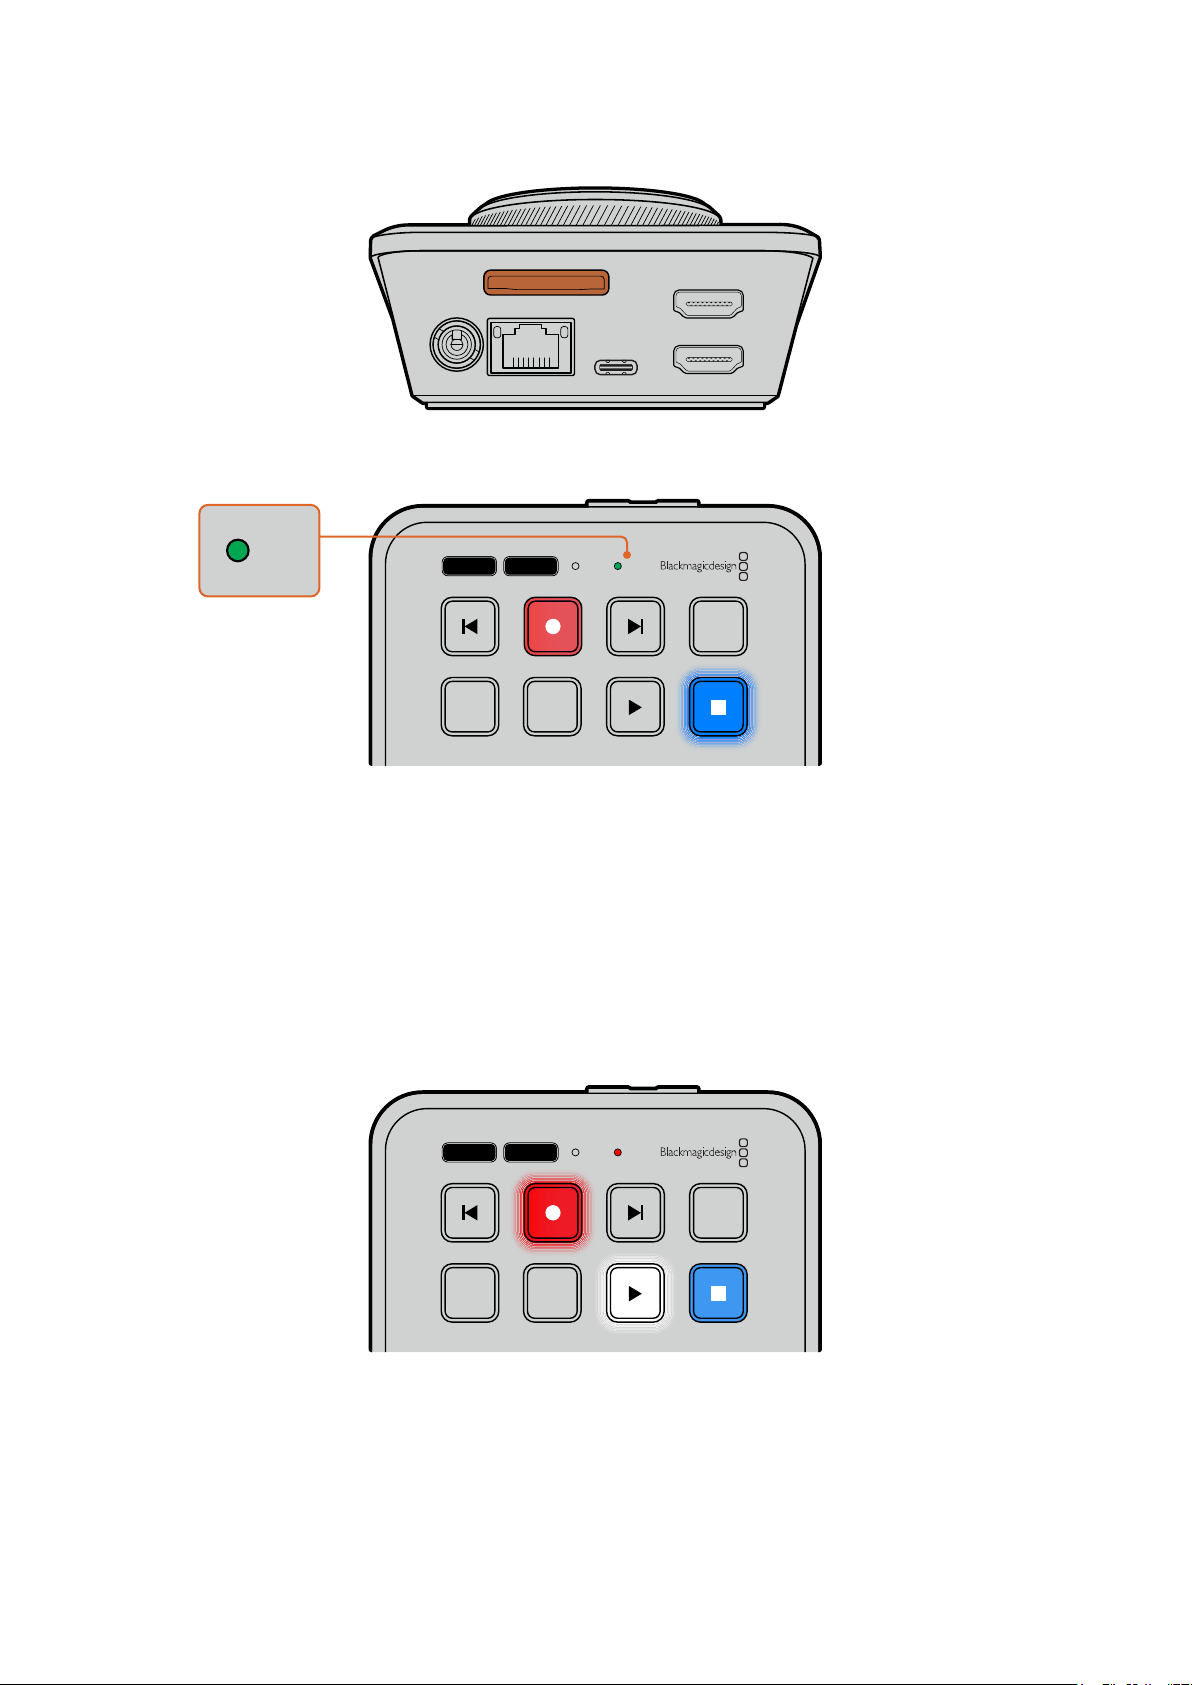
HDMI OUT
HDMI IN
EXT DISK
SD CARD
ETHERNET
+
12V DC
2
您的HyperDeck将验证插入的SD卡。此时,HyperDeck Shuttle HD上方的SD卡提示灯会亮
起绿色。验证完毕后,提示灯会熄灭。
JOG SCR
CLIP
MENU SET
DISK SD
DISK SD
至此,HyperDeck Shuttle HD的准备工作全部完成,您现在就可以开始记录和播放了!
请继续阅读本操作手册,了解更多关于如何记录和播放片段、如何更改设置等方面的详细信息。
记录视频
在HDMI目标设备上确认视频源显示后,就可以立即开始记录了!
要开始记录,请按记录按钮。使用SD卡记录时,设备上的SD提示灯会亮起红色,并且记录和播放按钮也会
相应亮起。使用外部存储盘记录时,设备上的存储盘提示灯会亮起红色。
JOG SCR
CLIP
MENU SET
DISK SD
要结束记录,请按停止按钮。
247
记录视频

播放
按下播放按钮可开始片段播放。播放期间,播放按钮会亮起,并且相应的“DISK”或“SD”存储介质插槽提
示灯会亮起绿色。
如果记录了多个片段,您可以按向前和向后跳过按钮在这些片段之间快速移动。
JOG SCR
CLIP
MENU SET
DISK SD
使用跳过按钮
按向后跳过按钮可以跳转到片段开始的位置。反复按该按钮可逐个退回到之前记录的片段。
按向前跳过按钮可以逐个向前跳转片段。
JOG SCR
CLIP
MENU SET
DISK SD
使用向前或向后跳过按钮可跳转到每个片段的开始位置
提示 要在HyperDeck上播放视频文件,需要设置相应的编解码以匹配记录文件时所使用的
编解码。您可以使用菜单来完成这一操作。详情请阅读本手册后续在“更改设置”部分的介绍。
248
播放
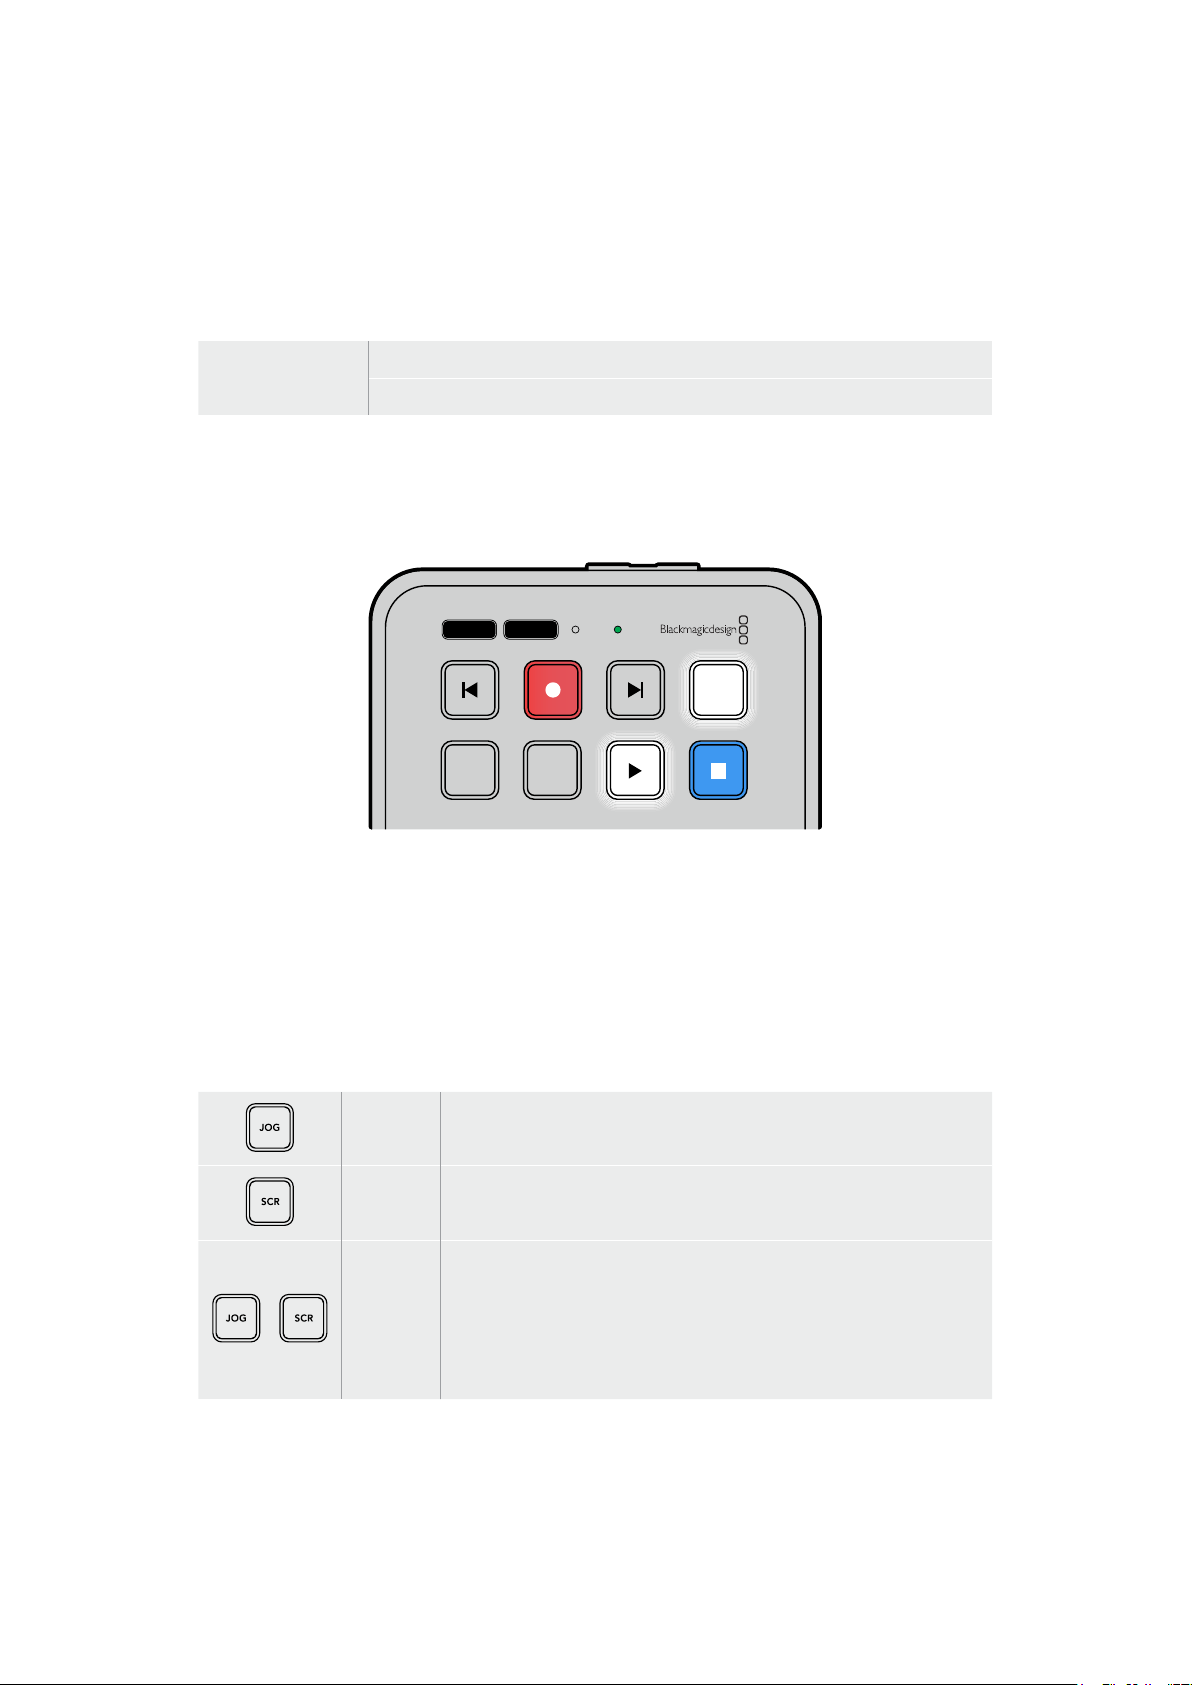
循环片段
播放期间,再次按下播放按钮可将您的HyperDeck Shuttle HD设置为循环所有片段,按停止按钮可终
止循环播放。
如果要循环单个片段,可将
HyperDeck
设置为“
CLIP
”(片段)模式。该模式下,按播放按钮一次可开始播
放,再次按下播放按钮可循环播放。
循环所有片段播放期间,再次按下播放按钮可循环播放所有记录片段。
循环当前片段在片段模式下,再次按下播放按钮可循环播放当前片段。
片段模式
片段模式能将播放限制为单个片段。比如,启用片段模式后,您可以快速运行或跳到某个片段,然后按下
播放键,播放将会在片段结束时停止。
JOG SCR
CLIP
MENU SET
DISK SD
选中片段模式时,再次按下播放按钮将会循环播放当前片段。
使用搜索旋钮
使用搜索旋钮可以在片段之间快速移动,选择某个具体部分进行播放,或者逐帧查看。这是一项重要的功
能,您可以转动旋钮以直观的方式查看片段,找到某个特定位置。此外,您还可以使用它将播放头停在特定
的提示点做好准备,以便在直播期间切入片段。
搜索旋钮模式包括慢速搜索、极速搜索和快速搜索。
慢速逐帧播放片段内容,从而实现精准控制。
极速
极速模式能快速地在所有记录的媒体文件中向前或向后移动。在您转动搜索
旋钮的时候,极速模式会与您的转动操作绑定,从而全面控制播放的位置。
快速
同时按下“
JOG”和“SCR”按钮可进入快速模式。进入快速模式后,只要向左或
向右旋转旋钮,就可以在媒体文件之间快退或快进。在您转动旋钮的时候,媒
体文件的速度移动会加快,直至达到x50的最大速度。要将快速运行速度降
低到停止状态,可转动旋钮使其回到开始位置。快速运行期间,如果想在某个
特定位置停止,可按停止按钮;按播放按钮可在当前位置重新开始播放运行。
此外,使用设置菜单也可以降低最大快速运行速度。详情请参考本手册“设置”
部分的内容。
249
播放

JOG SCR
CLIP
MENU SET
DISK SD
按下专设的“
JOG
”和“
SCR
”按钮可相应选择慢速和极速搜索模式
JOG SCR
CLIP
MENU SET
DISK SD
选定搜索模式后,转动旋钮进行搜索
提示 要回到正常播放模式,可按播放或停止按钮。
250
播放
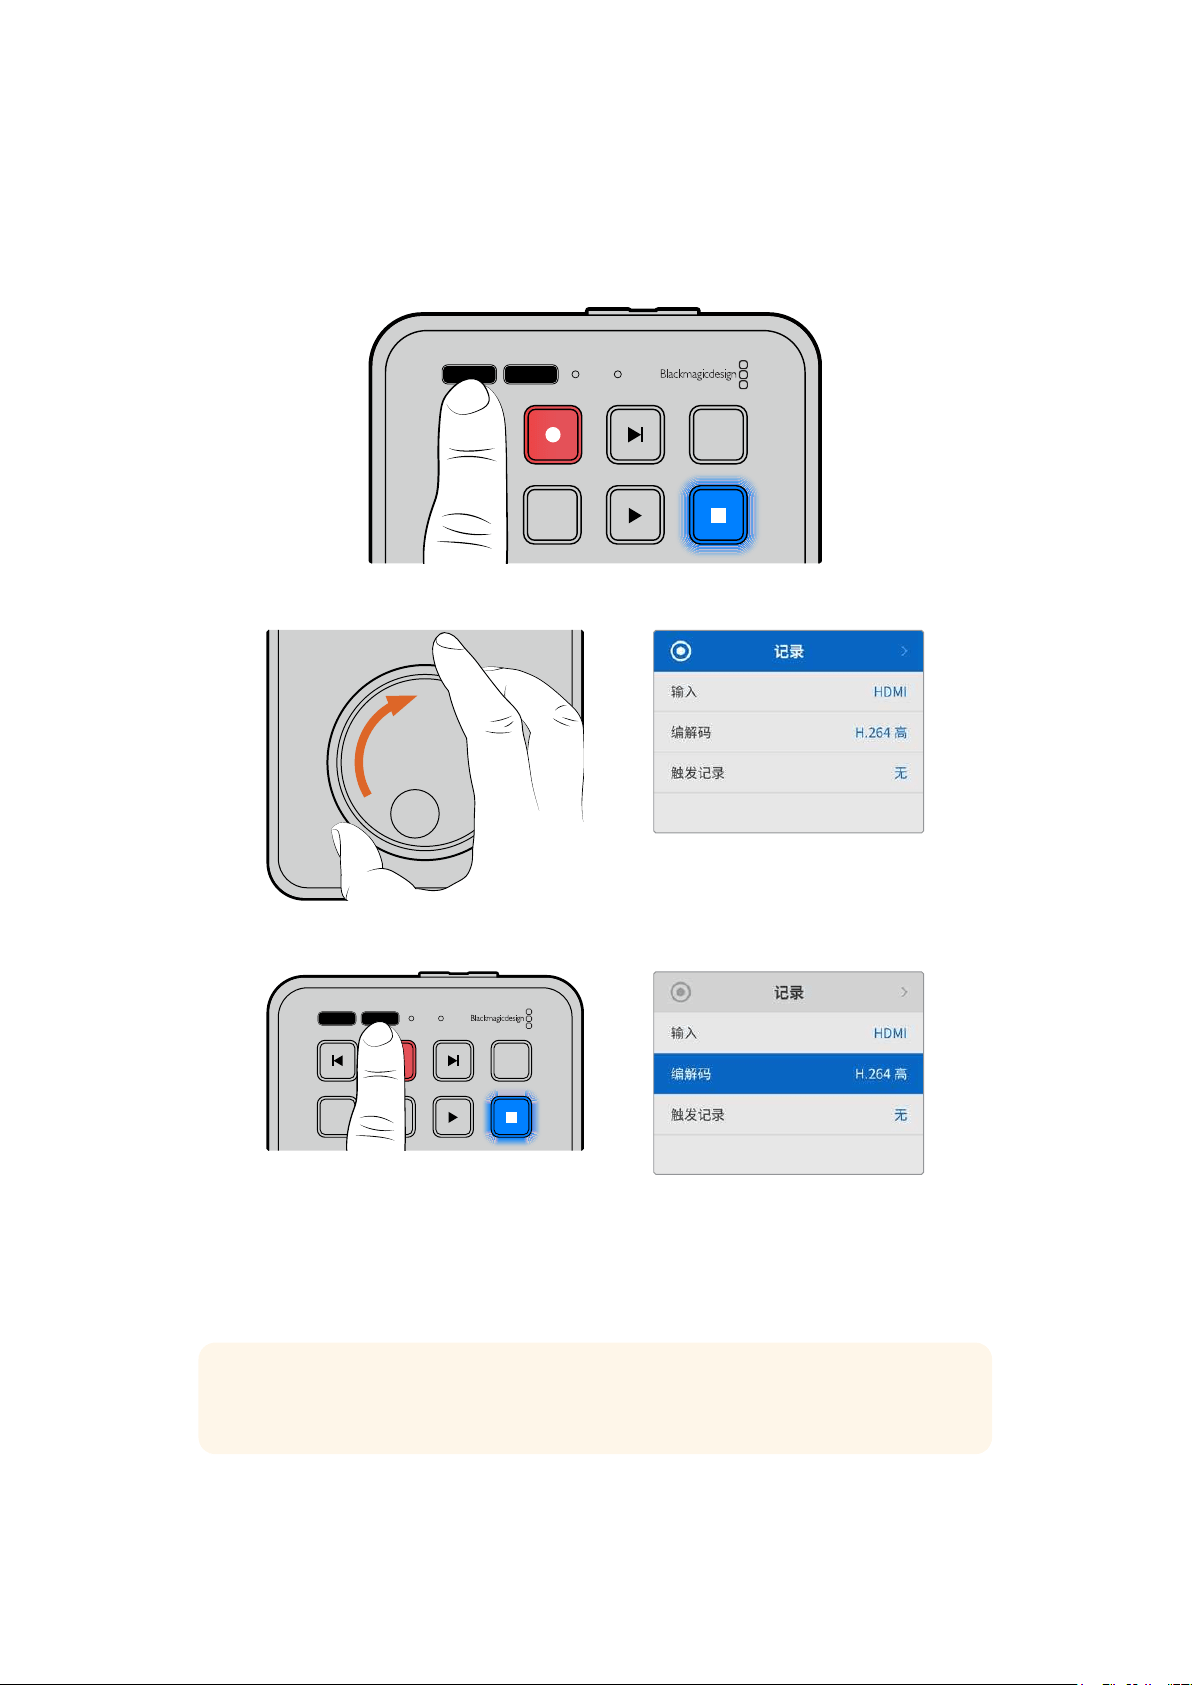
更改设置
按“
MENU
”(菜单)按钮可打开设置菜单,该菜单会以视频叠加信息的形式显示在所连接
HDMI
显示器的
左下角。
JOG SCR
CLIP
MENU SET
DISK SD
按“
MENU
”按钮打开设置菜单。
使用搜索旋钮在子菜单或各项设置之间导航
按“
SET
”按钮选择相应的子菜单或设置
要调整设置,可转动搜索旋钮,或者使用向前、向后跳过按钮。按“SET”按钮确认选择。
要退出菜单界面,可按“
MENU”按钮逐层返回各级选项并回到主页面。
提示
您可以使用设置菜单将菜单显示放置在屏幕四角的任意一角上。建议您完成设置更改后关闭
菜单显示,从而确保
HDMI
输出连接
ATEM
Mini
Extreme
等
HDMI
切换台时为干净的画面信号。
JOG SCR
CLIP
MENU SET
DISK SD
251
更改设置
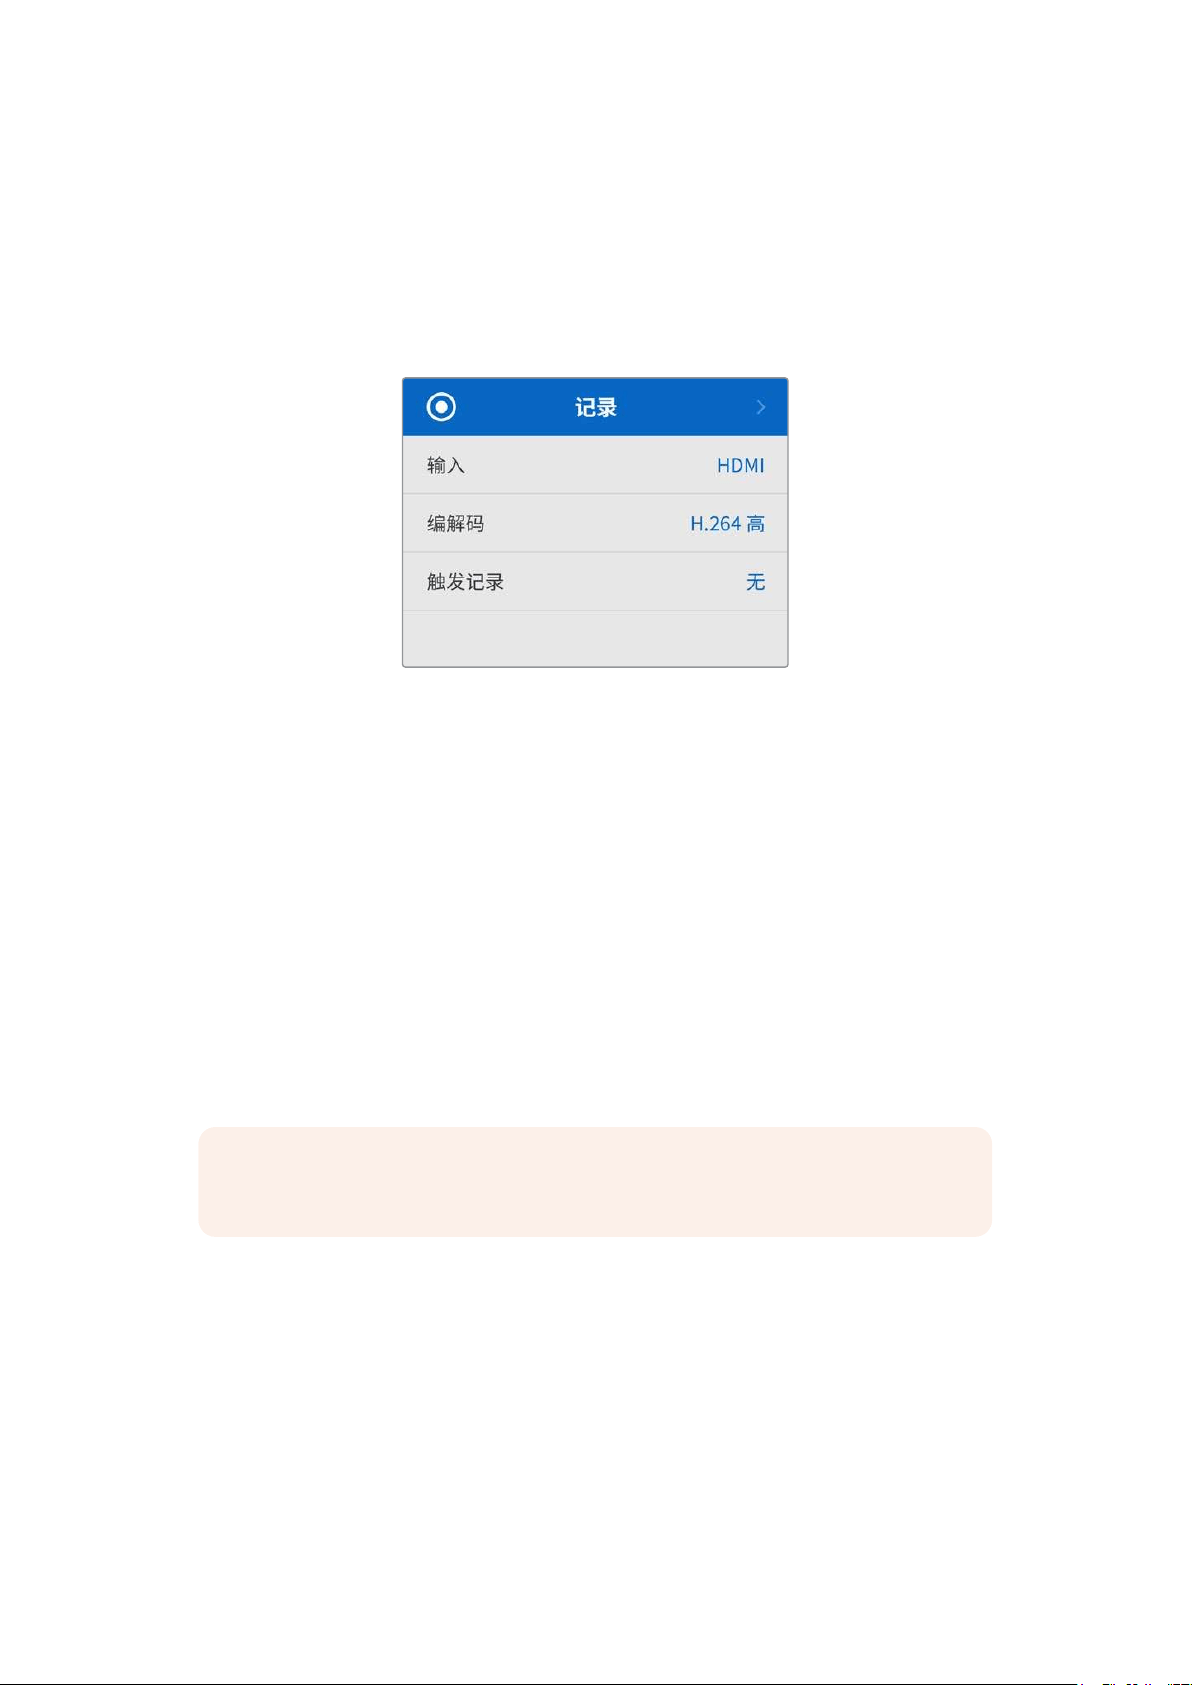
设置
设置菜单一共分为5个不同类别,具体是记录、监看、音频、存储以及设置。每个子菜单都包含相关的设置,
大部分设置都能通过使用HyperDeck Shuttle HD控制面板进行调整。部分设置仅供显示,并且呈灰色
字体,比如“文件名前缀”。在本例中,设置可通过
HyperDeck Setup实用程序进行调整。
记录菜单
输入
可显示
HyperDeck Shuttle HD的HDMI输入。
编解码
HyperDeck Shuttle HD都可使用H.264、Apple ProRes和DNxHD编解码记录压缩视频。如要使用
提词器功能,可选择“提词器”。
触发记录
共有两种触发记录模式,“视频开始/停止”和“时间码运行”。
包括Blackmagic Pocket Cinema Camera 4K在内的部分摄影机可通过HDMI向外部记录设备发送
开始和停止记录的信号。选择“视频开始/停止”选项后,按摄影机上的记录按钮就可以触发HyperDeck
开始或停止记录。
使用“时间码运行”选项时,只要设备通过HDMI输入接收到有效时间码信号,就会触发开始记录的动作。
当信号停止时,记录也停止。选择“无”选项可禁用触发记录功能。
备注 从HDMI摄影机记录时,请确保设备输出的是无叠加信息的纯画面,因为任何显示在摄影
机视频输出画面上的叠加信息都将被一同记录下来。
252
设置
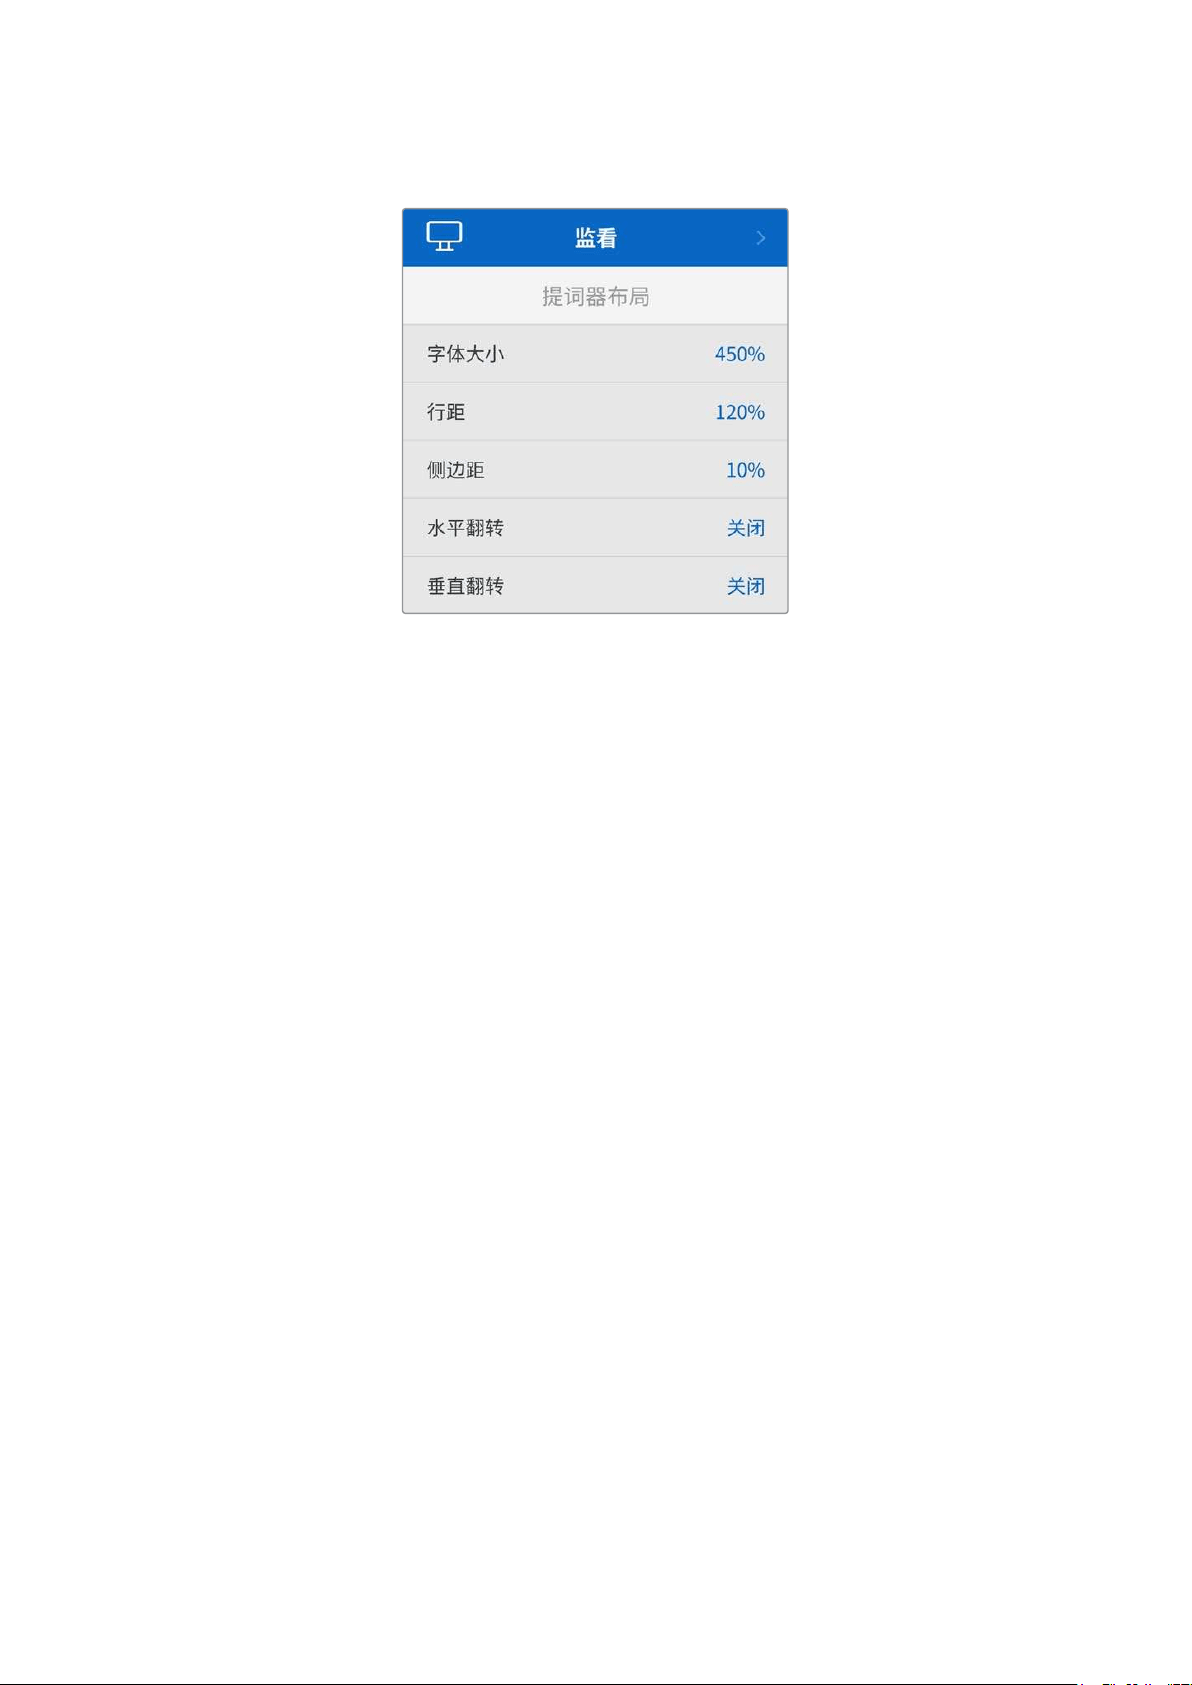
监看菜单
提词器布局
监看菜单包含将HyperDeck Shuttle HD作为提词器使用时所需的全部设置。
字体大小
选择相应的字体大小选项后,按下
SET
按钮,完成文本大小调整。顺时针转动旋钮可放大字体,逆时针转
动可缩小字体。
行距
转动旋钮来增加或减少行距。
侧边距
调整提词器显示的两侧宽度。
翻转
如果提词器的显示器是设置为反射到玻璃上的,比如在摄影机前或演讲台上,就需要使用翻转设置,方便
主持人或演讲者阅读。翻转模式共有两种:
水平翻转 - 如果提词器显示器的底部被安装固定在最靠近玻璃底部的位置,可使用这一模式。
垂直翻转 - 如果提词器显示器的底部被安装固定在远离玻璃底部的位置,可使用这一模式。
253
设置
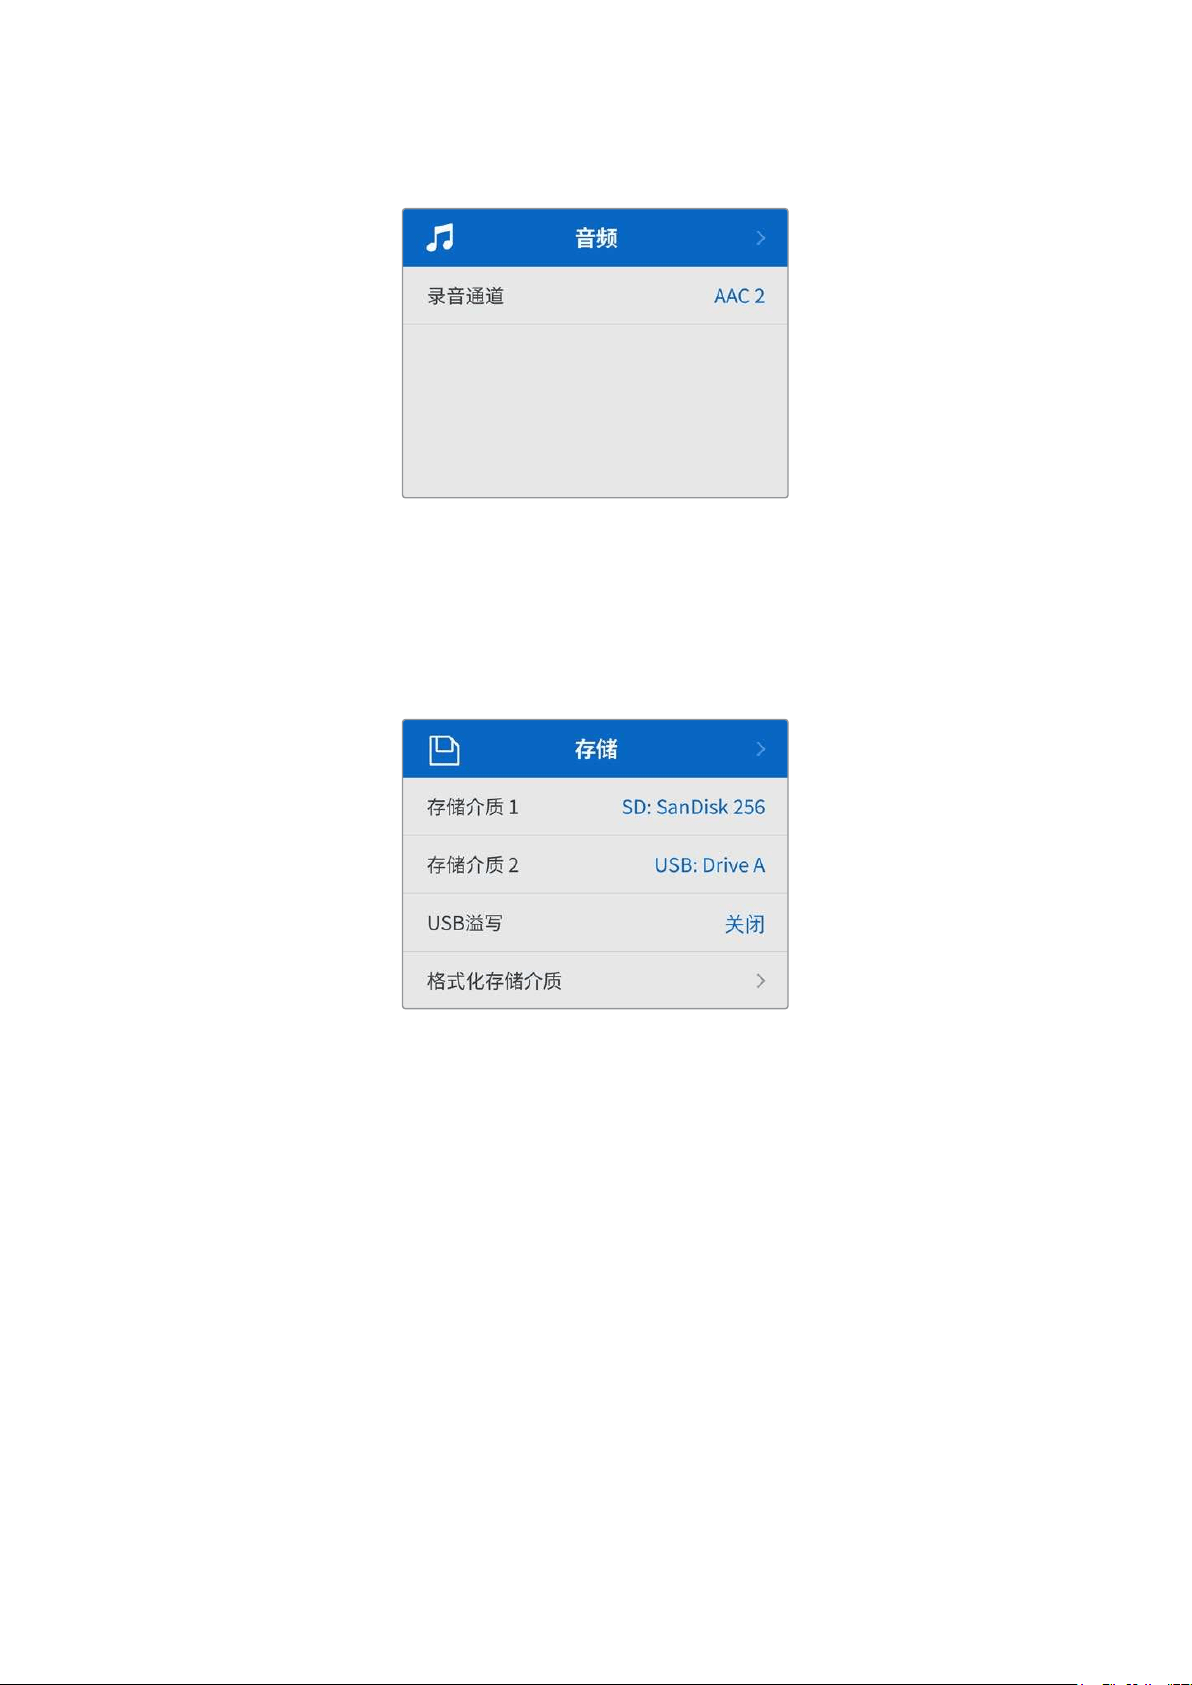
音频菜单
录音通道
HyperDeck Shuttle HD一次可记录多达8声道PCM音频。要选择记录通道的数量,请扩展录音频通道
列表,选择
2、4或8声道。
如果编解码被设为
H.264,您可以选择2声道AAC音频,以便直接将记录内容上传到YouTube。
存储菜单
连接的存储介质将会显示在存储设置中。存储介质 1会显示所连接的SD卡名称列表,存储介质 2会显示
连接到外部存储盘接口的USB硬盘。使用Blackmagic MultiDock 10G等USB集线器设备时,当前活跃
的存储盘会被显示出来。
USB溢写
如果使用
Blackmagic MultiDock 10G或类似产品通过标有“EXT DISK”的USB接口连接多个存储盘,
开启“
USB溢写”功能可以确保记录内容将从一个外部存储盘跳转到下一个外部存储盘。
格式化存储介质
通过“
EXT
DISK
”接口连接的
SD
卡和其他存储介质可直接在设备上或通过
Mac
或
Windows
计算机格式化。
使用HyperDeck Shuttle HD格式化存储介质:
1
使用搜索旋钮和“SET”按钮,选择“格式化存储介质”。
2
从列表中选择要格式化的存储介质,并按“SET”按钮。
3
选定格式后,按“SET”按钮。
4
随后会出现确认窗口,显示即将被格式化的存储介质以及选定的格式化选项,选择“格式化”。
5
格式化完毕后会出现一个提示窗口,选择“确定”。
254
设置
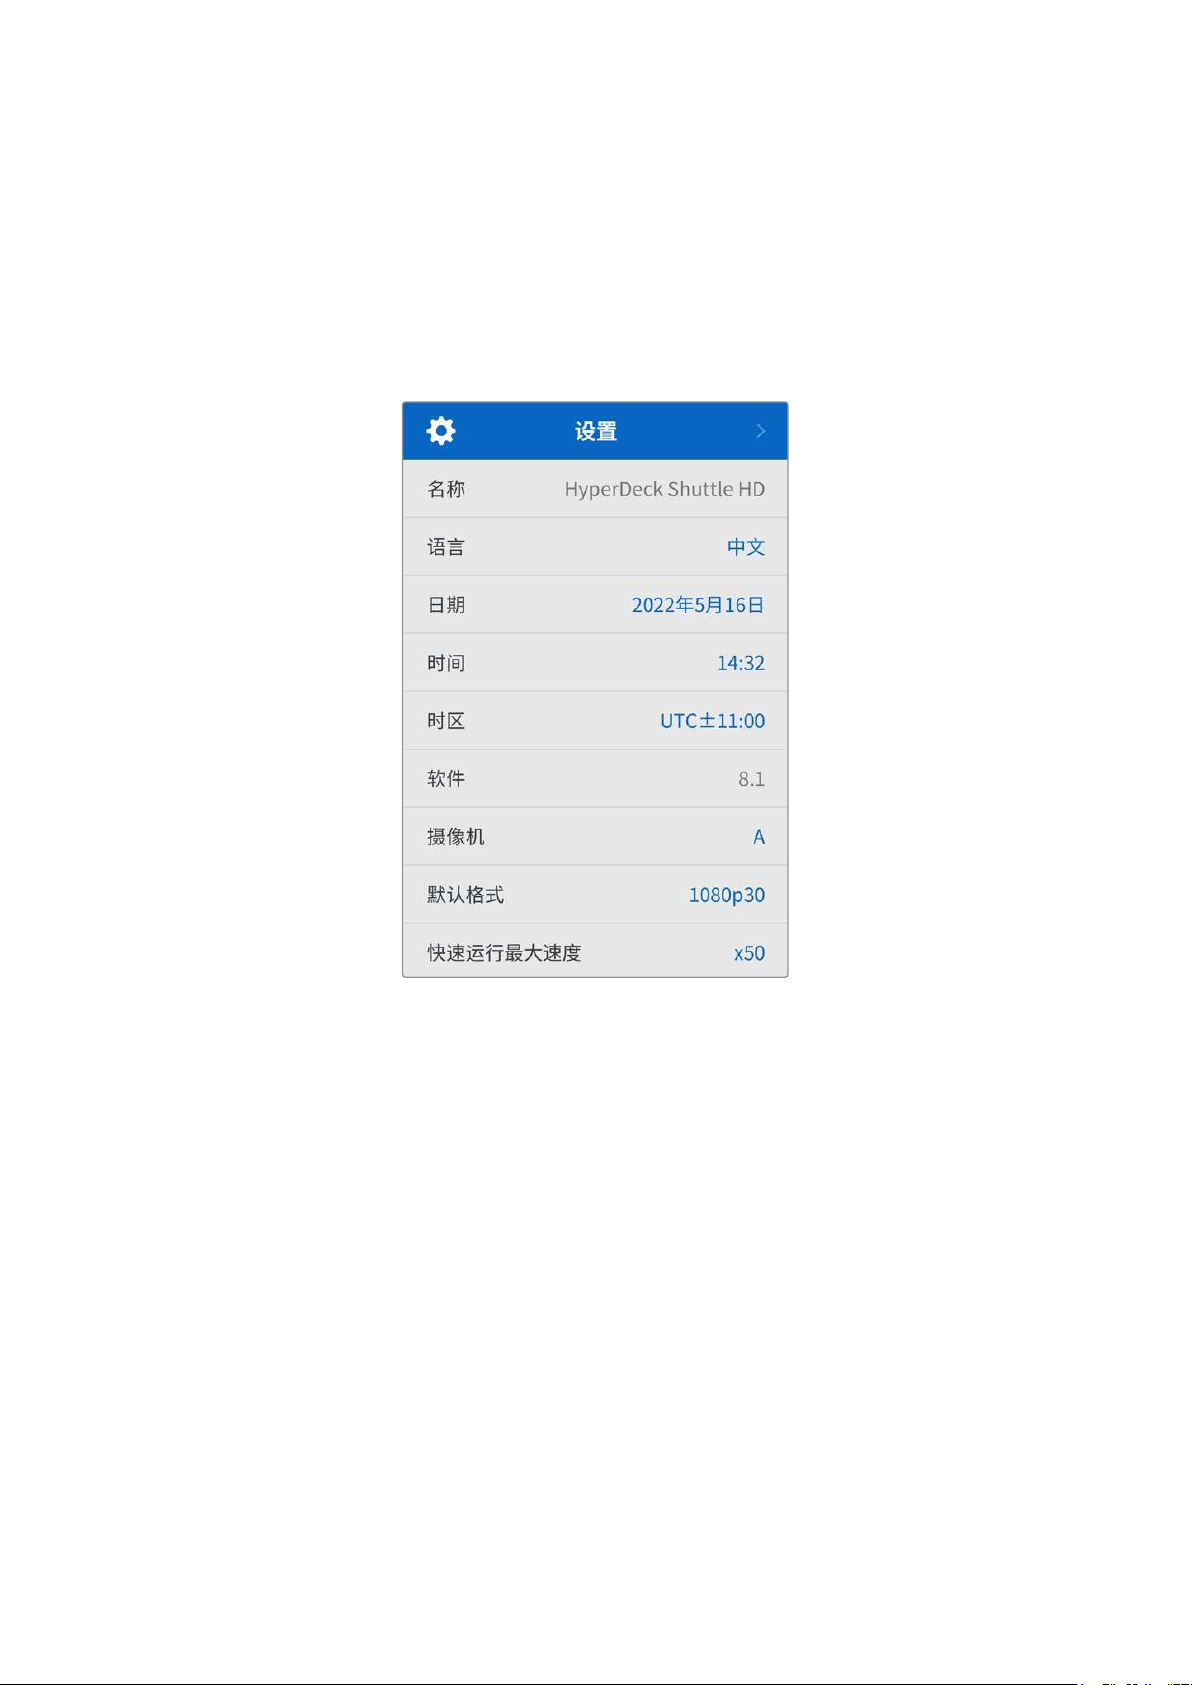
HFS
+也被称为
Mac
OS
X
扩展格式,因为它支持“日志功能”,所以被广为推荐。一旦发生存储介质损坏的情
况,具有日志功能的存储介质更易恢复数据。
HFS
+受
Mac
系统的原生支持。
exFAT
则受
Mac
和
Windows
系统的支持,无需使用额外软件,但不支持日志功能。
要在
Mac或Windows计算机上格式化存储介质,请参考本手册中“格式化存储介质”部分的内容。
设置菜单
设置菜单包含语言选项和默认格式,以及菜单显示、网络设置和时间码等选项。
名称
如果网络中存在多台HyperDeck Shuttle HD,您可以对它们进行命名加以区分。该操作可通过Blackmagic
HyperDeck Setup或Blackmagic HyperDeck Ethernet Protocol终端程序操作完成。设备名称将会
出现在设置菜单中。
语言
HyperDeck
Shuttle
HD
支持
13
种语言界面,包括英语、中文、日语、韩语、西班牙语、德语、法语、俄语、
意大利语、葡萄牙语、土耳其语、乌克兰语以及波兰语。
选择语言步骤如下:
1
当设置菜单高光显示时,按“SET”按钮。
2
旋转搜索旋钮向下滚动菜单,选择“语言”,按“SET”按钮。
3
使用搜索旋钮选择相应语言,按“SET”按钮。选定后,系统将自动返回设置菜单。
日期
要调整日期,请选择“日期”栏,然后按“
SET
”按钮。使用搜索旋钮选择日、月、年。选中后,该信息将作为
时间戳文件后缀出现。
255
设置
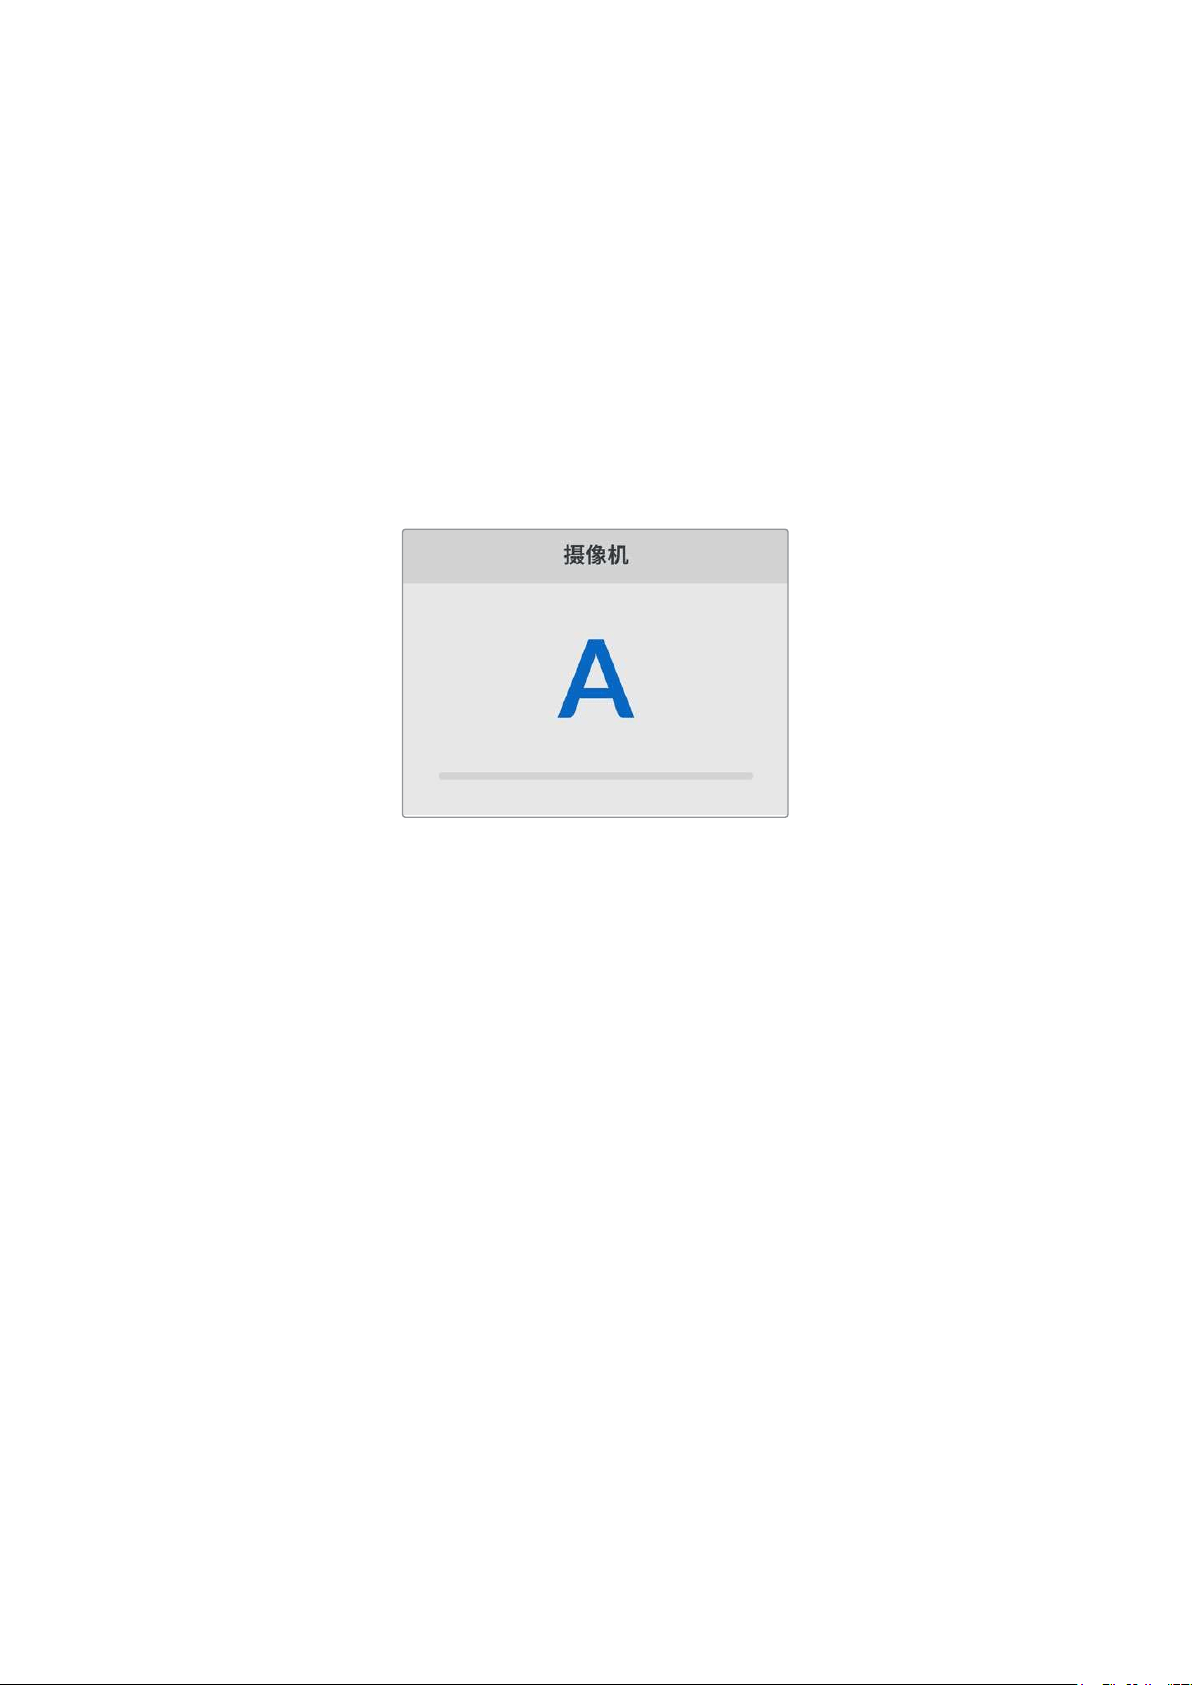
时间
要调整时间,请选择“时间”,然后按“SET”按钮。使用搜索旋钮调整小时和分钟。HyperDeck Shuttle
HD的内部时钟使用24小时制。
软件
可显示当前安装的软件版本。
摄像机
当使用
HyperDeck
记录多台摄影机的
ISO
单独文件,然后要将其在
DaVinci
Resolve
中作为多机位时间
线剪辑时,该设置就非常有用。
每台单独的摄影机的识别性字符都将显示在文件的元数据中,从而DaVinci Resolve在使用同步媒体夹
功能时可以轻松识别每个角度。
通过
A
-
Z
或者
1
-
9
来指派摄影机
默认格式
有时,HyperDeck Shuttle HD无法判断您想要使用什么视频格式。这一设置可以让HyperDeck明确
大多数情况下您想要使用的视频格式。
一个很好的例子就是,如果您开启了HyperDeck Shuttle HD,设备上并未连接视频输入,此时您插入一
块硬盘,硬盘中含有两种不同视频格式的文件,那么HyperDeck会播放哪种视频格式? 默认视频格式功
能会提示设备您所偏好的视频格式,让设备切换到这一格式来播放这些文件。
另外,当您首次开启HyperDeck Shuttle HD,并且没有连接任何视频输入,也没有插入任何存储介质
时,默认视频格式功能也会很有帮助。在这类情况下,HyperDeck无法判断应该使用哪类视频格式进行
监看输出。此时,默认视频格式会引导设备进行操作。
但是,默认视频格式只是作为指引,它不会覆盖任何内容。因此,如果您的存储介质中只含有一类视频文
件,当您按下播放键时,HyperDeck硬盘录机会切换到对应的视频格式进行播放。此时默认视频格式功
能会被忽略,因为很明显此时只需要播放存储介质上的文件即可。
记录期间的情况也会类似。当您按下记录键后,
HyperDeck
只会以连接到视频输入上的视频格式进行记
录 。此外,当 您 记 录 完成 后 ,HyperDeck Shuttle HD会以相同视频格式播放存储介质上的文件,即使存
储介质上存在其他匹配默认视频格式的文件。因为设备会认为您想要使用和刚才所记录文件相同的视频
格式来进行播放。只有在您将存储介质拔出后再次插入设备的时候,设备才会启用默认视频格式让您选
择使用哪类文件播放。
默认 视频格式只是作为指引 ,在HyperDeck Shuttle HD不确定如何操作的情况下帮助其进行判断。该
功能不属于覆盖命令,因此不会强制录机以任何特定方式运行。
256
设置
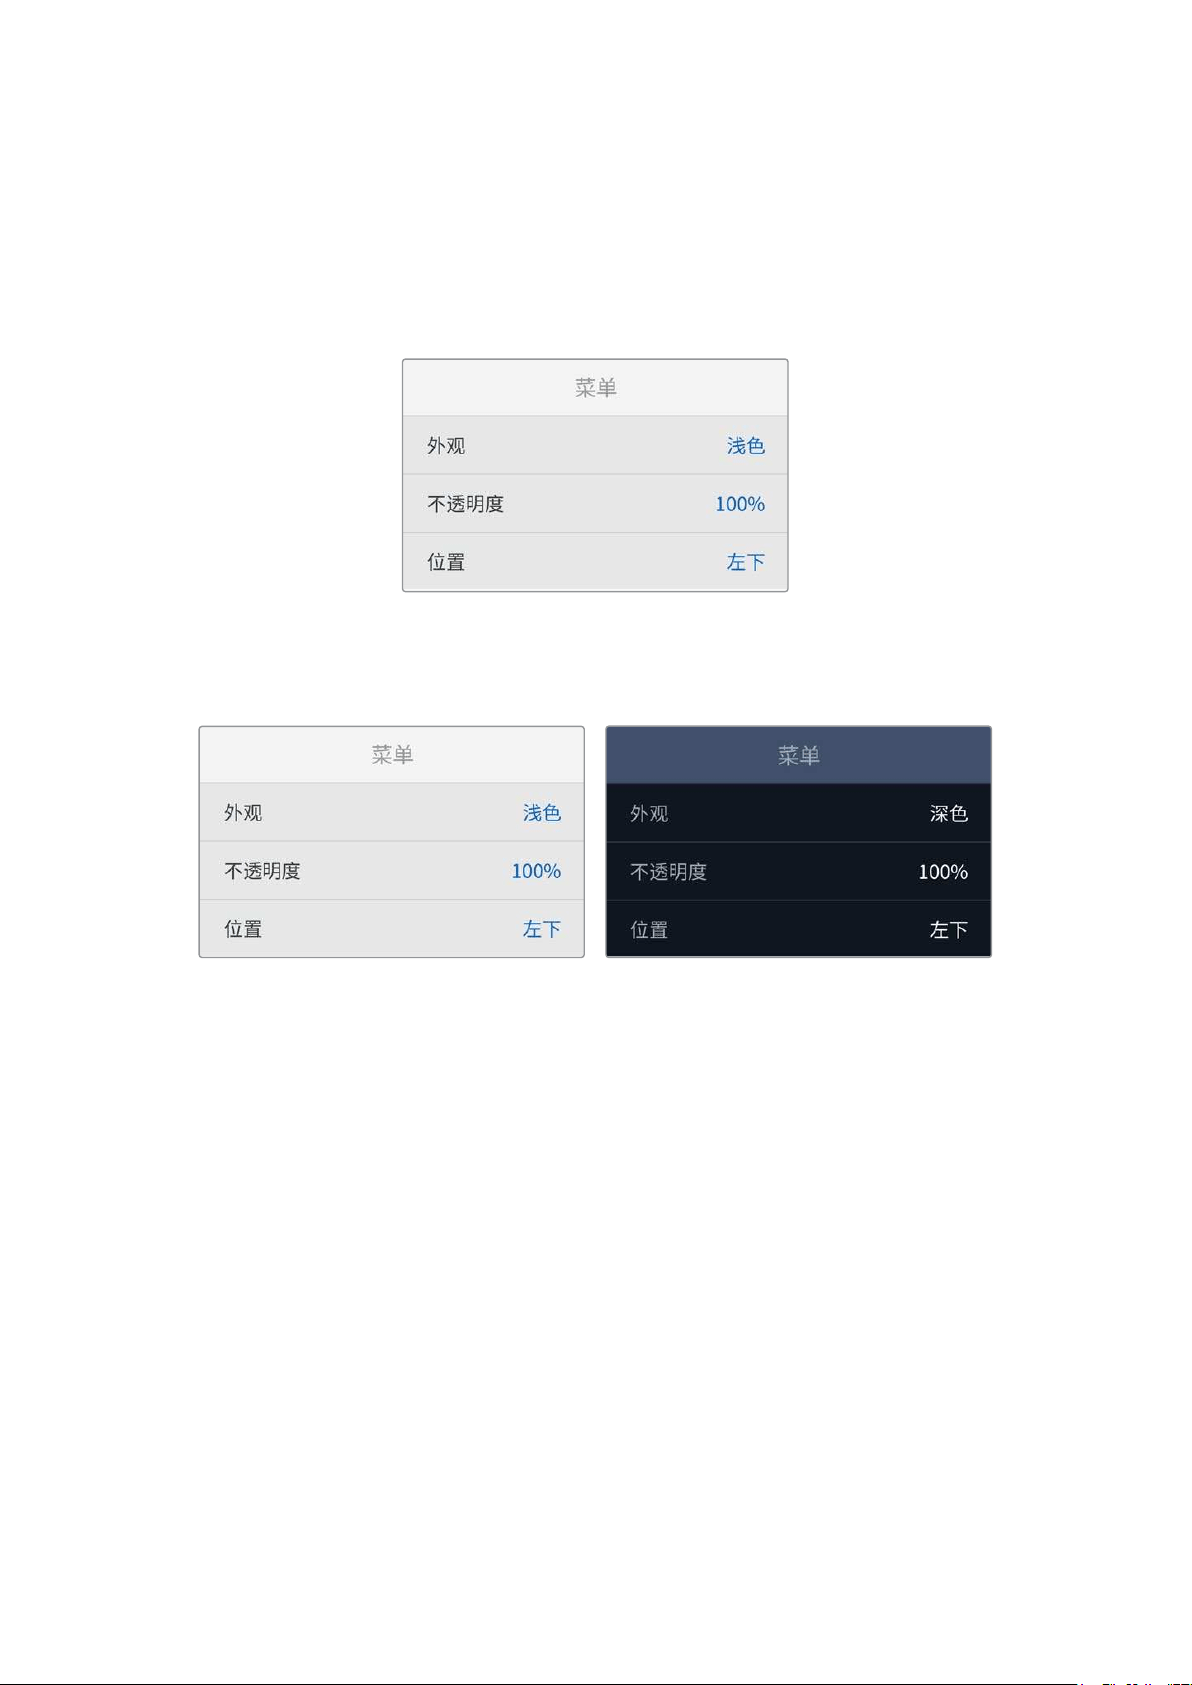
最大快速运行速度
HyperDeck Shuttle HD的最大快速运行速度为x50倍速。如果您想要降低这一速度,只要在其他速度
预设选项中选择一项即可。
菜单设置
您可以使用菜单设置来调整菜单在所连接HDMI显示器上的位置和外观。
外观
可将
HyperDeck
的屏幕菜单设置为深色或浅色模式。浅色模式可提供更高的对比度,适用于较暗的媒体
素材,或者搭配提词器模式使用。
不透明度
可通过调整来降低所连接显示器上菜单叠加信息的不透明度,调整范围为
100%(默认)到20%。
位置
菜单叠加信息的默认位置是屏幕左下角。如果要移动菜单的位置,可选择“位置”然后按“SET”按钮,就可
以选择将其移动到屏幕的左上角、右上角、左下角或者右下角了。
257
设置
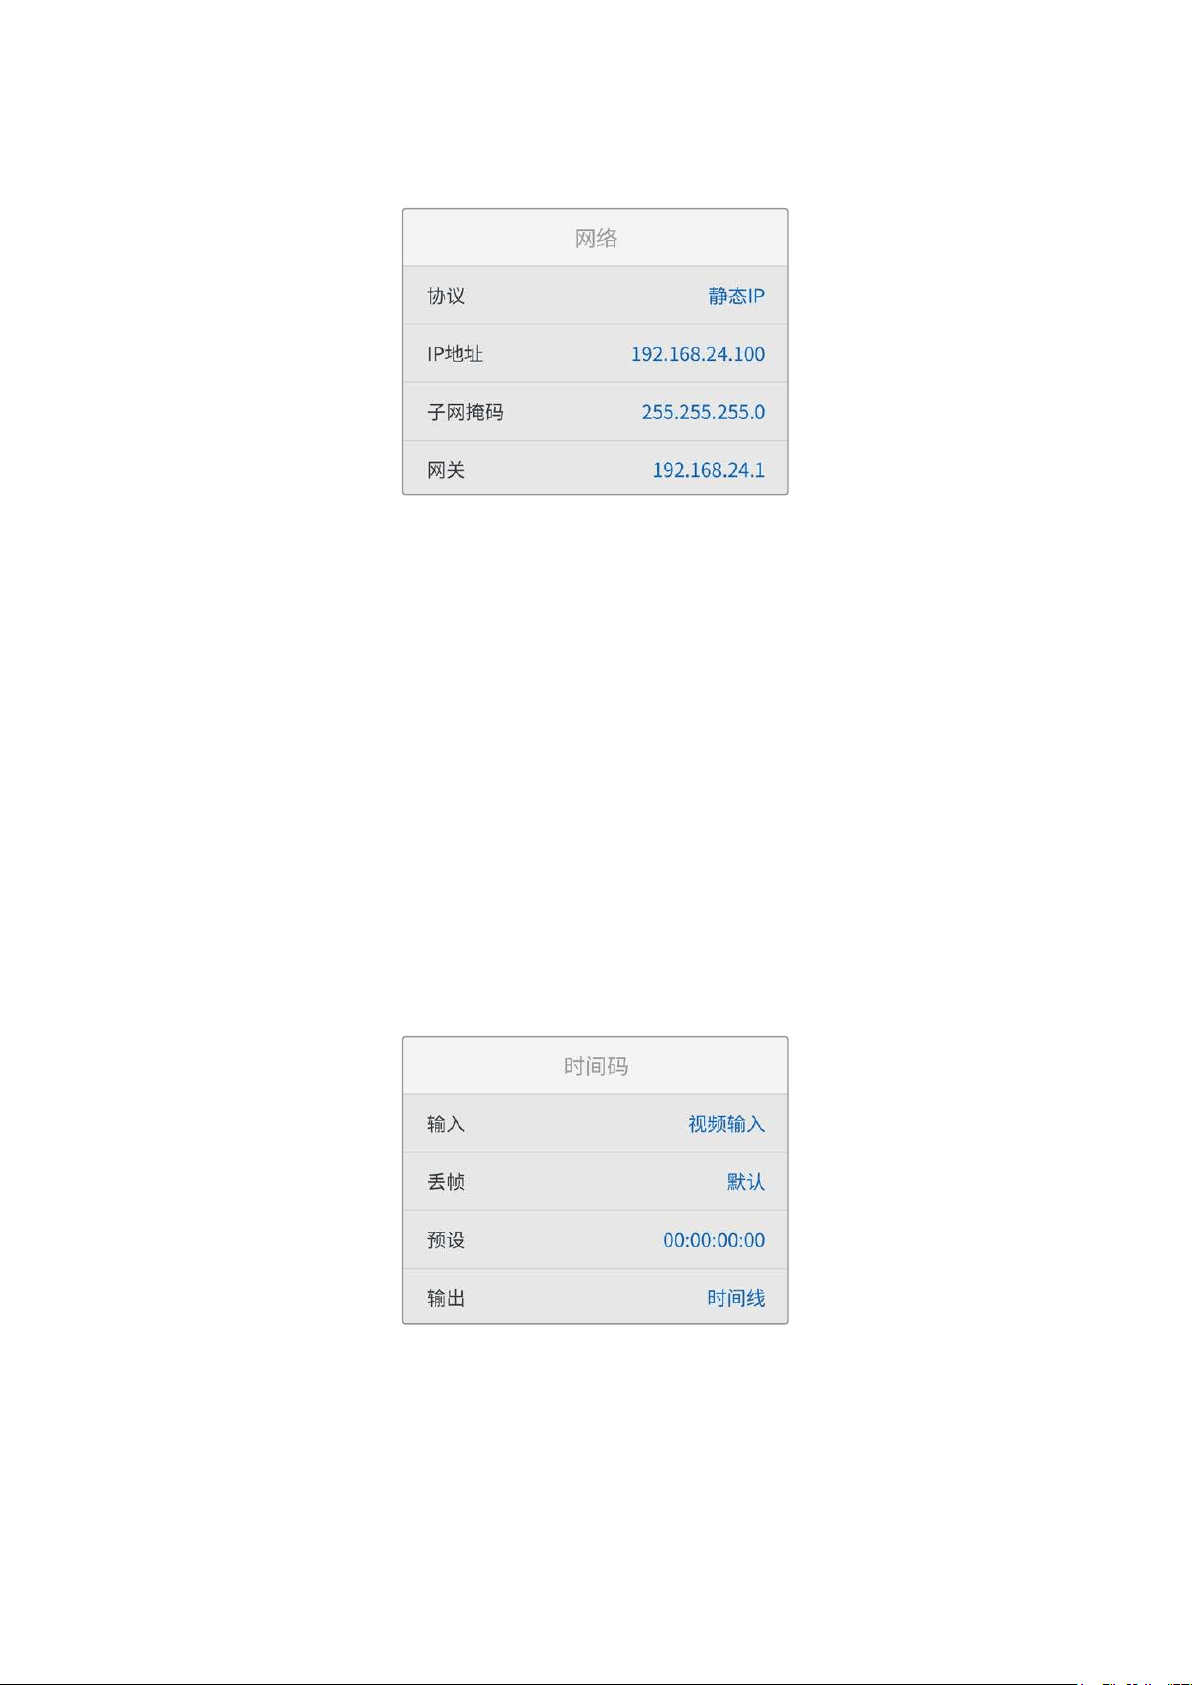
网络设置
协议
Blackmagic HyperDeck出厂设置为DHCP,因此连接后,您的网服务器会自动指派一个IP地址,无需
调整其他网络设置。如果需要手动设置地址,可通过静态IP连接。
选中“协议”后,按下“
SET”按钮,滚动到菜单中的“静态IP”然后按“SET”。
IP地址、子网掩码、网关、主DNS服务器和次DNS服务器
选中“静态
IP”后,就可以手动输入网络信息了。
要更改
IP地址:
1
通过搜索旋钮将“IP地址”高光选中,按下HyperDeck控制面板上的“SET”按钮。
2
使用搜索旋钮调整IP地址:旋转搜索旋钮更改IP地址,按“SET”按钮确认,然后再调整下一个数值。
3
按下“SET”以确认更改,并跳至下个值。
输入完
IP地址后,重复这些步骤调整子网掩码和网关。完成后,按“MENU”按钮退出并返回主页面。
时间码设置
设置时间码输入和输出选项,包括在记录源时间码、当日时间码或手动设置时间码之间选择。
258
设置

输入
记录时,共有四个时间码输入选项。
视频输入
选择“视频输入”将从带有SMPTE RP 188元数据的HDMI信号源提取其嵌入式时间
码。该操作将保存HDMI信号源和HyperDeck Shuttle HD所记录文件之间的同步。
内部使用此选项可记录通过内置时间码发生器所产生的当日时间码。
从上个片段生成
为时间码输入选择“从上个片段生成”选项时,每个文件将从上一个片段尾帧的下
一帧开始。例如,如果首个片段以
10
:
28
:
30
:
10
结束,那么下一个片段时间码将从
10:28:30:11开始。
预设
如果想要手动设置时间码,选择预设选项。记录的片段会按照“预设”中设置的时间
码开始,本章节之后会显示。
丢帧
对于29.97或59.94帧率NTSC信号源,您可以选择“丢帧”或“无丢帧”时间码。如果是未知信号源,选择
“默认”。这样将保持输入格式,或如果没有有效时间码默认为丢帧。
预设
如果要手动设置时间码,可按“
SET
”按钮,并使用搜索旋钮和“
SET
”按钮来输入起始时间码。请确保输入
菜单中的“预设”选项被勾选。
输出
为您的输出选择时间码选项。
时间线要为记录在存储卡或硬盘上的所有片段输出连续时间码,请选择时间线。
片段选择片段选项可输出每个单独片段的时间码。
文件设置
文件名前缀
首次设置时,您的
HyperDeck Shuttle HD将采用以下文件名规范将片段记录至SD卡或USB闪存盘。
HyperDeck_0001
HyperDeck
_0001
前缀
HyperDeck_0001
片段编号
您可以通过HyperDeck Setup实用程序修改文件名前缀。更多信息请参考本手册中“Blackmagic
HyperDeck设置”部分的内容。
259
设置
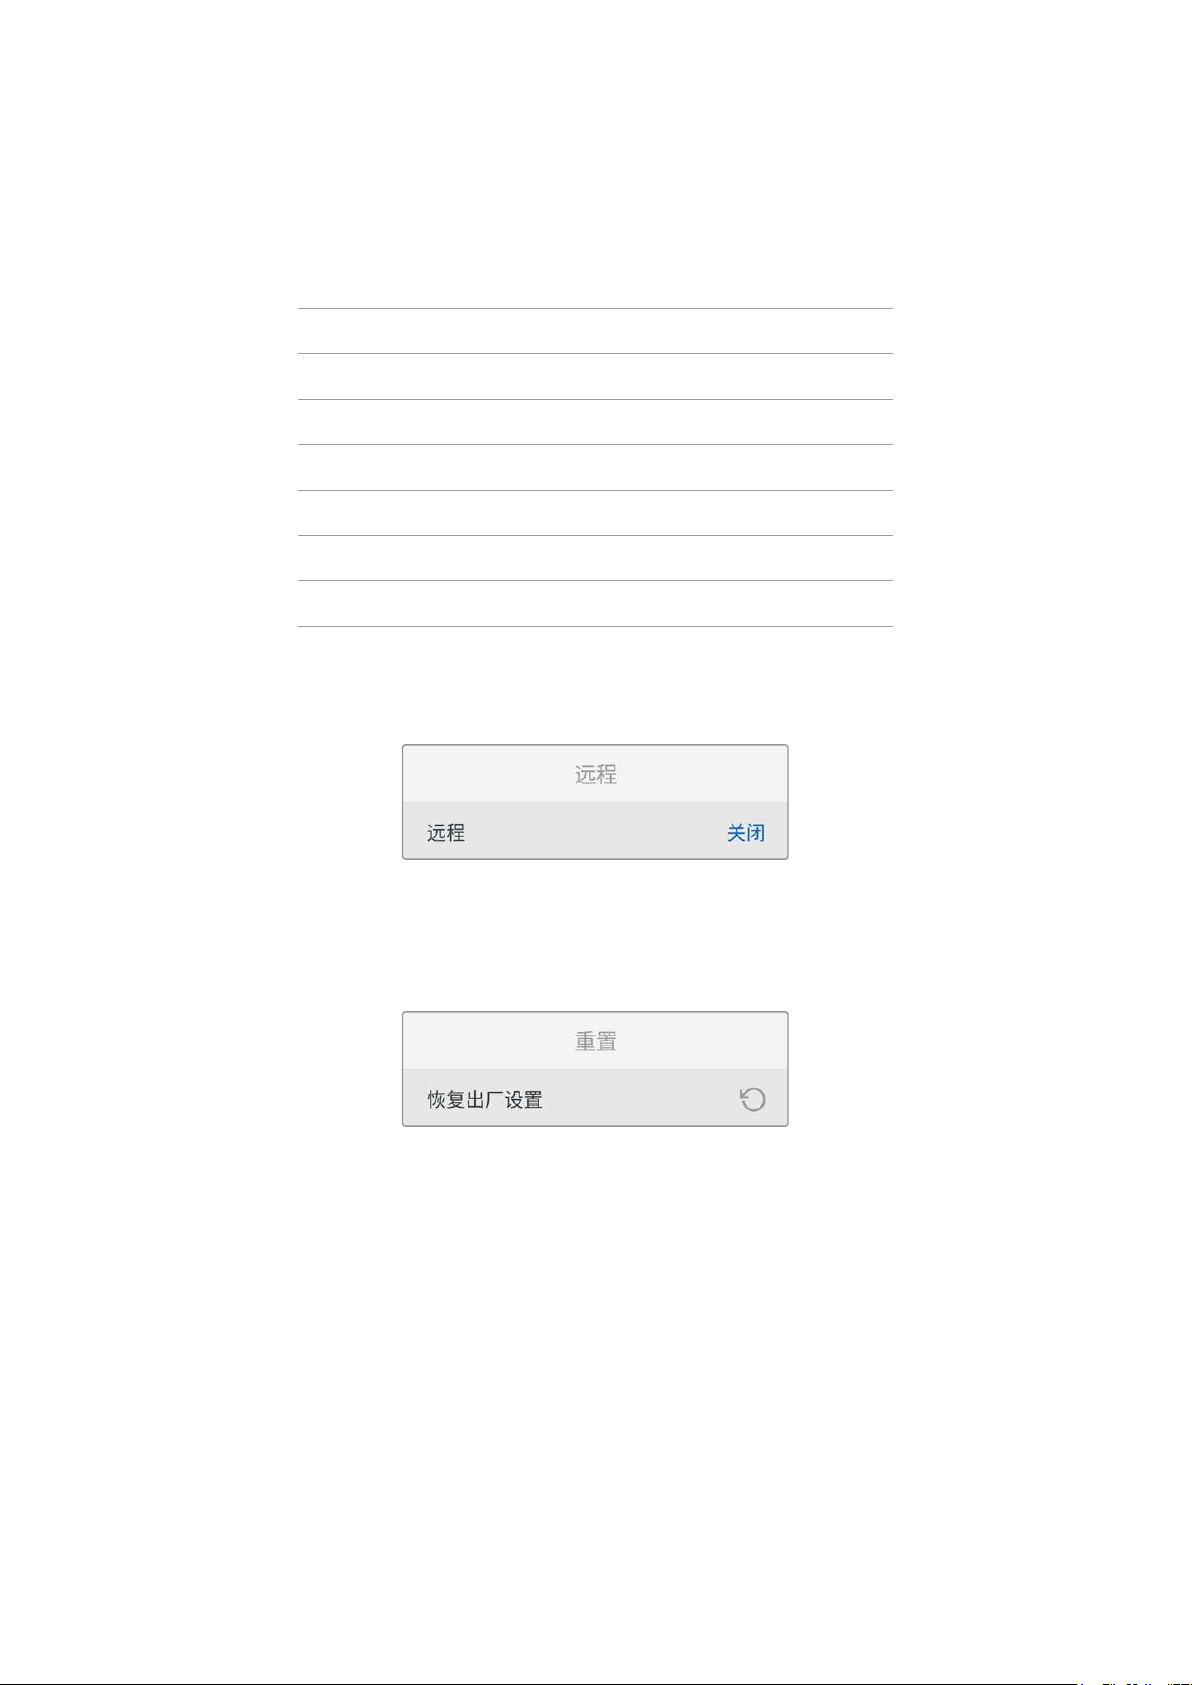
时间戳文件后缀
默认设置下,时间戳添加至文件名是关闭状态。如果您想要将日期和时间记录到文件名中,可将“时间戳文
件后缀”选项切换至“开启”状态。
HyperDeck_2201061438_0001
HyperDeck
_2201061438_0001
文件名前缀
HyperDeck_2201061438_0001
年
HyperDeck_2201061438_0001
月
HyperDeck_2201061438_0001
日
HyperDeck_2201061438_0001
时
HyperDeck_2201061438_0001
分
HyperDeck_2201061438_0001
片段编号
远程设置
远程设置可以让HyperDeck被其他视频设备远程控制,比如ATEM Mini Extreme切换台。
远程
选择“远程”启用以太网远程控制。取消远程控制可回到本机控制。
重置设置
恢复出厂设置
在设置菜单中高光“恢复出厂设置”可将
HyperDeck
恢复到出厂时的设置。按下“
SET
”时,设备会弹出确
认信息。
260
设置

后面板
HDMI OUT
HDMI IN
EXT DISK
SD CARD
ETHERNET
+
12V DC
1
2
3 4 5
1
电源
HyperDeck Shuttle HD通过一块AC适配器获得电源。提示 附带的电源线配有防止断开的带
锁接口,但您也可以使用任何
36W 12V的电源线为HyperDeck Shuttle HD供电。
2
SD卡
将
SD卡插入卡槽内可实现记录和播放。
3
以太网
以太网接口可让您连接到网络进行快速FTP传输或通过HyperDeck Ethernet Protocol远程
协议远程控制设备。更多关于通过FTP客户端传输文件的信息,请参考本手册后面关于“通过网
络传输文件”部分的内容。
连接到ATEM切换台所在的同一个网络下时,您还可以使用ATEM切换台或ATEM硬件控制面板
来控制HyperDeck。
4
外接硬盘
将硬盘连接至
USB
-
C
接口,您可以高达
5Gb/s
的速度记录至外接硬盘。您还可以连接多端口
USB-C集线器或Blackmagic MultiDock 10G,从而连接一个或多个SSD。
5
HDMI
将HDMI输出连接到HDMI电视机、监视器或者ATEM Mini Extreme等切换台。HDMI输出还
可用于查看菜单叠加。
261
后面板
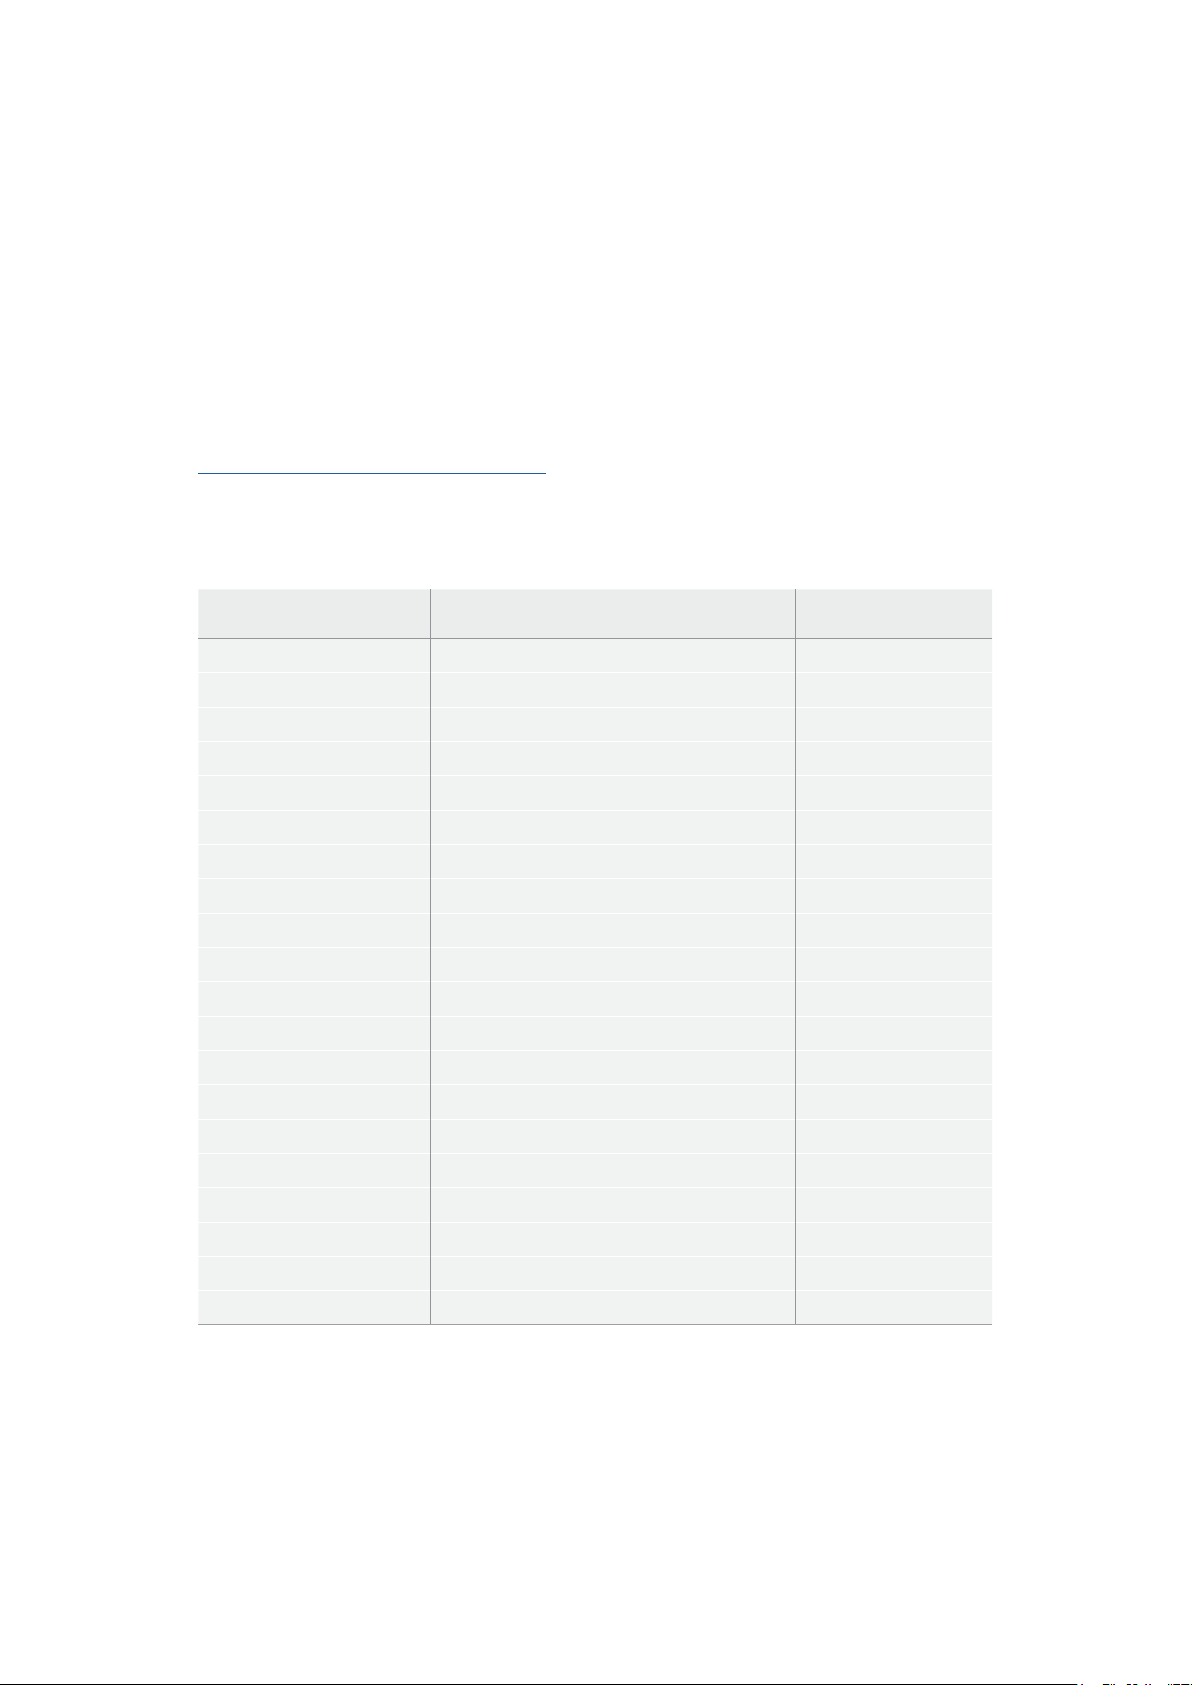
存储介质
SD
卡
为获得高质量
HD
记录,我们建议使用高速
UHS
-
I
型
SD
卡。这些卡需要具备超过
220MB/s
的写入速度,
可记录高达Ultra HD 2160p60的影像。
但是,如果您以低比特率记录更高压缩格式,那么或许能使用更低速的存储卡。通常来讲,卡的速度越快
越好。
请定期关注本操作手册是否已有更新版本,以便获得最新信息。请到Blackmagic Design网站
www.blackmagicdesign.com/cn/support进行下载。
HyperDeckShuttleHD应使用哪些SD卡?
建议您使用以下几款SD卡记录最高60fps的1080p影像:
品牌型号 容量
Angelbird AV PRO SD UHS-II 300MB/s V90 SDXC256GB
Angelbird AV PRO SD UHS-II 260MB/s V60 SDXC128GB
Angelbird AV PRO SD UHS-II 260MB/s V60 SDXC64GB
SanDisk Extreme Pro UHS-I 95MB/s SDXC64GB
Wise SD2-64U3 UHS-II 285MB/s SDXC64GB
LexarProfessional 1000x UHS-II 150MB/s SDXC128GB
SONYTough SF-G128T128GB
Kingston CANVAS GO! Plus 170MB/s V3064GB
Kingston CANVAS GO! Plus 170MB/s V30128GB
KingstonCANVAS GO! Plus 170MB/s V30512GB
ProGrade Digital SDXC UHS-II V90 300R 64GB
ProGrade Digital SDXC UHS-II V90 300R 128GB
SONYTough SF-G64T UHS-II SDXC64GB
Delkin Devices Black UHS-II V90 SDXC256GB
Delkin Devices Power UHS-II V90 SDXC128GB
Delkin Devices Power UHS-II V90 SDXC256GB
Delkin Devices Black UHS-II V90 SDXC128GB
ExascendEssential SDXC UHS-II V90 R 300MB/s64GB
Exascend Essential SDXC UHS-II V90 R 300MB/s128GB
ExascendCatalyst SDXC UHS-II V90 R 300MB/s64GB
262
存储介质
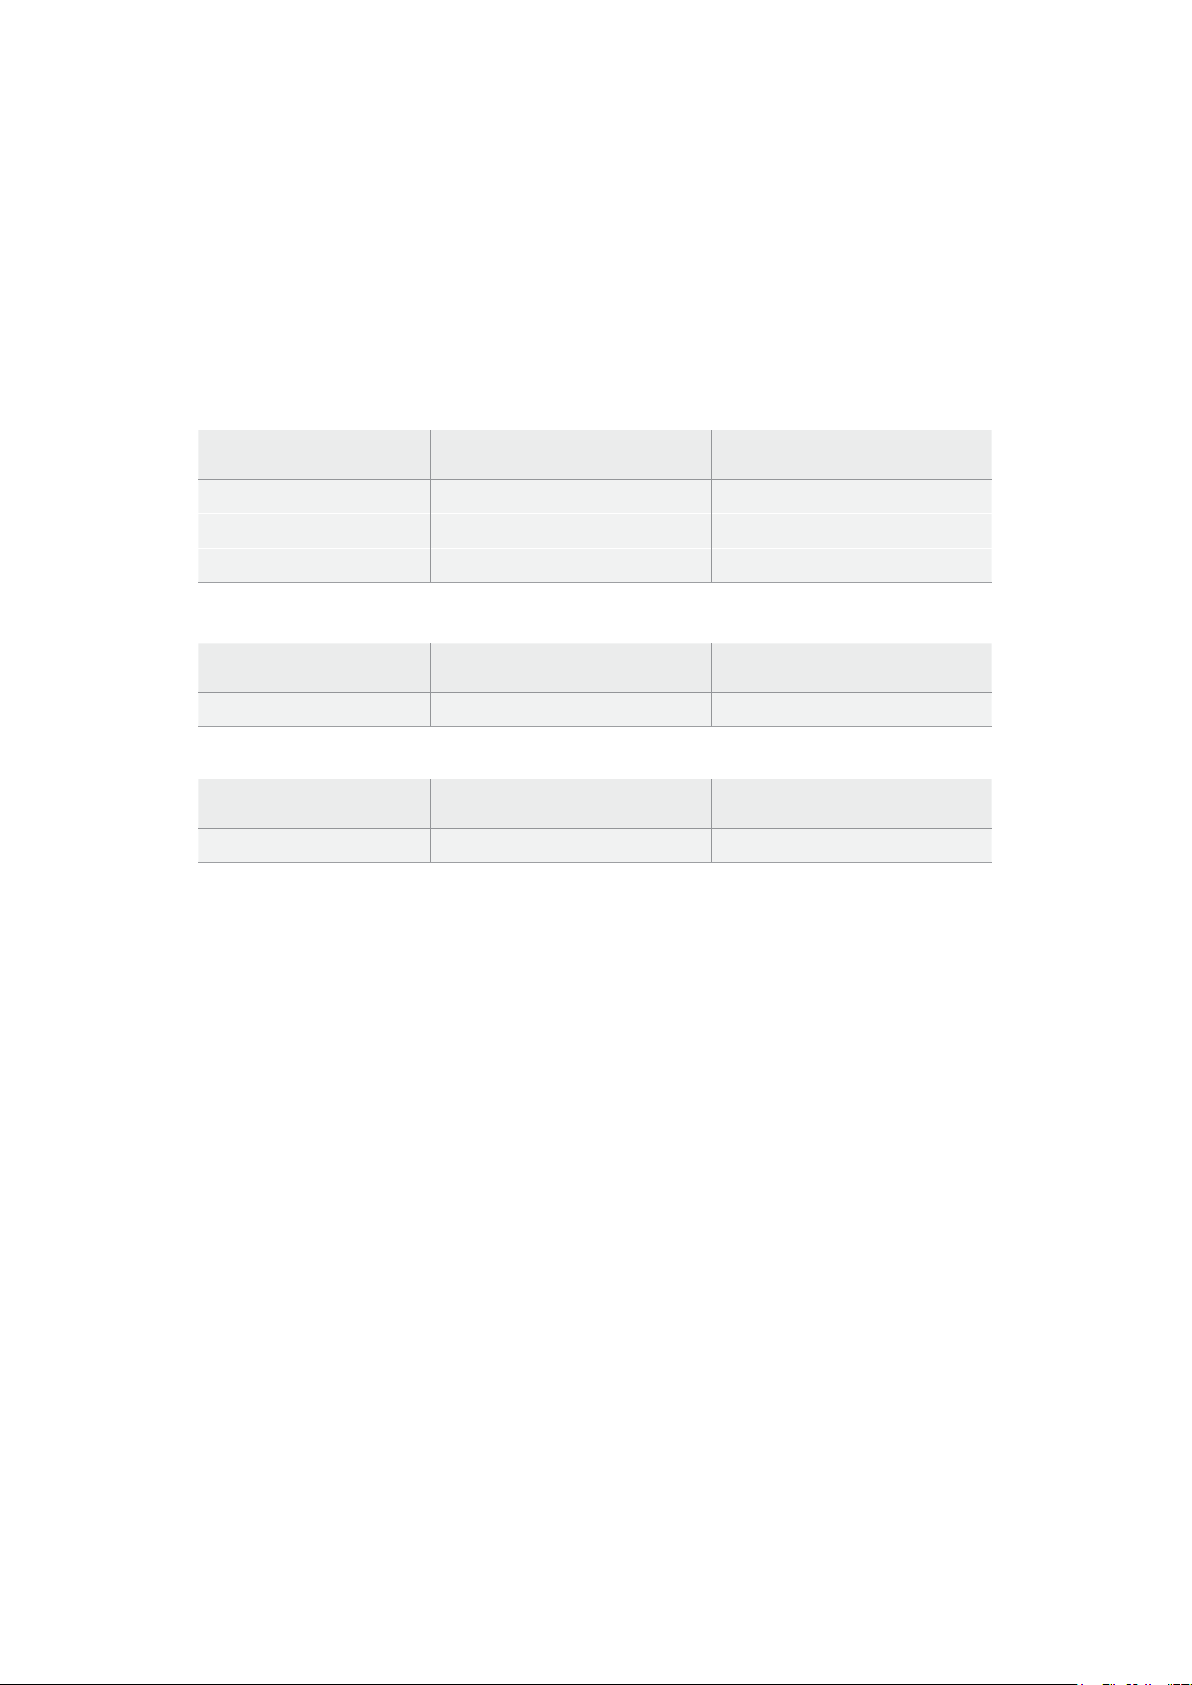
外接硬盘
所有HyperDeck型号都可以直接记录到USB-C硬盘上。这类存储盘速度快,容量大,可进行长时间视频
记录。您可以将硬盘连接到计算机,直接在硬盘上进行剪辑!
如要获得更大的存储空间,可以连接
USB
-
C
硬盘坞或外置硬盘。如要连接
Blackmagic
MultiDock
10G
或USB-C硬盘,可使用线缆将USB-C设备连接到HyperDeck后方的“EXT DISK”端口。
HyperDeckShuttleHD应使用哪些USB-C硬盘?
建议您使用以下几款USB-C硬盘记录最高60fps的1080p ProRes HQ影像:
品牌型号 容量
WisePTS-256 Portable SSD 4K256GB
OWCEnvoy Pro Ex240GB
BUFFALOSSD-PHE500U3-BA500GB
建议您使用以下几款USB-C硬盘记录最高60fps的1080p DNxHR HQX影像:
品牌型号 容量
OWCEnvoy Pro Ex240GB
建议您使用以下几款USB-C硬盘记录最高60fps的1080p H.264影像:
品牌型号 容量
OWCEnvoy Pro Ex240GB
格式化存储介质
在计算机上准备存储介质
在Mac计算机上格式化存储介质
Mac系统自带的“磁盘工具”应用程序可以将硬盘格式化为HFS+或exFAT格式。
由于格式化后硬盘内所有文件都会被清除,因此请务必在格式化前备份硬盘上的所有重要文件。
1
通过外部连接器或数据线将
USB
硬盘连接至电脑,忽略任何关于使用
SSD
作为
Time
Machine
备份选择的信息。SD卡可通过外部读卡器连接到您的计算机。
2
进入“应用程序/实用工具”界面,运行“磁盘工具”程序。
3
点击SD卡或USB硬盘图标,再点击“抹掉”按钮。
4
将格式设置为“Mac OS扩展(日志式)”或“exFAT”。
5
输入新增分区的名字,点击“抹掉”。您的存储介质会迅速格式化,以备HyperDeck使用。
263
格式化存储介质
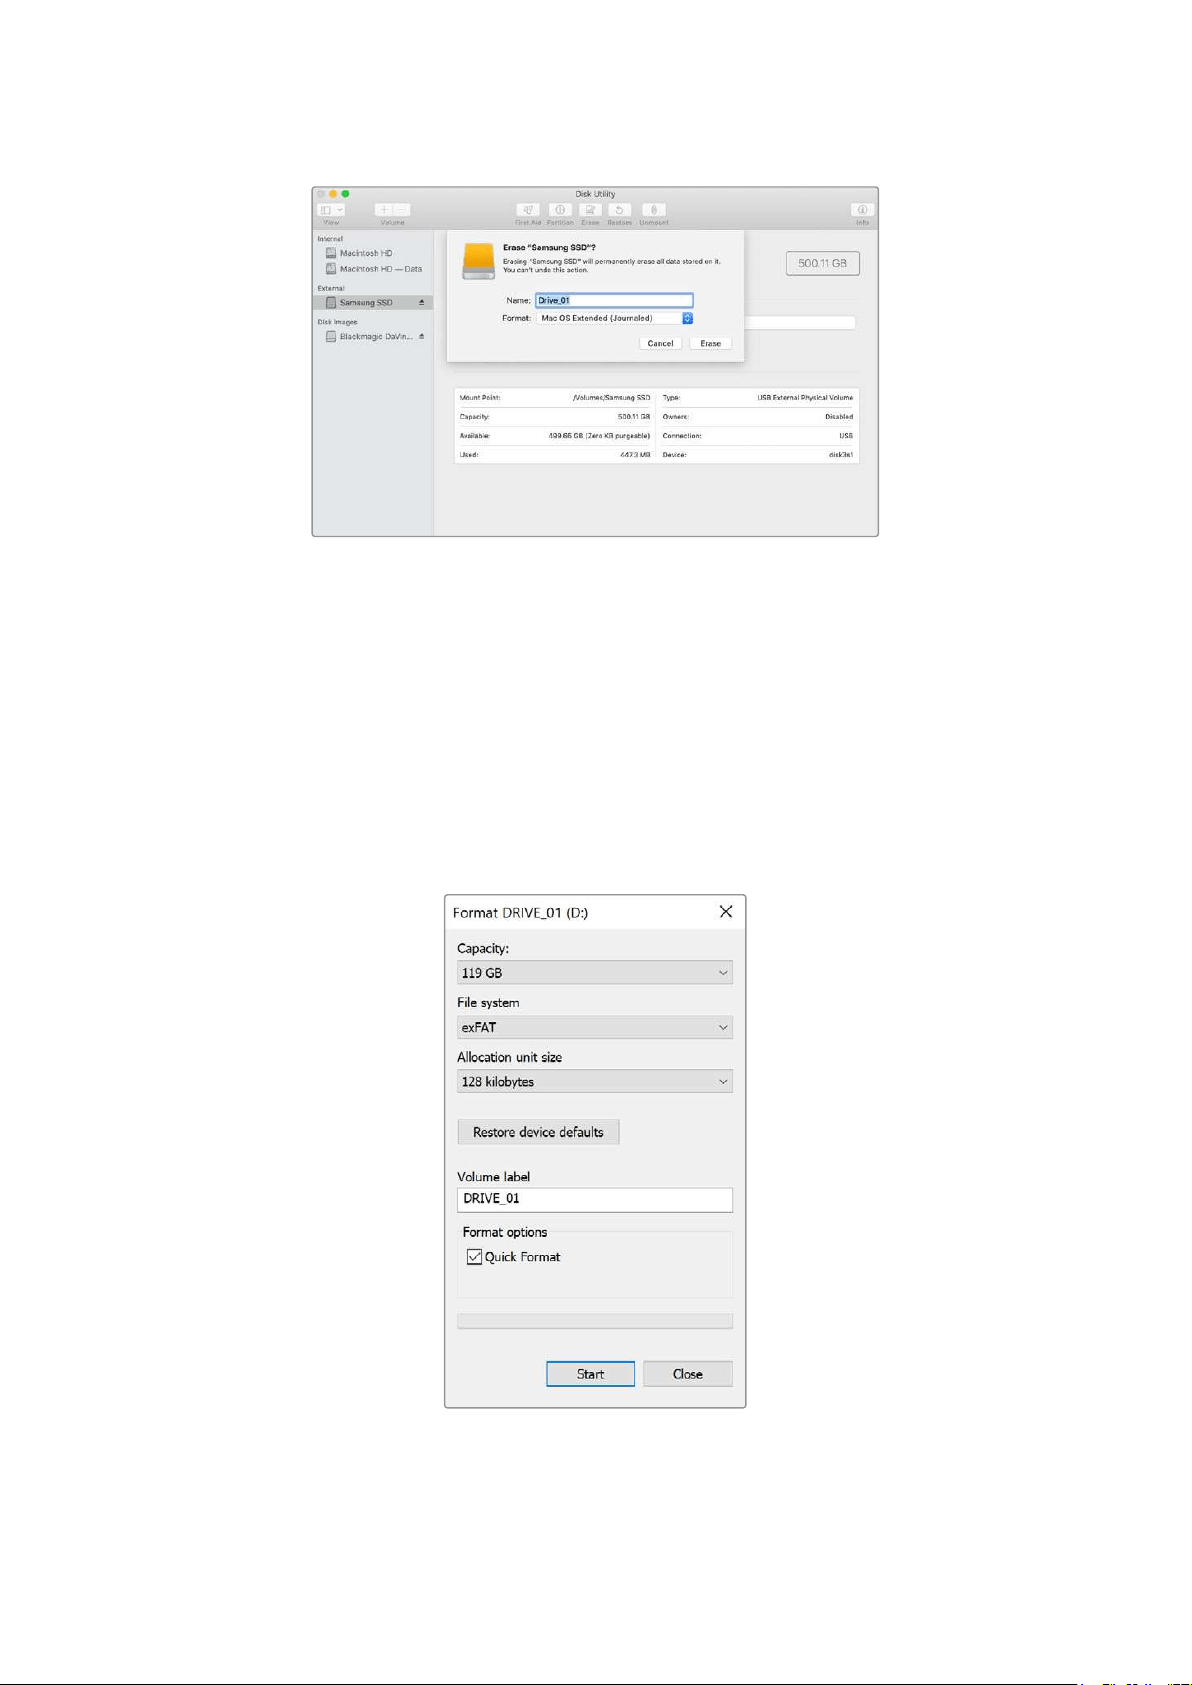
在Windows计算机上格式化存储介质
使用Windows PC的格式化对话框可将硬盘格式化为exFAT。由于格式化后SSD硬盘或SD卡内所有文
件都会被清除,因此请务必在格式化前备份硬盘上的所有重要文件。
1
通过外接硬盘座或数据线将USB硬盘连接至计算机。SD卡可通过外部读卡器连接到您的计算机。
2
打开“开始菜单”或“开始画面”,选择“我的电脑”。右键点击USB硬盘或SD卡。
3
从上下文菜单中选择“格式化”。
4
将文件系统设置为“exFAT”,将分配单元大小设置成128kb。
5
输入卷标,选择“快速格式化”,点击“开始”。
6
您的存储介质会迅速格式化,以备HyperDeck使用。
264
格式化存储介质
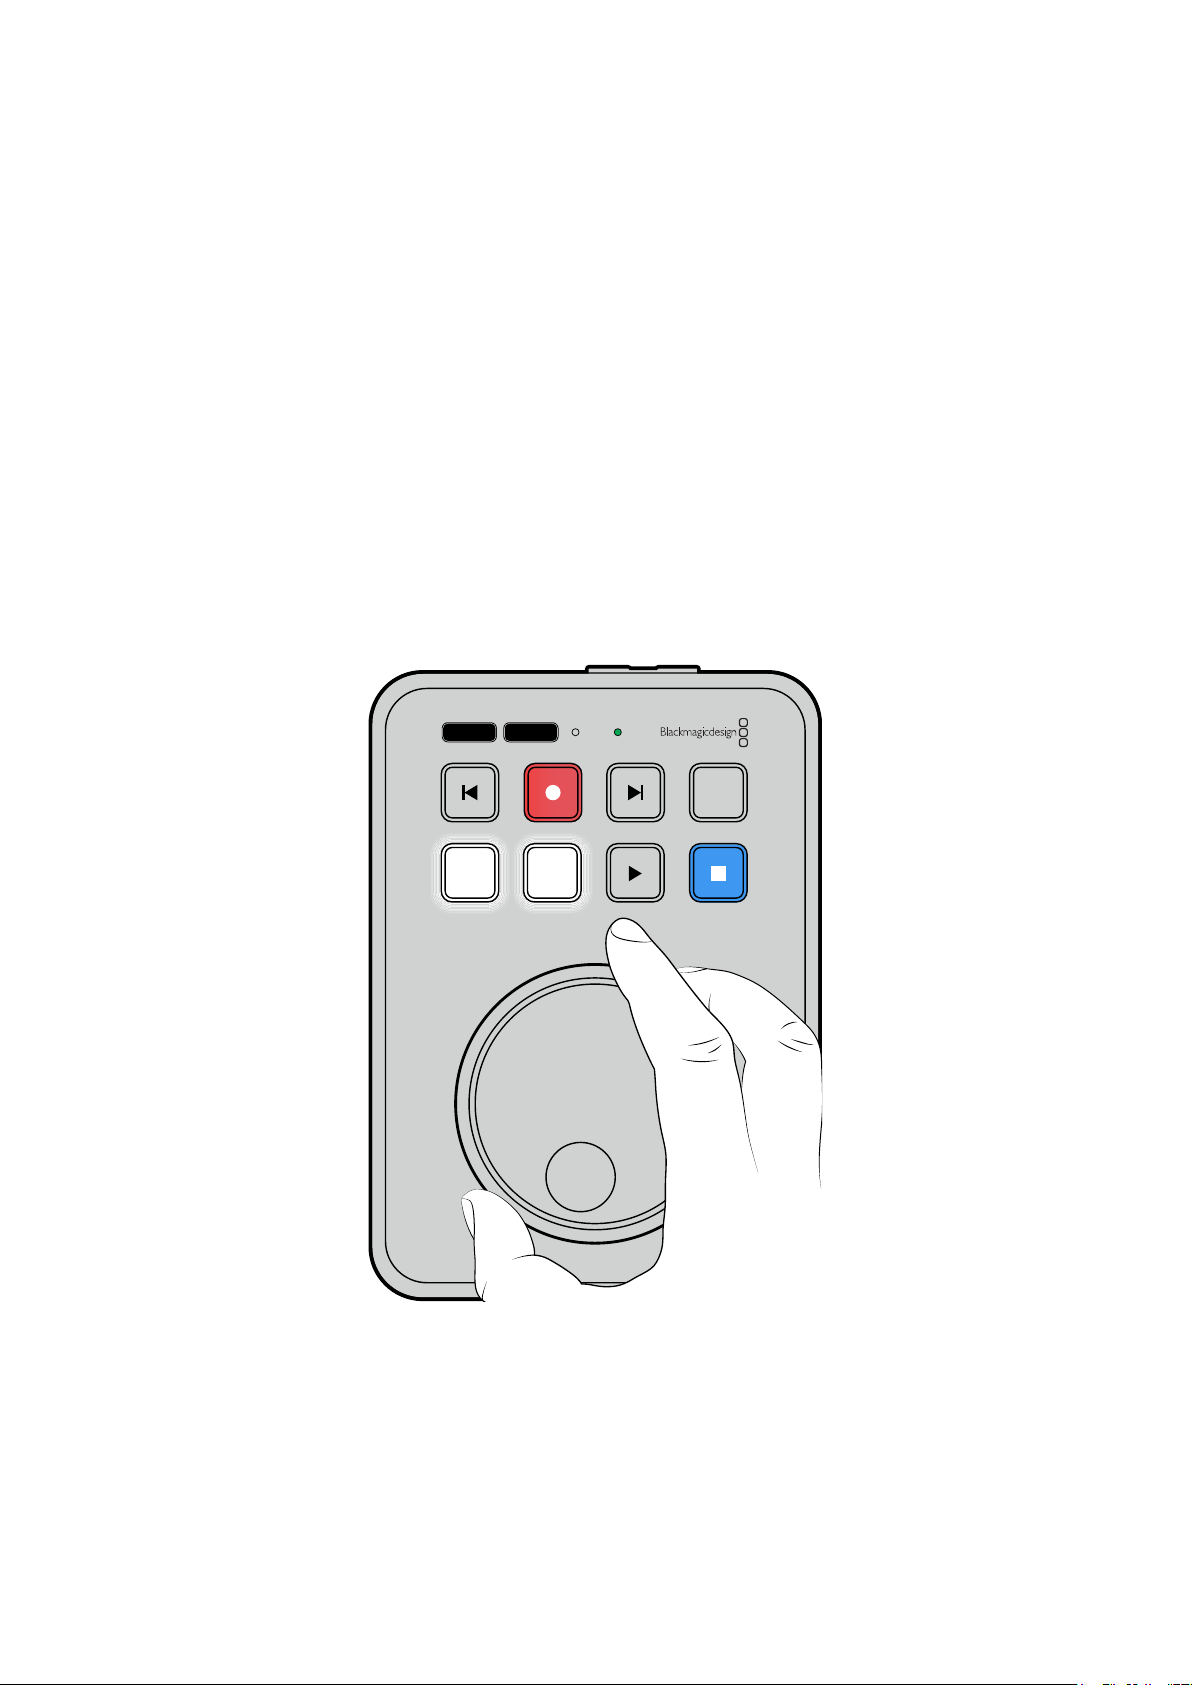
使用提词器功能
使用标准RTF文件时,您可以将Blackmagic HyperDeck Shuttle HD作为提词器使用。在TextEdit或
WordPad中创建文件,以13中支持语言中的任何一种保存为多信息文本格式。用HyperDeck Shuttle
HD打开后,您可以调整稿件文本的字体大小和行距。
如要使用提词器功能:
1
将HyperDeck Shuttle HD的HDMI输出与您希望使用的HDMI显示器连接。
2
插入包含稿件文本的SD卡或者连接USB硬盘。
3
在记录菜单中选择编解码选项。前往“提词器”设置,按下“SET”按钮。
稿件文本会出现在显示器上。然后您可以用播放按钮开始自动播放,或者通过旋钮进行其他控制。
控制提词器播放速度
HyperDeck Shuttle HD上的大尺寸旋钮在提词器模式下可以用于控制播放,就像播放媒体一样。加载
稿件文本后,同时按下“JOG”和“SCR”按钮可以启用变速播放。选定后转动旋钮。稿件文本的移动速度会
根据旋钮的移动而变化。比如,转动旋钮的速度越快,稿件文本滚动的速度就会越快。
JOG SCR
CLIP
MENU SET
DISK SD
如要获得固定的速度,您可以单独使用JOG和SCR按钮。选定后,在慢速搜索模式下旋转旋钮,稿件文本
会按照固定的低速移动,在极速模式下会以更快的速度移动。
如要在
SD卡或外部硬盘上的RTF文件之间浏览,可以按前进和倒退按钮。
提词器会识别到文件中的字体大小、颜色以及粗体设置。此外,当您把显示内容投射到分光镜上时,可以
使用监看菜单调整字体大小、行距、侧边距,还能水平或垂直翻转显示内容。详情请参考本手册前面“菜
单设置”部分的内容。
265
使用提词器功能
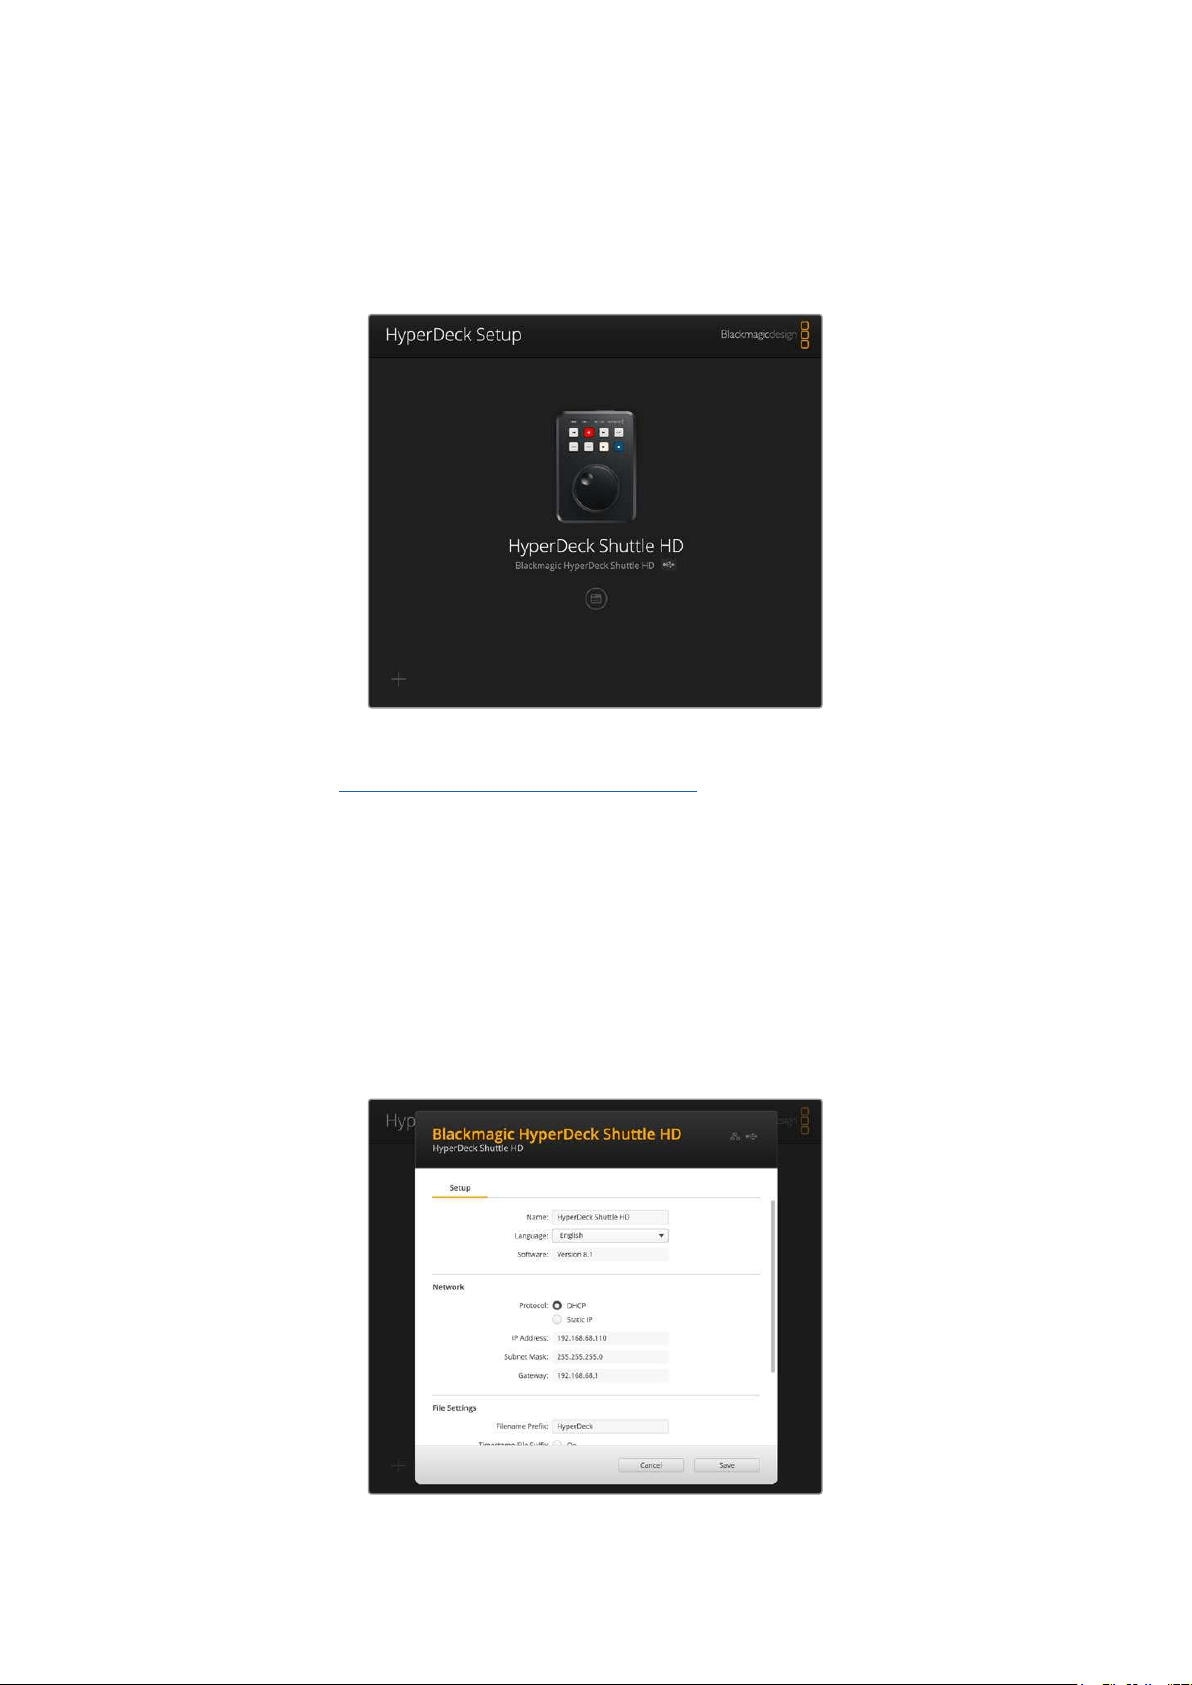
Blackmagic HyperDeck Setup
Blackmagic HyperDeck Setup是一款软件实用程序,可用于更改HyperDeck的各项设置并更新其
内部软件。
要安装软件:
1
登陆网址www.blackmagicdesign.com/cn/support,下载最新Blackmagic HyperDeck
Setup安装程序。
2
运行Blackmagic HyperDeck Setup安装程序,根据屏幕提示完成安装。
3
安 装 完成 后,将 HyperDeck Shuttle HD通过后面板的USB或以太网端口连接到计算机。
4
运行Blackmagic HyperDeck Setup程序,并根据屏幕提示更新内部软件。如果系统未弹出
任何提示信息,即表示当前内部软件已是最新版本,无需升级。
点击
HyperDeck画面或者设置图标可以打开设置菜单。
屏幕主页会显示
HyperDeck
Shuttle
HD
和设备名称。当您的计算机连接了一台以上的
HyperDeck
时,
该名称可用于识别设备,也可以通过实用程序中的设置菜单进行设置。
266
Blackmagic HyperDeck Setup

网络
协议
如果要用
ATEM
切换台控制
HyperDeck
Shuttle
HD
,或者通过
HyperDeck
Ethernet
Protocol
以太网
协议对设备进行远程控制,那么HyperDeck Shuttle HD就需要和其他使用DHCP的设备位于同一网络
下,或者您也可以手动添加固定的IP地址。
DHCP
HyperDeck
Shuttle HD硬盘录机默认使用DHCP设置。动态主机配置协议也叫DHCP,
这个网络服务器可以自动寻找您的HyperDeck硬盘录机并为其指派一个IP地址。DHCP方
便易用,可通过以太网连接设备,并确保设备的IP地址相互不冲突。大部分计算机和网络交
换机支持DHCP。
静态
IP
选中“静态IP”选项后,您可以手动输入具体的网络信息。当您进行手动设置IP地址以便让所
有设备都能建立通信时,这些设备必须共享同一个子网掩码和网关设置。此外,控制面板IP
地址的前三段数值也必须匹配。
如果网络上其他设备的
IP
地址具有相同的识别数值,就会发生冲突,导致设备无法连接。如果遇到冲突,
只要将该设备IP地址的识别数值进行修改即可。
文件设置
初次设置时,
HyperDeck
Shuttle
HD
将会使用“
HyperDeck
”前缀把片段记录在
SD
卡或
USB
硬盘上。
您可以输入新的文件名修改前缀。
默认设置下,时间戳添加至文件名是关闭状态。如果您希望在文件名中记录日期和时间,可以将其设为“开
启”状态。HyperDeck Shuttle HD的屏幕菜单中也有文件名前缀和时间戳的设置。
267
Blackmagic HyperDeck Setup

通过网络传输文件
HyperDeck硬盘录机支持通过文件传输协议,即“FTP”来传输文件。这个强大功能可让您通过本地网
络可提供的快速网络,直接从电脑上复制文件到HyperDeck。例如,您可以将新文件复制到位于异地的
HyperDeck远程设备上,用于数字标牌。
连接HyperDeckShuttleHD
当计算机和
HyperDeck
Shuttle
HD
处于同一个网络时,您只需要一个
FTP
客户端和
HyperDeck
Shuttle
HD的IP地址即可。
1
在用来连接HyperDeck的计算机上下载安装FTP客户端。我们推荐Cyberduck、FileZilla或
Transmit,但大多数FTP应用程序都可以使用。Cyberduck与FileZilla均可免费下载。
2
通过以太网线将HyperDeck Shuttle HD连接到网络,并记下它的IP地址。要查询IP地址,按
“菜单”按钮,旋转旋钮进入“网络”设置即可。屏幕下方会显示HyperDeck的IP地址。
您可以在设置菜单的“网络”选项卡中找到
HyperDeck
Shuttle
HD
的
IP
地址。
3
将
HyperDeck
的
IP
地址输入
TCP
应用程序的连接对话框。对话框的名字和位置会根据应用程
序的不同而发生变化,但通常会标为“服务器”或“主机”。如果您的FTP程序包含“匿名登录”复
选框,请务必勾选该复选框。
连接
HyperDeck
Shuttle
HD
时,不需要输入用户名或密码。只需在
FTP
应用程序的“服务器”或“主机”一
栏输入硬盘录机的
IP
地址,如有“匿名登录”复选框的话同时勾选该复选框。
268
通过网络传输文件

传输文件
连接HyperDeck后,您可以像使用FTP程序一样传输文件。大多数FTP应用程序都具备拖放界面,具体
方式请查看您使用的应用程序。
您的
HyperDeck
可以发送和接收任何文件,但请注意,如果您需要在
HyperDeck
Shuttle
HD
上播放任
何文件,该文件必须符合HyperDeck所支持的编解码器和分辨率。
提示
您可以在
HyperDeck
录制的同时通过网络传输文件。
HyperDeck
会自动调整传输速度,
确保记录不受影响。
269
通过网络传输文件

Developer Information
Blackmagic
HyperDeck
Ethernet
Protocol
The Blackmagic HyperDeck Ethernet Protocol is a text based protocol accessed by connecting
to TCP port 9993 on HyperDeck models that have a built in Ethernet connection. If you are
a software developer, you can use the protocol to construct devices that integrate with our
products. Here at Blackmagic Design our approach is to open up our protocols and we eagerly
look forward to seeing what you come up with!
Protocol
Commands
Command Command Description
help or ? Provides help text on all commands and parameters
commands return commands in XML format
device info return device information
disk list query clip list on active disk
disk list: slot id: {n} query clip list on disk in slot {n}
quit disconnect ethernet control
ping check device is responding
preview: enable: {true/false} switch to preview or output
play play from current timecode
play: speed: {-5000 to 5000} play at specific speed
play: loop: {true/false} play in loops or stop-at-end
play: single clip: {true/false} play current clip or all clips
playrange query playrange setting
playrange set: clip id: {n} set play range to play clip {n} only
playrange set: clip id: {n} count: {m} set play range to {m} clips starting from clip {n}
playrange set: in: {inT} out: {outT}
set play range to play between:
- timecode {inT} andtimecode {outT}
playrange set: timeline in: {in} timeline out:
{out}
set play range in units of frames between:
- timeline position {in} and position {out} clear/reset play
rangesetting
playrange clear clear/reset play range setting
play on startup query unit play on startup state
play on startup: enable: {true/false} enable or disable play on startup
play on startup: single clip: {true/false} play single clip or all clips on startup
play option query play options
play option: stop mode:
{lastframe/nextframe/black}
set output frame when playback stops
record record from current input
record: name: {name} record named clip
record spill spill current recording to next slot
270
Developer Information

Command Command Description
record: spill: slot id: {n}
spill current recording to specified slot
use current id to spill to same slot
stop stop playback or recording
clips count query number of clips on timeline
clips get query all timeline clips
clips get: clip id: {n} query a timeline clip info
clips get: clip id: {n} count: {m} query m clips starting from n
clips get: version: {1/2}
query clip info using specified output version:
version 1: id: name startT duration
version 2: id: startT duration inT outT name
clips add: name: {name} append a clip to timeline
clips add: clip id: {n} name: {name} insert clip before existing clip {n}
clips add: in: {inT} out: {outT} name: {name} append the {inT} to {outT} portion of clip
clips remove: clip id: {n}
remove clip {n} from the timeline
(invalidates clip ids following clip {n})
clips clear empty timeline clip list
transport info query current activity
slot info query active slot
slot info: slot id: {n} query slot {n}
slot select: slot id: {n} switch to specified slot
slot select: video format: {format} load clips of specified format
slot unblock unblock active slot
slot unblock: slot id: {n} unblock slot {n}
cache info query cache status
dynamic range query dynamic range settings
dynamic range: playback override:
{off/Rec709/Rec2020_SDR/HLG/
ST2084_300/ST2084_500/
ST2084_800/ST2084_1000/
ST2084_2000/ST2084_4000/ST2084
set playback dynamic range override
dynamic range: record override:
{off/Rec709/Rec2020_SDR/HLG/
ST2084_300/ST2084_500/
ST2084_800/ST2084_1000/
ST2084_2000/ST2084_4000/ST2048}
set record dynamic range override
notify query notification status
notify: remote: {true/false} set remote notifications
notify: transport: {true/false} set transport notifications
notify: slot: {true/false} set slot notifications
notify: configuration: {true/false} set configuration notifications
notify: dropped frames: {true/false} set dropped frames notifications
271
Developer Information

Command Command Description
notify: display timecode: {true/false} set display timecode notifications
notify: timeline position: {true/false} set playback timeline position notifications
notify: playrange: {true/false} set playrange notifications
notify: cache: {true/false} set cache notifications
notify: dynamic range: {true/false} set dynamic range settings notifications
notify: slate: {true/false} set digital slate notifications
notify: clips: {true/false}
set timeline clips notifications where two types of changes can
occur:
add: partial update with list of clips and insert positions
snapshot: complete update of all clips on timeline
notify: disk: {true/false}
set disk clips notifications where two types of changes can
occur:
add: partial update with list of clips and insert positions
snapshot: complete update of all clips on timeline
goto: clip id: {start/end} goto first clip or last clip
goto: clip id: {n} goto clip id {n}
goto: clip id: +{n} go forward {n} clips
goto: clip id: -{n} go backward {n} clips
goto: clip: {n} goto frame position {n} within current clip
goto: clip: +{n} go forward {n} frames within current clip
goto: clip: -{n} go backward {n} frames within current clip
goto: clip: {start/end} goto start or end of clip
goto: timeline: {n} goto frame position {n} within timeline
goto: timeline: +{n} o forward {n} frames within timeline
goto: timeline: -{n} go backward {n} frames within timeline
goto: timeline: {start/end} goto start or end of timeline
goto: timecode: {timecode} goto specified timecode
goto: timecode: +{timecode} go forward {timecode} duration
goto: timecode: -{timecode} go backward {timecode} duration
goto: slot id: {n} goto slot id {n}
jog: timecode: {timecode} jog to timecode
jog: timecode: +{timecode} jog forward {timecode} duration
jog: timecode: -{timecode} jog backward {timecode} duration
shuttle: speed: {-5000 to 5000} shuttle with speed
remote query unit remote control state
remote: enable: {true/false} enable or disable remote control
remote: override: {true/false} session override remote control
configuration query configuration settings
configuration: video input: SDI switch to SDI input
configuration: video input: HDMI switch to HDMI input
272
Developer Information

Command Command Description
configuration: video input: component switch to component input
configuration: audio input: embedded capture embedded audio
configuration: audio input: XLR capture XLR audio
configuration: audio input: RCA capture RCA audio
configuration: file format: {format} switch to specific file format
configuration: audio codec: PCM switch to PCM audio
configuration: audio codec: AAC switch to AAC audio
configuration: timecode input:
{external/embedded/internal/preset/clip}
change the timecode input
configuration: timecode output:
{clip/timeline}
change the timecode output
configuration: timecode preference:
{default/dropframe/nondropframe}
whether or not to use drop frame timecodes when not
otherwise specified
configuration: timecode preset:
{timecode}
set the timecode preset
configuration: audio input channels: {n} set the number of audio channels recorded to {n}
configuration: record trigger:
{none/recordbit/timecoderun}
change the record trigger
configuration: record prefix: {name} set the record prefix name (supports UTF-8 name)
configuration: append timestamp:
{true/false}
append timestamp to recorded filename
configuration: xlr input id: {n} xlr type:
{line/mic}
configure xlr input type
multiple xlr inputs can be configured in a single command
configuration: genlock input resync:
{true/false}
enable or disable genlock input resync
uptime return time since last boot
format: slot id: {n} prepare:
{exFAT/HFS+} name: {name}
prepare a disk formatting operation to filesystem {format}
format: confirm: {token} perform a pre-prepared formatting operation using token
identify: enable: {true/false} identify the device
watchdog: period: {period in seconds} client connection timeout
reboot reboot device
slate clips slate clips information
slate project slate project information
slate lens slate lens information
273
Developer Information

Multiline commands: Command Description
slate clips↵ set slate clips information:
reel: {n} slate reel number, where {n} is in [1, 999]
scene id: {id} slate scene id value, where {id} is a string
shot type: {WS/MS/BCU/MCU/ECU/none} slate shot type
take: {n} slate take number, where {n} is in [1, 99]
take scenario: {PU/VFX/SER/none} slate take scenario
take auto inc: {true/false} slate take auto increment
good take: {true/false} slate good take
environment: {interior/exterior} slate environment
day night: {day/night} slate day or night
slate project:↵ set slate project information:
project name: {name} project name (can be empty, supports UTF-8)
camera: {index} set camera index e.g. A
director: {name} director (can be empty, supports UTF-8)
camera operator: {name} camera operator (can be empty, supports UTF-8)
slate lens:↵ set lens information:
lens type: {type} lens type (can be empty, supports UTF-8)
iris: {type} camera iris (can be empty, supports UTF-8)
focal length: {length} focal length (can be empty, supports UTF-8)
distance: {distance} lens distance (can be empty, supports UTF-8)
filter: {filter} lens filter (can be empty, supports UTF-8)
Command Combinations
You can combine the parameters into a single command, for example:
play: speed: 200 loop: true single clip: true
Or for configuration:
configuration: video input: SDI audio input: XLR
Or to switch to the second disk, but only play NTSC clips:
slot select: slot id: 2 video format: NTSC
Protocol
Details
Connection
The HyperDeck Ethernet server listens on TCP port 9993.
Basic syntax
The HyperDeck protocol is a line oriented text protocol. Lines from the server will be separated by an ascii
CR LF sequence. Messages from the client may be separated by LF or CR LF.
New lines are represented in this document as a "↵" symbol.
274
Developer Information

Single line command syntax
Command parameters are usually optional. A command with no parameters is terminated with a new line:
{Command name}↵
If parameters are specified, the command name is followed by a colon, then pairs of parameter names and
values. Each parameter name is terminated with a colon character:
{Command name}: {Parameter}: {Value} {Parameter}: {Value} ...↵
Multiline command syntax
The HyperDeck protocol also supports an equivalent multiline syntax where each parameter-value pair is
entered on a new line. E.g.
{Command name}:↵
{P a r a m e t e r}: { Va lu e}↵
{P a r a m e t e r}: { Va lu e}↵
↵
Response syntax
Simple responses from the server consist of a three digit response code and descriptive text terminated by a
new line:
{Response code} {Response text}↵
If a response carries parameters, the response text is terminated with a colon, and parameter name and
value pairs follow on subsequent lines until a blank line is returned:
{Response code} {Response text}:↵
{P a r a m e t e r}: { Va lu e}↵
{P a r a m e t e r}: { Va lu e}↵
...
↵
Successful response codes
A simple acknowledgement of a command is indicated with a response code of 200:
200 ok↵
Other successful responses carry parameters and are indicated with response codes in the range of 201
to299.
275
Developer Information

Failure response codes
Failure responses to commands are indicated with response codes in the range of 100 to 199:
100 syntax error
101 unsupported parameter
102 invalid value
103 unsupported
104 disk full
105 no disk
106 disk error
107 timeline empty
108 internal error
109 out of range
110 no input
111 remote control disabled
112 clip not found
120 connection rejected
150 invalid state
151 invalid codec
160 invalid format
161 invalid token
162 format not prepared
163 parameterized single line command not supported
Asynchronous response codes
The server may return asynchronous messages at any time. These responses are indicated with response
codes in the range of 500 to 599:
5xx {Response Text}:↵
{P a r a m e t e r}: { Va lu e}↵
{P a r a m e t e r}: { Va lu e}↵
↵
Connection response
On connection, an asynchronous message will be delivered:
500 connection info:↵
protocol version: {Version}↵
model: {Model Name}↵
↵
Timecode syntax
Timecodes are expressed as non-drop-frame timecode in the format:
HH:MM:SS:FF
276
Developer Information

Handling of deck "remote" state
The “remote” command may be used to enable or disable the remote control of the deck. Any attempt to
change the deck state over ethernet while remote access is disabled will generate an error:
111 remote control disabled↵
To enable or disable remote control:
remote: enable: {“true”, “false”} ↵
The current remote control state may be overridden allowing remote access over ethernet irrespective of the
current remote control state:
remote: override: {“true”, “false”} ↵
The override state is only valid for the currently connected ethernet client and only while the connection
remains open.
The “remote” command may be used to query the remote control state of the deck by specifying no
parameters:
remote↵
The deck will return the current remote control state:
210 remote info:↵
enabled: {“true”, “false”}↵
override: {“true”, “false”}↵
↵
Asynchronous remote control information change notification is disabled by default and may be
configured with the “notify” command. When enabled, changes in remote state will generate a “510 remote
info:”asynchronous message with the same parameters as the “210 remote info:” message.
Closing connection
The "quit" command instructs the server to cleanly shut down the connection:
quit↵
Checking connection status
The "ping" command has no function other than to determine if the server is responding:
ping↵
Getting help
The "help" or "?" commands return human readable help text describing all available commands and
parameters:
help↵
Or:
?↵
The server will respond with a list of all supported commands:
201 help:↵
{Help Text}↵
{Help Text}↵
↵
277
Developer Information

Switching to preview mode
The "preview" command instructs the deck to switch between preview mode and output mode:
preview: enable: {"true", "false"}↵
Playback will be stopped when the deck is switched to preview mode. Capturing will be stopped when the
deck is switched to output mode.
Controlling device playback
The “play” command instructs the deck to start playing:
play↵
The play command accepts a number of parameters which may be used together in most combinations.
By default, the deck will play all remaining clips on the timeline then stop.
The “single clip” parameter may be used to override this behavior:
play: single clip: {“true”, “false”}↵
By default, the deck will play at normal (100%) speed. An alternate speed may be specified in percentage
between -5000 to 5000:
play: speed: {% normal speed}↵
By default, the deck will stop playing when it reaches to the end of the timeline. The “loop” parameter may be
used to override this behavior:
play: loop: {“true”, “false”}↵
The “playrange” command instructs the deck to play all the clips. To override this behavior: and select a
particular clip:
playrange set: clip id: {Clip ID}↵
To only play a certain timecode range:
playrange set: in: {in timecode} out: {out timecode}↵
To clear a set playrange and return to the default value:
playrange clear↵
The “play on startup command” instructs the deck on what action to take on startup. By default, the deck will
not play. Use the “enable” command to start playback after each power up.
play on startup: enable {“true”, “false”}↵
By default, the unit will play back all clips on startup. Use the “single clip” command to override.
play on startup: single clip: {“true”, “false”}↵
Stopping deck operation
The "stop" command instructs the deck to stop the current playback or capture:
stop↵
278
Developer Information

Changing timeline position
The "goto" command instructs the deck to switch to playback mode and change its position within the
timeline.
To go to the start of a specific clip:
goto: clip id: {Clip ID}↵
To move forward/back {count} clips from the current clip on the current timeline:
goto: clip id: +/-{count}↵
Note that if the resultant clip id goes beyond the first or last clip on timeline, it will be clamp at the first or last
clip.
To go to the start or end of the current clip:
goto: clip: {“start”, “end”}↵
To go to the start of the first clip or the end of the last clip:
goto: timeline: {“start”, “end”}↵
To go to a specified timecode:
goto: timecode: {timecode}↵
To move forward or back a specified duration in timecode:
goto: timecode: {“+”, “-”}{duration in timecode}↵
To specify between slot 1 and slot 2:
goto: slot id: {Slot ID}↵
Note that only one parameter/value pair is allowed for each goto command.
Enumerating supported commands and parameters
The "commands" command returns the supported commands:
commands↵
The command list is returned in a computer readable XML format:
212 commands:
<commands>↵
<command name="…"><parameter name="…"/>…</command>↵
<command name="…"><parameter name="…"/>…</command>↵
…
</commands>↵
↵
279
Developer Information

Controlling asynchronous notifications
The “notify” command may be used to enable or disable asynchronous notifications from the server.
To enable or disable transport notifications:
notify: transport: {“true”, “false”}↵
To enable or disable slot notifications:
notify: slot: {“true”, “false”}↵
To enable or disable remote notifications:
notify: remote: {“true”, “false”}↵
To enable or disable configuration notifications:
notify: configuration: {“true”, “false”}↵
Multiple parameters may be specified. If no parameters are specified, the server returns the current state of
all notifications:
209 notify:↵
transport: {“true”, “false”}↵
slot: {“true”, “false”}↵
remote: {“true”, “false”}↵
configuration: {“true”, “false”}↵
dropped frames: {“true”, “false”}↵
display timecode: {“true”, “false”}↵
timeline position: {“true”, “false”}↵
playrange: {“true”, “false”}↵
cache: {“true”, “false”}↵
dynamic range: {“true”, “false”}↵
slate: {“true”, “false”}↵
clips: {“true”, “false”}↵
disk: {“true”, “false”}↵
↵
Retrieving device information
The "device info" command returns information about the connected deck device:
device info↵
The server will respond with:
204 device info:↵
protocol version: {Version}↵
model: {Model Name}↵
unique id: {unique alphanumeric identifier}↵
slot count: {number of storage slots}↵
software version: {software version}↵
↵
280
Developer Information

Retrieving slot information
The "slot info" command returns information about a slot. Without parameters, the command returns
information for the currently selected slot:
slot info↵
If a slot id is specified, that slot will be queried:
slot info: slot id: {Slot ID}↵
The server will respond with slot specific information:
202 slot info:↵
slot id: {Slot ID}↵
status: {"empty", "mounting", "error", "mounted"}↵
volume name: {Volume name}↵
recording time: {recording time available in seconds}↵
video format: {disk's default video format}↵
blocked: {“true”, “false”}↵
↵
Asynchronous slot information change notification is disabled by default and may be configured with
the "notify" command. When enabled, changes in slot state will generate a "502 slot info:" asynchronous
message with the same parameters as the "202 slot info:" message.
Retrieving clip information
The “disk list” command returns the information for each playable clip on a given disk. Without parameters,
the command returns information for the current active disk:
disk list↵
If a slot id is specified, the disk in that slot will be queried:
disk list: slot id: {Slot ID}↵
The server responds with the list of all playable clips on the disk in the format of: Index, name, formats, and
duration in timecode:
206 disk list:↵
slot id: {Slot ID}↵
{clip index}: {name} {file format} {video format} {Duration
ti m ecode}↵
{clip index}: {name} {file format} {video format} {Duration
ti m ecode}↵
…
↵
Note that the clip index starts from 1.
Retrieving clip count
The "clips count" command returns the number of clips on the current timeline:
clips count ↵
The server responds with the number of clips:
214 clips count: ↵
clip count: {Count}↵
281
Developer Information

Retrieving timeline information
The "clips get" command returns information for each available clip on the current timeline. Without
parameters, the command returns information for all clips on timeline:
clips get↵
The server responds with a list of clip IDs, names and timecodes:
205 clips info:↵
clip count: {Count}↵
{Clip ID}: {Start timecode} {Duration timecode} {In timecode}
{Out timecode} {Name}↵
{Clip ID}: {Start timecode} {Duration timecode} {In timecode}
{Out timecode} {Name}↵
…
↵
Retrieving transport information
The “transport info” command returns the state of the transport:
transport info ↵
The server responds with transport specific information:
208 transport info:
status: {“preview”, “stopped”, “play”, “forward”, “rewind”,
“j o g ”, “ s h u t t l e ”,” r e c o r d ”}↵
speed: {Play speed between -5000 and 5000 %}↵
slot id: {Slot ID or “none”}↵
clip id: {Clip ID or “none”}↵
single clip: {“true”, “false”}↵
display timecode: {timecode}↵
timecode: {timecode}↵
video format: {Video format}↵
loop: {“true”, “false”}↵
timeline: {n}↵
input video format: {Video format”}↵
dynamic range: {“off”, “Rec709”, “Rec2020_SDR”, “HLG”,
“ST2084_300”, “ST2084_500”, “ST2084_800”, “ST2084_1000”,
“ST2084_2000”, “ST2084_4000”, “ST2048” or “none”}↵
↵
The "timecode" value is the timecode within the current timeline for playback or the clip for record. The
"display timecode" is the timecode displayed on the front of the deck. The two timecodes will differ in some
deck modes.
Asynchronous transport information change notification is disabled by default and may be configured
with the "notify" command. When enabled, changes in transport state will generate a "508 transport info:"
asynchronous message with the same parameters as the "208 transport info:" message.
282
Developer Information

Video Formats
The following video formats are currently supported on HyperDeck Shuttle:
720p50, 720p5994, 720p60
1080p23976, 1080p24, 1080p25, 1080p2997, 1080p30, 1080p60
1080i50, 1080i5994, 1080i60
Video format support may vary between models and software releases.
File Formats
All HyperDeck models currently support the following file formats:
H.264High
H.264Medium
H.264Low
QuickTimeProResHQ
QuickTimeProRes
QuickTimeProResLT
QuickTimeProResProxy
QuickTimeDNxHD220x
DNxHD220x
QuickTimeDNxHD145
DNxHD145
QuickTimeDNxHD45
DNxHD45
Supported file formats may vary between models and software releases.
283
Developer Information

Querying and updating configuration information
The "configuration" command may be used to query the current configuration of the deck:
configuration↵
The server returns the configuration of the deck:
211 configuration:↵
audio input: {“embedded”, “XLR”, “RCA”}↵
audio mapping: {n}↵
video input: {“SDI”, “HDMI”, “component”, “composite”}↵
file format: {format}↵
audio codec: {“PCM”, “AAC”}↵
timecode input: {“external”, “embedded”, “preset”, “clip”}↵
timecode output: {“clip”, “timeline”}↵
timecode preference: {“default”, “dropframe”, “nondropframe”}↵
timecode preset: {timecode}↵
audio input channels: {n}↵
record trigger: {“none”, “recordbit”, “timecoderun”}↵
record prefix: {name}↵
append timestamp: {“true”, “false”}↵
genlock input resync: {“true”, “false”}↵
↵
One or more configuration parameters may be specified to change the configuration of the deck.
To change the current video input:
configuration: video input: {“SDI”, “HDMI”, “component”}↵
Valid video inputs may vary between models. To configure the current audio input:
configuration: audio input: {“embedded”, “XLR”, “RCA”}↵
Valid audio inputs may vary between models.
To configure the current file format:
configuration: file format: {File format}↵
Note that changes to the file format may require the deck to reset, which will cause the client connection to
be closed. In such case, response code 213 will be returned (instead of 200) before the client connection is
closed:
“213 deck rebooting”
Asynchronous configuration information change notification is disabled by default and may be configured
with the “notify” command. When enabled, changes in configuration will generate a “511 configuration:”
asynchronous message with the same parameters as the “211 configuration:” message.
284
Developer Information

Selecting active slot and video format
The "slot select" command instructs the deck to switch to a specified slot, or/and to select a specified output
video format.
To switch to a specified slot:
slot select: slot id: {slot ID}↵
To select the output video format:
slot select: video format: {video format}↵
Either or all slot select parameters may be specified. Note that selecting video format will result in a rescan of
the disk to reconstruct the timeline with all clips of the specified video format.
Clearing the current timeline
The "clips clear" command instructs the deck to empty the current timeline:
clips clear↵
The server responds with
200 ok↵
Adding a clip to the current timeline
The "clips add:" command instructs the deck to add a clip to the current timeline:
clips add: name: {clip name}↵
The server responds with
200 ok↵
or in case of error
1xx {error description}↵
Configuring the watchdog
The “watchdog” command instructs the deck to monitor the connected client and terminate the connection if
the client is inactive for at least a specified period of time.
To configure the watchdog:
watchdog: period: {period in seconds}↵
To avoid disconnection, the client must send a command to the server at least every {period} seconds. Note
that if the period is set to 0 or less than 0, connection monitoring will be disabled.
285
Developer Information

帮助
获得帮助
获得帮助最快捷的途径是登陆
Blackmagic
Design
在线支持页面并浏览有关
Blackmagic
HyperDeck
硬盘录机的最新支持信息和材料。
BlackmagicDesign在线支持页面
请登陆Blackmagic Design支持中心www.blackmagicdesign.com/cn/support获得最新版操作手
册、软件以及技术答疑文章。
BlackmagicDesign论坛
您可以登陆我们的网站访问Blackmagic Design论坛,获得更多信息和有用的创意资源。访问论坛也是
获取帮助的一个捷径,因为论坛中不乏经验丰富的用户和Blackmagic Design的员工,他们都能为您答
疑解惑。请登陆网址http://forum.blackmagicdesign.com进入论坛。
联系BlackmagicDesign支持中心
如果我们提供的支持信息和论坛均无法解答您的疑问,请到支持页面下点击“给我们发送电子邮件”按钮
即可发送技术支持请求。或者,您也可以点击支持页面下的“查找您所在地区的支持团队”按钮,致电您所
在地区的Blackmagic Design支持中心获得帮助。
查看当前安装的软件版本
要检查您计算机上的Blackmagic HyperDeck软件版本,请打开“About Blackmagic HyperDeck
Setup”窗口查看。
在
Mac OS系统下,请到“应用程序”文件夹下打开Blackmagic HyperDeck Setup。到程序菜
单中点击“
About Blackmagic HyperDeck Setup”即可查看版本号。
在Windows系统下,请到开始菜单或开始界面打开Blackmagic HyperDeck Setup实用程序。
点击“Help”(帮助)菜单并选择“About Blackmagic HyperDeck Setup”即可查看版本号。
如何获得软件更新
检查完电脑上安装的Blackmagic HyperDeck Setup软件版本号之后,请登陆网址
www.blackmagicdesign.com/cn/support
,访问
Blackmagic
Design
支持中心查看最新版本。请及
时将软件升级到最新版本,但切勿在重要项目制作过程中升级软件。
286
帮助
监管告知
在欧盟范围内处置电子垃圾和电子设备的注意事项。
根据产品所附的提示标志,本设备不得与其它废弃材料共同处置。处置废弃设备时,必须交给
指定收集点进行回收。对废弃设备进行单独收集并回收能够节省自然资源,且回收方式不会损
害环境和人体健康。获取更多关于废弃设备回收点的信息,请联系您所在城市的回收站,或当时
购买设备的经销商。
本设备经过测试,符合
FCC
规则的第
15
部分对
A
类数字设备的限制。这些限制旨在为运行于商业
环境中的设备提供合理保护,使其免受有害干扰的影响。本设备可生成、使用且辐射射频能量,如
果未按照安装手册来安装和使用本设备,则可能导致对无线电通信的有害干扰。在住宅区运行本
产品可能会产生有害干扰,在这种情况下将由用户自行承担消除干扰的费用。
必须满足以下条件后方可操作:
1
设备不会造成有害干扰。
2
设备必须能够承受任何干扰,包括可能导致意外操作的干扰。
R-R-BMD-20211410001
加拿大ISED认证声明
本设备符合加拿大
A类数码产品的相关标准。
任何对本产品的改装或预期用途之外的使用均可能导致相关标准认证无效。
必须使用有高品质屏蔽的
HDMI电缆连接HDMI接口。
本设备经检测符合商业环境使用要求。在家用环境中,本设备可能会造成无线电干扰。
287
监管告知


保修
12
个月有限保修
Blackmagic Design保证本产品自购买之日起12个月内不会有材料和工艺上的缺陷。若本产品在保修期
内出现质量问题,Blackmagic Design可选择为产品提供免费修理或更换零部件,或者更换缺陷产品。
为确保消费者有权享受本保修条款中的服务,如遇产品质量问题请务必在保修期内联系Blackmagic
Design并妥善安排保修事宜。消费者应将缺陷产品包装并运送到Blackmagic Design的指定服务中心
进行维修,运费由消费者承担并预先支付。若消费者因任何原因退货,所有运费、保险费、关税等各项税
务以及其他费用均由消费者承担。
本保修条款不适用于任何因使用、维护不当或保养不周造成的缺陷、故障或损坏。根据本保修服
务,Blackmagic Design的保修服务范围不包括以下内容:1. 对由非Blackmagic Design专门人员进行
的安装、维修或保养所造成的损坏进行维修,
2
. 对因使用不当或连接到不兼容设备所造成的损坏进行维
修,3. 对因使用了非Blackmagic Design生产的零部件所导致的损坏或故障进行维修,及 4. 对经过改装
或和其他产品进行组装的产品进行保养维修(因为产品经改装或组装后会增加保养维修所需时间或保养难
度)。本保修条款由
BLACKMAGIC
DESIGN
提供,它可取代所有其他明示或隐含的保修。
BLACKMAGIC
DESIGN
及其供应商对任何有关适销性及就特定用途的适用性等隐含保证不作任何担保。
BLACKMAGIC
DESIGN负责为消费者提供缺陷产品的维修或更换服务是完整和排他性补救措施,不论BLACKMAGIC
DESIGN
或其供应商是否事先获悉发生间接、特殊、偶然或必然损坏等损坏的可能性。若消费者对本设备进
行非法使用,
BLACKMAGIC
DESIGN
概不负责。对因使用本产品造成的损失,
BLACKMAGIC
DESIGN
概不负责。本产品的操作风险由用户自行承担。
© Copyright 2022 Blackmagic Design。保留一切权利。“Blackmagic Design”、“DeckLink”、“HDLink”、“Workgroup Videohub”、
“Multibridge Pro”、“Multibridge Extreme”、“Intensity”以及“Leading the creative video revolution”均为美国及其他国家的
注册商标。所有其他公司名称及产品名称可能是其他所有者的注册商标。
289
保修
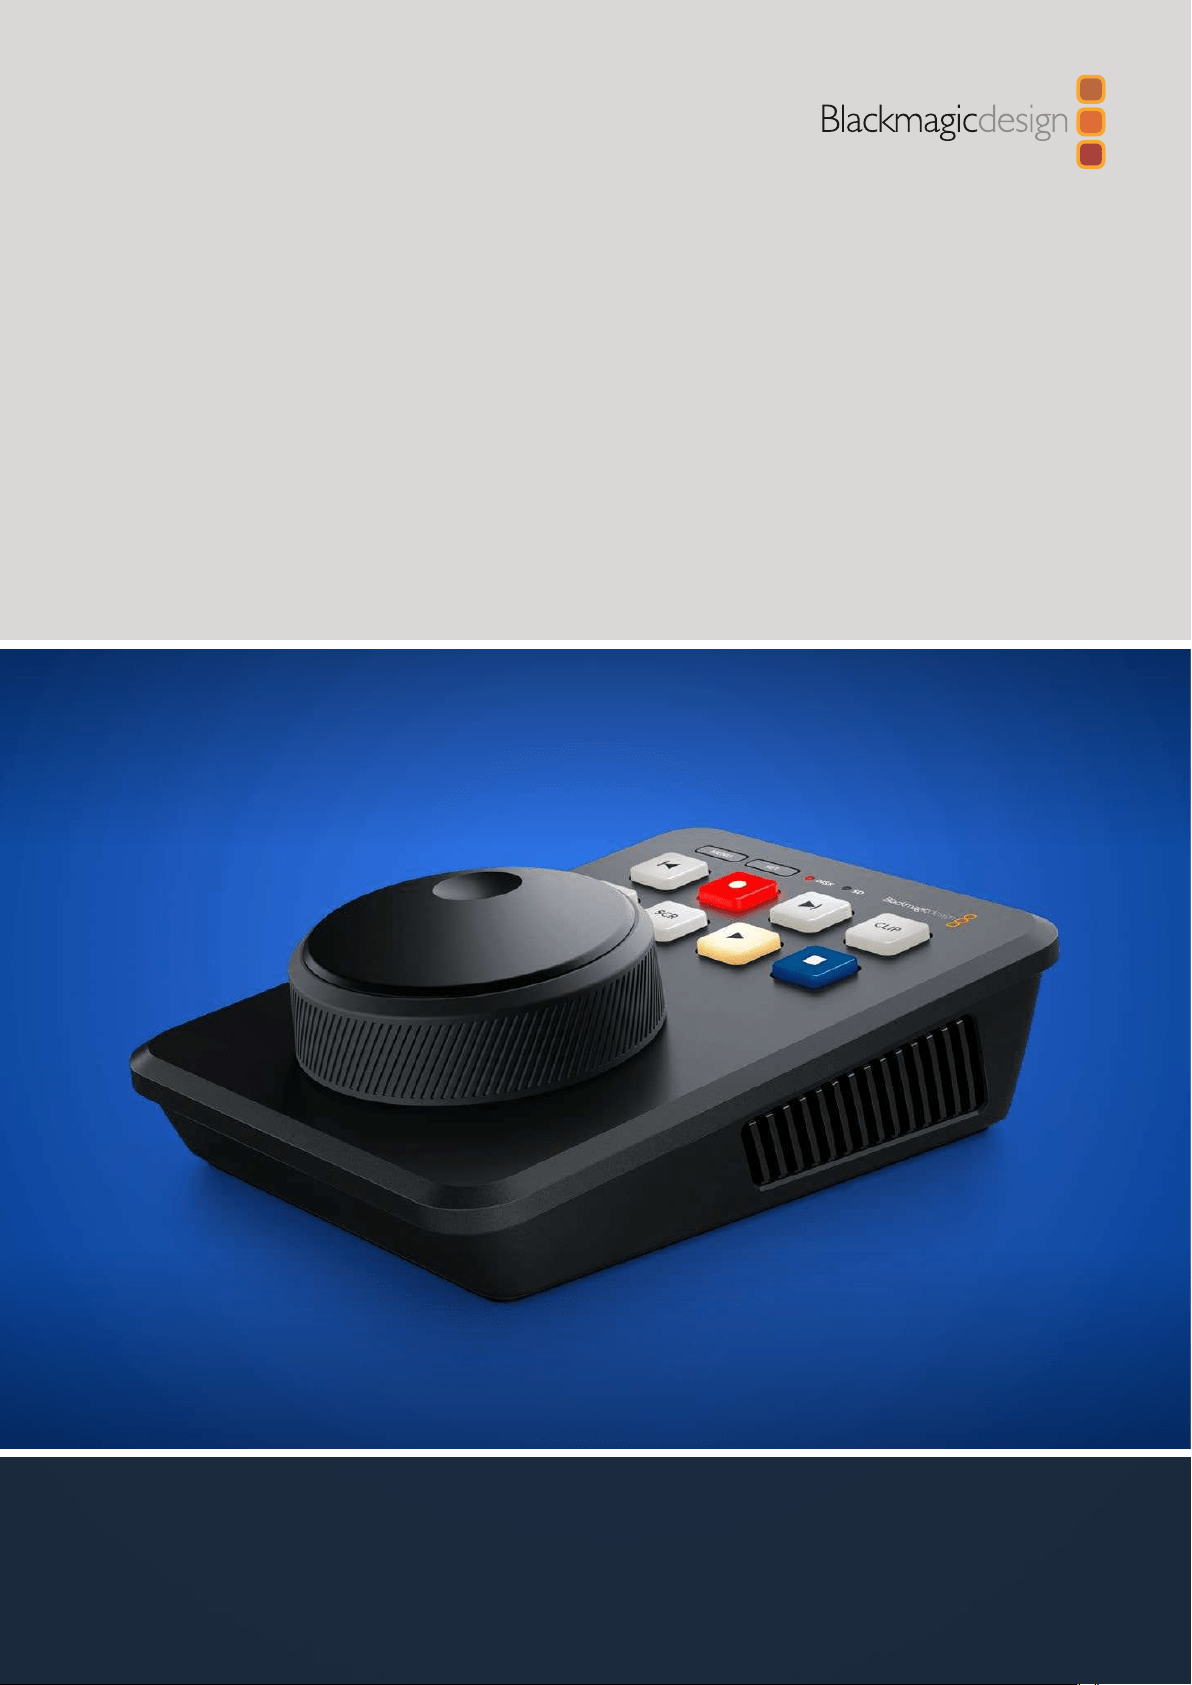
HyperDeck Shuttle HD
HyperDeck
Shuttle HD
2022년 4월
설치 및 사용 설명서

환영합니다
Blackmagic HyperDeck Shuttle HD 디스크 레코더를 구매해 주셔서 감사합니다.
Blackmagic HyperDeck 디스크 레코더를 처음 개발할 당시 저희는 속도가 빠른 SSD 스토리지를
사용하여 비디오 녹화 및 재생을 쉽게 할 수 있는 제품을 만들고자 했습니다. 이제 이렇게
HyperDeck Shuttle HD를 출시하게 되어 매우 기쁩니다.
HyperDeck Shuttle HD는 책상에 두고 사용할 수 있도록 설계된 작은 크기의 휴대용 HDMI 비디오
레코더입니다. 커다란 검색 다이얼과 친숙한 트랜스포트 컨트롤을 사용해 레코더를 한 손으로
운영할 수 있기 때문에
HyperDeck Shuttle HD는 라이브 프로덕션 작업 시 ATEM Mini 스위처와
함께 사용하기 완벽한 제품입니다.
HyperDeck Shuttle HD는 텔레프롬프터로도 사용 가능합니다!
HyperDeck Shuttle HD는 ProRes, DNxHD, H.264 코덱을 사용하여 SD 카드나 외장 플래시
디스크에 영상을 녹화하기 때문에 매우 빠른 녹화 및 재생 속도를 제공합니다.
또한 자사 웹사이트
www.blackmagicdesign.com/kr 고객지원 페이지에서 최신 버전의
사용 설명서와
HyperDeck 관련 업데이트를 확인하시기 바랍니다. 최신 버전의 소프트웨어로
업데이트해야 모든 신규 기능을 사용하실 수 있습니다. 소프트웨어를 다운로드할 때 사용자
정보를 등록하시면 새로운 소프트웨어가 출시될 때마다 업데이트 소식을 받아보실 수 있습니다.
저희는 새로운 기능과 제품 향상을 위해서 끊임없이 노력하고 있으며, 항상 고객 여러분의 의견을
기다립니다.
Blackmagic Design의 CEO
그랜트 패티

목차
시작하기 293
전원연결하기 293
비디오및오디오연결하기 294
미디어연결하기 294
비디오녹화하기 295
재생 296
검색다이얼사용하기 297
설정변경하기 299
설정 300
뒷면패널 309
저장미디어 310
SD카드 310
외장디스크 311
미디어포맷하기 311
컴퓨터에서미디어준비하기 311
텔레프롬프터기능사용하기 313
BlackmagicHyperDeckSetup314
네트워크를통해파일전송하기 316
DeveloperInformation318
BlackmagicHyperDeckEthernetProtocol318
ProtocolCommands318
ProtocolDetails322
지원 334
규제사항 335
안전정보 336
보증 337
292
HyperDeckShuttleHD

시작하기
HyperDeck Shuttle HD는 간단히 전원을 연결하고 HDMI 비디오 소스에 연결한 다음 SD 카드나 외장
미디어를 연결해 녹화 버튼을 누르기만 하면 사용 준비가 완료됩니다.
여기서는
HyperDeck Shuttle HD를 사용하는 방법에 대해 설명합니다.
JOG SCR
CLIP
MENU SET
DISK SD
전원연결하기
HyperDeck Shuttle HD에 전원을 연결하려면 우선 전원 어댑터를 뒷면 패널에 있는 전원 입력에
연결하세요. 전원 케이블이 실수로 빠지는 일이 없도록 잠금 링을 단단히 조이세요.
HDMI OUT
HDMI IN
EXT DISK
SD CARD
ETHERNET
+
12V DC
전원 어댑터를 HyperDeck Shuttle HD의 전원 입력에 연결하세요.
293
시작하기
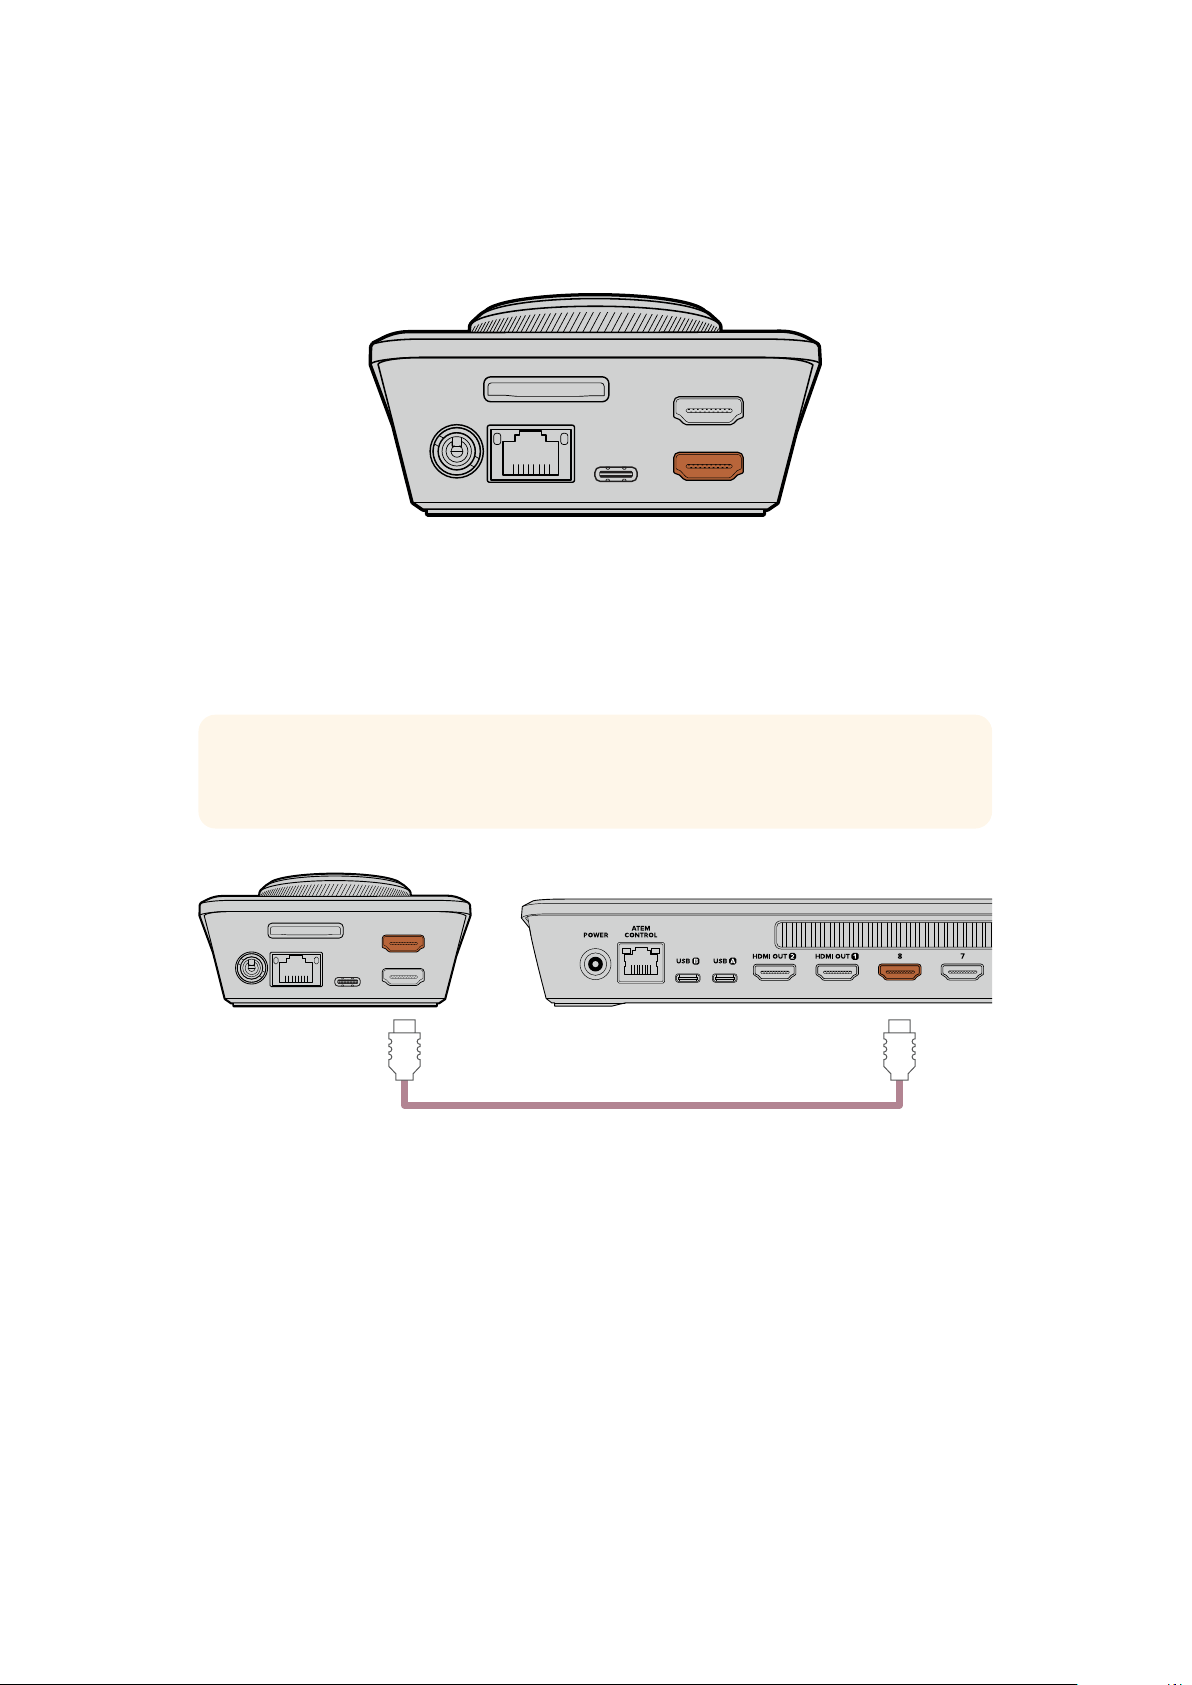
비디오및오디오연결하기
HyperDeck Shuttle HD에 비디오를 연결하려면, HDMI 비디오 소스를 뒷면 패널의 HDMI 입력 단자에
연결하세요.
HDMI OUT
HDMI IN
EXT DISK
SD CARD
ETHERNET
+
12V DC
HDMI 출력 단자에는 수신 장비를 연결하세요. 수신 장비로는 ATEM Mini 스위처나 HDMI TV가
있습니다.
HDMI 출력은 또한 HyperDeck의 설정 변경 시 설정 메뉴를 확인하는 용도로도 사용합니다. 이는 설정
메뉴를
HDMI 출력의 비디오 오버레이를 통해 볼 수 있기 때문입니다. 이러한 설정 변경 방법에 대한
자세한 정보는 본 사용 설명서의 [설정 변경하기] 부분을 참고하세요.
정보 연결된 디스플레이에 입력 비디오 소스가 나타나지 않을 경우, 현재 모드가 재생 모드로
설정되어 있지 않은지 확인하세요. 녹화 버튼을 누르면 녹화 모드가 활성화됩니다.
HDMI OUT
HDMI IN
EXT DISK
SD CARD
ETHERNET
+
12V DC
HDMI
HDMI TV나 ATEM Mini 스위처 같은 수신 장비는 HDMI 출력에 연결하세요.
미디어연결하기
모든 HyperDeck Shuttle HD 디스크 레코더는 설정 변경 없이 바로 녹화할 수 있는 상태로 출고됩니다.
포맷된
SD 카드 또는 외장 디스크만 있으면 바로 녹화를 시작할 수 있습니다.
메뉴 설정을 통해 미디어를 쉽게 포맷할 수 있습니다. 컴퓨터에서 미디어를 포맷할 수도 있습니다. 더
자세한 정보는 본 설명서의 [미디어 포맷하기] 부분을 참고하세요. 영상 녹화에 가장 적합한 미디어 유형과
권장
SD 카드 및 외장 디스크 목록에 대한 정보도 확인할 수 있습니다.
SD 카드 장착하기
1
SD
카드의 금색 접촉부가 위쪽으로 향하도록 잡고 미디어 슬롯에 잘 맞추세요. 이제 카드를
슬롯에 집어넣고 완전히 장착될 때까지 부드럽게 밀어 넣으세요.
294
시작하기
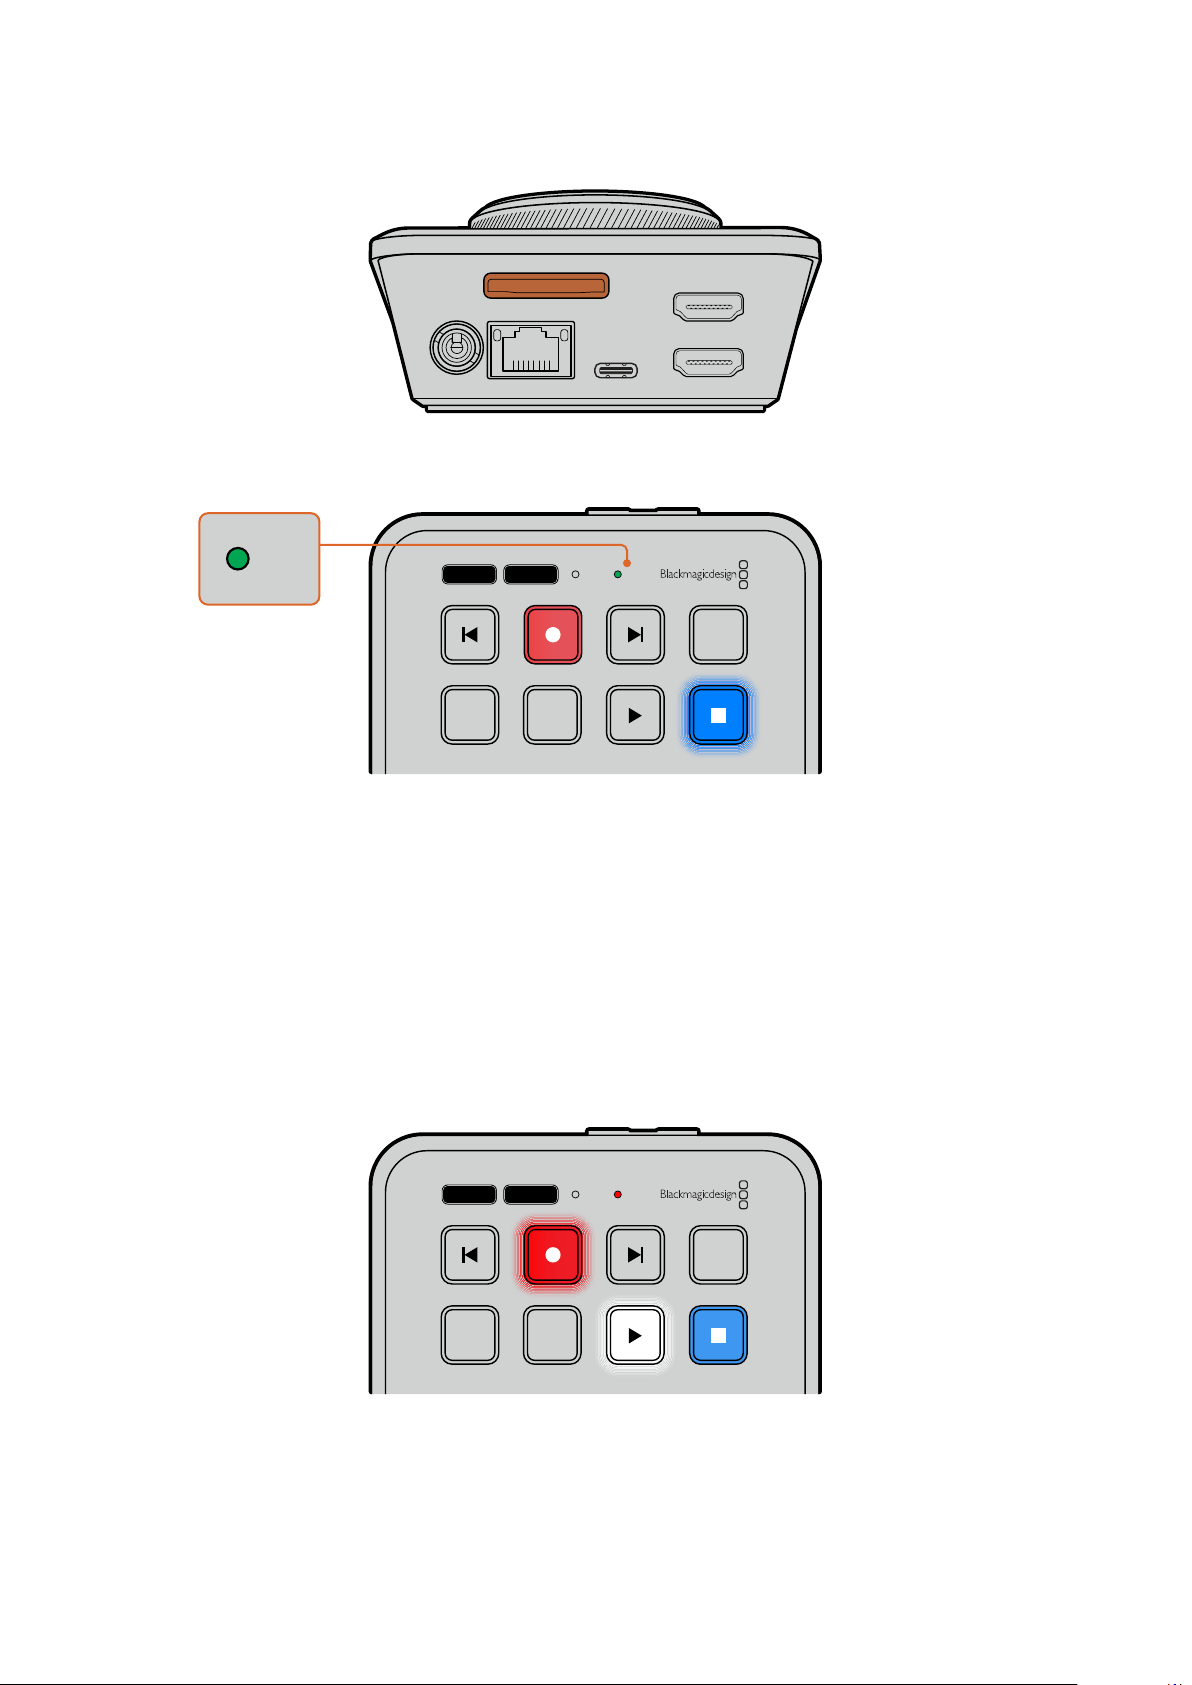
HDMI OUT
HDMI IN
EXT DISK
SD CARD
ETHERNET
+
12V DC
2
이제 HyperDeck에서 SD 카드를 인식합니다. 그러면 HyperDeck Shuttle HD 상단에 있는 SD
카드 표시등에 녹색불이 들어옵니다. 확인 과정이 끝나면 표시등의 불이 꺼집니다.
JOG SCR
CLIP
MENU SET
DISK SD
DISK SD
이것으로 모든 준비가 완료되었습니다. 이제 HyperDeck Shuttle HD로 영상을 녹화 및 재생할 수
있습니다.
사용 설명서를 끝까지 읽고 클립 녹화 및 재생, 설정 변경 등에 대한 자세한 정보를 확인하세요.
비디오녹화하기
비디오 소스가 HDMI 수신 장비에 나타나는 걸 확인하고 나면 녹화를 바로 시작할 수 있습니다.
녹화를 시작하려면 녹화 버튼을 누르세요. SD 카드에 녹화할 경우, SD 표시등에 빨간불이 들어오며 녹화
및 재생 버튼에도 불이 들어옵니다. 외장 디스크에 녹화할 경우엔 디스크 표시등에 빨간불이 들어옵니다.
JOG SCR
CLIP
MENU SET
DISK SD
녹화를 마치려면 정지 버튼을 누르세요.
295
비디오녹화하기
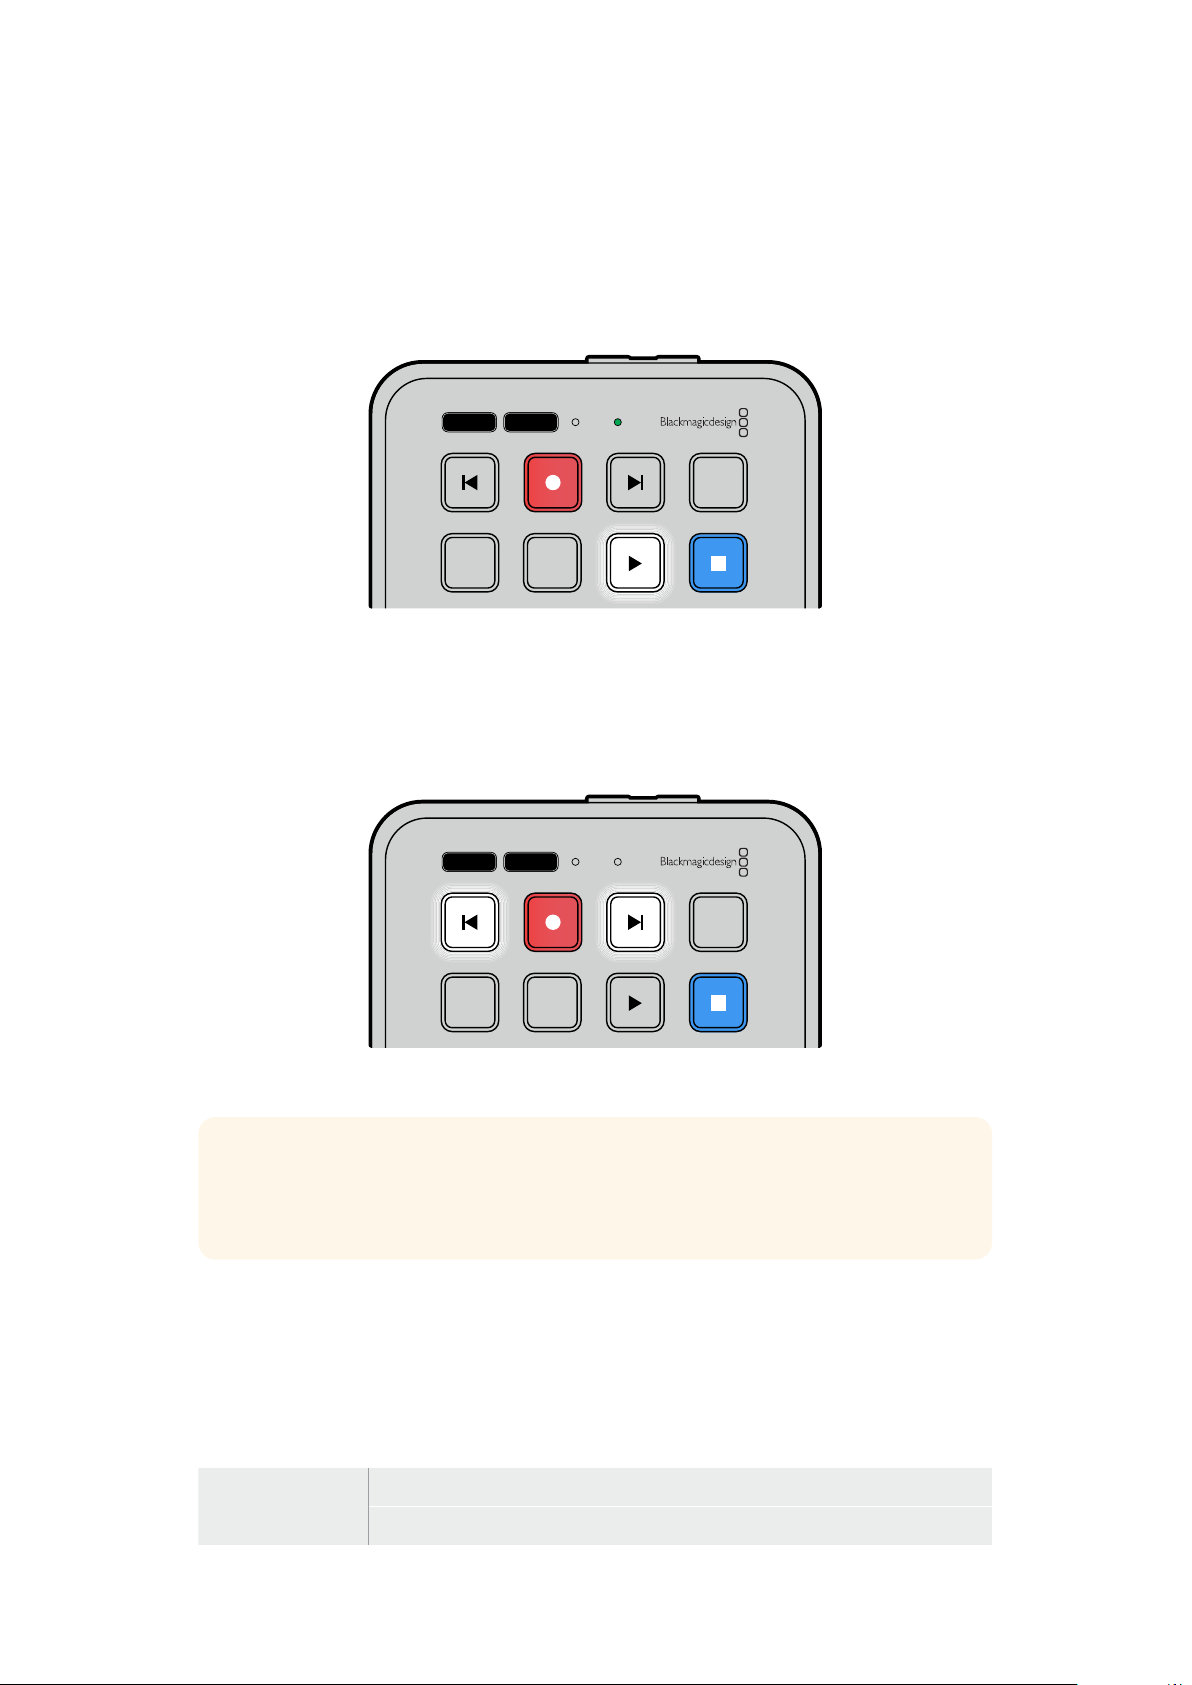
재생
재생 버튼을 누르면 재생이 시작됩니다. 재생 중에는 재생 버튼에 불이 들어오며 DISK 또는 SD 미디어
슬롯 표시등에 녹색불이 들어옵니다.
여러 개의 녹화 클립이 존재할 경우, 건너뛰기 및 뒤로 가기 버튼을 눌러 클립 간을 이동할 수 있습니다.
JOG SCR
CLIP
MENU SET
DISK SD
스킵버튼사용하기
뒤로 가기 버튼을 누르면 클립이 시작 부분으로 큐잉됩니다. 버튼을 한 번 이상 누르면 이전 녹화 클립으로
이동됩니다.
건너뛰기 버튼을 눌러 클립 간을 이동할 수 있습니다.
JOG SCR
CLIP
MENU SET
DISK SD
건너뛰기 및 뒤로 가기 버튼을 누르면 각 클립의 시작 지점으로 큐잉됩니다.
정보 HyperDeck에서 비디오 파일을 재생하려면, 파일 녹화에 사용된 코덱과 일치하는
코덱으로 설정해야 합니다. 이 설정은 메뉴를 통해 설정할 수 있습니다. 더 자세한 정보는 본
설명서 뒤편의 [설정 변경하기] 부분을 참고하세요.
클립반복재생
클립 재생 중에 재생 버튼을 한 번 더 누르면 HyperDeck Shuttle HD에서 정지 버튼을 누를 때까지 모든
클립을 반복 재생합니다.
클립 하나만 반복 재생하고자 할 경우,
HyperDeck을 ‘클립’ 모드로 하고 재생 버튼을 한 번 누르면
재생이, 한 번 더 누르면 반복 재생이 실행됩니다.
전체 클립 루프
클립 재생 중에 재생 버튼을 한 번 더 누르면 녹화된 모든 클립이 반복 재생됩니다.
현재 클립 루프
클립 모드에서 재생 버튼을 한 번 더 누르면 현재 클립이 반복 재생됩니다.
296
재생
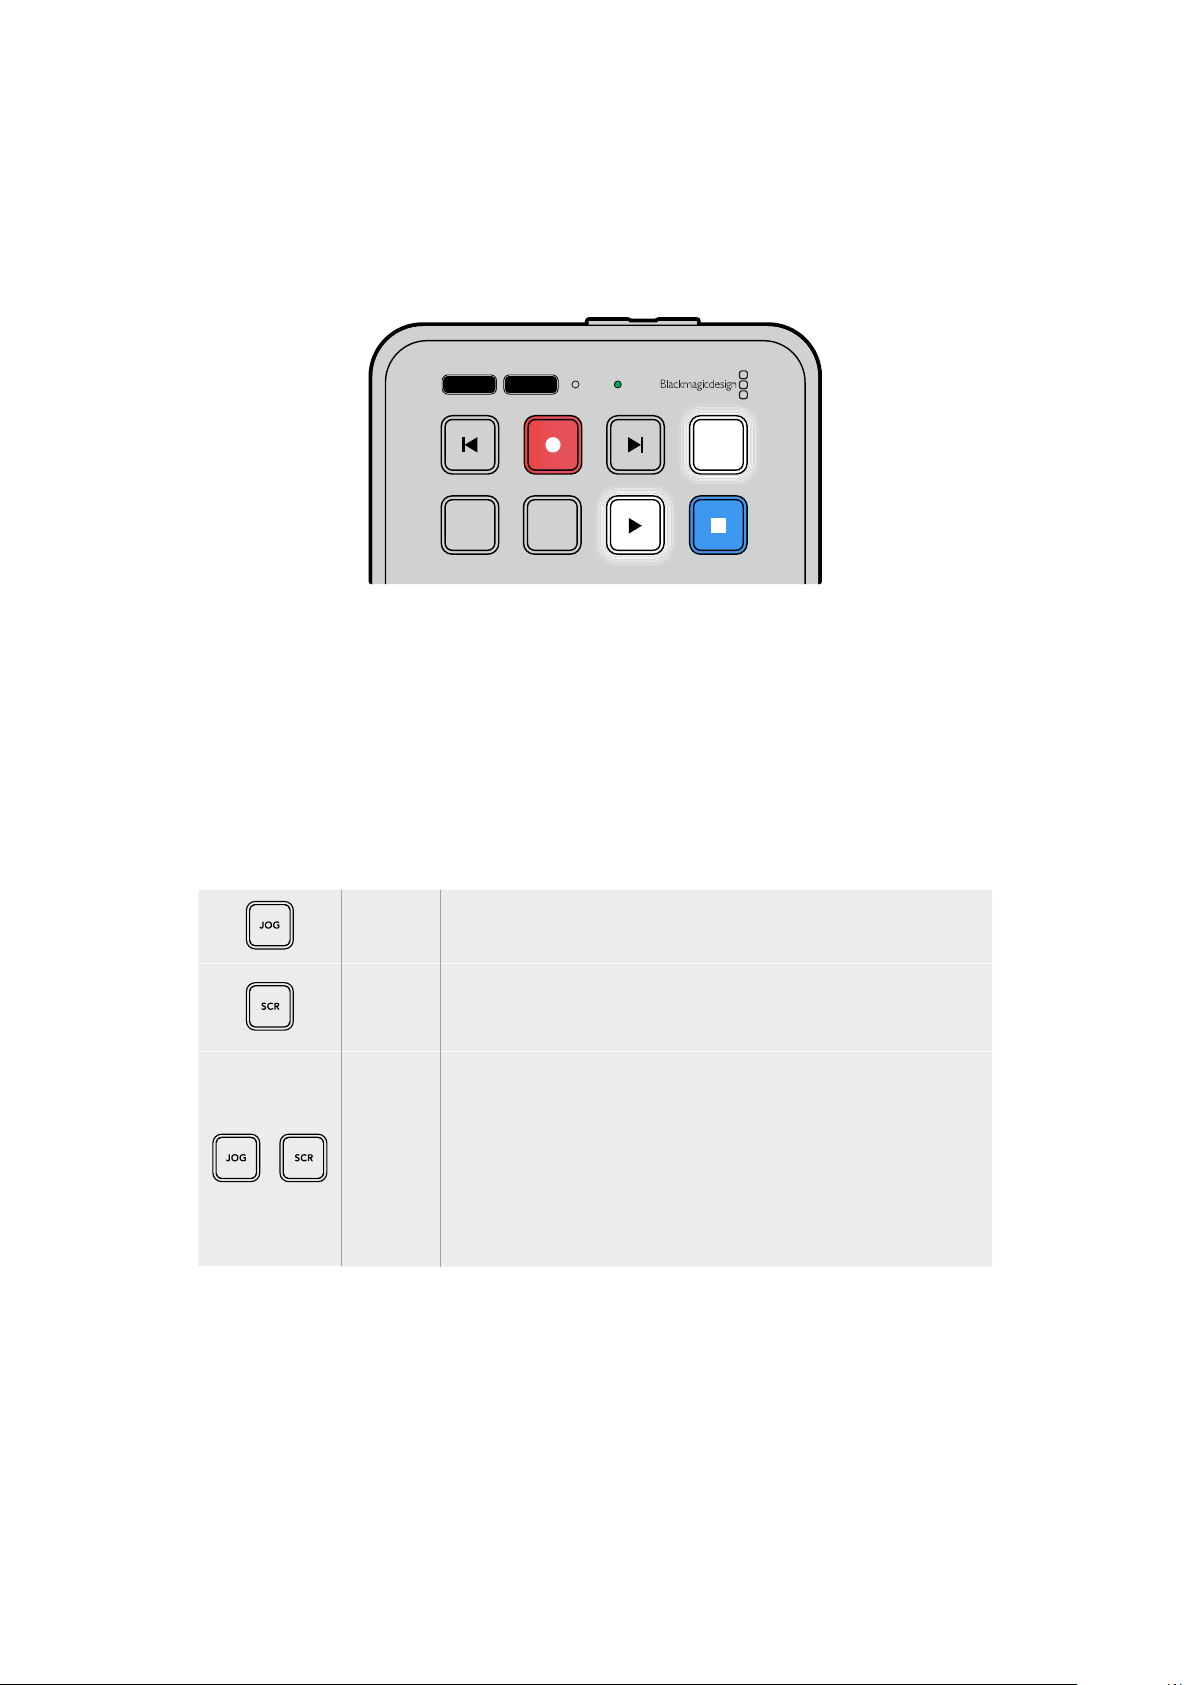
클립모드
클립 모드에서는 재생이 단일 클립으로 제한됩니다. 예를 들어, 클립 모드를 활성화하면 클립을
셔틀하거나 다른 클립으로 건너뛸 수 있으며, 이후 재생 버튼을 누르면 클립이 끝나는 지점에서 재생이
종료됩니다.
JOG SCR
CLIP
MENU SET
DISK SD
클립 모드가 선택된 상태에서 재생 버튼을 한 번 더 누르면 현재 클립이
반복 재생됩니다.
검색다이얼사용하기
검색 다이얼을 사용해 클립 간을 신속하게 이동할 수 있으며, 특정 부분을 골라 재생하거나 프레임 단위로
검토할 수 있습니다. 이는 특정 부분을 찾을 때 중요한 기능으로, 다이얼을 돌려 클립을 시각적으로
모니터링할 수 있습니다. 또한 플레이헤드를 특정 큐 지점으로 이동시켜 생방송 도중 내보낼 클립을
준비할 때 유용한 기능입니다.
검색 다이얼 모드에는 조그, 셔틀, 스크롤이 있습니다.
조그
클립 전체를 재생해 프레임 단위로 정확하게 컨트롤할 수 있습니다.
스크롤
스크롤 모드에서는 신속하게 앞/뒤로 이동하면서 녹화된 모든 미디어를
검색할 수 있습니다. 검색 다이얼을 돌리면 다이얼을 돌리는 만큼
스크롤되어 재생 위치를 원하는 곳으로 완벽하게 조절할 수 있습니다.
셔틀
JOG 및 SCR 버튼을 동시에 누르면 셔틀 모드로 전환됩니다. 셔틀 모드로
전환되면 다이얼을 좌/우로 돌려 미디어를 되감기 또는 빨리 감기 할 수
있습니다. 다이얼을 돌리면 최대
50배속에 다다를 때까지 미디어가 빠른
속도로 셔틀됩니다. 셔틀 속도를 줄여서 완전히 멈추려면, 검색 다이얼을
처음 위치로 다시 돌리세요. 셔틀 도중에 특정 지점에서 멈추려면, 정지
버튼을 누르거나 재생 버튼을 눌러 현재 위치에서 재생이 다시 시작되도록
하세요. ‘설정’ 메뉴를 사용해 최대 셔틀 속도를 줄일 수 있다는 점을
기억하세요. 더 자세한 정보는 본 설명서 뒤편의 [설정] 부분을 참고하세요.
297
재생
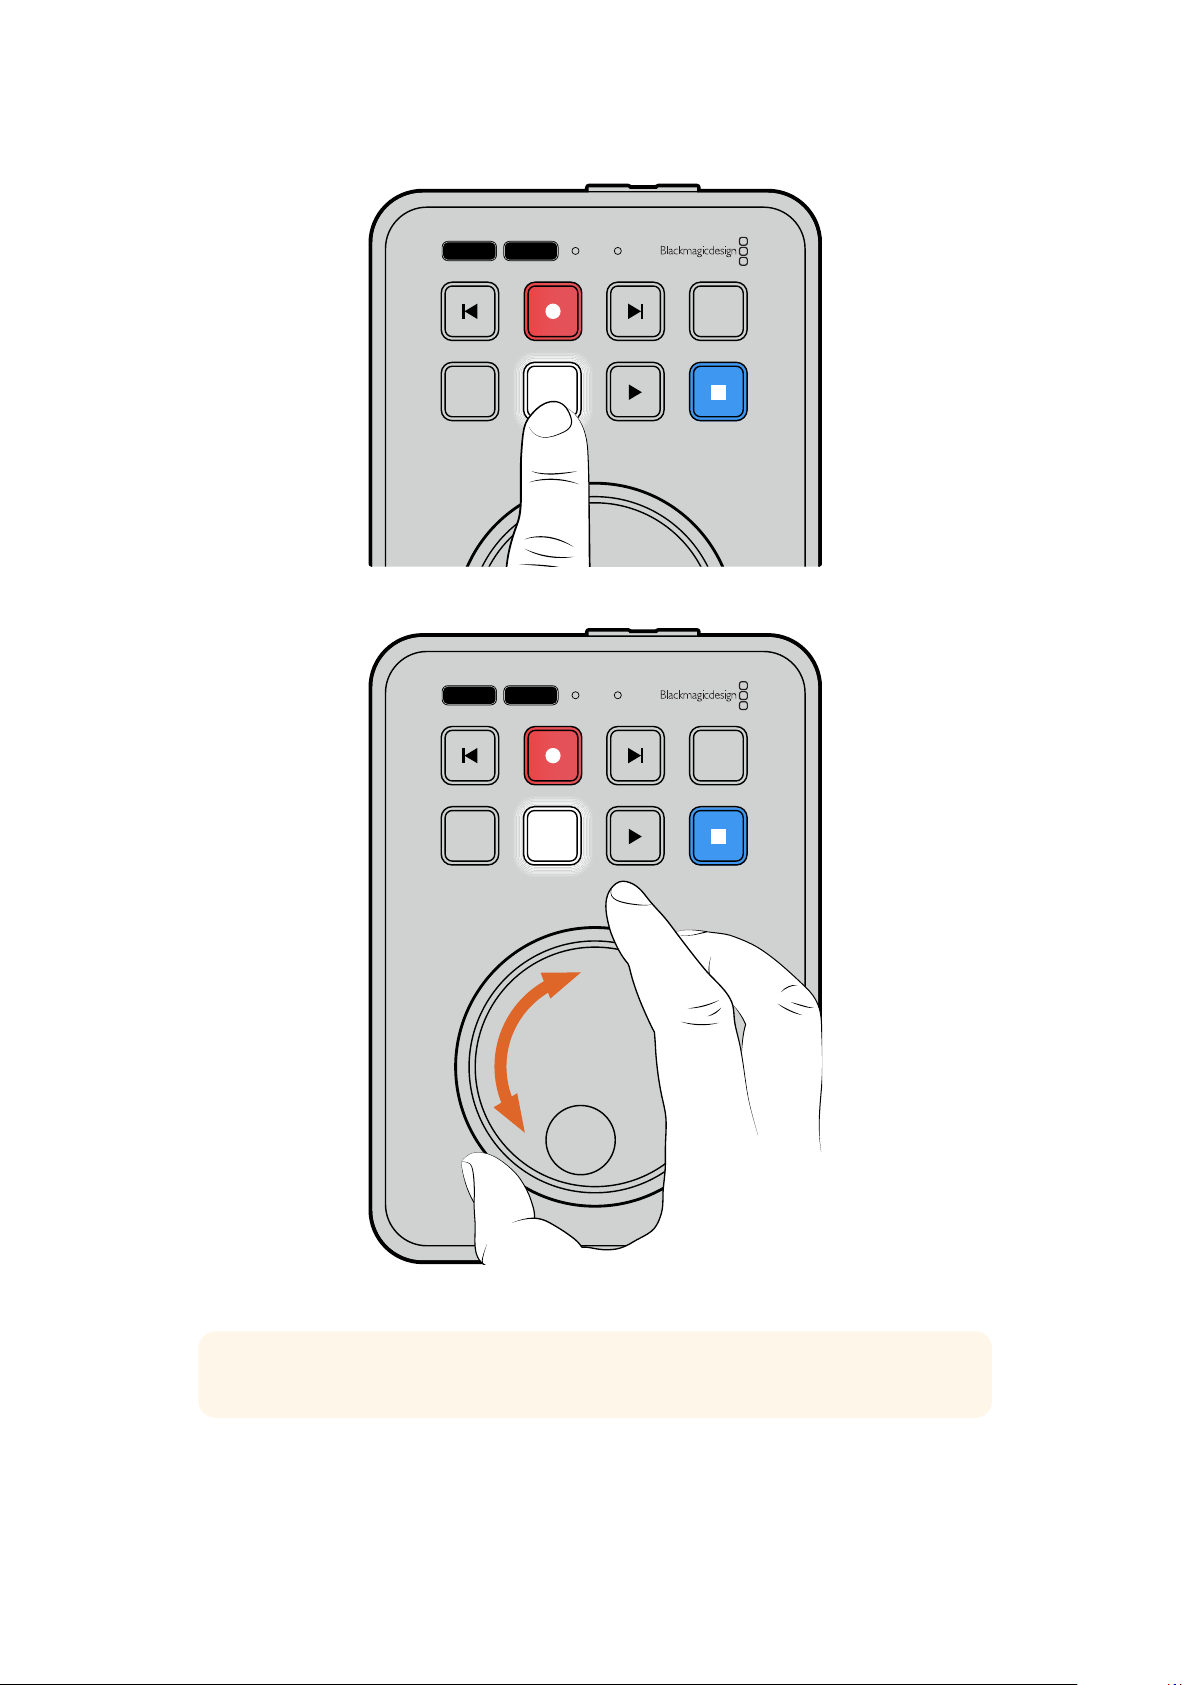
JOG SCR
CLIP
MENU SET
DISK SD
JOG 또는 SCR 버튼을 눌러 조그 및 스크롤 검색 모드를 선택하세요.
JOG SCR
CLIP
MENU SET
DISK SD
검색 모드를 선택한 다음 검색 다이얼을 돌리세요.
정보 일반 재생 모드로 돌아가려면 재생 또는 정지 버튼을 누르세요.
298
재생
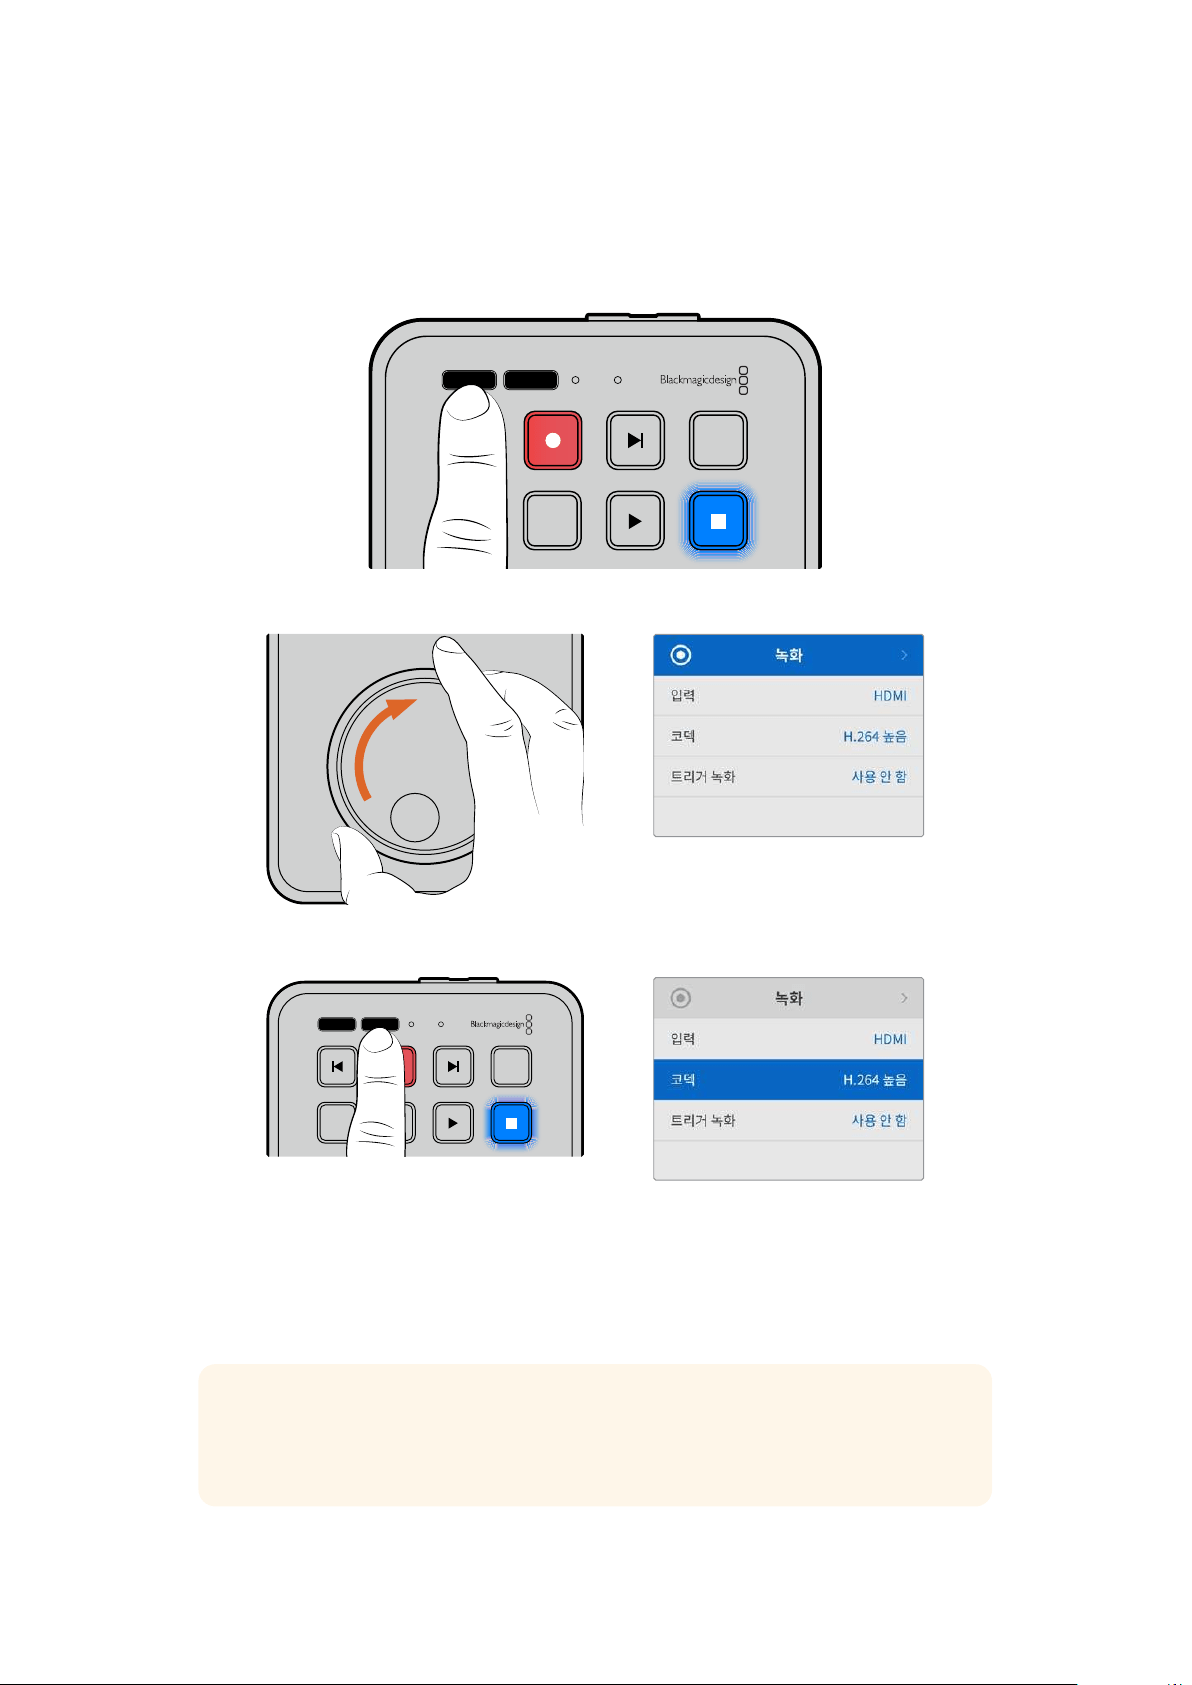
설정변경하기
MENU 버튼을 누르면 연결된 HDMI 디스플레이의 좌측 하단에 비디오 오버레이 형태로 설정 메뉴가
나타납니다.
JOG SCR
CLIP
MENU SET
DISK SD
MENU 버튼을 눌러 설정 메뉴에 접속하세요.
검색 다이얼을 사용해 하위 메뉴 또는 설정 화면으로 이동하세요.
SET 버튼을 눌러 하위 메뉴 또는 설정 항목을 선택하세요.
검색 다이얼이나 건너뛰기 및 뒤로 가기 버튼을 사용해 설정을 조정하세요. SET 버튼을 눌러 선택을
완료하세요.
MENU 버튼을 누르면 이전 메뉴 항목으로 이동해 시작 화면으로 되돌아갑니다.
정보 설정 메뉴를 사용해 메뉴가 디스플레이의 네 모서리 중 원하는 부분에 나타나도록 할
수 있습니다. 설정 변경을 마치고 나면 해당 메뉴를 끄는 것이 좋습니다. 그래야
ATEM Mini
Extreme과 같은 HDMI 스위처에 연결했을 때 HDMI 출력이 클린 피드로 출력됩니다.
JOG SCR
CLIP
MENU SET
DISK SD
299
설정변경하기
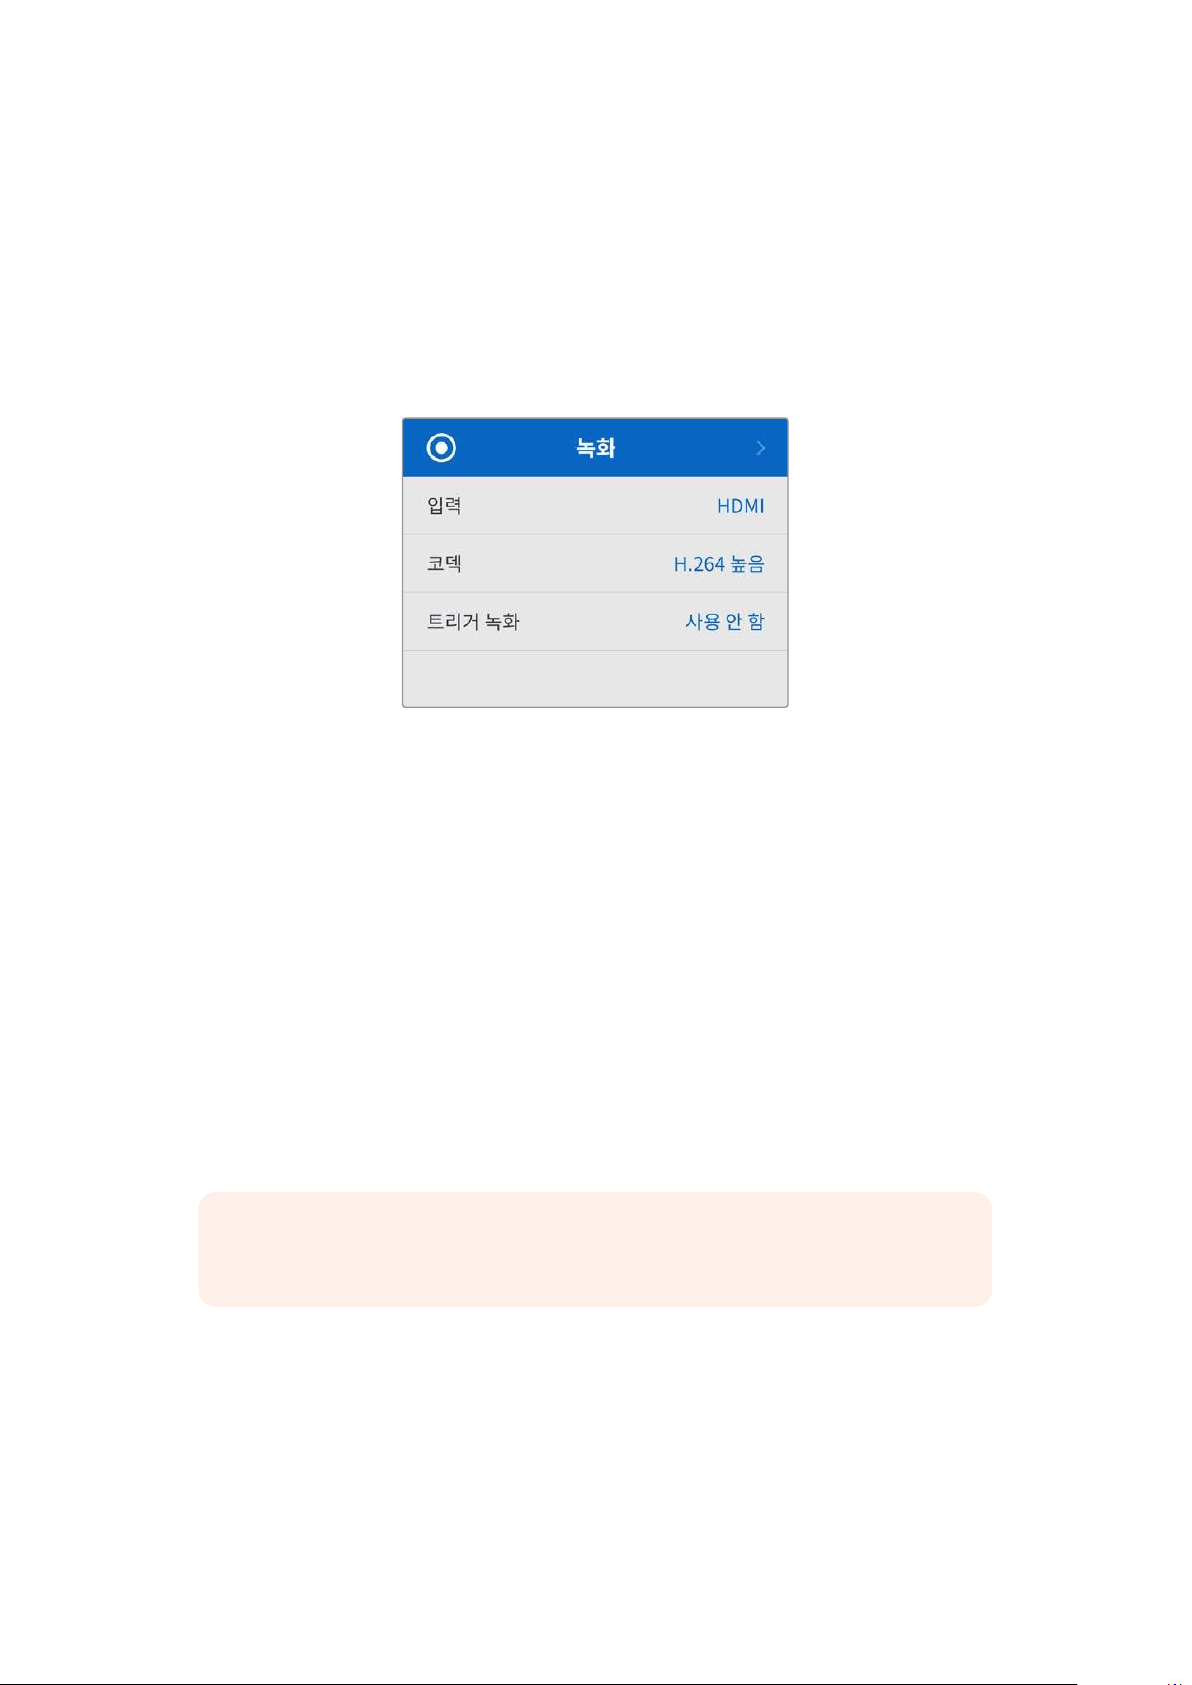
설정
이 설정 메뉴는 녹화, 모니터링, 오디오, 저장 공간, 설정의 총 5개 카테고리로 구성되어 있습니다. 각 하위
메뉴에는 관련 설정이 포함되어 있으며, 대부분은
HyperDeck Shuttle HD 컨트롤 패널에서도 조절할 수
있습니다. 파일명 접두사와 같은 일부 설정은 편집이 불가능하기 때문에 회색으로 처리되어 나타납니다.
이런 경우엔
HyperDeck Setup 유틸리티에서 해당 설정을 조절할 수 있습니다.
녹화메뉴
입력
HyperDeck Shuttle HD HDMI 입력이 디스플레이됩니다.
코덱
HyperDeck Shuttle HD는 H.264, Apple ProRes 및 DNxHD 코덱을 사용해 압축 비디오로
녹화합니다. 텔레프롬프트 기능을 사용하려면 ‘텔레프롬프터’를 선택하세요.
트리거 녹화
‘비디오 시작/정지’와 ‘타임코드 런’의 두 가지 모드 중 선택할 수 있습니다.
Blackmagic Pocket Cinema Camera 4K 같은 일부 카메라는 외부 녹화 장비에 녹화를 시작하거나
정지할 때
HDMI를 통해 명령을 전송합니다. ‘비디오 시작/정지’ 모드를 선택하면 촬영 카메라에서 녹화
버튼이 눌러지는 시점에
HyperDeck이 녹화를 시작/정지합니다.
‘타임코드 런’ 옵션은 유효한 타임코드 신호가 HDMI 입력을 통해 전송되는 시점에 녹화를 시작하도록
합니다. 타임코드 신호 입력이 멈추면 녹화도 자동으로 멈춥니다. ‘사용 안 함’을 선택하면 트리거가
비활성화됩니다.
참고 HDMI 카메라 영상을 녹화할 경우, 출력에 나타나는 오버레이도 영상과 함께 녹화되므로
오버레이 기능을 끈 상태에서 클린 피드만 출력되는지 확인하세요.
300
설정

모니터링메뉴
텔레프롬프터레이아웃
모니터링 메뉴에는 HyperDeck Shuttle HD를 텔레프롬프터로 사용할 때 필요한 모든 설정이 포함되어
있습니다.
폰트 크기
‘폰트 크기’ 설정을 선택한 다음 SET 버튼을 눌러 텍스트 크기를 조절하세요. 다이얼을 시계 방향으로
돌려 증가시키거나 시계 반대 방향으로 돌려 감소시킬 수 있습니다.
줄 간격
다이얼을 돌려 줄 간격을 늘리거나 줄일 수 있습니다.
측면 여백
프롬프터 디스플레이의 양쪽 측면 여백 폭을 조절합니다.
반전
카메라나 단상 앞에 텔레프롬프터 모니터가 유리에 반사되도록 설치해둔 경우, 진행자가 화면 내용을 읽을
수 있도록 반전 설정을 사용해야 합니다. 반전 모드는 두 가지 모드로 지원됩니다.
가로뒤집기 - 텔레프롬프터 모니터가 유리의 바닥 면과 가깝게 설치된 경우에 사용하세요.
세로뒤집기 - 텔레프롬프터 모니터가 유리의 바닥 면에서 멀리 떨어진 곳에 설치된 경우에
사용하세요.
301
설정
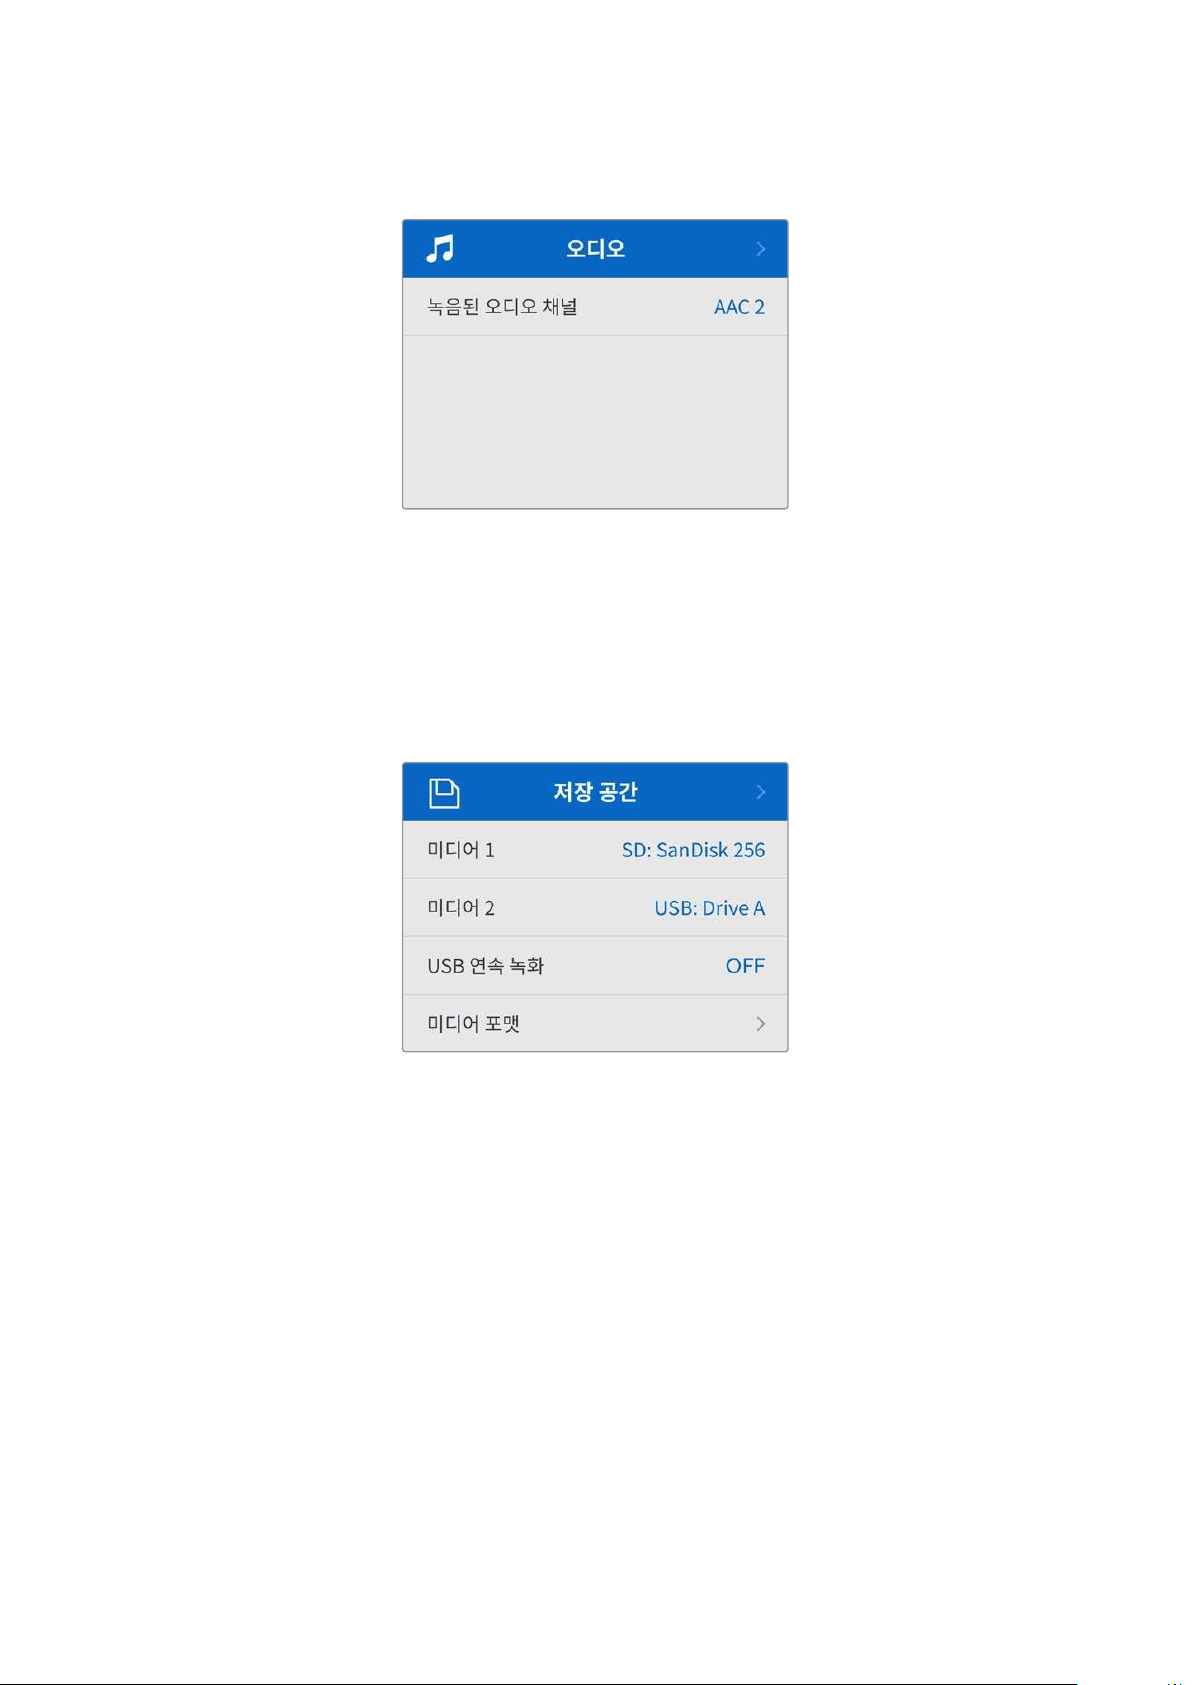
오디오메뉴
녹음된 오디오 채널
HyperDeck Shuttle HD를 사용하여 한 번에 최대 8개의 PCM 오디오 채널을 녹음할 수 있습니다.
녹화할 채널 수를 선택하려면. 녹음된 오디오 채널 목록을 확장한 다음
2채널 또는 8채널 중에서
선택하세요.
코덱이
H.264로 설정된 경우, 2채널의 AAC 오디오를 선택하면 유튜브에 바로 업로드할 수 있습니다.
저장공간메뉴
‘저장 공간’ 설정에는 연결된 미디어가 나타납니다. ‘미디어 1’에는 연결된 SD 카드명이, ‘미디어 2’에는
EXT DISK 단자에 연결된 모든 USB 플래시 디스크명이 표시됩니다. Blackmagic MultiDock 10G와 같은
USB 허브를 사용할 경우, 활성화된 디스크가 표시됩니다.
USB 연속 녹화
Blackmagic MultiDock 10G 등의 장비에 있는 EXT DISK 단자에 USB를 연결하여 하나 이상의
드라이브를 연결하고자 할 경우, ‘
USB 연속 녹화’ 기능을 활성화하여 녹화가 한 외장 디스크에서 다른
디스크로 이어질 수 있도록 하세요.
미디어 포맷
SD 카드와 뒷면 EXT DISK 단자에 연결된 미디어는 장치에서 바로 포맷하거나, Mac/Windows
컴퓨터에서 포맷할 수 있습니다.
HyperDeck Shuttle HD에서 미디어 사용 준비하기
1
검색 다이얼과 SET 버튼으로 포맷할 미디어를 선택하세요.
2
해당 목록에서 포맷하려는 미디어를 선택하고 SET 버튼을 누르세요.
3
포맷을 선택하고 SET 버튼을 누르세요.
302
설정
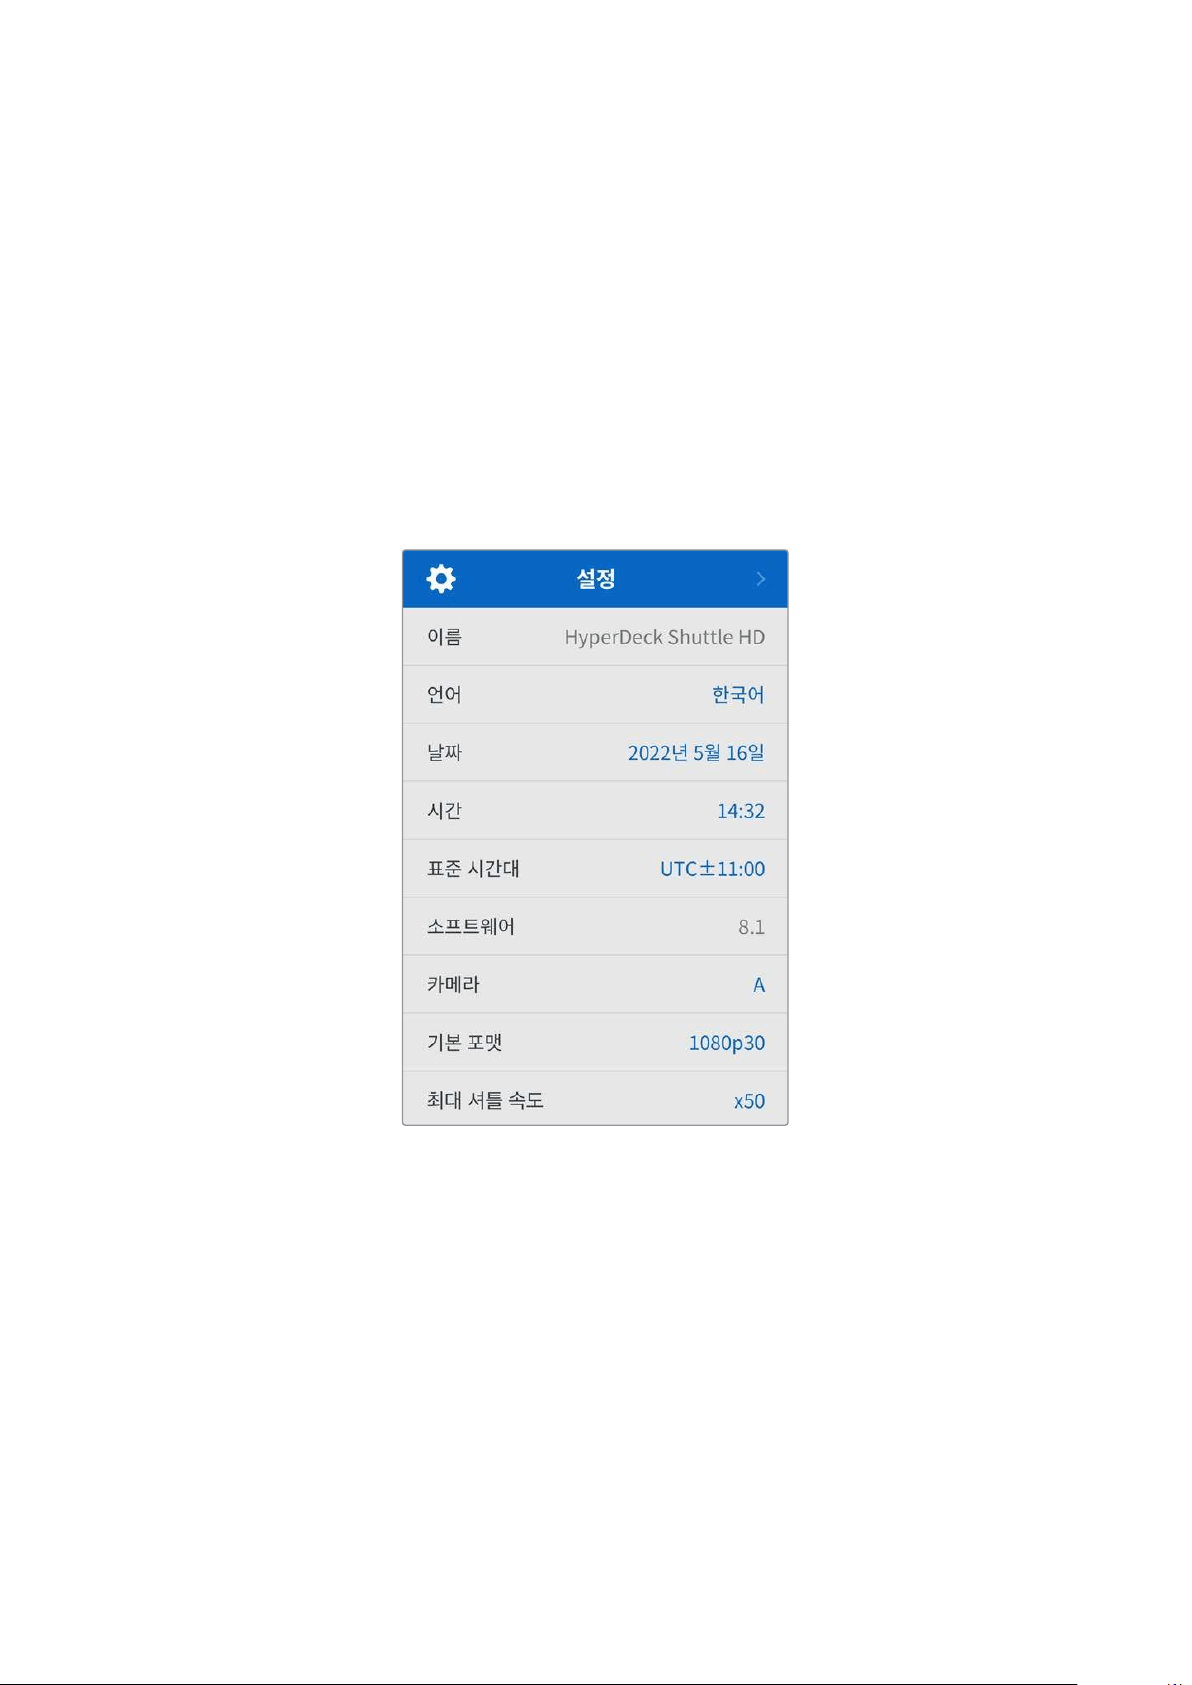
4
포맷하려는 카드와 선택된 포맷 옵션을 보여주는 확인 창이 나타납니다.
5
작업 완료 후, 포맷 창이 나타나면 ‘확인’을 선택하세요.
Mac OS X 확장 포맷으로도 알려진 HFS+는 저널링을 지원하여 사용이 권장됩니다. 사용하는 저장
미디어에 문제가 생길 경우, 저널링이 적용된 미디어 카드의 데이터는 복원될 가능성이 훨씬 높습니다.
HFS+는 Mac에서 기본 지원됩니다. exFAT는 Mac과 Windows에서 기본 지원되므로 추가 소프트웨어가
필요하지 않으나, 저널링을 지원하지는 않습니다.
Mac/Windows 컴퓨터에서 미디어를 포맷하려면 본 설명서의 [미디어 포맷하기] 부분을 참고하세요.
설정메뉴
‘설정’ 메뉴에는 언어 선택, 기본 표준 설정, 메뉴 디스플레이, 네트워크 설정, 타임코드 설정 옵션이
포함되어 있습니다.
이름
한 대 이상의 HyperDeck Shuttle HD가 네트워크에 연결된 경우, 고유의 이름을 설정하여 다른 장치를
쉽게 구분할 수 있습니다. 이는
Blackmagic HyperDeck Setup 또는 터미널 응용 프로그램을 사용하는
Blackmagic HyperDeck 이더넷 프로토콜을 통해서도 설정할 수 있습니다. 해당 이름은 ‘설정’ 메뉴에
나타납니다.
언어
HyperDeck Shuttle HD는 한국어, 영어, 중국어, 일본어, 스페인어, 독일어, 불어, 러시아어, 이탈리아어,
포르투갈어, 터키어, 우크라이나어, 폴란드어를 포함해 총
13개 언어를 지원합니다.
언어 설정 방법
1
‘설정’ 메뉴가 하이라이트되면 SET 버튼을 누르세요.
2
검색 다이얼로 스크롤하여 ‘언어’를 선택한 뒤, SET 버튼을 누르세요.
3
검색 다이얼로 원하는 언어를 선택한 뒤, SET 버튼을 누르세요. 언어가 선택되면 자동으로 설정
메뉴로 되돌아갑니다.
303
설정

날짜
날짜 입력란을 선택하고 SET 버튼을 누르세요. 검색 다이얼을 사용하여 년/월/일을 선택하세요.
타임스탬프 파일 접미사에 해당 날짜가 적용됩니다.
시간
시간을 설정하려면 ‘시간’을 선택하고 SET 버튼을 누르세요. 검색 다이얼을 사용하여 시간과 분을
조절하세요.
HyperDeck Shuttle HD의 내부 시계는 24시간 형식으로 표시됩니다.
소프트웨어
현재 소프트웨어의 버전을 표시합니다.
카메라
이 설정은 HyperDeck을 사용해 여러 대의 카메라로부터 개별 카메라 파일을 녹화하여 DaVinci Resolve
의 멀티카메라 타임라인으로 편집할 경우에 유용한 기능입니다.
파일 메타데이터에 개별 카메라 식별 글자가 나타나 DaVinci Resolve에서 동기화 빈 기능을 사용해
각각의 카메라 앵글을 쉽게 확인할 수 있습니다.
A~Z 또는 1~9를 사용해 카메라를 지정하세요.
기본 비디오 표준
HyperDeck Shuttle HD는 때때로 사용자가 사용하길 원하는 비디오 표준이 무엇인지 알지 못합니다.
이 설정을 통해
HyperDeck이 사용자가 가장 선호하는 비디오 표준을 알 수 있습니다.
한 가지 좋은 예는, HyperDeck Shuttle HD를 켰을 때 연결된 비디오 입력이 없고 삽입된 디스크에
저장된 파일들이
2개의 서로 다른 비디오 표준을 가지는 경우입니다. 이런 경우엔 HyperDeck에서
어느 비디오 표준을 사용하여 재생할까요? ‘기본 비디오 표준’ 설정은 사용자가 선호하는 비디오 표준을
파악하여 해당 포맷으로 파일을 전환해 재생하도록 합니다.
‘기본 비디오 표준’은, 처음으로
HyperDeck Shuttle HD를 켰을 때 연결된 비디오 및 삽입된 미디어
디스크가 없을 시에도 유용하게 사용됩니다. 이 경우,
HyperDeck Shuttle HD는 모니터링 출력에 어느
비디오 표준을 사용할지 알지 못합니다. 이때 ‘기본 비디오 표준’ 설정이 이를 알려줍니다.
하지만, ‘기본 비디오 표준’은 단순히 가이드 역할을 하며, 다른 어떤 설정도 덮어쓰지 않습니다. 따라서,
1개의 파일이 담긴 미디어 디스크를 재생하면 HyperDeck Shuttle HD에서 해당 파일의 비디오 표준으로
전환하여 재생을 실행합니다. 이는 단순히 디스크에 저장된 파일을 재생하려는 사용자의 의도가 명확하기
때문에 ‘기본 비디오 표준’ 설정을 무시하게 됩니다.
녹화에도 비슷한 상황이 적용됩니다. 녹화 버튼을 누르면,
HyperDeck은 비디오 입력 단자에 연결된
비디오 표준과 상관없이 그대로 녹화합니다. 또한 녹화를 마친 뒤, ‘기본 비디오 표준’과 일치하는 다른
파일이 디스크에 있더라도
HyperDeck Shuttle HD는 디스크에 방금 녹화한 비디오 표준 파일을
재생합니다. 이는 사용자가 방금 녹화한 비디오 표준과 동일한 비디오 표준으로 재생을 원하는 것으로
304
설정
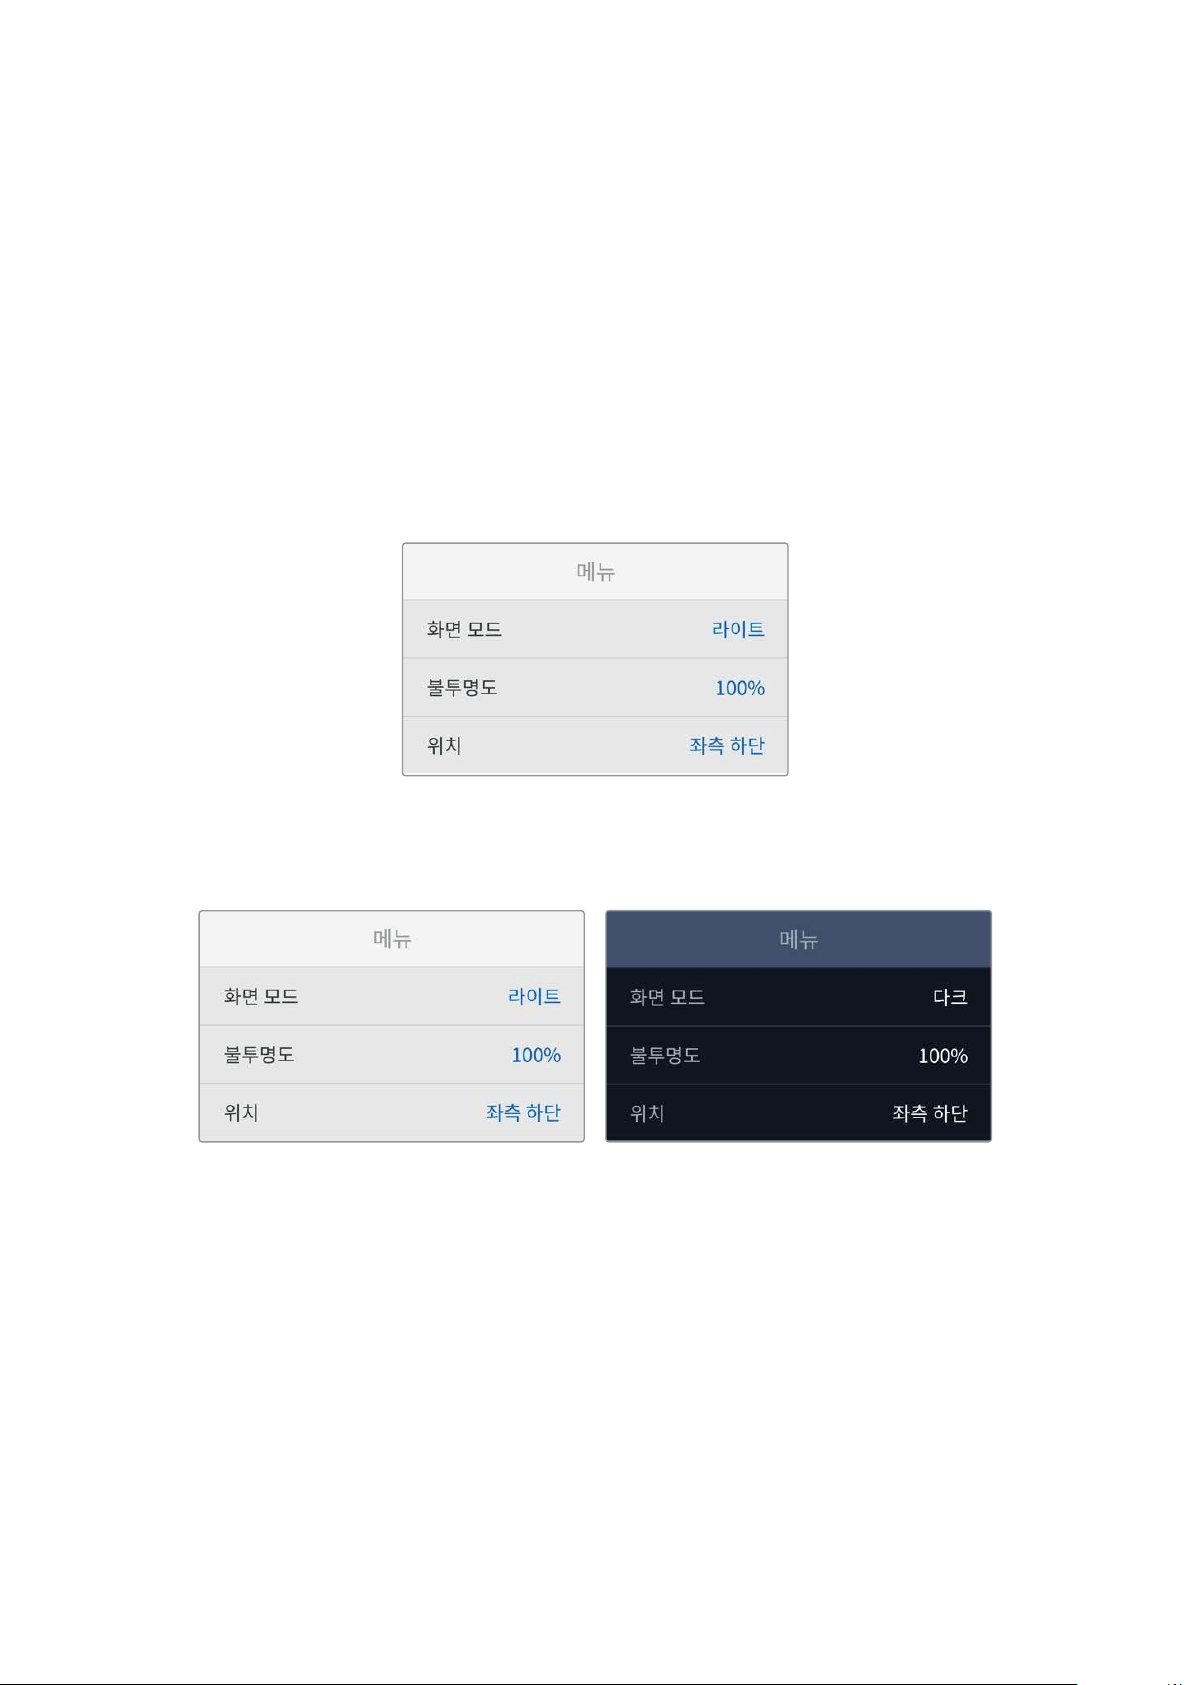
가정하기 때문입니다. 만약 미디어 디스크를 빼낸 후 다시 삽입하면 ‘기본 비디오 표준’ 기본 설정을
사용하여 재생할 파일을 고르게 됩니다.
‘기본 비디오 표준’ 설정은
HyperDeck Shuttle HD가 어떤 결정을 내려야 할지 불명확할 때 오로지
가이드로써 사용됩니다. 이는 특정 방식으로 실행시키도록 우선하는 기능은 아닙니다.
최대 셔틀 속도
HyperDeck Shuttle HD의 최대 셔틀 속도는 50배속입니다. 속도를 줄이려면 다른 속도 프리셋을
선택하세요.
메뉴설정하기
메뉴 설정을 사용하면 연결된 HDMI 디스플레이에 나타나는 메뉴의 위치와 화면 모드를 조절할 수
있습니다.
화면 모드
HyperDeck의 온스크린 메뉴를 다크 또는 라이트 모드로 설정할 수 있습니다. 라이트 모드는 미디어
화면이 어두울 경우나 텔레프롬프터 모드 사용 시 더욱 풍부한 콘트라스트를 제공합니다.
불투명도
이 레벨을 조절할 경우, 연결된 디스플레이에 나타나는 메뉴 오버레이 불투명도를 기본 설정된 100%에서
20%까지 줄일 수 있습니다.
위치
메뉴 오버레이는 화면 좌측 하단에 나타나도록 기본 설정되어 있습니다. 메뉴를 다른 위치로 옮기려면
‘위치’를 선택한 다음
SET 버튼을 누르세요. 그러면 이제 메뉴 위치를 좌측 상단, 우측 상단, 좌측 하단,
우측 하단으로 설정할 수 있습니다.
305
설정
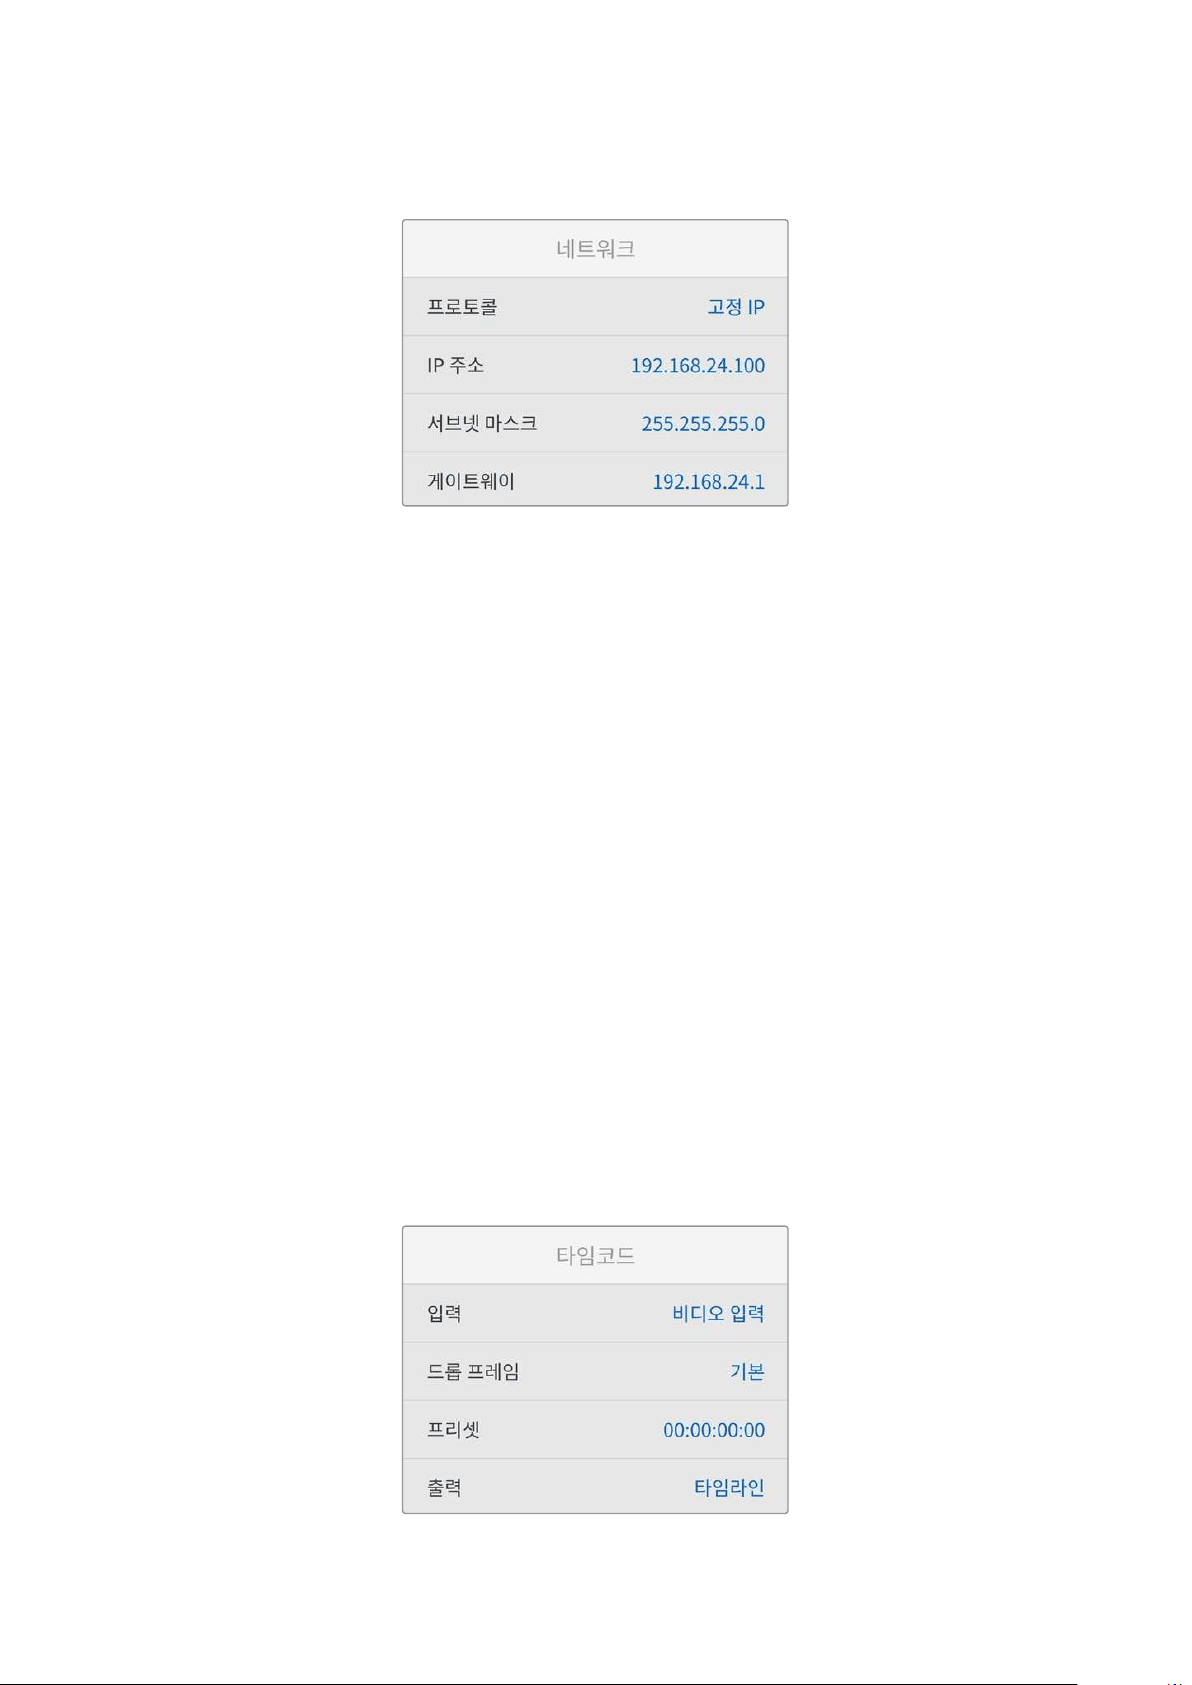
네트워크설정
프로토콜
Blackmagic HyperDeck은 DHCP로 기본 설정되어 있으므로, 장치를 연결하면 사용하는 네트워크
서버가 자동으로
IP 주소를 지정하여 다른 네트워크 설정을 변경하지 않아도 됩니다. 수동으로 IP 주소를
입력해야 하는 경우, 고정
IP 주소를 통해 연결하세요.
‘프로토콜’을 선택한 상태에서 깜빡이는 SET 버튼을 눌러 메뉴에 접속한 뒤, ‘고정 IP’로 스크롤해 SET
버튼을 누르세요.
IP 주소, 서브넷 마스크, 게이트웨이, 프라이머리 DNS, 세컨더리 DNS
고정 IP를 선택한 후 네트워크 세부사항을 직접 입력할 수 있습니다.
IP 주소 변경하기
1
검색 다이얼을 사용하여 'IP address'로 맞춘 뒤, HyperDeck의 전면 패널에서 깜박이는 'set'
버튼을 누르세요.
2
검색 다이얼을 사용하여 IP 주소를 조정한 다음 '설정'을 눌러 확인한 후 다음 값 설정 단계로
넘어갑니다.
3
SET
버튼을 눌러 변경 사항을 확인하고 다음 값으로 이동하세요.
IP 주소 입력이 끝나면 위 단계를 반복하여 서브넷 마스크 및 게이트웨이를 조정할 수 있습니다. 완료되면
깜박이는
MENU 버튼을 눌러 종료하고 시작 화면으로 돌아갑니다.
타임코드설정하기
소스 타임코드, 타임코드 입력 및 출력 옵션과 현재 시각 타임코드, 또는 수동 타임코드 설정 등 타임코드
입/출력 옵션을 설정하세요.
306
설정

입력
녹화 시 총 4개의 타임코드 입력 중 선택하여 사용할 수 있습니다.
비디오 입력
비디오 입력을 선택하면
SMPTE RP 188 메타데이터가 있는 HDMI 소스에서
타임코드를 가져와 사용합니다. 이를 통해
HDMI 소스와 HyperDeck Studio 녹화
파일 간 동기화가 유지됩니다.
내장 타임코드
내장 타임임코드 생성기를 통한 현재 시간 타임코드를 사용하고자 할 경우 이 옵션을
선택하세요.
마지막 클립
이어가기
이 옵션을 선택 시, 이전 클립 마지막 프레임의 바로 다음 프레임에 연속하여
시작합니다. 예를 들어, 첫 번째 클립이
10:28:30:10에 끝난다면 다음 클립의
타임코드는
10:28:30:11에서 시작합니다.
프리셋
타임코드를 수동으로 설정하는 경우 프리셋 옵션을 선택하세요. 녹화 클립은 프리셋
설정을 통한 특정 타임코드에서 시작합니다. 다음의 자세한 설명을 확인하세요.
드롭 프레임
29.97 혹은 59.94 프레임 레이트의 NTSC 소스로부터 타임코드를 전송받는 경우 ‘드롭 프레임’ 또는 ‘논드롭
프레임’ 타임코드를 선택할 수 있습니다. 소스가 불명확할 시 ‘기본값’을 선택하세요. 이 경우, 입력 소스의
표준을 그대로 사용하거나, 유효한 타임코드 입력이 없는 경우에는 드롭 프레임 방식으로 처리합니다.
프리셋
타임코드를 수동으로 설정하려면 SET 버튼을 누르고 검색다이얼과 SET 버튼을 사용하여 시작 시간을
입력하세요. 입력 메뉴의 하위 항목에 있는 ‘프리셋’을 선택해야 합니다.
출력
출력을 위한 타임코드 옵션은 다음과 같습니다.
타임라인
카드 또는 드라이브에 녹화된 모든 클립에 대해 연속 타임 코드를 출력하려면
‘타임라인’을 선택하세요.
클립
‘클립’을 선택하면 각 개별 클립의 타임코드가 출력됩니다.
파일설정하기
파일명 접두사
처음 설치 시, HyperDeck Shuttle HD는 SD 카드나 USB 플래시 디스크에 녹화할 때 다음과 같은
파일명 규칙을 사용합니다.
HyperDeck_0001
HyperDeck
_0001
접두사
HyperDeck_0001
클립 번호
이러한 파일명 접두사는 HyperDeck Setup 유틸리티에서 변경할 수 있습니다. 자세한 정보는 본
설명서의 뒷편의 [
Blackmagic HyperDeck 셋업] 부분을 참고하세요.
307
설정
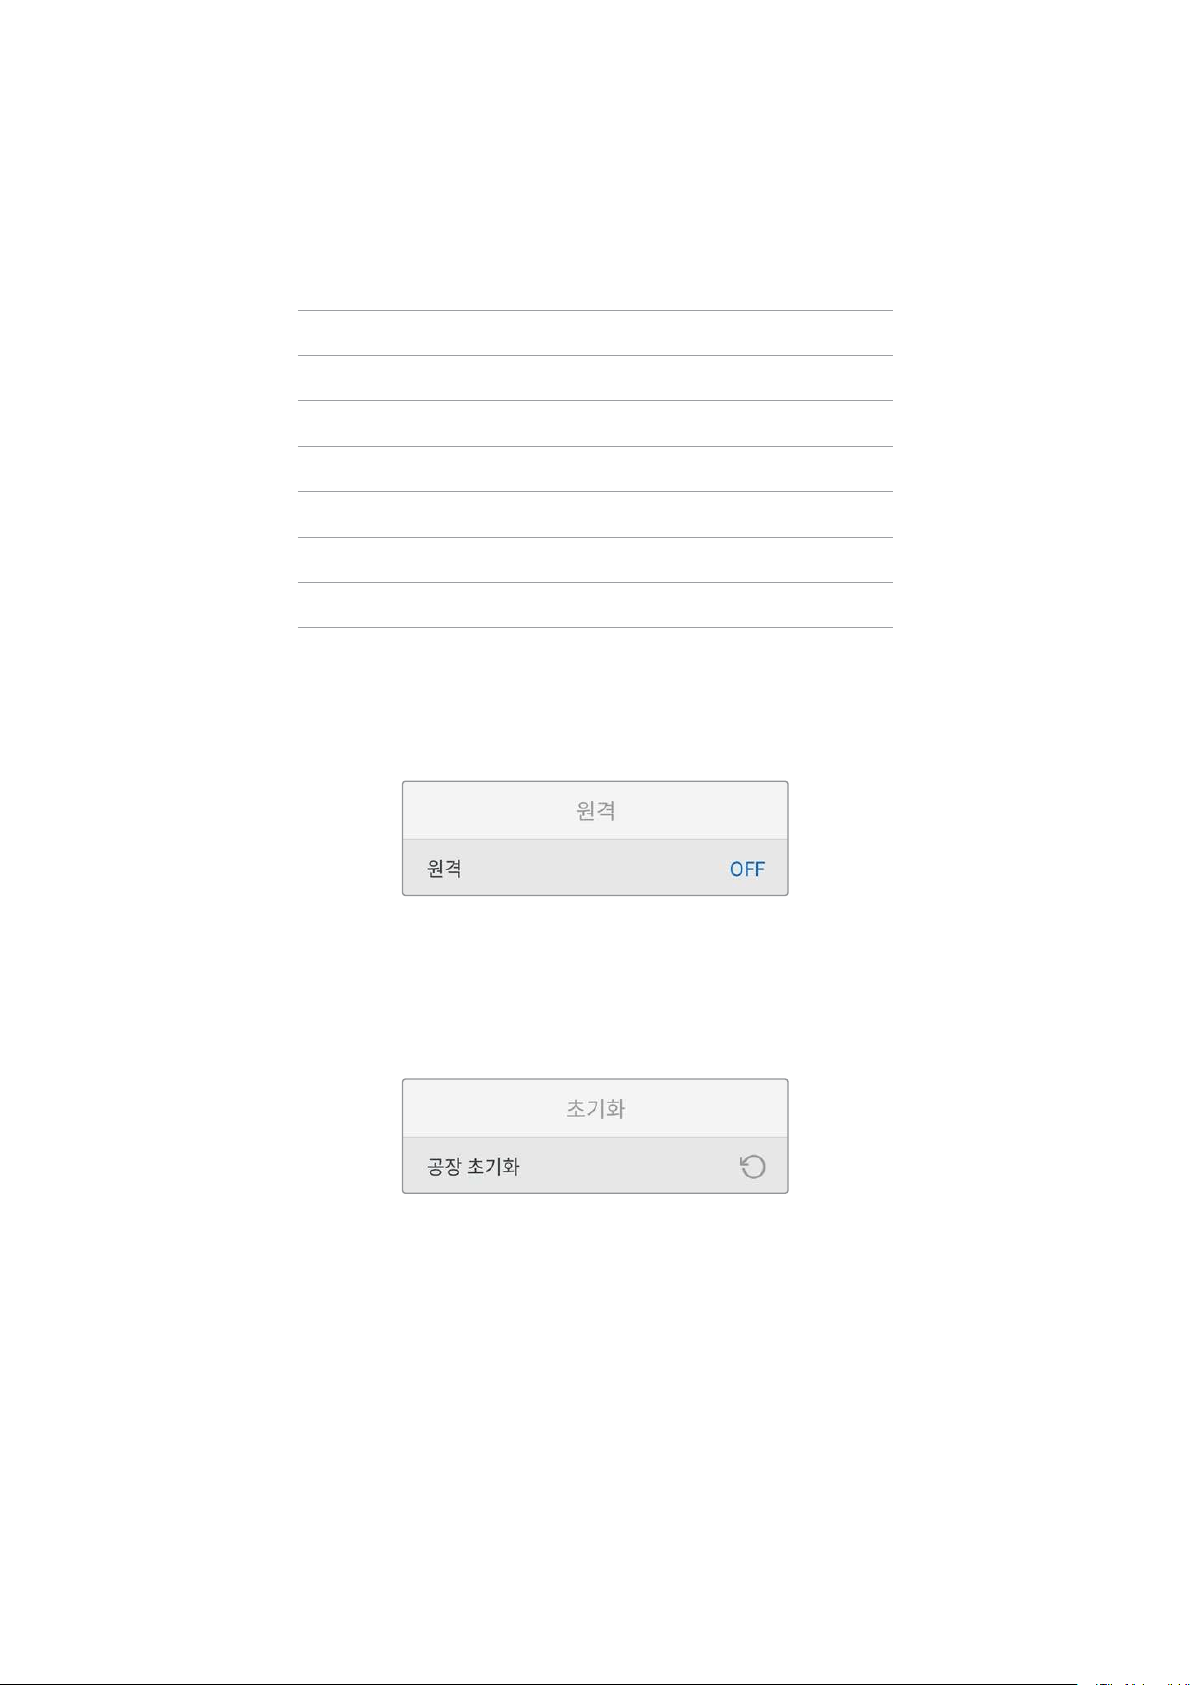
타임스탬프 파일 접미사
타임스탬프가 파일명에 포함되는 기능은 OFF로 기본 설정되어 있습니다. 파일명에 날짜와 시간을
포함하려면 ‘타임스탬프 파일 접미사’ 기능을
On으로 변경하세요.
HyperDeck_2201061438_0001
HyperDeck
_2201061438_0001
파일명 접두사
HyperDeck_2201061438_0001
연도
HyperDeck_2201061438_0001
월
HyperDeck_2201061438_0001
일
HyperDeck_2201061438_0001
시
HyperDeck_2201061438_0001
분
HyperDeck_2201061438_0001
클립 번호
원격기능설정하기
원격 기능 설정을 통해 ATEM Mini Extreme 스위처와 같은 다른 영상 장비에서 HyperDeck을 제어할 수
있습니다.
원격
‘원격’ 기능을 활성화하면 이더넷을 통한 원격 제어가 가능합니다. 장치를 직접 제어하려면 이 옵션을
비활성화 하세요.
초기화설정하기
공장 초기화
HyperDeck을 공장 초기화 설정으로 돌리려면 ‘설정’ 메뉴의 ‘공장 초기화’ 메뉴로 가세요. SET 버튼을
누르면 선택을 확인하는 메시지가 뜹니다.
308
설정

뒷면패널
HDMI OUT
HDMI IN
EXT DISK
SD CARD
ETHERNET
+
12V DC
1
2
3 4 5
1 전원
HyperDeck Shuttle HD는 AC 플러그 팩을 통해 전원을 공급받습니다. 함께 제공되는 전원
케이블은 안전한 연결을 위해 잠금 커넥터가 있습니다. 하지만 다른 케이블을 사용하고자 할
경우, 종류에 관계 없이
36W 12V 전원 케이블을 연결하여 HyperDeck Shuttle HD에 전원을
공급할 수 있습니다.
2 SD 카드
녹화 및 재생을 위해 SD 카드를 슬롯에 삽입하세요.
3 이더넷
이더넷 포트를 통해 네트워크에 연결하여 빠른 FTP 전송을 이용하거나 HyperDeck 이더넷
프로토콜을 사용하여
HyperDeck HD를 원격으로 제어할 수 있습니다. FTP 클라이언트를 통한
파일 전송의 자세한 내용은 본 사용 설명서 뒤편의 [네트워크를 통해 파일 전송하기] 부분을
참고하세요.
ATEM 스위처와 공유하는 네트워크에 연결하면 ATEM 스위처 또는 ATEM 하드웨어 패널을
사용하여
HyperDeck을 제어할 수 있습니다.
4 외장 디스크
USB-C 단자에 플래시 디스크를 연결하여 최대 5Gb/s의 속도로 녹화할 수 있습니다. 이 외에도
다포트
USB-C 허브를 연결하거나 Blackmagic MultiDock 10G를 연결하여 한 개 또는 여러
개의
SSD 카드를 사용할 수도 있습니다.
5 HDMI
HDMI 출력을 HDMI TV 및 모니터, ATEM Mini Extreme 스위처 등으로 연결하세요. HDMI
출력을 통해 메뉴 오버레이를 표시할 수 있습니다.
309
뒷면패널
저장미디어
SD
카드
고화질의 HD로 녹화할 경우, 초고속 UHS-I SD 카드를 사용할 것을 권장합니다. SD 카드는 최대
2160p60의 UHD 화질의 녹화 시 220MB/s 이상의 쓰기 속도를 지원해야 합니다.
하지만, 낮은 비트 전송률의 고압축 영상으로 녹화할 경우에는 이렇게 빠른 카드를 사용할 필요가
없습니다. 일반적으로 카드 속도는 빠를수록 좋습니다.
최신 버전의 설명서를 통해 주기적으로 최신 정보를 확인하는 것이 좋습니다.
Blackmagic Design
웹사이트
www.blackmagicdesign.com/kr/support에서 다운로드할 수 있습니다.
HyperDeckShuttleHD에는어떤SD카드를사용해야하나요?
다음은 최대 60 fps의 1080p 녹화에 권장되는 SD 카드 목록입니다.
제조사 모델 용량
Angelbird
AV PRO SD UHS-II 300MB/s V90 SDXC 256GB
Angelbird
AV PRO SD UHS-II 260MB/s V60 SDXC 128GB
Angelbird AV PRO SD UHS-II 260MB/s V60 SDXC 64GB
SanDisk Extreme Pro UHS-I 95MB/s SDXC 64GB
Wise SD2-64U3 UHS-II 285MB/s SDXC 64GB
Lexar Professional
1000x UHS-II 150MB/s
SDXC
128GB
SONY Tough
SF-G128T 128GB
Kingston
CANVAS GO! Plus 170MB/s V30 64GB
Kingston
CANVAS GO! Plus 170MB/s V30 128GB
Kingston CANVAS
GO! Plus 170MB/s V30 512GB
ProGrade
Digital SDXC UHS-II V90 300R 64GB
ProGrade
Digital SDXC UHS-II V90 300R 128GB
SONY Tough
SF-G64T UHS-II SDXC 64GB
Delkin Devices Black UHS-II V90 SDXC 256GB
Delkin Devices Power UHS-II V90 SDXC 128GB
Delkin
Devices Power UHS-II V90 SDXC 256GB
Delkin Devices Black UHS-II V90 SDXC 128GB
Exascend Essential SDXC UHS-II V90 R 300MB/s 64GB
Exascend Essential SDXC UHS-II V90 R 300MB/s 128GB
Exascend Catalyst SDXC UHS-II V90 R 300MB/s 64GB
310
저장미디어
외장디스크
HyperDeck 전체 모델은 USB-C 플래시 디스크에 바로 녹화할 수 있습니다. 이 디스크는 속도가 빠르고
용량이 커서 장시간 녹화에 사용할 수 있습니다. 녹화 후에는 플래시 디스크를 컴퓨터에 연결하여 바로
편집 작업을 시작할 수 있습니다.
더 큰 저장 공간을 사용하고 싶다면
USB-C 도크 장비나 외장 하드 드라이브를 연결할 수 있습니다.
Blackmagic MultiDock 10G 또는 USB-C 플래시 디스크를 연결하기 위해서는 해당 USB-C 장비와
HyperDeck 후면 패널의 EXT 디스크 단자를 케이블로 연결하세요.
HyperDeckShuttleHD로녹화시,어떤USB-C드라이브를사용해야하나요?
다음은 최대 60 fps의 1080p ProRes HQ 녹화에 권장되는 SD 카드 목록입니다.
제조사 모델 용량
Wise PTS
-256 Portable SSD 4K 256GB
OWC Envoy
Pro Ex 240GB
BUFFALO SSD
-PHE500U3-BA 500GB
다음은 최대 60 fps의 1080p DNxHR HQX 녹화에 권장되는 USB-C 드라이브 목록입니다.
제조사 모델 용량
OWC Envoy
Pro Ex 240GB
다음은최대60fps의1080pH.264녹화에권장되는USB-C드라이브목록입니다.
제조사 모델 용량
OWC Envoy
Pro Ex 240GB
미디어포맷하기
컴퓨터에서미디어준비하기
Mac 컴퓨터를 이용하여 미디어 포맷하기
Mac에 포함된 디스크 유틸리티를 사용하여 각 드라이브를 HFS+ 또는 exFAT 형식으로 포맷하세요.
포맷이 진행되면 디스크의 모든 정보가 삭제되므로 중요한 정보는 포맷 전에 반드시 백업해 두어야
합니다.
1
외장 도크 또는 케이블 어댑터를 사용하여 USB 플래시 디스크를 컴퓨터에 연결하세요. SSD를
타임머신 백업 용도로 사용할 것인지 묻는 메시지는 모두 거절하세요.
SD 카드를 포맷하려면
외장 카드 리더기에 장착해 컴퓨터에 연결하세요.
2
‘응용 프로그램 > 유틸리티’로 이동해 ‘디스크 유틸리티’를 실행하세요.
3
SD
카드 또는 USB 플래시 디스크 아이콘을 클릭한 뒤, ‘지우기’ 탭을 클릭하세요.
4
포맷을 ‘Mac OS 확장(저널링)’ 또는 ‘exFAT’로 설정하세요.
5
새로운 볼륨의 이름을 입력하고 ‘지우기’를 클릭합니다. 미디어가 신속하게 포맷되어 HyperDeck에
사용할 준비가 완료됩니다.
311
미디어포맷하기
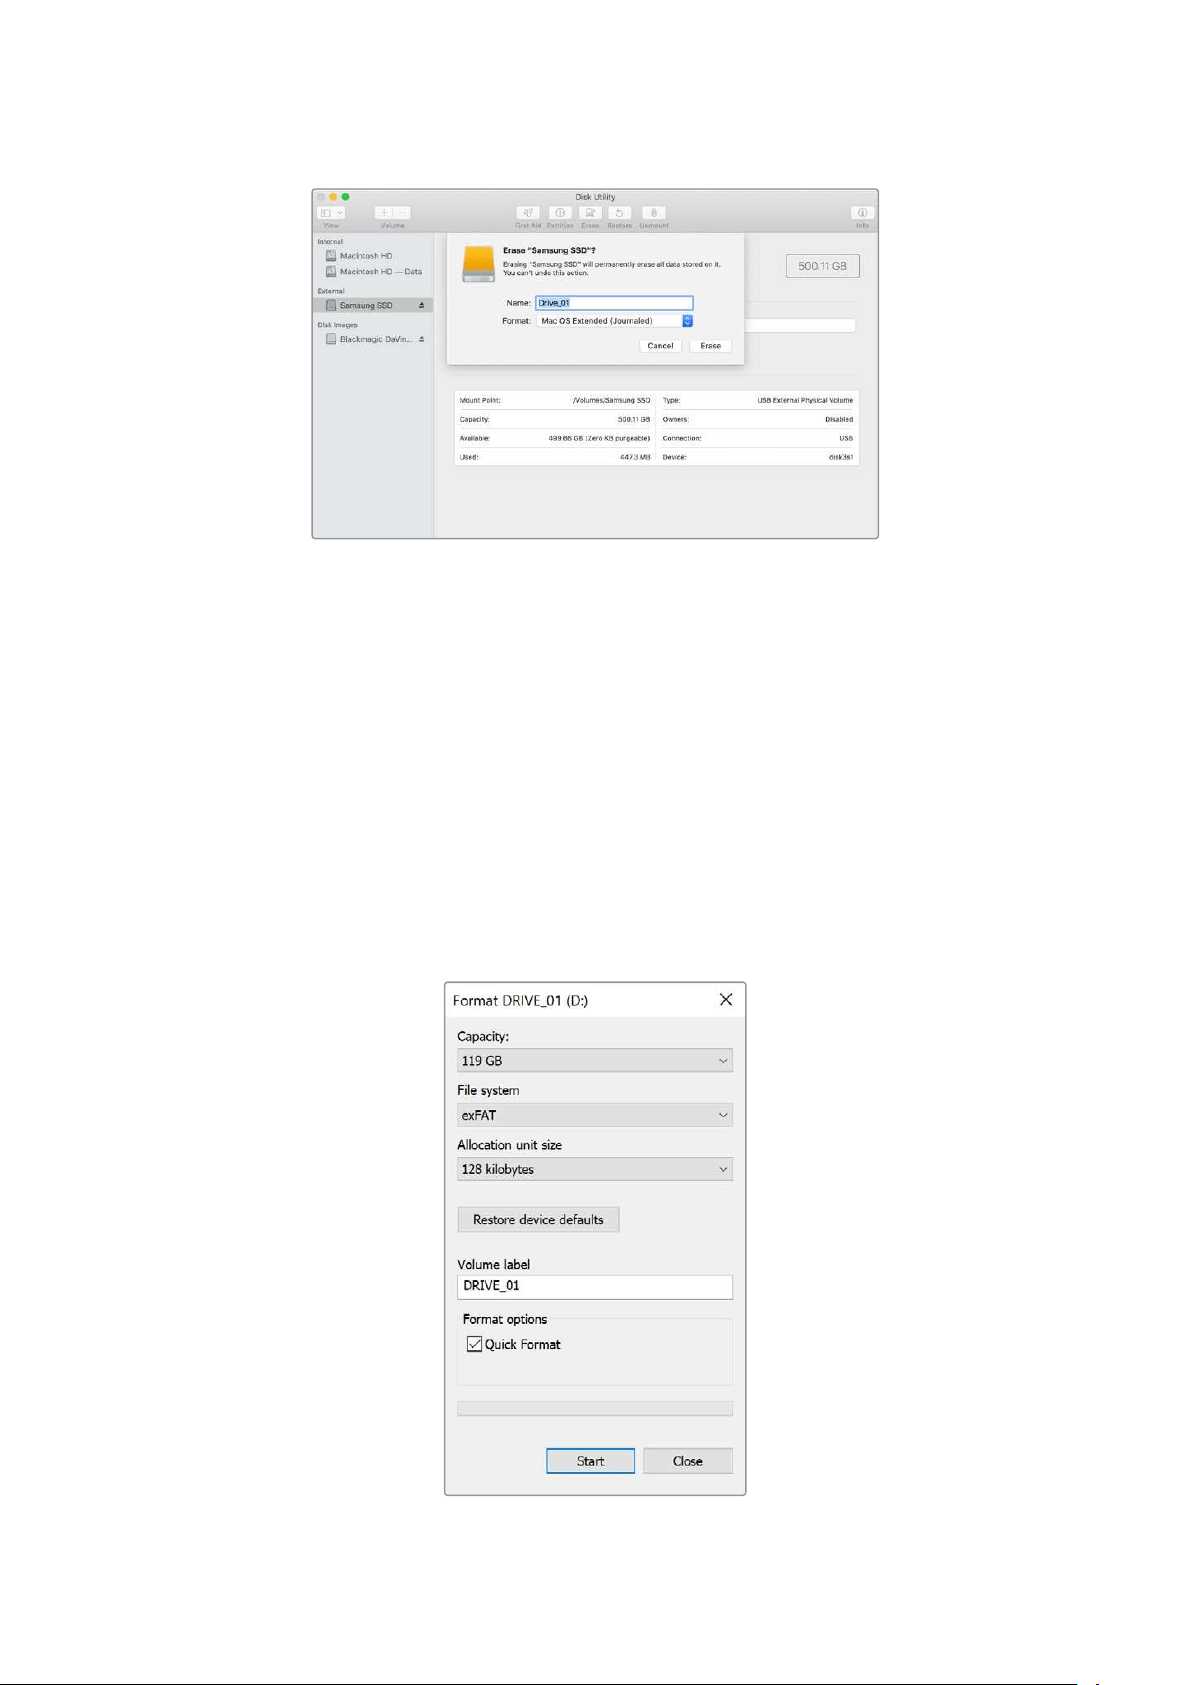
Windows 컴퓨터에서 미디어 포맷하기
Windows PC의 포맷 대화 상자에서 드라이브를 exFAT 형식으로 포맷할 수 있습니다. 포맷이 진행되면
SSD 또는 SD 카드의 모든 정보가 삭제되므로 중요한 정보는 포맷하기 전에 반드시 백업해 두어야
합니다.
1
외장 도크 또는 케이블 어댑터를 사용하여 USB 플래시 디스크를 컴퓨터에 연결하세요. SD
카드를 포맷하려면 외장 카드 리더기에 장착해 컴퓨터에 연결하세요.
2
‘시작 메뉴’ 또는 ‘시작 화면’을 열고 ‘내컴퓨터’를 선택하세요. USB 플래시 디스크 또는 SD 카드를
우클릭하세요.
3
나타나는 메뉴에서 ‘포맷’을 선택하세요.
4
‘파일 시스템’을 ‘exFAT’으로 설정한 뒤, ‘할당 단위’를 ‘128킬로바이트’로 설정하세요.
5
볼륨 라벨을 입력하고 ‘빠른 포맷’을 선택한 뒤, ‘시작’을 클릭하세요.
6
미디어가 신속하게 포맷되어 HyperDeck에 사용할 준비가 완료됩니다.
312
미디어포맷하기
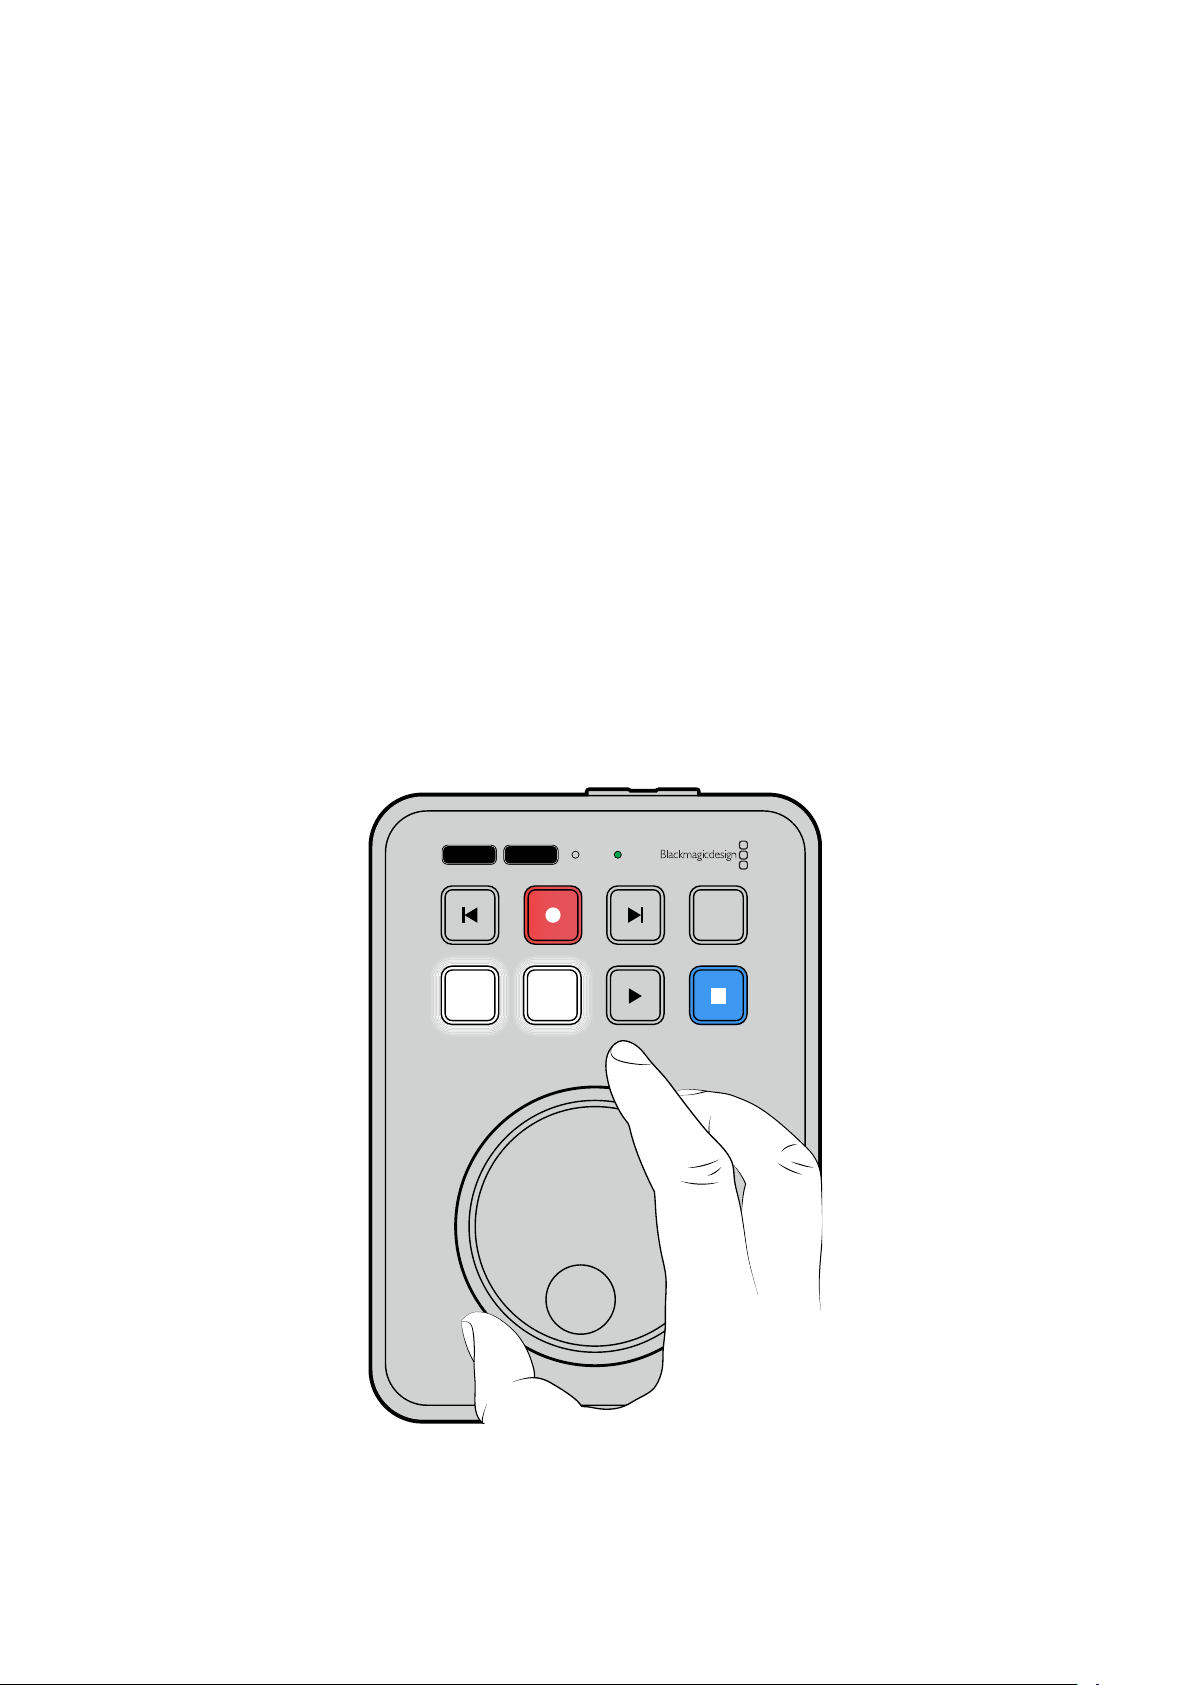
텔레프롬프터기능사용하기
표준 RTF 파일을 사용하여 Backmagic HyperDeck Shuttle HD를 텔레프롬프터로 사용할 수 있습니다.
TextEdit 또는 WordPad에서 파일을 생성한 후, 지원되는 13개 언어 중 하나로 ‘리치 텍스트 형식(RTF)’
파일로 저장합니다.
HyperDeck Shuttle HD로 열면 스크립트의 글꼴 크기와 줄 간격을 조정할 수
있습니다.
텔레프롬프터 사용하기
1
HyperDeck
Shuttle HD의 HDMI 출력을 사용하려는 HDMI 디스플레이에 연결하세요.
2
SD
카드를 삽입하거나 스크립트가 저장된 외장 USB 플래시 디스크를 연결하세요.
3
‘녹화’ 메뉴에서 ‘코덱’ 옵션을 선택하세요. '텔레프롬프터' 설정으로 이동한 후 SET 버튼을
누르세요.
스크립트가 디스플레이에 나타납니다. 여기에서 재생 버튼을 사용하여 자동으로 재생을 시작하거나
다이얼을 사용하여 이 외의 제어 기능을 사용할 수 있습니다.
텔레프롬프터 재생 속도 제어하기
HyperDeck Shuttle HD의 큰 다이얼을 사용하여 미디어를 재생하는 방식과 동일하게 텔레프롬프터
모드에서 재생을 제어할 수 있습니다. 스크립트가 로딩된 상태에서
JOG 및 SCR 버튼을 함께 눌러
가변 속도 재생 기능을 켜세요. 선택한 후 다이얼을 돌리세요. 스크립트는 다이얼이 움직이는 속도로
이동합니다. 예를 들어 다이얼을 빨리 돌릴수록 스크립트가 더 빨리 스크롤됩니다.
JOG SCR
CLIP
MENU SET
DISK SD
313
텔레프롬프터기능사용하기

일정한 속도의 경우 조그 및 스크롤 버튼을 개별적으로 사용할 수 있습니다. 버튼을 선택 후, 다이얼을
돌리면 조그 모드에서 일정하게 낮은 속도로 스크립트를 이동하거나 스크롤 모드에서 더 빠른 속도로
스크립트를 이동시킬 수 있습니다.
SD 카드 또는 외장 디스크의 rtf 파일 간 탐색하려면 앞으로 가기 및 뒤로가기 키를 누르세요.
텔레프롬프터는 글꼴 크기, 색상 및 파일에서 볼드체로 설정되었는지 여부를 확인합니다. 또한 글꼴 크기,
줄 간격, 여백을 조정하거나, 모니터 메뉴를 사용하여 디스플레이를 빔 스플리터 글래스에 투사하는
경우를 위해 디스플레이를 수평 또는 수직으로 뒤집을 수 있습니다. 정보 더욱 자세한 정보는 본 설명서의
[메뉴 설정하기] 부분을 참고하세요.
BlackmagicHyperDeckSetup
Blackmagic HyperDeck Setup은 HyperDeck 설정을 변경하고 내부 소프트웨어를 업데이트하는
소프트웨어 유틸리티입니다.
Blackmagic HyperDeck Setup 소프트웨어 설치하기
1
www.blackmagicdesign.com/kr/support
에서 최신 Blackmagic HyperDeck Setup
인스톨러를 다운받으세요.
2
컴퓨터에 설치된 Blackmagic HyperDeck Setup 설치 프로그램을 실행하고 화면에 나타나는
지시 사항을 따르세요.
3
설치가 완료되면 HyperDeck Shuttle HD 뒷면 패널에 있는 이더넷 단자 또는 USB를 통해
컴퓨터에 연결하세요.
4
Blackmagic
HyperDeck Setup을 실행한 뒤, 화면에 나타나는 지시 사항에 따라 내부
소프트웨어 업데이트를 진행하세요. 내부 소프트웨어가 최신 버전일 경우 아무런 메시지가
나타나지 않으며 더 이상의 추가 작업이 필요하지 않습니다.
HyperDeck 이미지 또는 설정 아이콘을 클릭하여 설정 메뉴를 여세요.
홈 화면에 HyperDeck Shuttle HD와 기기명이 표시됩니다. 기기명은 컴퓨터에 두 대 이상의 HyperDeck이
연결되어 있을 때 장치를 식별하는 데 도움이 되며 소프트웨어의 설정 메뉴를 사용하여 설정할 수 있습니다.
314
BlackmagicHyperDeckSetup
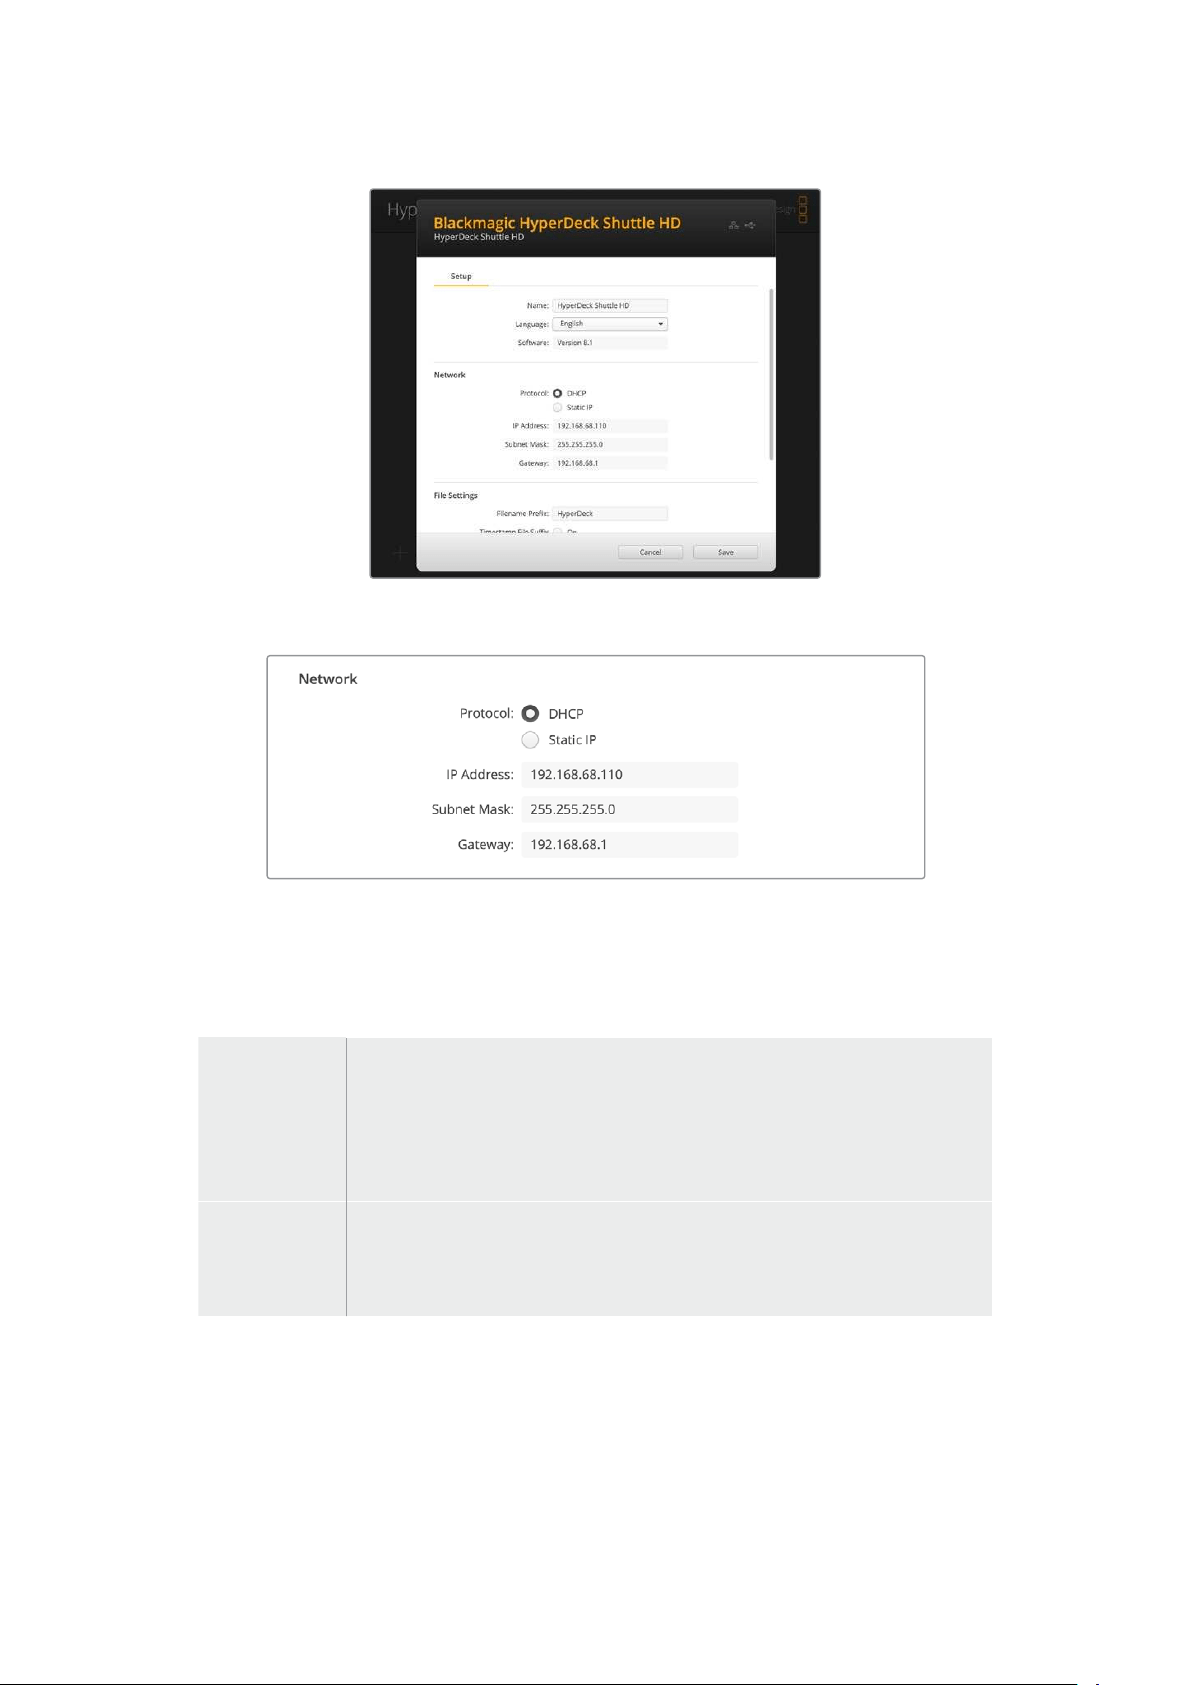
네트워크
프로토콜
HyperDeck Shuttle HD와 ATEM 스위처를 함께 제어하거나, HyperDeck 이더넷 프로토콜을
통해 원격으로 제어하려는 경우,
DHCP를 사용하거나, 수동으로 고정 IP 주소를 추가하는 방식으로
HyperDeck Shuttle HD를 다른 장비에서 사용하는 네트워크에 연결해야 합니다.
DHCP
HyperDeck
Shuttle HD 디스크 레코더는 DHCP로 기본 설정되어 있습니다.
DHCP(Dynamic Host Configuration Protocol)는 자동으로 HyperDeck 디스크
레코더를 검색하여
IP 주소를 지정하는 네트워크 서버의 서비스입니다. 또한 DHCP 는
이더넷을 통해 장비를 쉽게 연결하도록 돕고 지정된
IP 주소가 서로 충돌하지
않도록 하는 훌륭한 서비스입니다. 대부분의 컴퓨터와 네트워크 스위처는
DHCP를
지원합니다.
고정
IP
‘고정 IP’를 선택하면 네트워크 정보를 수동으로 입력할 수 있습니다. 모든 장치가 통신할
수 있도록 고정
IP 주소를 수동으로 설정할 경우, 동일한 서브넷 마스크 및 게이트웨이
설정을 공유하도록 해야 합니다. 또한 패널의
IP 주소의 첫 3개 필드 숫자가 동일해야
합니다.
만약 해당 네트워크에 이미 같은 IP를 보유한 장비가 있다면, 이 설정은 충돌을 일으켜 네트워크에 제대로
연결되지 않습니다. 충돌 발생 시
IP 주소의 마지막 필드를 변경하면 문제가 해결됩니다.
315
BlackmagicHyperDeckSetup
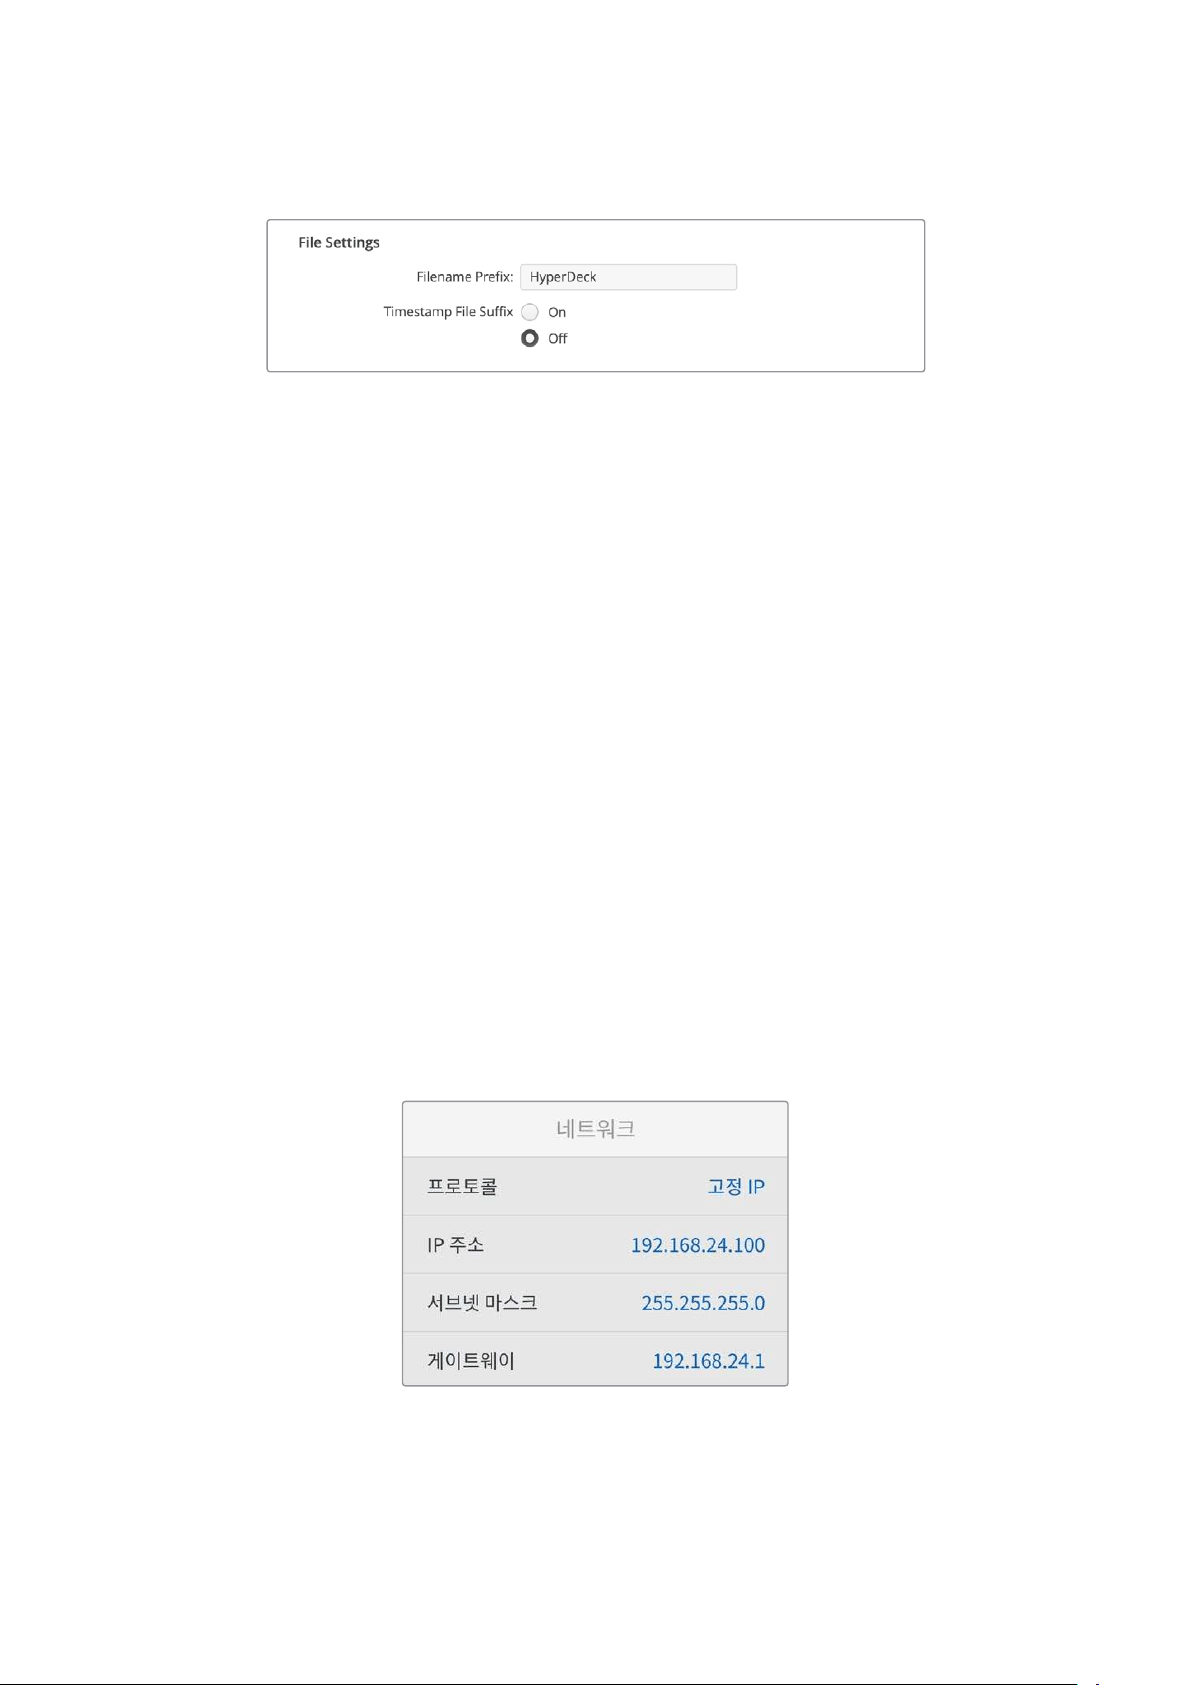
파일설정하기
처음 설정 시, HyperDeck Shuttle HD는 'HyperDeck'을 접두사로 사용하여 SD 카드 또는 USB 플래시
디스크에 클립을 녹화합니다. 접두사를 변경하려면 새 파일 이름을 입력하세요.
타임스탬프가 파일명에 포함되는 기능은
OFF로 기본 설정되어 있습니다. 파일명에 날짜와 시간을
기록하려면
ON으로 전환하세요. 파일명 접두어 및 타임스탬프 설정은 HyperDeck Shuttle HD의 화면
메뉴를 통해서도 사용할 수 있습니다.
네트워크를통해파일전송하기
HyperDeck 디스크 레코더는 파일 전송 프로토콜(FTP)을 통한 파일 전송을 지원합니다. 이는
네트워크를 통해 컴퓨터에서 바로
HyperDeck 장비에 파일을 전송하는 강력한 기능으로, 인터넷 공급
업체에서 제공하는 최고의 속도로 전송할 수 있습니다. 예를 들어, 새로운 파일을 디지털 사이니지 구동을
위해 다른 곳에 위치한 원격
HyperDeck 장비에 복사할 수 있습니다.
HyperDeckShuttleHD에연결하기
컴퓨터와 HyperDeck Shuttle HD가 동일한 네트워크에 있는 경우, FTP 클라이언트와 HyperDeck
Shuttle HD의 IP 주소만 있으면 서로 연결 가능합니다.
1
HyperDeck
에 연결하려는 컴퓨터에 FTP 클라이언트를 다운로드하여 설치하세요. Cyberduck,
FileZilla, Transmit 등의 사용을 추천하지만, 대부분의 FTP 클라이언트 소프트웨어와 호환
가능합니다.
Cyberduck과 FileZilla는 무료로 다운로드할 수 있습니다.
2
이더넷 케이블을 사용하여 HyperDeck Shuttle HD를 네트워크에 연결한 뒤, IP 주소를
적어두세요.
MENU 버튼을 누른 다음 검색 다이얼을 돌려 ‘네트워크’ 화면에 들어가면 IP 주소를
확인할 수 있습니다.
HyperDeck의 IP 주소는 화면 하단에 나타납니다.
‘설정’ 메뉴의 네트워크 항목에서 HyperDeck Shuttle HD
의 IP 주소를 확인할 수 있습니다.
3
FTP
프로그램에 있는 연결 대화 상자에 HyperDeck의 IP 주소를 입력하세요. 대화 상자의
이름이 프로그램마다 다를 수 있지만, 일반적으로 ‘
Server’ 또는 ‘Host’라고 표기되어 있습니다.
FTP 프로그램에 ‘Anonymous Login’ 확인란이 있는 경우에는 해당 확인란을 선택하세요.
316
네트워크를통해파일전송하기

HyperDeck Shuttle HD에 연결할 때는 사용자 이름이나 비밀번호를 입력할 필요가 없습니다. 간단히
디스크 레코더의 IP 주소를 FTP 프로그램의 ‘Server’ 또는 ‘Host’ 필드에 입력하세요. FTP 프로그램에
‘Anonymous Login’ 확인란이 있는 경우에는 해당 확인란을 선택하세요.
파일전송하기
HyperDeck 에 연결하고 나면 FTP 프로그램과 같은 방식으로 파일을 전송할 수 있습니다. 대부분의 FTP
프로그램에서 드래그 & 드롭 기능을 지원하지만, 현재 사용 중인 프로그램에 맞는 사용법을 확인하세요.
HyperDeck에서 모든 파일을 주고받을 수 있지만 HyperDeck Shuttle HD에서 재생하려는 모든 파일은
HyperDeck에서 지원하는 코덱 및 해상도를 준수해야 합니다.
정보 HyperDeck에서 녹화가 진행되는 동안 네트워크를 통해 파일을 전송할 수 있습니다.
HyperDeck이 자동으로 전송 속도를 조절하기 때문에 녹화에 영향을 끼치지 않습니다.
317
네트워크를통해파일전송하기

DeveloperInformation
Blackmagic
HyperDeck
Ethernet
Protocol
The Blackmagic HyperDeck Ethernet Protocol is a text based protocol accessed by connecting
to TCP port 9993 on HyperDeck models that have a built in Ethernet connection. If you are
a software developer, you can use the protocol to construct devices that integrate with our
products. Here at Blackmagic Design our approach is to open up our protocols and we eagerly
look forward to seeing what you come up with!
Protocol
Commands
Command Command Description
help or ? Provides help text on all commands and parameters
commands return commands in XML format
device info return device information
disk list query clip list on active disk
disk list: slot id: {n} query clip list on disk in slot {n}
quit disconnect ethernet control
ping check device is responding
preview: enable: {true/false} switch to preview or output
play play from current timecode
play: speed: {-5000 to 5000} play at specific speed
play: loop: {true/false} play in loops or stop-at-end
play: single clip: {true/false} play current clip or all clips
playrange query playrange setting
playrange set: clip id: {n} set play range to play clip {n} only
playrange set: clip id: {n} count: {m} set play range to {m} clips starting from clip {n}
playrange set: in: {inT} out: {outT}
set play range to play between:
- timecode {inT} andtimecode {outT}
playrange set: timeline in: {in} timeline out:
{out}
set play range in units of frames between:
- timeline position {in} and position {out} clear/reset play
rangesetting
playrange clear clear/reset play range setting
play on startup query unit play on startup state
play on startup: enable: {true/false} enable or disable play on startup
play on startup: single clip: {true/false} play single clip or all clips on startup
play option query play options
play option: stop mode:
{lastframe/nextframe/black}
set output frame when playback stops
record record from current input
record: name: {name} record named clip
record spill spill current recording to next slot
318
DeveloperInformation

Command Command Description
record: spill: slot id: {n}
spill current recording to specified slot
use current id to spill to same slot
stop stop playback or recording
clips count query number of clips on timeline
clips get query all timeline clips
clips get: clip id: {n} query a timeline clip info
clips get: clip id: {n} count: {m} query m clips starting from n
clips get: version: {1/2}
query clip info using specified output version:
version 1: id: name startT duration
version 2: id: startT duration inT outT name
clips add: name: {name} append a clip to timeline
clips add: clip id: {n} name: {name} insert clip before existing clip {n}
clips add: in: {inT} out: {outT} name: {name} append the {inT} to {outT} portion of clip
clips remove: clip id: {n}
remove clip {n} from the timeline
(invalidates clip ids following clip {n})
clips clear empty timeline clip list
transport info query current activity
slot info query active slot
slot info: slot id: {n} query slot {n}
slot select: slot id: {n} switch to specified slot
slot select: video format: {format} load clips of specified format
slot unblock unblock active slot
slot unblock: slot id: {n} unblock slot {n}
cache info query cache status
dynamic range query dynamic range settings
dynamic range: playback override:
{off/Rec709/Rec2020_SDR/HLG/
ST2084_300/ST2084_500/
ST2084_800/ST2084_1000/
ST2084_2000/ST2084_4000/ST2084
set playback dynamic range override
dynamic range: record override:
{off/Rec709/Rec2020_SDR/HLG/
ST2084_300/ST2084_500/
ST2084_800/ST2084_1000/
ST2084_2000/ST2084_4000/ST2048}
set record dynamic range override
notify query notification status
notify: remote: {true/false} set remote notifications
notify: transport: {true/false} set transport notifications
notify: slot: {true/false} set slot notifications
notify: configuration: {true/false} set configuration notifications
notify: dropped frames: {true/false} set dropped frames notifications
notify: display timecode: {true/false} set display timecode notifications
319
DeveloperInformation

Command Command Description
notify: timeline position: {true/false} set playback timeline position notifications
notify: playrange: {true/false} set playrange notifications
notify: cache: {true/false} set cache notifications
notify: dynamic range: {true/false} set dynamic range settings notifications
notify: slate: {true/false} set digital slate notifications
notify: clips: {true/false}
set timeline clips notifications where two types of changes can
occur:
add: partial update with list of clips and insert positions
snapshot: complete update of all clips on timeline
notify: disk: {true/false}
set disk clips notifications where two types of changes can
occur:
add: partial update with list of clips and insert positions
snapshot: complete update of all clips on timeline
goto: clip id: {start/end} goto first clip or last clip
goto: clip id: {n} goto clip id {n}
goto: clip id: +{n} go forward {n} clips
goto: clip id: -{n} go backward {n} clips
goto: clip: {n} goto frame position {n} within current clip
goto: clip: +{n} go forward {n} frames within current clip
goto: clip: -{n} go backward {n} frames within current clip
goto: clip: {start/end} goto start or end of clip
goto: timeline: {n} goto frame position {n} within timeline
goto: timeline: +{n} o forward {n} frames within timeline
goto: timeline: -{n} go backward {n} frames within timeline
goto: timeline: {start/end} goto start or end of timeline
goto: timecode: {timecode} goto specified timecode
goto: timecode: +{timecode} go forward {timecode} duration
goto: timecode: -{timecode} go backward {timecode} duration
goto: slot id: {n} goto slot id {n}
jog: timecode: {timecode} jog to timecode
jog: timecode: +{timecode} jog forward {timecode} duration
jog: timecode: -{timecode} jog backward {timecode} duration
shuttle: speed: {-5000 to 5000} shuttle with speed
remote query unit remote control state
remote: enable: {true/false} enable or disable remote control
remote: override: {true/false} session override remote control
configuration query configuration settings
configuration: video input: SDI switch to SDI input
configuration: video input: HDMI switch to HDMI input
configuration: video input: component switch to component input
320
DeveloperInformation

Command Command Description
configuration: audio input: embedded capture embedded audio
configuration: audio input: XLR capture XLR audio
configuration: audio input: RCA capture RCA audio
configuration: file format: {format} switch to specific file format
configuration: audio codec: PCM switch to PCM audio
configuration: audio codec: AAC switch to AAC audio
configuration: timecode input:
{external/embedded/internal/preset/clip}
change the timecode input
configuration: timecode output:
{clip/timeline}
change the timecode output
configuration: timecode preference:
{default/dropframe/nondropframe}
whether or not to use drop frame timecodes when not
otherwise specified
configuration: timecode preset:
{timecode}
set the timecode preset
configuration: audio input channels: {n} set the number of audio channels recorded to {n}
configuration: record trigger:
{none/recordbit/timecoderun}
change the record trigger
configuration: record prefix: {name} set the record prefix name (supports UTF-8 name)
configuration: append timestamp:
{true/false}
append timestamp to recorded filename
configuration: xlr input id: {n} xlr type:
{line/mic}
configure xlr input type
multiple xlr inputs can be configured in a single command
configuration: genlock input resync:
{true/false}
enable or disable genlock input resync
uptime return time since last boot
format: slot id: {n} prepare:
{exFAT/HFS+} name: {name}
prepare a disk formatting operation to filesystem {format}
format: confirm: {token} perform a pre-prepared formatting operation using token
identify: enable: {true/false} identify the device
watchdog: period: {period in seconds} client connection timeout
reboot reboot device
slate clips slate clips information
slate project slate project information
slate lens slate lens information
321
DeveloperInformation

Multiline commands: Command Description
slate clips↵ set slate clips information:
reel: {n} slate reel number, where {n} is in [1, 999]
scene id: {id} slate scene id value, where {id} is a string
shot type: {WS/MS/BCU/MCU/ECU/none} slate shot type
take: {n} slate take number, where {n} is in [1, 99]
take scenario: {PU/VFX/SER/none} slate take scenario
take auto inc: {true/false} slate take auto increment
good take: {true/false} slate good take
environment: {interior/exterior} slate environment
day night: {day/night} slate day or night
slate project:↵ set slate project information:
project name: {name} project name (can be empty, supports UTF-8)
camera: {index} set camera index e.g. A
director: {name} director (can be empty, supports UTF-8)
camera operator: {name} camera operator (can be empty, supports UTF-8)
slate lens:↵ set lens information:
lens type: {type} lens type (can be empty, supports UTF-8)
iris: {type} camera iris (can be empty, supports UTF-8)
focal length: {length} focal length (can be empty, supports UTF-8)
distance: {distance} lens distance (can be empty, supports UTF-8)
filter: {filter} lens filter (can be empty, supports UTF-8)
Command Combinations
You can combine the parameters into a single command, for example:
play: speed: 200 loop: true single clip: true
Or for configuration:
configuration: video input: SDI audio input: XLR
Or to switch to the second disk, but only play NTSC clips:
slot select: slot id: 2 video format: NTSC
Protocol
Details
Connection
The HyperDeck Ethernet server listens on TCP port 9993.
Basic syntax
The HyperDeck protocol is a line oriented text protocol. Lines from the server will be separated by an ascii
CR LF sequence. Messages from the client may be separated by LF or CR LF.
New lines are represented in this document as a "↵" symbol.
322
DeveloperInformation

Single line command syntax
Command parameters are usually optional. A command with no parameters is terminated with a new line:
{Command name}↵
If parameters are specified, the command name is followed by a colon, then pairs of parameter names and
values. Each parameter name is terminated with a colon character:
{Command name}: {Parameter}: {Value} {Parameter}: {Value} ...↵
Multiline command syntax
The HyperDeck protocol also supports an equivalent multiline syntax where each parameter-value pair is
entered on a new line. E.g.
{Command name}:↵
{P a r a m e t e r}: { Va lu e}↵
{P a r a m e t e r}: { Va lu e}↵
↵
Response syntax
Simple responses from the server consist of a three digit response code and descriptive text terminated by a
new line:
{Response code} {Response text}↵
If a response carries parameters, the response text is terminated with a colon, and parameter name and
value pairs follow on subsequent lines until a blank line is returned:
{Response code} {Response text}:↵
{P a r a m e t e r}: { Va lu e}↵
{P a r a m e t e r}: { Va lu e}↵
...
↵
Successful response codes
A simple acknowledgement of a command is indicated with a response code of 200:
200 ok↵
Other successful responses carry parameters and are indicated with response codes in the range of 201
to299.
323
DeveloperInformation

Failure response codes
Failure responses to commands are indicated with response codes in the range of 100 to 199:
100 syntax error
101 unsupported parameter
102 invalid value
103 unsupported
104 disk full
105 no disk
106 disk error
107 timeline empty
108 internal error
109 out of range
110 no input
111 remote control disabled
112 clip not found
120 connection rejected
150 invalid state
151 invalid codec
160 invalid format
161 invalid token
162 format not prepared
163 parameterized single line command not supported
Asynchronous response codes
The server may return asynchronous messages at any time. These responses are indicated with response
codes in the range of 500 to 599:
5xx {Response Text}:↵
{P a r a m e t e r}: { Va lu e}↵
{P a r a m e t e r}: { Va lu e}↵
↵
Connection response
On connection, an asynchronous message will be delivered:
500 connection info:↵
protocol version: {Version}↵
model: {Model Name}↵
↵
Timecode syntax
Timecodes are expressed as non-drop-frame timecode in the format:
HH:MM:SS:FF
324
DeveloperInformation

Handling of deck "remote" state
The “remote” command may be used to enable or disable the remote control of the deck. Any attempt to
change the deck state over ethernet while remote access is disabled will generate an error:
111 remote control disabled↵
To enable or disable remote control:
remote: enable: {“true”, “false”} ↵
The current remote control state may be overridden allowing remote access over ethernet irrespective of the
current remote control state:
remote: override: {“true”, “false”} ↵
The override state is only valid for the currently connected ethernet client and only while the connection
remains open.
The “remote” command may be used to query the remote control state of the deck by specifying no
parameters:
remote↵
The deck will return the current remote control state:
210 remote info:↵
enabled: {“true”, “false”}↵
override: {“true”, “false”}↵
↵
Asynchronous remote control information change notification is disabled by default and may be
configured with the “notify” command. When enabled, changes in remote state will generate a “510 remote
info:”asynchronous message with the same parameters as the “210 remote info:” message.
Closing connection
The "quit" command instructs the server to cleanly shut down the connection:
quit↵
Checking connection status
The "ping" command has no function other than to determine if the server is responding:
ping↵
Getting help
The "help" or "?" commands return human readable help text describing all available commands and
parameters:
help↵
Or:
?↵
The server will respond with a list of all supported commands:
201 help:↵
{Help Text}↵
{Help Text}↵
↵
325
DeveloperInformation

Switching to preview mode
The "preview" command instructs the deck to switch between preview mode and output mode:
preview: enable: {"true", "false"}↵
Playback will be stopped when the deck is switched to preview mode. Capturing will be stopped when the
deck is switched to output mode.
Controlling device playback
The “play” command instructs the deck to start playing:
play↵
The play command accepts a number of parameters which may be used together in most combinations.
By default, the deck will play all remaining clips on the timeline then stop.
The “single clip” parameter may be used to override this behavior:
play: single clip: {“true”, “false”}↵
By default, the deck will play at normal (100%) speed. An alternate speed may be specified in percentage
between -5000 to 5000:
play: speed: {% normal speed}↵
By default, the deck will stop playing when it reaches to the end of the timeline. The “loop” parameter may be
used to override this behavior:
play: loop: {“true”, “false”}↵
The “playrange” command instructs the deck to play all the clips. To override this behavior: and select a
particular clip:
playrange set: clip id: {Clip ID}↵
To only play a certain timecode range:
playrange set: in: {in timecode} out: {out timecode}↵
To clear a set playrange and return to the default value:
playrange clear↵
The “play on startup command” instructs the deck on what action to take on startup. By default, the deck will
not play. Use the “enable” command to start playback after each power up.
play on startup: enable {“true”, “false”}↵
By default, the unit will play back all clips on startup. Use the “single clip” command to override.
play on startup: single clip: {“true”, “false”}↵
Stopping deck operation
The "stop" command instructs the deck to stop the current playback or capture:
stop↵
326
DeveloperInformation

Changing timeline position
The "goto" command instructs the deck to switch to playback mode and change its position within the
timeline.
To go to the start of a specific clip:
goto: clip id: {Clip ID}↵
To move forward/back {count} clips from the current clip on the current timeline:
goto: clip id: +/-{count}↵
Note that if the resultant clip id goes beyond the first or last clip on timeline, it will be clamp at the first or last
clip.
To go to the start or end of the current clip:
goto: clip: {“start”, “end”}↵
To go to the start of the first clip or the end of the last clip:
goto: timeline: {“start”, “end”}↵
To go to a specified timecode:
goto: timecode: {timecode}↵
To move forward or back a specified duration in timecode:
goto: timecode: {“+”, “-”}{duration in timecode}↵
To specify between slot 1 and slot 2:
goto: slot id: {Slot ID}↵
Note that only one parameter/value pair is allowed for each goto command.
Enumerating supported commands and parameters
The "commands" command returns the supported commands:
commands↵
The command list is returned in a computer readable XML format:
212 commands:
<commands>↵
<command name="…"><parameter name="…"/>…</command>↵
<command name="…"><parameter name="…"/>…</command>↵
…
</commands>↵
↵
327
DeveloperInformation

Controlling asynchronous notifications
The “notify” command may be used to enable or disable asynchronous notifications from the server.
To enable or disable transport notifications:
notify: transport: {“true”, “false”}↵
To enable or disable slot notifications:
notify: slot: {“true”, “false”}↵
To enable or disable remote notifications:
notify: remote: {“true”, “false”}↵
To enable or disable configuration notifications:
notify: configuration: {“true”, “false”}↵
Multiple parameters may be specified. If no parameters are specified, the server returns the current state of
all notifications:
209 notify:↵
transport: {“true”, “false”}↵
slot: {“true”, “false”}↵
remote: {“true”, “false”}↵
configuration: {“true”, “false”}↵
dropped frames: {“true”, “false”}↵
display timecode: {“true”, “false”}↵
timeline position: {“true”, “false”}↵
playrange: {“true”, “false”}↵
cache: {“true”, “false”}↵
dynamic range: {“true”, “false”}↵
slate: {“true”, “false”}↵
clips: {“true”, “false”}↵
disk: {“true”, “false”}↵
↵
Retrieving device information
The "device info" command returns information about the connected deck device:
device info↵
The server will respond with:
204 device info:↵
protocol version: {Version}↵
model: {Model Name}↵
unique id: {unique alphanumeric identifier}↵
slot count: {number of storage slots}↵
software version: {software version}↵
↵
328
DeveloperInformation

Retrieving slot information
The "slot info" command returns information about a slot. Without parameters, the command returns
information for the currently selected slot:
slot info↵
If a slot id is specified, that slot will be queried:
slot info: slot id: {Slot ID}↵
The server will respond with slot specific information:
202 slot info:↵
slot id: {Slot ID}↵
status: {"empty", "mounting", "error", "mounted"}↵
volume name: {Volume name}↵
recording time: {recording time available in seconds}↵
video format: {disk's default video format}↵
blocked: {“true”, “false”}↵
↵
Asynchronous slot information change notification is disabled by default and may be configured with
the "notify" command. When enabled, changes in slot state will generate a "502 slot info:" asynchronous
message with the same parameters as the "202 slot info:" message.
Retrieving clip information
The “disk list” command returns the information for each playable clip on a given disk. Without parameters,
the command returns information for the current active disk:
disk list↵
If a slot id is specified, the disk in that slot will be queried:
disk list: slot id: {Slot ID}↵
The server responds with the list of all playable clips on the disk in the format of: Index, name, formats, and
duration in timecode:
206 disk list:↵
slot id: {Slot ID}↵
{clip index}: {name} {file format} {video format} {Duration
ti m ecode}↵
{clip index}: {name} {file format} {video format} {Duration
ti m ecode}↵
…
↵
Note that the clip index starts from 1.
Retrieving clip count
The "clips count" command returns the number of clips on the current timeline:
clips count ↵
The server responds with the number of clips:
214 clips count: ↵
clip count: {Count}↵
329
DeveloperInformation

Retrieving timeline information
The "clips get" command returns information for each available clip on the current timeline. Without
parameters, the command returns information for all clips on timeline:
clips get↵
The server responds with a list of clip IDs, names and timecodes:
205 clips info:↵
clip count: {Count}↵
{Clip ID}: {Start timecode} {Duration timecode} {In timecode}
{Out timecode} {Name}↵
{Clip ID}: {Start timecode} {Duration timecode} {In timecode}
{Out timecode} {Name}↵
…
↵
Retrieving transport information
The “transport info” command returns the state of the transport:
transport info ↵
The server responds with transport specific information:
208 transport info:
status: {“preview”, “stopped”, “play”, “forward”, “rewind”,
“j o g ”, “ s h u t t l e ”,” r e c o r d ”}↵
speed: {Play speed between -5000 and 5000 %}↵
slot id: {Slot ID or “none”}↵
clip id: {Clip ID or “none”}↵
single clip: {“true”, “false”}↵
display timecode: {timecode}↵
timecode: {timecode}↵
video format: {Video format}↵
loop: {“true”, “false”}↵
timeline: {n}↵
input video format: {Video format”}↵
dynamic range: {“off”, “Rec709”, “Rec2020_SDR”, “HLG”,
“ST2084_300”, “ST2084_500”, “ST2084_800”, “ST2084_1000”,
“ST2084_2000”, “ST2084_4000”, “ST2048” or “none”}↵
↵
The "timecode" value is the timecode within the current timeline for playback or the clip for record. The
"display timecode" is the timecode displayed on the front of the deck. The two timecodes will differ in some
deck modes.
Asynchronous transport information change notification is disabled by default and may be configured
with the "notify" command. When enabled, changes in transport state will generate a "508 transport info:"
asynchronous message with the same parameters as the "208 transport info:" message.
330
DeveloperInformation

Video Formats
The following video formats are currently supported on HyperDeck Shuttle:
720p50, 720p5994, 720p60
1080p23976, 1080p24, 1080p25, 1080p2997, 1080p30, 1080p60
1080i50, 1080i5994, 1080i60
Video format support may vary between models and software releases.
File Formats
All HyperDeck models currently support the following file formats:
H.264High
H.264Medium
H.264Low
QuickTimeProResHQ
QuickTimeProRes
QuickTimeProResLT
QuickTimeProResProxy
QuickTimeDNxHD220x
DNxHD220x
QuickTimeDNxHD145
DNxHD145
QuickTimeDNxHD45
DNxHD45
Supported file formats may vary between models and software releases.
331
DeveloperInformation

Querying and updating configuration information
The "configuration" command may be used to query the current configuration of the deck:
configuration↵
The server returns the configuration of the deck:
211 configuration:↵
audio input: {“embedded”, “XLR”, “RCA”}↵
audio mapping: {n}↵
video input: {“SDI”, “HDMI”, “component”, “composite”}↵
file format: {format}↵
audio codec: {“PCM”, “AAC”}↵
timecode input: {“external”, “embedded”, “preset”, “clip”}↵
timecode output: {“clip”, “timeline”}↵
timecode preference: {“default”, “dropframe”, “nondropframe”}↵
timecode preset: {timecode}↵
audio input channels: {n}↵
record trigger: {“none”, “recordbit”, “timecoderun”}↵
record prefix: {name}↵
append timestamp: {“true”, “false”}↵
genlock input resync: {“true”, “false”}↵
↵
One or more configuration parameters may be specified to change the configuration of the deck.
To change the current video input:
configuration: video input: {“SDI”, “HDMI”, “component”}↵
Valid video inputs may vary between models. To configure the current audio input:
configuration: audio input: {“embedded”, “XLR”, “RCA”}↵
Valid audio inputs may vary between models.
To configure the current file format:
configuration: file format: {File format}↵
Note that changes to the file format may require the deck to reset, which will cause the client connection to
be closed. In such case, response code 213 will be returned (instead of 200) before the client connection is
closed:
“213 deck rebooting”
Asynchronous configuration information change notification is disabled by default and may be configured
with the “notify” command. When enabled, changes in configuration will generate a “511 configuration:”
asynchronous message with the same parameters as the “211 configuration:” message.
332
DeveloperInformation

Selecting active slot and video format
The "slot select" command instructs the deck to switch to a specified slot, or/and to select a specified output
video format.
To switch to a specified slot:
slot select: slot id: {slot ID}↵
To select the output video format:
slot select: video format: {video format}↵
Either or all slot select parameters may be specified. Note that selecting video format will result in a rescan of
the disk to reconstruct the timeline with all clips of the specified video format.
Clearing the current timeline
The "clips clear" command instructs the deck to empty the current timeline:
clips clear↵
The server responds with
200 ok↵
Adding a clip to the current timeline
The "clips add:" command instructs the deck to add a clip to the current timeline:
clips add: name: {clip name}↵
The server responds with
200 ok↵
or in case of error
1xx {error description}↵
Configuring the watchdog
The “watchdog” command instructs the deck to monitor the connected client and terminate the connection if
the client is inactive for at least a specified period of time.
To configure the watchdog:
watchdog: period: {period in seconds}↵
To avoid disconnection, the client must send a command to the server at least every {period} seconds. Note
that if the period is set to 0 or less than 0, connection monitoring will be disabled.
333
DeveloperInformation

지원
지원받기
가장 빠르게 지원받을 수 있는 방법은 Blackmagic Design 온라인 고객지원 페이지에 접속하여 해당
Blackmagic HyperDeck 디스크 레코더 관련 최신 지원 정보를 확인하는 것입니다.
BlackmagicDesign온라인고객지원페이지
최신 사용 설명서와 소프트웨어, 지원 노트는 Blackmagic 고객 지원 센터
(
www.blackmagicdesign.com/kr/support)에서 확인하실 수 있습니다.
BlackmagicDesign포럼
저희 웹사이트에 있는 Blackmagic Design 포럼은 유용한 정보를 제공하는 곳으로, 방문을 통해 자세한
정보와 창의적인 아이디어를 얻을 수 있습니다. 또한 숙련된 사용자나
Blackmagic Design 직원들이
기존에 올려놓은 해결책을 통해 원하는 해답을 얻을 수도 있으므로 신속하게 도움을 받아 한 단계 성장할
수 있는 방법이기도 합니다. 포럼은
http://forum.blackmagicdesign.com을 방문해 이용할 수 있습니다
BlackmagicDesign고객지원에문의하기
고객 지원 페이지나 포럼에서 원하는 정보를 얻지 못한 경우에는 [이메일 보내기] 버튼을 클릭하여 지원
요청 이메일을 보내주세요. 다른 방법으로는, 고객지원 페이지의 [지역별 고객 지원팀 찾기] 버튼을
클릭하여 가장 가까운
Blackmagic Design 고객지원 사무실에 문의하세요.
현재설치된소프트웨어버전확인하기
컴퓨터에 설치된 Blackmagic HyperDeck 소프트웨어 버전을 확인하려면 [About Blackmagic
HyperDeck Setup] 창을 엽니다.
Mac OS에서는 애플리케이션 폴더에 있는 Blackmagic HyperDeck Setup을 실행합니다.
애플리케이션 메뉴에서 [
About Blackmagic HyperDeck Setup]을 선택하고 버전을
확인하세요.
윈도우에서는 ‘시작’ 메뉴 또는 시작 화면에서 HyperDeck Setup을 실행하세요. 도움말 메뉴를
클릭한 뒤 [
About Blackmagic HyperDeck Setup]을 선택해 버전을 확인할 수 있습니다.
최신버전소프트웨어로업데이트하기
컴퓨터에 설치된 Blackmagic Cloud Setup 소프트웨어 버전을 확인한 뒤, Blackmagic Design 고객
지원 센터(
www.blackmagicdesign.com/kr/support)에 방문하여 최신 업데이트를 확인하세요. 최신
버전으로 업데이트하는 것을 권장하지만, 중요한 프로젝트를 실행하는 도중에는 소프트웨어 업데이트를
하지 않는 것이 좋습니다.
334
지원
규제사항
유럽 연합 국가 내의 전기전자제품 폐기물 처리 기준
제품에 부착된 기호는 해당 제품을 다른 폐기물과는 별도로 처리되어야 함을 나타냅니다.
제품을 폐기하려면 반드시 재활용 지정 수거 장소에 폐기해야 합니다. 폐기물 제품을 분리수거
및 재활용으로 처리하는 것은 자연 자원을 보전하고 인간의 건강과 환경을 보호할 수 있도록
폐기물을 재활용할 수 있는 방법입니다. 재활용을 위한 제품 폐기물 장소에 관한 자세한 정보는
해당 지역 시청의 재활용 센터 혹은 해당 제품을 구입한 상점으로 문의하십시오.
본 제품은 테스트 결과
FCC 규정 제15항에 따라 A급 디지털 기기 제한 사항을 준수하는 것으로
확인되었습니다. 해당 제한 사항은 본 제품을 상업적 환경에서 사용할 시 발생할 수 있는 유해
혼선으로부터 적절한 보호를 제공하기 위함입니다. 이 제품은 무선 주파수를 생성 및 사용,
방출할 수 있습니다. 따라서 설명서의 안내에 따라 제품을 설치 및 사용하지 않을 시, 무선 통신을
방해하는 전파 혼선을 일으킬 수 있습니다. 해당 제품을 주거 지역에서 사용할 경우 유해 전파
혼선이 발생할 가능성이 있으며, 이 경우 사용자는 자체 비용으로 전파 혼선 문제를 해결해야
합니다.
제품 작동은 다음 두 가지 조건을 전제로 합니다.
1
본 기기는 유해 혼신을 일으키지 않습니다.
2
본 기기는 원치 않는 작동을 일으킬 수 있는 혼신을 포함하여 모든 혼신을 수용합니다.
R-R-BMD-20211410001
ISED
캐나다 성명
본 기기는 캐나다 표준 A급 디지털 장치 규정을 준수합니다.
정해진 사용 목적 이외의 다른 목적의 사용 또는 제품 변경은 표준 규정 위반으로 간주할 수
있습니다.
HDMI 인터페이스 연결 시에는 반드시 고품질의 쉴드 HDMI 케이블을 사용해야 합니다.
이 기기는 업무용 환경에서 사용할 목적으로 적합성 평가를 거쳤습니다. 가정용 환경에서
사용하는 경우 전파간섭의 우려가 있습니다.
335
규제사항

안전정보
본 제품은 주위 온도가 최대 40ºC인 열대 지역에서 사용하기 적합합니다.
공기가 잘 통할 수 있도록 제품을 통풍이 잘되는 곳에 둡니다.
제품 내부에는 사용자가 수리 가능한 부품이 없습니다. 제품 수리는 해당 지역 Blackmagic Design
서비스 센터에 문의하세요.
최대 작동 고도는 해수면 기준
2000m입니다.
캘리포니아주 성명
본 제품을 사용하는 사용자는 제품의 플라스틱 내 폴리브롬화 비페닐에 노출될 수 있으며
캘리포니아주에서는 해당 물질이 암, 선천적 결손증, 기타 생식기능의 손상을 유발하는 것으로 알려져
있습니다.
더욱 자세한 정보는
www.P65Warnings.ca.gov을 확인하세요.
336
안전정보

보증
12
개월한정보증
Blackmagic Design은 본 제품의 부품 및 제조에 어떠한 결함도 없음을 제품 구매일로부터 12개월 동안
보증합니다. 보증 기간 내에 결함이 발견될 경우,
Blackmagic Design은 당사의 결정에 따라 무상 수리 또는
새로운 제품으로 교환해드립니다.
구매 고객은 반드시 보증 기간이 만료되기 전에 결함 사실을
Blackmagic Design에 통지해야 적절한 보증
서비스를 제공받을 수 있습니다. 구매 고객은 지정된
Blackmagic Design 서비스 센터로 결함 제품을 포장
및 운송할 책임이 있으며, 운송 비용은 선불로 지급되어야 합니다. 구매 고객은 또한 이유를 불문하고 제품
반송에 대한 운송료, 보험, 관세, 세금, 기타 비용을 부담해야 합니다.
이 보증은 부적절한 사용, 관리 및 취급으로 인한 파손, 고장, 결함에는 적용되지 않습니다.
Blackmagic
Design
은 다음과 같은 경우에 보증 서비스를 제공할 의무가 없습니다.
a
)
Blackmagic
Design
판매 대리인이
아닌 개인에 의해 발생한 제품 손상. b) 부적절한 사용 및 호환하지 않는 장비와의 연결로 인한 제품 손상. c)
Blackmagic Design사의 부품 및 공급품이 아닌 것을 사용하여 발생한 손상 및 고장. d) 제품을 개조하거나
다른 제품과 통합하여 제품 작동 시간 증가 및 기능 저하가 발생한 경우.
BLACKMAGIC
DESIGN
에서
제공하는 제품 보증은 다른 모든 명시적 또는 묵시적 보증을 대신합니다.
BLACKMAGIC
DESIGN
사와
관련 판매 회사는 상품성 및 특정 목적의 적합성과 관련된 모든 묵시적 보증을 부인합니다. 구매 고객에게
제공되는
BLACKMAGIC DESIGN의 결함 제품 수리 및 교환 관련 책임은 BLACKMAGIC DESIGN 또는
판매 회사에서 관련 위험의 가능성에 대한 사전 통보의 여부와 관계없이 모든 간접적, 특별, 우발적, 결과적
손해에 대한 유일한 배상 수단입니다. BLACKMAGIC DESIGN은 장비의 불법적 사용과 관련하여 어떤 법적
책임도 지지 않습니다. Blackmagic Design은 본 제품의 사용으로 인해 발생하는 손해에 대해서는 어떤
법적 책임도 지지 않습니다. 제품 사용으로 인해 발생할 수 있는 위험에 대한 책임은 본인에게 있습니다.
© Copyright 2022 Blackmagic Design. 모든 권리 보유. ‘ Blackmagic Design’, ‘DeckLink’, ‘ HDLink’, ‘ Workgroup
Videohub’, ‘Multibridge Pro’, ‘Multibridge Extreme’, ‘ Intensity’, ‘Leading the creative video revolution’은
모두 미국 및 기타 국가에 등록된 상표입니다. 다른 회사명 및 제품 이름은 관련 회사의 등록 상표일 수 있습니다.
337
보증

HyperDeck Shuttle HD
HyperDeck
ShuttleHD
Апрель 2022 г.
Руководство по установке иэксплуатации

Уважаемый пользователь!
Благодарим вас за покупку устройства Blackmagic HyperDeck ShuttleHD.
Когда мы разрабатывали первые дисковые рекордеры HyperDeck, то стремились
создать доступное для каждого решение, которое позволяет записывать
ивоспроизводить видео спомощью скоростных SSD-накопителей. Сейчас эта линейка
пополнилась новой моделью HyperDeck ShuttleHD.
Она представляет собой небольшой портативный рекордер сHDMI-интерфейсом,
предназначенный для размещения на рабочем столе. Знакомые элементы управления
иудобный диск для навигации позволяют использовать его одной рукой, что делает
устройство идеальным решением для создания контента вреальном времени при
работе смикшером ATEMMini. Кроме того, HyperDeck ShuttleHD может служить как
телесуфлер.
Для быстрой записи ивоспроизведения материала этот рекордер позволяет
вести сохранение как на традиционные SD-карты, так ина внешние накопители
вформатахProRes, DNxHD иH.264.
Последнюю версию руководства иобновленияПО для HyperDeck можно найти
вразделе поддержки на веб-сайте
www.blackmagicdesign.com/ru. Использование
актуальной версииПО гарантирует доступ ко всем имеющимся функциям. Чтобы
своевременно узнавать овыходе релизов, зарегистрируйтесь при загрузкеПО. Мы
постоянно работаем над совершенствованием наших продуктов, поэтому ваши отзывы
помогут нам сделать их еще лучше.
Грант Петти
Генеральный директор Blackmagic Design

Содержание
Подготовка кработе 341
Подключение питания 341
Подключение источника видео- иаудиосигнала 342
Подключение накопителей 342
Запись видео 343
Воспроизведение 344
Круглая ручка поиска 345
Изменение настроек 347
Настройки 348
Задняя панель 357
Работа снакопителями 358
SD-карта 358
Внешний диск 359
Форматирование накопителя 359
Подготовка накопителя на компьютере 359
Использование функции телесуфлера 361
Blackmagic HyperDeck Setup 362
Передача файлов по сети 364
Developer Information 366
Blackmagic HyperDeck Ethernet Protocol 366
Protocol Commands 366
Protocol Details 370
Помощь 382
Соблюдение нормативных требований 383
Правила безопасности 384
Гарантия 385
340
HyperDeck ShuttleHD
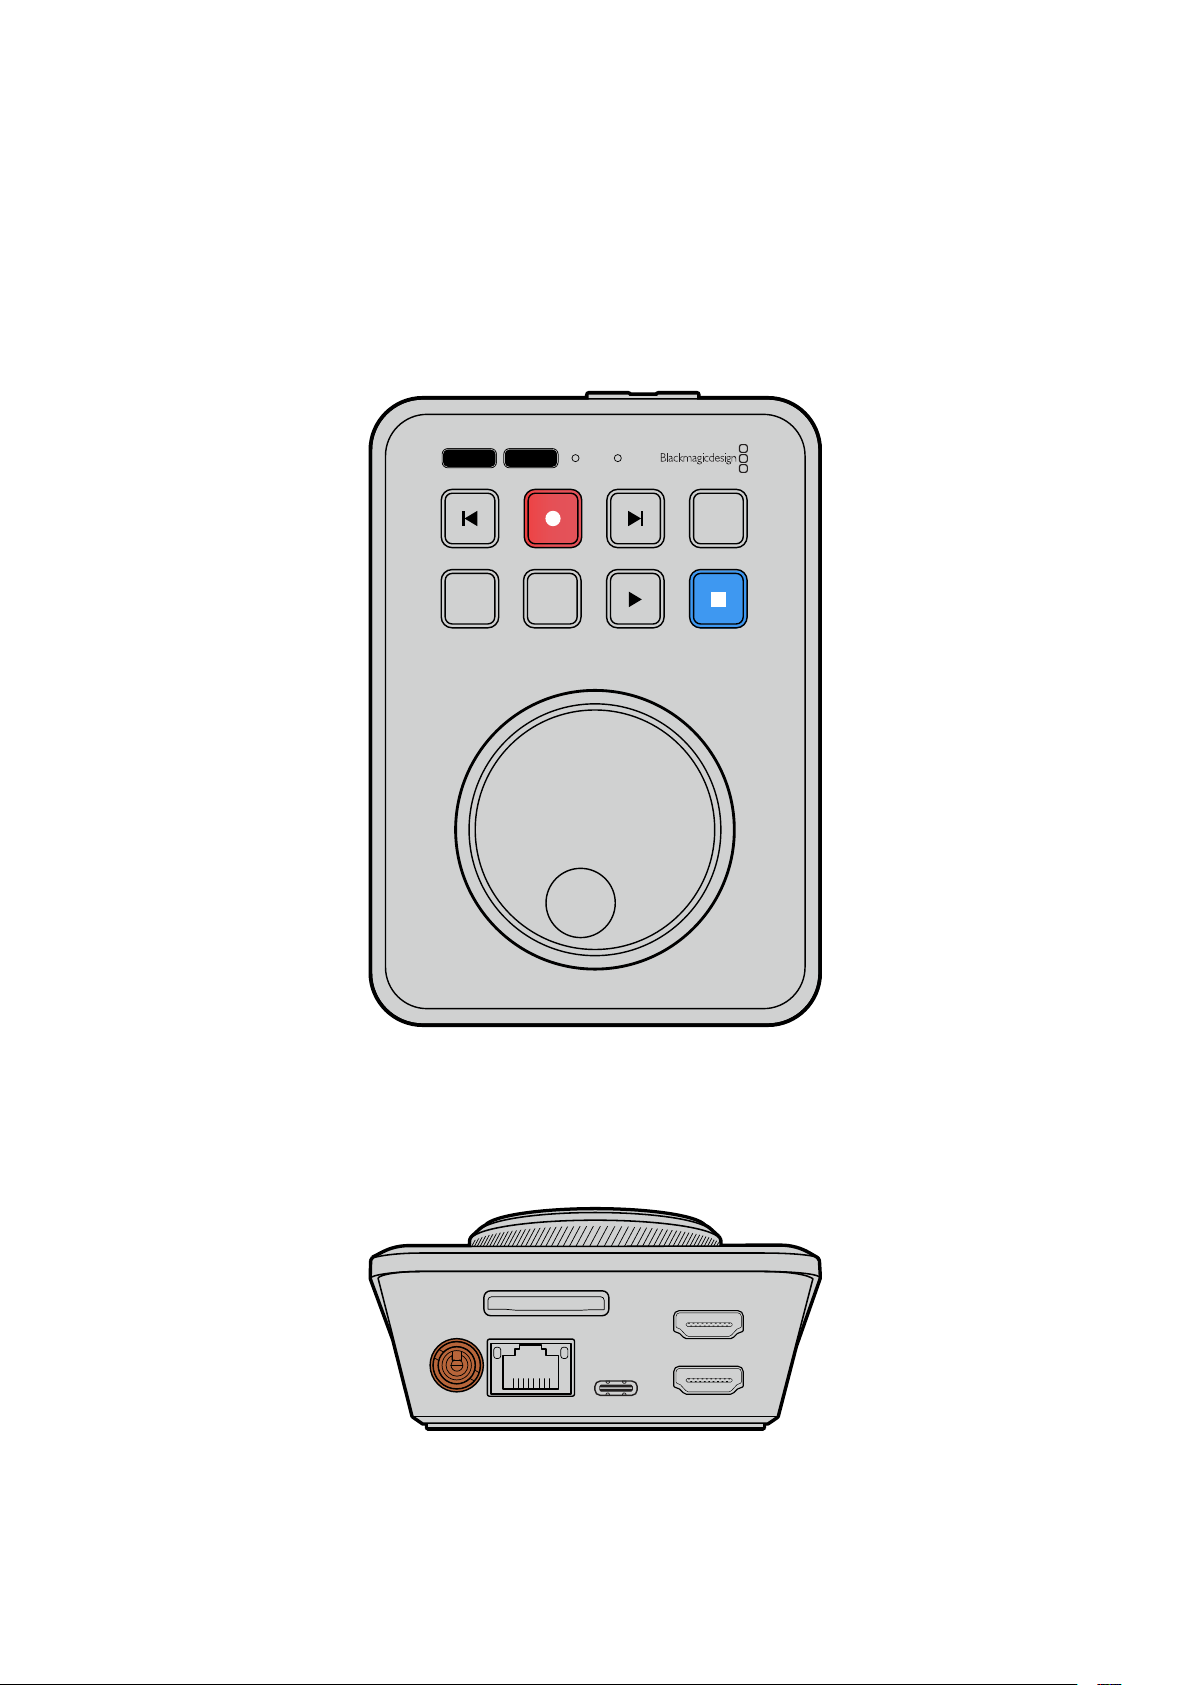
Подготовка кработе
Чтобы начать работу срекордером HyperDeck ShuttleHD, достаточно подключить питание,
подсоединить источник HDMI-сигнала, установить SD-карту или внешний накопитель, азатем
нажать кнопку записи.
Вэтом разделе описан порядок подготовки кначалу работы срекордером HyperDeck
ShuttleHD.
JOG SCR
CLIP
MENU SET
DISK SD
Подключение питания
Для подачи электроэнергии подключите прилагаемый сетевой адаптер кгнезду на задней
панели рекордера HyperDeck ShuttleHD. Затяните фиксирующее кольцо для предотвращения
случайного отсоединения кабеля.
HDMI OUT
HDMI IN
EXT DISK
SD CARD
ETHERNET
+
12V DC
Подключите сетевой адаптер ксиловому разъему на HyperDeck ShuttleHD
341
Подготовка кработе

Подключение источника видео- иаудиосигнала
Для подключения источника видеосигнала кHyperDeck ShuttleHD подсоедините HDMI-
кабель ксоответствующему входу на задней панели устройства.
HDMI OUT
HDMI IN
EXT DISK
SD CARD
ETHERNET
+
12V DC
Подключите оборудование, предназначенное для получения сигнала (например, микшер
ATEMMini или HDMI-телевизор), кHDMI-выходу рекордера.
Данный разъем также предназначен для просмотра выводимого поверх видео меню
настроек при изменении параметров устройства. Подробнее см. раздел «Настройки» ниже.
СОВЕТ. Если видеоисточник на подключенном дисплее не отображается, возможно,
используется режим воспроизведения. Для начала записи нажмите
соответствующую кнопку.
HDMI OUT
HDMI IN
EXT DISK
SD CARD
ETHERNET
+
12V DC
HDMI
Подключите оборудование, предназначенное для получения сигналов (например,
микшер ATEMMini или HDMI-телевизор), кHDMI-выходу рекордера
Подключение накопителей
Рекордеры HyperDeck ShuttleHD поставляются готовыми кработе ине требуют
дополнительной установки настроек. Все, что нужно,— это отформатированная SD-карта или
внешний накопитель.
Носители легко отформатировать спомощью меню настроек. Также это можно сделать на
компьютере. Подробнее см.раздел «Форматирование накопителей» ниже. Там же приводится
информация отипах носителей, наиболее подходящих для записи видео, атакже список
рекомендуемых SD-карт ивнешних дисков.
Порядок установки SD-карты
1 Возьмите SD-карту так, чтобы позолоченные контакты были направлены вверх,
иустановите ее всоответствующий слот. Осторожно надавите на карту, чтобы она
вошла внего до конца.
342Подготовка кработе
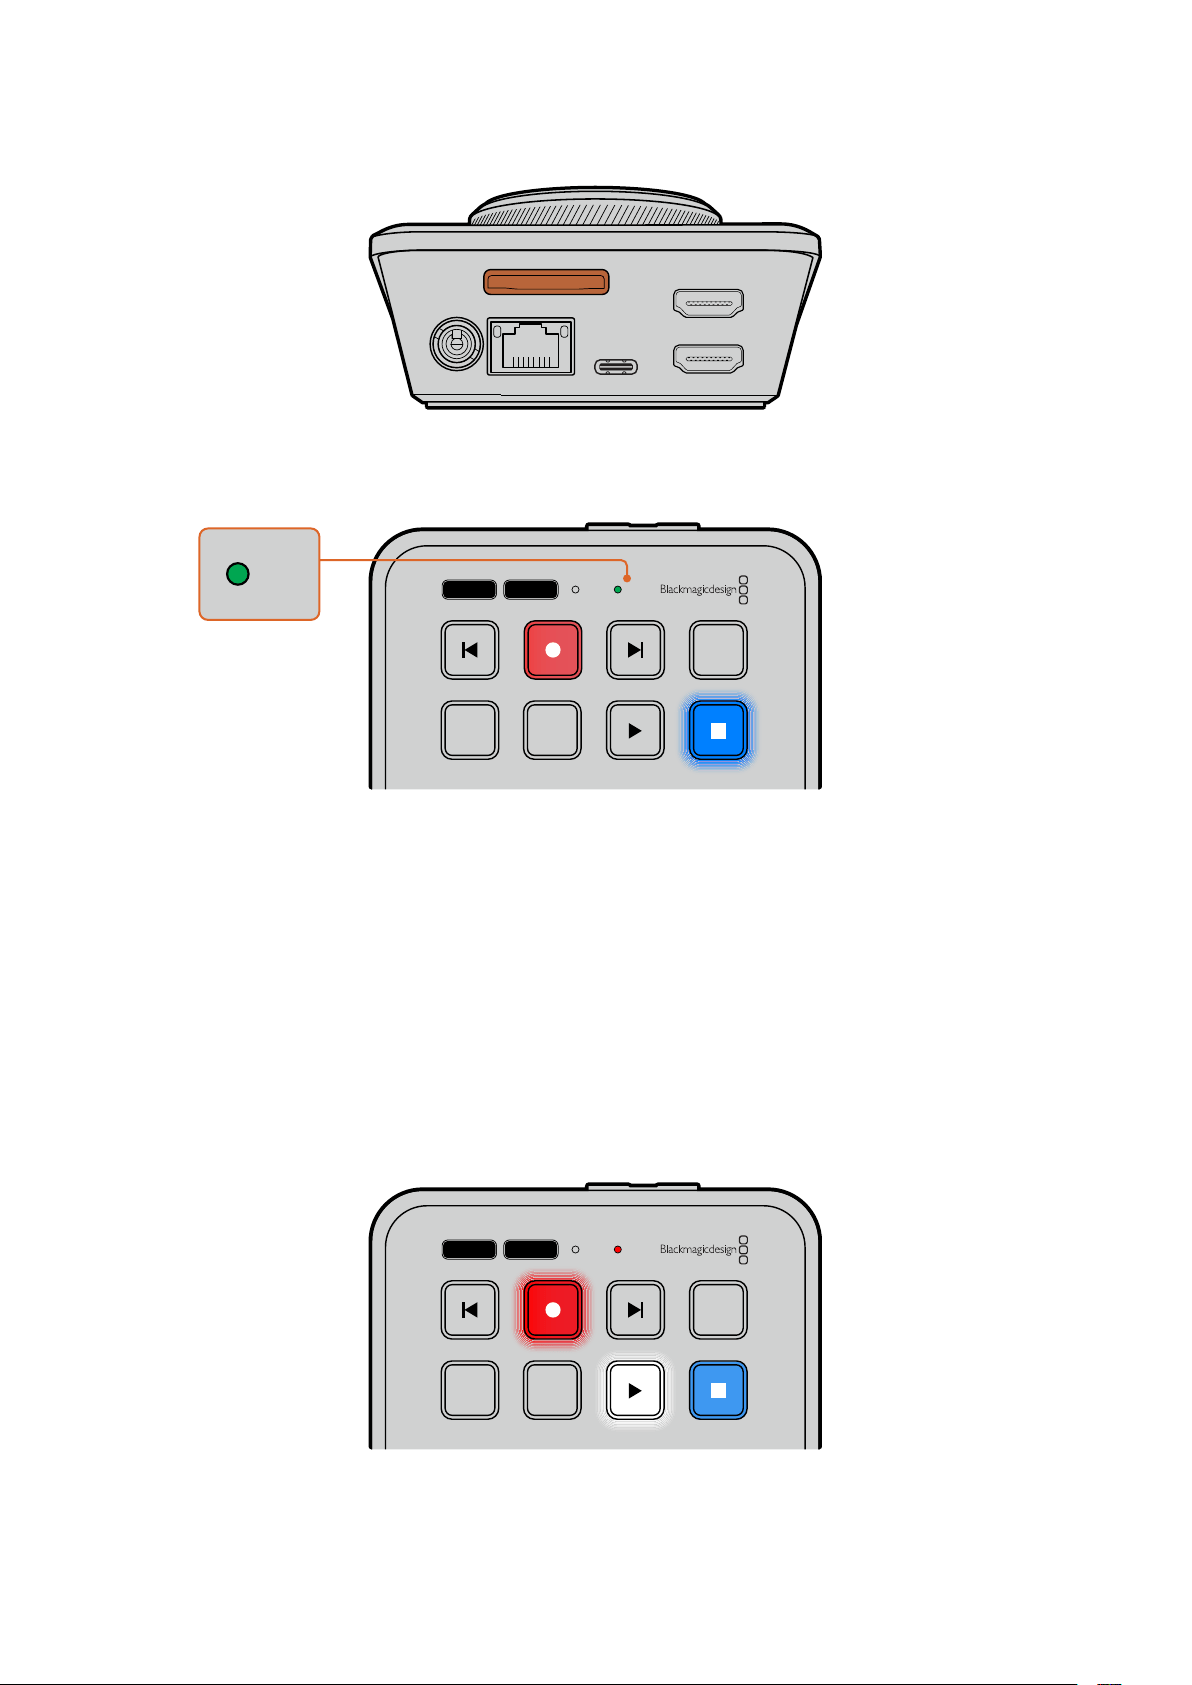
HDMI OUT
HDMI IN
EXT DISK
SD CARD
ETHERNET
+
12V DC
2 Рекордер выполнит проверку SD-карты. Вэто время индикатор SD-слота на верхней
панели устройства будет гореть зеленым цветом. После окончания проверки
он погаснет.
JOG SCR
CLIP
MENU SET
DISK SD
DISK SD
Теперь рекордер HyperDeck ShuttleHD готов кзаписи ивоспроизведению материала.
Подробнее озаписи ивоспроизведении видео, установке настроек иработе срекордером
HyperDeck ShuttleHD см. следующие разделы этого руководства.
Запись видео
Прежде всего убедитесь, что коборудованию, предназначенному для получения HDMI-
сигнала, подключен нужный источник. После этого можно приступать кзаписи контента.
Для ее начала нажмите соответствующую кнопку. При записи материала на SD-карту
индикатор слота будет гореть красным цветом, акнопки записи ивоспроизведения— белым.
Во время сохранения на внешний накопитель индикатор его слота также будет гореть
красным цветом.
JOG SCR
CLIP
MENU SET
DISK SD
Чтобы прекратить запись, нажмите кнопку остановки.
343Запись видео
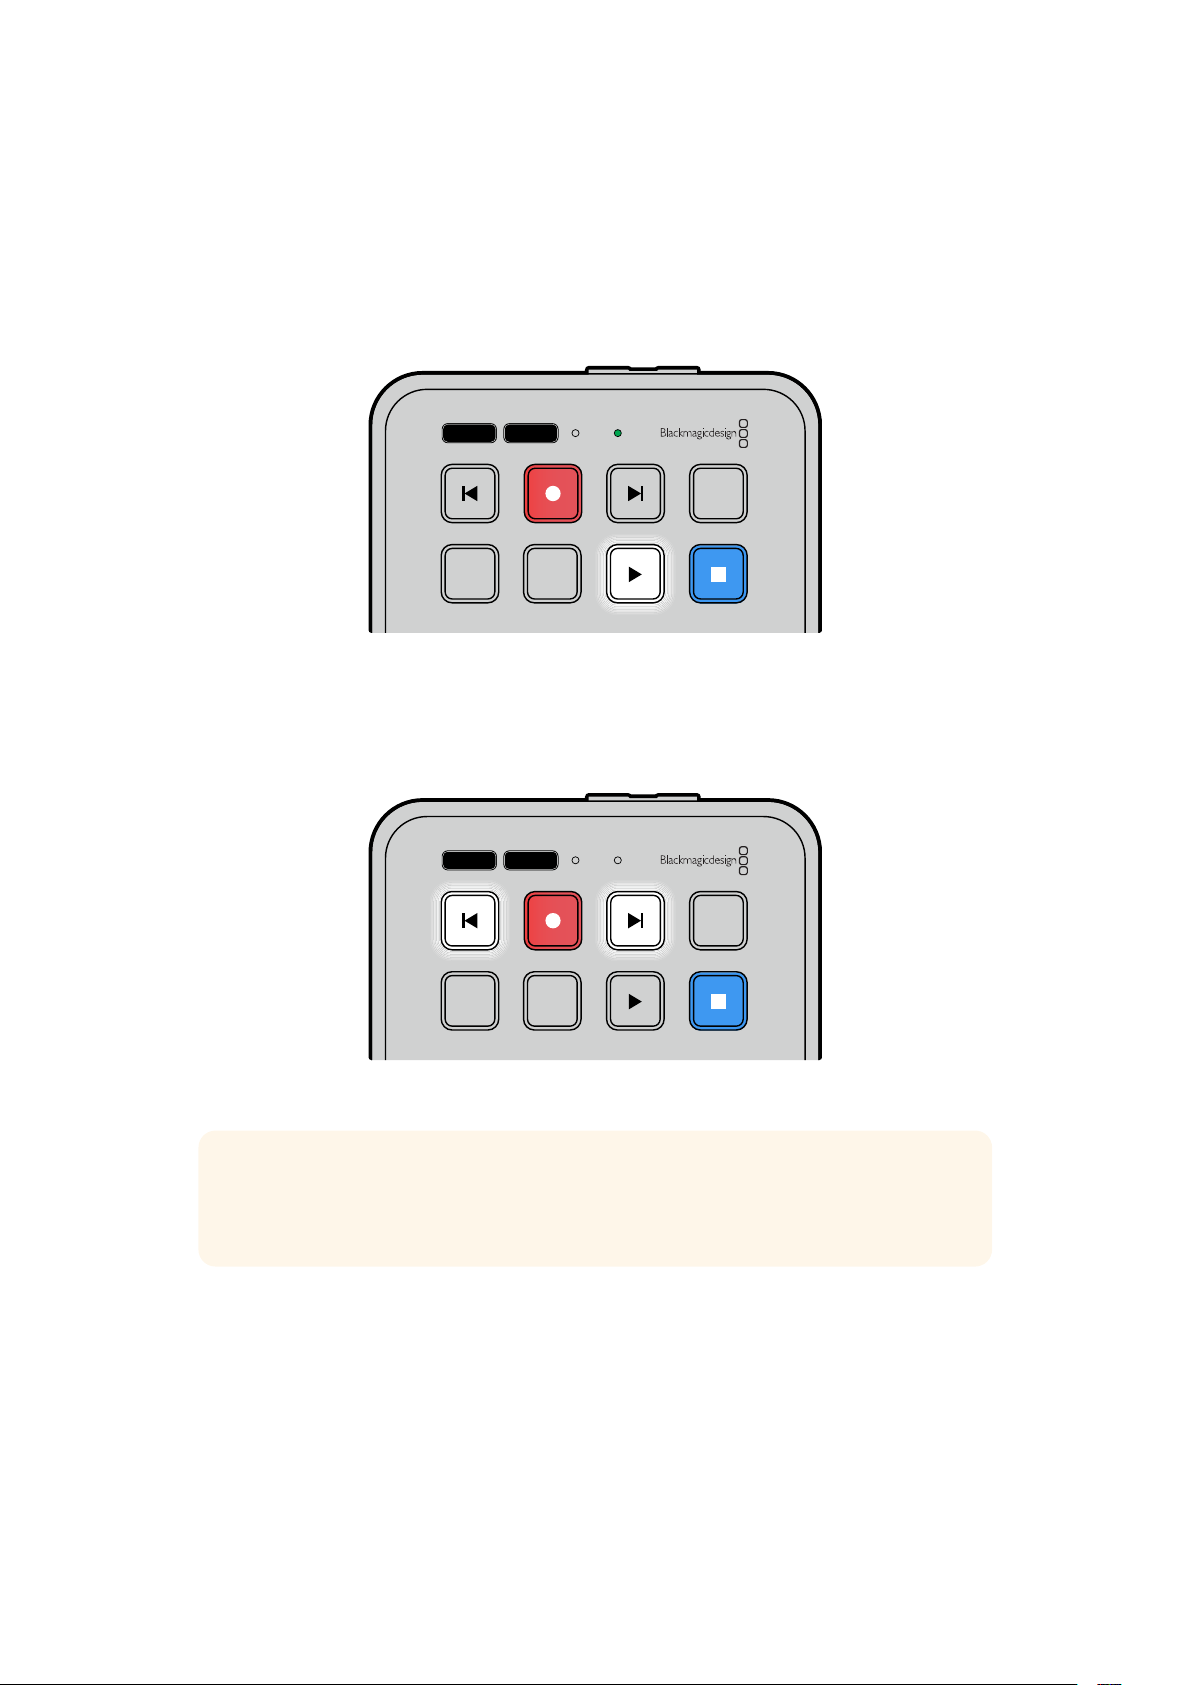
Воспроизведение
Для воспроизведения нажмите соответствующую кнопку. После этого она загорится белым
цветом, аиндикаторы внешнего накопителя или SD-карты— зеленым.
Для перехода между несколькими сохраненными клипами можно использовать кнопки
перемотки вперед или назад.
JOG SCR
CLIP
MENU SET
DISK SD
Использование кнопок перемотки
Нажмите кнопку перемотки назад для перехода кначалу текущего клипа. Нажатие более
одного раза позволит вернуться кранее записанным видео.
Нажмите кнопку перемотки вперед для перехода кследующим клипам.
JOG SCR
CLIP
MENU SET
DISK SD
Для перехода кначалу каждого клипа служат кнопки перемотки вперед иназад
СОВЕТ. Для обеспечения правильного воспроизведения видеофайлов на
рекордере HyperDeck требуется выбрать надлежащий кодек. Это можно сделать
спомощью меню настроек. Подробнее см. раздел «Изменение настроек» ниже.
Циклическое воспроизведение клипов
Для перевода воспроизведения вциклический режим при просмотре контента на рекордере
HyperDeck ShuttleHD следует еще раз нажать кнопку воспроизведения. Чтобы из него выйти,
используйте кнопку остановки.
Для проигрывания текущего видеофайла вциклическом режиме нажмите клавишуCLIP,
азатем кнопку воспроизведения еще два раза.
344Воспроизведение
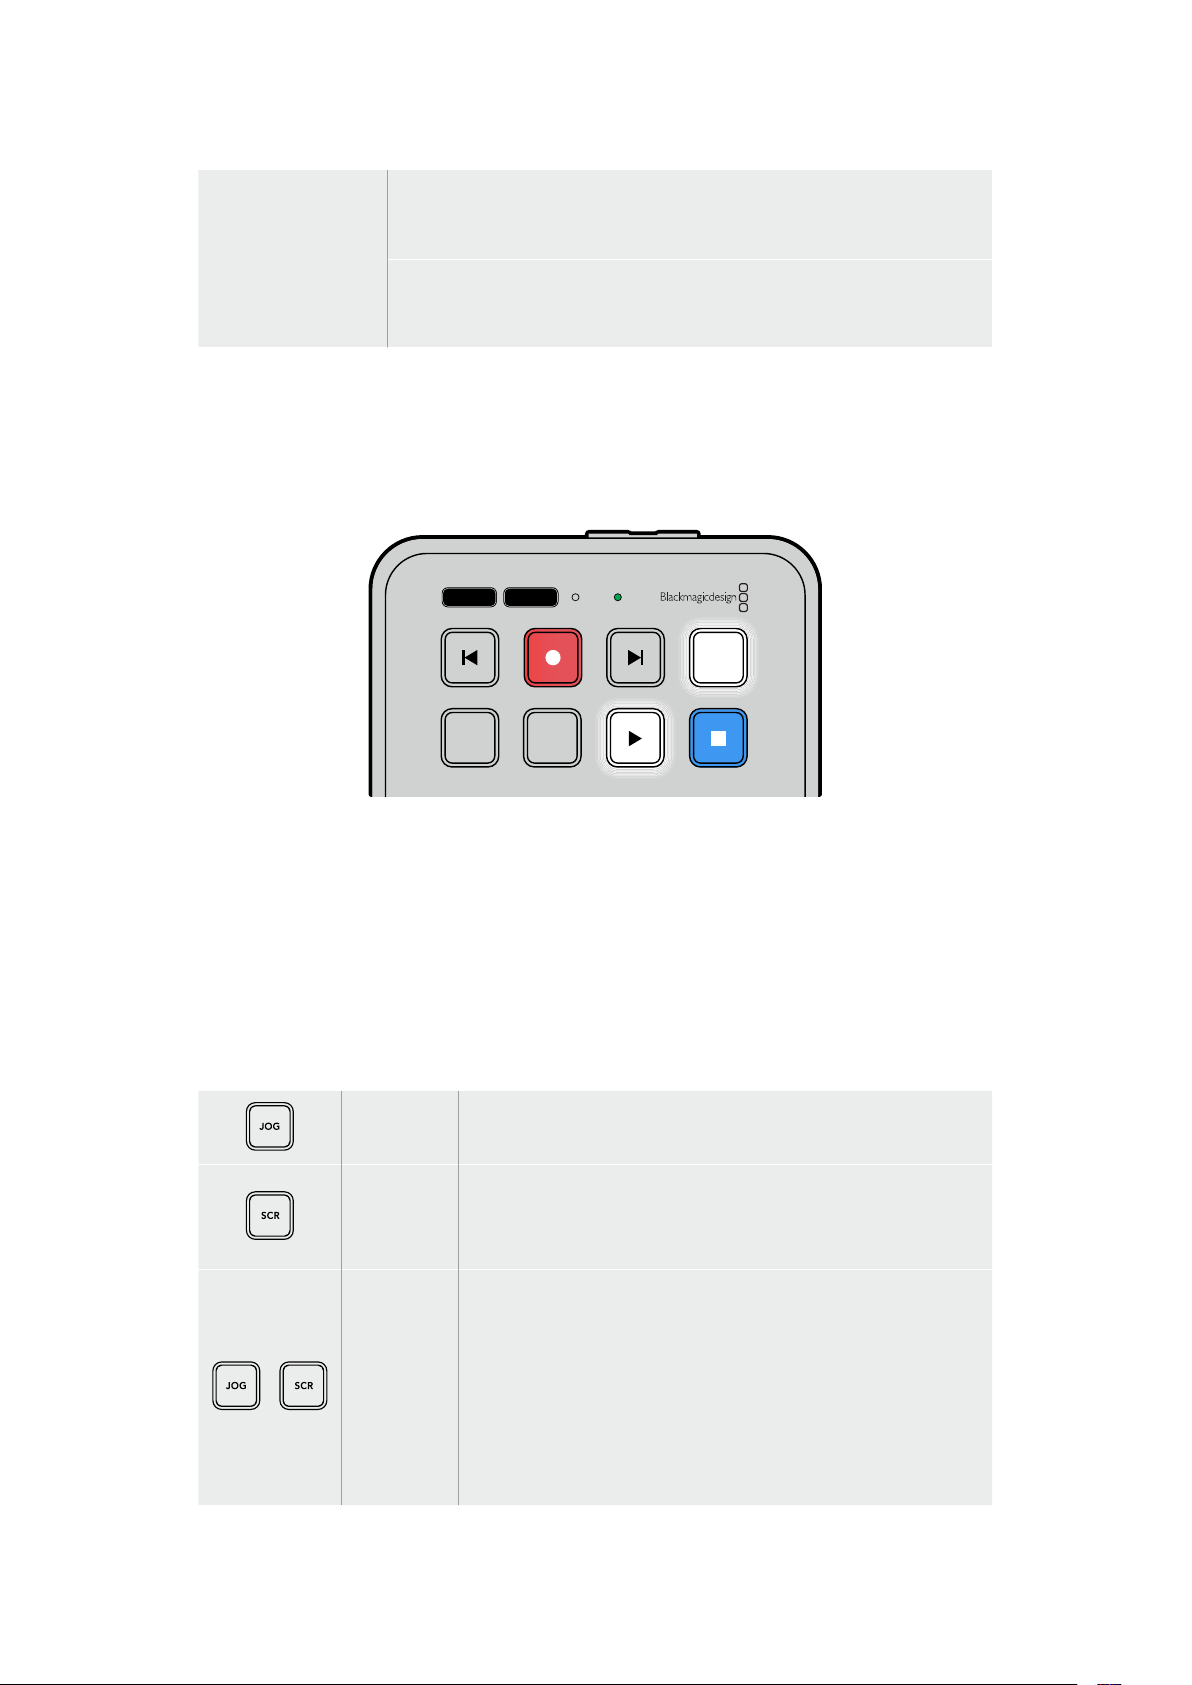
Циклическое
воcпроизведение
всех клипов
Во время воспроизведения контента нажмите соответствующую кнопку
еще раз для воспроизведения всех клипов вциклическом режиме.
Циклическое
воcпроизведение
текущего клипа
ВрежимеCLIP нажмите кнопку воспроизведения еще раз для
циклического воспроизведения текущего клипа.
РежимCLIP
РежимCLIP позволяет настраивать воспроизведение врамках одного клипа. При его
активации можно выполнить переход кнужному файлу спомощью соответствующей кнопки
или режима перемотки, азатем нажать клавишу воспроизведения. Оно автоматически
остановится, когда выбранный клип закончится.
JOG SCR
CLIP
MENU SET
DISK SD
ВрежимеCLIP нажмите кнопку воспроизведения еще раз
для циклического воспроизведения текущего клипа
Круглая ручка поиска
Ручка поиска позволяет быстро переходить от одного клипа к другому, атакже выбирать
отдельные фрагменты ивыполнять покадровый просмотр. Это дает возможность оперативно
находить нужный участок визуально иустанавливать точку начала проигрывания клипа для
вывода его вэфир при потоковом вещании.
На данном устройстве доступны режимы протяжки, перемотки ипрокрутки.
Протяжка Воспроизведение клипа на покадровом уровне.
Прокрутка
Режим прокрутки дает возможность оперативно просматривать
ранее записанный материал. Поворот круглой ручки поиска
смеханизмом фиксации обеспечивает полный контроль ипозволяет
перейти ктому месту, скоторого нужно начать воспроизведение.
Перемотка
Для перехода кэтому режиму нажмите одновременно кнопкиJOG
иSCR. Поворот круглой ручки поиска вправо или влево позволит
выполнить перемотку вперед или назад, атакже увеличить
ее значение до максимального 50-кратного ускорения. Чтобы
уменьшить его вплоть до полного прекращения, верните круглую
ручку висходное положение. Кнопка остановки поможет
остановить перемотку, а клавиша воспроизведения— возобновить
проигрывание с текущей позиции. Значение максимальной
скорости перемотки можно уменьшить спомощью меню настроек.
Подробнее см. раздел «Настройки» ниже.
345Воспроизведение
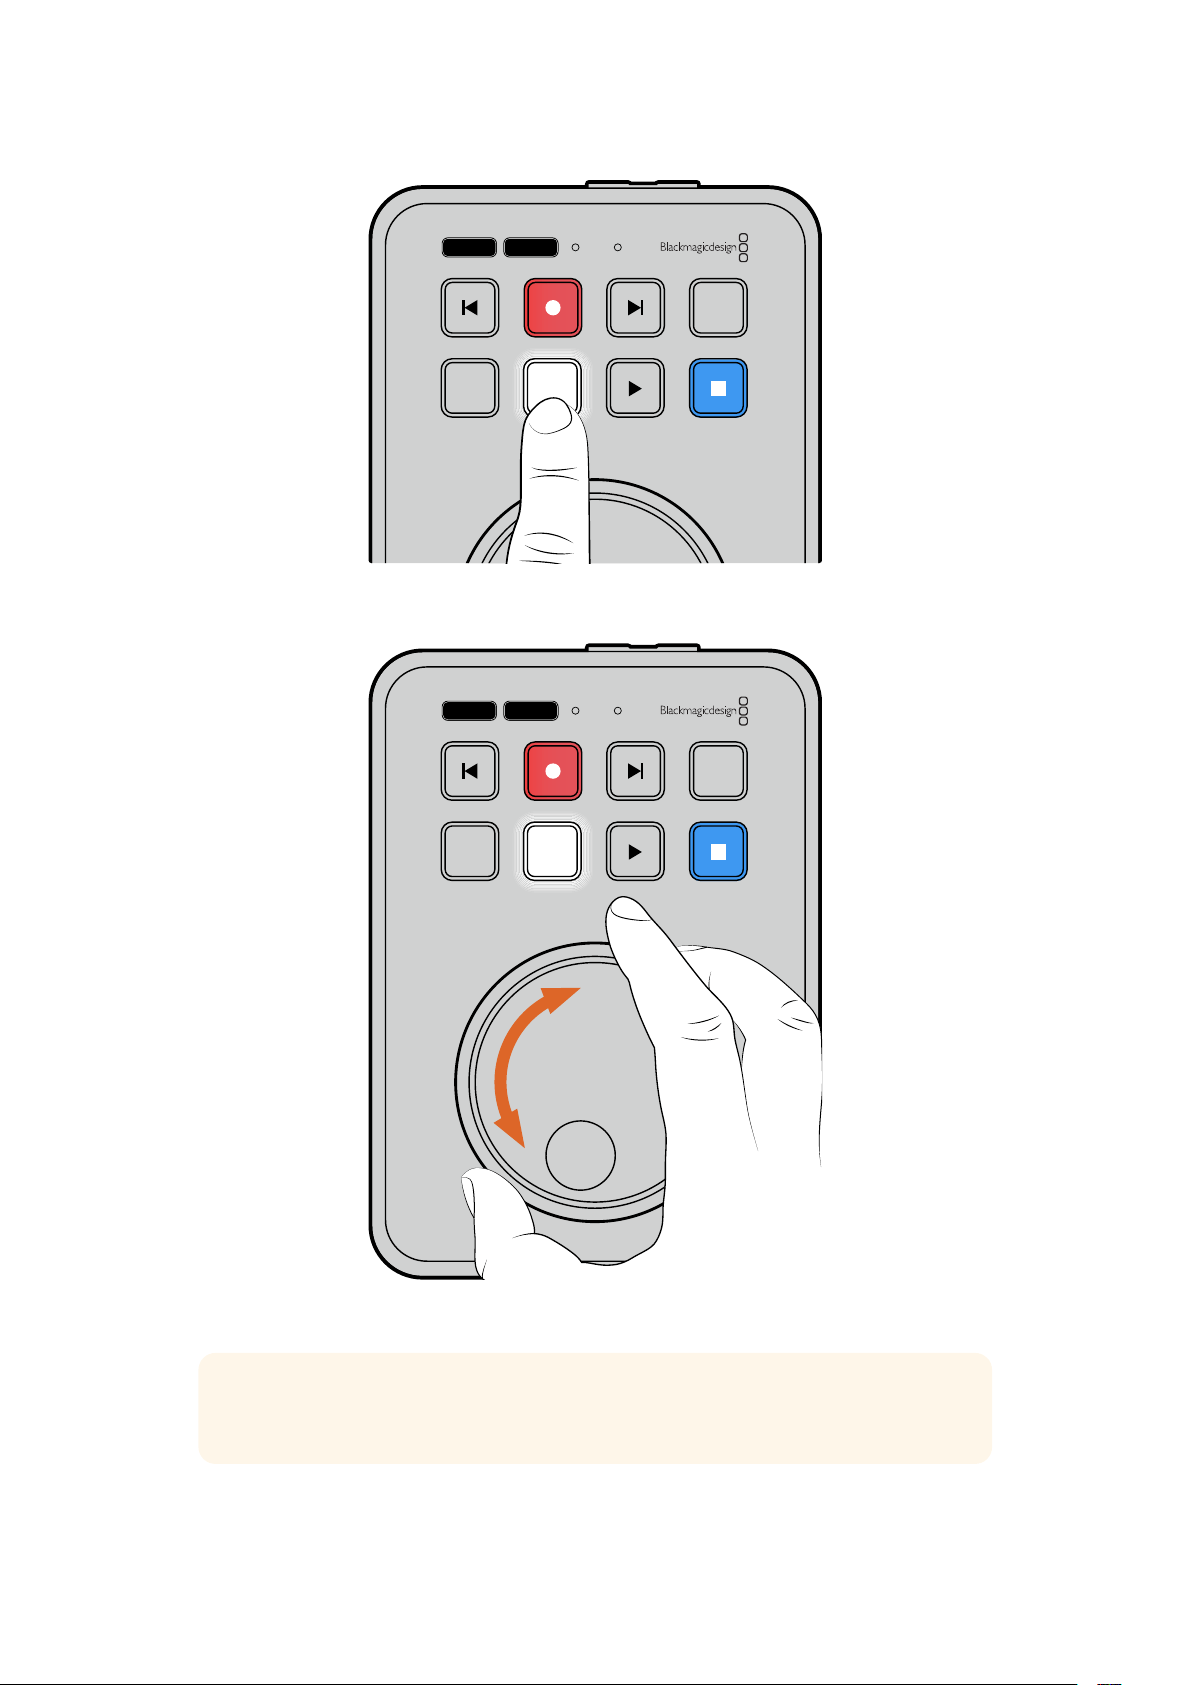
JOG SCR
CLIP
MENU SET
DISK SD
Для выбора режимов протяжки ипрокрутки
используют соответственно кнопкиJOG иSCR
JOG SCR
CLIP
MENU SET
DISK SD
После выбора режима поиска поверните круглую ручку
СОВЕТ. Чтобы вернуться вобычный режим воспроизведения, нажмите кнопку
воспроизведения или остановки.
346Воспроизведение

Изменение настроек
При нажатии кнопкиMENU на рекордере внижнем левом углу подключенного HDMI-
монитора поверх изображения откроется меню настроек.
JOG SCR
CLIP
MENU SET
DISK SD
Для перехода кменю настроек нажмите кнопкуMENU
Для перехода кподменю или отдельной настройке используйте круглую ручку поиска
Для выбора подменю или изменяемой настройки нажмите кнопкуSET
Регулировку настроек выполняют спомощью круглой ручки или кнопок перемотки.
Дляподтверждения выбора нажмитеSET.
Чтобы выйти из меню ивернуться на один шаг назад вплоть до начальной страницы,
используют кнопкуMENU.
СОВЕТ. Меню настройки можно расположить влюбом углу экрана. После изменения
необходимых параметров рекомендуется закрыть меню, чтобы при подключении к
HDMI-микшеру, например ATEM Mini Extreme, на HDMI-выход передавался чистый
сигнал.
JOG SCR
CLIP
MENU SET
DISK SD
347Изменение настроек
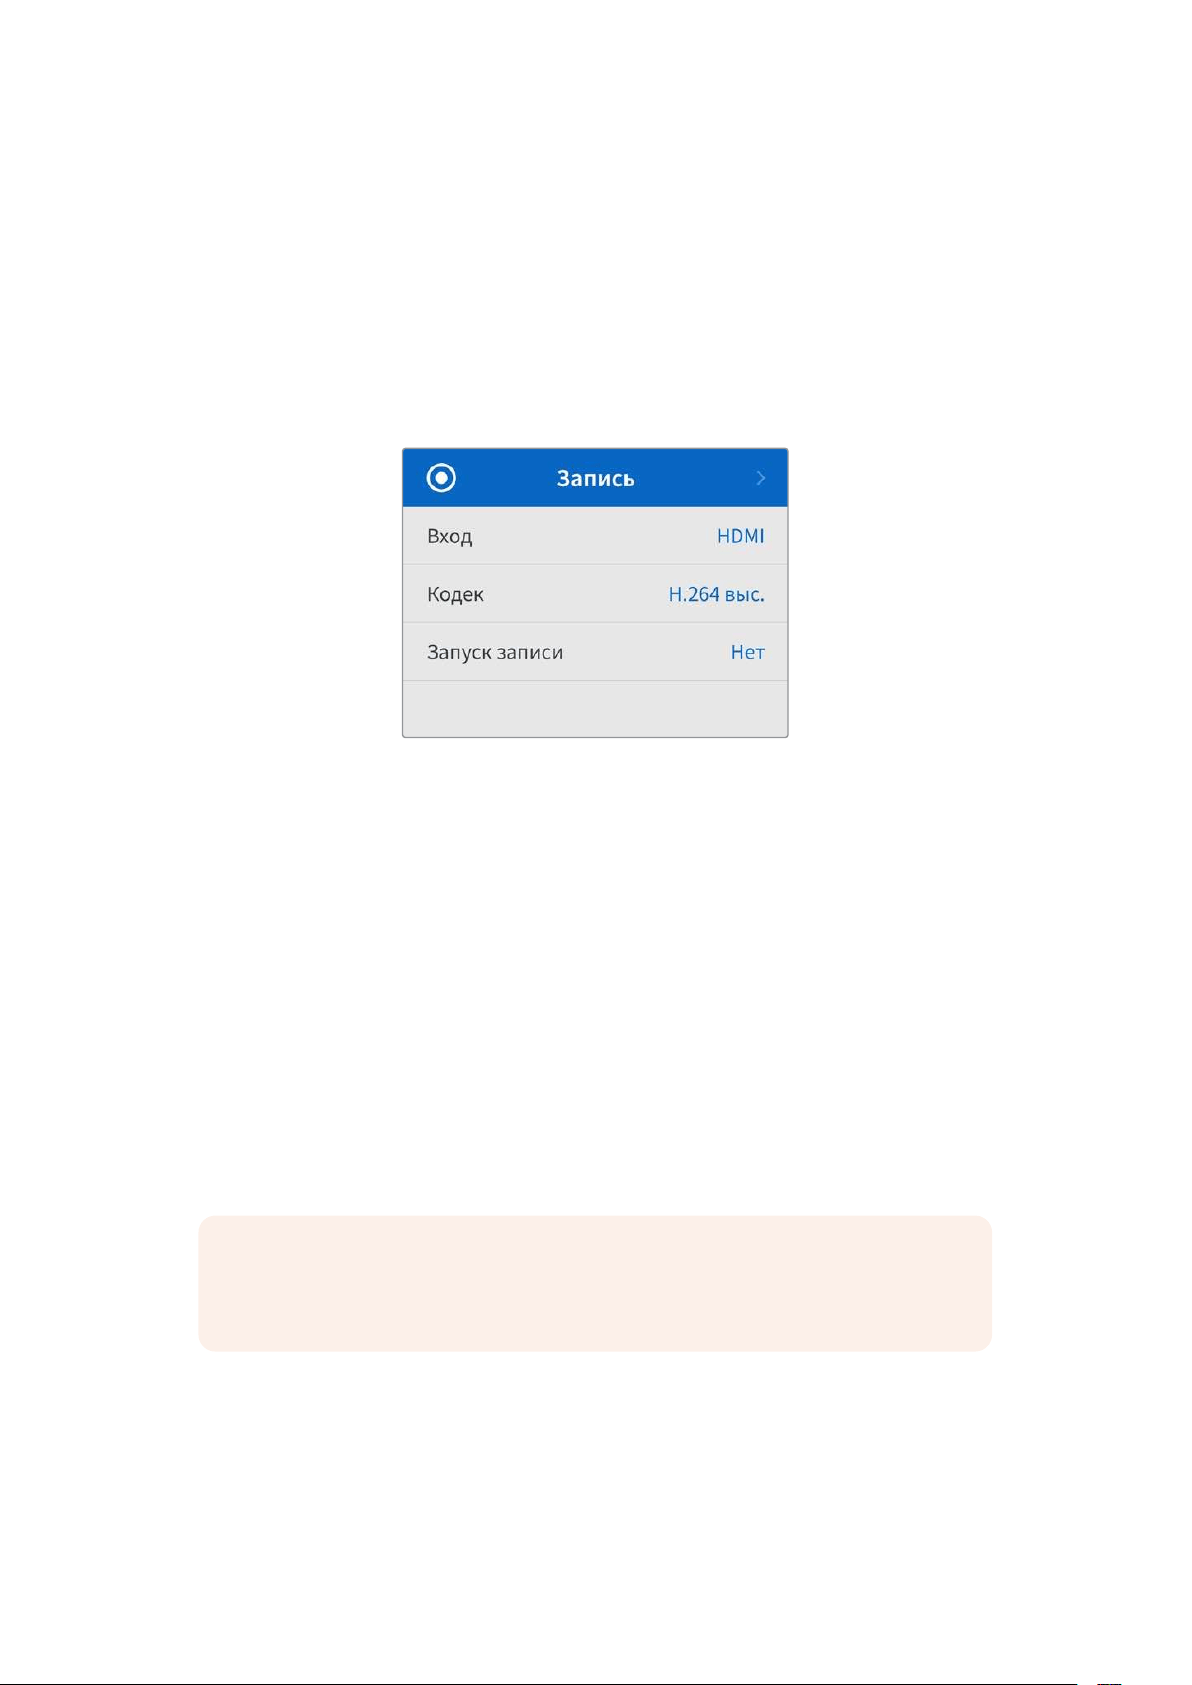
Настройки
Меню настроек состоит из пяти отдельных вкладок: «Запись», «Монитор», «Звук»,
«Сохранение» и«Настройка». На этих страницах изменяют соответствующие параметры,
причем большинство из них можно отрегулировать спанели управления на HyperDeck
ShuttleHD. Некоторые настройки отключены иотображены неактивными, например метка
вимени файла. В данном случае их можно изменить через утилитуBlackmagic
HyperDeck Setup.
Запись
Ввод
Отображает HDMI-вход на HyperDeck ShuttleHD.
Кодек
Модель HyperDeck ShuttleHD позволяет записывать видео скомпрессией вформатахH.264,
AppleProRes иDNxHD. Чтобы воспользоваться функцией телесуфлера, выберите
соответствующую опцию.
Запуск записи
Для этой настройки доступны две опции: «Начало/остановка видео» и«По тайм-коду».
Некоторые камеры (например, Blackmagic Pocket Cinema 4K) используют HDMI-интерфейс для
передачи сигнала озапуске иостановке записи на внешних рекордерах. Привыборе данной
опции сохранение на HyperDeck будет начинаться ипрекращаться при соответствующем
нажатии кнопки записи на камере.
При выборе второй опции запись на рекордере будет начинаться при поступлении на
HDMI-вход действительного тайм-кода. Вотсутствие сигнала сохранение остановится.
Дляотключения данной настройки нужно выбрать«Нет».
ПРИМЕЧАНИЕ. При записи сHDMI-камеры убедитесь втом, что используется
чистый сигнал, так как впротивном случае вместе сизображением будут записаны
выводимые параметры.
348Настройки
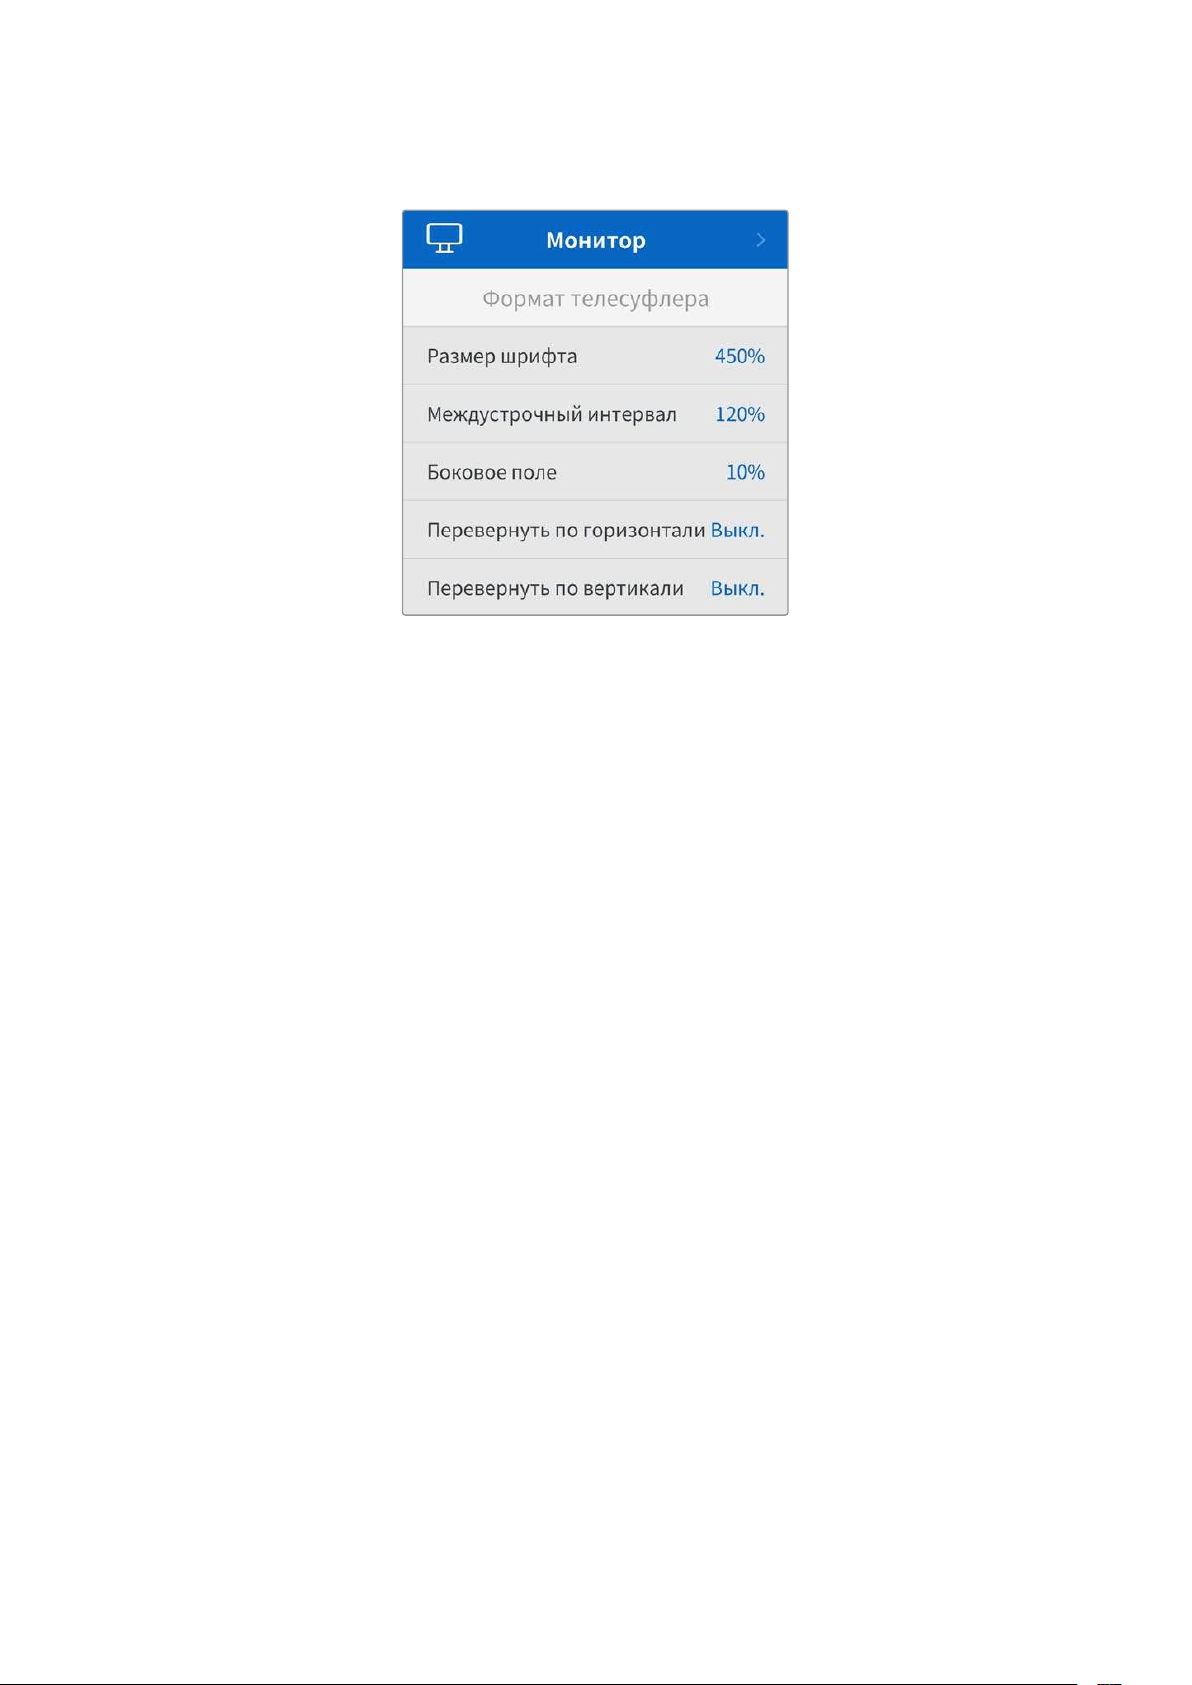
Монитор
Формат телесуфлера
При использовании HyperDeck ShuttleHD в качестве телесуфлера все параметры этой
функции можно установить вменю «Монитор».
Размер шрифта
Размер шрифта можно установить, выбрав необходимое значение инажав кнопкуSET. Чтобы
его увеличить, ручку нужно повернуть по часовой стрелке, а чтобы уменьшить– в обратном
направлении.
Междустрочный интервал
Чтобы увеличить или уменьшить междустрочный интервал, нужно повернуть круглую ручку.
Боковое поле
Эта настройка позволяет регулировать ширину бокового поля по обе стороны дисплея
телесуфлера.
Поворот
Если необходимо зеркально отобразить текст стелесуфлера (например, когда он расположен
перед камерой или на сцене для выступающих), можно использовать настройки поворота.
Предусмотрены два режима.
Поворот по горизонтали: применяется, когда нижняя часть экрана телесуфлера
установлена близко коснованию светоделительного стекла.
Поворот по вертикали: применяется, когда нижняя часть экрана телесуфлера
установлена на расстоянии от основания светоделительного стекла.
349Настройки

Звук
Записанные аудиоканалы
HyperDeck Shuttle HD позволяет одновременно записывать до восьми каналов звука PCM.
Чтобы задать количество каналов записи, откройте список данной настройки и выберите
значение 2, 4 или 8.
Если используется кодекH.264, можно также выбрать два канала AAC-аудио, что позволит
напрямую выгружать записанный материал на платформуYouTube.
Сохранение
Внастройках сохранения указываются подключенные накопители. Поля «Слот1» и«Слот2»
показывают имя подключенной SD-карты и любого флеш-накопителяUSB, подсоединенного
через разъемEXTDISK, соответственно. При использовании USB-разветвителя, например
станцииBlackmagic MultiDock10G, отображается активный носитель.
Переход на USB
Если для подключения нескольких накопителей черезUSB-разъемEXTDISK используется
станция Blackmagic MultiDock10G или другое аналогичное устройство, то при заполнении
одного из носителей активация опции «Переход на USB» обеспечит автоматическое
сохранение данных на другом.
Форматирование
SD-карты инакопители, подключенные кразъемуEXTDISK на задней панели устройства,
можно отформатировать непосредственно на рекордере или компьютере соперационной
системойMac илиWindows.
Подготовка накопителя на HyperDeck ShuttleHD
1 Перейдите к настройке «Форматирование» поворотом круглой ручки ивыберите ее
спомощью кнопкиSET.
2 Из списка выберите накопитель для форматирования инажмитеSET.
350Настройки
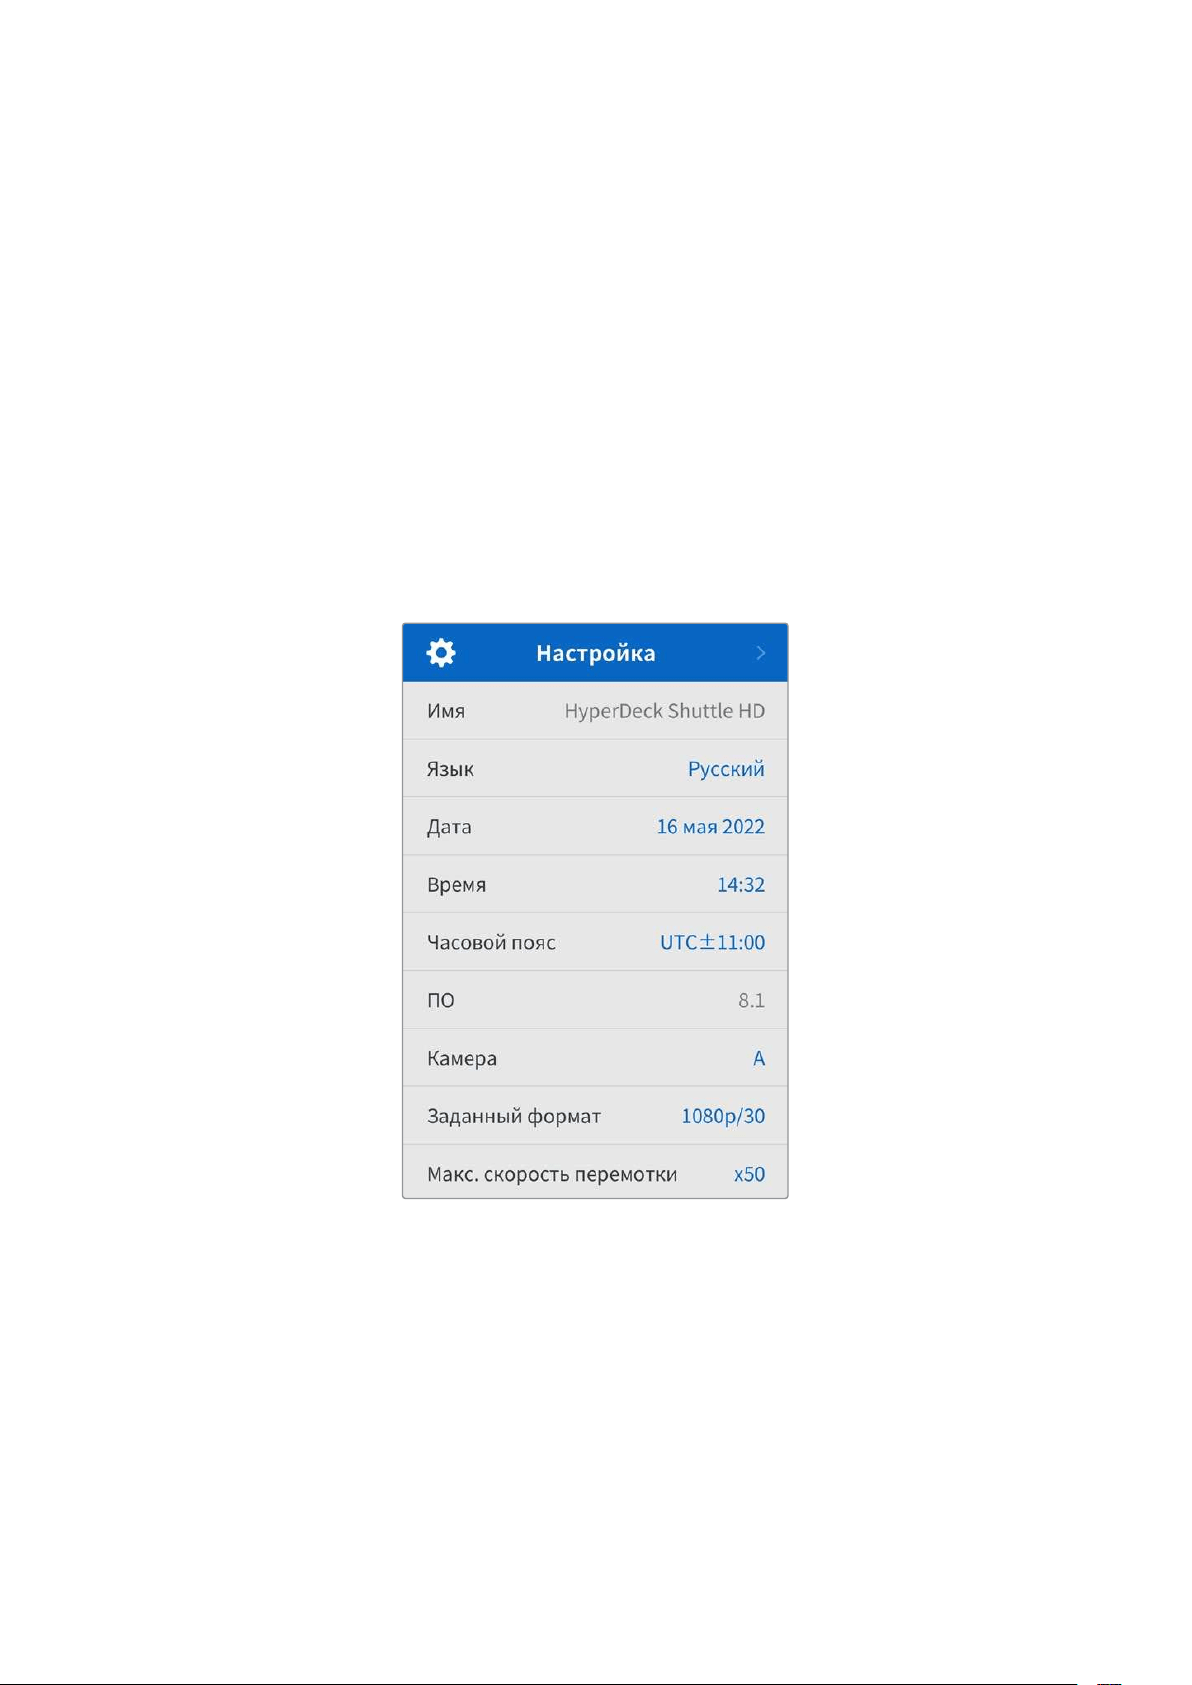
3 Укажите желаемый формат инажмитеSET.
4 Появится подтверждение, содержащее имя карты изаданный формат. Выберите
«Форматировать».
5 После завершения процедуры появится окно форматирования. Выберите«ОК».
ФорматHFS+ также известен как Mac OSX Extended иявляется предпочтительным, поскольку
он поддерживает протоколирование. Вэтом случае при повреждении носителя содержащиеся
на нем данные будет проще восстановить. ФорматHFS+ совместим соперационной системой
Mac, аexFAT можно использовать на платформах Mac иWindows без дополнительного
программного обеспечения, однако он не предусматривает протоколирования.
Инструкции по форматированию накопителей вОС Mac иWindows приведены вразделе
«Форматирование накопителей».
Настройка
Вкладка «Настройка» содержит такие параметры, как язык, заданный стандарт, атакже опции
отображения меню, сетевых параметров иработы стайм-кодом.
Имя рекордера
Когда ксети подключено несколько рекордеров HyperDeck ShuttleHD, им следует присвоить
отдельные имена, чтобы их было легко различать. Для этого можно использовать
утилитуBlackmagic HyperDeck Setup или протоколBlackmagic HyperDeck Ethernet. Имя
появится в меню «Настройка».
Язык
HyperDeck ShuttleHD имеет пользовательский интерфейс на 13основных языках, включая
английский, китайский, японский, корейский, испанский, немецкий, французский, русский,
итальянский, португальский, турецкий, украинский ипольский.
Выбор языка
1 Выберите меню «Настройка» инажмитеSET.
2 Перейдите копции «Язык» поворотом круглой ручки инажмитеSET.
351Настройки
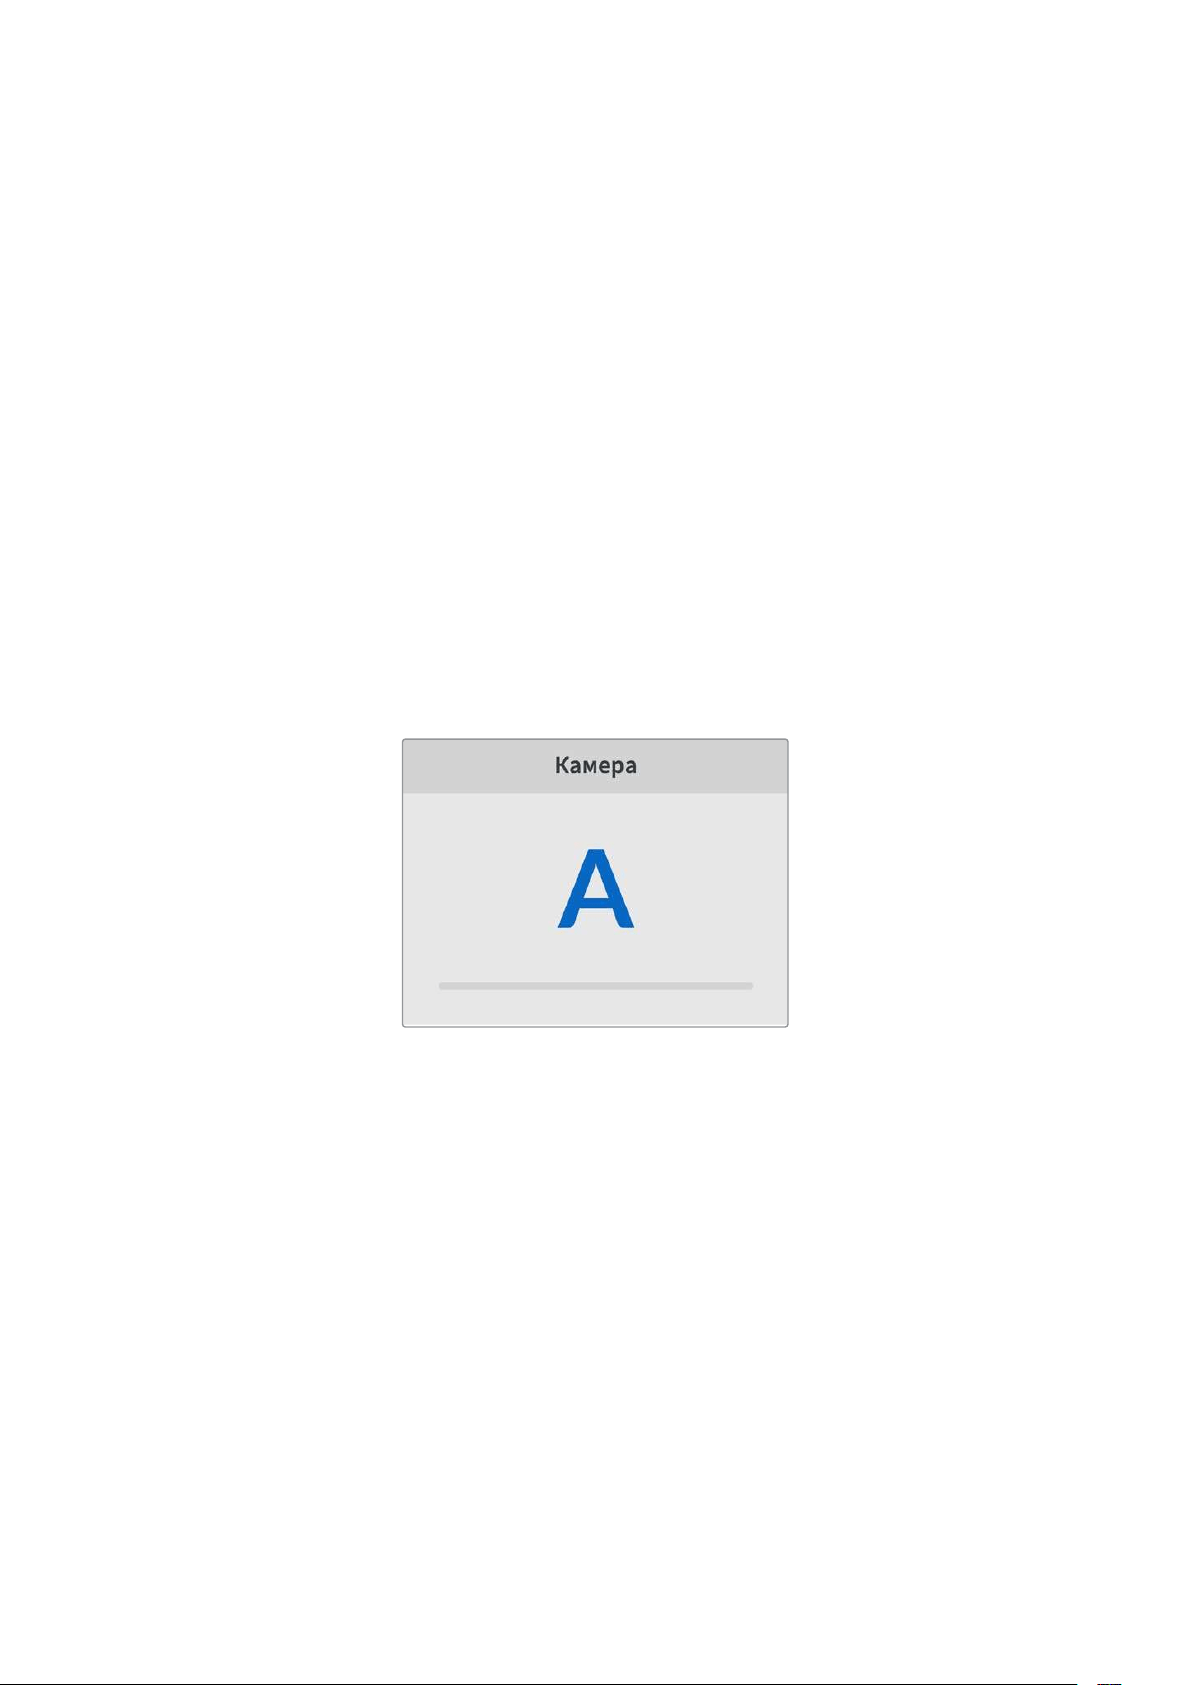
3 Выберите нужный язык спомощью круглой ручки инажмитеSET. После этого на
экране снова появится основное меню настроек.
Дата
Чтобы изменить дату, выберите соответствующий параметр инажмитеSET. Спомощью
круглой ручки установите день, месяц игод. Эти данные будут добавлены кимени файла
ввиде временных меток.
Время
Чтобы изменить время, выберите соответствующий параметр инажмитеSET. Спомощью
круглой ручки установите часы иминуты. На моделях HyperDeck ShuttleHD используется
24-часовой формат.
Программное обеспечение
Отображает текущую версию программного обеспечения.
Камера
Данную настройку используют при записи многоракурсного контента ввиде отдельных
файлов, которые затем редактируют на специальной временной шкале вприложении
DaVinciResolve.
Вметаданных файлов каждая из камер будет иметь свое обозначение, что позволит легко
определить все доступные ракурсы спомощью синхроящика.
Для наименования камер можно использовать обозначения A-Z или 1-9
Заданный формат
Иногда HyperDeck ShuttleHD не всостоянии определить, какой видеоформат следует
использовать. Данная настройка поможет рекордеру выбрать формат, применяемый
чаще всего.
Вкачестве примера возьмем ситуацию, когда при включении HyperDeck ShuttleHD
отсутствует источник видео, ана вставленном диске записаны файлы двух форматов. Какой
из них следует рекордеру воспроизвести? Вданном случае устройство будет использовать
формат, заданный по умолчанию.
Эта функция также применяется, когда при первом включении HyperDeck ShuttleHD кнему
не подсоединен источник видео ине вставлен диск. Вданном случае для вывода сигнала
мониторинга рекордер использует формат, заданный по умолчанию.
Тем не менее такой вариант является всего лишь рекомендуемым, ане обязательным. Если
на диске содержатся файлы только одного типа, при воспроизведении HyperDeck
переключится на их формат. Рекордер не будет использовать заданный формат, так как
вданном случае выбор очевиден.
352Настройки

То же происходит иво время сохранения контента. Используемый при записи на HyperDeck
формат соответствует формату поступающего на него видеосигнала. Он будет применяться
рекордером при воспроизведении этого материала, даже если на диске есть другие файлы,
которые имеют формат, заданный по умолчанию. Предполагается, что при записи
ивоспроизведении форматы должны быть одинаковыми. Если диск извлечь, азатем снова
вставить, только тогда для проигрывания устройство переключится на формат по умолчанию.
Заданный по умолчанию формат является всего лишь рекомендуемым, ане обязательным,
ипредназначен только для тех случаев, когда автоматический выбор затруднен.
Максимальная скорость перемотки
Максимальное значение перемотки на HyperDeck ShuttleHD соответствует 50-кратному
ускорению. При необходимости можно выбрать другие доступные варианты.
Меню
Спомощью вкладки «Меню» можно задать положение ивид меню настроек на подключенном
через HDMI-интерфейс экране.
Вид
Здесь можно выбрать темный или светлый вариант отображения менюHyperDeck. При
светлом варианте повышается контрастность, если изображение является темным или при
использовании функции телесуфлера.
Непрозрачность
Степень непрозрачности выводимого на подключенный экран меню можно отрегулировать
сзаданных по умолчанию100% до20%.
Положение
По умолчанию выводимое меню всплывает внижнем левом углу экрана. Чтобы перенести
его вдругое место, нужно выбрать поле «Положение» инажать кнопкуSET. Теперь меню
можно разместить влюбом углу экрана – верхнем левом, верхнем правом, нижнем левом
или нижнем правом.
353Настройки
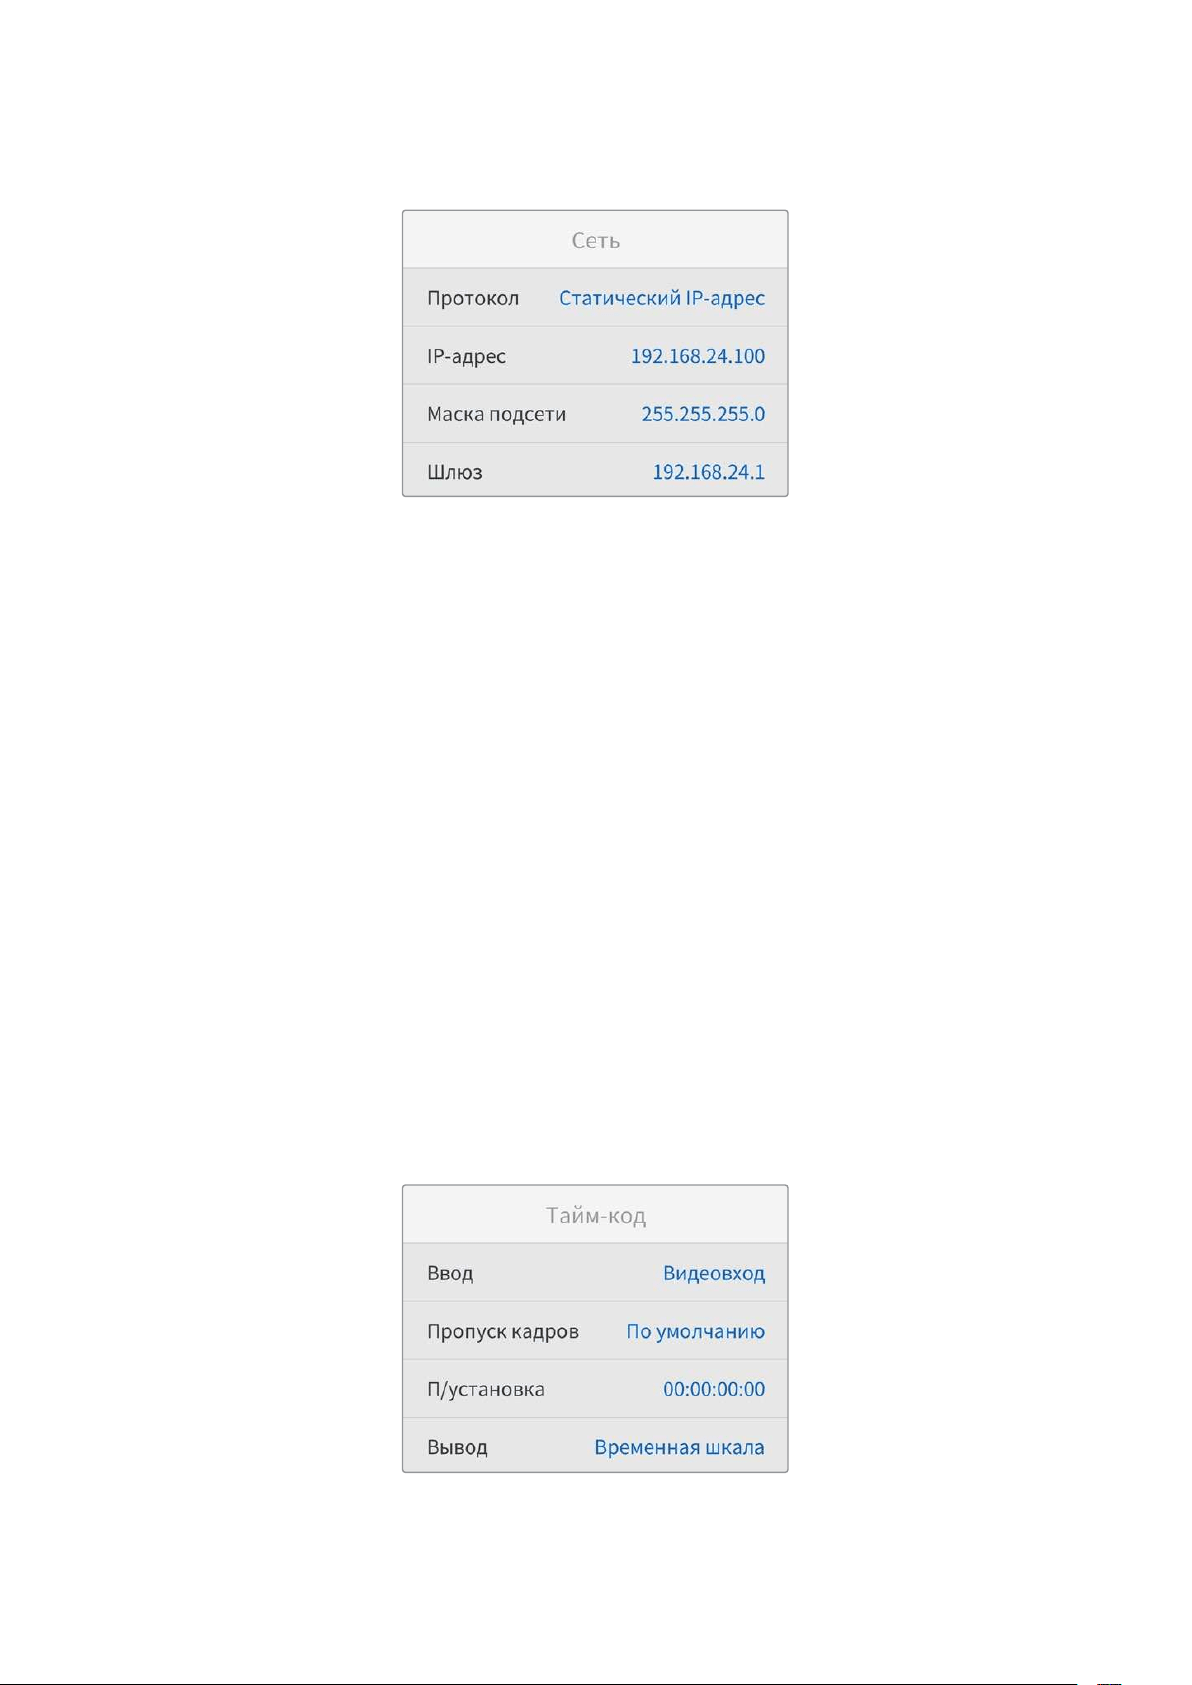
Сетевые параметры
Протокол
Впоставляемых рекордерах Blackmagic HyperDeck по умолчанию используется протокол
DHCP. При подключении устройства ксети сервер автоматически присвоит ему IP-адрес,
поэтому выполнять дополнительную настройку не требуется. Чтобы внести адрес вручную,
следует выбрать «Статический IP-адрес».
Выделите настройку «Протокол» инажмите кнопкуSET. Перейдите кпараметру «Статический
IP-адрес» иеще раз нажмитеSET.
IP-адрес, маска подсети, шлюз, первичныйDNS ивторичныйDNS
Когда выбран «Статический IP-адрес», сетевые настройки можно задавать вручную.
Порядок изменения IP-адреса
1 Выделите настройку «IP-адрес» спомощью круглой ручки инажмите кнопкуSET на
контрольной панели рекордераHyperDeck.
2 Внесите изменения вIP-адрес поворотом круглой ручки. Для подтверждения одного
сегмента иперехода кследующему нажмите кнопкуSET.
3 Чтобы подтвердить изменение иперейти кследующему значению, нажмитеSET.
После вводаIP-адреса выполните те же операции для настройки маски подсети ишлюза.
Когда установка параметров завершена, нажмите кнопкуMENU, чтобы вернуться
кначальной странице.
Настройки тайм-кода
Это меню позволяет задать параметры ввода ивывода тайм-кода, втом числе запись стайм-
кодом источника, временем суток или установленным вручную значением.
354Настройки
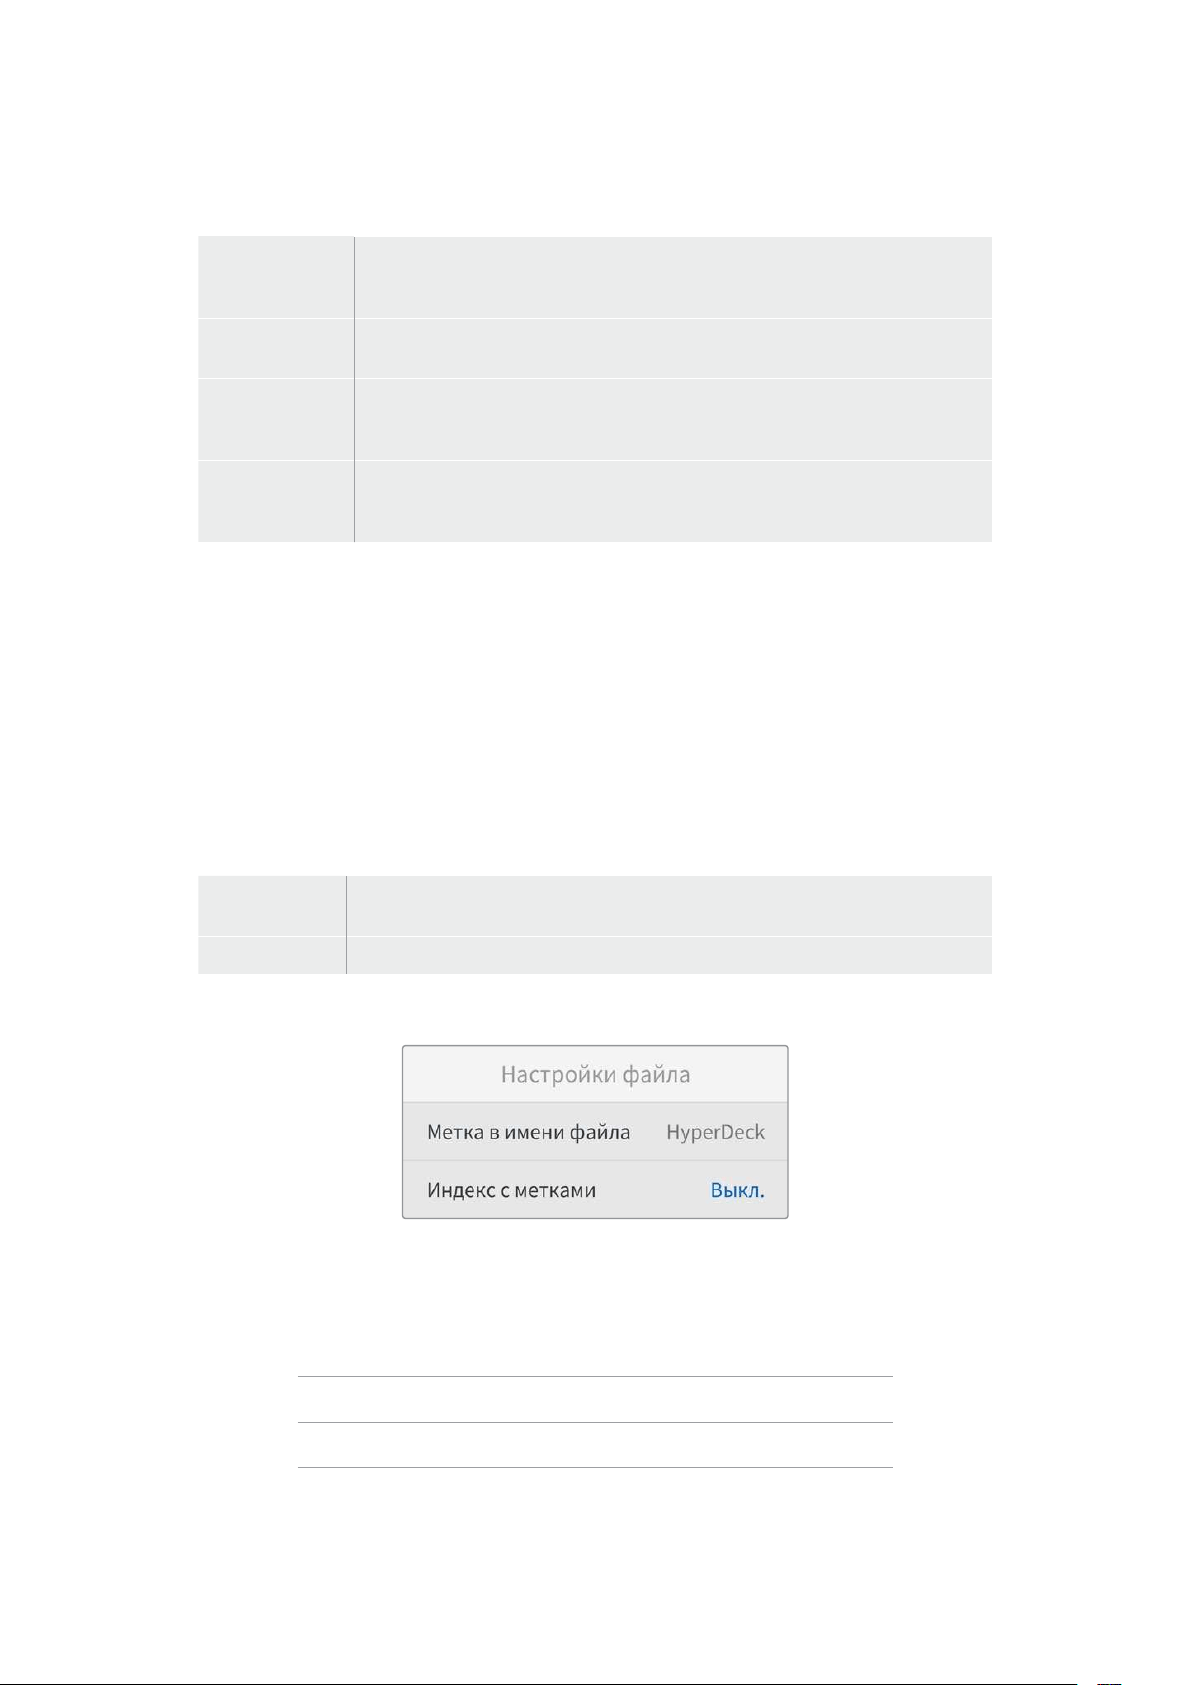
Ввод
При записи доступны четыре опции использования тайм-кода.
Видеовход
Эта опция позволяет использовать встроенный тайм-код изHDMI-источников
сметаданнымиSMPTE RP188. Она обеспечивает синхронизациюHDMI-сигнала
сфайлом, сохраняемым наHyperDeck StudioHD.
Внутренний
Эту опцию используют для записи времени суток, получаемого от встроенного
генератора тайм-кода.
Возобновление
При выборе этой опции тайм-код каждого последующего файла будет
продолжаться стого значения, на котором закончился предыдущий клип. Например,
если первый клип остановился на10:28:30:10, то второй начнется с10:28:30:11.
Предустановка
Для ввода тайм-кода вручную выберите опцию «П/установка». Запись контента
начнется по тайм-коду, который задан спомощью настройки «П/установка»
(см.соответствующий раздел ниже).
Пропуск кадров
При работе свидео вNTSC на частоте29,97 или 59,94fps можно использовать опцию
«Спропуском кадров» или «Без пропуска кадров». Если параметры источника неизвестны,
выберите «По умолчанию». Вэтом случае сохраняется формат входящего сигнала, апри
отсутствии действительного тайм-кода выполняется пропуск кадров.
Предустановка
Чтобы ввести тайм-код вручную, нажмите кнопкуSET, установите значение спомощью круглой
ручки иснова нажмитеSET. Убедитесь, что вменю «Ввод» выбрана опция «П/установка».
Вывод
Эта настройка задает вывод тайм-кода.
Временная
шкала
Данная настройка позволяет выводить непрерывный тайм-код для всех клипов,
записываемых на карту или диск.
Клип При выборе этой опции выводится тайм-код каждого отдельного клипа.
Настройки файла
Метка вимени файла
После первоначальной настройки рекордераHyperDeck ShuttleHD при записи клипов на
SD-карту или флеш-дискUSB файлам присваиваются имена по приведенному ниже образцу.
HyperDeck_0001
HyperDeck_0001 Метка
HyperDeck_0001 Номер клипа
Метку можно изменить программным способом. Подробнее см.раздел «Утилита Blackmagic
HyperDeck Setup».
355Настройки
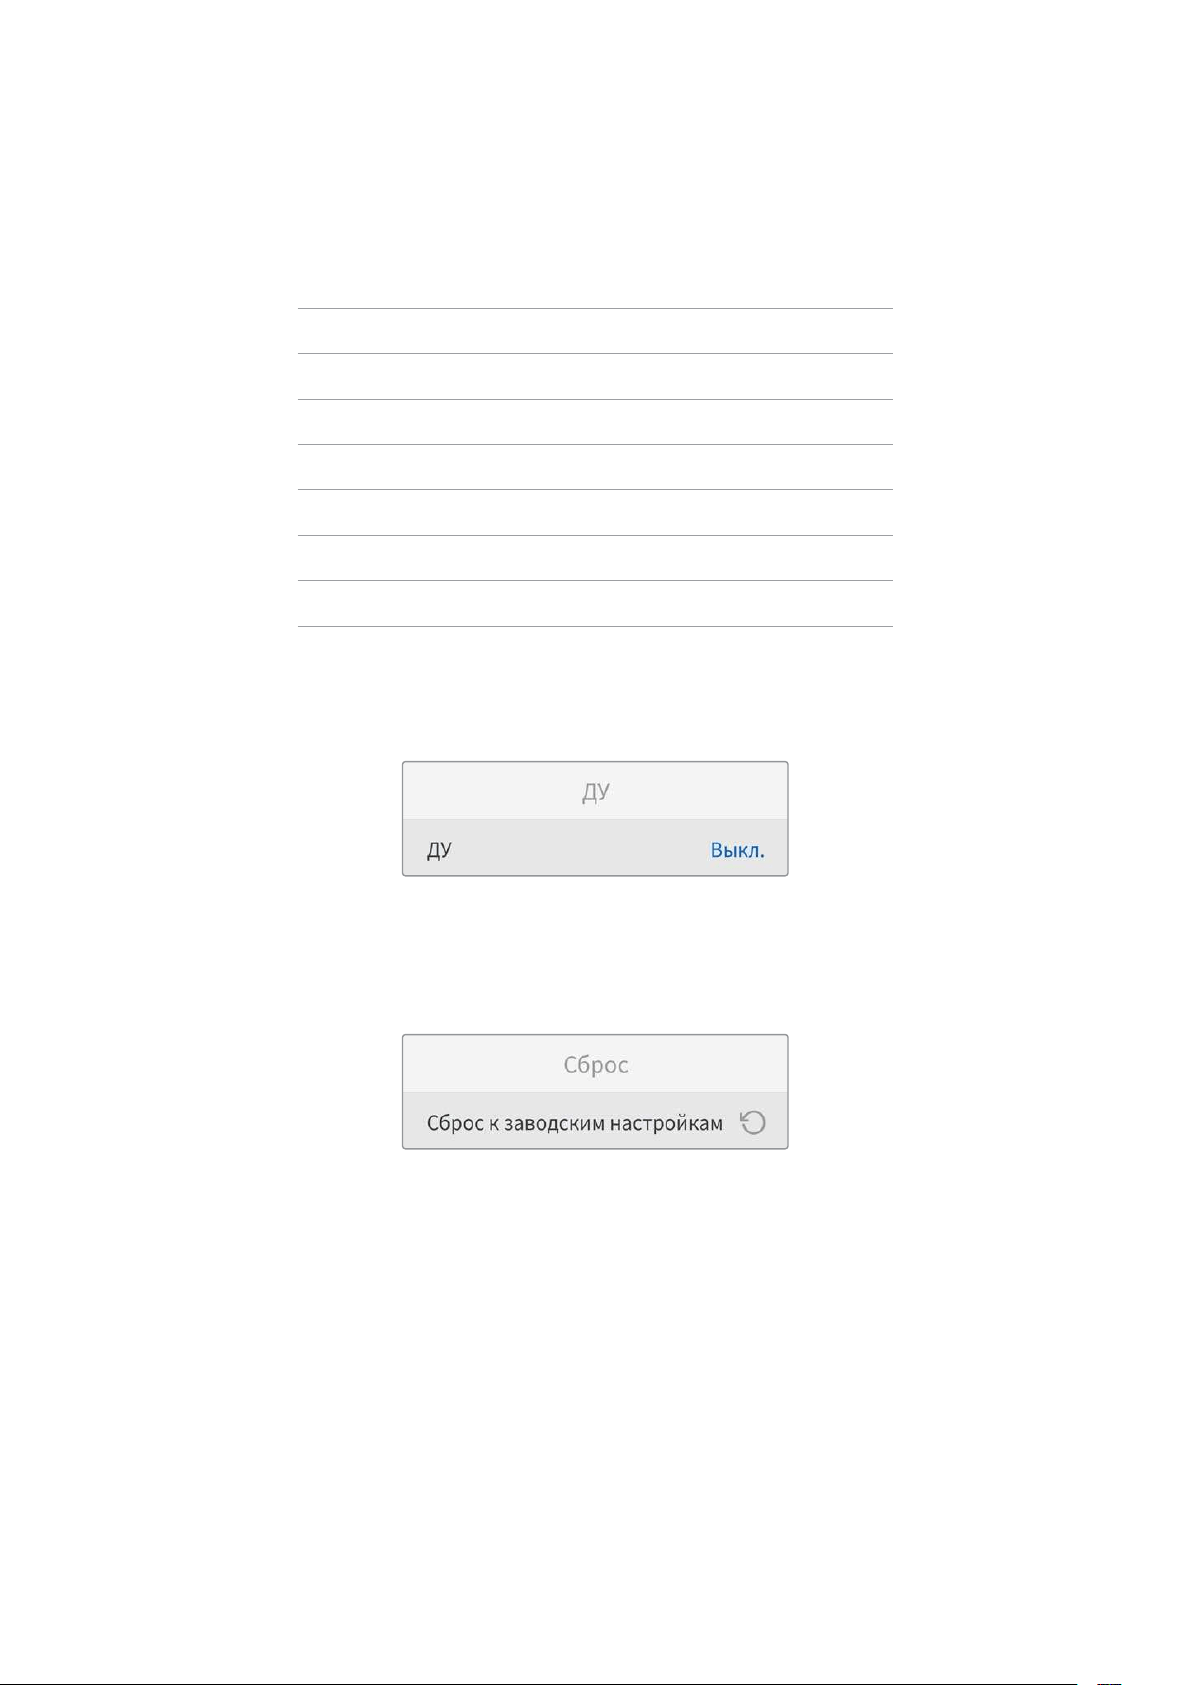
Индекс сметками
По умолчанию индекс сметками времени не добавляется к имени файла. Чтобы активировать
эту функцию, ее нужно включить.
HyperDeck_2201061438_0001
HyperDeck_2201061438_0001 Метка вимени файла
HyperDeck_2201061438_0001 Год
HyperDeck_2201061438_0001 Месяц
HyperDeck_2201061438_0001 День
HyperDeck_2201061438_0001 Часы
HyperDeck_2201061438_0001 Минуты
HyperDeck_2201061438_0001 Номер клипа
Настройки ДУ
Дистанционное управление позволяет контролировать рекордерHyperDeck сдругого
оборудования (например, свидеомикшераATEM Mini Extreme).
ДУ
Для активации удаленного контроля через Ethernet нужно включить функцию«ДУ». Чтобы
перейти к обычному способу управления, ее следует отключить.
Настройки сброса
Сброс кзаводским настройкам
Чтобы восстановить первоначальные параметры, выберите «Сброс кзаводским настройкам».
После нажатия кнопкиSET появится сообщение спросьбой подтвердить действие.
356Настройки

Задняя панель
HDMI OUT
HDMI IN
EXT DISK
SD CARD
ETHERNET
+
12V DC
1
2
3 4 5
1 Питание
Для энергоснабжения рекордераHyperDeck ShuttleHD служит блок питания
переменного тока. Входящий вкомплект поставки силовой кабель имеет
фиксирующий разъем, который позволяет предотвратить случайное отсоединение.
Также можно также использовать любой другой электрический кабель (мощность
36Вт, напряжение 12В).
2 SD CARD
Этот слот позволяет использоватьSD-карты для записи ивоспроизведения.
3 ETHERNET
Порт ETHERNET позволяет подключаться клокальной сети для быстрой передачи
данных поFTP иуправлять рекордером вдистанционном режиме спомощью
протокола HyperDeckEthernet. Подробнее см.раздел «Передача файлов по
сети» ниже.
Рекордером HyperDeck также можно управлять спомощью микшераATEM или
пультаATEM, если они подключены кединой сети.
4 EXT DISK
Через разъемUSB-C спропускной способностью до5Гбит/с можно вести запись на
внешний носитель. Также допускается подключение кконцентраторамUSB-C
икстанцииMultiDock10G для сохранения материала на один или несколько
твердотельных накопителей.
5 HDMI
HDMI-выход позволяет подключать телевизоры имониторы, атакже видеомикшеры,
оснащенные соответствующим разъемом (например,ATEM Mini Extreme). Этот
интерфейс можно дополнительно использовать для вывода меню.
357Задняя панель
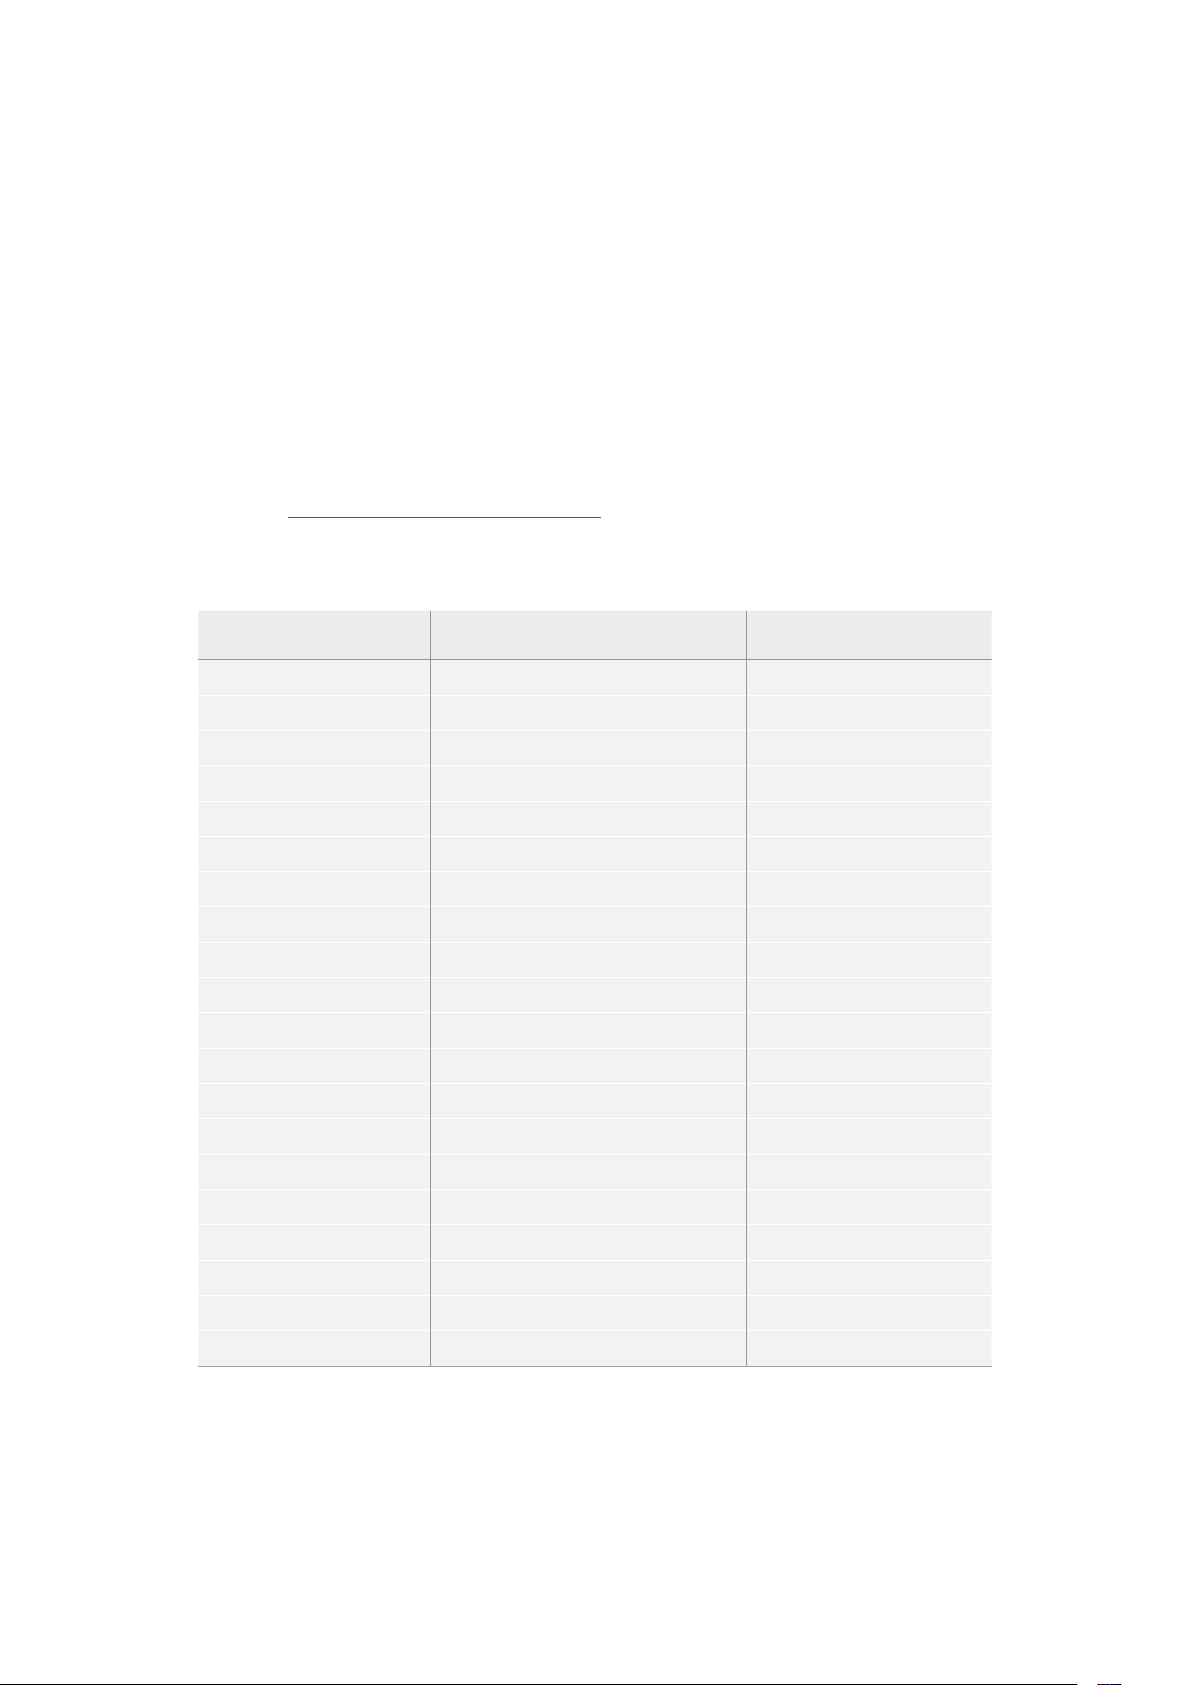
Работа снакопителями
SD-карта
Для HD-материала высокого качества рекомендуется использовать скоростныеSD-карты
классаUHS-I. Эти носители способны работать на скорости свыше220МБ/с при сохранении
UltraHD-видео вформатах вплоть до2160p/60.
При записи сболее низким битрейтом ивысоким сжатием можно работать сдругими
носителями, однако скоростные накопители обычно обеспечивают наилучший результат.
Эта информация регулярно обновляется, поэтому мы рекомендуем обращаться ксамой
последней версии данного руководства, которую можно загрузить на сайте Blackmagic Design
по адресу www.blackmagicdesign.com/ru/support.
Выбор SD-карт при работе сHyperDeck ShuttleHD
Рекомендуемые карты SD для записи в формате 1080p с частотой до 60 кадров/с
Производитель Модель Емкость
Angelbird AV PRO SD UHS-II 300MB/s V90 SDXC 256 ГБ
Angelbird AV PRO SD UHS-II 260MB/s V60 SDXC 128 ГБ
Angelbird AV PRO SD UHS-II 260MB/s V60 SDXC 64 ГБ
SanDisk Extreme Pro UHS-I 95MB/s SDXC 64 ГБ
Wise SD2-64U3 UHS-II 285MB/s SDXC 64 ГБ
Lexar Professional 1000x UHS-II 150MB/s SDXC 128 ГБ
SONY Tough SF-G128T 128 ГБ
Kingston CANVAS GO! Plus 170MB/s V30 64 ГБ
Kingston CANVAS GO! Plus 170MB/s V30 128 ГБ
Kingston CANVAS GO! Plus 170MB/s V30 512 ГБ
ProGrade Digital SDXC UHS-II V90 300R 64 ГБ
ProGrade Digital SDXC UHS-II V90 300R 128 ГБ
SONY Tough SF-G64T UHS-II SDXC 64 ГБ
Delkin Devices Black UHS-II V90 SDXC 256 ГБ
Delkin Devices Power UHS-II V90 SDXC 128 ГБ
Delkin Devices Power UHS-II V90 SDXC 256 ГБ
Delkin Devices Black UHS-II V90 SDXC 128 ГБ
Exascend Essential SDXC UHS-II V90 R 300MB/s 64 ГБ
Exascend Essential SDXC UHS-II V90 R 300MB/s 128 ГБ
Exascend Catalyst SDXC UHS-II V90 R 300MB/s 64 ГБ
358Работа снакопителями
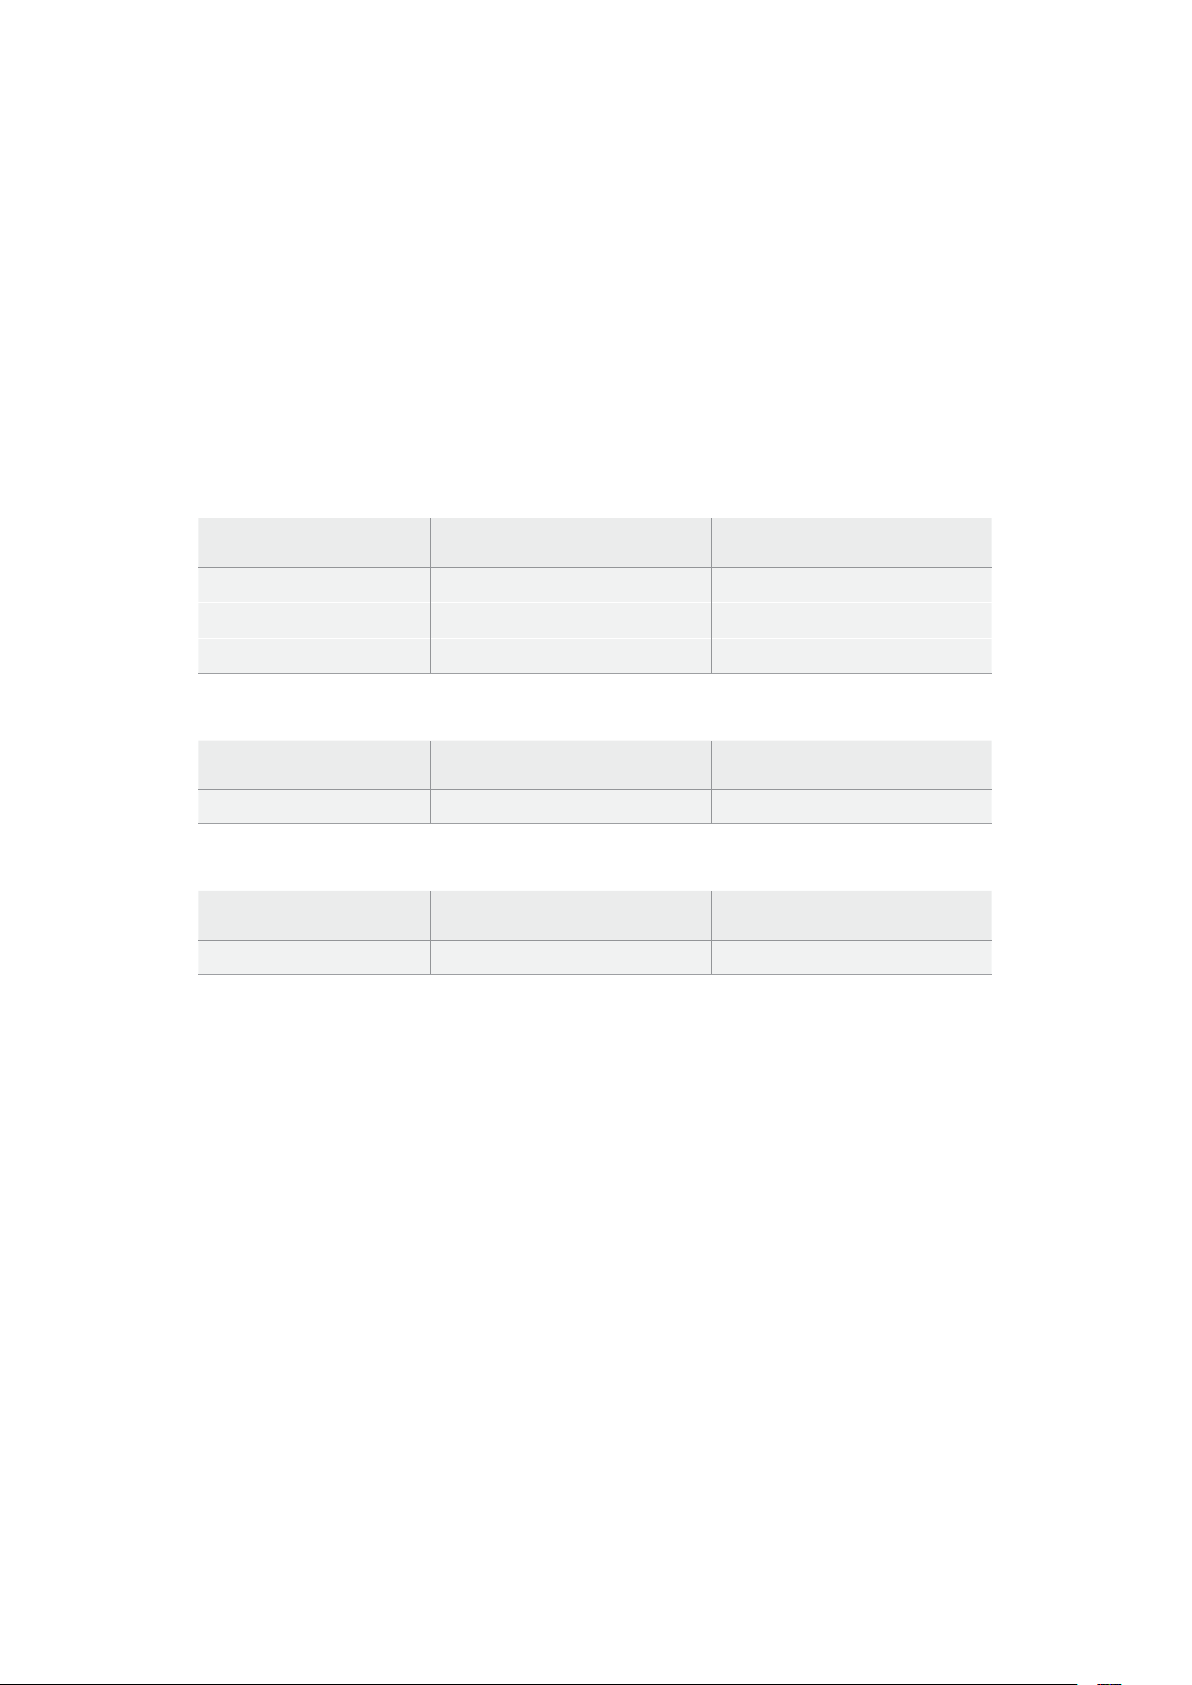
Внешний диск
Все модели HyperDeck позволяют вести запись непосредственно на флеш-дискиUSB-C. Эти
носители имеют большую емкость иобеспечивают запись втечение долгого времени. Затем
можно подключить их ккомпьютеру исразу приступить кмонтажу.
Чтобы получить еще больше места для хранения видео, можно добавить док-станцию
спортом USB-C или внешний жесткий диск. Для подключения станции Blackmagic MultiDock
10G или флеш-дискаUSB-C используют кабельUSB-C, который соединяют сразъемомEXT
DISK на задней панели рекордераHyperDeck.
Выбор дисков USB-C при работе с HyperDeck Shuttle HD
Рекомендуемые диски USB-C для записи в формате 1080p ProRes HQ с частотой до
60 кадров/с
Производитель Модель Емкость
Wise PTS-256 Portable SSD 4K 256 ГБ
OWC Envoy Pro Ex 240 ГБ
BUFFALO SSD-PHE500U3-BA 500 ГБ
Рекомендуемые диски USB-C для записи в формате 1080p DNxHR HQX с частотой до
60 кадров/с
Производитель Модель Емкость
OWC Envoy Pro Ex 240 ГБ
Рекомендуемые диски USB-C для записи в формате 1080p H.264 с частотой до
60 кадров/с
Производитель Модель Емкость
OWC Envoy Pro Ex 240 ГБ
Форматирование накопителя
Подготовка накопителя на компьютере
Форматирование накопителя на Mac
Для форматирования диска под системуHFS+ илиexFAT воспользуйтесь дисковой утилитой,
которая входит впакетMac.
Выполните резервное копирование всех важных данных, потому что при форматировании
носителя они будут удалены.
1 ПодключитеUSB-диск ккомпьютеру при помощи внешней док-станции или
переходного кабеля ипропустите сообщение, предлагающее использовать диск для
создания резервной копииTime Machine. При работе сSD-картой подключите
накопитель ккомпьютеру через внешний картридер.
2 Выберите «Программы» > «Утилиты» изапустите приложение «Дисковая утилита».
3 Щелкните кнопкой мыши по значкуSD-карты илиUSB-диска ивыберите вкладку
«Стереть».
4 Выберите форматMac OS Extended (журналируемый) илиexFAT.
5 Введите название нового тома ивыберите «Стереть». По окончании форматирования
носитель будет готов киспользованию наHyperDeck.
359Форматирование накопителя
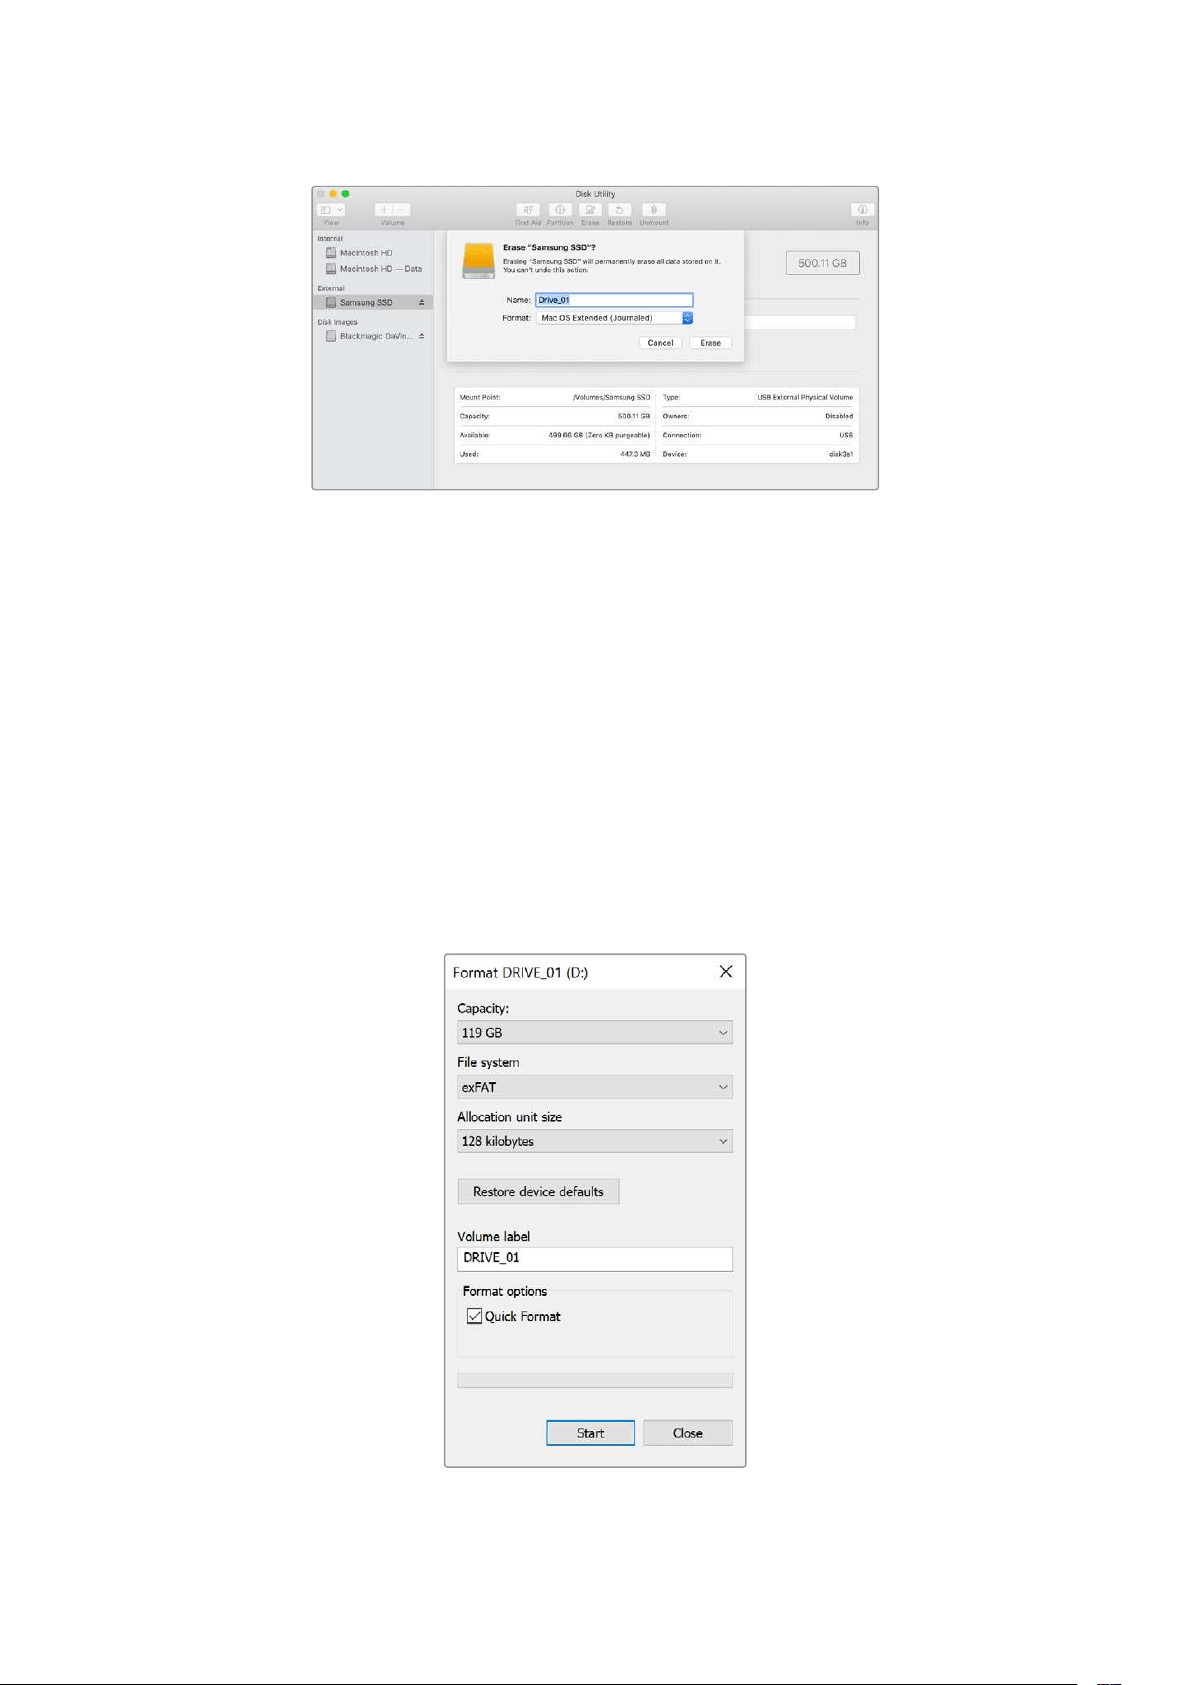
Форматирование накопителя на Windows
На компьютере под управлениемWindows форматирование диска под системуexFAT
выполняется спомощью диалогового окна «Форматировать». Выполните резервное
копирование всех важных данных, потому что при форматированииSSD-диска илиSD-карты
они будут удалены.
1 Подключите USB-диск ккомпьютеру спомощью внешней док-станции или
переходного кабеля. При работе сSD-картой подключите накопитель ккомпьютеру
через внешний картридер.
2 Откройте меню или экран «Пуск» ивыберите «Компьютер». Щелкните правой кнопкой
мыши по значкуUSB-диска илиSD-карты.
3 Вконтекстном меню выберите «Форматировать».
4 Выберите файловую системуexFAT иустановите размер кластера, равный128Кб.
5 Укажите метку тома, выберите «Быстрое форматирование» и нажмите «Начать».
6 По окончании форматирования носитель будет готов киспользованию наHyperDeck.
360Форматирование накопителя

Использование функции телесуфлера
РекордерBlackmagic HyperDeck ShuttleHD позволяет использовать функцию телесуфлера.
Для этого достаточно создать файл.rtf вприложенииTextEdit илиWordPad исохранить его
влюбом из13поддерживаемых языков. Когда такой файл открыт наHyperDeck ShuttleHD,
для текста можно изменить размер шрифта имеждустрочный интервал.
Порядок использования телесуфлера
1 Подключите HDMI-выход рекордераHyperDeck ShuttleHD кHDMI-дисплею.
2 УстановитеSD-карту или подключите внешнийUSB-диск стекстом сценария.
3 Вменю «Запись» выберите опцию «Кодек». Перейдите кнастройке «Телесуфлер»
инажмитеSET.
Сценарий будет отображаться на дисплее. Для автоматического запуска нажмите кнопку
воспроизведения, адля дополнительного управления выводом используйте круглую ручку.
Скорость телесуфлера при воспроизведении
Круглая ручка на рекордереHyperDeck ShuttleHD позволяет регулировать скорость
телесуфлера так же, как при воспроизведении медиаконтента. Когда сценарий загружен,
нажмите одновременно кнопкиJOG иSCR, чтобы активировать вывод сизменяемым
значением данного параметра. Затем поверните ручку. Скорость ее движения определяет,
как быстро будет сменяться текст на экране: чем она интенсивнее, тем выше этот темп.
JOG SCR
CLIP
MENU SET
DISK SD
Если нужно использовать постоянную скорость, скнопкамиJOG иSCR работают по
отдельности. После нажатия одной из них при повороте круглой ручки выполняется
медленная (впервом случае) или быстрая (во втором) смена текста на экране.
361Использование функции телесуфлера

Для навигации по файлам.rtf наSD-карте или внешнем диске используют кнопки перехода
вперед иназад.
При выводе на телесуфлер учитываются такие параметры, как шрифт, цвет ивыделение
полужирным. Дополнительно можно настроить размер текста, междустрочный интервал, поля
иповорот по горизонтали или вертикали, когда проецирование на светоделительное стекло
выполняют спомощью меню «Монитор». Подробнее см.раздел «Меню настроек».
Blackmagic HyperDeck Setup
Blackmagic HyperDeck Setup представляет собой программную утилиту, которая позволяет
изменять настройки иобновлять прошивку рекордера.
Порядок установки программного обеспечения
1 Загрузите последнюю версиюBlackmagic HyperDeck Setup вразделе поддержки по
адресу
www.blackmagicdesign.com/ru/support.
2 Запустите установщикBlackmagic HyperDeck Setup иследуйте инструкциям
на экране.
3 После установки подключитеHyperDeck ShuttleHD ккомпьютеру через портUSB или
разъемEthernet на задней панели устройства.
4 Для обновления программного обеспечения запуститеBlackmagic HyperDeck Setup
иследуйте инструкциям на экране. Если они не появятся, используемая версия
является актуальной.
Щелкните кнопкой мыши по изображениюHyperDeck или значку настроек, чтобы получить
доступ кменю.
На начальной странице будет показан рекордерHyperDeck Shuttle HD со своим именем. Это
облегчает идентификацию устройства, если ккомпьютеру подключено несколько единиц
такой техники. Имя можно задать спомощью меню настроек вутилите.
362Blackmagic HyperDeck Setup
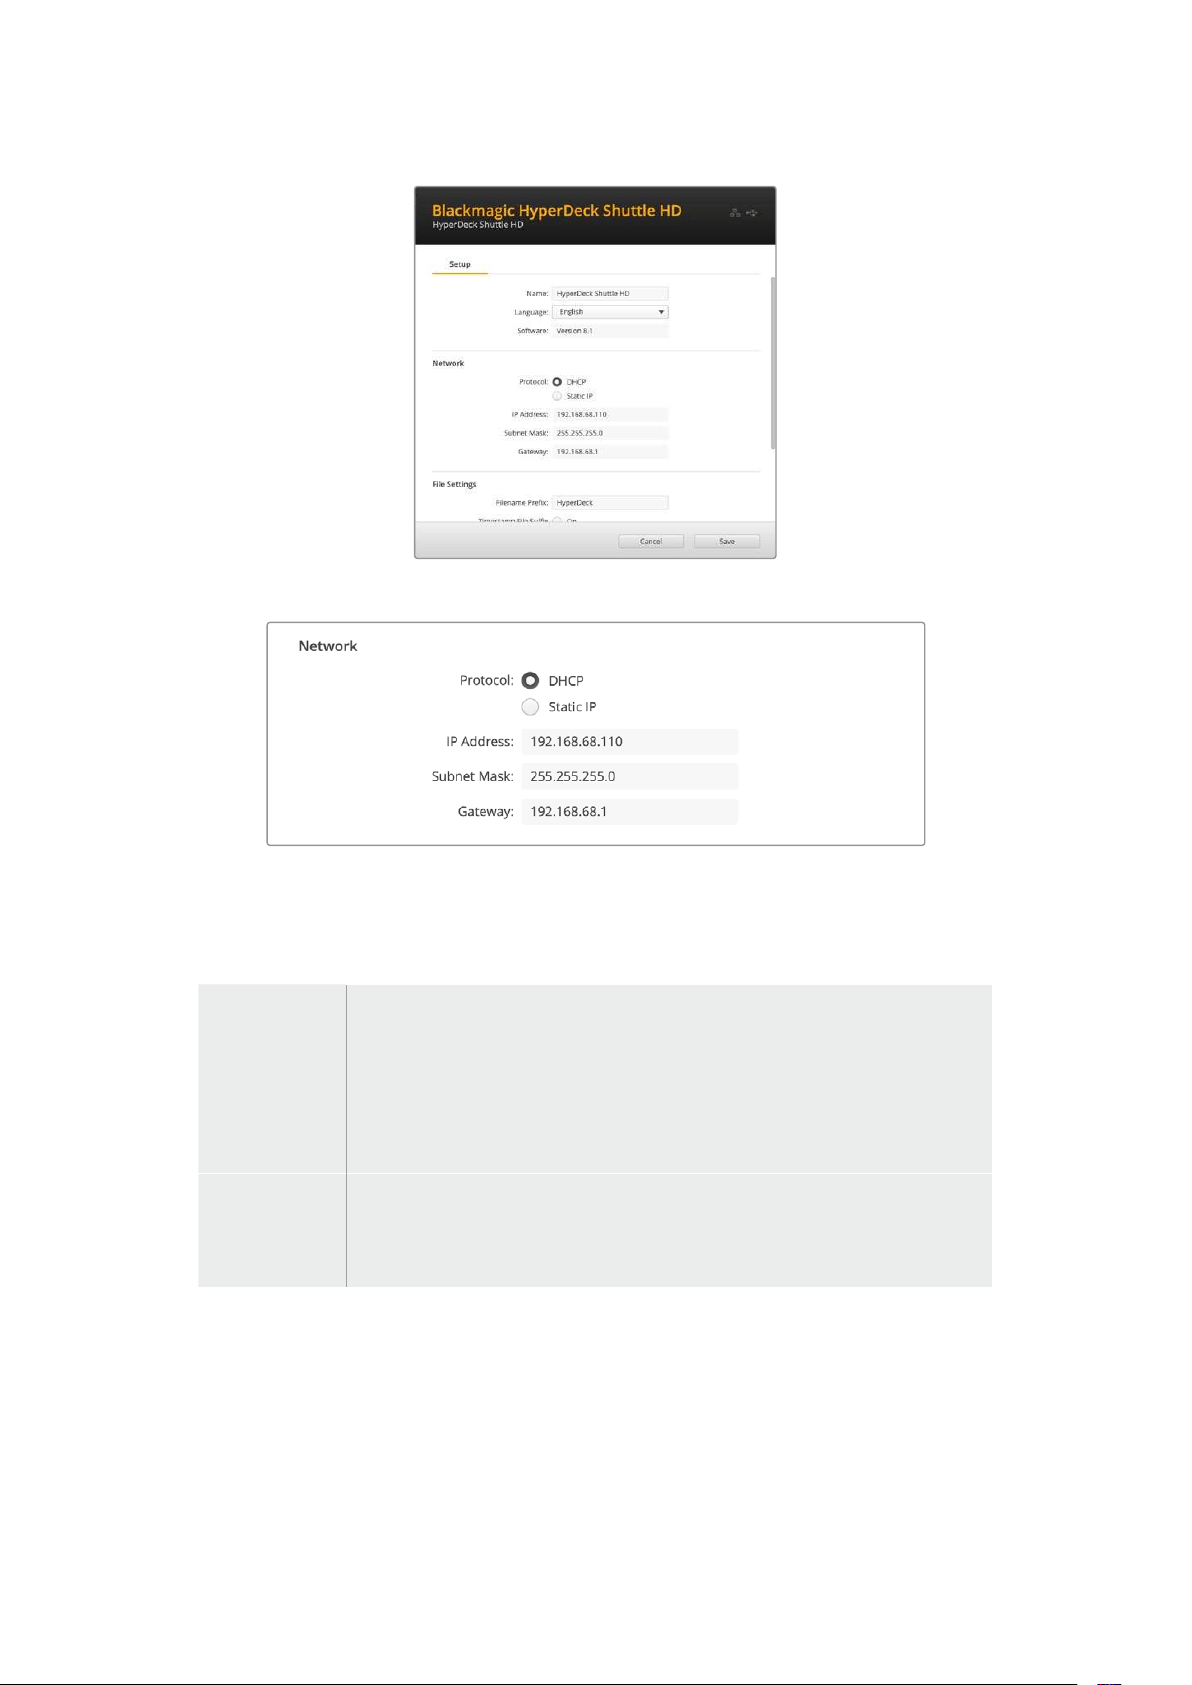
Network (Сеть)
Protocol (Протокол)
Чтобы использовать рекордерHyperDeck ShuttleHD свидеомикшерамиATEM или
дистанционно управлять им по протоколуHyperDeck Ethernet, устройство нужно подключить
клокальной сети сприменением протоколаDHCP или фиксированногоIP-адреса.
DHCP
Рекордеры HyperDeck ShuttleHD по умолчанию используют протоколDHCP.
DHCP— это протокол динамической настройки узла, используемый сетевыми
серверами для автоматического обнаружения устройстваHyperDeck
иприсвоения емуIP-адреса. Данная функция, которая поддерживается
большинством компьютеров исетевых маршрутизаторов, значительно
облегчает подключение оборудования черезEthernet ине допускает
конфликтаIP-адресов.
Static IP
(Статический
IP-адрес)
Когда выбран «Статический IP-адрес», сетевые настройки можно задавать
вручную. Чтобы между устройствами существовал канал связи, они должны
иметь одинаковые настройки маски подсети ишлюза. Еще одно условие—
совпадение первых трех компонентов вIP-адресах панели и микшера.
Если идентифицирующий компонентIP-адреса уже используется другим устройством
компьютерной сети, из-за конфликта настроек подключение не будет выполнено. Вэтом
случае необходимо изменить соответствующее поле вIP-адресе.
363Blackmagic HyperDeck Setup
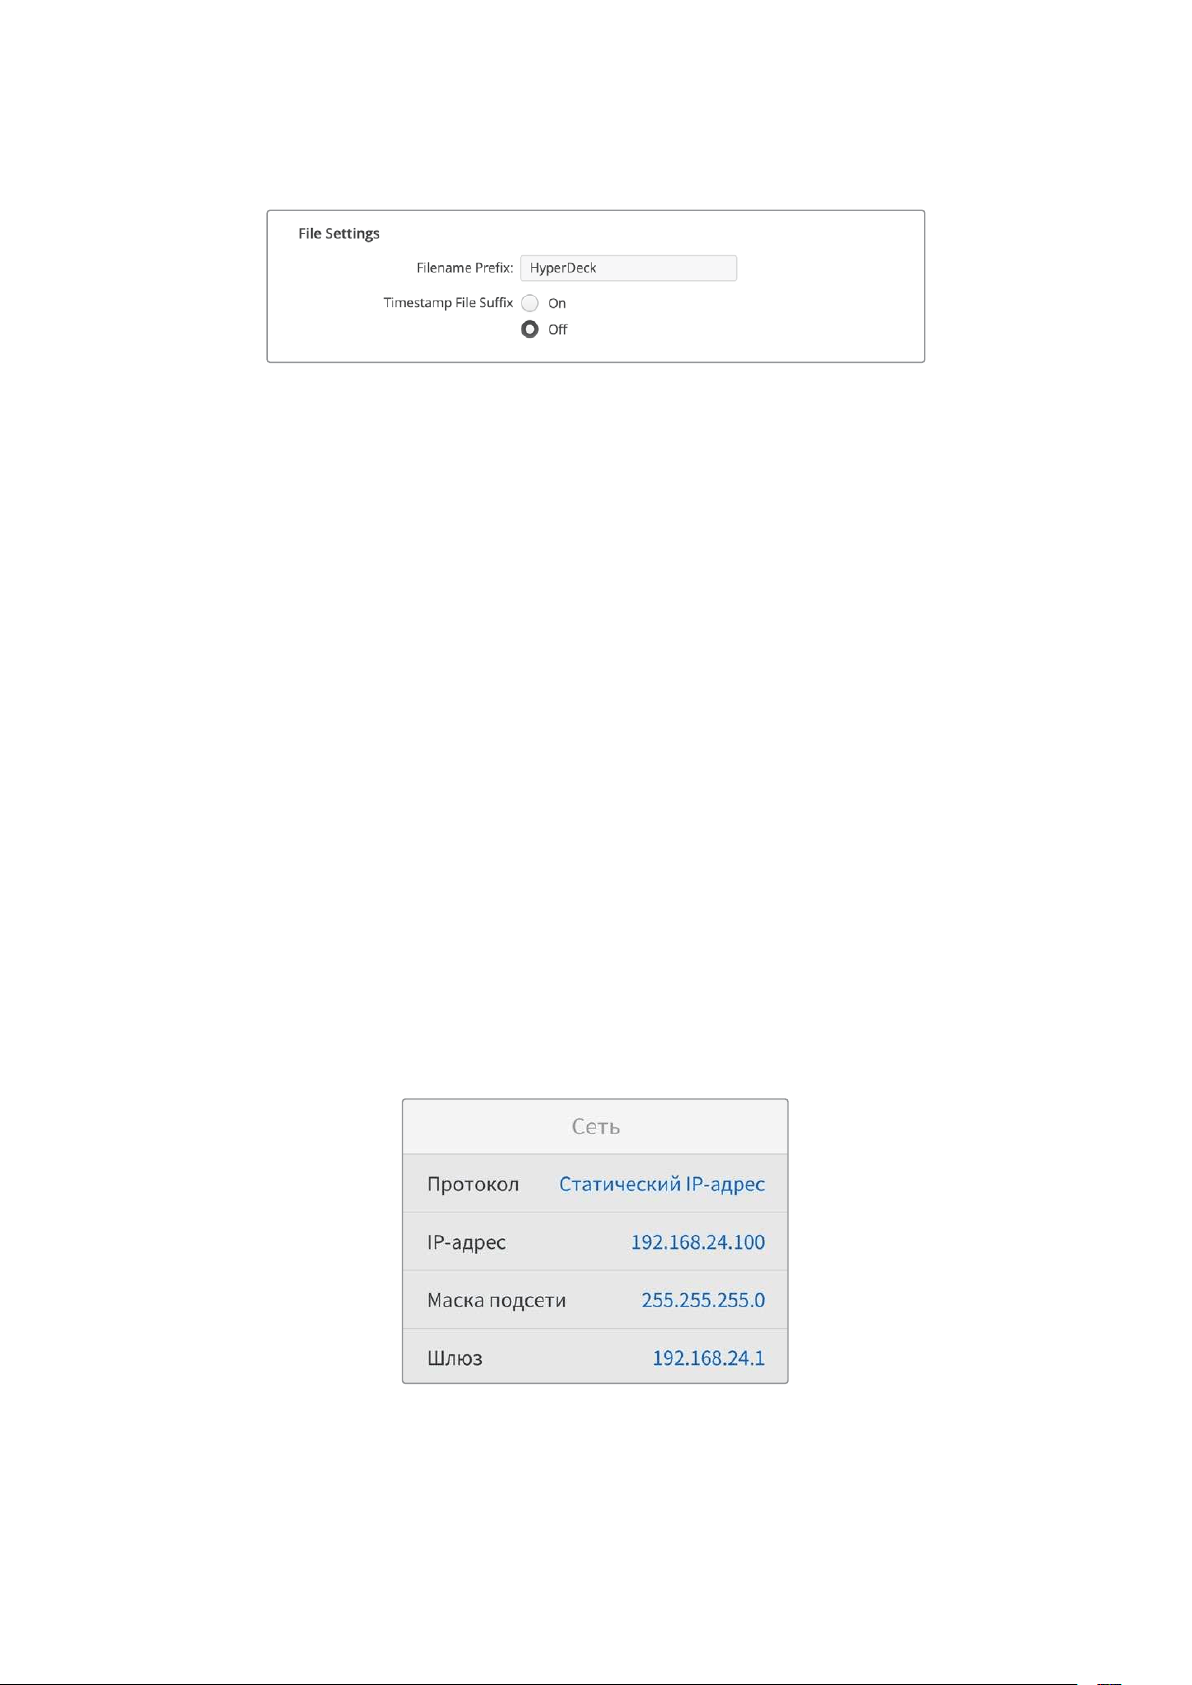
File Settings (Настройки файла)
После первоначальной настройки рекордераHyperDeck ShuttleHD при записи клипов
наSD-карту или флеш-дискUSB файлы будут содержать метку"HyperDeck". Если ее нужно
изменить, введите новое имя файла.
По умолчанию индекс сметками времени не добавляется к имени файла. Чтобы активировать
эту функцию (Timestamp File Suffix), ее нужно включить. Задать метки для имени ивремени
можно спомощью соответствующих настроек вменю наHyperDeck ShuttleHD.
Передача файлов по сети
Рекордеры HyperDeck поддерживают передачу файлов поFTP-протоколу. Это позволяет
быстро копировать материалы скомпьютера непосредственно на устройство по локальной
сети. Например, можно вудаленном режиме перенести файлы наHyperDeck, чтобы
использовать их для вывода изображения на цифровые рекламно-информационные панели.
Подключение кHyperDeck ShuttleHD
Для обмена файлами между компьютером иHyperDeck ShuttleHD водной локальной сети
потребуются приложение для работы сFTP-протоколом иIP-адрес рекордера.
1 Загрузите иустановите приложение для работы сFTP-протоколом на компьютер,
который будет подключен крекордеру. Рекомендуется использоватьCyberduck,
FileZilla илиTransmit, однако подойдут идругие аналогичные программы. Cyberduck
иFileZilla предлагаются бесплатно.
2 Спомощью кабеляEthernet подключитеHyperDeck ShuttleHD клокальной сети
ипосмотритеIP-адрес рекордера. Для этого нажмите кнопкуMENU иповерните
круглую ручку, чтобы перейти кнастройкам «Сеть». Адрес устройства будет
отображаться внизу экрана.
IP-адрес рекордера HyperDeck ShuttleHD
можно найти вразделе «Сеть» меню настроек
3 Введите IP-адрес рекордераHyperDeck вдиалоговом окне приложения для работы
сTCP-протоколом. Взависимости от программы имя иположение поля могут
меняться, но обычно оно называетсяServer илиHost. Если есть опцияAnonymous
Login, поставьте для нее флажок.
364Передача файлов по сети

При подключении кHyperDeck ShuttleHD вводить имя пользователя
или пароль не нужно. Достаточно указатьIP-адрес рекордера
ипоставить флажок для опцииAnonymous Login при ее наличии.
Передача файлов
После установки соединения сHyperDeck можно выполнять передачу файлов поFTP.
Вбольшинстве приложений для работы стаким протоколом используется простое
перетаскивание.
HyperDeck ShuttleHD позволяет импортировать иэкспортировать любые файлы, однако их
воспроизведение возможно только втом случае, если рекордер поддерживает
используемые кодек иразрешение.
СОВЕТ. Передавать файлы по сети можно вто время, когдаHyperDeck ведет запись.
Вэтом случае скорость обмена данными корректируется автоматически.
365Передача файлов по сети

Developer Information
Blackmagic HyperDeck Ethernet Protocol
The Blackmagic HyperDeck Ethernet Protocol is a text based protocol accessed by connecting
to TCP port 9993 on HyperDeck models that have a built in Ethernet connection. If you are
a software developer, you can use the protocol to construct devices that integrate with our
products. Here at Blackmagic Design our approach is to open up our protocols and we eagerly
look forward to seeing what you come up with!
Protocol Commands
Command Command Description
help or ? Provides help text on all commands and parameters
commands return commands in XML format
device info return device information
disk list query clip list on active disk
disk list: slot id: {n} query clip list on disk in slot {n}
quit disconnect ethernet control
ping check device is responding
preview: enable: {true/false} switch to preview or output
play play from current timecode
play: speed: {-5000 to 5000} play at specific speed
play: loop: {true/false} play in loops or stop-at-end
play: single clip: {true/false} play current clip or all clips
playrange query playrange setting
playrange set: clip id: {n} set play range to play clip {n} only
playrange set: clip id: {n} count: {m} set play range to {m} clips starting from clip {n}
playrange set: in: {inT} out: {outT}
set play range to play between:
- timecode {inT} andtimecode {outT}
playrange set: timeline in: {in} timeline out:
{out}
set play range in units of frames between:
- timeline position {in} and position {out} clear/reset play
rangesetting
playrange clear clear/reset play range setting
play on startup query unit play on startup state
play on startup: enable: {true/false} enable or disable play on startup
play on startup: single clip: {true/false} play single clip or all clips on startup
play option query play options
play option: stop mode:
{lastframe/nextframe/black}
set output frame when playback stops
record record from current input
record: name: {name} record named clip
366Developer Information

Command Command Description
record spill spill current recording to next slot
record: spill: slot id: {n}
spill current recording to specified slot
use current id to spill to same slot
stop stop playback or recording
clips count query number of clips on timeline
clips get query all timeline clips
clips get: clip id: {n} query a timeline clip info
clips get: clip id: {n} count: {m} query m clips starting from n
clips get: version: {1/2}
query clip info using specified output version:
version 1: id: name startT duration
version 2: id: startT duration inT outT name
clips add: name: {name} append a clip to timeline
clips add: clip id: {n} name: {name} insert clip before existing clip {n}
clips add: in: {inT} out: {outT} name: {name} append the {inT} to {outT} portion of clip
clips remove: clip id: {n}
remove clip {n} from the timeline
(invalidates clip ids following clip {n})
clips clear empty timeline clip list
transport info query current activity
slot info query active slot
slot info: slot id: {n} query slot {n}
slot select: slot id: {n} switch to specified slot
slot select: video format: {format} load clips of specified format
slot unblock unblock active slot
slot unblock: slot id: {n} unblock slot {n}
cache info query cache status
dynamic range query dynamic range settings
dynamic range: playback override:
{off/Rec709/Rec2020_SDR/HLG/
ST2084_300/ST2084_500/
ST2084_800/ST2084_1000/
ST2084_2000/ST2084_4000/ST2084
set playback dynamic range override
dynamic range: record override:
{off/Rec709/Rec2020_SDR/HLG/
ST2084_300/ST2084_500/
ST2084_800/ST2084_1000/
ST2084_2000/ST2084_4000/ST2048}
set record dynamic range override
notify query notification status
notify: remote: {true/false} set remote notifications
notify: transport: {true/false} set transport notifications
notify: slot: {true/false} set slot notifications
notify: configuration: {true/false} set configuration notifications
367Developer Information

Command Command Description
notify: dropped frames: {true/false} set dropped frames notifications
notify: display timecode: {true/false} set display timecode notifications
notify: timeline position: {true/false} set playback timeline position notifications
notify: playrange: {true/false} set playrange notifications
notify: cache: {true/false} set cache notifications
notify: dynamic range: {true/false} set dynamic range settings notifications
notify: slate: {true/false} set digital slate notifications
notify: clips: {true/false}
set timeline clips notifications where two types of changes can
occur:
add: partial update with list of clips and insert positions
snapshot: complete update of all clips on timeline
notify: disk: {true/false}
set disk clips notifications where two types of changes can
occur:
add: partial update with list of clips and insert positions
snapshot: complete update of all clips on timeline
goto: clip id: {start/end} goto first clip or last clip
goto: clip id: {n} goto clip id {n}
goto: clip id: +{n} go forward {n} clips
goto: clip id: -{n} go backward {n} clips
goto: clip: {n} goto frame position {n} within current clip
goto: clip: +{n} go forward {n} frames within current clip
goto: clip: -{n} go backward {n} frames within current clip
goto: clip: {start/end} goto start or end of clip
goto: timeline: {n} goto frame position {n} within timeline
goto: timeline: +{n} o forward {n} frames within timeline
goto: timeline: -{n} go backward {n} frames within timeline
goto: timeline: {start/end} goto start or end of timeline
goto: timecode: {timecode} goto specified timecode
goto: timecode: +{timecode} go forward {timecode} duration
goto: timecode: -{timecode} go backward {timecode} duration
goto: slot id: {n} goto slot id {n}
jog: timecode: {timecode} jog to timecode
jog: timecode: +{timecode} jog forward {timecode} duration
jog: timecode: -{timecode} jog backward {timecode} duration
shuttle: speed: {-5000 to 5000} shuttle with speed
remote query unit remote control state
remote: enable: {true/false} enable or disable remote control
remote: override: {true/false} session override remote control
configuration query configuration settings
configuration: video input: SDI switch to SDI input
368Developer Information

Command Command Description
configuration: video input: HDMI switch to HDMI input
configuration: video input: component switch to component input
configuration: audio input: embedded capture embedded audio
configuration: audio input: XLR capture XLR audio
configuration: audio input: RCA capture RCA audio
configuration: file format: {format} switch to specific file format
configuration: audio codec: PCM switch to PCM audio
configuration: audio codec: AAC switch to AAC audio
configuration: timecode input:
{external/embedded/internal/preset/clip}
change the timecode input
configuration: timecode output:
{clip/timeline}
change the timecode output
configuration: timecode preference:
{default/dropframe/nondropframe}
whether or not to use drop frame timecodes when not
otherwise specified
configuration: timecode preset:
{timecode}
set the timecode preset
configuration: audio input channels: {n} set the number of audio channels recorded to {n}
configuration: record trigger:
{none/recordbit/timecoderun}
change the record trigger
configuration: record prefix: {name} set the record prefix name (supports UTF-8 name)
configuration: append timestamp:
{true/false}
append timestamp to recorded filename
configuration: xlr input id: {n} xlr type:
{line/mic}
configure xlr input type
multiple xlr inputs can be configured in a single command
configuration: genlock input resync:
{true/false}
enable or disable genlock input resync
uptime return time since last boot
format: slot id: {n} prepare:
{exFAT/HFS+} name: {name}
prepare a disk formatting operation to filesystem {format}
format: confirm: {token} perform a pre-prepared formatting operation using token
identify: enable: {true/false} identify the device
watchdog: period: {period in seconds} client connection timeout
reboot reboot device
slate clips slate clips information
slate project slate project information
slate lens slate lens information
369Developer Information

Multiline commands: Command Description
slate clips↵ set slate clips information:
reel: {n} slate reel number, where {n} is in [1, 999]
scene id: {id} slate scene id value, where {id} is a string
shot type: {WS/MS/BCU/MCU/ECU/none} slate shot type
take: {n} slate take number, where {n} is in [1, 99]
take scenario: {PU/VFX/SER/none} slate take scenario
take auto inc: {true/false} slate take auto increment
good take: {true/false} slate good take
environment: {interior/exterior} slate environment
day night: {day/night} slate day or night
slate project:↵ set slate project information:
project name: {name} project name (can be empty, supports UTF-8)
camera: {index} set camera index e.g. A
director: {name} director (can be empty, supports UTF-8)
camera operator: {name} camera operator (can be empty, supports UTF-8)
slate lens:↵ set lens information:
lens type: {type} lens type (can be empty, supports UTF-8)
iris: {type} camera iris (can be empty, supports UTF-8)
focal length: {length} focal length (can be empty, supports UTF-8)
distance: {distance} lens distance (can be empty, supports UTF-8)
filter: {filter} lens filter (can be empty, supports UTF-8)
Command Combinations
You can combine the parameters into a single command, for example:
play: speed: 200 loop: true single clip: true
Or for configuration:
configuration: video input: SDI audio input: XLR
Or to switch to the second disk, but only play NTSC clips:
slot select: slot id: 2 video format: NTSC
Protocol Details
Connection
The HyperDeck Ethernet server listens on TCP port 9993.
Basic syntax
The HyperDeck protocol is a line oriented text protocol. Lines from the server will be separated by an ascii
CR LF sequence. Messages from the client may be separated by LF or CR LF.
New lines are represented in this document as a "↵" symbol.
370Developer Information

Single line command syntax
Command parameters are usually optional. A command with no parameters is terminated with a new line:
{Command name}↵
If parameters are specified, the command name is followed by a colon, then pairs of parameter names and
values. Each parameter name is terminated with a colon character:
{Command name}: {Parameter}: {Value} {Parameter}: {Value} ...↵
Multiline command syntax
The HyperDeck protocol also supports an equivalent multiline syntax where each parameter-value pair is
entered on a new line. E.g.
{Command name}:↵
{P a r a m e t e r}: { Va lu e}↵
{P a r a m e t e r}: { Va lu e}↵
↵
Response syntax
Simple responses from the server consist of a three digit response code and descriptive text terminated by a
new line:
{Response code} {Response text}↵
If a response carries parameters, the response text is terminated with a colon, and parameter name and
value pairs follow on subsequent lines until a blank line is returned:
{Response code} {Response text}:↵
{P a r a m e t e r}: { Va lu e}↵
{P a r a m e t e r}: { Va lu e}↵
...
↵
Successful response codes
A simple acknowledgement of a command is indicated with a response code of 200:
200 ok↵
Other successful responses carry parameters and are indicated with response codes in the range of 201
to299.
371Developer Information

Failure response codes
Failure responses to commands are indicated with response codes in the range of 100 to 199:
100 syntax error
101 unsupported parameter
102 invalid value
103 unsupported
104 disk full
105 no disk
106 disk error
107 timeline empty
108 internal error
109 out of range
110 no input
111 remote control disabled
112 clip not found
120 connection rejected
150 invalid state
151 invalid codec
160 invalid format
161 invalid token
162 format not prepared
163 parameterized single line command not supported
Asynchronous response codes
The server may return asynchronous messages at any time. These responses are indicated with response
codes in the range of 500 to 599:
5xx {Response Text}:↵
{P a r a m e t e r}: { Va lu e}↵
{P a r a m e t e r}: { Va lu e}↵
↵
Connection response
On connection, an asynchronous message will be delivered:
500 connection info:↵
protocol version: {Version}↵
model: {Model Name}↵
↵
Timecode syntax
Timecodes are expressed as non-drop-frame timecode in the format:
HH:MM:SS:FF
372Developer Information

Handling of deck "remote" state
The “remote” command may be used to enable or disable the remote control of the deck. Any attempt to
change the deck state over ethernet while remote access is disabled will generate an error:
111 remote control disabled↵
To enable or disable remote control:
remote: enable: {“true”, “false”} ↵
The current remote control state may be overridden allowing remote access over ethernet irrespective of the
current remote control state:
remote: override: {“true”, “false”} ↵
The override state is only valid for the currently connected ethernet client and only while the connection
remains open.
The “remote” command may be used to query the remote control state of the deck by specifying no
parameters:
remote↵
The deck will return the current remote control state:
210 remote info:↵
enabled: {“true”, “false”}↵
override: {“true”, “false”}↵
↵
Asynchronous remote control information change notification is disabled by default and may be
configured with the “notify” command. When enabled, changes in remote state will generate a “510 remote
info:”asynchronous message with the same parameters as the “210 remote info:” message.
Closing connection
The "quit" command instructs the server to cleanly shut down the connection:
quit↵
Checking connection status
The "ping" command has no function other than to determine if the server is responding:
ping↵
Getting help
The "help" or "?" commands return human readable help text describing all available commands and
parameters:
help↵
Or:
?↵
The server will respond with a list of all supported commands:
201 help:↵
{Help Text}↵
{Help Text}↵
↵
373Developer Information

Switching to preview mode
The "preview" command instructs the deck to switch between preview mode and output mode:
preview: enable: {"true", "false"}↵
Playback will be stopped when the deck is switched to preview mode. Capturing will be stopped when the
deck is switched to output mode.
Controlling device playback
The “play” command instructs the deck to start playing:
play↵
The play command accepts a number of parameters which may be used together in most combinations.
By default, the deck will play all remaining clips on the timeline then stop.
The “single clip” parameter may be used to override this behavior:
play: single clip: {“true”, “false”}↵
By default, the deck will play at normal (100%) speed. An alternate speed may be specified in percentage
between -5000 to 5000:
play: speed: {% normal speed}↵
By default, the deck will stop playing when it reaches to the end of the timeline. The “loop” parameter may be
used to override this behavior:
play: loop: {“true”, “false”}↵
The “playrange” command instructs the deck to play all the clips. To override this behavior: and select a
particular clip:
playrange set: clip id: {Clip ID}↵
To only play a certain timecode range:
playrange set: in: {in timecode} out: {out timecode}↵
To clear a set playrange and return to the default value:
playrange clear↵
The “play on startup command” instructs the deck on what action to take on startup. By default, the deck will
not play. Use the “enable” command to start playback after each power up.
play on startup: enable {“true”, “false”}↵
By default, the unit will play back all clips on startup. Use the “single clip” command to override.
play on startup: single clip: {“true”, “false”}↵
Stopping deck operation
The "stop" command instructs the deck to stop the current playback or capture:
stop↵
374Developer Information

Changing timeline position
The "goto" command instructs the deck to switch to playback mode and change its position within the
timeline.
To go to the start of a specific clip:
goto: clip id: {Clip ID}↵
To move forward/back {count} clips from the current clip on the current timeline:
goto: clip id: +/-{count}↵
Note that if the resultant clip id goes beyond the first or last clip on timeline, it will be clamp at the first or last
clip.
To go to the start or end of the current clip:
goto: clip: {“start”, “end”}↵
To go to the start of the first clip or the end of the last clip:
goto: timeline: {“start”, “end”}↵
To go to a specified timecode:
goto: timecode: {timecode}↵
To move forward or back a specified duration in timecode:
goto: timecode: {“+”, “-”}{duration in timecode}↵
To specify between slot 1 and slot 2:
goto: slot id: {Slot ID}↵
Note that only one parameter/value pair is allowed for each goto command.
Enumerating supported commands and parameters
The "commands" command returns the supported commands:
commands↵
The command list is returned in a computer readable XML format:
212 commands:
<commands>↵
<command name="…"><parameter name="…"/>…</command>↵
<command name="…"><parameter name="…"/>…</command>↵
…
</commands>↵
↵
375Developer Information

Controlling asynchronous notifications
The “notify” command may be used to enable or disable asynchronous notifications from the server.
To enable or disable transport notifications:
notify: transport: {“true”, “false”}↵
To enable or disable slot notifications:
notify: slot: {“true”, “false”}↵
To enable or disable remote notifications:
notify: remote: {“true”, “false”}↵
To enable or disable configuration notifications:
notify: configuration: {“true”, “false”}↵
Multiple parameters may be specified. If no parameters are specified, the server returns the current state of
all notifications:
209 notify:↵
transport: {“true”, “false”}↵
slot: {“true”, “false”}↵
remote: {“true”, “false”}↵
configuration: {“true”, “false”}↵
dropped frames: {“true”, “false”}↵
display timecode: {“true”, “false”}↵
timeline position: {“true”, “false”}↵
playrange: {“true”, “false”}↵
cache: {“true”, “false”}↵
dynamic range: {“true”, “false”}↵
slate: {“true”, “false”}↵
clips: {“true”, “false”}↵
disk: {“true”, “false”}↵
↵
Retrieving device information
The "device info" command returns information about the connected deck device:
device info↵
The server will respond with:
204 device info:↵
protocol version: {Version}↵
model: {Model Name}↵
unique id: {unique alphanumeric identifier}↵
slot count: {number of storage slots}↵
software version: {software version}↵
↵
376Developer Information

Retrieving slot information
The "slot info" command returns information about a slot. Without parameters, the command returns
information for the currently selected slot:
slot info↵
If a slot id is specified, that slot will be queried:
slot info: slot id: {Slot ID}↵
The server will respond with slot specific information:
202 slot info:↵
slot id: {Slot ID}↵
status: {"empty", "mounting", "error", "mounted"}↵
volume name: {Volume name}↵
recording time: {recording time available in seconds}↵
video format: {disk's default video format}↵
blocked: {“true”, “false”}↵
↵
Asynchronous slot information change notification is disabled by default and may be configured with
the "notify" command. When enabled, changes in slot state will generate a "502 slot info:" asynchronous
message with the same parameters as the "202 slot info:" message.
Retrieving clip information
The “disk list” command returns the information for each playable clip on a given disk. Without parameters,
the command returns information for the current active disk:
disk list↵
If a slot id is specified, the disk in that slot will be queried:
disk list: slot id: {Slot ID}↵
The server responds with the list of all playable clips on the disk in the format of: Index, name, formats, and
duration in timecode:
206 disk list:↵
slot id: {Slot ID}↵
{clip index}: {name} {file format} {video format} {Duration
ti m ecode}↵
{clip index}: {name} {file format} {video format} {Duration
ti m ecode}↵
…
↵
Note that the clip index starts from 1.
Retrieving clip count
The "clips count" command returns the number of clips on the current timeline:
clips count ↵
The server responds with the number of clips:
214 clips count: ↵
clip count: {Count}↵
377Developer Information

Retrieving timeline information
The "clips get" command returns information for each available clip on the current timeline. Without
parameters, the command returns information for all clips on timeline:
clips get↵
The server responds with a list of clip IDs, names and timecodes:
205 clips info:↵
clip count: {Count}↵
{Clip ID}: {Start timecode} {Duration timecode} {In timecode}
{Out timecode} {Name}↵
{Clip ID}: {Start timecode} {Duration timecode} {In timecode}
{Out timecode} {Name}↵
…
↵
Retrieving transport information
The “transport info” command returns the state of the transport:
transport info ↵
The server responds with transport specific information:
208 transport info:
status: {“preview”, “stopped”, “play”, “forward”, “rewind”,
“j o g ”, “ s h u t t l e ”,” r e c o r d ”}↵
speed: {Play speed between -5000 and 5000 %}↵
slot id: {Slot ID or “none”}↵
clip id: {Clip ID or “none”}↵
single clip: {“true”, “false”}↵
display timecode: {timecode}↵
timecode: {timecode}↵
video format: {Video format}↵
loop: {“true”, “false”}↵
timeline: {n}↵
input video format: {Video format”}↵
dynamic range: {“off”, “Rec709”, “Rec2020_SDR”, “HLG”,
“ST2084_300”, “ST2084_500”, “ST2084_800”, “ST2084_1000”,
“ST2084_2000”, “ST2084_4000”, “ST2048” or “none”}↵
↵
The "timecode" value is the timecode within the current timeline for playback or the clip for record. The
"display timecode" is the timecode displayed on the front of the deck. The two timecodes will differ in some
deck modes.
Asynchronous transport information change notification is disabled by default and may be configured
with the "notify" command. When enabled, changes in transport state will generate a "508 transport info:"
asynchronous message with the same parameters as the "208 transport info:" message.
378Developer Information

Video Formats
The following video formats are currently supported on HyperDeck Shuttle:
720p50, 720p5994, 720p60
1080p23976, 1080p24, 1080p25, 1080p2997, 1080p30, 1080p60
1080i50, 1080i5994, 1080i60
Video format support may vary between models and software releases.
File Formats
All HyperDeck models currently support the following file formats:
H.264High
H.264Medium
H.264Low
QuickTimeProResHQ
QuickTimeProRes
QuickTimeProResLT
QuickTimeProResProxy
QuickTimeDNxHD220x
DNxHD220x
QuickTimeDNxHD145
DNxHD145
QuickTimeDNxHD45
DNxHD45
Supported file formats may vary between models and software releases.
379Developer Information

Querying and updating configuration information
The "configuration" command may be used to query the current configuration of the deck:
configuration↵
The server returns the configuration of the deck:
211 configuration:↵
audio input: {“embedded”, “XLR”, “RCA”}↵
audio mapping: {n}↵
video input: {“SDI”, “HDMI”, “component”, “composite”}↵
file format: {format}↵
audio codec: {“PCM”, “AAC”}↵
timecode input: {“external”, “embedded”, “preset”, “clip”}↵
timecode output: {“clip”, “timeline”}↵
timecode preference: {“default”, “dropframe”, “nondropframe”}↵
timecode preset: {timecode}↵
audio input channels: {n}↵
record trigger: {“none”, “recordbit”, “timecoderun”}↵
record prefix: {name}↵
append timestamp: {“true”, “false”}↵
genlock input resync: {“true”, “false”}↵
↵
One or more configuration parameters may be specified to change the configuration of the deck.
To change the current video input:
configuration: video input: {“SDI”, “HDMI”, “component”}↵
Valid video inputs may vary between models. To configure the current audio input:
configuration: audio input: {“embedded”, “XLR”, “RCA”}↵
Valid audio inputs may vary between models.
To configure the current file format:
configuration: file format: {File format}↵
Note that changes to the file format may require the deck to reset, which will cause the client connection to
be closed. In such case, response code 213 will be returned (instead of 200) before the client connection is
closed:
“213 deck rebooting”
Asynchronous configuration information change notification is disabled by default and may be configured
with the “notify” command. When enabled, changes in configuration will generate a “511 configuration:”
asynchronous message with the same parameters as the “211 configuration:” message.
380Developer Information

Selecting active slot and video format
The "slot select" command instructs the deck to switch to a specified slot, or/and to select a specified output
video format.
To switch to a specified slot:
slot select: slot id: {slot ID}↵
To select the output video format:
slot select: video format: {video format}↵
Either or all slot select parameters may be specified. Note that selecting video format will result in a rescan of
the disk to reconstruct the timeline with all clips of the specified video format.
Clearing the current timeline
The "clips clear" command instructs the deck to empty the current timeline:
clips clear↵
The server responds with
200 ok↵
Adding a clip to the current timeline
The "clips add:" command instructs the deck to add a clip to the current timeline:
clips add: name: {clip name}↵
The server responds with
200 ok↵
or in case of error
1xx {error description}↵
Configuring the watchdog
The “watchdog” command instructs the deck to monitor the connected client and terminate the connection if
the client is inactive for at least a specified period of time.
To configure the watchdog:
watchdog: period: {period in seconds}↵
To avoid disconnection, the client must send a command to the server at least every {period} seconds. Note
that if the period is set to 0 or less than 0, connection monitoring will be disabled.
381Developer Information

Помощь
Как получить помощь
Самый быстрый способ получить помощь— обратиться кстраницам поддержки на сайте
Blackmagic Design ипроверить наличие последних справочных материалов по
рекордерамHyperDeck.
Раздел поддержки на сайте Blackmagic Design
Последние версии руководства по эксплуатации, программного обеспечения
идополнительную информацию можно найти вцентре поддержки Blackmagic Design на
странице
www.blackmagicdesign.com/ru/support.
Форум Blackmagic Design
Посетите форум сообщества Blackmagic Design на нашем веб-сайте, чтобы получить
дополнительную информацию иузнать об интересных творческих идеях. На нем можно
поделиться своими идеями, атакже получить помощь от персонала поддержки идругих
пользователей. Адрес форума
https://forum.blackmagicdesign.com.
Обращение вслужбу поддержки Blackmagic Design
Если спомощью доступных справочных материалов решить проблему не удалось,
воспользуйтесь формой «Отправить нам сообщение» на странице поддержки. Можно также
позвонить вближайшее представительствоBlackmagic Design, телефон которого вы найдете
на нашем веб-сайте.
Проверка используемой версии программного обеспечения
Чтобы узнать версию утилитыBlackmagic HyperDeck Setup, установленной на вашем
компьютере, откройте окноAbout Blackmagic HyperDeck Setup.
На компьютере с операционной системойMac OS откройтеBlackmagic HyperDeck
Setup впапке «Программы». Вменю выберитеAbout Blackmagic HyperDeck Setup,
чтобы узнать номер версии.
На компьютере соперационной системойWindows откройтеBlackmagic HyperDeck
Setup вменю «Пуск» или выберите на начальном экране. В меню«Справка»
выберитеAbout Blackmagic HyperDeck Setup, чтобы узнать номер версии.
Загрузка последних версий программного обеспечения
Узнав установленную версиюBlackmagic HyperDeck Setup, перейдите вцентр поддержки
Blackmagic на странице
www.blackmagicdesign.com/ru/support, чтобы проверить наличие
обновлений. Рекомендуется всегда использовать последнюю версию программного
обеспечения, однако обновление лучше всего выполнять после завершения
текущего проекта.
382Помощь
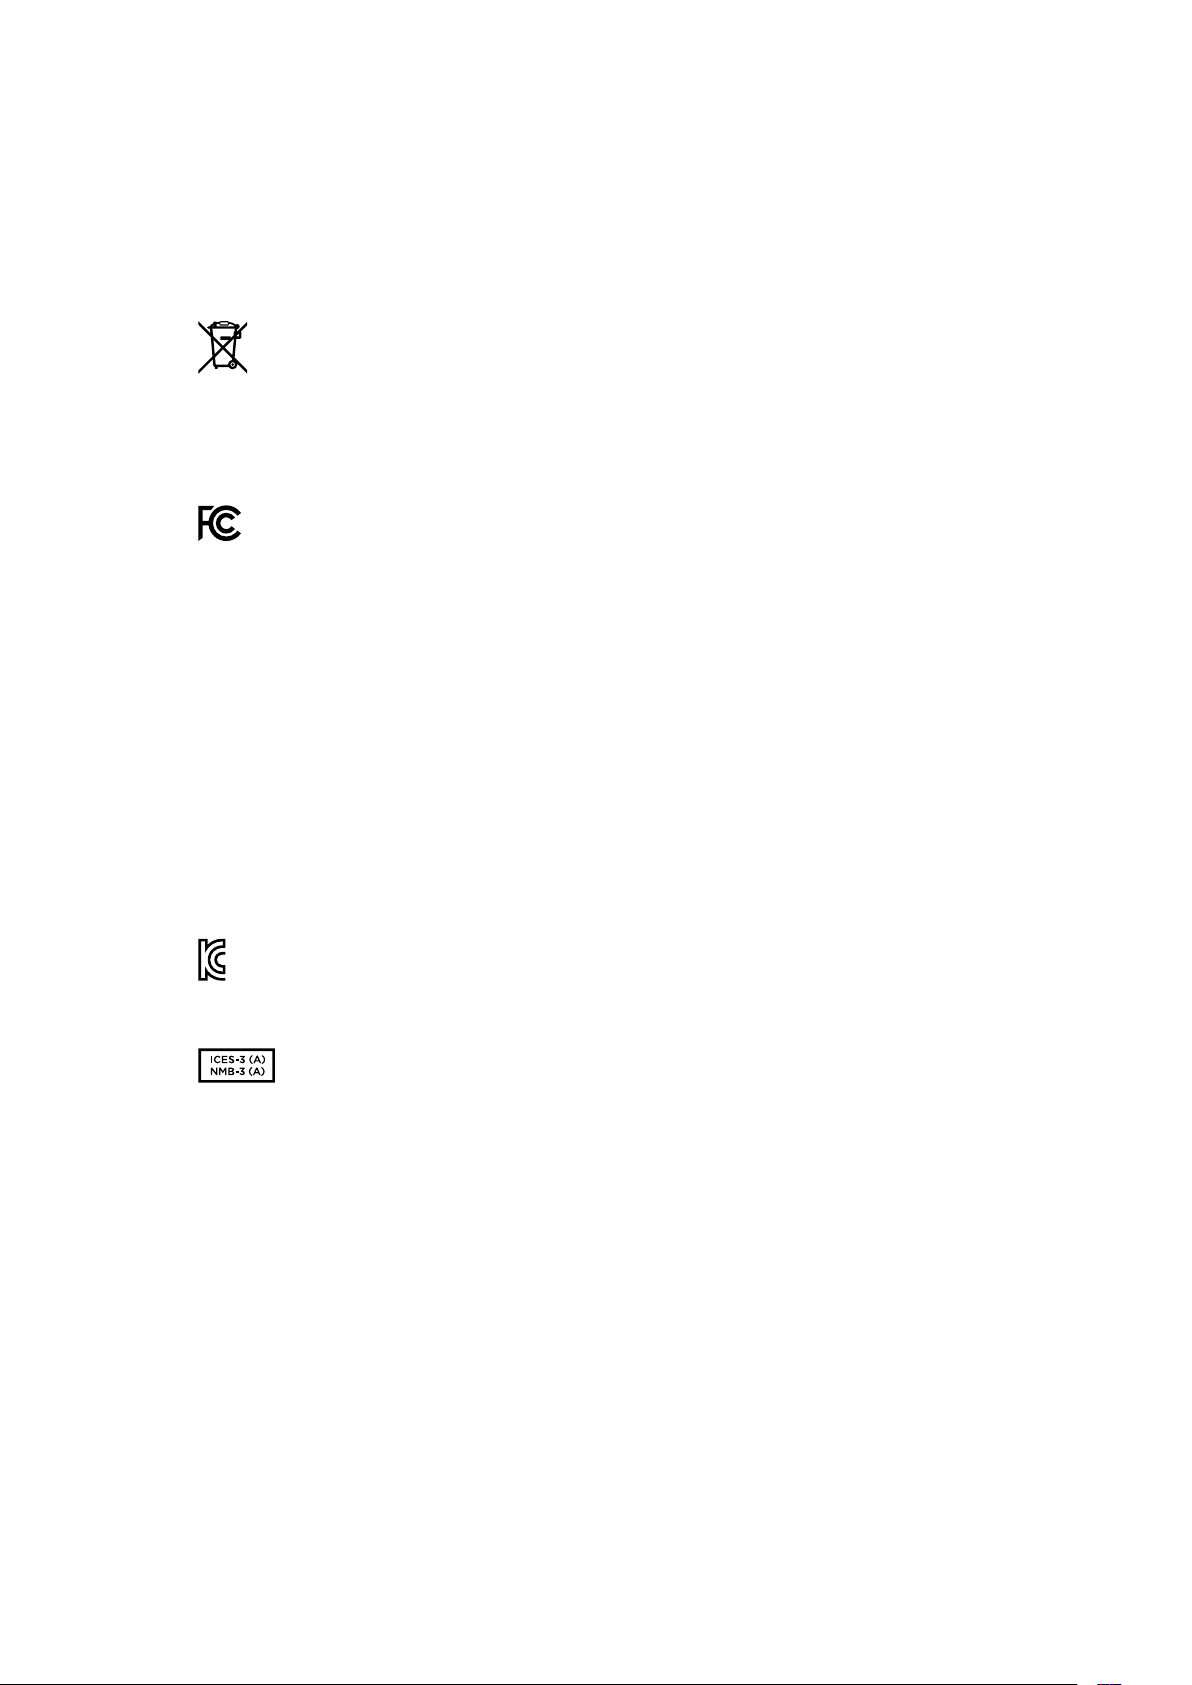
Соблюдение нормативных
требований
Утилизация электрооборудования иэлектронной аппаратуры вЕвропейском Союзе
Изделие содержит маркировку, всоответствии скоторой его запрещается
утилизировать вместе сбытовыми отходами. Непригодное для эксплуатации
оборудование необходимо передать впункт вторичной переработки. Раздельный
сбор отходов иих повторное использование позволяют беречь природные ресурсы,
охранять окружающую среду изащищать здоровье человека. Чтобы получить
подробную информацию опорядке утилизации, обратитесь вместные
муниципальные органы или кдилеру, укоторого вы приобрели это изделие.
Данное оборудование протестировано по требованиям для цифровых устройств
классаA (раздел15 спецификацийFCC) ипризнано соответствующим всем
предъявляемым критериям. Соблюдение упомянутых нормативов обеспечивает
достаточную защиту от вредного излучения при работе оборудования внежилых
помещениях. Так как это изделие генерирует иизлучает радиоволны, при
неправильной установке оно может становиться источником радиопомех. Если
оборудование эксплуатируется вжилых помещениях, высока вероятность
возникновения помех, влияние которых вэтом случае пользователь должен
устранить самостоятельно.
До эксплуатации допускаются устройства, соответствующие двум главным
требованиям.
1 Оборудование не должно быть источником вредных помех.
2 Оборудование должно быть устойчивым кпомехам, включая те, которые могут
вызвать сбой вработе.
R-R-BMD-20211410001
Соответствие требованиямISED (Канада)
Данное оборудование соответствует канадским стандартам для цифровых
устройств классаA.
Любая модификация или использование изделия не по назначению могут
повлечь за собой аннулирование заявления осоответствии этим стандартам.
Подключение кHDMI-интерфейсу должно выполняться спомощью
качественного экранированного кабеля.
Данное оборудование протестировано по требованиям, предъявляемым
кустройствам при работе внежилых помещениях. При использовании вбытовых
условиях оно может становиться источником помех для радиосигнала.
383Соблюдение нормативных требований

Правила безопасности
Допускается его эксплуатация вусловиях тропического климата стемпературой
окружающей среды до40ºC.
Для работы устройства необходимо обеспечить достаточную вентиляцию.
Внутри корпуса не содержатся детали, подлежащие обслуживанию. Для выполнения
ремонтных работ обратитесь вместный сервисный центрBlackmagic Design.
Допускается эксплуатация вместах не выше2000метров над уровнем моря.
Уведомление для жителей штата Калифорния
При работе сэтим оборудованием существует возможность контакта ссодержащимися
впластмассе микропримесями многобромистого бифенила, который вштате Калифорния
признан канцерогеном иувеличивает риск врожденных дефектов ипороков
репродуктивной системы.
Подробнее см.информацию на сайте www.P65Warnings.ca.gov.
384Правила безопасности

Гарантия
Ограниченная гарантия сроком 12месяцев
Компания Blackmagic Design гарантирует отсутствие вданном изделии дефектов материала
ипроизводственного брака втечение12месяцев сдаты продажи. Если во время гарантийного
срока будут выявлены дефекты, Blackmagic Design по своему усмотрению выполнит ремонт
неисправного изделия без оплаты стоимости запчастей итрудозатрат или заменит такое
изделие новым.
Чтобы воспользоваться настоящей гарантией, потребитель обязан уведомить компанию
Blackmagic Design одефекте до окончания гарантийного срока иобеспечить условия для
предоставления необходимых услуг. Потребитель несет ответственность за упаковку идоставку
неисправного изделия всоответствующий сервисный центрBlackmagic Design соплатой почтовых
расходов. Потребитель обязан оплатить все расходы по доставке истрахованию, пошлины,
налоги ииные сборы всвязи свозвратом изделия вне зависимости от причины возврата.
Настоящая гарантия не распространяется на дефекты, отказы иповреждения, возникшие из-за
ненадлежащего использования, неправильного ухода или обслуживания. КомпанияBlackmagic Design
не обязана предоставлять услуги по настоящей гарантии: а)для устранения повреждений,
возникших врезультате действий по установке, ремонту или обслуживанию изделия лицами,
которые не являются персоналомBlackmagic Design; б)для устранения повреждений, возникших
врезультате ненадлежащего использования или подключения кнесовместимому оборудованию;
в)для устранения повреждений или дефектов, вызванных использованием запчастей или
материалов других производителей; г)если изделие было модифицировано или интегрировано
сдругим оборудованием, когда такая модификация или интеграция увеличивает время или
повышает сложность обслуживания изделия. НАСТОЯЩАЯ ГАРАНТИЯ ПРЕДОСТАВЛЯЕТСЯ
КОМПАНИЕЙBLACKMAGIC DESIGN ВМЕСТО ЛЮБЫХ ДРУГИХ ПРЯМО ВЫРАЖЕННЫХ ИЛИ
ПОДРАЗУМЕВАЕМЫХ ГАРАНТИЙ. КОМПАНИЯBLACKMAGIC DESIGN ИЕЕ ДИЛЕРЫ ОТКАЗЫВАЮТСЯ
ОТ ЛЮБЫХ ПОДРАЗУМЕВАЕМЫХ ГАРАНТИЙ КОММЕРЧЕСКОЙ ЦЕННОСТИ ИЛИ ПРИГОДНОСТИ
ДЛЯ КАКОЙ-ЛИБО ОПРЕДЕЛЕННОЙ ЦЕЛИ. ОТВЕТСТВЕННОСТЬBLACKMAGIC DESIGN ПО
РЕМОНТУ ИЛИ ЗАМЕНЕ НЕИСПРАВНЫХ ИЗДЕЛИЙ ЯВЛЯЕТСЯ ПОЛНЫМ ИИСКЛЮЧИТЕЛЬНЫМ
СРЕДСТВОМ ВОЗМЕЩЕНИЯ, ПРЕДОСТАВЛЯЕМЫМ ПОТРЕБИТЕЛЮ ВСВЯЗИ СКОСВЕННЫМИ,
ФАКТИЧЕСКИМИ, СОПУТСТВУЮЩИМИ ИЛИ ПОСЛЕДУЮЩИМИ УБЫТКАМИ, ВНЕ ЗАВИСИМОСТИ
ОТ ТОГО, БЫЛА ИЛИ НЕТ КОМПАНИЯ BLACKMAGIC DESIGN (ЛИБО ЕЕ ДИЛЕР) ПРЕДВАРИТЕЛЬНО
ИЗВЕЩЕНА О ВОЗМОЖНОСТИ ТАКИХ УБЫТКОВ. BLACKMAGIC DESIGN НЕ НЕСЕТ
ОТВЕТСТВЕННОСТИ ЗА ПРОТИВОПРАВНОЕ ИСПОЛЬЗОВАНИЕ ОБОРУДОВАНИЯ СО СТОРОНЫ
ПОТРЕБИТЕЛЯ. BLACKMAGIC DESIGN НЕ НЕСЕТ ОТВЕТСТВЕННОСТИ ЗА УБЫТКИ, ВОЗНИКАЮЩИЕ
ВСЛЕДСТВИЕ ИСПОЛЬЗОВАНИЯ ЭТОГО ИЗДЕЛИЯ. РИСКИ, СВЯЗАННЫЕ СЕГО ЭКСПЛУАТАЦИЕЙ,
ВОЗЛАГАЮТСЯ НА ПОТРЕБИТЕЛЯ.
© Copyright2022 Blackmagic Design. Все права защищены. Blackmagic Design, DeckLink, HDLink, Workgroup Videohub,
Multibridge Pro, Multibridge Extreme, Intensity и"Leading the creative video revolution" зарегистрированы как товарные
знаки вСША идругих странах. Названия других компаний инаименования продуктов могут являться товарными знаками
соответствующих правообладателей.
385Гарантия

HyperDeck Shuttle HD
HyperDeck
Shuttle HD
Aprile 2022
Manuale di istruzioni

Gentile utente
Grazie per aver acquistato il registratore su disco Blackmagic HyperDeck Shuttle HD!
Abbiamo sviluppato i primi HyperDeck per semplificare la registrazione e la riproduzione
del video usando supporti di memoria SSD veloci. Ora siamo felici di presentare
HyperDeck Shuttle HD!
HyperDeck Shuttle HD è un registratore video HDMI piccolo e portatile pensato per la
scrivania. La grande manopola di ricerca e i comuni controlli di trasporto permettono di
operarlo con una mano, ideale in congiunzione allo switcher ATEM Mini nella produzione
dal vivo. HyperDeck Shuttle HD funge anche da teleprompter!
HyperDeck Shuttle HD registra sulle schede SD e sui flash disk esterni nei codec ProRes,
DNxHD o H.264, offrendo registrazione e riproduzione fulminee.
La versione più recente del manuale e gli aggiornamenti del software HyperDeck
sono disponibili alla pagina
www.blackmagicdesign.com/it. Consigliamo di aggiornare
regolarmente il dispositivo per accedere alle ultime funzioni. Quando scarichi il software,
registra i tuoi dati personali per stare al passo con gli aggiornamenti che rilasciamo. Siamo
sempre al lavoro per fornire nuove funzioni e miglioramenti, e ti invitiamo a condividere i
tuoi preziosi suggerimenti!
Grant Petty
CEO Blackmagic Design

Indice
Operazioni preliminari 389
Collegare l'alimentazione 389
Collegare video e audio 390
Collegare i supporti di memoria 390
Registrazione 391
Riproduzione 392
Usare la manopola 393
Cambiare le impostazioni 395
Impostazioni 396
Lato posteriore 405
Supporti di memoria 406
Schede SD 406
Dischi esterni 407
Formattare i supporti di memoria 407
Preparare i supporti di memoria sul computer 407
Usare la funzione Teleprompter 409
Blackmagic HyperDeck Setup 410
Trasferire i file in rete 412
Developer Information 414
Blackmagic HyperDeck Ethernet Protocol 414
Protocol Commands 414
Protocol Details 418
Assistenza 430
Normative 431
Sicurezza 432
Garanzia 433
388
HyperDeck Shuttle HD
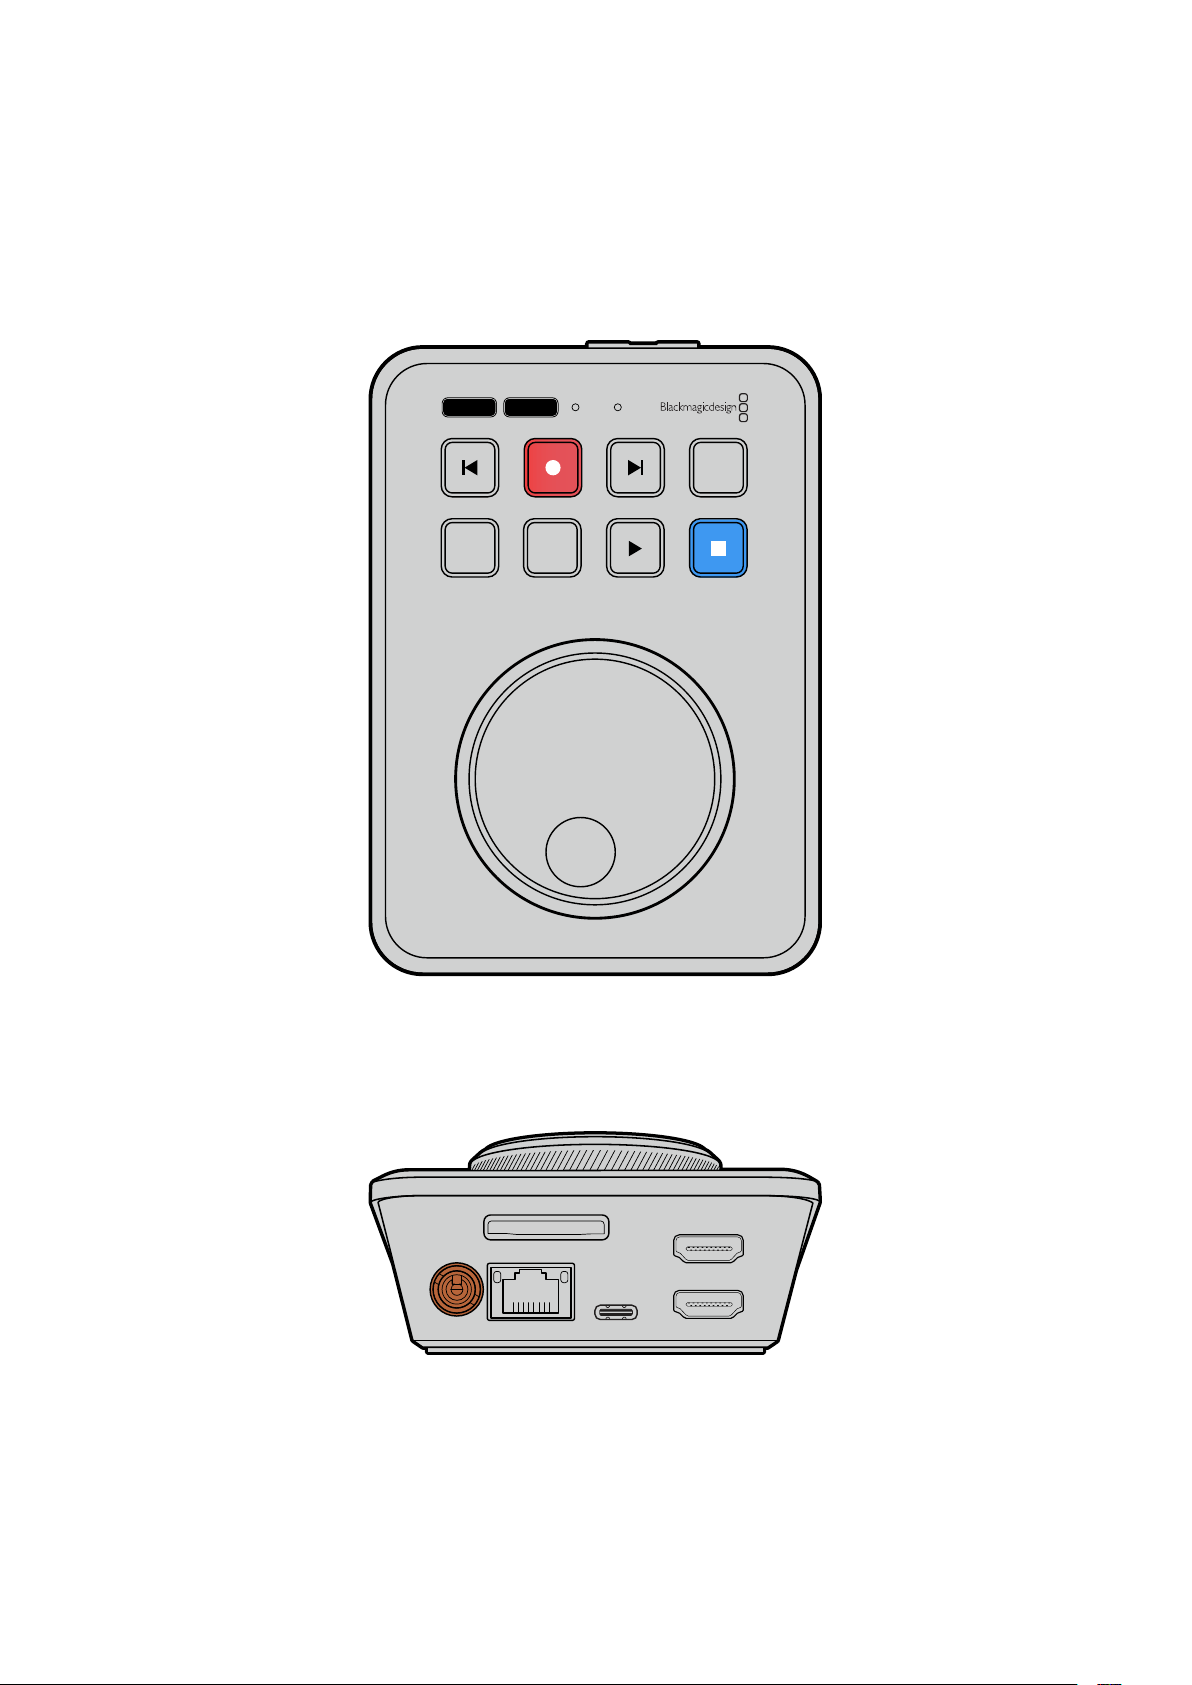
Operazioni preliminari
Per preparare HyperDeck Shuttle HD all’utilizzo basta collegare l’alimentazione e una sorgente
video HDMI, inserire una scheda SD o un supporto di memoria esterno e premere REC.
Questa parte del manuale illustra come mettere in pratica queste operazioni.
JOG SCR
CLIP
MENU SET
DISK SD
Collegare l'alimentazione
Inserisci l’adattatore in dotazione nell’ingresso di alimentazione sul retro di HyperDeck Shuttle
HD, avvitando l’anello di bloccaggio per evitare che il cavo si scolleghi.
HDMI OUT
HDMI IN
EXT DISK
SD CARD
ETHERNET
+
12V DC
Inserisci e blocca l’adattatore nell’ingresso di alimentazione
389
Operazioni preliminari
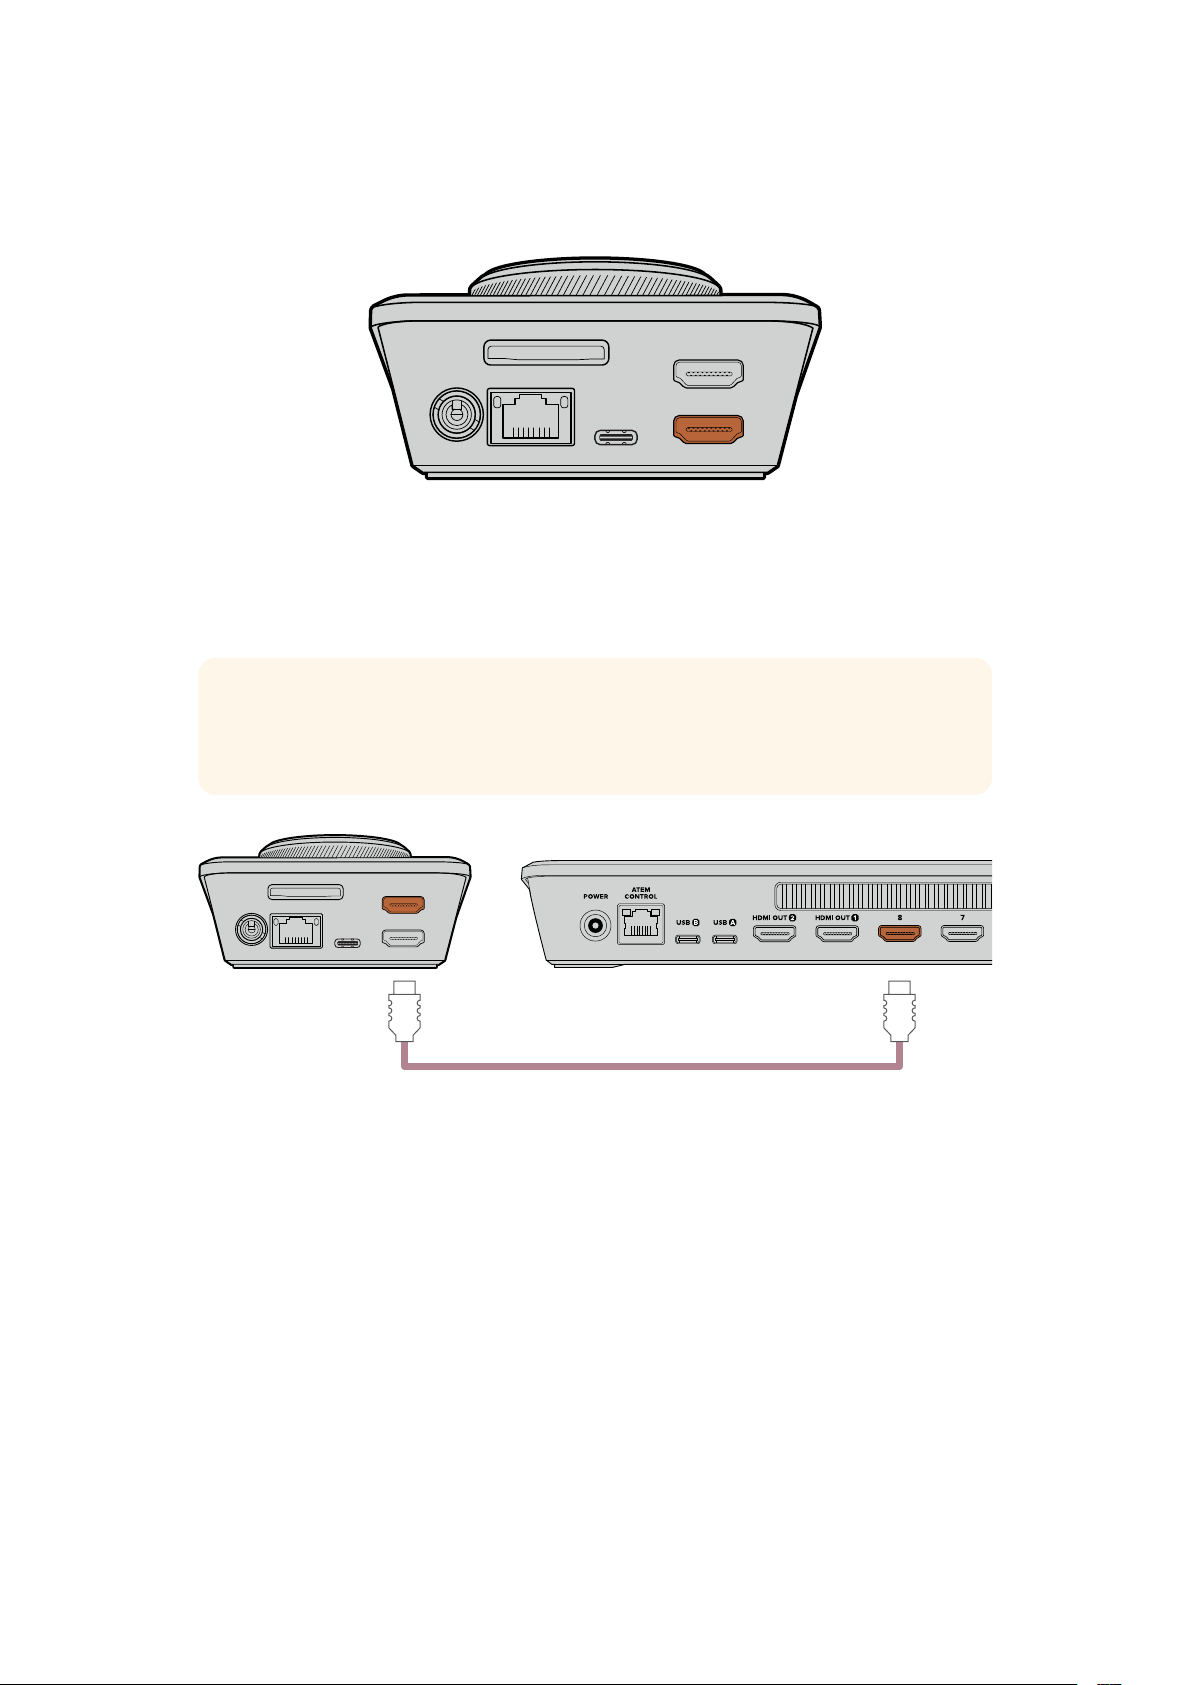
Collegare video e audio
Collega una sorgente video nell’ingresso HDMI sul retro di HyperDeck Shuttle HD.
HDMI OUT
HDMI IN
EXT DISK
SD CARD
ETHERNET
+
12V DC
Collega un dispositivo di destinazione all’uscita HDMI, per esempio uno switcher ATEM Mini o
una televisione HDMI.
Mentre cambi le impostazioni di HyperDeck, l’uscita HDMI consente di visualizzare il menù in
sovraimpressione sul video. Le informazioni sui menù sono fornite nella sezione “Cambiare le
impostazioni”.
SUGGERIMENTO Se il display connesso non visualizza la sorgente video in entrata, è
probabile che HyperDeck sia in modalità di riproduzione. Premi il tasto REC per
abilitare la modalità di registrazione.
HDMI OUT
HDMI IN
EXT DISK
SD CARD
ETHERNET
+
12V DC
HDMI
Collega l’uscita HDMI a un dispositivo di destinazione, ad esempio
una televisione HDMI o uno switcher ATEM Mini
Collegare i supporti di memoria
I registratori HyperDeck Shuttle HD sono già pronti per registrare e non richiedono una
configurazione preliminare. Basta inserire una scheda SD o un disco esterno formattati.
I supporti di memoria si possono formattare dal menù o su un computer. La sezione “Formattare
i supporti di memoria” contiene tutte le informazioni necessarie, compresi i supporti migliori per
registrare il video e la lista delle schede SD e dei dischi esterni consigliati.
Inserire una scheda SD
1 Accosta la scheda allo slot con i connettori dorati rivolti verso l’alto. Spingi
delicatamente la scheda nello slot fino a bloccarla in posizione.
390Operazioni preliminari
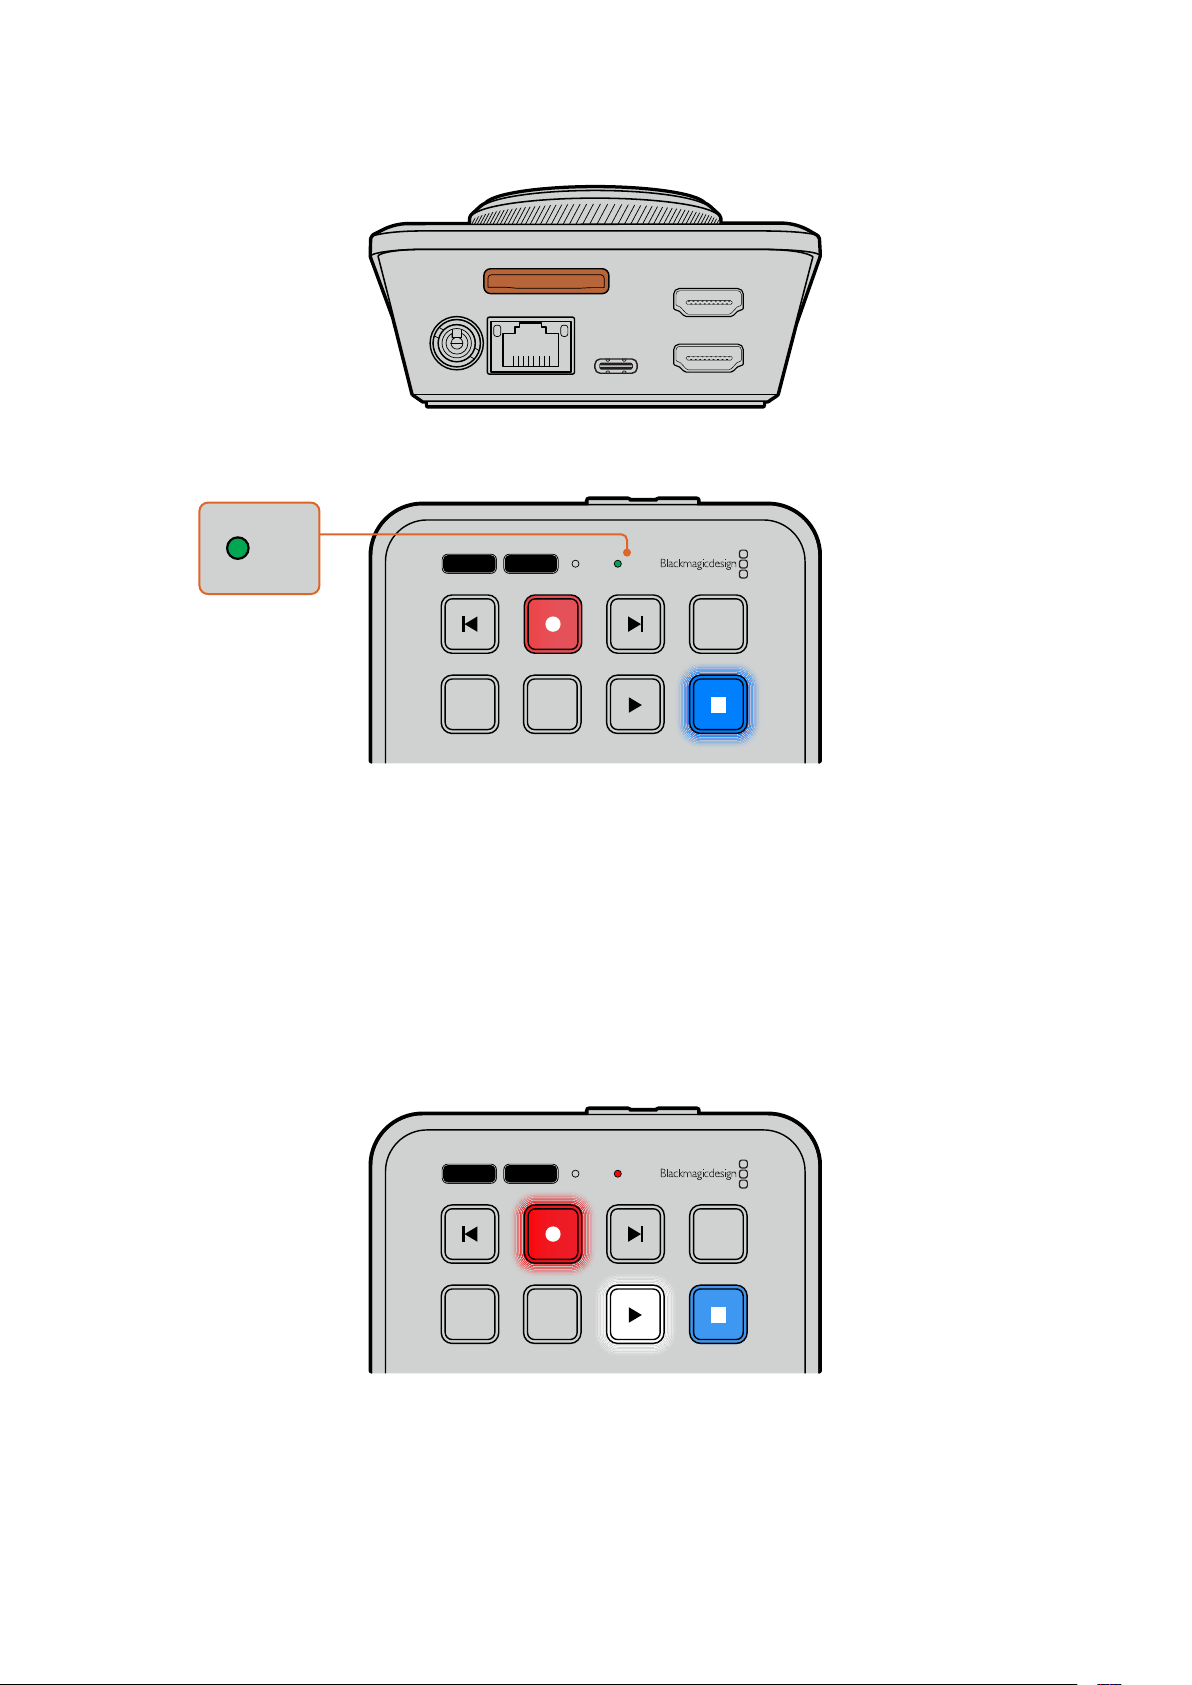
HDMI OUT
HDMI IN
EXT DISK
SD CARD
ETHERNET
+
12V DC
2 HyperDeck verificherà la scheda. Durante questa fase, la spia SD frontale è illuminata
di verde. La spia si spegne a verifica effettuata.
JOG SCR
CLIP
MENU SET
DISK SD
DISK SD
Ora HyperDeck Shuttle HD è pronto per registrare e riprodurre.
Continua a leggere il manuale per scoprire come registrare e riprodurre le clip e cambiare le
impostazioni.
Registrazione
Dopo aver verificato la sorgente video sul dispositivo HDMI di destinazione, puoi iniziare a
registrare.
Premi REC per avviare la registrazione. Se registri su una scheda SD, la spia SD diventa rossa e
i tasti REC e PLAY si illuminano. Se registri su un disco esterno, la spia DISK diventa rossa.
JOG SCR
CLIP
MENU SET
DISK SD
Premi STOP per interrompere la registrazione.
391Registrazione

Riproduzione
Premi PLAY per avviare la riproduzione. Il tasto PLAY si illumina e la spia SD o DISK diventa verde.
Se la registrazione contiene diverse clip, puoi scorrere con i tasti SKIP Avanti e Indietro.
JOG SCR
CLIP
MENU SET
DISK SD
Usare i tasti SKIP
Premi SKIP Indietro per raggiungere l’inizio della clip; premilo più di una volta per indietreggiare
tra le clip registrate.
Premi SKIP Avanti per avanzare tra le clip registrate.
JOG SCR
CLIP
MENU SET
DISK SD
Premi SKIP Avanti e Indietro per raggiungere l’inizio di ogni clip
SUGGERIMENTO Per riprodurre i file video è necessario che il codec coincida con
quello usato per registrarli. Questa impostazione è disponibile nel menù. Consulta la
sezione “Cambiare le impostazioni” per tutti i dettagli.
Riproduzione continua
Durante la riproduzione, premi di nuovo PLAY per abilitare la riproduzione continua di tutte le
clip; premi STOP per disabilitarla.
Per riprodurre continuamente una sola clip è necessario impostare HyperDeck sulla modalità
Clip, ovvero selezionare CLIP e poi premere due volte PLAY.
Tutte le clip
Durante la riproduzione, premi due volte PLAY per riprodurre continuamente tutte
leclip.
Una clip In modalità Clip, premi due volte PLAY per riprodurre continuamente la clip corrente.
392Riproduzione

Modalità Clip
Limita la riproduzione a una sola clip. Quando è abilitata, puoi scorrere o spostarti su una clip
con shuttle o SKIP e riprodurla. La riproduzione terminerà dove termina la clip.
JOG SCR
CLIP
MENU SET
DISK SD
Premi CLIP e poi due volte PLAY per riprodurre
continuamente la clip corrente in modalità Clip
Usare la manopola
La manopola consente di scorrere con rapidità le clip e trovare parti specifiche da riprodurre,
orivedere fotogramma per fotogramma. È utile per cercare un momento specifico della clip
osservando le immagini, e per posizionare con precisione la playhead nel punto da mandare in
onda durante la trasmissione.
La manopola funziona in modalità jog, shuttle o scroll.
Jog Riproduci fotogramma per fotogramma con precisione.
Scroll
Spostati velocemente tra tutti i file multimediali registrati ruotando
la manopola. In questa modalità puoi posizionare con precisione la
playhead prima di avviare la riproduzione.
Shuttle
Premi insieme i tasti JOG e SCR per passare alla modalità shuttle.
In questa modalità, ruota la manopola verso destra o sinistra per
spostarti avanti o indietro veloce tra tutti i file multimediali, a una
velocità massima di x50. Per diminuire la velocità fino a un punto di
arresto, ruota la manopola verso la posizione di partenza. Durante
lo shuttle, premi STOP per interrompere la riproduzione in un punto
esatto e premi PLAY per farla ripartire da quel punto. Puoi cambiare la
velocità massima della funzione di shuttle nel menù Configurazione.
Consulta la sezione “Impostazioni” per tutti i dettagli.
393Riproduzione

JOG SCR
CLIP
MENU SET
DISK SD
Abilita la modalità jog, scroll o shuttle
premendo i tasti corrispondenti
JOG SCR
CLIP
MENU SET
DISK SD
Ruota la manopola per scorrere nella modalità selezionata
SUGGERIMENTO Premi PLAY o STOP per tornare alla modalità di riproduzione
normale.
394Riproduzione
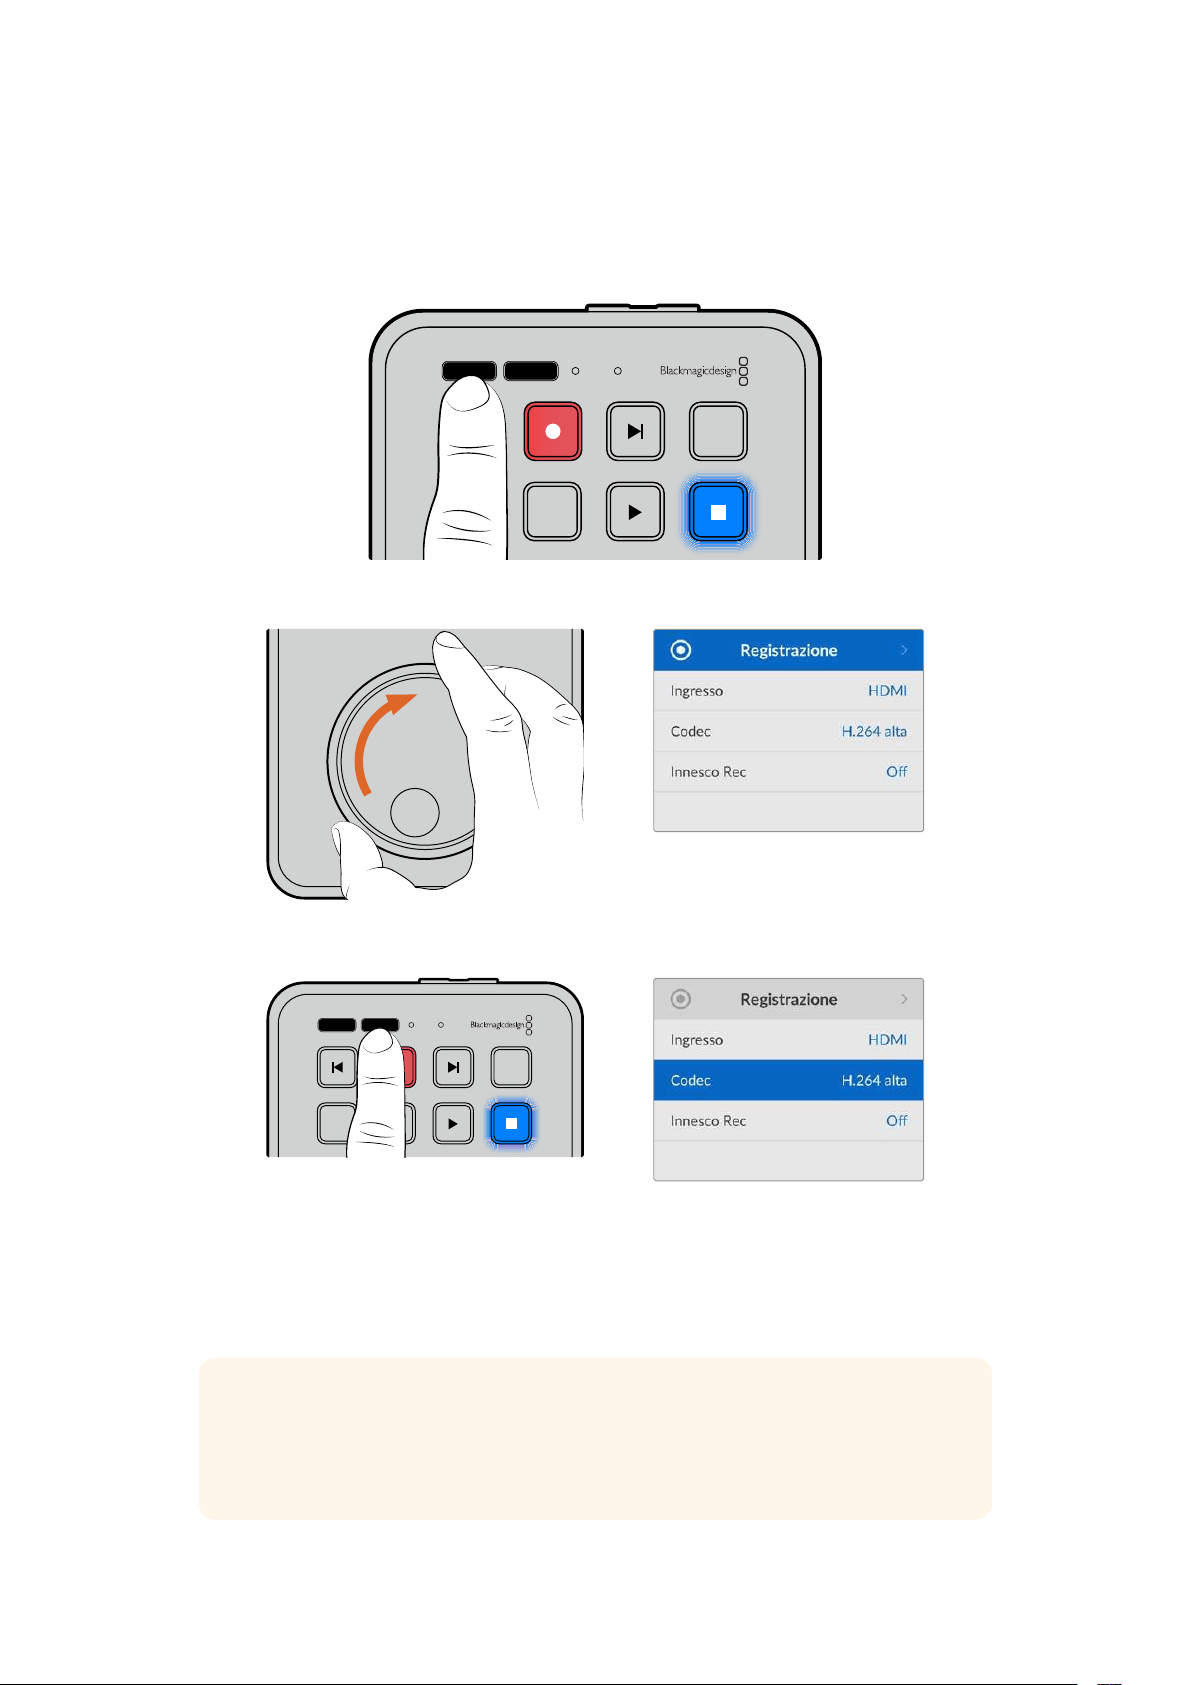
Cambiare le impostazioni
Premi il tasto MENU per vedere il menù in sovraimpressione in basso a sinistra del video
visualizzato sul display HDMI connesso.
JOG SCR
CLIP
MENU SET
DISK SD
Premi MENU per visualizzare il menù
Ruota la manopola per navigare i sottomenù e le impostazioni
Premi SET per selezionare un sottomenù o un’impostazione
Puoi cambiare le impostazioni usando la manopola o i tasti SKIP Avanti e Indietro. Premi SET
per confermare le selezioni.
Premi MENU per indietreggiare nelle impostazioni fino a tornare alla schermata principale.
SUGGERIMENTO Puoi posizionare il menù in uno qualsiasi dei quattro angoli del
display. Dopo aver cambiato le impostazioni, consigliamo di nascondere il menù
sull’uscita HDMI per vedere solo il clean feed dello switcher HDMI connesso, ad
esempio ATEM Mini Extreme.
JOG SCR
CLIP
MENU SET
DISK SD
395Cambiare le impostazioni

Impostazioni
Le impostazioni sono organizzate in 5 menù: Registrazione, Monitoraggio, Audio, Archiviazione
e Configurazione. La maggior parte delle impostazioni si può modificare dal pannello di
controllo di HyperDeck Shuttle HD. Le impostazioni non selezionabili, per esempio il prefisso
del nome del file, si possono modificare solo dall’utility HyperDeck Setup.
Registrazione
Ingresso
Indica l’ingresso HDMI di HyperDeck Shuttle HD.
Codec
HyperDeck Shuttle HD può registrare video compresso nel codec H.264, Apple ProRes o
DNxHD. Seleziona
Teleprompter per usare questa funzione.
Innesco Rec
La funzione di innesco della registrazione è disponibile in due modalità: Video Start/Stop
e Timecode.
Alcune camere, per esempio Blackmagic Pocket Cinema Camera 4K, inviano un segnale tramite
HDMI per avviare e interrompere la registrazione sui registratori esterni. Scegli
Video Start/Stop
per far sì che HyperDeck avvii e interrompa la registrazione quando viene premuto Rec sulla
telecamera.
Scegli
Timecode per far sì che HyperDeck avvii la registrazione quando riceve un segnale di
timecode valido dall’ingresso HDMI. Se il segnale si disconnette, la registrazione si interrompe.
Scegli Off per disabilitare la funzione di innesco della registrazione.
NOTA Se la telecamera è HDMI, appurati che il segnale in uscita non mostri
informazioni in sovraimpressione per evitare di registrarle con l'immagine.
396Impostazioni
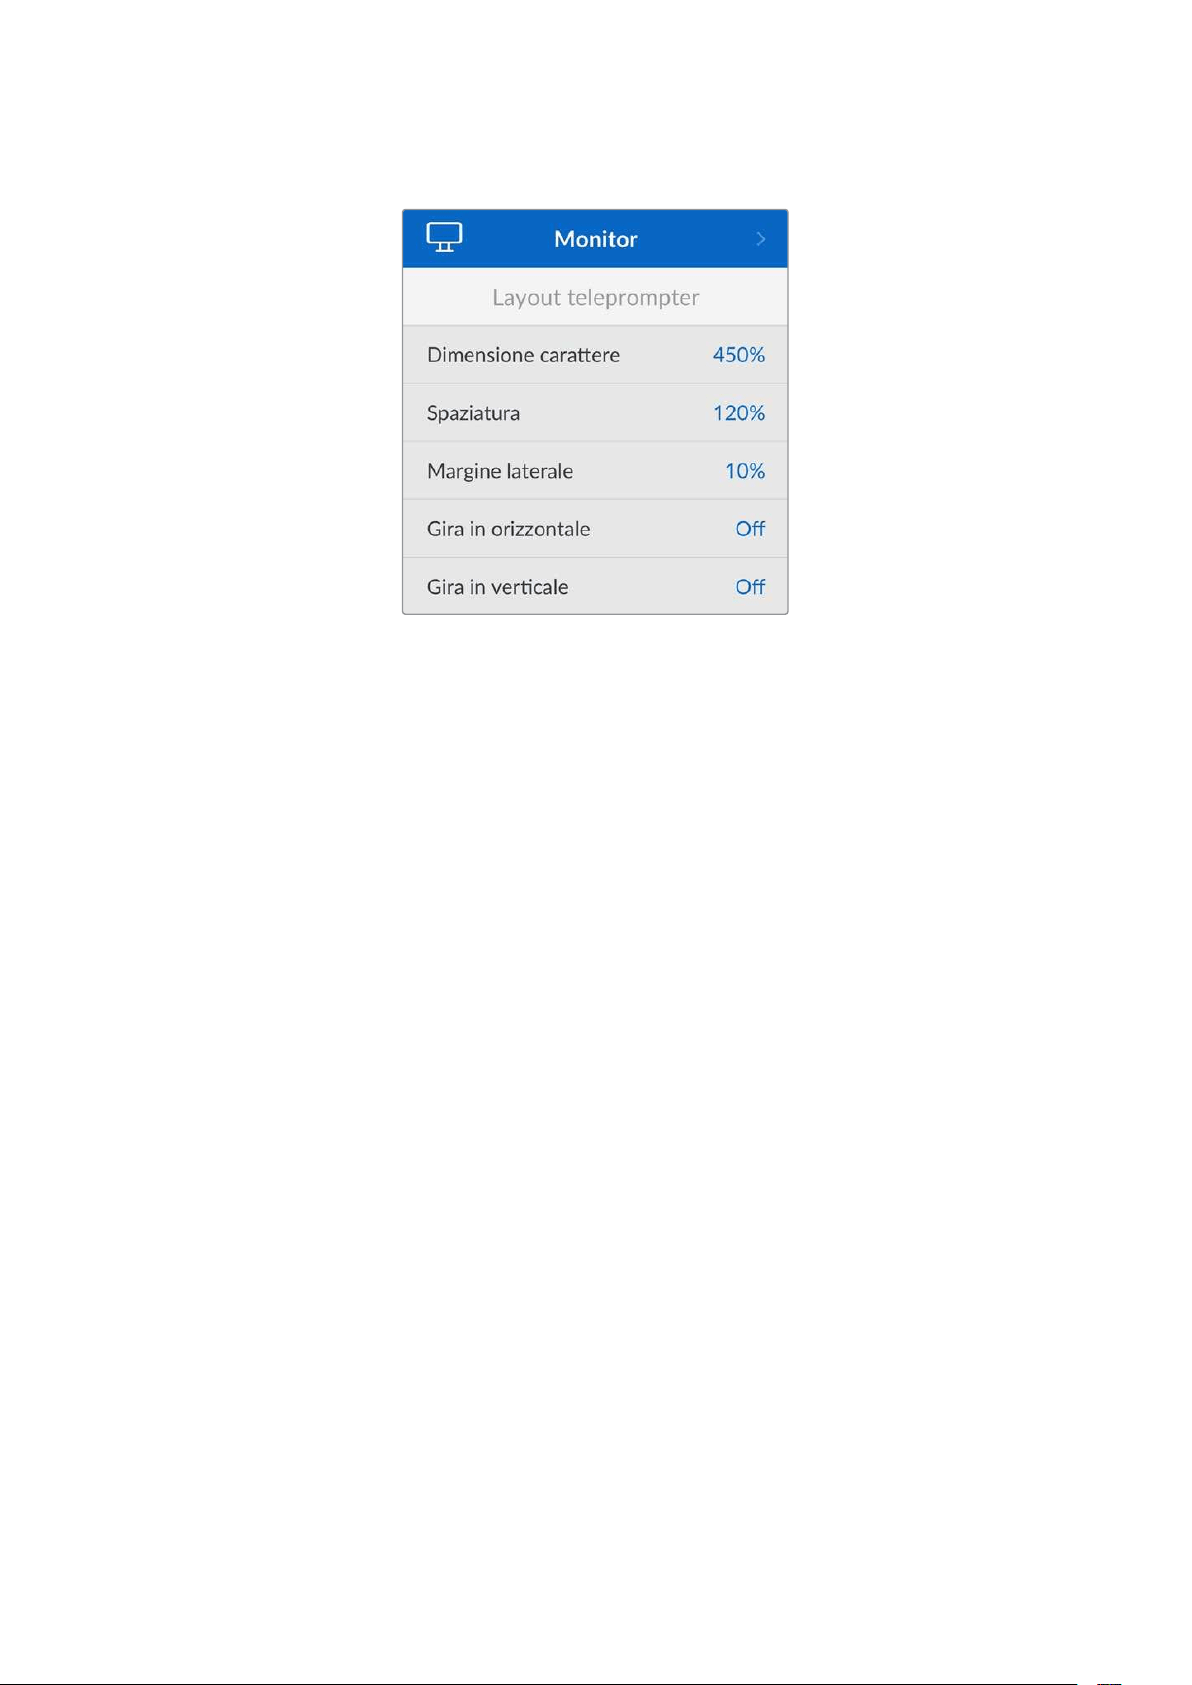
Monitoraggio
Layout teleprompter
Queste impostazioni servono per gestire il teleprompter di HyperDeck Shuttle HD.
Dimensione carattere
Regola la dimensione del testo e premi SET per confermare. Ruota la manopola per
incrementare o ridurre la percentuale.
Spaziatura
Ruota la manopola per incrementare o ridurre la spaziatura tra le righe.
Margine laterale
Regola la larghezza dei due margini laterali del teleprompter.
Gira
Se il monitor del tuo teleprompter è impostato per riflettere su vetro, ad esempio davanti a una
telecamera o su un podio, gira il testo per consentirne la lettura. Sono disponibili due opzioni:
Gira in orizzontale - Quando la parte inferiore del teleprompter è montata vicino alla
base del vetro riflettente.
Gira in verticale - Quando la parte inferiore del teleprompter è montata lontano dalla
base del vetro riflettente.
397Impostazioni
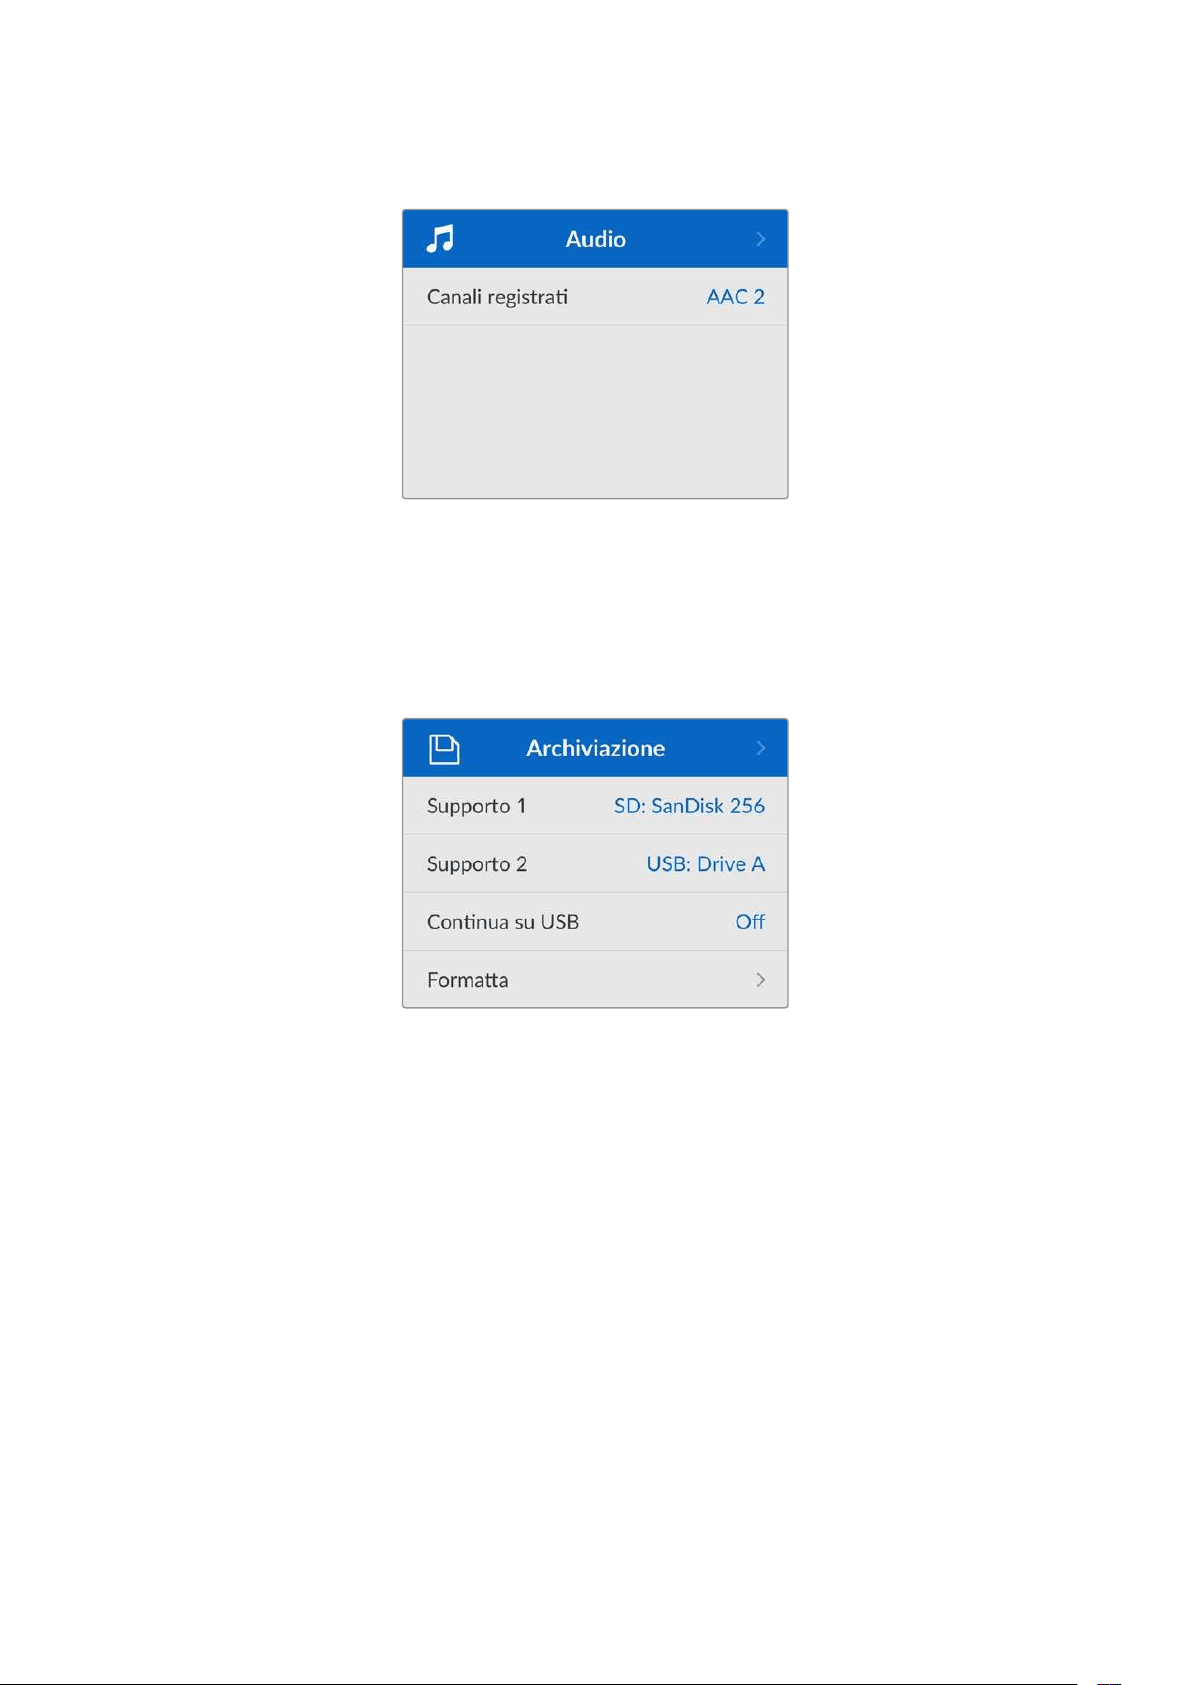
Audio
Canali registrati
Il deck consente di registrare fino a 8 canali di audio PCM alla volta. Apri questa impostazione
escegli
2, 4 o 8 canali dalla lista.
Se il codec è H.264, puoi selezionare 2 canali di audio AAC per caricare le registrazioni
direttamente su YouTube.
Archiviazione
Queste impostazioni si riferiscono ai supporti di memoria collegati. Supporto 1 mostra il nome
della scheda SD inserita. Supporto 2 indica il flash disk USB collegato al connettore EXT DISK;
nel caso di un hub USB, come Blackmagic MultiDock 10G, indica il disco attivo.
Continua su USB
Se usi Blackmagic MultiDock 10G o un dispositivo simile per collegare diversi drive tramite il
connettore EXT DISK, abilita questa impostazione per far sì che la registrazione prosegua da un
disco esterno all’altro.
Formatta
Le schede SD e i supporti di memoria collegati al connettore EXT DISK si possono formattare
su HyperDeck o su un computer Mac o Windows.
Formattare su HyperDeck Shuttle HD
1 Ruota la manopola fino all’impostazione Formatta e premi SET.
2 Seleziona il supporto da formattare dalla lista e premi SET.
3 Seleziona il formato e premi SET.
4 Nella finestra che conferma il supporto e il formato selezionati, procedi con Formatta.
5 Nella finestra che conferma la formattazione effettuata, procedi con OK.
398Impostazioni
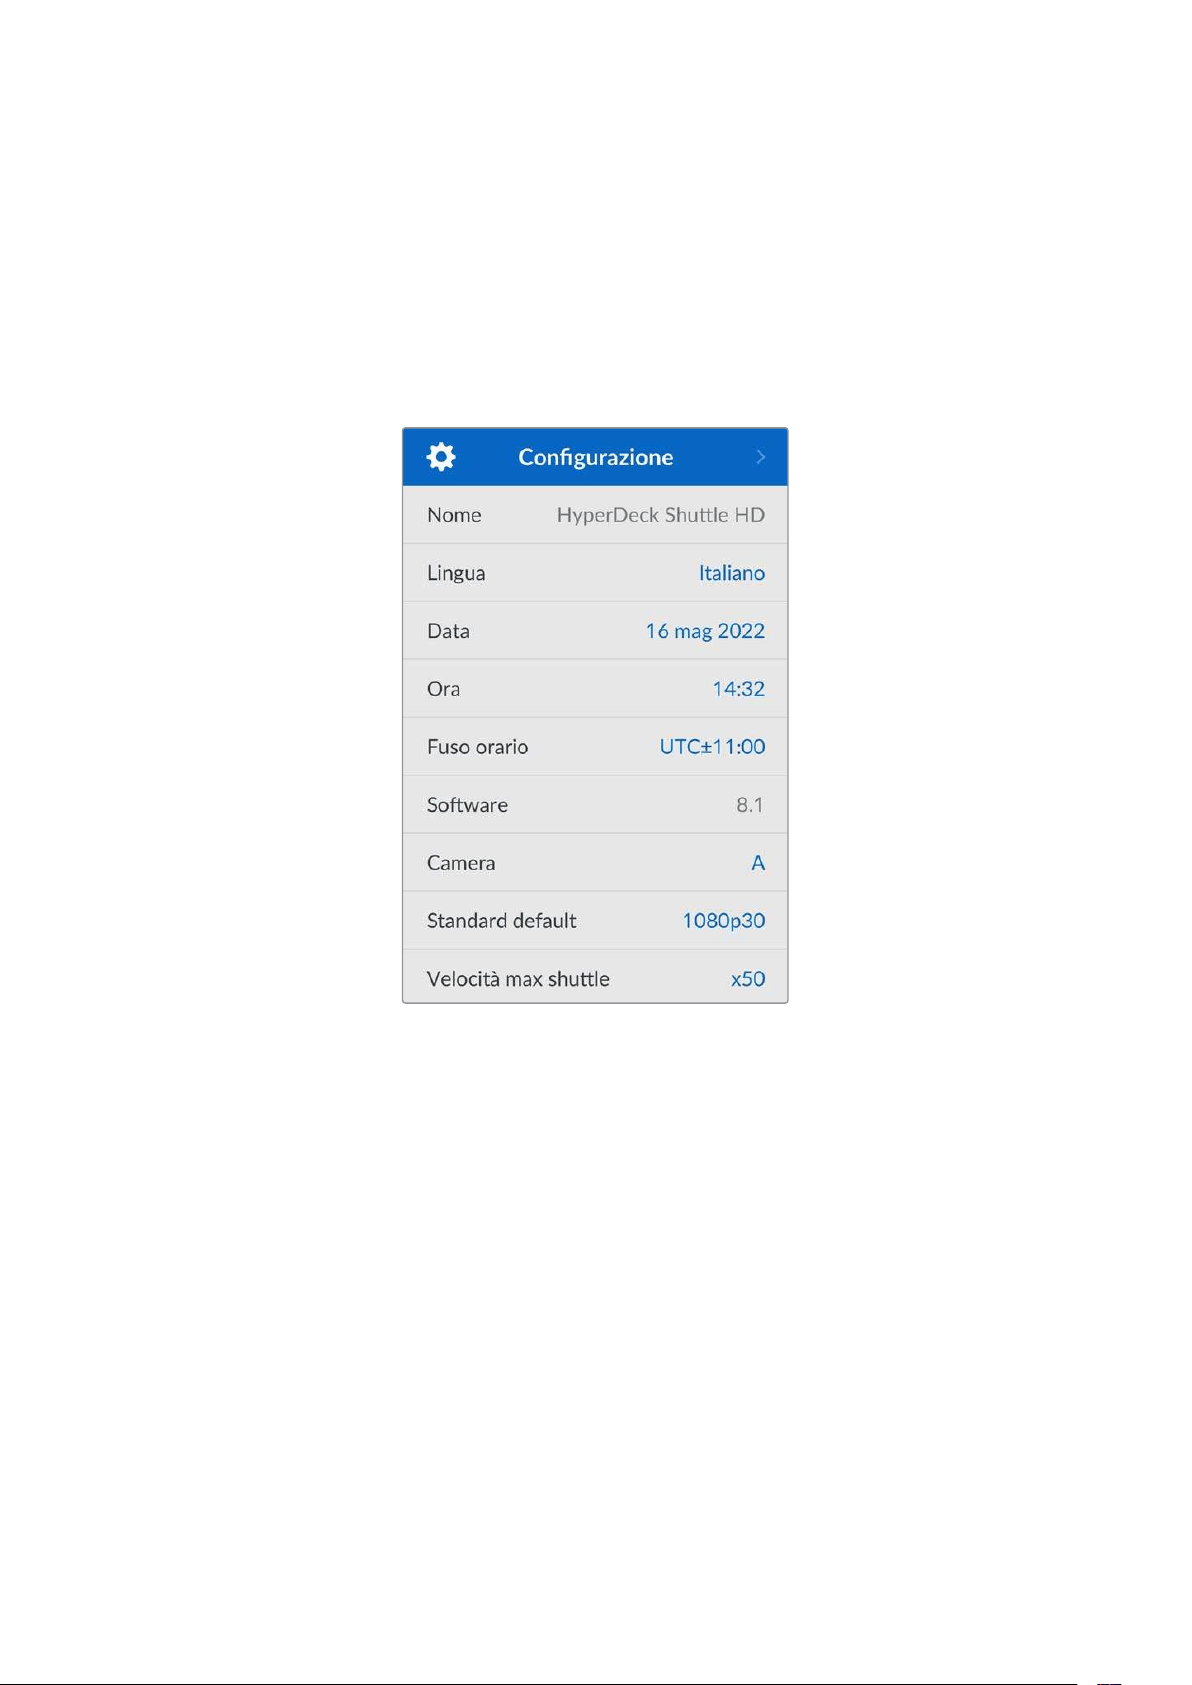
HFS+, conosciuto anche come Mac OS X Extended, è il formato consigliato perché supporta il
journaling, grazie a cui è molto più probabile recuperare i dati in caso di danneggiamento del
supporto di memoria. HFS+ è supportato nativamente da Mac; exFAT è supportato nativamente
da Mac e Windows senza richiedere altri software, ma non ammette il journaling.
Leggi la sezione “Formattare i supporti di memoria” per formattare su Windows o Mac.
Configurazione
Queste impostazioni permettono di gestire la lingua del software, lo standard di default,
l’aspetto del menù, le opzioni di rete e il timecode.
Nome
Se in rete ci sono vari HyperDeck Shuttle HD, conviene dare un nome a ciascuno per
distinguerli. Puoi farlo nell’utility Blackmagic HyperDeck Setup o mediante Blackmagic
HyperDeck Ethernet Protocol con una applicazione terminale. Il nome inserito compare in
questa voce.
Lingua
HyperDeck Shuttle HD si può usare in 13 lingue: inglese, cinese, giapponese, coreano,
spagnolo, tedesco, francese, russo, italiano, portoghese, turco, ucraino e polacco.
399Impostazioni

Selezionare la lingua
1 Seleziona il menù Configurazione e premi SET.
2 Ruota la manopola fino alla voce Lingua e premi SET.
3 Ruota la manopola fino alla lingua desiderata e premi SET. La schermata tornerà
automaticamente al menù Configurazione.
Data
Seleziona questa impostazione e premi SET. Ruota la manopola per impostare giorno, mese e
anno. Questi dati finiranno nel suffisso timestamp, se abilitato.
Ora
Seleziona questa impostazione e premi SET. Ruota la manopola per impostare ora e minuti.
L’orologio di HyperDeck Shuttle HD è nel formato 24 ore.
Software
Indica la versione attuale del software.
Camera
Questa impostazione è utile se usi HyperDeck per registrare i file di ciascuna camera
separatamente e montarli nella timeline multicamera di DaVinci Resolve.
La lettera identificativa comparirà nei metadati del file, consentendo a DaVinciResolve di
identificare le inquadrature sfruttando la funzione del Sync Bin.
Assegna alla camera una lettera A-Z o un numero 1-9
Standard default
Questa impostazione è utile quando HyperDeck non è in grado di determinare quale standard
video usare.
Per esempio se al deck non è connesso nessun ingresso video e colleghi un disco contenente
file di due standard video differenti, quale dei due verrà riprodotto? Abilitando questa
impostazione, il deck seleziona lo standard più adatto e riproduce i file pertinenti.
L’impostazione dello standard video di default è utile anche alla prima accensione di
HyperDeck Shuttle HD, in assenza di un ingresso video e di un supporto di memoria. Non
essendo in grado di determinare quale standard video usare sull’uscita di monitoraggio, il deck
si basa su quello suggerito da questa impostazione.
Lo standard di default è solo una guida e non prevarica sulle altre funzioni. Ad esempio se
colleghi un disco contenente file video dello stesso standard e premi PLAY, HyperDeck passa a
quello standard per riprodurre i file, tralasciando lo standard di default.
400Impostazioni

Lo stesso si verifica nella registrazione. Se premi REC, HyperDeck registra lo standard video
dell’ingresso video collegato. Terminata la registrazione, riprodurrà i file in questo stesso
standard video, anche se il disco contiene altri file il cui standard video combacia con quello di
default. Dà per scontato che voglia riprodurre i file nello stesso standard video con cui sono
stati registrati. Solo se scolleghi e ricolleghi il disco, il deck adotterà lo standard video di default
e riprodurrà i file pertinenti.
Lo standard video di default è un ausilio che consente ad HyperDeck Shuttle HD di effettuare la
selezione più adatta nelle circostanze menzionate, senza comprometterne il
funzionamento consueto.
Velocità max shuttle
La velocità massima della funzione di shuttle è x50. Scegli una delle opzioni disponibili
per ridurla.
Menù
Queste impostazioni permettono di modificare la posizione e l’aspetto del menù in
sovraimpressione sul display HDMI collegato.
Aspetto
Scegli se visualizzare il menù con uno sfondo chiaro o scuro. Lo sfondo chiaro è più adatto se il
materiale multimediale è scuro o se usi il teleprompter.
Opacità
Regola l’opacità del menù in sovraimpressione sul display collegato tra il 100% di
default e il 20%.
Posizione
Di default, il menù in sovraimpressione compare in basso a sinistra sul display collegato. Apri
questa impostazione e scegli un’altra opzione per riposizionarlo in alto a sinistra, in alto a destra
o in basso a destra.
401Impostazioni
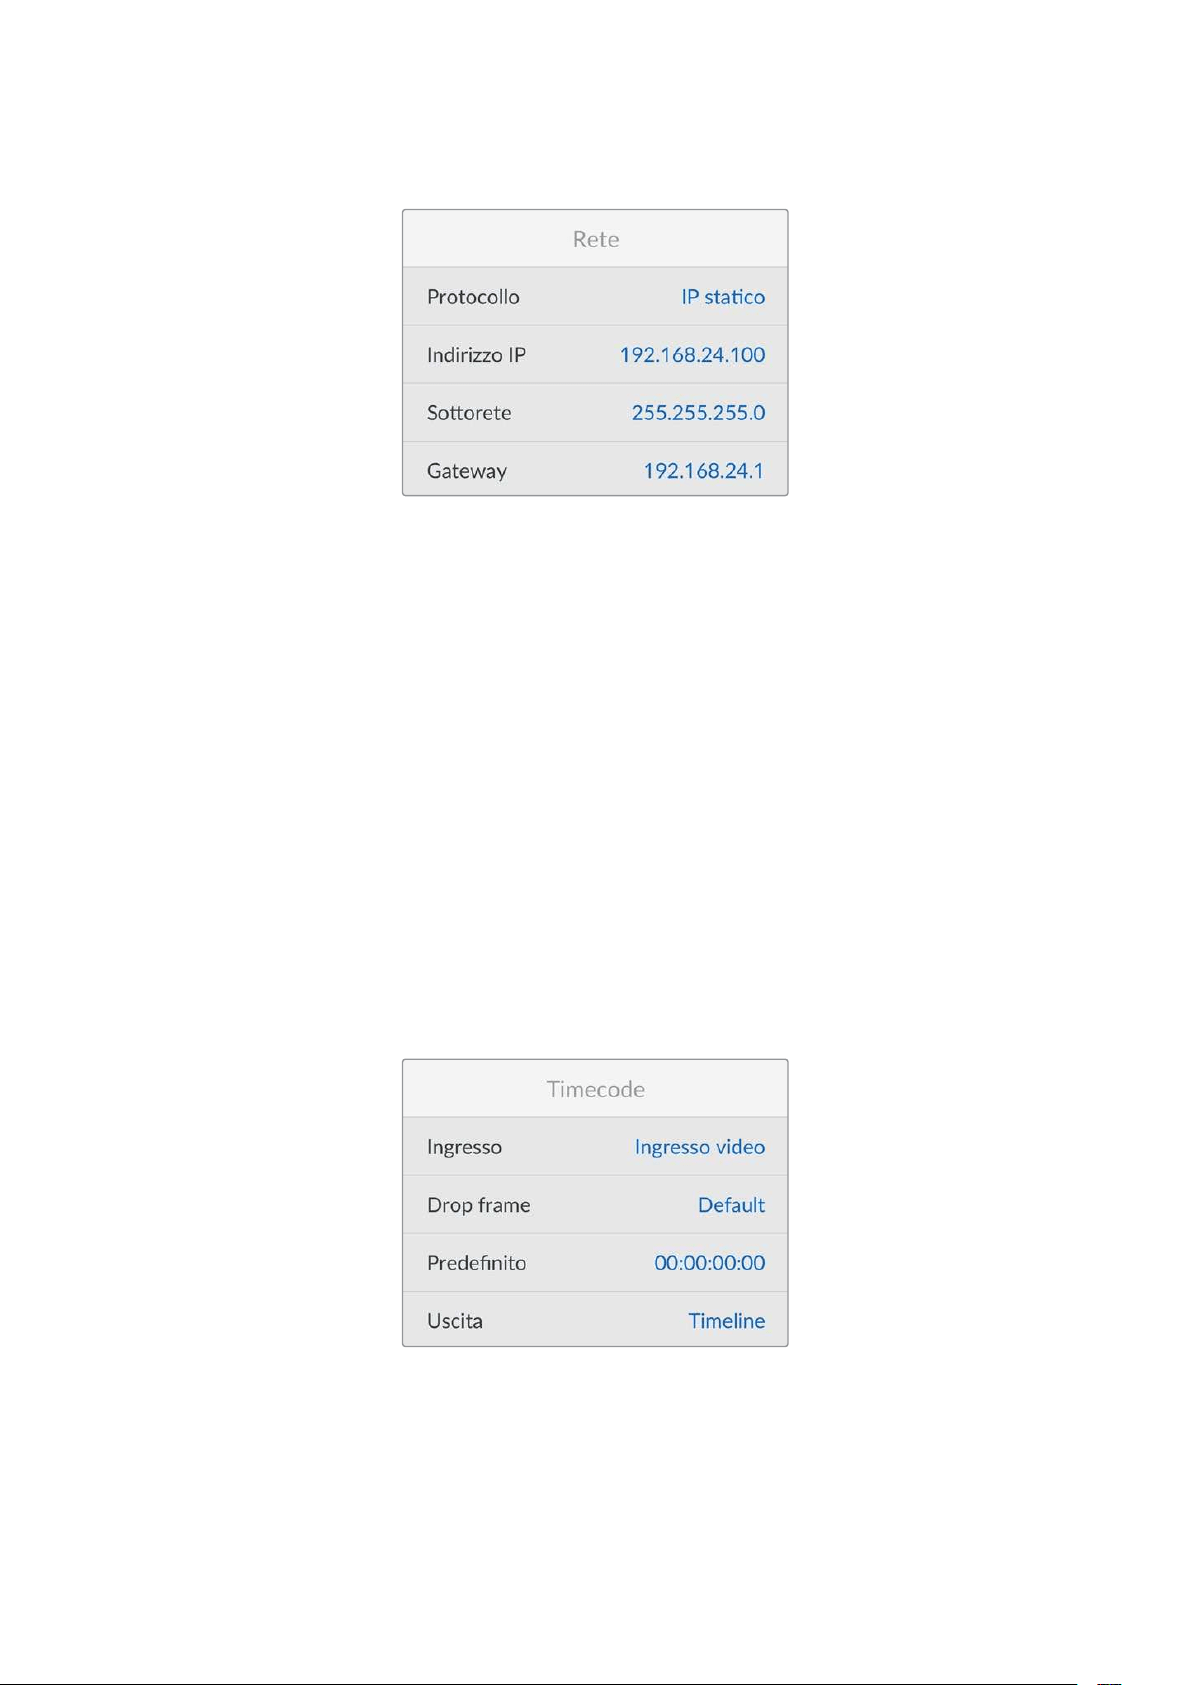
Rete
Protocollo
HyperDeck è impostato su DHCP di default: una volta connesso, il server di rete gli assegna
automaticamente un indirizzo IP e non c’è bisogno di configurare nessun’altra impostazione. Per
impostare manualmente l’indirizzo è necessario un IP statico.
Seleziona
Protocollo e premi SET; seleziona IP statico dalla lista e premi SET.
Indirizzo IP, Sottorete, Gateway, DNS primario e DNS secondario
Dopo aver selezionato l’opzione di IP statico, puoi inserire i valori manualmente.
Cambiare indirizzo IP
1 Ruota la manopola fino all’impostazione Indirizzo IP e premi SET.
2 Ruota la manopola per cambiare i campi dell’indirizzo IP.
3 Premi SET per confermare un campo e passare al successivo.
Segui lo stesso procedimento per modificare Sottorete e Gateway. Premi MENU per tornare alla
schermata principale.
Timecode
Queste impostazioni servono per definire il timecode in entrata e uscita, e scegliere di
registrare il timecode sorgente, ora del giorno o predefinito.
402Impostazioni
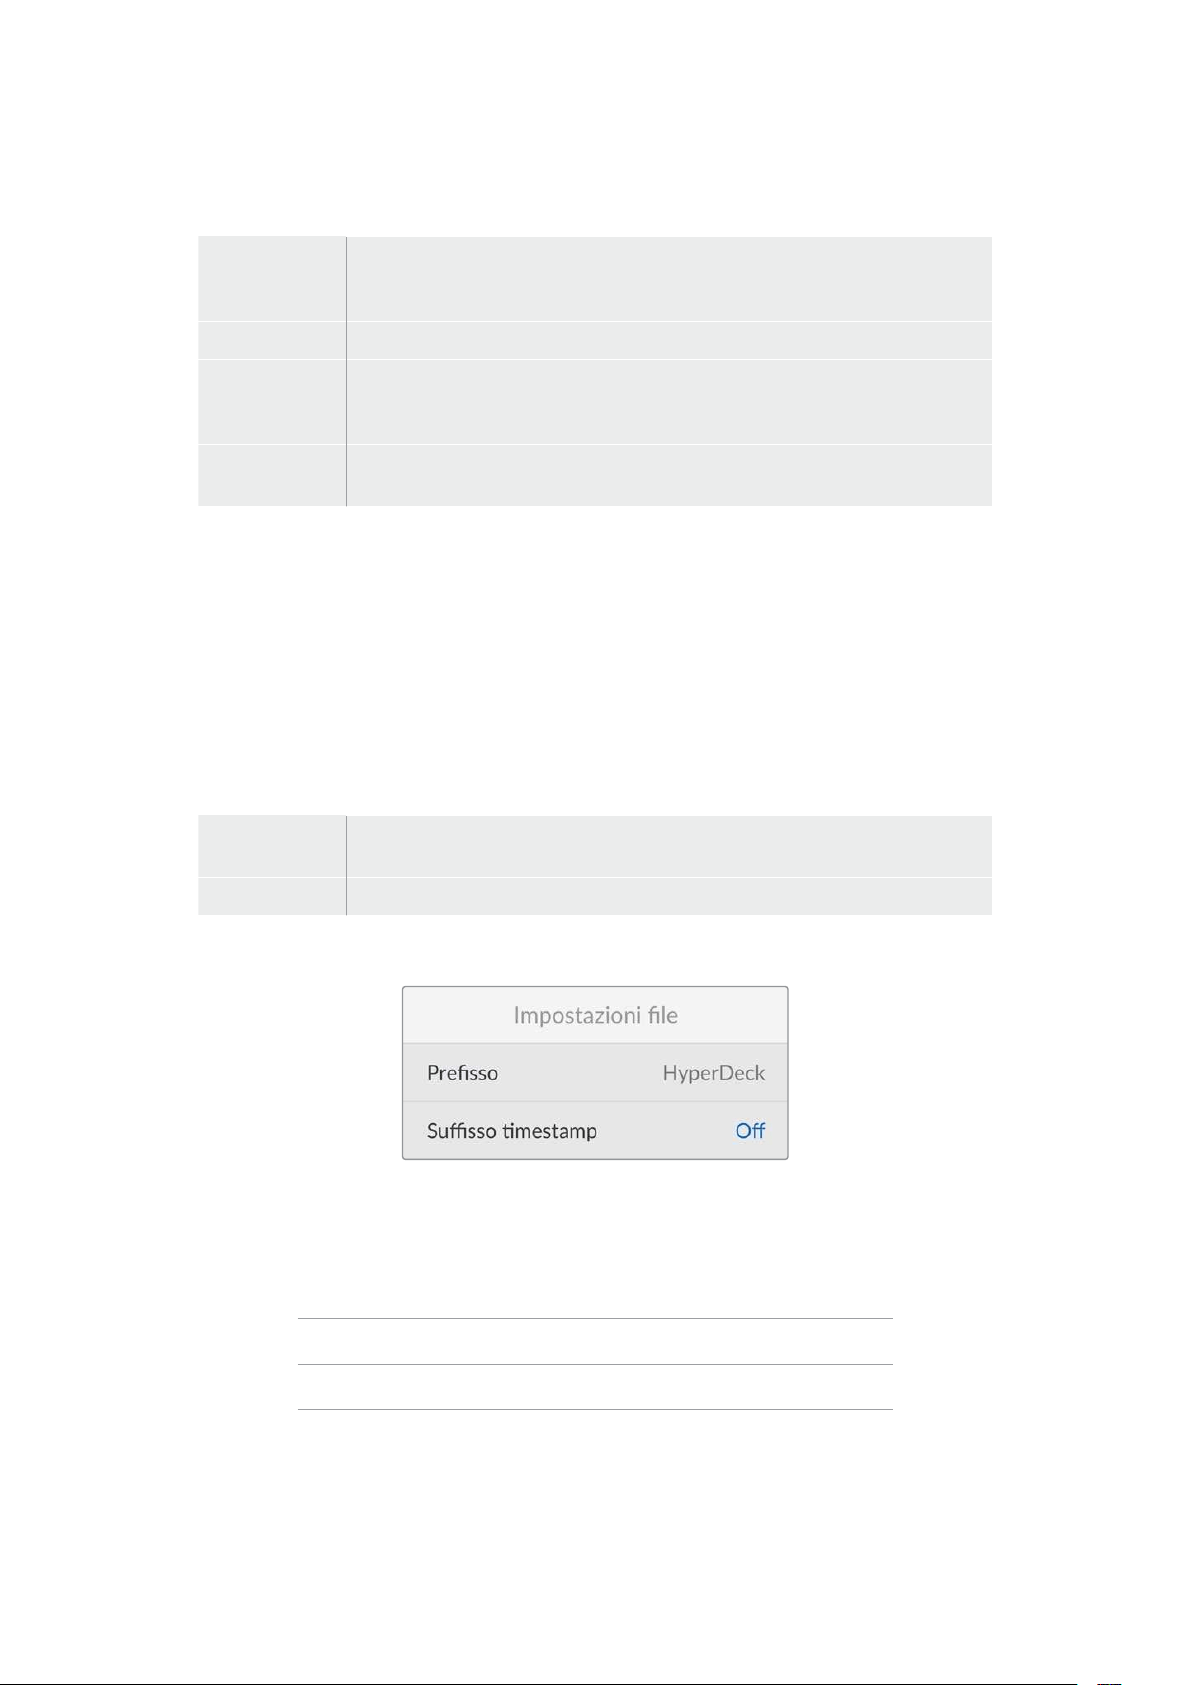
Ingresso
Sono disponibili quattro opzioni per il timecode in entrata.
Ingresso video
Utilizza il timecode integrato nelle sorgenti HDMI con metadati SMPTE RP 188.
Questa opzione rispetta la sincronizzazione tra la sorgente HDMI e il file registrato
dal deck.
Interno Registra l’ora del giorno attraverso il generatore interno di timecode.
Ultima clip
Fa partire ogni file un fotogramma dopo l’ultimo fotogramma della clip
precedente. Per esempio se la prima clip finisce a 10:28:30:10, il timecode della
clip successiva inizia a 10:28:30:11.
Predefinito
Utilizza il timecode da te impostato. Le clip registrate partono dal timecode
definito nell’impostazione Predefinito descritta più avanti.
Drop frame
Scegli
Drop frame o Senza drop frame per le sorgenti NTSC con frame rate di 29.97 o 59.94.
Scegli Default se la sorgente è sconosciuta. Questa opzione mantiene lo standard
dell’ingresso, o passa a Drop frame in assenza di un timecode valido.
Predefinito
Ruota la manopola per impostare il timecode di inizio e premi SET per confermare. Scegli
questa opzione nell’impostazione Ingresso per usare il timecode predefinito.
Uscita
Scegli come usare il timecode per le uscite.
Timeline
Trasmette un timecode continuo per tutte le clip registrate su una scheda o su un
drive.
Clip Trasmette il timecode di ciascuna clip.
Impostazioni file
Prefisso
Inizialmente, HyperDeck Shuttle HD registra le clip sulla scheda SD o sul flash disk USB con la
denominazione riportata di seguito.
HyperDeck_0001
HyperDeck_0001 Prefisso
HyperDeck_0001 Numero clip
È necessario aprire l’utility HyperDeck Setup per modificare il prefisso del nome del file.
Consulta la sezione “Blackmagic HyperDeck Setup” per tutti i dettagli.
403Impostazioni

Suffisso timestamp
L’impostazione della marca temporale del nome del file è disabilitata di default. Abilitala per
integrare la data e l’ora registrate nel nome del file.
HyperDeck_2201061438_0001
HyperDeck_2201061438_0001 Prefisso
HyperDeck_2201061438_0001 Anno
HyperDeck_2201061438_0001 Mese
HyperDeck_2201061438_0001 Giorno
HyperDeck_2201061438_0001 Ora
HyperDeck_2201061438_0001 Minuti
HyperDeck_2201061438_0001 Numero clip
Remoto
HyperDeck si può controllare da un dispositivo video remoto, ad esempio da uno switcher
ATEM Mini Extreme.
Remoto
Abilita questa impostazione per attivare il controllo remoto tramite ethernet; disabilitala per
controllare il deck a livello locale.
Reset
Impostazioni di fabbrica
Ripristina le impostazioni di fabbrica di HyperDeck. Un messaggio ti chiederà di procedere o
annullare l’operazione.
404Impostazioni

Lato posteriore
HDMI OUT
HDMI IN
EXT DISK
SD CARD
ETHERNET
+
12V DC
1
2
3 4 5
1 Alimentazione
Collega l’adattatore AC in dotazione per alimentare il deck. Il connettore dell’adattatore
dispone di un anello di bloccaggio per evitare che si scolleghi. Sono compatibili anche i
cavi 12V 36W.
2 Slot SD
Inserisci una scheda SD per registrare e riprodurre.
3 Ethernet
La porta ethernet permette di connettere il deck alla rete per trasferire i file con FTP ad
alta velocità o per controllarlo remotamente usando HyperDeck Ethernet Protocol.
Idettagli sul trasferimento file tramite un client FTP si trovano nella sezione “Trasferire i
file in rete”.
Se HyperDeck è connesso alla stessa rete di uno switcher ATEM, è possibile
controllarlo da quest’ultimo o da un pannello ATEM.
4 Disco esterno
Il connettore USB-C permette di collegare e registrare su un flash disk esterno fino a
5Gb/s. Puoi anche collegare gli hub USB-C o Blackmagic MultiDock 10G per usare uno
o più SSD.
5 HDMI
L’uscita HDMI permette di collegare televisioni HDMI, monitor e persino switcher, per
esempio ATEM Mini Extreme. Serve anche per visualizzare il menù in sovraimpressione.
405Lato posteriore

Supporti di memoria
Schede SD
Consigliamo di usare schede SD UHS-I veloci per registrare in HD ad alta qualità. Hanno una
velocità di scrittura superiore a 220MB/s ideale per l’Ultra HD 2160p60.
Per registrare a bit rate più bassi con una compressione maggiore potrebbero essere sufficienti
schede più lente, ma in generale è preferibile scegliere schede veloci.
Consigliamo di visitare regolarmente la pagina
www.blackmagicdesign.com/it/support per
scaricare l’ultima versione del manuale con le informazioni aggiornate.
Quali schede SD usare con HyperDeck Shuttle HD?
Queste schede SD sono consigliate per registrare a 1080p fino a 60 fps
Marca Modello Capienza
Angelbird AV PRO SD UHS-II 300MB/s V90 SDXC 256GB
Angelbird AV PRO SD UHS-II 260MB/s V60 SDXC 128GB
Angelbird AV PRO SD UHS-II 260MB/s V60 SDXC 64GB
SanDisk Extreme Pro UHS-I 95MB/s SDXC 64GB
Wise SD2-64U3 UHS-II 285MB/s SDXC 64GB
Lexar Professional 1000x UHS-II 150MB/s SDXC 128GB
SONY Tough SF-G128T 128GB
Kingston CANVAS GO! Plus 170MB/s V30 64GB
Kingston CANVAS GO! Plus 170MB/s V30 128GB
Kingston CANVAS GO! Plus 170MB/s V30 512GB
ProGrade Digital SDXC UHS-II V90 300R 64GB
ProGrade Digital SDXC UHS-II V90 300R 128GB
SONY Tough SF-G64T UHS-II SDXC 64GB
Delkin Devices Black UHS-II V90 SDXC 256GB
Delkin Devices Power UHS-II V90 SDXC 128GB
Delkin Devices Power UHS-II V90 SDXC 256GB
Delkin Devices Black UHS-II V90 SDXC 128GB
Exascend Essential SDXC UHS-II V90 R 300MB/s 64GB
Exascend Essential SDXC UHS-II V90 R 300MB/s 128GB
Exascend Catalyst SDXC UHS-II V90 R 300MB/s 64GB
406Supporti di memoria
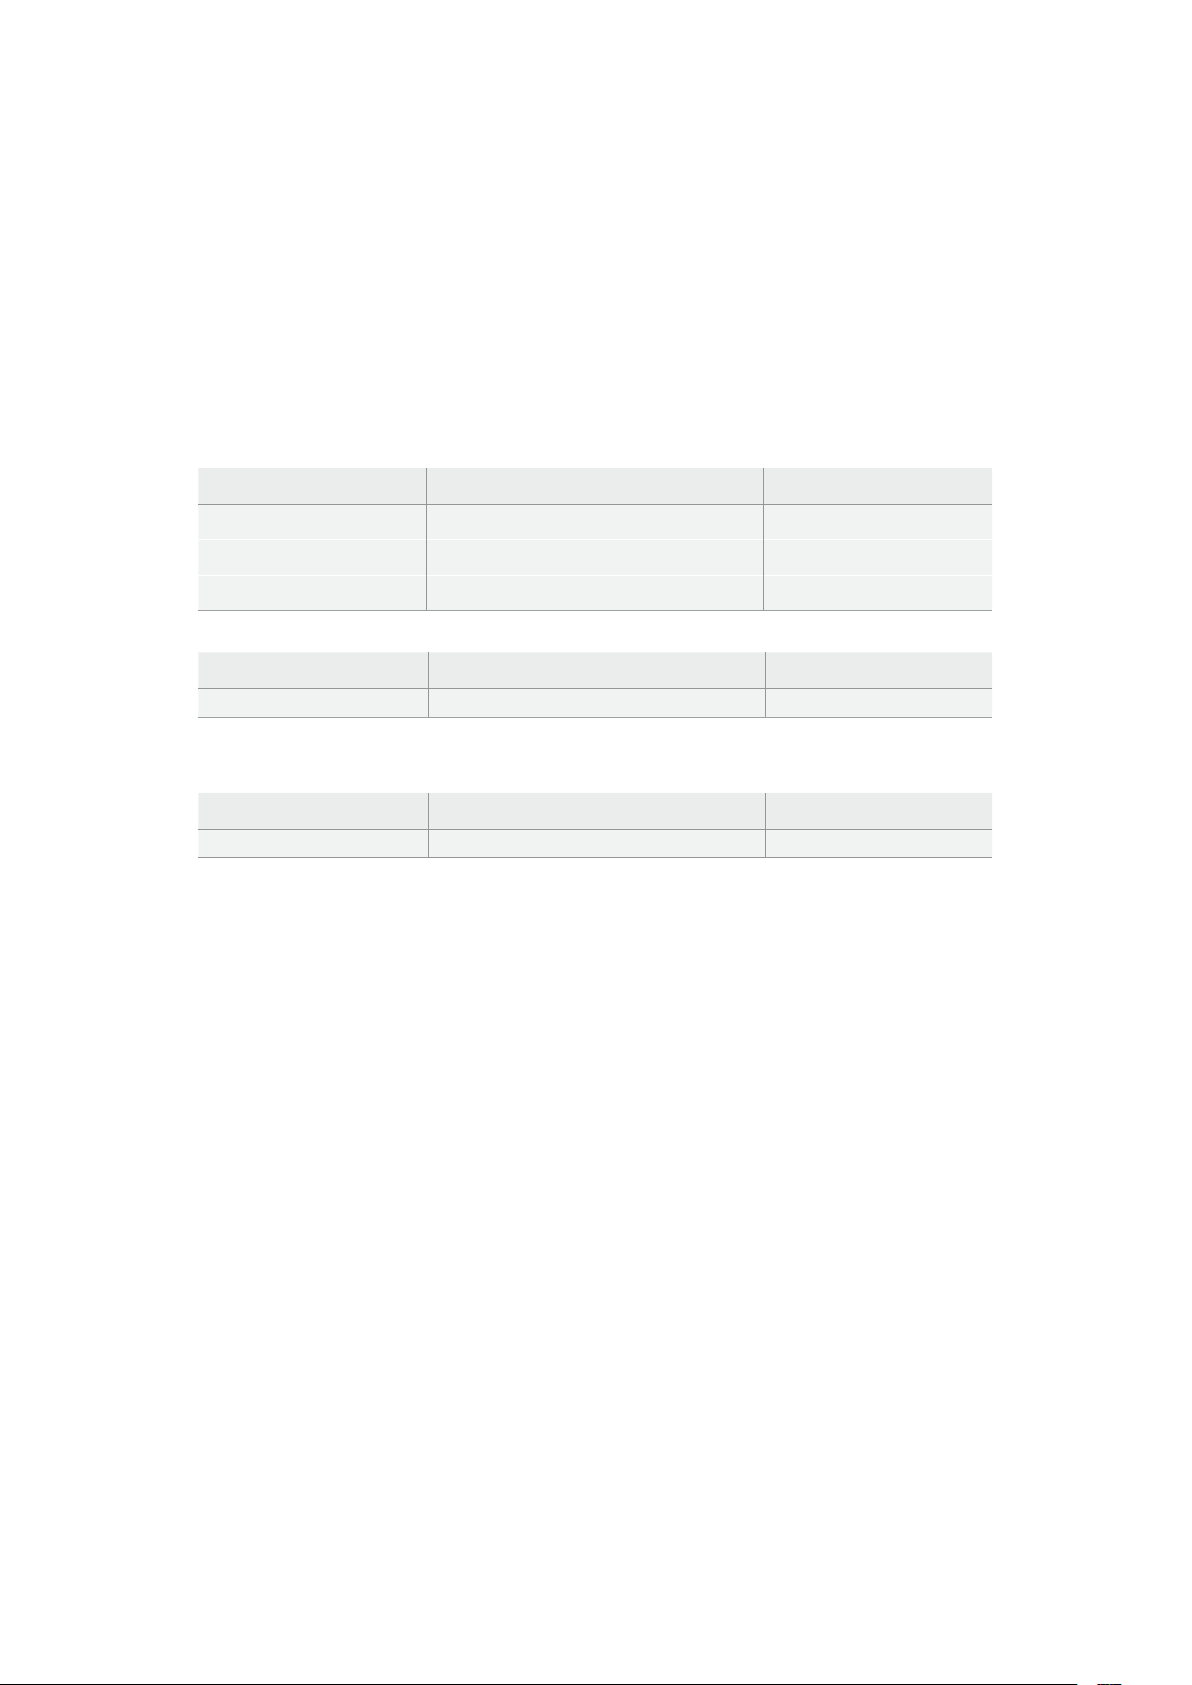
Dischi esterni
Tutti i modelli HyperDeck sono in grado di registrare sui flash disk USB-C, drive veloci e ad alta
capacità che consentono registrazioni di lunga durata. Poi basta collegare i drive al computer
per montare il materiale direttamente da lì.
Per una capienza maggiore puoi collegare un dock USB-C o un hard drive esterno. Per usare
Blackmagic MultiDock 10G o un flash disk USB-C, collega un cavo USB-C dal dispositivo alla
porta EXT DISK di HyperDeck.
Quali drive USB-C usare con HyperDeck Shuttle HD?
Questi drive USB-C sono consigliati per registrare in ProRes HQ 1080p fino a 60 fps
Marca Modello Capienza
Wise PTS-256 Portable SSD 4K 256GB
OWC Envoy Pro Ex 240GB
BUFFALO SSD-PHE500U3-BA 500GB
Questi drive USB-C sono consigliati per registrare in DNxHR HQX 1080p fino a 60 fps
Marca Modello Capienza
OWC Envoy Pro Ex 240GB
Questi drive USB-C sono consigliati per registrare in H.264 1080p fino a 60 fps
Marca Modello Capienza
OWC Envoy Pro Ex 240GB
Formattare i supporti di memoria
Preparare i supporti di memoria sul computer
Formattare su Mac
L’applicazione Utility Disco del Mac consente di formattare i drive in HFS+ o exFAT.
Ricorda di fare il backup dei contenuti importanti archiviati sul disco perché la formattazione li
elimina permanentemente.
1 Nel caso di un flash disk USB, collegalo al computer tramite un dock esterno o un cavo
adattatore e ignora il messaggio che suggerisce di usare l’SSD per i backup della Time
Machine. Nel caso di una scheda SD, collegala al computer tramite un lettore esterno
di schede.
2 Vai su Applicazioni > Utility Disco.
3 Clicca sull’icona del disco della scheda SD o del flash disk USB e clicca sulla tab
Inizializza.
4 Seleziona il formato Mac OS Extended (Journaled) o exFAT.
5 Dai un Nome al nuovo volume e poi clicca su Elimina. La formattazione durerà pochi
istanti e il supporto di archiviazione sarà pronto all'uso.
407Formattare i supporti di memoria

Formattare su Windows
Usa la finestra di dialogo Formatta su Windows per formattare i drive in exFAT. Ricorda di fare il
backup dei contenuti importanti archiviati sulla scheda SD o sull’SSD perché la formattazione li
elimina permanentemente.
1 Nel caso di un flash disk USB, collegalo al computer tramite un dock esterno o un cavo
adattatore. Nel caso di una scheda SD, collegala al computer tramite un lettore esterno
di schede.
2 Seleziona Computer dal menù Start o dalla schermata iniziale. Fai clic destro sul flash
disk USB o sulla scheda SD.
3 Seleziona Inizializza dal menù contestuale.
4 Imposta File system su exFAT e Dimensioni unità di allocazione su 128 kilobyte.
5 Dai un nome al volume, seleziona Formattazione veloce e clicca su Esegui.
6 La formattazione durerà pochi istanti e il supporto di archiviazione sarà pronto all'uso.
408Formattare i supporti di memoria
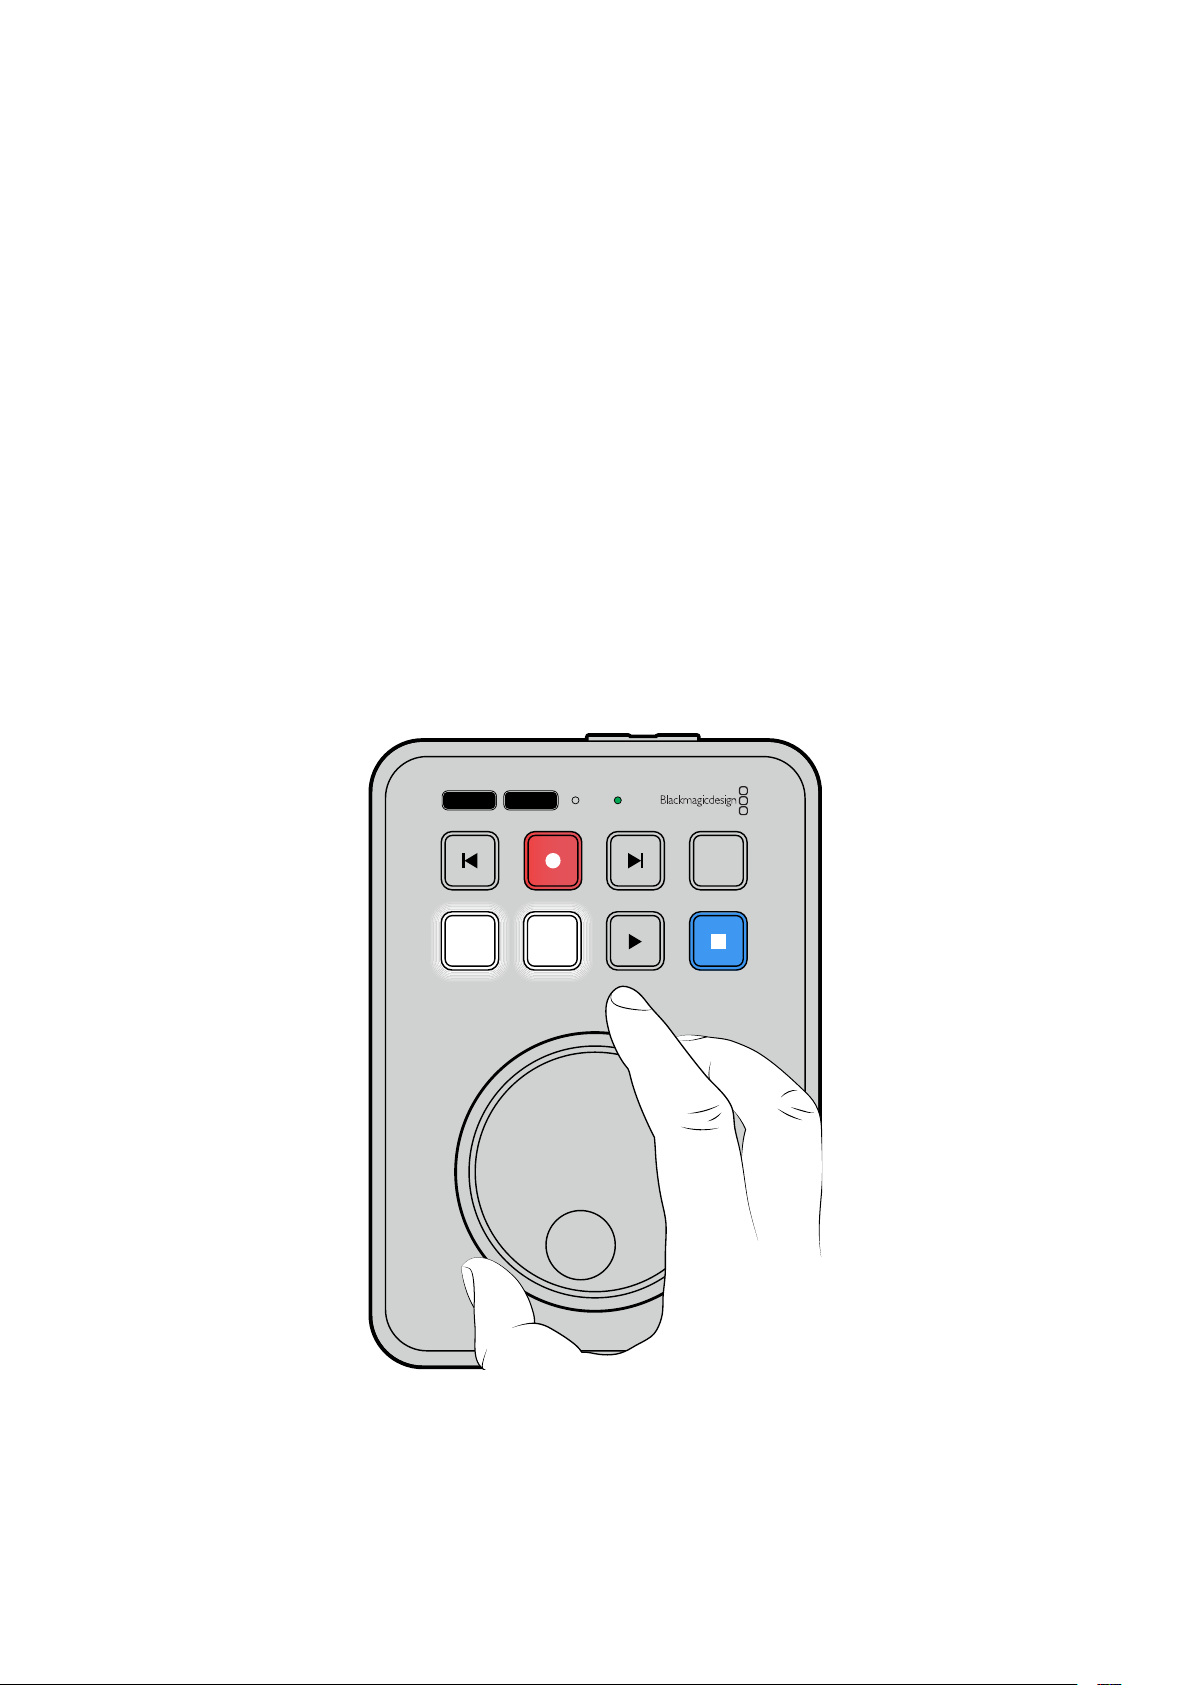
Usare la funzione Teleprompter
Blackmagic HyperDeck Shuttle HD si può usare come teleprompter con i file RTF standard
(Rich Text Format). Basta creare un file su TextEdit o WordPad e salvarlo in RTF in una delle 13
lingue compatibili. Dopo aver aperto il testo con HyperDeck Shuttle HD, potrai modificare le
dimensioni del carattere e la spaziatura.
Usare il teleprompter
1 Collega l’uscita HDMI di HyperDeck Shuttle HD al display HDMI desiderato.
2 Inserisci la scheda SD o collega il flash disk USB esterno su cui è salvato il testo.
3 Scegli un codec nel menù Registrazione. Vai all’impostazione Teleprompter e
premi SET.
Il testo comparirà sul display. A questo punto puoi avviare la riproduzione premendo PLAY e
gestirla con la manopola.
Velocità di scorrimento del testo
Come la riproduzione dei file multimediali, anche lo scorrimento del testo del teleprompter si
può controllare con la manopola di HyperDeck Shuttle HD. Dopo aver caricato un testo, premi
insieme i tasti JOG e SCR per abilitare la modalità di scorrimento variabile. Il testo scorrerà alla
stessa velocità con cui ruoti la manopola.
JOG SCR
CLIP
MENU SET
DISK SD
Se invece premi singolarmente i tasti JOG o SCR, ruotando la manopola il testo scorrerà a una
velocità bassa e costante (jog) o a una velocità alta e costante (scroll).
Premi i tasti SKIP Avanti e Indietro per navigare tra i file RTF sulla scheda SD o sul disco esterno.
409Usare la funzione Teleprompter
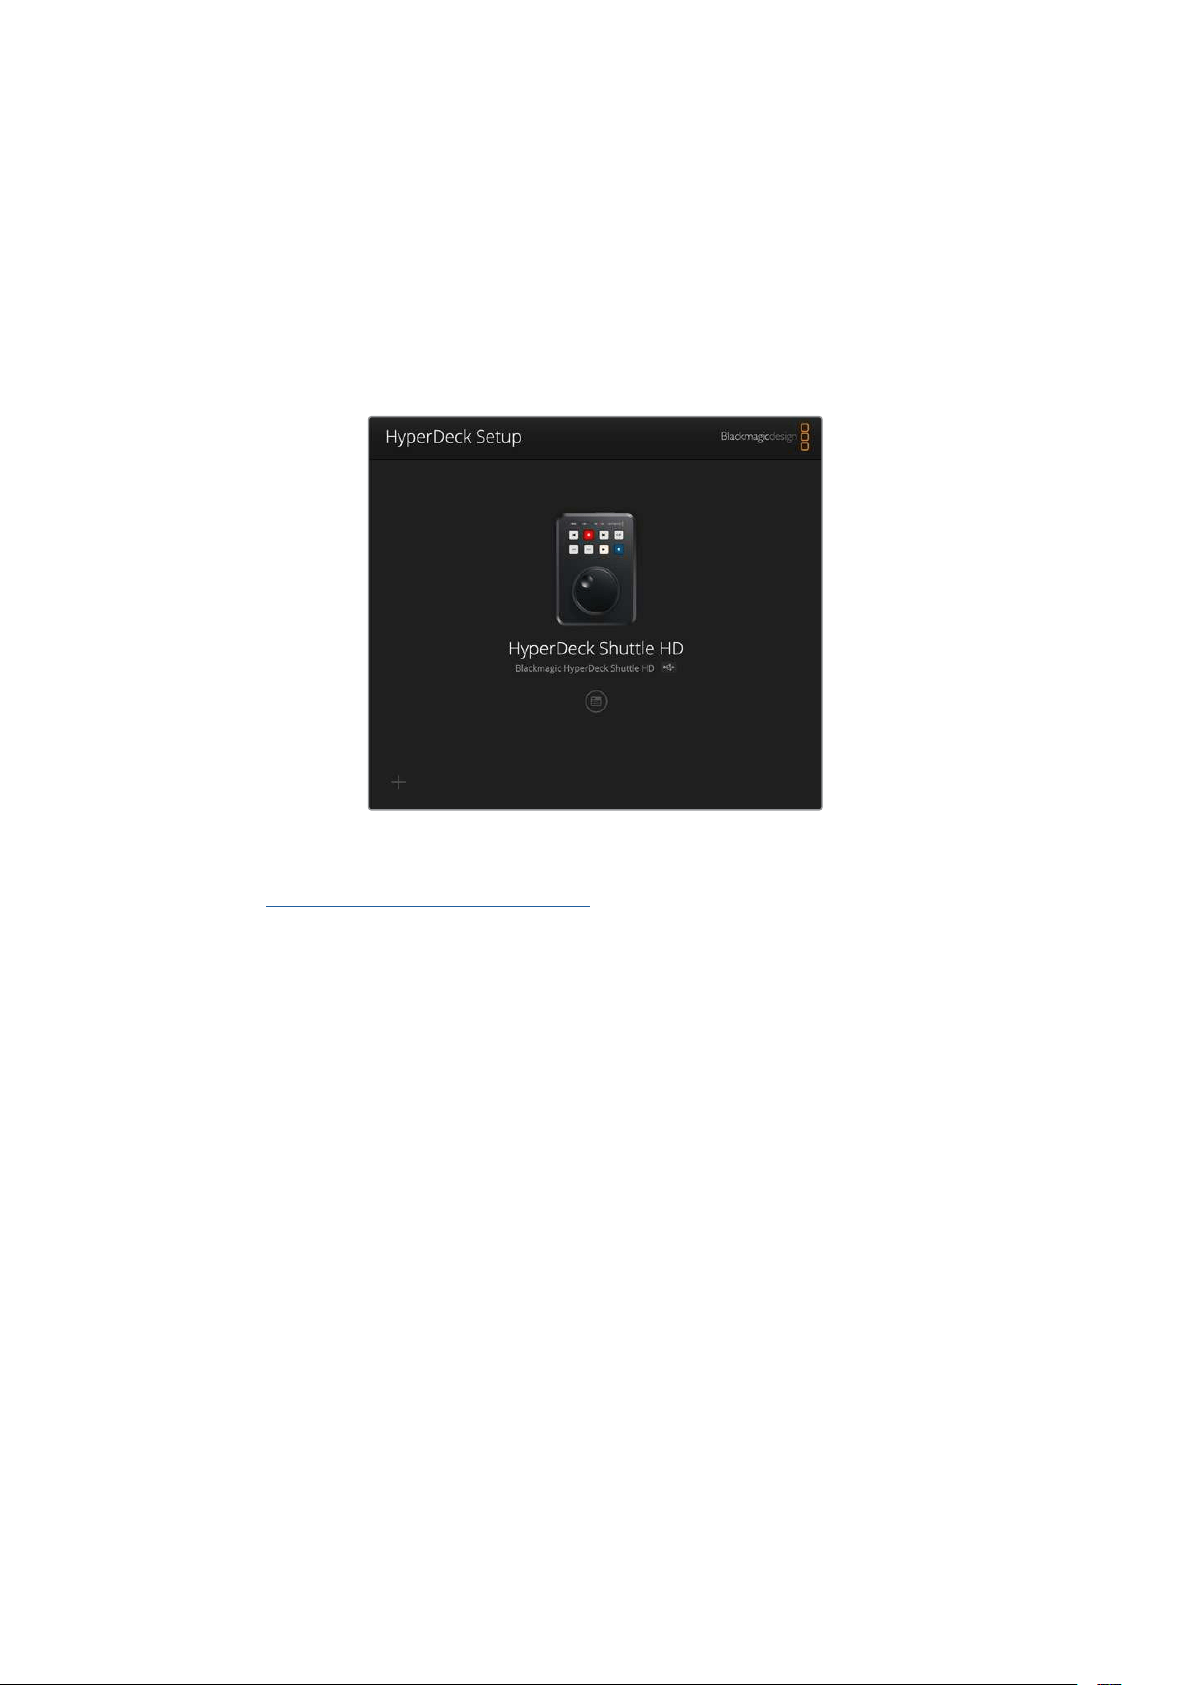
Il teleprompter rileva le dimensioni, il colore e il grassetto del testo. Nel menù Monitoraggio puoi
modificare le dimensioni del carattere, la spaziatura, i margini e la posizione verticale/orizzontale
del testo per lavorare con un vetro riflettente. Leggi la sezione “Impostazioni” per tutti i dettagli.
Blackmagic HyperDeck Setup
L’utility Blackmagic HyperDeck Setup consente di modificare le impotazioni e di aggiornare il
software interno di HyperDeck.
Installare l’utility
1 Scarica l’installer Blackmagic HyperDeck Setup più recente da
www.blackmagicdesign.com/it/support
2 Apri l’installer e segui le istruzioni a schermo per installare l’utility sul computer.
3 Completata l’installazione, collega HyperDeck Shuttle HD al computer tramite i
connettori USB o ethernet sul retro del dispositivo.
4 Lancia Blackmagic HyperDeck Setup e segui le istruzioni nella finestra che compare
per aggiornare il software interno. Se la finestra non compare, il software interno è già
aggiornato e non dovrai fare nient’altro.
Clicca sull'icona circolare sotto l’immagine di HyperDeck per accedere alle impostazioni.
La schermata principale mostra HyperDeck Shuttle HD e il suo nome. Il nome è utile per
distinguere i deck collegati al computer e si può inserire dall’utility.
410Blackmagic HyperDeck Setup

Network
Protocol
Per controllare HyperDeck Shuttle HD da uno switcher ATEM o in remoto con HyperDeck
Ethernet Protocol, il deck e il dispositivo prescelto devono trovarsi sulla stessa rete mediante
DHCP o un indirizzo IP fisso impostato manualmente.
DHCP
HyperDeck Shuttle HD è impostato su DHCP di default. Il protocollo di
configurazione IP dinamica (DHCP) è un servizio sui server di rete che trova e
assegna automaticamente un indirizzo IP all’HyperDeck. Questo servizio facilita
la connessione dei dispositivi tramite ethernet, evitando che gli indirizzi IP entrino
in conflitto tra loro. La maggior parte dei computer e dei commutatori di rete è
compatibile con il DHCP.
Static IP
Selezionalo per inserire manualmente le impostazioni di rete. Per poter
comunicare, tutte le unità devono avere la stessa maschera di sottorete e
gateway, e gli stessi primi tre campi dell’indirizzo IP.
Se sulla rete ci sono altri dispositivi che hanno lo stesso numero identificativo nell’indirizzo IP, le
unità interessate non riusciranno a connettersi. In questi casi è necessario modificare l’ultimo
campo dell’indirizzo IP dell’unità.
411Blackmagic HyperDeck Setup
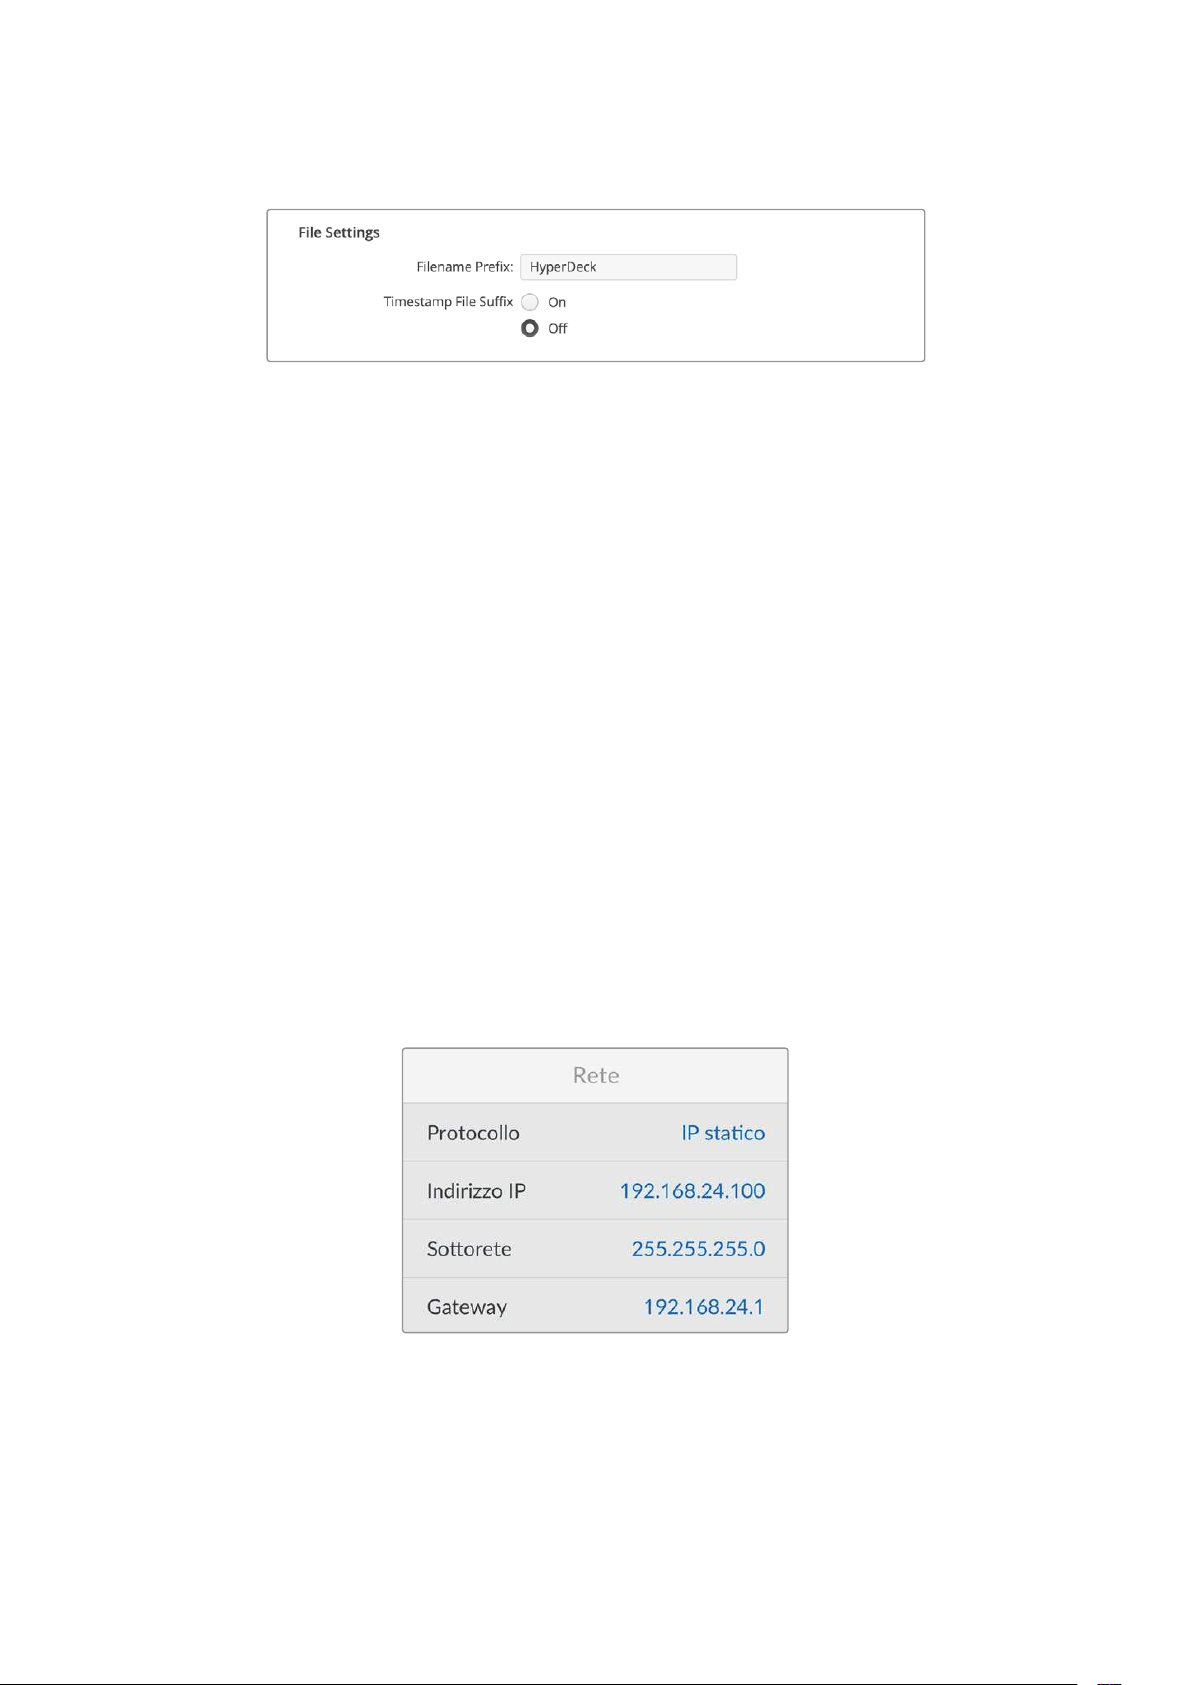
File Settings
Inizialmente, HyperDeck Shuttle HD registra le clip sulla scheda SD o sul flash disk USB usando
“HyperDeck” come prefisso del nome del file. Per cambiarlo, scrivi un altro nome nel campo
Filename Prefix.
L’impostazione della marca temporale
Timestamp File Suffix è disabilitata di default. Seleziona
On per integrare la data e l’ora registrate nel nome del file. Le impostazioni del prefisso e della
marca temporale sono disponibili anche nel menù di HyperDeck Shuttle HD.
Trasferire i file in rete
HyperDeck consente il trasferimento dei file mediante FTP (protocollo di trasferimento file).
Grazie a questa funzione è possibile copiare i file dal computer direttamente su HyperDeck
all’interno di una rete, alla velocità offerta dalla rete locale. Ad esempio puoi copiare dei file su
un HyperDeck remoto impiegato per un’insegna digitale.
Connettere HyperDeck Shuttle HD
Quando il computer e HyperDeck Shuttle HD sono sulla stessa rete, servono solo un client FTP
e l’indirizzo IP del deck.
1 Scarica e installa un client FTP sul computer a cui vuoi connettere HyperDeck.
Consigliamo Cyberduck, FileZilla o Transmit, ma gran parte delle applicazioni FTP è
compatibile. Cyberduck e FileZilla sono gratuiti.
2 Connetti HyperDeck Shuttle HD alla rete con un cavo ethernet e appuntati l’indirizzo IP.
Per accedere all’indirizzo IP, premi MENU e ruota la manopola fino all’impostazione
Rete. L’indirizzo IP è indicato in questa schermata.
L’indirizzo IP di HyperDeck Shuttle HD è
indicato nel menù Configurazione > Rete
3 Inserisci l’indirizzo IP nella finestra di dialogo dell’applicazione TCP. Il nome e la
posizione del campo in cui inserire l’indirizzo IP variano a seconda dell’applicazione. Di
solito è Server o Host. Se la finestra include la casella Anonymous Login, spuntala.
412Trasferire i file in rete

Per connettere HyperDeck Shuttle HD non servono nome utente e password.
Inserisci l’indirizzo IP del deck nel campo Server o Host dell’applicazione
FTP e spunta la casella Anonymous Login (se disponibile)
Trasferire i file
Quando HyperDeck è connesso puoi trasferire i file normalmente con l’applicazione FTP. Gran
parte delle applicazioni FTP offre un’interfaccia di tipo trascina e rilascia.
Puoi trasferire qualsiasi file da e su HyperDeck, ma ricorda che i file che intendi riprodurre con
HyperDeck Shuttle HD devono essere compatibili con le risoluzioni e con i codec da esso
supportati.
SUGGERIMENTO Puoi trasferire file in rete mentre HyperDeck sta registrando. Il deck
regola automaticamente la velocità di trasferimento per non compromettere la
registrazione.
413Trasferire i file in rete

Developer Information
Blackmagic HyperDeck Ethernet Protocol
The Blackmagic HyperDeck Ethernet Protocol is a text based protocol accessed by connecting
to TCP port 9993 on HyperDeck models that have a built in Ethernet connection. If you are
a software developer, you can use the protocol to construct devices that integrate with our
products. Here at Blackmagic Design our approach is to open up our protocols and we eagerly
look forward to seeing what you come up with!
Protocol Commands
Command Command Description
help or ? Provides help text on all commands and parameters
commands return commands in XML format
device info return device information
disk list query clip list on active disk
disk list: slot id: {n} query clip list on disk in slot {n}
quit disconnect ethernet control
ping check device is responding
preview: enable: {true/false} switch to preview or output
play play from current timecode
play: speed: {-5000 to 5000} play at specific speed
play: loop: {true/false} play in loops or stop-at-end
play: single clip: {true/false} play current clip or all clips
playrange query playrange setting
playrange set: clip id: {n} set play range to play clip {n} only
playrange set: clip id: {n} count: {m} set play range to {m} clips starting from clip {n}
playrange set: in: {inT} out: {outT}
set play range to play between:
- timecode {inT} andtimecode {outT}
playrange set: timeline in: {in} timeline out:
{out}
set play range in units of frames between:
- timeline position {in} and position {out} clear/reset play
rangesetting
playrange clear clear/reset play range setting
play on startup query unit play on startup state
play on startup: enable: {true/false} enable or disable play on startup
play on startup: single clip: {true/false} play single clip or all clips on startup
play option query play options
play option: stop mode:
{lastframe/nextframe/black}
set output frame when playback stops
record record from current input
record: name: {name} record named clip
414Developer Information

Command Command Description
record spill spill current recording to next slot
record: spill: slot id: {n}
spill current recording to specified slot
use current id to spill to same slot
stop stop playback or recording
clips count query number of clips on timeline
clips get query all timeline clips
clips get: clip id: {n} query a timeline clip info
clips get: clip id: {n} count: {m} query m clips starting from n
clips get: version: {1/2}
query clip info using specified output version:
version 1: id: name startT duration
version 2: id: startT duration inT outT name
clips add: name: {name} append a clip to timeline
clips add: clip id: {n} name: {name} insert clip before existing clip {n}
clips add: in: {inT} out: {outT} name: {name} append the {inT} to {outT} portion of clip
clips remove: clip id: {n}
remove clip {n} from the timeline
(invalidates clip ids following clip {n})
clips clear empty timeline clip list
transport info query current activity
slot info query active slot
slot info: slot id: {n} query slot {n}
slot select: slot id: {n} switch to specified slot
slot select: video format: {format} load clips of specified format
slot unblock unblock active slot
slot unblock: slot id: {n} unblock slot {n}
cache info query cache status
dynamic range query dynamic range settings
dynamic range: playback override:
{off/Rec709/Rec2020_SDR/HLG/
ST2084_300/ST2084_500/
ST2084_800/ST2084_1000/
ST2084_2000/ST2084_4000/ST2084
set playback dynamic range override
dynamic range: record override:
{off/Rec709/Rec2020_SDR/HLG/
ST2084_300/ST2084_500/
ST2084_800/ST2084_1000/
ST2084_2000/ST2084_4000/ST2048}
set record dynamic range override
notify query notification status
notify: remote: {true/false} set remote notifications
notify: transport: {true/false} set transport notifications
notify: slot: {true/false} set slot notifications
notify: configuration: {true/false} set configuration notifications
415Developer Information

Command Command Description
notify: dropped frames: {true/false} set dropped frames notifications
notify: display timecode: {true/false} set display timecode notifications
notify: timeline position: {true/false} set playback timeline position notifications
notify: playrange: {true/false} set playrange notifications
notify: cache: {true/false} set cache notifications
notify: dynamic range: {true/false} set dynamic range settings notifications
notify: slate: {true/false} set digital slate notifications
notify: clips: {true/false}
set timeline clips notifications where two types of changes can
occur:
add: partial update with list of clips and insert positions
snapshot: complete update of all clips on timeline
notify: disk: {true/false}
set disk clips notifications where two types of changes can
occur:
add: partial update with list of clips and insert positions
snapshot: complete update of all clips on timeline
goto: clip id: {start/end} goto first clip or last clip
goto: clip id: {n} goto clip id {n}
goto: clip id: +{n} go forward {n} clips
goto: clip id: -{n} go backward {n} clips
goto: clip: {n} goto frame position {n} within current clip
goto: clip: +{n} go forward {n} frames within current clip
goto: clip: -{n} go backward {n} frames within current clip
goto: clip: {start/end} goto start or end of clip
goto: timeline: {n} goto frame position {n} within timeline
goto: timeline: +{n} o forward {n} frames within timeline
goto: timeline: -{n} go backward {n} frames within timeline
goto: timeline: {start/end} goto start or end of timeline
goto: timecode: {timecode} goto specified timecode
goto: timecode: +{timecode} go forward {timecode} duration
goto: timecode: -{timecode} go backward {timecode} duration
goto: slot id: {n} goto slot id {n}
jog: timecode: {timecode} jog to timecode
jog: timecode: +{timecode} jog forward {timecode} duration
jog: timecode: -{timecode} jog backward {timecode} duration
shuttle: speed: {-5000 to 5000} shuttle with speed
remote query unit remote control state
remote: enable: {true/false} enable or disable remote control
remote: override: {true/false} session override remote control
configuration query configuration settings
configuration: video input: SDI switch to SDI input
416Developer Information

Command Command Description
configuration: video input: HDMI switch to HDMI input
configuration: video input: component switch to component input
configuration: audio input: embedded capture embedded audio
configuration: audio input: XLR capture XLR audio
configuration: audio input: RCA capture RCA audio
configuration: file format: {format} switch to specific file format
configuration: audio codec: PCM switch to PCM audio
configuration: audio codec: AAC switch to AAC audio
configuration: timecode input:
{external/embedded/internal/preset/clip}
change the timecode input
configuration: timecode output:
{clip/timeline}
change the timecode output
configuration: timecode preference:
{default/dropframe/nondropframe}
whether or not to use drop frame timecodes when not
otherwise specified
configuration: timecode preset:
{timecode}
set the timecode preset
configuration: audio input channels: {n} set the number of audio channels recorded to {n}
configuration: record trigger:
{none/recordbit/timecoderun}
change the record trigger
configuration: record prefix: {name} set the record prefix name (supports UTF-8 name)
configuration: append timestamp:
{true/false}
append timestamp to recorded filename
configuration: xlr input id: {n} xlr type:
{line/mic}
configure xlr input type
multiple xlr inputs can be configured in a single command
configuration: genlock input resync:
{true/false}
enable or disable genlock input resync
uptime return time since last boot
format: slot id: {n} prepare:
{exFAT/HFS+} name: {name}
prepare a disk formatting operation to filesystem {format}
format: confirm: {token} perform a pre-prepared formatting operation using token
identify: enable: {true/false} identify the device
watchdog: period: {period in seconds} client connection timeout
reboot reboot device
slate clips slate clips information
slate project slate project information
slate lens slate lens information
417Developer Information

Multiline commands: Command Description
slate clips↵ set slate clips information:
reel: {n} slate reel number, where {n} is in [1, 999]
scene id: {id} slate scene id value, where {id} is a string
shot type: {WS/MS/BCU/MCU/ECU/none} slate shot type
take: {n} slate take number, where {n} is in [1, 99]
take scenario: {PU/VFX/SER/none} slate take scenario
take auto inc: {true/false} slate take auto increment
good take: {true/false} slate good take
environment: {interior/exterior} slate environment
day night: {day/night} slate day or night
slate project:↵ set slate project information:
project name: {name} project name (can be empty, supports UTF-8)
camera: {index} set camera index e.g. A
director: {name} director (can be empty, supports UTF-8)
camera operator: {name} camera operator (can be empty, supports UTF-8)
slate lens:↵ set lens information:
lens type: {type} lens type (can be empty, supports UTF-8)
iris: {type} camera iris (can be empty, supports UTF-8)
focal length: {length} focal length (can be empty, supports UTF-8)
distance: {distance} lens distance (can be empty, supports UTF-8)
filter: {filter} lens filter (can be empty, supports UTF-8)
Command Combinations
You can combine the parameters into a single command, for example:
play: speed: 200 loop: true single clip: true
Or for configuration:
configuration: video input: SDI audio input: XLR
Or to switch to the second disk, but only play NTSC clips:
slot select: slot id: 2 video format: NTSC
Protocol Details
Connection
The HyperDeck Ethernet server listens on TCP port 9993.
Basic syntax
The HyperDeck protocol is a line oriented text protocol. Lines from the server will be separated by an ascii
CR LF sequence. Messages from the client may be separated by LF or CR LF.
New lines are represented in this document as a "↵" symbol.
418Developer Information

Single line command syntax
Command parameters are usually optional. A command with no parameters is terminated with a new line:
{Command name}↵
If parameters are specified, the command name is followed by a colon, then pairs of parameter names and
values. Each parameter name is terminated with a colon character:
{Command name}: {Parameter}: {Value} {Parameter}: {Value} ...↵
Multiline command syntax
The HyperDeck protocol also supports an equivalent multiline syntax where each parameter-value pair is
entered on a new line. E.g.
{Command name}:↵
{P a r a m e t e r}: { Va lu e}↵
{P a r a m e t e r}: { Va lu e}↵
↵
Response syntax
Simple responses from the server consist of a three digit response code and descriptive text terminated by a
new line:
{Response code} {Response text}↵
If a response carries parameters, the response text is terminated with a colon, and parameter name and
value pairs follow on subsequent lines until a blank line is returned:
{Response code} {Response text}:↵
{P a r a m e t e r}: { Va lu e}↵
{P a r a m e t e r}: { Va lu e}↵
...
↵
Successful response codes
A simple acknowledgement of a command is indicated with a response code of 200:
200 ok↵
Other successful responses carry parameters and are indicated with response codes in the range of 201
to299.
419Developer Information

Failure response codes
Failure responses to commands are indicated with response codes in the range of 100 to 199:
100 syntax error
101 unsupported parameter
102 invalid value
103 unsupported
104 disk full
105 no disk
106 disk error
107 timeline empty
108 internal error
109 out of range
110 no input
111 remote control disabled
112 clip not found
120 connection rejected
150 invalid state
151 invalid codec
160 invalid format
161 invalid token
162 format not prepared
163 parameterized single line command not supported
Asynchronous response codes
The server may return asynchronous messages at any time. These responses are indicated with response
codes in the range of 500 to 599:
5xx {Response Text}:↵
{P a r a m e t e r}: { Va lu e}↵
{P a r a m e t e r}: { Va lu e}↵
↵
Connection response
On connection, an asynchronous message will be delivered:
500 connection info:↵
protocol version: {Version}↵
model: {Model Name}↵
↵
Timecode syntax
Timecodes are expressed as non-drop-frame timecode in the format:
HH:MM:SS:FF
420Developer Information

Handling of deck "remote" state
The “remote” command may be used to enable or disable the remote control of the deck. Any attempt to
change the deck state over ethernet while remote access is disabled will generate an error:
111 remote control disabled↵
To enable or disable remote control:
remote: enable: {“true”, “false”} ↵
The current remote control state may be overridden allowing remote access over ethernet irrespective of the
current remote control state:
remote: override: {“true”, “false”} ↵
The override state is only valid for the currently connected ethernet client and only while the connection
remains open.
The “remote” command may be used to query the remote control state of the deck by specifying no
parameters:
remote↵
The deck will return the current remote control state:
210 remote info:↵
enabled: {“true”, “false”}↵
override: {“true”, “false”}↵
↵
Asynchronous remote control information change notification is disabled by default and may be
configured with the “notify” command. When enabled, changes in remote state will generate a “510 remote
info:”asynchronous message with the same parameters as the “210 remote info:” message.
Closing connection
The "quit" command instructs the server to cleanly shut down the connection:
quit↵
Checking connection status
The "ping" command has no function other than to determine if the server is responding:
ping↵
Getting help
The "help" or "?" commands return human readable help text describing all available commands and
parameters:
help↵
Or:
?↵
The server will respond with a list of all supported commands:
201 help:↵
{Help Text}↵
{Help Text}↵
↵
421Developer Information

Switching to preview mode
The "preview" command instructs the deck to switch between preview mode and output mode:
preview: enable: {"true", "false"}↵
Playback will be stopped when the deck is switched to preview mode. Capturing will be stopped when the
deck is switched to output mode.
Controlling device playback
The “play” command instructs the deck to start playing:
play↵
The play command accepts a number of parameters which may be used together in most combinations.
By default, the deck will play all remaining clips on the timeline then stop.
The “single clip” parameter may be used to override this behavior:
play: single clip: {“true”, “false”}↵
By default, the deck will play at normal (100%) speed. An alternate speed may be specified in percentage
between -5000 to 5000:
play: speed: {% normal speed}↵
By default, the deck will stop playing when it reaches to the end of the timeline. The “loop” parameter may be
used to override this behavior:
play: loop: {“true”, “false”}↵
The “playrange” command instructs the deck to play all the clips. To override this behavior: and select a
particular clip:
playrange set: clip id: {Clip ID}↵
To only play a certain timecode range:
playrange set: in: {in timecode} out: {out timecode}↵
To clear a set playrange and return to the default value:
playrange clear↵
The “play on startup command” instructs the deck on what action to take on startup. By default, the deck will
not play. Use the “enable” command to start playback after each power up.
play on startup: enable {“true”, “false”}↵
By default, the unit will play back all clips on startup. Use the “single clip” command to override.
play on startup: single clip: {“true”, “false”}↵
Stopping deck operation
The "stop" command instructs the deck to stop the current playback or capture:
stop↵
422Developer Information

Changing timeline position
The "goto" command instructs the deck to switch to playback mode and change its position within the
timeline.
To go to the start of a specific clip:
goto: clip id: {Clip ID}↵
To move forward/back {count} clips from the current clip on the current timeline:
goto: clip id: +/-{count}↵
Note that if the resultant clip id goes beyond the first or last clip on timeline, it will be clamp at the first or last
clip.
To go to the start or end of the current clip:
goto: clip: {“start”, “end”}↵
To go to the start of the first clip or the end of the last clip:
goto: timeline: {“start”, “end”}↵
To go to a specified timecode:
goto: timecode: {timecode}↵
To move forward or back a specified duration in timecode:
goto: timecode: {“+”, “-”}{duration in timecode}↵
To specify between slot 1 and slot 2:
goto: slot id: {Slot ID}↵
Note that only one parameter/value pair is allowed for each goto command.
Enumerating supported commands and parameters
The "commands" command returns the supported commands:
commands↵
The command list is returned in a computer readable XML format:
212 commands:
<commands>↵
<command name="…"><parameter name="…"/>…</command>↵
<command name="…"><parameter name="…"/>…</command>↵
…
</commands>↵
↵
423Developer Information

Controlling asynchronous notifications
The “notify” command may be used to enable or disable asynchronous notifications from the server.
To enable or disable transport notifications:
notify: transport: {“true”, “false”}↵
To enable or disable slot notifications:
notify: slot: {“true”, “false”}↵
To enable or disable remote notifications:
notify: remote: {“true”, “false”}↵
To enable or disable configuration notifications:
notify: configuration: {“true”, “false”}↵
Multiple parameters may be specified. If no parameters are specified, the server returns the current state of
all notifications:
209 notify:↵
transport: {“true”, “false”}↵
slot: {“true”, “false”}↵
remote: {“true”, “false”}↵
configuration: {“true”, “false”}↵
dropped frames: {“true”, “false”}↵
display timecode: {“true”, “false”}↵
timeline position: {“true”, “false”}↵
playrange: {“true”, “false”}↵
cache: {“true”, “false”}↵
dynamic range: {“true”, “false”}↵
slate: {“true”, “false”}↵
clips: {“true”, “false”}↵
disk: {“true”, “false”}↵
↵
Retrieving device information
The "device info" command returns information about the connected deck device:
device info↵
The server will respond with:
204 device info:↵
protocol version: {Version}↵
model: {Model Name}↵
unique id: {unique alphanumeric identifier}↵
slot count: {number of storage slots}↵
software version: {software version}↵
↵
424Developer Information

Retrieving slot information
The "slot info" command returns information about a slot. Without parameters, the command returns
information for the currently selected slot:
slot info↵
If a slot id is specified, that slot will be queried:
slot info: slot id: {Slot ID}↵
The server will respond with slot specific information:
202 slot info:↵
slot id: {Slot ID}↵
status: {"empty", "mounting", "error", "mounted"}↵
volume name: {Volume name}↵
recording time: {recording time available in seconds}↵
video format: {disk's default video format}↵
blocked: {“true”, “false”}↵
↵
Asynchronous slot information change notification is disabled by default and may be configured with
the "notify" command. When enabled, changes in slot state will generate a "502 slot info:" asynchronous
message with the same parameters as the "202 slot info:" message.
Retrieving clip information
The “disk list” command returns the information for each playable clip on a given disk. Without parameters,
the command returns information for the current active disk:
disk list↵
If a slot id is specified, the disk in that slot will be queried:
disk list: slot id: {Slot ID}↵
The server responds with the list of all playable clips on the disk in the format of: Index, name, formats, and
duration in timecode:
206 disk list:↵
slot id: {Slot ID}↵
{clip index}: {name} {file format} {video format} {Duration
ti m ecode}↵
{clip index}: {name} {file format} {video format} {Duration
ti m ecode}↵
…
↵
Note that the clip index starts from 1.
Retrieving clip count
The "clips count" command returns the number of clips on the current timeline:
clips count ↵
The server responds with the number of clips:
214 clips count: ↵
clip count: {Count}↵
425Developer Information

Retrieving timeline information
The "clips get" command returns information for each available clip on the current timeline. Without
parameters, the command returns information for all clips on timeline:
clips get↵
The server responds with a list of clip IDs, names and timecodes:
205 clips info:↵
clip count: {Count}↵
{Clip ID}: {Start timecode} {Duration timecode} {In timecode}
{Out timecode} {Name}↵
{Clip ID}: {Start timecode} {Duration timecode} {In timecode}
{Out timecode} {Name}↵
…
↵
Retrieving transport information
The “transport info” command returns the state of the transport:
transport info ↵
The server responds with transport specific information:
208 transport info:
status: {“preview”, “stopped”, “play”, “forward”, “rewind”,
“j o g ”, “ s h u t t l e ”,” r e c o r d ”}↵
speed: {Play speed between -5000 and 5000 %}↵
slot id: {Slot ID or “none”}↵
clip id: {Clip ID or “none”}↵
single clip: {“true”, “false”}↵
display timecode: {timecode}↵
timecode: {timecode}↵
video format: {Video format}↵
loop: {“true”, “false”}↵
timeline: {n}↵
input video format: {Video format”}↵
dynamic range: {“off”, “Rec709”, “Rec2020_SDR”, “HLG”,
“ST2084_300”, “ST2084_500”, “ST2084_800”, “ST2084_1000”,
“ST2084_2000”, “ST2084_4000”, “ST2048” or “none”}↵
↵
The "timecode" value is the timecode within the current timeline for playback or the clip for record. The
"display timecode" is the timecode displayed on the front of the deck. The two timecodes will differ in some
deck modes.
Asynchronous transport information change notification is disabled by default and may be configured
with the "notify" command. When enabled, changes in transport state will generate a "508 transport info:"
asynchronous message with the same parameters as the "208 transport info:" message.
426Developer Information

Video Formats
The following video formats are currently supported on HyperDeck Shuttle:
720p50, 720p5994, 720p60
1080p23976, 1080p24, 1080p25, 1080p2997, 1080p30, 1080p60
1080i50, 1080i5994, 1080i60
Video format support may vary between models and software releases.
File Formats
All HyperDeck models currently support the following file formats:
H.264High
H.264Medium
H.264Low
QuickTimeProResHQ
QuickTimeProRes
QuickTimeProResLT
QuickTimeProResProxy
QuickTimeDNxHD220x
DNxHD220x
QuickTimeDNxHD145
DNxHD145
QuickTimeDNxHD45
DNxHD45
Supported file formats may vary between models and software releases.
427Developer Information

Querying and updating configuration information
The "configuration" command may be used to query the current configuration of the deck:
configuration↵
The server returns the configuration of the deck:
211 configuration:↵
audio input: {“embedded”, “XLR”, “RCA”}↵
audio mapping: {n}↵
video input: {“SDI”, “HDMI”, “component”, “composite”}↵
file format: {format}↵
audio codec: {“PCM”, “AAC”}↵
timecode input: {“external”, “embedded”, “preset”, “clip”}↵
timecode output: {“clip”, “timeline”}↵
timecode preference: {“default”, “dropframe”, “nondropframe”}↵
timecode preset: {timecode}↵
audio input channels: {n}↵
record trigger: {“none”, “recordbit”, “timecoderun”}↵
record prefix: {name}↵
append timestamp: {“true”, “false”}↵
genlock input resync: {“true”, “false”}↵
↵
One or more configuration parameters may be specified to change the configuration of the deck.
To change the current video input:
configuration: video input: {“SDI”, “HDMI”, “component”}↵
Valid video inputs may vary between models. To configure the current audio input:
configuration: audio input: {“embedded”, “XLR”, “RCA”}↵
Valid audio inputs may vary between models.
To configure the current file format:
configuration: file format: {File format}↵
Note that changes to the file format may require the deck to reset, which will cause the client connection to
be closed. In such case, response code 213 will be returned (instead of 200) before the client connection is
closed:
“213 deck rebooting”
Asynchronous configuration information change notification is disabled by default and may be configured
with the “notify” command. When enabled, changes in configuration will generate a “511 configuration:”
asynchronous message with the same parameters as the “211 configuration:” message.
428Developer Information

Selecting active slot and video format
The "slot select" command instructs the deck to switch to a specified slot, or/and to select a specified output
video format.
To switch to a specified slot:
slot select: slot id: {slot ID}↵
To select the output video format:
slot select: video format: {video format}↵
Either or all slot select parameters may be specified. Note that selecting video format will result in a rescan of
the disk to reconstruct the timeline with all clips of the specified video format.
Clearing the current timeline
The "clips clear" command instructs the deck to empty the current timeline:
clips clear↵
The server responds with
200 ok↵
Adding a clip to the current timeline
The "clips add:" command instructs the deck to add a clip to the current timeline:
clips add: name: {clip name}↵
The server responds with
200 ok↵
or in case of error
1xx {error description}↵
Configuring the watchdog
The “watchdog” command instructs the deck to monitor the connected client and terminate the connection if
the client is inactive for at least a specified period of time.
To configure the watchdog:
watchdog: period: {period in seconds}↵
To avoid disconnection, the client must send a command to the server at least every {period} seconds. Note
that if the period is set to 0 or less than 0, connection monitoring will be disabled.
429Developer Information

Assistenza
Ottenere assistenza
Il modo più veloce per ottenere assistenza è consultare il materiale di riferimento più recente
alla pagina Supporto del sito di Blackmagic Design.
Supporto online Blackmagic Design
Il manuale, il software e le note di supporto più recenti sono disponibili alla
pagina
www.blackmagicdesign.com/it/support
Blackmagic Forum
Il Blackmagic Forum sul nostro sito web è un'ottima risorsa per ottenere informazioni utili e
condividere idee creative. Qui trovi le risposte alle domande più frequenti, oltre ai consigli
forniti da utenti esperti e dal team Blackmagic Design. Visita il Forum alla pagina
https://forum.blackmagicdesign.com
Contattare Blackmagic Design
Se il materiale di supporto disponibile e il Blackmagic Forum non rispondono alle tue domande,
clicca su
Invia una email o su Trova un team di supporto per contattare direttamente il team di
Blackmagic Design più vicino a te.
Verificare la versione del software
Per verificare quale versione del software HyperDeck è installata sul tuo computer, lancia
Blackmagic HyperDeck Setup.
Su Mac OS, apri la cartella
Applicazioni e seleziona Blackmagic HyperDeck Setup.
Ilnumero della versione del software è indicato nel menù
About Blackmagic
HyperDeck Setup.
Su Windows, seleziona
Blackmagic HyperDeck Setup dal menù Start o dalla
schermata iniziale. Clicca su Help e seleziona About Blackmagic HyperDeck Setup
per leggere il numero della versione del software.
Scaricare gli aggiornamenti software
Dopo aver verificato quale versione del software HyperDeck è installata sul tuo computer, visita
il Centro assistenza di Blackmagic Design su
www.blackmagicdesign.com/it/support per
scaricare gli ultimi aggiornamenti. Consigliamo di non aggiornare il software in pieno
svolgimento di un progetto importante.
430Assistenza
Normative
Smaltimento di apparecchiature elettriche ed elettroniche nell'Unione Europea
Questo simbolo indica che il dispositivo non deve essere scartato insieme agli altri
rifiuti, ma consegnato a uno degli appositi centri di raccolta e riciclaggio. La raccolta e
lo smaltimento differenziato corretto di questo tipo di apparecchiatura evita lo spreco di
risorse e contribuisce alla sostenibilità ambientale e umana. Per tutte le informazioni sui
centri di raccolta e riciclaggio, contatta gli uffici del tuo comune di residenza o il punto
vendita presso cui hai acquistato il prodotto.
Questo dispositivo è stato testato e dichiarato conforme ai limiti relativi ai dispositivi
digitali di Classe A, ai sensi dell'articolo 15 del regolamento FCC. Tali limiti sono stati
stabiliti con lo scopo di fornire protezione ragionevole da interferenze dannose in
ambienti commerciali. Questo dispositivo genera, usa e può irradiare energia a
radiofrequenza e, se non è installato o usato in conformità alle istruzioni, può causare
interferenze dannose che compromettono le comunicazioni radio. Operare questo
dispositivo in ambienti residenziali può causare interferenze dannose, nella cui
evenienza l'utente dovrà porvi rimedio a proprie spese.
Il funzionamento è soggetto alle due condizioni seguenti:
1 Questo dispositivo non deve causare interferenze dannose.
2 Questo dispositivo deve accettare eventuali interferenze ricevute, incluse le
interferenze che possono causare un funzionamento indesiderato.
R-R-BMD-20211410001
Dichiarazione ISED (Canada)
Questo dispositivo è conforme agli standard canadesi sui dispositivi digitali
di Classe A.
Qualsiasi modifica o utilizzo del dispositivo al di fuori di quello previsto potrebbero
invalidare la conformità a tali standard.
Connettere le interfacce HDMI usando cavi schermati HDMI di alta qualità.
Questo dispositivo è stato testato per l’uso in ambienti commerciali. Se utilizzato in
ambienti domestici, può causare interferenze radio.
431Normative

Sicurezza
Questo dispositivo è adatto all'uso nei luoghi tropicali con una temperatura ambiente non
superiore ai 40ºC.
Lasciare uno spazio adeguato intorno al dispositivo per consentire sufficiente ventilazione.
Le parti all'interno del dispositivo non sono riparabili dall'utente. Contattare un centro
assistenza Blackmagic Design per le operazioni di manutenzione.
Usare il dispositivo a un'altitudine non superiore a 2000 m sopra il livello del mare.
Dichiarazione dello Stato della California
Questo dispositivo può esporre l’utente a sostanze chimiche, per esempio tracce di bifenili
polibromurati nelle parti in plastica, che nello Stato della California sono considerati causa di
cancro e difetti congeniti o altri danni riproduttivi.
Per maggiori informazioni, visitare
www.P65Warnings.ca.gov
432Sicurezza

Garanzia
Garanzia limitata di 12 mesi
Blackmagic Design garantisce che questo prodotto è fornito privo di difetti nei materiali e nella
manifattura per un periodo di 12 mesi a partire dalla data d'acquisto. Durante il periodo di garanzia,
Blackmagic Design, a sua scelta, riparerà il prodotto difettoso senza alcun costo per le parti o la
manodopera, o sostituirà il prodotto purché questo venga restituito dal/la Cliente.
Per ottenere l'assistenza prevista dalla presente garanzia, il/la Cliente deve notificare
Blackmagic Design del difetto entro il periodo di garanzia e accordarsi sulla prestazione del servizio.
Il/la Cliente è responsabile del costo di imballaggio e di spedizione del prodotto difettoso al centro
assistenza indicato da Blackmagic Design, con spese di spedizione prepagate. Le spese di
spedizione, l’assicurazione, le tasse, la dogana e altre spese pertinenti la resa del prodotto a
Blackmagic Design sono a carico del/la Cliente.
Questa garanzia perde di validità per difetti, malfunzionamento o danni causati da utilizzo improprio
o da manutenzione e cura inadeguate del prodotto. Blackmagic Design non ha obbligo di fornire
assistenza sotto questa garanzia: a) per riparare danni causati da tentativi di installazione, riparazione
o manutenzione da parte di personale che non sia autorizzato da Blackmagic Design, b) per riparare
danni causati da uso improprio o connessione ad attrezzatura incompatibile, c) per riparare danni
o malfunzionamenti causati dall’uso di parti o ricambi non originali Blackmagic Design, o d) per
fare manutenzione se il prodotto è stato modificato o integrato ad altri prodotti con il risultato di
allungare i tempi della manutenzione o di renderla più difficoltosa. LA PRESENTE GARANZIA DI
BLACKMAGIC DESIGN SOSTITUISCE QUALSIASI ALTRA GARANZIA, ESPLICITA O IMPLICITA.
BLACKMAGIC DESIGN E I SUOI FORNITORI ESCLUDONO QUALSIASI ALTRA GARANZIA IMPLICITA
DI COMMERCIABILITÀ O DI IDONEITÀ AD UN USO SPECIFICO. L'INTERA RESPONSABILITÀ DI
BLACKMAGIC DESIGN E L'UNICO ESCLUSIVO RICORSO DEL/LA CLIENTE PER QUALSIASI DANNO
ARRECATO DI NATURA INDIRETTA, SPECIFICA, ACCIDENTALE O CONSEQUENZIALE, ANCHE
QUALORA BLACKMAGIC DESIGN O UN SUO FORNITORE FOSSERO STATI AVVERTITI DELLA
POSSIBILITÀ DI TALI DANNI, È LA RIPARAZIONE O LA SOSTITUZIONE DEI PRODOTTI DIFETTOSI.
BLACKMAGIC DESIGN NON SI ASSUME ALCUNA RESPONSABILITÀ PER QUALSIASI USO
ILLEGALE DEL DISPOSITIVO DA PARTE DEL/LA CLIENTE. BLACKMAGIC DESIGN NON SI ASSUME
ALCUNA RESPONSABILITÀ PER DANNI DERIVANTI DALL'USO DI QUESTO PRODOTTO. IL/LA
CLIENTE USA QUESTO PRODOTTO A PROPRIO RISCHIO.
© Copyright 2022 Blackmagic Design. Tutti i diritti riservati. “Blackmagic Design”, “DeckLink”, “HDLink”, “Workgroup Videohub”,
“Multibridge Pro”, “Multibridge Extreme”, “Intensity” e “Leading the creative video revolution” sono marchi registrati negli Stati
Uniti e in altri Paesi. Altri nomi di prodotti e aziende qui contenuti potrebbero essere marchi dei rispettivi proprietari.
433Garanzia

HyperDeck Shuttle HD
HyperDeck
Shuttle HD
Abril 2022
Manual de Instalação e Operação

Prezado Cliente,
Obrigado por adquirir um gravador de disco Blackmagic HyperDeck Shuttle HD.
Quando criamos os gravadores de disco Blackmagic HyperDeck originais, nossa intenção
era facilitar a gravação e reprodução de vídeos utilizando mídias SSD rápidas. Agora, temos o
orgulho de apresentar o HyperDeck Shuttle HD.
O HyperDeck Shuttle HD é um gravador de vídeo HDMI compacto e portátil, desenvolvido
para uso em mesa. O seletor de busca grande e os controles de transporte familiares
permitem que você opere o gravador com uma mão só, o que torna o HyperDeck Shuttle HD
a companhia perfeita para produção ao vivo com um switcher ATEM Mini. Você pode inclusive
utilizar o HyperDeck Shuttle HD como um teleprômpter.
O HyperDeck Shuttle HD grava em cartões SD ou discos flash externos usando codecs
ProRes, DNxHD ou H.264 para gravação e reprodução ultrarrápidas.
Consulte a página de suporte em
www.blackmagicdesign.com/br para obter a versão mais
recente deste manual e das atualizações do software HyperDeck. Para garantir que você
receba todos os recursos mais recentes, mantenha o seu programa atualizado. Ao baixar
o software, registre suas informações para que possamos mantê-lo atualizado quando
novos programas forem lançados. Estamos sempre trabalhando com novos recursos e
aprimoramentos, então adoraríamos ouvir a sua opinião.
Grant Petty
Diretor Executivo da Blackmagic Design

Índice
Primeiros Passos 437
Conexão de alimentação 437
Conexão de vídeo e áudio 438
Conexão de mídias 438
Gravação de Vídeo 439
Reprodução 440
Usar o seletor de busca 441
Alterar Configurações 443
Configurações 444
Painel Traseiro 453
Mídias de Armazenamento 454
Cartão SD 454
Discos Externos 455
Formatar Mídias 455
Preparar mídias em um computador 455
Usar a Função Teleprômpter 457
Blackmagic HyperDeck Setup 458
Transferir Arquivos via Rede 460
Developer Information 462
Blackmagic HyperDeck Ethernet Protocol 462
Protocol Commands 462
Protocol Details 466
Ajuda 478
Informações Regulatórias 479
Informações de Segurança 480
Garantia 481
436
HyperDeck Shuttle HD
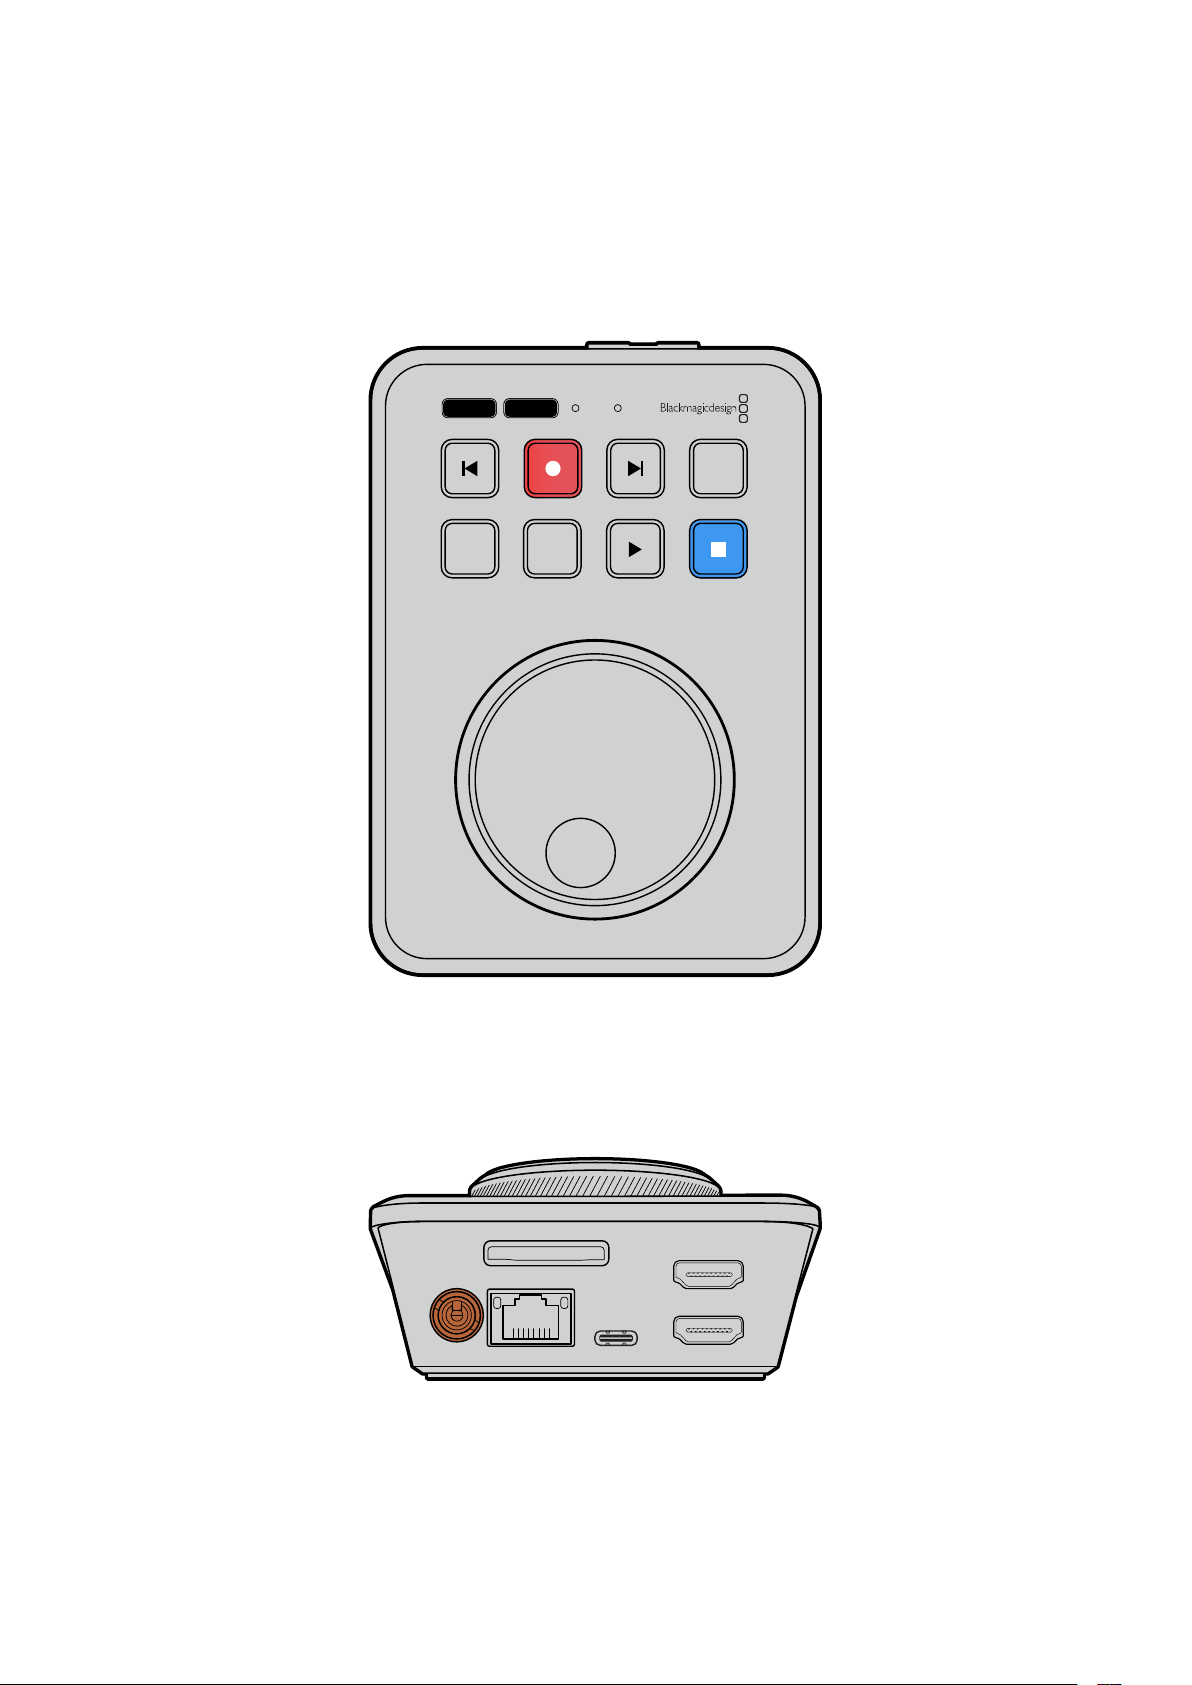
Primeiros Passos
Para começar a usar o seu HyperDeck Shuttle HD, basta conectar a alimentação, plugar uma fonte
de vídeo HDMI, inserir um cartão SD ou mídia externa e pressionar o botão de gravação.
Esta seção do manual mostra como começar a usar o seu HyperDeck Shuttle HD.
JOG SCR
CLIP
MENU SET
DISK SD
Conexão de alimentação
Para alimentar o HyperDeck Shuttle HD, conecte a fonte de alimentação fornecida à entrada de
alimentação no painel traseiro. É recomendável utilizar o anel de travamento para fixar o cabo de
alimentação e prevenir desconexões acidentais.
HDMI OUT
HDMI IN
EXT DISK
SD CARD
ETHERNET
+
12V DC
Prenda o adaptador de alimentação na entrada de
alimentação do HyperDeck Shuttle HD.
437
Primeiros Passos
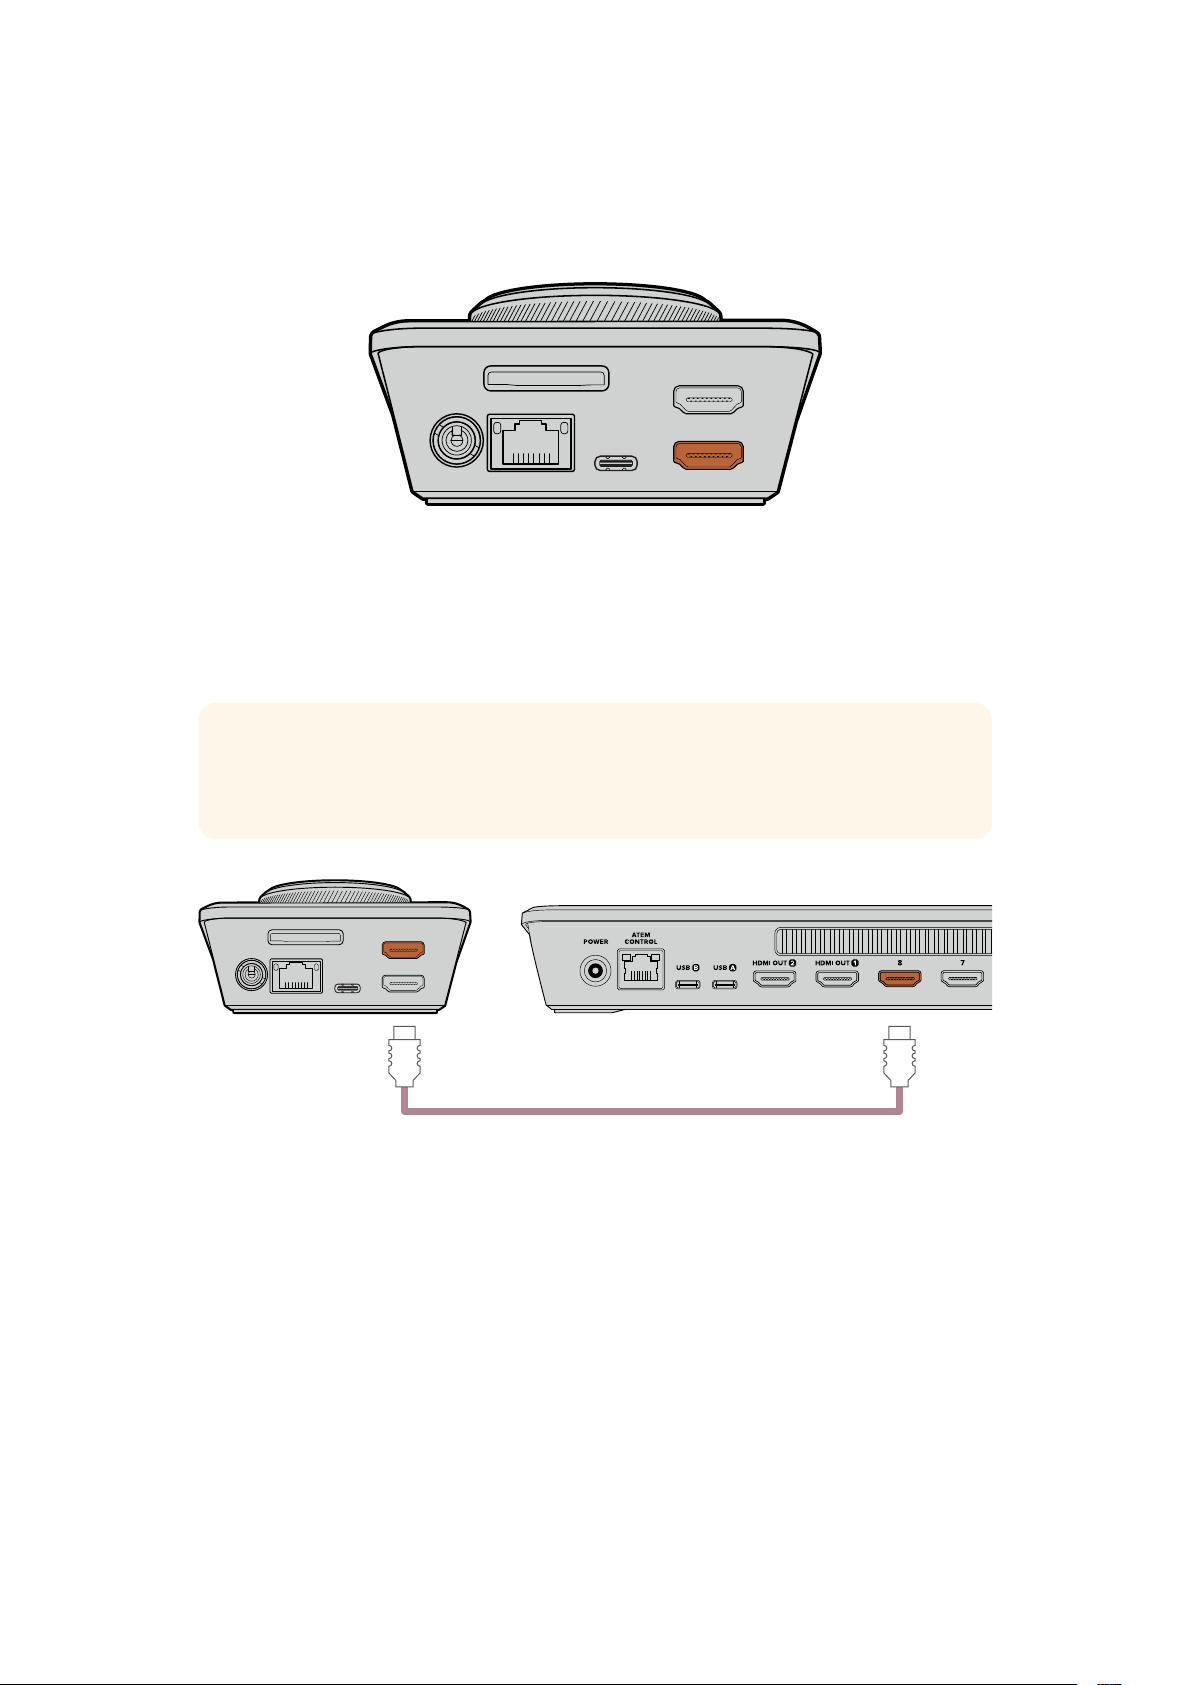
Conexão de vídeo e áudio
Para conectar vídeo ao HyperDeck Shuttle HD, plugue uma fonte de vídeo HDMI na entrada HDMI
no painel traseiro.
HDMI OUT
HDMI IN
EXT DISK
SD CARD
ETHERNET
+
12V DC
Conecte o seu equipamento de destino na saída HDMI. Por exemplo, um switcher ATEM Mini ou
uma televisão HDMI.
A saída HDMI também é usada para visualizar o menu de configurações ao alterar definições no seu
HyperDeck. Isso ocorre porque o menu de configurações é visualizado através de uma
sobreposição de vídeo na saída HDMI. Para mais informações sobre o menu de configurações,
consulte a seção “Alterar Configurações” deste manual.
DICA Caso não consiga visualizar sua fonte de entrada de vídeo na tela conectada, é
possível que você esteja no modo de reprodução. Pressione o botão de gravação para
habilitar o modo de gravação.
HDMI OUT
HDMI IN
EXT DISK
SD CARD
ETHERNET
+
12V DC
HDMI
Conecte a saída HDMI ao equipamento de destino, como uma televisão HDMI ou um switcher ATEM Mini.
Conexão de mídias
Todos os gravadores de disco HyperDeck Shuttle HD são comercializados prontos para gravar
imediatamente sem precisar ajustar nenhuma configuração. Tudo que você precisa é de um cartão
SD ou disco externo formatado.
Você pode formatar mídias facilmente através das configurações do menu. Você também pode
formatar usando um computador. Para mais informações, consulte a seção ‘Formatar Mídias’ neste
manual. Você também pode encontrar informações sobre os tipos de mídia mais indicados para
gravar vídeos e uma lista de cartões SD e discos externos recomendados.
Para plugar um cartão SD:
1 Segure o cartão SD com os conectores dourados voltados para cima e alinhe-o com o
compartimento de mídia. Agora, insira o cartão no compartimento cuidadosamente até que
ele se encaixe firmemente no lugar.
438Primeiros Passos
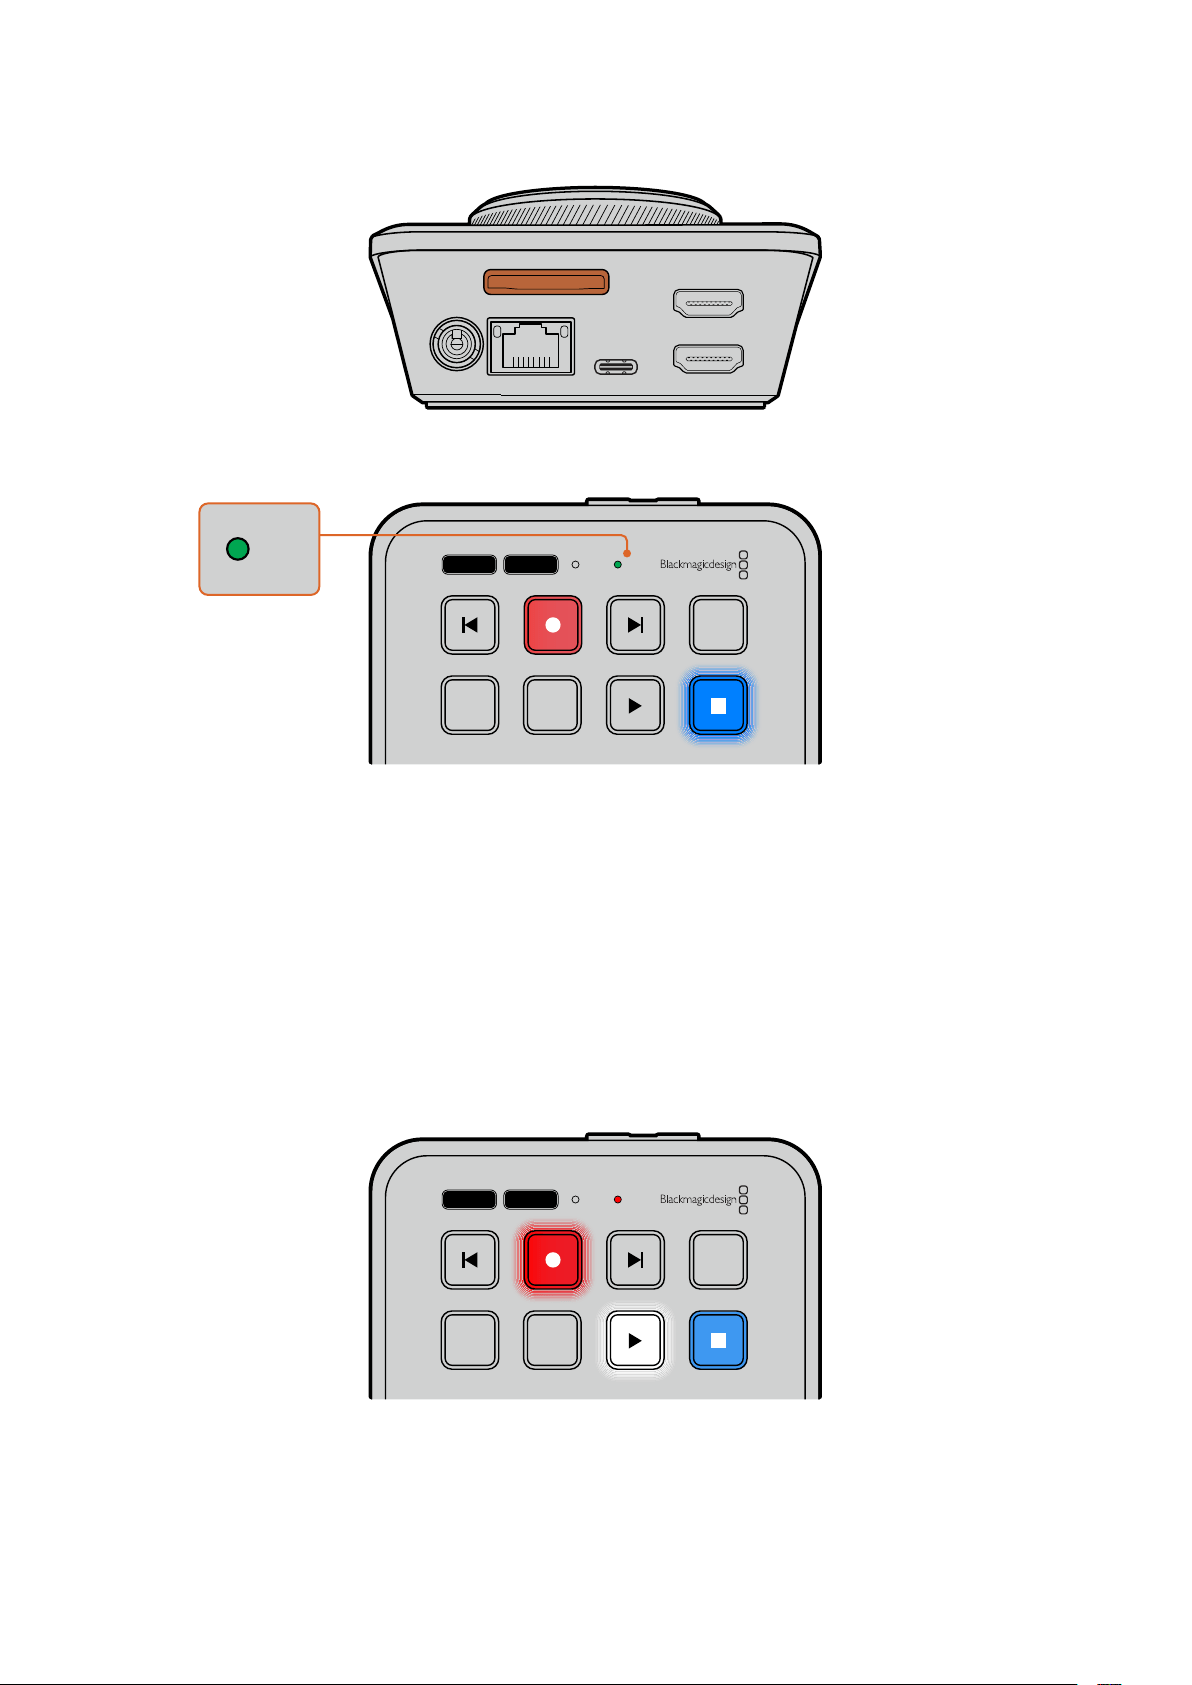
HDMI OUT
HDMI IN
EXT DISK
SD CARD
ETHERNET
+
12V DC
2 O HyperDeck verificará o cartão SD. O indicador verde “SD” acenderá na parte superior do
HyperDeck Shuttle HD. Após a verificação, o indicador desligará.
JOG SCR
CLIP
MENU SET
DISK SD
DISK SD
Seu HyperDeck Shuttle HD está pronto para gravar e reproduzir!
Continue lendo este manual para obter informações detalhadas sobre como gravar e reproduzir
clipes, alterar configurações e muito mais.
Gravação de Vídeo
Depois de confirmar que sua fonte de vídeo está sendo exibida no equipamento HDMI de destino,
você pode começar a gravar imediatamente.
Para iniciar a gravação, pressione o botão de gravação. Ao gravar em um cartão SD, o indicador SD
acenderá em vermelho. Os botões de gravação e reprodução também acenderão. Ao gravar em um
disco externo, o indicador de disco acenderá em vermelho.
JOG SCR
CLIP
MENU SET
DISK SD
Pressione o botão “Stop” para finalizar a gravação.
439Gravação de Vídeo

Reprodução
Pressione o botão “Play” para iniciar a reprodução. Durante a reprodução, o botão “Play” acenderá
e o indicador de compartimento de mídia “Disk” ou “SD” acenderá em verde.
Se houver vários clipes gravados, você pode alternar entre eles pressionando os botões de avanço
e retrocesso.
JOG SCR
CLIP
MENU SET
DISK SD
Usar os botões Skip
Pressione o botão de retrocesso para saltar ao início do clipe. Pressionar mais de uma vez navegará
pelos clipes gravados anteriormente.
Pressione o botão de avanço para navegar pelos clipes em avanço.
JOG SCR
CLIP
MENU SET
DISK SD
Use os botões de avanço e retrocesso para saltar ao início de cada clipe.
DICA Para reproduzir arquivos de vídeo no seu HyperDeck, você precisará corresponder
o codec usado para gravar os arquivos. Isso pode ser feito no menu. Consulte a seção
“Alterar Configurações” neste manual para mais informações.
Repetição de clipes
Durante a reprodução, pressionar o botão “Play” novamente configurará o seu HyperDeck Shuttle
HD para repetir todos os clipes até que você pressione o botão “Stop”.
Caso deseje repetir um único clipe, configure o seu HyperDeck no modo “Clipe” e pressione o
botão “Play” uma vez para reproduzir e novamente para repetir.
Repetir todos
Durante a reprodução, pressione o botão “Play” uma segunda vez para repetir
todos os clipes gravados.
Repetir atual
No modo clipe, pressione o botão “Play” uma segunda vez para repetir o clipe
atual.
440Reprodução
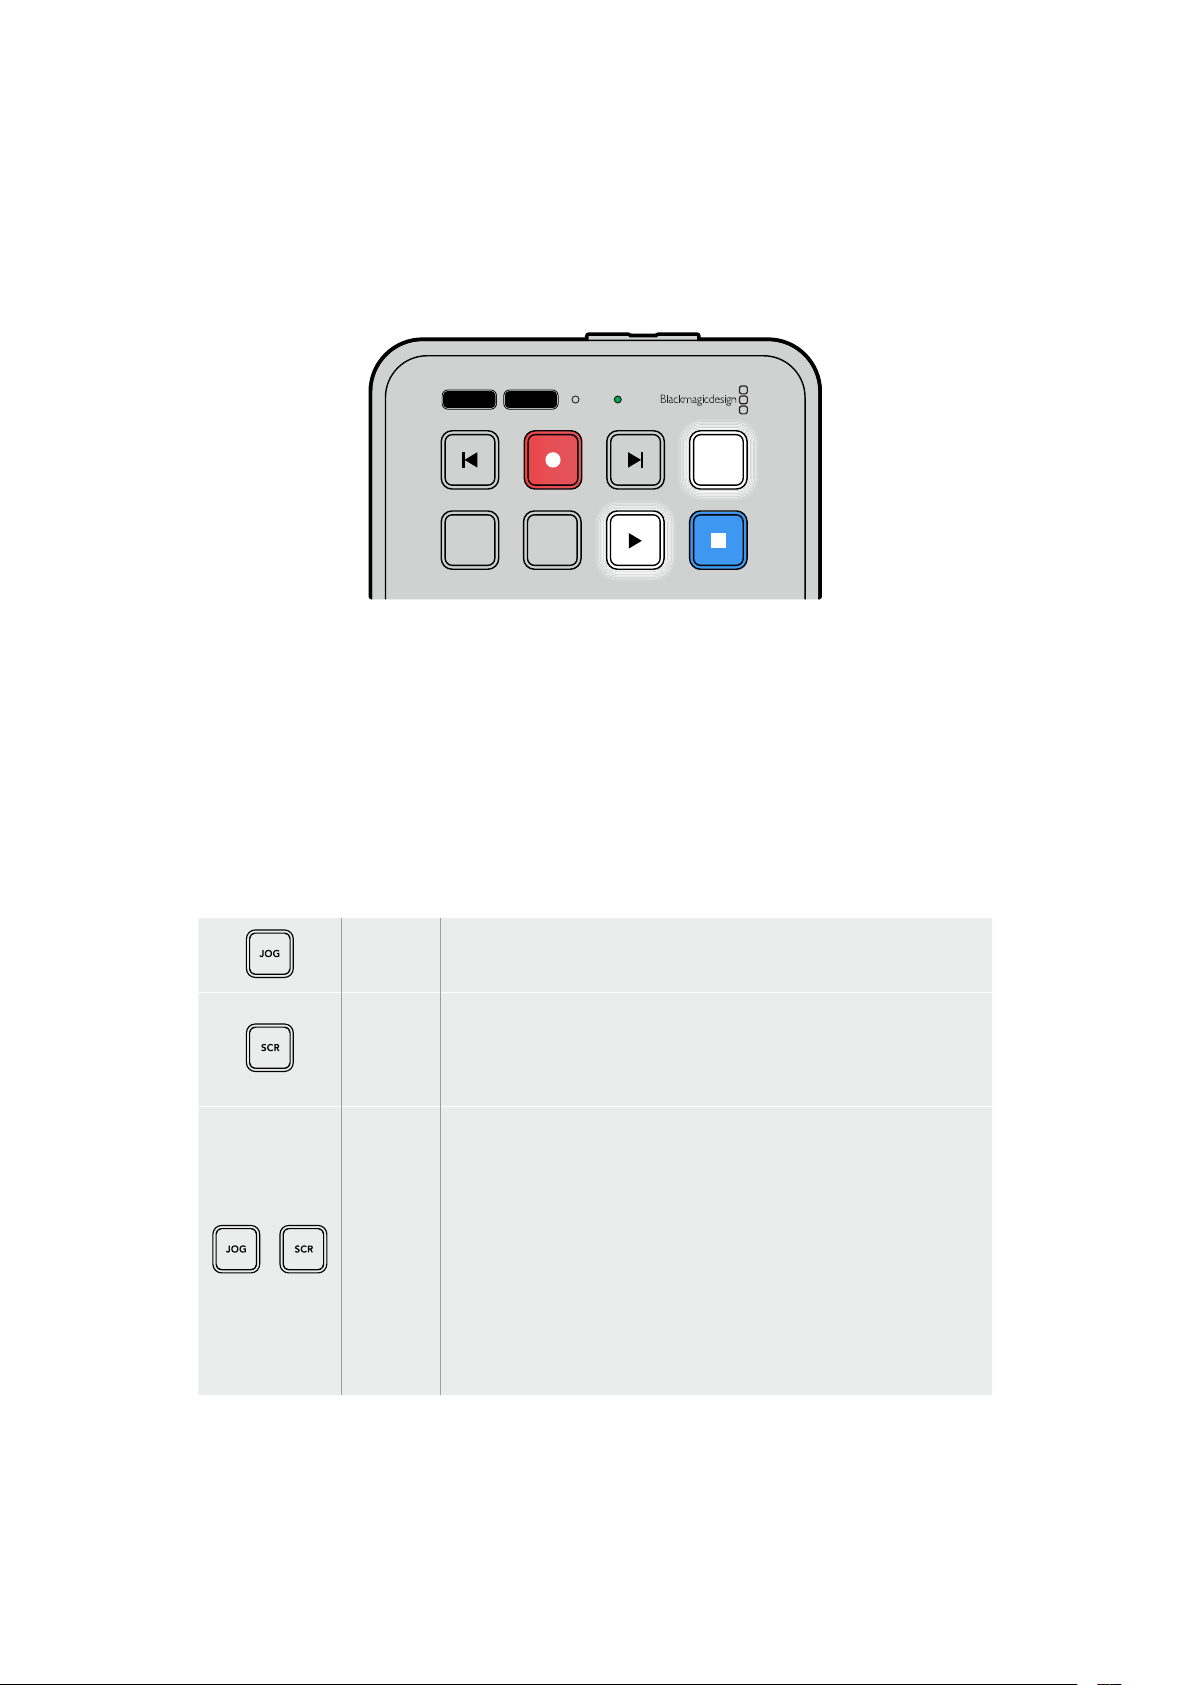
Modo clipe
No modo clipe, é possível restringir a reprodução a um único clipe apenas. Por exemplo, com o
modo clipe habilitado, você pode navegar ou pular para um clipe e, em seguida, pressionar “Play”
sabendo que a reprodução cessará quando o clipe terminar.
JOG SCR
CLIP
MENU SET
DISK SD
Quando o modo clipe é selecionado, pressionar
“Play” uma segunda vez repetirá o clipe atual.
Usar o seletor de busca
O seletor de busca oferece uma maneira rápida de navegar pelos seus clipes e selecionar
momentos específicos para reproduzi-los, ou revisá-los quadro a quadro. Isso pode ser importante
caso você precise localizar um momento específico monitorando o clipe visualmente à medida que
você gira o seletor. Também é útil para posicionar o cursor de reprodução em um ponto de
indicação específico, pronto para colocar o clipe no ar durante uma transmissão ao vivo.
Os modos de busca do seletor são: jog, scroll e shuttle.
Jog Reproduz o clipe quadro por quadro, oferecendo controle preciso.
Scroll
O modo scroll permite navegar em avanço ou retrocesso por todas
as suas mídias gravadas. Conforme você gira o seletor, a rolagem
acompanha a velocidade do movimento, oferecendo controle total
sobre o posicionamento da reprodução.
Shuttle
Pressione os botões “JOG” e “SCR” simultaneamente para entrar no
modo shuttle. No modo shuttle, você pode retroceder ou avançar pela
sua mídia girando o seletor para a esquerda ou direita. Conforme você
gira o seletor, a mídia se movimenta mais rápido, até a velocidade
máxima de 50x. Para reduzir a velocidade de navegação a zero,
gire o seletor de volta à posição inicial. Caso deseje parar em um
ponto específico durante a navegação, pressione o botão “Stop”;
ou pressione “Play” para continuar a reprodução na posição atual. É
importante observar que a velocidade máxima de navegação pode
ser reduzida no menu de configurações. Para mais informações,
consulte a seção “Configurações” neste manual.
441Reprodução

JOG SCR
CLIP
MENU SET
DISK SD
Pressione os botões “JOG” ou “SCR” para
selecionar os modos de busca jog e scroll.
JOG SCR
CLIP
MENU SET
DISK SD
Após selecionar um modo de busca, gire o seletor.
DICA Para retornar à reprodução normal, pressione o botão “Play” ou “Stop”
442Reprodução

Alterar Configurações
Pressionar o botão “Menu” abrirá o menu de configurações, que será exibido como uma
sobreposição de vídeo no canto inferior esquerdo da tela HDMI conectada.
JOG SCR
CLIP
MENU SET
DISK SD
Pressione o botão “Menu” para acessar o menu de configurações.
Use o seletor de busca para navegar até um submenu ou configuração.
Pressione o botão “Set” para selecionar um submenu ou configuração.
Ajuste as configurações usando o seletor de busca ou os botões de avanço e retrocesso. Confirme
a seleção pressionando o botão “Set”.
Para sair do menu, pressione “Menu” para retornar pelas opções até a tela inicial.
DICA Você pode posicionar o menu em qualquer um dos quatro cantos da sua tela usando
o menu de configurações. Recomendamos desabilitar o menu após alterar as
configurações para garantir que a saída HDMI forneça uma alimentação limpa quando
conectada a um switcher HDMI, como o ATEM Mini Extreme.
JOG SCR
CLIP
MENU SET
DISK SD
443Alterar Configurações
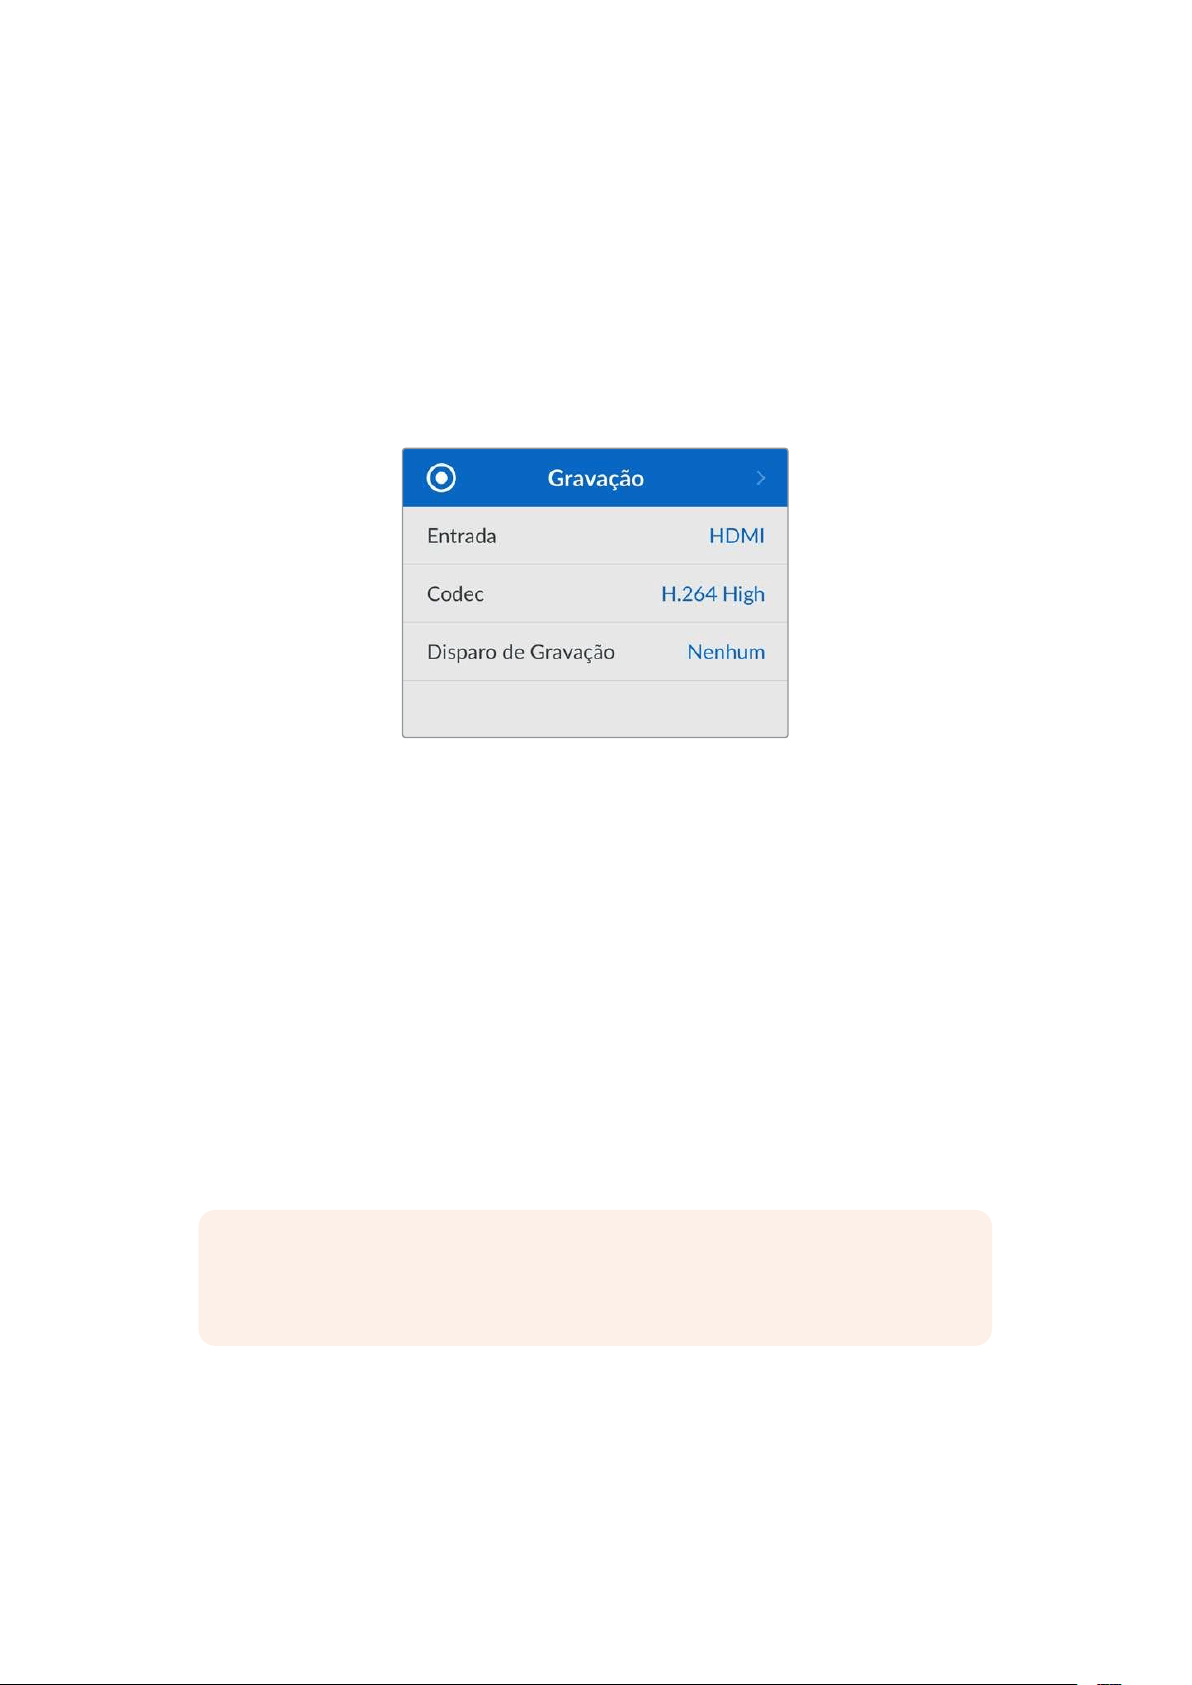
Configurações
O menu de configurações é dividido em cinco categorias diferentes, incluindo Gravação,
Monitoramento, Áudio, Armazenamento e Configuração. Cada um desses submenus contém
configurações relacionadas, a maioria das quais podem ser ajustadas usando o painel de controle
do HyperDeck Shuttle HD. Algumas configurações são exibidas apenas para referência e
aparecerão sombreadas, como “Prefixo do Arquivo”, por exemplo. Nestes casos, as configurações
podem ser ajustadas através do utilitário HyperDeck Setup.
Menu Gravação
Entrada
Exibe a entrada HDMI do HyperDeck Shuttle HD.
Codec
O HyperDeck Shuttle HD pode gravar vídeos compactados usando codecs H.264, Apple ProRes e
DNxHD. Para usar a função de teleprômpter, selecione “Teleprômpter”.
Disparo de Gravação
Há dois modos de disparo de gravação disponíveis: “Iniciar/Parar Vídeo” e “Timecode de Execução”.
Algumas câmeras, como a Blackmagic Pocket Cinema Camera 4K, enviam um sinal via HDMI para
iniciar e cessar a gravação em gravadores externos. A configuração “Iniciar/Parar Vídeo” acionará o
HyperDeck para que inicie ou pare a gravação quando você pressionar o botão de gravação
na câmera.
Utilize a opção “Timecode de Execução” para acionar a unidade e iniciar a gravação quando ela
receber um sinal de código de tempo válido através da entrada HDMI. Quando o sinal parar, a
gravação também irá parar. Você pode desabilitar o disparo de gravação selecionando a
opção “Nenhum”.
OBSERVAÇÃO Ao gravar com uma câmera HDMI, certifique-se de que a saída esteja
limpa e com as sobreposições desativadas, pois qualquer sobreposição presente na saída
de vídeo da sua câmera será gravada com a sua imagem.
444Configurações
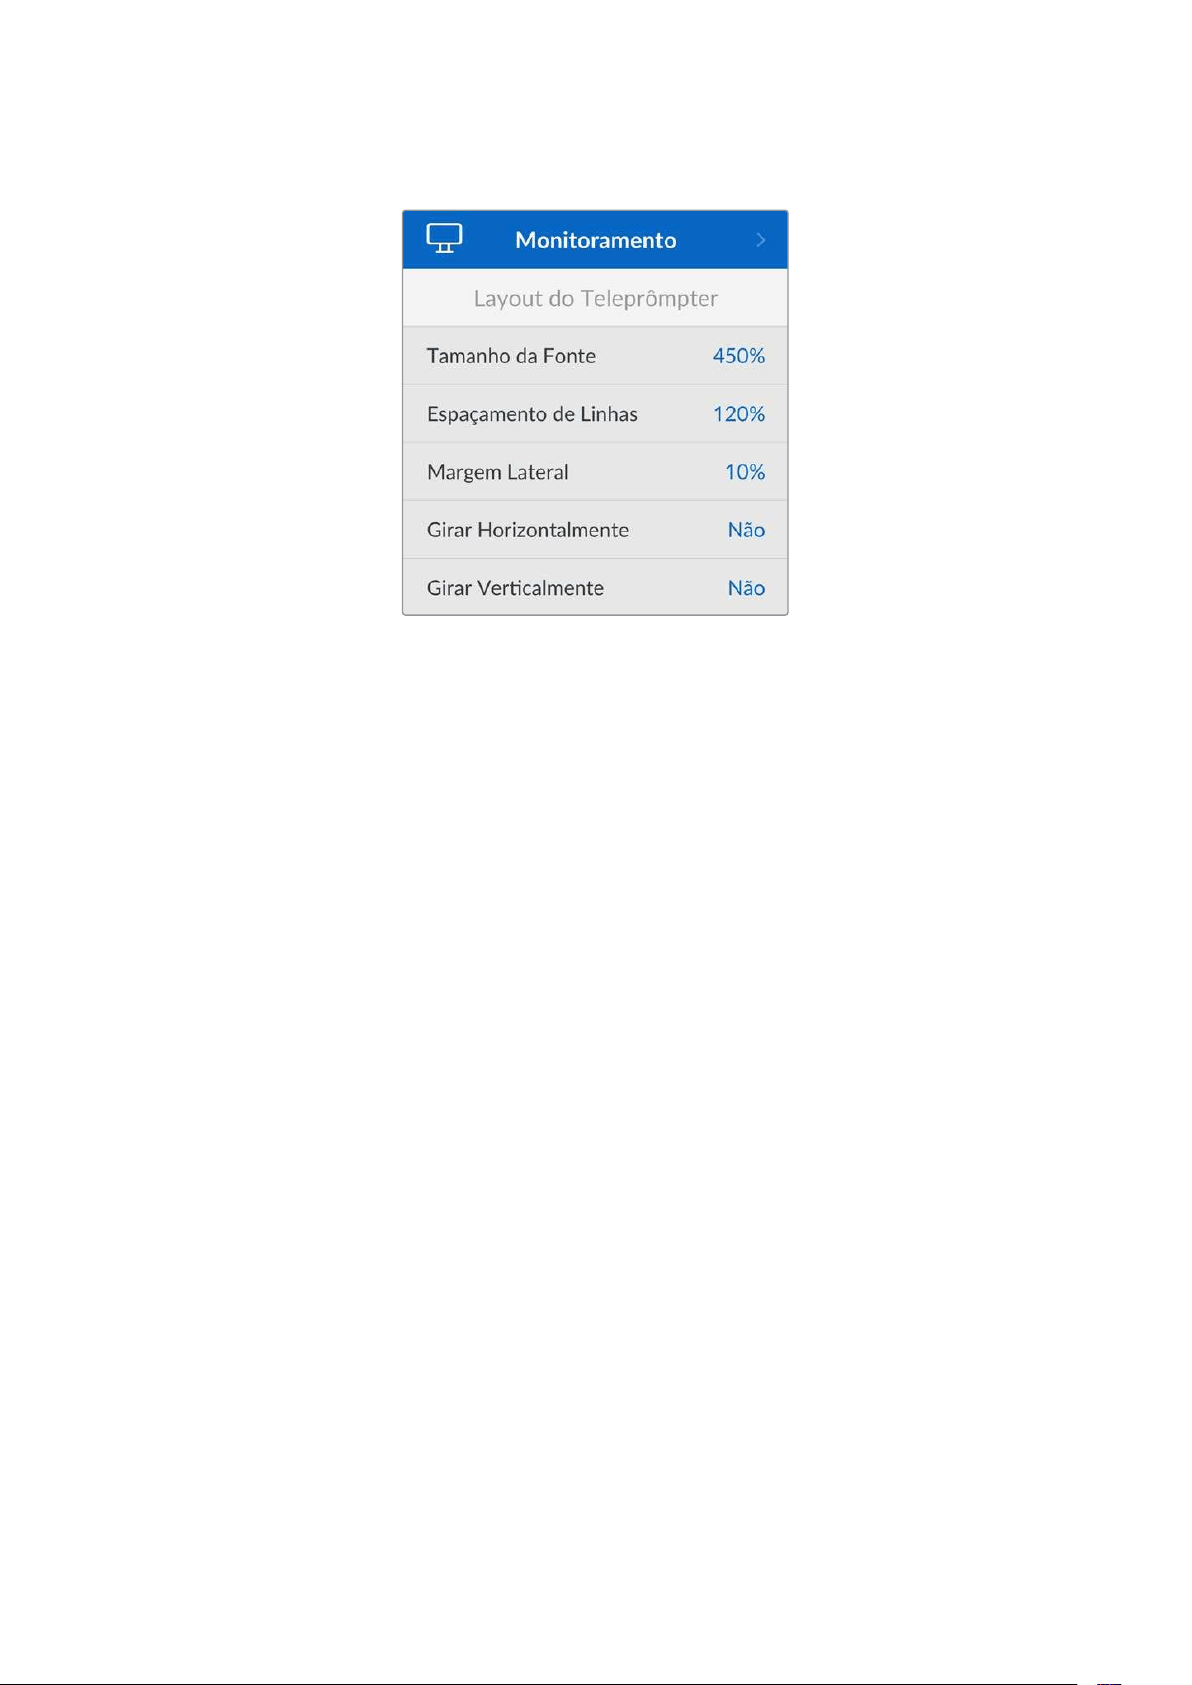
Menu Monitoramento
Layout do Teleprômpter
O menu de monitoramento contém todas as configurações necessárias para utilizar o HyperDeck
Shuttle HD como um teleprômpter.
Tamanho da Fonte
Ajuste o tamanho do texto selecionando a opção “Tamanho da Fonte” e pressionando “Set”. Gire o
seletor no sentido horário para aumentar ou no sentido anti-horário para reduzir.
Espaçamento de Linhas
Gire o seletor para aumentar ou reduzir o espaçamento entre linhas.
Margem Lateral
Ajuste a largura das margens em ambos os lados da tela do teleprômpter.
Girar
Se o monitor do seu teleprômpter estiver configurado para refletir em um vidro, por exemplo, diante
de uma câmera ou um púlpito, será necessário ajustar as configurações no menu “Girar” para que o
texto fique legível para o apresentador. Duas opções estão disponíveis:
Girar Horizontalmente - Utilize essa opção quando a parte inferior do monitor do
teleprômpter estiver instalada mais perto da base do vidro.
Girar Verticalmente - Utilize essa opção quando a parte inferior do monitor do
teleprômpter estiver instalada mais distante da base do vidro.
445Configurações

Menu Áudio
Canais de Áudio Gravados
O HyperDeck Shuttle HD pode gravar até oito canais de áudio PCM por vez. Para selecionar a
quantidade de canais para gravação, expanda a lista de canais de áudio gravados e selecione
2,4ou 8 canais.
Menu Armazenamento
As mídias conectadas aparecerão nas configurações de armazenamento. Mídia 1 mostrará o nome
do cartão SD conectado e Mídia 2 mostrará quaisquer discos flash USB plugados no conector “Ext
Disk”. Ao utilizar um hub USB, como a Blackmagic MultiDock 10G, o disco ativo será exibido.
USB Sequencial
Caso esteja utilizando uma Blackmagic MultiDock 10G ou similar para conectar mais de um drive
através da conexão USB “Ext Disk”, ativar o recurso “USB Sequencial” garantirá que a gravação
passe de um disco externo para o próximo.
Formatar Mídia
Cartões SD e mídias conectadas à porta rotulada “Ext Disk” na parte traseira podem ser formatados
diretamente no HyperDeck ou através de um computador Mac ou Windows.
Para preparar mídias no HyperDeck Shuttle HD:
1 Usando o seletor de busca e o botão “Set”, selecione “Formatar Mídia”.
2 Selecione a mídia a ser formatada na lista e pressione “Set”.
3 Escolha o formato e pressione “Set”.
446Configurações
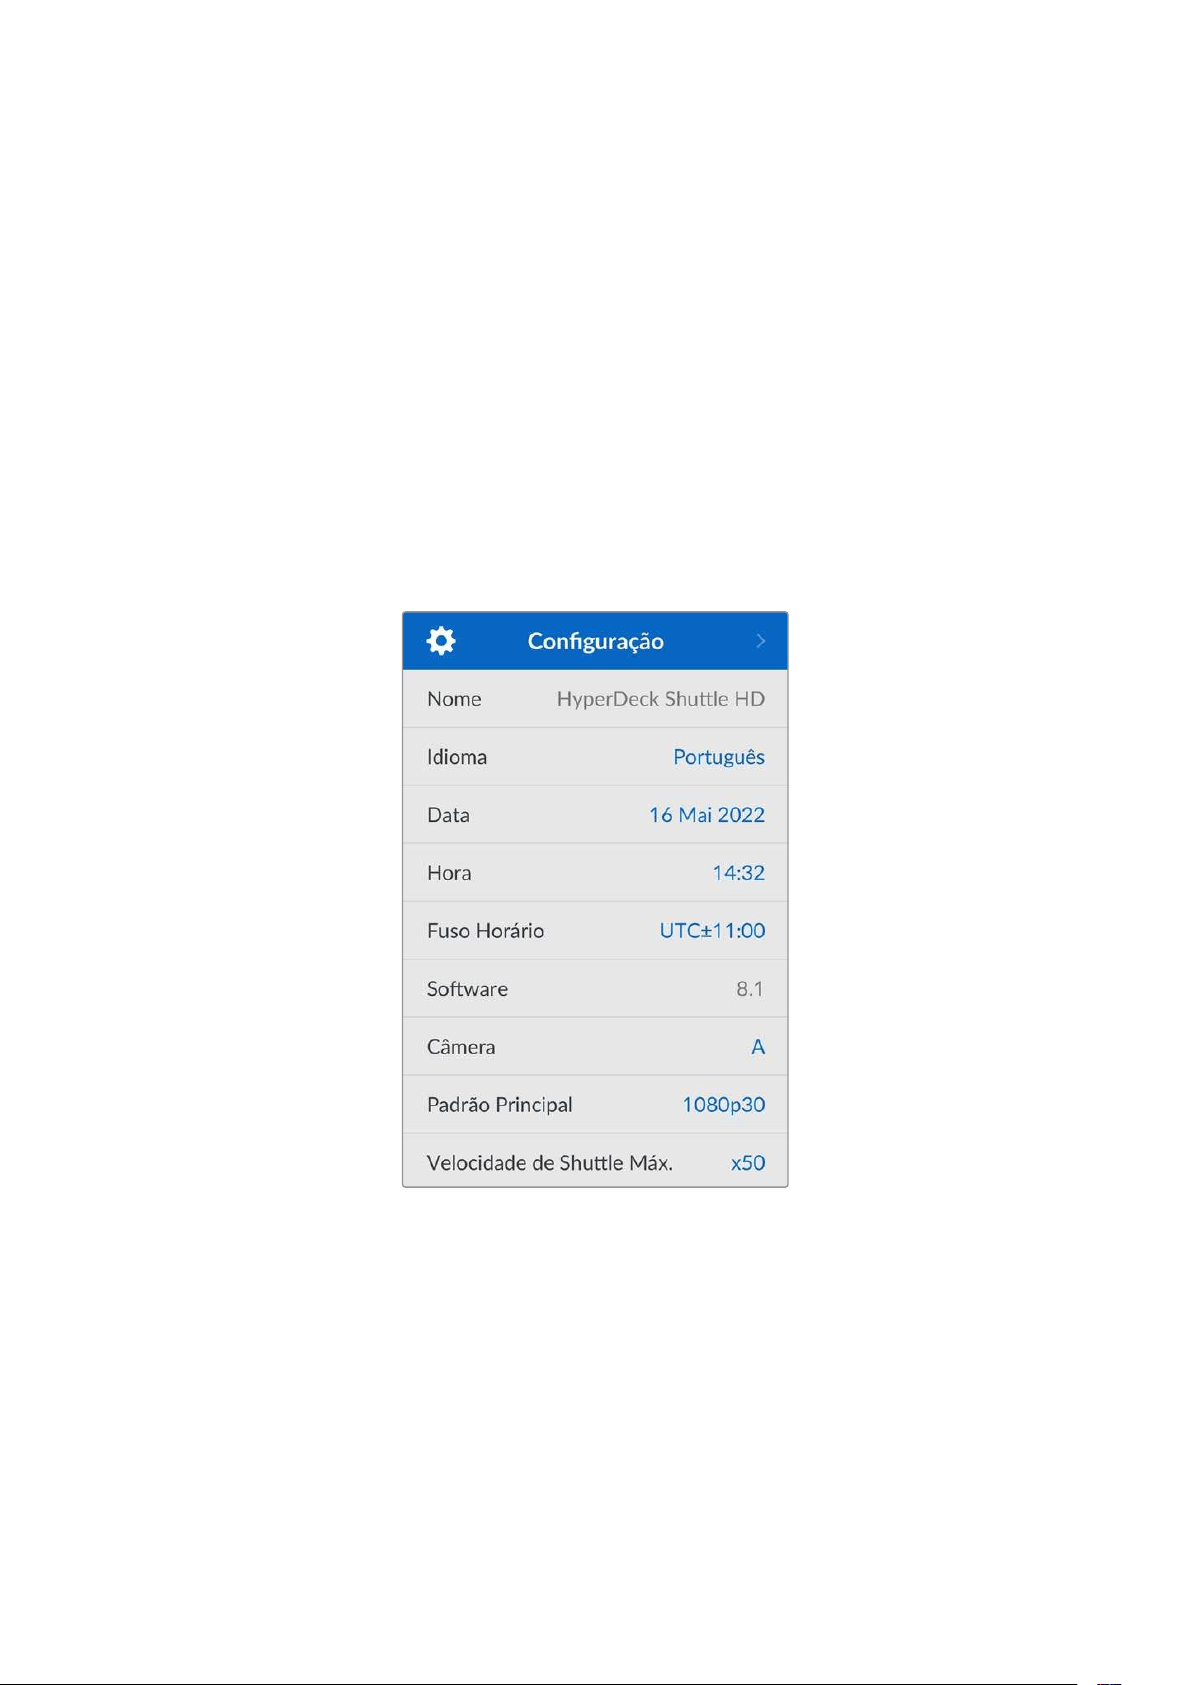
4 Uma janela de confirmação será exibida, detalhando qual cartão será formatado e o
formato selecionado. Selecione “Formatar”.
5 Uma vez concluída, uma janela de formatação será exibida. Selecione “Ok”.
O HFS+, também conhecido como macOS X Expandido, é o formato recomendado porque é
compatível com “journaling”. Dados em mídias com “journaling” têm uma probabilidade maior de
recuperação na rara eventualidade da sua mídia de armazenamento se corromper. O HFS+ é
nativamente suportado pelo Mac. Já o exFAT é suportado nativamente pelo Mac e Windows sem a
necessidade de adquirir um software adicional. No entanto, o formato exFAT não é compatível com
“journaling”.
Para formatar mídias em um computador Mac ou Windows, consulte a seção “Formatar Mídias”
neste manual.
Menu Configuração
Este menu oferece várias configurações, incluindo seleção de idioma e padrão principal, além de
submenus para ajustar a exibição do menu, configurações de rede e código de tempo.
Nome
Quando mais de um HyperDeck Shuttle HD estiver na rede, é recomendável nomear os gravadores
para ajudar a identificá-los. Isso pode ser feito através do Blackmagic HyperDeck Setup ou do
Blackmagic HyperDeck Ethernet Protocol usando um aplicativo terminal. O nome será exibido no
menu de configurações.
Idioma
O HyperDeck Shuttle HD suporta 13 idiomas, incluindo inglês, chinês, japonês, coreano, espanhol,
alemão, francês, russo, italiano, português, turco, ucraniano e polonês.
Para selecionar o idioma:
1 Após destacar o menu “Configuração”, pressione “Set”.
2 Gire o seletor de busca para escolher “Idioma” e pressione “Set”.
447Configurações
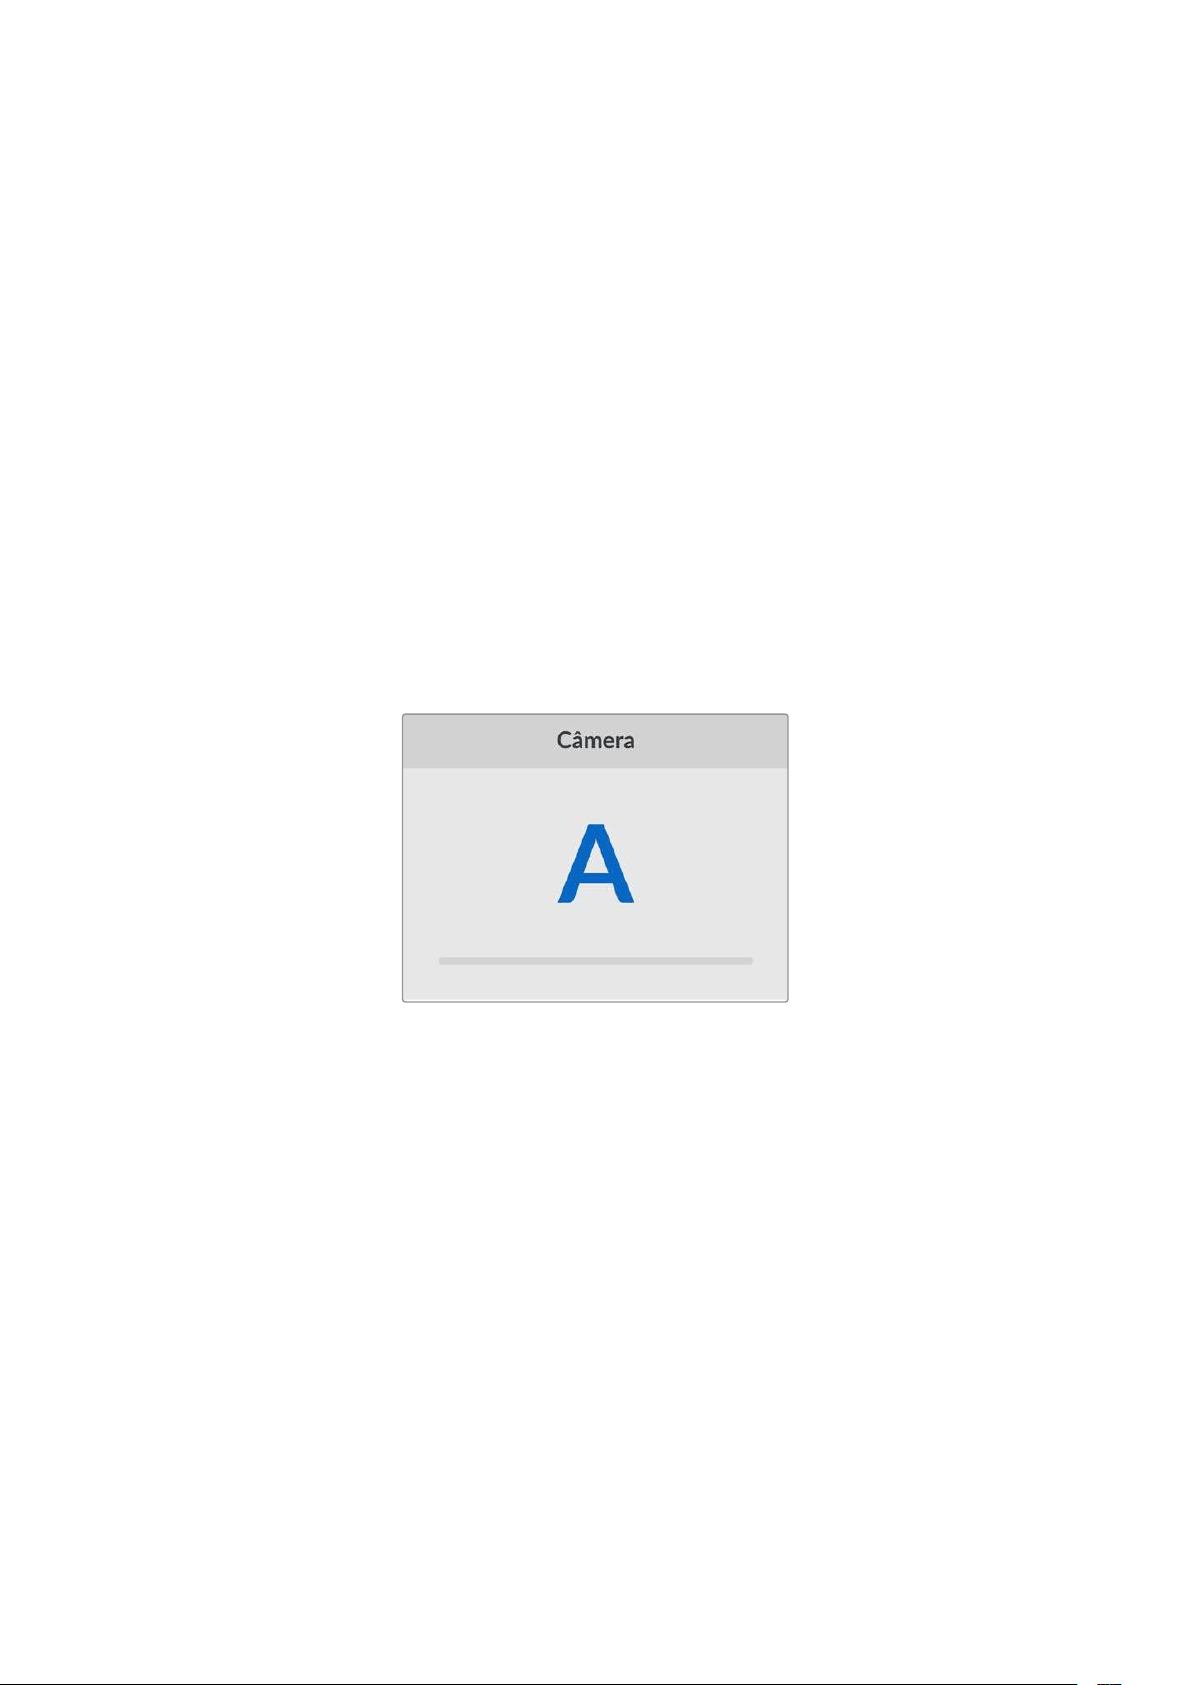
3 Utilize o seletor para escolher o idioma e pressione “Set”. Após a seleção, você retornará
ao menu de configurações automaticamente.
Data
Para ajustar a data, selecione o campo “Data” e pressione “Set”. Com o seletor de busca, você pode
selecionar dia, mês e ano. Quando selecionado, este recurso registrará a data e hora nos nomes
dos arquivos.
Hora
Para ajustar a hora, selecione “Hora” e pressione “Set". Use o seletor de busca para ajustar as horas
e os minutos. O relógio interno do HyperDeck Shuttle HD utiliza o padrão 24 horas.
Software
Exibe a versão do software instalado.
Câmera
Esta configuração é útil ao usar o HyperDeck para gravar arquivos ISO de várias câmeras e, em
seguida, editá-los em uma linha de tempo multicâmera no DaVinci Resolve.
Cada letra de identificação de câmera aparecerá nos metadados dos arquivos, permitindo que o
DaVinci Resolve identifique cada ângulo facilmente ao usar o recurso de compartimento
sincronizado.
Identifique sua câmera usando caracteres de A a Z; ou 1 a 9.
Padrão Principal
Em alguns casos, o HyperDeck Shuttle HD não consegue identificar qual é o padrão de vídeo que
você deseja usar. Este recurso indicará ao HyperDeck qual é o padrão de vídeo que você mais usa.
Um bom exemplo é quando você habilita um HyperDeck Shuttle HD sem uma entrada de vídeo
conectada e insere um disco com arquivos em dois padrões de vídeo diferentes. Qual padrão de
vídeo o HyperDeck deve reproduzir? O recurso de padrão principal indicará o padrão de vídeo de
sua preferência, alternará para esse formato e reproduzirá os arquivos.
O padrão principal também é útil quando você inicializa um HyperDeck Shuttle HD pela primeira vez e
não há uma entrada de vídeo ou um disco de mídias inserido. Neste caso, o HyperDeck não consegue
identificar qual padrão de vídeo usar para a saída de monitoramento. O padrão principal de vídeo
indicará o que fazer.
Contudo, o recurso do padrão de vídeo principal é apenas um guia. Ele não substituirá nada. Por isso,
se você tiver um disco de mídia com somente um tipo de arquivo de vídeo e acionar a reprodução, o
gravador de disco HyperDeck alternará para esse padrão de vídeo e reproduzirá. O padrão principal
de vídeo será ignorado, já que é óbvio que você deseja apenas reproduzir os arquivos do disco.
É uma situação semelhante com a gravação. Se você acionar a gravação, o HyperDeck simplesmente
gravará qualquer padrão de vídeo que esteja conectado à entrada de vídeo. Depois que você concluir a
gravação, o HyperDeck Shuttle HD reproduzirá os arquivos no mesmo padrão de vídeo do disco,
448Configurações
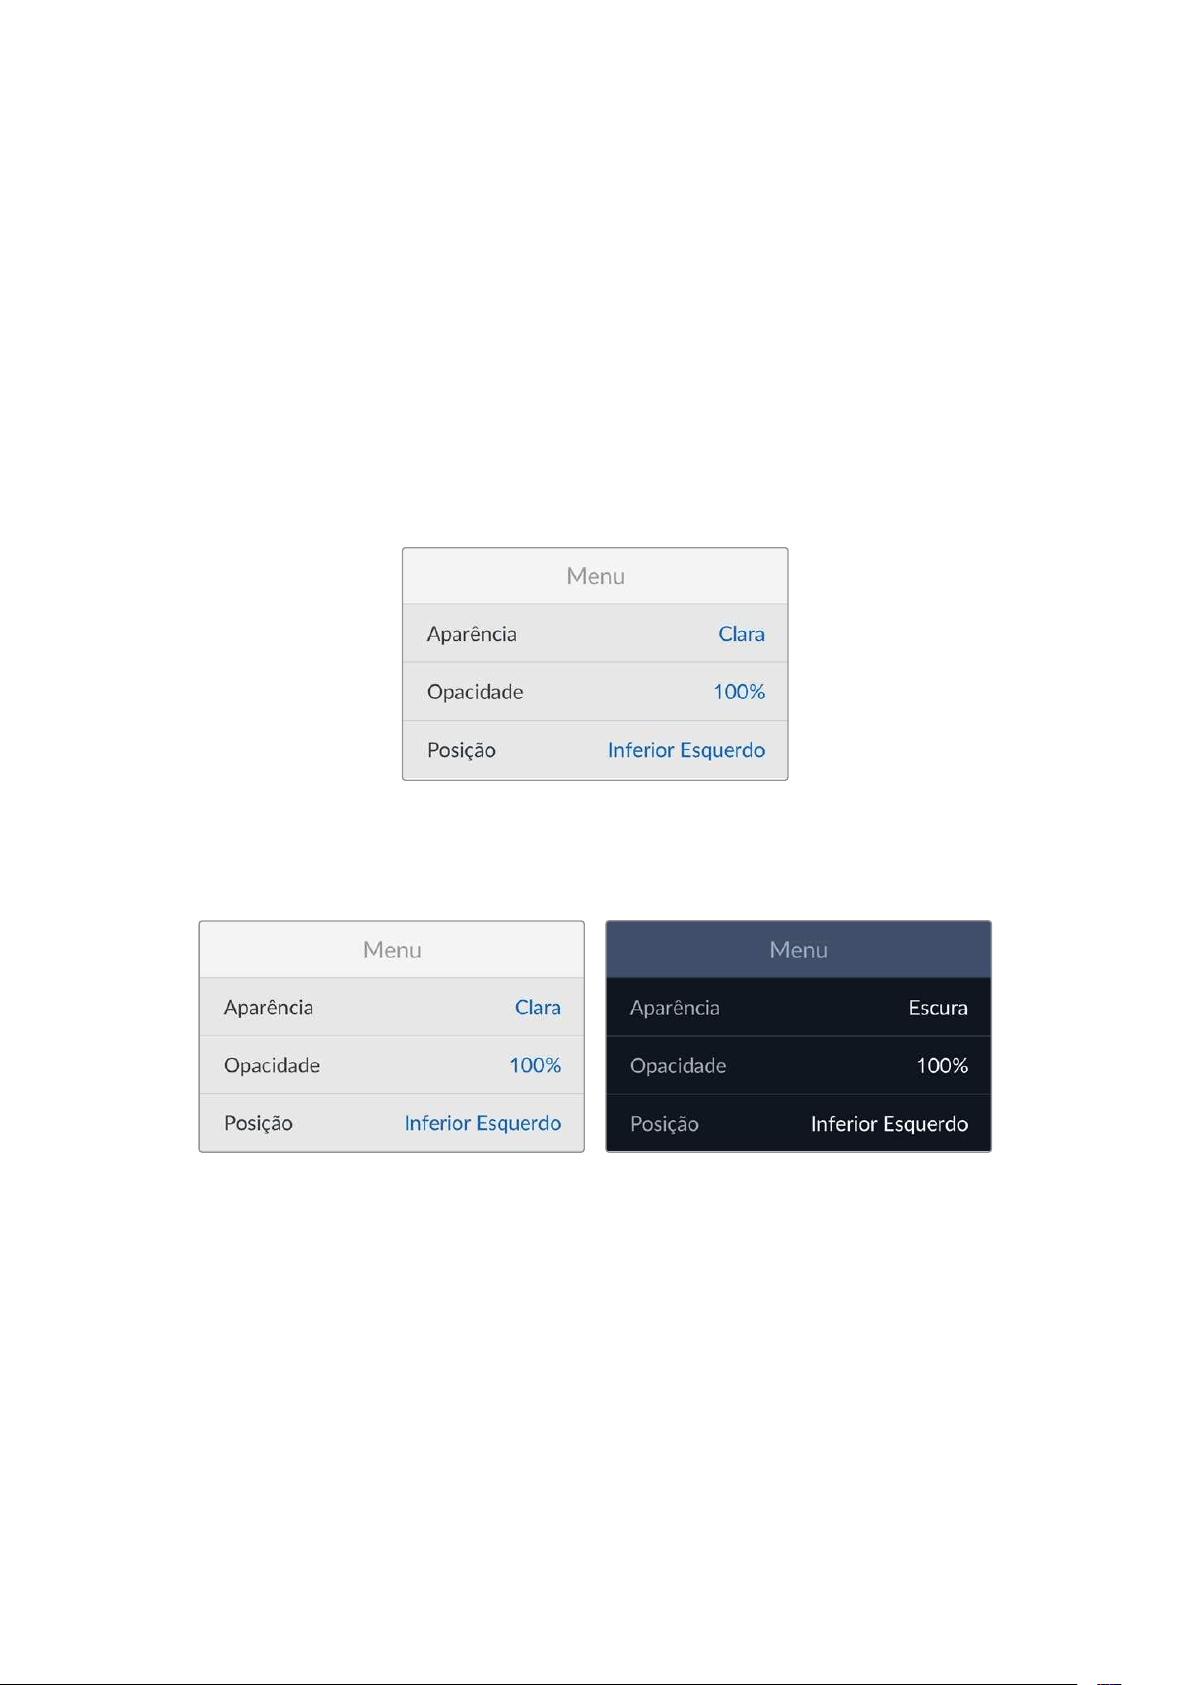
mesmo se existirem outros arquivos no disco que correspondam ao padrão principal. É presumido que
você deseja reproduzir o mesmo padrão de vídeo que acabou de gravar. Se você desconectar o disco
de mídia e plugá-lo novamente, somente então o padrão principal será utilizado para selecionar quais
tipos de arquivo você deseja reproduzir.
O recurso de padrão principal é apenas um guia para ajudar o HyperDeck Shuttle HD a tomar decisões
sobre o que fazer quando ele não tiver certeza. Ele não é uma substituição que força o deck a se
comportar de uma maneira específica.
Velocidade de Shuttle Máx.
A velocidade de shuttle máxima do HyperDeck Shuttle HD é 50x. Caso queira reduzi-la, você pode
selecionar uma das outras predefinições de velocidade.
Menu
Use as configurações de Menu para ajustar a posição e a aparência do menu na tela HDMI conectada.
Aparência
Você pode configurar o menu na tela do HyperDeck no modo “Aparência Clara” ou “Aparência
Escura”. O modo “Aparência Clara” oferece mais contraste ao utilizar mídas mais escuras, assim
como no modo teleprômpter.
Opacidade
Ajuste os níveis para reduzir a opacidade da sobreposição do menu na tela conectada de 100%
(nível padrão) para 20%.
Posição
Por padrão, o menu será sobreposto ao canto inferior esquerdo da tela. Para alterar a posição do
menu, selecione “Posição” e pressione o botão “Set”. Agora você pode selecionar o canto superior
esquerdo, superior direito, inferior esquerdo ou inferior direito da tela.
449Configurações

Rede
Protocolo
O Blackmagic HyperDeck vem configurado de fábrica como DHCP, portanto, uma vez conectado, o
servidor de rede atribuirá um endereço IP automaticamente e nenhuma outra configuração de rede
precisará ser ajustada. Caso precise definir um endereço manualmente, você pode conectar usando
um IP estático.
Com “Protocolo” selecionado, pressione o botão “Set” para acessar o menu, navegue até “IP
Estático” e pressione “Set”.
Endereço IP, Máscara de Sub-rede, Gateway, DNS Primário e DNS Secundário
Quando “IP Estático” estiver selecionado, você pode inserir as informações da sua rede
manualmente.
Para alterar o endereço IP:
1 Use o seletor de busca para destacar “Endereço IP” e pressione o botão “Set” no painel
frontal do HyperDeck.
2 Usando o seletor de busca, ajuste o seu endereço IP, pressionando “Set” para confirmar
antes de ajustar o próximo valor.
3 Pressione “Set” para confirmar a alteração e passar para o próximo valor.
Após inserir seu endereço IP, você pode repetir esses passos para ajustar a Máscara de Sub-rede e
o Gateway. Quando concluir, pressione o botão “Menu” para sair e retornar à tela inicial.
Timecode
Defina suas opções de entrada e saída de código de tempo. É possível gravar o código de tempo
de origem, código de tempo da hora do dia ou definir seu código de tempo manualmente.
450Configurações

Entrada
Há quatro opções de entrada de código de tempo disponíveis durante a gravação.
Entrada de
Vídeo
A seleção da entrada de vídeo obterá o código de tempo embutido de fontes HDMI
com metadados SMPTE RP 188. Isso manterá a sincronização entre sua fonte HDMI
e o arquivo gravado no HyperDeck Shuttle HD.
Interno
Use esta opção para gravar timecode de hora do dia através do gerador de
timecode integrado.
Regen. Último
Clipe
Selecionando a opção “Regen. Último Clipe” para sua entrada de código de
tempo, cada arquivo iniciará um quadro após o último quadro do clipe anterior.
Por exemplo, se o primeiro clipe terminar em 10:28:30:10, o código de tempo do
próximo clipe começará em 10:28:30:11.
Predefinição
Caso deseje definir um código de tempo manualmente, selecione a opção
“Predefinição”. Os clipes gravados começarão no código de tempo definido através
da configuração “Predefinição”, descrita abaixo.
Descarte
Para fontes NTSC com taxas de quadros de 29,97 ou 59,94, você pode selecionar entre “Descartar
Quadros” e “Sem Descartar Quadros”. Caso a fonte seja desconhecida, selecione “Padrão”. Isso manterá o
padrão da entrada ou gravará com descarte de quadros se não houver nenhum código de tempo válido.
Predefinição
Você pode definir seu código de tempo manualmente ao pressionar o botão “Set” e inserir o código
de tempo de início usando o seletor de busca e o botão “Set”. Certifique-se de que a opção
“Predefinição” esteja selecionada no menu “Entrada”.
Saída
Selecione as opções de código de tempo para as saídas.
Linha de
Tempo
Para enviar um código de tempo contínuo a todos os clipes gravados em um
cartão ou drive, selecione “Linha de Tempo”.
Clipe Selecionar a opção “Clipe” enviará o código de tempo de cada clipe individual.
Configurações de Arquivo
Prefixo do Arquivo
Quando configurado pela primeira vez, o HyperDeck Shuttle HD gravará clipes no seu cartão SD ou
disco flash USB usando a seguinte convenção de nome de arquivo:
HyperDeck_0001
HyperDeck_0001 Prefixo
HyperDeck_0001 Número do Clipe
Você pode alterar o prefixo do nome do arquivo através do utilitário HyperDeck Setup. Para mais
informações, consulte a seção ‘Blackmagic HyperDeck Setup’ neste manual.
451Configurações
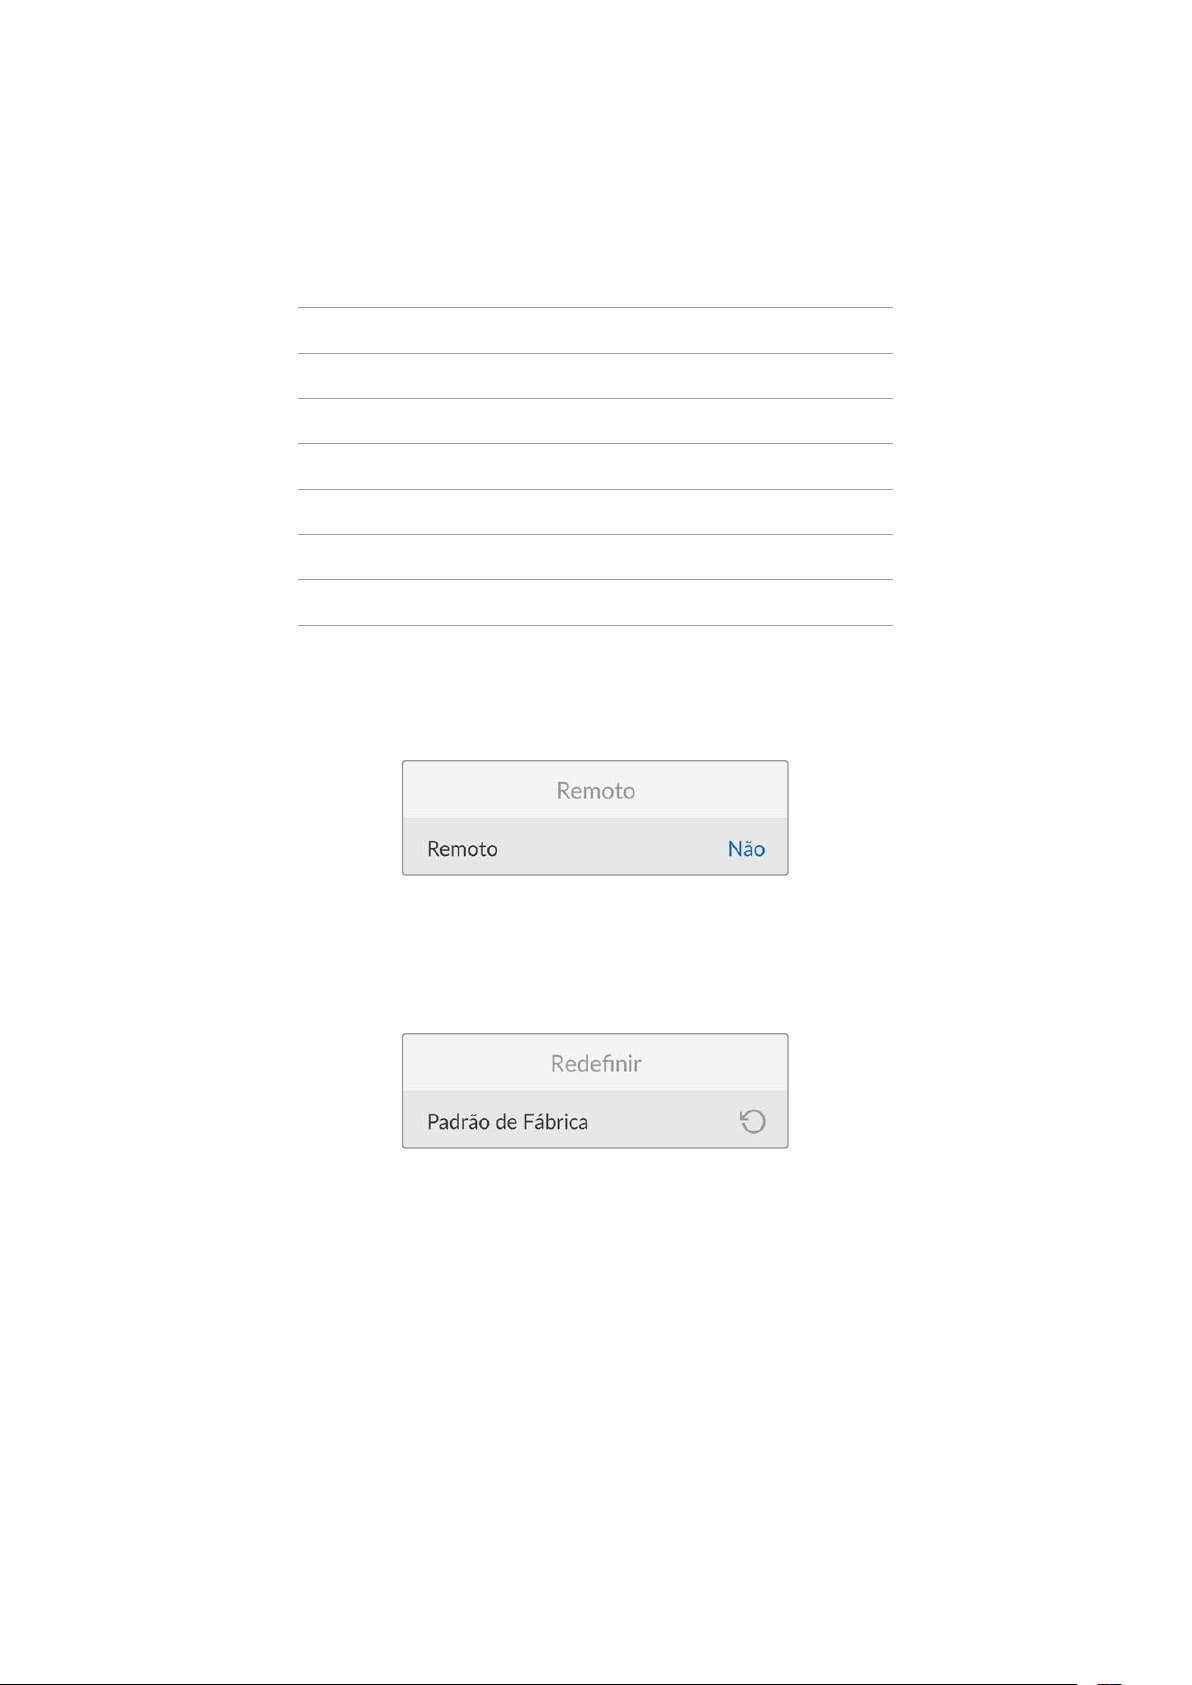
Sufixo com Timestamp
O carimbo de data/hora adicionado ao nome do arquivo é desativado por padrão. Caso queira
registrar a data e a hora no nome do arquivo, habilite a opção “Sufixo com Timestamp”.
HyperDeck_2201061438_0001
HyperDeck_2201061438_0001 Prefixo do Arquivo
HyperDeck_2201061438_0001 Ano
HyperDeck_2201061438_0001 Mês
HyperDeck_2201061438_0001 Dia
HyperDeck_2201061438_0001 Hora
HyperDeck_2201061438_0001 Minutos
HyperDeck_2201061438_0001 Número do Clipe
Remoto
Esta configuração permite que o HyperDeck seja controlado remotamente por outro equipamento
de vídeo, como um switcher ATEM Mini Extreme.
Remoto
Selecione “Remoto” para habilitar o controle remoto via Ethernet. Basta desativar “Remoto” para
controlar a unidade localmente.
Redefinir
Padrão de Fábrica
Destaque “Padrão de Fábrica” no menu de configurações para redefinir seu HyperDeck com as
configurações de fábrica. Quando você pressionar “Set”, será solicitado que você confirme sua seleção.
452Configurações

Painel Traseiro
HDMI OUT
HDMI IN
EXT DISK
SD CARD
ETHERNET
+
12V DC
1
2
3 4 5
1 Alimentação
O HyperDeck Shuttle HD é alimentado através de um kit de alimentação AC. O cabo de
alimentação fornecido possui um conector com trava para prevenir desconexões, mas você
também pode usar qualquer cabo 12 V 36 W para alimentar o HyperDeck Shuttle HD.
2 Cartão SD
Insira cartões SD no compartimento para gravação e reprodução.
3 Ethernet
A conexão Ethernet permite que você se conecte à sua rede para transferências FTP
rápidas ou para controlar a unidade remotamente através do HyperDeck Ethernet Protocol.
Para mais detalhes sobre a transferência de arquivos através de um cliente de FTP, consulte
a seção “Transferir Arquivos via Rede” mais adiante neste manual.
Quando conectado à mesma rede compartilhada com um switcher ATEM, você também
pode controlar seu HyperDeck usando o switcher ATEM ou um painel ATEM físico.
4 Disco Externo
Conecte um disco flash no conector USB-C para gravar em unidades externas a até 5 Gb/s.
Você também pode utilizar hubs USB-C multiporta ou uma Blackmagic MultiDock 10G para
conectar um ou vários SSDs.
5 HDMI
Conecte a saída HDMI a televisores, monitores ou até mesmo um switcher HDMI, como o
ATEM Mini Extreme. A saída HDMI também é usada para visualizar a
sobreposição de menu.
453Painel Traseiro
Mídias de Armazenamento
Cartão SD
Para gravações HD de alta qualidade, recomendamos cartões SD UHS-I de alta velocidade. Esses
cartões precisam ser capazes de obter velocidades de gravação acima de 220 MB/s para
gravações de até Ultra HD 2160p60.
No entanto, caso esteja gravando a uma taxa de bits mais baixa com compactação mais elevada,
você deve conseguir usar cartões mais lentos. Geralmente, quanto mais rápidos forem os cartões,
melhores eles serão.
É recomendável verificar regularmente a última versão deste manual, que pode ser baixado a
qualquer momento no site da Blackmagic Design em www.blackmagicdesign.com/br/support
Quais cartões SD devo usar com o HyperDeck Shuttle HD?
Os seguintes cartões SD são recomendados para 1080p a até 60 fps:
Marca Modelo Capacidade
Angelbird AV PRO SD UHS-II 300MB/s V90 SDXC 256GB
Angelbird AV PRO SD UHS-II 260MB/s V60 SDXC 128GB
Angelbird AV PRO SD UHS-II 260MB/s V60 SDXC 64GB
SanDisk Extreme Pro UHS-I 95MB/s SDXC 64GB
Wise SD2-64U3 UHS-II 285MB/s SDXC 64GB
Lexar Professional 1000x UHS-II 150MB/s SDXC 128GB
SONY Tough SF-G128T 128GB
Kingston CANVAS GO! Plus 170MB/s V30 64GB
Kingston CANVAS GO! Plus 170MB/s V30 128GB
Kingston CANVAS GO! Plus 170MB/s V30 512GB
ProGrade Digital SDXC UHS-II V90 300R 64GB
ProGrade Digital SDXC UHS-II V90 300R 128GB
SONY Tough SF-G64T UHS-II SDXC 64GB
Delkin Devices Black UHS-II V90 SDXC 256GB
Delkin Devices Power UHS-II V90 SDXC 128GB
Delkin Devices Power UHS-II V90 SDXC 256GB
Delkin Devices Black UHS-II V90 SDXC 128GB
Exascend Essential SDXC UHS-II V90 R 300MB/s 64GB
Exascend Essential SDXC UHS-II V90 R 300MB/s 128GB
Exascend Catalyst SDXC UHS-II V90 R 300MB/s 64GB
454Mídias de Armazenamento
Discos Externos
Todos os modelos HyperDeck podem gravar diretamente em unidades flash USB-C. Essas unidades
rápidas e de capacidade superior possibilitam a gravação de vídeos por períodos prolongados.
Depois, você pode conectar a unidade flash ao seu computador e editar diretamente dela.
Para capacidades de armazenamento ainda mais elevadas, você pode conectar uma doca ou um
disco rígido externo USB-C. Para conectar sua Blackmagic MultiDock 10G ou unidade flash USB-C,
conecte um cabo do seu dispositivo USB-C à porta “EXT DISK” na parte traseira do HyperDeck.
Quais drives USB-C devo utilizar com o HyperDeck Shuttle HD?
Os seguintes drives USB-C são recomendados para 1080p ProRes HQ a até 60 fps:
Marca Modelo Capacidade
Wise PTS-256 Portable SSD 4K 256GB
OWC Envoy Pro Ex 240GB
BUFFALO SSD-PHE500U3-BA 500GB
Os seguintes drives USB-C são recomendados para 1080p DNxHR HQX a até 60 fps:
Marca Modelo Capacidade
OWC Envoy Pro Ex 240GB
Os seguintes drives USB-C são recomendados para 1080p H.264 a até 60 fps:
Marca Modelo Capacidade
OWC Envoy Pro Ex 240GB
Formatar Mídias
Preparar mídias em um computador
Formatar mídias em um computador Mac
O Utilitário de Disco incluído no Mac pode formatar um drive nos formatos HFS+ ou exFAT.
Lembre-se de fazer o backup de gravações importantes do seu disco, pois todos os dados serão
perdidos após a formatação.
1 Conecte um disco flash USB ao seu computador através de uma doca externa ou adaptador
de cabo e ignore qualquer mensagem relativa à utilização do SSD para backups com Time
Machine. Para cartões SD, faça a conexão com o seu computador usando um leitor externo.
2 Vá até “Aplicativos/Utilitários” e inicie “Utilitário de Disco”.
3 Clique no ícone de disco do seu cartão SD ou disco flash USB e, em seguida, clique na
aba “Apagar”.
4 Defina o formato como “macOS Expandido (Journaling)” ou “exFAT”.
5 Digite um nome para o novo volume e clique em “Apagar”. A sua mídia será formatada
rapidamente e disponibilizada para uso com o HyperDeck.
455Formatar Mídias
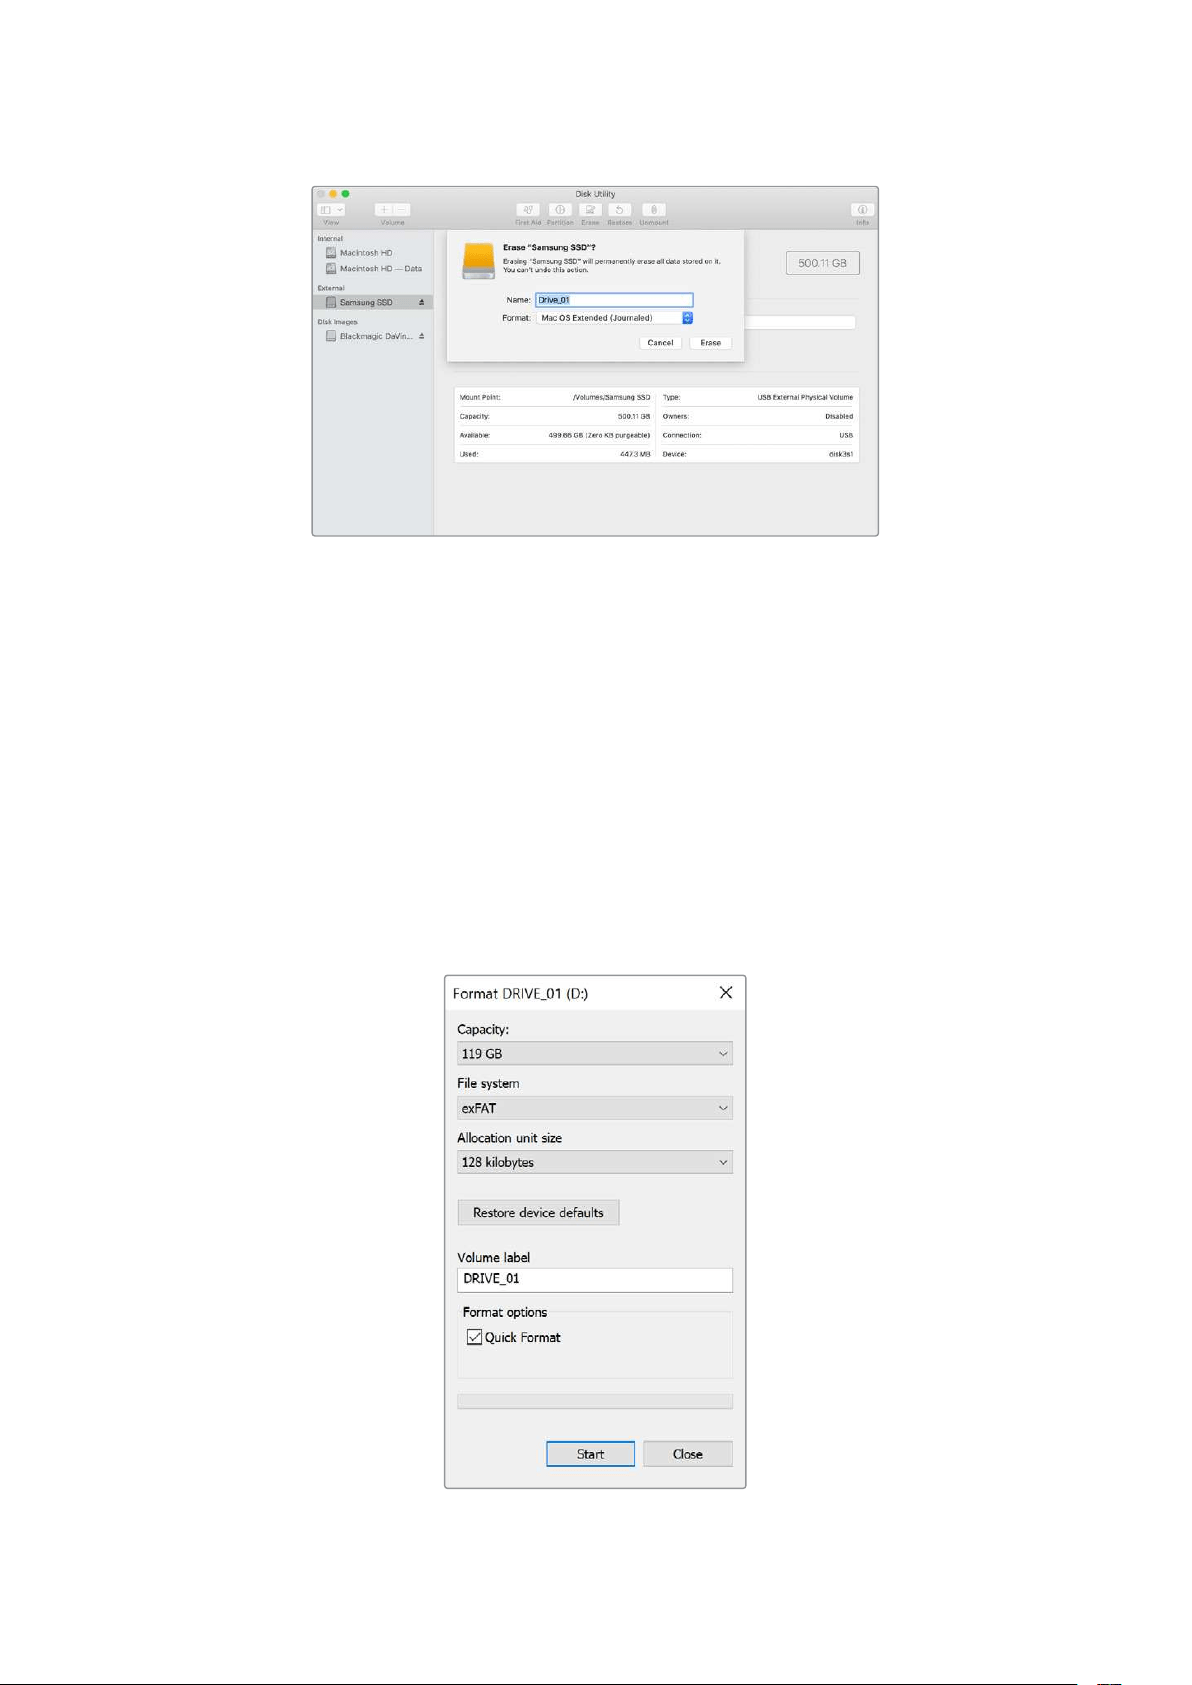
Formatar mídias em um computador Windows
A caixa de diálogo “Formatar” permite formatar um drive no formato exFAT em um computador
Windows. Lembre-se de fazer o backup de gravações importantes do seu SSD ou cartão SD, pois
todos os dados serão perdidos após a formatação.
1 Conecte um disco flash USB ao seu computador com uma doca externa ou cabo adaptador.
Para cartões SD, faça a conexão com o seu computador usando um leitor externo.
2 Abra o menu “Iniciar” ou a “Tela Inicial” e selecione “Computador”. Clique com o botão
direito do mouse no seu disco flash USB ou cartão SD.
3 No menu contextual, selecione “Formatar”.
4 Defina o sistema de arquivo como “exFAT” e o tamanho da unidade de alocação para 128
kilobytes.
5 Digite um rótulo de volume, selecione “Formatação Rápida” e clique em “Iniciar”.
6 A sua mídia será formatada rapidamente e disponibilizada para uso com o HyperDeck.
456Formatar Mídias

Usar a Função Teleprômpter
Com um arquivo RTF padrão, você pode usar o Blackmagic HyperDeck Shuttle HD como um
teleprômpter. Crie seu arquivo no Editor de Texto ou WordPad e salve como um arquivo .rtf em
qualquer um dos 13 idiomas suportados. Uma vez aberto com o HyperDeck Shuttle HD, você pode
ajustar o tamanho da fonte e o espaçamento entre linhas do seu texto.
Para usar o teleprômpter:
1 Conecte a saída HDMI do HyperDeck Shuttle HD à tela HDMI que deseja utilizar.
2 Insira um cartão SD ou conecte um disco flash USB externo contendo o seu texto.
3 No menu “Gravação”, selecione a opção “Codec”. Navegue até a configuração
“Teleprômpter” e pressione “Set”.
O texto aparecerá na sua tela. Agora, você pode iniciar a reprodução automaticamente usando o
botão “Play” ou, para controle adicional, utilizando o seletor.
Controlar a velocidade de reprodução do teleprômpter
O seletor do HyperDeck Shuttle HD pode ser usado para controlar a reprodução no modo
teleprômpter da mesma maneira que na reprodução de mídias. Após carregar o texto, pressione os
botões “Jog” e “Scr” ao mesmo tempo para habilitar a reprodução de velocidade variável.
Emseguida, gire o seletor. A rolagem do texto acompanhará a velocidade do movimento do seletor.
Ou seja, quanto mais rápido você girar o seletor, mais rápido o texto se movimentará.
JOG SCR
CLIP
MENU SET
DISK SD
Para velocidades constantes, você pode usar os botões “Jog” e “Scroll” individualmente. No modo
jog, girar o seletor movimentará o texto em uma velocidade lenta constante. No modo scroll, a
velocidade será mais alta.
Para navegar pelos arquivos .rtf no seu cartão SD ou disco externo, pressione os botões de avanço
e retrocesso.
457Usar a Função Teleprômpter

O teleprômpter reconhecerá o tamanho, cor e se o texto está em negrito. Além disso, no menu
“Monitoramento”, você pode ajustar o tamanho da fonte, espaçamento entre linhas, margens ou
inverter a exibição horizontal ou verticalmente quando estiver projetando a tela em vidros divisores
de feixe. Para mais informações, consulte a seção “Menu” acima.
Blackmagic HyperDeck Setup
O Blackmagic HyperDeck Setup é um utilitário de software para ajustar configurações e atualizar o
software interno no seu HyperDeck.
Para instalar o programa:
1 Baixe o instalador do Blackmagic HyperDeck Setup mais recente em
www.blackmagicdesign.com/br/support.
2 Execute o instalador do Blackmagic HyperDeck Setup e siga as instruções na tela.
3 Após a instalação, conecte o seu HyperDeck Shuttle HD ao computador via o conector
USB ou Ethernet no painel traseiro.
4 Inicie o Blackmagic HyperDeck Setup e siga as orientações na tela para atualizar o
programa interno. Caso nenhuma instrução apareça, o software interno está atualizado e
não há nada mais que você precise fazer.
Clique na imagem do HyperDeck ou no ícone de configuração para abrir o menu de configurações.
A tela inicial mostrará o seu HyperDeck Shuttle HD e o nome da unidade. Este nome é útil para
identificar a unidade quando mais de um HyperDeck estiver conectado ao seu computador e pode
ser definido utilizando o menu de configurações do utilitário.
458Blackmagic HyperDeck Setup
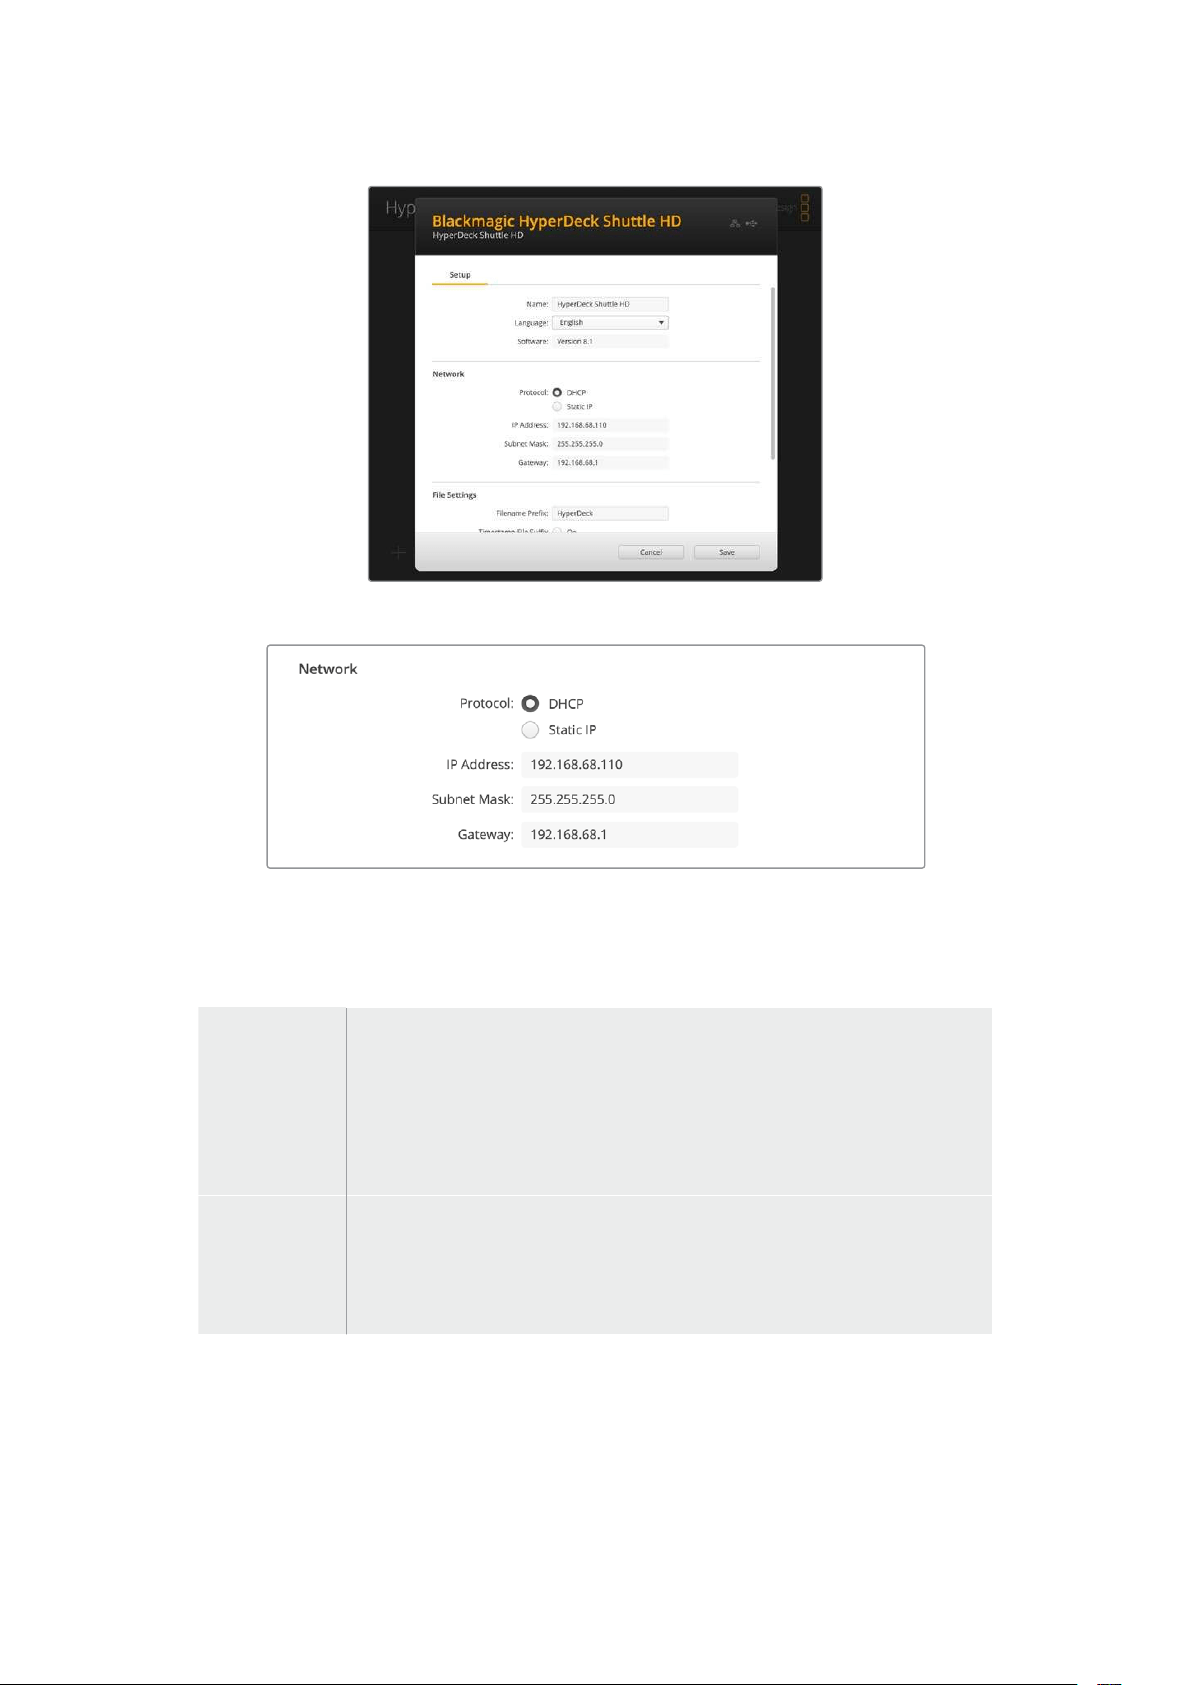
Network
Protocol
Para controlar o HyperDeck Shuttle HD com switchers ATEM ou controlá-lo remotamente através do
HyperDeck Ethernet Protocol, o HyperDeck Studio precisa estar na mesma rede que o outro
equipamento usando DHCP ou adicionando um endereço IP fixo manualmente.
DHCP
Os gravadores de disco HyperDeck Shuttle HD vêm de fábrica configurados como
DHCP. O protocolo dinâmico de configuração do host, ou DHCP, é um serviço
em servidores de rede que encontra automaticamente o gravador de disco
HyperDeck e atribui um endereço IP. O DHCP é um ótimo recurso que facilita a
conexão de equipamentos via Ethernet e garante que seus endereços IP não
entrem em conflito entre si. A maioria dos computadores e switchers de rede
suporta DHCP.
Static IP
Quando “Static IP” estiver selecionado, você pode inserir as informações
da sua rede manualmente. Ao definir endereços IP manualmente para que
todas as unidades possam se comunicar, elas devem compartilhar as mesmas
configurações de máscara de sub-rede e gateway. Além disso, os três primeiros
campos de números no endereço IP do painel também precisam corresponder.
Se existirem mais dispositivos na rede com o mesmo número de identificação nos seus endereços
IP, haverá um conflito e as unidades não se conectarão. Caso haja um conflito, basta alterar o
número de identificação no endereço IP da unidade.
459Blackmagic HyperDeck Setup
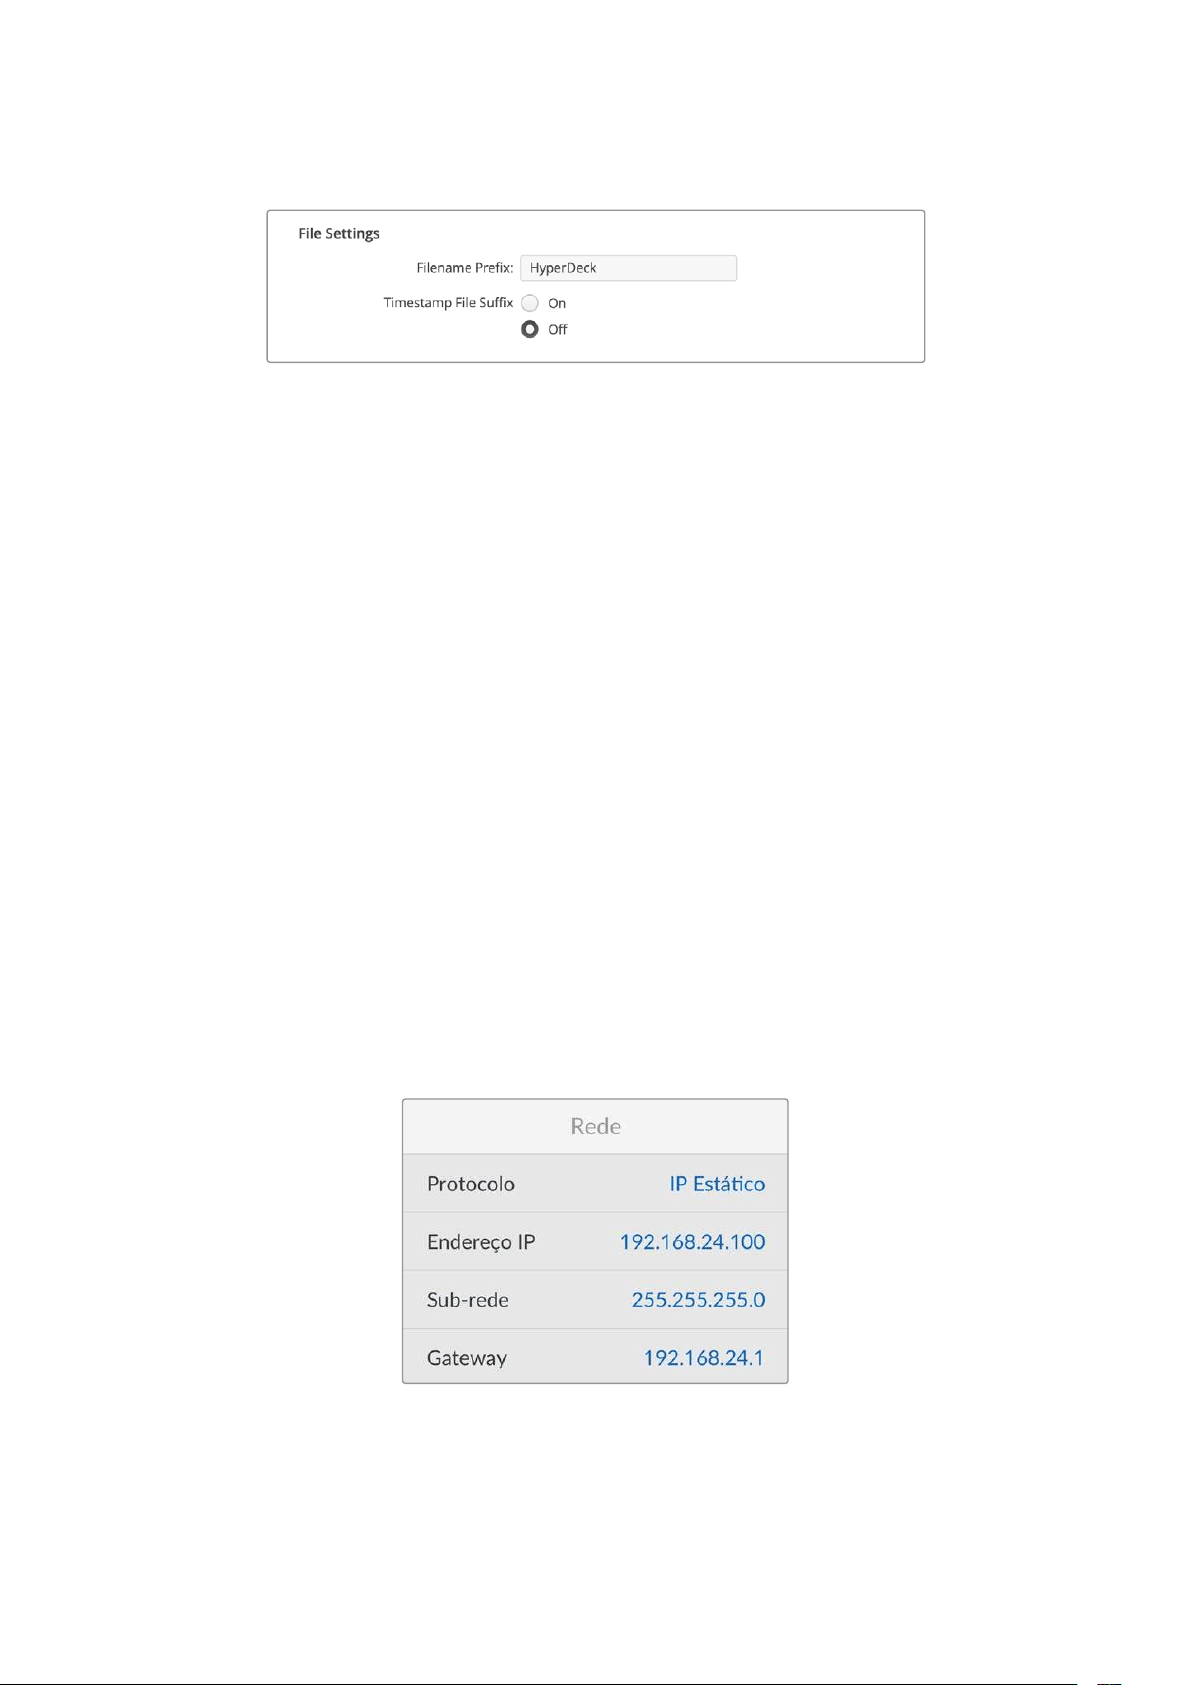
File Settings
Quando configurado pela primeira vez, o HyperDeck Shuttle HD gravará clipes no seu cartão SD ou
disco flash USB usando o prefixo “HyperDeck”. Digite um novo nome de arquivo para alterar
o prefixo.
O carimbo de data/hora adicionado ao nome do arquivo é desativado por padrão. Caso queira
registrar a data e a hora no nome do arquivo, selecione “On”. As configurações de prefixo e
timestamp para o nome de arquivo também estão disponíveis através do menu na tela do
HyperDeck Shuttle HD.
Transferir Arquivos via Rede
O gravador de disco HyperDeck suporta transferência de arquivos via protocolo de transferência de
arquivos, ou FTP. Este recurso poderoso permite que você copie arquivos diretamente do seu
computador para o seu HyperDeck através de uma rede com as velocidades rápidas que uma rede
local pode oferecer. Por exemplo, você pode copiar novos arquivos para uma unidade HyperDeck
remota baseada em outro local para sinalização digital.
Conectar ao HyperDeck Shuttle HD
Com o computador e o HyperDeck Shuttle HD na mesma rede, você só precisará de um cliente FTP
e do endereço IP do seu HyperDeck Shuttle HD.
1 Baixe e instale um cliente FTP no computador ao qual você quer conectar o HyperDeck.
Recomendamos o Cyberduck, FileZilla ou Transmit, mas a maioria dos aplicativos FTP
funcionará. O download do Cyberduck e do FileZilla é gratuito.
2 Conecte o HyperDeck Shuttle HD à sua rede utilizando um cabo Ethernet e anote o endereço
IP. Para acessar o endereço IP, pressione o botão “Menu” e gire o seletor de busca para
acessar a tela “Rede”. O endereço IP do HyperDeck aparecerá na parte inferior dessa tela.
O endereço IP do seu HyperDeck Shuttle HD pode ser
encontrado na seção “Rede” do menu de configurações. s
3 Insira o endereço IP do HyperDeck na caixa de diálogo de conexão do aplicativo TCP. O
nome e a posição da caixa podem variar dependendo do aplicativo, mas normalmente é
denominada como “Server” ou “Host”. Se o programa FTP possuir a caixa de seleção
“Anonymous Login”, marque esta opção.
460Transferir Arquivos via Rede

Não é preciso digitar um nome de usuário ou senha para se conectar ao HyperDeck
Shuttle HD. Basta digitar o endereço IP do gravador de disco no campo “Server” ou
“Host” do aplicativo FTP e marcar a caixa de seleção “Anonymous Login”, se existente.
Transferir Arquivos
Após se conectar ao HyperDeck, você pode transferir arquivos da mesma maneira que em um
programa FTP. A maioria dos aplicativos oferece uma interface de arrastar e soltar, no entanto,
verifique o método mais adequado para o aplicativo que você estiver usando.
É possível transferir qualquer arquivo para o HyperDeck ou a partir dele, mas vale a pena ressaltar
que qualquer arquivo que você pretenda reproduzir a partir do HyperDeck Shuttle HD precisará ser
compatível com os codecs e as resoluções que o seu HyperDeck suporta.
DICA Você pode transferir arquivos através de uma rede enquanto o HyperDeck estiver
gravando. O HyperDeck ajustará automaticamente a velocidade de transferência para
garantir que a gravação não seja afetada.
461Transferir Arquivos via Rede

Developer Information
Blackmagic HyperDeck Ethernet Protocol
The Blackmagic HyperDeck Ethernet Protocol is a text based protocol accessed by connecting
to TCP port 9993 on HyperDeck models that have a built in Ethernet connection. If you are
a software developer, you can use the protocol to construct devices that integrate with our
products. Here at Blackmagic Design our approach is to open up our protocols and we eagerly
look forward to seeing what you come up with!
Protocol Commands
Command Command Description
help or ? Provides help text on all commands and parameters
commands return commands in XML format
device info return device information
disk list query clip list on active disk
disk list: slot id: {n} query clip list on disk in slot {n}
quit disconnect ethernet control
ping check device is responding
preview: enable: {true/false} switch to preview or output
play play from current timecode
play: speed: {-5000 to 5000} play at specific speed
play: loop: {true/false} play in loops or stop-at-end
play: single clip: {true/false} play current clip or all clips
playrange query playrange setting
playrange set: clip id: {n} set play range to play clip {n} only
playrange set: clip id: {n} count: {m} set play range to {m} clips starting from clip {n}
playrange set: in: {inT} out: {outT}
set play range to play between:
- timecode {inT} andtimecode {outT}
playrange set: timeline in: {in} timeline out:
{out}
set play range in units of frames between:
- timeline position {in} and position {out} clear/reset play
rangesetting
playrange clear clear/reset play range setting
play on startup query unit play on startup state
play on startup: enable: {true/false} enable or disable play on startup
play on startup: single clip: {true/false} play single clip or all clips on startup
play option query play options
play option: stop mode:
{lastframe/nextframe/black}
set output frame when playback stops
record record from current input
record: name: {name} record named clip
462Developer Information

Command Command Description
record spill spill current recording to next slot
record: spill: slot id: {n}
spill current recording to specified slot
use current id to spill to same slot
stop stop playback or recording
clips count query number of clips on timeline
clips get query all timeline clips
clips get: clip id: {n} query a timeline clip info
clips get: clip id: {n} count: {m} query m clips starting from n
clips get: version: {1/2}
query clip info using specified output version:
version 1: id: name startT duration
version 2: id: startT duration inT outT name
clips add: name: {name} append a clip to timeline
clips add: clip id: {n} name: {name} insert clip before existing clip {n}
clips add: in: {inT} out: {outT} name: {name} append the {inT} to {outT} portion of clip
clips remove: clip id: {n}
remove clip {n} from the timeline
(invalidates clip ids following clip {n})
clips clear empty timeline clip list
transport info query current activity
slot info query active slot
slot info: slot id: {n} query slot {n}
slot select: slot id: {n} switch to specified slot
slot select: video format: {format} load clips of specified format
slot unblock unblock active slot
slot unblock: slot id: {n} unblock slot {n}
cache info query cache status
dynamic range query dynamic range settings
dynamic range: playback override:
{off/Rec709/Rec2020_SDR/HLG/
ST2084_300/ST2084_500/
ST2084_800/ST2084_1000/
ST2084_2000/ST2084_4000/ST2084
set playback dynamic range override
dynamic range: record override:
{off/Rec709/Rec2020_SDR/HLG/
ST2084_300/ST2084_500/
ST2084_800/ST2084_1000/
ST2084_2000/ST2084_4000/ST2048}
set record dynamic range override
notify query notification status
notify: remote: {true/false} set remote notifications
notify: transport: {true/false} set transport notifications
notify: slot: {true/false} set slot notifications
notify: configuration: {true/false} set configuration notifications
463Developer Information

Command Command Description
notify: dropped frames: {true/false} set dropped frames notifications
notify: display timecode: {true/false} set display timecode notifications
notify: timeline position: {true/false} set playback timeline position notifications
notify: playrange: {true/false} set playrange notifications
notify: cache: {true/false} set cache notifications
notify: dynamic range: {true/false} set dynamic range settings notifications
notify: slate: {true/false} set digital slate notifications
notify: clips: {true/false}
set timeline clips notifications where two types of changes can
occur:
add: partial update with list of clips and insert positions
snapshot: complete update of all clips on timeline
notify: disk: {true/false}
set disk clips notifications where two types of changes can
occur:
add: partial update with list of clips and insert positions
snapshot: complete update of all clips on timeline
goto: clip id: {start/end} goto first clip or last clip
goto: clip id: {n} goto clip id {n}
goto: clip id: +{n} go forward {n} clips
goto: clip id: -{n} go backward {n} clips
goto: clip: {n} goto frame position {n} within current clip
goto: clip: +{n} go forward {n} frames within current clip
goto: clip: -{n} go backward {n} frames within current clip
goto: clip: {start/end} goto start or end of clip
goto: timeline: {n} goto frame position {n} within timeline
goto: timeline: +{n} o forward {n} frames within timeline
goto: timeline: -{n} go backward {n} frames within timeline
goto: timeline: {start/end} goto start or end of timeline
goto: timecode: {timecode} goto specified timecode
goto: timecode: +{timecode} go forward {timecode} duration
goto: timecode: -{timecode} go backward {timecode} duration
goto: slot id: {n} goto slot id {n}
jog: timecode: {timecode} jog to timecode
jog: timecode: +{timecode} jog forward {timecode} duration
jog: timecode: -{timecode} jog backward {timecode} duration
shuttle: speed: {-5000 to 5000} shuttle with speed
remote query unit remote control state
remote: enable: {true/false} enable or disable remote control
remote: override: {true/false} session override remote control
configuration query configuration settings
configuration: video input: SDI switch to SDI input
464Developer Information

Command Command Description
configuration: video input: HDMI switch to HDMI input
configuration: video input: component switch to component input
configuration: audio input: embedded capture embedded audio
configuration: audio input: XLR capture XLR audio
configuration: audio input: RCA capture RCA audio
configuration: file format: {format} switch to specific file format
configuration: audio codec: PCM switch to PCM audio
configuration: audio codec: AAC switch to AAC audio
configuration: timecode input:
{external/embedded/internal/preset/clip}
change the timecode input
configuration: timecode output:
{clip/timeline}
change the timecode output
configuration: timecode preference:
{default/dropframe/nondropframe}
whether or not to use drop frame timecodes when not
otherwise specified
configuration: timecode preset:
{timecode}
set the timecode preset
configuration: audio input channels: {n} set the number of audio channels recorded to {n}
configuration: record trigger:
{none/recordbit/timecoderun}
change the record trigger
configuration: record prefix: {name} set the record prefix name (supports UTF-8 name)
configuration: append timestamp:
{true/false}
append timestamp to recorded filename
configuration: xlr input id: {n} xlr type:
{line/mic}
configure xlr input type
multiple xlr inputs can be configured in a single command
configuration: genlock input resync:
{true/false}
enable or disable genlock input resync
uptime return time since last boot
format: slot id: {n} prepare:
{exFAT/HFS+} name: {name}
prepare a disk formatting operation to filesystem {format}
format: confirm: {token} perform a pre-prepared formatting operation using token
identify: enable: {true/false} identify the device
watchdog: period: {period in seconds} client connection timeout
reboot reboot device
slate clips slate clips information
slate project slate project information
slate lens slate lens information
465Developer Information

Multiline commands: Command Description
slate clips↵ set slate clips information:
reel: {n} slate reel number, where {n} is in [1, 999]
scene id: {id} slate scene id value, where {id} is a string
shot type: {WS/MS/BCU/MCU/ECU/none} slate shot type
take: {n} slate take number, where {n} is in [1, 99]
take scenario: {PU/VFX/SER/none} slate take scenario
take auto inc: {true/false} slate take auto increment
good take: {true/false} slate good take
environment: {interior/exterior} slate environment
day night: {day/night} slate day or night
slate project:↵ set slate project information:
project name: {name} project name (can be empty, supports UTF-8)
camera: {index} set camera index e.g. A
director: {name} director (can be empty, supports UTF-8)
camera operator: {name} camera operator (can be empty, supports UTF-8)
slate lens:↵ set lens information:
lens type: {type} lens type (can be empty, supports UTF-8)
iris: {type} camera iris (can be empty, supports UTF-8)
focal length: {length} focal length (can be empty, supports UTF-8)
distance: {distance} lens distance (can be empty, supports UTF-8)
filter: {filter} lens filter (can be empty, supports UTF-8)
Command Combinations
You can combine the parameters into a single command, for example:
play: speed: 200 loop: true single clip: true
Or for configuration:
configuration: video input: SDI audio input: XLR
Or to switch to the second disk, but only play NTSC clips:
slot select: slot id: 2 video format: NTSC
Protocol Details
Connection
The HyperDeck Ethernet server listens on TCP port 9993.
Basic syntax
The HyperDeck protocol is a line oriented text protocol. Lines from the server will be separated by an ascii
CR LF sequence. Messages from the client may be separated by LF or CR LF.
New lines are represented in this document as a "↵" symbol.
466Developer Information

Single line command syntax
Command parameters are usually optional. A command with no parameters is terminated with a new line:
{Command name}↵
If parameters are specified, the command name is followed by a colon, then pairs of parameter names and
values. Each parameter name is terminated with a colon character:
{Command name}: {Parameter}: {Value} {Parameter}: {Value} ...↵
Multiline command syntax
The HyperDeck protocol also supports an equivalent multiline syntax where each parameter-value pair is
entered on a new line. E.g.
{Command name}:↵
{P a r a m e t e r}: { Va lu e}↵
{P a r a m e t e r}: { Va lu e}↵
↵
Response syntax
Simple responses from the server consist of a three digit response code and descriptive text terminated by a
new line:
{Response code} {Response text}↵
If a response carries parameters, the response text is terminated with a colon, and parameter name and
value pairs follow on subsequent lines until a blank line is returned:
{Response code} {Response text}:↵
{P a r a m e t e r}: { Va lu e}↵
{P a r a m e t e r}: { Va lu e}↵
...
↵
Successful response codes
A simple acknowledgement of a command is indicated with a response code of 200:
200 ok↵
Other successful responses carry parameters and are indicated with response codes in the range of 201
to299.
467Developer Information

Failure response codes
Failure responses to commands are indicated with response codes in the range of 100 to 199:
100 syntax error
101 unsupported parameter
102 invalid value
103 unsupported
104 disk full
105 no disk
106 disk error
107 timeline empty
108 internal error
109 out of range
110 no input
111 remote control disabled
112 clip not found
120 connection rejected
150 invalid state
151 invalid codec
160 invalid format
161 invalid token
162 format not prepared
163 parameterized single line command not supported
Asynchronous response codes
The server may return asynchronous messages at any time. These responses are indicated with response
codes in the range of 500 to 599:
5xx {Response Text}:↵
{P a r a m e t e r}: { Va lu e}↵
{P a r a m e t e r}: { Va lu e}↵
↵
Connection response
On connection, an asynchronous message will be delivered:
500 connection info:↵
protocol version: {Version}↵
model: {Model Name}↵
↵
Timecode syntax
Timecodes are expressed as non-drop-frame timecode in the format:
HH:MM:SS:FF
468Developer Information

Handling of deck "remote" state
The “remote” command may be used to enable or disable the remote control of the deck. Any attempt to
change the deck state over ethernet while remote access is disabled will generate an error:
111 remote control disabled↵
To enable or disable remote control:
remote: enable: {“true”, “false”} ↵
The current remote control state may be overridden allowing remote access over ethernet irrespective of the
current remote control state:
remote: override: {“true”, “false”} ↵
The override state is only valid for the currently connected ethernet client and only while the connection
remains open.
The “remote” command may be used to query the remote control state of the deck by specifying no
parameters:
remote↵
The deck will return the current remote control state:
210 remote info:↵
enabled: {“true”, “false”}↵
override: {“true”, “false”}↵
↵
Asynchronous remote control information change notification is disabled by default and may be
configured with the “notify” command. When enabled, changes in remote state will generate a “510 remote
info:”asynchronous message with the same parameters as the “210 remote info:” message.
Closing connection
The "quit" command instructs the server to cleanly shut down the connection:
quit↵
Checking connection status
The "ping" command has no function other than to determine if the server is responding:
ping↵
Getting help
The "help" or "?" commands return human readable help text describing all available commands and
parameters:
help↵
Or:
?↵
The server will respond with a list of all supported commands:
201 help:↵
{Help Text}↵
{Help Text}↵
↵
469Developer Information

Switching to preview mode
The "preview" command instructs the deck to switch between preview mode and output mode:
preview: enable: {"true", "false"}↵
Playback will be stopped when the deck is switched to preview mode. Capturing will be stopped when the
deck is switched to output mode.
Controlling device playback
The “play” command instructs the deck to start playing:
play↵
The play command accepts a number of parameters which may be used together in most combinations.
By default, the deck will play all remaining clips on the timeline then stop.
The “single clip” parameter may be used to override this behavior:
play: single clip: {“true”, “false”}↵
By default, the deck will play at normal (100%) speed. An alternate speed may be specified in percentage
between -5000 to 5000:
play: speed: {% normal speed}↵
By default, the deck will stop playing when it reaches to the end of the timeline. The “loop” parameter may be
used to override this behavior:
play: loop: {“true”, “false”}↵
The “playrange” command instructs the deck to play all the clips. To override this behavior: and select a
particular clip:
playrange set: clip id: {Clip ID}↵
To only play a certain timecode range:
playrange set: in: {in timecode} out: {out timecode}↵
To clear a set playrange and return to the default value:
playrange clear↵
The “play on startup command” instructs the deck on what action to take on startup. By default, the deck will
not play. Use the “enable” command to start playback after each power up.
play on startup: enable {“true”, “false”}↵
By default, the unit will play back all clips on startup. Use the “single clip” command to override.
play on startup: single clip: {“true”, “false”}↵
Stopping deck operation
The "stop" command instructs the deck to stop the current playback or capture:
stop↵
470Developer Information

Changing timeline position
The "goto" command instructs the deck to switch to playback mode and change its position within the
timeline.
To go to the start of a specific clip:
goto: clip id: {Clip ID}↵
To move forward/back {count} clips from the current clip on the current timeline:
goto: clip id: +/-{count}↵
Note that if the resultant clip id goes beyond the first or last clip on timeline, it will be clamp at the first or last
clip.
To go to the start or end of the current clip:
goto: clip: {“start”, “end”}↵
To go to the start of the first clip or the end of the last clip:
goto: timeline: {“start”, “end”}↵
To go to a specified timecode:
goto: timecode: {timecode}↵
To move forward or back a specified duration in timecode:
goto: timecode: {“+”, “-”}{duration in timecode}↵
To specify between slot 1 and slot 2:
goto: slot id: {Slot ID}↵
Note that only one parameter/value pair is allowed for each goto command.
Enumerating supported commands and parameters
The "commands" command returns the supported commands:
commands↵
The command list is returned in a computer readable XML format:
212 commands:
<commands>↵
<command name="…"><parameter name="…"/>…</command>↵
<command name="…"><parameter name="…"/>…</command>↵
…
</commands>↵
↵
471Developer Information

Controlling asynchronous notifications
The “notify” command may be used to enable or disable asynchronous notifications from the server.
To enable or disable transport notifications:
notify: transport: {“true”, “false”}↵
To enable or disable slot notifications:
notify: slot: {“true”, “false”}↵
To enable or disable remote notifications:
notify: remote: {“true”, “false”}↵
To enable or disable configuration notifications:
notify: configuration: {“true”, “false”}↵
Multiple parameters may be specified. If no parameters are specified, the server returns the current state of
all notifications:
209 notify:↵
transport: {“true”, “false”}↵
slot: {“true”, “false”}↵
remote: {“true”, “false”}↵
configuration: {“true”, “false”}↵
dropped frames: {“true”, “false”}↵
display timecode: {“true”, “false”}↵
timeline position: {“true”, “false”}↵
playrange: {“true”, “false”}↵
cache: {“true”, “false”}↵
dynamic range: {“true”, “false”}↵
slate: {“true”, “false”}↵
clips: {“true”, “false”}↵
disk: {“true”, “false”}↵
↵
Retrieving device information
The "device info" command returns information about the connected deck device:
device info↵
The server will respond with:
204 device info:↵
protocol version: {Version}↵
model: {Model Name}↵
unique id: {unique alphanumeric identifier}↵
slot count: {number of storage slots}↵
software version: {software version}↵
↵
472Developer Information

Retrieving slot information
The "slot info" command returns information about a slot. Without parameters, the command returns
information for the currently selected slot:
slot info↵
If a slot id is specified, that slot will be queried:
slot info: slot id: {Slot ID}↵
The server will respond with slot specific information:
202 slot info:↵
slot id: {Slot ID}↵
status: {"empty", "mounting", "error", "mounted"}↵
volume name: {Volume name}↵
recording time: {recording time available in seconds}↵
video format: {disk's default video format}↵
blocked: {“true”, “false”}↵
↵
Asynchronous slot information change notification is disabled by default and may be configured with
the "notify" command. When enabled, changes in slot state will generate a "502 slot info:" asynchronous
message with the same parameters as the "202 slot info:" message.
Retrieving clip information
The “disk list” command returns the information for each playable clip on a given disk. Without parameters,
the command returns information for the current active disk:
disk list↵
If a slot id is specified, the disk in that slot will be queried:
disk list: slot id: {Slot ID}↵
The server responds with the list of all playable clips on the disk in the format of: Index, name, formats, and
duration in timecode:
206 disk list:↵
slot id: {Slot ID}↵
{clip index}: {name} {file format} {video format} {Duration
ti m ecode}↵
{clip index}: {name} {file format} {video format} {Duration
ti m ecode}↵
…
↵
Note that the clip index starts from 1.
Retrieving clip count
The "clips count" command returns the number of clips on the current timeline:
clips count ↵
The server responds with the number of clips:
214 clips count: ↵
clip count: {Count}↵
473Developer Information

Retrieving timeline information
The "clips get" command returns information for each available clip on the current timeline. Without
parameters, the command returns information for all clips on timeline:
clips get↵
The server responds with a list of clip IDs, names and timecodes:
205 clips info:↵
clip count: {Count}↵
{Clip ID}: {Start timecode} {Duration timecode} {In timecode}
{Out timecode} {Name}↵
{Clip ID}: {Start timecode} {Duration timecode} {In timecode}
{Out timecode} {Name}↵
…
↵
Retrieving transport information
The “transport info” command returns the state of the transport:
transport info ↵
The server responds with transport specific information:
208 transport info:
status: {“preview”, “stopped”, “play”, “forward”, “rewind”,
“j o g ”, “ s h u t t l e ”,” r e c o r d ”}↵
speed: {Play speed between -5000 and 5000 %}↵
slot id: {Slot ID or “none”}↵
clip id: {Clip ID or “none”}↵
single clip: {“true”, “false”}↵
display timecode: {timecode}↵
timecode: {timecode}↵
video format: {Video format}↵
loop: {“true”, “false”}↵
timeline: {n}↵
input video format: {Video format”}↵
dynamic range: {“off”, “Rec709”, “Rec2020_SDR”, “HLG”,
“ST2084_300”, “ST2084_500”, “ST2084_800”, “ST2084_1000”,
“ST2084_2000”, “ST2084_4000”, “ST2048” or “none”}↵
↵
The "timecode" value is the timecode within the current timeline for playback or the clip for record. The
"display timecode" is the timecode displayed on the front of the deck. The two timecodes will differ in some
deck modes.
Asynchronous transport information change notification is disabled by default and may be configured
with the "notify" command. When enabled, changes in transport state will generate a "508 transport info:"
asynchronous message with the same parameters as the "208 transport info:" message.
474Developer Information

Video Formats
The following video formats are currently supported on HyperDeck Shuttle:
720p50, 720p5994, 720p60
1080p23976, 1080p24, 1080p25, 1080p2997, 1080p30, 1080p60
1080i50, 1080i5994, 1080i60
Video format support may vary between models and software releases.
File Formats
All HyperDeck models currently support the following file formats:
H.264High
H.264Medium
H.264Low
QuickTimeProResHQ
QuickTimeProRes
QuickTimeProResLT
QuickTimeProResProxy
QuickTimeDNxHD220x
DNxHD220x
QuickTimeDNxHD145
DNxHD145
QuickTimeDNxHD45
DNxHD45
Supported file formats may vary between models and software releases.
475Developer Information

Querying and updating configuration information
The "configuration" command may be used to query the current configuration of the deck:
configuration↵
The server returns the configuration of the deck:
211 configuration:↵
audio input: {“embedded”, “XLR”, “RCA”}↵
audio mapping: {n}↵
video input: {“SDI”, “HDMI”, “component”, “composite”}↵
file format: {format}↵
audio codec: {“PCM”, “AAC”}↵
timecode input: {“external”, “embedded”, “preset”, “clip”}↵
timecode output: {“clip”, “timeline”}↵
timecode preference: {“default”, “dropframe”, “nondropframe”}↵
timecode preset: {timecode}↵
audio input channels: {n}↵
record trigger: {“none”, “recordbit”, “timecoderun”}↵
record prefix: {name}↵
append timestamp: {“true”, “false”}↵
genlock input resync: {“true”, “false”}↵
↵
One or more configuration parameters may be specified to change the configuration of the deck.
To change the current video input:
configuration: video input: {“SDI”, “HDMI”, “component”}↵
Valid video inputs may vary between models. To configure the current audio input:
configuration: audio input: {“embedded”, “XLR”, “RCA”}↵
Valid audio inputs may vary between models.
To configure the current file format:
configuration: file format: {File format}↵
Note that changes to the file format may require the deck to reset, which will cause the client connection to
be closed. In such case, response code 213 will be returned (instead of 200) before the client connection is
closed:
“213 deck rebooting”
Asynchronous configuration information change notification is disabled by default and may be configured
with the “notify” command. When enabled, changes in configuration will generate a “511 configuration:”
asynchronous message with the same parameters as the “211 configuration:” message.
476Developer Information

Selecting active slot and video format
The "slot select" command instructs the deck to switch to a specified slot, or/and to select a specified output
video format.
To switch to a specified slot:
slot select: slot id: {slot ID}↵
To select the output video format:
slot select: video format: {video format}↵
Either or all slot select parameters may be specified. Note that selecting video format will result in a rescan of
the disk to reconstruct the timeline with all clips of the specified video format.
Clearing the current timeline
The "clips clear" command instructs the deck to empty the current timeline:
clips clear↵
The server responds with
200 ok↵
Adding a clip to the current timeline
The "clips add:" command instructs the deck to add a clip to the current timeline:
clips add: name: {clip name}↵
The server responds with
200 ok↵
or in case of error
1xx {error description}↵
Configuring the watchdog
The “watchdog” command instructs the deck to monitor the connected client and terminate the connection if
the client is inactive for at least a specified period of time.
To configure the watchdog:
watchdog: period: {period in seconds}↵
To avoid disconnection, the client must send a command to the server at least every {period} seconds. Note
that if the period is set to 0 or less than 0, connection monitoring will be disabled.
477Developer Information

Ajuda
Obtendo Ajuda
A maneira mais rápida de obter ajuda é visitando as páginas de suporte online da
Blackmagic Design e consultando os materiais de suporte mais recentes disponíveis para o seu
gravador de disco Blackmagic HyperDeck.
Central de Suporte Técnico Online Blackmagic Design
O manual, o software e as notas de suporte mais recentes podem ser encontrados na Central de
Suporte Técnico da Blackmagic Design em
www.blackmagicdesign.com/br/support.
Fórum Blackmagic Design
O fórum da Blackmagic Design no nosso site é um recurso útil que você pode acessar para obter
mais informações e ideias criativas. Também pode ser uma maneira mais rápida de obter ajuda, pois
já podem existir respostas de outros usuários experientes e da equipe da Blackmagic Design, o que
o ajudará a seguir em frente. Você pode visitar o fórum em
https://forum.blackmagicdesign.com
Entrar em Contato com o Suporte Técnico Blackmagic Design
Caso não encontre a ajuda que precisa no nosso material de suporte ou no fórum, use o botão
“Envie-nos um email” na página de suporte para nos encaminhar uma solicitação de suporte. Como
alternativa, clique no botão “Encontre sua equipe de suporte local” na página de suporte e ligue
para a sua assistência técnica da Blackmagic Design mais próxima.
Verificar a Versão de Software Instalada
Para verificar a versão do software Blackmagic HyperDeck instalada no seu computador, abra a
janela “Sobre Blackmagic HyperDeck Setup”.
No macOS, abra o Blackmagic HyperDeck Setup na pasta de aplicativos. Selecione “Sobre
Blackmagic HyperDeck Setup” no menu de aplicativos para revelar o número da versão.
No Windows, abra o utilitário Blackmagic HyperDeck Setup a partir do menu “Iniciar” ou da
tela inicial. Clique em “Ajuda” na barra de menu e selecione “Sobre Blackmagic HyperDeck
Setup” para revelar o número da versão.
Como Obter as Atualizações de Software Mais Recentes
Após verificar a versão do software Blackmagic HyperDeck Setup instalado no seu computador, por
favor visite a Central de Suporte Técnico da Blackmagic Design em
www.blackmagicdesign.com/br/support para conferir as últimas atualizações. Embora seja
aconselhável executar as atualizações mais recentes, você deve evitar atualizar aplicativos caso
esteja no meio de um projeto importante.
478Ajuda

Informações Regulatórias
Eliminação de resíduos de equipamentos elétricos e eletrônicos dentro da União Europeia
O símbolo no produto indica que este equipamento não pode ser eliminado com outros
materiais residuais. Para descartar seus resíduos de equipamento, ele deve ser entregue a
um ponto de coleta designado para reciclagem. A coleta separada e a reciclagem dos seus
resíduos de equipamento no momento da eliminação ajudarão a preservar os recursos
naturais e a garantir que sejam reciclados de uma maneira que proteja a saúde humana e o
meio ambiente. Para mais informações sobre onde você pode eliminar os resíduos do seu
equipamento para reciclagem, por favor entre em contato com a agência de reciclagem
local da sua cidade ou o revendedor do produto adquirido.
Este equipamento foi testado e respeita os limites para um dispositivo digital Classe A,
conforme a Parte 15 das normas da FCC. Esses limites foram criados para fornecer proteção
razoável contra interferências nocivas quando o equipamento é operado em um ambiente
comercial. Este equipamento gera, usa e pode irradiar energia de radiofrequência e, se não
for instalado ou usado de acordo com as instruções, poderá causar interferências nocivas
nas comunicações via rádio. A operação deste produto em uma área residencial pode
causar interferência nociva, nesse caso o usuário será solicitado a corrigir a interferência às
suas próprias custas.
A operação está sujeita às duas condições a seguir:
1 Este dispositivo não poderá causar interferência nociva.
2 Este dispositivo deve aceitar qualquer interferência recebida, incluindo interferência
que possa causar uma operação indesejada.
R-R-BMD-20211410001
Norma Canadense ISED
Este dispositivo está em conformidade com os padrões do Canadá para equipamentos
digitais de Classe A.
Quaisquer modificações ou utilização deste produto fora dos limites previstos poderão
anular a conformidade com estas normas.
A conexão com interfaces HDMI deve ser feita com cabos HDMI com proteção de alta
qualidade.
Este equipamento foi testado para fins de cumprimento com a sua utilização pretendida
em um ambiente comercial. Se o equipamento for usado em um ambiente doméstico,
ele poderá causar interferência radioelétrica.
479Informações Regulatórias

Informações de Segurança
O produto é adequado para uso em locais tropicais com temperatura ambiente de até 40
o
C.
Certifique-se de que ventilação adequada seja fornecida ao redor do produto e não esteja
restringida.
Não há componentes internos reparáveis pelo operador. Solicite o serviço de manutenção à
assistência técnica local da Blackmagic Design.
Utilize apenas em altitudes inferiores a 2000 m acima do nível do mar.
Declaração do Estado da Califórnia
Este produto pode expô-lo a produtos químicos, tais como vestígios de bifenilos polibromados
dentro de peças de plástico, que é conhecido no estado da Califórnia por causar câncer e defeitos
congênitos ou outros danos reprodutivos.
Para mais informações, visite www.P65Warnings.ca.gov.
480Informações de Segurança

Garantia
12 Meses de Garantia Limitada
A Blackmagic Design garante que este produto estará livre de defeitos de materiais e fabricação por
um período de 12 meses a partir da data de compra. Se o produto apresentar defeito durante este
período de garantia, a Blackmagic Design, a seu critério, consertará o produto com defeito sem cobrança
pelos componentes e mão de obra, ou providenciará a substituição em troca pelo produto defeituoso.
Para obter o serviço sob esta garantia você, o Consumidor, deve notificar a Blackmagic Design do
defeito antes da expiração do período de garantia e tomar as providências necessárias para o
desempenho do serviço. O Consumidor é responsável pelo empacotamento e envio do produto
defeituoso para um centro de assistência designado pela Blackmagic Design com os custos de envio
pré-pagos. O Consumidor é responsável pelo pagamento de todos os custos de envio, seguro, taxas,
impostos e quaisquer outros custos para os produtos que nos forem devolvidos por qualquer razão.
Esta garantia não se aplica a defeitos, falhas ou danos causados por uso inadequado ou manutenção
e cuidado inadequado ou impróprio. A Blackmagic Design não é obrigada a fornecer serviços sob esta
garantia: a) para consertar danos causados por tentativas de instalar, consertar ou fornecer assistência
técnica ao produto por pessoas que não sejam representantes da Blackmagic Design, b) para consertar
danos causados por uso ou conexão imprópria a equipamentos não compatíveis, c) para consertar
danos ou falhas causadas pelo uso de componentes ou materiais que não são da Blackmagic Design,
d) para fornecer assistência técnica de um produto que foi modificado ou integrado a outros produtos
quando o efeito de tal modificação ou integração aumenta o tempo ou a dificuldade da assistência
técnica do serviço. ESTA GARANTIA É FORNECIDA PELA BLACKMAGIC DESIGN NO LUGAR DE
QUAISQUER OUTRAS GARANTIAS, EXPLÍCITAS OU IMPLÍCITAS. A BLACKMAGIC DESIGN E SEUS
FORNECEDORES NEGAM QUAISQUER GARANTIAS IMPLÍCITAS DE COMERCIALIZAÇÃO OU
ADEQUAÇÃO A UMA FINALIDADE ESPECÍFICA. A RESPONSABILIDADE DA BLACKMAGIC DESIGN
DE CONSERTAR OU SUBSTITUIR PRODUTOS DEFEITUOSOS É A ÚNICA E EXCLUSIVA MEDIDA
FORNECIDA AO CONSUMIDOR PARA QUAISQUER DANOS INDIRETOS, ESPECIAIS OU ACIDENTAIS
INDEPENDENTEMENTE DA BLACKMAGIC DESIGN OU DE FORNECEDORES POSSUÍREM INFORMAÇÕES
PRÉVIAS SOBRE A POSSIBILIDADE DE TAIS DANOS. A BLACKMAGIC DESIGN NÃO É RESPONSÁVEL
POR QUAISQUER USOS ILEGAIS DO EQUIPAMENTO PELO CONSUMIDOR. A BLACKMAGIC NÃO É
RESPONSÁVEL POR QUAISQUER DANOS CAUSADOS PELO USO DESTE PRODUTO. O USUÁRIO
DEVE OPERAR ESTE PRODUTO POR CONTA E RISCO PRÓPRIOS.
© Direitos autorais 2022 Blackmagic Design. Todos os direitos reservados. “Blackmagic Design”, “DeckLink”, “HDLink”, “Workgroup
Videohub”, “Multibridge Pro”, “Multibridge Extreme”, “Intensity” e “Leading the creative video revolution” são marcas comerciais
registradas nos Estados Unidos e em outros países. Todos os outros nomes de empresas e produtos podem ser marcas comerciais
de suas respectivas empresas com as quais elas são associadas.
481Garantia

HyperDeck Shuttle HD
HyperDeck
Shuttle HD
Nisan 2022
Kurulum ve Kullanım Kılavuzu

Hoş Geldiniz
Blackmagic HyperDeck Shuttle HD disk kaydedicinizi satın aldığınız için teşekkür ederiz!
İlk Blackmagic HyperDeck disk kaydedicileri tasarladığımızda, hızlı SSD depolama kullanarak
video kaydını ve oynatımını kolaylaştırmak istedik. Şu an, HyperDeck Shuttle HD’yi sunmaktan
heyecan duyuyoruz!
HyperDeck Shuttle HD, masaüstünüz için tasarlanmış, küçük, taşınabilir bir HDMI video kayıt
cihazıdır. Büyük bir arama kadranının ve alışık olduğunuz aktarım kontrollerinin, kayıt cihazını tek
elle çalıştırmanıza olanak vermesi, canlı yapımda bir ATEM Mini switcher ile birlikte kullanmak
üzere HyperDeck Shuttle HD'yi mükemmel bir eş haline getirir. HyperDeck Shuttle HD'yi, bir
teleprompter olarak bile kullanabilirsiniz!
ProRes, DNxHD ya da H.264 kodeklerini kullanan HyperDeck Shuttle HD, yıldırım gibi hızlı kayıt
ve oynatım için SD kartlara veya harici flaş disklere kayıt yapar.
Bu kullanım kılavuzunun en güncel versiyonu ve HyperDeck yazılım güncellemeleri için lütfen,
www.blackmagicdesign.com/tr adresindeki destek sayfamıza bakın. Yazılımınızı güncel tutarak,
daima en son özelliklere sahip olduğunuzdan emin olabilirsiniz. Yeni yazılımlar çıktığında
size duyurabilmemiz için yazılımı indirirken, lütfen güncel bilgilerinizle sitemize kaydolun.
Yeni özellikler ve geliştirmeler üzerinde sürekli çalıştığımızdan, yorumlarınızı almaktan
mutluluk duyarız!
Grant PettyBlackmagic Design CEO

İçindekiler
Başlarken 485
Güç Kaynağının Takılması 485
Video ve Sesin Bağlanması 486
Ortamın Takılması 486
Video Kaydı 487
Oynatım 488
Arama Kadranının Kullanımı 489
Ayarların Değiştirilmesi 491
Ayarlar 492
Arka Panel 501
Depolama Ortamı 502
SD Kart 502
Harici Disk 503
Ortamın Formatlanması 503
Ortamın bir Bilgisayar Üzerinde Hazırlanması 503
Teleprompter Fonksiyonunun Kullanımı 505
Blackmagic HyperDeck Kurulumu 506
Bir Ağ Üzerinden Dosyaların Aktarımı 508
Developer Information 510
Blackmagic HyperDeck Ethernet Protocol 510
Protocol Commands 510
Protocol Details 514
Yardım 526
Mevzuata İlişkin Bildirimler 527
Güvenlik Bilgileri 528
Garanti 529
484
HyperDeck Shuttle HD
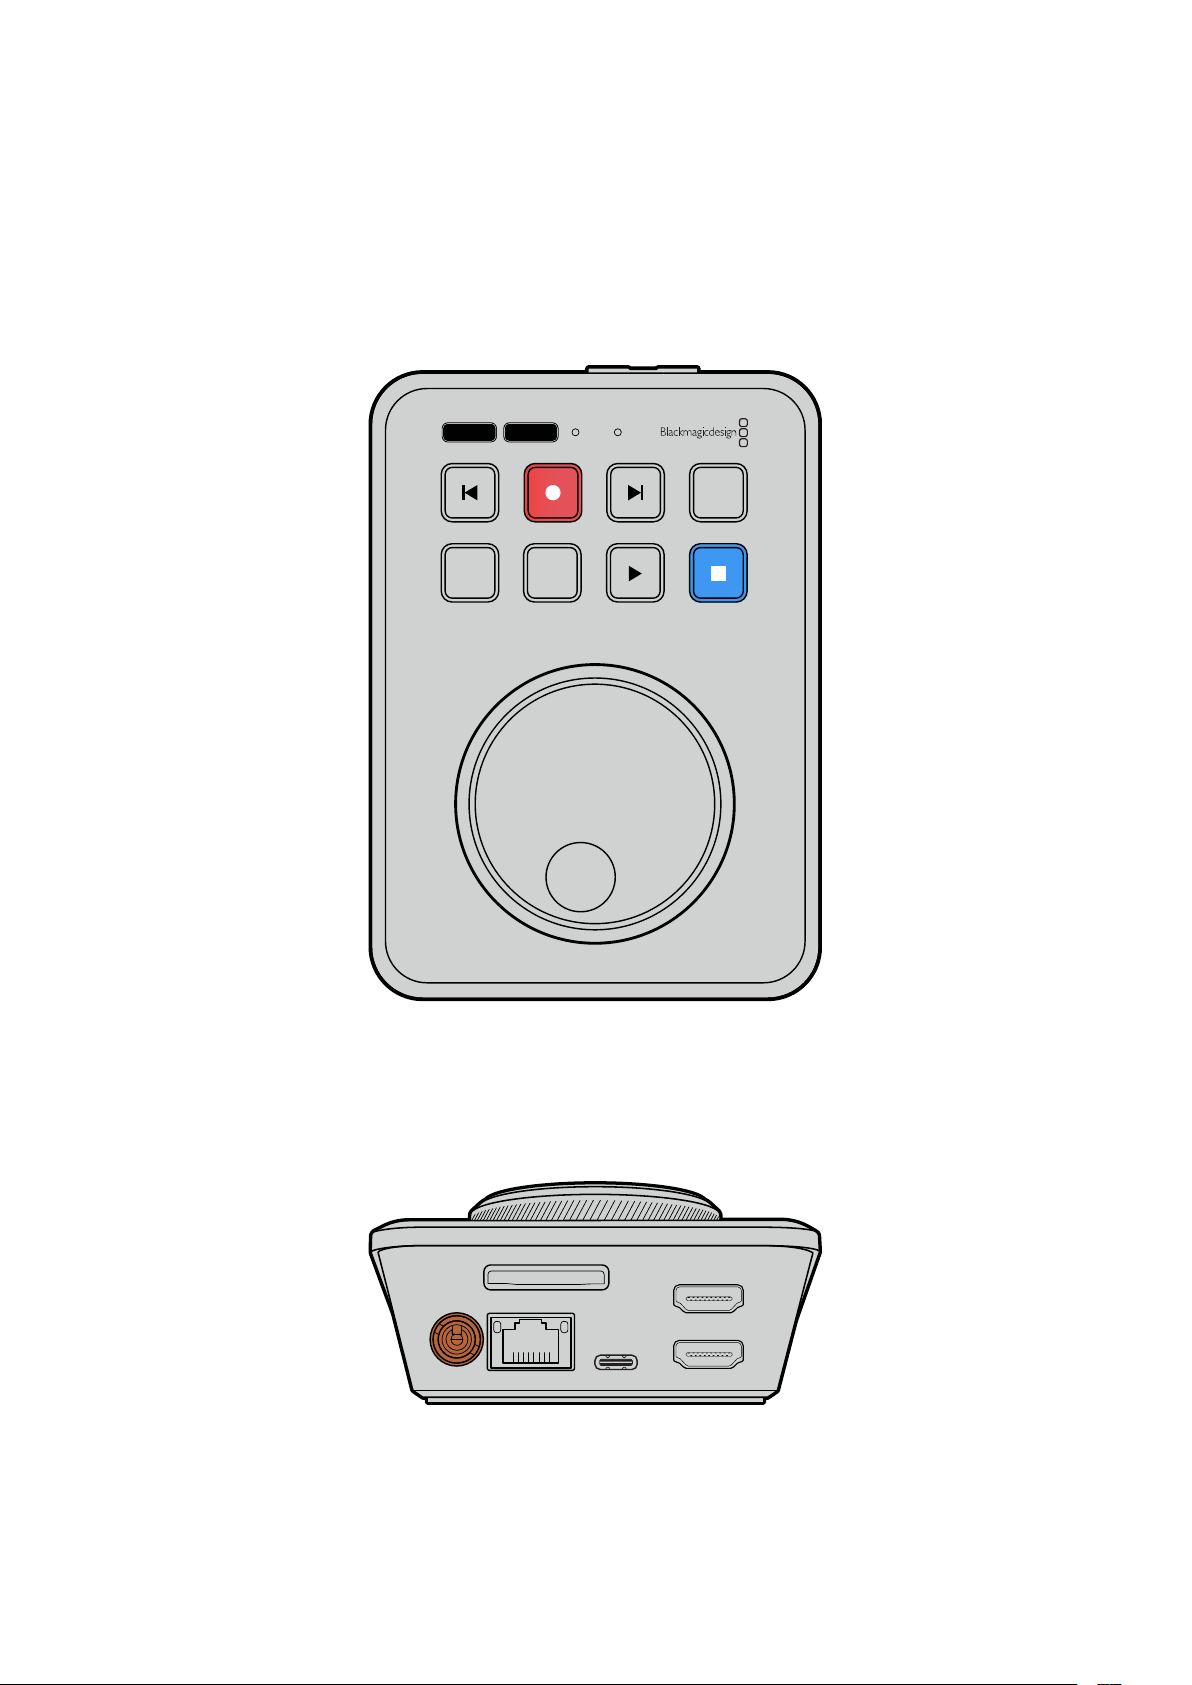
Başlarken
HyperDeck Shuttle HD'nizi kullanmaya başlamak için; güç kaynağını bağlamanız, bir HDMI video
kaynağı takmanız, bir SD kart veya harici ortam yerleştirmeniz ve ardından kaydet butonuna
basmanız yeterlidir!
HyperDeck Shuttle HD cihazınızı kullanmaya nasıl başlayacağınızı, kılavuzun bu bölümü gösterir.
JOG SCR
CLIP
MENU SET
DISK SD
Güç Kaynağının Takılması
HyperDeck Shuttle HD'nize güç vermek için beraberinde gelen güç adaptörünü, arka paneldeki
güç girişine takın. Kilitleme halkasının sıkılması, kazayla çıkmasını önlemek üzere güç
kablosunu sabitler.
HDMI OUT
HDMI IN
EXT DISK
SD CARD
ETHERNET
+
12V DC
Güç adaptörünün kablosunu, HyperDeck Shuttle HD'nin güç girişine bağlayın
485
Başlarken

Video ve Sesin Bağlanması
HyperDeck Shuttle HD'nize video bağlantısı yapmak için, arka paneldeki HDMI girişine bir HDMI
video kaynağı takın.
HDMI OUT
HDMI IN
EXT DISK
SD CARD
ETHERNET
+
12V DC
Bir ATEM Mini switcher ya da HDMI televizyon gibi hedef ekipmanlarınızı, HDMI
çıkışına bağlayın.
HyperDeck'inizin ayarlarını değiştirirken, ayarlar menüsünü görüntülemek için de HDMI çıkışı
kullanılır. Çünkü ayarlar menüsü, HDMI girişindeki video katmanı aracılığıyla görüntülenir. Menü
ayarları hakkında daha fazla bilgiyi, bu kılavuzun ilerisindeki ‘Ayarların Değiştirilmesi’ bölümünde
bulabilirsiniz.
BİLGİ Giriş video kaynağınızı, bağlı ekranda göremiyorsanız muhtemelen oynatım
modunda olabilirsiniz. Kayıt modunu etkinleştirmek için ‘kayıt’ butonuna basın.
HDMI OUT
HDMI IN
EXT DISK
SD CARD
ETHERNET
+
12V DC
HDMI
Bir HDMI televizyon veya ATEM Mini switcher gibi hedef ekipmanlarınızı, HDMI çıkışına bağlayın
Ortamın Takılması
Tüm HyperDeck Shuttle HD disk kayıt cihazları, hiçbir ayarı yapılandırmaya gerek kalmadan,
hemen kayıt yapmaya hazır bir şekilde satılırlar. İhtiyacınız olan tek şey, formatlanmış bir SD kart
veya harici disktir.
Menü ayarları üzerinden ortamı kolaylıkla formatlayabilirsiniz. Ayrıca, bir bilgisayar kullanarak da
formatlayabilirsiniz. Daha fazla bilgi için bu kılavuzdaki 'Ortamın Formatlanması' bölümüne
başvurun. Video kaydetmek için en iyi ortam türleri hakkında bilgiler ile önerilen SD kartlar ve
disklerin bir listesini de orada bulabilirsiniz.
Bir SD kart takmak için:
1 Altın rengindeki konnektörler yukarı bakacak şekilde SD kartı tutun ve ortam yuvasıyla
hizalayın. Sıkı bir şekilde yerine kilitlendiğini hissedene dek, kartı yuvaya yavaşça itin.
486Başlarken
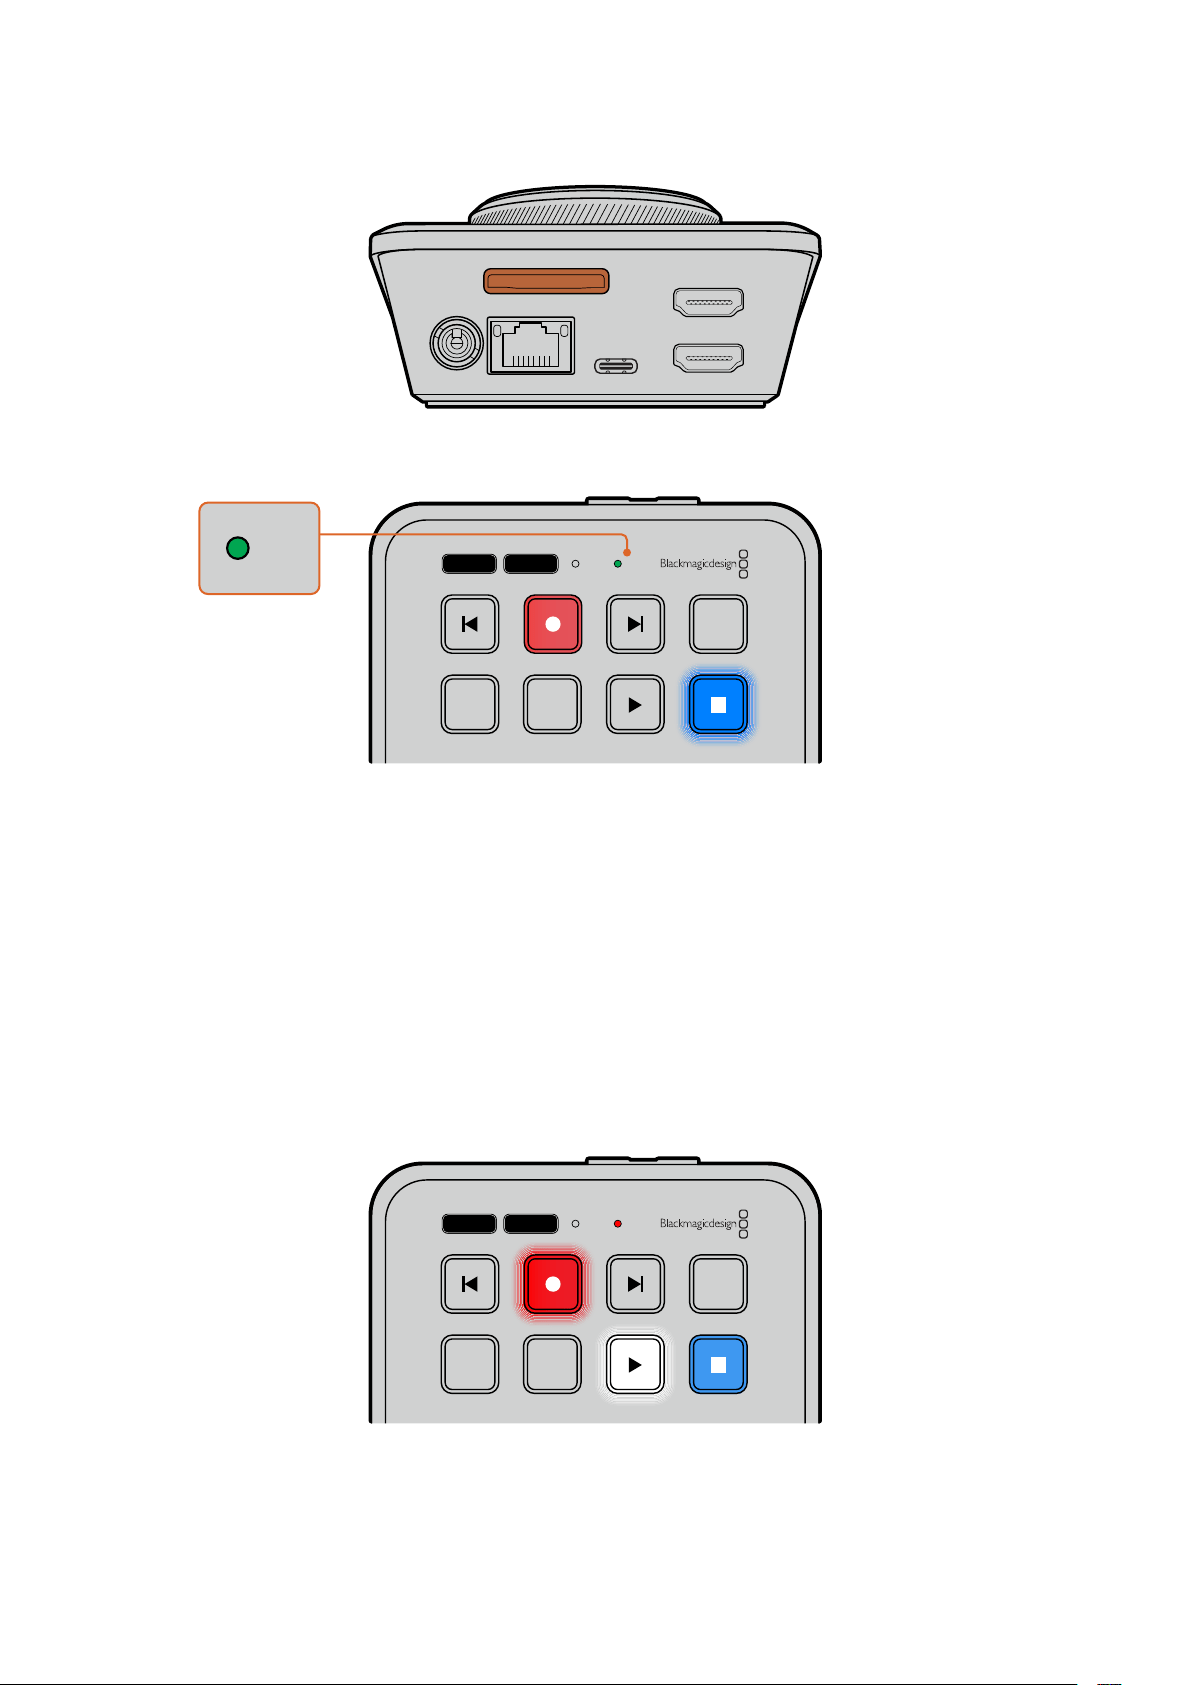
HDMI OUT
HDMI IN
EXT DISK
SD CARD
ETHERNET
+
12V DC
2 HyperDeck’iniz, SD kartı doğrular. HyperDeck Shuttle HD'nin üst tarafındaki ışıklı SD
göstergesi, doğrulama yapılırken yeşil yanar. Doğrulandıktan sonra gösterge kapanır.
JOG SCR
CLIP
MENU SET
DISK SD
DISK SD
Başlamak için yapmanız gerekenlerin hepsi bundan ibarettir ve artık HyperDeck Shuttle HD'niz,
kayıt ve oynatım için hazırdır!
Kliplerin nasıl kaydedildiği ve oynatıldığı, ayarların nasıl değiştirildiği ve benzeri birçok konuda
ayrıntılı bilgi için bu kılavuzu okumaya devam edin.
Video Kaydı
Video kaynağınızın HDMI hedef ekipmanınızda görüntülendiğini teyit ettikten sonra, hemen
kayda başlayabilirsiniz!
Kaydı başlatmak için, ‘kayıt’ butonuna basın. Bir SD karta kayıt yaparken, SD göstergesinin yanı
sıra, ‘kayıt’ ve ‘oynat’ butonları da kırmızı yanar. Harici bir diske kayıt yaparken, ‘disk’ göstergesi
kırmızı yanar.
JOG SCR
CLIP
MENU SET
DISK SD
Kaydı bitirmek için ‘durdur’ butonuna basın.
487Video Kaydı
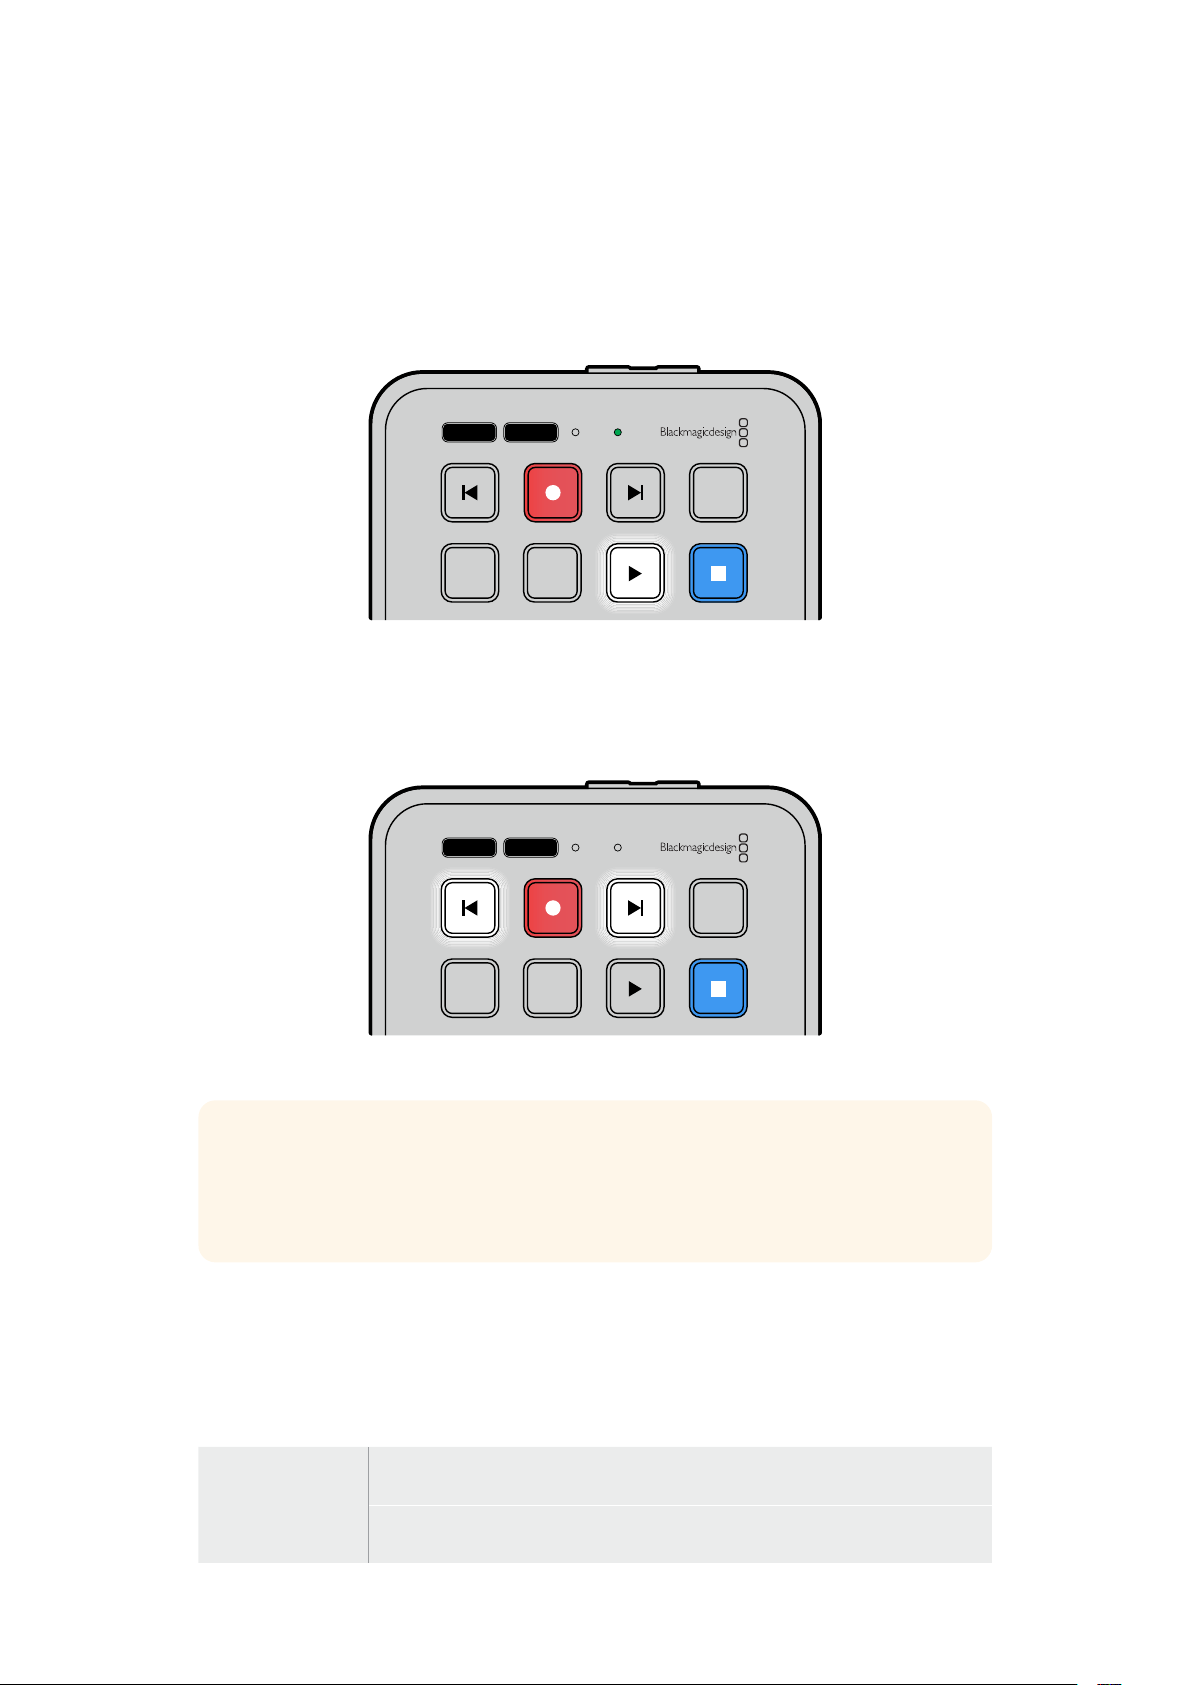
Oynatım
Oynatımı başlatmak için ‘oynat’ butonuna basın. Oynatım sırasında, ‘oynat’ butonunun ışığı yanar
ve ‘disk’ ya da ‘SD’ ortam yuvasının göstergesi yeşil yanar.
Kaydedilmiş birden fazla klip varsa ‘ileri’ ve ‘geri’ atlama butonlarına basarak bunlar arasında
hızla hareket edebilirsiniz.
JOG SCR
CLIP
MENU SET
DISK SD
Atlama Butonlarının Kullanımı
Klibin başına gitmek için 'geri' atlama butonuna basın. Bu butona birden fazla basmak, daha
önce kaydedilmiş kliplerden geçerek geriye doğru gider.
Klipleriniz arasında ilerlemek için 'ileri' atlama butonuna basın.
JOG SCR
CLIP
MENU SET
DISK SD
Her klibin başına gitmek için 'ileri' ve ‘geri' atlama butonlarını kullanın.
BİLGİ Video dosyalarını oynatmak üzere HyperDeck'inizi, dosyaları kaydetmek için
kullanılan kodekle eşleşecek şekilde ayarlamanız gerekir. Bunu, menüyü kullanarak
yapabilirsiniz. Daha fazla bilgi için, bu kullanım kılavuzunun ilerisindeki 'Ayarların
Değiştirilmesi' bölümüne başvurun.
Kliplerin Döngüye Alınması
Oynatım sırasında 'oynat' butonuna tekrar basmak, siz 'durdur' butonuna basana kadar
HyperDeck Shuttle HD'nizi, tüm klipleri döngüye alacak şekilde ayarlar.
Tek klibi döngüye almak istiyorsanız HyperDeck'inizi ‘klip’ moduna alın ve oynatmak için bir ve
döngüye almak için iki kez ‘oynat’ butonuna basın.
Tüm klipleri
döngüye al
Oynatım sırasında, kaydedilmiş tüm klipleri döngüye almak için 'oynat'
butonuna ikinci kez basın
Oynatılan klibi
döngüye al
Klip modundayken, oynatılan klibi döngüye almak için 'oynat' butonuna ikinci
kez basın
488Oynatım
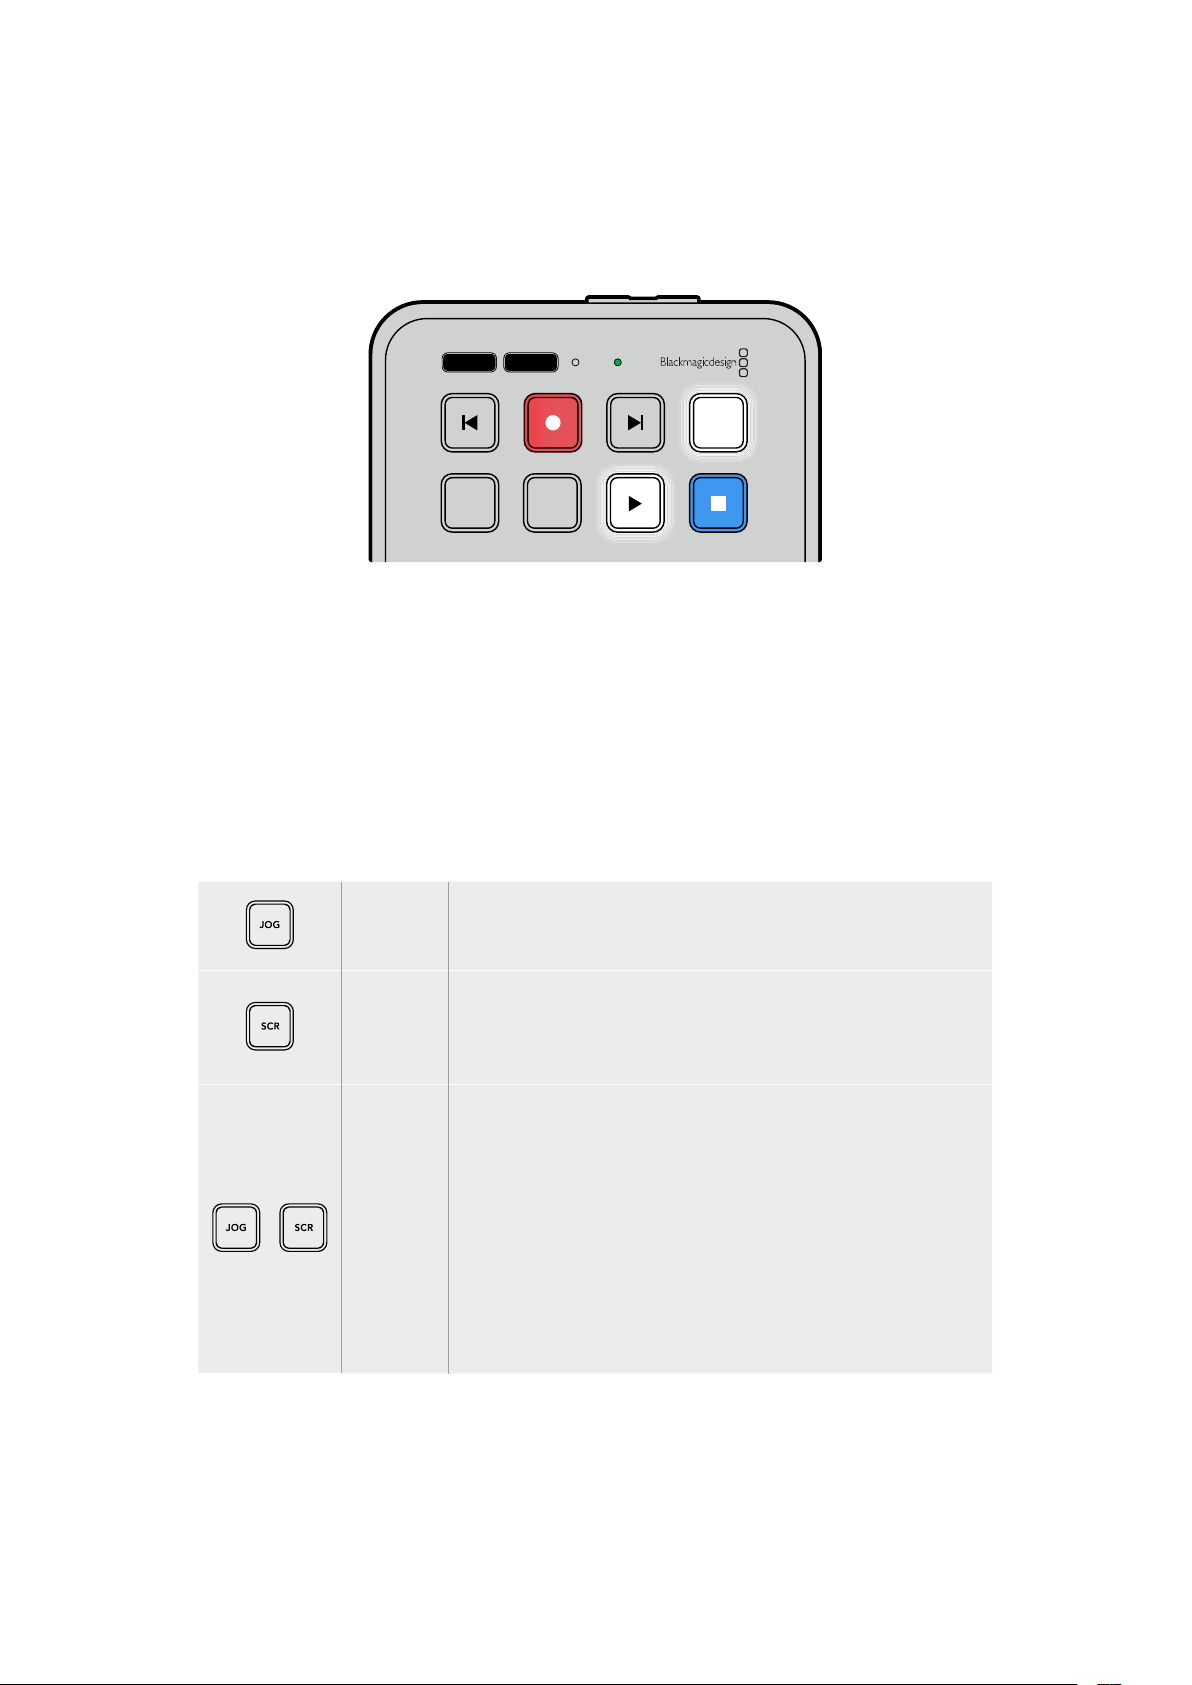
Klip Modu
Klip modu, oynatmayı tek bir kliple sınırlamanıza izin verir. Örneğin, klip modu
etkinleştirildiğinde, bir klibe hızlı geçiş yapabilir veya atlayabilirsiniz ve ardından, klip sona
erdiğinde oynatımın duracağını bilerek oynat butonuna basabilirsiniz.
JOG SCR
CLIP
MENU SET
DISK SD
Klip modu seçildiğinde, ‘oynat’ butonuna ikinci
kez basmak oynatılan klibi döngüye alır
Arama Kadranının Kullanımı
Arama kadranı, kliplerinizin arasında gezinmek ve oynatım için belirli anları seçmek veya kare
kare klipleri gözden geçirmek için hızlı bir yöntem sunar. Bu, kadranı çevirdikçe klibi gözünüzle
takip ederek belirli bir anı bulmanız gerektiğinde önemli olabilir. Ayrıca, canlı bir yayın sırasında
yayına alınacak bir klibin belirli bir noktasında, oynatım çubuğunu bekletmek için de yararlıdır.
Arama kadranı modları arasında; Jog (yavaş oynatım), Scroll (interaktif oynatım) ve Shuttle (hızlı
oynatım) bulunur.
Yavaş
Oynatım
(Jog)
Klibi kare kare oynatarak hassas kontrol sağlar.
İnteraktif
Oynatım
(Scroll)
İnteraktif oynatım modu, tüm kayıtlı medyanız arasında hızla ileri
ve geri gitmenizi sağlar. Arama kadranını çevirdikçe, interaktif
oynatım modu hareketinize kilitlenir, böylece oynatımı nereden
başlatacağınız üzerinde tam kontrole sahip olursunuz.
Hızlı
Oynatım
(Shuttle)
Hızlı oynatım moduna girmek için ‘jog’ ve ‘scr’ butonlarına
eşzamanlı basın. Hızlı oynatım modundayken kadranı sola veya
sağa çevirerek, medyanızı geri veya hızlı ileri sarabilirsiniz. Kadranı
çevirdikçe, medya maksimum hız olan x50’ye ulaşana kadar daha
hızlı oynayacaktır. Hızlı oynatımı yavaşlatarak durdurmak için
kadranı tekrar başlangıç konumuna çevirin. Hızlı oynatım esnasında
belirli bir noktada durmak için, durdurma butonuna basın veya
oynatımı mevcut konumdan devam ettirmek için oynat butonuna
basın. Kurulum menüsü kullanılarak maksimum hızlı oynatım hızının
düşürülebileceğini belirtmekte fayda var. Daha fazla bilgi için bu
kılavuzun ilerleyen bölümlerindeki ‘Ayarlar’ kısmına bakınız.
489Oynatım

JOG SCR
CLIP
MENU SET
DISK SD
Yavaş oynatım ve interaktif oynatım arama modlarını
seçmek için özel 'JOG' veya 'SCR' butonlarına basın.
JOG SCR
CLIP
MENU SET
DISK SD
Bir arama modu seçildikten sonra, arama kadranını çevirin
BİLGİ Normal oynatıma geçmek için, 'oynat' veya 'durdur' butonuna basın.
490Oynatım

Ayarların Değiştirilmesi
‘Menu’ butonuna basmak, ayarlar menüsünü açar. Bu menü, bağlı HDMI ekranınızın sol alt
köşesinde bir video katmanı olarak görüntülenir.
JOG SCR
CLIP
MENU SET
DISK SD
Ayarlar menüsünü açmak için ‘menu’ butonuna basın
Alt menüye veya ayara gitmek için arama kadranını kullanın
Alt menüyü veya ayarı seçmek için 'set' butonuna basın
Arama kadranını ya da ileri ve geri atlama butonlarını kullanarak ayarları düzenleyin. ‘Set’
butonuna basarak seçimi onaylayın.
Menüden çıkmak üzere seçenekler boyunca geri gelerek ana ekrana dönmek için 'menu'
butonuna basın.
BİLGİ Kurulum menüsünü kullanarak, ekranınızın dört köşesinden herhangi birine
menüyü yerleştirebilirsiniz. ATEM Mini Extreme gibi bir HDMI switcher’e bağlanıldığında,
ayarlarda değişiklik yapmayı tamamladıktan sonra, HDMI çıkışındaki sinyalin temiz bir
sinyal olduğundan emin olmak için menüyü kapatmanızı tavsiye ederiz.
JOG SCR
CLIP
MENU SET
DISK SD
491Ayarların Değiştirilmesi
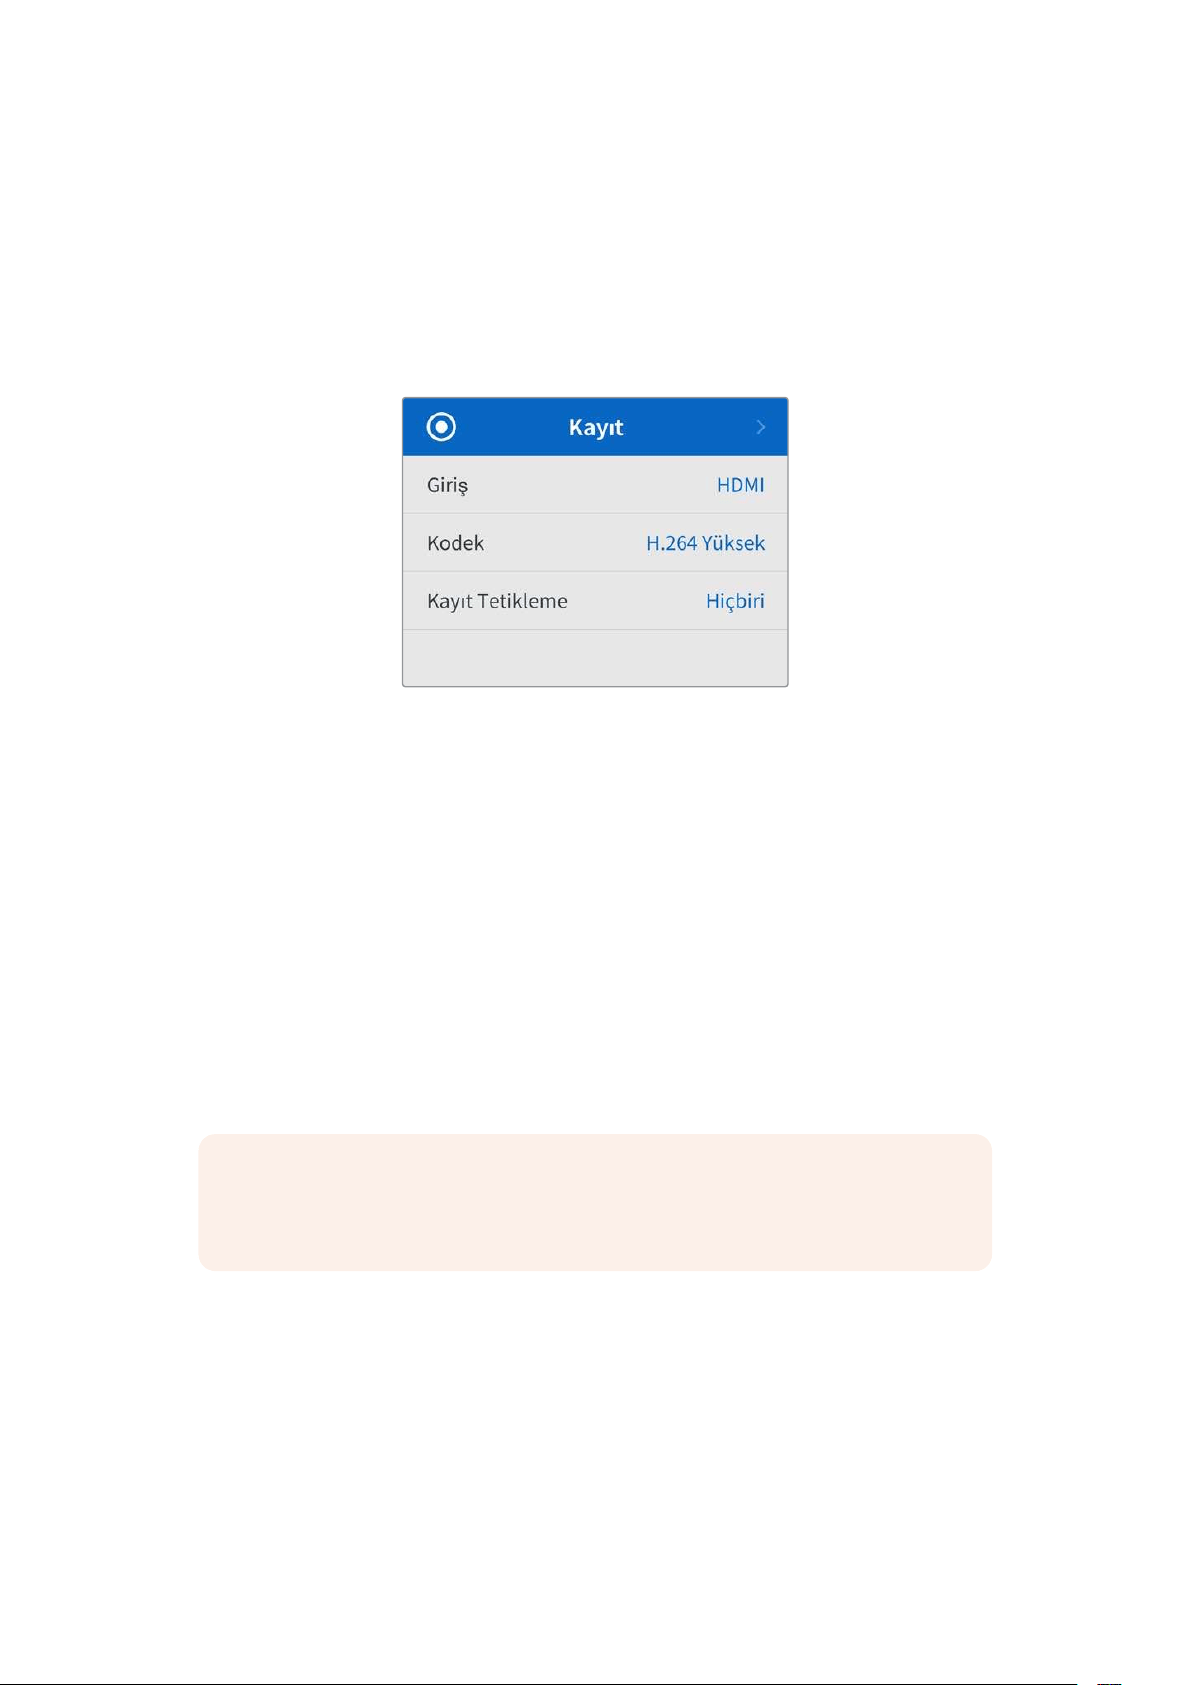
Ayarlar
Ayarlar menüsü; kayıt, monitör, ses, depolama ve kurulum olarak 5 ayrı bölümde düzenlenmiştir.
Bu alt menülerin her biri, HyperDeck Shuttle HD kontrol paneli kullanılarak çoğu ayarlanabilen,
ilgili ayarları kapsar. Dosya adı öneki gibi bazı ayarlar gridir ve yalnızca gösterilirler. Bu durumda,
HyperDeck Kurulum yardımcı programı aracılığıyla ayar yapılabilir.
Kayıt Menüsü
Giriş
HyperDeck Shuttle HD HDMI girişini gösterir.
Kodek
HyperDeck Shuttle HD; H.264, Apple ProRes ve DNxHD kodeklerini kullanarak sıkıştırılmış
video kaydedebilir. Teleprompter işlevini kullanmak için 'teleprompter'i seçin.
Kayıt Tetikleme
Geçerli olan iki kayıt tetikleme modu vardır; video ile başlat/durdur ve zaman kodu ile tetikle.
Blackmagic Pocket Cinema Camera 4K gibi bazı kameralar, harici kayıt cihazlarında kaydı
başlatmak ve durdurmak için HDMI bağlantısı üzerinden bir sinyal gönderir. 'Video ile başlat/
durdur' seçeneğini kullanmak, kamerada kayıt düğmesine basıldığında, kaydı başlatması veya
durdurması için Hyperdeck'i tetikler.
HDMI girişi üzerinden geçerli bir zaman kodu sinyali aldığında kaydı başlatması için cihazı
tetiklemek üzere, 'zaman kodu ile tetikle' seçeneğini kullanın. Sinyal durduğunda, kayıt da durur.
'Hiçbiri' seçeneğini kullanarak kaydı tetiklemeyi etkisiz hale getirin.
NOT Bir HDMI kameradan kayıt yaparken, kameranızın video çıkışında bulunan
herhangi bir katman görüntünüzle birlikte kayıt edileceği için çıkışın temiz ve
katmanların ise kapalı olduğundan emin olun.
492Ayarlar
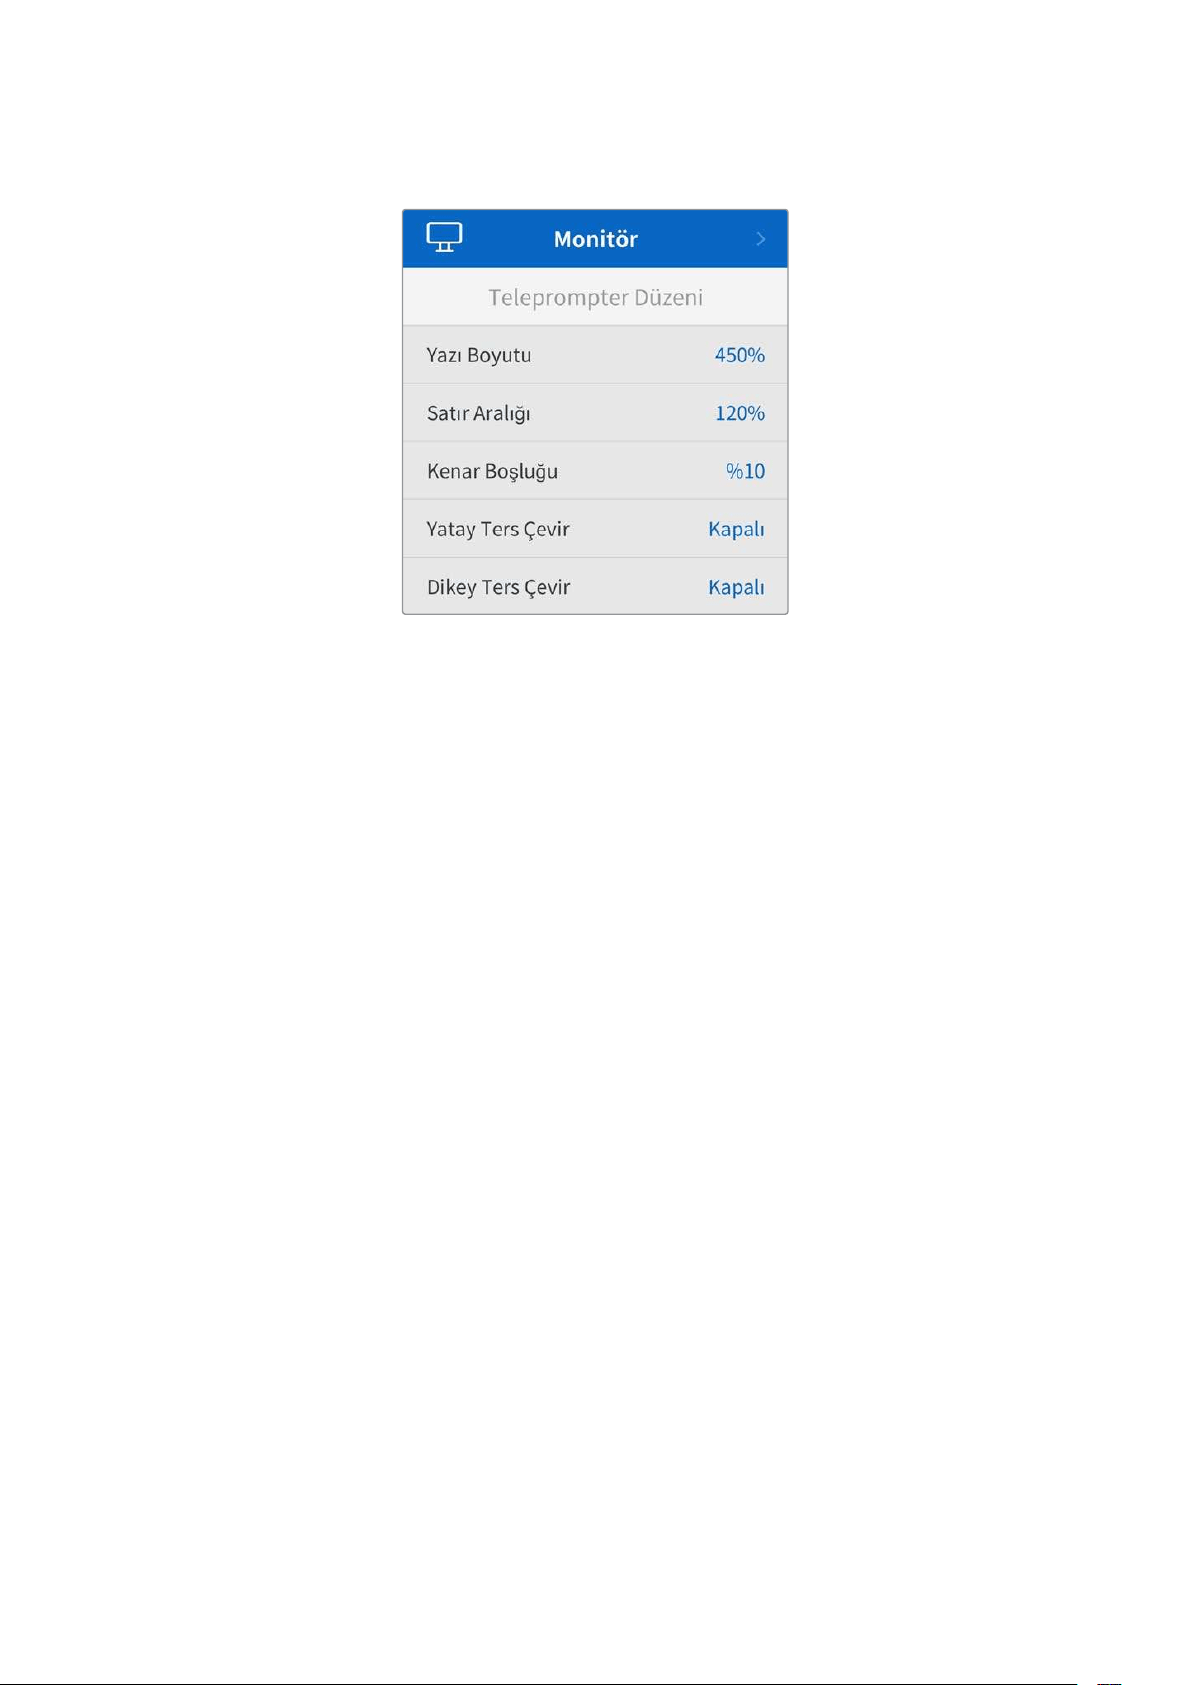
Monitör Menüsü
Teleprompter Düzeni
HyperDeck Shuttle HD'yi teleprompter olarak kullanmak için gereken tüm ayarlar monitör
menüsündedir.
Yazı Boyutu
Yazı boyutu seçeneğini belirleyip ‘set’ butonuna basarak metnin boyutunu ayarlayın. Yazı
boyutunu artırmak için saat yönünde veya azaltmak için saat yönünün tersine kadranı çevirin.
Satır Aralığı
Satır aralığını artırmak veya azaltmak için kadranı çevirin.
Kenar Boşluğu
Teleprompter ekranının her iki tarafındaki kenar boşluklarının genişliklerini ayarlayın.
Ters Çevir
Teleprompter monitörünüz, bir kameranın önü veya bir podyumdaki konuşmacının önü gibi bir
cam üzerine yansıtılacak şekilde ayarlanmışsa sunumu yapan kişi için okunabilir hale getirmek
üzere ‘ters çevirme’ ayarlarını kullanmanız gerekecektir. Kullanabileceğiniz iki ters çevirme
modu vardır:
Yatay Ters Çevir - Bunu, teleprompter monitörünün alt kısmı, camın tabanına en yakın
monte edildiğinde kullanın.
Dikey Ters Çevir - Bunu, teleprompter monitörünün alt kısmı, camın tabanından uzağa
monte edildiğinde kullanın.
493Ayarlar
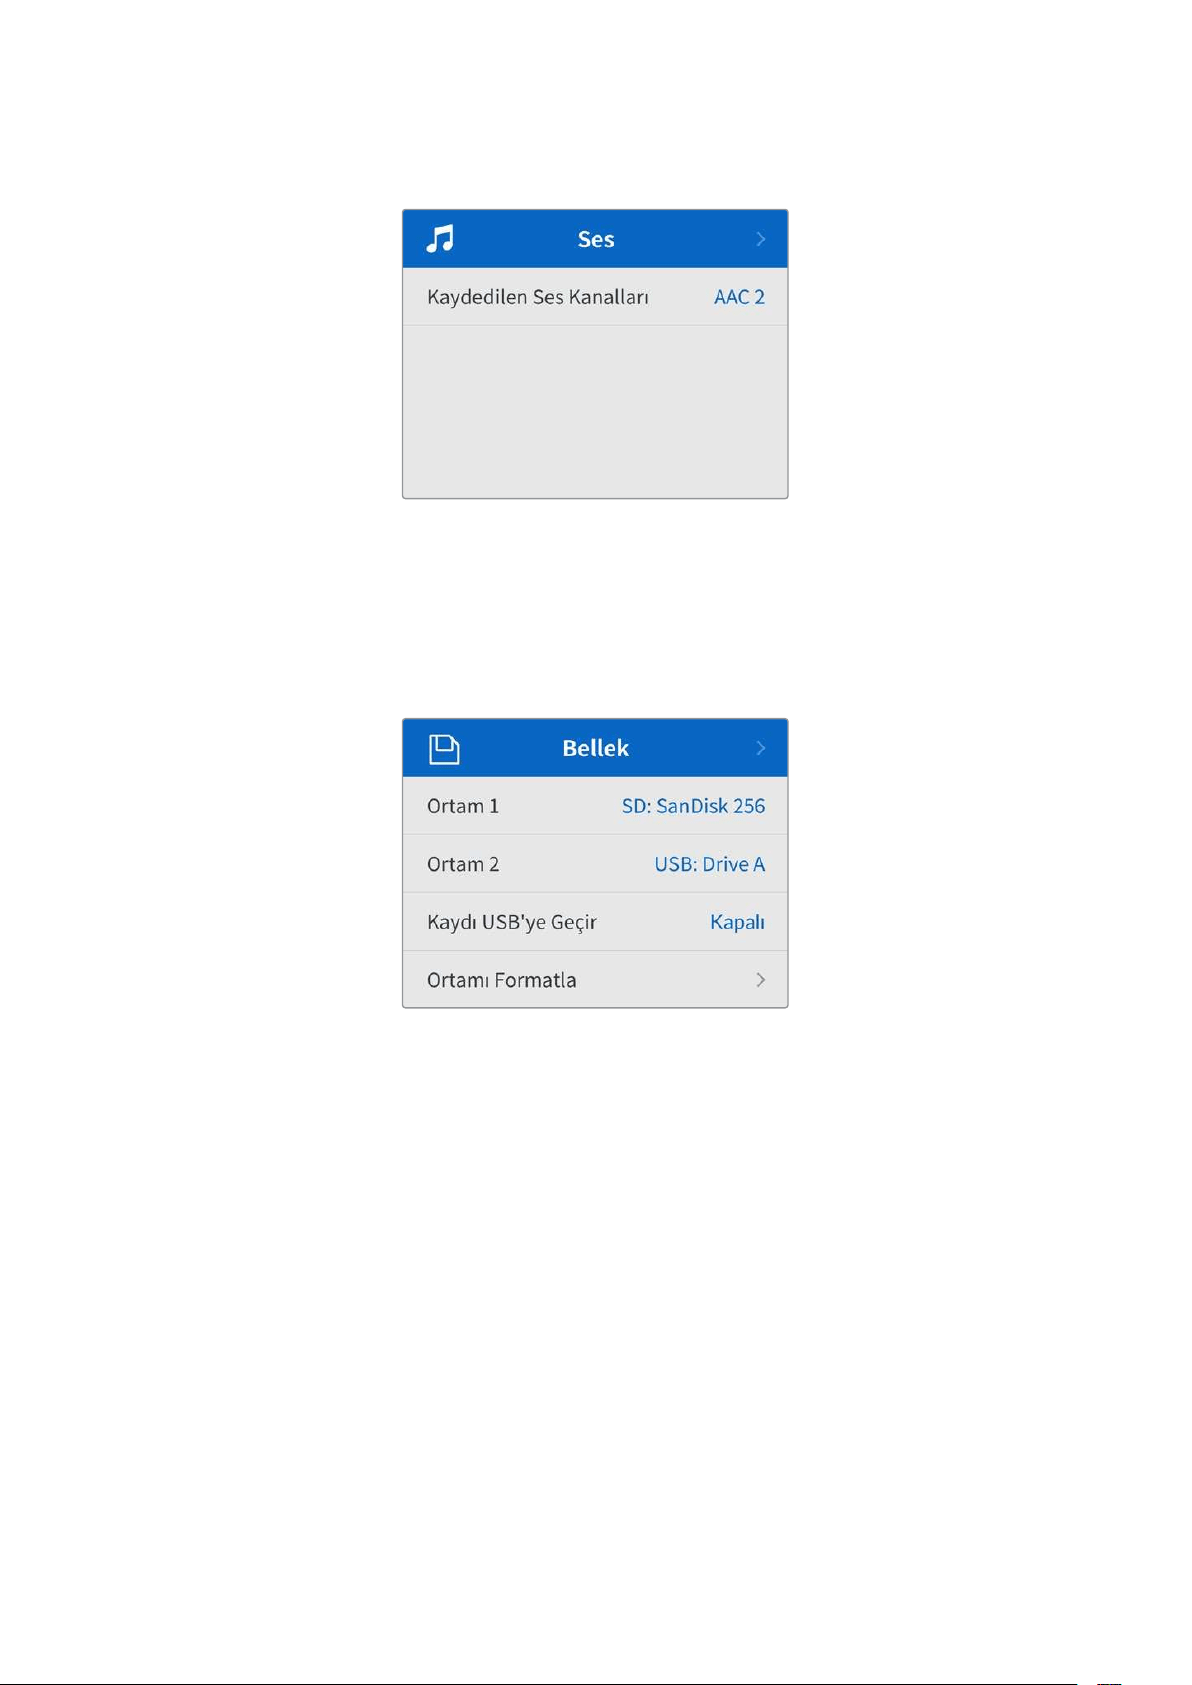
Ses Menüsü
Kaydedilen Ses Kanalları
HyperDeck Shuttle HD, bir seferde 8 kanala kadar PCM ses kaydedebilir. Kaydedilen kanal
sayısını seçmek için, kaydedilen ses kanalları listesini genişletin ve 2, 4 veya 8 kanal seçin.
Kodek, H.264 olarak ayarlanmışsa 2 kanal AAC sesi de seçebilirsiniz, böylece kayıtları
doğrudan YouTube'ye yükleyebilirsiniz.
Depolama Menüsü
Bağlanan ortam, depolama ayarlarında belirir. Ortam 1, takılan SD kartın adını listeler ve ortam 2,
harici disk bağlantısına takılan herhangi bir USB flaş diski gösterir. Blackmagic MultiDock 10G
gibi bir USB çoğaltıcı kullanıyorsanız, aktif olan disk görüntülenir.
Kaydı USB’ye Geçir Ayarı
'Harici disk' usb bağlantısı üzerinden birden fazla diski bağlamak için bir Blackmagic MultiDock
10G veya benzer bir cihaz kullanıyorsanız kaydı USB’ye geçir ayarını açmak, kaydın bir harici
diskten diğerine geçmesini sağlar.
Ortamı Formatla
Kartlar ve arkadaki harici disk bağlantısı üzerinden bağlı ortam, doğrudan cihazda veya bir Mac
veya Windows bilgisayar üzerinden formatlanabilir.
HyperDeck Shuttle HD’de Ortamın Hazırlanması:
1 Arama kadranı ve ‘SET’ butonunu kullanarak, ‘Ortamı Formatla' seçeneğini seçin.
2 Formatlamak için listeden ortamı seçin ve ‘SET’ butonuna basın.
3 Formatı seçin ve ‘SET’ butonuna basın.
494Ayarlar
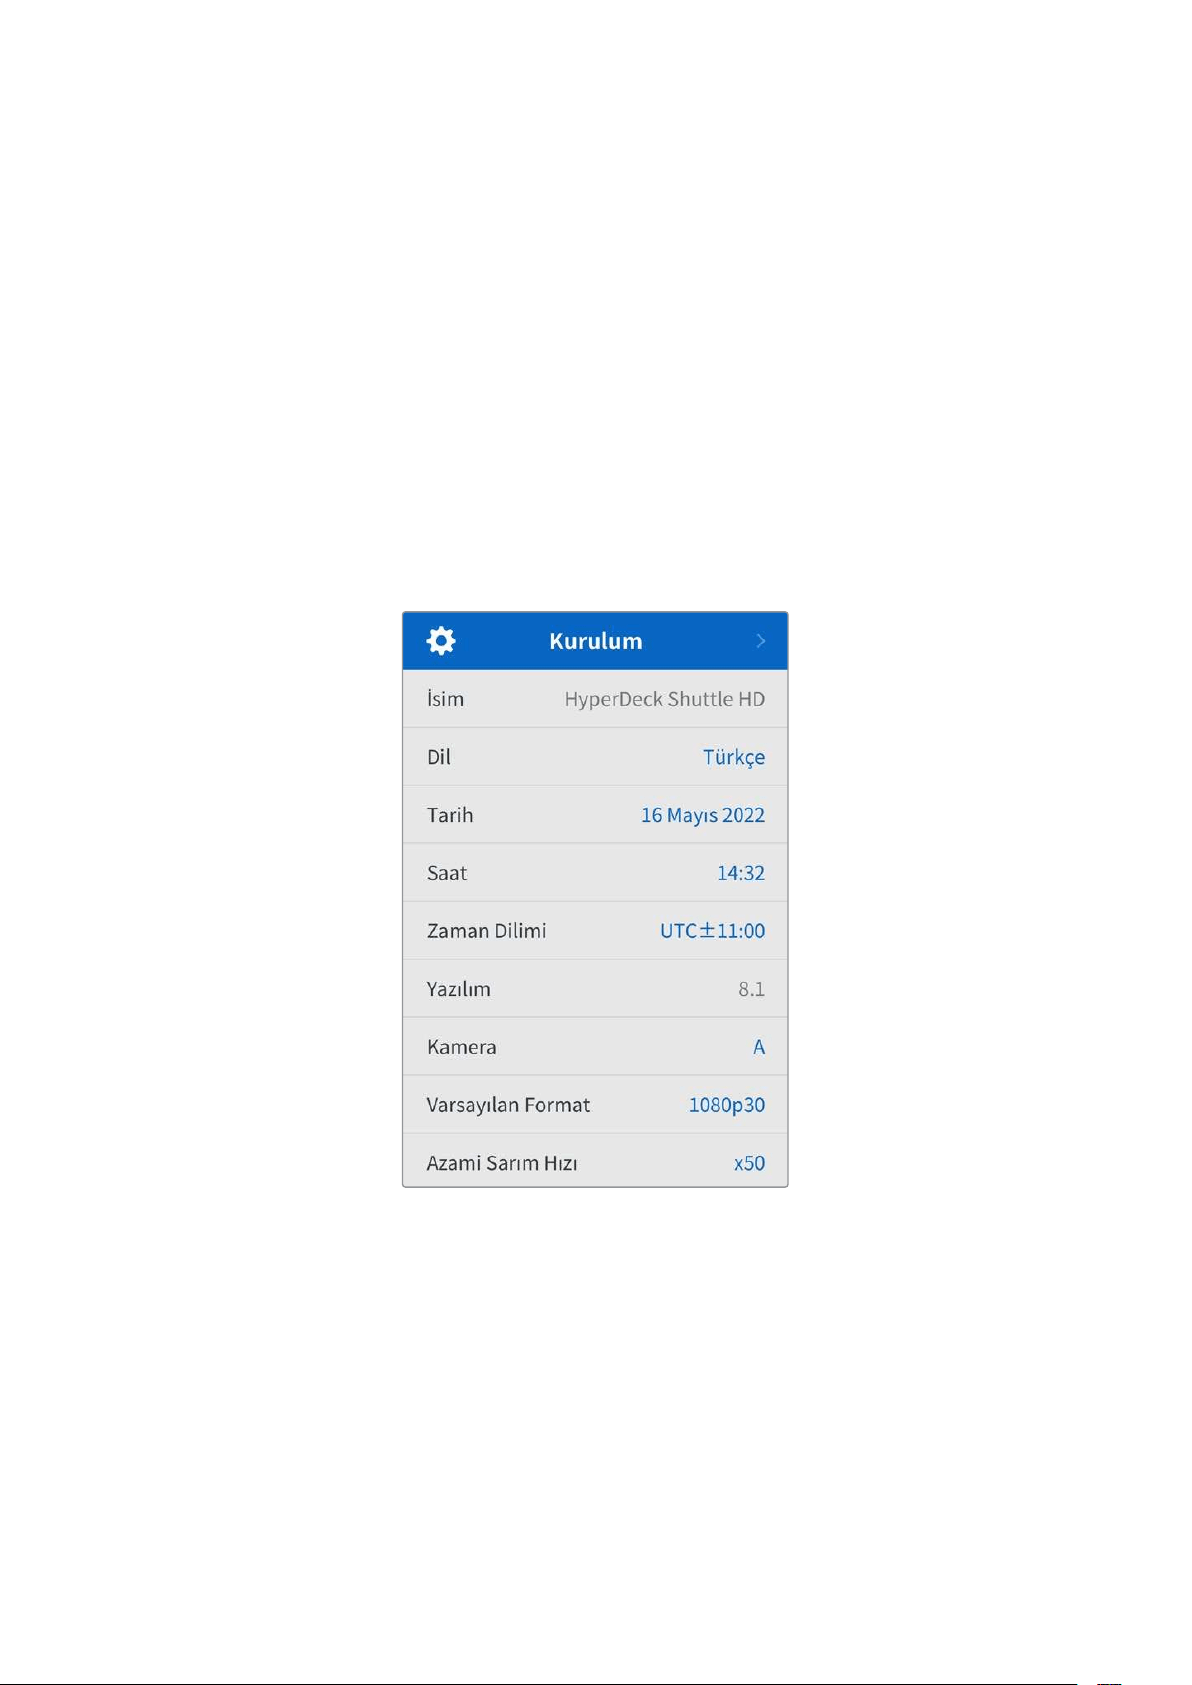
4 Hangi kartın formatlanacağını ve seçilen format seçeneğini ayrıntılı olarak gösteren bir
onay penceresi görünecektir. Formatla komutunu seçin.
5 Bir formatlama penceresi görünecektir. Formatlama biter bitmez ‘Tamam'
butonuna basın.
Aynı zamanda Mac OS X Extended olarak da bilinen HFS+ formatı, ‘journaling’ (günlükleme)
işlemini desteklediğinden, tavsiye edilen formattır. Depolama ortamınızda nadiren olabilecek
bozulmalarda, ‘journaled’ isimli günlüklü ortamdaki verilerin, geri getirilmeleri daha muhtemeldir.
HFS+ yerel olarak Mac tarafından desteklenir. ExFAT, ek yazılıma gerek kalmadan Mac ve
Windows tarafından yerel olarak desteklenir, ama günlüklemeyi desteklemez.
Bir Mac veya Windows bilgisayarda ortamı formatlamak için, bu kılavuzdaki ortamın
formatlanması bölümüne bakın.
Kurulum Menüsü
Dil seçimi ve varsayılan format gibi ayarları kapsayan kurulum menüsü ayrıca; menü ekranı, ağ
ayarları ve zaman kodu seçenekleri için bölümler içerir.
İsim
Ağınızda birkaç HyperDeck Shuttle HD olduğunda, farklı cihazları tanımak için onlara ayrı ayrı
isimler vermeyi isteyebilirsiniz. Bu, Blackmagic HyperDeck Setup yazılımı üzerinden veya bir
terminal uygulaması kullanılarak Blackmagic Hyperdeck Ethernet Protokolü ile yapılabilir. Ad,
kurulum menüsünde görünür.
Dil
HyperDeck Shuttle HD 13 dili destekler. Desteklenen diller arasında; İngilizce, Çince, Japonca,
Korece, İspanyolca, Almanca, Fransızca, Rusça, İtalyanca, Portekizce, Türkçe, Ukraynaca ve
Polonyaca bulunur.
Dili seçmek için:
1 Kurulum menüsü seçiliyken, ‘set’ butonuna basın.
2 Dili seçmek için arama kadranıyla menüde ilerleyin ve ‘set’ butonuna basın.
495Ayarlar
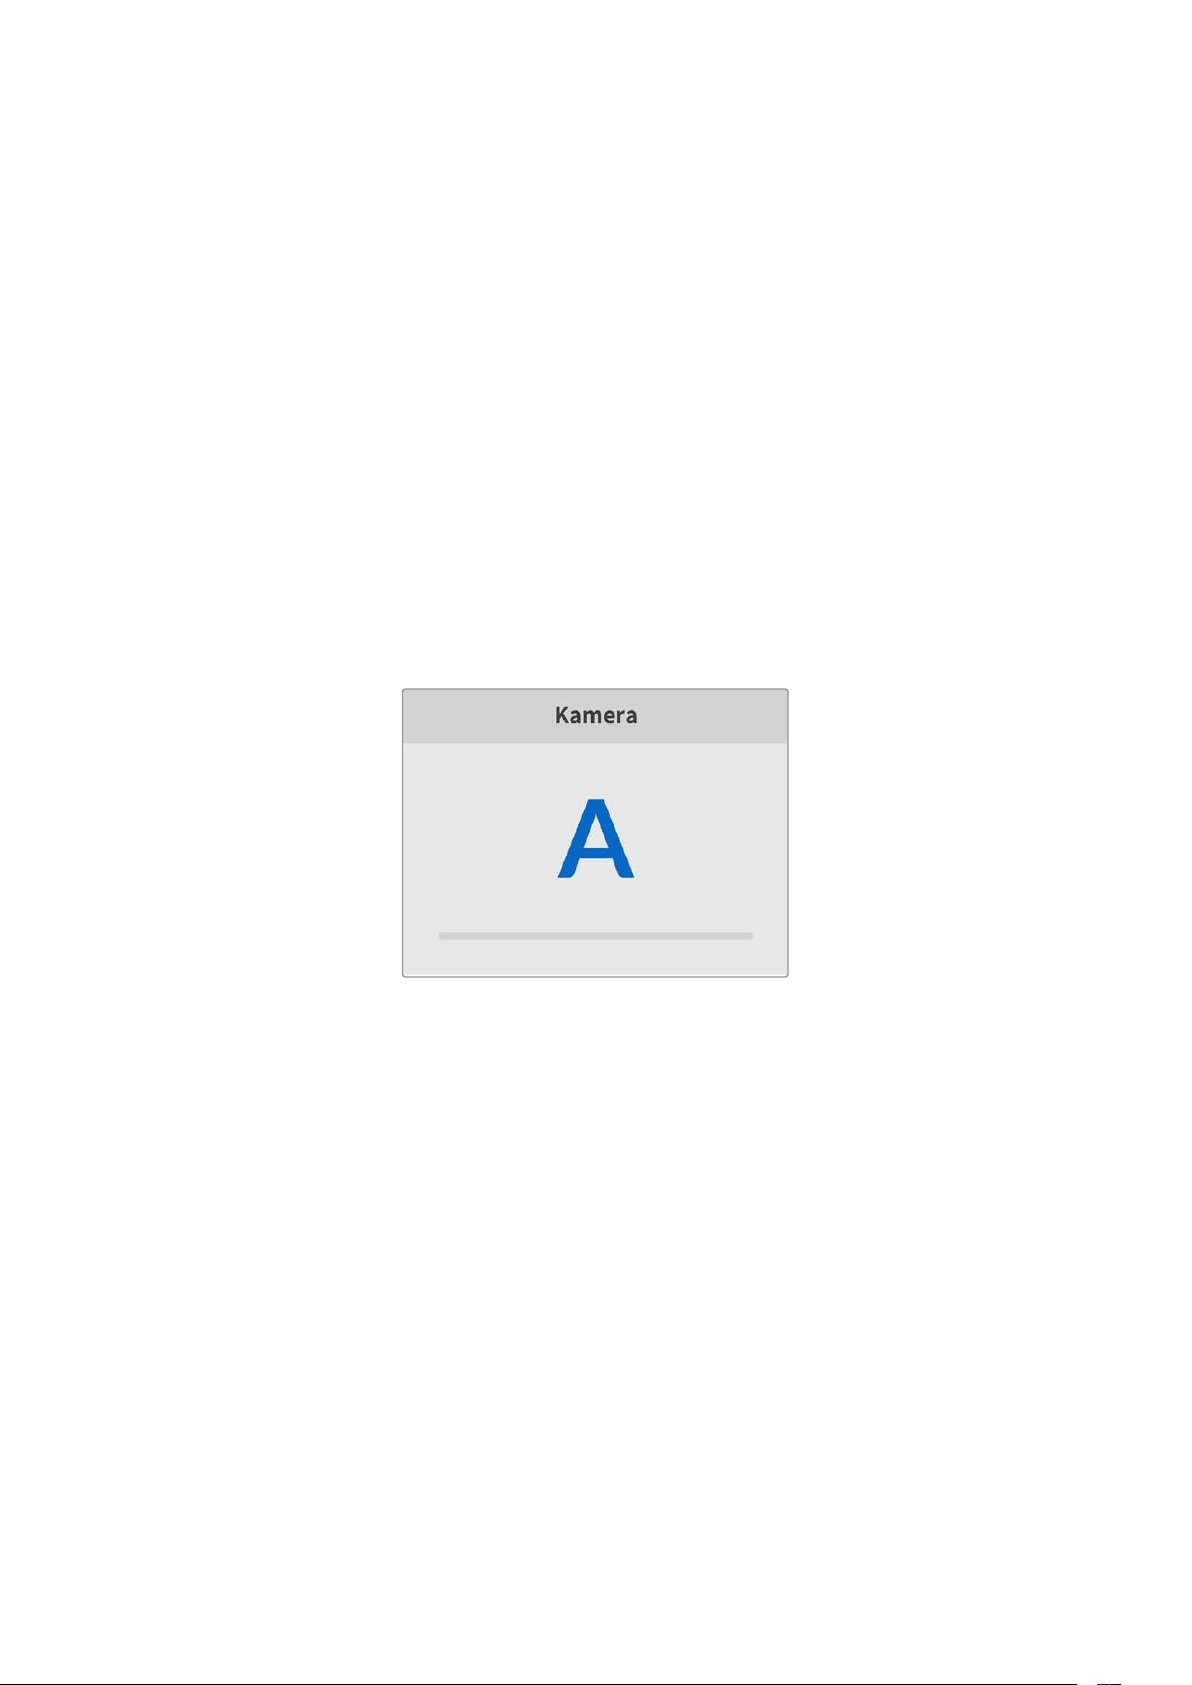
3 Arama kadranını kullanarak dili seçin ve ‘set’ butonuna basın. Dil seçilir seçilmez,
otomatik olarak kurulum menüsüne dönersiniz.
Tarih
Tarihi ayarlamak için, tarih alanını seçin ve ‘set’ butonuna basın. Arama kadranını kullanarak,
gün, ay ve yılı seçebilirsiniz. Seçildiğinde, dosya adı tarih ekini doldurur.
Saat
Saati ayarlamak için, saati seçin ve ‘set’ butonuna basın. Saat ve dakika ayarını yapmak için
arama kadranını kullanın. HyperDeck Shuttle HD’nin saati 24 saate ayarlıdır.
Yazılım
Mevcut yazılım sürümünü görüntüler.
Kamera
Bu ayar; HyperDeck’i birkaç kameradan ISO kayıt, yani ayrı dosyalar kaydetmek için kullanırken
ve daha sonra onları DaVinci Resolve’de çok kameralı bir zaman çizelgesinde kurgulamak için
faydalıdır.
Her bir kamerayı temsilen kimlik harfleri, dosyaların metaverilerinde görünerek, Senkron Bin
özelliğini kullanırken, DaVinci Resolve’nin her bir kamerayı kolaylıkla belirlemesini sağlar.
A-Z arasında harfleri veya 1-9 arasında rakamları
kullanarak kameranıza bir kimlik verin.
Varsayılan Format
HyperDeck Shuttle HD, kullanmak istediğiniz video formatını bazen bilemez. Bu ayar, en sık
kullanmayı istediğiniz video formatını HyperDeck'in bilmesini sağlar.
Bir HyperDeck Shuttle HD'yi açtığınızda, bağlı video sinyali yoksa ve 2 farklı video formatına
sahip dosyalar içeren bir disk yerleştirdiyseniz, buna iyi bir örnektir. HyperDeck’in hangi video
formatını oynatması gerekir? Varsayılan video formatı, hangi video formatını tercih ettiğiniz
konusunda cihazı yönlendirir ve cihaz, o formata geçerek dosyaları oynatır.
HyperDeck Shuttle HD'yi ilk açtığınızda, bir video giriş sinyalinin ve takılı bir diskin olmadığında
da varsayılan video fotmatı kullanışlıdır. Bu durumda HyperDeck, monitör çıkışı için hangi video
formatını kullanacağını bilmez. Varsayılan video formatı, ne yapacağı konusunda cihazı
yönlendirir.
Bunların yanında, varsayılan video formatı yalnızca bir kılavuzdur. Hiçbir şeyi geçersiz kılmaz.
Yani, üzerinde sadece 1 tip video dosyası bulunan bir medya diskiniz varsa ve oynat düğmesine
basarsanız HyperDeck disk kaydedici o video formatına geçer ve videoyu oynatır. Bu durumda,
varsayılan video formatını yok sayar, çünkü yalnızca diskteki dosyaları oynatmak
istediğiniz açıktır.
496Ayarlar
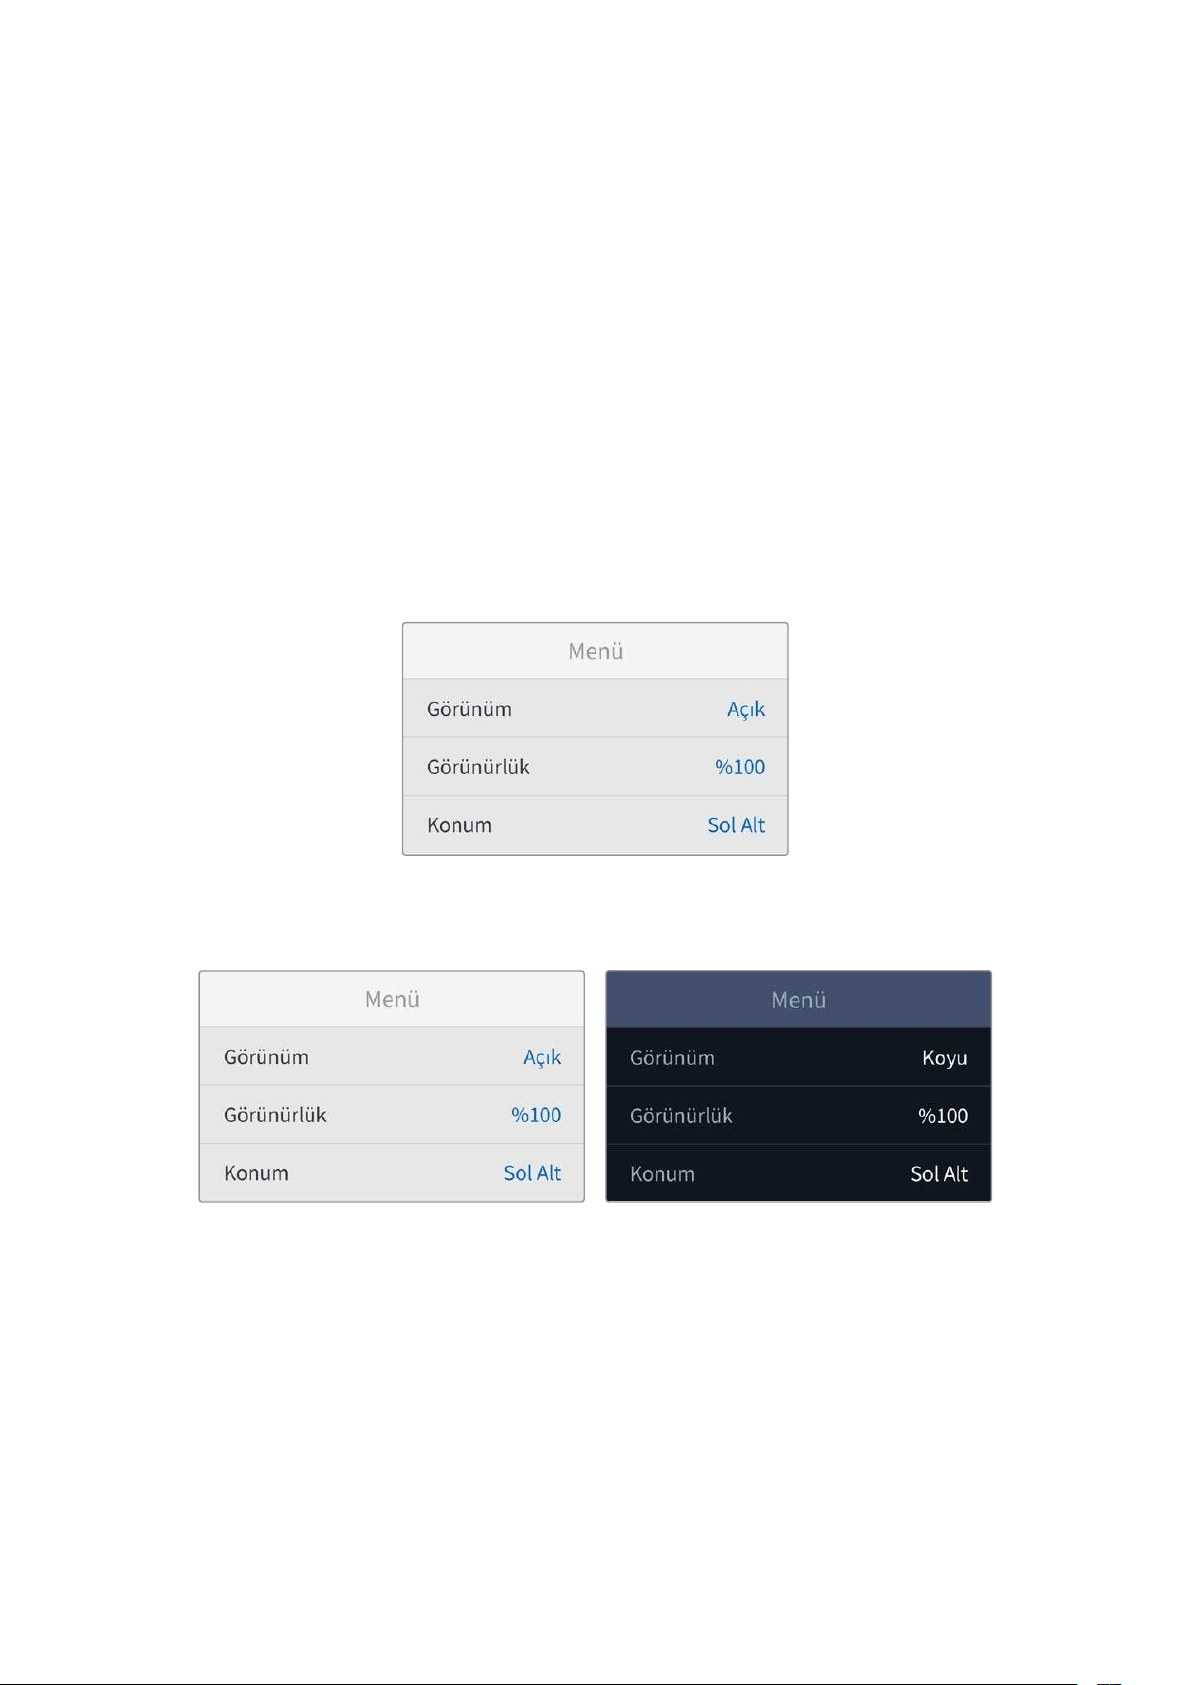
Kayıt için de benzer bir durum söz konusudur. Kayıt butonuna bastığınızda, HyperDeck, video
girişine bağlı olan video formatında kayıt yapar. Üstelik, kayıt tamamlandıktan sonra, diskte
varsayılan video formatıyla eşleşen başka dosyalar olsa bile, HyperDeck Shuttle HD diskteki
aynı formattaki video dosyalarını oynatır. Biraz önce kayıt işleminde kullandığınız video formatını
oynatmak istediğiniz varsayılır. Medya diskini cihazdan çıkartır ve tekrar takarsanız, sadece bu
durumda hangi tip dosyaların oynatılacağını seçmek için varsayılan video formatını kullanılır.
Varsayılan video formatı, sadece HyperDeck Shuttle HD ne yapacağı konusunda emin
olmadığında karar vermesine yardımcı olan bir kılavuzdur. Deck’in belirli bir şekilde
davranmasını zorlayan bir geçersiz kılma işlemi değildir.
Hızlı Oynatım Azami Hızı
HyperDeck Shuttle HD'deki hızlı oynatımın azami hızı, 50 kat hızındadır. Bu hızı düşürmek
isterseniz farklı hız ön ayarlarından birini seçebilirsiniz.
Menü Ayarları
Menü ayarlarını kullanarak, menünün bağlı olan HDMI ekranındaki yerini ve görünümünü
ayarlayabilirsiniz.
Görünüm
HyperDeck’inizin ekranı üzerindeki menüyü, koyu veya açık moda ayarlayın. Açık mod, medya
koyu olduğunda ya da teleprompter modundayken daha yüksek kontrast sunar.
Görünürlük
Bağlı ekrandaki menü katmanının görünürlüğü varsayılan seviye olan %100'den %20'ye kadar
düşürmek için seviyeleri ayarlayın.
Konum
Menü katmanı, varsayılan olarak ekranın sol alt köşesindedir. Menüyü farklı bir yere taşımak için
‘konum’u seçin ve ‘SET’ butonuna basın. Artık ekranın sol üst, sağ üst, sol alt veya sağ alt
köşesini seçebilirsiniz.
497Ayarlar
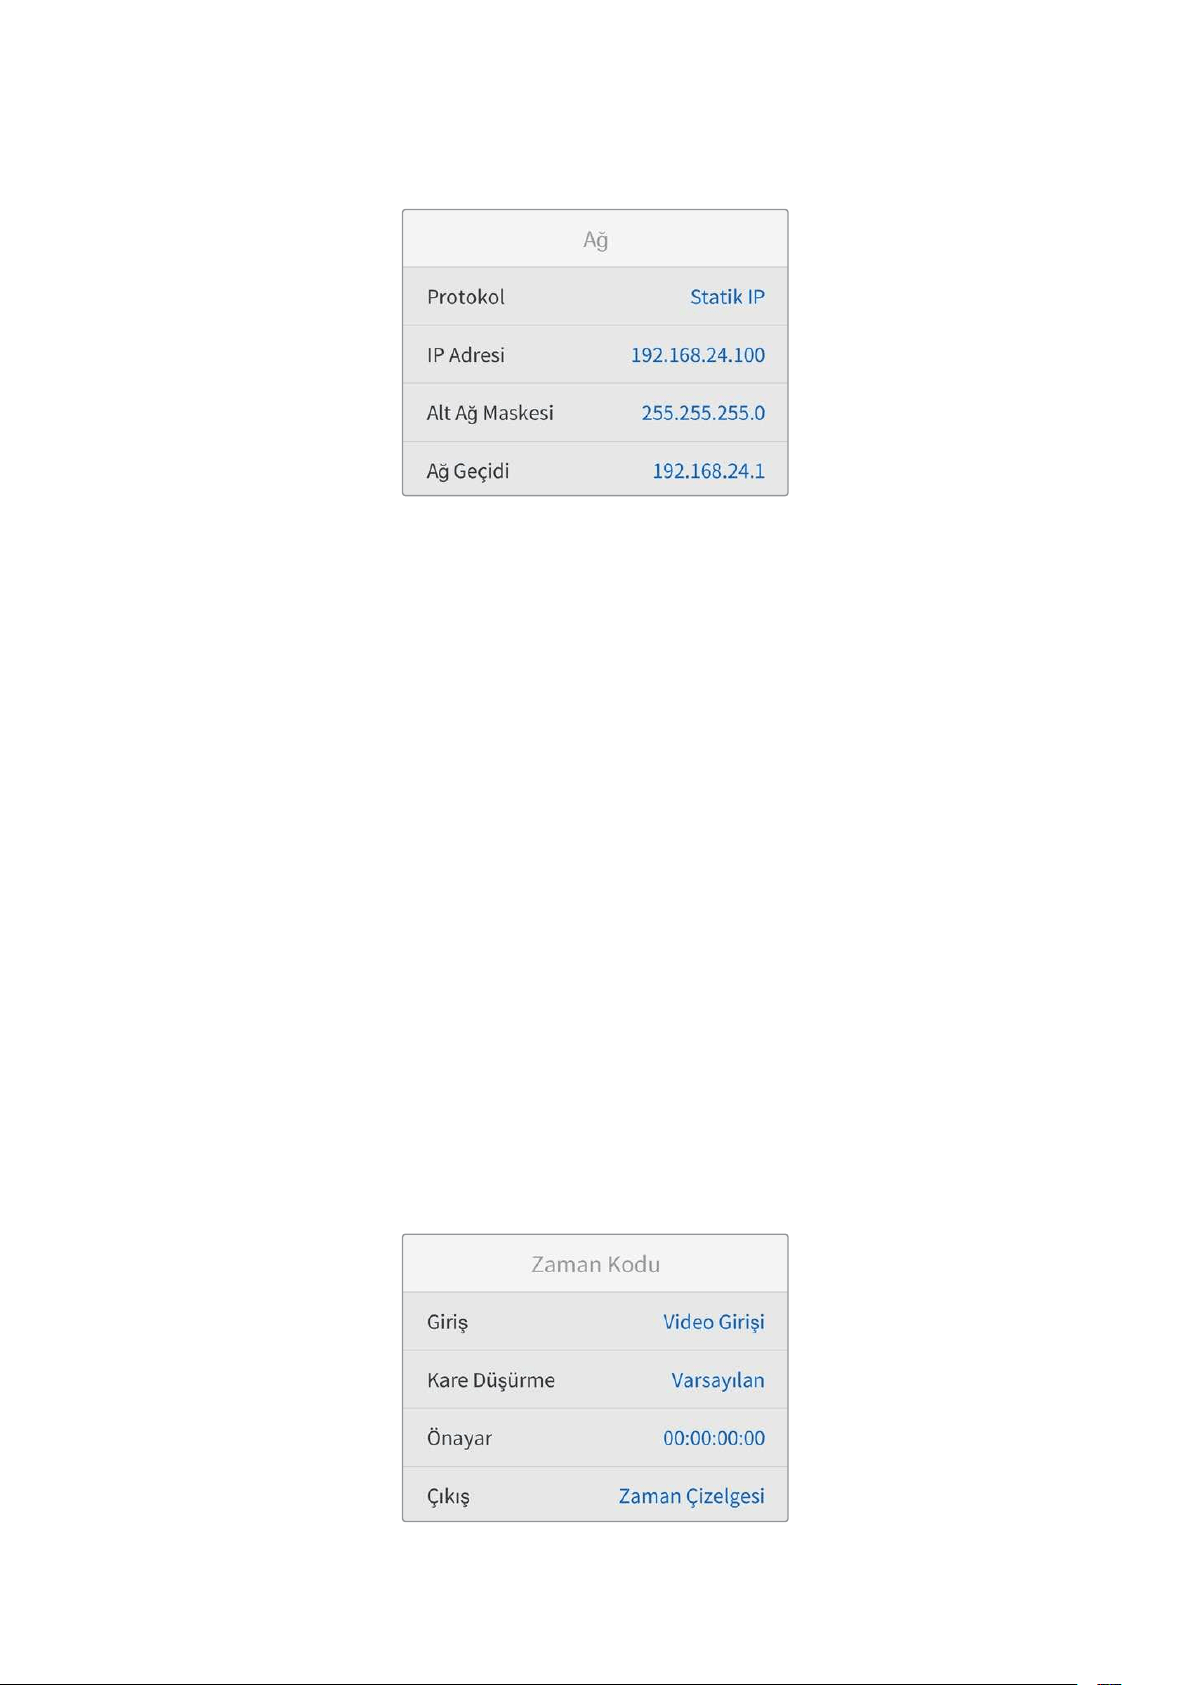
Ağ Ayarları
Protokol
Blackmagic Hyperdeck, DHCP'ye ayarlanmış olarak gelir, yani bir kez bağlandıktan sonra, ağ
sunucunuz otomatik olarak bir IP adresi atayacaktır ve başka bir ağ ayarının yapılması
gerekmez. Manuel bir adres belirlemeniz gerekiyorsa, statik bir IP üzerinden bağlanabilirsiniz.
Menüye erişmek için 'protokol' seçiliyken 'set' butonuna basın, 'Statik IP' seçeneğine gidin ve
tekrar 'set' butonuna basın.
IP Adresi, Alt Ağ Maskesi, Ağ Geçidi, Birincil DNS ve İkincil DNS
Statik IP seçildikten sonra, ağ bilgilerinizi manuel olarak girebilirsiniz.
IP adresini değiştirmek için:
1 Arama kadranını kullanarak 'IP Adresi' seçeneğini vurgulayın ve HyperDeck'inizin
kontrol panelindeki 'set' butonuna basın.
2 Arama kadranını kullanarak IP adresini ayarlayın, IP adresinizi ayarlamak için arama
kadranını döndürün, bir sonraki basamağı ayarlamadan önce, girdiğiniz değeri teyit
etmek üzere 'set' butonuna basın.
3 Yaptığınız değişikliği onaylamak için 'set' butonuna basın ve bir sonraki basamağa
ilerleyin.
IP adresini girme işlemini tamamladığınızda, alt ağ maskesini ve ağ geçidini ayarlamak için bu
adımları tekrarlayabilirsiniz. İşlemler tamamlandığında, menüden çıkmak ve ana ekrana geri
dönmek için 'menü' butonuna basın.
Zaman Kodu Ayarları
Kaynak zaman kodunu kaydetme, sistem saati zaman kodunu kaydetme veya zaman kodunuzu
manuel olarak ayarlama arasında seçim yapmak da dahil olmak üzere, zaman kodu giriş ve çıkış
seçeneklerinizi ayarlayın.
498Ayarlar
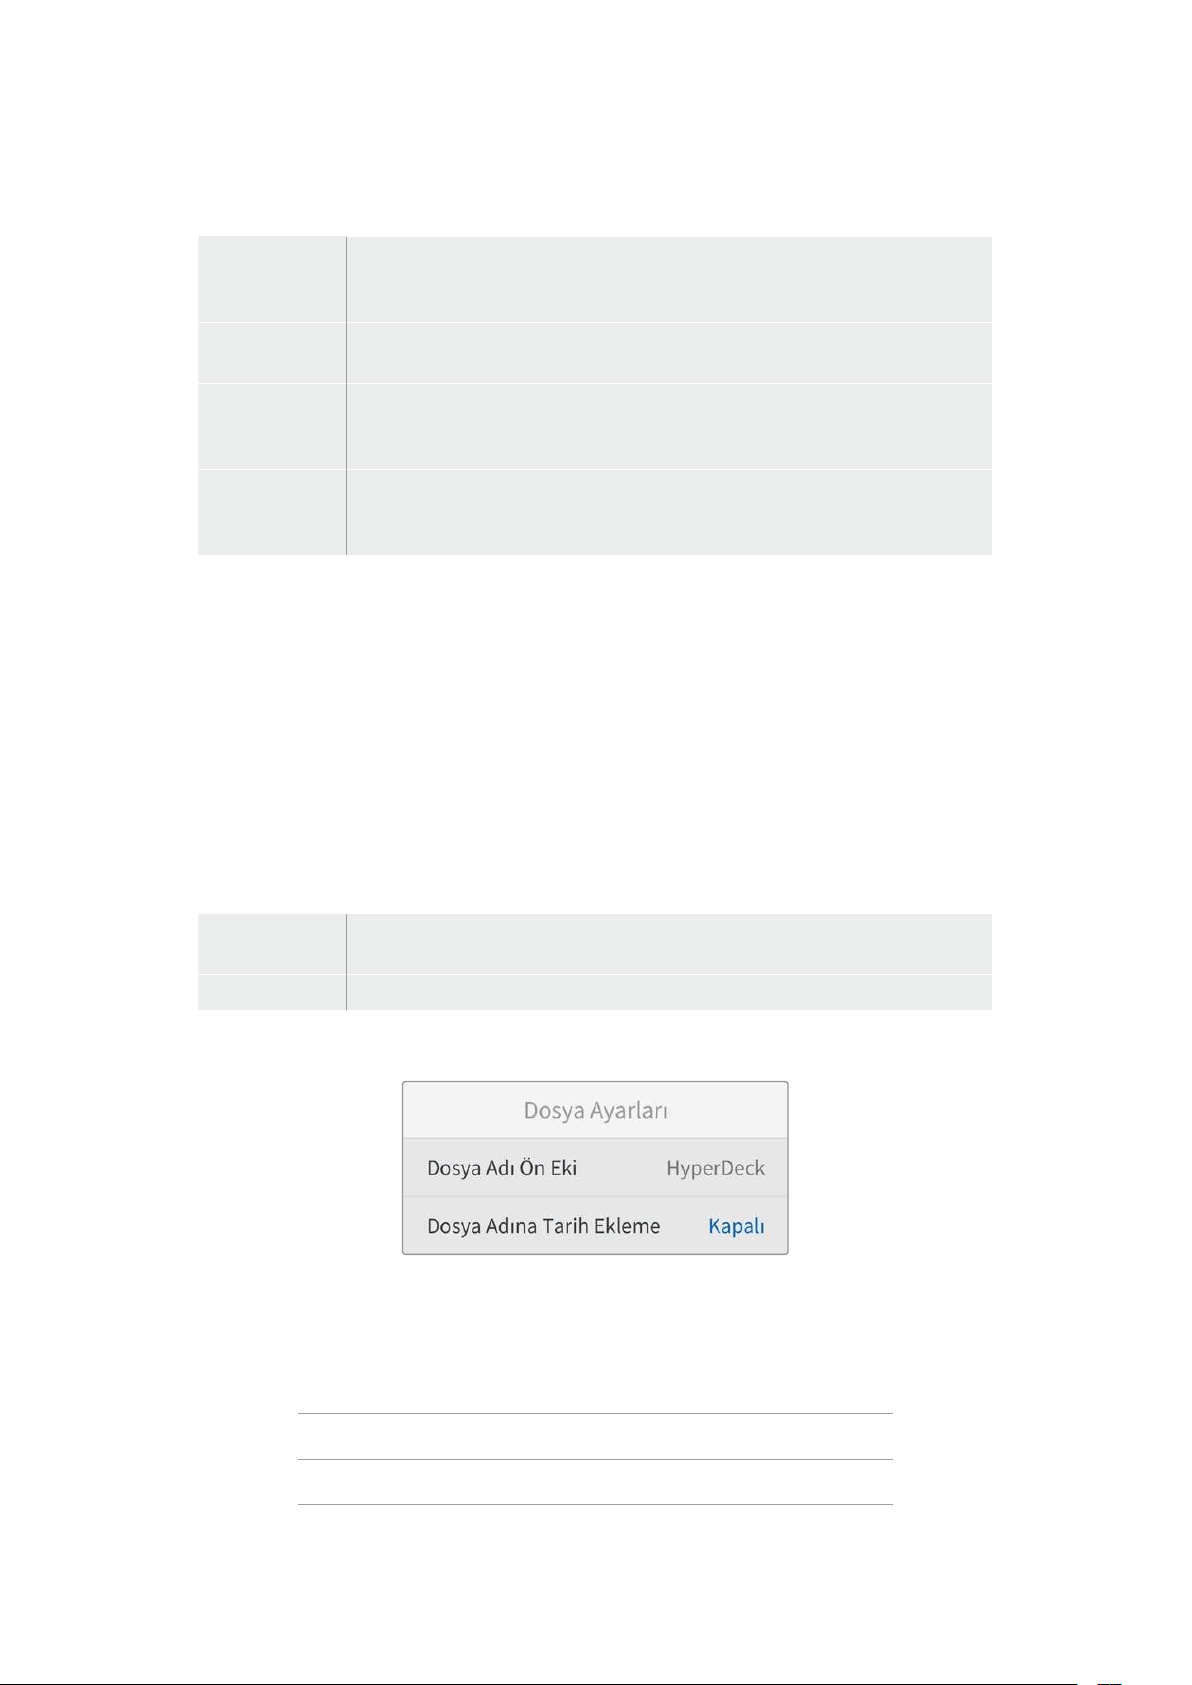
Giriş
Kayıt yaparken, dört tane zaman kodu girişi seçeneği vardır.
Video Girişi
Video girişinin seçilmesi, SMPTE RP 188 metaveri içeren HDMI kaynaklarından,
gömülü zaman kodunu alır. Bu, HDMI kaynağınız ile HyperDeck Shuttle HD’de
kaydedilen dosya arasındaki senkronu muhafaza eder.
Dahili
Dahili zaman kodu üreteci aracılığıyla günlük saat zaman koduyla kaydetmek için,
bu seçeneği kullanın.
Son Klipten Al
Zaman kodu girişiniz için ‘son klipten al’ opsiyonunu seçtiğinizde, dosyaların her
biri bir önceki klibin en son karesinden bir kare sonra başlar. Örneğin, ilk klibiniz
10:28:30:10’da bitiyorsa bir sonraki klibin zaman kodu 10:28:30:11’de başlayacaktır.
Önayar
Zaman kodunu manuel olarak ayarlamak istiyorsanız önayar seçeneğini belirleyin.
Kaydedilen klipler, bu bölümün ilerleyen sayfalarında gösterildiği üzere 'önayar'
ayarı aracılığıyla düzenlenen zaman kodunda başlar.
Kare Düşüren
29.97 veya 59.94 kare hızlarındaki NTSC kaynaklar için, ‘kare düşüren’ veya ‘kare düşürmeyen’
zaman kodunu seçebilirsiniz. Kaynağın ne olduğu bilinmiyorsa ‘varsayılan’ı seçin. Bu işlem,
girişin standardını muhafaza eder veya geçerli bir zaman kodu olmadığında, varsayılan ayar
olarak kare düşüren moda geçer.
Önayar
Zaman kodunuzu; 'set' butonuna basarak ve arama kadranı ile ‘set’ butonunu kullanmak
suretiyle başlangıç zaman kodunu girerek, manuel olarak ayarlayabilirsiniz. Giriş menüsünde
'önayar'ın seçildiğinden emin olun.
Çıkış
Çıkışlarınız için zaman kodu seçeneklerinizi belirleyin.
Zaman
Çizelgesi
Bir kart veya diskte kayıtlı tüm klipler için kesintisiz bir zaman kodu çıkarmak üzere
zaman çizelgesini seçin.
Klip Klip seçeneği, her bir klibe ait zaman kodunu çıkarır.
Dosya Ayarları
Dosya Adı Öneki
Kurulumunu ilk yaptığınızda, HyperDeck Shuttle HD cihazınız aşağıdaki dosya adı düzenini
kullanarak, klipleri SD kartınıza veya USB Flaş diskinize kaydeder.
HyperDeck_0001
HyperDeck_0001 Ön Ek
HyperDeck_0001 Klip Numarası
Dosya adı öne ekini, HyperDeck Setup yardımcı yazılımı ile değiştirebilirsiniz. Daha fazla bilgi
için, bu kılavuzun ilerleyen kısımlarındaki 'Blackmagic HyperDeck Kurulumu' bölümüne bakın.
499Ayarlar
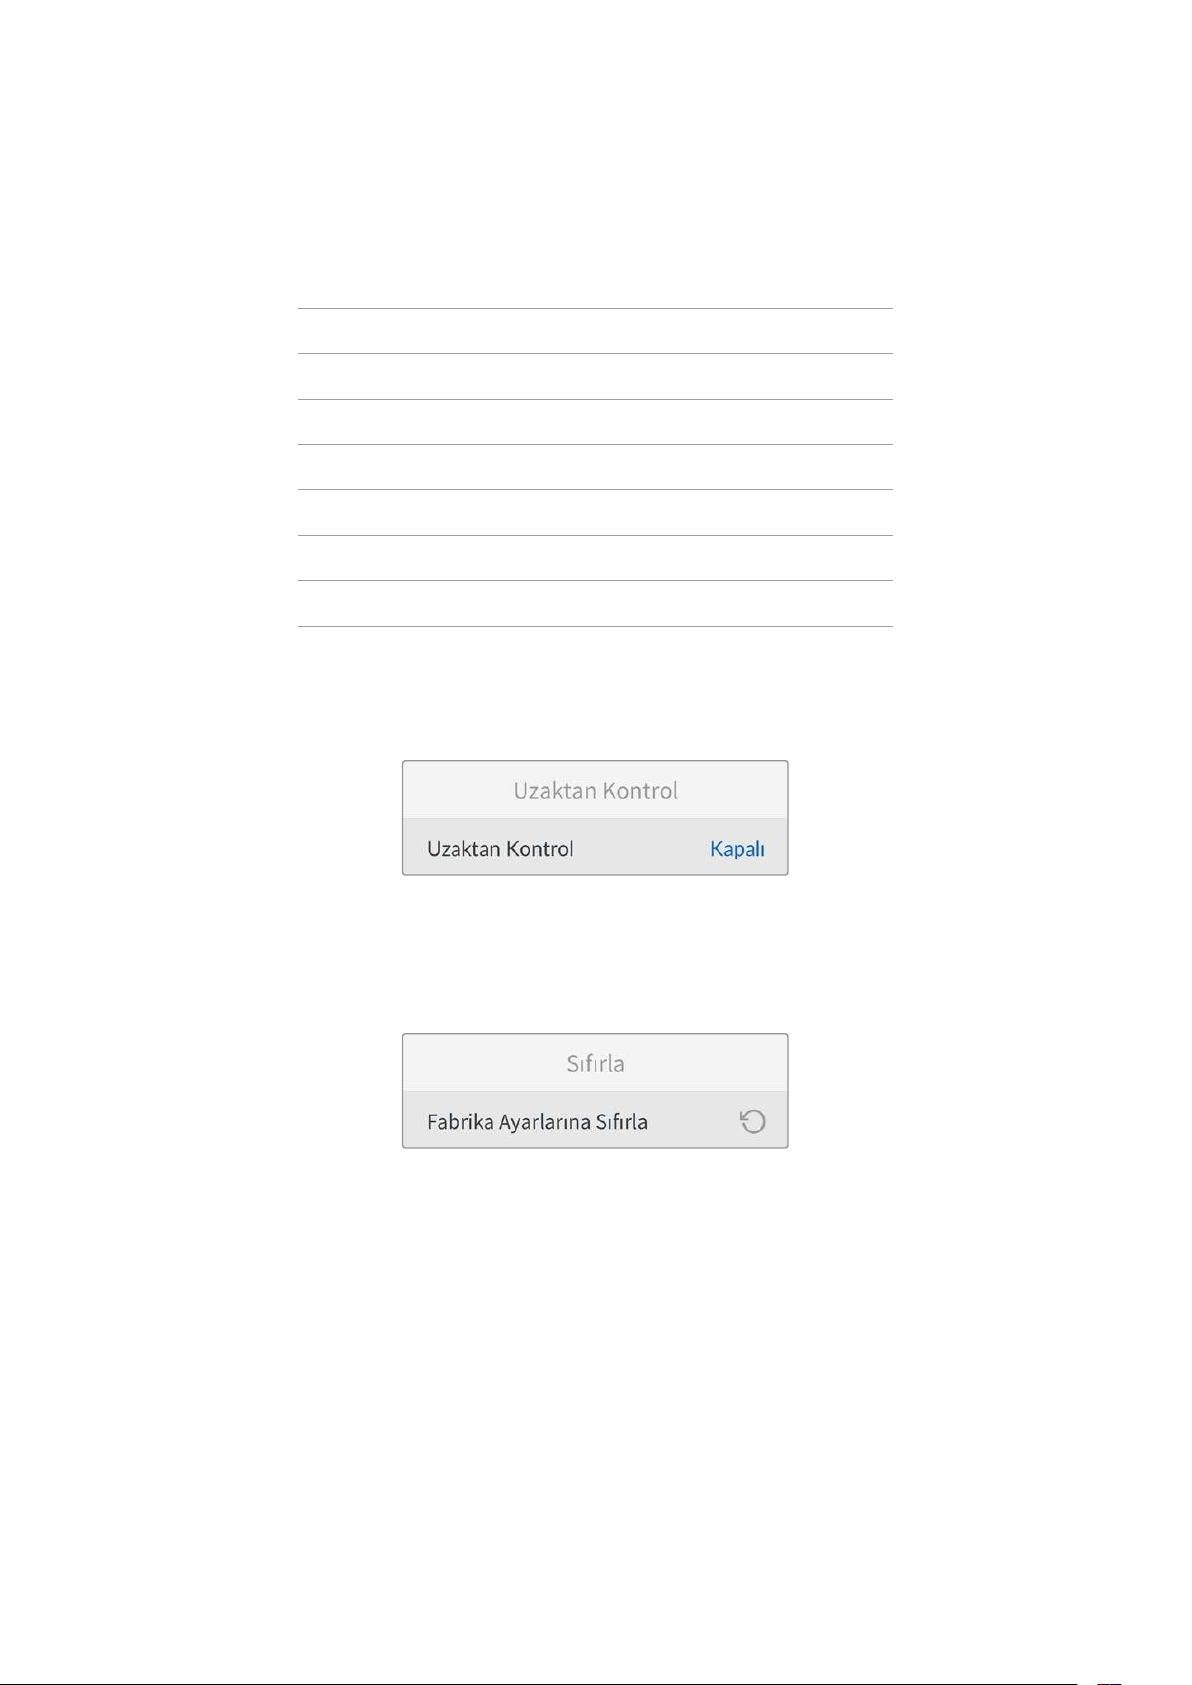
Dosya Adı Tarih Eki
Dosya adına eklenen tarih bilgisi, fabrika ayarı olarak kapalı durumdadır. Dosya adına tarih ve
saat bilgilerinin kaydedilmesini istiyorsanız, ‘dosya adı tarih eki’ seçeneğini etkin hale getirin.
HyperDeck_2201061438_0001
HyperDeck_2201061438_0001 Dosya Adı Öneki
HyperDeck_2201061438_0001 Yıl
HyperDeck_2201061438_0001 Ay
HyperDeck_2201061438_0001 Gün
HyperDeck_2201061438_0001 Saat
HyperDeck_2201061438_0001 Dakika
HyperDeck_2201061438_0001 Klip Numarası
Uzaktan Kontrol Ayarları
Uzaktan kontrol ayarı, HyperDeck'in diğer video ekipmanları, örneğin bir ATEM Mini Extreme
switcher tarafından uzaktan kontrol edilmesini sağlar.
Uzaktan Kontrol
Ethernet üzerinden uzaktan kontrolü etkinleştirmek için ‘uzaktan kontrol’ modunu seç. Cihazı
yerel olarak kontrol etmek için uzaktan kontrol seçimini kaldırın.
Sıfırlama Ayarları
Fabrika Ayarlarına Sıfırla
HyperDeck'inizi fabrika ayarlarına geri döndürmek için kurulum menüsünde 'fabrika ayarlarına
sıfırla’yı vurgulayın. 'Set' butonuna basar basmaz, sizden seçiminizi onaylamanız istenir.
500Ayarlar

Arka Panel
HDMI OUT
HDMI IN
EXT DISK
SD CARD
ETHERNET
+
12V DC
1
2
3 4 5
1 Güç
HyperDeck Shuttle HD, bir AC adaptör ile çalışır. Cihaz ile gelen güç kablosu, güç
kesintisini önlemek için kilitlenebilir bir konektöre sahiptir fakat, HyperDeck Shuttle
HD’yi çalıştırmak için herhangi bir 36W 12V güç kablosunu da kullanabilirsiniz.
2 SD Kart
Kayıt ve oynatım için SD kartları yuvaya yerleştirin.
3 Ethernet
Ethernet portu, HyperDeck Ethernet Protocol’ü kullanarak, hızlı ftp aktarımları için
ağınıza bağlanmayı veya cihazı uzaktan kontrol etmeyi mümkün kılar. Bir FTP istemcisi
aracılığıyla dosyaların aktarılması hakkında daha fazla bilgi için, bu kılavuzdaki 'Bir Ağ
Üzerinde Dosyaların Aktarımı' bölümüne bakın.
Bir ATEM switcher’in bağlı olduğu aynı ağı paylaştığında, ATEM switcher veya ATEM
donanım paneli kullanarak da HyperDeck’inizi kontrol edebilirsiniz.
4 Harici Disk
Harici disklere 5Gb/sn’ye kadar hızlarda kayıt yapmak için, USB-C konektöre bir flaş
disk bağlayın. Bir veya daha çok sayıda SSD bağlamak üzere çok portlu USB-C hub
cihazlarını veya Blackmagic MultiDock 10G'yi bağlayabilirsiniz.
5 HDMI
HDMI çıkışını; HDMI televizyonlara, monitörlere ve hatta ATEM Mini Extreme gibi bir
switcher’e bağlayın. HDMI çıkışı, menü katmanını görüntülemek için de kullanılır.
501Arka Panel

Depolama Ortamı
SD Kart
Yüksek kalitede HD kayıt için yüksek hızlı UHS-I SD kartları öneriyoruz. Ultra HD 2160p60’a
kadar kaydedebilmesi için bu kartların, 220MB/sn’nin üzerinde bir yazma hızına sahip
olmaları gerekir.
Ancak, daha yüksek sıkıştırma ile daha düşük bit hızında kayıt yapıyorsanız, daha yavaş kartlar
kullanabilirsiniz. Genel olarak, kartlarınız ne kadar hızlıysa o kadar iyidir.
Daha güncel bilgiler için düzenli olarak bu kılavuzun en güncel sürümüne bakmanızda fayda
vardır ve her zaman
www.blackmagicdesign.com/tr/support adresindeki Blackmagic Design
internet sitesinden indirilebilir.
HyperDeck Shuttle HD ile hangi SD kartları kullanmalıyım?
60 fps’ye kadar 1080p için, aşağıdaki SD Kartlar önerilir.
Marka Model Kapasite
Angelbird AV PRO SD UHS-II 300MB/s V90 SDXC 256GB
Angelbird AV PRO SD UHS-II 260MB/s V60 SDXC 128GB
Angelbird AV PRO SD UHS-II 260MB/s V60 SDXC 64GB
SanDisk Extreme Pro UHS-I 95MB/s SDXC 64GB
Wise SD2-64U3 UHS-II 285MB/s SDXC 64GB
Lexar Professional 1000x UHS-II 150MB/s SDXC 128GB
SONY Tough SF-G128T 128GB
Kingston CANVAS GO! Plus 170MB/s V30 64GB
Kingston CANVAS GO! Plus 170MB/s V30 128GB
Kingston CANVAS GO! Plus 170MB/s V30 512GB
ProGrade Digital SDXC UHS-II V90 300R 64GB
ProGrade Digital SDXC UHS-II V90 300R 128GB
SONY Tough SF-G64T UHS-II SDXC 64GB
Delkin Devices Black UHS-II V90 SDXC 256GB
Delkin Devices Power UHS-II V90 SDXC 128GB
Delkin Devices Power UHS-II V90 SDXC 256GB
Delkin Devices Black UHS-II V90 SDXC 128GB
Exascend Essential SDXC UHS-II V90 R 300MB/s 64GB
Exascend Essential SDXC UHS-II V90 R 300MB/s 128GB
Exascend Catalyst SDXC UHS-II V90 R 300MB/s 64GB
502Depolama Ortamı

Harici Disk
Tüm HyperDeck modelleri, doğrudan USB-C flaş disklere kayıt yapabilir. Bu hızlı ve yüksek
kapasiteli diskler, uzun süreler boyunca video kaydetmenize olanak verir. Sonra, aynı flaş diski
bilgisayarınıza takabilir ve doğrudan bu diskten kurgulama yapabilirsiniz!
Daha da yüksek depolama kapasiteleri için bir USB-C docking istasyonu veya harici bir sabit
disk bağlayabilirsiniz. Blackmagic MultiDock 10G’nizi veya USB-C flaş diskinizi bağlamak için,
USB-C’ye bağlı olan cihazdan HyperDeck’nizin arka panelindeki ‘ext disk’ (harici disk) portuna
bir kablo bağlayın.
HyperDeck Shuttle HD ile hangi USB-C diskleri kullanmalıyım?
60 fps’ye kadar 1080p ProRes HQ için, aşağıdaki USB-C diskler önerilir.
Marka Model Kapasite
Wise PTS-256 Portable SSD 4K 256GB
OWC Envoy Pro Ex 240GB
BUFFALO SSD-PHE500U3-BA 500GB
60 fps’ye kadar 1080p DNxHR HQX için, aşağıdaki USB-C diskler önerilir.
Marka Model Kapasite
OWC Envoy Pro Ex 240GB
60 fps’ye kadar 1080p H.264 için, aşağıdaki USB-C diskler önerilir.
Marka Model Kapasite
OWC Envoy Pro Ex 240GB
Ortamın Formatlanması
Ortamın bir Bilgisayar Üzerinde Hazırlanması
Bir Mac Bilgisayarda Ortamın Formatlanması
Mac ile gelen Disk Utility uygulaması, bir sürücüyü HFS+ veya exFAT formatlarında
formatlayabilir.
Diskte bulunan önemli dosyalarınızı yedeklediğinizden emin olun, çünkü formatlama
yapıldığında, diskteki her şey silinecektir.
1 Harici bir dock veya bir kablo adaptörü ile bilgisayarınıza bir USB flaş disk bağlayın ve
Time Machine yedeklemesi için SSD’nizi kullanma taleplerini içeren mesajları reddedin.
SD kartları, harici bir kart okuyucu üzerinden bilgisayarınıza bağlayın.
2 Uygulamalar/yardımcı yazılımlar sekmesine girin ve Disk Utility uygulamasını başlatın.
3 SD kart veya USB flaş diskinizin disk simgesini tıklayın ve sonra ‘erase’ (sil)
sekmesine tıklayın.
4 Formatı ‘Mac OS Extended (Journaled)’ veya ‘exFAT’ olarak ayarlayın.
5 Yeni disk bölümü için bir isim girin ve sonra ‘sil’ üzerine tıklayın. Ortamınız hızla
formatlanacaktır ve HyperDeck ile kullanıma hazır hale getirilecektir.
503Ortamın Formatlanması

Ortamın bir Windows Bilgisayarda Formatlanması
‘Format’ diyalog kutusu, bir Windows PC üzerindeki bir diski exFAT formatında formatlayabilir.
SSD veya SD kartınızda bulunan önemli dosyalarınızı yedeklediğinizden emin olun, çünkü
formatlama yapıldığında hepsi silinecektir.
1 Harici bir dock veya kablo adaptörüyle, bilgisayarınıza bir USB flaş disk bağlayın. SD
kartları, harici bir kart okuyucu üzerinden bilgisayarınıza bağlayın.
2 Başlat menüsünü veya başlat ekranını açın ve bilgisayarım sekmesini seçin. USB flaş
diskinize veya SD kartınıza sağ tıklayın.
3 İçerik menüsünden ‘format’ ibaresini seçin.
4 Dosya sistemini ‘exFAT’ olarak ve birim ayırma boyutunu da 128 kilobyte olarak
ayarlayın.
5 Bir disk bölümü adı girin, ‘quick format’ (hızlı format) ibaresini seçin ve ‘start’
üzerine tıklayın.
6 Ortamınız hızla formatlanacaktır ve HyperDeck ile kullanıma hazır hale getirilecektir.
504Ortamın Formatlanması

Teleprompter Fonksiyonunun Kullanımı
Standart bir RTF dosyası kullanarak, Blackmagic HyperDeck Shuttle HD'yi teleprompter olarak
kullanabilirsiniz. Dosyanızı TextEdit veya WordPad'de oluşturun ve desteklenen 13 dilden
herhangi birinde, zengin metin formatı dosyası olarak kaydedin. HyperDeck Shuttle HD ile
açıldıktan sonra, komut dosyanızın yazı tipi boyutunu ve satır aralığını ayarlayabilirsiniz.
Teleprompteri kullanmak için:
1 HyperDeck Shuttle HD'nin HDMI çıkışını, kullanmak istediğiniz HDMI ekranına bağlayın.
2 Bir SD kart takın veya komut dosyanızı içeren harici bir USB flaş disk bağlayın.
3 Kayıt menüsünden kodek seçeneğini seçin. ‘Teleprompter’ ayarına gidin ve
‘ayarla’ya basın.
Komut dosyası ekranınızda görünecektir. Oynatım butonunu kullanarak, oynatımı otomatik
olarak buradan başlatabilir veya ek kontrol için kadranı kullanabilirsiniz.
Teleprompter oynatım hızını kontrol etme
HyperDeck Shuttle HD üzerindeki büyük kadran, medya oynatımı için olduğu gibi teleprompter
modundayken, oynatımı kontrol etmek için de kullanılabilir. Bir komut dosyası yüklendiğinde,
değişken hızlı oynatımı açmak için "jog" ve "scr" düğmelerine birlikte basın. Seçildikten sonra
kadranı çevirin. Komut dosyası, kadranın hareketine göre bir hızda hareket edecektir. Örneğin,
kadran ne kadar hızlı çevrilirse, komut dosyası o kadar hızlı ilerler.
JOG SCR
CLIP
MENU SET
DISK SD
Sabit hızlar için, yavaş oynatım ve interaktif oynatım butonlarını ayrı ayrı kullanabilirsiniz. Bir kez
seçildiğinde, kadranı çevirmek komut dosyasını yavaş oynatım modunda sabit bir düşük hızda
veya interaktif oynatım modunda daha yüksek bir hızda hareket ettirir.
SD kartınızdaki veya harici diskinizdeki rtf dosyaları arasında gezinmek için ileri ve geri
tuşlarına basın.
505Teleprompter Fonksiyonunun Kullanımı
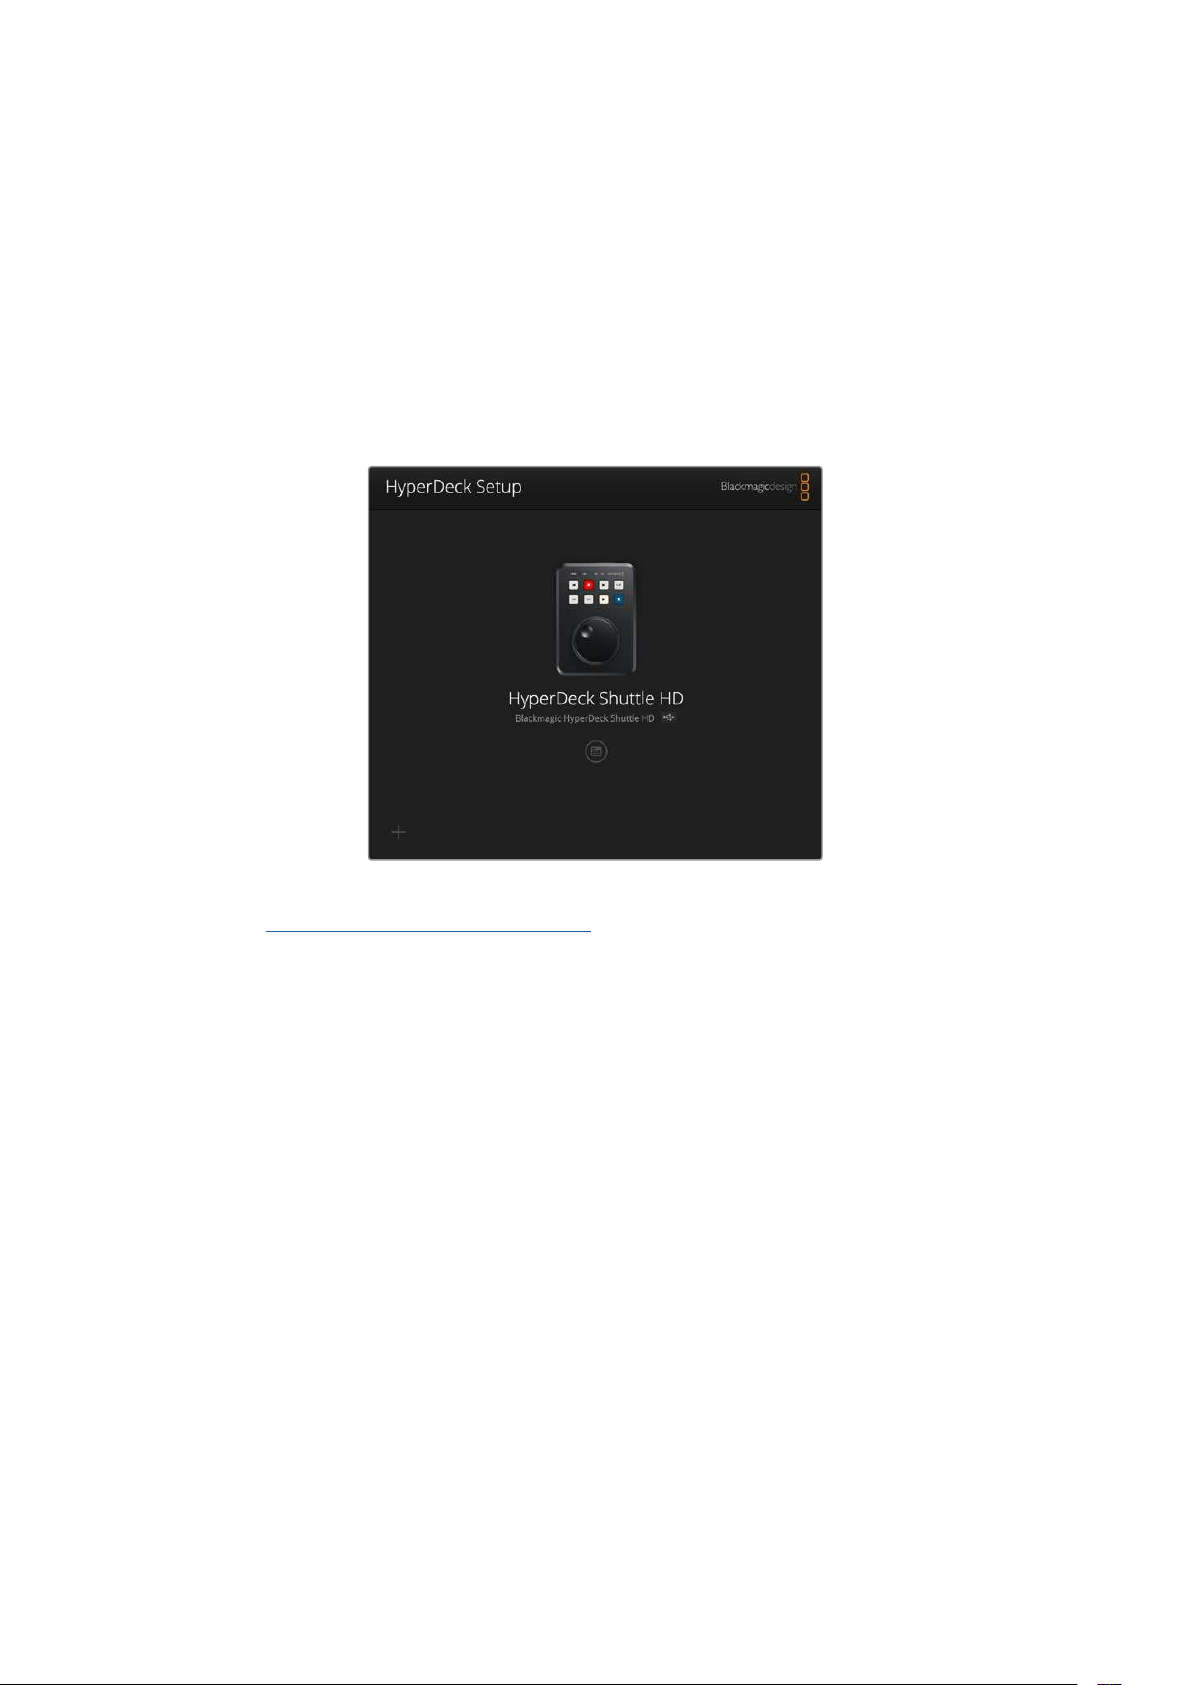
Teleprompter; dosyadan kalın yazı tipinin ayarlanıp ayarlanmadığını, yazı tipi boyutunu ve rengini
tanıyacaktır. Buna ek olarak, monitör menüsünü kullanarak, ekranı teleprompter camına
yansıtırken, ekranı yatay veya dikey olarak çevirebilir veya yazı tipi boyutunu, satır aralığını ve
kenar boşluklarını değiştirebilirsiniz. Daha fazla bilgi için, bu kılavuzun daha önceki
kısımlarındaki 'menü ayarları' bölümüne bakın.
Blackmagic HyperDeck Kurulumu
Blackmagic HyperDeck Setup, ayarları değiştirmek ve HyperDeck’inizdeki dahili yazılımı
güncellemek için kullanabileceğiniz bir yardımcı yazılımdır.
Yazılımı yüklemek için:
1 www.blackmagicdesign.com/tr/support adresinden, en son Blackmagic HyperDeck
Setup yükleyici sürümünü indirin.
2 Bilgisayarınızda Blackmagic HyperDeck Kurulum yükleyicisini çalıştırın ve ekran
talimatlarını takip edin.
3 Yükleme tamamlandıktan sonra, HyperDeck Shuttle HD’nizi arka panelindeki USB veya
Ethernet bağlantısı aracılığıyla bilgisayara bağlayın.
4 Blackmagic HyperDeck Setup yazılımını başlatın ve dahili yazılımı güncellemek için
ekrandaki komutları takip edin. Herhangi bir komut belirmezse, bu dahili yazılımın
güncel olduğunu işaret eder ve yapmanız gereken başka bir şey yoktur.
Ayarlar menüsü açmak için HyperDeck görüntüsünü veya ayarlar simgesini tıklayın.
Ana ekran, HyperDeck Shuttle HD'nizi ve cihazın adını gösterecektir. Bu ad, bilgisayarınıza
birden fazla HyperDeck bağlandığında cihazı tanımlamaya yardımcı olur ve yardımcı yazılımın
ayarlar menüsü kullanılarak düzenlenebilir.
506Blackmagic HyperDeck Kurulumu

Ağ
Protokol
HyperDeck Shuttle HD cihazınızı ATEM switcher’lerle kontrol etmek veya HyperDeck Ethernet
Protokolü aracılığıyla uzaktan kontrol etmek için sabit bir IP adresini manuel olarak ekleyerek
veya DHCP kullanarak, HyperDeck Shuttle HD’yi diğer ekipmanlarınızla aynı ağa bağlamalısınız.
DHCP
HyperDeck Shuttle HD disk kaydedicileri, varsayılan olarak DHCP'ye ayarlanmış
olarak gelir. Dinamik ana bilgisayar yapılandırma protokolü veya diğer adıyla
DHCP, HyperDeck disk kaydedicinizi otomatikman tespit eden ve IP adresi
atayan, ağ sunucularında bir hizmettir. DHCP, Ethernet üzerinden ekipmanların
bağlanmasını ve IP adreslerinin birbirleriyle çakışmasını önlemeyi kolaylaştıran
harika bir hizmettir. Bilgisayarların ve ağ switcher’lerinin çoğu DHCP’yi destekler.
Statik IP
‘Statik IP’ seçildiğinde, ağ detaylarınızı manuel olarak girebilirsiniz. Tüm ünitelerin
birbiriyle iletişim kurabilmesi için IP adreslerini manuel olarak ayarlarken, bunların
aynı altağ maskesi ve ağ geçidi ayarlarını paylaşıyor olması lazım. Bunların
yanında, panelin IP adresindeki rakamların ilk üç hanesinin aynı olması gerekir.
Ağda, IP adreslerinde aynı tanımlama numarasına sahip başka cihazlar olduğunda, bir çelişki
ortaya çıkar ve cihazlar ağa bağlanmaz. Bir uyuşmazlıkla karşılaştığınızda, cihazın IP adresindeki
tanımlayıcı numarayı değiştirmeniz yeterlidir.
507Blackmagic HyperDeck Kurulumu

Dosya Ayarları
İlk kurulduğunda HyperDeck Shuttle HD’niz, ön ek olarak 'HyperDeck'i kullanarak klipleri SD
kartınıza veya USB flaş diskinize kaydeder. Ön eki değiştirmek için yeni bir dosya adı yazın.
Dosya adına eklenen tarih bilgisi, fabrika ayarı olarak kapalı durumdadır. Dosya adınıza tarih ve
saatin kaydedilmesini istiyorsanız bu işlemi etkinleştirin. Dosya adı ön eki ve zaman bilgisi
ayarları, HyperDeck Shuttle HD'deki ekran menüsü aracılığıyla da yapılabilir.
Bir Ağ Üzerinden Dosyaların Aktarımı
HyperDeck disk kaydediciniz, dosya transfer protokolü veya diğer adıyla ftp üzerinden, dosya
aktarma işlemini destekler. Bu güçlü özellik, bir ağ aracılığıyla dosyaları doğrudan
bilgisayarınızdan HyperDeck'inize, yerel bir ağın sağlayabileceği yüksek hızlarda kopyalamanızı
sağlar. Örneğin, dijital tabela için uzak bir yerde bulunan bir HyperDeck cihazına, yeni dosya
kopyalıyor olabilirsiniz.
HyperDeck Shuttle HD’ye Bağlanma
Bilgisayarınız ve HyperDeck Shuttle HD aynı ağ üzerindeyken, tek ihtiyacınız olan bir ftp
istemcisi ve HyperDeck Shuttle HD'nizin IP adresidir.
1 HyperDeck'inizi bağlamak istediğiniz bilgisayara bir FTP istemcisi indirin ve yükleyin.
Cyberduck, FileZilla veya Transmit’i tavsiye ediyoruz ama FTP uygulamalarının çoğu
çalışacaktır. Cyberduck ve FileZilla’yı ücretsiz olarak indirebilirsiniz.
2 HyperDeck Shuttle HD'nizi bir Ethernet kablosu kullanarak ağınıza bağlayın ve IP
adresini not edin. IP adresine erişmek için 'menü' butonuna basın ve 'ağ' ekranına
erişmek için arama kadranını çevirin. HyperDeck cihazınızın IP adresini, bu ekranın alt
kısmında göreceksiniz.
HyperDeck Shuttle HD’nizin IP adresini
kurulummenüsünün ağ bölümünde bulabilirsiniz.
3 HyperDeck’nizin IP adresini, TCP uygulamasının bağlantı diyaloğuna girin. Bu kutunun
ismi ve konumu uygulamalar arasında değişebilir, fakat genellikle ‘server’ veya ‘host’
olarak adlandırılır. FTP programınızda bir ‘anonymous login’ (isimsiz giriş) varsa
işaretlendiğinden emin olun.
508Bir Ağ Üzerinden Dosyaların Aktarımı

HyperDeck Shuttle HD’ye bağlanırken, kullanıcı adı ve şifre girmenize gerek yoktur.
Sadece disk kaydedicinizin IP adresini, FTP uygulamanızın ‘server’ veya ‘host’ alanına
girin ve varsa ‘anonymous login’ (isimsiz giriş) onay kutusunu işaretleyin.
Dosya Transferi
HyperDeck’e bağlandığınızda, ftp uygulama ile normalde yaptığınız gibi, dosyaları
aktarabilirsiniz. FTP uygulamalarının çoğunda ‘sürükle ve bırak’ arayüzü vardır ancak, uygun
metodun ne olduğunu tespit etmek için uygulamanızı inceleyin.
Herhangi bir dosyayı, HyperDeck cihazınıza ya da HyperDeck cihazınızdan aktarabilirsiniz fakat,
HyperDeck Shuttle HD’den oynatmayı düşündüğünüz dosyaların, HyperDeck’inizin desteklediği
kodeklerle ve çözünürlüklerle uyumlu olması gerektiğini belirtmemizde fayda var.
BİLGİ HyperDeck cihazınız kayıt yaparken, bir ağ üzerinden dosyaları transfer
edebilirsiniz. Kayıt işleminin etkilenmemesi için aktarım hızlarını HyperDeck cihazı
otomatikman ayarlayacaktır.
509Bir Ağ Üzerinden Dosyaların Aktarımı

Developer Information
Blackmagic HyperDeck Ethernet Protocol
The Blackmagic HyperDeck Ethernet Protocol is a text based protocol accessed by connecting
to TCP port 9993 on HyperDeck models that have a built in Ethernet connection. If you are
a software developer, you can use the protocol to construct devices that integrate with our
products. Here at Blackmagic Design our approach is to open up our protocols and we eagerly
look forward to seeing what you come up with!
Protocol Commands
Command Command Description
help or ? Provides help text on all commands and parameters
commands return commands in XML format
device info return device information
disk list query clip list on active disk
disk list: slot id: {n} query clip list on disk in slot {n}
quit disconnect ethernet control
ping check device is responding
preview: enable: {true/false} switch to preview or output
play play from current timecode
play: speed: {-5000 to 5000} play at specific speed
play: loop: {true/false} play in loops or stop-at-end
play: single clip: {true/false} play current clip or all clips
playrange query playrange setting
playrange set: clip id: {n} set play range to play clip {n} only
playrange set: clip id: {n} count: {m} set play range to {m} clips starting from clip {n}
playrange set: in: {inT} out: {outT}
set play range to play between:
- timecode {inT} andtimecode {outT}
playrange set: timeline in: {in} timeline out:
{out}
set play range in units of frames between:
- timeline position {in} and position {out} clear/reset play
rangesetting
playrange clear clear/reset play range setting
play on startup query unit play on startup state
play on startup: enable: {true/false} enable or disable play on startup
play on startup: single clip: {true/false} play single clip or all clips on startup
play option query play options
play option: stop mode:
{lastframe/nextframe/black}
set output frame when playback stops
record record from current input
record: name: {name} record named clip
510Developer Information

Command Command Description
record spill spill current recording to next slot
record: spill: slot id: {n}
spill current recording to specified slot
use current id to spill to same slot
stop stop playback or recording
clips count query number of clips on timeline
clips get query all timeline clips
clips get: clip id: {n} query a timeline clip info
clips get: clip id: {n} count: {m} query m clips starting from n
clips get: version: {1/2}
query clip info using specified output version:
version 1: id: name startT duration
version 2: id: startT duration inT outT name
clips add: name: {name} append a clip to timeline
clips add: clip id: {n} name: {name} insert clip before existing clip {n}
clips add: in: {inT} out: {outT} name: {name} append the {inT} to {outT} portion of clip
clips remove: clip id: {n}
remove clip {n} from the timeline
(invalidates clip ids following clip {n})
clips clear empty timeline clip list
transport info query current activity
slot info query active slot
slot info: slot id: {n} query slot {n}
slot select: slot id: {n} switch to specified slot
slot select: video format: {format} load clips of specified format
slot unblock unblock active slot
slot unblock: slot id: {n} unblock slot {n}
cache info query cache status
dynamic range query dynamic range settings
dynamic range: playback override:
{off/Rec709/Rec2020_SDR/HLG/
ST2084_300/ST2084_500/
ST2084_800/ST2084_1000/
ST2084_2000/ST2084_4000/ST2084
set playback dynamic range override
dynamic range: record override:
{off/Rec709/Rec2020_SDR/HLG/
ST2084_300/ST2084_500/
ST2084_800/ST2084_1000/
ST2084_2000/ST2084_4000/ST2048}
set record dynamic range override
notify query notification status
notify: remote: {true/false} set remote notifications
notify: transport: {true/false} set transport notifications
notify: slot: {true/false} set slot notifications
notify: configuration: {true/false} set configuration notifications
511Developer Information

Command Command Description
notify: dropped frames: {true/false} set dropped frames notifications
notify: display timecode: {true/false} set display timecode notifications
notify: timeline position: {true/false} set playback timeline position notifications
notify: playrange: {true/false} set playrange notifications
notify: cache: {true/false} set cache notifications
notify: dynamic range: {true/false} set dynamic range settings notifications
notify: slate: {true/false} set digital slate notifications
notify: clips: {true/false}
set timeline clips notifications where two types of changes can
occur:
add: partial update with list of clips and insert positions
snapshot: complete update of all clips on timeline
notify: disk: {true/false}
set disk clips notifications where two types of changes can
occur:
add: partial update with list of clips and insert positions
snapshot: complete update of all clips on timeline
goto: clip id: {start/end} goto first clip or last clip
goto: clip id: {n} goto clip id {n}
goto: clip id: +{n} go forward {n} clips
goto: clip id: -{n} go backward {n} clips
goto: clip: {n} goto frame position {n} within current clip
goto: clip: +{n} go forward {n} frames within current clip
goto: clip: -{n} go backward {n} frames within current clip
goto: clip: {start/end} goto start or end of clip
goto: timeline: {n} goto frame position {n} within timeline
goto: timeline: +{n} o forward {n} frames within timeline
goto: timeline: -{n} go backward {n} frames within timeline
goto: timeline: {start/end} goto start or end of timeline
goto: timecode: {timecode} goto specified timecode
goto: timecode: +{timecode} go forward {timecode} duration
goto: timecode: -{timecode} go backward {timecode} duration
goto: slot id: {n} goto slot id {n}
jog: timecode: {timecode} jog to timecode
jog: timecode: +{timecode} jog forward {timecode} duration
jog: timecode: -{timecode} jog backward {timecode} duration
shuttle: speed: {-5000 to 5000} shuttle with speed
remote query unit remote control state
remote: enable: {true/false} enable or disable remote control
remote: override: {true/false} session override remote control
configuration query configuration settings
configuration: video input: SDI switch to SDI input
512Developer Information

Command Command Description
configuration: video input: HDMI switch to HDMI input
configuration: video input: component switch to component input
configuration: audio input: embedded capture embedded audio
configuration: audio input: XLR capture XLR audio
configuration: audio input: RCA capture RCA audio
configuration: file format: {format} switch to specific file format
configuration: audio codec: PCM switch to PCM audio
configuration: audio codec: AAC switch to AAC audio
configuration: timecode input:
{external/embedded/internal/preset/clip}
change the timecode input
configuration: timecode output:
{clip/timeline}
change the timecode output
configuration: timecode preference:
{default/dropframe/nondropframe}
whether or not to use drop frame timecodes when not
otherwise specified
configuration: timecode preset:
{timecode}
set the timecode preset
configuration: audio input channels: {n} set the number of audio channels recorded to {n}
configuration: record trigger:
{none/recordbit/timecoderun}
change the record trigger
configuration: record prefix: {name} set the record prefix name (supports UTF-8 name)
configuration: append timestamp:
{true/false}
append timestamp to recorded filename
configuration: xlr input id: {n} xlr type:
{line/mic}
configure xlr input type
multiple xlr inputs can be configured in a single command
configuration: genlock input resync:
{true/false}
enable or disable genlock input resync
uptime return time since last boot
format: slot id: {n} prepare:
{exFAT/HFS+} name: {name}
prepare a disk formatting operation to filesystem {format}
format: confirm: {token} perform a pre-prepared formatting operation using token
identify: enable: {true/false} identify the device
watchdog: period: {period in seconds} client connection timeout
reboot reboot device
slate clips slate clips information
slate project slate project information
slate lens slate lens information
513Developer Information

Multiline commands: Command Description
slate clips↵ set slate clips information:
reel: {n} slate reel number, where {n} is in [1, 999]
scene id: {id} slate scene id value, where {id} is a string
shot type: {WS/MS/BCU/MCU/ECU/none} slate shot type
take: {n} slate take number, where {n} is in [1, 99]
take scenario: {PU/VFX/SER/none} slate take scenario
take auto inc: {true/false} slate take auto increment
good take: {true/false} slate good take
environment: {interior/exterior} slate environment
day night: {day/night} slate day or night
slate project:↵ set slate project information:
project name: {name} project name (can be empty, supports UTF-8)
camera: {index} set camera index e.g. A
director: {name} director (can be empty, supports UTF-8)
camera operator: {name} camera operator (can be empty, supports UTF-8)
slate lens:↵ set lens information:
lens type: {type} lens type (can be empty, supports UTF-8)
iris: {type} camera iris (can be empty, supports UTF-8)
focal length: {length} focal length (can be empty, supports UTF-8)
distance: {distance} lens distance (can be empty, supports UTF-8)
filter: {filter} lens filter (can be empty, supports UTF-8)
Command Combinations
You can combine the parameters into a single command, for example:
play: speed: 200 loop: true single clip: true
Or for configuration:
configuration: video input: SDI audio input: XLR
Or to switch to the second disk, but only play NTSC clips:
slot select: slot id: 2 video format: NTSC
Protocol Details
Connection
The HyperDeck Ethernet server listens on TCP port 9993.
Basic syntax
The HyperDeck protocol is a line oriented text protocol. Lines from the server will be separated by an ascii
CR LF sequence. Messages from the client may be separated by LF or CR LF.
New lines are represented in this document as a "↵" symbol.
514Developer Information

Single line command syntax
Command parameters are usually optional. A command with no parameters is terminated with a new line:
{Command name}↵
If parameters are specified, the command name is followed by a colon, then pairs of parameter names and
values. Each parameter name is terminated with a colon character:
{Command name}: {Parameter}: {Value} {Parameter}: {Value} ...↵
Multiline command syntax
The HyperDeck protocol also supports an equivalent multiline syntax where each parameter-value pair is
entered on a new line. E.g.
{Command name}:↵
{P a r a m e t e r}: { Va lu e}↵
{P a r a m e t e r}: { Va lu e}↵
↵
Response syntax
Simple responses from the server consist of a three digit response code and descriptive text terminated by a
new line:
{Response code} {Response text}↵
If a response carries parameters, the response text is terminated with a colon, and parameter name and
value pairs follow on subsequent lines until a blank line is returned:
{Response code} {Response text}:↵
{P a r a m e t e r}: { Va lu e}↵
{P a r a m e t e r}: { Va lu e}↵
...
↵
Successful response codes
A simple acknowledgement of a command is indicated with a response code of 200:
200 ok↵
Other successful responses carry parameters and are indicated with response codes in the range of 201
to299.
515Developer Information

Failure response codes
Failure responses to commands are indicated with response codes in the range of 100 to 199:
100 syntax error
101 unsupported parameter
102 invalid value
103 unsupported
104 disk full
105 no disk
106 disk error
107 timeline empty
108 internal error
109 out of range
110 no input
111 remote control disabled
112 clip not found
120 connection rejected
150 invalid state
151 invalid codec
160 invalid format
161 invalid token
162 format not prepared
163 parameterized single line command not supported
Asynchronous response codes
The server may return asynchronous messages at any time. These responses are indicated with response
codes in the range of 500 to 599:
5xx {Response Text}:↵
{P a r a m e t e r}: { Va lu e}↵
{P a r a m e t e r}: { Va lu e}↵
↵
Connection response
On connection, an asynchronous message will be delivered:
500 connection info:↵
protocol version: {Version}↵
model: {Model Name}↵
↵
Timecode syntax
Timecodes are expressed as non-drop-frame timecode in the format:
HH:MM:SS:FF
516Developer Information

Handling of deck "remote" state
The “remote” command may be used to enable or disable the remote control of the deck. Any attempt to
change the deck state over ethernet while remote access is disabled will generate an error:
111 remote control disabled↵
To enable or disable remote control:
remote: enable: {“true”, “false”} ↵
The current remote control state may be overridden allowing remote access over ethernet irrespective of the
current remote control state:
remote: override: {“true”, “false”} ↵
The override state is only valid for the currently connected ethernet client and only while the connection
remains open.
The “remote” command may be used to query the remote control state of the deck by specifying no
parameters:
remote↵
The deck will return the current remote control state:
210 remote info:↵
enabled: {“true”, “false”}↵
override: {“true”, “false”}↵
↵
Asynchronous remote control information change notification is disabled by default and may be
configured with the “notify” command. When enabled, changes in remote state will generate a “510 remote
info:”asynchronous message with the same parameters as the “210 remote info:” message.
Closing connection
The "quit" command instructs the server to cleanly shut down the connection:
quit↵
Checking connection status
The "ping" command has no function other than to determine if the server is responding:
ping↵
Getting help
The "help" or "?" commands return human readable help text describing all available commands and
parameters:
help↵
Or:
?↵
The server will respond with a list of all supported commands:
201 help:↵
{Help Text}↵
{Help Text}↵
↵
517Developer Information

Switching to preview mode
The "preview" command instructs the deck to switch between preview mode and output mode:
preview: enable: {"true", "false"}↵
Playback will be stopped when the deck is switched to preview mode. Capturing will be stopped when the
deck is switched to output mode.
Controlling device playback
The “play” command instructs the deck to start playing:
play↵
The play command accepts a number of parameters which may be used together in most combinations.
By default, the deck will play all remaining clips on the timeline then stop.
The “single clip” parameter may be used to override this behavior:
play: single clip: {“true”, “false”}↵
By default, the deck will play at normal (100%) speed. An alternate speed may be specified in percentage
between -5000 to 5000:
play: speed: {% normal speed}↵
By default, the deck will stop playing when it reaches to the end of the timeline. The “loop” parameter may be
used to override this behavior:
play: loop: {“true”, “false”}↵
The “playrange” command instructs the deck to play all the clips. To override this behavior: and select a
particular clip:
playrange set: clip id: {Clip ID}↵
To only play a certain timecode range:
playrange set: in: {in timecode} out: {out timecode}↵
To clear a set playrange and return to the default value:
playrange clear↵
The “play on startup command” instructs the deck on what action to take on startup. By default, the deck will
not play. Use the “enable” command to start playback after each power up.
play on startup: enable {“true”, “false”}↵
By default, the unit will play back all clips on startup. Use the “single clip” command to override.
play on startup: single clip: {“true”, “false”}↵
Stopping deck operation
The "stop" command instructs the deck to stop the current playback or capture:
stop↵
518Developer Information

Changing timeline position
The "goto" command instructs the deck to switch to playback mode and change its position within the
timeline.
To go to the start of a specific clip:
goto: clip id: {Clip ID}↵
To move forward/back {count} clips from the current clip on the current timeline:
goto: clip id: +/-{count}↵
Note that if the resultant clip id goes beyond the first or last clip on timeline, it will be clamp at the first or last
clip.
To go to the start or end of the current clip:
goto: clip: {“start”, “end”}↵
To go to the start of the first clip or the end of the last clip:
goto: timeline: {“start”, “end”}↵
To go to a specified timecode:
goto: timecode: {timecode}↵
To move forward or back a specified duration in timecode:
goto: timecode: {“+”, “-”}{duration in timecode}↵
To specify between slot 1 and slot 2:
goto: slot id: {Slot ID}↵
Note that only one parameter/value pair is allowed for each goto command.
Enumerating supported commands and parameters
The "commands" command returns the supported commands:
commands↵
The command list is returned in a computer readable XML format:
212 commands:
<commands>↵
<command name="…"><parameter name="…"/>…</command>↵
<command name="…"><parameter name="…"/>…</command>↵
…
</commands>↵
↵
519Developer Information

Controlling asynchronous notifications
The “notify” command may be used to enable or disable asynchronous notifications from the server.
To enable or disable transport notifications:
notify: transport: {“true”, “false”}↵
To enable or disable slot notifications:
notify: slot: {“true”, “false”}↵
To enable or disable remote notifications:
notify: remote: {“true”, “false”}↵
To enable or disable configuration notifications:
notify: configuration: {“true”, “false”}↵
Multiple parameters may be specified. If no parameters are specified, the server returns the current state of
all notifications:
209 notify:↵
transport: {“true”, “false”}↵
slot: {“true”, “false”}↵
remote: {“true”, “false”}↵
configuration: {“true”, “false”}↵
dropped frames: {“true”, “false”}↵
display timecode: {“true”, “false”}↵
timeline position: {“true”, “false”}↵
playrange: {“true”, “false”}↵
cache: {“true”, “false”}↵
dynamic range: {“true”, “false”}↵
slate: {“true”, “false”}↵
clips: {“true”, “false”}↵
disk: {“true”, “false”}↵
↵
Retrieving device information
The "device info" command returns information about the connected deck device:
device info↵
The server will respond with:
204 device info:↵
protocol version: {Version}↵
model: {Model Name}↵
unique id: {unique alphanumeric identifier}↵
slot count: {number of storage slots}↵
software version: {software version}↵
↵
520Developer Information

Retrieving slot information
The "slot info" command returns information about a slot. Without parameters, the command returns
information for the currently selected slot:
slot info↵
If a slot id is specified, that slot will be queried:
slot info: slot id: {Slot ID}↵
The server will respond with slot specific information:
202 slot info:↵
slot id: {Slot ID}↵
status: {"empty", "mounting", "error", "mounted"}↵
volume name: {Volume name}↵
recording time: {recording time available in seconds}↵
video format: {disk's default video format}↵
blocked: {“true”, “false”}↵
↵
Asynchronous slot information change notification is disabled by default and may be configured with
the "notify" command. When enabled, changes in slot state will generate a "502 slot info:" asynchronous
message with the same parameters as the "202 slot info:" message.
Retrieving clip information
The “disk list” command returns the information for each playable clip on a given disk. Without parameters,
the command returns information for the current active disk:
disk list↵
If a slot id is specified, the disk in that slot will be queried:
disk list: slot id: {Slot ID}↵
The server responds with the list of all playable clips on the disk in the format of: Index, name, formats, and
duration in timecode:
206 disk list:↵
slot id: {Slot ID}↵
{clip index}: {name} {file format} {video format} {Duration
ti m ecode}↵
{clip index}: {name} {file format} {video format} {Duration
ti m ecode}↵
…
↵
Note that the clip index starts from 1.
Retrieving clip count
The "clips count" command returns the number of clips on the current timeline:
clips count ↵
The server responds with the number of clips:
214 clips count: ↵
clip count: {Count}↵
521Developer Information

Retrieving timeline information
The "clips get" command returns information for each available clip on the current timeline. Without
parameters, the command returns information for all clips on timeline:
clips get↵
The server responds with a list of clip IDs, names and timecodes:
205 clips info:↵
clip count: {Count}↵
{Clip ID}: {Start timecode} {Duration timecode} {In timecode}
{Out timecode} {Name}↵
{Clip ID}: {Start timecode} {Duration timecode} {In timecode}
{Out timecode} {Name}↵
…
↵
Retrieving transport information
The “transport info” command returns the state of the transport:
transport info ↵
The server responds with transport specific information:
208 transport info:
status: {“preview”, “stopped”, “play”, “forward”, “rewind”,
“j o g ”, “ s h u t t l e ”,” r e c o r d ”}↵
speed: {Play speed between -5000 and 5000 %}↵
slot id: {Slot ID or “none”}↵
clip id: {Clip ID or “none”}↵
single clip: {“true”, “false”}↵
display timecode: {timecode}↵
timecode: {timecode}↵
video format: {Video format}↵
loop: {“true”, “false”}↵
timeline: {n}↵
input video format: {Video format”}↵
dynamic range: {“off”, “Rec709”, “Rec2020_SDR”, “HLG”,
“ST2084_300”, “ST2084_500”, “ST2084_800”, “ST2084_1000”,
“ST2084_2000”, “ST2084_4000”, “ST2048” or “none”}↵
↵
The "timecode" value is the timecode within the current timeline for playback or the clip for record. The
"display timecode" is the timecode displayed on the front of the deck. The two timecodes will differ in some
deck modes.
Asynchronous transport information change notification is disabled by default and may be configured
with the "notify" command. When enabled, changes in transport state will generate a "508 transport info:"
asynchronous message with the same parameters as the "208 transport info:" message.
522Developer Information

Video Formats
The following video formats are currently supported on HyperDeck Shuttle:
720p50, 720p5994, 720p60
1080p23976, 1080p24, 1080p25, 1080p2997, 1080p30, 1080p60
1080i50, 1080i5994, 1080i60
Video format support may vary between models and software releases.
File Formats
All HyperDeck models currently support the following file formats:
H.264High
H.264Medium
H.264Low
QuickTimeProResHQ
QuickTimeProRes
QuickTimeProResLT
QuickTimeProResProxy
QuickTimeDNxHD220x
DNxHD220x
QuickTimeDNxHD145
DNxHD145
QuickTimeDNxHD45
DNxHD45
Supported file formats may vary between models and software releases.
523Developer Information

Querying and updating configuration information
The "configuration" command may be used to query the current configuration of the deck:
configuration↵
The server returns the configuration of the deck:
211 configuration:↵
audio input: {“embedded”, “XLR”, “RCA”}↵
audio mapping: {n}↵
video input: {“SDI”, “HDMI”, “component”, “composite”}↵
file format: {format}↵
audio codec: {“PCM”, “AAC”}↵
timecode input: {“external”, “embedded”, “preset”, “clip”}↵
timecode output: {“clip”, “timeline”}↵
timecode preference: {“default”, “dropframe”, “nondropframe”}↵
timecode preset: {timecode}↵
audio input channels: {n}↵
record trigger: {“none”, “recordbit”, “timecoderun”}↵
record prefix: {name}↵
append timestamp: {“true”, “false”}↵
genlock input resync: {“true”, “false”}↵
↵
One or more configuration parameters may be specified to change the configuration of the deck.
To change the current video input:
configuration: video input: {“SDI”, “HDMI”, “component”}↵
Valid video inputs may vary between models. To configure the current audio input:
configuration: audio input: {“embedded”, “XLR”, “RCA”}↵
Valid audio inputs may vary between models.
To configure the current file format:
configuration: file format: {File format}↵
Note that changes to the file format may require the deck to reset, which will cause the client connection to
be closed. In such case, response code 213 will be returned (instead of 200) before the client connection is
closed:
“213 deck rebooting”
Asynchronous configuration information change notification is disabled by default and may be configured
with the “notify” command. When enabled, changes in configuration will generate a “511 configuration:”
asynchronous message with the same parameters as the “211 configuration:” message.
524Developer Information

Selecting active slot and video format
The "slot select" command instructs the deck to switch to a specified slot, or/and to select a specified output
video format.
To switch to a specified slot:
slot select: slot id: {slot ID}↵
To select the output video format:
slot select: video format: {video format}↵
Either or all slot select parameters may be specified. Note that selecting video format will result in a rescan of
the disk to reconstruct the timeline with all clips of the specified video format.
Clearing the current timeline
The "clips clear" command instructs the deck to empty the current timeline:
clips clear↵
The server responds with
200 ok↵
Adding a clip to the current timeline
The "clips add:" command instructs the deck to add a clip to the current timeline:
clips add: name: {clip name}↵
The server responds with
200 ok↵
or in case of error
1xx {error description}↵
Configuring the watchdog
The “watchdog” command instructs the deck to monitor the connected client and terminate the connection if
the client is inactive for at least a specified period of time.
To configure the watchdog:
watchdog: period: {period in seconds}↵
To avoid disconnection, the client must send a command to the server at least every {period} seconds. Note
that if the period is set to 0 or less than 0, connection monitoring will be disabled.
525Developer Information

Yardım
Yardım İçin
Yardım almanın en hızlı yolu, Blackmagic Design online destek sayfalarına girip, Blackmagic
HyperDeck disk kaydedici için mevcut olan en son destek kaynaklarını incelemenizdir.
Blackmagic Design Online Destek Sayfaları
En güncel kılavuz, yazılım ve destek notlarına,
www.blackmagicdesign.com/tr/support
adresindeki BlackmagicDesign destek merkezinden ulaşılabilir.
Blackmagic Design Forum
İnternet sitemizdeki Blackmagic Design forum sayfası, daha fazla bilgi ve yaratıcı fikirler için
ziyaret edebileceğiniz faydalı bir kaynaktır. Burası, yardım almanız için daha hızlı bir yol olabilir
çünkü, sorularınız için, başka deneyimli kullanıcılar ya da Blackmagic Design çalışanları
tarafından verilen yanıtları bulabilir ve böylelikle çalışmalarınıza devam edebilirsiniz. Foruma
https://forum.blackmagicdesign.com adresinden ulaşabilirsiniz.
Blackmagic Design Destek Hizmetiyle İrtibat
Aradığınız yardımı destek kaynaklarında ya da forum'da bulamadığınız durumda, lütfen destek
sayfamıza girerek "Bize e-posta gönderin" butonunu tıklayarak e-post yoluyla destek talebinde
bulunun. Bunun yerine, destek sayfasındaki "Yerel destek ekibini arayın" butonunu tıklayabilir ve
size en yakın olan Blackmagic Design destek ofisini arayabilirsiniz.
Yüklü Olan Yazılım Sürümünün Kontrol Edilmesi
Bilgisayarınızda Blackmagic HyperDeck yazılımının hangi sürümünün yüklü olduğunu kontrol
etmek için, ‘Blackmagic HyperDeck Setup Hakkında’ penceresini açın.
Mac OS’te, Blackmagic HyperDeck Setup yazılımını, ‘Uygulamalar’ (Applications)
dosyasından açın. Sürüm numarasını görüntülemek için, uygulamalar menüsünden
‘About Blackmagic HyperDeck Setup sekmesini seçin.
Windows bilgisayarlarda, başlat menüsündeki veya başlangıç ekranındaki Blackmagic
HyperDeck Setup yardımcı yazılımını açın. Sürüm numarasını görüntülemek için ‘Help’
(Yardım) menüsünü tıklayın ve ‘About Blackmagic HyperDeck Setup’ ibaresini seçin.
En Son Yazılım Güncellemelerine Erişim
Bilgisayarınızda yüklü olan Blackmagic HyperDeck Setup yazılımının sürümünü gözden
geçirdikten sonra, en son güncellemeleri incelemek üzere,
www.blackmagicdesign.com/tr/support adresinden, Blackmagic Design destek merkezine
bakın. En son güncellemelerle çalışmak faydalı olsa da, yazılımı önemli bir projenin
ortasındayken güncellemekten kaçınmanızda yarar vardır.
526Yardım
Mevzuata İlişkin Bildirimler
Avrupa Birliği Dahilinde Elektrikli ve Elektronik Ekipman Atıklarının Bertaraf Edilmesi.
Ürün üzerindeki sembol, bu ekipmanın başka atık malzemelerle bertaraf edilmemesi
şartını belirler. Atık ekipmanlarınızı bertaraf edebilmeniz için, geri dönüşümünü
sağlamak üzere, belirlenmiş toplama noktasına teslim edilmeleri gerekmektedir.
Bertaraf anında atık cihazlarınızın ayrı olarak toplanması ve geri dönüşümü, doğal
kaynakların korunmasına yardımcı olacaktır ve insan sağlığını ve çevreyi koruyucu bir
şekilde geri dönüşümünü sağlayacaktır. Atık ekipmanlarınızı geri dönüşüm için nereye
teslim edebileceğiniz konusunda daha fazla bilgi için, lütfen yerel belediyenizin geri
dönüşüm şubesini ya da ürünü satın aldığınız satış bayisini arayınız.
Bu cihaz, test edilmiş ve Federal İletişim Komisyonu (FCC) koşullarının 15. bölümü
doğrultusunda A Sınıfı dijital cihazların sınırlarıyla uyumlu olduğu tespit edilmiştir. İlgili
sınırlar, bu cihaz ticari bir ortamda çalıştırıldığında, zararlı müdahalelere karşı makul
koruma sağlaması amacıyla tasarlanmıştır. Bu ekipman, radyo frekans enerjisi üretir,
kullanır ve saçabilir ve talimatlar doğrultusunda kurulmadığı ve kullanılmadığı takdirde,
radyo komünikasyonlarına zararlı müdahaleye yol açabilir. Bu ürünün bir yerleşim
bölgesinde çalıştırılması zararlı müdahaleye yol açabilir. Bu durumda, müdahalenin
düzeltilmesi için ilgili maliyeti kullanıcı karşılamak zorundadır.
Bu cihazın çalıştırılması aşağıdaki iki şarta bağlıdır:
1 Bu cihaz, zararlı müdahaleye sebebiyet vermemelidir.
2 Bu cihaz, arzu edilmeyen bir çalışma şekline yol açacak müdahale de dahil olmak
üzere maruz kaldığı her türlü müdahaleyi kabul etmelidir.
R-R-BMD-20211410001
ISED Kanada Beyannamesi
Bu cihaz, A Sınıfı dijital cihazlar için Kanada standartlarıyla uyumludur.
Bu cihaza yapılacak herhangi bir değişiklik veya kullanım amacı dışında kullanılması,
bu standartlara uyumluluğunu hükümsüz kılabilir.
HDMI arayüzlerine bağlantı, yüksek kaliteli korumalı HDMI kablolarıyla yapılmalıdır.
Bu cihaz, ticari ortamda kullanım amacına uygunluk için test edilmiştir. Cihaz ev
ortamında kullanıldığında, radyo parazitine neden olabilir.
527Mevzuata İlişkin Bildirimler

Güvenlik Bilgileri
Bu ürün çevresel ısısı 40º C'ye kadar olan tropikal ortamlarda kullanılmaya uygundur.
Bu ürünün çevresinde yeterli havalandırma olduğundan ve hava akımının kısıtlanmadığından
emin olun.
Ürünün içinde, kullanıcı tarafından tamir edebilecek hiçbir parça bulunmamaktadır. Gerekli
tamiratları yerel Blackmagic Design servis merkezine yönlendirin.
Deniz seviyesinden yüksekliğin 2000m'yi aşmadığı yerlerde kullanın.
Kaliforniya Eyaleti Beyannamesi
Bu ürün; plastik parçaları dahilinde, eser miktarda polibromine bifenil gibi kimyasal maddelere
sizi maruz bırakabilir. Kaliforniya eyaletinde, bu maddelerin kansere, doğum kusurlarına veya
başka üreme bozukluklarına sebebiyet verdiği bilinmektedir.
Daha fazla bilgi için
www.P65Warnings.ca.gov adresini ziyaret ediniz.
528Güvenlik Bilgileri

Garanti
12 Ay Sınırlı Garanti
Blackmagic Design şirketi, bu ürünün satın alındığı tarihten itibaren malzeme ve işçilik bakımından
12 ay boyunca kusursuz ve arızasız olacağını garanti eder. Bu garanti süresi içinde üründe bir arıza
ve kusur söz konusu olursa, Blackmagic Design kendi seçimi doğrultusunda, arızalı ürünü parça
ve işçilik bedeli talep etmeksizin tamir edecektir veya yenisiyle değiştirecektir.
Bu garanti kapsamındaki hizmetten yararlanmak için, kusur ve hataya ilişkin garanti süresi sona
ermeden, Müşteri Blackmagic Design'i bilgilendirmeli ve söz konusu hizmetin sağlanması için
uygun düzenlemeleri yapmalıdır. Blackmagic Design tarafından özel belirlenmiş ve yetkilendirilmiş
bir hizmet merkezine arızalı ürünün ambalajlanarak nakliyesi, Müşteri’nin sorumluluğudur ve nakliye
ücretleri, peşin ödenmiş olmalıdır. Herhangi bir sebepten dolayı bize iade edilen ürünlerin; tüm
nakliye, sigorta, gümrük vergileri, vergi ve tüm diğer masrafların ödenmesi, Müşteri sorumluluğu
altındadır.
Bu garanti; yanlış kullanım ya da yanlış veya kusurlu bakımdan kaynaklanan herhangi bir arızayı,
bozukluğu ya da hasarı kapsamaz. Blackmagic Design, burada açıklanan durumlarda bu garanti
kapsamında hizmet sağlamak zorunda değildir: a) Blackmagic Design temsilcileri haricindeki başka
personelin ürünü kurma, tamir etme ya da bakımını yapma girişimlerinden kaynaklanan hasarın
tamiri, b) uygun olmayan kullanım veya uyumlu olmayan ekipmanlara bağlamaktan kaynaklanan
hasarın tamiri, c) Blackmagic Design ürünü olmayan parçaların ya da malzemenin kullanımından
kaynaklanan hasarın ya da arızanın tamiri ya da d) Modifiye veya başka ürünlerle entegre edilmiş
bir ürünü; söz konusu modifikasyon ya da entegrasyonun, gereken tamiratın süresini uzattığı ya
da ürün bakımını zorlaştırdığı durumlarda tamir edilmesi. BU GARANTİ, BLACKMAGIC DESIGN
TARAFINDAN VERİLMİŞTİR VE AÇIK YA DA ZIMNİ, HERHANGİ BİR GARANTİNİN YERİNİ TUTAR.
BLACKMAGIC DESIGN VE SATICILARI, ZIMNİ TİCARİ UYGUNLUK GARANTİSİNİ YA DA ÖZEL BİR
AMACA UYGUNLUK GARANTİSİNİ KABUL ETMEZ. KUSURLU BİR ÜRÜNÜN TAMİRİ VEYA
DEĞİŞTİRİLMESİ, BLACKMAGIC DESIGN’İN MÜŞTERİLERİNE SUNDUĞU TAM VE MÜNHASIR
ÇÖZÜMDÜR. BLACKMAGIC DESIGN YA DA SATICILARININ OLABİLECEK HASARLAR HAKKINDA
ÖNCEDEN BİLGİSİ OLMASINI GÖZETMEKSİZİN, ÜRÜNDE DOLAYLI, ÖZEL, TESADÜFİ YA DA
NETİCE OLARAK ORTAYA ÇIKAN HERHANGİ BİR HASAR İÇİN, BLACKMAGIC DESIGN SORUMLU
DEĞİLDİR. BLACKMAGIC DESIGN, MÜŞTERİLER TARAFINDAN EKİPMANIN YASAL OLMAYAN
HERHANGİ BİR KULLANIMINDAN SORUMLU DEĞİLDİR. BLACKMAGIC DESIGN, BU ÜRÜNÜN
KULLANIMINDAN KAYNAKLANAN HERHANGİ BİR HASARDAN SORUMLU DEĞİLDİR. BU ÜRÜNÜN
ÇALIŞTIRILMASINDAN DOĞAN RİSK, KULLANICININ KENDİSİNE AİTTİR.
© Telif Hakkı Saklıdır 2022 Blackmagic Design. Tüm hakları saklıdır. ‘Blackmagic Design’, ‘DeckLink’, ‘HDLink’, ‘Workgroup
Videohub’, ‘Multibridge Pro’, ‘Multibridge Extreme’, ‘Intensity’ ve ‘Leading the creative video revolution’, ABD ve diğer ülkelerde
tescil edilmiş ticari markalardır. Diğer tüm şirket ve ürün isimleri, bağlantılı oldukları ilgili şirketlerin/firmaların ticari markaları olabilir.
529Garanti