1
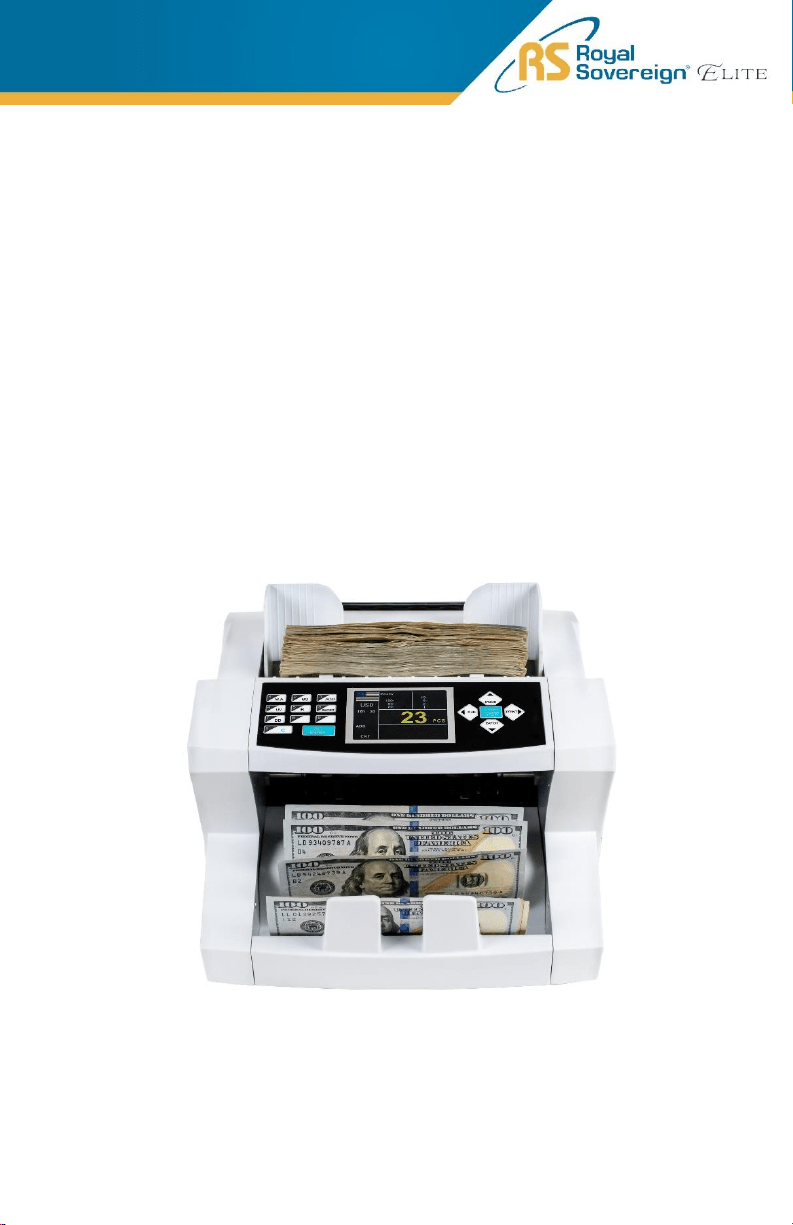
EBC-1000
Front Load One Pocket
Currency Discriminator
OPERATING MANUAL

2
Thank you for purchasing the Royal Sovereign Front Load
One Pocket Currency Discriminator, EBC-1000. This manual
will provide you with safety information, instructions for
optimal use, and proper care and maintenance for your
product. Please read this manual carefully before operating.
CONTENTS
3
SAFETY INSTRUCTIONS
Always be careful when using the machine. To reduce the risk of fire, electrical
shock, or other injuries, keep these safety considerations in mind when installing,
using, and maintaining your machine:
WARNING
1. Place the machine on a secure, stable surface. The machine can be seriously
damaged if it falls.
2. Provide the correct power to the machine, as listed on the back of the
machine.
3. If the plug has three prongs, it must be plugged into a grounded (three hole)
outlet. Grounded plugs and outlets are designed for your safety. Do not try to
make a three-prong plug fit into a two-prong outlet by modifying the plug or
outlet in any way.
4. Do not plug too many electrical devices into a wall outlet or into an extension
cord.
5. Before dusting the machine, unplug it from the power outlet. Clean exposed
parts with a soft cloth slightly dampened with water. Do not use aerosol
cleaners.
6. Never use any machine close to a gas leak. If you think gas is leaking, call your
gas company immediately. A small electrical spark in the machine could cause
a fire or an explosion.
CAUTION
1. Never push objects of any kind into your machine through the case or cabinet
openings.
2. Do not use your machine near water, in wet locations, or outdoors.
3. Do not allow anything to rest on the power cord.
4. Do not place your machine where the cords can be damaged.
5. Use supplies or cleaning materials only as directed. Keep all supplies and
materials out of reach from children.
6. The power supply turns this machine on and off. Make sure that your machine
is installed near an outlet and is easily accessible.
7. Never remove covers or guards that require a tool for removal. Refer servicing
to authorized service personnel.
8. Never alter the interlock switches. This machine is designed to restrict the
operator access to unsafe areas. Covers, guards, and interlock switches are
provided to ensure that the machine will not operate when the covers are open.
9. Avoid direct viewing of the image sensor lights. The lamps are bright and, while
not harmful, may cause an annoying afterimage. Always keep the rear cover
closed during operation and storage.
4
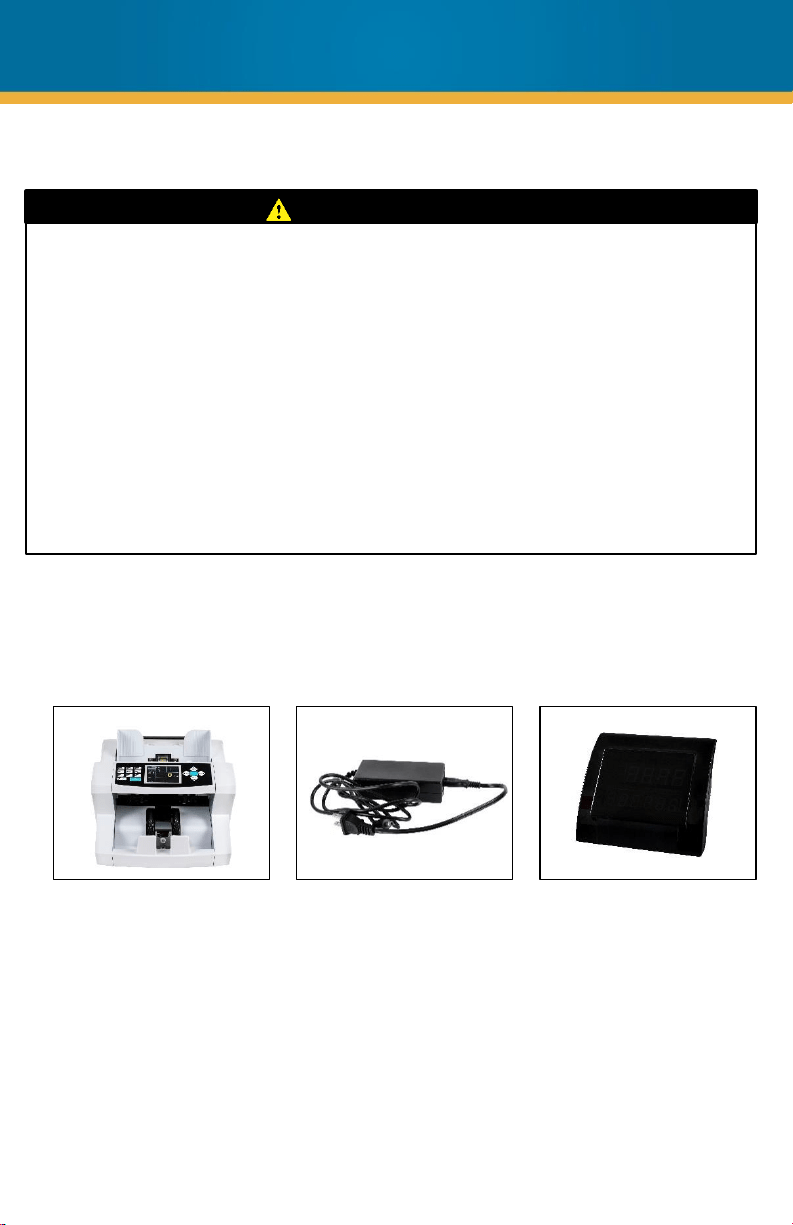
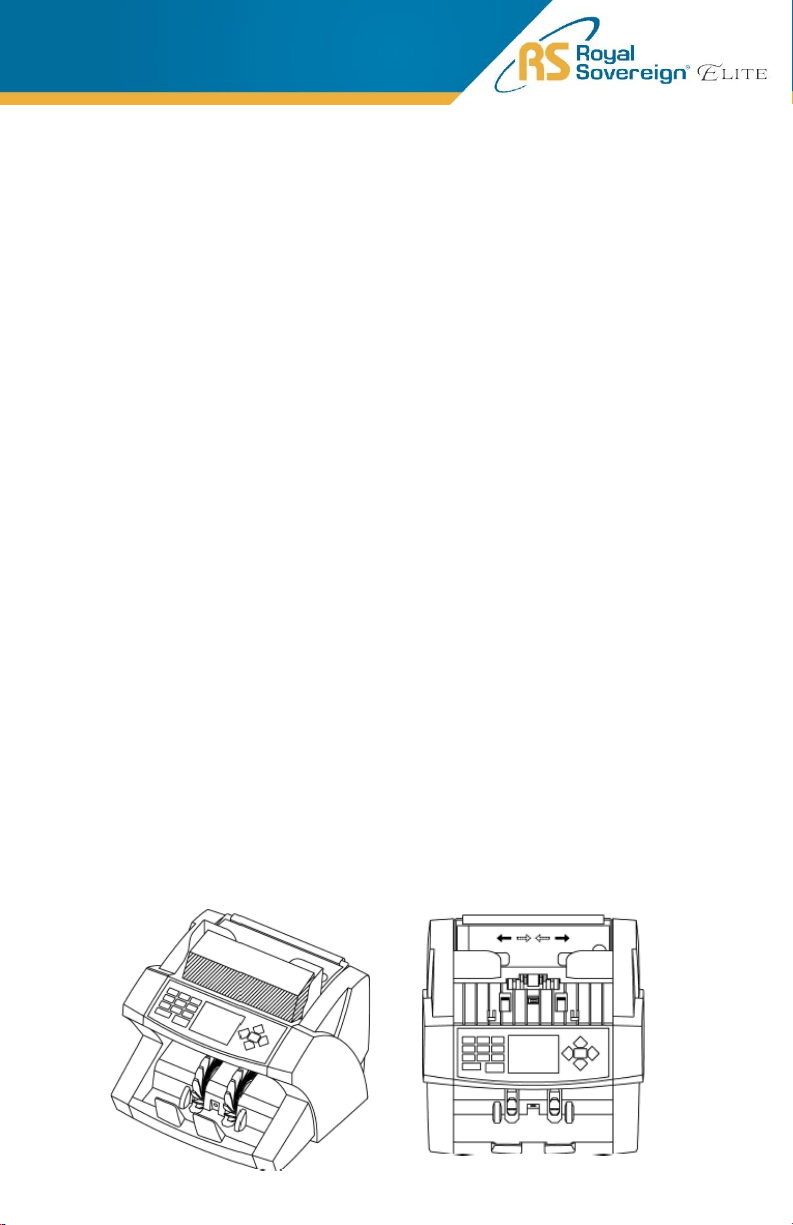
BOX CONTENTS
Bill Counter
Power Cord
PRECAUTION
Managing the Performance of the Machine
This unit has many sophisticated sensors. To ensure a long life, please read
the “Daily Maintenance” section of this manual carefully. If the performance
becomes deteriorated, please clean all the sensors first before calling your
Royal Sovereign Customer Service.
Safety Notes
Your machine and the supplies are designed and tested to meet strict safety
requirements. Please read the following instructions carefully before operating
your machine and refer to them as needed to ensure the continued safe
operation of your machine.
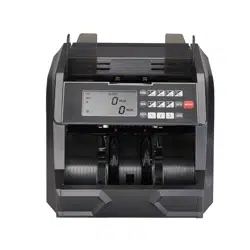
External Display
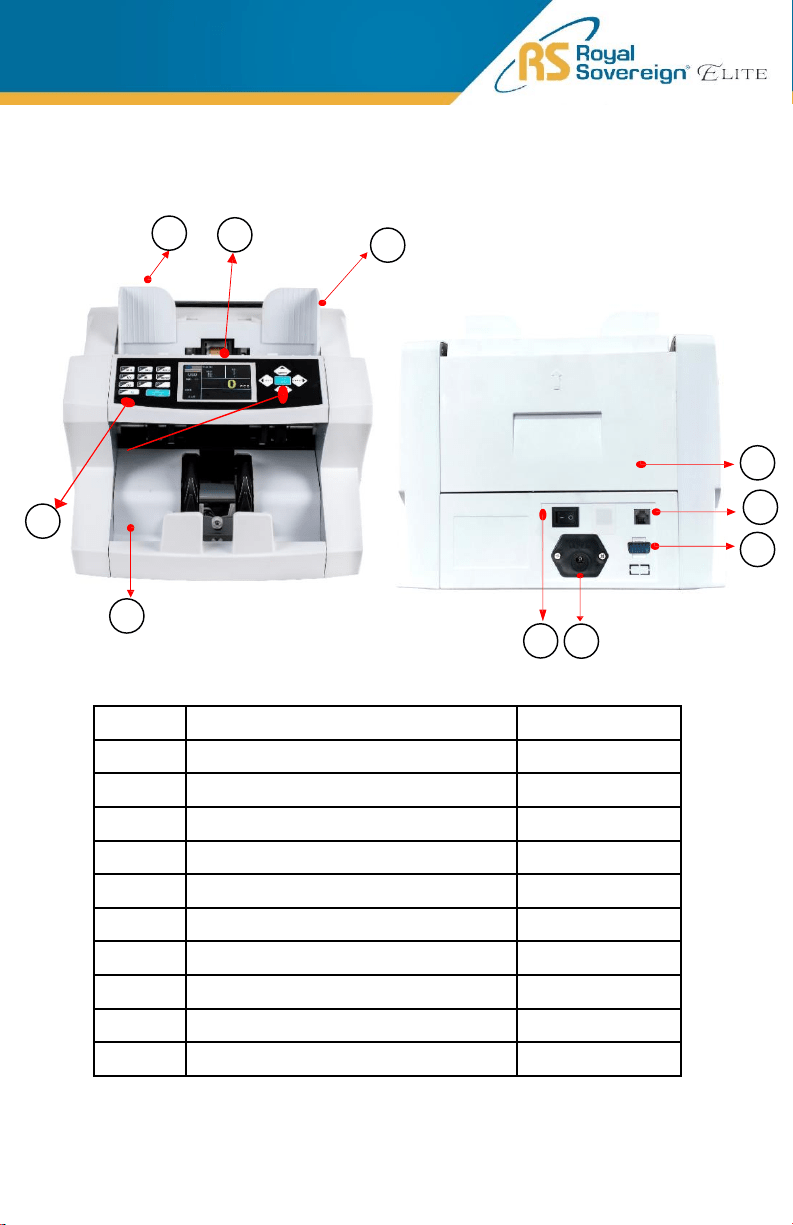
No. Parts Note
1 Guide for Counting Notes Expansion guide
2 Hopper
3 Thickness Adjustment Screw Gap control screw
4 Control Panel
5 Stacker
6 Back Cover
7 Power Plug
8 Power Switch
9 Printer Port
10 External Display Port
5
1
2
3
4
5
6
PRODUCT VIEW
7
8
9
10
EB-20
MENU
6
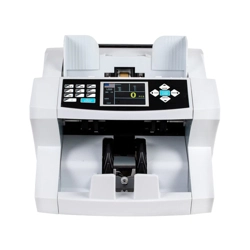
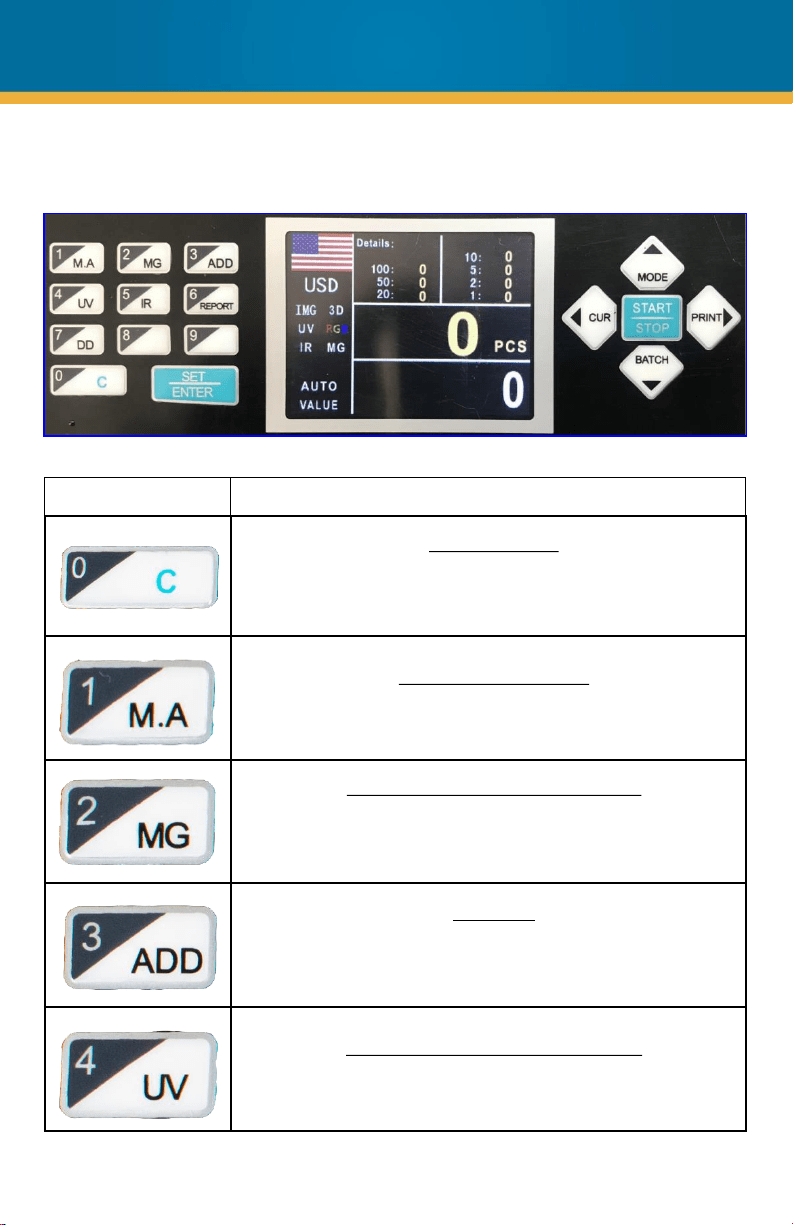
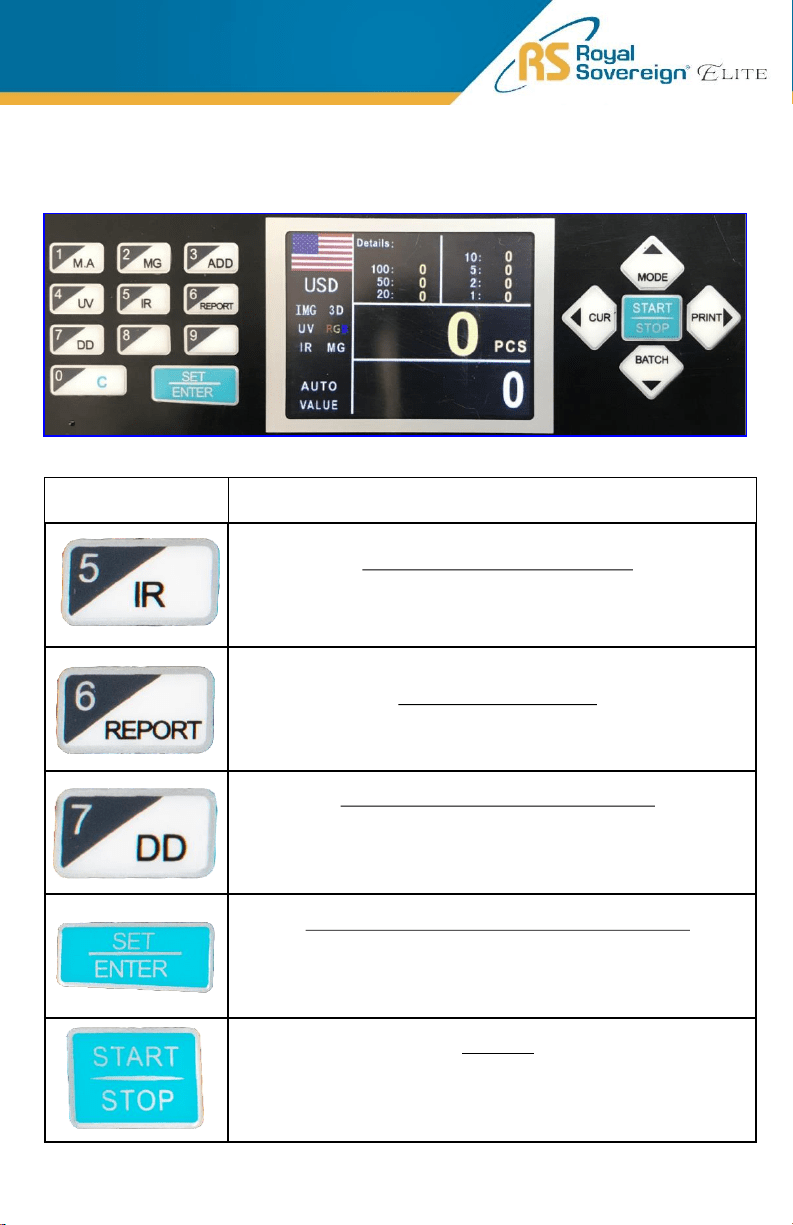
CONTROL PANEL
Key Description/Action
Clear the screen
By pressing this key, you can clear the counted number and
total value after counting. If you would like to go back to the
main screen, press this key.
Manual / Auto Counting
This key can be used to choose between Manual counting or
Auto counting.
MG (Magnetic) Counterfeit Detection
Magnetic sensors detect chemical properties of the specially
formulated iron inks used by the U.S. Bureau of Engraving and
Printing.
Add Mode
This key can be used to turn on Add mode. This mode will
count the bills placed into the hopper and add that amount to
the next bills counted.
UV (Ultraviolet) Counterfeit Detection
Ultraviolet sensors detect and verify the presence of UV
security strips embedded in U.S. currency.
EB-20
MENU
CONTROL PANEL
Key Description/Action
IR (Infrared) Counterfeit Detection
Infrared sensors detect double and half notes and verify proper
dimensional specifications of banknotes.
View the bill count report
This key can be used to show the counting details.
DD (Dimensional) Counterfeit Detection
The dimensional detector measures the width of the center of
each bill, looking for odd sizes.
Machine will enter setting mode (with password)
This key can be used to enter the setting menu of the machine.
Please note that you'll need PASSWORD (8888) to enter the
service menu.
Start Key
This key can be used to start counting your bills or to resume
counting once an error is cleared.
If you would like to go back to
the main screen, press this key.
7

Key Description/Action
Change the counting mode
This key can be used to select the bill counting mode. You can
select CNT (Count Mode), VALUE (Mixed Mode), and VER (Sort
Mode).
Change the currency mode
This key can be used to select which currency you will be
counting.
1. USD – United States Dollar
2. CAD – Canadian Dollar
3. EUR – Euro
4. KRW – South Korean Won
Print Function
This key can be used to print a detailed count report
Batch Mode
This key can be used to count in batch mode. Press the 10
numeric batch keys from 0 to 9 to set the batch number. The
batch function will be On. When clearing the batch number, press
the “BATCH” key, enter 0, and wait 5 seconds (or press the
“START” key) for the batch function to turn off.
CONTROL PANEL
8
1. PLACING BILLS INTO HOPPER
It is very important to place the bills into the hopper correctly because recognition
performance of the bills is highly affected by the arrangement of the bills. Please
avoid counting bills in bad conditions such as wet, excessively dirty, folded, curled
notes, or with foreign material like clips, bands, etc., as it may cause a malfunction
of the machine.
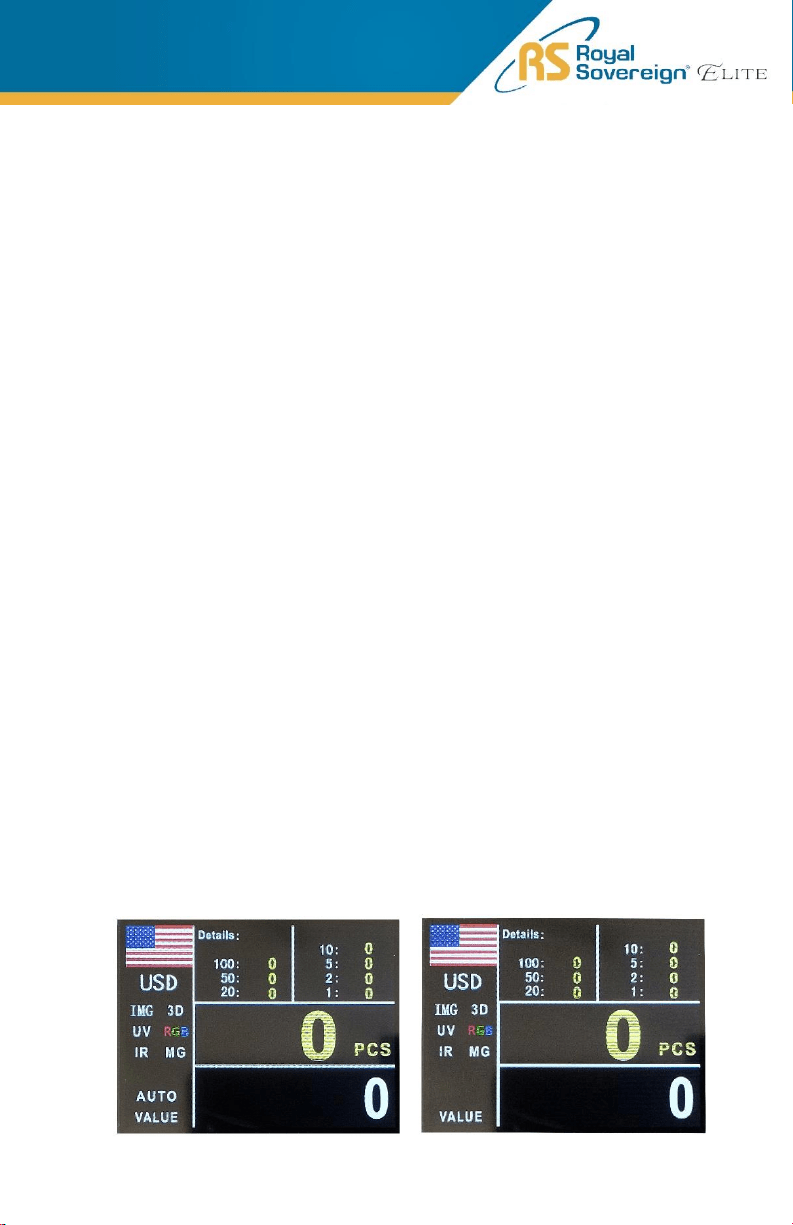
2. SELECTING AUTOMATIC/MANUAL COUNTING
The machine is preset to Automatic Mode.
In Automatic Mode, when the hopper sensor detects banknotes on the hopper,
the machine will automatically start to count the bills.
To change to Manual Mode, press the “M.A” key and the “AUTO” will remove
from your screen (right image).
In Manual Mode, the machine will not count the bills automatically even though
the bills are on the hopper. When the user presses the “START" key manually,
the machine will count the notes.
While counting, the machine will display the number of the bills on the TFT display.
The machine might stop counting when it meets the conditions described below:
• No bills on the hopper
• The number of the bills counted is the same as the batch number set in
Batch Mode.
• Errors have occurred.
When the machine finishes counting without errors, the final number of counted bills
will be displayed on the TFT screen.
PRODUCT OPERATION
9
3. COUNTING
• To count banknotes, place them in the hopper. The machine will start counting
banknotes automatically if in AUTO Mode. If in MANUAL Mode, the user must
press the “START” key. The machine will stop calculating when the hopper is
empty. Pieces of counted banknotes will be shown on the display.
• If an error occurs during operation and the machine stops, an error message will
be displayed. To clear the error, press the “C” key. The machine will solve the
problem automatically, however if it fails to clear a jam or there is some other
mechanical error, please remove the jammed bills manually and check the error
messages in the troubleshooting section. Then, press the “C” key again to clear
the error message.
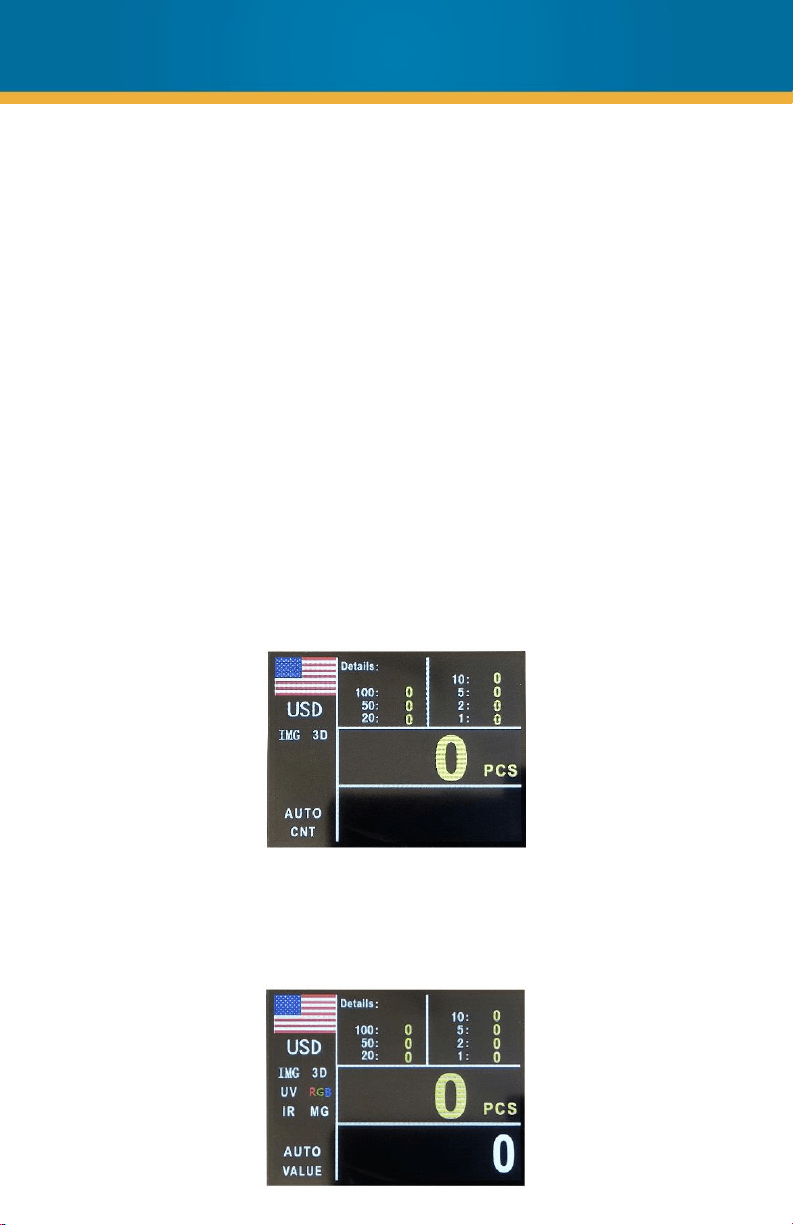
COUNT MODE
In this mode, the machine is only counting the bills without any denomination
recognition and without counterfeit detection. To turn on the counting mode, press
the "MODE" key on the control panel. The display will show CNT, which means the
mode is active.
VALUE MODE
In this mode, the machine can count a mixed bundle of banknotes from different
denominations. To turn on value mode, press “MODE” key on the control panel. The
display will show VALUE, which means the mode is active.
10
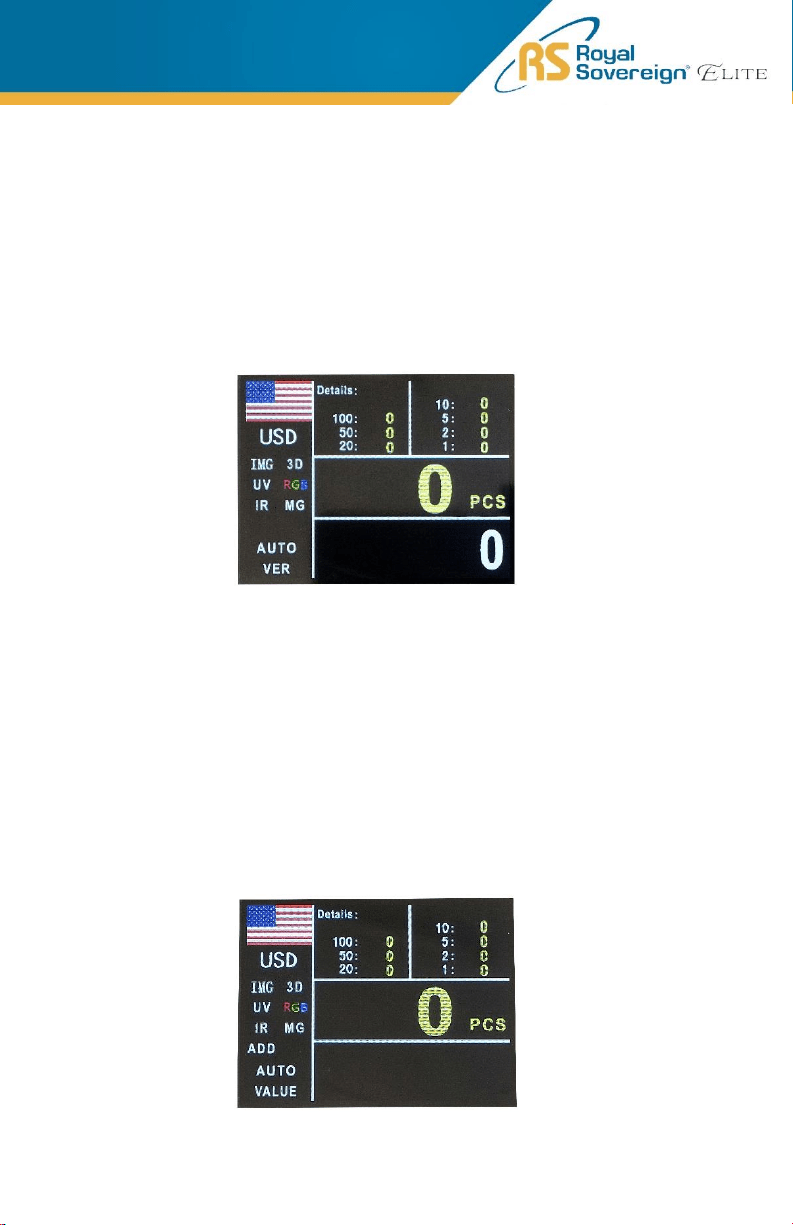
SORT MODE
In this mode, the machine is set to calculate one given denomination. The
denomination is set automatically according to the first banknote when counting. If
the machine detects another denomination, the counting will stop, and an error code
will appear. To turn on the sort mode, press the "MODE" key on the control panel. The
display will show VER, which means the mode is active.
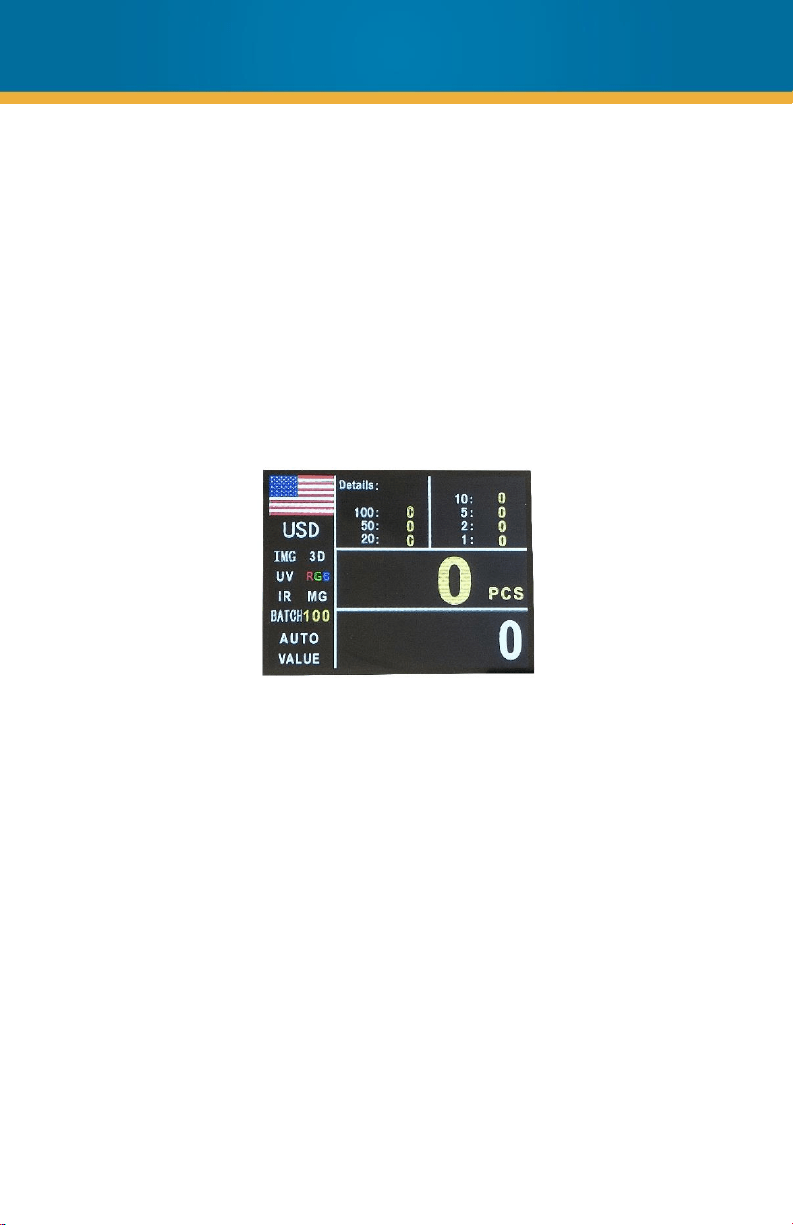
4. ADD MODE
In this mode the unit will count multiple stacks of bills while keeping
track of the total amount of bills counted. To switch to ADD Mode,
shortly press the “ADD” key. Place the first stack of bills to be counted on
the hopper. The unit will start counting automatically. The number of bills
will be displayed on screen. When ready to count the next stack of bills,
empty the stacker and add the new stack to be counted on the hopper.
The unit will continue counting and add the new count to the total.
11
12
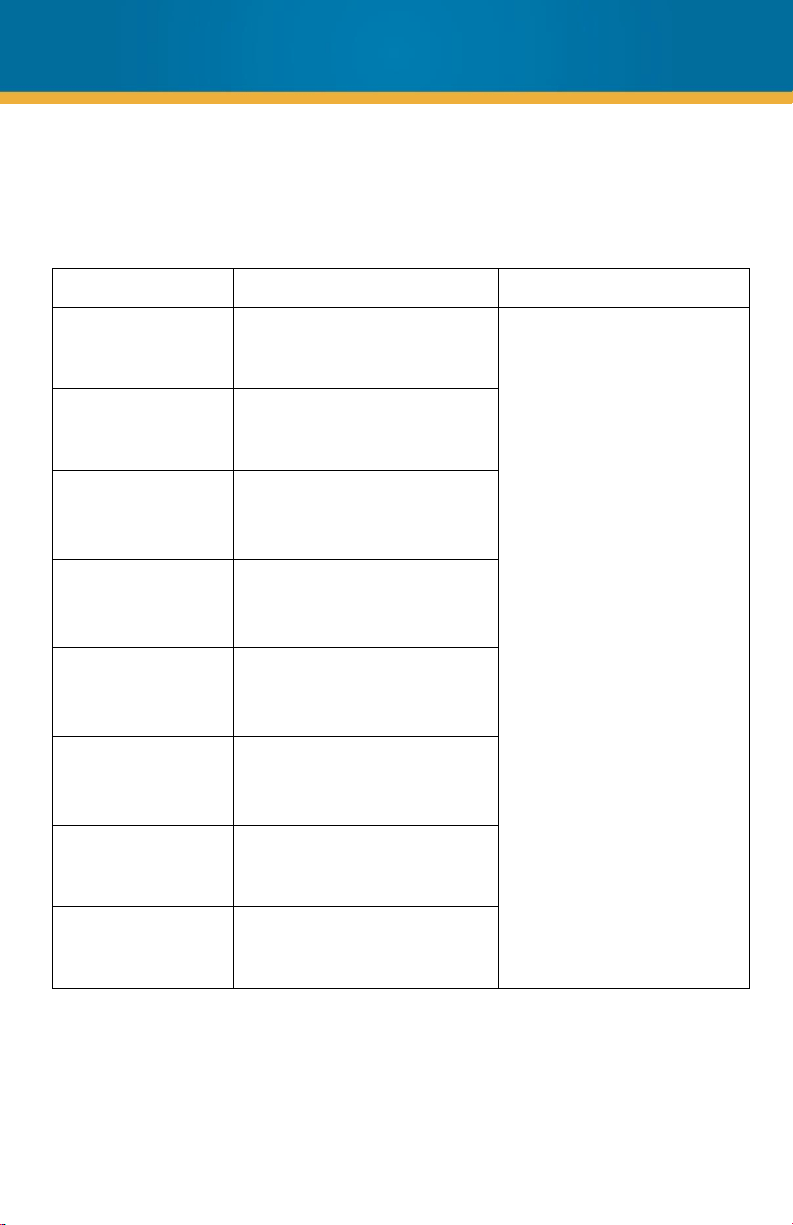
5. BATCH MODE
To use Batch Mode, press the “BATCH” key. You may use all number
keys (1-9) to manually select your desired batch size.
The machine will start counting automatically after bills are placed on
the feeding desk. When it reaches the set batch quantity it will
automatically stop (even though bills are still in the hopper) and the
number of bills counted will be displayed on the screen. When the
hopper is emptied, the machine will automatically continue to count to
the preset batch quantity again. Set the number to “0” and press the
“BATCH” key again to switch off Batch Mode.
6. MENU
To enter the Service Menu, press the “SET” key and enter the password:
8888. This Menu will display:
1.User Setting 2.Version 3.Parameters Setting
4.Data Collect 5.Maintenance
From here the user can check on setting parameters, however it is not
recommended that the user makes any changes. These settings are to
be used by repair technicians.
7. THERMAL PRINTER (OPTIONAL)
Available Printers: Compatible via RS232 Printer. Only recommend to
use with Royal Sovereign Thermal Printers.
This machine cannot use both the printer and external display at the
same time. Before connecting printer, please unplug the external
display and restart the bill counter. Connect a transfer cable to the
printer input (shown on page 5). After counting banknotes and back in
the main display, manually press the “PRINT” key.

ERROR MESSAGES & TROUBLESHOOTING
Error Code
Error Cause Error Solution
ERROR_FEED_SENSOR Feed sensor error
Clean the sensor. If
error continues,
sensor may need to
be changed. Contact
Royal Sovereign if
error persists.
ERROR_COUNT_IR_ON IR counting sensor ON error
ERROR_COUNT_IR_OFF IR counting sensor OFF error
ERROR_MOTOR_OR_CODER Motor or encoder eroor
ERROR_RGB_ON RGB sensor ON error
ERROR_RGB_OFF RGB sensor OFF error
ERROR_LENGTH_ON Length sensor ON error
ERROR_LENGTH_OFF Length sensor OFF error
ERROR_MT_SENSOR Main MG sensor error
13
Error Message Cause of Error Solution
E01 Note tilt
Remove the first bill from the
stacker. Press “START” to
continue counting.
E02 Double note
E03 RGB no signal
E04 Length error
E05 Width error
E06 Size error
E07 No magnetic
E08
No magnetic from left/right
MG sensor
ERROR MESSAGES & TROUBLESHOOTING
(Continued)
14
Error Message Cause of Error Solution
E09 RGB error
Remove the first bill from the
stacker. Press “START” to
continue counting.
E10 Chain notes
E11 Denomination error
E12 UV error
E13
The size does not correspond
with the color
E14
Denomination
classification error
E15 Magnetic denomination error
E16 No IR calculation results
ERROR MESSAGES & TROUBLESHOOTING
(Continued)
15

Error Message Cause of Error Solution
E17 RGB Color Suspicious
Clean the sensor. If error
continues, sensor may
need to be changed.
Contact Royal Sovereign if
error persists.
MOTOR JAM Motor jamming
COUNT IR JAM
Note jamming on IR counting
sensor
RGB SENSOR JAM Note jamming on RGB sensor
NO BANKNOTE
No note
(Please check feed sensor)
COUNT IR ERROR IR counting sensor error
ERROR MESSAGES & TROUBLESHOOTING
(Continued)
16
Elimination of General Errors
a) Self-test error
The machine will automatically go through the self-test after it is turned on. If
the self-test proves to be successful, the machine will turn on counting face. If
the self-test finds a problem, before turning to counting face, the machine will
show the exact problem which is detected.
b) Unsmooth counting or inaccurate counting
Generally, the feeding mechanism can be adjusted in the following two ways to
eliminate these kind of problems:
1. Feeding clearance adjustment (left image)
The adjustment of the feeding clearance should be conducted with
reference to the banknotes to be counted. Turn the adjusting knob
clockwise (to the direction of “+”) to increase feeding clearance,
counterclockwise (to the direction of “-”) to decrease the feeding
clearance.
2. The paper guide adjustment (right image)
The position of the paper guide should be in accordance with the length
of the banknotes to be counted . When the length of the banknotes
changes, the paper guide should be adjusted accordingly.
c) The elimination of the electricity cut-off
The possible reason for the electricity cut-off of the machine could be the burn-
out of a fuse. Contact Royal Sovereign for repair.
NOTE: The power switch must be off, and power cord should be
unpulled when conducting the above adjustments.
17

DAILY CARE
CAUTION:
DO NOT CHANGE THE POSITION OF THE DETECTORS AND/OR OPTICAL SENSORS.
WARNING: Before dusting, turn the power switch off and disconnect the power
cord from the machine. It is very important to clean all the sensors in the machine
with a soft brush to avoid any paper particles or dust from sticking to the light
transmitter or the light-receiver sensors. It is important to clean the inside of the
machine occasionally. See below for cleaning cards which can clean the internal
parts of the bill counter.
If necessary, the glass surfaces of the detectors may also be wiped with a soft
cloth damped with alcohol.
To get the best results out of your bill counter, Royal Sovereign recommends
using Royal Sovereign Cleaning Cards (RBC-CLN) to remove dirt, dusts, oils, and
other contaminates from your bill counter. With the machine on, simply run the
cleaning card through the machine like a bill. This cleaning card will run through
and clean the sensors of dirt and other contaminates. Cleaning cards are
recommended to be used after every 100 cycles.
18
Model
EBC
-1000
Dimensions (WxDxH)
10.6” W x 9.7” D x 9.6” H
Weight
10.6 lbs.
Hopper Capacity
500 pcs
Stacker Capacity
200 pcs
Display Type
TFT
Currencies
USA, CAD, EUR, KRW
Counting Speed
1,200 pcs/min
Preset Batch Number
1
– 999 pcs
Counterfeit Detection
IMG, MG, IR, DD
Power Requirements
Input: AC100
-240V, 50/60Hz
Output: DC24V, 2.75A
SPECIFICATIONS
19

For product support and warranty questions, please visit us at
www.royalsovereign.com/Customer-Support.html
ROYAL SOVEREIGN
INTERNATIONAL, INC.
2 Volvo Dr., Rockleigh, NJ 07647
USA TEL: (+1) 800-397-1025
Email: info@royalsovereign.com
Royal Sovereign International, Inc. warranties this product to be free from
defects in material and workmanship for a period of one (1) year. This
warranty is extended to the original purchaser only.
This warranty only covers products that are properly installed, properly maintained,
and properly operated in accordance with the instructions provided. This limited
warranty does not cover any failures or operating difficulties due to normal wear
and tear, accident, abuse, misuse, alteration, misapplication, improper installation,
or improper maintenance and service by you or any third party.
Returned product will not be accepted without a Return Authorization number. To
request a Return Authorization number, please visit us at
www.royalsovereign.com. All transportation costs for the return of damaged
product or parts will be the responsibility of the purchaser. Return defective
product, in original packaging, to the address below.
Royal Sovereign International, Inc. requires reasonable proof of your date of
purchase from an authorized retailer or distributor. Therefore, you should keep
your receipt, invoice, or canceled check from the original purchase. The limited
warranty shall be limited to the repair or replacement of parts which prove
defective under normal use and service within the warranty period.
Royal Sovereign International, Inc. (and its affiliated companies) SHALL HAVE
NO LIABILITY WHATSOEVER TO PURCHASER OR ANY THIRD PARTY FOR
ANY SPECIAL, INDIRECT, PUNITIVE, INCIDENTAL,OR CONSEQUENTIAL
DAMAGES. Some states do not allow the exclusion or limitation of incidental or
consequential damages so the above exclusion and limitations may not apply to
you.
ONE YEAR LIMITED WARRANTY
20