important Safety Instructions 2
First Steps , 3
Energy Saving ideas
Setting the Controls
Fresh Food Storage
.....
Care and Cleaning
• 6-7
Automatic Ice Maker (some models) .................. 7
Reversible Door Instructions ............... 8-10
Avoid Service Checklist .......
....... lO-11
Normal Operating Sounds .......
11
Sears Service
12
Refrigerator Warranty
]2
:%
RefrigeraterS......
Model and Serial
Number Pfate
Read and Save These Instructions
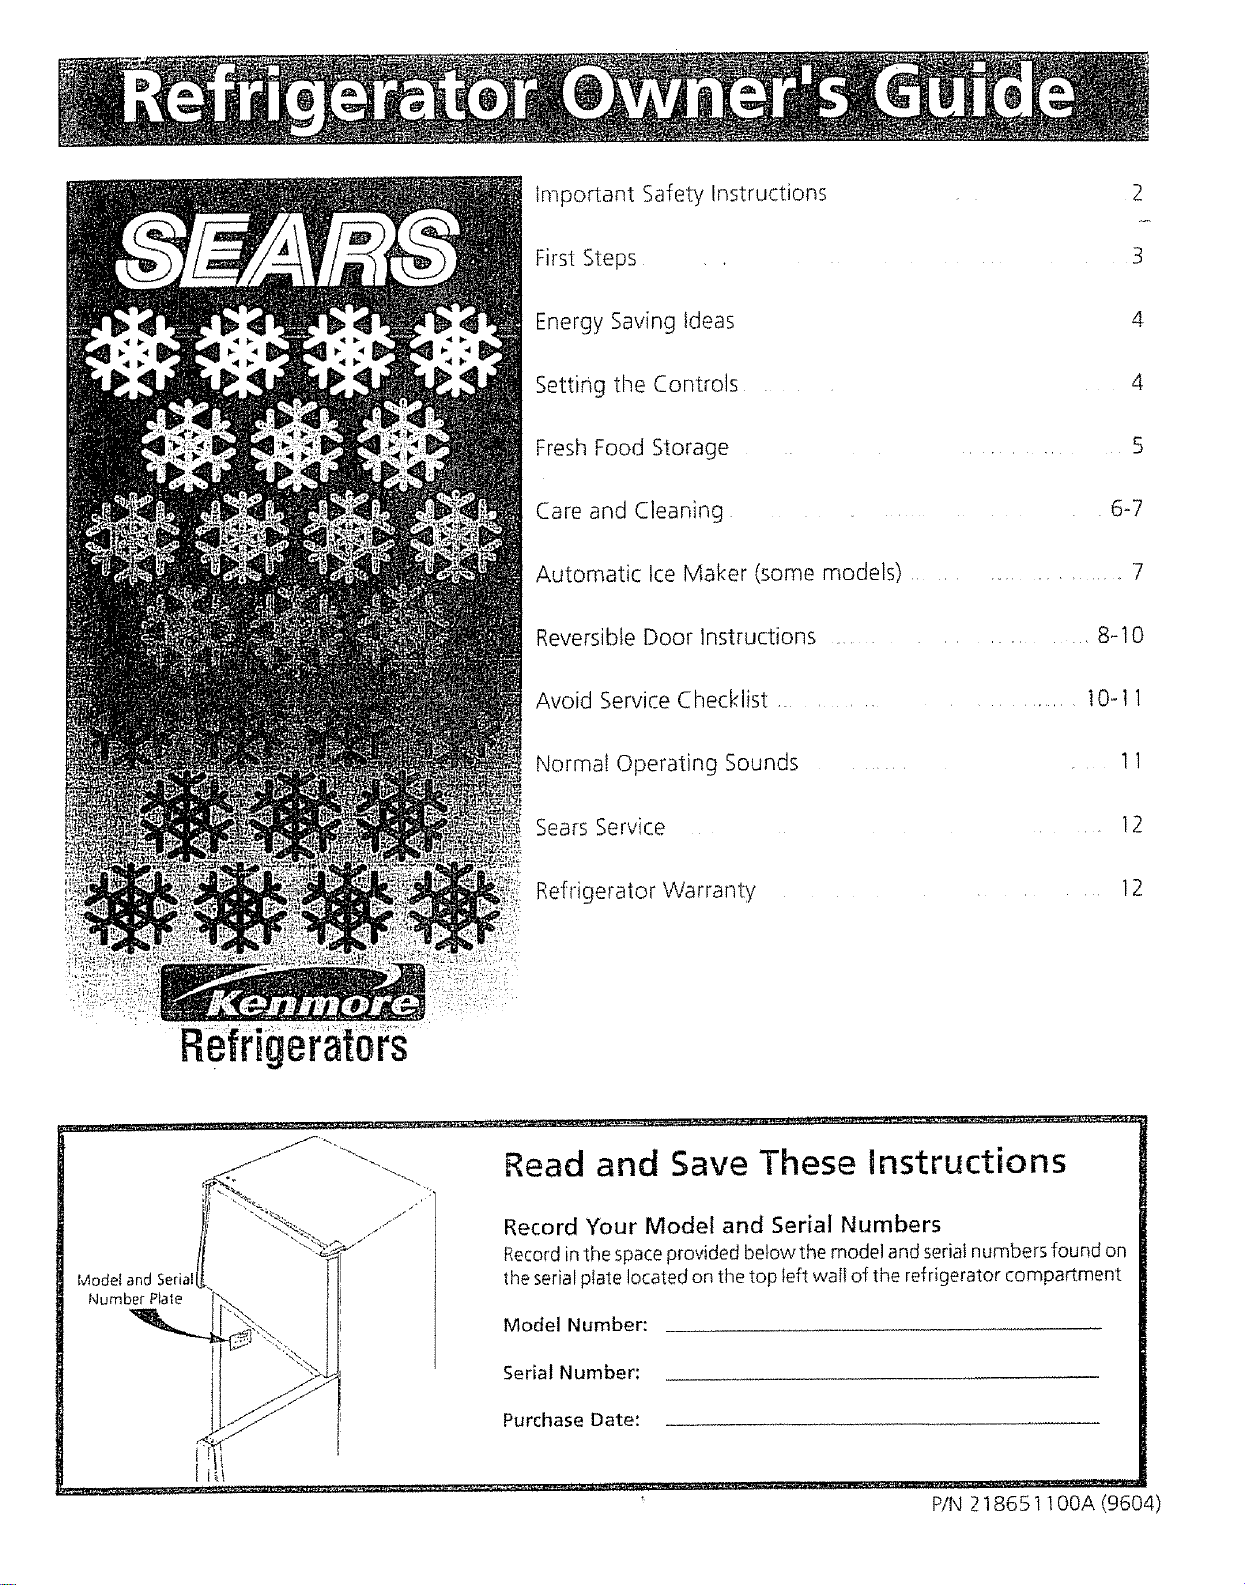
Record Your Model and Serial Numbers
Record in the space provided below the model and seriaI numbers found on
the serial plate located on the top left walt of the refrigerator compartment
Model Number:
Serial Number:
Purchase Date:
P!N 218651 !OOA (9604)
Important Safety
Instructions
f_ Owner's Guide contains general
rating instructions for your
gerator and features information for
ral models Your refrigerator may
have all the described features
The instructions appearing _n this Owners Guide are not meant to cover every
possible condition and situation that may occur Common sense and caution must
be practiced when installing, operating, and maintaining any appliance
For' Your Safety
Do not store or usegasoline or other flammable vapors and liquids in the vicinity of
this or anyotherappliance Readproduct labelsfor flammability and other warnings
Child Safety
Destroy carton, plastic bags, and any exterior wrapping material immediately
after the refrigerator is unpacked Children should never use these items for
play Cartons covered with rugs, bedspreads, plastic sheets or stretch wrap may
become airtight chambers and can quickly cause suffocation
° Remove all staples from the carton Staples can causesevere cuts and destroy
finishes if they come in contact with other appliances or furniture
• An empty, discarded ice box, refrigerator or freezer is a very dangerous
attraction to children Remove the door of any appliance that isnot in use,
even if it is being discarded Carefully read and follow the child safety pre-
cautions in the pamphlet enclosed with your new refrigerator It ispublished by
the Association of Home Appliance Manufacturers
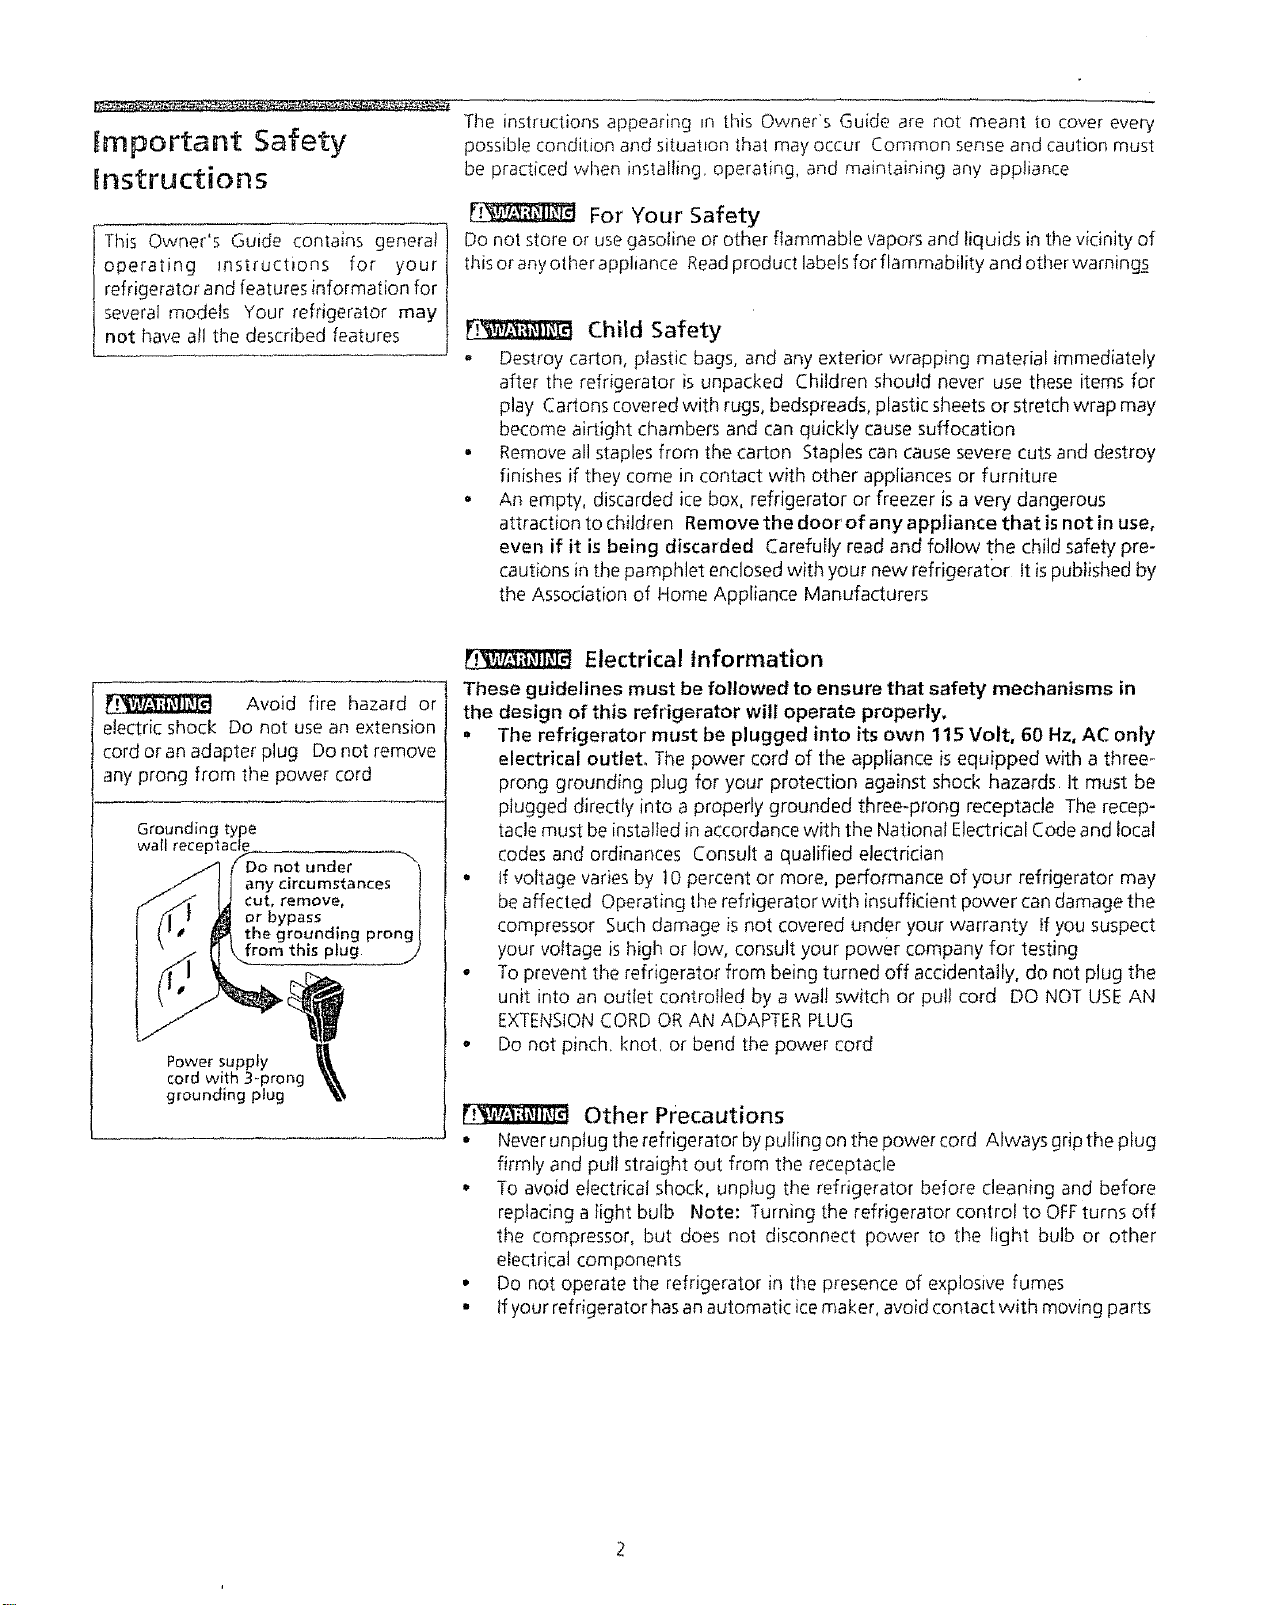
Avoid fire hazard or
electric shock Do not use an extension
cord oran adapter plug Do not remove
any prong from the power cord
Groundim itype
wall rece
not under
/pass
_rounding prong
plug
Power supply
cord with 3-prong
grounding plug
Electrical Information
These guidelines must be followed to ensure that safety mechanisms in
the design of this refrigerator will operate properly,
• The refrigerator must be plugged into its own 115 Volt, 60 Hz, AC only
electrical outlet,, The power cord of the appliance isequipped with a three-
prong grounding phJg for your protection against shock hazards it must be
plugged directly into a properly grounded three-prong receptacle The recep-
tacle must be installed in accordance with the National Electrical Code and local
codes and ordinances Consult a qualified electrician
, tf voltage varies by !0 percent or more, performance of your refrigerator may
be affected Operating the refrigerator with insufficient power can damage the
compressor Such damage is not covered under your warranty tf you suspect
your voltage is high or low, consult your power company for testing
• To prevent the refrigerator from being turned off accidentally, do not plug the
unit into an outlet controlle d by a wal! switch or pul! cord DO NOT USEAN
EXTENSIONCORD ORAN ADAPTERPLUG
o Do not pinch, knot, or bend the power cord
Other Precautions
• Never unplug the refrigerator bypulling on the power cord Always grip the ptug
firmly and pull straight out from the receptacle
• To avoid electrical shock, unpIug the refrigerator before cleaning and before
replacing a light bulb Note: Turning the refrigerator control to OFFturns off
the compressor, but does not disconnect power to the light bulb or other
electrical components
° Do not operate the refrigerator in the presence of explosive fumes
, If your refrigerator hasan automatic icemaker, avoid contact with moving parts
First Steps
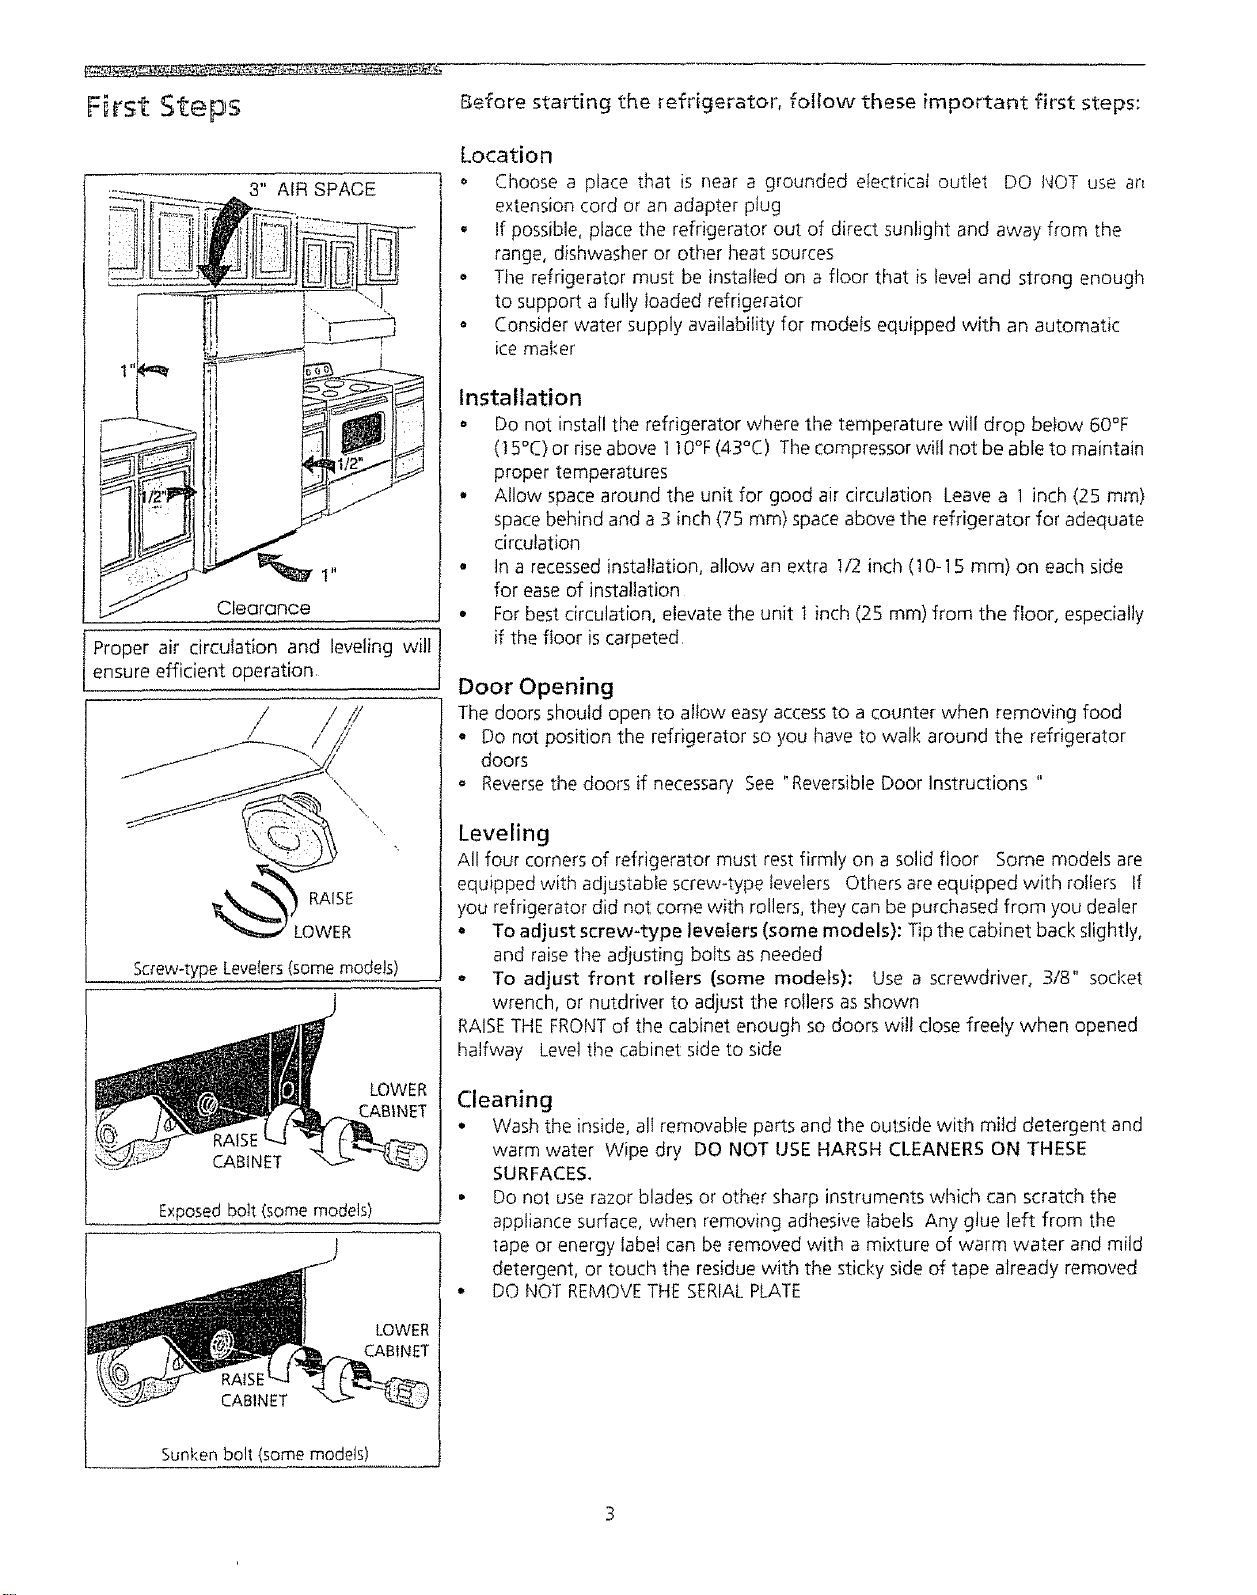
3" AIR SPACE
Clearance
Proper air circulation and leveling will
ensure efficient operation
/ /,¢
J-'_-'_,i ,/
%,
_._ RAISE
LOWER
Sc_ewotypeLevelers(somemodels)
LOWER
CABINET
CABINET
Exposed bolt (some models)
LOWER
CABINET
CABINET
Sunken bolt (some models)
Before starting the refrigerator, follow these important first steps:
Location
o Choose a place that is near a grounded electrical outlet DO NOT use an
extension cord or an adapter plug
, If possible, place the refrigerator out of direct sunlight and away from the
range, dishwasher or other heat sources
o Tile refrigerator must be installed on a floor that is level and strong enough
to support a fully loaded refrigerator
o Consider water supply availability for models equipped with an automatic
ice maker
Installation
o Do not install the refrigerator where the temperature will drop below 60%
(! 5°C) or riseabove 110% (43°C) The compressor will not be able to maintain
proper temperatures
• Allow space around the unit for good air circulation Leave a 1 inch (25 ram)
space behind and a 3 inch (75 ram) space above the refrigerator for adequate
circulation
o tn a recessedinstallation, allow an extra t/2 inch (t0-15 ram) on each side
for easeof installation
° Forbest circulation, elevate the unit 1 inch (25 mm) from the floor, especially
if the floor iscarpeted,
Door Opening
The doors should open to allow easy accessto a counter when removing food
• Do not position the refrigerator so you have to walk around the refrigerator
doors
Reversethe doors if necessary See "Reversible Door Instructions "
Leveling
All four corners of refrigerator must rest firmly on a solid floor Some models are
equipped with adjustable screwotype Ievelers Others are equipped with rollers If
you refrigerator did not come with rollers, they can be purchased from you dealer
• To adjust screw-type levelers (some models): Tipthe cabinet back slightly,
and raisethe adjusting bolts as needed
o To adjust front rollers (some models): Use a screwdriver, 3/8" socket
wrench, or nutdriver to adjust the roilers asshown
RAISETHE FRONTof the cabinet enough so doors will close freely when opened
halfway Levelthe cabinet side to side
Cleaning
° Wash the inside, all removable parts and the outside with mild detergent and
warm water Wipe dry DO NOT USE HARSH CLEANERS ON THESE
SURFACES,
• Do not use razor blades or other sharp instruments which can scratch the
appliance surface, when removing adhesive tabels Any gtue left from the
_apeor energy label can be removed wittq a mixture of warm water and mild
detergent, or touch the residue with the sticky side of tape already removed
• DO NOT REMOVETHE SERIALPLATE
Energy Saving deas
/
Locate the refrlgerator _nthe coobsi part of the room out ofd_rectsunhghtand
away horn heating ducts o_registers Do noi place the tetr_gerator next to 17eab
produong apphances such as a range, oven or dishwasher If this tsnot possible
a section of cabinetry or an added layerof insulation between the two appliances
will help the refrigerator operate more efficiently
o Level the refrigerator so the doors close tightly
. Refer to this Owner's Guide for the suggested refrigerator settings
° Periodic cleaning of the condenser will help the refrigerator run more efficiently
SeeOutside in the "Care and C}eaning" section
• Do not overcrowd the refrigerator or block cold air vents Doing so causes the
refrigerator to run longer and use more energy Shelves should not be lined with
aluminum foil, wax paper or paper toweling Liners interfere with cold air
circulation, making the refrigerator less efficient, which could cause food
spoilage
• Cover foods and wipe containers dry before placing them in the refrigerator This
cuts down on moisture buitd-up inside the unit
. Organize the refrigerator to reduce door openings Remove as many items as
needed at one time and close the door as soon as possible
Setting the Controls
RE_G_P_TOR
I
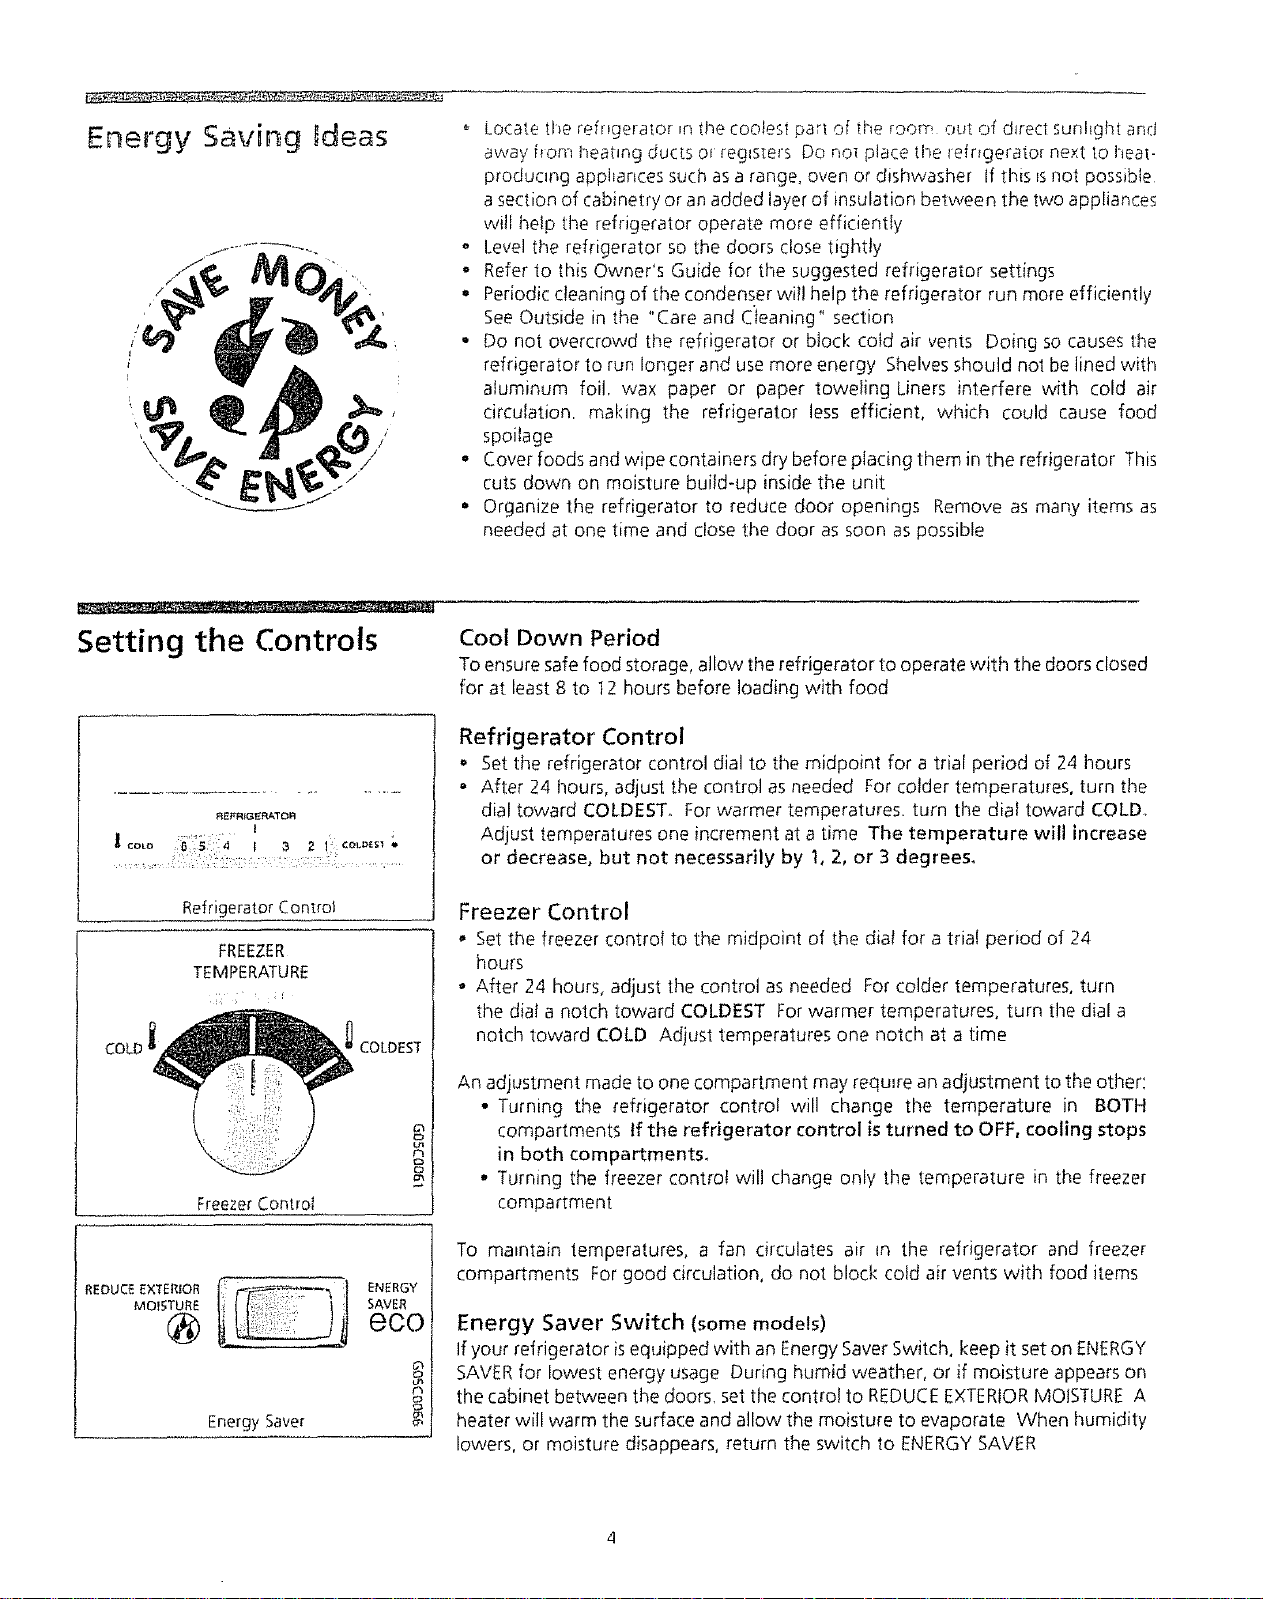
Refrigerator Control
FREEZER
TEMPERATURE
COLD _ COLDEST
Freezer Control
G_
rt3
u_
r_
REDUCE MOISTUREEXTERIOR : _-_ SAVERENERGY
eco
Energy Saver
d_
th
oi
Cool Down Period
To ensure safe food storage, allow the refrigerator to operate with the doors closed
for at least 8 to 12 hours before loading with food
Refrigerator Control
, Set the refrigerator control dial to the midpoint for a trial period of 24 hours
o After 24 hours, adjust the control as needed For colder temperatures, turn the
dial toward COLDEST° Forwarmer temperatures, turn the dial toward COLD.
Adjust temperatures one increment at a time The temperature will increase
or decrease, but not necessarily by t, 2, or 3 degrees,
Freezer Control
Setthe freezer control to the midpoint of the dial for a trial period of 24
hours
• After 24 hours, adjust the control as needed For colder temperatures, turn
the dial a notch toward COLDEST Forwarmer temperatures, turn the dial a
notch toward COLD Adjust temperatures one notch at a time
An adjustment made to one compartment may require an adjustment to the other:
• Turning the refrigerator control will change the temperature in BOTH
compartments If the refrigerator control is turned to OFF, cooling stops
in both compartments,
° Turning the freezer control will change only the temperature in the freezer
compartment
To maintain temperatures, a fan circulates air in the refrigerator and freezer
compartments For good circulation, do not block cold air vents with food items
Energy Saver Switch (some models)
If your refrigerator isequipped with an Energy SaverSwitch, keep it set on ENERGY
SAVERfor lowest energy usage During humid weather, or if moisture appears on
the cabinet between the doors, set the control to REDUCEEXTERIORMOISTURE A
heater will warm the surface and allow the moisture to evaporate When humidity
lowers, or moisture disappears, return the switch to ENERGYSAVER
Fresh Food Storage
I
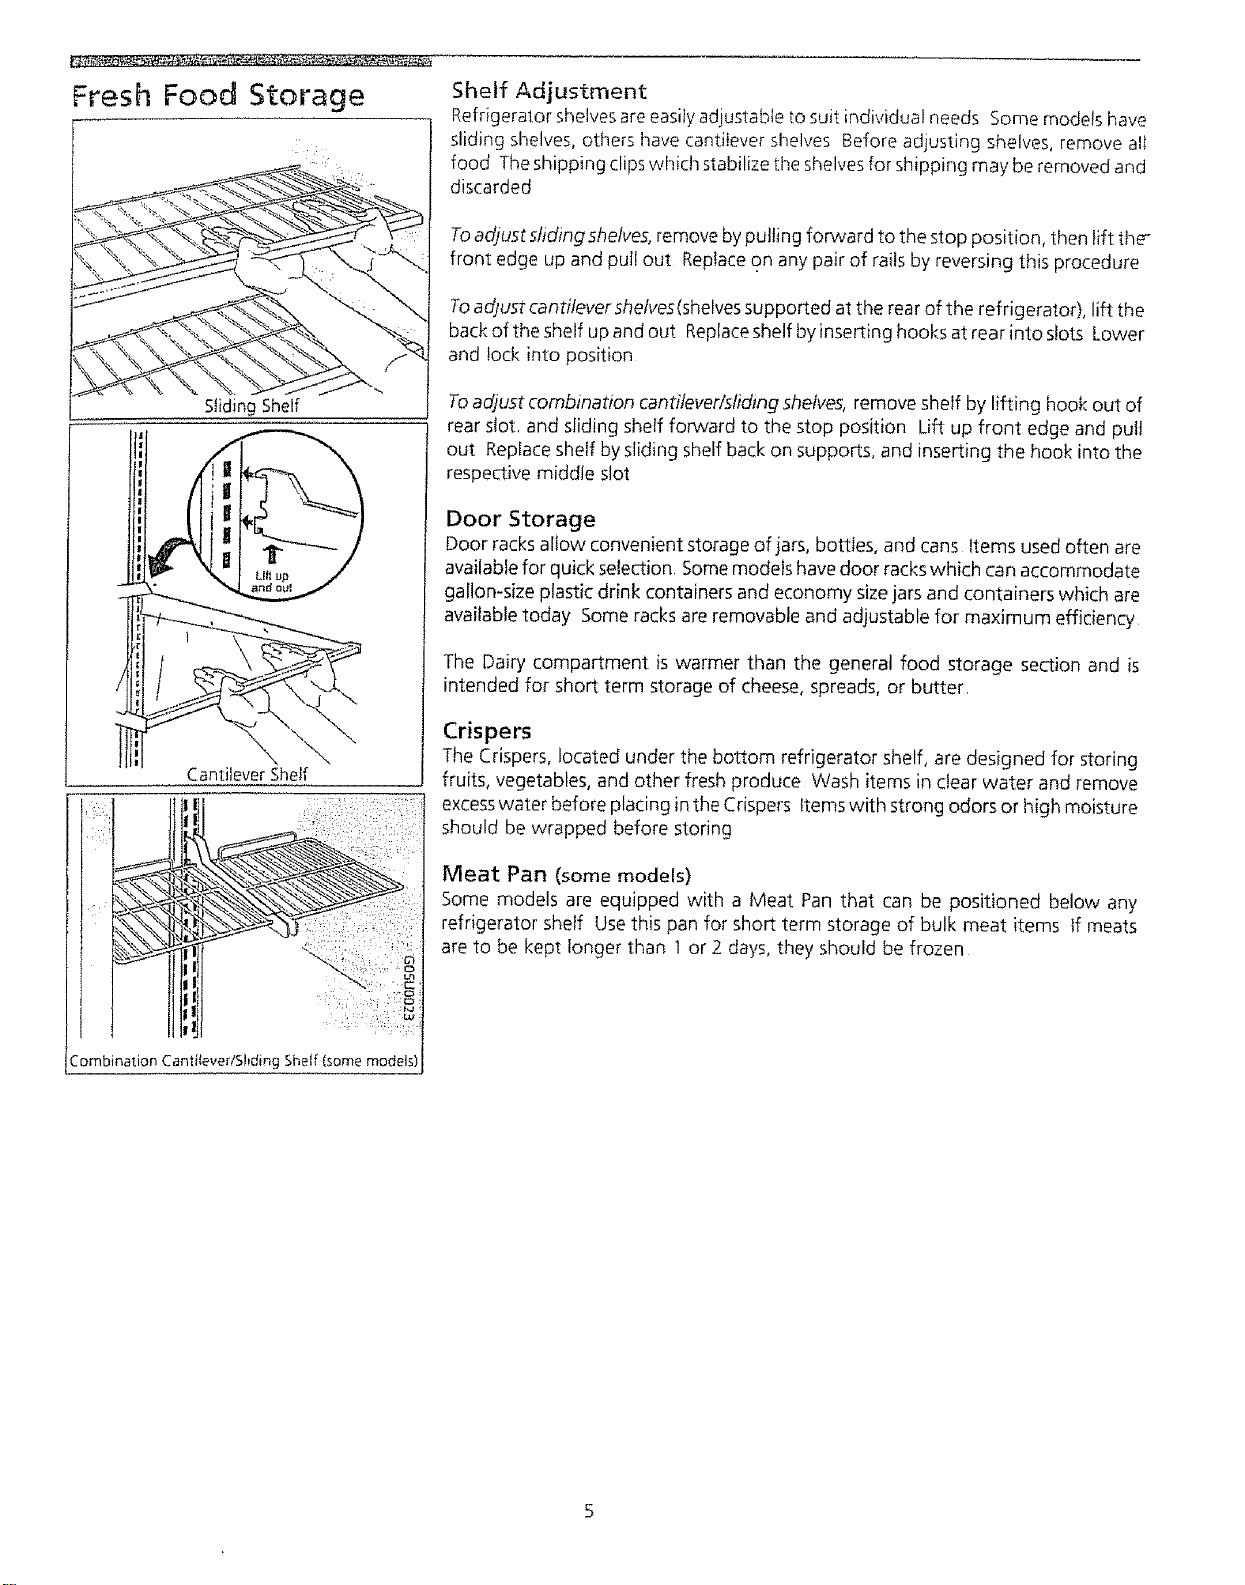
Sliding Shelf
Cantilever Shelf
Shelf
Shelf Adjustment
Refrigerator shelvesareeasilyadjustable to suit individual needs Some models have
sliding shelves, others have cantilever shelves Before adjusting shelves, remove all
food Theshipping clips which stabilize tile shelvesfor shipping may be removed and
discarded
Toadjust sfiding shelves, remove by putting forward to the stop position, then lift the-
front edge up and pul! out Replaceon any pair of rails by reversing this procedure
Toadjust cantilevershetves(shelves supported at the rear of the refrigerator), lift the
back of the shelf up and out Replaceshelf byinserting hooks at rear into slots Lower
and lock into position
Toadjust combination cantilever/sfidlng shelves, remove shelf by lifting hook out of
rear slot, and sliding shelf forward to the stop position Lift up front edge and pul!
out Replaceshelf bysliding shelf back on supports, and inserting the hook into the
respective middle slot
Door Storage
Door racksallow convenient storage of jars, bottles, and cans Items used often are
availabSefor quick selection Some modeJshavedoor rackswhich can accommodate
gallon-size plastic drink containers and economy sizejars and containers which are
avaitable today Some racks are removable and adjustable for maximum efficiency
The Dairy compartment is warmer than the general food storage section and is
intended for short term storage of cheese, spreads, or butter,
Crispers
The Crispers, located under the bottom refrigerator shelf, are designed for storing
fruits, vegetables, and other fresh produce Wash items in clear water and remove
excesswater before placing in the Crispers Items with strong odors or high moisture
should be wrapped before storing
Meat Pan (some models)
Some models are equipped with a Meat Pan that can be positioned below any
refrigerator shelf Use this pan for short term storage of bulk meat items tf meats
are to be kept longer than 1 or 2 days, they should be frozen
Care and Ctean ng
[ !_:_I]_! Damp objectsstick to cold ]
metal surfaces Do not touch refriger-
ated surfaces with wet or damp hands
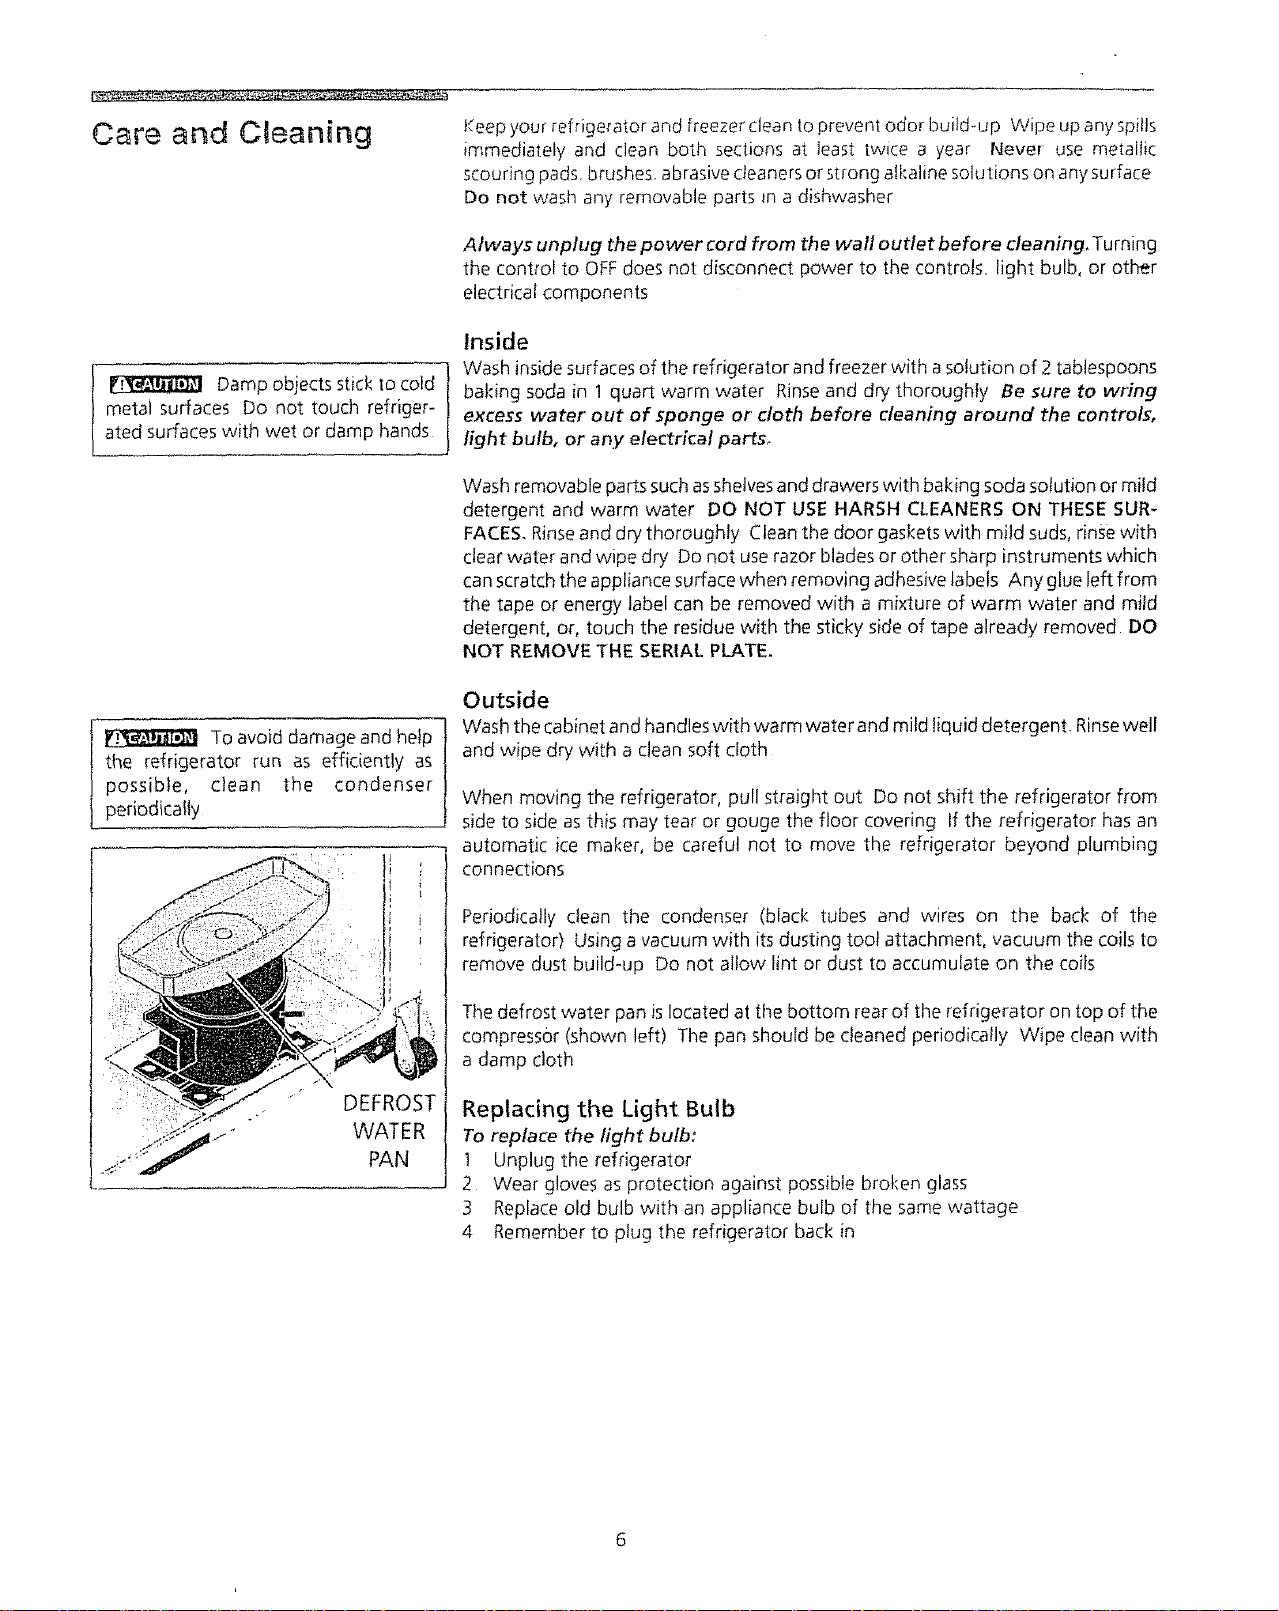
To avoid damage and help
the refrigerator run as efficiently as
possible, clean the condenser
periodically
DEFROST
WATER
PAN
Keep your refrigerator and freezer clean to prevent odor buitd-up Wipe up any spills
immediately and clean both sections at least twice a year Never use metallic
scouring pads, brushes, abrasive cleaners or strong aft:aline solutions on any surface
Do not wash any removable parts in a dishwasher
Always unplug the power cord from the wall outlet before cleaning, Turning
the control to OFFdoes not disconnect power to the controls, light bulb, or other
electrical components
Inside
Wash inside surfaces of the refrigerator and freezer with a solution of 2 tablespoons
baking soda in 1 quart warm water Rinseand dry thoroughly Be sure to wring
excess water out of sponge or" cloth before cleaning around the controls,
light bulb, or any electrical parts_
Wash removable parts such asshelvesand drawers with baking soda solution or mild
detergent and warm water DO NOT USE HARSH CLEANERS ON THESE SUR-
FACES. Rinseand dry thoroughly Clean the door gaskets with mild suds, rinsewith
clear water and wipe dry Do not userazor blades or other sharp instruments which
canscratch the appliance surface when removing adhesive labels Any glue left from
the tape or energy label can be removed with a mixture of warm water and mild
detergent, or, touch the residue with the sticky side of tape already removed DO
NOT REMOVE THE SERIAL PLATE.
Outside
Wash the cabinet and handles with warm water and mild liquid detergent. Rinsewell
and wipe dry with a clean soft cloth
When moving the refrigerator, pull straight out Do not shift the refrigerator from
side to side asthis may tear or gouge the floor covering If the refrigerator has an
automatic ice maker, be careful not to move the refrigerator beyond plumbing
connections
Periodically clean the condenser (black tubes and wires on the back of the
refrigerator) Using a vacuum with its dusting too! attachment, vacuum the coils to
remove dust build-up Do not allow lint or dust to accumulate on the coils
The defrost water pan is located at the bottom rear of the refrigerator on top of the
compressor (shown left) The pan should be cleaned periodically Wipe clean with
a damp cloth
Replacing the Light Bulb
To replace the light bulb:
t Unplug the refrigerator
2 Wear gloves as protection against possible broken glass
3 Replaceold bulb with an appliance bulb of the same wattage
4 Remember to plug the refrigerator back in
Care and Cleaning
(continued)
Vacation and Moving Tips
Short vacations: Leavethe refrigerator operating du_ingvacations of 1to 3 weeks
Use up all perishable items from the refrigerator section Wrap and store other
items in the freezer If the unit hasan automatic icemaker_turn off the ice maker
Long vacations: Removeall food and ice if you wilt begone ] month or more Turn
the control to OFFand disconnect the power If the unit has an automatic ice
malcer, turn off the ice maker and turn the water supply valve to the closed°_
position Defrost and clean the iqterior thoroughly Leave both doors open to
prevent odor and mold buildup Block open if necessary
Moving: When moving the refrigerator, follow these guidelines to prevent
damage:
• Remove all food and other items from both the refrigerator and freezer
compartments Empty the ice storage bin Defrost and clean the
interior thoroughly
° If a hand truck is used in moving, load the refrigerator from the side
- Turn front rollers asfar up aspossible (some models) This will protect them
during sliding or moving
• The cabinet should be well padded and handled with care DO NOT
DROP°
Automatic Ice Maker
If your refrigerator hasan automatic ice maker, it wil! provide a continuous supply
of ice for normal use The automatic ice maker isan optional accessory which may
be installed in most models at any time Call your local dealer for installation
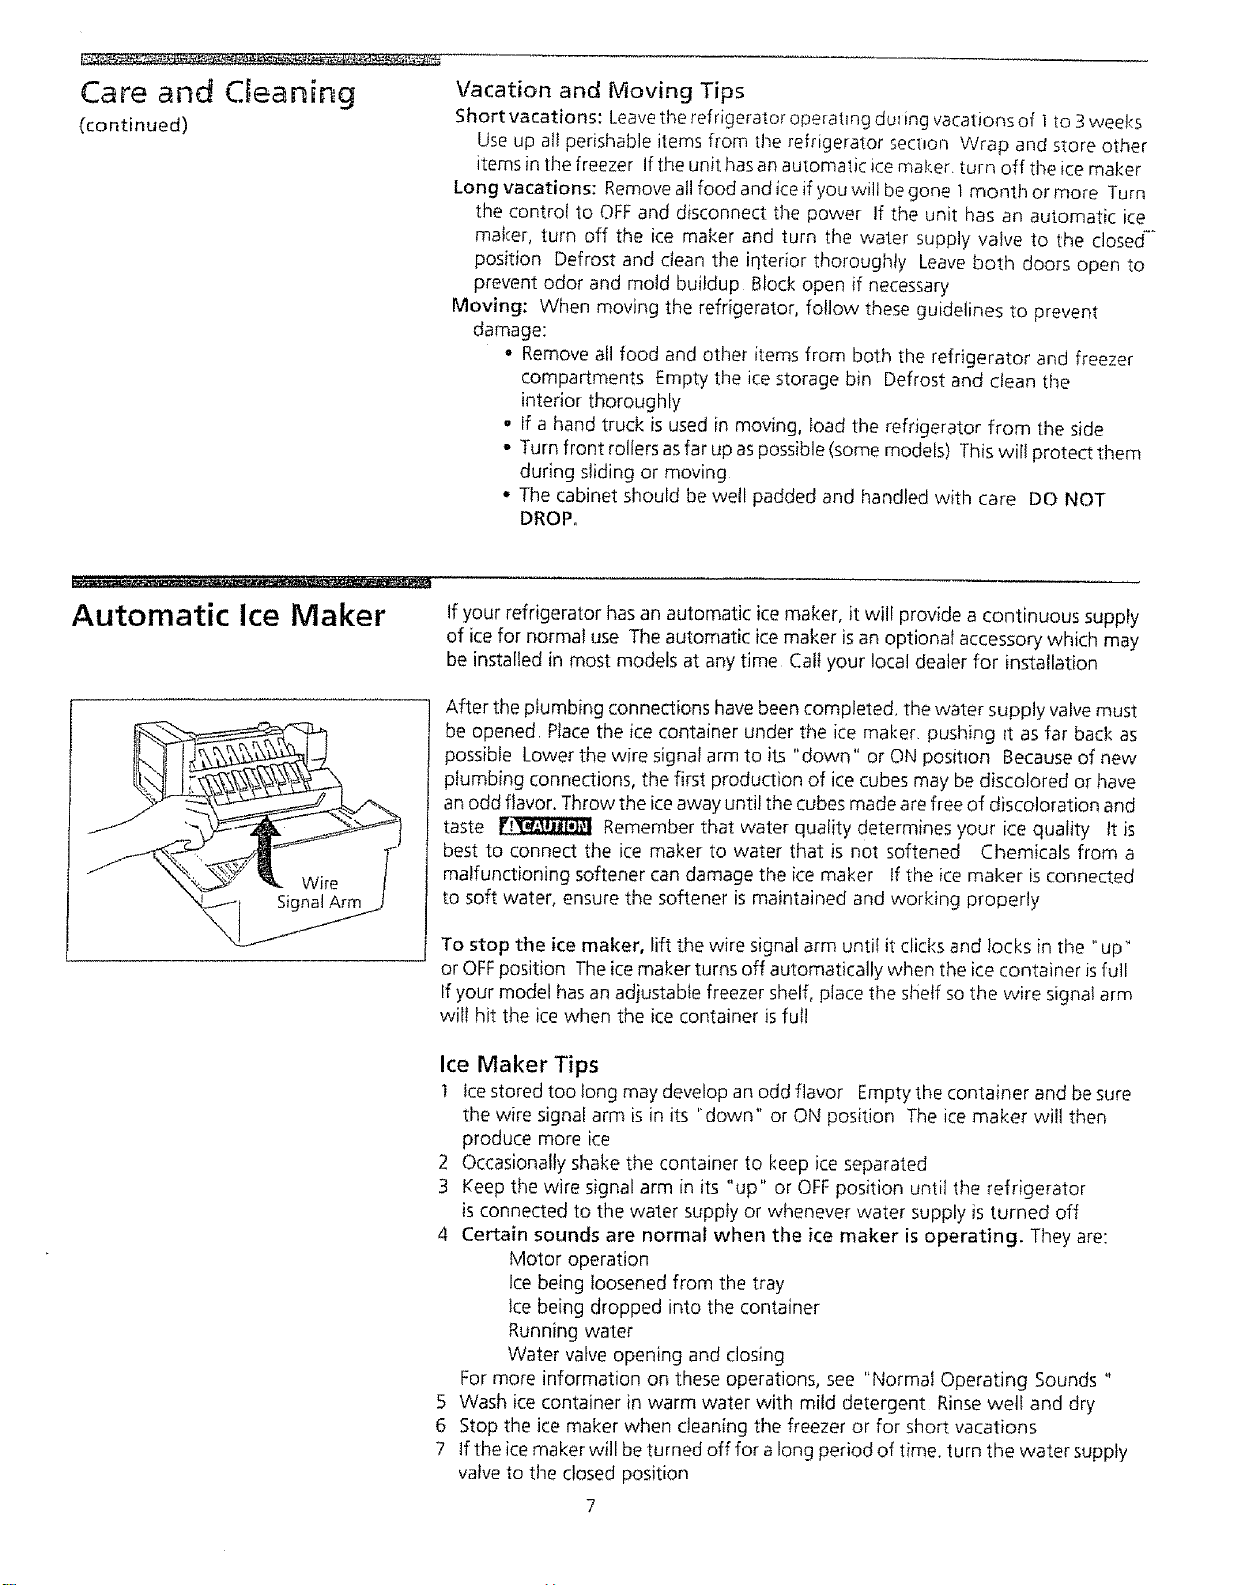
After the plumbing connections have been completed, the water supply valve must
be opened Place the ice container under the ice maker, pushing It asfar back as
possible Lower the wire signal arm to its "down" or ON position Because of new
plumbing connections, the first production of ice cubes may be discolored or have
an odd flavor. Throw the iceaway until the cubes made are free of discoloration and
taste _ Remember that water quality determines your ice quality tt is
best to connect the ice maker to water that is not softened Chemicals from a
malfunctioning softener can damage the ice maker If the ice maker is connected
to soft water, ensure the softener is maintained and working properly
To stop the ice maker, lift the wire signal arm until it clicks and locks in the "up *'
or OFFposition The icemaker turns off automatically when the ice container isfull
If your model hasan adjustable freezer shelf, place the shelf so the wire signa! arm
will hit the ice when the ice container isfull
Ice Maker Tips
t tce stored too long may develop an odd flavor Empty the container and be sure
the wire signal arm is in its "down" or ON position The ice maker wifl then
produce more ice
2 Occasionally shake the container to keep ice separated
3 Keep the wire signal arm in its "up" or OFFposition until the refrigerator
is connected to the water supply or whenever water supply is turned off
4 Certain sounds are normal when the ice maker is operating. They are:
Motor operation
Ice being loosened from the tray
Ice being dropped into the container
Running water
Water valve opening and closing
For more information on these operations, see "Normal Operating Sounds "
5 Wash ice container in warm water with mild detergent Rinsewell and dry
6 Stop the ice maker when cleaning the freezer or for short vacations
7 tf the ice maker will be turned off for a long period of time, turn the water supply
valve to the closed position
fourrefrigeralorisequippedwithconvertibledoorhingesHmgingofdqedoorcanbe
changedtotheoppositesideanytimeyouvwshAnenvelopecontaininge×uaplastic
holeplugsisincludedinsomemodelsTurntherefngeratorcontroltoOFFRemoveall
food,bottles,andotheritemsfromthedoorBeginwith freezerdoor Completely
removeonedoorbeforebeginningtheother
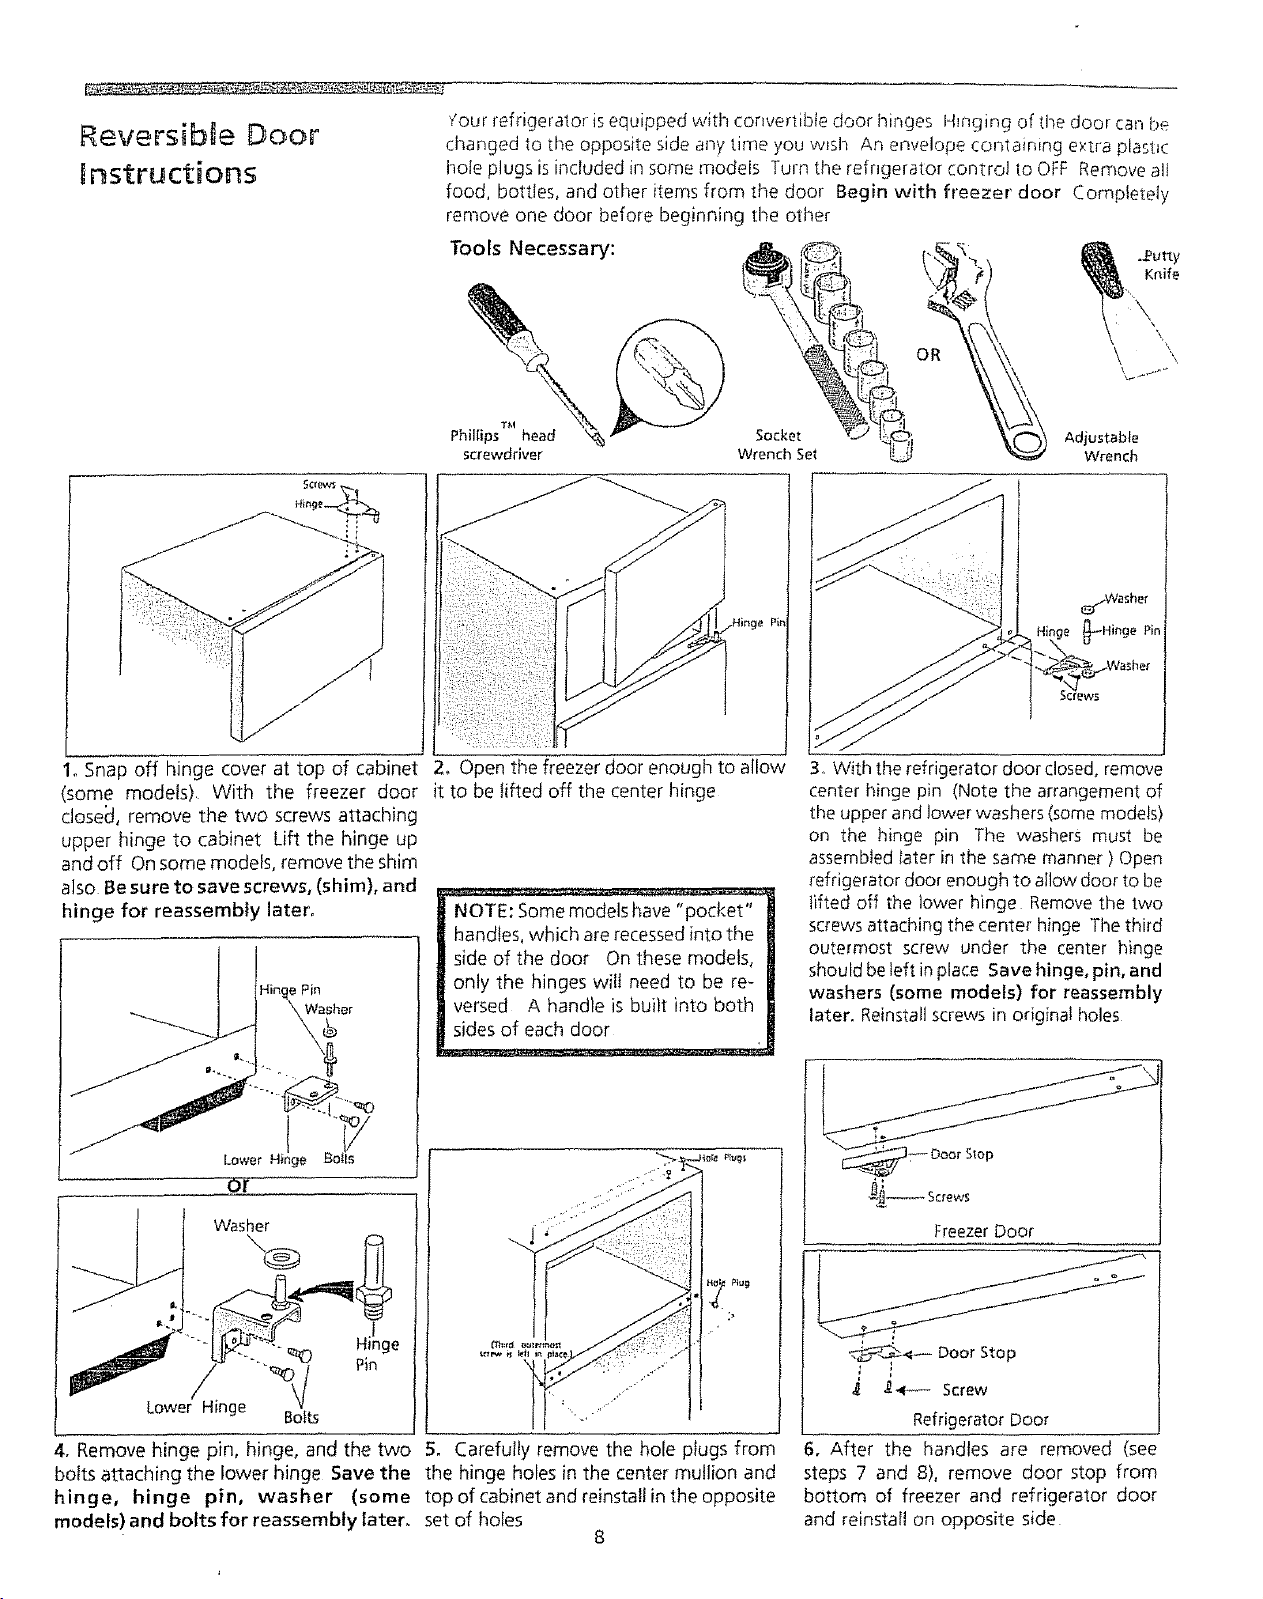
ToolsNecessary:
Reversible Door
nstructions
Phillips he_a_d'_%
screwdriver
Socket
Wrench Set
Adjustable
Wrench
_Washer
ge FHinge Pin
I. Snap off hinge cover at top of cabinet 2_ Open the freezer door enough to allow
(some models) With the freezer door it to be lifted off the center hinge
closecl, remove the two screws attaching
upper hinge to cabinet Lift the hinge up
and off On some models, remove the shim
also Be sure to save screws, (shim), and
hinge for reassembly later,
Hinge Pin
or
Washer
\®
Lower Hinge
_0
Bolts
NOTE: Some models have "pocket"
handles, which are recessedinto the
side of the door On these models,
onty the hinges will need to be re-
versed A handle is built into both
sides of each door
4. Remove hinge pin, hinge, and the two 5. Carefully remove the hole plugs from
bolts attaching the lower hinge Save the the hinge holes in the center mullion and
hinge, hinge pin, washer (some top of cabinet and reinstall in the opposite
models) and bolts for reassembty later, set of holes
8
3,. With the refrigerator door closed, remove
center hinge pin (Note the arrangement of
the upper and lower washers (some models)
on the hinge pin The washers must be
assembled later in the same manner ) Open
refrigerator door enough to allow door to be
lifted off the lower hinge Remove the two
screws attaching the center hinge The third
outermost screw under the center hinge
should be left in place Save hinge, pin, and
washers (some models) for reassembly
later. Reinstall screws in original holes
'_i_ Screws
Freezer Door
4_ Door Stop
, i
a! 2_ Screw
RefrigeratorDoor
6. After the handles are removed (see
steps 7 and 8), remove door stop from
bottom of freezer and refrigerator door
and reinstall on opposite side

ReversibIe Door
nstructions (continued)
Freezer Door
Lo_l: _a_dt_ Ove_
Do_elalt _guZlon
_ Frame
_tie "'_- _* "' - Magnetit
w_
7, (When needed, please refer to your literature
pack). Reverse handles while doors are off Remove the
two screws attaching the handle to the bottom of the
freezer door Swing bottom of handle away from the
door and slide handle straight up and off of dovetail
button Remove screw and dovetail button and install
on other side using the same holes asthe nameplate To
move nameplate to other side, remove the nameplate
from its frame, turn frame upside down and install in
old handle holes Insert nameplate into frame Reverse
instructions for reattachJng handle Start with handle
offset away from the door Place top of handle over
dovetail button, swing handle into an upright position
and push upward, locking it into place Secure bottom
of handle with screws
Hinge,Pin ;
i
Washer / _
s / . ."
¢-_ b 1' "'--
Bolls LowerHinge
Or
Washer
Lower Hinge
Bolts
9r Using a putty knife, remove black plastic
plug (in some models) from front of base,
and reinstall in opposite set of lower hinge
holes Assemble lower hinge to cabinet
Install hinge pin in opposite hinge hole from
which it was removed Install the washer
(some models) on the lower hinge pin and
insert hinge bolts, but do not tighten
Hinges will have to remain loose against
cabinel to align door
I 8. (When needed, please refer
!to your literature pack)To
remove handle: Remove the
two screws attaching the handle
to the top of the refrigerator door
Swing the top of handle away_
from the door an slide handle
down and off of dovetail button
Remove screw and dovetail button
and instait on other side. moving
hole plugs from corresponding
holes to the opposite side Reverse
instructions for reattaching
handle Start with the handle
offset away from the door Piece
bottom of handle over dovetail
'button, swing handle into an
upright position and push
downward, locking it into place
Secure top of ha ndle with screws
_,{mt_ Trim Removal (Full-Length Trim
models only):
In some models, the refrigerator door has a full tenothtri__ m piece which
continues from the bottom of the handle to the bottom of the door The
top of the trim fits into the base of the handle An adhesive "trim lock" is
positioned about half-way down The bottom of the trim is held in place by
either an adhesive trim lock, or a trim lock"with two pronc?s inserted into a
hole on the face of the door Remove the trim by gently pulling the trim lock
areas out and away from the door When the trim is free from the door,
gentJy pul} the trim down and away from the base of the handle
To Reattach Trim: Slide both trim locks out of trim Insert the new adhesive
trim locks contained in your literature pack NOTE; Trim lock must be
removed and installed by sliding OVER _he two donut shaped areas Install
trim to handle bysliding under base of handle Carefully align trim and press
down at trim lock locations Replace hole plug on opposite side Use
rubbing alcohol [o remove any adtqeswe residue from old trim tock
tocation(s)
10. Turn center hinge upside down and
secure to cabinet asshown, using the screws
which are in the new hotes Instaft
refrigerator door on lower hinge pin Align
door with edge of cabinet Hold the door on
front of cabinet
Reversible Door
Dnstructions (continued)
!
i
:t
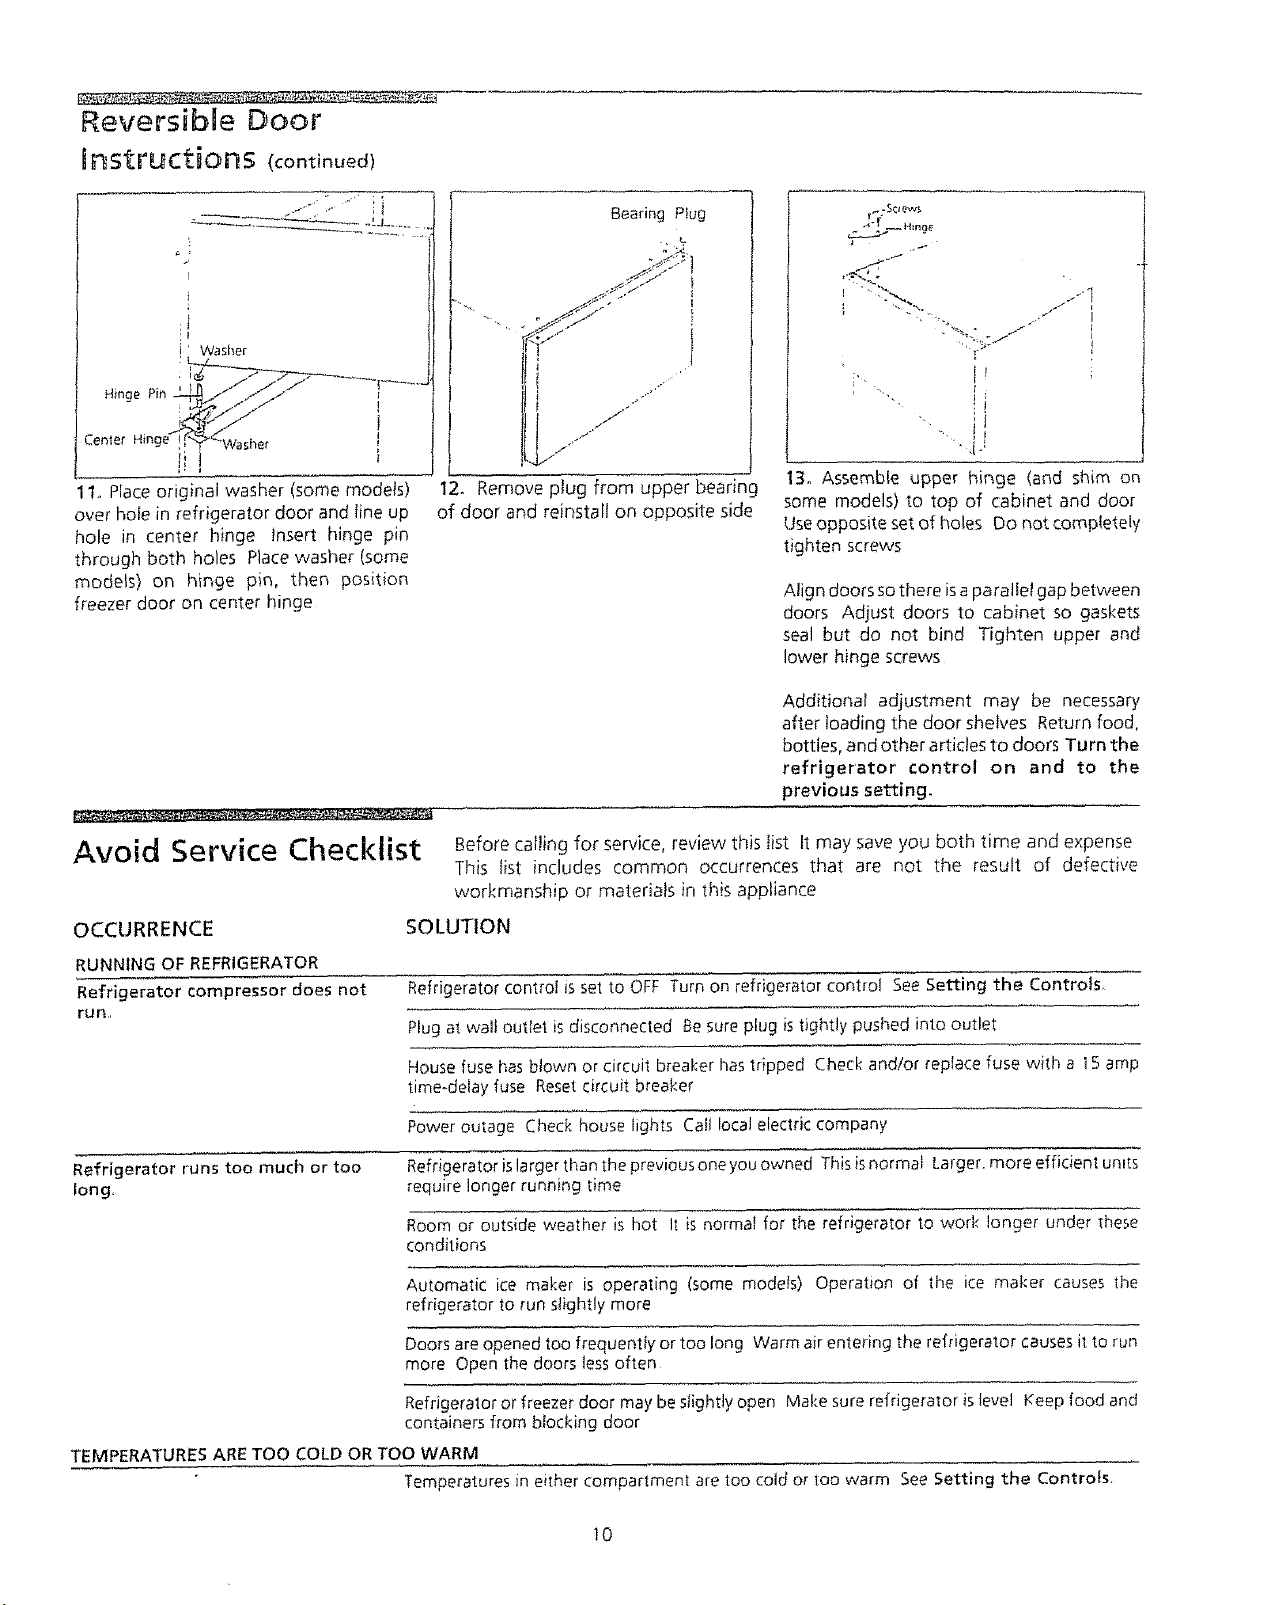
i' Washer
_inge Pn ,..- i__L___F/f_/
{
t., Place original washer (some models)
over hole in refrigerator door and tine up
hole in center hinge Insert hinge pin
through both holes Place washer (some
models) on hinge pin, then position
freezer door on center hinge
Bearing Plug
• Lz
:4t,
,J
.f
/
12. Removeplug from upper bearing
of door and reinstall on opposite side
_-S¢lews
i *¸ %.
I_ _ 1
_?:-:
I r
i ]
.....•,iJ
13. Assemble upper hinge (and shim on
some models) to top of cabinet and door
Use opposite set of holes Do not completely
tighten screws
Align doors so there isa parallel gap between
doors Adjust doors to cabinet so gaskets
seal but do not bind Tighten upper and
lower hinge screws
Avoid Service Checklist
Additional adjustment may be necessary
after loading the door shelves Return food,
bottles, and other articles to doors Turn the
refrigerator control on and to the
previous setting•
Before calling for service, review this tist It may save you both time and expense
This list includes common occurrences that are not the result of defective
workmanship or materials in this appliance
OCCURRENCE
SOLUTION
RUNNING OF REFRIGERATOR
Refrigerator compressor does not
run,,
Refrigerator control is set to OFF Turn on refrigerator control See Setting the Controls.
Plug at wall outlet is disconnected Be sure plug is tightly pushed into outlet
House fuse has blown or circuil breaker hastripped Check and/or replace fuse with a 15 amp
time-delay fuse Reset circuit breaker
Power outage Check house lights Call local electric company
Refrigerator runs too much or too
long,
Refrigerator is larger than the previous one you owned This is normal Larger. more efficient umts
require longer running time
Room or outside weather is hot It is normal for the refrigerator to work longer under these
conditions
Automatic ice maker is operating (some models) Operation of the ice maker causes the
refrigerator to run slightly more
Doors are opened too frequently or too long Warm air entering the refrigerator causes it to run
more Open the doors less often
Refrigerator or freezer door may be slightly open Make sure refrigerator is level Keep food and
containers from blocking door
TEMPERATURES ARE TOO COLD OR TOO WARM
Temperatures in either compartment are too cold or too warm See Setting the Controls.
10
OCCURRENCE SOLUTION
AUTOMATIC ICE MAKER (some models)
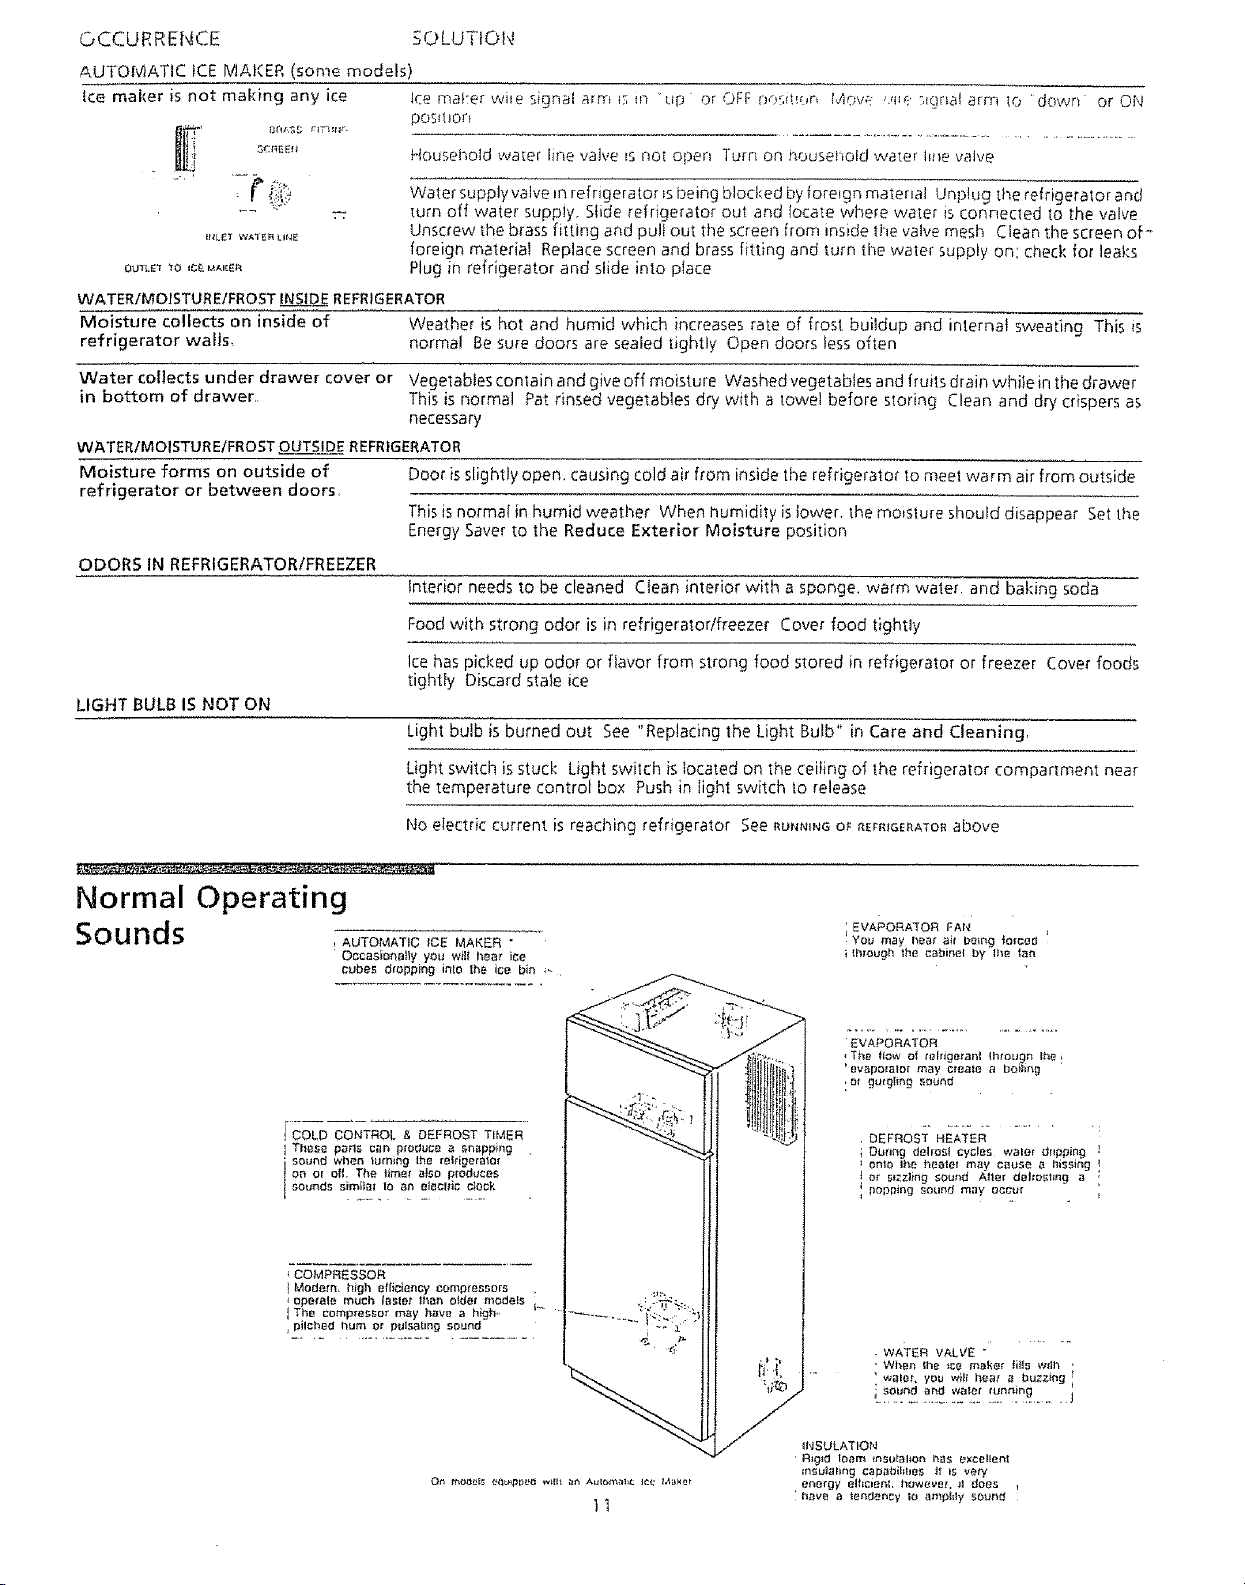
Ice maker is not making any ice Ice maker wile signal arm t; _n 'Lip or OFF- i)o';_!v,r, t,4Ov,! '?ue ;_()nal arm _o 'down or ON
posmon
Housel_old water line valve _sno_ open Turn on household wa_er tu_e valve
-' * eels[; F_TS_Mr-
_ S_RSEf_
#_LET WATER _.It4E
OUTLE'I TO ICe, I,,tAI{ER
Water supply valve in refrigerator Is being blocked by tore_gn matenal UnpkJg the refrigerator and
wrn oft water supply, Slide refrigerator out and focate where water is connected to the valve
Unscrew the brass fitting and pult out ttle screen from inside the valve mesh Clean the screen of-'
foreign material Replace screen and brass fitting and turn ti3e water supply on; check tor leaks
Plug in refrigerator and slide into place
WATERIMOISTURE/FROST INSIDE REFRIGERATOR
Moisture collects on inside of Weather is hot and humid which increases rate of frost buildup and internal sweating This *s
refrigerator walls, normal Be sure doors are sealed tightly Open doors less often
Water collects under drawer cover or Vegetables contain and give off moisture Washed vegetables and fruits drain while in the drawer
in bottom of drawer This is normal Pat rinsed vegetables dry with a towel before sloring Clean and dry crispers as
necessary
WATER/MOISTUREtFROST pUTSIDE REFRIGERATOR
Moisture forms on outside of Door is slightly open. causing cold air from inside the refrigerator to meet warm air from outside
refrigerator or between doors
This is normal in humid weather When humidity is lower, the moislure should disappear Set the
Energy Saver to the Reduce Exterior Moisture position
ODORS IN REFRIGERATORIFREEZER
Interior needs to be cleaned Clean interior with a sponge, warm water and baking soda
Food with strong odor is in refrigerator!freezer Cover food tighUy
LIGHT BULB IS NOT ON
Ice has picked up odor or flavor from strong food stored in refrigerator or freezer Cover foods
tightly Discard stale ice
Light bulb is burned out See "Replacing the Light Bulb" in Care and Cleaning,
Light switch isstuck Light swilch is located on the ceiling of the refrigerator compartment near
the temperature control box Push in light switch _o release
No electric current is reaching refrigerator See RUNNINGO_RErmGE_ATORabove
Normal Operating
Sounds , -
Occasiooa_y you will hear ice
cubes dropping inlo the ice bin _-
COLD CONTROL & DEFROST TIMER
These peMa can pleduce e snapping ,
sound when _umiag lhe reldgefa_m
on o{ all, The limst also produces
sour_ds simifal Io ao e_eollie ctook
; COMPRESSOR
I Modem, high efliciensy compressors
opefele much (aslet _han olde_ models
I The compressor may have a h_gh. _°-
pilched hum or pulsating sound
......... "[._:L: :
-- &
]1
; EVAPORATOR FAN
: You may hear air bs_rlg {orce_
i thlou#h 1he cabinel by P}e lan
' The flow el telrigm'enl Illtou_n Ihe F
_ev_poralo[ may creale a boding
,or gu_9li_g sound
DEFROST HEATER
Dueeg dehosl cycles walel dnppin£
enle Ihe heale_ may cause a hissing
or s)zzlingsound Alter det_o._Iing a
popping sound may occur
WATER VALVE " ........
_'_ .. ' When the ice m_ke_ ti_s Wllh '
' walet, yDU will hea_ a buzzing i
'" 'so.oda_d,_a!_:...............
L ..... _unning
INSULATION
Rigid loam _ns_._t_l_onI_as excel_enl
_nsulaling capa_i_a_es h is very
energy elhcienl, howeveL 11 does
i have a _er_dency lo att_pMy seurld
Sears Service
We Serwce What We Sell _sour a_surance you can depend on Sears for service
and Sears se_wce _s nallonw_de Your refngera_o_ has added value when you
consider tha_ Seals tna5 serwce units nationwide, staffed with professional
technicians specifically trained on Sears appliances and having parts, tools and
equipment to insure that we meet our pledge to you "We Service What We Sell "
Sears Maintenance Agreement ._
Maintain the value of your Kenmore® refrigerator with a Sears Maintenance
Agreement Searsrefrigerators are designed, manufactured_ and tested for years of
dependable operabon Yet. any modern appliance may require service from time to
time
The Sears Maintenance Agreement
• Is your way to buy tomorrow's service at today's price
• Eliminates repair bins resulting from normal use
o Allows for as many service calls as required
• Provides for service by professional Sears-trained technicians
• Offers an annual preventive maintenance check-up at your request
This maintenance agreement does not cover original installation, reinstallation, or
damage resulting from external causessuchasactsof God, abuse, theft, fire, flood,
wind, lightning, freezing, power failure, power reduction, etc Please ask a
salesperson to see the agreement for all of the terms and conditions
Refrigerator Warranty Full One-Year Warranty on Refrigerator
For one year from date of purchase, when this refrigerator is operated and
maintained according to the instructions provided in this Owner's Guide, Searswill
repair this refrigerator, free of charge, if defective in material or workmanship
Full Five-Year Warranty on Sealed Refrigeration System
For five years from the date of purchase, when this refrigerator is operated and
maintained according to the instructionsprovided in this Owner's Guide, Searswill
repair the seated system (consisting of refrigerant, connecting tubing, and
compressor motor), free of charge, if defective in material or workmanship
The above warranty coverage applies only to refrigerators which are used for
storage of food for private household purposes
Warranty service isavailable by contacting the NEARESTSEARSSERVICE
CENTER/DEPARTMENTin the United States or call i-800-4-REPAIR
For parts, call ]-800-FON-PART
This warranty gives you specific legal rights, and you may have other rights which
vary from state to state
SEARS, ROEBUCK and CO.
3333 Beverly Road
Hoffman Estates, IL 60179
!2
PRINTED IN U S A