ICH587A03XX17
11/14
CHANDELIER
TOOLS AND MATERIALS REQUIRED:
Phillips
Screwdriver
Wire Cutters
Pliers Wrench
Wiring supplies
as required by
the Canadian
Electrical Code
and/or the
Quebec
Electrical code
!
INSTRUCTIONS PERTAINING TO RISK OF FIRE OR INJURY TO PERSONS
READ ALL INSTRUCTIONS
IMPORTANT SAFETY
INSTRUCTIONS
SAVE THESE INSTRUCTIONS
L
I
G
H
T
I
N
G
&
F
A
N
S
E
C
L
A
I
R
A
G
E
S
&
V
E
N
T
I
L
A
T
E
U
R
S
QUESTIONS OR CONCERNS CONTACT CANARM AT:
1-800-265-1833 (English) / 1-800-567-2513 (French)
Monday through Friday 8:00 AM to 5:00 PM E.S.T.
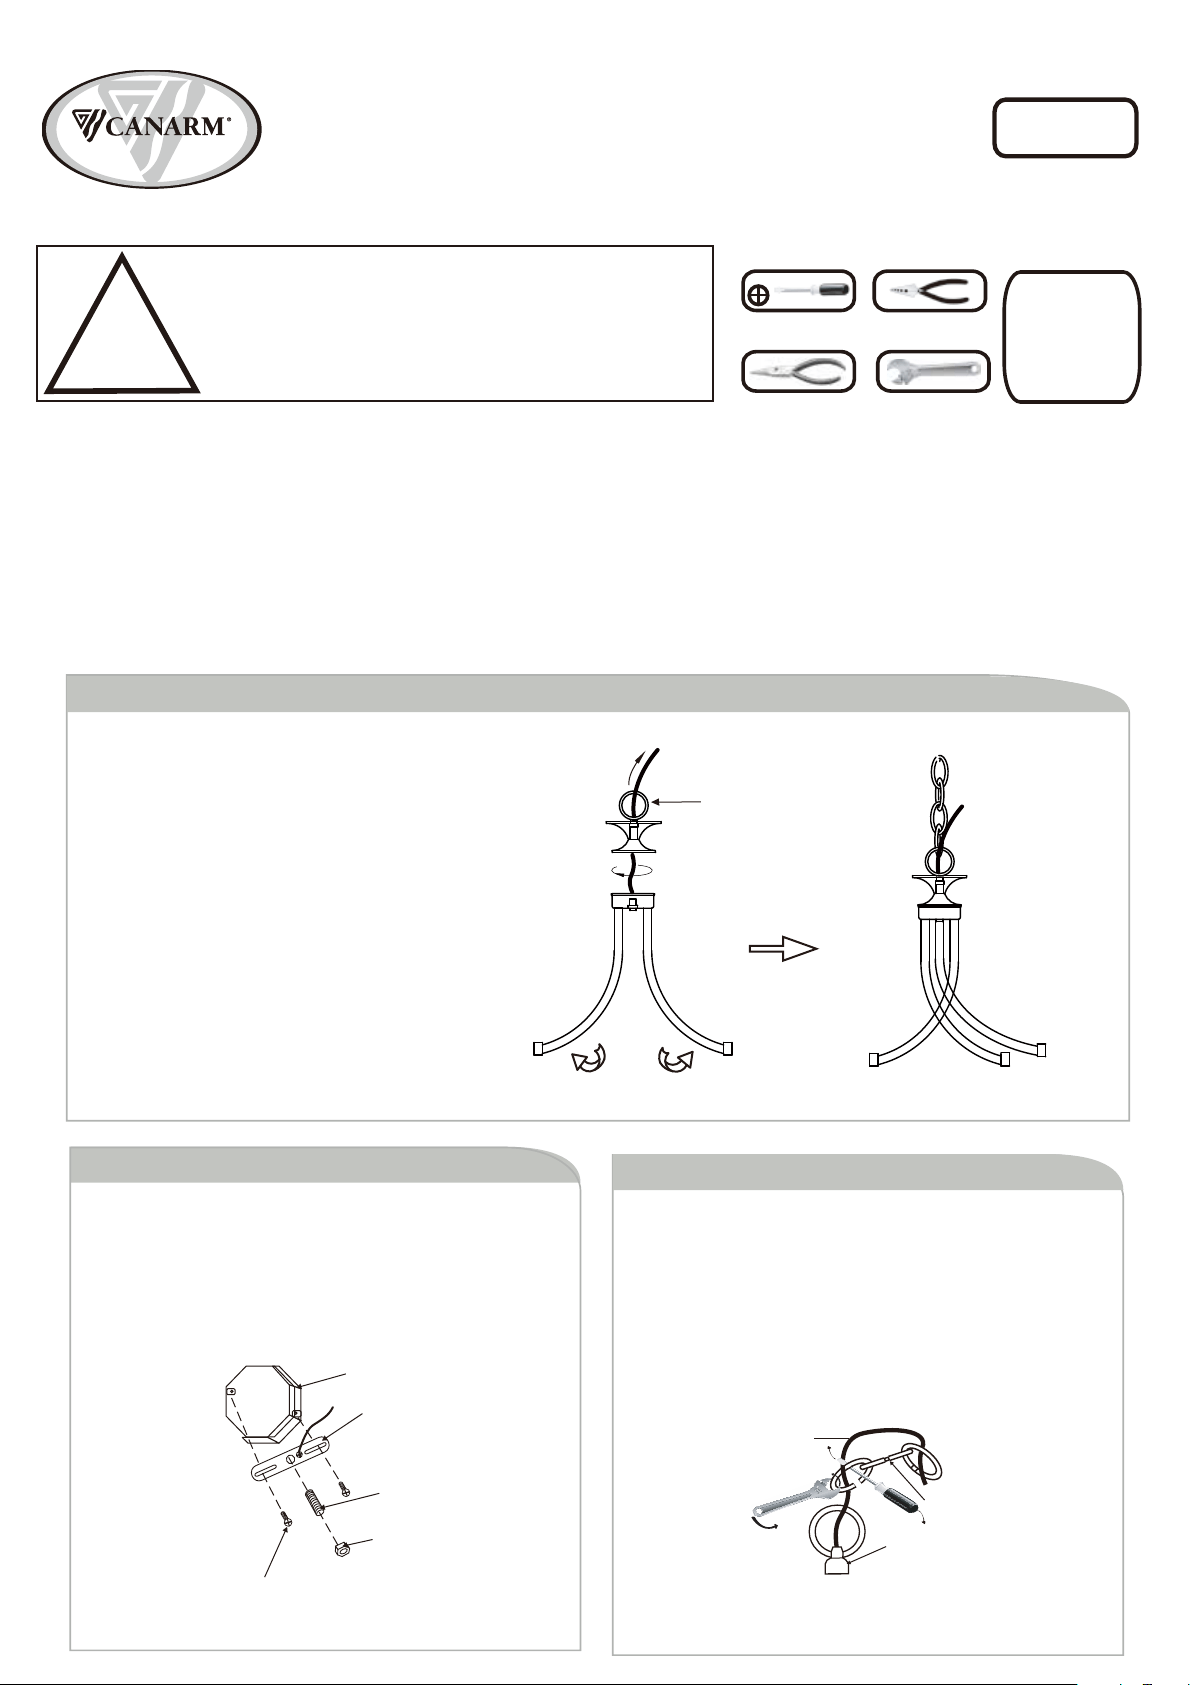
Step 2
Step 3
Power
Cord
Chain
Lower
Connector
Nipple
Hex Nut
Outlet Box
Outlet Box Screws
(not included)
Mounting
Bracket
Attach the mounting bracket to the outlet box using electrical
box screws (not included) . Attach the nipple to the mounting
bracket and adjust until it will clear the canopy when assembled
(Place the canopy over the nipple and tighten the upper
connector onto the nipple until snug. The upper connector
should hold the canopy snug to the ceiling). Lock the nipple in
the correct position using the hex nut.
To attach chain loop to light fixture, use a screwdriver and wrench
to open and close chain loop. Ensure to close the opening.
Weave the power cord and ground wire through the links in the
chain.
Step 1
Step 1
Loop
Spread the arms evenly.
Tighten the loop to the stem on the canopy.
INSTALLATION:
SAFETY PRECAUTIONS:
1. TURN OFF ELECTRICAL POWER BEFORE STARTING INSTALLATION OF LIGHT FIXTURE.
2. THIS PRODUCT MUST BE INSTALLED IN ACCORDANCE WITH THE APPLICABLE INSTALLATION CODE
BY A PERSON FAMILIAR WITH THE CONSTRUCTION AND OPERATION OF THE PRODUCT AND THE
HAZARDS INVOLVED.
3. CONNECT THE GROUND WIRES (BARE COPPER OR GREEN) FROM YOUR FIXTURE TO THE GROUND
WIRE (BARE COPPER OR GREEN) OR GROUND SCREW IN THE ELECTRICAL OUTLET BOX.
NOTE: Product May Not Look Exactly As Shown In Figures.

Step 2
Step 4
Step 1
Step 2
Step 5
Step 6
Step 2
Step 7
Canopy
Nut
Attach the stem to the fixture. Install the rod and metal covers
against the stem by nut. Secure the glass in place using the
fibre washer hex nut, decorative cap and finial. Install proper
bulb type and wattage (not included).
Canopy
Nipple
Upper
Connector
Nut
White
Black
House supply
Ground wire
Fixture
Ground
wire
Upper
Connector
Nipple
Loosen the nut on the upper connector and slide it down the
chain towards the lower connector. Slide the canopy down the
chain towards the lower connector. Feed the wire through
nut, canopy, the upper connector and onto the nipple. Tighten
the upper connector onto the nipple. Spread the other end of
the chain open and fasten to the upper connector. Ensure the
opening is closed.
Connect the ground wires (bare copper or green) from your
fixture to the ground wire (bare copper or green) or ground
screw in the electrical outlet box. Connect the black wire (or
wire marked “SPT-1”) from the fixture to the black wire in the
electrical box and connect the white wire from the fixture to the
white wire in the electrical box.
Once connections of wires are completed, carefully tuck wires and
wire nuts into the outlet box making sure no bare wire (on the
black and white) is visible at the wire nuts. Slide canopy into
position and tighten in place by nut into position.
Imported By: CANARM LTD., 2157 Parkedale Ave., Brockville, Ontario, K6V 5V6, Tel: (613) 342-5424, Fax: (800) 263-4598
Glass
Decorative
Cap
Fibre Washer
Hex Nut
Rod
Small
metal cover
Big
metal cover
Finial
Bulb
Stem

