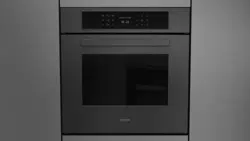
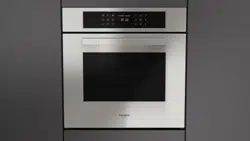
User Guide Fulgor Milano F1SP30S3 Wall Oven
Safety for the Oven
• Tie long hair so that it doesn't hang loose.
• Do not touch heating elements or interior surfaces of oven.
• The heating elements may be hot even though they are dark in color. Interior surfaces of an oven become hot enough to cause burns
. • During and after use, do not touch or let clothing or other flammable materials contact the heating elements or the interior surfaces of the oven until they have had sufficient time to cool.
• The trim on the top and sides of the oven door may become hot enough to cause burns.
• Use care when opening the door. Open the door slightly to let hot air or steam escape before removing or replacing food.
• Do not heat unopened food containers. Build-up of pressure may cause the container to burst and cause injury.
• Always place oven racks in desired location while oven is cool. If a rack must be moved while oven is hot, do not let pot holder contact the hot heating elements.
Use only dry pot holders. Moist or damp pot holders on hot surfaces may result in burns from steam. Do not let pot holder touch hot heating elements. Do not use a towel or other bulky cloth.
• Do not allow aluminum foil to contact heating elements
Safety for the Cleaning Oven
- Confirm that the door locks and will not open once both [CLEAN] commands have been activated and the "AUTO LOCK SIMBOL" appears. If the door does not lock, turn the Cook
- Mode dial to OFF and do not run Self-Cleaning.
- Phone for Service.
- Do not clean the Door gasket. It is essential for a good seal. Care should be taken not to rub, damage, move or remove the Door gasket.
- Do not use commercial oven cleaners or oven liner protective coatings of any kind in or around any part of the oven.
- Clean only oven parts listed in this manual. (see page 25)
- Before Self-Cleaning the oven, remove the broiler pan, oven racks (only when not made of porcelain), other utensils and excess soft spillage.
Features of your Oven
High Altitude Baking
- When cooking at high altitude, recipes and cooking time will vary from the standard.
Power Failure
- After the power returns to the oven, the clock displays the time 12.00.
Error Number Codes
- If E codes are displayed when the electronic control detects a problem in the oven or in the electronics.
Squeak Noise
- You may hear a sound from the unit while using the oven due to heat warping, but this is not a malfunction.
Flashing Symbols or Numbers
- Signal an incomplete action that is in progress locking the door, preheat, etc.).
Beeps
- Signal that the set temperature has been reached.
- Beeps also signal the end of a function or an oven fault.
Convection Fan
- The convection fan operates during any Convection
- Mode and Dehydrate Mode.
Component Cooling Fan
- Activates during any cooking or Self-Cleaning mode to cool inner components and outer door surfaces.
- This air is exhausted through the vent located above the oven door. It continues to run until components have cooled sufficiently.
- The cooling fan operates at double speed (or RPM's) in Self-Cleaning and whenever the internal components temperature becomes high.
Using Oven Lights
- When the oven is in use, oven lights turn on automatically when a mode is started. Oven lights will turn off automatically when finish and the oven mode is cancelled.
- The lights do not operate in the Self-Cleaning
Mode.
- LIGHT] Knob to activates the lights in oven.
- Fahrenheit and Celsius
- The temperature is preset in Fahrenheit, however it can be changed to Celsius. (see page 10)
Oven Condensation and Temperature
- It is normal for a certain amount of moisture to evaporate from the food during any cooking process. The amount depends on the moisture content of the food. The moisture may condense on any surface cooler than the inside of the oven, such as the control panel.
- Your new oven has an electronic temperature sensor that allows maintaining an accurate temperature.
- Your previous oven may have had a mechanical thermostat that drifted gradually over time to a higher temperature. It is normal that you may need to adjust your favorite recipes when cooking in a new oven.
Electronic control
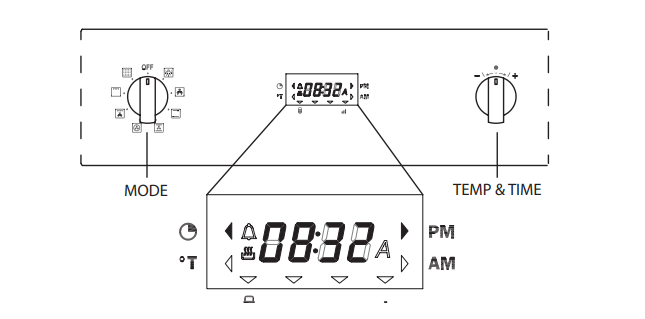
Control panel description
- The oven control panel is made with one display and two knobs.
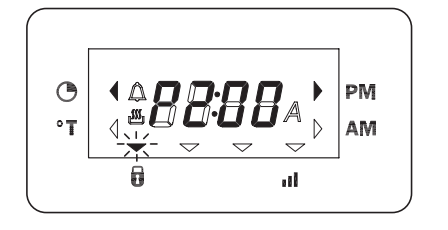
- Time & Temperature display.
- Time & Temperature knob (Push & Shuttle).
- Mode (oven functions) knob. The push & shuttle knob is mainly for clock or temperature setting and automatic time functions programming. Select the desired item by pushing the knob.

Programming time functions
- At every power-up, the control shows the time of day blinking, set at 12:00AM as the initial value. The time increases every minute. The only possible action is the “Clock Regulation”, all other oven operations are inhibited.
- In general, turn the Temp/Time selector left or right in order to edit the values and modify them by steps; hold the knob on the left or right to fasten the decrease/ increase operations.
Setting the time of day
- The time of day is always displayed in the 12:00 AM/PM hours format. Hours and minutes are set separately.
- In order to set the time of day, mode selector must be in ZERO position, the -/+ knob acts on the time of day by default.
- Turn the selector left/right, the hours flash.
- Modify the flashing hours value turning the selector left/right.
- Push the Temp&Time selector to switch back and forth between hours and minutes.
- Modify the flashing minutes turning left/right.
- After a few seconds the whole time of day value starts flashing: wait until the new time of day is steady.
- Push the knob to toggle between the time of day and the minute minder and check the set values. The clock is selected by default while the symbol appears when the minute minder is displayed.
Setting the minute minder
- When the symbol is displayed, turn the knob left/ right in order to set the timer value.
- The standard value is 30 minutes, it’s possible to modify it in the range between 0 and 240 minutes.
- This timer has no influence on the oven activities and can be set also when the oven is off. The time of day is displayed with priority in any case, the symbol shows the minute minder is active.
- When the time expires, the symbol flashes and the buzzer sounds a warning sequence (two short beeps repeated every 3 seconds) to recall the user attention.
Push the knob to stop it.
- The buzzer stops in any case after a time-out.
Buzzer volume
- The buzzer volume can be set turning the Time&Temp knob to the left when the control is in light mode. At any detents the buzzer sounds a double beep, selecting the volume out of three available levels.
- The buzzer must always be silent between 22:00 and 8:00.
Temperature Unit Measurement
- To select Fahrenheit or Celsius press +/- knob twice, when the display shows F or C turn +/- knob to change the unit on measurement, press again +/- knob to confirm.
Cooking with the Convection Oven
- In a conventional oven, the heat sources cycle on and off to maintain an average temperature in the oven cavity. As the temperature gradually rises and falls, gentle air currents are produced within the oven.
- This natural convection tends to be inefficient because the currents are irregular and slow. In this convection system, the heat is “conveyed” by a fan that provides continuous circulation of the hot air.
- This European Convection system provides state-of-the-art engineering and advanced design to create the finest convection oven. In standard convection ovens, a fan simply circulates the hot air around the food.
- The system is characterized by the combination of an additional heating element located around the convection fan and the venting panel that distributes heated air in three dimensions: along the sides, the top and the full depth of the oven cavity
- This European Convection system aids in maintaining a more even oven temperature throughout the oven cavity. The circulating air aids in speeding up the baking process and cooks the food more evenly.
- By controlling the movement of heated air, convection cooking produces evenly browned foods that are crispy on the outside yet moist inside.
- Convection cooking works best for breads and pastries as well as meats and poultry. Airleavened foods like angel food cakes, soufflés and cream puffs rise higher than in a conventional oven.
- Meats stay juicy and tender while the outside is flavourful and crisp. By using European Convection, foods can be cooked at a lower temperature and cooking times can be shorter. When using this mode, the standard oven temperature should be lowered by 25 °F (15 °C).
- Foods requiring less cooking time should be checked slightly earlier than normal. For best results, foods should be cooked uncovered, in low-sided pans to take advantage of the forced air circulation. When using the Convection Roast mode, the standard oven temperature does not need to be reduced.
Oven Modes
- The following illustrations give an overview of what happens in the oven with each mode setting. The arrows represent the location of the heat sources during specific modes. The lower element is concealed under the oven floor.
- In maximum setting time for heating, it is until 11 hours 59 minutes.
- After the heating end, “End” is displaying it to a display:
- Time is united by + [INC] or - [DEC], and additional heating can be performed.
- Change of a function can be performed by Cooking Mode Dial.

Convection Bake MULTI CONV BAKE)
- Set temperature: from 120 °F (50 °C) to 485 °F (250 °C) preset position 375 °F (190 °C)
- Convection Bake cooks with heat from ring elements behind the back wall of the oven. The heat is circulated throughout the oven by the
- Convection Fan.
Convection Broil CONV BROIL)
- Set temperature: from 120 °F (50 °C) to 485 °F (250 °C) preset position 445 °F (230 °C)
- Convection Broil combines the intense heat from the upper element with the heat circulated by the Convection Fan.
Convection Roast CONV ROAST)
- Set temperature: from 120 °F (50 °C) to 485 °F (250 °C) preset position 375 °F (190 °C)
- Convection Roast uses the upper and lower elements and Convection Fan.
QUICK TIPS
CONVECTION COOKING
- About Convection Cooking Standard cooking modes (Bake, Broil, etc.) use heat radiated from one or more elements to cook food.
- Convection modes use both heat from the elements and fans in the back of the oven to continuously circulate the heated air throughout the oven.
Advantages of Convection Cooking
• Even baking, browning and crisping.
• Juices and flavors are sealed in.
• Air-leavened foods such as cream puffs, soufflés, meringues and breads are higher and lighter.
• Multiple rack cooking.
• No special bakeware required.
• Saves time and energy
Convection Bake
• Large quantities of food on multiple racks.
- Pastries, breads, snack, foods and appetizers.
- Use low-sided, uncovered pans.
- Center baking sheets side to side on the oven rack.
- Reduce recipe temperature by 25 °F (15 °C).
- Check food for doneness early:
- If recipe call for Check food min. 3 min. early min. 5 min. early min.-1hr. 10 min. early
Convection Broil
- Thicker, tender, cuts of meat, poultry and fish.
- DO NOT use this mode for browning breads or casseroles.
- Meats should be at least 1” thick.
- No conversion from standard Broil is necessary.
- Refer to Convection Broil
- Chart in this Manual for cooking times.
Setting an oven function manually
Setting an automatic oven function
- After having selected a function as described before, the control can be programmed in order to set timed cooking activities. The time program remains active even if the function is changed (exception: pyrolyse).
- The following possibilities are available:
- Timed cooking setting the cooking time (duration).
- Timed cookitng setting the end of cooking time stop time).
- Delayed cooking setting duration and stop time.
- Push the knob in order to toggle between cooking duration (cook time) and end of cooking time (stop time): the words “dur” or “End” are displayed respectively.
- Turn the knob left/right to edit the duration or the stop time when the proper word is displayed:
- When the word dur is displayed, the control shows as the standard cooking duration. Turn the knob left/right in order to set the actually desired cooking time in a range between 0 and 240 minutes.
- The display will flash dur and its value alternatively for a few seconds then it will show the time of day, the pot symbol and the letter to indicate that a timed cooking is active. The end of cooking time is updated automatically.
- When the word End is displayed, the control shows the current time as the initial stop time. In order to set the actually desired end of cooking time in a 24 hours range:
- Turn the knob left/right, the hours flash.
- Modify the flashing hours value turning the knob left/right.
- Push the knob to switch back and forth between hours and minutes or wait a few seconds until the minutes flash.
- Modify the flashing minutes value the knob left/ right.
- Wait until the new End of Cooking time value stops flashing.
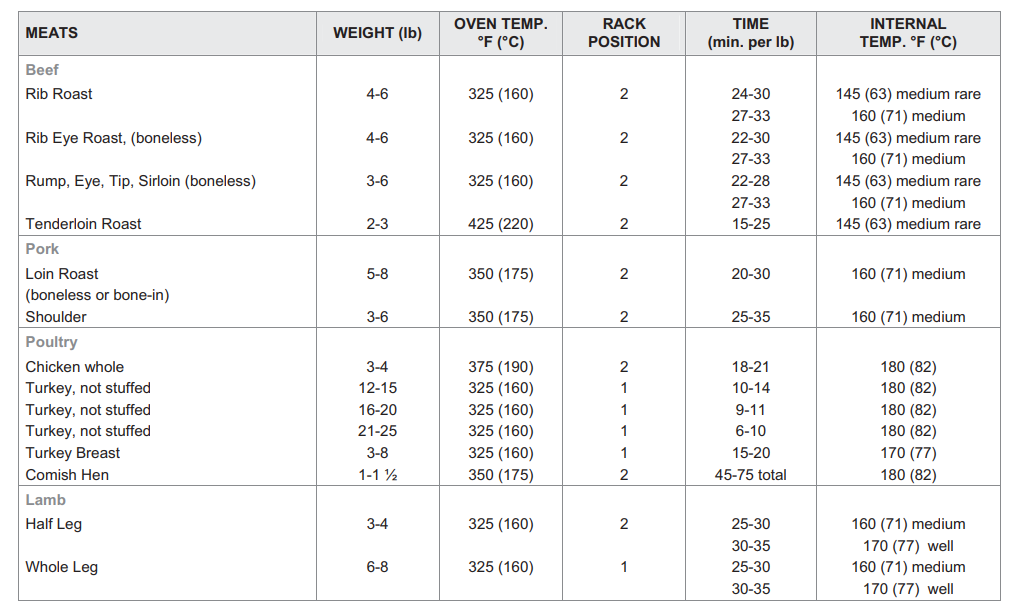
Convection Roast Chart
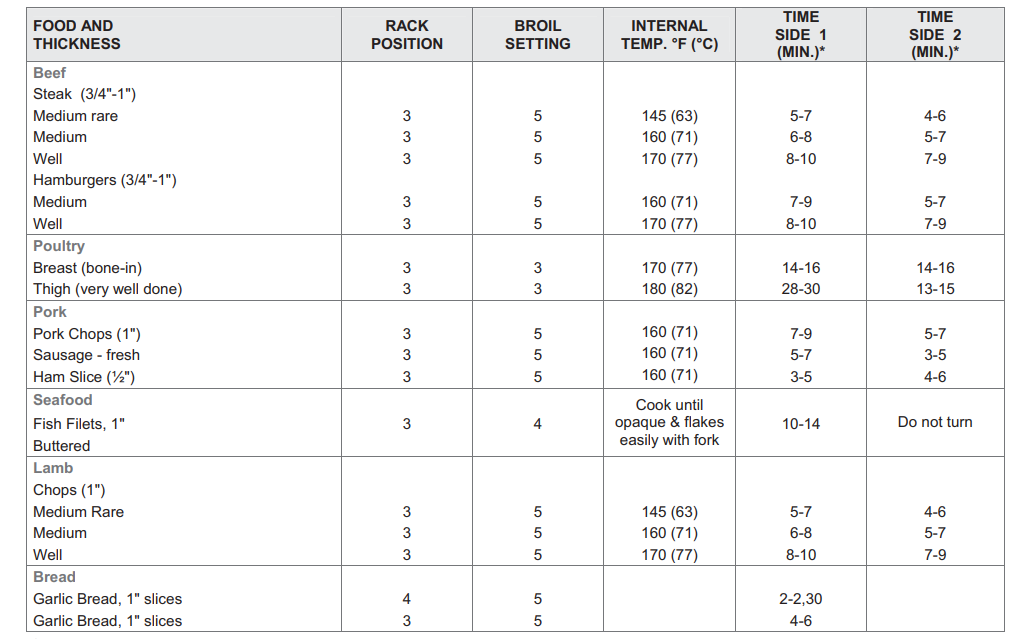
Broil Tips and Techniques
Oven Care and Cleaning
Self-Cleaning the Oven
- This oven features a pyrolytic Self-Cleaning function that eliminates the difficult and time consuming manual scrubbing of the oven interior. During Self-Cleaning, the oven uses a very high temperature (approx.
- F/460 °C) to burn away food soil and grease.
- It is common to see smoke and/or an occasional flame-up during the Self-Cleaning cycle, depending on the content and amount of soil remaining in the oven. If a flame persists, turn off the oven and allow it to cool before opening the door to wipe up the excessive food soil.
- The door latch is automatically activated after selecting the Self-Cleaning cycle. The “SYMBOL” writings will appear in the display. This ensures that the door cannot be opened while the oven interior is at clean temperatures.
- The oven light does not operate during this mode.
- During Self-Cleaning, the kitchen should be well ventilated to help eliminate odors associated with SelfCleaning. Odors will lessen with use. h:30 is the preset length of cleaning.
- The mode automatically stops at the end of the clean hours.
- When the oven heat drops to a safe temperature, the automatic door lock will release and the door can be opened.
Preparing the Oven for Self-Cleaning
- Remove all utensils and bakeware.
- Remove non-porcelain oven racks.
- Wipe up any soft soil spills and grease with paper towels. Excess grease will cause flames and smoke inside the oven during Self-Cleaning.
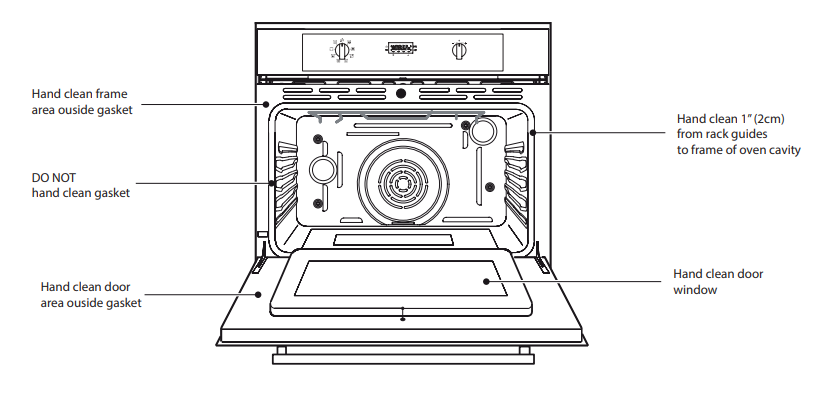
- Review illustration below. Some areas of the oven must be cleaned by hand before the cycle begins.
- They do not get hot enough during the cleaning cycle for soil to burn away. Use a soapy sponge or plastic scrubber or a detergent-filled S.O.S.® pad.
- Hand-clean the oven door edge, oven front frame and up to cm) inside the frame with detergent and hot water. Do not rub the gasket on oven. Clean by hand the oven door window. Rinse all areas thoroughly then dry.
- Be sure oven interior lights are turned off and the light bulbs and lens covers are in place. See Page 28.
Setting the Self-Cleaning Mode
Pyrolyse (Self-Clean)
- Turn the mode knob in the proper position than press the +/- knob to start a cleaning cycle.
- The clean time can be set according to the same rules of the automatic functions, and therefore the pyrolitic cycle can be delayed.
- The maximum allowed clean time is 3 hours, the minimum 1 hour. The standard time is 1h:30min, the clock display shows P1:30. At the end of the selfcleaning activity the display shows P--- steady and flashing. The writings on the display disappear when the mode selector is placed in the ZERO position. The door remains locked until the oven temperature drops below the safety threshold, at this time the control unlocks the door.
- The cooling fan starts as soon as the function is selected and turns to its higher speed when the inner parts get hot. The oven temperature is automatically set to 460°C in order to perfectly clean the cavity.
- The control also locks immediately the door in order to guarantee the user safety, given that the temperature inside gets very hot. A lock led shows the status of the latch mechanism at any time:
- Door unlocked, lock led off.
- Door locked, lock led always on.
- Latch moving, transition in progress, lock led flashing.
- To reuse the oven after a pyrolyse, turn the mode selector to ZERO (OFF) position.

General Oven Care
How to Use the Cleaning Chart
1. Locate the number of the part to be cleaned in the illustration on this page.
2. Find the part name in the Cleaning Chart.
3. Match the letter with the cleaning method on following page.
Oven Finishes / Cleaning Methods
• The entire oven can be safely cleaned with a soapy sponge, rinsed and dried. If stubborn soil remains, follow the recommended cleaning methods below.
• Always use the mildest cleaner that will do the job.
• Rub metal finishes in the direction of the grain.
• Use clean, soft cloths, sponges or paper towels.
• Rinse thoroughly with a minimum of water so it does not drip into door slots.
• Dry to avoid water marks. The cleaners listed below indicate types of products to use and are not being endorsed. Use all products according to package directions.
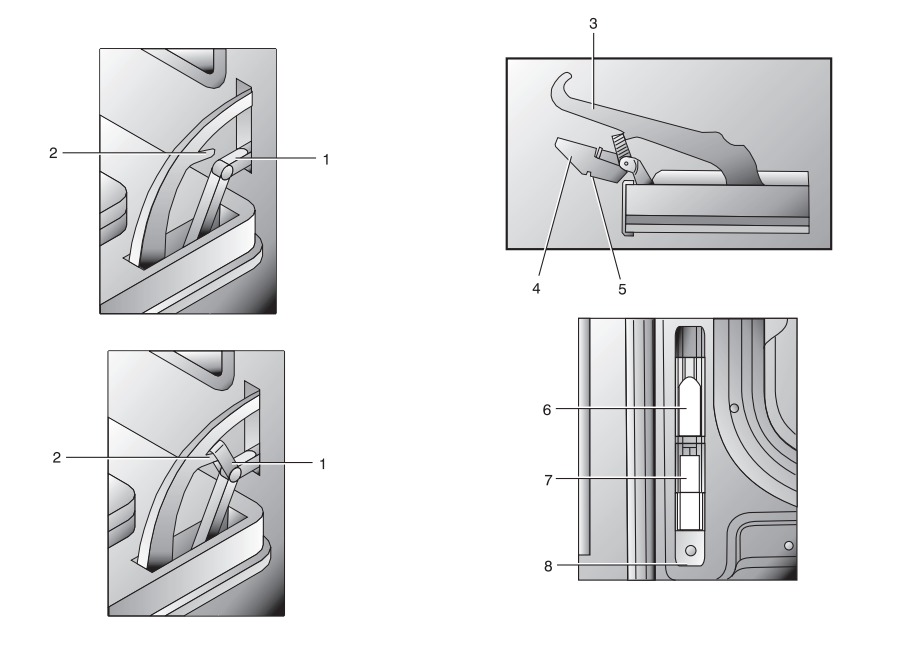
Do-it-Yourself Maintenance Oven Door Removal

Replacing an Oven Light
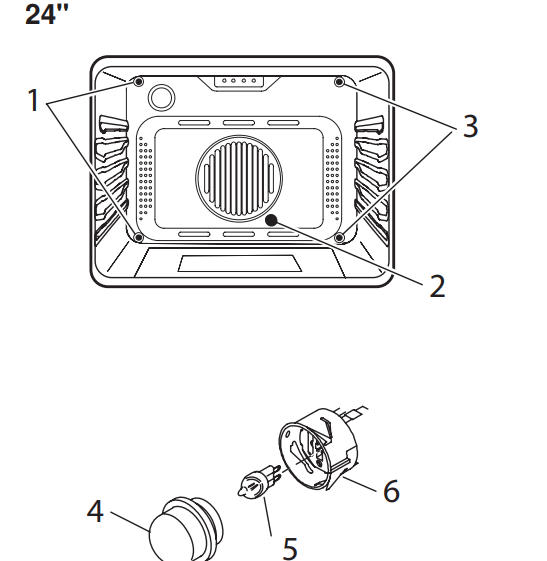
[IMAGE]
Solving Baking and Roasting Problems
Food browns unevenly
- Oven not preheated
- Aluminum foil on oven rack or oven bottom
- Baking utensil too large for recipe
- Pans touching each other or oven walls
Food too brown on bottom
- Oven not preheated
- Using glass, dull or darkened metal pans
- Incorrect rack position
- Pans touching each other or oven walls
- Food is dry or has shrunk excessively
Oven temperature too high
- Baking time too long
- Oven door opened frequently
- Pan size too large
- Food is baking or roasting too slowly
Oven temperature too low
- Oven not preheated
- Oven door opened frequently
- Tightly sealed with aluminum foil
Pan size too small
- Piecrust do not brown on bottom or have soggy crust
- Baking time not long enough
- Using shiny steel pans
- Incorrect rack position
Oven temperature is too low
- Cakes pale, flat and may not be done inside
- Oven temperature too low
- Incorrect baking time
- Cake tested too soon
Oven door opened too often
- Pan size may be too large
- Cakes high in middle with crack on top
- Oven temperature too high
Baking time too long
- Pans touching each other or oven walls
- Incorrect rack position
- Pan size too small
- Piecrust edges too brown • Oven temperature too high
- Edges of crust too thin
Oven is not heating
- Check the circuit breaker or fuse box to your house. Make sure there is proper electrical power to the oven. Make sure the oven temperature has been selected.
Oven is not cooking evenly
- Refer to cook charts for recommended rack position. Always reduce recipe temperature by 25 °F (15 °C) when baking with Convention Bake mode.
Oven will not Self-Cleaning properly
- Allow the oven to cool before running Self-Cleaning. Always wipe out loose soils or heavy spill-over before running Self-Cleaning. If oven is badly soiled, set oven for a four-hour Self-Cleaning. See Preparing the Oven for Self-Cleaning, Page 23 to 24.