Dishwasher Use & Care Guide
Operating Tips
Before You Start
- Don't prerinse. Simply scrape off any bones or large food particles.
- If connected to a food waste disposer, make certain the disposer is empty before starting the dishwasher.
- Scrape off tomato=based food soils (see page 7).
- Remove certain foods such as mustard, mayonnaise, lemon juice, vinegar, salt or dressings from stainless steel flatware as soon as possible.
- These foods may cause rusting and pitting if allowed to remain in contact with the surface for an extended period of time.
Operating the Dishwasher
1. After loading the dishwasher and adding detergent, select the desired cycle by pressing the cycle select pad until the light next to the desired cycle is illuminated. Choose the desired options by pressing the pads. The indicator lights for the selected cycle and options will illuminate. To cancel an option press the pad again.
2. To start a cycle, close the door until it latches then press the START/Cancel pad once. After a pause, the fill will begin. The display countdown (select models) will flash until START/Cancel is pressed.
Note
- If START/Cancel is not pressed within 30 seconds of choosing your cycle, the dishwasher will turn off.
The dishwasher remembers your last cycle so you do not have to reset the cycle each time. To start the dishwasher using the same cycle and options selected on the previous wash, just press the START/Cancel pad.
3. To cancel a running cycle, press the START/Cancel pad once. The dishwasher will drain, then shut off. To turn the dishwasher off without draining, press the START/Cancel pad twice. To prevent unplanned cycle or option changes, these selections are "locked in" after 1 minute.
Note
- If the cycle select pad is pressed after the controls have been "locked in",the light above the current cycle will flash three times.
Adding a Forgotten item
For best cleaning, the forgotten item should be added early in the cycle.
- Grasp door handle and unlatch door without opening completely. All lights will flash to indicate that the cycle is suspended.
- Wait for the water circulation to stop.
- Open the door and add the item.
- Close and latch the door. Lights will stop flashing when the door is properly shut. After a slight delay, the cycle resumes automatically at the point of interruption.
Notes
If the door is opened during a running cycle, there may be up to a 30 second delay before the dishwasher restarts after closing the door. . Extended interruption of the wash cycle is not recommended.
General Recommendations (Rack features vary by model)
- Items can be centered behind a single tine or loaded at an angle to maximize space.
- Avoid blocking or preventing the spray arms from spinning freely. Do not allow items to extend beyond the racks.
- Face soiled surfaces toward the center of the dishwasher.
For best dishwashing results follow these guidelines to determine the best arrangement for your items.
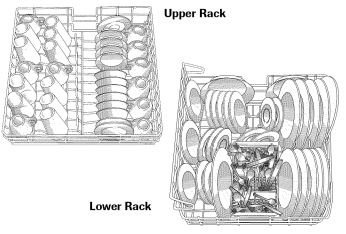
10 Place Setting Load (Rack features vary by model)
Loading
Upper Rack
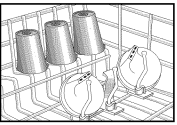
Glasses, cups, stemware, light-weight plastics, plates, bowls, pans, long-handled utensils etc. can be loaded in this rack. Do not load glasses over the tines.
The Stack=Rack (select models) on the right side of the upper rack folds up or down for loading flexibility. Fold it down to hold long-handled knives, spatulas and spoons or short items like cups or juice glasses. Fold it up for taller items like glasses, bowls, plates, etc.
The edge of the Stack - Rack (select models) is designed to hold stemware in place. Taller stemware will fit better on the right side as the upper rack is deeper on this side.
The Cap Clips (select models) located in the center of the upper rack can be used to hold light-weight plastic items, cooking utensils, knives, etc. in place. Clip the item between the tine and the clip.
Lower Rack
A variety of items such as dinner plates, mixing bowls, pots and pans and baking dishes can be loaded in this rack. Wider items can be placed along the left side and back of this rack.
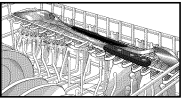
Utensil Basket
Removable Standard Utensil Basket (style may vary)
For best cleaning results, prevent items from nesting together by placing some items in the basket with handles up and some with handles down. On models with slotted covers, load knives, handles up and spoons and forks handles down. 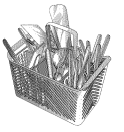
Be sure that thin, finely pointed items do not extend through the basket. This could block the lower wash arm.
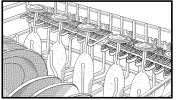
Auxiliary Basket (select models)
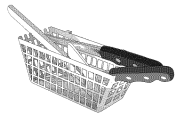
Use this supplemental basket in the upper or lower rack for loading miscellaneous items and utensils. This is also a safe place to load sharp knives and pointed items.
Removing the Upper Rack
The upper rack can be removed when tall or oversized items need to be loaded into the lower rack. Unload the rack before removing it from the dishwasher.
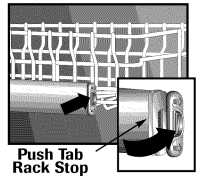
To remove rack: .
- Roll the rack '_ to '/2 of the way out.
- To remove each plastic push tab rack stop from the end of each track, push inward (toward the rack) on the ridged area of the rack stop. The rack stop will snap open and can be easily removed by pulling straight out. Take care to support the track while removing rack stops.
- Roll the rack all the way out of the track and remove from the dishwasher.
To replace:
- Reverse the above procedure to replace the rack into the dishwasher.
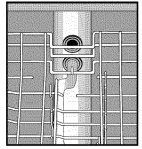
Important
The dishwasher will not operate correctly if the wash arm is not aligned with one of the water inlet holes on back wall of the dishwasher.
Dishwasher Use
Hot Water
For optimal cleaning and drying results, hot water is necessary. The incoming water temperature should be 120 ° F (49 ° C) to properly activate the detergent and melt greasy food soils.
To check the incoming water temperature, turn on the hot water faucet nearest the dishwasher and let it run into a glass in the sink. Place a candy thermometer in the glass and check the temperature once it has stopped rising.
Detergent
Use a detergent designed specifically for use in an automatic dishwasher. Be sure it is fresh. Store granular detergent in a cool, dry place (not under the sink).
Recommended Amount
Too little detergent results in poor cleaning, hard water filming/spotting and poor drying. Too much detergent can cause permanent etching/cloudiness.
The amount of detergent to use is determined by the hardness of the water and soil level of the load. Refer to the following chart for detergent usage recommendations.
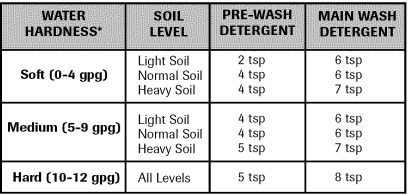
*Your local water utility or state university extension service can tell you the degree of water hardness in your area.
In extremely hard water conditions (13 grains per gallon or more*), it is difficult to achieve good results with any dishwasher. A mechanical water softener may be necessary to improve water quality, detergent effectiveness, and protect the dishwasher parts from the damage that hard water can cause.
Add recommended amount of detergent to each cup as shown and close the detergent lid.
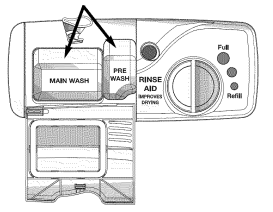
Do not use detergent with the Rinse Only (select models:) cycle. Leave the detergent lid open when running Rinse Only (select models:).
Rinse Aid
Regular use of a rinse aid improves drying, reduces spotting and filming, and reduces moisture left on the dishwasher interior.
An automatic rinse aid dispenser is located next to the detergent cup.
The window next to the dispenser cap indicates when the rinse aid reservoir needs to be refilled. When the level of rinse aid is below the indicator marks and the window is nearly clear, it is time to refill the dispenser. Check the dispenser monthly.
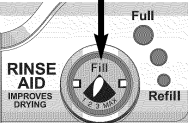
To add rinse aid to the dispenser, turn the cap counterclockwise to open. Remove the cap and pour liquid rinse aid into the opening. The amount of rinse aid dispensed during the cycle is adjustable by moving the lever inside the reservoir area. For most water conditions use the manufacturer recommended setting of "2': Adjust it up to the "MAX" setting for hard water. Set the lever anywhere between these amounts as needed to get the best results. Replace the cap and turn it clockwise to close.
Cycles,Options and Lights
Cycles
Choose the cycle that best describes your dishload by pressing the cycle select pad. (See page 2, Operating Tips, for how to begin the cycle).

* Includes approxtmately 30 mtnutes of dry trine.
**Number of fills wtll vary dependtng on the sotl level of each load.
Notes
- Depending on water temperature, there may be ttr]_eadded to the cycle to brmg water up to temperature.
- Only the follow,ng cert,fied cycles have been des,gned to meet NSF requirements (NSF/ANSI 184 Res,dent,al Dishwasher) for samttzat,on: Heavy Wash, Normal Wash and Light Wash.
Cycle Options
In addition to choosing a cycle, choose as many available options as are needed for your dishload.

* Only these cycles have beet] designated to meet NSF requirements (NSF/ANSI 184 Restdent,al Dishwasher) for santttzatton.
CAUTION - In models with plastic interiors, it is normal to notice vapor escaping from the door vent in the upper left corner of the door as the heat dries your dishes. The vapor is hot and may cause minor burns.
Options

Lights/Display
Delay
The Belay option can be used to automatically start the cycle at a later time to reduce daytime heat buildup in the home or to take advantage of reduced energy costs if available in your area. This option is also useful for conserving hot water at times of high household usage (showers, laundry).
To set up a Delay:
- Select the appropriate cycle and options for the load. Close the door.
- Press theDelay pad until the desired amount of delay time is selected.
- The Delay indicator and the count down display (select models) will flash until the START/Cancel pad is pressed.
- As soon as the START/Cancel pad is pressed, the flashing will stop and the delay time will begin counting down. The Delay indicator will remain lit until the delay time has counted down.
- The cycle will automatically start as soon as the delay time expires.
Note
- If 30 seconds elapse between setting the cycle and options and pressing the START/Cancel pad, the dishwasher will turn off.
To cancel a Delay:
When the delay is counting down, press the Delay pad again. The indicator light will go out and the cycle will start or resume immediately.
To cancel a Delay and the cycle:
- Press START/Cancel once to drain and turn off the dishwasher.
Or
- Press START/Cancel twice to turn dishwasher off without draining.
Lights/Display (select models)

Notes
- When Sanitize is selected, cycles are monitored to assure sanitization. The SANITIZED light will not activate if sanitization requirements are not met. This could happen if the cycle is interrupted, power failure occurs or incoming water temperature is below 120° F (49° F).
- The CLEAN and SANITIZED indicator lights (select models) will not relight after a power failure until after the next cycle is run.
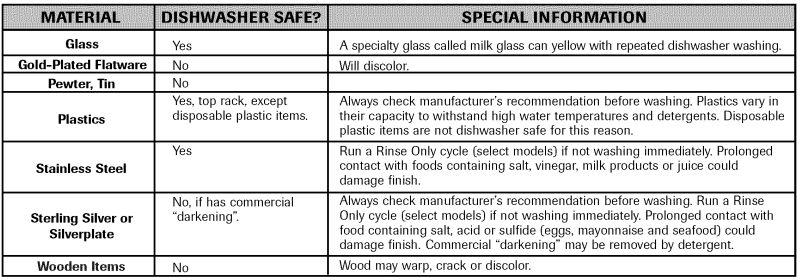
What Can and Cannot Be Washed
Most tableware, cookware and flatware can safely be washed in your dishwasher. Check with the manufacturer.
Care and Cleaning
General Recommendations
- The dishwasher interior is normally self-cleaning. Periodically check the bottom of the dishwasher tub to see if any large particles remain.
- Wipe the edge of the inner door liner to remove any food soil splashes which occurred during loading.
- When cleaning stainless steel. always wipe with the grain. Never use products containing chlorine bleach or citric acid.
-
The color from some tomato-based food soils may occasionally adhere to various components of the dishwasher interior. causing temporary discoloration.
To minimize this:
- Remove excess tomato-based food soils from dishes. prior to loading.
- Run the Heavy Wash cycle when washing loads containing tomato-based food soils.
- Use a dishwasher detergent that contains chlorine to better fight staining.
Standard Exterior
Light to moderate
- Soft damp cloth and liquid spray cleaner. Do Not use abrasive powders or cleaning pad.
Stainless Steel Exterior (select models)
Daily cleaning and light soil
- Soft cloth or sponge and one of the following:
- Mild detergent and water
- A solution of white vinegar and water
- Formula 409 Glass and Surface Cleaner*. or similar multi-surface cleaner.
- Do Not use products containing chlorine bleach or citric acid.
- Follow with rinse and dry.
Moderate to heavy soil
- Soft cloth or damp sponge and Bon Ami**. Follow with rinse and dry.
Streaks or fingerprints/restore shine
- Soft cloth and Stainless Steel Magic Spray**
Discoloration
- Soft cloth or damp sponge and Cameo Stainless Steel Cleaner*. Rinse immediately and dry.
Interior
Light to moderate
- Soft cloth or damp sponge.
Discoloration, or tomato-based stain
- Switch dishwasher detergent to chlorine-based product.
*Brand names are trademarks of the respective manufacturer.
**Call 1-877-232-6771 to order.
Storage/Moving
Fill detergent cup with a fresh-scented dishwasher detergent or baking soda and select the Normal Wash cycle. Allow the dishwasher to complete the cycle. Then turn the water supply off and drain the dishwasher. To drain, press the START/Cancel pad once to activate the dishwasher. Press STARTICancel again to activate the drain. Operate the drain twice to ensure most of the water is removed. Last, disconnect the electrical supply and prop open the door.
When turning the water supply to the home off, the water shut off at the dishwasher must be turned off also.
Troubleshooting
CHECK THESE POINTS TO HELP SAVE YOU TiME AND MONEY.
Dishwasher will not fill
- Press the START/Cancel pad to start the dishwasher.
- Be sure door is latched securely.
- Be sure the water is turned on.
- Check that the pad is properly selected for a cycle.
- Check your home's circuit breaker or fuse box.
- Check inlet hose for a kink.
- Check water valve inlet for sediment and clean if necessary.
Dishwasher will not drain/ water in tub bottom
- If hooked up to a food waste disposer. be sure the knock-out is removed from the disposer inlet.
- Check for food obstruction in the drain or disposer.
- Check drain hose for a kink.
- Check your home's circuit breaker or fuse box.
- Check that the cycle is completed.
Dishwasher adds water at end of cycle
- This is normal. The sensor (select models) in the pump must stay submerged so a short fill of water is added after the cycle's last drain.
Detergent cup is not empty
- Check that the cycle is completed.
- Be sure dispenser is not blocked.
- Use fresh detergent stored in a cool, dry place.
Dishwasher seems noisy
- A water valve hiss during fill is normal.
- Water circulation sounds are normal.
- A thumping sound may be a wash arm bumping an item that is extending beyond the racks. Readjust load to avoid obstructing wash arm.
- Chopping or grinding sounds may be heard as the internal food disposer chops hard items like fruit seeds. nuts. etc.
- Humming during the drain is normal.
- A snap noise is the detergent cup lid hitting the door liner when the dishwasher door is opened at the end of the cycle. This is normal.
- Proper installation affects the noise level.
Cycle takes too long (Heating Delay light [select models] stays on)
- Sanitize has been selected and the cycle is extended to heat water.
- Check to see that the incoming water temperature is 120° F (49° C).
Dishwasher has an odor
- Run dishes being held in the dishwasher through a Rinse Only cycle (select models).
- Many dishwashers have a “new” smell when first installed. This will dissipate with use.
- Dishwasher may not be draining properly. (See “Dishwasher Will Not Drain” section.)
- For a strong odor. place baking soda in both sides of the detergent cup. Select Light Wash cycle and allow the water to circulate for about 10 minutes. Interrupt the cycle by unlatching the door and let it stand overnight. Restart the dishwasher by latching the door and allow it to complete the cycle. Another alternative is to use a dishwasher cleaning product such as Jet-Dry Dishwasher Cleaner*.
Dishwasher leaks
- Check that the dishwasher is level. (Refer to the Installation Instructions.)
- Suds can cause the dishwasher to overflow. Measure the detergent carefully and use only detergents designed for use in a dishwasher. Less detergent is needed in soft water. Try another brand of detergent if sudsing continues
- Follow directions closely on how to add a forgotten item (pg. 2).
- To avoid rinse aid leaking from the dispenser. be sure the lid is securely attached.
Display time suddenly drops or increases by several minutes (select models)
- This is normal when the Normal Wash cycle is selected and the dishwasher decides to skip or add a drain and refill.
Indicator lights flashing
- The countdown display (select models) flashes after a cycle is selected until the START/Cancel pad is pressed.
- The countdown display (select models) and the delay indicator flash after a delay is selected until the START/Cancel pad is pressed.
- All active display indicators flash if the door is opened during a running cycle or delay.
- The currently selected cycle flashes if an attempt is made to change the cycle after cycle “lock-in”
Glasses are cloudy/spotted
- Select Extra Rinse (select models).
- Check water temperature. Incoming water should be 120° F (49° C).
- Always use a rinse aid
- Confirm that the cloudiness is removable by soaking the item in white vinegar for approximately 5 minutes. If removed. the problem is due to hard water. Adjust detergent amount being used to match water hardness (pg. 4). Be sure detergent is fresh. stored properly and is a high quality brand
- If cloudiness is not removable. it is etching. This is an erosion of the surface of the glassware and can be caused by water that is too hot. from using too much detergent or by prewashing. Detergent needs food soil to act upon. If etching has occurred. the glassware is permanently damaged. To prevent further etching. adjust the detergent amount to match the water hardness. stop prewashing. and use water heating options only when incoming water temperature is below 120° F (49° C).
Food soil remains on dishes
- Check water temperature. Incoming water should be 120° F (49° C).
- Run hot water at the sink before starting the dishwasher.
- Check water hardness and adjust detergent amount accordingly (pg. 4).
- Use fresh detergent stored in a cool dry place.
- Select proper cycle for the soil level (pg. 5).
- Make sure the upper rack wash arm connector is correctly aligned in one of the water inlet holes (pg. 3).
- Load items so they do not block the wash arms (pg. 2-3).
- Load the utensil basket with knife handles up and spoon and fork handles down.
- Do not place glasses over tines.
- Prior to loading. scrape off burnt on foods and wipe the starchy film from utensils used with pasta. rice and oatmeal. These soils require more energy than the rest of the load to clean.
Items washed in the dishwasher or the dishwasher tub itself are stained/ discolored
- Aluminum utensils or pans can leave marks when they rub against other items. Leave a slight space between items.
- Iron deposits in the water can leave a yellow. brown or orange film on dishes or the dishwasher tub. A rust filter may be needed. Check with a water treatment company.
- Separate silver or silver-plated silverware from stainless steel. These metals can be damaged by contact with each other during washing
- Color from tomato sauces may adhere to the interior parts of the dishwasher (pg. 7). If light staining has occurred. leave the door open to oxidize the stain away. Use a dishwasher detergent that contains chlorine to better fight staining
- Certain dishwasher detergents may stain silver. Try another brand of detergent.
Items not properly dried/ moisture is present on the dishwasher interior after the dry cycle
- Be sure Heated Dry is selected.
- Water droplets may form on the inner door as part of the drying process.
- Use a rinse aid separate from the detergent like Jet Dry* or Cascade Rinse Aid* regularly. to improve drying. Turn the rinse aid selector toward the MAX setting.
- Check water temperature. Incoming water should be 120° F (49° C).
- Select Sanitize.
- Increase detergent amount to match water hardness (pg. 4).
- Load properly. (pg. 2-3)
- Plastic and items with non-stick surfaces are difficult to dry because they have a porous surface which tends to collect water droplets. Towel drying may be necessary.
- Glasses and cups with concave bottoms hold water and require towel drying. Locate these items on the more slanted side of the rack for improved results.
Dishware is chipped
- Load dishes according to instructions so they do not strike each other (pg. 2-3).
- Washing fine antique china/crystal in the dishwasher is not recommended.
- Do not load glasses over the tines.
- Do not overload.
Sanitized light does not illuminate at the end of the cycle (select models)
- Sanitize was not selected.
- Sanitization can only be achieved with the Heavy Wash. Normal Wash or Light Wash cycles.
- Sanitization may not be achieved if there is an interruption of the cycle. power failure or if incoming water temperature is below 120° F (49° C).
*Brand names are trademarks of the respective manufacturer.
Warranty and Service
Dishwasher Warranty
Full One Year Warranty
For one (1) year from the date of original retail purchase. any part which fails in normal home use will be repaired or replaced free of charge.
Limited Second Year Warranty
After the first year from the date of original retail purchase. through the second year. parts which fail in normal home use will be repaired or replaced free of charge for the part itself. with the owner paying all other costs. including labor. mileage. transportation. trip and diagnostic charges. if required.
Limited Third Through Fifth Year Warranty
After the second year from the date of original retail purchase. through the fifth year. all of the following components which fail 1n normal home use will be repaired or replaced free of charge for the part itself. with the owner paying all other costs. including labor. mileage. transportation. trip and diagnostic charges. if required. These components include:
All parts of the Jetclean II* wash system for all models. including the complete power module assembly. soil sensor. spray arms. wash manifold and motor.
Any microprocessor and touch pad assemblies.
All models against rust. including exterior cabinet and front panels of convertible models. the exterior front panels and accessory side panels of built-in models and DuraGuard* coated racks (available on select models).
Full Twenty-Year Warranty — Plastic Tub
From the date of original purchase through the twentieth year. should the tub develop a water leak in normal home use. the dishwasher will be replaced FREE OF CHARGE.
From the date of original purchase through the twentieth year. should the door liner develop a water leak in normal home use. repair or replacement of the door liner will be made FREE OF
CHARGE
PLEASE NOTE: These full warranties apply only when the dishwasher is located in the United States or Canada Dishwashers located elsewhere are covered by the limited warranties only. including a limited warranty for parts which fail during the first year.
Canadian Residents
These warranties cover only those dishwashers installed in
Canada that have been listed with Canadian Standards
Association unless the dishwashers are brought into Canada due to transfer of residence from the United States to Canada.
The specific warranties expressed above are the ONLY warranties provided by the manufacturer. These warranties give you specific legal rights. and you may also have other rights that vary from state to state.
What is Not Covered By These Warranties:
1. Conditions and damages resulting from any of the following:
a. Improper installation. delivery. or maintenance.
b. Any repair. modification. alteration. or adjustment not authorized by the manufacturer or an authorized servicer.
c. Misuse. abuse. accidents. or unreasonable use.
d. Incorrect electric current. voltage. or supply.
e. Improper setting of any control.
2. Warranties are void if the original serial numbers have been removed. altered or cannot be readily determined.
3. Products purchased for commercial or industrial use.
4. The cost of service or service call to: a. Correct installation errors. b. Instruct the user on the proper use of the product. c. Transport the appliance to the servicer.
5. Consequential or incidental damages sustained by any person as a result of any breach of these warranties.
Some states do not allow the exclusion or limitation of consequential or incidental damages. so the above exclusion may not apply.
To Receive Warranty Service
To locate an authorized service company in your area contact the Maytag dealer from whom your appliance was purchased or call Maytag Services. Maytag Customer
Assistance at the number listed below. Should you not receive satisfactory warranty service. please Call or write:
Maytag Services
Attn: CAIR’ Center
P.O. Box 2370. Cleveland. TN 37320-2370
U.S. 1-800-688-9900
Canada 1-800-688-2002
U.S. customers using TTY for deaf. hearing impaired or speech impaired. call 1-800-688-2080.
Note: When writing or calling about a service problem. please include the following information:
a. Your name. address and telephone number;
b. Model number and serial number of your appliance;
c. Name and address of your dealer or servicer and the date the appliance was purchased;
d. A clear description of the problem you are having;
e. Water hardness. detergent brand and amount. water temperature and cycle used;
f. Proof of purchase (sales receipt).
- User's guides. service manuals and parts information are available from Maytag Services'. Maytag Customer Assistance.
Maytag • 403 West Fourth Street North
P.O. Box 39 • Newton. lowa 50208

