Loading ...
Loading ...
Loading ...
ENGLISH
7
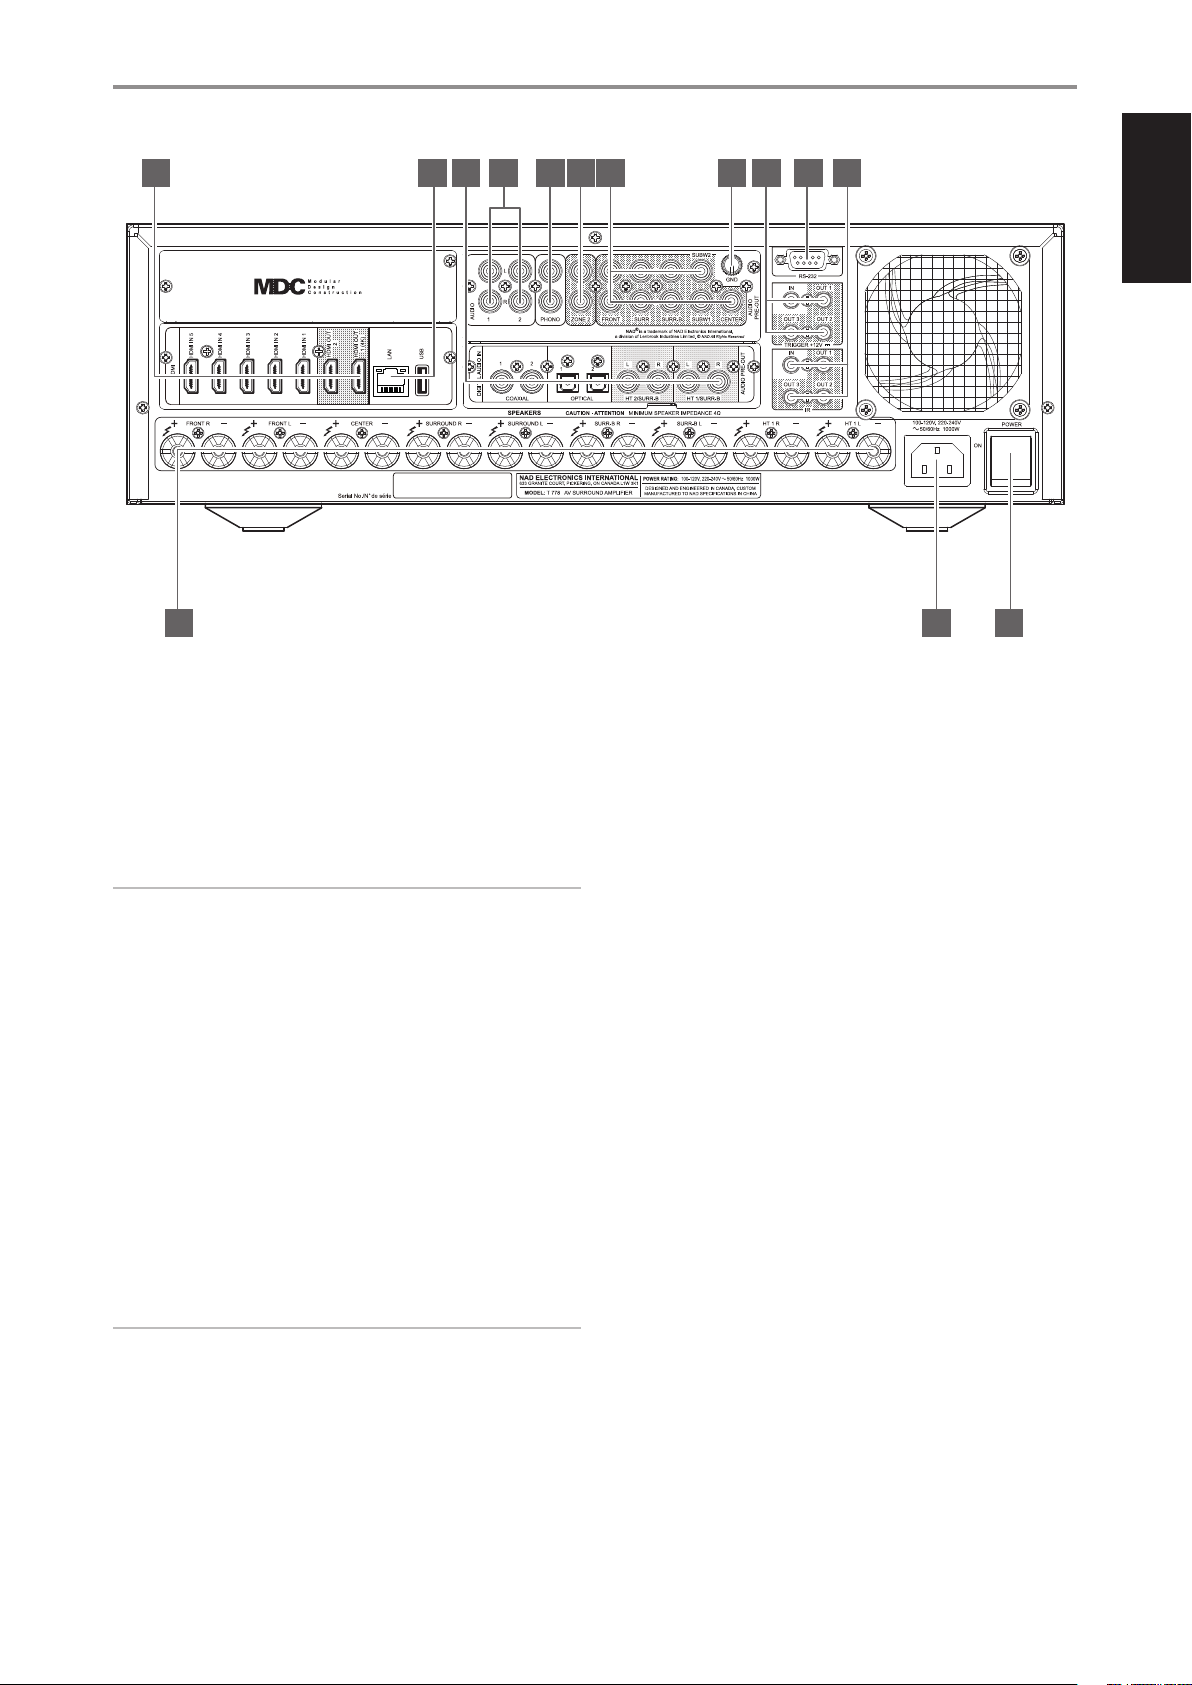
1 HDMI (HDMI 1-5, HDMI 1-2 OUT)
• Connect HDMI 1-5 to various HDMI OUT connectors of source
components such as DVD player, BD player, HDTV satellite/cable
box and other applicable types of equipment.
• Connect HDMI 1-2 OUT to HDTVs or projectors with HDMI input.
HDMI 1 OUT supports 4K@60 4:4:4 and HDCP 2.2 compliant. Both
HDMI output ports display simultaneously the same audio/video
source.
WARNING
Before connecting and disconnecting any HDMI cables, both the T 778
and the ancillary source must be powered OFF and unplugged from
the AC outlet. Failure to observe this practice may cause permanent
damage to all types of equipment connected via HDMI sockets.
2 ETHERNET/LOCAL AREA NETWORK (LAN) PORT
• LAN connection must be setup for wired connection to be
established. Set up a Wired Ethernet broadband router with
broadband internet connection. Your router or home network
should have a built-in DHCP server to consummate the connection.
• Using a standard straight-through Ethernet cable (not supplied),
connect one end of the Ethernet cable to the LAN port of your
wired Ethernet broadband router and the other end to T 778’s LAN
port.
• This Ethernet connection has similar function as that of the RS232
connection. With your PC and the T 778 on the same network,
it allows remote control of the T 778 via compatible external
controllers.
NOTES
• NAD is not responsible for any malfunction of the T 778 and/or the
internet connection due to communication errors or malfunctions
associated with your broadband internet connection or other
connected equipment. Contact your Internet Service Provider (ISP) for
assistance or the service bureau of your other equipment.
• Contact your ISP for policies, charges, content restrictions, service
limitations, bandwidth, repair and other related issues pertinent to
internet connectivity.
USB
• Connect the USB connector of the supplied BluOS/USB hub to this
USB input. Ensure that the Wi-Fi dongle and Bluetooth USB Micro
Adaptor are securely connected to any of the 4 ports of the USB
hub. If wireless connectivity is poor, connect Wi-Fi dongle to the
supplied extension cable and straighten out for better reception.
• Refer also to instructions on HOW TO SETUP WIRELESS
CONNECTION in the BluOS SETUP menu.
3 DIGITAL AUDIO IN (COAXIAL 1-2, OPTICAL 1-2)
• Connect to corresponding optical or coaxial digital output of
sources such as CD or BD/DVD players, digital cable box, digital
tuners and other applicable types of equipment.
• Coaxial and optical digital input association is congurable via the
Source Setup item of the Setup Menu.
HT 2/SURR-B HT 1/SURR-B
• Connect HT 2/SURR-B and/or HT 1/SURR-B to the audio input of an
external power amplier hooked up with up to 4 Height speakers.
4 AUDIO 1-2
• Input for line level sources such as CD player, tuner or any
compatible devices. Use dual RCA-to-RCA cable to connect the
source device’s left and right “Audio Output” to these line input
ports.
5 PHONO
• Input for a Moving Magnet (MM) phono cartridge only. Connect
twin RCA-to-RCA lead from your turntable to this input if you are
using a Moving Magnet cartridge.
• If your turntable includes a ground/earth lead, it can be connected
to the Ground Terminal (item 8).
6 ZONE 2
• Send zone selected audio source to the corresponding audio
input of a separately located additional amplier or receiver (not
supplied) that can power its matching set of speakers.
• Use high quality patch cables to reduce noise pickup over long
distance runs.
IDENTIFICATION OF CONTROLS
REAR PANEL
1 2 3 4 5 6
12 13
7 8 9 10 11
14
Loading ...
Loading ...
Loading ...