Loading ...
Loading ...
Loading ...
14
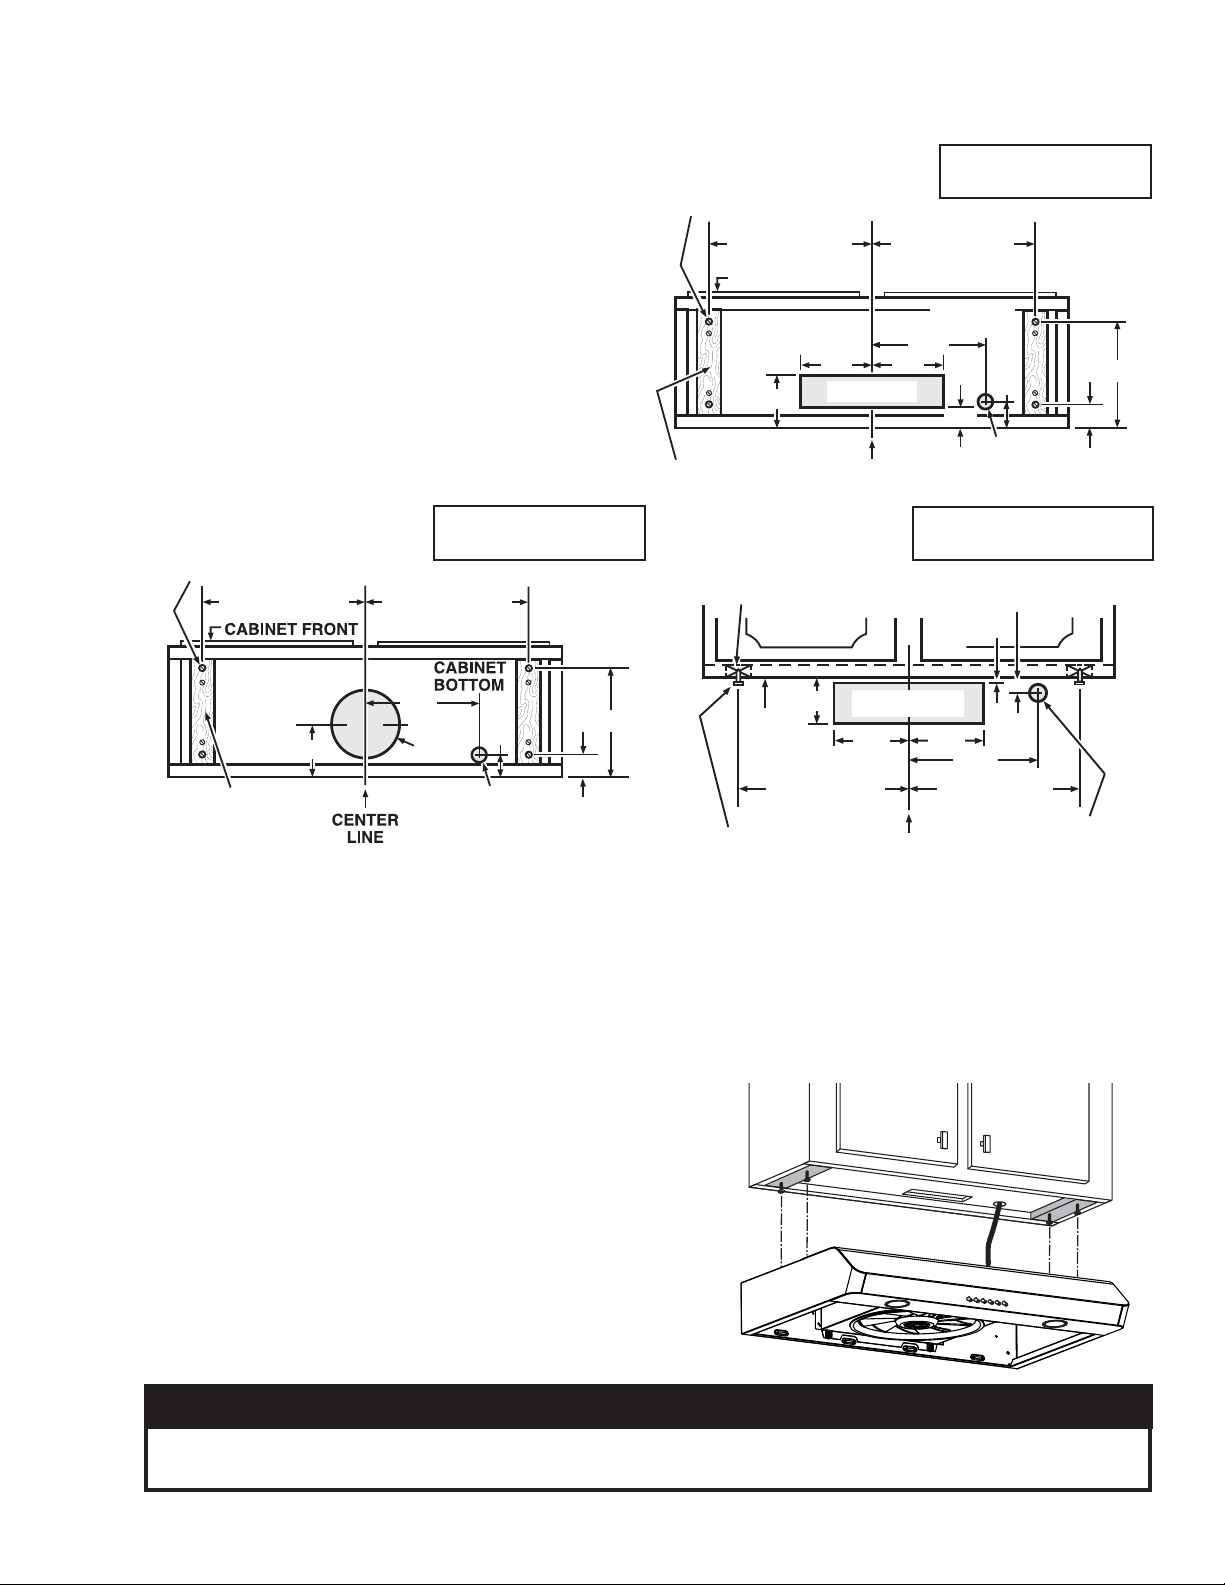
3¼” x 10”
VERTICAL DUCTING
3¼” x 10”
HORIZONTAL DUCTING
7” ROUND
VERTICAL DUCTING
1. Use these diagrams for proper placement of ductwork
and electrical cutout in cabinet or wall.
For a non-ducted installation, DO NOT cut a duct
access hole, only cut the hole for electrical wiring
Standard Installation (without EZ1 brackets)
VERTICAL DUCT
ACCESS HOLE
10
15
/16"
5¼"
5¼"
CENTER
LINE
HOOD MOUNTING SCREWS (4)
ELECTRICAL
ACCESS HOLE
(
IN CABINET BOTTOM)
WOOD SHIMS
(
RECESSED-BOTTOM
CABINETS
ONLY)
CABINET FRONT
3/4"
1⅜"
1½"
7³/16"
12⅞" (30" HOOD)
15⅞" (36"
HOOD)
4
7
/16"
CABINET
BOTTOM
12⅞" (30"
HOOD)
15⅞" (36"
HOOD)
CABINET
BOTTOM
CABINET FRONT
HORIZONTAL DUCT
ACCESS HOLE
HOOD
MOUNTING
SCREWS (4)
ELECTRICAL
ACCESS HOLE
(
IN WALL)
3⅞"
CENTER
LINE
WOOD SHIMS
(
RECESSED-BOTTOM
CABINETS
ONLY)
13/16"
3/16"
5¼"
5¼"
12⅞" (30" HOOD)
15⅞" (36"
HOOD)
12⅞" (30"
HOOD)
15⅞" (36"
HOOD)
7³/
16"
ELECTRICAL
ACCESS HOLE
(
IN CABINET BOTTOM)
HOOD MOUNTING SCREWS (4)
4¹¹/16"
8" DIA.
HOLE
7-IN. ROUND
7-IN. ROUND
DUCT
DUCT
ACCESS
ACCESS
HOLE
HOLE
7-IN. ROUND
DUCT
ACCESS
HOLE
WOOD SHIMS
(
RECESSED-BOTTOM
CABINETS
ONLY)
12⅞" (30"
HOOD)
15⅞" (36"
HOOD)
12⅞" (30"
HOOD)
15⅞" (36"
HOOD)
10
15
/16"
1½"
1⅜"
7³/
16"
2. Install part-way four (4) ROUND HEAD no. 8 x 5/8”
mounting screws into shims/cabinet, according to
the proper diagram above. (Mounting screws are
included in parts bag, but wood shims and shim
mounting screws are not included)
Install the Hood (Standard Installation)
1. Run house power cable between service panel and
hood location. Run the house power cable into the
hood through the strain relief previously installed in
step 5 on page 8.
2. Hang hood from (4) mounting screws previously installed.
Slide hood back towards wall until mounting screw
heads are engaged in narrow end of keyhole slots in
top of hood. Tighten screws securely. Attach power
cable to the hood using the strain relief.
DUCTED INSTALLATIONS ONLY
3. Connect the ductwork to the hood and use metal foil duct tape to make joints secure and air-tight. Make sure
the damper assembly (or round duct plate) enters the ductwork and that the damper opens and closes freely.
NOTE: Two installers are recommended because of the weight of this hood.
Loading ...
Loading ...
Loading ...