G2336U-G2351
UNIDAD ELECTRÓNICA
ELECTRONIC MONITOR
UNITÉ ÉLECTRONIQUE
ELEKTRONIKEINHEIT
UNIDADE ELECTRÓNICA
IMPIANTO ELETTRONICO
ELEKTRONISCHER MONITOR
Fig. 1 Fig. 2
Fig. 3 Fig. 4
Fig. 5 Fig. 6

3
Español
PUESTA EN MARCHA.-
Para poner en marcha el monitor en
primer lugar tiene que enchufar el
adaptador que se suministra con la
máquina a un enchufe de corriente
(220v.- 240v) y el terminal del adaptador
a la clavija situada en la parte inferior
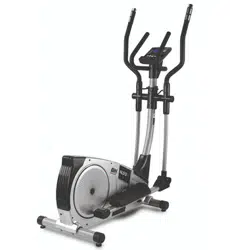
trasera de la máquina (Fig 4).
Si durante el desarrollo del ejercicio
pulsa el botón START/STOP todas las
funciones del electrónico se pararán.
Si pulsa de nuevo START/STOP
todas las funciones se pondrán de
nuevo en funcionamiento.
El monitor se apagará automática-
mente cuando la unidad esté 4
minutos parada.
Importante: Deposite los componen-
tes electrónicos en contenedores
especiales, Fig. 1.
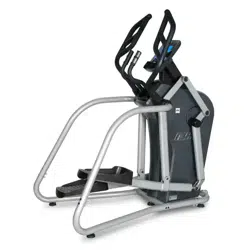
FUNCIONES DEL MONITOR.-
Este monitor dispone de 5 teclas: UP,
DOWN, START/ STOP; ENTER,
RESET. En el centro de la pantalla se
muestra simultaneamente el nivel del
programa que haya elegido. En la
parte inferior del display le indica la
VELOCIDAD/RPM; el TIEMPO; la
DISTANCIA; los WATIOS/CALORÍAS;
el PULSO.
Este monitor dispone también de 1
programa manual; 9 programas
predefinidos; 4 programa de usuario; 1
programa de watios; 4 programas de
control de ritmo cardiaco y 1 programa
random.
PASO DE UN MODO DE
TRABAJO A OTRO.-
Tras seleccionar el usuario
aparecerán parpadeando distintos
programas.
Este monitor tiene la posibilidad de
trabajar con 6 modos diferentes:
Manual, Programas, Watios (WATT),
Usuario (USER), Pulso (H.R.C.) y
aleatorio (Random). Para pasar de un
modo a otro hay que pulsar el botón
START/STOP para detener el
monitor, después pulsar RESET y,
usando los botones UP▲/DOWN▼
seleccionar el modo deseado.
FUNCION MANUAL.-
Pulsando las teclas UP▲/DOWN▼
seleccione la función manual y pulse
ENTER. Pulse la tecla START/STOP
para iniciar el ejercicio y con las teclas
UP▲/DOWN▼ suba o baje la
resistencia del ejercicio, teniendo 24
niveles de frenada. Si en el estado
inicial pulsa la tecla START/STOP
comenzará el ejercicio en función
manual directamente.
Programación de tiempo.-
Si tras seleccionar la función manual
pulsa la tecla ENTER, le parpadeará
la ventana del tiempo. Pulsando las
teclas UP▲/DOWN▼, puede
programar el tiempo de su ejercicio
entre (5-99 Minutos). Seleccione el
tiempo y pulse START/STOP para
comenzar el ejercicio. El tiempo irá
disminuyendo hasta alcanzar el valor
“cero“, y el monitor le emitirá unos
pitidos advirtiéndole que ha llegado al
valor programado.

4
Programación de la distancia.-
Si tras seleccionar la función manual
pulsa la tecla ENTER dos veces, le
parpadeará la ventana de la distancia.
Pulsando las teclas UP/DOWN, puede
programar la distancia de su ejercicio
entre (1- 99 Km). Seleccione la
distancia y pulse START/STOP para
comenzar el ejercicio. La distancia ira
disminuyendo hasta alcanzar el valor
«cero» y el monitor le emitirá unos
pitidos advirtiéndole que ha llegado al
valor programado.
Programación de las calorías.-
Si tras seleccionar la función manual
pulsa la tecla ENTER tres veces le
parpadeara la ventana de las calorías.
Pulsando las teclas UP▲/DOWN▼,
puede programar las calorías de su
ejercicio entre (10 - 990 Cal.).
Seleccione las calorías y pulse
START/STOP para comenzar el
ejercicio. Las calorías disminuirán
hasta alcanzar el valor “cero“, y el
monitor le emitirá unos pitidos
advirtiéndole que ha llegado al valor
programado.
FUNCIÓN PROGRAMAS.-
Pulsando las teclas UP▲/DOWN▼
seleccione la función PROGRAM y
pulse ENTER. Pulse las teclas
UP▲/DOWN▼ para seleccionar el
gráfico de programa (2-10) que desee
para hacer su ejercicio y pulse la tecla
ENTER. Pulse START/STOP para
comenzar el ejercicio. El tiempo de
duración del gráfico del programa es
de 10 minutos, repartidos en 10
escalas de un minuto.
Para programar tiempo, distancia y/o
calorías lleve a cabo los siguientes
pasos. Una vez seleccionado el
programa y antes de pulsar la tecla
START/STOP, pulse la tecla ENTER
para programar el tiempo utilizando
las teclas
UP▲/DOWN▼. En este
caso la duración del programa será
repartido entre las 10 escalas. Pulse
ENTER para programar la distancia.
Vuelva a pulsar ENTER para
programar las calorías. Pulse la tecla
START/STOP para comenzar el
ejercicio.
Una vez comenzado el ejercicio usted
puede variar la resistencia de frenada
pulsando las teclas UP▲/DOWN▼.
PROGRAMA DE WATIOS
CONSTANTES
Pulsando las teclas UP▲/DOWN▼
seleccione la función WATT y pulse
ENTER.
Pulsando las teclas UP▲/DOWN▼,
puede programar los watios de su
ejercicio entre (70 - 310 Watt.) y pulse
ENTER para programar el tiempo.
Pulse ENTER para programar la
distancia. Vuelva a pulsar ENTER para
programar las calorías. Pulse la tecla
START/STOP para comenzar el
ejercicio.
El nivel de esfuerzo del ejercicio se
autoajustará en función de la
velocidad y los watios seleccionados.
PROGRAMA DE USUARIO.-
Pulsando las teclas UP▲/DOWN▼
seleccione la función USER y pulse
ENTER.
Seleccione el usuario con las teclas
UP▲/DOWN▼ entre U1-U4 y pulse la
tecla ENTER.
Pulse la tecla ENTER durante 4
segundos.
A la izquierda de la zona central de la
pantalla aparecerá parpadenado la
primera columna de nivel del ejercicio.

5
Seleccione el nivel deseado para esta
primera escala pulsando las teclas
UP▲/DOWN▼ y luego pulse ENTER.
Repita el procedimiento para
programar las 10 escalas del
programa de usuario.
Una vez definido el programa de
usuario y antes de pulsar la tecla
START/STOP, pulse la tecla ENTER
durante 4 segundos hasta que
parpadee la función tiempo. Pulse las
teclas UP▲/DOWN▼ para seleccionar
el tiempo. Pulse ENTER para
programar la distancia. Vuelva a pulsar
ENTER para programar las calorías.
Pulse la tecla START/STOP para
comenzar el ejercicio.
PROGRAMAS DEL CONTROL
DEL RITMO CARDIACO.-
Pulsando las teclas UP▲/DOWN▼
seleccione la función H.R.C. y pulse
ENTER. Deberá seleccionar el ritmo
cardiaco objetivo para el ejercicio.
Con las teclas UP▲/DOWN▼
seleccione la opción deseada (60%,
70%, 85% o Tag) y pulse la tecla
ENTER. Las tres primeras indican el
porcentaje respecto al pulso cardiaco
máximo (220-edad) y la cuarta se
utiliza para introducir el ritmo cardiaco
objetivo de forma manual. Si elige
Tag, deberá utilizar las teclas
UP▲/DOWN▼ para seleccionar el
ritmo cardiaco deseado y pulsar
ENTER. Pulse START/STOP para
comenzar el ejercicio. El nivel de
frenada se ajustará automáticamente
de acuerdo al valor de pulso
seleccionado. Si el valor de pulso está
por debajo del valor objetivo, la
frenada aumentará un nivel cada 30
segundos hasta llegar al máximo de
24. Si el valor de pulso está por
encima del valor objetivo el monitor
emitirá unos pitidos de aviso y la
frenada disminuirá un nivel cada 15
segundos hasta llegar al mínimo de 1.
Si aún así el valor del pulso se
mantiene por encima del valor objetivo
durante más de 30 segundos, el
mónitor se parará por protección del
usuario y emitirá unos pitidos de aviso.
Para programar tiempo, distancia
y/o
calorías lleve a cabo los siguientes
pasos. Una vez seleccionado el
programa de pulso cardiaco y antes
de pulsar la tecla START/STOP, pulse
la tecla ENTER para programar el
tiempo utilizando las teclas
UP▲/DOWN▼. Vuelva a pulsar
ENTER para programar la distancia.
Por último vuelva a pulsar ENTER
para programar las calorias. Pulse la
tecla START/STOP para comenzar el
ejercicio.
En estos programas tienen que estar
las manos colocadas en los sensores
de pulso (R).
FUNCIÓN RANDOM.-
Pulsando las teclas UP▲/DOWN▼
seleccione la función RANDOM y
pulse ENTER. Aparecerá un
programa aleatorio. Pulse
START/STOP para comenzar el
ejercicio. El tiempo de duración del
gráfico del programa es de 10
minutos, repartidos en 10 escalas de
un minuto.
Para programar tiempo, distancia y/o
calorías lleve a cabo los siguientes
pasos. Una vez seleccionado el
programa y antes de pulsar la tecla
START/STOP, pulse la tecla ENTER
para programar el tiempo utilizando
las teclas
UP▲/DOWN▼. En este
caso la duración del programa será
repartido entre las 10 escalas. Pulse
ENTER para programar la distancia.

6
Vuelva a pulsar ENTER para
programar las calorías. Pulse la tecla
START/STOP para comenzar el
ejercicio.
Una vez comenzado el ejercicio usted
puede variar la resistencia de frenada
pulsando las teclas UP▲/DOWN▼.
INSTRUCCIONES - USO DEL
HAND-GRIP MEDICION DE
PULSO.-
PULSO Hand-grip.
El pulso de este modelo se mide
colocando ambas manos en los
sensores (R), que están puestos en el
manillar como se indica en la Fig.2.
Una vez colocadas ambas manos en
los sensores, comenzará a parpadear
el corazón en la parte derecha de la
pantalla que indica PULSE de la
pantalla del monitor y al cabo de unos
segundos aparecerá el valor de su
ritmo cardíaco.
Si no tiene colocadas ambas manos
correctamente como muestra la Fig.3,
el pulso no funciona.
Si en pantalla aparece una «P» o no
parpadea el corazón, asegúrese de
que tiene colocadas ambas manos en
los sensores.
PROGRAMA DE GRASA
CORPORAL.-
Este programa esta diseñado para
calcular el porcentaje de grasa corporal
del usuario. Con las teclas UP/DOWN
seleccione la función BODYFAT.
Seleccione con las teclas UP/DOWN la
altura (HEIGHT 90-210cm), pulse
ENTER, seleccione con las teclas
UP/DOWN su peso (WEIGHT 10–
150Kg), pulse ENTER, seleccione
seleccione con las teclas UP
/DOWN su edad (AGE 10–100 años).
Pulsando las teclas UP/DOWN
seleccione el sexo (Hombre – Mujer)
pulse ENTER para confirmar.
Pulse la tecla START/STOP y coloque
las manos sobre los sensores (R) de
pulso (hand-grip) como muestra la
Fig.3 y al cabo de unos segundos le
dará el resultado en las pantallas
inferiores del display los valores FAT
% (% de grasa). Si le aparece en el
display el símbolo «ERROR», posicione
bien las manos sobre los sensores de
pulso (R) de la Fig.3.
TABLA DE REF. PORCENTAJE
GRASA CORPORAL % (BODY FAT)
GRASA% BAJA BAJA /
MEDIA
MEDIA ALTA
HOMBRE < 13% 13%-
25,8%
26%-
30%
>30%
MUJER <23% 23%-
35,8%
36%-
40%
>40%
FUNCIONAMIENTO iOS (iPod
Touch/iPhone/iPad)
Conecte el módulo Bluetooth
(opcional) en el conector USB situado
en la parte trasera del monitor, Fig. 6.
Active la función Bluetooth en el
iPod/iPhone/iPad y realice una
búsqueda de dispositivos Bluetooth.
Seleccione su módulo BH de la lista
de dispositivos para vincularlo. A
continuación descargue una
aplicación compatible Pafers de Apple
Store y ejecútela.
FUNCIONAMIENTO CON
DISPOSITIVOS ANDROID
Conecte el módulo Bluetooth
(opcional) en el conector USB situado
en la parte trasera del monitor, Fig. 6.
Active la función Bluetooth en el
dispositivo Android.

7
A continuación descargue una
aplicación compatible Pafers de
Google Play y ejecútela.
Cuando la aplicación lo requiera
seleccione su módulo BH de la lista
de dispositivos para vincularlo.
GUÍA DE PROBLEMAS.-
Problema: Se enciende el display y
sólo funciona la función de Tiempo
Solución:
a.-Compruebe si el cable de conexión
está conectado.
Problema: Si algún segmento de
alguna función no se enciende o si se
producen indicaciones erróneas en
alguna función.
Solución:
a.- Desconecte la conexión a 220V
durante 15 segundos y vuelva a
conectarlo.
b.-Si el paso anterior no le ayuda,
reemplace el monitor electrónico.
Transformador
Problema: No se enciende el monitor.
Solución:
a.-Compruebe la conexión a 220V.
b.-Compruebe la conexión de salida
del transformador, a la máquina.
c.-Compruebe la conexión de los
cables del tubo remo.
Evite que le dé a su monitor
electrónico la luz directa del sol, pues
se puede estropear la pantalla del
cristal líquido. No lo exponga tampoco
al agua ni a golpes.
Para cualquier consulta, no dude en
ponerse en contacto con el
(S.A.T).Servicio de Asistencia
Técnica, llamando al teléfono de
atención al cliente (ver página final del
presente manual).
BH SE RESERVA EL DERECHO A
MODIFICAR LAS ESPECIFICACIO-
NES DE SUS PRODUCTOS SIN
PREVIO AVISO.

8
English
STARTING.-
To switch the monitor on first plug the
adapter, supplied with the machine,
into the mains socket (220 V – 240 V)
and the jack on the adapter into the
socket at the bottom of the machine.
(Fig. 4)
If at any time during exercise you
press the START/STOP button then
all of the unit’s functions will stop.
Pressing the START/STOP button
again will restart the machine.
The monitor will switch itself off
automatically if the unit stands idle for
more than 4 minutes.
Important: Deposit electronic
components in special containers,
Fig.1.
MONITOR FUNCTIONS.-
This electronic unit has 5 function
keys: START/STOP; RESET, ENTER;
UP▲; DOWN. The centre of the
screen will simultaneously display the
selected program level. There are five
windows that indicate the
SPEED/RPM; TIME; DISTANCE;
WATTS/CALORIES and PULSE
RATE.
This monitor also has 1 manual
program, 9 pre-set exertion level
programs; 4 user defined program and
4 Heart Rate Control programs; 1 watt
program and 1 random program.
CHANGING FROM ONE
WORK MODE TO ANOTHER.-
After selecting the user various
programs will start flashing. This
monitor allows you to work in 6
different modes: Manual, Program,
Personal, Watt, Pulse (HRC) and
Random. In order to pass from one
mode to another, press the
START/STOP button to stop the
monitor, then press RESET and, with
the help of the UP▲/DOWN▼
buttons, select the desired mode.
MANUAL FUNCTION.-
Use the UP▲/DOWN▼ keys to select
the manual function and press
ENTER. Press the START/STOP key
to start exercising and use the
UP▲/DOWN▼ keys to increase or
decrease the exertion level. There are
24 exertion levels. If you press the
START/STOP key while at the start
screen, exercise will begin directly in
manual mode.
Programming a time limit.-
If, after selecting manual mode, you
press the ENTER key the time window
will start flashing. By pressing the
UP▲/DOWN▼ keys you can program
a time limit for the exercise (between
5-99 minutes). Select the time and
press START/STOP to begin the
exercise. The time will begin to count
down until it reaches zero and the
monitor will beep several times to
advise you that you have reached the
programmed value.
Programming a distance limit.-
If, after selecting manual mode, you
press the ENTER key twice the
distance window will start flashing. By
pressing the UP▲/DOWN▼ keys you
can program a distance for your
exercise (between 1–99 km).

9
Select the distance and press
START/STOP to begin the exercise.
The distance will begin to count down
until it reaches zero and the monitor
will beep several times to advise you
that you have reached the
programmed value.
Programming a calorie limit.-
If, after selecting manual mode, you
press the ENTER key three times the
calorie window will start flashing. By
pressing the UP▲/DOWN▼ keys you
can program the calories for the
exercise (between 10-990 Cal.).
Select the calories and press
START/STOP to begin the exercise.
The calories will begin to count down
until they reach zero and the monitor
will beep several times to advise you
that you have reached the
programmed value.
PROGRAM FUNCTION.-
Use the UP▲/DOWN▼ keys to select
the PROGRAM function and press
ENTER. Press the UP▲/DOWN▼ keys
to select the program graph (2-10) that
you wish to use and then press the
ENTER key. Press START/STOP to
start the exercise. The duration of the
program graph is 10 minutes, divided
into 10 minutes stages.
To program time, distance and/or
calories, go through the following
procedure: Once the program has
been selected and before pressing the
START/STOP key, press the ENTER
key to program the time using the
UP▲/DOWN▼ keys. In this case the
time will be divided into 10 stages.
Press the ENTER key to program the
distance. Press ENTER again to
program the calories. Press
START/STOP to start the exercise.
You can vary the exertion level during
the exercise by pressing the
UP▲/DOWN▼ keys.
STEADY WATT RATE
PROGRAM
Press the UP▲/DOWN▼ keys to
select the WATT function and press
ENTER. By pressing the
UP▲/DOWN▼ keys you can program
the watts to produce for the exercise
(between 70-310 Watt.). Select the
watts and press ENTER to program
the time. Press ENTER again to
program the distance. Press the ENTER
key one last time to program the
calories. Press START/STOP to start
the exercise.
The exertion level for the exercise is
self adjusting based on the speed and
number of watts selected.
USER PROGRAM.-
Use the UP▲/DOWN▼ keys to select
the USER function and press ENTER.
Select the user, between U1-U4, using
the UP▲/DOWN▼ keys and then
press ENTER.
Press and hold the ENTER key for 4
seconds.
The first column of the exercise level
will start flashing to the left of the
central area of the display. Select the
desired level for this first stage using
the UP▲/DOWN▼ keys and then
press ENTER. Repeat this procedure
to program all 10 stages of the user
program.
Once the user program has been
defined and before pressing the
START/STOP key, press and hold the
ENTER key for 4 seconds until the
time function starts to flash. Press the
UP▲/DOWN▼ keys to
select the
time.

10
Press the ENTER key to program the
distance. Press ENTER again to
program the calories. Press
START/STOP to start the exercise.
HEART RATE CONTROL
PROGRAMS.-
Use the UP▲/DOWN▼ keys to select
the H.R.C function and press ENTER.
Use the UP▲/DOWN▼ keys to select
the desired option (60%, 70% 85% or
Tag) and press the ENTER key. The
first three represent the percentage with
respect to maximum heart rate (220-
age) and the fourth is used to specify
the target heart rate manually. If you
choose Tag then you should use the
UP▲/DOWN▼ keys to select the
desired heart rate and then press
ENTER. Press START/STOP to start
the exercise. The exertion level will
adjust automatically in accordance with
the selected hart rate value. If the pulse
rate is below the target value then the
exertion setting will increase by one
level every 30 seconds until it reaches
the maximum 24. If the pulse rate is
above the target value the monitor will
give out warning beeps and reduce the
exertion settings by one level every 15
seconds until it reaches the minimum 1.
If the pulse rate still stays above the
target value for more than 30 seconds
the monitor will beep and stop in order
to protect the user.
To program time, distance, and/or
calories, go through the following
procedure: Once the heart rate program
has been selected and before pressing
the START/STOP key, press the
ENTER key to program the time limit
using the UP▲/DOWN▼ keys. Press
ENTER again to program the distance.
Press the ENTER key one last time to
program the calories.
Press START/STOP to start the
exercise. Your hands must be placed
on the pulse sensors (R) when using
these programs.
RANDOM FUNCTION.-
Use the UP▲/DOWN▼ keys to select
the RANDOM function and press
ENTER.
You will see a random program profile.
Press START/STOP to start the
exercise. The duration of the program
graph is 10 minutes, divided into 10
minutes stages.
To program time, distance and/or
calories, go through the following
procedure: Once the program has
been selected and before pressing the
START/STOP key, press the ENTER
key to program the time using the
UP▲/DOWN▼ keys. In this case the
time will be divided into 10 stages.
Press the ENTER key to program the
distance. Press ENTER again to
program the calories. Press
START/STOP to start the exercise.
You can vary the exertion level during
the exercise by pressing the
UP▲/DOWN▼ keys.
HAND-GRIP PULSE
MEASUREMENT INSTRUCTIONS
– USE.-
PULSE Hand-grip.
On this model the pulse rate is
measured by placing both hands on
the sensors (R), located on the
handlebar, as shown in Fig.2.
When both hands are placed on the
sensors the heart symbol on the right-
hand side of the screen, marked
PULSE, will begin to flash and after a
few seconds a heart rate reading will
be displayed.

11
If both hands are not placed correctly
as shown in Fig.3 then the pulse
function will not work. If a «P» appears
on the screen or the heart symbol does
not flash, make sure that both hands
are placed correctly on the sensors.
BODY FAT PROGRAM.-
This program is designed to calculate
the user’s body fat percentage.
Press the UP/DOWN keys to select the
BODYFAT function and press ENTER.
Use the UP/DOWN keys to select your
HEIGHT (90-210cm), press ENTER to
confirm. Use the UP/DOWN keys to
select your WEIGHT (10-150cm), press
ENTER to confirm. Use the UP/DOWN
keys to select your AGE (10-100 years).
Press ENTER and then use the
UP/DOWN keys to select your sex
(Male–Female). Press ENTER to
confirm.
Press the START/STOP key and place
your hands on the pulse sensors (R)
(Hand-grips), as shown in Fig.3, and
after a few seconds the lower screens
on the display will show your FAT%.
If the error code “ERROR” appears,
position your hands correctly on the
pulse sensors (R). Fig 3.
REFERENCE TABLE: BODY FAT
PERCENTAGE %
SEX /
FAT%
LOW LOW /
AVERAGE
AVERAGE
HIGH
MALE <
13%
13%-
25,8%
26%-30% >30%
FEMALE <23% 23%-
35,8%
36%-40% >40%
iOS OPERATION (compatible
iPhone, iPad and iPod Touch)
Download a Pafers App from the App
Store (Check compatible apps at the
BH website: www.bhfitness.com).
Then connect the USB Bluetooth
module (purchased separately) into
the USB port on the back of the
monitor (Fig. 6.) Turn Bluetooth to
“ON” in settings on the iOS device and
the device will begin to search for
active Bluetooth equipment in range.
Select the appropriate BH Module
from the list displayed on the iOS
device to pair. Open the Pafers app to
run it.
ANDROID OPERATION
(compatible Android devices)
Download a Pafers App from Google
Play (Check compatible apps at the
BH website: www.bhfitness.com).
Then connect the USB Bluetooth
module (purchased separately) into
the USB port on the back of the
monitor (Fig. 6.) Turn Bluetooth to
“ON” in settings on the Android
device. Open the Pafers app to run it.
When prompted by the app, select the
appropriate BH Module from the list
displayed on the Android device to
pair.
TROUBLESHOOTING GUIDE.-
Problem: The display comes on but
only the Time function works.
Solution:
a.- Make sure that the connection
cable is connected.
Problem: Display segments of a
function read-out are not visible or
error messages for a particular
function appear.
Solution:
a.- Unplug it from the 220 V mains
socket for 15 seconds and then plug it
back in.
b.- If the above steps do not help then
replace the electronic monitor.

12
Transformer
Problem: The monitor does not switch
on.
Solution:
a.- Check the 220 V mains connection
b.- Check the output connection from
the transformer to the machine.
c.- Check the cable connections for
the main post.
Avoid leaving the electronic monitor in
direct sunlight as this might damage
the liquid crystal display. Similarly, do
not expose it to water or knocks.
Do not hesitate to get touch with the
Technical Assistance Service if you
have any queries by phoning customer
services (see last page in manual)
BH RESERVES THE RIGHT TO
MODIFY THE SPECIFICATIONS OF
ITS PRODUCTS WITHOUT PRIOR
NOTICE

13
Français
MISE EN MARCHE.-
Pour mettre en marche le moniteur
brancher d’abord l’adaptateur fourni
avec la machine, dans une prise de
courant (220 v.- 240 v) et le
connecteur de l’adaptateur à la fiche
qui se trouve en-bas derrière la
machine. (Fig. 4)
Si durant le déroulement de l'exercice,
vous appuyez sur le bouton
START/STOP, toutes les fonctions de
l'électronique s’arrêteront. Si vous
appuyez à nouveau sur
START/STOP, toutes les fonctions se
mettront à nouveau en marche.
Si l’unité est 4 minutes arrêtée, l’écran
s’éteint automatiquement.
Remarque importante: Les
composants électroniques hors
d’usage doivent être déposés dans
des conteneurs spécialement prévus à
cet effet. Fig.1.
FONCTIONS DU MONITEUR.-
Ce moniteur dispose de 5 touches:
START/STOP; RESET, ENTER; UP▲;
DOWN▼. Le niveau du programme
sélectionné s’affiche simultanément au
milieu de l’écran. En-bas du display
cinq fenêtres s’affichent indiquant: la
VITESSE/TPM, la DUREE, la
DISTANCE, les WATTS/CALORIES, le
POULS.
Ce moniteur dispose également d'un
programme manuel, de 9 programmes
prédéfinis des niveaux de freinage,
d’un programme d’utilisateur, de
quatre programmes pour le contrôle
de la fréquence cardiaque, d’un
programme watt et d’un programme
aléatoire.
POUR PASSER D’UN MODE
DE TRAVAIL À L’AUTRE.-
Après choix de l'utilisateur, les LED
associées aux différents programmes
clignoteront. Ce moniteur peut
travailler avec 6 modes différents:
Manuel, Programmes, Watt,
Utilisateur (PERSONAL) Pouls
(H.R.C) et aléatoire (RANDOM).
Pour passer d’un mode à l’autre,
appuyer sur le bouton START/STOP
pour arrêter le moniteur puis sur
RESET et sélectionner le mode
souhaité avec les boutons
UP▲/DOWN▼.
FONCTION MANUELLE.-
Avec les touches UP▲/DOWN▼
sélectionner la fonction manuel et
appuyer sur ENTER. Appuyer sur la
touche START/STOP pour démarrer
l’exercice et avec les touches
UP▲/DOWN▼ augmenter ou baisser
la résistance de l’exercice. L’appareil
dispose de 24 niveaux de freinage. Si
dans l’état initial, vous appuyez sur la
touche START/STOP l’exercice
commencera directement en mode
manuel.
Programmation de la durée.-
Si après avoir sélectionné la fonction
manuel, vous appuyez sur la touche
ENTER, la fenêtre durée clignotera.
En appuyant sur les touches
UP▲/DOWN▼, vous pourrez
programmer la durée de l’exercice
entre 5 et 99 minutes. Pour
commencer l’exercice, sélectionner la
durée et appuyer sur la touche
START/STOP.

14
La durée diminuera jusqu'à atteindre
la valeur "zéro" et le moniteur émettra
un signal sonore pour indiquer que la
valeur programmée a été atteinte.
Programmation de la distance.-
Si après avoir sélectionné la fonction
manuel, vous appuyez deux fois sur la
touche ENTER, la fenêtre distance
clignotera. En appuyant sur les
touches UP/DOWN, vous pourrez
programmer la distance de l’exercice
entre 1 et 99 km. Pour commencer
l’exercice, sélectionner la distance et
appuyer sur la touche START/STOP.
La distance diminuera jusqu'à
atteindre la valeur "zéro" et le
moniteur émettra un signal sonore
pour indiquer que la valeur
programmée a été atteinte.
Programmation des calories.-
Si après avoir sélectionné la fonction
manuel, vous appuyez trois fois sur la
touche ENTER, la fenêtre calories
clignotera. En appuyant sur les
touches UP▲/DOWN▼, vous pourrez
programmer les calories de l’exercice
entre 10 et 990 calories. Pour
commencer l’exercice, sélectionner
les calories et appuyer sur la touche
START/STOP. Les calories
diminueront jusqu'à atteindre la valeur
"zéro" et le moniteur émettra un signal
sonore pour indiquer que la valeur
programmée a été atteinte.
FONCTION PROGRAMMES.-
Avec les touches UP▲/DOWN▼
sélectionner la fonction PROGRAM et
appuyer sur ENTER. Appuyer sur les
touches UP▲/DOWN▼ pour
sélectionner le graphique du
programme (2-10) souhaité pour
réaliser l’exercice puis appuyer sur la
touche ENTER. Pour commencer
l’exercice, appuyer sur la touche
START/STOP. La durée du graphique
du programme est de 10 minutes
divisées en 10 étapes de 1 minute.
Pour programmer la durée, la distance
et/ou les calories, faire comme indiqué
ci-après: Après avoir sélectionné le
programme et avant d’appuyer sur la
touche START/STOP.
Appuyer sur ENTER pour programmer
la durée avec les touches
UP▲/DOWN▼. Dans durée du
programme seront ainsi répartie dans
les 10 étapes. Pour programmer la
distance, appuyer sur ENTER. Pour
programmer les calories, appuyer à
nouveau sur ENTER. Pour
commencer l’exercice, appuyer sur la
touche START/STOP. Après avoir
commencé l'exercice, vous pouvez
modifier la résistance de freinage en
appuyant sur les touches
UP▲/DOWN▼.
PROGRAMME WATTS
CONSTANTS.
En appuyant sur les touches
UP▲/DOWN▼ sélectionner la
fonction WATT et appuyer sur
ENTER. En appuyant sur les touches
UP▲/DOWN▼, vous pourrez
programmer les watts de l’exercice
entre 70 et 310 watts.
Pour programmer la dureé appuyer
sur ENTER. Pour programmer la
distance, appuyer sur ENTER. Pour
programmer les calories, appuyer à
nouveau sur ENTER. Pour
commencer l’exercice, appuyer sur la
touche START/STOP.
Le niveau de l’effort de l’exercice se
réglera automatiquement d’après la
vitesse et les watts sélectionnés.
PROGRAMMES DE

15
L'UTILISATEUR.-
Avec les touches UP▲/DOWN▼
sélectionner la fonction USER et
appuyer sur ENTER. Sélectionner
l’utilisateur avec les touches
UP▲/DOWN▼ entre U1-U4 et
appuyer sur la touche ENTER.
Appuyer quatre secondes sur ENTER.
La première colonne du niveau de
l’exercice sera affichée au milieu à
gauche de l’écran. Sélectionner le
niveau souhaité pour cette première
étape en appuyant sur les touches
UP▲/DOWN▼ puis sur ENTER.
Répéter cette procédure pour
programmer les 10 étapes du
programme de l’utilisateur.
Après avoir sélectionné le programme
et avant d’appuyer sur la touche
START/STOP, appuyer quatre
secondes sur ENTER jusqu’au
clignotement de la fonction temps.
Appuyer sur les touches
UP▲/DOWN▼ pour sélectionner la
durée. Pour programmer la distance,
appuyer sur ENTER. Pour
programmer les calories, appuyer à
nouveau sur ENTER. Pour
commencer l’exercice, appuyer sur la
touche START/STOP.
PROGRAMMES POUR LE
CONTROLE DE LA
FREQUENCE CARDIAQUE.-
Avec les touches UP▲/DOWN▼
sélectionner la fonction H.R.C. et
appuyer sur ENTER. Avec les touches
UP▲/DOWN▼ sélectionner l’option
voulue (60%, 70%, 85% ou Tag) et
appuyer sur ENTER.
Les trois premières indiquent le
pourcentage concernant le pouls
cardiaque maximum (220-âge) et la
quatrième est utilisée pour introduire
manuellement la fréquence cardiaque
cible. Si vous choisissez Tag, il faudra
utiliser les touches UP▲/DOWN▼
pour sélectionner la fréquence
cardiaque voulue puis appuyer sur
ENTER. Pour commencer l’exercice,
appuyer sur la touche START/STOP.
Le niveau de freinage sera
automatiquement réglé d’après la
valeur du pouls sélectionnée. Si la
valeur du pouls est en dessous de la
valeur cible, le freinage augmenter un
niveau toutes les 30 secondes jusqu’à
atteindre le maximum de 24. Si la
valeur du pouls dépasse la valeur
cible, le moniteur émettra un signal
sonore et le freinage baissera d’un
niveau toutes les 15 secondes jusqu’à
atteindre le minium de 1. Si malgré
cela, la valeur du pouls dépasse
encore la valeur cible pendant plus de
30 secondes, le moniteur s’arrêtera
pour éviter tous risques à l’utilisateur
et il émettra un signal sonore
d’avertissement.
Pour programmer la durée, la distance
et les calories, faire comme indiqué ci-
après: Après avoir sélectionné le
programme du pouls cardiaque et
avant d’appuyer sur la touche
START/STOP, appuyer sur ENTER
pour programmer la durée avec les
touches UP▲/DOWN▼. Pour
programmer la distance, appuyer à
nouveau sur ENTER. Enfin, pour
programmer les calories, appuyer à
nouveau sur ENTER. Pour
commencer l’exercice, appuyer sur la
touche START/STOP.
Pour pouvoir réaliser les exercices
avec ces programmes, les mains
doivent être bien posées sur les
senseurs de pouls (R).
FONCTION RANDOM.-

16
Avec les touches UP▲/DOWN▼
sélectionner la fonction RANDOM et
appuyer sur ENTER.
Vous verrez un
programme aléatoire. Pour commencer
l’exercice, appuyer sur la touche
START/STOP. La durée du graphique
du programme est de 10 minutes
divisées en 10 étapes de 1 minute.
Pour programmer la durée, la distance
et/ou les calories, faire comme indiqué
ci-après: Après avoir sélectionné le
programme et avant d’appuyer sur la
touche START/STOP, appuyer sur
ENTER pour programmer la durée
avec les touches UP▲/DOWN▼.
Dans durée du programme seront
ainsi répartie dans les 10 étapes. Pour
programmer la distance, appuyer sur
ENTER. Pour programmer les
calories, appuyer à nouveau sur
ENTER. Pour commencer l’exercice,
appuyer sur la touche START/STOP.
Après avoir commencé l'exercice,
vous pouvez modifier la résistance de
freinage en appuyant sur les touches
UP▲/DOWN▼.
MODE D’EMPLOI DU HAND-
GRIP MESURE DU POULS.-
POULS Hand-grip.
Sur ce modèle, le pouls se mesure en
posant les deux mains sur les
senseurs (R) placés sur le guidon,
comme indiqué dans la Fig.2.
Dès que vos mains seront posées sur
les senseurs, un cœur commencera à
clignoter sur la droite de l’écran
PULSE de l’écran du moniteur et votre
fréquence cardiaque sera affichée
dans les secondes suivantes.
Si vos deux mains ne sont pas posées
correctement comme indiqué dans la
Fig.3, la fonction pouls ne
fonctionnera pas.
Si la lettre «P» s’affiche à l’écran ou si
le cœur ne clignote pas, vérifier que
vos mains sont bien posées sur les
senseurs.
PROGRAMME GRAISSE
CORPORELLE .-
En appuyant sur les touches UP/DOWN
sélectionner la fonction BODYFAT et
appuyer sur ENTER.
Avec les touches UP/DOWN,
sélectionnez la taille (HEIGHT 90-
210cm), appuyez sur ENTER. Avec les
touches UP/DOWN, sélectionnez votre
poids (WEIGHT 10-150kg), appuyez sur
ENTER. Avec les touches UP/DOWN,
sélectionnez votre âge (AGE 10-
100ans). Appuyez alors sur ENTER puis
sur les touches UP/DOWN pour
sélection-ner le sexe (Homme-Femme),
et sur ENTER pour accepter.
Ensuite appuyez sur la touche
UP/DOWN et posez les mains sur les
senseurs (R) de pouls (hand-grip)
comme indiqué dans la Fig.3 et dans les
secondes qui suivent, les résultats
seront affichés sur les écrans inférieurs
du display, à savoir: valeurs FAT % (%
de graisse).
En cas le message “ERROR” affiché à
l’écran, vous devrez alors poser
correctement les mains sur les senseurs
de pouls (R) de la Fig 3.
TABLEAU DE RÉFÉRENCE TAUX DE
GRAISSE CORPORELLE % (BF)
SEXE /
GRAISSE
%
FAIBLE
FAIBLE
/
MOYEN
MOYEN
ÉLEVÉ
HOMME < 13% 13%-
25,8%
26%-
30%
>30%
FEMME <23% 23%-
35,8%
36%-
40%
>40%
FONCTIONNEMENT IOS

17
(IPOD TOUCH / IPHONE /
IPAD)
Connectez le module Bluetooth
(optionnel) dans le connecteur USB
situé à l’arrière du moniteur, Fig 6.
Activez alors la fonction Bluetooth de
votre IPOD/IPAD/IPHONE et réalisez
une recherche de dispositifs
Bluetooth.
Selectionnez votre module BH dans la
liste des dispositifs pour les relier.
Téléchargez ensuite une application
compatible PAFERS via Apple Store
et exécutez-la.
FONCTIONNEMENT AVEC
DISPOSITIFS ANDROID
Connectez le module Bluetooth
(optionnel) dans le connecteur USB
situé à l’arrière du moniteur, Fig 6.
Activez alors la fonction Bluetooth de
votre dispositif ANDROID.
Téléchargez ensuite une application
compatible PAFERS via Google Play
et exécutez-la. Lorsque l’application
vous le demande, sélectionnez votre
module BH dans la liste des dispositifs
pour les relier.
GUIDE DES PROBLÈMES.-
Problème: Le display s’allume bien
mais seule fonctionne la fonction
durée.
Solution:
a- Vérifier si le cordon de connexion
est bien connecté.
Problème: Si un segment d’une
fonction ne s’allume pas ou si les
informations affichées sont faussées
Solution:
a.- Déconnecter 15 secondes, la
connexion 220V puis connectez-la à
nouveau.
b- Si les problèmes persistent après
avoir suivi l’instruction précédente,
remplacer le moniteur électronique.
Transformateur
Problème: Le moniteur ne s’allume
pas.
Solution:
a. Vérifier la connexion sur 220V.
b.- Vérifier la connexion de sortie du
transformateur à la machine.
c.- Vérifier la connexion des câbles du
tube rameur.
Garder le moniteur électronique à
l’abri du rayonnement direct du soleil
car cela risquerait d’endommager le
verre liquide. Tenir le moniteur à
l’écart de l’eau et éviter les coups.
Pour toute information complémentaire
et en cas de doute sur le bon état de
l’une quelconque partie de la machine,
l’hésitez pas à appeler le Service
d’Assistance Technique (SAT) au
numéro de téléphone d’Assistance
Clientèle qui figure à la dernière page
de cette notice.
BH SE RÉSERVE LE DROIT DE
MODIFIER LES
CARACTÉRISTIQUES DE SES
PRODUITS SANS PRÉAVIS.

18
Deutsch
ANSTELLEN.-
Um den Monitor anzustellen, müssen
Sie zuerst den Adapter in eine
Steckdose (220 V- 240 V) einstecken,
der mit der Maschine geliefert wird und
das Adapterterminal an den Stecker,
der sich im unteren hinteren Bereich der
Maschine befindet. (Abb. 4)
Wenn Sie während der Ausübung die
Taste START/STOP drücken, werden
alle Funktionen des Geräts gestoppt.
Wenn Sie erneut START/STOP
drücken, werden alle Funktionen
wieder aufgenommen.
Der Monitor geht automatisch aus,
wenn die Einheit mehr als 4 Minuten
still steht.
Wichtig: Entsorgen Sie elektronische
Komponenten in speziellen
Containern Fig.1.
FUNKTIONEN DES MONITORS.-
Dieser Monitor verfügt über 5 Tasten:
START / STOP; RESET, ENTER;
UP▲; DOWN▼. In der Mitte des
Displays erscheint gleichzeitig das
Niveau des Programms, das Sie
gewählt haben. Im unteren Bereich
des Monitors sieht man fünf Fenster
die Ihnen Folgendes angeben:
GESCHWINDIGKEIT/RPM, die ZEIT;
die DISTANZ; die WATT/KALORIEN;
PULS.
Dieser Monitor verfügt auch über ein
manuelles Programm: 9 vordefinierte
Programme mit unterschiedlichem
Widerstand; 4 Nutzerprogramm 4
Programm zur Kontrolle der
Herzfrequenz, 1 Watt Programm und
ein beliebiges Programm.
ÜBERGANG VON EINEM
ARBEITSMODUS ZUM
NÄCHSTEN.-
Nach der Benutzer vorgewählt worden
ist blinken die den verschiedenen
Programmen entsprechenden LEDs.
Dieser Monitor bietet die Möglichkeit
mit 6 verschiedenen Modi zu arbeiten:
Manuell, Programm, Watt, Nutzer
(USER) Puls (H.R.C.) und beliebiges
(RANDOM).
Um von einem Modus zum nächsten
zu wechseln, drücken Sie die Taste
START/STOP, um den Monitor
anzuhalten, drücken Sie danach
RESET und wählen Sie mit den
Tasten UP▲/DOWN▼ den
gewünschten Modus.
MANUELLE FUNKTION.-
Mit den Tasten UP▲/DOWN▼
wählen Sie die manuelle Funktion und
drücken Sie ENTER. Drücken Sie die
Taste START/STOP, um die Übung
zu beginnen und mit den Tasten
UP▲/DOWN▼ erhöhen oder
verringern Sie den Widerstand der
Übung, wobei Ihnen 24 verschiedene
Niveaus zur Verfügung stehen. Wenn
Sie zu Beginn die Taste START/STOP
drücken, beginnt die Übung direkt in
der manuellen Funktion.
Programmierung der Zeit.-
Wenn Sie nach dem Wählen der
manuellen Funktion die Taste MODE
drücken, blinkt das Fenster der Zeit.
Sie können die Zeit Ihrer Übung
programmieren, indem Sie die Tasten
UP▲/DOWN▼ drücken (5-99
Minuten).

19
Wählen Sie die Zeit und drücken Sie
START/STOP, um die Übung zu
beginnen. Die Zeit wird zurücklaufen,
bis der Wert „Null“ erreicht wird und
der Monitor piept, um anzuzeigen,
dass der programmierte Wert erreicht
ist.
Programmierung der Entfernung.-
Wenn Sie nach dem Wählen der
manuellen Funktion die Taste MODE
zwei Mal drücken, blinkt das Fenster
der Entfernung. Sie können die
Distanz Ihrer Übung programmieren,
indem Sie die Tasten UP▲/DOWN▼
drücken (1- 99 Km). Wählen Sie die
Distanz und drücken Sie
START/STOP, um die Übung zu
beginnen. Die Distanz wird
zurücklaufen, bis der Wert „Null“
erreicht wird und der Monitor piept, um
anzuzeigen, dass der programmierte
Wert erreicht ist.
Programmierung der Kalorien.-
Wenn Sie nach dem Wählen der
manuellen Funktion die Taste ENTER
drei Mal drücken, blinkt das Fenster
der Kalorien. Sie können die Kalorien
Ihrer Übung programmieren, indem
Sie die Tasten UP▲/DOWN▼
drücken (10 - 990 Kalorien). Wählen
Sie die Kalorien und drücken Sie
START/STOP, um die Übung zu
beginnen. Die Kalorien werden
zurücklaufen, bis der Wert „Null“
erreicht wird und der Monitor piept, um
anzuzeigen, dass der programmierte
Wert erreicht ist.
FUNKTION PROGRAMME.-
Mit den Tasten UP▲/DOWN▼
wählen Sie die Funktion PROGRAM
und drücken Sie ENTER. Drücken Sie
die Tasten UP▲/DOWN▼, um die
Graphik des Programms (2-10) zu
wählen, das Sie für Ihre Übung
wünschen und drücken Sie ENTER.
Drücken Sie START/STOP, um die
Übung zu beginnen. Die Dauer der
Graphik des Programms beträgt 10
Minuten, die sich in 10 Skalen von 1
Minute aufteilen.
Zum Programmieren von Zeit, Distanz
und/oder Kalorien folgen Sie diesen
Schritten: Nachdem Sie das
Programm gewählt haben und bevor
Sie die Taste START/STOP drücken,
drücken Sie ENTER, um die Zeit mit
den Tasten UP▲/DOWN▼ zu
programmieren. In diesem Fall wird
die Programmdauer zwischen den 24
Niveaus aufgeteilt. Drücken Sie
ENTER, um die Distanz zu
programmieren. Drücken Sie erneut
ENTER, um die Kalorien zu
programmieren. Drücken Sie
START/STOP, um die Übung zu
beginnen.
Nach Beginn der Übung können Sie
den Widerstand regulieren, indem Sie
UP▲/DOWN▼ drücken.
PROGRAMM MIT
KONSTANTER WATTZAHL
Wählen Sie die Funktion WATT mit
den Tasten UP▲/DOWN▼ und
drücken Sie ENTER/MODE. Sie
können die Wattzahl Ihrer Übung
programmieren, indem Sie die Tasten
UP▲/DOWN▼ drücken (70 - 310
Watt). Drücken Sie ENTER, um der
Zeit zu programmieren. Drücken Sie
ENTER, um die Distanz zu
programmieren. Drücken Sie erneut
ENTER, um die Kalorien zu
programmieren. Drücken Sie
START/STOP, um die Übung zu
beginnen.

20
Das Niveau der Anstrengung bei der
Übung passt sich automatisch in
Abhängigkeit von der gewählten
Geschwindigkeit und Wattzahl an.
NUTZERPROGRAMM.-
Mit den Tasten UP▲/DOWN▼
wählen Sie die Funktion USER und
drücken Sie ENTER. Wählen Sie den
Nutzer mit den Tasten UP▲/DOWN▼
zwischen U1-U4 und drücken Sie die
Taste ENTER. Drücken Sie die Taste
ENTER 4 Sekunden lang.
Links der Mitte des Displays erscheint
blinkend die erste Säule des
Übungsniveaus. Wählen Sie das
gewünschte Niveau für diese erste
Skala, indem Sie die Tasten
UP▲/DOWN▼ drücken und drücken
Sie dann ENTER. Wiederholen Sie
den Vorgang, um die 10 Skalen des
Nutzerprogramms zu programmieren.
Ist das Nutzerprogramm definiert und
vor dem Drücken der Taste
START/STOP drücken Sie die Taste
ENTER 4 Sekunden lang, bis die
Funktion Zeit blinkt. Drücken Sie die
Tasten UP▲/DOWN▼, um die Zeit zu
wählen. Drücken Sie ENTER, um die
Distanz zu programmieren. Drücken
Sie erneut ENTER, um die Kalorien zu
programmieren. Drücken Sie
START/STOP, um die Übung zu
beginnen.
PROGRAMME ZUR
KONTROLLE DER
HERZFREQUENZ.-
Mit den Tasten UP▲/DOWN▼
wählen Sie die Funktion H.R.C und
drücken Sie ENTER. Wählen Sie mit
den Tasten UP▲/DOWN▼ die
gewünschte Option (60%, 70%, 85%
oder Tag) und drücken Sie die Taste
ENTER. Die ersten drei geben den
Prozentsatz hinsichtlich der höchsten
Herzfrequenz (220 – Alter) an und die
vierte wird verwendet, um die
Zielfrequenz manuell einzugeben.
Wenn Sie Tag wählen, müssen Sie
die Tasten UP▲/DOWN▼benutzen,
um die gewünschte Herzfrequenz zu
wählen und ENTER drücken. Drücken
Sie START/STOP, um die Übung zu
beginnen. Der Widerstand wird
automatisch gemäss der gewünschten
Pulsfrequenz eingestellt. Ist der
Pulswert unter dem Zielwert, wird der
Widerstand automatisch alle 30
Sekunden erhöht bis zu einem
Höchstwert von 24. Ist der Pulswert
über dem Zielwert, piepst der Monitor
und der Widerstand verringert sich alle
15 Sekunden bis zu dem niedrigsten
Wert 1. Wenn selbst so noch der Puls
länger als 30 Sekunden über dem
Zielwert liegt, stellt sich der Monitor
zum Schutz des Nutzers aus und piept
zur Warnung.
Zum Programmieren von Zeit, Distanz
und Kalorien folgen Sie diesen
Schritten: Nachdem Sie das
Programm der Herzfrequenz gewählt
haben und bevor Sie die Taste
START/STOP drücken, drücken Sie
ENTER, um die Zeit mit den Tasten
UP▲/DOWN▼ zu programmieren.
Drücken Sie erneut ENTER, um die
Distanz zu programmieren. Drücken
Sie erneut ENTER, um die Kalorien zu
programmieren. Drücken Sie
START/STOP, um die Übung zu
beginnen.
Bei diesen Programmen müssen die
Hände auf den Pulssensoren (R)
liegen.

21
FUNKTION RANDOM.-
Mit den Tasten UP▲/DOWN▼ wählen
Sie die Funktion RANDOM und
drücken Sie ENTER. Sie werden
sehen, ein beliebiges Programm.
Drücken Sie START/STOP, um die
Übung zu beginnen. Die Dauer der
Graphik des Programms beträgt 10
Minuten, die sich in 10 Skalen von 1
Minute aufteilen.
Zum Programmieren von Zeit, Distanz
und/oder Kalorien folgen Sie diesen
Schritten: Nachdem Sie das Programm
gewählt haben und bevor Sie die Taste
START/STOP drücken, drücken Sie
ENTER, um die Zeit mit den Tasten
UP▲/DOWN▼ zu programmieren. In
diesem Fall wird die Programmdauer
zwischen den 24 Niveaus aufgeteilt.
Drücken Sie ENTER, um die Distanz
zu programmieren. Drücken Sie erneut
ENTER, um die Kalorien zu
programmieren. Drücken Sie
START/STOP, um die Übung zu
beginnen.
Nach Beginn der Übung können Sie
den Widerstand regulieren, indem Sie
UP▲/DOWN▼ drücken.
ANWEISUNGEN
VERWENDUNG DES HAND-
GRIP PULSMESSUNG.-
PULS Handgrip
Bei diesem Modell wird der Puls
gemessen, indem man beide Hände
auf die Sensoren (R) legt, die sich am
Lenker befinden, siehe Fig.2.
Wenn beide Hände auf den Sensoren
liegen, beginnt das Herz auf der
rechten Seite des Displays zu blinken,
das PULSE des Monitors anzeigt und
nach einigen Sekunden erscheint Ihre
Herzfrequenz.
Dies funktioniert nur, wenn Sie beide
Arme korrekt aufgelegt haben, wie die
Fig.3 zeigt.
Erscheint auf dem Bildschirm ein „P“
oder blinkt ein Herz, versichern Sie
sich, dass beide Hände auf den
Sensoren liegen.
KÖRPERFETT-PROGRAMM
Wählen Sie die Funktion BODYFAT
mit den Tasten UP/DOWN und
drücken Sie ENTER.
Geben Sie mit den Tasten UP/DOWN
die Körpergröße (HEIGHT 90-210 cm)
ein. Betätigen Sie ENTER und geben
Sie mit den Tasten UP/DOWN ihr
Gewicht (WEIGHT 10-150Kg) ein. Nach
erneutem Betätigen von ENTER geben
Sie dann mit den Tasten UP/DOWN ihr
Alter (AGE 10-100Jahre) ein. Geben Sie
dann mit Hilfe der Tasten UP/DOWN
das Geschlecht (männlich-weiblich) ein.
Betätigen Sie ENTER.
Drücken Sie jetzt die Taste
START/STOP und legen Sie die Hände
auf die Pulssensoren (R) (Hand-Grip)
Fig.3. Nach einigen Sekunden erscheint
das Ergebnis auf den unteren
Bildschirmanzeigen des Displays: die
Werte für FAT % (Körperfett in %).
Erscheint auf dem Bildschirm das
Zeichen “ERROR”, liegt ein Fehler vor.
Legen Sie Ihre Hände korrekt auf die
Pulssensoren (R) (Abbildung 3).
REFERENZTABELLE KÖRPERFETT
IN PROZENT % (BF)
GESCHL./
FETT %
NIEDRIG
NIEDRIG/
MITTEL
MITTEL
HOCH
MÄNNER
< 13% 13%-
25,8%
26%-
30%
>30%
FRAUEN <23% 23%-
35,8%
36%-
40%
>40%

22
BETRIEB mit iOS (iPod Touch
/ iPhone / iPad)
Schließen Sie den Bluetooth-Modul
(optional) in den USB-Anschluss auf
der Rückseite des Monitors an, siehe
Bild 6.
Aktivieren Sie die Bluetooth-Funktion
des iPod / iPhone / iPad´s und suchen
Sie nach Bluetooth-Geräten.
Wählen Sie Ihren BH-Modul aus der
Liste der zur verbindenden Geräte.
Dann laden Sie eine mit Ihrer
Maschine kompatibele Pafers
Anwendung aus Apple Store runter
und führen Sie sie aus.
BETRIEB mit Android-Geräte
Schließen Sie den Bluetooth-Modul
(optional) in den USB-Anschluss auf
der Rückseite des Monitors, siehe Bild
6. Aktivieren Sie die Bluetooth-
Funktion des Android-Gerätes.
Dann laden Sie eine mit Ihrer
Maschine kompatibele Pafers
Anwendung aus Google Play runter
und führen Sie sie aus.
Wenn die Anwendung Ihnen es
erfordert wählen Sie Ihren BH Modul
aus der Liste der Geräte um sie zu
verknüpfen.
PROBLEMLÖSUNG.-
Problem: Sie stellen das Display an
und es funktioniert nur die die
Funktion Zeit.
Lösung:
a.- Überprüfen Sie ob das
Verbindungskabel angeschlossen ist.
Problem: Ein Segment einer Funktion
geht nicht an oder es kommt zu
falschen Angaben bei einer Funktion.
Lösung:
a.- Nehmen Sie das Gerät 15
Sekunden lang von der 220V-
Spannung und schliessen Sie es
erneut an.
c.- Wenn der vorherige Schritt nicht
hilft, ersetzen Sie den Monitor.
Transformator
Problem: Der Motor geht nicht an.
Lösung:
a.-Überprüfen Sie den 220V-
Anschluss.
b. Überprüfen Sie den Anschluss des
Tranformators an die Maschine.
c.- Überprüfen Sie den Anschlus der
Kabel des Ruderrohrs.
Vermeiden Sie das direkte
Sonnenlicht auf den Monitor, da das
Flüssigkristalldisplay beschädigt
werden könnte. Setzen Sie ihn weder
Wasser noch Schlägen aus.
Sollten über den Zustand einer
Komponente Zweifel bestehen, setzen
Sie sich bitte mit dem (TKD)
Technischen Kundendienst in
Verbindung, indem Sie das
Servicetelefon anrufen (siehe letzte
Seite des Handbuchs).
BH BEHÄLT SICH DAS RECHT
VOR, DIE SPEZIFIKATIONEN DES
PRODUKTS OHNE
VORANKÜNDIGUNG ZU ÄNDERN.

23
Português
COLOCAÇÃO EM MARCHA.-
Para colocar em marcha o monitor,
em primeiro lugar tem que ligar o
adaptador, que se fornece com a
máquina, a uma ficha de electricidade
(220 v.- 240 v) e o terminal do
adaptador à tomada situada na parte
inferior traseira da máquina. (Fig 4)
Se durante a realização o exercício
carregar no botão START/STOP,
todas as funções do monitor
electrónico pararão. Se carregar de
novo em START/STOP, todas as
funções irão pôr-se de novo em
funcionamento.
O monitor apagar-se-á automatica-
mente quando a unidade estiver 4
minutos parada.
Importante: Deposite os compo-
nentes electrónicos em contentores
especiais, Fig.1.
FUNÇÕES DO MONITOR.-
Este monitor dispõe de 5 teclas:
START / STOP; RESET, ENTER;
UP▲; DOWN▼. No centro do display,
mostra-se simultaneamente o nível do
programa que escolheu. Na parte
inferior do display aparecem cinco
janelas que lhe indicam a
VELOCIDADE / RPM; o TEMPO; a
DISTÂNCIA; os WATTS / CALORIAS;
a PULSAÇÃO.
Este monitor dispõe também de 1
programa manual; 9 programas pré-
definidos de níveis de dificuldade; 4
programa de utilizador; 4 programas
de controlo de ritmo cardíaco, 1
programa de watt e 1 programa de
forma aleatória.
PASSAGEM DE UM MODO DE
TRABALHO PARA OUTRO.-
Após ter selecionado o usuário,
aparecerão a piscar os LEDs
correspondentes aos vários
programas. Este monitor tem a
possibilidade de trabalhar com 6 modos
diferentes: Manual, Programas,
Utilizador (USER), Watt, Pulsação
(H.R.C.) e aleatório (RANDOM).
Para passar de um modo para outro, é
necessário carregar no botão
START/STOP para parar o monitor,
depois pressionar RESET e, usando os
botões UP▲/DOWN▼, seleccionar o
modo desejado.
FUNÇÃO MANUAL.-
Carregando nas teclas
UP▲/DOWN▼, seleccione a função
Manual e carregue em ENTER.
Carregue na tecla START / STOP
para iniciar o exercício e com as
teclas UP▲/DOWN▼ suba ou baixe a
resistência do exercício, tendo 24
níveis de dificuldade. Se no estado
inicial carregar na tecla START /
STOP, começará o exercício em
função Manual directamente.
Programação de tempo.-
Se após seleccionar a função Manual
carregar na tecla ENTER, piscará a
janela do tempo. Carregando nas
teclas UP▲/DOWN▼, pode
programar o tempo do seu exercício
entre (5-99 Minutos). Seleccione o
tempo e carregue em START/STOP
para começar o exercício. O tempo irá
diminuindo até alcançar o valor “zero“,
e o monitor vai apitar para o advertir
de que chegou ao valor programado.

24
Programação da distância.-
Se após seleccionar a função Manual
carregar na tecla ENTER duas vezes,
piscará a janela da distância.
Carregando nas teclas UP/ DOWN,
pode programar a distância do seu
exercício entre (1- 99 Km). Seleccione
a distância e carregue em
START/STOP para começar o
exercício. A distância irá diminuindo
até alcançar o valor «zero» e o
monitor emitirá uns avisos sonoros,
advertindo-o que chegou ao valor
programado.
Programação das calorias.-
Se após seleccionar a função Manual
carregar na tecla ENTER três vezes,
piscará a janela das calorias.
Carregando nas teclas UP▲/DOWN▼,
pode programar as calorias do seu
exercício entre (10-990 Cal).
Seleccione as calorias e carregue em
START/STOP para começar o
exercício. As calorias diminuirão até
alcançar o valor “zero“, e o monitor
emitirá uns avisos sonoros, advertindo-
o que chegou ao valor programado.
FUNÇÃO PROGRAMAS.-
Carregando nas teclas
UP▲/DOWN▼, seleccione a função
PROGRAM e carregue em ENTER.
Carregue nas teclas UP▲/DOWN▼
para seleccionar o gráfico de
programa (2-10) que desejar para
fazer o seu exercício e carregue na
tecla ENTER. Carregue em
START/STOP para começar o
exercício. O tempo de duração do
gráfico do programa é de 10 minutos,
repartidos em 10 escalas de minuto.
Para programar tempo, distância e/ou
calorias leve a cabo os passos que se
indicam de seguida. Uma vez
seleccionado o programa e antes de
carregar na tecla START/STOP,
carregue na tecla ENTER para
programar o tempo utilizando as
teclas UP▲/DOWN▼. Neste caso, a
duração do programa será repartida
entre as 10 escalas. Carregue em
ENTER para programar a distância.
Volte a carregar em ENTER para
programar as calorias. Carregue na
tecla START/STOP para começar o
exercício.
Uma vez começado o exercício, pode
variar a resistência de dificuldade
carregando as teclas UP▲/DOWN▼.
PROGRAMA DE WATTS
CONSTANTES
Carregando nas teclas
UP▲/DOWN▼, seleccione a função
WATT e carregue em ENTER.
Carregando nas teclas
UP▲/DOWN▼, pode programar os
watts do seu exercício entre (70 - 310
Watt.). Carregue em ENTER para
programar o tempo. Carregue em
ENTER para programar a distância.
Volte a carregar em ENTER para
programar as calorias. Carregue na
tecla START/STOP para começar o
exercício.
O nível de esforço do exercício
autoajustar-se-á em função da
velocidade e dos watts seleccionados.
PROGRAMA DE UTILIZADOR.-
Carregando nas teclas
UP▲/DOWN▼, seleccione a função
USER e carregue em ENTER.
Seleccione o utilizador com as teclas
UP▲/DOWN▼ entre U1-U4 e
carregue na tecla ENTER. Carregue
na tecla ENTER durante 4 segundos.

25
À esquerda da zona central do
display, aparecerá a piscar a primeira
coluna de nível do exercício.
Seleccione o nível desejado para esta
primeira escala carregando nas teclas
UP▲/DOWN▼ e depois carregue em
ENTER. Repita o procedimento para
programar as 10 escalas do programa
de utilizador.
Uma vez definido o programa de
utilizador e antes de carregar na tecla
START/STOP, carregue na tecla
ENTER durante 4 segundos até que
pisque a função Tempo. Carregue nas
teclas UP▲/DOWN▼ para
seleccionar o tempo. Carregue em
ENTER para programar a distância.
Volte a carregar em ENTER para
programar as calorias. Carregue na
tecla START/STOP para começar o
exercício.
PROGRAMAS DO CONTROLO
DO RITMO CARDÍACO.-
Carregando nas teclas
UP▲/DOWN▼, seleccione a função
H.R.C. e carregue em ENTER. Com
as teclas UP▲/DOWN▼, seleccione
a opção desejada (60%, 70%, 85% ou
Tag) e carregue na tecla ENTER. As
três primeiras indicam a percentagem
relativamente à pulsação cardíaca
máxima (220-idade) e a quarta utiliza-
se para introduzir o ritmo cardíaco
objectivo de forma manual.
Se escolher Tag, deverá utilizar as
teclas UP▲/DOWN▼ para
seleccionar o ritmo cardíaco desejado
e carregar em ENTER. Carregue em
START/STOP para começar o
exercício. O nível de dificuldade
ajustar-se-á automaticamente de
acordo com o valor de pulsação
seleccionado.
Se o valor de pulsação estiver abaixo
do valor objectivo, a dificuldade
aumentará um nível a cada 30
segundos até chegar ao máximo de
24. Se o valor de pulsação estiver
acima do valor objectivo, o monitor
emitirá uns avisos sonoros e a
dificuldade diminuirá um nível a cada
15 segundos até chegar a um mínimo
de 1. Se ainda assim o valor da
pulsação se mantiver acima do valor
objectivo durante mais de 30
segundos, o monitor parará para
protecção do utilizador e emitirá uns
avisos sonoros.
Para programar tempo, distância e
calorias leve a cabo os passos que se
indicam de seguida. Uma vez
seleccionado o programa de pulsação
cardíaca e antes de carregar na tecla
START/STOP, carregue na tecla
ENTER para programar o tempo
utilizando as teclas UP▲/DOWN▼.
Volte a carregar ENTER para
programar a distância. Por último,
volte a carregar ENTER para
programar as calorias. Carregue na
tecla START/STOP para começar o
exercício.
Nestes programas as mãos têm que
estar colocadas nos sensores de
pulsação (R).
FUNÇÃO RANDOM.-
Carregando nas teclas
UP▲/DOWN▼, seleccione a função
RANDOM e carregue em ENTER.
Você vai ver um programa aleatório.
Carregue em START/STOP para
começar o exercício. O tempo de
duração do gráfico do programa é de
10 minutos, repartidos em 10 escalas
de minuto.
Para programar tempo, distância e/ou
calorias leve a cabo os passos que se
indicam de seguida.

26
Uma vez seleccionado o programa e
antes de carregar na tecla
START/STOP, carregue na tecla
ENTER para programar o tempo
utilizando as teclas UP▲/DOWN▼.
Neste caso, a duração do programa
será repartida entre as dezasseis
escalas. Carregue em ENTER para
programar a distância. Volte a
carregar em ENTER para programar
as calorias. Carregue na tecla
START/STOP para começar o
exercício.
Uma vez começado o exercício, pode
variar a resistência de dificuldade
carregando as teclas UP▲/DOWN▼.
INSTRUCÇÕES - USO DO
HAND-GRIP MEDIÇÃO DE
PULSAÇÃO.-
PULSAÇÃO Hand-grip.-
A pulsação deste modelo mede-se
colocando ambas as mãos nos
sensores (R), que estão localizados
nos punhos, como se indica na Fig.2.
Uma vez colocadas ambas as mãos
nos sensores, começará a piscar o
coração na parte direita do display
que indica PULSE e ao cabo de uns
segundos aparecerá o valor do seu
ritmo cardíaco.
Se não tiver colocadas ambas as
mãos correctamente como mostra a
Fig.3, a pulsação não funciona.
Se no display aparece um «P» ou não
piscar o coração, assegure-se de que
tem colocadas ambas as mãos nos
sensores.
PROGRAMA DE GORDURA
CORPORAL.-
O programa está desenhado para
calcular a percentagem de gordura
corporal do usuário. Carregando nas
teclas UP/DOWN, seleccione a função
BODYFAT e carregue em ENTER.
Seleccione com as teclas UP/DOWN a
altura (HEIGHT 90-210cm), aperte
ENTER. Seleccione com as teclas
UP/DOWN o seu peso (WEIGHT 10–
150Kg), aperte ENTER. Seleccione com
as teclas UP/DOWN a sua idade (AGE
10–100anos). Apertando as teclas
UP/DOWN seleccione o sexo (Homem–
Mulher); aperte ENTER para confirmar.
Aperte a tecla START/STOP e coloque
as mãos sobre os sensores (R) de
pulsação (hand-grip) como mostra a
Fig.3 e de pois de uns segundos
aparecer-lhe-á o resultado nos ecrãs
inferiores do display, os valores FAT %
(% de gordura).
Se lhe aparecer no display o símbolo
“ERROR” deverá colocar bem as mãos
sobre os sensores de pulsação (R),
como na Fig 3.
TABELA DE REF. PERCENTAGEM
GORDURA CORPORAL % (BF)
SEXO /
GORDURA%
BAIXO BAIXO /
MÉDIO
MÉDIO ALTO
HOMEM
< 13% 13%-
25,8%
26%-
30%
>30%
MULHER
<23% 23%-
35,8%
36%-
40%
>40%
FUNCIONAMENTO IOS (iPod
Touch/iPhone/iPad)
Ligue o seu módulo Bluetooth
(opcional) na ligação USB situado na
parte traseira do monitor, Fig.6. Active
a função de Bluetooth no
iPod/iPhone/iPad e realize uma
procura de dispositivos Bluetooth.
Escolha o seu módulo BH a partir da
lista de dispositivos para se ligar. De
seguida descarregue uma aplicação
compatível Pafers de Apple Store e
execute-a.

27
Funcionamento com
dispositivo Android
Ligue o seu módulo Bluetooth
(opcional) na ligação USB situado na
parte traseira do monitor, Fig.6. Active
a função de Bluetooth com o
dispositivo Android. De seguida
descarregue uma aplicação
compatível Pafers do Google Play e
execute-a.
Quando a aplicação pedir selecione o
seu módulo BH da lista de dispositivos
para poder vincular.
GUIA DE PROBLEMAS.-
Problema: Acende-se o display e só
funciona a função de Tempo
Solução:
a.- Comprove se o cabo de conexão
está ligado.
Problema: se um segmento de
qualquer função não acender ou se se
produzirem indicações erróneas em
alguma função.
Solução:
a.- Desconecte a ligação a 220V
durante 15 segundos e volte a
conectá-lo.
b.- Se o passo anterior não ajudar,
substitua o monitor electrónico.
Transformador
Problema: o monitor não acende.
Solução:
a.- Verifique a ligação a 220V.
b.- Verifique a ligação de saída do
transformador à máquina.
c.- Verifique a ligação dos cabos do
tubo remo.
Evite expor o seu monitor electrónico
à luz directa do sol, pois pode
danificar o display do cristal líquido.
Não o exponha também à água ou a
golpes.
Para qualquier consulta, não hesite em
contactar com o S.A.T - Serviço de
Assistência Técnica - , telefonando
para o serviço de apoio ao cliente (ver
página final do presente manual).
A BH RESERVA-SE DIREITO A
MODIFICAR AS ESPECIFICAÇÕES
DOS SEUS PRODUTOS SEM AVISO
PRÉVIO.

28
Italiano
AVVIAMENTO.-
Per avviare il monitor innanzitutto
bisogna inserire l’adattatore che si
fornisce con la macchina ad una presa
di corrente (220 v.- 240 v) ed il
terminale dell’adattatore nella spina
situata nella parte inferiore posteriore
della macchina. (Fig. 4)
Se, durante la realizzazione dell’eser-
cizio, si preme il pulsante START/STOP
tutte le funzioni del dispositivo
elettronico si fermeranno. Premendo di
nuovo START/STOP tutte le funzioni
inizieranno a funzionare di nuovo.
Il monitor si spegne automaticamtne
quando l’unità resta ferma per 4 minuti.
Importante: Depositare i componenti
elettronici negli appositi contenitori
speciali, Fig.1.
FUNZIONI DEL MONITOR.-
Il presente monitor dispone di 5 tasti:
START/STOP; RESET, ENTER; UP▲;
DOWN▼. Al centro dello schermo si
indica simultaneamente il livello del
programma prescelto. Nella parte
inferiore si indica la VELOCITÀ/RPM; il
TEMPO; la DISTANZA; i
WATTS/CALORIE, il POLSO.
Questo monitor dispone inoltre di 1
programma manuale; 9 programmi
predefiniti dei livelli di frenata; 4
programma di utente; 4 programmi per
il controllo del ritmo cardiaco, 1
programma Watt e 1 programma
casuale.
PASSAGGIO DA UNA MODALITÀ
DI ATTIVITÀ AD UN ALTRA.-
Dopo la selezione dell'utente,
appariranno lampeggiando i LEDs che
corrispondono ai diversi programmi.
Questo monitor permette esercitarsi
utilizzando 6 diverse modalità:
Manuale, Programmi, Watt, Utente
(PERSONAL) Polso (H.R.C.) e
casuale (RANDOM). Per passare da
una modalità ad un’altra bisogna
premere il pulsante START/STOP per
fermare il monitor, in seguito premere
RESET e, utilizzando i pulsanti
UP▲/DOWN▼ selezionare la
modalità preferita.
Premendo il tasto QUICKSTART
direttamente inizierà in modalità
manuale.
FUNZIONE MANUALE.-
Premendo i tasti UP▲/DOWN▼
selezionare la funzione manuale e
premere ENTER. Premere il tasto
START / STOP per iniziare l’esericizio
e con i tasti UP▲/DOWN▼aumentare
o diminuire la resistenza dell’esercizio,
avendo a disposizione 24 livelli di
frenata. Se durante lo stato iniziale si
preme il tasto START/STOP
l’esercizio inizierà direttamente in
funzione manuale.
Programmazione del tempo.-
Se dopo aver selezionato la funzione
manuale si preme il tasto ENTER due
volte, vi lampeggerà la finestra della
distanza. Premendo i tasti UP/DOWN,
si può programmare la distanza del
vostro esercizio tra (1-99 km).
Selezionare la distanza e premere
START/STOP per iniziare l’esercizio. la
distanza diminuirà fino a raggiungere il
valore “zero” ed il monitor emetterà dei
segnali acustici avvisando che si è
giunti al valore programmato.

29
Programmazione delle calorie.-
Se dopo aver selezionato la funzione
manuale si preme il tasto ENTER tre
volte, vi lampeggerà la finestra delle
calorie. Premendo i tasti
UP▲/DOWN▼, si possono
programmare le calorie del vostro
esercizio tra (10-990 Cal). Selezionare
le calorie e premere START/STOP per
iniziare l’esercizio. le calorie
diminuiranno fino a raggiungere il
valore “zero” ed il monitor emetterà
dei segnali acustici avvisando che si è
giunti al valore programmato.
FUNZIONE PROGRAMMI.-
Premendo i tasti UP▲/DOWN▼
selezionare la funzione PROGRAM e
premere ENTER. Premere i tasti
UP▲/DOWN▼ per selezionare il
grafico del programa (2-10) che si
desidera per eseguire l’ esercizio e
premere il tasto ENTER. Premere
START / STOP per iniziare l’esercizio.
Il tempo di durata del grafico del
programma è di 10 minuti, suddivisi in
10 scale di un minuto.
Per programmare il tempo, la distanza
e/o le calorie eseguire i seguenti
passi. Una volta selezionato il
programma e prima di premere il tasto
START/STOP, premere il tasto
ENTER per programmare il tempo
utilizzando i tasti UP▲/DOWN▼. In
questo caso la durata del programma
è suddivisa tra le 10 scale. Premere
ENTER per programmare la distanza.
Premere di nuovo ENTER per
programmare le calorie. Premere il
tasto START/STOP per iniziare
l’esercizio. Una volta iniziato
l’esercizio si può decidere di cambiare
la resistenza di frenata premendo i
tasti UP▲/DOWN▼.
PROGRAMMA DEI WATTS
COSTANTI
Premendo i tasti
UP▲/DOWN▼selezionare la funzione
WATTS e premere ENTER.
Premendo i tasti UP▲/DOWN▼, si
possono programmare i watt del
vostro esercizio tra (70-310 Watt).
Premere ENTER per programmare il
tempo. Premere ENTER per
programmare la distanza. Premere di
nuovo ENTER per programmare le
calorie. Premere il tasto START /
STOP per iniziare l’esercizio. Il livello
di sforzo dell’esercizio si auto-regolerà
in funzione della velocità e dei watts
selezionati.
PROGRAMMA UTENTE.-
Premendo i tasti UP▲/DOWN▼
selezionare la funzione USER e
premere ENTER. Selezionare l’utente
con i tasti UP▲/DOWN▼ tra U1-U4 e
premere il tasto ENTER. Premere il
tasto ENTER per 4 secondi.
Nel lato sinistro della zona centrale
dello schermo apparirà lampeggiando
la prima colonna circa il livello
dell’esercizio. Selezionare il livello
desiderato per questa prima scala
premendo i tasti UP▲/DOWN▼ e poi
premere ENTER. Ripetere il
procedimento per programmare le
sedici scale del programma di utente.
Una volta definito il programma di
utente e prima di premere il tasto
START/STOP, premere il tasto
ENTER per 4 secondi fino a quando
lampeggi la funzione tempo. Premere i
tasti UP▲/DOWN▼ per selezionare il
tempo. Premere
ENTER per
programmare la distanza. Premere di
nuovo ENTER per programmare le
calorie. Premere il tasto START /
STOP per iniziare l’esercizio.

30
PROGRAMMI PER IL
CONTROLLO DEL RITMO
CARDIACO.-
Premendo i tasti UP▲/DOWN▼
selezionare la funzione H.R.C e
premere ENTER. Con i tasti
UP▲/DOWN▼ selezionare l’opzione
desiderata (60%, 70%, 85% o Tag) e
premere il tasto ENTER. Le prime tre
indicano la percentuale rispetto alle
pulsazioni caridiache massime (220-
età) e la quarta si utilizza per
introdurre il ritmo cardiaco oggettivo in
modo manuale. Se si sceglie Tag, si
dovranno utilizzare i tasti
UP▲/DOWN▼ per selezionare il ritmo
cardiaco desiderato e premere
ENTER. Premere START / STOP per
iniziare l’esercizio. Il livello di frenata si
regola automaticamente secondo il
valore del polso selezionato. Se il
valore del polso è inferiore al valore
oggettivo, la frenata aumenterà un
livello ogni 30 secondi fino a
raggiungere un massimo di 24. Se il
valore del polso è al di sopra del
valore oggettivo il monitor emetterà un
segnale acustico di avviso e la frenata
diminuirà un livello ogni 15 secondi
fino ad arrivare ad un minimo di 1.
Nonostante ciò se il valore del polso si
mantiene al di sopra del valore
oggettivo per più di 30 secondi, il
monitor si fermerà come protezione
per l’utente ed emetterà una serie di
segnali acustici di avviso.
Per programmare il tempo, la distanza
e le calorie eseguire i seguenti passi.
Una volta selezionato il programma
del polso cardiaco e prima di premere
il tasto START/STOP, premere il tasto
ENTER per programmare il tempo
utilizzando i tasti UP▲/DOWN▼.
Premere di nuovo ENTER per
programmare la distanza.
Infine premere di nuovo ENTER per
programmare le calorie. Premere il
tasto START/STOP per iniziare
l’esercizio. In questi programmi le
mani devono essere appoggiate sui
sensori del polso (R).
FUNZIONE RANDOM.-
Premendo i tasti UP▲/DOWN▼
selezionare la funzione RANDOM e
premere ENTER. Vedrete un
programma casuale. Premere
START/STOP per iniziare l’esercizio.
Il tempo di durata del grafico del
programma è di 10 minuti, suddivisi in
10 scale di un minuto.
Per programmare il tempo, la distanza
e/o le calorie eseguire i seguenti
passi. Una volta selezionato il
programma e prima di premere il tasto
START/STOP, premere il tasto
ENTER per programmare il tempo
utilizzando i tasti UP▲/DOWN▼. In
questo caso la durata del programma
è suddivisa tra le sedici scale.
Premere ENTER per programmare la
distanza. Premere di nuovo ENTER
per programmare le calorie. Premere il
tasto START/STOP per iniziare
l’esercizio.
Una volta iniziato l’esercizio si può
decidere di cambiare la resistenza di
frenata premendo i tasti
UP▲/DOWN▼.
ISTRUZIONI – USO
DELL’HAND-GRIP
MISURAZIONE DEL POLSO.-
POLSO Hand-grip.
In questo modello, il polso si misura
collocando entrambe le mani sui
sensori (R), i quali sono collocati sul
manubrio come indica la Fig.2.

31
Una volta collocate entrambe le mani
sui sensori, inizierà a lampeggiare il
cuore sulla parte destra dello schermo
che indica PULSE sullo schermo del
monitor, trascorsi alcuni secondi
approssimativamente apparirà il
valore del vostro ritmo cardiaco.
Se non avete entrambe le mani
collocate correttamente come indica la
Fig.3, il polso non funziona.
Se sullo schermo appare una «P»
oppure non lampeggia il cuore,
assicurarsi che entrambe le mani sono
collocate sui sensori.
PROGRAMMA DI GRASSO
CORPORALE.-
Il programma è stato creato per
calcolare la percentuale di grasso
corporale dell’ utente e disegnare così
profili specifici. Premendo i tasti
UP/DOWNselezionare la funzione
BODYFAT e premere ENTER.
Scelga con i tasti UP/DOWN l’ altezza
(HEIGHT 90-210 cm), prema ENTER,
scelga con i tasti UP/DOWN il suo peso
(WEIGHT 10–150 Kg), prema ENTER,
scelga con i tasti UP/DOWN la sua età
(AGE 10–100 anni). Premendo i tasti
UP/DOWN scelga il sesso (Uomo–
Donna) prema ENTER per confermare.
Prema il tasto START/STOP e collochi le
mani sui sensori (R) del polso (hand-grip)
come mostra la Fig.3 e passati alcuni
secondi le daranno il risultato negli
schermi inferiori del display i valori FAT
% (% di grasso) Se appare nel display il
simbolo “ERROR” significa che c’ è stato
un errore, collochi bene le mani sui
sensori del polso (R) della Fig 3.
TABELLA DI RIF. PERCENTUALE DI
GRASSO CORPORALE % (BF)
SESSO /
GRASSO
%
BASSO BASSO
/
MEDIO
MEDIO ALTO
UOMO < 13% 13%-
25,8%
26%-
30%
>30%
DONNA <23% 23%-
35,8%
36%-
40%
>40%
FUNZIONAMENTO iOS (iPod
Touch/iPhone/iPad)
Scaricare una App Pafers dall’ App
Store (controllare le compatibilità dal
sito BH: www.bhfitness.com ), quindi
collegare il disposidivo Bluetooth
(venduto separatamente) alla porta
USB sita dietro dal monitor, Fig. 6.
Attivate la funzione Bluetooth dell’
iPod/iPhone/iPad in modo da attivare
la ricerca dei dispositivi Bluetooth
automaticamente. Selezionare il
corretto modulo BH dalla lista che
appare sul display in modo da
collegare i due sistemi. Aprire l’App
Pafers per iniziare.
FUNZIONAMENTO
DISPOSITIVI ANDROID.
Scaricare una App Pafers da Google
Play (controllare le compatibilità dal
sito BH: www.bhfitness.com ), quindi
collegare il disposidivo Bluetooth
(venduto separatamente) alla porta
USB sita dietro dal monitor, Fig. 6.
Attivate la funzione Bluetooth del
dispositivo Android e aprire l’App
Pafers. Quando verrà riconosciuto
dall’applicazione, selezionare il
corretto modulo BH dall’elenco sul
display del vostro dispositivo Android
per collegare i due sistemi.

32
SOLUZIONE AI PROBLEMI.-
Problema: Se si accende il display e
funziona solamente la funzione del
Tempo
Soluzione:
a.- Verificare se il cavo di connessione
è collegato.
Problema: Se qualche segmento di
una delle funzioni non si accende o se
si producono indicazioni erronee in
alcune funzioni.
Soluzione:
a.- Scollegare la connessione a 220v
per 15 secondi e collegarla di nuovo.
b.- Se i passi descritti anteriormente
non vi aiutano, sostituire il monitor
elettronico.
Trasformatore
Problema: Non si accende il monitor.
Soluzione:
a.- Verificare la connessione a 220V.
b.- Verificare la connessione di uscita
del trasformatore alla macchina.
c.- Verificare la connessione dei cavi
del tubo remo.
Evitare che al vostro monitor
elettronico giunga la luce del sole
direttamente, poichè potrebbe
danneggiare lo schermo a cristalli
liquidi. Non esporlo all’acqua né a
colpi.
Per qualsiasi domanda, non esitate a
mettervi in contatto con il Servizio di
Assistenza Tecnica, chiamando al
telefono di attenzione al cliente
(consultare l’ultima pagina del
presente manuale).
BH SI RISERVA IL DIRITTO DI
MODIFICARE LE SPECIFICAZIONI
DEI SUOI PRODOTTI SENZA
PREVIO AVVISO.

33
Nederlands
STARTEN.-
Als u de monitor wilt inschakelen, moet
u eerst de adapter, geleverd bij het
toestel, in het stopcontact (220 V – 240
V) steken en de adapteraansluiting in de
fitting onderaan het toestel. (Fig 4)
Als u op een willekeurig tijdstip
gedurende het oefenen op de knop
START/STOP drukt, zullen alle functies
van het toestel stoppen. Opnieuw op
de knop START/STOP drukken zal het
toestel weer laten starten.
De monitor zal automatisch
uitgeschakeld worden als het toestel
meer dan 4 minuten ongebruikt blijft.
Belangrijk: Deponeer elektronische
componenten in speciale containers,
Fig.1.
FUNCTIES VAN DE MONITOR.-
Dit elektronische apparaat heeft 5
functietoetsen: START / STOP; RESET
(opnieuw instellen), ENTER; UP▲;
DOWN▼. Het centrum van het scherm
zal tegelijkertijd het geselecteerde
programmaniveau weergeven. Er zijn
vijf vensters onderaan het
weergavescherm die het volgende
aangeven: SPEED/RPM (snelheid /
toerental per minuut); TIME (tijd);
DISTANCE (afstand); WATTS /
CALORIES (watts/calorieën) en PULSE
RATE (pulsfrequentie).
Deze monitor heeft ook 1 manueel
programma, 9 programma’s met vooraf
ingesteld inspanningsniveau; 4 door de
gebruiker gedefinieerd programma en 4
controleprogramma’s voor de
hartfrequentie, 1 watt-programma en 1
willekeurig programma.
VAN DE ENE OPERATIEMODUS
OVERGAAN OP DE ANDERE.-
Na het selecteren van de gebruiker
zal, zullen de LED’s voor de
verschillende programma’s gaan
knipperen.
Deze monitor biedt u de mogelijkheid
in 7 verschillende modi te opereren:
Manual (Manueel), Program
(Programma), Fitness, Watt, Personal
(Gebruiker) H.R.C.
(DOELHARTFREQUENTIE) en
willekeurig (RANDOM).
Als u van de ene modus wilt overgaan
op de andere, druk op de
START/STOP-knop om de monitor te
laten stoppen, druk vervolgens op
RESET en selecteer, met behulp van
de toetsen UP▲/DOWN▼, de
gewenste modus.
MANUELE FUNCTIE.-
Gebruik de toetsen UP▲/DOWN▼ om
de functie MANUAL (manueel) te
selecteren en druk op ENTER. Druk op
de toets START/STOP om met oefenen
te beginnen en gebruik de toetsen UP▲
/ DOWN▼ om het inspanningsniveau te
verhogen of verlagen. Er zijn 24
inspanningsniveaus. Als u op
START/STOP drukt terwijl u zich op het
beginscherm bevindt, zal het oefenen
meteen in manuele modus beginnen.
Een tijdslimiet programmeren.-
Als u na het selecteren van de manuele
modus op ENTER drukt, zal het
tijdsvenster gaan knipperen. Door
op de
toetsen UP▲/DOWN▼ te drukken, kunt
u een tijdslimiet programmeren voor de
oefening (tussen 5-99 minuten).

34
Selecteer de tijd en druk op
START/STOP om met de oefening te
beginnen. De tijd zal beginnen af te
tellen totdat nul is bereikt en de monitor
zal verschillende malen piepen om u te
waarschuwen dat u de
geprogrammeerde waarde hebt bereikt.
Een afstandslimiet programmeren.-
Als u na het selecteren van de manuele
modus tweemaal op ENTER drukt, zal
het afstandsvenster gaan knipperen.
Door op de toetsen UP▲/DOWN▼ te
drukken, kunt u een afstand voor uw
oefening programmeren (tussen 1 – 99
km). Selecteer de afstand en druk op
START/STOP om met de oefening te
beginnen. De afstand zal beginnen af te
tellen totdat nul is bereikt en de monitor
zal verschillende malen piepen om u te
waarschuwen dat u de
geprogrammeerde waarde hebt bereikt.
Een calorielimiet programmeren.-
Als u na het selecteren van de manuele
modus driemaal op ENTER drukt, zal
het calorievenster gaan knipperen.
Door op de toetsen UP▲/DOWN▼ te
drukken, kunt u de calorieën voor uw
oefening programmeren (tussen 10 –
990 Cal.). Selecteer de calorieën en
druk op START/STOP om met de
oefening te beginnen. De calorieën
zullen beginnen af te tellen totdat nul is
bereikt en de monitor zal verschillende
malen piepen om u te waarschuwen dat
u de geprogrammeerde waarde hebt
bereikt.
PROGRAMMAFUNCTIE.-
Gebruik de toetsen UP▲/DOWN▼
om de functie PROGRAM
(programma) te selecteren en druk op
ENTER. Druk op de toetsen
UP▲/DOWN▼ om de
programmagrafiek (2-10) te selecteren
die u wilt gebruiken en druk
vervolgens op ENTER. Druk op
START / STOP om met de oefening te
beginnen. De duur van de
programmagrafiek is 10 minuten,
verdeeld in 10 fases van anderhalve
minuut. Als u tijd, afstand en/of
calorieën wilt programmeren, doorloop
de volgende procedure:
Zodra het programma geselecteerd is
en voordat u op START/STOP drukt,
drukt u op ENTER om de tijd te
programmeren, gebruik makende van
de toetsen UP▲/DOWN▼.
In dit geval zal de tijd verdeeld worden
in 10 fases. Druk op ENTER om de
afstand te programmeren. Druk
opnieuw op ENTER om de calorieën te
programmeren. Druk op START/STOP
om met de oefening te beginnen.
U kunt het inspanningsniveau variëren
gedurende de oefening door te
drukken op de toetsen
UP▲/DOWN▼.
WATT-CONTINU PROGRAMMA
Gebruik de toetsen UP▲/DOWN▼
om de functie WATT te selecteren en
druk op ENTER. Door op de toetsen
UP▲/DOWN▼ te drukken, kunt u de
te produceren watts programmeren
voor de oefening (tussen 70-310
Watt). Druk op ENTER om de tijd te
programmeren. Druk op ENTER om
de afstand te programmeren. Druk
opnieuw op ENTER om de calorieën
te programmeren. Druk op
START/STOP om met de oefening te
beginnen. Het inspanningsniveau van
de oefening zal vanzelf aangepast
worden, gebaseerd op de snelheid en
het aantal geselecteerde watts.

35
GEBRUIKERSPROGRAMMA
Gebruik de toetsen UP▲/DOWN▼ om
de functie USER (gebruiker) te
selecteren en druk op ENTER.
Selecteer de gebruiker, tussen U1-U4,
gebruik makende van de toetsen
UP▲/DOWN▼ en druk vervolgens op
ENTER. Drukt u op ENTER en houdt
de toets 4 seconden.
De eerste kolom van het
oefeningsniveau zal gaan knipperen
aan de linkerkant van het centrale
gebied van het weergavescherm.
Selecteer het gewenste niveau voor de
eerste fase, gebruik makende van de
toetsen UP▲/DOWN▼, en druk
vervolgens op ENTER. Herhaal deze
procedure om alle fases van het
gebruikersprogramma te
programmeren.
Zodra het gebruikersprogramma
gedefinieerd is en voordat u op
START/STOP drukt, drukt u op ENTER
en houdt de toets 4 seconden vast
totdat de tijdsfunctie begint te
knipperen. Druk op de toetsen
UP▲/DOWN▼ om de tijd te
selecteren. Druk op ENTER om de
afstand te programmeren. Druk
opnieuw op ENTER om de calorieën te
programmeren. Druk op START/STOP
om met de oefening te beginnen.
CONTROLEPROGRAMMA’S
VOOR DE HARTFREQUENTIE.-
Gebruik de toetsen UP▲/DOWN▼
om de functie H.R.C.
(doelhartfrequentie) te selecteren en
druk op ENTER. Gebruik de toetsen
UP▲/DOWN▼ om de gewenste optie
te selecteren (60%, 70%, 85% of Tag)
en druk op ENTER. De eerste drie
vertegenwoordigen het percentage in
verhouding tot de maximum
hartfrequentie (220-leeftijd) en de
vierde wordt gebruikt om de
hartfrequentie manueel te bepalen.
Als u Tag kiest, moet u de toetsen
UP▲/DOWN▼ gebruiken om de
gewenste hartfrequentie te selecteren
en vervolgens op ENTER drukken.
Druk op START/STOP om met de
oefening te beginnen. Het
inspanningsniveau zal automatisch
aangepast worden in
overeenstemming met de
geselecteerde waarde voor de
hartfrequentie. Als de pulsfrequentie
onder de doelwaarde ligt, zal de
inspanningsinstelling elke 30
seconden verhoogd worden met één
niveau totdat het maximum van 24
bereikt is. Als de pulsfrequentie boven
de doelwaarde ligt, zal de monitor
waarschuwende piepjes te horen
geven en de inspanningsinstellingen
elke 15 seconden met één niveau
verlagen totdat het minimum van 1
bereikt is. Als na meer dan 30
seconden de pulsfrequentie nog
steeds boven de doelwaarde blijft, zal
de monitor piepen en stoppen om de
gebruiker te beschermen.
Als u tijd, afstand en/of calorieën wilt
programmeren, doorloop de volgende
procedure: Zodra het programma voor
de hartfrequentie geselecteerd is en
voordat u op START/STOP drukt, drukt
u op ENTER om de tijdslimiet te
programmeren, gebruik makende van
de toetsen UP▲/DOWN▼. Druk
opnieuw op ENTER om de afstand te
programmeren.
Druk nog eenmaal op ENTER om de
calorieën te programmeren. Druk op
START/STOP om met de oefening te
beginnen.
Uw handen moeten op de
pulssensoren (R) geplaatst zijn bij het
gebruik van deze programma’s.

36
RANDOMFUNCTIE.-
Gebruik de toetsen UP▲/DOWN▼
om de functie RANDOM (programma)
te selecteren en druk op ENTER.
U ziet een willekeurig programma.
Druk op START / STOP om met de
oefening te beginnen. De duur van de
programmagrafiek is 10 minuten,
verdeeld in 10 fases van anderhalve
minuut.
Als u tijd, afstand en/of calorieën wilt
programmeren, doorloop de volgende
procedure: Zodra het programma
geselecteerd is en voordat u op
START/STOP drukt, drukt u op ENTER
om de tijd te programmeren, gebruik
makende van de toetsen
UP▲/DOWN▼. In dit geval zal de tijd
verdeeld worden in zestien fases. Druk
op ENTER om de afstand te
programmeren. Druk opnieuw op
ENTER om de calorieën te
programmeren. Druk op START/STOP
om met de oefening te beginnen.
U kunt het inspanningsniveau variëren
gedurende de oefening door te
drukken op de toetsen
UP▲/DOWN▼.
INSTRUCTIES EN GEBRUIK VAN
HANDGREEPPULSMETING.-
Pulshandgreep
Op dit model wordt de pulsfrequentie
gemeten door beide handen op de
sensoren (R) op het stuur te plaatsen,
zoals weergegeven in Fig.2.
Als beide handen op de sensoren zijn
geplaatst, zal het hartsymbool aan de
rechterzijde van het scherm,
gemarkeerd met PULSE, beginnen te
knipperen en na een paar seconden
zal er een hartfrequentielezing
weergegeven worden.
Als de handen niet op de juiste wijze
worden geplaatst zoals weergegeven
in Fig.3, zal de pulsfunctie niet
functioneren.
Als er een «P» op het scherm
verschijnt of als het hartsymbool niet
knippert, controleer of beide handen
op de juiste wijze op de sensoren zijn
geplaatst.
PROGRAMMA LICHAAMSVET
Programma is een programma voor de
calculatie van percentage lichaamsvet
van de gebruiker.
Druk op de toetsen UP/DOWN en kies
u uw lichaamslengte (HEIGHT 90-
210cm). Druk op ENTER om de keuze
vast te leggen. Druk op de toetsen
UP/DOWN en kies u uw
lichaamsgewicht (HEIGHT 10-150kg).
Druk op ENTER om de keuze vast te
leggen. Druk op de toetsen UP/DOWN
en kies u uw leeftijd (AGE 10-100 jaar).
Door op de toetsen UP/DOWN te
drukken kiest u het geslacht (Man-
Vrouw). Druk op ENTER om de keuze
vast te leggen. Druk op de toets
START/STOP en leg uw handen over
de hartslagsensoren (R) (hand-grip)
zoals wordt getoond in Fig.3 en na
enkele seconden worden de waarden
FAT % (% lichaamsvet)Wanneer op het
beeldscherm de boodschap “ERROR”
verschijnt, betekent dit dat u uw handen
niet correct op de sensoren (R)
(handgrip) geplaatst zijn Fig 3.
REFERENTIETABEL PERCENTAGE
LICHAAMSVET % (BF)
GESLACHT/
VET%
LAAG LAAG /
GEMIDDELD
GEMIDDELD
HOOG
MAN <
13%
13%-
25,8%
26%-30% >30%
VROUW <23%
23%-
35,8%
36%-40% >40%

37
iOS handleiding (geschikt
voor iPhone, iPad en iPod
Touch)
Download een Pafers App uit de App
Store (Een overzicht van beschikbare
apps vindt u op de BH website:
www.bhfitness.com). Plug vervolgens
de USB Bluetooth module (los te
verkrijgen) in de achterzijde van de
monitor (Fig. 6). Zet Bluetooth aan in
de instellingen van uw iOS toestel en
het toestel zal automatisch naar
actieve Bluetooth apparatuur in de
buurt zoeken. Selecteer de BH
module uit de lijst om deze te
verbinden. Open de Pafers app en
begin met trainen.
ANDROID handleiding
(geschikt voor Android
toestellen)
Download een Pafers App via Google
Play (Een overzicht van beschikbare
apps vindt u op de BH website:
www.bhfitness.com). Plug vervolgens
de USB Bluetooth module (los te
verkrijgen) in de achterzijde van de
monitor (Fig. 6). Zet Bluetooth aan in
de instellingen van uw Android toestel
en het toestel zal automatisch naar
actieve Bluetooth apparatuur in de
buurt zoeken. Selecteer de BH
module uit de lijst om deze te
verbinden. Open de Pafers app en
begin met trainen.
HANDLEIDING VOOR
FOUTOPSPORING.-
Probleem: Het weergavescherm gaat
aan, maar alleen de Tijdfunctie
functioneert
Oplossing:
a.- Controleer of de verbindingskabel
aangesloten is.
Probleem: Weergavesegmenten van
een functielezing zijn niet zichtbaar of
er verschijnen foutboodschappen voor
een bepaalde functie.
Oplossing:
a.- Haal de stekker 15 seconden uit
het 220 V-stopcontact en steek hem
er daarna weer in.
b.- Als bovenstaande stappen niet
helpen, vervang dan de elektronische
monitor.
Transformator
Probleem: De monitor kan niet
ingeschakeld worden.
Oplossing:
a.- Controleer de 220 V-aansluiting
b.- Controleer de aansluiting van de
transformatoruitgang naar het toestel.
c.- Controleer de kabelaansluitingen
van de hoofdsteun.
Voorkom dat de elektronische monitor
aan direct zonlicht wordt blootgesteld,
aangezien dit het weergavescherm
van vloeibaar kristal kan beschadigen.
Stel het ook niet bloot aan water of
klappen.
Als u twijfels hebt over enig onderdeel
van dit toestel, aarzel dan niet contact
op te nemen met de technische
bijstandsdienst door dienstverlening te
bellen (zie laatste pagina van de
handleiding).
BH BEHOUDT ZICHZELF HET
RECHT VOOR DE SPECIFICATIES
VAN HAAR PRODUKTEN TE
WIJZIGEN ZONDER
VOORAFGAANDE BEKENDMAKING
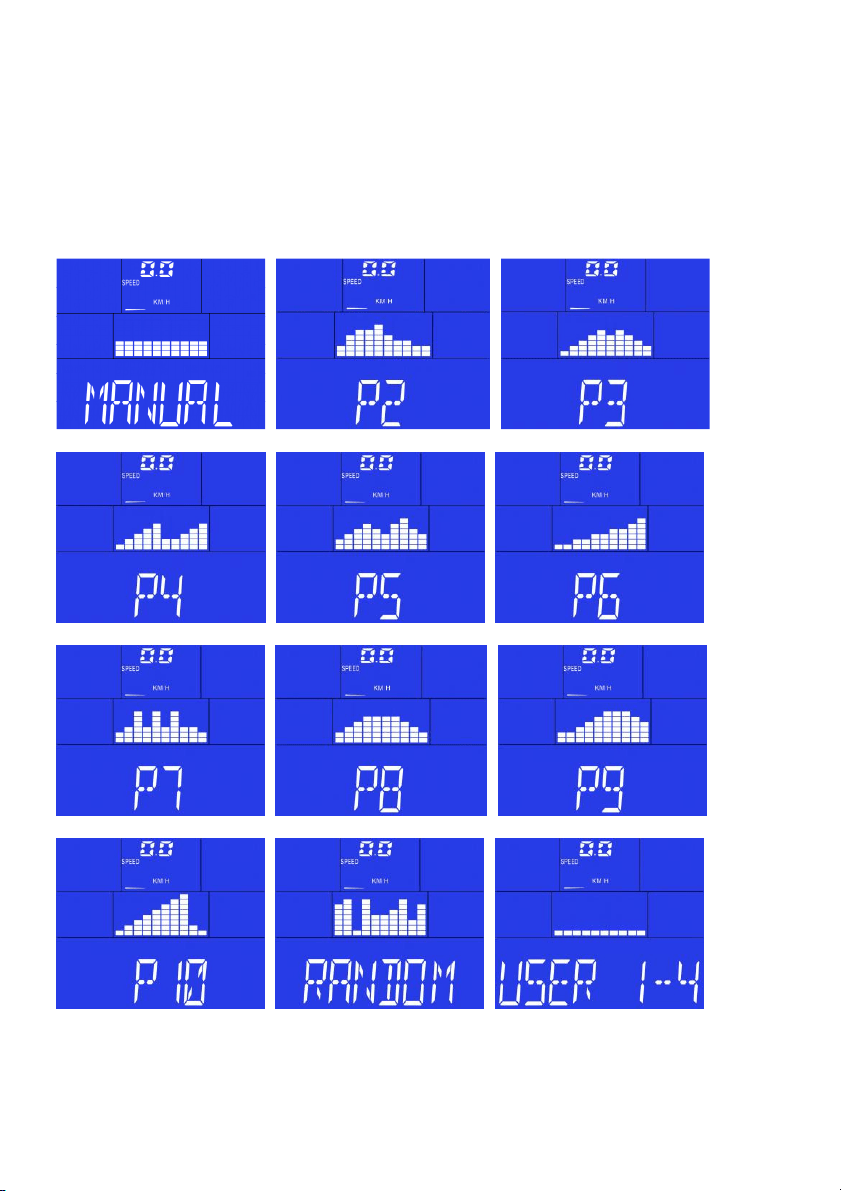
(E) PERFILES DE LOS PROGRAMAS
(GB) PROGRAM PROFILES
(F) PROFILS DES PROGRAMMES
(D) PROGRAMMPROFILE
(P) PERFIS DOS PROGRAMAS
(I) PROFILI DEI PROGRAMMI
(NL) PROGRAMMAPROFIELEN
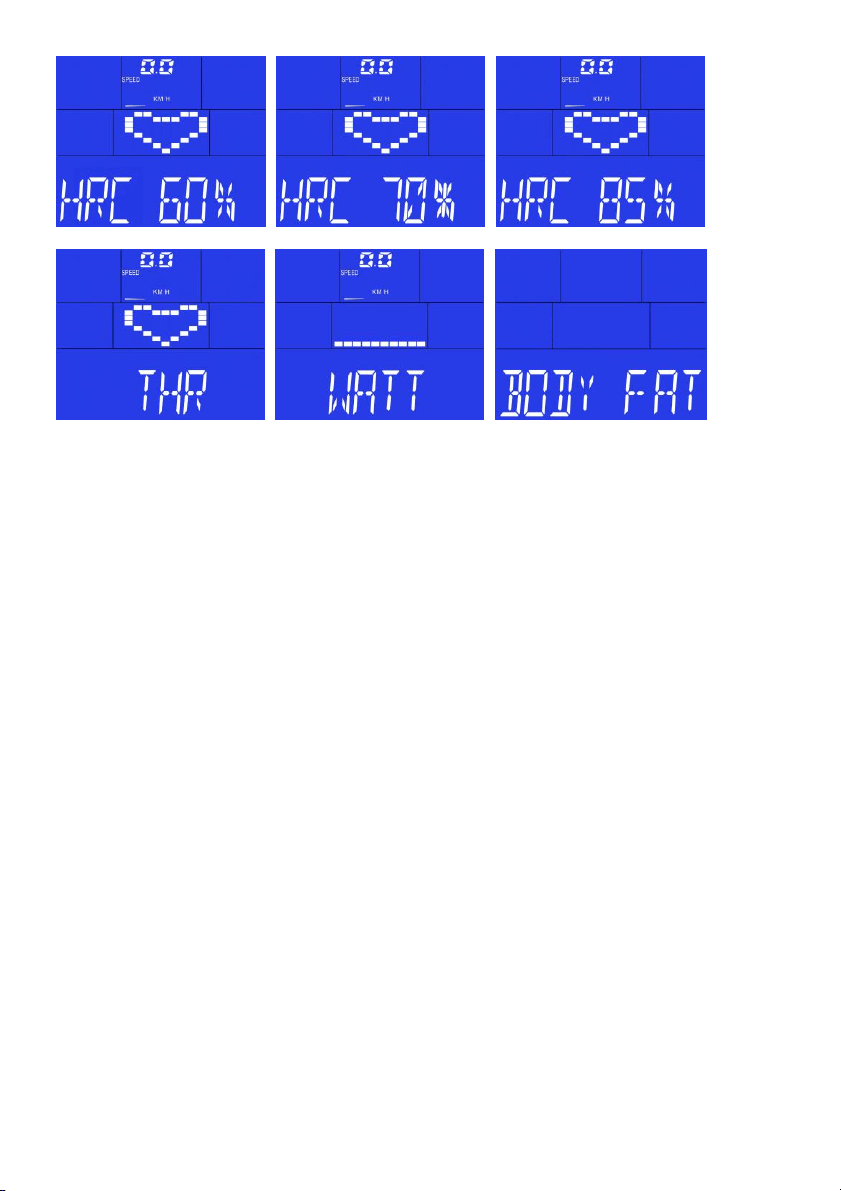

Lista de dispositivos compatibles:
List of supported devices:
Liste des périphériques pris en charge:
Liste der unterstützten Geräte:
Lista de dispositivos suportados:
Elenco dei dispositivi supportati:
Lijst van ondersteunde apparaten:
iOS:
• iPod touch (3
rd
Gen +)
• iPhone 3GS +
• mini iPad +
• iPad +
BH Fitness iConcept products need to be compatible with Apple devices with iOS
4.2.3 or later. It is recommended to update iOS to latest version to obtain the best
user experience.
“Made for iPod “, “Made for iPhone,” and “Made for iPad” mean that an electronic accessory has
been designed to connect specifically to iPod, iPhone, or iPad, respectively, and has been certified
by the developer to meet Apple performance standards. Apple is not responsible for the operation
of this device or its compliance with safety and regulatory standards. Please note that the use of
this accessorywith iPod, iPhone, or iPad may affect wireless performance.
iPad, iPhone, iPod, iPod classic, iPod nano, iPod shuffle, and iPod touch are trademarks of Apple Inc.,
registered in the U.S. and other countries.
Android:
• Samsung Galaxy Note 2 +
• Nexus 7 +
• Samsung Galaxy S4 +
This App is optimized to be used in the listed devices, but it also should work in
Android devices equipped with listed Android versions or superior, and Bluetooth
2.1 or superior, and 4.3" screen or superior. However, performance on non-listed
devices is not guaranteed.
Check updated list of compatible devices at: www.bhfitness.com

BH FITNESS SPAIN
EXERCYCLE,S.L.
(Manufacturer)
P.O.BOX 195
01080 VITORIA (SPAIN)
Tel.: +34 945 29 02 58
Fax: +34 945 29 00 49
e-mail: sat@bhfitness.com
www.bhfitness.com
POST-VENTA
Tel: +34 945 292 012 /
902 170 258
Fax: +34 945 56 05 27
e-mail: sat@bhfitness.com
BH FITNESS NORTH AMERICA
20155 Ellipse
Foothill Ranch
CA 92610
Tel: + 1 949 206 0330
Toll free: +1 866 325 2339
Fax: +1 949 206 0013
e-mail:
fitness@bhnorthamerica.com
www.bhnorthamerica.com
BH FITNESS ASIA
No.139, Jhongshan Rd.
Daya Township
Taichung 428, Taiwan. R.O.C.
Tel.: +886 4 25609200
Fax: +886 4 25609280
e-mail: info@bhasia.com.tw
BH FITNESS PORTUGAL
MAQUINASPORT, APARELHOS
DE DESPORTO, S.A.
Rua do Metalúrgico 465
Zona Industrial Giesteira
3750-325 Águeda (PORTUGAL)
Tel.: +351 234 729 510
Fax: +351 234 729 519
e-mail: info@bhfitness.pt
BH SERVICE PORTUGAL
Tel.: +351 707 22 55 24
Fax: +351 234 729 519
e-mail: info@bhfitness.pt
BH FITNESS MEXICO
BH Exercycle de México S.A. de
CV
Eje 132 / 136
Zona Industrial, 2A Secc.
78395 San Luis Potosí
S:L:P: MÉXICO
Tel.: +52 (444) 824 00 29
Fax: +52 (444) 824 00 31
www.bhlatam.com.mx
BH FITNESS CHINA
BH China Co., Ltd.
Block A, NO.68, Branch Lane
455, Lane 822,
Zhen Nan RD., Li Zi Yuan,
Putuo, Shanghai 200331, P.R.C.
Tel: +86-021-5284 6694
Fax:+86-021-5284 6814
e-mail: info@i-bh.cn
BH FITNESS UK
Unit 12 Arlington Court
Newcastle Staffs
ST5 6SS
UK 0844 3353988
International
00441782634703
AFTER SALES - UK
e-mail: service@bh-uk.co.uk
BH Germany GmbH
Altendorfer Str. 526
45355 Essen
Tel: +49 201 450910-0
e-mail:
info@bhgermany.com
Kostenfreie Telefonnummer:
0800 0996655
Ersatzteile:
www.bhfitness.com
BH FITNESS FRANCE
SAV FRANCE
Tel : +33 0810 000 301
Fax : +33 0810 000 290
savfrance@bhfitness.com
BH SE RESERVA EL DERECHO A MODIFICAR LAS ESPECIFICACIONES DE SUS PRODUCTOS
SIN PREVIO AVISO.
SPECIFICATIONS MAY BE CHANGED WITHOUT PRIOR NOTICE DUE TO OUR PROGRAMME OF
CONTINUOUS PRODUCT DEVELOPMENT.
BH SE RÉSERVE LE DROIT DE MODIFIER LES SPECIFICATIONS DE SES PRODUITS SANS
PRÉAVIS.
BH BEHALT SICH DAS RECHT VOR, ÄNDERUNGEN DER MODELL-ANGABEN OHRE
VORHERIGE ANKÜNDIGUNG VORZUNEHMEN.
DATI TECNICI E COMMERCIALI RELATIVI AGLI ARTICOLI DEL PRESENTE CATALOGO
POSSONO ESSERE SOGGETIL A VARIAZIONI SENZA ALGUN PREAVVISO.
BH SE RESERVA O DIREITO A MODIFICAÇÀO ESPECIFICAÇOES DOS SEUS PRODUCTOS SEM
PRÉVIO AVISO.
DOOR KONSTANTE PRODUKTVERNIEUWING EN VERBETERING HOUDEN WIJ ONS HET
RECHT VAN WIJZIGING VOOR ZONDER VOORAFGAAND BERICHT.
v1