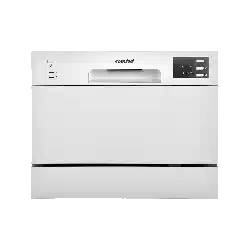
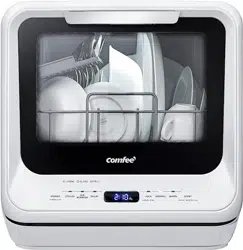
User Manual Comfee CDC17P0ABB Dishwasher
QUICK START GUIDE
Please read the entire manual for detailed operating instructions.
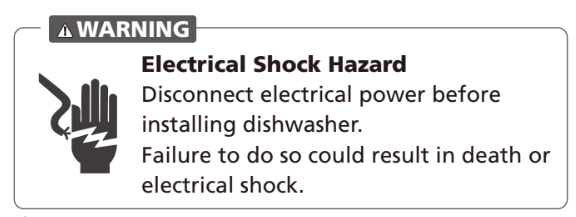
Connecting to Power Supply
The power required is 120VAC 60Hz, 10Amp circuit.
Drain hose installation
Place the end of the drain Hose into a sink or bucket.

Adding Water to the Tank
Note: Before adding water, you need to press the power button to turn on the diswasher .There are two ways to add water into the tank:
- Add water into the tank automatically by connecting inlet hose to the tap.
- Open the cap and slowly add water into the tank manually by using water container.
IMPORTANT:
The water tap symbol will be on if there is not enough water in the tank. Add water until the unit beeps rapidly for 3 seconds and is off, which means the tank is filled.
Prep the Dishware
Remove the large residue on the dishware and glasses before placing into the dishwasher.
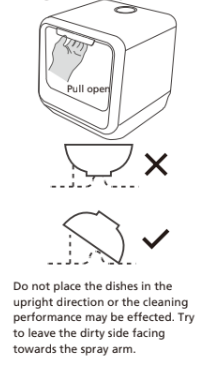
Loading The Dishwasher
Place dishes in the dishwasher in order by size and starting from the two ends, then load into the middle. All dishes are suggested to be tilted to improve cleaning performance.
The top arm will be blocked if dishes are improperly placed and the cleaning effect may not be ideal.
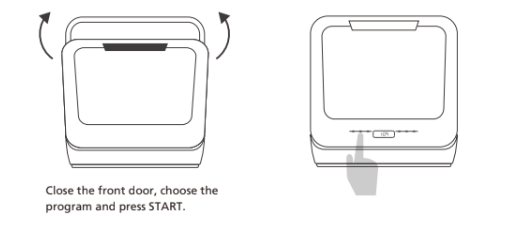
Starting The Dishwasher
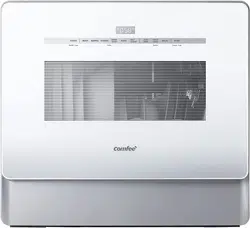
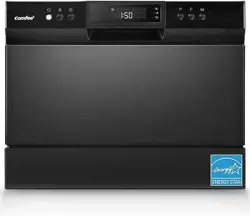
GETTING TO KNOW YOUR APPLIANCE
IMPORTANT:
Before using this dishwasher for the first time and to get the best performance, read these instructions.
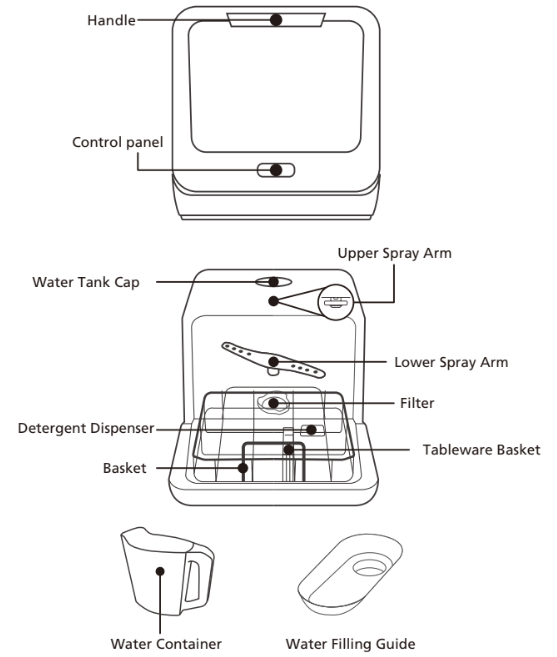
Dishwasher features
INSTALLATION
Attention
The installation of the pipes and electrical equipments should be done by professionals.
Installation preparation
The installation position of dishwasher should be near the existing water inlet tap and drain outlet and power socket.
One side of the sink should be chosen to secure the drain hoses of the dishwasher.
Positioning the Appliance
The dishwasher is equipped with water supply and drain hoses that can be positioned to the right or the left to facilitate proper installation.
About Power Connection
Electrical Requirements
Please look at the rating label to know the rating voltage and connect the dishwasher to the appropriate power supply. Individual,properly polarized and grounded 10-amp (minimum) branch circuit fused with 10-amp (minium) time-delay fuse or circuit breaker.
Electrical Connection
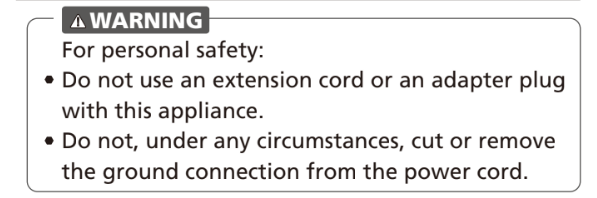
Ensure the voltage and frequency of the power being corresponds to those on the rating plate. Only insert the plug into an electrical socket which is grounded properly. If the electrical socket to which the appliance must be connected is not appropriate for the plug , replace the socket, rather than using adaptors or the like as they could cause overheating and burns.
Water Connection

- Take the existing aerator off your faucet.
- Screw the faucet adapter onto (or into) the faucet tap. Check for leaks (Use Teflon tape
- Take the existing aerator off your faucet.
- Attach the quick connect onto the faucet adapter by pulling down the locking collar. Then pull up the locking collar to fix the connection.
- Slowly open the hot water line and check for any sign of water leaks at all hose connections.
IMPORTANT: Please confirm whether the supplied adapter is suitable for your faucet tap. If not, please contact our customer service where adapter is available for purchase.
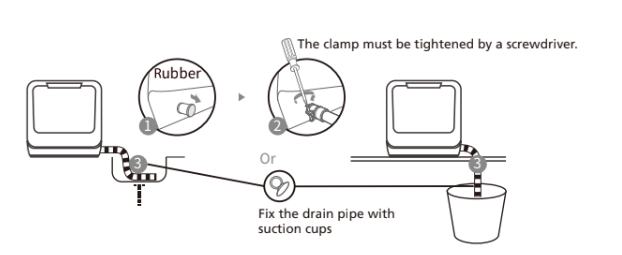
Connection of drain hoses
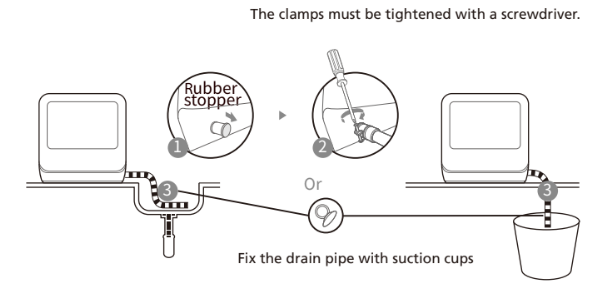
- Remove the rubber stopper.
- Fix the drain pipe with the back pipe of the machine.The interface is fitted with clamps and tightened with a screwdriver.
- Place the free end of drain hose into a sink or bucket.Use the suction cup to hold the hose in place.(Note: the hose will shift when water is running if not secured)
The dishwasher drain hose should not be installed higher than 39 1/4"(1m) from the surface that the dishwasher is sitting on to prevent performance issues.
Note: If the drain hose is routed above the dishwasher it will haold water,and will need to be drained to be moved or relocated.
Caution:Do not extend the dishwasher hose more than 13" or 33cm to prevent the supplied drain hose. performance issues. Any extension should be of the same material and diameter as
Caution
The drain hose must be correctly fitted to avoid water leaks. Ensure that the water drain hose is not kinked or crushed.
USING YOUR DISHWASHER
Loading The Dishwasher
Recommendation
- All items to be washed should be marked "dishwasher safe".
- Use only dish detergent designed for automatic dishwashers, hand dishwasher soap will create foam and require significant clean up and issues with the dishwahser.
- For delicate items, select a program with lower temperatures.
- CAUTION: Do not take glass and cutlery out of the dishwasher immediately after the program has ended. These items will still be very hot.
Items Not Recommended for Dishwasher Use
Not suitable for use:
- Cutlery with wooden, horn, china or mother- of-pearl handles
- Plastic items that are not heat resistant, older cutlery with glued parts that are not temperature resistant
- Bonded cutlery items or dishes
- Pewter or copper items
- Crystal glass
- Steel items subject to rusting
- Wooden items
- Items made from synthetic fibres
Limited suitability:
- Some glasses can become dull after a large number of washes.
- Silver and aluminium have a tendency to discolour during washing.
- Glazed patterns may fade if washed frequently.
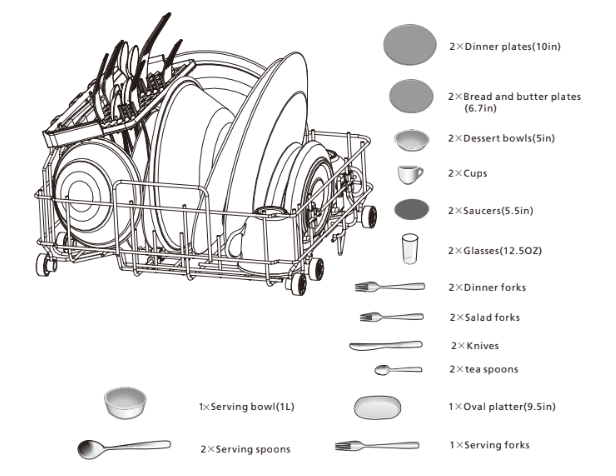
Dishwasher Loading Tips
(For the best performance of the dishwasher, follow these loading guidelines. Features and appearance of baskets and cutlery baskets may vary for your model.)
Scrape off any large food particles. Soften remnants of burnt food in pans. It is not necessary to rinse the dishes under running water. Place objects in the dishwasher in following way:
- Items such as cups, glasses, pots/pans, etc. load face downwards.
- Curved items, or those with recesses, should be loaded at a slant so that water can run off.
- All utensils are stacked securely and can not tip over.
- All utensils are placed in the way that the spray arms can rotate freely during washing.

- Place cups,deep bowls,and pans face down
- Load items in a way that the dirty surface faces the center of the dishwasher
- Position items such that they will not collect water of have puddles of water on top
- Load long and/or sharp cutlery horizontally on the cutlery tray
- Avoid nesting dishes for best results(example two spoons together)
- Ensure items do not touch or move/wobble in the basket,this can cause damage to your dishes
- Do not allow items to extend below the dishwasher rack,this could cause and interference with the wash arm.
- Do not overload your dishwasher. If the water can not get to your dishes from the bottom or top wash results may be poor.
Loading The Baskets
Position the dishes and cookware so that they will not get moved by the spray of water.
Recommended loading layouts below
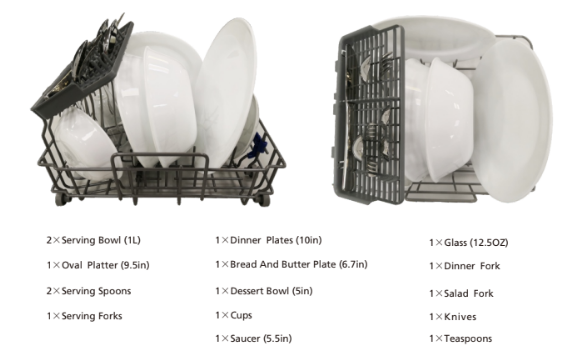
Recommended loading layout with 1 serving bowl and 2 settings personal tableware.
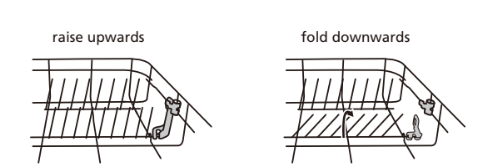
Folding Down The Rack Shelves
The tines are used for holding plates and a platters. They can be lowered to make more room for large items, such as large tableware, the fruit basket, or baby bottle rack.
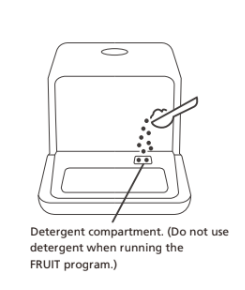
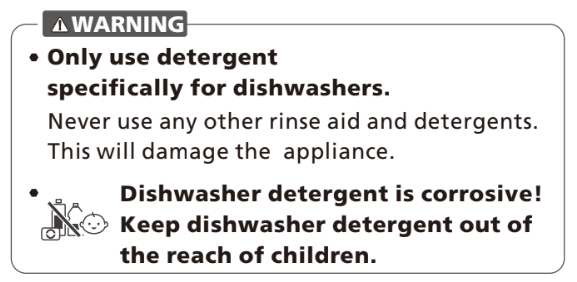
Loading The Detergent
This product not support rinse aid. Only add detergent.
Detergent Tablets
Detergent tablets of different brands dissolve at different speeds. For this reason some detergent tablets will not dissolve and develop their full cleaning power during short programs. Therefore use long programs when using detergent tablets, to ensure the detergent tablet dissolves completely.
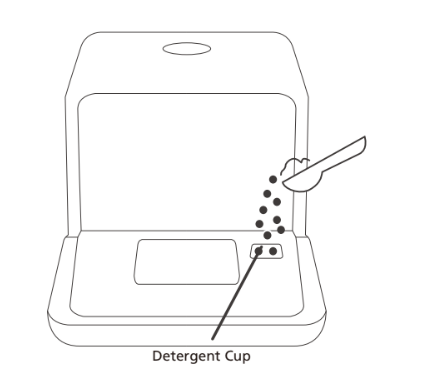
Detergent
The detergent must be refilled before the start of each wash cycle following the instructions provided in the Wash Cycle Table. Your dishwasher uses less detergent then conventional dishwasher. Generally, only one tablespoon of detergent is needed for a normal wash load. More heavily soiled items need more detergent.
Always add the detergent just before starting the dishwasher.
Adding detergent
WASH CYCLE SELECTION
Wash Cycle Programs
The table below shows which programs are best for the levels of food residue on them and how much detergent is needed. It also show various information about the programs.

Turning On The Appliance
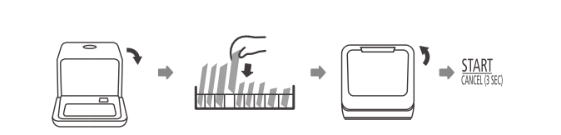
Starting a wash cycle...
Draw out the basket(see the section entitled "Loading the Dishwasher").
Pour in the detergent (see the sectionFill the detergent).
Insert the plug into the socket. The power supply is 120VAC 60HZ,
Press the power button to turn on the appliance,
Connect the inlet hose to the tap, make sure that the water supply is turned on to full pressure, or add water to the tank manually.
Select a suitable program according to the Wash cycle table;
If a program is selected, the response light will illuminate. Then press the Start/ Cancel button, the dishwasher begins to start.
Change The Program
A wash cycle can only be changed if it has been running for a short time otherwise, the detergent may have already been released and the dishwasher may have already drained the wash water. If this is the case, the dishwasher needs to be reset and the detergent dispenser must be refilled. To reset the dishwasher, follow the instructions below:
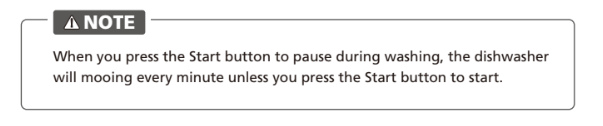
- Press and hold Start button for more than 3 seconds,the machine will be in stand by state.
- Press CYCLES button to select the desired program.
- Press the Start button.

Forget to add a dish?
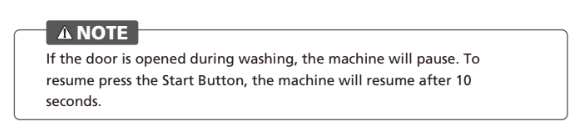
A forgotten dish can be added within the first 10 minutes of the cycle.If this is the case, follow the instructions below:
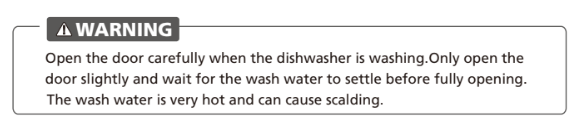
- Open the door a little to stop the washing.
- After the spray arms stop moving, you can open the door completely.
- Add forgotten dishes.
- Close the door.
- Press the Start button, the dishwasher will start working after 10 seconds.
End Of Wash Cycle
When the cycle has finished, the buzzer of dishwasher will sound 8 seconds,then stop.Turn off the appliance using the ON/OFF button, shut off the water supply and open the door of the dishwasher. Wait a few minutes before unloading the dishwasher to avoid scald. The dishes and utensils are still hot and more susceptible to breakage. They will also dry better.
- Switch Off the Dishwasher
- S witch off the dishwasher by pressing the ON/OFF button.
- Turn off the water tap!
Open the dishwasher's door, leave it ajar.In this way they will be cooler and the drying will be improved
The dishes should be allowed to cool down around 15 minutes before removing from the appliance.
Forced Tank Draining Operation
In standby mode, you can press and hold NORMAL button + RAPID button for 3 seconds simultaneously to drain the water tank.
MAINTENANCE AND CLEANING
Filter System
The filter efficiently removes food particles from the wash water, allowing it to be recycled during the cycle.
For best performance and results, the filter assembly must be cleaned regularly.
For this reason, it is a good idea to remove the larger food particles trapped in the filter after each wash cycle by rinsing the filter and cup under running water.

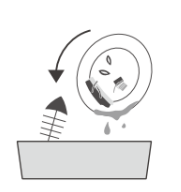
Step 1: Turn the filter assembly clockwise, then lift it up.

Step 2: Lift fine filter up and seperate it from the main filter.

Step3: Clean all of filter elements under running water to remove food soils.
- Inspect the filters for blockages every time the dishwasher has been used.
- By unscrewing the coarse filter, you can remove the filter system. Remove any food remnants and clean the filters under running water.

Dishwasher Care
The control panel and exterior can be cleaned by using a lightly dampened cloth.
After cleaning, make sure to dry it thoroughly.Never use sharp objects,scouring pads or harsh cleaners on any part of the dishwasher.
Cleaning The Door
To clean the edge around the door, you should use only a soft warm, damp cloth.
To avoid allowing water into the door lock and electrical components, do not use a spray cleaner of any kind.
Protect against freezing
Protect the dish washer from freezing temperatures.If the dishwasher will experience freezing temperature please flow the below procedure:
- In standby mode,press and hold DELAY button + AUTO OPEN button for 3 seconds simultaneously to drain the water tank.
- Unplug electrical power to the dishwasher.
- Turn off the water supply and disconnect the water inlet pipe from the back of the dishwasher.
- Drain water from the inlet pipe and dishwasher (use a pan to catch the water).
- Disconnect drain hose,and drain water from hose and back of dishwasher (place a catch pan under connection before disconnecting to catch water).
- Reconnect the water inlet pipe and drain hose to the back of the dishwasher.
- Remove the filter at the bottom of the tub and use a sponge to soak up water in the sump.

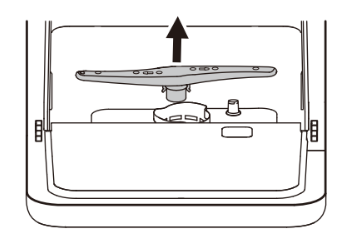
Cleaning The Spray Arms
The spray arms can be easily removed for periodic cleaning of the nozzles to remove possible clogging. Wash them under running water and carefully replace them in their seats, checking that their rotary movement is in no way impeded.
Grasp the middle of the spray arm, pull it upwards to remove it. Wash the arms under a jet of running water and replace it carefully to its seat. After reassembly, check that the spray arms rotate freely and are snapped in securely.
Dishwasher Maintenance
After Every Wash
After every wash, turn off the water supply to the appliance and leave the door slightly open so that moisture and odors are not trapped inside.
Cleaning Best Practices
To clean the exterior and rubber parts of the dishwasher, do not use solvents or abrasive cleaning products. Only use a cloth with warm soapy
To remove spots or stains from the surface of the interior, use a cloth dampened with water an a little vinegar, or a cleaning product made specifically for dishwashers.
When Left Unused
It is recommend that you run a wash cycle with thedishwasher empty and then unplug from power, turn off the water supply and leave the door of the appliance slightly open. This will help the door seals last longer and prevent odors from forming within the appliance.
Moving the Appliance
If the appliance must be moved, try to keep it in vertical position to prevent water from draining from the dishwasher.
If transporting a long distance drain water from the interior tank and hoses:
- Drain water from interior tank In standby mode,press and hold NORMAL button + RAPID button for 3 seconds simultaneously to drain the water tank.
- Disconnect water inlet and drain hoses from the back of the dishwasher (place a catch pan under the connections before removing the hoses to catch any water ).
- Remove the filter at the bottom of the tub and use a sponge to soak up water in the sump.
TROUBLESHOOTING TIPS
Before calling for service
Reviewing the charts on the following pages may save you from calling for service.
1. Dishwasher doesn't start
- Fuse blown, or the circuit break tripped - Replace fuse or reset circuit breaker. Remove any other appliances sharing the same circuit with the dishwasher
- Power supply is not turned on - Make sure the dishwasher is turned on and the door is closed securely. Make sure the power cord is properly plugged into the wall socket.
- Error code: E1. Water pressure is low - Check that the water supply is connected properly and the water is turned on.
- Door of dishwasher not properly closed - Make sure to close the door properly and latch it.
2. Water not pumped from the dishwasher
- Kinked or crushed drain hose - Check the drain hose.
- Filter clogged - Check filters.
- Kitchen sink clogged - Check the kitchen sink to make sure it is draining well. If the problem is the kitchen sink that is not draining , you may need a plumber rather than a serviceman for dishwashers.
4. Drain hose routing is too high
- The dishwasher drain hose should not be installed higher than 39 1/4"(1m) from the surface that the dishwasher is sitting on to prevent performance issues.
5. Suds in the tub
- Incorrect Detergent/Soap - Remove all of the dishes from the dishwasher.Scoop out as much of the suds as you can with a plastic container. Add a cup of either olive ail or white vineger,and run normal wash for a few minutes,and force a drain.Repeat as necessary until the foam is cleared, then run a complete Normal Cycle with no dishes.
- Spilled rinse-aid - Always wipe up rinse-aid spills immediately.
6. Stained tub interior
- Detergent with colorant may have been used - Make sure that the detergent has no colorant.
7. White film on inside surface
- Hard water minerals - To clean the interior, use a damp sponge with dishwasher detergent and wear rubber gloves. Never use any other cleaner than dishwasher detergent otherwise, it may cause foaming or suds.
8. Rust stains on cutlery
- The affected items are not corrosion resistant - Avoid washing items that are not corrosion resistant in the dishwasher.
9. Knocking noise in the dishwasher
- A spray arm is knocking against an item in a basket - Interrupt the program and rearrange the items which are obstructing the spray arm.
10. Rattling noise in the dishwasher
- Items of crockery are loose in the dishwasher - Interrupt the program and rearrange the dishware.
11. Knocking noise in the water pipes
- Water hammer in household piping - This has no influence on the dishwasher function. If in doubt, contact a qualified plumber.
12. The dishes are not clean
- The dishes were not loaded correctly - See notes in Loading & unloading your dishwasher.
- The program was not powerful enough - Select a more intensive program.