Loading ...
Loading ...
Loading ...

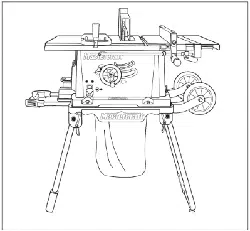
ATTACH TABLE SAW TO STAND (Fig. 26)
1. Place stand on tevel surface and adjust
front right adjustable stand pad (1) to level
the stand to the floor.
2. Ptace table saw on the top of stand aligning
holes in base with holes in stand.
3. Insert four hex bolts (2) through the flat
washers and holes in base and stand.
4. Tighten all four bolts. NOTE: Do not over
tighten bolts holding saw to stand. This will
damage the saw base.
Fig. 26
2
FOLDING THE TABLE SAW/STAND (Fig. 27)
1. Rotate the stand locking hook to the left. Lift up on the two right side stand locking levers
to unlock and lift the right side of the table saw up slightly off the floor (Fig. 27). Fold up
the teg set on the right side up to the base of the saw until it snaps into position with the
spring clip (Fig. 27).
2. Adjust the rip guide to the IN-RIP position (Fig. 27-1).
3. Rest the right side of the saw onto the floor, release the two left side stand locking levers
and tilt the saw on its right side. Fold the left side leg set up to the base (Fig. 27).
4. Secure the stand legs into position by rotating the stand locking hook to the right.
SETTING UP THE TABLE SAW/STAND (Fig. 27)
1. Rotate the stand locking lever to the left. Unfold the teg set and tock the stand locking
levers in place by sliding the levers down the slots of the mounting brackets and pushing
downwards to lock in place.
2. Rest the left side of the saw onto the floor and lift up on the right side of the stand and
unfold the narrower right side teg set (Fig. 27).
3. Secure the right side legs into position by locking the stand locking levers in place as
described in step 1.
NOTE:
e Make sure the table saw is locked in position securely and that the adjustable stand pad
has stabilized the table saw before operation.
Fig. 27
FOLDING
SET-UP
Fig. 27-1
Loading ...
Loading ...
Loading ...