HWF95AN1
HWF85AN1
HWF75AN1
NZ AU
Thank You
NZ AU
2
Legend
Warning – Important Safety information
General information and tips
Environmental information
Disposal
Thank you for purchasing a Haier Product.
Keep this manual in a convenient place so you can always refer to it for the safe and proper
use of the appliance.
If you sell the appliance, give it away, or leave it behind when you move house, make sure
you also pass this manual so that the new owner can become familiar with the appliance
and safety warnings.
WARNING!
of it. Remove the door catch to prevent children and pets to get closed in the appliance.
Please read these instructions carefully before using this appliance. The instructions
contain important information which will help you get the best out of the appliance and
ensure safe and proper installation, use and maintenance.
Help protect the environment and human health. Put
the packaging in applicable containers to recycle it.
Help to recycle waste of electrical and electronic
appliances. Do not dispose appliances marked with this
symbol with the household waste. Return the product
to your local recycling facility or contact your municipal

NZ AU
Content
3
1-Safety information ........................................................................................................................... 4
2-Product description ......................................................................................................................... 7
3-Control panel .................................................................................................................................... 8
4-
11
6-Consumption ..................................................................................................................................13
5-Programmes ..................................................................................................................................12
7-Daily use ...........................................................................................................................................14
8-Eco-friendly washing ....................................................................................................................19
9-Care and cleaning ..........................................................................................................................20
10-Troubleshooting .......................................................................................................................... 23
11-Installation .....................................................................................................................................26
12-Technical data ...............................................................................................................................30
13-Customer service ........................................................................................................................31
WiFi connection & Remote mode.............................................................................................
1-Safety information
NZ AU
4
Bef
-
ing safety hints!
WARNING!
Make sure there is no transport damage.
Make sure all transport bolts are removed.
Remove all packaging and keep out of children´s reach.
Handle the appliance always with at least two persons because it
is heavy.
Daily use
▶
▶
▶
▶
▶
▶
▶
▶
▶
▶
▶
▶
▶
▶
▶
▶
Children shall not play with the appliance.
Do not let children or pets come close to the appliance when the
door is open.
Store washing agents out of reach of children.
prevent laundry from being entangled. If necessary, use an
bag or net.
Do not touch or use the appliance when barefoot or with wet or
damp hands or feet.
Do not cover or encase the appliance during operation or
to allow any moisture or dampness to evaporate.
Do not place heavy objects or sources of heat or damp on top of
the appliance.
Do not use or store flammable detergent or dry cleaning agent in
close vicinity to the appliance.
Do not use any flammable sprays in close vicinity to the appliance.
Do not wash any garments treated with solvents in the appliance
without having dried them previously in the air.
appropriate
afterwards
This appliance is not intended for use by persons (including child-
ren) with reduced physical,sensory or mental capabilities, or lack
of experience and knowledge, unless they have beengiven super-
vision or instruction concerning use of the appliance by a person
responsible for their safety.
Children should be supervised to ensure that they do not play with
the appliance.
NZ AU
1-Safety information
5
WARNING!
Daily use
▶ Do not remove or insert the plug in the presence of flammable
gas.
▶ Do not hot wash foam rubber or sponge-like materials.
▶ Do not wash any laundry which is polluted with flour.
▶ Do not open detergent drawer during any wash cycle.
▶ Do not touch the door during the washing process, it gets hot.
▶ Do not open the door if the water level is visibly over the porthole.
▶ Do not force the door to open. The door is
tted with a self-lock
device and will open shortly after the washing procedure is ended.
▶
undertaking any routine maintenance and disconnect the appli-
ance from the electrical supply to save electricity and for safety.
▶ Hold the plug, not the cable, when unplugging the appliance.
Maintenance / cleaning
▶ Make sure children are supervised if they carry out cleaning and
maintenance.
▶ Disconnect the appliance from the electrical supply before
undertaking any routine maintenance.
▶ Keep the lower part of the porthole clean and open door and
detergent drawer if appliance is not in use to prevent odours.
▶ Do not use water spray or steam to clean the appliance.
▶
▶ Do not try to repair the appliance by yourself. In case of repair
please contact our customer service.
Installation
▶ The appliance should be placed in a well-ventilated place. Ensure
a location which allows opening the door fully.
▶ Never install the appliance outdoors in a damp place, or in an area
which may be prone to water leaks such as under or near a sink
unit. In the event of a water leak cut power supply and allow the
machine to dry naturally.
Replace a damaged supply cord only by the manufacturer, its
ser
hazard.
1-Safety information
NZ AU
6
Intended use
This appliance is intended for washing machine-washable laundry
only. Anytime follow the instructions given on the label of each
garment label. It is designed exclusively for domestic use inside the
house. It is not intended for commercial or industrial use.
use may cause hazards and loss of of all warranty and liability claims.
WARNING!
Installation
▶ Install or use the appliance only where the temperature is above
5 °C.
▶ Do not place the appliance directly on a carpet, or close to a wall
or furni
t
ur
e.
▶ Do not install the appliance in direct sunlight or in the near of heat
sources(e.g. stoves, heaters).
▶ Make sure that the electrical information on the rating plate
agrees with the power supply.
If
it
does
not,
contact
an
electrician.
▶ Do not use multi-plug adapters and extension cables.
▶ Make sure only the delivered electric cable and hose set are used.
▶ Make sure not to damage the electric cable and the plug. If
damaged have it replaced by an electrician.
▶ Use a separate earthed socket for the power supply which is easy
accessible after installation. The appliance must be earthed.
▶
no leakage.
▶
The new hose-sets supplied with the appliance are to be used
and that old hose-sets should not be reused.
The manual are suitable for 7.5kg, 8.5kg, 9.5kg washing machines.
The applicable water pressure of the washing machine is 0.03MPa
to 1MPa.
▶
NZ AU
2-Product description
7
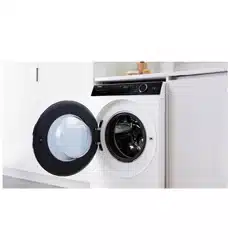
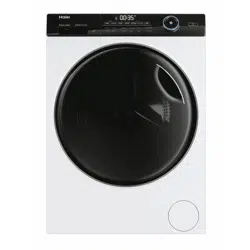
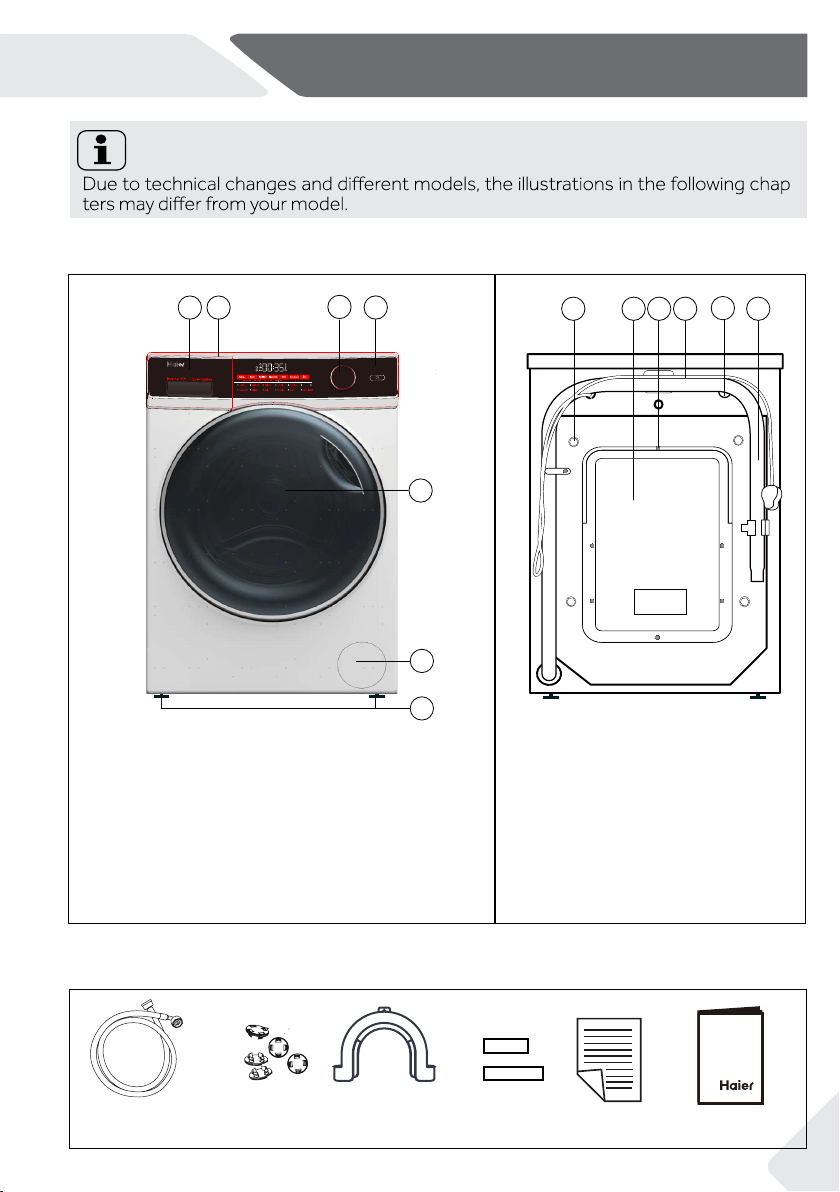
2.1 Picture of appliance
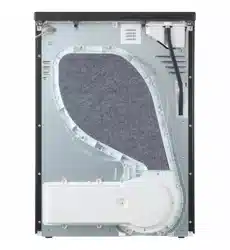
Front (Fig. 2-1): Rear side (Fig. 2-2):
2.2 Accessories
Check the accessories and literature in accordance with this list (Fig.2-3):
Note:
-
2-3
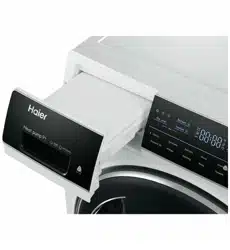
1 Detergent /
Softener drawer
2 Work top
3 Programme selector
4 Panel
5 Washer door
6 Service flap
7 Adjustable feet
2-1
2-2
Inlet hose-
assembly
5 Blanking
plugs
Drain hose
bracket
User manual
Warranty
card
Noise reduc-
tion pads
2x
2x
Stain removal
Delay
Steam
Extra Rinse
Speed
Temp.
Outdoor
Spin
Cotton
Synthetics
Wool
Express 15’
Refresh
MixBabycare
Duvet
Eco 40-60Cotton 20
Delicate
Fast
REFR
ESH
5
25 D
RUM
7
5
6
3
1
4
2
5
6
1
2 3 4
1 Transportation bolts
2
Back cover
3
Back cover screws
4
Power cord
5
W
Drain hose
ater inlet valve
6
T1
T2
T3
S1
S2
S3 S5
S6
S4
T4
Refresh
Refresh
Refresh
3-1
3-2
3-3
8
3-4
NZ AU
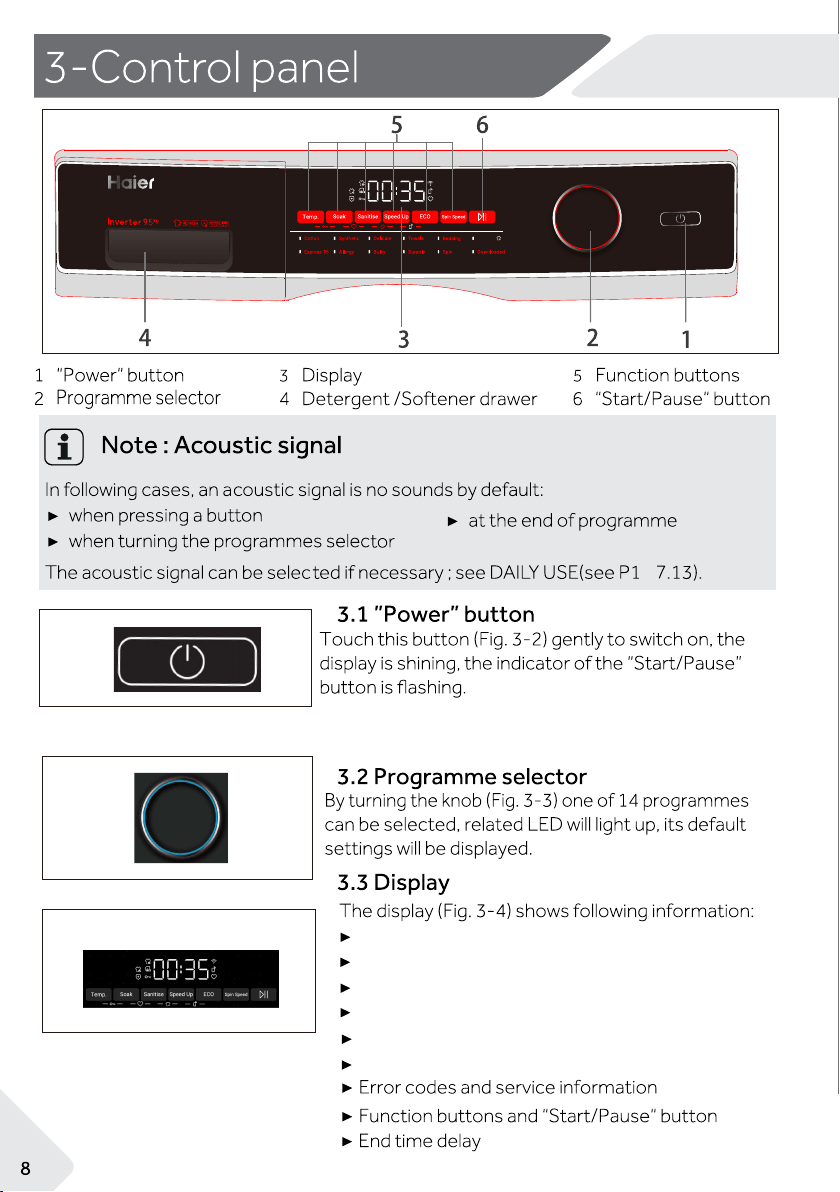
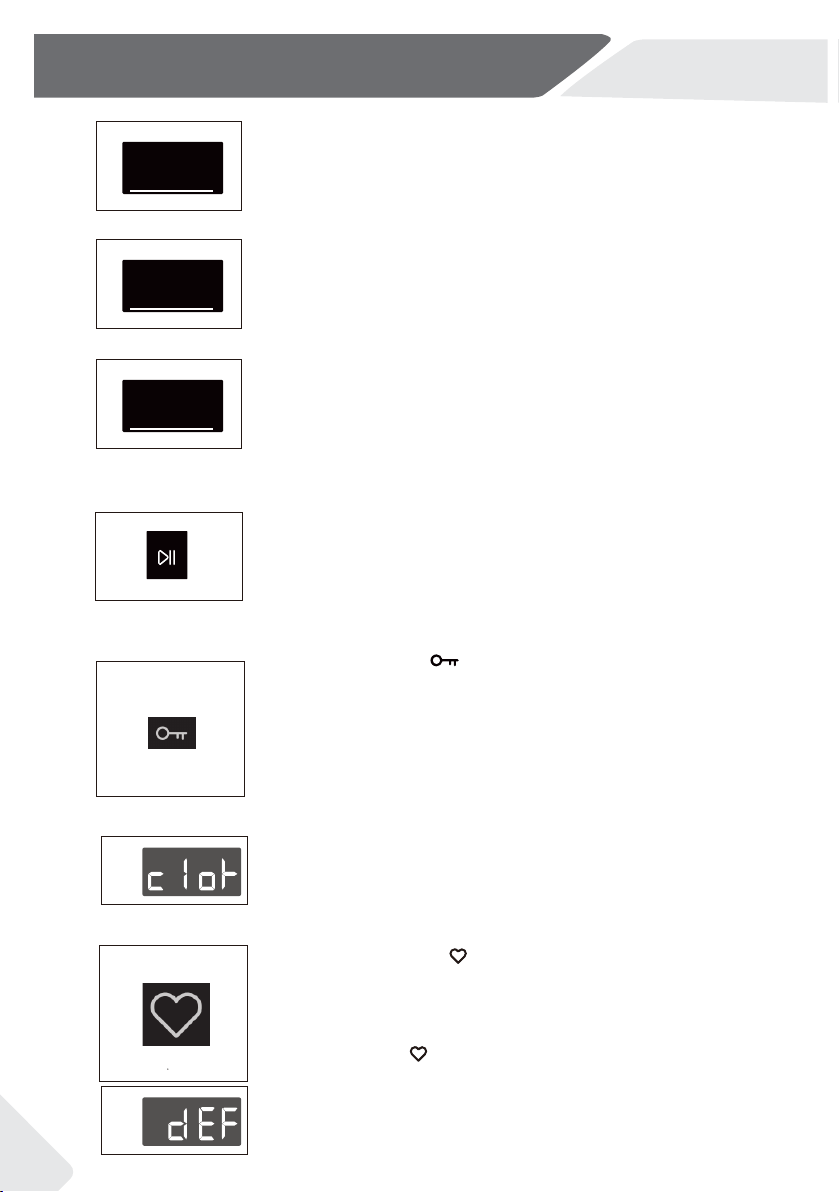
take HWF95AN1 as an example
Refresh
Press to turn the washer ON/OFF.
Press and hold the Power button for five seconds
until the power is turned on and the APP will be displ-
ayed on the screen to turn on the network function.
Temp: Select washing temperature
Soak: Select the number of soak
Sanitise: Select sanitise function
Speed up: Select different speed as needed
ECO: Touch to select energy saving mode
Spin Speed: Touch to select different speeds
9
3.5 Function buttons
lanoitidda elbane )6-3 .giF(snottub noitcnuf ehT
options in the selected programme before programme
starts. The related indicators are displayed.
programme, all options are disabled.
If a button has multiple options, the desired option can
be selected by pressing the button sequentially.
By touching the buttons, when it is in dull light, the
function is unselected; when it is in bright light, the
function is selected.
3.5.1-Function button “ TEMP. “
3.5.2 Function button “Soak”
Note: Factory settings
there is no special requirement default settings are recommended.
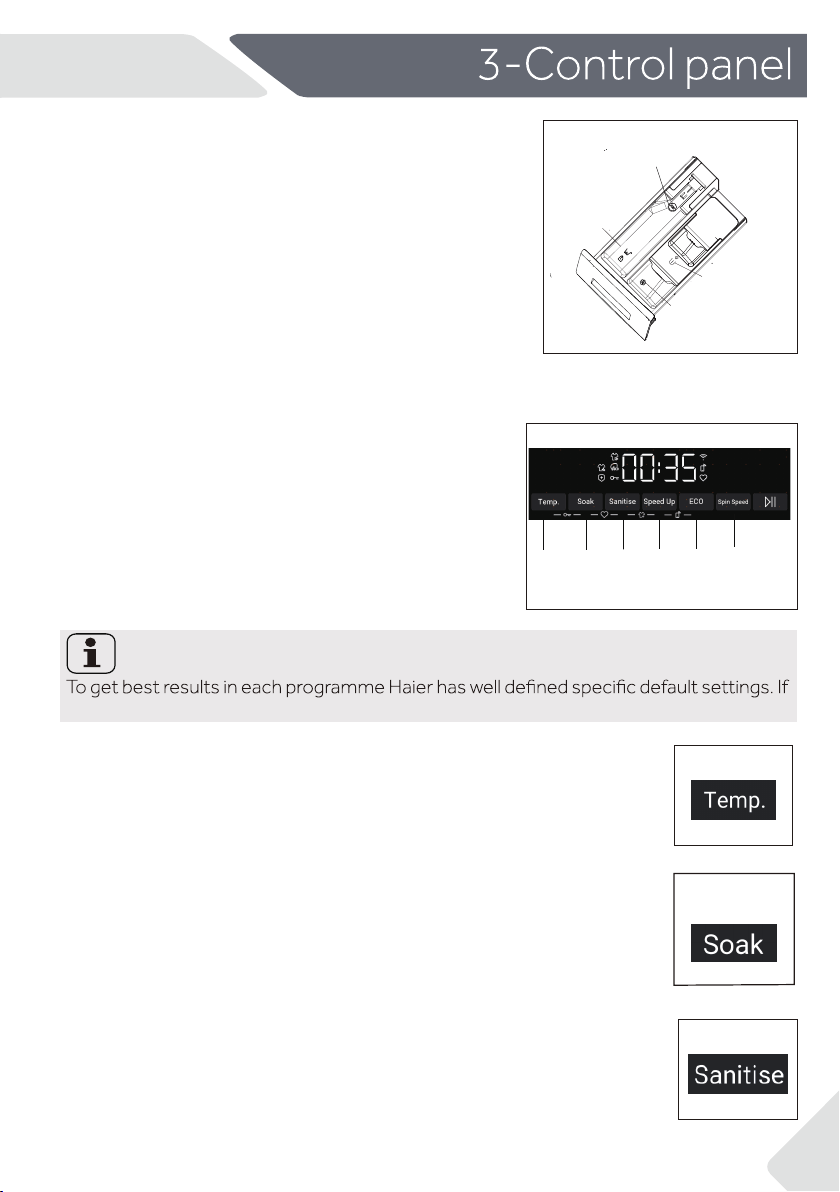
3.4 Detergent drawer
Open dispenser drawer,the following components can
be seen (Fig. 3-5):
1: compartment for powder or liquid detergent.
2: compartment for laundry aid products such as
powder stain removers and soaking agents.
3: compartment for softener.
4: lock tab, press it down to pull out dispenser drawer.
The recommendation on the type of detergents is
suitable for the various washing temperatures, please
refer to the manual of detergent (see P11).
Touch
this button (Fig. 3-8) to add a deep soak for to the wash. Select
the desired time by press soak, increase soak time(30min,60min,90min,
120min).
3.5.1
3.5.2 3.5.53.5.43.5.3
3-5
3-6
3-8
NE AU
MAX
MAX
1
4
2
3
3.5.6
3-7
Touch this button (Fig. 3-7) to change the washing teperature
of the programme. If no value is illuminated (the display"--°C ")
the water will not be heated.
3-9
3.5.3 Function button “sanitise”
Touch this button (Fig. 3-9)
,sanitisation turns on during wash and rinses.
When selceting this function the temperature is set to 90°C .
Sanitisation
is by default ON in the Allergy programme.
By switching off the appliance or setting a new
3-Control panel
NZ AU
10
3.7 Key lock
Press and hold Temp. and Soak combination
keys for
three seconds, the Keylock icon
(Fig. 3-14) lights up.
All buttons on control panel excepting the Power
buttons are disabled. Repeat the operation to release
the lock.
The display shows c oI
I
- (Fig. 3-15) if a button is
pressed, when the key lock is activa
(Fig. 3-17). to acknowledge the
ted.
Speed
3-14
3-15
3.8 Favourite
Choosing a programme and then start,touch button“ Soak“
and ”Sanitise ” ( Fig .3-16) for 3 seconds simultaneously
to save personalised options for available programme, pa-
nel displays .
To return to the default options for the cycle,
dEf
Speed
3-16
3-17
Speed Up
3-10
Touch the button (
Fig. 3-11
) to reduce washing time.
3.5.4 Function button”Speed Up”
ECO
3-11
3.5.5 Function button”ECO”
Spin Speed
3-12
3.5.6 Function button”Spin Speed”
Touch the button (
Fig. 3-11
) to Use the ECO option to
save water and energy.
Touch this button (Fig. 3-12) to change the spin speed
of the programme. If “ ” is selected, the laundry will
not spin.
3-13
3.6 “Start/Pause“ button
Touch this button (Fig. 3-13) gently to start or
the currently displayed programme. During programme
setting and during programme run the LED above the
button is shining, or if paused blinking.
0
When select” speed up” function, the weight of the laundry
is less than the normal weight.
press “Soak“ and “Sanitise“
for 3 seconds simultaneously,
the display will show “ ”
change.
pause

NZ AU
11
1. Press and hold and combination keys for
three seconds and the icon lights up.
be accessed via the app. For disabling remote mode please
touch again the two buttons, and the icon goes out.
When your machine is connected to WiFi successfully, the icon lights up.
2. When turning off the whasher, the Remote Mode will be automatically released. When the
washer runs the programme in Remote Mode via app,
the remote mode indicator flashes
every second.
is now enabled certain functions that your washer can now
4-WiFi connection & Remote mode
Your appliance can be connected to your home wireless network and operated remotely using the app.
Ge ng started
Ensure your home WiFi network is turned on.
You will be given step by step guidance on both your appliance and mobile device.
It may take up to 10 minutes to connect your appliance.
On your mobile device:
1.
2.
3.
Register and create an account.
Add your appliance and set up the WiFi connection.
Connec ng to your home WiFi
Speed up
Remote Mode
ECO
Speed up
Speed
4-1
ECO
Your product is WiFi connectable. Please visit the webpage below to download the app and find out more:
Australia https://www.haier.com.au/smart
New Zealand https://www.haier.co.nz/smart

12
NZ AU
5-Programmes
1)
Water is not heated up.
*
Choose 90°C wash temperature only for special hygienic requirements.
2)
Reduce detergent amount because programme duration is short.
The design and specifications are subject to change without notice for quality improvement
purposes.
Max. load Temperature Preset
spin
speed
in rpm
in kg
in °C
1)
2)
Preset
Soak
EC0
Programme
selectable
range 1 2
Fabrics
type
Cotton 7.5/8.5/9.5
7.5/8.5/9.5
* to 90
20
Cotton
Synthetic or mixed
1200
1000
Synthetic
5/6/7
* to 90
30
60
• •
Bedding
* to 60
30
•
Lightly soiled mixed-
laundry of cotton and
synthetic
Delicate
Allergy
* to 30
30
• •
º
Delicate laundry and
silk
600
60
• •
Towel
1400
/
0
1000
* to 90
/
Express 15
1
*
• •
Cotton / Synthetic
Cotton / Synthetic
Cotton / Synthetic
Cotton / Synthetic
1000
/
* to 60
• •
800
/
•
* to 90
30
* to 90
40
• •
1400
1000
/
/
Cotton / Synthetic
Cotton / Synthetic
Detergent compartment for:
1
2
Powder Detergent/Liquid Detergent
Prewash
Softener or care product
2/2/2.5
7.5/8.5/9.5
7.5/8.5/9.5
1
1000
6/7/7
40
• •
Spin
7.5/8.5/9.5
/ /
Non-fragile fabric
1400
/
/
/
/
/
7.5/8.5/9.5
4/4/5
/
/
• •
•
•
•
• •
• •
/
/
• •
• •
HWF75AN1
/HWF85AN1
/HWF95AN1
•
•
•
•
Bulky
* to 90
Towels
Refresh
Durable
Downloaded
* to 40
3
•
Yes,
º
Optional, / No
3
º
º
º
º
º
/
/
º
º
º
• •
º
MAX
MAX
1
2
3
3)
3) Refresh tips: Refresh care clothing should be dry clothing, if the clothes are wet or soaked,
please air dry before Refresh care, such as Refresh wet clothes directly, there is a risk of
shrinkage, deformation; Please use soft cloth to protect the embroidery and decorations
on the clothing surface in advance to avoid scratching the clothing surface; Refresh has
the function of removing smell, please do not spray perfume, freshener, etc.; Please do
not place too many clothes. Single care is recommended for best results; Not suitable for
large, coated down jackets; suitable for small, short down jacket care.
fabric
NZ AU
13
6-Consumption
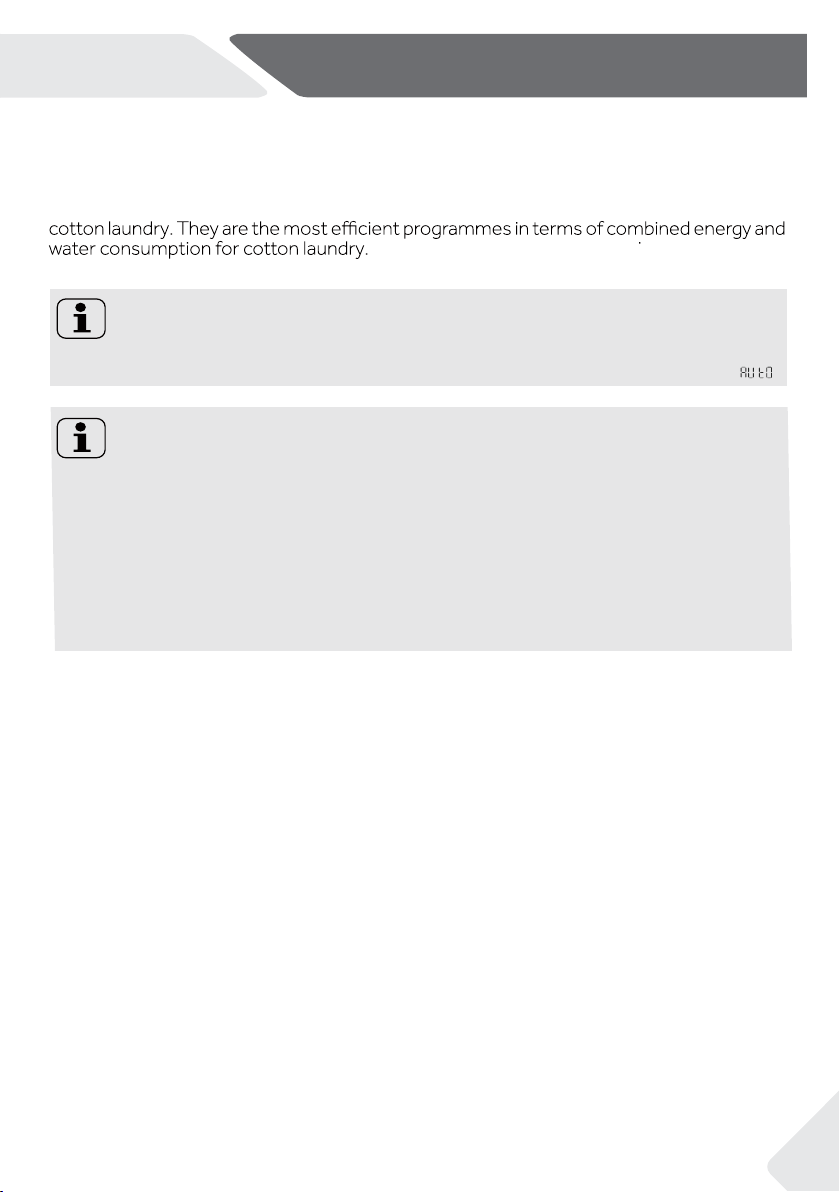
Note: Auto Weight
The appliance is equipped with a loading recognition. At low loading, energy, water and
washing time will be reduced automatically in some progr
ammes.
The display shows “ ”.
Check the energy label for energy consumption information.
The actual energy consumption may differ from the declared one according to local
conditions.
The standard
60°C
and
40°C
cotton programmes are suitable to clean normally soiled
cycle tempe
rature.
General information and tips:
Standard programme for the Energy and Water Labelling according to AS/N ZS
, 1400 rpm ,
others are default setting. When using standard program
Cotton, 40 °C
2040.2
Actual water temperature may differ from declared
washing, please use 80% standard detergent.
Detergent dissolvent method: Dissolve the detergengt first and pour the dissolved
detergent into the machine when the main wash starts. The washing operation starts
at the end of the first water filling.
7-Daily use
NZ AU
14
7.3 Preparing laundry
▶ Sort out clothes according to fabric (cotton,
synthetics, wool or silk etc.) and how to dirty they
- fo gnillebal erac eht ot noitnetta ya
P
.)3-7 .giF(
washing labels.
▶ Separate white clothes from coloured ones.
they fade or run.
▶ Empty pockets (keys, coins, etc.) and remove
harder decorative objects (e.g. brooches).
▶
into a wash bag to care for this delicate laundry
(hand or dry cleaning would be better).
▶ Close zippers, velco fastener and hooks, make
sure the buttons are sewn on tightly.
▶
hem, delicate underwear and small items such
as socks, belts, bras, etc. in a wash bag.
▶ Unfold large pieces of fabric such as bed sheets,
bedspreads etc.
▶ Turn jeans and printed, decorated or color-inten-
sive textiles inside out; possibly wash separately.
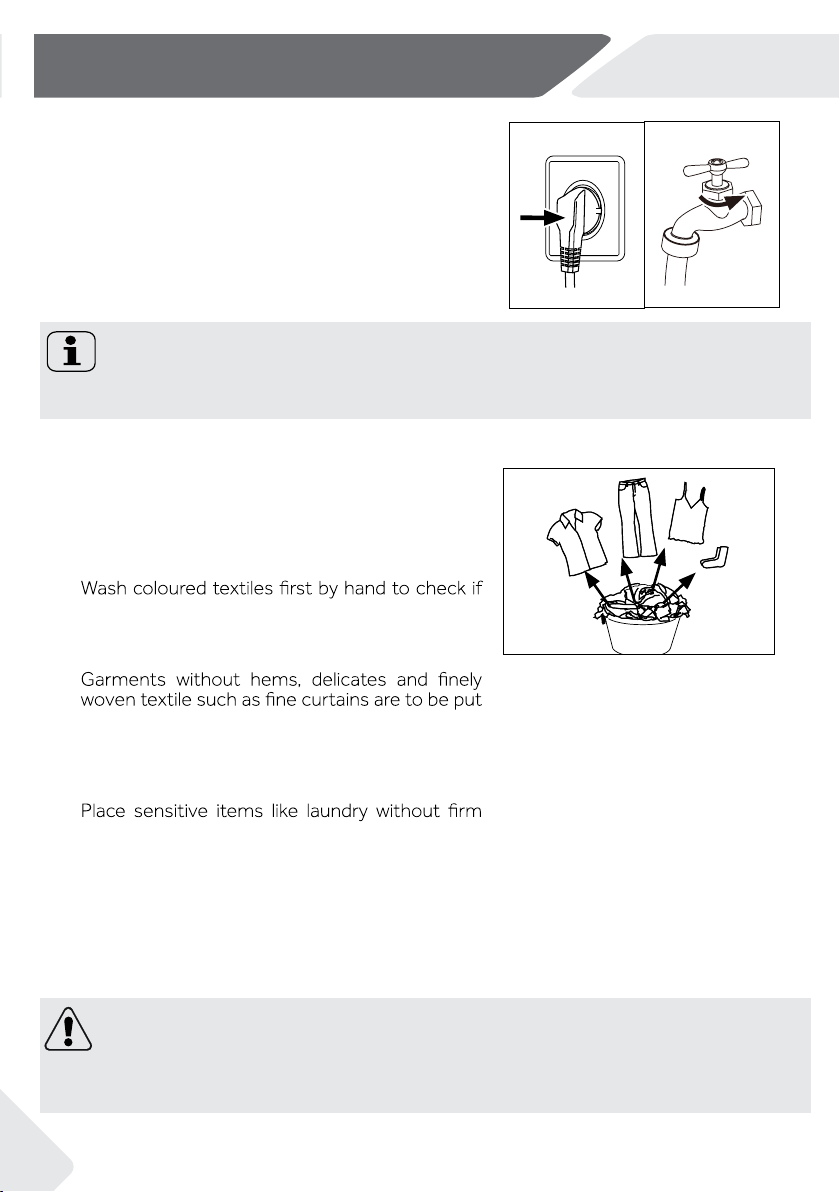
7.1 Power supply
Connect the washing machine to a power supply
(220V to 240V~/50Hz; Fig. 7-1). Please refer also to
section INSTALLATION (see P29).
7.2 Water connection
▶ Before connecting check the cleanliness and
▶ Turn on the tap (Fig.7-2).
Note: Tightness
Before use check for leakage in the joints between the tap and the inlet hose by turning on
the tap.
CAUTION!
Non-textile, as well as small, loose or sharp-edged items may cause malfunctions and
damage of clothes and appliance.
7-3
7-1 7-2
clarity of the water inlet
are
15
NZ AU
7-Daily use
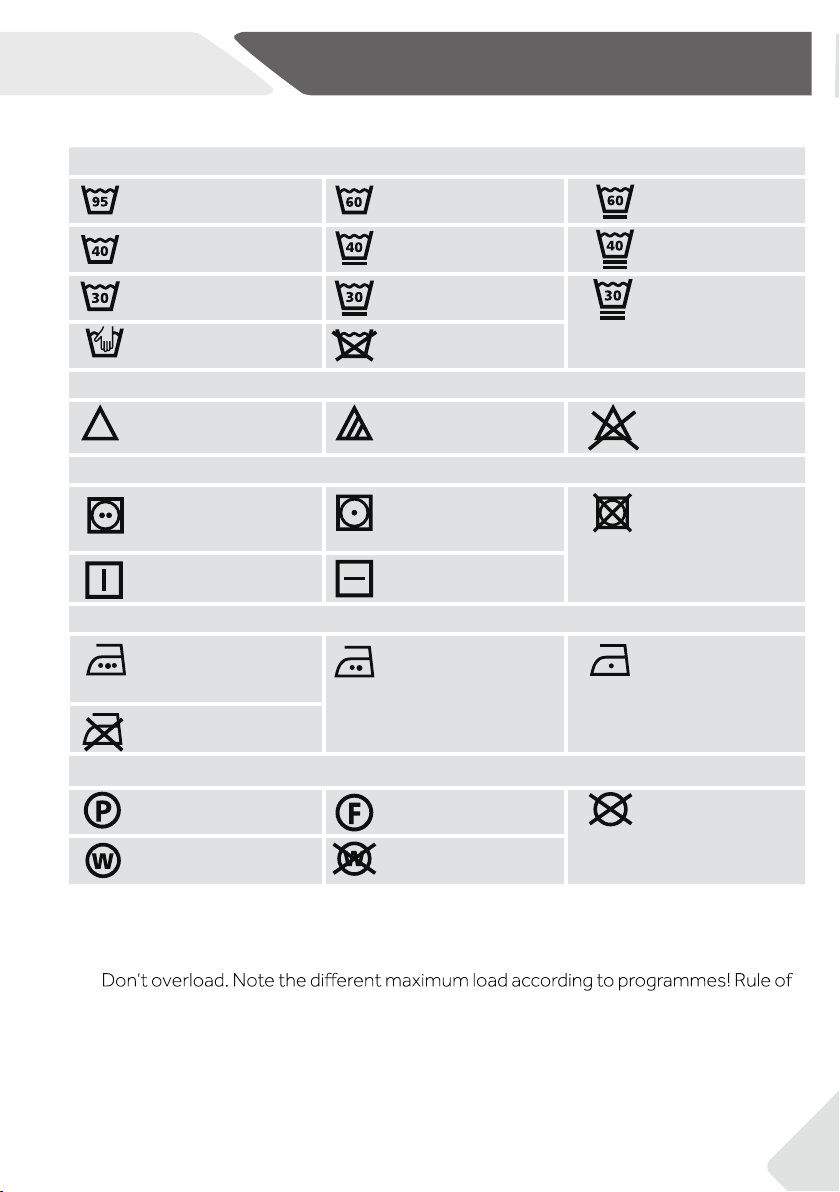
Care chart
Washing
Washable up to 95°C
normal process
Washable up to 60°C
normal process
Washable up to 60°C
mild process
Washable up to 40°C
normal process
Washable up to 40°C
mild process
Washable up to 40°C
very mild process
Washable up to 30°C
normal process
Washable up to 30°C
mild process
Washable up to 30°C
very mild process
Wash by hand
max. 40°C
Do not wash
Bleaching
Any bleaching allowed Only oxygen/
non-chlorine
Do not bleach
Drying
Tumble drying possible
normal temperature
Tumble drying possible
lower temperature
Do not tumble dry
Line drying Flat drying
Ironing
Iron at a maximum
temperature
up to 200 °C
Iron at a medial
temperature
up to 150°C
Iron at a low temper-
ature up to 110 °C;
without steam (steam
ironing may cause
irreversible damage)
Do not iron
Professional Textile Care
Dry cleaning in Dry cleaning in
hydrocarbons
Do not dry clean
Professional wet clean Do not professional
wet clean
7.4 Loading the appliance
▶ Put in the laundry piece by piece.
▶
thumb for maximum load: Keep six inches between load and drum top.
▶ Close the door carefully. Make sure that no pieces of laundry are pinched.
tetrachloroethene
16
7-Daily use
NZ AU
7.5 Selecting detergent
▶
▶ Use only machine wash approved detergent.
▶
▶
See tips for countertop detergent stickers.
.
▶ Do not use dry cleaning agents such as trichloroethylene and similar products.
Choose the best detergent
Programme
Kind of detergent
Universal Colour Delicate Special Softener
Cotton
L/P L/P - - o
Synthetic -
-
L/P
-
Delicate - - L/P o
o
Towels
- L
Refresh
- - - - -
Allergy
L/P L/P
- - o
Bedding
P L/P - - o
Express 15
L - - o
Bulky
L - - o
Spin
- - - - -
Durable
L/P L/P - - o
Downloaded
L/P L/P - - o
L = gel-/liquid detergent P = powder detergent O = optional
_
= no
If using liquid detergent, it is not recommended to activate the time delay.
We recomment by using:
▶ Laundry powder: 20°C to 90°C* (best use: 40-60°C)
▶ Color detergent: 20°C to 60°C (best use: 30-60°C)
▶ Wool/delicate detergent: 20°C to 30°C (best use:20-30°C)
* Choose 90 °C wash temperature only for special hygienic requirements.
If you choose the water temperature 60°C or above,we would like to advise you to use
less detergent.
*
* It is better to use less or free suds detergent powder.
L/P
-
L
L/P
o
-
MAX
MAX
NZ AU
7-Daily use
17
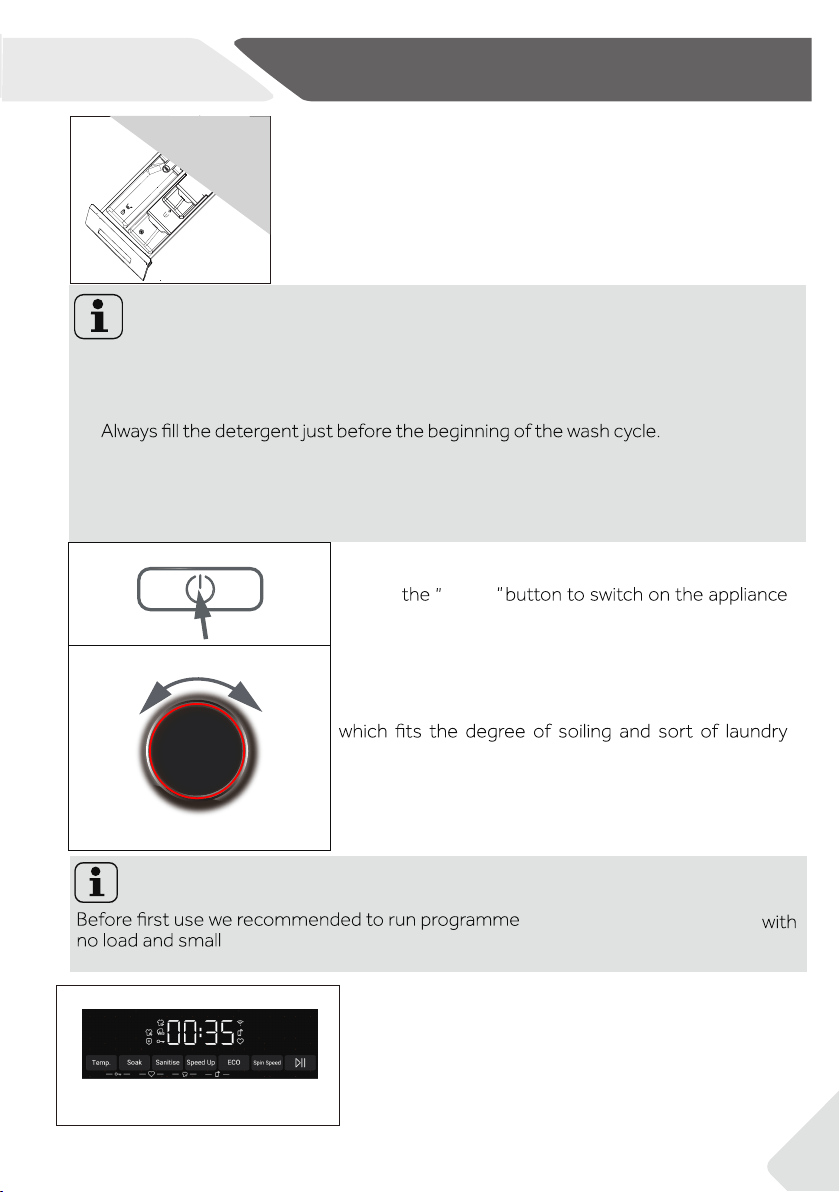
7.7 Switch on the appliance
7.6 Adding detergent
1. Slide out the detergent drawer.
2. Put the required chemicals into corresponding
compartments (Fig. 7-4),
3. Push back the drawer gently.
Note:
▶ Remove detergent residues before next wash cycle from the detergent drawer.
▶ Do not overuse detergent or softener.
▶ Please follow the instruction on the detergent package.
▶
▶ Concentrated liquid detergent should be diluted before adding.
▶ Do not use liquid detergent if function “Delay“ is selected.
▶ Carefully choose the programme settings according to the care symbols on all
laundry labels and according to the programme table.
7.8 Select a programme
To get the best washing results, select a programme
type.
Turn the programme knob (Fig. 7-6) to select the right
programme. Related programme LED lights up and
the default settings are displayed.
7.9 Add individual selections
Select required options and settings (Fig. 7-7); refer to
Control Panel.
7-5
7-6
7-4
Note: Odour removal
amount of detergent in washing agent compartment (2) or special
“COTTON+90 °C
+600rpm”
cleaner
to
remove possib
machine
ly corruptive
r
esidues.
7-7
(Fig. 7-5). The LED of the
„
Start/Pause“ button is
flashing.
PowerTouch

7-
NZ AU
18
Daily use
1. At programme cycle end END is displayed.
2.
3. Remove laundry as soon as possible to go easy on it and to prevent more wrinkling.
4.
5. Unplug the power cord.
6. Open the door to prevent formation of moisture and odours. Leave it open while not used.
7.13 Activate or deactivate the sounds
The sounds and signals can be deselected if necessary. :
1. Switch on the appliance.
2. Select the
ces 3
at the same time for about “Soak” button and “speed up” button eht hcuoT .3
onds. “bEEP ON ” will be displayed and the buzzer will be activated.
For activating the buzzer touch these two buttons at the same time again. “bEEP
OFF“
will
be displayed.
To interrupt a running programme press gently “Start/Pause“. The LED above the button
is flashing. Press it again to resume operation.
To cancel a running programme and all its individual settings:
1. Touch ”Start/Pause” button to interrupt the running programme.
2.
3.
4.
Select a new programme and start it.
7.12 After washing
Note: Door lock
For safety reasons the door is locked during the washing cycle. It is only
to open the door at the end of the programme or after the programme was cancelled
correctly (see description above).
In case of high water level, high water temperature and during spinning it is not
possible to open the door; Lock
is displayed.
Note: Standby-mode / energy-saving mode
7.10 Start wash programme
Touch “Start/Pause“ button (Fig. 7-8) to start. The LED of the”Start/
Pause“ button stops flashing and lights up continuously.
Appliance operates according to present settings.
Changes are only possible by cancelling the programme.
7.11 Interrupt / cancel wash programme
7-8
Power
Touch
e. No select speed and run progra-cnailppa eht no nrut ot nottub "rewoP " eht hcuoT
The appliance will go into stand-by mode after 2 minutes of inactivity. The display turns
off to save energy. Resume operation by pressing the power button to turn product on.
Express 15
programme.
▶
▶
mme Spin to drain water.
possible

NZ AU
19
8-Eco-friendly washing
Environmentally responsible use
▶
To achieve best use of energy, water, detergent and time you should use the
recommended maximum load size.
▶ Do not overload (hand width clearance above laundry).
▶ For slightly soiled laundry select the Express 15 programme.
▶ Apply exact dosages of each washing agent.
▶
efficiently cleaning below 60°C.
▶ Raise default settings only due to heavy staining.
▶ Select max. spinning speed if a domestic dryer is used.
era stnegreted nredom-erutarepmet gnihsaw etau qeda tsewol eht esoohC
9-Care and cleaning
NZ AU
20
9.1 Cleaning the detergent drawer
Take always care there are no detergent residues.
Clean the drawer regularly (Fig. 9-1):
1. Pull out the drawer until it stops.
2. Press the release button and remove the drawer.
3. Flush the drawer with water until it is clean and
insert the drawer back in the appliance.
9.2 Cleaning the machine
9
▶ Unplug the machine during cleaning and maintenance
▶ Use a soft cloth with soap liquid to clean the machine
case (Fig. 9-2) and rubber components.
▶ Do not use organic chemicals or corrosive solvents.
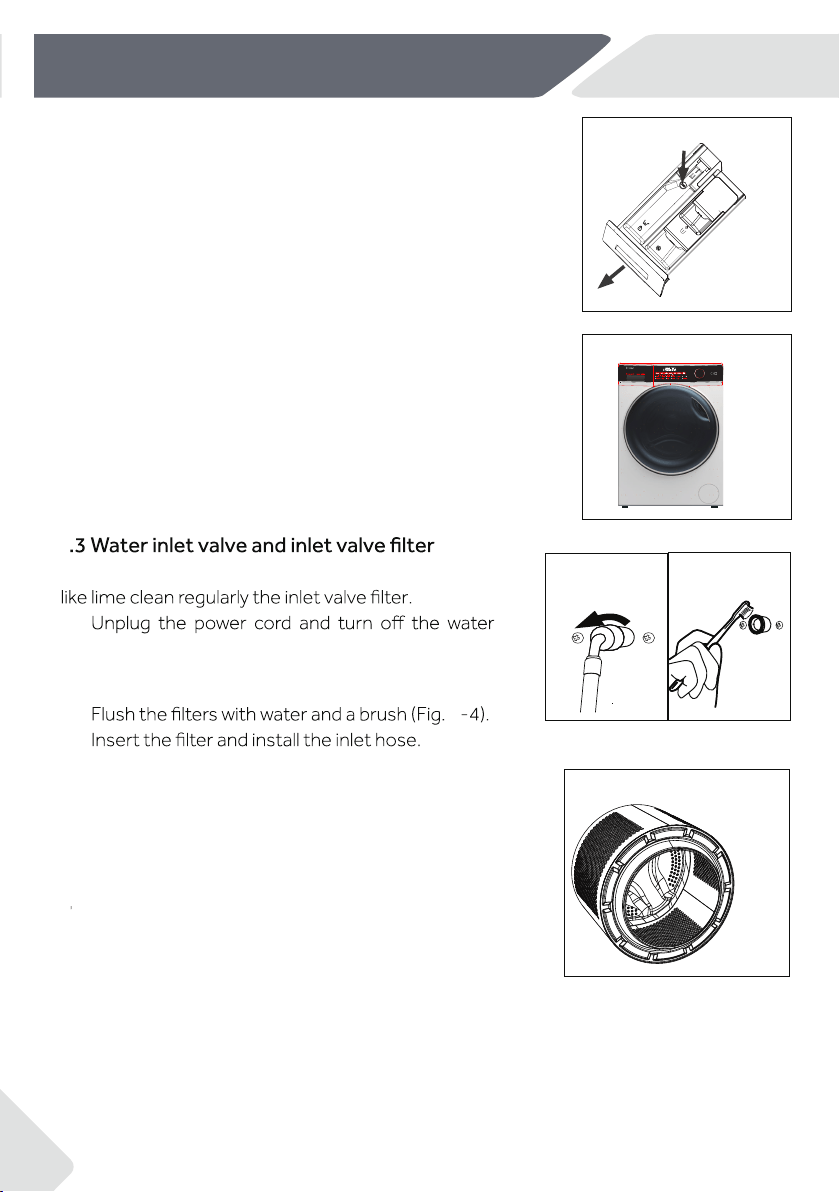
To prevent blockage of water supply by solid substances
▶
supply.
▶ Unscrew the water inlet hose at the back (Fig.
9-3) of the applian
9
ce as well as on the tap.
▶
▶
9.4 Cleaning the drum
▶
Remove accidentally washed items,especially metal
parts such as pins, coins, etc. from the drum (Fig.9-5)
because they cause rust stains and damage.
▶ Use a non-chloride cleaner for removing rust
stains. Observe the warning hints of the cleaning
agent manufacturer.
▶ Do not use any hard objects or steel wool for clean
ing.
9-5
9-2
Stain removal
Delay
Steam
Extra Rinse
Speed
Temp.
Outdoor
Spin
Cotton
Synthetics
Wool
Express 15’
Refresh
MixBabycare
Duvet
Eco 40-60Cotton 20
Delicate
Fast
R
E
F
R
ESH
5
2
5
DRUM
9-1
Refresh
MAX
MAX
2
1
9-3
9-4
9-Care and cleaning
NZ AU
21
9.5 Long periods of disuse
If the appliance is left idle for a longer period:
1. Pull out the electrical plug (Fig. 9-6).
92.
3. Open the door to prevent formation of mould
and odours. Leave door open while not used.
Before next usage check carefully power cord, water
inlet and drain hose. Make sure everything is properly
installed and without leaks.
9-6 9-7
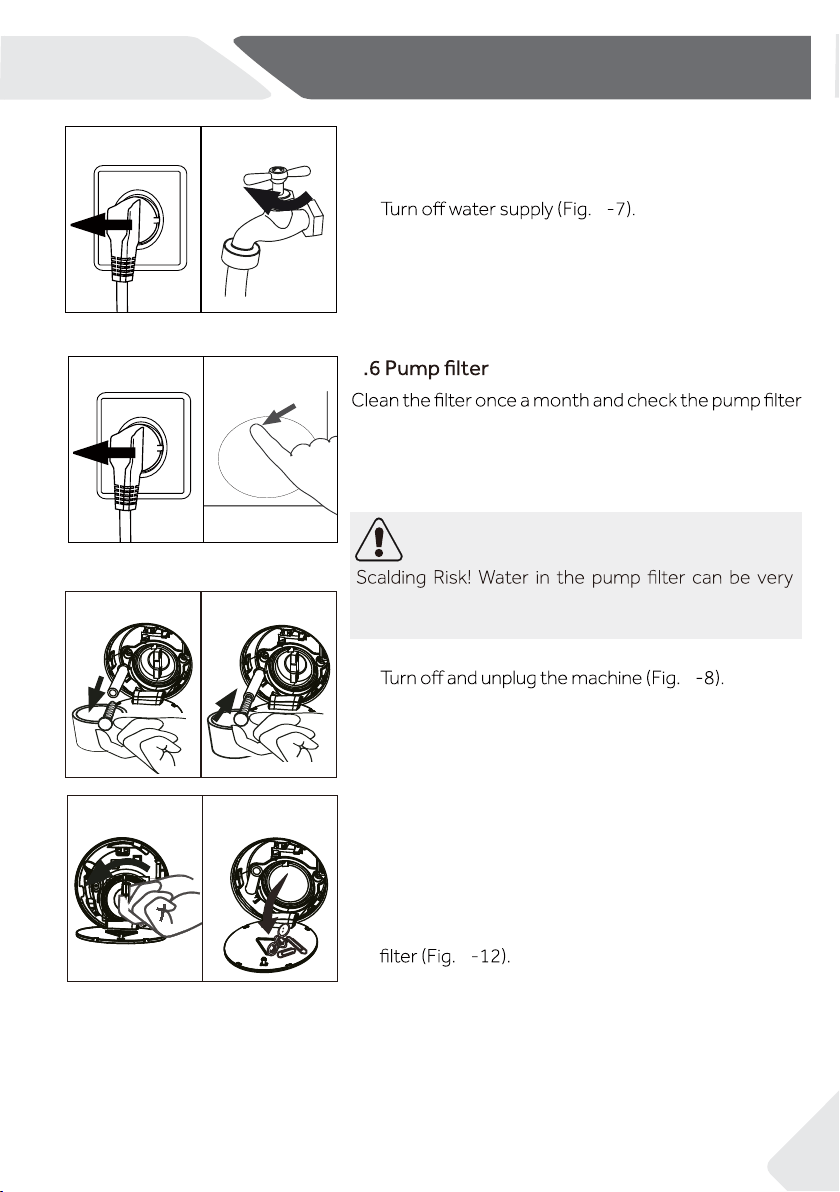
1.
2.
Push and open service flap
(Fig. 9-9).
3. Provide a flat container to catch leach water
(Fig. 9-10). Be prepared to catch large amounts
4. Pull the drainhose out and hold its end above the
container (Fig. 9-10).
5. Take the sealing plug out of the drainhose (Fig.
9-10).
6. After complete drainage close drainhose (Fig.
9-11). and push it back into the machine.
7. Unscrew and remove counter clockwise the pump
8. Remove contaminants and dirt (Fig. 9-13).
WARNING!
hot! Before any action please ensure water has
cooled down.
for instance if the appliance:
▶ Doesn´t drain the water.
▶ Doesn´t spin.
▶ Cause unusual noise while running.
9
9
9
9-10
9-11
9-8 9-9
9-12 9-13
of water.
NZ AU
22
9-Care and cleaning
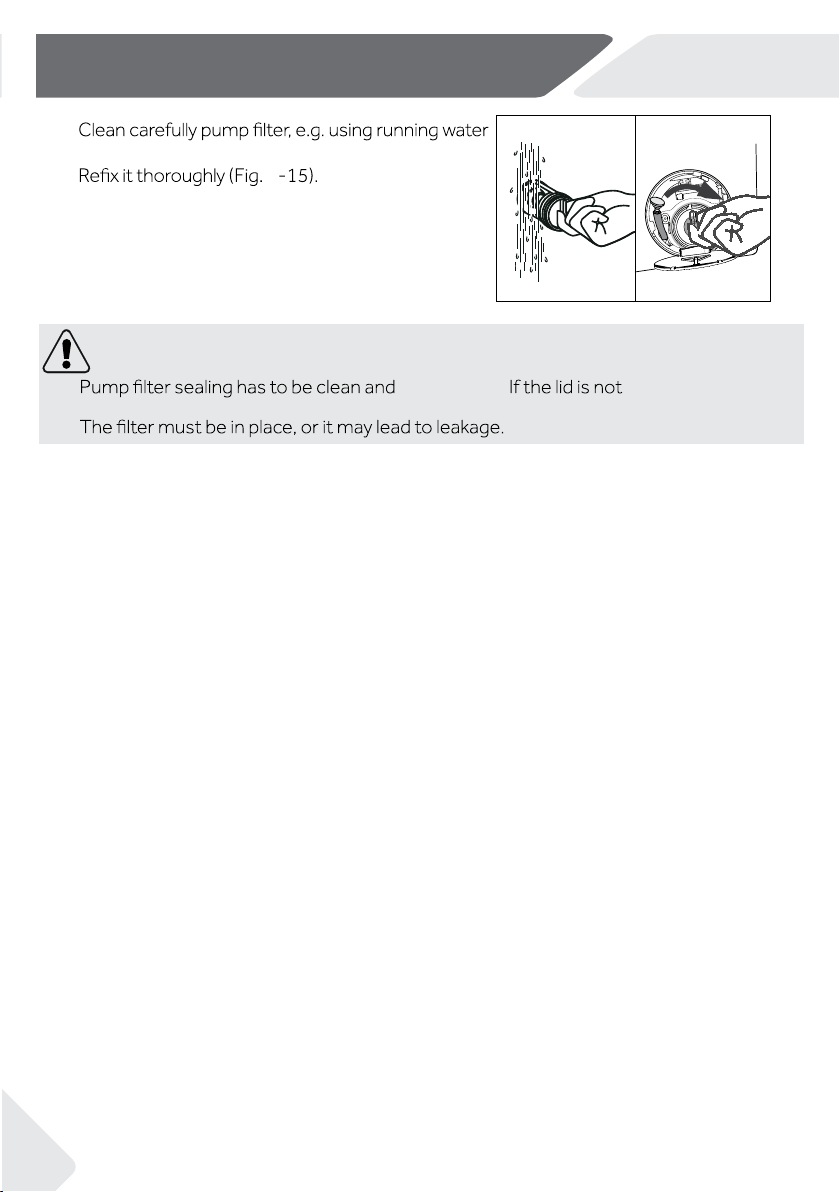
CAUTION!
▶
▶
9.
(Fig. 9-14).
910.
11. Close service flap.
9-14 9-15
undamaged. properly tightened,
water can leak.
10-Troubleshooting
NZ AU
23
of a problem please check all shown possibilities and follow below instructions before you
WARNING!
▶ Before maintenance, deactivate the appliance and disconnect the mains plug from
the mains socket.
▶
improper repairs can cause considerable consequential damages.
▶ A damaged power cable should only be replaced by the manufacturer, its service
10.1 Information codes
Following codes are displayed only for information referring to the washing cycle. No
measures must be performed.
Code Message
1:25
The remaining wash cycle time will be 1 hour and 25 minutes.
AUTO
Automatic load detection is working; only in some programmes.
End
Lock
Door is closed because of high water level, high water temperature or spinning cycle
.
bEEP OFF
The sound is deactivated.
bEEP ON
The sound is activated.
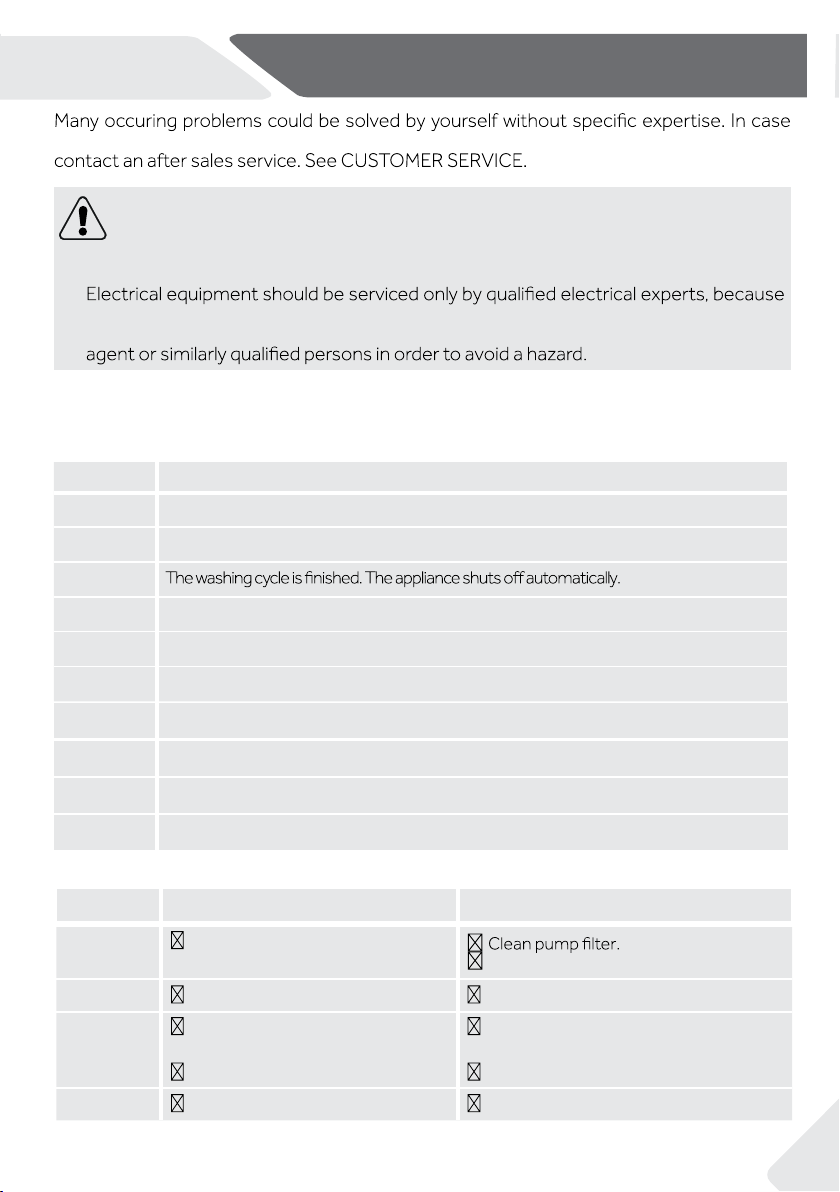
10.2 Troubleshooting with display code
Problem Cause Solution
CLr
FLtr
Drainage error, water is not fully drained
within 6 minutes.
Check drain hose installation.
E2
Lock error. Shut the door properly.
E4
Drain hose is self-syphoning.
Make sure that tap is fully opened and water
pressure is normal.
Check drain hose installation.
E8
Water protective level error. Contact the After sales service.
The keylock is activated. Deactivate to make changes to the selection.
The machine is in configuration for remote mode.
The garment function is working.
Restore the default parameters for all programmes.
Water level not reached after 12 minutes.
App
Add
dEF
cLok
10-Troubleshooting
NZ AU
24
Problem Cause Solution
F3
Temperature sensor error. Contact the After sales service.
F4
Heating error.
Contact the After sales service.
F7
Motor error. Contact the After sales service.
FA
Water level sensor error.
FC0, FC1 or
FC2
Abnormal communication error.
Contact the After sales service.
Unb
Unbalanced load error.
Check and balance laundry load in the drum.
Reduce the load.
9.3 Troubleshooting without display code
Problem Cause Solution
Washing machine
fails to operate.
Programme is not yet started.
Door is not properly closed.
Machine has not been switched on.
Power failure.
Key lock is activated.
Check programme and start it.
Close the door properly.
Switch the machine on.
Check power supply.
Deactivate child lock.
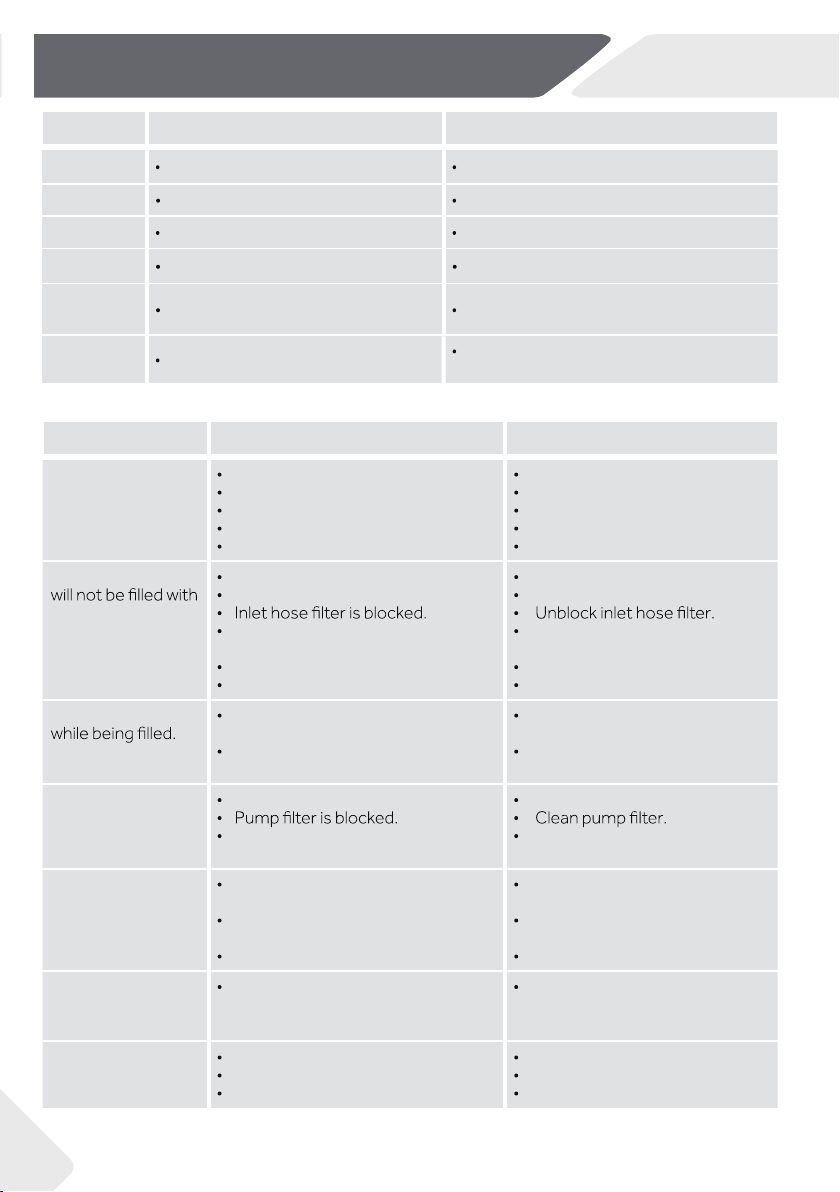
Washing machine
water.
No water.
Inlet hose is kinked.
Water pressure is less than 0.03
MPa.
Door is not properly closed.
Water supply failure.
Check water tap.
Check inlet hose.
Check water pressure.
Close the door properly.
Ensure the water supply.
Machine is draining
Height of drain hose is below 80
cm.
Drain hose end could reach into
water.
Make sure that drain hose is
properly installed.
Make sure the drain hose is not
in water.
Drainage failure.
Drain hose is blocked.
Drain hose end is higher than 100
cm above floor level.
Unblock drain hose.
Make sure that drain hose is
properly installed.
Strong vibration
while spinning.
Not all transportation bolts have
been removed.
Appliance has not being leveled .
Machine load is not correct.
Remove
all
transportation bolts.
Ensure solid ground and a
leveled position.
Check load weight and balance.
Operation stops
before completing
wash cycle.
Water or electric failure. Check power and water supply.
Operation stops for
a period of time.
Appliance displays error code.
Problem due to load pattern.
Programme performs soaking cycle.
Consider display codes.
Reduce or adjust load.
Cancel programme and restart.
Contact the After sales service.
25
10-Troubleshooting
NZ AU
Problem Cause Solution
Excessive foam in
Detergent is not a appropriate.
Detergent is too concentrated.
Check detergent recommen-
dations.
Dilute detergent.
Au tomatic adjus
tment
ment of washing time.
Washing programme duration will
be adjusted.
This is normal and doesn‘t
aff
ect functionality.
Spinning fails.
Redistribute load and run a spin
program again.
washing result.
Cycle was not selected for the soil
level in the garments.
Detergent quantitiy was not
sufficient
Maximum load has been exceeded
ded.
Laundry was unevenly distrib u-
ted in the drum.
Select an other programme.
Choose an adequate detergent
and dose according to the man-
ufacturer specifications.
Reduce loading.
Loose the laundry.
W
ashing powder
r
esidues are on the
laundry.
Insoluble particles of detergent can
remain as white spots on the
laundry.
Avoid choosing speed up or ex-
Try
to brush the points from the
dry laundry.
Choose another detergent.
Laundry has grey
patches.
Caused by fats such as oils, creams
or ointments.
Pretreat the laundry with a
special cleaner.
Note: Foam formation
If too much foam is sensed during spin cycle, motor stops and drain pump will be
activated for 90 seconds. If that elimination of foam fails up to 3 times, programme
ends without spinning.
appliance, disconnect the power supply and contact the customer service.
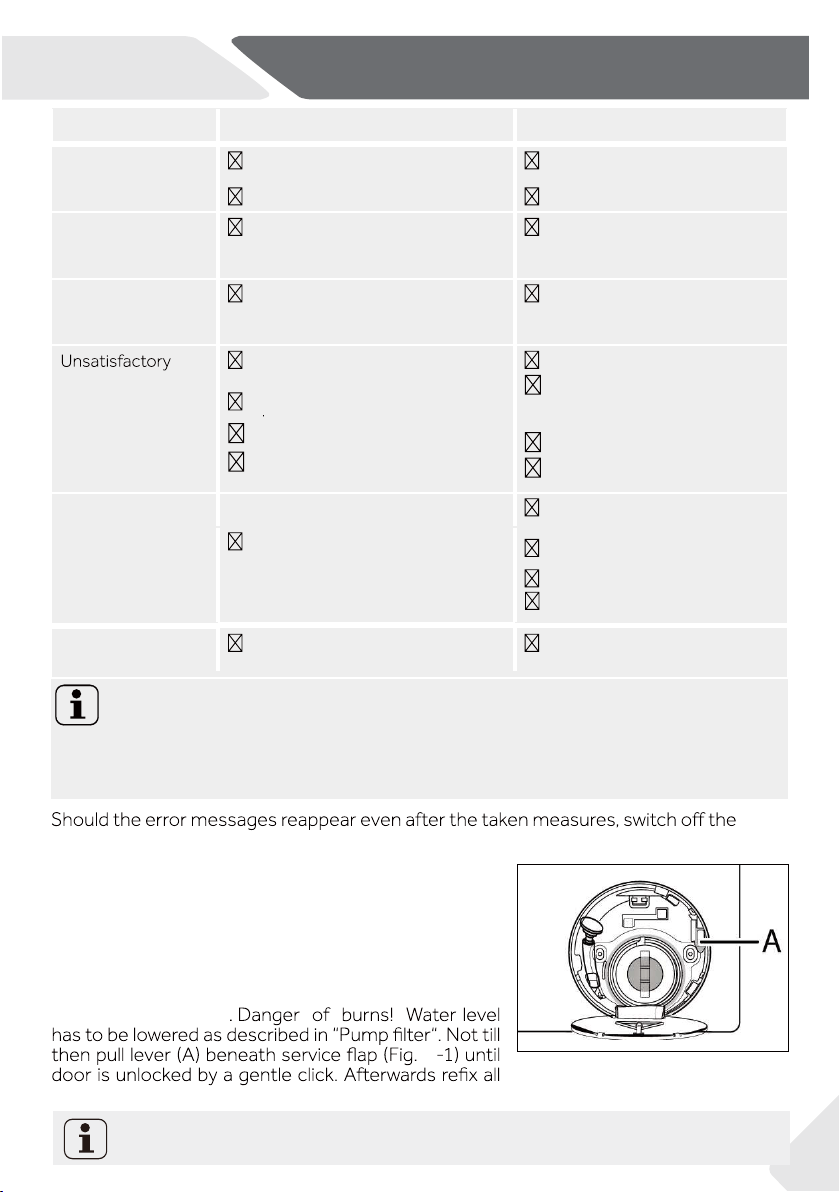
10.4 In case of power failure
The current programme and its setting will be saved.
When power supply is restored operation will be re-
sumed.
If a power failure cuts an operating wash programme
door opening is mechanically bloc
10
ked. To get out any
laundry water
level
should
not
be
seen through
parts.
10-1
When the washing machine in a safe state (under the water level below the window along a certain
distance, barrel temperature below 55 ℃, the inner barrel did not turn), may unlock the doors of the
machine operation.
Unbalanced of laundry.
press cycles for heavily soiled
garments.
Try adding Soak functionality
to the cycle.
the door porthole
drum and or deter-
gent drawer.
11-Installation
NZ AU
26
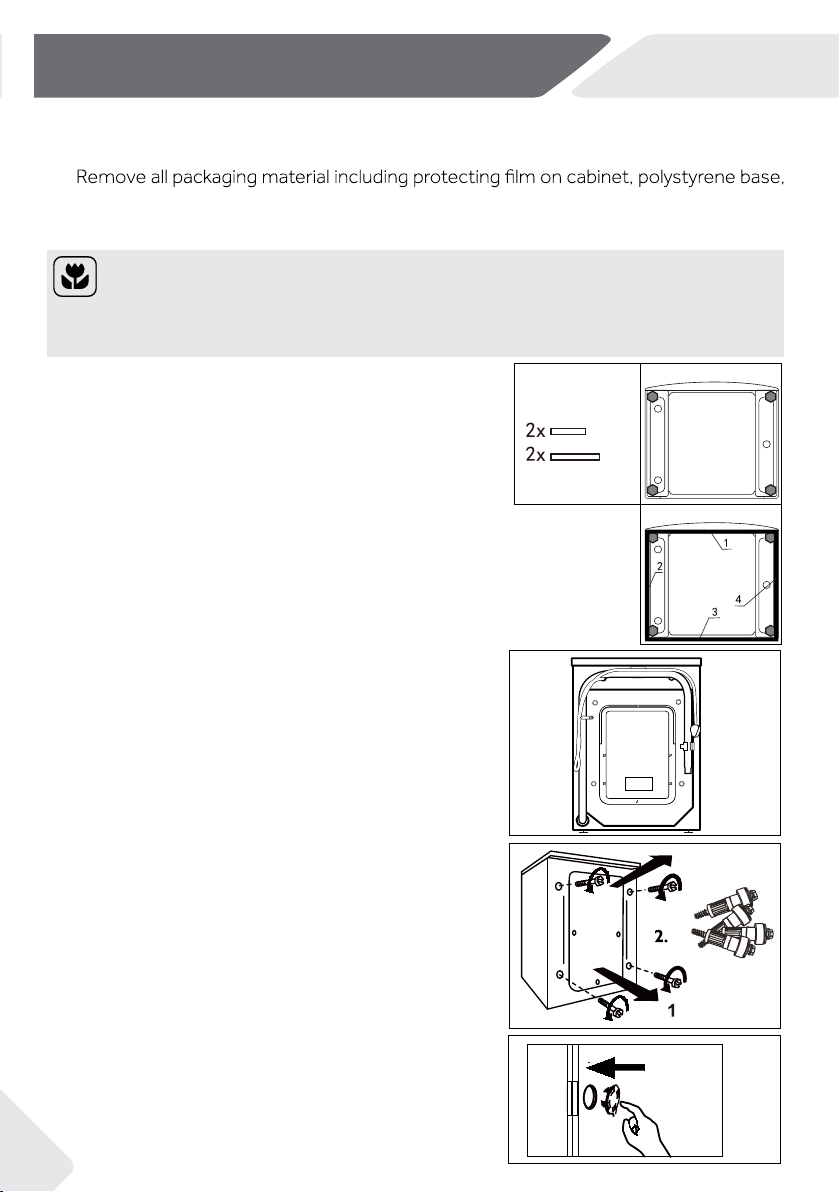
11.1 Preparation
▶ Take the appliance out of the packaging.
▶
keep them out of childrens reach. While opening the package, water drops may be
seen on plastic bag and porthole. This normal phenomenon results from water tests
in the factory.
11.3 Dismantle the the transportation bolts
The transport protection on the rear side is designed
for clamping anti-vibration components inside the ap-
pliance during transportation to prevent inner damage.
All elements (T1-T4, Fig 11-2) must be removed before
use.
1.Remove all 4 bolts (T1 - T4) (Fig. 11-3).
(Fig. 11-4).
Note: Packaging disposal
Keep all packaging materials out of children´s reach and dispose them in an
environmrntally
friendly manner.
11.2 OPTIONAL: Install noise reduction pads
1.
2.
3.
11-1
11-2
11-3
1.When opening the shrink package, you will find four
noise reduction pads. These are used for reducing
noise (Fig. 11-1).
holetrop ,edis sti ot nwod enihcam gnihsaw eht yaL .2
pointing upwards, bottom side towards operator.
3.
Take out the noise reduction pads and remove the
double-sided adhesive protective film;
paste around
the bottom
; the noise reduction pads under the
washing machine cabinet as shown in Figure 3 (two
longer pads in position 1 and 3, two shorter pads in
position 2 and 4). Finally set the machine upright again.
T1
T2
T3
T4
Keep the transportation bolts in a safe place for later
use. If the machine is to be moved to another location,
replace tansportation bolts contrariwise to prevent
2. Fill the transportation bolt holes with blanking plugs
General information and tips:
11-4
damage.

11-Installation
NZ AU
27
11.5 Aligning the appliance
Adjust all feet (Fig. 11-7) to achieve a complete level position.
This will minimize
vibra
and thus noise
during
use. It will also reduce wear and tear. We recom
mend to
a spirit level for adjustment. Floor should
be as stable and flat as possible.
1. Loose the locknut (1) by using a wrench.
2. Adjust the high by turning the foot (2).
3. Tighten lock ut (1) against the housing.
11.4 Moving the appliance
If the machine is to be moved to a distant location, replace the transportation bolts removed
before installation to prevent damage: The assembly takes place in reverse order.
11-7
tions
28
11-Installation
NZ AU
Following connections are possible:
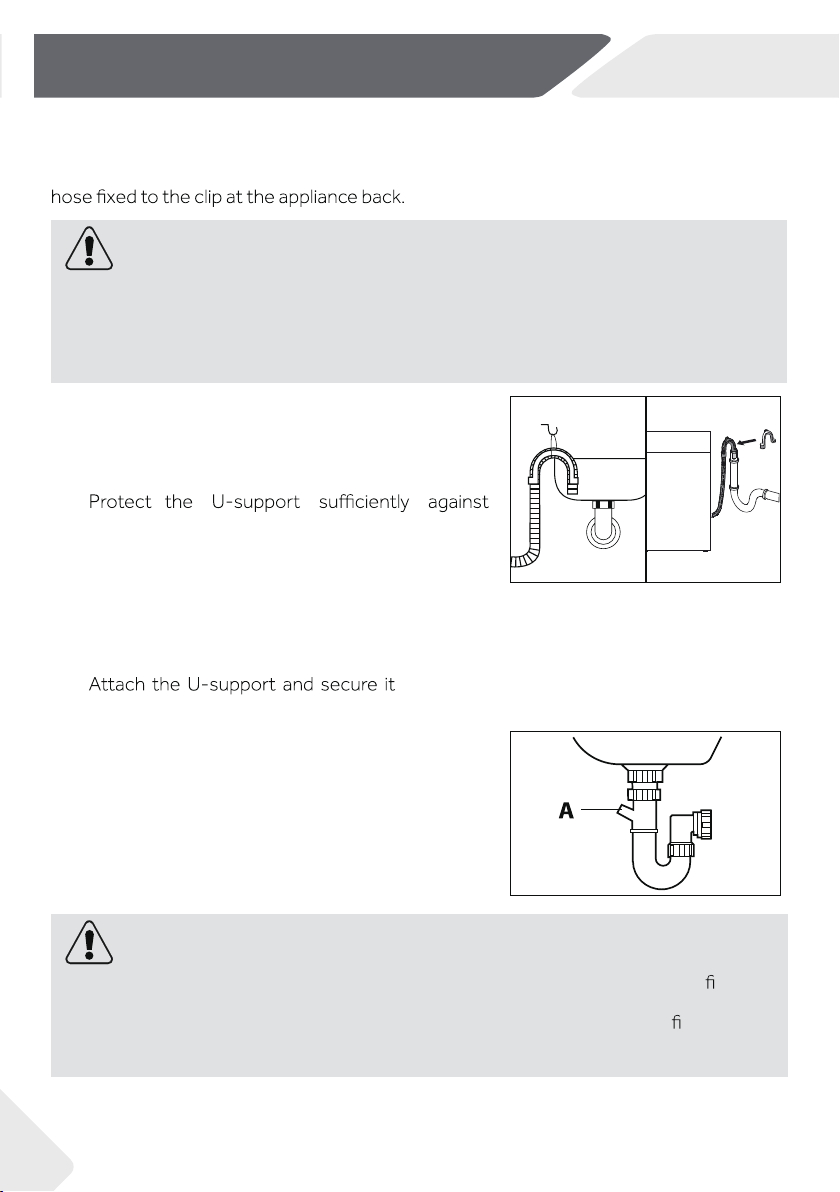
11.6.1 Drain hose to sink
▶ Hang the drain hose with the U-support over the
edge of a sink with adequate size (Fig. 10-8).
▶
slipping.
11.6.2 Drain hose to waste water connection
▶ The internal diameter of the stand pipe with
vent-hole must be minimum 40 mm.
▶ eht ni mm 001-08 rof esoh niard eht tuP
wastewater pipe.
▶
(Fig. 10-9).
CAUTION!
▶ The drain hose should not be submerged in water and should be securely
xed and
leak-free. If the drain hose is placed on the ground or if the pipe is at a height of less
than 80 cm, the washing machine will continuously drain while being
lled (self-si-
phoning).
▶ Drain hose is not to be extended. If necessary contact after sales service.
11.6.3 Drain hose to sink connection
▶ The junction must lie above the siphon.
▶ A spigot connection is usually closed by a pad (A).
That must be removed to prevent any
disfunction (Fig. 10-10).
▶ Secure the drain hose with a clamp.
11.6 Drain Water Connection
Fix the water drain hose properly to the piping. The hose has to reach at one point a height
between 80 and 100 cm above the appliance bottom line! If possible keep always drain
WARNING!
▶ Use only the supplied hose set for the connection.
▶ Never reuse old hose sets!
▶ Only connect to cold water supply.
▶ Before connection, check whether the water is clean and clear.
11-8 11-9
11-10
NZ AU
29
11-Installation
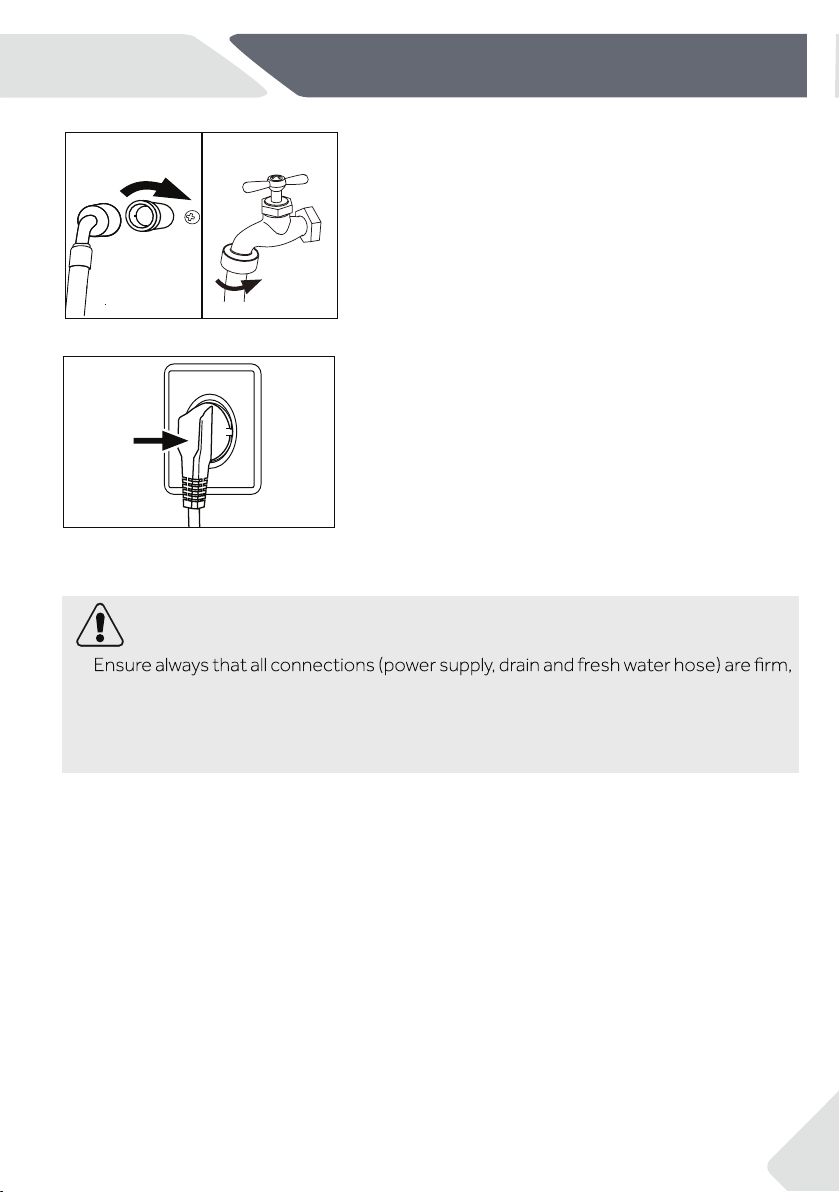
11.8 Electrical Connection
Before each connection check if:
▶ power supply, socket and fusing are appropriate to
the rating plate.
▶ the power socket is earthed and no multi-plug or
extension are used.
▶ the power plug and socket are strictly according.
Put the plug into the socket (Fig. 11-13).
WARNING!
▶
dry and leak free!
▶ Take care these parts are never to be crushed, kinked, or twisted.
▶ If the supply cord is damaged, it must be replaced by the service agent (see warranty
card) in order to avoid a hazard.
11-13
11.7 Fresh Water Connection
Make sure that the gaskets are inserted.
1. Connect the water inlet hose with the angled
end to the appliance (Fig. 11-11). Tighten the
screw joint by hand.
2. The other end connect to a water tap with a
3/4” thread (Fig. 11-12).
11-11
11-12
HWF10AN1 HWF90AN1 HWF80AN1
Voltage in V 220-240 V~/50Hz
Current in A 10
Max power in W 2000
Water pressure in MPa 0.03≤P ≤1
Netto weight in kg 77 7080
11.1 Additional technical data
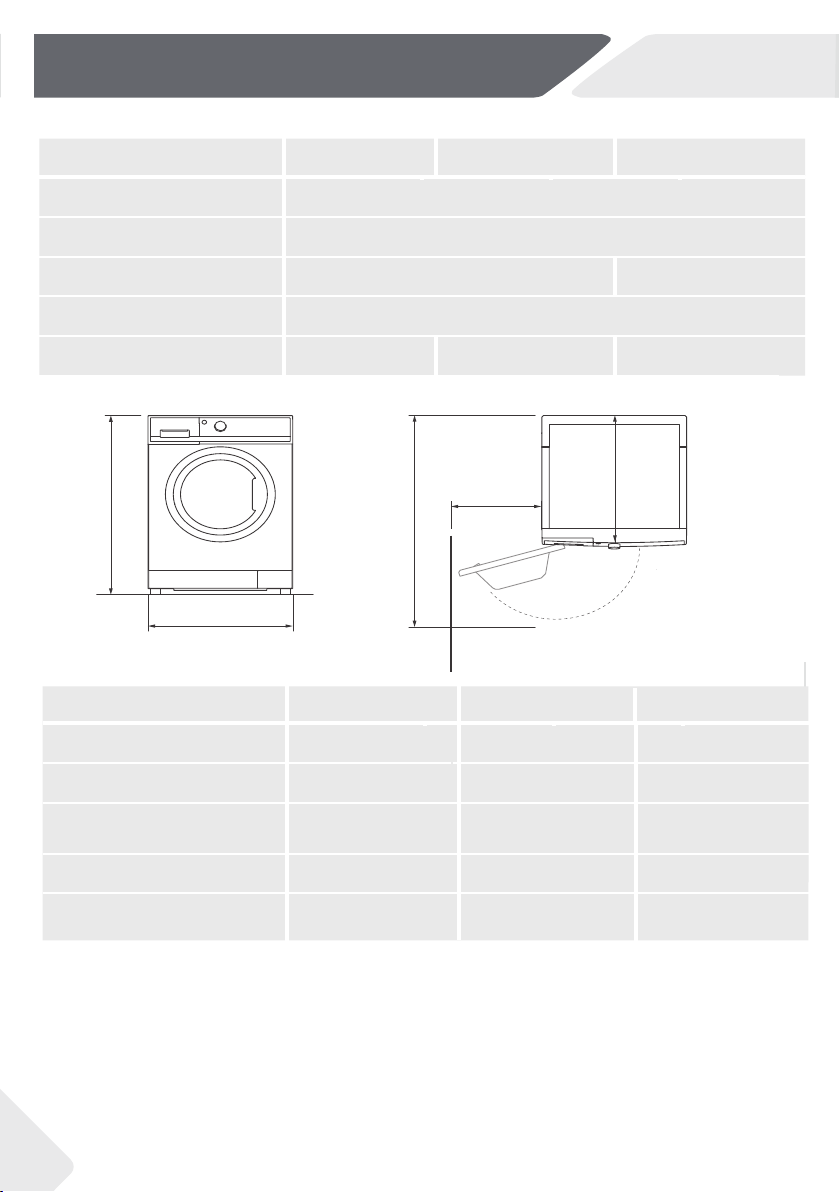
Note: The exact height of your washer is dependent on how far the feet are extended from
the base of the machine. The space where you install your washer needs to be at least
40mm wider and 20mm deeper than its dimensions.
TOP VIEWL LAWFRONT VIEW
A
B
E
D
C
HWF10AN1 HWF90AN1 HWF80AN1PRODUCT DIMENSIONS
B Overall width of product mm
A Overall height of product mm
C Overall depth of product
(To main control board size) mm
D
Depth of door open mm
E Minimum door clearance
to adjacent wall mm
11.2 Product dimensions
850 850 850
595 595 595
600 0 35 460
1190 1120 1050
00 3
00 3
00 3
12-
NZ AU
Technical data
30
HWF75AN1 HWF85AN1 HWF95AN1
Voltage in V 220-240 V~/50Hz
Current in A 10
Max power in W 1900
1900
Water pressure in MPa 0.03≤P ≤1
Net weight in kg 70 7170
12.1 Additional technical data
Note: The exact height of your washer is dependent on how far the feet are extended from
the base of the machine. The space where you install your washer needs to be at least
40mm wider and 20mm deeper than its dimensions.
TOP VIEWL LAWFRONT VIEW
A
B
E
D
C
HWF95AN1 HWF85AN1 HWF75AN1PRODUCT DIMENSIONS
B Overall width of product mm
A Overall height of product mm
C Overall depth of product
(To main control board size) mm
D
Depth of door open mm
E Minimum door clearance
to adjacent wall mm
12.2 Product dimensions
850 850 850
595 595 595
600 0 55 550
1134 1084 1084
06 2
06 2
06 2
NZ AU
1 3
13-Customer service
We recommend our Haier Customer Service and the use of original spare parts.
▶ your local dealer.
:
▶
and FAQs and where you can activate the service claim.
To contact our Service, ensure that you have the following data available.
The information can be found on the rating plate.
Model ____________________ Serial No. _____________________
Also check the Warranty Card supplied with the product in case of warranty.
contact our Customer Care Centre according to
For more information please refer to www.haier.com.
Warranty Card.

0020507792V