WahlUSA.com
Operating Instructions for
07061 Series Shavers
Instrucciones de Funcionamiento
para Rasuradoras Serie 07061

1
© 2019 Wahl Clipper Corporation
Part No. 91590-301
Printed in China
For more information or Product Registration, visit WahlUSA.com
5-YEAR LIMITED WARRANTY
Valid in U.S.A. Only
If your Wahl product fails to operate satisfactorily within five (5)
years from the date of original purchase or receipt as a gift, Wahl
will, at our option, repair or replace the product and return it to
you FREE OF CHARGE. Do not return this product to store where
purchased. Products needing repair under this warranty should
be returned with postage pre-paid to the following address or call
1-800-767-9245 for assistance:
Wahl Clipper Corp.
Attn: Repair Department
3001 Locust Street
Sterling, Illinois 61081
When mailing, please include a note describing the defect and
the date of original purchase or receipt as a gift. Products out of
warranty will be repaired at our standard repair charges.
This warranty does not cover products damaged by:
1. Modification or repair by anyone other than Wahl Clipper
Corporation or a Wahl authorized service center;
2. Commercial (non-consumer) use or unreasonable use.
This warranty gives you specific legal rights, and you may also
have other rights which vary from state to state. No other written
express warranty is given. No responsibility is assumed for
incidental or consequential damages of any type or for the use
of unauthorized attachments. Some states may not allow the
exclusion or limitation of incidental or consequential damages, so
the limitation may not apply to you. Warranty valid in U.S.A. only.
Outside U.S.A., check with store for Wahl authorized distributor’s
warranty.

2
SAVE THESE INSTRUCTIONS
For Household Use Only
LITHIUM-ION BATTERY REPLACEMENT,
SHAVER DISPOSAL AND RECYCLING:
• For battery replacement send the entire, intact shaver unit to:
Wahl Annex 3001 North Locust, P.O. Box 578, Sterling, IL 61081
• Do not attempt to remove the battery. Lithium-Ion batteries can
explode, catch fire, and/or cause burns if disassembled, damaged,
or exposed to water or high temperatures.
• If you choose not to replace the battery, the entire, intact shaver
unit must be disposed. Do not attempt to remove the battery for
disposal. Lithium-Ion batteries may be subject to local disposal
regulations. Many locations prohibit disposal in standard waste
receptacles. Check your local laws and regulations.
• For recycling contact a government recycling agency, waste
disposal service, retailer, or visit online recycling sources, such as
www.batteryrecycling.com or www.rbrc.org.

3
TIPS FOR FIRST-TIME USERS
If you are using an electric shaver for the first time, your skin will
probably need to condition itself to this new shaving technique.
Start on the easiest part of the face first, usually the smooth
portion of the face below the ear. Shave with a light touch and use
your Wahl shaver exclusively for three to four weeks, or longer if
you have sensitive skin or if your whiskers grow at different angles
in certain areas. Initially your shaves may not be as close as you
would like, and your skin may become a bit irritated. But if you
stick with it, you will eventually get great shaves.
If you go several days without shaving and your beard gets a bit
long, use the pop-up trimmer to go over your beard, catching all
the longer hairs and setting up the remaining stubble for the foil to
shave smooth and clean.
If you have been using another type of electric shaver before, there
may also be a period of conditioning prior to receiving maximum
results.
QUICK TIPS & HANDY REMINDERS
1. If you are a first-time electric shaver user, or changing from
another brand, there will be a 2 to 3 week (or less) adjustment
period while your face and beard adapts to the new foil.
2. When you open your package, charge your shaver for 1 hour
before the first shave or until charging is complete.
3. Replace the foil head and cutter bars every 12 months or if foils
are damaged. Replacement foils can be ordered at
https://home.wahl.com.
4. Be sure to clean the shaver, cutter bars and foil after every three
or four shaves.
5. Use the pop-up long-hair trimmer to snip stray hairs.
6. Keep using and both your face and beard will adapt to the
shaver.

4
TRAVEL LOCK
The Wahl 07061 Series Shaver comes with an electronic travel
lock to avoid accidental activation while transporting.
Hold power button down for 3 seconds to engage travel lock.
Hold power button down for 3 seconds to disengage travel lock.
When travel lock is active, pressing the power button will cause the
LED(s) to flash for 1 second.
NOTE: The shaver can be charged even if the travel lock is
engaged. When travel lock is active, and the shaver is charged
then is disconnected from the transformer, the travel lock will be
disengaged.
WET/DRY USE
NOTE: Do not submerge shaver in more than 3 feet of water or for
more than 30 minutes to prevent water ingress into the electronics.
Warranty is void if shaver is submerged beyond these limitations.
The Wahl shaver is designed to be water resistant and shower
proof. This lets you use your Wahl shaver in the shower or at the
sink without worry and makes it easy to clean under running water.
NOTE: The shaver is for wet/dry use. The shaver will not run while
the cord is attached for safety.
5
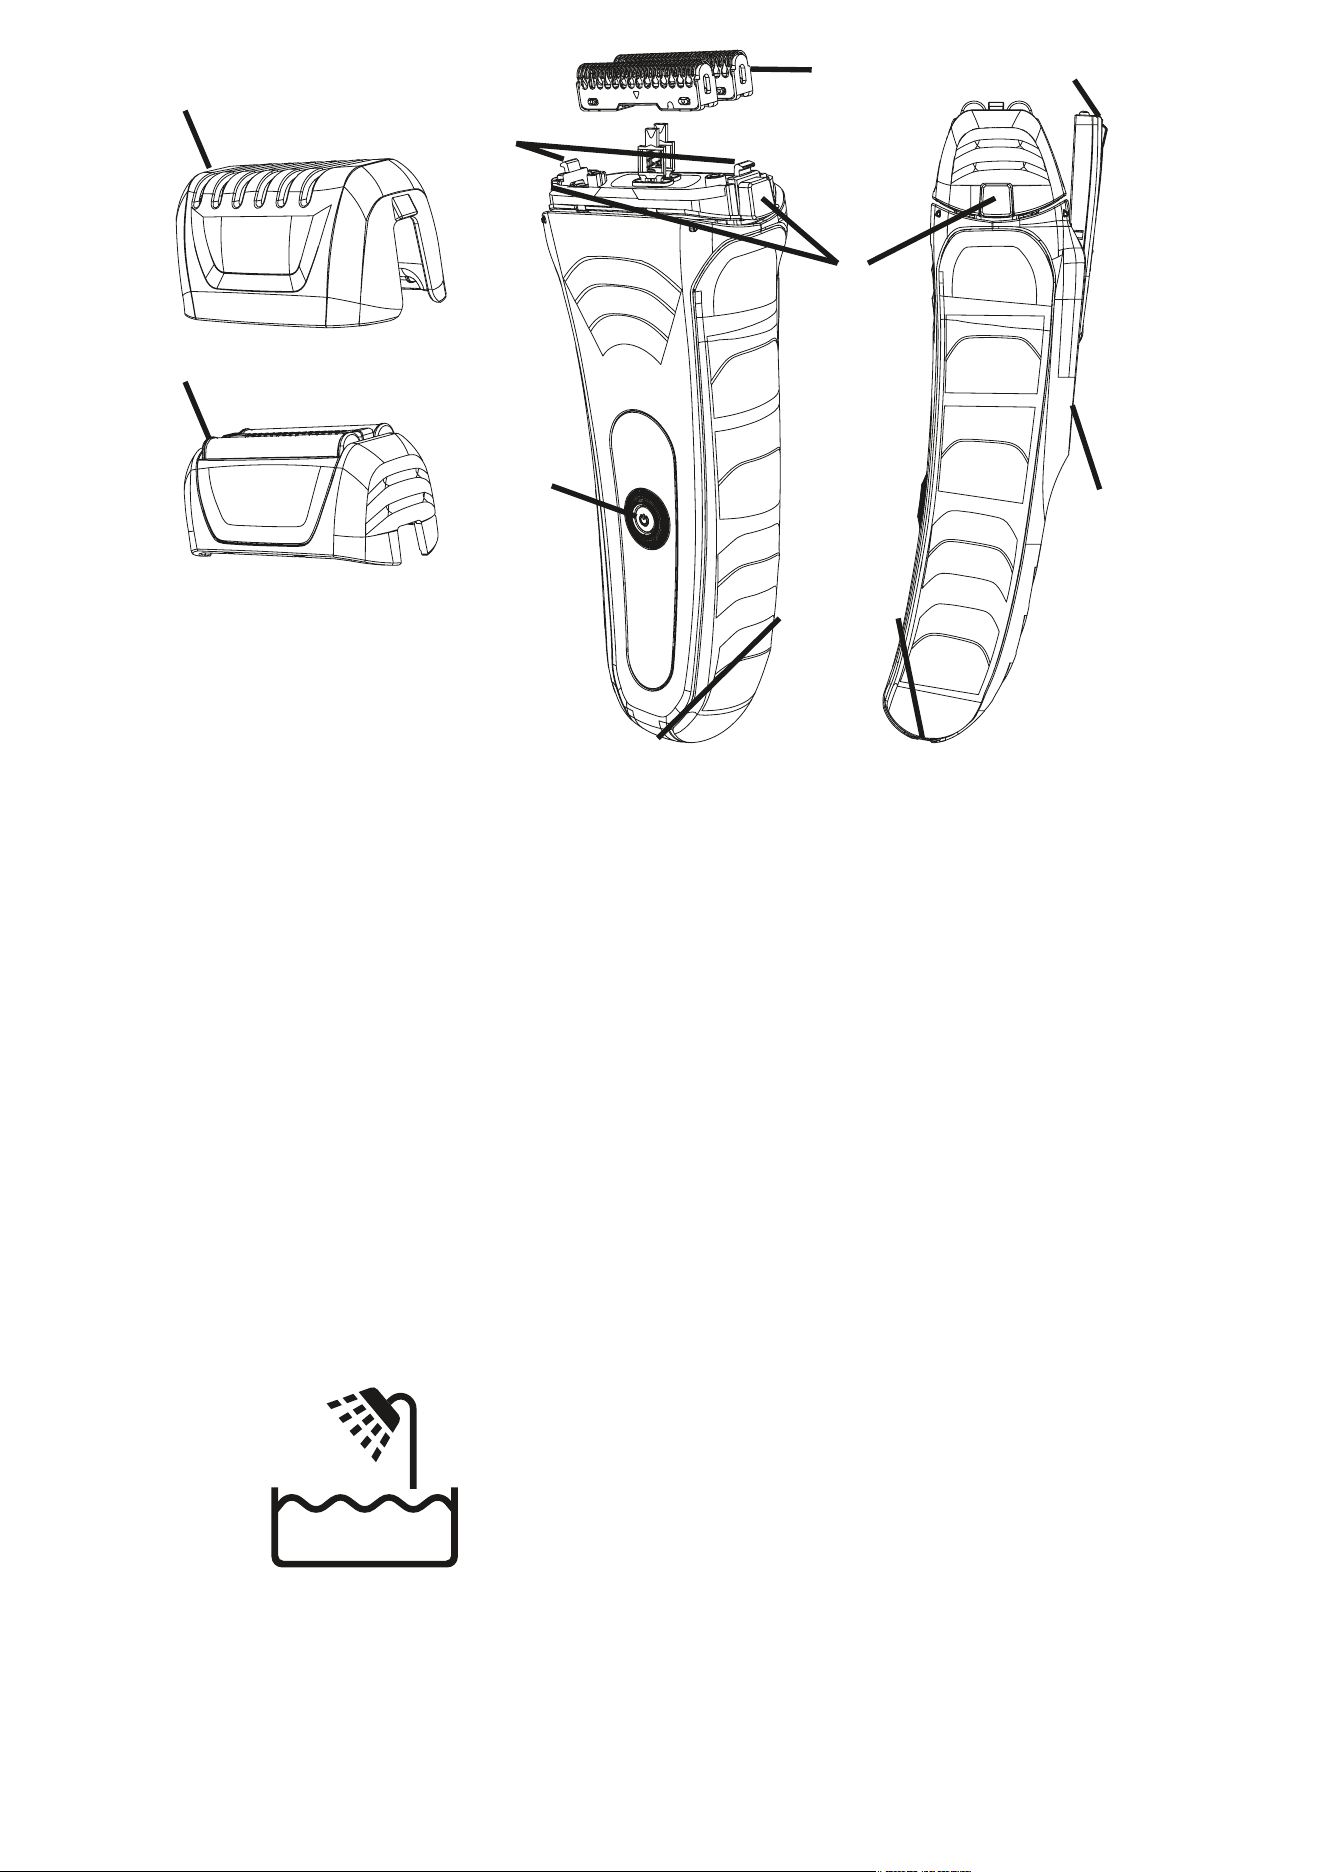
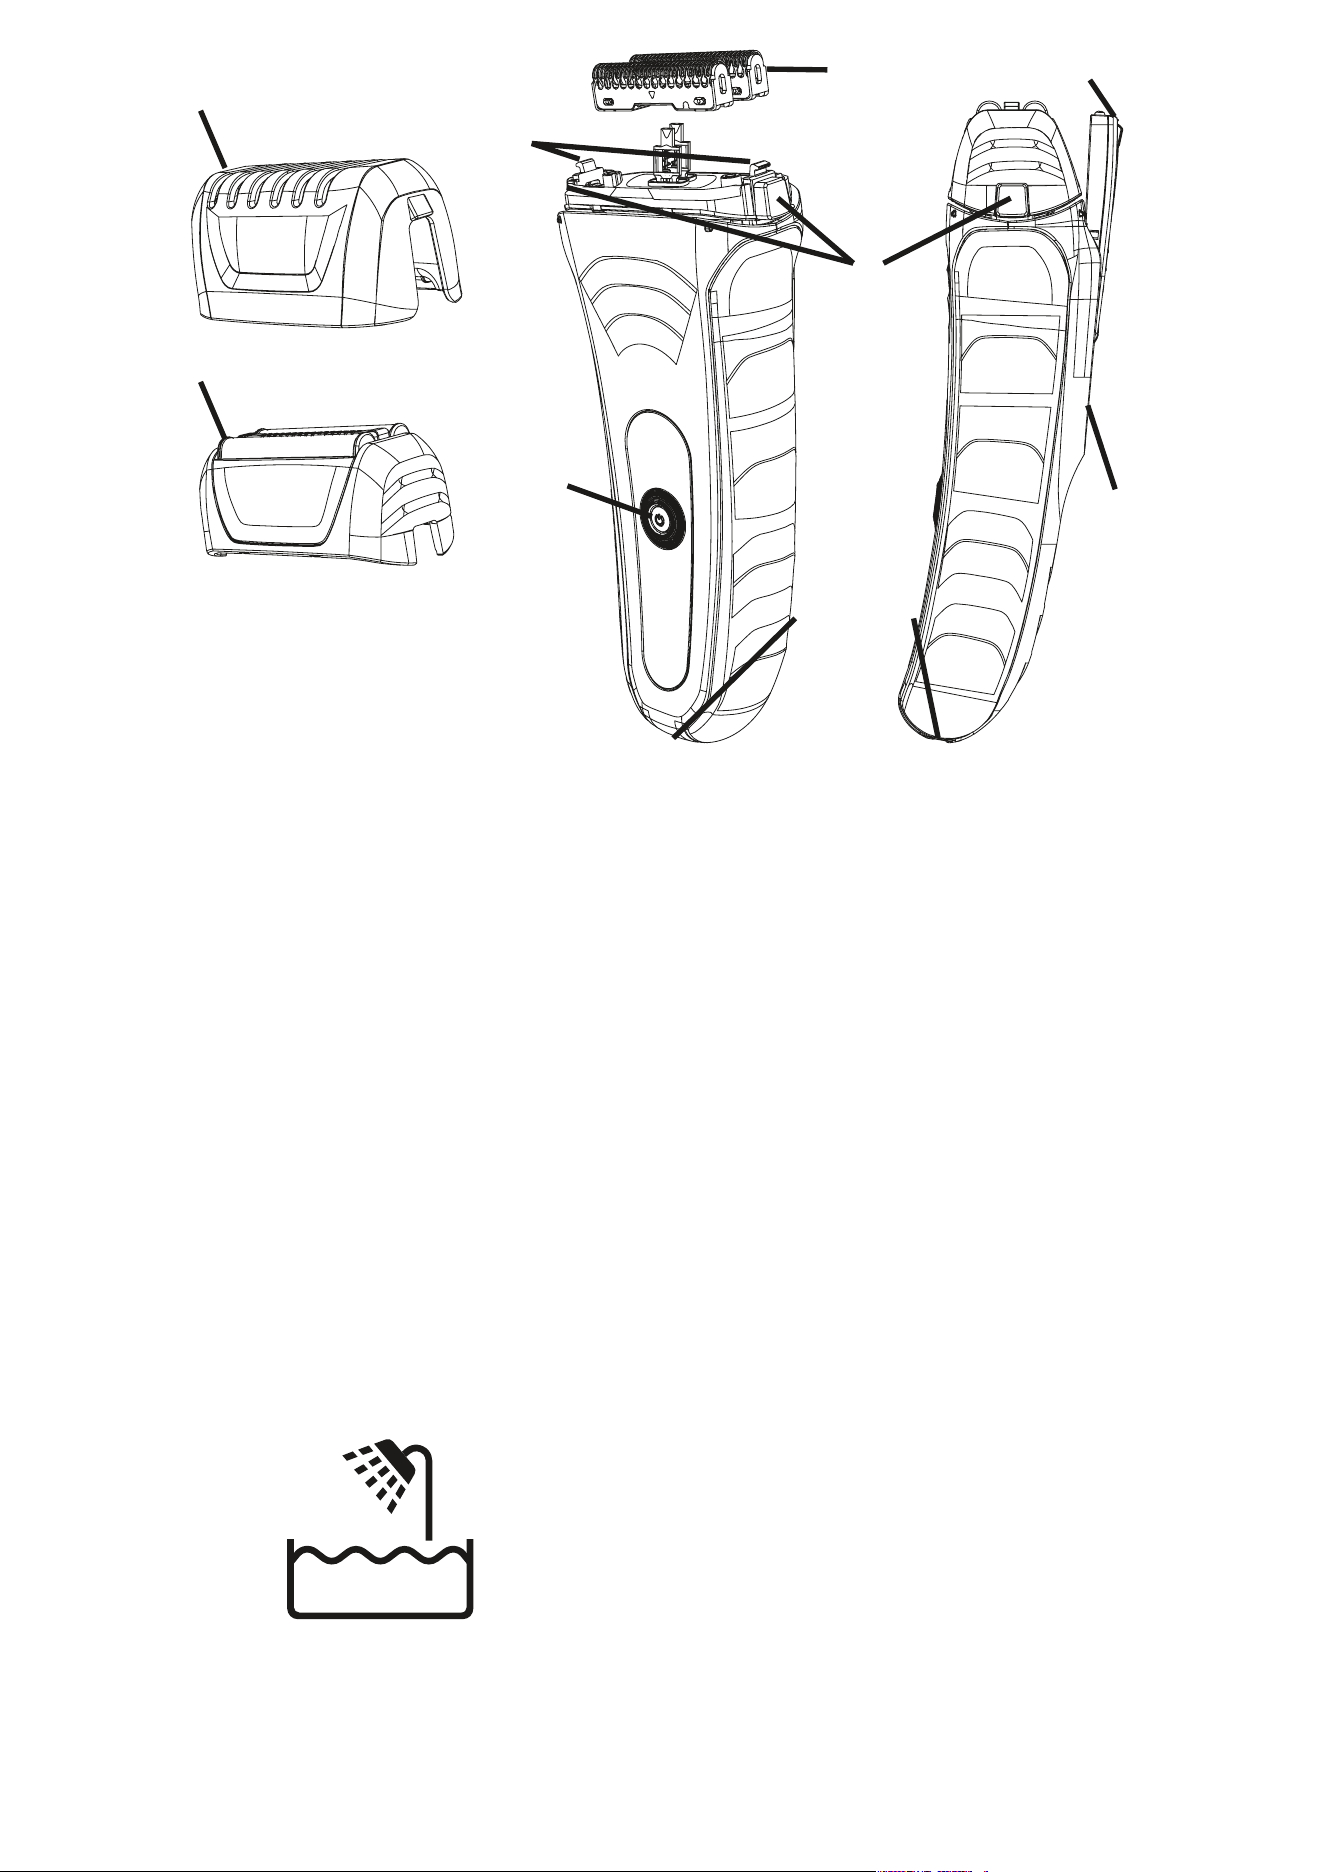
FEATURES
1. Socket
2. On/Off Switch
3. Cutter Bar Assembly
4. Flex Foil Head
5. Long-Hair Pop-Up Trimmer
6. Long-Hair Trimmer Switch
7. Shaver Head Release Button
8. Foil Guard
9. Charger Contacts
10. Spring Clips
Note: Remove LED label before first use.
This symbol, located on the shaver,
represents that the shaver is suitable
for use in the bath and shower.
1 & 9
7
3
6
10
4
2
8
5

6
CHARGING OPERATION
The shaver cannot be overcharged, so you may charge it as often
as desired. However, periodic recharging of the shaver, rather than
continuous recharging, will prolong battery life.
MODELS WITH 1 LED
Charge when shaver seems to lose power or run slower. The
charging LED will light up while charging. LED will turn off when
charging is complete.
MODELS WITH 2 LEDS
The red LED will flash for one second when turning off the shaver
when it is time to charge (below 10%).
The blue LED will light up while charging. LED will turn off when
charging is complete.
MODELS WITH 5 LEDS
The LED meter will show the amount of charge left on the shaver.
The fewer lights that are lit, the lower the charge on the battery is.
The red LED will flash for one second when turning off the shaver
when it is time to charge (below 10%).
While charging, the LED meter will show the progression of
charging. All LEDs will turn off when charging is complete.
7
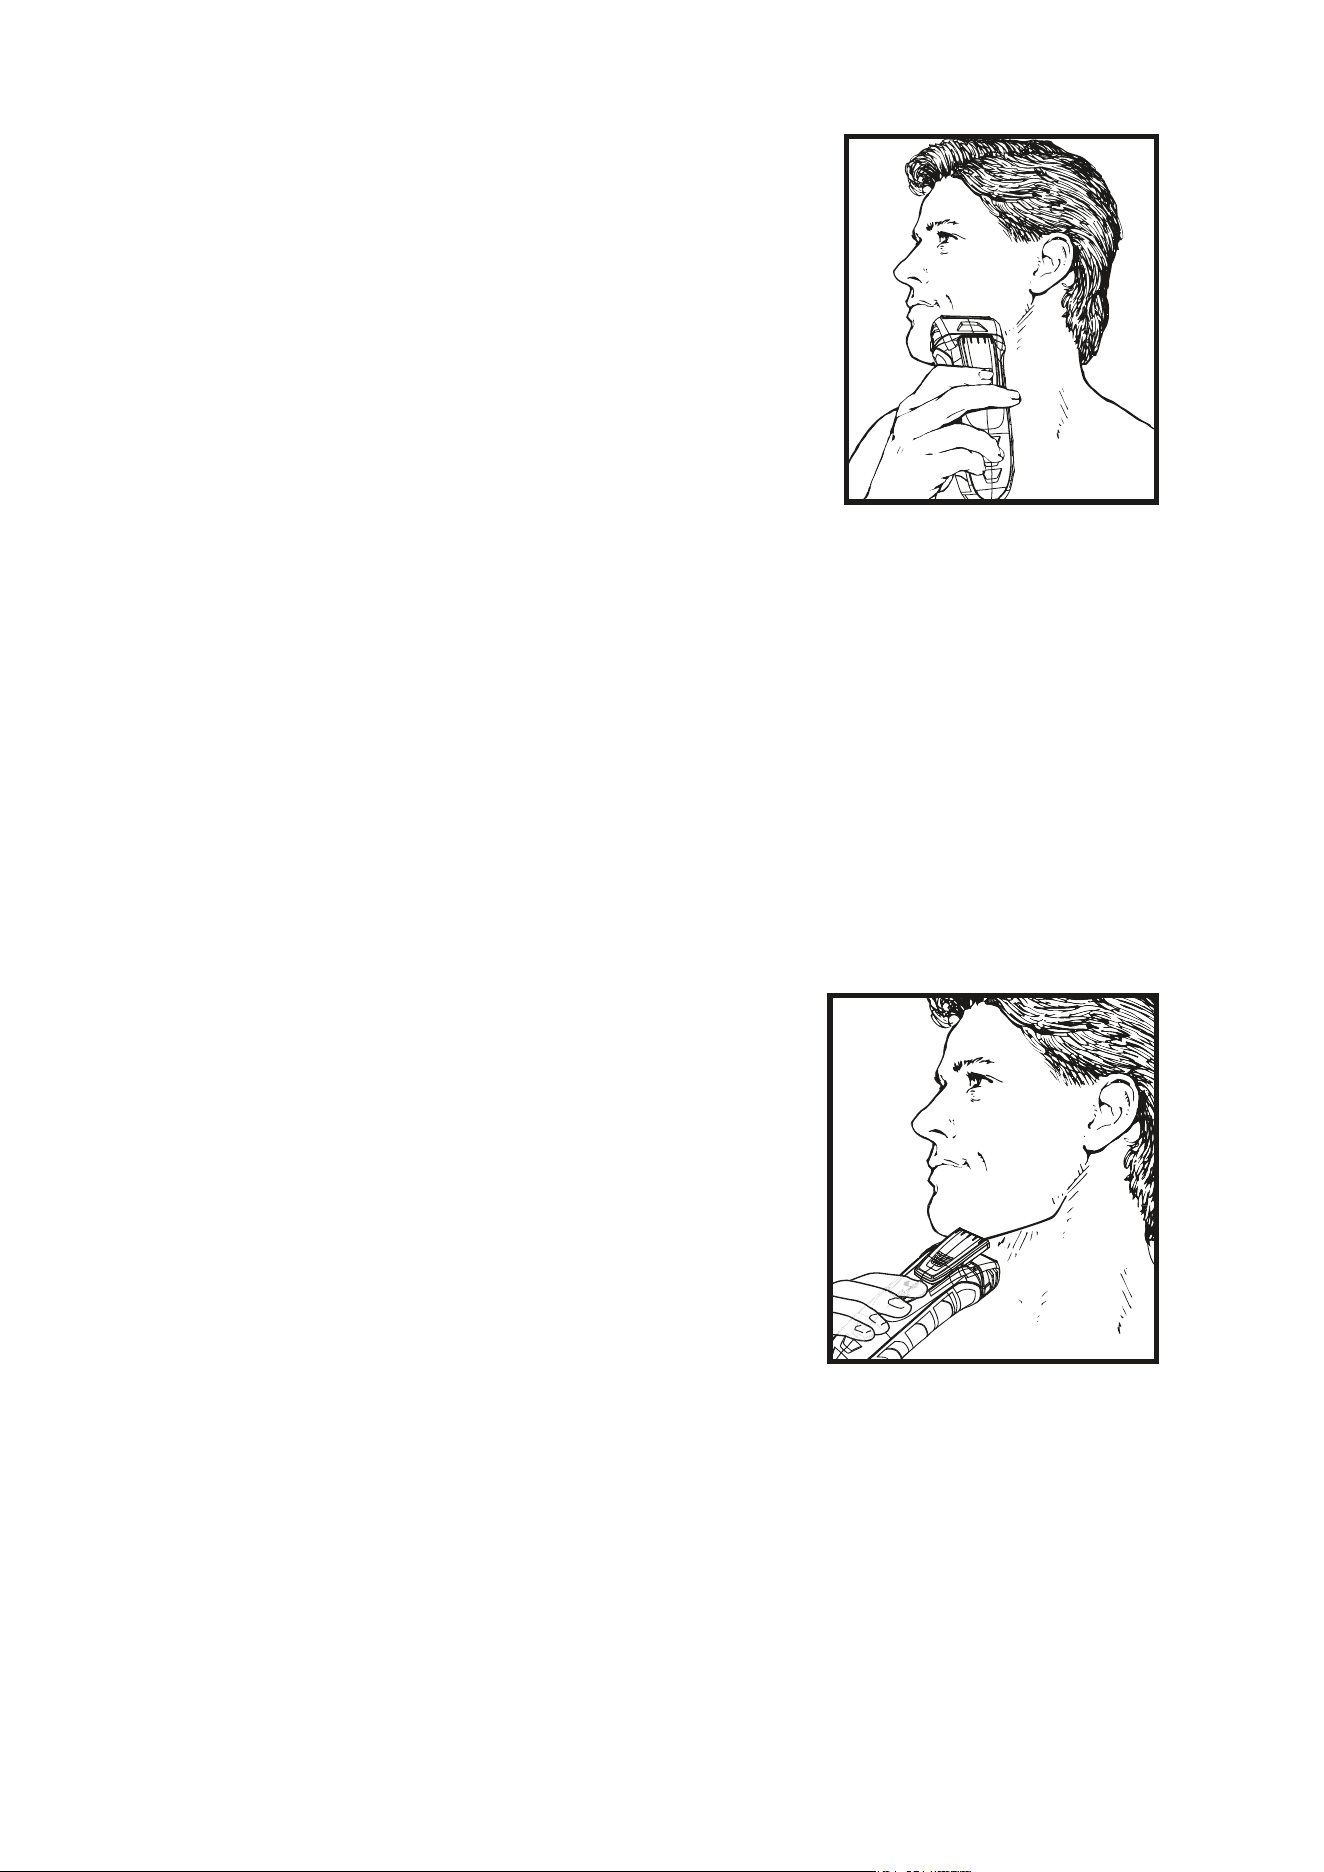
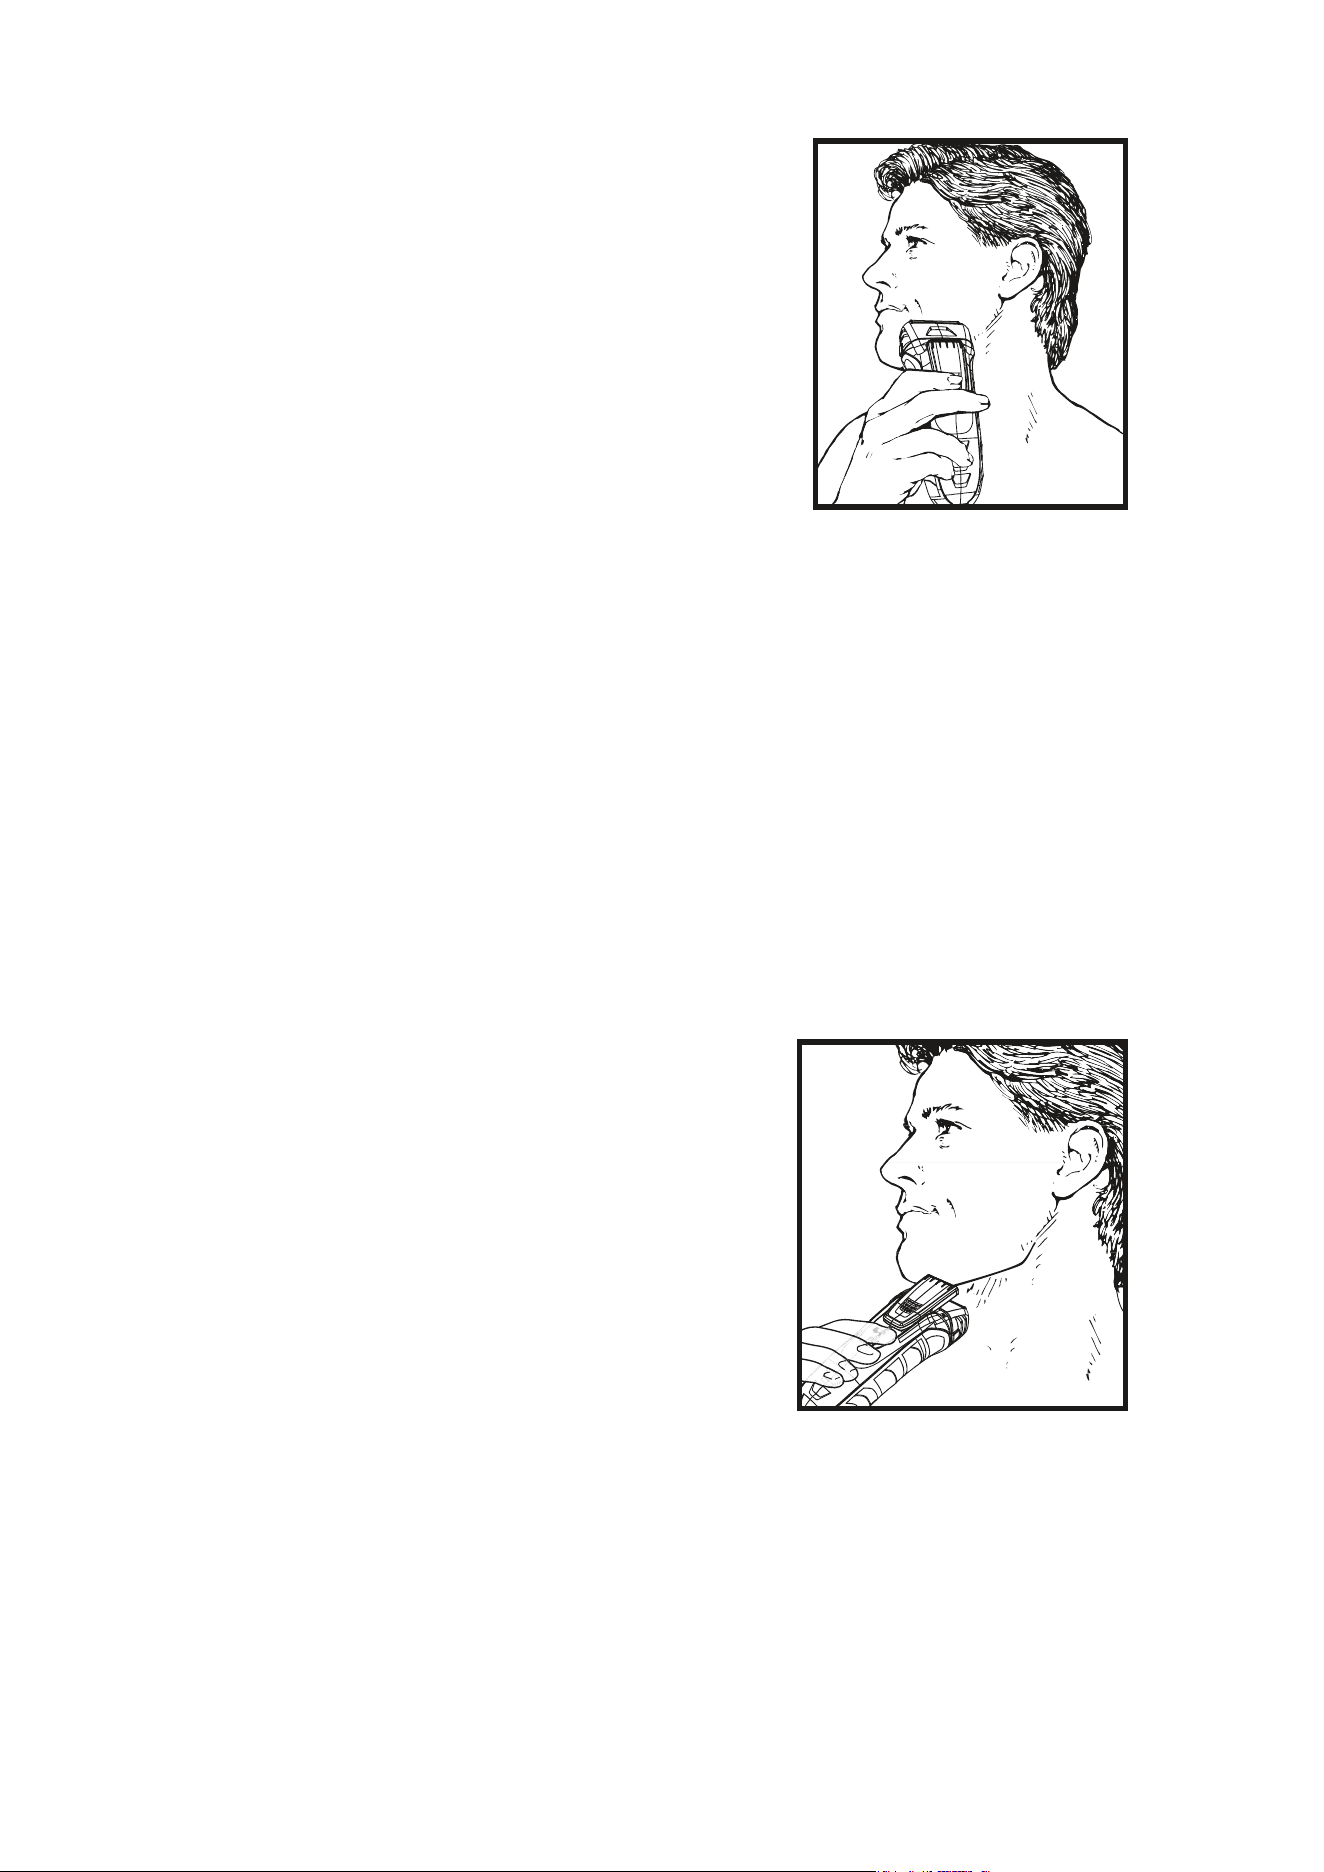
SHAVING PROCEDURES FOR FAST,
CLOSE SHAVES
We suggest that you thoroughly cleanse and
completely dry your skin prior to shaving.
For maximum speed and efficiency, hold the
shaver so that both screens are in contact
with the skin. When shaving the upper lip
or neck, hold shaver so that the uppermost
screen is in contact with skin.
Shave both with and against the grain of the
beard, and stretch the skin taut in the path of the shaver. Guide the
dual foil heads gently back and forth, primarily against the grain of
the beard. Do not press screen heads hard against face. Heavy
scrubbing action with the shaver could damage the foil and will not
result in a closer shave.
Always replace the foil guard to protect the delicate dual foil heads
when shaver is off.
SHAVING HEAVY BEARD GROWTH
Begin shaving in a less dense area of the
beard. Move the shaver in a circular motion
on a small area of the face (this picks up
the hairs that grow in all directions). When
you see that this small area is shaved clean,
gradually move into a new area while still
using the circular motion. Continue this
motion, one small section at a time, until
entire face is shaved.
If your beard has more than 3 days of growth, use the pop-up
long-hair trimmer to cut the beard down to about a one-day
growth before using the shaver foil.

8
LONG-HAIR TRIMMER
OPERATION
Your shaver features a special
long-hair trimmer located on
the back of the shaver which
telescopes up from the foil head
for precise and easy trimming of
sideburns, beards or mustaches,
and for removing long hairs from
the neck. And, as mentioned earlier, it can be used to “knock
down” heavy beard growth prior to shaving with the foil.
To use, remove foil guard and simply push the long-hair trimmer
Switch in an upward motion until trimmer slides (clicks) into
position. Push On/Off switch. Then begin trimming/styling.
CLEANING AND MAINTENANCE
SHAVER HEAD CARE
For maximum performance, we recommend you clean your
shaver after every few shaves. If using shaving cream or gel,
rinse with warm water after every use. Any servicing, other than
replacement of foil head and cutter bars, should be performed
by an authorized Wahl Shaver Service Center or Wahl Clipper
Corporation (see Warranty for mailing address information).
To clean, turn shaver “OFF” and remove
the foil head by pushing the shaver head
release buttons on the sides of the shaver
and lifting the foil head upward.
Lightly tap the open side of the foil head
on a hard surface to remove the majority
of loose stubble particles. Be careful not
to tap foil.
For easy cleaning, you may rinse your
shaver with water. While the foils can be
rinsed, we recommend removing the foil
9
head, and rinsing the cutter
bars. This will allow any hairs
still on the cutter bars to be
washed away. Leaving the foil
head on while rinsing makes
in more difficult for hairs to be
washed clean.
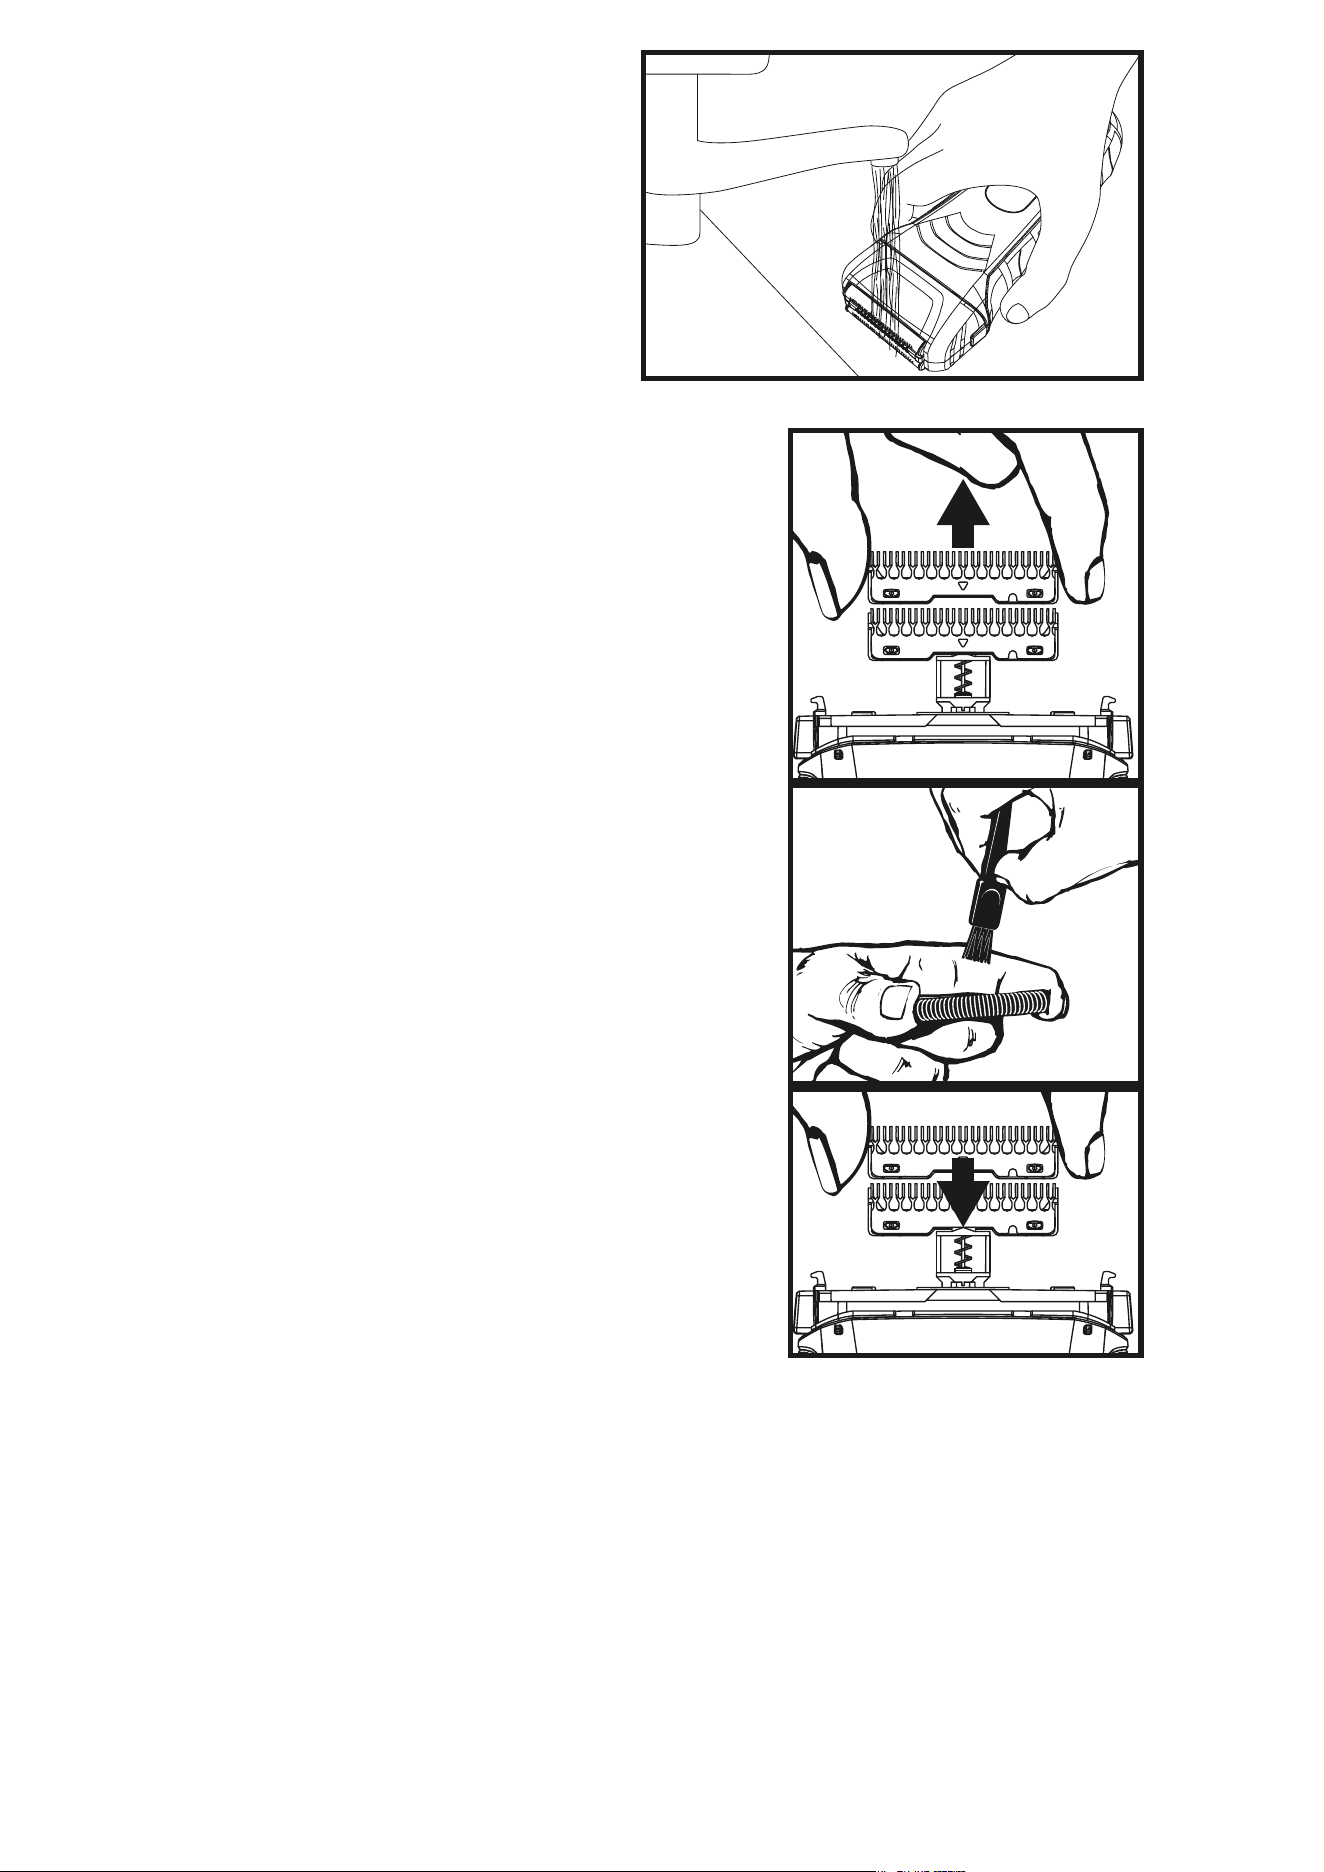
TO REMOVE CUTTER
BAR
Turn shaver off. Remove the foil
head and, holding the shaver in one
hand, gently pull up on cutter bar. Be
sure your thumb and first finger are
positioned at each end of the cutter bar.
Warning: Handle cutting components
with care to avoid personal injury.
NOTE: If you do not hold the cutter bar
as shown, brushing the blades could
result in damage to the assembly.
When the foil head and cutter bars are
removed from the shaver, an alternate
cleaning method is to rinse them under
running water. Simply let them air dry.
After cleaning, replace the cutter bars by
pressing down gently. Carefully replace
the foil head, snapping it into place.
From time to time, depending on the density of your beard, you will
need to replace the cutters and foils. If you notice that it is taking
you longer to shave, or if your face starts to feel some irritation,
or if the foil seems to become warm to the touch, it is probably
time to replace the cutters and foils. Replace the cutters and foils
only with WAHL parts (Yellow: 7045-100, Silver: 7045-400, Black
Chrome: 7045-700).
10
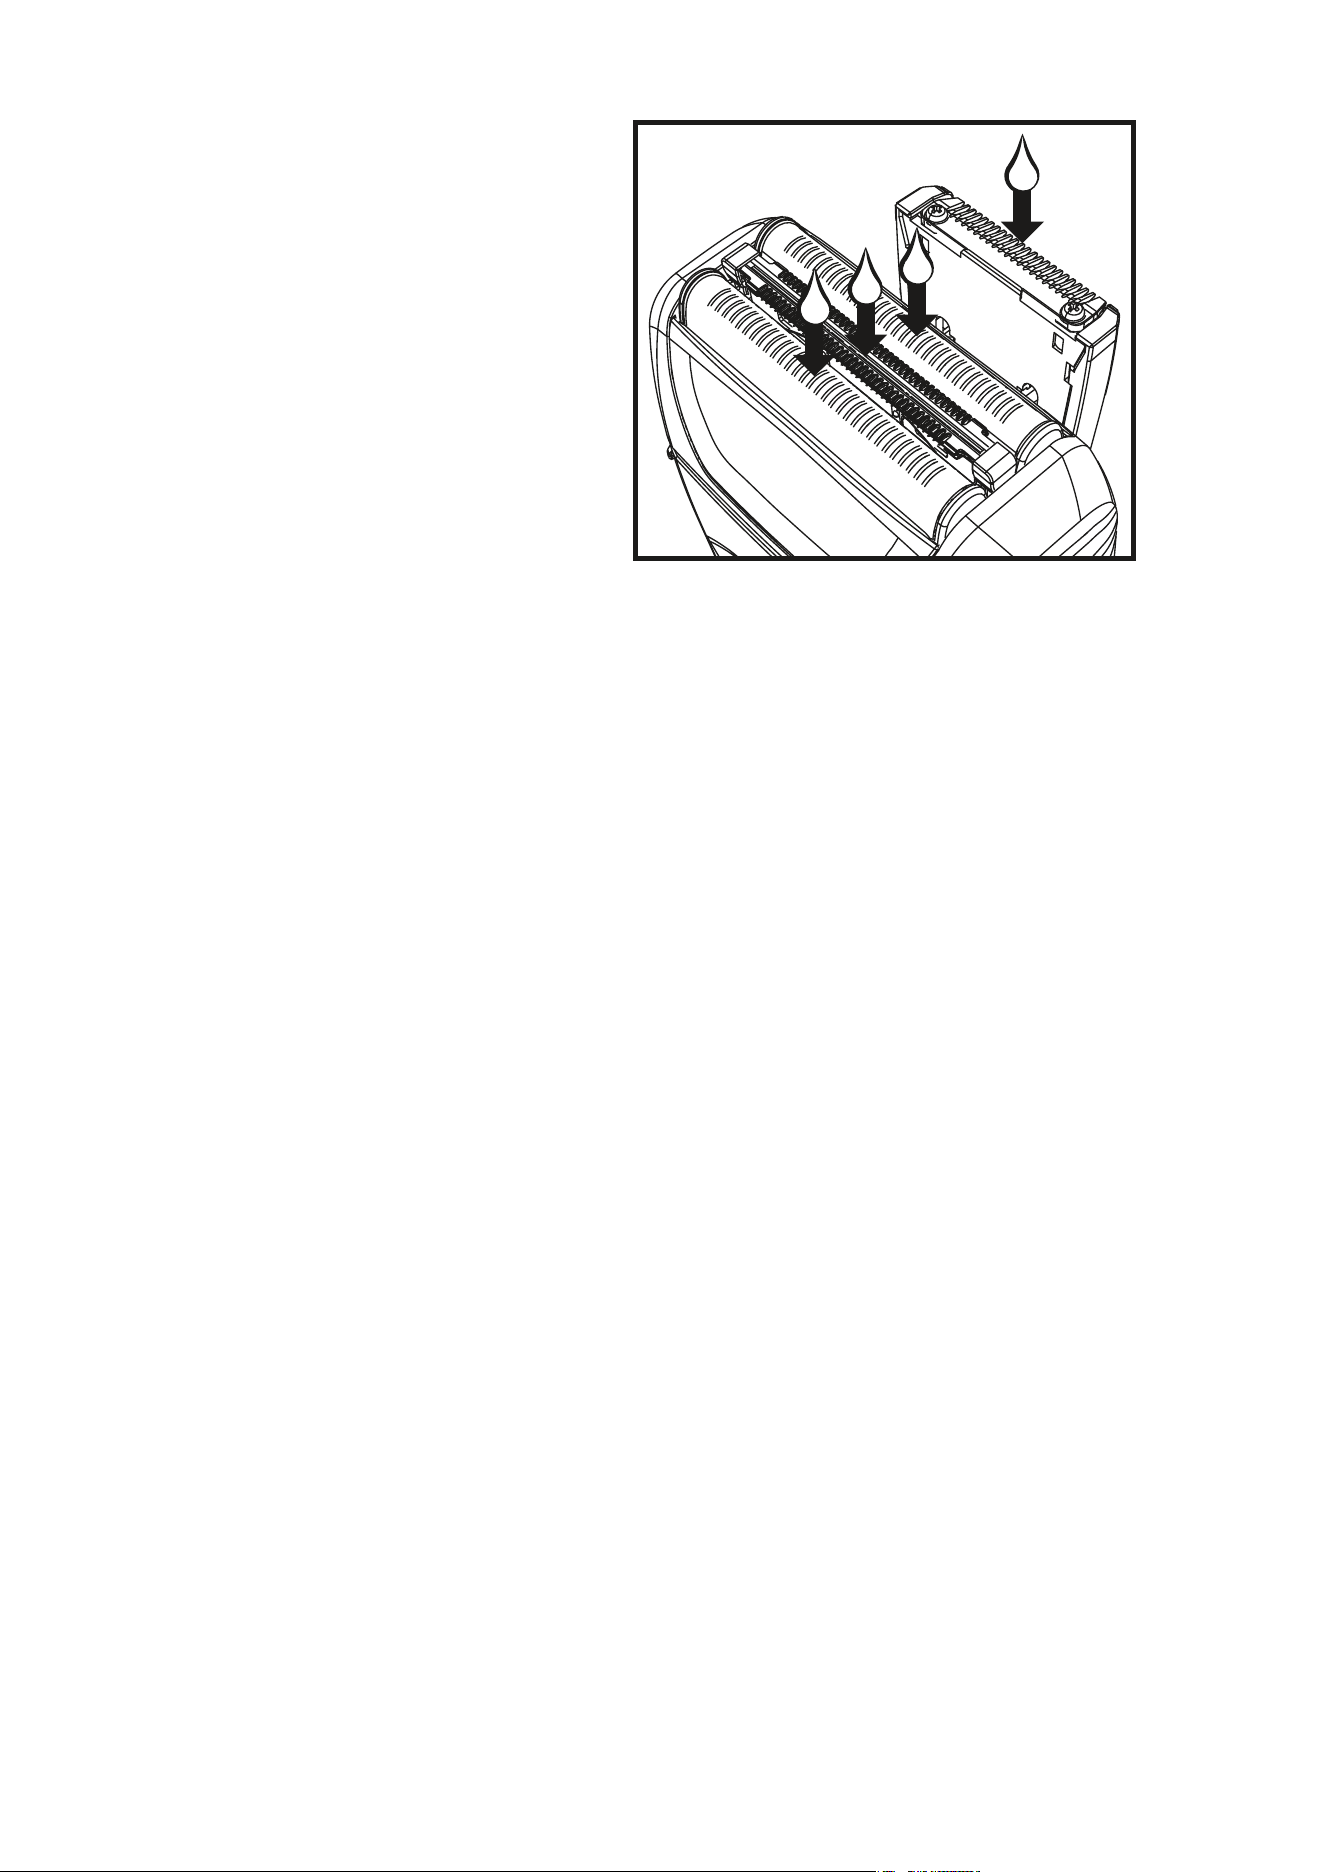
CLEANING & OILING FOILS
Clean with the included brush.
For best results, put one or
two drops of Wahl Clipper
oil on the foils and pop-up
trimmer blades only when
necessary, or approximately
once a month. Motor bearings
are permanently lubricated—
do not attempt to oil.
When oiling your foils, turn
the shaver “ON - I,” hold the unit with the blades facing DOWN and
squeeze one or two drops of oil onto the blades. Keep the unit on
for ten seconds. Wipe off excess oil with soft cloth.
NOTICE—DO NOT OVER OIL!
Excessive oiling or application of liquids will cause damage if
allowed to seep back into motor.
FOIL & BLADE CARE
Shaver blades have precision-hardened, ground and lapped cutting
teeth. Foils, cutter bar, and blades should be handled carefully and
never bumped or used to cut dirty or abrasive material.
STORAGE
Before storing your shaver, use the cleaning brush to whisk any
loose hairs from the unit, foils, cutter bar, and blades. Store unit in
such a manner so that blades are protected from damage.
When the shaver is not in use, the shaver foil/blade guard
attachment should be in place to protect the blades.
This appliance should be stored in a manner where it is not
subjected to crushing, heating above 100°C (212°F), or
incineration.

11
SERVICE AND REPAIR
If you have problems with your shaver, send it prepaid with a note
explaining the problem to:
Wahl Clipper Corporation
Attn: Repair Department
3001 Locust Street
Sterling, IL 61081
Telephone (800) 767-9245
For products purchased outside the United States, contact your distributor.
If for any reason within 60 days of purchase of your Wahl
®
shaver
you are not satisfied with your shaver and would like a refund, just
return your shaver, together with the sales receipt, to the retailer
from whom you purchased it. Wahl will reimburse all retailers
who accept shavers within 60 days of purchase. If you have any
questions regarding this money-back guarantee, please call
1-800-767-9245 in the United States.
60 Day Money Back Guarantee!
CORD CARE
The cord should not be used to pull the shaver. Freedom of
movement needs to be maintained. Care should be used to keep
the cord untwisted and undamaged.
When stored, the cord should be coiled and replaced neatly in its
original package or storage pouch.

1
GUARDE ESTAS INSTRUCCIONES
Solamente Para Uso Residencial
CAMBIO DE LA PILA DE LITIO ION,
DESECHO DE LA RASURADORA Y
RECICLAJE:
• Para cambiar la pila, envíele toda la rasuradora intacta a: Wahl
Annex 3001 North Locust, P.O. Box 578, Sterling, IL 61081
• No intente sacar la pila. Las pilas de litio ion pueden explotar,
incendiarse o causar quemaduras si se desarman, se dañan o las
exponen al agua o altas temperaturas.
• Si decide no cambiar la pila, debe desechar toda la rasuradora.
No intente sacar la pila para desecharla. Las pilas de litio ion
están sujetas a reglamentos de desechos locales. Muchos lugares
prohíben el desecho en recipientes de basura corrientes. Consulte
las leyes y reglamentos locales.
• Para el reciclaje, contacte a la agencia de reciclaje gubernamental,
el servicio de basuras, el comerciante minorista o las fuentes de
reciclaje en línea, tal como www.batteryrecycling.com o
www.rbrc.org.
USO MOJADO Y SECO
NOTA: No sumerja la rasuradora en más de 3 pies (91 cm) de
agua durante más de 30 minutos para evitar que el agua llegue a
los componentes electrónicos. La garantía quedará anulada si la
rasuradora se sumerge más allá de este límite.
La rasuradora Wahl está diseñada para ser a prueba de agua y de
duchas. Esto le permite utilizar su rasuradora Wahl en la ducha o
en el lavabo sin preocupaciones, y facilita su limpieza bajo agua
corriente.
NOTA: La rasuradora es para uso mojado y seco. La rasuradora
no funcionará mientras el cable está conectado, para mayor
seguridad.

2
CONSEJOS PARA USAR POR PRIMERA
VEZ
Si es la primera vez que va a utilizar una rasuradora eléctrica,
probablemente necesitará acondicionar la piel para esta nueva
técnica de rasurar. Empiece en la parte más fácil de rasurar de
su rostro, generalmente el la parte de su cara debajo de su oído.
Rasúrese con gentileza y use exclusivamente su rasuradora por
tres o cuatro semanas, o por más tiempo si su piel es sensible o
si su pelo facial crece en diferente dirección en ciertas partes de su
rostro. Al principio sus rasuradas no serán tan perfectas como
lo desearía, y la piel puede irritarse un poco. Sin embargo, al
continuar usando la rasuradora, obtendrá en el tiempo indicado
unas rasuradas perfectas.
Si ha dejado pasar varios días sin rasurarse y si su barba está un
poco larga, use la recortadora oculta para rebajar todos los pelos
más largos y permitirle después al cabezal que corra suavemente y
obtener una rasurada limpia.
Si anteriormente ha usado otro tipo de rasurada eléctrica,
es posible que tenga que transcurrir un cierto período de
acondicionamiento antes de obtener los mejores resultados.

3
CONSEJOS RÁPIDOS Y COSAS PARA
RECORDAR
1. Si es la primera vez que utiliza una rasuradora eléctrica, o ha
utilizado una rasuradora eléctrica de otra marca, su cara y su
barba necesitarán de un período de ajuste de 2 a 3 semanas (o
menos) para adaptarse al nuevo cabezal.
2. Cuando abra el empaque, cargue su rasuradora por un hora
antes de utilizarla por primera vez o hasta la carga es completo.
3. Cambie el cabezal con lámina y las barras cortadoras cada 12
meses o si la lámina está dañada. Puede ordenar láminas de
repuesto en https://home.wahl.com.
4. Asegúrese de limpiar la rasuradora, el ensamblaje de la barra
cortadora y el cabezal cada tres o cuatro rasuradas.
5. Utilice la recortadora para cortar los cabellos largos.
6. Siga utilizando la rasuradora y se dará cuenta como su rostro y
su barba se adaptan a la rasuradora.
SEGURO DE VIAJE
La rasuradora Serie 07061 de Wahl incluye un seguro electrónico
de viaje que evita que se encienda accidentalmente mientras se
transporta.
Mantenga oprimido el botón de encendido durante 3 segundos
para activar el seguro de viaje.
Mantenga oprimido el botón de encendido durante 3 segundos
para desactivar el seguro de viaje.
Cuando el seguro de viaje esté activo, oprimir el botón de
encendido hará que los LED parpadeen por 1 segundo.
NOTA: El rastrillo se puede cargar incluso si el seguro de viaje está
activado. Cuando el seguro de viaje está activado, y el rastrillo está
cargado, entonces se desconecta del transformador y el seguro de
viaje se desactiva.
4
CARACTERÍSTICAS
1. Enchufe
2. Interruptor de Encendido/
Apagado (On/Off)
3. Ensamblaje de la Barra
Cortadora
4. Cabezal Flex Foil
5. Recortadora de Pelos
Largos
6. Interruptor de Abrir y Cerrar
la Recortadora de Pelos
Largos
7. Botón de Desenganche del
Cabezal de la Rasuradora
8. Protector del Cabezal
9. Contactos del Cargador
Nota: Quite la etiqueta del LED antes de usarla por primera vez.
Este símbolo, que se encuentra en la
rasuradora, indica que es apta para
su uso en el baño y en la ducha.
1 & 9
7
3
6
10
4
2
8
5

5
CÓMO RECARGAR LA
RASURADORA
No es posible cargar la rasuradora en exceso por lo que puede
cargarla tanto como lo desee. Sin embargo, recargando la
rasuradora periódicamente, en vez de continuamente, prolongará
la vida útil de su batería.
MODELOS CON 1 LED
Cargue cuando la rasuradora parezca perder la potencia o
funcionar más lento. El LED de carga se encenderá mientras se
carga. El LED se apagará cuando la carga esté completa.
MODELOS CON 2 LED
El LED rojo parpadeará por un segundo al apagar la rasuradora
cuando necesite carga (debajo del 10%).
El LED azul se encenderá mientras está cargando. El LED se
apagará cuando la carga esté completa.
MODELOS CON 5 LED
El medidor con LED mostrará la cantidad de carga que le queda
a la rasuradora. Mientras menos luces tenga encendidas, menos
carga tiene la batería.
El LED rojo parpadeará por un segundo al apagar la rasuradora
cuando necesite carga (debajo del 10%).
Mientras se carga, el medidor con LED mostrará el avance de la
carga. Todos los LED se apagarán cuando la carga esté completa.
6
MÉTODO PARA LOGRAR UN RASURADO
RÁPIDO Y AL RAS
Sugerimos que limpie y seque por completo
su piel antes de rasurarse. Para lograr
máxima velocidad y eficiencia, sujete la
rasuradora de modo que ambas rejillas estén
en contacto con la piel. Cuando se rasura
por encima del labio superior o en el cuello,
sujete la rasuradora de modo que la rejilla
superior esté en contacto con la piel.
Rasúrese la barba tanto en el sentido de su crecimiento como en
sentido contrario, y estire la piel antes de pasar la máquina. Mueva
suavemente los cabezales dobles a uno y otro lado, principalmente
en contra del sentido de crecimiento de la barba. No presione las
rejillas contra su cara. Presionar demasiado la afeitadora puede
dañar la hoja, lo cual afectaría la afeitada.
Coloque siempre el protector de la hoja para evitar daños a los
cabezales dobles cuando la rasuradora esta apagado.
RASURADO DE BARBAS POBLADAS
Empiece rasúrandose la zona de la
barba que esté menos poblada. Mueva
la rasuradora en forma circular en una
pequeña zona de la cara (esto para
cortar los pelos que crecen en diferentes
direcciones). Cuando se haya rasurado
completamente esta zona pequeña, mueva
la rasuradora gradualmente a una zona
nueva sin abandonar el movimiento circular.
Siga avanzando en pequeñas áreas hasta terminar de rasurar toda
su cara.
Si ha dejado crecer la barba por más de 3 días, use primero la
recortadora de pelo largo para reducir el tamaño de la barba hasta
que parezca como si fuera de un solo día de crecimiento, antes de
pasar las hojas.

7
OPERACIÓN DE LA RECORTADORA
DE-PELOS LARGOS
Su rasuradora cuenta con una recortadora
especial de pelo largo que se
encuentra en la parte trasera de
la rasuradora y que se proyecta
hacia arriba desde el cabezal con
lámina para recortar con precisión
y facilidad las patillas, barbas o
bigotes, y para eliminar cabellos
largos del cuello. Además, según
se mencionó anteriormente, se puede usar para rebajar la barba
espesa antes de rasurarse con el cabezal.
Para usarla, quite el protector de la hoja y simplemente empuje
hacia arriba el interruptor de la recortadora de pelo largo hasta
que la misma quede en posición (se escuchará un “clic”). Ponga
el interruptor en la posición de Encendido. Después empiece a
recortar y dar forma.
LIMPIEZA Y MANTENIMIENTO
CUIDADO DEL CABEZAL DE LA
AFEITADORA
Para un máximo rendimiento, recomendamos que limpie la
rasuradora regularmente después de usarla unas cuantas veces.
Si utiliza crema o gel de afeitar, enjuague con agua tibia
después de cada uso. Cualquier otro tipo de servicio, que no sea el
reemplazo del cabezal foil y las barras cortadoras, debe ser llevado
a cabo por un Centro de Servicio autorizado para las Rasuradoras
de Wahl, o por Wahl Clipper Corporation (en la garantía encontrará
la dirección correspondiente).
Para limpiar la rasuradora, apáguela (coloque el interruptor en Off)
y quite el cabezal foil empujando los botónes de desenganche del
mismo a unos lados de la rasuradora y moviendo hacia arriba el
cabezal de la hoja.
Golpee ligeramente el lado abierto del cabezal foil contra una

8
superficie dura para expulsar la mayoría
de los residuos capilares. Tenga cuidado
de no golpear la hoja.
Para limpiar con más facilidad, puede
enjuagar su rasuradora con agua.
Aunque las láminas pueden enjuagarse,
recomendamos quitar el cabezal con
lámina y enjuagar las barras cortadoras.
Esto permitirá eliminar todos los cabellos
que sigan en las barras cortadoras. Si
deja el cabezal con lámina puesto mientras
enjuaga, será más difícil que se eliminen
los cabellos.
PARA REMOVER EL ENSAMBLAJE DE
LA BARRA CORTADORA
Apague la rasuradora. Retire el cabezal de la hoja y, mientras
sostiene la afeitadora con una mano, levante cuidadosamente la
barra de la cortadora. Asegúrese de sujetarlo colocando el pulgar
y el índice a ambos extremos de la barra cortadora.
Advertencia: Maneje los
componentes de corte con
cuidado para evitar lesiones.
NOTA: Si no sujeta la barra
cortadora según se indica,
puede causar daños a la misma
al cepillar las hojas.
Cuando el cabezal foil y las barras cortadoras se han quitado de
la rasuradora, pueden ser enjuagados
con agua bajo la llave, esto le da una
alternativa de limpieza. Después déjelos
secar al aire libre.
Después de limpiar la rasuradora,
vuelva a poner las barras cortadoras
apretandolas suavemente hacia abajo.

9
Instale con cuidado el cabezal foil
encájandolo a presión.
Después de un período de uso, y
dependiendo de la densidad de su
barba, usted necesitará reemplazar
la barra cortadora y los cabezales. Si
usted nota que le toma más tiempo el
rasurarse, o si su cara se irrita, o si el
cabezal se calienta, es probable que
necesite reemplazar la barra cortadora y
los cabezales. Solamente utilice piezas
WAHL (Amarillo: 7045-100, Plateado:
7045-400, Negro Cromado: 7045-700).
LIMPIEZA & LUBRICACIÓN DE LÁMINAS
Límpielas con el cepillo
incluido. Para lograr resultados
óptimos, coloque una o dos
gotas de aceite para cortadora
de Wahl en las láminas y las
cuchillas de recorte emergentes
solo cuando sea necesario
o aproximadamente una
vez al mes. Los cojinetes
del motor están lubricados
permanentemente. No trate de
lubricarlos.
Cuando lubrique sus láminas, coloque el rastrillo en posición de
encendido (“ON – I”), sostenga la unidad con las cuchillas mirando
hacia ABAJO y escurra una o dos gotas de aceite en las cuchillas.
Mantenga la unidad encendida durante diez segundos. Limpie el
exceso de aceite con un paño suave.
AVISO: ¡NO LUBRIQUE EXCESIVAMENTE!
La lubricación o aplicación de líquidos excesiva causará daños si se
deja que se filtre y llegue al motor.

10
CUIDADO DE LA LÁMINA Y LAS
CUCHILLAS
Las hojas de la rasuradora tienen dientes de corte endurecidos con
precisión, rectificados y pulidos. La lámina, la barra cortadora y las
cuchillas deben manipularse con cuidado y nunca deben golpearse
o usarse para cortar material sucio o abrasivo.
ALMACENAMIENTO
Antes de guardar la rasuradora, use el cepillo de limpieza para
retirar cualquier vello suelto de la unidad, las láminas, la barra
cortadora y las cuchillas. Guarde la unidad de tal manera que las
hojas estén protegidas contra los daños.
Cuando la rasuradora no esté en uso, el accesorio protector de
láminas y cuchillas de la rasuradora debe estar colocados de forma
que se protejan las cuchillas.
Este aparato se debe guardar de manera que no sea sometido
a aplastamiento, calentamiento a más de 100°C (212°F) o
incineración.
CUIDADO DEL CABLE
No utilice el cable para tirar de la rasuradora. Es necesario
mantener la libertad de movimiento. Mantenga el cable libre de
torceduras. Cuando guarde la rasuradora, el cable debe estar
amarrado y colocado en su paquete original o bolsa.

11
SERVICIO Y REPARACIÓN
Si tiene problemas con la rasuradora, envíela con franqueo
prepagado y una nota explicando el problema a:
Wahl Clipper Corporation
Attn: Repair Department
3001 Locust Street • P.O. Box 578
Sterling, IL 61081
Teléfono (800) 767-9245
Para productos comprados fuera de Estados Unidos, póngase en
contacto con su distribuidor.
Si por cualquier razón entre los 60 días de la compra de su
rasuradora de Wahl no esta satisfecho con su compra y desea
una devolución de su dinero, regrese la recortadora junto con su
recibo de compras a la tienda donde lo compro. Wahl reembolsara
a las tiendas quienes acepta las rasuradoraa entre los 60 días de
su compra. Si tiene preguntas tocantes esta Garantía, por favor
llamanos al 1-800-767-9245 en los Estados Unidos.
GARNATÍA 60 DIAS PARA DEVOLUCIÓN DE SU DINERO

12
Para mas informacion o Registracion de Producto
visite WahlUSA.com
GARANTÍA LIMITADA DE 5 AÑOS
Válida en EE. UU. Solamente
Si su producto Wahl no funciona de forma satisfactoria durante
un período de cinco (5) años contados a partir de la fecha
original de compra o de recibirlo como regalo, Wahl reparará
o reemplazará el producto a su criterio y se lo devolverá SIN
CARGO. No devuelva este producto a la tienda donde fue
adquirido. Los productos que necesiten ser reparados conforme
a esta garantía deben enviarse con franqueo pagado a la siguiente
dirección o llame al
1-800-767-9245 para obtener asistencia:
Wahl Clipper Corp.
Attn: Repair Department
3001 Locust Street
Sterling, Illinois 61081
Cuando envíe un correo, incluya una nota que describa el defecto
y la fecha original en que se compró o se recibió como regalo.
Los productos fuera de garantía se repararán aplicando nuestros
cargos de reparación estándar.
Esta garantía no cubre los productos dañados por las siguientes
causas:
1. Modificación o reparación efectuada por otra persona que
no pertenezca a Wahl Clipper Corporation ni a un centro de
servicio autorizado por Wahl;
2. Uso comercial (no de consumidor) o no razonable.
Esta garantía le otorga derechos legales específicos y usted
también puede tener otros derechos que varían en cada estado.
No se otorga ninguna otra garantía explícita por escrito. No
se asume responsabilidad alguna por daños indirectos o
consecuentes de cualquier tipo, ni por el uso de accesorios no
autorizados. Algunos estados pueden prohibir la exclusión o la
limitación de daños indirectos o consecuentes, de modo que esta
limitación puede no aplicarse a su caso. Garantía sólo válida en
EE. UU. Fuera de EE. UU., consulte en la tienda sobre la garantía
del distribuidor autorizado de Wahl.