Loading ...
Loading ...
Loading ...
www.factorybuysdirect.com
13200372-01A
INSTALLATION
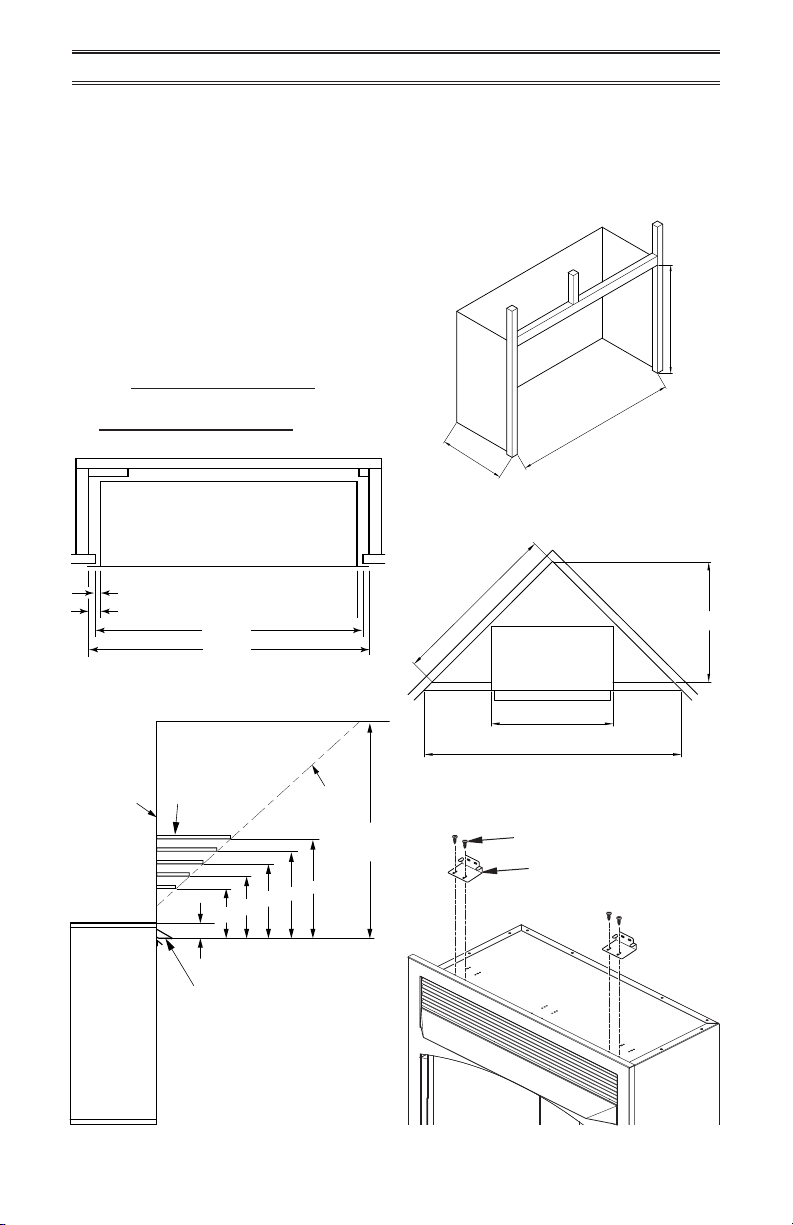
Figure 9 - Rough Opening for Corner
Installation
Figure 10 - Installing Standoff Brackets
27
5
/
8
"
26
7
/
8
"
37
3
/
4
"
53
3
/
8
"
Figure 8 - Rough Opening for Wall
Installation
Figure 6 - Clearance to Combustibles
Figure 7 - Fireplace Clearances
3/4" Clearance to Facia
Note: Height of fireplace opening on facia to be 29"
3/4
" Clearance to Sides, Back and Top
27
5
/
8
"
28
7
/
8
"
Bottom Edge
of Vent Hood
Fireplace
2
1
/
2
"
4"
6"
8"
10"
12"
10"
Note: All vertical measurements
are from lower edge of vent
hood to bottom of mantel shelf.
42" to
Ceiling
Safe
Zone
1.0 Slope
Factor
Wall
Surface
Mantel
Shelf
14"
16"
18"
2"
27
5
/
8
"
29"
14
1
/
4
"
1. Frame in rough opening. Use dimensions
shown in Figure 7 for the rough opening.
If installing in a corner, use dimensions
shown in Figure 9, for the rough opening.
The height is 23
1
/
4
", which is the same as
the wall opening above.
2. Locate standoff brackets in the hardware
bag. Remove screws from the top of the
rebox. Install brackets with screws as
shown in Figure 10.
3. Carefully set replace in front of rough
opening with back of replace inside wall
opening.
4. Attach gas line to replace gas regulator.
See Connecting to Gas Supply, page 14.
5. Check all gas connections for leaks. See
Checking Gas Connections, page 16.
IMPORTANT: When nishing your rebox,
combustible materials such as wall board,
gypsum board, sheet rock, drywall, plywood,
etc, must have 1/2" clearance to the sides
and top of the rebox. Combustible materials
should never overlap the rebox front.
Screws
Standoff Bracket
Loading ...
Loading ...
Loading ...