final page size: 8.5 x 5.5 in CRAFTSMAN
Digital Refrigerator &
Freezer Thermometer
CMXWDCR00514
INSTRUCTION MANUAL
IF YOU HAVE QUESTIONS OR COMMENTS, CONTACT US.
1-888-331-4569 WWW.CRAFTSMAN.COM
Definitions: Safety Alert Symbols and Words
This instruction manual uses the following safety alert symbols and words to alert you to hazardous situations and your risk
of personal injury or property damage.
DANGER: Indicates an imminently hazardous situation which, if not avoided, will result in death or seriousinjury.
WARNING: Indicates a potentially hazardous situation which, if not avoided, could result in death or seriousinjury.
CAUTION: Indicates a potentially hazardous situation which, if not avoided, may result in minor or moderateinjury.
(Used without word) Indicates a safety related message.
NOTICE: Indicates a practice not related to personal injury which, if not avoided, may result in propertydamage.
Read all safety warnings and all instructions before operating devices.
Compare the illustrations with the devices to familiarize yourself with the supplied components and setup instructions.
SAVE ALL WARNINGS AND INSTRUCTIONS FOR FUTURE REFERENCE

1
English (original instructions)
LangRef_U_NA_U_U-ENG
WARNING: GENERAL SAFETY
• Do not immerse device in water. This can cause electrical shock and damage the product.
• Intended for indoor use only.
• Do not disassemble device or tamper with internal components. Damage caused by disassembly is not covered
by the warranty. No user-serviceable parts are inside these devices.
• Avoid dropping device; this may damage internal components.
• Keep all parts and batteries out of the reach of children.
• Magnets are not toys. If magnet(s) separate from Indoor Display, discontinue use and contact us for repair or replacement.
Keep magnets out of reach of children. If swallowed, get immediate medical attention.
WARNING: BATTERY SAFETY AND DISPOSAL BATTERY SAFETY
WARNING: MAINTENANCE AND CARE
• Clean devices with a soft, damp cloth. Do not use caustic cleaners or abrasives.
• Keep Display away from dust, dirt, and moisture. Clean ventilation ports regularly with a gentle puff of air.
• Replace device batteries when low battery icon is shown. Follow all battery recommendations, disposal, and safety
information detailed in this guide.
BATTERY SAFETY
Clean the battery contacts and also those of the device prior to
battery installation. Remove batteries from device which is not
to be used for an extended period of time. Replace all batteries of
a set at the same time. Only batteries of the same or equivalent
type as recommended are to be used. Ensure the batteries are
installed with correct polarity (+ and -). Promptly remove dead
or expired batteries.
CAUTION: DO NOT mix old and new batteries or batteries
of different types. DO NOT use rechargeable batteries. DO
NOT recharge non-rechargeable batteries. DO NOT short-
circuit the supply terminals.
WARNING: DO NOT incinerate used batteries.
DO NOT dispose of batteries in fire, because they
could explode or leak.
BATTERY DISPOSAL
Dispose of old or defective batteries in an environmentally
safe way and in accordance with your local laws
and regulations.
2
8
11
9
10
5
12
13
14
6
5
4
3
7
2
1
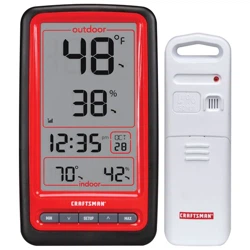
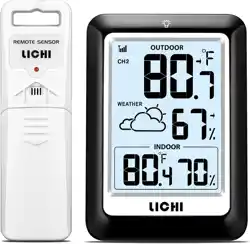
KNOW YOUR THERMOMETER
Never open your fridge to spoiled food again by monitoring the internal temperature of your refrigerator and freezer with this
CRAFTSMAN Brushed Stainless Steel Digital Refrigerator & Freezer Thermometer. Mount the sensors inside the refrigerator or freezer
and set an audible alert on the display so that you can quickly make adjustments when temperatures begin to rise or fall.
Digital Refrigerator & Freezer Thermometer
CMXWDCR00514
FRONT OF DISPLAY
1
^
& Buttons
• For setup preferences and to view all-time records
2
SET Button
• For alarm setup preferences
3
Freezer Sensor Signal Strength
4
Freezer Sensor Low Battery Indicator
5
Wireless Signal Indicators
• Flashes when sensor has lost signal from display
6
Alarm ON Indicator
7
Min/Max Records
• Highest and lowest temperatures from the past 24
hours
8
Freezer Sensor Current Temperature
9
& Buttons
• For alarm and records settings
10
Refrigerator Sensor Current Temperature
11
Display Low Battery Indicator
12
Refrigerator Sensor Low Battery Indicator
13
Refrigerator Sensor Signal Strength
14
Button
• For alarm setup preferences
3
BACK OF DISPLAY
1
Fold-out Stand
2
Battery Compartment
3
°C/°F Button
• Select between degrees Celsius or
Fahrenheit
4
Integrated Keyhole Hanger
5
Magnet Mount
6
A-B-C Switch
• ID code that must match sensor's A-B-C
switch to ensure units synchronize
7
Battery Compartment Cover
3
1
55
4
62 7
1
4
5
3
6
2
4
5
3
6
WIRELESS REFRIGERATOR/FREEZER SENSOR FEATURES
1
Refrigerator Sensor
2
Freezer Sensor
3
Suction Cup / Shelf Clip
• For versatile mounting options
4
A-B-C Switch
• ID code that must match display's A-B-C switch to
ensure units synchronize
5
Battery Compartment
6
Wireless Signal Indicator
• Flashes when data is being sent to the display
4
HOW TO SET UP YOUR THERMOMETER
Setup Requires:
• Display
• Wireless Sensors (2)
• Instruction Manual
What You'll Need (Not Included)
• (7) AA batteries) for the Display and Wireless Sensors
Be sure to use high-quality alkaline batteries. Heavy duty or rechargeable batteries are not recommended. The freezer
sensor requires lithium batteries for low temperature conditions. Cold temperatures can cause alkaline batteries to
function improperly. Use lithium batteries in the freezer sensor for temperatures below -4ºF / -20ºC.
STEP 2
Set A-B-C switch to match display. Insert
wireless sensor batteries.
STEP 1
Set A-B-C switch to match wireless
sensors. Insert display batteries and
select degrees Fahrenheit or Celsius.
To select between degrees Fahrenheit (ºF) or Celsius (ºC)
temperature units, press and release the “ºC/ºF” button,
located on the back of the thermometer display.
STEP 3
Display Placement
Place display in a dry area free of dirt and dust. Display is magnet mountable and has a fold-out stand for tabletop use. For
wall mounting, hang using the keyhole located on the back of the unit.
Sensor Placement
• Both sensors will work in either the refrigerator or freezer, however the default alerts are set based on the sensor's
indicated use (see page 5).
• Each sensor is equipped with a silicon band to securely attach to a wire shelf.
• Each sensor also includes a detachable suction cup that can be used to attach the sensor to the interior surface of the
refrigerator. Please note: suction cups do not adhere well to freezing surfaces.
• Display and sensors must be located within 75 ft (23 m) of each other.
5
USING THE THERMOMETER DISPLAY
STEP 4
High & Low Records
The thermometer displays high and low temperature
records for all-time and the past 24 hours (rolling). All-
time records reflect the highest and lowest temperatures
recorded since the batteries were inserted or the records
have been cleared. High and low records for the past 24
hours are shown on the display, by default.
Press and the release the “
^
” or “ ” button to view all-time
records. If no buttons are pressed for 5 seconds, the display
will return to normal operation mode.
To clear the high records, press and hold the “
^
” button
for 5 seconds while viewing the record you wish to clear. To
clear the low records, press and hold the “ ” button for 5
seconds while viewing the records you wish to clear. Dashes
display to confirm you have cleared the record(s).
Note:
When thermometer is in normal operating mode (not in alarm
setup mode), the min/max readings display the highest/
lowest temperatures from the previous 24 hours.
Programmable Alarms
Programmable alarms notify you audibly and visually
when temperatures exceed your preset minimum /
maximum temperature range. An alert is triggered when a
temperature is out of range for longer than 5 minutes. This
prevents false alarms due to the fridge/freezer door being
held open while new items are being loaded/unloaded.
To enable alerts for both sensors, press and hold the
“
” button for 5 seconds until “ ” is shown next to the
current temperatures.
To enable alerts for a select sensor, press the “
” or
“ ” button first, then press the “ ” button once to
enable alarm. Disable the alarms at any time by following
the same steps until “
” is shown next to the current
temperature. The default temperature alarm settings for the
refrigerator thermometer are minimum 33ºF / maximum
40ºF. The default temperature alarm settings the freezer
thermometer are minimum -20ºF / maximum 32ºF.
Setup an Alarm
1. Select the sensor you want to customize by pressing the
“
” or “ ” button.
2. Press and release the “SET” button; the minimum
temperature alarm setting will blink.
3. Press the “
^
” or “ ” button to increase or decrease the
minimum temperature alarm setting.
4. Press the “SET” button to confirm the minimum
temperature alarm setting.
5. Press the “
^
” or “ ” button to increase or decrease the
maximum temperature alarm setting.
6. Press the “SET” button to confirm the maximum
temperature alarm setting.
6
PROBLEM CORRECTION
Temperature is showing
dashes
• Relocate the display and/or the sensors.
• The units must be within 75 ft (23 m) of each other.
• Flashing of the temperature is generally an indication of wireless interference. Perform a hard reset to gain a strong
connection between the units:
1. Bring all 3 units together, side-by-side.
2. Remove all batteries from all 3 units.
3. Reinstall batteries in thermometer display first.
4. Reinstall batteries into sensor #1.
5. Reinstall batteries into sensor #2.
6. The display should read temperatures from both sensors almost instantly.
Inaccurate temperature Use standard alkaline batteries (or lithium batteries in sensor when temperature is below -4ºF/-20ºC). Do not use heavy
duty or rechargeable batteries.
Display screen not
working
• Check that the batteries are installed correctly. Batteries may need to be replaced.
• Verify you're within the measurable temperature range (32º F to 122º F; 0°C to 50°C).
TROUBLESHOOTING

7
SPECIFICATIONS
Temperature range
Sensor: -40ºF to 100ºF; -40ºC to 37ºC
Display Operation: 32º F to 122º F; 0°C to 50°C
Wireless range 75ft / 23m depending on sensor location and may vary
Operating frequency 433 MHz
Power
Display: 3 x AA alkaline or lithium batteries
Sensor: 2 x AA alkaline or lithium batteries each
Data Reporting 60 second updates
REGISTER ONLINE
Thank you for your purchase. Register your product nowfor:
• WARRANTY SERVICE: Registering your product will help you obtain more efficient warranty service in case there is a
problem with yourproduct.
• CONFIRMATION OF OWNERSHIP: In case of an insurance loss, such as fire, flood or theft, your registration of
ownership will serve as your proof ofpurchase.
• YOUR SAFETY: Registering your product will allow us to contact you in the unlikely event a safety notification is
required under the Federal Consumer SafetyAct.
Register online at www.craftsman.com/registration

8
FCC Radio Frequency Interference
This equipment has been tested and found to comply
with the limits for a Class B digital device, pursuant to Part
15 of the FCC Rules. These limits are designed to provide
reasonable protection against harmful interference in a
residential installation.
This equipment generates, uses and can radiate radio
frequency energy and, if not installed and used in
accordance with the instructions, may cause harmful
interference to radio communications. However, there
is no guarantee that interference will not occur in a
particular installation. If this equipment does cause
harmful interference to radio or television reception,
which can be determined by turning the equipment
off and on, the user is encouraged to try to correct the
interference by one or more of the following measures:
• Reorient or relocate the receiver’s antenna.
• Increase the distance between the equipment
and the receiver.
• Connect the equipment to an outlet on a circuit
different from that to which the receiver is connected.
• Consult the dealer or an experienced radio/TV
technician for help.
To assure continued appliance, any changes or
modifications not expressly approved by the party
responsible for compliance could voice the user's
authority to operate this equipment. (Example -use only
shielded interface cables when connecting to computer or
peripheral devices).
FCC Warning
Any Changes or modifications not expressly approved by
the party responsible for compliance could void the user's
authority to operate the equipment.
Note: This equipment has been tested and found to
comply with the limits for a Class B digital device, pursuant
to part 15 of the FCC Rules. These limits are designed
to provide reasonable protection against harmful
interference in a residential installation. This equipment
generates uses and can radiate radio frequency energy
and, if not installed and used in accordance with the
instructions, may cause harmful interference to radio
communications. However, there is no guarantee that
interference will not occur in a particular installation. If this
equipment does cause harmful interference to radio or
television reception, which can be determined by turning
the equipment off and on, the user is encouraged to try to
correct the interference by one or more of the following
measures:
• Reorient or relocate the receiving antenna.
• Increase the separation between the equipment
and receiver.
• Connect the equipment into an outlet on a circuit
different from that to which the receiver is connected.
• Consult the dealer or an experienced radio/TV
technician for help.
This equipment complies with FCC radiation exposure
limits set forth for an uncontrolled environment. This
equipment should be installed and operated with
minimum distance 20cm between the radiator and
your body.
REGULATORY INFORMATION

9
One-Year Limited Warranty
The Manufacturer will repair or replace, without charge, any
defects due to faulty materials or workmanship for one year
from the date of purchase. This warranty does not cover
part failure due to normal wear or tool abuse. For further
detail of warranty coverage and warranty repair information,
visit www.craftsman.com or call 1-888-331-4569. This
warranty does not apply to accessories or damage caused
where repairs have been made or attempted by others.
THIS LIMITED WARRANTY IS GIVEN IN LIEU OF ALL OTHERS,
INCLUDING THE IMPLIED WARRANTY OF MERCHANTABILITY
AND FITNESS FOR A PARTICULAR PURPOSE, AND EXCLUDES
ALL INCIDENTAL OR CONSEQUENTIAL DAMAGES. Some
states do not allow limitations on how long an implied
warranty lasts or the exclusion or limitation of incidental
or consequential damages, so these limitations may not
apply to you. This warranty gives you specific legal rights
and you may have other rights which vary in certain states
or provinces.
90-DAY MONEY BACK GUARANTEE
If you are not completely satisfied with the performance
of your Digital Refrigerator & Freezer Thermometer for any
reason, you can return it within 90 days from the date of
purchase with a receipt for a full refund – no questions
asked.
LATIN AMERICA: This warranty does not apply to products
sold in Latin America. For products sold in Latin America,
see country specific warranty information contained in
the packaging, call the local company or see website for
warranty information.
CRAFTSMAN®
is a registered trademark of Stanley Black & Decker, Inc., used under license.
© 2021 CRAFTSMAN
Product Manufactured by:
Chaney Instrument Company
Lake Geneva, WI 53147
U.S. & Canada Only
7/09 CMXWDCR00514