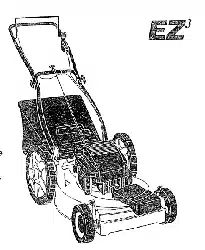
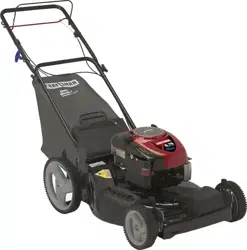
Operator's Manual
CRRF[SM ®
19-inch Rechargeable
Rotary Mower
Model No. 247.370480
CAUTION: Before using
this product, read this
manual and follow aJl
safety rules and operating
instructions.
,, SAFETY
* ASSEMBLY
* OPERATION
* MAINTENANCE
* PARTS LIST
* ESPANOL R 22
o his symbol on the product's nameplatemeans it is listed by
LISTEDUNDERWRITERSLABORATORIESINC,
Sears, Roebuck and Co., Hoffman Estates, IL 60179, U.S.A.
Visit our web site: www.craftsman.com FORMNO.769-04644A
January11,2010
WarrantyStatement..........................................................2
Safetyinstructions............................................................3
SafetyLabels....................................................................6
SlopeGuide.......................................................................7
Assembly...........................................................................8
Operation........................................................................10
Craftsman TwoYear Limited Warranty
Ifthis Craftsmanproductfailsdueto a defectinmaterialor workmanshipwithintwo yearsfrom thedateof purchase,returnitto any Searsstore,
SearsServiceCenter,or other Craftsmanoutletin the UnitedStatesfor free repair.
Thiswarrantydoesnot include:
• Expendableitemswhichcan wearout from normaluse withinthe warrantyperiod,suchas the grassbagandrotarymowerblade.
Repairsnecessarybecauseof operatorabuseor negligence,includingbentmotorshafts andthefailureto operateor maintainthe
equipmentaccordingto all suppliedinstructions.
Thiswarrantyappliesforonly 90 days ifthis productiseverusedfor commercialor rentalpurposes.
Thiswarrantyappliesonly whilethisproductis usedinthe UnitedStates.
Thiswarrantygivesyou specificlegal rights,and you mayalso haveotherrightswhich vary from stateto state.
Sears, Roebuck and Co., Hoffman Estates, IL 60179
Battery: 12Volt
Motor: 48Volt DC
Model Number
Serial Number
Dateof Purchase
Recordthe modelnumber,serialnumber,
anddateof purchaseabove.
© Sears Brands,LLC
2
Thissymbolpointsout importantsafetyinstructions
which,if not followed,couldendangerthe personal
safetyand/or propertyof yourselfandothers.Read
andfollowall instructionsin thismanualbefore
attemptingto operatethis machine.Failureto complywith these
instructionsmay resultin personalinjury.Whenyou seethissymbol,
HEEDITSWARNING!
Your Responsibility: Restrictthe useof this powermachineto
personswhoread,understand,and followthe warningsand instruc-
tionsinthis manualandonthe machine.
Thismachinewasbuiltto beoperatedaccordingto the rulesfor
safeoperationinthis manual.As with anytypeof powerequipment,
carelessnessor error on the partof the operatorcan resultin serious
injury.Thismachineis capableof amputatinghandsandfeetand
throwingobjects.Failureto observethefollowingsafetyinstructions
could resultin seriousinjury ordeath.
Whenusingelectriclawnmowers,basicsafetyprecautionsshould
alwaysbe followedto reducethe riskof fire, electricshock,and
personalinjury.Thesebasicprecautionsincludethe following:
Children
Tragicaccidentscanoccur if operatoris not alert to presenceof children.Chil-
dren areoften attractedto mowerandmowingactivity.Theydo notunderstand
thedangers.Neverassumethat childrenwillremainwhereyou lastsawthem.
,, Keepchildren out of the mowingarea and underwatchfulcare of a
responsibleadult otherthanthe operator.
,, Be alert andturn moweroff if a child entersthe area.
Beforeandwhile movingbackwards,look behindanddown for small
children.
,, Use extremecare when approachingblind corners,doorways,shrubs,
trees, orotherobjectsthat mayobscureyourvisionof a childwho may
run into the mower.
Neverallow childrenunder 14yearsold to operatea power mower.
Children14years old and overshouldread and understandoperation
instructionsand safetyrulesin this manualand shouldbe trainedand
supervisedbya parent.
Operation
General Operation:
,, Readthis operator'smanual carefullyin its entiretybefore attempting
to assemblethis machine.Read,understand,andfollow all instructions
on the machineand inthe manual(s) beforeoperation.Be completely
familiarwith the controlsand the properuse of this machinebefore
operatingit. Keepthis manualin a safe placeforfuture andregular
referenceand for orderingreplacementparts.
,, This machineis a precision pieceof powerequipment,not a plaything.
Therefore,exerciseextremecautionat all times.Your unit has been
designedto performonejob: to mowgrass. Do notuse it for anyother
purpose.
,, Don'tforce lawn mower- it willdo the job betterandsafer at the ratefor
whichit wasdesigned.
,, Neverallow childrenunder 14yearsold to operatethis machine.
Children14years old and overshouldread and understandthe instruc-
tions inthis manualand shouldbe trainedandsupervisedby a parent.
Onlyresponsibleindividualswho arefamiliar withthese rulesof safe
operationshouldbe allowedto usethis machine.
,, Thoroughlyinspectthearea wherethe equipmentis to be used.Remove
all stones,sticks,wire, bones,toys andother foreign objectswhich could
betripped overor pickedup andthrown bythe blade.Thrownobjects
can causeserious personalinjury.Planyour mowingpatternto avoid
dischargeof materialtowardroads,sidewalks,bystandersand the like.
Also, avoid dischargingmaterialagainsta wall or obstructionwhichmay
causedischargedmaterialto ricochet backtoward theoperator.
,, To helpavoid bladecontactor a thrownobject injury,stay in operator
zone behindhandlesand keepchildren,bystanders,helpersand petsat
least75 feet from mowerwhile itis inoperation.Stopmachine if anyone
entersarea.
,, Alwayswearsafetyglassesor safetygoggles duringoperationand while
performingan adjustmentor repairto protectyoureyes. Thrownobjects
which ricochetcan causeserious injuryto the eyes.
,, Wear sturdy,rough-soledworkshoesandclose-fittingslacksandshirts.
Shirts and pantsthat coverthe armsand legs andsteel-toedshoes
are recommended.Neveroperatethis machinein barefeet, sandals,
slipperyor light weight(e.g.canvas)shoes.
,, Donot puthandsor feetnear rotating partsor undercutting deck.
Contactwith bladecan amputatehandsandfeet.
,, A missingor damageddischargecover can causebladecontact or
thrown objectinjuries.
,, Manyinjuriesoccur as a resultof the mower beingpulledoverthefoot
duringa fall causedby slippingor tripping.Do notholdon to the mowerif
you are falling; releasethe handleimmediately.
,, Neverpull the mowerbacktoward you whileyou are walking.If you must
backthe mowerawayfrom a wall or obstructionfirst look downand
behindto avoidtrippingandthenfollow thesesteps:
,, Step backfrom mowerto fullyextend your arms.
,, Be sure you are well balancedwith surefooting.
,, Pullthe mowerbackslowly, no morethan half waytowardyou.
,, Repeatthese stepsas needed.
,, Donot operatethe mowerwhile underthe influenceof alcoholordrugs.
,, Stay alert- Watch whatyou are doing. Usecommonsense.Do not
operatelawnmowerwhenyou are tired.
3
• The motor/bladecontrolhandleis a safetydevice.Neverattemptto
bypassits operation.Doingso makesthe safety device inoperativeand
mayresultin personalinjurythroughcontactwiththe rotatingblade.The
motor/bladecontrolhandlemustoperate easilyin bothdirectionsand
automaticallyreturnto the disengagedpositionwhen released.
• Do not chargethe mower in rain,or inwet conditions.
• Neveroperatethe mowerin rainor wetgrass. Alwaysbe sureof your
footing. A slip andfall can causeserious personalinjury. Ifyou feel
you are losingyourfooting,release the motor/bladecontrolhandle
immediatelyandthe bladewill stop rotatingwithinthree seconds.
• Mow only indaylightor goodartificial light.Walk, never run.
• Stopthe bladewhencrossinggraveldrives,walks or roads.
• If the equipmentshould startto vibrateabnormally,stopthe motorand
check immediatelyfor the cause.Vibrationis generallya warningof
trouble.
• Shutthe motoroff and waituntil the bladecomesto a completestop
beforeremovingthe grass catcheror uncloggingthe chute.The cutting
bladecontinuesto rotatefora few secondsafter the motoris shutoff.
Neverplaceany part of the bodyinthe bladearea untilyou are surethe
bladehas stoppedrotating.
• Neveroperatemowerwithoutproper trailingshield, dischargecover,
grasscatcher,motor/bladecontrolhandleor othersafetyprotective
devicesinplaceand working.Neveroperatemowerwithdamaged
safetydevices.Failureto do so, can resultin personalinjury.
• Only use partsand accessoriesmadefor this machineby manufacturer.
Failureto do so can result in personalinjury.
• If situationsoccurwhich are not coveredinthis manual,use careand
goodjudgment. ContactyourSears ServiceCenterfor assistance.
Slope Operation:
Slopesare a major factorrelatedto slip andfall accidentswhichcan resultin
severeinjury.Operationon slopesrequiresextracaution.Ifyou feel uneasyon
a slope,donotmowit.For yoursafety,usethe slopegaugeincludedas part
of this manualto measureslopesbeforeoperatingthis unit on a slopedor hilly
area.If theslopeis greaterthan 15 degrees,do not mowit.
Do:
• Mow acrossthe faceof slopes; neverup anddown. Exerciseextreme
cautionwhen changingdirectionon slopes.
• Watchfor holes,ruts,rocks, hiddenobjects,or bumpswhich can cause
youto slip or trip.Tall grasscan hide obstacles.
• Alwaysbe sureof your footing.A slip andfall can causeseriouspersonal
injury.If you feel you are losingyour balance,releasethe motor/blade
control handleimmediately,andthe bladewill stoprotatingwithinthree
(3) seconds.
Do Not:
• Do not mow neardrop-offs, ditchesorembankments,youcould lose
yourfooting or balance.
• Do not mow slopesgreaterthan 15degrees asshown on the slope
gauge.
Service
• Ifthe mower'sbuilt-inoverloadprotectionswitchfrequentlytrips, contact
your nearestSearsService Centerfor repair.
• Removekeyand store idlelawn mowerindoorswhennot in use. Allow
motorto cool beforestoringin any inclosure.Lawnmowershould be
storedindoorsin a dry,high,or locked-upplace,outof reachof children.
• When servicinguse only identicalreplacementparts listed in this
manual."Use of parts whichdo not meet the original equipmentspecifi-
cationsmayleadto improperperformanceandcompromisesafety!"
• Beforecleaning, repairing,or inspecting,makecertainthe blade and
all movingparts havestopped.Removethe keyto preventaccidental
starting.
• Removekey beforeservicing, cleaning,or removingmaterialfrom the
lawn mower.
• Followinstructionsfor lubricatingand changingaccessories.
• Keep handlesdry,cleanand free from oil and grease.
• To reducea fire hazard,keepthe motorcoverfree of grass, leavesand
debris build-up.
• Checkthe bladeand motormountingbolts at frequentintervals
for propertightness.Also,visually inspectbladefordamage (e.g.,
bent, cracked,and worn). Replacebladewiththe originalequipment
manufacturer's(OEM)bladeonly, listed inthis manual.
• Maintainyourmowerwith care-- Keepmowerbladesharp andclean for
best andsafestperformance.Mowerbladesare sharpand can cut, wrap
the bladeor wearglovesand use extra cautionwhen servicingthem.
• Keep all nuts, bolts,and screwstightto be surethe equipmentis in safe
workingcondition.
• Nevertamperwith safetydevices.Checktheir properoperationregularly.
• Neverattemptto makewheel or cuttingheight adjustmentswhilethe
motor is running.
• After strikinga foreignobject, stopthe motor,removethe key,and
thoroughlyinspectthe mowerfor any damage.Repairthedamage
beforeoperatingthe mower.
• Grasscatchercomponents,dischargecover,andtrailingshield are
subjectto wearanddamagewhich couldexpose movingparts orallow
objectsto be thrown.Forsafety protection,frequentlycheckcomponents
and replaceimmediatelywith originalequipmentmanufacturer's(OEM)
parts only, listedin this manual.
SAVE THESE INSTRUCTIONS!
• Do not mow on wetgrass. Unstablefooting couldcauseslipping.
4
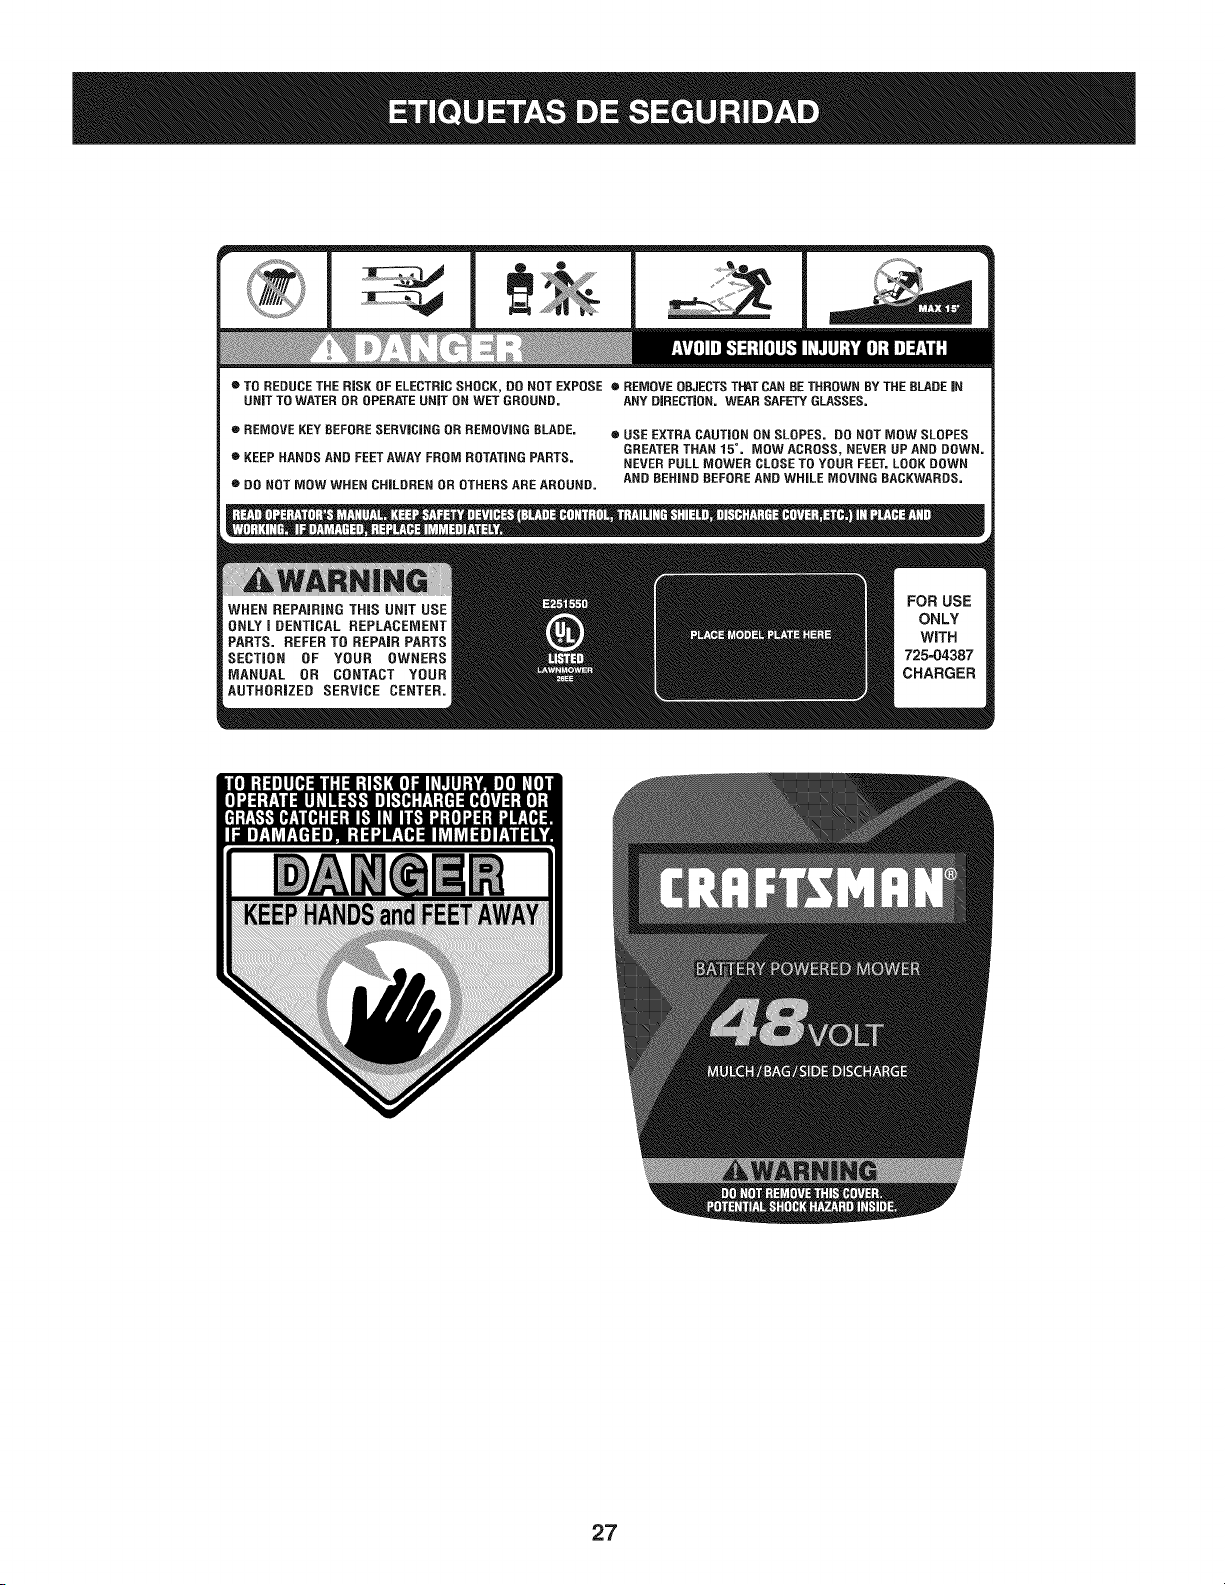
SAFETY SYMBOLS
Thispagedepictsand describessafety symbolsthatmayappearonthis product. Read,understand,and follow all instructionson the machine
beforeattemptingto assembleand operate.
-" "- READ THE OPERATOR'S MANUAL(S)
Read,understand,and followall instructionsinthe manual(s)beforeattemptingto assembleand
_ operate
DANGER m ROTATING BLADES
To reducethe riskof injury,keephandsand feet away.Donotoperateunlessdischargecoveror grass
catcheris in itsproperplace.Ifdamaged,replaceimmediately.
, Donot mowwhenchildrenorothersarearound.
_J DANGER -- HAND/FOOT CUT
_._ Keephandsand feetawayfromrotatingparts.
/_:_,,-_ _ DANGER m THROWN DEBRIS
DANGER _ SLOPESUseextracautiononslopes.Do not mowslopesgreaterthan 15°.
WARNING_ ELECTRICAL SHOCK
Donot operatethe mowerin the rain.
05
(!3
oo
c
o
o
E
c
CD
0
"5
c
0
cb
g3
o
c
o5
E
o
q3
q3
o
cb
c
E
CD
q3
o5
(D
o5
Do notmowoninclineswitha slopein excessof 15degrees(a riseof approximately2-1/2feet every 10feet).
OperateWALK-BEHINDmowersacrossthe faceof slopes,neverup and downslopes.
Sight and hold this level with a vertical tree...
15°
¢0

e TO REDUCETHE RiSK OF ELECTRIC SHOCK, DO NOT EXPOSE • REMOVE OBJECTSTHATCAN BE THROWN BY THE BLADEiN
UNiT TO WATER DR OPERATEUNiT ON WET GROUND. ANY DiRECTiON. WEAR SAFETY GLASSES,
e REMOVE KEY BEFORESERViCiNG OR REMOVING BLADE, • USE EXTRA CAUTION ON SLOPES, DO NOT MOW SLOPES
GREATERTHAN 15 °. MOW ACROSS, NEVER UP AND DOWN.
e KEEPHANDS AND FEETAWAY FROM ROTATING PARTS. NEVER PULL MOWER CLOSETO YOUR FEEr, LOOKDOWN
e DO NOT MOW WHEN CHILDREN OR OTHERS ARE AROUND. AND BEHIND BEFOREAND WHILE MOVING BACKWARDS,
7

iMPORTANT:Becertainto chargethe batteryfor at least14 hours
beforeoperatingyourmower.Referto Operationsection.
NOTE:Standbehindthe moweras if youweregoing to operateit.Your
righthand correspondsto the rightside of the mower;yourleft hand
correspondsto the left side of the mower.
LOOSE PARTS iN CARTON
Thefollowingitemsare packagedloosein thecarton:
Operator'sManual,GrassCatcher
REMOVING THE UNiT FROM THE CARTON
1. Cut the cornersof thecartonandlaythe sidesflaton the ground.
Removeall packinginserts.
2. Movethe mowerandgrasscatcheroutof the carton.
3. Makecertainthe cartonhas beencompletelyemptiedbefore
discardingit.
ASSEMBLING THE HANDLE
1. Removeany packingmaterialwhich may be betweenupperand
lowerhandles.
2. Looseneachhandknobfoundon theinsideof the upperhandle.
3. Gentlylift and pivotthe upperhandleintothe operatingposition
as shownin Figure1.
6. Tightenstar knobs securinglowerhandleto handle brackets.See
Figure2. Makecertain the lowerhandleis seatedsecurelyinto
the handlemountingbrackets.
f
Figure2
ATTACHING THE GRASS CATCHER
1. Lift rear dischargedoor.
2. Removemulchingbaffle.See Figure3.
J
Figure1
4. Removestar knobsfrom handlemountingbracketsand secure
the lowerhandleonto the handlebracketsby placingthe lower
holeof the lowerhandleontothe pinsof the handlebrackets.
5. Securethe upperhandleandlowerhandlebytighteningthe
handknobs. Eachcarriagebolt mustbe seatedproperlyintothe
squareholefoundin the plasticconnector.
Figure3
8
Placegrasscatcheronthe pivot rod.Let go of dischargedoor so
thatit restson the grasscatcher.See Figure4.
Figure4
Toremovethe grasscatcher,lift the reardischargedoor on the
mower.Liftthe grasscatcherup,off of the pivotrod.Releasethe rear
dischargedoor.
Neveroperatemowerunlessthe hookson the grasscatcherare
firmlyseatedon the pivotrodandthe rear dischargedoorrestsfirmly
againsttop of thegrass catcher.
CONVERTING TO SIDE DISCHARGE
Toconvertto sidedischarge,makesuregrass catcheris off of the unit.
Replacethe rearmulchingbaffleand closerear dischargedoor.To
dischargegrassto the side:
1. Lift mulchingplugonthe right sideof mower.
2. Slide two hooksof side dischargechuteunderthe hingepinon
the mulchingplug assemblyandlowerthe side mulchingplug.
SeeFigure5.
\4
...................................................................
NOTE:Donot removethe side mulchingplug at anytime,evenwhen
you are not mulching.
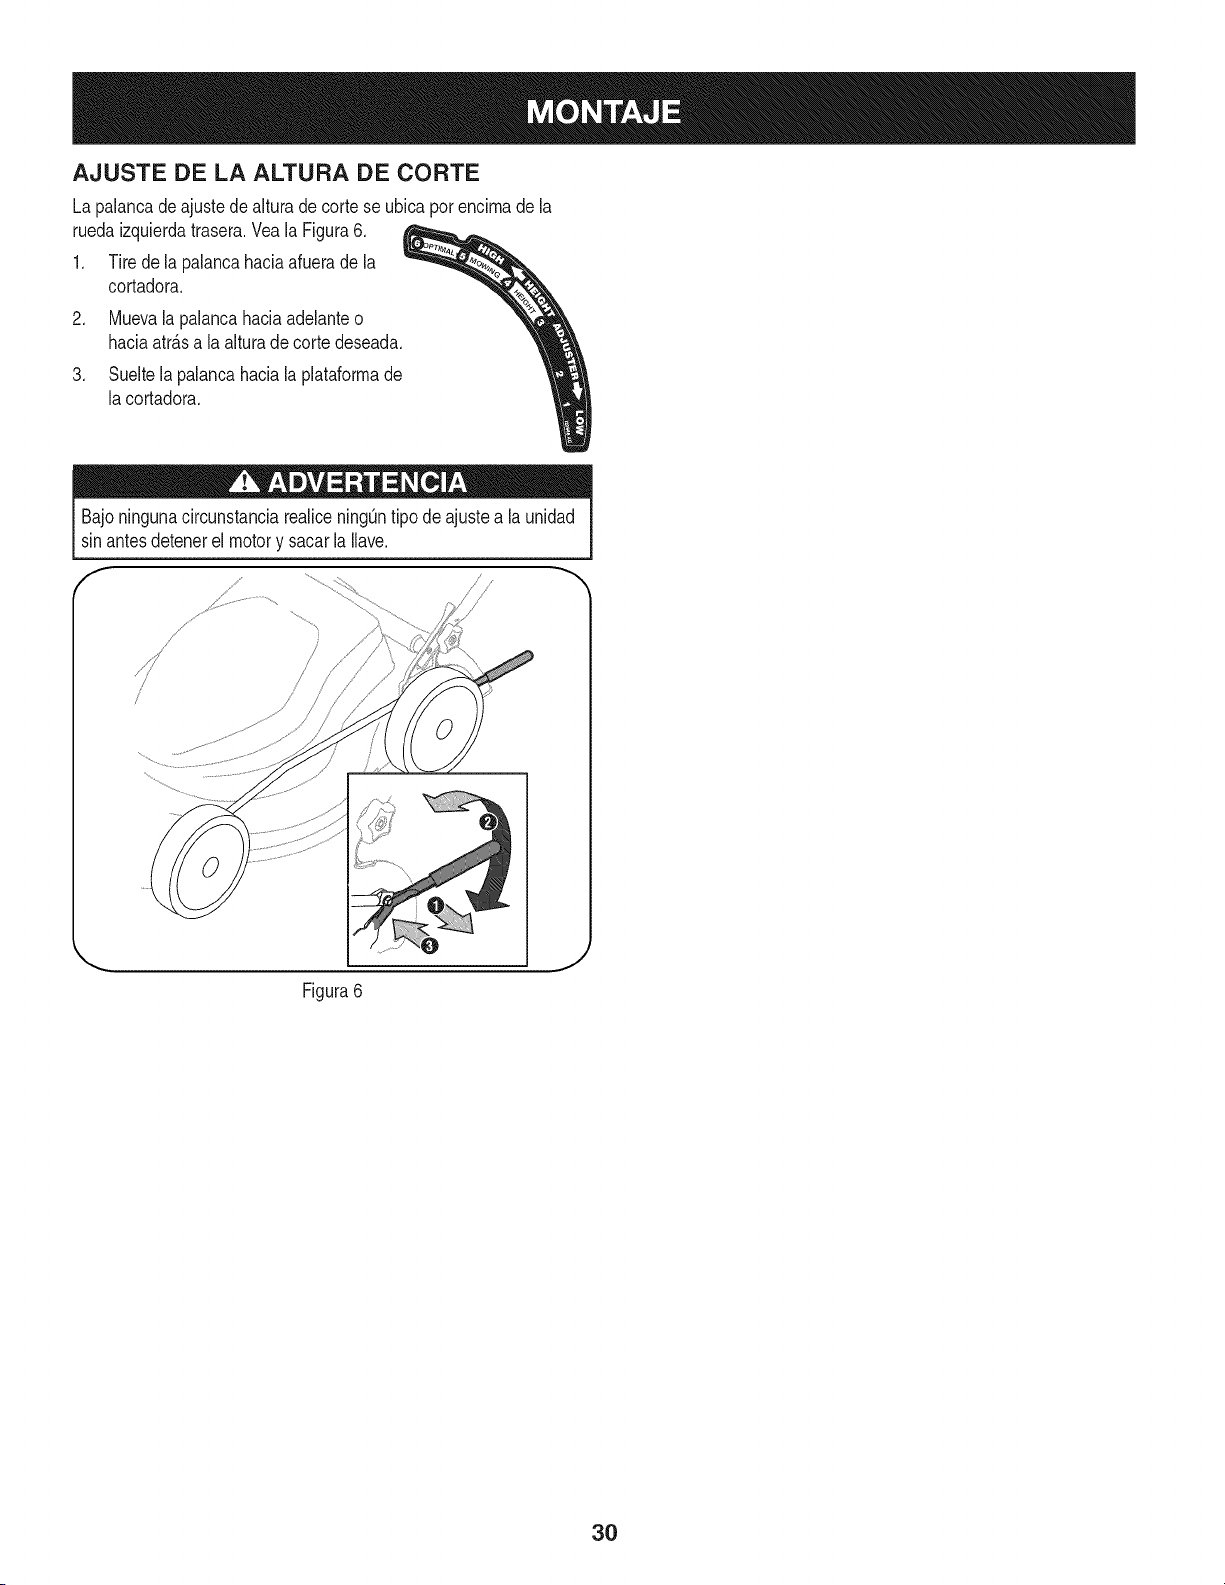
CUTTING HEIGHT ADJUSTMENT
The cuttingheightadjustmentleveris
locatedabovethe rearleftwheel.See
Figure6.
1. Pullthe leverout andawayfromthe
mower.
2. Movethe leverforwardor backfor
desiredcuttingheight.
3. Releaselevertowardsmowerdeck.
Do notat any timemakeanyadjustmentto lawnmowerwithoutfirst
stoppingmotorand removingkey.
J
Figure6
Figure5
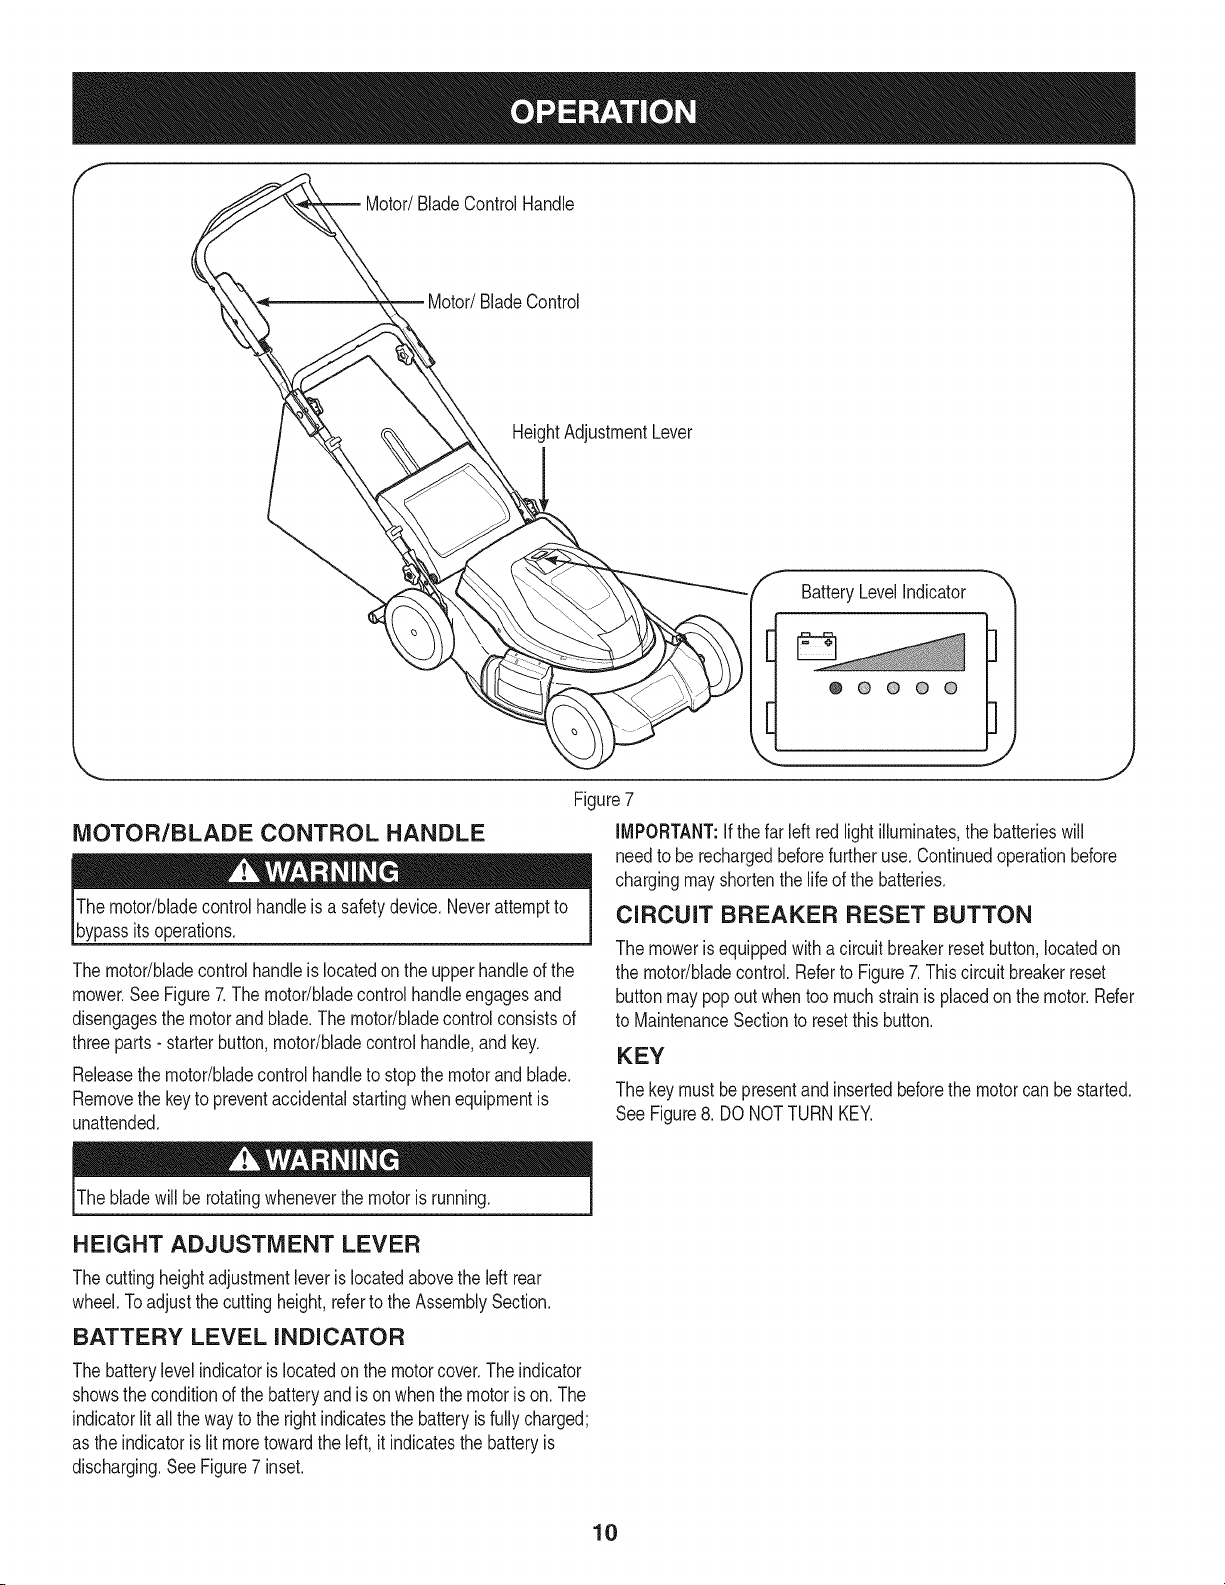
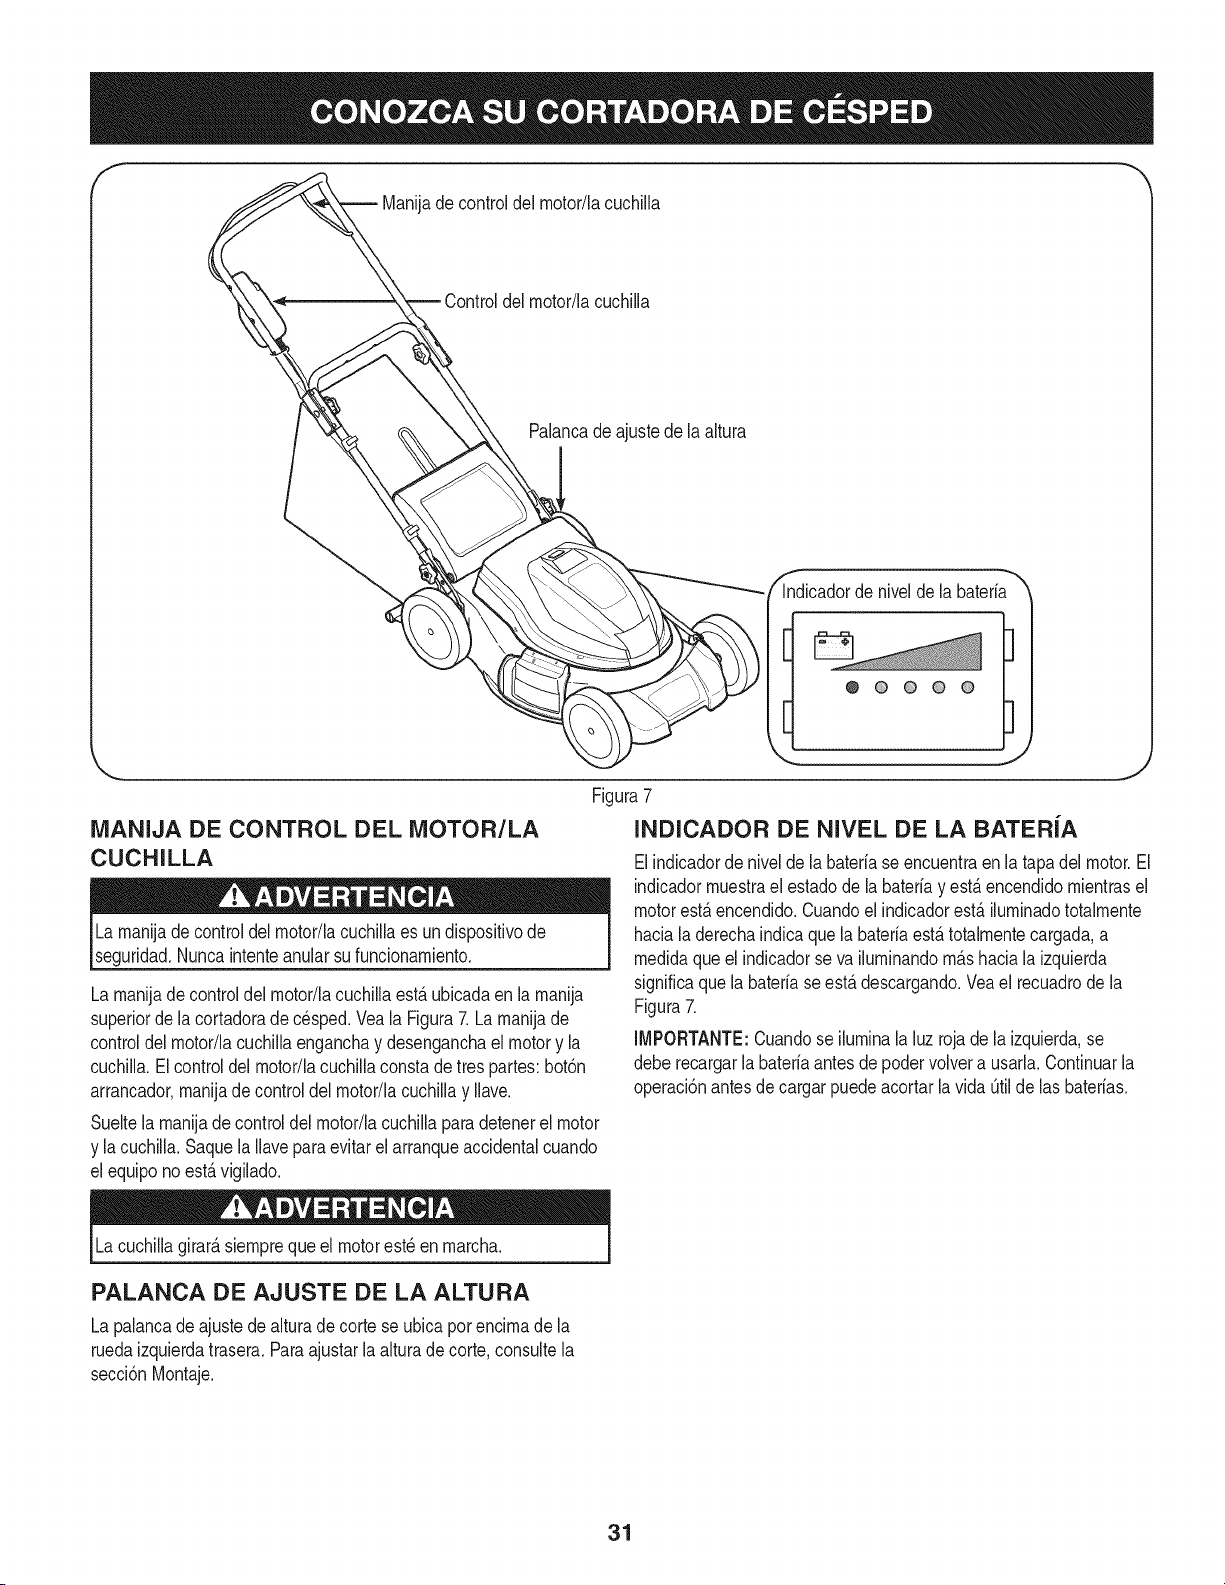
f
Motor/BladeControlHandle
BladeControl
HeightAdjustmentLever
I
BatteryLevelIndicator
@ @ @ @ @
l
Figure7
MOTOR/BLADE CONTROL HANDLE
Themotor/bladecontrolhandleis a safetydevice.Neverattemptto
bypassits operations.
The motor/bladecontrolhandleis locatedon the upperhandleof the
mower.SeeFigure7.The motor/bladecontrolhandleengagesand
disengagesthe motorand blade.The motor/bladecontrolconsistsof
threeparts- starterbutton,motor/bladecontrolhandle,andkey.
Releasethe motor/bladecontrolhandleto stopthe motorandblade.
Removethe keyto preventaccidentalstartingwhenequipmentis
unattended.
IMPORTANT:if the far left red light illuminates,the batterieswill
needto be rechargedbeforefurtheruse. Continuedoperationbefore
chargingmayshortenthe lifeof the batteries.
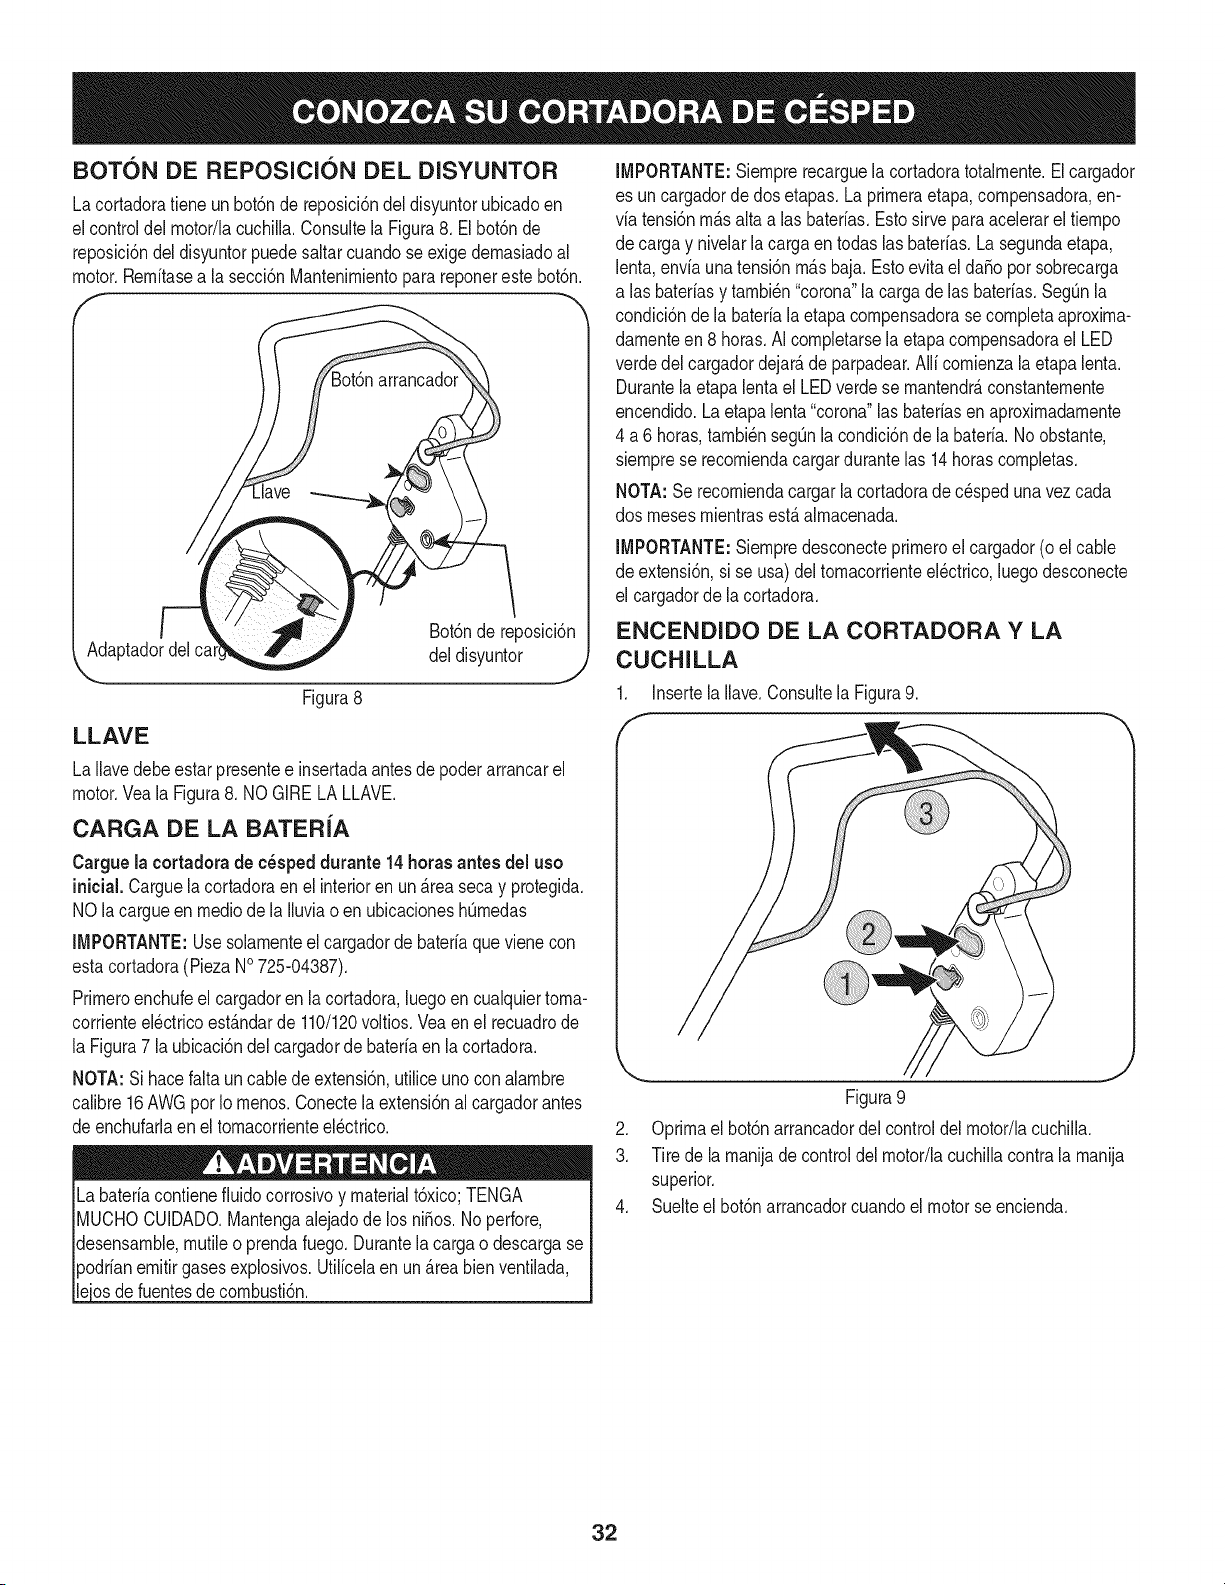
CIRCUIT BREAKER RESET BUTTON
The moweris equippedwitha circuitbreakerresetbutton,locatedon
the motor/bladecontrol.Referto Figure7.Thiscircuitbreakerreset
buttonmaypopout whentoo much strainis placedon the motor.Refer
to MaintenanceSectionto resetthisbutton.
KEY
The key mustbepresentandinsertedbeforethe motorcan be started.
See Figure8. DONOTTURN KEY.
The bladewill be rotatingwheneverthe motoris running.
HEIGHT ADJUSTMENT LEVER
Thecuttingheightadjustmentleveris locatedabovethe left rear
wheel.Toadjustthe cuttingheight,referto the AssemblySection.
BATTERY LEVEL INDICATOR
The batterylevelindicatoris locatedon the motorcover.The indicator
showsthe conditionof the batteryand is onwhenthe motoris on. The
indicatorlit all the wayto the rightindicatesthe batteryis fullycharged;
as the indicatoris lit moretowardthe left, it indicatesthe batteryis
discharging.See Figure7inset.
10
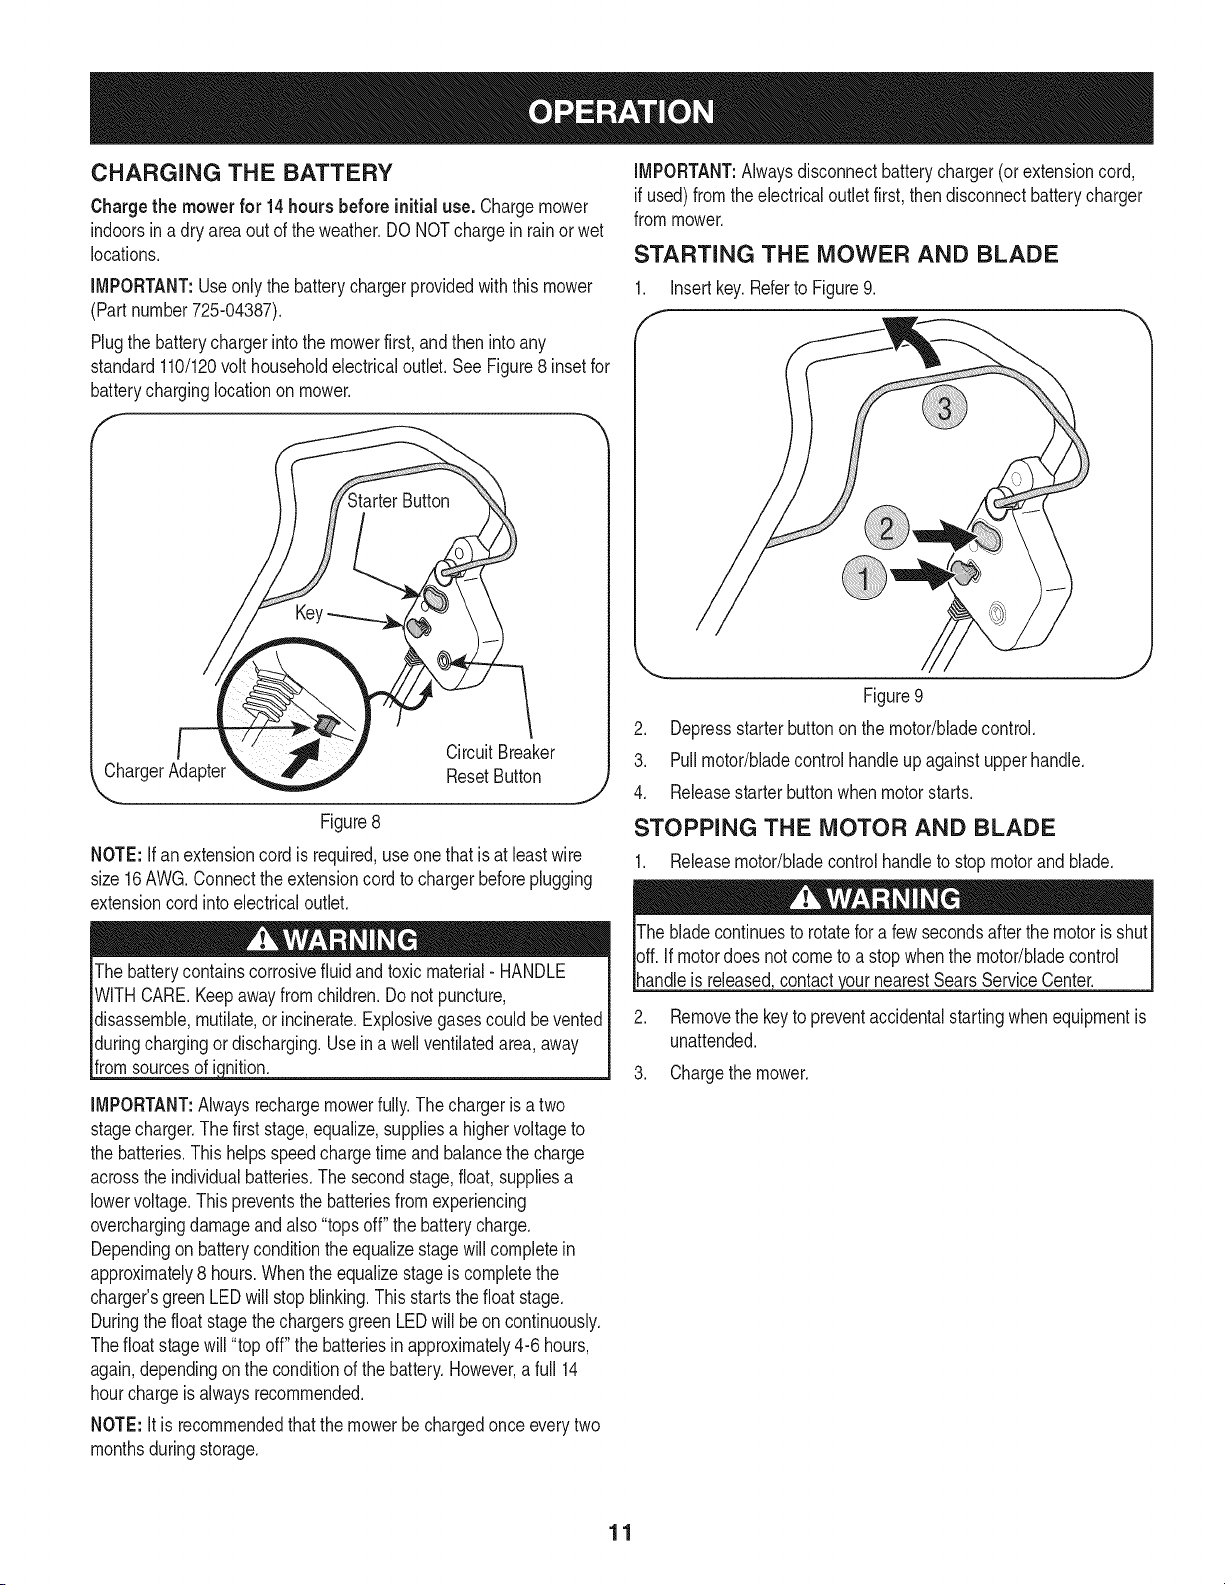
CHARGING THE BATTERY
Charge the mower for 14hours before initialuse. Chargemower
indoorsina dry areaoutof the weather.DO NOTchargeinrainorwet
locations.
IMPORTANT:Useonly the batterychargerprovidedwiththismower
(Part number725-04387).
Plugthe batterychargerintothe mowerfirst,and then intoany
standard110/120volthouseholdelectricaloutlet.SeeFigure8 inset for
batterycharginglocationon mower.
IMPORTANT:Alwaysdisconnectbatterycharger(or extensioncord,
if used)fromtheelectricaloutletfirst,thendisconnectbatterycharger
frommower.
STARTING THE MOWER AND BLADE
1. Insertkey.Referto Figure9.
f
CircuitBreaker
ChargerAdapter ResetButton
'_. ...J
Figure8
NOTE: If an extensioncord is required,useonethat isat leastwire
size16AWG.Connecttheextensioncordto chargerbeforeplugging
extensioncordintoelectricaloutlet.
The batterycontainscorrosivefluidandtoxic material- HANDLE
WITHCARE.Keepawayfromchildren.Do not puncture,
disassemble,mutilate,or incinerate.Explosivegasescould be vented
duringchargingor discharging.Use in a wellventilatedarea,away
fromsourcesofignition.
IMPORTANT:Alwaysrechargemowerfully.The chargerisa two
stagecharger.The first stage,equalize,suppliesa highervoltageto
the batteries.This helpsspeedchargetime and balancethe charge
acrosstheindividualbatteries.The secondstage,float,suppliesa
lowervoltage.This preventsthe batteriesfrom experiencing
overchargingdamageandalso"topsoff" the batterycharge.
Dependingon batteryconditionthe equalizestagewill completein
approximately8 hours.Whenthe equalizestageis completethe
charger'sgreenLEDwill stopblinking.Thisstartsthe float stage.
Duringthe float stage thechargersgreenLEDwill be on continuously.
Thefloat stage will"top off" the batteriesinapproximately4-6 hours,
again,dependingonthe conditionof the battery.However,a full 14
hourchargeis alwaysrecommended.
NOTE: It is recommendedthatthe mowerbe chargedonceeverytwo
monthsduringstorage.
Figure9
2. Depressstarterbutton on the motor/bladecontrol.
3. Pullmotor/bladecontrolhandleupagainstupperhandle.
4. Releasestarterbuttonwhenmotorstarts.
STOPPING THE MOTOR AND BLADE
1. Releasemotor/bladecontrolhandleto stopmotorandblade.
handleis released SearsServiceCenter.
2. Removethe key to preventaccidentalstartingwhenequipmentis
unattended.
3. Chargethe mower.
11
USING YOUR LAWN MOWER
Theoperationof any lawnmowercan resultin foreignobjectsbeing
thrownintothe eyes,whichcan damageyoureyesseverely.Always
wearsafetyglasseswhileoperatingthe mower,or while performing
an ad ustmentsor re ars on t.
• Besurethat lawnis clearof stones,sticks,wires,or otherobjects
whichcoulddamagethelawn moweror motor.Suchobjects
couldbe accidentallythrownby the mowerinany directionand
causeseriouspersonalinjuryto the operatorand others.
If youstrikea foreignobject,stopthe motor,andremovethe key.
Thoroughlyinspectthe mowerforany damage,and repairthe
damagebeforerestartingand operatingthe mower.Excessive
vibrationof the mowerduringoperationis an indicationof damage.
Theunit shouldbe promptlyinspectedand repaired.
o
o
Whenusingthe sidedischarge,the mosteffectivemowingpattern
is one that allowsthe clippingsto dischargetowardsthe uncut
part of the lawn.
DO NOTuse mowerinthe rain.
Fora healthylawn,alwayscut offone-thirdor lessof the total
lengthof the grass.
Forbest results,do notcut wetgrass becauseit tendsto stick
to the undersideof thedeckpreventingpropermulchingor
dischargeof grass clippings.Newor thickgrassmay requirea
narrowercut.
12
GENERAL RECOMMENDATIONS
Alwaysobservesafetyruleswhenperforming
anytype of maintenance.
Thewarrantyon this lawnmowerdoesnot coveritemsthathave
beensubjectedto operatorabuseor negligence.To receivefull
valuefromwarranty,operatormustmaintainthe lawnmoweras
instructedhere.
• AIiadjustmentsshouldbe checkedat leastonceeach season.
• Periodicallycheckall fastenersand make surethesearetight.
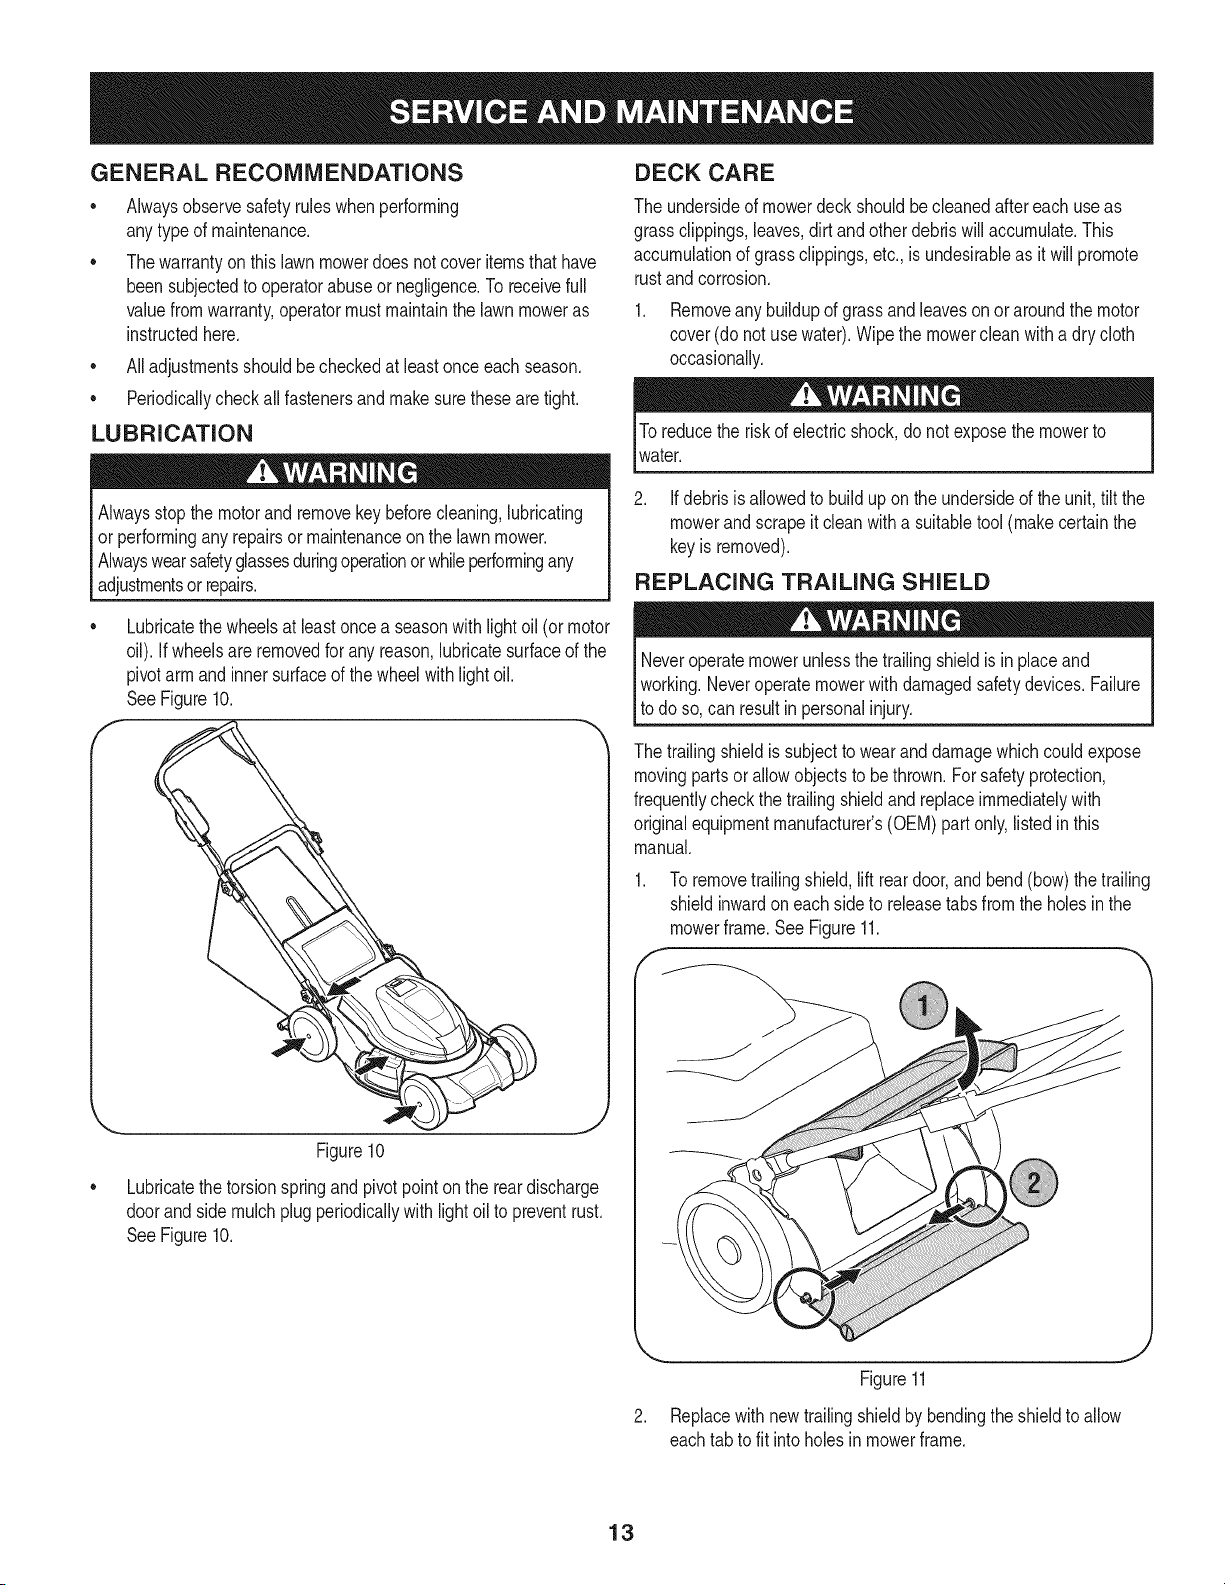
LUBRICATION
Alwaysstopthe motorand removekeybeforecleaning,lubricating
or performingany repairsor maintenanceon the lawnmower.
Alwayswearsafetyglassesduringoperationorwhileperformingany
adjustmentsor repairs.
DECK CARE
The undersideof mowerdeckshouldbecleanedafter eachuseas
grassclippings,leaves,dirt and otherdebriswill accumulate.This
accumulationof grassclippings,etc.,is undesirableas it will promote
rustandcorrosion.
1. Removeany buildupof grassandleavesonor aroundthe motor
cover(donot usewater).Wipe the mowercleanwith a dry cloth
occasionally.
Toreducethe risk of electricshock,do not exposethe mowerto
water.
2. If debrisis allowedto buildup onthe undersideof the unit, tilt the
mowerandscrapeit cleanwitha suitabletool(makecertain the
keyis removed).
REPLACING TRAILING SHIELD
f
Lubricatethe wheelsat leastoncea seasonwith lightoil (or motor
oil). If wheelsareremovedfor any reason,lubricatesurfaceof the
pivotarm and inner surfaceof the wheelwithlightoil.
SeeFigure10.
Figure10
Lubricatethe torsionspringandpivotpointon the reardischarge
doorandsidemulch plug periodicallywith lightoil to preventrust.
SeeFigure10.
Neveroperatemowerunlessthe trailingshieldis inplaceand
working.Neveroperatemowerwithdamagedsafetydevices.Failure
to do so, can resultinpersonalinjury.
The trailingshieldis subjectto wearanddamagewhichcouldexpose
movingpartsor allowobjectsto be thrown.For safetyprotection,
frequentlycheckthe trailingshieldand replaceimmediatelywith
originalequipmentmanufacturer's(OEM)partonly, listed in this
manual.
E
To removetrailingshield,lift reardoor,andbend(bow)the trailing
shieldinwardon eachside to releasetabsfromthe holesinthe
mowerframe.See Figure11.
Figure11
Replacewithnewtrailingshieldby bendingthe shieldto allow
eachtab to fit into holesin mowerframe.
13

BLADE CARE
Whenremovingthe cuttingbladefor sharpeningor replacement,
protectyour handswith a pairof heavy glovesoruse a heavyragto
holdthe blade.Becertainto stop motorand removekey.
Periodicallyinspectthe bladeadapterfor cracks,especiallyif you
strikea foreignobject.Replacewhen necessary.Followthe steps
belowfor bladeservice.
Blade Removal
.
f
Stopthe motorandremoveignitionkey.Turnthe moweron its
side.
Placea 2x4blockof woodapproximately8.5" longbetweenthe
deckhousingandthe cuttingbladeto act as a stabilizer.See
Figure12.
Block of Locking _ Blade
Wood Plate _ _"'Bolt
Figure12
3. Loosenand removethe bladebolt,lockingplate,andblade.See
Figure12.
Blade Sharpening
IMPORTANT:If any metalseparationispresent,replacethe blades
withnew ones.
To properlysharpenthecutting blades,removeequalamountsof
metalfrombothendsof the bladesalongthe cuttingedges,parallelto
the trailingedge,at a250to 300angle.SeeFigure13.
f
Figure13
NOTE: It is importantthateachcuttingbladeedgebe groundequally
to maintainproperbladebalance.A poorlybalancedbladewill cause
excessivevibrationand maycausedamageto the mowerandresult
in personalinjury.The bladecan betestedby balancingit on a round
shaft screwdriver.Grindmetalfromtheheavy sideuntil it balances
evenly.
An unbalancedbladewill causeexcessivevibrationwhen rotating
at highspeeds.It maycausedamageto mowerandcould break
lcaus ngpersona njury.
Blade Installation
1. Placethe cuttingblade,lockingplate,andbladebolton the motor
shaft and threadthe bladeboltin fingertight.
NOTE: Makecertainto replacethe partsinthe exactorderinwhich
theywere removed.When installingthe cuttingblade,be sureit is
installedwiththe curvedendspointingtowardsthe mowerdeck and
not towardsthe ground.
2. Torquethe bladeboltdownusinga torquewrenchto assurethe
bolt is tightenedproperly.The recommendedtorquefor the blade
bolt is 170-220in. Ibs.
Toensuresafeoperationof your mower,periodicallycheckthe blade
bolt for correcttorque.
Theblade hardwareis notonly usedto attachthe bladeassembly,
but isalso an insulatedsafetydeviceandshouldneverbe alteredin
anyway.If replacementis necessary,useoriginalequipmentpartsas
showninthe parts list.
14
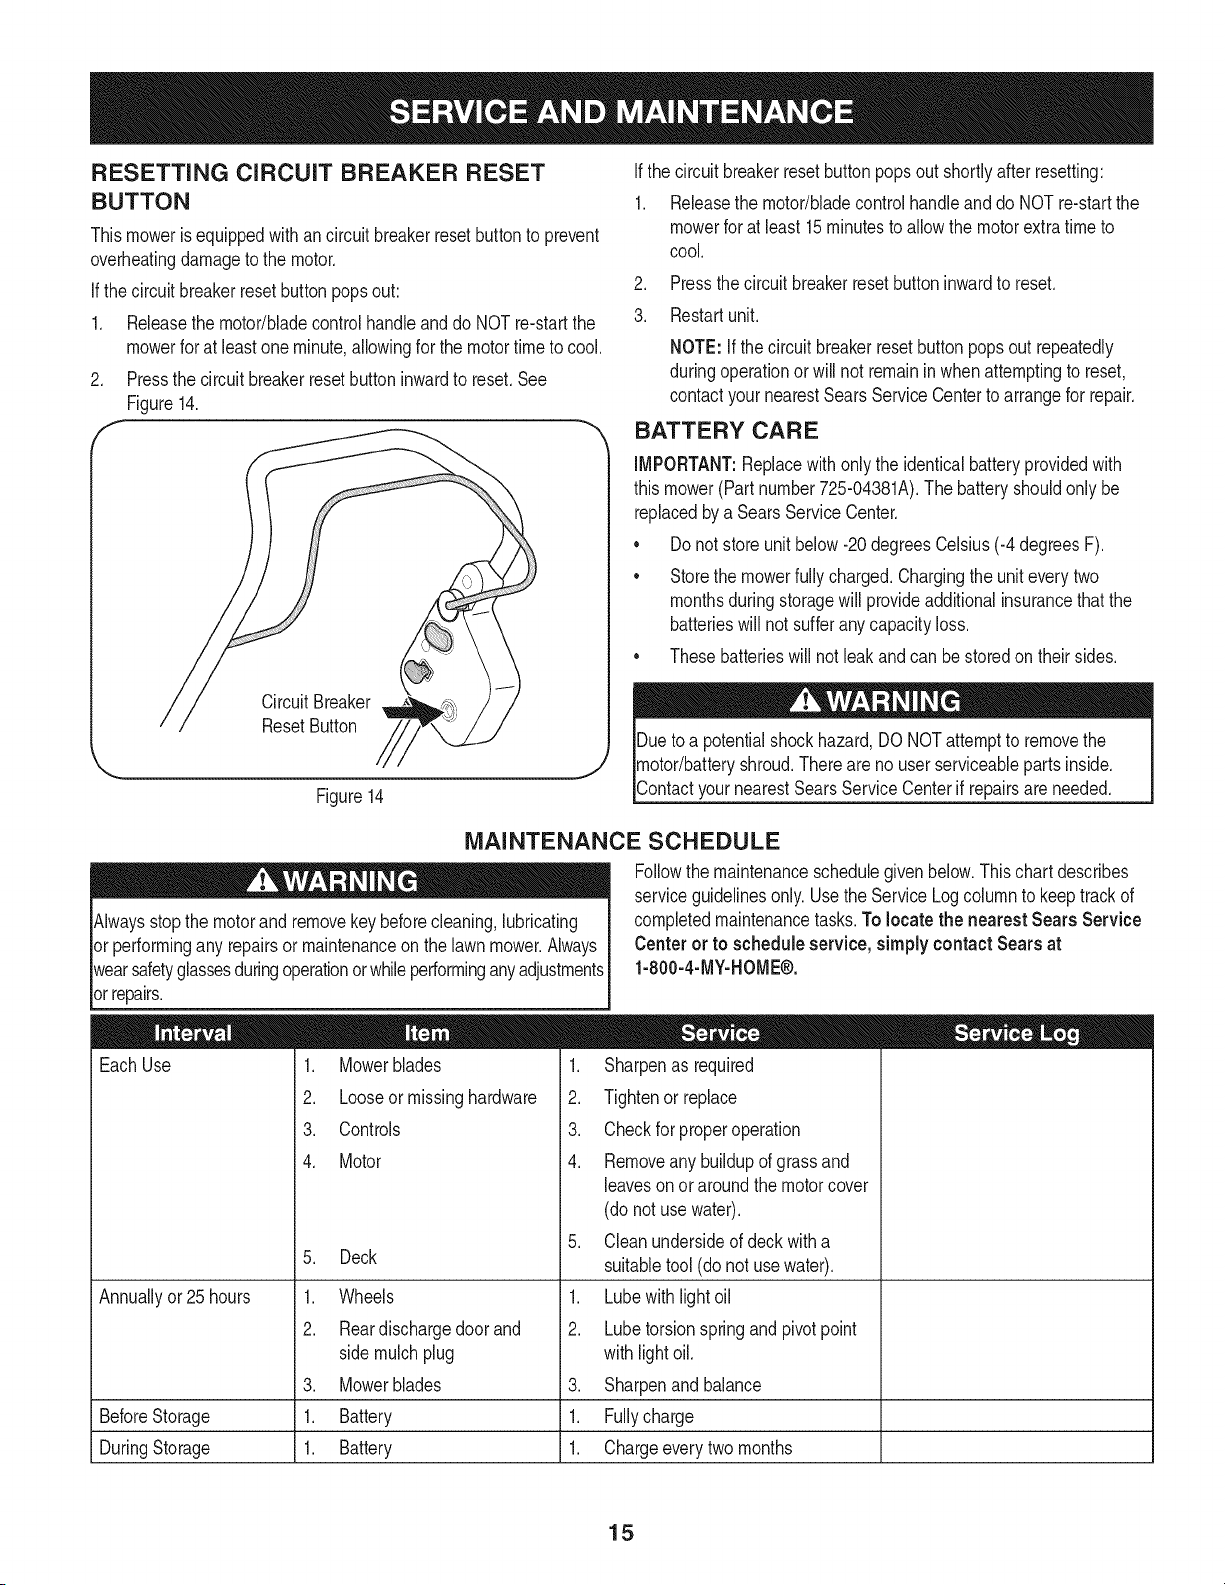
RESETTING CiRCUiT BREAKER RESET
BUTTON
Thismowerisequippedwith ancircuit breakerresetbuttonto prevent
overheatingdamageto the motor.
If thecircuit breakerresetbuttonpopsout:
1. Releasethe motor/bladecontrolhandleanddo NOTre-startthe
mowerforat leastone minute,allowingfor the motortime to cool.
2. Pressthe circuitbreakerresetbutton inwardto reset.See
Figure14.
f
ResetButton
Ifthe circuitbreakerreset buttonpopsout shortlyafterresetting:
1. Releasethe motor/bladecontrolhandleanddo NOT re-startthe
mowerfor at least15minutesto allowthe motorextra time to
cool.
.
3.
Pressthecircuit breakerresetbuttoninwardto reset.
Restartunit.
NOTE:If thecircuit breakerresetbuttonpopsout repeatedly
duringoperationor will not remaininwhen attemptingto reset,
contactyour nearestSearsServiceCenterto arrangefor repair.
BATTERY CARE
IMPORTANT:Replacewith onlythe identicalbatteryprovidedwith
this mower(Partnumber725-04381A).The batteryshouldonly be
replacedbya SearsServiceCenter.
• Donot storeunitbelow-20degreesCelsius(-4 degreesF).
• Storethe mowerfully charged.Chargingthe uniteverytwo
monthsduringstoragewill provideadditionalinsurancethat the
batterieswill not sufferanycapacityloss.
• Thesebatterieswill notleakand can be storedontheir sides.
Dueto a potentialshockhazard, DONOTattemptto removethe
motor/batteryshroud.Thereare no userserviceablepartsinside.
Contactyour nearestSearsServiceCenterif repairsare needed.
MAINTENANCE SCHEDULE
Alwaysstopthe motorand removekeybeforecleaning,lubricating
or performingany repairsor maintenanceonthe lawn mower.Always
wearsafetyglassesduringoperationorwhileperforminganyadjustments
or repairs.
EachUse
Annuallyor 25hours
1. Mowerblades
2. Looseor missinghardware
3. Controls
4. Motor
.
1.
2.
.
BeforeStorage 1.
DuringStorage 1.
Deck
Wheels
Reardischargedoor and
side mulchplug
Mowerblades
Battery
Battery
Followthe maintenanceschedulegivenbelow.Thischartdescribes
serviceguidelinesonly.Usethe Service Logcolumnto keeptrackof
completedmaintenancetasks.To locatethe nearest Sears Service
Centeror to scheduleservice,simplycontactSears at
1-800-4-MY-HOME®.
1. Sharpenas required
2. Tightenor replace
3. Checkfor properoperation
4. Removeany buildupof grassand
leaveson oraroundthe motorcover
(donot usewater).
5. Cleanundersideof deckwitha
suitabletool (do not usewater).
1. Lubewith lightoil
2. Lubetorsionspringandpivotpoint
with lightoil.
3. Sharpenand balance
1. Fullycharge
1. Chargeeverytwo months
15
PREPARING THE LAWN MOWER
Thefollowingstepsshouldbe takento prepareyourlawnmowerfor
storage:
• Lubricatemowerthoroughlyas describedin the lubrication
instructions.
• Removeany buildupof grassand leaveson or aroundthe motor
cover(do notuse water).Wipethe mowercleanwith a dry cloth.
Ifdebris is allowedto build up on the undersideof the unit,tilt the
mowerandscrapeit cleanwitha suitabletool (makecertainthe
keyis removed).
Storemowerfully charged.Chargingthe uniteverytwo months
duringstoragewill provideadditionalinsurancethat the batteries
will notsufferany capacityloss.
IMPORTANT:We stronglyrecommendthe mowerbecharged
onceeverytwo monthsduring storage.
Storemowerin a dry, cleanarea.Do not storenextto corrosive
materials,suchasfertilizer.
Wipethe cordto removeanystainsor foreignsubstancesuch as
oil.
Coatmower'scuttingbladewithchassisgreaseto prevent
rusting.
Do not storeunit below-20 degreesCelsius(-4 degreesF).
Thesebatterieswill not leakand can bestoredon theirsides.
16
Alwaysstopthe motorand removekeybeforecleaning,lubricating
or performingany repairsor maintenanceon the lawnmower,Always
wearsafetyglassesduringoperationorwhileperforminganyadjustments
orrepairs,
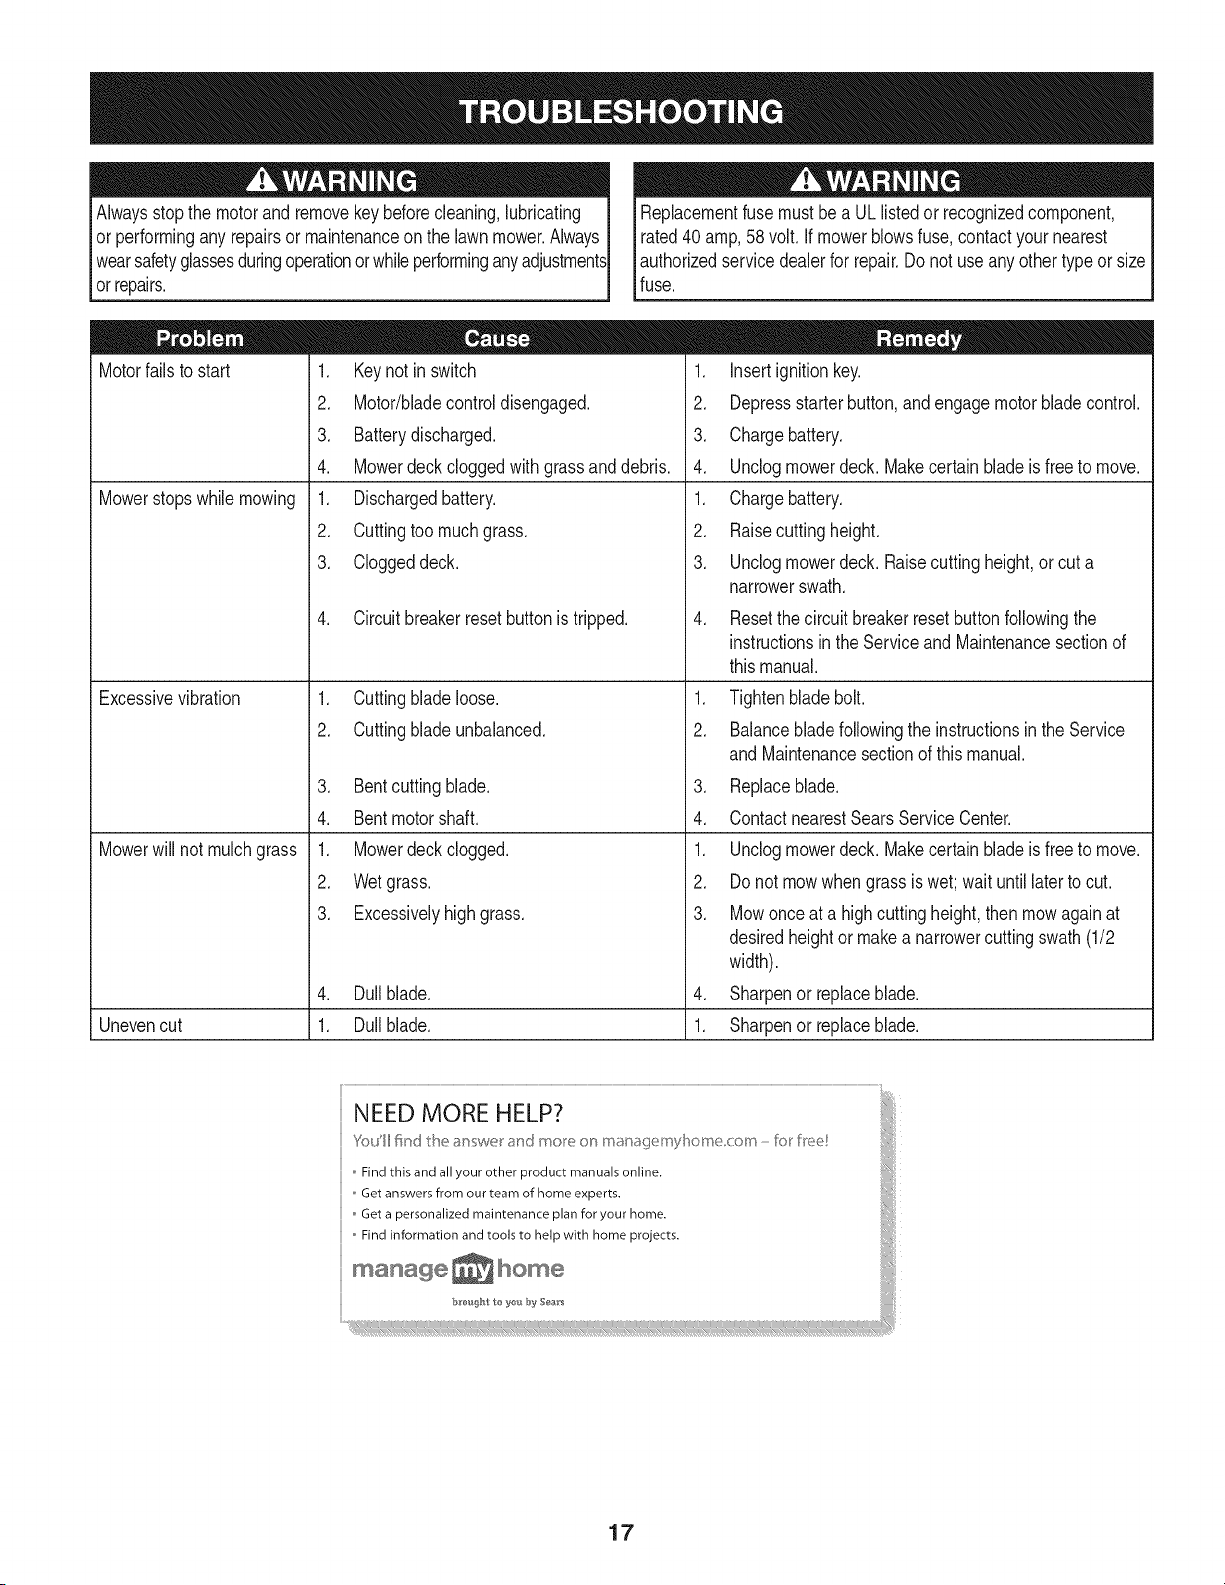
Motorfailsto start
Mowerstopswhilemowing
Excessivevibration
Mowerwill not mulchgrass
1. Keynot in switch
2. Motor/bladecontroldisengaged.
3. Batterydischarged.
4. Mowerdeck cloggedwith grass and debris.
1. Dischargedbattery.
2. Cuttingtoo muchgrass.
3. Cloggeddeck.
4. Circuitbreakerresetbuttonis tripped.
1. Cuttingblade loose.
2. Cuttingbladeunbalanced.
3. Bentcuttingblade.
4. Bentmotorshaft.
1. Mowerdeck clogged.
2. Wet grass.
3. Excessivelyhigh grass.
,
Unevencut 1.
Replacementfusemustbe a UL listedor recognizedcomponent,
rated40 amp,58 volt. Ifmowerblowsfuse,contactyour nearest
Iauthorizedservicedealerfor repair.Donot useany othertype or size
_fuse.
1. Insertignitionkey.
2. Depressstarterbutton,andengagemotorbladecontrol.
3. Chargebattery.
4. Unclogmowerdeck. Makecertainbladeis freeto move.
1. Chargebattery.
2. Raisecuttingheight.
3. Unclogmowerdeck. Raisecuttingheight,orcut a
narrowerswath.
4. Resetthe circuitbreakerresetbutton followingthe
instructionsinthe Serviceand Maintenancesectionof
thismanual.
1. Tightenblade bolt.
2. Balancebladefollowingthe instructionsin the Service
and Maintenancesectionof thismanual.
3. Replaceblade.
4. ContactnearestSearsServiceCenter.
1. Unclogmowerdeck. Makecertainbladeis freeto move.
2. Donot mowwhengrassis wet;wait untillaterto cut.
3. Mowonceat a highcuttingheight,thenmowagainat
desiredheightor makea narrowercuttingswath(1/2
width).
Sharpenor replaceblade.
Sharpenor replaceblade.
NEED MORE HELP?
" Find this and all your other product manuals online.
o Get answers from our team of home experts.
Get a personalized maintenance plan for your home.
o Find information and tools to help with home projects.
manage _ home l
17

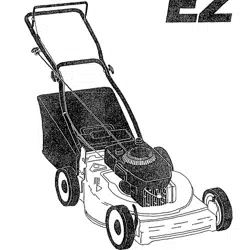
19-inch RechargeableRotary Mower- Model No. 247.370480
\\\
r
) i
[]
18

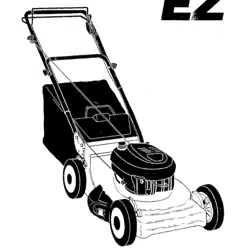
19-inch Rechargeable Rotary Mower B Model No. 247.370480
2
3
4
5
6
7
787-01649-4044 19"Deck
731-05727 MotorBracket
710-1241 Screw,1/4-15x 1.000
724-04025P Motor,48V
749-04312 LowerHandle
731-05753 BatteryShroud
631-04228 BladeHub
8 731-05832 ElectricFan
9 942-04152 MulchingBlade
10 782-7051 Blade LockingPlate
11 624-0078 Blade BoltAssembly
12 731-05639A TrailShield
13 731-05746 Rear MulchPlug
14 731-04177 SideDischargeChute
15 987-02055 MulchPlug(Incl. 16-18)
16 732-1014 TorsionSpring
17 747-0710 HingePin
18 17032A Chute DeflectorAdapter
19 736-0270 BellevilleWasher
20 710-0599 Screw
21 931-05686 Rear Door
22 931-05634 FrontCover
23 687-02325-0637 HandleBracket-RH
-- 687-02324-0637 HandleBracket-LH
24 964-04076 GrassBag
25 647-04082-0637 GrassBagFrame
26 687-02225-0637 FrontBracketAssembly
27 938-0148 Screw,Shoulder,.50x .66
28 687-02228-0637 Rear BracketAssembly
29 710-3025 Hhcs,5/16-18x .625
30 710-04995 Screw,5/16-14x .750
31 712-04063 Nut, FlangeLock,5/16-18
32 712-04065 Nut, FlangeLock,3/8-16
33 734-04176A FrontWheel
34 734-2004B RearWheel
35 720-0230 FoamGrip
36 712-0324 Nut, Hex Lock,1/4-20
749-04353 UpperHandle
38 925-04037A Motor/BladeControl
39 753-04430 Screw,Fiat, 1/4-20x 1.75
40 749-04356-0637 CrossBracket
41 738-04278 Screw,Shldr.,1/4-20x .50
42 731-05186 LowerHandleinsulator
43 731-05178 UpperHandleInsulator
44 747-04663A Motor/BladeControlHandle
45 710-0572 BoltCarriage,5/16-18x 2.50
46 720-04072A StarKnob
47 731-05710A RearBaffle
48 732-04534 DoorTorsionSpring- RH
-- 732-04535 DoorTorsionSpring- LH
49 732-04377C SpringLever
50 726-0201 Nut,Speed
51 936-0504 Washer,Wave,.510x .750x .017
52 938-0507B Screw,Shoulder,.500 Dia.X .434
53 741-0492A Bushing,Block,.505 Dia.X .62
54 747-04589 RearDoorPivot Rod
55 925-04381A Battery,12V
56 725-04387A BatteryCharger
57 725-04438 BatteryLevelindicator
58 731-05754 BatteryTray
59 725-04497A BatteryJumper
60 710-0895 Screw,1/4-15x .750
61 731-2422 CableGuide
62 731-05880 Spacer,.515x 1.00x .310Lg.
63 936-0255 Washer,Bell, .510x 1.14x .040
64 736-04413 Washer,Wave,.385x .598
65 731-07532 Hubcap
66 710-0779A Screw,#10-16x .500
67 710-0726 Screw,5/16-12x .750
68 726-0230 CableTie
-- 731-06089t Key
-- 725-04763t Fuse
-- 725-04539t CircuitBreaker
t NotShown
19
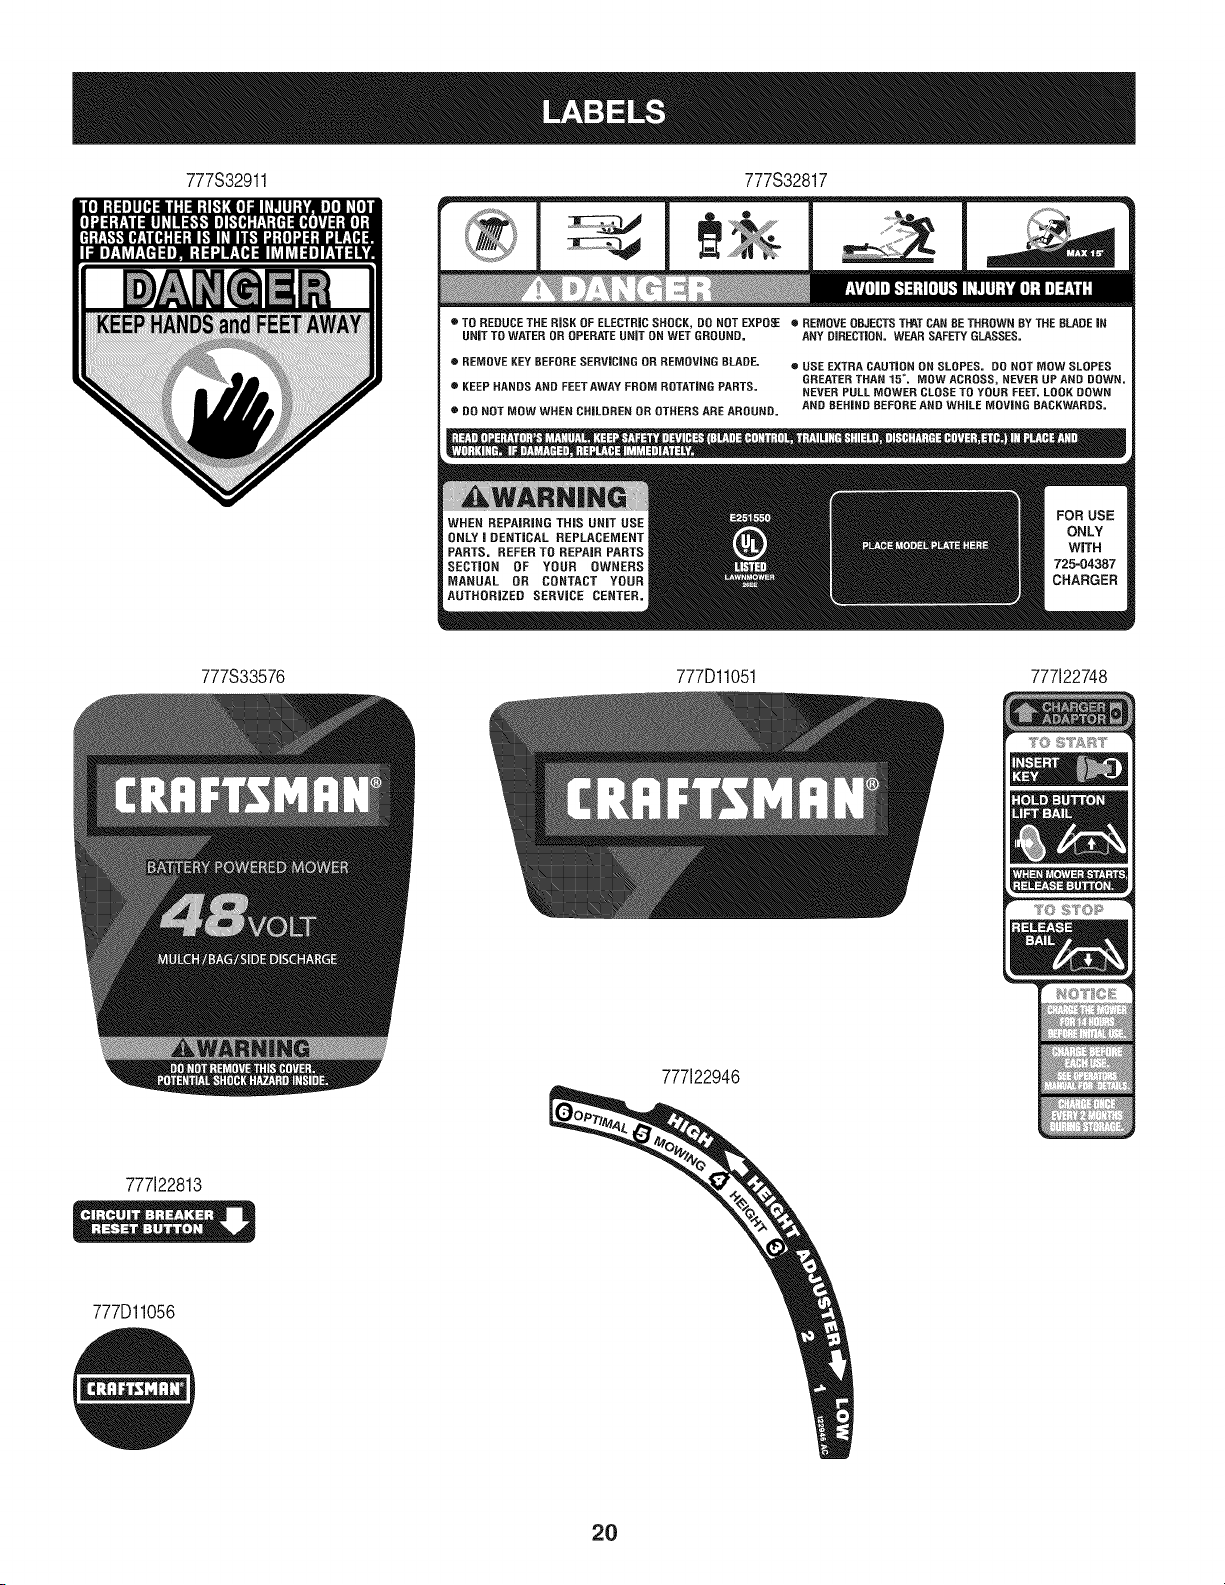
777S32911 777S32817
e TO REDUCE THE RiSK OF ELECTRIC SHOCK, DO NOT EXPOSE • REMOVE OBJECTS TFATCAN BE THROWN BY THE BLADE iN
UNiT TO WATER OR OPERATE UNiT ON WET GROUND. ANY DiRECTiON. WEAR SAFETY GLASSES.
• REMOVE KEY BEFORE SERViCiNG OR REMOVING BLADE.
e KEEP HANDS AND FEET AWAY FROM ROTATING PARTS.
e DO NOT MOW WHEN CHILDREN OR OTHERS ARE AROUND.
o USE EXTRA CAUTION ON SLOPES. DO NOT MOW SLOPES
GREATER THAN 1B°. MOW ACROSS, NEVER UP AND DOWN.
NEVER PULL MOWER CLOSE TO YOUR FEET. LOOK DOWN
AND BEHIND BEFORE AND WHILE MOVING BACKWARDS.
777S33576 777Dl1051 777122748
777122813
777Dl1056
777122946
2O
Congratulationson makinga smartpurchase.YournewCraftsman@
productis designedand manufacturedfor yearsof dependableopera-
tion.But likeall products,it mayrequirerepairfromtimeto time.That's
whenhavinga RepairProtectionAgreementcansave youmoneyand
aggravation.
Here'swhatthe RepairProtectionAgreement*includes:
* Expert service byour 10,000professionalrepairspecialists
o Unlimitedserviceand no chargefor partsand laboron all
coveredrepairs
o Product replacementupto $1500if yourcoveredproductcan't be
fixed
• Discountof 10%from regularprice of serviceand relatedinstalled
partsnotcoveredby theagreement;also, 10%off regularpriceof
preventivemaintenancecheck
• Fast help by phone- we call it RapidResolution- phone support
froma Searsrepresentative.Thinkof usas a "talkingowner's
manual."
Onceyou purchasethe Agreement,a simplephonecall is all thatit
takesfor youto scheduleservice.Youcan call anytimedayor night,or
schedulea serviceappointmentonline.
The RepairProtectionAgreementis a risk-freepurchase.If youcancel
for any reasonduringthe productwarrantyperiod,wewill providea full
refund.Or,a proratedrefundanytimeafterthe productwarrantyperiod
expires.Purchaseyour RepairProtectionAgreementtoday!
Somelimitationsand exclusionsapply. For pricesand additional
informationin the U.S.A. call 1-800-827-6655.
*Coverage in Canadavaries on some items.Forfull details call
Sears Canadaat 1-800-361-6665.
Sears Installation Service
ForSearsprofessionalinstallationof homeappliances,garagedoor
openers,waterheaters,andothermajorhomeitems,in the U.S.A.or
Canadacall 1-800-4-MY-HOME®.
21
Declaraci6n de garantia .................................................. 22
Instrucciones de seguridad ............................................. 23
Gu[a de cuesta ................................................................ 26
Etiquetas de seguridad ................................................... 27
Montaje ........................................................................... 28
Operaci6n ........................................................................ 31
Servicio y Mantenimiento ............................................... 34
Almacenamiento fuera de temporada ............................ 37
Soluci6n de problemas ................................................... 38
Piezas de Reemplazo ............................. 18 (Manual ingles)
NOmero de servicio ............................... Cubierta posterior
Garantia de dos aSos de Craftsman
SiesteproductoCraftsmanfalla debidoa undefectoen los materialeso la manode obra dentrodelos dos a_osde la fechade compra,s[rvase
devolverloa cualquiertiendaSears,Centrode servicioSears,u otro puntodeventaCraftsmanen los EstadosUnidosparasu reparaci6nsin
cargo.
Estagaranfiano cubre:
• Arficulosde duraci6nlimitadaquepuedendesgastarsebajocondicionesnormalesdeuso duranteel per[ododegaranfia,talescomo
correasy cuchillasde cortadorarotativas.
• Las reparacionesrequeridasdebidoa abusoo negligenciadel operador,incluiyendoabolladurasdel cig(Je_aly nooperaro mantenerel
equipodeacuerdoconlas instruccionessuministradas.
Estagaranfias61otendr_,validezdurante90 d[assi este productoseutilizaencualquiermomentoparafinescomercialesode alquiler.
Estagaranfias61otendr_validezmientrasel productose utiliceen los EstadosUnidos.
Estagarant[aleotorgaderechoslegalesespecfficos,peroustedpodr[agozarde otrosderechosen raz6nde su lugarde residencia.
Sears, Roebuck and Co. Hoffman Estates, IL 60179
Bater[a: 12Voltios
Motor: 48 VoltiosDC
NSmerode modelo
NSmerode serie
Fechade compra
RegistreelnOmerode modelo,nOmerode seriey fechade compra
m&sarriba.
© SearsBrands,LLC 22
__IL a presenciade este sirnboloindicaquese trata
deinstruccionesde seguridadirnportantesque
deberespetarparaevitarponeren riesgosu
seguridadpersonaly/o materialy la de losdern_.s.
Leay siga todaslas instruccionesdeestemanualantesde poner
enfuncionarnientoestarn_.quina.Si no respetaestasinstrucciones
puedeprovocarlesionespersonales.Cuandovea estesirnbolo,
TENGAEN CUENTALA ADVERTENCIA!
Su responsabilidad:Restrinjael usode esta rn_.quinarnotorizada
a las personasquelean,cornprendany respetenlas advertenciase
instruccionesque figuranen este manualy sobrela rn_.quina.
Estarn_.quinaest,.dise_adapara serutilizadarespetandolas reglas
de seguridadcontenidasen este manual.AI igualqueconcualquier
tipo de equipo rnotorizado,undescuidoo errorpot partedel operadol
puedeproducirlesionesgraves.Estarn_.quinaes capazdearnputar
rnanosy piesy de arrojarobjetoscongran fuerza.De no respetarlas
instruccionesde seguridadsiguientesse puedenproducirlesiones
graveso la rnuerte.
Cuandoseutilizancortadorasdec_spedel_ctricas,se deben curnpli_
siernprelas precaucionesb_.sicasdeseguridadparareducirla |
posibilidaddeincendios,descargasel_ctricasy lesionespersonales.|
Estasprecaucionesb_.sicasincluyen:
Ni5os
Puedenocurriraccidentestr_gicos si el operadorno est_ atentoa la presencia
de ni_os.PorIogenerala losni_os lesatraenlas cortadorasy la actividadde
cortarel cesped.Noentiendenlos riesgosni lospeligros.Nuncasupongaque
losni6os permanecer_nen el lugardondelosvio pot Qltimavez.
,, Mantengaa los ni_os fueradel _rea de trabajoy bajoestrictavigilancia
de un adultoresponsableadem_sdel operador.
,, Este alerta y apaguelacortadorasi un ni_o ingresaal _rea.
,, Antesde moversehaciaatr_sy mientrasIo este haciendo,mirehacia "
arrasy cuide que no hayani6os.
,, Tengamuchocuidadocuandose aproximea las esquinasciegas,
puertas,arbustos,_rbolesu otros objetosquepuedanobstaculizarlela
vistade un ni_o que pudiesecorrer hacia la cortadora.
,, Nunca permitaqueni_os menoresde 14a_os operenesta m_quina. "
Los ni_osmayoresde 14a_os debenleery entenderlasinstrucciones
de funcionamientoy reglasde seguridadcontenidasen este manualy
debenset entrenadosy supervisadospor sus padres.
®
Funcionamiento
Funcionamientogeneral:
,, Leay siga todas lasinstruccionescontenidasen estemanualantesde
intentarensamblaresta m_quina.Lea,comprenday respetetodas las
instruccionesquefiguranen la m_quinayen el(los) manual(es)antes
de hacerlafuncionar.Antes de hacerfuncionar este equipo,familiaricese
totalmentecon los controlesy el uso correctodel mismo.Guardeeste
manualen un lugar seguropara consultasfuturasy peri6dicas,as[ como
para solicitarrepuestos.
,, Esta m_quinaes un equipo motorizadode precisi6n,no unjuguete.
Por Iotanto,tenga muchocuidadoen todo momento.Esta unidadfue
dise_adapara realizarunatarea: cortarel cesped. Nola utilice para
ningQnotro fin.
,, No fuercela cortadora- trabajar_mejor y con m_s seguridada la
velocidadpara lacual fue dise_ada.
,, No permitanuncaque losni_os menoresde 14a_osutilicenesta
m_quina.Los ni_os mayoresde 14a6osdeben leery entenderlas
instruccionesdeoperaci6ncontenidasen este manual,y debenset
entrenadosy supervisadospor suspadres.S61ose debe permitirusar
estam_quinaa individuosresponsablesy familiarizadoscon sus reglas
de seguridad.
®
®
®
®
®
®
®
Inspeccioneminuciosamenteel _rea dondeutilizar_el equipo.Retire
todas laspiedras,palos,alambre, huesos,juguetesy otrosobjetos
extra6osque podrianhacertropezaro ser recogidosy arrojadospor
laacci6n de lacuchilla. Los objetosarrojadospor la m_quinapueden
producirlesionesgraves.Planifiqueel patr6nde corte ha seguir
paraevitar descargarel materialen los caminos,lasveredas,los
observadores,etc.Evite adem_sdescargarmaterialcontra unaparede
uobstrucci6nque podriahacer queel materialdescargadorebote
contrael operador.
Paraayudara evitarel contactocon la cuchillao una lesi6n pot un
objeto arrojado,mantengaseen la zonadel operadordetr_sde las
manijasy mantengaa losni_os,observadores,ayudantesy mascotas
apartadosal menos25 metrosde la podadoramientrasest_ en
funcionamiento.Detengala m_quinasi alguienentraenel _rea.
Paraprotegerselos ojos utilicesiempreanteojoso antiparrasde
seguridadmientrasopera lam_quinao mientrashaceajusteso la
repara.Los objetosarrojadosquerebotanpuedenproducirlesiones
ocularesgraves.
Utilicezapatosde trabajo resistentes,desuelafuerte, as[como
pantalonesy camisasajustados.Se recomiendavestir camisay
pantal6nparacubrir brazosy piernasy usarzapatoscon punterade
acero.Nunca opereesta m_quinadescalzo,con sandalias,zapatos
resbalososo livianos(pot ej. de Iona).
Nopongalas manoso los piescerca de laspiezas rotatoriasni debajo
de la plataformade corte. Elcontactocon lascuchillaspuedeproducir la
amputaci6nde manosy pies.
Unacubiertade descargafaltanteo da_ada puedeprovocarel contacto
con lacuchilla o lesionesporobjetosarrojados.
Muchaslesionesocurren comoresultadode pasarla cortadorasobre
lospies duranteuna caidaluegode resbalaro tropezar.Nose sostenga
de la cortadorasi se est_cayendo,suelte lamanija inmediatamente.
Nuncatire lacortadora haciaustedmientrascamina.Si debe retroceder
con lacortadoraparaevitar unaparedu obst_culo,mireprimeroabajoy
arraspara evitartropezarsey luegosiga estospasos:
Retrocedade la cortadorahasta estirarcompletamentelos brazos.
AsegQreseque est_bienequilibradoy bienparado.
Jale la cortadoralentamentehaciausted, no m_s de lamitad de la
distanciaentre ustedy la cortadora.
Repitaestospasostantasveces comosea necesario.
Noopereestacortadora bajo losefectosdel alcoholo lasdrogas.
Mantengasealerta:ObserveIoque est_ haciendo.Utiliceel sentido
comQn.No utilicela cortadorasi est_ cansado.
23

• La manijade controldel motor/lacuchillaes un dispositivode seguridad.
Nuncaintenteevitarsu funcionamiento.De hacerlo,dejariande operar
los dispositivosde seguridady podrianproducirselesionespersonales
por elcontactocon la cuchillagiratoria.Lamanijade control del motor/
la cuchilladebe funcionarf_cilmenteen ambas direccionesy regresar
autom_ticamentea laposici6ndesenganchadacuandose lasuelta.
• Nocarguela cortadorabajo laIluviao encondicioneshOmedas.
• Nuncahagafuncionarla cortadoraen la Iluviao sobreel cesped
mojado.Siempreestesegurode estar bien parado. Si resbalay cae
puedelesionarseseriamente.Si sienteque pierdeel equilibrio,suelte
inmediatamentela manijade control del motor/la cuchillay lacuchilla
dejar&derotaren tres segundos.
• Corteel cespedsolamentecon luz de dia o con unabuenaluz artificial.
Camine,nuncacorra.
• Detengala cuchillacuandocrucesendas, senderoso caminosde grava.
• Si la m_quinacomenzaraa vibrarde maneraanormal,detengael motor,
y busqueinmediatamentelacausa. La vibraci6npot Io generales una
advertenciade alg_n problema.
• Apagueel motory esperehasta quela cuchillase detenga
completamenteantesde retirarel colector de cespedo destaparla
tolva.LacuchillacontinOarotandoporunoscuantos segundosdespues
queel motorse ha apagado.Nuncacoloque ningunapartedel cuerpo
en el &teade lacuchilla hastaqueeste segurode quela mismaha
detenidosu movimientogiratorio.
• Nuncahagafuncionarla cortadorasin el correspondienteescudo
posterior,la cubiertade descarga,el colector de cesped, lamanija
de control del motor/lacuchilla y otros dispositivosde seguridady
protecci6ncolocadosy funcionando.Nuncaopere lacortadorasi los
dispositivosde seguridadest_n daSados.DeIo contrario,pueden
producirselesionespersonales.
• Utilicesolamentepartesy accesoriosmanufacturadosespecialmente
para estam&quinapot elfabricante.Si no Io hace,puedenproducirse
lesionespersonales.
• Sise presentansituacionesque no est_n previstasen este manual,
tengacuidadoy use el sentidocomOn.Comuniquesecon su centrode
servicioSearsparaobtenerayuda.
Funcionamientoen pendientes:
Las pendientesson un factorimportantequese relacionacon losaccidentes
producidospot derrapesycaidas y que puedenproducirlesionesgraves.La
operaci6nen pendientesrequieremuchaprecauci6n.Si nose sienteseguro
en una pendiente,no corte el cesped.Parasu seguridad,use el indicadorde
pendientesquese incluyecomopartede estemanualpara medirla pendiente
antesde operar launidaden unazonainclinada.Sila pendientesuperalos 15
grados,nocorte el cesped.
Haga Io siguiente:
• Corteen sentidotransversala la carsde lapendiente,nunca hacia
arribay abajo.Tengamuchocuidado al cambiarde direcci6nen una
pendiente.
• Este atentoa losagujeros,ra[ces,rocas,objetosocultoso
abultamientosque puedanhacerloresbalaro tropezar.Elcespedalto
puedeocultarobst_culos.
• Siempreeste segurode estar bienparado.Si resbalay cae puede
lesionarseseriamente.Si sienteque pierdeel equilibrio,suelte
inmediatamentela manijade control del motor/la cuchillay lacuchilla
dejarAdegiraren tres (3) segundos.
No haga Iosiguiente:
• No corte el cespedcercade ca[das,zanjas o terraplenes,puede perder
el equilibrio.
• No corte en pendientesmayoresde 15 gradoscomo ilustrael indicador
de pendientes.
• No corte el cespedmojado.Si no est_firmementeparado, puede
resbalarse.
Servicio
• Si el interruptorde protecci6ncontrasobrecargaincorporadose
desconectafrecuentemente,p6ngaseen contactocon el Centrode
servicioSears m_scercanopara hacerloreparar.
• Cuandono la use, saquela Ilavey almacenela cortadorade cesped
en el interior.Permitaqueel motorse enfr[eantesde almacenarloen
cualquierrecinto.La cortadorade cesped sedebe almacenaren un
lugar seco, alto y bajoIlave,fueradel alcancede los niSos.
• CuandoefectOeel mantenimientoutilice s61opartesde reemplazo
identicasde la listadeeste manual."El uso de piezasque no cumplen
con lasespecificacionesdel equipooriginal podriatenercomoresultado
un rendimientoincorrectoy adem_sporteren riesgo laseguridad".
• Antesde limpiar,repararo inspeccionarla m_quina,compruebeque
la cuchillay todas laspartesm6vilesse hayandetenido.Saquela Ilave
para evitar elarranqueaccidental.
• Saquela Ilaveantesde efectuarel mantenimiento,limpiaro retirar
materialde lacortadora.
• Siga lasinstruccionespara lubricary reemplazarlosaccesorios.
• Mantengalasmanijassecas,limpiasy sin aceiteo grasa.
• Parareducirla posibilidadde incendiomantengalatapa del motorsin
pasto, hojasy otros desechosacumulados.
• Reviselos pernosde montajede la cuchillay del motora intervalos
frecuentespara verificar queesten bienapretados.Adem_s,
inspeccionevisualmentela cuchilla paraver si est_daSada(por
ejemplo,doblada,rajada,gastada).Reemplacelacuchilla Onicamente
pot otra del fabricantedel equipooriginal(OEM) queapareceen este
manual.
• Conservelacortadora en buenascondiciones:Mantengala cuchilla
afiladay limpiaparaun mejor y m_ssegurorendimiento.Las cuchillas
de lacortadora son afiladasy puedencortar, envuelvalacuchilla o use
guantesy extremelas precaucionesal efectuarel mantenimiento.
• Mantengatodos los pernos,tuercasy tornillosbienajustadospara
asegurarsede que la m_quinase encuentraen condicionessegurasde
funcionamiento.
• Nuncaalterelosdispositivosde seguridad.Controleperi6dicamenteque
funcionencorrectamente.
• Nuncaintenteajustaruna ruedao la altura de corte mientrasel motor
est_ en marcha.
• Despuesde golpear un objetoextraSo,detengael motor,saque laIlave
e inspeccionedetenidamentela cortadoraparaverificarsi se produjo
algOndaSo.Repareel daSoantesde hacerfuncionarla cortadora.
• Los componentesdel colector de cesped, la cubiertade descargay el
escudo posterior,est_n sujetosa desgastey daSosquepodr[an dejar
expuestaslaspartesm6viles o permitirquese arrojen objetos.Para
protegersu seguridad,verifiquefrecuentementetodos los componentes
y reempl_celosinmediatamentes61opot piezas delfabricantedel
equipooriginal (OEM)queaparecenen este manual.
GUARDE ESTAS INSTRUCCIONES
24
Simbolos De Seguridad
Estap_.ginarepresentay describela seguridadlos sirnbolosquepuedenpareceren esteproducto.Lea,cornprenda,y sigatodas instrucciones
enla rn_.quinaantesprocurarparareuniry operar.
=
0 ®
LEA EL MANUAL(S) DEL OPERADOR
Lea,cornprenda,y siga todasinstruccionesenel manual(rnanuales)antesprocurarparareuniry
operar.
PELIGRO m GIRANDO HOJAS
Parareducirel riesgode herida,guarde rnanosy pieslejos. Nofuncionea rnenosque la tapade des-
cargao el receptorde hierbaest_nensu lugarapropiado.De serda_ado,sustituyainrnediatarnente.
PELIGROm ESPECTADORES
Nosieguecuandolosni_oso los otrosest&nalrededor.
PELIGRO= DE EL CORTE DE PiE
Guardernanosy pieslejosde hacergirarpartes.
PELIGRO= ESCOMBROS LANZADOS
Quiteobjetosque puedenser lanzadospor la I&rninaencualquierdirecci6n.Llevegafasde seguridad.
PELIGRO= CUESTAS
Useextrala precauci6nen cuestas.No sieguecuestasrnayoresque 15o.
ADVERTENCiA = ELECTROCHOQUE
Nouse eljuez de saiidaeBctrico del motoren lalluvia.
25
_D
CD
0
0
"O
(D
O
O
O
(D
O-
I:D
I:D
(D
I:D
._o
o
-U
E
I:D
I:D
,_ ._
2x
s_
,g" g
-o
o
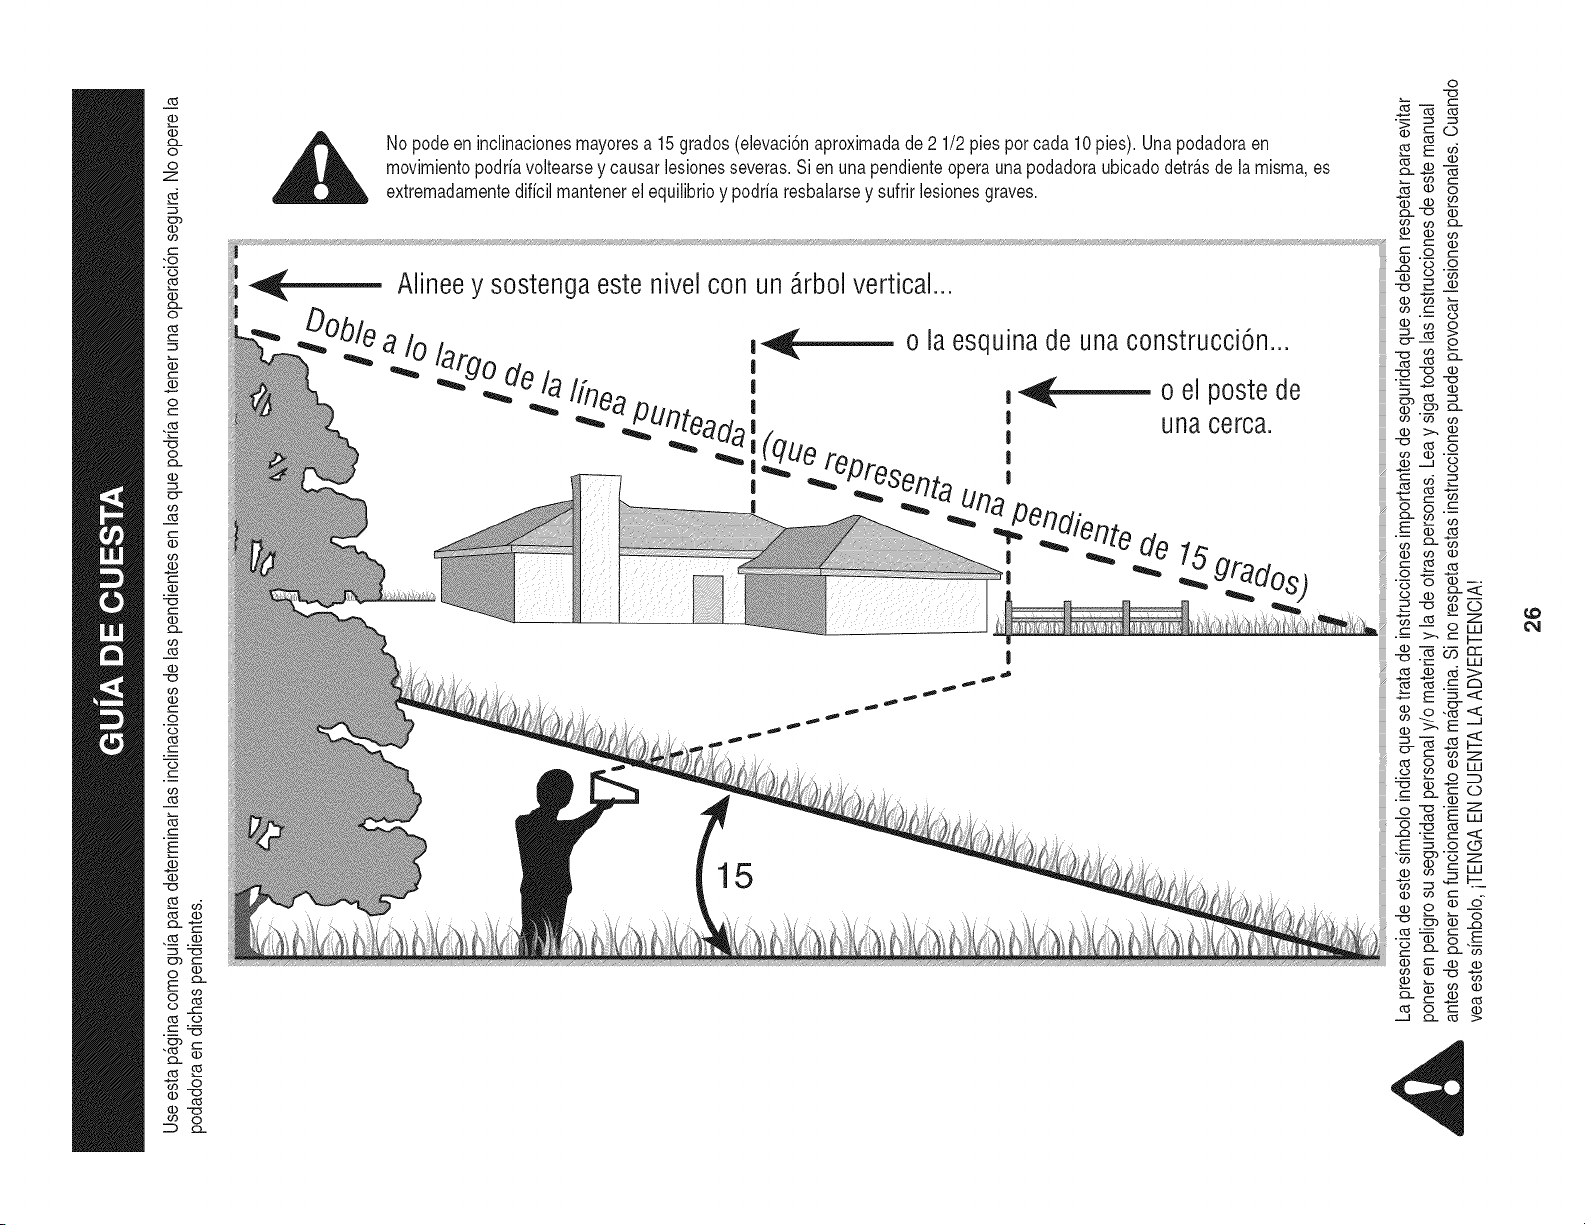
No podeen inclinacionesmayoresa 15grados(elevaci6naproximadade2 1/2pies porcada 10pies).Una podadoraen
movimientopodriavoltearsey causarlesionesseveras.Sien unapendienteopera una podadoraubicadodetr_.sdela misma,es
extremadamentedificilmantenerel equilibrioy podriaresbalarsey sufrirlesionesgraves.
....._ Alinee y sostenga este nivel con un _rbol vertical...
_. o la esquina de una construcci6n...
a/o/argo de/a
_ IfneaPUntea
|
-- _ _ Senta
! I
| iiiiiii"22J _
_:_ o el postede = o
una cerca.
I
i
!
|
e TO REDUCETHE RiSK OF ELECTRIC SHOCK, DO NOT EXPOSE • REMOVE OBJECTSTHATCAN BE THROWN BY THE BLADEiN
UNiT TO WATER DR OPERATEUNiT ON WET GROUND. ANY DiRECTiON. WEAR SAFETY GLASSES,
e REMOVE KEY BEFORESERViCiNG OR REMOVING BLADE, • USE EXTRA CAUTION ON SLOPES, DO NOT MOW SLOPES
GREATERTHAN 15 °. MOW ACROSS, NEVER UP AND DOWN.
e KEEPHANDS AND FEETAWAY FROM ROTATING PARTS. NEVER PULL MOWER CLOSETO YOUR FEEr, LOOKDOWN
e DO NOT MOW WHEN CHILDREN OR OTHERS ARE AROUND. AND BEHIND BEFOREAND WHILE MOVING BACKWARDS,
27
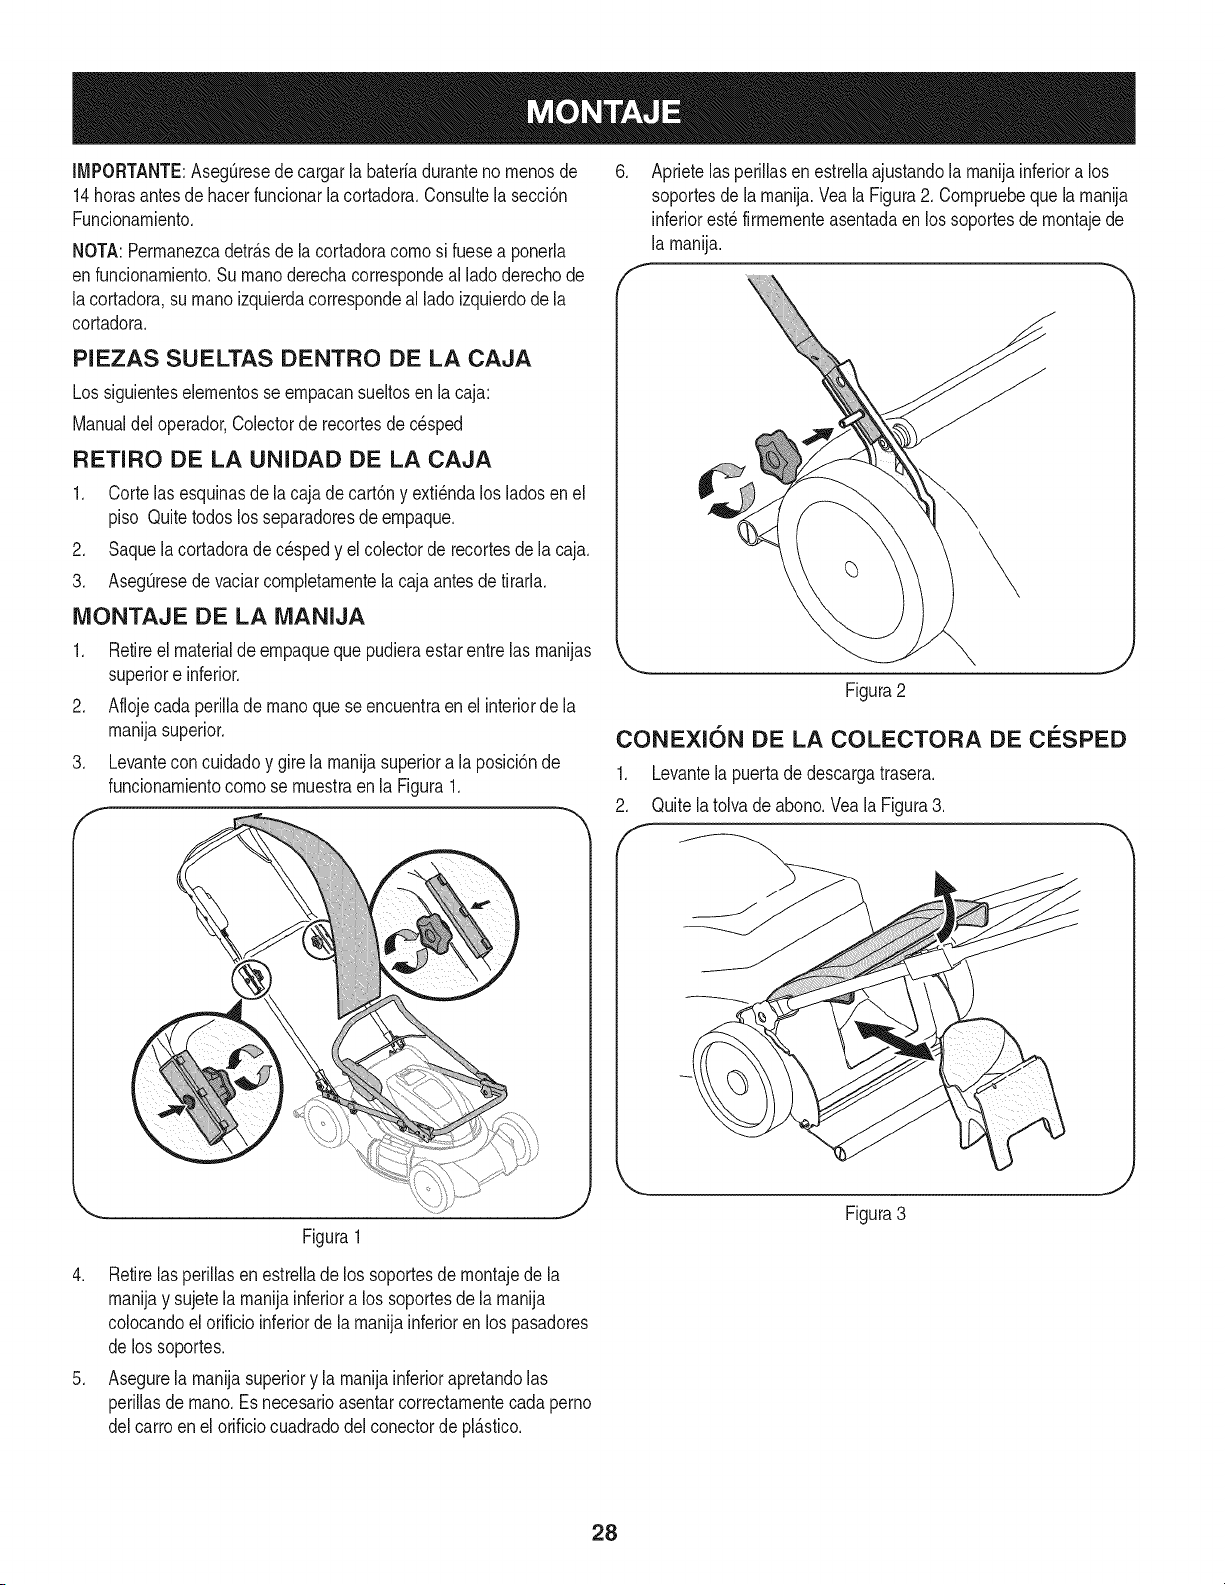
IMPORTANTE:AsegQresede cargarla bateriadurantenornenosde
14horasantesde hacerfundonar lacortadora,Consultela secci6n
Funcionarniento.
NOTA:Perrnanezcadetr_.sde lacortadoracornosi fuesea ponerla
enfuncionarniento.Surnanoderechacorrespondeal ladoderechode
lacortadora,su rnanoizquierdacorrespondeal lado izquierdode la
cortadora.
PIEZAS SUELTAS DENTRO DE LA CAJA
Los siguienteselernentosse ernpacansueltosen la caja:
Manualdeloperador,Colectorde recortesde c_sped
RETIRO DE LA UNIDAD DE LA CAJA
1. Corte lasesquinasdela cajade cart6ny exti_ndalosladosen el
piso Quitetodoslos separadoresde ernpaque.
2. Saquela cortadorade cespedy el colectorde recortesde lacaja.
3. AsegQresede vaciarcompletarnentela cajaantesdetirarla.
MONTAJE DE LA MANIJA
1. Retireel materialde ernpaqueque pudieraestarentrelas rnanijas
superiore inferior.
2. Aflojecadaperillade rnanoquese encuentraenel interiorde la
rnanijasuperior.
3. Levantecon cuidadoy gire la rnanijasuperiora la posici6nde
funcionarnientocornose rnuestraenla Figura1.
Figura1
4. Retirelas perillasen estrelladelos soportesde rnontajede la
rnanijay sujetela rnanijainferiora los soportesde la rnanija
colocandoel orificioinferiorde la rnanijainferioren los pasadores
de lossoportes.
5. Asegurela rnanijasuperiory la rnanijainferiorapretandolas
perillasde rnano.Es necesarioasentarcorrectarnentecadaperno
delcarroen el orificio cuadradodel conectorde pl_.stico.
6. Aprietelas perillasen estrellaajustandola rnanijainferiora los
soportesde la rnanija.Vea la Figura2. Cornpruebeque la rnanija
inferiorest_ firrnernenteasentadaen los soportesde rnontajede
la rnanija.
f
Figura2
CONEXION DE LA COLECTORA DE CESPED
1. Levantela puertade descargatrasera.
2. Quite latolvadeabono.Veala Figura3.
f
Figura3
28
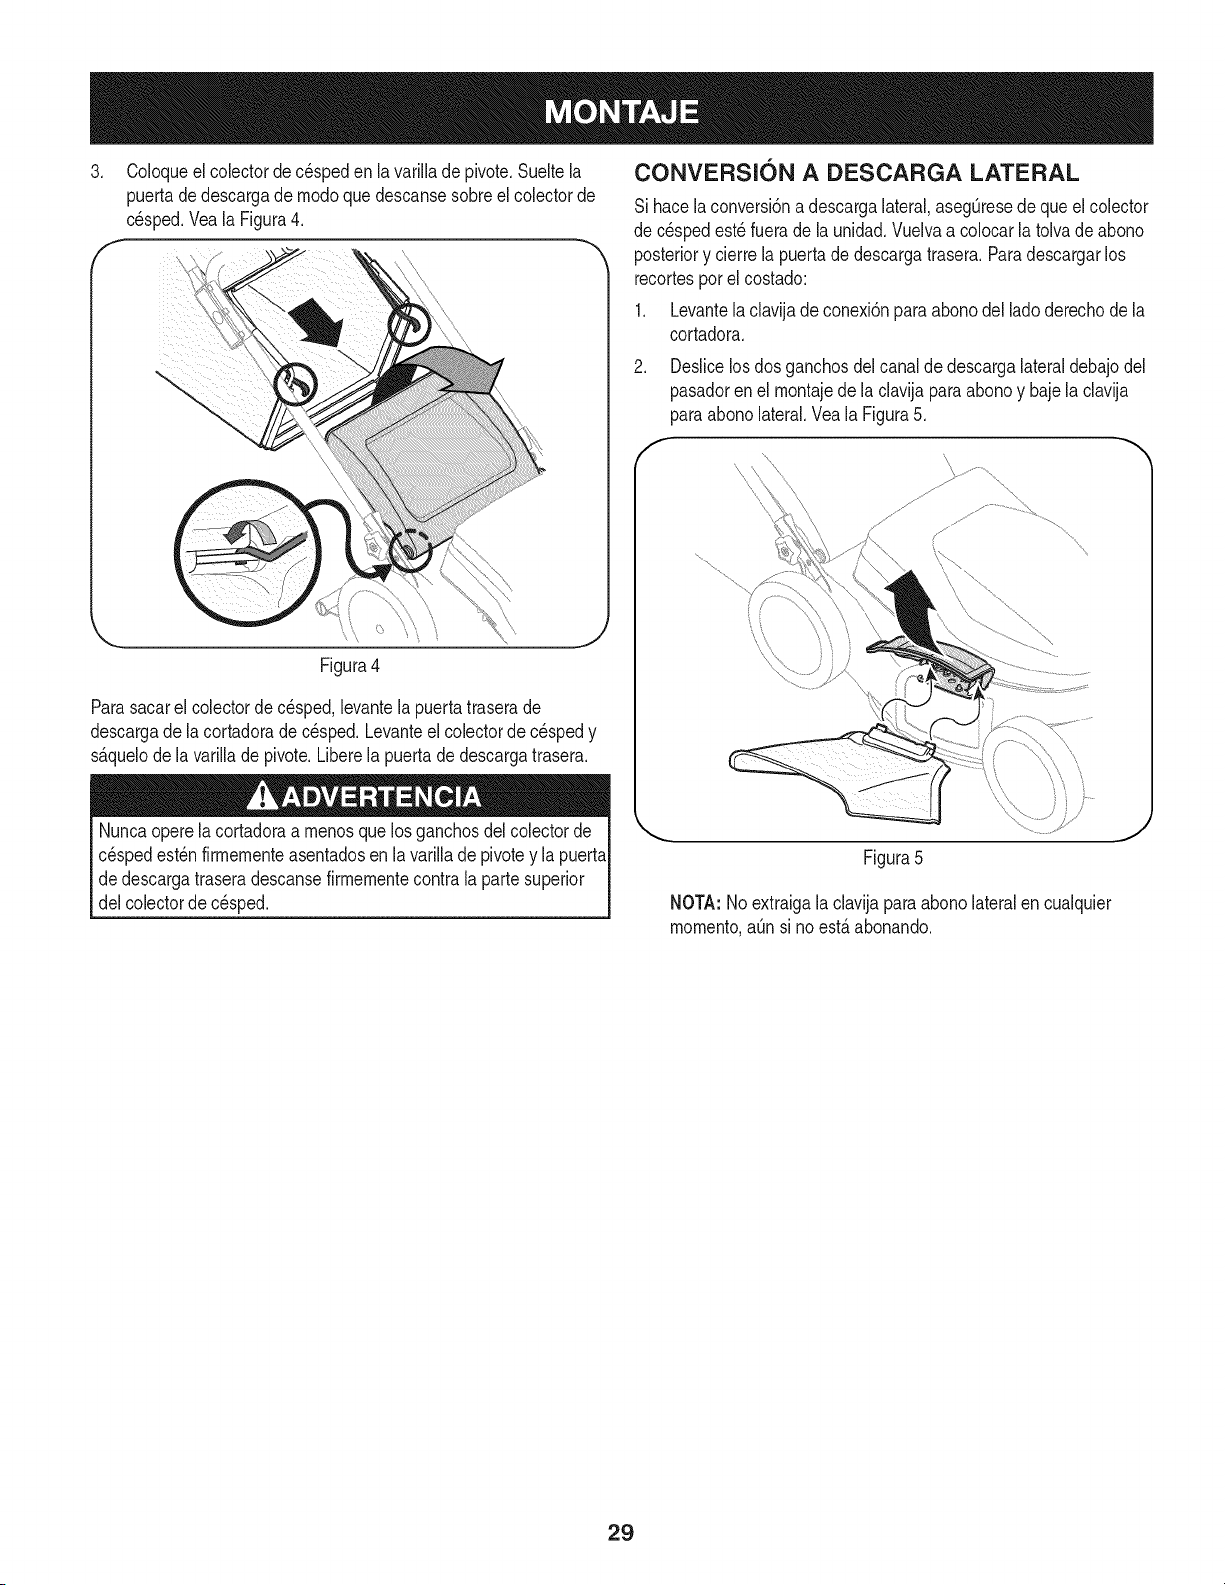
.
f
Coloqueel colectordecespeden la varillade pivote.Sueltela
puertade descargade modoquedescansesobreel colectorde
c_sped.Veala Figura4.
Figura4
Parasacarel colectordec_sped,levantela puertatraserade
descargade lacortadoradec_sped.Levanteel colectorde c_sped y
s_.quelode lavarillade pivote.Liberela puertade descargatrasera.
O A
Nuncaoperelacortadoraa menosquelos ganchosdel colectorde
c_spedest_nfirmementeasentadosen la varillade pivotey la puerta
dedescargatraseradescansefirmementecontralaparte superior
delcolectorde c_sped.
CONVERSION A DESCARGA LATERAL
Sihacela conversi6na descargalateral,asegQresedequeel colector
de c_spedest_fuerade launidad.Vuelvaa colocarlatolvadeabono
posteriory cierrela puertadedescargatrasera.Paradescargarlos
recortesporel costado:
1. Levantela clavijade conexi6npara abonodel lado derechode la
cortadora.
Deslicelos dosganchosdelcanalde descargalateraldebajodel
pasadoren el montajede laclavijaparaabonoy baje la clavija
paraabonolateral.Veala Figura5.
Figura5
NOTA:Noextraigala clavijaparaabonolateralen cualquier
momento,aQnsi no est,.abonando.
29
AJUSTE DE LA ALTURA DE CORTE
La palancadeajustede alturadecortese ubica porencimadela
ruedaizquierdatrasera.Vea la Figura6.
1. Tirede la palancahaciaafuerade la
cortadora.
,
,
Muevala palancahaciaadelanteo
haciaatr_.sa la alturadecortedeseada.
Sueltela palancahaciala plataformade
lacortadora.
BajoningunacircunstanciarealiceningQnfipo de ajustea la unidad
sin antesdetenerel motory sacar la llave.
J
Figura6
30
f
de controldel rnotor/lacuchilla
Palancadeajustede la altura
Indicadordenivelde la bateria
I @ @ @ @ @ l
J
Figura7
MANIJA DE CONTROL DEL iVIOTOR/LA
CUCHILLA
Larnanijade controldelrnotor/lacuchillaes un dispositivode
seguridad.Nuncaintenteanularsufuncionarniento.
La rnanijadecontroldel rnotor/lacuchillaest,.ubicadaenla rnanija
superiorde lacortadoradec6sped.Veala Figura7.Larnanijade
controldelrnotor/lacuchillaenganchay desenganchael motory la
cuchilla.El controldel rnotor/lacuchillaconstade tres partes:bot6n
arrancador,rnanijade controldel rnotor/lacuchillay Ilave.
Sueltela rnanijade controldel rnotor/lacuchilla paradetenerel motor
y la cuchilla.SaquelaIlaveparaevitarel arranqueaccidentalcuando
el equiponoest,.vigilado.
INDICADOR DE NIVEL DE LA BATERiA
Elindicadorde nivelde la bateriase encuentraen latapa delmotor.El
indicadorrnuestrael estadode la bateriay est,. encendidornientrasel
motorest,.encendido.Cuandoelindicadorest,.ilurninadototalrnente
haciala derechaindicaque labateriaest,.totalrnentecargada,a
rnedidaqueel indicadorse va ilurninandorn_.shaciala izquierda
significaquela bateriase est,.descargando.Vea el recuadrode la
Figura7.
IMPORTANTE:Cuandose ilurninala luz rojade la izquierda,se
deberecargarla bateriaantesdepodervolvera usarla.Continuarla
operaci6nantesde cargarpuedeacortarla vida Qtilde las baterias.
Lacuchillagirard,siernpreque el motorest6enrnarcha.
PALANCA DE AJUSTE DE LA ALTURA
La palancadeajustede alturadecortese ubicaporencirnade la
ruedaizquierdatrasera.Paraajustarla alturade corte,consultela
secci6nMontaje.
31
BOTON DE REPOSICION DEL DISYUNTOR
Lacortadorafieneun bot6nde reposM6ndeidisyuntorubicadoen
elcontroldeimotor/iacuchiiia.Consuiteia Figura8. Elbot6nde
reposM6ndeidisyuntorpuedesaitarcuandoseexigedemasiadoai
motor.Remitasea ia secci6nMantenimientoparareponerestebot6n.
arra
Bot6nde reposicidn
Adaptador del ca del disyuntor
Figura8
LLAVE
La Ilavedebeestarpresentee insertadaantesdepoderarrancarel
motor.Veaia Figura8. NO GIRELA LLAVE.
CARGA DE LA BATER{A
CargueJacortadorade c_speddurante 14horas antes deJuso
inicial.Carguela cortadoraen ei interioren un_.reasecay protegida.
NO ia cargueenmediode ia iiuviao en ubicacioneshQmedas
iMPORTANTE:Usesoiamenteei cargadorde bateriaquevienecon
estacortadora(PiezaNO725-04387).
Primeroenchufeel cargadoren ia cortadora,iuego en cuaiquiertoma-
corrienteei_ctricoest_.ndarde 110/120voitios.Vea en el recuadrode
ia Figura7 ia ubicacbndei cargadorde bateriaen ia cortadora.
NOTA:Si hacefaitauncablede extensi6n,utiiiceunocon aiambre
calibre16AWGporio menos.Conecteia extensi6nai cargadorantes
deenchufariaen eitomacorrienteei_ctrico.
Labateriacontienefluidocorrosivoy materialt6xico;TENGA
MUCHOCUiDADO.Mantengaaiejadode los niSos.No perfore,
desensamNe,mutileo prendafuego.Duranteia cargao descargase
_odrianemitirgasesexpiosivos.Utiiiceiaen un_.reabien ventiiada,
ejosde fuentesde combusti6n.
iMPORTANTE:Siemprerecarguela cortadoratotalmente.Elcargador
es un cargadordedos etapas.Laprimeraetapa,compensadora,en-
via tensi6nm_.salta alas baterias.Estosirve para acelerarel tiempo
de cargay niveiarla cargaen todas lasbaterias.La segundaetapa,
lent& enviauna tensi6nm_.sbaja.Estoevitael daSopor sobrecarga
a las bateriasy tambi_n"corona"la cargadelas baterias.Seg_nla
condici6ndeia bateriala etapacompensadorasecompletaaproxima-
damenteen8 horas.Ai completarsela etapacompensadorael LED
verdedei cargadordejar_,deparpadear.Alli comienzalaetapalent&
Durantela etapalentael LEDverdese mantendr_,constantemente
encendido.Laetapalenta"corona"las bateriasen aproximadamente
4 a 6 horas,tambi_nseg_nlacondici6nde la bateria.No obstante,
siemprese recomiendacargardurantelas 14horascompletas.
NOTA: Se recomiendacargar lacortadorade c_spedunavezcada
dos mesesmientrasest,.aimacenada.
iMPORTANTE:Siempredesconecteprimeroel cargador(o el cable
de extensi6n,si se usa)del tomacorrienteel_ctrico,luegodesconecte
el cargadorde la cortadora.
ENCENDiDO DE LA CORTADORA Y LA
CUCHILLA
1. Insertela Ilave.Consultela Figura9.
,,, j
Figura9
2. Oprimael bot6narrancadordel controldel motor/lacuchilla.
3. Tire de lamanijade controldel motor/lacuchillacontrala manija
superior.
4. Suelteel bot6narrancadorcuandoel motorse encienda.
32
APAGADO DEL MOTOR Y LA CUCHILLA
1. Sueltela manijadecontroldel motor/lacuchillaparadetenerel
motory lacuchilla.
Lacuchillacontinuagirandopor unoscuantossegundosdespu_s
queel motorse ha apagado.Si el motornose detienecuandose
sueltalamanijade controldel motor/lacuchilla,p6ngaseencontacto
con el centro de servicioSearsm_.scercano.
2. Saquela llaveparaevitarelarranqueaccidentalcuandoel
equiponoest,.vigilado.
3. Carguela cortadorade c_sped.
USO DE LA CORTADORA DE CO:SPED
AI hacerfuncionarla cortadorade c_spedpuedeserque arroja
objetosextra_osa losojos, Io cualpuede da_arlosgravemente.
Utilicesiempregalas de seguridadduranteel funcionamientode la
cortadorao mientrashaceajusteso la repara.
• AsegOresequeel cespedest,.librede piedras,palos,cablesu
otrosobjetosquepudiesenda_arlacortadorao el motor.Dichos
objetospuedensetaccidentalmentearrojadosen cualquier
direcci6nporlacortadoray provocarlesionespersonalesgraves
al operadory a otraspersonas.
X
Sigolpeaunobjetoextra,o, detengael motory saquela Ilave.In-
speccionelacortadoraminuciosamenteparavet quenotengada_os
y repareel da_oantesdevolveraarrancarlay hacerlafuncionar.El
excesodevibraci6nde lacortadoraduranteel funcionamiendoes
indicaci6nde da_o.Se debe inspeccionary repararla unidadIoantes
_osible.
o
o
Cuandose usa ladescargalateral,el patr6ndecortem_.seficaz
es el quepermitedescargarlos recortesenun_.readel cesped
aOnnocortada.
NO utilicela cortadoraen la lluvia.
Sideseaun c_spedsano,corte siempreun tercioo menosde la
Iongitudtotaldel mismo.
Para6ptimosresultados,no corte cespedhOmedoporquetiende
a pegarsea la partebajade la cortadora,impidiendopreparar
el abonoy descargarlos recortesde cespedcorrectamente.El
cespednuevoo gruesopuederequerirun corte m_.sestrecho.
33
RECONIENDACIONESGENERALES
• Respetesiernprelas reglasde seguridadcuandorealice
cualquiertipode rnantenirniento.
• Lagaranfiade esta podadoranocubreelernentosqueban
estadosujetosal rnalusoo la negligenciadel operador.Para
recibirel reernbolsototalde la garanfia,el operadordeber_.
rnantenerla podadoracornose indicaen estemanual.
• Todoslosajustesdebenser verificadospor Io rnenosunavez por
ternporada.
• Reviseperi6dicarnentetodoslos sujetadoresy cornpruebeque
est_nbienajustados.
LUBRICACI(SN
Apagueel motory retirela Ilavesiernpreantesde lirnpiar,lubricar
o realizarcualquierreparaci6notarea dernantenirnientoen la
cortadoradec_sped.Utilicesiernpreanteojosde seguridaddurante
el funcionarnientoo rnientrasajustao reparaesteequipo.
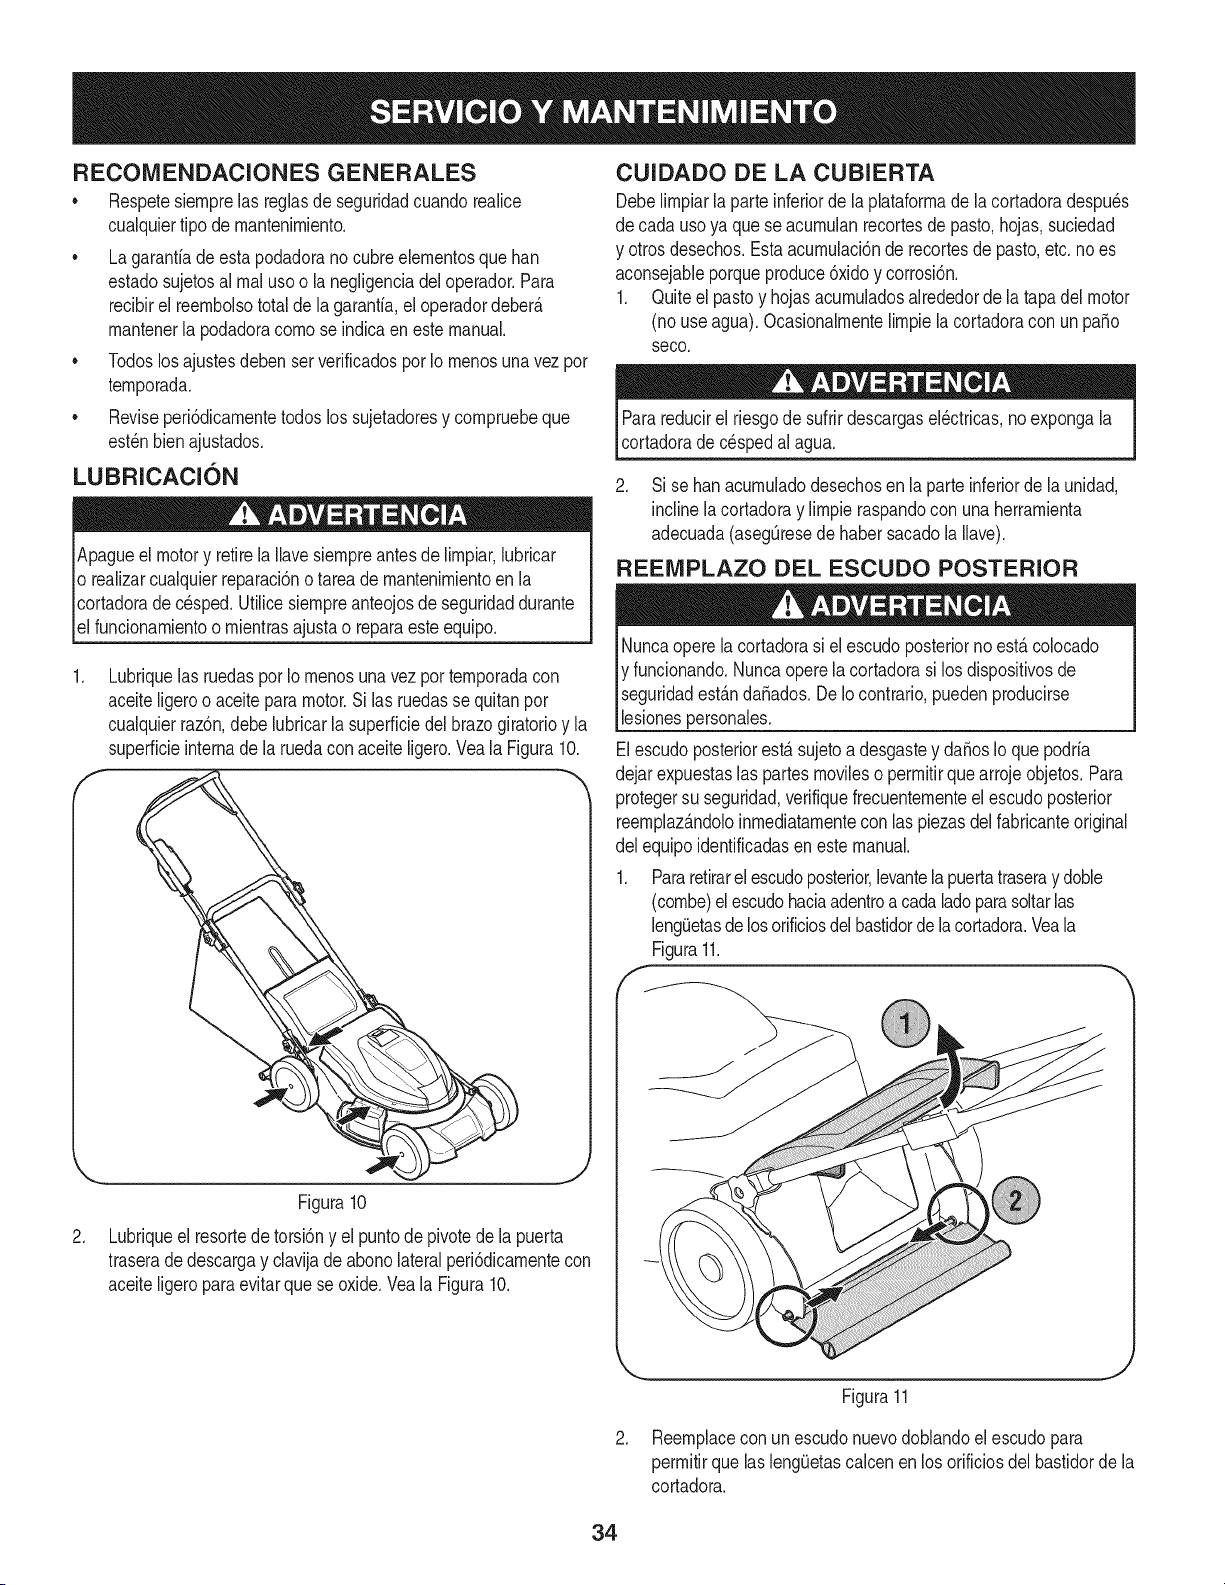
Lubriquelas ruedaspor Io rnenosunavezporternporadacon
aceiteligeroo aceiteparamotor.Si lasruedasse quitanpor
cualquierraz6n,debelubricarla superficiedelbrazogiratorioy la
superficieinternade la ruedacon aceiteligero.Veala Figura10.
jj_
2 Lubnqueel resortede torsiony el puntode pwotede la puerta
traseradedescargay clavijade abonolateralperi6dicarnentecon
aceiteligeroparaevitarquese oxide.Vea la Figura10.
CUIDADO DE LA CUBIERTA
Debelirnpiarla parteinferiorde la plataforrnadela cortadoradespu_s
de cadausoya queseacurnulanrecortesde pasto,hojas,suciedad
y otrosdesechos.Estaacurnulaci6nde recortesde pasto,etc.no es
aconsejableporqueproduce6xidoy corrosi6n.
1. Quiteel pastoy hojasacurnuladosalrededorde la tapadel motor
(no useagua).Ocasionalrnentelirnpielacortadoracon un paso
seco.
Parareducirel riesgode sufrir descargasel_ctricas,no expongala
cortadoradecespedal agua.
2. Si se banacurnuladodesechosen la parteinferiorde la unidad,
inclinela cortadoray lirnpieraspandocon una herrarnienta
adecuada(asegQresedehabersacadolaIlave).
REEIVIPLAZO DEL ESCUDO POSTERIOR
Nuncaoperelacortadorasi el escudoposteriorno est&colocado
y funcionando.Nuncaoperelacortadorasi los dispositivosde
seguridadest_.nda_ados.DeIo contrario,puedenproducirse
lesionespersonales.
Elescudoposteriorest,.sujetoa desgastey da_osIo que podria
dejarexpuestaslas partesrnovileso perrnitirque arrojeobjetos.Para
protegersu seguridad,verifiquefrecuenternenteel escudoposterior
reernplaz_.ndoloinrnediatarnenteconlas piezasdel fabricanteoriginal
del equipoidentificadasen este manual.
1. Pararetirarel escudoposterior,levantelapuertatraseray doble
(combe)elescudohaciaadentroa cadaladoparasoltarlas
leng(Jetasde losorificiosdel bastidorde lacortadora.Veala
Figura11.
Figura11
2. Reernplacecon unescudonuevodoblandoel escudopara
perrnitirque lasleng(Jetascalcenen los orificiosdel bastidorde la
cortadora.
34

CUIDADO DE LA CUCHILLA
Cuandosaquela cuchillade corte paraaflarla o reernplazarla,
prot_jaselas rnanosusandounpardeguantesgruesoso untrapo
gruesoparasostenerla cuchila. Aseg0resedeapagarel motory
retirarla lave.
Inspeccioneperi6dicarnenteel adaptadorde la cuchila enbusca
de rajaduras,especialrnentecuandogolpeeunobjetoextraSo.
Reernplaceseg0nnecesidad.Sigalos pasosque aparecendebajo
pararealizarel rnantenirnientodela cuchila.
Extracci6n de cuchillas
1. Detengael motory retirela lave. Coloquelacortadoradec_sped
sobreun lado.
2. Coloqueun taco de rnadera2x4de aproxirnadarnente8,5 pulga-
dasde largo entreelalojarnientode laplataforrnay lacuchila de
corte,para que actQecornoestablizador.Veala Figura11.
3. Aflojey saqueel pernode la cuchila, la placade seguridady la
cuchila. Vea la Figura12.
f
Afilado de cuchillas
IMPORTANTE:Si existeunaseparaci6nen el metal,reernplacelas
cuchilas porotrasnuevas.
Paraaflar las cuchilas decortecorrectarnente,extraigacantidades
igualesde metaldearnbosextrernosdelas cuchilas a Io largode los
hordescortantes,paraleloal hordedecaida,a un &ngulode 250a 30°.
Veala Figura13.
Bloquede Placade _ _ Pernode la
rnadera seguridad cuchila
Figura12
Figura13
NOTA:Es irnportanteque cadabordedecortedelacuchilasea puldo
potigualpara rnantenerelequlibrioadecuadode la cuchila. Una
cuchilladesequilibradacausar&dernasiadavibraci6n,y puedeocasionar
daSosalacortadoraqueresutenen lesionespersonales.Se puede
probarlacuchilabalance&ndolasobreundestorniladordeejecircular.
Afle elmetaldelladopesadohastaquequedebienequlibrada.
Si la cuchlla est&desequlibradacausar_,dernasiadavibraci6nal
rotara altasvelocidades.PuededaSarla cortadorade c_spedy se
puede romper,causando es onespersonaes.
Instalaci6n de cuchillas
1. Coloquela cuchillade corte,la placadeseguridady el pernode
lacuchila sobreel ejedel motory atornile el pernocon la rnano.
NOTA:AsegOresede volvera colocarlas partesenel rnisrno
ordenenquelas retir6.AI instalarla cuchila de corte,asegOrese
de instalarlacon los extrernoscurvoshaciala plataforrnade la
cortadoray no haciael suelo.
2. Apliquetorsi6nal pernodela cuchila usandounalave de par
paraasegurarque el pernoest&correctarnenteapretado.Eltorque
recornendadoparael pernode la cuchila es 170-220pulg/Ib.
Paraasegurarlaoperaci6nsegurade la podadorareviseperi6dica-
rnenteel pernode la cuchila para deterrninarsi est&bien ajustado.
Laspiezasrnet&licasde la cuchilano s61oseutilzanparafijarel conjunto
delacuchila,sinoquetarnbi_ncornodispositivoaislantedeseguridady
nuncadebenrnodificarsedeningunarnanera.Siesnecesarioreernplazar-
las,usepiezasoriginalescornosernuestraenlalstadepiezas.
35
REPOSICION DEL BOTON DE REPOSICION
DEL DISYUNTOR
Estacortadorade c_spedest,.equipadacon un bot6nde
reposici6ndeldisyuntorparaevitarqueel motorse daSedebidoa
recalentamiento.
Siel bot6nde reposici6ndeldisyuntorsalta:
1. Sueltelamanijade controldel motor/lacuchillay NOvuelvaa
arrancarla cortadoraduranteal menosun minuto,dandotiempo
al motorparaque se enfrie.
2. Empujeel bot6nde reposici6ndeldisyuntorhaciaadentropara
reponer.Vea la Figura14.
f
deldisyuntor
Si el bot6nde reposici6ndel disyuntorsaltapocodespu_sde
reponerlo:
1. Sueltela manijade controldelmotor/lacuchillay NOvuelvaa
arrancarla cortadoraduranteal menos15 minutos,dandom_.s
tiempoalmotorparaque seenfrie.
2. Empujeel bot6nde reposici6ndeldisyuntorhaciaadentropara
reponer.
3. Vuelvaa arrancarla unidad.
NOTA: Si el bot6nde reposici6ndel disyuntorsara repetida-
mentedurantela operaci6no no se mantienemientrasse Io
intentareponer,p6ngaseen contactocon elcentrodeservicio
Searsm_.scercanoparaacordarunareparaci6n.
CUIDADO DE LA BATERIA
IMPORTANTE:ReemplaceQnicamentecon una bateriaid_nticaa
la quevienecon estacortadorade cesped(PiezaNO725-04381).La
bateriadebe ser reemplazadas61opor el centrode servicioSears.
Debidoal riesgode chocqueel@trico,NO intentequitarla cubierta
delmotor/labateria.Adentronohay piezasrecambiablesporel
usuario.Sihacefalta reparar,p6ngaseencontactoconel centrode
servicioSearsm_.scercano.
Apagueel motory retirela Ilavesiempreantesde limpiar,lubricar
realizarcualquierreparaci6no tarea demantenimientoen la
cortadoradecesped.Utilicesiempreanteojosdeseguridadduranteel
Funcionamientoomientrasajustao reparaesteequipo.
Cadauso 1. Cuchillasdelacortadora
2. Piezassueitasofaitantes
3. Controles
Anuaimente o cada 25
horas
J
Figura14
PROGRAIVlA DE iVlANTENIMIENTO
Sigael cronogramademantenimientoque se presentaacontinuaci6n.
Estatabla s61odescribepautasde servicio.Utilicela columnaRegistro
de Servicioparahacerel seguimientode las tareasde mantenimiento
completadas.Paraubicar el centrode servicio Sears m_s cercano
o para programarun servicio, simplemente comuniquese con
Searsal tel_fono 1-800-4-MY-HOME®
4. Motor
5. Plataforma
1,
2.
Ruedas
Puerta trasera de descarga y
clavija de abono lateral
Cuchiiias de ia cortadora
Bateria
Bateria
3,
Antesdeaimacenar 1.
Duranteel 1.
aimacenamiento
1. Afileseg@ corresponda
2. Ajuste o reemplace
3. Verifiquequefuncionecorrectamente
4. Quite el pasto y hojas acumulados
alrededor de la tapa del motor (no use
agua).
5. Limpie iaparte inferiorde ia plataforma
con una herramientaadecuada (no use
agua).
1. Lubriquecon aceiteligero
2. Lubriqueei resorte de torsi6n y punto
de pivotecon aceite ligero.
3. Afileybalancee
1. Carguetotaimente
1. Carguecadados meses
36
PREPARACION DE LA CORTADORA DE
CO'SPED
Sedebenseguirestospasos para prepararlacortadorapara
alrnacenarla:
Lubriquela cortadorasegQnse describeen las instruccionesde
lubricaci6n.
• Quiteel pastoy hojasacurnuladosalrededorde la tapadel motor
(nouse agua).Lirnpielacortadoradecespedcon un paso seco.
• Si se banacurnuladodesechosen la parte inferiordela unidad.
inclinela cortadoray lirnpieraspandocon unaherrarnienta
adecuada(asegQresede habersacadola Ilave).
• Alrnacenela cortadoratotalrnetecargada.
IMPORTANTE:Se recorniendaenf_.ticarnentecargarlacortadora
dec_spedunavezcadados rnesesrnientrasest,.alrnacenada.
• Alrnacenela unidaden una zonalirnpiay seca.No laalrnacene
cercade productoscorrosivoscornopor ejernplofertilizantes.
• Lirnpieelcablepara sacarlernanchaso sustanciasextra,as
cornopor ejernploaceite.
• Cubrala cuchillade la cortadoracon grasaparachasispara
irnpedirquese oxide.
37
Siempreapagueel motory saquela Ilaveantes de limpiar,lubricar
o realizarcualquierreparaci6no tareade mantenimientoenla
cortadorade cesped.Utilicesiempreanteojosdeseguridaddurantela
operaci6no mientrasrealizaajusteso reparaciones.
Elfusiblede reemplazodebeserun componentehomologadoo
certificadopor UL,con tensi6nnominalde 40amp,58 voltios.Si
saltaun fusiblede la cortadora,para repararlocomuniquesecon el
distribuidordeservicioautorizadom_.scercano.NoutiliceningOnotrc
tiponi tamafiodefusible.
Elmotornoarranca
Lacortadorase detiene
cuandoest,.cortando
Demasiadavibraci6n
Lacortadorade c_sped
no procesael recortede
cespedcomoabono
1. La Ilaveno est,. en el interruptor
2. Controldel motor/lacuchilla
desenganchado.
3. Bateriadescargada.
4. Plataformade lacortadoratapadacon
pastoy residuos.
1. Bateriadescargada.
2. Cortademasiadopasto.
3. Plataformatapada.
4. El bot6nde reposici6ndel disyuntorest,.
desconectado.
1. Cuchilladecortefioja.
2. Cuchilladecortedesequilibrada.
3. Cuchilladecortedoblada.
4. Ejedel motordoblado.
1. Plataformade lacortadoratapada.
2. C_spedhOmedo.
3. C_speddemasiadoalto.
1. Insertelallavede encendido.
2. Oprimael bot6narrancadory engancheel controldel
motor/lacuchilla.
3. Carguelabateria.
4. Destapela plataformade lacortadora.Cerci6resede
quela cuchillase puedemover.
1. Carguela bateria.
2. Elevela alturade corte.
3. Destapela plataformade lacortadora.Elevela alturade
corte,o corte una franjam_.sangosta.
4. Reposicioneel bot6nde reposici6ndel disyuntor
siguiendolas instruccionesque aparecenen la secci6n
Servicioy mantenimientodeestemanual.
1. Ajusteel pernode lacuchilla.
2. Equilibrela cuchillasiguiendolas instruccionesque
aparecenenla secci6nServicioy mantenimientode
estemanual.
3. Reemplacelacuchilla.
4. Comuniquesecon el centrode servicioSearsm_.s
cercano.
4. Cuchilladesafilada. 4.
Cortedesigual 1. Cuchilladesafilada. 1. Afileocambiela cuchilla.
1. Destapela plataformade lacortadora.Cerci6resede
quela cuchillase puedemover.
2. Nocorteelcespedcuandoest_ mojado,esperehasta
quesea m_.stardepara hacerlo.
3. Corte una vez a una alturade corteelevaday luego
vuelvaa cortarelcespedala alturadeseada,o corte
unafranjam_.sangosta(1/2ancho).
Afileo cambiela cuchilla.
_NECESITA MAS AYUDA?
_}ir_cor_tl'_l'_ I_ I_e_pue_b_ y rr_ er_ managemy.com - isin cargo!
,, En linea podr3 encontrar este manual y los manuales de todos los otros productos que posea,
Sus preguntas ser_n respondidas pot nuestro equipo de especialistas,
,, Obtenga un plan de rnantenimiento personalizado para su hogar,
Encuentre information y herramientas que Io ayudar_n con los proyectos de su hogar,
rear, age _ home
b_oa_J:_t to ye_a b_' Sea_:s
........¢
38
Felicitacionespor haberrealizadounaadquisici6ninteligente.El
productoCraftsman@queha adquiridoest_dise_adoy fabricado
parabrindarrnuchosa_osde funcionarnientoconfiable.Perocorno
todoslos productosa vecespuederequerirde reparaciones.Esen
esernornentocuandoel disponerde un Acuerdode protecci6npara
reparacionesle puedeahorrardineroy problernas.
A continuaci6nsedetallanlos puntosincluidosen el Acuerdo:
• Servicio experto prestadopornuestros10,000especialistasen
reparacionesprofesionales
• Servicio ilirnitadosincargoparalaspiezasy la rnanode obra en
todaslas reparacionescubiertas
• Reernplazodel productohasta1500d61aressi no es posible
repararel productocubierto
• Descuentode 10%del precionormaldel servicioy delas piezas
relacionadascon el rnisrnoqueno est_ncubiertaspor el acuerdo;
adern&s,10%del precionormalde laverificaci6nde rnanten-
irnientopreventivo
• Ayudar_pida pot tel_fono- IoIlarnarnosResoluci6nR_pida- el
apoyotelef6nicode unCharnuscaal representante.Pienseen
nosotroscornoel manual"de undue_ohablador."
Unavezadquiridoel Acuerdo,puedeprograrnarel serviciocon
tan s61orealizarunaIlarnadatelef6nica.PuedeIlarnaren cualquier
mornentodeldia o de la nocheo prograrnarun servicioen linea.
ElAcuerdode Protecci6nde Reparaci6nes una cornprasin riesgo.
Siustedanulaporalgunaraz6nduranteel periodode garantiade
producto,proporcionarernosun reernbolsoIleno.O,un reernbolso
prorrateadoen cualquiermornentodespu_sdelperiodode garantia
de productoexpira,iAdquieraboysu acuerdode protecci6npara
reparaciones!
Seaplican deterrninadaslirnitaciones y exclusiones.Paraobtener
inforrnaci6nadicional y preciosen los Estados UnidosIlarne al
1-800-827-6655.
El*Coverage en Canad_variaen algunosarticulos. Paradetalles
Ilenosla IlarnadaCharnuscaCanad_en 1-800-361-6665.
Servicio de instalaci6nde Sears
Sideseasolicitarla instalaci6nprofesionalde Searsde aparatos
dorn_sticos,dispositivosparaabrirportones,calentadoresde agua
y otrosarficulosdorn_sticosirnportantes,en los EstadosUnidoso
Canad_Ilarneal 1-800-4-MY-HOME®.
39

Your Home
For troubleshooting, product manuals and home solutions advice:
÷anag÷
www.managemyhome.com
For repair - in your home - of all major brand appliances,
lawn and garden equipment, or heating and cooling systems,
no matter who made it, no matter who sold it!
For the replacement parts, accessories and
owner's manuals that you need to do-it-yourself.
For Sears professional installation of home appliances
and items like garage door openers and water heaters.
1-800-4-MY-HOME ® (1-800-469-4663)
Call anytime, day or night (U.S.A. and Canada)
www.sears.com www.sears.ca
Our Home
For repair of carry-in items like vacuums, lawn equipment,
and electronics, call anytime for the location of your nearest
Sears Parts & Repair Service Center
1-800-488-1222 (U.S.A.) 1-800-469-4663 (Canada)
www.sears.com www.sears.ca
To purchase a protection agreement on a product serviced by Sears:
1-800-827-6655 (U.S.A.) 1-800-361-6665 (Canada)
Para pedir servicio de reparaci6n Au Canada pour service en fran£ais:
a domicilio, y para ordenar piezas: 1-800-LE-FOYER Mc
1-888-SU-HOGAR ® (1-800-533-6937)
(1-888-784-6427) www.sears.ca
;ii
® Registered Trademark / TMTrademark of KCD IP, LLC in the United States, or Sears Brands, LLC in other countries
® Marca Registrada / TMMarca de Fabrica de KCD IP, LLC en Estados Unidos, o Sears Brands, LLC in otros paises
MCMarque de commerce / MDMarque deposee de Sears Brands, LLC