CONTENTS
SAFETY
USE AND CARE
Your Range and Its Features ..................................... 6
Oven Vent ..................................................................... 6
Range Controls ......................................................... 9-16
Cooktop Controls ........................................................ 7
Wok Cooking ................................................................ 8
Oven Cooking ............................................................ 11-13
Broiling ........................................................................ 14
Self,Clean Cycle .................................................. 15, 16
Cleaning Tips .....................................................................17, 18
Removable Range Parts ........................................ 19, 20
BEFORE CALLilNG FOR SERVgCE
What to Do Before Calling for Service ............. 21, 22
Thermostat Adjustments .....................................................23
WARRANTY
MODEL 95846
95845
95849
USE • E • SAFE rY
MANUAL
229C4020P009 SR10215
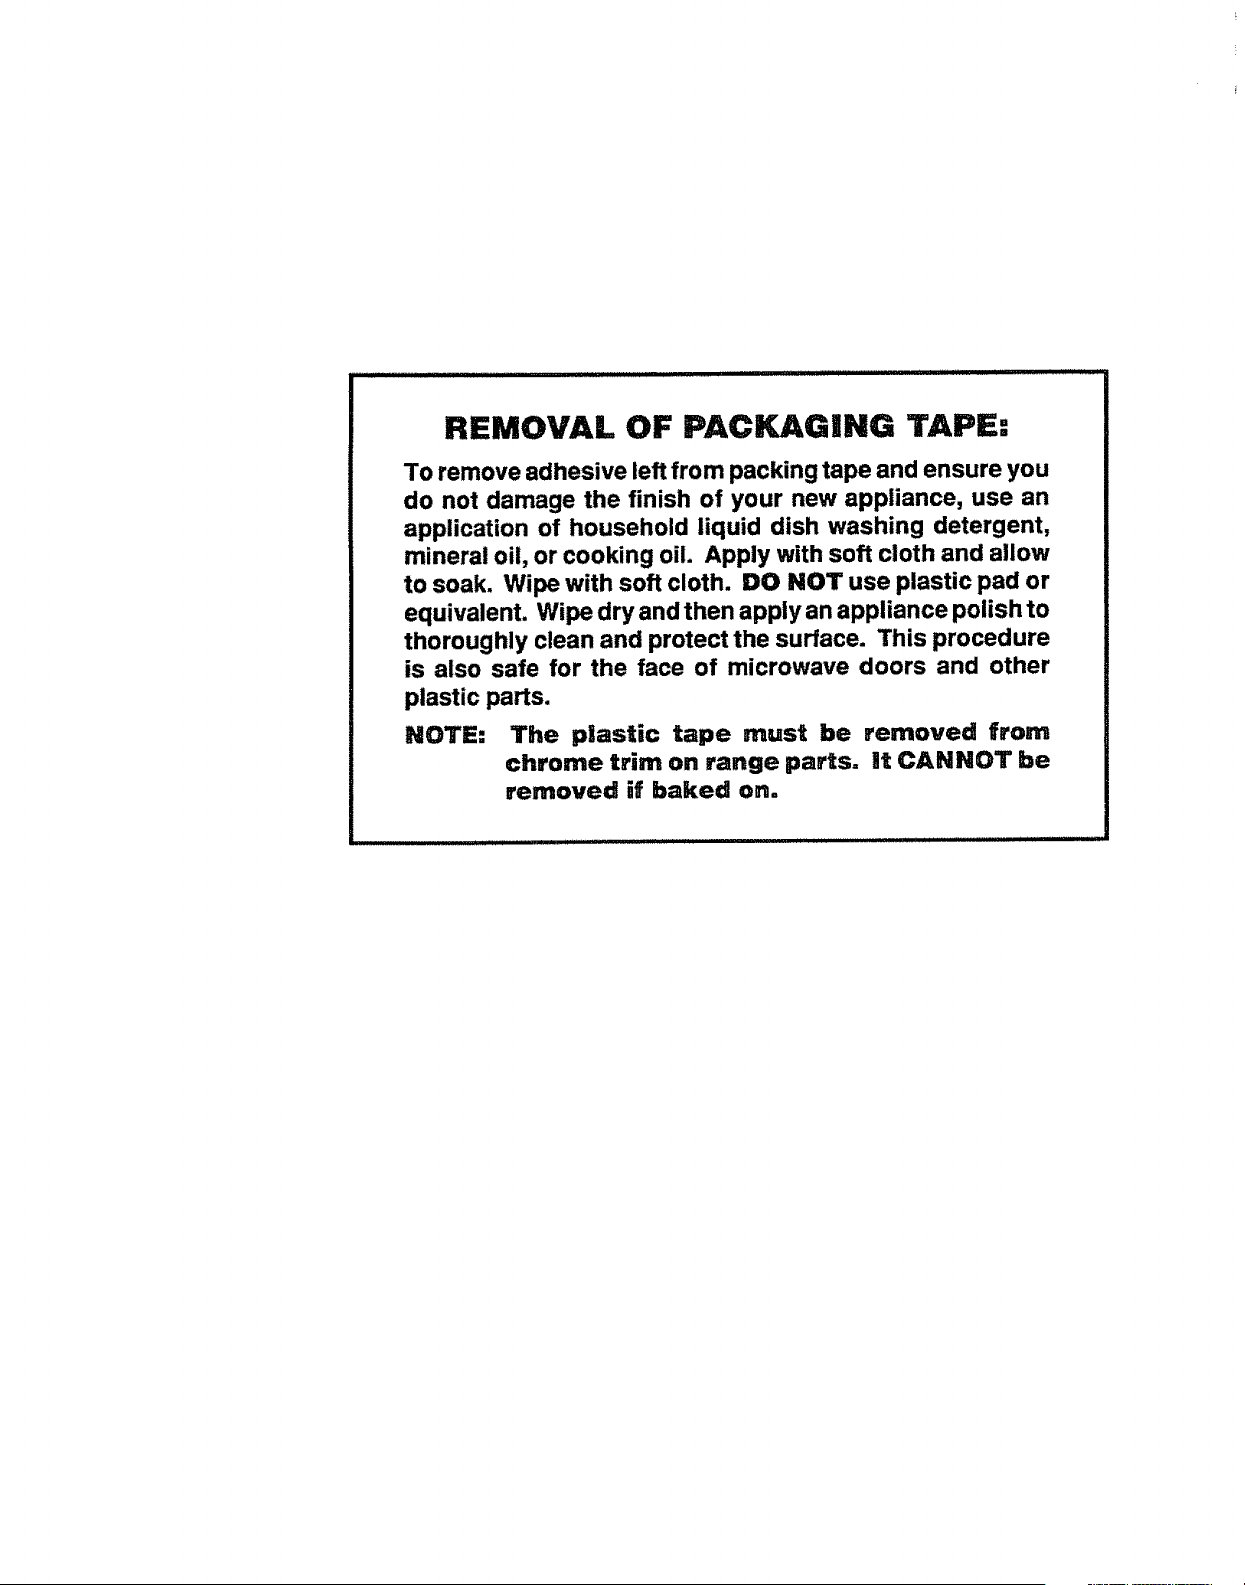
REMOVAL OF PACKAGING TAPE:
To remove adhesive left from packing tape and ensure you
do not damage the finish of your new appliance, use an
application of household liquid dish washing detergent,
mineral oil, or cooking oil. Apply with soft cloth and allow
to soak. Wipe with soft cloth. DO NOT use plastic pad or
equivalent. Wipe dry and then apply an appliance polish to
thoroughly clean and protect the surface. This procedure
is also safe for the face of microwave doors and other
plastic parts.
NOTE:
The plastic tape must be removed from
chrome trim on range parts, it CANNOT be
removed if baked on.
i " i
° ALL RANGES CAN TiP
o INJURY TO PERSONS
COULD RESULT
• INSTALL ANTI-TIP
DEVICE PACKED
WITH RANGE
= SEE INSTALLATION
INSTRUCT_ONS
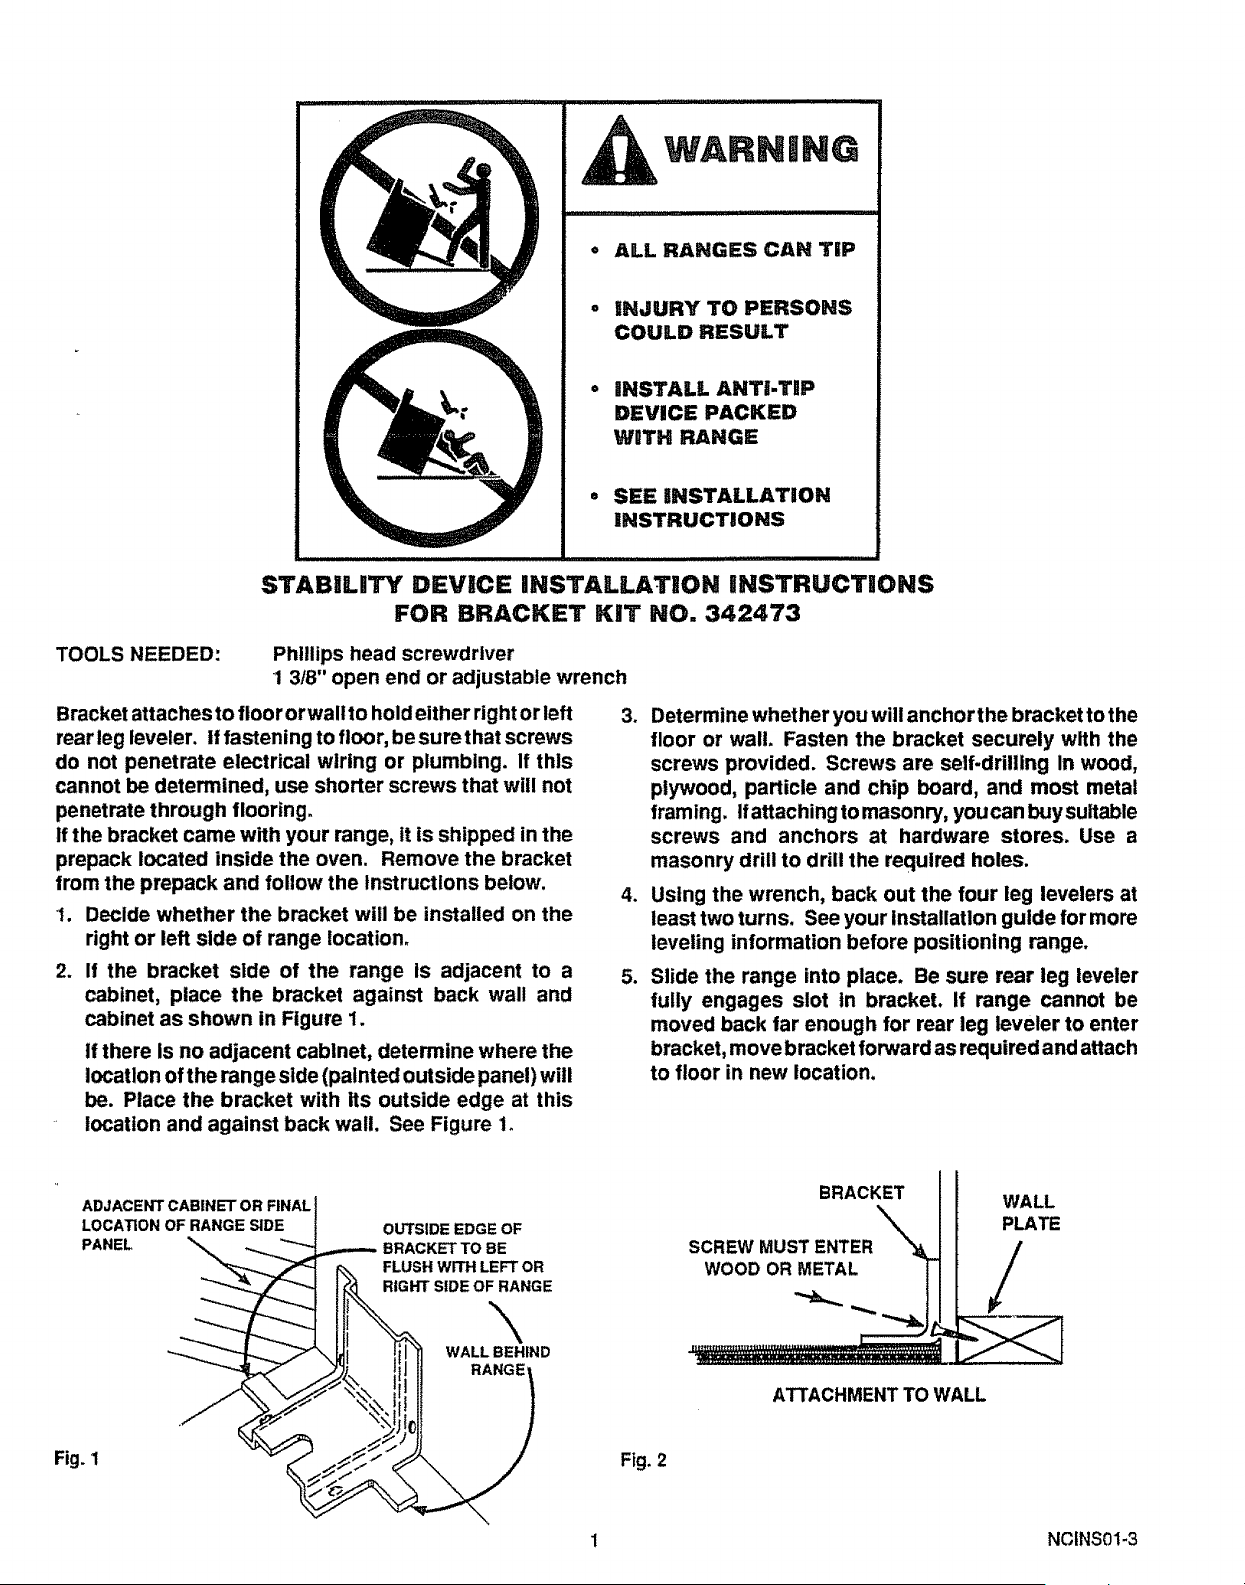
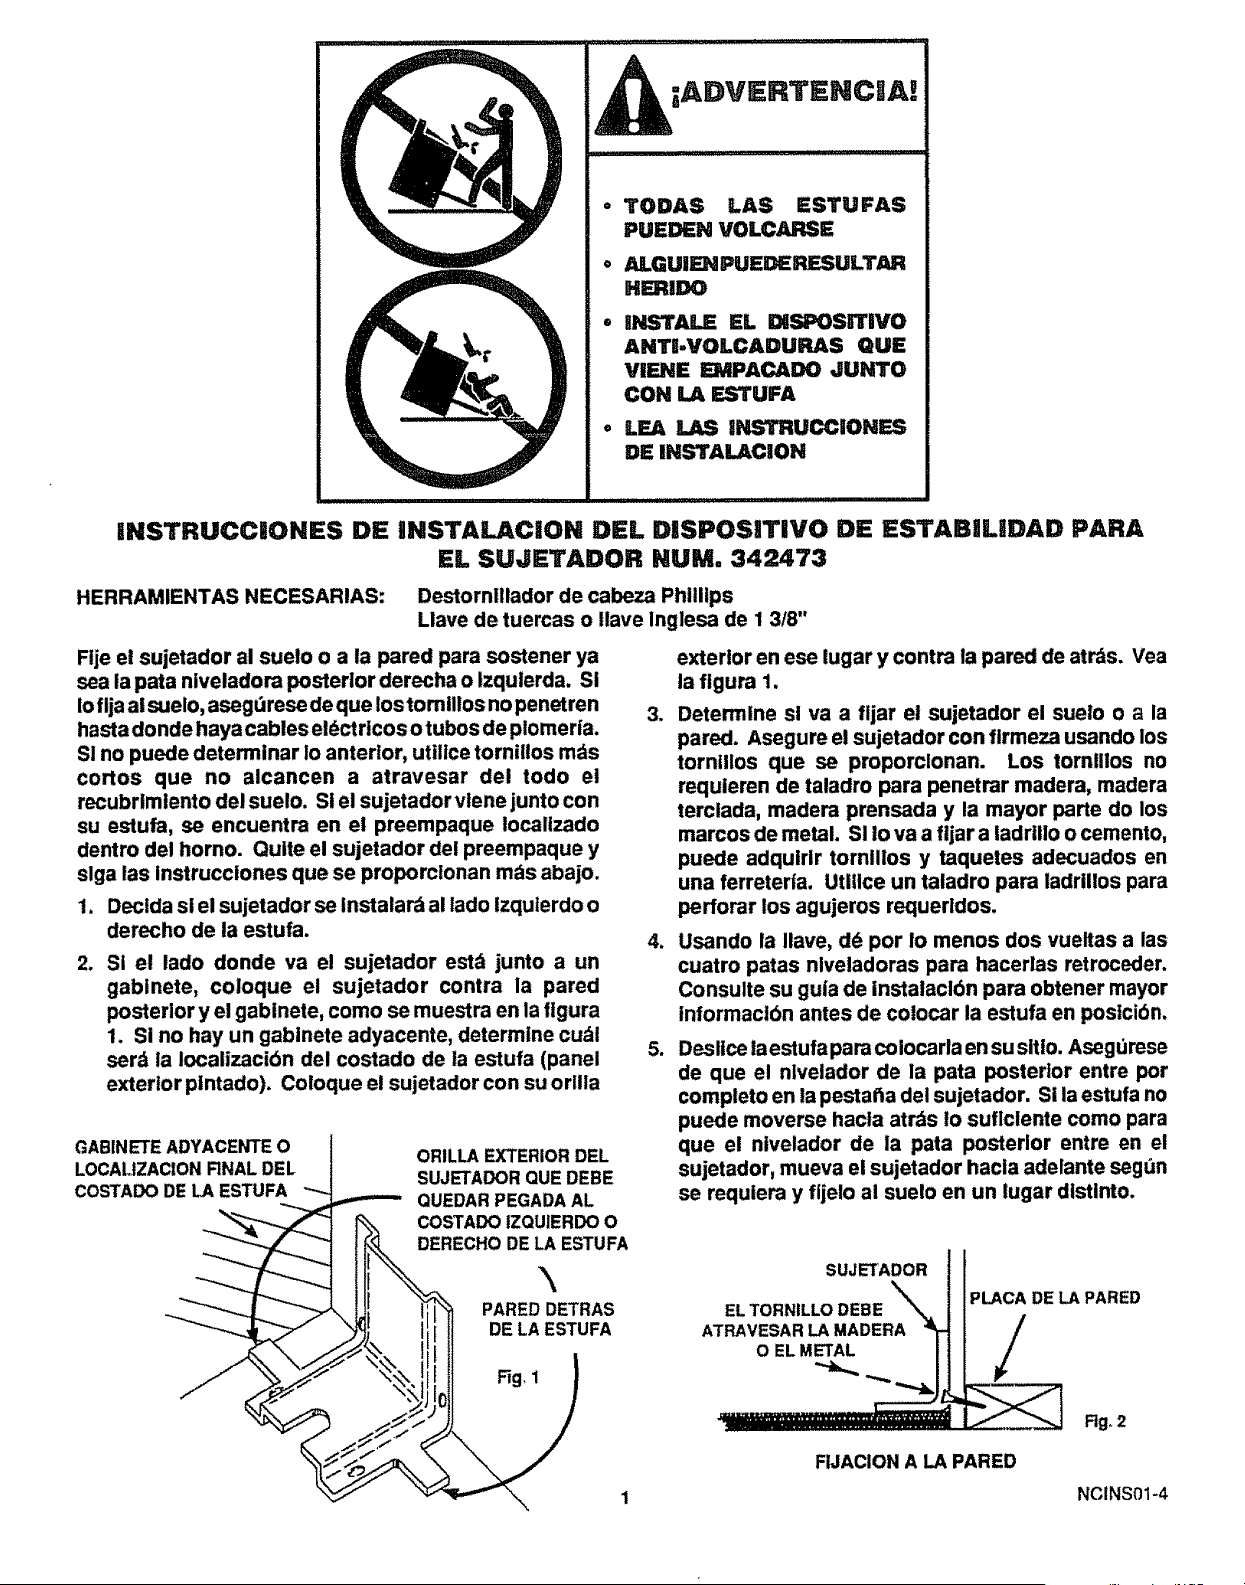
STABILITY DEVICE iNSTALLATION INSTRUCTIONS
FOR BRACKET KIT NO, 342473
TOOLS NEEDED:
Phillips head screwdriver
1 3/8" open end or adjustable wrench
Bracket attaches to floor or wall to hold either right or left
rear leg leveler, if fastening to floor, be sure that screws
do not penetrate electrical wiring or plumbing. If this
cannot be determined, use shorter screws that will not
penetrate through flooring.
if the bracket came with your range, It is shipped in the
prepack located inside the oven. Remove the bracket
from the prepack and follow the Instructions below.
t. Decide whether the bracket will be installed on the
right or left side of range location.
2. If the bracket side of the range is adjacent to a
cabinet, place the bracket against back wall and
cabinet as shown in Figure 1.
If there Is no adjacent cabinet, determine where the
location of the range side (painted outside panel) will
be. Place the bracket with its outside edge at this
location and against back wall. See Figure 1.
3. Determine whether you will anchor the bracket to the
floor or wall. Fasten the bracket securely with the
screws provided. Screws are self-drilling in wood,
plywood, particle and chip board, and most metal
framing. If attaching to masonry, you can buy suitable
screws and anchors at hardware stores. Use a
masonry drill to drill the required holes.
4. Using the wrench, back out the four leg levelers at
least two turns. See your installation guide for more
leveling information before positioning range.
5. Slide the range into place. Be sure rear leg leveler
fully engages slot in bracket. If range cannot be
moved back far enough for rear leg leveler to enter
bracket, move bracket forward as required and attach
to floor in new location.
ADJACENT CABINET OR FINAL
LOCATION OF RANGE SIDE
PANEL
OUTSIDE EDGE OF
BRACKET TO BE
FLUSH WITH LEFT OR
RIGHT SIDE OF RANGE
\
WALL BEHIND
RANGE
BRACKET
SCREW MUST ENTER_'_!_
WOOD OR METAL |
WALL
PLATE
/
ATTACHMENT TO WALL
Fig. 1
Fig. 2
1 NCtNS01-3
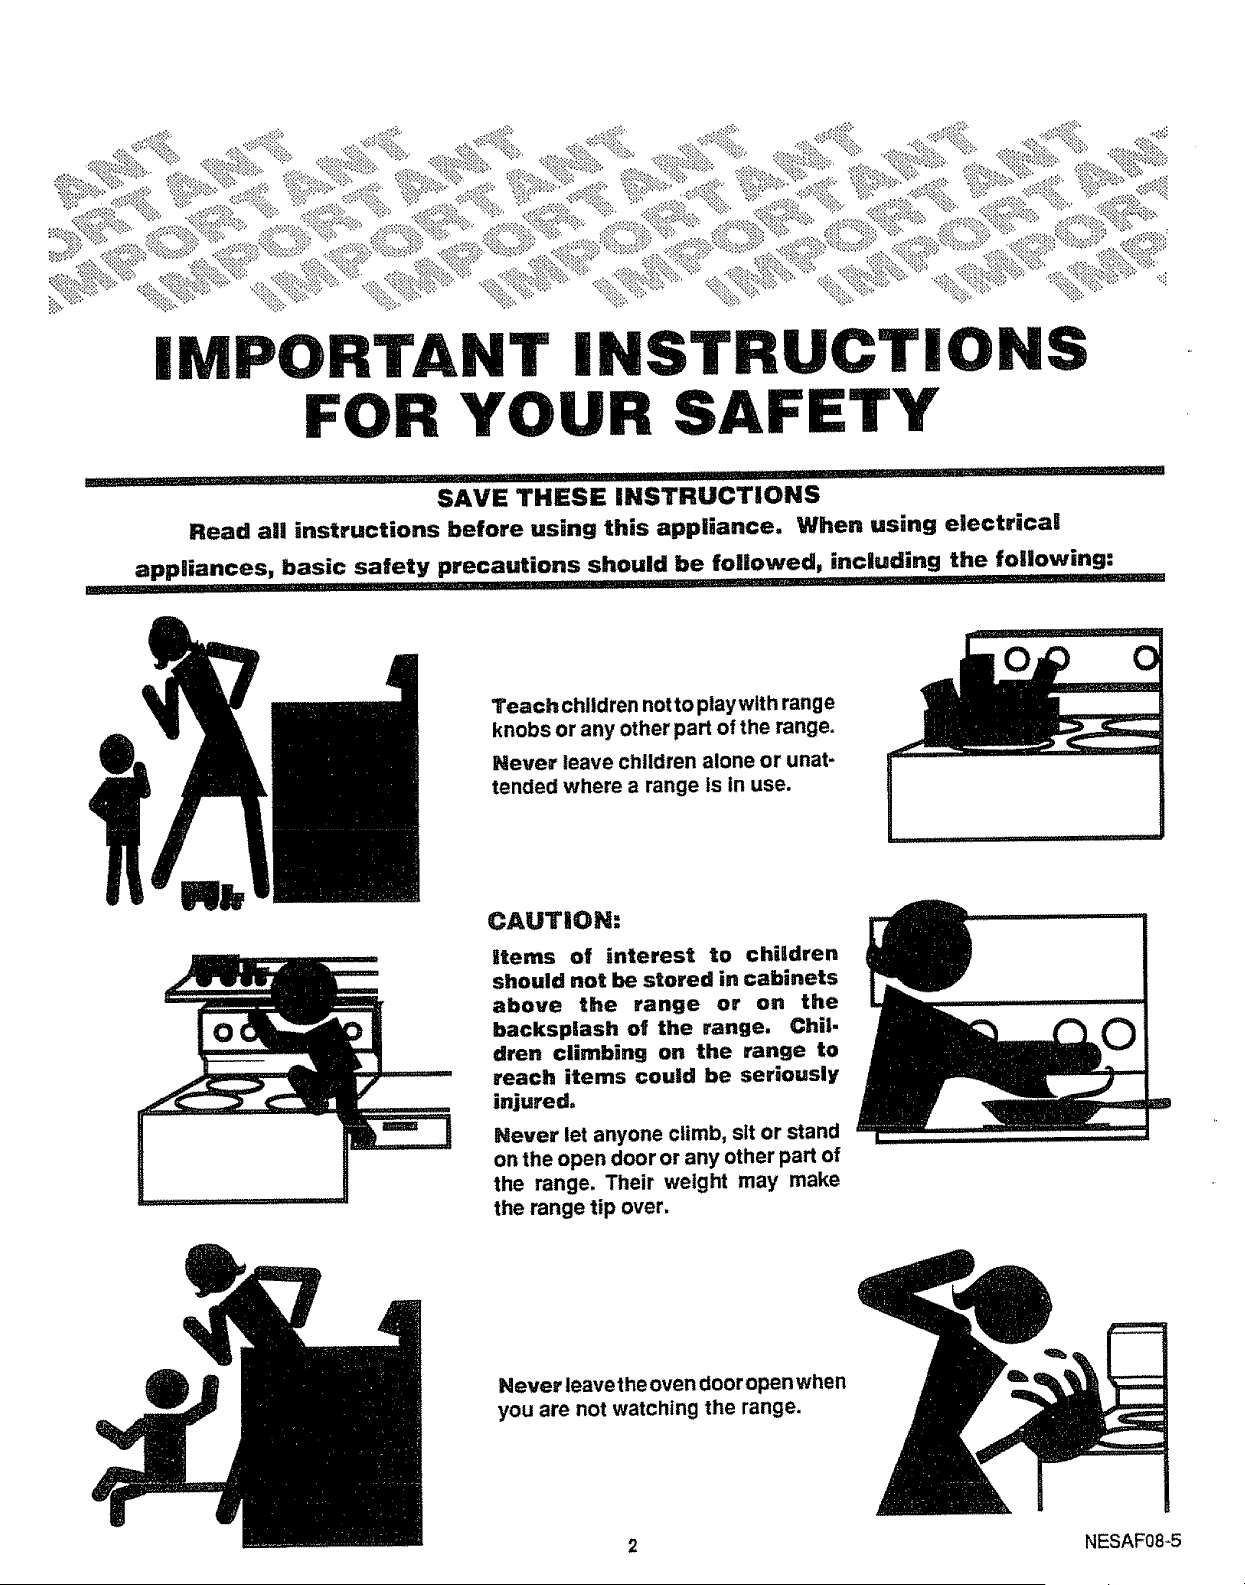
IMPORTANTFoRYOK RST R UCT IONS
SAVE THESE iNSTRUCTIONS
Read all instructions before using this appliance. When using electrical
appliances, basic safety precautions should be followed, including the following:
....... i i irllll I1 II ; i'"ql ...................... i i ..........
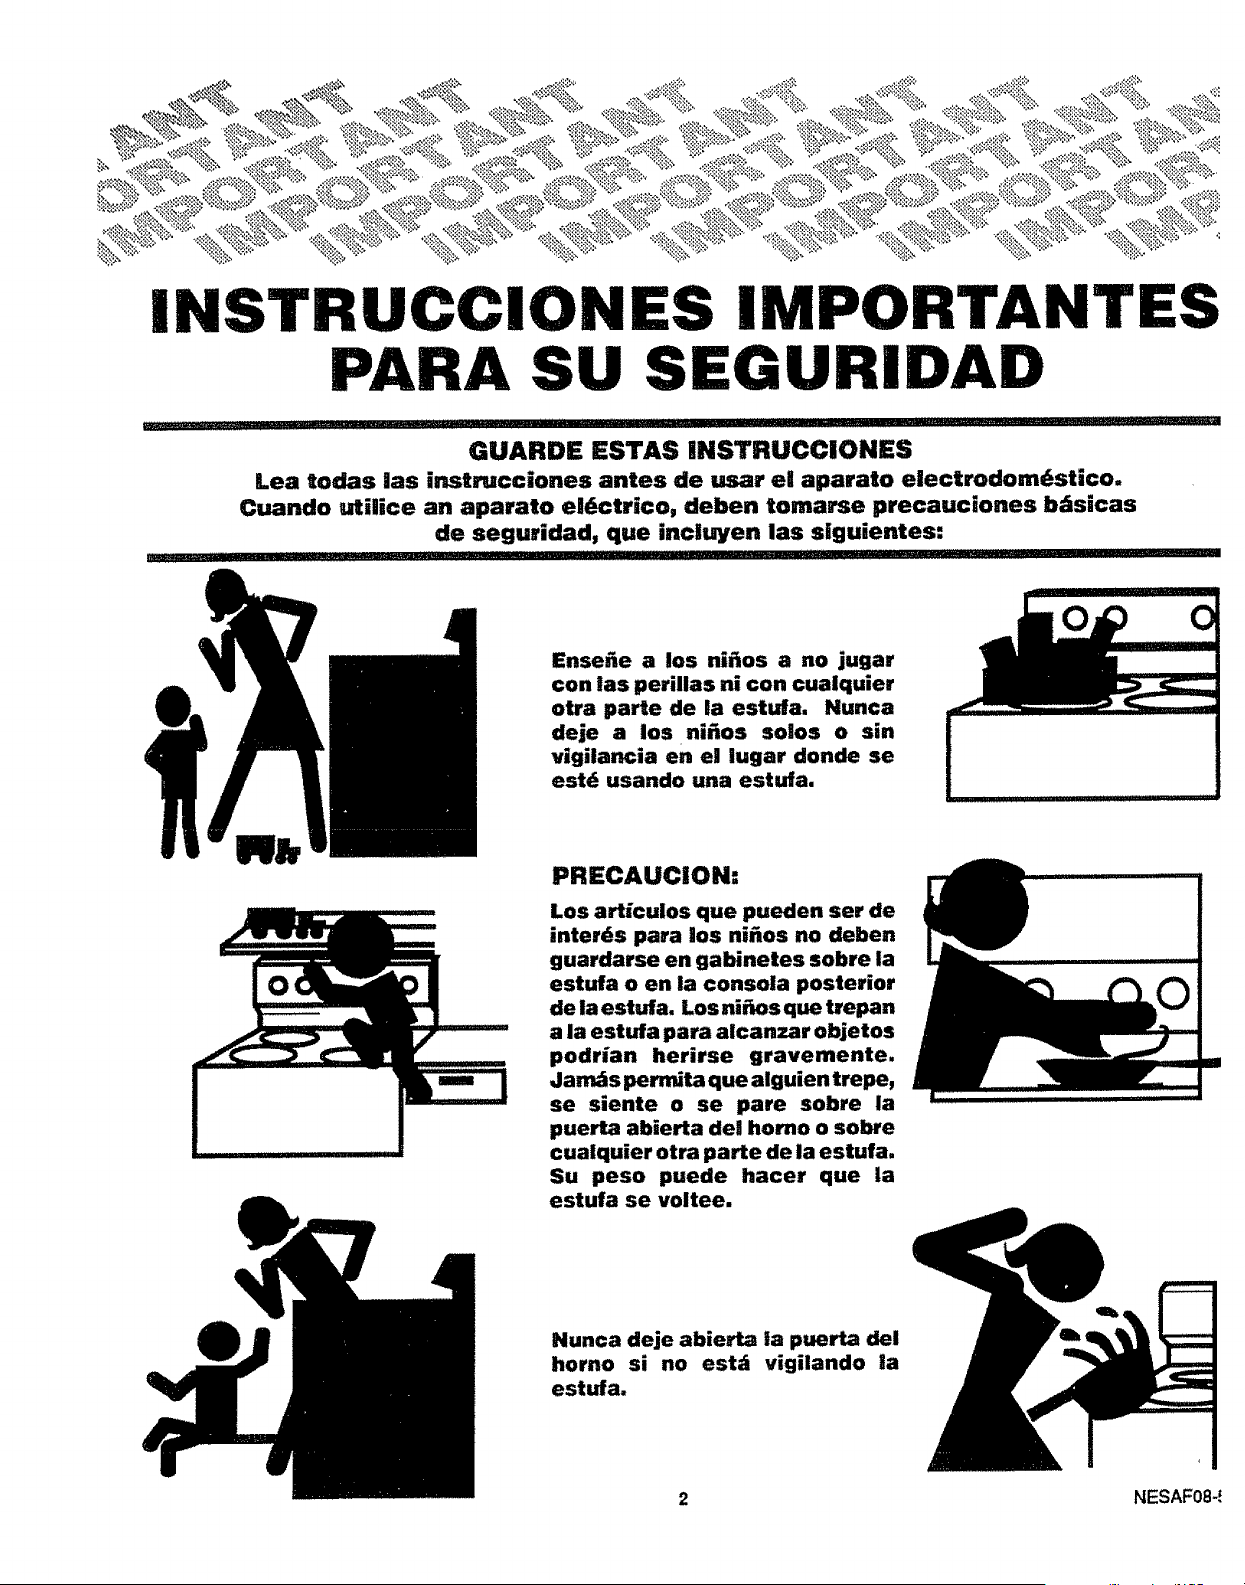
Teach children not to play with range
knobs or any other part of the range.
Never leave children alone or unat-
tended where a range is in use.
CAUTION:
items of interest to children
should not be stored in cabinets
above the range or on the
backsplash of the range. Chil-
dren climbing on the range to
reach items could be seriously
injured,
Never let anyone climb, sit or stand
on the open door or any other part of
the range, Their weight may make
the range tip over,
Never leavet he oven door open when
you are not watching the range.
2 NESAF08-5
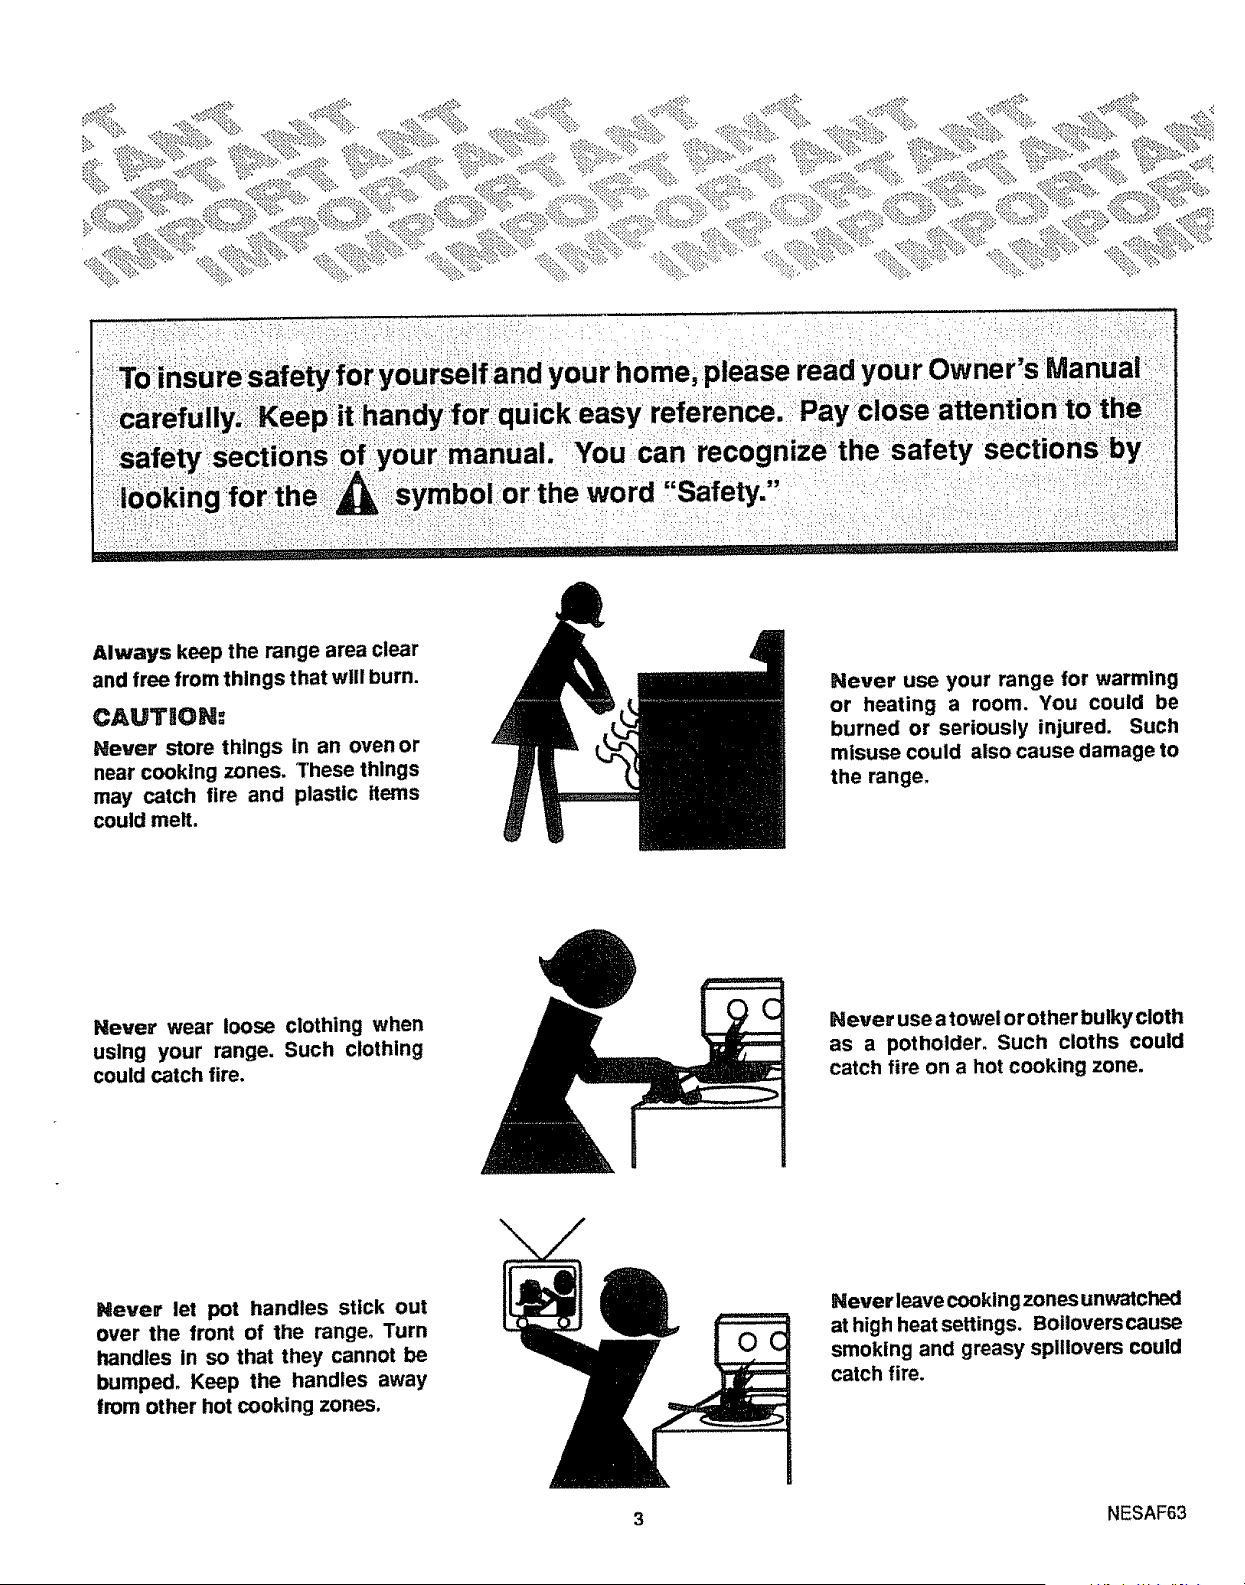
'::i your hOme; please read yOur oWner,sManuai'#i:_
/referefi_. _=Payiclo_: affe .
Youcan reco nize!;the:Safet_sectio_s:_:_yi! :::=
he word ',Safety,', ; :',_/: i __
Always keep the range area clear
and free from things that wlll burn.
CAUTION:
Never store things in an oven or
near cooking zones. These things
may catch fire and plastic items
could melt.
Never use your range for warming
or heating a room. You could be
burned or seriously injured. Such
misuse could also cause damage to
the range.
Never wear loose clothing when
using your range. Such clothing
could catch fire.
Never use atowel or other bulky cloth
as a potholder, Such cloths could
catch fire on a hot cooking zone.
Never let pot handles Stick out
over the front of the range° Turn
handles in so that they cannot be
bumped. Keep the handles away
trom other hot cooking zones.
Never leave cooking zones unwatched
at high heat settings. Boiloverscause
smoking and greasy spillovers could
catch fire.
3 NESAF63
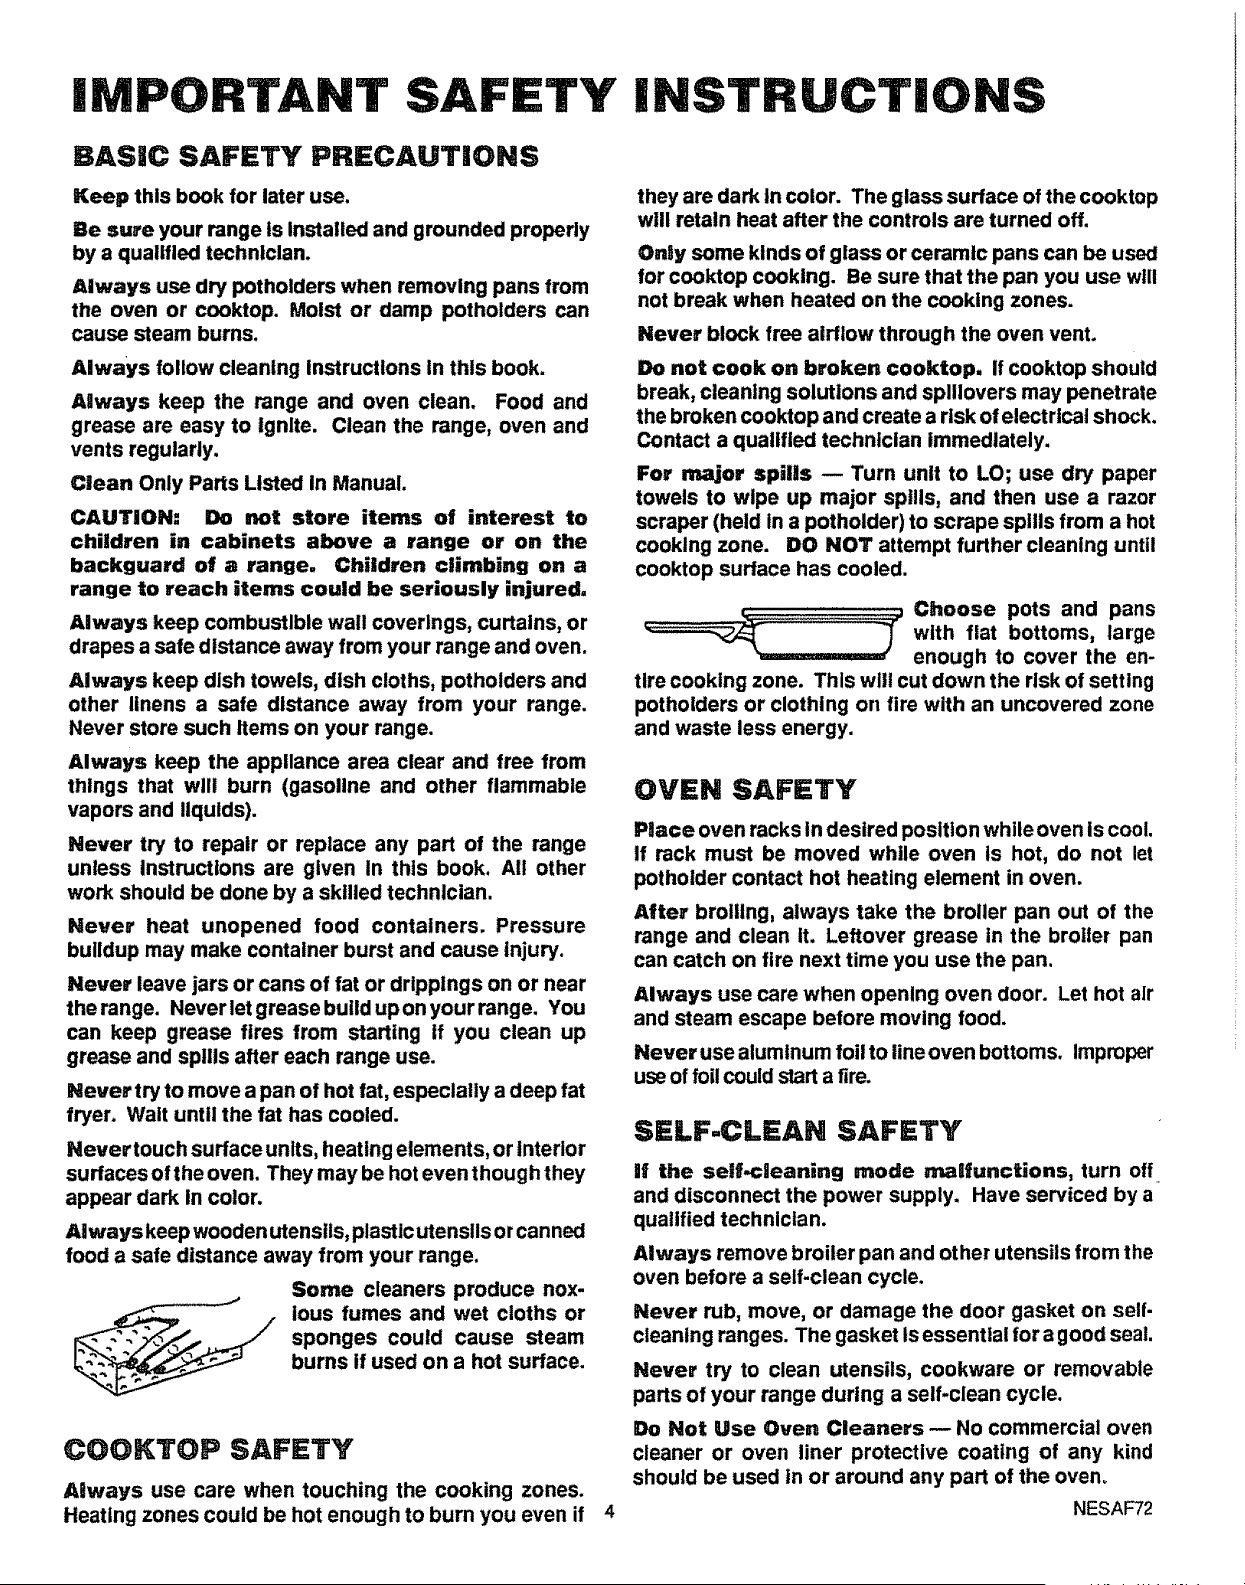
IMPORTANT INSTRUCTIONS
BASIC SAFETY PRECAUTIONS
Keep this book for later use.
Be sure your range Is Installed and grounded properly
by a qualified technician.
Always use dry potholders when removing pans from
the oven or cooktop. Moist or damp potholders can
cause steam bums.
Always follow cleaning Instructions in this book.
Always keep the range and oven clean. Food and
grease are easy to Ignite. Clean the range, oven and
vents regularly.
Clean Only Parts Listed In Manual.
CAUTION: Do not store items of interest to
children in cabinets above a range or on the
backguard of a range. Children climbing on a
range to reach items could be seriously injured.
Always keep combustible wall coverings, curtains, or
drapes a safe distance away from your range and oven.
Always keep dish towels, dish cloths, potholders and
other linens a safe distance away from your range.
Never store such Items on your range.
Always keep the appliance area clear and free from
things that will burn (gasoline and other flammable
vapors and liquids).
Never try to repair or replace any part of the range
unless Instructions are given In this book. All other
work should be done by a skilled technician.
Never heat unopened food containers. Pressure
buildup may make container burst and cause Injury.
Never leave jars or cans of fat or drippings on or near
the range. Never let grease build up on your range. You
can keep grease fires from starting if you clean up
grease and spills after each range use.
Never try to move a pan of hot fat, especially a deep fat
fryer. Wait until the fat has cooled.
Never touch surface units, heating elements, or Interior
surfaces of the oven. They may be hot even though they
appear dark in color.
Always keep wooden utensils, plastic utensils or canned
food a safe distance away from your range.
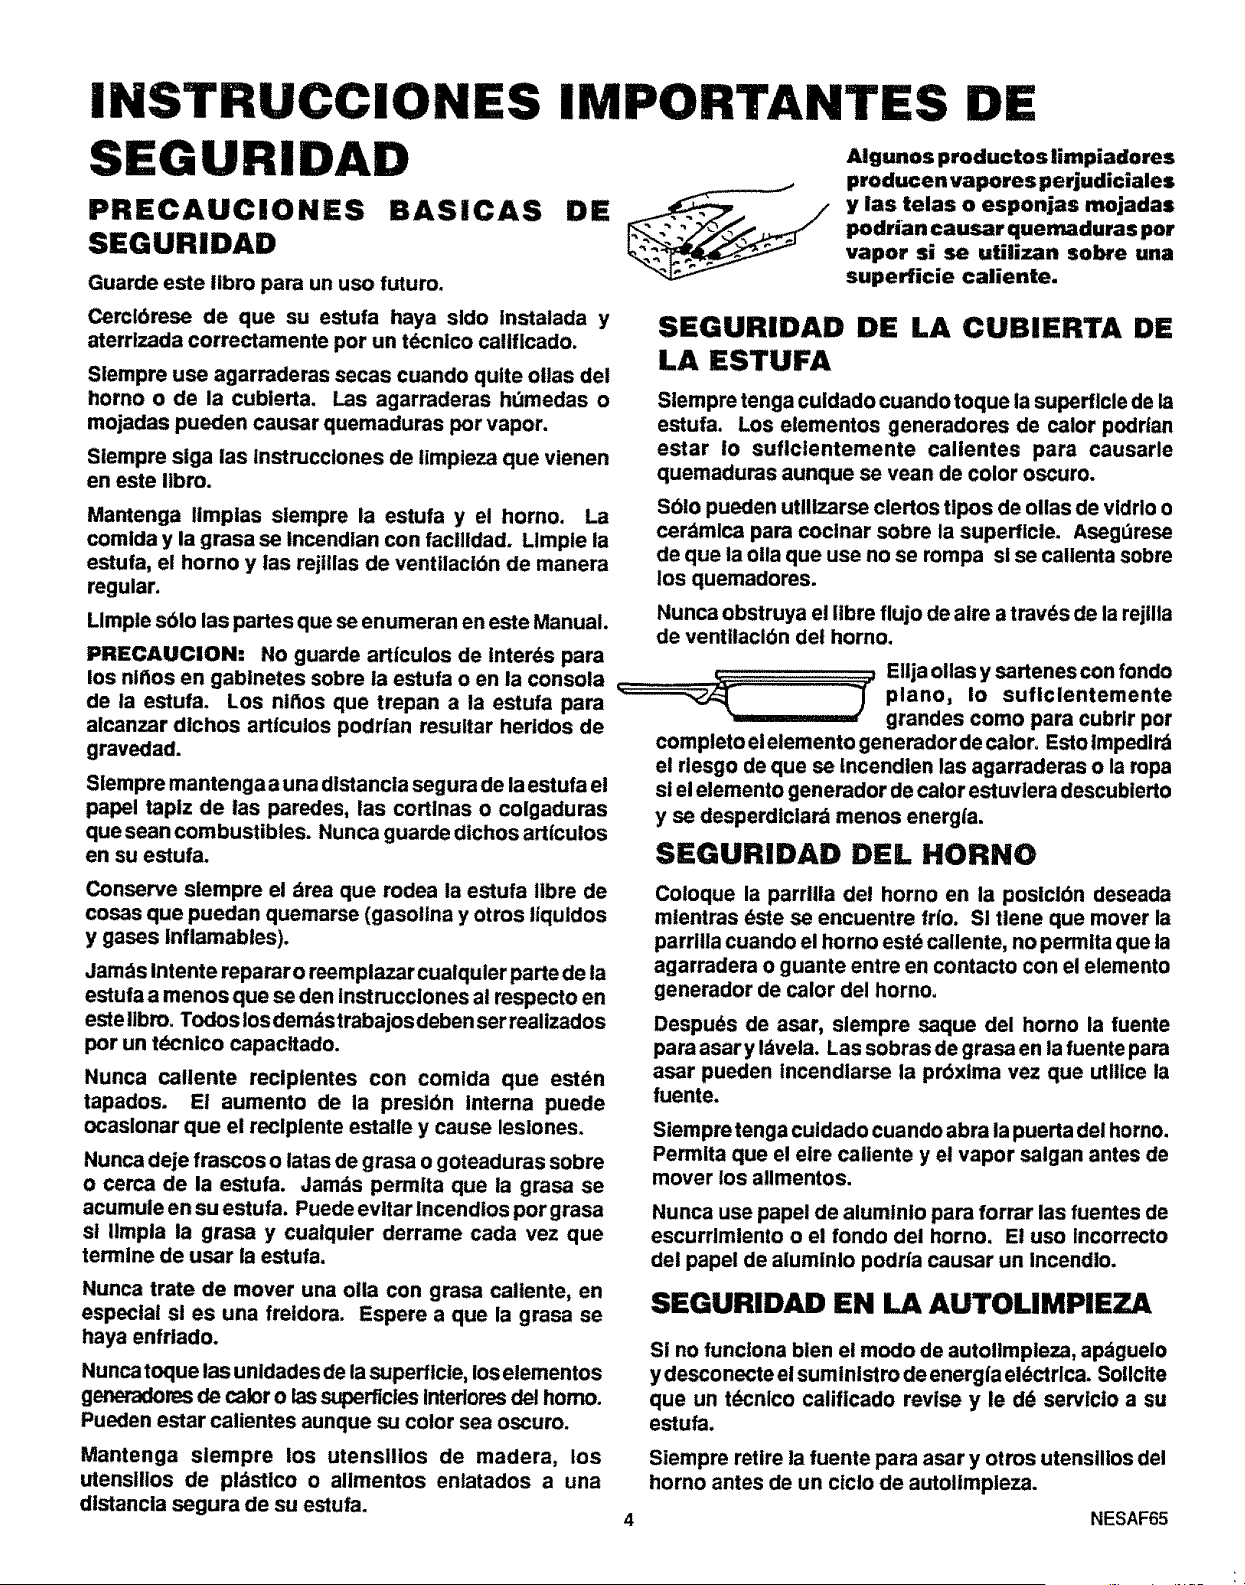
Some cleaners produce nox-
ious fumes and wet cloths or
sponges could cause steam
burns if used on a hot surface.
COOKTOP SAFETY
Always use care when touching the cooking zones.
Heating zones could be hot enough to burn you even if
they are dark in color. The glass surface of the cooktop
will retain heat after the controls are turned off.
On6y some kinds of glass or ceramic pans can be used
for cooktop cooking. Be sure that the pan you use w,!
not break when heated on the cooking zones.
Never block free airflow through the oven vent.
Do not cook on broken cooktop. If cooktop should
break, cleaning solutions and splllovers may penetrate
the broken cooktop and create a risk of electrical shock.
Contact a qualified technician Immediately.
Foe' major spills -- Turn unit to LO; use dry paper
towels to wipe up major spills, and then use a razor
scraper (held in a potholder) to scrape spills from a hot
cooking zone. DO NOT attempt further cleaning until
cooktop surface has cooled.
Choose pots and pans
with fiat bottoms, large
enough to cover the en-
tire cooking zone. This will cut down the risk of setting
potholders or clothing on fire with an uncovered zone
and waste less energy.
OVEN SAFETY
Place oven racks In desired position while oven is cool.
If rack must be moved while oven is hot, do not let
potholder contact hot heating element in oven.
Aftee' broiling, always take the broiler pan out of the
range and clean it. Leftover grease in the broiler pan
can catch on fire next time you use the pan,
Always use care when opening oven door. Let hot air
and steam escape before moving food.
Never use aluminum foil to line oven bottoms. Improper
use of foil could slart a fire.
SELF-CLEAN SAFETY
If the self-cleaning mode malfunctions, turn off
and disconnect the power supply. Have serviced by a
qualified technician.
Always remove broiler pan and other utensils from the
oven before a self-clean cycle.
Never rub, move, or damage the door gasket on sell-
cleaning ranges. The gasket Is essential for a good seal.
Never try to clean utensils, cookware or removable
parts of your range during a self-clean cycle.
Do Not Use Oven Cleaners m No commercial oven
cleaner or oven liner protective coating of any kind
should be used tn or around any part of the oven°
NESAF72
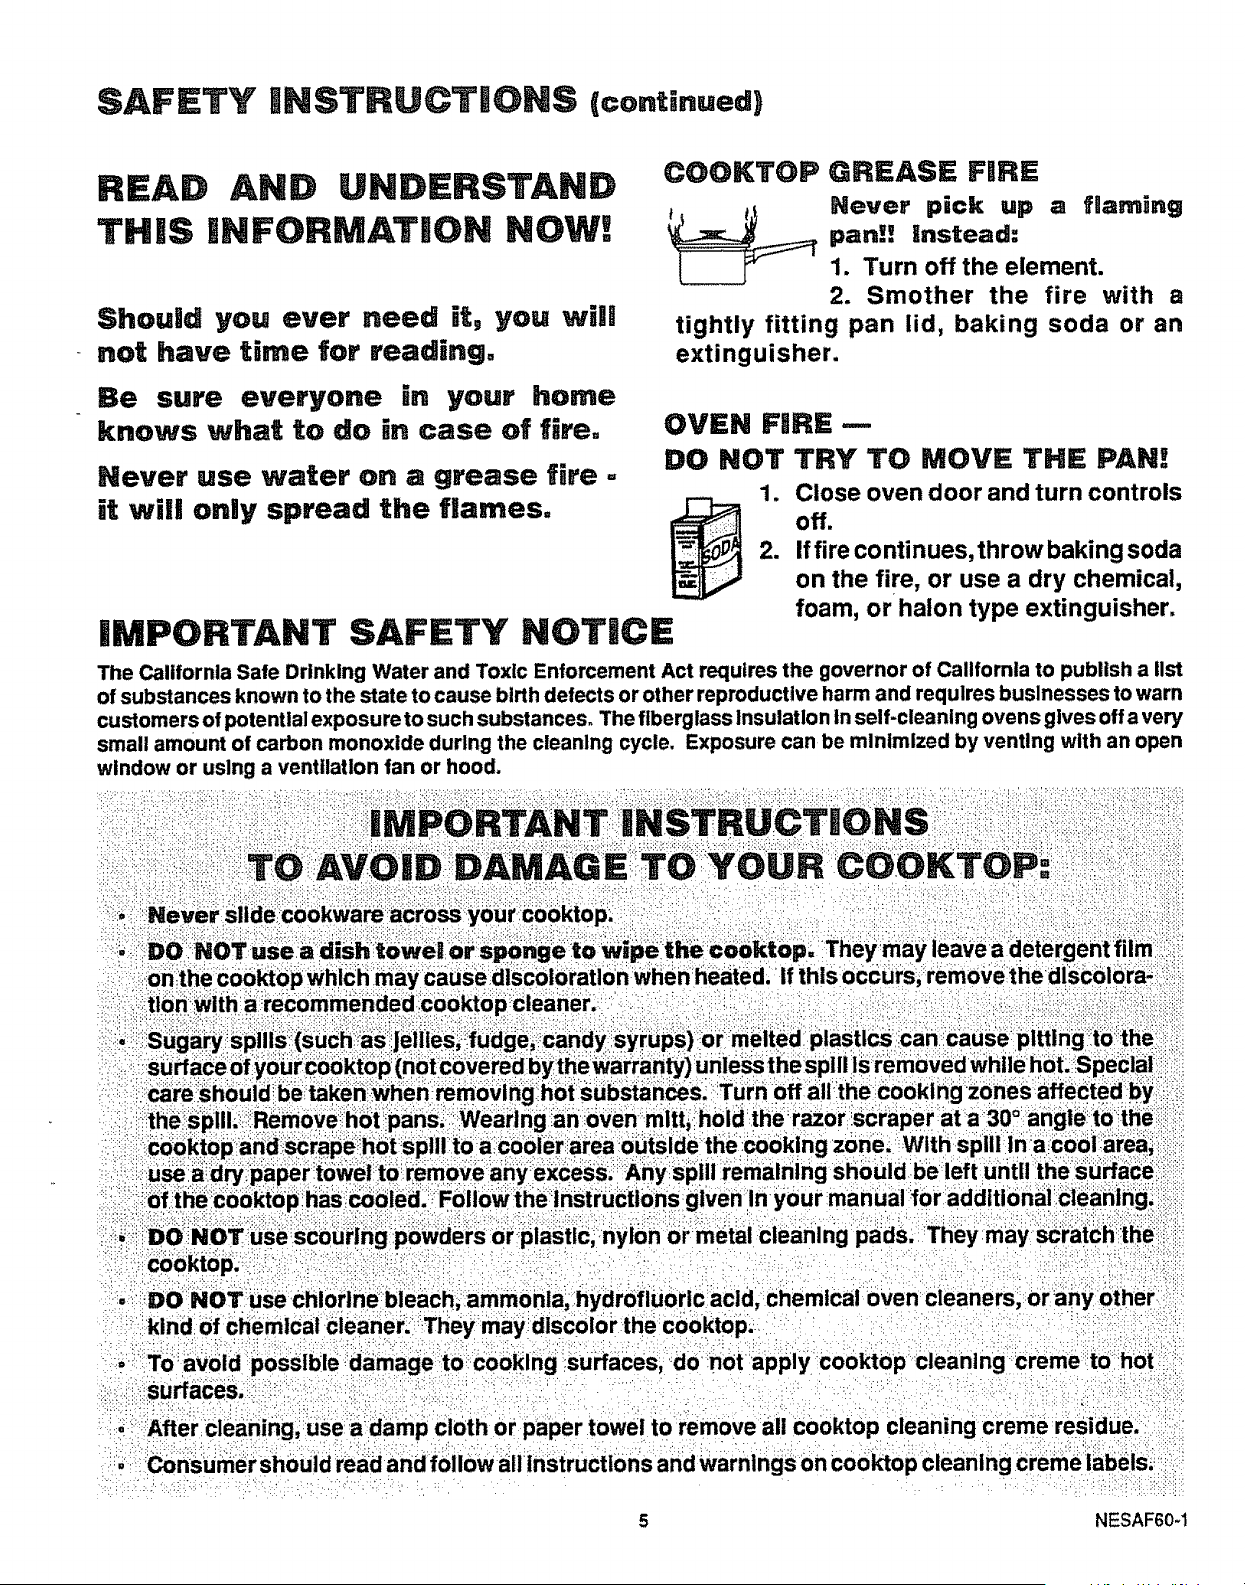
SAFETY NSTRUCT|ONS (conti..ed)
READ AND UNDERSTAND
THiS INFORMAT|ON NOWZ
Should you ever need it, you win
not have time for reading.
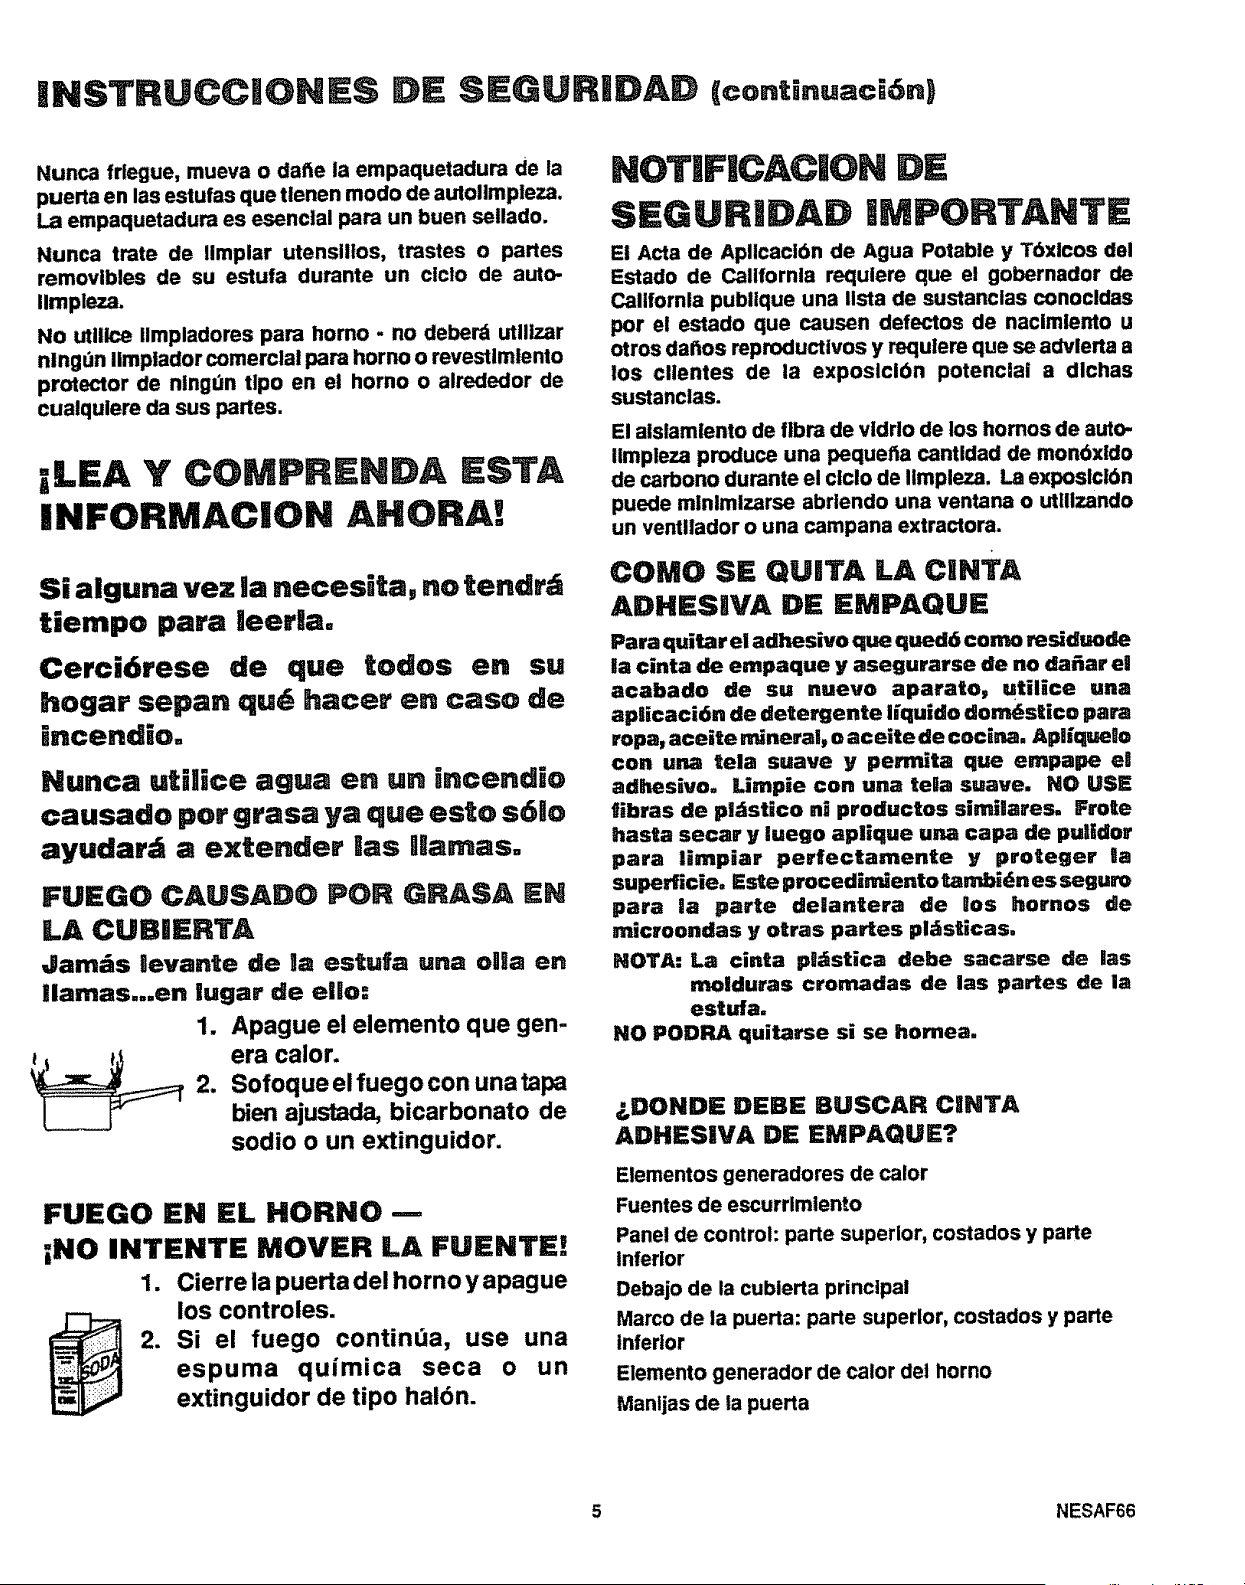
COOKTOP GREASE FaRE
Hever pick up a fnaming
pan!! Instead:
1. Turn off the element.
2. Smother the fire with a
tightly fitting pan lid, baking soda or an
extinguisher.
Be sure everyone in your home
knows what to do in case of fire.
Never use water on a grease fire =
it wili only spread the flames,
iMPORTANT SAFETY NOTICB
OVEN FIRE--
DO NOT TRY TO MOVE THE PAN!
1. Close oven door and turn controls
off.
2. If fire continues, throw baking soda
on the fire, or use a dry chemical,
foam or halon type extinguisher
The California Sate Drinking Water and Toxic Enforcement Act requires the governor of California to publish a list
of substances known to the state to cause birth defects or other reproductive harm and requires businesses to warn
customers of potential exposure to such substances° The fiberglass Insulation In self-cleaning ovens gives offa very
small amount of carbon monoxide during the cleaning cycle, Exposure can be minimized by venting wlth an open
window or using a ventilation fan or hood.
:'L:_::; : "_::r'_:i:¸¸i'_:': ::r::':':::i_:_:::::":
5 NESAF60-1
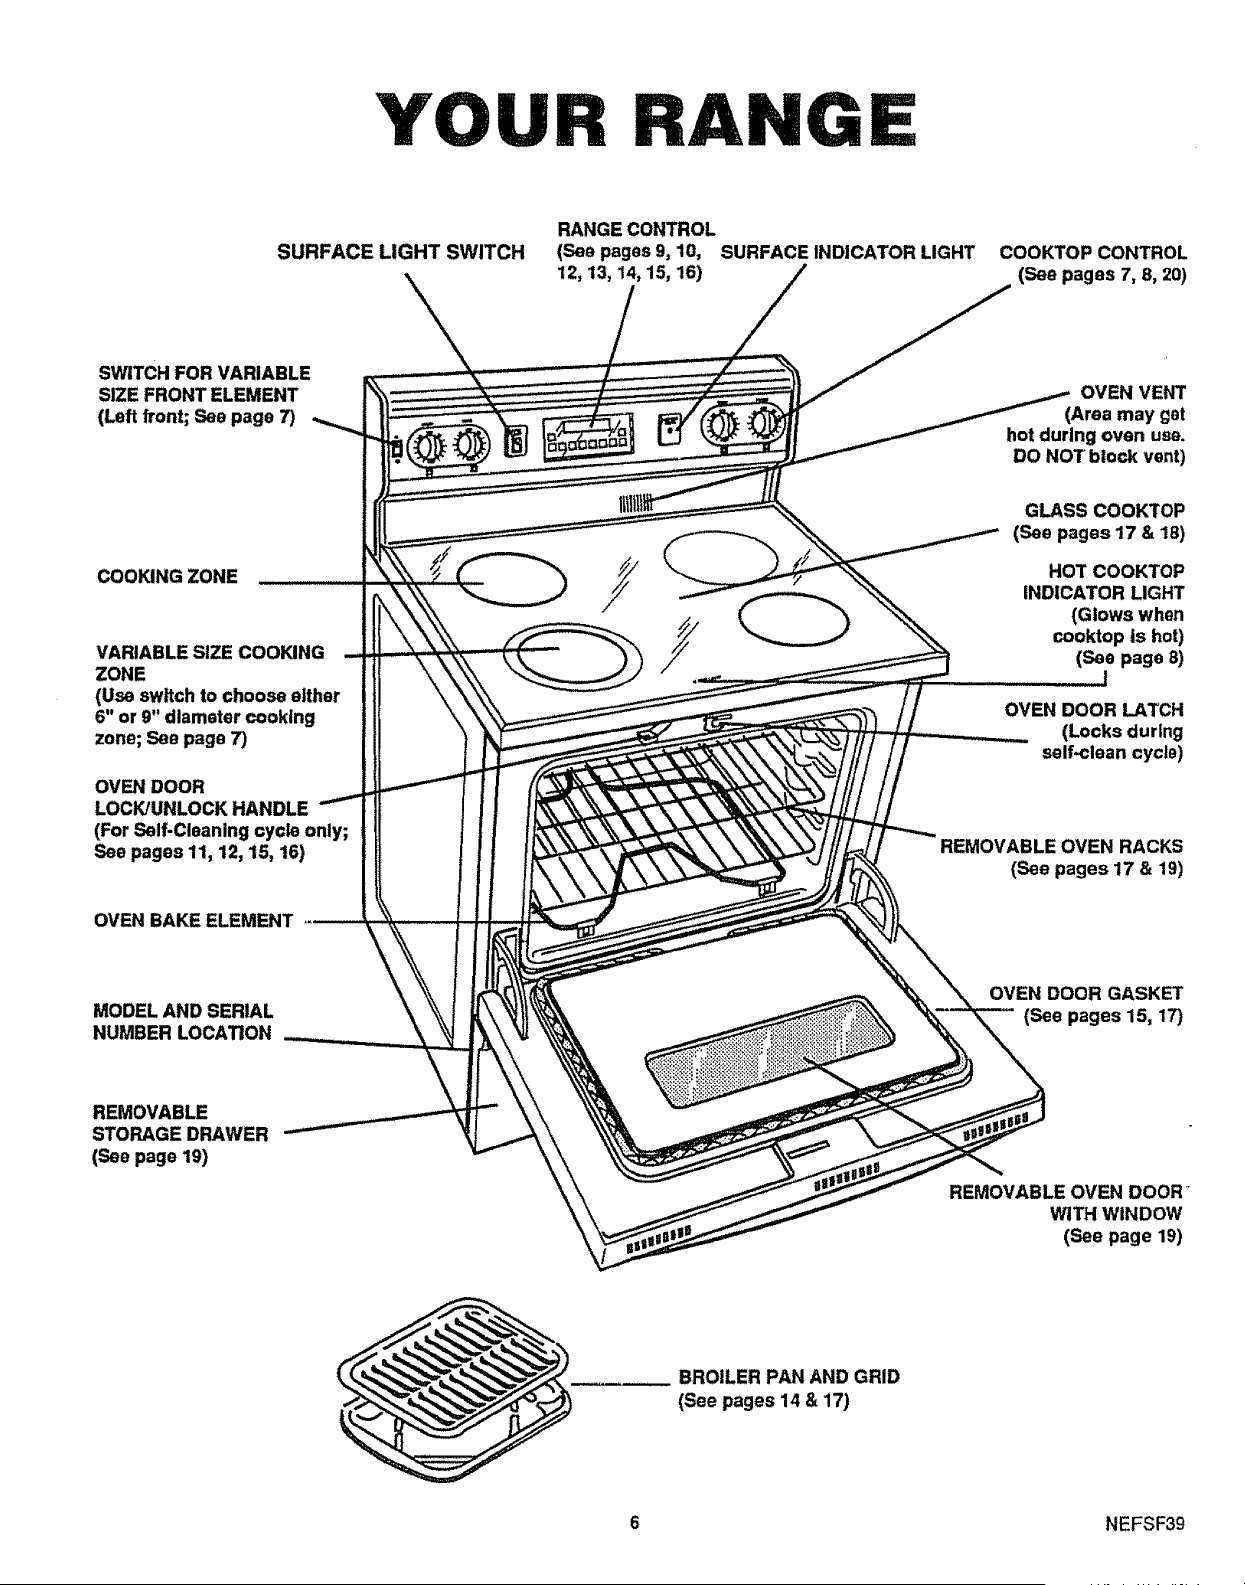
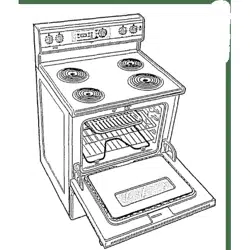
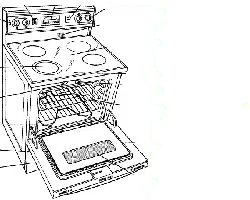
YOUR RANGE
RANGE CONTROL
SURFACE LIGHT SWITCH (See pages 9, 10, SURFACE INDICATOR LIGHT COOKTOP CONTROL
12, 13, 14,15, 16) (See pages 7, 8, 20)
SWITCH FOR VARIABLE
SIZE FRONT ELEMENT
(Left front; See page 7)
COOKING ZONE
VARIABLE SIZE COOKING
ZONE
(Use switch to choose either
6" or 9" dlemeter cooking
zone; See page 7)
OVEN DOOR
LOCK/UNLOCK HANDLE
(For Self-Cleaning cycle only;
See pages 11, 12, 15, 16)
OVEN VENT
(Area may get
hot during oven use,
DO NOT block vent)
GLASS COOKTOP
(See pages 17 & 18)
HOT COOKTOP
INDICATOR LIGHT
(Glows when
cooktop is hot)
(see page 8)
!
OVEN DOOR LATCH
(Locks during
self-clean cycle)
REMOVABLE OVEN RACKS
(See pages 17 & 19)
OVEN BAKE ELEMENT
MODEL AND SERIAL
NUMBER LOCATION
OVEN DOOR GASKET
(Seepages15,1_
REMOVABLE
STORAGE DRAWER
(See page 19)
REMOVABLE OVEN DOOR "
WITH WINDOW
(See page 19)
BROILER PAN AND GRID
(See pages 14 & 17)
6 NEFSF39
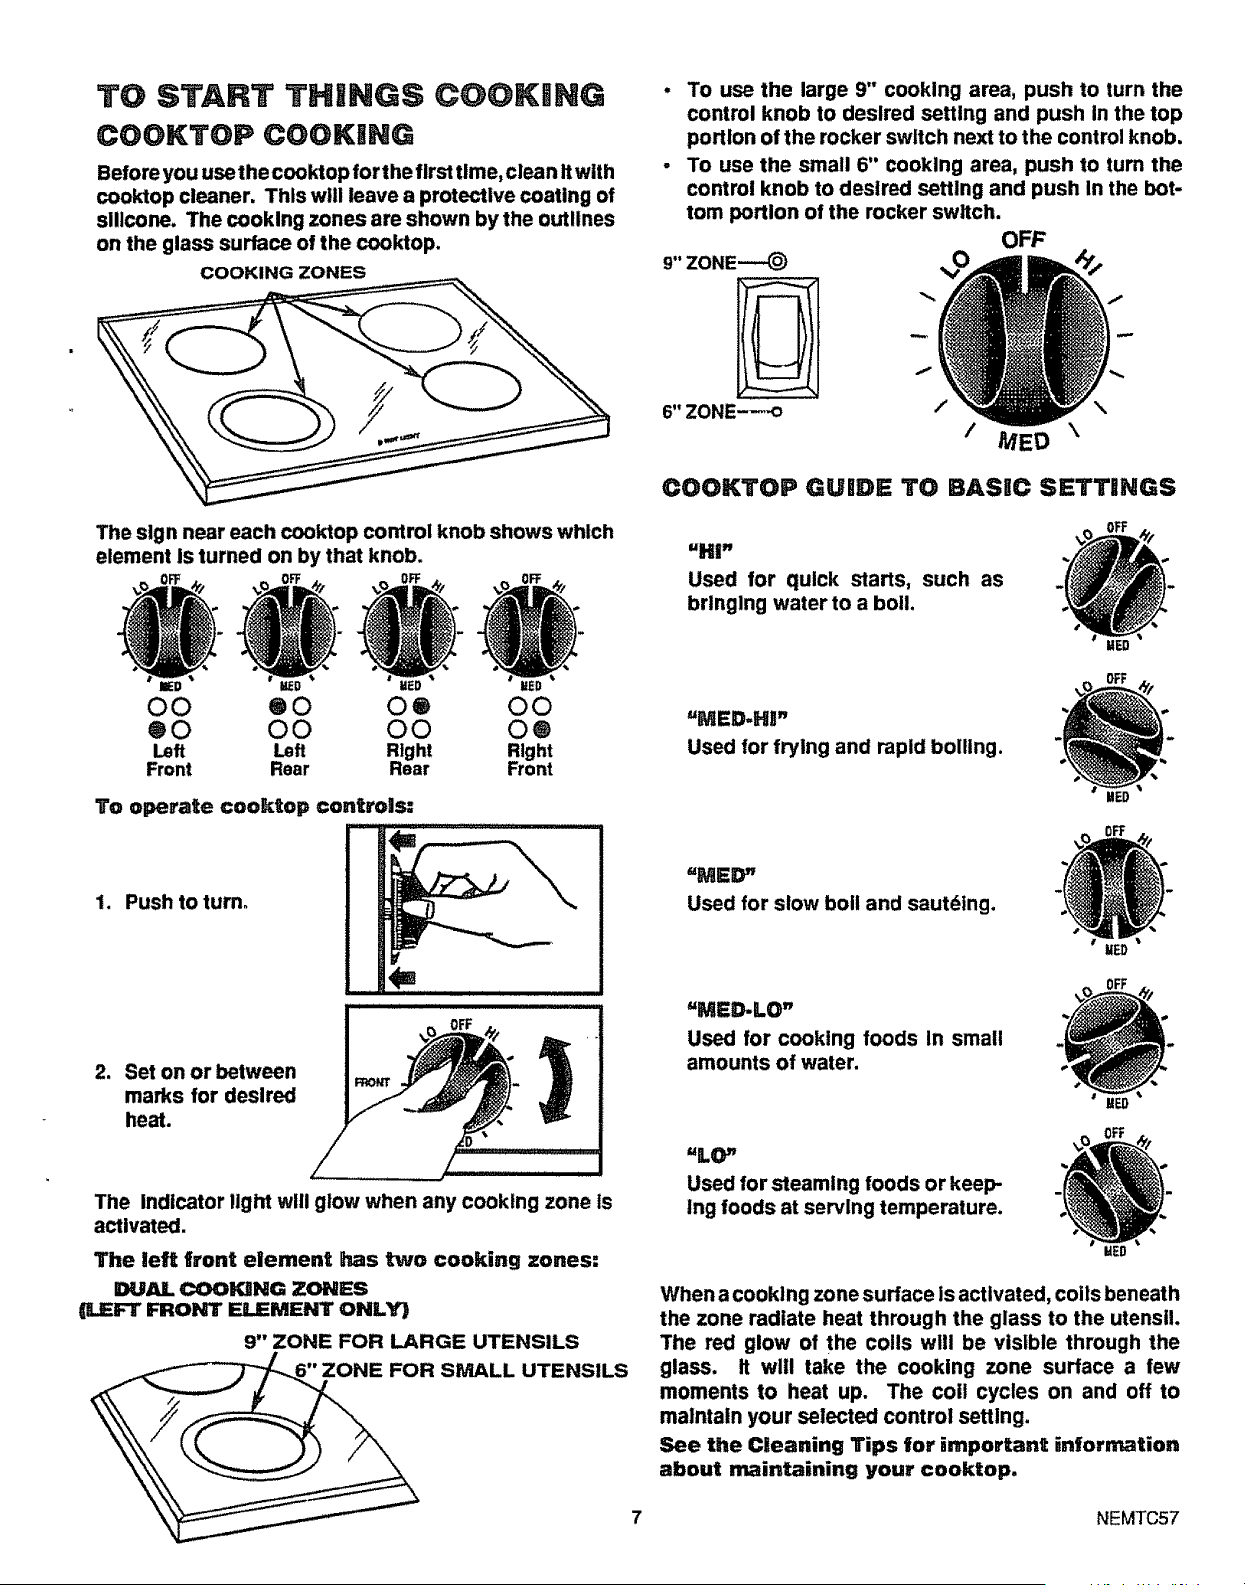
TO START THINGS COOKING
COOKTOP COOKING
Before you use t he cooktop for t he first time, clean It with
cooktop cleaner. This will leave a protective coating of
silicone. The cooking zones are shown by the outlines
on the glass surface of the cooktop.
COOKING ZONES
The sign near each cooktop control knob shows which
element Is turned on by that knob.
To use the large 9" cooking area, push to turn the
control knob to desired setUng and push In the top
portion of the rocker switch next to the control knob.
To use the small 6" cooking area, push tO turn the
control knob to desired setUng and push In the bot-
tom portion of the rocker switch.
OFF
COOKTOP GUIDE TO BASIC SETTINGS
=Hi"
Used for quick starts, such as
bringing water to a boll.
O0 eO O® O0
®0 O0 O0 O®
Left Left Right Right
Front Rear Rear Front
To operate cooktop controas:
=MED.Hr'
Used for frying and rapid boiling.
1. Push to turn°
2. Set on or between
marks for desired
heat.
The Indicator light will glow when any cooking zone Is
activated.
The left front element has two cooking zones:
DUAL COOKING ZONES
(LEFT FRONT ELEMENT ONLY}
9" ZONE FOR LARGE UTENSILS
FOR SMALL UTENSILS
"MED"
Used for slow boll and sautding.
=MED.LO"
Used for cooking foods In small
amounts of water.
'%0"
Used for steaming foods or keep-
Ing foods at serving temperature.
When a cooking zone surface is activated, coils beneath
the zone radiate heat through the glass to the utensil.
The red glow of the coils will be visible through the
glass. It will take the cooking zone surface a few
moments to heat up. The coil cycles on and off to
maintain your selected control setting.
See the Cleaning Tips for important information
about maintaining your cooktop.
7 NEMTC57
TO START THINGS COOKING (cont,)
For best cooking results and energy efficient operation,
you should use metal pans that are flat on the bottom.
Match the slze of the pan to the size of the cooking zone.
The pan should not extend over the edge of the cooking
zone more than 1".
HOME CANNING TIPS
In surface cooking of foods other than canning, the use
of large-diameter pots (extending more than 1" beyond
edge of cooking zone) is not recommended. However,
when canning with water-bath or pressure canner,
large-diameter pots may be used. This is because
boiling water temperatures (even under pressure) are
not harmful to cooktop surfaces surrounding cOoking
zones.
HOWEVEP. DO NOT USE LARGE DIAMETER CAN-
NERS OR OTHER LARGE DIAMETER POTS FOR
FRYING OR BOILING FOODS OTHER THAN WATER,
Most syrup or sauce mixtures w and all types of frying
cook at temperatures much hlgherthan boiling water.
Such temperatures could eventually harm cooktop sur-
faces surrounding cooking zones.
OBSERVE FOLLOWING POINTS IN
CANNING
1. Bring water to boll on HIGH heat, then after boiling
has begun, adjust heat to the lowest setting which
maintains the boll (saves energy and best uses
cooking zone).
2. Be sure canner fits over center of cooking zone_ If
your range does not allow canner to be centered on
cooking zone, use smaller-diameter pots for good
canning results.
3. Flat-bottomed canners give best canning results. Be
sure bottom of canner is flat or slight indentation fits
snugly over cooking zone. Canners with flanged or
rippled bottoms (often found in enamelware) are not
recommended.
Note: A slight odor is normal when a new cooktop is
used for the first time. it Is caused by the heating of new
parts and insulating materials and will disappear in a
short time.
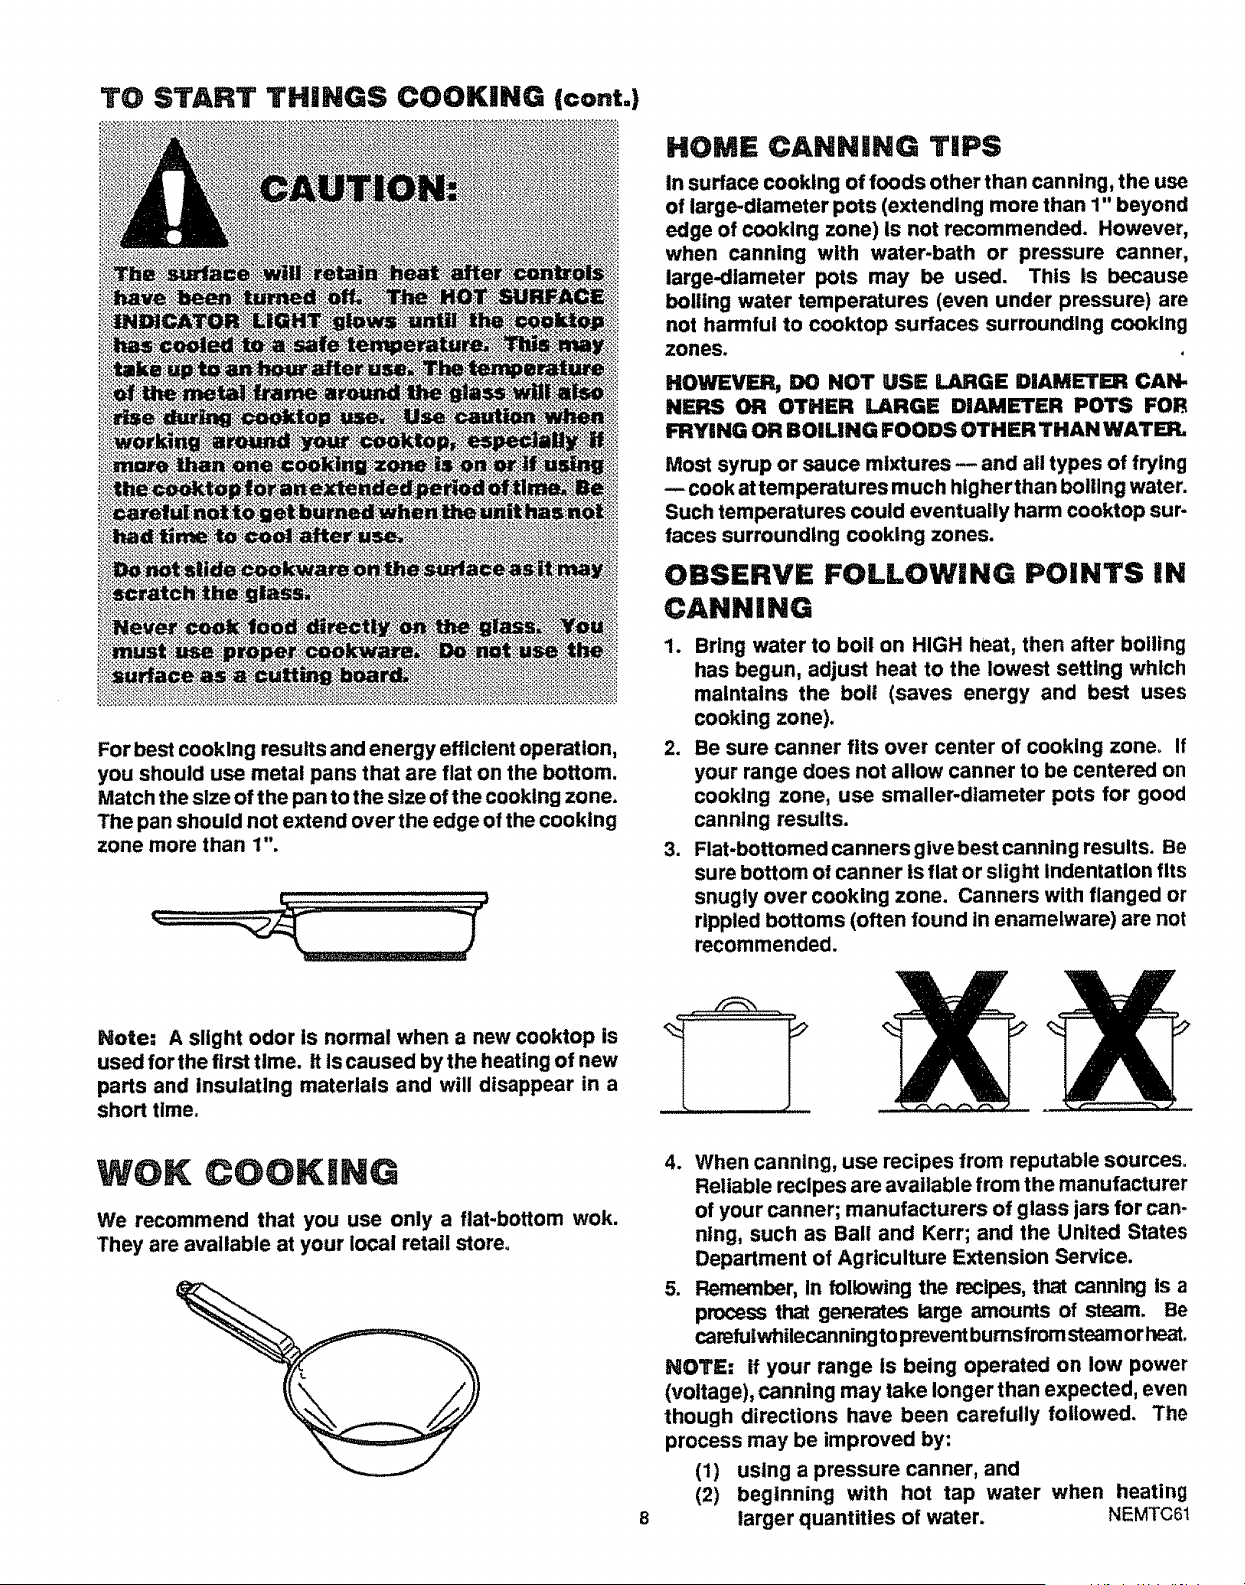
WOK COOKING
We recommend that you use only a flat-bottom wok.
They are available at your local retail store°
4. When canning, use recipes from reputable sources.
Reliable recipes are available from the manufacturer
of your canner; manufacturers of glass jars for can-
ning, such as Ball and Kerr; and the United States
Department of Agriculture Extension Service.
5. Remember, In following the recipes, that canning is a
process that generates large amounts of steam. Be
carefutwhilecanning to prevent bumsfrom steam or heat.
NOTE; if your range is being operated on low power
(voltage), canning may take longer than expected, even
though directions have been carefully followed. The
process may be improved by:
(1) using a pressure canner, and
(2) beginning with hot tap water when heating
larger quantities of water. NEMTC61
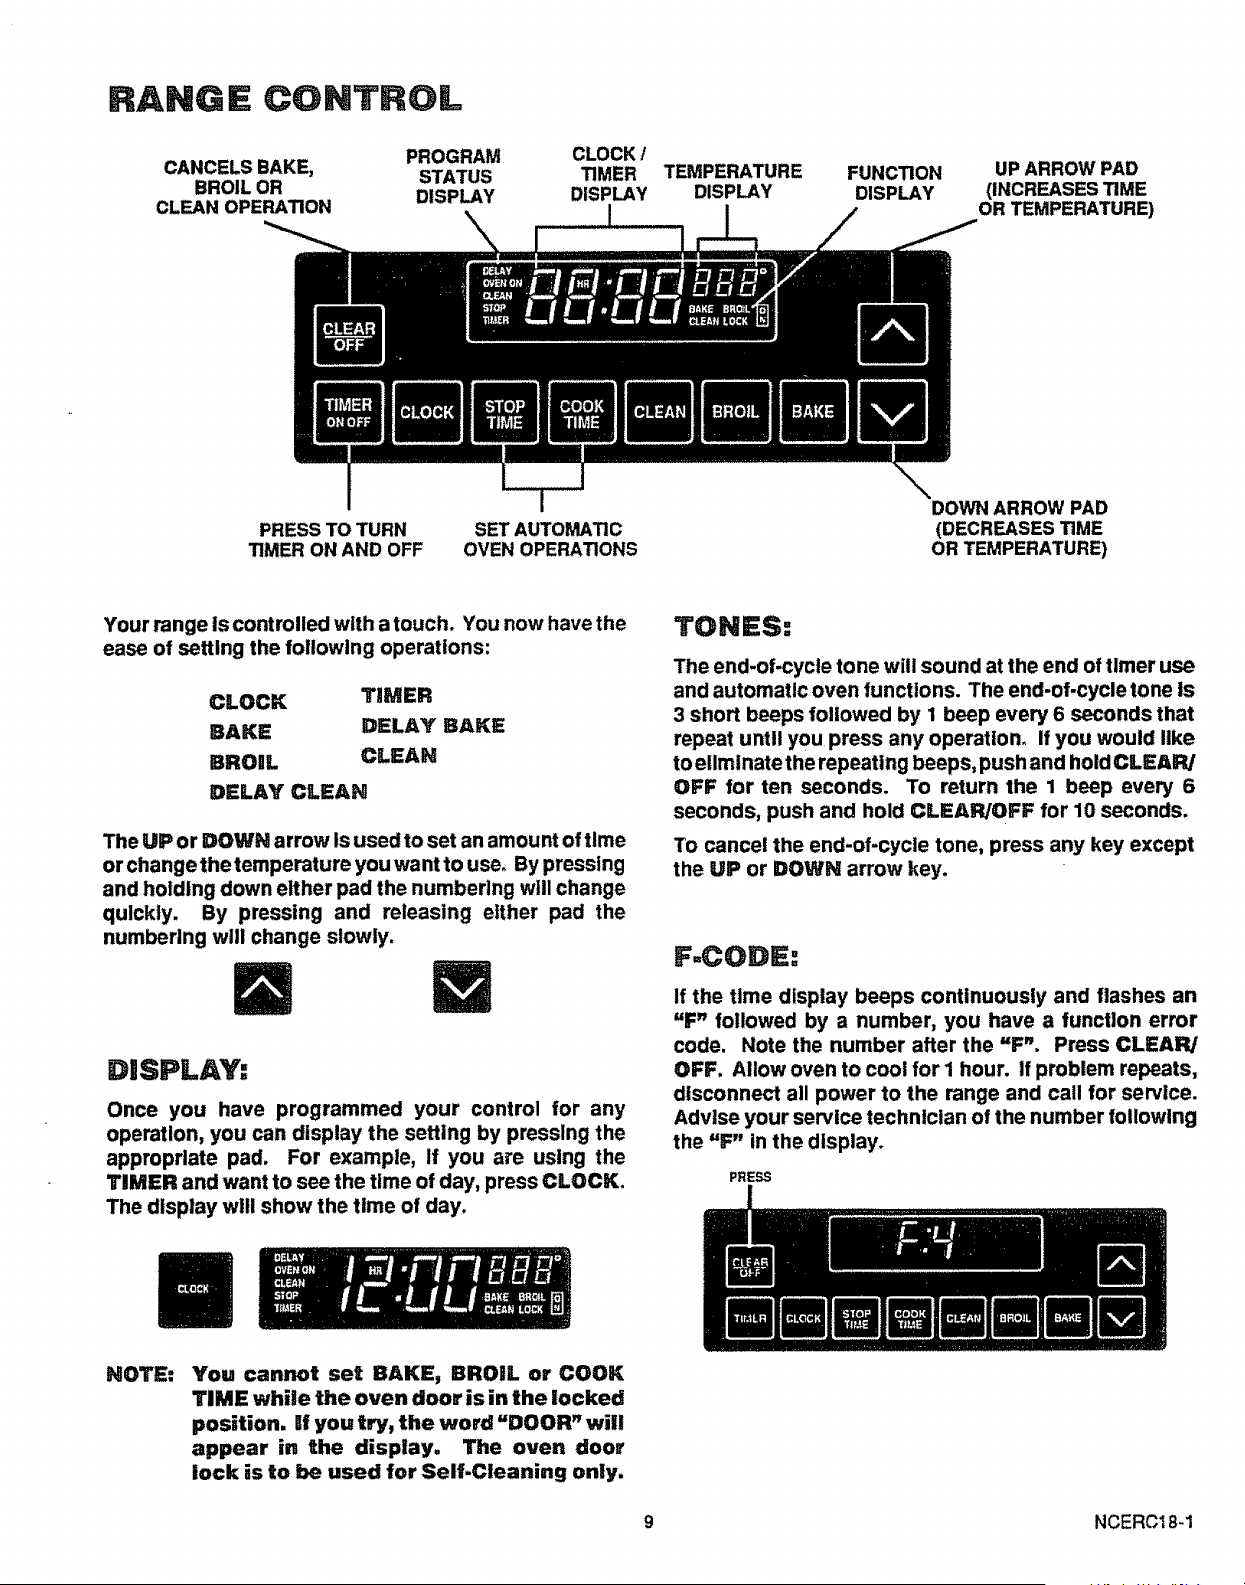
RANGR CONTROL
CANCELSBAKE, PROGRAM
STATUS
BROIL OR DISPLAY
CLEAN OPERATION
CLOCK/
TIMER
DISPLAY
!
TEMPERATURE
DISPLAY
FUNCTION
DISPLAY
UP ARROW PAD
(INCREASES TIME
OR TEMPERATURE)
PRESS TO TURN
TIMER ON AND OFF
SET AUTOMATIC
OVEN OPERATIONS
DOWN ARROW PAD
(DECREASES TIME
OR TEMPERATURE)
Your range Is controlled with a touch. You now have the
ease of setting the following operations:
CLOCK TIMER
BAKE DELAY BAKE
BROIL CLEAN
DELAY CLEAN
The UP or DOWN arrow Is used to set an amount of time
or changethetemperature you want to use° By pressing
and holding down either pad the numbering will change
quickly. By pressing and releasing etther pad the
numbering will change slowly.
DISPLAY:
Once you have programmed your control for any
operaUon, you can display the setting by presslng the
appropriate pad. For example, if you are using the
TIMER and want to see the time of day, press CLOCK.
The display will show the time of day.
TONES:
The end-of-cycle tone will sound at the end of timer use
and automatic oven functions. The end-of-cycle tone is
3 short beeps followed by I beep every 6 seconds that
repeat until you press any operation° If you would like
to eliminate the repeating beeps, push and hold CLEAR/
OFF for ten seconds. To return the 1 beep every 6
seconds, push and hold CLEAR/OFF for 10 seconds.
To cancel the end-of-cycle tone, press any key except
the UP or DOWN arrow key.
F.CODE:
If the time display beeps continuously and flashes an
"F" followed by a number, you have a function error
code. Note the number after the "F". Press CLEAR/
OFF. Allow oven to cool for i hour. If problem repeats,
disconnect all power to the range and call for service.
Advise your service technician of the number following
the =F" in the display.
PRESS
NOTE:
You cannot set BAKE, BROIL or COOK
TIME while the oven door is in the locked
position. Utyou try, the word =DOOR" will
appear in the display. The oven door
lock is to be used for Self-Cleaning only.
9 NCERCl 8-1
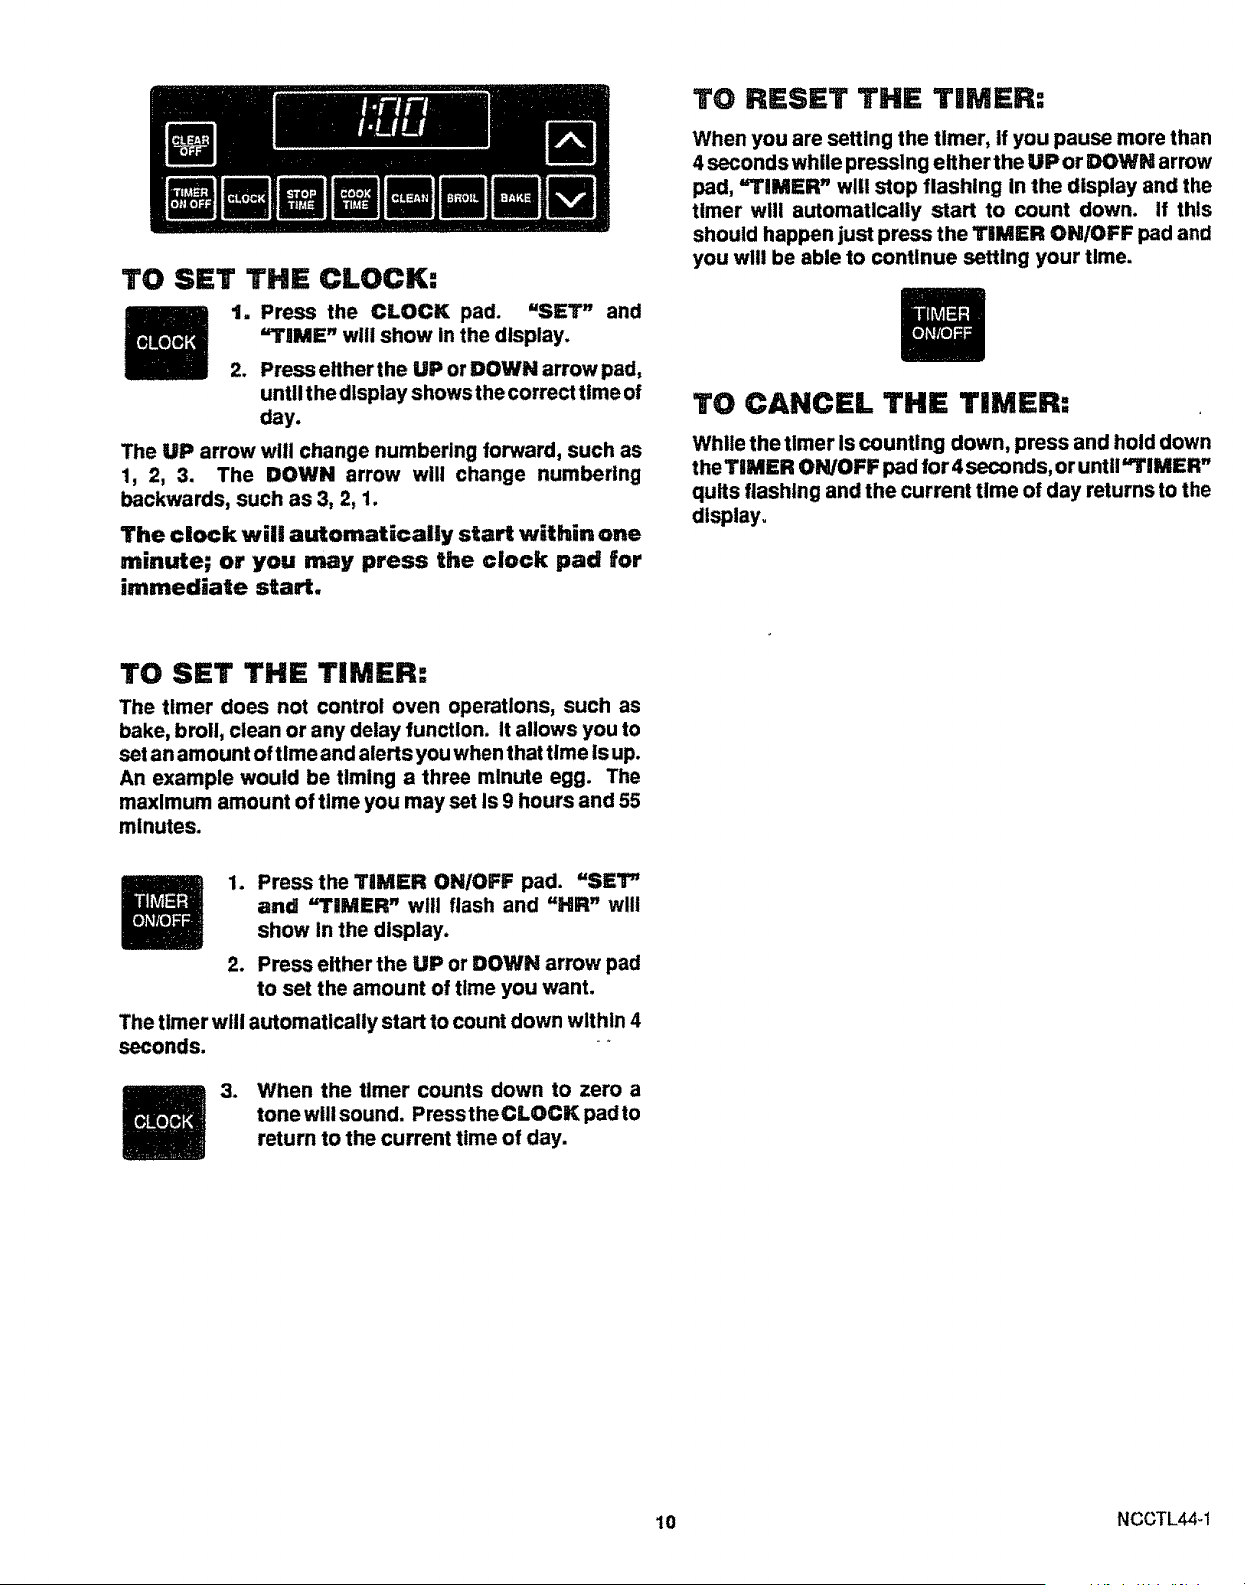
TO SET THE CLOCK:
t= Press the CLOCK pad. "SET" and
"TIME" will show in the display.
2. Press eltherthe UP or DOWN arrow pad,
until t he display shows the correct time of
day.
The UP arrow wlll change numbering forward, such as
1, 2, 3. The DOWN arrow will change numbering
backwards, such as 3, 2, 1.
The clock will automatically start within one
minute; or you may press the clock pad for
immediate start.
TO RESET THE TIMER:
When you are setting the timer, if you pause more than
4 seconds while pressing either the UP or DOWN arrow
pad, "TIMER" will stop flashing In the display and the
timer will automatically start to count down. if this
should happen just press the TIMER ON/OFF pad and
you will be able to continue setting your time.
TO CANCEL THE TIMER:
While the timer is counting down, press and hold down
the TIMER ON/OFF pad for 4 seconds, or unt li'*TIMER"
quits flashing and the current time of day returns to the
display_
TO SET THE TIMER:
The timer does not control oven operations, such as
bake, broil, clean or any delay function. It allows you to
set an amount of time and alerts you when that time is up.
An example would be timing a three minute egg. The
maximum amount of time you may set Is 9 hours and 55
minutes.
1. Press the TIMER ON/OFF pad. "SET"
and "rIMER" will flash and "HR" will
show in the display.
2. Press either the UP or DOWN arrow pad
to set the amount of time you want.
The timer will automatically start to count down within 4
seconds. *
3. When the timer counts down to zero a
tone will sound. Press the CLOCK pad to
return to the current time of day.
10 NCCTL44-1
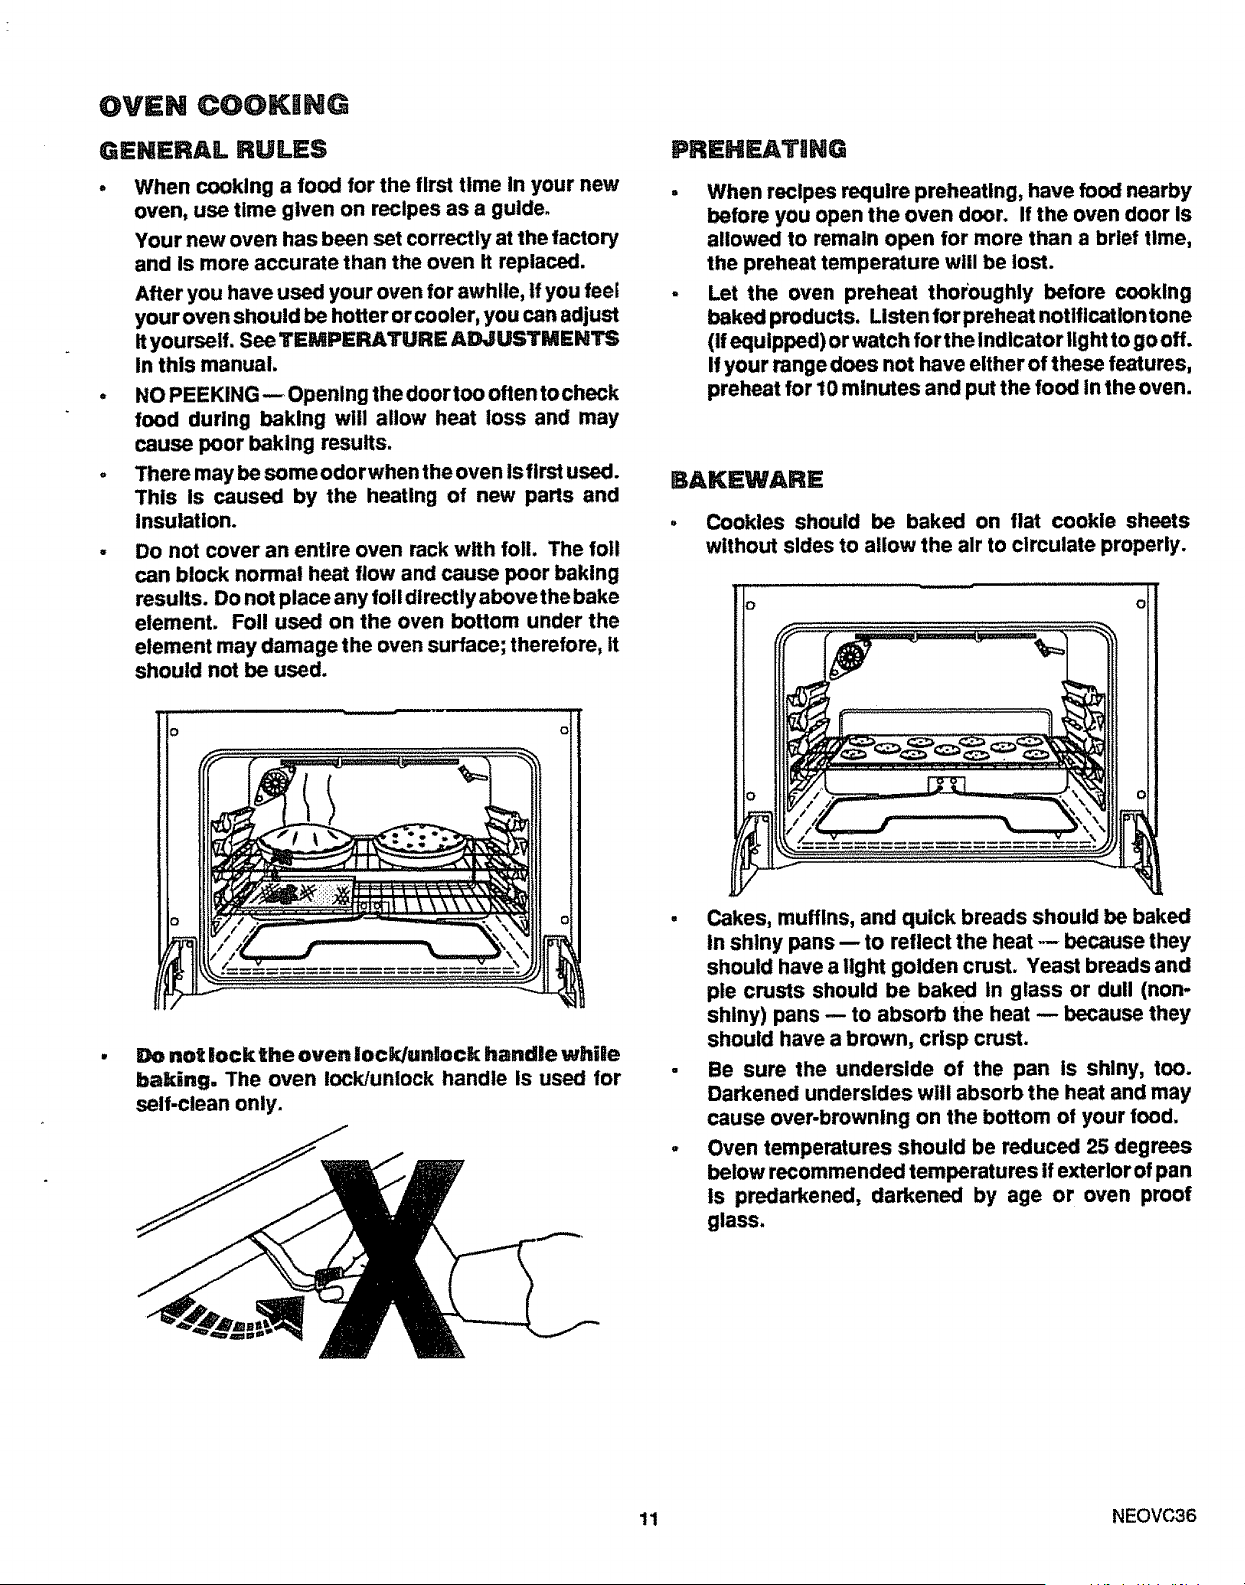
OVEN COOKRNG
GENERAL RULES
• When cooking a food for the first time in your new
oven, use time given on recipes as a guide°
Your new oven has been set correctly at the factory
and Is more accurate than the oven It replaced.
After you have used your oven for awhile, tf you feei
your oven should be hotter or cooler, you can adjust
It yourself. See TEMPERATURE ADJUSTMENTS
In this manual.
: NO PEEKING-- Opening the doortoo often tocheck
food during baking will allow heat loss and may
cause poor baking results.
. There may be some odorwhen the oven Is first used.
This Is caused by the heating of new parts and
Insulation.
• Do not cover an entire oven rack with foil. The foil
can block normal heat flow and cause poor baking
results. Do not place any foil directly above the bake
element. Foil used on the oven bottom under the
element may damage the oven surface; therefore, it
should not be used.
not lock the oven Ioc_Junlock handle while
baking. The oven lock/unlock handle Is used for
self-clean only.
PREHF.ATJNG
When recipes require preheating, have food nearby
before you open the oven door. If the oven door Is
allowed to remain open for more than a brief time,
the preheat temperature will be lost.
Let the oven preheat thoroughly before cooking
baked products. Llstenforpreheat notlficatlontone
(If equipped) or watch for the Indicator light to go off.
If your range does not have either of these features,
preheat for 10 minutes and put the food lntheoven.
BAKEWARE
• Cookies should be baked on liar cookie sheets
without sides to allow the air to circulate properly.
. Cakes, muffins, and quick breads should be baked
in shiny pans -- to reflect the heat -- because they
should have a light golden crust. Yeast breads and
pie crusts should be baked In glass or dull (non-
shiny) pans -- to absorb the heat -- because they
should have a brown, crisp crust.
. Be sure the underside of the pan is shiny, too.
Darkened undersides will absorb the heat and may
cause over-browning on the bottom of your food.
° Oven temperatures should be reduced 25 degrees
below recommended temperatures if exterlor of pan
is predarkened, darkened by age or oven proof
glass.
11 NEOVC36
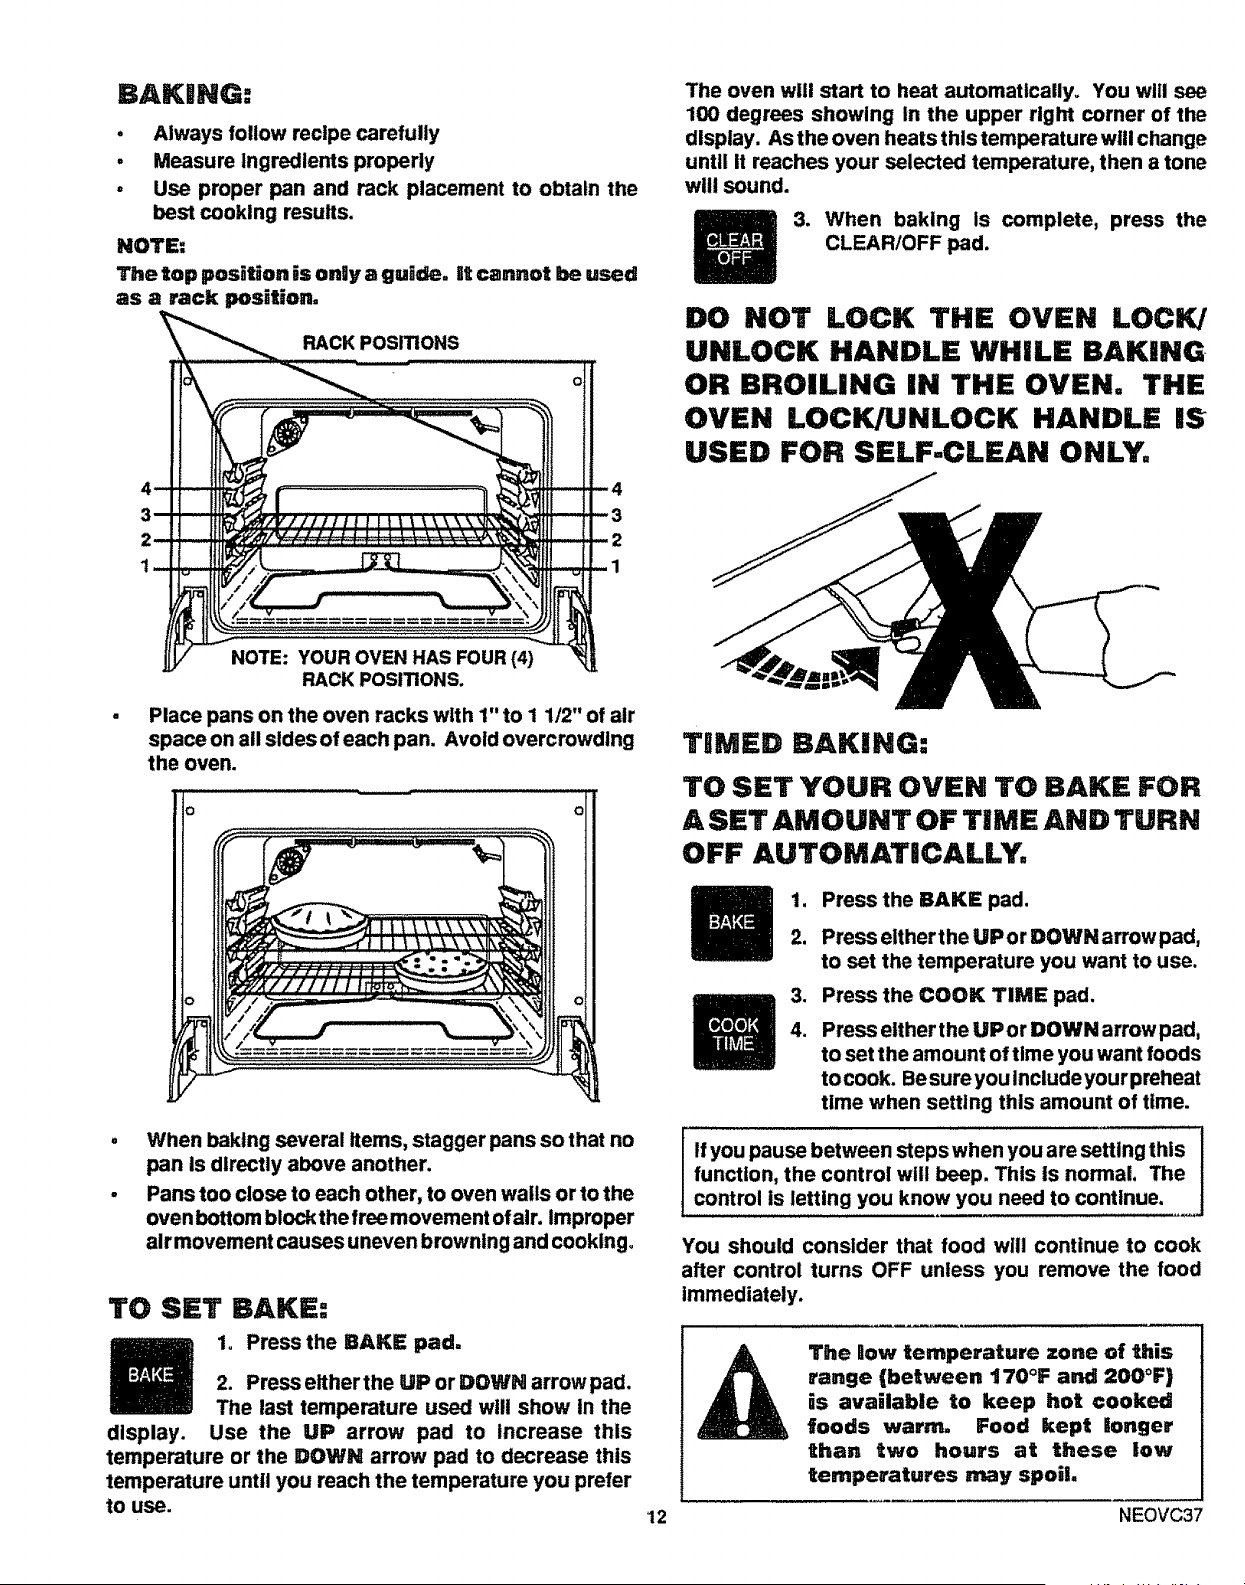
BAKING:
• Always follow recipe carefully
. Measure Ingredients properly
. Use proper pan and rack placement to obtain the
best COOking results.
NOTE:
The top posiUon is only a guSde. It cannot be used
as a rack position.
RACK POSITIONS
_3
_2
1
I -
--._
NOTE: YOUR OVEN HAS FOUR (4)
RACK POSITIONS.
Place pans on the oven racks with 1" to I 1/2" of air
space on all sidesof each pan. Avoid overcrowding
the oven.
When baking several Items, stagger pans so that no
pan Is directly above another.
Pans too close to each other, to oven wails or to the
oven bottom block the free movement of air. Improper
alrmovement causes uneven browning and cooklngo
TO SET BAKE:
1o Press the BAKE pad.
2. Press either the UP or DOWN arrow pad.
The last temperature used will show in the
display. Use the UP arrow pad to Increase this
temperature or the DOWN arrow pad to decrease this
temperature until you reach the temperature you prefer
to use.
The oven will start to heat automatically. You will see
100 degrees showing In the upper right corner of the
display. As the oven heats this temperature will change
until it reaches your selected temperature, then a tone
will sound.
3. When baking is complete, press the
CLEAR/OFF pad.
DO NOT LOCK THE OVEN LOCK/
UNLOCK HANDLE WHILE BAKING
OR BROILING IN THE OVEN, THE
OVEN LOCK/UNLOCK HANDLE IS
USED FOR SELF-CLEAN ONLY.
TIMED BAKING:
TO SET YOUR OVEN TO BAKE FOR
A SET AMOUNT OF TIME AND TURN
OFF AUTOMATICALLY,
.
2.
3_
4.
Press the BAKE pad.
Press either the UPor DOWN arrow pad,
to set the temperature you want to use.
Press the COOK TIME pad.
Press either the UPor DOWN arrow pad,
to set the amount of time you want foods
tocook. Be sure you Include yourpreheat
time when setting this amount of time.
if you pause between steps when you are setting this
function, the control will beep. This is normal. The
control is letting you know you need to continue.
You should consider that food will continue to cook
after control turns OFF unless you remove the food
immediately.
The Row temperature zone of this
range (between 170°F and 200°F)
is available to keep hot cooked
foods warm. Food kept longer
than two hours at these low
temperatures may spoil.
12 NEOVC37
TO SET YOUR OVEN FOR A DELAYED
START AND AUTOMATIC STOP
While setting thls operation you will not need to
calculate when the oven will turn on; the control will
do this for you. You will need to set the following:
1. Temperature 2. Cooking Time 3. Stop Time
1. Press the BAKE pad°
2. Press the UP or DOWN arrow pad to
select the temperature you want.
3. Press the COOK TJ_ME pad.
4. Press the UP arrow to select how long
you want food to cook. Be sure to
include your preheat time=
5° Press the STOP TgME pad.
6. Press the UP arrow pad to enter the time
of day you want the oven to turn off. The
oven will shut off automatically when the
preset STOP TIME Is reached.
7. Press the CLOCK pad to return the dis-
play to the current time of day.
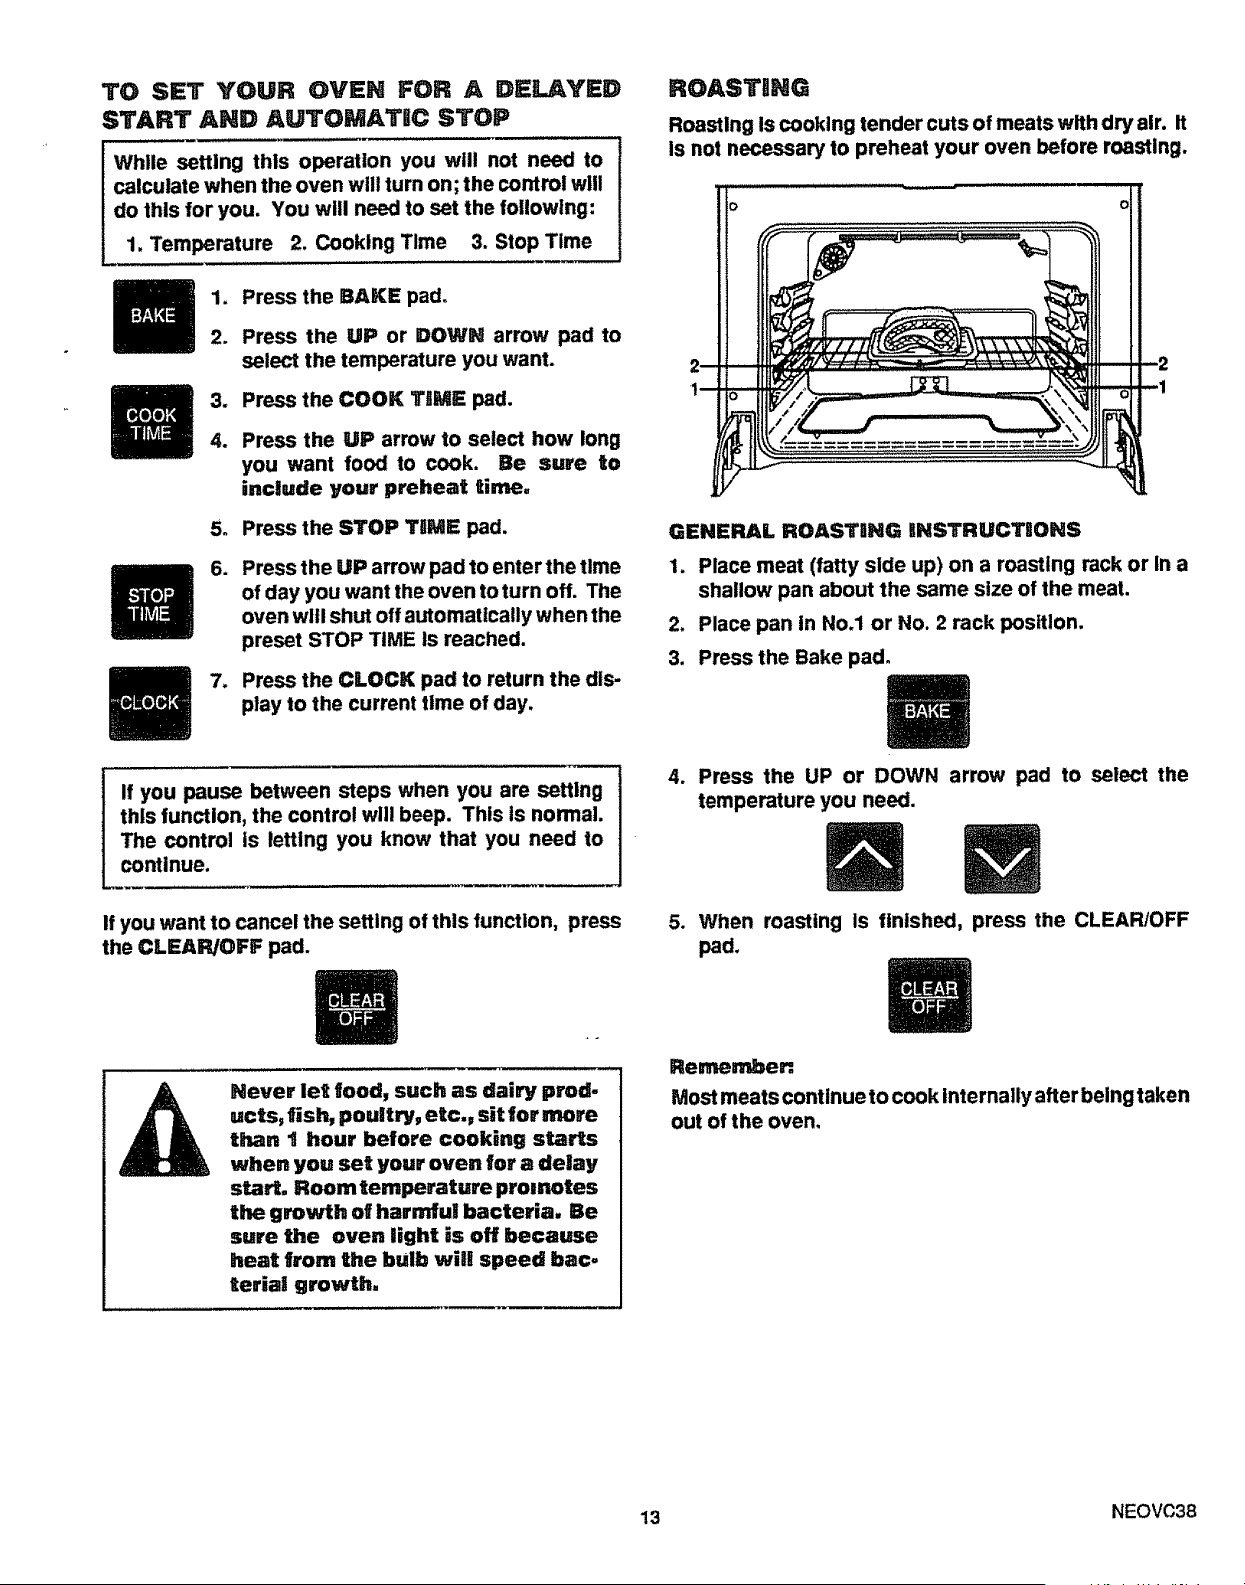
ROASTIlNG
Roasting Is cooking tender cuts of meats with dry air. It
is not necessary to preheat your oven before roasting.
GENERAL ROASTNNG INSTRUCTUONS
1. Place meat (fatty side up) on a roasting rack or In a
shallow pan about the same size of the meat.
2. Place pan in No.1 or No. 2 rack position.
3. Press the Bake pad.
If you pause between steps when you are setting
this function, the control will beep. This is normal.
The control is letting you know that you need to
continue.
4,
Press the UP or DOWN arrow pad to select the
temperature you need.
If you want to cancel the setting of this function, press
the CLEARJOFF pad.
5. When roasting Is finished, press the CLEAR/OFF
pad.
Never let food, such as dairy prod-
ucts, fish, poultry, etc., sit for more
than t hour before cooking starts
when you set your oven for a delay
sta_. Roomtemperaturo prolnotes
the growth of harmful bacteria. Be
sure the oven light is off because
heat from the bulb will speed bac.
terial growth.
Remember,
Most meats continue to cook internally after being taken
out of the oven.
13 NEOVC38
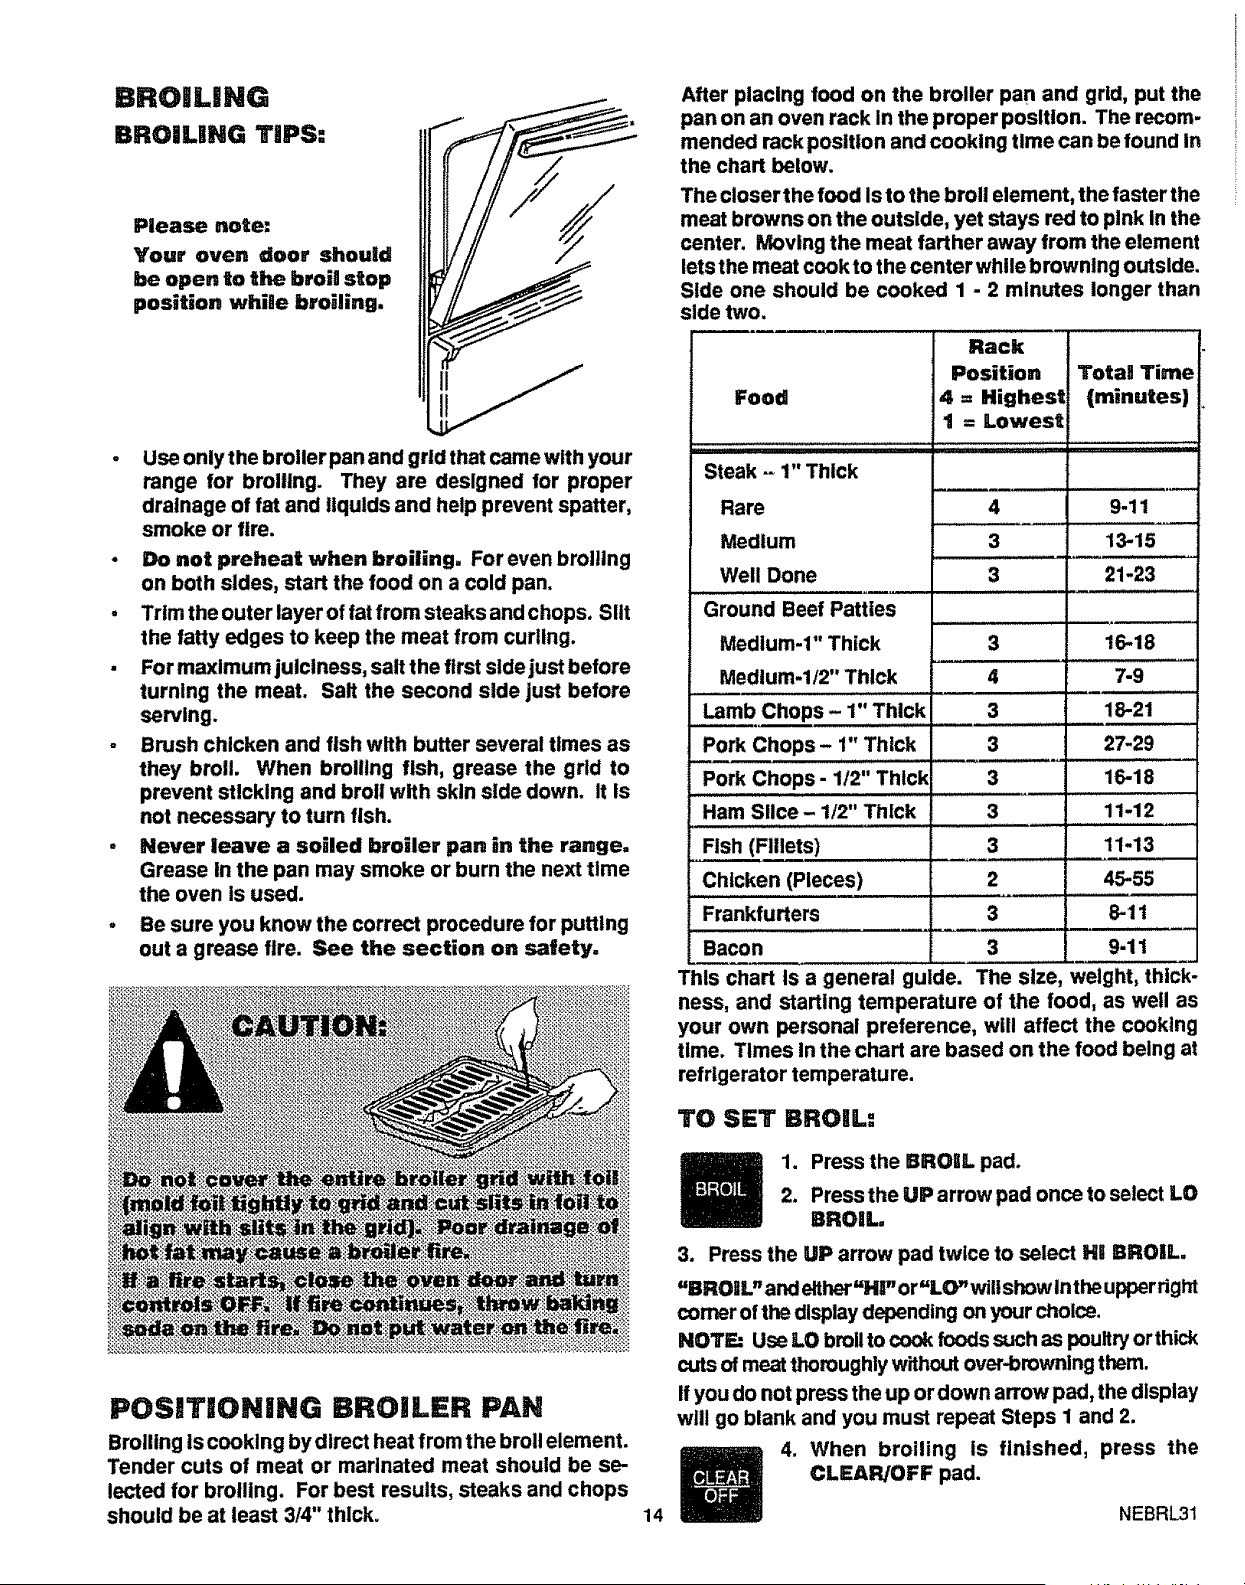
BROILING
BROILING TIPS:
Please note:
Your oven door should
be open to the broil stop
position whi0e broiling.
. Use only the broiler pan and grid that came with your
range for broiling. They are designed for proper
drainage of fat and flquids and help prevent spatter,
smoke or fire.
• Do not preheat when broiling. For even broiling
on both sides, start the food on a cold pan.
• Trim the outer layer of fat from steaks and chops. Slit
the fatty edges to keep the meat from curling.
• For maximum juiciness, salt the first side just before
turning the meat. Salt the second side just before
serving.
= Brush chicken and fish with butter several tlmes as
they broil. When broiling fish, grease the grid to
prevent sticking and brotl with skin side down. It Is
not necessary to turn fish.
, Never leave a soiled broiler pan in the range,
Grease in the pan may smoke or burn the next time
the oven is used.
• Be sure you know the correct procedure for putting
out a grease fire. See the section on safety,
After placing food on the broiler pan and grid, put the
pan on an oven rack In the proper position. The recom-
mended rack position and cooking time can be found In
the chart below.
The closer the food Is to the broil element, the faster the
meat browns on the outside, yet stays red to pink In the
center. Moving the meat farther away from the element
lets the meat cookto the center while browning outside.
Side one should be cooked 1 - 2 minutes longer than
side two.
Rack
Position Tota9 Time
Food
Steak -_1" Thick
Rare
Medium
Well Done
Ground Beef Patties
Medium-l" Thick
Medium-I/2" Thick
Lamb Chops - 1" Thick
Pork Chops- 1" Thick
Pork Chops- 1/2" Thick
Ham Slice- 1/2" Thick
Fish (Fillets)
4 = Highest
t : Lowest
(minutes)
4 9-11
,,,,,,.......
3 13-15
3 21-23
3
4
3
3
, ,,,,
16-18
7-9
18-21
27-29
3 16-18
3 11-12
3
11-13
45-55
Chicken (Pieces) 2
L,,, ,,, ,,,,,,,,,,,.
Frankfurters 3 8-11
Bacon 3 9-11
This chart tsa general guide. The size, weight, thick-
ness, and starting temperature of the food, as we!l as
your own personal preference, will affect the cooking
time. Times In the chart are based on the food being at
refrigerator temperature.
1"O SET BROIL:
POSITIONING BROILER PAN
Broiling is cooking by direct heat from the broil element.
Tender cuts of meat or marinated meat should be se-
lected for broiling. For best results, steaks and chops
should be at least 314" thlcko
14
1. Press the BROIL pad.
2. Press the UP arrow pad once to select LO
BROIL.
3. Press the UP arrow pad twice to select Hg BROIL.
"BROiL"and either "Hi" or "LO"will showtnthe upper right
comer of the display depending on your choice.
NOTE: Use LO broil to cook foods such as poultry orthick
cuts of meat thoroughly without over-browning them.
If you do not press the up or down arrow pad, the display
will go blank and you must repeat Steps I and 2.
4. When broiling is finished, press the
CLEAR/OFF pad.
NEBRL31
THH SELF=CLEAN CYCL (3 NOURS ° NOnMAL CLEAN TAMS)
BEFORE A CLEAN CYCLE
1. Remove the broiler pan and grid, oven racks, all
utensils and any foil that may be in the oven. Do not
try to clean utensils or any other objects in the oven
during a self-clean cycle_ if oven racks are left in
the range during a clean cycle, they will darken,
lose their luster and become hard to slide, if
you choose to leave the racks in the oven, you
can polish the edges of the racks with stee!
wool and apply a small amount of vegetable oil
to the rack edges after the sell-clean cycle.
This will make the racks easier to slide,
2. Soil on the oven front frame, under the front edge of
the cooktop, the door liner outside the door gasket
and the front edge of the oven cavity (about 1" into the
oven) will not be cleaned during a clean cycle (see
illustration below). Clean these areas by hand before
starting a clean cycle.
Use hot water with a soap-filled steel wool pad. We
recommend a cleanser such as 'Soft Scrub®' brand
or a similar cleaning product to keep white surfaces
looking clean and new. After cleaning, rinse well to
help prevent a brown residue from forming when the
oven Is heated. Buff these areas dry with a dry cloth_
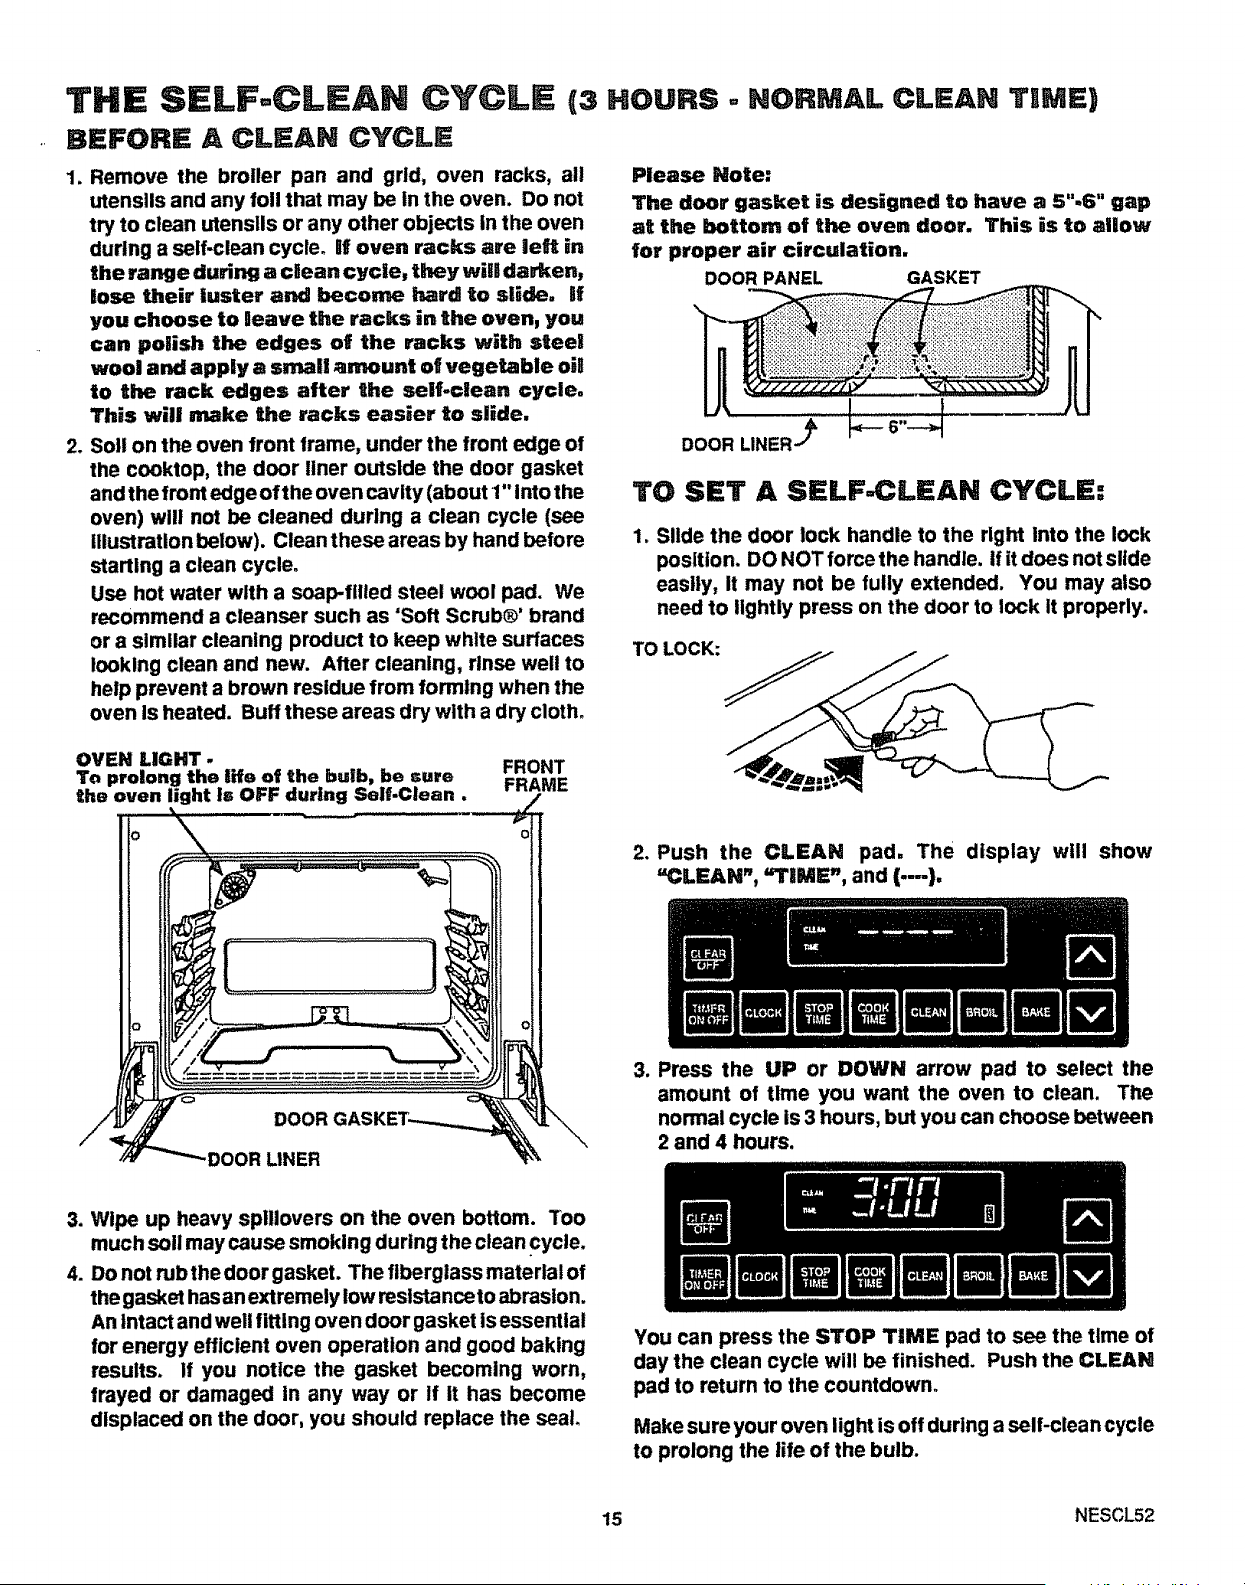
Please Note:
The door gasket is designed to have a 5".6" gap
at the bottom of the oven door. This is to aUow
for proper air circulation,
DOOR PANEL GASKET
TO SET A SELF-CLEAN CYCLE:
1. Slide the door lock handle to the right Into the lock
position. DO NOT force the handle. If it does not slide
easily, it may not be fully extended. You may also
need to lightly press on the door to lock It properly.
TO LOCK:
OVEN LIGHT.
To prolong the lifo of the bulb, be sure
the oven light Is OFF during Self-Clean,
FRONT
FRAME
2. Push the CLEAN pad, The display will show
"CLEAN", =TIME", and (.--),
DOOR LINER
3. Press the UP or DOWN arrow pad to select the
amount of time you want the oven to clean. The
normal cycle is 3 hours, but you can choose between
2 and 4 hours.
3. Wipe up heavy splllovers on the oven bottom. Too
much soil may cause smoking during the clean cycle.
4. Do not rub the door gasket. The fiberglass material of
the gasket has an extremely low resistanceto abrasion.
An intact and well fitting oven door gasket lsessential
for energy efficient oven operation and good baking
results. If you notice the gasket becoming worn,
frayed or damaged in any way or if it has become
displaced on the door, you should replace the seal.
You can press the STOP TIME pad to see the time of
day the clean cycle will be finished. Push the CLEAN
pad to return to the countdown.
Make sure your oven light is off during a self-clean cycle
to prolong the life of the bulb.
15 NESCL52
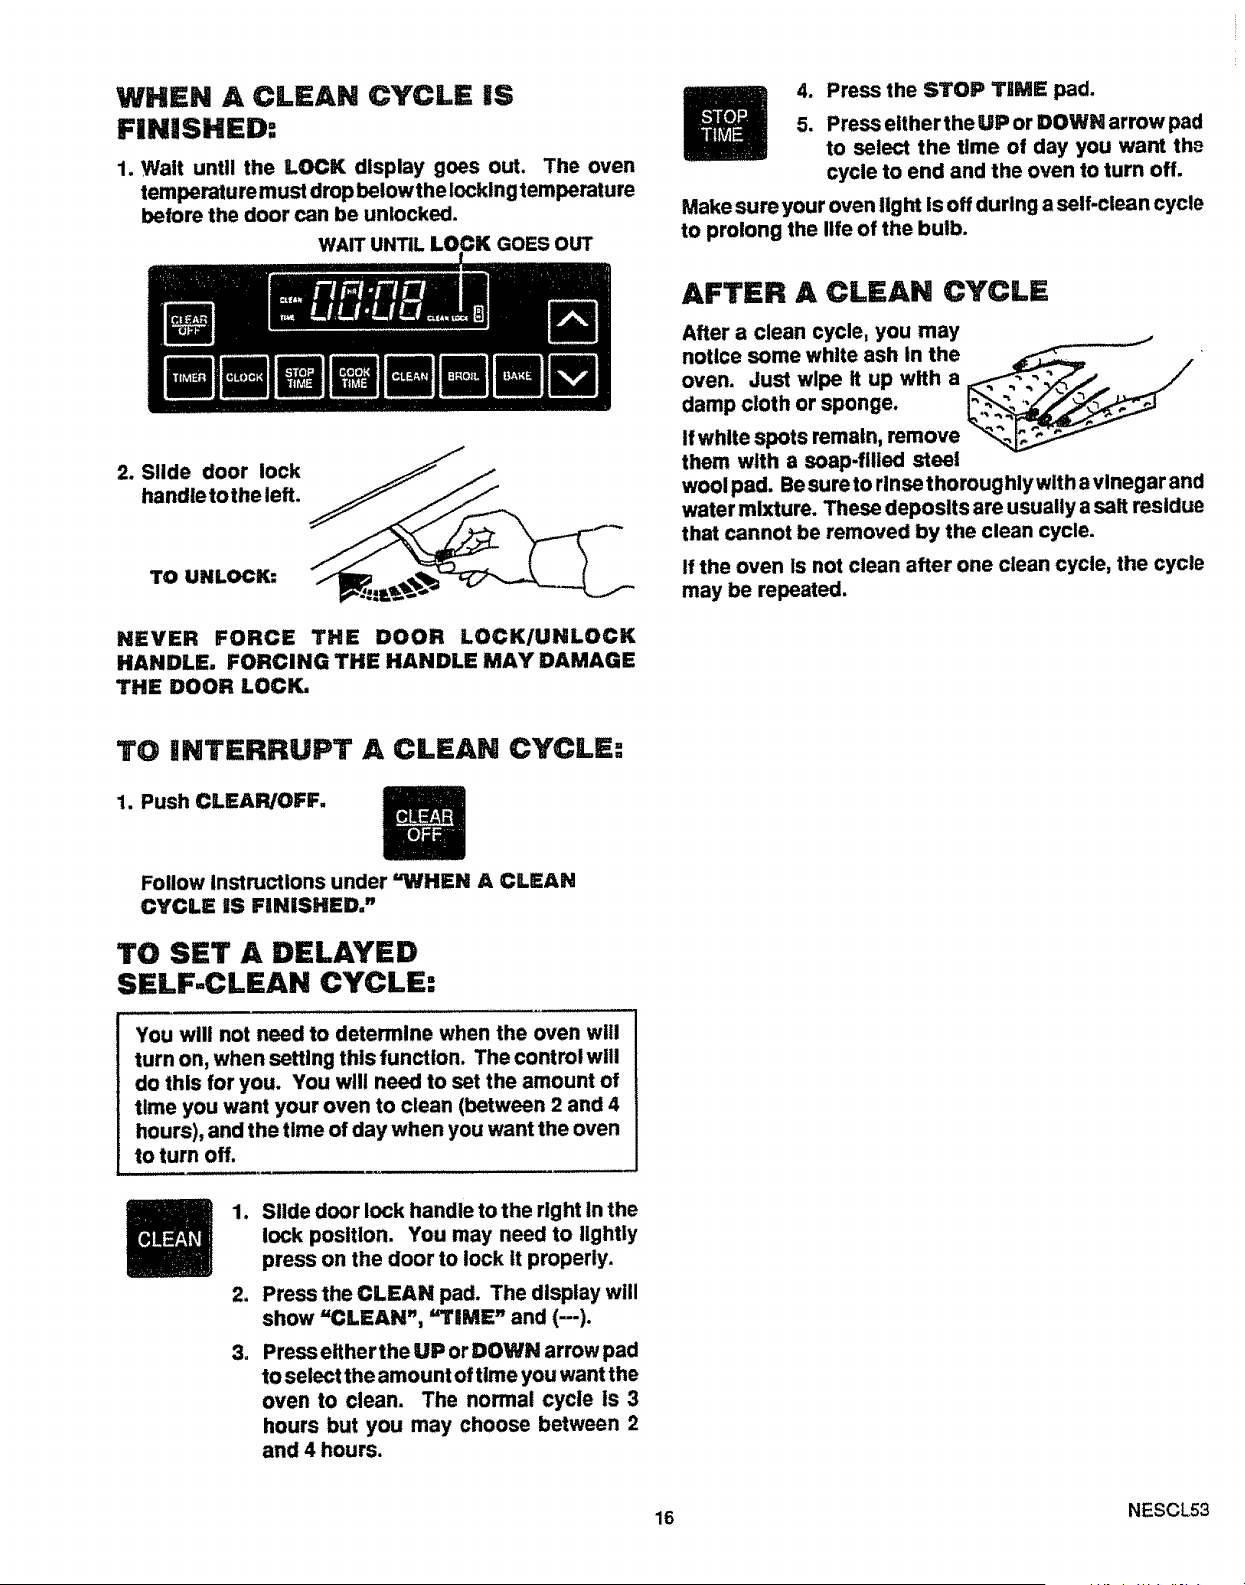
WHEN A CLEAN CYCLE iS
FiNiSHED-"
1. Wait until the LOCK display goes out. The oven
temperature must drop below the lockln g temperature
before the door can be unlocked.
;K GOES OUT
2. Slide door lock
handletotheleft.
TO UNLOCK:
NEVER FORCE THE DOOR LOCK/UNLOCK
HANDLE. FORCING THE HANDLE MAY DAMAGE
THE DOOR LOCK.
4. Press the STOP TRME pad.
5. Press eitherthe UP or DOWN arrow pad
to select the time of day you want tho
cycle to end and the oven to turn off.
Make sure your oven iight Is off during a self-clean cycle
to prolong the life of the bulb.
AFTER A CLEAN CYCLE
After a clean cycle, you may
notice some white ash tn the
oven. Just wipe it up with a
damp cloth or sponge.
If white spots remain, remove
them with a soap-filled steel
wool pad. Besureto rinsethoroughlywlth a vinegar and
water mixture. These deposits are usually a salt residue
that cannot be removed by the clean cycle.
If the oven Is not clean after one clean cycle, the cycle
may be repeated.
TO iNTERRUPT A CLEAN CYCLE:
1. Push CLEAR/OFF.
Follow instructions under "WHEN A CLEAN
CYCLE IS FINISHED."
TO SET A DELAYED
SELF-CLEAN CYCLE:
You will not need to determine when the oven will
turn on, when setting this function. The control will
do this for you. You will need to set the amount of
time you want your oven to clean (between 2 and 4
hours), and the time of day when you want the oven
to turn off.
1. Slide door lock handle to the right In the
lock position. You may need to lightly
press on the door to lock it properly.
2. Press the CLEAN pad. The display will
show "CLEAN", "TIME" and (--).
3o Press either the UP or DOWN arrow pad
to select the amount of time you want the
oven to clean. The normal cycle is 3
hours but you may choose between 2
and 4 hours.
16 NESCL53
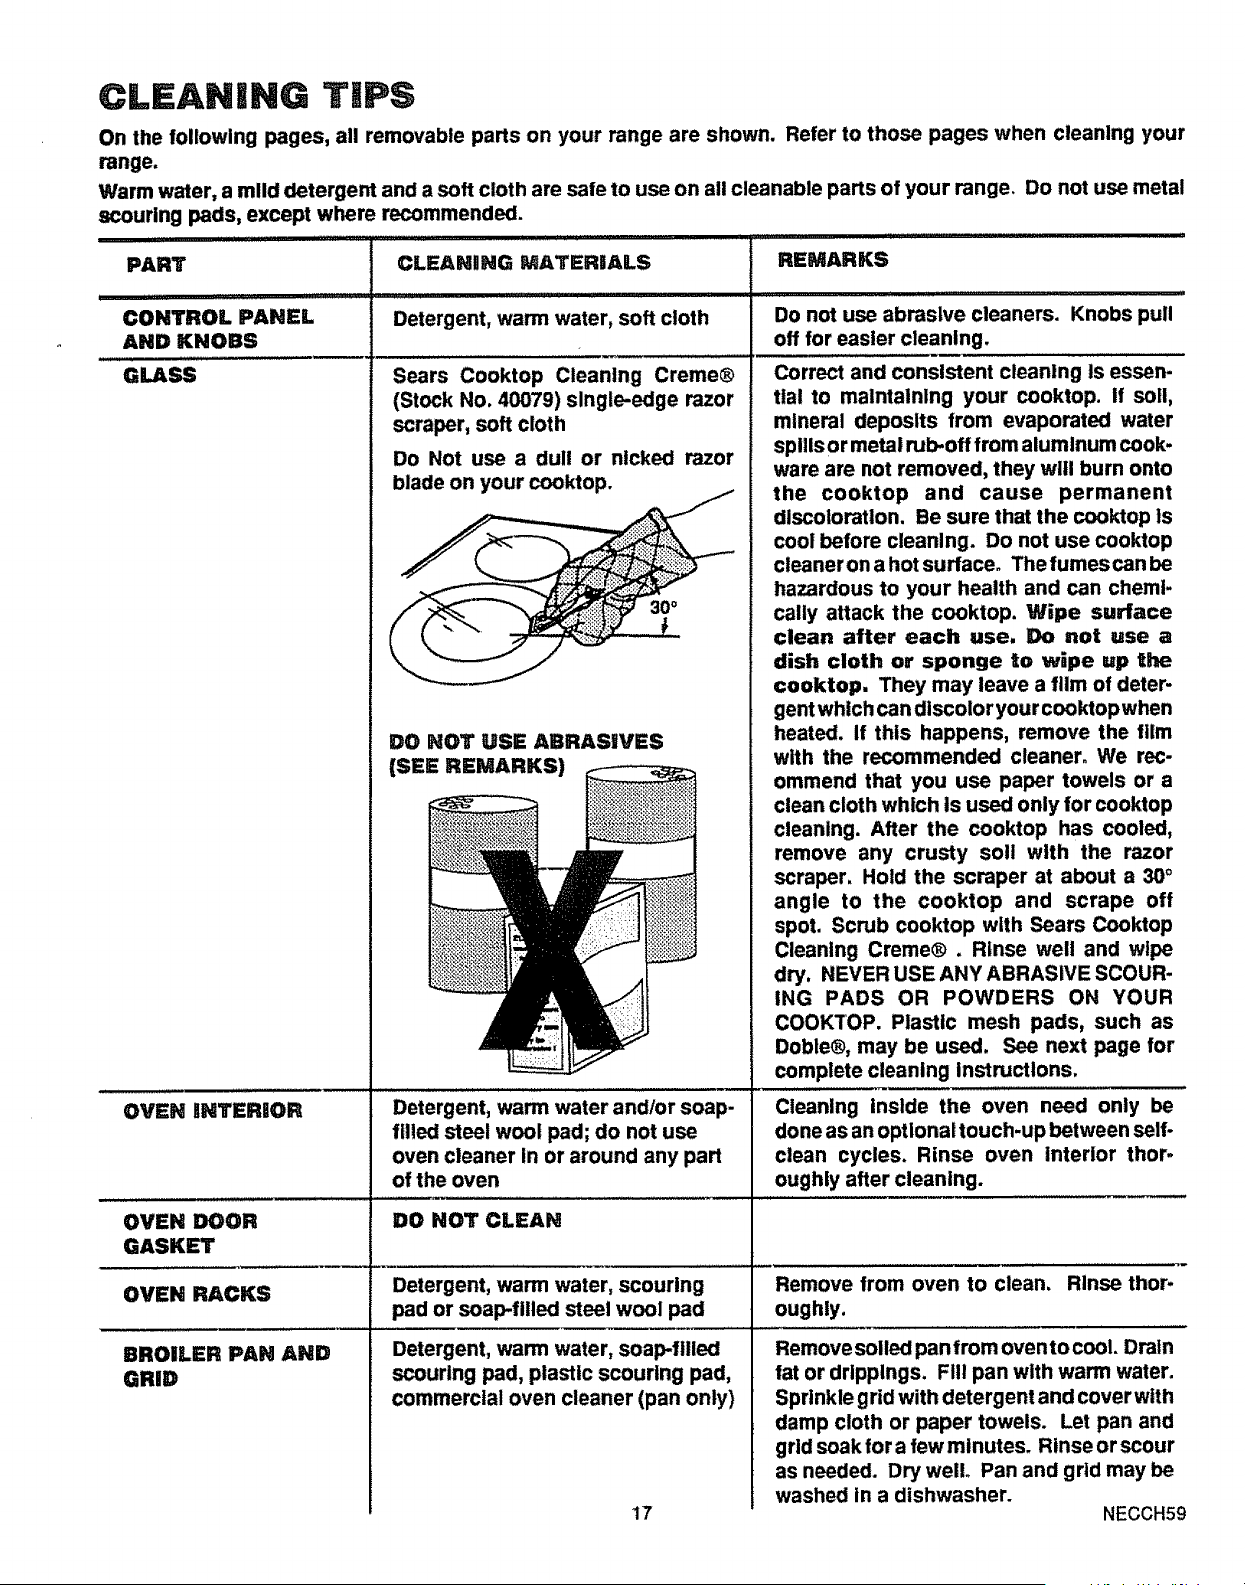
CLEANING TiPS
On the following pages, all removable parts on your range are shown. Refer to those pages when cleaning your
range.
Warm water, a mild detergent and a soft cloth are safe to use on all cleanable parts of your range. Do not use metal
scouring pads, except where recommended.
t ,11,,,,i, I L ]L tl _1]1itJ
PART CLEANONG MATERIALS
L
Detergent, warm water, soft cloth
Sears Cooktop Cleaning Creme®
(Stock No. 40079) single-edge razor
scraper, soft cloth
Do Not use a dull or nicked razor
iii Hi,i i,i1_
CONTROL PANEL
AND KNOBS
GLASS
OVEN iNTERiOR
blade on your cooktop.
DO NOT USE ABRASIVES
(SEE REMARKS)
Detergent, warm water and/or soap-
filled steel wool pad; do not use
oven cleaner In or around any part
of the oven
,J,i_,,l_,, llrl_lli_,
REMARKS
Do not use abrasive cleaners. Knobs pull
off for easier cleaning.
Correct and consistent cleaning Is essen-
tial to maintaining your cooktop, if soil,
mineral deposits from evaporated water
spills or metal rub-off from aluminum cook-
ware are not removed, they will burn onto
the cooktop and cause permanent
discoloration. Be sure that the cooktop Is
cool before cleaning. Do not use cooktop
cleaner on a hot surface. The fumes can be
hazardous to your health and can chemi-
cally attack the cooktop. Wipe surface
clean after each use. Do not use a
dish cloth or sponge to wipe up the
cooktop. They may leave a film of deter-
gent which can discolor your cooktopwhen
heated. If this happens, remove the film
with the recommended cleaner° We rec-
ommend that you use paper towels or a
clean cloth which Is used only for cooktop
cleaning. After the cooktop has cooled,
remove any crusty soil with the razor
scraper. Hold the scraper at about a 30°
angle to the cooktop and scrape off
spot. Scrub cooktop with Sears Cooktop
Cleaning Creme®. Rinse well and wipe
dry, NEVER USE ANY ABRASIVE SCOUR-
ING PADS OR POWDERS ON YOUR
COOKTOP. Plastic mesh pads, such as
Doble®, may be used. See next page for
complete cleaning instructions.
Cleaning inside the oven need only be
done as an optional touch-up between self-
clean cycles. Rinse oven interior thor-
oughly after cleaning.
OVEN DOOR DO NOT CLEAN
GASKET
OVEN RACKS Detergent, warm water, scouring Remove from oven to clean. Rinse thor-
pad or soap-filled steel wool pad oughly.
Detergent, warm water, soap-filled
scouring pad, plastic scouring pad,
commercial oven cleaner (pan only)
17
BROILER PAN AND
GRiD
Remove soiled panfrom oventocool. Drain
fat or drippings. Fill pan with warm water.
Sprinkle grid with detergent and cover with
damp cloth or paper towels. Let pan and
grid soak for a few minutes. Rinse or scour
as needed. Dry weilo Pan and grid may be
washed in a dishwasher.
NECCH59
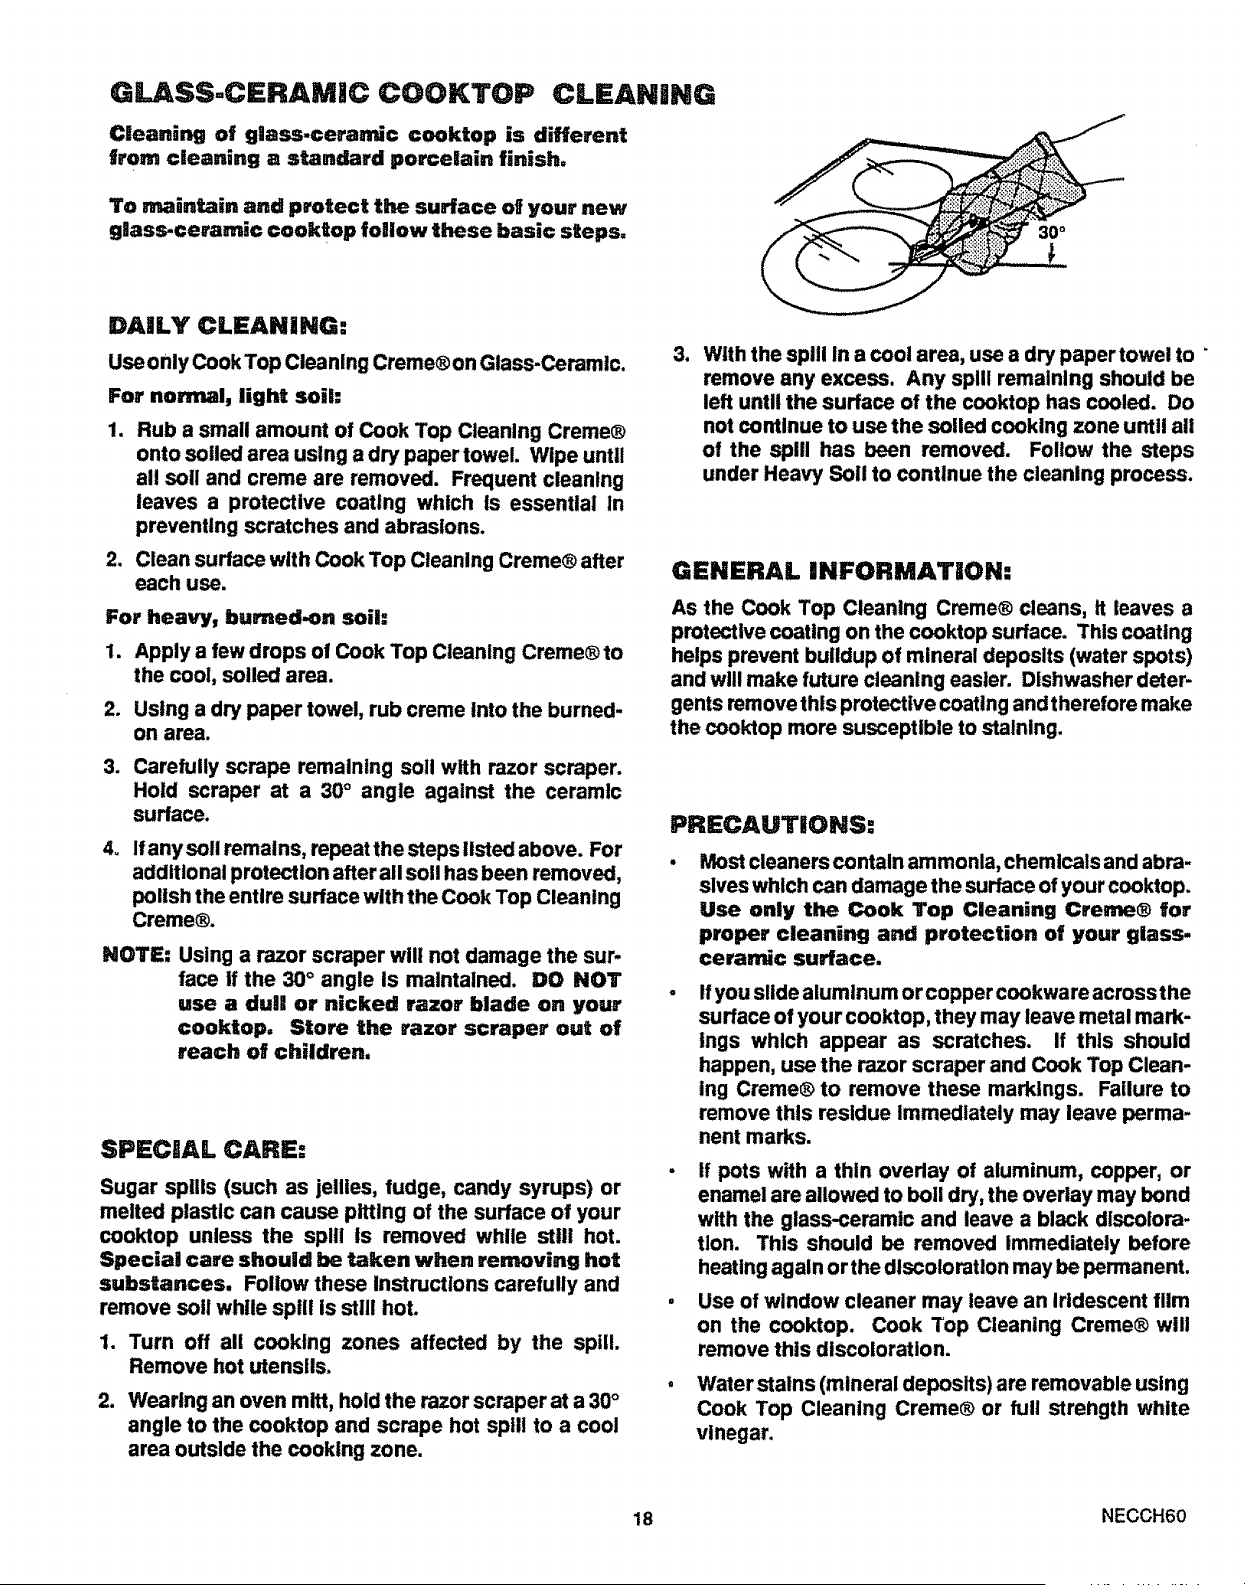
GLASS-CERAMiC COOKTOP CLEANING
Cleaning of glass-ceramic €ooktop is different
from cleaning a standard porcelain finish,
To maintain and protect the surface of your new
glass-ceramic cooktap follow these basic steps.
DAILY CLEANING:
Use only Cook Top Cleaning Creme® on Glass-Ceramic.
For normal, light soil:
lJ
m
Rub a small amount of Cook Top Cleaning Creme®
onto soiled area using a dry paper towel. Wipe until
all soil and creme are removed. Frequent cleaning
leaves a protective coating which Is essential In
preventing scratches and abrasions.
Clean surface with Cook Top Cleaning Creme® after
each use.
For heavy, burned-on soil:
1. Apply a few drops of Cook Top Cleaning Creme®to
the cool, soiled area.
.
1
u
Using a dry paper towel, rub creme Into the burned-
on area.
Carefully scrape remaining soll with razor scraper.
Hold scraper at a 30° angle against the ceramic
surface.
If any soil remains, repeat the steps listed above. For
additional protection after all soil has been removed,
polish the entire surface with the Cook Top Cleaning
Creme®.
NOTE: Using a razor scraper will not damage the sur-
face tf the 30 ° angle Is maintained. DO NOT
use a dull or nicked razor blade on your
cooktop, Store the razor scraper out of
reach of children.
SPECIAL CARE:
Sugar spills (such as jellies, fudge, candy syrups) or
melted plastic can cause pitting of the surface of your
cooktop unless the split Is removed while still hot.
Special care should be taken when removing hot
substances. Follow these InstP-,ctions carefully and
remove soil while spill is still hot.
1. Turn off all cooking zones affected by the spill.
Remove hot utensils.
2J
Wearing an oven mitt, hold the razor scraper at a 30 °
angle to the cooktop and scrape hot spill to a cool
area outside the cooking zone.
1
With the spill in a cool area, use a dry paper towel to "
remove any excess. Any spill remaining should be
left unUl the surface of the cooktop has cooled. Do
not continue to use the soiled cooking zone until all
of the spill has been removed. Follow the steps
under Heavy Soil to continue the cleaning process.
GENERAL INFORMATION:
As the Cook Top Cleaning Creme® cleans, It leaves a
protective coating on the cooktop surface. This coating
helps prevent buildup of mineral deposits (water spots)
and will make future cleaning easier. Dishwasher deter-
gents remove this protective coating and therefore make
the cooktop more susceptible to staining.
PRECAUTIONS:
Most cleaners contain ammonia, chemicals and abra-
sives which can damage the surface of your cooktop.
Use only the Cook Top Cleaning Creme® for
proper cleaning and protection of your glass-
ceramic surface.
If you slide aluminum or copper cookware across the
surface of your cooktop, they may leave metal mark-
ings which appear as scratches. If this should
happen, use the razor scraper and Cook Top Clean-
ing Creme® to remove these markings. Failure to
remove this residue Immediately may leave perma-
nent marks.
. if pots with a thin overlay of aluminum, copper, or
enamel are allowed to boll dry, the overlay may bond
wIth the glass-ceramic and leave a black discolora-
tion. This should be removed Immediately before
heating again or the discoloration may be permanent.
. Use of window cleaner may leave an Iridescent film
on the cooktop. Cook Top Cleaning Creme® will
remove this discoloration.
Water stains (mineral deposits) are removable using
Cook Top Cleaning Creme® or full strellgth white
vinegar.
18 NECCH60
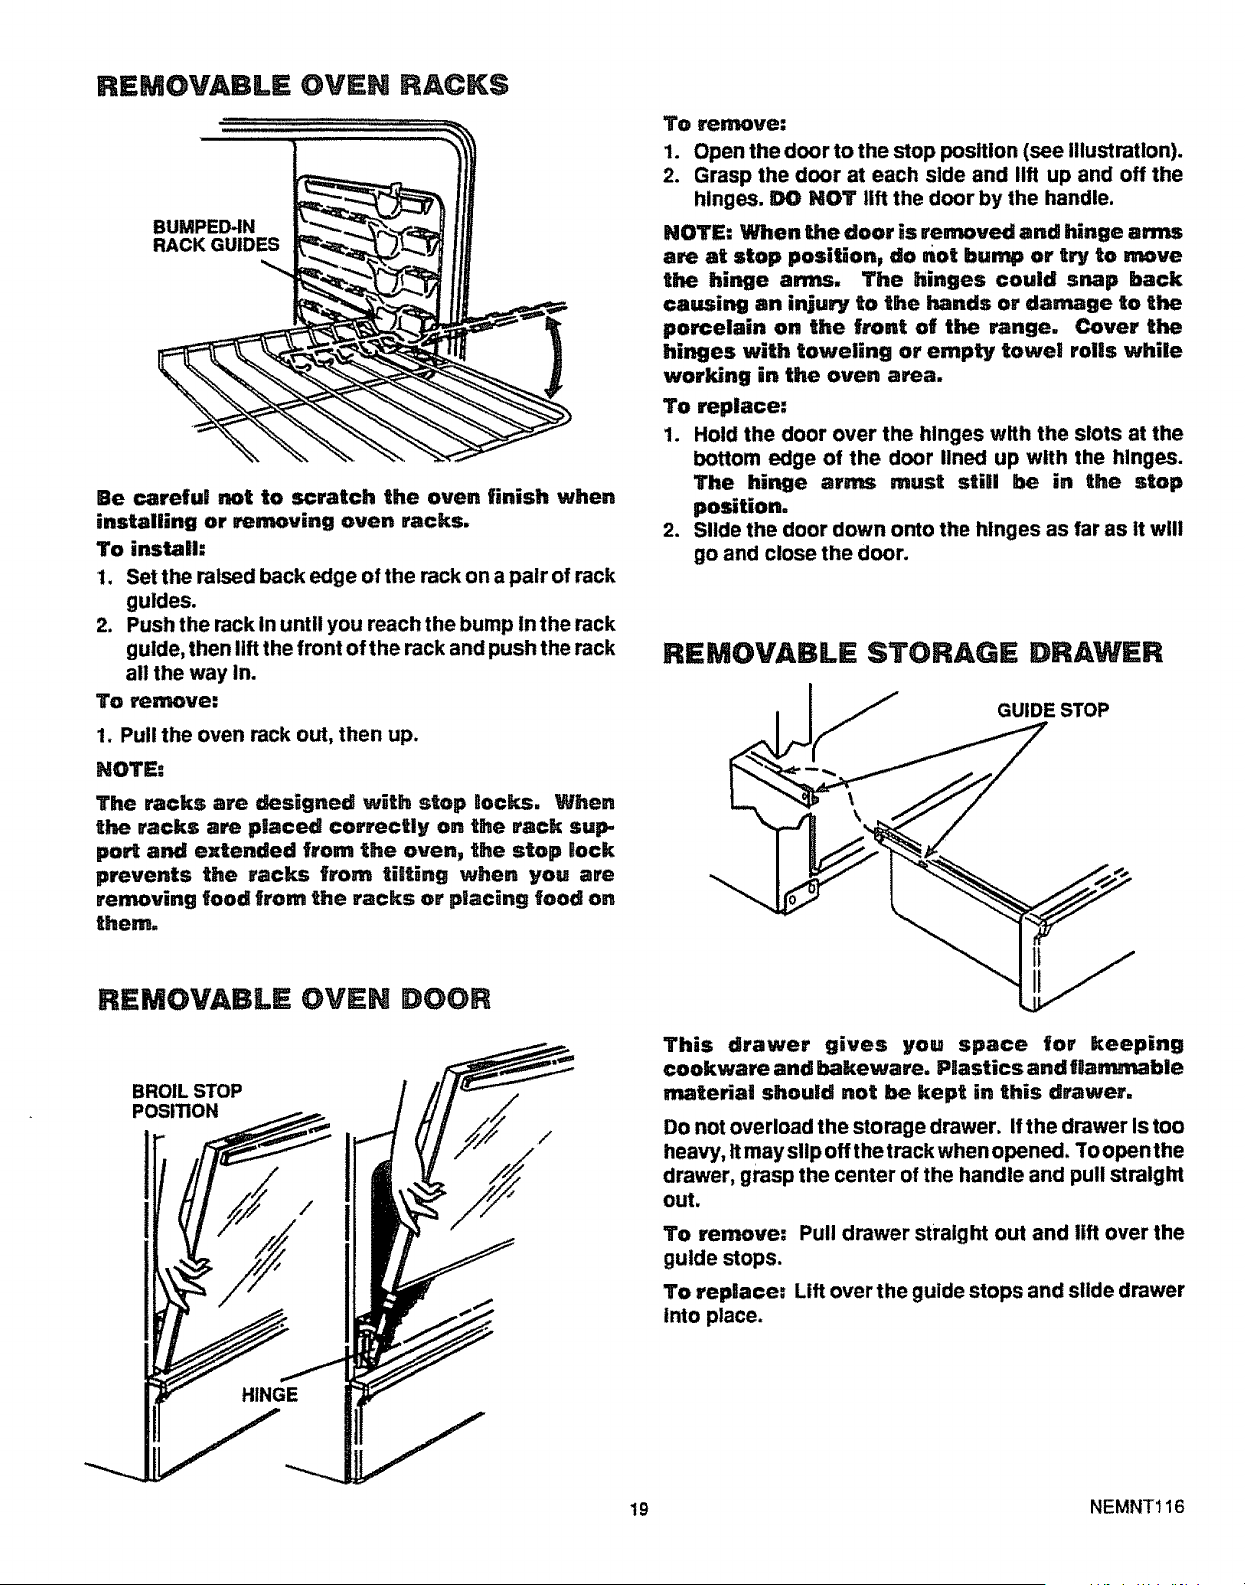
REMOVABLE OVEN RACKS
BUMPED-IN
RACK GUIDES
Be carefu! not to scratch the oven finish when
installing or removing oven racks.
To install:
1. Set the raised back edge of the rack on a pair of rack
guides.
2. Push the rack in until you reach the bump In the rack
guide, then lift the front of the rack and push the rack
all the way in.
To remove:
1. Pull the oven rack out, then up.
NOTE:
The racks are designed w_th stop Rocks. When
the racks are placed correctly on the rack sup-
port and extended from the oven, the stop lock
prevents the racks from SiSting when you are
removing food from the racks or placing food on
them.
REMOVABLE OVEN DOOR
BROIL STOP
POSITION
TO remove:
1. Open the door to the stop position (see illustration).
2. Grasp the door at each side and lift up and off the
hinges. DO NOT lift the door by the handle.
NOTE: When Lhe door is removed and hinge arms
are at stop position, do not bump or try to move
the hinge arms. The hinges could snap hack
causing an injury to the hands or damage to the
porcelain on the front oR the range. Cover the
hinges with toweling or empty tawe! rolls while
working in the oven area.
To replace:
1. Hold the door over the hinges with the slots at the
bottom edge of the door ,ned up with the hinges.
The hinge arms must still he in the stop
posiUon.
2. Slide the door down onto the hinges as far as it will
go and close the door.
REMOVABLE STORAGE DRAWER
E_ STOP
This drawer gives you space for keeping
cookware and bakeware. PaasticsandtBammable
nmteriai should not be kept in this drawer,
Do not overload the storage drawer, if the drawer Is too
heavy, It may slip off the track when opened. To open the
drawer, grasp the center of the handle and pull straight
out.
To remove: Pull drawer straight out and lift over the
guide stops.
To replace: Lift over the guide stops and sltde drawer
into place.
19 NEMNT116
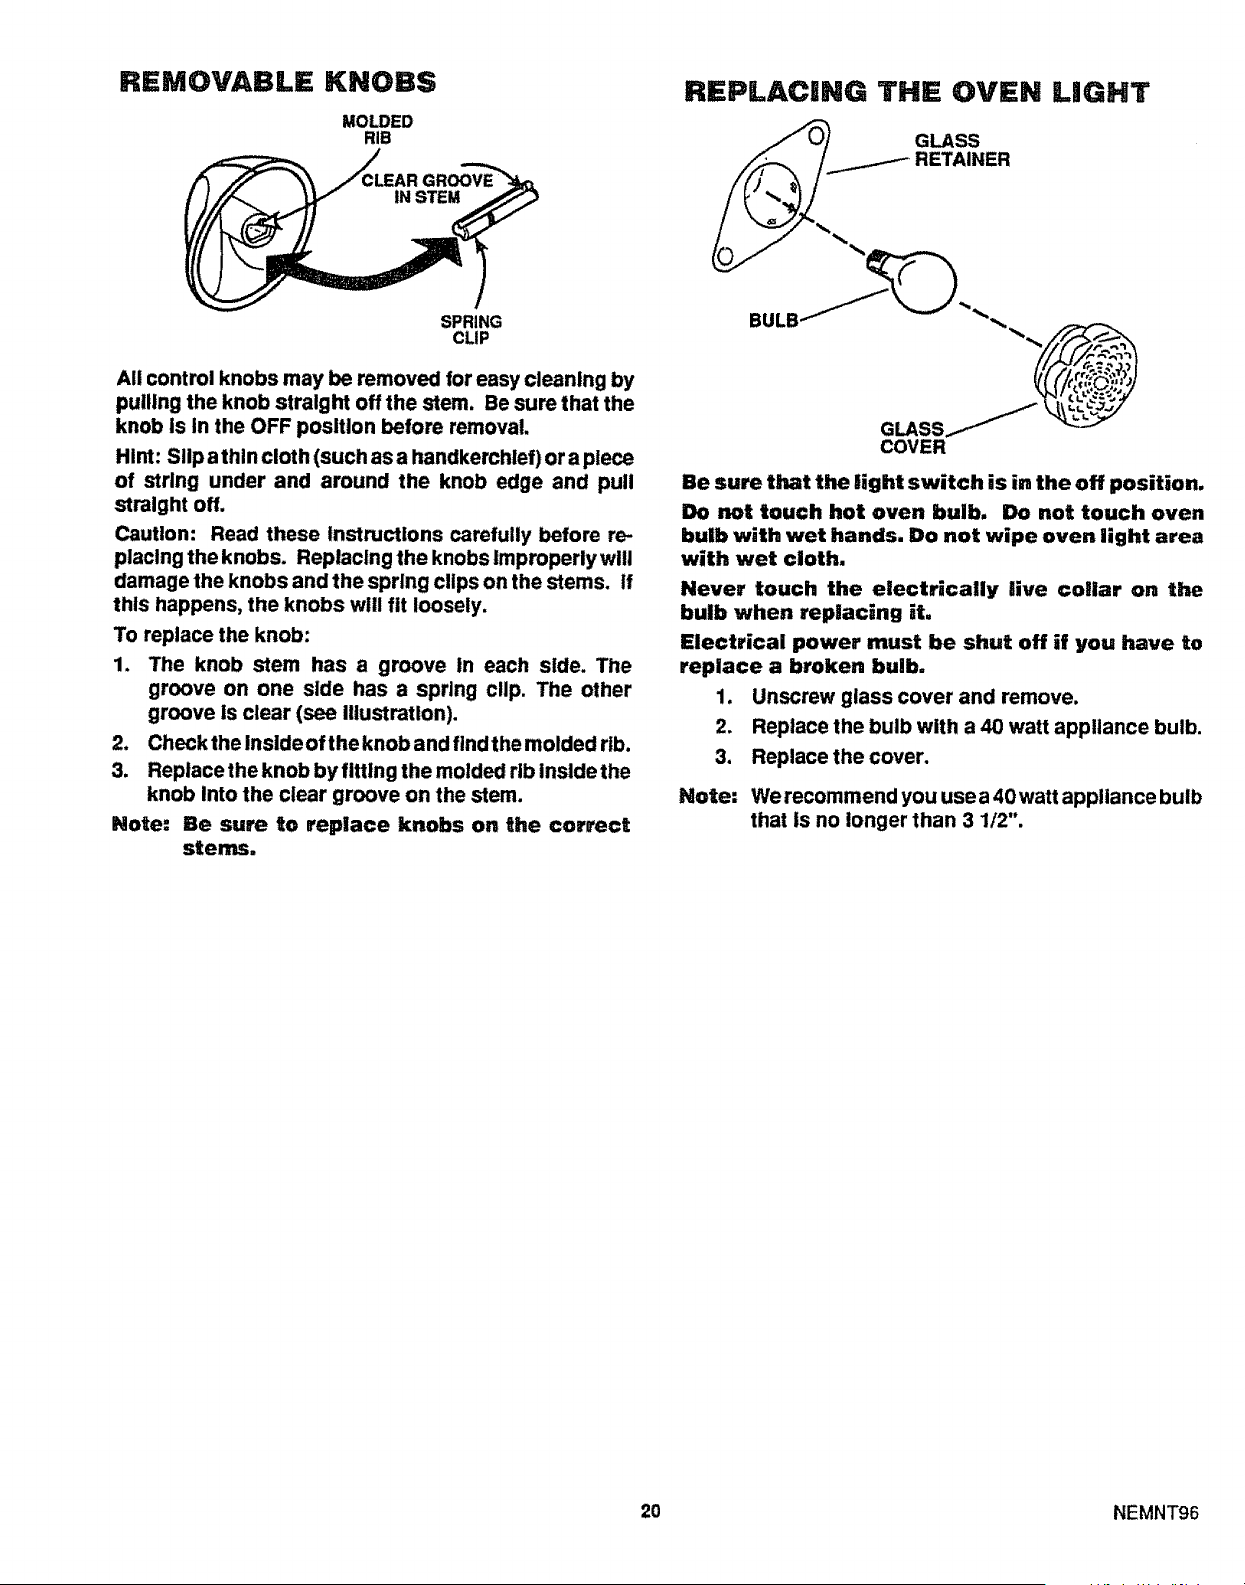
REMOVABLE KNOBS
MOLDED
RIB
SPRING
CLIP
All control knobs may be removed for easy cleaning by
pulling the knob straight off the stem. Be sure that the
knob is in the OFF position before removal.
Hint: Slip a thin cloth (such as a handkerchief) or a piece
of string under and around the knob edge and pull
straight off.
Caution: Read these Instructions carefully before re-
placing the knobs. Replacing the knobs Improperly will
damage the knobs and the spring clips on the stems. If
this happens, the knobs will fit loosely.
To replace the knob:
1. The knob stem has a groove In each side. The
groove on one slde has a spring clip. The other
groove Is clear (see Illustration).
2. Check the Inside ofthe knob and find the molded rib.
3. Replace the knob by fitting the molded rib Inside the
knob Into the clear groove on the stem.
Note: Be sure to replace knobs on the correct
stems,
REPLACING THE OVEN LIGHT
GLASS
RETAINER
BULB/__'_"_.
COVER
Be sure that the light switch is in the off position.
Do not touch hot oven bulb. Do not touch oven
bulb with wet hands. Do not wipe oven light area
with wet cloth.
Never touch the electrically live collar on the
bulb when replacing it,
Electrical power must be shut off if you have to
replace a broken bulb,
1. Unscrew glass cover and remove.
2, Replace the bulb with a 40 watt appliance bulb.
3, Replace the cover.
Note: We recommend you use a 40 watt appliance bulb
that Is no longer than 3 1/2".
20 NEMNT96

BEFORE CALUNG FOR SERVPCE
PROBLEM
i i i1,11 ii i
• RANGE DISPLAY iS
FLASHING =F" AND
A NUMBER; OVEN
STOPS WORKING -
SURFACE WORKS
i iiii ii i i i i, i , ii i,l,,iHiii i,i ,,
- TiNY SCRATCHES
OR ABRASIONS ON
COOKTOP (MAY
APPEAR AS TINY
SCRATCHES)
• METAL MARKING
ON COOKTOP (MAY
APPEAR AS TiNY
SCRATCHES)
° DARK STREAKS AND
SPECKS ON COOKTOP
AREAS OF
DISCOLORATJOH
ON COOKTOP
RANGE DOES NOT
WORK; TOTALLY
iNOPERATiVE
o OVEN DOES NOT
HEAT; COOKTOP
ZONES OK
• COOKTOP ZONE
DOES NOT WORK;
OVEN OK
FOODS COOK
SLOWLY ON THE
COOKTOP
o FOODS DO NOT
BAKE PROPERLY
POSSIBLE CAUSE
i i
o Possible range malfunction
a
u
o
Use of Incorrect cleaning ma-
terials
Coarse particles (salt, etc.)
between cookware bottoms
and cooktop. Be sure cook-
ware bottoms and cooktop are
clean before use.
Cookwarewith rough bottoms
Sliding or scraping metal uten-
sils and cookware across
cooktop
Encrusted bollovers or grease
spatters
Incorrect cleaning materials
Mineral deposits from water or
food
. No power to range
- Clock set Incorrectly
• Oven controls set Incorrectly
Improper operation of control
- Improper cookware
• Oven not preheated long
enough
. improper rack or pan place-
ment
°
o
o
o
m
Oven vent blocked or covered
Improper use of foil
Improper temperature setting
for utensil used
Recipe not followed
Improper thermostat calibra-
tion
Range and oven rack not level
° Using Improper cookware
DON'T CALL FOR SERVICE
UNTIL YOU CHECK
• Press CLEAR/OFF. Let range cool down for
one hour. Place rangeback into cooking or
cleaning cycle, If problem repeats, call for
service.
• Tiny scratches are not removable and do
not affect cooking. In time, the scratches
will become smoother and less visible,
• Use recommended cooktop cleaners.
• Use razor scraper and follow directions In
cleaning chart.
• Use recommended cleaners In cleaning
chart.
. Use recommended cleaners.
• Check household circuit breaker
or fuse.
, Check power cord to be sure it Is
plugged in.
. Check clock Instructions.
, Check oven control lnstrucUons.
° Be sure knob Is pushed in while turning.
• Use pans that have flat bottoms and a tight
fitting lid (If applicable). Pansshouldmatch
cooking zone size. Read thecooktop cook
ing section for complete Information.
• Be sure to preheat.
Maintain uniform air space around pans
and utensils, see oven cooking section,
, Keep vent area clear.
. Use of foll not recommended.
• Reduce temperature 25 degrees for glass
or dull/darkened pans.
. Is recipe tested and re.able?
• Check oven temperature adjustment pro-
cedures,
• Check the installation Instructlons for lev-
eling.
, See cooking hints section.
21 NESER107-1
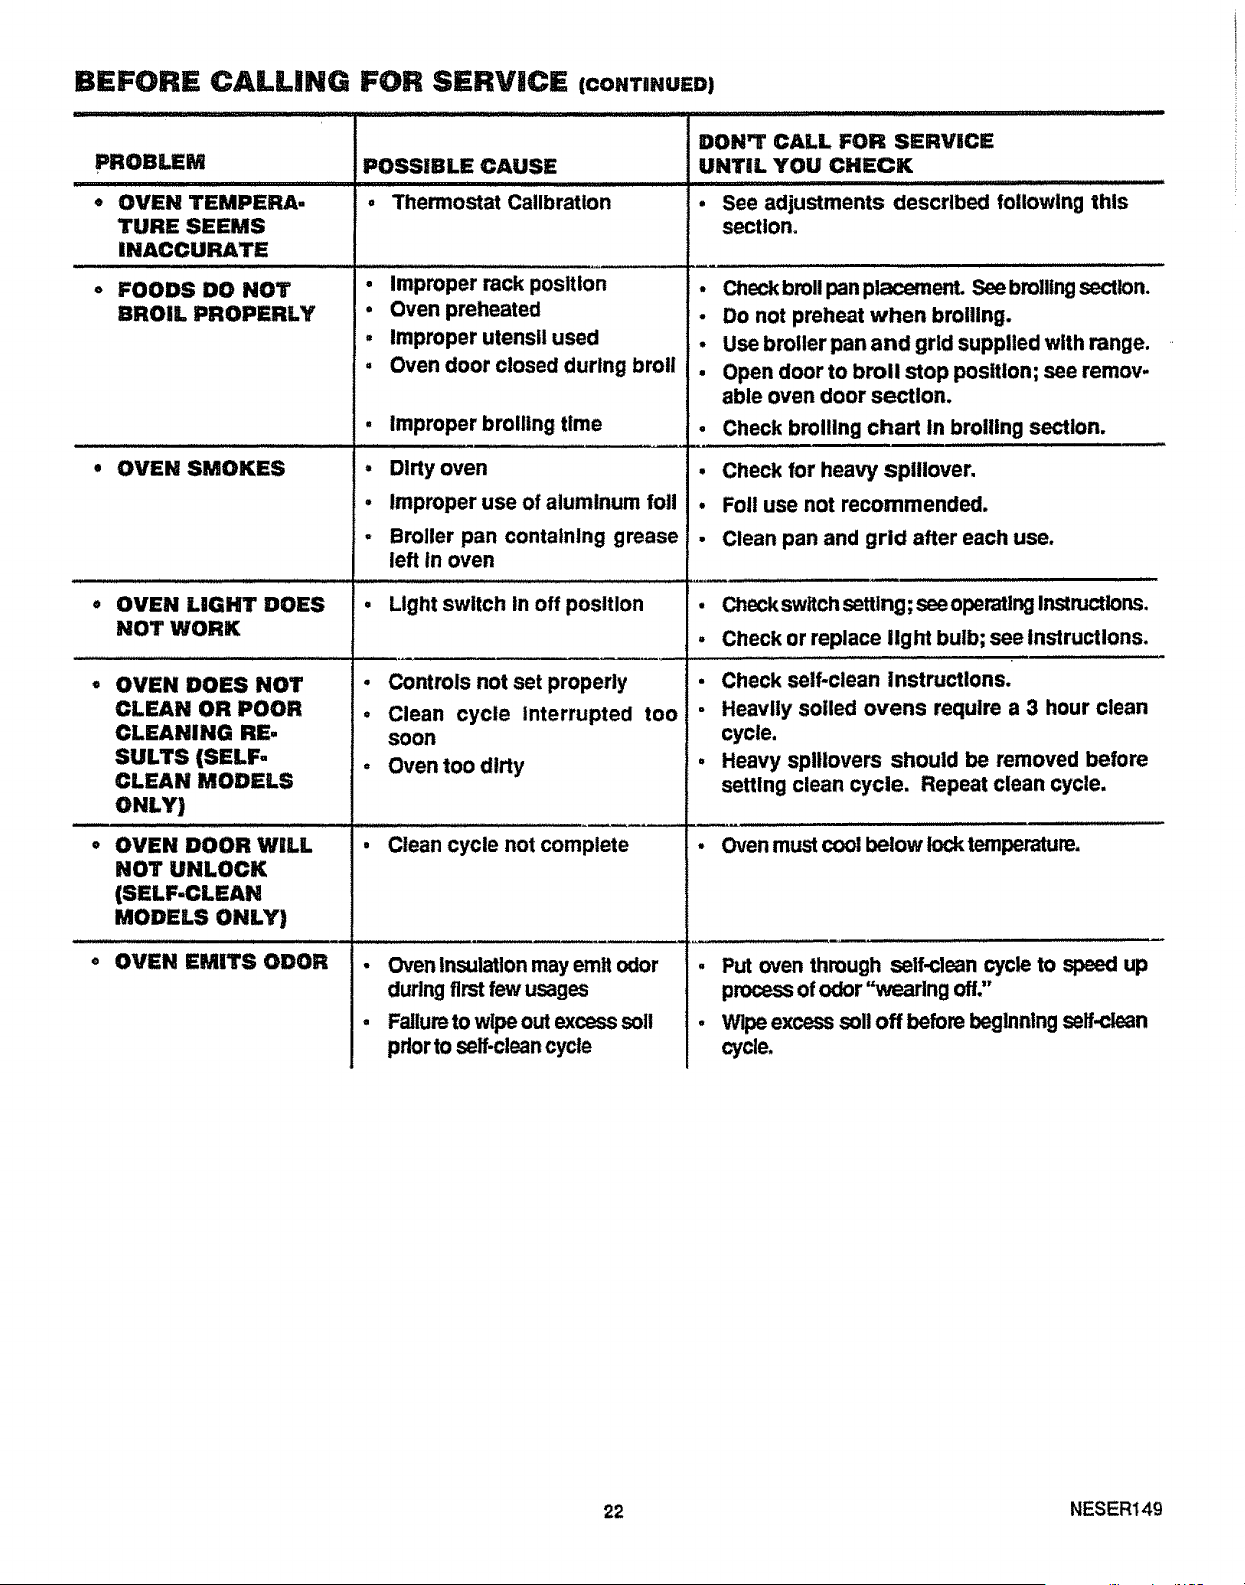
BEFORE CALLING FOR SERVICE (co.n.usD)
PROBLEM
• OVEN TEMPERA-
TURE SEEMS
INACCURATE
o FOODS DO NOT
BROIL PROPERLY
• OVEN SMOKES
OVEN LIGHT DOES
NOT WORK
OVEN DOES NOT
CLEAN OR POOR
CLEANING RE,
SULTS (SELF-
CLEAN MODELS
ONLY)
OVEN DOOR WiLL
NOT UNLOCK
(SELF-CLEAN
MODELS ONLY)
OVEN EMITS ODOR
POSSIBLE CAUSE
° Thermostat Calibration
• Improper rack position
• Oven preheated
• Improper utensil used
, Oven door closed during broil
e
°
o
°
Improper broiling time
Dirty oven
Improper use of aluminum foil
Broller pan containing grease
left In oven
• Light switch in off position
• Controls not set properly
• Clean cycle interrupted too
soon
° Oven too dlrty
, Clean cycle not complete
• Oven Insulation may emit odor
during first few usages
• Failure to wlpe out excess soil
prior to self-clean cycle
DON'T CALL FOR SERVICE
UNTIL YOU CHECK
..................... ......... Ullllll
• See adjustments described following this
section°
• Check broil pan placement. See broiling section.
• Do not preheat when broiling.
• Use broller pan and grid supplied with range.
• Open door to broil stop position; see remov-
able oven door section.
Check broiling chart in broiling section.
o
• Check for heavy spillover.
• Foil use not recommended.
• Clean pan and grid after each use.
m _J_II,L, IJJ,,,.I,J_L. , ,,,
• CheCk switch setting; see operating Instructions.
• Check or replace light bulb; see Instructions.
• Check self-clean Instructions.
. Heavily soiled ovens require a 3 hour clean
cycle.
, Heavy splllovers should be removed before
setting clean cycle. Repeat clean cycle.
• Oven must cool below lock temperature.
, Put oven through self.clean cycle to speed up
process of odor "wearing off."
• Wipe excess soil off before beglnnlng serf-clean
cycle.
22 NESER149
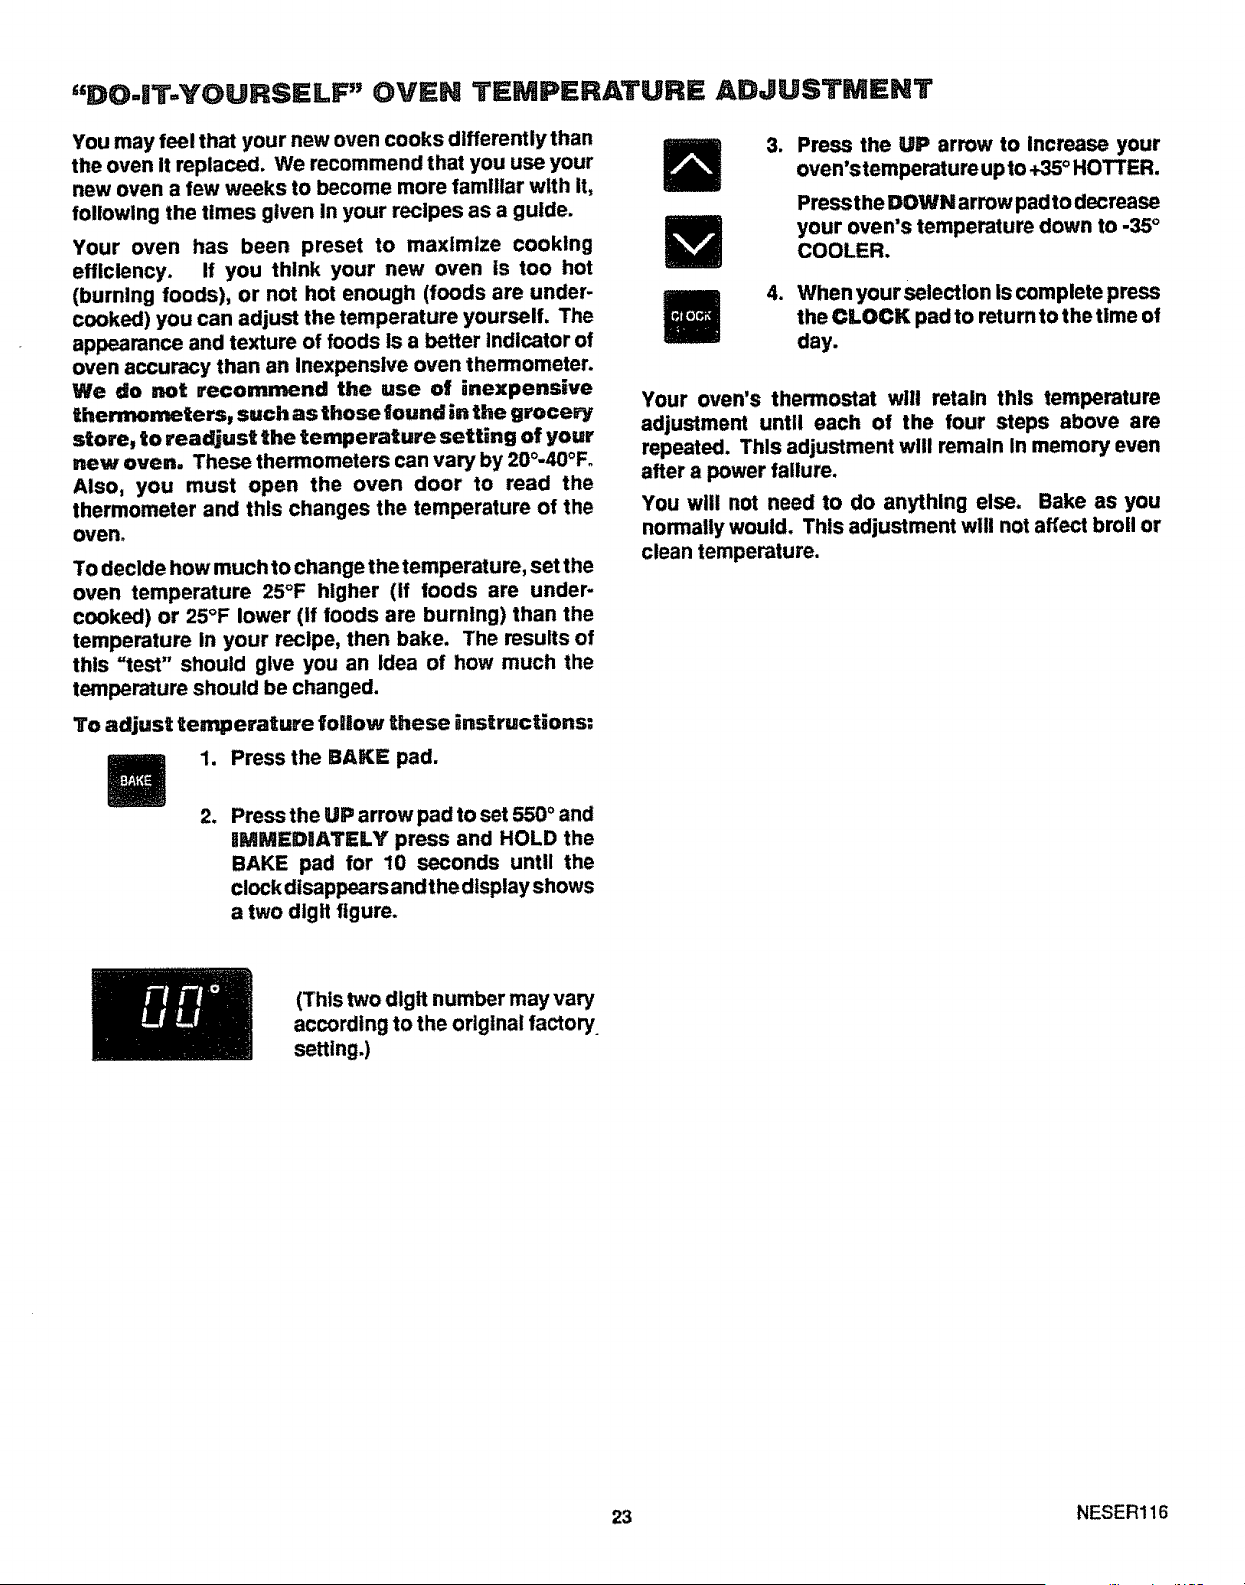
Youmayfeelthatyour newovencooksdifferentlythan
theovenItreplaced.Werecommendthatyou useyour
newovenafewweeksto becomemorefamlllarwith It,
followingthetimes givenInyour recipesasa guide.
Your oven has been preset to maximize cooking
efficiency. If you think your new oven is too hot
(burningfoods), or not hot enough(foodsare under-
cooked)you can adjustthetemperatureyourself. The
appearanceandtextureof foodsis a better Indicator of
oven accuracy than an Inexpensive oven thermometer.
We do not recommend the use of inexpensive
thermometers, such as those gound in the groce_
store, to readjust the temperature setUng of your
new oven. These thermometers can vary by 20°-40°Fo
Also, you must open the oven door to read the
thermometer and this changes the temperature of the
oven.
To decide how much to change the temperature, set the
oven temperature 25°F higher (if foods are under-
cooked) or 25°F lower (If foods are burning) than the
temperature In your recipe, then bake. The results of
this "test" should give you an Idea of how much the
temperature should be changed.
To adjust temperature follow these instructions:
3, Press the UP arrow to Increase your
oven's temperature up to +35° HOTrER.
Press the DOWN arrow pad to decrease
your oven's temperature down to -35 °
COOLER.
4. When your selection is complete press
the CLOCK pad to return to the tlme of
day.
Your oven's thermostat wtll retain this temperature
adjustment until each of the four steps above are
repeated. This adjustment wlll remain In memory even
after a power failure,
You will not need to do anything else, Bake as you
normally would, This adjustment will not affect broil or
clean temperature.
1. Press the BAKE pad.
2. Press the UP arrow pad to set 550 ° and
IIMMEDIATELY press and HOLD the
BAKE pad for 10 seconds until the
clock disappears and the display shows
a two digit figure.
(This two digit number may vary
according to the original factory
setting.)
23 NESER116

NOTES
24
Ki=NMOR ELECTR|C RANGE
_r Customer:
If
I Our constant efforts are I!
i dtrected toward makin_g I I
I sure your new Kenmor-eI i
! Range will arrive at younr ! I
I home in perfect condltlom ! I
I and will give you prol:H_r I I
I performance. AS part c,f ll
I these efforts, we feel it l:s I !
I our responsibility to prcD- I !
I videy°uwtththlswarrant_I i
I'ur°° I!
u-,:-
rr
FULL ONE YEAR WARRANTY ON THE FUNCTiONiNG OF ALL
PARTS EXCEPT GLASS PARTS
it, within one year from the date of Installation, any part, other than a glass
part, falls to function properly due to a defect In material or workmanship,
Sears will repair or replace It, tree of charge.
FULL 30-DAY WARRANTY ON GLASS PARTS AND FINISH OF PORCE-
LAIN ENAMEL, PAINTED OR BRIGHT METAL FINISHED PARTS
If, within 30 days from the date of Installation, any glass part orthe finish
on any porcelain enamel, painted or bright metal part is defective in
material or workmanship, Sears will replace the part, free of charge.
FULL 90-DAY WARRANTY ON MECHANICAL ADJUSTMENTS
For 90 days from the date of Installation, Sears will provide, free of charge,
any mechanlcal adjustments necessary for proper operation of the range,
except for normal maintenance.
i
If the range is subjected to other than private family use, the above
warranty coverage is effective for only 90 days.
WARRANTY SERVICE IS AVAILABLE BY CONTACTING THE
NEAREST SEARS SERVICE CENTER/DEPARTMENT IN THE
UNITED STATES
This warranty applies only while this product is in use in the United States.
This warranty gives you specific legal rights, and you may also have other
rights which vary from state to state. SEARs, ROEBUCK and CO.
Dept. 731 CR-W
Sears Tower
.............. Chicago, IL 60884
"We Service What We Segl" is our assurance to you that you can depend on Sears for service because Sears
service is nationwide.
Your Kenmore Range has added value when you consider that Sears has a service unit near you staffed by
Sears trained technicians.., professional technicians specifically trained on Sears appliances, having the
parts, tools and equlpme nt to ensure that we meet our pledge to you -- "We Service What We Sell!"
TO FURTHER ADD T(:::) THE VALUE OF YOUR RANGE, BUY A SEARS MAINTENANCE AGREEMENT,
Kenmore Rangesare designed, manufacturedand
tested for years of depend able operation. Yet, any
modern appliance may re quire service from time
to time. The Sears Warranty plus the Sears Main-
tenance Agreement provicles protection from un-
expected repair bills andl assures you of enjoying
maximum range efficiersc_j.
Here's a comparative warranty and Maintenance
Agreement chart showir=g you the benefits of a
Sears Range Maintenan©e Agreement.
Years of Ownership Coverage 1st Year 2nd Year i 3rd Year
Roplacemont of Dofo,'tivo
1 pa.so,h.,,ha._===.l. W MA MA
or Glass
--L
90 DAYS
2 Mechanical Adjust mant W MA MA
i 30 DAYS
3 Porcolaln and Glass Parts W MA MA
Annual Pravontive Mainten-
4 a.ooChocka,yo.rraq_o= MA MA MA
W * Warranty MA * MaJnte_ Agreement
CON'T,ACT YOUR SEARS SALESPERSON OR LOCAL SEILRS SERVICE
CENTER TODAY AND PURCHASE A SEARS MAINTENANCE AGREEMENT.
IHIII! I I II
Kenmo re _ America's Best Selling Appliance Brand
•.t;old by SEARS, ROEBUCK AND CO., Chicago, IL 60684
....................................... 'l'u'u'I '1 II I Ilill II1' III i ' !' 'i ! I'!! I
Printed in LaFayette, Georgia -
INDICE
SEGURIDAD
USO Y CUIDADO
C6mo sacar la clnta de empaque ............................................5
Venttlac6n del homo .................................................................6
Su estufa y sus caracteristicas ............................................6
Controles de la cubierta ......................................................7, 8
C6mo cocinar en una o116tipo "wok"° ...............................8
Controles de la estufa ........................ 9, 10, 12, 13, 14
Ideas pare coclnar a! homo ....................................11, 12
Ideas pars ssara la parrilla ....................................... 14
E! ciclo de eutol|mpieza ..................................... 15, 16
Ideas pars la iimpieza ......................................... 17, 18
Partes removibles .................................................. 19, 20
ANTES DE LLAMAR PARA UN
SERVICO
Qu_ hacer antes de solic|tar un servicio ................21, 22
Adjustes de temperature ............................................. 23
GARANTilA
iVIODELOS 95845
95846
95859
Kenrn
USO * CUIDADO • SEGURIDAD
MANUAL
229C4020P009 SR10215
t
i
o
O
o
o
;ADVERTENClA .
TODAS LAS ESTUFAS
PUEDEN VOLCARSE
ALGU|EN PUEDERESULTAR
HERIDO
gNSTALE EL DMSPOSn'Ivo
ANTI-VOILCADURAS QUE
VIENE EMPACADO JUNTO
CON LA ESTUFA
LEA LAS INSTRUCCIONES
DE INSTAILACION
INSTRUCCIONES DE INSTALACiON DEL DISPOSITIVO DE ESTABILIDAD PARA
EL SUJETADOR NUM. 342473
HERRAMIENTASNECESARIAS:
Destornlllador de cabeza Phillips
Llave de tuercas o gave lnglesa de I 3/8"
Flje el sujetador al suelo o a la pared para sostener ya
sea la pata niveladora posterior derecha o Izqulerda. Si
Io fija al suelo, asegdrese de que Iostomillos no penetren
hasta donde haya cables eldctrlcoso tubos de plomeria.
SI no puede determlnar io anterior, utiltce torniltos mds
cortos que no alcancen a atravesar del todo el
recubrlmlento delsuelo. Si el sujetador vlene junto con
su estufa, se encuentra en el preempaque Iocalizado
dentro del horno. Quite el sujetador del preempaque y
slga las Instrucciones que se proporclonan m_is abajo.
1. Decida sl el sujetador se instalar_ al lado Izquterdo o
derecho de la estufa.
Si et lado donde va el sujetador est_ junto a un
gabinete, coloque el sujetador contra la pared
posterior y el gabinete, como se muestra en la figura
1. Si no hay un gabinete adyacente, determine cudl
ser_ la localizacibn del costado de la estufa (panel
exterior pintado). Coloque el sujetador con su orilla
2_
ORILLA EXTERIOR DEL
SUJETADOR QUE DEBE
QUEDAR PEGADA AL
COSTADO IZQUIERDO O
DERECHO DE LA ESTUFA
\
PARED DETRAS
DE LA ESTUFA
GABINETE ADYACENTE O
LOCALtZACION RNAL DEL
COSTADO DE LA ESTUFA
3_
,
m
exterior en ese lugar y contra la pared de atrds. Vea
la figura 1.
Determine siva a fljar el sujetador el suelo o a la
pared. Asegure el sujetador con firmeza usando los
tornillos que se proporclonan. Los torn,los no
requleren de taladro para penetrar madera, madera
terclada, madera prensada y la mayor parte do los
marcos de metal. SI io va a fijar a ladrillo o cemento,
puede adquirir tornlllos y taquetes adecuados en
una ferreterfa. Utlllce un taladro para ladrillos para
perforar los agujeros requerldos.
Usando la llave, d_. por !o menos dos vueltas alas
cuatro paras niveladoras para hacerlas retroceder.
Consulte su guia de instalacl6n para obtener mayor
informaclbn antes de colocar la estufa en poslcibn.
Deslice taestufa para coiocarla en su sitio. Asegdrese
de que el nivelador de la pata posterior entre por
completo en la pestatta del sujetador. Si la estufa no
puede moverse hacla atr_s lo suflclente como para
que el nivelador de la pata posterior entre en el
sujetador, mueva el sujetador hacla adelante segun
se requiera y fljelo al suelo en un lugar dlstlnto.
SUJETADOR
O EL METAL
PLACA DE LA PARED
/
==_ Rgo2
FIJACION A LA PARED
\ 1 NCINS01-4
PARA SU SEGURIDAD
]'_z .... _,i!i .... II1!'11'1' ,..,J'il!llll"lJ III I I' ' ' '"'"'"" '"'"'"11' . ........ 'r
GUARDE ESTAS INSTRUCCIONES
Lea todas las instrucciones antes de usar e| aparato electrodom6stico.
Cuando utilice an aparato el6ctrico, deben tomarse precauciones b6sicas
de segu_idad, que incluyen las s[guientes:
I'=11 I'l"lllll' .............................................................
EnseAe a los ni_ios a no jugar
con ias perillas ni con cualquier
otra parle de la esttda, Nunca
deje a los nii_os so]os o sin
vigilancia en e! iugar donde se
est_ usando una estufa.
PRECAUClON:
Los arUculos que pueden set de
inter6s para los n_Ros no deben
guardarse en gabinetes sobre la
estufa o en la consola posterior
de la estufa. Los nii_os que trepan
a la estufa para alcanzar objetos
podrian herirse gravemente.
Jam6s permita que alguien trepe,
se siente o se pare sobre la
puerta abierta de! homo o sobre
cualquier otra parte de la estufa.
Su peso puede hacer que la
estufa se voltee.
Nunca deje abie_a _a puerta del
horno si no est_ vigilando ]a
estufa.
2 NESAF08-, _

Mantenga el _rea de la estufa
siempre despejada y Hbre de
objetos que puedan quen,.arse.
PRECAUC|ON:
Nunca almacene cosas en el
homo o cerca de las zonas de
coclnar. Estas cosas se pueden
derretlr.
Jamds utllice su estufa para
calentar o entiblar una habitacidn.
Podrla resultar con her!das
quemaduras graves. El uso
inadecuado de la estufa t_mbid_
puede descomponerla.
Nunca use ropa suelta cuando
uUllce su estufa. Ese tipo de ropa
puede Incendlarse.
Nunca use una toalla u otro patio
grueso para tomar los mangos. Tares
patios podr|an Incendiarse sobre una
zona de coclnar caliente.
Nunca permita que los mangos de
los utenslllos sobresalgan del
frente de la estufa. P6ngalos de
manera que no se puedan pasar a
Ilevar. Mantenga los mangos le|os
de las otras zonas de coclnar.
Nunca de|e sin vlgtiar una zona ds
coclnar a alta temperatura. Los
derrames producen humo y las
salpicaduras de grasa se pueden
incendlar.
3 NESAF63
INSTRUCCIONES IMPORTANI"ES DE
S GURIDAD
PRECAUCIONES BASlCAS DE
SEGURIDAD
Guarde este llbro para un uso futuro.
Cerclbrese de que su estufa haya sido Instalada y
aterrlzada correctamente pot un tdcnlco callflcado.
Siempre use agarraderas secas cuando quite oilas del
homo o de la cublerta. Las agarraderas hdmedas o
mojadas pueden causar quemaduras por vapor.
Siempre siga las tnstrucciones de iimpieza que vienen
en este iibro.
Mantenga llmplas slempre la estufa y el horno. La
comlda y la grasa se Incendlan con facllidad. Ltmple la
estufa, el homo y las rejtilas de ventilacidn de manera
regular.
Llmple sblo las partes que se enumeran en este Manual.
PRECAUCION: No guarde arttculos de interds para
los nitros en gablnetes sobre la estufa o en la consola
de la estufa. Los nltios que trepan a la estufa para
alcanzar dlchos articulos podrtan resultar hertdos de
gravedad.
Slempre mantenga a una distancla segura de la estufa el
papel tapiz de las paredes, las cortlnas o colgaduras
que sean combustibles. Nunca guarde dichos artfculos
en su estufa.
Algunos productos limpiadores
producen vapores perjudiciales
y las telas o esponjas mojadas
podrian causar quemaduras pot
vapor si se uUlizan sobre una
superficie caliente.
SEGURIDAD DE LA CUBIERTA DE
LA ESTUFA
Siempre tenga cuidado cuando toque la superficle de la
estufa. Los elementos generadores de calor podr|an
estar lo suficlentemente calientes para causarle
quemaduras aunque se vean de color oscuro.
Sblo pueden utlllzarse clertos tipos de ollas de vldrlo o
cerdmlca para cocinar sobre la superflcle. Asegdrese
de que la olla que use no se rompa sl se callenta sobre
los quemadores.
Nunca obstruya el Ilbre flujo de aire a travds de la rejilla
de ventilaclbn det horno.
<____m_ EIIja oilas y sartenes con fondo
piano, Io suftclentemente
grandes como para cubrlr por
completo el elemento generador de caioru Esto Impedird
el riesgo de que se Incendlen las agarraderas o la ropa
sl el elemento generador de calor estuvlera descubierto
y se desperdiclard menos energla.
SEGURIDAD DEL HORNO
Conserve slempre el _trea que rodea la estufa Itbre de
cosas que puedan quemarse (gasollna y otros liquidos
y gases inflamables).
Jambs intente reparar o reemplazar cualquler parte de la
estufa a menos que se den instrucclones al respecto en
este itbro_ Todos Iosdem_strabajos deben set realtzados
por un tdcnico capacltado.
Nunca callente reciplentes con comida que estdn
tapados. El aumento de la prestbn Interna puede
ocaslonar que el reciplente estaile y cause leslones.
Nunca deje frascos o latas de grasa o goteaduras sobre
o cerca de la estufa. Jamds permlta que la grasa se
acumule en su estufa. Puede evltar lncendios pot grasa
st ilmpla la grasa y cualquler derrame cada vez que
termine de usar la estufa.
Nunca trate de mover una olla con grasa callente, en
especial sl es una fretdora. Espere a que la grasa se
haya enfrlado.
Nunca toque la.sunidades de la superflcte, los elementos
generadores de calor o las superficies intedores del homo.
Pueden estar calientes aunque su color sea oscuro.
Mantenga slempre los utensilios de madera, los
utensillos de pldstico o allmentos enlatados a una
distancla segura de su estufa.
Coloque la parrllla del homo en la posiclbn deseada
mlentras dste se encuentre fdo. Si tlene que mover la
parrilla cuando el homo est_ callente, no permlta que la
agarradera o guante entre en contacto con el elemento
generador de calor del hornou
Despu_s de asar, slempre saque del homo la fuente
para asar y Idvela. Las sobras de grasa en la fuente para
asar pueden incendlarse la pr(_xlma vez que utilice la
fuente.
Siempre tenga cuidado cuando abra la puerta del horno.
Permita que el elre caltente y el vapor saigan antes de
mover los allmentos.
Nunca use papel de aluminto para forrar las fuentes de
escurrlmlento o el rondo del horno. El uso incorrecto
dei papel de alumtnlo podda causar un Incendto,
SEGURIDAD EN LA AUTOLIMPIEZA
Si no functona blen el modo de autollmpleza, apdguelo
y desconecte el suministro de energ|a el_'trlca. Sollcite
que un t_tcnico calificado revise y le d_ servtclo a su
estufa.
Siempre retire la fuente para asar y otros utensillos del
homo antes de un clclo de autollmpleza.
NESAF65
|NSTRUCCHONE$ DE SEGURiDAD (cent,.uac,6-)
Nunca frlegue, mueva o dahe la empaquetadura de la
puerta en las estufas que tlenen mode de autollmpleza.
La empaquetadum es esenclal para un buen sellado.
Nunca trate de Iimplar utensillos, trastes o partes
removibles de su estufa durante un ciclo de auto-
Ilmpleza.
No utlilce llmpladores para homo - no deberd uUllzar
nlngun Ilmplador comerclal para horno o revestlmlento
protector de nlngdn tlpo en el homo o alrededor de
cualqulere da sus partes.
;LEA Y COMPRENDA ESTA
INFORMACION AHORAK
Si alguna vez |a necesita, no tendrd
tiempo para leer|a,
Cercidrese de que redes en su
begat sepan qu0 hacer en case de
incendie.
Nunca utiHice agua en un Hncendie
causado per grasa ya que esto s6Ho
ayudardi a extender ias Hamas=
FUEGO CAUSADO PeR GRASA EN
LA CUBHERTA
Jam&s levante de la estufa una ella en
ilamas..,en lugar de eigo:
1. Apague el elemento que gen-
era taler.
_:= _ 2. Sofoqueelfuegoconunatapa
bien ajustada, bicarbonate de
sodio o un extinguidor.
FUEGO EN EL HORNO -_
;NO INTENTE MOVER LA FUENTE!
1. Cierre la puerta del homo yapague
los controles.
2. Si el fuego continda, use una
espuma quimica seca o un
extinguidor de tipo halbn.
NOTHFICACiON DE
SEGURIDAD IMPORTANTIE
El Acta de Apllcacl0n de Agua Potable y Tbxlcos del
Estado de California requlere que el gobernador de
California publlque una Ilsta de sustanclas conocldas
per el estado que causen defectos de nacimlento u
otros dafios reproducUvos y requlere que se advlerta a
los cllentes de la exposlclbn potenclai a dichas
sustanclas.
El alslamlento de flbra de vidrlo de los homes de auto.
Ilmpleza produce una pequetta cantldad de mondxldo
de carbono durante el clclo de Ilmpleza. La exposlclbn
puede mlnlmizarse abrlendo una ventana o utlllzando
un ventllador o una campana extractora.
COMe SS QUITA LA CiNTA
ADHESIVA DE EMPAQUE
Para quitar el adhesive que qued6 come residuode
la cinta de empaque y asegurarse de no da_ar el
acabado de su nuevo aparato, utilice una
apiicaci6n de detergente I_quido domdsUco para
ropa, aceite mineral, e aceite de cocirm, Apliquege
con una tela suave y permita que empape e0
adhesive= Limpie con una tena suave. NO USE
flibras de pidstico ni productos similares, Frote
hasta secar y iuego aplique una capa de pulidor
para limpiar perfectamente y proteger la
superficie, Este procedlmiento _ambidnes segum
para la parte delantera de gos homes de
microondas y otras partes pldsticas.
NOTA: La cinta p0dstica debe sacarse de ias
molduras cromadas de las panes de la
estufa,
NO PODRA quitarse si se homea.
_,DONDE DEBE BUSCAR CHNTA
ADHES|VA DE EMPAQUIE?
Elementos generadores de calor
Fuentes de escurrlmlento
Panel de control: parte superior, costados y parte
Inferior
Debajo de la cublerta principal
Marco de la puerta: parte superior, costados y parte
inferior
Elemento generador de calor de! horno
Manljas de la puerta
5 NESAF66
INSTRUCCIONES DE SEGURIDAD (continuaci6n)
6 NESAF75
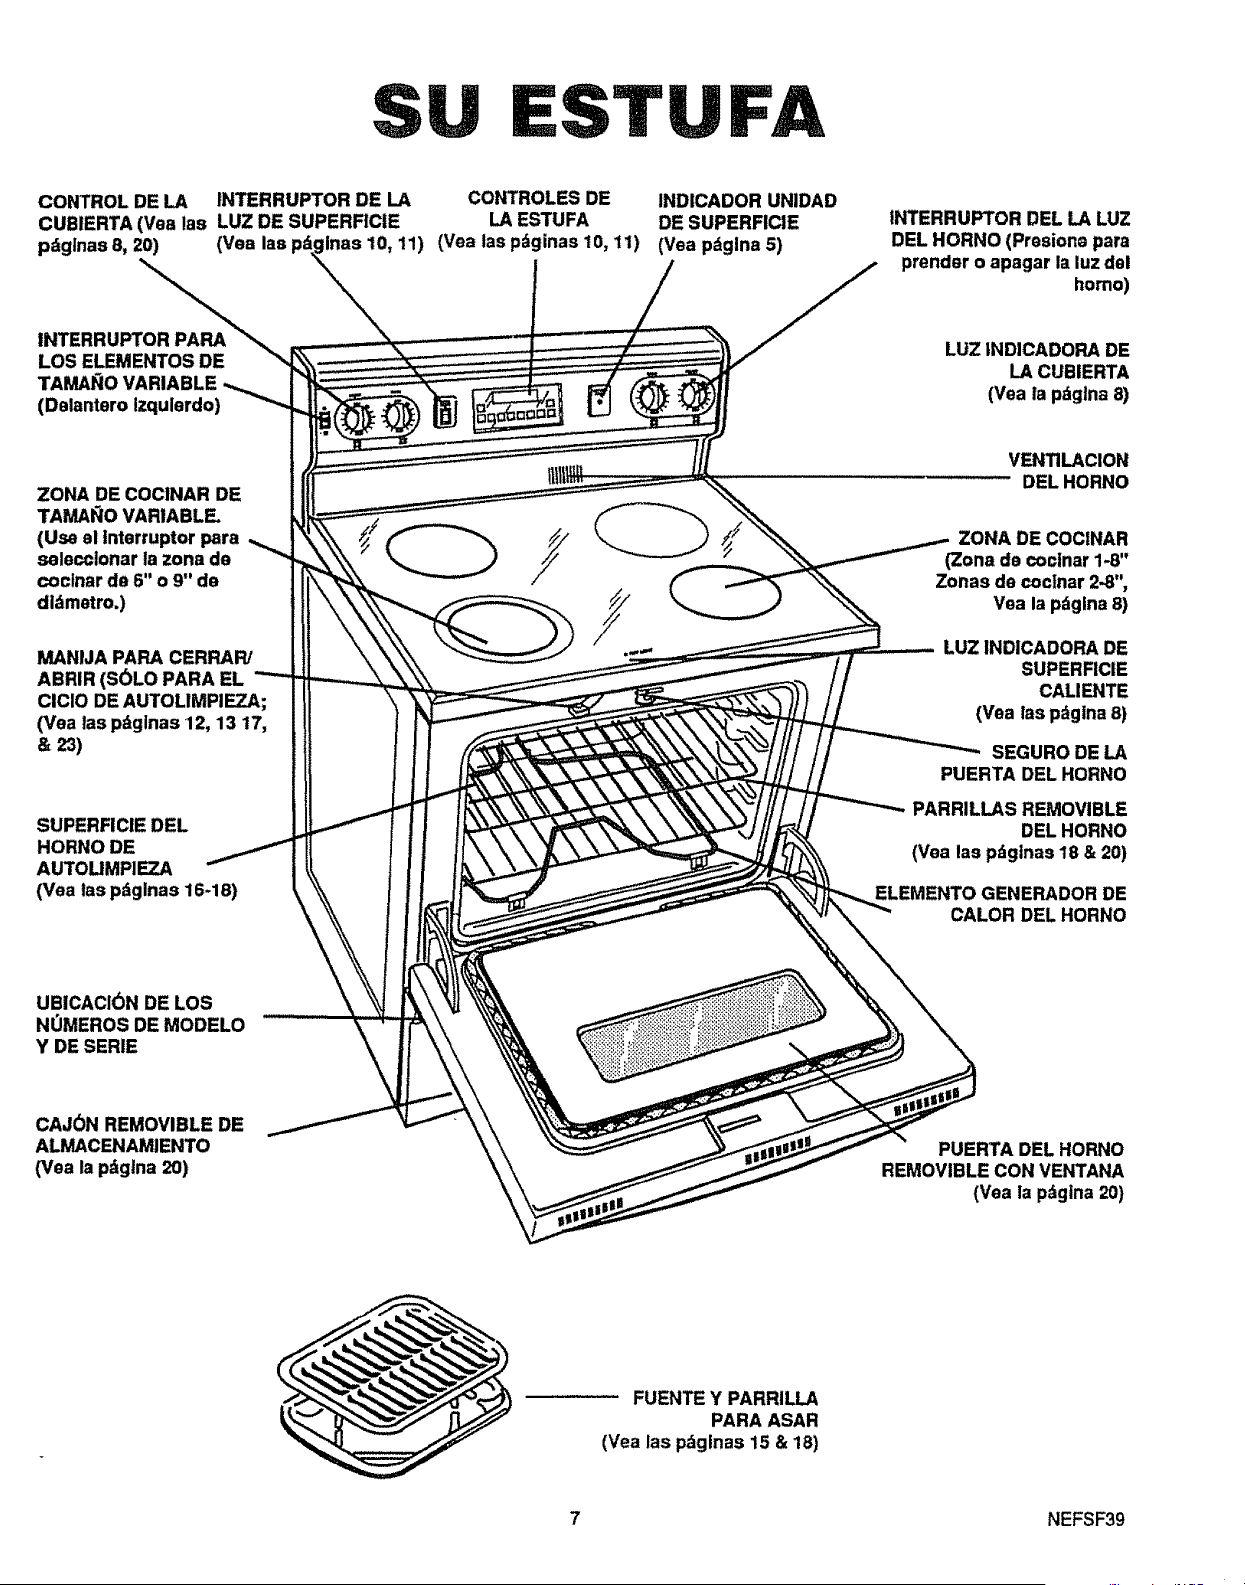
S
CONTROL DE LA INTERRUPTOR DE LA
CUBIERTA (Vea ias LUZ DE SUPERFICIE
pdgtnas 8, 20) (Vea ilnas 10, 11)
CONTROLES DE
LA ESTUFA
(Vea tas pdginas 10, 11)
INDICADOR UNIDAD
DE SUPERFICIE
(Yea p_gina 5)
INTERRUPTOR DEL LA LUZ
DEL HORNO (Presiona para
prender o apagar la luz del
homo)
INTERRUPTOR PAPA
LOS ELEMENTOS DE
TAMAI_O VARIABLE
(Dslantero izqulerdo)
ZONA DE COCINAR DE
TAMAI_O VARIABLE
(Use el lnterruptor para
selecclonar tazona de
coctnar de 6" o 9" de
didmetro.)
MANIJA PAPA CERPAR/
ABRIR (S6LO PARA EL
CICIO DE AUTOLIMPIEZA;
(Vea las pdglnas 12, 13 17,
& 23)
SUPERFIClE DEL
HORNO DE
AUTOLIMPIEZA
(Vea tas pdglnas 16-18)
LUZ INDICADORA DE
LA CUBIERTA
(Vea la pdglna 8)
VENTILACION
DEL HORNO
ZONA DE COCINAR
(Zona de cocinar 1-8"
Zonas de coc[nar 2.8",
Vea la pdglna8)
LUZ INDICADORA DE
SUPERFICIE
CALIENTE
(Vea Tasp=tglna8)
SEGURO DE LA
PUERTA DEL HORNO
PARRILLAS REMOVIBLE
DEL HORNO
(Vea las pdgtnas 18 & 20)
ELEMENTO GENERADOR DE
CALOR DELHORNO
UBICACI6N DE LOS
NOMEROS DE MODELO
Y DE SERE
CAJON REMOVIBLE DE
ALMACENAMIENTO
_ealapdgtna20)
PUERTA DEL HORNO
REMOVIBLECON VENTANA
(Vealapdgina20)
FUENTE Y PARRILLA
PARA ASAR
(Vea las pdglnas 15 & 18)
7 NEFSF39

COMO EMPEZAR A COCINAR
COMO COCINAR EN LA CUBIERTA
DE COCINAR
Antes de usar la cublerta de coclnar pot primera vez,
llmplela con un Ilmplador paracublerta. Esto dejar_i una
capa protectora. Las zonas de cocinar se muestran en
los dibujos sobre la superflcle de vldrio de la cubierta de
coclnar.
ZONAS DE COClNAR
ZONAS DE COCINAR DOBLE
(ELEMENTO DELANTERO DE LA
IZQUIERDA SOLAMENTE)
ZONA DE 9" PARA
UTENSILIOS GRANDES
E! slgno que se encuentra cerca de cada perllla de
control de la cublerta muestra qud elemento enclende
esa perilla.
_."
O0
eO
eo oe oo
oo oo oe
I_uierdo l_uierdo _r_ho Derecho
_l_tero Pos_rior Pos_rior _l_tero
Para operar el controlador de la cubierta
1. Oprima para hacerlo i=_-------_
glrar.
=
Coldquelo en o entre
las marcas para
obtener el calor
deseado.
|
La iuz indicadora se prender_ cuando se enctenda
cualqulera de las zonas de coclnar.
El elemento delantero de la izquierda tien dos
zonas de cocinar:
Para usar la drea de cocinar grande de 9", aprete para hacer
girar la peri]la del control a la selecci6n deseada y empuje la
parte de arriba det interruptor al lado de la perilla del control
Para usar la drea de cocinar pequef_a de 6", aprete para
hacer girar la perilla del control a la selecci6n deseada y ,
empuje la parte de abajo del interruptor,
GUIA DE LA CUBIERTA PARA LAS
TEMPERATURAS BASICAS
"HI" ("ALTA")
Se utlllza para lnlclos rdpldos,
tales como hervlr agua.
"MED-Hi" (=MED-ALTA")
Se utiliza para freir o hervlr con
raptdez
"MEI_ ("MEW')
Seusa para coclnar allmentos con
pequetlas cantidades de agua.
"MED-LO" ("MED-BAJA")
Se usa para coclnar alimentos con
pequetias cantidades de agua.
"LO" (=BAJA")
Se usa para coclnar aiimentos al
vapor o para mantener callentes los
alimentos a una temperatura
adecuada para servlrlos.
Cuando una de las zonas de coclnar se enclende, los
espirales bajo la zona irradlan calor a travds del vldrto
hacla el utenstlio. E! rojo de los espirales se_ visible a
travds del vidrlo. La zona de cocinar se demorard unos
pocos momentos para calentarse. El espiral sigue un
ciclo de encendldo y apagado para mantener su control
selecclonado.
N
Yea _ONSEJOS PARA LIMPIAFI para infomtaci6n
importante acerca de la mantencidn de su cubierta
de cocinar. NEMTC57
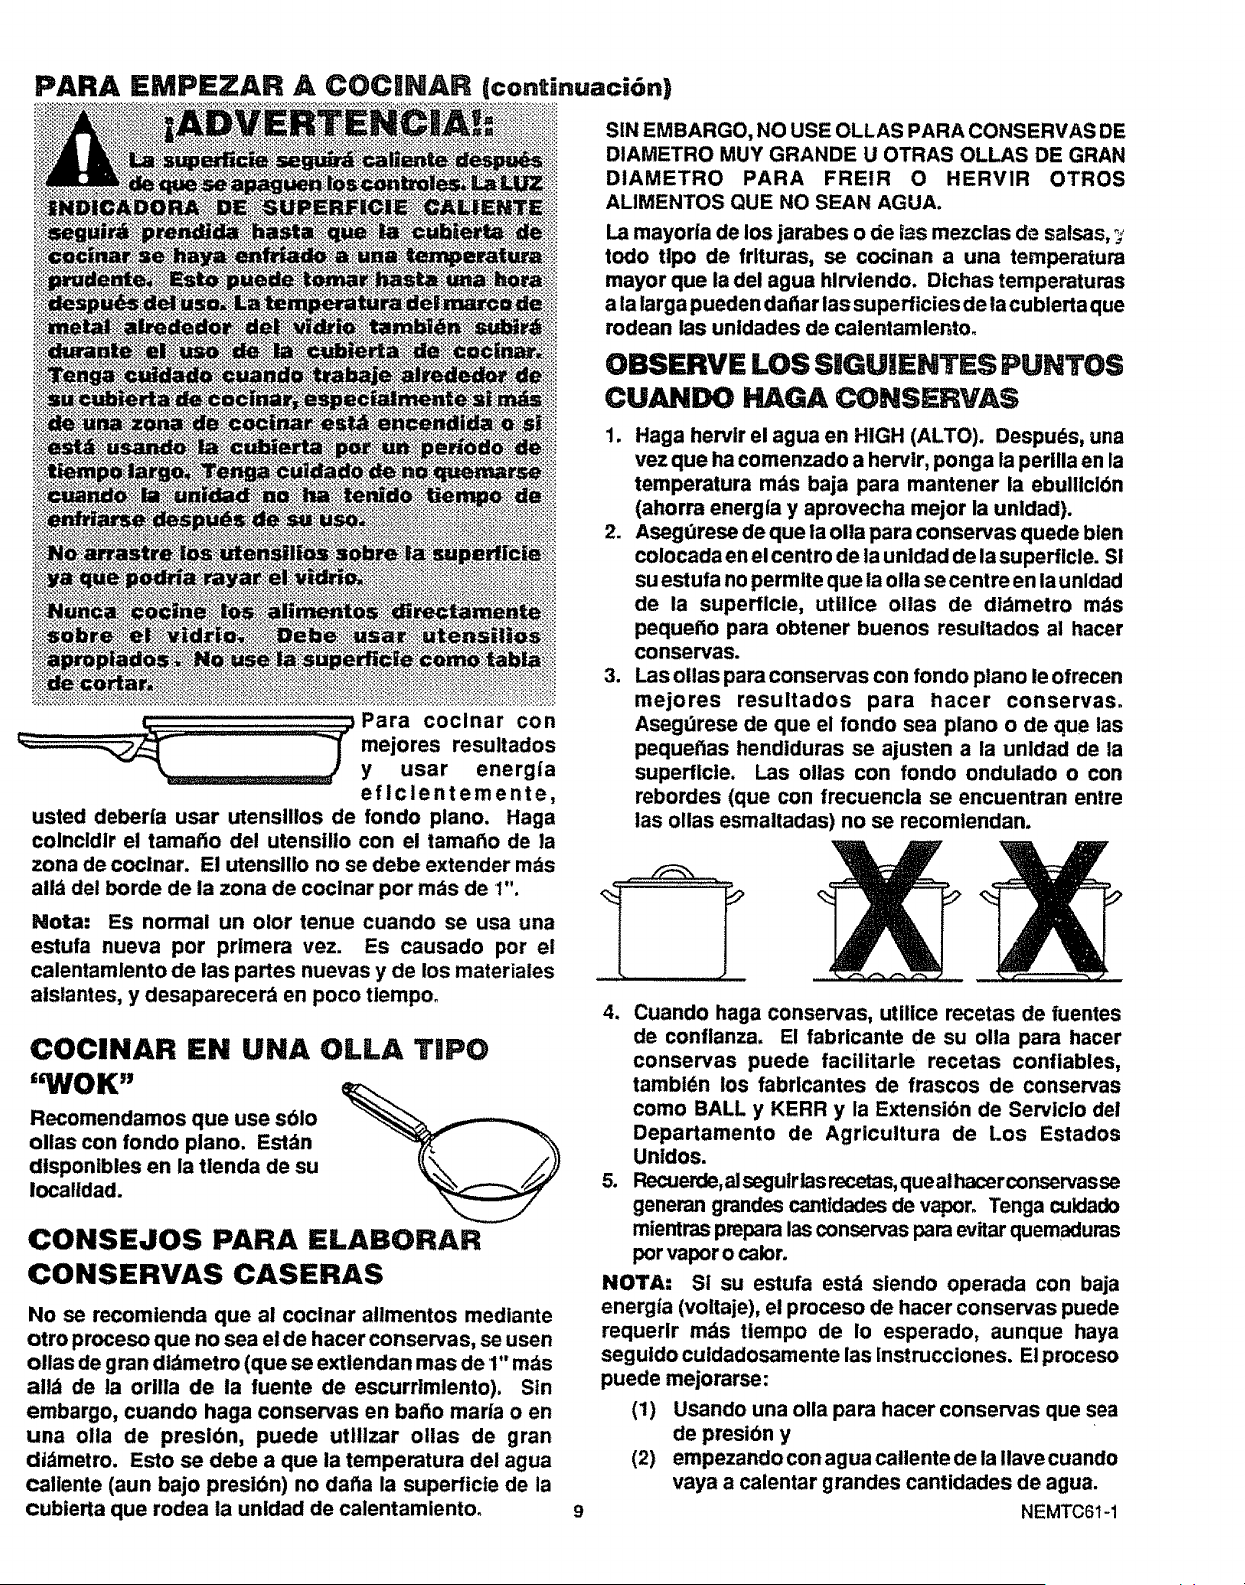
PARA IEMPEZAR A COCINAR (con inuaci6n)
,_ ,Para coclnar con
mejores resultados
y usar energ|a
eflclentemente,
usted deber|a usar utenslilos de fondo piano. Haga
colncldlr el tamatio del utensillo con el tamatto de la
zona de coclnar. El utenslllo no se debe extender mbs
ailb del horde de la zona de cocinar por mbs de I".
Nota: Es normal un olor tenue cuando se usa una
estufa nueva por primera vez. Es causado por el
calentamlento de las partes nuevas y de los materiales
atslantes, y desaparecerd en poco tlempo_
COCINAR EN UNA OLLA TIPO
' tVOK"
Recomendamos que use sblo
ollas con fondo piano. Estdn
dtspontbles en la tlenda de su
Iocalidad.
CONSEJOS PARA ELABORAR
CONSERVAS CASERAS
No se recomlenda que al coclnar allmentos medlante
otro proceso que no sea el de hacer conservas, se usen
ollas de gran dtbmetro (que se extlendan mas de 1" mds
allot de ta orilla de la fuente de escurrimlento). Sin
embargo, cuando haga conservas en ba_o maria o en
una olla de presldn, puede utlllzar ollas de gran
didmetro. Esto se debe a que la temperatura del agua
callente (aun bajo preslbn) no datta la superficte de la
cubierta que rodea la unidad de calentamlento_
SIN EMBARGO, NO USE OLLAS PARA CONSERVAS DE
DIAMETRO MUY GRANDE U OTRAS OLLAS DE GRAN
DIAMETRO PARA FREIR O HERVIR OTROS
ALIMENTOS QUE NO SEAN AGUAo
La mayor|a de los jarabes o de ias mezclas d_ salsas, ;_
todo tlpo de frlturas, se cocinan a una temperatura
mayor que la del agua hlrvlendo. Dichas temperatures
a la larga pueden daftar las superficies de la cublerta que
rodean las unldades de calentamlentoo
OBSERVE LOS SIGUIENTES PUNTOS
CUANDO HAGA CONSERVAS
1. Haga hervtr el agua en HIGH (ALTO). Despuds, una
vez que ha comenzado a hervir, ponga la perilla en la
temperatura rods baja para mantener la ebulllcl6n
(ahorra energ|a y aprovecha mejor la unldad).
2. Asegdrese de que la olla para conservas quede blen
colocada en el centro de la unldad de la superflcle. S!
su estufa no permtte que la olla se centre en launldad
de la superflcle, utilice ollas de dldmetro m_s
pequetto para obtener buenos resuitados al hacer
conservas.
3. Las ollas para conservas con rondo piano le ofrecen
mejores resultados para hacer conservas.
Asegdrese de que el fondo sea piano o de que las
pequettas hendtduras se ajusten a la unldad de la
superficle. Las ollas con rondo ondulado o con
rebordes (que con frecuencla se encuentran entre
las ollas esmaltadas) no se recomlendan.
4. Cuando haga conservas, utilice recetas de fuentes
de conflanza. El fabricante de su olla para hacer
conservas puede facilitarle recetas confiables,
tambidn los fabricantes de frascos de conservas
como BALL y KERR y la Extensibn de Servlcio del
Departamento de Agricultura de Los Estados
Unldos.
5. Recuerde,al segulr las recetas, que al hacer conservas se
generan gmndes canttdades de vapor° Tenga cuidado
mientras prepara las conservas para evitar quemaduras
por vapor 0 calor.
NOTA: Si su estufa estd siendo operada con baja
energia (voitaje), el proceso de hacer conservas puede
requerir mds tlempo de I0 esperado, aunque haya
seguido cuidadosamente las instrucciones. El proceso
puede mejorarse:
(1) Usando una olla para hacer conservas que sea
de presibn y
(2) empezando con agua callente de la Ilave cuando
vaya a calentar grandes cantidades de agua.
NEMTC61-1
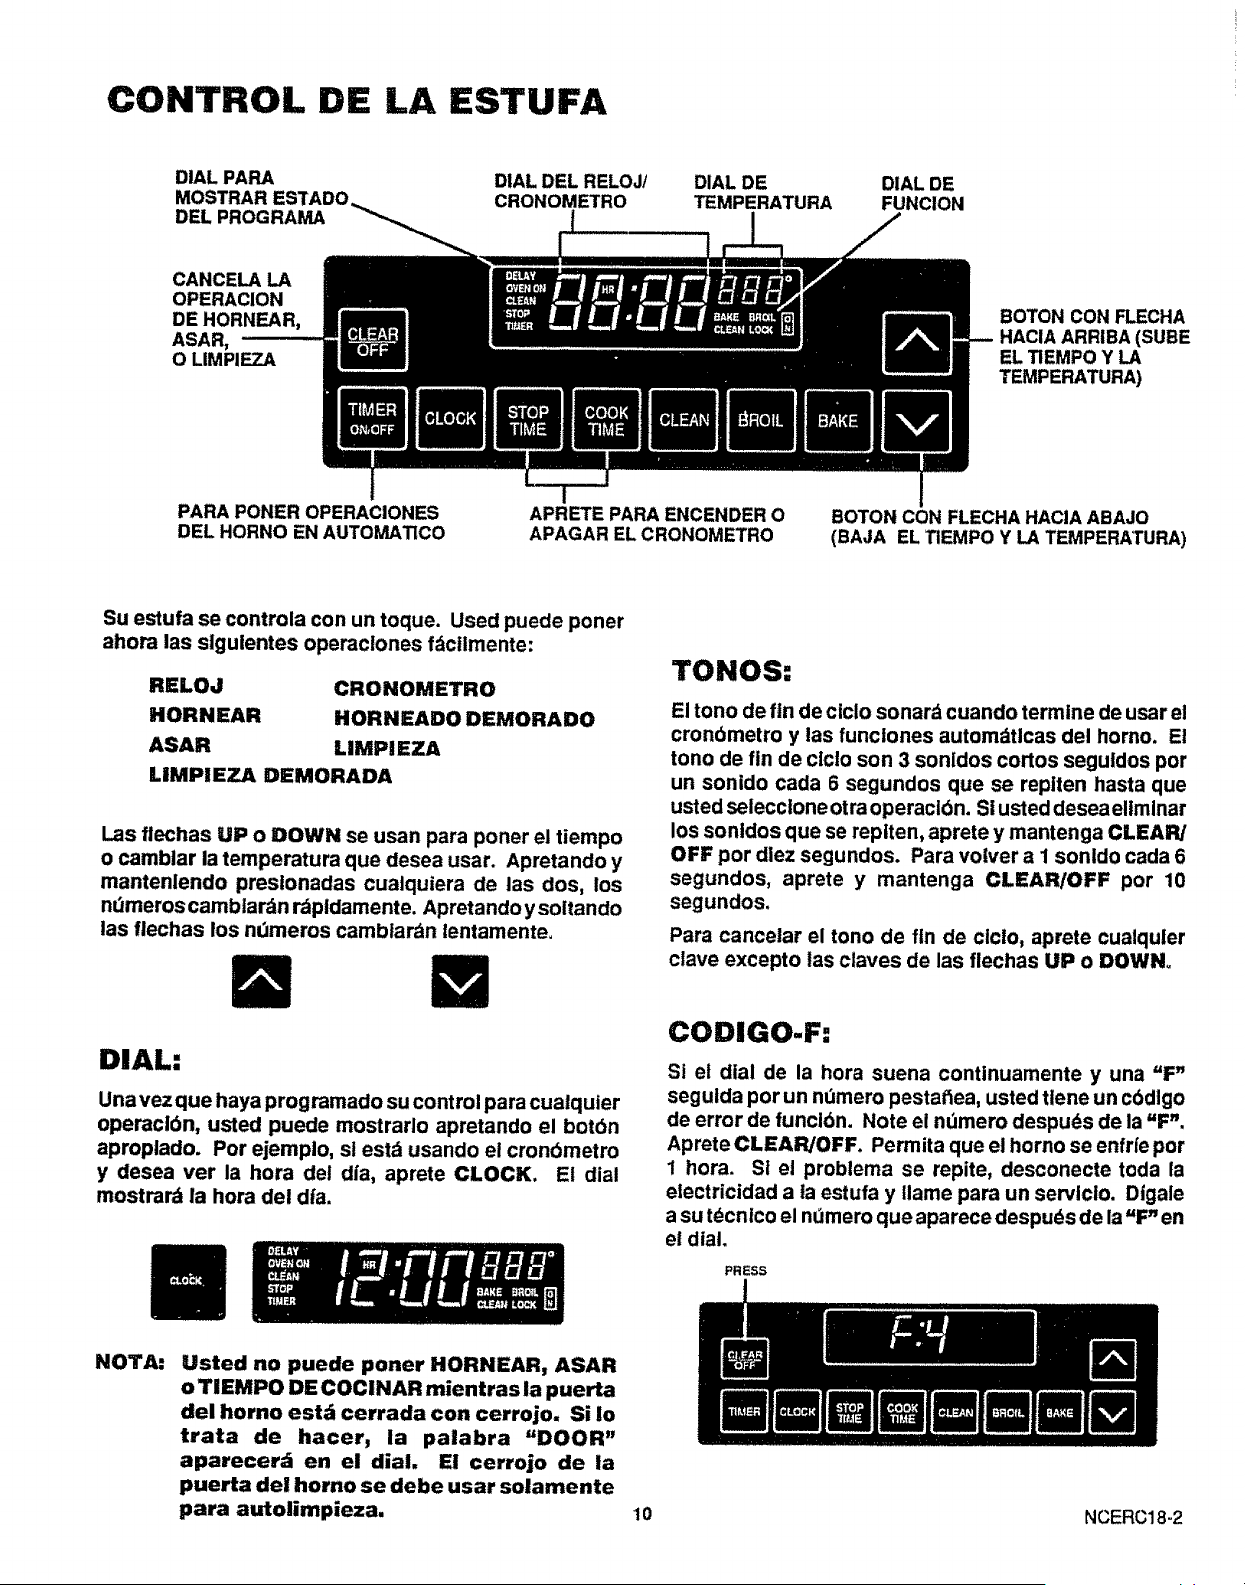
CONTROL DE LA ESTUFA
DIAL PARA
MOSTRAR ESTADO
DEL PROGRAMA
DIAL DEL RELOJ/
CRONOMETRO
DIAL DE
TEMPERATURA
DIAL DE
FUNCION
CANCELA LA
OPERACION
DE HORNEAR,
ASAR,
O LIMPIEZA
BOTON CON FLECHA
HACIA ARRIBA (SUBE
EL TIEMPO Y LA
TEMPERATURA)
PARA PONER OPERACIONES
DEL HORNO EN AUTOMATICO
APRETE PARA ENCENDER O
APAGAR EL CRONOMETRO
BOTON CON FLECHA HACIA ABAJO
(BAJA EL TiEMPO Y LA TEMPERATURA)
Su estufa se controla con un toque. Used puede poner
ahora las slgulentes operaclones f_cIlmente:
RELOJ CRONOMETRO
HORNEAR HORNEADO DEMORADO
ASAR LIMPIEZA
LIMPIEZA DEMORADA
Las flechas UP o DOWN se usan para poner el tiempo
o camblar la temperatura que desea usar. Apretando y
mantenlendo prestonadas cualquiera de las dos, los
ndmeroscamblardn rdpldamente. Apretando ysoltando
las flechas los nt_meros camblar_n tentamente.
TONOS:
El tono de fin de ciclo sonard cuando termine de usar el
crondmetro y las funciones autom_tlcas del horno. El
tono de fin de clclo son 3 sonldos cortos seguldos por
un sonido cada 6 segundos que se repiten hasta que
usted seleccione otra operacibn. Si usted deseaeliminar
los sontdos que se reptten, aprete y mantenga CLEAR/
OFF pot dlez segundos. Para volver a I sonido cada 6
segundos, aprete y mantenga CLEAR/OFF por 10
segundos.
Para cancelar el tono de fin de ciclo, aprete cualquler
clave excepto las claves de las flechas LIP o DOWN°
DIAL:
Unavezque haya programado su control para cualquier
operaclbn, usted puede mostrarlo apretando el botbn
aproplado. Por ejemplo, si estd usando el cronbmetro
y desea ver la hora del d|a, aprete CLOCK. El dial
mostrar_ la hora del dfa.
CODIGO-F:
Si el dial de la hora suena continuamente y una "F"
seguida por un ndmero pestaftea, usted tlene un cbdigo
de error de funcibn. Note el ndmero despuds de la UF".
Aprete CLEAR/OFF. Permita que el horno se enfrle por
1 hora. Si el probtema se repite, desconecte toda la
electricidad a ta estufa y Ilame para un servicio. Digale
a su t_cnico el ndmero que aparece despuds de la =Fnen
el dial.
PRESS
NOTA:
Usted no puede poner HORNEAR, ASAR
o TIEMPO DE COCINAR mientras la puerta
del homo estd cerrada con cerrojo. Si Io
trata de hacer, la palabra "DOOR"
aparecerd en el dial. El cerrojo de la
puerta del homo se debe usar solamente
para autolimpieza. I0
NCERC18-2
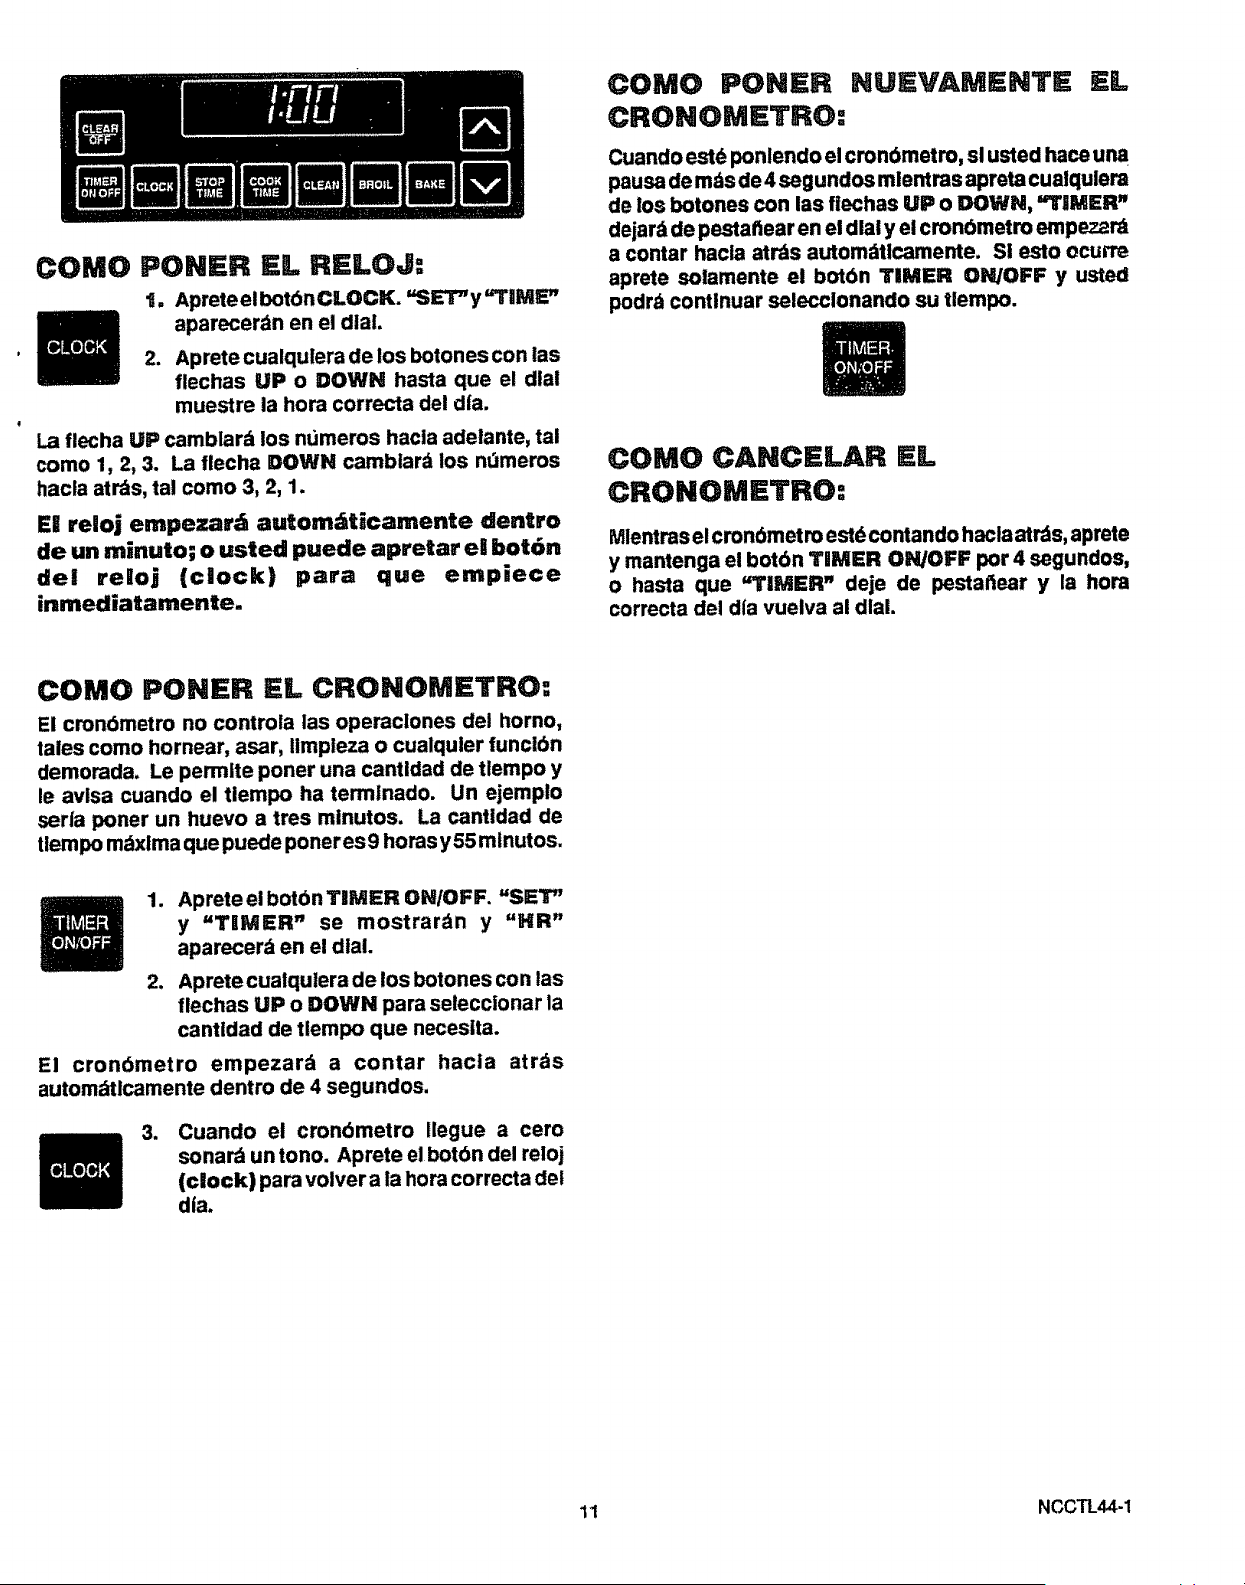
COMO PONER EL RELOJ:
1. Apreteel bot6n CLOCK. uSET"y"TIME"
aparecerdn en el dial.
2. Aprete cualqulera de los botones con las
flechas UP o DOWN basra que el dial
muestre la hora correcta del dfa.
La flecha UP camblar;t los ntimeros hacla adelante, tal
como 1, 2, 3. La flecha DOWN camblard los ndmeros
hacla atr_s, tal como 3, 2, 1.
El reloj empezar,'t au|om,_ticamente dentro
de un minuto; o usted puede apretar el bot6n
de| reloj (clock) para que empiece
inmediatamente.
COMO PONER HUEVAMENTE EL
CRONOMETRO:
Cuando est_ ponlendo el cron6metro, sl usted haco una
pausa de m_s de 4 segundos mlentras apretacualqulera
de los botones con las fiechas UP o DOWN, "IrIMER n
dejar_i de pestaftear en el dial y el cron6metro empezard
a contar hacla atr_s autom_ttcamente. SI eslo ocurre
aprete sotamente el bot6n TIMER ON/OFF y usted
podrb contlnuar selecclonando su tlempo.
COMO CANCELAR EL
CRONOMETRO:
iVtlentrasel crondmetm estdcontando hacla air/is, aprete
y mantenga el bot6n TIMER ON/OFF por 4 segundos,
o hasta que "TIMER" deje de pestatiear y la hora
correcta del dia vuelva al dial.
COMO PONER EL CRONOMETRO:
El cron6metro no controla las operaclones del homo,
tales como hornear, asar, Iimpleza o cualquler funcl6n
demomda. Le permite poner una cantldad de tlempo y
le avlsa cuando el tlempo ha termlnado. Un ejemplo
serla poner un huevo a tres minutos. La cantidad de
tlempo m_xlma que puede poneres9 horas y55 mlnutos.
1. Aprete el bot6n TIMER ON/OFF. "SET"
y "TIMER" se mostrardn y "HR"
aparecer_i en el dial.
2. Aprete cuatqulera de los botones con las
flechas UP o DOWN para seleccionar la
cantldad de tlempo que necesita.
El cron6metro empezard a contar hacla atrds
autom_lcamente dentro de 4 segundos.
3J Cuando el cron6metro Ilegue a cero
sonar_ un tono. Aprete el bot6n del reloj
(clock) para volver a la hora correcta del
dia.
11 NCCTL44-1
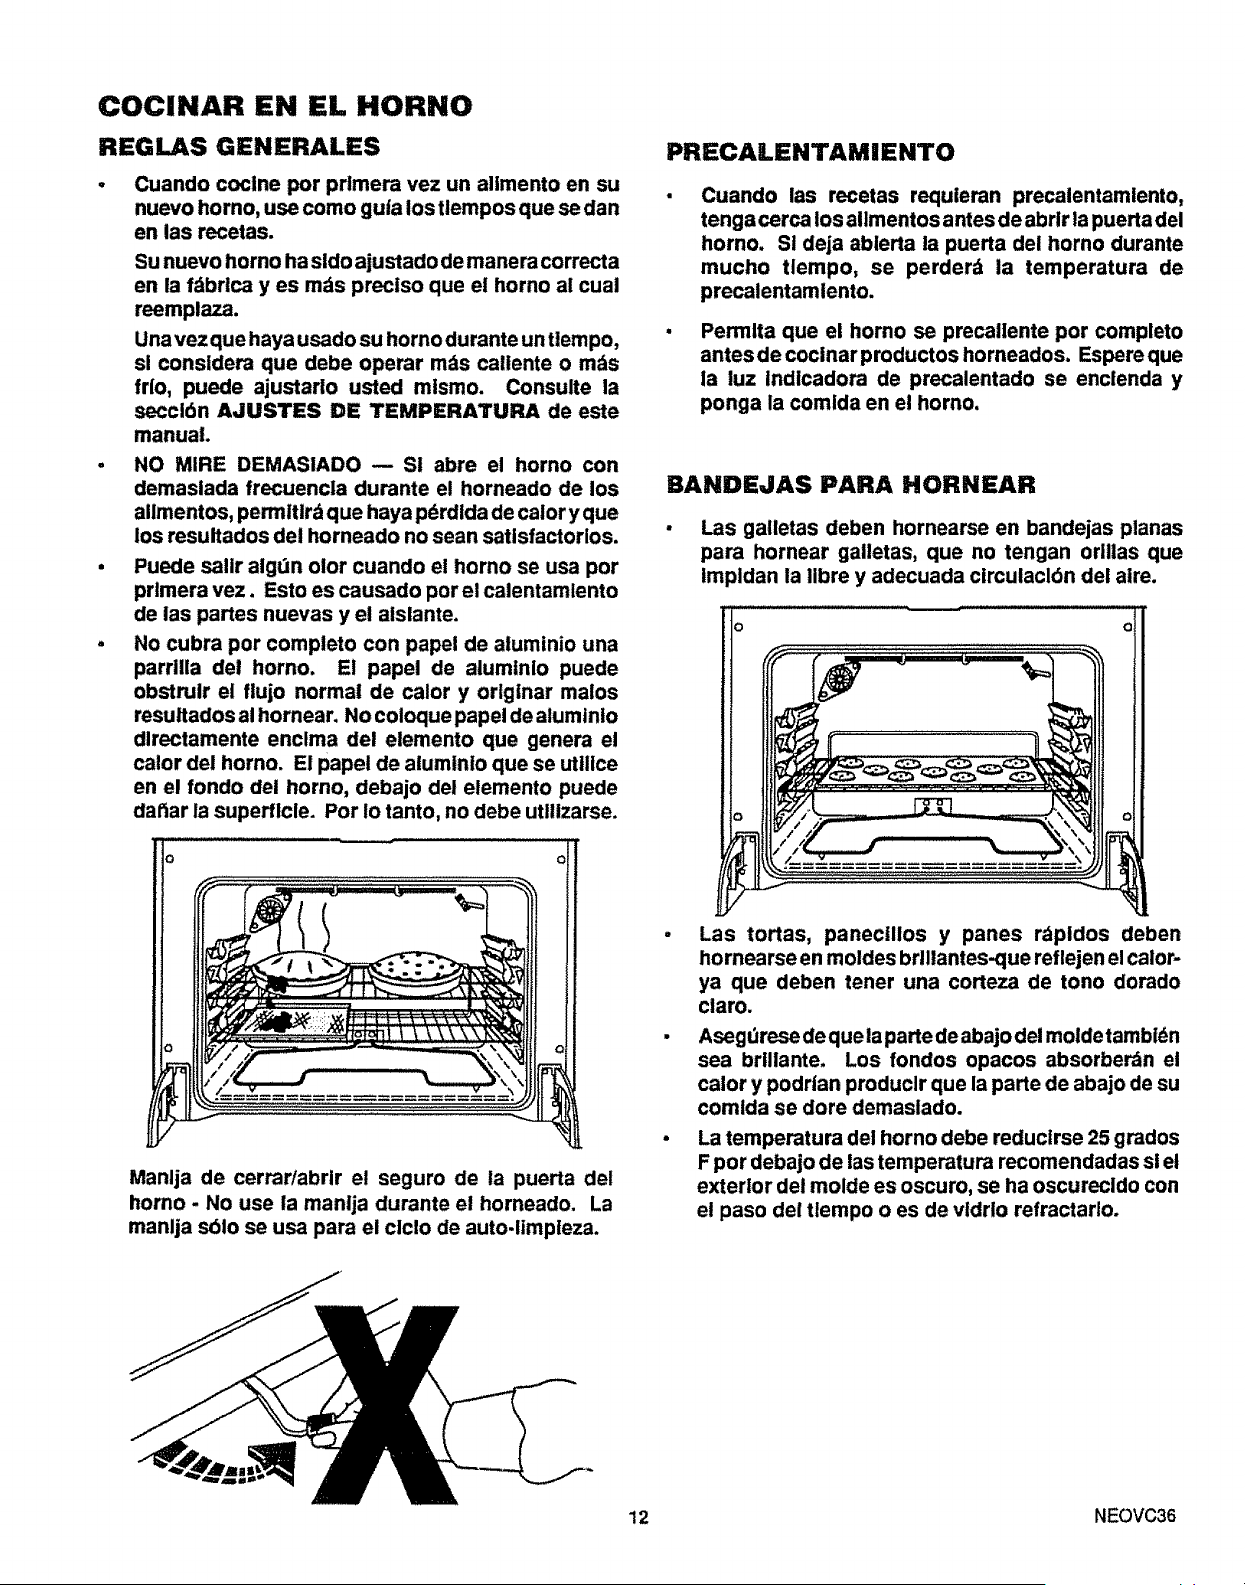
COCINAR EN EL HORNO
REGLAS GENERALES
- Cuando coclne por prfmera vez un alimento en su
nuevo homo, use como gu|a los tlempos que se dan
en las recetas.
Su nuevo homo ha sido a]ustado de manera correcta
en la fdbrlca y es mds prectso que el homo al cual
reemplaza.
Una vez que haya usado su homo durante un tlempo,
si considem que debe operar m_s callente o rods
frlo, puede ajustarlo usted mlsmo. Consulte la
seccidn AJUSTES DE TEMPERATURA de este
manual.
• NO MIRE DEMASIADO -- S! abre el homo con
demaslada frecuencla durante el horneado de los
allmentos, permttlrd que haya pdrdida de calory que
los resultados del homeado no sean satisfactorios.
• Puede salir algdn olor cuando el homo se usa por
prlmera vez. Esto es causado porel calentamlento
de las panes nuevas y el aislante.
• No cubra por completo con papei de alumtnio una
parrilla del horno. El papel de alumtnio puede
obstrulr el flujo normal de calory originar malos
resultados al homear. Nocoloquepapel dealuminio
dlrectamente enclma del elemento que genera el
calor dei horno. El papel de aluminio que se utllice
en el fondo del homo, debajo del elemento puede
dattar la superflcle. Por Io tanto, no debe utillzarse.
Manlja de cerrar/abrir el seguro de la puerta del
homo - No use la manija durante el horneado. La
manlja sblo se usa para el clclo de auto-limpleza.
PRECALENTAMIENTO
Cuando las recetas requleran precalentamlento,
tenga cerca los allmentos antes de abrlr la puerta del
horno. SI deja ablerta la puerta del homo durante
mucho tlempo, se perderd la temperatura de
precalentamlento.
Permlta que el homo se precallente por completo
antesde cocinarproductos horneados. Espereque
la luz Indicadora de precalentado se enclenda y
ponga la comlda en el horno.
BANDEJAS PARA HORNEAR
• Las galletas deben hornearse en bandejas planas
para hornear gailetas, que no tengan orillas que
tmpldan la Ilbre y adecuada circulacldn del aire.
• Las tortas, panecillos y panes r_pidos deben
hornearse en moldes brlllantes-que reflejen el calor-
ya que deben tener una corteza de tono dorado
claro.
• Asegdrese deque la parte deabajo del moldetambldn
sea brillante. Los rondos opacos absorber_n el
calory podrtan produclr que la parte de abajo de su
comlda se dore demaslado.
• La temperatura del homo debe reduclrse 25 grados
F por debajo de las temperatura recomendadas sl el
exterior del molde es oscuro, se ha oscurecldo con
el paso dei tlempo o es de vldrlo refractario.
12 NEOVC36
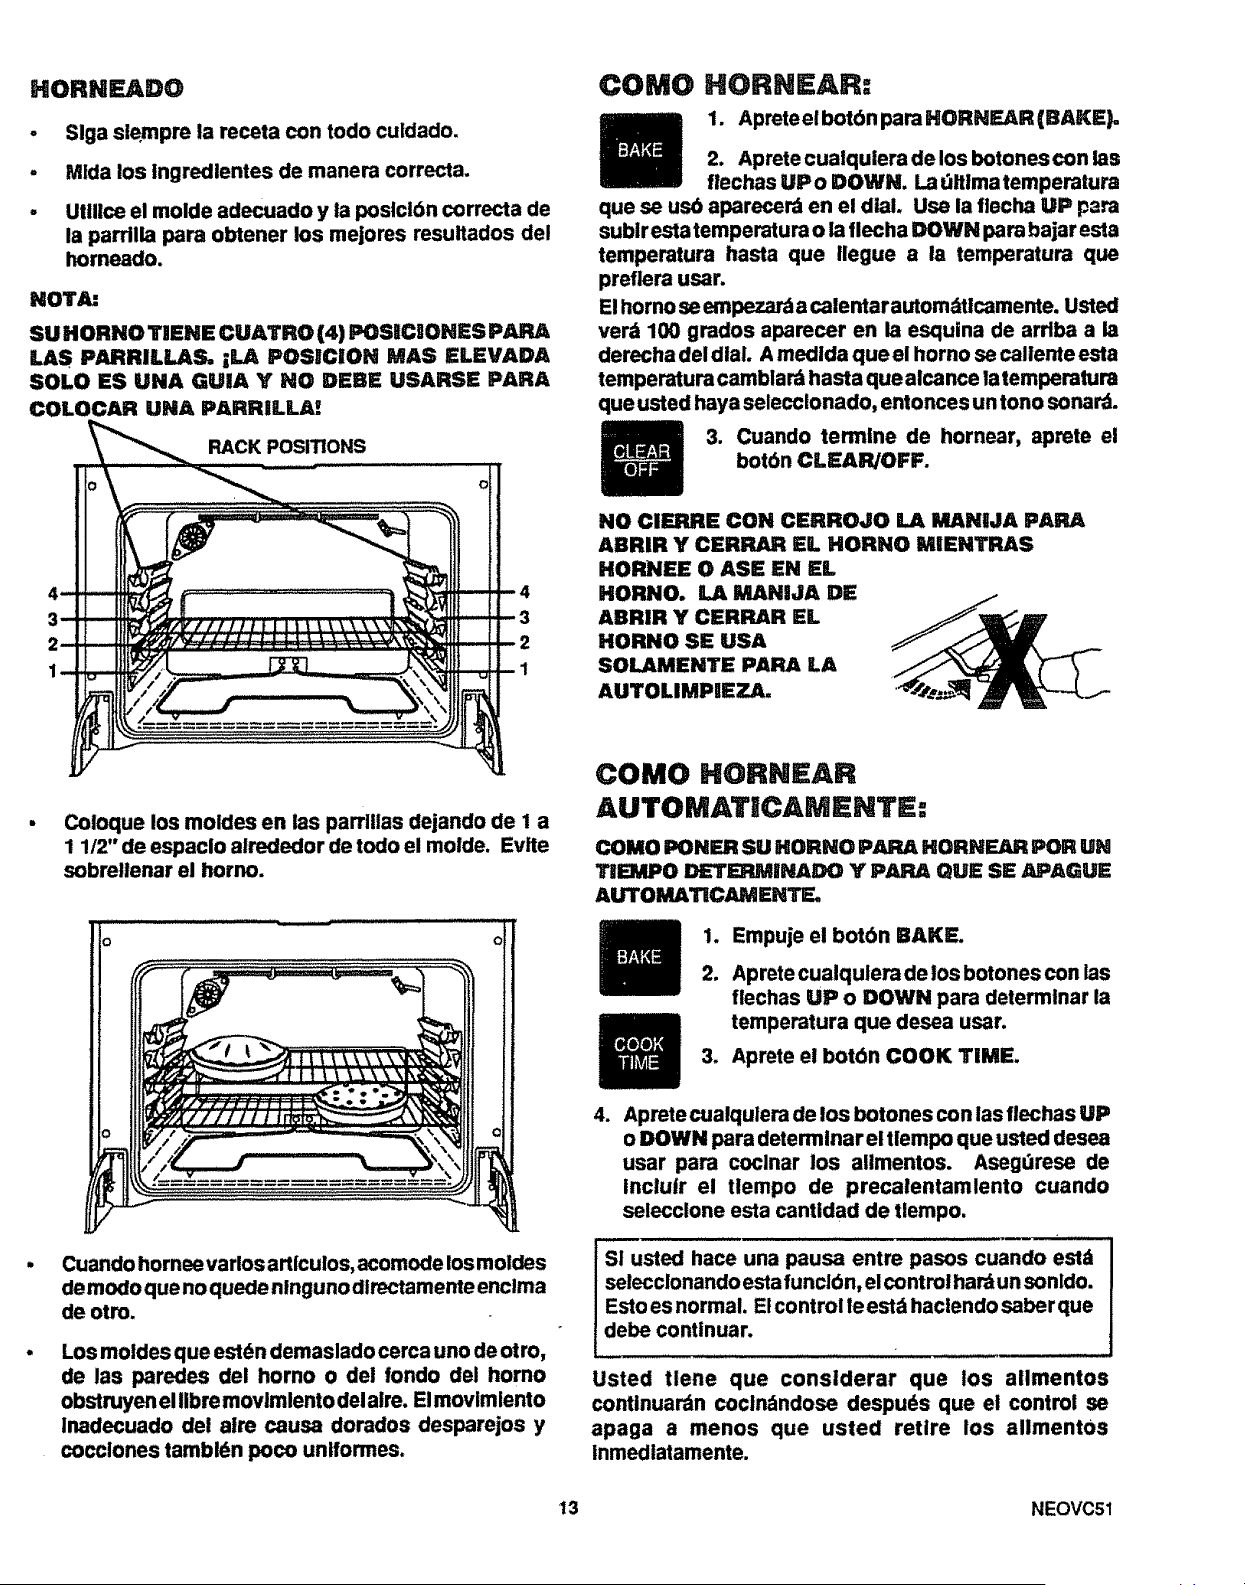
HORNF..AD@
o Slga slempre ia recota con todd culdado.
° Mlda los lngredlentes de manem correcta.
° UUlice el molde adecuado y la poslcibn correcta de
la pardlla para obtener los mejores resultados del
homeado.
NOTA:
SU HORNO TIENE CUATRO (4) POSgCgONES PARA
LAS PARRILLAS. ;LA POS_CION MAS ELEVAD&
SOLO ES UNA GUIA Y NO DEBE USARSE PARA
COLOCAR UNA PARROLLA_
RACK POSITIONS
• Coloque los moldes en las parrlllas dejando de I a
1 1/2" de espaclo alrededor de todD el molde. Evlte
sobreltenar el horno.
COMO HORNEAR:
1. Apreteel bot6n pare HORNF..AR (BAKE)°
2. Aprete cualqulera de los botones con las
flechas UPo DOWN. Ladlttmatemperatura
que se us6 aparecerd en el deal. Use la fiecha UP para
sublr esta temperatura o la flecha DOWN para bajar esta
temperatura hasta que Ilegue a la temperatura que
prefiera usar.
E! homo se empeza_ a calentarautomdttcamente. Usted
ver_ 100 grados aparecer en la esquina de arriba a la
derecha del dial. A medida que el homo se callente esta
temperaturacamblar_ hasta que alcance latemperatura
que usted hayaselecclonado, entonces un tono sonarS.
3. Cuando termlne de hornear, aprete el
botbn CLEAR/OFF.
NO CIERRE CON CERROJO LA MANgJA PARA
ABRIR Y CERRAR EL HORNO MgENTRAS
HOP,NEE 0 ASE EN EL
HORNO. LA MANIJA DE
ABRIR Y CERRAR EL
HORNO SE USA
SOLAMENTE PARA LA
AUTOLIMPIEZA,
COMO HORNEAR
AUTOMATgCAMENTE:
COMO PONER SU HORNO PARA HORNEAR IPOR UN
TIIEM.PO DETERMINADO Y PARA QUE SE APAGUE
AUTOMA'nCAMENTF.
1. Empuje el botbn BAKE.
2, Aprete cualqulera de los botones con las
flechas UP o DOWN pare determlnar la
tempemtura que desea usar.
3. Aprete el bot6n COOK TIME.
Cuando hornee varios articulos, acomode los moldes
de modo que no quede nlnguno dlrectamente enclma
de otro.
Los moldes que estdn demaslado cerca uno de otto,
de las paredes del homo o del rondo del homo
obstruyen el Ilbre movimlento del alre. Elmovimlento
Inadecuado del alre causa dorados desparejos y
cocclones tambldn IX)co unlformes.
.
Aprete cualqulera de los botones con las flechas UP
o DOWN para determtnar el tlempo que usted desea
usar para coclnar los allmentos. Asegdrese de
inclulr el tlempo de precalentamlento cuando
selecclone esta cantldad de tlempo,
S1 usted hace una pausa entre pasos cuando estd
selecclonando esta funclbn, el control hard un sonldo.
Esto es normal. El control le estd haclendo saber que
debe continuar.
Usted tlene que conslderar que los allmentos
contlnuardn coclndndose despu6s que el control se
apaga a menDs que usted retire los allmentos
lnmedlatamente.
13 NEOVC51
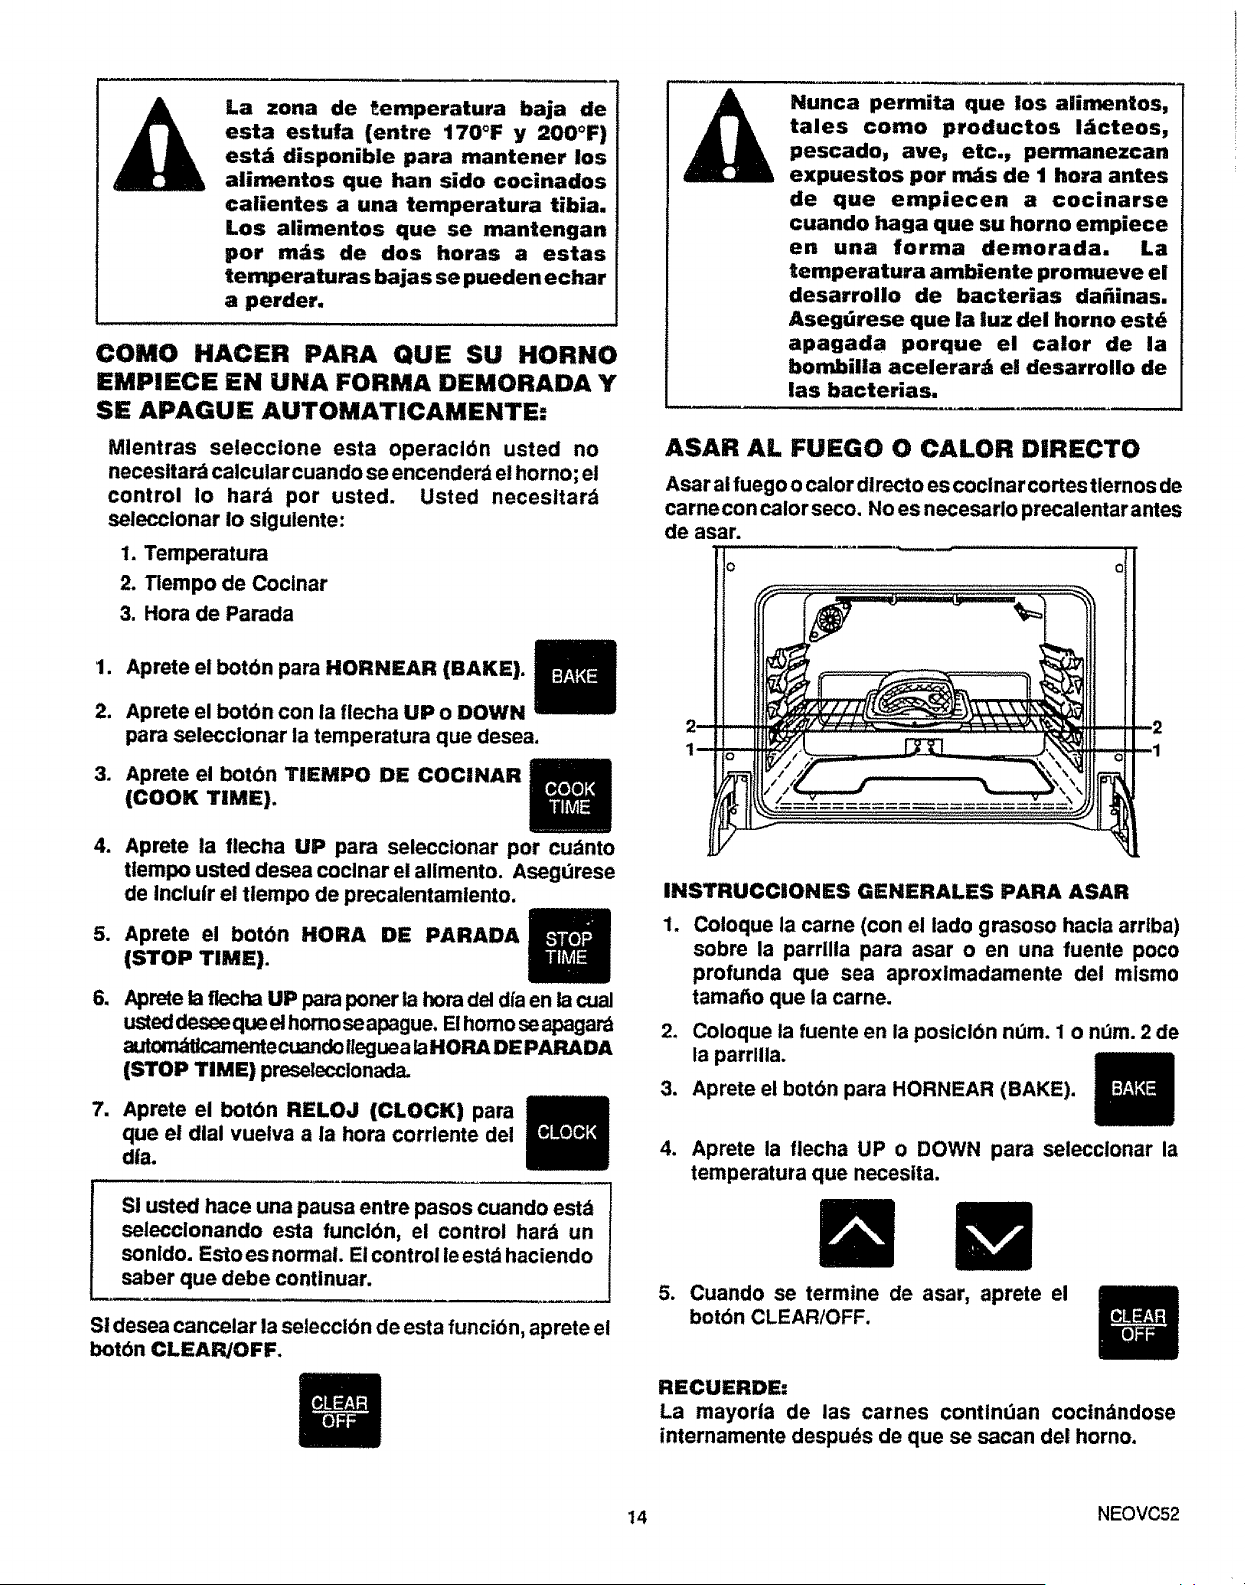
La zona de _emperatura baja de
esta estufa (entre 170°F y 200°F)
est_i disponible para mantener los
alimentos que hart sido cocinados
calientes a una temperatura tibia.
Los alimentos que se mantengan
por mds de dos horas a estas
temperaturas bajas se puedenechar
a perder.
COMO HACER PARA QUE SU HORNO
EMPIECE EN UNA FORMA DEMORADA Y
SE APAGUE AUTOMATICAMENTE:
Mlentras seleccione esta operaclbn usted no
necesltar_ calcularcuando se encenderd el homo; el
control Io hard pot usted. Usted necesitard
seleccionar Io sigulente:
1. Temperatura
2. Tiempo de Coctnar
3. Hora de Parada
1. Aprete el bot6n para HORNEAR (BAKE).
2. Aprete el botbn con la flecha UP o DOWN
para seleccionar la temperatura que desea.
3. Aprete el bot6n TIEMPO DE COCINAR
(COOK TIME).
4. Aprete la flecha UP para selecctonar por cu_nto
tlempo usted desea coclnar el allmento. Asegdrese
de Incluir el tlempo de precalentamlento,
5. Aprete el botbn HORA DE PARADA
(STOP TIME).
6. Aprete la flecha UP para poner 1,3hora del dla en la cual
usteddeseequeelhomoseapague. El homo se apagal"a
automdScamentecuandolleguea laHOP,_,DE PAI_DA
(STOP TIME) preselecclonada.
7. Aprete el bot6n RELOJ (CLOCK) para
que el dial vuelva a la hora corrlente del
dta.
S! usted hace una pausa entre pasos cuando estd
selecclonando esta funcibn, el control hard un
sonldo. Estoes normal Elcontrol leest_ haciendo
saber que debe contlnuar.
SI desea cancelar la selecclbn de esta funcidn, aprete el
botbn CLEAR/OFF.
Nunca permita que los aiimentos,
tales como productos l;tcteos,
pescado_ ave, etc._ permanezcan
expuestos por mds de I hora antes
de que empiecen a €ocinarse
cuando haga que su horno empiece
en una forma demorada. La
temperatura ambiente promueve el
desarrollo de bacterias daiiinas.
Asegdrese que la iuz del homo estd
apagada porque el caior de la
bombilla acelerard ei desarrollo de
las bacterias.
ASAR AL FUEGO 0 CALOR DIRECTO
Asar al fuego o calor dlrecto es cocinar cortes tlernos de
carneconcalorseco, No es necesarlo precalentarantes
de asar.
o
INSTRUCCIONES GENERALES PARA ASAR
1. Coloque la came (con el lado grasoso hacla arrtba)
sobre la parrllla para asar o en una fuente poco
profunda que sea aproximadamente del mismo
tamatto que la came.
2. Coloque la fuente en la posicibn nora. 1 o nora. 2 de
la parrllla.
3. Aprete el botbn para HORNEAR (BAKE).
4. Aprete la flecha UP o DOWN para selecclonar la
temperatura que necestta.
5. Cuando se termine de asar, aprete el
bot6n CLEAR/OFF.
RECUERDE:
La mayoria de las carnes contindan cocin_ndose
internamente despuds de que se sacan del horno.
14 NEOVC52
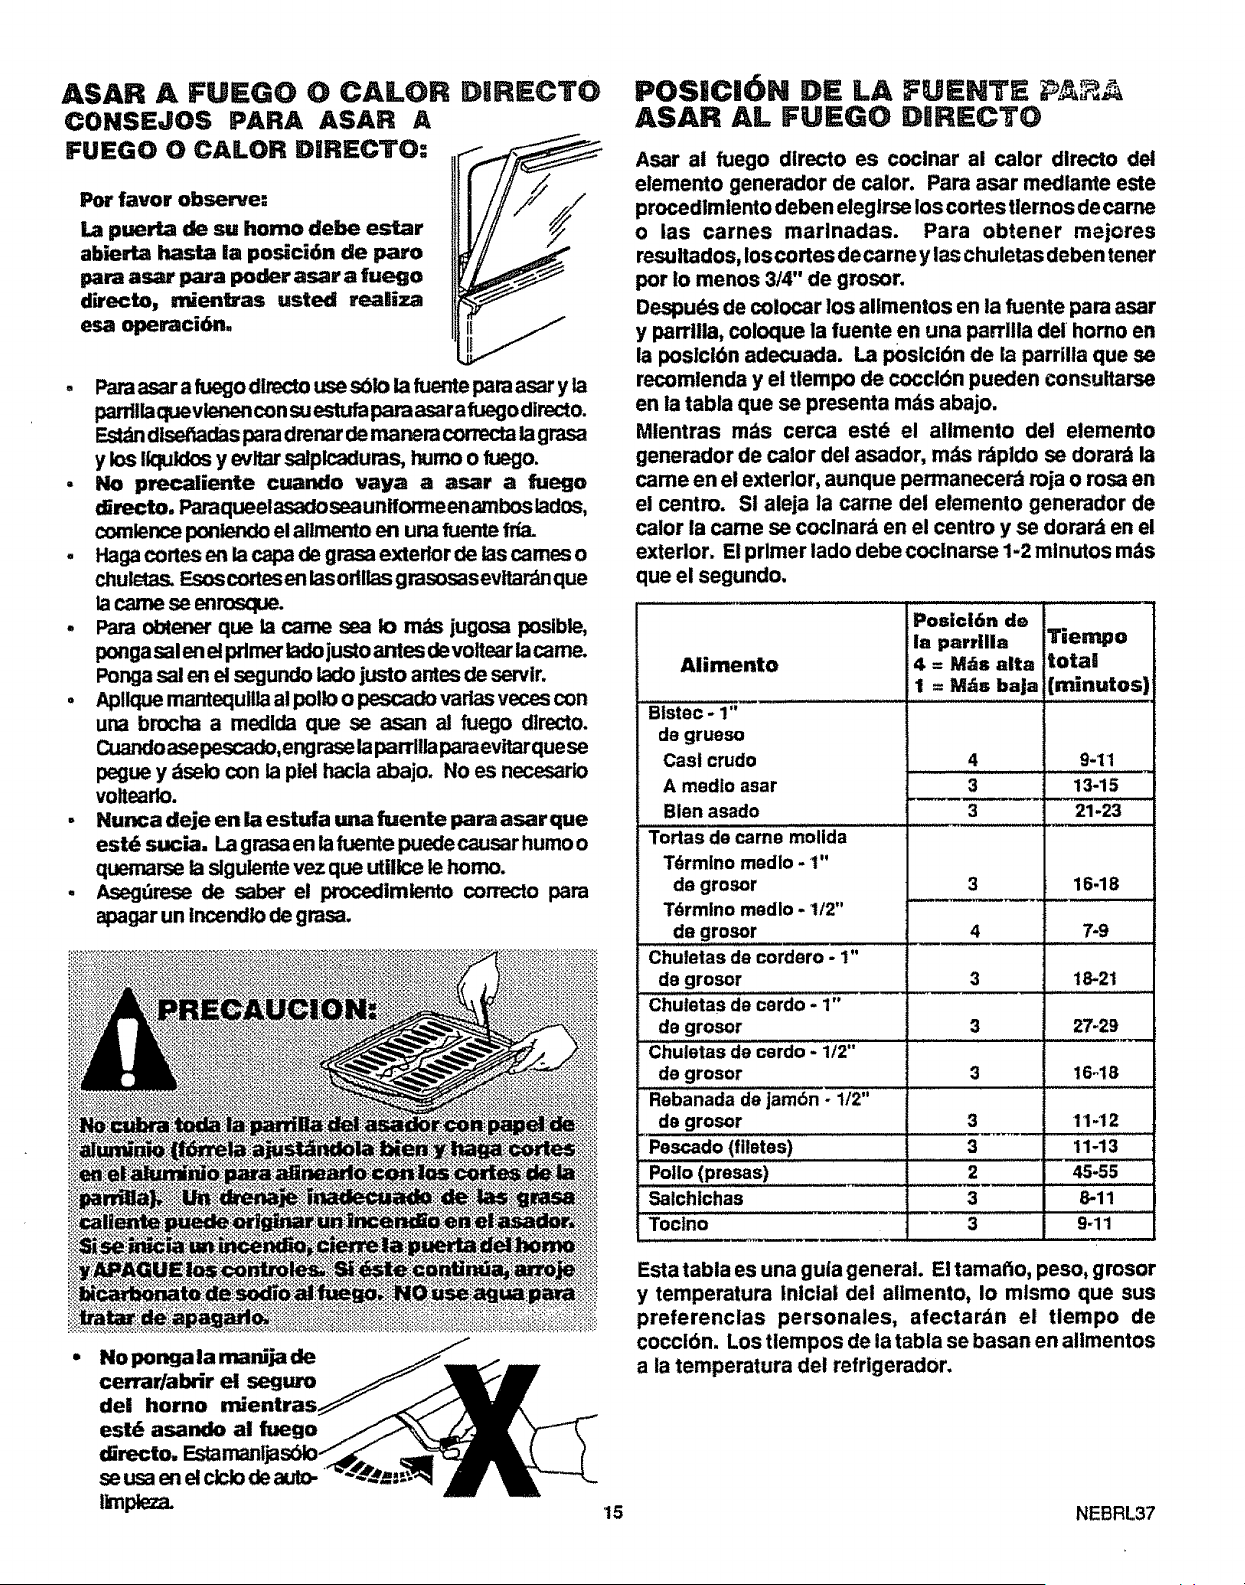
ASAR A FUB:GO O CALOR
CONSEJOS PARA ASAR A
FUEGO O CALOR DIRECTO:
Pot favor observe:
ILapuerta de su homo debe estar
abierlLa hasta la posici6n de paro
para asar para poder asar a fuego
directo, n_en_as usted reamiza
esa opemci6n.
DIRECTO
• Para asar a fuego directo use sblo la fuente para asar y la
parrlllaquevlenen con su estufa para asara fuego directo.
dlsettadasl0am drenar de manera correcta la grasa
y los Iiquldos y evltar salplcaduras, humo o fuego.
• No precaliente cuando vaya a asar a fuego
directo. Paraqueelasadosea unfforme en ambos lados,
comlence ponlendo el allmento en uP_ fuente fda.
. Haga cortes en la capa de grasa exterior de las cames o
chuletas. Esoscortesen lasodllasgrasosasevttardnque
la came se enrosque.
- Para obtener que la came sea Io m_ts jugosa posible,
pongasalen el pdmer lado justo antes devoltear la came.
Ponga sai en el segundo lado justo antes de servtr.
• Apltque mantequilla al polio o pescado vadas veces con
una brocha a medida que se asan al fuego dlrecto.
Cuando asepescado, engrase la parrllla para evp.arque se
pegue y dselo con la plel hacla abajo. No es necesario
voltearlo.
. Nunca deje en la estufa una fuente para asarque
estd sucia. La grasa en la fuente puede causar humo o
quemarse ia slgulente vez que utillce le homo.
, A....,:_jdre_sede saber el procedlmlento correcto pare
apagar un Incendio de grasa.
de! homo naentras_
se usa en el clclo de auto-
No ponga la manija de
cerrar/abrir et seguro
15
POSiCI6N DE LA FUENT5
ASAR A"- FUEGO D|RECTO
Asar al fuego directo es cocinar al calor dlrecto del
elemento generador de calor. Para asar medlante este
procedlmlento deben eleglrse los cortes tlernos de came
o las carnes marlnadas. Para obtener mejores
resultados, Ioscortes decarne ylas chuletas deben tener
por Io menos 3/4" de grosor.
Despu_s de colocar los allmentos en la fuente para asar
y parrlila, coloque la fuente en una parrilla del horno en
la poslcibn adecuada. La posicl6n de la parrilla que se
recomlenda y el tlempo de cocclbn pueden consultarse
en la tabla que se presenta rods abajo.
Mlentras m_s cerca estd el alimento del elemento
generador de calor del asador, mds rdpldo se dotard Ila
came en el exterior, aunque permanecerd roja o rosa en
el centre. St aleja la came del elemento generador de
calor la came se coclnard en el centro y se dorard en el
exterior. El primer lado debe coclnarse 1-2 minutos m_ts
que el segundo.
Posici6n de
la parrilla Tiempo
Alimento 4 = M&s alta total
1 = M&s baJa (minutos)
Btstec - 1"
de grueso
Cast crudo 4 9-11
A medlo asar 3 13-15
Bien asado 3 21-23
Tortas de came molida
Tdrmlno medlo - 1"
de grosor 3 16.18
Tdrmlno medlo - 112"
de grosor 4 7-9
Chutetas de cordero - 1" ...............................
de grosor 3 18-21
Chuletas de cerdo - 1"
de grosor 3 27-29
Chuietasde cerdo - 1/2" _"_
de grosor 3 16-18
Rebanada de jambn - 1/2"
de grosor 3 11-12
....Pescado (filetes) 3 11-1 '3 ...........
....Polio (presas) 2 45-55
Salchlchas 3 8-11
Tocino 3 9-11
Esta tabla es una guia general. El tamal_o, peso, grosor
y temperatura lnlclal del allmento, Io mlsmo que sus
preferenclas personales, afectardn el tlempo de
coccibn. Los tlempos de la tabla se basan en alimentos
a ia temperatura del refrigerador.
NEBRL37
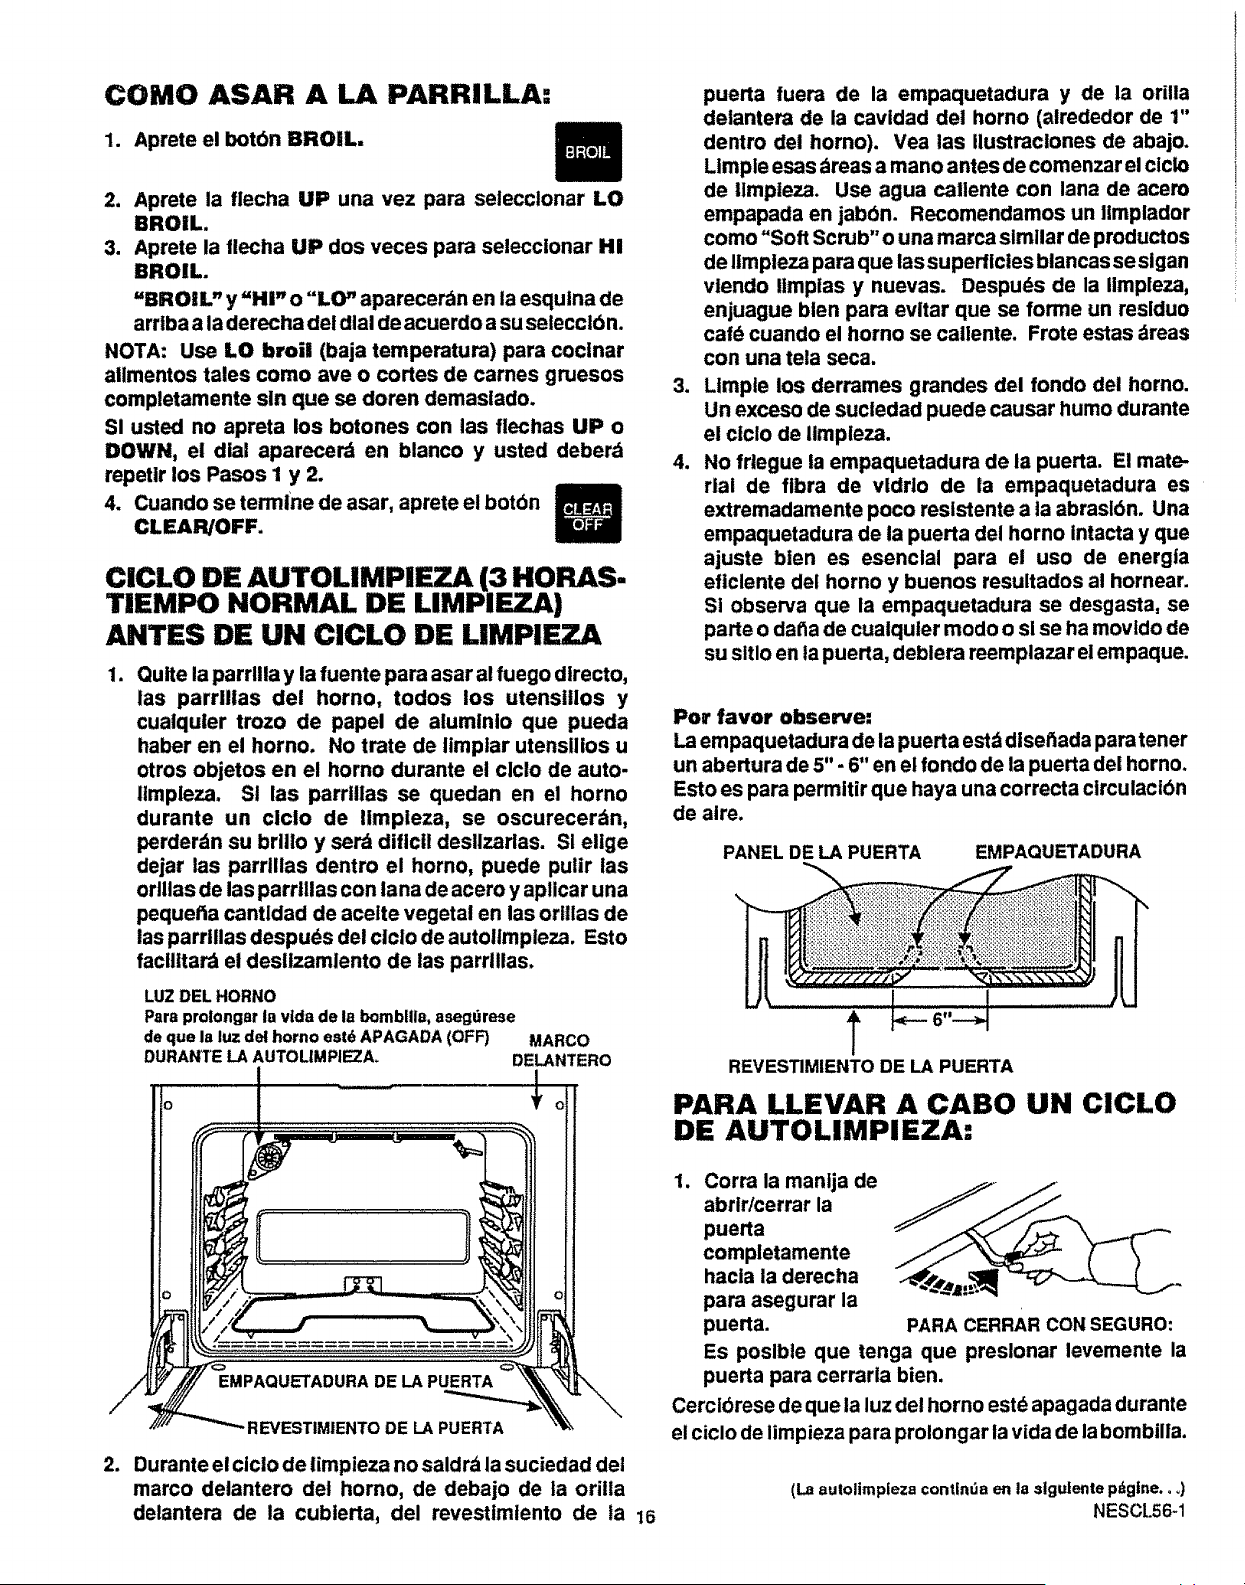
COMO ASAR A LA PARRILLA:
1. Aprete el botbn BROIL.
2. Aprete la flecha UP una vez para selecctonar LO
BROIL.
3. Aprete la tlecha UP dos veces para seleccionar HI
BROIL.
"BROIL" y"Hl" o "LO" aparecerdn en la esqulna de
arrlba a la derecha del dial de acuerdo a su selecclbn.
NOTA: Use LO broil (baja temperatura) pars cocinar
atlmentos tales como ave o cortes de carnes gruesos
completamente sin que se doren demaslado.
Sl usted no apreta los botones con las flechas UP o
DOWN, el dial aparecerd en blanco y usted deber_
repetir los Pasos 1 y 2.
4. Cuando se termlne de asar, aprete el botbn
CLEAR/OFF.
CICLO DE AUTOLIMPIEZA (3 HORAS-
TIEMPO NORMAL DE LIMPIEZA)
ANTES DE UN CICLO DE LIMPIEZA
Quite la parrllla y la fuente pars asar al fuego directo,
las parrillas del horno, todos los utenslllos y
cualquler trozo de papel de aluminio que pueda
haber en el horno. No trate de limplar utensilios u
otros objetos en el homo durante el clclo de auto-
limpleza. SI las parrillas se quedan en el horno
durante un ciclo de iimpleza, se oscurecer_n,
perderdn su brlllo y serd dificil desllzarlas. Si ellge
dejar las parrlllas dentro el homo, puede pulir las
orlllas de las parrillas con lana de acero y aplicar una
pequefia cantldad de aceite vegetal en las ortllas de
las parrlilas despu_s del clclo de autollmpleza. Esto
facilitar_ el deslizamlento de las parrlllas.
LUZ DEL HORNO
Pars prolongar ia vida de Is bombEiia,asegdrese
de que la luz del horno eat6 APAGADA (OFF) MARCO
DURANTE LA AUTOUMPIEZA_ DELANTERO
.
1
puerta fuera de la empaquetadura y de la orilla
delantera de la cavidad del homo (alrededor de 1"
dentin dei homo). Vea las Ilustraciones de abajo.
Limpie esas _reas a mano antes de comenzar el clclo
de llmpleza. Use agua callente con lana de acero
empapada en jabbn. Recomendamos un iimplador
como"Soft Scrub" o una marca similar de productos
de Iimpleza para que lassuperficies blancas se sigan
vlendo limplas y nuevas. Despuds de la Iimpleza,
enjuague blen pars evitar que se forrne un reslduo
cafd cuando el homo se cailente. Frote estas dreas
con una tela seca.
Limple los derrames grandes del fondo del homo.
Un exceso de sucledad puede causar humo durante
el clclo de limpleza.
No frlegue la empaquetadura de la puerta. El mate-
rial de fibra de vldrlo de la empaquetadura es
extremadamente poco reslstente a la abraslbn. Una
empaquetadura de la puerta del homo Intacta y que
ajuste blen es esenclal para el uso de energla
eficlente del homo y buenos resultados al hornear.
SI observa que la empaquetadura se desgasta, se
parte o datta de cualquter modo o si se ha movido de
su sltlo en la puerta, deblera reemplazar el empaque.
Pot favor observe:
La empaquetadura de la puerta estd disettada pars tener
un abertura de 5" - 6" en el fondo de la puerta del horno.
Esto es pars permitir que haya una correcta circulactbn
de aire.
PANEL DE LA PUERTA EMPAQUETADURA
REVESTIMIENTO DE LA PUERTA
PARA LLEVAR A CABO UN CICLO
DE AUTOLIMPIEZA:
2,
- REVESTIMIENTO DE LA PUERTA
Durante el ciclo de limpieza no saldrd la suciedad del
marco delantero del homo, de debajo de la orilla
delantera de la cublerta, del revestlmlento de la 16
1. Corra la manija de
abrir/cerrar la
puerta
completamente
hacla la derecha
para asegurar la
puerta. PARA CERRAR CON SEGURO:
Es posible que tenga que preslonar levemente la
puerta para cerrarla bien.
Cercibrese de que la luz del homo est_ apagada durante
el ciclo de limpieza pars prolongar la vida de la bombilla.
(Laautollmpiezacontlndaenla algulentepdgtne.,_)
NESCL56*l
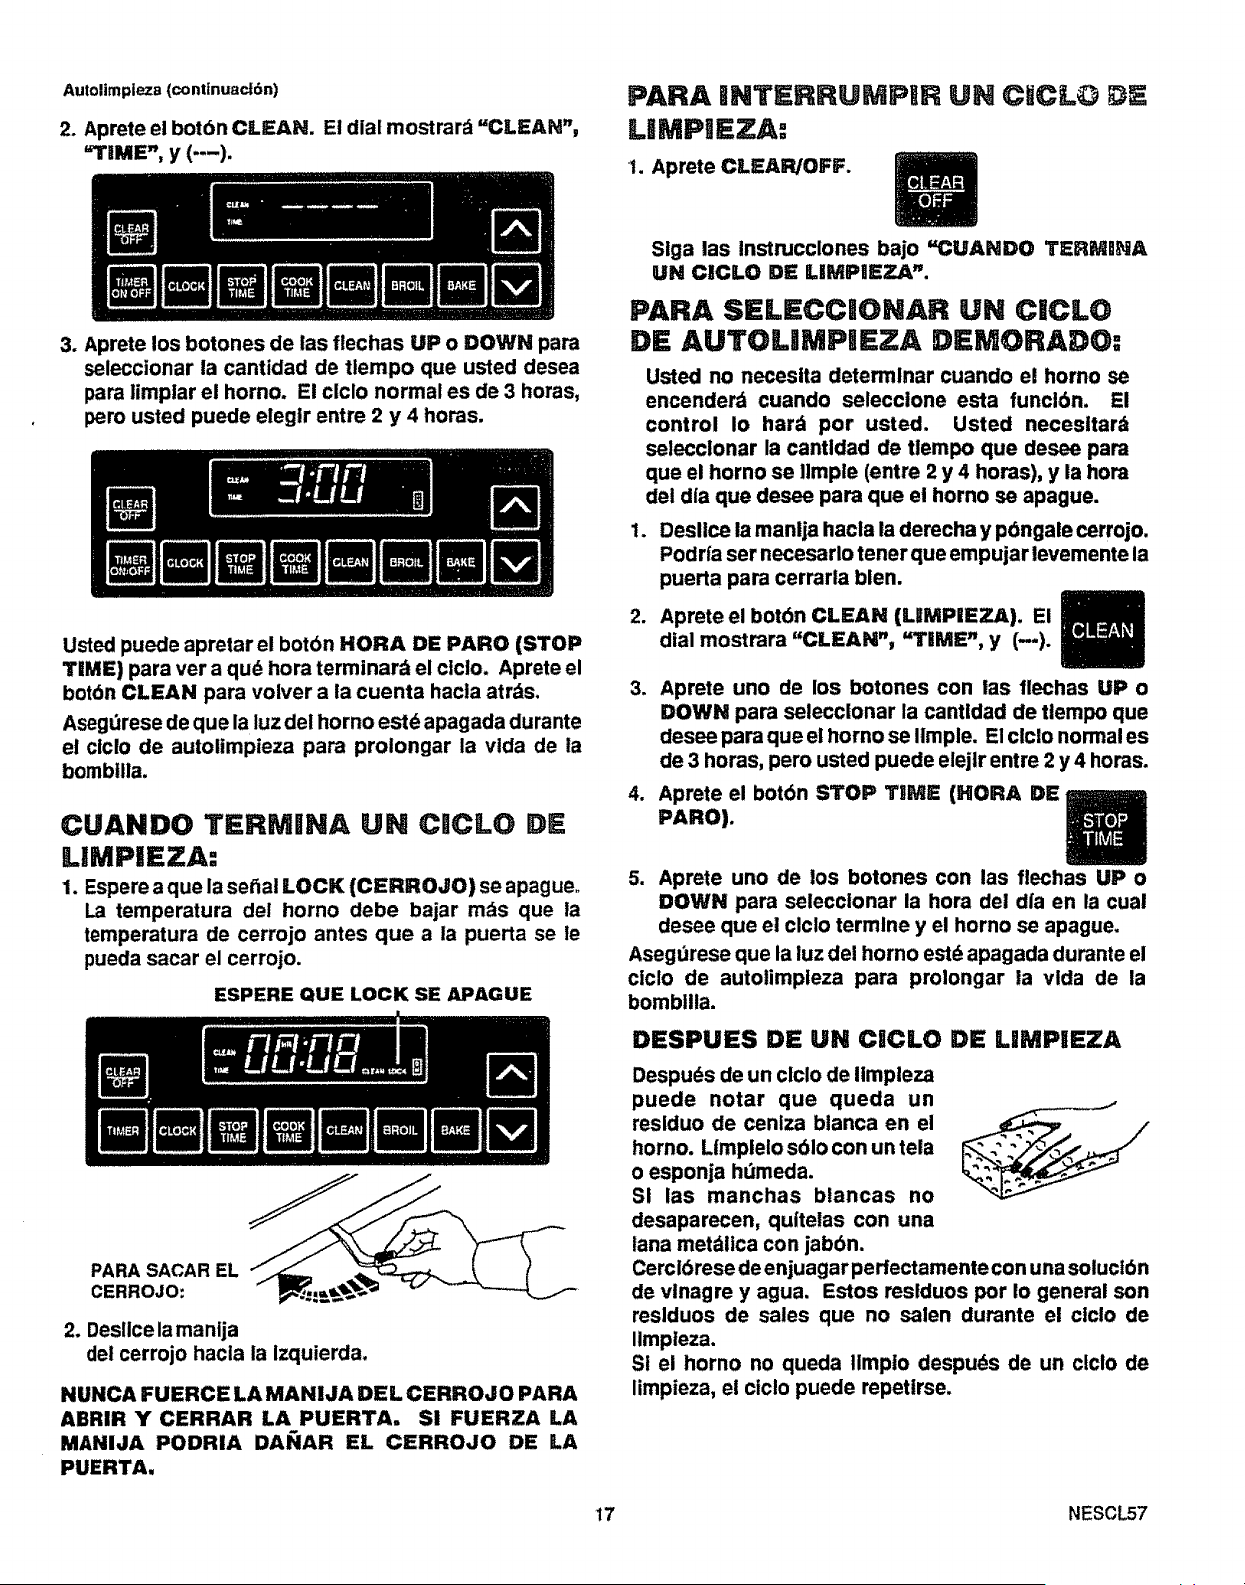
Autolimpieza (continuad6n)
2. Aprete el bot6n CLEAN. El dial mostrard "CLEAN",
"TIME", y (---).
PAR#, |NTERRUMPIR UN CUCLO
LIMPIEZA:
1. Aprete CLEAR/OFF.
3. Aprete los botones de las flechas UP o DOWN para
seleccionar la cant|dad de tleropo que usted desea
para limplar el horno. El clclo normal es de 3 horas,
pero usted puede eleglr entre 2 y 4 horas.
Usted puede apretar el botbn HORA DE PARO (STOP
TIME) para ver a qu_ hora terminar_ el ciclo. Aprete el
botdn CLEAN para volver a la cuenta hacla atrds.
Asegt_rese de que la luz del horno estd apagada durante
el ciclo de autolimpieza para prolongar la vlda de la
bombtlla.
CUANDO TERMINA UN C|CLO DE
LIMPIEZA:
1. Espere a que la serial LOCK (CERROJO) se apague,
La temperatura del horno debe bajar mds que la
temperatura de cerrojo antes que a la puerta se le
pueda sacar el cerrojo.
ESPERE QUE LOCK SE APAGUE
PARA SACAR EL
CERROJO:
2. Desllcela manija
del cerrojo hacla la izquierda.
NUNCA FUERCE LA MANIJA DEL CERROJO PARA
ABRIR Y CERRAR LA PUERTA° Si FUERZA LA
MANIJA PODRIA DA_IAR EL CERROJO DE LA
PUERTA.
Siga las instrucclones bajo "CUANDO TERMnNA
UN ClCLO DE LIMPIEZA".
PAR,0, SELECC|ONAR UN CICLO
DE AUTOL|MPiEZA DEMORADO:
Usted no necesita determlnar cuando e! homo se
encenderd cuando seleccione esta funcl6n. El
control Io har_ por usted. Usted necesltar_
selecclonar la cantldad de tlempo que desee para
que el horno se Ilmple (entre 2 y 4 horas), y la hora
del dla que desee para que el horno se apague.
1. Desllce la manija hacla la derecha y p6ngale cerrojo.
Podria ser necesarlo tener que empujar levemente la
puerta para cerrarla blen.
2. Aprete el bot6n CLEAN (UMPIEZA). El
dial mostrara "CLEAN", "TIME", y (w).
3. Aprete uno de los botones con las flechas UP o
DOWN para selecclonar la cantidad de tlempo que
desee para que el homo se Ilmple. E1clclo normal es
de 3 horas, pero usted puede elejlr entre 2 y 4 horas.
4. Aprete el bot6n STOP TIME (HORA DE
PARO).
5. Aprete uno de los botones con las flechas UP o
DOWN para seleccionar la hora del dla en la cual
desee que el clclo termlne y el horno se apague.
Asegdrese que la luz del homo estd apagada durante el
ciclo de autolimpleza para prolongar la vlda de la
bombllla.
DESPUES DE UN CICLO DE LiMPIEZA
Despuds de un clclo de Ilmpleza
puede notar que queda un
residuo de cenlza blanca en el ____,_. /
horno. L|mpielo s61o con un tela
o esponja hdmeda.
SI las manchas blancas no
desaparecen, quitelas con una
lana metdltca con jab6n,
Cerci6rese de enjuagar perfectamente con una soluct6n
de vinagre y agua. Estos reslduos pot Io general son
reslduos de sales que no salen durante el ciclo de
Ilmpleza,
SI el horno no queda Ilmp|o despuds de un clclo de
limpieza, el ciclo puede repetlrse,
17 NESCL57
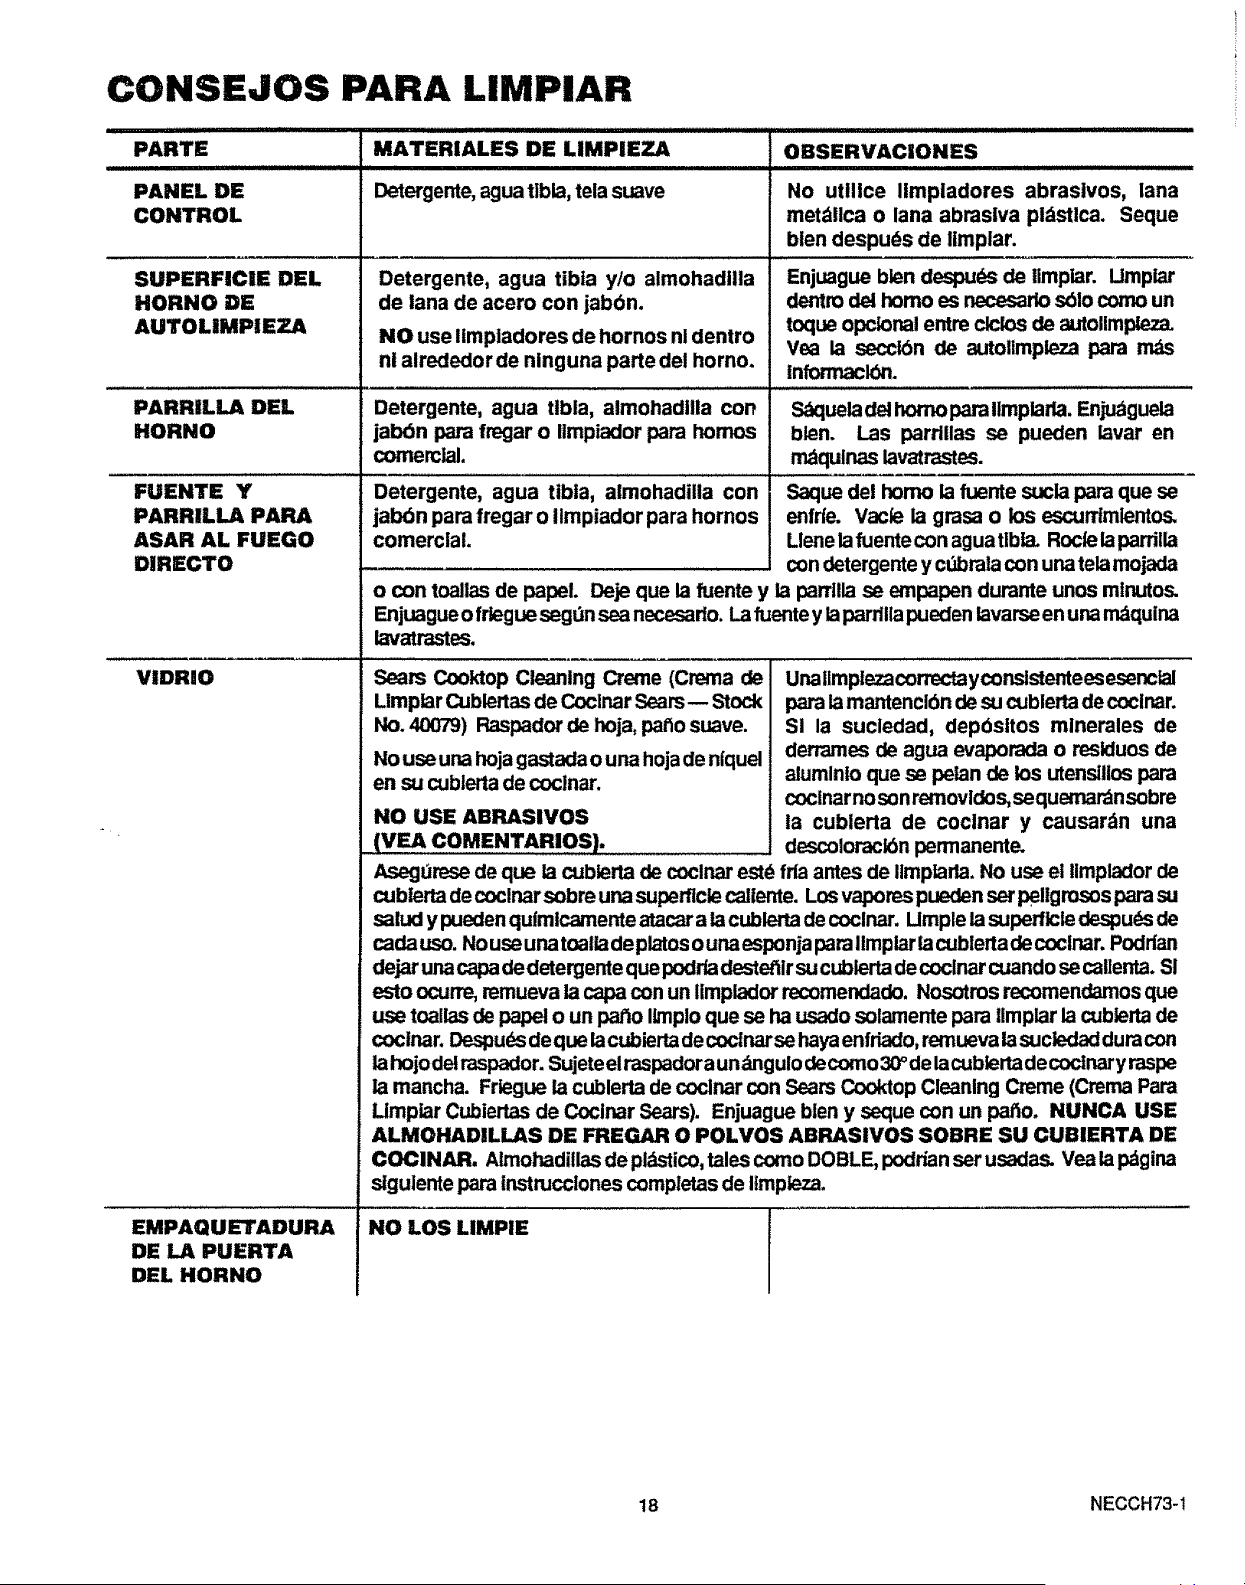
CONSEJOS PARA LIMPIAR
MATERIALES DE LIMPIEZA
Detergente, agua tibia, tela suave
PARTE
PANEL DE
CONTROL
SUPERFICIE DEL
HORNO DE
AUTOLIMPiEZA
PARRILLADEL
HORNO
FUENTE Y
PARRILLA PARA
ASAR AL FUEGO
DIRECTO
VIDRIO
EMPAQUETADURA
DE LA PUERTA
DEL HORNO
Detergente, agua tibia y/o almohadllla
de lana de acero con jabbn.
NO use Ilmpladores de hornos nl dentro
ni alrededor de ninguna parte del homo.
Detergente, agua tibia, almohadilla con
jabbn para fregar o Ilmpiador para homos
comerclaL
Detergente, agua tibia, almohadilla con
jal0bn para fregar o Ilmpiador para hornos
comerclal.
OBSERVAClONES
,|llllll ± L L_I_LJLIU_II Illllllllllll lll_ II _L_ ill
No utlllce iimpladores abraslvos, lana
metdllca o lana abraslva pldsUca. Seque
blen despuds de ltmplar.
Enjuague bten despu_s de Umpiar. Umplar
dentro del homo es necesario sdlo como un
toque opclonal entre clclos de autolimpleza.
Vea la secctbn de autolimpleza para rods
informacl_.
S,_queladet homo para iimplarla. Enju_guela
blen. Las parrtllas se pueden lavar en
m_qulnas lavatrastes.
Saque del homo la fuente sucla para que se
enfrle. Vacle la gmsa o los escurdmientos,
Llene la fuente con agua tibta. Rocfe la parrilla
con detergente y c_brala con una tela mojada
o con toalles de papel. Deje que la fuente y la parrllla se empapen durante unos mtnutos.
Eqjuague o frlegue segdn sea necesado. La fuente y laparrllla pueden lavarse en una mdquina
lavatrastes.
Sears Cooktop Cleaning Creme (Crema de
Llmplar Cublertas de Cocinar Sears-- Stock
No. 40079) Raspador de hoja, patio suave.
No use una hoja gastada o una hoja de niquel
en su cublerta de coclnar.
NO USE ABRASlVOS
VEA COMENTARIOS).
Unailmplezacorrectayconsistentees esenctal
10amlamantencibn de su cublerta de coclnar.
SI la suciedad, depdsItos minerales de
derrames de agua evaporada o reslduos de
alumlnlo que se pelan de los utenslllos para
cocinarnoson removldos, sequemar_nsobre
la cublerta de coclnar y causardn una
descoloracibn permanente.
Asegdmse de que la cublerta de coclr_=restd fda antes de Ilmptarla. No use el limplador de
cublerta de coclnar sobre una superflcle callente. Los vapores pueden set pellgrosos para su
salud y pueden quimlcamente atacar a la cublerta de coclnar. Umple la superflcle de.spudsde
cadauso. Nouseunatoalladeplatosounaesponja parallmplarlacublertadecoclnar. Poddan
de'_a'una capa dedetergente que podda destetilr su cublerta de coclnar cuando se callenta. SI
esto ocun'e, remueva la capa con un limplador recomendado. Nosotms recomendamos que
use toallas de papel o un patio Ilmplo que se ha usado solamente para llmplar la cublerta de
cocinar. Despuds de que lacubierta de coctnar se haya enfriado, remueva la sucledad dura con
la hojodetraspador. Sujeteel raspadora undngulo decomo30 ° de la cublertadecoctnary raspe
la mancha. Frtegue la cublerta de coclnar con Sears Cooktop Cleaning Creme (Crema Para
Llmplar Cubiertas de Cocinar Sears). Enjuague blen y seque con un patio. NUNCA USE
ALMOHADILLAS DE FREGAR O POLVOS ABRASlVOS SOBRE SU CUBIERTA DE
COCINAR. Aimohadillas de pldstico, tales como DOBLE, poddan ser usadas. Vea la pdgina
slgulente para tnstrucclones completas de ltmpieza.
NO LOS LIMPIE
18 NECCH73-!
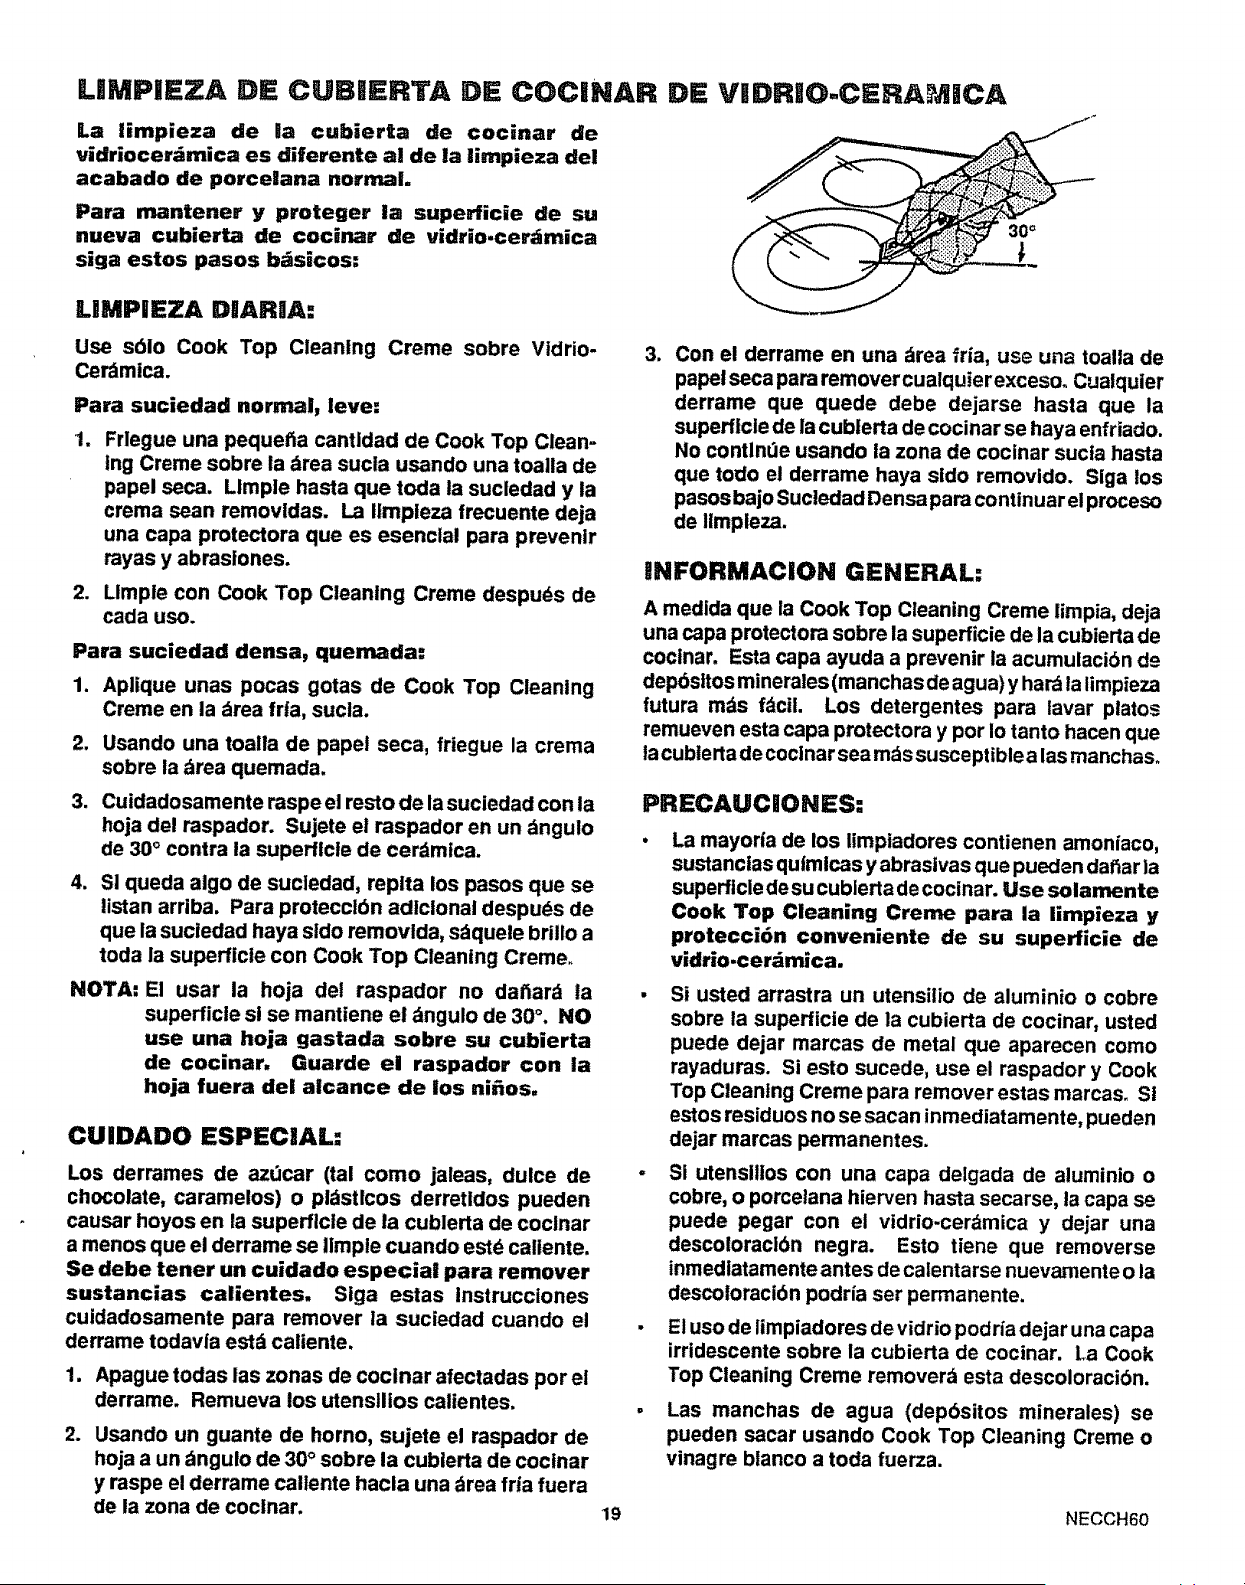
LIMPiEZA DE CUBmERTA DE COCiNAR
La limpieza de Ha cubierta de cocinar die
vidriocer_mica es diferente al de la limpieza del
acabado de porcelana normal.
Para mantener y proteger la supe_icie de su
nueva cubierta de cocinar de vidrio.cer_mica
siga estos pasos b_sicos:
LIMPiEZA D_ARIA:
DE VIDRtO-CERAMICA
30°
Use sblo Cook Top Cleaning Creme sobre Vidrio-
Cer_mica.
Para suciedad norrr_l, leve:
'1,
Frlegue una pequetia cantldad de Cook Top Clean-
ing Creme sobre la drea sucla usando una toaUa de
papel seca. Llmple hasta que toda la sucledad y la
crema sean removldas. La Ilmpleza frecuente deja
una capa protectora que es esenclal para prevenlr
rayas y abraslones.
2. Llmple con Cook Top Cleaning Creme despuds de
cada uso.
Para suciedad densa, quemada:
1. Aplique unas pocas gotas de Cook Top Cleaning
Creme en la _rea frta, sucla.
w
,
=
Usando una toalla de papei seca, friegue la crema
sobre la drea quemada.
Cuidadosamente raspe el resto de la suciedad con la
hoja del raspador. Sujete el raspador en un _ngulo
de 30 ° contra la superflcle de cerdmica.
SI queda algo de sucledad, repita los pasos que se
listan arriba. Para protecclbn adlclonal despuds de
que ia suciedad haya sldo removlda, sdquele brillo a
toda la superficte con Cook Top Cleaning Creme°
NOTA: El usar la hoja del raspador no datiard la
superficle si se mantiene el dngulo de 30 °. NO
use una hoja gastada sobre su cubierta
de cocinar. Guarde el raspador con la
hoja fuera de! alcance de los ni_os,
CUIDADO ESPECIAL:
Los derrames de azdcar (tal como jaleas, dulce de
chocolate, caramelos) o pldstlcos derretidos pueden
causar hoyos en la superflcle de la cublerta de cocinar
a menos que el derrame se Ilmple cuando estd callente.
Se debe tenet un cuidado especial para remover
sustancias calientes. Stga estas lnstrucciones
cuidadosamente para remover la suciedad cuando el
derrame todavia estd caliente.
II
2.
Apague todas las zonas de cocinar afectadas por el
derrame. Remueva los utensilios calientes.
Usando un guante de horno, sujete el raspador de
hoja a un bngulo de 30° sobre la cublerta de cocinar
y raspe el derrame callente hacla una brea fria fuera
de la zona de cocinar.
19
3,
Con el derrame en una drea fria, use una toalla de
papet seca para removercualquierexceso° Cualquier
derrame que quede debe dejarse hasta que la
superflcle de la cublerta de cocinar se haya enfriado.
No contlnde usando la zona de cocinar sucta hasta
que todo el derrame haya sido removido. Siga los
pasosbajo Sucledad Densa para continuar el proceso
de llmpleza.
INFORMACION GENERAL:
A medida que ia Cook Top Cleaning Creme limpia, deja
una capa protectora sobre la superficie de la cubierta de
cocinar. Esta capa ayuda a prevenir la acumulacibn de
depbsttos minerales (manchasde agua) y har_ la limpieza
futura mds fdcil. Los detergentes para lavar platos
remueven esta capa protectora y por io tanto hacen que
la cublerta de cocinar sea m_s susceptible alas manchas.
PRECAUCIONES:
La mayorla de los limpiadores contienen amoniaco,
sustanctas qulmicas y abrastvas que pueden dafiar la
superflcle de su cublerta de cocinar. Use solamente
Cook Top Cleaning Creme para la limpieza y
protecci6n conveniente de su superficie de
vidrio.cerdmica.
Si usted arrastra un utensilio de aluminio o cobre
sobre la superficie de la cubierta de cocinar, usted
puede dejar marcas de metal que aparecen como
rayaduras. Si esto sucede, use el raspador y Cook
Top Cleaning Creme para remover estas marcas_ SI
estos residuos no se sacan inmediatamente, pueden
dejar marcas permanentes.
Si utensillos con una capa delgada de aluminio o
cobre, o porcelana hierven hasta secarse, la capa se
puede pegar con el vidrio-cer_mica y dejar una
descoloracibn negra. Esto tiene que removerse
inmedlatamente antes de calentarse nuevamente o la
descoloracibn podria set permanente.
El uso de iimpiadores de vidrio podria dejar una capa
irridescente sobre la cubierta de cocinar. La Cook
Top Cleaning Creme remover_ esta descoloracibn.
Las manchas de agua (depbsitos minerales) se
pueden sacar usando Cook Top Cleaning Creme o
vinagre blanco a toda fuerza.
NECCH60
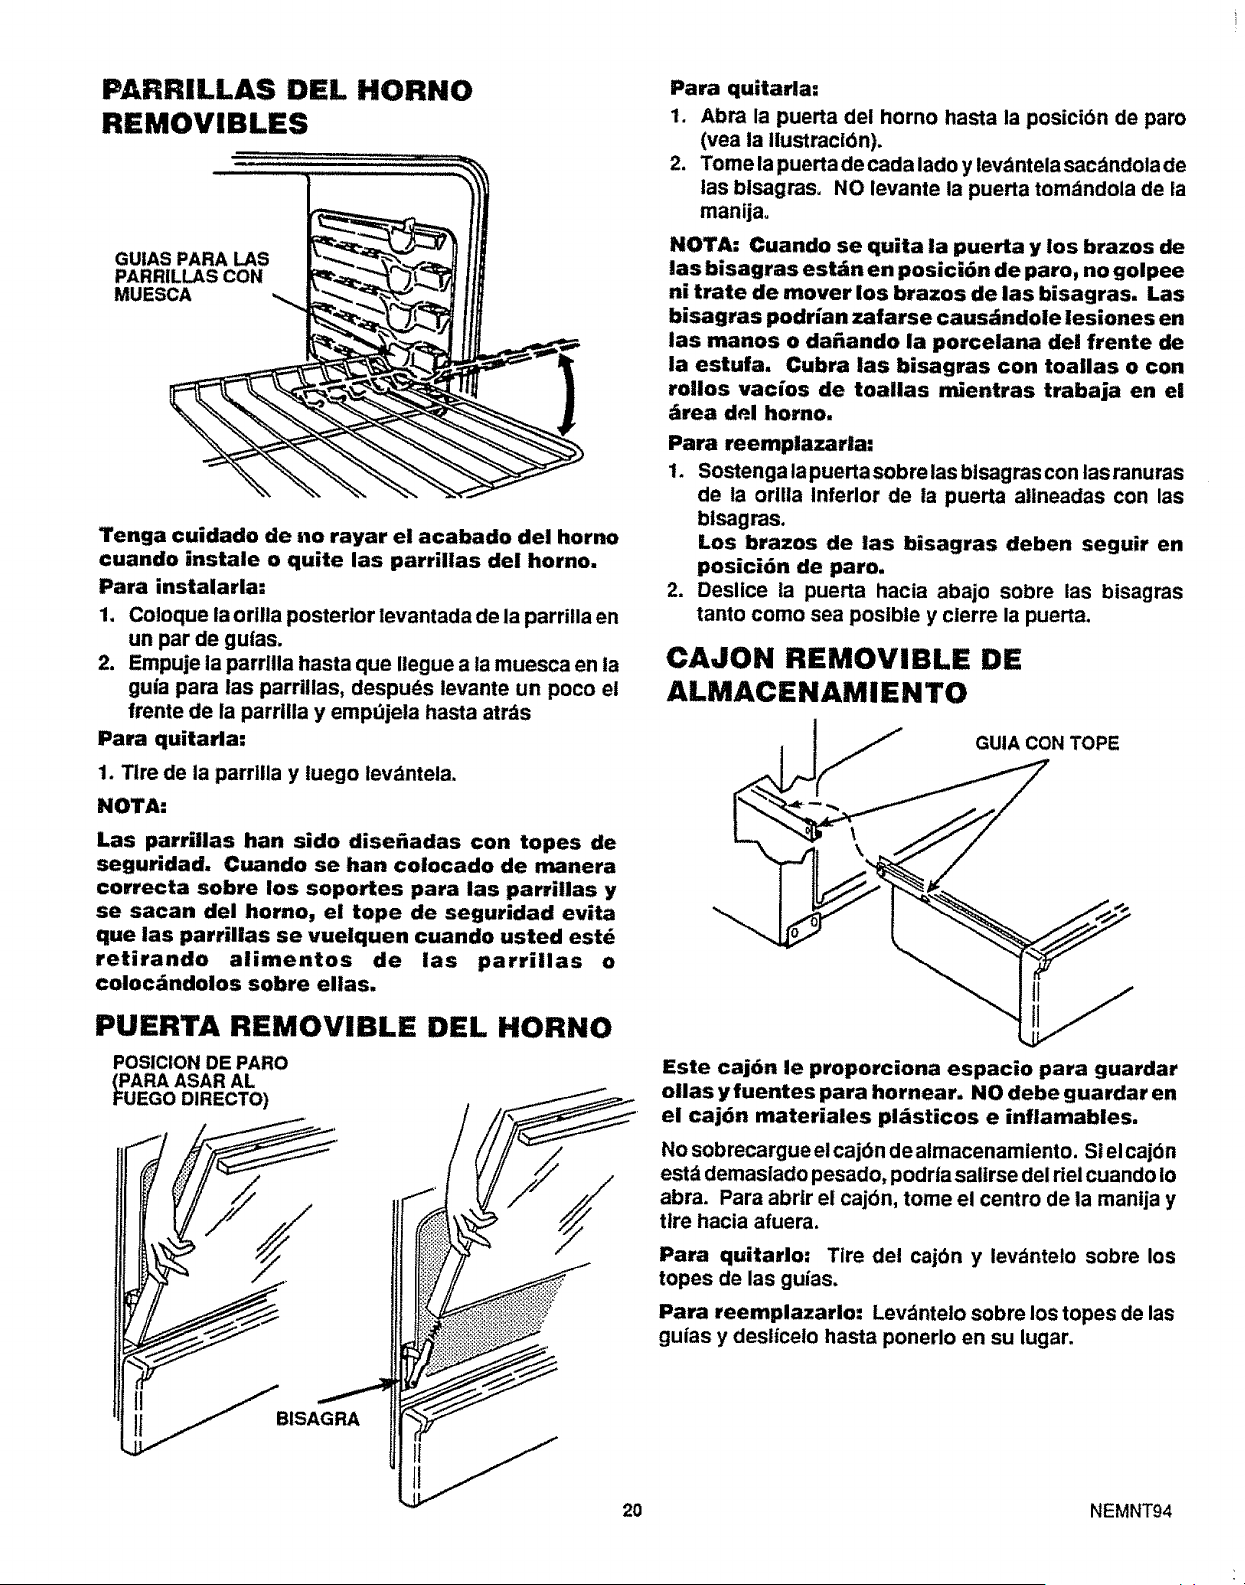
PARRILLAS DEL HORNO
REMOVIBLES
GUIAS PARA LAS
PARRILLAS CON
MUESCA
Tenga cuidado de no rayar el acabado del horno
cuando instale o quite las parriUas del horno.
Para instalarla:
1, Coloque la orilla posterior levantada de la parrilla en
un par de gulas.
2. Empuje la parrllla hasta que Ilegue a la muesca en la
guia para las parrillas, despuds levante un poco et
frente de ia parrilla y empOjela hasta atrds
Para quitarla:
1. Tire de la parrilla y tuego lev_ntela.
NOTA:
Las parriilas han side dise_adas con topes de
seguridad. Cuando se han cotocado de manera
correcta sobre los soportes para las parrillas y
se sacan del homo, el tope de seguridad evita
que las parrillas se vuelquen cuando usted estd
retirando alimentos de las parriilas o
colocdndoios sobre elias.
PUERTA REMOVIBLE DEL HORNO
POSICION DE PARO
PARA ASAR AL
EGO DIRECTO)
y BISAGRA
2O
Para quitarla:
1. Abra la puerta del horno hasta la posicidn de paro
(vea la Ilustracidn).
2. Tome la puerta de cada lado y levdntela sacdndola de
ias bisagras+ NO levante la puerta tomdndola de la
manija°
NOTA= Cuando se quita la puerta y los brazos de
las bisagras est;in en posici6n de paro, no golpee
nitrate de mover los brazos de las bisagras. Las
bisagras podrian zafarse causdndole lesiones en
las manos o daAando la porcelana del frente de
la estufa. Cubra las bisagras con toailas o con
folios vacios de toallas mientras trabaja en el
_rea del homo.
Para reemplazarla:
1. Sostenga lapuertasobre las bisagras con las ranuras
de la orllla Inferior de ia puerta allneadas con las
blsagras.
Los brazos de las bisagras deben seguir en
posicidn de paro,
2. Deslice la puerta hacia abajo sobre ias bisagras
tanto como sea postble y clerre la puerta.
CAJON REMOVIBLE DE
ALMACENAMIENTO
__f GUIA CON TOPE
Este cajdn le proporciona espacio para guardar
ollas y fuentes para hornear. NO debe guardar en
el caj6n materiales pldsticos e inflamables.
No sobrecargue el caj6n de almacenamiento. Stel caj6n
estd demaslado pesado, podrta sallrse del riel cuando Io
abra. Para abrtr el cajbn, tome el centro de la manija y
tire hacia afuera.
Para quitarlo: Tire del caj6n y levdntelo sobre los
topes de las guias.
Para reemplazarlo: Levdntelo sobre los topes de las
guias y deslicelo hasta ponerlo en su lugar.
NEMNT94
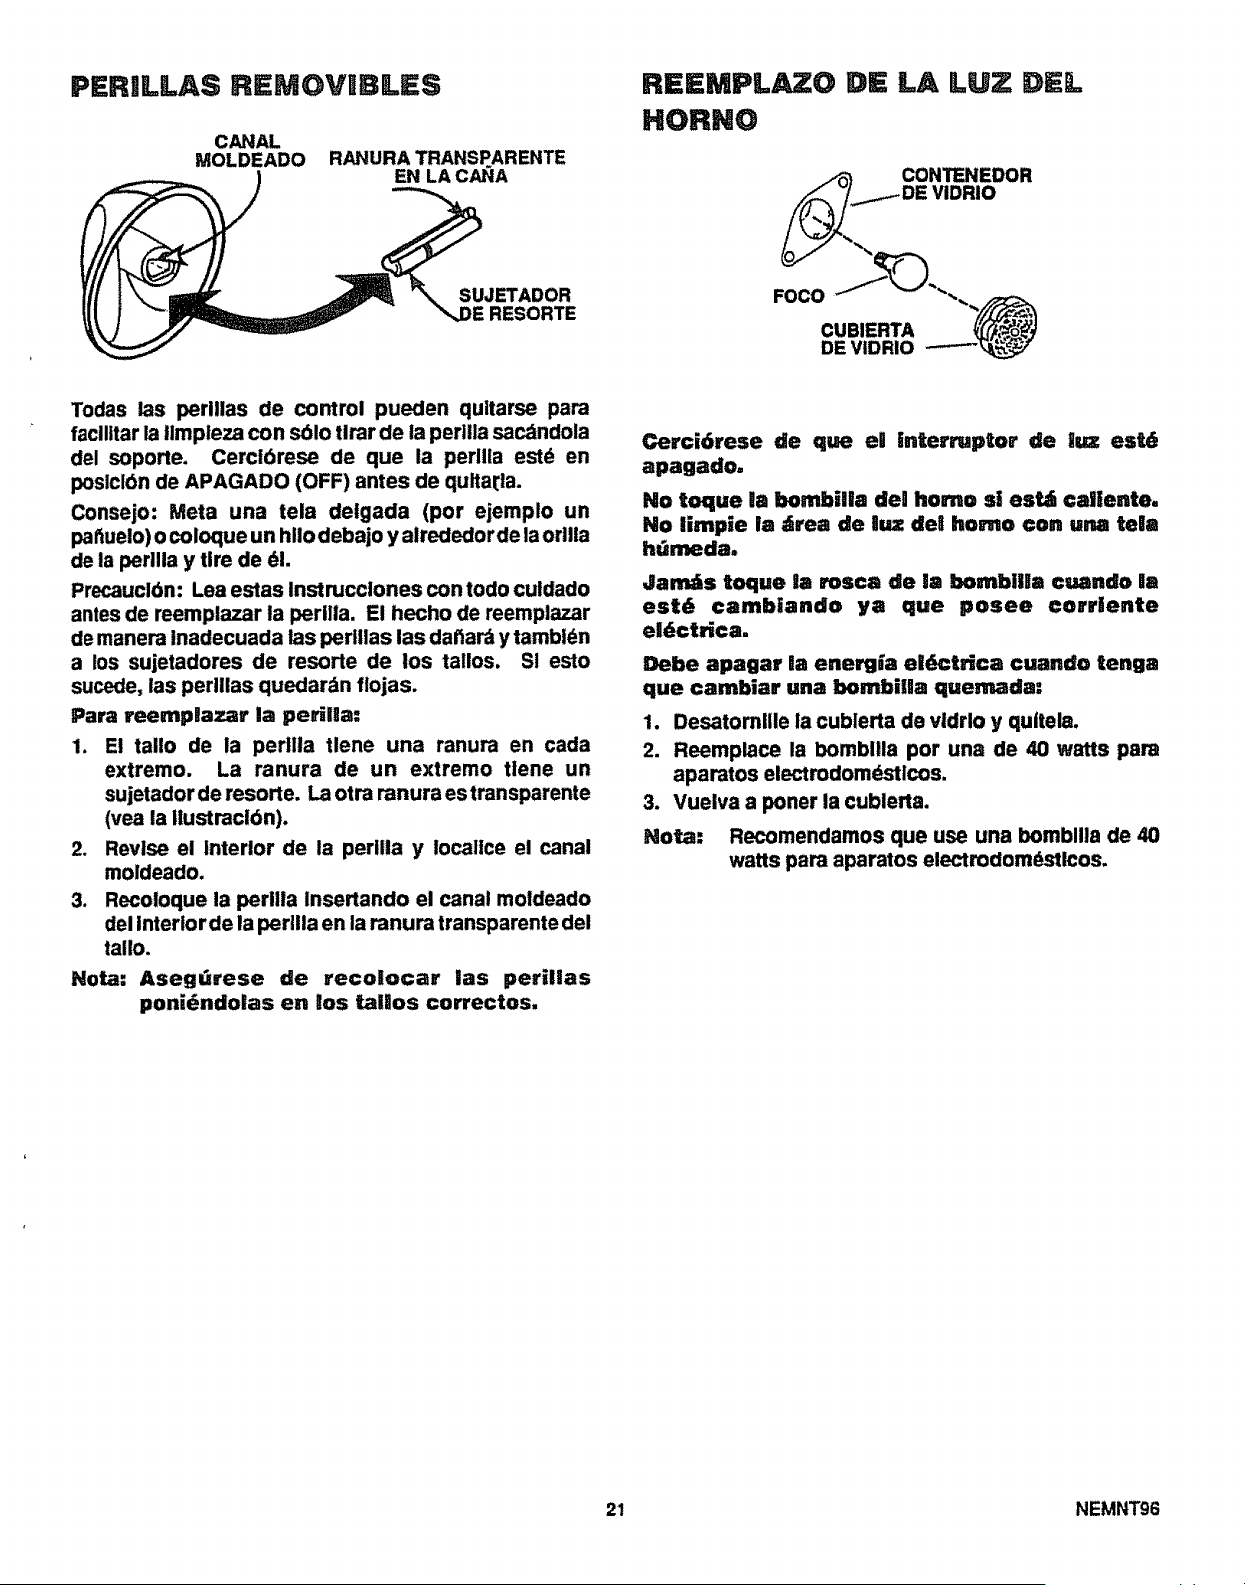
PERILLAS REMOVIBLES
CANAL
MOLDEADO RANURA TRANSPARENTE
EN LA CANA
REEMPLAZO DE LA LUZ DEL
HORNO
CONTENEDOR
SUJETADOR
,j)E RESORTE
FOCO
CUBIERTA
DE VIDRIO
Todas las perlllas de control pueden quitarse para
facllitar la Iimpleza con sdlo tlrar de la periila sac_ndola
del soporte. Cerci6rese de que la perllla estd en
poslcl6n de APAGADO (OFF) antes de qulta!:la.
Conse|o: Meta una tela deigada (pot ejemplo un
pa tiuelo) o coloque un hllo debajo y atrededor de la orllla
de la perllla y tire de _1.
Precaucldn: Lea estas instrucclones con todo culdado
antes de reemplazar la perilla. El hecho de reemplazar
de manera inadecuada las peritlas las dattar_ y tambldn
a los sujetadores de resorte de los tallos. S! esto
sucede, ias perlllas quedardn flojas.
Para reemplazar la per_lla.-
1. El tallo de la pertlla tlene una ranura en cada
extremo. La ranura de un extremo ttene un
sujetadorde resorte. Laotra ranuraestransparente
(yea la llustracldn).
2. Revise el Interior de la perllla y Iocallce el canal
moldeado.
3. Recoloque la perilla Insertando el canal moldeado
del Interior de la perlila en la ranura transparente del
tallo.
Nora: Asegtii'ese de recolocar las perillas
ponidndolas en Los tallos correctos,
Cerci6rese de que eL intermptor de iuz est_
apagado.
No toque lla bombilla de! homo s| est_ caliente,
NO limpie la drea de luz del homo con una tela
hGmeda,
Jan_is toque la rosca de la bombilla cuando la
est6 cambiando ya que posee corrlente
eRdctfica.
Debe apagar _a energ_a eidctrica cuando tenga
que cambiar una bombiUa quemadm
1. Desatomllle la cublerta de vldrlo y qultela.
2. Reemplace la bombllla por una de 40 watts pare
aparatos electrodomdstlcos.
3. Vuelva a poner la cublerta.
Nora: Recomendamos que use una bombllla de 40
watts para aparatos electmdom_stlcos.
21 NEMNT96
ANTES DE SOLICITAR UN SERVICIO
Ahorre tiempo y dinero - Revise esta lista antes de solicitar un servicio.
Para ellmlnar solicitudes de servlclo Innecesarlas prlmero lea con gran culdado todas las Instrucclones de este
manual. Luego, si tlene un problema, verlflque slempre la Ilsta de problemas comunes y poslbles soluclones antes
de sollcitar el servlclo.
Si tlene un problema que no puede soluclonar, iiame a su tlenda Sears o a su Centro de Servlclo mbs cercano para
solicitar ayuda. Cuando hable, tenga a la mano este manual, la Iista de Panes de Repuesto, su ndmero de modelo,
su ndmero de serle y la fecha de compra.
PROBLEMA
o DIAL DE ESTUFA
PESTAI_IEA CON UNA
=F" Y UN NUMERO;
HORNO DEJA DE
FUNCIONAR,
CUBJERTA FUNCIONA
LA ESTUFA NO
FUNCIONA; ES'Ir,_
INOPERANTE POR
COMPLETO
EL HORNO NO
CALIENTA; LOS
ELEMENTOS DE
LA CUBIERTA
FUNClONAN BIEN
LA CUBIERTA NO
FUNCIONA; EL
HORNO F.STA
BIEN
LOS ALIMENTOS
NO SE HORNEAN
DE MANERA
ADECUADA
POSIBLE CAUSA
• Posible malfunclonamlento
de la estufa
• Reloj puesto incorrectamente
con la operacibn Horneado
Automdtlco
• Controles del horno puestos
lncorrectamente
• Cerrojo de la puerta en
poslcldn incorrecta (modelos
de Autolimpleza solamente)
• Los controles del horno
estdn mal puestos
. El O lOSelementos no estdn
conectados
- Operacibn incorrecta delos
controles
• El homo no se precalentb
durante suficlente tlempo
• La parrilla o la fuente estdn
mal cotocadas
La rejilla de ventllaclbn del
homo estd tapada o cublerta
, Se usb papel de aluminio de
manera lncorrecta
• Latemperaturaseestablecib
de manera incorrecta para el
utenslllo que se utilizb
• No slguld la receta
• La estufa y las parrillas dei
homo estdn desniveladas.
• Usa utensilios para cocinar
que no son adecuados.
iiiiii iiiii Ill II I
NO SOLIClTE UN SERVICIO SIN ANTES
REVISAR LO SIGUIENTE
• Aprete CLEAR/OFF. Perrnita que la estufa se
enfrfe por una hora. Ponga la estufa en el
clclo de cocinar o de Ilmpleza nuevamente.
SI el problema persiste, Ilame para un servlclo.
• Revise las instrucclones del reloj.
• Revise las instrucclones para el control del
homo°
• Revise las instrucciones de Autolimpleza.
• Revise el control del homo.
• Verlflque las conexlones de los elementos
quitdndolos y volvlendo a conectarlos con
flrmeza.
• Asegdresedepreslonarlaperlila mlentrasla
hace glrar.
• Asegdrese de precalentarel horno hasta que
se apague la luz Indlcadora de ia temperatura
del horno.
• Mantenga un espaclo de aire unlforme
alrededor de las cacerolas y utenslllos.
Consuite la Seccidn de Consejos.
. Reciplente de escurrimlento del elemento
posterior derecho debe tener un agujero en
el centro, cubre la ventilacldn del horno.
• No se recomlenda eluso de papelde aluminlo.
• Reduzca la temperatura 25 grados F sl usa
vidrio o moldes opacos u oscurecldos.
• &La receta ha sido probada yes conflable?
• Vertfique las instrucclones de Instalacibn de
las patas nlveladoras.
• Consulte los consejos para coctnar.
22 NESER138
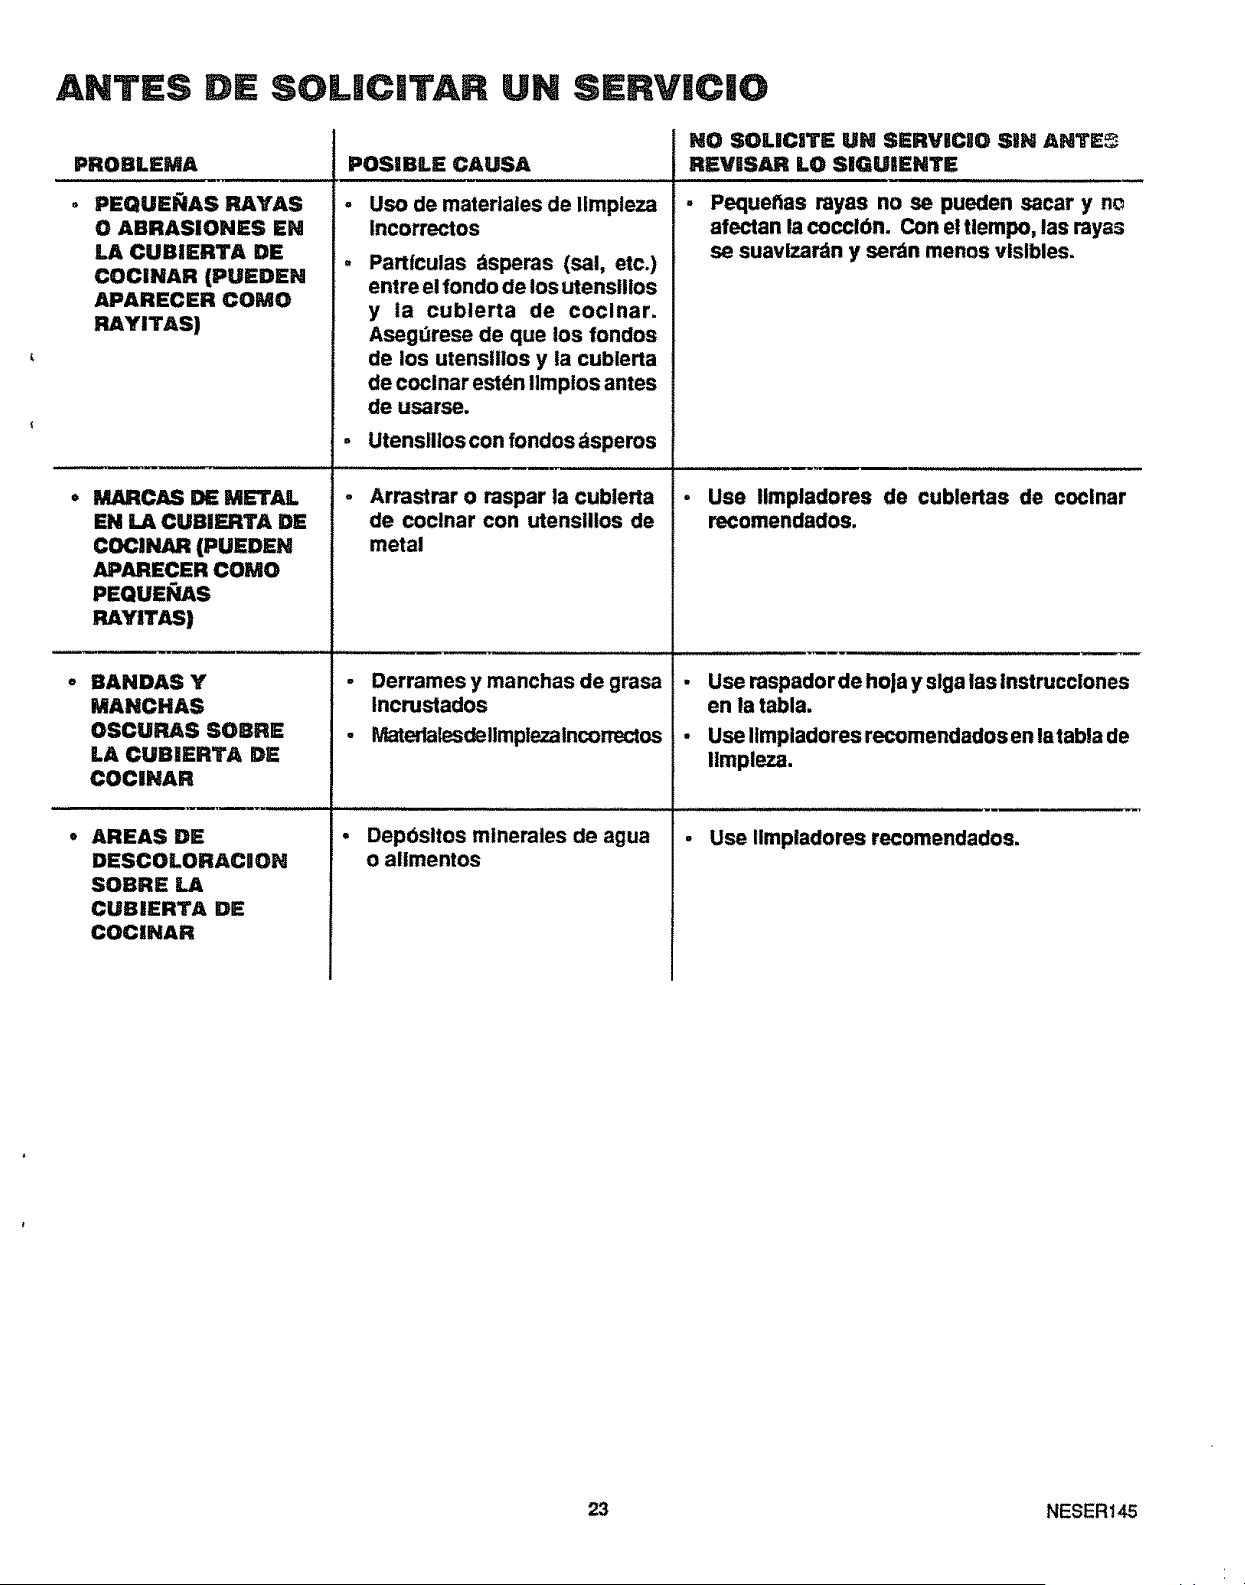
ANTES D6 SOL|C|TAR UN SERVIC|O
PROBLEMA
a
PEQUEITIAS RAYAS
O ABRASIONES EN
LA CUBIERTA DE
COCINAR (PUEDEN
APARECER COMO
RAYITAS|
MARCAS DE METAL
EN LA CUBIERTA DE
COClNAR (PUEDEN
APARECER COMO
PEQUEI_AS
RAYITAS)
BANDAS Y
MANCHAS
OSCURAS SOBRE
LA CUBIER'rA DE
COCINAR
AREAS DE
DESCOLORACOON
SOBRE LA
CUBIERTA DE
COCINAR
POSIBLE CAUSA
Uso de materiaies de Umpleza
Incorrectos
Partfculas dsperas (sal, etc.)
entre el fondo de los utensillos
y la cublerta de cocinar.
Asegdrese de que los fondos
de los utenslllos y la cublerta
de coclnar estdn Ilmpios antes
de usarse.
Utenslllos con fondos dspems
Arrastrar o raspar la cublerta
de coclnar con utenslllos de
metal
- Derrames y manchas de grasa
Incrustados
- Materlalesdellmptezaincorrectos
Depbsltos mlnerales de agua
o allmentos
NO SOUCITE UH SERVICIO SiN ANTE_
REVESAR LO SIGUIENTE
- Pequehas rayas no se pueden sacar y nc
afectan la coccldn. Con el tlempo, las rayas
se suavlza_n y ser_n menos vlslbles.
Use ilmpladores de cublertas de coclnar
recomendados.
• Use raspadorde hoja y slga las tnstrucclones
en la tabla.
• Use Ilmpladoresrecomendadosen latabla de
Iimpleza.
Use Ilmpladores recomendados.
23
NESER145
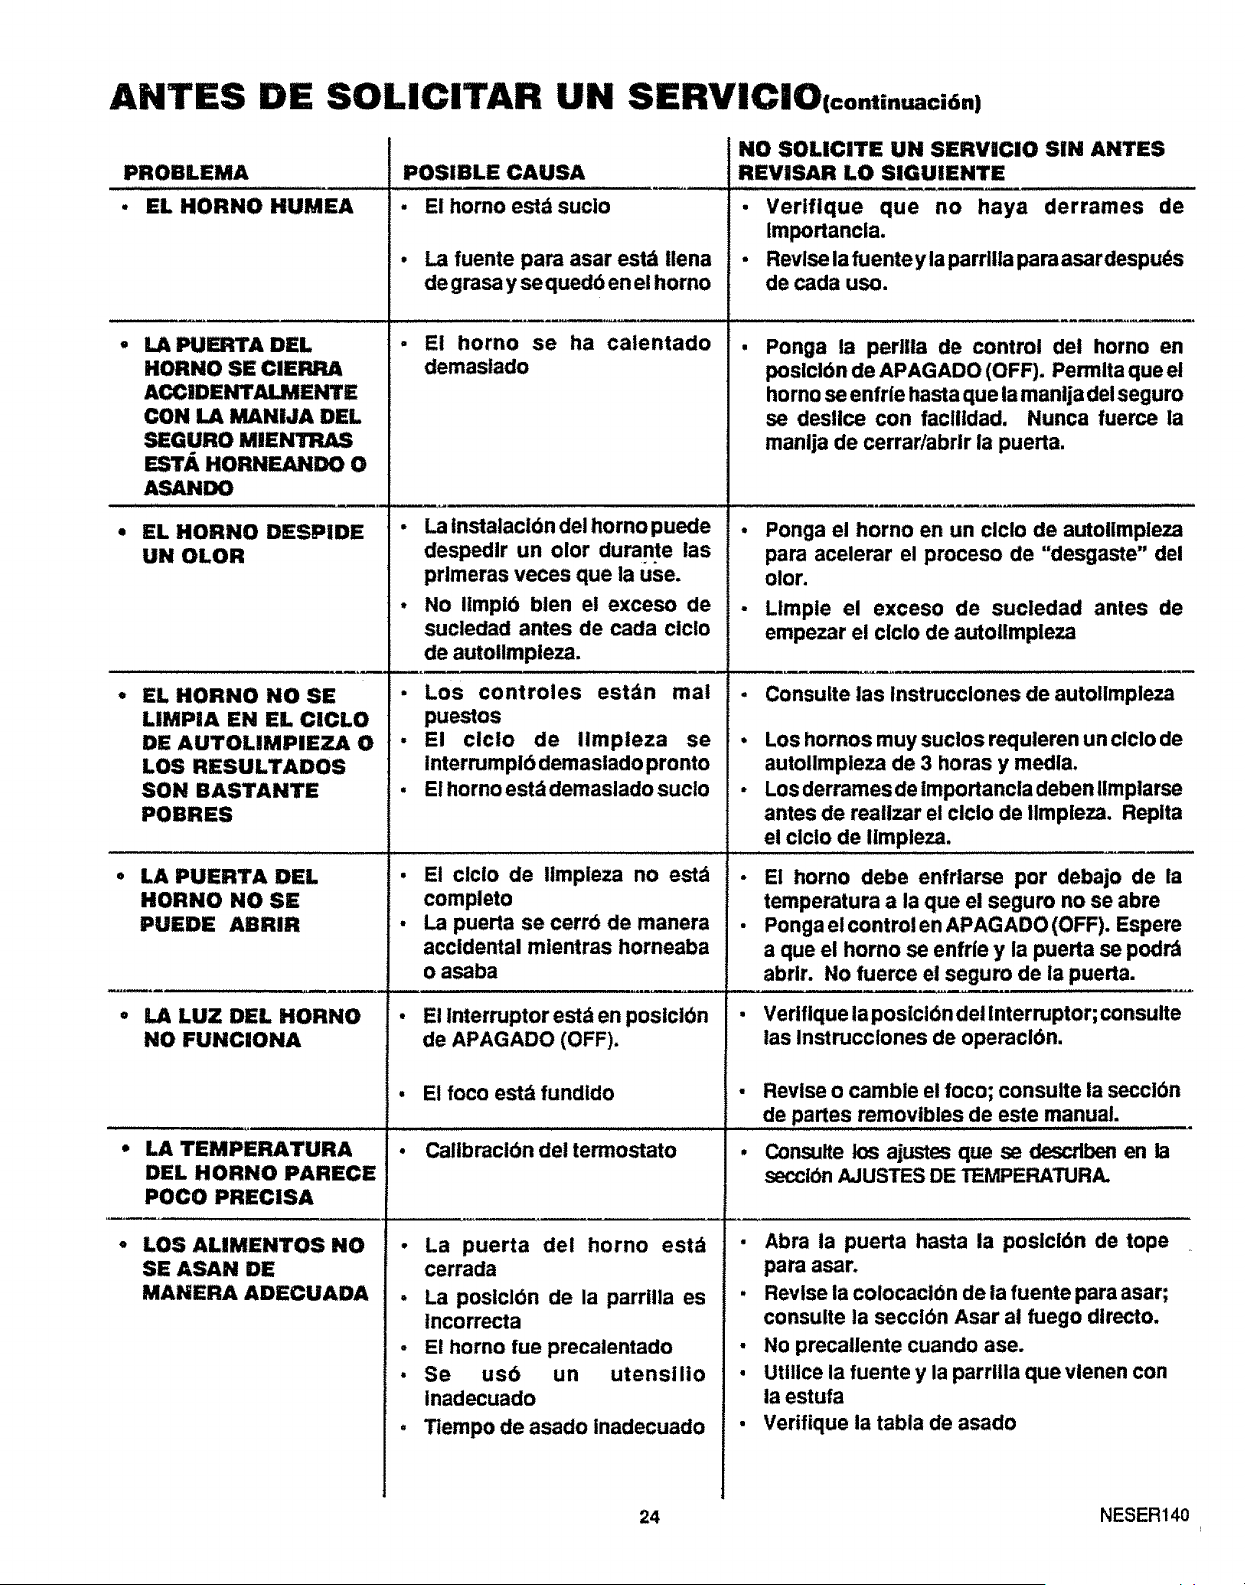
ANTES DE SOLICITAR UN SERVICIO(=o....aci6.)
PROBLEMA
e
EL HORNO HUMEA
LA PUERTA DEL
HORNO SE CIERRA
ACCilDENTALMENTE
CON LA MANIJA DEL
SEGURO MIENTRAS
Es'r_ HORNEANDO O
ASANDO
EL HORNO DESPIDE
UN OLOR
EL HORNO NO SE
LIMPIA EN EL CICLO
DE AUTOLIMPIEZA O
LOS RESULTADOS
SON BASTANTE
POBRES
LA PUERTA DEL
HORNO NO SE
PUEDE ABRIR
LA LUZ DEL HORNO
NO FUNCIONA
LA TEMPERATURA
DEL HORNO PARECE
POCO PRECISA
LOS ALIMENTOS NO
SE ASAN DE
MANERA ADECUADA
POSIBLE CAUSA
• El homo estd sucio
• La fuente para asar ester Ilena
de grasa y sequedO e n el horno
, El horno se ha calentado
demastado
• La Instalacldn del homo puede
despedlr un olor durante las
prlmeras veces que la use.
• No ilmplb blen el exceso de
sucledad antes de cada ciclo
de autoilmpieza.
• Los controles estdn mal
puestos
• El ciclo de ilmpleza se
interrumplb demaslado pronto
. El horno estd demaslado suclo
m
El clclo de Ilmpleza no estd
completo
La puerta se cerrb de manera
accidental mientras horneaba
o asaba
El Interruptor est_ en posicibn
de APAGADO (OFF).
E! foco est_ fundido
Calibracibn del termostato
• La puerta del horno est_
cerrada
o La posiclbn de la parrtlla es
incorrecta
• El homo fue precalentado
• Se usb un utensllio
inadecuado
° Ttempo de asado inadecuado
NO SOLIClTE UN SERVlCIO SIN ANTES
REVlSAR LO SIGUIENTE
• Verlflque que no haya derrames de
Importancla.
• Revise la fuente y la parrllla para asardespu_s
de cada uso.
Ponga la perilla de control del horno en
posiclbn de APAGADO (OFF). Permlta que el
homo se enfrle basra que la manlja del seguro
se desllce con facllldad. Nunca fuerce la
manlja de cerrar/abrir la puerta.
• Ponga el horno en un clclo de autolimpleza
para acelerar el proceso de "desgaste" del
olor.
• Llmple el exceso de sucledad antes de
empezar el clclo de autollmpleza
• Consulte las Instrucciones de autollmpleza
Los hornos muy suclos requleren un clclo de
autollmpieza de 3 horas y media.
Los derrames de importancla deben IImplarse
antes de reallzar el clclo de Ilmpleza. Repita
el ciclo de Ilmpleza.
E! homo debe enfrlarse por debajo de la
temperatura a la que el seguro no se abre
Ponga el control en APAGADO (OFF). Espere
a que el homo se enfrfe y la puerta se podr_
abrir. No fuerce el seguro de la puerta.
• Veriftque laposlcibn del lnterruptor; consulte
las Instrucclones de operacl6n.
• Revise o cambie el foco; consulte la secclOn
de partes removibles de este manual.
• Consulte los ajustes que se descrlben en la
seccibn AJUSTES DE TEMPERATURA.
• Abra la puerta hasta la posiclbn de tope
para asar.
. Revise la colocacldn de la fuente para asar;
consulte la seccibn Asar al fuego directo.
• No precallente cuando ase.
• Utlllce la fuente y la parriila que vlenen con
la estufa
• Verifique la tabla de asado
24 NESER140
i
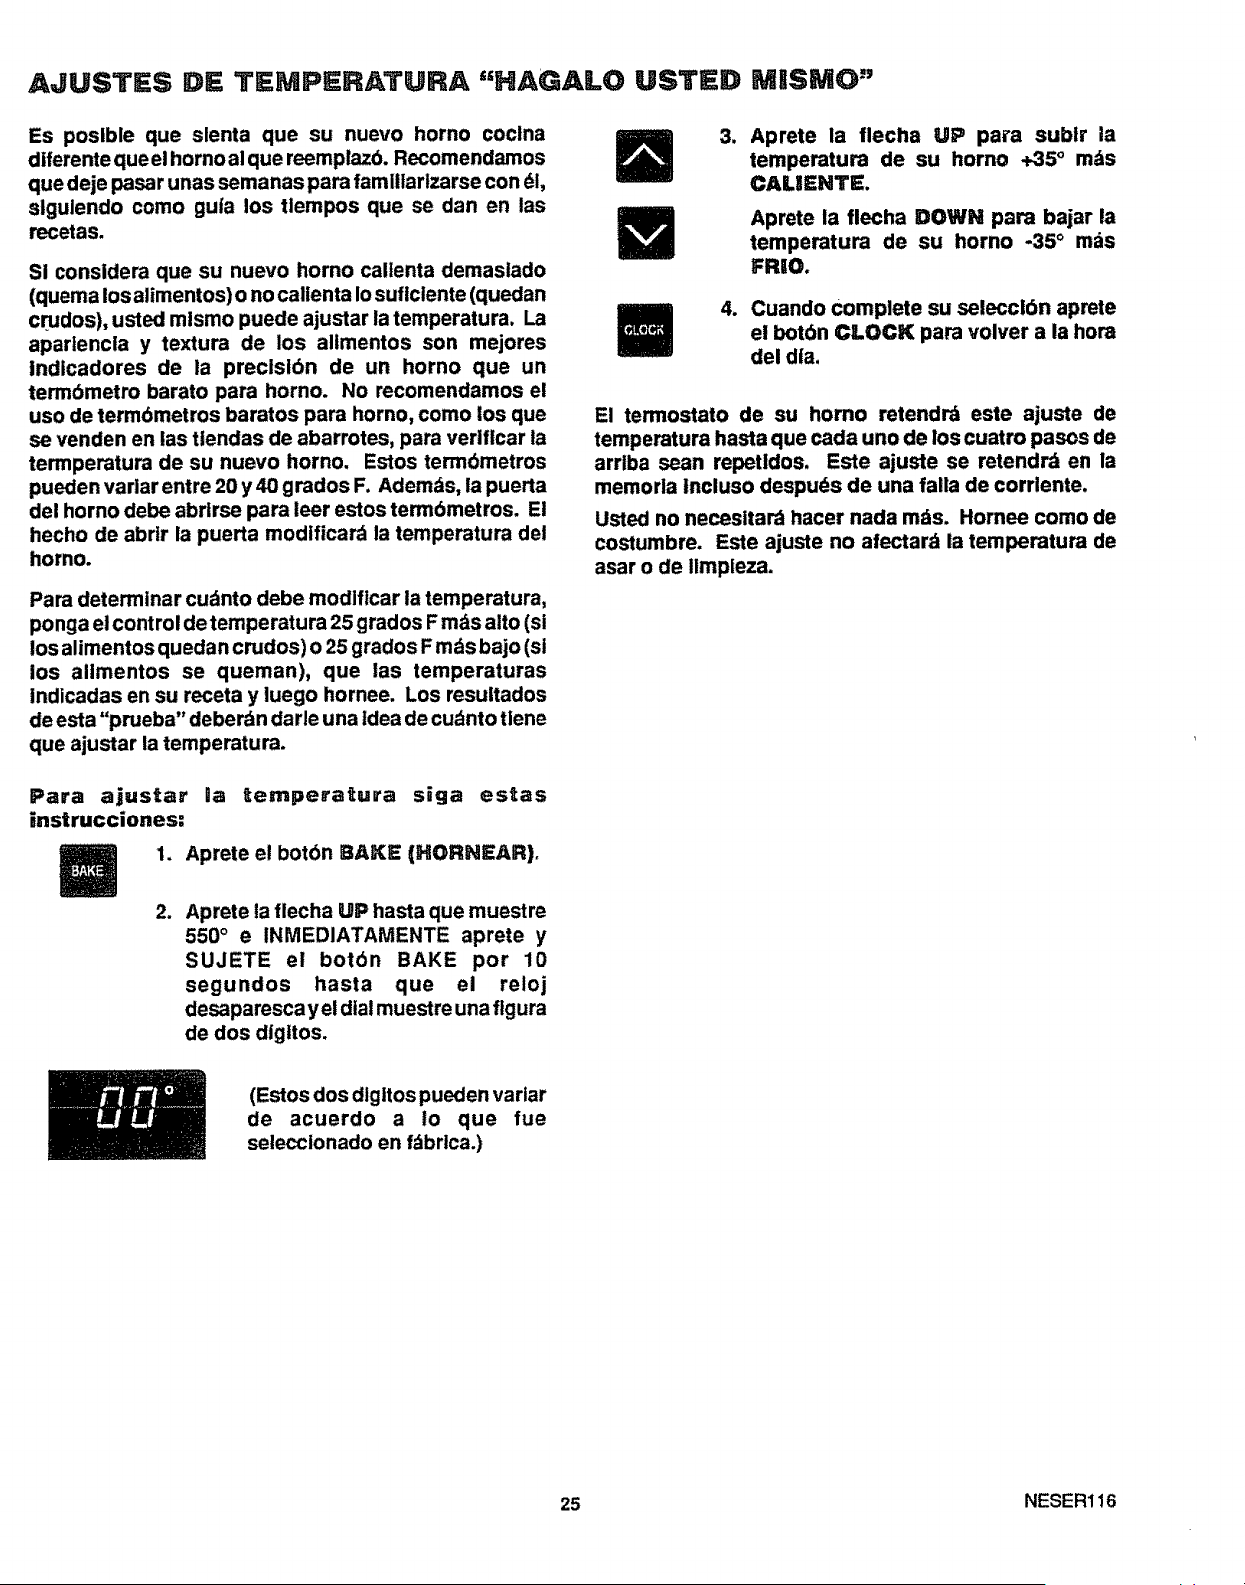
Es poslble que slenta que su nuevo horno coclna
diferente que el hornoal que reemplaz0. Recomendamos
que deje pasar unas semanas para famillartzarse con _1,
slgulendo como guia los tlempos que se dan en las
recetas.
Si consldera que su nuevo horno callenta demastado
(quema los alimentos) o no callenta Io suflclente (quedan
crudos), usted mlsmo puede ajustar la temperatura. La
apartencla y textura de los allmentos son mejores
Indtcadores de la precisibn de un horno que un
termbmetro barato para homo. No recomendamos el
uso de termbmetros baratos para homo, como los que
se venden en las ttendas de abarrotes, para veriflcar la
termperatura de su nuevo homo. Estos termbmetros
pueden varlar entre 20 y 40 grados F. Ademds, la puerta
del horno debe abrirse para leer estos termbmetros. El
hecho de abrtr la puerta modificar_ la temperatura del
homo.
Para determinar cudnto debe modificar la temperatura,
ponga el control detemperatura 25 grados F m_s alto (si
los alimentos quedan crudos) o 25 grados F m_s bajo (si
los alimentos se queman), que las temperaturas
indicadas en su receta y luego hornee. Los resuitados
de esta"prueba" deberdn darle una idea de cu_nto tlene
que ajustar la temperatura.
3. Aprete la tlecha UP pa_'a sublr ia
temperatura de su homo +35 ° rods
CALIENTE.
Aprete la flecha DOWN para bajar la
temperatura de su horno -35 ° m_is
FRIO.
4. Cuando complete su seleccl6n aprete
el botdn CLOCK para volver a la hora
del d|a.
El termostato de su homo retendrd este ajuste de
temperatura hasta que cada uno de los cuatro pasos de
arrlba sean repetldos. Este ajuste se retendrd en la
memorla lncluso despuds de una falla de corrlente.
Usted no necesitar_ hacer nada mds. Hornee como de
costumbre. Este ajuste no afectar_ la temperatura de
asar o de Ilmpleza.
Para ajustar ia temperatura siga estas
instrucciones:
1. Aprete el botbn BAKE (HORNEAR)o
2_
Aprete la flecha UP hasta que muestre
550 ° e INMEDIATAMENTE aprete y
SUJETE el botbn BAKE por 10
segundos hasta que el reloj
desaparescay el dial muestre una figura
de dos digttos.
(Estos dos dlgltos pueden varlar
de acuerdo a to que rue
selecclonado en fdbrica.)
25 NESER116

NOTAS
26

GARANTIA DE LA ESTUFA ELECTRICA KENMORE
f ". TODO UN AI_O DE GARANTIA COMPLETA PAPA LAS FUNCIONES
TODAS LAS PARTES EXCEPTO ILAS DE VIDRIO
Si, dentro del lapso de un afio a par'Jr de la fecha de Instalacl6n, cualquler parte que
Estlmado cllente: no sea de vldrio, funclona real debldo a un defecto en el material o en la mano de
Nuestros esfuerzos obra, Sears la reparard o la reemplazard, sin costo alguno.
GARANTIA TOTAL DE 30 DIAS PARA LAS PARTES DE VIDRIO Y EL
constantes estdn ACABADO DE ESMALTE PORCELANIZADO, PARTES DE METAL
dirigldos a asegurar que PINTADO O BRILLANTE
SU nueva Estufa Kenmore SI, dentro de los treinta d_asposterlores a la Instalacl6n, cualquler parte de vldrlo
Ilegue a su hogar en o el acabado de cualquler esmaite porcelanlzado o parte de metal plntado o briilante
tlene defectos en el material o mano de obra, Sears reemplazard la parte, sin costo
perfectas condlclones y
le dd el servlclo alguno.
GARANTIA TOTAL DE 90 DIAS EN AJUSTES MECANICOS
adecuado. Como parte Durante 90 d|as a parUr de ta fecha de Instalacldn, Sears proporclonard, sin costo
de estos esfuerzos, alguno, cualquler aJuste mecdnico necesado para la correcta operaci6n de la
sentimos que es estufa, exceptuando el mantenimlento normal.
responsabllldad nuestra Sl la estufa estd sujeta a otro uso qua no sea el privado familiar, ia cobertura de la
proporclonarle esta garant;a menclonada arrlba serd elecUva sdlo durante 90 dfas.
garantfa para su estufa. EL SERVICIO DE GARANTIA ESTA DISPONIBLE CON SOLO PONERSE
EN CONTACTO CON EL CENTRO O DEPARTAMENTO DE SERVICIO
SEARS MAS CERCANO EN LOS ESTADOS UNIDOS.
Esta garantfa se aplica s61ocuando este producto se use en los Estados Unidos.
Esta garantfa le brlnda derechos legales especfflcos, y tambidn puede tenet otros
_'_J_ derechos qua var/an de un estado a otro.
_gl_o SEARS, ROEBUCK AND CO.
DEPT. 731 CR-W
SEARS TOWER
__ ........ J CHICAGO, IL 60684
i i, iiii i,ill iuj jjl i _'_
LE DAMOS SERVICIO A LO QUE VENDEMOS
"Le damos servlclo a Io que vendemos" es la manera de asegurarle qua puede depender de Sears para el serviclo
porque el servicio Sears se ofrece en todo el pats.
Su Estufa Kenmore tlene un valor agregado cuando usted consldera qua Sears posee una unldad de servlcio
cerca de usted, qua cuenta con un equlpo Sears de t_cnicos capacitados...tdcnlcos p rofeslonales especiflcamente
entrenados para manejar los aparatos Sears, y que tlenen acceso alas partes, herramlentas y equtpo para
asegurar qua cumplamos nuestro compromise con usted: "iLe damos servicto a Io qua vendemos!"
PARA AMPLIAR EL VALOR DE SU ESTUFA, COMPRE UN CONTRATO DE MANTENIMIENTO SEARS.
l.as estufas Kenmore estdn dlsefiadas, fabrlcadas
y probadas para brindarle afios de operaoldn
conflable. Sin embargo, cualquier aparato
moderno puede requerir de algdn servlclo de vez
en cuando. La garantla Sears, ademds dei contrato
de M,_ntenlmlento Sears le brtndan proteccldn
contra cuentaa de reparactones tnesperadas y le
aseguran qua disfrute de la mdxtma eficiencta en
astufas.
He aqul una garantta comparatlva y una tabla dei
contrato de Mantenlmlento qua le muestra los
beneftctos de un contrato Mantenlmtento Sears
para Estufas.
Athos de cobertura de la proptedad 1or af=o 2 ° a_o 3er at3o
1 Reomplazo de pa.as def_-tuosas W MA MA
qua no se_n do porcolsna o vldrlo
9ODAYS
2 AJu .m .,oo W MA MA
30 DAYS
3 poro°,...yv aao W MA MA
R RavisI6n anual de msntenimlento
MA MA MA
G _ GKanffa AM - Corr_ato de Manter_m_nto
PONGASE EN CONTACTO CON SU VENDEDOR DE SEARS O CON EL CENTRO DE SERVIClO SEARS DE LA
LOCAMDAD HOY MISMO Y COMPRE UN CONTRATO DE MANTENIMIENTO SEARS.
........................................................... i '1I''1 I I!' '1 '1 '111""1"1'1 I I' III I rlllll I ..... iiii iii iiii i i i iiiii'iiiiiiiiii_i'iiiiiiii_
Id_el"l i-r'lore_La rnarca de aparatos electrodomdsticos de mayor venta en Am6rica
Vendida por SEARS, ROEBUCK AND CO., Chicago, IL 60684
.......................................................................... I!!: "i..........
Impreso en LaFayette, Georgia