Loading ...
Loading ...
Loading ...
6 7
ninjakitchen.co.uk
ninjakitchen.co.uk
PARTS
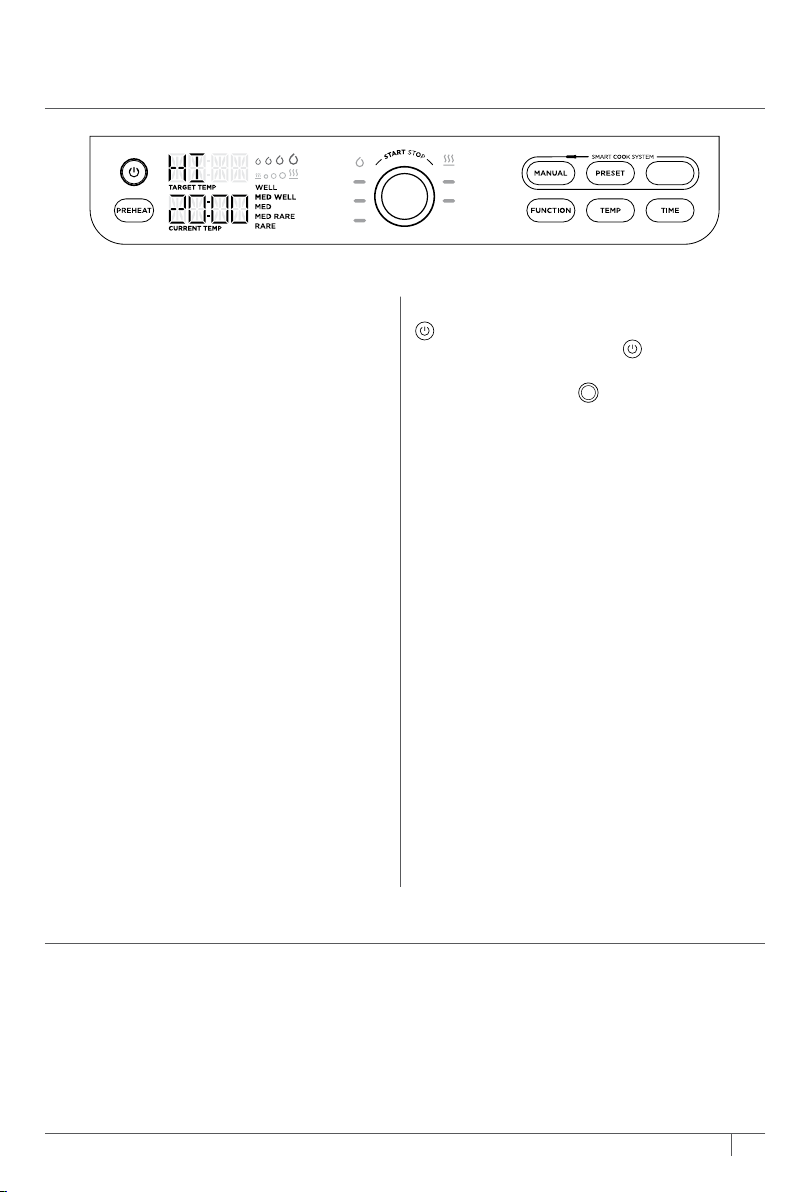
GETTING TO KNOW YOUR GRILL
1 Remove all packaging material, promotional labels and tape from the unit.
2 Remove all accessories from the package and read this manual carefully. Please pay
particular attention to operational instructions, warnings and important safeguards
to avoid any injury or property damage.
3 Wash the grill plate, flat plate, crisper basket, probe and splatter guard in warm, soapy
water, then rinse and dry thoroughly. All accessories, except the probe and probe
storage, are dishwasher safe. NEVER clean the main unit or probe in the dishwasher.
4 Do not use abrasive brushes or sponges on the cooking surfaces, as they will cause
damage to the coating.
BEFORE FIRST USE
FUNCTION BUTTONS
GRILL Closed-lid cooking: Top and bottom
heat which is best for grilling large or thick
cuts of meat, frozen food or for an
all-around sear.
Open lid cooking: Ideal for grilling delicate
foods or lean proteins to develop
char-grilled textures without over-cooking.
ROAST Tenderise meats, roast vegetables
and more.
AIR FRY For crispiness and crunch with
little to no oil.
BAKE Make cakes, treats, desserts and
more.
FLAT PLATE Perfect for delicate foods like
onions, eggs, fish or fajitas.
REHEAT Revive leftovers by gently warming
them, leaving you with crispy results.
DEHYDRATE Dehydrate meats, fruits and
vegetables for healthy snacks.
MANUAL Switches the display so you can
manually set the internal outcome with the
dial.
PRESET When probe is inserted, the display
will allow you to select your food type. Turn
the dial to select your protein.
COOK LEVEL Cook to your preference,
choose from Rare to Well Done.
OPERATING BUTTONS
POWER Make sure unit is plugged in. To
turn on the unit, press the
button.
DIAL To select a cooking function or other
setting, turn the dial
.
START/STOP Press the centre of the dial to
start or stop the selected cooking function.
When most cooking functions are started,
the unit enters preheat mode, then cooking
begins when the temperature setting is
reached.
TEMP To select temperature, press the
TEMP button and use the dial to adjust.
TIME To select cook time, press TIME
button and use the dial to adjust.
FUNCTION Press to clear all settings or
when probe is in “Rest” state (if preheating
and cooking have not begun).
PREHEAT After you set function, time
and temperature then press the dial, the
unit will automatically begin preheating. If
PREHEAT button is selected after pressing
dial, the unit will skip preheating (not
recommended).
PREHEAT FOR BETTER RESULTS For best
grilling results, let the unit fully preheat
before adding food. Adding food before
preheating is complete may lead to
overcooking, smoke and longer preheat time.
NOTE: Not all functions included with every model.
GRILL
ROAST
AIR FRY
BAKE
FLAT PLATE
REHEAT
DEHYDRATE
COOK
LEVEL
Splatter Guard
Lid
Main Unit
(power cord
not shown)
Flat Plate
Control
Panel
Crisper Basket
Grill Plate
On-Board
Probe Storage
Magnetic
Probe Storage
Digital Cooking
Probe
Loading ...
Loading ...
Loading ...