Loading ...
Loading ...
Loading ...
Reheat
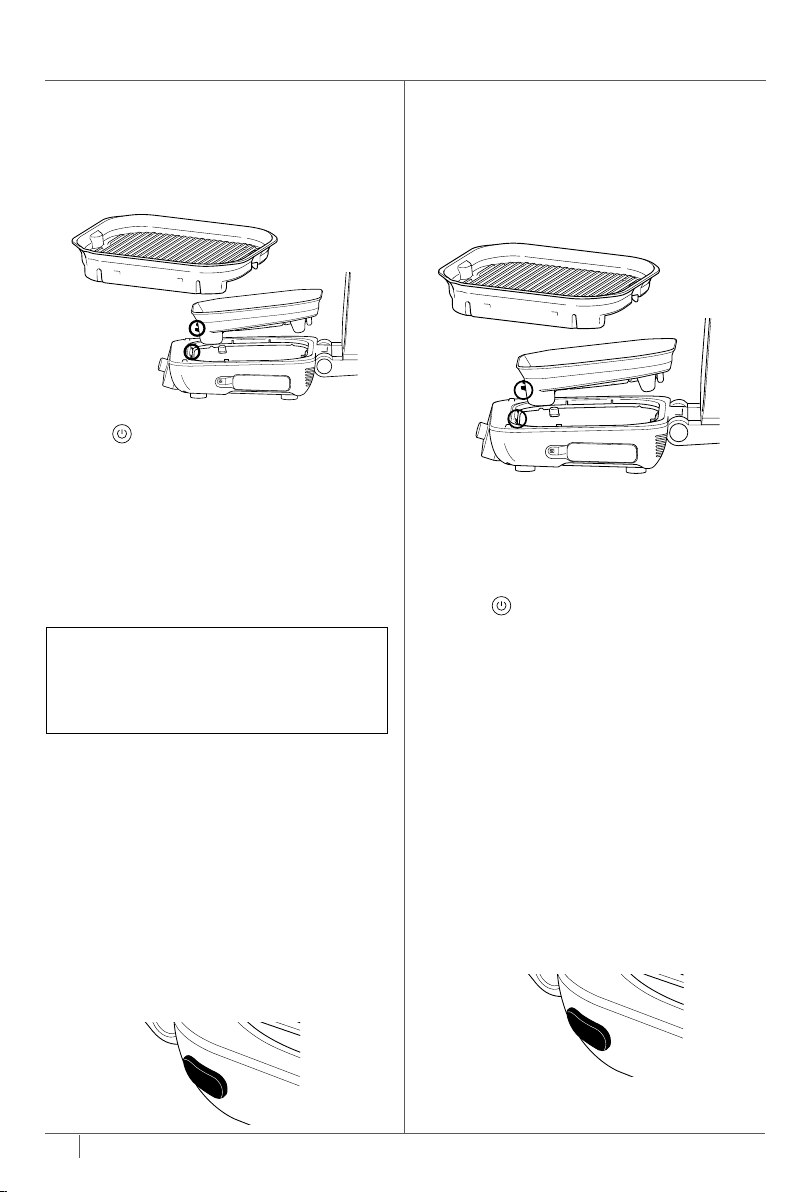
1 To install the grill plate, position it in the front
of the base so it hooks in, then press down
on the back of the plate until it clicks in place.
Ensure the splatter guard is in place.
2 Place the crisper basket on the plate and
position the basket to sit along the rear of the
grill plate so the basket feet sit in the grill plate
spaces. Add ingredients, then close the lid.
3 Make sure the unit is plugged in and press
to turn the unit on.
4 Turn the dial to REHEAT. The default
temperature setting will appear on the
display. To adjust temperature if desired,
press TEMP button and turn dial.
5 Press the TIME button and turn the dial to
select the desired time. Press the dial to
begin (the unit does not preheat in Reheat
mode). Cooking will begin and the timer will
start counting down.
6 For best results, we recommend shaking
ingredients frequently. When you open the
lid, the unit will pause. use silicone-tipped
tongs or oven gloves to shake the basket
and close the lid. Cooking will automatically
resume after lid is closed.
7 When cook time reaches zero, the unit will
beep and END will appear on the display.
8 Remove crisper basket from the grill plate.
9 Remove the grill plate by pressing the orange
release button on the left side of the unit.
The plate will pop from the back, then lift up.
COOKING FUNCTIONS – CONT.
Dehydrate
1 To install the grill plate, position it in the
front of the base so it hooks in, then
press down on the back of the plate
until it clicks in place. Ensure the
splatter
guard is in place.
2 Place the crisper basket on the grill
plate and add ingredients to the basket.
Close the lid, as the unit does not
require preheating for this function.
3 Make sure the unit is plugged in and
press
to turn the unit on.
4 Turn the dial to DEHYDRATE function.
The default temperature setting will
display. To adjust temperature if desired,
press TEMP button and turn dial.
5 Press the TIME button and turn the
dial to select the desired time.
6 Press the dial to begin. (The unit does
not preheat in dehydrate mode.)
7 When dehydrate time reaches zero, the
unit will beep and END will appear on
the display.
8 Remove ingredients and basket from
the grill plate.
9 Remove the grill plate by pressing the
orange release button on the left side of
the unit. The plate will pop up from the
back, then you can lift it up and out.
Bake
1 To install the grill plate, position it in the
front of the base so it hooks in, then
press down on the back of the plate
until it clicks in place. Ensure the
splatter
guard is in place, then close the lid.
2 Make sure the unit is plugged in and
press
to turn the unit on.
3 Turn the dial to BAKE. The default
temperature setting will appear on the
display. To adjust temperature if desired,
press TEMP button and turn dial.
4 Press the TIME button and turn the dial
to select the desired time.
5 Press the dial to begin preheating. The
progress bar will begin illuminating. It will
take approximately 3 minutes to preheat.
6 When preheating is complete, the unit
will beep and ADD FOOD will appear
on the display.
7 Open the lid and place ingredients on the
plate or place loaf tin on the plate. Once
the lid is closed, cooking will begin and the
timer will start counting down.
8 When cook time reaches zero, the unit will
beep and END will appear on the display.
9 Remove food from the grill plate.
10 Remove the grill plate by pressing the
orange release button on the left side of
the unit. The plate will pop up from the
back, then you can lift it up and out.
NOTE: While preheating is strongly
recommended for best results, you can
skip it by pressing the PREHEAT button.
Display will show ADD FOOD, lift and
close lid to begin cooking.
16 17
ninjakitchen.co.uk
ninjakitchen.co.uk
16 17
NOTE: If you would like to use the probe
to check your food’s internal temperature,
press MANUAL for 2 seconds and the
food’s internal temp will appear on the
screen for 5 seconds.
COOKING FUNCTIONS – CONT.
Loading ...
Loading ...
Loading ...