
Husqvarna
ROYAL 53S INTEK
Operator's Manual
Read the operator's manual
carefully and make sure that you
understand the contents before
using the lawnmewer.
Manual del operador
Lea el manual del operador con
atencien y asegQrese de que
cemprende el contenido antes
de utilizar el certac_sped_
WARNING: Engine exhaust, some of
its constituents, and certain vehicle
components contain or emit
chemicals known to the State of
California to cause cancer and birth
defects or other reproductive harm.
5119477-01
AVlSO: El Estado de California tiene
conocimiento de que los humos del
escape del motor, algunos de sus
canstituyentes, y ciertos camponentes
del vehiculo pueden causar cdncer,
defectos de nacimiento y otros dahos
de t_producci6n.
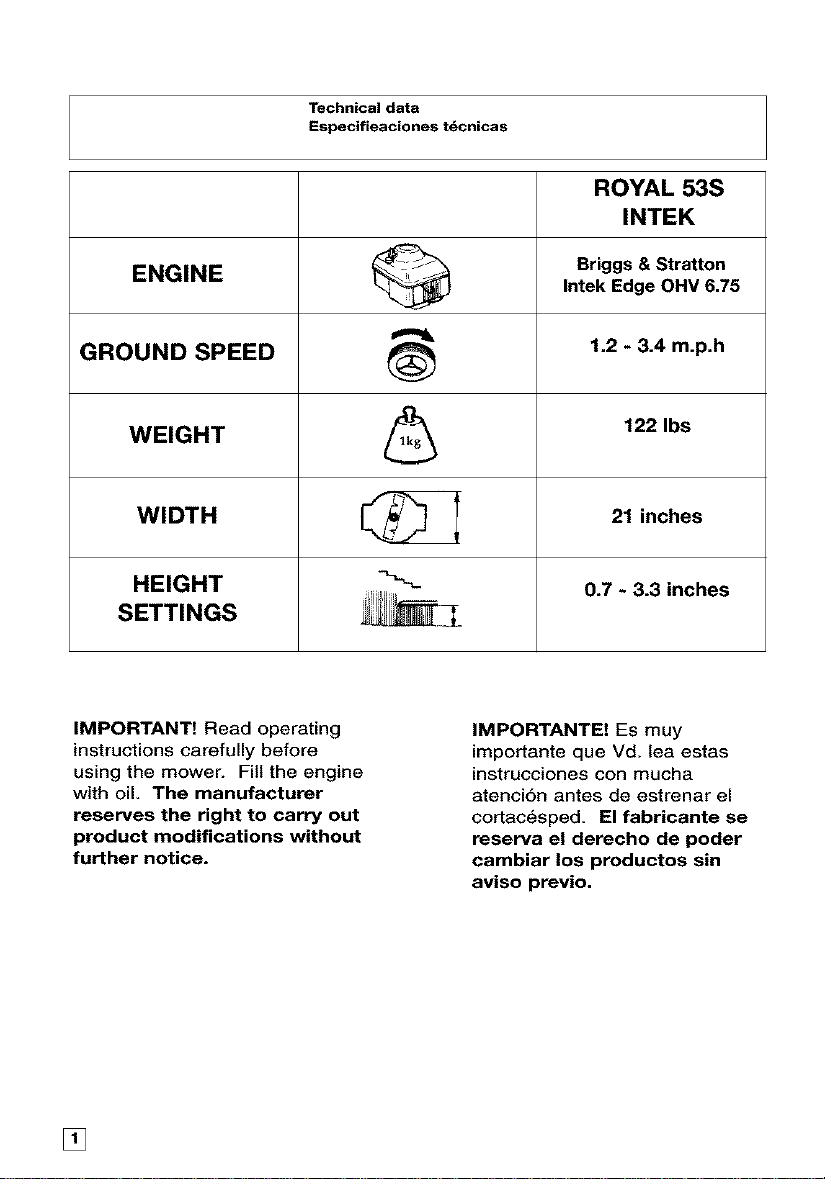
Technical data
Especifieaciones t_cnicas
ROYAL 53S
INTEK
ENGINE _ Briggs & Stratton
Intek Edge OHV 6,75
GROUND SPEED _ 1.2 - 3.4 m.p.h
WEIGHT _ 122 Ibs
WIDTH _ 21 inches
HEIGHT 0.7 - 3.3 inches
SETTINGS
IMPORTANT! Read operating
instructions carefully before
using the mower. Fill the engine
with oil. The manufacturer
reserves the right to carry out
product modifications without
further notice.
IMPORTANTE! Es muy
importante que Yd. tea estas
instrucciones con mucha
atenci6n antes de estrenar el
cortac_sped, El fabricante se
reserva el derecho de poder
cambiar los productos sin
aviso previo.
[]
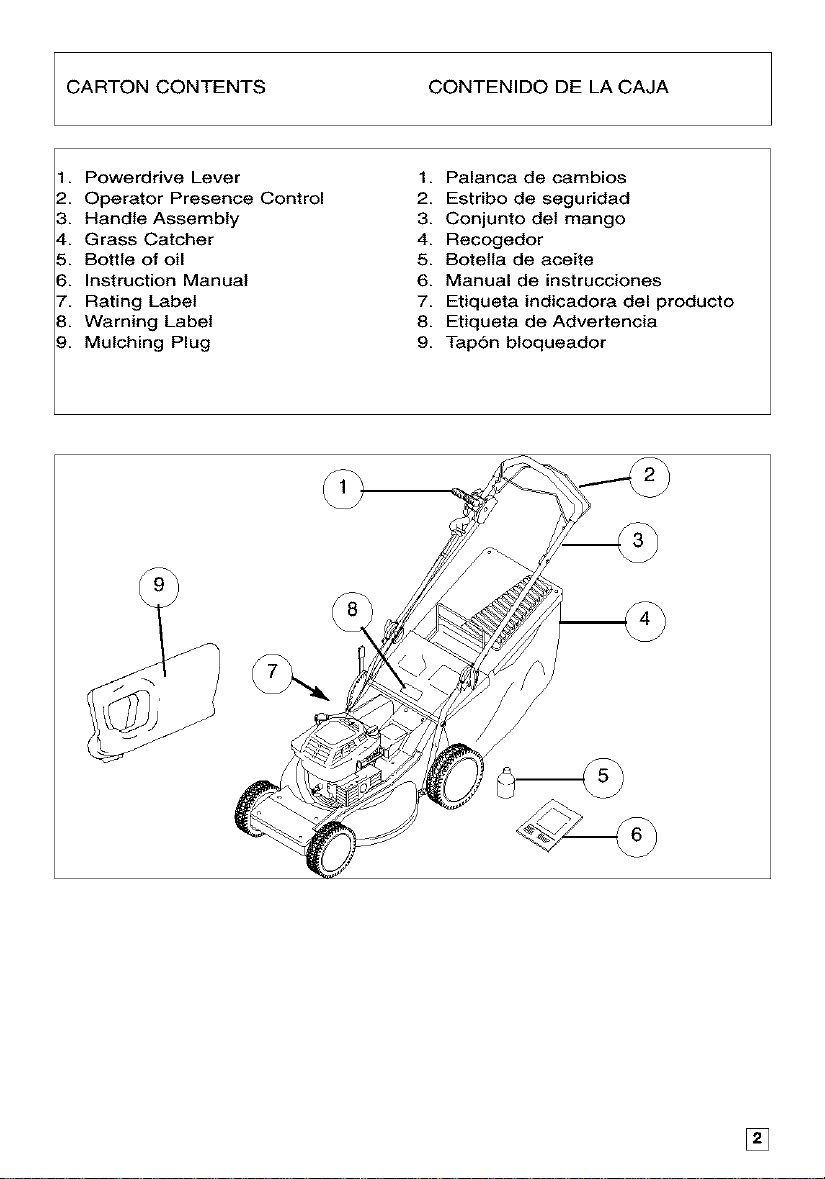
CARTON CONTENTS CONTENIDO DE LA CAJA
1. Powerdrive Lever
2. Operator Presence Control
3. Handle Assembly
4. Grass Catcher
5. Bottle of oil
8. Instruction Manual
7. Rating Label
8. Warning Label
9. Mulching Plug
1. Palanca de cambios
2. Estribo de seguridad
3. Conjunto det mango
4. Recogedor
5. Botetta de aceite
6. Manual de instrucciones
7. Etiqueta indicadora del producto
8. Etiqueta de Advertencia
9. Tap6n bloqueador
[]
r:_'J
lab
I;P.,1
K4
llllll
[]
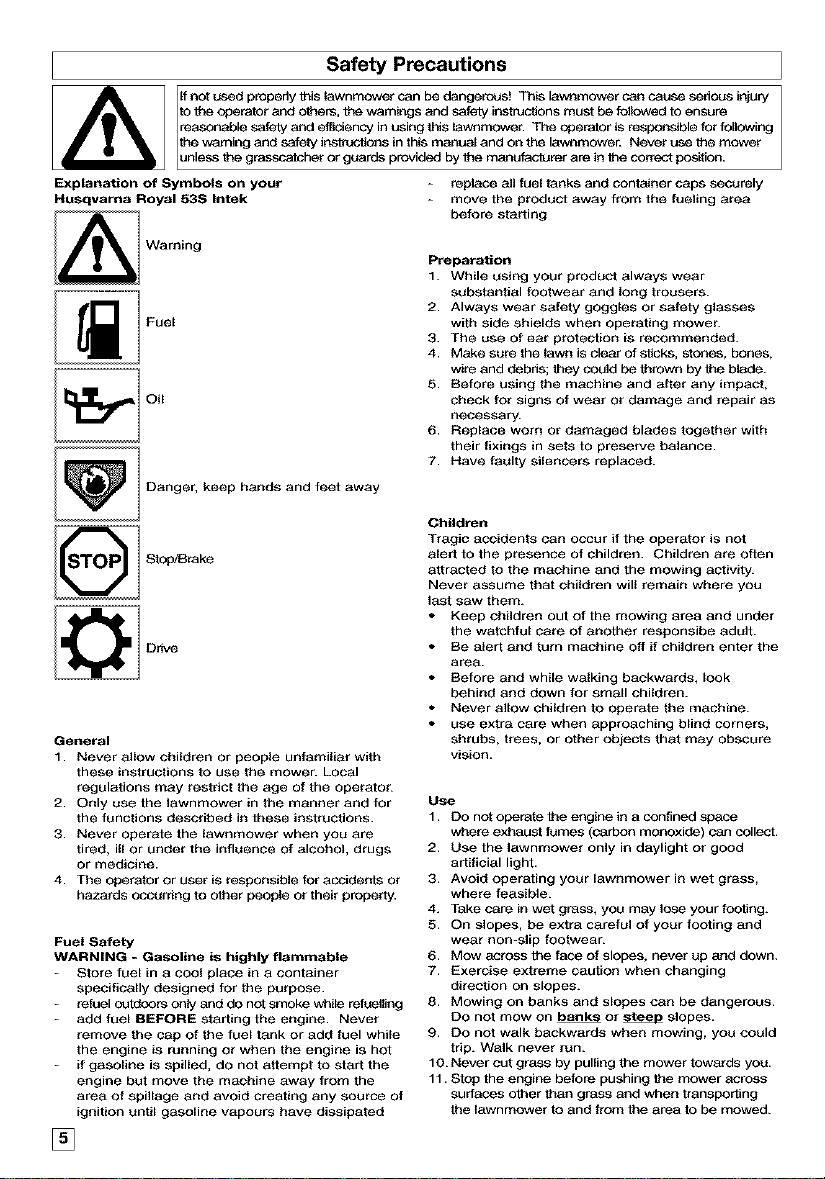
Safety Precautions
If not t_ed propedy this lawnmower can be dangerous! This lawi_mower ca_ cause serious injury
to the operator and others, the wamfags and safety ins_cfJons must be fullowed to ensure
reasonable safety and e_ciency in using this lawnmower. The operator is res_ble for following
unless the grasscatcher or guards provided by _e manufacturer are in the correct posi_on.
the warning and safety i_s in this manuaJ and on the lawnmowen Never use the mower
Explanation of Symbols on your replace egl fuel tanks and container caps securely
Nusqvarna Royal 53S Intek move the product away from the fueJing area
-- before starting
1_'_ Warning
D" • _,i
Fuel
Oil
ISTOPI _o_ks
m m i Drive
Danger, keep hands and feet away
General
1. Never allow children or people unfamiliar with
these instructions to use the mowe_ Local
regulations may restrict the age of the operato_
2. Only use the Jawnmower in the manner and for
the functions described in these instructions.
g. Never operate the lawnmower when you are
tired, ill or under the influence of alcohol, drugs
or medicine.
4. The operator or user is responsible fur accidents or
hazards occurring to other peopJe or their properf_
Fuel Safety
WARNING - Gasoline is highly flammable
- Store fuel in a cool place in a container
specifically designed for the purpose.
- refuel outdoors only and do not smoke while refueJling
- add fuel BEFORE starting the engine. Never
remove the cap of the fuel tank or add fuel while
the engine is running or when the engine is hot
- if gasoline is spilled, do not attempt to start the
engine but move the machine away from the
area of spillage and avoid creating any source of
ignition until gasoline vapours have dissipated
Preparation
1. While using your product always wear
substantial footwear and rung trousers.
2. Always wear safety goggles or safety glasses
with side shields when operating mower.
3. The use of ear protection is recommended.
4. Make sure the lawn is clear of sticks, stones, bones,
wire and debris; they could be thrown by the blade.
5. Before using the machine and after any impact,
check for signs of wear or damage and repair as
necessary.
6. Replace worn or damaged blades together with
their fixings in sets to preserve balance.
7. Nave faulty silencers replaced.
Children
Tragic accidents can Occur if the operator is not
alert to the presence of children. Children are often
attracted to the machine and the mowing activitgL
Never assume that children will remain where you
last saw them.
• Keep children OUt of the mowing area and under
the watchful care of another responsibe adult.
• Be alert and turn machine Off if children enter the
area.
• Before and while walking backwards, look
behind and down for small children.
• Never allow children to operate the machine.
• use extra care when approaching blind corners,
shrubs, trees, or other objects that may obscure
vision.
Use
1. DO nct opsrate the engfae in a confined space
where exhaust fumes (carbon monoxide) can collect.
2. Use the lawnmower only in daylight or good
artificial light.
3. Avoid operating your lawnmower in wet grass,
where feasible.
4. Take care in wet grass, you may lose your footing.
5. On slopes, be extra careful of your footing and
wear non=slip factwean
6. MOW across the face of slopes, never up and down.
7. Exercise extreme caution when changing
direction on slopes.
8. Mowing on banks and slopes can be dangerous.
DO not mow on b_ or _ slopes.
9. DO not walk backwards when mowing, you could
trip. Walk never run.
10. Never cut grass by pulling the mower towards you.
11. Stop the engine before pushing the mower across
surfaces other than grass and when transporting
the lawnmower to and from the area to be mowed.
[]
Safety Precautions
12. Never operate the lawnmower with damaged
guards or without guards in place.
13. DO not overspeed the engine or alter governor
settings. Excessive speed is dangerous and
shortens lawnmower life.
14. Disengage all blade and drive clutches before
starting.
15. Keep h&qds and feet away from the cutting means at
_I times and especially when switching On the engine.
16. DO not tilt lawnmower when starting the engine
17. DO not put hands near the grass discharge chute
whilst engine is running.
18. Never pick up or carry a lawnmower while the
engine is running
19. Spark plug wire may be hot - handle with care.
20. DO not attempt any maintenance on your
lawnmower when the engine is hot.
21. Stop the engine, and wait unlil the blade has stopped:-
- before leaving the mower uP,attended for any period.
22. Release the Operator Presence Control to stop
the engine, wait until the blade has stepped,
disconnect the spark plug lead and wait until the
engine has coofed:-
= before refueling;
= before clearing a blockage;
- before _g, bleaning or working on _e appliance;
= if you hit an object. DO not use your lawnmower
until you are sure that the entire lawnmower is in
a safe operating condition.;
= if the lawnmower starts to vibrate abnormally. Check
immediately. Excessive vibration can cause injury.
23. Reduce the throttle setting during engine shut down
and, if the engine is provided with a shut-off valve,
turn the fuel off at the conclusion of mowing.
Maintenance and storage
t= Keep all nuts, bolts and screws tight to be sure
the lawnmower is in safe working condition.
2. Check the grasscatcher frequently for wear or
deterioration.
3 Replace worn or damaged parts for safety.
4. Only use the replacement blade, blade boft,
spacer and impeller specified for this product.
5. Never store the lawnmower with fuel in the tank
inside a building where fumes can reach an
open flame or spark.
6. Allow the engine to cool before storing in any
enclosure.
7. TO reduce fire hazard, keep the engine, silencer,
battery compartment and fuel storage area free
of grass, leaves or excessive grease.
8. If the fuel tank has to be drained, this should be
done outdoors.
9. Be caraful during adjustment of the machine to
prevent entrapment of the fingers between
moving blades and fixed parts of the machine.
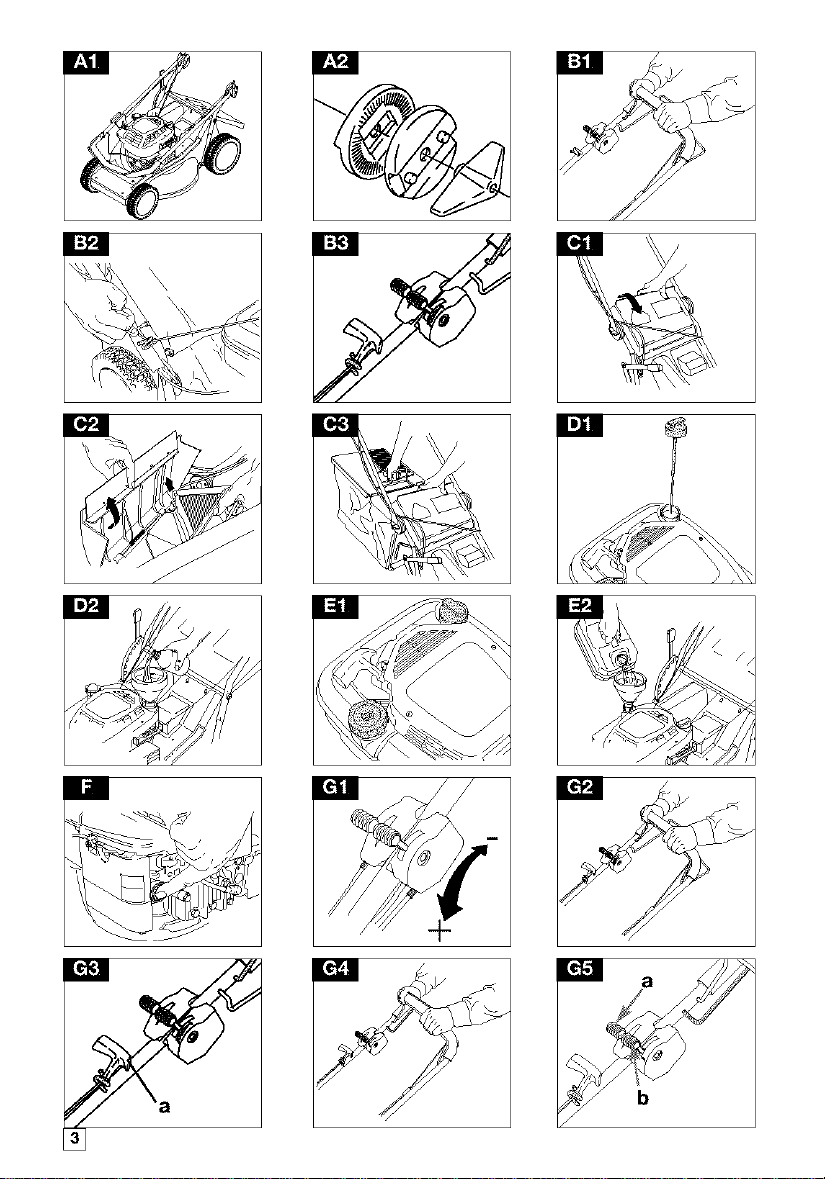
Assembly Instructions
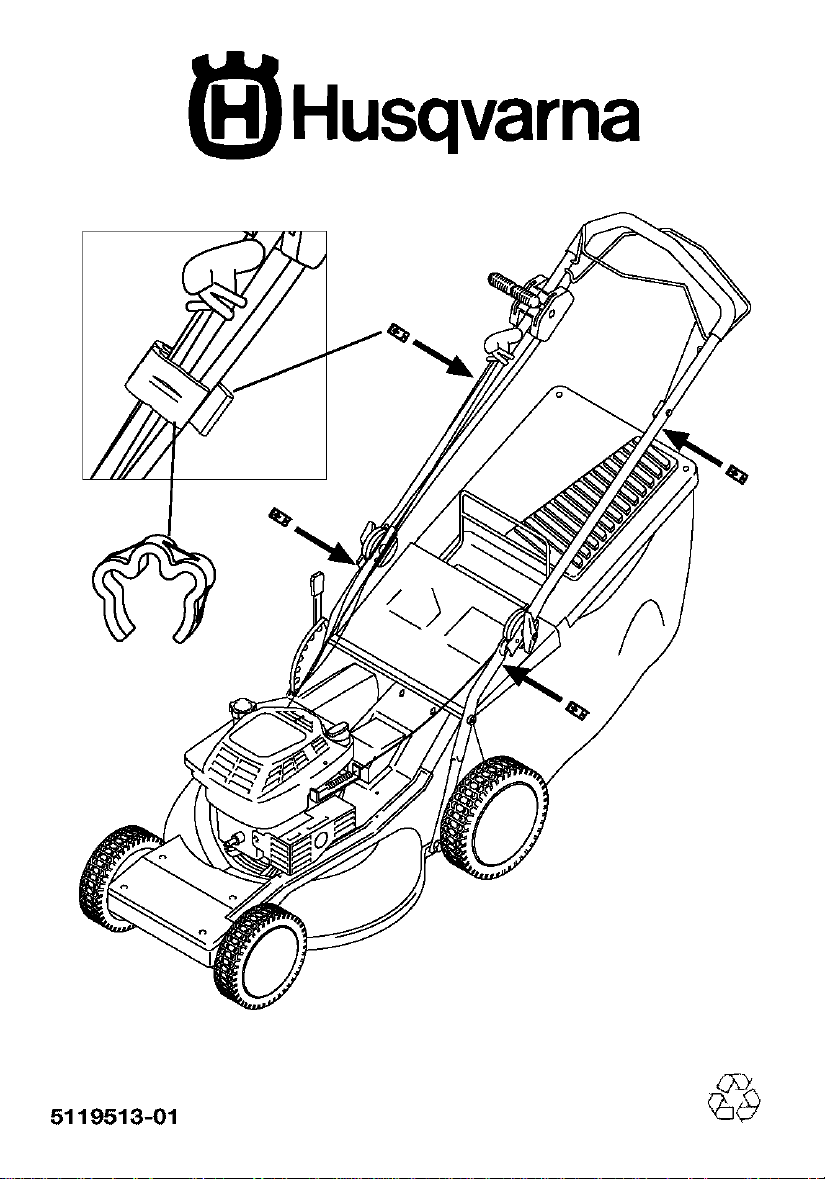
Handle Assembly
1. Your product is supplied with the handles folded
over the product. (AI)
2. Loosen handle adjusters (A2) on both sides of
the product and lift handle assembly up.
3. Adjust handle assembly to the most comfortable
operating position and tighten handle adjusters
(A2) on both sides of the product
Recoil Starter
1. Disconnect the spark plug lead.
2. Pall the Operator Presence Controf (B1) to
release the brake on the engine.
YOU must release the brake by pulling the OPC
lever to the handle before pulling out the cord.
3. Locate cord in the pull cord guide on the lower
handle. (B2)
4. Locate cord in the pull cord guide on the upper
handle. (B3)
Fitting the Grasscatcber
1. Lift safety flap. (CI)
2. Place the grasscatcher onto the hooks.(C2)
3. Lower the grasscatcher onto the rear surface of
the mower.
4. Locate safety flap onto the top of the
grasscateher. (03). Ensure the grasscatcher is
securely located.
Please Note :- Ensure no gap remains between the
safety flap and the grasscateher
Where grass collection is not required you can use
the lawnmower without the grasscatcher. Ensure
the safety flap is fully closed.
Engine
Oil
1. Check oil level periodically and after every five
hours of operation.
2. Add oil as necessary to keep the level to the
FULL mark On the dipstick.
3. Use a good quality SAE 30 four stroke oil.
4. TO fill with oil:-
a) Remove oil filler cap. (Dr)
b) Fill to the FULL mark on the dipstick. (D2)
5. Change the oil after the first five hours operation
and thereafter every 25 working hours.
6. Always change the oil while the engine is warm =
but not hot = never attempt any maintenance on a
hot engine.
Notes
Gasoline
t. Use fresh regular grade lead free gasoline.
2. DO not fill the fuel tank when the engine is hot.
3. DO not fill the fuel tank while smoking.
4. DO not fill the fuel tank while the engine is
running.
5. TO avoid introducing did into the fuel system,
wipe all grass and dirt from the gasoline filler cap
before unscrewing it. (El)
6. It is recommended that you fill the tank through a
funnel with a filter. (E2)
7. Wipe away spillages before starting.
Please Note :- move the product away from the
fuelling area before starting
[]
Starting - Priming the Engine
Please Note:- When starting the engine for the first 3. Follow instructions in the Use - starting and
time, till with oil and gasaiine as described above in the stopping section.
Oil and Gasoline section. Priming is usually 4. If engine fails to stad after three pulls of the pull cord,
unnecessary when restarting a warm en_ne. However, push primer bulb three times and repeat step 3.
coot weather may require priming to be repeated. Starting engine thereafter
Starting the engine for the first time 1. MOVe engine speed control to FAST %' position and
1. AdVance engine speed contr_ to FAST '+' as iUus_ted push primer bulb firmly three times before starting
in _e Use - starBng and st_pp_g seclton, engine. (if engine stopped because it ran out of fuel,
2. Push primer bulb (F) firmly five times, refuel engine - push primer bulb three times.
Use - Starting
G_a - Recoil Starter Gh-a - Drive Speed Conf_ol
Gh-b - Engine Speed Control
Starting & Stopping Royal 53S Intek.
Starting
1. Connect the spark plug lead.
2. Move the Engine Speed Control to the FAST %'
position before starting. (GI)
3. Pull the operator presence control (OPC) to release
the brake on the engine aqd the biade.(G2)
4. Pail the recoil starter fully towards you until you feel
the full resistance, return the handle slowly then pull
the handle firmly towards you to its full extent. (Gg)
and Stopping
5. After the engine has started, aiJow to run for 30
seconds before commencing to use.
Engaging the Drive
1. Forward drive is engaged and disengaged with the
Powerddve lever at the top of the h&qdJe (G4).
2. Drive speed can be altered with the drive speed
control. (Gh)
3. Releasing the Powerdrive Lever stops the
forward drive automatically.
Stopping
1. Release the powerddve lever.
2. Release the OPC lever.
Use - Mowing
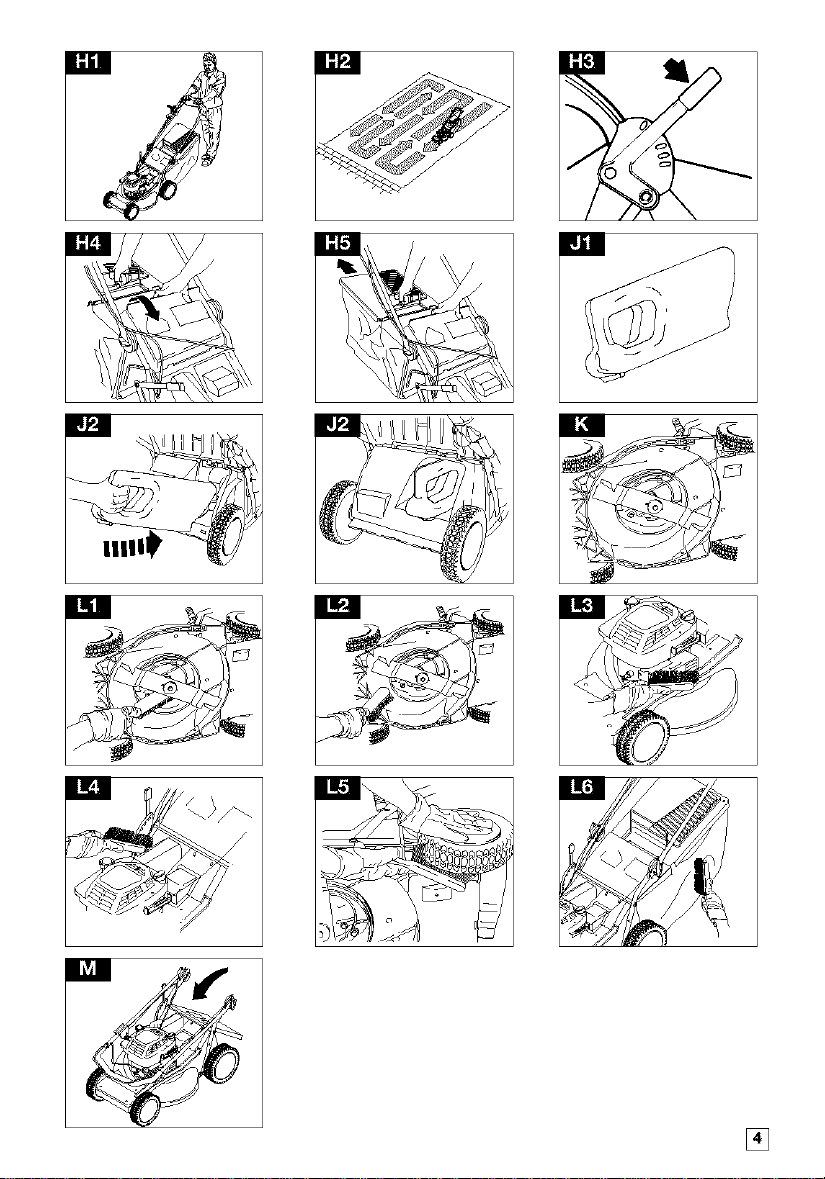
Now to Mow
1. Always use the correct mowing position (H1).
2. Start mowing from the outside edge of the lawn,
mowing in strips in alternate directions (H2).
3. Mow twice a week in the growing season, your lawn
will suffer if more than one third of its length is cut at
one time and this may also result in poor collestfon.
Cutting Height Adjustment
1. The height of cut is altered by pulling the
adjustment lever away from the location slots and
moving to the selected position {Hg).
Emptying the Grasscateher
1. Lift the safety flap (H4).
2. Remove the grasscatoher from the machine (Hh)
3. Empty grasscafcher.
Please Note:-
Do not overload your Lawnmower
When mowing in long thick grass a first cut with the
cutting height adjusted to its highest setting, see
Cutting Height, will help reduce engine oveifoad
and will help prevent damage to your Jawnmower.
Using as a mulcher
1. Your lawnmower is supplied with a mulching plug (Jl).
2. Stop your lawnmower as described in Use - starting
and stopping, &qd disconnest the spark plug.
3. Lift safety flap. Slide mulching plug into rear
discharge chute. (J2)
4. Ensure mulching plug is securely fitted. (J3)
5. The mulching plug prevents grass from being
collected by blocking the collection chute on the
underside of the deck.
6. Ensure the safety flap is positioned correctly.
Cutting System (K)
Always handle the blade with care - sharp edges
could cause injury. USE GLOVES.
Replace your metal blade after 50 hours mowing
or 2 years whichever is the sooner - regardless
of condition. If the blade is cracked or riamageri
replace it with a new one.
Removing the Blade
• Disconnect the spark plug lead.
t. Use wrench to loosen blade bolt by turning anti-
clockwise.
2. Remove the blade bolt, blade and spacer washer.
3. Inspect for damage and clean as necessary.
Fitting the Blade
1. Fit the blade to the machine with the sharp edges
pointing away from the machine.
2. Re-assemble blade bolt through blade and
spacer washer.
3. Hold firmly and tighten blade bolt firmly with a
wrench. Do not over tighten.
Maintenance
IMPORTANT
Do not attempt any maintenance on your
lawnmower when the engine is hot.
IMPORTANT
Never use water for cleaning your lawnmowe_ DO
not aiean with chemical, including gasoline, or
solvents = some can destroy critical plastic parts.
[]
Cleaning
• Disconnect the spark plug lead.
1. Remove grass from under the deck with a brush
(L1 and L2).
2. Using a soft brush - remove grass clippings from
the engine air intakes and exhaust (L3), cutting
height adjustment area. (L4), around the wheels
(Lh) and the grasscatcher (L6).
3. Wipe over the surface of your lawnmower with a
dry cloth.
Maintenance
The engine brake Cable should always be
adjusted to stop the engine within 3 sec.
CAUTION! For adjustment contact your
authorized service dealer.
At the End of the Mowing Season
1. Replace blade, bolts, nuts or screws, if necessary_
2. Clean your lawnmewer thorough_
3. Ask your local service dealer to clean the air
filter thoroughly and carry out any service or
repairs required.
4. Drain engine of oil and gasoline.
Storing your Lawnmower
1. DO nct stere your lawnmower immediately after use.
2. Wait uatil the engine has cooled to avoid a
potential fire hazard.
3. Disconnect the spark plug lead.
4. Clean your lawnmower
5. Loosen handle adjusters (A2) on both sides of
the product and fold the handJe forward.(i)
6. Store in a cool, dry p_aee where your lawnmower
is protected from damage.
Service Recommendations
Your product is uniquely identified by a silver and
black product rating label.
We strongly recommend that your product is
serviced at least every twelve months, mare often in
a professional app_ie_on.
Engine Maintenance Schedule
Fellow the hourly or calendar intervals, whichever
occur first. More frequent service is required when
operating in adverse conditions
First 5 hours = Change oil.
Every 5 hours or daily - Check oiJ leve_ Clean
finger guard. C_ean around muft_e_
Every 25 hours or every season = Change oil if
operating under heavy lead or high ambient
temperature. Service air cleane_
Every 50 hours or every season = Change oil.
Inspect spark arrester, if equipped.
Every 100 hours or every season = Clean cooling
system*. Replace spark p_ug.
C_ean mere often under dusty conditions, or
when airborne debris is present or after
proJonged opera, on cutting tall, dry grass.
Engine Servicing & Guarantee
The engine fitted to your tewnmower is
guaranteed by the Engine Manufacturer. TO
obtain further information contact your dealer`
Trouble Shooting
Engine Will Not Start
1. Ensure OPC Lever is in the start position.
2. Check that the control lever is in the '+' position
3= Check that there is sufficient fuel in the tank
and the cap air vent is clear.
4. Remove and dry the spark plug.
5= Gasoline may be state, replace. Once gasoline
has been replaced, It may take a {ltfte time for
fresh gasoline to filter through.
6. Check that the blade bolt is tight. A loose bolt
could cause difficult starting.
7. If the engine will still not start_ immediately
disconnect the spark plug lead.
8= CONSULT YOUR LOCAL APPROVED
SERVICE DEALER.
Lack of Engine Power and/or Overheating
1_ Check that the control lever is in the 'normal'
position.
2. Disconnect the spark plug lead and allow the
engine to cool down.
3= Clean grass clippings and debris from around
the engine and air inlets and the underside of
the deck inciudtsg the chute.
4. Clean the engine air filter (Ask your local
Approved Service Dealer to clean the engine air
filter thoroughly).
5. Gasoline may be stale, replace. Once gasoline
has been replaced, It may take a liftle time for
fresh gasoline to fitter through.
6. If the engine still lacks power and/or is
overheating_ Immediately disconnect the
spark plug lead.
7. CONSULT YOUR LOCAL APPROVED
SERVICE DEALER=
Excessive Vibration
1. Disconnect the spark plug tend.
2. Check that the blade is correctly fitted.
3. If the blade is damaged or worn replace it with
a new one.
4. If vibration persista_ immediately disconnect
the spark plug lead.
5. CONSULT YOUR LOCAL APPROVED
SERVICE DEALER.
Environmental Information
Electrolux Outdoor Products are manufactured
under an Environmental Management System (ISO
14001) using, where practical, components
manufactured in the most environmentally
responsible manner, according to company
procedures, and with the pctential for recycling at
the end Of the products' lifo.
• Packaging is recyctable and p_astie components
have been labelled (where practical) for
eategodsed recycling.
• Awareness Of the environment must be
considered when disposing of 'end-of=life'
product.
• If necessary, contact your local authority for
disposal information.
DISPOSAL OF FUELS AND LUBRICATING OILS
• Wear protective clothing when handling any fuels
and lubricants.
• Avoid contact with skin.
• Remove gasoline and engine oil before
transporting the product.
• Contact your local authority far information of
your nearest Recycling/Disposal Station.
• DO NOT dispose of used faels/oils with
household waste
• Waste fuels/oils are harmful, but can be
recycled and should be disposed of through
the recognised facilities.
• DO NOT dispose of used fuels/oils to water.
• Do NOT incinerate
[]
Husqvarna
5119513-01 _

©

Husqvarna
©

