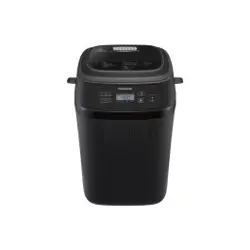
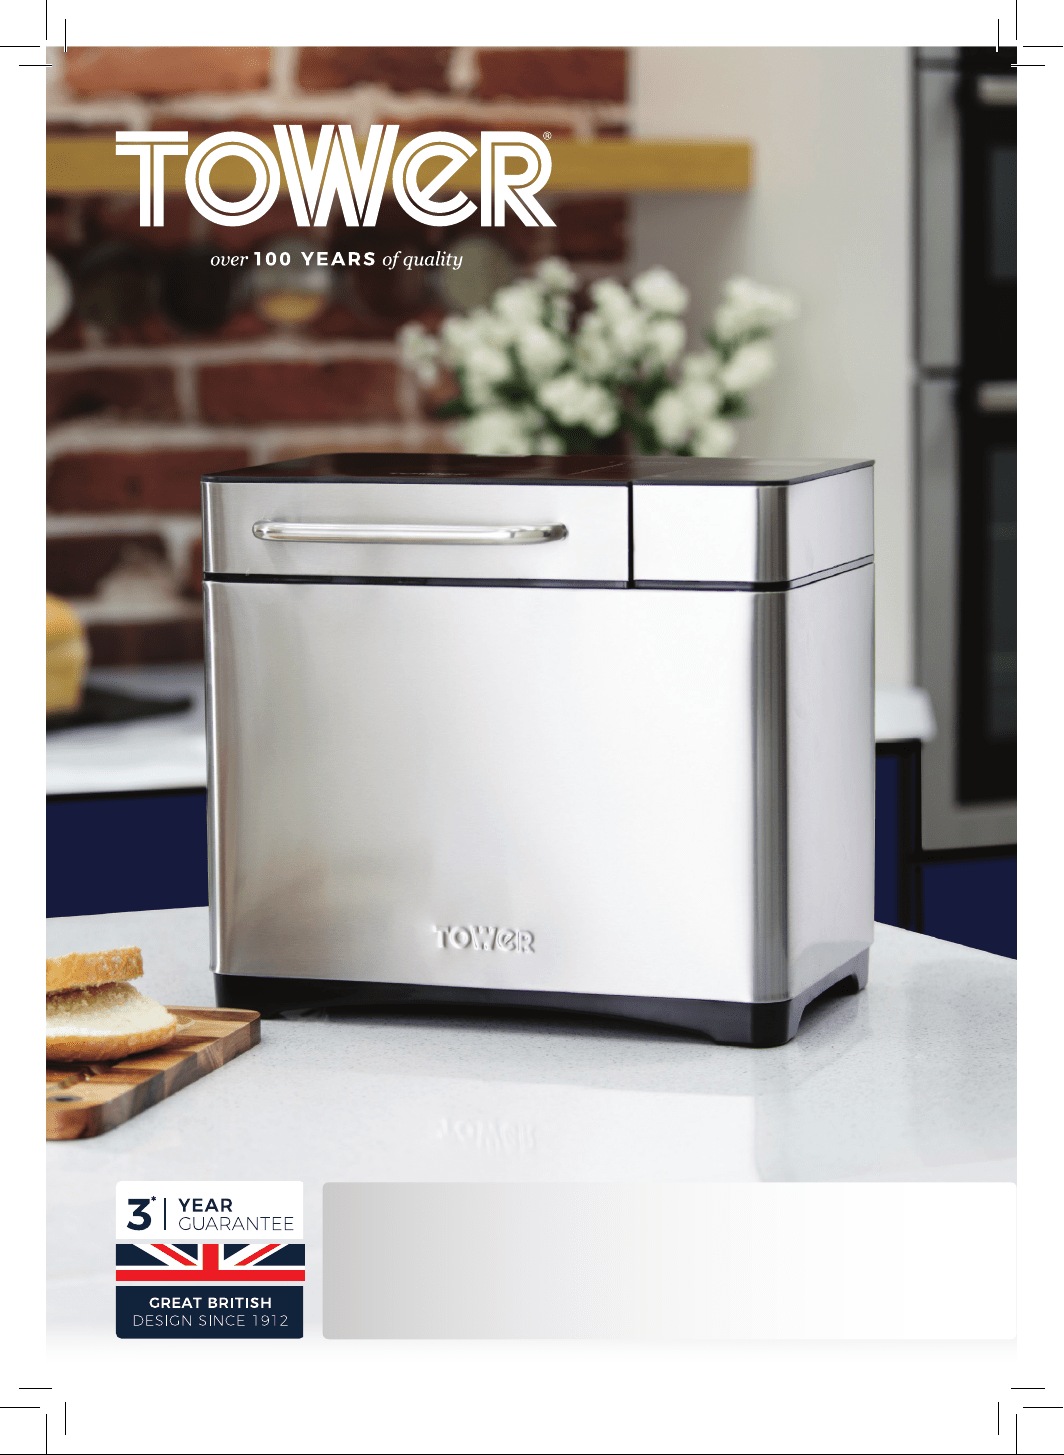
T11002
Digital Bread Maker
SAFETY AND INSTRUCTION MANUAL
PLEASE READ CAREFULLY
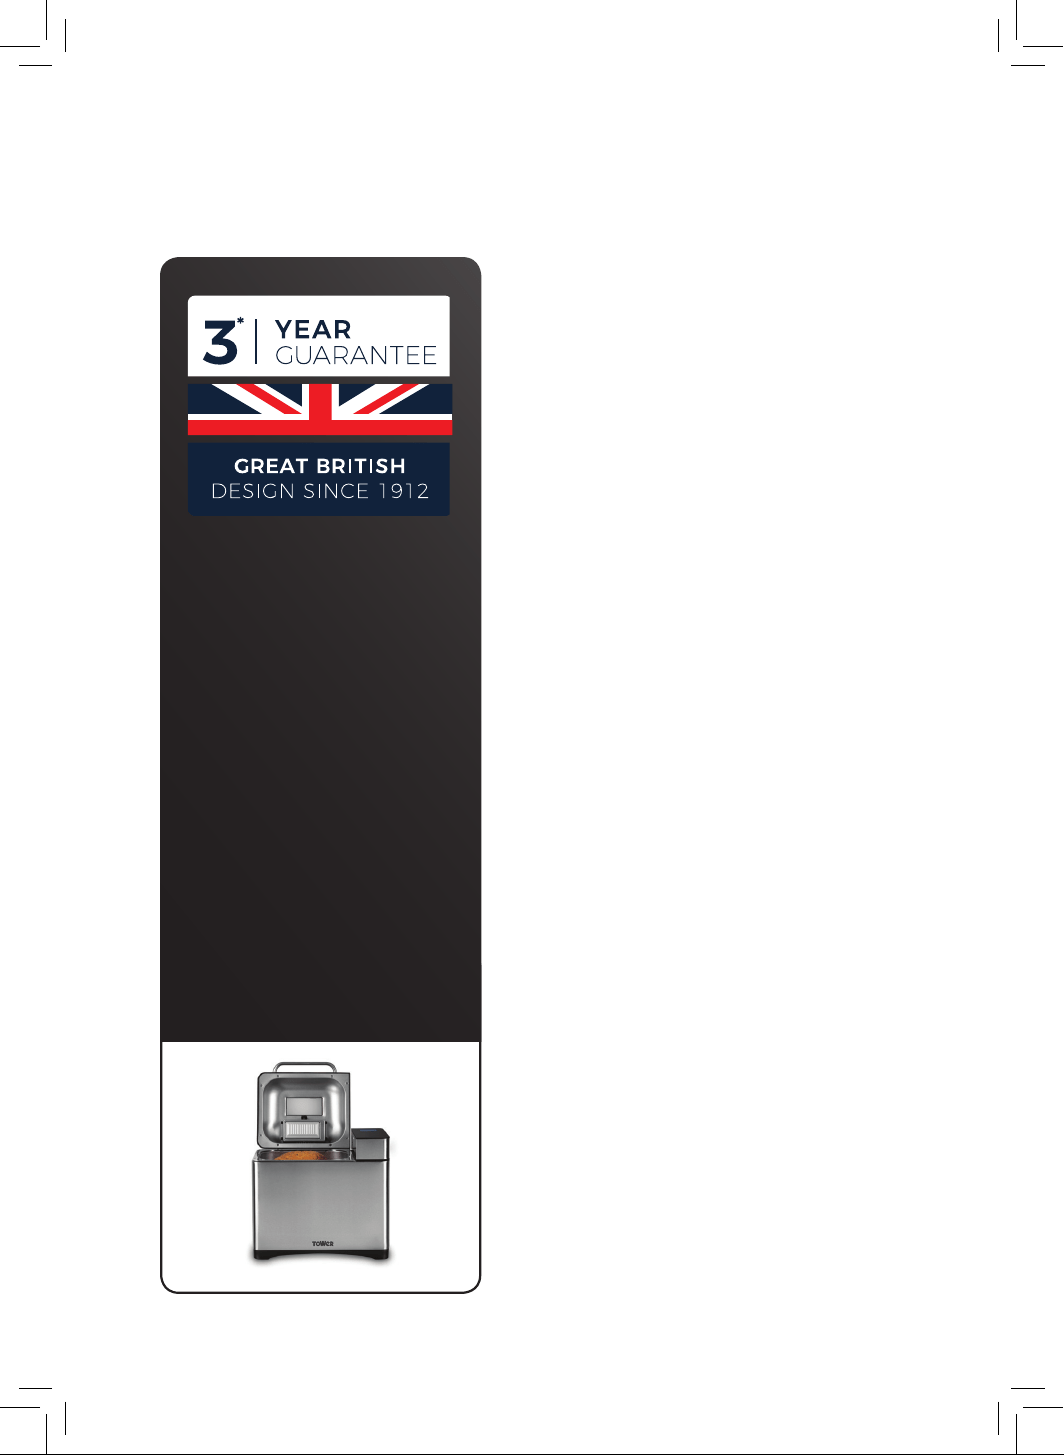
*Subject to registering your Extended Guarantee online at www.towerhousewares.co.uk.

2
GREAT BRITISH DESIGN, INNOVATION
AND EXCELLENCE SINCE 1912
Since the turn of the 20th century, Tower has been designing,
developing and manufacturing housewares and small
appliances used by millions of households throughout the
UK and beyond. During the 1960s, the rise in popularity
of pressure cooking saw Tower become the UK’s largest
producer of pressure cookers, right through into the late
1980s. In recent years the Tower brand has been reborn with
an exciting and varied range of housewares and electrical
appliances that have quickly reinstated the brand’s richly
deserved status as a household name.
Visit
www.towerhousewares.co.uk
for more fantastic products.

3
Contents:
Thank you for purchasing this appliance from the
Tower range.
Please read this manual carefully BEFORE using the
appliance for your own safety.
It has been designed to provide many years of
trouble-free use.
There are many benefits to using the Tower Digital
Bread Maker:
• Choice of light, medium or dark crust.
• Automatic 1 hour keep warm function.
• 15 hour timer with LED display.
• Non-stick barrel and kneading blade.
• Stylish stainless steel exterior.
• Viewing window to allow you to check on your
bread without opening the lid and disturbing the
baking process.
• Automatic Dispenser adds fruits, nuts and dry
ingredients at just the right time.
• 17 programs including gluten free option.
• 3 loaf sizes available.
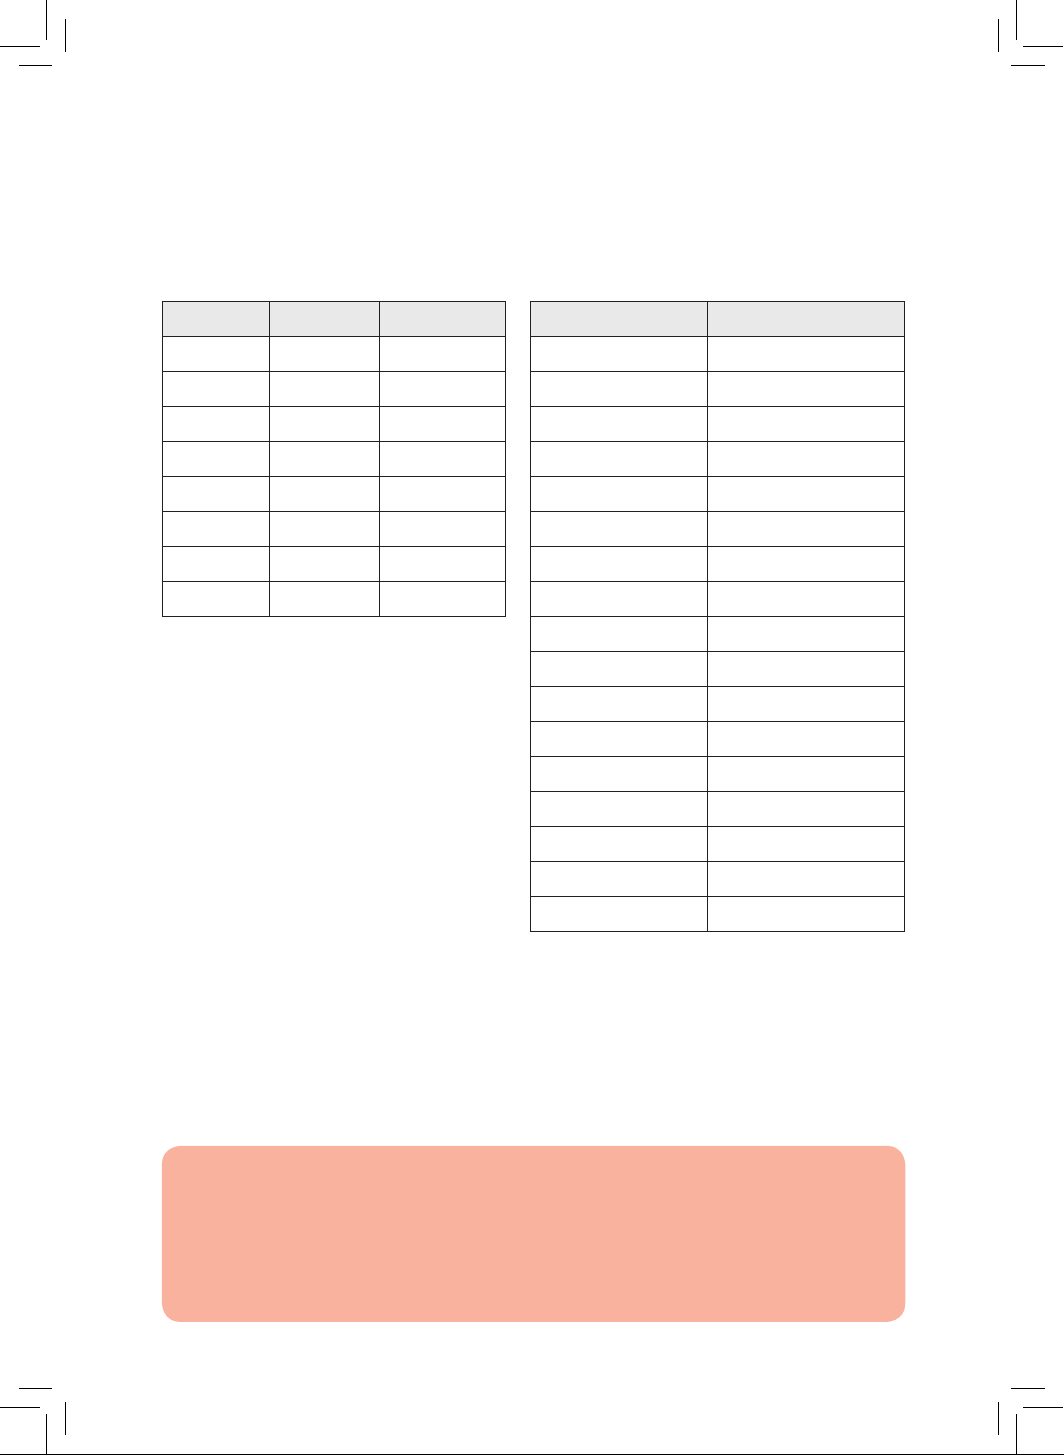
1. Specifications
Components and
structure
2. Technical Data
3. Important Safety
Information
4. Before First Use
5. Using your Appliance
6. Troubleshooting
7. Recycling
8. Cleaning & Care
9. Wiring Safety
10. Warranty Information
11. Weights and Measures
12. Recipes
See back page for Customer
Service Information.

4
This box contains:
Instruction Manual
Measuring cup
Measuring spoon
Hook
Stirring rod
1. Handle
2. Lid
3. Viewing window
4. Automatic dispenser
5. Digital control panel
6. Air vent
7. Inner light
8. Bread barrel
1 - Specifications:
Structure of your appliance:
3
4
1
5
2
7
6
8
M
e
a
s
u
r
i
n
g
C
u
p
M
e
a
s
u
r
i
n
g
S
p
o
o
n
H
o
o
k
A
u
t
o
m
a
t
i
c
D
i
s
p
e
n
s
e
r

5
Description: Digital Bread Maker
Model: T11002
Rated Voltage: 220V-240V ~50/60Hz
Power Consumption: 710 Watts
Documentation
We declare that this product conforms to the following product legislation in
accordance with the following directive(s):
2014/30/EU Electromagnetic Compatibility Directive.
2014/35/EU Low Voltage Directive.
2011/65/EU Restriction of Hazardous Substances Directive.
1935/2004/EC Materials & Articles in Contact With Food
(LFGB section 30 & 31).
RK Wholesale LTD Quality Assurance, United Kingdom.
2 - Technical Data:
Should you encounter problems or require a replacement part, contact the
Tower Customer Support Team on: +44 (0) 333 220 6066.
Any necessary spare parts may be ordered from the Tower website.
Your warranty becomes void should you decide to use non Tower spare parts.
Spare parts can be purchased from www.towerhousewares.co.uk
The spares and accessories are guaranteed for 1 year from date of purchase.
The main body and housing are guaranteed for the extended free warranty
subject to registration.
If any defect arises due to faulty materials of workmanship, the faulty products
must be returned to the place of purchase.
Refund or replacement is at the discretion of the retailer.

6
• Check that the voltage
of the main circuit
corresponds with the
rating of the appliance
before operating.
• Please ensure that the
appliance is used on a
stable, level, and heat
resistant surface.
• DO NOT immerse cords,
plugs or any part of the
appliance in water or
any other liquid.
• DO NOT leave the
appliance unattended
while it is operating.
• Close supervision is
necessary when any
appliance is used by or
near children or pets.
• This appliance can
be used by children
aged from 8 years and
above and persons
with reduced physical,
sensory or mental
capabilities or lack
of experience and
knowledge if they have
been given supervision
or instruction
concerning use of the
appliance in a safe way
and understand the
hazards involved.
• Children shall not play
with the appliance.
• Cleaning and user
maintenance shall not
be made by children
without supervision.
• Switch off at the wall
socket then remove the
plug from the socket
when not in use or
before cleaning.
Please read these notes carefully BEFORE using your
Tower appliance
3 - Important Safety Information:

7
• If the supply cord or
appliance is damaged,
stop using the
appliance immediately
and seek advice from
the manufacturer or
its service agent or
a similarly qualified
person.
• DO NOT let the cord
hang over the edge of a
table or counter or let it
come into contact with
any hot surfaces.
• The use of accessory
attachments is not
recommended by the
appliance manufacturer
apart from those
supplied with this
product. DO NOT use
extension cords with
the appliance.
• DO NOT pull the plug
out by the cord as this
may damage the plug
and/or the cable.
• DO NOT use this
product for anything
other than its intended
use.
• This appliance is for
household use only.
• VERY IMPORTANT: DO
NOT immerse in water
or other liquids or use
near wash basins or
sinks any part of the
motor assembly. Ensure
that the appliance base
does not get wet (water
splashes etc.) and DO
NOT operate it with wet
hands.
• Always fully unwind
any cord to avoid
overheating.
• Directly after bread
making the appliance
is HOT. Always use oven
gloves when touching
the Bread maker or
the bread barrel after
baking.

8
• Unplug the Bread
maker after use and
allow it to cool before
handling or cleaning
any parts. Pull on the
plug, not on the cable.
• At least 100mm
clearance must be
provided on all sides of
the Bread maker.
• The appliance is
not intended to be
operated by means of
an external timer or
separate remote-control
system.
• DO NOT cover the
Bread maker when in
use.
• DO NOT use
attachments or
accessories not
recommended by the
manufacturer.
• DO NOT operate the
Bread maker empty.
• DO NOT dent or
damage the bread
barrel . The Bread
maker will not operate
properly if damaged.
• When baking
bread, never bake
amounts greater
than the maximum
recommended in the
recipes accompanying
this manual. If you do,
the bread may not be
baked evenly and the
dough could overflow.
• There are no user
serviceable parts in
your Bread maker.
Unauthorised
dismantling or servicing
will void the product
warranty.
• In the unlikely event
the appliance develops
a fault, stop using
it immediately and
seek advice from the
Customer Support
Team:
+44 (0) 333 220 6066

9
1. Remove the appliance from the packaging.
2. Check that there is no damage to the cord or any visible damage to the body
or attachments.
3. Remove any stickers or labels on the appliance or attachments.
4. Dispose of the packaging in a responsible manner
Filling with Ingredients:
• Ensure you have all the ingredients to hand.
• Carefully fill the barrel making sure you don’t leave any ingredients out. When
filling, it is essential that the ingredients are filled in the prescribed order,
otherwise the bread will not be properly baked.
IMPORTANT: The capacity of the Breadmaker is sucient to bake a 2lb loaf, or
to raise the equivalent amount of dough for baking elsewhere. Do not exceed
this amount otherwise the mechanism may be damaged, or the dough may rise
through the lid.
• The ingredients should be at a warm room temperature (20º-25ºC). If the room
is cold (below 18ºC), use warm water (40ºC) to make sure the yeast ferments
fully. To gauge the temperature if you do not have a thermometer, heat some
water and slowly add this to a jug of cold water until the resulting temperature
is barely warm to the touch.
• Measure and add the water to the barrel. Next add the salt and the other dry
ingredients. Finally add the yeast.
• It is essential to keep the yeast away from the salt and the water before mixing
commences or the bread will not rise properly.
• Clean off any spills around the outside of the bread barrel and lower it into the
breadmaker, reversing the process described earlier. Push down at the sides
and ensure the barrel is firmly held in the side clips.
Keep Warm:
The Bread Maker has an automatic Keep Warm function which heats the bread for
one hour after baking. If you do not wish to use the Keep Warm function, hold the
ON/OFF button down for 3 seconds once the baking function has finished. A buzzer
will sound when the Keep Warm function has turned off.
4 - Before First Use
5 - Using Your Appliance

10
Inner Light:
The Bread Maker has a built in inner light. This enables you to check on your bread
when it is baking, without having to open the lid and disturb the baking process.
Press the ‘+’ and ‘-’ keys down at the same time to switch the inner light on. To
switch it off, press the same keys again.
Automatic Dispenser:
The Automatic Dispenser allows fruit, nuts and other dry ingredients to be emptied
into the bread barrel at the correct time during use.
1. Before baking, open the lid of the bread maker and remove the dispenser box
by pressing the dispenser box handle and lifting it up.
2. Add the ingredients that you want to be added into the bread.
3. Place the two pillars in the bottom of the box holder; push the fruit box handle
until it is set on the lid.
Note: The dispenser does not operate during the Dough, Jam or Bake programs.
Memory Recall:
If the power supply is temporarily interrupted, the process of bread making will
continue automatically when power is restored. If the power cut exceeds 15
minutes the bread maker must be restarted manually and you will have to begin
the bread making process again with fresh ingredients.
Cold Weather:
Although the Bread-maker works perfectly well at low temperatures, if your kitchen
is cold the bread may not be satisfactory. Bread should be baked in an ambient
temperature around 20ºC (70ºF).
The Delay Timer (RESERVE):
The delay timer function allows you to delay the start time of the bread making
program. If the dough contains milk, fruit or onions, do not select the time delay
function, but bake the dough immediately.
If you would like to make your bread later: Press + or - to set the time you want the
bread maker to start operating in increments of 10 minutes.
For example, if you would like to have fresh bread ready for 7am and it is currently
8:30pm, you would set the reserve time to 10 hours and 30 minutes, and then press
the START/STOP button.
This includes the baking time for the type of bread selected.
Tips: Cover the yeast under the flour to maintain activity of the yeast.
Note: The delay timer is not available on all functions.

11
Using Your Appliance:
1. Take out the bread barrel from the inside of the bread maker and locate the
stirring rod into hole at the base of the bread barrel.
2. Add the appropriate amount of water, eggs and flour to barrel, and finally add
yeast powder. (Ensure the yeast is added last).
3. Put the bread barrel holding the mixture into the bread maker ensuring the
stirring rod locates onto the axle in the bread maker and close the lid.
4. Plug the bread maker into the electrical outlet. You will hear a buzzer sound
and the digital control panel will illuminate: The default value after starting the
unit is 1.5lbs/Medium Colour/soft bread.
5. Select your bread recipe by pressing Menu. You can then cycle through
program settings 1-17.
6. Select your bread colour and loaf by pressing LOAF to select the weight
(1lb/1.5lb/2lb) then COLOUR to select how brown you would like your bread
(Light/Medium/Dark)
7. If you want the bread maker to start immediately press START/STOP. A buzzer
will sound at the start of the cycle.
8. The bread maker will start and begin a countdown.
9. The bread maker will begin to stir flour. To avoid splashing of flour, the program
can auto-set interval stirring for the first 7 minutes.
10. After 7 minutes, the bread maker auto-switches to continuous stirring.
11. After setting “Reserve”, “:” LCD indicator begins to flash and the unit will start.
When the countdown ends, flour stirring begins.
12. When the program is completed and the timer shows 00:00 a buzzer will
sound. The barrel may now be removed from the Bread Maker.
13. Your baked bread will be very warm, be careful when lifting it out of the bread
maker. Be sure to wear oven gloves to remove the bread.
14. The stirring rod may get stuck in the bread when you remove the bread. If this
happens, use the hook tool supplied with the bread maker. Insert into the
bottom of the stirring rod and pull the stirring rod out gently.
After Cooking:
1. Lift the lid. Using a pair of oven gloves, remove the barrel from the bread
maker.
2. Gently twist the barrel anti-clockwise as you remove it from the bread maker.
3. Place the bread barrel on a heatproof surface and leave it for 10 minutes.
4. Invert the bread barrel over a breadboard or other heat resistant surface and
tap the bread barrel lightly to release the bread.
5. Allow the bread to cool on a heatproof rack before use.
6. If the paddle has got stuck in the loaf, remove it with a melamine fork or other
suitable tool.
12
Note: Always use a rack. If you leave the bread to cool on a normal work surface,
water vapour in the bread will not evaporate and the bottom of the loaf may be
spoiled.
Program Selector:
When selecting a program on the control panel menu, the LCD display will show 1
-17. The program settings are as follows:
Jam:
• Prepare your fruit and other ingredients as per your recipe. When preparation
is done, put all the ingredients into the bread barrel.
• Press MENU and select program 13. Default time: 1 hour and 5 minutes.
• When the jam-making cycle is finished, a buzzer will sound. Take the bread
barrel out and allow to cool. Pour the jam into containers.
CAUTION! the jam will be very hot.
Bake:
• Once you have grasped how to make bread, you can just use “Leaven Dough”
to control the time of stirring and of leavening needed and even invent your
own recipes.
• Press MENU and select program 14. Default time: 10 minutes.
• Adjustable time: 5 minutes to 1 hour 30 minutes.
Yoghurt:
• This program setting allows you to make yoghurt or rinse dough.
• Press MENU and select program 15. Default time: 8 hours
• Adjustable time: 5 hours to 13 hours
•
Ferment:
• Press MENU and select program 17. Default time: 30 minutes
• Adjustable time: 10 minutes to 2 hours.
PROGRAM PRODUCT
1 Soft Bread
2 Sweet Bread
3 Natural sour-dough
4 French
5 Whole-Wheat
6 Quick Bread
7 Sugar-free
8 Multi-grain
PROGRAM PRODUCT
9 Milky Loaf
10 Cake
11 Raw Dough
12 Leaven Dough
13 Jam
14 Bake
15 Yoghurt
16 Gluten free
17 Ferment

13
Bread Mixes
Follow the information for bread mixes on the bread mix packet. Use Programme
1, the basic soft setting when using bread mixes, based on a 1.5lb loaf.Many Bread
mixes will allow use of Programme 6 (Quick Bake). Check the instructions on the
packet.
There are 2 types of bread mixes currently available.
1. Just Add Water.
These mixes are complete and they have all the necessary ingredients provided,
even yeast. You only add water, occasionally butter/nuts/fruit.
IMPORTANT:
Follow the packet instructions carefully, as some mixes contain more than the
normal amount of yeast, which could over rise in the barrel. Use 3 cups of mix
maximum.
These mixes are more prone to over-rising and collapsing when the weather is hot
and humid. Since these mixes are complete, we cannot advise how to adjust, as
with our own recipes.
Bake in the coolest part of the day, use water between 21-28°C
2. Just Add Flour And Water.
These mixes have the necessary ingredients in separate sachets.
Remember strong white bread flour is required. A packet of this mix will usually
produce a 1.5lb loaf. Check the instructions carefully.
14
6 - Troubleshooting
Symptom Likely Cause Remedy
Bread rises too
much.
Too much yeast or flour.
Not enough salt.
Check ingredients carefully.
Ingredients old, out of date
Reduce water content.
Bread does not
rise enough.
Too little yeast or wrong yeast.
Damp or out of date yeast.
Yeast in contact with salt.
Water too warm.
Wrong type of flour.
Damp, out of date flour.
Check yeast condition carefully.
Only use sachet yeast.
Keep ingredients separated.
Use fresh water at room temp.
Use fresh bread flour.
Keep flour dry and in a dark, cool
place.
Bread has collapsed. Ingredients too warm. Use water at room temp.
And fresh correctly stored
ingredients.
Bread rose well but
flattened during
baking.
Too much water Ingredients
not fresh.
Poor quality flour.
Reduce water slightly.
Do not exceed “use by” dates.
Use fresh proper bread flour.
Bread deformed
after baking.
Gluten content of flour too low.
Too much water
Use fresh proper bread flour.
Reduce amount of water slightly.
Texture lumpy or
uneven.
Flour to water ratio is incorrect.
Texture lumpy or uneven.
Flour is damp or out of date.
Check quantity and quality of all
ingredients.
Mushroom-like
rough surface.
Too much flour, especially with
white bread.
Excessive salt or sugar.
Check quantity and quality of all
ingredients.
Bread is dicult
to slice.
Bread too warm. Let bread cool on an open rack.

15
DISPOSAL OF THE UNIT
Appliances bearing the symbol shown here may not be disposed of in domestic
rubbish. You are required to dispose of old electrical and electronic appliances like
this separately.
Please visit www.recycle-more.co.uk or www.recyclenow.co.uk for access to
information about the recycling of electrical items.
Please visit www.weeeireland.ie for access to information about the recycling of
electrical items purchased in Ireland.
The WEEE directive, introduced in August 2006, states that all electrical items must
be recycled, rather than taken to landfill.
Please arrange to take this appliance to your local Civic Amenity site
for recycling, once it has reached the end of its life.
7 - Recycling
1. Regular maintenance of your appliance will keep it safe and in proper
operational order.
2. Before cleaning always disconnect the appliance from the mains supply.
3. Wash removable parts in warm, soapy water then rinse and dry all parts.
4. Regularly clean the outside of the appliance with a soft damp cloth and dry
with a dry towel.
IMPORTANT:
Allow to dry fully after cleaning before using again.
Do not use the appliance if damp. Ensure the appliance is completely clean and
dry before storing.
CAUTION!
1. To prevent damage to the appliance do not use harsh solvents, alkaline
cleaning agents, abrasive cleansers or scouring agents of any kind when
2. cleaning.
3. Do not immerse the motor unit or supply cord in water.
4. Always check that the appliance is in good working order and that all
removable parts are secure. Check the power supply cord and plug regularly
for cuts or damage.
To store your appliance:
1. Unplug power cord from the power outlet.
2. Allow the appliance to fully cool.
3. Store your appliance and all its accessories and instruction manual in a safe
and dry place.
8 - Cleaning & Care

16
WARNING:
This appliance MUST be earthed!
9 - Wiring Safety for UK Use Only
IMPORTANT
As the colours in the
mains lead of this
appliance may not
correspond with the
coloured markings
identifying the
terminals in your plug,
please proceed as
follows:
The wires in the mains lead are coloured
in accordance with the following code:
Blue neutral [N] Brown live
[L] Green/Yellow [EARTH]
Plug Fitting Details (Where Applicable).
The wire coloured blue is the neutral
and must be connected to the terminal
marked [N] or coloured black.
The wire coloured brown is the live wire
and must be connected to the terminal
marked [L] or coloured red.
The wire coloured green/yellow must be
connected to the terminal marked with
the letter [E] or marked
.
On no account must either the brown
or the blue wire be connected to the
[EARTH] terminal
.
Always ensure that the cord grip is
fastened correctly.
The plug must be fitted with a fuse
of the same rating already fitted and
conforming to BS 1362 and be ASTA
approved.
If in doubt consult a qualified electrician
who will be pleased to do this for you.
Non-Rewireable Mains Plug
If your appliance is supplied with a non-
rewireable plug fitted to the mains lead
and should the fuse need replacing,
you must use an ASTA approved one
(conforming to BS 1362 of the same
rating).
If in doubt, consult a qualified
electrician who will be pleased to do
this for you.
If you need to remove the plug –
disconnect it from the mains – and
then cut it off of the mains lead and
immediately dispose of it in a safe
manner. Never attempt to reuse the
plug or insert it into a socket outlet as
there is a danger of an electric shock.
FUSE
17
This product is guaranteed for 12 months
from the date of original purchase.
If any defect arises due to faulty materials
of workmanship, the faulty products must
be returned to the place of purchase.
Refund or replacement is at the discretion
of the retailer.
The Following Conditions Apply:
• The product must be returned to the
retailer with proof of purchase or a
receipt.
• The product must be installed and
used in accordance with the
instructions contained in this
instruction guide.
• It must be used only for domestic
purposes.
• It does not cover wear and tear,
damage, misuse or consumable parts.
• Tower has limited liability for incidental
or consequential loss or damage.
This guarantee is valid in the UK and Eire
only.
The standard one year guarantee is only
extended to the maximum available for
each particular product upon registration
of the product within 28 days of purchase.
If you do not register the product with us
within the 28 day period, your product is
guaranteed for 1 year only.
To validate your extended warranty, please
visit www.towerhousewares.co.uk and
register with us online. Alternatively, call
our customer registration line on
+44 (0) 333 220 6066.
Please note that length of extended
warranty offered is dependent on product
type and that each qualifying product
needs to be registered individually in order
to extend its warranty past the standard
1 year.
Extended warranty is only valid with proof
of purchase or receipt.
As a thank you for purchasing
one of our fantastic products,
we are offering you an extra
2 years peace of mind in
addition to your 1 year
guarantee.
To receive your extra 2 year
guarantee, register your
appliance online within 28
days of purchase by visiting
www.towerhousewares.co.uk
10 - Warranty
18
Check these charts for basic imperial to metric
conversions of weights.
Food Allergies
Important Note: Some of the recipes contained in this document may
contain nuts and/or other allergens. Please be careful when making any of our
sample recipes that you ARE NOT allergic to any of the ingredients. For more
information on allergies, please visit the Food Standards Agency’s website at:
www.food.gov.uk
11 - Weights & Measures
Metric Imperial US cups
250ml 8 floz 1 cup
180ml 6 fl oz 3/4 cup
150ml 5 floz 2/3 cup
120ml 4 floz 1/2 cup
75ml 2 1/2 floz 1/3 cup
60ml 2 floz 1/4 cup
30ml 1 floz 1/8 cup
15ml 1/2 floz 1 tablespoon
Imperial Metric
1/2 oz 15g
1 oz 30g
2 oz 60g
3 oz 90g
4 oz 110g
5 oz 140g
6 oz 170g
7 oz 200g
8 oz 225g
9 oz 255g
10 oz 280g
11 oz 310g
12 oz 340g
13 oz 370g
14 oz 400g
15 oz 425g
1 lb 450g

19
NOTES
20
NOTES

21
NOTES

22
For more great recipes and inspiration from the
Tower Kitchen, visit
www.towerhousewares.co.uk/blog
Recipes
Recipes for use with the T11002 Digital Bread Maker.

23
The basics of bread making
An understanding of ingredients and their interaction is essential to good bread
making. This short guide will help you understand some of the processes and the
materials used.
Flour
Flour is the essential ingredient. It should be fresh, and stored in cool, dry
conditions, preferably in an airtight jar. Use only bread making flour. General
purpose flours do not contain enough gluten to produce well-structured bread.
Wholemeal wheat flour contains the whole grain. This results in heavier denser
loaves than bread made with white bread flour, and takes longer to rise - use the
Wholemeal settings for best results.
Flours such as oatmeal are often added to bread flours to make specialty loaves.
Many of these flours contain no gluten so they cannot be used entirely on their
own.
Flours vary - millers all have their own special methods, and age and storage
play their part. Although you should always follow the recipe carefully there are
occasions when you may have to adjust the dough.
You may do this a few minutes into the kneading cycle. Open the Bread maker lid
and gently touch the dough. It should feel very slightly sticky. If it is sloppy, add a
little flour (½ -1 tablespoon). Allow this to work in and re-check if necessary. If the
dough is too dry, add the same amount of lukewarm water. Re-check if necessary.
As you gain experience, you will get to know the feel of good dough. It should be
soft and smooth with the faintest sticky feel, but should leave no residue when
turned out of the barrel, as in our recipes for doughnuts and other recipes blended
on the Dough programme.
The only time you can adjust the quality of the dough is during the kneading cycle.
Once baking commences do not lift the lid or the bread may spoil.
Milk
Whole, semi-skimmed or skimmed milk can be used in bread making but it should
always be added lukewarm. Refrigerated milk must be heated to around 27ºC
(80ºF). Never heat milk above 37ºC (98ºF) as this can cause problems with yeast.
Liquid Quantities
Milk can usually be substituted for water in most recipes, but the quantity may
need to be adjusted - usually slightly higher. If dried milk features in the recipe,
leave it out when substituting milk for water. Flour is absorbent, its texture will vary
to some extent with the prevailing atmospheric conditions.
The amount of liquid may have to be adjusted if the conditions in your kitchen
are excessively dry or humid. If there is too much water in the bread it will not
rise properly, even to the point of collapse. Insucient liquid will result in a poorly
structured, lumpy loaf.

24
If you are in any way unsure, it is good policy to monitor the dough while it is
kneading, using the notes above.
Butter, Margarine, Cooking Fat and Oil
These are interchangeable in bread making. Fats add flavour and help the keeping
properties of bread. If you wish to use margarine based or vegetable oil, ensure
that you use the regular kind. Avoid the “light” varieties as they contain quite large
amounts of water which will adversely affect the bread. If you are in doubt, read the
small print on the container; this will indicate whether the product is suitable for
bread making.
When substituting oil for butter, margarine or solid cooking fat, reduce the amount
of liquid by around ¾ tbsp. to compensate for the extra liquid content of the oil.
As you will see from our recipes, it is good practice to cut butter and solid fats into
small pieces before using them.
Low fat bread can be made by substituting natural low fat yoghurt for some or all
the fat in the recipe, in equal amounts. Apple purée may also be used. Once again,
monitor the dough and adjust accordingly.
Sugar
Sugar provides food for the yeast, helps bread to rise and improves flavour, structure
and colour. Almost any kind of natural sweetener can be used, - all the various
sugars, corn and maple syrup, honey, etc. Once again, when using liquid sweeteners
to replace sugar, reduce the amount of water slightly to compensate. Artificial
sweeteners are not suitable for bread making.
Salt
Salt in bread is NOT just a matter of taste! Salt restrains the growth of the yeast,
and improves elasticity and structure. If you reduce or eliminate salt from the bread
it will rise excessively - if you use too much salt the loaf will not rise enough. Use
common table salt.
When adding salt to the bread barrel, keep it away from the yeast by introducing
it at one corner. If the yeast comes into premature contact with salt, the bread will
not rise properly. This situation is obviously more important when using the delay
timer.
Yeast
Yeast is a micro-organism which feeds on sugars and starches in the bread mix
producing carbon dioxide gas which in turn causes the bread to rise.
We recommend the use of dried fast-acting yeast which is intended for bread
makers. The instructions on the sachet will tell you if the yeast is suitable for bread
makers. Easy-blend yeasts are readily available from all good supermarkets.
When adding yeast, be especially careful to get the quantity correct otherwise you
could have a disaster on your hands, especially if you add too much!

25
Help! My bread has gone wrong - some easy remedies
1. Have all the ingredients been added?
2. Have all the ingredients been accurately measured?
3. Was the yeast in contact with any liquid or salt before the program started?
4. Has the correct program been used?
5. Has the delay timer been properly set?
6. Has the mains been switched off during the cycle?
7. Was the lid opened at the wrong point in the cycle?
8. Was the water temperature correct?
9. Was the bread maker in a very cold kitchen when the program started?
10. Was bread left in the machine after the “keep warm” time?
11. Did you cool the bread on a rack?
26
Soft Bread
Program 1
Default time:
3 hours and 11 minutes
Sourdough
Program 3
Default time:
6 hours and 44 minutes
Sweet Bread
Program 2
Default time:
2 hours and 59 minutes
French Bread
Program 4
Default time:
3 hours and 19 minutes
Ingredients 1lb 1.5lb 2lb
Water 160ml 240ml 310ml
Butter 2 tbsp. 2 tbsp. 3 tbsp.
Salt ½ tsp. ½ tsp. 1 tsp.
Sugar 1 tbsp. 2 tbsp. 3 tbsp.
Powdered
Milk
2 tbsp. 3 tbsp. 5 tbsp.
Flour 300g 400g 520g
Yeast
Powder
1 tsp. 1 tsp. 1 tsp.
Ingredients 1lb 1.5lb 2lb
Water 160ml 240ml 310ml
Vegetable
Oil
1 tbsp. 1 tbsp. 2 tbsp.
Salt ½ tsp. ½ tsp. 1 tsp.
Sugar 1 tbsp. 1 tbsp. 3 tbsp.
Powdered
Milk
1 tbsp. 1 tbsp. 3 tbsp.
Flour 300g 400g 520g
Yeast
Powder
1
⁄3
tsp.
1
⁄3
tsp.
1
⁄3
tsp.
Ingredients 1lb 1.5lb 2lb
Water 160ml 240ml 310ml
Butter 2 tbsp. 2 tbsp. 4 tbsp.
Salt ½ tsp. ½ tsp. 1 tsp.
Sugar 4 tbsp. 6 tbsp. 8 tbsp.
Powdered
Milk
2 tbsp. 3 tbsp. 4 tbsp.
Flour 250g 375g 510g
Almond
Essence
A little A little A little
Yeast
Powder
1¼ tsp. 1¼ tsp. 1½ tsp.
Ingredients 1lb 1.5lb 2lb
Water 155ml 230ml 300ml
Butter 2 tbsp. 2 tbsp. 3 tbsp.
Salt ½ tsp. ½ tsp. 1 tsp.
Flour 250g 375g 500g
Yeast
Powder
1 tsp. 1¼ tsp. 1½ tsp.
27
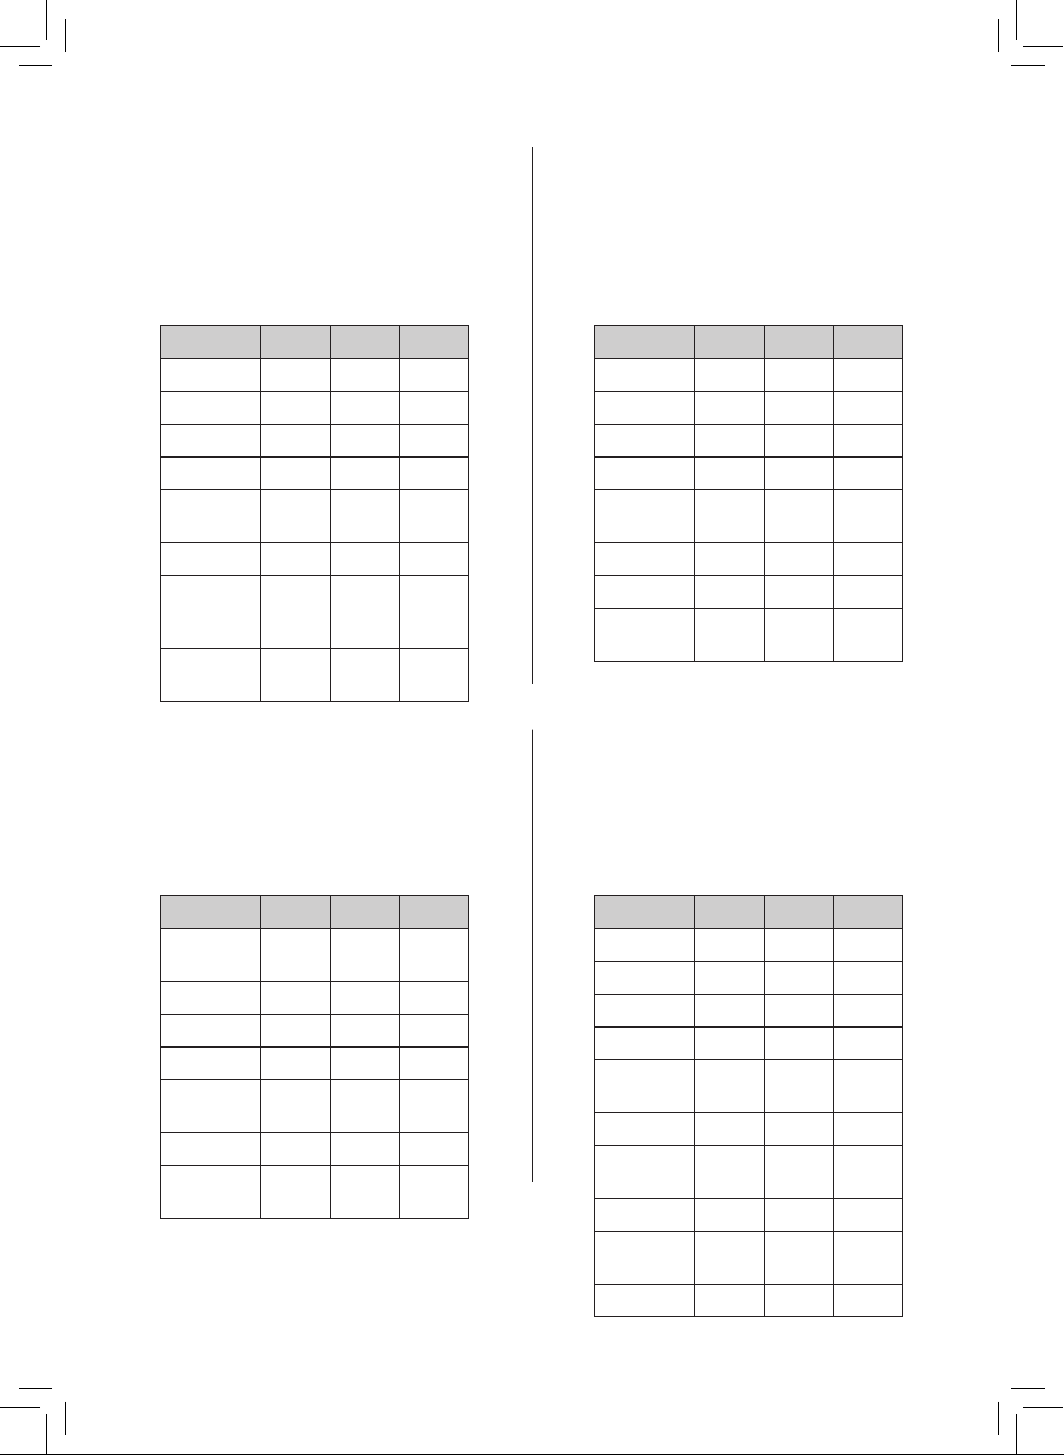
Whole Wheat
Program 5
Default time:
3 hours and 18 minutes
Quick Bread
Program 6
Default time:
1 hour and 38 minutes
Sugar-Free
Program 7
Default time:
3 hours and 11 minutes
Multi-Grain Bread
Program 8
Default time:
3 hours and 7 minutes
Ingredients 1lb 1.5lb 2lb
Water 155ml 230ml 310ml
Butter 2 tbsp. 2 tbsp. 3 tbsp.
Salt ½ tsp. ½ tsp. 1 tsp.
Sugar 2 tbsp. 3 tbsp. 4 tbsp.
Powdered
Milk
2 tbsp. 3 tbsp. 4 tbsp.
Flour 100g 150g 200g
Whole
Wheat
Flour
200g 300g 400g
Yeast
Powder
1 tsp. 1 ¼
tsp.
1 ½
tsp.
Ingredients 1lb 1.5lb 2lb
Water 40-
50°C
160ml 240ml 310ml
Butter 2 tbsp. 2 tbsp. 3 tbsp.
Salt 1 tsp. 1 tsp. 1 tsp.
Sugar 1 tbsp. 2 tbsp. 3 tbsp.
Powdered
Milk
2 tbsp. 3 tbsp. 5 tbsp.
Flour 300g 400g 520g
Yeast
Powder
2 tsp. 3 tsp. 4 tsp.
Ingredients 1lb 1.5lb 2lb
Water 160ml 240ml 310ml
Butter 2 tbsp. 2 tbsp. 3 tbsp.
Salt 1 tsp. 1 tsp. 2 tsp.
Xylitol 3 tbsp. 4 tbsp. 6 tbsp.
Powdered
Milk
2 tbsp. 3 tbsp. 4 tbsp.
Flour 300g 450g 550g
Eggs 1 1 1
Yeast
Powder
1 tsp. 1¼ tsp. 1½ tsp.
Ingredients 1lb 1.5lb 2lb
Water 120ml 170ml 210ml
Butter 2 tbsp. 2 tbsp. 3 tbsp.
Salt ½ tsp. ½ tsp. 1 tsp.
Sugar 1 tbsp. 1 tbsp. 2 tbsp.
Powdered
Milk
1 tbsp. 2 tbsp. 3 tbsp.
Flour 150g 230g 300g
Whole
Wheat Flour
50g 75g 100g
Oatmeal 50g 75g 100g
Yeast
Powder
1 tsp. 1¼ tsp. 1½ tsp.
Eggs 1 1 1
28
Milky Loaf
Program 9
Default time:
3 hours and 6 minutes
Cake
Program 10
Default time:
1 hour and 33 minutes
Raw Dough
Program 11
Default time:
23 minutes
Leaven Dough
Program 12
Default time:
1 hour and 24 minutes
Ingredients 1lb 1.5lb 2lb
Milk 160ml 240ml 310ml
Butter 2 tbsp. 2 tbsp. 3 tbsp.
Sugar 1 tsp. 1 tsp. 2 tsp.
Eggs 1 1 1
Powdered
Milk
2 tbsp. 3 tbsp. 5 tbsp.
Flour 300g 400g 520g
Oatmeal 50g 75g 100g
Yeast
Powder
1 tsp. 1¼ tsp. 1½ tsp.
Ingredients Quantity
Eggs 4
Butter 100g
Sugar 150g
Cake Flour 380g
Salt 1 tsp.
Soda Powder 3.5g
Ingredients Quantity
Water 280ml
Vegetable Oil 2 tbsp.
Eggs 2
Salt 1 1/3 tsp.
Sugar 1 tbsp.
Flour 560g
Ingredients Quantity
Water 240ml
Vegetable Oil 2 tbsp.
Salt 1 ½ tsp.
Sugar 1 tbsp.
Flour 420g
Yeast Powder 1 ½ tsp.
29
Jam
Program 13
Default time:
1 hour and 5 minutes
Yoghurt
Program 15
Default time:
8 hours
Gluten Free Bread
Program 16
Default time:
2 hours and 55 minutes
Ingredients Quantity
Fruit 600g
Sugar 300g
Gelatin or Pudding
Powder
50g
Ingredients Quantity
Milk 350ml
Yoghurt 50ml
Sugar 3 tbsp.
Ingredients 1lb 1.5lb 2lb
Water 120ml 180ml 240ml
Sugar 2 ½
tbsp.
3 tbsp. 3 ½
tbsp.
Salt ½ tsp. 1 tsp. 2 tsp.
Vegetable
Oil
2 tbsp. 2 ½
tbsp.
3 tbsp.
Gluten Free
Flour
140g 210g 280g
Corn Flour 140g 210g 280g
Yeast
Powder
1 tsp. 1 ¼
tsp.
1 ½
tsp.
thank you!
We hope you enjoy your appliance for many years. As a thank you for
purchasing one of our fantastic products, we are offering you an extra
2 years peace of mind.
*To receive your extra 2 years guarantee, register your appliance online
within 28 days of purchase by visiting:
www.towerhousewares.co.uk
Should you have a problem with your appliance, or need any spare parts,
please call our Customer Support Team:
+44 (0) 333 220 6066
1018.V3
Your warranty becomes void should you
decide to use non Tower spare parts.
Spare parts can be purchased from
www.towerhousewares.co.uk