Owner's Manual
E: L ! T
TM
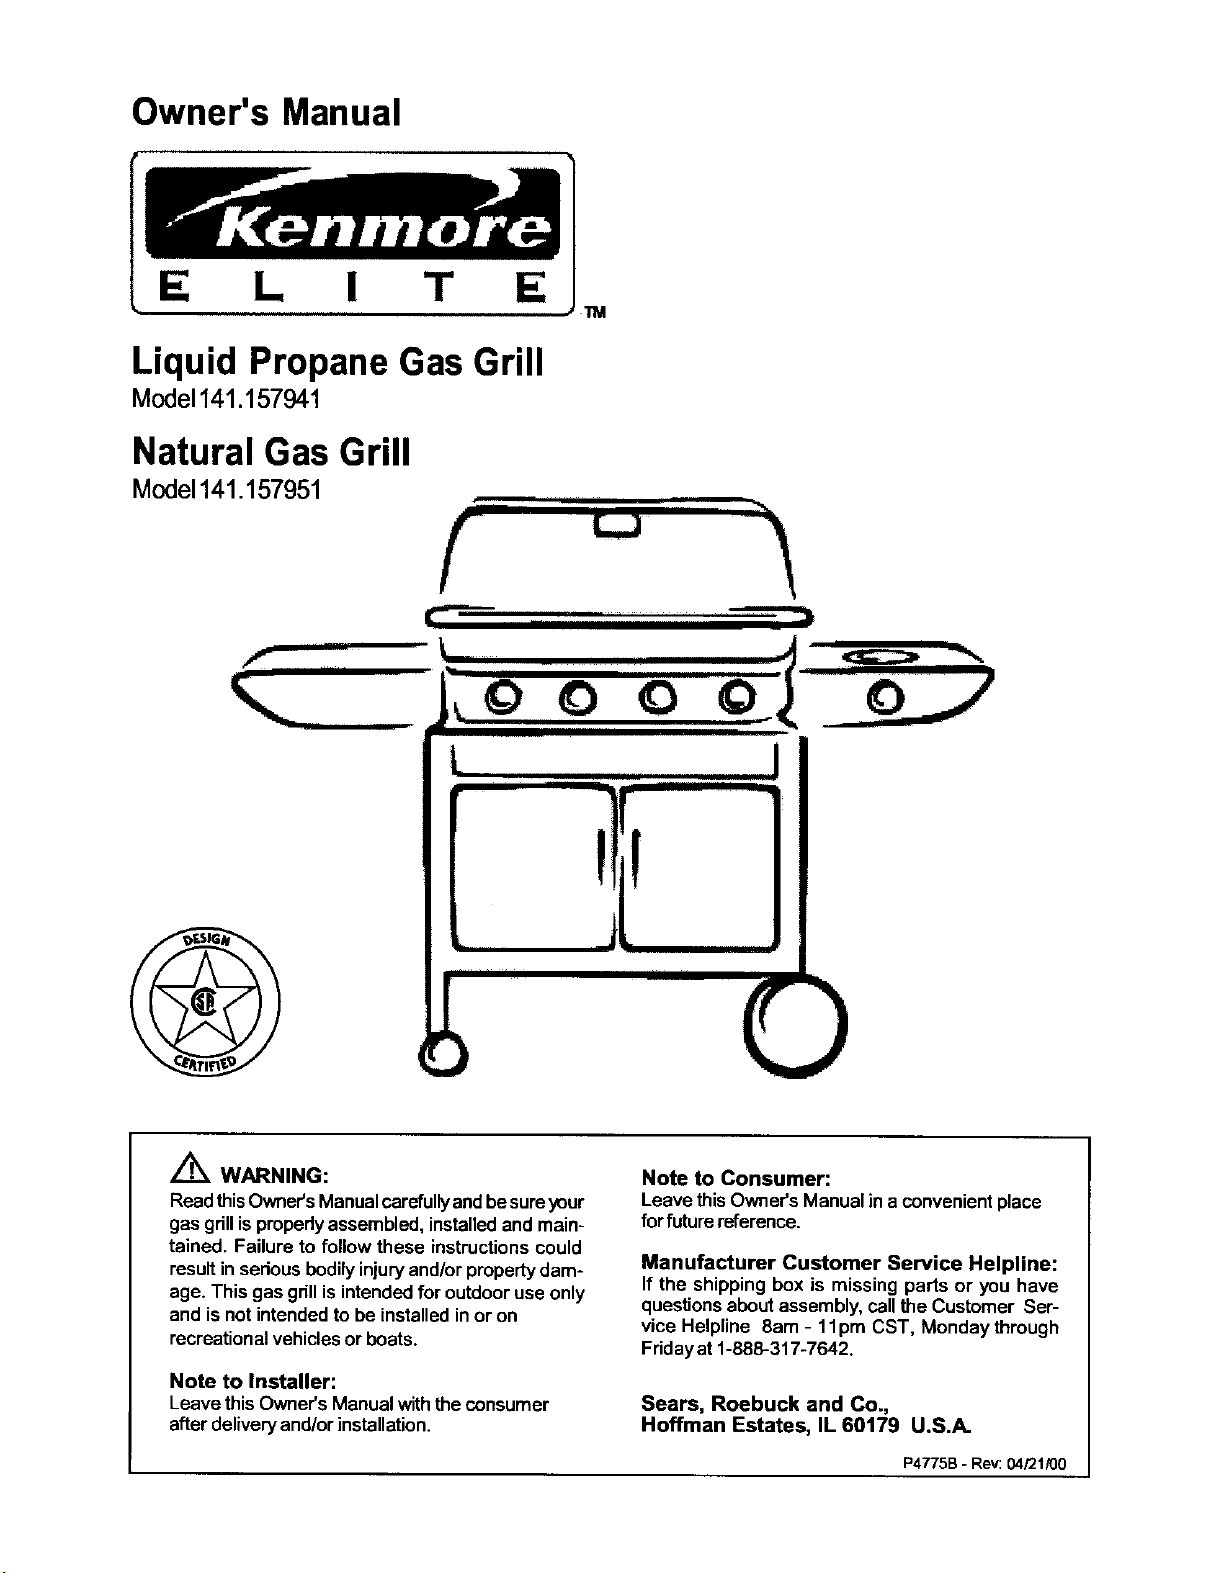
Liquid Propane Gas Grill
Model141.157941
Natural Gas Grill
Model141.157951
IIfllll
f
O O
m
Z_ WARNING:
ReadthisOwner'sManualcarefullyandbesureyour
gas grillispropedyassembled, installedand main-
tained. Failure to follow these instructionscould
resultinsedous bodilyinjuryand/orpropertydam-
age. This gasgdll isintendedfor outdooruseonly
and isnot intendedto be installedinor on
recreationalvehiclesor boats.
Note to Installer:
Leave thisOwner's Manual withtheconsumer
afterdeliveryand/orinstallation.
Note to Consumer:
Leave this Owner'sManual in a convenientplace
for future reference.
Manufacturer Customer Service Helpline:
If the shipping box is missing parts or you have
questions aboutassembly,call the Customer Ser-
vice Helpline 8am - 11pro CST, Monday through
Fridayat 1-888-317-7642.
Sears, Roebuck and Co.,
Hoffman Estates, IL 60179 U.S.A.
P4775B - Rev: 04/21/00
Warranty ..................................................... 2
Safety Instructions ..................................... 2
Pre-Assembly Instructions ......................... 4
Parts Diagram and Part Lists ............... 5
Assembly Instructions ................................. 8
Lighting Instructions .................................. 14
Cooking Instructions ................................ 16
Cleaning and Maintenance Instructions .... 16
Frequently Asked Questions .................. 19
Cooking Guide and Recipes ................ 20
/_ WARNING
Failure to comply with these instructions
could result in a fire or explosion which
could cause serious bodily injury, death,
or property damage.
Grill Installation Codes
This gas grill must be installed in accordance
with all local codes. In areas without local
codes, follow the latest edition of the National
Fuel Gas Code ANSI Z223.1. In Canada. installa-
tion must conform to standard CAN/CGA lb149.1
or 1-b149.2 (Installation Code for Gas Burning
Appliances and Equipment) and all local codes.
From the date of purchase for the designated time
periods listed below, Sears will replace the following
grillpartsfree of charge iftheyare defective inmaterial
or workmanship.
• Lifetime of Grill: Exterior Stainless Steel Parts,
Aluminum Castings (except for paint loss)
• 3 Years: Flame Tamers, Cooking Grids, Burners
• 5 Years: All Other Grill Parts (except ignitorbattery)
This warranty does not cover:
• Labor costs for repairs
• Grill if it is used for commercial or rental
purposes.
Replacement parts are available by contacting the
nearest Sears Service Center.
This warranty applies only when the grill is used
in the United States.
This warranty gives you specific legal rights, and
you may also have other rights which vary from
state to state.
Sears, Roebuck and Co., Dept. 817WA,
Hoffman Estates, IL 60179
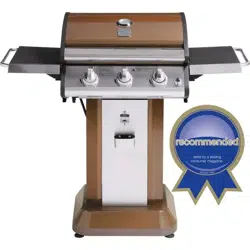
Proper Placement and Clearance of Grill
Never use your gas grillina garage, porch,shed,
breezewayor anyotherenclosedarea. Yourgas grill
isto beused outdoors only, at least24" from the
back and side of any combustible surface.Your
gas grillshould not be placed under any surface
that will bum. Do not obstruct theflow ofventila-
tion air around the gas gdll housing.
This outdoorgas grillis notintendedto be installedin
or on recreational vehicles and/or beats.
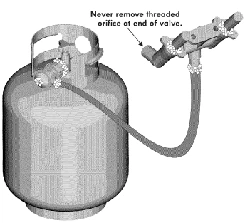
Correct LPG Cylinder Use
LPG grill models are designed for use with a
standard 20 lb. Liquid Propane Gas (LPG)
cylinder, not included with grill box. Never
connect your gas grill to an LPG cylinder that
exceeds this capacity. A cylinder of approxi-
mately 12 inches in diameter by 18-1/2 inches
high should be the maximum size LPG cylinder
used. We recommend buying an "OPD" gas
cylinderwhich offers an Overfill Prevention
Device. This safety feature prevents the cylinder
from being overfilled which can cause malfunction
of the LPG cylinder, regulator and/or grill.
The LPG cylinder must be constructed and
marked in accordance with specifications of the
U.S. Dept. of Transportation (DOT). In Canada,
the LPG cylinder must meet the Canadian
Transportationand Communications(CTC)
specifications. Also be sure:
1. The LPG cylinder has a shutoff valve, termi-
nating in an LPG supply cylinder valve outlet,
that is compatible with a Type 1 cylinder
connection device. The LPG cylinder must
also have a safety relief device that has a
direct communication with the vapor space of
the cylinder.
2. The cylinder supply system must be arranged
for vapor withdrawal.
3. The LPG cylinder used must have a collar
to protect the cylinder valve.
2 © Sears, Roebuck and Co.
WARNING
Failure to comply with these instructions
could result in a fire or explosion which
could cause serious bodily injury, death,
or property damage.
• Never connect an unregulated LPG cylinder
to your gas grill. The gas regulator assembly
supplied with your gas grill is adjusted to
have an outlet pressure of 11" water column
(W.C.) for connection to an LPG cylinder.
• Only use the regulator and hose assembly
supplied with your gas grill. Replacement
regulators and hose assemblies must be
those specified by Sears.
• Have your LPG cylinder filled by a reputable
propane gas dealer and visually inspected
and re-qualified at each filling.
• Never fill the gas cylinder beyond 80% full.
Have your propane gas dealer check the
release valve after every filling to ensure that
it remains free of defects.
• Always keep LPG cylinders in an upright
position.
• Do not store (or use) gasoline or other flammable
vapors and liquids in the vicinity of this gas gdll.
• An LPG cylinder that is not connected for use
must not be stored inthe vicinityof this or any
other gas grill.
• Do not subject the LPG cylinder to excessive
heat.
• Never store an LPG cylinder indoors. If you
store your gas grill in the garage or other
indoor location, always disconnect the LPG
cylinder first and store it safely outside.
• LPG cylinders must be stored outdoors in a
well-ventilated area. Disconnected LPG cylin-
ders must not be stored in a building,
garage or any other enclosed area.
• When your gas grill is not in use the gas
must be turned off at the LPG cylinder.
• The regulator and hose assembly must be
inspected before each use of the grill. If
there is excessive abrasion or wear or if the
hose is cut, it must be replaced prior to the
grill being used again.
• Keep the gas regulator hose away from
hot grill surfaces and dripping grease.
Avoid unnecessary twisting of hose. Visually
inspect hose prior to each use for cuts,
cracks, excessive wear or other damage.
• If the hose appears damaged do not use gas
grill. Call Sears at 1-800--4-MY-HOME for
a Sears authorized replacement hose.
• Never light your gas grill with the lid closed
or before checking to insure the burner tubes
are fully seated over the gas valve orifices.
• Never allow children to operate your grill. Do
not allow children to play near your grill.
WARNING
IF YOU SMELL GAS:
• Shut off gas supply to the grill.
• Extinguish any open flame.
• Open grill lid.
• If odor continues, immediately call your
gas company or local fire department.
Failure to comply with these instructions
could result in a fire or explosion which
could cause serious bodily injury, death, or
property damage.
WARNING
A strong gas smell, or the hissing sound of
gas indicates a serious problem with your
gas grill or the LPG cylinder. Failure to
immediately follow the steps listed below
could result in a fire or explosion which
could cause serious bodily injury, death, or
propertydamage.
• Get away from the LPG cylinder.
• Do not try to fix the problem yourself.
• Call your fire department. (Do not call
near the LPG cylinder because your
telephone is an electrical device.)
CAUTION: Spiders and small insects occa-
sionally spin webs or make nests in the
grill burner tubes dudng transit and
warehousing. These webs can lead to a gas
flow obstruction which could result in a fire
in and around the burner tubes. This type of
fire is known as a "FLASH-BACK" and can
cause serious damage to your grill and
create an unsafe operating condition for the
user.
Although an obstructed burner tube is not
the only cause of "FLASH-BACK", it is the
most common cause.
To reduce the chance of "FLASH-BACK",
you must clean the burner tubes before
assembling your grill, and at least once a
month in late summer or early fall when
spiders are most active. Also perform this
burner tube cleaning procedure if your gdll
has not been used for an extended period
of time.
3
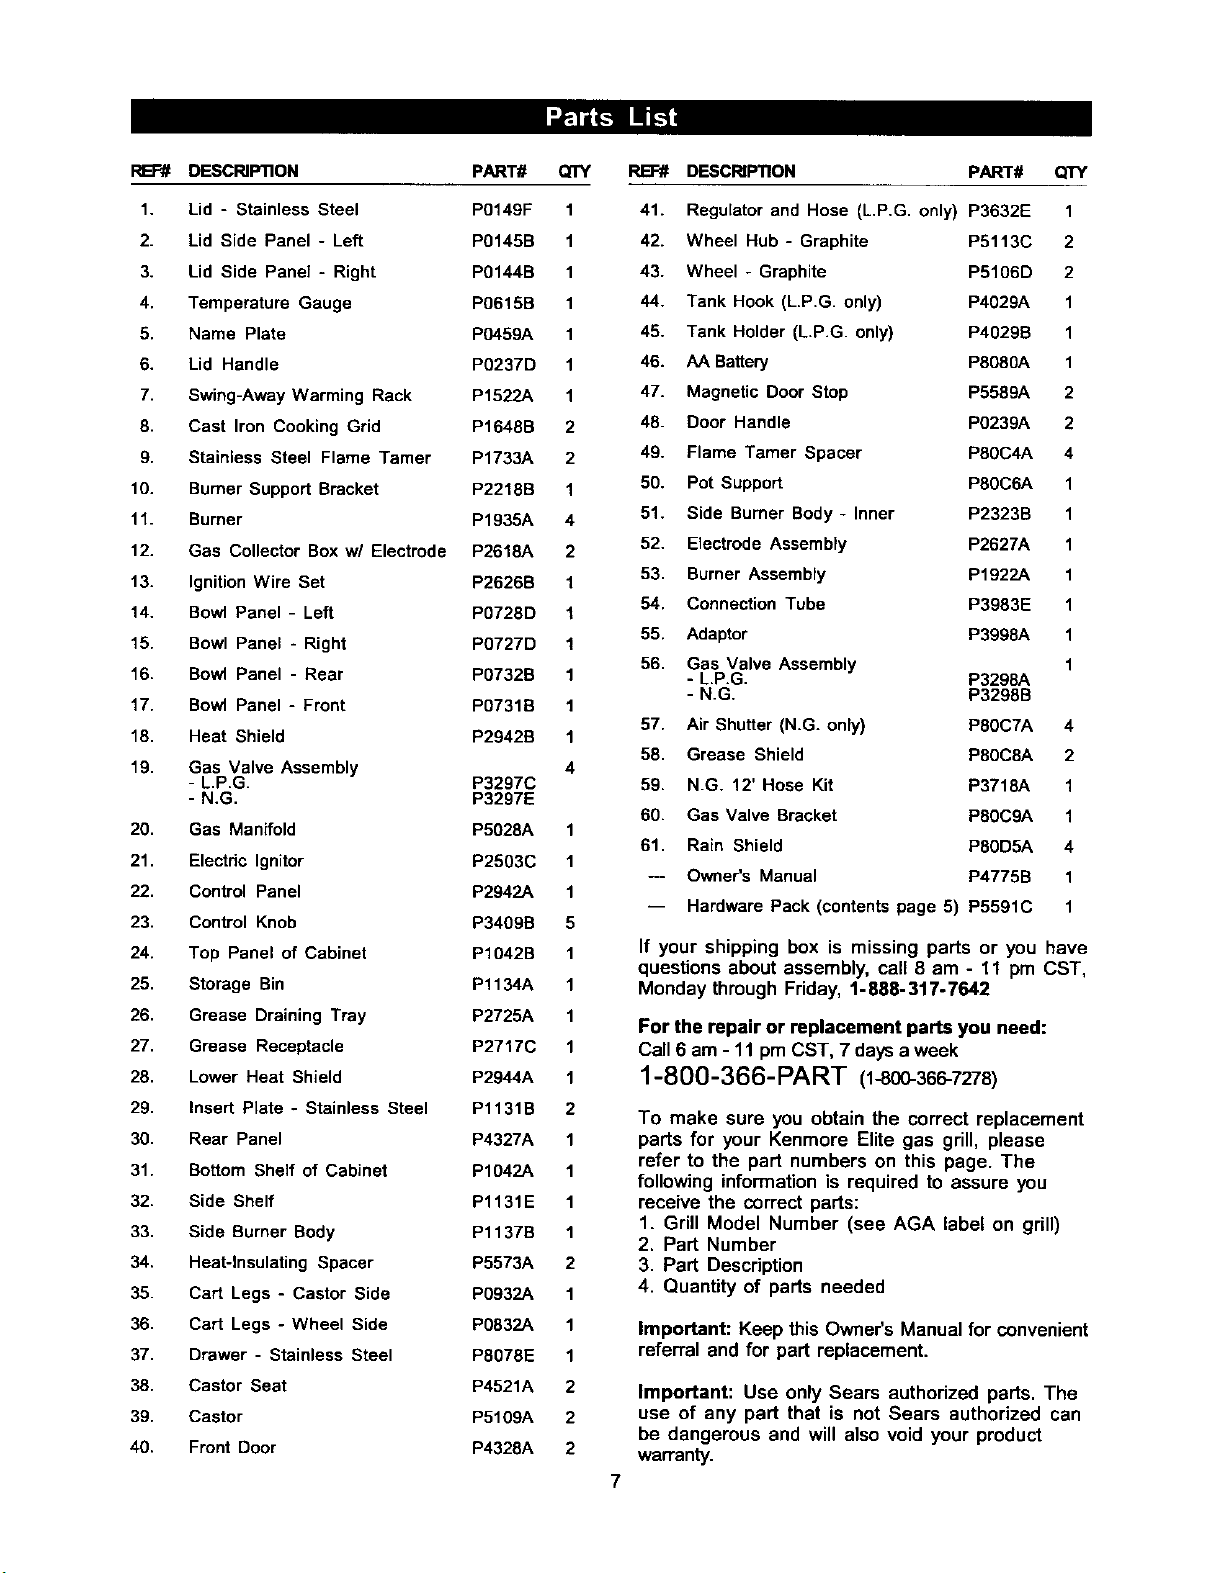
Toreduce the chance of "FLASH-BACK" (see
caution on page 3) clean the burner tubes and
burners before fully assembling your grill• Remove
the cotter pin from the rear underside of each
burner using a pair of long nose pliers. Carefully
lift each burner up and away from the gas valve
orifice, then refer to Figure 1 and perform one of
these three cleaning methods:
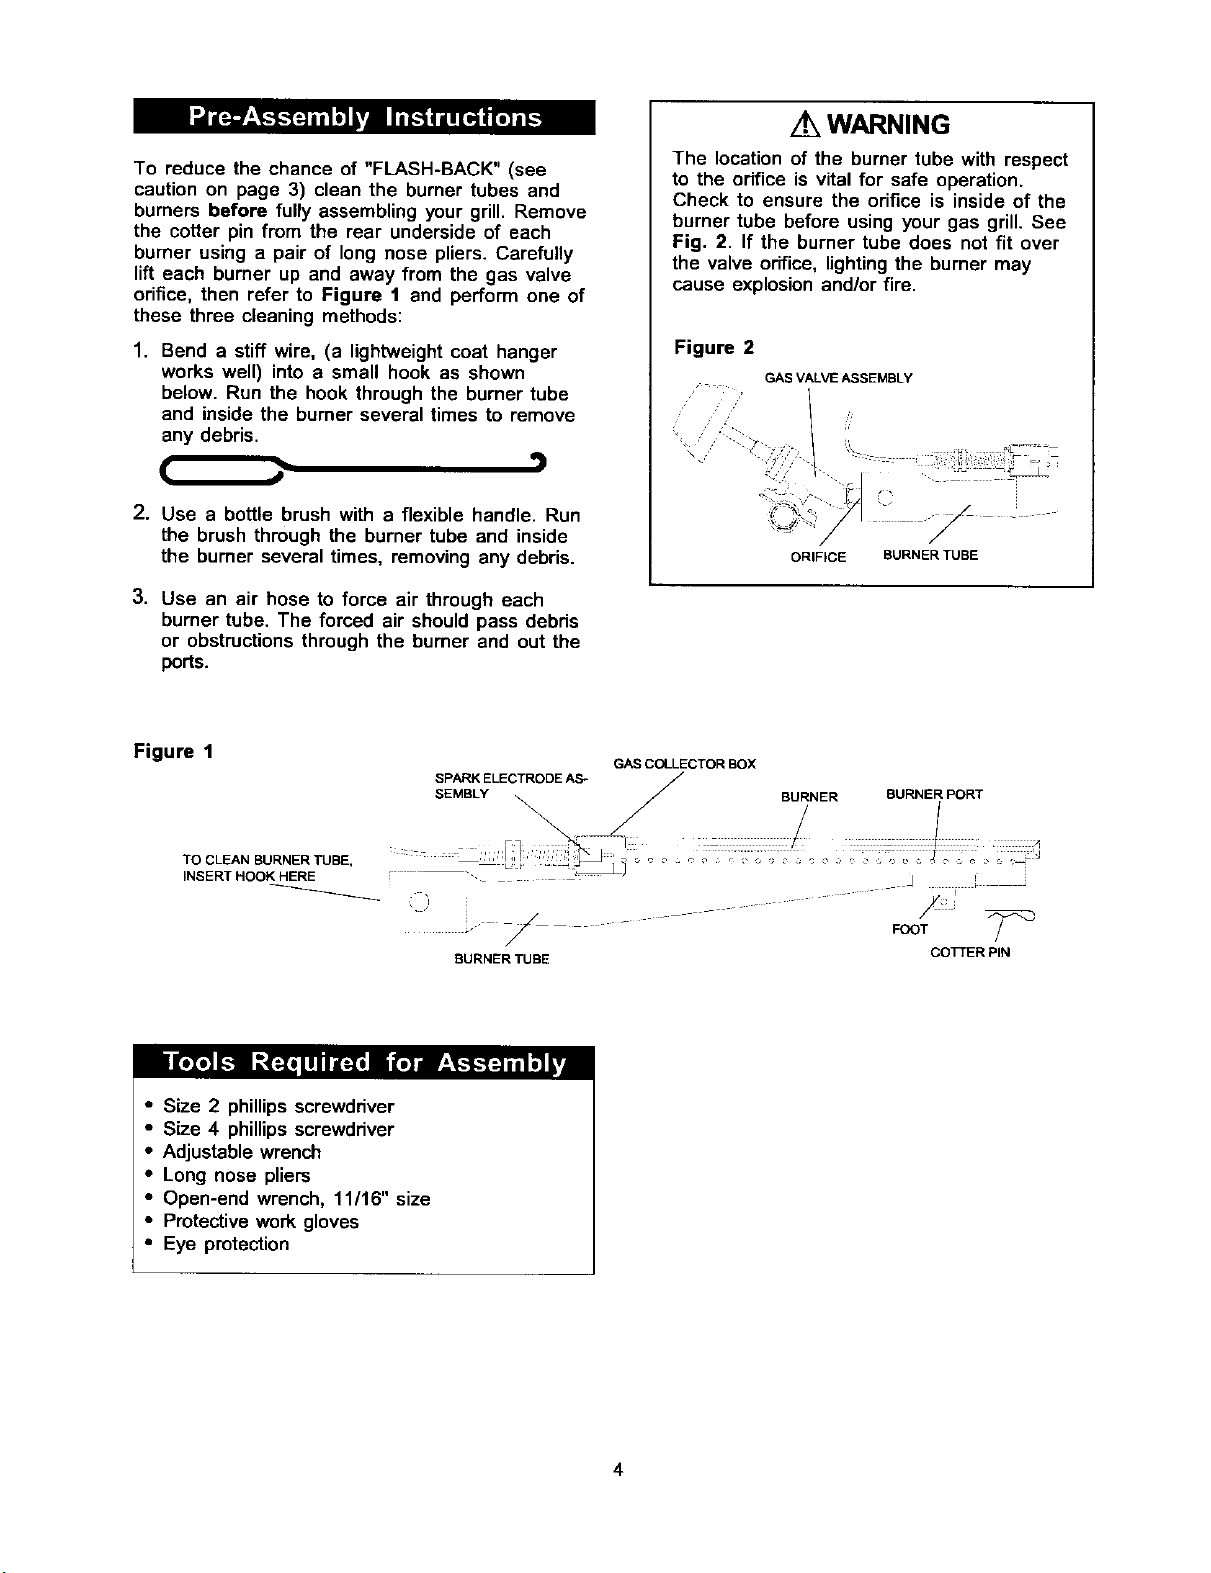
1. Bend a stiff wire, (a lightweight coat hanger
works well) into a small hook as shown
below• Run the hook through the burner tube
and inside the burner several times to remove
any debris•
( ;- '1)
2. Use a bottle brush with a flexible handle• Run
the brush through the burner tube and inside
the burner several times, removing any debris.
3. Use an air hose to force air through each
burner tube. The forced air should pass debds
or obstructions through the burner and out the
ports.
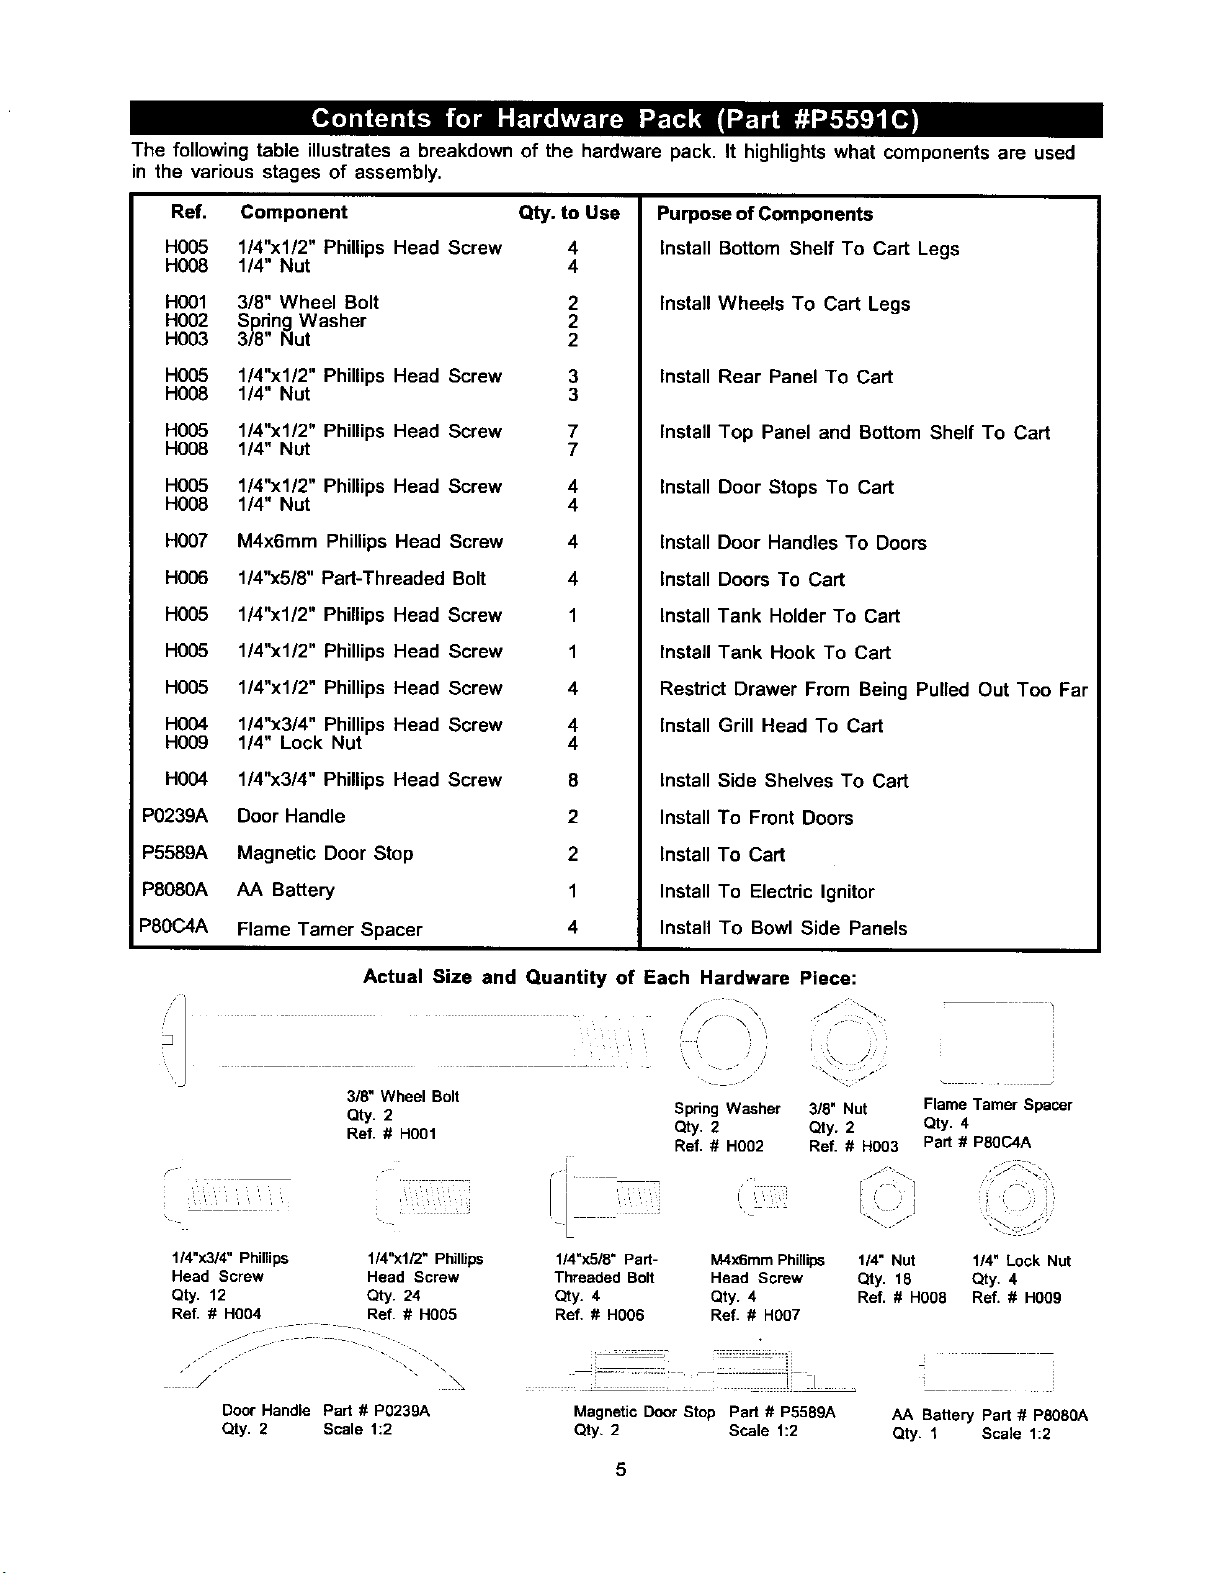
/h WARNING
The location of the burner tube with respect
to the orifice is vital for safe operation.
Check to ensure the orifice is inside of the
burner tube before using your gas grill. See
Fig. 2. If the burner tube does not fit over
the valve orifice, lighting the burner may
cause explosion and/or fire.
Figure 2
GAS VALVE ASSEMBLY
ORIFICE BURNER TUBE
Figure 1
TO CLEAN BURNER TUBE,
INSERT HOOK HERE
GAS COLLECTOR BOX
SPARK ELECTRODE AS-
SEMBLY "_ _ BURNER BURNER PORT
_J
I i
FOOT _
/
BURNER TUBE COTTER PIN
• Size 2 phillipsscrewdriver
• Size 4 phillips screwdriver
• Adjustable wrench
• Long nose pliers
• Open-end wrench, 11116" size
• Protective work gloves
• Eye protection
4
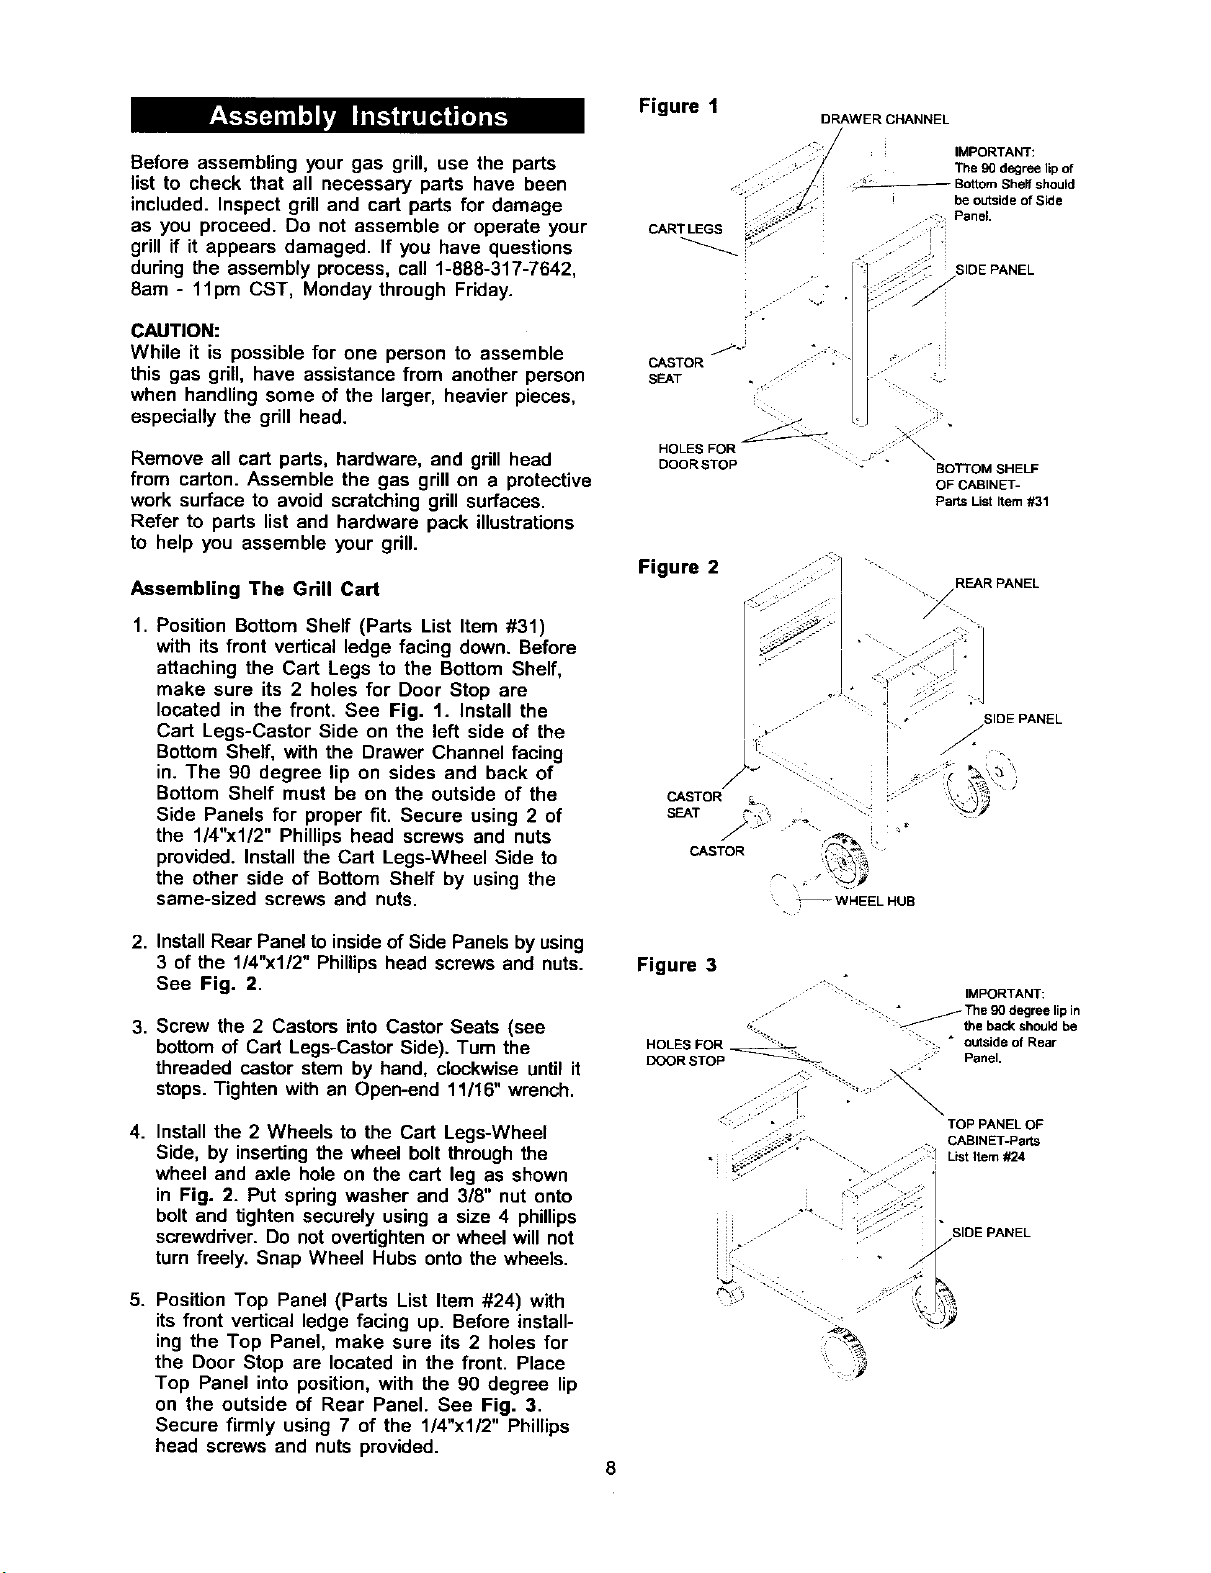
The following table illustrates a breakdown of the hardware pack. It highlights what components are used
in the various stages of assembly.
Ref,
H005
H008
H001
H002
H003
H005
H008
H005
H008
H005
Hog8
HO07
H006
H005
H005
H005
H004
H009
HO04
P0239A
P5589A
P8080A
P80C4A
Component Qty. to Use
1/4"xl/2" Phillips Head Screw 4
1/4" Nut 4
3/8" Wheel Bolt 2
Spring Washer 2
3/8" Nut 2
1/4"xl/2" Phillips Head Screw 3
1/4" Nut 3
1/4"xl/2" Phillips Head Screw 7
1/4" Nut 7
1/4"xl/2" Phillips Head Screw 4
1/4" Nut 4
M4x6mm Phillips Head Screw 4
1/4"x5/8" Part-Threaded Bolt 4
1/4"xl/2" Phillips Head Screw 1
1/4"xl/2" Phillips Head Screw 1
1/4"xl/2" Phillips Head Screw 4
1/4"x3/4" Phillips Head Screw 4
1/4" Lock Nut 4
1/4"x3/4" Phillips Head Screw 8
Door Handle 2
Magnetic Door Stop 2
AA Battery 1
Flame Tamer Spacer 4
Purpose of Components
Install Bottom Shelf To Cart Legs
Install Wheels To Cart Legs
Install Rear Panel To Cart
Install Top Panel and Bottom Shelf To Cart
Install Door Stops To Cart
Install Door Handles To Doors
Install Doors To Cart
Install Tank Holder To Cart
Install Tank Hook To Cart
Restdct Drawer From Being Pulled Out Too Far
Install Grill Head To Cart
Install Side Shelves To Cart
Install To Front Doors
Install To Cart
Install To Electric Ignitor
Install To Bowl Side Panels
Actual Size and Quantity of Each Hardware Piece:
i
3/8" Wheel Bolt
Qty. 2
Ref. # H001
\
114"x3/4"Phillips 114"xl/2" Phillips
Head Screw Head Screw
Qty. 12 Qty. 24
Ref. # H004 Ref. # H005
J J ". \\
/ •
Door Handle Part # P0239A
Qty. 2 Scale 1:2
Spring Washer 318" Nut Flame Tamer Spacer
Qty. 2 Qty. 2 Qty. 4
Ref. # H002 Ref. # H003 Part # PSOC4A
r
, , ,, ,
1/4"x518" Part- M4x6mm Phillips
Threaded Bolt Head Screw
Qty. 4 Qty. 4
Ref, # H006 Ref. # H007
Magnetic Door Stop Part # P5589A
Qty. 2 Scale 1:2
1/4" Nut 1/4" Lock Nut
Qty. 18 Qty. 4
Ref. # H0O8 Ref. # H009
AA Battery Part # PS08OA
Qty. 1 Scale 1:2
5

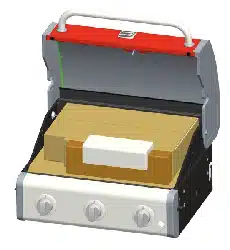
Removeallcomponentsfrom the packing carton and place within easy reach. Do not throw the shippingcarton
away; instead use it as an elevated assembly surface.
= .
_ . 7f
AR
'I
?: ! > -N
¢ 7 "_ ,I,
41
6
DESCRIPllON PART# QI"Y RE_# DESCRIPTION
PART# QTY
1. Lid - Stainless Steel P0149F 1
2. Lid Side Panel - Left PO145B 1
3. Lid Side Panel - Right PO144B 1
4. Temperature Gauge P0615B 1
5. Name Plate P0459A 1
6. Lid Handle P0237D 1
7. Swing-Away Warming Rack P1522A 1
8. Cast Iron Cooking Grid P1648B 2
9. Stainless Steel Flame Tamer P1733A 2
10. Burner Support Bracket P2218B 1
11. Burner P1935A 4
12. Gas Collector Box w/ Electrode P2618A 2
13. Ignition Wire Set P2626B 1
14. Bowl Panel - Left P0728D 1
15. Bowl Panel - Right P0727D 1
16. Bowl Panel - Rear P0732B 1
17. Bowl Panel - Front P0731B 1
18. Heat Shield P2942B 1
19. Gas Valve Assembly 4
- L.P.G. P3297C
- N.G. P3297F
20. Gas Manifold P5028A 1
21. Electric Ignitor P2503C 1
22. Control Panel P2942A 1
23. Control Knob P3409B 5
24. Top Panel of Cabinet P1042B 1
25. Storage Bin P1134A 1
26. Grease Draining Tray P2725A 1
27. Grease Receptacle P2717C 1
28. Lower Heat Shield P2944A 1
29. Insert Plate - Stainless Steel P1131B 2
30. Rear Panel P4327A 1
31. Bottom Shelf of Cabinet P1042A 1
32. Side Shelf P1131E 1
33. Side Burner Body P1137B 1
34. Heat-Insulating Spacer P5573A 2
35. Cart Legs - Castor Side P0932A 1
36. Cart Legs - Wheel Side P0832A 1
37. Drawer - Stainless Steel PS078E 1
38. Castor Seat P4521A 2
39. Castor P5109A 2
40. Front Door P4328A 2
41. Regulator and Hose (L.P.G. only) P3632E 1
42. Wheel Hub - Graphite P5113C 2
43. Wheel - Graphite P5106D 2
44. Tank Hook (L.P.G. only) P4029A 1
45. Tank Holder (L.P.G. only) P4029B 1
46. AA Battery P8080A 1
47. Magnetic Door Stop P5589A 2
48. Door Handle P0239A 2
49. Flame Tamer Spacer PSOC4A 4
50. Pot Support P80C6A 1
51. Side Burner Body - Inner P2323B 1
52. Electrode Assembly P2627A 1
53. Burner Assembly P1922A 1
54. Connection Tube P3983E 1
55. Adaptor P3998A 1
56. Gas Valve Assembly 1
- L.P.G. P3298A
- N.G. P3298B
57. Air Shutter (N.G. only) P80C7A 4
58. Grease Shield P80CSA 2
59. N.G. 12' Hose Kit P3718A 1
60. Gas Valve Bracket P80C9A 1
61. Rain Shield P80D5A 4
-- Owner's Manual P4775B 1
-- Hardware Pack (contents page 5) P5591C 1
If your shipping box is missing parts or you have
questions about assembly, call 8 am - 11 pm CST,
Monday through Friday, 1-888-317-7642
For the repair or replacement parts you need:
Call 6 am - 11 pm CST, 7 days a week
1-800-366-PART (1-800-366-7278)
To make sure you obtain the correct replacement
parts for your Kenmore Elite gas grill, please
refer to the part numbers on this page. The
following information is required to assure you
receive the correct parts:
1. Grill Model Number (see AGA label on grill)
2. Part Number
3. Part Description
4. Quantity of parts needed
Important: Keep this Owner's Manual for convenient
referral and for part replacement.
Important: Use only Sears authorized parts. The
use of any part that is not Sears authorized can
be dangerous and will also void your product
warranty.
Beforeassemblingyourgas grill, use the parts
list to check that all necessary parts have been
included• Inspect grill and cart parts for damage
as you proceed• Do not assemble or operate your
grill if it appears damaged• If you have questions
during the assembly process, call 1-888-317-7642,
8am - 11pm CST, Monday through Friday•
CAUTION:
While it is possible for one person to assemble
this gas grill, have assistance from another person
when handling some of the larger, heavier pieces,
especially the grill head.
Remove all cart parts, hardware, and grill head
from carton. Assemble the gas grill on a protective
work surface to avoid scratching grill surfaces.
Refer to parts list and hardware pack illustrations
to help you assemble your grill•
Assembling The Grill Cart
1. Position Bottom Shelf (Parts List Item #31)
with its front vertical ledge facing down. Before
attaching the Cart Legs to the Bottom Shelf,
make sure its 2 holes for Door Stop are
located in the front. See Fig. 1. Install the
Cart Legs-Castor Side on the left side of the
Bottom Shelf, with the Drawer Channel facing
in. The 90 degree lip on sides and back of
Bottom Shelf must be on the outside of the
Side Panels for proper fit. Secure using 2 of
the 1/4"x1/2" Phillips head screws and nuts
provided. Install the Cart Legs-Wheel Side to
the other side of Bottom Shelf by using the
same-sized screws and nuts.
2. InstallRear Panel to insideof Side Panels by using
3 of the 1/4"x1/2" Phillips head screws and nuts.
See Fig. 2.
3. Screw the 2 Castors into Castor Seats (see
bottomof Cart Legs-Castor Side). Turn the
threaded castor stem by hand, clockwise until it
stops•Tighten with an Open-end 11/16" wrench.
4. Install the 2 Wheels to the Cart Legs-Wheel
Side, by inserting the wheel bolt through the
wheel and axle hole on the cart leg as shown
in Fig. 2. Put spring washer and 3/8" nut onto
bolt and tighten securely using a size 4 phillips
screwddver. Do not overtightan or wheel will not
turn freely. Snap Wheel Hubs onto the wheels•
5. Position Top Panel (Parts List Item #24) with
its front vertical ledge facing up. Before install-
ing the Top Panel, make sure its 2 holes for
the Door Stop are located in the front• Place
Top Panel into position, with the 90 degree lip
on the outside of Rear Panel. See Fig. 3.
Secure firmly using 7 of the 1/4"x1/2" Phillips
head screws and nuts provided•
Figure 1
DRAWER CHANNEL
- _.:_/ IMPORTANT:
._- The 90 degree lipof
• ./ _ Bottom Sheff should
- _/. i be outside of Side
;J; ' Panel.
CART LEGS _:_: i •
SIDE PANEL
CASTOR ::: ,
SEAT • ,: ::
HOLES FOR
DOORSTOP J " BOTTOM SHELF
OF CABINET-
Parts List Item #31
Figure 2
CASTOR _.. ..: •
SEAT ;-.'
CASTOR
• _WHEELHUB
REAR PANEL
' SIDE PANEL
Figure 3
IMPORTANT:
... " :" :-:. _ The 90 degree lip in
HOLES FOR < _..... :': " o_uesiLde(_ofheOUa_be
DOOR STOP _ ;'" Panel.
TOP PANEL OF
: ;:-" . . . CABINET-Parts
_;_-. . , List Item #24
-" SIDE PANEL
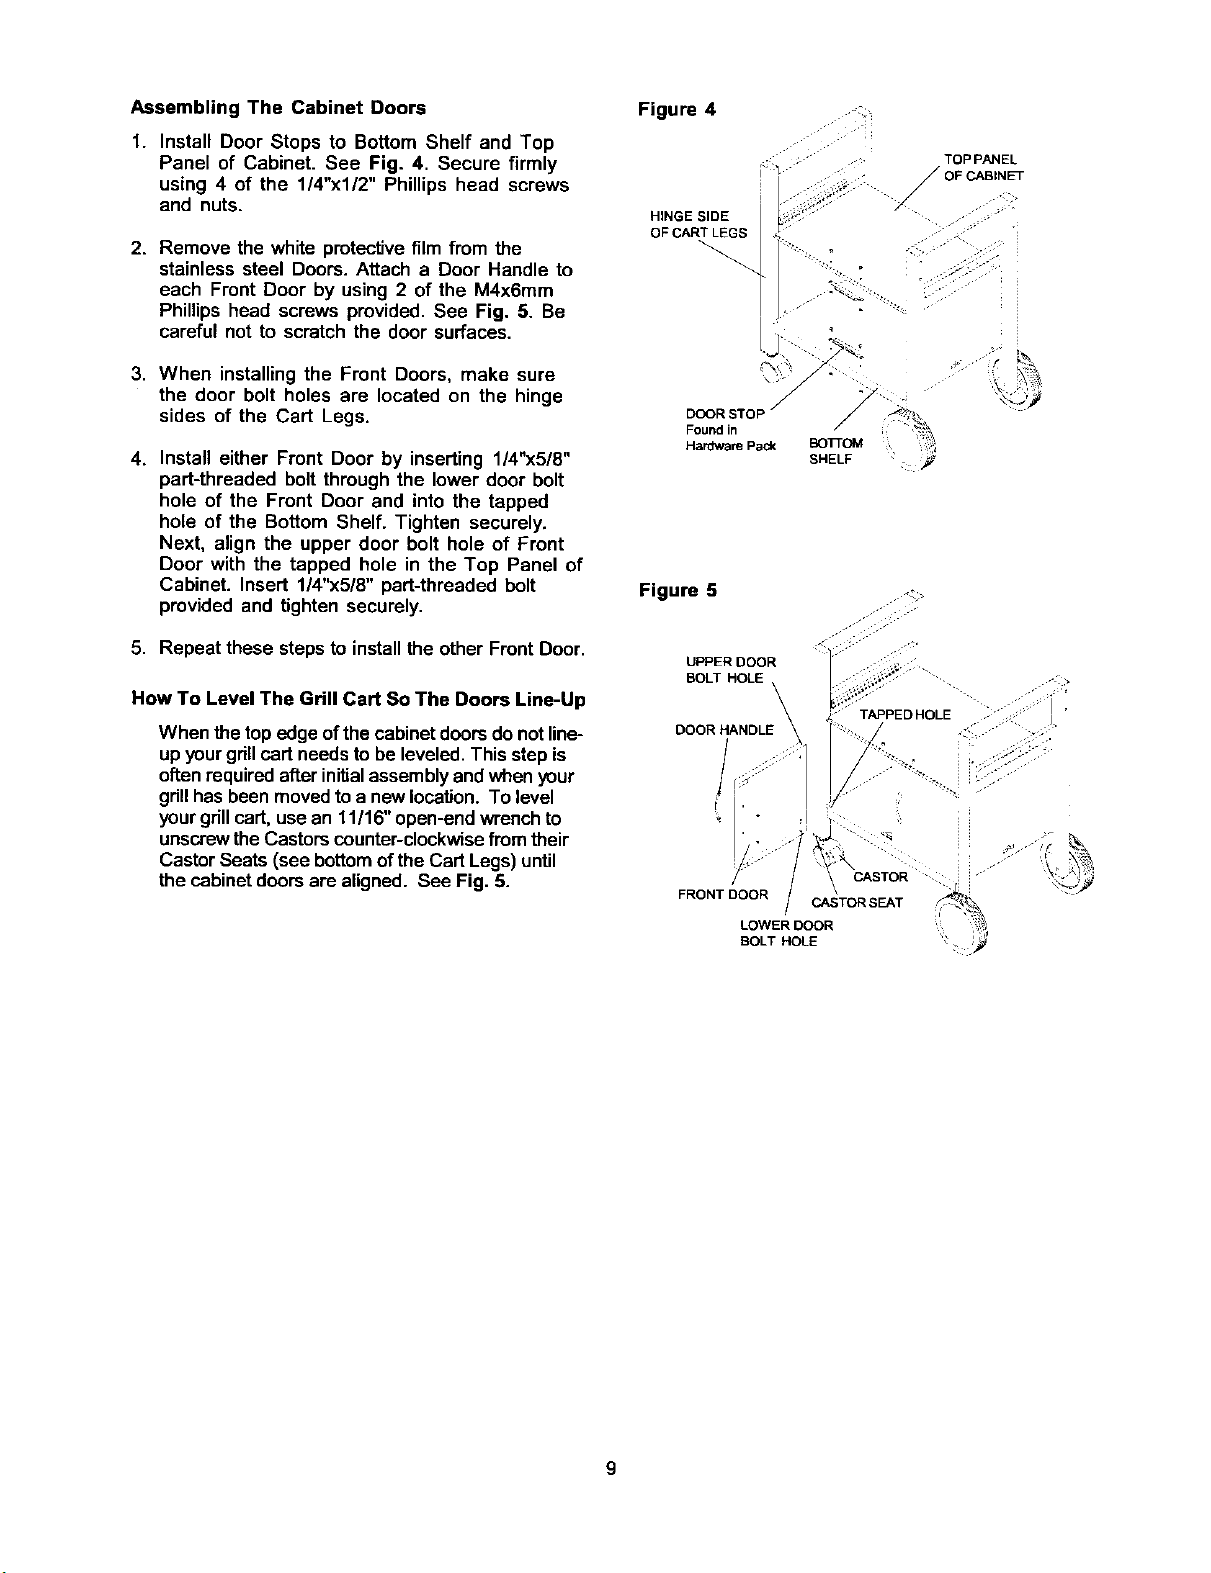
Assembling The Cabinet Doors
1. Install Door Stops to Bottom Shelf and Top
Panel of Cabinet. See Fig. 4. Secure firmly
using 4 of the 1/4"x1/2" Phillips head screws
and nuts.
2. Remove the white protective film from the
stainless steel Doors. Attach a Door Handle to
each Front Door by using 2 of the M4x6mm
Phillips head screws provided. See Fig. 5. Be
careful not to scratch the door surfaces.
3. When installingthe Front Doors, make sure
the door bolt holes are located on the hinge
sides of the Cart Legs.
4. Install either Front Door by inserting 1/4"x5/8"
part-threaded bolt through the lower door bolt
hole of the Front Door and into the tapped
hole of the Bottom Shelf. Tighten securely.
Next, align the upper door bolt hole of Front
Door with the tapped hole in the Top Panel of
Cabinet. Insert 1/4"x5/8" part-threaded bolt
provided and tighten securely.
5. Repeat these stepsto installthe other Front Door.
How To Level The Grill Cart So The Doors Line-Up
When the top edgeofthe cabinetdoorsdo not line-
up yourgdllcart needsto be leveled. Thisstep is
oftenrequiredafterinitialassemblyand whenyour
grillhas been movedtoa newlocation. To level
yourgrillcart, usean 11/16"open-endwrenchto
unscrewthe Castorscounter-clockwisefrom their
CastorSeats (see bottomofthe Cart Legs) until
the cabinet doorsare aligned. See Fig. 5.
Figure 4
TOP PANEL
• OF CABINET
/
.,.J..
/
f
DOOR STO D
Found in
SHELF
Figure 5
UPPER DOOR
ZL\
TAPPED HOLE
.':_ >
,- j,
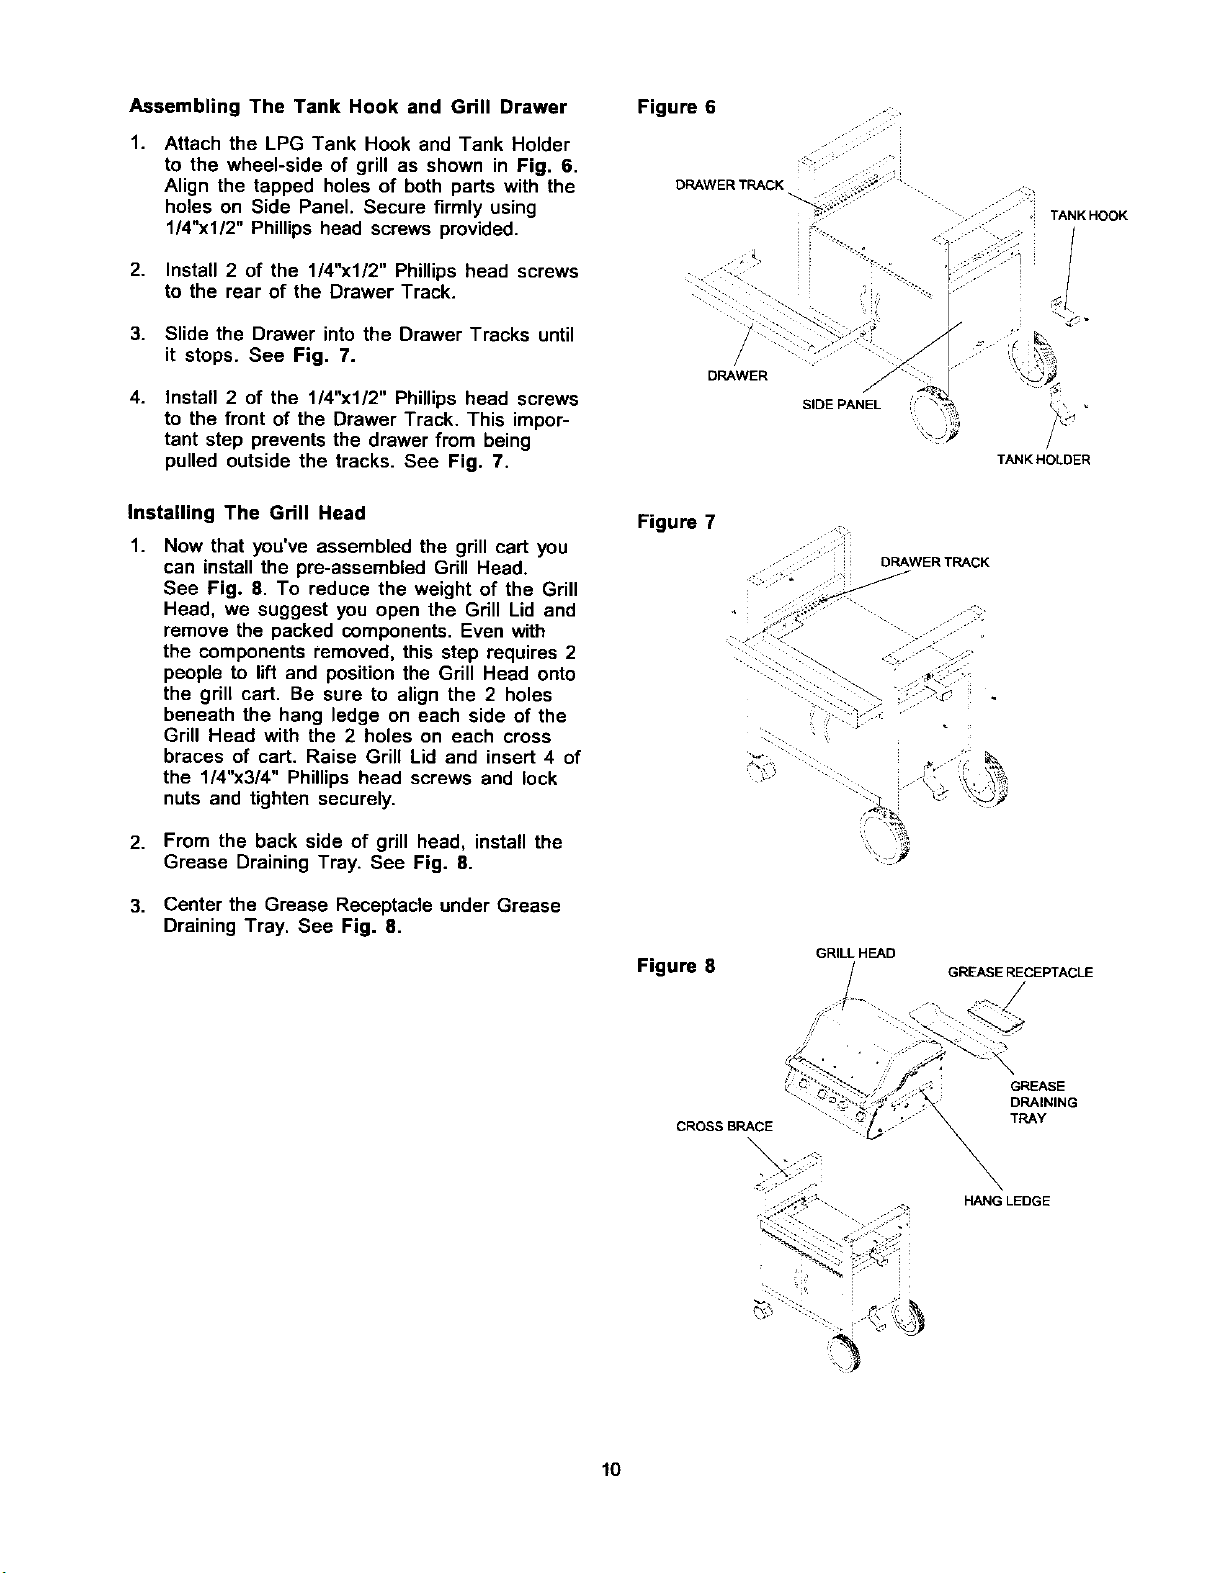
Assembling The Tank Hook and Grill Drawer
1.
Attach the LPG Tank Hook and Tank Holder
to the wheel-side of grill as shown in Fig. 6.
Align the tapped holes of both parts with the
holes on Side Panel. Secure firmly using
1/4"xl/2" Phillips head screws provided.
2. Install 2 of the 1/4"x1/2" Phillips head screws
to the rear of the Drawer Track.
3. Slide the Drawer into the Drawer Tracks until
it stops. See Fig. 7.
4.
Install 2 of the 1/4"x1/2" Phillips head screws
to the front of the Drawer Track. This impor-
tant step prevents the drawer from being
pulled outside the tracks. See Fig. 7.
Installing The Grill Head
1.
Now that you've assembled the grill cart you
can install the pre-assembled Grill Head.
See Fig. 8. To reduce the weight of the Grill
Head, we suggest you open the Grill Lid and
remove the packed components. Even with
the components removed, this step requires 2
people to lift and position the Grill Head onto
the grill cart. Be sure to align the 2 holes
beneath the hang ledge on each side of the
Grill Head with the 2 holes on each cross
braces of cart. Raise Grill Lid and insert 4 of
the 1/4"x3/4" Phillips head screws and lock
nuts and tighten securely.
2. From the back side of grill head, install the
Grease Draining Tray. See Fig. 8.
3. Center the Grease Receptacle under Grease
Draining Tray. See Fig. 8.
Figure 6
DRAWER TRACK
TANK HOOK
DRAWER
SIDE PANEL
TANK HOLDER
Figure 7
DRAWER TRACK
.... •••,
Figure 8
GRILL HEAD
GREASE RECEPTACLE
CROSS BRACE
GREASE
DRAINING
TRAY
HANG LEDGE
10
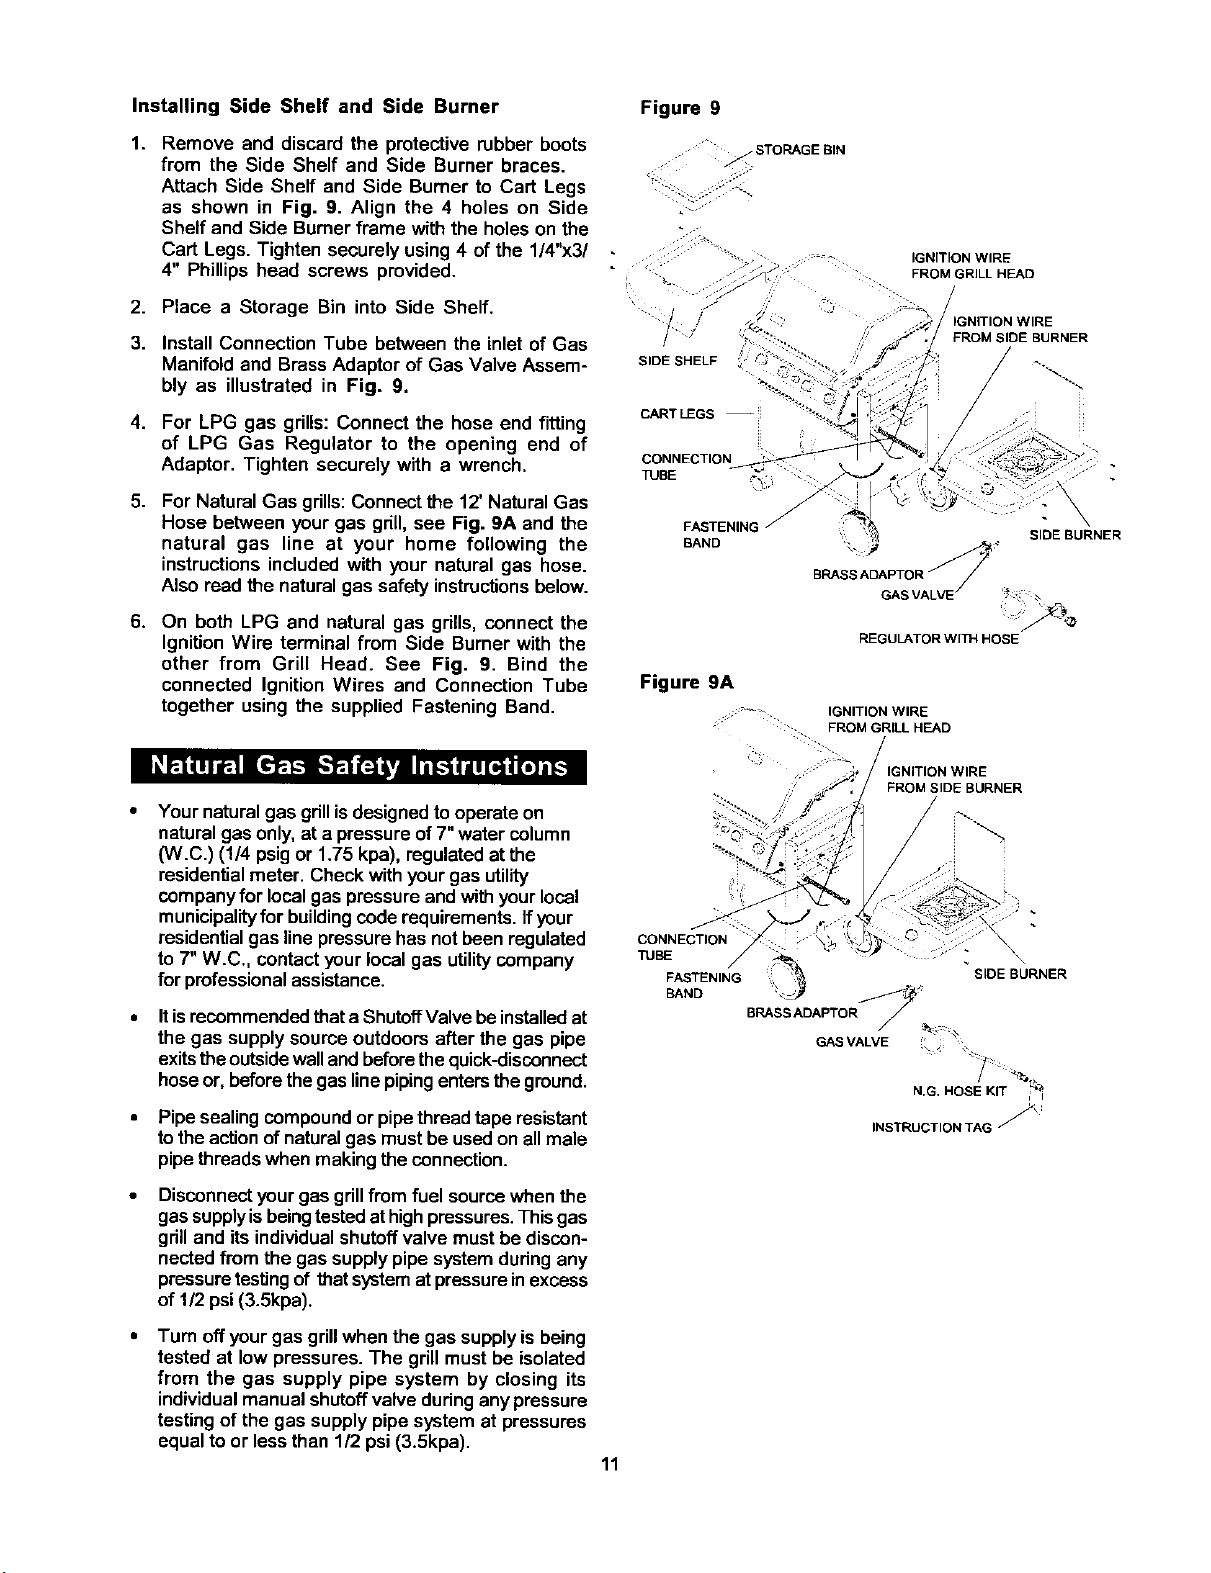
InstallingSideShelf and Side Burner
1. Remove and discard the protective rubber boots
from the Side Shelf and Side Burner braces.
Attach Side Shelf and Side Burner to Cart Legs
as shown in Fig. 9. Align the 4 holes on Side
Shelf and Side Burnerframe with the holes on the
Cart Legs. Tighten securely using4 of the 1/4"x3/
4" Phillips head screws provided.
2. Place a Storage Bin into Side Shelf.
3. Install Connection Tube between the inlet of Gas
Manifoldand BrassAdaptor of Gas Valve Assem-
bly as illustrated in Fig. 9.
4. For LPG gas grills: Connect the hose end fitting
of LPG Gas Regulator to the opening end of
Adaptor. Tighten securely with a wrench.
5. For Natural Gas grills:Connect the 12' NaturalGas
Hose between your gas grill, see Fig. 9A and the
natural gas line at your home following the
instructionsincluded with your natural gas hose.
Also read the natural gas safety instructionsbelow.
6. On both LPG and natural gas grills, connect the
IgnitionWire terminal from Side Burner with the
other from Grill Head. See Fig. 9. Bind the
connected Ignition Wires and Connection Tube
together using the supplied Fastening Band.
Your natural gas grillisdesignedto operateon
naturalgasonly, at a pressure of 7"water column
(W.C.) (1/4 psig or 1.75 kpa), regulated at the
residential meter. Check with your gas utility
company for local gas pressure and with your local
municipality for building code requirements. If your
residential gas line pressure has not been regulated
to 7" W.C., contact your local gas utility company
for professional assistance.
Itisrecommendedthat a ShutoffValvebe installedat
the gas supplysource outdoors after the gas pipe
exitsthe outsidewalland beforethequick-disconnect
hoseor,beforethe gaslinepipingentersthe ground.
Pipe sealingcompound or pipe thread tape resistant
tothe actionof naturalgas mustbe usedon allmale
pipethreads when makingtheconnection.
Disconnectyour gas grillfrom fuel sourcewhen the
gassupply is beingtestedat highpressures. This gas
gdll and its individual shutoff valve must be discon-
nected from the gas supply pipe system during any
pressure testing of that system at pressure in excess
of 1/2psi (3.5kpa).
Turn offyourgas grillwhen the gas supplyis being
tested at low pressures. The grillmust be isolated
from the gas supply pipe system by closing its
individualmanualshutoffvalve duringanypressure
testingof the gas supply pipesystem at pressures
equalto or lessthan 1/2 psi (3.5kpa).
Figure 9
STORAGE BIN
S"
4 .
" 1::: IGNITION WIRE
= :. ." :'_ : FROM GRILL HEAD
- i_Y . .
,J
GNITION WIRE
FROM SIDE BURNER
SIDE SHELF / _..
CART LEGS --
CONNECTION
TUBE --_%:
FASTENING
BAND
SIDE BURNER
BRASS ADAPTOR _'_ ;_
GAS VALVE / _'_ a
REGULATOR WITH HOSE
Figure 9A
IGNITION WIRE
::.. FROM GRILL HEAD
:::.
FROM SIDE BURNER
CONNECTION
TUBE
FASTENING
BAND
:; •'_ SIDE BURNER
BRASS ADAPTOR /
GAS VALVE
N.G. HOSE KIT ,_
INSTRUCTION TAG J_
11
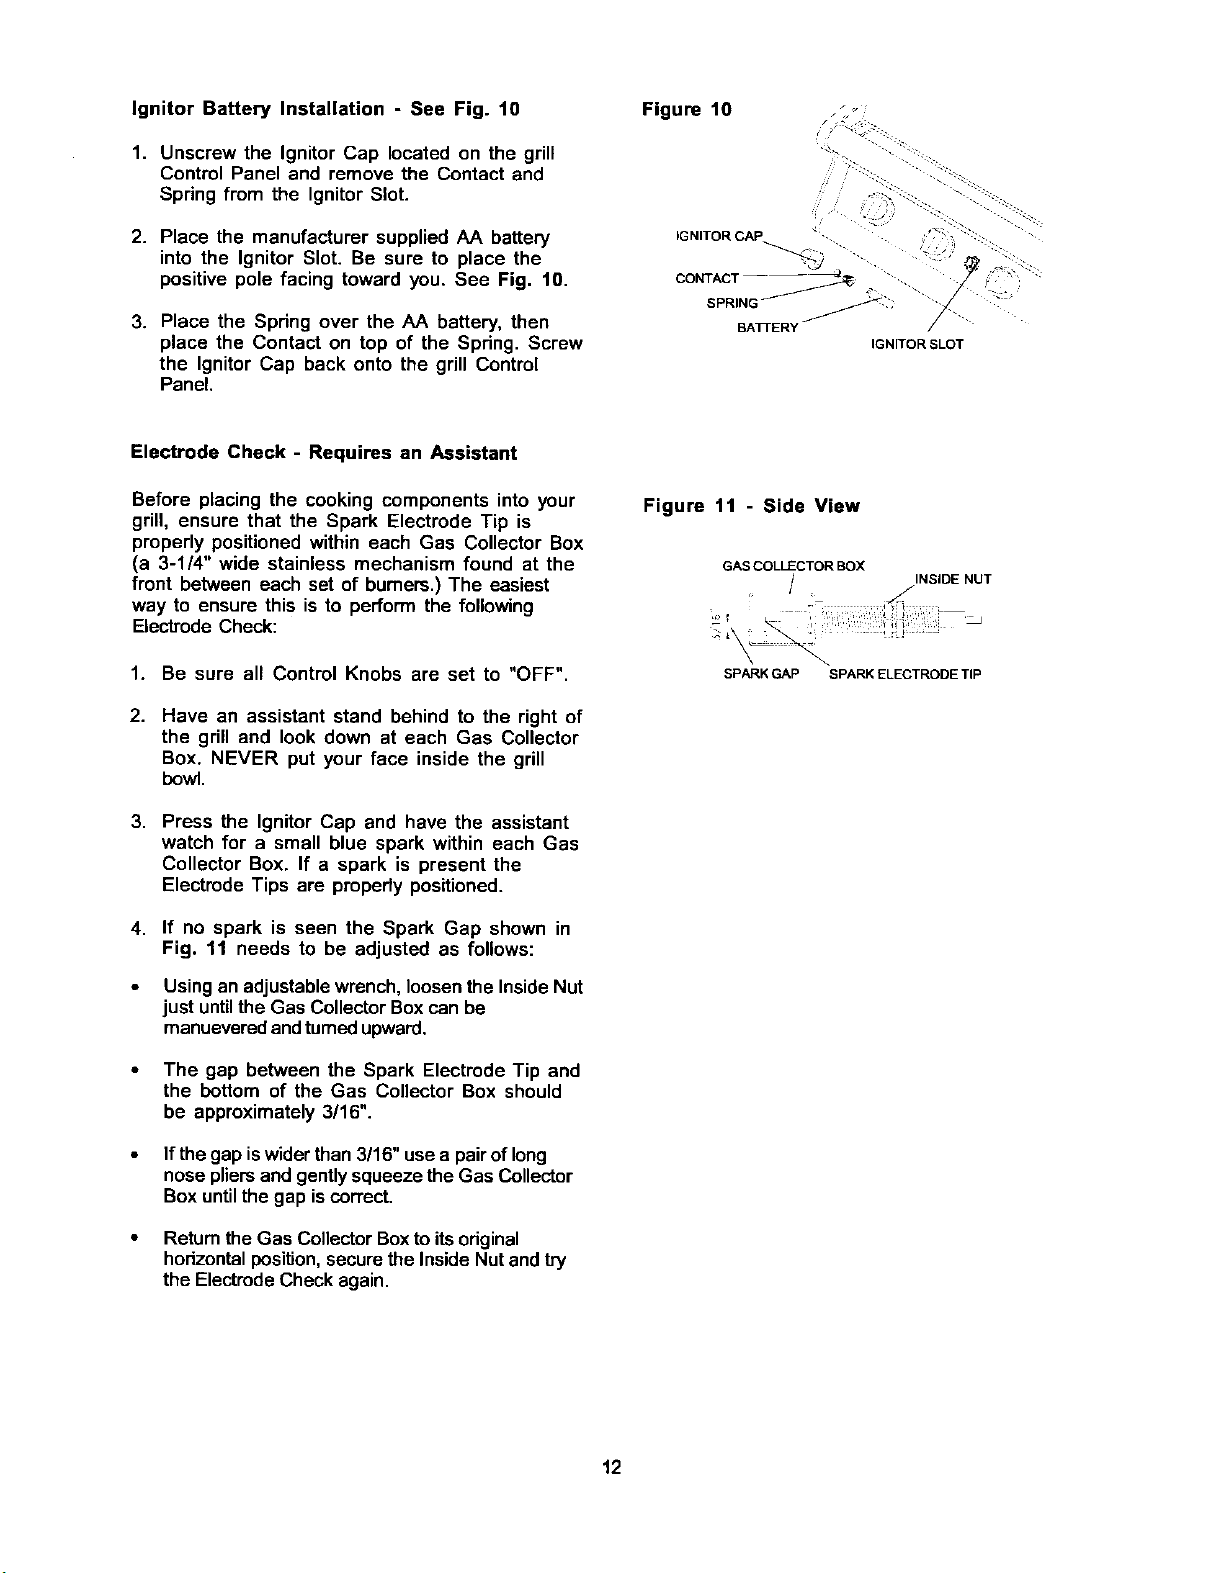
Ignitor BatteryInstallation- SeeFig.10
1. Unscrewthe Ignitor Cap located on the grill
Control Panel and remove the Contact and
Spring from the Ignitor Slot.
2. Place the manufacturer supplied AA battery
into the Ignitor Slot. Be sure to place the
positive pole facing toward you. See Fig. 10.
3. Place the Spring over the AA battery, then
place the Contact on top of the Spring. Screw
the Ignitor Cap back onto the grill Control
Panel.
Figure 10 _--
Electrode Check - Requires an Assistant
Before placing the cooking components into your
grill, ensure that the Spark Electrode Tip is
properly positioned within each Gas Collector Box
(a 3-1/4" wide stainless mechanism found at the
front between each set of burners.) The easiest
way to ensure this is to perform the following
Electrode Check:
1. Be sure all Control Knobs are set to "OFF".
2.
Have an assistant stand behind to the right of
the grill and look down at each Gas Collector
Box. NEVER put your face inside the grill
bowl.
3. Press the Ignitor Cap and have the assistant
watch for a small blue spark within each Gas
Collector Box, If a spark is present the
Electrode Tips are properly positioned.
4. If no spark is seen the Spark Gap shown in
Fig. 11 needs to be adjusted as follows:
• Usingan adjustablewrench, loosen the InsideNut
just untilthe Gas CollectorBox can be
manueveredandturnedupward,
• The gap between the Spark Electrode Tip and
the bottom of the Gas Collector Box should
be approximately 3/16".
• Ifthe gap is widerthan 3/16" usea pair oflong
nose pliers and gentlysqueeze the Gas Collector
Box untilthe gap iscorrect.
• Returnthe Gas Collector Boxto itsoriginal
horizontalposition, secure the Inside Nut and try
the Electrode Check again.
Figure tl - Side View
GAS COLLECTOR BOX
INSIDE NUT
. 4
SPARK GAP SPARK ELECTRODE TIP
12

InstallingCookingComponents
Important:Beforecookingonyourgrillthe first
time, wash the cooking grids and warming reck with
warm, soapy water. Rinse and dry thoroughly.
Season with cooking oil regularly. (After cooking is
completed, turn grillto HIGH setting for about five
minutes to bum off excess grease or food residue.)
1. Screw the 4 Flame Tamer Spacers on the Bowl
Side Panels• See Fig. 12. Place the 2 Stain-
less Steel Flame Tamers on the lower ledge
above burners. They should meet in the center•
2. Evenly space the reversible Cast Iron Cooking
Grids on the ledge above the Stainless Steel
Flame Tamers.
3. The inside of the Grill Lid has a U-shaped
support on each side. Place the arms of the
swing-away Warming Rack into both supports.
Connecting A Liquid Propane Gas (LPG)
Cylinder To Your Grill
1. Hang your filled gas cylinder on the top Tank
Hook. The ring foot of the gas cylinder will
rest on the Tank Holder. See Fig. 13. Make
sure the LPG cylinder valve is in the full OFF
position. (Turn clockwise to close.)
2. Check the cylinder valve features to ensure it
has proper external mating threads to fit the
hose & regulator assembly provided. (Type 1
connection per ANSI Z21.58a-1998)
3. Make sure all burner valves are in the OFF
position.
4. Inspect the valve connection port and regulator
assembly. Look for any damage or debris.
Remove any debris. Inspect hose for damage.
Never attempt to use damaged or plugged
equipment.
5. When connecting the hose and regulator
assembly to the cylinder valve, hand tighten
nut clockwise to a full stop. Do Not use a
wrench to tighten because it could damage
the Quick Coupling Nut and result in a
hazardous condition.
6. Open the cylinder valve fully
(countemlockwise). Use a soapy water solution
to check all connections for leaks before
attempting to light your grill. If a leak is
found, turn the cylinder valve off and do not
use your grill until repairs are made.
Disconnecting A Liquid Propane Gas (LPG)
Cylinder From Your Grill
1. Turn the burner valves and LPG cylinder valve
to the full OFF position. (Turn clockwise to
close.)
2. Detach the hose and regulator assembly from
the LPG cylinder valve by turning the Quick
Coupling Nut counterclockwise.
Figure 12
/:/
H
SWING-AWAY - =._,_
WARMING RACK
COOKING GRID
FLAME TAMER
SPACER
Figure t3
ALREADY CONNECTED
/.. TO ADAPTOR
/
QUICK
COUPLING
NUT
CAUTION: When the appliance is not in use, the
gas must be tumed off at the supply cylinder.
Congratulations
Your Kenmore Elite gas grill is now ready for
use, Before the first use and at the beginning
of each season (and whenever the LPG gas
cylinder has been changed):
1. Read all safety, lighting and operating
instructions.
2. Check gas valve orifices, burner tubes and
burner ports for any obstructions.
3. Perform gas leak check according to
instructions found on page 14 of this
manual•
13
BasicLightingProcedures
1. Familiadzeyourself with the safetyguidelinesat
the front of this manual. Do not smoke while
lighting gdll or checking gas supply connections.
2. Be sure the LPG cylinder is filled.
3. Check that the end of eachburner tube is propedy
locatedover each valve orifice.
4. Make sure all gas connections are securely
tightened.
5. Open the Grill Lid or Side Burner Insert Plate.
/ WARNING
Failure to open Grill Lid or Insert Plate
during the lighting procedures could
result in a fire or explosion which could
cause serious bodily injury, death, or
property damage.
6. Set control knobsto OFF and open the LPG
cylinder valve.
7. Push and turn one cont]'ol knob to HIGH.
8. Then immediately press the electric ignitor for
3-4 seconds to light the burner.
9. Ifthe burnerdoes not light, turnthe control knobto
OFF, wait 5 minutesfor gas toclear, then retry.
10.Once the first gdllburner is ignited,the adjacent
burner can be lit by simply turning it's control knob
to HIGH.
11.Adjust centrol knobstoyourdesired cooking
temperature.
WARNING
IF YOU SMELL GAS:
• Shut off gas supply to the grill.
• Extinguish any open flame.
• Open grill lid.
• If odor continues, immediately call your
gas company or local fire department.
Failure to comply with these instructions
could result in a fire or explosion which
could cause serious bodily injury, death, or
propertydamage.
Checking For LP Gas Leaks
Never test for leaks with a flame. Pdor to first
use, at the beginning of each season, or every
time your LPG cylinder is changed, you must
check for gas leaks. Follow these four steps:
1.
2.
3.
4.
Make a soap solution by mixing one part
liquid detergent and one part water.
Turn the grill control knobs to the full OFF
position, then turn the gas ON at source.
Apply the soap solution to all gas
connections. Bubbles will appear in the soap
solution if the connections are not properly
sealed. Tighten or repair as necessary.
If you have a gas leak that you cannot
repair, turn off the gas at the source, discon-
nect fuel line from your grill and call 1-800-4-
MY-HOME or your gas supplier for repair
assistance.
WARNING
A strong gas smell, or the hissing sound of
gas indicates a serious problem with your
gas grill or the LPG cylinder. Failure to
immediately follow the steps listed below
could result in a fire or explosion which
could cause serious bodily injury, death, or
propertydamage.
• Get away from the LPG cylinder.
• Do not try to fix the problem yourself.
• Call your fire department. (Do not call
near the LPG cylinder because your
telephone is an electrical device.)
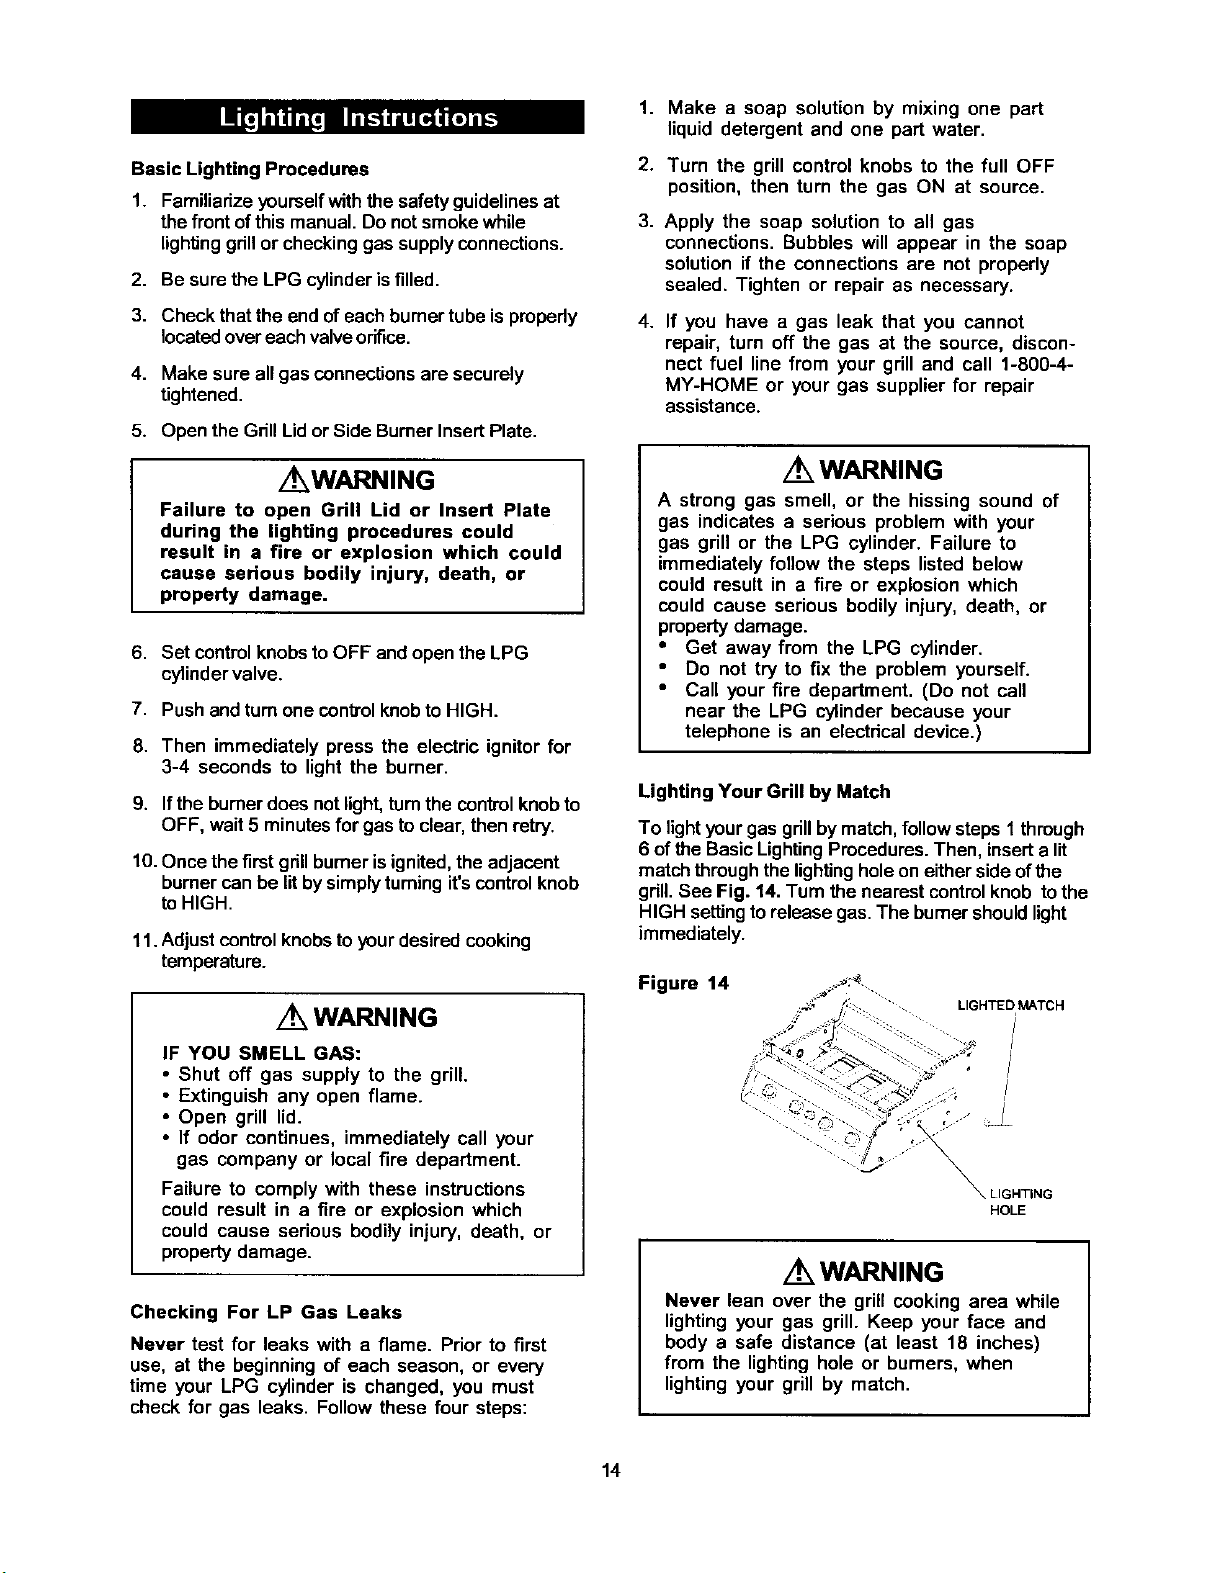
Lighting Your Grill by Match
To lightyour gas grillbymatch,follow steps 1 through
6 of the BasicLightingProcedures.Then, inserta lit
matchthrough the lightingholeon eitherside ofthe
gdll.See Fig. 14. Tum the nearest control knob tothe
HIGH settingto releasegas. The burnershouldlight
immediately.
Figure 14 __
LIGHTED MATCH
I
!
!
I
\ LIGHTING
HOLE
WARNING
Never lean over the grill cooking area while
lighting your gas grill. Keep your face and
body a safe distance (at least 18 inches)
from the lightinghole or burners, when
lighting your grill by match.
14
Ifthegrillfailstolightproperly:
1. Turn gas off at sourceand tum the controlknob to
OFF. Wait at least five minutesfor gas to clear,
then retry.
2. Check gas supply and connections.
3. Repeat lighting procedure. If yourgrill still fails
to operate properly,turn the gas off at source,
turnthe control knobs to OFF, then check the
following:
• Misalignmentof burnertubes overorifices
Correction: Repositionburnertubesover
orifices.
• Obstructionin gas line
Correction: Remove fuelline from grill.Do not
smoke!Open gas supplyfor one secondto
clear anyobstructionfromfuel line,Closeoff
gas supplyst sourceand reconnectfuel lineto
grill,
• Pluggedorifice
Correction: Remove bumersfrom grillbypulling
cotter pin(beneathburner)usinga screwdriver
or pliers.Carefullylifteach bumer upand away
from gasvalveorifice.Removetheorificefrom
gasvalve and gentlyclear anyobstructionwitha
fine wire.Then reinstallallorifices,burners,
cotter pinsand cooking components.
Ifanobstructionissuspectedingas valvesor
gasvalve bracket,please cellforrepairservice
at 1-8O0-4-MY-HOME.
Misalignmentof ignitoron burner
• Correction: Check forproperpositionofthe
electrodetip.The tip ofthe electrodeshouldbe
pointingtowardthe bottomof the collectorbox,
as shownin Figure 11. The gap between the
spark electrodeandthe bottom of the gas
collector box shouldbe 3/16".Adjustif
necessary.With the gas supplyclosedand all
control knobsset to OFF press the electric
ignitorcap and checkforthe presenceof a
spark at the electrode.
DisconnectedIgnitionWires
• Correction: Inspectthelgnitorjunction box
found beneaththe ControlPanel.Connect loose
Ignitorwires to the junctionbox and tryto light
the grill.
Weak AA battery
• Correction: Unscrewthe IgnitorCapand
replacethe battery.
WARNING
Should a "FLASH-BACK" fire occur inlor
around the burner tubes, follow the
instructions below. Failure to comply
with these instructions could result in a
fire or explosion which could cause
serious bodily injury, death, or property
damage.
• Immediately turn the gas OFF at its
source.
• Turn the control knobs to OFF position.
• Once the grill has cooled down, clean
the burner tubes and burners according
to the cleaning instructionsfound on
page 17 in this manual.
4. If all checksor corrections have been made and
yourgrillstillfailstooperate properly, cell 1-800-4-
MY-HOME for repairservice.
15
Bum-off
Beforecooking on your gasgrillfor the first time, you
will wantto "bum off" the grill to eliminate anyodoror
foreign matter. Just ignite the burners, close the lid,
and operate grill on the HIGH setting for about five
minutes.
CAUTION:
Operatingyourgrillon the HIGH settingfor longerthan
five minutesmaydamage certainpartsofyour grill.Do
not leave your grill unattended.
Seasoning Cast-Iron
Beforeand aftereachcookout,applya thin layerof
cookingoil,spray or vegetableshorteningtoeach
cooking grid.Besuretocoat the entiresurfaceincluding
edgesandany areaswithchippedporcelain.Insertthe
cookinggridsintoyour warmgrillfor 2 to 3 minutes.
Flare-Ups
The fats andjuicesdrippingfromgrilled food can cause
flare-ups.Sinceflare-ups impartafavorably distinctive
taste and color tofood cooked over an openflame,
theyshouldbe accepted upto a point.Nevertheless,
uncontrolledflaringcan resultin a ruinedmeal.
Preheating
To preheat, light your grillon HIGH, closethe lidand
follow this timetable:
• For hightemperature cooking, preheatgrill
5 minutes.
• For lowtemperature cooking, preheat grill
3 minutes.
• To slow cook, preheating is not necessary.
Cooking Temperatures
High setting: Only usethis settingforfast warm-up,
searingsteaksor chopsand for bumingfood residue
offthe gdllaftercookingis complete.Never use the
HIGH settingfor extendedcooking.
Medium to Low settings: Most recipesspecify
medium to low settings,includingall smoking,rotis-
sede cooking and for cooking lean cutssuch as fish.
NOTE: Temperaturesettingswill varywith the amount
ofwind andtemperature outsideyour home.
Direct Cooking
The directcookingmethodcan be used with the
suppliedcast-iron grids,optionalgriddle orcooking
pan placed directlyover the litgrillburners.Direct
cooking requires the grill lid to be open. This
methodisidealfor searingandwhenever youwant
meat, poultryor fish tohave anopen-flamebarbecued
taste. Deep frying and smokingare also bestcooked
inthis manner becausethey requiredirectheat.
Indirect Cooking
The indirectcooking methodcan alsobe used with the
supplied cast-irongrids,optionalgriddleorcooking
pan. To cook indirectly, the food should be placed on
the left or right side of your grill with the burner lit on
the opposite side. Or place your food on the warming
rack mounted inside your grill lid and light the outer
grillburners. Either way, indirect cooking must be
done with the lid down.
WARNING
Your grill will get very hot. Never lean
over the cooking area while using your grill.
Do not touch cooking surfaces, grill housing,
grill lid or any other grill parts while the grill
is in operation, or until the grill has cooled
down after use.
Failure to comply with these instructions may
result in serious bodily injury•
16
As with allappliances,proper care and maintenance
willkeep your grillintop operatingcondition and
prolongitslife.Byfollowing these cleaningprocedures
on a timely basis,your grillwillstay clean and work
propedywith minimumeffort.
Cleaning The Cooking Grids
Before initialuseand periodically we suggestyouwash
your cookinggridsin a mildsoap and warmwater
solution.You canuse a wash clothor vegetablebrush
to clean your cookinggrids.
CAUTION:
Take care notto chip or scratchthe porcelain finish
because itwillvoidyourwarranty.Never tryto clean
yourcooking gridsunlessyou are surethe gridsare
cool to thetouch.
Cleaning The Flame Tamers
Periodicallyyou shouldwash the Flame Tamers in a
soap and warmwater solution.Use a wire brushto
removestubbornburnt-oncookingresidue.Drythe
Flame Tamers thoroughlybeforeyoureinstallthem into
the cooking bowl.
Cleaning The Grease Tray and Receptacle
To reducethe chance offire,the Grease DrainingTray
and Grease Receptacleshouldbevisually inspected
beforeeach grilluse. Remove anygrease andwash
grease trayand receptaclewitha mildsoapand warm
water solution.
CleaningTheBurnerTubesandBumerPorts
Toreducethechanceof"FLASH-BACK"theproce-
durebelowshouldbefollowedatleastonceamonthin
latesummerorearlyfallwhenspidersare mostactive
or when yourgrillhas notbeen usedfor a periodof
time.
1. Turn allburnervalvestothefullOFF position.
2. TurntheLPGcylindervalveorNG ShutoffValvetothe
full OFF position.
3. Detach the LPG regulator assembly or NG hose
assembly from your gas grill.
4. Remove the cooking grids, flametamers, and
grease trays from your grill.
5. Remove the cotter pin from the rear underside of
each burner using a pair of long nose pliers.
6. Carefully lift each burner up and away from the gas
valveorifice.
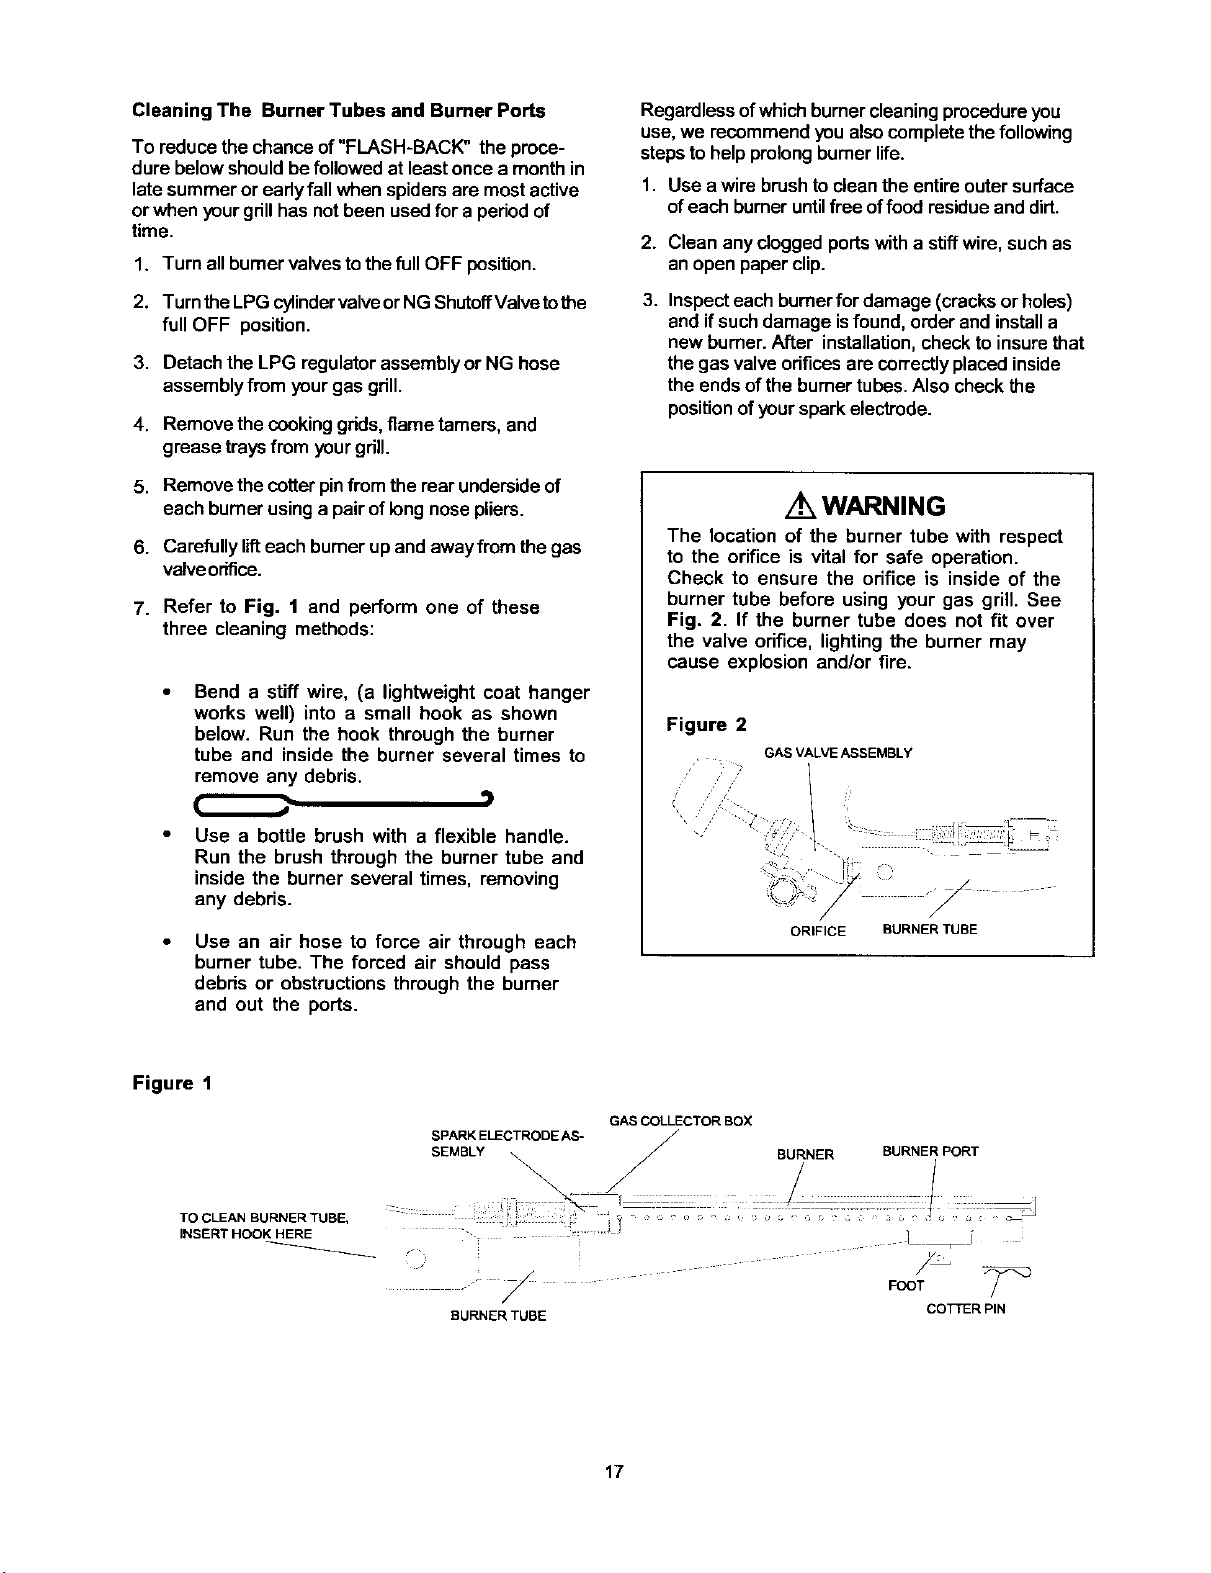
7. Refer to Fig. 1 and perform one of these
three cleaning methods:
Bend a stiff wire, (a lightweight coat hanger
works well) into a small hook as shown
below. Run the hook through the burner
tube and inside the burner several times to
remove any debris.
Use a bottle brush with a flexible handle.
Run the brush through the burner tube and
inside the burner several times, removing
any debris.
Use an air hose to force air through each
burner tube. The forced air should pass
debris or obstructionsthrough the burner
and out the ports.
Regardlessofwhichburnercleaningprocedure you
use,we recommend youalso completethe following
stepstohelp prolongburnerlife.
1. Use a wire brushtocleanthe entireouter surface
ofeach burneruntilfree offood residueand dirt.
2. Clean anycloggedports witha stiffwire, such as
anopen paper clip.
3.
Inspect each burnerfor damage (cracks orholes)
and ifsuch damage is found, orderand installa
newburner.After installation,checkto insurethat
the gasvalveodficesarecorrectlyplacedinside
the ends ofthe burner tubes.Also checkthe
positionofyoursparkelectrode.
WARNING
The location of the burner tube with respect
to the orifice is vital for safe operation.
Check to ensure the orifice is inside of the
burner tube before using your gas grill. See
Fig. 2. If the burner tube does not fit over
the valve orifice, lightingthe burner may
cause explosion and/or fire.
Figure 2
GAS VALVE ASSEMBLY
l
/
ORIFICE BURNER TUBE
Figure 1
GAS COLLECTOR BOX
TO CLEAN BURNER TUBE,
INSERT HOOK HERE
/
BURNER TUBE
FOOT
COTTER PIN
17
CAUTION:
BesureyourgrillisOFF and coolbeforecleaning.
Take care notto chipor scratchthe painted surfaces
because itwillvoidyour warranty.
Annual Cleaning of The Grill Interior
Burning-offthe grill aftereverycookout will keep it
ready for instant use. However, once a year you should
give the entire grill a thorough cleaning to keep it in top
operating condition. Follow these steps:
1. Turn allburner valvestothe fuUOFF position.
2. Turn the LPG cylinder valveor NGShutoff Valve to
the full OFF position.
3. Detach the LPG regulator assembly or NG hose
assembly from your gas grill.
4. Remove and clean the flame tamers, cooking grids
and grill burners.
5. Cover each gas valveorificewith aluminumfoil.
6. Brushthe inside and bottomofthe grillwith a stiff
wire brush, and washwith a mildsoap andwarm
water solution.Rinsethoroughlyand letdry.
7. Remove aluminumfoil from orificesand check
eachorificefor obstruction.
8. Check each spark electrode,adjustingas needed.
The Electrode tip shouldbe pointingtowardthe
bottomofthe gas collector box and approximately
3/16" from the bottom ofthe collector box.
9. Replace the burnersand adjustthe gas collector
box.The edge ofthe collector box shouldbe
overlappingthe burner port.
10.Replaceflame tamers and the cookinggrids.
11.Reconnectthegas sourceand observethe burner
flamefor correct operation.
Cleaning Exterior Surfaces:
Beforeinitialuse, and periodically thereafter, we
suggestyou wash your grillusinga mildsoap and
warm watersolution.You canuse a washclothor
spongefor thisprocess.Do not use a stiffwireor
brass brushthatmightremove paintdudngthe clean-
ingprocess.
Cleaning Exterior Stainless Steel Surfaces:
Weathering and extreme heat cancause exterior
stainless steelsurfacesto tam tan in color. Follow
these steps for the best cleaning results.
1. Turn theLPG cylinder valve(clockwise) tothefull OFF
position. Disconnect the regulator and hose assem-
blyfrom LPG cylinder. Cover exposed gas fitting with
aluminum foil.
2,
Remove dirtor grease using a softclothand polish
stainless surfacesusing a Stainless Steel Foam
Cleaner.Never useabrasivecleanersorscrub-
bers-they willscratchand damage your stainless
steel.
3. Wipe with a softclothand allowto air dry before
lighting your grill.
WARNING
Do not line the bottom of the grill housing
with aluminum foil, sand or any substance
that will restrict the flow of grease into the
grease draining tray and receptacle.
Failure to comply with these instructions
could result in a fire or explosion which
could cause serious bodily injury, death, or
propertydamage.
18

Question:Who do Icallwith questions about grill
assemblyor parts missing from my shippingbox?
Answer: Callthe CustomerService Helpline
8 am - 11 pm CST, MondaythroughFriday,at
1-800-317-7642.
Question: Can Iconvertmy KenmoreElite gasgrill
from one fuel typetoanother?
Answer: YourKenmoreElitegasgrillismanufacturedto
exactspecifications and isapprovedbytheAmerican
GasAssociation (AGA) for LPGorNG useonly.Foryour
ownsafety,conversionkitsare notavailableand any
attemptto convert yourgrillfrom onefueltypeto another
will voidyour product warranty.
Question: Arethe serialandmodelnumbersofmy
grilllisted somewherefor futurcreference?
Answer:.Yes,this valuableinformaSonislistedon a
silverlabelfoundonthe backofyour grill.
Question: Why doesn'tthe hoseand regulatorassem-
blysuppliedwithmy newKenmoreElitegrillfit the older
LPGcylinderrve usedforyears?
Answer:. The U.S.Governmentregulatesgasappliances
and LPGcylinders.Whenever newregulationsare
passedthe LPGcylinderfittingsarc altered.Ifyour
currentcylinderdoesnotfitthe hoseand regulator
suppliedwithyournewgrill,the cylinderisoutdatedand
mustbe replaced.
Question: What isthe bestway to protectmy new
Kenmore Elitegasgrill?
Answer:A goodquality grillcover shouldbe usedto
protectyourgrillwhen notisuse.Also,follow the
cleaningand maintenanceinstructionsinthis owner's
manualon a timelybasis,and your newgrillwill offeryou
years ofenjoyment.
Question: I understandrustingisa naturaloxidation
process, butwhatcanIdotohelpprevent the cast-iron
cookinggridsfrom rusting?
Answer:. To protectagainstthe naturalrustingprocess,
your cast-ironcookinggridshavea porcelainfinish.
However,dropping,scrapingorscratchingthe cooking
gridswill damagethe porcelaintinish,andallowrusting.
To minimizerusting we recommendyou"season" the
cest-ironcookinggridsrcgulady--beforc and aftereach
use. Consistentseasoningwill helpcast-ironresist
rusting and will createa non-stickcookingsurface.
Question: Howdo Iseasoncast-iron?
Answer: Beforeand after eachcookout,applya thin
layerofcookingoil,sprayor vegetableshortening to
eachcookinggrid.Besuretocoat the entiresurface
includingedges and anyarcaswithchipped porcelain.
Preheatyour gdllfor 2 to3 minutesthen insertthe
cookinggrids.The cookinggddswillbe seasonedand
readyfor useafter5 minutes inyour warmgrill.
Question: Sometimes my grilldoes notlight when I
pushthe ignitor button. Why?.
Answer:. Refertothe LightingInstructionsinthis
owner'smanual.Also checkthesecommoncauses.
• IgnitorAAbatterymayneed replacing.
• Ignitorwires maybe loose.Remove theAA
battery,inspectthe Ignitorjunctionbox found
beneaththeControlPanel,and connect any loose
wires.
Question: Where canI buyreplacementparts?
Answer:. For the repairor replacement parts you need
call 6 am- 11pm CST, 7 daysa week 1-800-366-
PART(1-806-366-7278). Use onlySearsauthorized
parts.The use ofanypart that isnotSears authorized
canbedangerousandwill also voidyour product
warranty.
19
Sum-off
Before cookingon yourgasgrill for thefirsttimeand
after everymeal, youwillwantto"bum off" the grill to
eliminateanyodor or foreignmatter. Justignitethe
burners,closethe lid,and operategdllonthe HIGH
settingfor aboutfiveminutes.
CAUTION:
Operatingyour grillon the HIGH settingfor longerthan
fiveminutesmay damage certainpartsofyour grill.Do
not leave your grill unattended.
Preheating
To preheat, lightyour grill on HIGH, close the lidand
follow this timetable:
• For high temperature cooking, preheat grill
5 minutes.
• For low temperature cooking, preheat grill
3 minutes.
• To slow cook, preheating is not necessary.
Cooking Temperatures
High setting: Only usethis settingfor fast warm-up,
searingsteaks or chops and forburning foodresidue
offthe grillaftercooking iscomplete. Never usethe
HIGH settingfor extendedcooking.
Medium to Low settings: Most recipesspecify
medium to lowsettings,includingall smoking,rotis-
serie cooking,and for cooking lean cutssuchas fish.
NOTE: Temperature settingswillvarywith theamount
ofwindand temperatureoutsideyour home.
Direct Cooking
The directcooking method can be usedwiththe
suppliedcast-irongdds, optionalgriddleor cooking
pan placeddirectlyover thelitgrillburners.Direct
cooking requires the grill lid to be open. This
methodisidealfor searing andwheneveryouwant
meat, poultryorfishto haveanopen-flame barbecued
taste. Deep frying and smokingare also bestcooked
in thismanner because they requiredirectheat.
Indirect Cooking
The indirectcooking method can also be used withthe
suppliedcast-iron grids, optionalgriddleor cooking
pan. To cook indirectly, the food should be placed on
the left or right side of your grill with the burner lit on
the opposite side. Or place your food on the warming
rack mounted inside your grill lid and light the outer
grillbumers. Either way, indirect cooking must be
done with the lid down.
Seasoning Cast-Iron
Beforeandaftereachcookout,applya thin layerof
cookingoil,sprayor vegetableshorteningtoeach
cookinggrid.Besuretocoatthe entiresurfaceincluding
edges and any areaswithchipped porcelain. Insertthe
cookinggridsintoyourwarm grillfor2 to3 minutes.
Flare-Ups
The fats andjuices dripping from grilled food cancause
flare-ups. Sinceflare-upsimpart a favorably distinctive
taste and color to food cooked over an open flame,
they should be accepted up to a point. Nevertheless,
uncontrolled flaringcan result in a ruined meal.
An Important Note About Heat Settings
The suggested heatsettingsshown onthe
following pages areapproximate.There aremany
factors suchas outsidetemperature,windcondi-
tionsand locationofgrillthat affectyour grill
performance.An overcookedmealcan ruinthe
fun, sowe offer these cooking timesas a
convenience, butsuggestyou watchthe grill
thermometerand adjustthe heataccordingly.
GRILLING TECHNIQUES
Grilling is a low fat cookingtechnique that lendsitself
to a wide rangeoffoods.Your KenmoreElitegas grill
isa fast heatinggrillthat producesthe barbecued
appearance and flavor everyoneenjoysso much.
You can expanda dinnerfortwotoa neighborhood
blockpartybysimplypurchasinglarger cutsand
quantitiesofmeat whichcook beautifullyonyour new
grill.Thistechniquedoesn'trequiremuchexperience
or skillon your part to producea superb supper.
Preparing to Grill
Preheatyour grillfor 5 minuteswith the burners on
highand the grill liddown. Beforeplacing the food onto
the grill, brush the cooking grids with a light coating of
cooking oil. This step isn't necessary when foods have
been marinating in an oil-based marinade.
Your Kenmore Elite gas grillisnow ready to grill.
Rememberto keepthe lidopenwhen cooking directly
on the grill Formostfoods it'sbestto startgrillingon
high.Oncethe food isseared, reducethe heatto
medium.Foods marinatedwith ingredientssuch as
honeymay bum because ofthe highsugarcontent.
You shouldbegintheir cookingon medium.Afavorite
on the grillissausages.Always cookthem slowlyand
ifthey're particularlyfatty, itmay be best to partially
boil them first.
2O
GrillingSteakandRibs
Tum the grillburners on high,closethe lid
and preheat your grill 5 minutes.After 5
minutes place the meat on the cooking grid
directly above the lit burners. Cook the meat
on both sides until seared. Reduce the heat
to medium and cook meat until done.
Grilling times will vary according to meat
thickness.
Grilling Hamburger and Sausages
Turn the grillburners on high,closelid and
preheat your gdll 5 minutes.After 5 minutes
place the meat on the cooking gdd directly
above the lit burners. Cook the meat on both
sides until seared. Reduce the heat to
medium and move the meat away from the
lit burners. Close the gdll lid and cook the
meat indirectly until done. Gdlling times will
vary according to meat thickness.
Grilling Poultry
Turn the gdllburners on high,close lid and
preheat your gdll 2 to 3 minutes.Then raise
the lid, reduce heat to medium and cook
poultry directly over lit burners untildone.
Poultry skin is fatty so you should expect
some flare-ups when using this direct
method.
To minimize flare-ups, try grilling poultry
usingthe indirectmethod. Placethe poultry
on one side of the grill with the opposing
burners on medium heat, and lower the grill
lid. Gdlling times will vary based on the size
of your poultry.
Grilling Pork
Turn burnerson highand preheatyour grill 5
minuteswiththe liddown. Raise lid, place
porkon cookinggrid and cookuntilseared.
Reduce heatto mediumand cookuntil
done. Gdllingtimeswillvaryaccordingto
meat thickness.
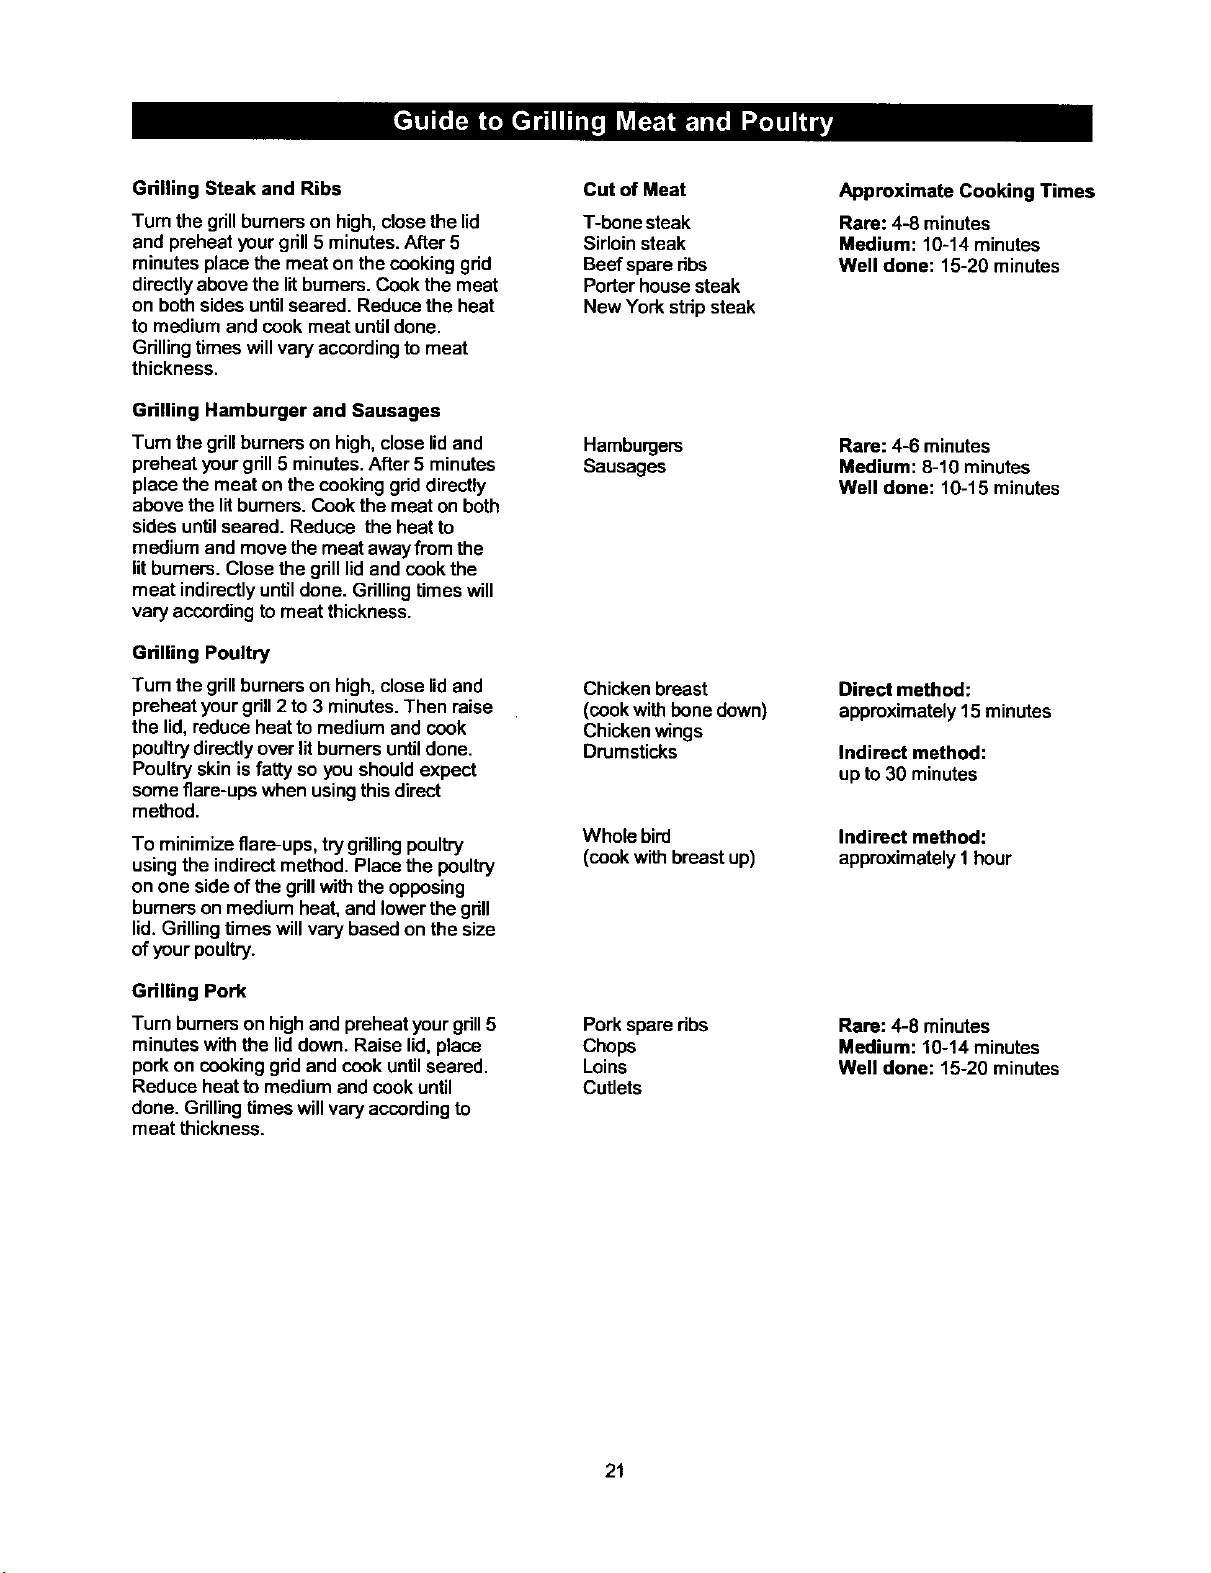
Cut of Meat
T-bone steak
Sirloinsteak
Beefspare dbs
Porter house steak
New York stdp steak
Hamburgers
Sausages
Chicken breast
(cookwithbonedown)
Chickenwings
Drumsticks
Whole bird
(cookwithbreast up)
Pork spareribs
Chops
Loins
Cutlets
Approximate Cooking Times
Rare: 4-8 minutes
Medium: 10-14 minutes
Well done: 15-20 minutes
Rare: 4-6 minutes
Medium: 8-10 minutes
Well done: 10-15 minutes
Direct method:
approximately15 minutes
Indirect method:
up to30 minutes
Indirect method:
approximately1 hour
Rare: 4-8 minutes
Medium: 10-14 minutes
Well done: 15-20 minutes
21
Whole Fish and Whole Fillets
Preheat your gdllon HIGH for 2-3 minutes
withthe liddown. Raise lidand turnburners
to medium heat. Place fish (skin down) on
grill and cook over direct heat until done.
Use cooking time as a guide or until fish is
opaque but still moist.
Smaller Fish Fillets and Cubes
Follow the directionsfrom above,using
approximatecooking times shownat right.
Place a small piece of aluminum foil on the
cooking grids ifthe fish pieces are small
enoughto drop between the cooking grids.
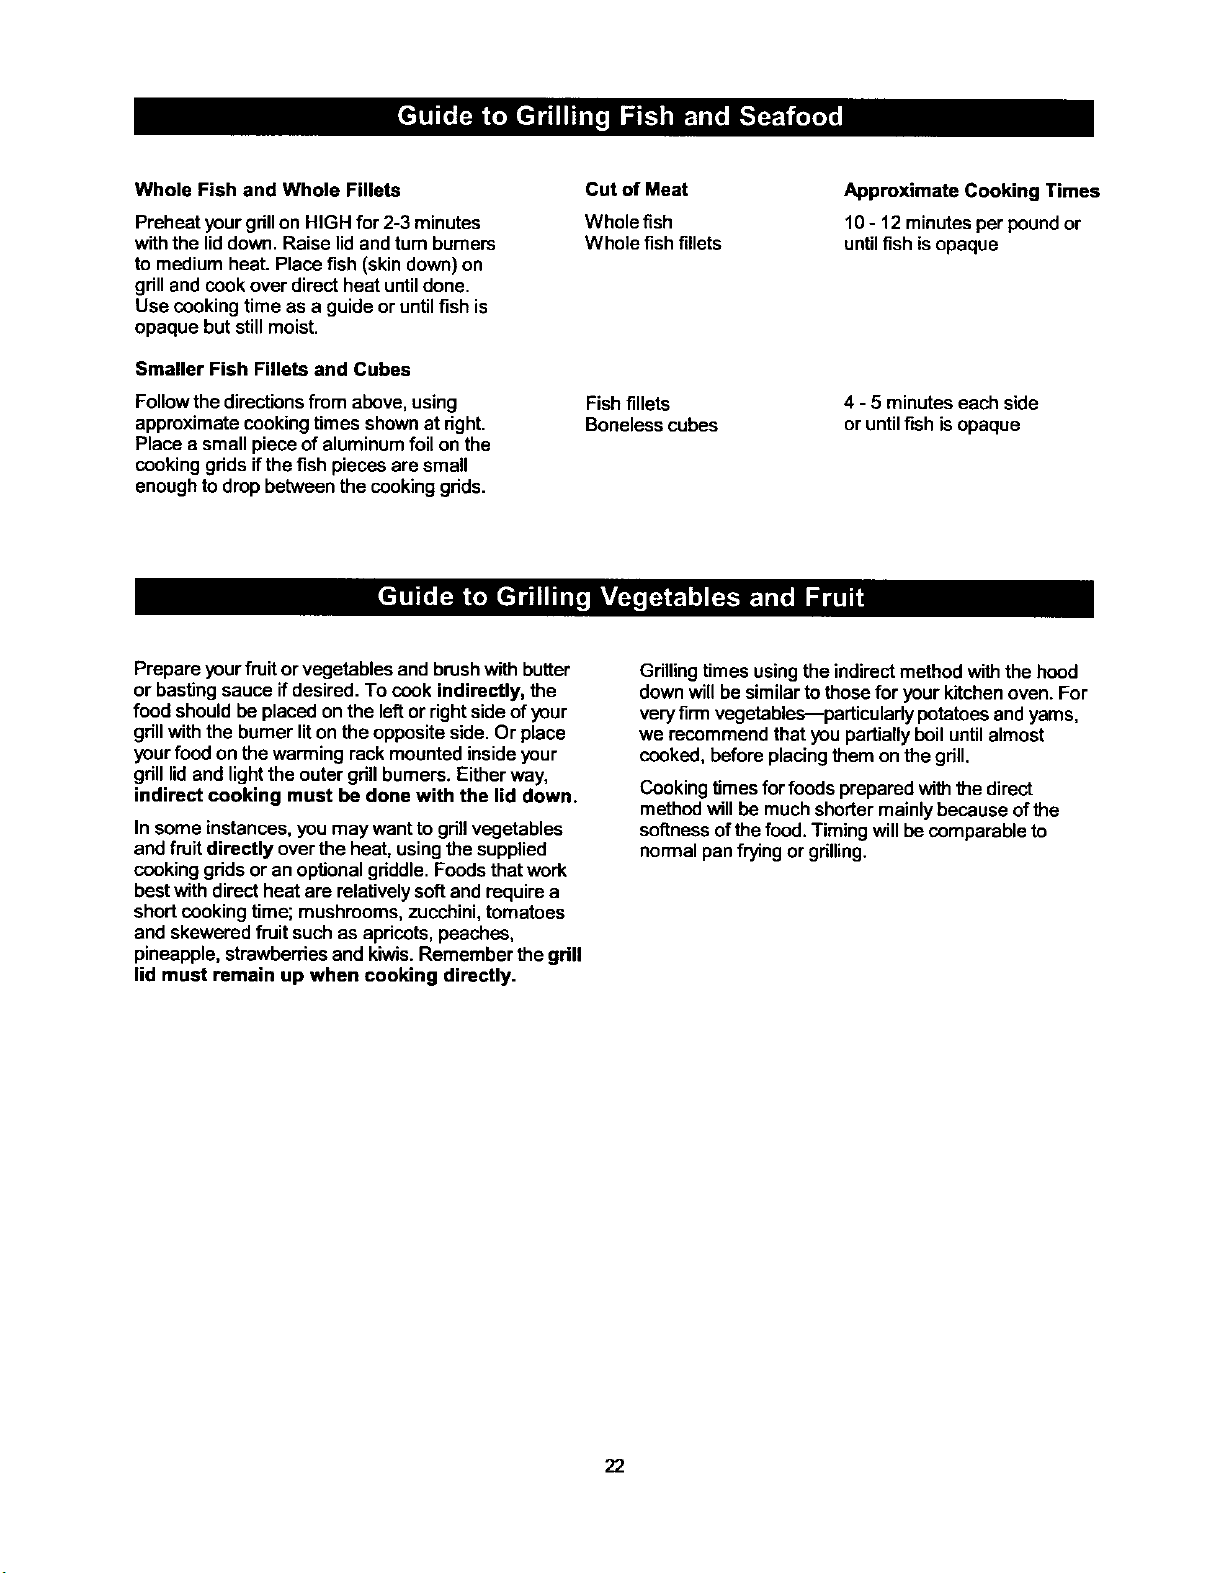
Cut of Meat
Wholefish
Whole fish fillets
Fish fillets
Bonelesscubes
Approximate Cooking Times
10 - 12 minutes per pound or
until fish is opaque
4 - 5 minutes each side
or until fish is opaque
Prepare yourfruitorvegetablesand brushwith butter
or bastingsauce if desired. To cook indirectly, the
food shouldbe placedon the leftorrightsideof your
grillwiththe burnerliton theoppositeside.Or place
your foodonthe warmingrackmountedinsideyour
grilllidand lightthe outergrillburners.Eitherway,
indirect cooking must be done with the lid down.
In some instances,youmay wanttogrill vegetables
and fruit directly over the heat, usingthe supplied
cookinggridsor an optionalgriddle.Foodsthatwork
bestwith directheat are relativelysoftand requirea
shortcookingtime; mushrooms,zucchini,tomatoes
and skeweredfruitsuchas apricots,peaches,
pineapple,strawberriesand kiwis.Remember the grill
lid must remain up when cooking directly.
Grilling times usingthe indirect methodwiththe hood
downwillbesimilarto those for your kitchenoven. For
veryfirmvegetables--particularlypotatoes and yams,
we recommendthat youpartiallyboil untilalmost
cooked,before placingthem onthe grill.
Cookingtimesforfoods prepared with the direct
methodwill be much shortermainly because ofthe
softnessofthe food.Timingwillbe comparableto
normal panfrying orgrilling.
22
ROASTINGTECHNIQUES
Roastingisveryeasy withyourKenmore Elite gas
grill.It leaves youplentyof time to relax withfamily
and friends and savesyou the hoursrequiredtoclean
a dirtykitchenoven. Roastingissuitablefor prime,
tendercutsof meat, poultryand game, manywhole
fishand somevegetables.
Preparing to Roast
Roastingusesthe indirect cooking method.
Therefore, thefood shouldbeplacedonthe lel_or
right side ofyour grillwiththe burnerlitonthe oppo-
siteside. Place your meat insidean optionalmasting
reckand cookingpan that allowsyou to collectjuices
for makinggravy.You canalso usethe supplied
cookinggridwithan aluminumdrippanunderneath.
Eitherway, indirectcookingrequiresthe lidofyour
grillto be closed.
Preheatingyourgdllisnotrequiredfor slowcooking
methods suchas masting. Ifyou do chooseto
preheatyour grillbeforemasting, turnthe burnerson
highand close lidfor approximately2-3 minutes.
Food preparation
Trim meat ofexcessfat. Truss meat and poultrywith
cooking stringto retainshape ifdesired. Baconstdps
canbe usedtocover the outsidesurfaceoflean meat
and poultrytohelppreventitfrom dryingout.Another
methodfor keepingfoodmoistduringroastingisto put
water in a cooking pan,then coverthefood(and
roastingrack) withfoil. The foil shouldbe removedfor
the firstor the lastpartof the cooking time to ensure
properbrowning.
Tips for masting
Except when mastingwith waterin the roastingpan,
the juices that collect in the pan can be used as the
basefor a tastysauce orgravy. Placea cooking pan
directlyover the heat, add extrabutterifneeded, then
add severalspoonfulsofflourtothickensauce. Finally,
add sufficientchickenor beef stocktoobtain the
desired consistency.
Once the meat iscooked,remove itfromyourgrill and
cover with a pieceoffoil. Allowitto stand for 10-15
minuteswhichallowsthejuices tosettle. Thiswill
make carvingeasier and ensurea tenderjuicyroast.
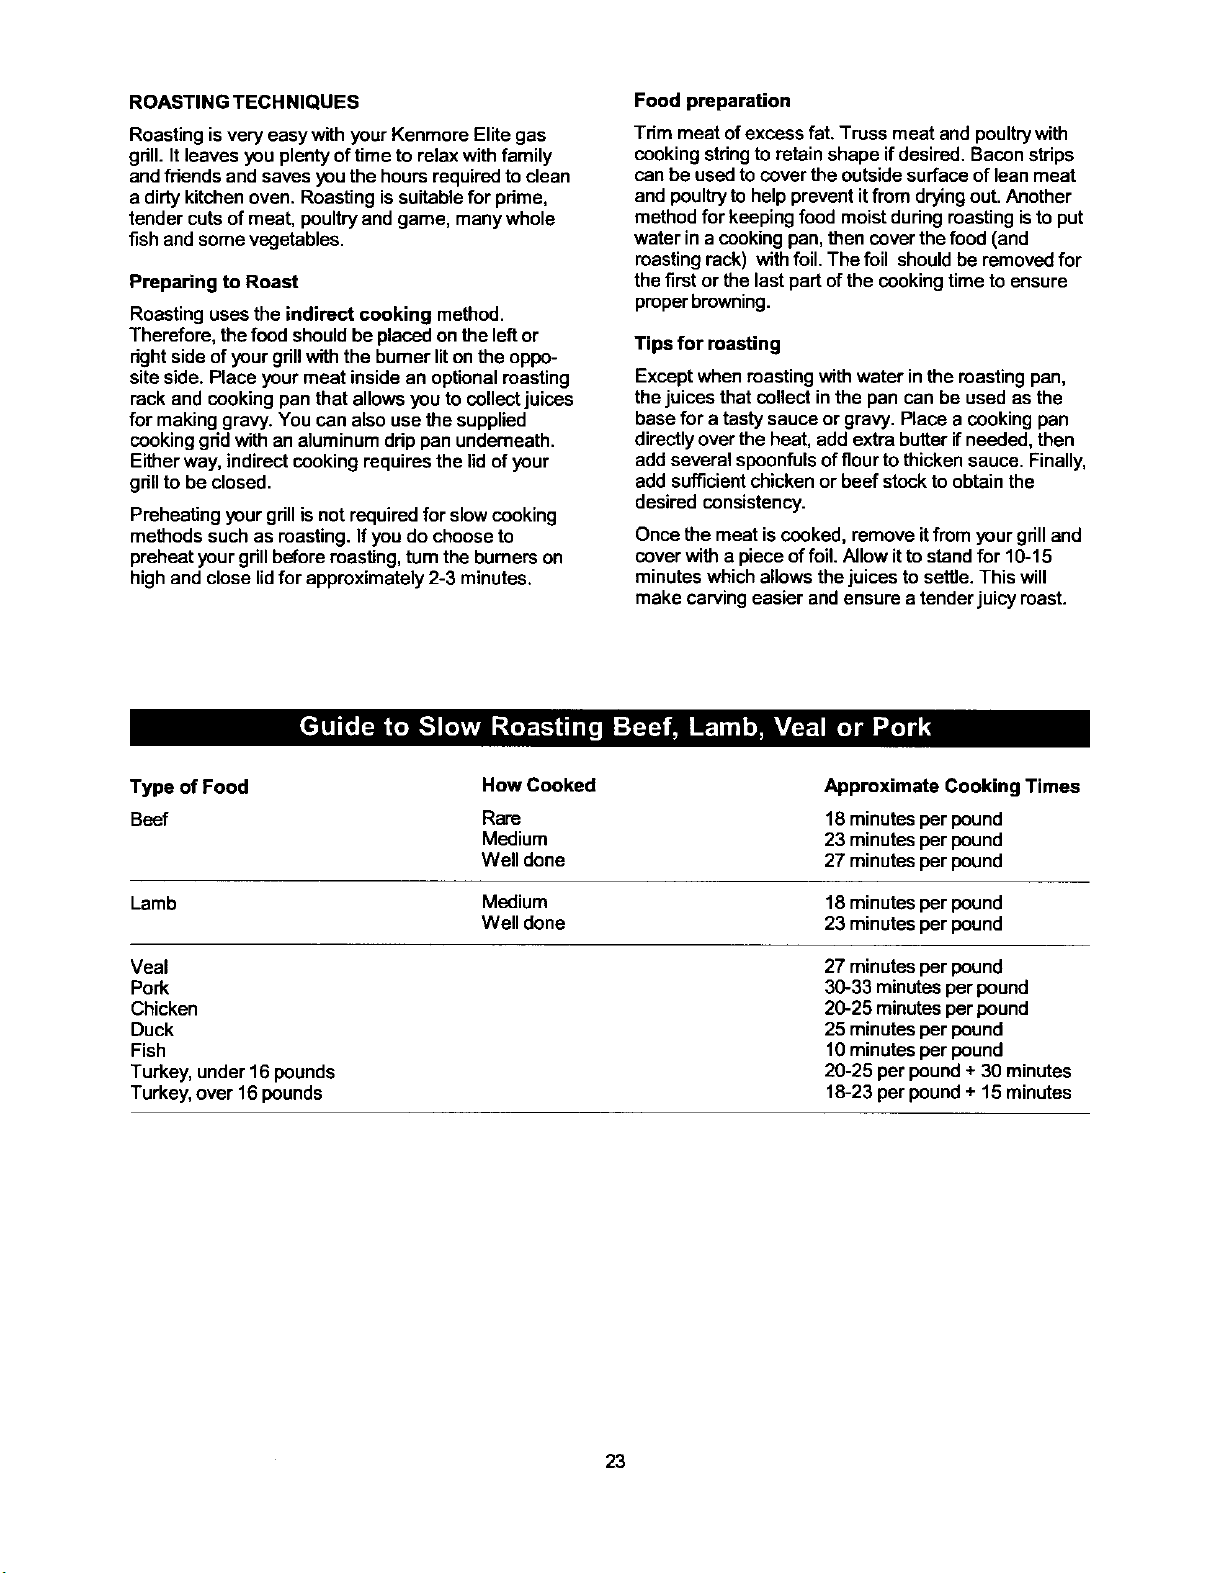
Type of Food
Beef
How Cooked
Rare
Medium
Well done
Approximate Cooking Times
18minutes per pound
23minutes per pound
27 minutesper pound
Lamb Medium 18 minutesper pound
Well done 23 minutesper pound
Veal
Pork
Chicken
Duck
Fish
Turkey, under 16 pounds
Turkey, over 16 pounds
27 minutesper pound
30-33 minutesper pound
20-25 minutesper pound
25 minutesper pound
10 minutesper pound
20-25 per pound + 30 minutes
18-23 per pound + 15 minutes
23

SMOKINGTECHNIQUES
Smoking gives food a distinctive, delicious flavor. This
surpdsinglyquickandversaUlecookingmethodexpands
the creativechef'smenuwithendlessnewandinnovafive
ways toprepare popularbarbecuedishes.
Preparing to Smoke
All youneed for smokingon yourKenmore Elitegas
grillis a cookingpan and mastingrack. First, linethe
insideof the panwithfoil.The smokingagent,either
purewoodchipsor smokingmix, isspdnkledover the
foil. Dded herbsand spicesmay also be addedto
producedifferentflavors. Placethe cookingpan
directlyover the bumer.The directheatwilleventually
producesmokeand season thefood. Elevateyour
food abovethe cooking panwitha masting rackor
bakingrack.
Tips for Smoking
You canreducethe strengthofthe smokeflavorby
onlysmokingfor half orthree quartersofthe cooking
time, then roastyour food untildone. The heat re-
quiredfor smokingisnormallylowto medium.
Foods naturallyhigh inoilslendthemselves well to
smoking,whiledderfoodsbenefitfrom a marinade.
Red meats, poultry,game, fish and seafoodcan all be
smoked easily inyournew gdll.You can also rubthe
foodwith herbs,spicesorflavoredoils.An enormous
array offoods canbe smoked inyour Kenmore Elite
gas gdlltoproducestunningresultswith verylittle
effort.Here area few suggestions:
• Tuna steaks, marinatedinAsianflavorsofsesame
oil, soysauce and sherry.
• Pork fillets, rubbedwithginger,orange dnd and
brushedwith maple syrup.
• Mussels, brushedwith lemonrindand chilioil.
• Lamb cutlets, madnatadinvirginoliveoil, lemon,
oreganoandblackpepper.The same madnadecan
be usedfor a whole legor rackoflamb.
STIR-FRYING TECHNIQUES
This methodof cooking ispopulararoundthe woddand
can be easilyaccomplishedoutdoorson your Kenmore
Elitegas gdll.It'sa quickand healthfulway of prepar-
inga complete meal usingmeat, poultry or seafoodin
infinitecombinationswithother interestingingredients
likevegetables, dce or noodles.
Preparing to Stir-fry
Although itis possible to stir fryin other dishes, the
wok is your best tool. Its high sides enable the cook to
stir food without spillage. Its construction allows you to
cook quickly at high temperatures, with instant control
of heat which is essential for successful stir frying.
Food preparation
Slice meat and poultry intolongthin stdps and cube
fish fillets. Remove all fat from meat and poultry and
cut large vegetables into even slices or cubes.
Madnatefoods for extraflavorandtenderness. Madnato
ing timeswill vary for red meat, fish and or vadous
cuts. Less tender cuts of meat should be marinated
longer. Remember to always chill madnating food in
the refrigerator prior to cooking.
Stir-fry meats, poultry or fishfirst. Next, add hard
vegetableslike carrots.Then continue with softer
vegetableslikesnowpeasand peppers.To ensureeven
cooking,continuallystirand tossthefood in thewok
usinga woodenspoonor spatula.
Tips for Stir-frying
Placethe wok directlyover a highheaton your grill.Add
only a small amount of food at a time to ensure fast
cooking and also to allowthe wok to reheat between
ingredients.
• Chicken, bonelesschicken pieces--especially
sliced breasts
• Fish, slicedfilletsoffirmfish,assortedseafood
suchas prawns, scallopsand calamad
• Pork, slicedfillets,dicedor mincedpork,sliced
leg steak, slicedchops
• Beef, slicedfillet,db-eye, round,rump, sidoin
• Lamb, slicedfillet,round, loin
24
DEEP-FRYINGTECHNIQUES
A wide variety of foods canbe deep-friedoutdoorson
your gdll,from potatoes, to seafoodand chicken.
Deep-frying uses a large portion of oil, preferably
saturated. The outdoor location is ideal for deep-frying
as smoke, grease and smells reach for the sky--not
the ceiling of your kitchen.
Preparing to Deep-fry
Deep-fry on your gdllusing a cooking panor wok,over
direct heat with the gdll lid raised.
Fill the cooking pan no more than halffull of vegetable
or corn oil. Start with low heat, then raise the heat
gradually. Check the temperature of the oil carefully
with a frying thermometer or test with a cube of bread.
The cube of bread should brawn in about 30 seconds
for most cooking needs. A temperature between 350
and 400 degrees is optimal for prepadng the majodty
ofdeep-fded foods.
Food Preparation
Foods being deep-fried taste betterwhen coatedwith
eitherbatteror breadcrumbstoaddflavorand prevent
moisturefrom escaping.
Tips for Deep-frying
Slowly lower foods intothe hotoil using a wire scoop
or stainless steel tongs. Add onlya small quantityof
food to the oil, allow it to cook, then repeat with
another small quantity. This ensuresthe oil doesn't
drop in temperature.Once the food iscooked, remove
it carefully and drain onto a paper towel. Turn the heat
off as soon as you have finished deep-frying and allow
the pan to cool. When the oil is cool, remove all
remnants of fried foods by straining it through a fine
metal sieve. Once the oil is quite cool, store it in a
clean bottle for future use.
COOKING ON THE WARMING RACK
Vegetables are generally easy to cook onthe gdlLThe
warming rack makes it convenient because you can
still use the main cooking area while the vegetables
are suspended from above.
Pre-cook hardvegetablesby bdefiy boiling or
microwavingthem before cooking onthe gdll. Wrap
vegetables in a double thickness of foil to protect them
while cooking on the grill. Then, remove the foil if
desired, 10-15 minutes before the end of cooking,
brush vegetables with butter or oil and finish cooking.
The warmingrack can be used for purposes other
than just the obvious. Consider using it for warming
French bread, garlic bread, croissants or even bagels.
A small whole fish wrapped in foil also cooks well in
the warming rack. Parcels of seafood such as
scallops, prawns and sliced fish fillets prepared in a
sauce and portioned into small foil wraps cooks well
this way, too.
ROTISSERIE TECHNIQUES
Rotisseriecookingproducesfoodsthat are moist,
flavorfuland attractive.Althoughthe retissedeismost
commonly usedfor cooking meat or poultry,neady
anythingcan be used ifpreparedproperly.
Balancing the Food
Inrotisseriecooking,balancingthe food isof utmost
importance.The rotisseriemustturnevenlyor the
stoppingand startingactionwillcausethe foodtocook
unevenlyand possibly bum the heavierside.
The easiestfoods to balance are those of uniform
shape and texture. To test ifthe food isbalanced
correctly whensecured, place the endsofthe rotis-
serie spit looselyin thepalms of your hands. If there is
no tendencyto roll,givethe spita quarterturn. If itis
stillstable,give ita finalquarterturn. Itshouldrest
withouttaming in eachofthese positions.Itcan then
be attached toyour gdll.
Food Preparation
When preparingpoultry,truss the birds tightlysothat
wings and drumsticks are closetothe bodyofthe bird.
The cavity ofthe birdmay be stuffedpdortothis if you
wish. Pullthe neckskindownand, usinga small
skewer, fix ittothe back ofthe bird.Push the retis-
serie spitthroughlengthwise,catchingthe birdin the
fork ofthewishbone. Centerthe birdandtightenwith
the holdingforks. Test the balance asdescribedabove.
A rolledpiece ofmeat requiresthe rotisserieskewerto
be insertedthrough thecenter ofthelengthofmeat,
then securedand balanced.
For meats that containbones, it isbestto securethe
rotiesede skewerdiagonallythroughthe meaty
sections.Ifprotrudingbones or wingsbrowntoo
quickly,cover with piecesoffoil.
Tips for Rotisserie Cooking
When retissedecooking,the majority of heat will come
from an indirect source. Inotherwords,the burners at
each end ofthe grillare litand thefood is placed
centrallyon the rotissede, with no directheat source
underneath.To catch anyddpsfromthe rotisseriefood
itwillbenecessaryto removethe cookinggddsand
then place a drippan directlyunderthefood.These
drippingscan beused tomake graviesandother
sauces toaccompanythe cooked meats. Place the lid
downoverthefood when you startto cook.
The cookingtimes on a rotissedewill be approximately
the same asfor oven cooking.
25
BAKINGTECHNIQUES
Certainly nota method of cooking usually associated
with the barbecue gdn,baking can be easily done on
your Kenmore Elite gas grill. There is no limit to the
recipes you can bake on your grill. From casseroles
and cornbread to delicious deserts like fondue fruit
skewers or crumb cake, it's as easy as baking in the
kitchen.
Preparing to Bake
To bake inyour newgrill you'll need a bakingdish or
cast-iron cooking pan, and a pair of insulated cooking
mitts. If the cooking pan is cast-iron be sure to season
the pan before use.
Preheat your grill 3-5 minutes, then lowerheat to
achieve the baking temperaturedesired. Bakinguses
the indirect cooking method. Therefore, your cooking
pan should be placed on the left or right side of your
grill with the burner lit on the opposite side.
Tips for Baking
Prepare your favorite recipe as you wouldinthe
kitchen.Foods cooked in the grillfor long periods of
time should always be covered in aluminum foil to
retain moisture. You will need to stir the food several
times as it bakes, and add additional liquid if required.
Watch the temperature, and adjust to cook according
to your recipe directions.
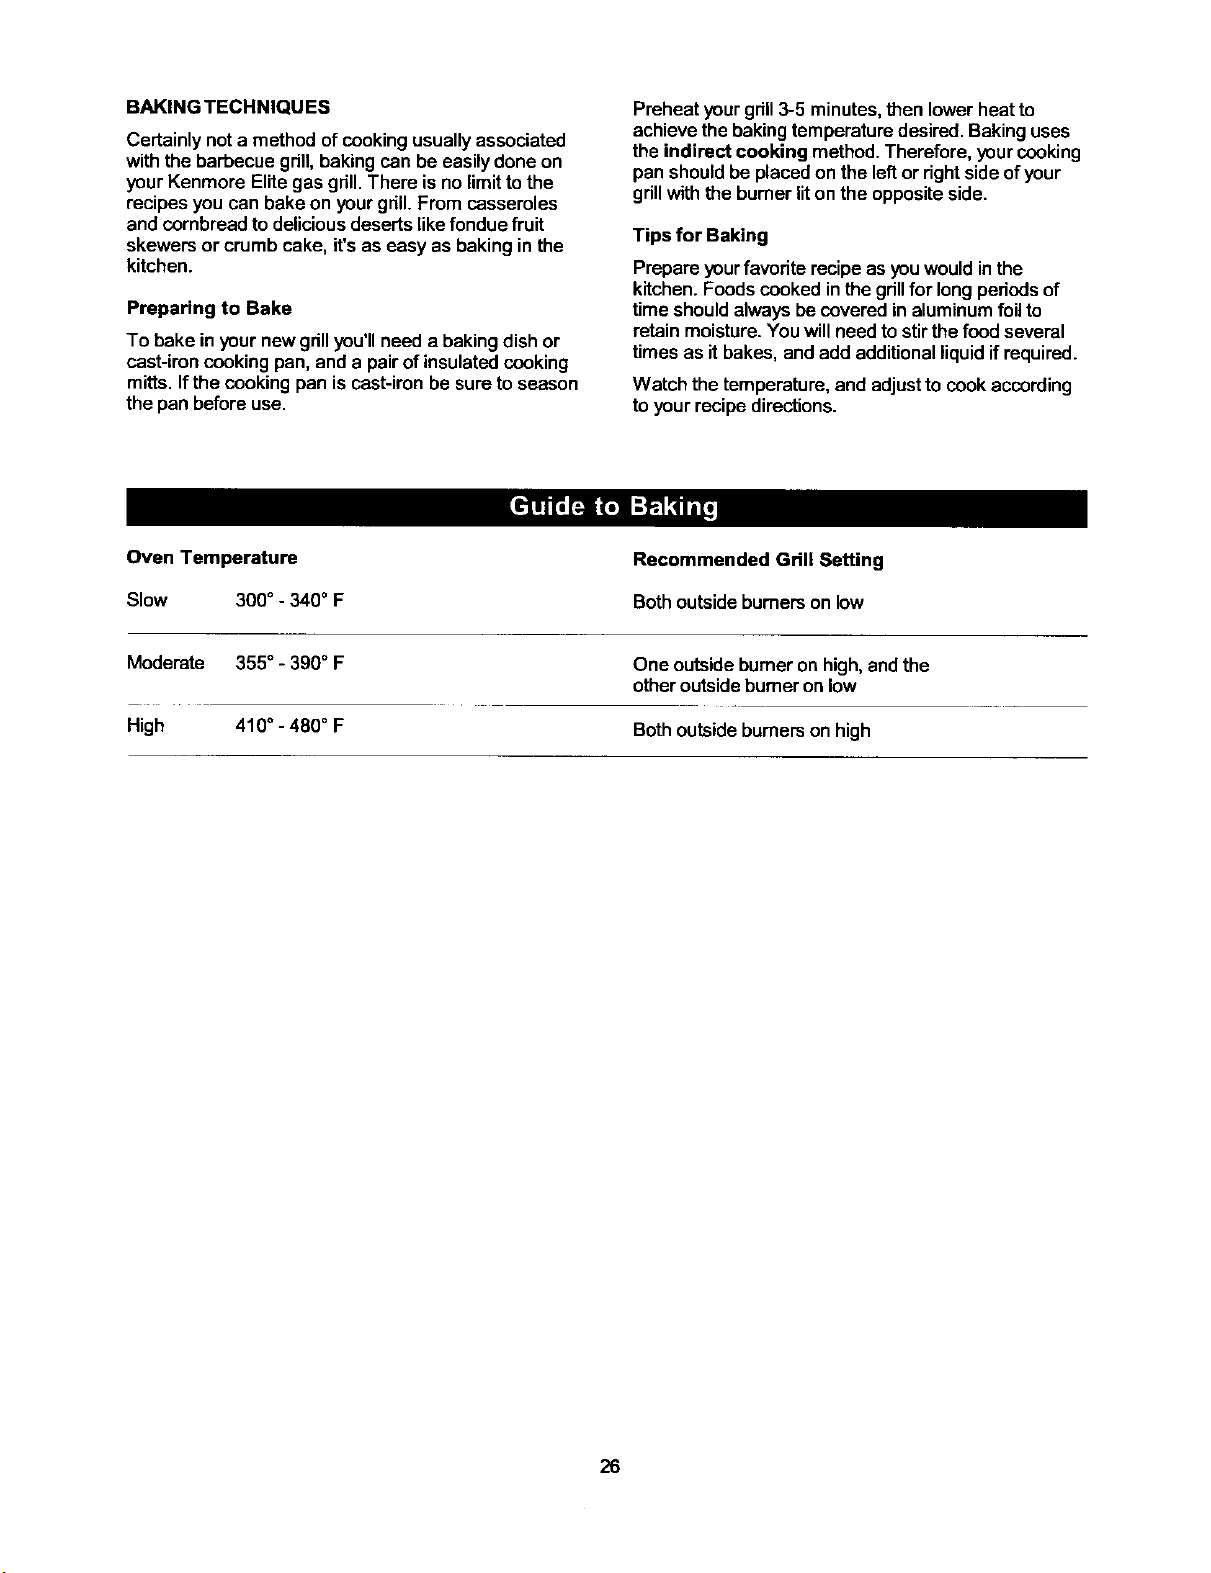
Oven Temperature
Slow 300° - 340° F
Recommended Grill Setting
Bothoutside burners onlow
Moderate 355° - 390° F
High 410°- 480° F
One outsideburner on high, and the
otheroutsidebumer on low
Bothoutside burnerson high
26
ONIONBURGERS
A honey and mustard sauceglazes the onionslices
as theycook alongside these delicious burgers.For
optimalsweetness, selectVidalia orWalla Walla
onions. Makes 4 open face burgers.
Ingredients
2 largesweet onions,sliced(12 to 16 ounces)
2 tablespoonsmargarineor melted butter
2 teaspoonsdrymustard
2 teaspoonshoney
1 poundleangroundbeef
1/4 teaspoonsalt
1/8 teaspoonpepper
4 slicesTexas toast
4 lettuce leaves
4 tomatoslices
Preparing Onions
Place onionsin a cooking pan or on a small piece of
aluminumfoil. Combine meltedmargadne,mustard
and honey, then ddzzle over onions. Cover pan with lid
or fold up edges of foil and seal with double fold to
completely enclose onions--leaving space for steam
to build. Place pan or foil packet on gdll directly over
medium heat for 15 minutes with the gdll hood up.
Preparing Burgers
While onionsare cooking,combinegroundbeef, salt
and pepper in a medium bowland mix well.Shape
mixtureintofour3/4 inch burgerpattiesand add to
gdll,directlyover heat. Grillburgersalongwith onions
for about5 minutes,then turnburgers.Gdllfor 8 to10
minutesmore or untilno pinkremainsin meat, and
onionsare tender.To serve, toastboth sidesofTexas
toaston grill.Then top each sliceof Texas toastwitha
burger,lettuce,tomato andonion.Spdnklewith pepper
ifdesired.
DOUBLE SALSA BURGERS
Afresh tomatosalsaflavorsthe beef mixture for a
zestytastingburger. The salsa also servesas a
colorfultopping.Makes 6 burger patties.
Ingredients
1 largetomato,seeded and finely chopped
112 cup finelychopped green pepper
1/4 cupfinelychoppedredonion
2 finelychopped,seeded jalapenopeppers
1 garlicclove,minced
1 tablespoonsnippedcilantro
1/4 teaspoon salt
1 1/2 pounds lean ground beef
2 cupsshreddedlettuce
113 cupfinelyshreddedcheddar cheese
1/4 cup dairysour creamand/or guacamole
Preparing the Salsa
Combine tomato,green pepper, onion,jalapeno
peppers, gadic, cilantroand saltin a bowl. Set
aside 2 tablespoons ofsalsa. Cover and chillremain-
ingsalsauntilservingtime.
Preparing Burgers
In anotherbowl, combine ground beef with2 table-
spoonsofreservedsalsa, mixwell.Shape mixture
intosix 1/2 inchthick burgersand placeon the grill
directlyovermediumheatwith hoodup.Grillfor 13
to 15 minutesor untilnopinkremains.Turn burgers
once, halfwaythrough gdlling time. Arrangethe
shreddedlettuceon individualplates.Top lettuce
with a burger,cheddarcheese and salsa.Serve with
sourcreamand/orguacamole.
CHICAGO STYLE HOT DOGS
Servethesehotdogs"Chicago-style"withpickledpeppers!
Makes 4 servings.
Ingredients
!/3 cup ketchup
1/4 cup chopped pickled peppers
2 tablespoonspicklerelish
2 tablespoons choppedonion
1/4 teaspoonpoppy seed
4 fullycooked4-ouncejumbo hotdogs
4 hot dog buns
Preparing the Relish
Combine ketchup,choppedpickledpeppers,relish,
onionand poppy seed in a small bowl,then set aside.
Preparing Hot Dogs
Place hot dogs on grill directly over mediumheat 5 to 8
minuteswiththe lidup.Turn hotdogsand brushwith
some ofthe relishmixture.Gdll hotdogs6 to 8
minutesmore oruntilthoroughlycooked.
To Serve
Toast innersidesof hotdogbunson gdll.Servehot
dogsinsidebunsandtop withremainingrelish mixture.
27
RIBEYESTEAKSWITHGRILLEDGARLIC
As they cook, the garlic cloves mellow inflavor,
making a delicioussauce for anygrilledmeat.And for
an appetizer,spread the softened cloves over toasted
slices of french bread! Makes 4 servings.
Ingredients
1
2
1
2
wholeheadof gadic
tablespoonsolive oilor cookingoil
tablespoonsnippedfresh basil,or 1/2
teaspoondried basil,crushed
tablespoonsnippedfresh rosemaryor 1/2
teaspoondriedrosemary,crushed
twelve-oz, boneless ribeye steaks
Preparing the Garlic
Use a cookingpan ortear offa 24x18-inchpiece of
aluminumfoil and fold long length in half, then trimto
make a 12-inchsquare. Remove theouterlayerof
gadic head,then cutoffand discardthetop 1/2-inchof
gadic head toexpose the garliccloves.Place gadic
head in center ofa cookingpan or in centeroffoilwith
all sidesofthe foilfolded up aroundthe garlictoform a
cup. Drizzle gadicwith oiland spdnklewith basiland
rosemary.Coverpan or twistthe endsofthe foil to
completelyenclose thegadic.
Preparing Steaks
Place steaks and the gadic pack on grilldirectlyover
medium heat and cook about7 minutes with the lid
up. Turn steaks and grill for 5 to 8 minutes more, or
until cooked to taste. Then remove steaks and place
on platter. Remove garlic end drizzle itsjuices over
your steak. Remove the softened garlic cloves and
spread over your steak. Season with salt and pepper
as desired and cut into serving-size pieces.
Preparation
Combine ketchup, pepper, rosemary, basil andgadic
powder.Coat bothsidesof steak with mixture.Grill
steak withhood up,directlyover mediumheatfor 6
minutes.Turn steak and grillfor 8 to 12 minutesmore
or untilcooked as desired. Cut intoservingsize
pieces.
BARBECUED RIBS
Serve this tangy barbecueclassic with corn-on-the-
cob, green salad,potato salad or coleslaw!
Makes 4 servings.
Ingredients
2 pounds American style pork spareribs
112 cup barbecue sauce
112 cup tomato sauce
2 cloves garlic, crushed
juice of 1 lemon
few drops of tabasco sauce
Preparation
Place ribsintoa large glassor ceramic dish.
Combine remaining ingredients and pour overthe
ribs. Refrigeratefor severalhours.
Preheat your grill3 minutesand place the ribson
cooking grid.Cook indirectly,overa Iowto medium
heat until cooked. During the last few minutes of
cooking you can cook the ribs over a direct fire for
added barbecue flavor and texture.
HERB-PEPPER SIRLOIN STEAK
The hearty beef flavoriscomplementedwith a deli-
ciousherb coating! Makes 6 servings.
Ingredients
2 tablespoons ketchup
1/2 teaspooncoarsely groundpepper
1 1/2 teaspoonssnippedfresh rosemaryor 1/2
teaspoondried rosemary,crushed
1 1/2 teaspoonssnippedfresh besilor 1/2teaspoon
dried basil,crushed
1/8 teaspoongarlicpowder
1 1 1/2-poundboneless beef sidoinsteak,
cut 1-inchthick
28
MARINATEDTUNASTEAK
Experiment with uniquedishes, like this tuna steak
recipe boasting a delicious wine madnade!
Makes 4 servings.
Ingredients
4 6-ounce fresh or frozen tuna steakscut 1 inch
thick. Thaw fish if frozen
1/3 cup dry white wine
1 tablespoon lemon juice
1 tablespoon olive oil or cooking oil
1 clove garlic, minced
2 teaspoons snipped fresh rosemary, crushed,
or 1/2teaspoon dded rosemary, crushed
1 teaspoon snipped fresh oregano, crushed, or
1/4teaspoon dded oregano, crushed
1/4 teaspoon salt
Preparation
Combine wine, oil,garlic, rosemary,oregano and
salt. Place tuna steak in plasticbag and into
shallowdish,add marinade then seal bag.Rotate
bag tocoat fish wellthen chillfor up to2 hours,
tumiegfish once.
Removefish fTombaganddiscordmarinade. Placea
cookingpanwithbakingrackor mastingrack into
centerofgdllwithouterburnerson mediumheat.
Cook tunasteak ontopof reckwithliddownfor8 to
12 minutesor untilfishbeginstoflake easily.Turn
fishoncedudngcooking.When cooked,removefish
from grillandserve.
MUSTARD-GLAZED HALIBUT STEAKS
Asimplesauce of melted margarine,lemon juice,
Dijon-style mustard and basiladds a scintillating note
to these sizzling fish steaks! Makes 4 servings.
Ingredients
4
2
2
1
2
6-ouncofresh or frozen halibutsteaks, cut1
inchthick
tablespoons margarineor butter
tablespoonslemonjuice
tablespoonDijon-stylemustard
teaspoonssnippedfreshbasilor 1/2
teaspoonsdded basil,crushed
Preparation
Combine thawed fish,margarine or butter, lemon
juice, mustardand basilintoa cooking pan or
aluminum foil rectangle, and cook direcUyover low
flame until melted. Brush mixture over both sides of
halibut fish steaks. Pour balance of mixture into
small bowl.
Placeclean cooking pan orfoil on centerof gdllwith
bothouterburnerson medium. Placefish on grill
and closelid.Cook indirectlyfor 8 to 12 minutesor
just untilfish beginsto flake easily,turningonce
and brushingas neededwithremainingmixture.
ALMOND COATED TROUT
Thisdeliciousrecipeisuniqueand easy toprepare on
yourKenmore Elite gas grill.Makes 4 servings.
Ingredients
2 trout
1/2 cupallpurposeflour
1 egg,lightlybeaten
1 cupslicedalmonds
1/3 cup parmesan cheese, grated
oliveor peanutoilfor frying
Preparation
Remove the head and tail fromtrout andfillet all
bones. Cut each fish inhalftoform 4 long fillets.
Coat fishinflour,dip inegg and rollinalmonds.
Refrigeratefor1 hour.
Filla cast-ironpan with 1 to2 inches ofoil, and
place over high heat.Cook trout untilgoldenbrown.
Drainoil, spdnkletroutwith parmesancheeseand
serverightfromthegdll.
29
SOUTHWESTCHICKENBREASTS
Thispopular recipe can also be a grilledchickensalad!
Slice chicken into small strips and place them on top
of shredded lettuce with avocado dressing and top with
cheese! Makes 6 servings.
Ingredients
1/4 cupdrywhite wine
2 tablespoons oliveoilor cookingoil
2 teaspoonssnippedfresh tarragonor 1/4
teaspoon driedtarragon,crushed
1/4 teaspoonsalt
6 skinless,boneless chickenbreast halves
2 avocados,pitted,peeledandchopped
1 tomato,chopped
1 clovegadic, minced
2 tablespoonsfinelychoppedseeded
green chilipeppers ofyour choice
2 greenonions,finelychopped
1 tablespoon snippedfresh cilantro
1 tablespoon honey
1 tablespoon lemonjuice
Preparing the Chicken
Combine wine,oil, tarragon and salt. Rinsechicken
and dry withpaper towels.Place chickenin plastic
bag and intoshallowdish--then add marinade and
seal bag. Rotate chickento coatwell and chillup to 24
hours,turning bagoccasionally.
Preparing the Avocado Dressing
Combine avocados,tomato,gadic, chilipeppers,
onions,cilantro, honeyand lemonjuice. Toss well
then coverand chillup to2 hours.
Grilling the Chicken
Remove the chicken from plastic bag andreserve the
marinade. Grill chickendirectlyover medium heatwith
lidupfor 5 minutes.Turn chickenand brushwith
marinade,then grillfor 5-10 minutesmoreor until
chicken isno longerpink.Servewithside ofavocado
dressing.
BARBECUEDCHICKEN
Another backyardfavorite,this recipe includes an
easy to make, sweet and spicysauce.
Makes 4 servings.
Ingredients
112 cup ketchup
1/4 cuporangemarmalade
1 tablespoon vinegar
1/2 teaspooncelery seed
1/2 teaspoonchilipowder
1/4 to 1/2teaspoon bottledhot pepper sauce
1 2 1/2to 3 poundbroiler-fryer chicken,pre-cut
Preparing the Sauce
Combineketchup,marmalade, vinegar,celeryseed,
chilipowder and hotpeppersauce in a cookingpan,
and cookdirectlyover a lowto mediumheat. Leave
the cookedsauceinthepan and removefrom heat
untilchickenisprepared.
Preparing the Chicken
Wash chickenand drywith paper towels.Turn
outsideburnerson mediumand placepre-cut
chickenpieces (boneside down)incenter ofgrill.
Closelidand cook indirectlyfor 1 hour or until
chickenisno longerpink. Brushoccasionallywith
sauce. Remove chickenfrom grillonce cooked,then
place cookingpanwith sauceintocenterofgrilland
reheat.Pourwarmedsauce overchickenandserve.
3O
TRADITIONALHOLIDAYTURKEY
Imagineeveryone's surprisewhenyou serve yournext
holidayturkey_cemplete withdressing--delicious
and tender straightfrom the griln Serves 8 - 10
Ingredients for Turkey
8 - 10 poundwholeturkey
4 ouncesbutter, softened
2 tablespoonschoppedthyme
2 tablespoonslemonjuice
2 teaspoonsgratedlemondnd
Ingredients for Dressing
2 ouncesbutter
2 onions,finely chopped
8 ouncesbacon, chopped
2 tablespoons port wine
1/4 cup redwine
2 chickenstock cubes
4 ounceschoppedcashews,hazelnutsor
pecans
1/2 cup choppedcelery
1/2 cup choppedcarrot
1 - 1 112cupsfresh white breedcrumbs
1 egg, lightlybeaten
-- saltand pepper totaste
Preparing the Dressing
Prepare dressingin a cookingpan directlyover
medium heat. Melt butter,add onionsand baconthen
saute 3 minutes.Addport, red wine and stockcubes
and bring to a boil.Cook2 minutes.Remove panto
allowingredientstocool.Addremainingingredients
and mix.
Preparing the Turkey
Although notrequired,youmaywanttopreheatyour
grill3 minutes.
Wash insideofturkeyanddrywithpapertowels.
Pack breadcrumbseasoningintothe turkeycavity.
Combinethebutter,thyme,lemonjuiceand rind
together ina bowl. Usingturkeybaster,insertbutter
mixtureunderskincoveringthe turkeybreast.
Truss the turkey_ stTingand place iton a baking
pan or roastingrackthatrestsintoa cookingpan.
Removethe cookinggddsfrom yourgdllifnecessary,
then placethecookingpan andturkeyinthe centerof
your grill.Turn oneoutsideburner tolow,the otherto
medium,and closelid. Cookindirectlyfor 3 1/2to 4
hoursoruntilcooked. Halfwaythrough cookingtime
you mayalternateburnertemperaturessothatthe
turkey brownsevenly.Oncecooked,removedressing
from cooked turkey, sliceandserve.
PIZZA ON THE GRILL
You may neverwanttocall outfor pizza again!
Followthis pizza dough recipe, or purchase ready-
made pizza doughfoundin your grocersrefrigerated
section---nextto the biscuits.Slice and servedirectly
from the gdll. Serves 6 - 8
Ingredients
1 1/2 teaspoonsdriedyeast
1 cup lukewarmwater
1/2 teaspoonsugar
3 tablespoonsoliveoil
3 cupsall purposeflour
1/4 cup tomato pasteor Italiantomato sauce
6 ouncesslicedpepperoni
1 red pepper,roastedand sliced
3/4 cup pittedblackolives
8 ounces gratedmozzarella cheese
It's easy to customize this recipewith toppingsto
suit yourfamily's taste. For spicier crust,lightlyrub
the doughwith oliveoilthen spicewith pepperand
gadic saltbeforespreadingyour tomatosauce.
Preparing the Pizza Dough
Combine yeast,waterandsugartogetherandlet
stand ina warmplace until mixturestartstofoam.
Addthis yeastmixturetoflourandoilandcombineto
formyour pizza dough.Kneadona lightlyfloured
surfaceuntilsmoothandelastic.Cover andstandina
warm placeuntildoubledinsize.Knockbackdough
and rollouttoa rectanglethe sizeofyour cooking
panor bakingdish.Placedoughintoa lightlyoiled
pan.
If you purchased a ready-made pizza dough, simply
open can and roll dough into a lightly oiled cooking
pan.
Preparing the Pizza
Spreadtomato paste or Italiantomatosauceontop of
your pi_,a dough. Topwith pepperoni,redpeppers,
olives,andlastly,mozzarellacheese. Or ifyou prefer,
you may placecheese firstwithtoppingson last.
Place cookingpan in center ofgdlland cook
indirectly,withone outside burneron highand the
otheron low,for approximately20 minutesor until
bottom ofcrustislightbrown.Lastly,raisethelidand
finishcooking pizzabyturningburnerunderthe
cookingpanon highfor about2 minutes.Thiswill
insurethe center ofpizzagetsbrown.Thenturnoff
heat,sliceand servedirectlyfrompan.
31
FRESHVEGETABLESTIR-FRY
TakeatriptotheOrientwiththiseasy,and healthy
vegetablerecipe. Makes 4- 6 servings.
Ingredients
2 tablespoons oil
1 onion,cutintowedges
1 carrot,thinly sliced
2 cupsbroccoli,cutintosmallflowerets
1 red popper,sliced
2 stickscelery, thinlysliced
1 cup snowpeas
1/2 cup chickenbroth
Preparation
Heat oilin a wok or saute pan,directlyover a high
heat. Add onion and cook I minute.Add carrot and
broccoliand stir-fry2 minutes,then add red pepper,
celery and snowpeas and continuecooking1
minutemore.Add chickenbrothand tossveg-
etables untilcookedto desireddoneness.
ONION BLOSSOMS
Great served as a snack, orto dress up barbecued
meats, poultry or flsh. Makea4servinge.
Ingredients
4 mediumsweatonions(4-5 ounceseach)
1 tablespoonsmargarineor butter,melted
1 teaspoon Dijon-stylemustard
1/8 teaspoon hotpepper sauce
1 tablespoon brownsugar
1 pepper(optional)
Preparation
Peel onions,then cut almost completely througheach
onion,forming 8 wedges.Onion willbeloose, butstill
beintact.Preparefour 12-inchsquaresofaluminum
foil. Place one onionin the centerof eachfoilsquare.
Stirmargarine(or butter)withhotpepper sauceand
drizzleover onions.Sprinklewithbrownsugar.Then
bringuptwosidesoffoilsquare and doublefold. Bring
remainingcomers upand completelyenclose--leaving
enoughspace for steam tobuild.
Place wrappedonionblossoms on grill,directly over
mediumheat. Close lidand cook 15 to 25 minutesor
untilonionsare neadytender. Make a 2-inchopening
at thetop of eachonionwrapping,thenclose lidand
cook 5 to 10 minutesmore,or untilonionsare lightly
browned.Sprinklewithpepperifdesiredandserve
warm.
GRILLED POTATO SKINS
Serve these crispypotatoesas a snackor side dish.
We've included microwaveinstructionsfor a timesav-
ingshortcut. Makes 12 servings.
Ingredients
6 bakingpotatoes (about 8 ounceseach)
3 tablespoons margarineor butter,melted
1/2 cup picante sauce
1 cup shredded cheddar cheese (4 ounces)
3 slices bacon, crisp-ceoked and crumbled
or use prepackaged bacon bits
1 choppedtomato (optional)
1 diced green onion (optional)
1/2 cup sour cream (optional)
Preparation
Puncturecleanpotatoes witha fork,wrap inaluminum
foiland place directly over lowto mediumheat. Close
lidand cookdirectlyfor 1 houror untilcenter is
tender. OR - Microwaveclean,puncturedpotatoes
on highfor 15 to20 minutes,or untilcenter tender.
Allowcookedpotatoesto coolthen unwrapand
discardfoil.
Cut potatoes in half- lengthwise.Scoop out potato
pulp (serveseparatelyor discard.) Be suretoleave
1/4-inch thickpotato shellremaining.Brushthe inside
ofeach potato shellwith meltedmargarine. Spoon2
teaspoons picantesauce intoeach potatoshell,
sprinklewith cheese and top with bacon.
Place preparedpotatoskins on grill, directly over
mediumheat. Close lidand cook for 8 to 10 minutes
or untilpotato skins are cdsp.Sprinkleeach potato
skinwithtomatoand green onionand then topwith
sourcream, ifdesired.
32

For in-home repair of a major appliance,
no matter who made it, no matter who sold it!
Call 24 hours a day, 7 days a week
SM
1-800-4-MY-HOME (1-800-469-4663)
Para pedir servicio o ordenar piezas:
1-888-SU-HOGAR s" (1-888-784-6427)
Pour tout le service:
1-877-LE-FOYER S" (1-877-533-6937)
For repair of carry-in products like
vacuums, lawn mowers, stereos and VCRs,
call for the nearest Sears Service Center location.
Call 24 hours a day, 7 days a week
1-800-488-1222
For the replacement parts and owner's manuals that
you need to "do-it-yourself," call and ask for PartsDirec["
Call 6 a.m. - 11 p.m. CT, 7 days a week
SM
1-800-4-MY-HOME (1-800-469-4663)
www.sears.comlDartsdirect
For a Sears Service Agreement purchase or inquiry:
Call 7 a.m. - 5 p.m. CT, Monday - Saturday
1-800-827-6655
p_
SEARS
HomeCentral°"
Part No. p4775B ® Registered Trademark I TM Trademark of Seam, Roebuck and Co.
© Seam, Roebuck and Co. ® Mama Registrada I TM Marca de Fabrica de Seam, Roebuck and Co.