Use & Care Guide
Manual de Uso y Cuidado
English / Espafiol
Models/Modelos: 119.16126011
I(enmore
@ @
P?ri
o
@ @
@
P/N MCDLPTA000
Sears Brands Management Corporation
Hoffman Estates, IL 60179 U.S.A
www.kenmore.com
www.sears.com
Primary Safety Warnings .................................... 1-3
Warranty Information ..............................................
Pre-Assembly instructions ..................................... 3
Part Diagram and Lists ....................................... 4-7
Assembly instructions ...................................... 8-17
Use & Care Instructions ................................. 18-27
Frequently Asked Questions .......................................... 27
Spanish Guide ............................................................. 28-54
Repair Protection Agreement ......................................... 55
Sears Parts and Service Information .......................... 56
Kenmore Full Warranty
If this grill fails due to a defect in material or workmanship
within one year from the date of purchase, call
1-800-4-MY-HOME® to arrange for free repair (or
replacement if repair proves impossible).
For five years from the date of purchase, the
stainless steel burners will be replaced free of
charge if they rust through. After the first year
from the date of purchase, you must pay the labor
cost to have them installed.
All warranty coverage excludes ignitor batteries,
grill part paint loss, discoloration, and surface
rusting, which are either expendable parts that can
wear out from normal use within the warranty
period, or are conditions that can be the result of
normal use, accident or improper maintenance.
All warranty coverage is void if this grill is ever used for
commercial or rental purposes.
All warranty coverage applies only if this grill is used in the
United States.
This warranty gives you specific legal rights, and you may
have other rights which vary from state to state.
Sears Brands Management Corporation
Hoffman Estates, IL 60179
For residential use only. Do not use for commercial cooking.
IF YOU SMELL GAS"
• Shut off gas to the appliance.
• Extinguish any open flame.
• Open lid.
• If odor continues, keep away
from the appliance and immediately
call your gas supplier or your fire
department.
• Do not store or use gasoline or other
flammable liquids or vapors in the
vicinity of this or any other appliance.
• An LP cylinder not connected for use
shall not be stored in the vicinity of this
or any other appliance.
If you are missing parts, need assistance during
assembly, or have any other questions, please call
1-800-933-0527 between the hours of 8:30am
and 5:00pm, Monday through Friday, Central time.
Note that you will be speaking with a
representative of the grill manufacturer and not a
Sears employee.
Product Record
IMPORTANT" Fill out the product record information
below.
• Model Number 119.16126011
Serial Number
(See silver CSA plate inside of Cabinet Panel)
• Date Purchased
• Read and follow all Safety, Assembly, and Use &
Care Instructions in this Guide before assemblin9
and cooking with this grill,
• Failure to follow all instructions in this Use & Care
Guide may lead to fire or explosion, which could
result in property damage, personal injury, or
death,
DO NOT light this grill without first reading
the Lighting Instructions.
DO NOT light this grill without checking the
burner tubes for blockage that could have
occurred during shipment. See the Cleaning and
Maintenance Instructions.
• DO NOT use any type of charcoal in this grill.
• DO NOT operate the main burners and back
burner at the same time. (If Equipped)
• ALWAYS inspect the grease tray before each
use. Remove and clean as necessary.
THIS GRILL IS FOR OUTDOOR USE ONLY!
This outdoor cooking gas appliance is not
intended to be installed in or on boats or
recreational vehicles.
Liquid Propane Gas (LPG) grills must be used with
the liquid propane gas regulator assembly
supplied. This grill is not convertible to natural
gas.
ALWAYS keep the gas hose assembly away from
any heated surface and dripping grease. Avoid
unnecessary twisting of the hose. Visually
inspect the hose prior to each use for cuts,
cracks, excessive wear, or other damage. Do not
use the gas grill if the hose appears damaged.
Call Sears at 1-800-4-MY-HOME®
(1-800-469-4663) for a Kenmore replacement
gas hose assembly.
The installation must conform with local codes or, ir
the absence of local codes, with either the National
Fuel Gas Code, ANSI Z223.1/NFPA 54, or CAN/CGA
B149.1, Natural Gas and Propane Installation Code
or Propane Storage and Handling Code, B149.2.
All electrical accessories (such as a rotisserie or
light) must be electrically grounded in accordance
with local codes, or in the absence of local codes,
with the National Electrical Code, ANSI/NFPA 70, or
the Canadian Electrical Code, CSA C22.1. Keep any
electrical cords away from hot surfaces.
use your gas gr ng, garage,
porch, shed, breezeway or any other enclosed
area.
• NEVER obstruct the flow of ventilation air around
your gas grill cabinet.
• DO NOT leave children and pets unattended in the
area when the grill is in operation.
• ENSURE the grill is on a level surface when in
operation. You can adjust the feet in the front to
level and stabilize the grill.
• NEVER attach an unregulated gas line to this
appliance.
PRE-ASSEM BLY
• Two people will be necessary to assemble the
larger parts of the grill.
• Lay a cardboard sheet on the floor and use as a
work surface to protect floor and grill parts from
scratches.
• Once all parts are removed and unpacked, use
the Hardware and Part Diagrams to ensure all
items are included and free of damage.
• Use protective gloves when assembling this grill.
SAVE THESE INSTRUCTIONS!
• Leave the instructions with the consumer.
• Retain the instructions for future reference.
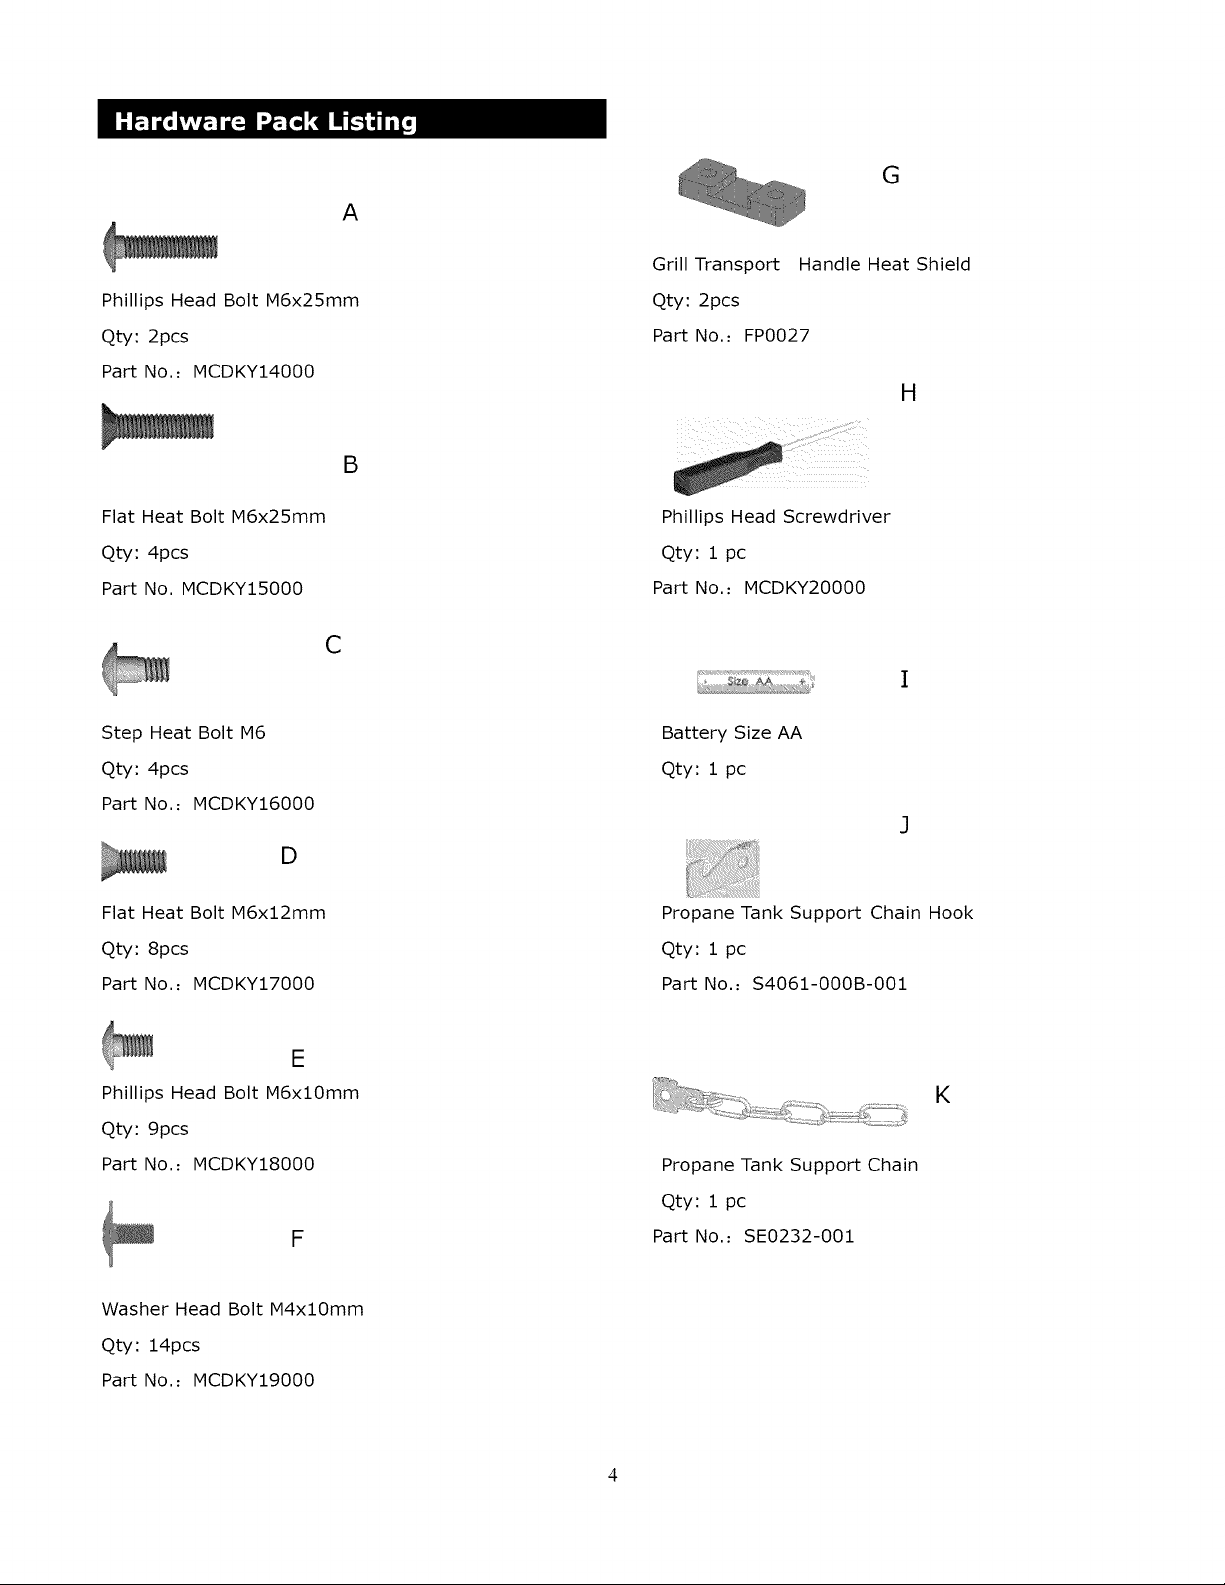
A
Phillips Head Bolt M6x25mm
Qty: 2pcs
Part No... MCDKY14000
Flat Heat Bolt M6x25mm
Qty: 4pcs
Part No. MCDKY15000
B
C
Step Heat Bolt M6
Qty: 4pcs
Part No.: MCDKY16000
D
Flat Heat Bolt M6x12mm
Qty: 8pcs
Part No.: MCDKY17000
E
Phillips Head Bolt M6xl0mm
Qty: 9pcs
Part No.: MCDKY18000
Washer Head Bolt M4xl0mm
Qty: 14pcs
Part No.: MCDKY19000
G
Grill Transport Handle Heat Shield
Qty: 2pcs
Part No.: FP0027
H
Phillips Head Screwdriver
Qty: 1 pc
Part No.: MCDKY20000
Battery Size AA
Qty: 1 pc
Propane Tank Support Chain Hook
Qty: 1 pc
Part No.: $4061-000B-001
K
Propane Tank Support Chain
Qty: 1 pc
Part No.: SE0232-001
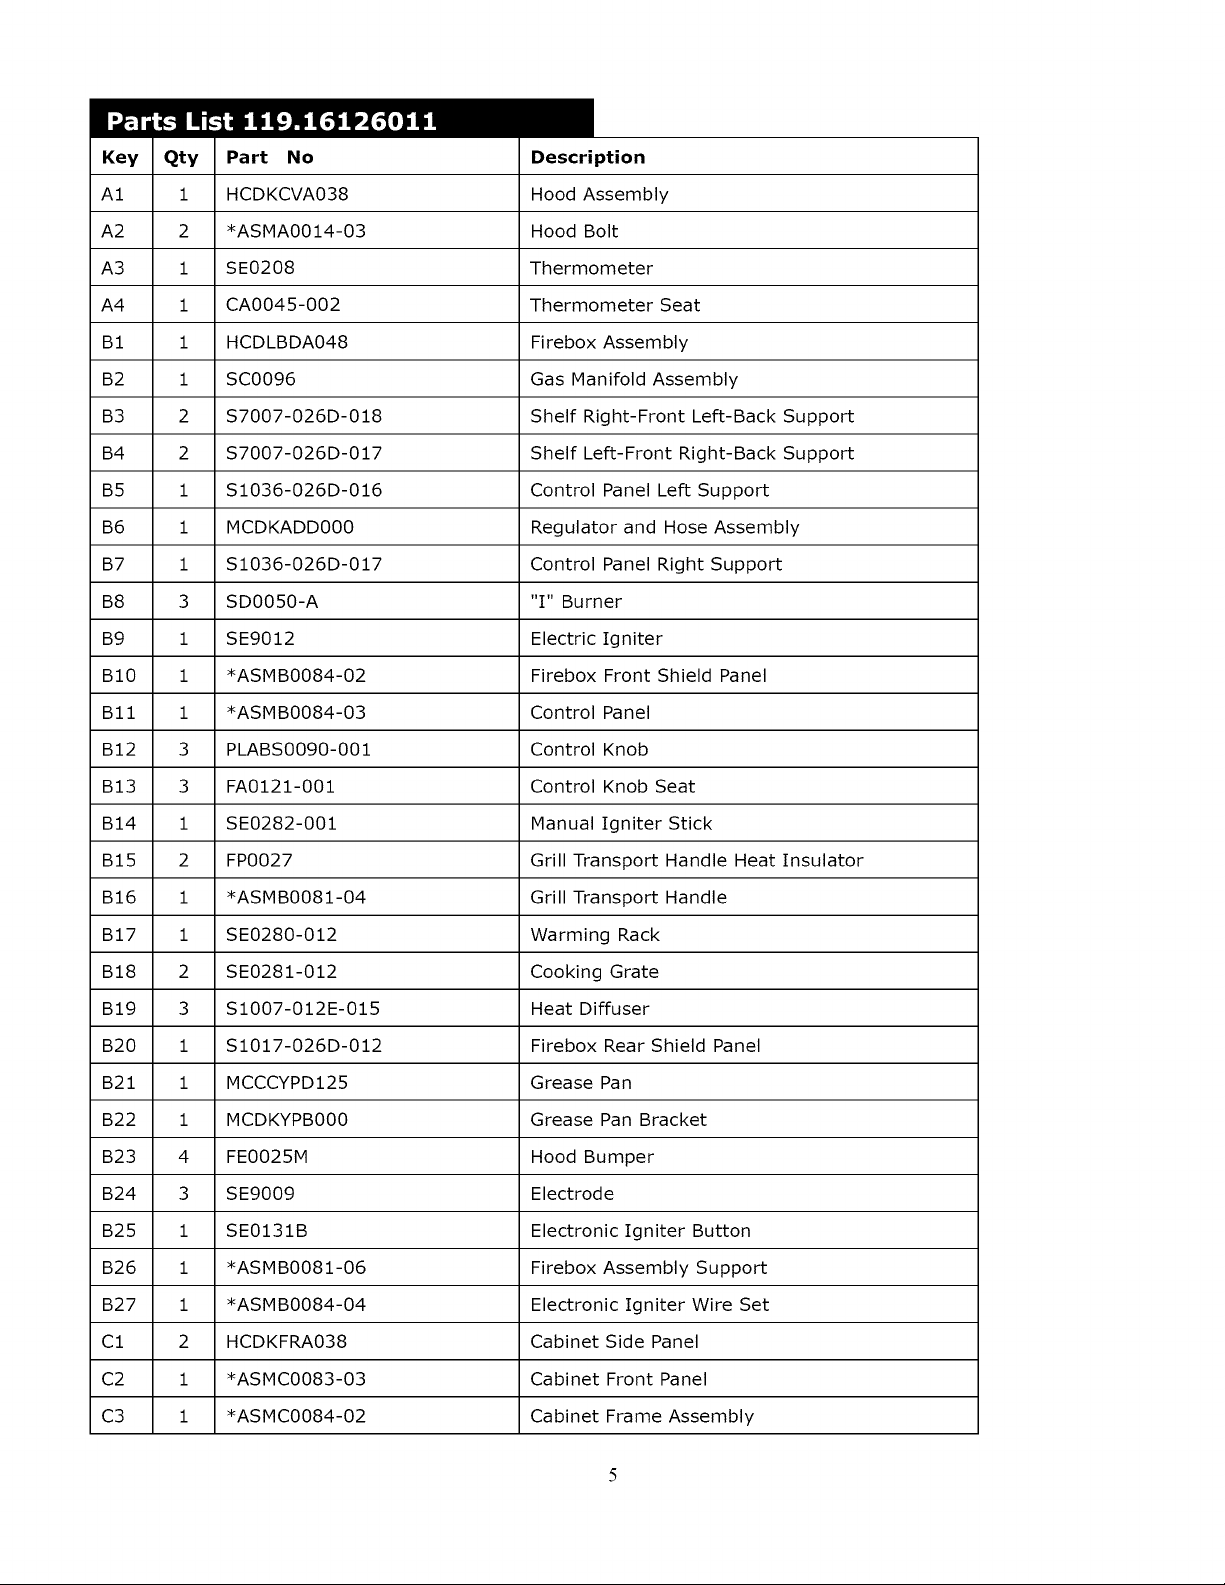
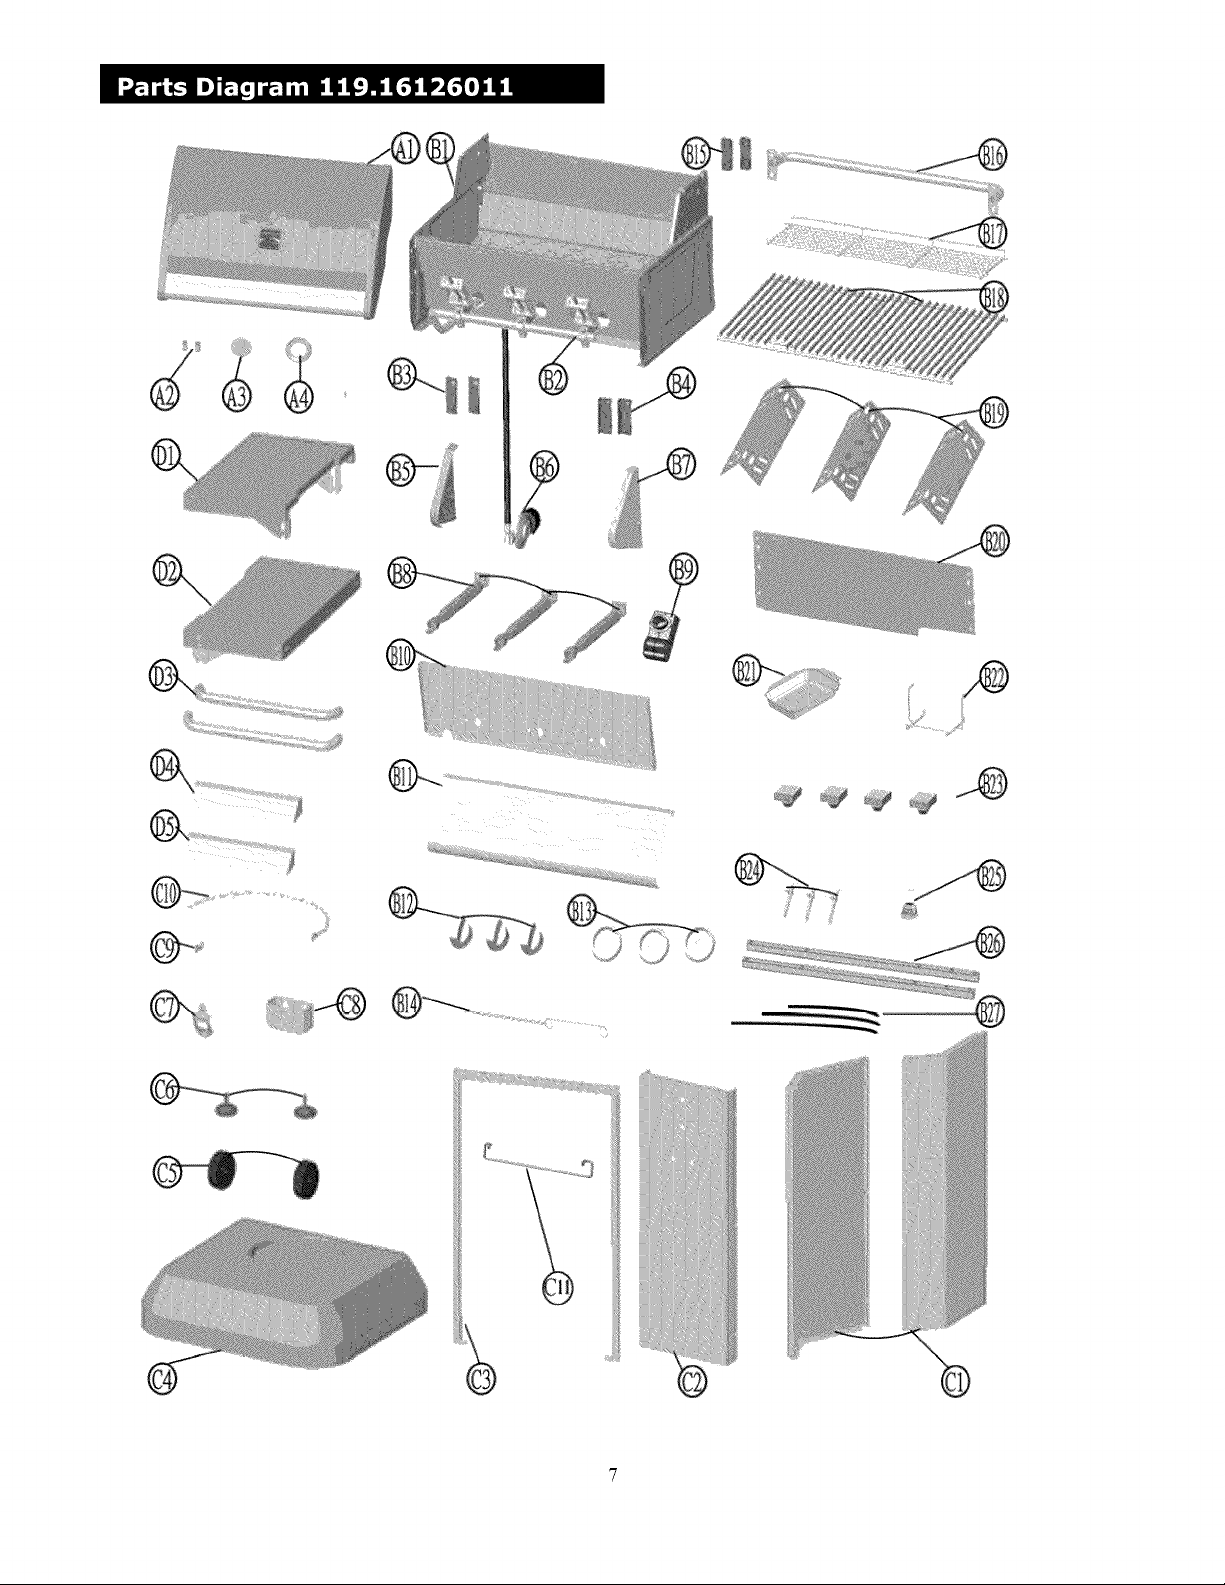
A1
A2
A3
A4
B1
B2
B3
B4
B5
B6
B7
B8
B9
B10
Bll
B12
B13
B14
B15
B16
B17
B18
B19
B20
B21
B22
B23
B24
B25
B26
B27
C1
C2
C3
i
2
i
i
i
i
2
2
i
i
i
3
i
i
i
3
3
i
2
i
i
2
3
i
i
i
4
3
i
i
i
2
i
i
Part No
HCDKCVA038
*ASMA0014-03
SE0208
CA0045-002
HCDLBDA048
SC0096
$7007-026D-018
$7007-026D-017
$1036-026D-016
MCDKADD000
$1036-026D-017
SD0050-A
SE9012
*ASMB0084-02
*ASMB0084-03
PLABS0090-001
FA0121-001
SE0282-001
FP0027
*ASMB0081-04
SE0280-012
SE0281-012
$1007-012E-015
$1017-026D-012
MCCCYPD125
MCDKYPB000
FE0025M
SE9009
SE0131B
*ASMB0081-06
*ASMB0084-04
HCDKFRA038
*ASMC0083-03
*ASMC0084-02
Description
Hood Assembly
Hood Bolt
Thermometer
Thermometer Seat
Firebox Assembly
Gas Manifold Assembly
Shelf Right-Front Left-Back Support
Shelf Left-Front Right-Back Support
Control Panel Left Support
Regulator and Hose Assembly
Control Panel Right Support
'T' Burner
Electric Igniter
Firebox Front Shield Panel
Control Panel
Control Knob
Control Knob Seat
Manual Igniter Stick
Grill Transport Handle Heat Insulator
Grill Transport Handle
Warming Rack
Cooking Grate
Heat Diffuser
Firebox Rear Shield Panel
Grease Pan
Grease Pan Bracket
Hood Bumper
Electrode
Electronic Igniter Button
Firebox Assembly Support
Electronic Igniter Wire Set
Cabinet Side Panel
Cabinet Front Panel
Cabinet Frame Assembly
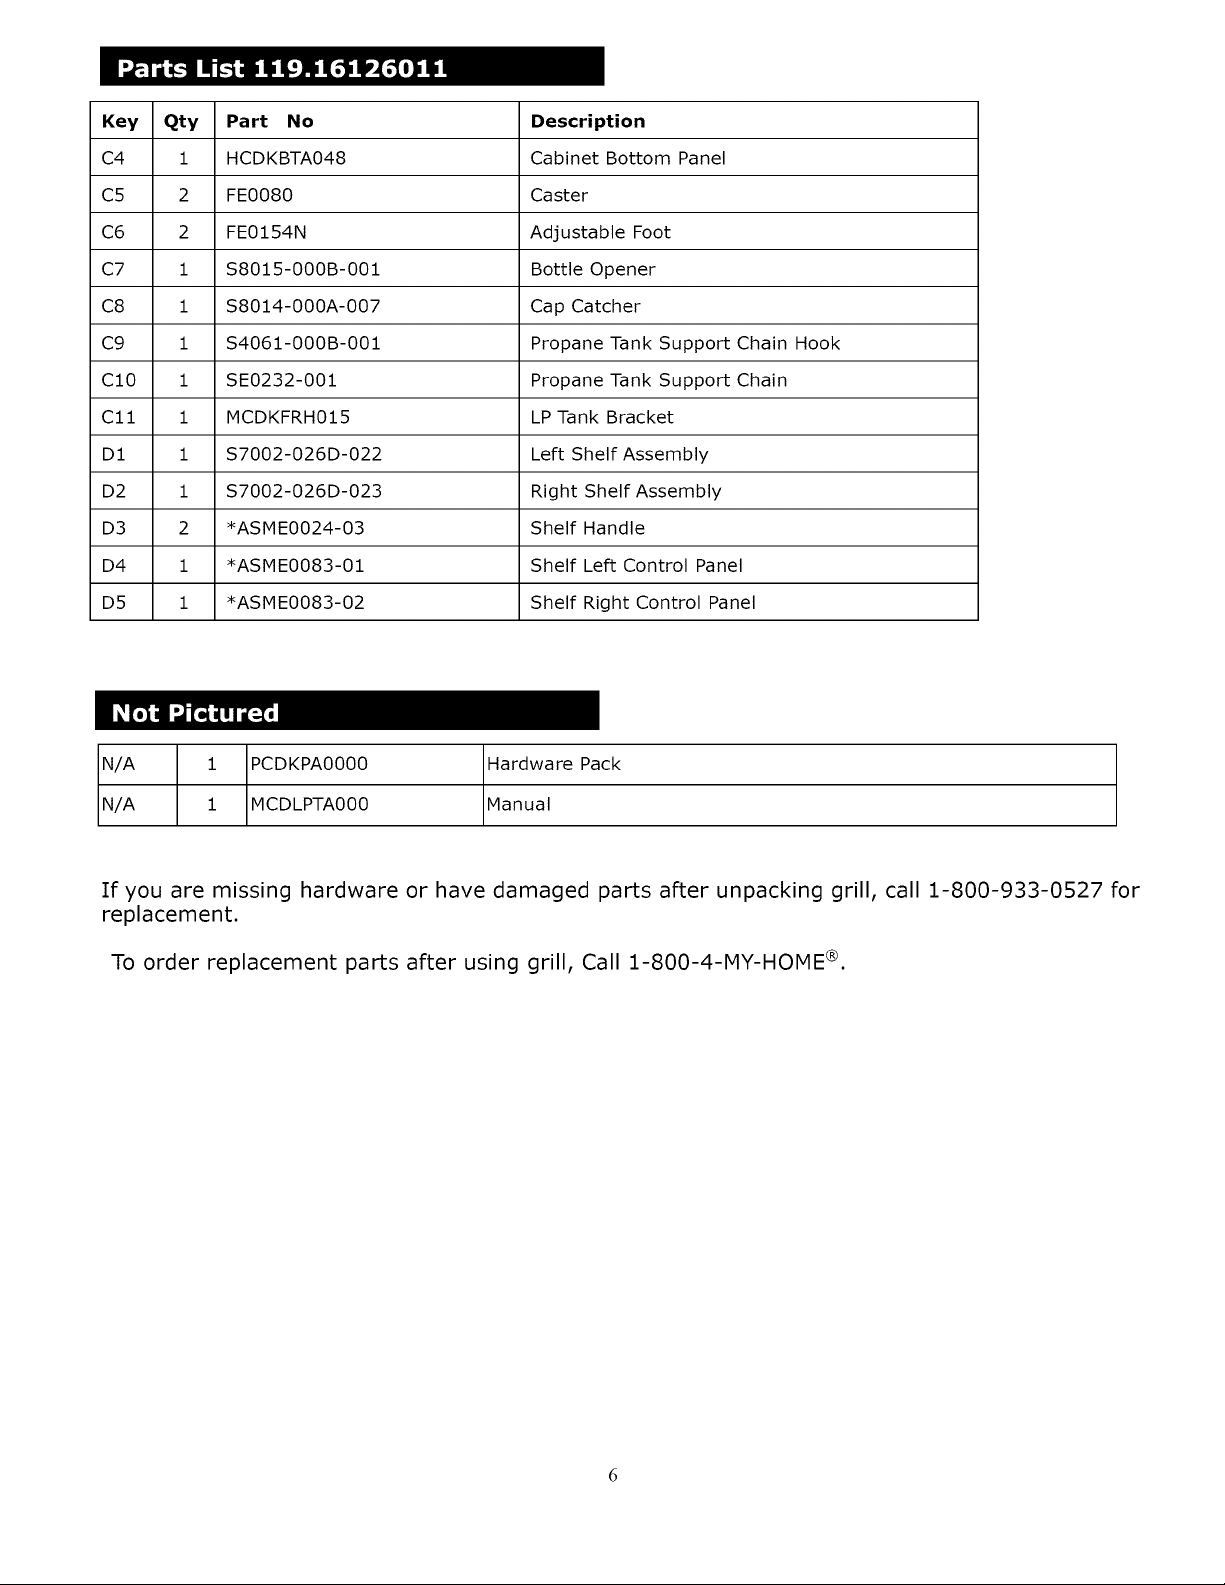
Key Qty Part No Description
C4 1 HCDKBTA048 Cabinet Bottom Panel
C5 2 FE0080 Caster
C6 2 FE0154N Adjustable Foot
C7 1 $8015-000B-001 Bottle Opener
C8 1 $8014-000A-007 Cap Catcher
C9 1 $4061-000B-001 Propane Tank Support Chain Hook
C10 1 SE0232-001 Propane Tank Support Chain
Cll 1 MCDKFRH015 LP Tank Bracket
D1 1 $7002-026D-022 Left Shelf Assembly
D2 1 $7002-026D-023 Right Shelf Assembly
D3 2 *ASME0024-03 Shelf Handle
D4 1 *ASME0083-01 Shelf Left Control Panel
D5 1 *ASME0083-02 Shelf Right Control Panel
N/A 1 PCDKPA0000 Hardware Pack
N/A 1 MCDLPTA000 Manual
If you are missing hardware or have damaged parts after unpacking grill, call 1-800-933-0527 for
replacement.
To order replacement parts after using grill, Call 1-800-4-MY-HOME ®.
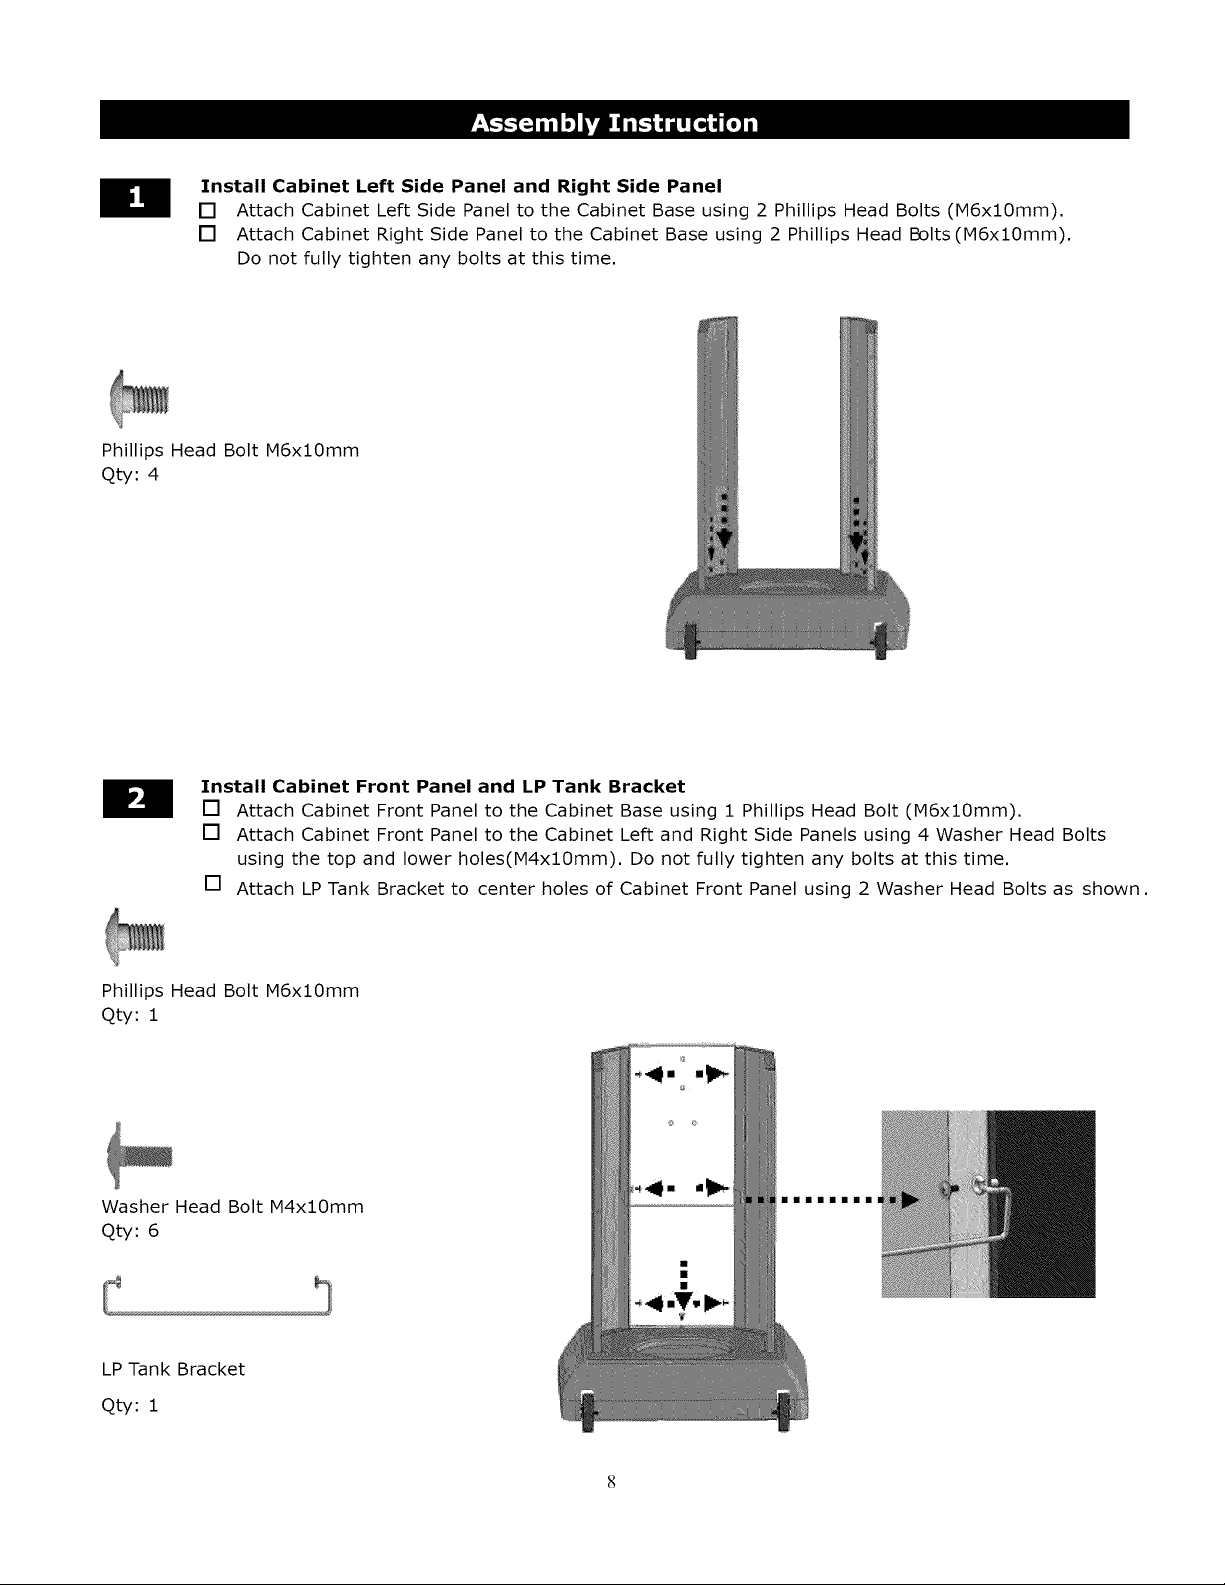
Install Cabinet Left Side Panel and Right Side Panel
[] Attach Cabinet Left Side Panel to the Cabinet Base using 2 Phillips Head Bolts (M6xl0mm).
[] Attach Cabinet Right Side Panel to the Cabinet Base using 2 Phillips Head Bolts (M6xl0mm),
Do not fully tighten any bolts at this time,
Phillips Head Bolt M6xl0mm
Qty: 4
Install Cabinet Front Panel and LP Tank Bracket
[] Attach Cabinet Front Panel to the Cabinet Base using 1 Phillips Head Bolt (M6xl0mm).
[] Attach Cabinet Front Panel to the Cabinet Left and Right Side Panels using 4 Washer Head Bolts
using the top and lower holes(M4xl0mm), Do not fully tighten any bolts at this time,
[] Attach LP Tank Bracket to center holes of Cabinet Front Panel using 2 Washer Head Bolts as shown,
Phillips Head Bolt M6xl0mm
Qty: 1
Washer Head Bolt M4xl0mm
Qty: 6
LP Tank Bracket
Qty: 1
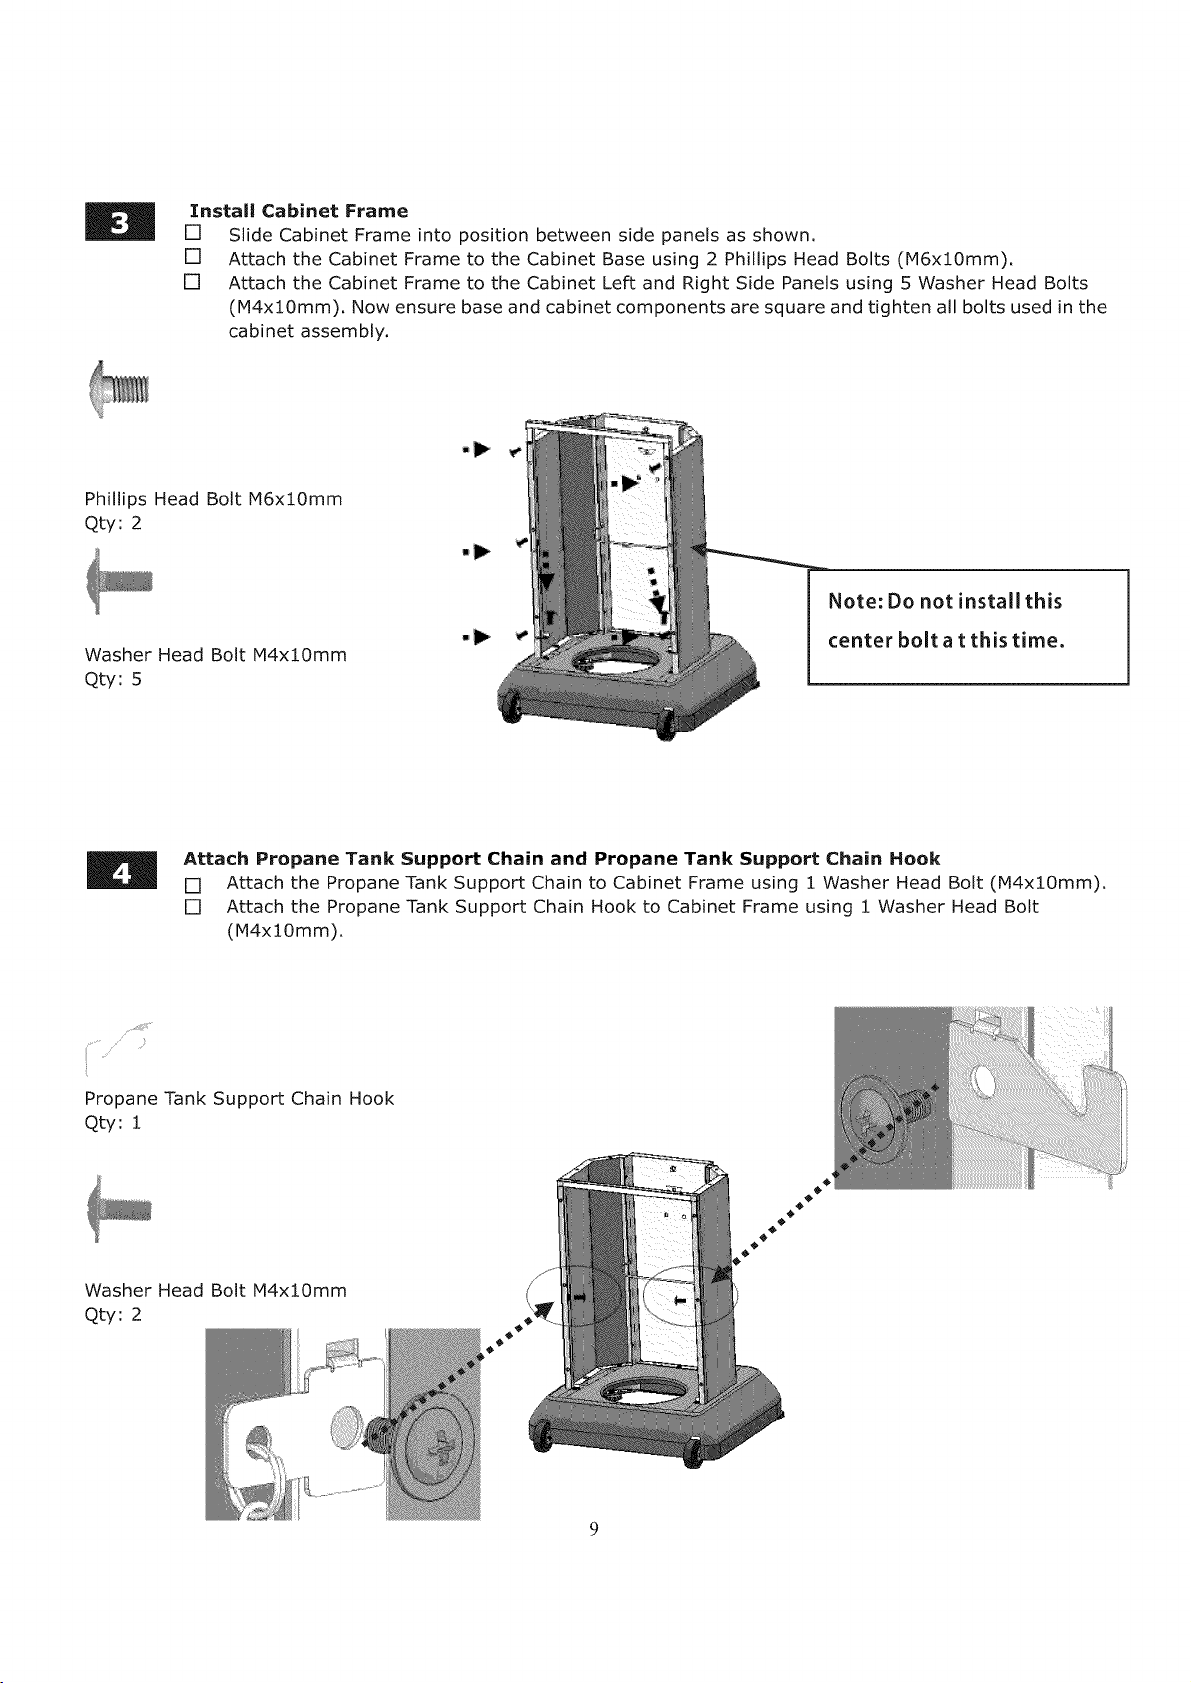
Instal| Cabinet Frame
[] Slide Cabinet Frame into position between side panels as shown.
[] Attach the Cabinet Frame to the Cabinet Base using 2 Phillips Head Bolts (M6xlOmm).
[] Attach the Cabinet Frame to the Cabinet Left and Right Side Panels using 5 Washer Head Bolts
(l_14x::[Omm). Now ensure base and cabinet components are square and tighten all bolts used in the
cabinet assembly,
Phillips Head Bolt lq6xlOmm
Qty: 2
Washer Head Bolt lq4xlOmm
Qty: 5
Note: Do not install this
center boltatthistime.
Attach Propane Tank Support Chain and Propane Tank Support Chain Hook
[] Attach the Propane Tank Support Chain to Cabinet Frame using 1 Washer Head Bolt (M4xlOmm),
[] Attach the Propane Tank Support Chain Hook to Cabinet Frame using 1 Washer Head Bolt
(M4xlOmm).
Propane Tank Support Chain Hook
Qty: 1
Washer Head Bolt M4xlOmm
Qty: 2
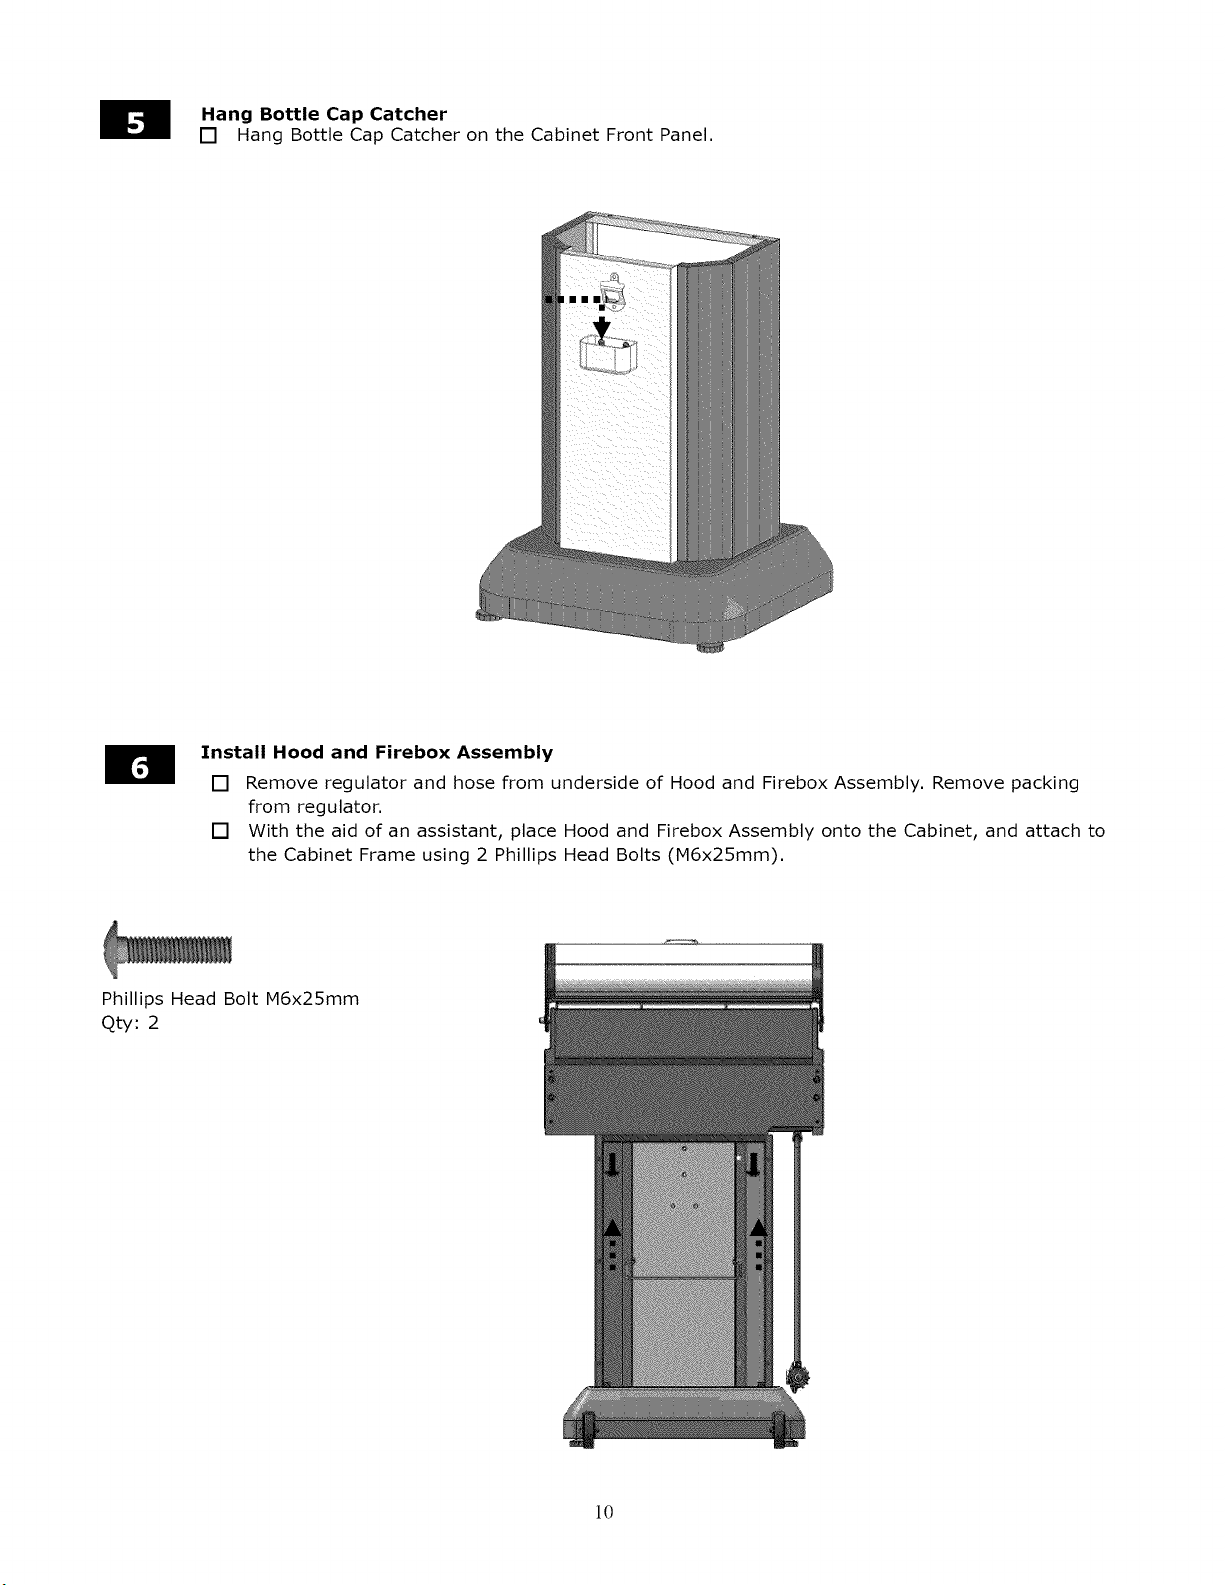
Hang Bottle Cap Catcher
[] Hang Bottle Cap Catcher on the Cabinet Front Panel.
Install Hood and Firebox Assembly
[] Remove regulator and hose from underside of Hood and Firebox Assembly. Remove packing
from regulator.
[] With the aid of an assistant, place Hood and Firebox Assembly onto the Cabinet, and attach to
the Cabinet Frame using 2 Phillips Head Bolts (M6x25mm).
Phillips Head Bolt M6x25mm
Qty: 2
10
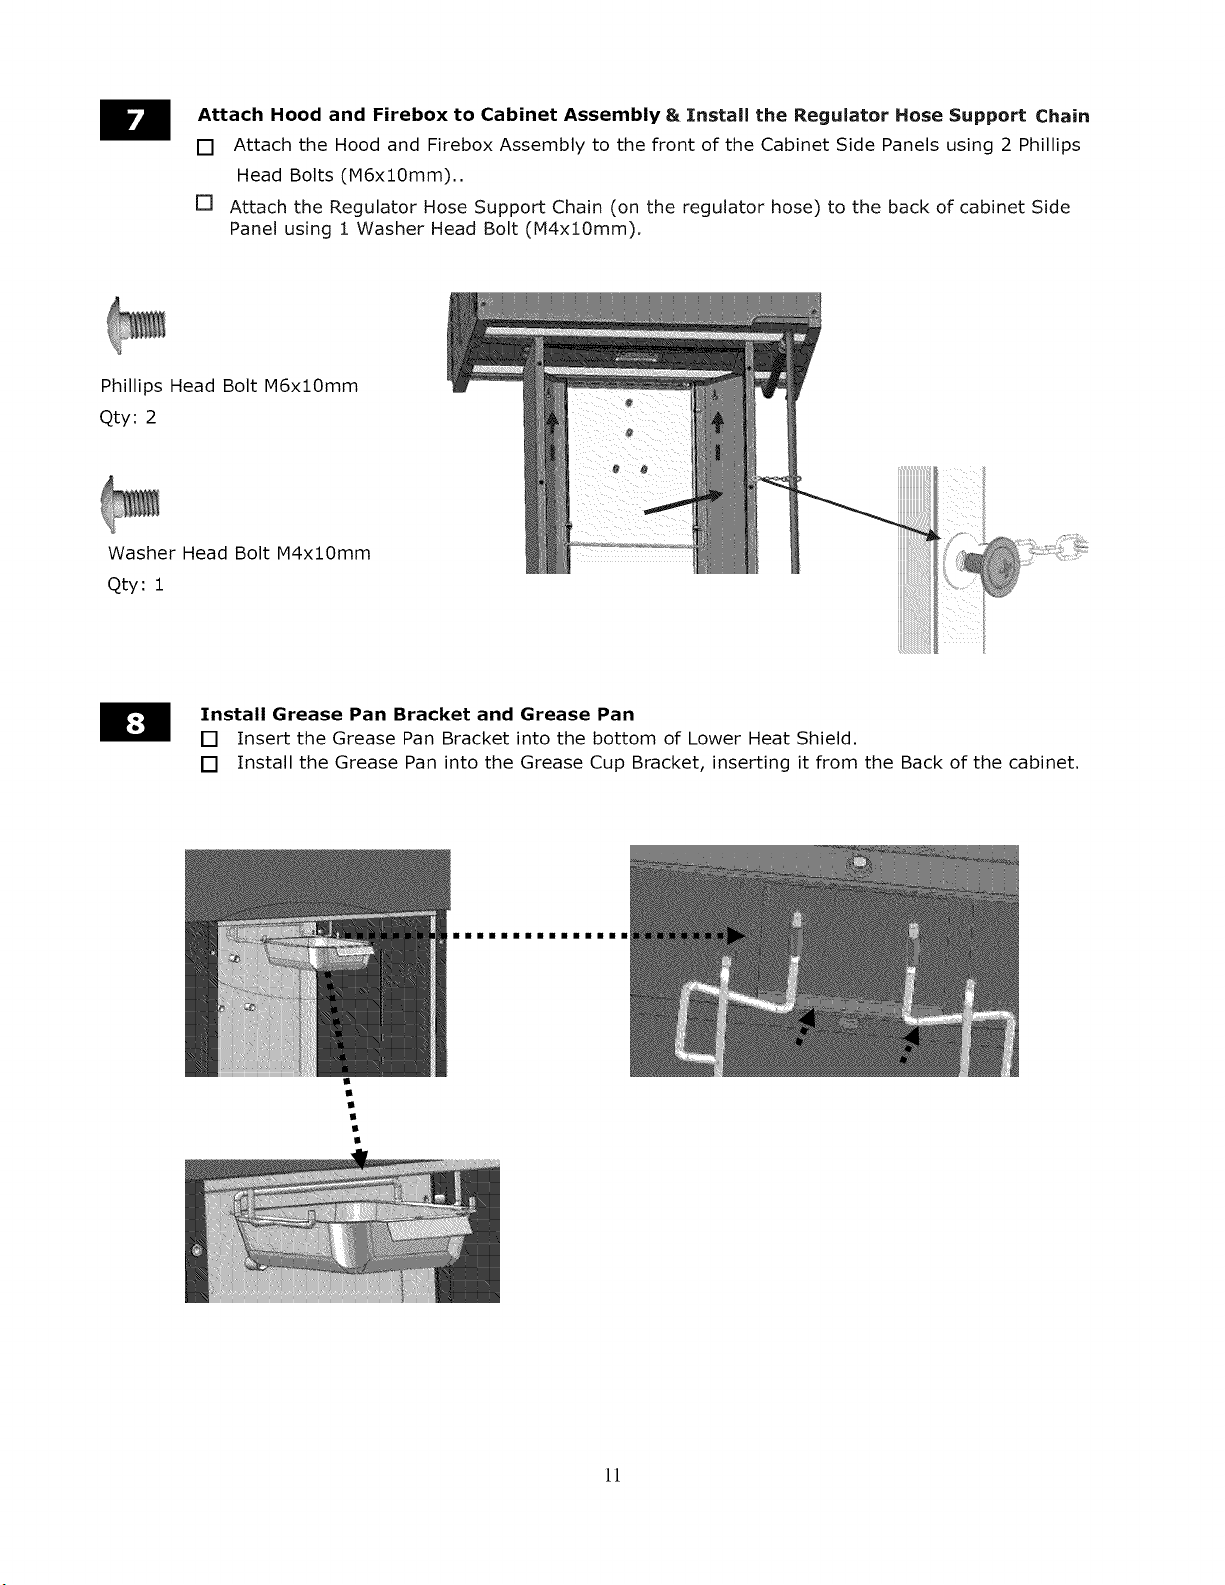
Attach Hood and Firebox to Cabinet Assembly 8= Install the Regulator Hose Support Chain
[] Attach the Hood and Firebox Assembly to the front of the Cabinet Side Panels using 2 Phillips
Head Bolts (M6xi0mm)..
[] Attach the Regulator Hose Support Chain (on the regulator hose) to the back of cabinet Side
Panel using ! Washer Head Bolt (M4xl0mm),
Phillips Head Bolt M6xi0mm
Qty: 2
Washer Head Bolt M4xi0mm
Qty: i
Install Grease Pan Bracket and Grease Pan
[] Insert the Grease Pan Bracket into the bottom of Lower Heat Shield.
[] Install the Grease Pan into the Grease Cup Bracket, inserting it from the Back of the cabinet.
1!
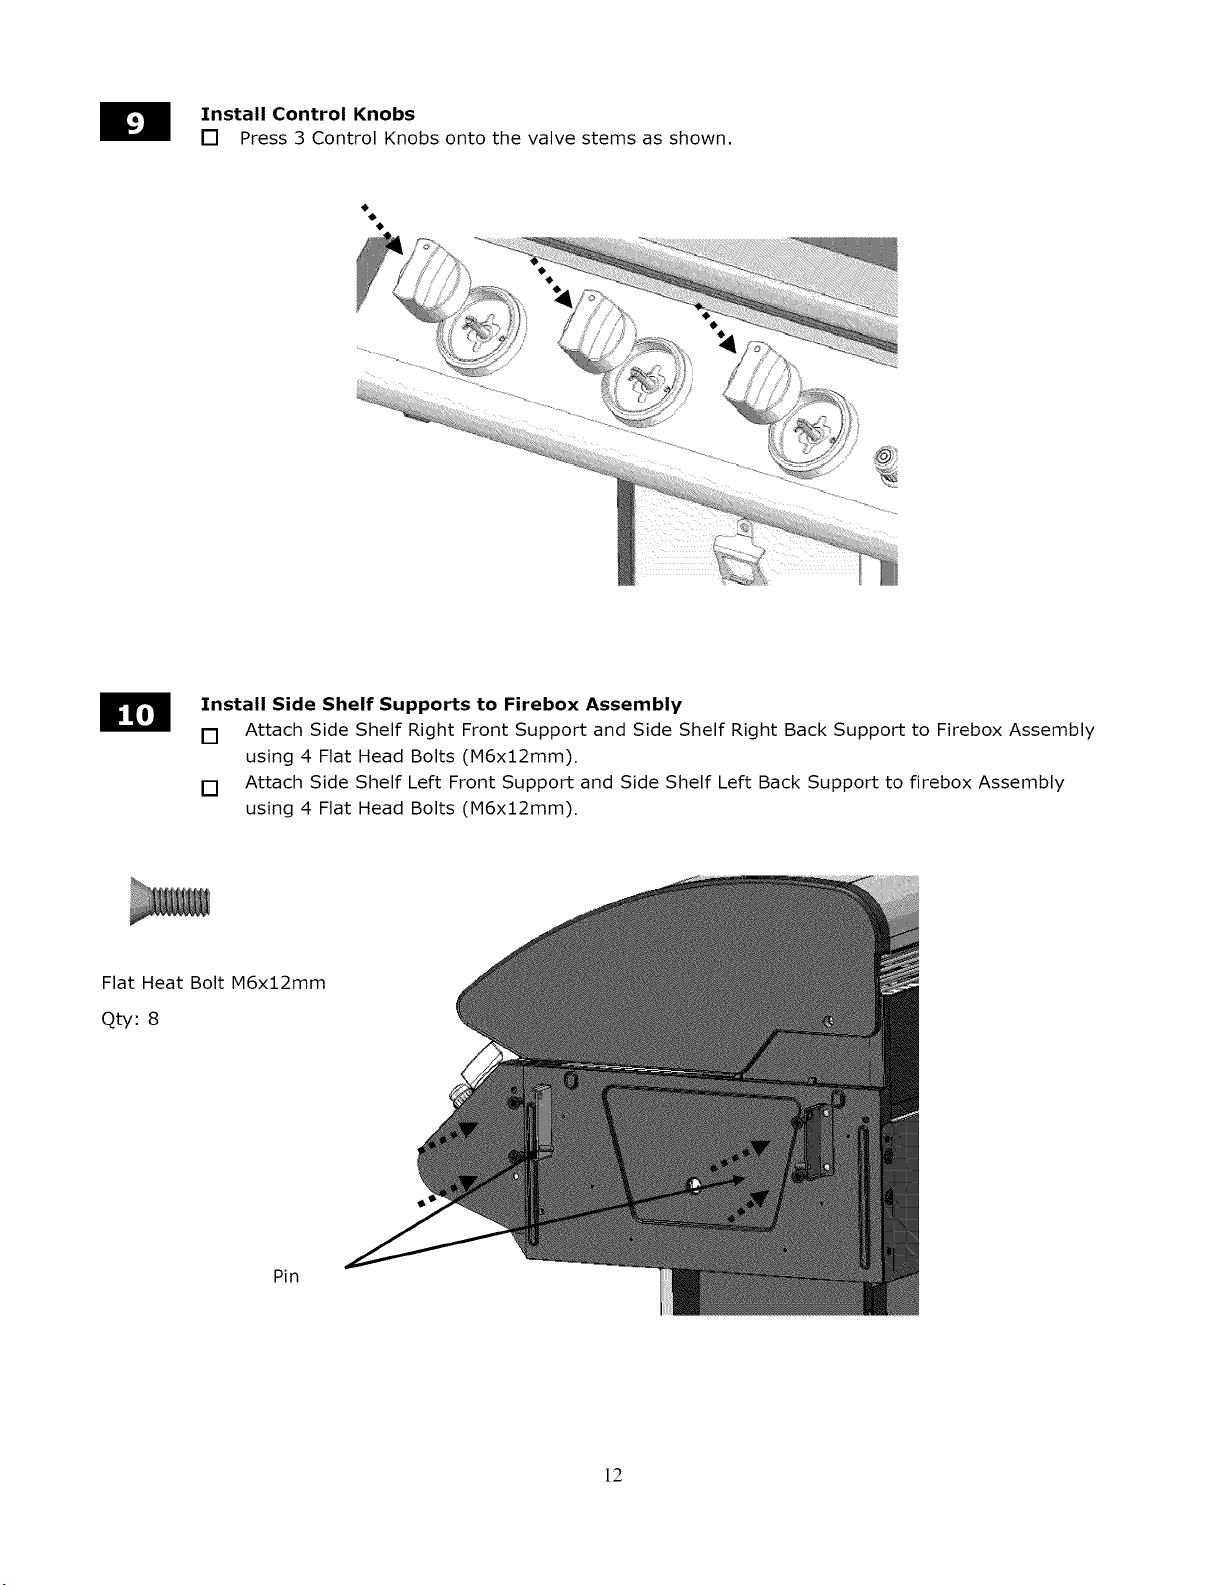
Install Control Knobs
[] Press 3 Control Knobs onto the valve stems as shown.
Install Side Shelf Supports to Firebox Assembly
[] Attach Side Shelf Right Front Support and Side Shelf Right Back Support to Firebox Assembly
using 4 Flat Head Bolts (M6x::[2mm).
[] Attach Side Shelf Left Front Support and Side Shelf Left Back Support to firebox Assembly
using 4 Flat Head Bolts (M6x12mm).
Flat Heat Bolt M6x12mm
Qty: 8
Pin
12
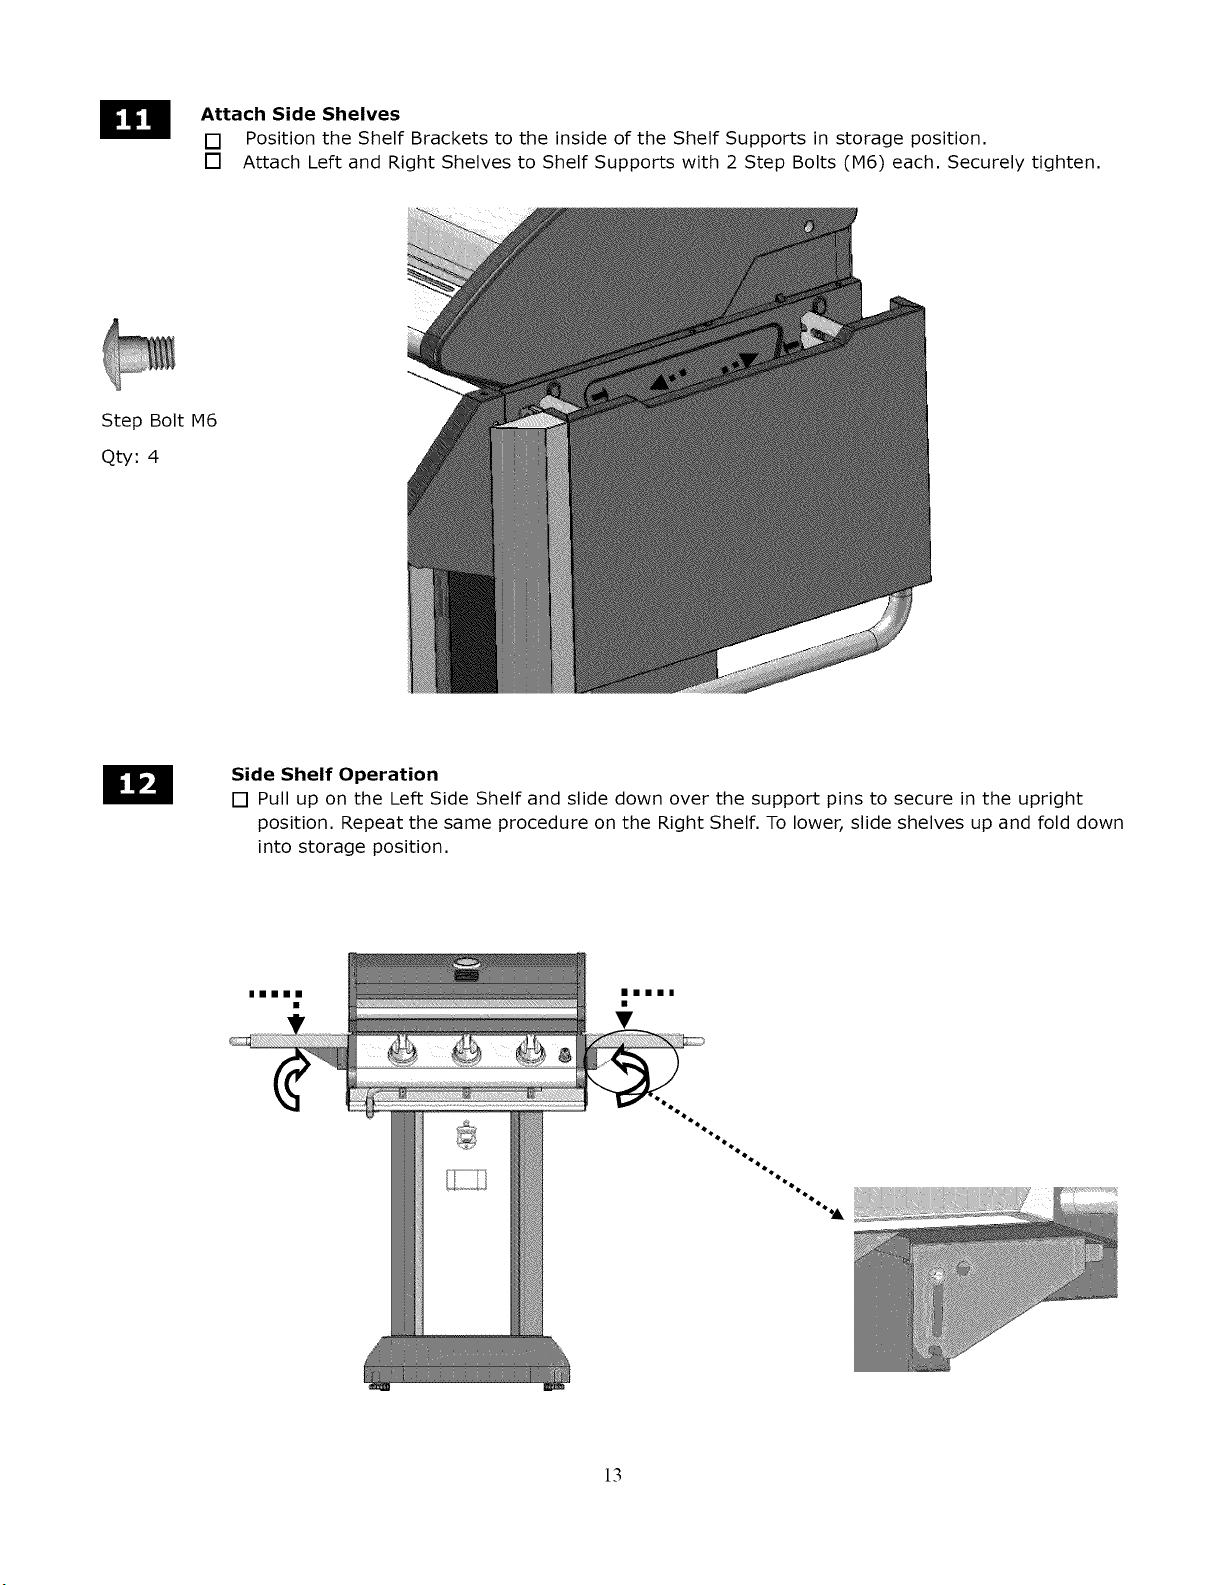
Attach Side Shelves
[] Position the Shelf Brackets to the inside of the Shelf Supports in storage position.
[] Attach Left and Right Shelves to Shelf Supports with 2 Step Bolts (M6) each. Securely tighten.
Step Bolt M6
Qty: 4
Side Shelf Operation
[] Pull up on the Left Side Shelf and slide down over the support pins to secure in the upright
position. Repeat the same procedure on the Right Shelf. To lower, slide shelves up and fold down
into storage position.
mmmmm mmmmm
• •
13
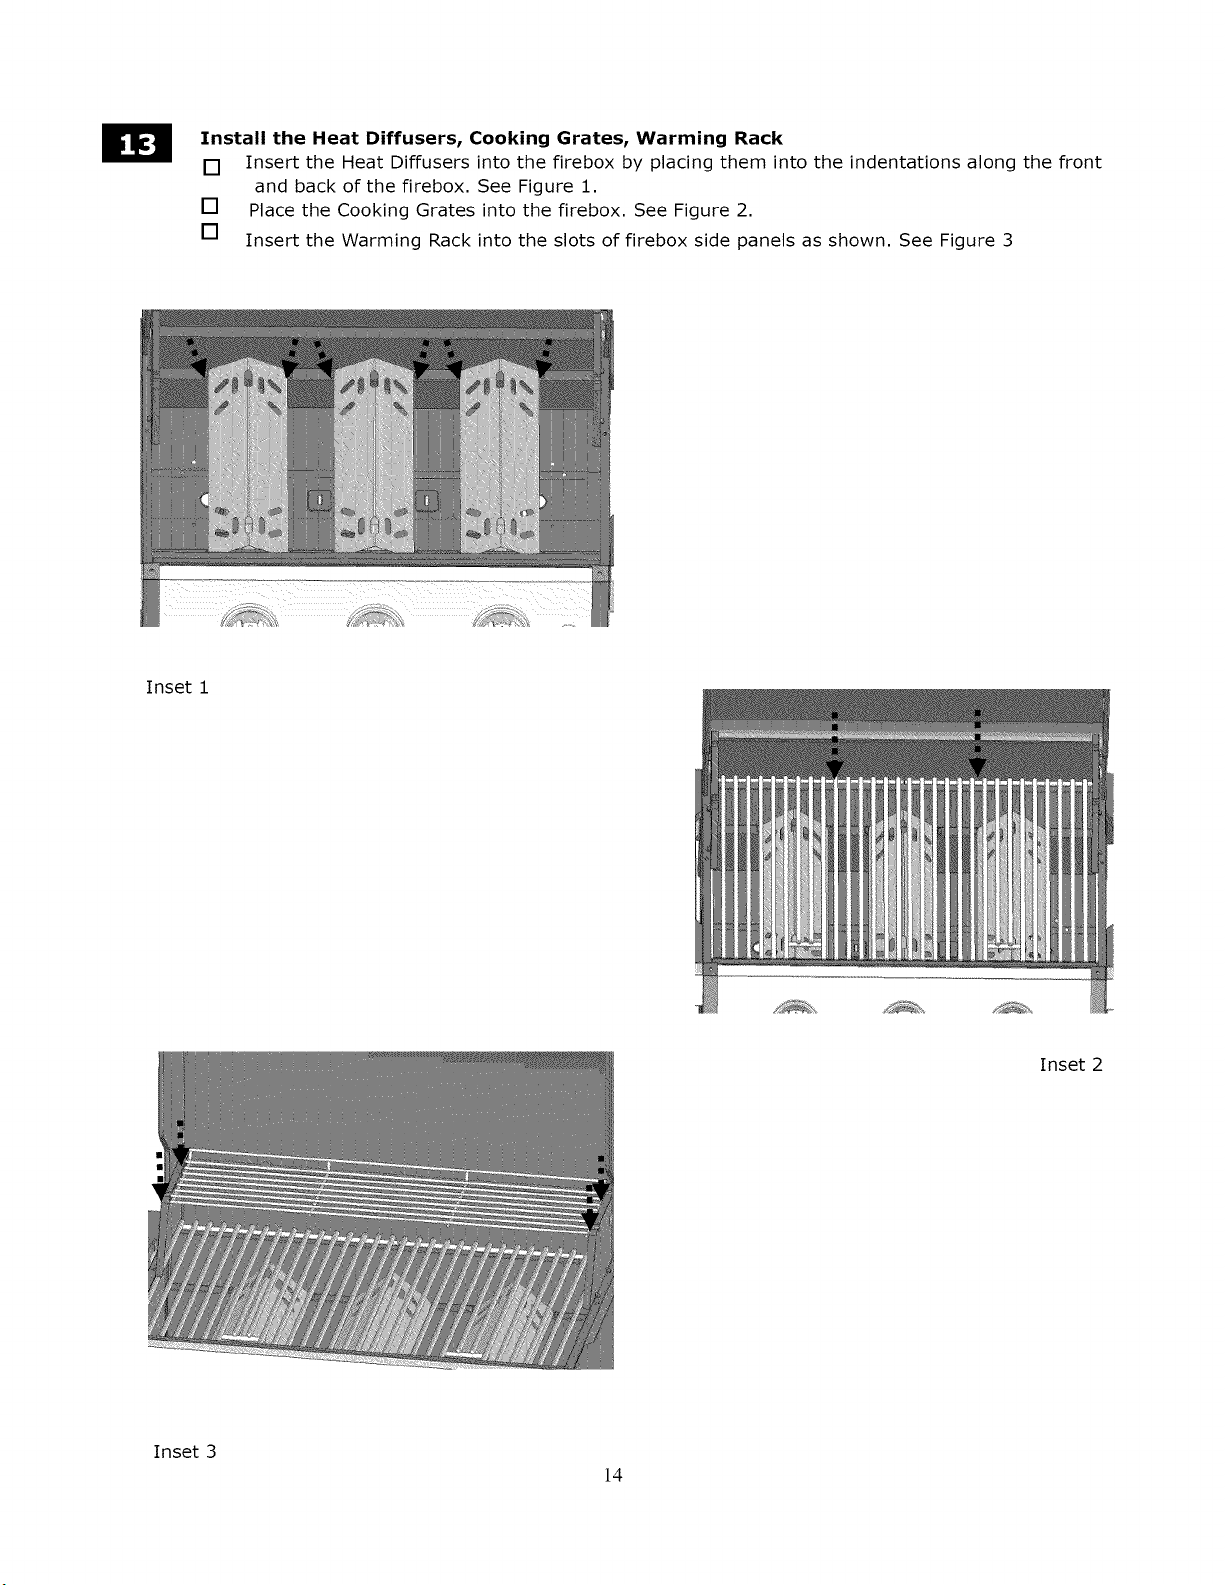
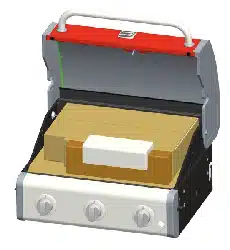
Install the Heat Diffusers, Cooking Grates, Warming Rack
[] Insert the Heat Diffusers into the firebox by placing them into the indentations along the front
and back of the firebox, See Figure 1,
[] Place the Cooking Grates into the firebox, See Figure 2,
[] Insert the Warming Rack into the slots of firebox side panels as shown, See Figure 3
Inset 1
Inset 2
Inset 3
14
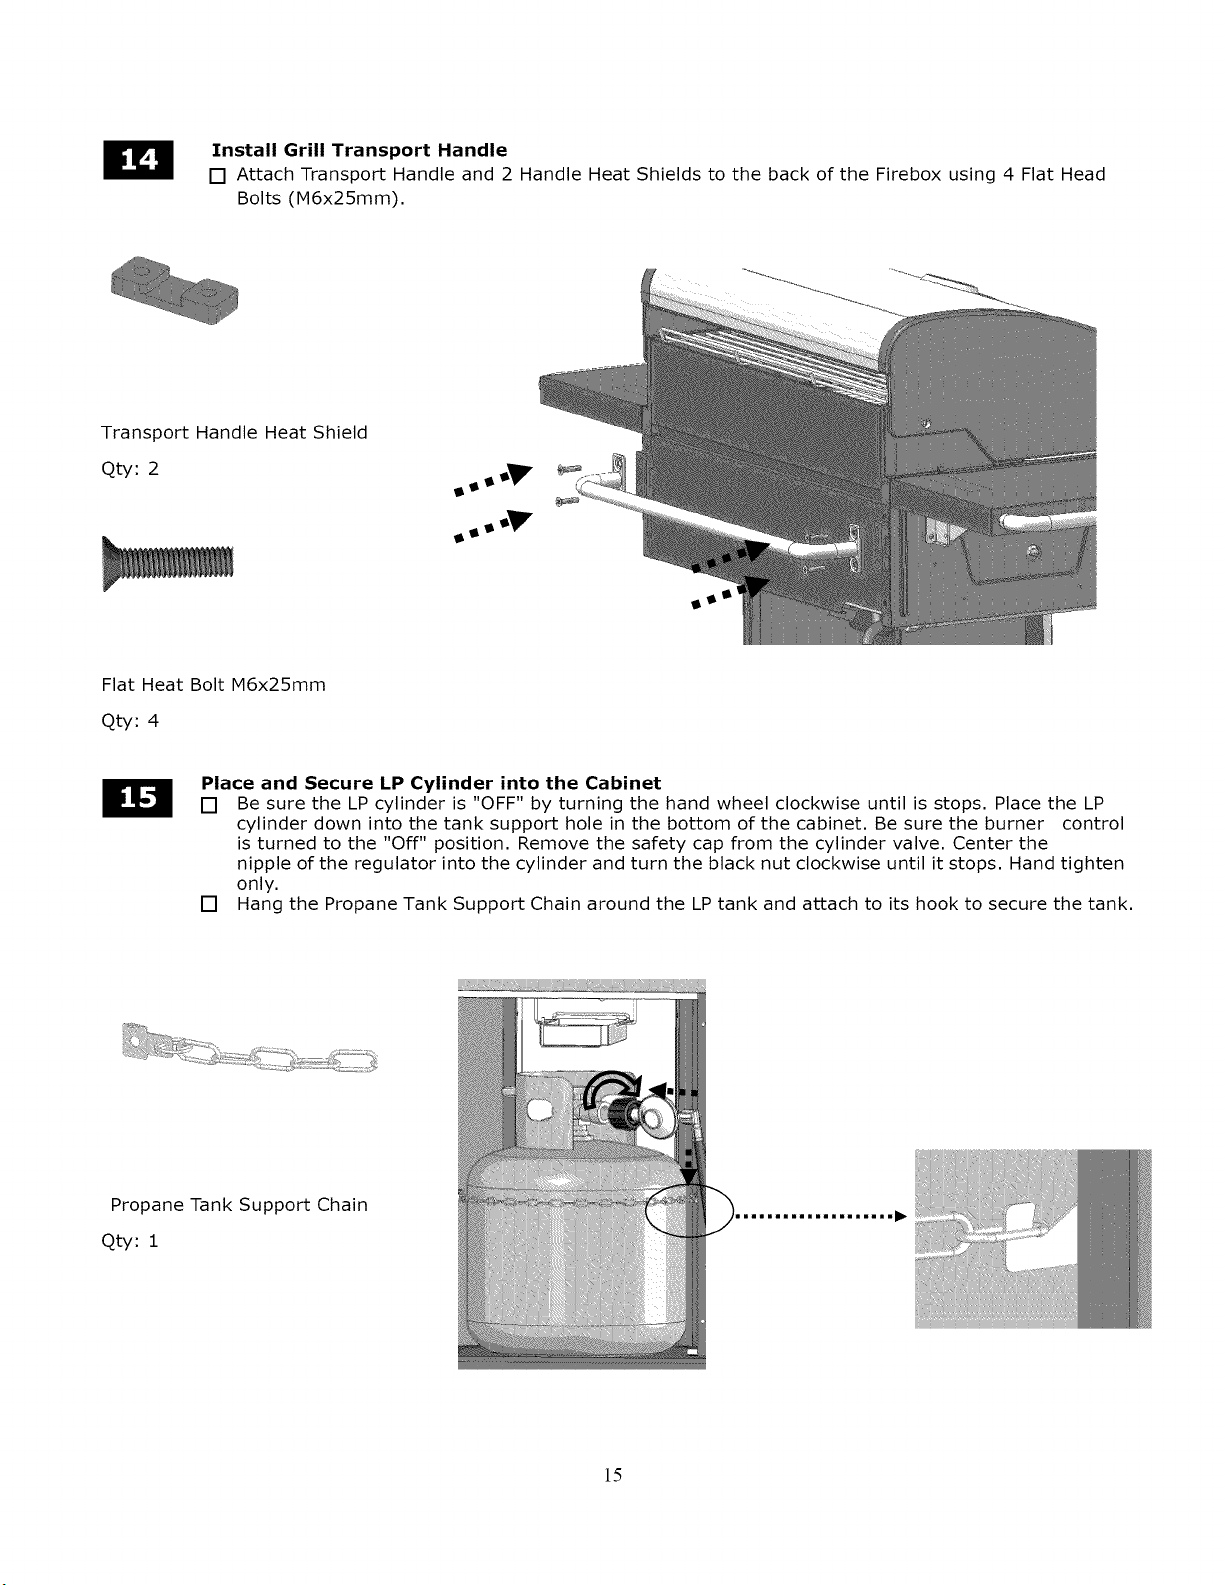
Install Grill Transport Handle
[] Attach Transport Handle and 2 Handle Heat Shields to the back of the Firebox using 4 Flat Head
Bolts (M6x25mm).
Transport Handle Heat Shield
Qty: 2
Flat Heat Bolt M6x25mm
Qty: 4
Place and Secure LP Cylinder into the Cabinet
[] Be sure the LP cylinder is "OFF" by turning the hand wheel clockwise until is stops. Place the LP
cylinder down into the tank support hole in the bottom of the cabinet. Be sure the burner control
is turned to the "Off" position, Remove the safety cap from the cylinder valve, Center the
nipple of the regulator into the cylinder and turn the black nut clockwise until it stops, Hand tighten
only,
[] Hang the Propane Tank Support Chain around the LP tank and attach to its hook to secure the tank,
Propane Tank Support Chain
Qty: 1
15
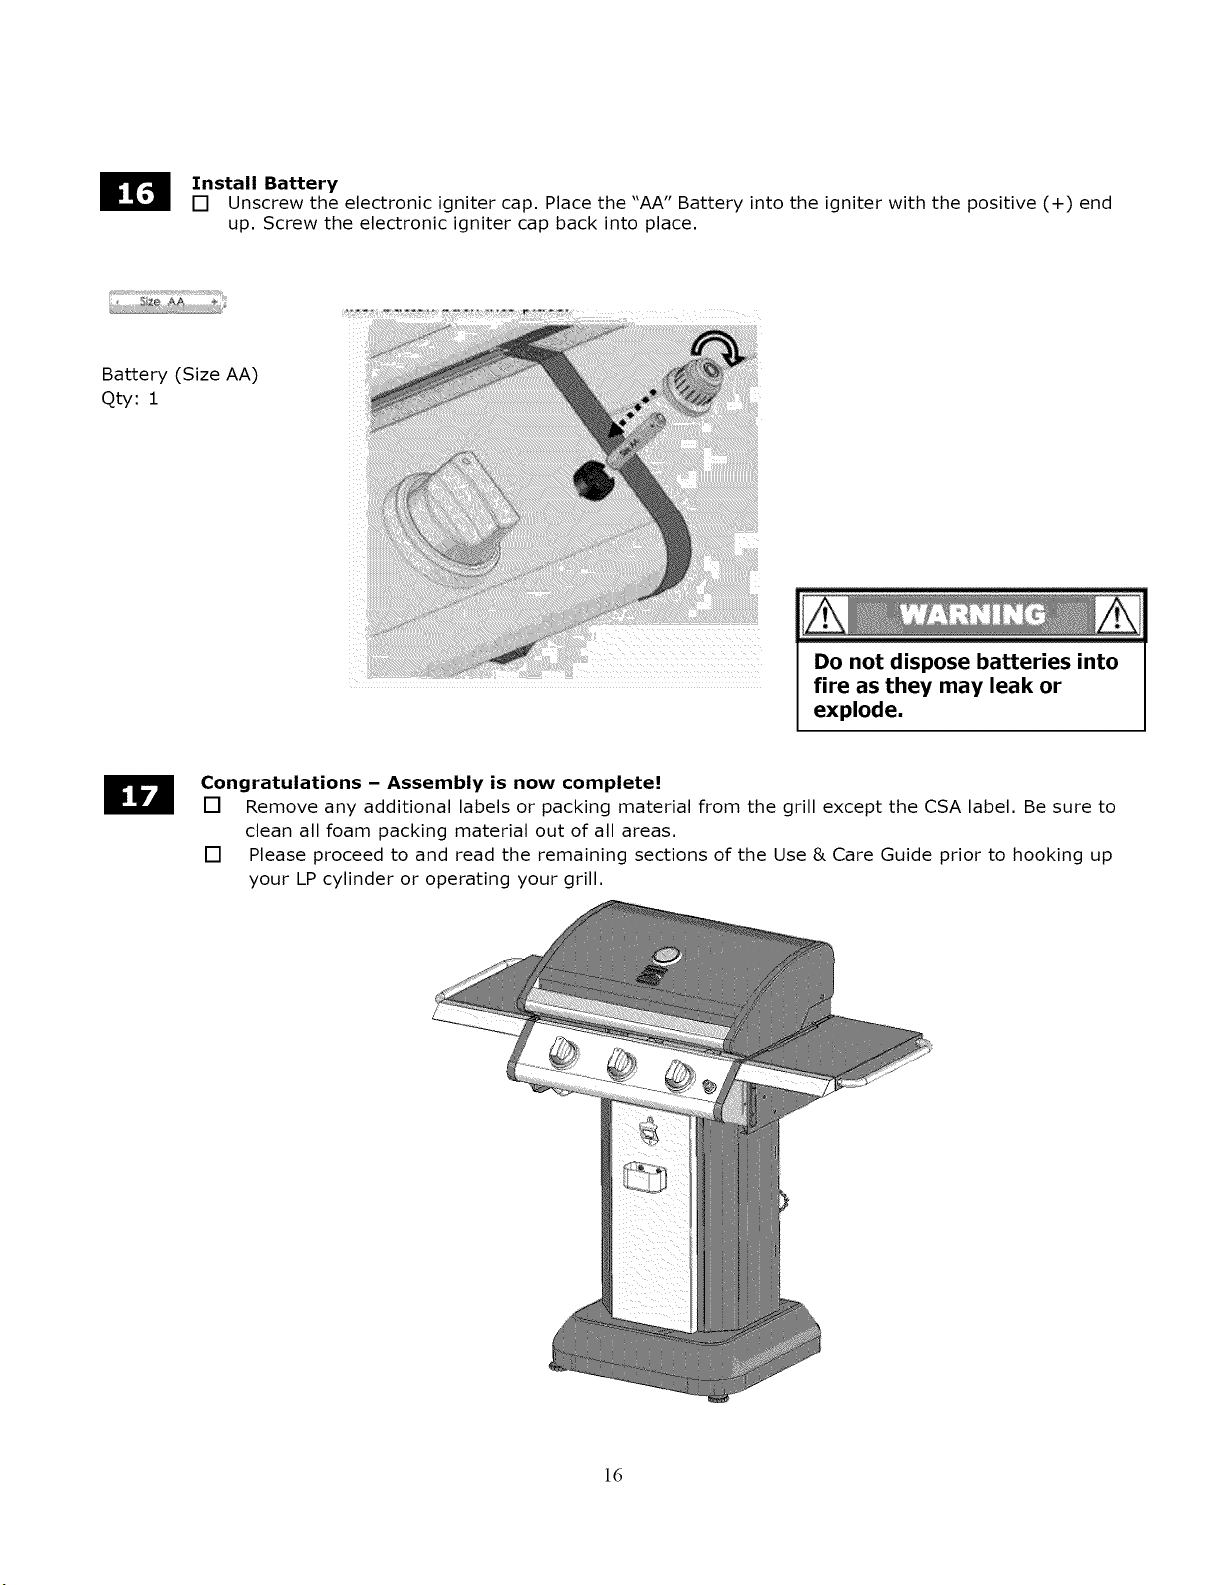
Install Battery
[] Unscrew the electronic igniter cap. Place the "AA" Battery into the igniter with the positive (+) end
up. Screw the electronic igniter cap back into place.
Battery (Size AA)
Qty: 1
Do not dispose batteries into
fire as they may leak or
explode,
Congratulations - Assembly is now complete!
[] Remove any additional labels or packing material from the grill except the CSA label. Be sure to
clean all foam packing material out of all areas.
[] Please proceed to and read the remaining sections of the Use & Care Guide prior to hooking up
your LP cylinder or operating your grill.
ld
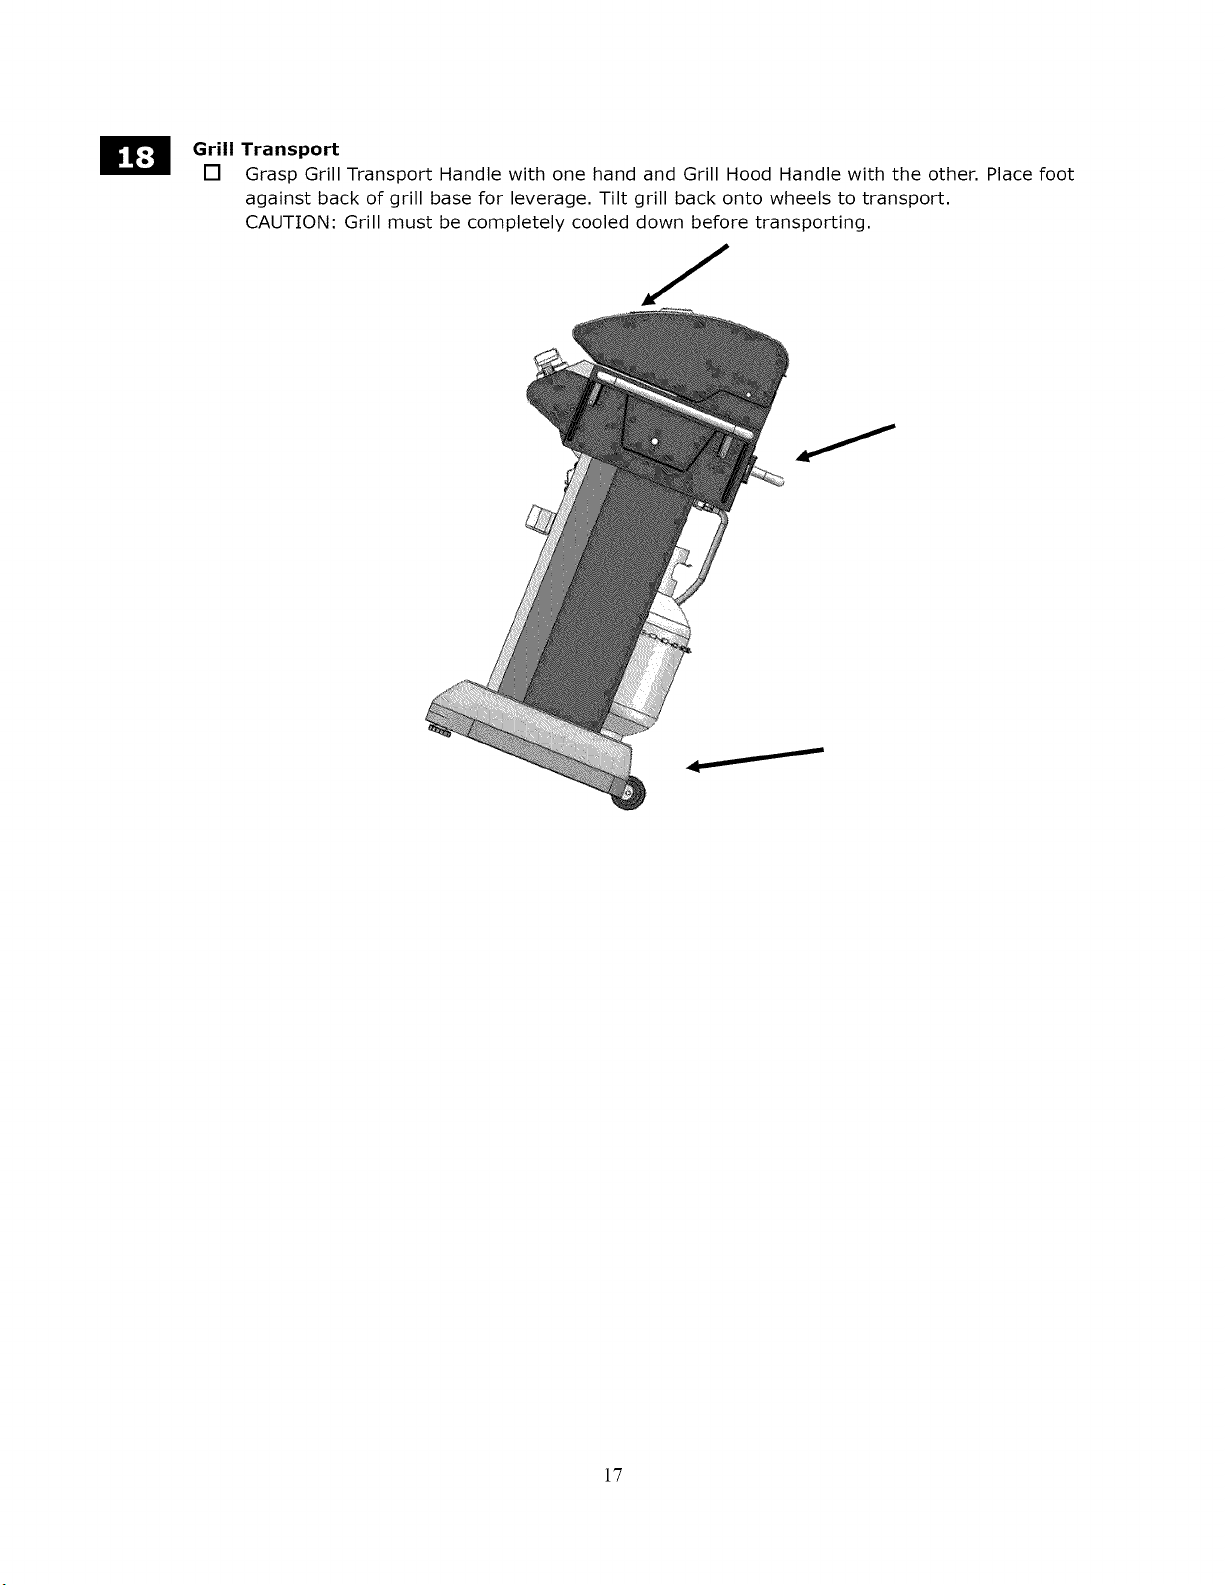
l_ 6rill Transport
[] Grasp Grill Transport Handle with one hand and Grill Hood Handle with the other. Place foot
against back of grill base for leverage. Tilt grill back onto wheels to transport.
CAUTION: Grill must be completely cooled down before transporting.
17
YournewKenmorePatioGrillhasbeendesignedand
manufacturedto highqualitystandards.It willprovide
youwith manyyearsof enjoymentwitha minimal
amountof maintenance.Pleasekeepin mindthe
followingFOR YOUR SAFETY.
OPERATION
1,
Your gas grill requires reasonable care during
operation. It will be hot during cooking and
cleaning. You should never leave the grill
unattended or move the grill when in use.
2,
Children should never use your gas grill. Keep
younger children and pets away when in use.
3,
Only use your gas grill outside in a well-ventilated
area. Never use indoor in any building, garage,
shed, or under any type of flammable canopy or
overhang.
4. Ensure your grill is on level ground before use.
5. Turn all gas valves off should the burner go out
when cooking. Open the lid and wait 5 minutes
before relighting.
6,
Do not lean over the grill or touch the edges of the
firebox or lid when in use.
7. Turn the burners off, close the lid, and shut off the
LP cylinder should a grease fire occur.
8, Do not obstruct the flow of combustion and
ventilation air to this grill.
Your new gas grill operates on LP (Liquefied Petroleum)
gas. LP gas is odorless, colorless, and non-toxic when
produced. You can smell LP gas as it has been given an
odor similar to rotten cabbage for your safety.
Your grill uses the newest and safest LP Gas
Cylinder. It must meet the following
requirements:
• 20-pound (9.1kg) propane cylinder.
• Measurements: 12-1/2 in. (317mm) in diameter
and 18-1/2 in. (472mm) in height.
In addition, the LP Gas Cylinder to be used must
be or have:
• Constructed and marked with U.S. Department of
Transportation (D.O.T.) for the US or
CAN/CSA-B339, Cylinders, Spheres and Tubes for
Transportation of Dangerous Goods; and
Commission, for Canada.
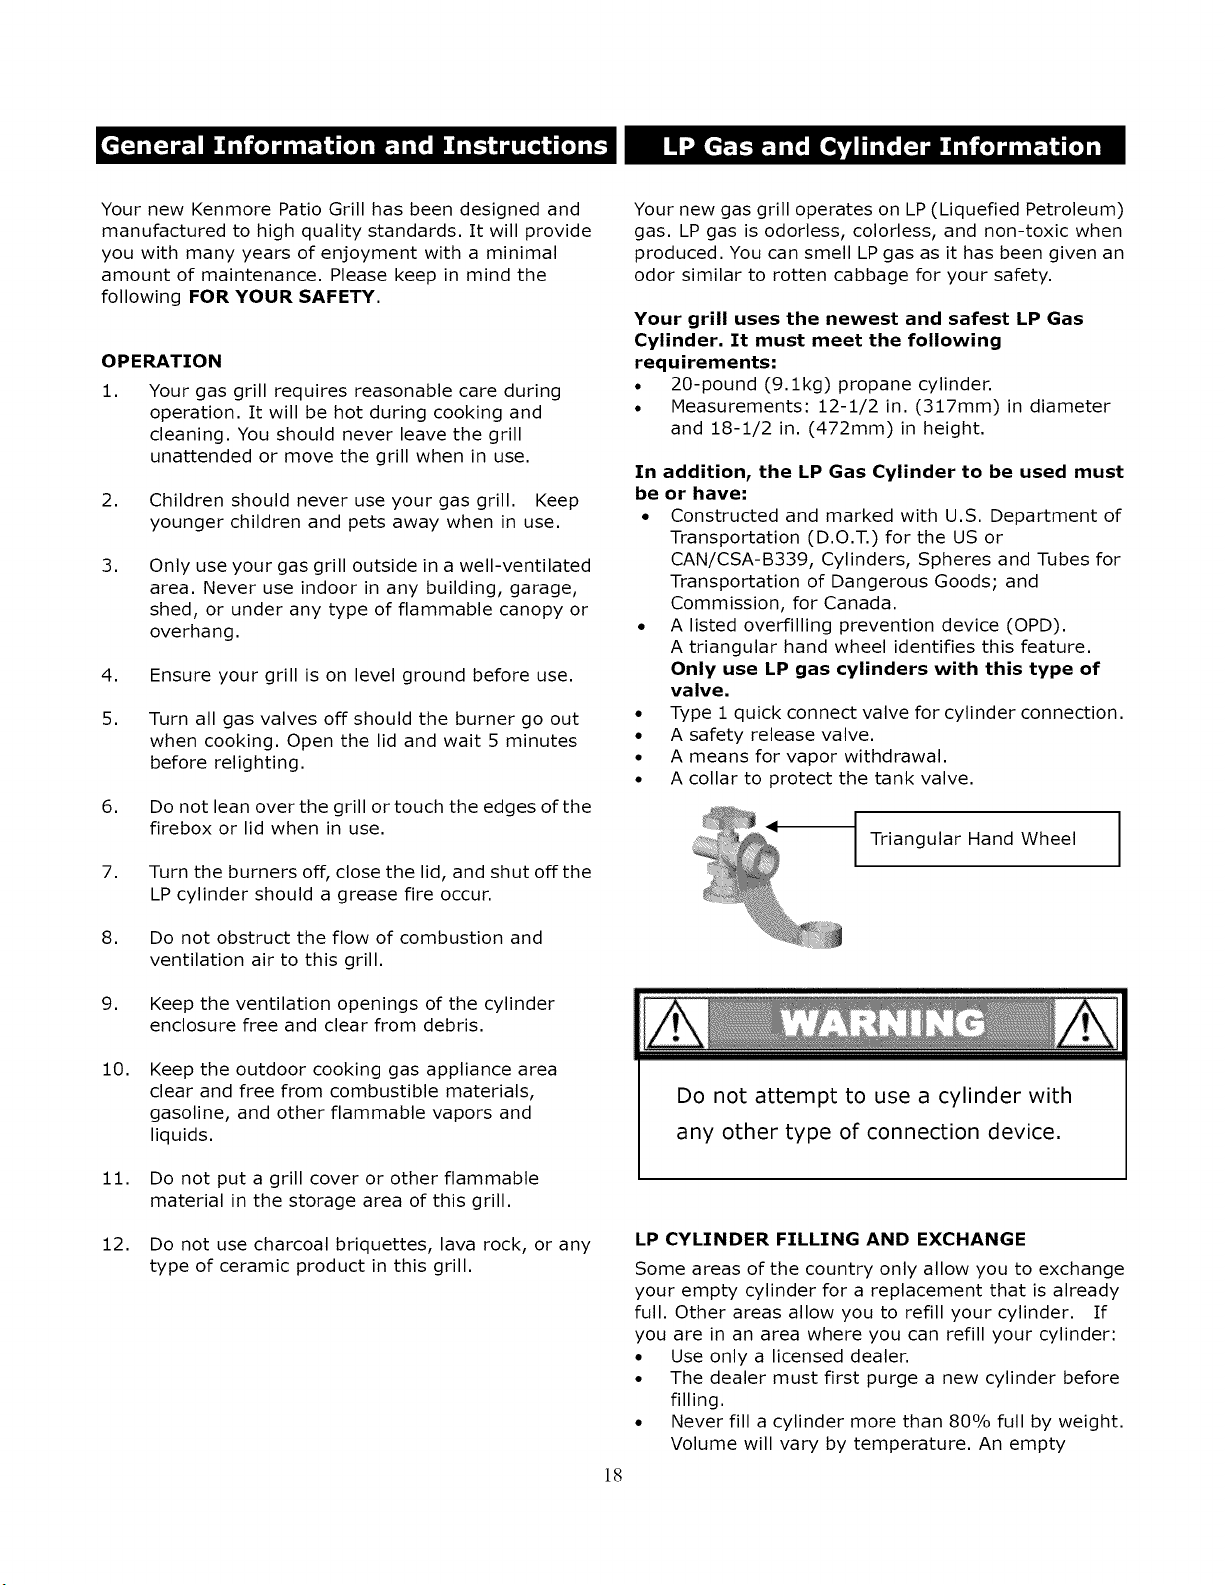
• A listed overfilling prevention device (OPD).
A triangular hand wheel identifies this feature.
Only use LP gas cylinders with this type of
valve,
• Type 1 quick connect valve for cylinder connection.
• A safety release valve.
• A means for vapor withdrawal.
• A collar to protect the tank valve.
Triangular Hand Wheel
9,
10.
Keep the ventilation openings of the cylinder
enclosure free and clear from debris.
Keep the outdoor cooking gas appliance area
clear and free from combustible materials,
gasoline, and other flammable vapors and
liquids.
Do not attempt to use a cylinder with
any other type of connection device.
11.
12.
Do not put a grill cover or other flammable
material in the storage area of this grill.
Do not use charcoal briquettes, lava rock, or any
type of ceramic product in this grill.
lg
LP CYLINDER FILLING AND EXCHANGE
Some areas of the country only allow you to exchange
your empty cylinder for a replacement that is already
full. Other areas allow you to refill your cylinder. If
you are in an area where you can refill your cylinder:
• Use only a licensed dealer.
• The dealer must first purge a new cylinder before
filling.
• Never fill a cylinder more than 80% full by weight.
Volume will vary by temperature. An empty
cylinderweighsapproximately18pounds
(8.2kgs).
• Besurethe LPdealerchecksthecylinderfor leaks
afterfilling.
• DonotreleaseLPgasintotheatmosphereasit can
unexpectedlyignitewhenmixedwithair.
• Contactan LPdealerto removeLPgasfroma
cylinder.
A frostycylindervalveindicatespossiblegas
overfill.ClosetheLPvalveandcallyourdealer
immediately.
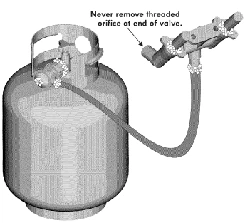
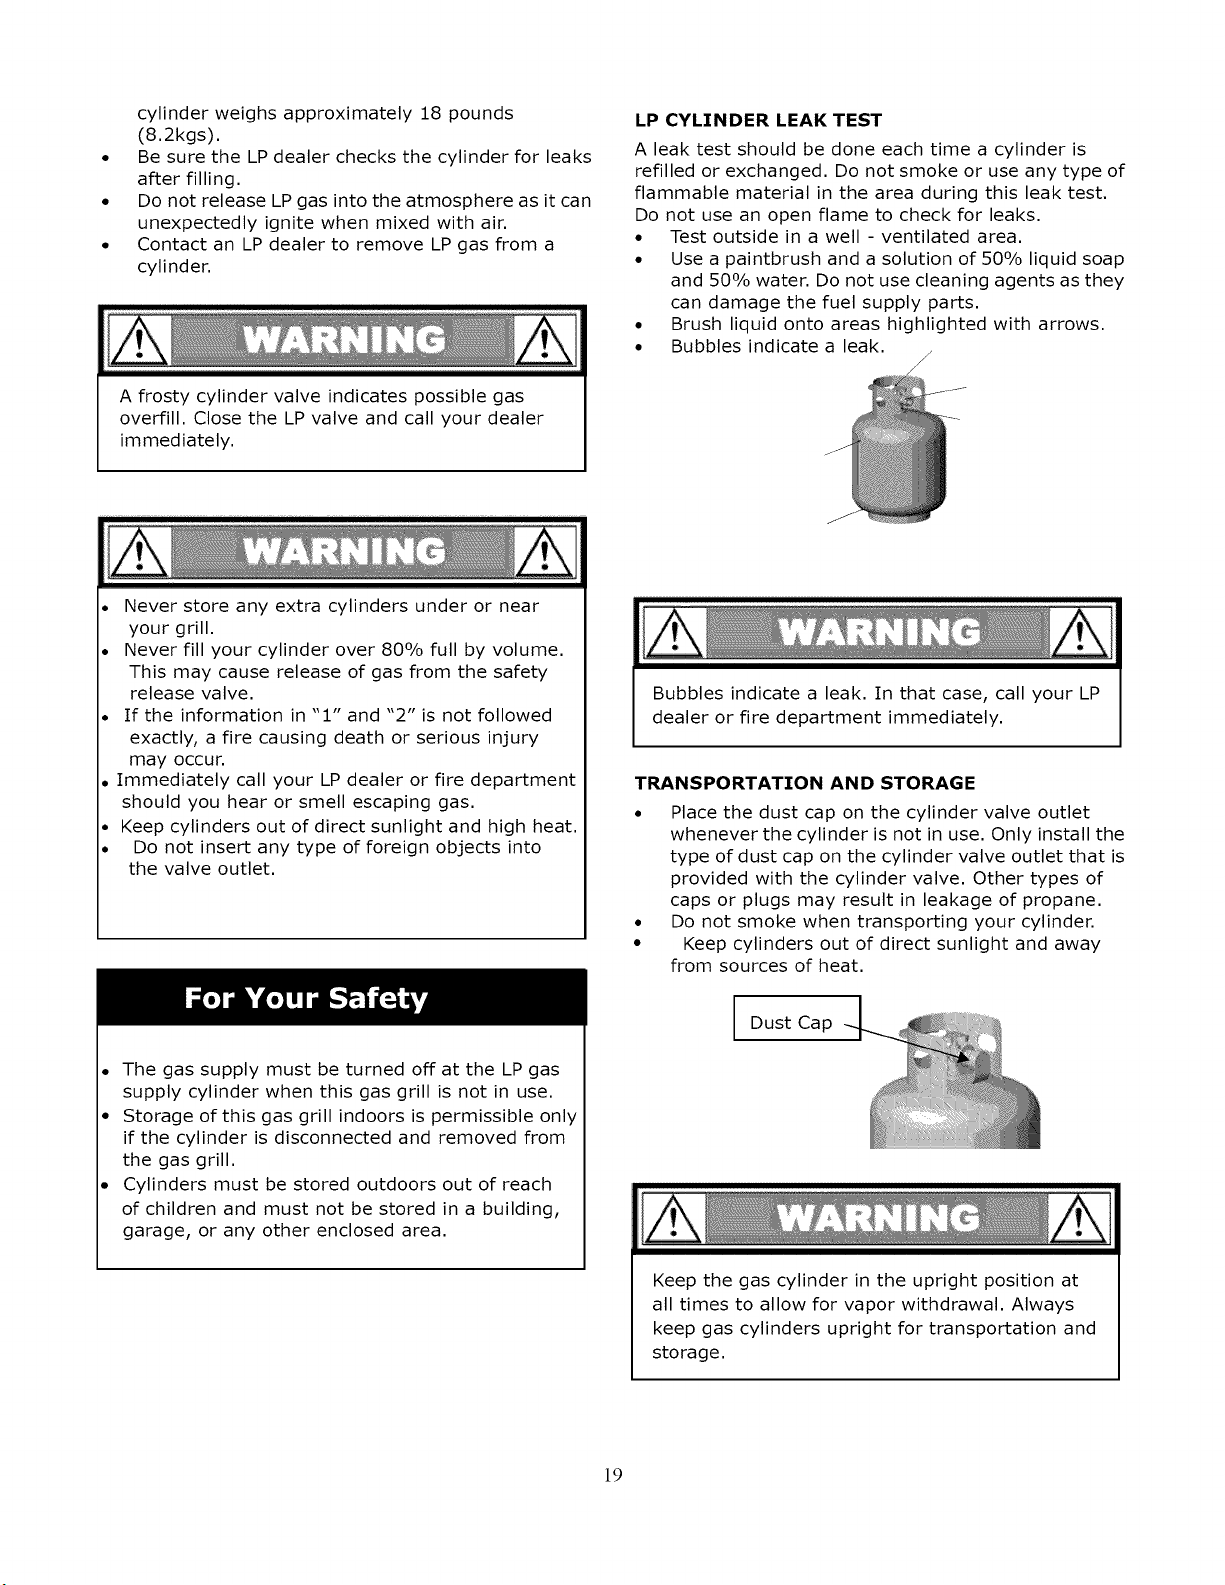
LP CYLINDER LEAK TEST
A leak test should be done each time a cylinder is
refilled or exchanged. Do not smoke or use any type of
flammable material in the area during this leak test.
Do not use an open flame to check for leaks.
• Test outside in a well - ventilated area.
• Use a paintbrush and a solution of 50% liquid soap
and 50% water. Do not use cleaning agents as they
can damage the fuel supply parts.
• Brush liquid onto areas highlighted with arrows.
• Bubbles indicate a leak.
Never store any extra cylinders under or near
your grill.
Never fill your cylinder over 80% full by volume.
This may cause release of gas from the safety
release valve.
If the information in "1" and "2" is not followed
exactly, a fire causing death or serious injury
may occur.
Immediately call your LP dealer or fire department
should you hear or smell escaping gas.
Keep cylinders out of direct sunlight and high heat.
Do not insert any type of foreign objects into
the valve outlet.
• The gas supply must be turned off at the LP gas
supply cylinder when this gas grill is not in use.
• Storage of this gas grill indoors is permissible only
if the cylinder is disconnected and removed from
the gas grill.
Cylinders must be stored outdoors out of reach
of children and must not be stored in a building,
garage, or any other enclosed area.
Bubbles indicate a leak. In that case, call your LP
dealer or fire department immediately.
TRANSPORTATION AND STORAGE
• Place the dust cap on the cylinder valve outlet
whenever the cylinder is not in use. Only install the
type of dust cap on the cylinder valve outlet that is
provided with the cylinder valve. Other types of
caps or plugs may result in leakage of propane.
• Do not smoke when transporting your cylinder.
• Keep cylinders out of direct sunlight and away
from sources of heat.
I Dust Cap
Keep the gas cylinder in the upright position at
all times to allow for vapor withdrawal. Always
keep gas cylinders upright for transportation and
storage.
19
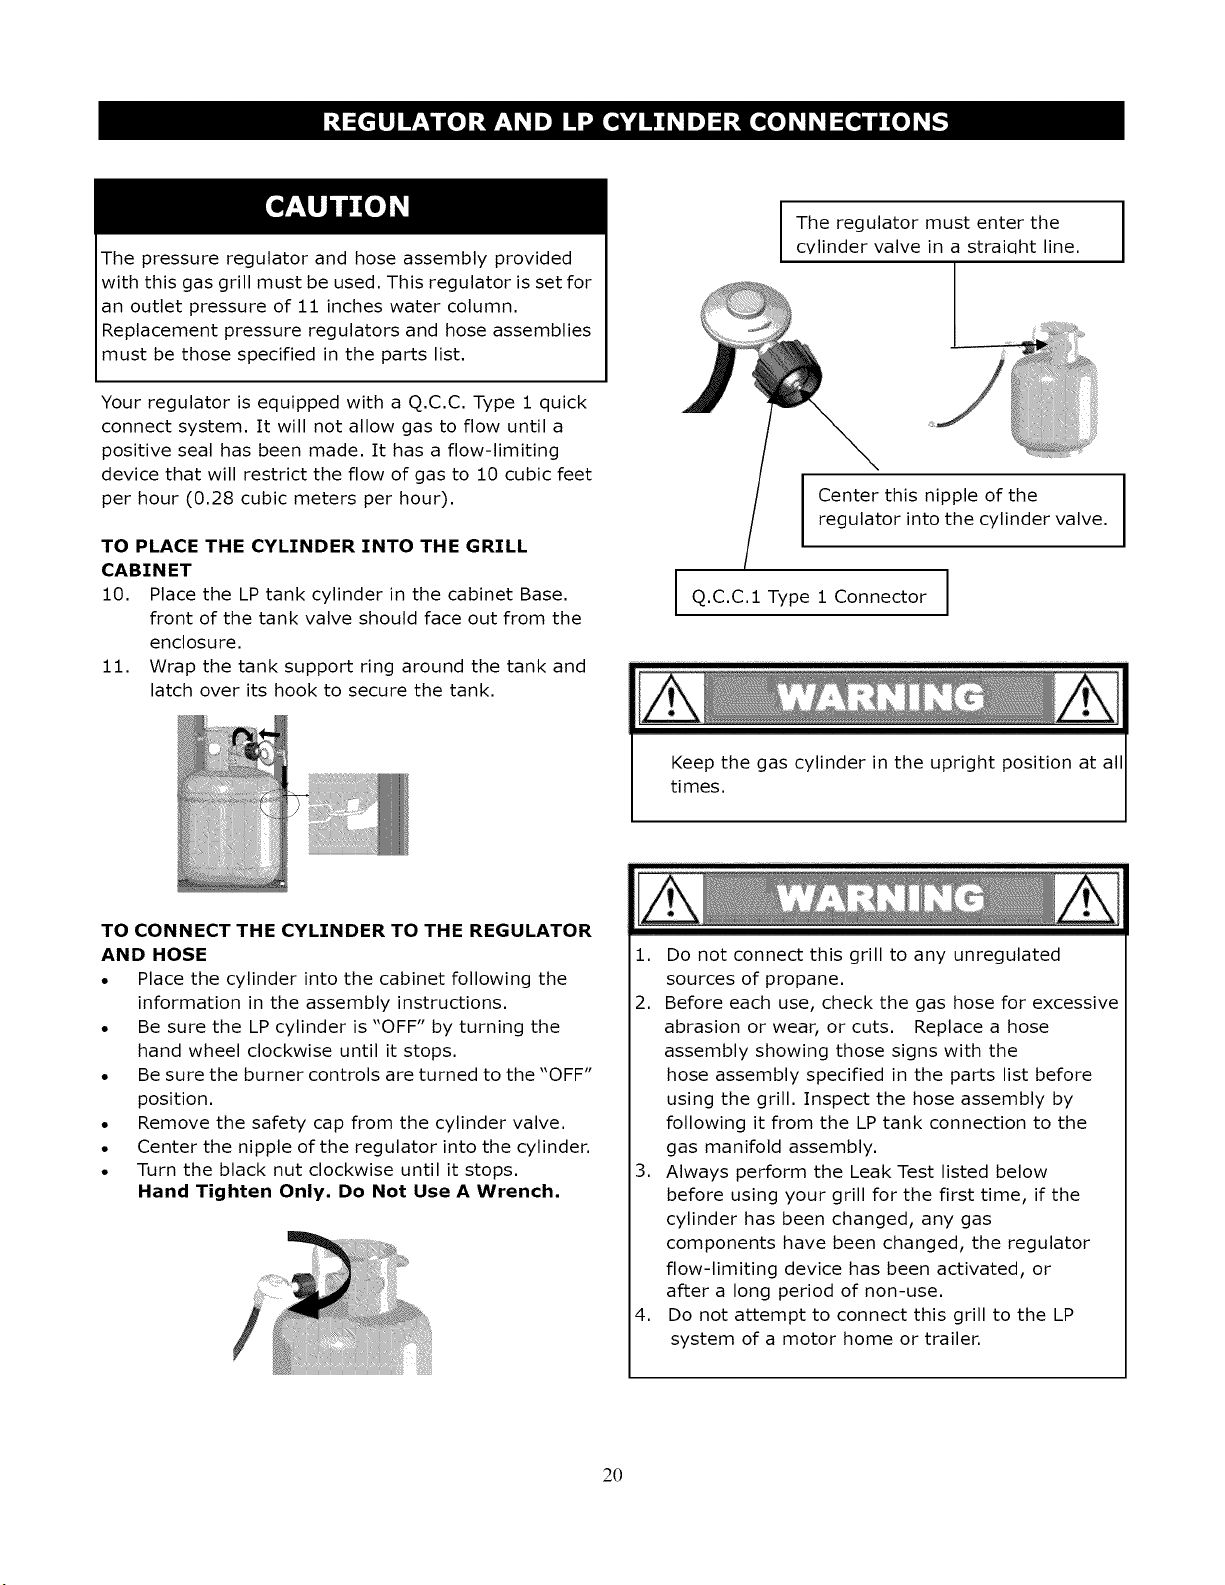
Thepressureregulatorandhoseassemblyprovided
withthisgasgrillmustbeused,Thisregulatorissetfor
an outletpressureof 11incheswatercolumn,
Replacementpressureregulatorsandhoseassemblies
mustbethosespecifiedinthepartslist,
Yourregulatorisequippedwitha Q.C.C.Type1quick
connectsystem.It willnotallowgasto flowuntila
positivesealhasbeenmade.It hasa flow-limiting
devicethatwillrestricttheflowof gasto 10cubicfeet
perhour(0.28cubicmetersperhour).
TO PLACE THE CYLINDER INTO THE GRILL
CABINET
10. Place the LP tank cylinder in the cabinet Base.
front of the tank valve should face out from the
enclosure.
11. Wrap the tank support ring around the tank and
latch over its hook to secure the tank,
I he regulator must enter the I
cylinder valve in a straiqht line.
I
I
Center this nipple of the
regulator into the cylinder valve,
Q.C.C.1 Type 1 Connector
Keep the gas cylinder in the upright position at all
times.
TO CONNECT THE CYLINDER TO THE REGULATOR
AND HOSE
• Place the cylinder into the cabinet following the
information in the assembly instructions.
• Be sure the LP cylinder is "OFF" by turning the
hand wheel clockwise until it stops.
• Be sure the burner controls are turned to the "OFF"
position.
• Remove the safety cap from the cylinder valve.
• Center the nipple of the regulator into the cylinder.
• Turn the black nut clockwise until it stops.
Hand Tighten Only. Do Not Use A Wrench.
1. Do not connect this grill to any unregulated
sources of propane.
2. Before each use, check the gas hose for excessive
abrasion or wear, or cuts. Replace a hose
assembly showing those signs with the
hose assembly specified in the parts list before
using the grill. Inspect the hose assembly by
following it from the LP tank connection to the
gas manifold assembly.
3. Always perform the Leak Test listed below
before using your grill for the first time, if the
cylinder has been changed, any gas
components have been changed, the regulator
flow-limiting device has been activated, or
after a long period of non-use.
4. Do not attempt to connect this grill to the LP
system of a motor home or trailer.
2O
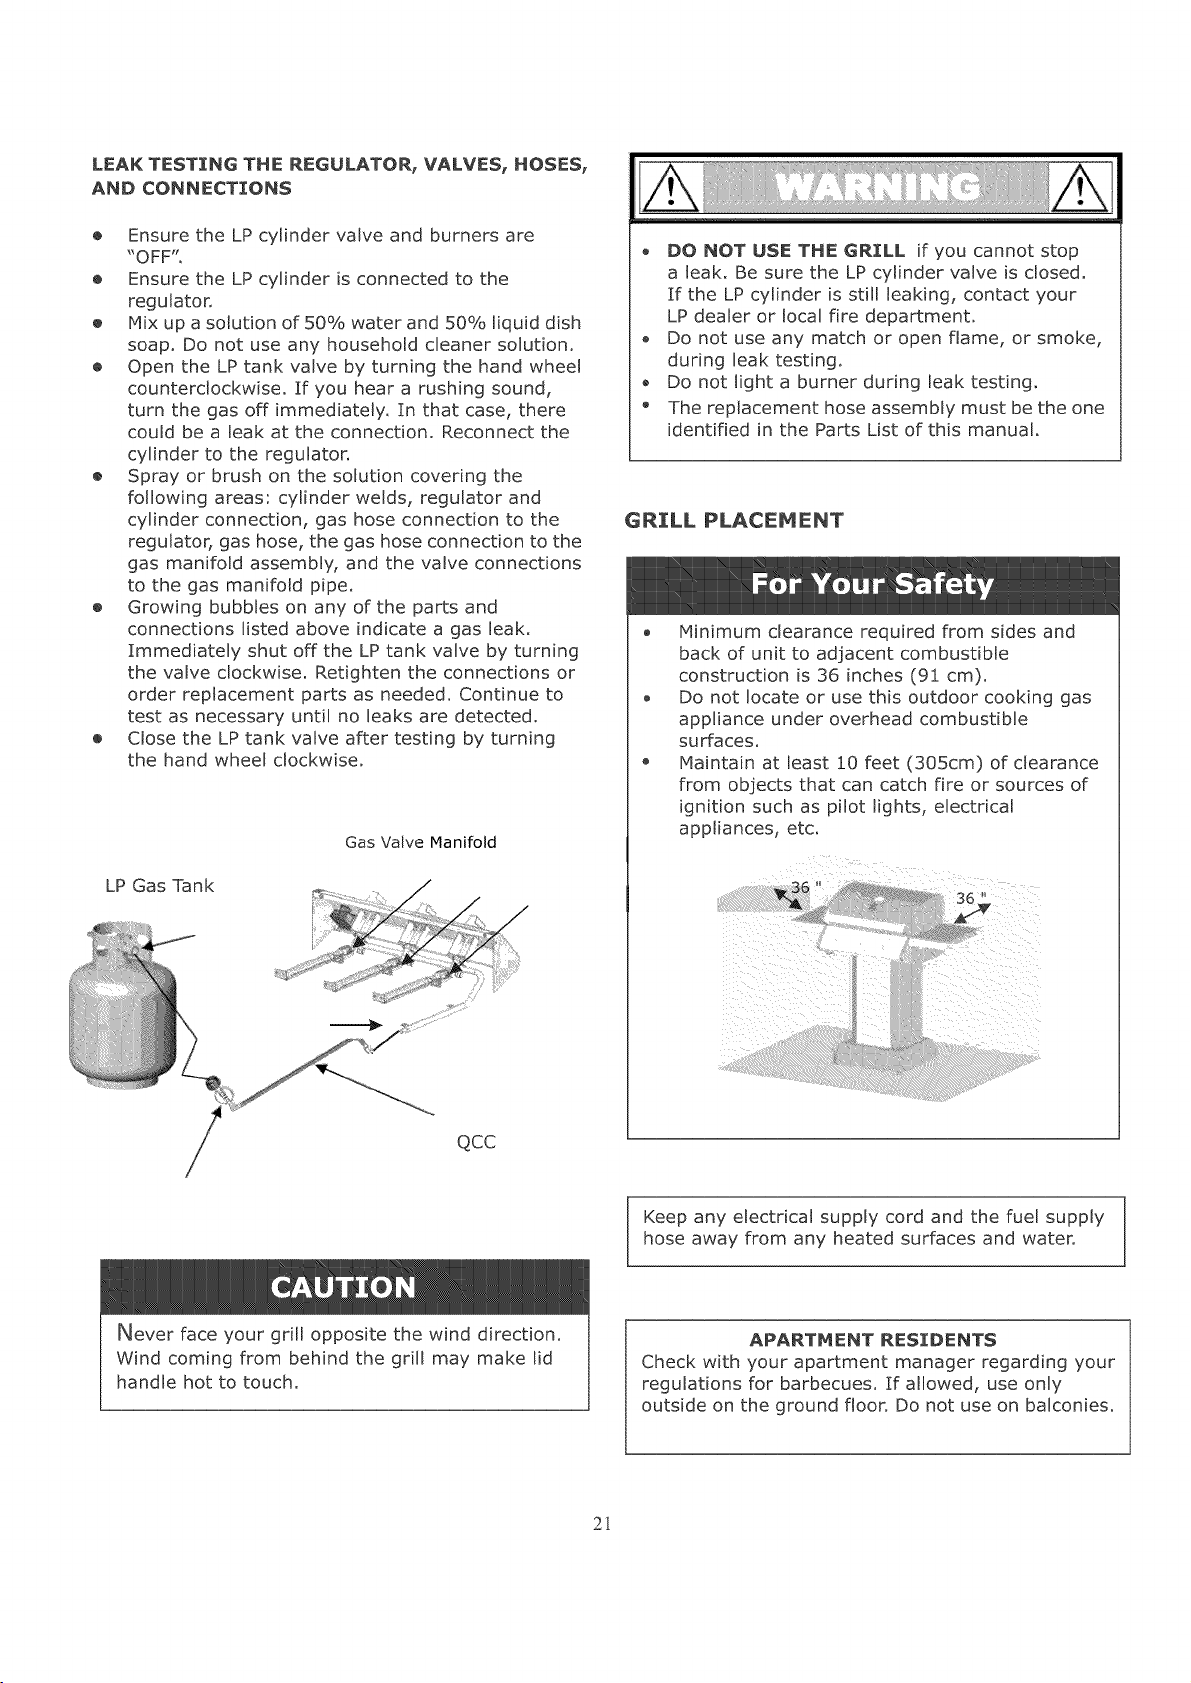
LEAK TESTING THE REGULATORr VALVESI HOSESr
AND CONNECTIONS
o Ensure the LP cylinder valve and burners are
"OFF".
® Ensure the LP cylinder is connected to the
regulator.
® Mix up a solution of 50% water and 50% liquid dish
soap_ Do not use any household cleaner solutiono
o Open the LP tank valve by turning the hand wheel
counterclockwise. If you hear a rushing sound,
turn the gas off immediately. In that case, there
could be a leak at the connection. Reconnect the
cylinder to the regulator.
® Spray or brush on the solution covering the
following areas: cylinder welds, regulator and
cylinder connection, gas hose connection to the
regulator, gas hose, the gas hose connection to the
gas manifold assembly, and the valve connections
to the gas manifold pipe,
® Growing bubbles on any of the parts and
connections listed above indicate a gas leak.
Immediately shut off the LP tank valve by turning
the valve clockwise. Retighten the connections or
order replacement parts as needed. Continue to
test as necessary until no leaks are detected,
o Close the LP tank valve after testing by turning
the hand wheel clockwise.
LP Gas Tank
Gas Valve Manifold
, DO NOT USE THE GRILL if you cannot stop
a leak, Be sure the LP cylinder valve is closed.
:If the LP cylinder is still leaking, contact your
LP dealer or local fire department.
o Do not use any match or open flame, or smoke,
during leak testing,
o Do not light a burner during leak testing.
The replacement hose assembly must be the one
identified in the Parts List of this manual.
GRILL PLACEMENT
® Minimum clearance required from sides and
back of unit to adjacent combustible
construction is 36 inches (91 cm).
, Do not locate or use this outdoor cooking gas
appliance under overhead combustible
surfaces.
o Maintain at least 10 feet (305cm) of clearance
from objects that can catch fire or sources of
ignition such as pilot lights, electrical
appliances, etc.
/
Qcc
Keep any electrical supply cord and the fuel supply
hose away from any heated surfaces and water.
Never face your grill opposite the wind direction.
Wind coming from behind the grill may make lid
handle hot to touch.
APARTMENT RESIDENTS
Check with your apartment manager regarding your
regulations for barbecues. If allowed, use only
outside on the ground floor. Do not use on balconies.
21
BEFORE AND AFTER LIGHTING
• Ensure your grill is located on a level surface and
use the adjustable feet as necessary to stabilize.
• Keep the gas grill area clear and free from
combustible materials, gasoline, and other
flammable vapors and liquids.
• Ensure nothing is obstructing the flow of
combustion and ventilation air.
, Ensure the ventilation openings of the cylinder
enclosure are free and clear of debris.
• Visually check burner flames.
, Never move the grill when it is hot.
• Never lean over the firebox and burners when
lighting the grill.
• Grills are ventilated for safety and performance
reasons. Closing the hood on a grease fire will
not extinguish the fire.
• Do not put water on a grease fire. If a grease
fire starts, turn the control knobs and LP
cylinder off. Flour may be used to help
smother a grease fire.
• Do not leave a grill unattended when
preheating, cooking, or cleaning. A grease fire
can occur during these events if grease has
been allowed to collect by not regularly cleaning
the grill.
5.
6.
7.
seconds, turn the burner control knob to "OFF".
Wait for 5 minutes for the gas to clear and repeat
the lighting procedure.
Repeat step 4 to light other burner.
Follow the match lighting instructions below if
burners do not light.
When lit, turn the burner control knob to its
desired heat setting.
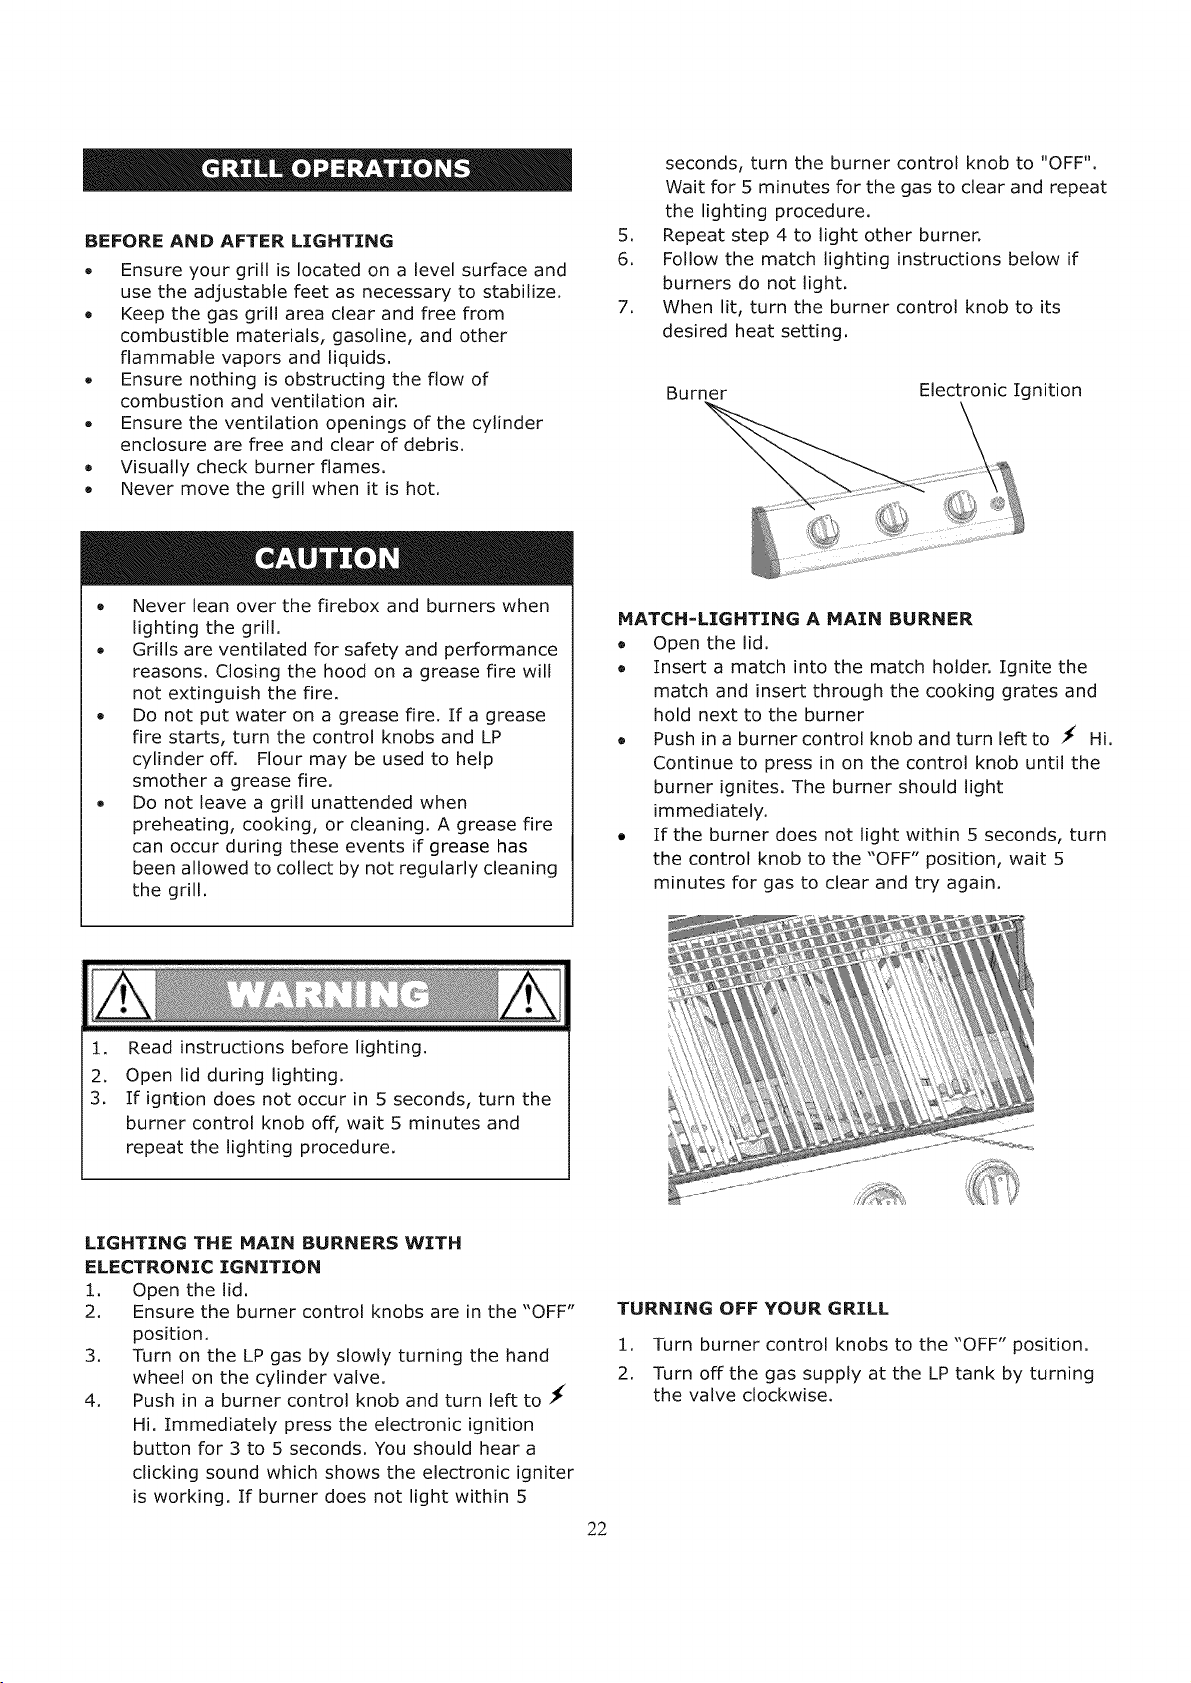
Burner Electronic Ignition
MATCH=LIGHTING A MAIN BURNER
o Open the lid.
o Insert a match into the match holder, Ignite the
match and insert through the cooking grates and
hold next to the burner
o Push in a burner control knob and turn left to # Hi.
Continue to press in on the control knob until the
burner ignites. The burner should light
immediately.
= If the burner does not light within 5 seconds, turn
the control knob to the "OFF" position, wait 5
minutes for gas to clear and try again.
1. Read instructions before lighting.
2. Open lid during lighting.
3. If igntion does not occur in 5 seconds, turn the
burner control knob off, wait 5 minutes and
repeat the lighting procedure.
LIGHTING THE MAIN BURNERS WITH
ELECTRONIC IGNITION
1. Open the lid.
2, Ensure the burner controlknobs are inthe "OFF"
position.
3. Turn on the LP gas by slowly turning the hand
wheel on the cylindervalve.
4, Push in a burner control knob and turn leftto
Hi. Immediately press the electronic ignition
button for 3 to 5 seconds. You should hear a
clicking sound which shows the electronic igniter
is working. If burner does not light within 5
TURNING OFF YOUR GRILL
1. Turn burner controlknobs to the "OFF" position.
2. Turn off the gas supply at the LP tank by turning
the valve clockwise.
22
Do not clean any part of your barbecue grill in a
self-cleaning oven.
Do not use oven cleaners, abrasive kitchen
cleaners, cleaners that contain citrus products, or
mineral spirits.
Do not use any type of steel bristled brush.
Clean your grill regularly to prohibit grease build-
ups and avoid a grease fire or excessive flare-ups.
Always wear protective gloves when cleaning your
grill.
Stainless Steel and Painted Surfaces
Wash with a mild dish soap and warm water. A cloth,
soft brush, or plastic cleaning pad can be used. Rinse
thoroughly and wipe dry. There are many specific
stainless steel cleaners available. Follow the
manufacturer's directions. Always polish in the
direction of the lines. Do not allow dirt and grease to
accumulate. Do not use steel wool, as it will scratch the
surface.
In addition, the following products and naturally
occurring substances in the outdoors will damage all
stainless steel finishes. Use caution so that they do not
come in contact with your gas grill. Immediately wash
them off and dry the stainless steel should they ever
come in contact with your Gas Grill. These include, but
are not limited to, Pool Chemicals (chlorine and
bromine), Lawn Fertilizer, Ice Melting Salts, Sea or Salt
Water, Urine, Bird Droppings, and Tree Sap. Store
your grill 50 to 100 feet away from a pool as
many pool chemicals will cause rust,
• Batteries will deteriorate over time. This
can cause their casings to leak.
, Remove the battery from the electronic ignition
when storing your grill.
• Check the condition of the battery periodically
before use.
Burners
We recommend you clean your burners at least twice a
year, or before use if the grill has not been used in over
one month.
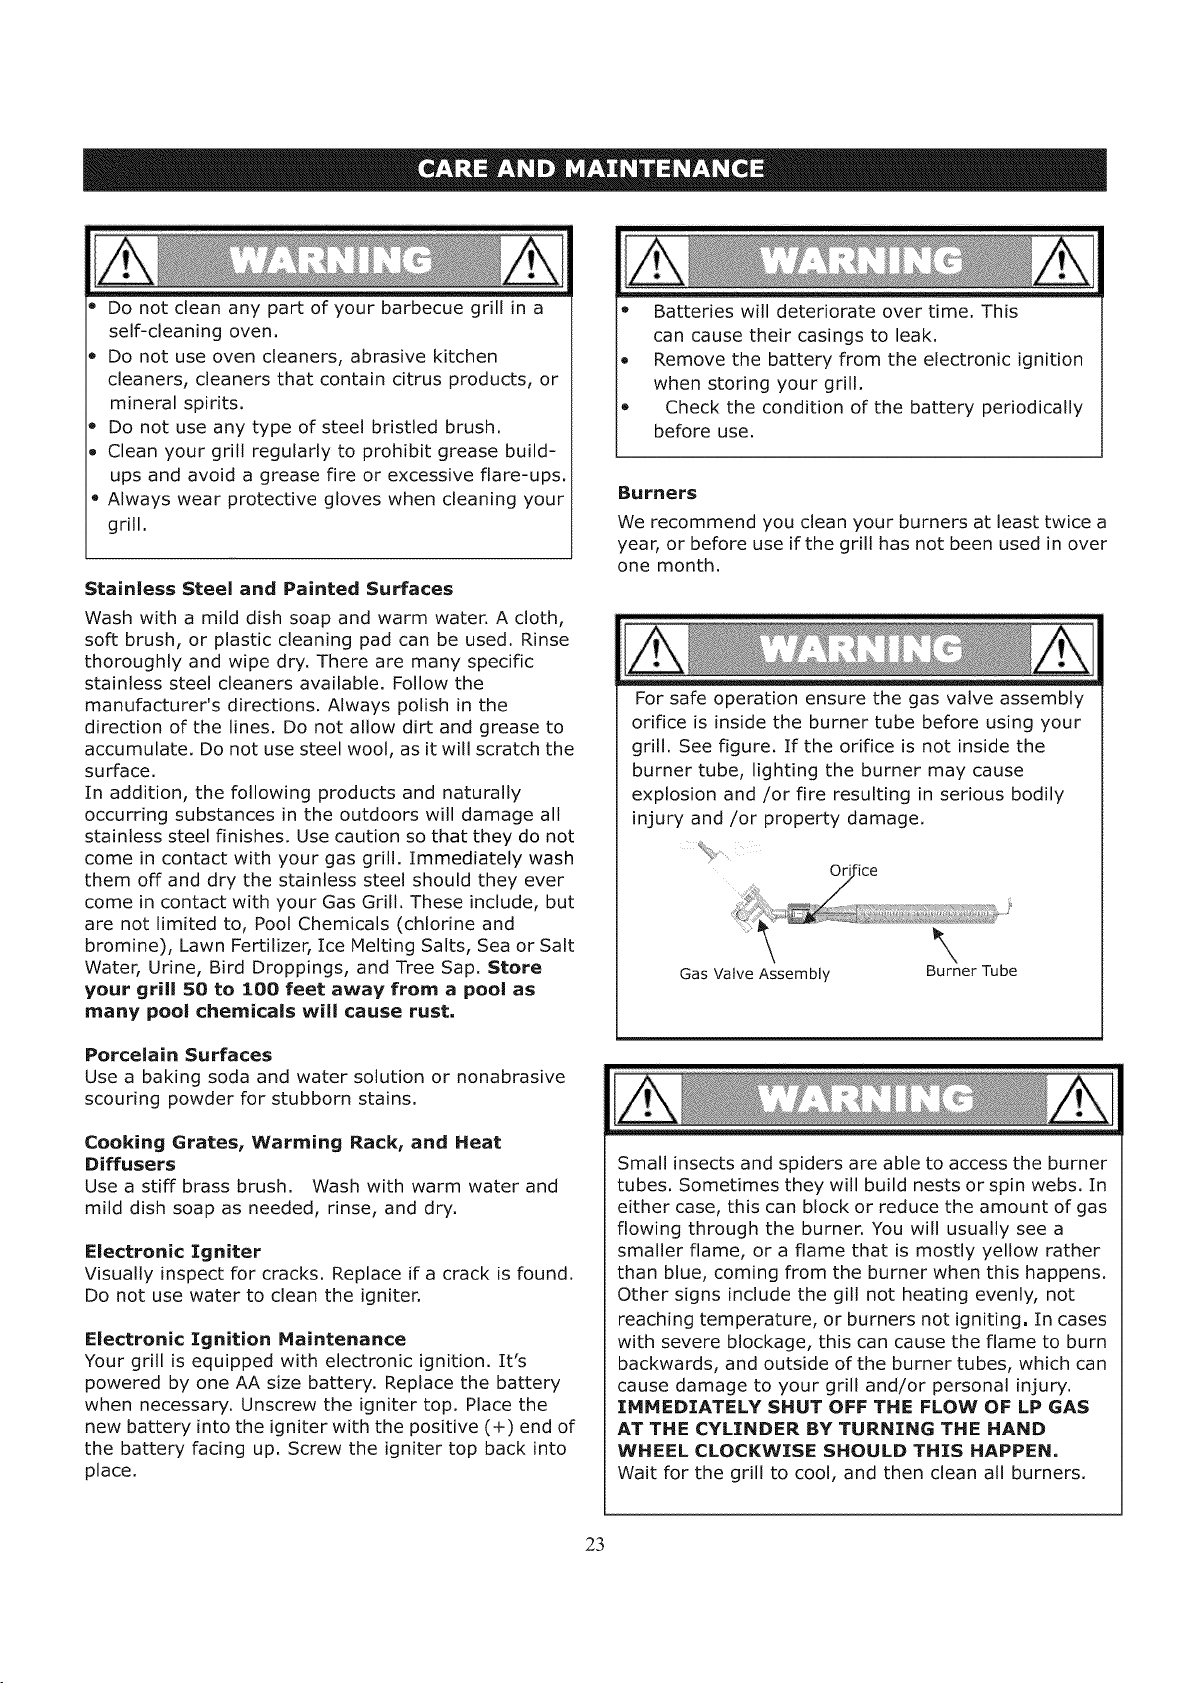
For safe operation ensure the gas valve assembly
orifice is inside the burner tube before using your
grill. See figure. If the orifice is not inside the
burner tube, lighting the burner may cause
explosion and/or fire resulting in serious bodily
injury and/or property damage.
Or ice
Gas Valve Assembly
\
Burner Tube
Porcelain Surfaces
Use a baking soda and water solution or nonabrasive
scouring powder for stubborn stains,
Cooking Grates, Warming Rack, and Heat
Diffusers
Use a stiff brass brush. Wash with warm water and
mild dish soap as needed, rinse, and dry.
Electronic Igniter
Visually inspect for cracks. Replace if a crack is found.
Do not use water to clean the igniter.
Electronic Ignition Maintenance
Your grill is equipped with electronic ignition. It's
powered by one AA size battery. Replace the battery
when necessary. Unscrew the igniter top. Place the
new battery into the igniter with the positive (+) end of
the battery facing up. Screw the igniter top back into
place.
Small insects and spiders are able to access the burner
tubes. Sometimes they will build nests or spin webs. In
either case, this can block or reduce the amount of gas
flowing through the burner. You will usually see a
smaller flame, or a flame that is mostly yellow rather
than blue, coming from the burner when this happens.
Other signs include the gill not heating evenly, not
reaching temperature, or burners not igniting. In cases
with severe blockage, this can cause the flame to burn
backwards, and outside of the burner tubes, which can
cause damage to your grill and/or personal injury.
IMMEDIATELY SHUT OFF THE FLOW OF LP GAS
AT THE CYLINDER BY TURNING THE HAND
WHEEL CLOCKWISE SHOULD THIS HAPPEN=
Wait for the grill to cool, and then clean all burners.
23
When to Look for Spiders
You should inspect the burners at least twice a year or
immediately after any of the following conditions
Occur:
1, The smell of gas in conjunction with burner
flames appearing yellow.
2, The grill does not reach the temperature.
3, The grill heats unevenly.
4. The burners make popping noise.
Cleaning the Main Burners
1. Ensure the LP gas is turned off at the LP cylinder.
2. Remove the cooking grates and heat diffusers.
3. Remove the Phillips head screws located at the
back end of each burner.
4. Lift each burner up and out.
5. Clean the inside of the burner using a stiff wire.
A straightened coat hanger is one suggested tool.
An alternative way to clean the inside of the
burner is using compressed air. Always wear eye
protection if using this method. Never enlarge
the burner ports during cleaning.
6. Brush the outer surface of the burner.
7. Ensure all ports (holes) are free of all debris.
8. Inspect the burner. Replace if any cracks or
enlarged holes.
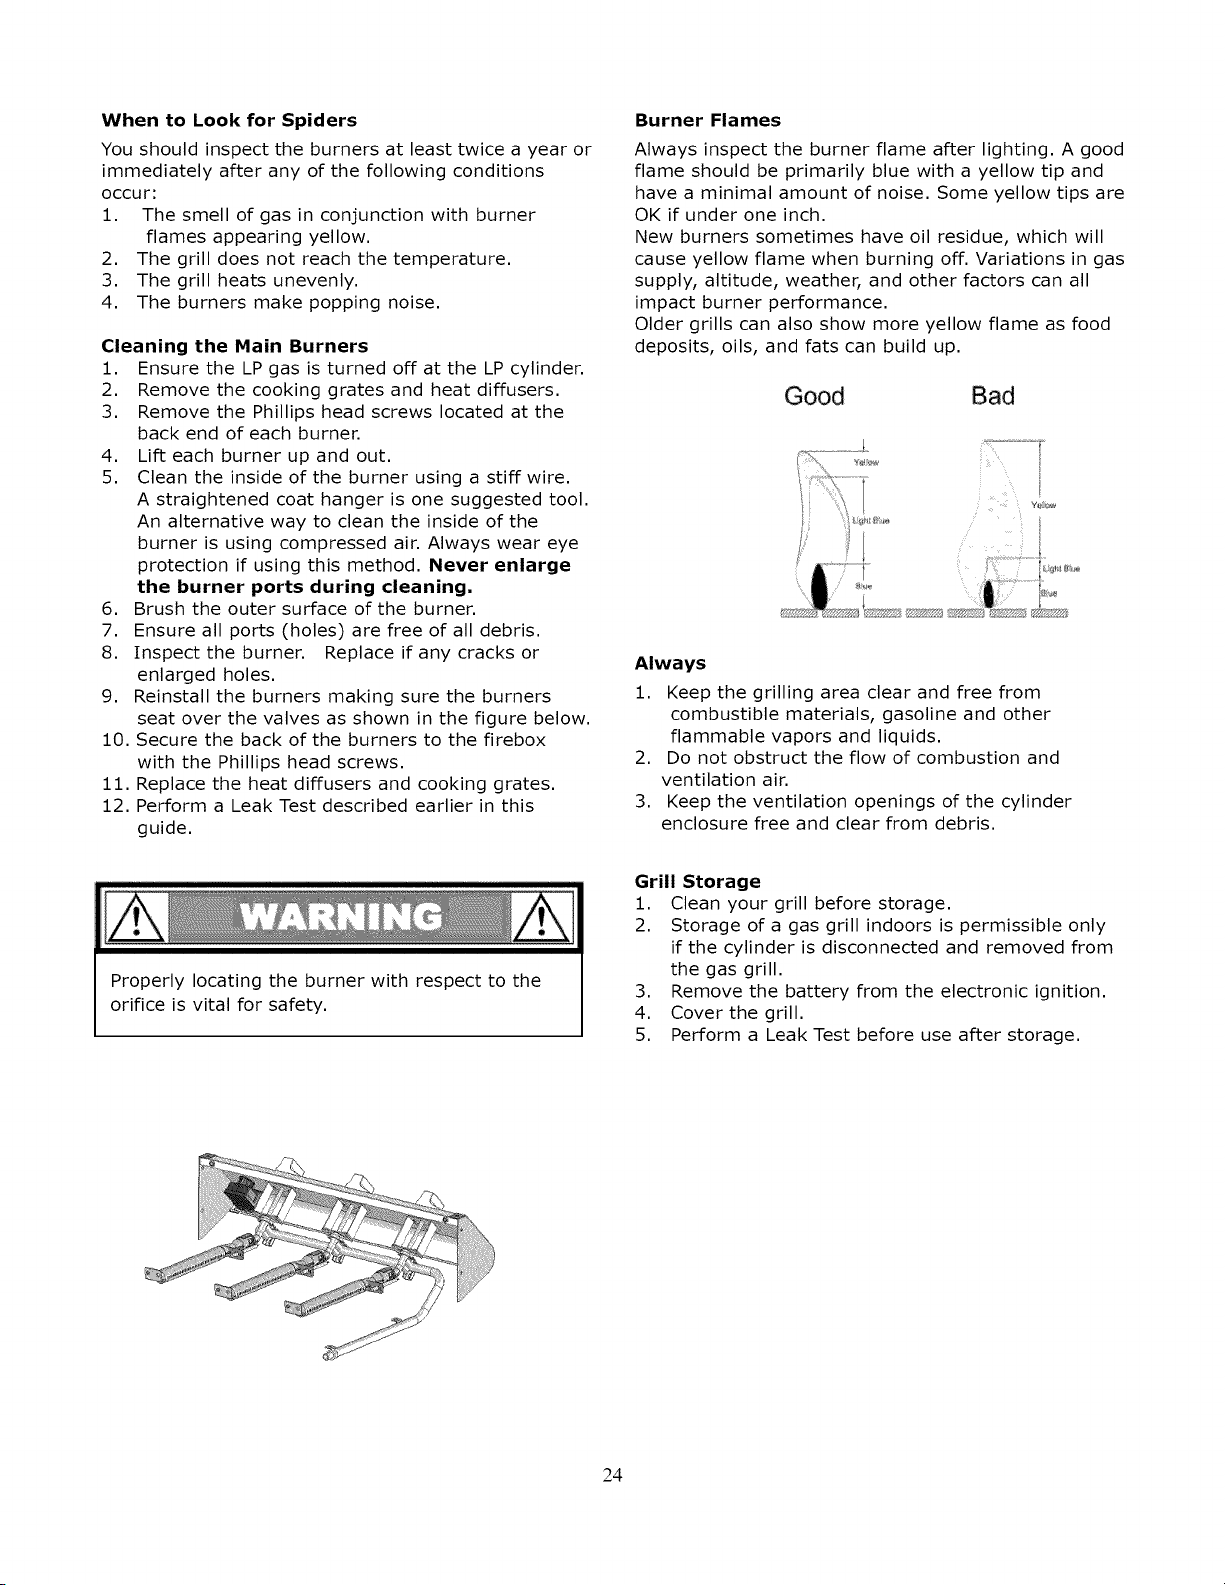
9. Reinstall the burners making sure the burners
seat over the valves as shown in the figure below.
10. Secure the back of the burners to the firebox
with the Phillips head screws.
11. Replace the heat diffusers and cooking grates.
12. Perform a Leak Test described earlier in this
guide.
Properly locating the burner with respect to the
orifice is vital for safety.
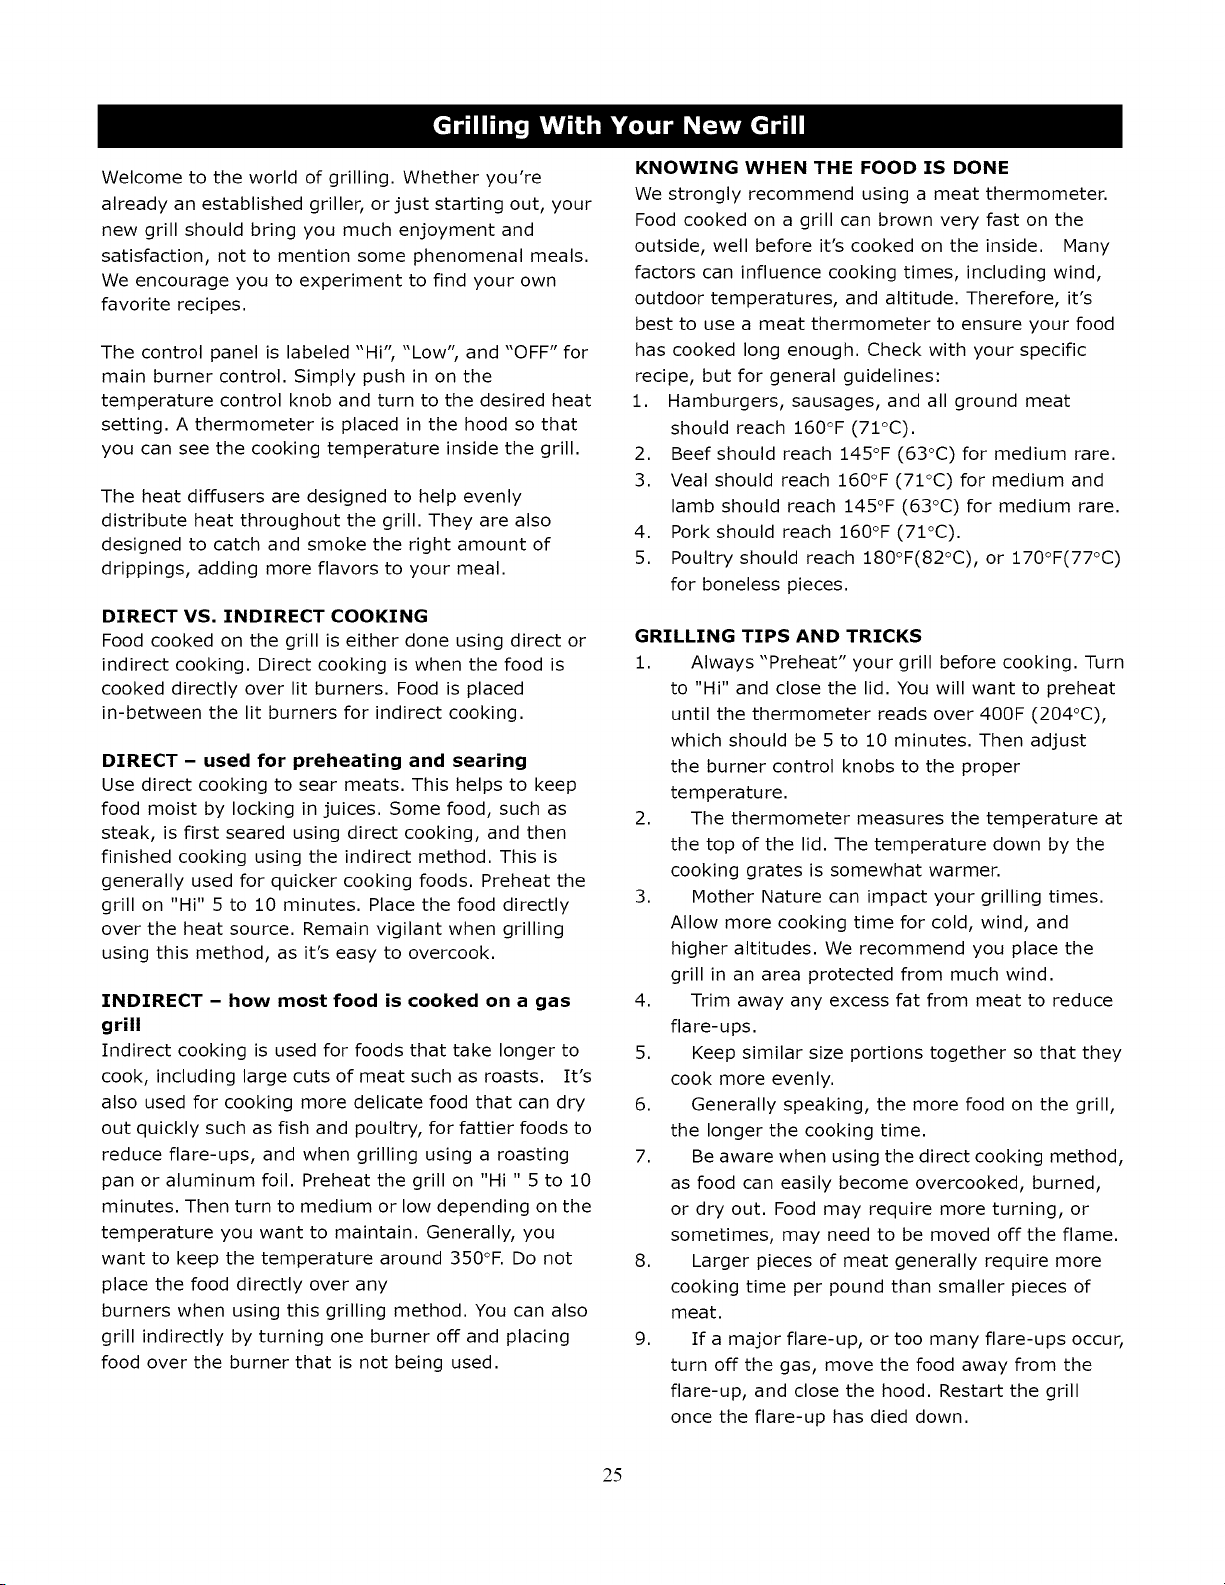
Burner Flames
Always inspect the burner flame after lighting. A good
flame should be primarily blue with a yellow tip and
have a minimal amount of noise. Some yellow tips are
OK if under one inch.
New burners sometimes have oil residue, which will
cause yellow flame when burning off. Variations in gas
supply, altitude, weather, and other factors can all
impact burner performance.
Older grills can also show more yellow flame as food
deposits, oils, and fats can build up.
Good Bad
.............
i¸i_,_ v_ i i
Always
1. Keep the grilling area clear and free from
combustible materials, gasoline and other
flammable vapors and liquids.
2. Do not obstruct the flow of combustion and
ventilation air.
3. Keep the ventilation openings of the cylinder
enclosure free and clear from debris.
Grill Storage
1. Clean your grill before storage.
2. Storage of a gas grill indoors is permissible only
if the cylinder is disconnected and removed from
the gas grill.
3. Remove the battery from the electronic ignition.
4. Cover the grill.
5. Perform a Leak Test before use after storage.
24
Welcometo the worldof grilling.Whetheryou're
alreadyanestablishedgriller,orjuststartingout,your
newgrillshouldbringyoumuchenjoymentand
satisfaction,notto mentionsomephenomenalmeals.
Weencourageyouto experimentto findyourown
favoriterecipes.
Thecontrolpanelis labeled"Hi","Low",and"OFF"for
mainburnercontrol.Simplypushin onthe
temperaturecontrolknobandturnto thedesiredheat
setting.Athermometerisplacedin thehoodsothat
youcanseethe cookingtemperatureinsidethegrill.
Theheatdiffusersaredesignedto helpevenly
distributeheatthroughoutthegrill.Theyarealso
designedto catchandsmoketherightamountof
drippings,addingmoreflavorsto yourmeal.
DIRECT VS. INDIRECT COOKING
Food cooked on the grillis eitherdone using director
indirectcooking. Direct cooking iswhen the food is
cooked directlyover litburners. Food isplaced
in-between the litburners for indirectcooking.
DIRECT - used for preheating and searing
Use direct cooking to sear meats. This helps to keep
food moist by locking in juices. Some food, such as
steak, is first seared using direct cooking, and then
finished cooking using the indirect method. This is
generally used for quicker cooking foods. Preheat the
grill on "Hi" 5 to 10 minutes. Place the food directly
over the heat source. Remain vigilant when grilling
using this method, as it's easy to overcook.
INDIRECT - how most food is cooked on a gas
grill
Indirect cooking is used for foods that take longer to
cook, including large cuts of meat such as roasts. It's
also used for cooking more delicate food that can dry
out quickly such as fish and poultry, for fattier foods to
reduce flare-ups, and when grilling using a roasting
pan or aluminum foil. Preheat the grill on "Hi " 5 to 10
minutes. Then turn to medium or low depending on the
temperature you want to maintain. Generally, you
want to keep the temperature around 350°F. Do not
place the food directly over any
burners when using this grilling method. You can also
grill indirectly by turning one burner off and placing
food over the burner that is not being used.
KNOWING WHEN THE FOOD IS DONE
We strongly recommend using a meat thermometer.
Food cooked on a grill can brown very fast on the
outside, well before it's cooked on the inside. Many
factors can influence cooking times, including wind,
outdoor temperatures, and altitude. Therefore, it's
best to use a meat thermometer to ensure your food
has cooked long enough. Check with your specific
recipe, but for general guidelines:
1. Hamburgers, sausages, and all ground meat
should reach 160°F (71°C).
2. Beef should reach 145°F (63°C) for medium rare.
3. Veal should reach 160°F (71°C) for medium and
lamb should reach 145°F (63°C) for medium rare.
4. Pork should reach 160°F (71°C).
5. Poultry should reach 180°F(82°C), or 170°F(77°C)
for boneless pieces.
GRILLING TIPS AND TRICKS
1. Always "Preheat" your grill before cooking. Turn
to "Hi" and close the lid. You will want to preheat
until the thermometer reads over 400F (204°C),
which should be 5 to 10 minutes. Then adjust
the burner control knobs to the proper
temperature.
2. The thermometer measures the temperature at
the top of the lid. The temperature down by the
cooking grates is somewhat warmer.
3. Mother Nature can impact your grilling times.
Allow more cooking time for cold, wind, and
higher altitudes. We recommend you place the
grill in an area protected from much wind.
4. Trim away any excess fat from meat to reduce
flare-ups.
5. Keep similar size portions together so that they
cook more evenly.
6. Generally speaking, the more food on the grill,
the longer the cooking time.
7. Be aware when using the direct cooking method,
as food can easily become overcooked, burned,
or dry out. Food may require more turning, or
sometimes, may need to be moved off the flame.
8. Larger pieces of meat generally require more
cooking time per pound than smaller pieces of
meat.
9. If a major flare-up, or too many flare-ups occur,
turn off the gas, move the food away from the
flare-up, and close the hood. Restart the grill
once the flare-up has died down.
25
10. Turnfoodsinfrequently.Generally,onlyturna
steakonceduringcooking.
11. Usetongsratherthanaforkwhenturningthe
foodonthe grill.Lessjuicewill be lostthat way.
12. Knowyoursauceandwhento apply.Oiland
vinegarbasedsaucescanbebrushedonany
time.Sugarbasedsauceslikebarbecuesauce
shouldbeappliedduringthelastfew minutesof
cooking.
13. Atimercanhelpyoukeepfromover-cookingthe
food.
14. Useinsulatedprotectivemittsor potholders
whenworkingarounda grillin operation.
15. Useasmallamountofcookingoilonthecooking
gratesbeforeheatingto reducefoodsstickingon
thegrates.
FOODSAFETY
1. Alwaysusesafefoodhandlingandpreparation
whenusingthisgrill.
2. Washall poultry,seafood,andvegetablesbefore
cooking.
3. Useseparateplatters,plates,andutensilsfor
uncookedandcookedfoods.
4. Leaveall meat,poultry,andseafoodinthe
refrigeratoruntilreadyto cook.
5. Usea meatthermometerto ensurefoodsare
adequatelycooked.
BURNER WILL NOT LIGHT
1. Gas supply is turned off. Turn on gas at LP
cylinder,
2. Out of propane. Check to be sure you still have
propane in your tank.
3. Regulator is not properly seated into the tank
valve. Remove and reattach. Hand tighten only.
4. Crimped fuel supply hose. Inspect and straighten.
5. Regulator failure or damaged hose. Order
replacement part and replace.
6. Make sure you can hear the electronic igniter
clicking. If not, replace the battery with an AA
size. Inspect the electrode to be sure it's not
coated in grease or dirt. If so, clean with rubbing
alcohol. Check the distance from the electrode
tip to the burner, The tip of the electrode should
be 1/8" to 1/4" from the main burner, Adjust if
necessary. Inspect the electrode to be sure it's
not cracked or broken. If so, order replacement
parts and replace.
7. Blockage in the gas system. Inspect the burner
to be sure insects, spider webs, etc do not block
them. Clean if necessary. Inspect under the
control panel to be sure the burner are aligned
properly with the valves.
IRREGULAR FLAME OR YELLOW FLAME
1. New burner may have residual oil, which will
burn off.
2. Tubes in burners are blocked. Remove and clean.
3. Burner has a high grease or dirt build-up.
Remove and clean.
4. Burner is not aligned properly with the valves.
Inspect under the control panel.
SUDDEN DROP IN GAS PRESSURE OR FLAMES
BLOW OUT
1. Out of gas. Check to be sure you still have
propane in your tank.
2. Your excessive fuel flow valve has tripped,
thereby reducing the flow of gas. Turn off all
burners, wait 30 seconds, and relight grill. If
problem persists, turn off all burners. Disconnect
regulator from tank. Wait 10 minutes. Reconnect
regulator and leak test. Slowly turn on LP tank
and relight grill. Other ways the flow limiting
device can be activated include
a. A ruptured gas hose. Inspect, perform a leak
test, and replace as necessary.
26
3,
b. Opening the control knob before turning on
the LP gas at the cylinder, Turn on the gas
at the LP cylinder first before turning on a
control knob to light,
c. Improper purging of cylinder before it was
filled. See your LP gas dealer,
Wind could be blowing out your burner, Turn
front of grill to face wind or move out of the wind.
EXCESSIVE FLARE-UPS
1. Heat diffuser, inside of grill, grates, and burners
need to be cleaned.
2. Grease tray needs to be cleaned and emptied.
3. Using too high of heat to cook. Reduce control
knob setting.
4. Direct cooking method will produce more flare-
ups than indirect, If using direct method, try
using indirect,
FlrRE BEHIND CONTROL PANEL
Immediately shut off cylinder valve and allow grill to
cool.
1. Check burner for obstructions and clean.
2. Inspect under the control panel to be sure the
burners are aligned properly with the valves.
1. Gas is leaking from a faulty connection or
damaged hose. Perform a leak test and inspect
for leaks. Tighten or replace parts as necessary.
Can [ convert my gas grill from one fuel source to
another?
No. Your gas grill is manufactured to specific
standards developed by CSA and ANSI for your
safety and grilling performance for LP Gas. We
do not offer conversion kits nor do we
recommend you change the fuel type.
How are your grills tested?
Our grills are tested and certified by CSA, a
leading worldwide independent testing center,
to meet or exceed various CSA and ANSI
standards along with various performance
standards. The burners and gas line in each
grill are also individually tested when each grill
comes off the assembly line just prior to
packaging. Each burner is ignited for this test.
What is the humming noise I sometimes here
coming from my regulator?
The humming sound you can hear is just gas
flowing through the regulator. There is no need
to be concerned with a low volume of noise.
My grill has a low flame on some burners, or
some burners will not light at all. What can cause
this?
This can be caused by the regulator's flow
limiting device, which is generated by a
sudden change in pressure. Opening the tank
valve too quickly can cause this. In this case,
close the LP tank valve and disconnect from
the regulator. Let it stand for 10 minutes.
Reconnect the regulator to the LP tank. Open
the grill lid. Slowly open the LP tank valve.
Follow the burner lighting procedures and light
the burner furthest from the LP tank. Continue
to light the other burners as you move towards
the LP tank.
Can [ use ceramic plates, briquettes of any kind,
or lava rocks?
No. Your grill is designed for use only with heat
diffusers. Grease drips down on to the
diffusers and is burned, creating steam and
additional flavor.
27
Congratulationsonmakinga smartpurchase.Your
newKenmore®productisdesignedandmanufactured
foryearsofdependableoperation.Butlikeallproducts,
it mayrequirerepairfromtimeto time.That'swhen
havinga RepairProtectionAgreementcansaveyou
moneyandaggravation.
Here'swhatthe RepairProtectionAgreement_
includes:
[] Expertservice byour 10,000 professional repair
specialists
[] Unlimited service and no charge for parts and
labor on all covered repairs
[] Product replacement up to $1500 if your
covered product can't be fixed
[] Discount of 10% from regular price of service
and related installed parts not covered by the
agreement; also, 10% off regular price of
preventive maintenance check
[] Fast help by phone - we call it Rapid Resolution-
phone support from a
Sears representative, Think of us as a "talking owner's
manual."
Once you purchase the Repair Protection Agreement, a
simple phone call is all that it takes for you to schedule
service. You can call anytime day or night, or schedule
a service appointment online.
The Repair Protection Agreement is a risk-free
purchase. If you cancel for any reason during the
product warranty period, we will provide a full refund.
Or, a prorated refund anytime after the product
warranty period expires. Purchase your Repair
Protection Agreement today!
Some limitations and exclusions apply. For
prices and additional information in the U.S.A.
CALL 1-800-827-6655.
*Coverage in Canada varies on some items. For
full details call Sears Canada at 1-800-361-6665
Sears Installation Service
For Sears professional installation of home appliances,
garage door openers, water heaters, and other major
home items, in the U.S.A. or Canada call
1-800-4-MY-HOME®
Felicitaciones por su compra inteligente. Su nuevo
producto Kenmore® viene dise_ado y manufacturado
para confiables operaciones por amos. Pero, como todo
producto, puede requerer reparaciones de vez en
cuando. All[ es cuando un Acuerdo de Protecci6n de
Reparaci6n puede ahorrar su dinero y agravamiento.
A continuaci6n son los elementos del Acuerdo :
[] Servicio de experto por nuestros 10,000
especialistas de reparaci6n.
[] Servici sin I[mite y cero cambio de piezas y mano
de obra en todas las reparaciones.
[] Repuesto de producto hasta a $1500 si su
producto amparado no se puede arreglar
[] 10% de descuento del precio regular de serviceio y
piezas relacionadas con el servicio que no sean
cubiertas por el acuerdo y, 10% de descuento del
precio regular de la preventiva revisi6n de
mantenimiento.
[] Ayuda inmediata por telbfono - le decimos
Tel_fono de Resoluci6n R_pida - entregada por un
representante de Sears. Piense en nosotros como un
"Manual de Usuario Parlante."
Una vez Ud. compre el Acuerdo, todo Io que necesita
es una Ilamada telef6nca para programar el servicio.
Ud. puede hacer la Ilamada en el d[a o en la noche, o
programar una cita para servicio.
El Acuerdo de Protecci6n por Reparaci6n se trata de
una compra libre de riesgos. Si Ud. cancela la compra
por cualquier raz6n durante el per[odo de la garantia
del producto, le reembolsamos todo el costo. O, un
reembolso proporcional en cualquier momento luego
de la fecha de vencimiento de la garantia del producto.
iCompre su Acuerdo de Protecci6n por Reparaci6n
hoy!
Algunas limitaciones y exclusions ser_n
aplicadas. Por precios y mayor informaci6n en
E.U., Ilamar a 1-800-827-6655.
* La garantia puede variar para algunos
articulos en Canada. Para mayor informaci6n,
Ilamar a Sears Canada en-800-361-6665
Seecio de Instalacibn Sears
Por la instalaci6n professional Sear de aparatos
dom_sticos, abrepuertas de garage, calentadores de
agua y otros grandes articulos dom_sticos en E.U. o
Canada, Ilamar a
1-800-4-MY-HOME®
28
Advertencias de seguridad importantes ............... 28-30
Informaci6n sobre la garantfa ............................ 29
Instrucciones previas al montaje ......................... 30
Listas y diagrama de piezas ........................... 31-34
Instrucciones de montaje .............................. 35-44
Instrucciones de uso y mantenimiento ................ 45-54
Preguntas frecuentes ..................................... 54
Acuerdo de protecci6n de reparaciones .................. 55
Piezas Sears e informaci6n del servicio .................. 56
SI DETECTA OLOR A GAS:
• Corte el suministro de gas a la unidad.
• Apague cualquier llama.
• Abra la tapa.
• Si el olor persiste, al_jese
de la unidad y p6ngase en contacto
inmediatamente con su proveedor de gas o con
el servicio de bomberos.
Garantia completa de Kenmore
En caso de defecto de material o de fabricaci6n en un a_o a
partir de la fecha de compra, se procederc_ a la reparaci6n
del aparato o a su sustituci6n por uno nuevo si la reparaci6n
no es posible (tel_fono de contacto: 1-800-4-MY-HOME®
Si los quemadores de acero inoxidable resultaran oxidados
durante los cinco amos posteriores a la fecha de compra, se
proceder_ a su sustituci6n gratuita. Transcurrido el primer
a_o tras la fecha de compra, el usuario se har_ cargo de los
costes de mano de obra resultantes de la instalaci6n de los
quemadores.
La garantfa no cubre, dentro del periodo de garantfa, las
pilas del encendedor, la p_rdida de pintura de pares de la
barbacoa, la p_rdida de color o el 6xido de la superficie,
dado que se trata de piezas sujetas a desgaste por el uso
normal. Tampoco cubre los da_os causados por uso normal
accidente o mantenimiento incorrecto.
La garant{a quedar_ sin efecto en caso del uso del aparato
con fines comerciales o de alquiler.
La garant_a s61oser_ v_lida en
Estados Unidos.
Esta garantfa asegura derechos legales especfficos sin
perjuicio de la obtenci6n por su parte de otros derechos, que
variar_n dependiendo del estado en el que resida.
Sears Brands Management Corporation
Hoffman Estates, IL 60179
Exclusivamente para uso dom_stico. No la utilice para
cocina comercial.
• No almacene ni use gasolina ni otros vapores o
liquidos inflamables en las inmediaciones de
este o cualquier otro aparato.
• No almacene bombonas de propano liquido en
las inmediaciones de este aparato ni de ning6n
otro.
Si le faltan piezas, necesita asistencia durante el montaje o
si tiene alguna otra pregunta Ilame al 1-800-933-0527, de
8:30 a 17:00, de lunes a viernes.
Ser_ atendido por personal del fabricante de la barbacoa y
no por el servicio de Sears.
Informe sobre el producto
IMPORTANTE: Rellene la siguiente ficha de registro de
producto:
N6mero de modelo 119.16126011
N6mero de serie
(Consulte la placa de caracterfsticas situada en el interior del
panel del armario)
Fecha de compra
• Lea y siga todas las instrucciones de uso y
mantenimiento, montaje y seguridad antes de montar o
cocinar con esta barbacoa.
El incumplimiento de las mismas podria ser causa de
una explosi6n o incendio, Io que podria provocar dafios
en la propiedad, dafios personales e incluso la muerte.
29

NO encienda esta barbacoa sin haber leido primero las
instrucciones de encendido.
No encienda esta barbacoa sin haber cornprobado si
los tubes dei quemador han resuitado obstruidos
durante el transporte.Consulte las instrucciones de
limpieza y mantenimiento.
La instalaci6n debe realizarse de conformidad con la normativa local
o, en su defecto, con la Normativa Nacional de Combustible de Gas,
ANSI Z223.1/NFPA 54, o CAN/CGA B149.1, C6digo de Instalaci6n de
Gas Propane y Gas Natural o el C6digo de Almacenamiento y
Nanipulaci6n de Gas Propane, B149.2.
• No utilice ning_n ripe de carb6n en esta barbacoa.
= NO maneje los principales quernadores y el quemador
trasere al mismo tiempo. (Si Io hubiera)
= Inspeccione SIEHPRE la bandeja recogegrasas antes
de cada use. Quitela y limpiela cuando proceda.
Todos los accesorios el_ctricos (come luces o asadores) deben ser
conectados a tierra de conformidad con las disposiciones locales o,
en su defecto, con el C6digo El_ctrico Nacional, ANSI/NFPA 70, o
con el C6digo El_ctrico Canadiense, CSA C22.1. Mantenga los cables
alejados de las superficies calientes.
• iESTA BARBACOAHA SIDe DISEI_IADA PARA SU
EXCLUSIVe USOEN EXTERIORES!
• No instale esta barbacea de gas en vehiculos
recreativos ni bores, ni sobre _stos.
Las barbacoas de gas propane liquido (LPG) deben set
utilizadas exclusivamente con el regulador de gas
suministrado. No se puede utilizar ni convertir para use
con gas natural.
Hantenga SIEHPRE la manguera de gas apartada de
cualquier superficie caliente y sit_ela donde no caiga
grasa. Evite que se retuerza la manguera de gas. Realice
una inspecci6n visual de la manguera antes de cada use
per si presentara cortes.
grietas, desgaste excesive u otros da_os. No utUice la
barbacoa si la manguera est_ da_ada. Llame a Sears
1-800-4-HY-HOHE®
(1=800-469-4663) y solicite una manguera de gas de
recambio Kenmore.
o NUNCA utilice su barbacoa de gas en un edificio, garaje, porche,
cobertizo, pasarela ni en cualquier otra zona cerrada.
• NUNCA obstruya el fiujo de aire de ventitad6n alrededor det
armario de la barbacoa de gas.
• NO deje a los ni_os ni alas mascotas sin atender cerca de la
barbacoa encendida.
• ASEGORESE de que la barbacoa est_ nivelada durante su uso.
Para ello, regule el pie situado en la parte delantera de la
barbacoa.
• NUNCA utilice una l[nea de gas sin regular con esta unidad.
INSTRUCCIONES PREVIAS AL IONTAJE
• Serc_n necesarias dos personas para montar las piezas m_s
grandes de la barbacoa.
® Coloque un cart6n en el suelo y utilicelo como superfide de
trabajo para proteger tanto el suelo como las piezas de la
barbacoa de posibles ralladuras.
• Saque todas las piezas y, sirvi_ndose del diagrama de piezas
y montaje, verifique que se hart recibido sin sufrir daffos.
• Utilice guantes de protecd6n para montar la barbacoa.
• GUARDE ESTAS INSTRUCCIONES
Deje este manual con el consumidor.
Guarde este manual para futuras consultas.
3O
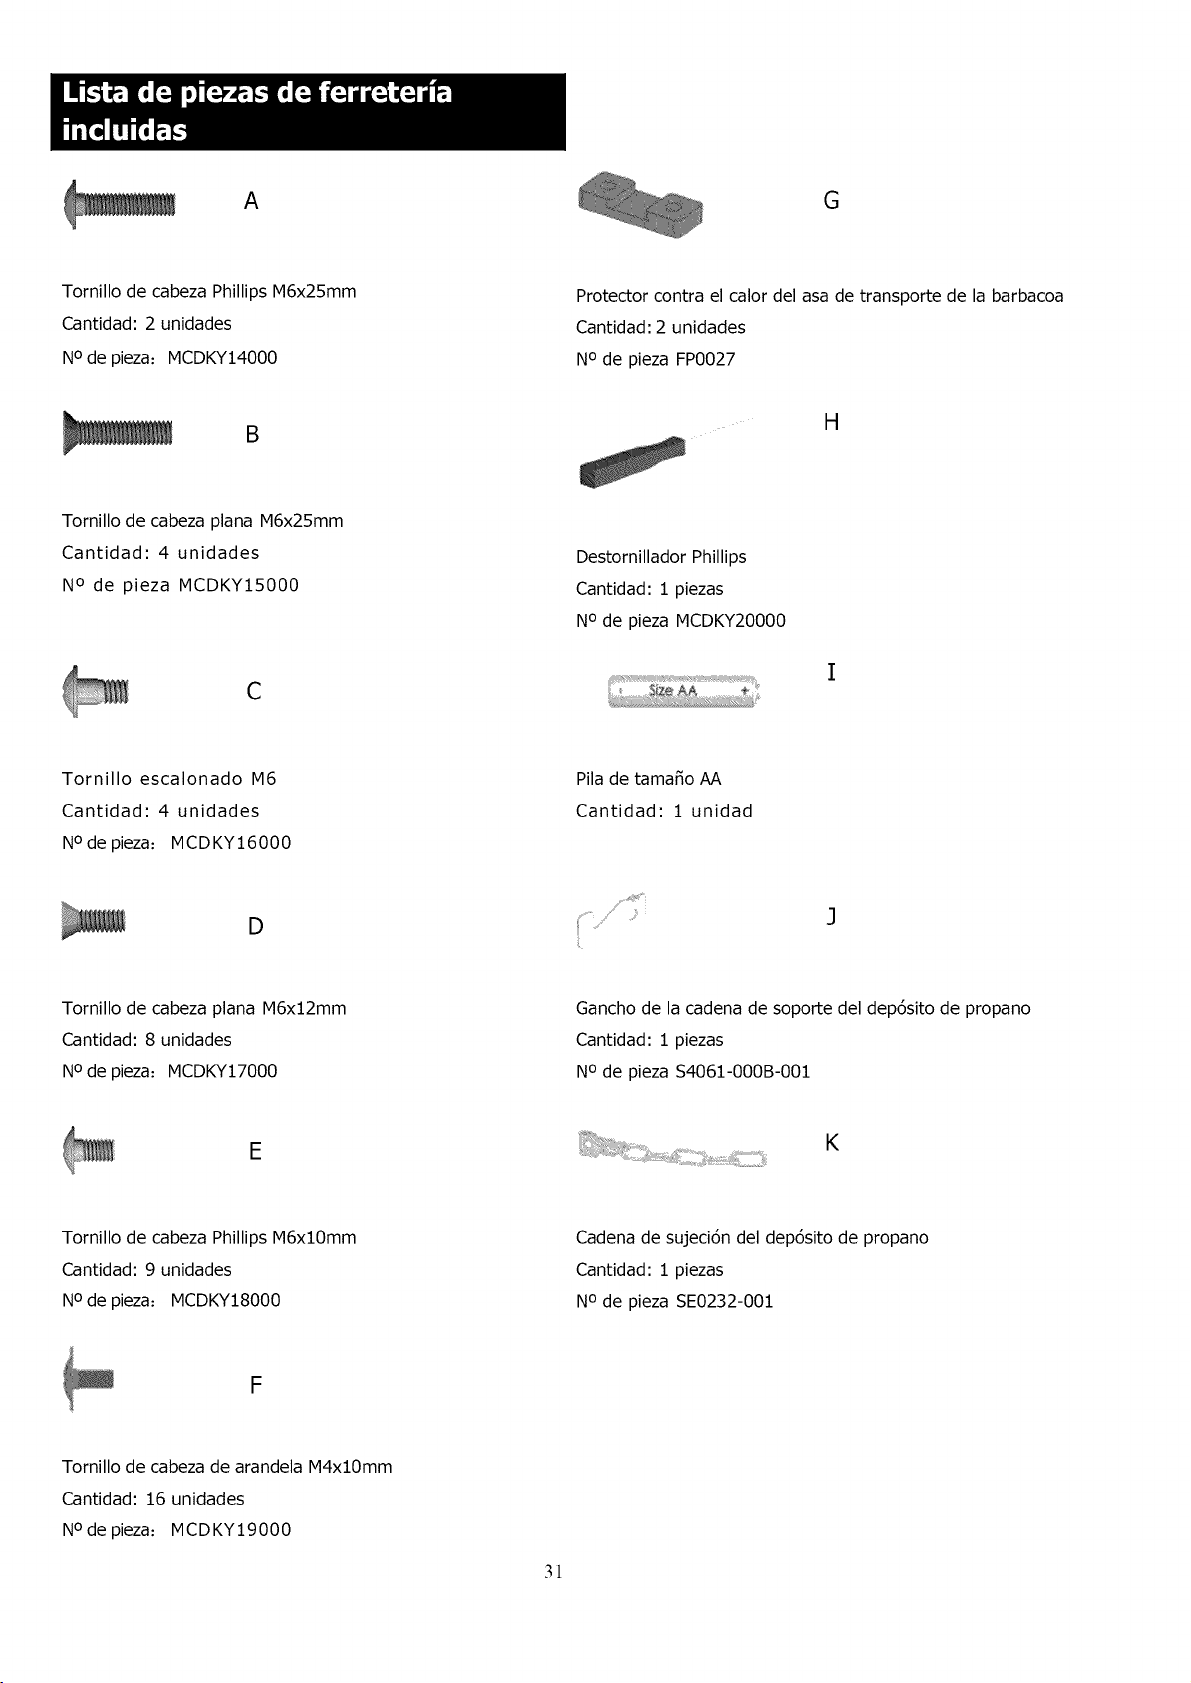
A
Tornillo de cabeza Phillips M6x25mm
Cantidad: 2 unidades
N o de pieza: MCDKY14000
B
Tornillo de cabeza plana M6x25mm
Cantidad: 4 unidades
N o de pieza MCDKY15000
C
Tornillo escalonado M6
Cantidad: 4 unidades
No de pieza: MCDKY16000
D
Tornillo de cabeza plana M6x12mm
Cantidad: 8 unidades
No de pieza: MCDKY17000
E
Tornillo de cabeza Phillips M6xl0mm
Cantidad: 9 unidades
N o de pieza: MCDKY18000
Tornillo de cabeza de arandela M4xl0mm
Cantidad: 16 unidades
N o de pieza: MCDKY19000
G
Protector contra el calor del asa de transporte de la barbacoa
Cantidad: 2 unidades
N o de pieza FP0027
H
Destornillador Phillips
Cantidad: 1 piezas
N o de pieza MCDKY20000
Pila de tama_o AA
Cantidad: 1 unidad
Gancho de la cadena de soporte del dep6sito de propano
Cantidad: 1 piezas
No de pieza $4061-000B-001
K
Cadena de sujeci6n del dep6sito de propano
Cantidad: 1 piezas
N o de pieza SE0232-001
31
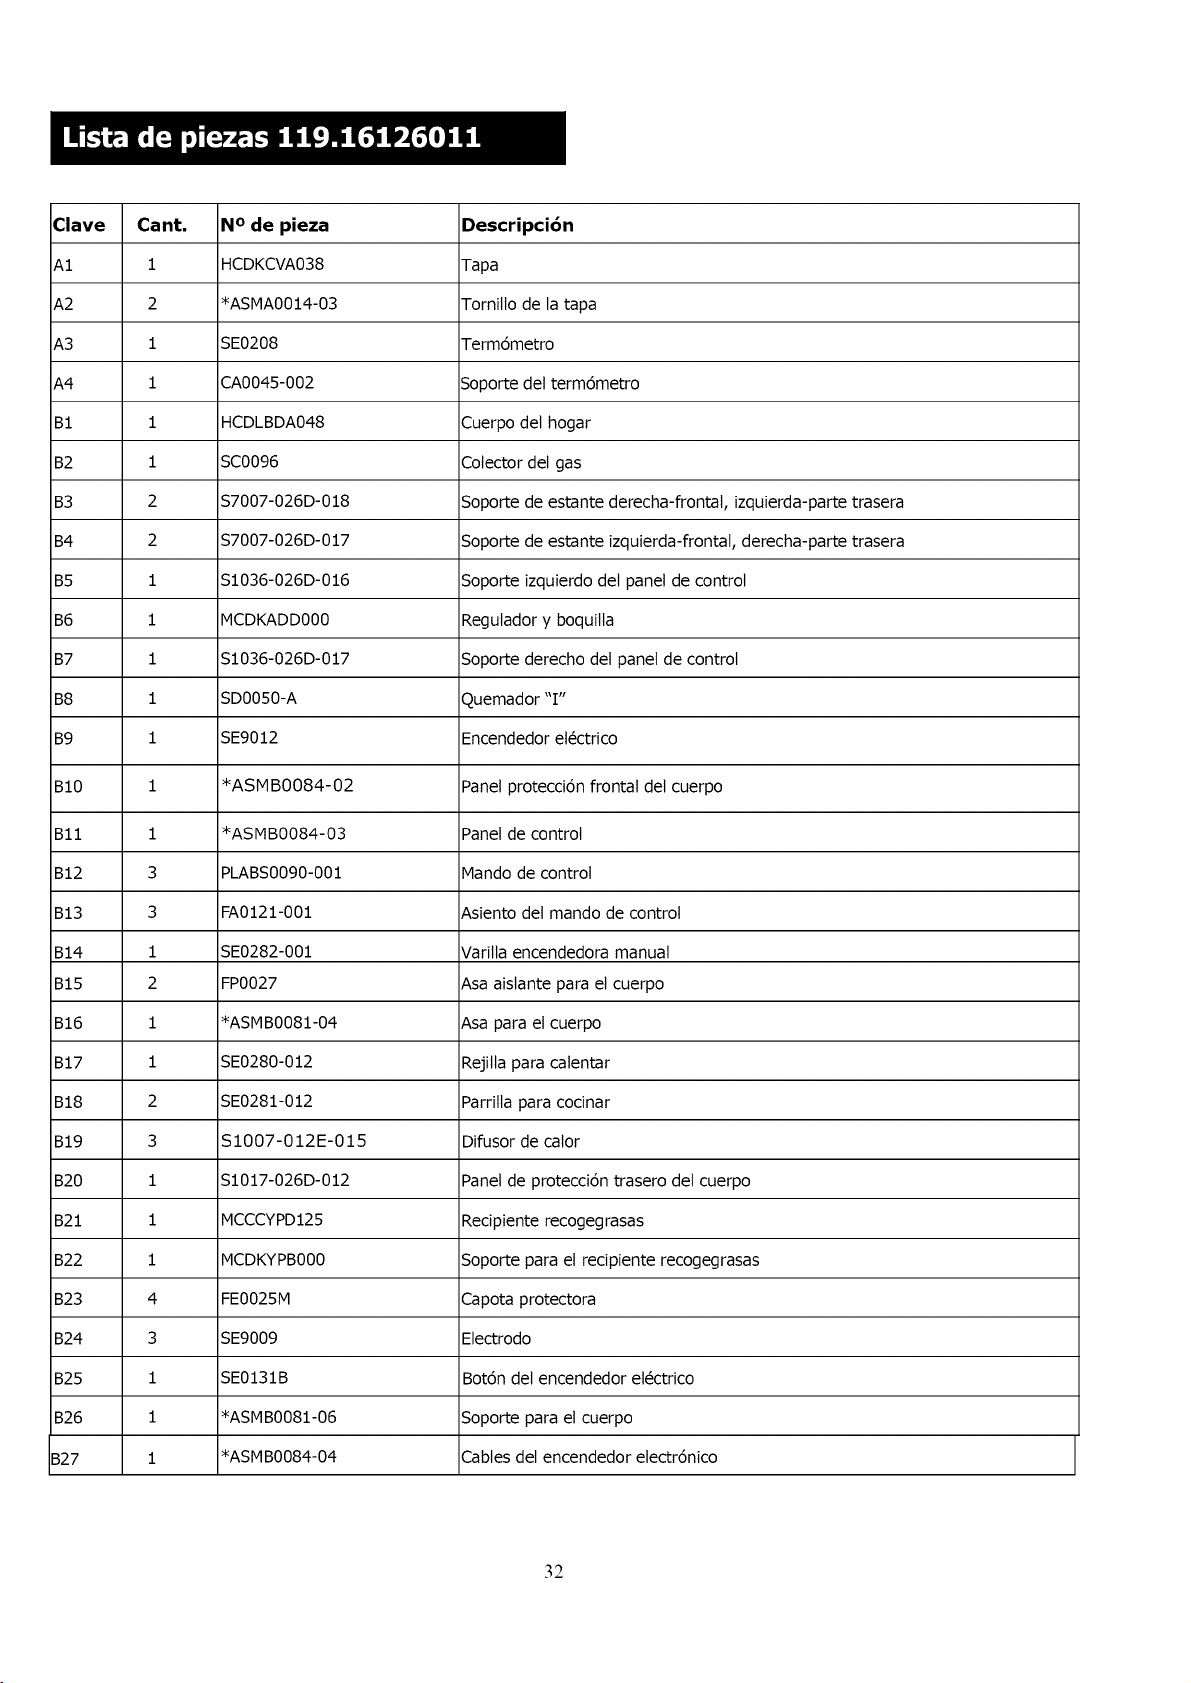
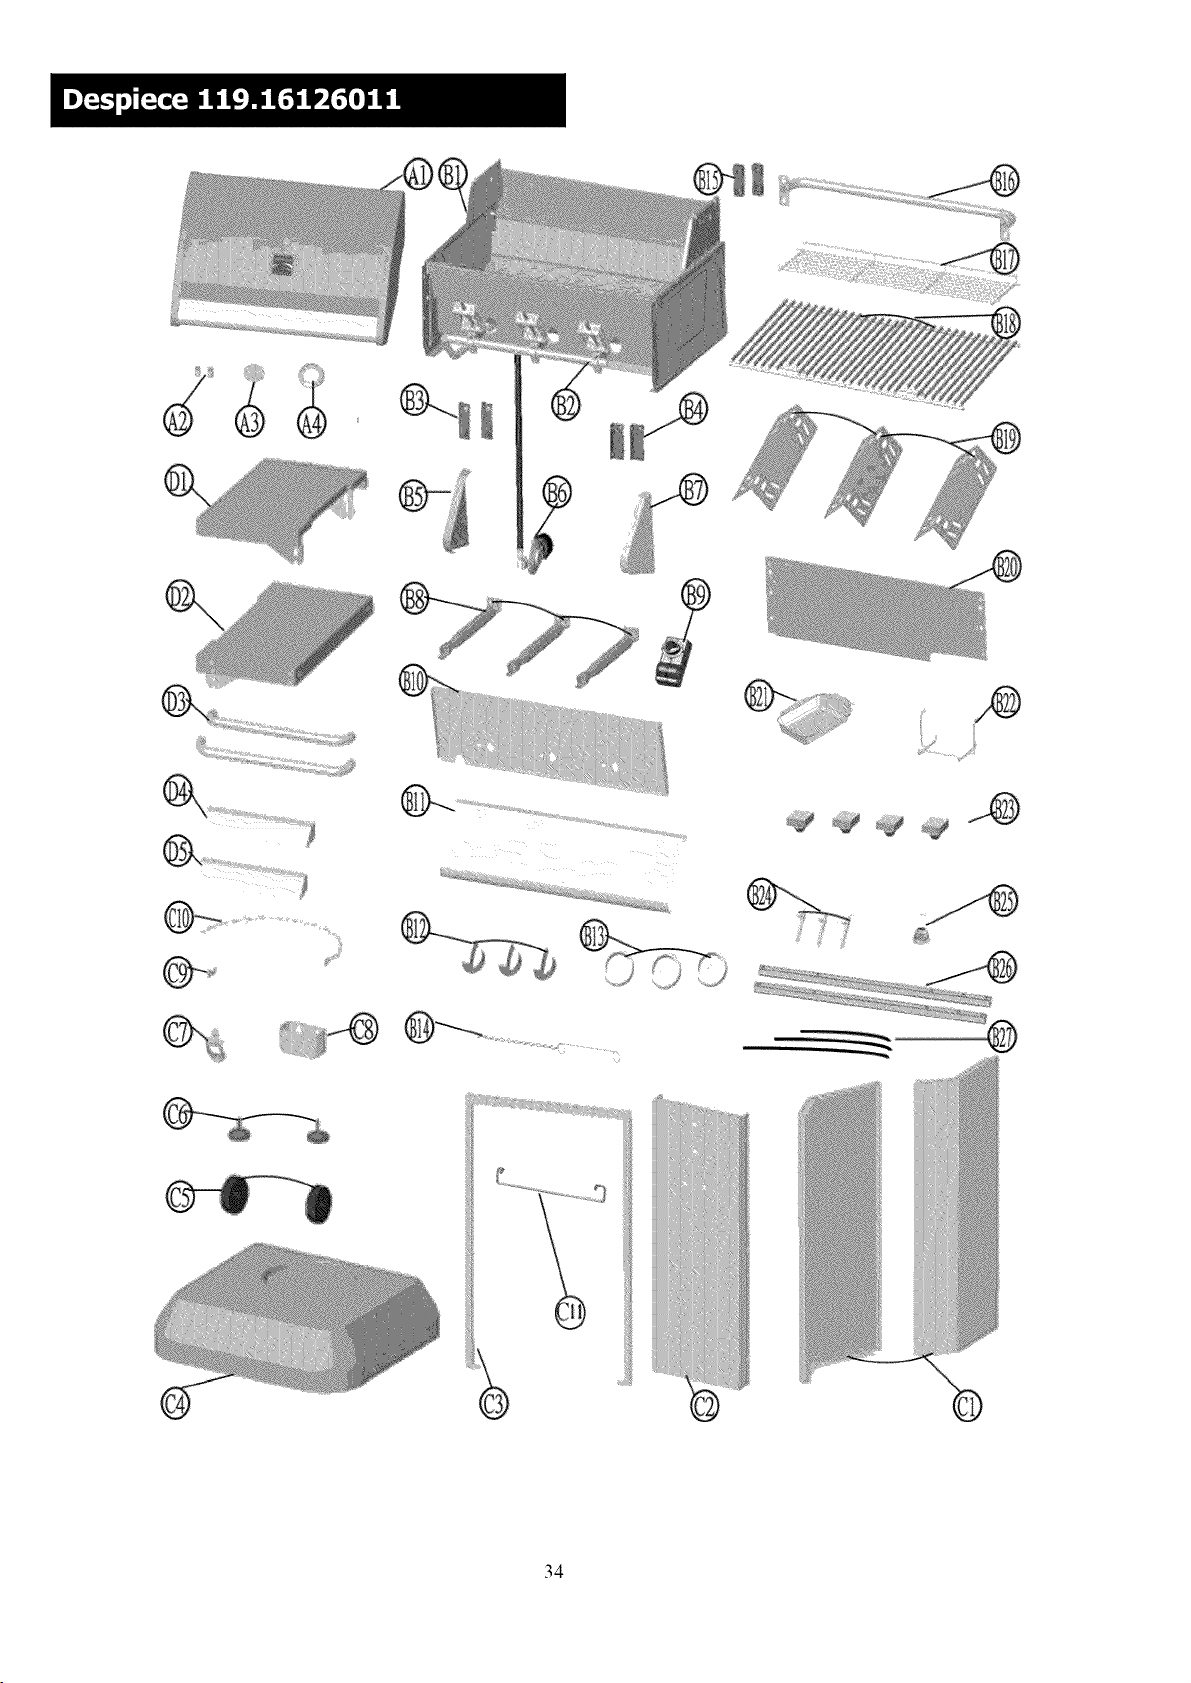
Clave Cant. N ° de pieza Descripci6n
A1 1 HCDKCVA038 Tapa
A2 2 *ASMA0014-03 Tornillo de la tapa
A3 1 SE0208 Term6metro
A4 1 CA0045-002 Soporte del term6metro
B1 1 HCDLBDA048 Cuerpo del hogar
B2 1 SC0096 Cotector del gas
B3 2 $7007-026D-018 Soporte de estante derecha-frontat, izquierda-parte trasera
B4 2 $7007-026D-017 Soporte de estante izquierda-frontat, derecha-parte trasera
B5 1 $1036-026D-016 Soporte izquierdo del panel de control
B6 1 MCDKADD000 Regutador y boquilla
B7 1 $1036-026D-017 Soporte derecho del panel de control
B8 1 SD0050-A Quemador "I"
B9 1 SE9012 Encendedor el_ctrico
B10 1 *ASMB0084-02 Panel protecci6n frontal del cuerpo
Bll 1 *ASMB0084-03 Panel de control
B12 3 PLABS0090-001 Mando de control
B13 3 FA0121-001 Asiento del mando de control
B14 1 SE0282-001 Varilla encendedora manual
B15 2 FP0027 Asa aislante para el cuerpo
B16 1 *ASMB0081-04 Asa para el cuerpo
B17 1 SE0280-012 Rejitla para catentar
B18 2 SE0281-012 Parrilla para cocinar
B19 3 S1007-012E-015 Difusor de cator
B20 1 $1017-026D-012 Panel de protecci6n trasero del cuerpo
B21 1 MCCCYPD125 Recipiente recogegrasas
B22 1 MCDKYPB000 Soporte para el recipiente recogegrasas
B23 4 FE0025M Capota protectora
B24 3 SE9009 Electrodo
B25 1 SE0131B Bot6n del encendedor el_ctrico
B26 1 *ASMB0081-06 Soporte para el cuerpo
B27 1 *ASMB0084-04 Cables del encendedor electr6nico
32
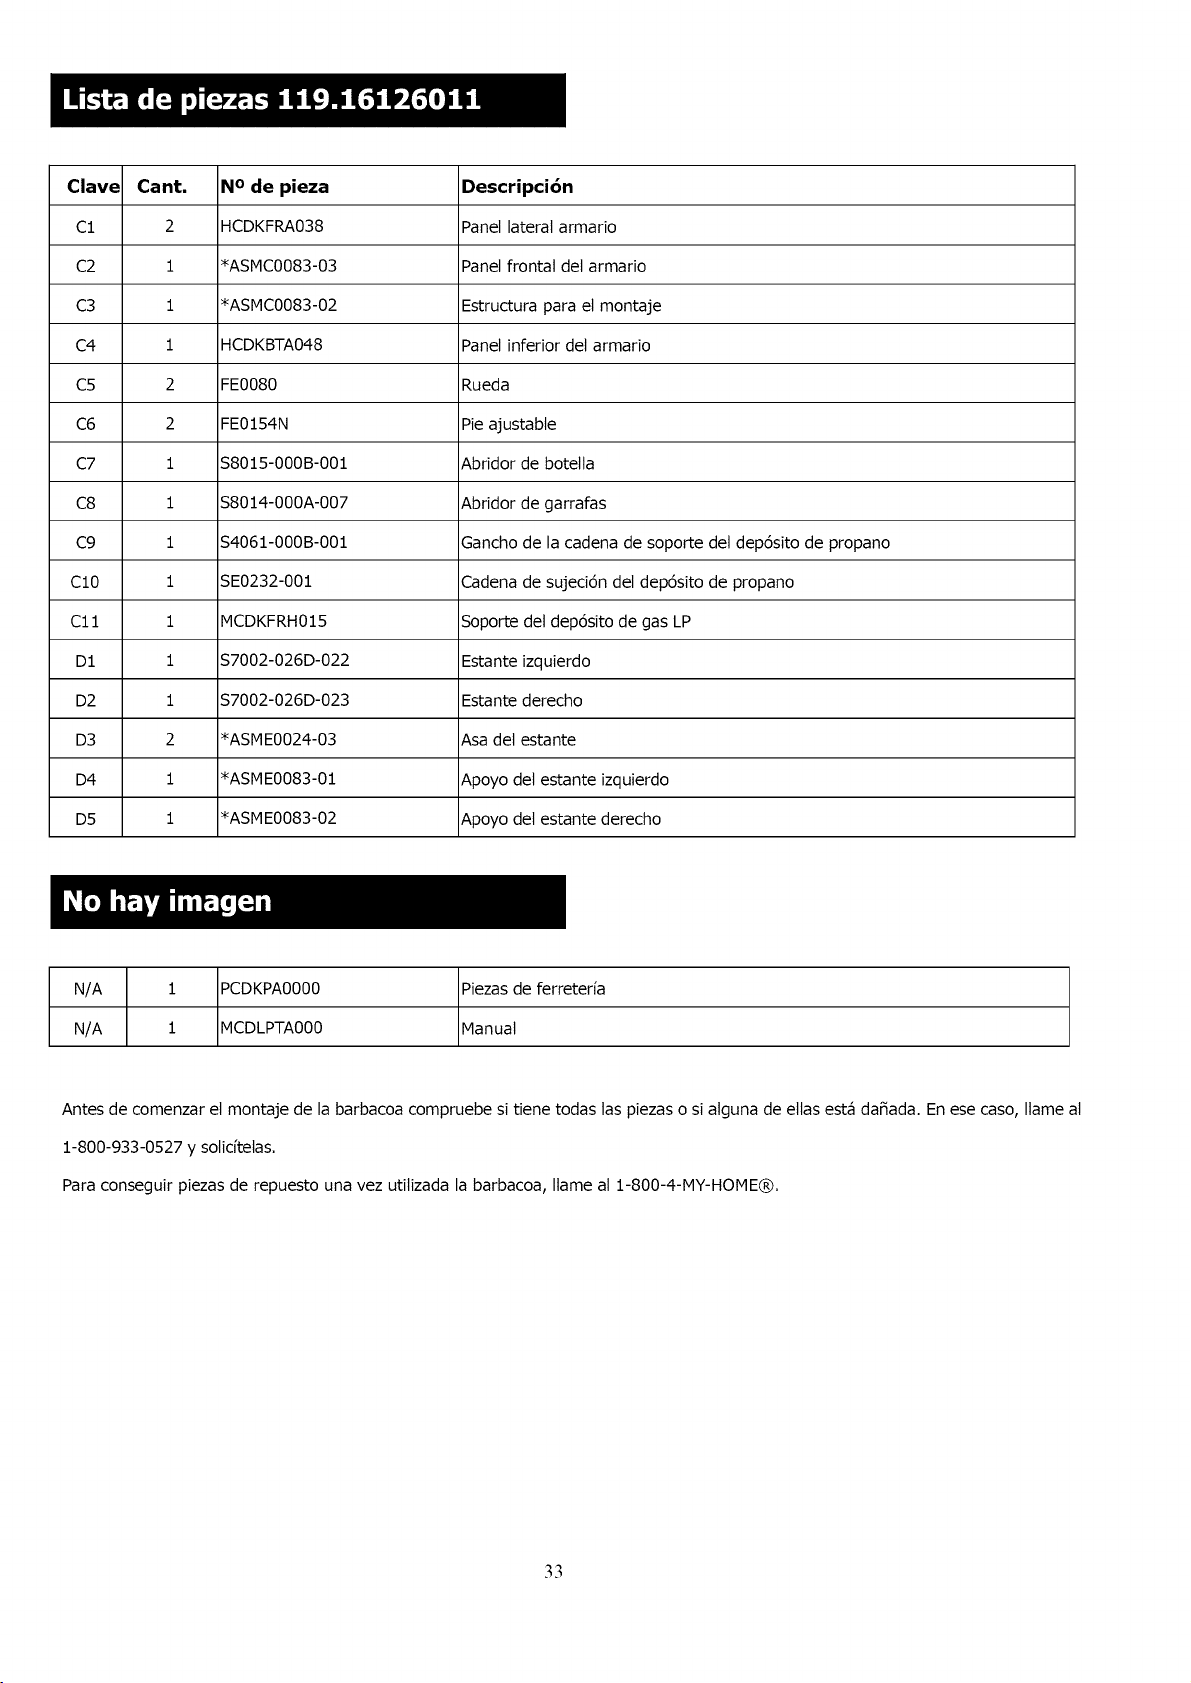
Clave Cant. N ° de pieza Descripci6n
C1 2 HCDKFRA038 Panel lateral armario
C2 1 *ASMC0083-03 Panel frontal del armario
C3 1 *ASMC0083-02 Estructura para el montaje
C4 1 HCDKBTA048 Panel inferior del armario
C5 2 FE0080 Rueda
C6 2 FE0154N Pie ajustable
C7 1 $8015-000B-001 Abridor de botelta
C8 1 $8014-000A-007 Abridor de garrafas
C9 1 $4061-000B-001 Gancho de la cadena de soporte del dep6sito de propano
C10 1 SE0232-001 Cadena de sujeci6n del dep6sito de propano
Cll 1 MCDKFRH015 Soporte del dep6sito de gas LP
D1 1 $7002-026D-022 Estante izquierdo
D2 1 $7002-026D-023 Estante derecho
D3 2 *ASME0024-03 Asa del estante
D4 1 *ASME0083-01 Apoyo del estante izquierdo
D5 1 *ASME0083-02 Apoyo del estante derecho
N/A 1 PCDKPA0000 Piezas de ferreterfa
N/A 1 MCDLPTA000 Manual
Antes de comenzar el montaje de la barbacoa compruebe si tiene todas las piezas o si atguna de elias est4 daffada. En ese caso, Ilame at
1-800-933-0527 y soticftelas.
Para conseguir piezas de repuesto una vez utilizada la barbacoa, Ilame at 1-800-4-MY-HOME®.
33
@
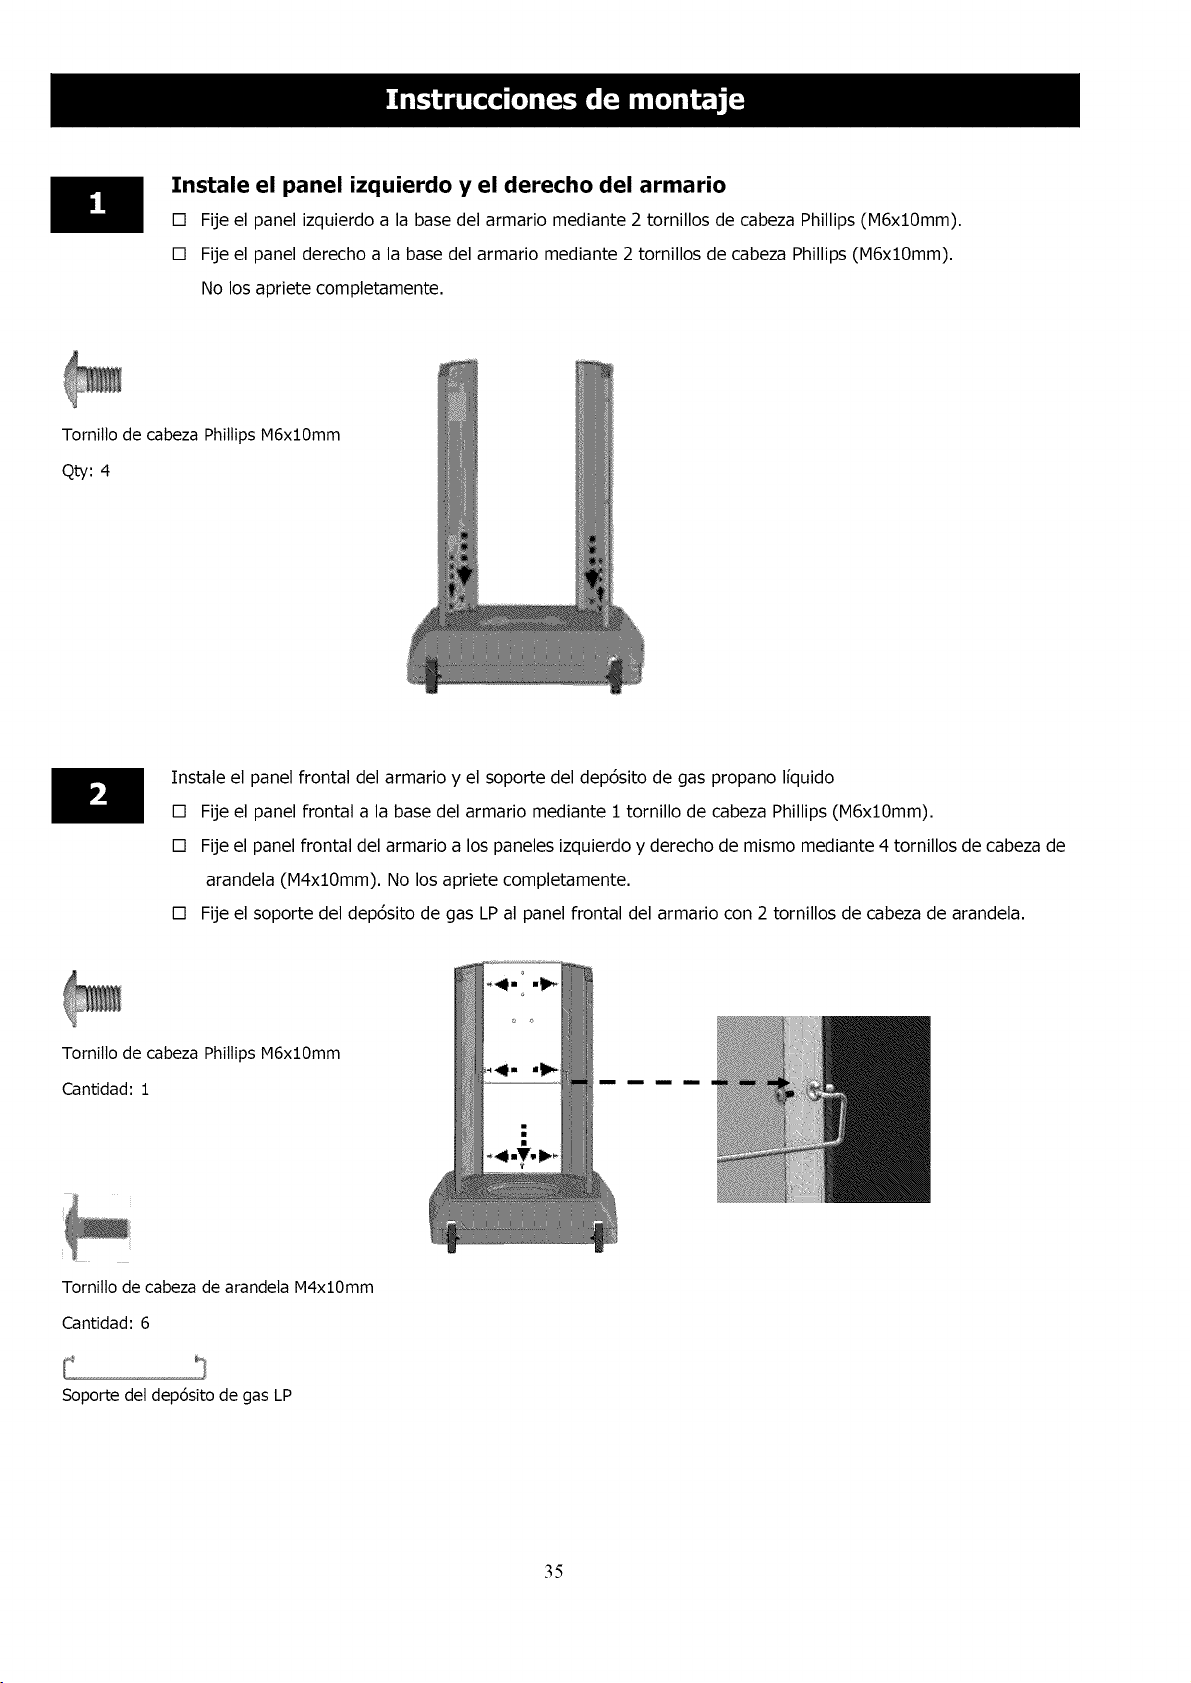
Instale el panel izquierdo y el derecho del armario
[] Fije el panel izquierdo a la base del armario mediante 2 tornillos de cabeza Phillips (M6xlOmm).
[] Fije el panel derecho a la base del armario mediante 2 tornillos de cabeza Phillips (M6xlOmm).
No los apriete completamente.
Tornillo de cabeza Phillips M6xlOmm
Qts': 4
Instale el panel frontal del armario y el soporte del depdsito de gas propano Ifquido
[] Fije el panel frontal a la base del armario mediante 1 tornillo de cabeza Phillips (M6xlOmm).
[] Fije el panel frontal del armario a los paneles izquierdo y derecho de mismo mediante 4 tornillos de cabeza de
arandela (M4xlOmm). No los apriete completamente.
[] Fije el soporte del depdsito de gas LP al panel frontal del armario con 2 tornillos de cabeza de arandela.
Tornillo de cabeza Phillips M6xlOmm
Cantidad: 1
Tornillo de cabeza de arandela M4xlOmm
Cantidad: 6
Soporte del depdsito de gas LP
35
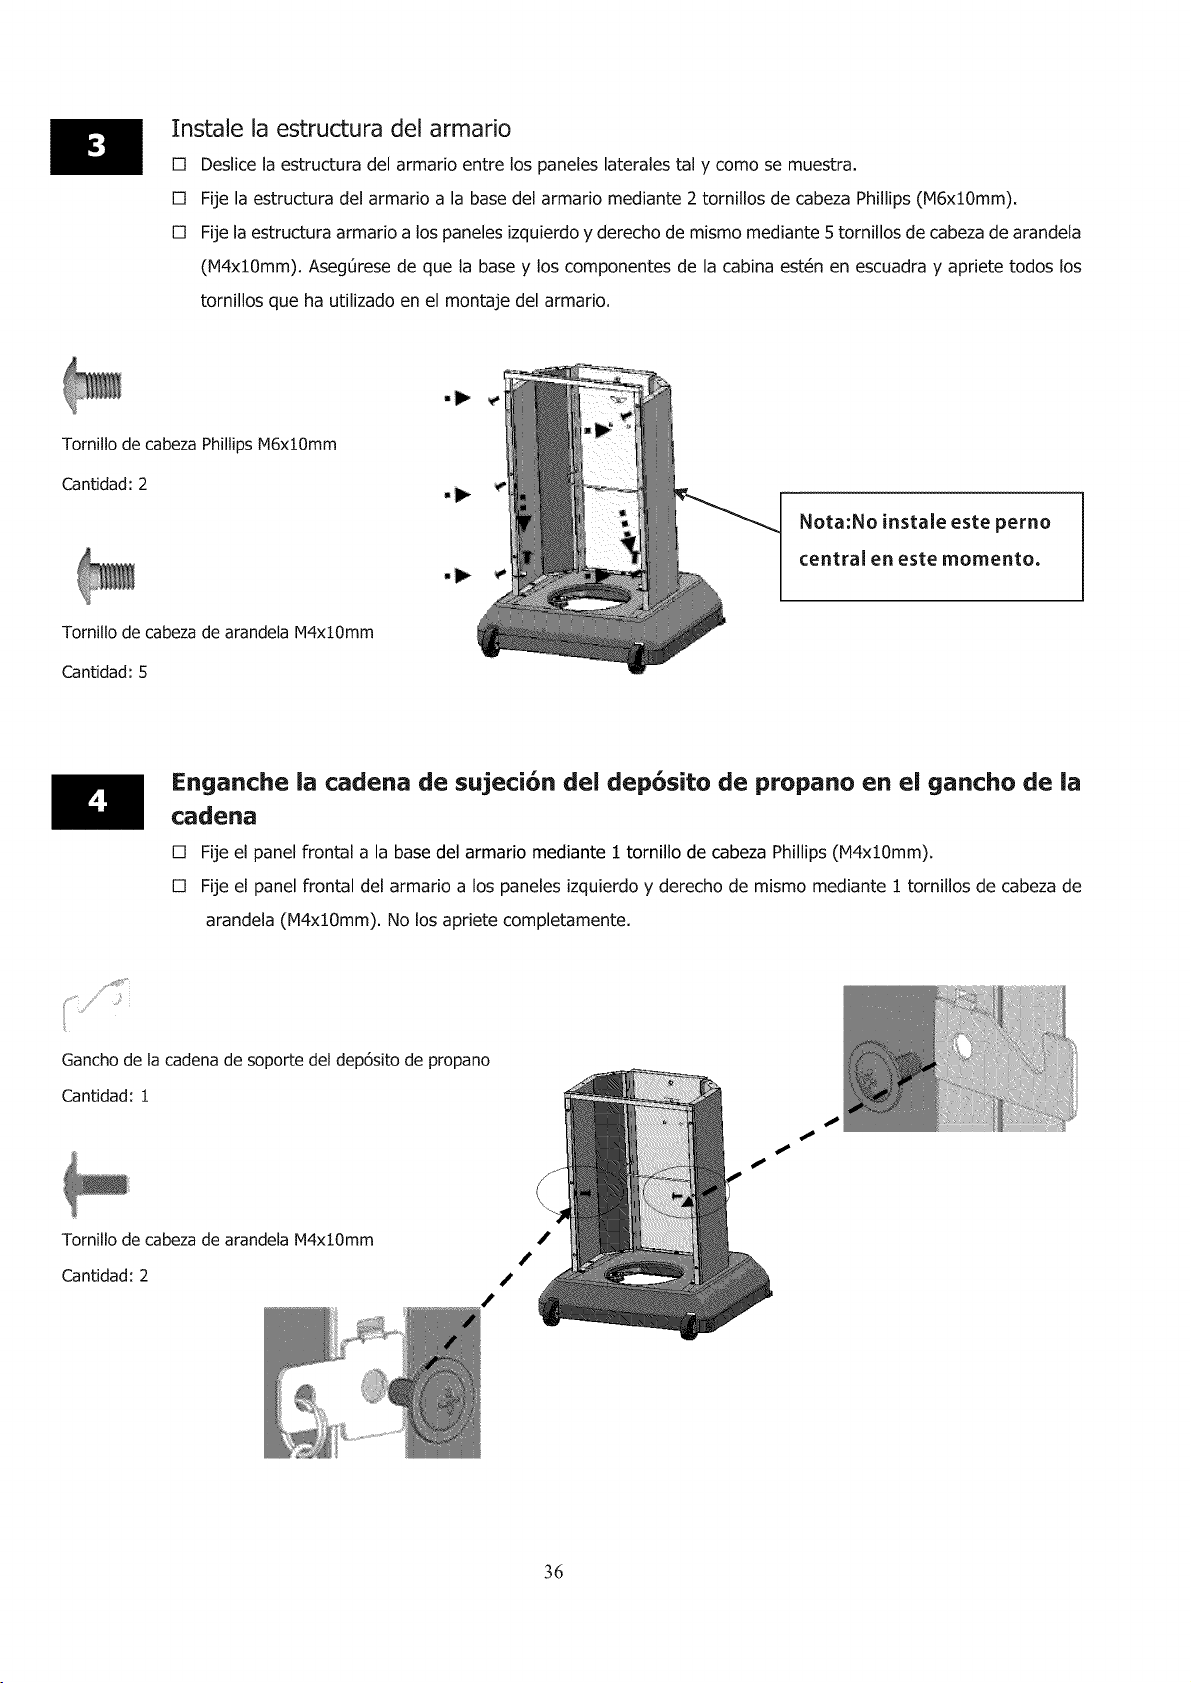
Instale la estructura del armario
[] Deslice la estructura del armario entre los paneles laterales tal y como se muestra.
[] Fije la estructura del armario a la base del armario mediante 2 tornillos de cabeza Phillips (M6xlOmm).
[] Fije la estructura armario a los paneles izquierdo y derecho de mismo mediante 5 tornillos de cabeza de arandela
(M4xlOmm). AsegOrese de que la base y los componentes de la cabina est_n en escuadra y apriete todos los
tornillos clue ha utilizado en el montaje del armario.
Tomillo de cabeza Phillips M6xlOmm
Cantidad: 2
Tornillo de cabeza de arandela M4xlOmm
Cantidad: 5
Nora:No instale este perno
central en este momento.
Enganche la cadena de sujeci6n del dep6sito de propano en el gancho de la
cadena
[] Fije el panel frontal a la base del armario mediante 1 tornillo de cabeza Phillips (M4xlOmm),
[] Fije el panel frontal del armario a los paneles izquierdo y derecho de mismo mediante 1 tornillos de cabeza de
arandela (M4xlOmm). No los apriete completamente.
Gancho de la cadena de soporte del dep6sito de propano
Cantidad: 1
s
Tornillo de cabeza de arandela M4x10mm
Cantidad: 2
36
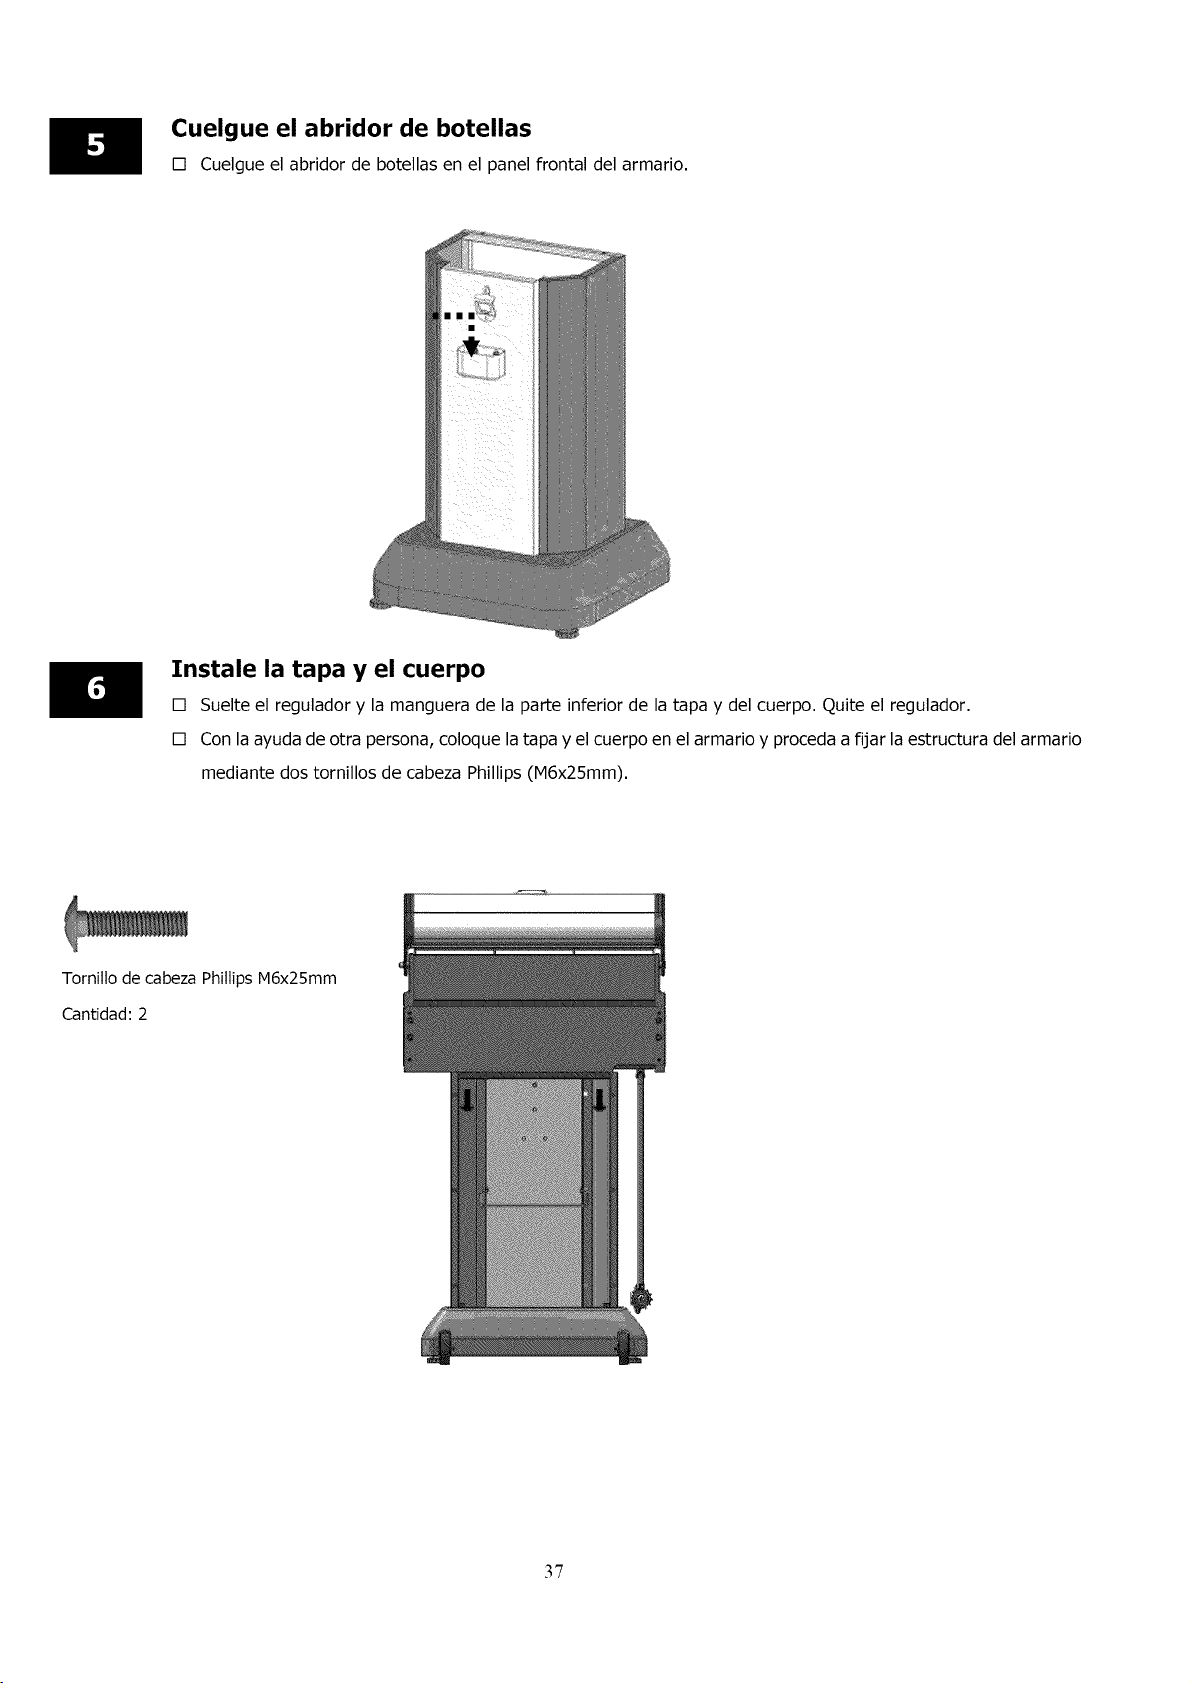
Cuelgue el abridor de botellas
[] Cuelcjue el abridor de botellas en el panel frontal del armario.
Instale la tapa y el cuerpo
[] Suelte el regulador y la manguera de la parte inferior de la tapa y del cuerpo. Quite el regulador.
[] Con la ayuda de otra persona, coloque la tapa y el cuerpo en el armario y proceda a fijar la estructura del armario
mediante dos tornillos de cabeza Phillips (M6x25mm).
Tornillo de cabeza Phillips M6x25mm
Cantidad: 2
37
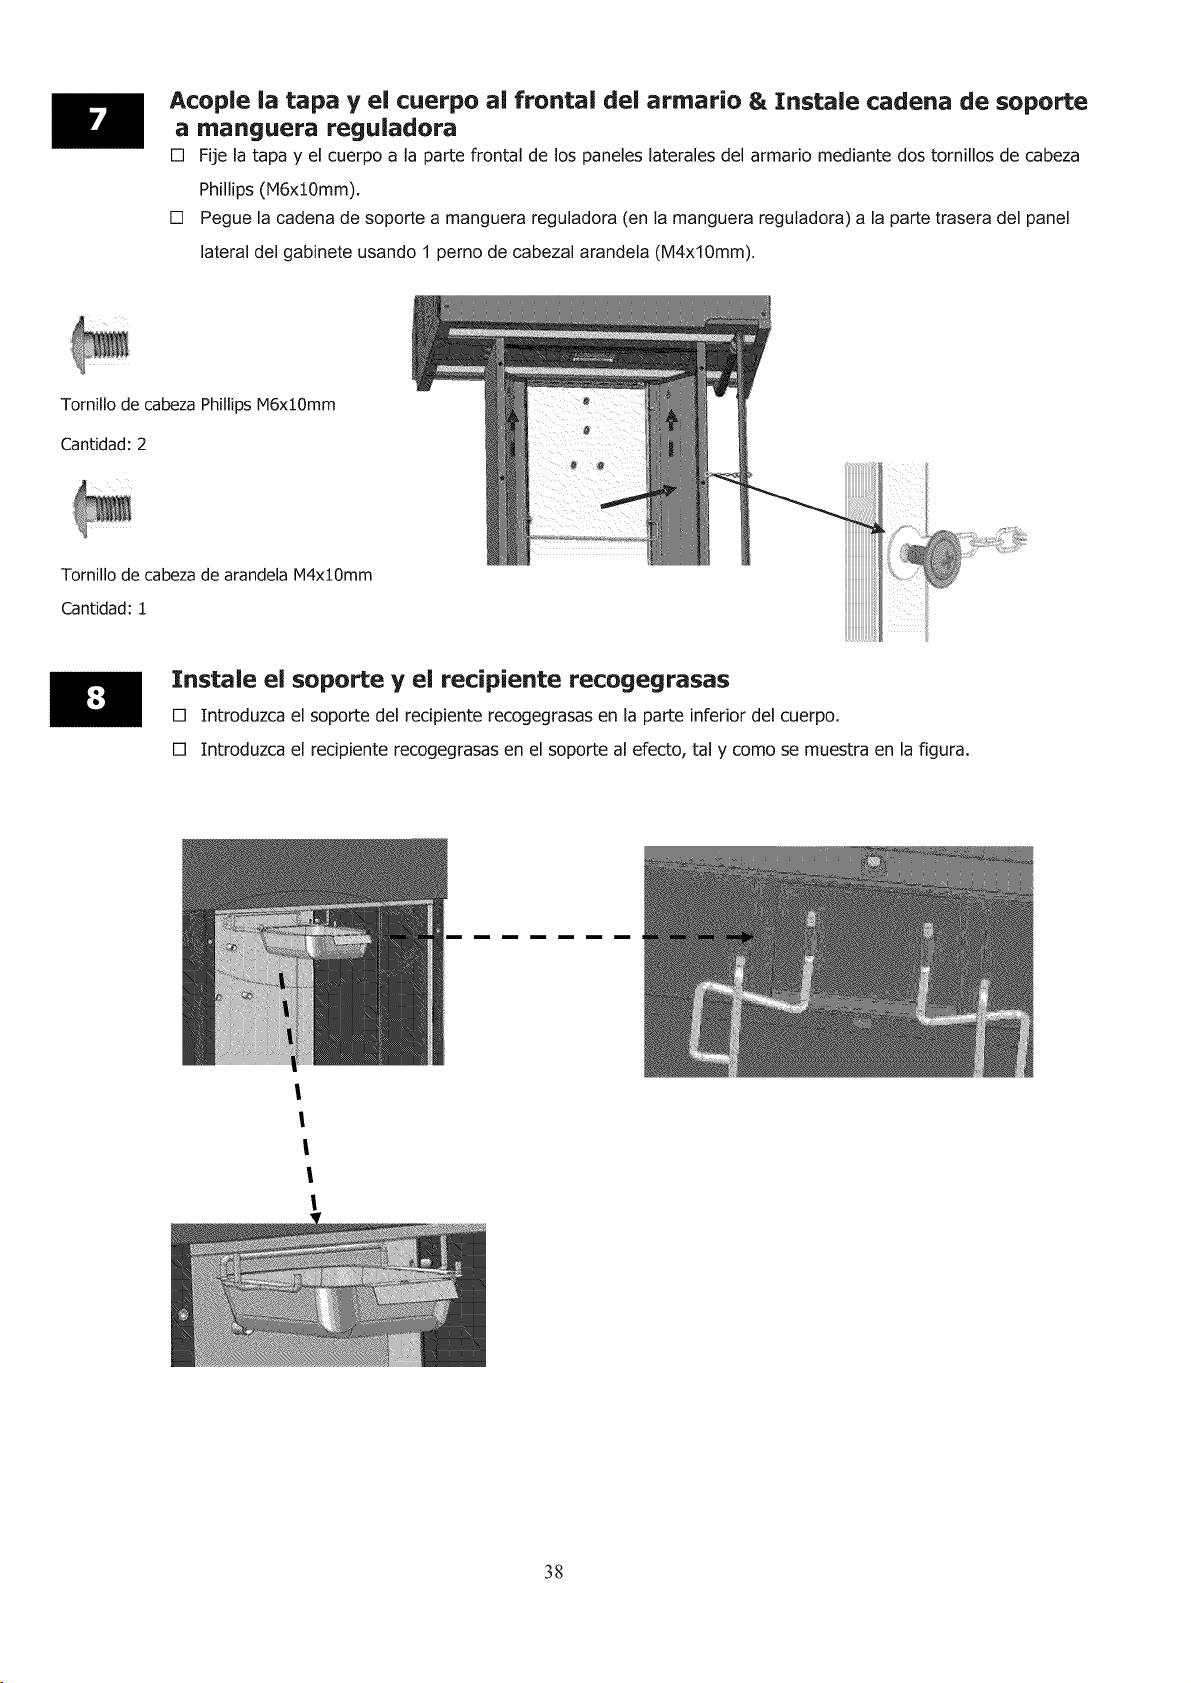
Acople ia tapa y el cuerpo a| frontal de| arrnario & Instale cadena de soporte
a rnanguera reguladora
[] Fije la tapa y e! cuerpo a la parLe frontal de los paneles laterales del armario mediante dos tornillos de cabeza
Phillips(M6xl0mm).
[] Pegue la cadena de soporte a manguera reguladora (en la manguera reguladora) a la parte trasera del panel
lateral del gabinete usando 1 perno de cabezal arandela (M4xlOmm).
Tornillo de cabeza Phillips M6xl0mm
Cantidad: 2
Tornillo de cabeza de arandela M4xl0mm
Cantidad: 1
Instale el soporte y el recipiente recogegrasas
[] Introduzca el soporLe del redpiente recogegrasas en la parle inferior del cuerpo.
[] Introduzca el recipiente recogegrasas en el soporLe al efecto, tal y como se muestra en la figura.
I
I
I
I
I
38
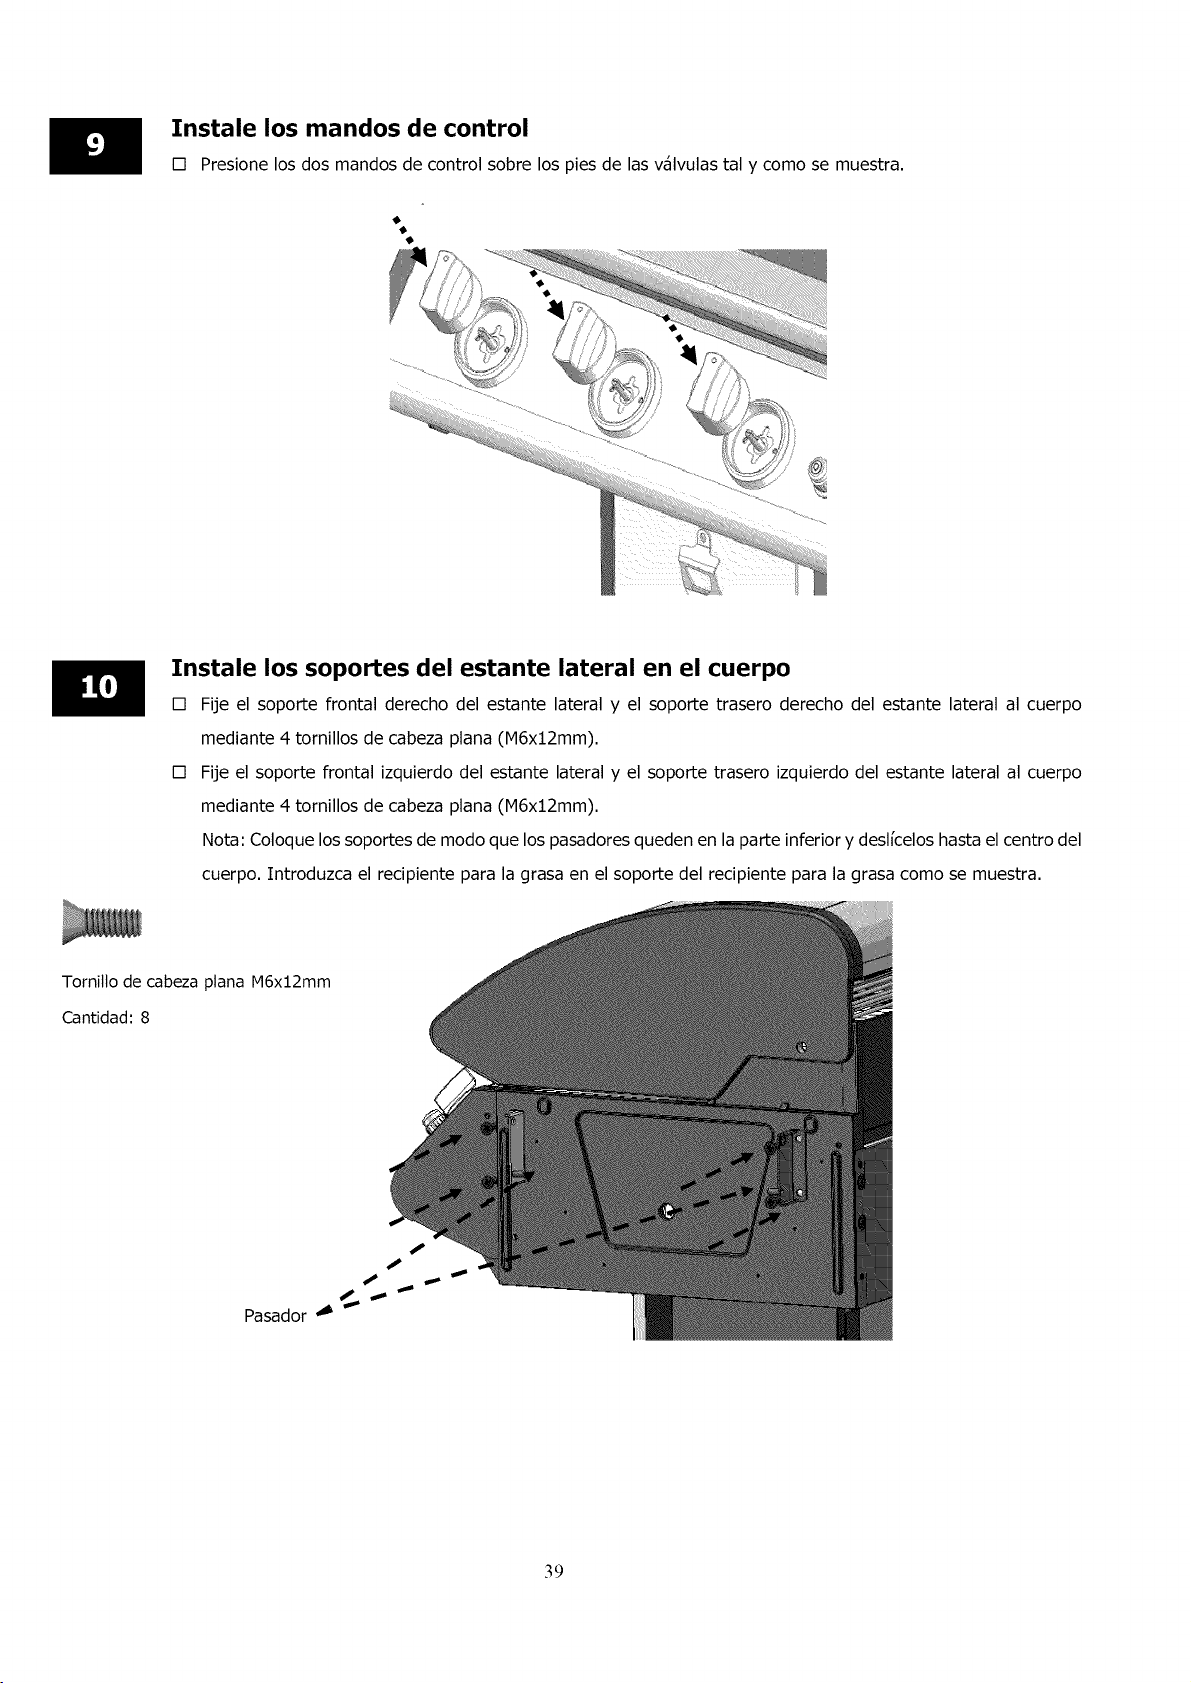
Instale los mandos de control
[] Presione los dos mandos de control sobre los pies de las v_lvulas tal y como se muestra.
Instale los soportes del estante lateral en el cuerpo
[] Fije el soporte frontal derecho del estante lateral y el soporte trasero derecho del estante lateral al cuerpo
mediante 4 tornillos de cabeza plana (M6x12mm).
[] Fije el soporte frontal izquierdo del estante lateral y el soporte trasero izquierdo del estante lateral al cuerpo
mediante 4 tornillos de cabeza plana (M6x12mm).
Nota: Coloque los soportes de modo que los pasadores queden en la parte inferior y deslfcelos hasta el centro del
cuerpo. Introduzca el recipiente para la cjrasa en el soporte del recipiente para la cjrasa como se muestra.
Tornillo de cabeza plana M6x12mm
Cantidad: 8
Pasador _
39
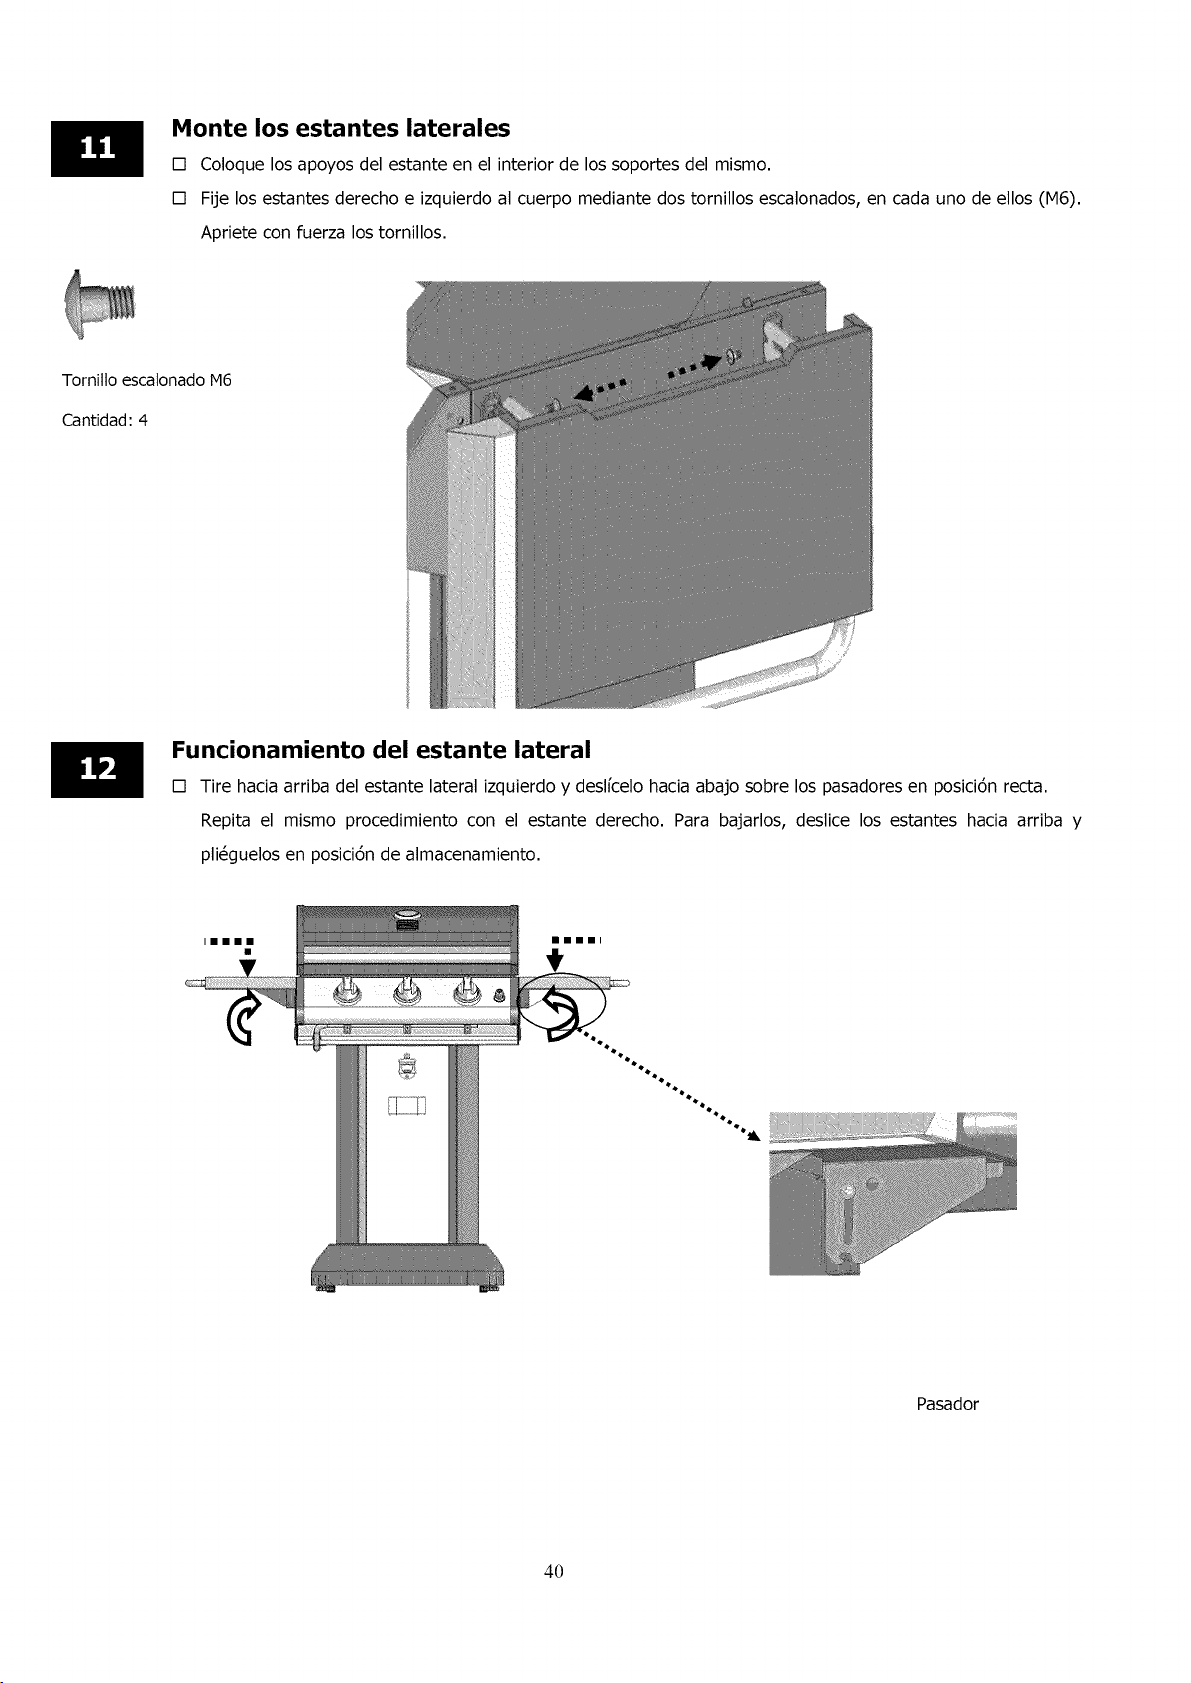
Monte los estantes laterales
[] Coloque los apoyos del estante en el interior de los soportes del mismo.
[] Fije los estantes derecho e izquierdo al cuerpo mediante dos tornillos escalonados, en cada uno de ellos (M6).
Apriete con fuerza los tornillos.
Torniiio escatonado M6
Cantidad: 4
Funcionamiento del estante lateral
[] Tire hacia arriba del estante lateral izquierdo y deslfcelo hacia abajo sobre los pasadores en posici6n recta.
Repita el mismo procedimiento con el estante derecho. Para bajarlos, deslice los estantes hacia arriba y
pli_guelos en posici6n de almacenamiento.
Immmlll
Pasador
4O
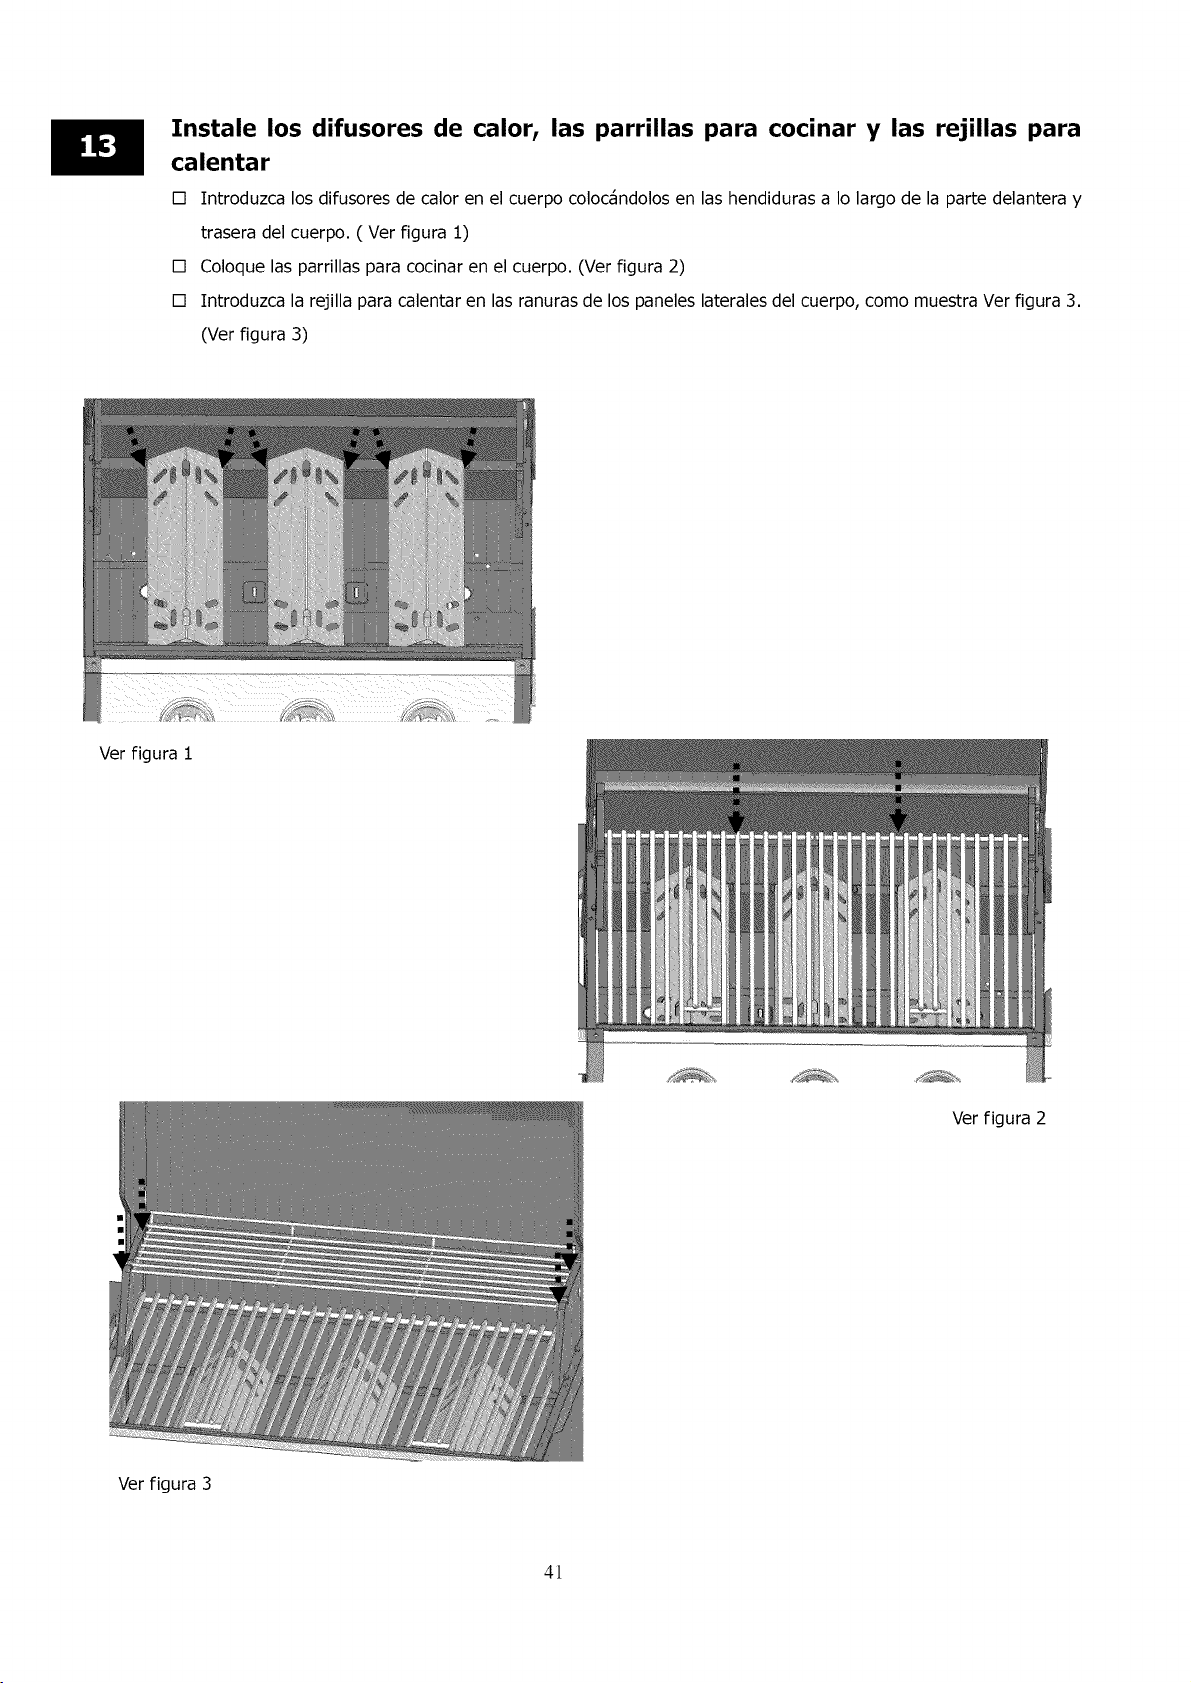
Instale los difusores de calor_ las parrillas para cocinar y las rejillas para
calentar
[] Introduzca los difusores de calor en el cuerpo coloc_ndolos en las hendiduras a Io largo de la parte delantera y
trasera del cuerpo. ( Ver figura 1)
[] Coloque las parrillas para cocinar en el cuerpo. (Ver figura 2)
[] Introduzca la rejilla para calentar en las ranuras de los paneles laterales del cuerpo, como muestra Ver figura 3.
(Ver figura 3)
Ver figura 1
Ver figura 3
Ver figura 2
41
lll
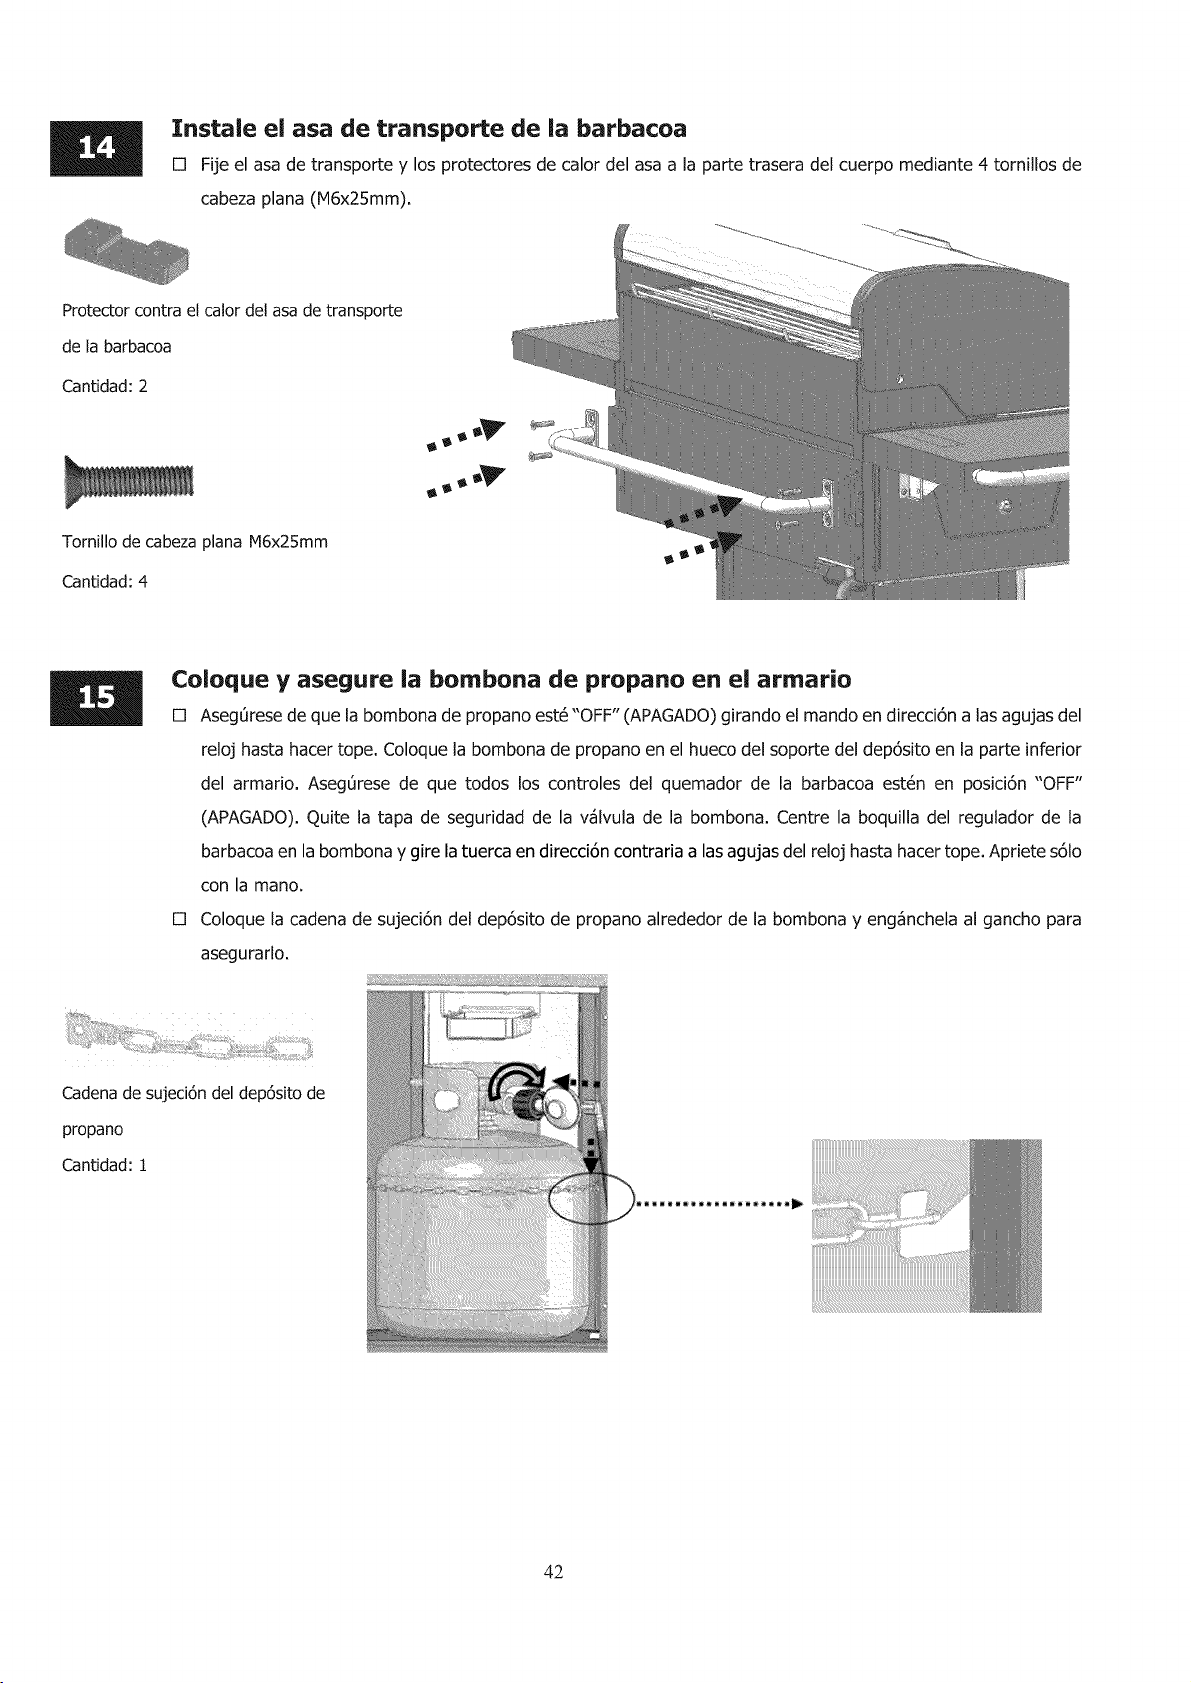
Instale el asa de transporte de la barbacoa
[] Fije el asa de transporte y los protectores de calor del asa a la parte trasera del cuerpo mediante 4 torniilos de
cabeza plana (M6x25mm).
Protector contra et calor del asa de transporte
de la barbacoa
Cantidad: 2
Tomillo de cabeza plana M6x25mm
Cantidad: 4
Coloque y asegure ia bornbona de propano en el armario
[] AsegL_resede que la bombona de propano est_ "OFF" (APAGADO) girando el mando en direcci6n alas agujas del
reloj hasta hacer tope. Coloque la bombona de propano en el hueco del soporte del dep6sito en la parle inferior
del armario. AsegOrese de que todos los controles del quemador de la barbacoa est_n en posici6n "OFF"
(APAGADO). Quite la tapa de seguridad de la v_lvula de la bombona. Centre la boquilla del regulador de la
barbacoa en la bombona y gire la tuerca en direcci6n contraria alas agujas del reloj hasta hacer tope. Apriete s61o
con la mano,
[] Coloque la cadena de sujeci6n del dep6sito de propano alrededor de la bombona y eng_nchela al gancho para
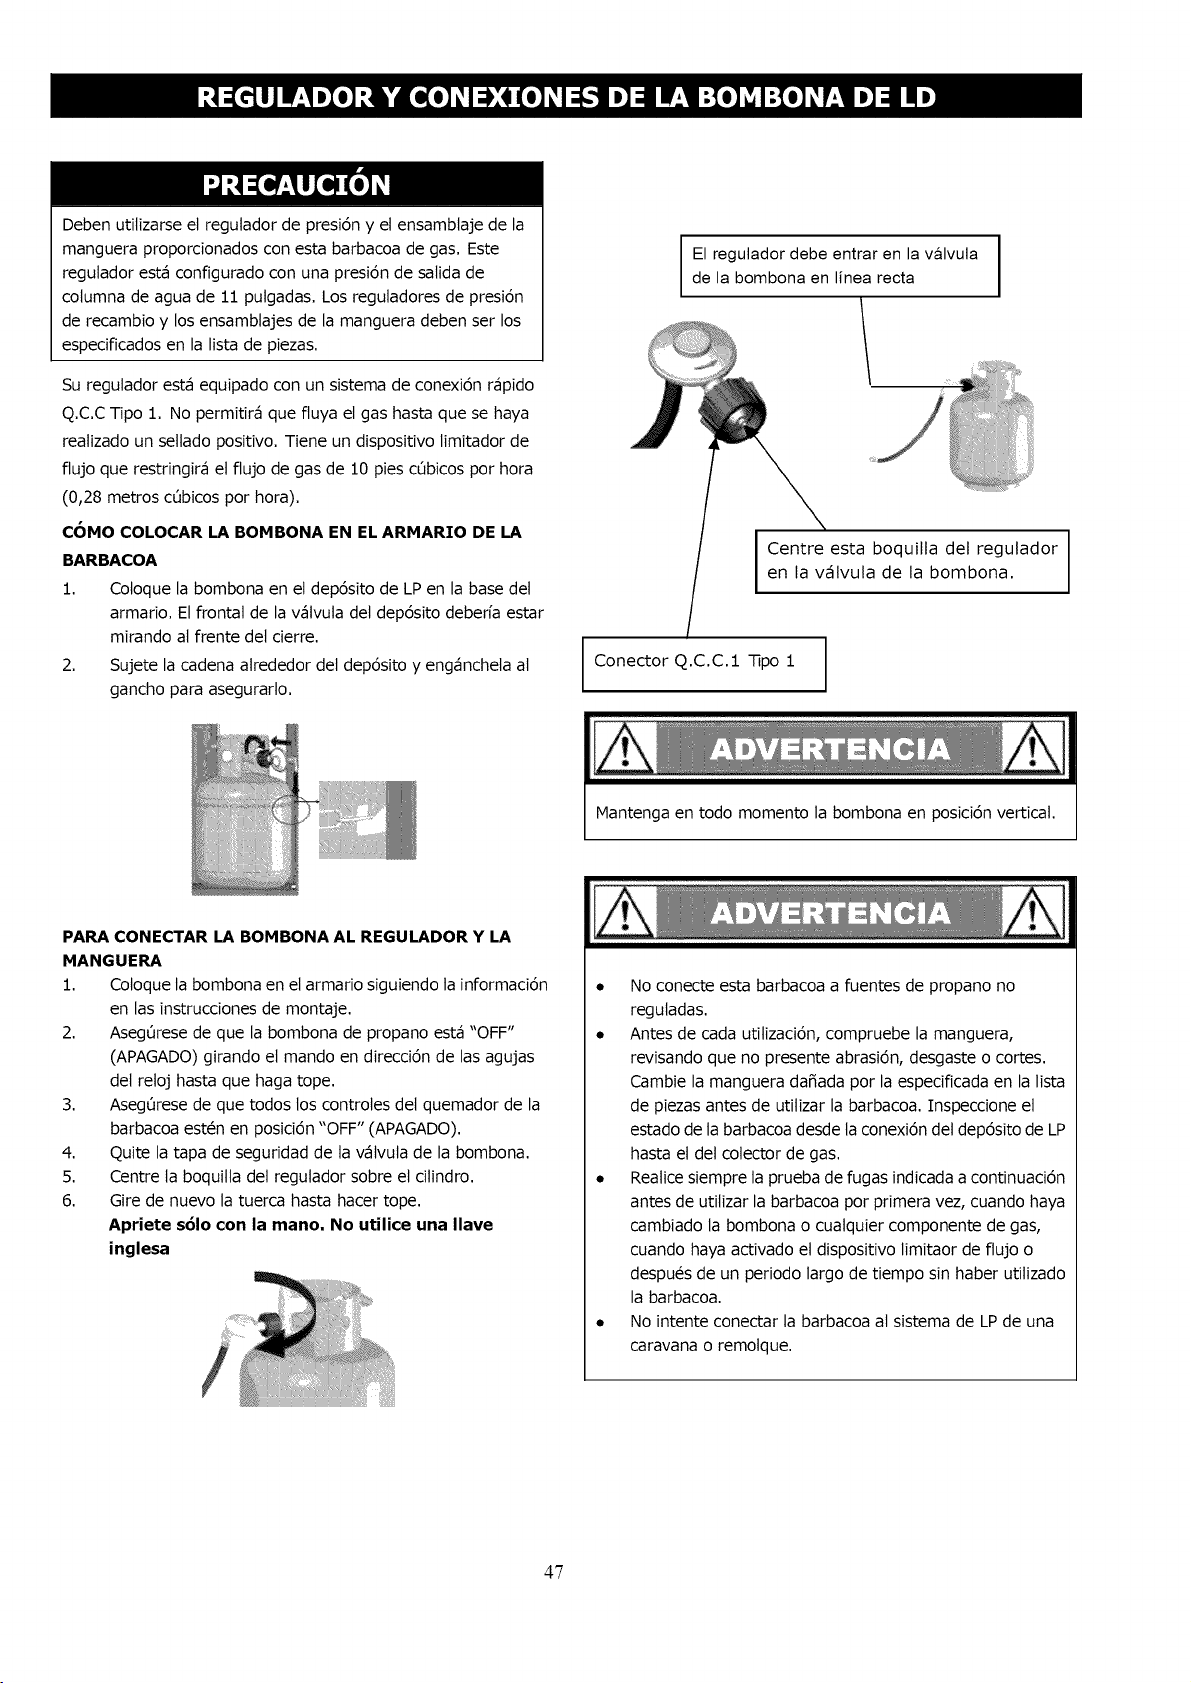
asegurarlo.
Cadena de sujeci6n del dep6sito de
propano
CanLidad: 1
42
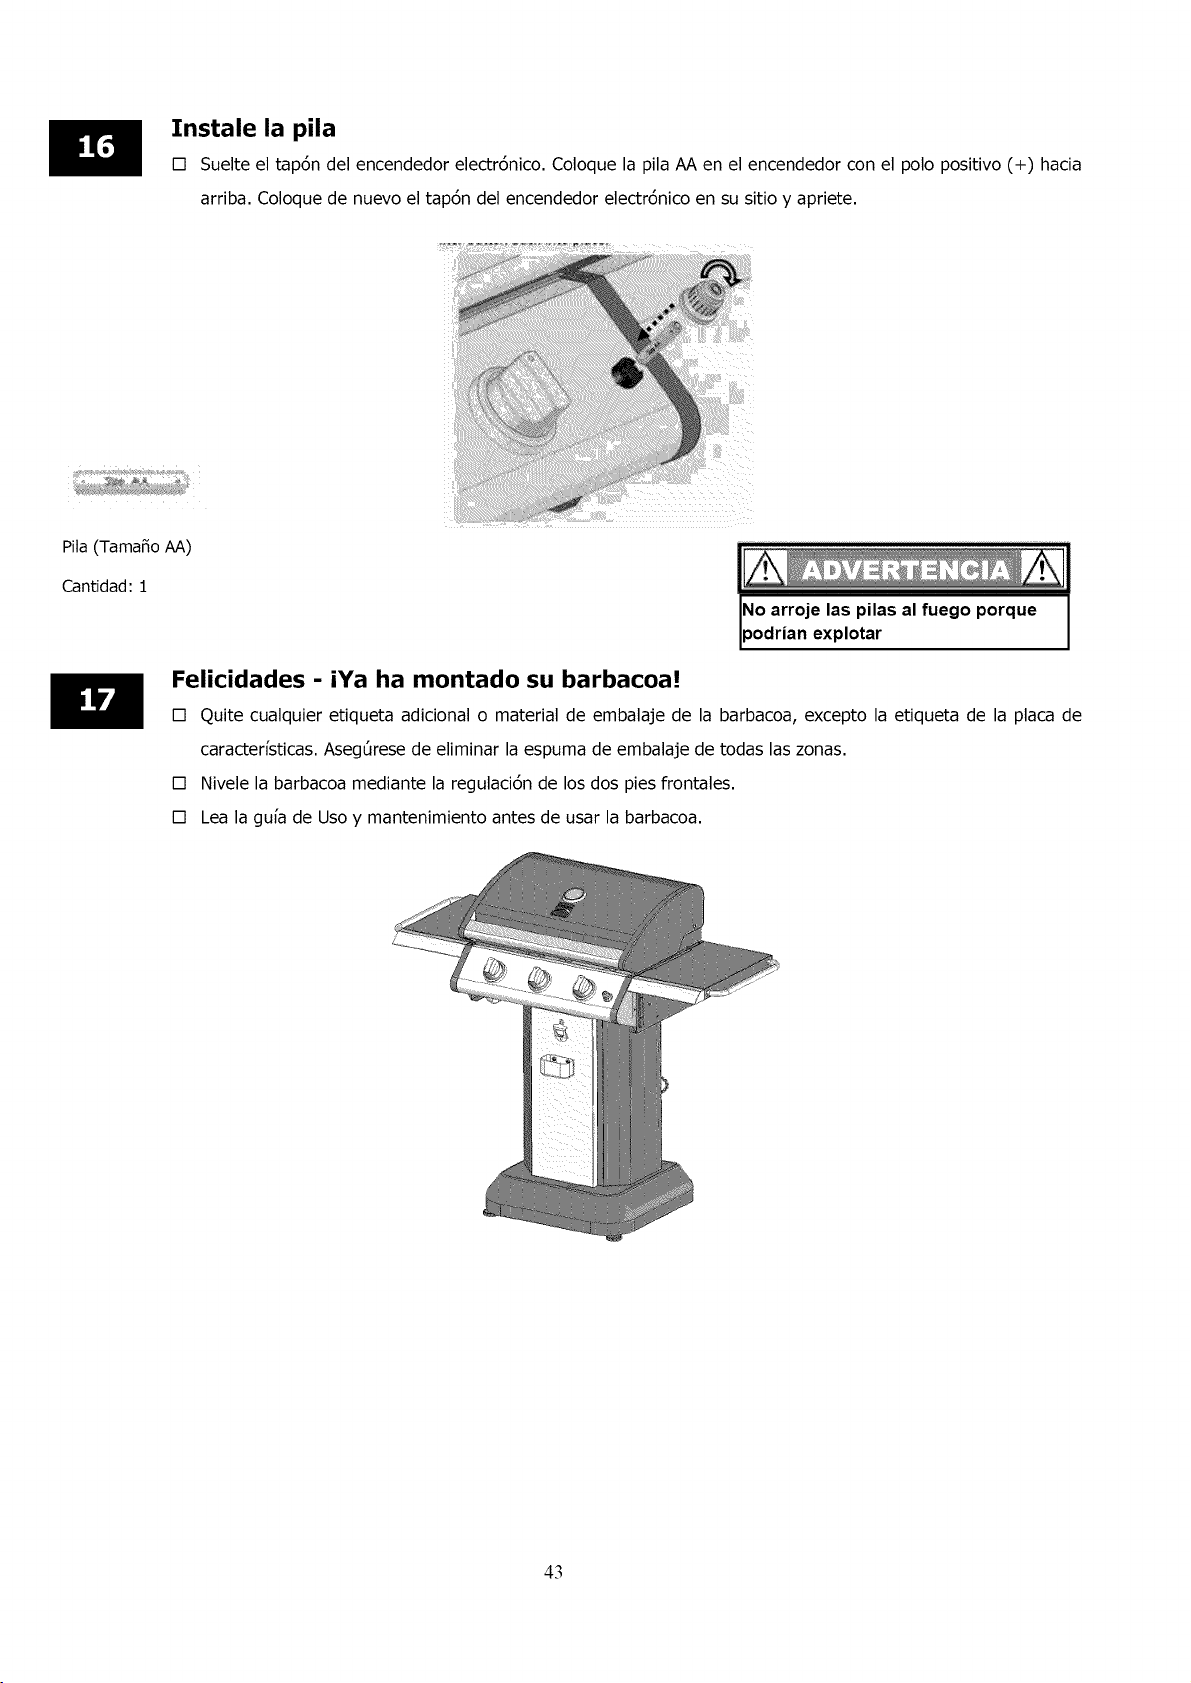
Instale la pila
[] Suelte el tap6n del encendedor electr6nico. Coloque la pila AA en el encendedor con el polo positivo (+) hacia
arriba. Coloque de nuevo el tap6n del encendedor electr6nico en su sitio y apriete.
Pila (Tama_o AA
Cantidad: 1
explotar
Felicidades - iYa ha montado su barbacoa!
[] Quite cualquier etiqueta adicional o material de embalaje de la barbacoa, excepto la etiqueta de la placa de
caracterfsticas. AsegOrese de eliminar la espuma de embalaje de todas las zonas.
[] Nivele la barbacoa mediante la regulaci6n de los dos pies frontales.
[] Lea la gufa de Uso y mantenimiento antes de usar la barbacoa.
43
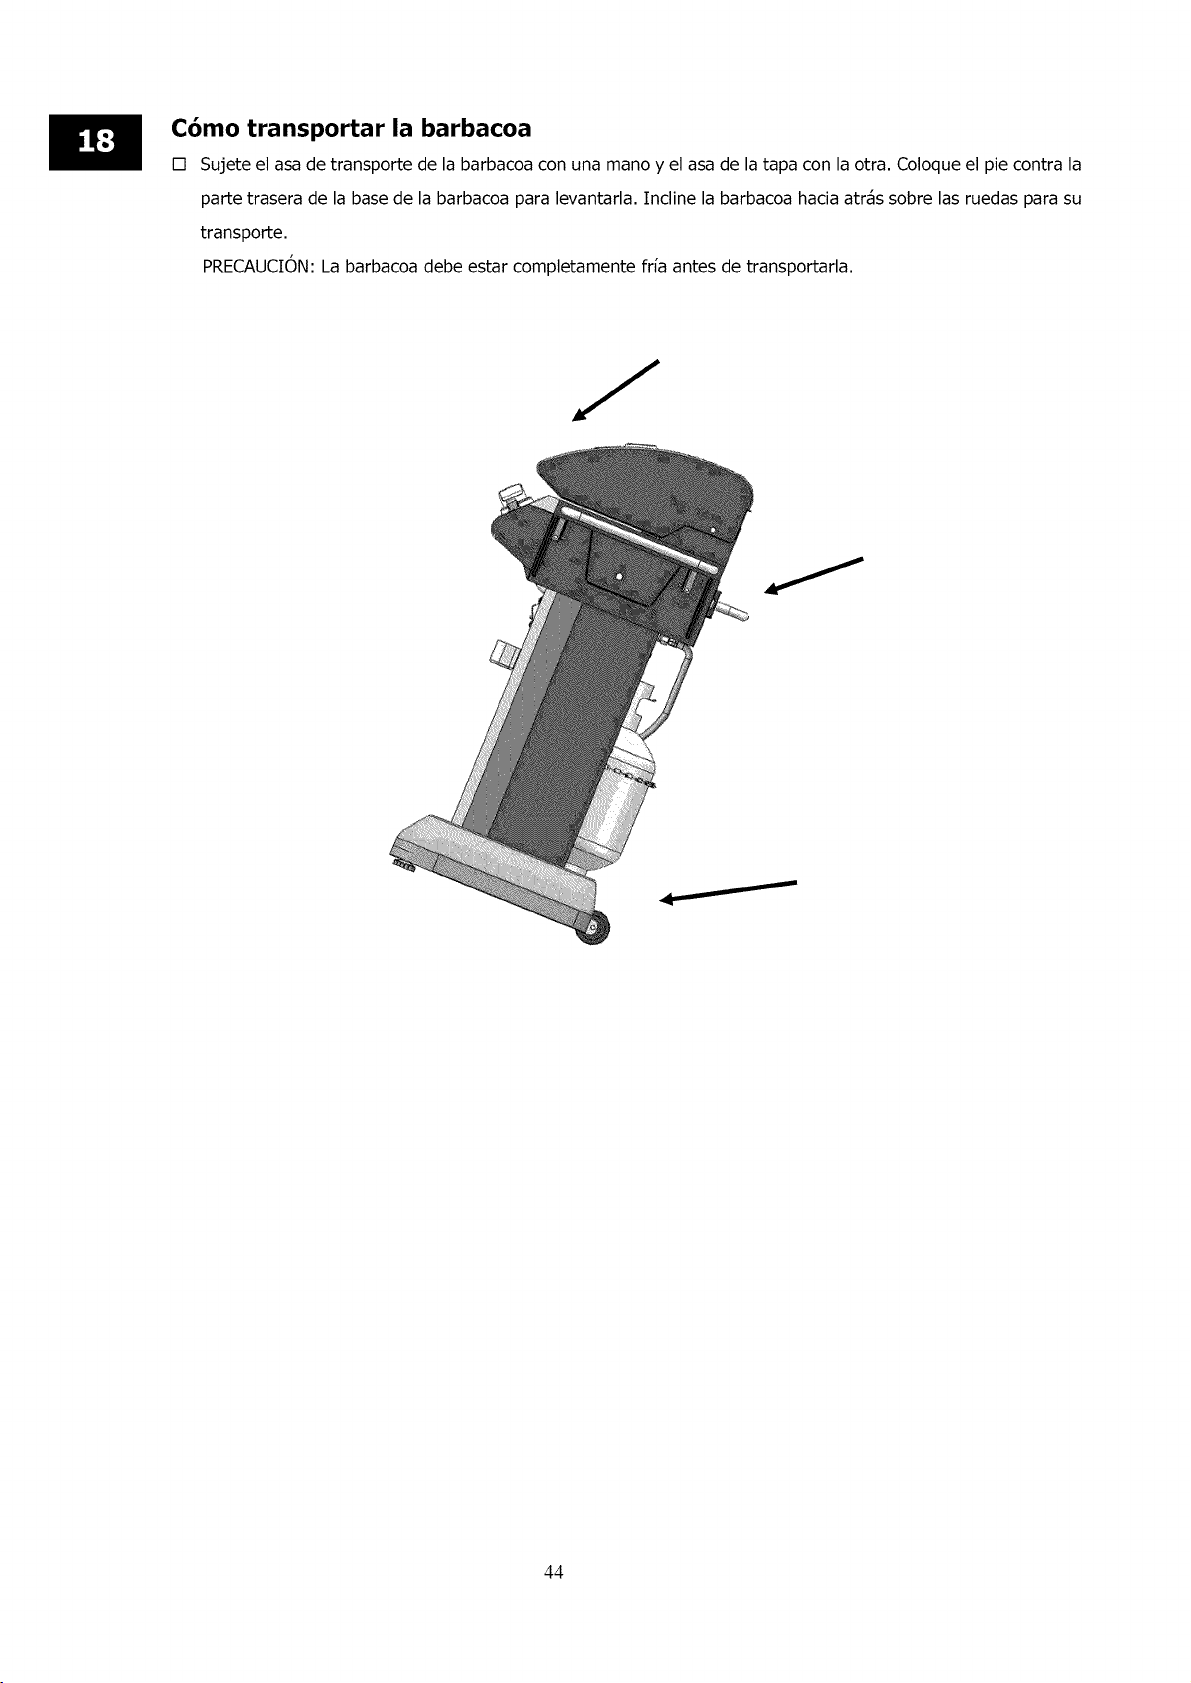
C6mo transportar la barbacoa
[] Sujete el asa de transporte de la barbacoa con una mano y el asa de la tapa con la otra. Coloque el pie contra la
parte trasera de la base de la barbacoa para levantarla. Incline la barbacoa hacia arras sobre las ruedas para su
transporte.
PRECAUCION: La barbacoa debe estar completamente frfa antes de transportarla.
/
44
Su nueva barbacoa de exterior Kenmore ha sido dise_ada y
fabricada siguiendo altos est_ndares de calidad. Le
proporcionar_ amos de disfrute con unos requisitos de
mantenimiento m[nimos. PAPa_ SU SEGURIDAD, tenga
en cuenta las siguientes indicaciones:
Su nueva barbacoa funciona con gas LP (petr61eo licuado).
El gas LP es incoloro, inodoro y no t6xico. Puede que el gas
LP desprenda un olor caracterfstico, ya que por motivos de
secjuridad tiene un olor similar a la col podrida.
FUNCIONAMIENTO
1,
Es necesario utilizar con precauci6n la barbacoa de
gas. Puede catentarse at cocinar y estar caliente
cuando la vaya a limpiar. No debe dejar nunca la
barbacoa sin atender ni moverta mientras la est_
utilizando.
2,
Impida que los ni_os utilicen la barbacoa.
Mantencja a los ni_os y a sus mascotas atejados
durante su uso.
3,
4,
Utilice la barbacoa solamente en zonas bien
ventiladas. Nunca la utilice en interiors, cjarajes o
cobertizos, ni bajo nincj0 tipo de cubierta o p_rcjota.
Aseg0rese de colocar la barbacoa en una superficie
nivelada antes de utilizarla.
5,
Apague todas las v_lvulas de gas antes de quitar et
quemador. Abra la tapa y espere 5 minutos antes de
votver a encenderta.
6,
7,
8,
No se incline sobre la barbacoa ni toque los extremos
del cuerpo ni la tapa mientras cocina.
Apague los quemadores, cierre la tapa y desconecte
la bombona en caso de que prenda la cjrasa.
No obstruya el flujo de combustible ni el aire de
ventilaci6n.
9,
Mantenga las aperturas de ventilaci6n del cierre de la
bombona libres y limpios.
Su barbacoa utilJza las bornbonas rn_s rnodernas
y seguras de Gas LP. Debe cumplJr los siguientes
requJsJtos:
1. Ser bombonas de propano de 20 libras (9,1 Kcj).
2. Medidas: 12-1/2 plcj. (317 ram) de di_metro
y 18-1/2 plcj (472 ram) de attura.
Adem-_s, la bombona de Gas LP debe ser o contar
con:
• Construida y marcada por et departamento de transporte
de los Estados Unidos (D.O.T) para EE.UU o
CAN/CSA-B339 de bombonas, esferas y tubos para el
transporte de mercancfas pelicjrosas; y para la puesta en
servicio en Canada.
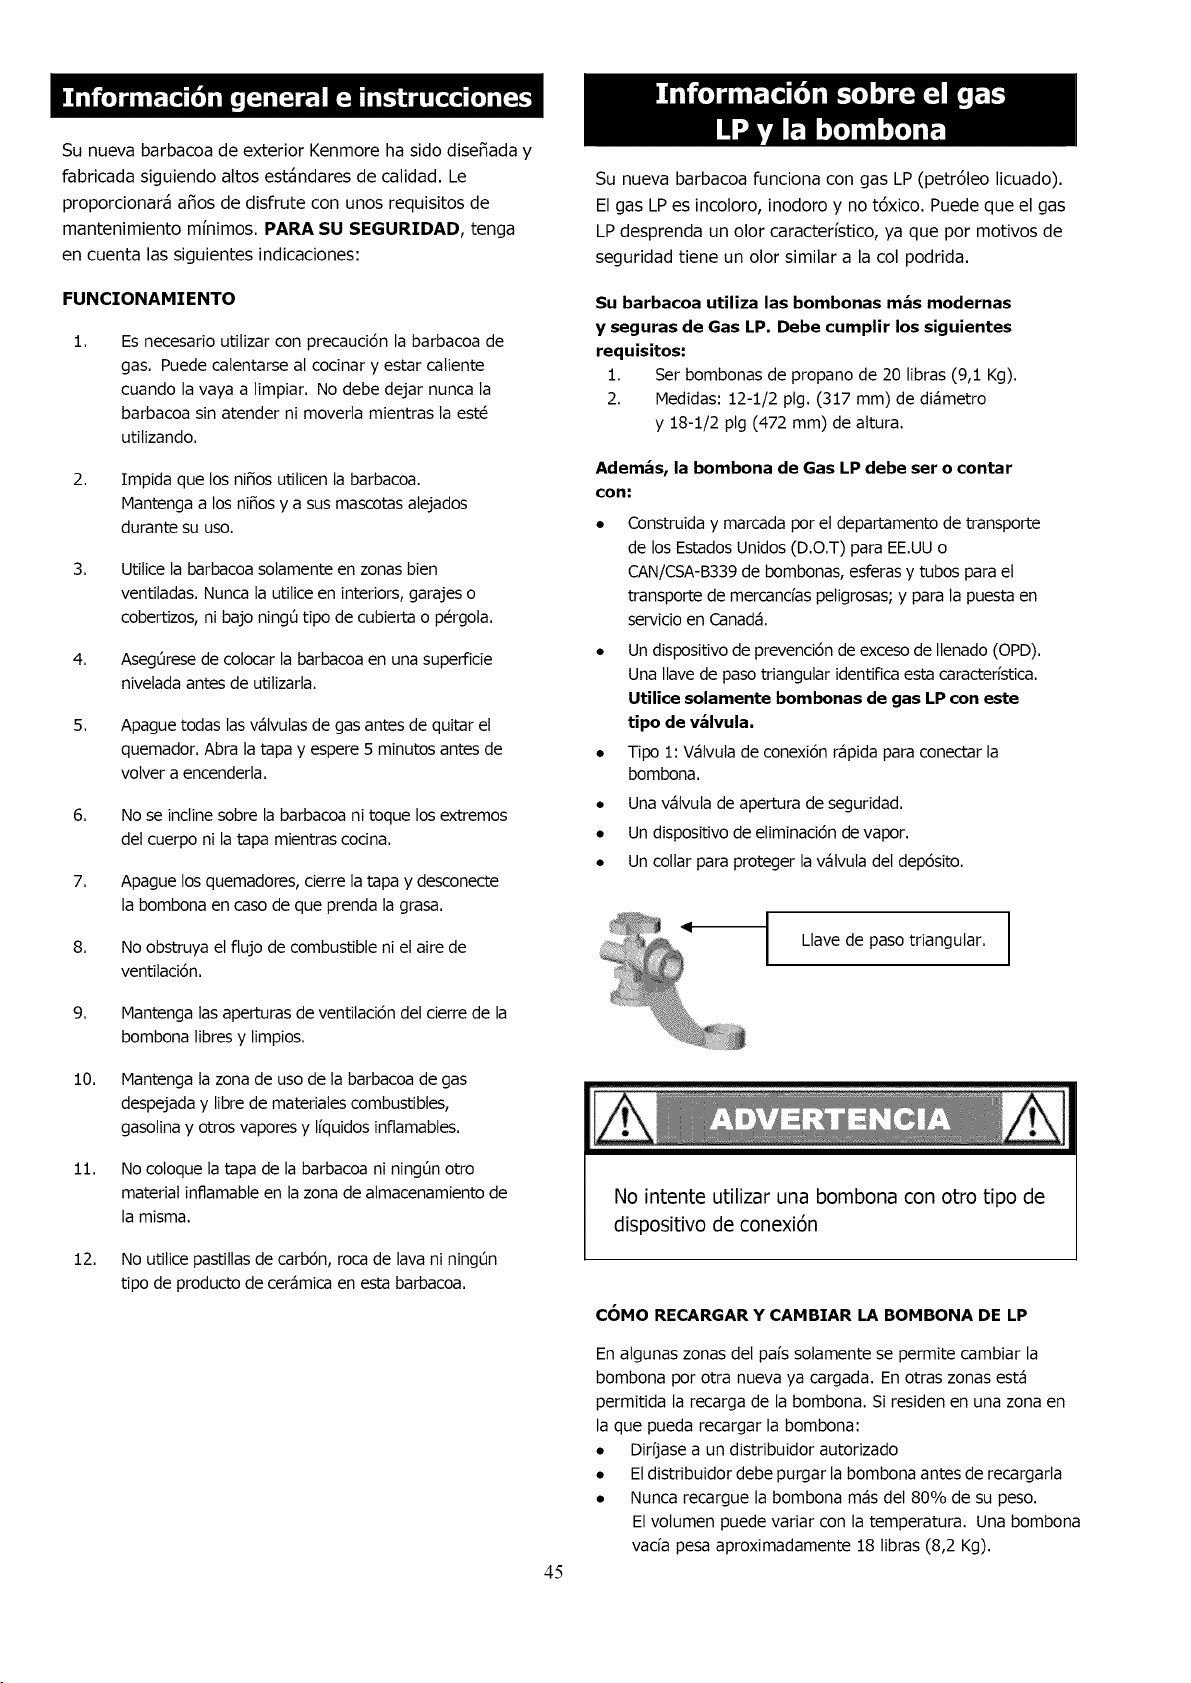
• Un dispositivo de prevenci6n de exceso de Ilenado (OPD).
Una Ilave de paso triangular identifica esta caracterfstica.
Utilice solamente bombonas de gas LP con este
tipo de v_lvula.
• Tipo 1: V_lvula de conexi6n r_pida para conectar la
bombona.
• Una v_lvuta de apertura de secjuridad.
• Un dispositivo de eliminaci6n de vapor.
• Un collar para protecjer la v_lvula del dep6sito.
Llave de paso triangular.
I
10. Mantencja ta zona de uso de la barbacoa de gas
despejada y libre de materiales combustibles,
cjasotina y otros vapores y liquidos inflamables.
11.
12.
No cotoque la tapa de la barbacoa ni ning0n otro
material inflamable en la zona de atmacenamiento de
la misma.
No utitice pastitlas de carb6n, roca de lava ni nincj0n
tipo de producto de cer_mica en esta barbacoa.
No intente utilizar una bombona con otro tipo de
dispositivo de conexi6n
COMO RECARGAR Y CAMBIAR LA BOMBONA DE LP
45
En algunas zonas del pais sotamente se permite cambiar la
bombona por otra nueva ya carcjada. En otras zonas est_
permitida la recarcja de la bombona. Si residen en una zona en
la que pueda recarcjar la bombona:
• Dirijase a un distribuidor autorizado
• El distribuidor debe purcjar la bombona antes de recarcjarla
• Nunca recarcjue la bombona m_s del 80% de su peso.
El volumen puede variar con la temperatura. Una bombona
vacia pesa aproximadamente 18 libras (8,2 Kcj).
• AsegQrese de que el distribuidor de LP comprueba que la
bombona no tiene fugas antes de recargarla.
• No libere gas LP en el ambiente ya que puede prender
fuego inesperadamente at mezclarse con el aire.
• P6ngase en contacto con un distribuidor para vaciar el gas
LP de una bombona.
Escarcha en la v_tvula de la bombona indica que puede haber
un exceso de gas en la bombona. Cierre la v_lvuta y p6ngase en
contacto con su distribuidor inmediatamente
PRUEBA DE FUGAS DE LA
BOMBONA DE LP
Deberfa realizar una prueba de fugas ¢ada vez que se cambia o rellena
una bombona. No fume ni utilice ningQn tipo de material inflamable en
la zona durante esta prueba de fuga. No utilice una llama abierta para
comprobar si hay fugas.
• Reatice la prueba at aire libre o en una zona bien
ventitada.
• Utilice una brocha y una soluci6n det 50% jab6n I[quido y
50% agua. No utitice ningOn limpiador, ya que podr[a
da_ar las piezas que suministran combustible.
• Aplique la soluci6n en las zonas marcadas con ftechas.
• Si se producen burbujas, esto indica que hay fuga.
1. Nunca guarde las bombonas adicionates debajo ni cerca de
su barbacoa.
2. Nunca Ilene la bombona por encima del 80% de su
volumen. Esto puede hacer que se libere gas por la v_lvuta
de apertura de seguridad.
3. Respete los puntos "1" y "2" para no provocar un incendio,
que podr[a causar heridas graves o inctuso ta muerte.
4. Llame inmediatamente a su distribuidor de LP o a los
bomberos si detecta otor o escucha escape de gas.
5. Mantenga las bombonas atejadas de la luz solar directa y
de las fuentes de calor.
6. No introduzca ningOn tipo de objeto extra_o en la satida de
la v_lvula.
• El suministro de gas debe ser desconectado en la bombona
de atimentaci6n de gas LP siempre que no se est_
utilizando la barbacoa.
• El atmacenamiento de esta barbacoa en el interior
solamente se permite con la bombona desconectada y
fuera de la barbacoa de gas.
• Las bombonas deben atmacenarse en exteriores, fuera det
atcance de los ni_os, y no deben atmacenarse en edificios,
garajes ni otras _reas cerradas.
Si se producen burbujas, esto indica que hay fuga. En ese caso,
p6ngase inmediatamente en contacto con su distribuidor de LP
o con los bomberos.
TRANSPORTE Y ALMACENAMIENTO
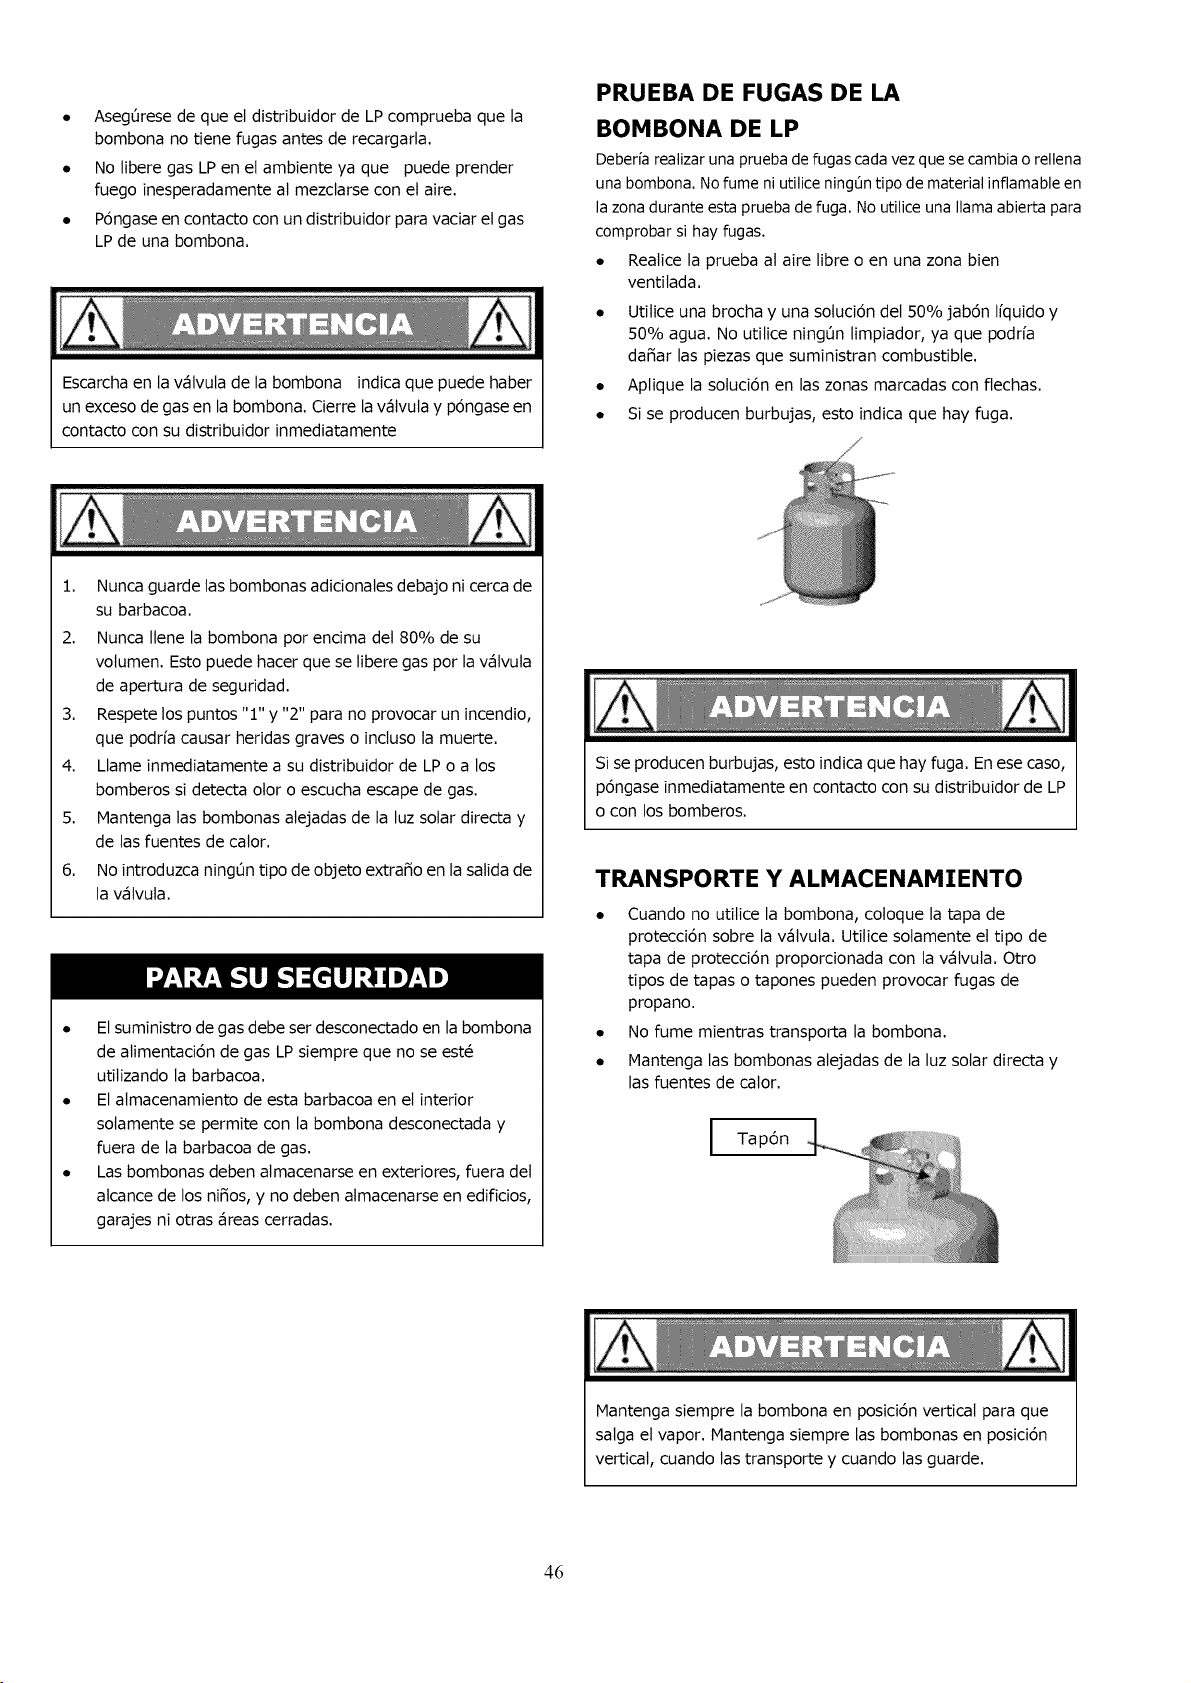
• Cuando no utitice la bombona, coloque la tapa de
protecci6n sobre la v_lvula. Utilice solamente et tipo de
tapa de protecci6n proporcionada con la v_lvuta. Otro
tipos de tapas o tapones pueden provocar fugas de
propano.
• No fume mientras transporta la bombona.
• Mantenga las bombonas atejadas de la luz solar directa y
las fuentes de cator.
Mantenga siempre la bombona en posici6n vertical para que
salga el vapor. Mantenga siempre las bombonas en posici6n
vertical, cuando las transporte y cuando las guarde.
46
Deben utilizarse el regulador de presi6n y et ensambtaje de la
manguera proporcionados con esta barbacoa de gas. Este
regutador est_ configurado con una presi6n de salida de
columna de agua de 11 putgadas. Los reguladores de presi6n
de recambio y los ensambtajes de la manguera deben ser los
especificados en la lista de piezas.
Su regutador est_ equipado con un sistema de conexi6n r_pido
Q.C.C Tipo 1. No permitir_ que fluya el gas hasta que se haya
realizado un sellado positivo. Tiene un dispositivo limitador de
flujo que restringir_ el flujo de gas de 10 pies c0bicos por hora
(0,28 metros c0bicos por hora).
COMO COLOCAR LA BOMBONA EN EL ARMARIO DE LA
BARBACOA
1. Cotoque la bombona en el dep6sito de LP en la base det
armario. El frontal de la v_lvuta del dep6sito deberfa estar
mirando al frente del cierre.
2. Sujete la cadena alrededor del dep6sito y eng_nchela at
gancho para asegurarlo.
El regulador debe entrar en la valvula
de la bombona en linea recta
I
I Centre esta boquitta det regulador
en la v41vula de la bombona.
I Conector Q.C.C.1 -ripo I I
Mantenga en todo momento la bombona en posici6n vertical.
PARA CONECTAR I.A BOMBONA AL REGULADOR Y LA
MANGUEPa_
1. Cotoque la bombona en el armario siguiendo la informaci6n
en las instrucciones de montaje.
2. Aseg0rese de que la bombona de propano est_ "OFF"
(APAGADO) girando el mando en direcci6n de las agujas
det retoj hasta que haga tope.
3. AsegOrese de que todos los controtes det quemador de la
barbacoa est_n en posici6n "OFF" (APAGADO).
4. Quite la tapa de seguridad de la v_lvuta de la bombona.
5. Centre la boquilta del regulador sobre el cilindro.
6. Gire de nuevo la tuerca hasta hacer tope.
Apriete s61o con la mano. No utilice una Ilave
inglesa
• No conecte esta barbacoa a fuentes de propano no
reguladas.
• Antes de cada utitizaci6n, compruebe la manguera,
revisando que no presente abrasi6n, desgaste o cortes.
Cambie la manguera daffada por la especificada en la lista
de piezas antes de utilizar la barbacoa. Inspeccione el
estado de la barbacoa desde la conexi6n del dep6sito de LP
hasta et del cotector de gas.
• Reatice siempre la prueba de fugas indicada a continuaci6n
antes de utilizar la barbacoa por primera vez, cuando haya
cambiado la bombona o cualquier componente de gas,
cuando haya activado et dispositivo limitaor de flujo o
despu_s de un periodo largo de tiempo sin haber utilizado
la barbacoa.
• No intente conectar la barbacoa at sistema de LP de una
caravana o remotque.
47
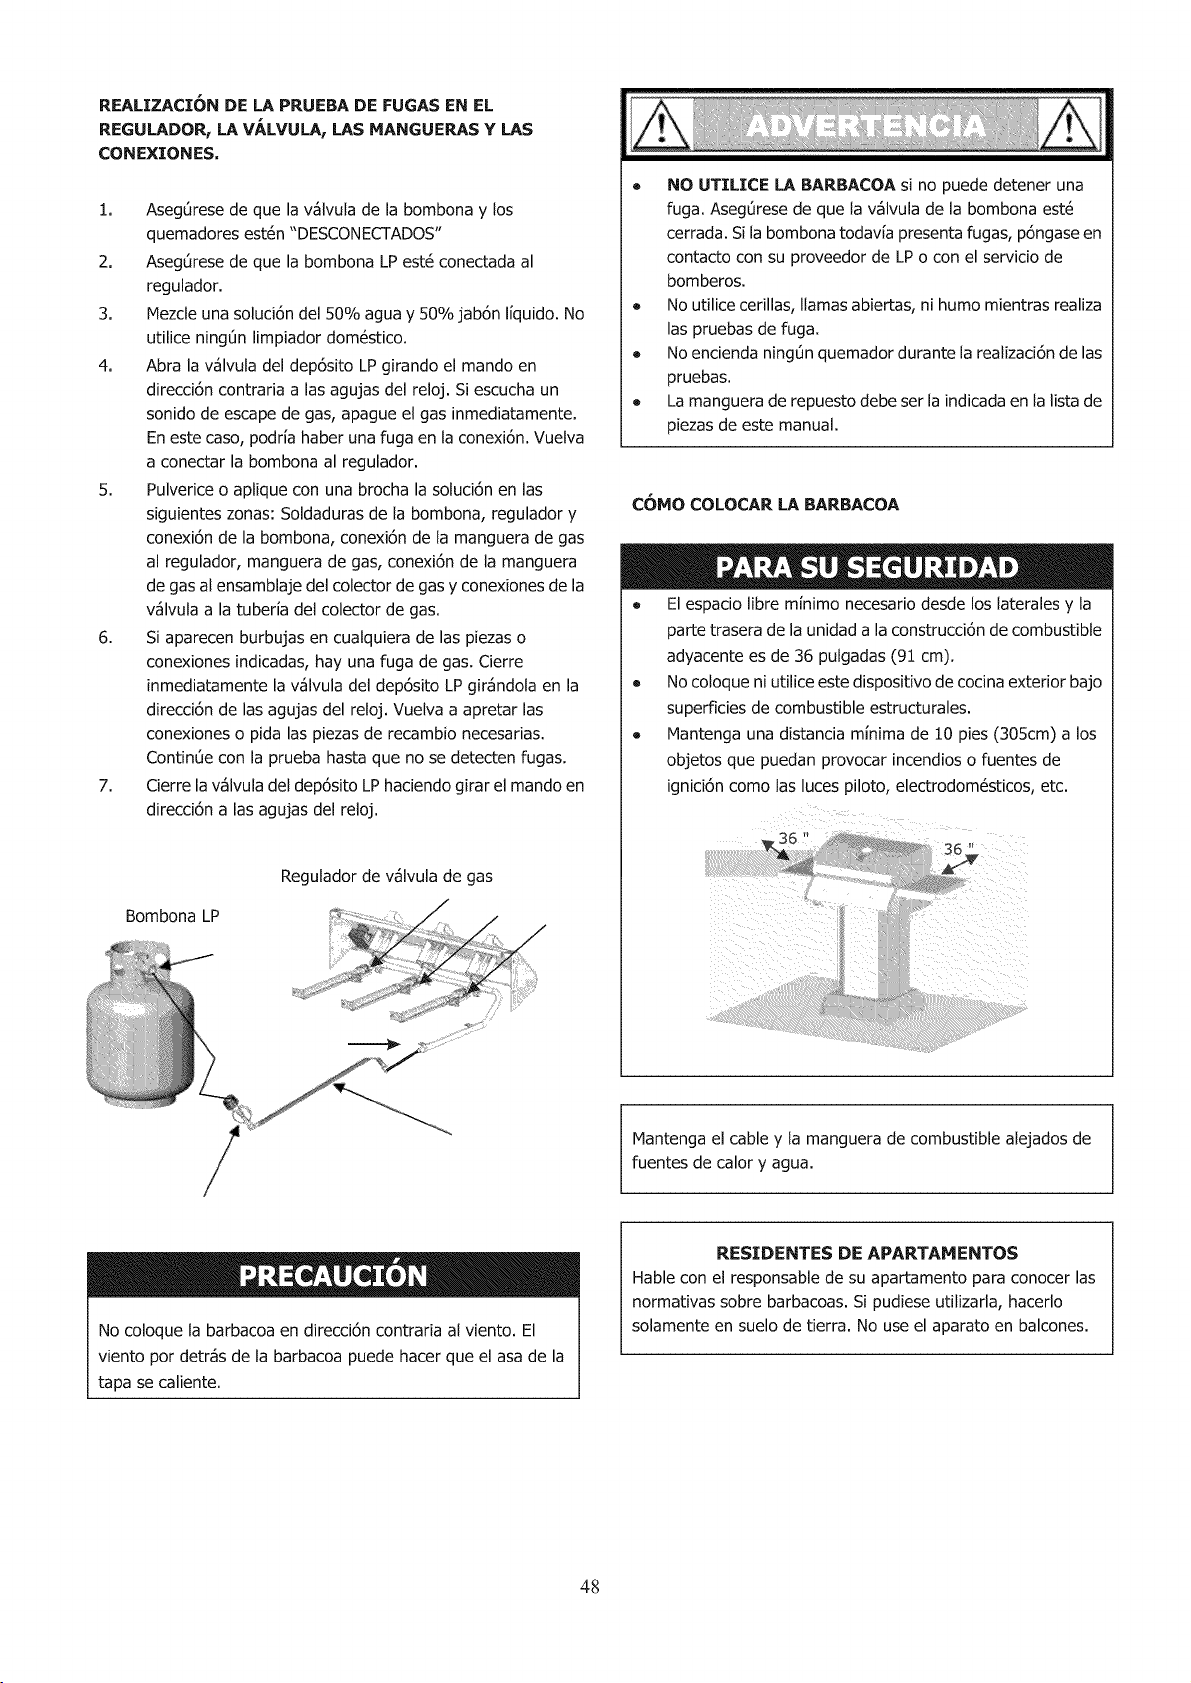
REALIZACION DE LA PRUEBA DE FUGAS EN EL
REGULADORr LA VALVULA, LAS HANGUERAS Y LAS
CONEXZONES,
1,
2,
3,
4,
5,
6,
7,
Aseg0rese de que la v_lvula de la bombona y los
quemadores est_n "DESCONECTADOS"
Aseg0rese de que la bombona LP est_ conectada al
regulador.
Mezcle una solud6n de150% agua y 50% jab6n liquido. No
utilice ningt_n limpiador dom_stico.
Abra la v_lvula del dep6sito LP girando el mando en
direcci6n contraria a las agujas del reloj. Si escucha un
sonido de escape de gas, apague el gas inmediatamente.
En este caso, podria haber una fuga en la conexi6n. Vuelva
a conectar la bombona al regulador.
Pulverice o aptique con una brocha la soluci6n en las
siguientes zonas: Soldaduras de la bombona, regulador y
conexi6n de la bombona, conexi6n de la manguera de gas
al regulador, manguera de gas, conexi6n de la manguera
de gas at ensamblaje del colector de gas y conexiones de la
v_lvula a la tuberia del colector de gas.
Si aparecen burbujas en cualquiera de las piezas o
conexiones indicadas, hay una fuga de gas. Cierre
inmediatamente la v_lvula del dep6sito LP gir_ndola en la
direcci6n de las agujas del reloj. Vuelva a apretar las
conexiones o pida las piezas de recambio necesarias.
ContinOe con la prueba hasta que no se detecten fugas.
Cierre la v_lvula del dep6sito LP hadendo girar el mando en
direcd6n alas agujas del reloj.
Bombona LP
Regulador de v_lvula de gas
® NO UTTLICE LA BARBACOA si no puede detener una
fuga, AsegOrese de que la v_lvula de la bombona est6
cerrada. Sila bombona todav[a presenta fugas, p6ngase en
contacto con su proveedor de LP o con el servido de
bomberos.
• No utilice cerillas, llamas abiertas, ni humo mientras realiza
las pruebas de fuga,
® No encienda ningOn quemador durante la realizad6n de las
pruebas.
® La manguera de repuesto debe ser la indicada en la lista de
piezas de este manual.
COHO COLOCAR LA BARBACOA
• El espacio libre minimo necesario desde los laterales y la
parte trasera de la unidad a la construcci6n de combustible
adyacente es de 36 pulgadas (91 cm).
• No coloque ni utilice este dispositivo de cocina exterior bajo
superficies de combustible estructurales.
e Mantenga una distancia minima de 10 pies (305cm) a los
objetos que puedan provocar incendios o fuentes de
ignici6n como las luces piloto, electrodom6sticos, etc.
Mantenga el cable y la manguera de combustible alejados de
fuentes de calory agua.
/
No coloque la barbacoa en direcci6n contraria al viento. El
viento por detr_s de la barbacoa puede hacer que el asa de la
tapa se caliente.
RESZDENTES DE APARTAHENTOS
Hable con el responsable de su apartamento para conocer las
normativas sobre barbacoas. Si pudiese utilizarla, hacerlo
solamente en suelo de tierra. No use el aparato en balcones.
48
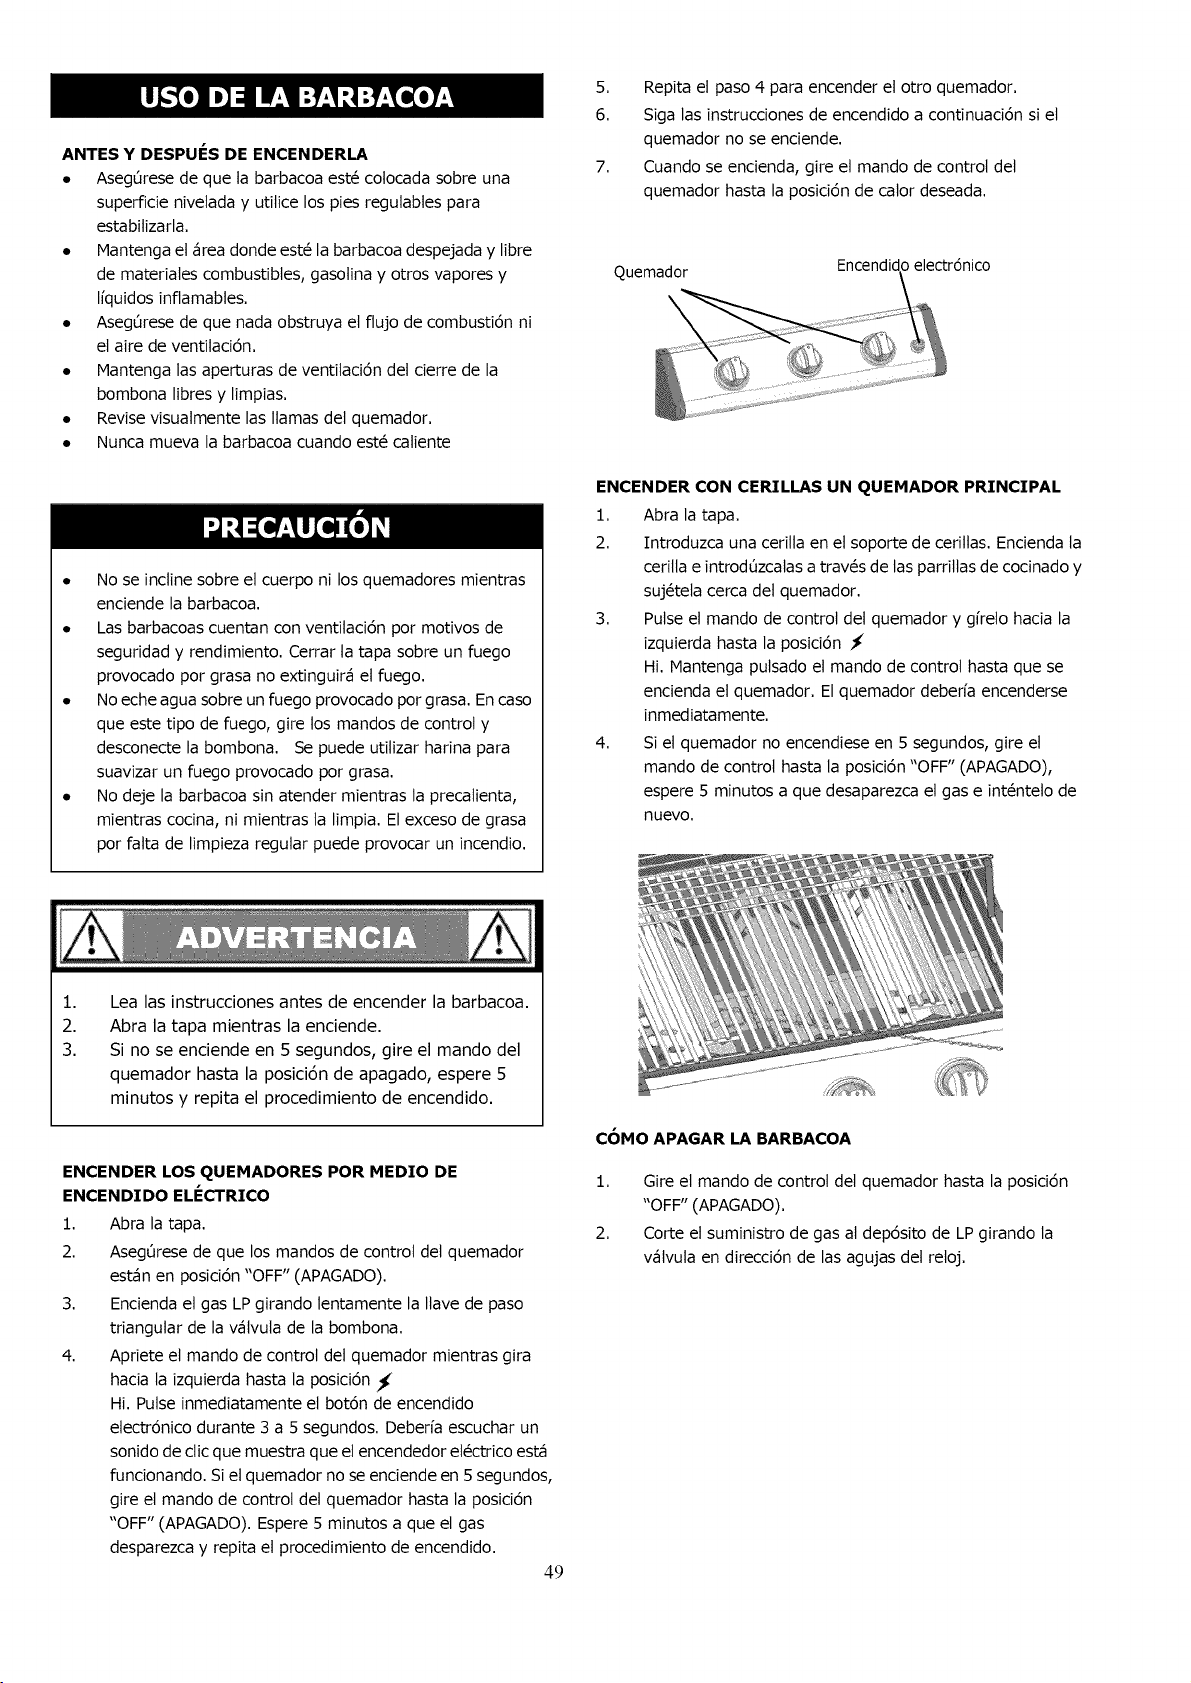
ANTES Y DESPUES DE ENCENDERLA
• AsegOrese de que la barbacoa est_ colocada sobre una
superficie nivelada y utilice los pies regutables para
estabilizarla.
• Mantenga el _rea donde est_ la barbacoa despejada y libre
de materiates combustibles, gasotina y otros vapores y
Ifquidos inftamabtes.
• AsegOrese de que nada obstruya el flujo de combusti6n ni
el aire de ventilaci6n.
• Mantenga las aperturas de ventilaci6n del cierre de la
bombona libres y limpias.
• Revise visuatmente las llamas del quemador.
• Nunca mueva la barbacoa cuando est_ catiente
• No se incline sobre el cuerpo ni los quemadores mientras
enciende la barbacoa.
• Las barbacoas cuentan con ventilaci6n por motivos de
seguridad y rendimiento. Cerrar ta tapa sobre un fuego
provocado por grasa no extinguir_ et fuego.
• No eche agua sobre un fuego provocado por grasa. En caso
que este tipo de fuego, gire los mandos de control y
desconecte la bombona. Se puede utilizar harina para
suavizar un fuego provocado por grasa.
• No deje la barbacoa sin atender mientras la precalienta,
mientras cocina, ni mientras ta limpia. El exceso de grasa
por fatta de limpieza regular puede provocar un incendio.
5. Repita el paso 4 para encender et otro quemador.
6. Siga las instrucciones de encendido a continuaci6n si el
quemador no se enciende.
7. Cuando se encienda, gire el mando de control del
quemador hasta la posici6n de cator deseada.
Quemador
X
Encendido electr6nico
ENCENDER CON CERILLAS UN QUEMADOR PRINCIPAL
1. Abra la tapa.
2. Introduzca una cerilla en el soporte de ceritlas. Encienda la
cerilla e introd0zcalas a tray,s de las parrillas de cocinado y
suj_tela cerca del quemador.
3. Pulse el mando de control det quemador y gfrelo hacia la
izquierda hasta la posici6n
Hi. Mantenga putsado el mando de control hasta que se
encienda el quemador. El quemador deberfa encenderse
inmediatamente.
4. Si et quemador no encendiese en 5 segundos, gire el
mando de control hasta la posici6n "OFF" (APAGADO),
espere 5 minutos a que desaparezca el gas e int_ntelo de
nuevo.
1. Lea las instrucciones antes de encender la barbacoa.
2. Abra la tapa mientras la enciende.
3. Si no se enciende en 5 segundos, gire el mando del
quemador hasta la posici6n de apagado, espere 5
minutos y repita el procedimiento de encendido.
ENCENDER LOS QUEMADORES POR MEDIO DE
ENCENDIDO ELECTRICO
1. Abra la tapa.
2. Aseg6rese de que los mandos de control del quemador
est_n en posici6n "OFF" (APAGADO).
3. Encienda el gas LP girando lentamente la llave de paso
triangular de la v_tvula de la bombona.
4. Apriete el mando de control del quemador mientras gira
hacia la izquierda hasta la posici6n _I'
Hi. Pulse inmediatamente el bot6n de encendido
etectr6nico durante 3 a 5 segundos. Deberfa escuchar un
sonido de ctic que muestra que el encendedor el_ctrico est_
funcionando. Si el quemador no se enciende en 5 segundos,
gire et mando de control del quemador hasta la posici6n
"OFF" (APAGADO). Espere 5 minutos a que et gas
desparezca y repita el procedimiento de encendido.
49
COMO APAGAR LA BARBACOA
1. Gire el mando de control del quemador hasta la posici6n
"OFF" (APAGADO).
2. Corte el suministro de gas al dep6sito de LP girando la
v_lvuta en direcci6n de las agujas del reloj.
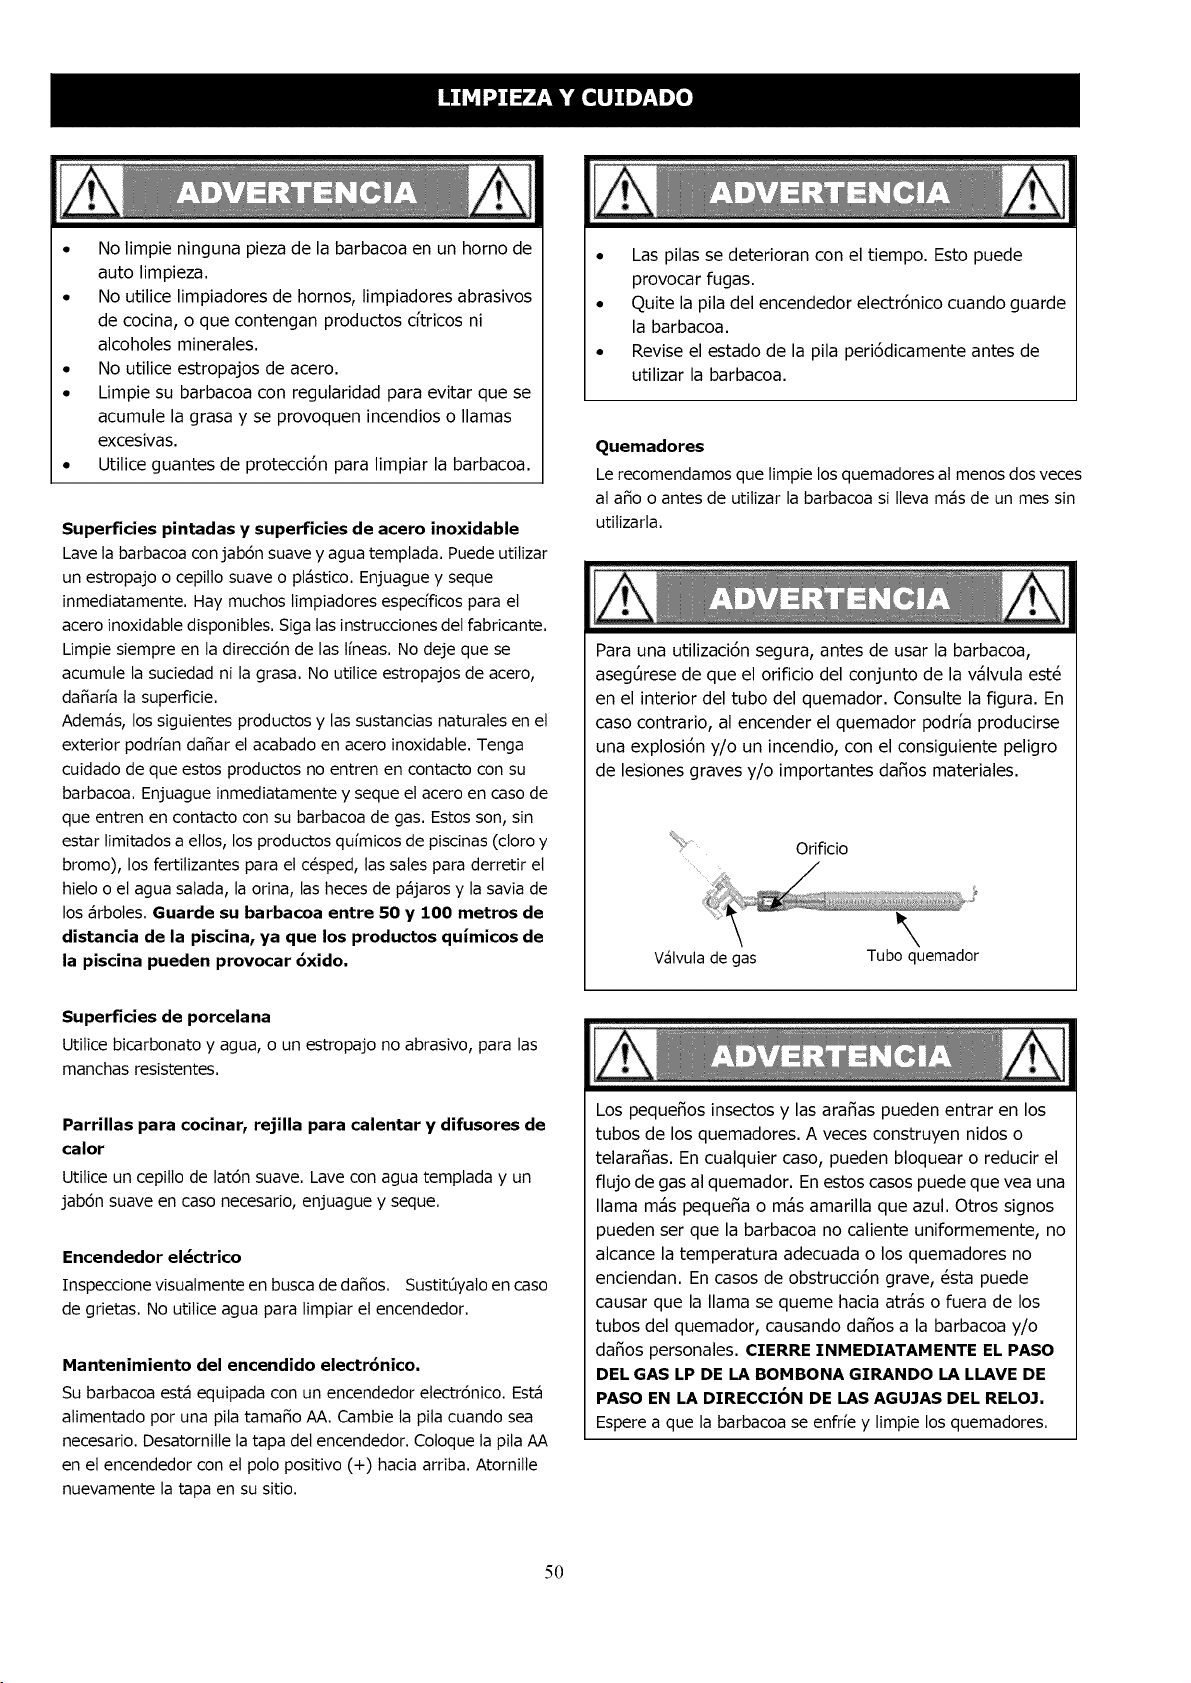
• No limpie ninguna pieza de la barbacoa en un homo de
auto limpieza.
• No utilice limpiadores de hornos, limpiadores abrasivos
de cocina, o que contengan productos c[tricos ni
alcoholes minerales.
• No utilice estropajos de acero.
• Limpie su barbacoa con regularidad para evitar que se
acumule la grasa y se provoquen incendios o llamas
excesivas.
• Utilice guantes de protecci6n para limpiar la barbacoa.
Superficies pintadas y superficies de acero inoxidable
Lave la barbacoa con jab6n suave y agua templada. Puede utilizar
un estropajo o cepillo suave o pl_stico. Enjuague y seque
inmediatamente. Hay muchos timpiadores espec[ficos para et
acero inoxidable disponibles. Siga tas instrucciones del fabricante.
Limpie siempre en la direcci6n de las l[neas. No deje que se
acumule la suciedad ni la grasa. No utilice estropajos de acero,
da_ar[a la superficie.
Adem_s, los siguientes productos y las sustancias naturates en el
exterior podffan da_ar el acabado en acero inoxidabte. Tenga
cuidado de que estos productos no entren en contacto con su
barbacoa. Enjuague inmediatamente y seque et acero en caso de
que entren en contacto con su barbacoa de gas. Estos son, sin
estar limitados a ellos, los productos qu[micos de piscinas (cloro y
bromo), los fertilizantes para el c_sped, las sales para derretir et
hieto o el agua salada, la orina, tas heces de p_jaros y la savia de
los _rbotes. Guarde su barbacoa entre 50 y 100 metros de
distancia de la piscina, ya que los productos quimicos de
la piscina pueden provocar 6xido.
• Las pilas se deterioran con el tiempo. Esto puede
provocar fugas.
• Quite la pila del encendedor electr6nico cuando guarde
la barbacoa.
• Revise el estado de la pila peri6dicamente antes de
utilizar la barbacoa.
Quemadores
Le recomendamos que limpie los quemadores at menos dos veces
al a_o o antes de utilizar la barbacoa si Ileva m_s de un mes sin
utilizarla.
Para una utilizaci6n segura, antes de usar la barbacoa,
asegOrese de que el orificio del conjunto de la vc_lvula est_
en el interior del tubo del quemador. Consulte la figura. En
caso contrario, al encender el quemador podrfa producirse
una explosi6n y/o un incendio, con el consiguiente peligro
de lesiones graves y/o importantes da_os materiales.
Orificio
V_lvula de gas Tubo quemador
Superficies de porcelana
Utilice bicarbonato y agua, o un estropajo no abrasivo, para las
manchas resistentes.
Parrillas para cocinar, rejilla para calentar y difusores de
calor
Utilice un cepitlo de lat6n suave. Lave con agua templada y un
jab6n suave en caso necesario, enjuague y seque.
Encendedor el_ctrico
Inspeccione visuatmente en busca de da_os. SustitOyato en caso
de grietas. No utilice agua para limpiar el encendedor.
Mantenimiento del encendido electr6nico.
Su barbacoa est_ equipada con un encendedor electr6nico. Est_
atimentado por una pila tama_o AA. Cambie la pila cuando sea
necesario. Desatornilte la tapa del encendedor. Cotoque la pita AA
en el encendedor con el polo positivo (+) hacia arriba. Atornille
nuevamente la tapa en su sitio.
Los peque_os insectos y las ara_as pueden entrar en los
tubos de los quemadores. A veces construyen nidos o
telara_as. En cualquier caso, pueden bloquear o reducir el
flujo de gas al quemador. En estos casos puede que vea una
llama m_s peque_a o mc_samarilla que azul. Otros signos
pueden ser que la barbacoa no caliente uniformemente, no
alcance la temperatura adecuada o los quemadores no
enciendan. En casos de obstrucci6n grave, _sta puede
causar que la llama se queme hacia atr_s o fuera de los
tubos del quemador, causando da_os a la barbacoa y/o
da_os personales. CIERRE INMEDIATAMENTE EL PASO
DEL GAS LP DE LA BOMBONA GIRANDO LA LLAVE DE
PASO EN LA DIRECCION DE LAS AGUJAS DEL RELOJ.
Espere a que la barbacoa se enfr[e y limpie los quemadores.
50
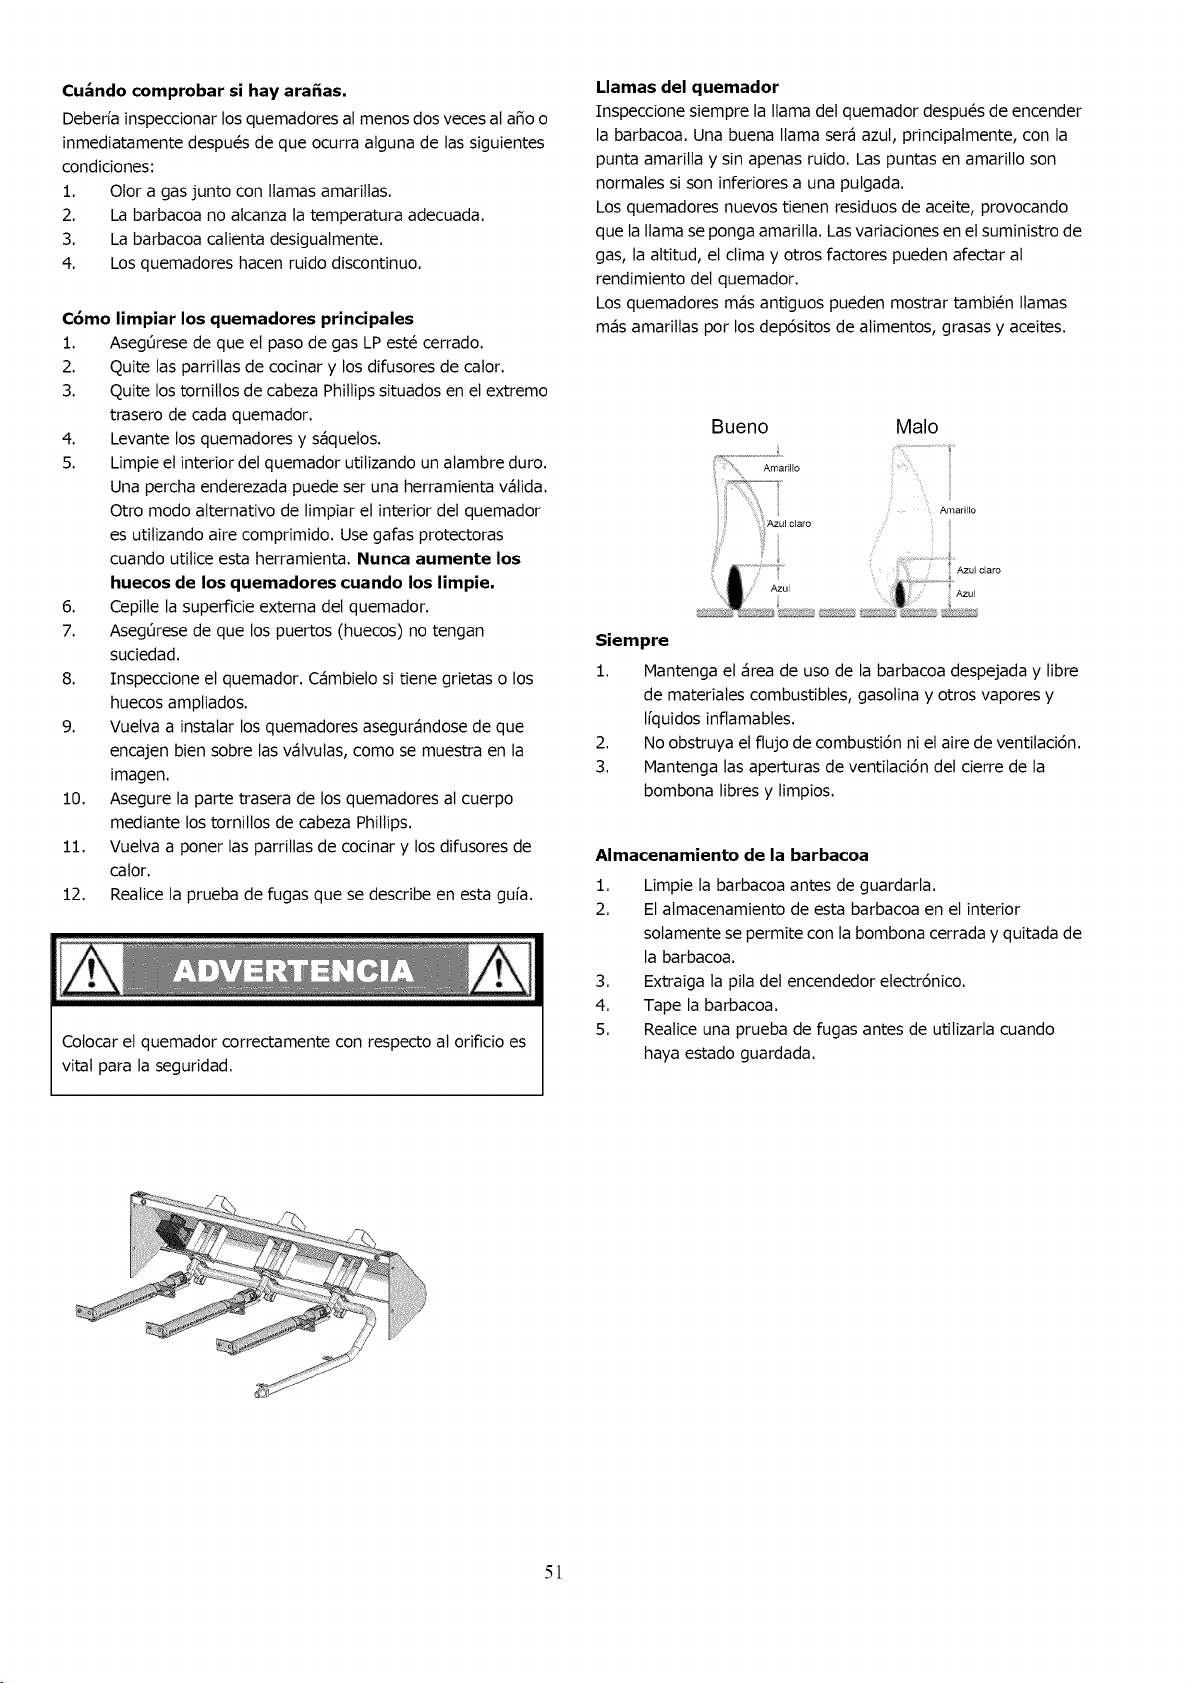
Cu_ndo comprobar si hay arafias.
Deberfa inspecdonar Jos quemadores al menos dos veces at a_o o
inmediatamente despu_s de que ocurra atguna de las siguientes
condiciones:
1. Otor a gas junto con llamas amarillas.
2. La barbacoa no atcanza la temperatura adecuada.
3. La barbacoa catienta desigualmente.
4. Los quemadores hacen ruido discontinuo.
C6mo limpiar los quemadores principales
1. Aseg0rese de que et paso de gas LP est_ cerrado.
2. Quite las parritlas de cocinar y los difusores de cator.
3. Quite los tornillos de cabeza Phillips situados en el extremo
trasero de cada quemador.
4. Levante los quemadores y s_quelos.
5. Limpie el interior del quemador utitizando un alambre duro.
Una percha enderezada puede ser una herramienta v_lida.
Otro modo atternativo de limpiar et interior det quemador
es utilizando aire comprimido. Use gafas protectoras
cuando utitice esta herramienta. Nunca aumente los
huecos de los quemadores cuando los limpie,
6. Cepille la superficie externa det quemador.
7. Aseg0rese de que los puertos (huecos) no tengan
suciedad.
8. Inspeccione el quemador. C_mbielo si tiene grietas o los
huecos ampliados.
9. Vuetva a instalar los quemadores asegur_ndose de que
encajen bien sobre las v_lvutas, como se muestra en la
imagen.
10. Asegure la parte trasera de los quemadores at cuerpo
mediante los tornitlos de cabeza Phillips.
11. Vuelva a poner las parrillas de cocinar y los difusores de
calor.
12. Reatice la prueba de fugas que se describe en esta gufa.
Colocar el quemador correctamente con respecto at orificio es
vital para la seguridad.
Llamas del quemador
Inspeccione siempre la llama del quemador despu_s de encender
la barbacoa. Una buena llama ser_ azul, principatmente, con la
punta amarilla y sin apenas ruido. Las puntas en amarillo son
normales si son inferiores a una putgada.
Los quemadores nuevos tienen residuos de aceite, provocando
que la llama se ponga amaritla. Las variaciones en el suministro de
gas, la attitud, el ctima y otros factores pueden afectar at
rendimiento del quemador.
Los quemadores m_s antiguos pueden mostrar tambi_n llamas
m_s amarillas por los dep6sitos de atimentos, grasas y aceites.
Bueno Malo
Amarillo
J
_ Azul claro
Siempre
1. Mantenga el _rea de uso de la barbacoa despejada y libre
de materiates combustibles, gasotina y otros vapores y
Ifquidos inftamabtes.
2. No obstruya et flujo de combusti6n ni el aire de ventilaci6n.
3. Mantenga las aperturas de ventilaci6n del cierre de la
bombona libres y limpios.
Almacenamiento de la barbacoa
1. Limpie la barbacoa antes de guardarla.
2. El atmacenamiento de esta barbacoa en el interior
solamente se permite con la bombona cerrada y quitada de
la barbacoa.
3. Extraiga la pila det encendedor electr6nico.
4. Tape la barbacoa.
5. Reatice una prueba de fugas antes de utitizarla cuando
haya estado guardada.
5!
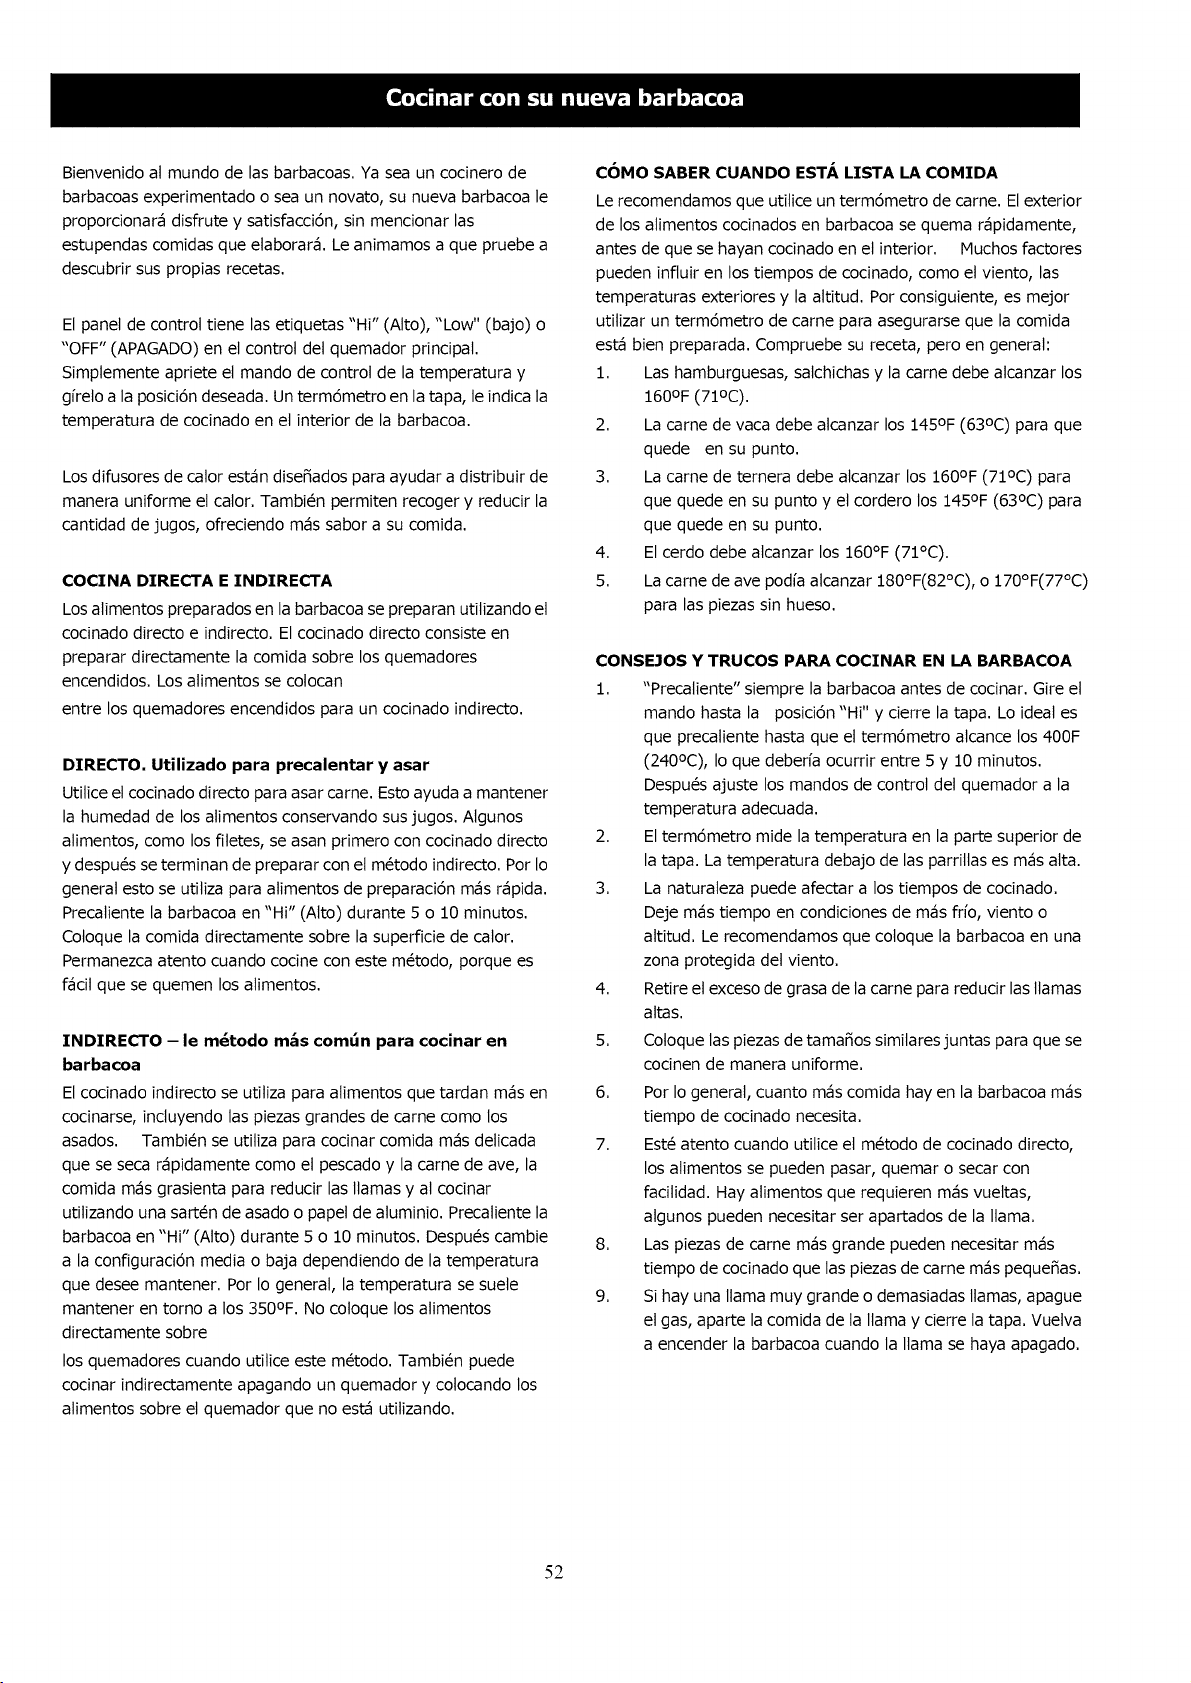
Bienvenido al mundo de las barbacoas. Ya sea un cocinero de
barbacoas experimentado o sea un novato, su nueva barbacoa le
proporcionar_ disfrute y satisfacci6n, sin mencionar las
estupendas comidas que etaborar_. Le animamos a que pruebe a
descubrir sus propias recetas.
El panel de control tiene las etiquetas "Hi" (Alto), "Low" (bajo) o
"OFF" (APAGADO) en et control det quemador principal.
Simplemente apriete et mando de control de la temperatura y
girelo a la posici6n deseada. Un term6metro en la tapa, le indica la
temperatura de cocinado en el interior de la barbacoa.
Los difusores de cator est_n dise_ados para ayudar a distribuir de
manera uniforme et calor. Tambi_n permiten recoger y reducir la
cantidad de jugos, ofreciendo m_s sabor a su comida.
COCINA DIRECTA E INDIRECTA
Los atimentos preparados en la barbacoa se preparan utitizando el
cocinado directo e indirecto. El cocinado directo consiste en
preparar directamente la comida sobre los quemadores
encendidos. Los atimentos se colocan
entre los quemadores encendidos para un cocinado indirecto.
DIRECTO. Utilizado para precalentar y asar
Utilice el cocinado directo para asar carne. Esto ayuda a mantener
la humedad de los atimentos conservando sus jugos. Atgunos
alimentos, como los filetes, se asan primero con cocinado directo
y despu_s se terminan de preparar con el m_todo indirecto. Por Io
general esto se utitiza para atimentos de preparaci6n m_s r_pida.
Precatiente la barbacoa en "Hi" (Alto) durante 5 o 10 minutos.
Cotoque la comida directamente sobre la superficie de calor.
Permanezca atento cuando cocine con este m_todo, porque es
f_cil que se quemen los atimentos.
INDIRECTO - le rn_todo rn_s comOn para cocinar en
barbacoa
El cocinado indirecto se utitiza para atimentos que tardan m_s en
cocinarse, incluyendo las piezas grandes de came como los
asados. Tambi_n se utiliza para cocinar comida m_s delicada
que se seca r_pidamente como el pescado y la came de ave, la
comida m_s grasienta para reducir las llamas y at cocinar
utilizando una sart_n de asado o papel de atuminio. Precaliente la
barbacoa en "Hi" (Alto) durante 5 o 10 minutos. Despu_s cambie
a la configuraci6n media o baja dependiendo de la temperatura
que desee mantener. Por Io general, la temperatura se suele
mantener en torno a los 350OF. No cotoque los atimentos
directamente sobre
los quemadores cuando utitice este m_todo. Tambi_n puede
cocinar indirectamente apagando un quemador y colocando los
atimentos sobre el quemador que no est_ utilizando.
COMO SABER CUANDO ESTA LISTA LA COMIDA
Le recomendamos que utitice un term6metro de carne. El exterior
de los alimentos cocinados en barbacoa se quema r4pidamente,
antes de que se hayan cocinado en el interior. Muchos factores
pueden influir en los tiempos de cocinado, como el viento, las
temperaturas exteriores y la altitud. Por consiguiente, es mejor
utilizar un term6metro de came para asegurarse que la comida
est_ bien preparada. Compruebe su receta, pero en general:
1. Las hamburguesas, satchichas y la carne debe atcanzar los
160OF (71oc).
2. La came de vaca debe atcanzar los 145OF (63oc) para que
quede en su punto.
3. La came de ternera debe atcanzar los 160OF (71oc) para
que quede en su punto y el cordero los 145OF (63oc) para
que quede en su punto.
4. El cerdo debe alcanzar los 160°F (71°C).
5. La came de ave podia alcanzar 180°F(82°C), o 170°F(77°C)
para las piezas sin hueso.
CONSEJOS Y TRUCOS PARA COCINAR EN LA BARBACOA
1. "Precatiente" siempre la barbacoa antes de cocinar. Gire et
mando hasta la posici6n "Hi" y cierre la tapa. Lo ideal es
que precaliente hasta que el term6metro atcance los 400F
(240oc), Io que deberia ocurrir entre 5 y 10 minutos.
Despu_s ajuste los mandos de control del quemador a la
temperatura adecuada.
2. El term6metro mide la temperatura en la parte superior de
la tapa. La temperatura debajo de las parrillas es m_s alta.
3. La naturaleza puede afectar a los tiempos de cocinado.
Deje m_s tiempo en condiciones de m_s frio, viento o
attitud. Le recomendamos que coloque la barbacoa en una
zona protegida det viento.
4. Retire el exceso de grasa de la came para reducir las llamas
attas.
5. Coloque las piezas de tamaffos similares juntas para que se
cocinen de manera uniforme.
6. Por Io general, cuanto m_s comida hay en la barbacoa m_s
tiempo de cocinado necesita.
7. Est_ atento cuando utilice el m_todo de cocinado directo,
los atimentos se pueden pasar, quemar o secar con
facilidad. Hay alimentos que requieren m_s vueltas,
atgunos pueden necesitar ser apartados de la llama.
8. Las piezas de came m_s grande pueden necesitar m_s
tiempo de cocinado que las piezas de came m_s pequeffas.
9. Si hay una llama muy grande o demasiadas llamas, apague
el gas, aparte la comida de ta llama y cierre la tapa. Vuetva
a encender la barbacoa cuando la llama se haya apagado.
52
10. Gire los atimentos con poca frecuencia. Por Io general, gire
un filete una vez sotamente mientras cocina.
11. Utilice tijeras de barbacoa en lugar de tenedores mientras
el atimento est_ en la barbacoa. Se perder_ menos jugo.
12. Conozca su salsa y cuando echarla. Eche salsas con base en
aceite y vinagre en cualquier momento. Las satsas con base
de az0car, como la salsa barbacoa, solamente se puede
aplicar en los Oltimos minutos de cocinado.
13. Un temporizador le puede ayudar a no quemar la comida.
14. Utilice asas protectoras o guantes protectores para sujetar
las ollas cuando trabaje cerca de la barbacoa.
15. Unte con un poco de aceite tas parrillas para cocinar antes
de calendar para evitar que la comida se pegue.
SEGURIDAD ALIMENTARIA
1. Manipule siempre de manera segura los atimentos cuando
utilice esta barbacoa.
2. Lave todos los vegetates, marisco y came de ave antes de
cocinar.
3. Utilice recipientes, platos y utensilios diferentes para los
atimentos cocinados y no cocinados.
4. Deje toda la carrie de ave y marisco en la nevera hasta que
est_ preparada para ser cocinada.
5. Utilice un term6metro de came para asegurar que la
comida est_ correctamente cocinada.
EL QUEMADOR NO ENCIENDE
1. El suministro de gas est_ apagado. Encienda el gas en la
bombona de LP.
2. No queda propano. Revise y aseg0rese de tener propano
en el dep6sito.
3. El regulador no est_ bien cotocado en la v_lvuta del
dep6sito. Quftelo y vuelva a cotocarlo. Apriete con la
mano,
4. La manguera est_ obstruida. Inspecci6nela y ender_ceta.
5. Fatlo del regulador o manguera da_ada. Pida un repuesto
y c_mbiela.
6. Aseg0rese de que escucha _l clic del encendedor
electr6nico. En caso contrario, cambie la pila por una de
tama_o AA. Inspeccione el electrodo para comprobar
que no haya grasa ni suciedad. En caso afirmativo,
Ifrnpielo con alcohol. Revise la distancia entre la punta det
electrodo y et quemador. La punta del electrodo deberfa
estar a 1/8" o 1/4" del quemador principal. Haga ajustes
si fuera necesario. Inspeccione el electrodo para
asegurarse de que no est_ agrietado ni roto. En ese caso,
pida uno de repuesto y c_mbieto.
7. BIoqueo en el sistema de gas. Inspeccione el quemador
para asegurarse de que no haya insectos o telara_as que
Io obstruyan. Limpiar en caso necesario. Inspeccione por
debajo del panel de control para comprobar si el
quemador est_ bien atineado con las v_lvutas.
LLAMA IRREGULAR O AMARILLA
1. Un quemador nuevo puede tener aceite residual, que se
quemar4.
2. Los tubos del quemador est_n bloqueados. Quitar y
limpiar.
3. El quemador tiene mucha grasa o suciedad acumutada.
Quitar y limpiar.
4. El quemador no est_ correctamente atineado con [as
v_lvutas. Inspeccione por debajo del panel de control.
BAJADA REPENTINA EN LA PRESION DE GAS O LAS
LLAMAS QUE SE APAGAN
1. No queda gas. Revise y aseg_rese de tener propano en el
dep6sito.
2. Se ha activado ta v_lvula por flujo excesivo, reduciendo el
flujo de gas. Apague todos los quemadores, espere 30
segundos y enci_ndalos de nuevo. Si et probtema
persiste, apague los quemadores. Desconecte et
regulador del dep6sito. Espere 10 minutos. Vuetva a
conectar et regutador y haga una prueba de fugas.
Encienda lentamente el dep6sito de LP y vuetva a
encender la barbacoa. Otras formas de activar el
dispositivo limitador son
a Una manguera de gas rota Inspeccione, realice
una prueba de fuga y c_mbiela en caso necesario
53
3.
b Abrir el mando de control antes de encender el gas
LP. Encender et gas en la bombona LP antes de girar
et mando de control de encendido.
c Purgado incorrecto de la bombona antes de Ilenarla
Consulte a su distribuidor de gas LP
El viento podrfa estar apagando el quemador Gire el frontal
de la barbacoa cara at viento o saque la barbacoa del
viento.
LLAMAS EXCESIVAS
1. El difusor de calor, dentro de la barbacoa, las parrillas y
los quemadores necesitan una limpieza.
2. Es necesario limpiar las bandejas de grasa y vaciarlas.
3. Utiliza demasiado cator para cocinar. Baje la perilla de
control de calor.
4. El m_todo de cocinado directo producir_ m_s llamas
attas que et m_todo indirecto. Si est_ utitizando el
m_todo directo, trate de utilizar el indirecto.
FUEGO POR DETRAS DEL PANEL DE CONTROL
Apague inmediatamente la v41vula de la bombona y espere a que
se enfrfe la barbacoa.
1. Revise el quemador para ver si hay obstrucciones y
Ifmpieto.
2. Inspeccione por debajo del panel de control para ver si
el quemador est_ bien alineado con las v_tvulas.
3. El gas se fuga por una conexi6n defectuosa o manguera
da_ada. Reatice una prueba de fugas.. Apriete o cambie las
piezas seg0n proceda.
_.Puedo convertir mi barbacoa de gas de un
combustible a otro?
No. Su barbacoa de gas est_ fabricada para cumplir
est_ndares especfficos desarrotlados por CSA y ANSI
para su seguridad y rendimiento de la barbacoa para
gas LP. No ofrecemos equipos de conversi6n ni le
recomendamos que cambie el tipo de combustible.
_.C6mo se prueban sus barbacoas?
Nuestras barbacoas est_n probadas y certificadas por
CSA, un centro de pruebas independiente y Ifder en el
mundo, que demuestran que cumpten diferentes
normativas CSA y ANSI junto con diferentes est_ndares
de rendimiento. Los quemadores y la Ifnea de gas se
prueban individuatmente cuando la barbacoa Ilega a la
Ifnea de ensamblaje justo antes de ser embatada. Los
quemadores se prueban individuatmente.
_.Qu_ es el ruido que sale a veces del regulador?
El sonido es el gas saliendo por et regulador. No es
necesario preocuparse si el sonido es bajo.
Mi barbacoa tiene la llama baja en algunos
quemadores, o algunos de los quemadores no
encienden. _.Cu_l puede ser la causa?
Esto puede ser debido at dispositivo limitador de flujo de
la llama, generado por un cambio repentino en la
presi6n. Abrir la v_lvuta demasiado r_pido puede
provocar esto. En este caso, cierre la v_lvuta del
dep6sito del LP y descon_cteta del regulador. Deje que
transcurran 10 minutos. Vuelva a conectar et regulador
at dep6sito de LP. Abra la tapa de la barbacoa. Abra
lentamente la v_lvuta del dep6sito de LP. Siga el
procedimiento de encendido del quemador y encienda
el quemador m_s atejado det dep6sito de LP. Contin0e
encendiendo los demos quemadores acerc_ndose at
dep6sito de LP.
_.Puedo utilizar platos cer_micos, briquetas o rocas de
lava?
No. Su barbacoa est4 dise_ada para usar sotamente con
difusores de calor. Las gotas de grasa caen en los
difusores y se queman, creando vapor y sabor adicionat.
54
Congratulationsonmakinga smartpurchase.Your
newKenmore®productis designedandmanufactured
for yearsofdependableoperation.Butlikeall products,
it mayrequirerepairfromtimeto time.That'swhen
havinga RepairProtectionAgreementcansaveyou
moneyandaggravation.
Here'swhatthe RepairProtectionAgreement_
includes:
[] Expert service by our 10,000 professional repair
specialists
[] Unlimited service and no charge for parts and
labor on all covered repairs
[] Product replacement up to $1500 if your
covered product can't be fixed
[] Discount of 10% from regular price of service
and related installed parts not covered by the
agreement; also, 10% off regular price of
preventive maintenance check
[] Fast help by phone - we call it Rapid Resolution-
phone support from a
Sears representative, Think of us as a "talking owner's
manual."
Once you purchase the Repair Protection Agreement, a
simple phone call is all that it takes for you to schedule
service. You can call anytime day or night, or schedule
a service appointment online.
The Repair Protection Agreement is a risk-free
purchase. If you cancel for any reason during the
product warranty period, we will provide a full refund.
Or, a prorated refund anytime after the product
warranty period expires. Purchase your Repair
Protection Agreement today!
Some limitations and exclusions apply. For
prices and additional information in the U.S.A.
CALL 1-800-827-6655.
*Coverage in Canada varies on some items. For
full details call Sears Canada at 1-800-361-6665
Felicitaciones por su compra inteligente. Su nuevo
producto Kenmore® viene dise_ado y manufacturado
para confiables operaciones por amos. Pero, como todo
producto, puede requerer reparaciones de vez en
cuando. All[ es cuando un Acuerdo de Protecci6n de
Reparaci6n puede ahorrar su dinero y agravamiento.
A continuaci6n son los elementos del Acuerdo :
[] Servicio de experto por nuestros 10,000
especialistas de reparaci6n.
[] Servici sin I[mite y cero cambio de piezas y mano
de obra en todas las reparaciones.
[] Repuesto de producto hasta a $1500 si su
producto amparado no se puede arreglar
[] 10% de descuento del precio regular de serviceio y
piezas relacionadas con el servicio que no sean
cubiertas por el acuerdo y, 10% de descuento del
precio regular de la preventiva revisi6n de
mantenimiento.
[] Ayuda inmediata por telbfono - le decimos
Tel_fono de Resoluci6n Rc_pida - entregada por un
representante de Sears. Piense en nosotros como un
"Manual de Usuario Parlante."
Una vez Ud. compre el Acuerdo, todo Io que necesita es
una Ilamada telef6nca para programar el servicio. Ud.
puede hacer la Ilamada en el dia o en la noche, o
programar una cita para servicio.
El Acuerdo de Protecci6n por Reparaci6n se trata de
una compra libre de riesgos. Si Ud. cancela la compra
por cualquier raz6n durante el per[odo de la garantia
del producto, le reembolsamos todo el costo. O, un
reembolso proporcional en cualquier momento luego
de la fecha de vencimiento de la garantia del producto.
iCompre su Acuerdo de Protecci6n por Reparaci6n hoy!
Algunas limitaciones y exclusions ser&n
aplicadas. Por precios y mayor informacibn en
E.U., Ilamar a 1-800-827-6655.
* La garantia puede variar para algunos articulos
en Canad&. Para mayor informacibn, Ilamar a
Sears Canada en-800-361-6665
Sears Installation Service
For Sears professional installation of home appliances,
garage door openers, water heaters, and other major
home items, in the U.S.A. or Canada call
1-800-4-MY-HOME®
Seecio de Instalacibn Sears
Por la instalaci6n professional Sear de aparatos
dom_sticos, abrepuertas de garage, calentadores de
agua y otros grandes articulos dom_sticos en E.U. o
Canadc_, Ilamar a
1-800-4-MY-HOME®
55
Your Home
For troubleshooting, product manuals and expert advice:
www.managemylife.com
For repair - in your home- of all major brand appliances,
lawn and garden equipment, or heating and cooling systems,
no matter who made it, no matter who sold it!
For the replacement parts, accessories and
owner's manuals that you need to do-it-yourself.
For Sears professional installation of home appliances
and items like garage door openers and water heaters.
1-800-4-MY-HOME _> (I-800-469-4663)
Call anytime, day or night (U.S.A. and Canada)
www.sears.com www.sears.ca
Our Home
For repair of carry-in items like vacuums, lawn equipment,
and electronics, call anytime for the location of your nearest
Sears Parts & Repair Service Center
1-800-488-1222 (U.S.A.) 1-800-46,9-466,3 (Canada)
www.sears.com www.sears.ca
To purchase a protection agreement on a product serviced by Sears:
1-800-827-6655 (U.S.A.) 1-800-361-6665 (Canada),
Para pedir servicio de reparaci6n
a domicilio, y para ordenar piezas:
1-888-SU-HOGAR ®
(1-888-784-6427)
'_vv,f,,_,'.sea rs. com
Au Canada pour service en fran£ais:
1-800-LE-FOYER Mc
(1-800-533-6937)
Vv'V'PW%sea rs. C8
® Registered Trademark / T_Tradema_-_ of KCD IP LLC in the United StaKes or Sears Brands, LLC n other countries
® Marca Reg strada / L_IMarca de F_brica de KCD _P, LLC en Estados Unidos o Sears Brands, LLC in otros paises
ac Marque de commerce t Marque d6pos6e de Sears Brands LLC