Loading ...
Loading ...
Loading ...
MAINTENANCE
GENERAL
ALL CHAIN SAW SERVICE, OTHER
THAN THE ITEMS LISTED IN THE
OWNER'S MANUAL MAINTENANCE IN-
STRUCTIONS, SHOULD BE PERFORMED
BY COMPETENT CHAIN SAW SERVICE
PERSONNEL_
WITH THE EXCEPTION OF POWER
SHARPENING AND CARBURETOR AD_
JUSTING, DISCONNECT SPARK PLUG
WIRE AND LET SAW COOL BEFORE
MAKING ADJUSTMENTS OR REPAIR_
A good maintenance program of regular inspection and care
will increase the life and maintain the performance of your
Saw°
Each working day, check Nuts, Screws and Wires, tightening
any that are loose and replacing those that are worn or damp
aged.
NOTE: WHEN REPLACNG FASTENERS USEATHREAD
ADHESIVE. SUCH AS "THREAD LOCK",--LOCTITE
SEALANT 'r, ETC. AVAILABLE AT YOUR SEARS SER-
VICE CENTER.
GUIDE BAR AND CHAIN
Service life of your Bar and Chain will be greatly increased by
roper Saw use-correct Chain Tension (page 4), Lubrication
page 6) and regular maintenance-Sharpening, Bar Deburring,
etco
CHAIN SHARPENING
If wood chips are becoming increasingly smaller as you cut,
from normal wear or accidental running Chain in dirt or sand,
your Chain may need sharpening. Check Chain for sharpness
or damage after every refueling and sharpen perhaps every
third or fourth refueling; more often when cutting seasoned
hard wood or frozen wood.
CUTTER TOP PLATE POWER SHARPENING
(MODEL 917.353770 & 917,353771 ONLY)
MAKE SURE INSIDE CHAIN SHIELD
AND POWER SHARP PARTS ARE FREE
OF PACKED SAWDUST AND WOOD
CHIPS.
t. Tension Chain slightly tighter than normal cutting tension
but still able to be pulled easily around the Guide Bar (page
4).
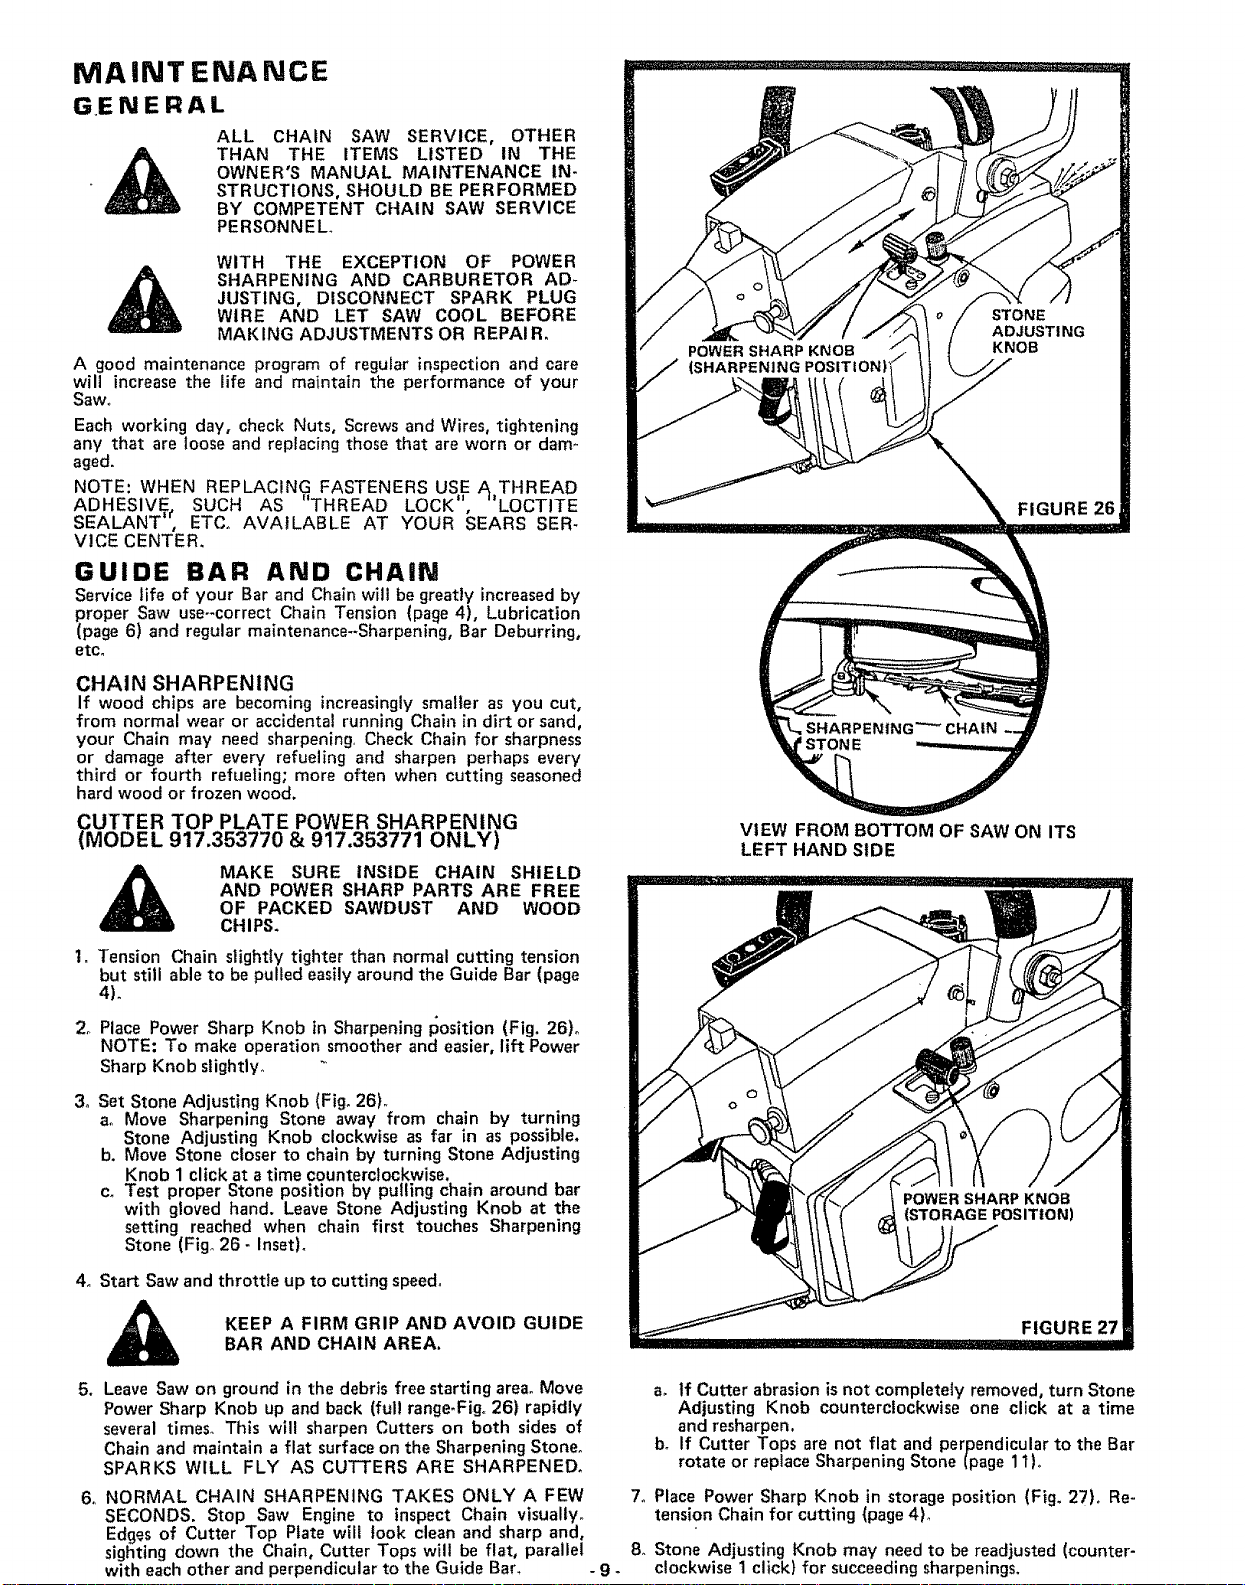
2o Place Power Sharp Knob in Sharpening I_OSition (Fig. 26)°
NOTE: To make operation smoother and easier, lift Power
Sharp Knob slightly_
3o Set Stone Adjusting Knob (Fig. 26).
ao Move Sharpening Stone away from chain by turning
Stone Adjusting Knob clockwise as far in as possible.
b. Move Stone closer to chain by turning Stone Adjusting
Knob 1 click at a time counterclockwise,
c. Test proper Stone position by pulling chain around bar
with gloved hand. Leave Stone Adjusting Knob at the
setting reached when chain first touches Sharpening
Stone (Fig° 26- Inset)°
4. Start Saw and throttle up to cutting speed.
POWER SHARP KNOB
(SHARPENING POSITION)
STONE
ADJUSTI NG
KNOB
FIGURE 26
SHARPENING _ CHAIN
uSTONE
VIEW FROM BOTTOM OF SAW ON ITS
LEFT HAND SIDE
KEEP A FIRM GRIP AND AVOID GUIDE
BAR AND CHAIN AREA.
5. Leave Saw on ground in the debris free starting area° Move
Power Sharp Knob up and back (ful! range-Figo26) rapidly
several times. This will sharpen Cutters on both sides of
Chain and maintain a flat surface on the Sharpening Stone.
SPARKS WILL FLY AS CUTTERS ARE SHARPENED.
6o NORMAL CHAIN SHARPENING TAKES ONLY A FEW
SECONDS. Stop Saw Engine to inspect Chain visually
Edg=_sof Cutter Top Plate will took clean and sharp and,
sighting down the Chain, Cutter Tops will be flat, parallel
with each other and perpendicular to the Guide Bar, -9.
a, If Cutter abrasion is not completely removed, turn Stone
Adjusting Knob counterclockwise one click at a time
and resharpen,
bo If Cutter Tops are not flat and perpendicular to the Bar
rotate or replace Sharpening Stone (page 1t)o
7o Place Power Sharp Knob in storage position (Fig. 27)° Re-
tension Chain for cutting (page 4)°
8. Stone Adjusting Knob may need to be readjusted (counter-
clockwise 1click} for succeeding sharpenings.
Loading ...
Loading ...
Loading ...