Owner's Manual
Manual Del Propietario
Vacuum Cleaner
Aspiradora
Model, Modelo
116.26212
IMPORTANT
Before returning this product-
For replacement parts, please contact:
Sears Parts and Repair Center
(1-800-488-1222)
Anytime, day or night
(U.S.A. only)
For any ot_herIssue, please contact.'
Vacuum Cleaner Help Line
(1-877-531-7321)
8:00am-5:00pm EST, M-F
(U.SoA.and Canada) T"-.
CAUTION:
Read and follow all
safety and operating
instructions before first
use of this product.
CUIDADO:
Lea y siga todas las
instrucciones de operaci6n
y seguridad antes del uso de
este producto.
Sears, Roebuck and Co., Hoffman Estates, IL 60179 U.S.A.
www.sears.com
Part No. CO1ZCZJ30U00-KC01ZCZJZOUO
Printed in Mexico
Impreso en M6xico
Before Using Your New
Vacuum Cleaner .................... 2
Kenmore Vacuum Cleaner Warranty ..... 3
Important Safety Instructions ......... 4
Parts and Features ....................... 5-6
Assembly Instructions ............... 7_
Operating Instructions .............. 9
How to Start .......................... 9
Vacuuming Tips ..................... 10
Suggested PHeHeight Settings ........ 11
Attachments ....................... 11
Attachment Use Table ............... 12
Performance Features ................ 12-13
How Your Vacuum Cleaner Works ........ 13
Canister Care ......................... 14
Bag Changing ...................... 14
Ctean[ng Exterior and Attachments ...... !4
Motor Safety Filter Changing .......... 15
Exhaust Filter Changing ............. 15
Power-Mate s Care ..................... 16
Belt Changing and Agitator Cleaning _• 16-17
Light Bulb Changing .............. 18
Agitator Servicing ....................... 18
Troubleshooting ...................... 19
Master Protection Agreements ....... 20
Requesting Assistance
Or Service ................... Back Cover
Please read this guide, It wilt help you assemble and operate your new Kenmore vacuum
cleaner in the safest and most effective way°
For more information about vacuum cleaner care and operation, call your nearest Sears store,
You will need the complete model and serial numbers when requesting information, Your vacu-
um cleaner's model and serial numbers are located on the Model and Serial Number Plate.
Use the space below to record the model number and serial number of your new Kenmore
vacuum cleaner,
Model No,
Serial No.
Date of Purchase
Keep this book and your sales check (receipt) in a safe place for future reference,
One Year Limited Warranty
When assembled, operated and maintained according to all instructions supplied with
the product, if this vacuum cleaner fails due to a defect in material or workmanship within
one year from the date of purchase, return it to any Sears store, Sears Parts & Repair
Center or other Kenmore outlet for free repair.
if this vacuum cleaner is used for other than private family purposes, this warranty
applies for only 90 days from the date of purchase°
This warranty covers only defects in material and workmanship. Sears will NOT
pay for:
1_ Expendable items that can wear out from normal use, including but not limited to
filters, belts, light bulbs, and bags.
2. A service technician to instruct the user in correct product assembly, operation or
maintenance_
3, A service technician to clean or maintain this product.
4. Damage to or failure of this product if it is not assembled, operated or maintained
according to al! instructions supplied with the product.
5. Damage to or failure of this product resulting from accident, abuse, misuse or use for
other than its intended purpose.
6. Damage to or failure of this product caused by the use of detergents, cleaners,
chemicals or utensils other than those recommended in all instructions supplied with
the product.
7. Damage to or failure of parts or systems resulting from unauthorized modifications
made to this product.
Disclaimer of implied warranties; limitation of remedies
Customer's sole and exclusive remedy under this limitedwarranty shall be product repair
as provided herein_ Implied warranties, including warranties of merchantability or fitness
for a particular purpose, are limited to one year or the shortest period allowed by law.
Sears shall not be liable for incidental or consequential damages° Some states and
provinces do not allow the exclusion or limitation of incidental or consequential damages,
or limitations on the duration of implied warranties of merchantability or fitness, so these
exclusions or limitations may not apply to you.
This warranty applies only while this vacuum cleaner is used in the United States and
Canada.
This warranty gives you specific legal rights, and you may also have other rights which
vary from state to state.
Sears, Roebuck and Co., Hoffman Estates, IL 60179
Sears Canada Inc.,Toronto, Ontario, Canada M5B 2B8
U_
WARNING
Yn_Ursafety is importa.nt to us. To reduce the risk of fire, electrical shock,.
ury to persons or aamage when usm,g your vacuum meaner, tollow Dastc
safety precautions including the following:
Read all instructions in this manual before
assembling or using your vacuum cleaner.
Use your vacuum cleaner only as
described in this manual. Use only with
Sears recommended attachments°
Disconnect electdcal supply before
servicing or cleaning out brush area,
Failure to do so could result in electrical
shock or brush suddenly starting,
Do not leave vacuum cleaner when
plugged lno Unplug from outlet when not in
use and before servicing.
To reduce the dsk of electrical shock - Do
not use outdoors or on wet surfaces.
Do not allow tobe used as a toy. Close
attention is necessary when used by or
near children.
Do not use with damaged cord or plug. If
vacuum cleaner is not workingas itshould,
has been dropped, damaged, leftoutdoors,
or dropped intowater, return itto a Sears
Service Center.
Do not pull or carry by cord, use cordas a
handle, close door on cord, or pull cord
around sharp edges or corners_ Do not run
vacuum cleaner over cord. Keep cord away
from heated surfaces.
Do not unplug by pulling on cord. To
unplug, grasp the plug, not the cord.
Do not handle plug or vacuum cleaner with
wet hands.
Do not put any objects intoopenings.
Do not use with any openlng blocked; keep
free of dust, lint, hair and anything that may
reduce airflow,
Keep hair, loose clothing, fingers, and all
parts of body away from openings and
moving parts.
Turn off all controls before unplugging.
Use extra care when cleaning on stairs°Do
not put on chairs, tables, etc, Keep on
floor.
Do not use vacuum cleaner to pick up
flammable or combustible liquids (gasoline,
cleaning fluids, perfumes, etc.), or use in
areas where they may be presenL The
fumes from these substances can create a
fire hazard or explosion°
Do not pick up anything that is burningor
smoking, such as cigarettes, matches, or
hot ashes.
Do not use vacuum cleaner without dust
bag and/or filters in place.
Always change the dust bag after
vacuuming carpet cleaners or freshener,
powders and fine dust. These products clog
the bag, reduce airflow and can cause the
bag to burst. Failure to change bag could
cause permanent damage to the vacuum
cleaner.
Do not use the vacuum cleaner to pick up
sharp hard objects, small toys, pins, paper
clips, etc. They may damage the vacuum
cleaner or dust bag,
Do not operate vacuum cleaner without the
exhaust filter or exhaust filter door in place
(if applicable).
The hose contains electrical wires_Do not
use when damaged, cut, or punctured.
Replace ifcut or worn_Do not pick up
sharp objects.
Always turn off and unplug the vacuum
cleaner before connecting or disconnecting
either hose, Handi-Mata Jr.® (if applicable),
or nozzle.
Hold plug when rewinding onto cord reel.
Do not allow plug to whip when rewinding.
You are responsible for making sure that
your vacuum cleaner is not used by anyone
unable tooperate it properly.
SAVE THESE INSTRUCTIONS
Proper assembly and safe use of your vacuum cleaner are your responsibilities.
ur vacuum cleaner is intended fc_r Household use. Read this Owner's Manual
carefully for important use and safety information, This guide contains safety
statements under warning and caution symbols_
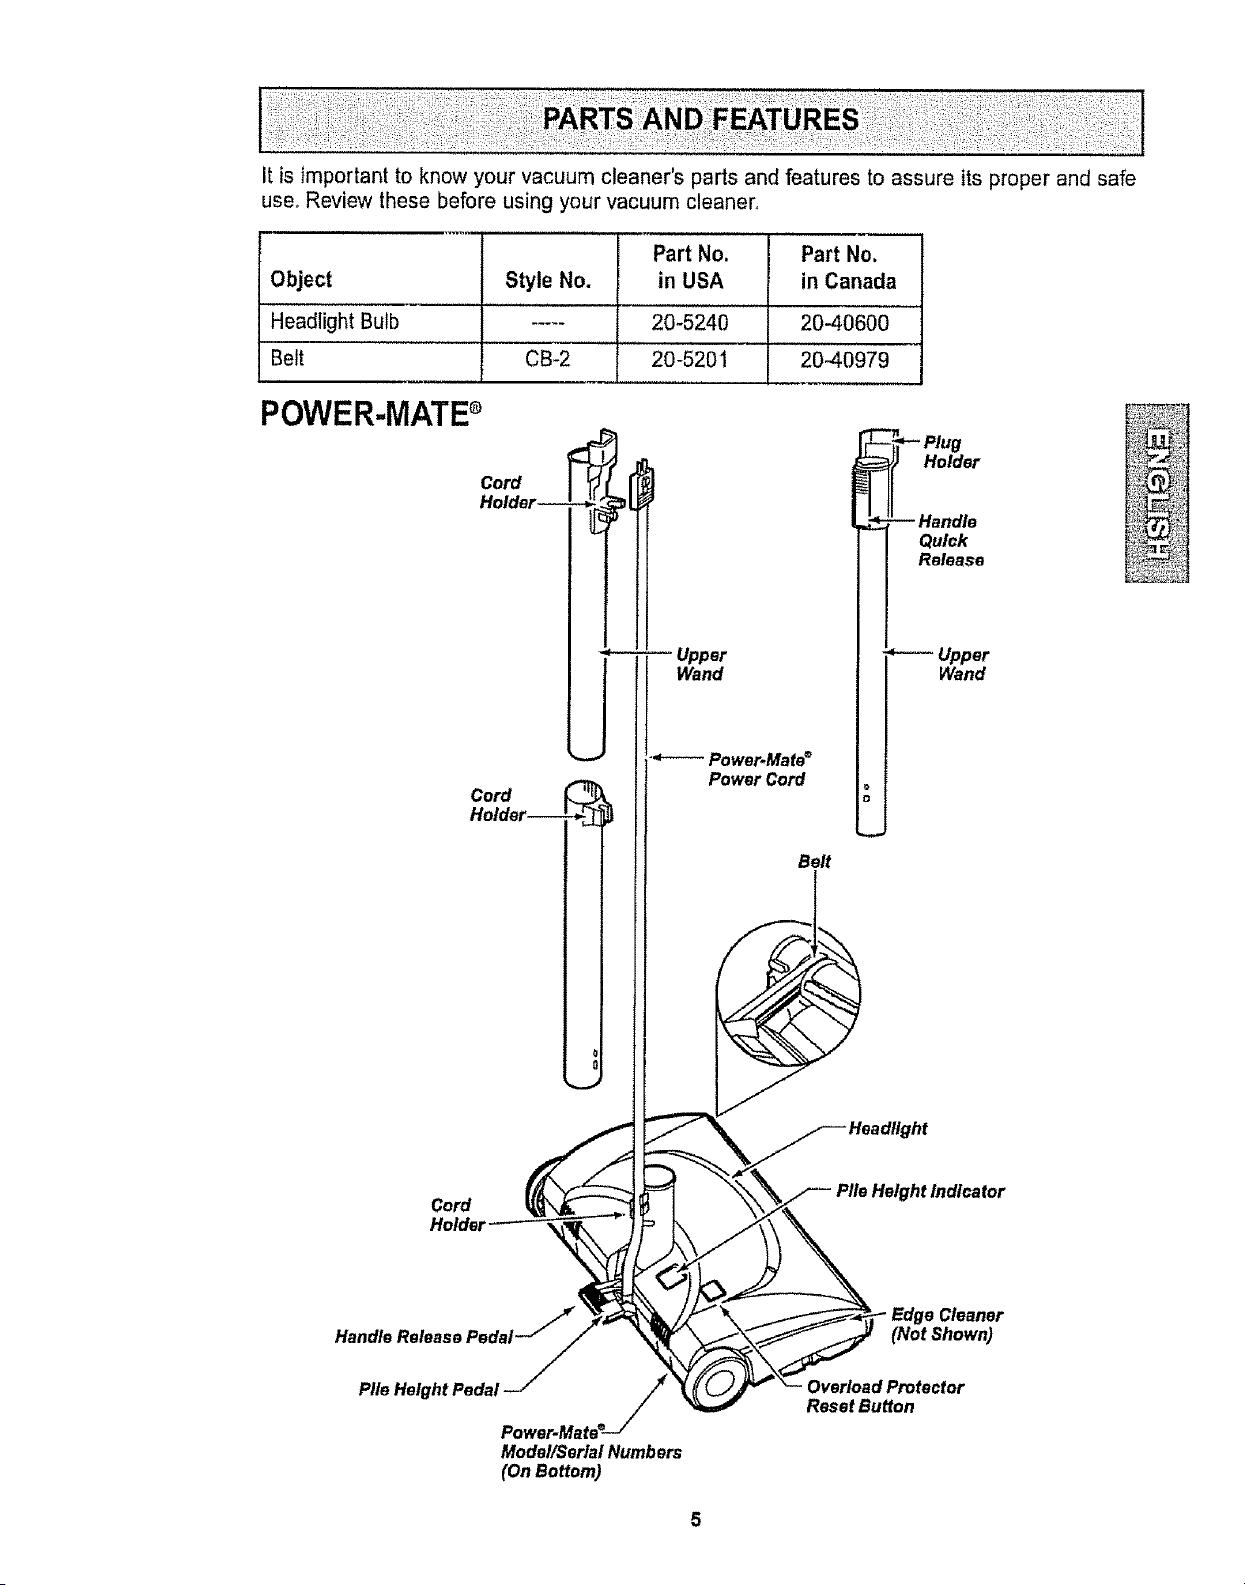
itisimportanttoknowyourvacuumcleaner'spartsandfeaturestoassureitsproperandsafe
use,Reviewthesebeforeusingyourvacuumcleaner°
PartNo. Part No.
Object Style No. in USA in Canada
Headlight Bulb ..... 20-5240 20-40600
Belt CB-2 20-5201 20-40979
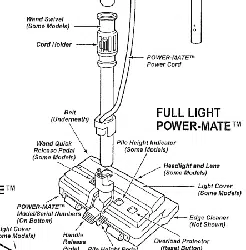
POWER-MATEs
Cord
Holder--
Cord
Holder--
Cord
-- Upper
Wand
,4----- Power.Mate=
Power Cord
Belt
-- Handle
Quick
Release
Upper
Wand
Height Indicator
Handle Release
Pile Height Pedal
Model[Serial Numbers
(On Bottom)
(Not Shown)
Overload Protector
Reset Button
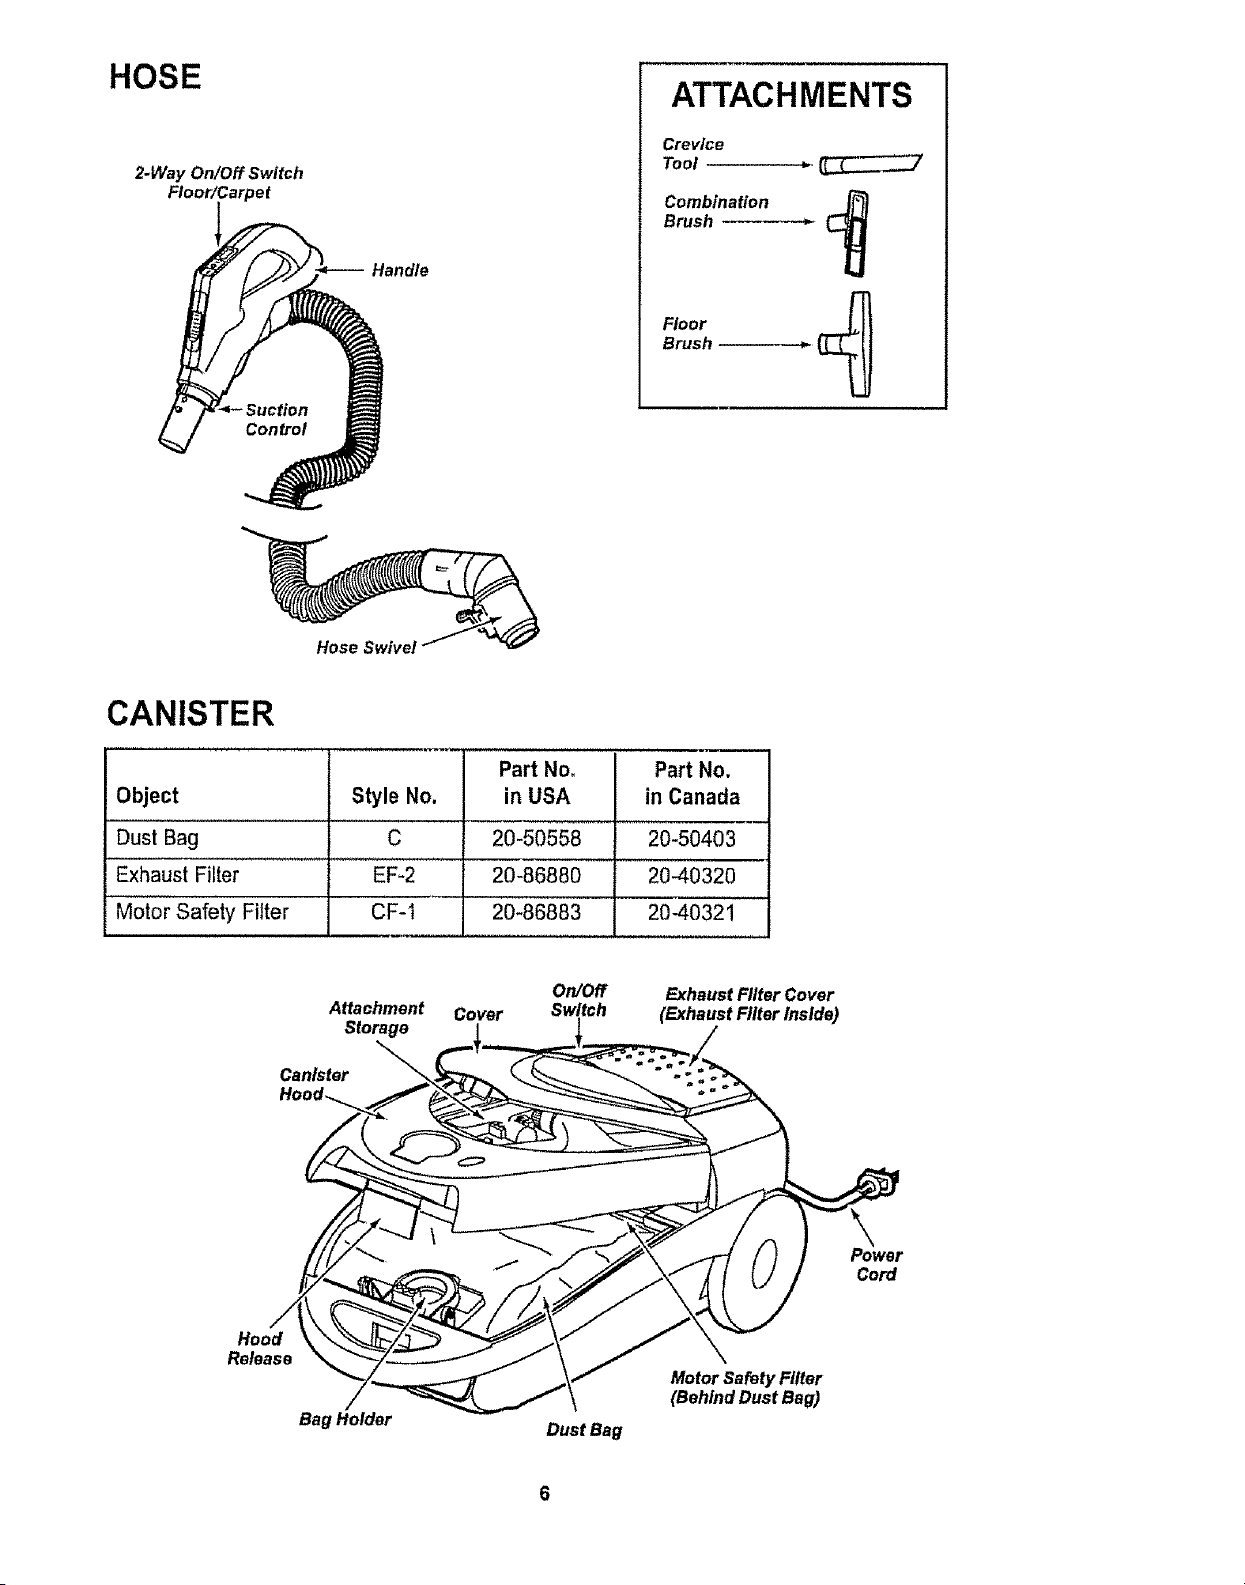
HOSE
2.Way On/Off Switch
Floor/Carpet
-_-- Hand/e
ATTACHMENTS
Crevice
Toot
Combination
Brush
Floor
Brush
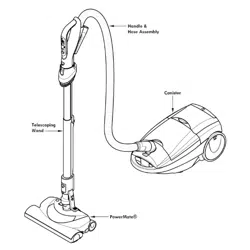
CANISTER
Part No_ Part No,
Object Style No. in USA in Canada
Dust Bag C 20-50558 20-50403
Exhaust Filter EF-2 20-86880 20-40320
Motor Safety Filter CF-I 20-86883 20-40321
Attachment Cover
Storage
Canister
On/Off
Switch
Exhaust Filter Cover
(Exhaust Filler Inside)
Cord
Hood
Re_ase
Bag Holder
Dust Bag
Motor Safety Filler
(Behind Dust Bag)

Please pay special attention to these hazard alert boxes, and follow any instruc-
tions given WARNING statements alert you to such dangers as fire, electric
shock, burns and personal injury. CAUTION statements alert you to such dangers
as personal injury and/or property damage.
WARNING
Electrical Shock Hazard
DO NOT plug into electrical supply until
assembly is complete, Failure to do so
could result in electrical shock or
injury.
, , ,,,,,,, ,, ,, , ,,,, , ,,,, , ,, ,,, ,, ,,,,,,,
Before assembling vacuum cleaner, check
the PACKING LIST on the cover of the
separate REPAIR PARTS LIST. Use this list
to verify that you have received all the
components of your new Kenmore vacuum
cleaner.
WANDS
Slide wands
together until
wand button
snaps into place.
m
Wand
8ut,o.-- iiI
Cord
POWER-MATE
1. Insert wands into Power-Mate _ until the
wand button snaps into place°
A tea
2. Connect Power-
Mate®plug and cord
as shown_ DO NOT
force. Raised area
of plug must be
toward hand.
3. Secure cord into
cord holder on wand
swivel
To remove: Disconnect cord, steady Power-
Mate ®with foot and turn wands until the
button disappears, then pull wands out of
Power-Mate _.
Handle
Wand
Button-------_,-
Cord
Holder --_*_
Wand
Wand
Button _ J
Cord
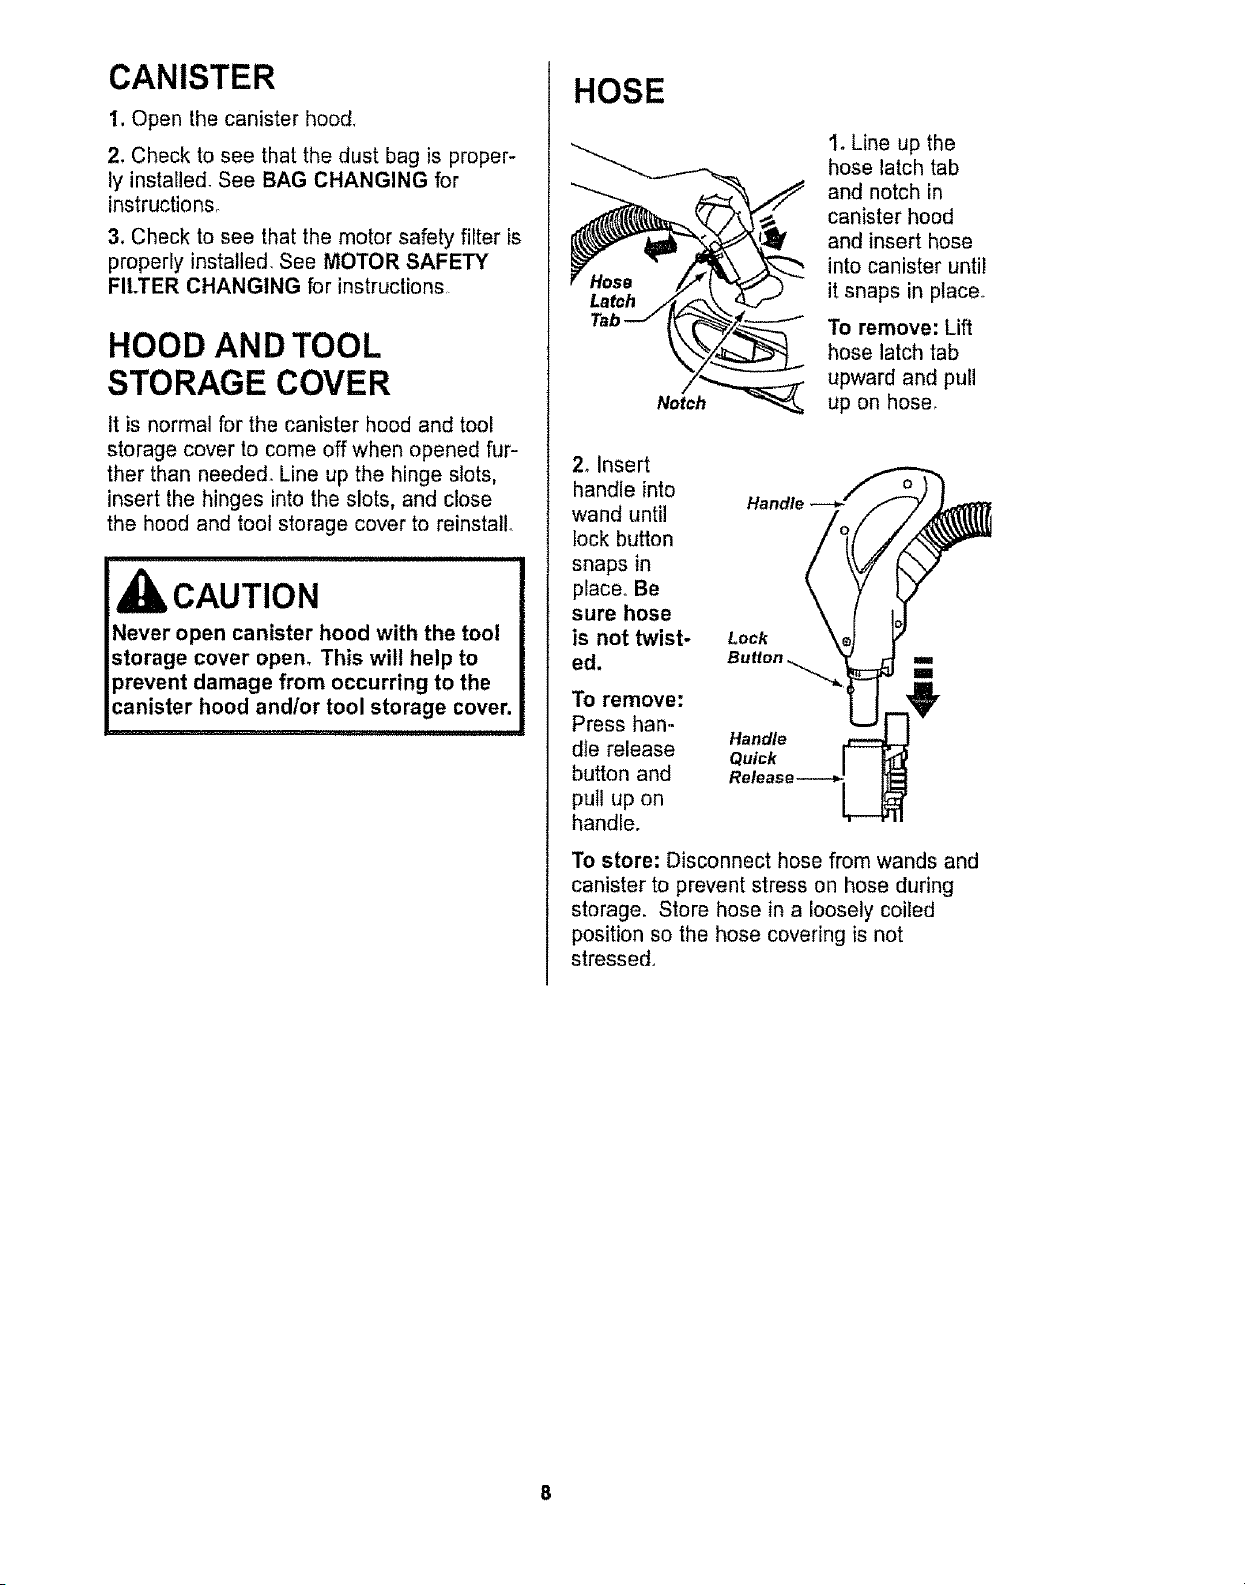
CANISTER
I. Open the canister hood+
2. Check to see that the dust bag is proper-
ly instatled. See BAG CHANGING for
instructions_
3. Check to see that the motor safety filter is
properly installed, See MOTOR SAFETY
FILTER CHANGING for instructions
HOOD AND TOOL
STORAGE COVER
It is normal for the canister hood and tool
storage cover to come off when opened fur-
ther than needed+ Line up the hinge slots,
insert the hinges into the slots, and close
the hood and tool storage cover to reinstall.
Ul
I CAUTION
Never open canister hood with the tool
storage cover open+ This will help to
prevent damage from occurring to the
canister hood and/or tool storage cover.
HOSE
Latch
Notch
1+Line up the
hose latch tab
and notch in
canister hoed
and insert hose
into canister until
it snaps in place.
To remove: Lift
hose latch tab
upward and pull
up on hose
2+ Insert
handle into
wand until
lock button
snaps in
place+ Be
sure hose
is not twist-
ed.
To remove:
Press han-
dle release
button and
pull up on
handle.
Lock
Handle
Quick
To store: Disconnect hose from wands and
canister to prevent stress on hose during
storage. Store hose in a loosely coiled
position so the hose covering is not
stressed+
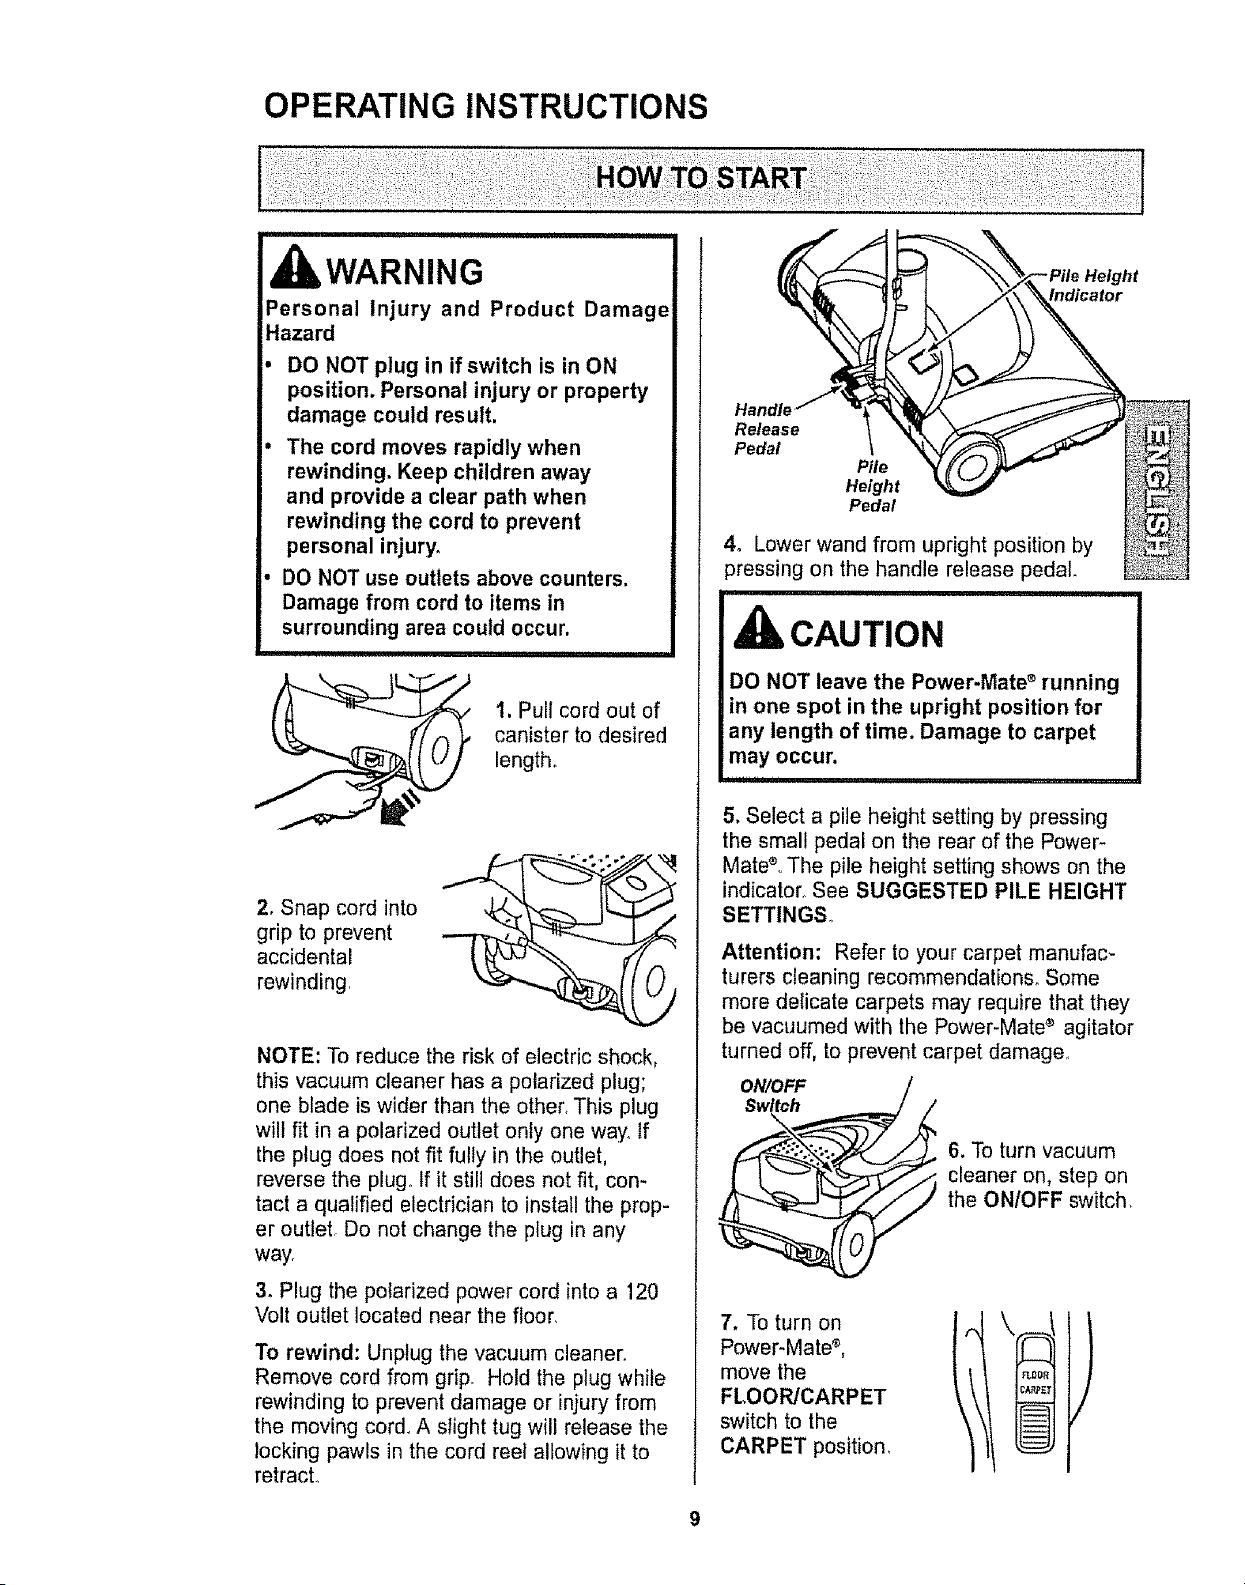
OPERATING INSTRUCTIONS
, WARNING
Personal Injury and Product Damage
Hazard
DO NOT plug in if switch is in ON
position. Personal injury or property
damage could result.
The cord moves rapidly when
rewinding, Keep children away
and provide a clear path when
rewinding the cord to prevent
personal injury,
DO NOT use outlets above counters.
Damage from cord to items in
surrounding area could occur.
1. Pull cord out of
canister to desired
length.
2, Snap cord into
grip to prevent
accidental
rewinding,
.o;..°
NOTE: To reduce the risk of electric shock,
this vacuum cleaner has a polarized plug;
one blade is wider than the other, This plug
will fit in a polarized outlet only one way. if
the plug does not fit fully in the outlet,
reverse the plug,. If it still does not fit, con-
tact a qualified electrician to install the prop-
er outlet. Do not change the plug in any
way.
3. Plug the polarized power cord into a 120
Volt outlet located near the floor,
To rewind: Unplug the vacuum cleaner.
Remove cord from grip. Hold the plug while
rewinding to prevent damage or injury from
the moving cord, A slight tug will release the
locking pawls in the cord reel allowing it to
retracL
Height
Indicator
Release
Pedal
Pile
Height
Pedal
4o Lower wand from upright position by
pressing on the handle release pedal
CAUTION
DO NOT leave the Power-Mate ®running
in one spot in the upright position for
any length of time, Damage to carpet
may occur.
,, ,,,,, ,,
5. Select a pile height setting by pressing
the small pedal on the rear of the Power-
MateZ,,The pile height setting shows on the
indicator_ See SUGGESTED PILE HEIGHT
SETTINGS,,
Attention: Refer to your carpet manufac-
turers cleaning recommendations. Some
more delicate carpets may require that they
be vacuumed with the Power-Mate ® agitator
turned off, to prevent carpet damage,,
ON/OFF /
-':::-i._-. 6. To turn vacuum
_ cleaner on, step on
the ON/OFF switch,
7. To turn on
Power-Mate _,
move the
FLOOR/CARPET
switch to the
CARPET position,
I FL[}[_R I
IC_£TI
®
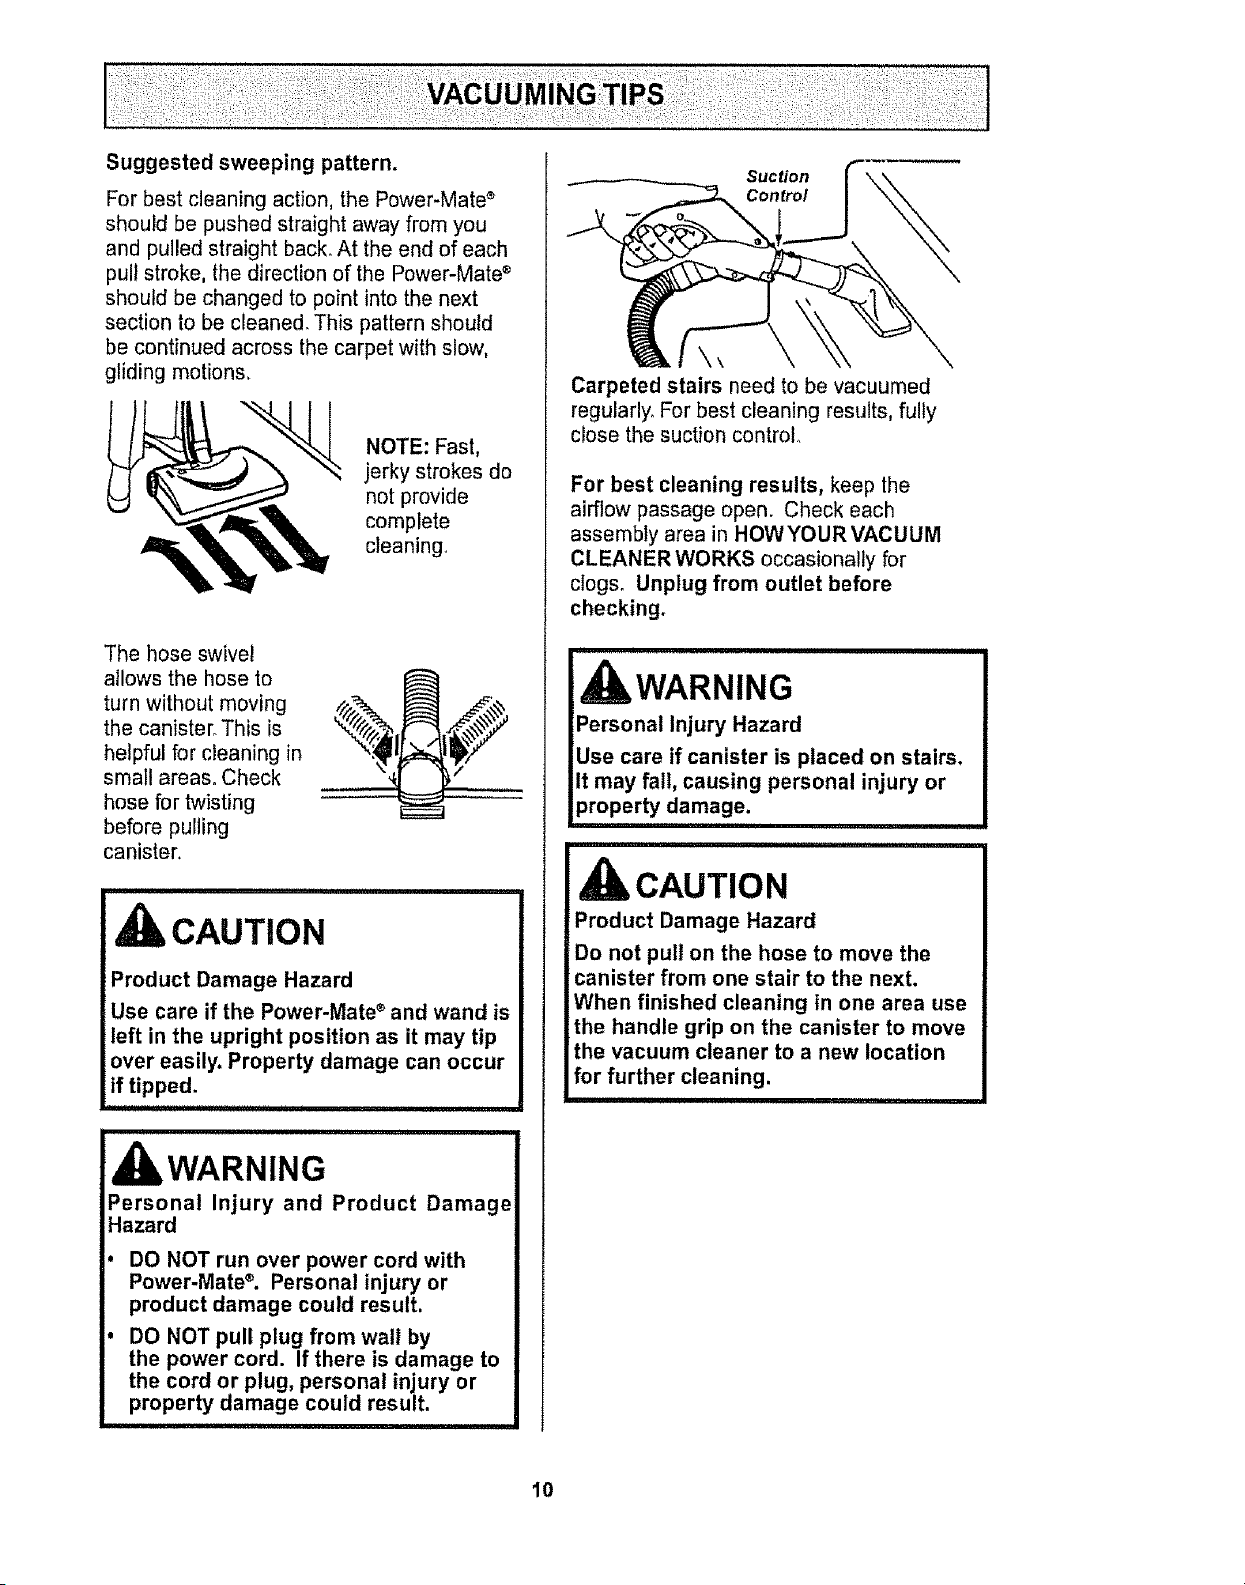
Suggested sweeping pattern.
For best cleaning action, the Power-Mate ®
should be pushed straight away from you
and pulled straight back. At the end of each
pull stroke, the direction of the Power-Mate ®
should be changed to point into the next
section to be cleaned_ This pattern should
be continued across the carpet with slow,
gliding motions_
NOTE: Fast,
jerky strokes do
not provide
complete
cleaning,
The hose swivel
allows the hose to
turn without moving
the canister, This is
helpful for cleaning in
small areas. Check
hose for twisting
before pulling
canister,
CAUTION
Product Damage Hazard
Use care if the Power-Mate ®and wand is
left in the upright position as it may tip
over easily. Property damage can occur
if tipped,
i
WARNING
Personal Injury and Product Damage
Hazard
DO NOT run over power cord with
Power-Mate ®. Personal injury or
product damage could result.
DO NOT pull plug from walt by
the power cord. If there is damage to
the cord or plug, personal injury or
property damage could result.
i i
Suction
Control
\\
Carpeted stairs need to be vacuumed
regularly° For best cleaning results, fully
close the suction control_
For beet cleaning results, keep the
airflow passage open. Check each
assembly area in HOWYOURVACUUM
CLEANER WORKS occasionally for
clogs. Unplug from outlet before
checking.
I WARNING
Personal Injury Hazard
Use care if canister is placed on stairs,
It may fail, causing personal injury or
property damage.
CAUTION
Product Damage Hazard
Do not pull on the hose to move the
canister from one stair to the next.
When finished cleaning in one area use
the handle grip on the canister to move
the vacuum cleaner to a new location
for further cleaning.
,,1111
10
For best deep down cleaning, use the XLO
setting. However, you may need to raise the
height to make some jobs easier, such as
scatter rugs and some deep pile carpets,
and to prevent the vacuum cleaner from
shutting off. Suggested settings are:
HI - Shag, deep pile, or scatter rugs°
MED - Medium to deep pile.
LO - Low to medium piled
XLO - Most carpets and bare floors,
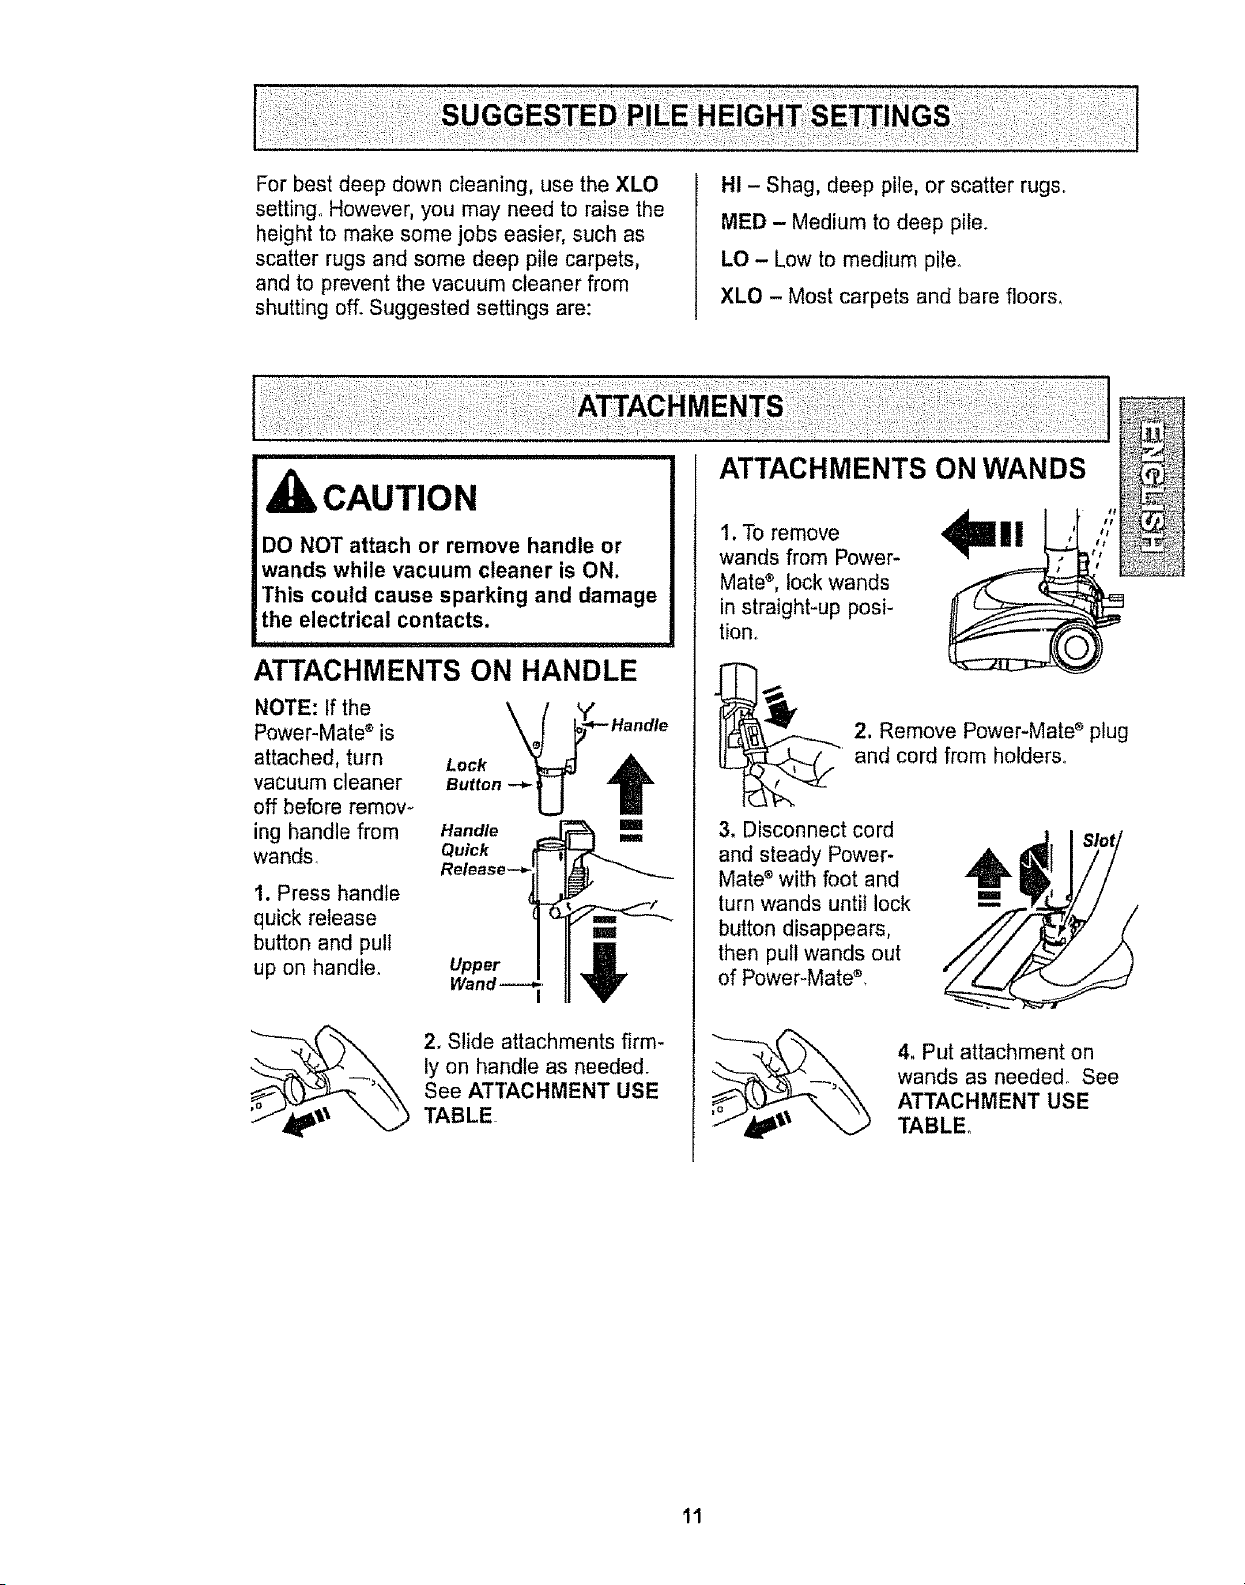
ATTACHMENTS ON WANDS
CAUTION
DO NOT attach or remove handle or
wands while vacuum cleaner is ON.
This could cause sparking and damage
the electrical contacts.
1111, , , ._.
ATTACHMENTS ON HANDLE
NOTE: If the \_ __
Power-Mate _ is Handle
attached, turn Lock t
vacuum cleaner Button "_L
off before remov e
ing handle from Handle
wands. Quick
Release-_
1. Press handle
quick release
button and pull
up on handle.
Upper
Wand--
2. Slide attachments firm-
ly on handle as needed.
See ATTACHMENT USE
TABLE.
,,4
1. To
remove _ll I !
wands from Power-
Mate ®, lock wands
in straight-up posi-
tion,,
2. Remove Power-Mate _ plug
and cord from holders,,
3. Disconnect cord
and steady Power-
Mate _ with foot and
turn wands until lock
button disappears,
then pull wands out
of Power-Mate ®.
4. Put attachment on
wands as needed° See
ATTACHMENT USE
TABLE.
tl
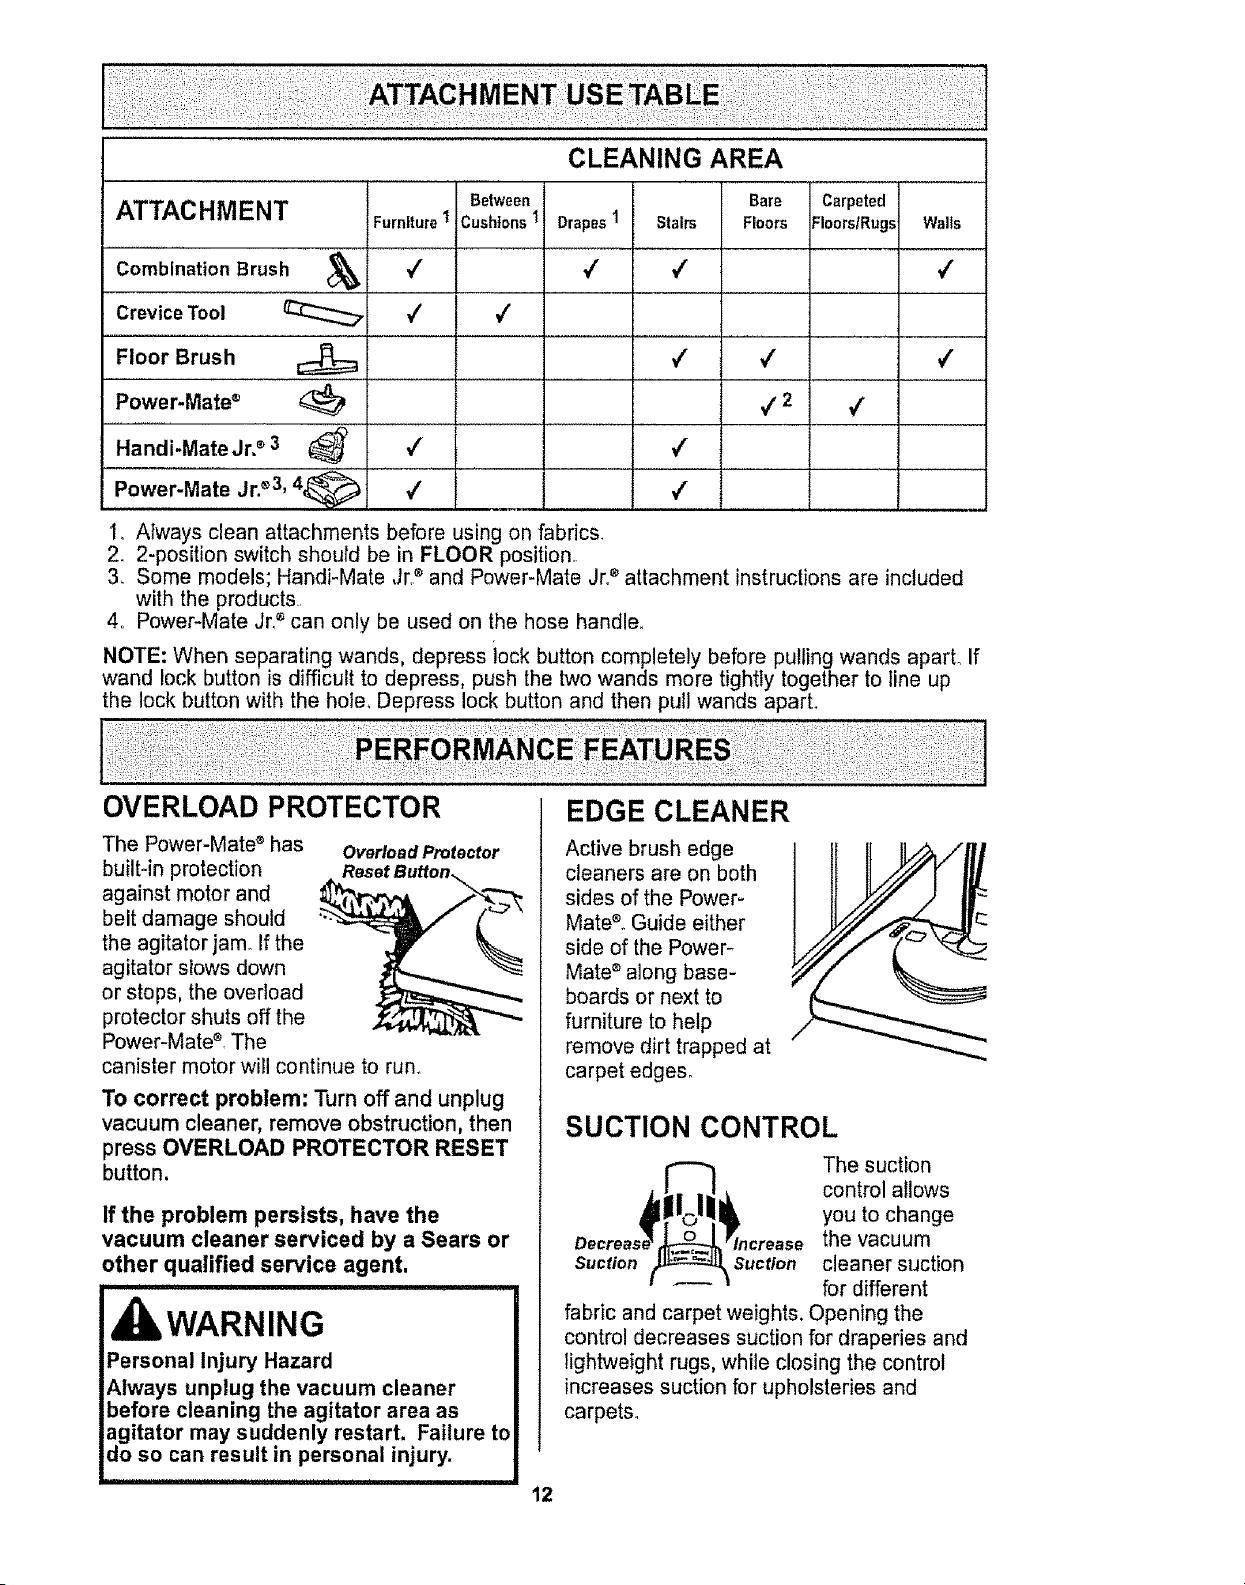
ATTACHMENT
,._......................... L ............ •
Between
FurnitureI Cushions1
Combination Brush _ V"
ii i i
v'
Power.Mai'e jr.®3, 4_ ' V•
CLEANING AREA
Drapes1
Stairs
Crevice Tool
Floor Brush
Power.Mate ®
Handi-Mate Jr2 3
4
4
Bare
Floors
4
v" ,/
V'2
,/
4
Carpeted
Floors/Rugs Walls
/
/
4
Always clean attachments before using on fabrics.
2. 2-position switch should be in FLOOR position,
3. Some models; Handi-Mate Jr,®and Power-Mate Jr,®attachment instructions are included
with the products
4o Power*Mate Jr2 can only be used on the hose handle°
NOTE: When separating wands, depress iock button completely before pulling wands aparL If
wand lock button is difficult to depress, push the two wands more tightly together to tine up
the lock button with the hole, Depress lock button and then pull wands aparL
OVERLOAD PROTECTOR
The Power-Mate ®has
built-in protection
against motor and
belt damage should
the agitator jamo If the
agitator slows down
or stops, the overload
protector shuts off the
Power-Mate s.The
canister motor will continue to run,
Overload Protector
Reset Button
To correct problem: Turn off and unplug
vacuum cleaner, remove obstruction, then
press OVERLOAD PROTECTOR RESET
button.
If the problem persists, have the
vacuum cleaner serviced by a Sears or
other qualified service agent,
i i i
, WARNING
Personal Injury Hazard
Always unplug the vacuum cleaner
before cleaning the agitator area as
agitator may suddenly restart, Failure to
do so can result in personal injury.
12
EDGE CLEANER
Active brush edge
cleaners are on both
sides of the Power-
Mate®_Guide either
side of the Power_
Mate ®along base-
boards or next to
furniture to help
remove dirt trapped at
carpet edges°
SUCTION CONTROL
The suction
control allows
you to change
the vacuum
Suction Suction cleaner suction
for different
fabric and carpet weights. Opening the
control decreases suction for draperies and
lightweight rugs, while closing the control
increases suction for upholsteries and
carpets_
THERMALPROTECTOR
This vacuum cleaner has a thermal protector
which automatically tripsto protect the
vacuum cleaner from overheating. If a clog
prevents the normal flow of air to the motor,
the thermal protector turns the motor off
automatically° This allows the motor to cool
in order to prevent possible damage to the
vacuum cleaner_
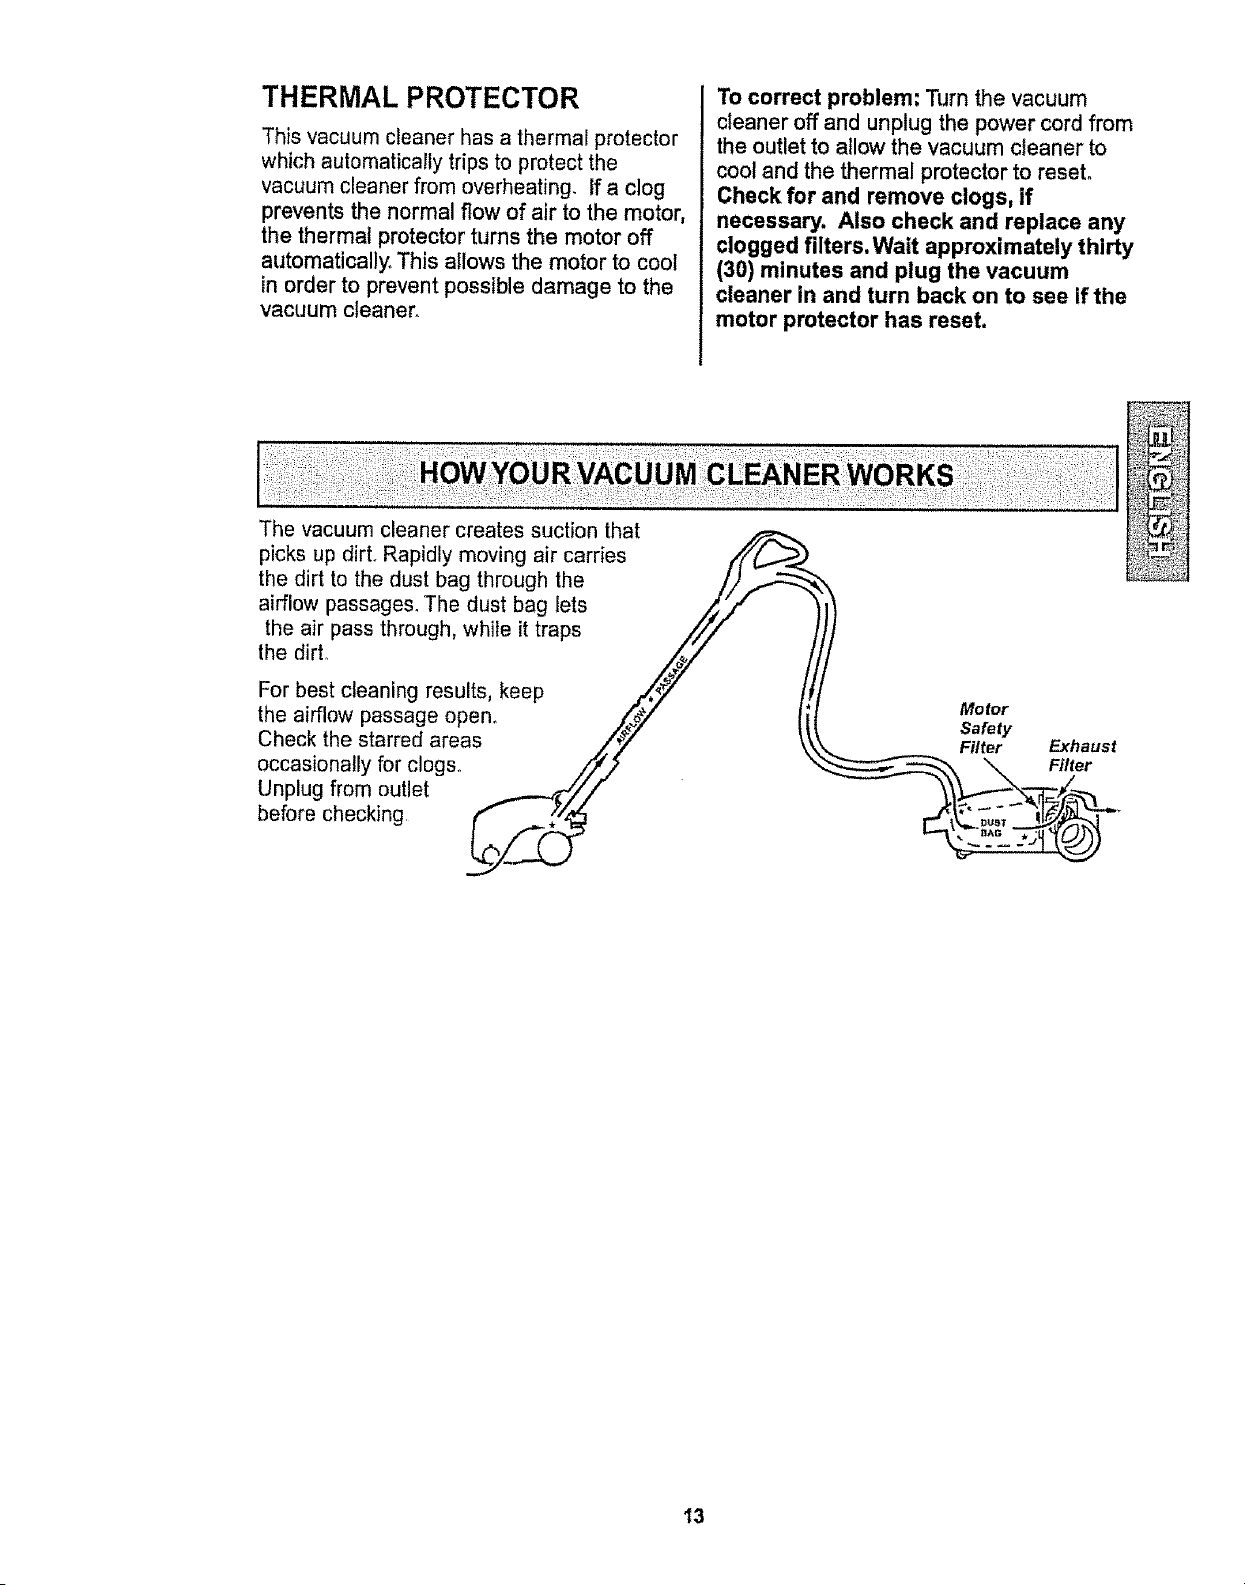
The vacuum cleaner creates suction that
To correct problem: Turn the vacuum
cleaner off and unplug the power cordfrom
the outlet to allow the vacuum cleaner to
cool and the thermal protector to reset.
Check for and remove clogs, if
necessary. Also check and replace any
clogged filters. Wait approximately thirty
(30) minutes and plug the vacuum
cleaner In and turn back on to see if the
motor protector has reset.
picks up dirt° Rapidly moving air carries f(/(1.._<)
the dirt to the dust bag throughthe //)_
k
airflow passages. The dust bag lets _.Y' _I!
the air pass through, while ittraps JJ',/
Y
For best cleaning results, keep .t_,_y
the airflow passage open. /__y Motor
Check the starred areas ._'#// safety
Filter Exhaust
occasionally for clogs.. /FJj_ _\ x,. Filter
_:-_l o ii 104
13
CANISTER CARE
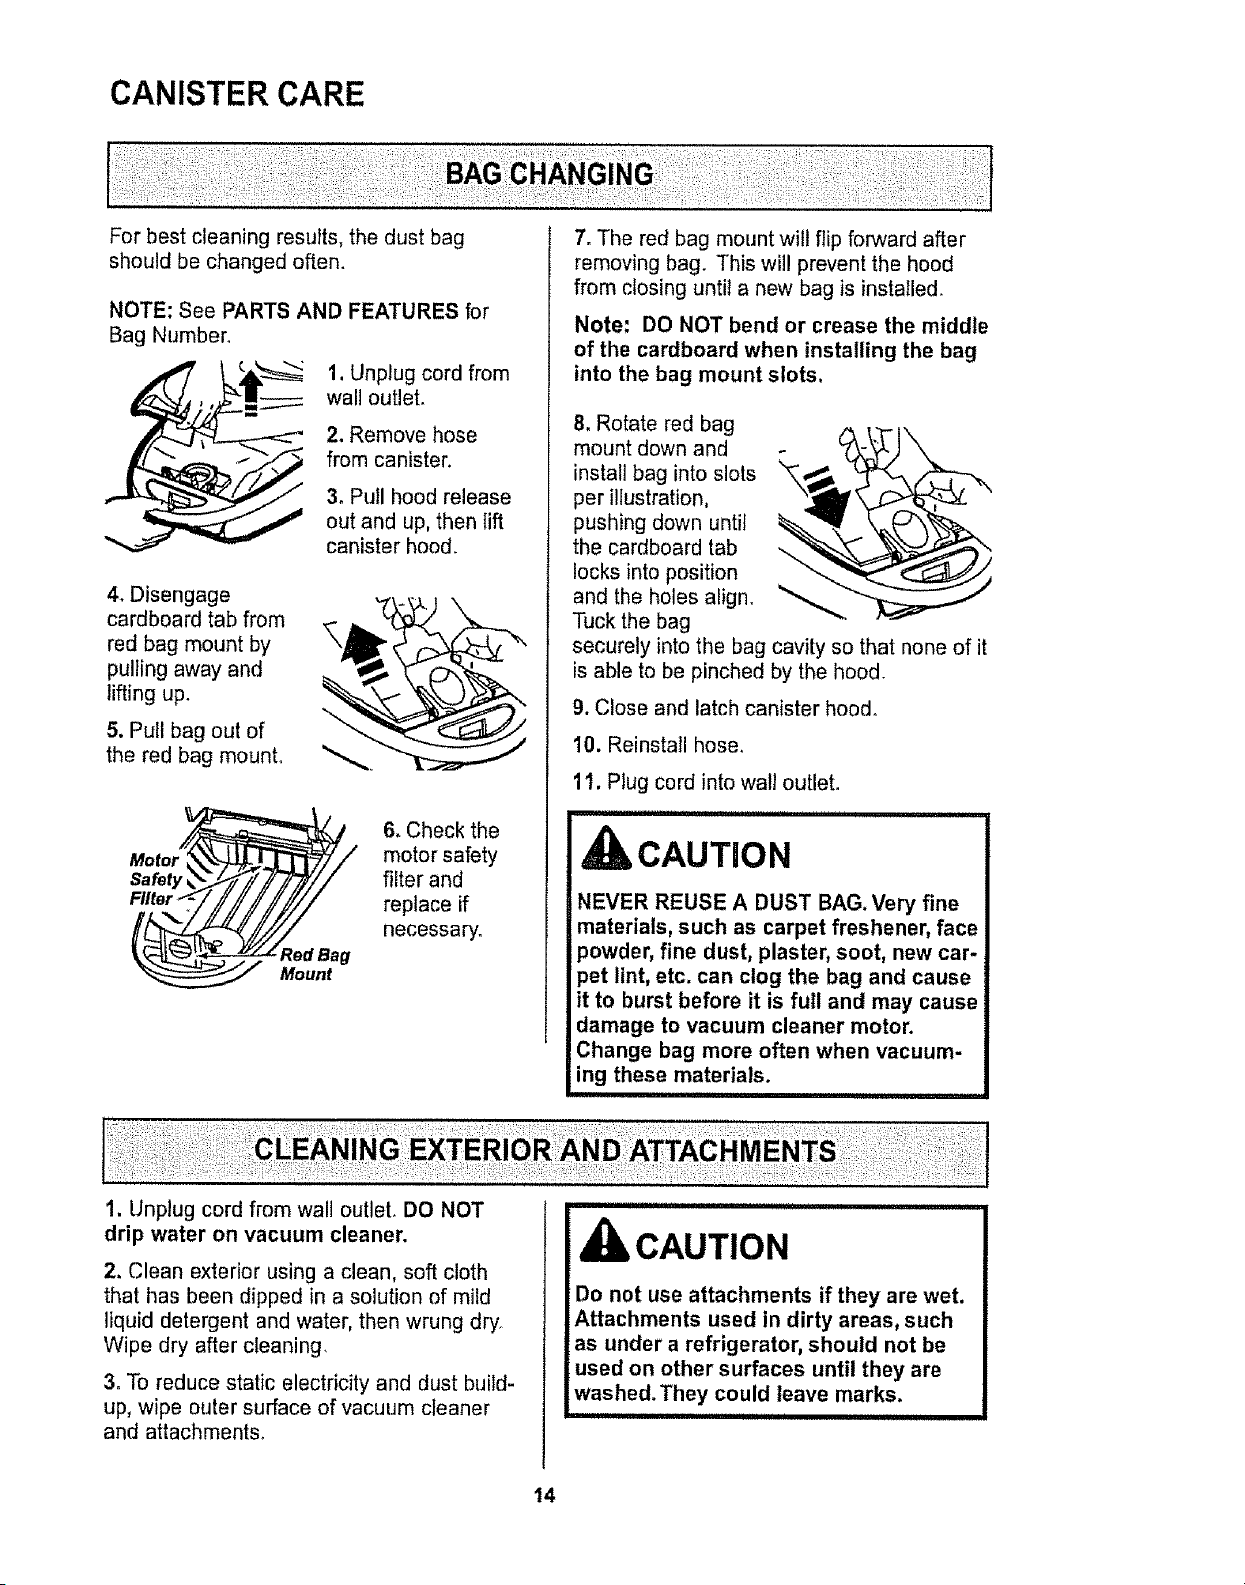
For best cleaning results, the dust bag
should be changed often.
NOTE: See PARTS AND FEATURES for
Bag Number°
1, Unplug cord from
wall outlet.
2. Remove hose
from canister.
3. Pull hood release
out and up, then lift
canister hood.
4+Disengage
cardboard tab from
red bag mount by
pulling away and
lifting up.
5. Pull bag out of
the red bag mount.
\
Motor_
Filter_/ // /i// //////
Mount
6+Check the
motor safety
filter and
replace if
necessary.
7. The red bag mount will flip forward after
removing bag. This will prevent the hood
from closing until a new bag is installed.
Note: DO NOT bend or crease the middle
of the cardboard when installing the bag
into the bag mount slots.
8, Rotate red bag
mount down and
install bag into slots
per illustration,
pushing down until
the cardboard tab
locks into position
and the holes align°
Tuck the bag
securely into the bag cavity so that none of it
is able to be pinched by the hood.
9. Close and latch canister hood_
10. Reinstall hose.
11, Plug cord into wall outlet.
i1,,11,11,1111111,111i iiiii ii
CAUTION
NEVER REUSE A DUST BAG. Very fine
materials, such as carpet freshener, face
_owder, fine dust, plaster, soot, new car-
_et lint, etc. can clog the bag and cause
it to burst before it is full and may cause
damage to vacuum cleaner motor.
Change bag more often when vacuum-
ing these materials.
1, Unplug cord from wall outlet. DO NOT
drip water on vacuum cleaner.
2. Clean exterior using a clean, soft cloth
that has been dipped in a solution of mild
liquid detergent and water, then wrung dry.
Wipe dry after cleaning,
3. To reduce static electricity and dust build-
up, wipe outer surface of vacuum cleaner
and attachments+
iiimlllll,ll,lll,i ii1_ ,
kCAUTION
Do not use attachments if they are wet.
Attachments used in dirty areas, such
as under a refrigerator, should not be
used on other surfaces until they are
washed. They could leave marks.
i i,iiii1,111111iii ii i ii , i
14
w
WARNING
Electrical Shock Hazard
Unplug power cord from electrical
outlet. Do not operate the vacuum
cleaner without the motor safety filter,
Be sure the filter is dry and properly
installed to prevent motor failure and/or
electrical shock.
MOTOR SAFETY FILTER
ELECTROSTATIC
This filter must be replaced when dirty, It
should be replaced regularly depending on
use conditions, The filter CANNOT be
washed as it will lose its dust trapping
ability.
NOTE: See PARTS AND FEATURES for
Filter Number,
1. Remove the bag as outlined in the BAG
CHANGING section.
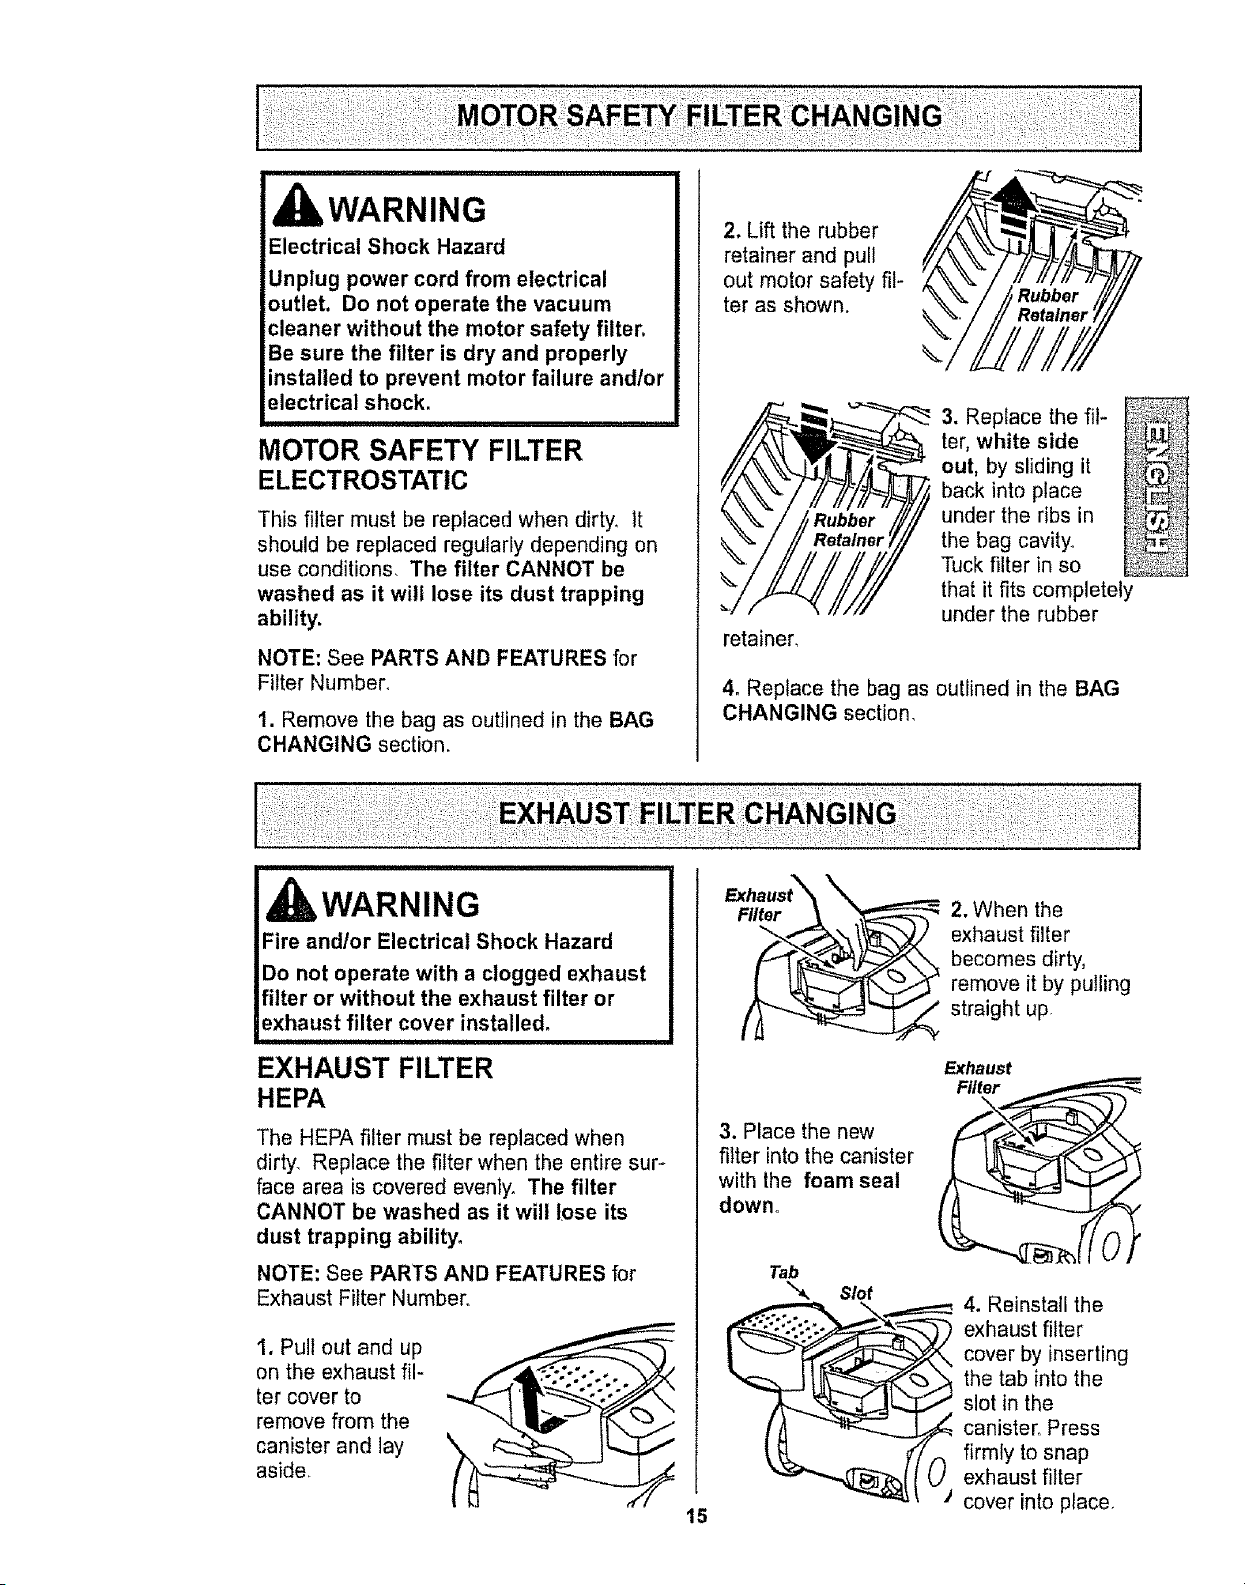
2. Lift the rubber
retainer and pull
out motor safety fil-
ter as shown.
retainer,
3. Repiace the fil-
ter, white side
out, by sliding it
back into place
under the ribs in
the bag cavity
Tuck filter in so
that it fits completely
under the rubber
4, Replace the bag as outlined in the BAG
CHANGING section,
,WARNING
Fire andtor Electrical Shock Hazard
Do not operate with a clogged exhaust
filter or without the exhaust filter or
exhaust filter cover installed.
,, ,, ,,,, ,,, ,, ,,,, , ,, , , ,,,,, ,,, , ,
EXHAUST FILTER
HEPA
The HEPA filter must be replaced when
dirty. Replace the filter when the entire sur-
face area is covered evenly, The filter
CANNOT be washed as it will lose its
dust trapping ability.
NOTE: See PARTS AND FEATURES for
Exhaust Filter Number
1, Pull out and up
on the exhaust fil-
ter cover to
remove from the
canister and lay
aside,
Exhaust_ X
FI/_r,_ - 2. When the
_ xhaust filter
becomes dirty,
remove it by pulling
straight up
Exhaust
Filter
\
3. Place the new
filter into the canister
with the foam seal
down°
15
Tab
(
"_ s/of
._ . Reinstall the
exhaust filter
___ cover by inserting
the tab into the
slot in the
canister, Press
_'"-_ 0 firmly to snap
exhaust filter
cover into place,
POWER-MATE s CARE
Always follow all safety precautions when
performing maintenance to the Power.-
Mate ®,
li, WARNING
Electrical Shock Or Personal Injury
Hazard
Disconnect electrical supply before
performing maintenance to the vacuum
cleaner. Failure to do so could result in
electrical shock or personal injury from
vacuum cleaner suddenly starting.
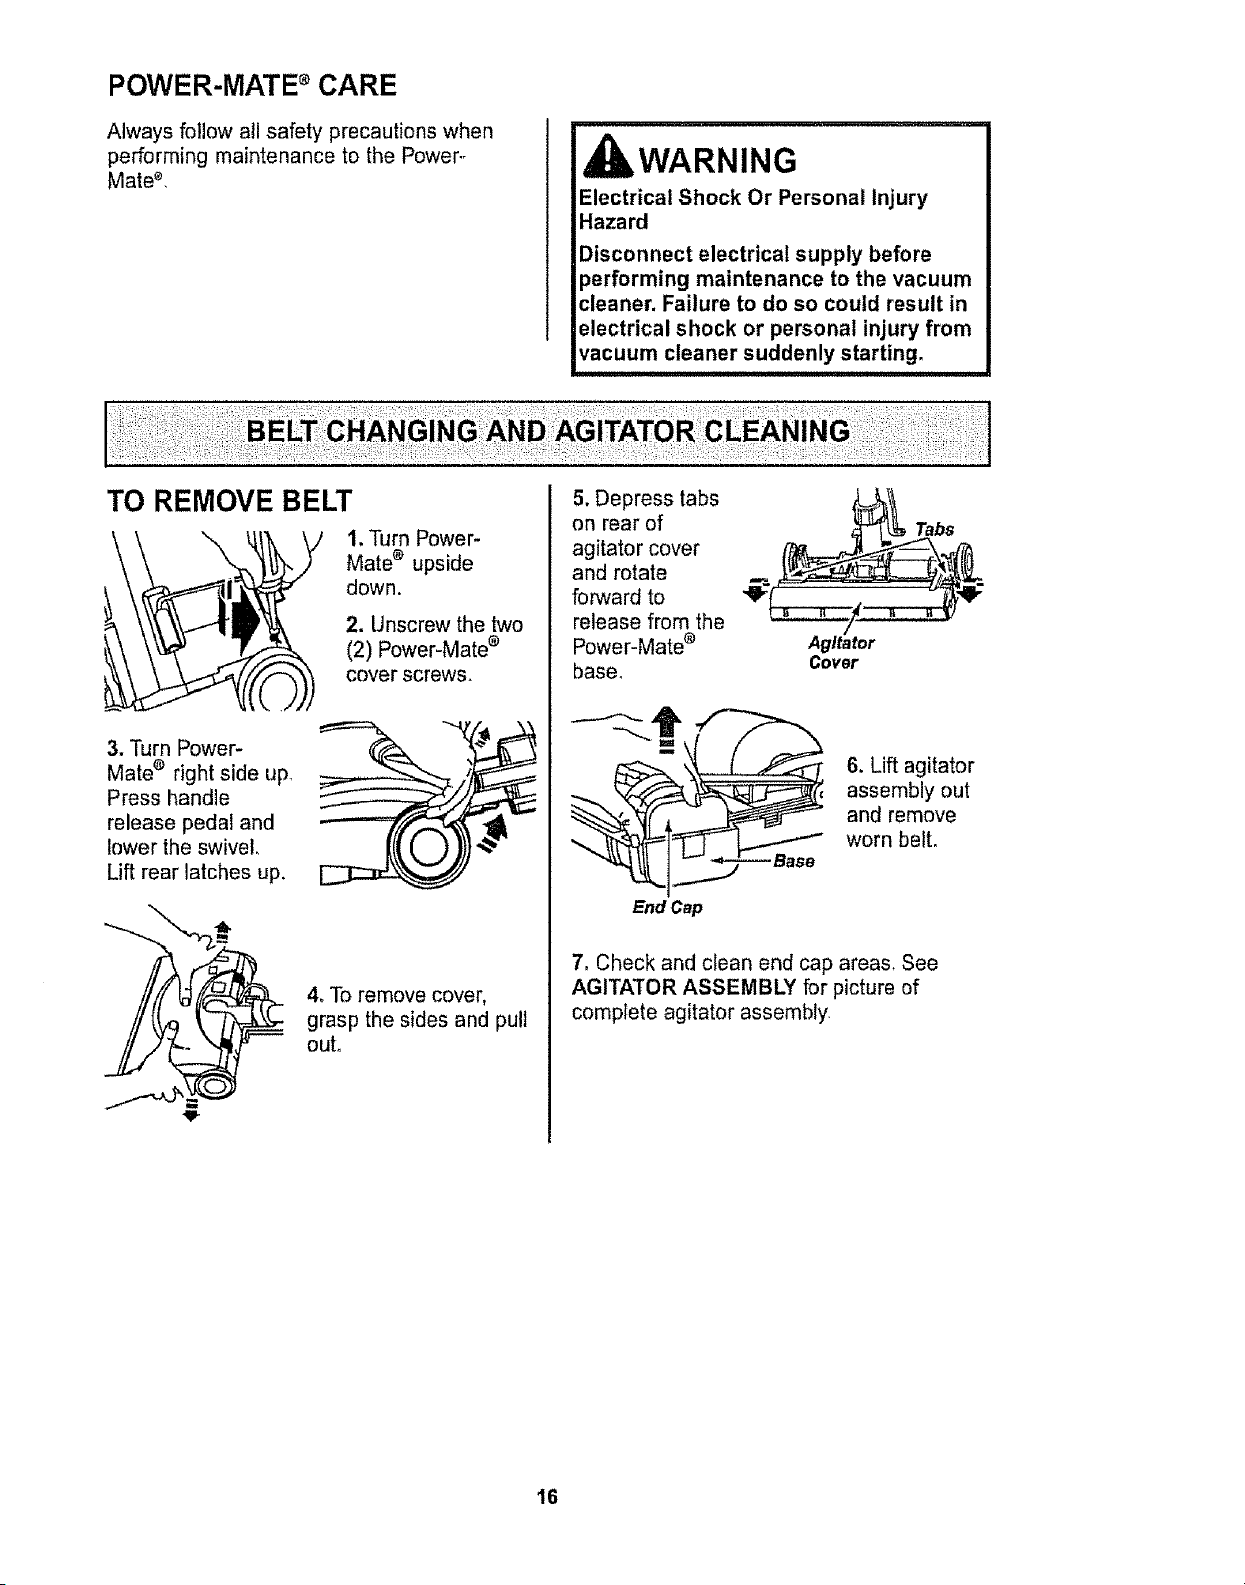
TO REMOVE BELT
3. Turn Power-
Mate s right side up,
Press handle
release pedal and
lower the swivel,
Lift rear latches up.
1, Turn Power-
Mate _ upside
down.
2. Unscrew the two
(2) Power-Mate s
cover screws.
4oTo remove cover,
grasp the sides and pull
out,
5, Depress tabs
on rear of
agitator cover
and rotate
forward to
release from the
Power-Mate _
base,
Agitator
Cover
End Cap
Tabs
6. Lift agitator
assembly out
and remove
worn belt.
7. Check and clean end cap areas. See
AGITATOR ASSEMBLY for picture of
complete agitator assembly
16
TO CLEAN AGITATOR:
NOTE: In order to keep cleaning efficiency
high and to prevent damage to your vacuum
cleaner, the agitator must be cleaned every
time the belt is changed.
The agitator must also be cleaned according
to the following schedule:
Vacuum Cleaner Use
HEAVY -
(used daily)
MODERATE -
(used 2-3 times/week)
LIGHT -
(used I time/week)
Clean Agitator
every week
every month
every 2 months
IMPORTANT
Disconnect vacuum cleaner from
electrical outlet. Check and remove hair,
string and tint build-up frequently in the
Power-Mate ® agitator and end cap areas.
Remove any dirt or debris in the belt path
area or in the brush roller area.
Carefully remove any string or debris
located on the agitator, or end caps.
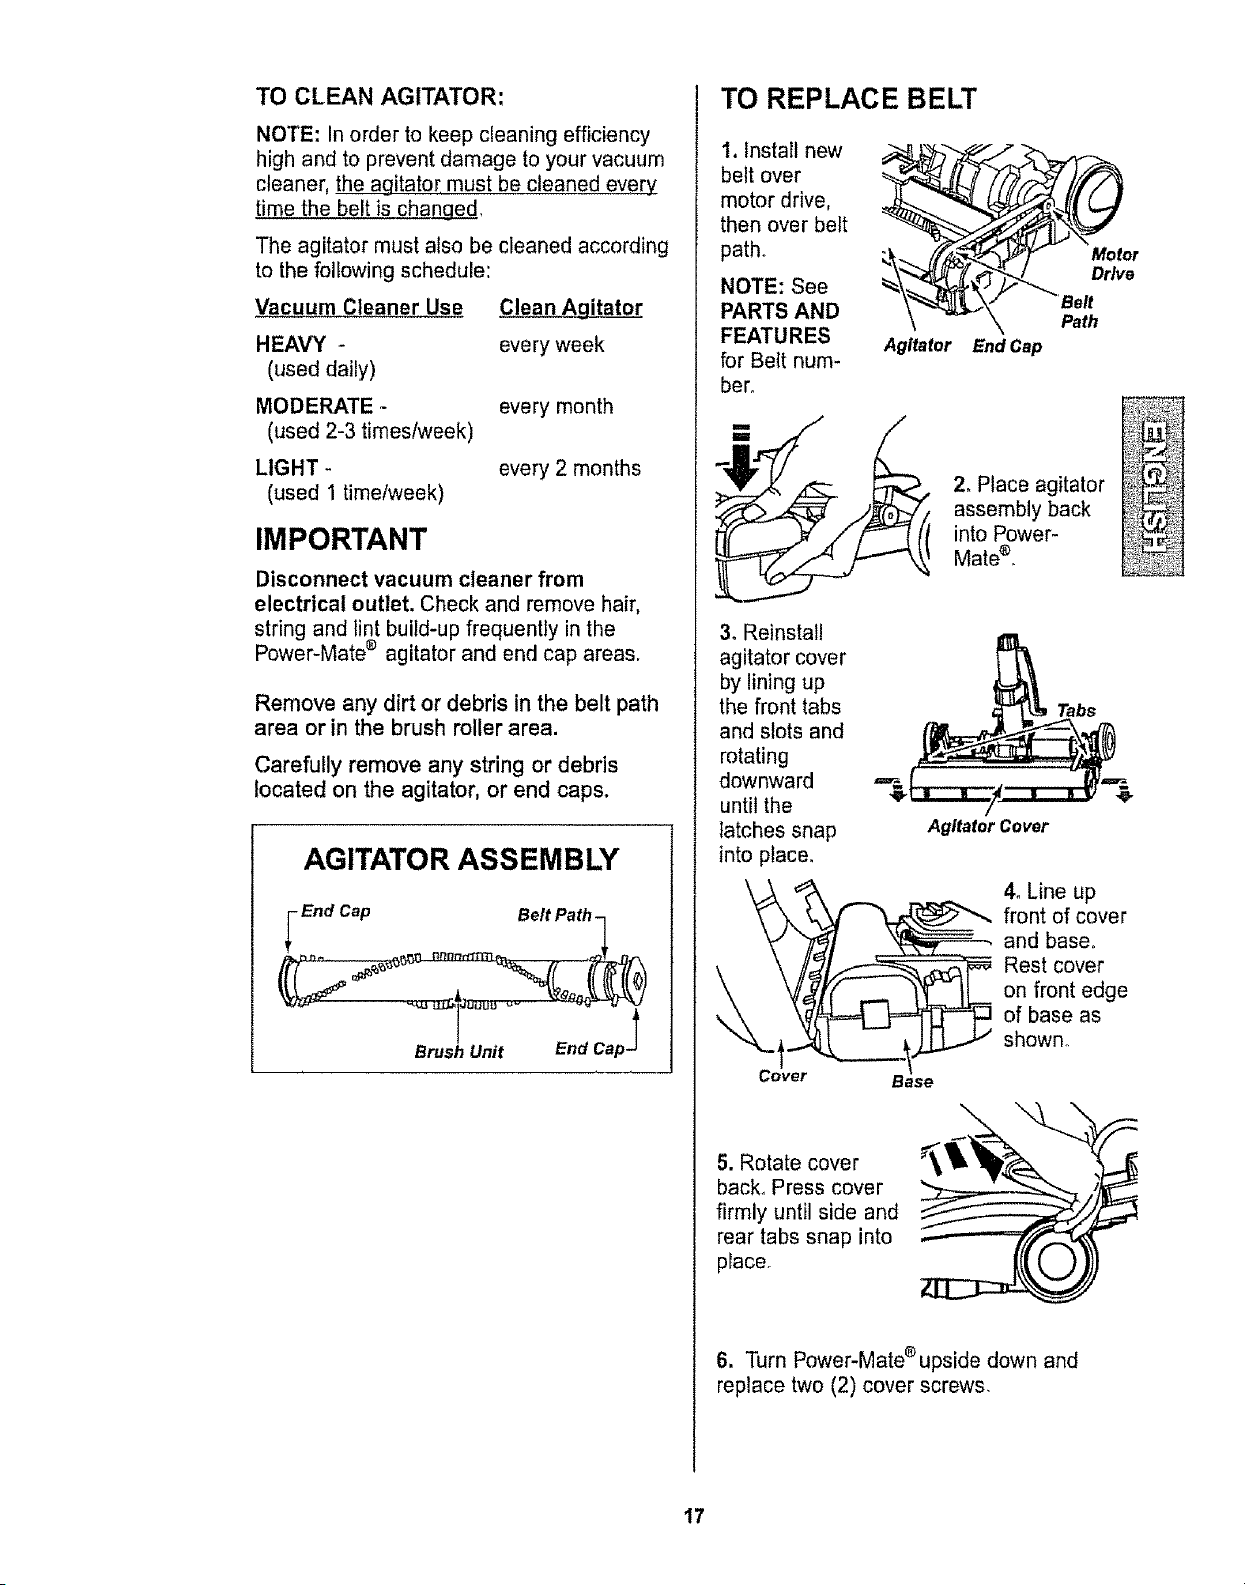
AGITATOR ASSEMBLY
_ End Cap Belt Path-
Brush Unit End Cap-
TO REPLACE BELT
1. Install new
belt over
motor drive,
then over belt
path,
NOTE: See
PARTS AND
FEATURES
for Bett num-
bero
\_\-" -Belt
\ _T \ Path
Agitator End Cap
2. Place agitator
assembly back
into Power-
Mate _,
3. Reinstall
agitator cover
by lining up
the front tabs
and slots and
rotating
downward
until the
Iatches snap
into place.
Agitator Cover
Tabs
4. Line up
front of cover
and base°
Rest cover
on front edge
of base as
shown.
Cover Base
5. Rotate cover
back° Press cover
firmly until side and
rear tabs snap into
place.
6. Turn Power-Mate®upside down and
replace two (2) cover screws,
17
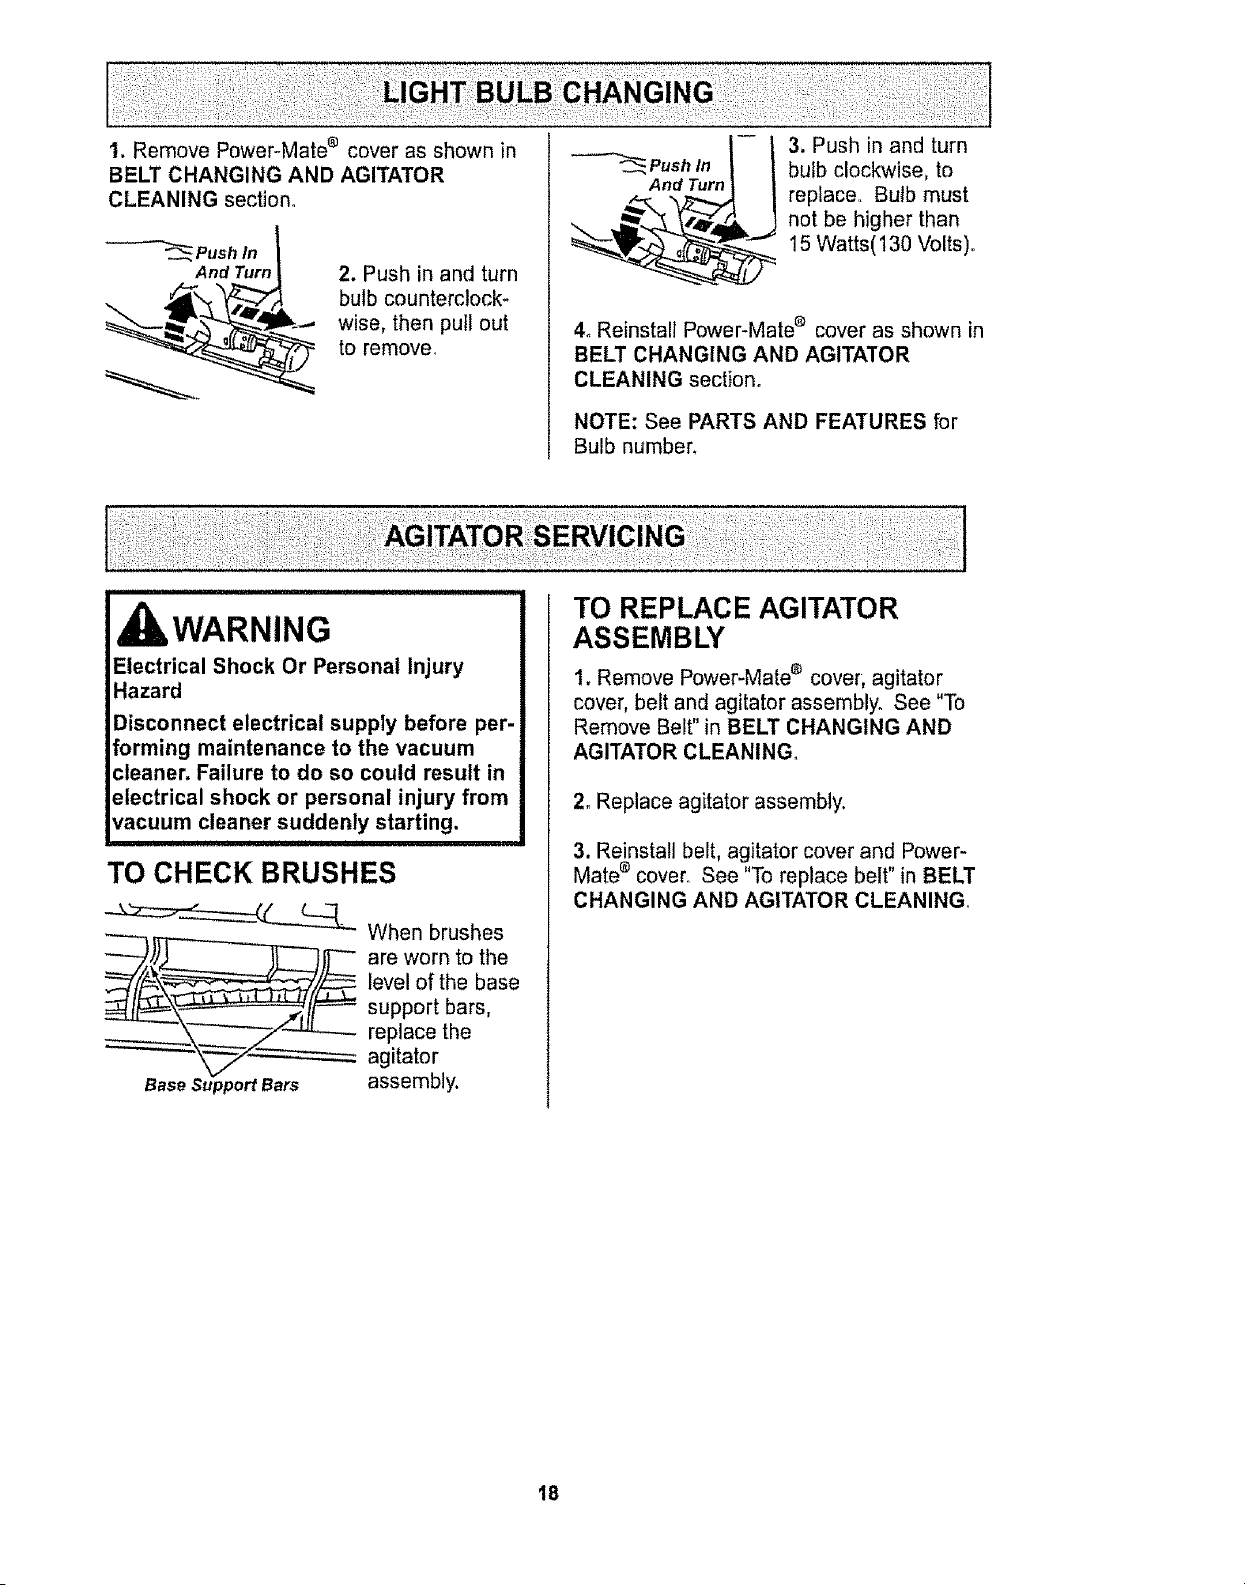
1. Remove Power°Mate ® cover as shown in
BELT CHANGING AND AGITATOR
CLEANING section°
And Turn
2. Push in and turn
bulb counterclock-
wise, then pull out
to remove_
3. Push in and turn
bulb clockwise, to
replacer Bulb must
not be higher than
15 Watts(130 Volts).
4. Reinstall Power-Mate _ cover as shown in
BELT CHANGING AND AGITATOR
CLEANING section°
NOTE: See PARTS AND FEATURES for
Bulb number_
WARNING
Electrical Shock Or Personal Injury
Hazard
Disconnect electrical supply before per-
forming maintenance to the vacuum
cleaner. Failure to do so could result in
electrical shock or personal injury from
vacuum cleaner suddenly starting.
, , , ,,, , , , , ,
TO CHECK BRUSHES
_L._.._ When brushes
are worn to the
level of the base
support bars,
replace the
agitator
Base Support Bars assembly.
TO REPLACE AGITATOR
ASSEMBLY
1. Remove Power-Mate e cover, agitator
cover, belt and agitator assembly. See "To
Remove Belt" in BELT CHANGING AND
AGITATOR CLEANING.
2. Replace agitator assembly.
3. Reinstall belt, agitator cover and Power-
Mate _ cover. See "To replace belt" in BELT
CHANGING AND AGITATOR CLEANING
18
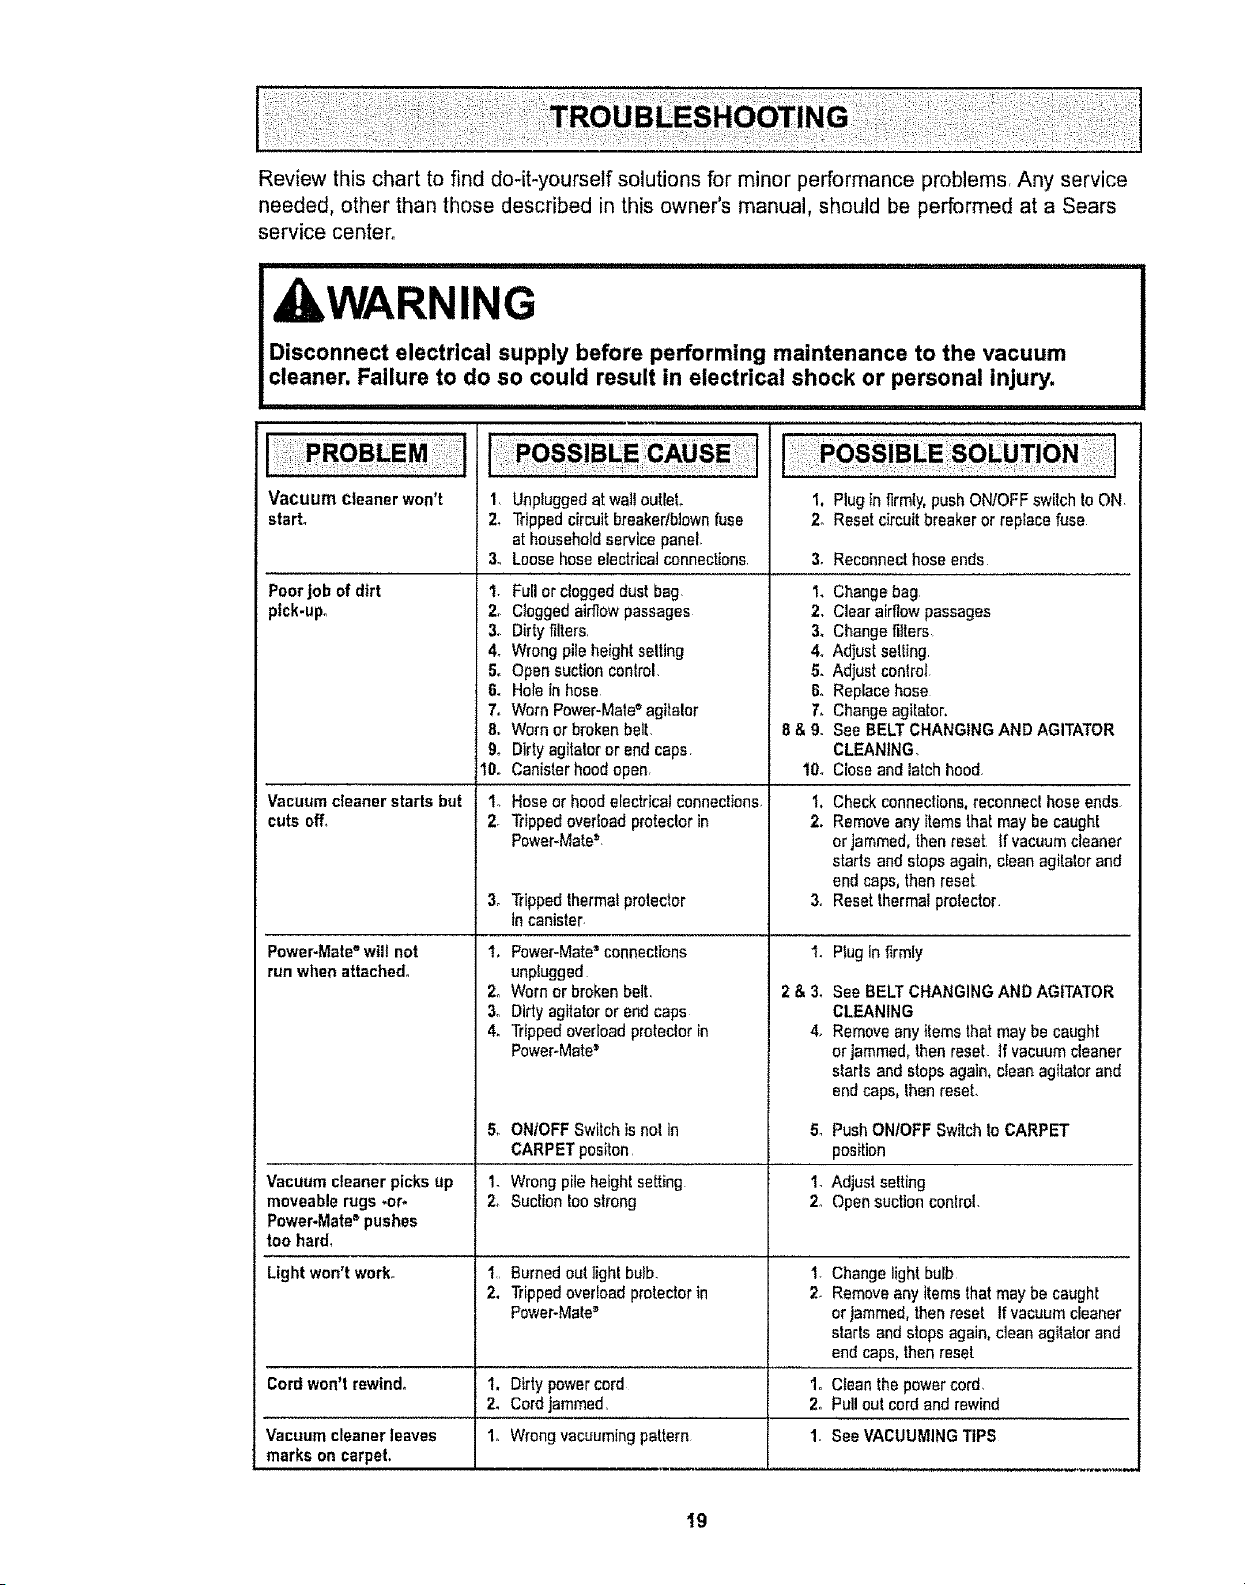
Reviewthischarttofinddo-it-yourselfsolutionsforminorperformanceproblems,Anyservice
needed,otherthanthosedescribedinthisowner'smanual,shouldbeperformedata Sears
servicecenter°
ii i ,i,iii1,1.................... ilUll,UllllU i i
,WARNING
Disconnect electrical supply before performing maintenance to the vacuum
cleaner. Failure to do so could result in electrical shock or persona! injury.
i,,111 i ii i ,i,1,111,1111111 iii i i i
Vacuum cleaner won't
start.
1,
2.
Poorjob of dirt I.
ptck-upo 2,
3_
4,
5,
6.
7.
9o
10,,
Vacuumcleaner starts but 1_
cuts off, 2,
3o
Power-Mate"will not 1,
run whenattached.
2o
3o
4.
Unpluggedat walloutlet.
Trippedcircuitbreakedbiownfuse
at householdse_lce panel.
Loosehoseelectricalconnections
1, Plug tnfirmly, pushONIOFF switch toON,
2o Reset circuitbreaker or replacefuse
3, Reconnecthose ends
, , , ] ,
Fullor cloggeddust bag. I. Changebag
Cloggedairflowpassages 2. Clear airflowpassages
Dirtyfiltars_ 3_ Changefillers
Wrong pileheightsetting
Opensuction control.
Holein hose
Worn Power-Mate° agitator
Worn or broken belt,
Dirtyagitatoror end caps
Canisterhood open,
Hoseor hoodelectricalconnections,
Trippedoverloadprotectorin
Power-Mate_',
Trippedthermalprotector
in canister
Power-Mate_connact|ons
unplugged
Wornor brokenbelt,
Dirty agitatoror endcaps
Trippedoverloadproteclor in
Power-Mate_
4o Adjustselling
Ii. Adjust conlrol
B. Replacehose
7. Changeagifator,
8 & 9. SeeBELT CHANGINGAND AGITATOR
CLEANING,
10_ Closeandlatchhood,
1, Checkconnections,reconnec! hose ends,
2. Removeany itemsthat may be caught
orjammed, then reset Ifvacuum cleaner
starts and stops again,clean agilatorand
endcaps, then reset
3,, Resetthermalprolector
5o ONIOFFSwitch is not in
CARPETpositon
Vacuum cleaner picks up 1. Wrongpile heightsetting
moveablerugs .or- 2, Suctiontoo strong
Power-Mates pushes
too hard,
Lightwon't work.. 1,, Burnedout light bulb.
2, Trippedoverload protectorin
Power-Mate_'
Cordwon't rewind. 1, Dirtypowercord
2. Cordjammed,
Vacuum cleanerleaves 1. Wrongvacuumingpattern
markson carpet,
1. Plug in firmly
2&3,
4,
See BELTCHANGINGAND AGITATOR
CLEANING
Removeanyilems thatmaybe caught
or jammed,thenreset, ff vacuum cleaner
starts andstopsagain, cleanagitatorand
endcaps, lhen reset.
5_
2o
PushONfOFFSwitch toCARPET
position
Adjust setting
Opensuctionconlrol,
1-
2.
Change light bulb
Removeany items thatmay be caught
or jammed, thenreset Ifvacuum cleaner
starts end stops again,cleanagitator and
end caps,then reset
1. Clean thepowercord,
2o Pul!out cordandrewind
1, See VACUUMINGTIPS
19
Master Protection Agreements
Congratulations on making a smart purchase. Your new Kenmore® product is designed and manu-
factured for years of dependable operation. But like all products, it may require preventive mainte-
nance or repair from time to time. That's when having a Master Protection Agreement can save you
money and aggravation.
The Master Protection Agreement also helps extend the life of your new product°Here's what the
Agreement* includes:
[] Parts and labor needed to help keep products operating properly under normal use, not just
defects. Our coverage goes well beyond the product warranty. No deductibles, no functional
failure excluded from coverage w real protection.
[] Expert service by a force of more than 10,000 authorized Sears service technicians, which
means someone you can trust will be working on your product.
[] Unlimited service calls and nationwide service, as often as you want us, whenever you
want us,
"No-lemon" guarantee - replacement of your covered product if four or more product failures
occur within twelve months.
[] Product replacement if your covered product can't be fixed.
[_ Annual Preventive Maintenance Check at your request - no extra charge.
[] Fast help by phone - we call it Rapid Resolution - phone support from a Sears representa-
tive on all products. Think of us as a "talking owner's manual"
r_ Power surge protection against electrical damage due to power fluctuations.
[] $250 Food Loss Protection annually for any food spoilage that is the result of mechanical fail-
ure of any covered refrigerator or freezer.
Rental reimbursement if repair of your covered product takes longer than promised.
E_ 10% discount off the regular price of any non-covered repair service and related installed
parts.
Once you purchase the Agreement, a simple phone call is all that it takes for you to schedule ear-
vice,You can call anytime day or night, or schedule a service appointment online.
The Master Protection Agreement is a risk free purchase. If you cancel for any reason during the
product warranty period, we will provide a fuU refund. Or, a prorated refund anytime after the product
warranty period expires. Purchase your Master Protection Agreement todayl
Some limitations and exclusions apply_ For prices and additional information in the U.S.A.
call %800-827-6655.
* Coverage in Canada varies on some items. For full details call Sears Canada at 1-800-361-
6665,
Sears Installation Service
For Sears professiona/insta//ation of home appliances, garage door openers, water heaters, and
other major home items, in the U,S,A, or Canada call 1-800-4-MY-HOME®
20
Antesdeusarsuaspiradoranueva ...... 1
Garantia de la aspiradora de Kenmore ,, 2
lnstrucciones importantes de
seguridad ............................. 3
Piezas y caracteristicas ............. 4-5
tnstrucciones de ensemblado ........ 6-7
lnstrucciones de operati6n ............ 8
Para comenzar ....................... 8
Sugerenciaspara aspirar ................ 9
Sugerenciassobre el ajuste de nive]de
pelo de laalfembra ................. 10
Accesorios .......................... 10
Cuadrode usede los accesorios ............ 11
Caracteristicasde rendimiento........ 11-12
Funcionamientode su aspiradora ......... I2
Cuidado del recept_culo ............... I3
Camb[ode la bolsa .................... I3
Limpiezader exterior y de los accesorios o. 13
Cambiodel fi[trode segufidad del motor ... 14
Cambiode] fi[trode escape ............... 14
Cuidado de la Power-Mate ® ............ 15
Cambiode la correay iimpieza
del cepillo ..................... 15-16
Cambiode la bombilla ................. 17
Cuidadodel agitador ................... 17
Reconocimiento de problemas .......... 16
Acuerdosmaestros de protecci6n ........ 19
InformaciSn de
assistancia o servicio ...... PosteriorCubierta
Per favor lea esta guia que ]e ayudaraa assemblary operarsu aspiradora nuevade Kenmoreen una manera
m&ssegura y effectiva,
Para mas informaciSnacerca de]cuidadoy operaci6n de estaaspirador,Ilamea su t[endaSears mas cercana,,
Cuando prequnteper informaci6nusted necisitar_,el n_merocompletede ser[e y modelode la aspiradoraque
est&]ocadoen taplaca de losn_meros de modelo y sefie
Use elespacio de abajo para registrar el numerode moderoy sede para su nueva aspiradorade Kenmore.
Numero de Mode]o
Nt_merode Serie
Fecha de Compra
Matenga este Jibroy su reciboen u ]ugarseguro para referenciasfutura&

Garantia limitada de un ar3o
Siesta aspiradora falla por un defecto en sus materiales o fabricaci6n en e! perfodo de
un afio desde la fecha de compra, cuando se instala, maneja y mantiene siguiendo
todas las instrucciones incluidas con el producto, devuSIvala a cualquier tienda Sears,
Sears Parts & Repair Center (Centro de Reparaciones y Piezas Sears) u a otro
dfstribuidor Kenmore para que reparen el aparato de forma gratuita.
Siesta aspiradora se utiliza para otros fines que no sea uso familiar privado, esta
garantla es v&lida solamente durante 90 dlas desde la fecha de compra°
Esta garantia cubre exclusivamente los defectos de materiales y fabricaci6n.
Sears NO pagar&:
1. Los elementos desechables que puedan desgastarse con un uso normal, incluyendo
sin car_cter excluyente, filtros, correas, l&mparas y bolsas.
2. Un t6cnico del servicio t6cnico para que ensefie al usuario a instalar, manejar o
mantener correctamente el producto.
3. Un t_cnico del servicio t_cnico para limpiar o mantener este productoo
4. Dafios o averla de este producto si no se ha instaiado, manejado o mantenido
siguiendo todas las instrucciones incluidas con el producto.
5. Dafios o averla de este producto originados por accidente, abuso, uso incorrecto u
uso del producto para otros fines distintos de los lndicados.
6. Dafios o averla de este producto causados por el uso de detergentes, limpiadores,
productos qulmicos o utensilios diferentes a los recomendados en todas las
instrucciones que se incluyen con el producto.
7. Dafios o averla de las plezas o sistemas causados por modificaciones no
autorizadas que se hayan hecho a este producto.
Limitaci6n de responsabilidad de las garantias implicitas; limitaci6n de remedios
€:1t3nico y exclusivo remedio del cliente bajo esta garant[a limitada ser_ la reparaci6n del
producto seg_n Io indicado en este documento. Las garantfas lmpl[citas, incluyendo las
garant{as de comerciabiltdad o idoneidad para un prop6sito especifico, se limitan a un
afio o el periodo m&s corto permitido por la ley. Sears no ser& responsable por dafios
incidentales ni consecuenciales. Atgunos estados o provincias no permiten la exclusi6n
o limitaci6n de dafios incidentales o consecuenciales, ni iimitaciones en la duraci6n de
las garantlas tmpllcitas de comerciabilidad o idoneidad, por Io que estas exclusiones o
timitaciones podrlan no apticar en su caso.
Esta garant|a aplica solamente cuando esta aspiradora se utiliza en Estados Unidos o
Canad&.
Esta garantia le otorga derechos tegales especificos, y usted podria tener otros
derechos que varlan en funci6n de cada estado_
Sears, Roebuck and Co., Hoffman Estates, IL 60179
Sears Canada inc., Toronto, Ontario, Canada MSB 2B8
,& ADVERTENCIA
Su segurida.d es muy. !mportante pars nosot.ros. Para reducir et riesgo de incendio_
cnoque erect.rico, ips0on corporal o aanos a! uttlizar su asplraaora, actt_e ae acuerao
con precauclones D_smas ae segurtdaa, entre etlas:
Lea las Instn_ccionesen este manual antes de
armar o usar su aspiradorao
Use su aspfradora _nicamente en la forma
descrita sn este manual. Use '3nicamentscon
accesorios recomendados pot Sears_
Desconecte e1cordon el_ctrtco antes de
componer o Iimpiar el _.readelceplllo, De Is
contrario, el cepillo podrfaarrancar de form
lmprevtstao podrlaproducirse un choque
el_ctrico.
No abandonsla asptradsracuandoest_
conectada. Descon_ctela ouandono laest_
usando y antes de dade servtcto_
Pars reducir el desgo de choque sl_ctrlco, no
use su asplradora at airs ltbre nlsobre
superficiesmojadas.
No permitsqus sea uttlJzadacorns juguete.
Ss requfere tenor mayor cuidado cuando sea
utilizada sn la proximidad ds nt_iosopor
ninos_
No use la asptradora si el cord6n o el enchufe
sst_ daSado. Si la aspiradora no estd
functonando adecuadaments o si se ha
dsjado caer,estd daSada, se ha dsjado
expussta a la tntemperleo se ha deJadocaer
en agua, dsvudlvaiaaun Centro de servicto
de Sears.
No hale nf transportslaaspiradora per el
csrdbn; no use el cord6n corns mango; no
clsrre puertasssbrs el cord6n; no haleel
cord6n sobre rebordes agudosni esqulnas.
No pass la asptradorasobre el cordSn.
Mantenga el cord6n alsjado de superficies
calienteso
No desconecte la aspiradora ttrandodel
cord6n sldctdco. Para desconectarla, hale el
enchufe, no el cord6n.
No toque laasplradora ni el enchufe con las
manse mojadas.
No coloqueobjetossn tas aberturas.
No utilice ta asplradorasf alguna absrtura
est_ bIoqueada; mant_ngala libre de polvo,
Apague todosloscontrsles antes de
desenchufar.
Tonga culdado especial al utilizar la
asptradora sn sscalones_ No la coloque ssbre
sttlas,mesas, etc_Mant_ngala enel piss,
No use la aspiradora pars asptrar Ifquidos
inflamableso combustibles (gasolina, Ifquldos
para ltmpleza, perfumes, etc.) ni la use en
lugares donds 6stos podrfan estar presentes,,
Los vapores de estas sustanolas pusden crest
un peltgrode lncendioo explosi6n.
No levante ninguna cosa qus se sst_
quemando o emitiendo hums, corns
clgarrtllos, cerilloso canizas calientes.
No use la aspiradora sin tenor Instatadala
bolsa pars polvo y/o los fiftroso
Cambla slempre la bo_sapara polvsdespu_s
de asplrar limptadores de alfombras o
desodorantes, talcosy poIvss rinse, Estos
prsductosatascan la bolsa, reducen el flujo de
airs y pusden causar que _sta se rsmpa. Si
no cambia la bofsa podrfa ocaslonar daSo
permanents a Iaaspiradora,
No use la asplradora pars levantar objetos
agudos, juguetes pequeSos, alfileres,
sujetapapsles, stc,Podrlan danar la
asplradora o Ia bolsa para polvo.
No opere sin el filtrode escape ni Iacubierta
del filtro de escape Instalados,
La manguera conttene cables eldctricos. No
la use cuando estd dai_ada,cortada, o
psrforada, Reemplaca si estd cortada o
desgastada. No levanteobjetos afilados°
Slempre apagud y desconecte la asplradsra
antes de conectaro desconectar la manguara,
Handt-Mate Jr.@ (si apllcable), o la boqutlla.
Sujete el enchufe conla mano al enrollar el
corddn eldctricooPara desconectarla, hale en
enchufe, no el cord6n.
Usted es responsabts de assgurar que su
asptradora no sea utllizada por ninguna
persona que no pueda maneJarla
corrsctaments.
GUARDE ESTAS INSTRUCClONES
El armado y uso seguro de su aspi,radora,son su responsabili,dad_ Esta aspiradora ha,sido
senaaa excnuswamenmpars uso aomesuco. Laasp!raaora qeDera,alma,cenarss en un lugar
seco yen el imerior_ Lea este Manual dot propjetario aeteniaamen_e_ pues contiene
mtormaci6n ,_mpo[tan_e.soDre seguri,qad ,y uso. _s[a quia contlene mTormacl6n soDre
segurtdad deDajo ee s_mr_o_osae a(_verliencta cuidaao.
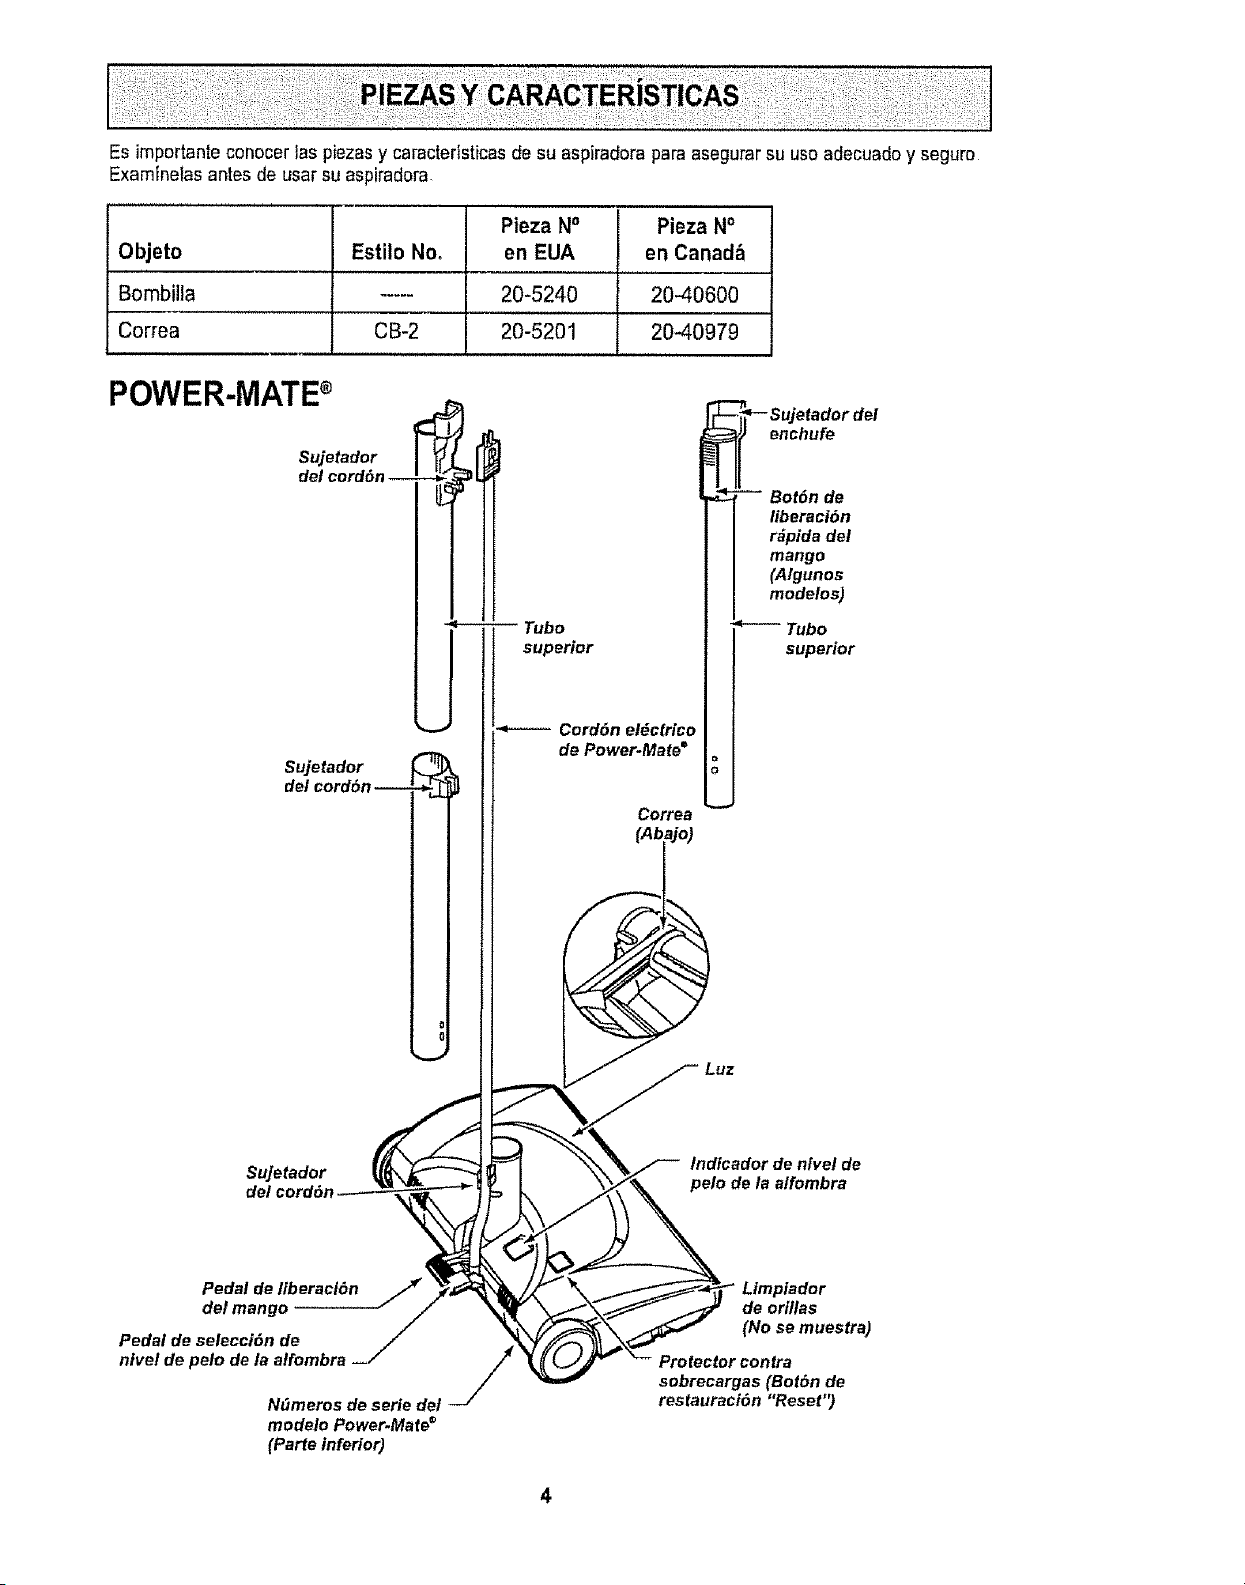
Esimportante conocer las p_ezasy caractedsticasde su aspiradora para asegurarsu usoadecuadoy seguro
Examfne_asantes de usarsu aspiradora.
Pieza N° Pieza No
Objeto Estilo No. en EUA en Canad_
Bombilla ..... 20-5240 20-40600
Correa CB-2 20-5201 20-40979
POWER-MATE®
Sujetador
del cord6n --
Sujetador
del cordSn
Sujetador
del cord61
--Tubo
supe_or
Cord6n el_cfrico
de Power-Mate =
o
Corl'ea
(Abajo)
__ _--Sujetadordel
enchufe
_ _ Bot6n de
liberaci6n
rdpide del
mango
(Algunos
modelos)
Tubo
superior
Indfcador de nlvel de
pelo de la alfombra
Pedal de liberacl_n 17"
del mango --------J"
Pedal de selecci6n de
nivet de pelo de la atfombra
N_meros de serie det
modelo Power.Mate s
(Parte inferior)
de orf/las
(No se muestra)
sobrecargas (Bot6n de
restauraci6n "Reset")
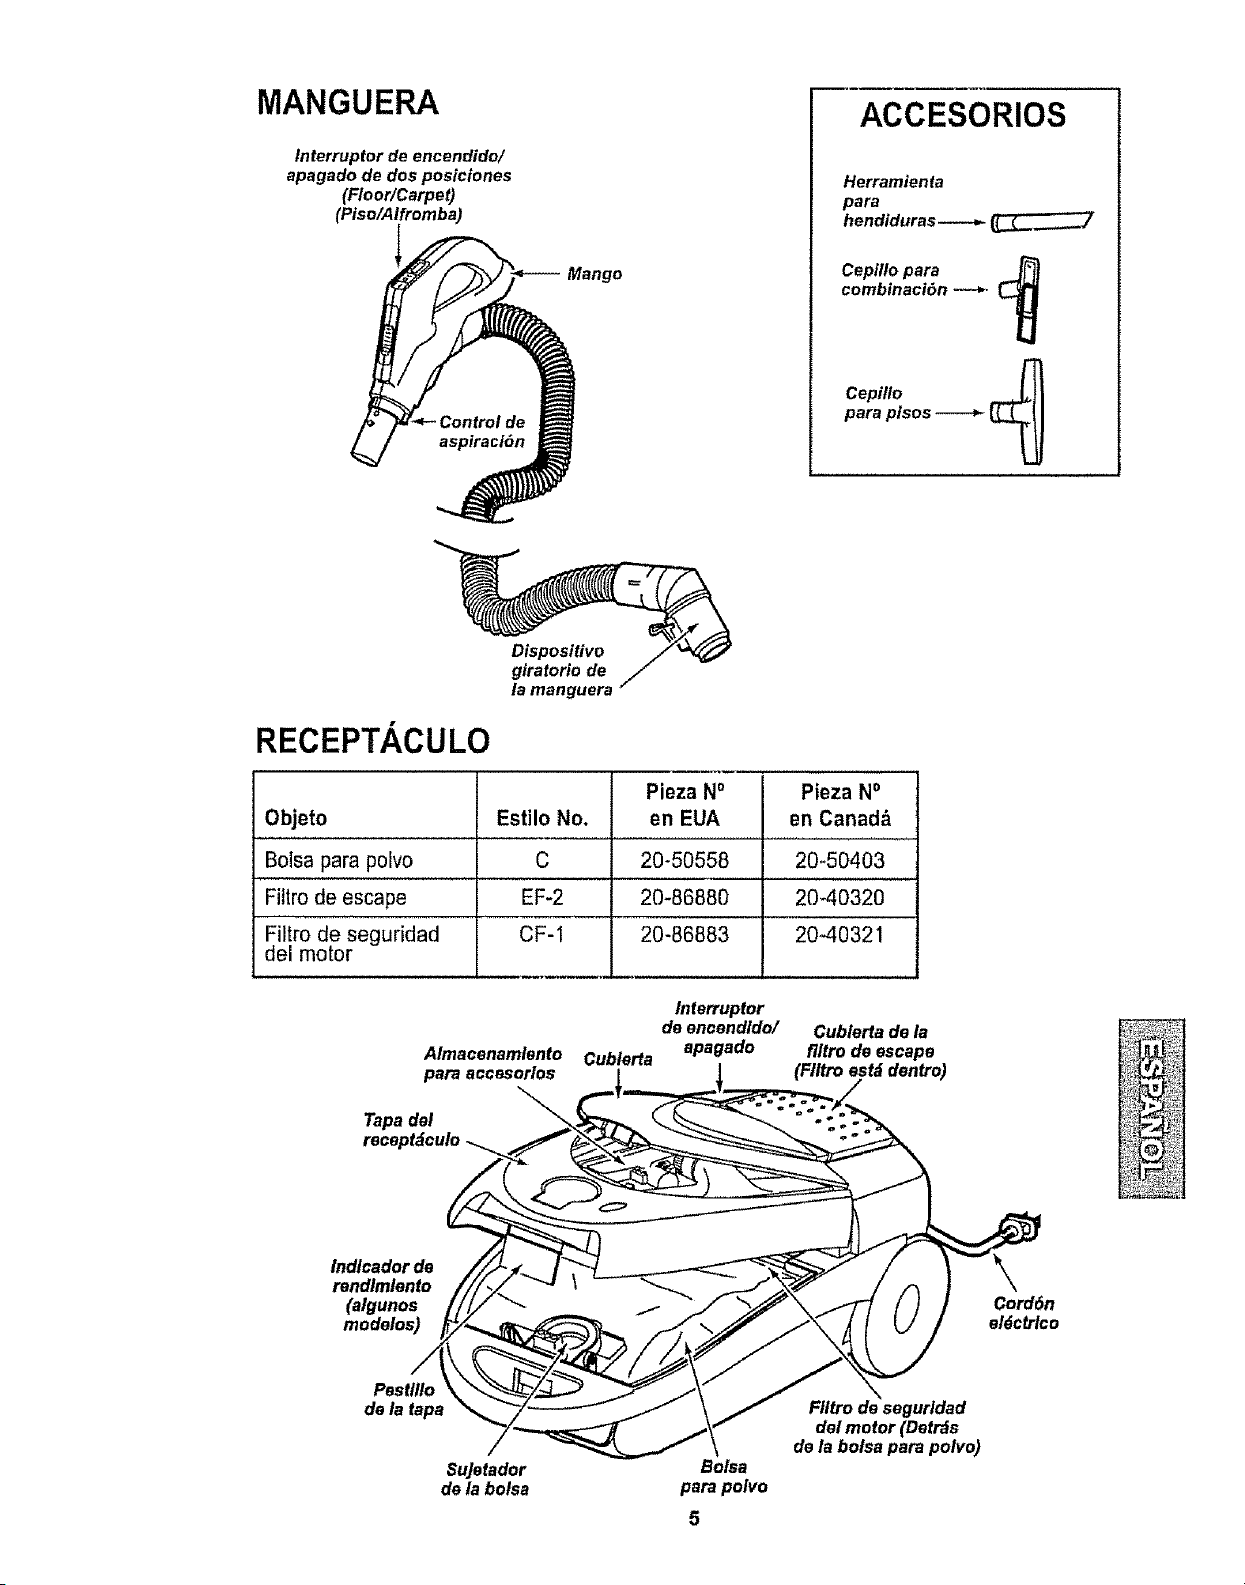
MANGUERA
tnterruptor de encendido/
apagado de dos posiciones
(Floor/Carpet)
(Piso/Alfromba)
Mango
ACCESORIOS
Herramienta
para
hendiduras_ _..._.___./
Cepiflo para
combinaci6n ----*.
Cepitlo __
para ptsos _ LL.(_ _I
RECEPTACULO
Dispositivo
giratorio de
la manguera
Pieza No Pieza No
Objeto Estilo No, en EUA en Canad,_
Bolsa para polvo C 20-50558 20_50403
Fittro de escape EF-2 20-86880 20`40320
Filtro de seguridad CF-1 20-86883 20-40321
del motor
Interruptor
de eneendldo/
Almacenamlento Cublerta apagado
pare accesorlos l
Tapa del
receptdculo
Cublerta de ia
flltro de escape
(FIItro est_ dentro)
Indlcador de
rendlmlento
(alguncs
modelos)
Cord6n
el6ctrlco
Pestlllo
de la tapa
Sujetador
de la bolsa
Bolsa
para polvo
5
Ffltro de sogurldad
del motor (Detr_s
de la bolsa para polvo)
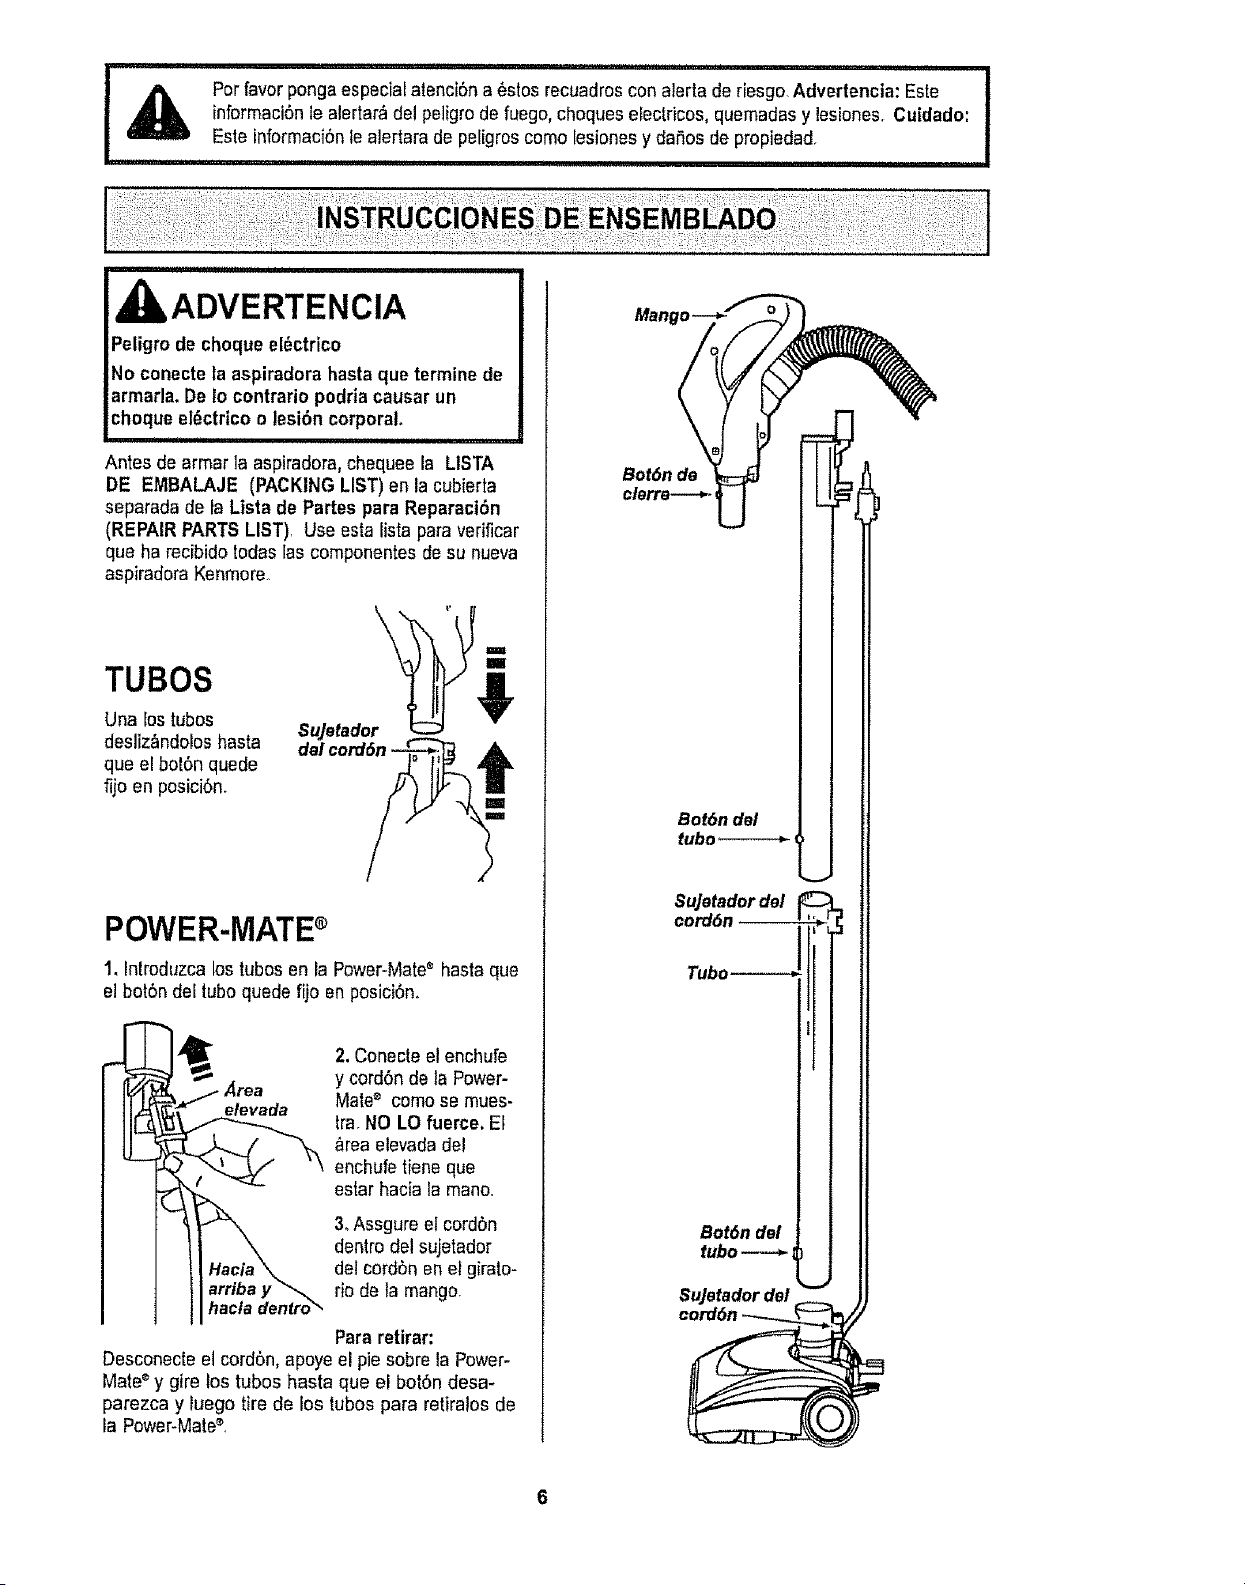
Par favor pongaespeciaEatenciSna _stos recuadroscon aierta de riesgo.Advertencia:Este
informaci6nle alertar_del peligrode fuego, chaques etectdcos, quemadasy lesiones,Cuidado:
Este informaciSnlealertara de perigroscomalesionesy daSosde propiedad.
ii,uiii _i, i_[,11lu,i HI i i i ,
I=ADVERTENCIA
Peligro de choque el_ctrico
No conecte ta aspiradora hastaqua termine de
armada. De1ocontrario podriacausar un
choque eI_ctrico o lesi6n corporal
Antes de armarla aspiradora, chequee la LISTA
DE EMBALAJE (PACKING LIST) en la cubierta
separada de la Lista de Partes para Reparaci6n
(REPAIR PARTSLIST)r Use esta lista para verificar
que ha recibido todas lascomponentes de su nueva
aspiradora Kenmore,
TUBOS
Una lostubas
desiiz_ndoloshasta
que el bot6n quede
fijoen posici6n.
i
SuJetador
del cord__
POWER-MATE
1, Introduzcalostubasen la Power-Mate®hasta que
el botSndel tubaquede fijo en posiciSn.
•/_rea
elevada
hacta ¢/enlro_,
2, Conecle el enchufe
y cord6n de la Power-
Mate® comase mues-
tra,NO LO fuerce, El
area elevadade!
enchufetieneque
estar hacia la mano.
3_Assgure el cordbn
dentrodel sujetador
del cordSnenel girato-
rio de la mango.
Pararetirar:
Desconecteel cordbn, apoye elpie sabre la Power-
Mate®y gire los tubas hasta que el botOndesa-
parezca y luego tire de los tubas para retiratos de
la Power-Mates,
Bot6n del
tuba
SuJetador del
cord6n
Tubo--_ _
Bot6n del
tuba----_
SuJetador dal
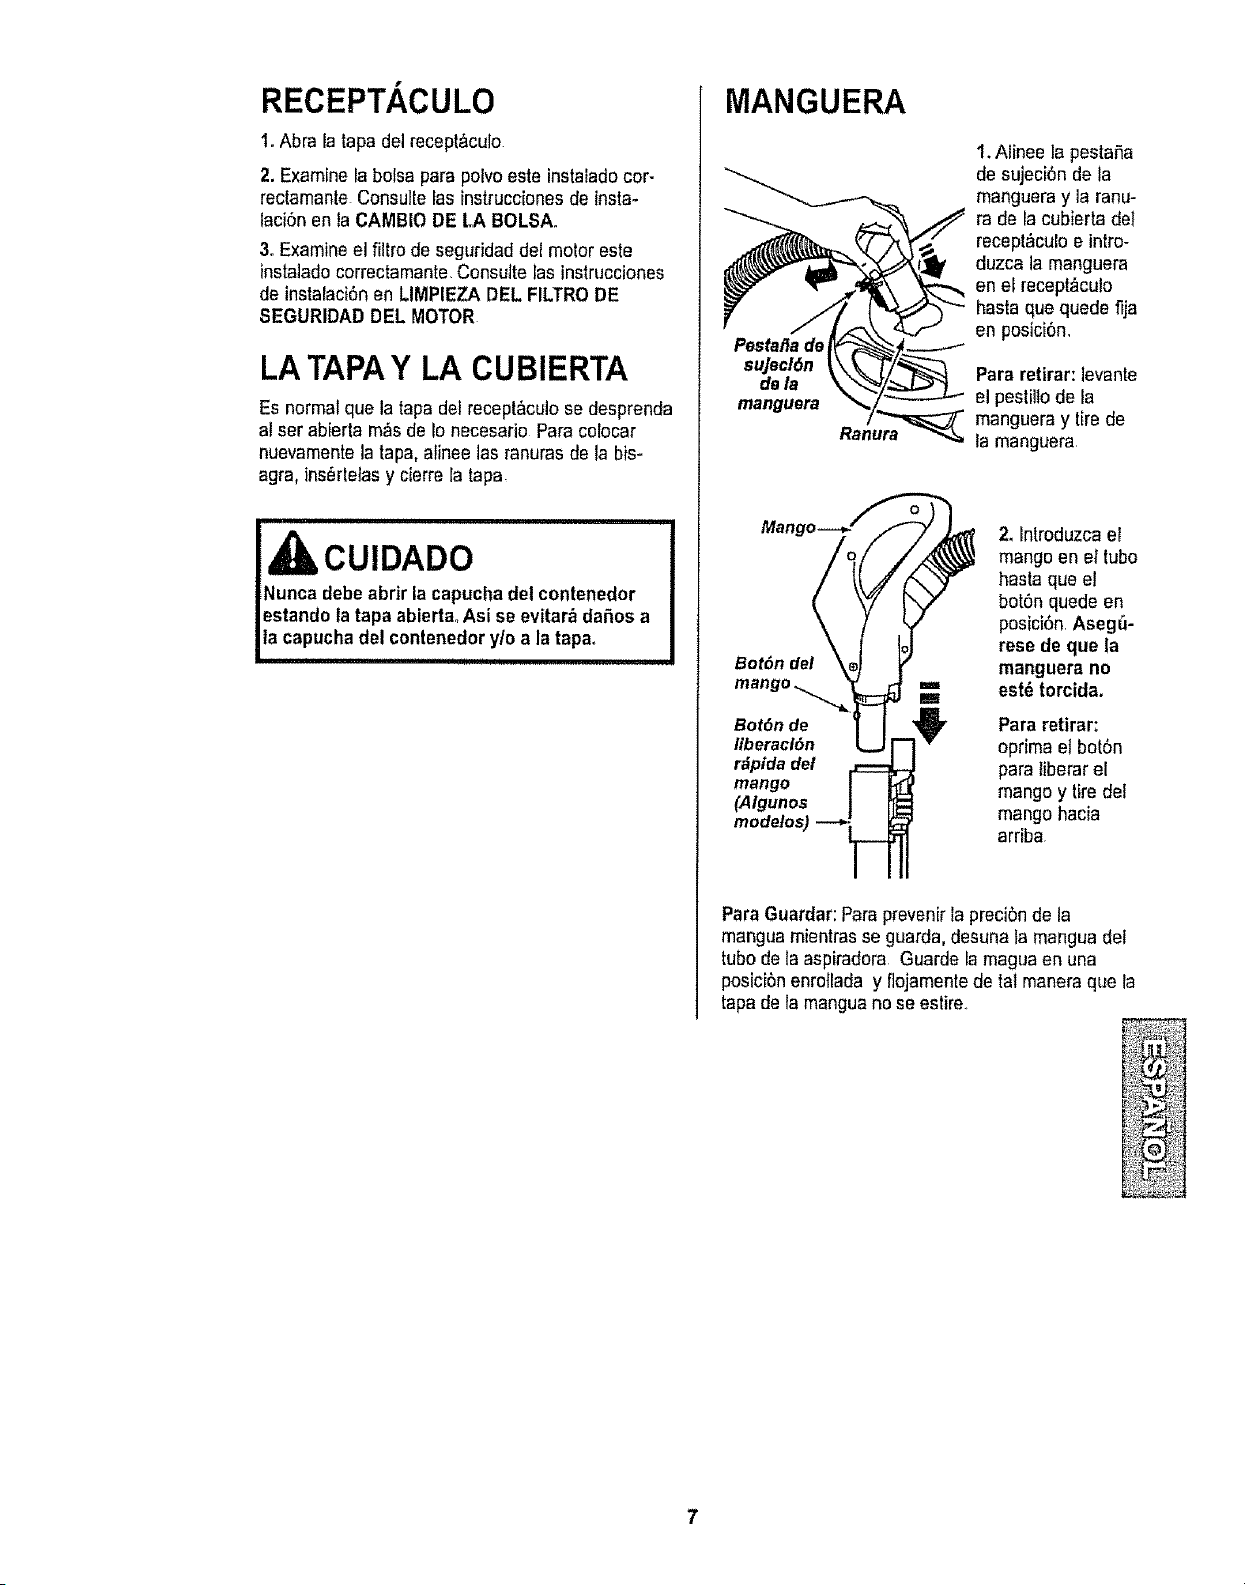
RECEPTACULO
1.Abra la tapa del recept_culo.
2. Examine la bolsa para polvoeste instalado cor-
rectamante Consulte fas instruccionesde insta-
laci6nen la CAMBIO DE LA BOLSA.
3. Examine el filtro de seguridad def motor este
insta]adocorrectamante.Consutte las instrucciones
de instafad6n en LIMPIEZA DEL FILTRO DE
SEGURIDAD DEL MOTOR
LATAPAY LA CUBIERTA
Es normal que la tapadotrecept&culose desprenda
al ser abierta m_s de 1onecesafio Para colocar
nuevamentela tap& aiinee las ranurasde la bis-
agra, ins_rtelasy cierre la tapa
CUIDADO
Nunca debe abrir la capuchadel contenedor
estando la tapa ablertaoAsi se evitar_ dafios a
la capuchadel contenedory/o a la tapa.
i .................................
MANGUERA
Pestal_a de
sujecl6n
dela
manguara
Ranura
1.Alinee la pestafia
de sujeci0n de la
mangueray la ranu-
ra de la cubierta det
recept_culoe intro-
duzca la manguera
en el recept&culo
hasta qua quede fija
en posici6n,
Pararetirar: levante
el pestiilo de la
mangueray tire de
la manguera
Bot6n del
Bot6n de
liberacl6n
r_pida del
mango
(Algunoa
2, bntroduzcael
mangoen el tubo
hasta qua el
bot0n quede en
posici6n.Asegr_-
rese de que la
manguera no
est_ tarcida,
Para retirar:
optima et bot6n
para liberar eE
mango y tiredef
mango hacia
arriba
Para Guardar:Para preven[rla preci6nde la
manguamientrasse guarda, desunafa manguadei
tubo de la aspiradora Guarde la maguaen una
posicibn enrollada y flojamentede tal maneraqua ta
tapa de la manguano se estire,
INSTRUCCIONES DE OPERATION
ADVERTENCIA
Peligrode lest6n personaly daSo af
}roducto
NOenchufe la aspiradora st el
interruptorest_ en la posici6n ON.
Podriacausar lesiSnpersonalo daSo
al productoo
El cord6n el_ctrico se mueve
r_pidamentedurante el enrollamlento,
Mantengaalejados a los niSosy
asegure espaclo libre suficiente para
evitar lesiones personalesal enrollar
et cord6n.
NOuse los enchufes Iocalizadossabre
los muebles, l,os objetos cercanos
podrian resultar daSados.
1.Tire del cord6n
para sacaflo del
recept_culohasta
tenerla longitud
deseada
2. Detenga ei
cord6nun
momenb para
interrumpirel
enrolJamiento
NOTA:Para
reducirel riesgo de choque el6ctrico,esta
aspiradoracuenta conuna clavija polarizada, unode
loscontactos es m_s anchoque el otro.La clavija
s61opuede introducirse de una maneraen el
enchufe,Si [a cfavijano cabe bien en el enchufe,
invi6rtalaSi aun no cabe, llamaa un electficista
para qua instale un enchufe correcto.No atterela
clavija de ninguna manera.
3oConecle et cord6nel_ctricopolafizado en un
enchufe de !20 vollios que se encuentre cerca del
piso
Para enrollar:Desconecte la aspiradora_Remover
el cord6nde el sujetador. Sujeteei enchufe mientras
enroltae! cord6n paraimpedirdaSoo lesi6ncorporal
parel movimiento del cord6n,Los sujeladores del
carrele del cordSnse desbloqueancon un tirOnlave,
Ioque permile que el cord6nse enrolle
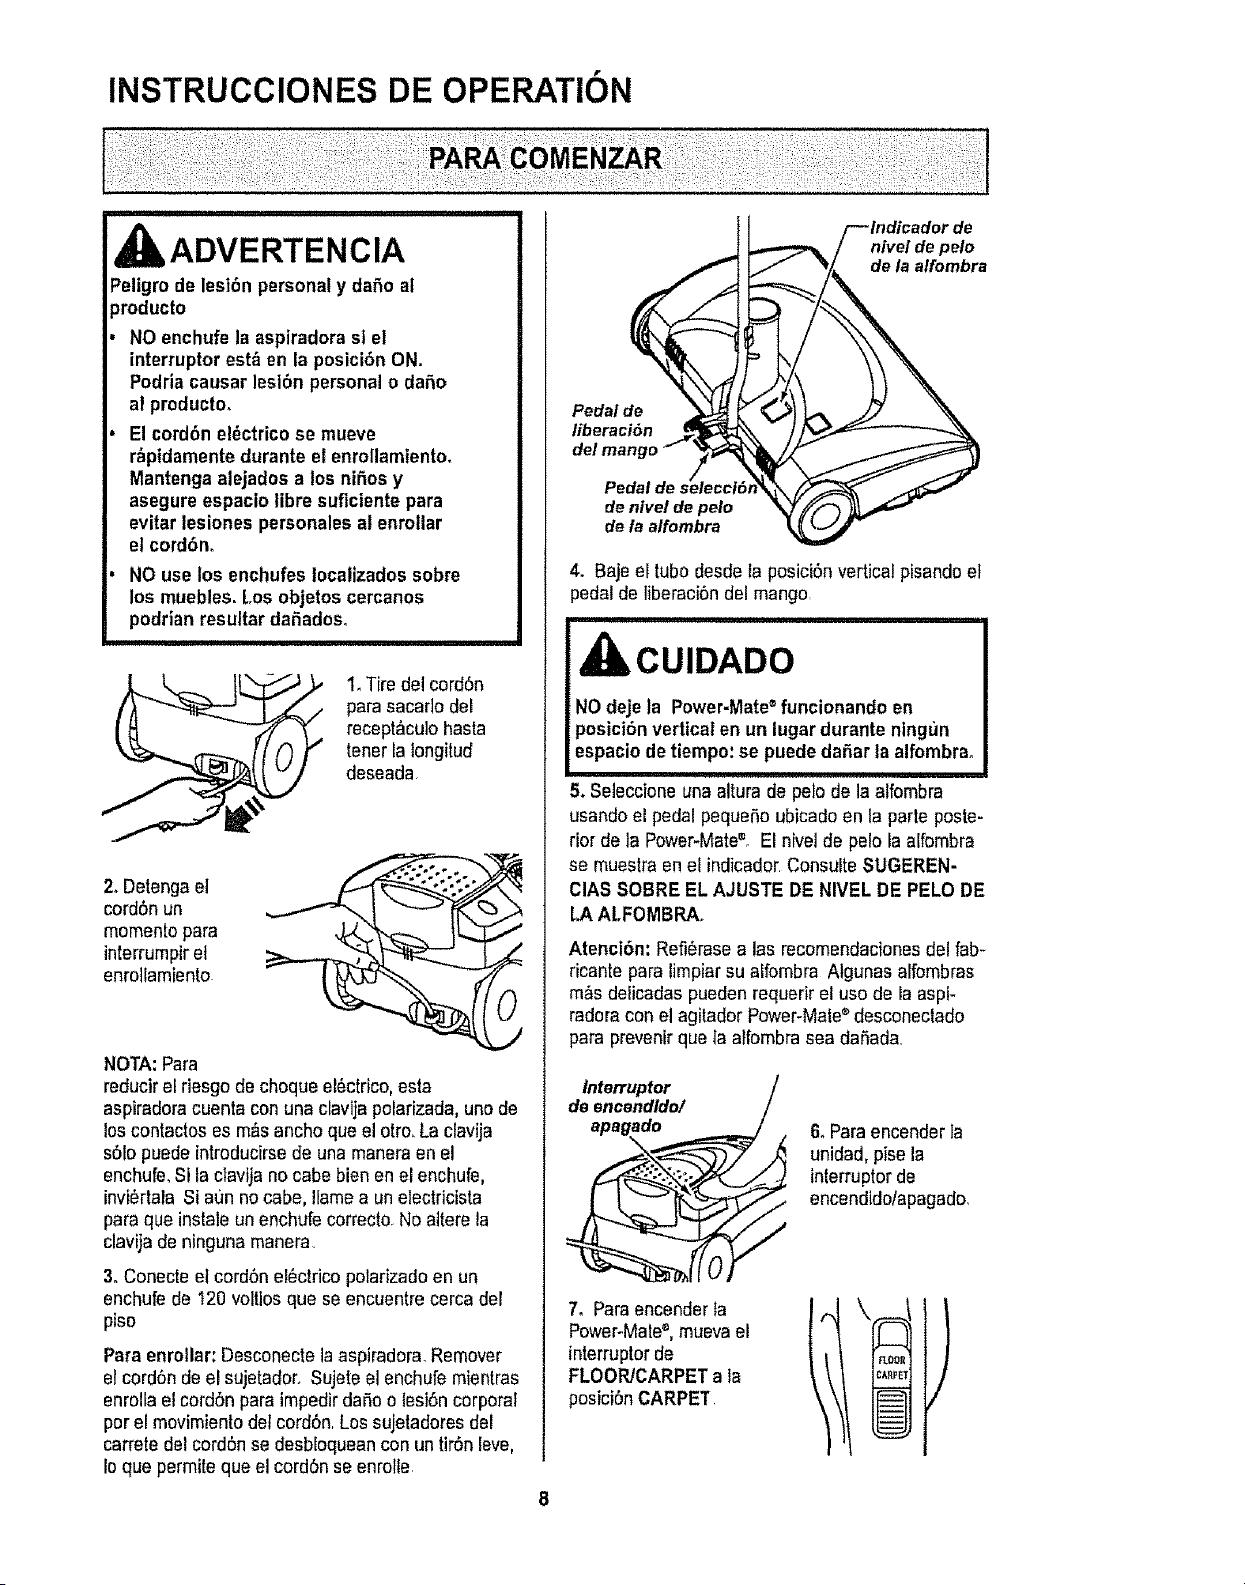
nivel de pelo
de la alfombra
Pedal de
liberaclon
Pedal
de nlvel de pelo
de la alfombra
4. Baje el tubadesdeta posicl6n vertical pisando el
pedal de iiberaci6n del mango
CUIDADO
NOdeje la Power-Mate®funcionando en
posicibnvertical en un lugardurante ningun
espaciodetiempo: se puede da_ar la alfombra°
5_Seleccione unaaltura de pelo de la alfombra
usando el pedal peque5o ubicado en laparle poste-
rior de la Power-Mate®, El nivei de pelo la alfombra
se muestra en el indicador,Consulte SUGEREN-
CIAS SABRE EL AJUSTE DE NIVEL DE PELO DE
LA ALFOMBRA_
Atenci6n: Refi6mse a las recomendacionesdel fab-
ricante para limpiarsu affombraAlgunas alfombras
m_s delicadas pueden requerir el usa de la aspi-
radom con el agitador Power-Male®desconeclado
para prevenirqua taalfombra sea daSada.
Interruptor
de encendldo/
apag_do
6. ParaencenderIa
unidad,pise la
interruptor de
encendido/apagado.
7oPara encenderla
PoweroMate®,muevael
interruptorde
FLOOR/CARPET a la
posici6nCARPET
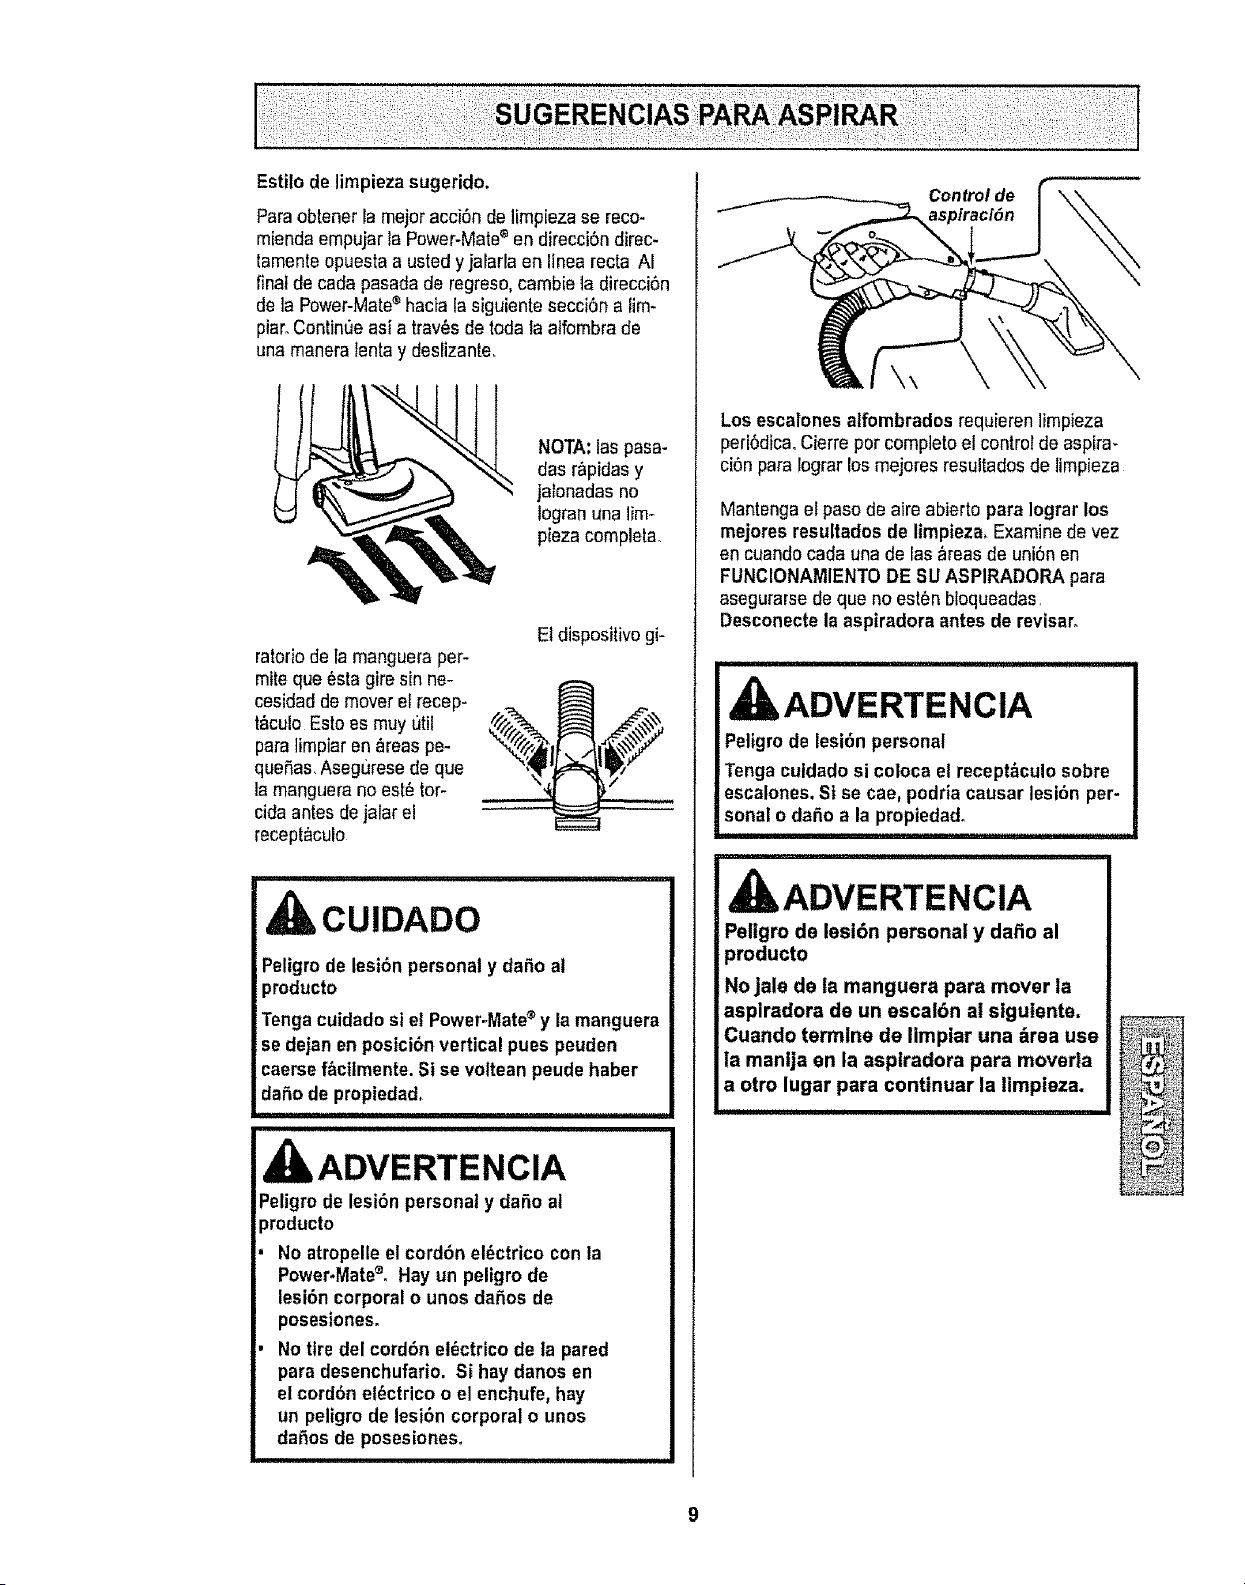
Estilodelimpiezasugerido.
Paraob[ener tamejoracciOndelimpiezase reco-
miendaempujarla Power-Mate®en direcciOndirec-
tamenteopuesta a usted yjalarlaen Itnea recta AI
finalde cada pasadade regreso,camb[e la direcciOn
de ]a Power-Mate®hacia lasiguientesecciOna lim-
piar.Continue asi a tray,s de todala atfombrade
una maneralentay deslizante.
NOTA:laspasa-
das rapidas y
jalonadasno
logran una lim-
pieza completa.
El dispositivo gi-
ratoriode ramangueraper-
mite que _sta gire sin ne-
cesidad de mover etrecep-
t_culoEsto es muy utii _'_."_. _\
para limpiaren_reas pe-
quef,as_Aseguresede que
la manguerano est6 tor- "_,_
cidaantes de jalar el
recept_culo
CUIDADO
Peligro de lesion personal y dafio al
producto
Tengacuidadosl el Power.Mate®y la manguera
se dejan enposicibn vertical pues peuden
caersef_cllmente. Si se volteanpeude haber
daOode propiedad.
ADVERTENClA
Peligrode lesion personaly dafio al
)roducto
No atropelleel cordon el_ctrico con la
Power*Mate®,Hay un peligro de
lesion corporal o unos dafios de
posesiones.
Notire del cordon el_ctrico de la pared
para desenchufario. Si haydanos en
el cordoneldctrico o el enchufe, hay
un peligro de lesion corporal o unos
dafios de posesiones.
Control de
aspiraciOn
\\
Los escalonesalfombradosrequierenlimpieza
periOdica.Cierreporcompletoel control de aspira_
ci0npara lograr los mejores resultadesde limpieza
Mantengael pasode aire abierto para Iograr los
mejores resultadosde limpieza. Examine devez
en cuandocada una de las_reas de unionen
FUNCIONAMIENTODE SU ASPIRADORA para
asegurarse de que no estOnbloqueadas.
Desconecte la aspiradora antes de revisar.
t ADVERTENClA
Peligro de lesion personal
Tenga cuidadosi coloca el recept_culosobre
escalones.SI se cae, podriacausar lesion per-
sonalo dafio a la propiedad.
ADVERTENCIA
Pellgro de lesion personal y dafio al
_mducto
No jale de la manguera para mover la
aspiradora de un escalOn al slguiente,
Cuando termlne de Iimplar una &rea use
ia mantja en la asplradora para moverla
a otro lugar para continuar la timpieza,
Use el ajuste XLO (bajo) para obtener la major iim-
piezaa fondo_Por otra parte, quiz_s se requiara ele-
vat el nivelpara facilitaralgunas Iareas,como por
ejemplo cuandose trata de tapetes y algunas alfom-
brasde petolargo,y para impedir que la aspiradora
se apague Se sugieren lossiguientes ajustes:
HI - Pefomuy largo y suelto, tapetes, alfombras
muy acojinadas.
MED - Petemedianoa largo.
LO - Palecorto a mediano,
XLO - La mayoda de tas albmbras y pisos
descubiertos
................ i, i iiiiiiiiiiiiiiiiiiiii1,1111111i,i iii, ii i I i
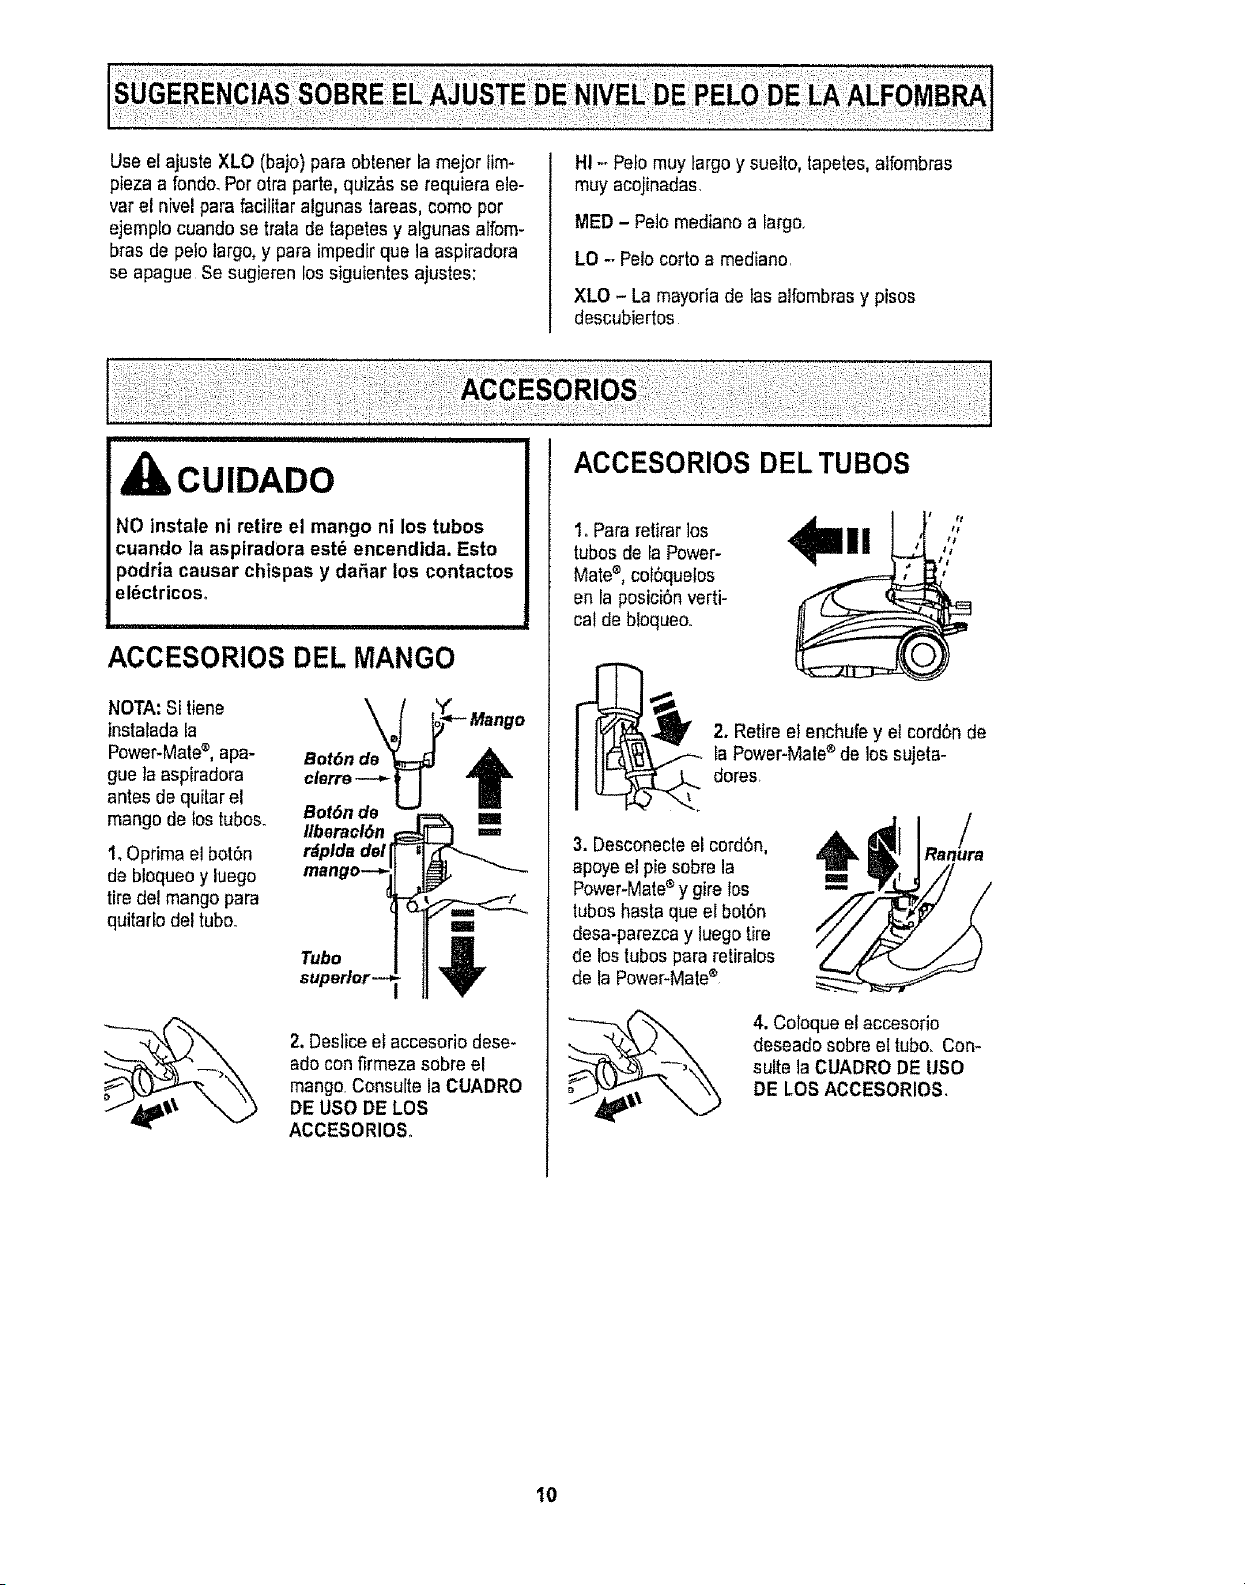
CUIDADO
NO instale ni retire el mango ni los tubos
cuando la aspiradora est6 encendida. Esto
)odria causar chispas y dar3arlos contactos
el_ctricoso
J
ACCESORIOS DEL MANGO
NOTA:Si tiene
instaladala
Power-Mate®,apa-
gue la aspiradora
antes de quitarel
mango de fos tubos.
1_Optima elbot6n
de bloqueoy luego
tiredel mango para
quitarfo dei tubo.
Bot6n de_m
clelTe _ 1
!
Bot6nde "-"
Ilberacl6n J
r6plda del --i
mango--_ -_
Tubo
superior-
_ Mango
t
2.Desliceel accesorio dese-
ado confirmeza sobre el
mango.Consulte la CUADRO
DEUSO DE LOS
ACCESORIOSo
ACCESORIOS DEL TUBOS
1.Para retirar los
tubosde la Power-
Mate_, cotSquefos
en la posiciSnverti-
cal de bloqueo.
1111 , ,/
_i . Retire el enchufe y el cordSnde
_aPower-Male®de los sujeta-
dores
3. Desconecteelcord6n,
apoye el pie sobre la
Power-Mate®y gire los
tubos hasta que el bot6n
desa-parezcay luegotire
de lostubos pare retiralos
de la Power-Mate®
Ran'ura
4. Cobque elaccesorio
deseado sobreel tubo. Con-
sufte la CUADRODE USO
DE LOS ACCESORIOS.
10
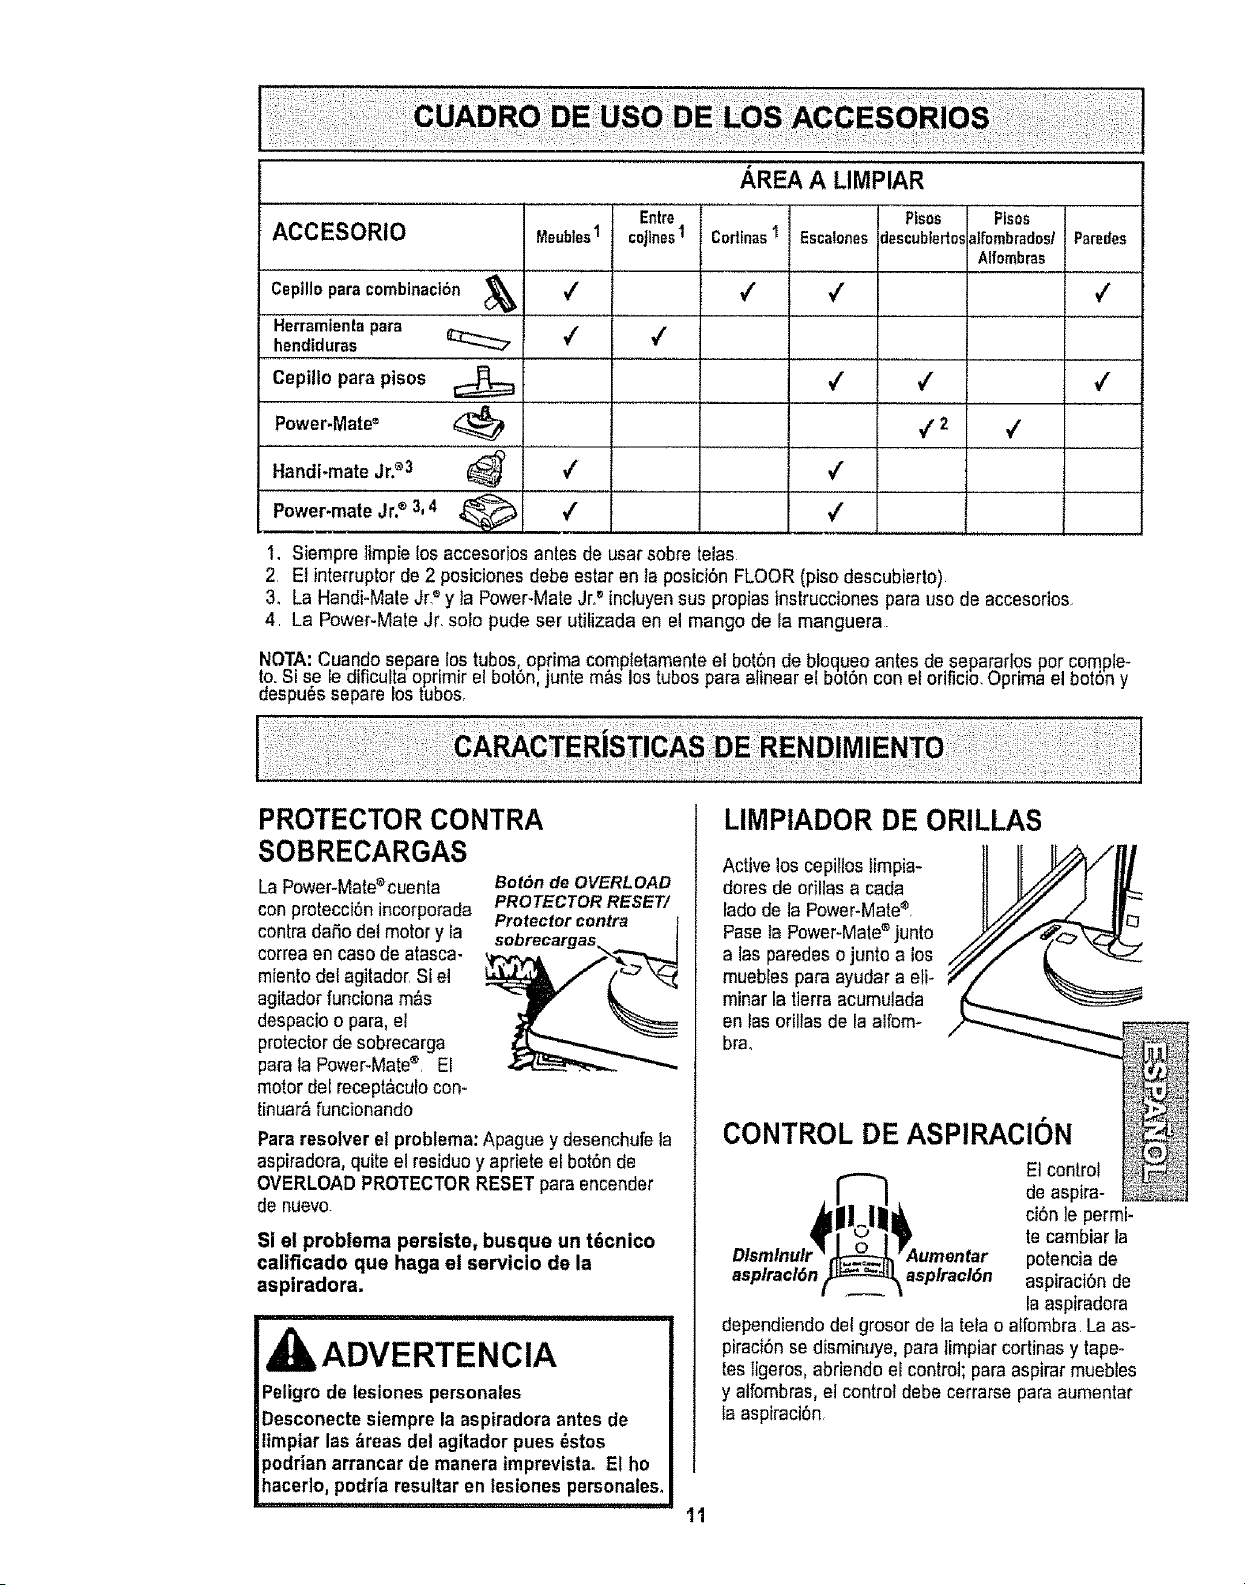
............. P,REA'A'LiMPIAR
ACCESORIO
Cepilloparacombinact6n _
Herramientapara
hendiduras
Cepillo para pisos
Power'Mate_
Handi-mate Jr.®3
Power-mateJr.®3,4
Meubtes1
Entre
coJlnes1 _scalones
Pisos PIsos
descublertosaifombrados/Par®des
Alfombras
4
#
4
• ,--
4
#
#
#
# #
# #
42
#
#
1. Siempre timpielos accesoriosantes de usar sobre telas
2 Etinterruptor de 2 posicionesdebe estaren la posici6n FLOOR(piso descubierto)
3. La Handi-Mate Jr." y ta Power-MateJr? incluyensus propias instrucciones para uso de accesorios.
4. La Power-Mote Jr. solo pude ser utilizada en el mango de la manguera
NOTA:Cuando separe los tubes,optima comptetamenteel bot6nde bloqueo antes de separaflos por comple-
to. Sise le dificul!aoprimir el bot6n, junte m_s lostubos paraalinearel bot6n con el orificio.Optima el botSny
eespu_s separe rostuDos,
PROTECTOR CONTRA
SOBRECARGAS
La Power-Mate%uenla
con protecci6n incorporada
contradaSodet motor y la
correa en caso de atasca-
mientodel agitador. Si el
agitador funciona m_,s
despacio o para,el
protectorde sobrecarga
parala Power-Mate®, El
motor del recept,'_culocon-
tinuar_ funcionando
Botdnde OVERLOAD
PROTECTORRESET/
Protectorcontra
Pararesolver el problema:Apague y desenchufela
aspiradora, quiteel residuoy apriete el bot6n de
OVERLOAD PROTECTORRESET para encender
de nuevo.
Si el problema persiste, busque un t6cnico
calificado que haga el servicio de la
aspiradora.
ADVERTENCIA
LIMPIADOR DE ORILLAS
Active los cepillos limpia-
dotes de ofillas a cada
lado de la Power-Mate®,
Pasela Power-Mate®junto
alas par®deso junto a los
muebles para ayudar a eli-
minar la tierraacumulada
enlas orillas de laaifom-
bra.
CONTROL DE ASPIRACION
El control
de aspira-
ci6n le permi-
t®cambiar la
poIencia de
asplracl6n asplracl6n aspiraciSnde
la aspiradora
dependiendo del grosor de ia tela o alfombra La as-
piraciSnse disminuye, para timpiar cortinas y tape-
tes Iigeros,abriendo el control; para aspirar muebles
y alfombras, e] controtdebe cerrarse para aumentar
la aspiraci6n.
11
PROTECTOR TERMAL
Esta aspiradora tiene un protector termal que se
ajusta automdticamente para proteger ala
aspiradora del sobrecalentamiento. Si una
obstruccibn impide el flujo normal de aire al
motor, el protectortermat apaga el motor
autom&ticamente pare permitirque el motor se
enfrle a fin de evitar posiblesdafios ala
aspiradora.
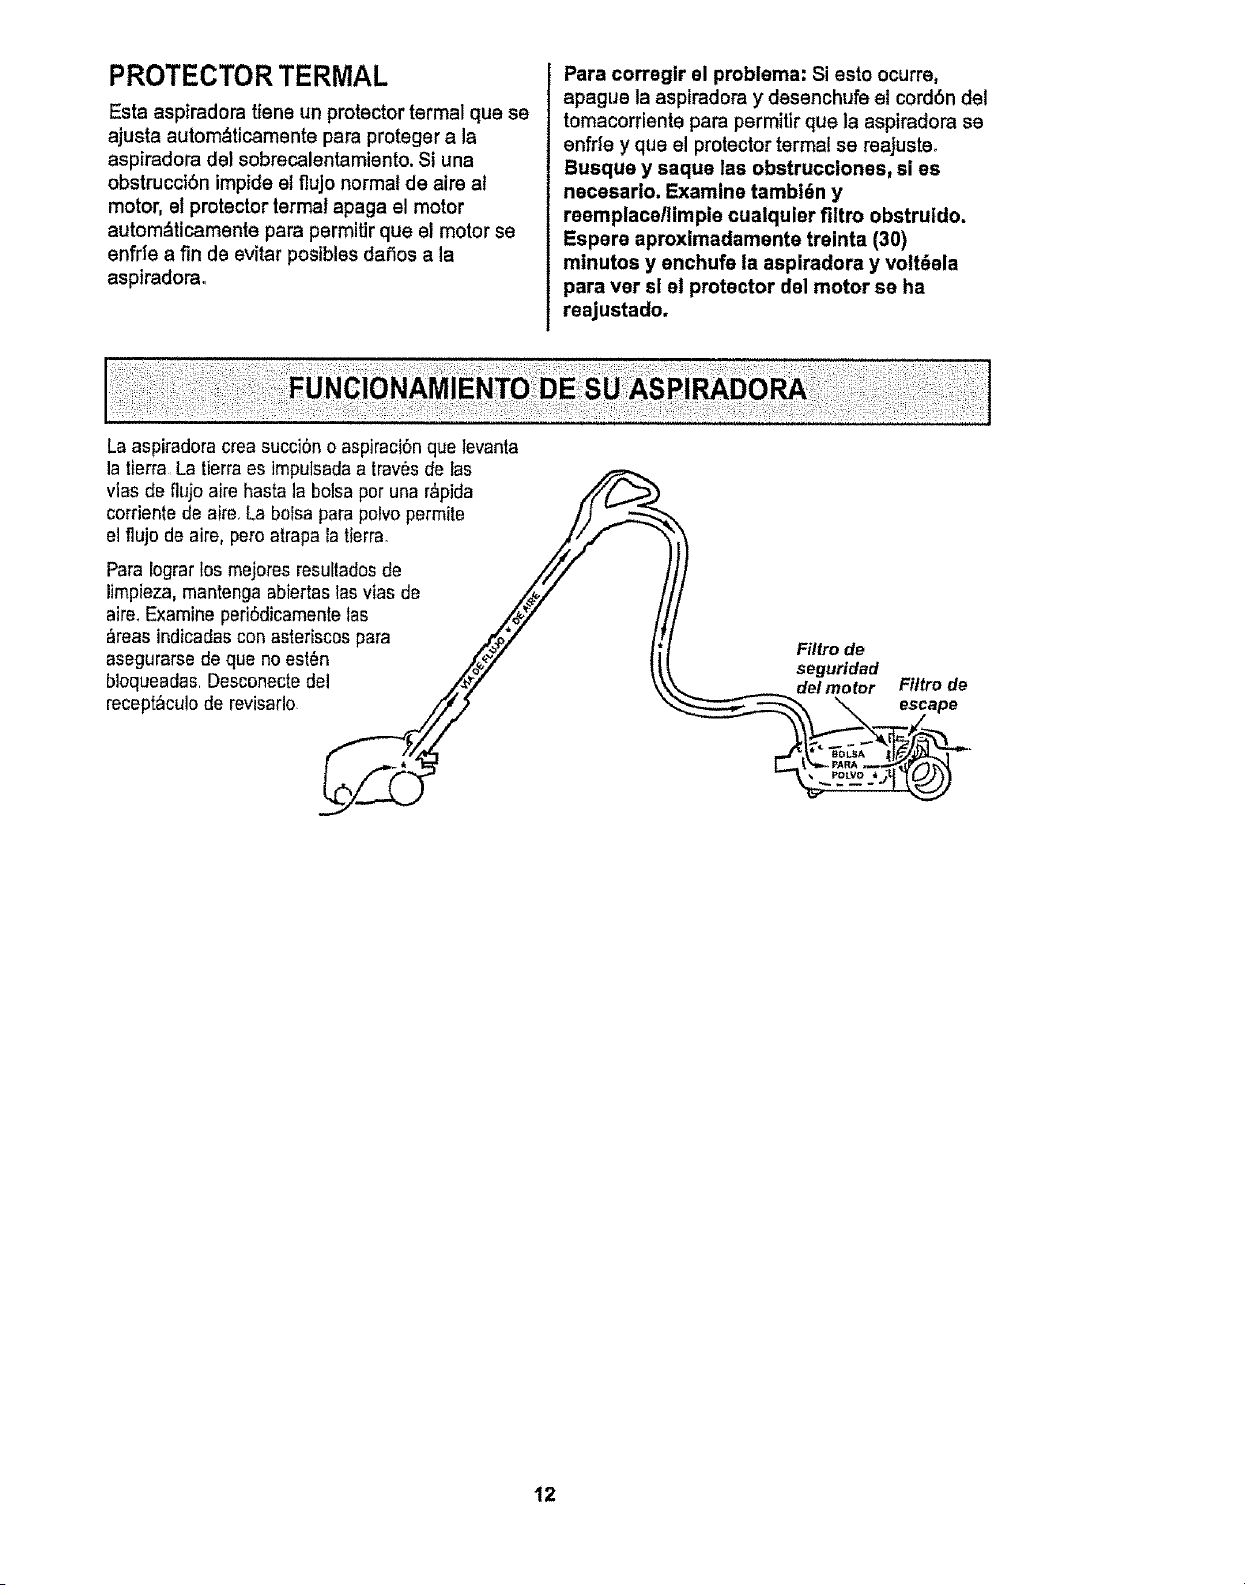
La aspiradora creasucci6n o aspiraciSnque levanta
la tierra Latierra es impulsadaa lrav_s delas
Para corregir el problema: Si esto ocurre,
apague la aspiradora y desenchufe el cord6n del
tomacorriente para permitir que la aspiradora se
enfde y que el protectorterma! se reajuste.
Busque y saque las obstrucciones, si es
necesarlo. Examine tambi6n y
reemplacellimpie cuatquler filtro obstruldo.
Espere aproximadamente treinta (30)
minutos y enchufe ta aspiradora y volt_ela
pare ver si el protector del motor se ha
reajustado.
vlasde flujo aire hasta ]abolsa pot una r&pida .//[_.,_
corriente de aim, La bolsa para polvopermite /)
el flujo de aire, pero atrapa latierra. ./_._'/" "_I_
/
ParaIograrlos mejores resulladosde /// j
limpieza, mantenga abiertas las vies de /_/ /
aire_Examine periSdicamenletas ,/_" !t
_reas indicadascon asteriscospara ,_y /[,
o,e°u,o,,e,equoooos, o tit ""°"°
seguridad
de/motor Fittro de
bloqueadas,Desconectedel /.._/ \\ __ _. escape
.../'- t*" .%_A !1.pJ.._L.'T'''_
12
CUIDADO DEL RECEPT.&,CULO
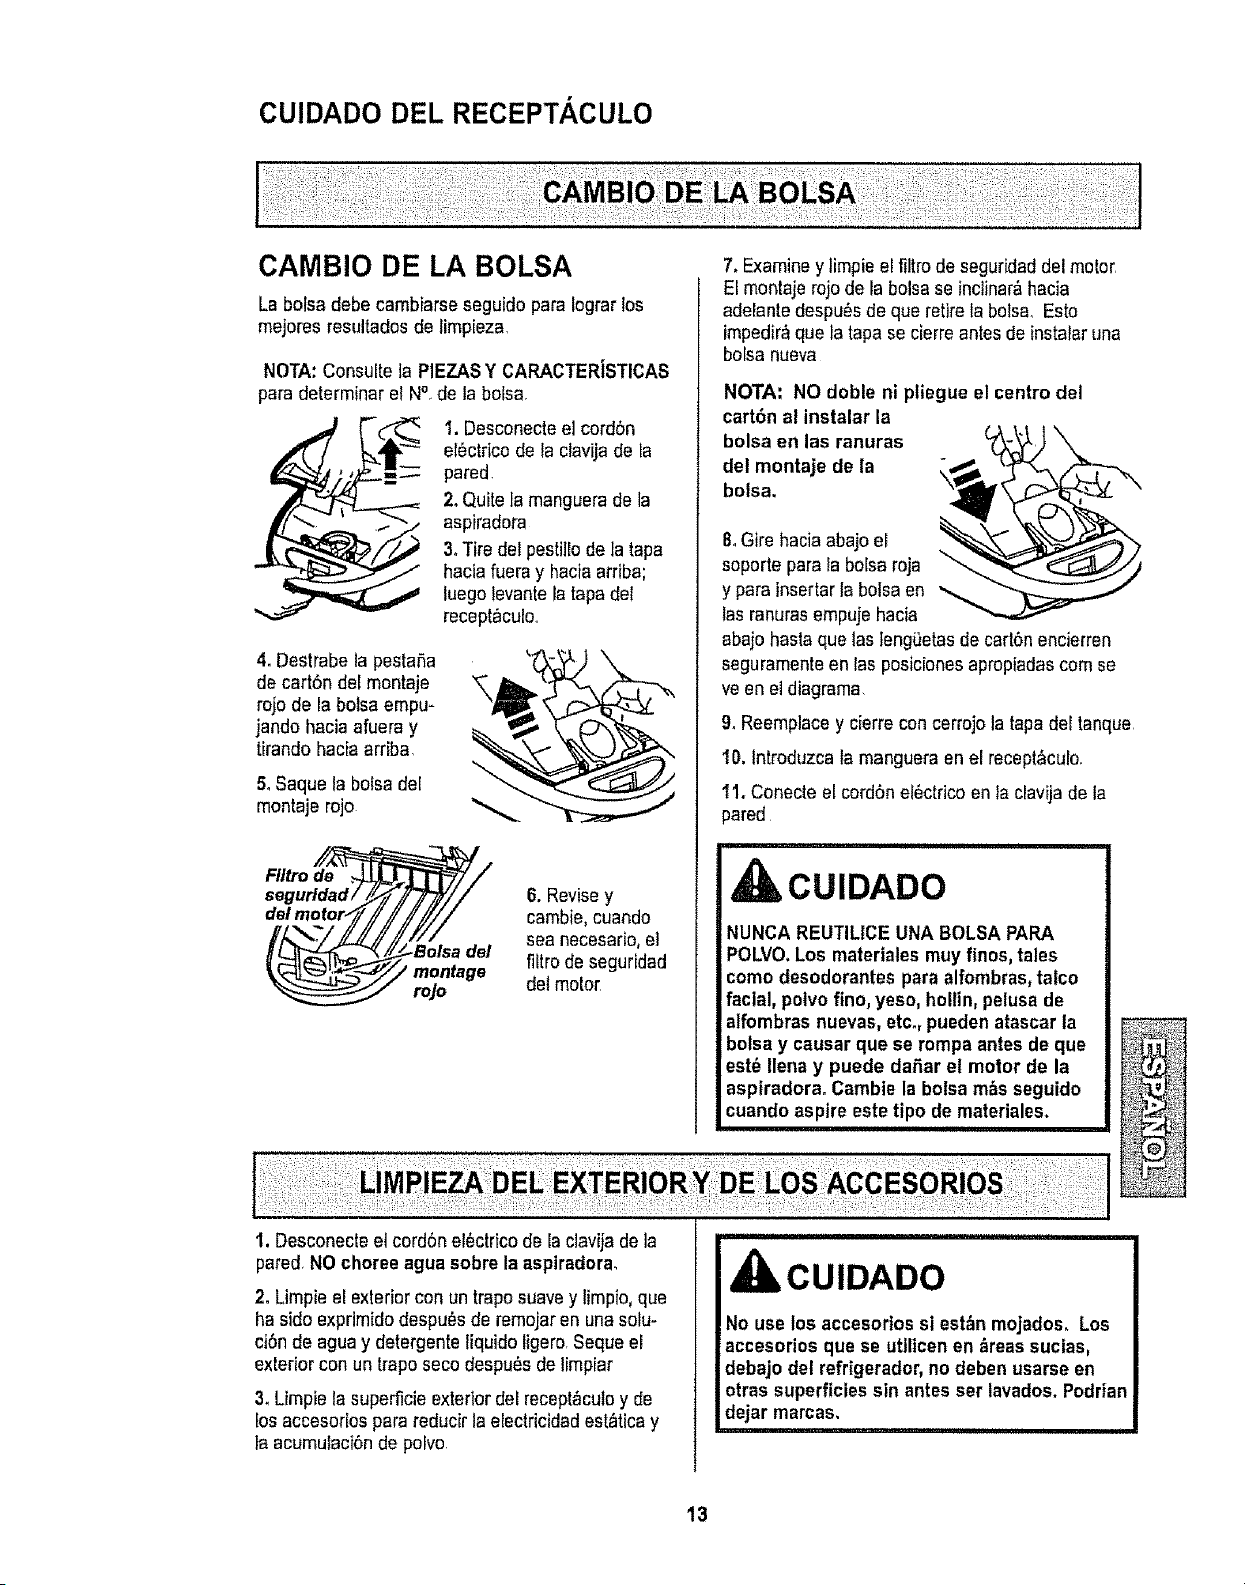
CAMBIO DE LA BOLSA
La bolsa debe cambiarse seguido para Iograrlos
mejores resultadesde limpieza.
NOTA:ConsuEtela PIEZASY CARACTERiSTICAS
para determinarel N°, de la bolsa,
1. Desconectee] cordSn
eI6ctrico de la clavija de la
pared
2. Quitela manguerade la
aspiradora
3.Tire del pestii!ode la tapa
hacia fueray haciaarriba;
luego ievante la tapadeI
recept_culo,,
4. Destrabe la pestaSa
de cart6n del montaje
rojo de la botsa empu-
jandohacia afuera y
tirandohacia arriba,
5.Saque la bofsa del
montaje rojo
FIl_o de
seguridad i
del motor_
6. Revisey
cambie,cuando
sea necesario,el
filtro de seguridad
clefmotor,
7, Examiney limpieePfiltro de seguridaddel motor,
El montaje rojo de la bolsaseinctinar_,hacia
adeFantedespu_,sde que retirela botsa, Esto
impedir_que la tapa se cierreantesdeinstataruna
borsanueva
NOTA: NO doble ni ptiegue el centre del
cart6n al instalar la
bolsaenlasranuras _ [(>,_,_*___"-_
de! montaje de la
bolsa.
8oGire haciaabajo ei _.'_ _ _
soporte para Fabolsaroja
y parainsertar la bolsaen
las ranurasempujehacia
abajo hasta que tas leng_etasde cart6n encierren
seguramenteen las posicionesapropiadascornse
ve en eldiagrama
9. Reemplacey cierre concerrojo la tapadel tanque
10, Introduzca la mangueraen el recept,_culo.
11. Conecteel cordSnel_ctricoentaclavija de la
pared
, CUIDADO
NUNCA REUTlUCE UNA BOLSA PAPA
POLVO.Los materiales muy fines, tales
come desodorantes para alfombras,talco
facial, polvo fine, yeso, hollin, pelusade
alfombras nuevas, etc°, pueden atascarla
bolsay causar que se rompa antes de que
est6 Ilena y puede daSar el motor de la
aspiradora. Cambie la bolsa mbsseguido
cuando aspire este ripe de materiales.
I
1, Desconecteel cord6nel6ctricode la clavijade ]a
pared,NO choreeagua sobre la asptradora.
2. Limpieel exterior con un traposuave y limpio,que
ha side exprimido despu_s de remojaren una solu-
ciOnde agua y detergente Iiquido ligere,Seque el
exterior con un trapo seco despu_s de limpiar
3. Limpie la superficieexterior del recept_culoy de
Fosaccesorios para reducir la electricidadest_ticay
la acumulaci6nde polvo,
CUIDADO
No use los accesodos si est_n mojados, Los
accesorios que se utilicen en _reas sucias,
debajo det refrigerador,no deben usarse en
otras superficies sin antesser lavados. Podrian
dejar marcas.
i IHHI H il I
13
IbADVERTENCIA
Peligro de choque el_ctrico
Desenchufeel cord6n de lacorriente el_ctrica,
No opere la aspiradora sin elfiltro desegurt-
dad del motor. Aseg_urese de que el filtro est_
seco e instalado adecuadamente para impedir
que el motor falle y/o que se produzca un
choque et_ctrico°
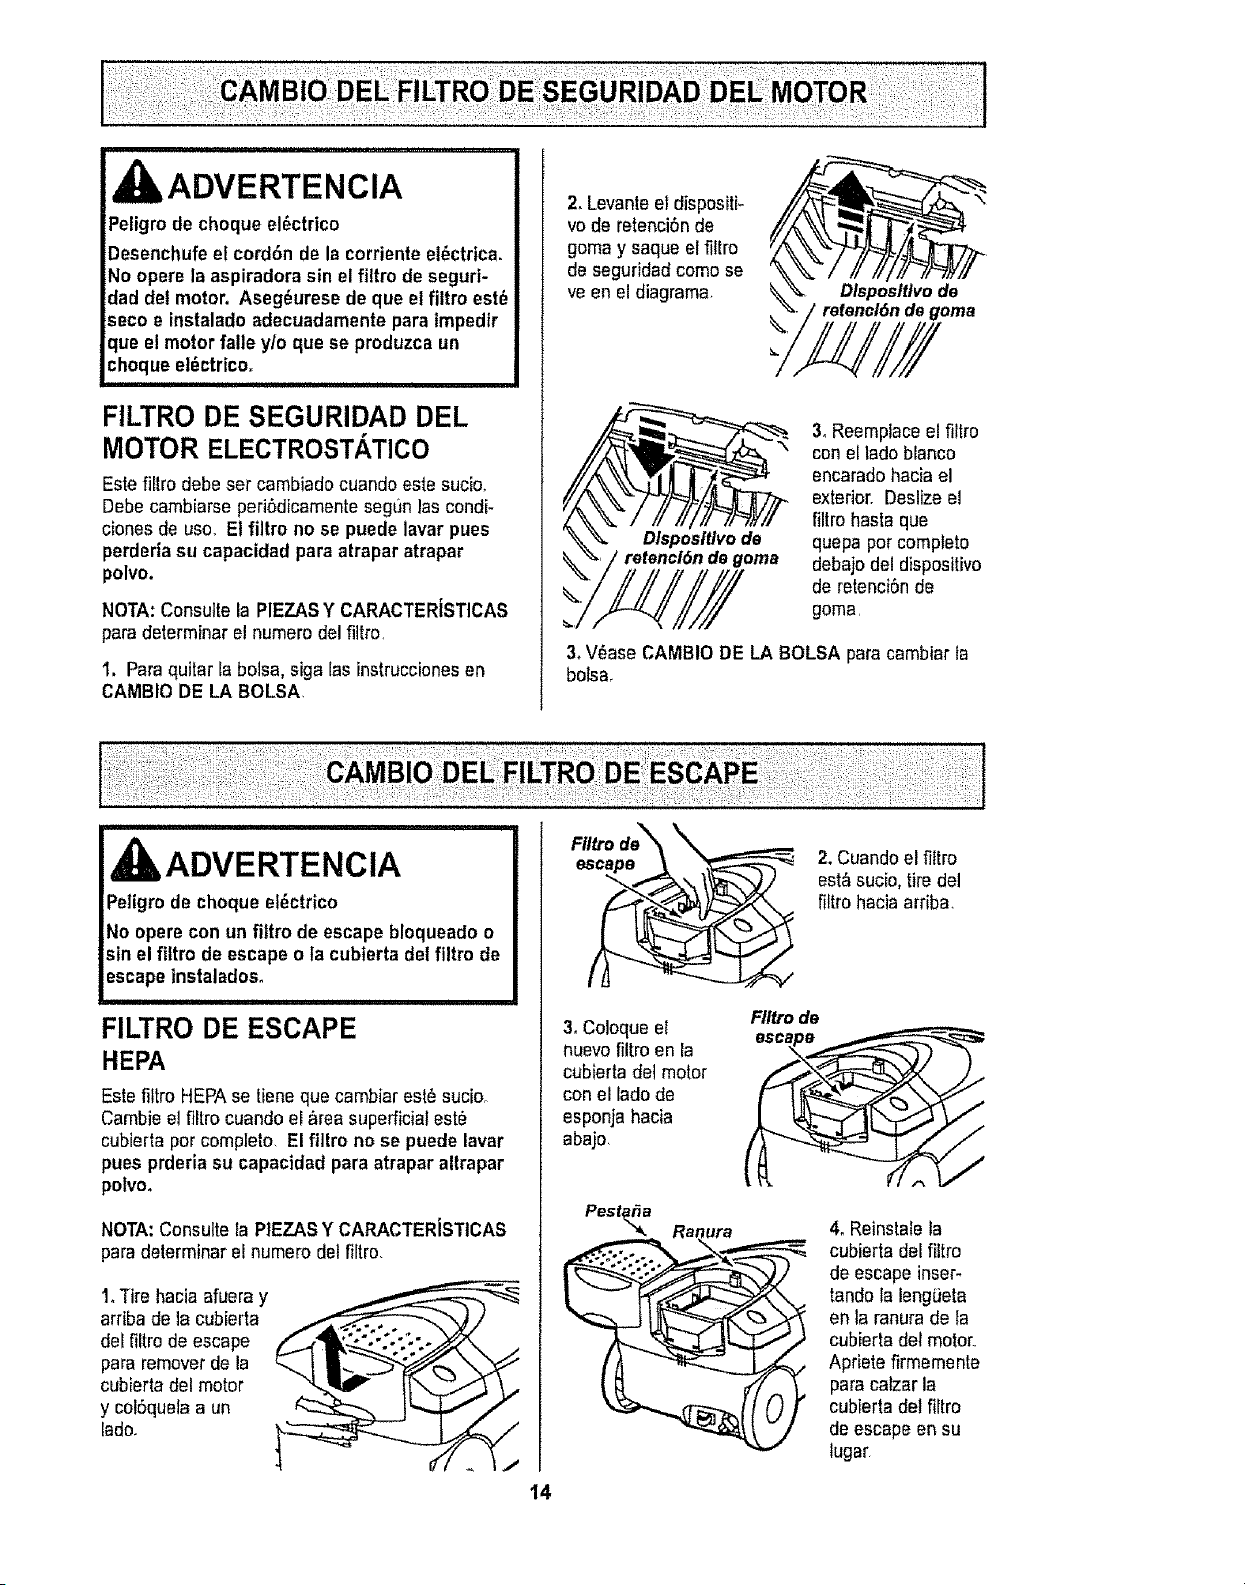
FILTRO DE SEGURIDAD DEL
MOTOR ELECTROSTATICO
Este fi[trodebe set cambiado cuando estesucio,
Debecambiarse peri6dicamente seg0nlascondi-
ciones de uso, E1filtro no se puede lavar pues
perderta su capacidad para atrapar atrapar
polvo.
NOTA: Consutte la PIEZASY CARACTERiSTICAS
para determ[narel numerodel filtro,
I. Para quitar la bolsa, siga las [nstruccionesen
CAMBIO DE LA BOLSA,
2, Levante el dispositi-
vo de retenciSnde
goma y saque elfiltro
de seguridadcomo se
ve en el diagrama, Dlsposltlvo de
refenel6n de goma
Dlspositlvo de
retenel6n de goma
3, Reemplaceel fiitro
conel lado blanco
encaradohaciael
exterior, Deslizeel
filtro hasla que
quepa pot completo
debajodel dispositivo
de retenci6n de
goma,
3,V_ase CAMBIO DE LA BOLSA paracambiar ta
botsa,
ADVERTENCIA
Peligro de choque el_ctrico
No opere con un filtro de escape bloqueado o
sin el ftltro de escape o la cubierta del filtro de
escapeinstalados,
FILTRO DE ESCAPE
HEPA
Este filtro HEPAse tiene que cambiar est_ sucioo
Cambie el filtro cuando ei Areasuperficialest_
cubierta por completo, El filtro no se puede lavar
pues prderia su capacidad para atrapar altrapar
polvo.
NOTA:Consulte ia PIEZASY CARACTERiSTtCAS
para determinar el numero del filtro,
1,Tire haciaafuera y
arriba de la cubierta
del filtro de escape
para remover de la
cubierta del motor
y colSquetaa un
lado,
FIICrod_ I \__
escape 1 __-'_'_
2. Cuandoel fiitro
est_ suciootire del
filtro hacia arriba
3. Coloque el
nuevofiltro en la
cubierta det motor
con el lado de
esponja hacia
aba)o,
FIItro de
lura
4, Reinstalela
cubierfa del filtro
de escapeinser-
tando la leng0eta
en la ranura de la
cubierta dot motor..
Apriete firmemente
paracalzar la
cubierta del filtro
de escape en su
lugar
14

CUIDADO DE LA POWER-MATEs
SIempre deber&n seguirse todas las precau-
clones de seguridad a! limpiar y dar servicio a
la Power-Mate_,
IbADVERTENCIA
Petigrode choqueel_ctrico o lesi6n corporal
Desconectela unidad antes de limpiarla o darle
servicio,De Io contrario podria producirseun
choque el_ctrico o causar lesi6n corporal si la
asplradora arrancade manera imprevista.
i, ,,111,1 !1 iiii
PARA RETIRAR LA CORREA
1, CoJoqueia Power-
Mate'_ con la parte
inferior haciaarriba
2, Quitelos dos (2)
tornilios en la cub_rta
de ra Power-Mate .
3, Co_oquela Power-
Mate en taposici0n
vertical,Aprieteel
pedaldel mangode
liberaciÜny baje la
articulaciOngiratoria,
Levantelos pestitlos
traseros
4. Para quitar fa cubierta,
agarre loslados y tire
afuera
5,Apriete las
[engCietasen la
parle trasera de la
cubierta del agita-
dory gire hacia
adelante pare lib-
erar de la basede
la Power-Mate®,
del agltador
6, Levantefa
unidad del agita-
dory quite la cor-
rea gastada,
Tape del extremo
7. Examiney limpie las_reas de tape del extremo.
En la ENSAMI]LE DEL AGITADOR se proporciona
una ilustraci6nde todoel ensamble dei agitador
1
15
LIMPIEZADELAGITADOR
NOTA: Para mantener una alta e_ciencia de
limpieza y evitar el dale a la aspiradora,
_gitado[ cada vez qua se cambia
Tambi_n hay qua limpiar el agitador seg0n el
siguiente horado:
E! use de la Ltmpie el
Frecuente -
(usada diradamente)
Moderado -
(usada 2 o 3 veces
per semana)
Ligero -
(usada I vez per semana)
cada semana
cada rues
cada 2 mesas
IMPORTANTE
Desconecte la aspiradora,Examine frecuente_
mente e! cepitioy_as _reas de soporte del mismo
de laPower-Mate_ y etimine rodecabello, hiloy
pelusaacumuladar Si_ acumulaci6nes excesiva,
separe la Power-Mate del tubey realice los pasos
a continuaciSn..
Retire rode indicio de basura o suciedad de la
zona de la correa y del rodit!o del cepillo°
Con cuidado quits las tapas y quits el hilo o los
restos ubicados en el agitador o en los
soportes del cepillo,
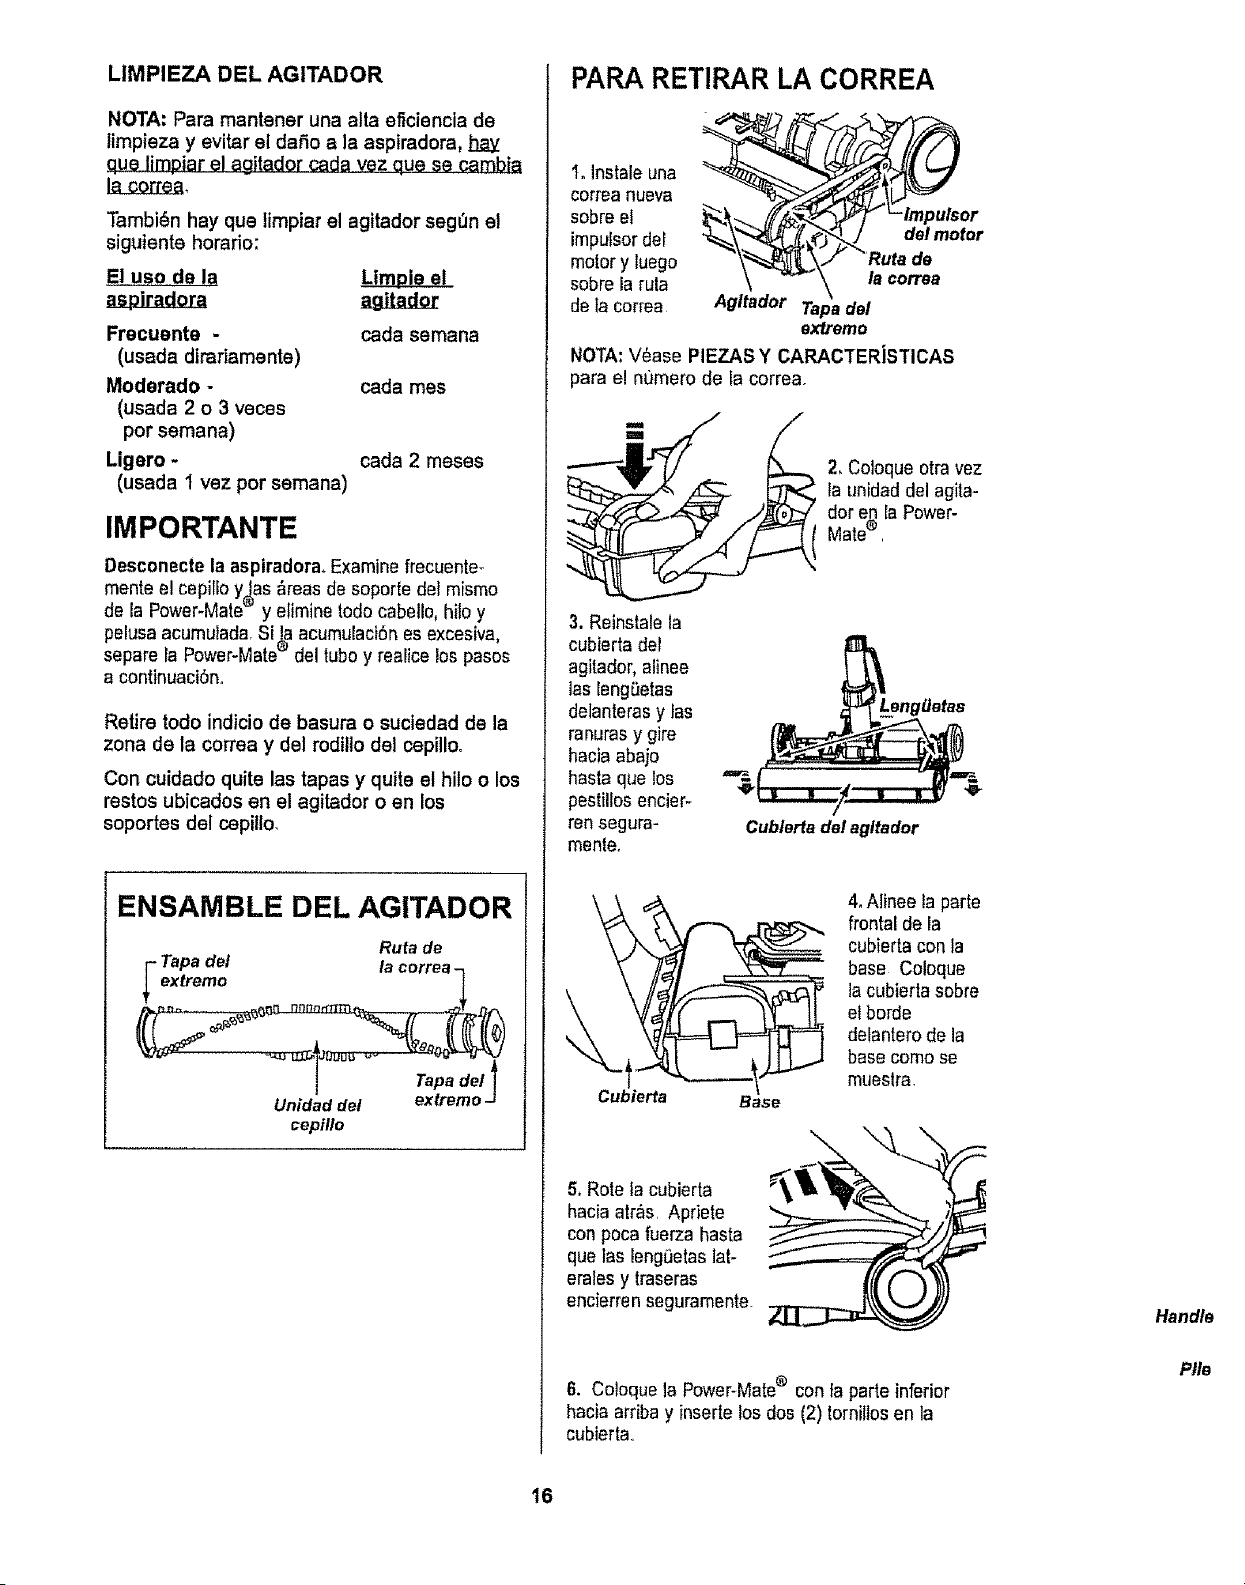
ENSAMBLE DEL AGITADOR
Rufa de
_ apadel ta eorrea-
extrerno
Tapa de/
Unidad del extreme -
cepiflo
PARA RETIRAR LA CORREA
t. Instale una
correa nueva
sobreel
impulsor der
motory luego
sobrela ruta
de tacorrea
or
tor
Agltador Tapadel
ex_remo
NOTA:V6ase PIEZAS Y CARACTERJSTICAS
para el numero de la correa.
3. Reinstale la
cubierta del
agitador, alinee
las lengSetas
delanterasy Jas
ranurasy gire
haciaabajo
hasta qua !os
pestilfosencier-
ran segura-
mente,
2_Coloque otra vez
la unidad del agita-
dot en la Power-
Mate®.
Cublerfadel agltador
Cubierta
Base
4.Alinee la parte
frontal de ia
cubierta con la
base Coleque
la cubierta sobre
el borde
delanterode la
base come se
mueslra,
5, Rote la cubierta
hacia atr,_s.Apriete
con poca fuerza basra
que las leng_etaslat-
eralesy traseras
encierrenseguramente.
6. Coloque la Power-Mete® conla parte inferior
hacia arriba y inserte los dos (2) tornillos en la
cubierta.
Handle
Pile
16
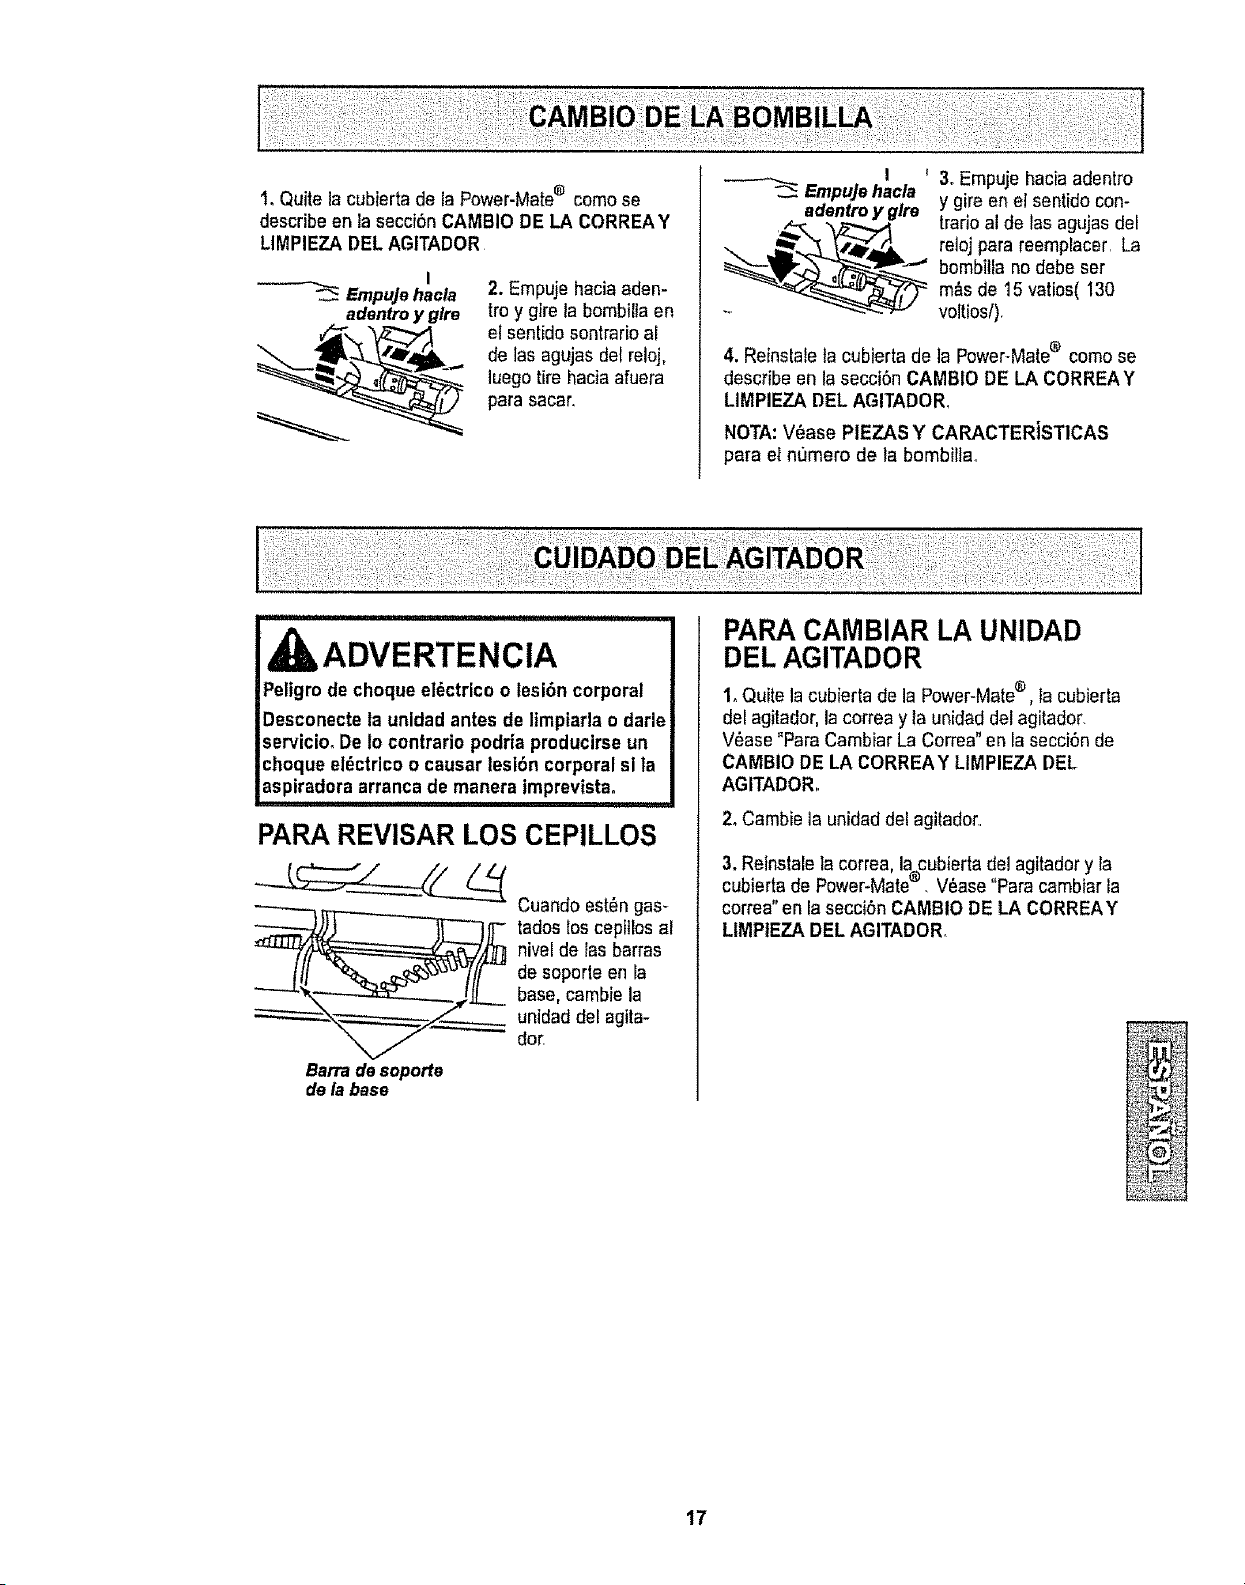
t. Quite lacubierta de la Power-Mate® como se
describeen la secci6nCAMBIO DE LA CORREAY
LIMPIEZA DEL AGITADOR
I
Empujehacia
adantroy glre
2. Empuje haciaaden-
troy gire la bombiilaen
el sentido sontrario al
de lasagujas del reloj,
luegotire hacia afuera
para sacar.
I f
Empujehacla
adentroy glre
3oEmpuje haciaadentro
y gire en el sentido con-
trarioal de las agujas del
reloj para reemplacer. La
bombilia no debeser
m&sde 15 vatios( 130
voltios/).
4. Reinstaletacubierta de la Power-Mate® comose
describe en la secciSnCAMBIODE LA CORREAY
LIMPIEZA DEL AGITADOR.
NOTA:V_ase PIEZAS Y CARACTERJSTlCAS
para eI n0mero de la bombiltao
ADVERTENCIA
laPeltgrode choque el_ctrlco o lesi6n corporal
I
Desconecteta unidad antes de ltmptarlao darle!
servicio.De 1ocontrario podria producirseun
choque eldctrico o causar lesi6n corporal si |a I
spiradora arrancade manera tmprevistao ,,,I
PARA REVISAR LOS CEPILLOS
_j_ ados loscepitlos al
nivel de las barras
de soporte en la
base. cambie la
unidad del agita-
dot
Barradeseporte
de la base
PARACAMBIAR LA UNIDAD
DEL AGITADOR
1.Quite la cubierta de la Power-Mate®, la cubierta
del agitador, la correay la unidad del agitador.
V_ase "ParaCambiar La Correa"en la secciOnde
CAMBIO DE LA CORREAY LIMPIEZA DEL
AGITADOR.
2. Cambie la unidad del agitador..
3. Reinstale]a correa, la_cubiertadel agitadory la
cubierta de Power-Mate . V6ase "Paracambiar la
correa"en la secci6n CAMBIO DELA CORREAY
LIMPtEZA DEL AGITADOR
17
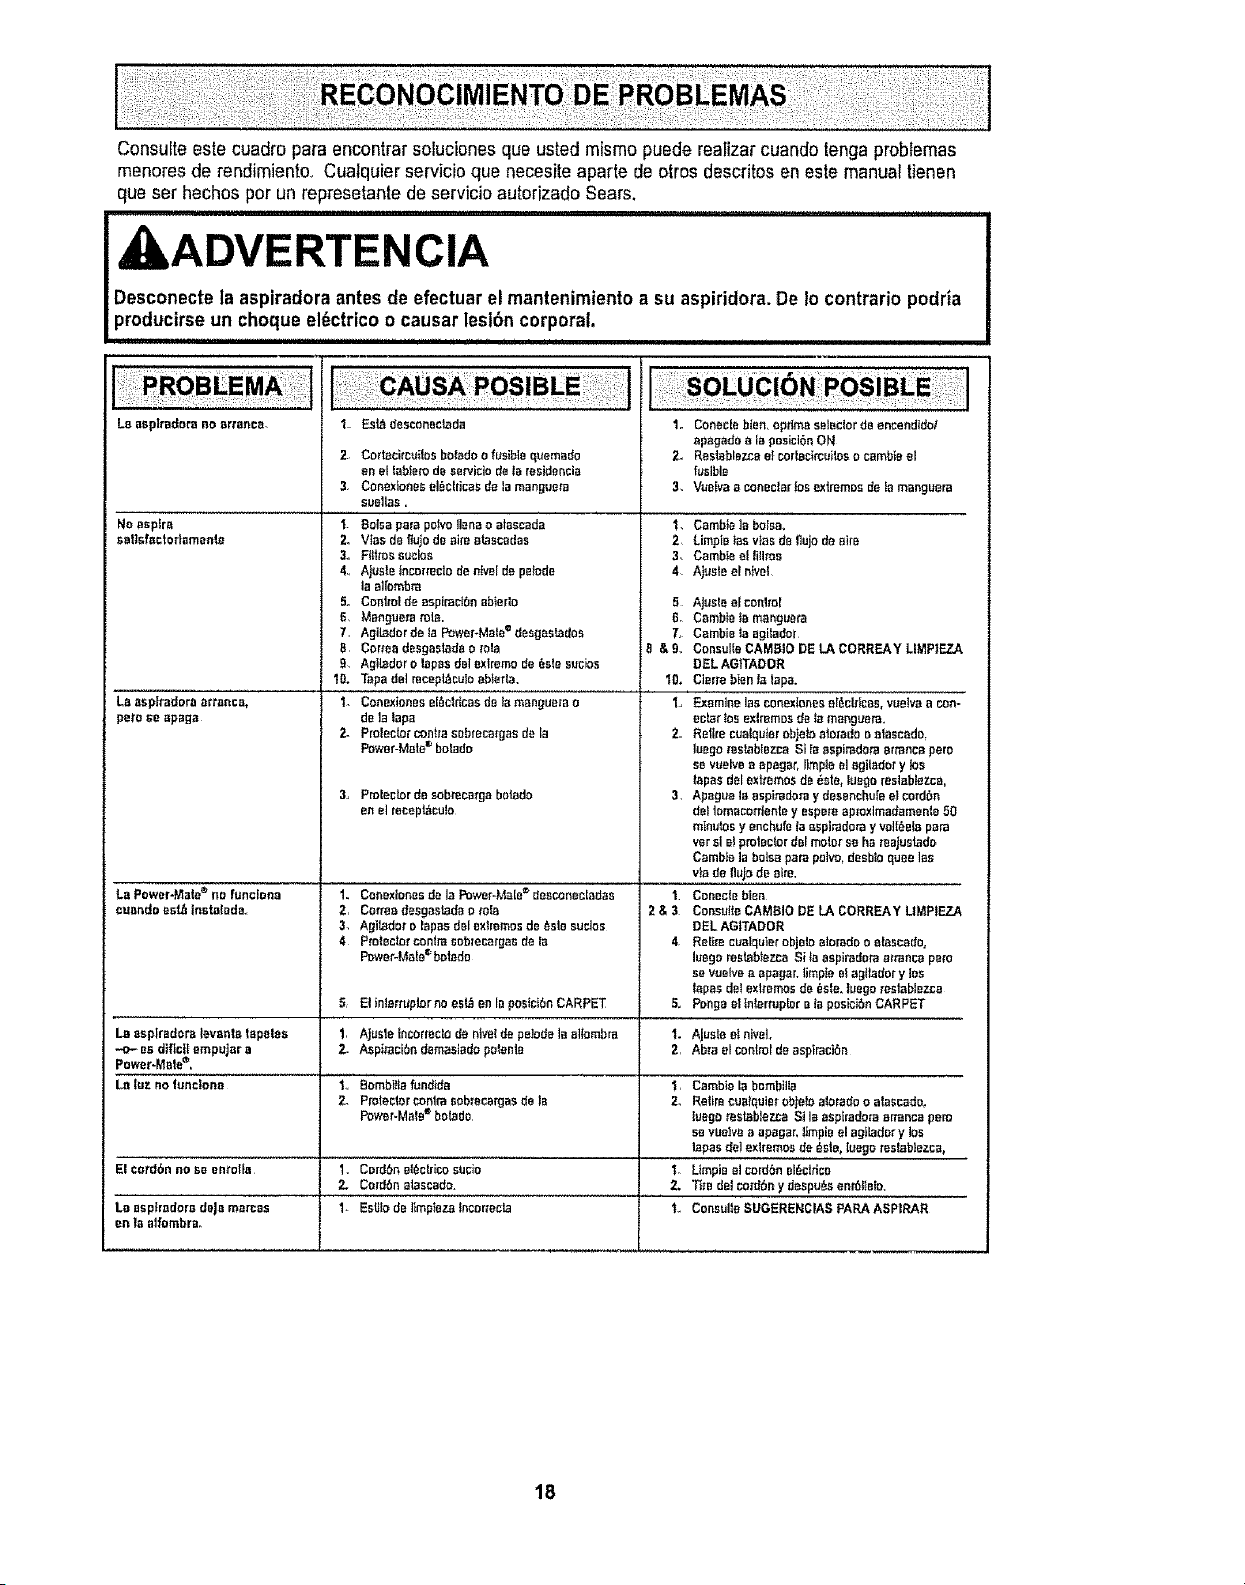
Consults este cuadro para encontrar sofucienesque usted mismo puede reafizar cuandotengaproblemas
menoresde rendimiento,,Cuatquier servicio que necesite aparte de otros descritos en este manual tienen
que set hechos per un represetante de servicio autofizado Sears.
rl,,, i,iiiii iiii i1,1,11,111,1 iiii, i
kADVERTENCIA
Desconectela aspiradora antes de efectuar el mantenimiento a su aspiridora.De Io contrario podria
_roducirse un cheque el6ctrico o causar lesi6n corporal,
Laaspttadera eo errancy-
No espfrtl
sBttefecterlemente
La esplradora arteries,
pom Beapaga
La Power-Mate®rio funcfona
cuBndo es_ Instatada.
La _splradora teventa tapBIea
...O- Badifictt empujar e
Power-Mete®.
La tuz no lunclono
_ k
El cord6n no se enteric
_a_ept,oa;r_eelsme,_.
en |a etforabre.
2,
suBtlas.
't. Boise pare pone Henao atascade
2, Vies de flujodeaim ataseadas
3. FIHrossucios
4, Ajuslelacorrectode one! de pc|ado
la ai[ombra
5. Control de aspiractbnabiedo
6, Menguera role,
7, Aglb_dorde ta Powm'-Mate®desgastados
8, Cormadesgasbda o ,role
9. Agi_dor o _pes del exlremo de _sle sucks
10. Tapa de]recepL_cuIBabterla.
I- Cortex|eBBsel6c_r_cesde la mengue,rao
dela lap;{
2. Prolector _nt,ra eobreca_gaede la
PowBr-M_le®bobdo
Est_ daeCBnSCteda 1.
Coflacirc_i|os bo_adoBfusiblequemado 2.
eB ellabletodBsent|etadela{esldencia
Conextonesel_cbicas dela mangueta 3.
3. Prolector de sobreca;rgabotado
enB]meepbculo
1. Conexlones de le Powet4AeIB® desconectedas
2, Coffee desgaslada e rob
3 Agliadet e lopes del extremes de _sto suclos
4 Protector _ntra sobleca,rgasde Ia
Power-Ma(ee_betedo
El inierruptor no est_ en la posici6nCARPET
1, Ajuste toter,rectade ntveIde pelodBla albmbra
Z Asp#acibn demastada petenlB
1,, Bombltla fund_da
P,roteclerBonitasobrecaq]as de t_
Power-Ma_Be bo_do
Conec{eblaB. opdmsselectords encendtdol
apagado ala posici6n ON
Restabiez,caelco,r_cireuitoso cembie el
fusible
Vue[va a coneciarbs extremesde tamanguem
1. Cordba Btbelrico sucio
2. Celdbn a_seado.
1. EBUIode Iimp_ezatncormcb
l, Cambb ]a boise.
2 Limpis |asvIas deflujo de aim
3, Camble ol Iilltos
4 Ajuete eln_vel
5 AJUSIBelcontrol
& Cambteta manguera
7, Cambie ]a agitador
tJ & 9,, ConsulleCAMBIO DE LA CeRREAY LtMPIEZ/
DEL AGITADOR
t0. Cie'rreb_en_atap&
1., Examine IasCOOBXIBnesaliBI#Bee, vuatva Bcert.
ec_3rlos exitemos de ie manguera.
2,, Retire cua_quterobjeb ate'rodeB alascado.
iu_gomsbbiezca Si [aaspimdom armncapete
so vuelve e apegar, Itmp_eelagiladef y toe
tapes delextremesds _ste, tuego ,reslabiezca,
3, Apague laaspirad_raydssenchurBelcBrdbn
del tomace_Bnte y espeteapfexlmadamente 50
minutes y enchufelaasplradoray vBII_elapare
versle_protector d[Hrr_iotse ha resjustado
Cambie la botsa para pBiVO_desbIoquee las
via de |luja de etre,
I COBeCtBbien
2 & 3 ConsulteCAMBIO DE LA ceRREAY LIMPtEZ/
DEL AGITADOR
4 Rel[m cualqulerobje!e alorado o BIasBedB,
luege reebb_ez.caSi_e aspimdBra a_mncapa'ro
se vuelvea apagar, limpIa elaQIladory los
lopes dstextremes ds _sle.tuego mslablezea
5_ Ponge eltn_rtuptor Bta pBsiCibnCARPET
1. Ajuste et hive],
21 Abrael controldeaspiracibn
1, Cembie la bembilla
2. RetirecuB|quietOb|e_oaloredo o atascado,
luegataslablezca St ]easpkadota arranca pero
se vue_vaa apogeelimpiael agibdor y los
tapes deiextremes,de ,_stB,luege resleb_ezce,
1. Llmpie el cordbn el_cttico
2. _'rB delco,ralPhy despu_eenl611elo,
.......... % CBnsuHeBUGERERCIAS PARA ASPIRAR
I
18
Acuerdos Maestros de Protecci6n
Enhorabuena pot hacer una compra inteligente, Su nuevo producto Kenmore® est_ dise_ado y fabri-
cado para ofrecerle afios de funcionamiento confiabteo Pero al igual que todos los productos pueden
precisar un mantenimiento preventivo o alguna reparaci6n de vez en cuandoo Por este motivo, tener
un Acuerdo Maestro de Protecci6n puede ahorrarle dinero e inconvenientes,
El Acuerdo Maestro de Protecci6n tambi_n le ayuda a prolongar la vida _til de su nuevo producto. A
continuaci6n indicamos Io que el Acuerdo* incluye:
[]
[]
r_
r_
r_
[]
[]
[]
[]
[]
Partes y mano de obra necesarios para ayudar a que estos productos funcione correctamente
bajo condicionales normales de uso, no simplemente defectos. Nuestra cobertura va mucho
m&s all_ de la garantia del producto, Ning_n deducible, ninguna averia funcional queda exclu-
ida de la cobertura- proteccl6n real.
Servlcio experto ofrecido por una lista de rn_s de 10.000 t_cnicos autorizados del servicio
t_cnico de Sears, Io que significa que alguien en quien usted puede confiar estard trabajando
en su producto,
NQmero ilimitado de Ilamadas al serviclo t_cnico y servtcio en toda la nacl6n, tan continuo
como usted nos lo solicite,sin importar donde est,.
Garantia seria de sustitucl6n del producto, La sustituci6n de su producto cubierto si se pro-
ducen cuatro o mds averlas en doce meses,
Sustitucl6n det producto pot otto nuevo st su producto cubierto no puede repararse.
Revtsi6n y mantenimlento anual preventivo siempre que Io desee y sin cargo alguno.
Ayuda r_plda por tel6fono - Nosotros io Ilamamos Resoluci6n r_pida. Soporte telef6nico de
un representante de Sears en todos tos productos. Piense en nosotros como un "manual del
usuario padante"
Protecci6n contra subldas de tensi6n que provoquendafios el_ctricos causados por las fluc-
tuaciones de la corriente,
$250 de protecci6n contra la p_rdida de alimentos anualmente en caso de que se estropee
algen alimento corno resultado de una averla rnecdnica de cualquier congelador o refrigerador
cubierto.
Reembolso del atquiler si la reparaci6n de su producto cubierto toma rn&sUempo del prometi-
do.
10% de descuento en el precio regular de cualquier servicio de reparaci6n no cubierto y de las
piezas instaladas relacionadas.
Una vez que compre et Acuerdo, s61obastar,_ una simple Itamada telef6nica para que pueda progra-
mar un servicioo Puede Ilamar a cualquier hora del dla o de la noche, o concertar una cita de servicio
en Ilnea.
El Acuerdo maestro de protecci6n es una compra libre de riesgos. Si pot cualquier raz6n cancela
durante el perlodo de garantia del producto, le devolveremos todo el dinero. O, un reembolso pror-
rateado despu_s del per|odo de vencimiento de la garantla, tCompre su Acuerdo maestro hoy[
Aplican algunas Ilmltaclones y excluslones. Para precios y m_s informaci6n en EE.UU., llame
al 1-800-827-6655,
* La cobertura en Canad_ varia en algunos artfculos. Para obtener todos los detalles, Ilame a
Sears Canada al 1-800-361.6665.
Servicio de instalaci6n de Sears
Para la instalaci6n profesionalpot parte de Sears de electrodom6sticos, abridores de puertas de gara-
jes, calentadores de agua y otros artfculos pdncipales para el hogar,en EE.UU o Canad& Ilame al 1-
800.4-MY.HOME®.
19

_ii!i,iiiiii,iiiili>ii,!i,!_!ii,i_:__'
_ii!]!:_i;_i,!ii!_ii
ii!i!i,i;i_ii!_i,
!:!ii:i!:_ :¸
iii_i:i!!:i!ii!i
i;iiiiiiiii iiii
i:]_iii_!i:,iI:
Your Home
For repair - in your home - of all major brand appliances,
lawn and garden equipment, or heating and cooling systems,
no matter who made it, no matter who sold itl
For the replacement parts, accessories and
owner's manuals that you need to do-it-yourself.
" ' ii i i!ili!iiii!i!ii!!iiiiii!ili!!
_ii!_;i!_ii!i,i'ii;!
:i,