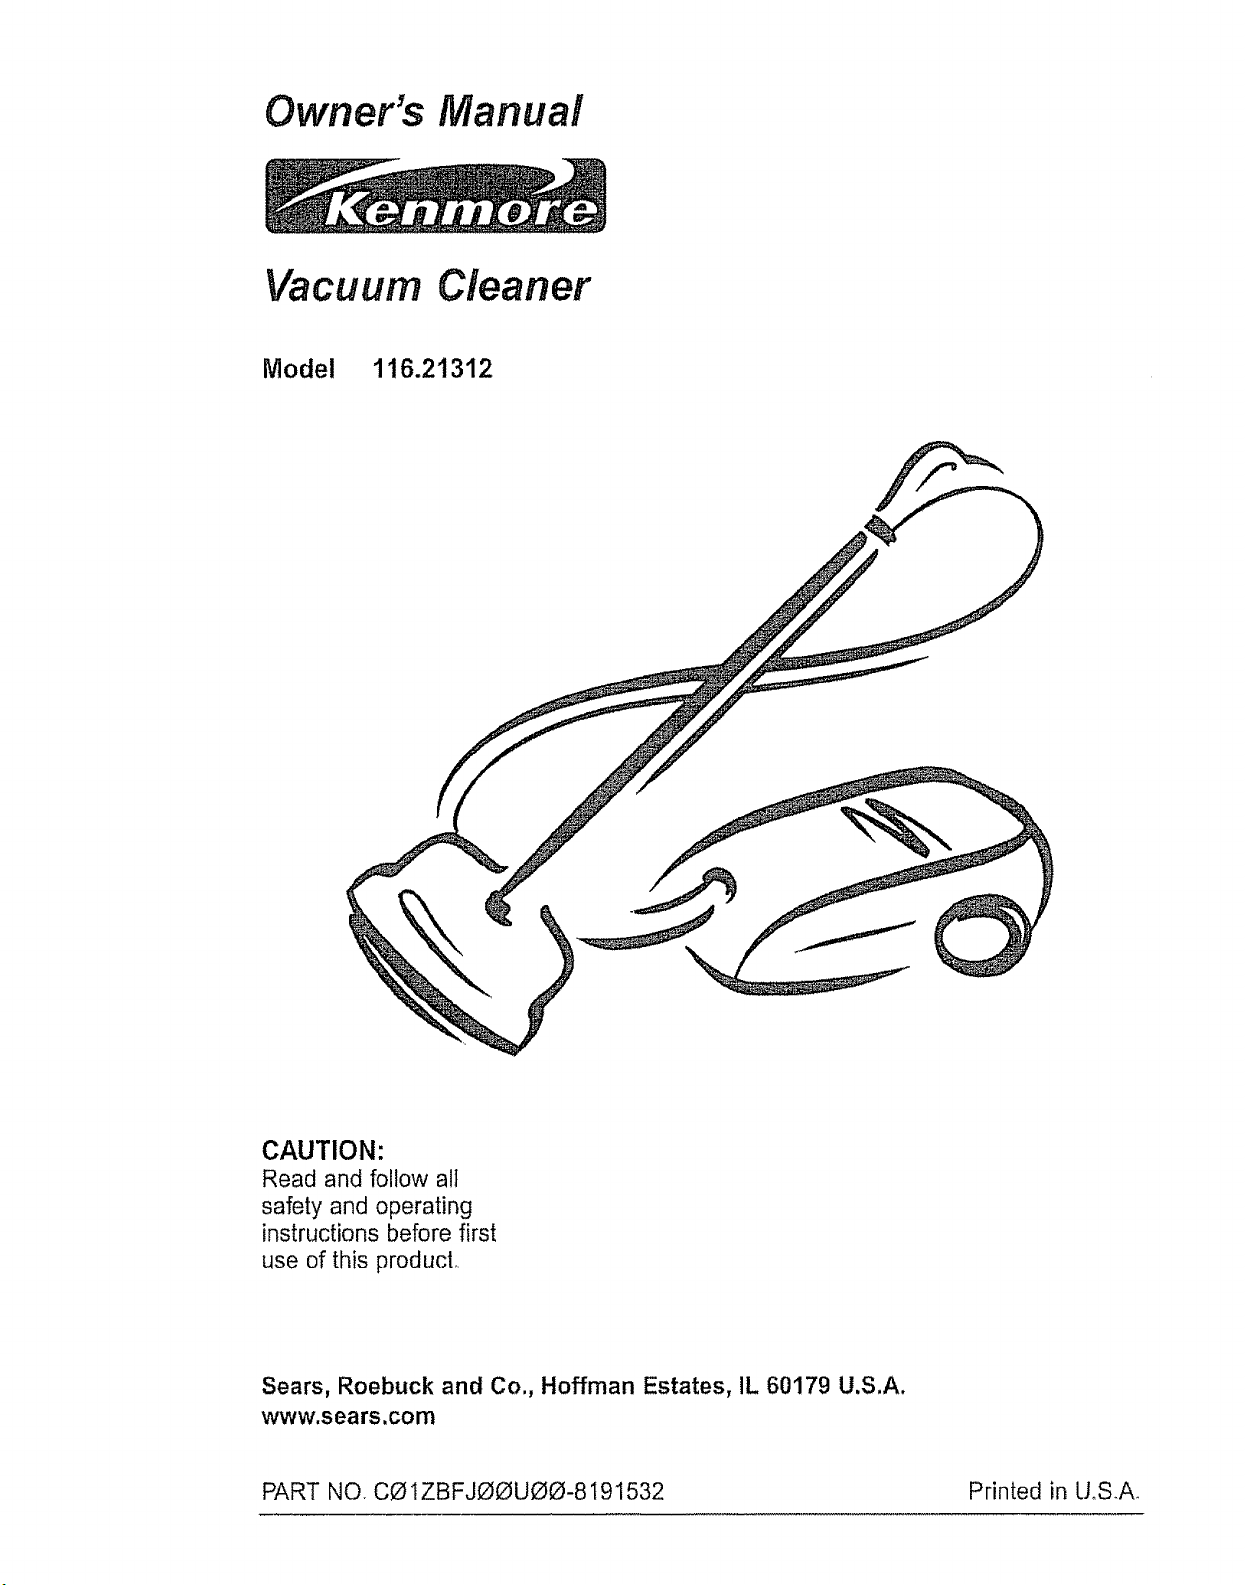
Owner's Manual
Vacuum Cleaner
Model 116.21312
CAUTION:
Read and follow all
safety and operating
instructions before first
use of this product,,
Sears, Roebuck and Co., Hoffman Estates, IL 60179 U.S,A.
www,sears,com
PART NO. C01ZBFJOOUOO-8191532 Printed in UoSA
Before Using Your NewVacuum ....... 2
Kenmore Vacuum Cleaner Warranty .. 2
Important Safety Instructions ......... 3
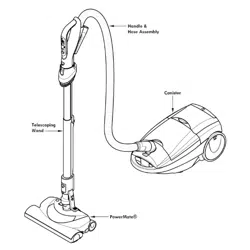
Parts and Features ................. 4-5
Assembly ......................... 6-7
Use ................................ 8
How to Start ........................ 8
Vacuuming Tips ...................... 9
Suggested Pile Height Settings ......... 9
Attachments ......................... 10
Attachment Use Chart ................. t0
Performance Features .............. 11
How Your Vacuum Works .............. 12
: i ::
Canister Care ................... 12
Bag Changing ......................... 12
Cleaning Exterior and Attachments ...... 13
Motor Safety Filter Changing .......... 13
Exhaust Filter Changing .............. t4
Power-Mate TM Care ................... 15
LightBulb Changing ................. t5
Belt Changing and Brush Cleaning , 15-16
Brush Servicing ................. 17
Brush Assembly ................... t7
Troubleshooting .................. t8
Requesting Assistance Or Service .19
Please read this guide, tt will help you assemble and operate your new Kenmore vacuum in
the safest and most effective way.
For more information about the care and operation, call your nearest Sears store. You will
need the complete model and serial numbers when requesting information. Your vacuum's
model and serial numbers are located on the Model and Serial Number Plate°
Use the space below to record the model number and serial number of your new Kenmore
vacuum.,
Model No,.
Serial No.
Date of Purchase
Keep this book and your sales check (receipt) in a safe place for future reference.
FULL. ONE-YEAR WARRANTY
When used for private household purposes, if within one year from the dale of purchase, this
vacuum cleaner fails due to a defect in material or workmanship, RETURN ITTO THE NEAR-
EST SEARS SERVICE CENTER/DEPARTMENT IN THE UNITED STATES, and Sears will
repair it free of charge.
This warranty gives you specific legal rights, and you may also have other rights which vary
from state to state_
SEARS, ROEBUCK AND CO., D!817WA, Hoffman Estates, IL 60179
WARNING
Your safety is important to us. To reduce the risk of fire, electrical shock, injury to
persons or damage when using your vacuum cleaner, follow basic safety precau-
tions including the following:
Read this manual before assembling or
using your vacuum cleaner.
Use your cleaner only as described in this
manual Use only with Sears recommended
attachments.
To reduce the risk of electrical shock - Do
not use outdoors or on wet surfaces.
Disconnect electrical supply before servic-
ing or cleaning out brush area. Failure to do
so could result in electrical shock or brush
suddenly starting
Always turn cleaner off before connecting or
disconnecting the hose or POWER-MATF M,
Always turn cleaner off before unplugging..
Do not unplug by pulling on cord. To unplug,
grasp the plug, not the cord.
Hold plug when rewinding onto cord reel.
Do not allow plug to whip when rewinding.
Do not use with damaged cord or plug.. If
cleaner is not working as it should, has been
dropped, damaged, left outdoors, or dropped
into water, return it to a Sears Service
Centre/Department..
Do not pull or carry by cord, use cord as a
handle, close door on cord, or pull cord
around sharp edges or corners. Do not run
cleaner over cord. Keep cord away from
heated surfaces.
Do not leave cleaner when plugged in.
Unplug from outlet when not in use and
before servicing°
Do not allow to be used as a toy. Close
attention is necessary when used by or near
children,
Do not handle plug or cleaner with wet
hands.
Do not put any objects into openings°
TH
Do not operate the cleaner with a punctured
hose, The hose contains electrical wires.
Replace if cut or worn. Avoid picking up
sharp objects.
Do not use with any opening blocked; keep
free of dust, lint, hair and anything that may
reduce air flow.
Keep hair, Ioose clothing, fingers, and al_
parts of body away from openings and mov-
ing parts.
Do not use cleaner without dust bag and/or
filters in place,
Always change the dust bag after vacuum-
ing carpet cleaners or freshener, powders
and fine dust These products clog the bag,
reduce airflow and can cause the bag to
burst, Failure to change bag could cause
permanent damage to the cleaner..
Do not use the cleaner to pick up sharp hard
objects, small toys, pins, paper clips, etc.
They may damage the cleaner or dust bag.
Do not pick up anything that is burning or
smoking, such as cigarettes, matches, or hot
ashes.
Do not use cleaner to pick up flammable or
combustible liquids (gasoline, cleaning fluids,
perfumes, etc ), or use in areas where they
may be present. The fumes from these sub-
stances can create a fire hazard or explo-
sion_
Use extra care when cleaning on stairs, Do
not put on chairs, tables, etc. Keep on floor°
You are responsible for making sure that
your vacuum cleaner is not used by anyone
unable to operate it properly.
Do not operate without exhaust filter or
exhaust filter cover installed.
INSTRUCTIONS
Proper assembly and safe use of your vacuum cleaner are your responsibilities_ Your cleaner
is intended only for household use.,Read this Owner's Manual carefully for important use and
safety information_ This guide contains safety statements under warning and caution symbols
Please pay special attention to these boxes and follow any instructions given, WARNING
statements alert you to such dangers as fire, electrical shock, burns and personal injury CAU-
TION statements alert you to such dangers as personal injury andlor property damage,.
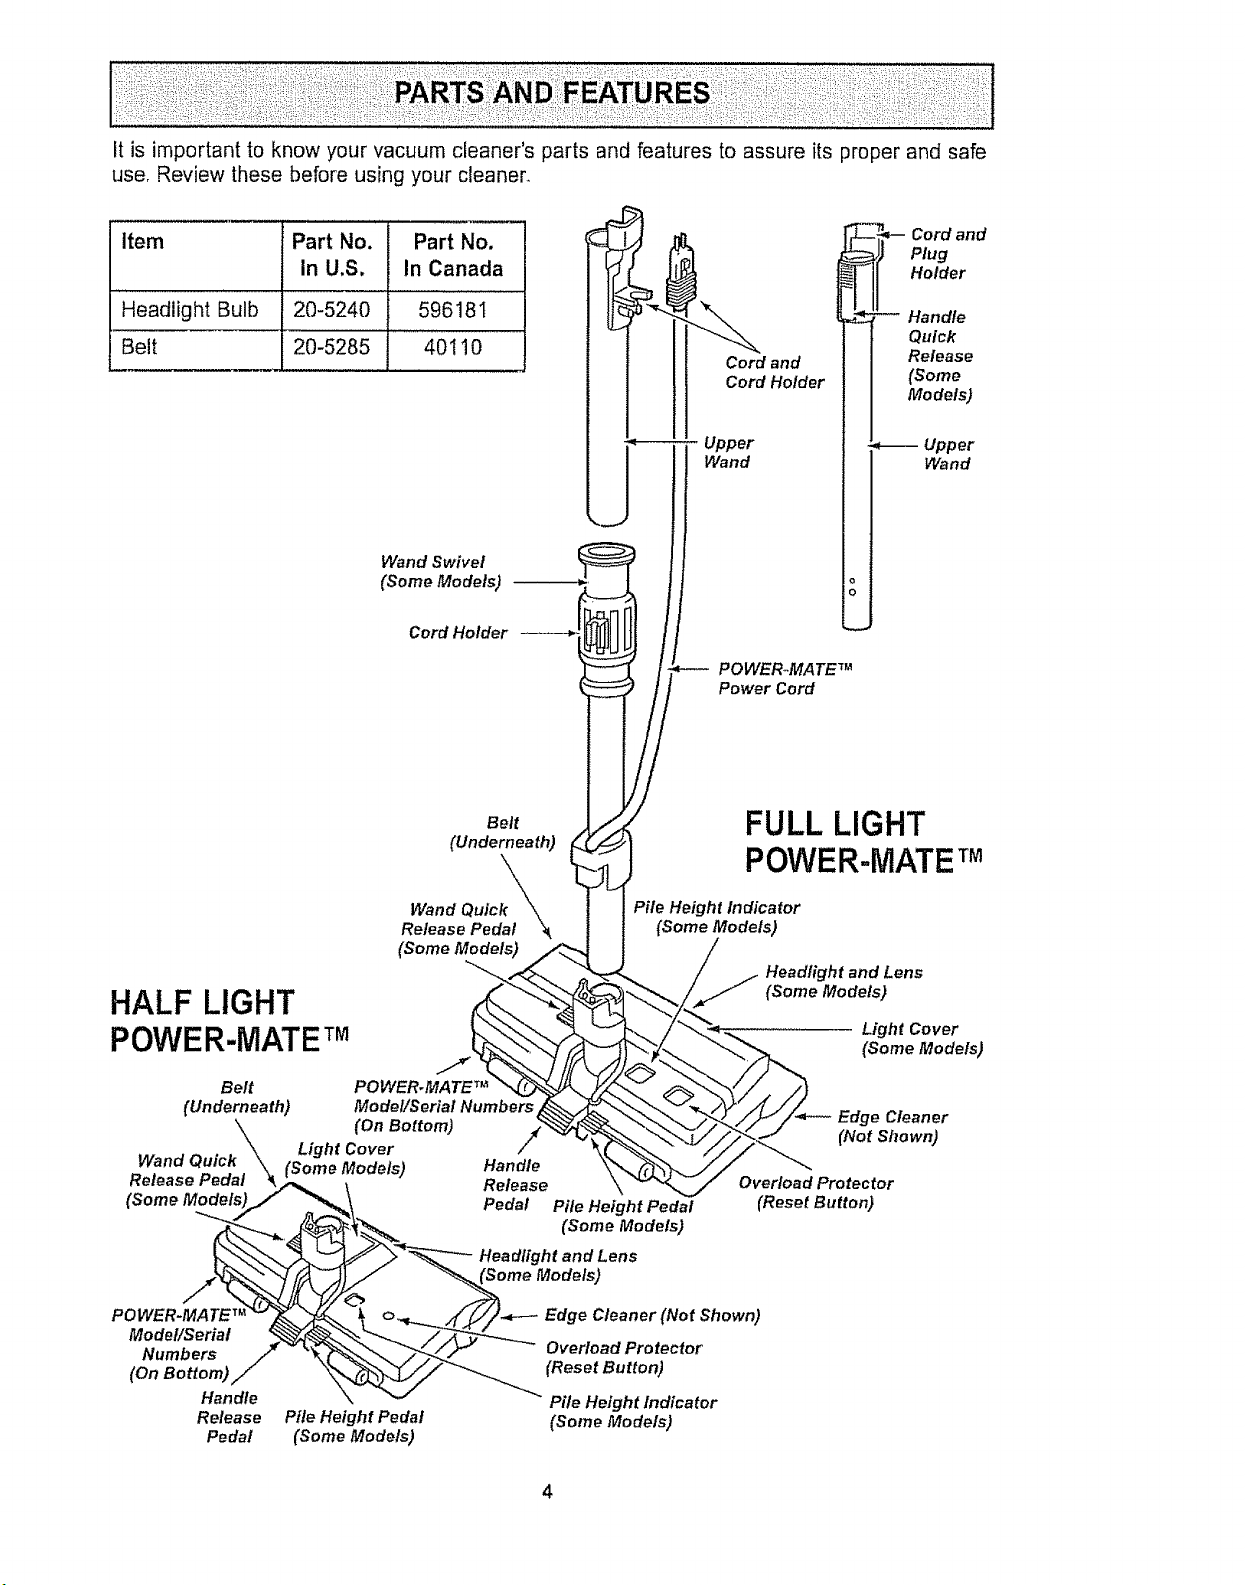
Itisimportantto knowyourvacuumcleaner'spartsandfeaturestoassureitsproperandsafe
use,Reviewthesebeforeusingyourcleaner_
Item PartNo. PartNo.
InU,S. In Canada
HeadlightBulb 20-5240 596181
Belt 20-5285 40110
Wand Swivel
(Some Models) --
Cord HoMer
Cord and
Cord Holder
Upper
Wand
POWERoMA TE TM
Power Cord
-_,-- ord and
Plug
Holder
, Handle
Quick
Release
(Some
Models)
_-- Upper
Wand
HALF LIGHT
POWER-MATETM
Belt
(Underneath)
(Some Models)
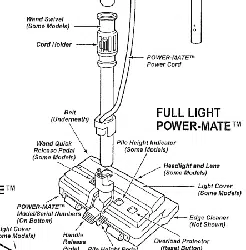
FULL LIGHT
POVVER..MATETM
Pile Height Indicator
(Some Models)
Headlight and Lens
(Some Models)
Light Cover
(Some Models)
Belt POWERoMA TE TM
(Underneath) Model/Serial Numbers
(On Bottom)
Light Cover /
Wand Quick (Some Models) Handle
Release Pedal Release
Pedal
POWER-MATE TM
Model/Serial
Numbers
(On Bottom)
Handle
Release
Pedal
Pile Height Pedal
(Some Models)
Pile Height Pedal
(Some Models)
Headlight and Lens
Edge Cleaner
(Not Shown)
Overload Protector
(Reset Button)
Edge Cleaner (Not Shown)
Overload Protector
(Reset Button)
Pile Height Indicator
(Some Models)

HOSE
3.Way On/Off Switch
Off/Bare Floor/Carpet
(Some Models)
Speed
Control __
(Some
Models) . _
Suction
Control
Handle
Crevice
Tool
Combination
Brush
Floor
Brush
ATTACHMENTS
PO WER-MATE TM Jr.
(Some Models)
HANDI-MATE TM Jr.
(Some Models)
Hose Swivel
NOTE: All models have one set of
attachments in the canister, Some
models have an additional set,
which can be kept in the accessory
bag for garage use.
CANISTER
Attachment
Storage
Canister
Cover
On/Off
Switch
Exhaust Filter Cover
(Exhaust Filter Inside)
Performance
Indicator
(Some Models)
Power
Cord
Hood
Release
Bag Holder
Dust Bag
Motor Safety Filter
(Behind Dust Bag)
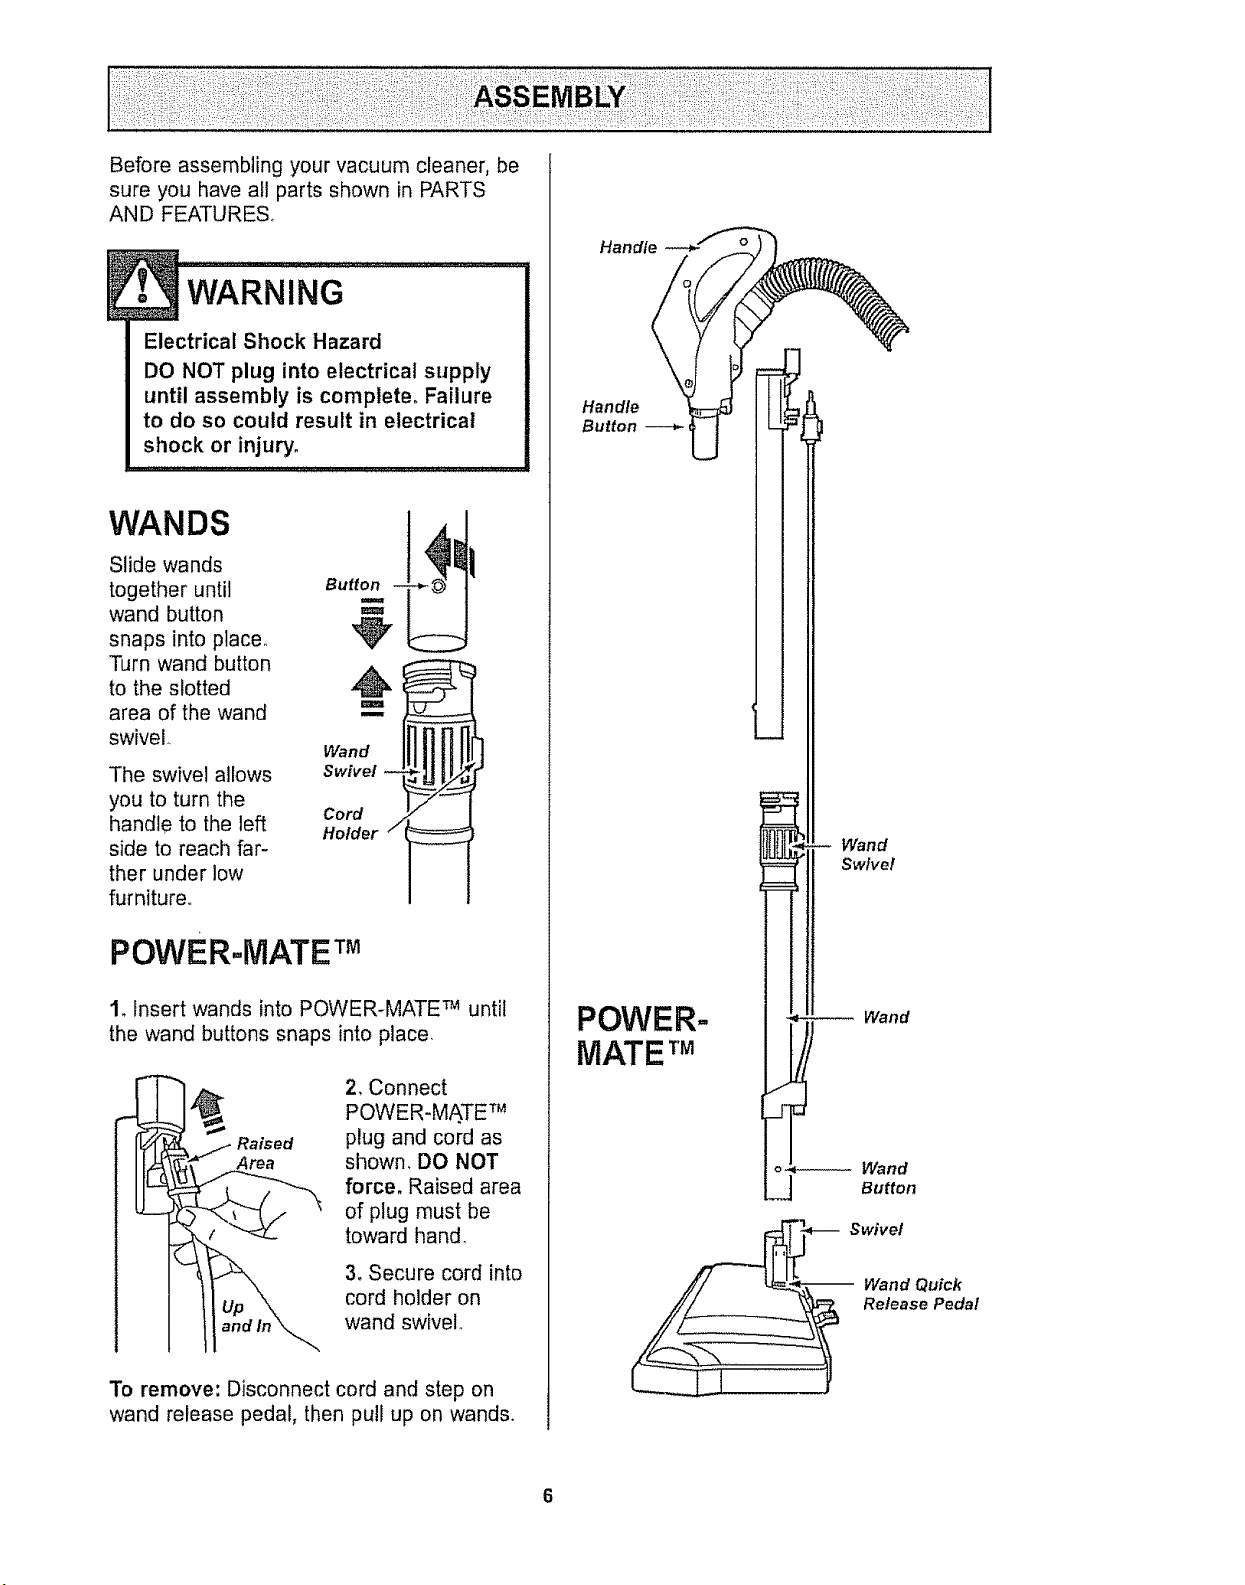
Before assembling your vacuum cleaner, be
sure you have all parts shown in PARTS
AND FEATURES°
Electrical Shock Hazard
DO NOT plug into electrical supply
until assembly is complete. Failure
to do so could result in electrical
shock or injury,
Slide wands
together until B.
wand button
snaps into place.
Turn wand button ._
to the slotted
area of the wand '==
swivel. Wand _
Swivel
Cord
Holder /
The swivel allows
you to turn the
handle to the left
side to reach far-
ther under low
furniture.,
POWERoMATE TM
1_ Insert wands into POWER-MATE TM untii
the wand buttons snaps into place,
Raised
Area
2, Connect
POWER-MA.TE TM
plug and cord as
shown. DO NOT
force. Raised area
of plug must be
toward hand,
3. Secure cord into
cord holder on
wand swivel
To remove: Disconnect cord and step on
wand release pedal, then pull up on wands.
Handle
Handle
Button
POWER-
MATE TM
Wand
Swivel
Wand
_-__ Swivel
Wand Quick
Release Pedal

CANISTER
1. Open the canister hood_
2, Check to see that the dust bag is proper-
ly installed See BAG CHANGING for
instructions.
3. Check to see that the motor safety filter is
properly installed, See MOTOR SAFETY
FILTER CLEANING for instructions,
HOOD
it is normal for the canister hood to come off
when opened further than needed. Line up
the hinges, insert them, and close the hood
to replace it.
HOSE
Hose
Latch
Tab
1. Line up the
hose latch tab
and notch in
canister hood
and insert hose
into canister until
it snaps in place.
To remove: lift
hose latch tab
upward and pull
up on hose
Handle
Handle
Button
Handle
Quick
Release
(Some
2. Insert
handle into
wand until
lock button
snaps in
place Be
sure hose
is not
twisted.
To remove:
press han-
dle release
button and
pull up on
handle°
To store: Disconnect hose from wands and
canister to prevent stress on hose during
storage. Store hose in a loosely coiled
position so the hose covering is not
stressed.
Hose
Hose
Latch Tab
Cover
Hood
Release
Dust Bag
Attachment
Storage
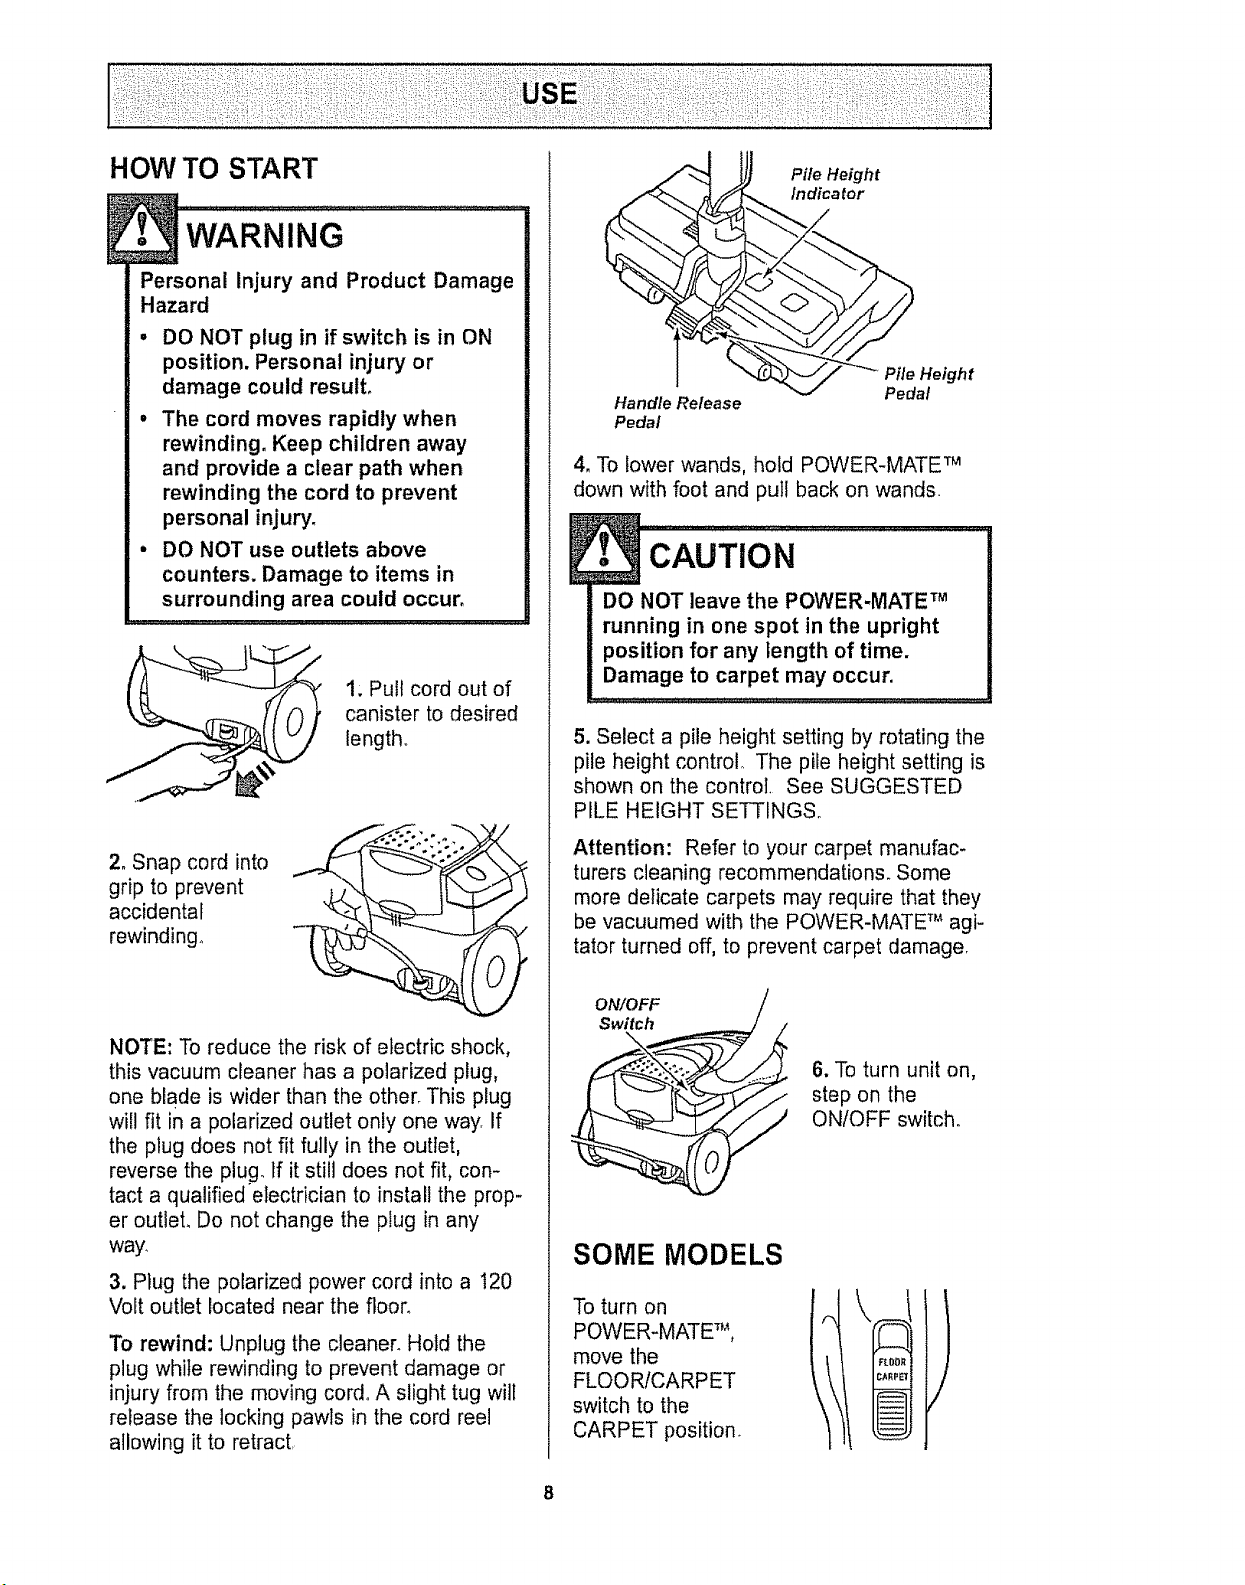
HOW TO START
Personal Injury and Product Damage
Hazard
• DO NOT plug in if switch is in ON
position. Personal injury or
damage could result.
• The cord moves rapidly when
rewinding, Keep children away
and provide a clear path when
rewinding the cord to prevent
personal injury.
• DO NOT use outlets above
counters. Damage to items in
surrounding area could occur.
t; Pull cord out of
canister to desired
length,
2. Snap cord into
grip to prevent
accidental
rewinding.
NOTE: To reduce the risk of electric shock,
this vacuum cleaner has a polarized plug,
one blade is wider than the otherr This plug
will fit in a polarized outlet only one way If
the plug does not fit fully in the outlet,
reverse the plug. If it still does not fit, con-
tact a qualified electrician to install the prop-
er outlet. Do not change the plug in any
way.
3. Plug the polarized power cord into a 120
Volt outlet located near the floor_
To rewind: Unplug the cleaner. Hold the
plug while rewinding to prevent damage or
injury from the moving cord, A slight tug will
release the locking pawls in the cord reel
allowing it to retract
Handle Release
Pedal
Pile Height
Indicator
J//_'_ Pile Height
.J Pedal
4, To lower wands, hold POWER-MATE TM
down with foot and pull back on wands
DO NOT leave the POWER-MA'fE TM
running in one spot in the upright
position for any length of time.
Damage to carpet may occur.
5. Select a pile height setting by rotating the
pile height control. The pile height setting is
shown on the control See SUGGESTED
PILE HEIGHT SETTINGSo
Attention: Refer to your carpet manufac-
turers cleaning recommendations_ Some
more delicate carpets may require that they
be vacuumed with the POWER-MATE T_'_agi-
tator turned off, to prevent carpet damage
ON/OFF
Switch
\
6. To turn unit on,
step on the
ON/OFF switch.
SOME MODELS
To turn on
POWER-MATE TM,
move the
FLOOR/CARPET
switch to the
CARPET position_
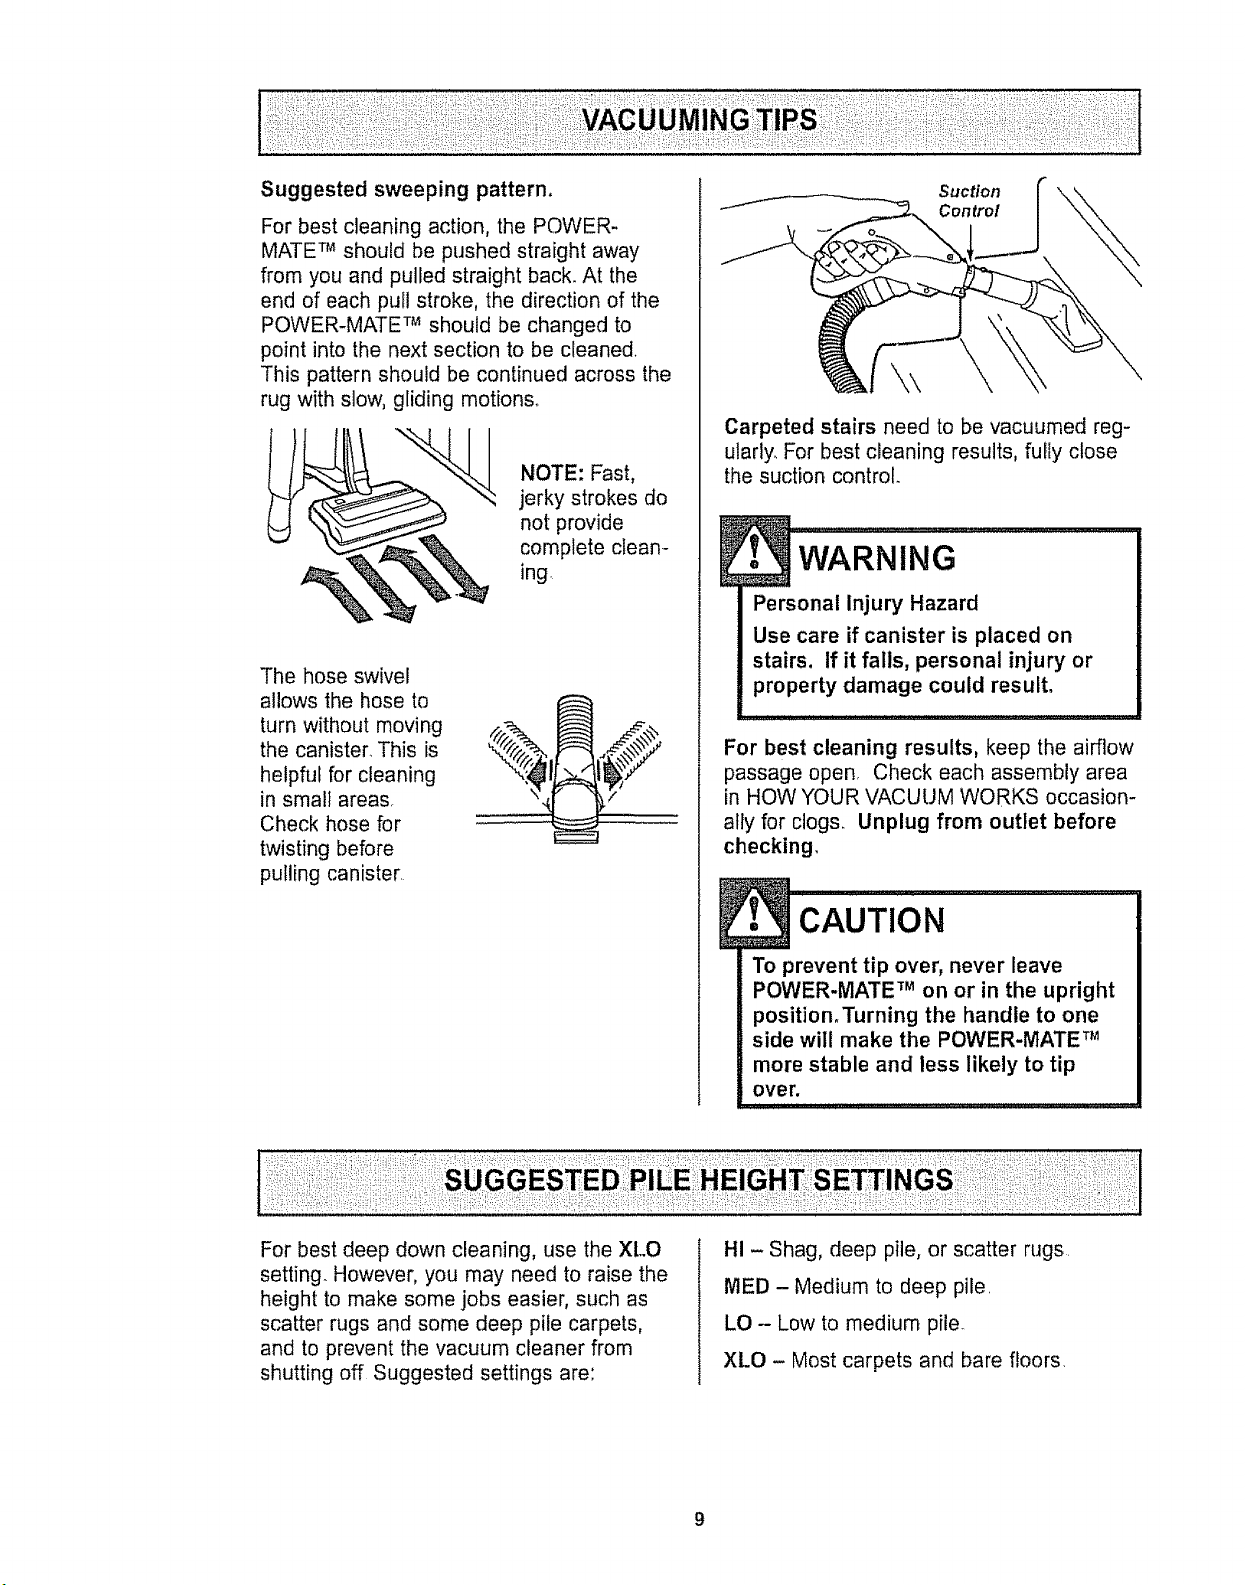
Suggested sweeping pattern,
For best cleaning action, the POWER-
MATE TM should be pushed straight away
from you and pulled straight back. At the
end of each pull stroke, the direction of the
POWER-MATE TM should be changed to
point into the next section to be cleaned
This pattern should be continued across the
rug with slow, gliding motions°
NOTE: Fast,
jerky strokes do
not provide
complete clean-
ing,
The hose swivel
allows the hose to
turn without moving
the canister. This is
helpful for cleaning
in small areas.
Check hose for
twisting before
pulling canister.
Suction
Control
\\
Carpeted stairs need to be vacuumed reg-
ularly. For best cleaning results, fully close
the suction control
Personal Injury Hazard
Use care if canister is placed on
stairs, if it fails, personal injury or
property damage could result,
For best cleaning results, keep the airflow
passage open, Check each assembly area
in HOW YOUR VACUUM WORKS occasion-
ally for clogs. Unplug from outlet before
checking,
l CAUTION ................ !
To prevent tip over, never leave
POWER-MATE TM on or in the upright
position_Turning the handle to one
side will make the POWER-MATE TM
more stable and less likely to tip
over.
For best deep down cleaning, use the XLO
setting. However, you may need to raise the
height to make some jobs easier, such as
scatter rugs and some deep pile carpets,
and to prevent the vacuum cleaner from
shutting off Suggested settings are:
HI - Shag, deep pile, or scatter rugs.
MED - Medium to deep pile.
LO - Low to medium pile.
XLO - Most carpets and bare floors,
9
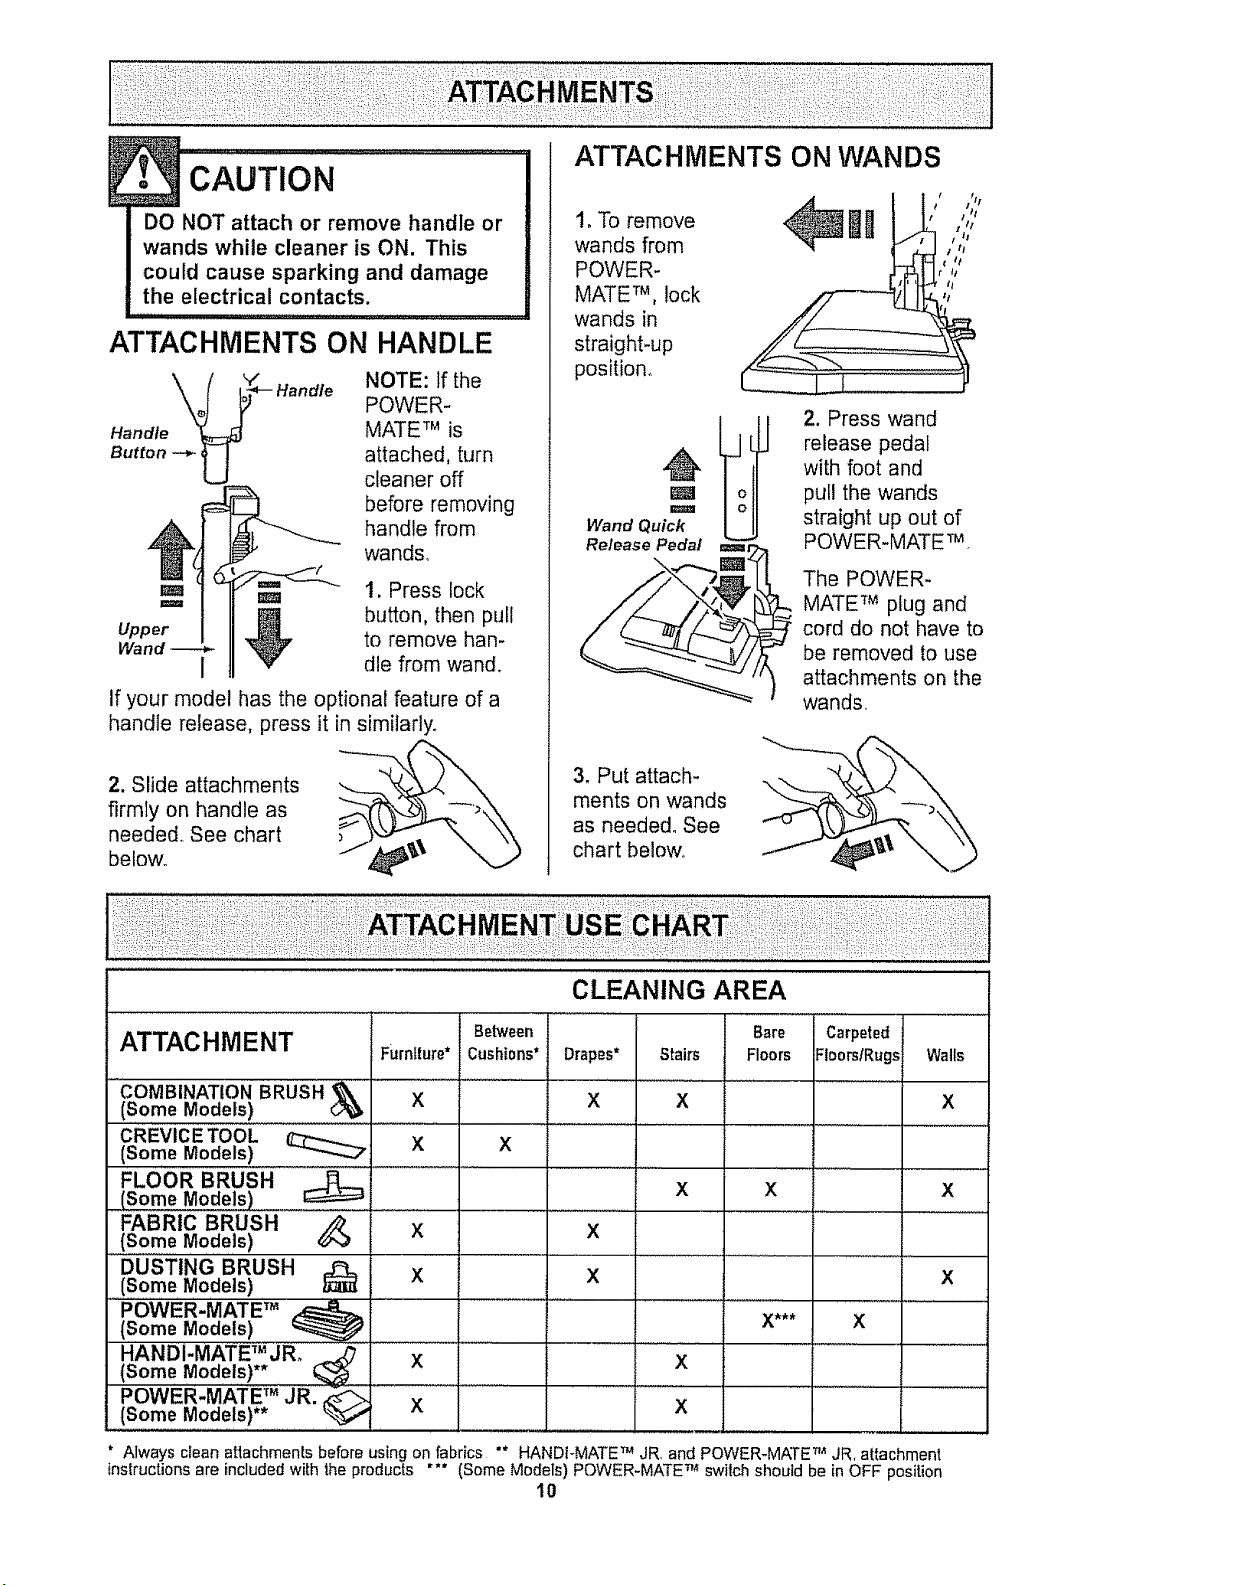
DO NOT attach or remove handle or
wands while cleaner is ON. This
could cause sparking and damage
the electrical contacts.
ATTACHMENTS ON HANDLE
Handle
Button --*- U
Handle
NOTE: If the
POWER-
MATE TM is
attached, turn
cleaner off
before removing
handle from
wands°
Em _= 1, Press lock
Upper _ button, then pull
Wand tO remove han-
I _ die from wand.
If your model has the optional feature of a
handle release, press it in similarly.
2. Slide attachments
firmly on handle as
needed. See chart
belov¢_ ,_\
1. To remove
wands from
POWER-
MATE TM, lock
wands in
straight-up
position.
m
m
Wand Quick
Release Pedal
3.Put attach-
ments on wands
as needed° See
chart below°
2. Press wand
release pedal
with foot and
pull the wands
straight up out of
POWER-MATE'rM °
The POWER-
MATE TM plug and
cord do not have to
be removed to use
attachments on the
wands..
CLEANING AREA
Bare Carpeted
ATTACHMENT Furniture* Floors FloorslRugs
.....COMBINATION BRUSH _ X ...............
(Some ModeLs)
CREVICE TOOL
(Some Models) __ X
FLOOR BRUSH
(Some Models)
FABRIC BRUSH
.......(som,,eM0de,'s)
DUSTING BRUSH
(Some Models)
......P,OWER.MATE, TM
(Some Models) _
HANDI-MATET_JRo
(Some Models)
POWER-MATE TM JR. _" X "
(Some Models)**
Between
Cushi0ns* Drapes* Stairs
X X
X
X
X
X
X
x
x X
*_.
Walls
X
x
X
x
x
X
Always clean attachmentsbefore using on fabrics "* HANDFMATETM JR, and POWER-MATETM JR. attachment
instructions are includedwith 1heproducts *** (Some Models) POWER-MATETM switch should be in OFF position
10
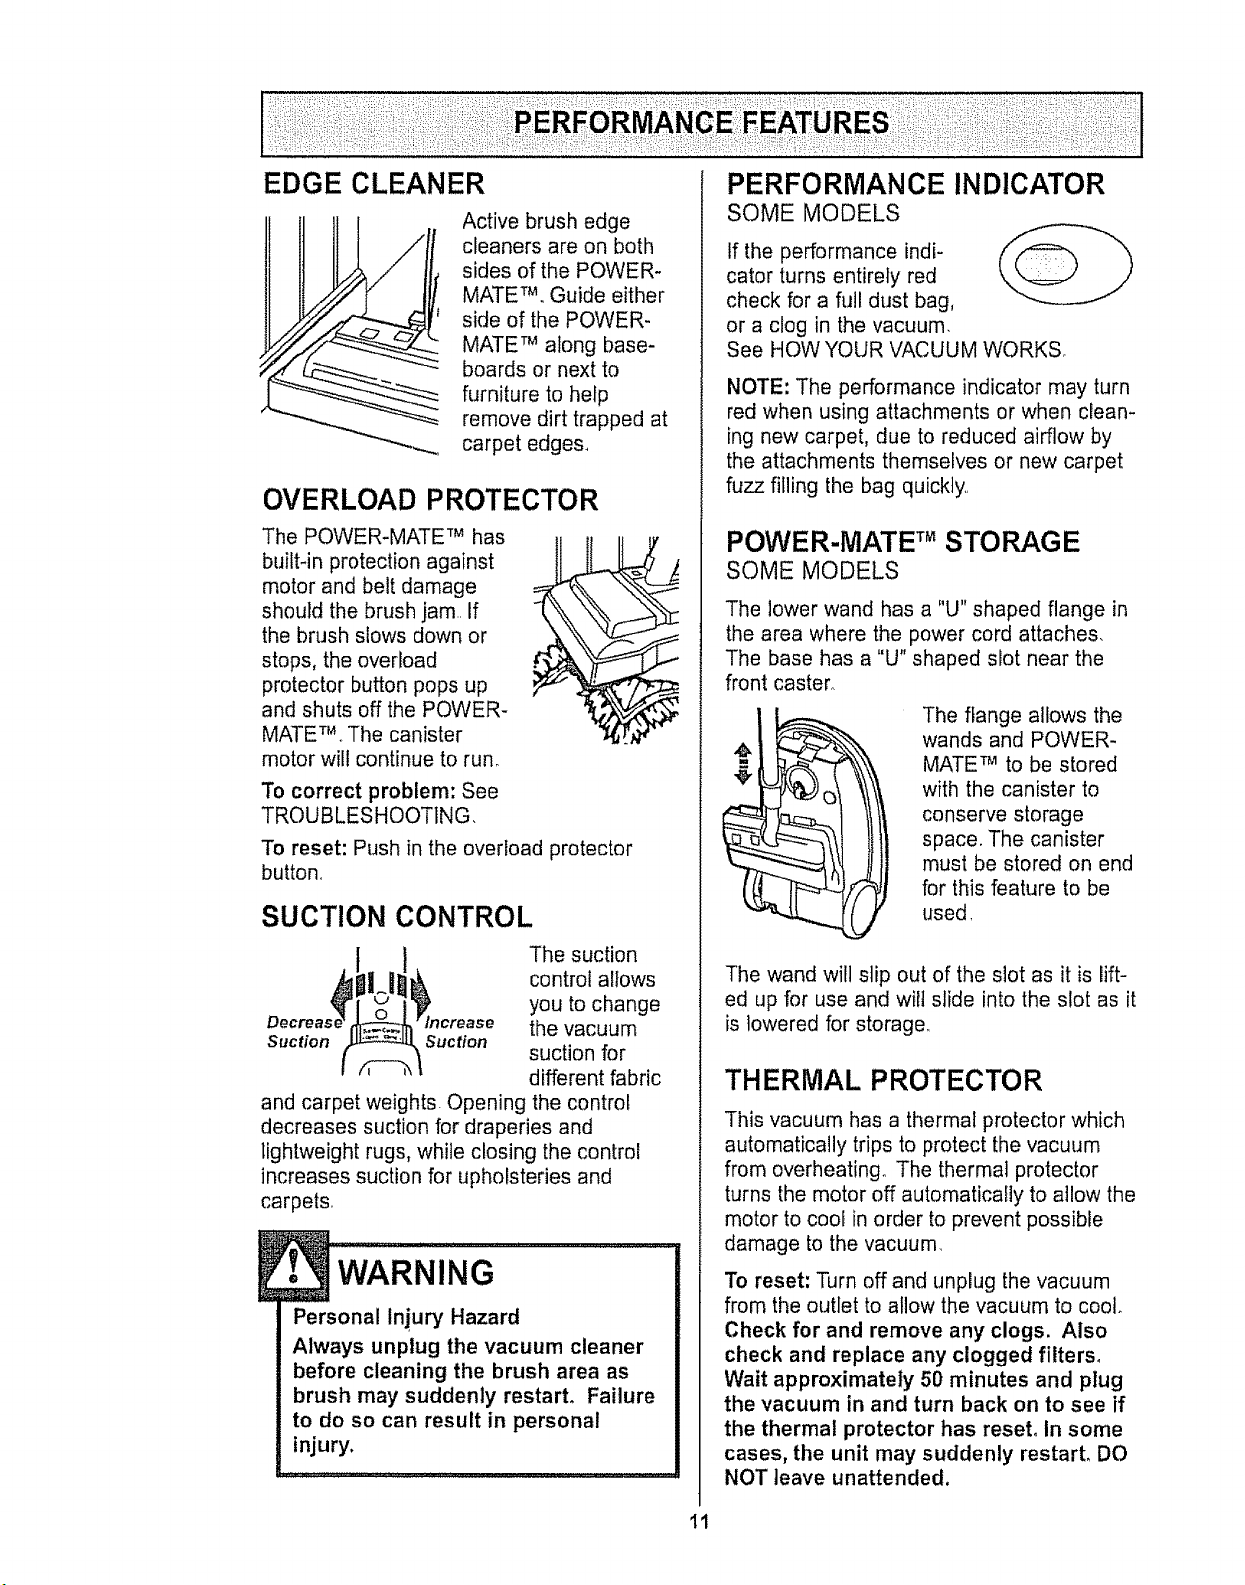
Active brush edge
cleaners are on both
sides of the POWER-
MATETM_Guide either
side of the POWER-
MATE TM along base-
boards or next to
furniture to help
remove dirt trapped at
carpet edges,
OVERLOAD PROTECTOR
The POWER-MATE TM has
builtqn protection against
motor and belt damage
should the brush jam.. If
the brush slows down or
stops, the overload
protector button pops up
and shuts off the POWER-
MATETM..The canister
motor will continue to run.
To correct problem: See
TROUBLESHOOTING,
To reset: Push in the overload protector
button,
SUCTION CONTROL
The suction
control allows
you to change
the vacuum
Suction Suction
suction for
different fabric
and carpet weights. Opening the control
decreases suction for draperies and
lightweight rugs, while closing the control
increases suction for upholsteries and
carpets
E• WARNING
Personal Injury Hazard
Always unplug the vacuum cleaner
before cleaning the brush area as
brush may suddenly restart, Failure
to do so can result in personal
injury.
i
PERFORMANCE INDICATOR
SOME MODELS
If the performance indi-
cator turns entirely red
check for a full dust bag,
or a clog in the vacuum.
See HOW YOUR VACUUM WORKS.
NOTE: The performance indicator may turn
red when using attachments or when clean-
ing new carpet, due to reduced airflow by
the attachments themselves or new carpet
fuzz filling the bag quickly
POWER-MATE TM STORAG E
SOME MODELS
The lower wand has a "U" shaped flange in
the area where the power cord attaches,
The base has a "U" shaped slot near the
front caster,
The flange allows the
wands and POWER-
MATE TM to be stored
with the canister to
conserve storage
space. The canister
must be stored on end
for this feature to be
used,
The wand will slip out of the slot as it is lift-
ed up for use and wilt slide into the slot as it
is lowered for storage,.
THERMAL PROTECTOR
This vacuum has a thermal protector which
automatically trips to protect the vacuum
from overheating_ The thermal protector
turns the motor off automatically to allow the
motor to cool in order to prevent possible
damage to the vacuum_
To reset: Turn off and unplug the vacuum
from the outlet to allow the vacuum to coot_
Check for and remove any clogs. Also
check and replace any clogged filters,
Wait approximately 50 minutes and plug
the vacuum in and turn back on to see if
the thermal protector has reset, in some
cases, the unit may suddenly restart, DO
NOT leave unattended.
11
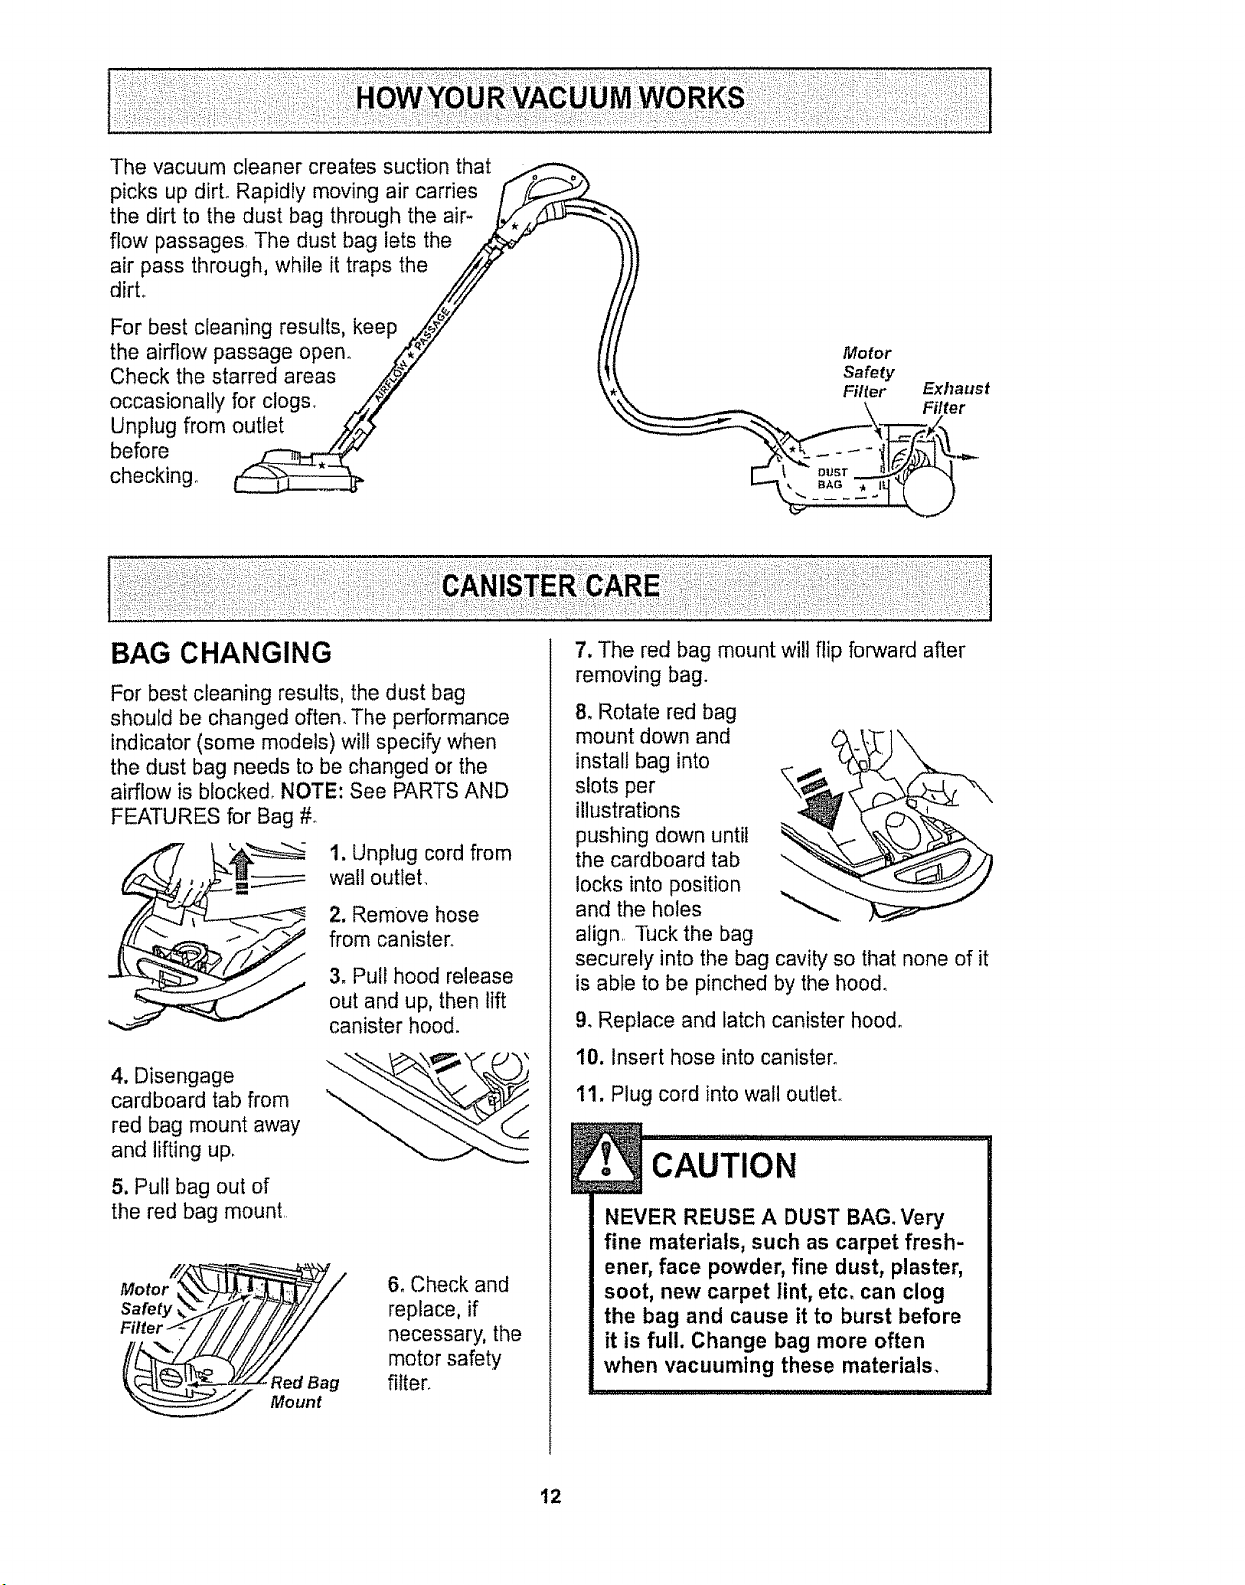
Thevacuumcleanercreatessuctionthat
picksupdirLRapidlymovingaircarries [f"
the dirt to the dust bag through the air-
flow passages The dust bag lets the
air pass through, while it traps the //iJ
dirL f!
For best cleaning results, keep ,,_._7"
the airflow passage open° _,_" Motor
Check the starred areas ,#'_}," _t_. Safety
Unplug from outlet ,,_,,_
before _ -- .,,..
checking° _ _T _-
BAG CHANGING
For best cleaning results, the dust bag
should be changed often. The performance
indicator (some models) will specify when
the dust bag needs to be changed or the
airflow is blocked. NOTE: See PARTS AND
FEATURES for Bag #.
1, Unplug cord from
wall outlet,
2. Remove hose
from canister.
3, Pull hood release
out and up, then lift
canister hood.
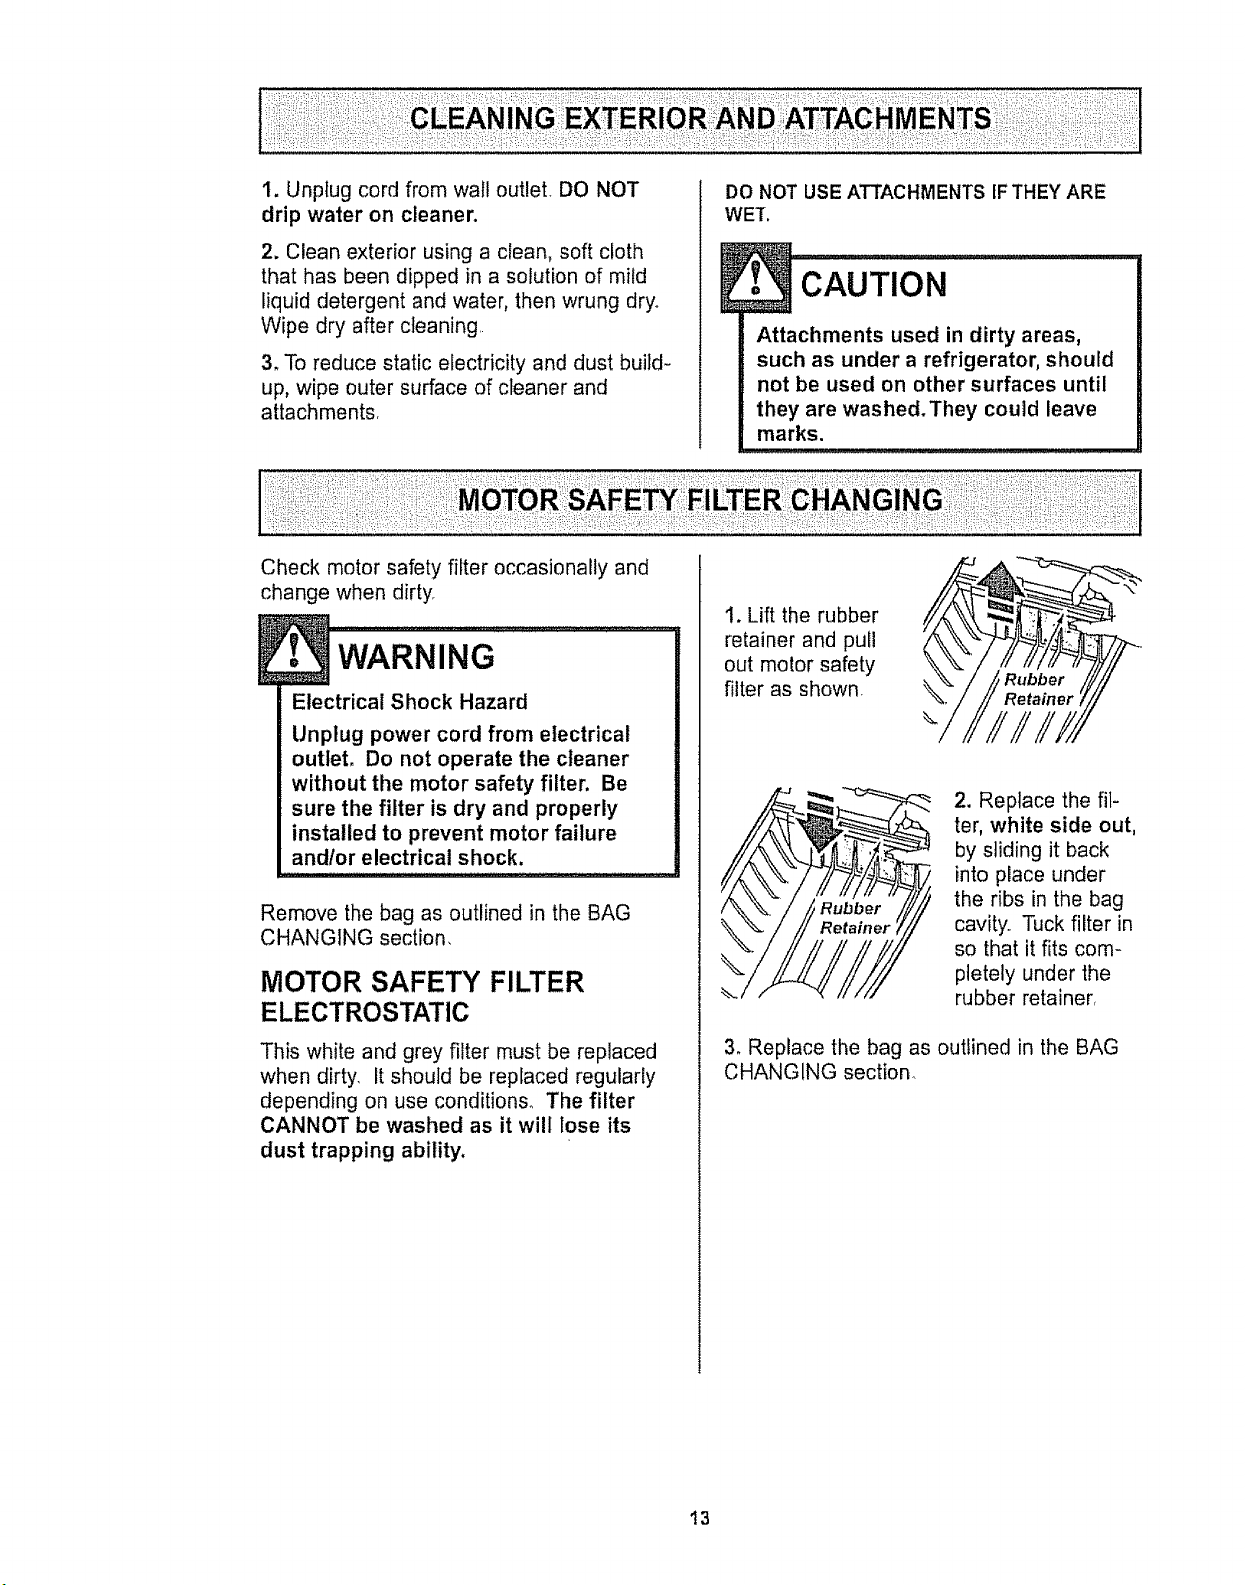
4. Disengage
cardboard tab from
red bag mount away
and lifting uF
5. Pull bag out of
the red bag mount.
6, Check and
replace, if
necessary, the
motor safety
filter,
7. The red bag mount will flip forward after
removing bag.
8. Rotate red bag
mount down and
install bag into
slots per
illustrations
pushing down until
the cardboard tab "-.
locks into position
and the holes
align, Tuck the bag
securely into the bag cavity so that none of it
is able to be pinched by the hood.
9. Replace and latch canister hood°
10. Insert hose into canister.
11, Plug cord into wall outlet.
NEVER REUSE A DUST BAG, Very
fine materials, such as carpet fresh-
ener, face powder, fine dust, plaster,
soot, new carpet lint, etc. can clog
the bag and cause it to burst before
it is full. Change bag more often
when vacuuming these materials.
t2
1.UnplugcordfromwalloutleLDONOT
dripwateron cleaner.
2. Cleanexteriorusingaclean,softcloth
thathasbeendippedin asolutionofmild
liquiddetergentandwater,thenwrungdry.
Wipedryaftercleaning
3,Toreducestaticelectricityanddustbuild-
up.wipeoutersurfaceofcleanerand
attachments,
DO NOT USE ATTACHMENTS IFTHEY ARE
WET.
! CAuTIoN I
Attachments used in dirty areas,
such as under a refrigerator, should
not be used on other surfaces until
they are washed. They could leave
marks.
Check motor safety filter occasionally and
change when dirty_
WARNING ..........................i
Electrical Shock Hazard
Unplug power cord from electrical
outlet, Do not operate the cleaner
without the motor safety filter. Be
sure the filter is dry and properly
installed to prevent motor failure
andlor electrical shock.
Remove the bag as outlined in the BAG
CHANGING section,
MOTOR SAFETY FILTER
ELECTROSTATIC
This white and grey filter must be replaced
when dirty. It should be replaced regularly
depending on use conditions. The filter
CANNOT be washed as it will lose its
dust trapping ability,
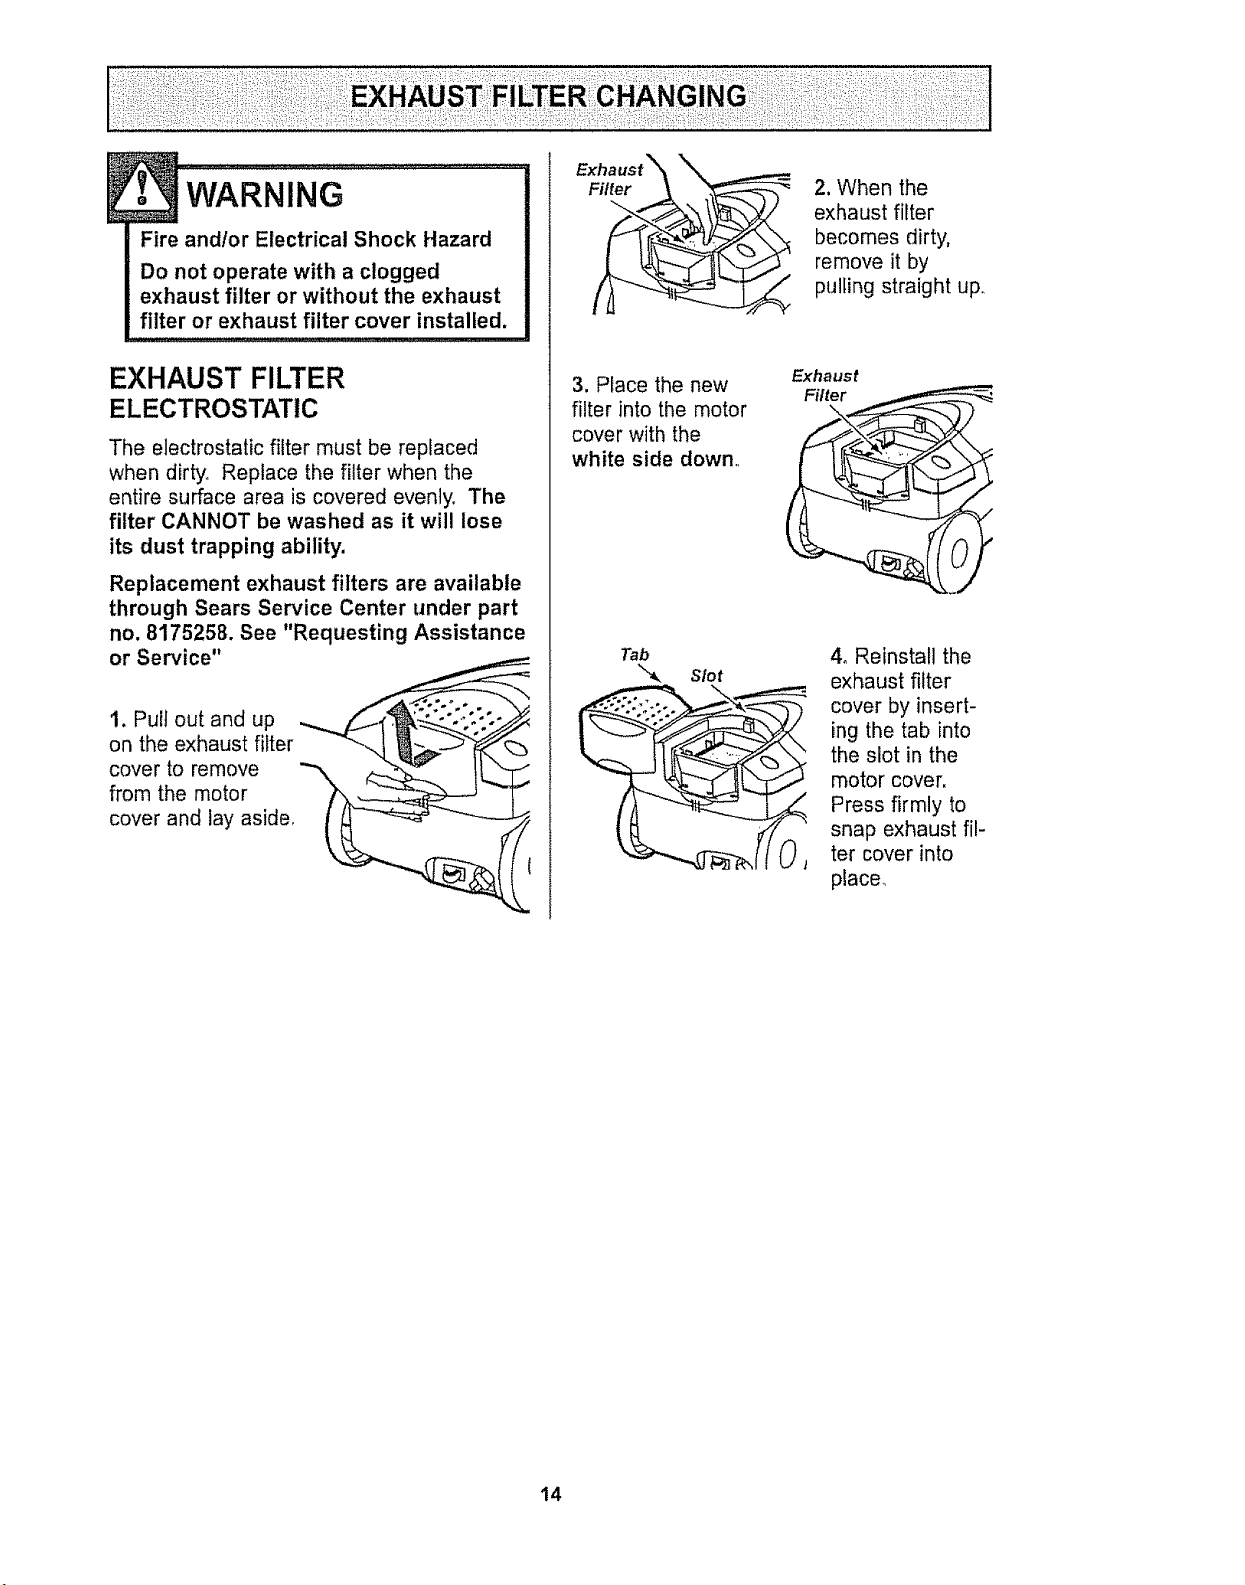
I. Lift the rubber
retainer and pull
out motor safety
filter as shown.
2. Replace the fil-
ter, white side out,
by sliding it back
into place under
the ribs in the bag
cavity.. Tuck filter in
so that it fits com-
pletely under the
rubber retainer.
3_ Replace the bag as outlined in the BAG
CHANGING section.
13
Fire and/or Electrical Shock Hazard
Do not operate with a clogged
exhaust filter or without the exhaust
filter or exhaust filter cover installed.
EXHAUST FILTER
ELECTROSTATIC
The electrostatic filter must be replaced
when dirty,, Replace the filter when the
entire surface area is covered evenly, The
filter CANNOT be washed as it will lose
its dust trapping ability.
Replacement exhaust filters are available
through Sears Service Center under part
no. 8175258. See "Requesting Assistance
or Service"
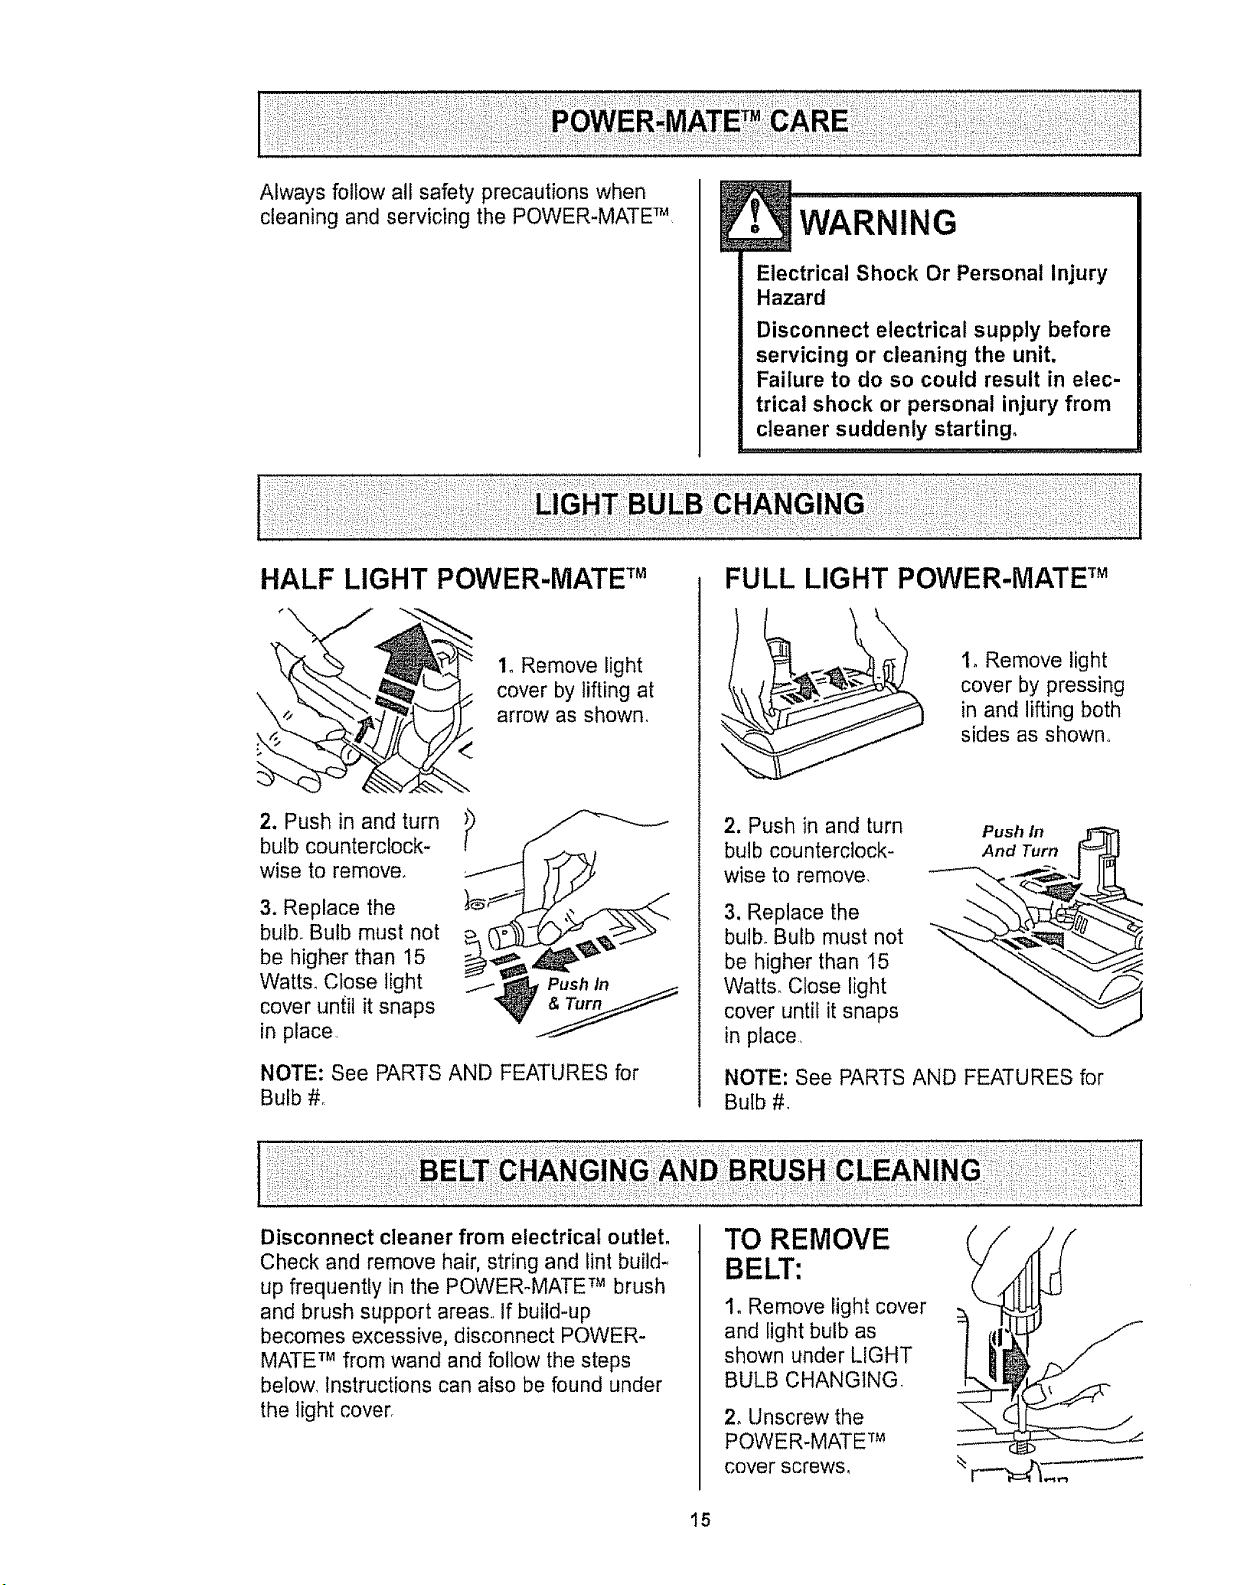
1, Pull out and up
on the exhaust filter
cover to remove
from the motor
cover and lay aside,
Filter _ _-_
3. Place the new
filter into the motor
cover with the
white side down
Tab
Slot
2. When the
exhaust filter
becomes dirty,
remove it by
pulling straight up,_
Exhaust
Filter
\
4o Reinstall the
exhaust filter
cover by insert-
ing the tab into
the slot in the
motor cover.
Press firmly to
snap exhaust fil-
ter cover into
place_
14
Always follow all safety precautions when
cleaning and servicing the POWER-MATE TM
wARNING ..........................
Electrical Shock Or Personal Injury
Hazard
Disconnect electrical supply before
servicing or cleaning the unit.
Failure to do so could result in elec-
trical shock or personal injury from
cleaner suddenly starting,
HALF LIGHT POWER-MATE TM
1, Remove light
cover by lifting at
arrow as shown.
2. Push in and turn
bulb counterclock-
wise to remove.
3. Replace the
bulb. Bulb must not
be higher than 15
Watt& Close light
cover until it snaps
in place
NOTE: See PARTS AND FEATURES for
Bulb #_
1
FULL LIGHT POWER-MATE TM
2. Push in and turn
bulb counterclock-
wise to remove,
3. Replace the
bulbo Bulb must not
be higher than 15
Watts. Close light
cover until it snaps
in place
1, Remove light
cover by pressing
in and lifting both
sides as shown
Push In
And Turn
NOTE: See PARTS AND FEATURES for
Bulb #,
Disconnect cleaner from electrical outlet,
Check and remove hair, string and lint build*
up frequently in the POWER-MATE TM brush
and brush support areas,, If build-up
becomes excessive, disconnect POWER-
MATE TM from wand and follow the steps
below, Instructions can also be found under
the light cover
TO REMOVE
BELT:
I. Remove light cover
and light bulb as
shown under LIGHT
BULB CHANGING
2, Unscrew the
POWER-MATE TM
cover screws,
15
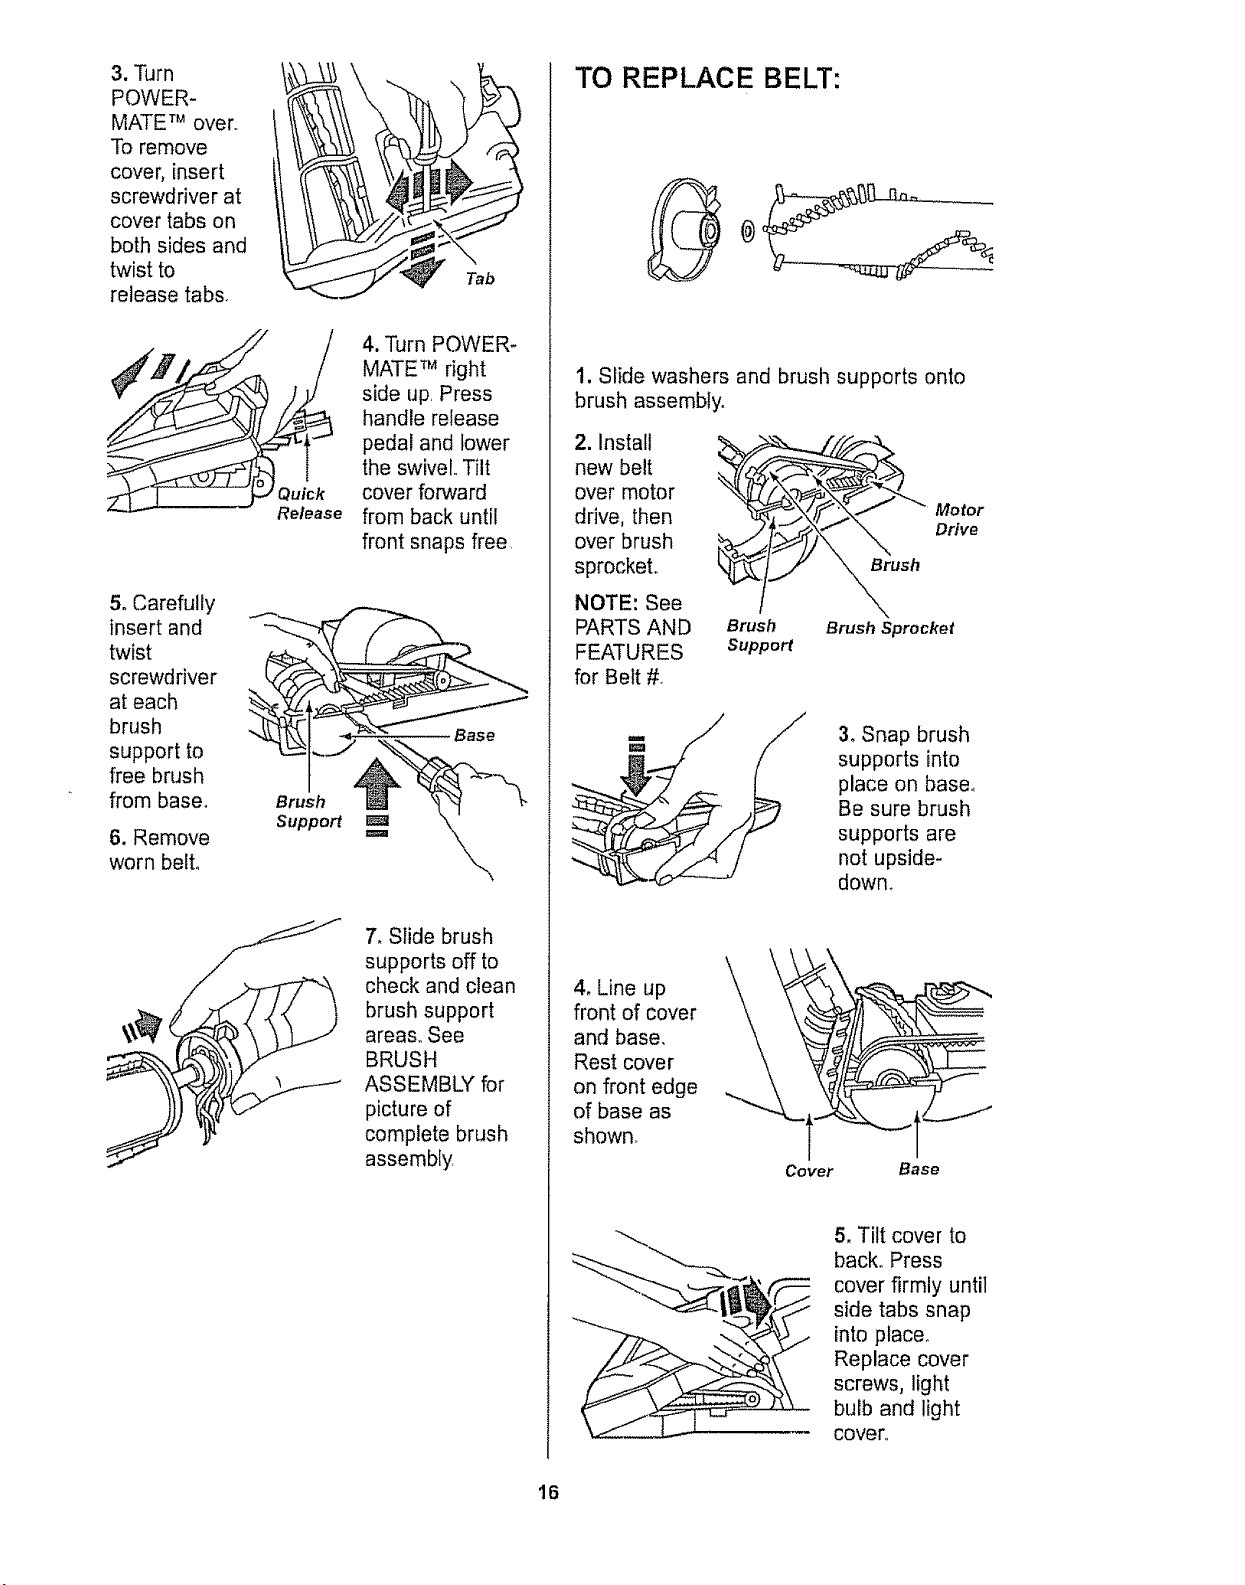
3, Turn
POWER-
MATE TM over.,
To remove
cover, insert
screwdriver at
cover tabs on
both sides and
twist to
release tabs,
Release
5o Carefully
insert and
twist
screwdriver
at each
brush
support to
free brush
from base,
6. Remove
worn belto
Brush
Support
4. Turn POWER-
MATE TM right
side up, Press
handle release
pedal and lower
the swivel., Tilt
cover forward
from back until
front snaps free
Base
7, Slide brush
supports off to
check and clean
brush support
areas,, See
BRUSH
ASSEMBLY for
picture of
complete brush
assembly
TO REPLACE BELT:
1. Slide washers and brush supports onto
brush assembly,
2. Install
new belt
over motor
drive, then
over brush
sprocket°
NOTE: See
PARTS AND
FEATURES
for Belt #_
Brush
Brush Brush Sprocket
Support
Motor
Drive
3oSnap brush
supports into
place on base,
Be sure brush
supports are
not upside-
dowm
\
4, Line up \
front of cover
and base,
Rest cover
on front edge
of base as
shown_
\_
Cover Base
5, Tilt cover to
back. Press
cover firmly until
side tabs snap
into place_
Replace cover
screws, light
bulb and light
cover,,
16
....."....................
Electrical Shock Or Personal Injury
Hazard
Disconnect electrical supply before
servicing or cleaning the unit.
Failure to do so could result in elec-
trical shock or personal injury from
cleaner suddenly starting,
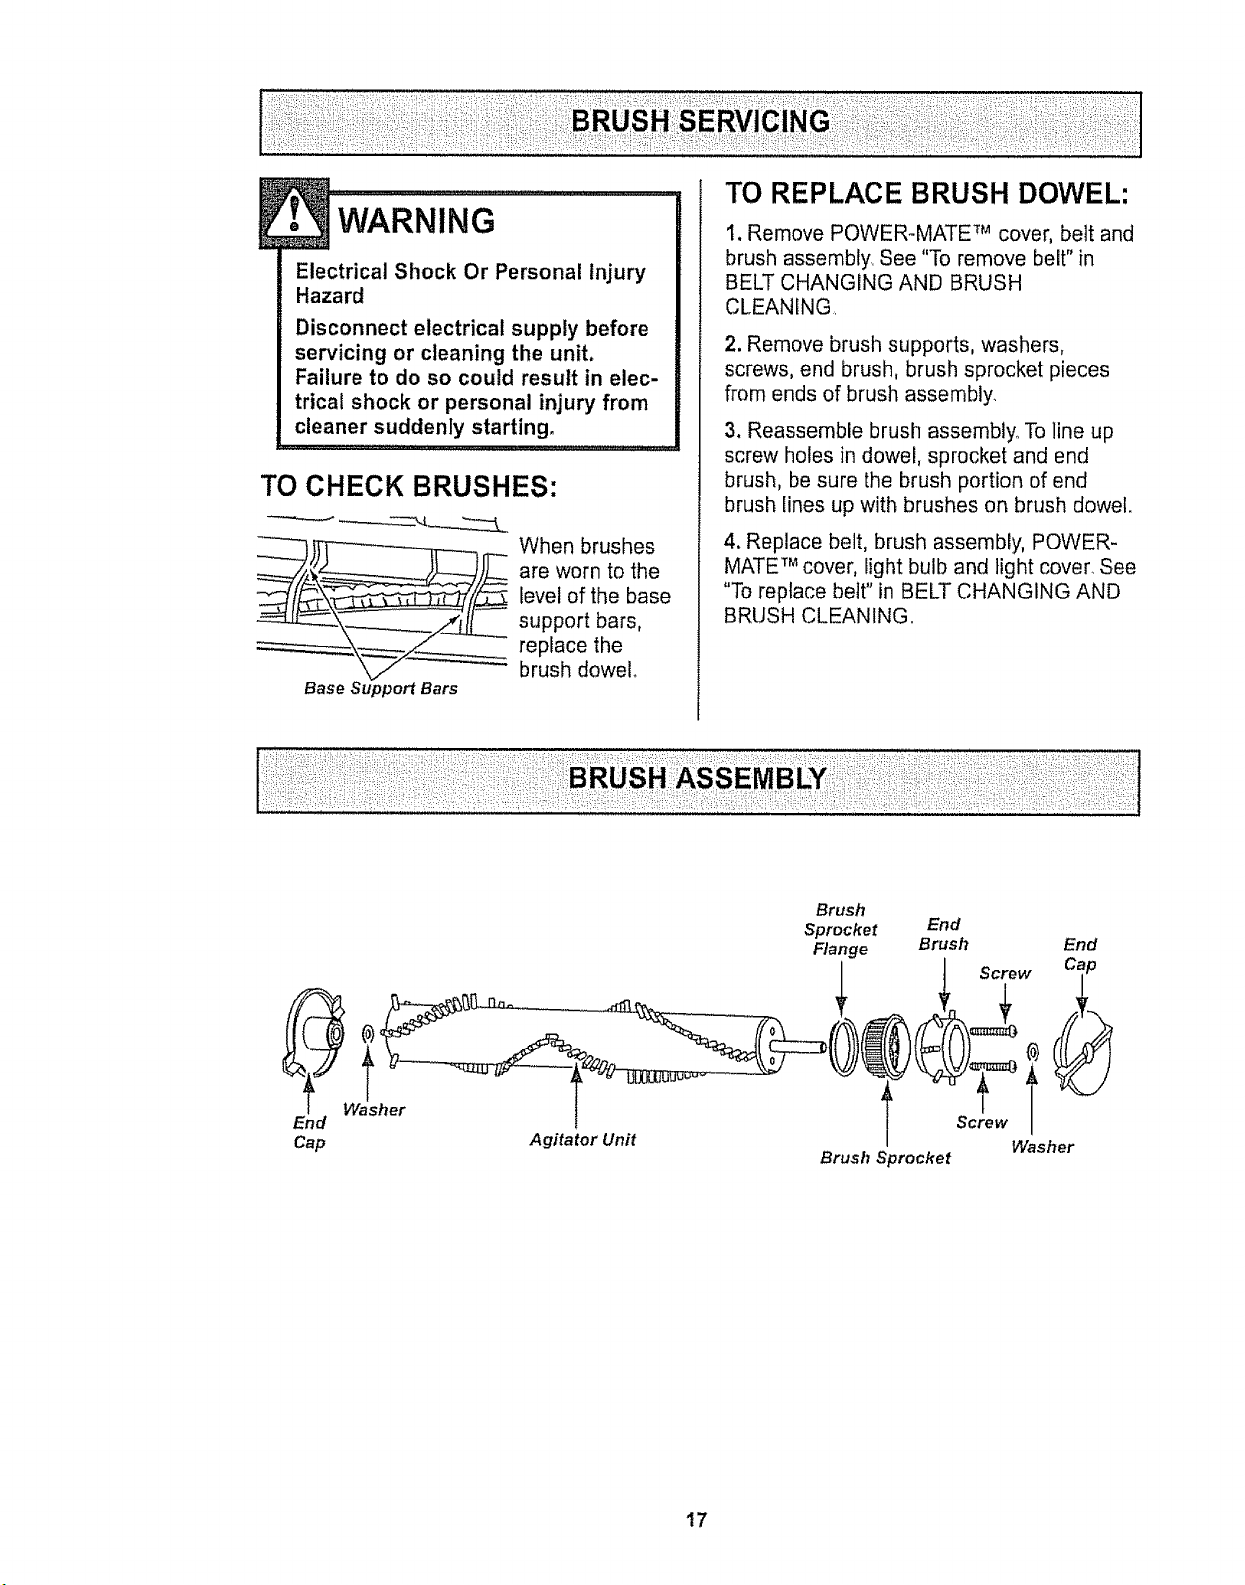
TO CHECK BRUSHES:
_'4.
___Z_ When brushes
are worn to the
level of the base
support bars,
replace the
brush dowel
Base Support Bars
I, Remove POWERoMATE TM cover, belt and
brush assembly. See "To remove belt" in
BELT CHANGING AND BRUSH
CLEANING,
2. Remove brush supports, washers,
screws, end brush, brush sprocket pieces
from ends of brush assembly,
3, Reassemble brush assembly,. To line up
screw holes in dowel, sprocket and end
brush, be sure the brush portion of end
brush lines up with brushes on brush dowel.
4, Replace belt, brush assembly, POWER-
MATE TM cover, light bulb and light cover, See
"To replace belt" in BELT CHANGING AND
BRUSH CLEANING.
Brush
Sprocket End
Range Brush End
I t Screw Cap
2, T ? T
Cap Agitator Unit I Washer
Brush Sprocket
17
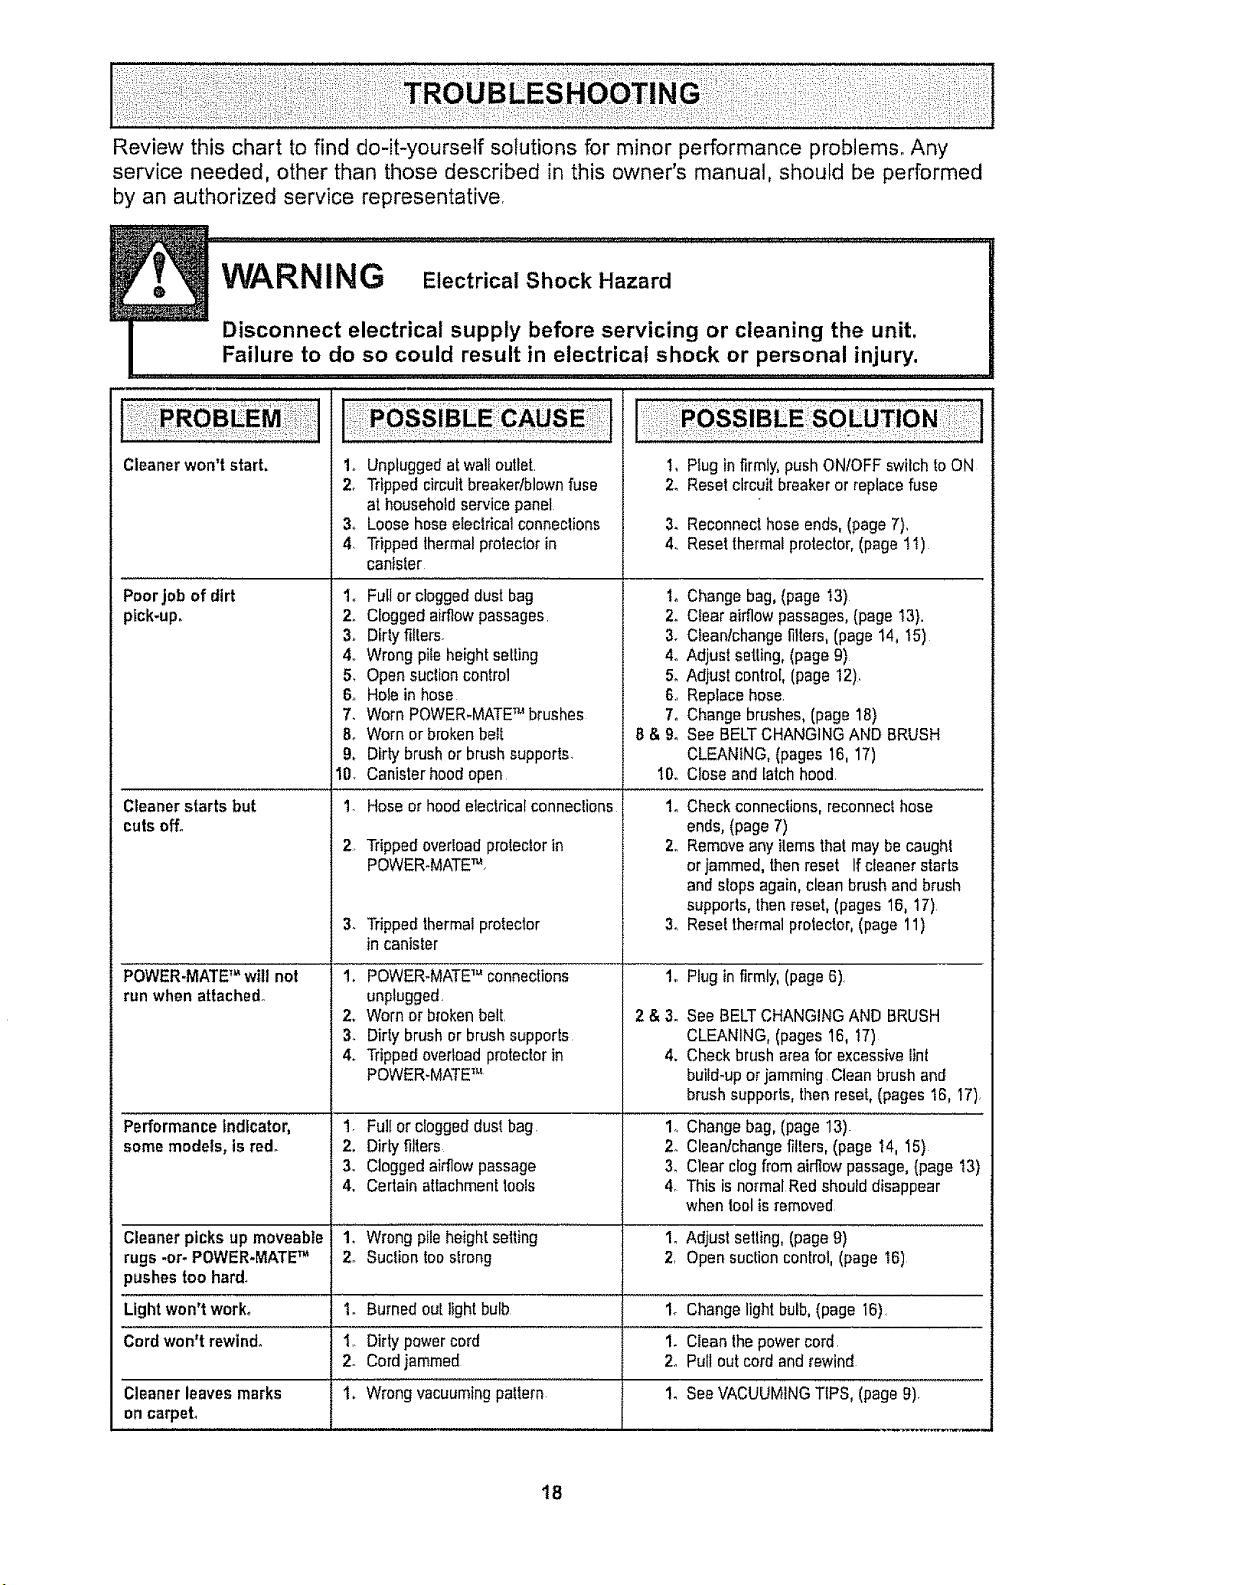
Reviewthischarttofind do-it-yourselfsolutionsfor minorperformanceproblems.Any
serviceneeded,otherthanthosedescribedin thisowner'smanual,shouldbe performed
byanauthorizedservicerepresentative,
Cleaner won'tstart. 1.
2o
3.
,
Poorjob of dirt 1.
ptck-up. 2.
3.
4..
5,
6,,
7.
8.
9.
I0.
Cleaner starts but t.
cutsoff.
2,
3.
POWER-MATETM will not 1.
run whenattached°
2.
3.
4.
Performanceindicator, 1,
some models, isred. 2.
3.
4.
Cleaner picksup moveable 1,
rugs -or- POWER-MATETM 2o
)ushes too hard.
Lightwon't work° 1.
Cord won't rewind. 1..
2.
1.Cleanerleaves marks
oncarpel
1, Pbg infirmly,pushONIOFFswilch to ON
2. Reset circuitbreaker or replacefuse
Unpluggedatwaltoutlet.
Trippedcircuit breakedblewnfuse
at householdservicepanel
Loose hoseeleclricatconnections
Trippedthermalprolector in
canlsler
Full or cloggeddust bag i,
Cloggedairflow passages. 2.
Dirtyf_llers. 3.
Wrong piteheightseWng 4o
Opensuclion control 5,
Holein hose 6..
Worn POWER-MATETM brushes 7.
Worn or brokenbeIt B& 9o
Dirty brushor brushsupports.
Canisterhood open 10,.
Hose of hoodelectricalconnecliens 1o
Trippedoverloadprotectorin 2.,
POWER-MATETM,
Trippedthermalprotector 3.
in canister
POWER-MATETM connections 1.
unplugged,
Worn or brokenbelt. 2 & 3.
Dirty brushor brushsupports
Trippedoverloadprotectorin 4.
POWER.MATETM
Full or cloggeddust bag. 1o
Dirtyfilters, 2.
Cloggedairflow passage 3,
Certain attachmenttools 4,
Wrongpileheight setting 1.
Suctiontoostrong 2,
Burnedout light bulb 1_
Dirtypowercord 1.
Cordjammed 2.
Wrongvacuumingpattern 1.
3. Reconnecthose ends,(page7),
4. Reset thermalprotector,(pagetl)
Change bag,(page I3)
Clear airflow passages,(page t3},
C_eanlchangefilters,(page 14, 15)
Adjust setting,(page9)
Adjust control, (page 12)_
Reptacehose.
Change brushes,(page18)
See BELTCHANGINGAND BRUSH
CLEANING,(pages 16, 17)
Closeand latchhood.
Checkconneclions,reconnec!hose
ends,(page7)
Removeany ilemsthatmay becaughl
or jammed,thenreset Ifcleaner starts
andslops again,clean brush and brush
supports, thenreset, (pages16, 17)
Rese! thermalprotector,(page 11)
Plug infirmly,(page6).
See BELTCHANGINGAND BRUSH
CLEANING,(pages 16, !7)
Checkbrush area for excessivelint
build-upor jamming Clean brush and
brush supports,then reset,(pages 16, 17),
Changebag, (page 13).
Cleanfchangefillers, (page I4, I5)
Clear clogfrom allow passage,(page I3}
This is normal Redshoulddisappear
when tool isremoved
Adjust selling, (page9)
Opensuction control, (page _6)
Changelight bulb,(page 16).
Cleanthe power cord.
Pullout cord and_ewind
SeeVACUUMINGTIPS, (page9)_
18

ome:,orours
For repair of major brand appliances in your own home...
no matter who made it, no matter who sold it[
1-800-4-MY-HOME suAnytime, day or night
(1-800-469-4663)
www.sears.com
To bring in products such as vacuums, lawn equipment and electronics
for repair, call for the location of your nearest Sears Parts & Repair Center.
1-800-488-1222 Anyt=me,dayor night
www.sears,co m
For the replacement parts, accessories and owner's manuals
that you need to do-it-yourself, call Sears PartsDirectS"l [
1-800-366-PART _ a.m- 11 p_m_CST,
(1-800-366-7278) 7 days a week
www.sears.comipartsdirect
To purchase or inquire about a Sears Service Agreement:
1-800-827-6655
7 a.m. - 5 prm. CST, Men.- Sat.
Pare pedir servicio de reparaci6n a domicilio,
y para ordenar piezas con entrega a domicilio:
1-888-SU-HOGAR s,._
(1_888-784_6427)
Au Canada pour service en frangais:
1-877-LE-FOY ER _"
(I -877_533_6937)
[Ho e1......
0 Seats. Roebuck anrJ Ca
® Registered Trademark / _ Trademark el Seats. Roebuck and Ca
@Ma_ca Reglsttada I _ Match .daFI{,blICF_de Seats. Roebuck al_d Co
19

Sears Roebuck and Co., Hoffman Estates, IL 60179 U_S.Ao
PART NOoC01ZBFJ00UO0-8191532
Printed in U.S,A.
2O
Manuel Del Propietario
Aspiradora
Modelo 116.21312
CUIDADO:
Lea y sigue todas tas
instrucciones de operaci6n
y seguridad antes deZuso de
este productoo
Sears, Roebuck and Co., Hoffman Estates, IL 60179 U.S.A.
www.sears.com
PIEZA N° CO1ZBFJOOUOO-8191532 Impreso en EUA
Antes de usar su aspiradora nueva .... 2
Garantia de la aspiradora de Kenmore 2
lnstrucciones importantes de
seguridad ......................... 3
Piezas y caracteristicas ............ 4-5
Armado ......................... 6-7
Uso ............................. 8
Para comenzar ..................... 8
Sugerencias para aspirar .............. 9
Sugerencias sobreel ajuste de nivelde
pelo de faalfombra ................. 9
Accesorios ....................... t0
Uso de los accesorios ............. tO
Caracteristicasde rendimiento ........... 11
Funcionamiento de su aspiradora ........ I2
Cuidado del recept_culo .............. 12
Cambiode la botsa .................... 12
Limpiezadet exterior y de los accesorios 13
Cambio del filtro de seguridad del motor ..... 13
Cambio del filtro de escape ......... 14
Cuidado de la Power-Mate TM ....... 15
Cambio de ta bombitla ........... 15
Cambio de la correay iimpieza
del cepillo ..................... I5-16
Cuidadodefcepilto ................ 17
Ensambfedef cepilto .................... 17
Reconocimiento de problemas .......... 18
Informaci6n de assistancia
o servicio ......................... 19
Porfavor lea esta guia que le ayudaraa assemblar y operar su aspiradoranuevade Kenmoreen una manera
m&s seguray effectivao
Para mas informaci6nacerca del cuidado y operaciOnde esta aspirador,llame a su tienda Searsmas cercana
Cuandoprequnte por informaci6nusted necisitar&el numero completode seriey modefode la aspiradoraque
est&tocado en la placa de los n_3merosde modelo y serie
Use el espacio de abajo para registrar el numero de mode!oy serie para su nueva aspiradoradeKenmore
Numero de Modelo
N_mero de Serie
Fecha de Compra
Matenga este libro y su reciboen u tugarseguropara referenciasfuturas
Mientras su uso se limite a fines dom_sticos particulares, si esta aspiradorafalta dentro de un per[odo de un
ado a partir de la fecha de cornpra, por razones de defectos en materiales o mano de obra, DEVUELVALA AL
CENTRO O DEPARTAMENTODE SERVtCIO DE SEARS MAS CERCANO y Sears la reparar& sin ningt)n
cargo_
Esta garantla le confiere derechos legales especiflcos y adem&s puede que tenga otros derechos que difieren
entre estados,
SEARS, ROEBUCKAND CO.,DI8t7 WA, Hoffman Estates, IL 60179

ADVERTE ClA
Su seguridad es muy tmportante para nosotros. Para reducirel riesgo de incendio,choque
el_ctrico, lesi6n corporal o daOosal utilizar su aspiradora, act_e de acuerdo con precauciones
bbsicasde seguridad,entre elias:
Lea estemanualantesde armoro utilizarsuaspira-
dora.
Use su aspiradora0nicamenteen lafarinadescrita
en estemanual.Useenicamentecon accesorios
recomendadosparSears.
Parareducirel riesgode choqueel_ctrico,no use
suaspiradoraatairelibrani sabresuperficiesmoja-
dos
Desconecte etcordonelbctricoantesde componer
o limpiarel_rea delcepifto Delocontrario,el cepiflo
podrla arrancardeformimprevislao podria
producirseun choqueel_ctrico
Siempre debeapagarla aspiradoraantesde
conectaro descanectarla manguerade ta POWER-
MATETM
Stempredebeapagarsuaspiradoraantesde des-
conectarla
No desconectetaaspiradoratirandodel cordon
ef_ctricoParadesconectarla,hale el enchufe,no el
cordon.
Sujete etenchufeconla monaal enroltarel cordon
el_ctricoParadesconectarla,hale en enchufe,noel
cord6n
No uselaaspiradorasi el cordono el enchufeest_
dariado.Sila aspiradoranoest_funcionandoade-
cuadamenteo si seha dejadocaer,est_ daOada,se
ha dejadoexpuestaa laintemperieo seha dejado
caeren agua,devu_lvalaa un CentrolDepartamento
de serviciode Sears..
No haleni transportela aspiradoraperet cordon;no
useel cord6ncoma mango;no cierrepuertassabre
el cordon;no haleel cordonsabrerebordesaguclos
ni esquinas No pasola aspiradorasabreel cordon.
Mantengae!cordonalejadode superficiescalientes.
No abandonela aspiradoracuandoest_conectada
Descon_ctelacuandono la est_usandoy antesde
darteservicio
No permitaquaseautilizadacomajuguete Se
requiemtonermayorcuidadocuandoseautilizada
en la proximidadde niOoso parniOos
No toquefaaspiradorani etenchufecon losmanos
mojadas
GUARDE
Nouse taaspiradorasila mangueraest_ rotaoLa
mangueracontienealambresel_ctricos.C_mbielasi
est&ratao desgastada Eviteaspirarobjetos
agudos.
Nocotoqueobjetosen losaberturas.
Noutilice la aspiradorasi algunaaberturaest&blo-
queada;mant_ngalalibra de po[vo,pelusa,cabellos
ycuaiquieracosaqua podrfadisminuirel flujode
aire
Mantengael cabelfo,ropa suelta,dedosy todaslos
partesdel cuerpoalejadasde lasaberturasy piezas
mec_nicas
Nouse laaspiradarasintonerinstatadala balsa
parapolvo$t/olosfiltros
Cambie siempre la balsaparapolvodespuOsde
aspirarlimpiadoresde alfombrasodesodorantes,
talcosy polvosfines Estosproductosatascanla
balsa,reducenel flujode aire ypuedencausar que
6stase rompa.Si no cambiala balsapodriaocasio-
nardaOopermanentea la aspiradora.
Nouse la aspiradorapara levantarobjetosagudos,
juguetespequerios,alfileres,sujetapapetes,etc.
Padrianda_arla aspiradorao la balsaparapolvo
Nolevanteningunacosaque seest6quemandoo
emitiendohumo,comacigarriUos,cerilloso cenizas
calientes.
Nouse la aspiradarapara aspirarliquidosinflama-
blesocombustibles(gasolina,liquidospara lim-
pieza,perfumes,etc) ni la use enlugaresdonde
6stospodrlanestarpresentes.Losvaporesde estas
sustanciaspuedencrearun peligrode incendioo
explosion.
Tonga cuidado especial al utilizarla aspiradoraen
escalonesNola co!oquesabresillas,mesas,etc
Mant_ngalaen el piso.
Usted esresponsabtede asegtJrarque suaspira-
dorano seaulilizadapar ningunapersonaque no
puedamanejarlacorrectamente.
No opera sin el filtro de escapeni la cubiertadel fii-
ira deescape instalados
INSTRUCClONES
Etarmada y usaseguro de su aspiradorason su responsabilidad Esta aspiradoraha sidodiseOada
exclusivamenteparausa dom_stico.La aspiradoradeber_almacenarseen un fugarseco yen el interior<
Lea esteManual detpropietariodetenidamente,pues contiene informaciOnimportantesabre seguridad y
usa Estaquia contieneinformaciOnsabre seguridaddebajo de simbolosde advertiencia cuidado Par
favor ponga atenci6nespecial a estas instruccionesdodos. Advertencia: Este informaciOnle alertar&con
el potigrode fuego, choques electricos,quemadasy tesiones. Cuidado: Este informaciOnle alertara a
pe!i.gr?;scom0 lesiones y da_osde propiedad, , ................................................
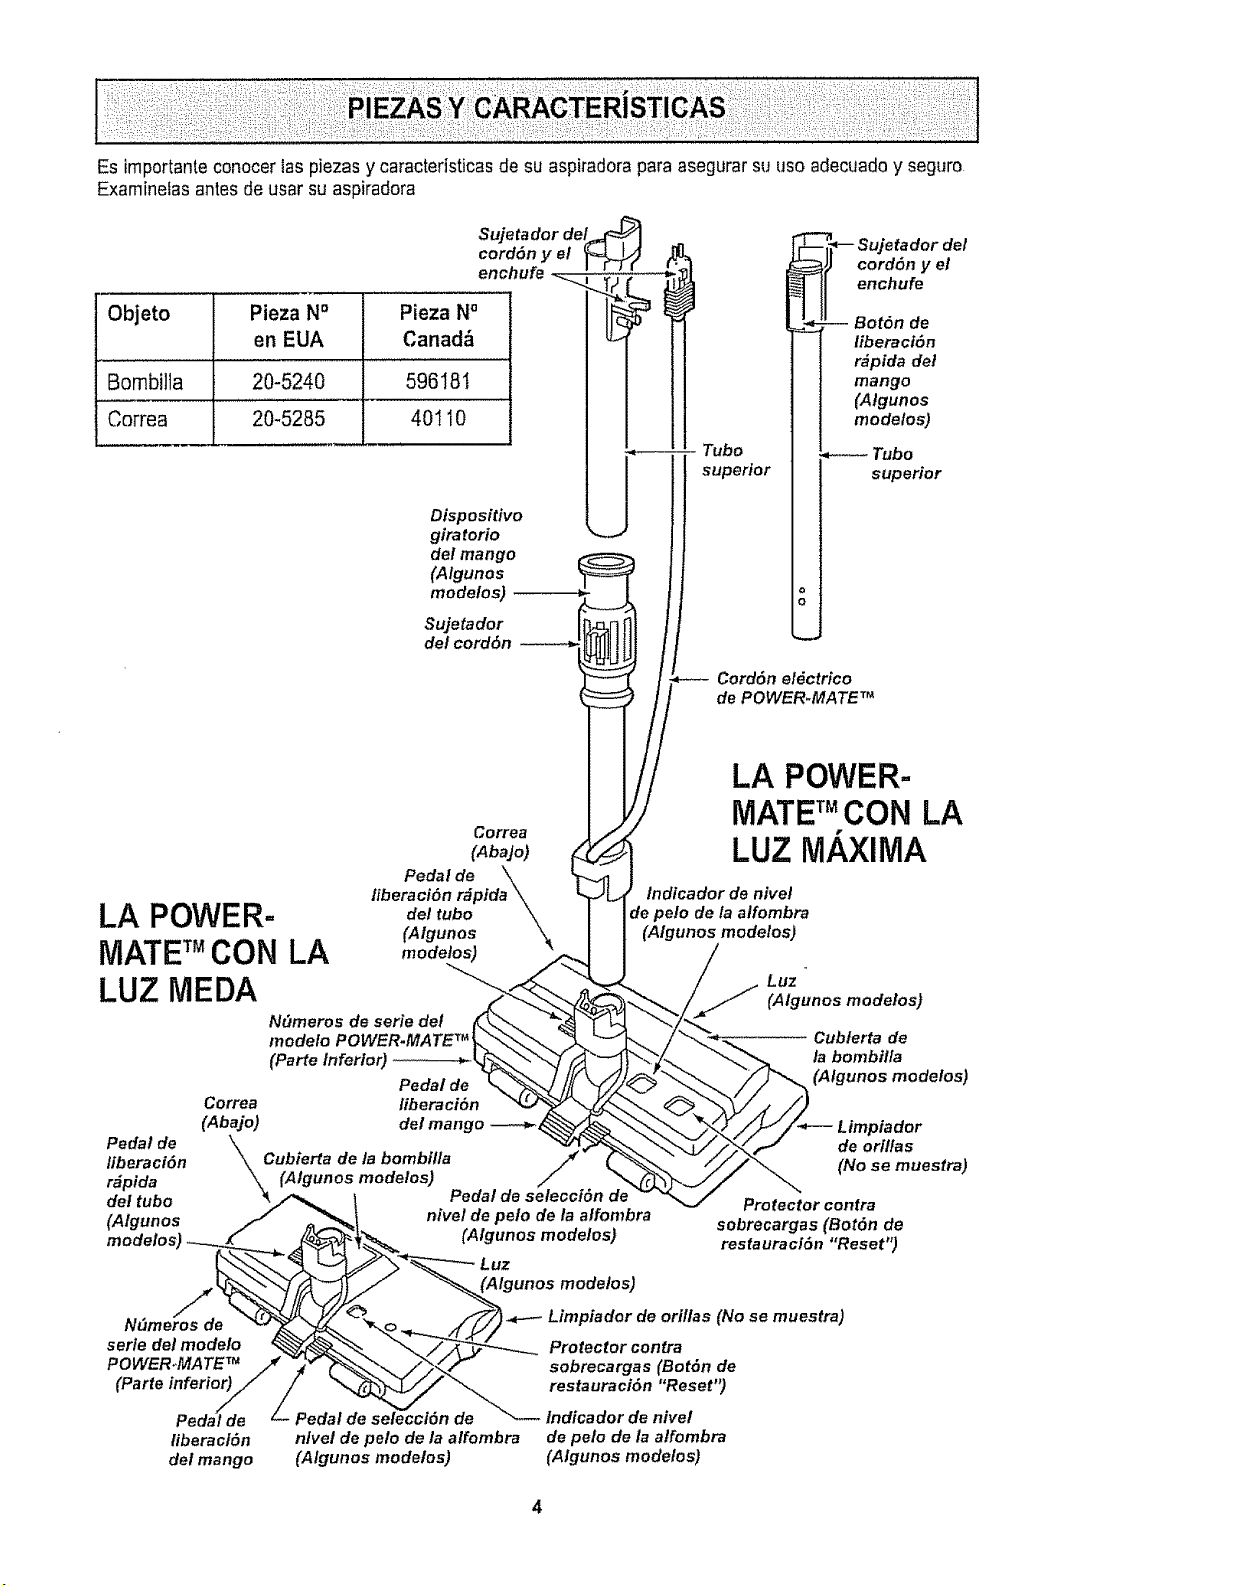
Esimportanteconocer 1aspiezas y caractedsticasde su aspiradorapara asegurar su use adecuadoy seguro,
Exarninetasantes de usar su aspiradora
Objeto Pieza No
en EUA
Bombilla 20-5240
Correa 20-5285
Sujeta dor del_
cordSn y el
enchufe _ ....
Pieza N°
Canad_
596181
4O11O
Dispositivo
giratorio
del mango
(Algunos
mode!os)
Sujetador
del cord&n
Tube
superior
q-- Sujetador del
cord6n y el
enchufe
-- Bot6n de
liberaci6n
r_pida det
mango
(Algunos
modelos)
Tubo
superior
CordSn eldctrico
de POWER.MATE T_
Correa
(AbaJo)
Pedal de \
liberaci6n r_pida \
LA POWER- dolt.be\
(Algunos
MATETMCON LA ,,,orioles)
LUZ MEDA
Peda! de
liberaci6n
r_pida
de! tubo
(Algunos
tiberaci6n
del mango -----_
Correa
(Abajo)
\.\kCubierta de la bombilla
(Algunos modelos) Pedal de selecciSn/' de
nivel de pelo de la alfombra
(Algunos modelos)
LA POWER-
MATE TMCON LA
LUZ MAXIMA
Indicador de nivel
Je pe!o de la alfombra
(Algunos modelos)
_ Luz '
(Algunos modelos)
_ ublerta de
la bombilla
(Algunos modelos)
_Y/_/t/_--- Limpiador
_/X_,_ deori,as
_j__,(Nosemuestra)
Protector contra
sobrecargas (Bot6n de
restauraclSn "Reset")
Luz
(Algunos modelos)
N_m
serie del modelo
POWER,,MATETM
(Parle inferior)
Limpiador de orillas (No se muestra)
Protector contra
sobrecargas (BotSn de
restauraci6n "Reset")
tiberacl6n
del mango
,Pedal de selecci6n de Indicador de nivel
nlvel de pelo de la alfombra de pelo de/a alfombra
(Algunos modetos) (Algunos modelos)
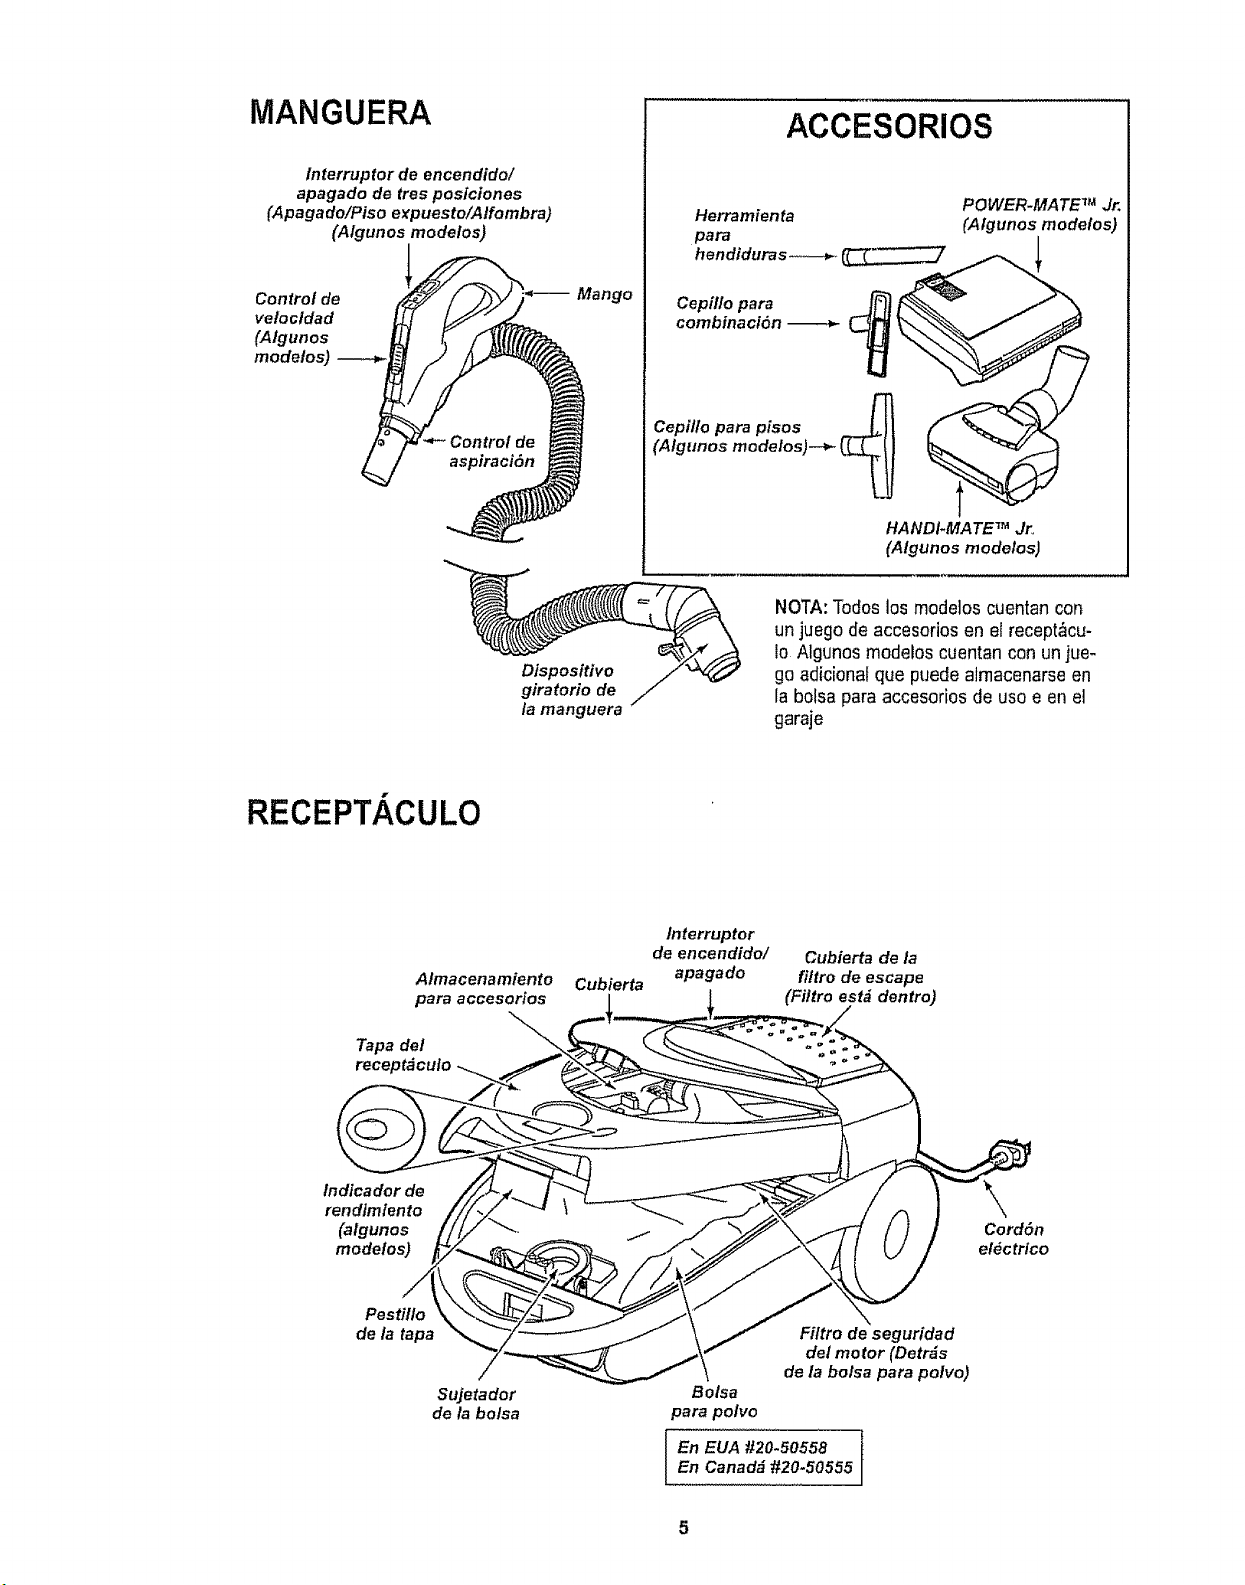
MANGUERA
/nterruptor de encendido/
apagado de ires posiciones
(Apagado/Piso expuesto/A/fombra)
(Algunos modelos)
Control de
velocldad
(Algunos
modelos)
Mango
ACCESORIOS
POWER-MATE TM Jr,
Herramienta (Algunos modelos)
para i
hendiduras-._--_'__
Cepil/o para F_ _"_
combinaci6n ___
Cepillo para pisos .-.-_J t
,j t',.Wf
HANDI*MATE TM Jr,
(Algunos modelos, I
Dispositivo
giratorio de
la manguera
NOTA:Todoslos modelos cuentan con
un juego de accesorios en el recept_cu-
io Algunosmodelos cuentan con un jue-
go adicionat que puede almacenarseen
la bolsa para accesorios de uso e en el
garaje
RECEPTACULO
Almacenamiento
para accesorios
Tapa del
Cubierta
Interruptor
de encendido/
apagado
Cubierta de la
fi/tro de escape
(Filtro est& dentro)
tndicador de
rendimlento
(algunos
modelos)
Cord6n
el#ctrico
Pestillo
de _ tapa
Sujetador
de la bolsa
Filtro de seguridad
del motor (Detr_s
de la bolsa para potvo)
Bolsa
para polvo
En EUA #20.50558
EnCanadd #20-50555
5
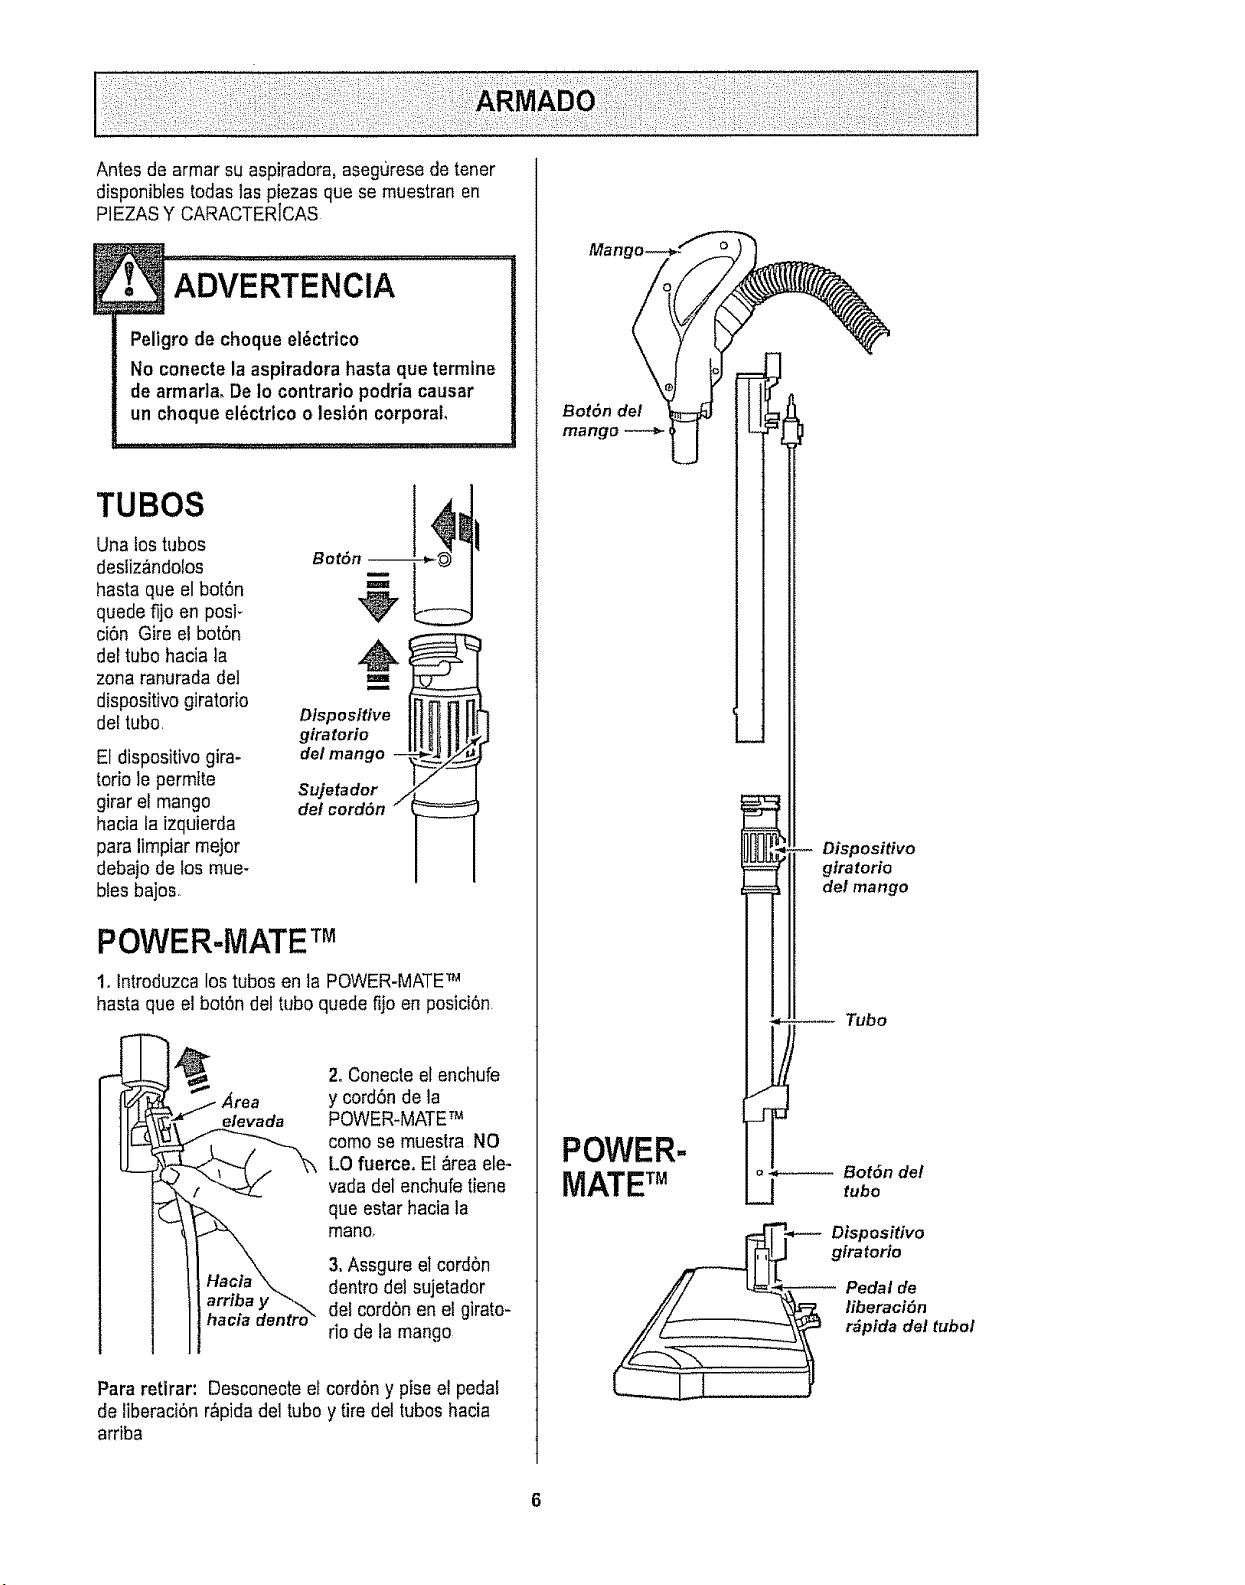
Antes de armar su aspiradora, aseguresede tener
disponibfestodas las piezas que se muestranen
PIEZASY CARACTERICAS
Peligro de choque el_ctrico
No conecte la aspiradora hastaque termine
de armada, De Io contrario podria causar
un choque el_ctrico o lesfOncorporal
TUBOS
Una lostubos
desliz&ndolos
hasta que el bot6n
quede fijo en posi-
ciOn Gire el botOn
del tubo hacia la
zona ranurada del
dispositivo giratorio
del tubo,
El dispositivogira-
torio le permfte
girar et mango
hacia taizquierda
para limpiar mejor
debajo de los mue-
bles bajos.
Dlspositive
giratorio
de/mango --
Sujetador /
del cord6n
POWER-MATETM
1, lntroduzca los tubos en la POWER-MATETM
hasta que el bot6ndel tubo quede fijo en posici6n
. Area
elevada
2. Conecteel enchufe
y cord6nde la
POWER.MATETM
como se muestra NO
LO fuerce. El _rea ele-
vadadel enchufetiene
que estar hacia la
mano,
3,Assgure el cordon
dentrodel sujetador
detcordon en el girato-
rio de la mango,
Para retirar: Desconecteel cordon y pise el pedal
de tiberaci6n r_pida del tubo y tire de!tubos hacia
arriba
!
Mang
BorOn del
mango
POWER-
MATE TM
Dispositivo
gtratorio
del mango
Tubo
o_ Bot6n del
_j tubo
Dtspositivo
giratorlo
Pedal de
liberaci6n
r_pfda del tubol
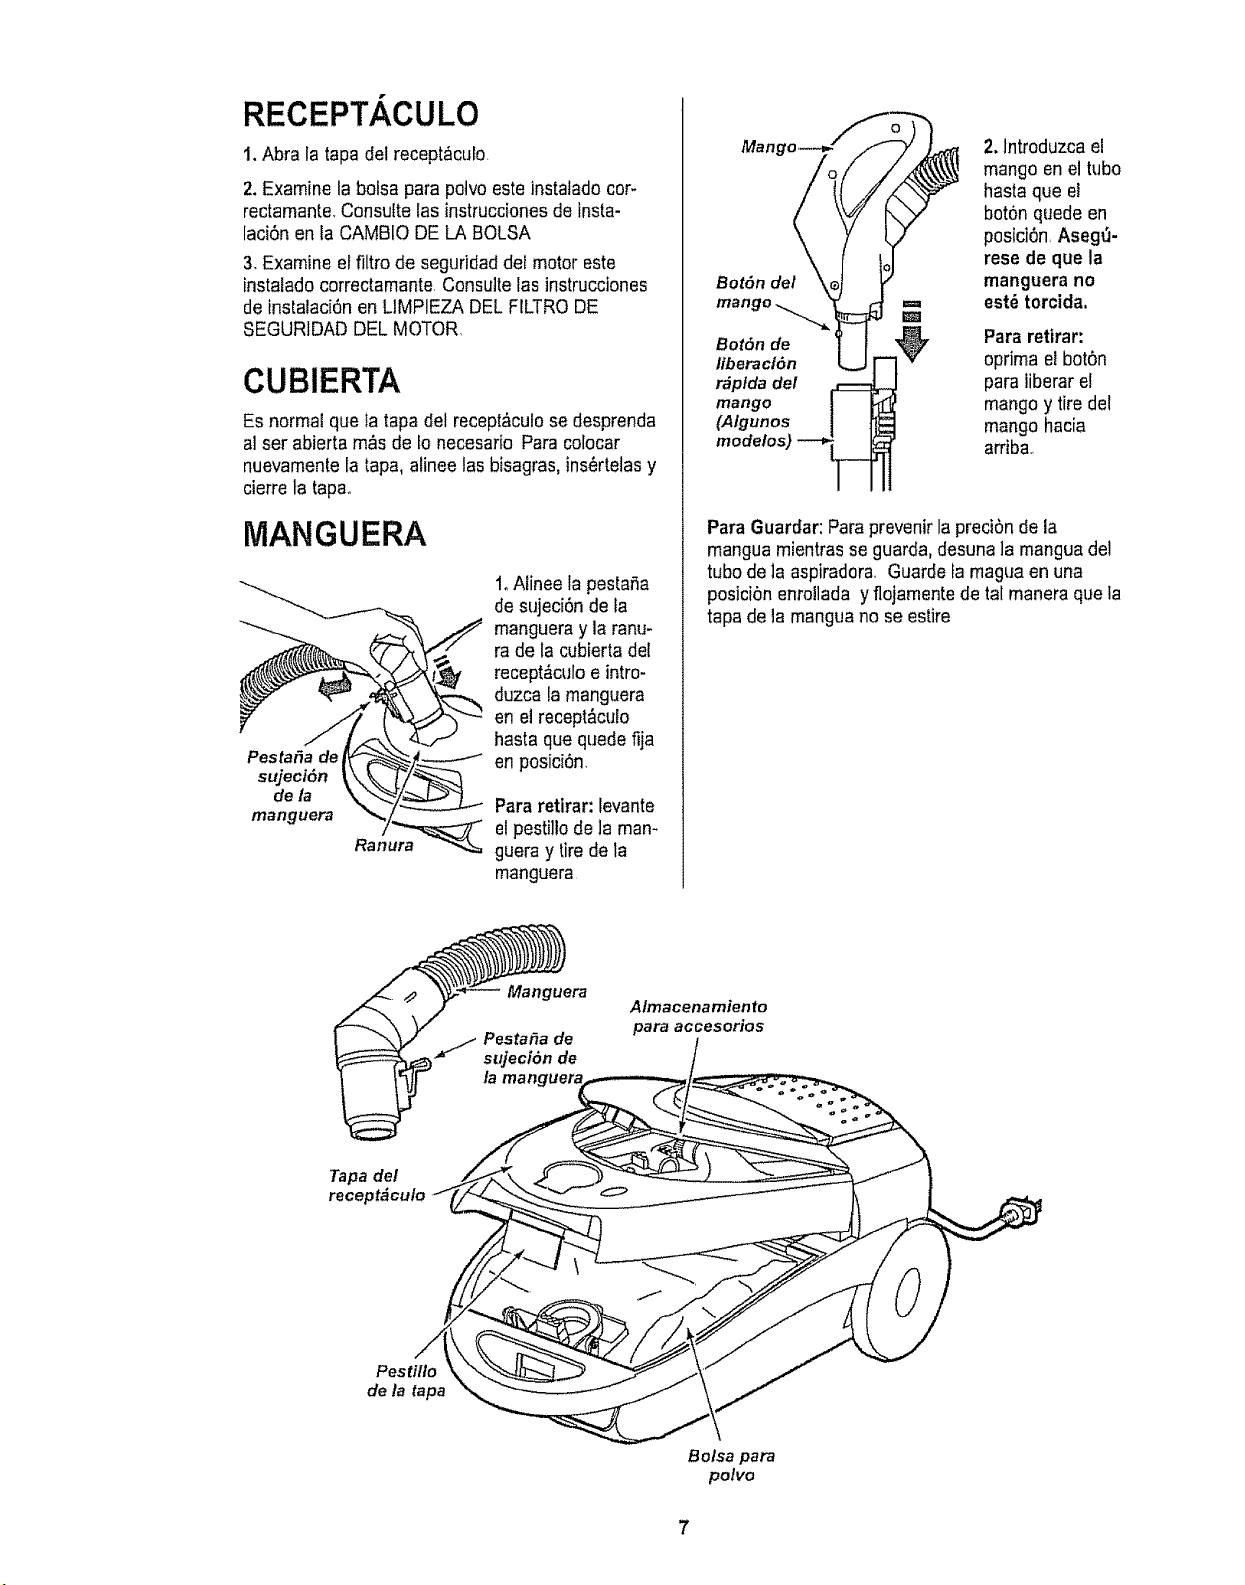
RECEPT ,CULO
t. Abra la tapa del recept_culo
2. Examine la boisa para polvo este instatadocor-
rectamante.Consutte las instruccionesdeinsta-
lad6n en la CAMBIO DE LA BOLSA
3. Examine el filtro de seguridaddel motor este
instalado correctamante Consultefas instrucciones
de instalaci6nen LIMPIEZA DEL FILTRODE
SEGURIDAD DELMOTOR
CUBIERTA
Es normal que Iatapa del recept&cufose desprenda
al ser abierta rn,_sde 1onecesario Para colocar
nuevamentela tapa, alinee los bisagras,ins_rtelas y
cierre ta tapao
MANGUERA
___, t 1oAlinee la pestafia
de sujeci6n de la
mangueray la ranu-
ra de la cubierta del
recept&culoe intro-
duzca la manguera
en el recept&culo
hasta que quede fija
Pestafia de rP-"_-._"._#--.-- -_ en posici6n
_jeci6n _k_i_
,o,a Pa,'a,'o.,'a,':Ievante
mdg_era Ran._---" el pestillo de ]aman-
guera y tire de la
manguera
2. lntroduzca el
mango en el tube
hasta que el
bot6n quede en
posici6n Aseg_-
rese de que la
Bot6n del manguera no
m est_ torcida.
mango _ m
Bot6n de Para retirar:
liberacl6n oprima el bot6n
r#plda #el para iiberar et
mango mangoy tire del
(Algunos mangohacia
modelos) arriba,
Para Guardar:Paraprevenirla preci6n de la
mangua mientrasse guarda,desuna]a manguadel
tube de la aspiradora Guarde famagua en una
posici6n enrollada y flojamentede tal maneraque la
tapa de la manguano seestire
Manguera
Almacena miento
para accesorios
Tapa del
recept_culo
Pestillo
de la tapa
Bolsa para
polvo
7
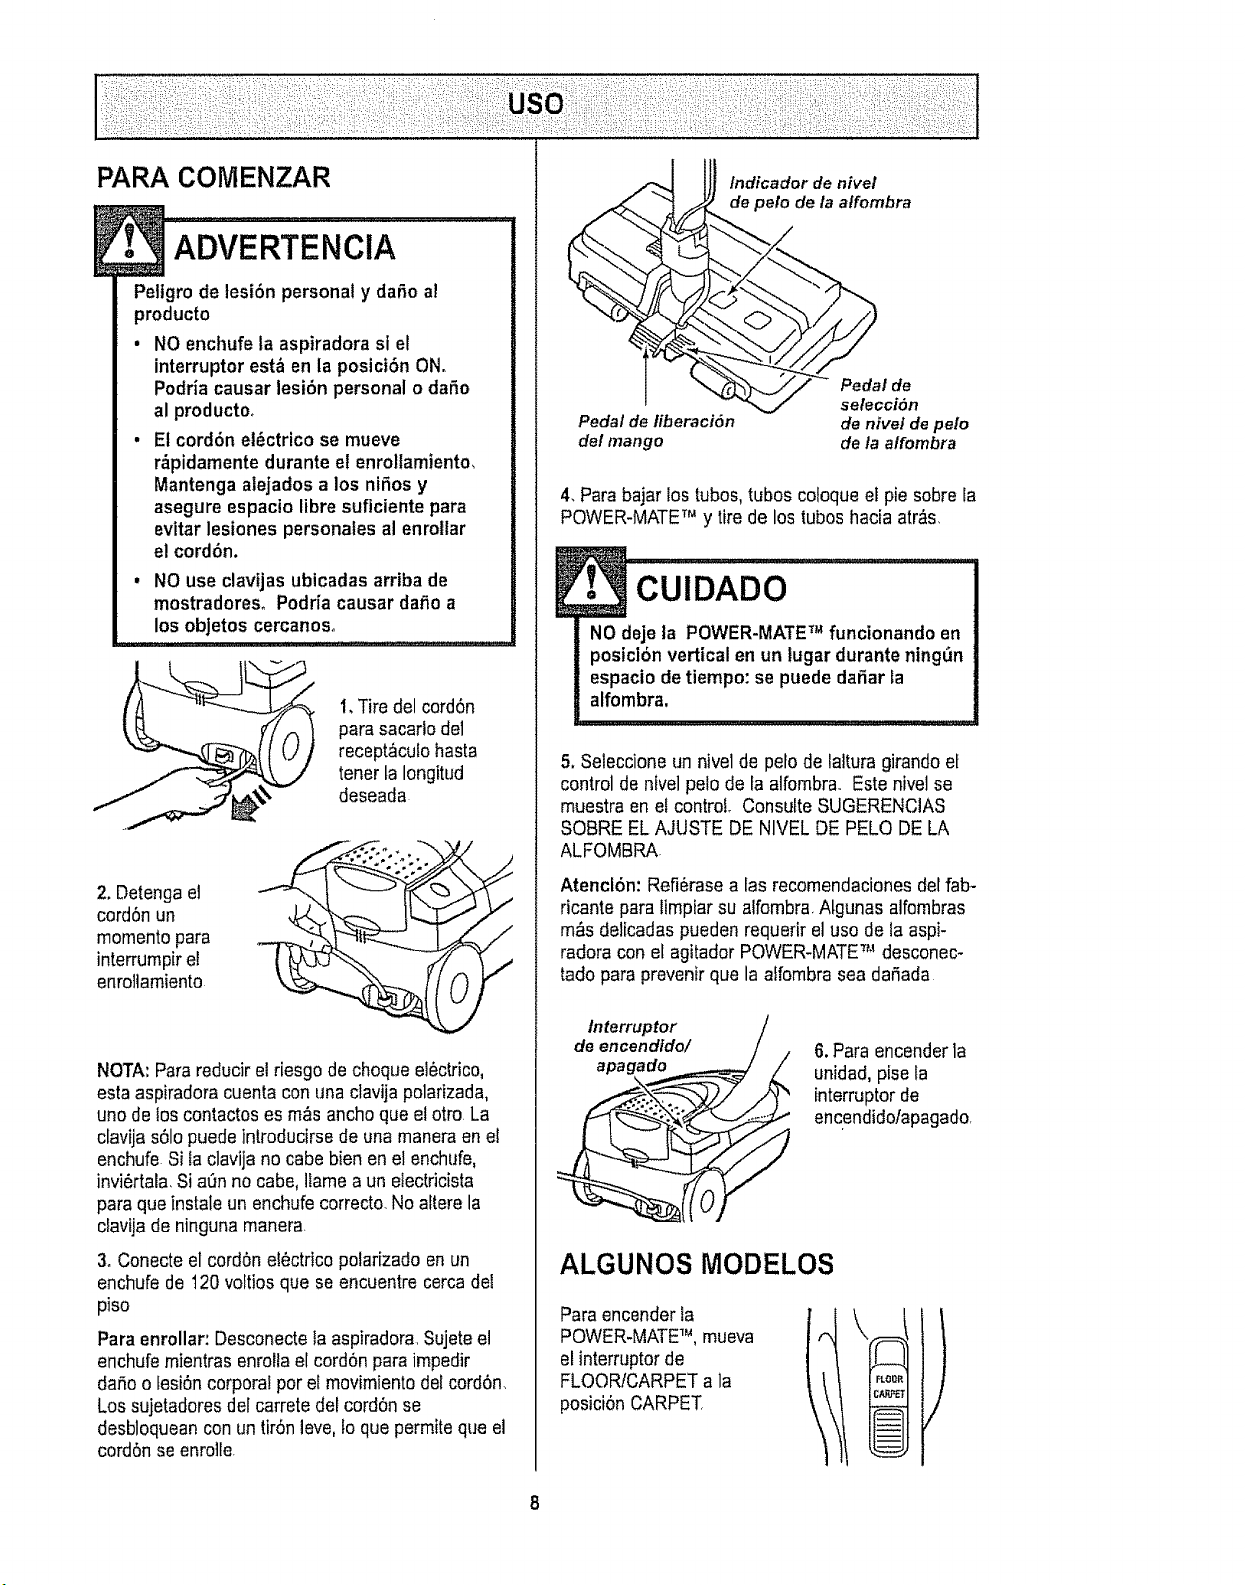
PARA COIVlENZAR
!• ADVERTENCiA : :1
Peligro de tesi6n personal y daRoa!
producto
• NO enchufela aspiradora si el
interruptor est_ en la posici6n ON.
Podria causar lesi6n personal o daSo
al producto,
• El cord6n et_ctricose mueve
r_pidamente durante el enrollamiento,
Mantenga alejados a los niSos y
asegure espacio libre suflciente para
evitar lesiones personates al enrottar
e! cord6n.
, NO use clavijas ubicadas arriba de
mostradoreso Podrfa causar dafio a
los objetos cercanoso
1.Tire del cord6n
para sacarlo det
recept_culohasta
tener la Iongitud
deseada
2. Detengael
cord6n un
momentopara
interrumpirel
enroliamiento
NOTA:Para reducirel riesgode choque el6ctrico,
esta aspiradoracuenta conunaclavija polarizada,
uno de loscontactos es m_s anchoque el otro La
clavija s61opuede introducirse de unamaneraenel
enchufe Si la clavija no cabe bien en el enchufe,
invi6rtala.Si a0n no cabe, lfamea un eiectricista
para que instale un enchufecorrecto. Noaftere la
clavija de ninguna manera
3. Conecteel cord6n electrico polarizado en un
enchufe de 120 voltiosque se encuentre cerca del
piso
Para enrollar, Desconectela aspiradora.Sujeteel
enchufe mientrasenrolla el cord6n para impedir
dario o fesi6ncorporal pot el movimiento del cord6n_
Los sujetadoresdefcarrete det cord6nse
desbloqueancon un tir6n leve,to que permiteque el
cord6n se enrolle
Indicador de nivel
de peto de la atfombra
Pedal de
sefecciSn
Pedal de liberaci6n de nivet de pelo
del mango de/a affombra
4. Para bajar los tubos,tubos coloque el pie sobre la
POWER-MATETr_y tire de los tubos hacia atr&s,
!• (::;uiDADo
NOdeje la POWER-MATE_ funcionando en
posici6nverticalen un lugardurantenlng_n
espaciodetiempo:sepuede daRarLa
alfombra,
5. Seleccione un nivel de pelo de lalturagirando el
control de nivelpelo de la alfombra. Este nivelse
muestraen el control. ConsulteSUGERENCIAS
SOBRE EL AJUSTE DE NIVEL DE PELO DELA
ALFOMBRA
Atencl6n: Refi6rasealas recomendacionesdel fab-
ricante para limpiarsu atfombra Algunas alfombras
m_s delicadas puedenrequerir el uso de la aspi-
radora con el agitador POWER-MATE_,'desconec-
tado para prevenirque la affornbrasea dariada
Interruptor
de encendldo/
apagado
6.Para encenderla
unidad,pisela
intermptor de
encendido/apagado,
ALGUNOS MODELOS
Paraencender la
POWER-MATE_, mueva
el interruptorde
FLOORtCARPETa la
posici6n CARPET,
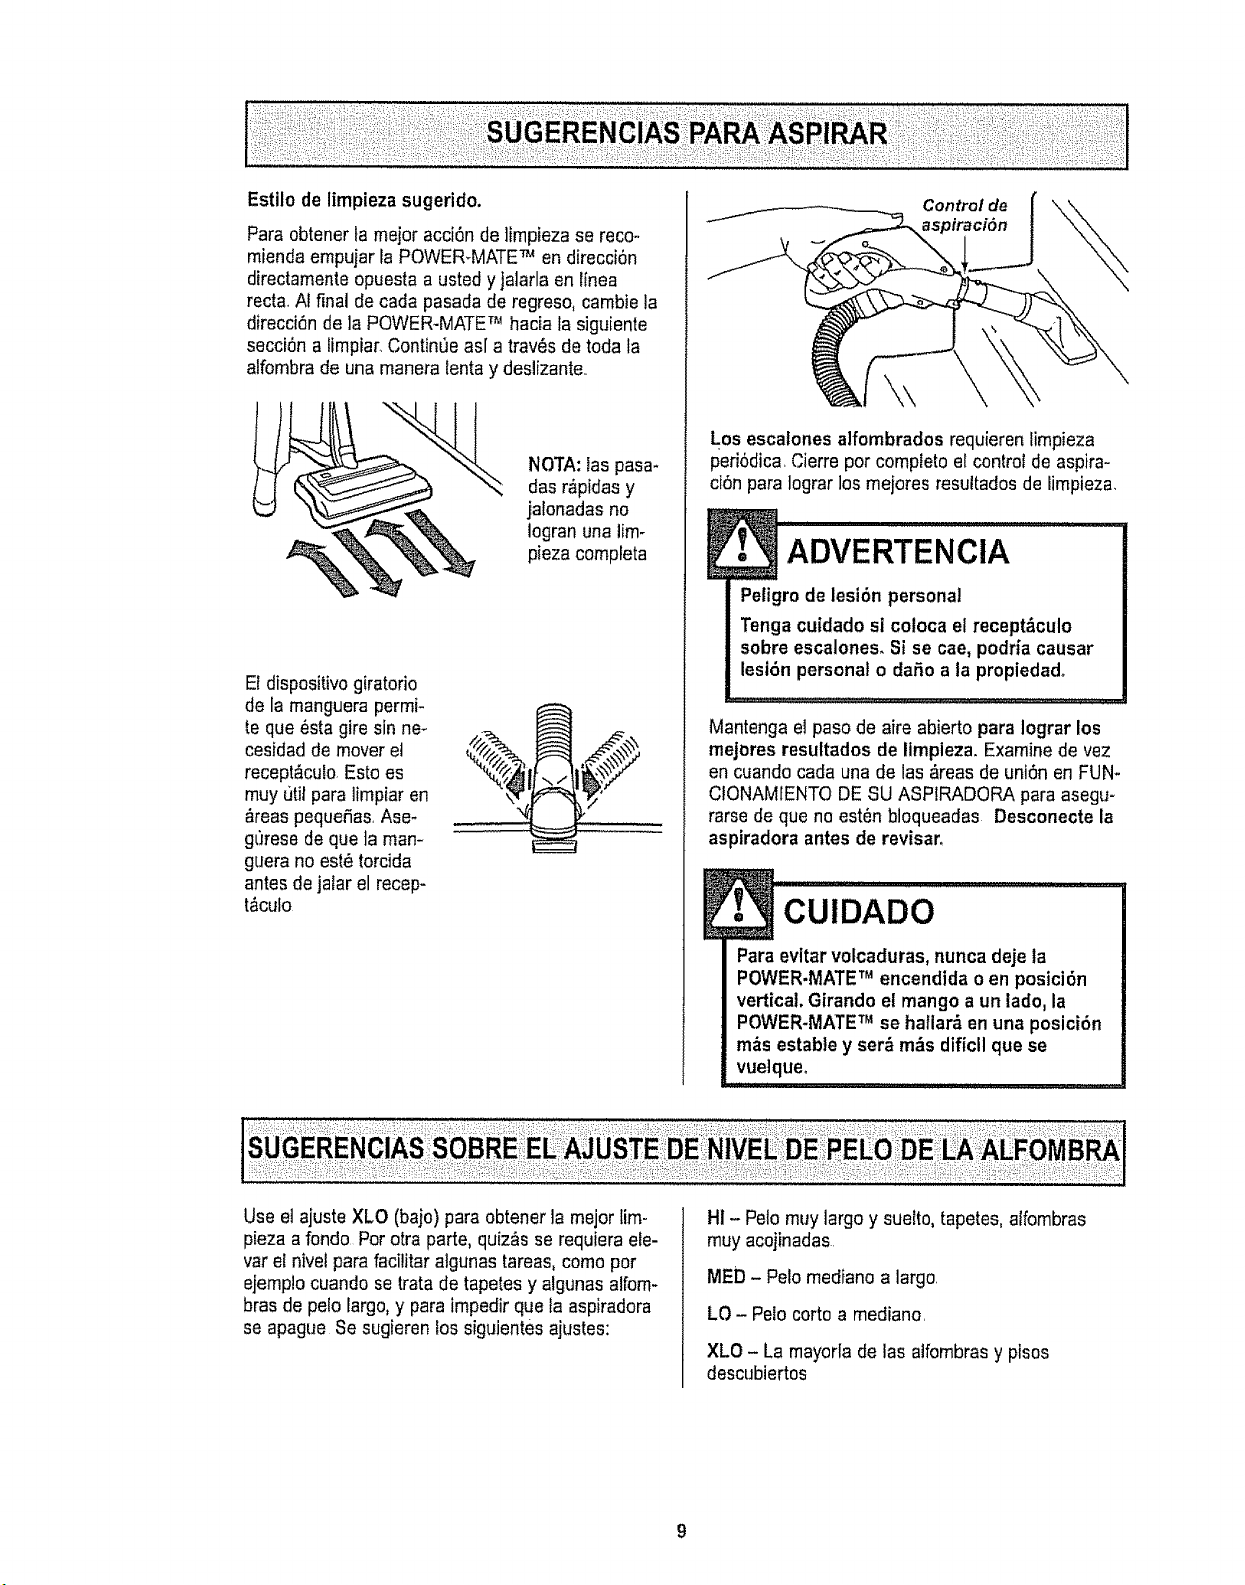
Paraobtenertameieracci6nde]impiezasereco-
miendaernpujarlaPOWER-MATETM en direcci6n
directamente opuesta a usted yjalarla en linea
recta,Al final de cada pasada de regreso, cambie la
direcci6n de la POWER-MATETM hacia la siguiente
secci6n a limpiar.ContinOeas[ a trav_s de toda la
alfombra de una maneralenta y deslizante..
NOTA:las pasa*
das r,_pidasy
jalonadas no
logran una lim-
pieza compteta
El dispositivogiratorio
de la rnanguera perrni-
teque _sta gire sin ne_
cesidad de mover et
recept&culo Esto es
muy t]til para lirnpiar en
&reaspequefias,Ase-
gOresede queta rnan-
guera no est_ torcida
antes de jalar el recep-
t_culo
Control de
aspiraci6n
Los escalones alfombrados requieren lirnpieza
periSdica,Cierre per complete e! control de aspira-
cl6n para Iograr losrnejores resultados de lirnpieza,
Peligrode lesi6n personal
Tengacuidadosi coloca el recept&culo
sobreescalones, Si se cae, podriacausar
lesi6n personalo dafio a la propiedado
Mantenga el pasode aire abierto para lograr los
rnejeres resultados de Iimpleza. Examinede vez
en cuando carla una de las _reas de uni6n en FUN-
CIONAMIENTODESU ASPIRADORA para asegu-
rarsede que no esten bloqueadas Desconecte la
aspiradora antes de revisar,
l• cuiDADo .............
Paraevltar volcaduras, nuncadeje la
POWER-MATETM encendida o en posici6n
vertica!. Girando et mango aun lade. la
POWER-MATETM se hallar_,en una posici6n
m&s establey ser_ m_s dificll que se
vuelqueo
,,,,,,,, ,, , ,,, ,,, , , , .........
Use el ajuste XLO (bajo) para obtener la meierlirn-
pieza a fondo Per otra parte, quiz&sse requiera ete-
var el nivelpara facilitar algunas tareas, come per
ejernp!ocuando setrata detapetes y algunas alforn-
bras de pelo largo,y para impedir que la aspiradora
se apague Se sugieren los siguientesajustes:
HI -Pelo muy largo y suelto, tapetes, alfombras
rnuyacojinadas
MED -Pelo mediano alargo,
LO - Polo corto a rnediano,
XLO - La rnayorlade las alfornbrasy pisos
descubiertos
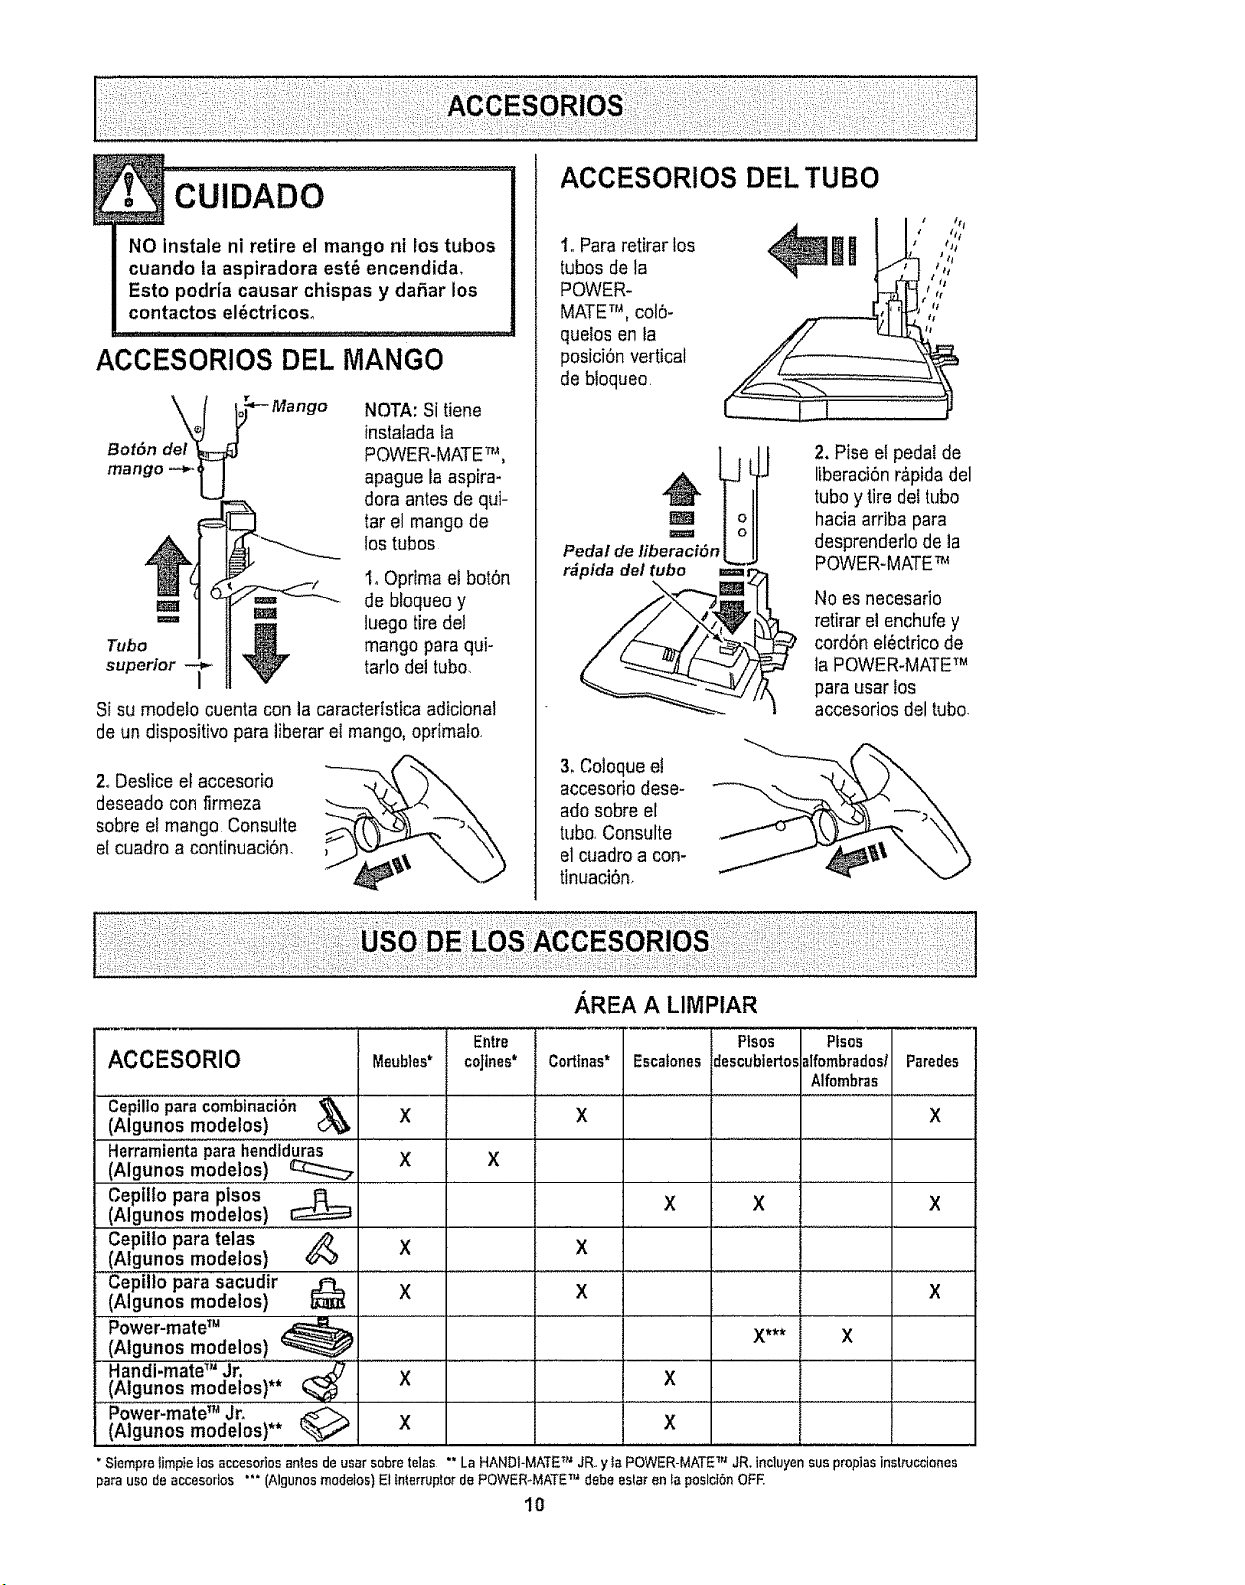
NO instale ni retire el mango ni los tubos
cuando la aspiradora est6 encendida,
Esto podria causar chispas y daBar los
contactos el6ctricos,
ACCESORIOS DEL MANGO
Bot6n del
mango -_
NOTA:Si tiene
instalada fa
POWER-MATETM,
apague la aspira-
dora antes de qui-
tar el mangode
los tubos
I, Oprimael bot6n
de bloqueoy
m_ _mm luegotire del
Tubo _ mangopara qui-
superior V tarlo del tubo.
Si su modelo cuenta con la caractertsticaadicional
de un dispositivo para liberar el mango,oprImalo,
2.,Deslice el accesorio
deseadocon firmeza
sobreet mango Consulte
el cuadro a continuaci6n.
ACCESORIOS DEL TUBO
1,,Pararetirar los
tubos de la
POWER-
MATETM, colS-
quelosen la
posiciOnvertical
de bloqueo
mi ,,;iii''
II
Pedal de libe_r_ci6nlJ
2. Pise el pedaZde
liberaci6nr,_pidadel
tuboy tiredei tubo
haciaarriba para
desprendedode ia
POWER-MATETM
Noes necesario
retirarel enchufey
cordSnet_ctricode
la POWER-MATETM
para usarlos
accesodosdel tubo
3, Coloqueet
accesoriodese-
adosobre el
tL_bo,Consulte
el cuadroa con-
tinuaci6n,
ACCESORIO
Cepllloparacombinaci6n
(Algunos mode!os)
Herramientaparahendlduras
(Algunos mode!os)
Cepiilo para pisos
(Algunos mode!os)
;epi!topara telas
Algunos modelos ) _
cepillo para sacudir
(Algunos modelos) _'
Power-mateTM
(Algunos modelos) _
Handl-mateTM Jr.
(Aigunos modelos)** _
Power-mateTM Jr.
(Algunos modelos)** _
Meubles*
X
X
X
X
X
x
Entre
coJtnes*
X
.AREA A LIMPIAR
Corttnas*
X
X
X
Escafones
X
X
Plsos Pfsos
descubiertos_lfombrados/
Alfombras
X
X*** X
Paredes
X
X
X
"Siempre timpietos accesoriosanles deusarsobretelas LaHANDI-MATETM JR.y taPOWER-MATE JR.incluyen suspropiasinslrucciones
pa_ uso de accesorlos (Algunos medelos) El tn_erruptor de POWER-MATE debe eslar en _aposld6n OFF.
10
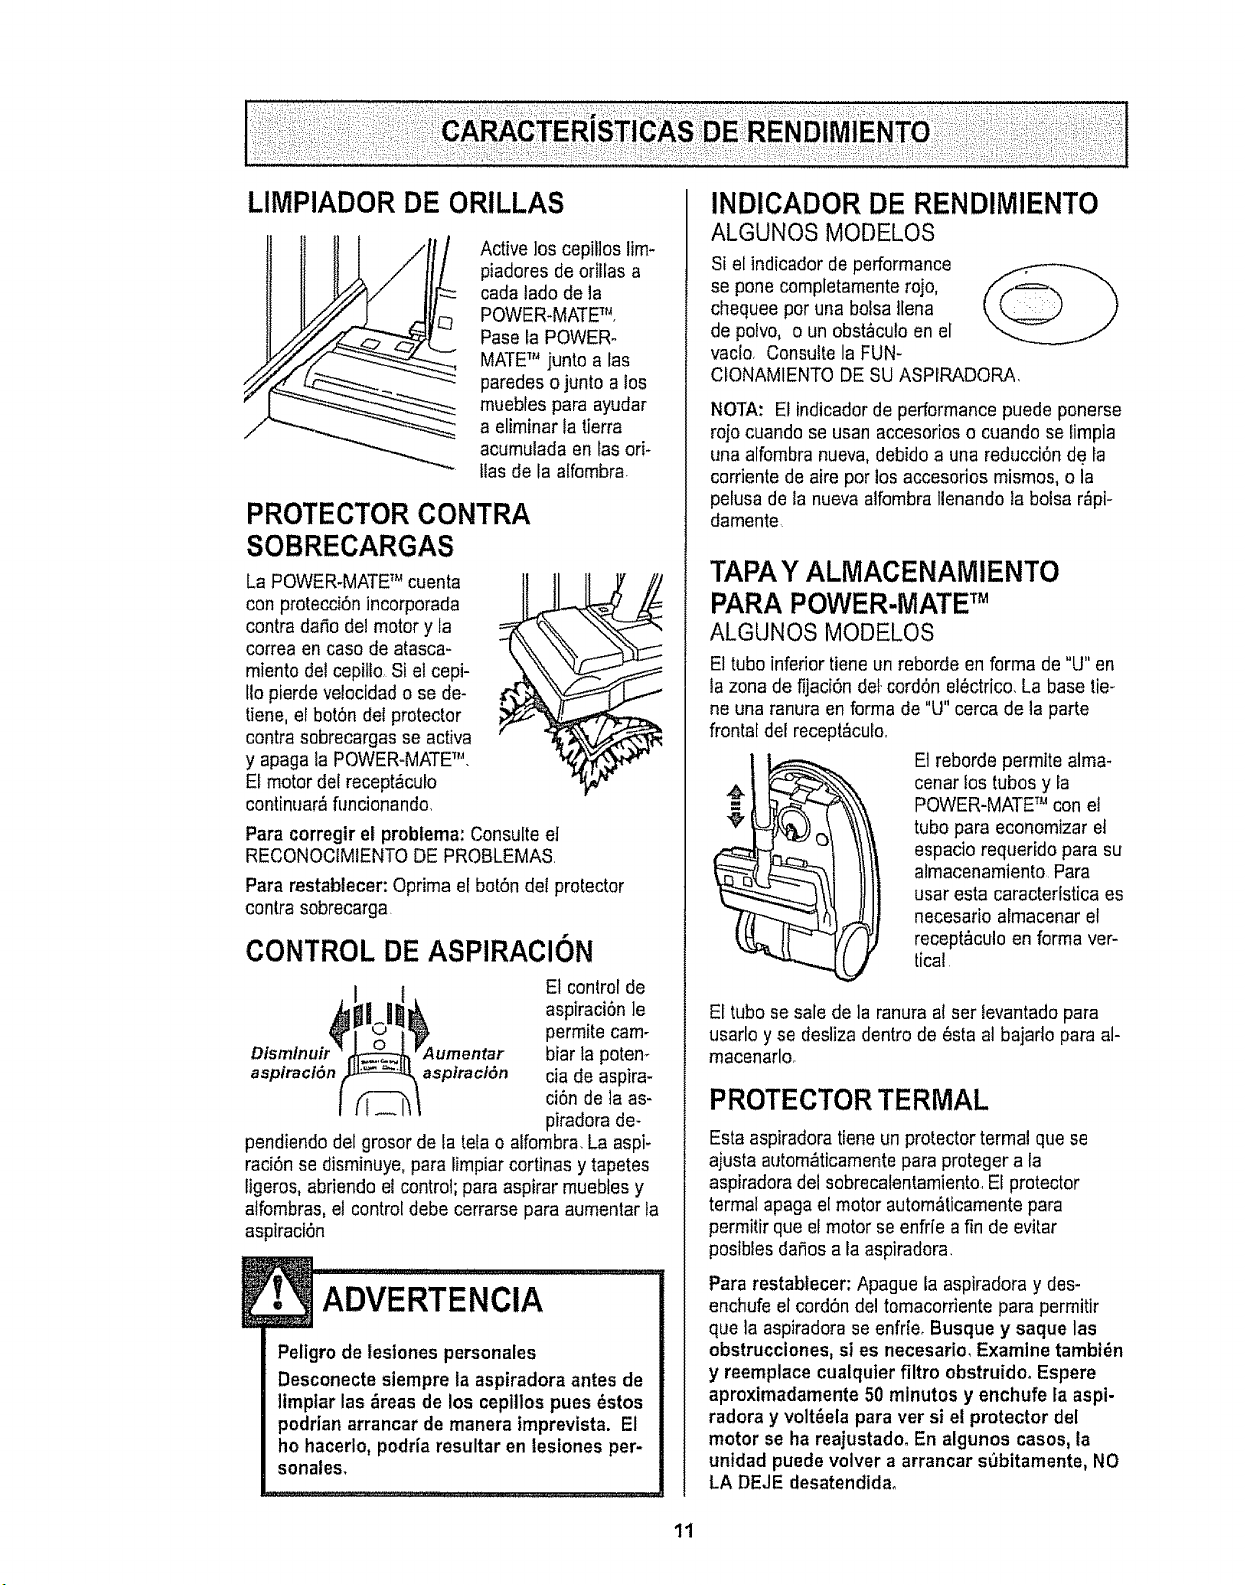
LIMPIADOR DE ORILLAS
Activelos cepillos lim-
piadores de orillas a
cada lade de la
POWER.MATETM,
Paseta POWER-
MATETM juntoa las
paredeso junto atos
muebles paraayudar
a eliminar la tierra
acumulada en tas ori-
Itasde la alfembra.
PROTECTOR CONTRA
SOBRECARGAS
La POWER-MATETM cuenta
conprotecci6n incorporada
contra daSodel motor y la
correaen case de atasca-
miento de!cepillo,Si el cepi-
Iiopierdeve!ocidado se de-
tiene, el botSndel protector
contra sebrecargasse activa
y apaga la POWER-MATETM.
El motor del recept&culo
continuar_flincionando,
Paracorregir el probtema: Consulteel
RECONOCIMIENTODE PROBLEMAS.
Para restablecer: Oprima el botSndel protector
contra sobrecarga
CONTROL DE ASPIRAClON
E1control de
aspiraci6n le
permite cam-
biar la poten-
aspiraci_n aspiration cia de aspira-
ci6n de la as-
piradora de-
pendiendo del grosor de tatela o alfombra.LaaspF
raci6n se disminuye,para limpiarcortinas y tapetes
ligeros, abriendo et control;para aspirar muebles y
atfombras,el control debe cerrarse para aumentar ta
asptraci6n
! ADvERTENoIA
Peligro de lesiones personales
Desconecte siempreta aspiradora antes de
limptar las _reas de los cepillos pues _stos
podrian arrancar de manera imprevista. El
he hacerlo,podr{aresultar en tesiones per-
sonales,
INDICADOR DE RENDIMIENTO
ALGUNOS MODELOS
Si el indicador de performance
se pone completamenterojo,
chequeeper una bolsa tlena
de polvo, o un obst_culoen el
vacio, Consultela FUN-
CfONAMIENTODESU ASPIRADORA
NOTA: Elindicador de performance puede ponerse
rojo cuando se usan accesorioso cuando se limpia
una alfombra nueva,debido a una reducci6n de la
corriente de aire per los accesorios mismos, o la
pelusade la nueva alfombraIlenandola bolsa r_pi-
damente
TAPA Y ALIVIACENAMIENTO
PARA POWER-IVlATETM
ALGUNOS MODELOS
El tube inferiortiene un reborde en forma de "LJ"en
la zonade fijaci6n det.cord6n el_ctrico.La base tie_
ne una ranura en forma de "U" cercade la parte
frontal del recept&culo.
Etreborde permite alma-
cenarlos tubes y la
POWER-MATETM con el
t tube para economizar et
espacio requerido para su
almacenamiento Para
usaresta caracteristica es
necesario almacenar el
recept&culoen forma ver-
tical
El tube sesale de la ranura a!ser levantadopara
usarlo y se desliza dentro de 6sta al bajado para al-
macenarlo.
PROTECTORTERMAL
Esta aspiradoratiene un protectortermal que se
ajusta autom_ticamentepara proteger a la
aspiradoradel sobrecatentamiento,El protector
termal apaga el motor autom_ticamentepara
permitir que el motor seenfr[e afin de evitar
posibles da_osa la aspiradora,
Para restablecer, Apague la aspiradora y des-
enchufe el cord6n del tomacorriente para permitir
que la aspiradorase enfrfe. Busque y saque las
obstrucciones, si es necesario, Examine tambi_n
y reemplace cualquterfiltro obstruido_ Espere
aproximadamente 50 minutes y enchufe fa aspi-
radora y volt_ela para ver si el protector del
motor se ha reajustadoo En algunos cases,la
untdad puede volver a arrancar subitamente, NO
LA DEJE desatendida_
1t
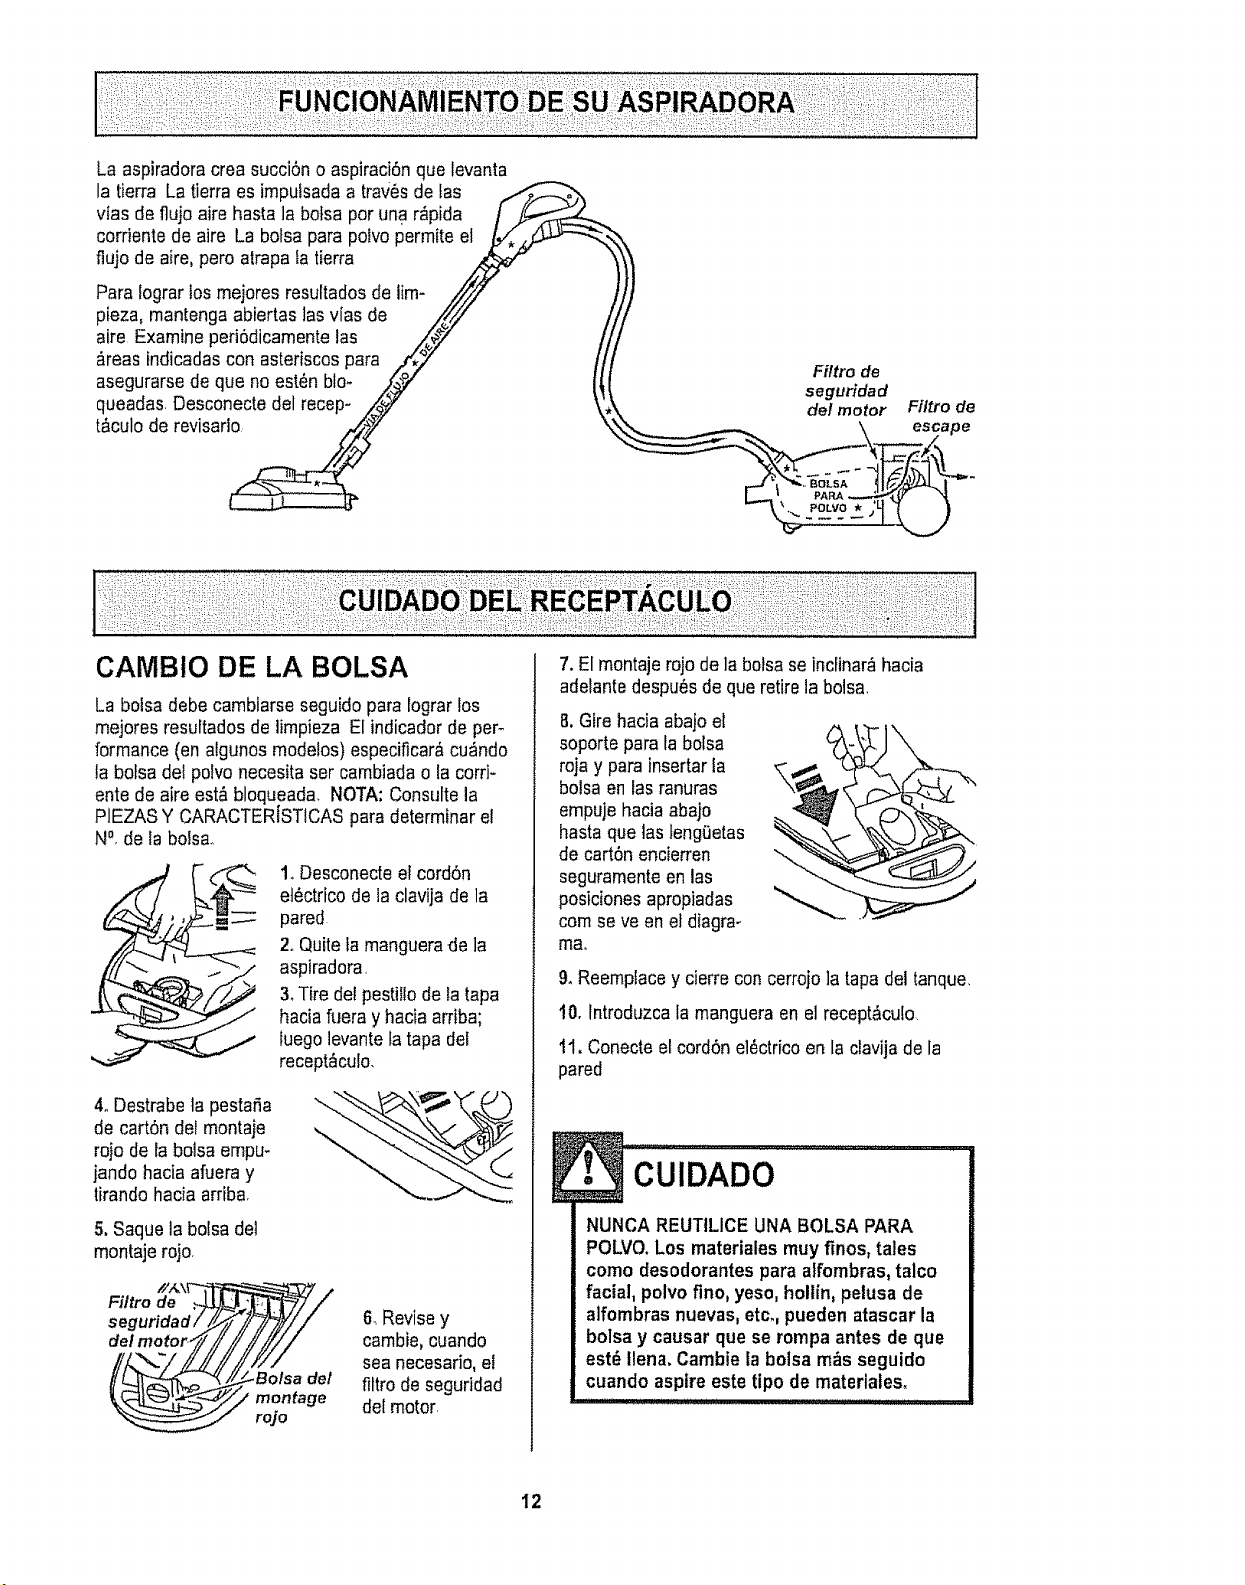
La aspiradoracrea succiSno aspiraciSnque levanta
la tierra Latierra es imp@sadaa traws de fas
vtas de fluja aire hasta la bofsa par una r_pida
corriente de aire La bofsa para poivopermiteel
fiuja de aire,pero atrapafa tierra
Para lograr tas me]aresresuftadasde lim-
plaza, mantenga abiertas lasvias de
aire Examine periSdicamentelas
#.reasindicadas con asteriscaspara
asegurarse de que na est_n bla-
queadas Desconecte del recep-
t&culo de revisado
Filtro de
seguridad
k _ del motor Filtro de
\ escape
La balsa debe cambiarse seguidopara lograr los
mejores resultadasde limpieza El indicadorde per-
formance (on algunos modetos)especificar_,cu_ndo
ta balsadel palvo necesitaset cambiadao la corri-
ante de aire est&bloqueada. NOTA:Consutte la
PIEZASY CARACTERISTICASpara determinar el
N_,de la balsa,,
1_Desconecteel cordSn
et6ctrico de la clavija de la
pared
2oQuiteta manguerade la
aspiradora,
3. Tire delpestillade la tapa
haciafuera y hacia arriba;
luego levante tatapa del
recept_culo.
4oDestrabela pestafia
de carton del montaje
ra}ode la balsa empu-
jando hada afueray
tirando haciaarriba,
5.Saque la balsa del
montajerojo.
/!/_\V"
Filtro de .,_
s egurida d /
del motor.,
6. Revisey
cambie,cuando
sea necesario,el
filtro de seguridad
del motor,
7. El mantajerajo de la balsaseinclinar_hacia
adetantedespu6sde quaretire la balsa.
8,Gire hacia aba}ael
soporte para la balsa
roja y para insertarIa
balsa en las ranuras
empuje haciaabajo
hasta que las tengQetas
de cartSn encierren
seguramenteen las
posicionesaprapiadas
cam seve en el diagra-
m8°
& Reemplacey cierre concerrajo]a tapa del tanque,
10. lntraduzcala mangueraen elrecept_cuIo
tl. Conecteetcord6nel_ctricoen la clavija de la
pared
CUIDADO ..................
NUNCA REUTtLICE UNA BALSA PARA
POLVO.Los materiales muyfinos, tales
coma desodorantespara aifombras, talco
facial, polvo flno, yeso, hollin, pelusa de
alfombrasnuevas, etc. pueden atascar la
balsa y causar qua se rompa antes de qua
est_ liana. Cambiela balsa m__sseguido
cuando aspire este tipo de materiales.
12
1.Desconecteelcord6nel_ctricodelactavijadela
paredNOchoreeaguasobrelaaspiradora.
2.Limpieelexteriorconuntraposuaveylimpio,que
hasidoexprimidodespu_sderemojarenunasolu-
ci6ndeaguaydetergenteIlquidoligeroSequeel
exteriorconuntraposecodespu6sdeIimpiar
3.Limpielasuperficieexteriorde!receptaculoyde
losaccesoriosparareducirlaelectricidadest_ticay
laacumulaci6ndepolvo
NOUSE LOSACCESORIOS Sl ESTJ.NMOJA-
DOS.
CU, o.......
Los accesorios que se utilicen en _reas
sucias,debajo del refrigerador,no deben
usarse en otras superficies sin antes ser
lavados. Podrian deJarmarcas.
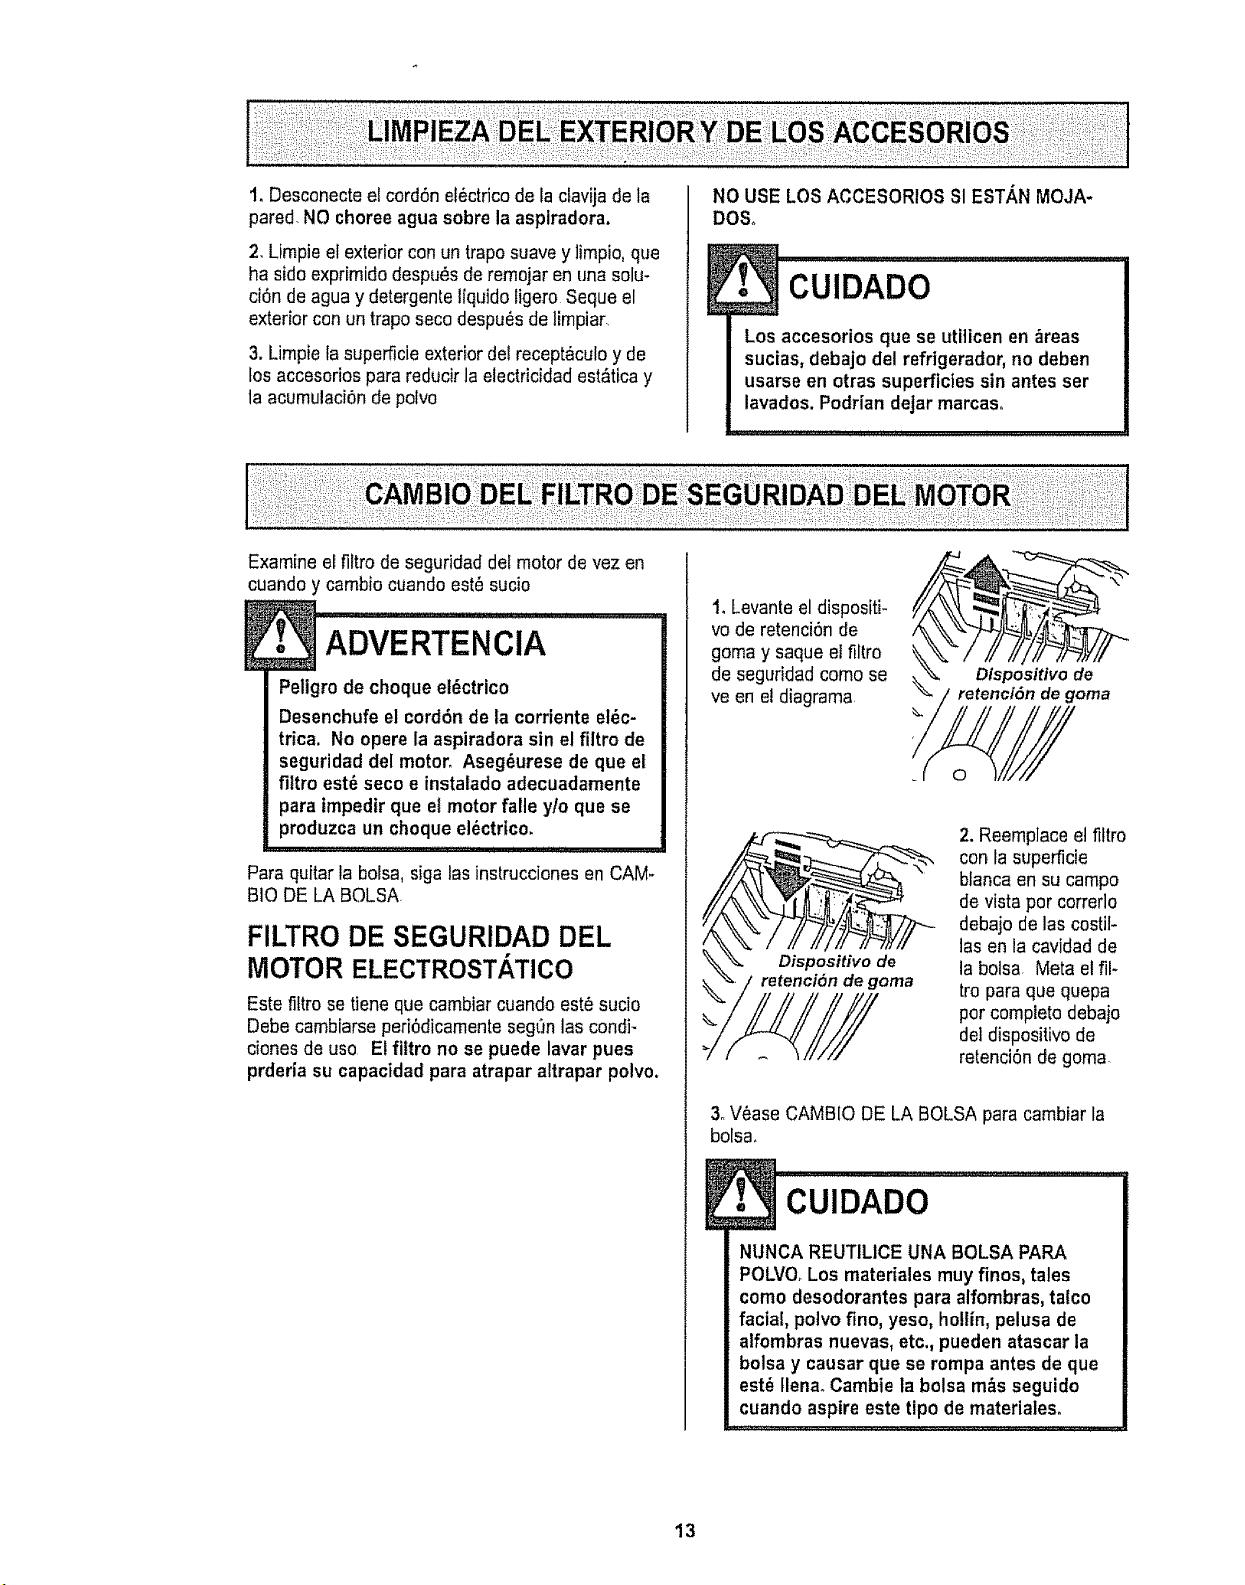
Examine el fittro de seguridad del motor de vez en
cuandoy cambio cuando est_ sucio
ADVERTENOiA
Peltgrode choque el_ctrico
Desenchufe el cord6n de ta corrtente et_c-
trica, No operela aspiradora sin el filtro de
seguridad del motor, Aseg_urese de que el
filtro est_ seco e instalado adecuadamente
para impedir que el motorfalle ylo que se
produzca un choque el_ctrico.
Para quitar la bolsa, sigalas instrucciones en CAM-
BIO DE LA BOLSA
FILTRO DE SEGURIDAD DEL
MOTOR ELECTROST ,TICO
Este fiftrose tiene que cambiar cuando est_ sucio
Debe cambiarseperi6dicamenteseg_mlas condi-
clones de uso El filtro no se puede lavar pues
prderia su capacidad para atrapar altrapar polvo.
1. Levante el dispositk
vo de retenci6n de
goma y saque el filtro
de seguridadcomo se
ve en e!diagrama
2. Reemplaceel fittro
con la superficie
blanca en su campo
de vistapor correrlo
debajo de las costil-
las en la cavidad de
la bolsa Meta elfll-
tro para que quepa
por compieto debajo
del dispositivo de
retenci6n de goma.
3oV6ase CAMBIO DE LA BOLSA para cambiar la
bolsa,
!• CuIDADO .................
NUNCA REUTILICEUNA BOLSA PARA
POLVO.Los materiales muyfinos, tales
como desodorantes para alfombras, talco
facial, polvo fino, yeso, he!tin, pelusa de
alfombras nuevas, etc., pueden atascar la
bolsa y causar que se rompa antes de que
est_ flena. Cambie la bolsa m&s seguido
cuando aspire este tipo de materiales.
13
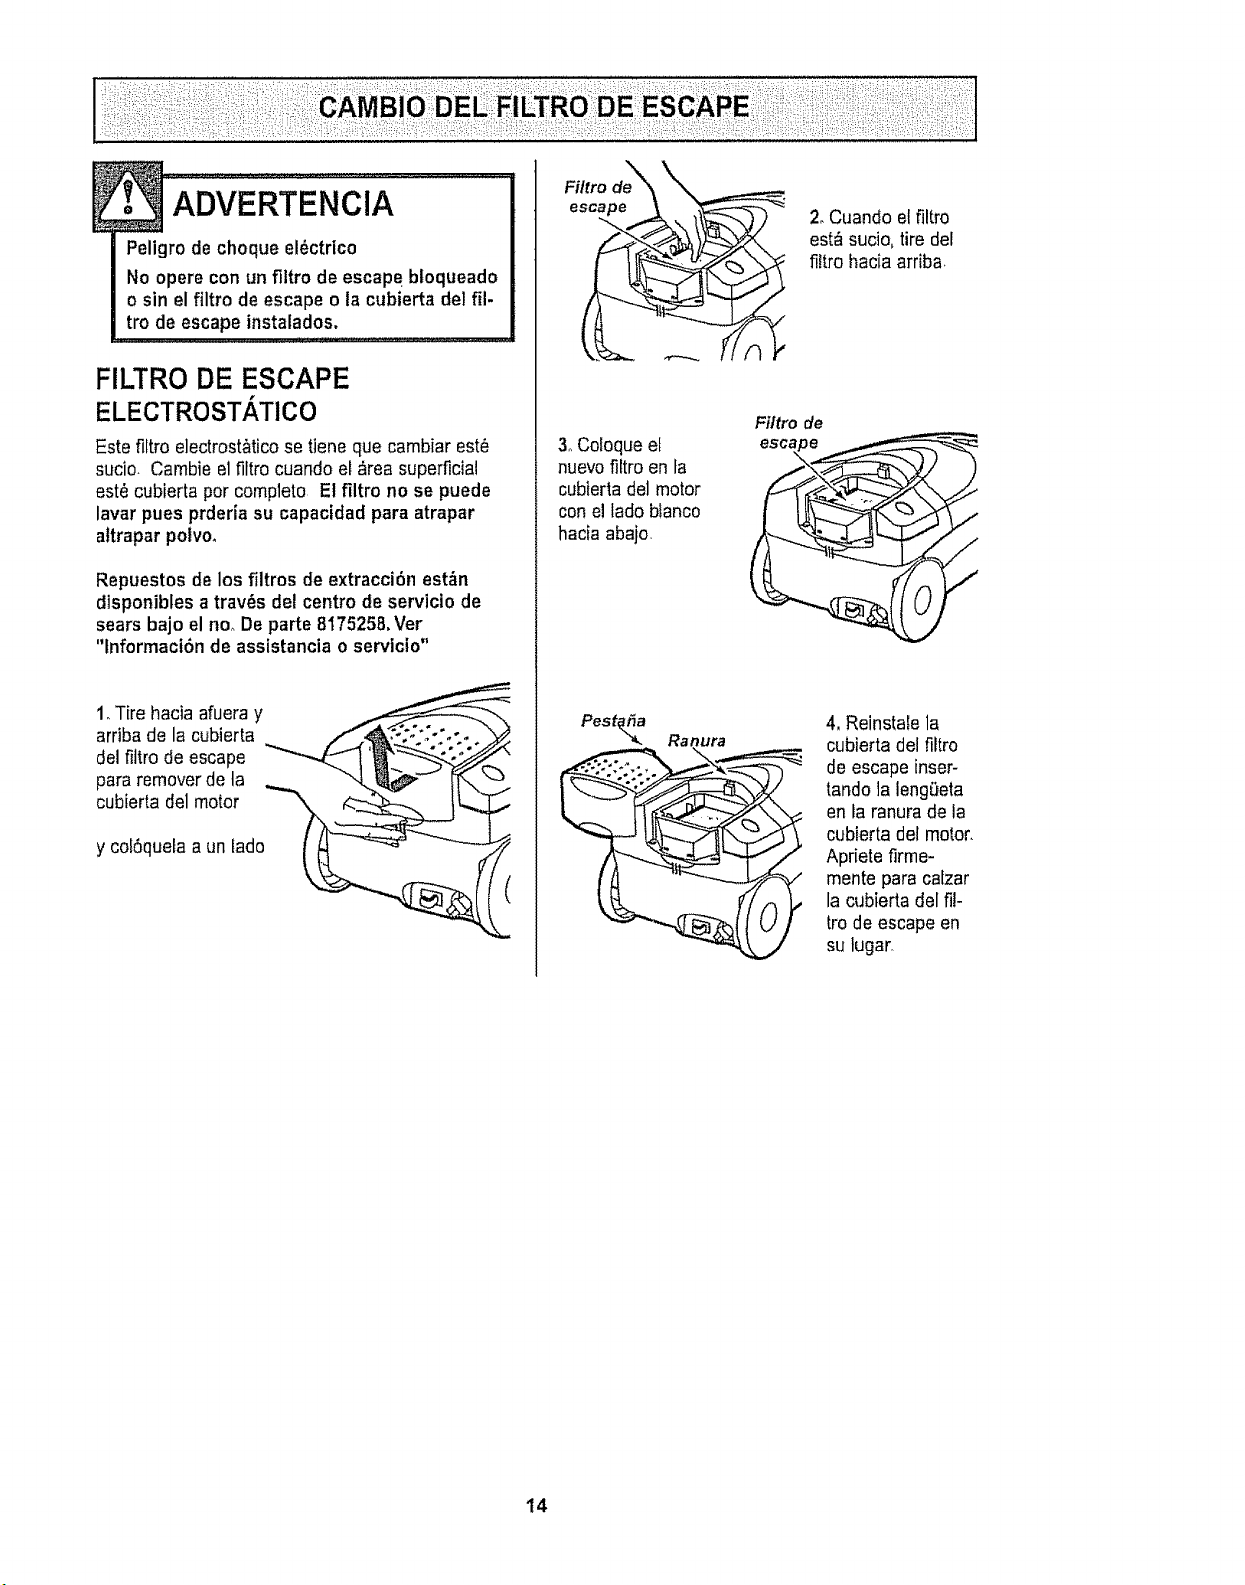
Peligro de choque el_ctrico
No operecon un filtro de escape bioqueado
o sin elfiltro de escapeo la cubierta del fil-
tro de escape instalados.
FILTRO DE ESCAPE
ELECTROSTATICO
Este filtro electrost&ticose tiene que cambiar est6
sucio Cambieel fittrocuando el &rea superficial
est_ cubierta por completo Etfiltro no se puede
lavar pues prderia su capacidad para atrapar
altrapar potvo,
Repuestos de los filtros de extraccibn est_n
disponiblesa trav_s del centrode servicio de
sears bajo el no, De parte 8175258,Ver
"lnformaci6n de assistancia o servicio"
1.Tire hacia afueray
arriba de la cubierta
del fiitro de escape
para removerde ta
cubierta del motor
y col6queta a un lado
Filtro de_
escape
3oColoque et
nuevofiltro en fa
cubierta deJmotor
conel lado blanco
hacia abajo.
Pest_a Ranura
) 2oCuando el filtro
est_ sucio,tire del
filtro hacia arriba
Filtro de
escape
4, Reinstale la
cubierta del filtro
de escape inser-
tando ]aleng_eta
en la ranura de la
cubierta del motor.
Apfiete firme-
mente para ca[zar
la cubierta ffel fi!-
tro de escape en
su lugar.
14
Slempre deber&n seguirse todas las precau-
clones de seguridad al limplar y dar ser¢icio a
ta POWER+MATETM-
Peligrode choque el_ctrico o lesi6n corpo-
ral
Desconectela unidad antes de limplarla o
darle ser¢icio.De Io contrario podria pro-
ducirse un choqueef_ctrico o causar
lesl6n corporal sl la aspiradora arranca de
manera imprevistao
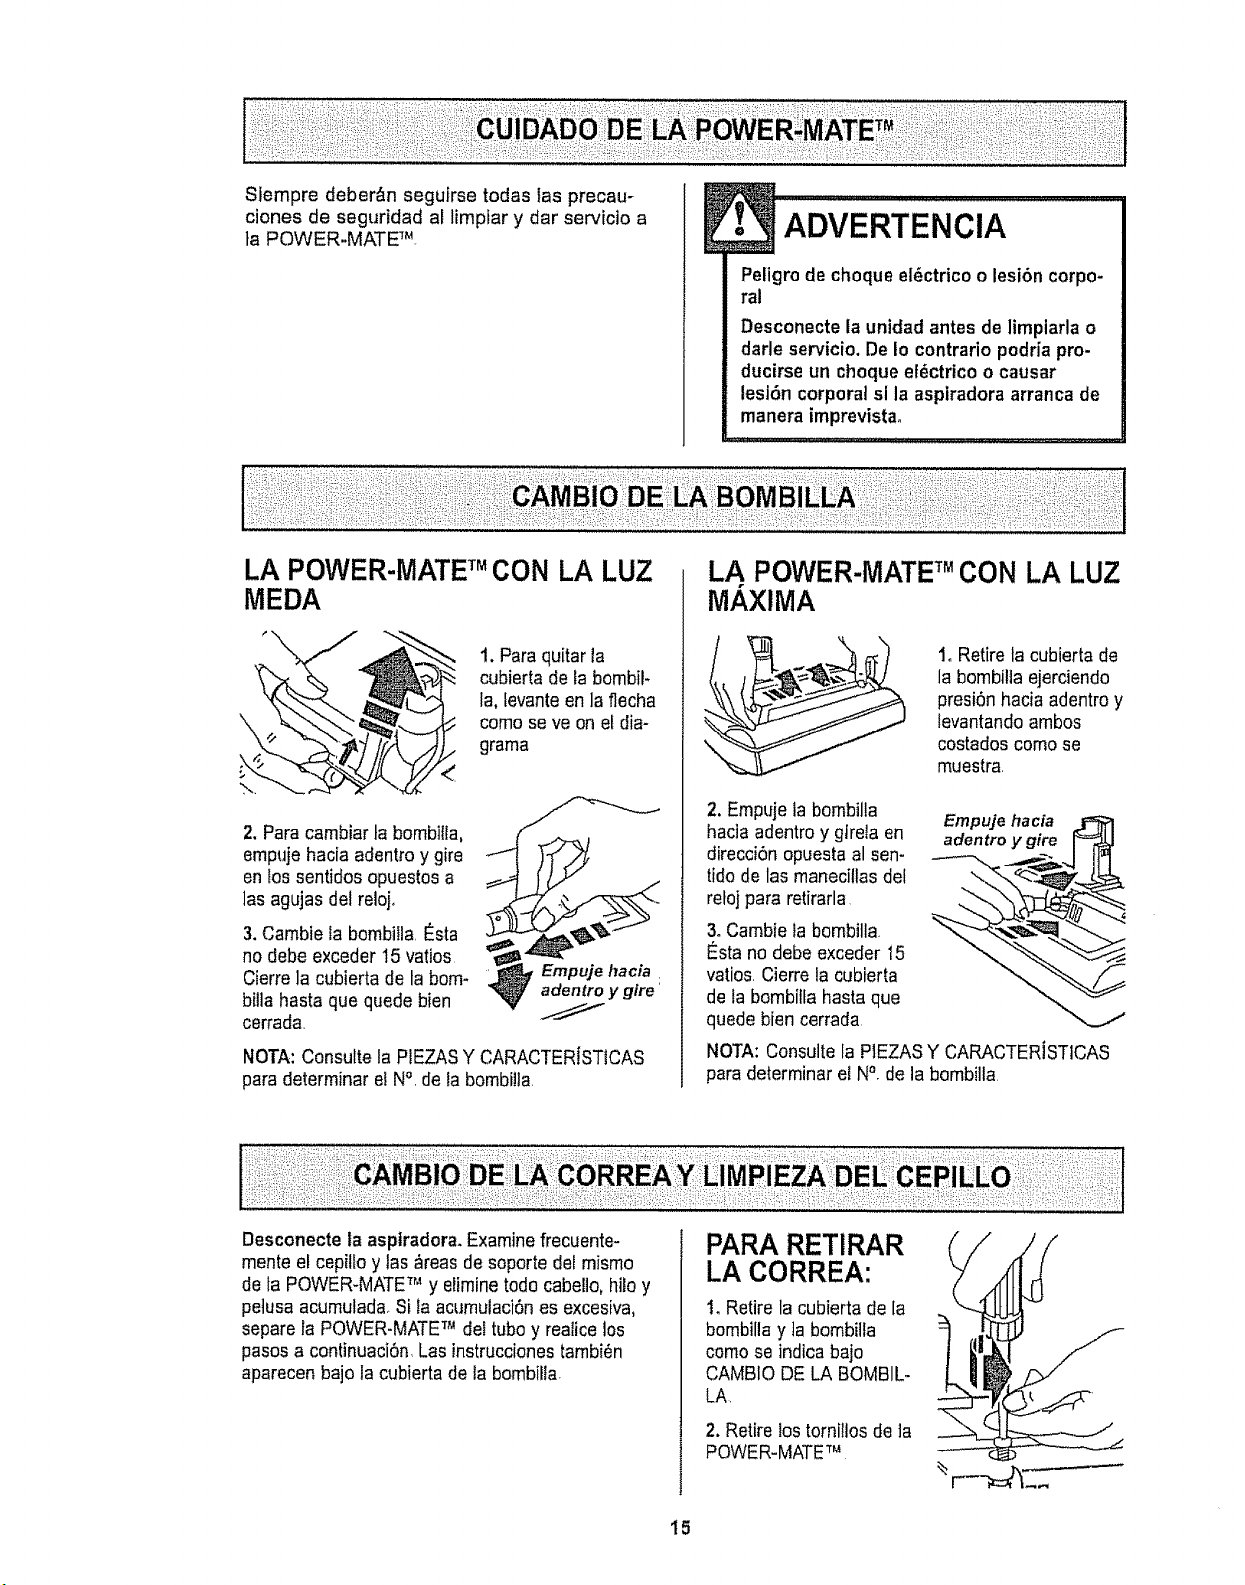
LA POWER-MATE TM CON LA LUZ
MEDA
2. Para cambiar la bombilta,
empuje hacia adentroy gire
en los sentidos opuestos a
lasagujas del reloj+
3. Cambie la bombilla,_sta
no debe exceder 15 vatios
Cierreia cubierta de la bom-
billa haste que quede bien
cerrada
t. Paraquitar la
cubierta de la bombil-
la, levanteen la flecha
como seve on etdia-
grama
NOTA:Consulte la PtEZASY CARACTERISTICAS
pare determinar el N°, de la bombi!la,
LA POWER-MATE TM CON LA LUZ
MAXIMA
1, Retire la cubierta de
la bombilia ejerciendo
presi6n hacia adentroy
levantando ambos
costados como se
muestra,
2. Empuje la bombilta
hacia adentroy gtrela en
direcciOnopuesta al sen-
tido de las manecillas del
reloj pare retirarla
3. Cambie la bombilla
_sta no debe exceder t5
ratios, Cierre la cubierta
de la bombitla hasta que
quede bien cerrada
Empuje hacia
adentro y gire
NOTA: Consultela PIEZASY CARACTERISTICAS
para determinar el N&de la bombilla
Desconecteta asptradora+Examine frecuente-
mente el cepilto y las _reas de soporte del misrno
de ta POWER-MATETM y elirnine rodecabello, hilo y
petusa acumulada Si la acumulaci6nes excesiva,
separe la POWER-MATETM de!tubo y realice los
pasosa continuaci6n Las instruccionestambi_n
aparecen bajo la cubierta de la bombilla
PARA RETIRAR
LA CORREA:
1_Retire la cubierta de la
bombilla y ]a bombilta
como se indicabajo
CAMBIO DE LA BOMBIL+
LA
2. Retire lostornitlos de ]a
POWER-MATETM
15

3.Volteela
POWER.MATET_*L
Para quitar la
cubierta, inserte
el destornillador
en las pesta_as
de la cubierta de
arnboscostados
y girelo para lib-
erar Ias pes-
taSas
5.lnserte el
destornillador
cuidadosamente
en cadasoporte
del cepille y
girefo para retirar
etcepittodela
base,
6. Retirela
banda desgas-
tada,
liberacl6n
Sopotfe
del cepil[o
Pestafia
4. Volteela
POWER-MATETM
hacia arriba.
Oprima la guia de
liberaci6n y baje
el dispositivo gira-
torio..Incline ta
cubierta de atr_s
hacia adelante
basraque se des-
prenda.
7, Retire los
soportes defcepi-
lie; examiney lira-
pie las &reasde
soporte det cepillo
En la ENSAMBLE
DE[. CEPILLOse
proporciona una
ifustraci6n de todo
el ensambiedel
cepiflo
PARA CAMBIAR LA CORREA:
t. Reinstafelas arandelasy los soportes del cepitto
en el ensambleo
2. lnstale una
correa nueva
sobre el
impulsor del
motor y luego
sobre la rueda
dentada del
cepi/Io,
/
Soperte
del cepillo
Im_ulsor
_ motor
x Cepilto
Rueda dentada
cel cepiflo
NOTA:Consulte la PIEZASY CARACTERISTICAS
para delerminar el N°, de correa,
3oinsta[elos soportes
del cepillosobre la
base.Asegurese de
que los soportes no
esl_n invertidos
4. Alinee fa
parte frontal de
la cubieda con
la base.
Co!oquela
cubierta sobre
el borde
delantero de la
basecome se
muestra
Cubierta Base
5. Incline la cubierta
hacia art&s.Ejerza
presiSnfirme sobre
la cubierta hasta que
las pesta_iastaF
erales queden fijas
en posiciSn.Instale
los tornillos de la
cubierta, ta bombilla
y la cubierta de la
bombiila.
16
1
Peligro de choque el_ctrico o lesibn corpo.
ral
Desconectela untdad antes de ltmpiarla o
darle servicioo De to contrario podria pro-
ductrseun choque el_ctrico o causar
lesi6n corporal si la aspiradora arranca de
manera imprevista.
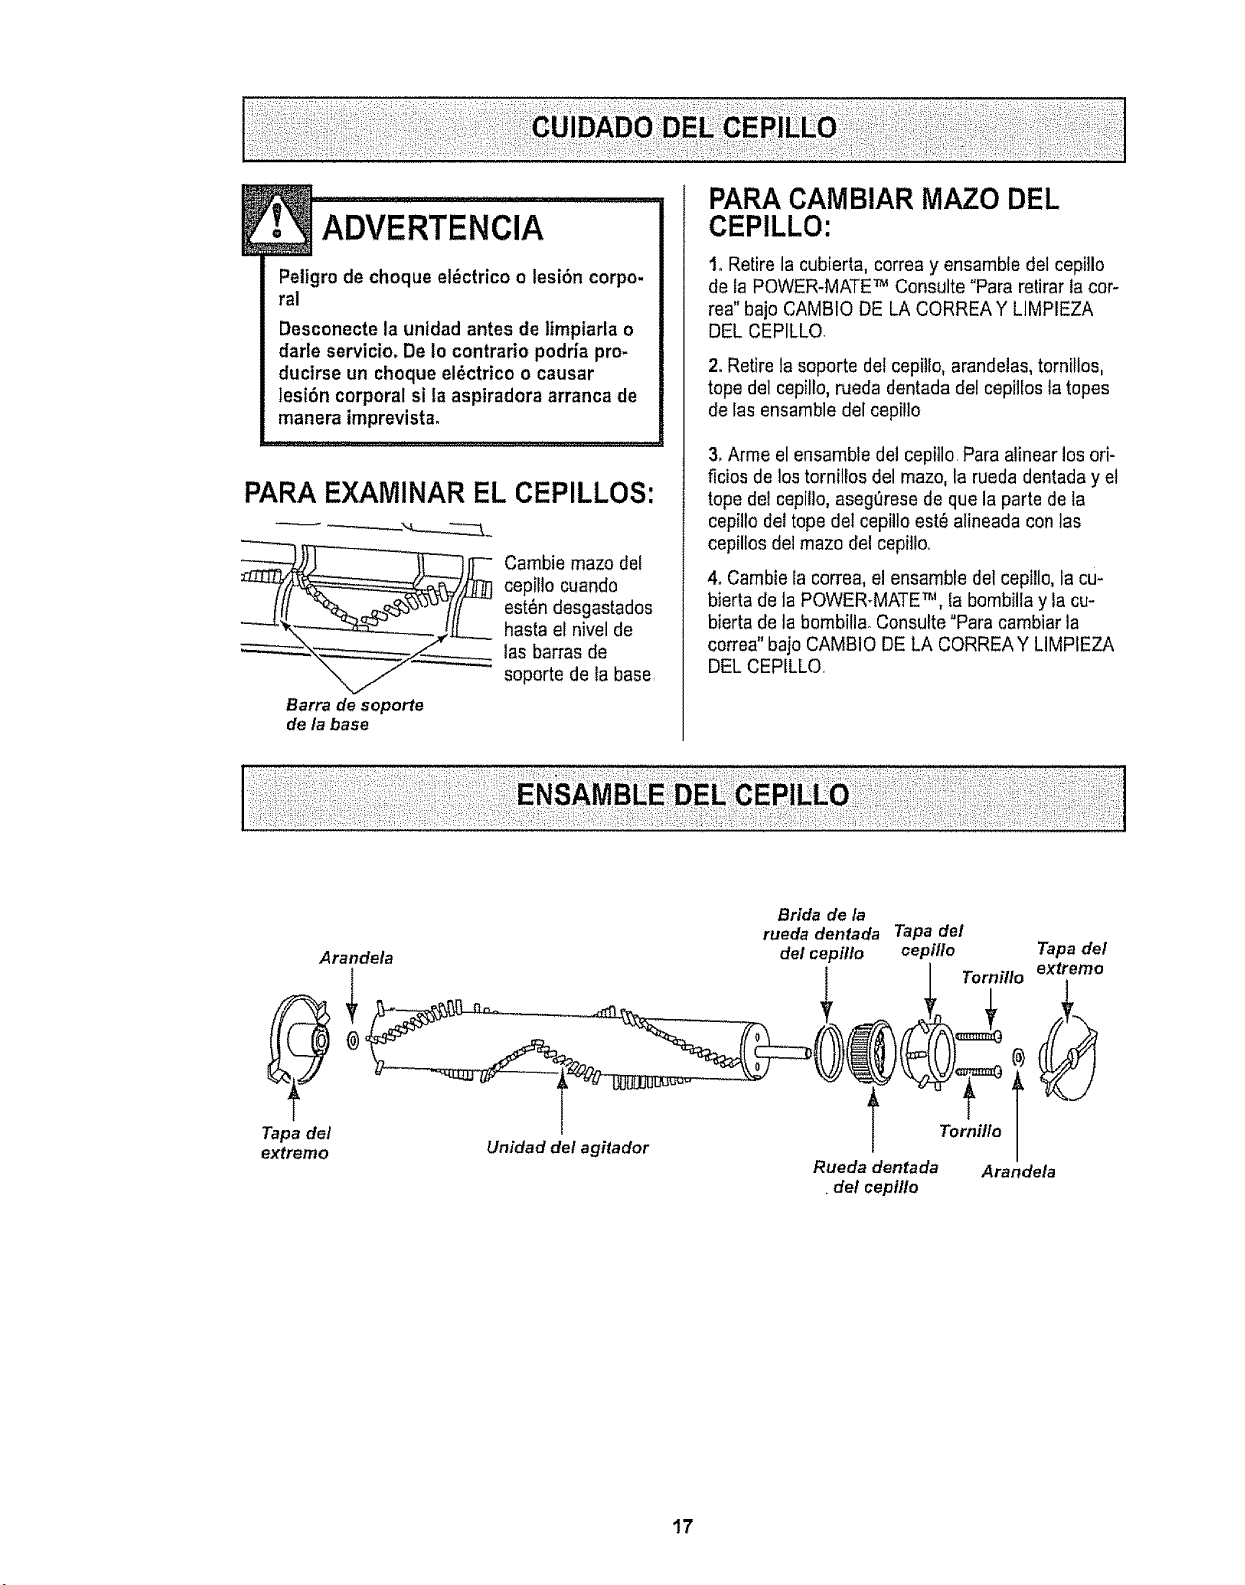
PARA EX_AMINAREL CEPILLOS:
Carnbiemazo det
cepillo cuando
est_n desgastados
hasta et nivelde
las barrasde
soporte de la base
Barra de soporte
de la base
PARA CAMBIAR MAZO DEL
CEPILLO:
1. Retire la cubierta, correa y ensamble del cepillo
de la POWER-MATETM Consulte"Para retiraria cor-
tea" bajoCAMBtO DE LA CORREAY LIMPIEZA
DEL CEPILLQ
2.Retire la seporte del cepillo, arandelas,tornillos,
tope del cepillo,rueda dentadadel cepillos latopes
de las ensambledel cepilto
3.Arme el ensamble del cepillo.Para alinearlos ori-
ficios de los tornillos del mazo,la rueda dentaday el
tope del cepillo,asegerese de que la parte de la
cepillodel tope del cepillo est_ alineada con las
cepillos del mazo del cepi]Io.
4, Cambie la correa, el ensamble del cepi!lo,la cu-
bierta de la POWER-MATETM, la bombillay la cu-
bierta de la bombill& Consulte"Para cambiar la
correa" bajoCAMBIODE LA CORREAY LIMPIEZA
DELCEPILLO,
T_3ade/
extremo
Arandela
Unidad del agitador
Bride dela
ruedadentada Tapade/
(#elcepfllo cepi/Io Tapade/
Tornfllo extremo
Rueda dentada Arandela
•de/cepilto
17
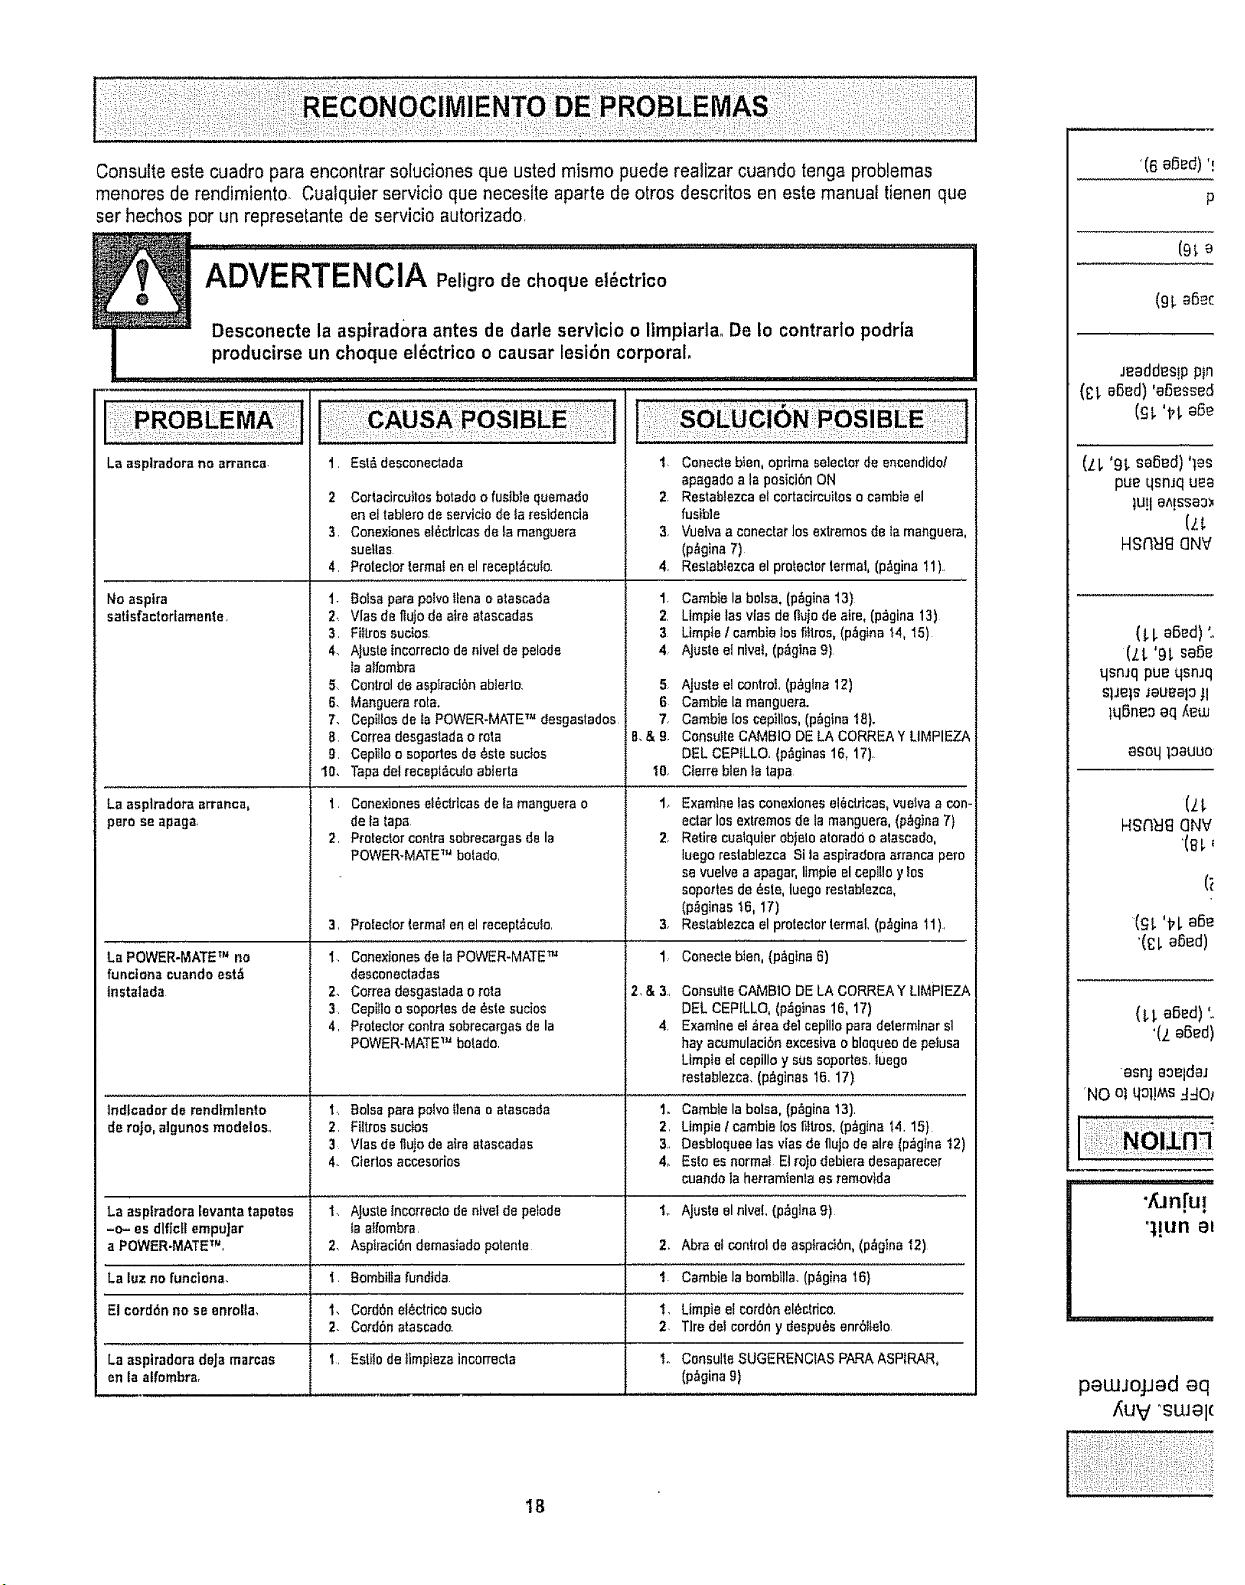
Consulteeste cuadropara encontrarsolucionesqua ustedmismo puede realizar cuando tenga problemas
menores de rendimiento. Cuatquier servicio que necesite aparte de otros descritos en este manual tienenqua
serhechos por un represetantede servicio autorizado,
La aspiradora no arrsncs- 1. Est& desconectada
No asptra
satisfactor[amente.
LB asptradora arranca,
pare se apaga
La POWER*MATE TM no
functona cuando est,t
tnstatada
2 Cor4acircuItas botado e.fusible quemado
en el tablera de servicio de ta resldencia
3. Conextones el_ctrlcas de. la manguera
sueilas
4. Protector termal en el recept_cu!o.
1. Balsa psra polvo Ilena o alascada
2, Vlas de flujo de atra stascadss
3, Fiftros sucios.
4, Ajusle incorrecto de nivel de pelode
Is atfombra
5. Control de ssptraci6n abierlo.
6. Manguers rots.
7. Cepilles de Is POWER-MATE "r" desgastados
B. Correa desgastada o rata
g. Ceplilo o soportes de _ste sucfos
10. Taps del recepl_cuto abierta
t. Conexiones elOctrlcss de Is manguera o
de fa taps
2. Protector centre sobrecargas de la
POWER-MATE TM horatio.
3. Proteclor termst en el recept_culo.
1. Conextones de la POWER-MATE TM
desconectadas
2. Ce.rrea desgastada e rata
3. Cepitlo a sapartes de _ste sucios
4, Protector centre eobrecargae de la
POWER-MATE TM botado.
1. Canecte bten, e.primaselector de encendido/
apagado a Is posici6n ON
2. Re.stablezca e! cortacircuitas o cambie el
fusible
3. Vuelva a cenectar los extremes de ta manguera,
(p,_gina 7)
4 Restablezca el protecler retinal, (p_gina 11).
1. Cambie la balsa, (p_gina 13}
2. Ltmpie las vies de fl_jo de aim, (p;_gina 13)
3 Limpie I cambie toe fitlree, (p_gina !4, 15)
4, AJusleelnlvel,(p_glna9)
5_
6
7.
B,&9.
t0,
Ajuste el control (p_g{na 12)
Cambie la manguera.
Cambte los cop]lies, (p_gina 18}.
Consutte CAMBIO DE LA CORREA Y LIMPIEZA
DEL CEPtLLO, (p&ginas 16, 17).
Cferre blen la tapa
1_ Examine las conexiones ei_ctrlcas, vuelvs s con-
ectar los extremes de la manguers, (p_g}r_a 7)
2, Retire cualquier eblelo atorado o alasca_o,
luago raetablezca Si ta aspiradora arranca pore
se vuelve a apagar, limple el cepiUo y Ies
sopades de _ste, luege restab[ezca,
(p._ginas 16, 17)
3, Restablezca el proleclor termaL (p_gina 11),
1_ Conecte bten, (p_,gtne 6)
2.&3, Consutle CAMBtO DE LA CORREA Y LIMPIEZA
DEL CEPILLO, (p,_gtnas 16, 17)
Examine. el area del cepillopa_'adelermlnar sl
hay acamulacibn exeeeivs o blequeo de peIusa
Limpta el cspillo y sus soportes_ luego
restablezca. (p_glnas 16, 17)
tndtcador de rendlmlento I.. Boles para polvo tlena a atasceda 1. Cambte la balsa, (p_gina 13).
de roje, algunos modelos., 2. Filtros suctos 2, Limpie I cambie los I_ttros,(p_gina 14.15)
3 Vies de ffujÜ de atre atascadas 3, Desbloquee los vies de fujo de sire (pz_g_nat2)
4. Ciertos accesorias 4_ Este. es normal Et ro)o debiera de.saparece.r
cuando la hetramtenla es removlda
La asplradora levanta tapetes t. AJuste tncorrec,_ode r_lvel de petode if AJusle el nlve(, (p_glna 9)
-o- es dlflctl empuJar _aa_fombra.
a POWER-MATE TM, 2. Aspiraci0n demasiado potente 2. Abra el con_rot de aspirad0n, (p_gIna I2)
La luz no funciana, i. Bombilia fundtda 1. Cambiela bombllla. (pAgina 16}
El cordon no se enrolta., t. CordOn el_ctdca sucio I, Limpie el cordon el_ctdco,
2. CordOn atascada. 2 Tire del cordon y despu_s enrbl_elo.
La asptradora deJa marcas i. Estito de _impteza incorrecta to Consulte. SUGERENCfAS PARA ASPtRAR,
en ta alfombra, (p_gina 9}
'(6 oS_d)'!
P
(9_e
(91.aOec
Jeaddes!ppln
(t;I, abed)'aO_ssed
(ill, 'tf!, a_e
(ZL '9_.eased)'les
pue qsnJq u_a
tU!l aA!SSaO_
HSREI_C]NV
(LI, aOad)'o
(,t.t.'9L saO_
qsnJqpue qsnJq
SlJels_au_aloJI
lqSneoaq _t_uJ
asoqtoauuo
HSNEI_] QNV
asnj aoeldaJ
'NO olqo1!N_s:I:I0_
" an[u!
'1!una_
pewJojJad eq
_uv "SWal(
18
...... , at your .......... ours
For repair of major brand appliances in your own home...
no matter who made it, no matter who sold it!
1-800-4-MY-HOME sMAnytime,dayo_night
(1-800-469-4663)
www.sears,colTi
To bring in products such as vacuums, lawn equipment and electronics
for repair, call for the location of your nearest Sears Parts & Repair Center.
1-800-488-1222 Anytime, day or night
WWW.Sears.corrl
For the replacement parts, accessories and owner's manuals
that you need to do-it-yourself, call Sears PartsDirectS'u !
1-800-366-PART eam- 1_pn_. CST,
(1-800-366-7278) 7 days a week
www.sears.comtpartsdirect
To purchase or inquire about a Sears Service Agreement:
1-800-827-6655
7 a.m.- 5 pom. CST, Mon. - Sat
Para pedir servicio de reparaci6n a domicilio, Au Canada pour service en frangais:
y para ordenar piezas con entrega a domicilio: 1-877-LE-FOYER '_'
1-888-SU-HOGAR s,,, (1-877-533_6937)
(t-888-784-6427)
LHomeCentral J
@Sears, Roebuck ot_d Co.
® Rerjislored Trademark t rw Tradomar_ c4Sears, Reohuok a,_l CO,
,/-_Marc_ Regia_rada / TM ;_4aroa de F,,tbrir_ de Sears, R0a_uck and Co,
19

Sears Roebuck and Co.,Hhoffman Estates, IL 60179 U.S.A.
Pieza No CO1ZBFJOOUOO-8191532
Impreso en EUA
20